

Orange Pi User Manual Shenzhen Xunlong Software Co., Ltd
www.orangepi.cn I www.xunlong.tv
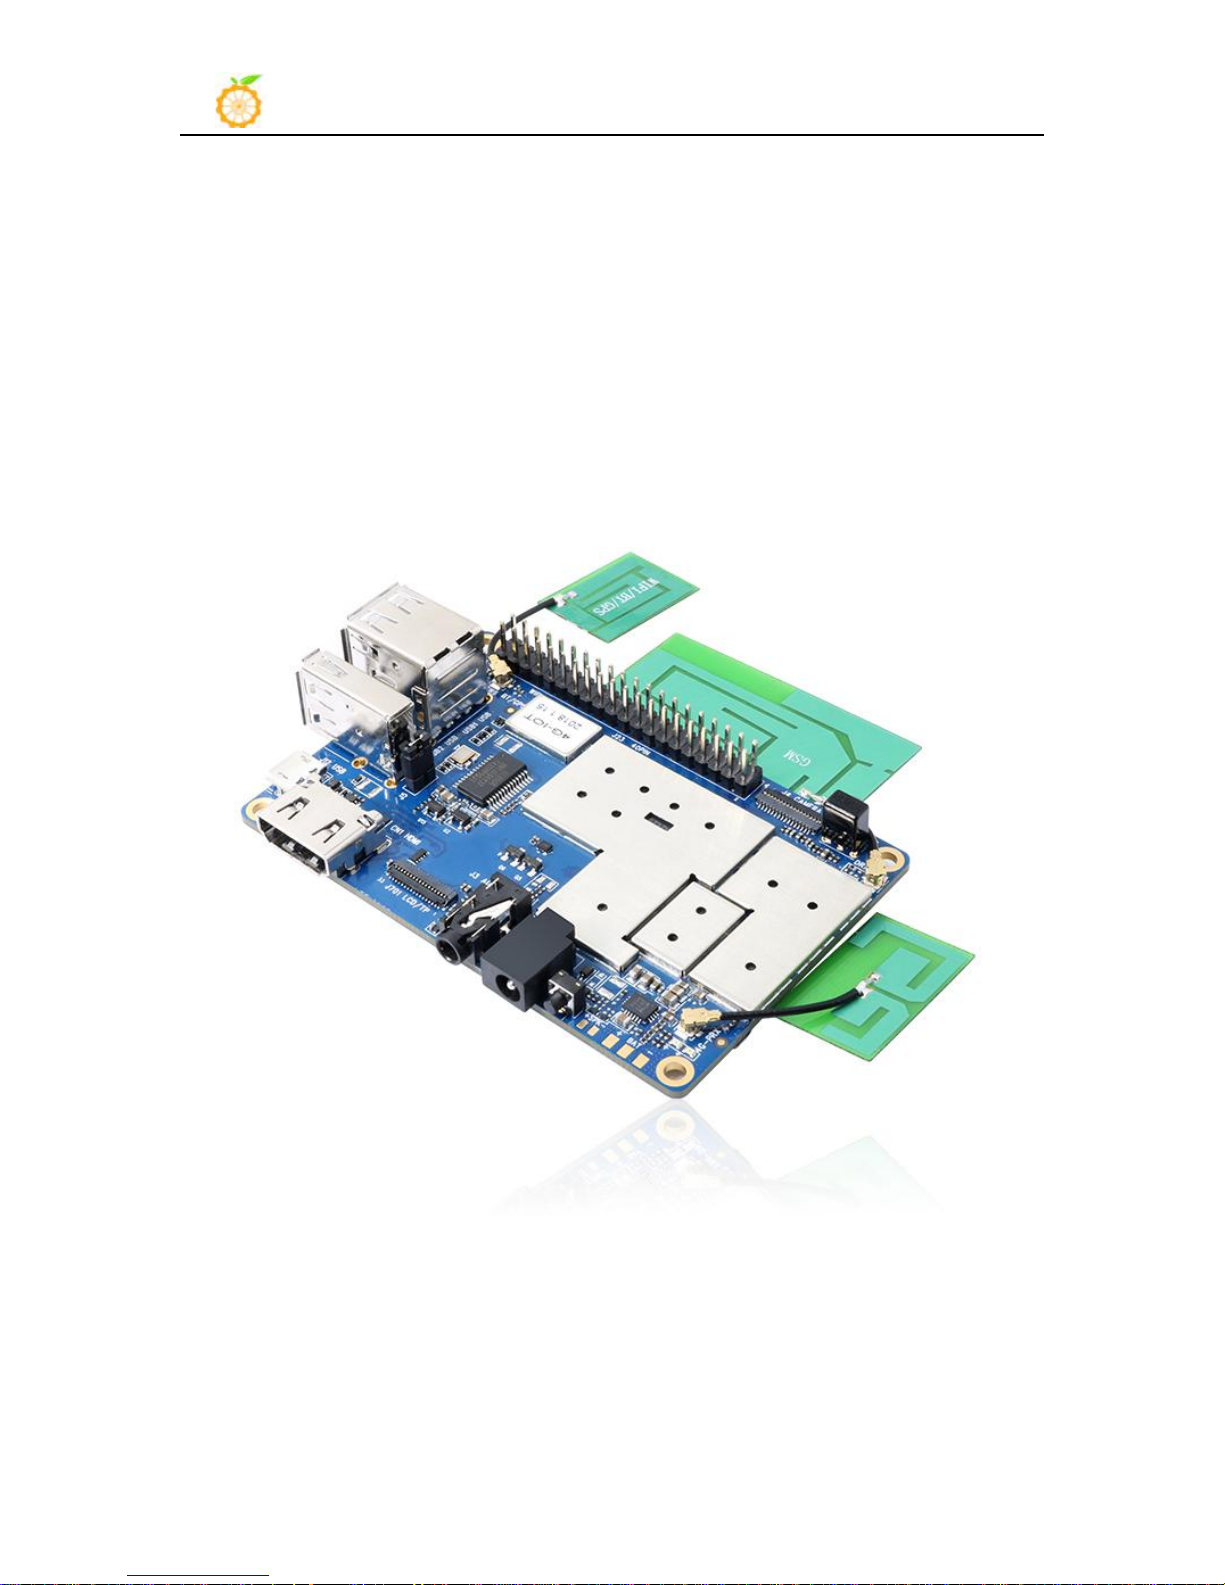
Orange Pi 4G-IoT
User Manual

Orange Pi User Manual Shenzhen Xunlong Software Co., Ltd
www.orangepi.cn II www.xunlong.tv
Ver
Data
Author
Brief
Publish
Memo
1.1
2018-01-26
Younix
Create File
2018-3-27
1.2
2018-05-10
Engineer Pan
Add Android8.1
2018-5-15
History

Orange Pi User Manual Shenzhen Xunlong Software Co., Ltd
www.orangepi.cn III www.xunlong.tv
Contents
I. Orange Pi Introduction...............................................................................................................................1
1.What is Orange Pi 4G-IOT?
2.What can I do with Orange Pi 4G-IOT?
3.Who is it for?
4.Orange Pi 4G-IOT Hardware Specification
II. Using Method............................................................................................................................................. 5
1.Prepare the Hardware and Software
2.Power Methods
3.Before Usage
III. Android Compilation Environment Construction.................................................................................7
1. Download SDK compression package................................................................................................. 7
2. Construct Compilation Environment....................................................................................................7
3. Compilation of SDK Source Code....................................................................................................... 8
4. Generated Firmware............................................................................................................................. 9
IV. Android Firmware Flashing.................................................................................................................. 10
1. Flash Tool Introduction.................................................................................................................... 11
2. Method for Image Flashing.............................................................................................................. 12
................................................................................................................................... 1
............................................................................................................................... 5
................................................................................................................................... 5
.............................................................................................................1
......................................................................................... 1
................................................................................... 1
............................................................................................ 5

Orange Pi User Manual Shenzhen Xunlong Software Co., Ltd
www.orangepi.org 1 www.xunlong.tv
I. Orange Pi Introduction
1.What is Orange Pi 4G-IOT?
2.What can I do with Orange Pi 4G-IOT?
A computer
A wireless server
Games
Music and sounds
HD video
A speaker
Android
Scratch
3.Who is it for?
4.Orange Pi 4G-IOT Hardware Specification
Orange Pi 4G-IoT Specification
Processor
MT6737
It’s an open-source single-board computer. It can run Android 6.0 Image. It
uses the MTK serial MT6737 SoC, and has 1GB DDR3 SDRAM.
You can use it to build…
Pretty much anything else, because Orange Pi 4G-IOT is open source.
Orange Pi 4G-IOT is for anyone who wants to start creating with technology
– not just consuming it. It's a simple, fun, useful tool that you can use to start
taking control of the world around you.

Orange Pi User Manual Shenzhen Xunlong Software Co., Ltd
www.orangepi.org 2 www.xunlong.tv
CPU
Quad core ARM® Cortex-A53, Main
frequency up to 1.25GHz
GPU
ARM Mali-T720 MP1
Memory
1GB DDR3
Emmc
8GB EMMC Flash
Wireless
WIFI / BT / FM / GPS Four in one
Radio
frequency
GSM
900/1800 (850/1900 optional)
WCDMA
B1/B8 (B2/B4/B5 optional)
TD-CDMA
/
CDMA2000
/
FDD-LTE
B1/B3/B7/B20 (B2/B4/B17optional)
TDD-LTE
B38/40/41B
Display
HD
Capacitance touch
Support
Camera
13M
(
25pin ZIF Connector
)
Accelerometer Sensor
Support
IR Control
Support (Adapted iDroid remote
controller)
Fingerprint Identification
Support
SIM Card
mini Single SIM Card
TF Card
Support hot-plugging
Audio
Earphone
For audio input / output
Mic
For audio input
USB
USB Host × 3
Support OTG
Micro USB × 1
Only for writing image
LED
Power Indicator
LED
Red
Status Indicator
LED
Green
Key
Power
HDMI
Support

Orange Pi User Manual Shenzhen Xunlong Software Co., Ltd
www.orangepi.org 3 www.xunlong.tv
Low-level
peripherals
40pin Headers
1.8V, SPI × 2 , I2C × 3, UART × 2
Power
DC
5V 2A
Battery
Connection through a weld plate
OS/Software
OS
Android 6.0
Programming support
C、C++、Kotlin、Java、Shell、Pyhon
Interface definition
Size
55mm*85mm
Weight
43g
Orange Pi™ is trademark of Shenzhen Xunlong Software CO., Limited

Orange Pi User Manual Shenzhen Xunlong Software Co., Ltd
www.orangepi.org 4 www.xunlong.tv
Interface instructions:

Orange Pi User Manual Shenzhen Xunlong Software Co., Ltd
www.orangepi.org 5 www.xunlong.tv
II. Using Method
1.Prepare the Hardware and Software
Orange Pi 4G-IoT Development Board
A PC for compilation with following specs:
Orange Pi 4G-IoT SDK
Orange Pi 4G-IoT Firmware
Android-image-flash-tool
2.Power Methods
DC (5V 2A)in for power:
Battery in for power:
3.Before Usage
Hardware Requirement:
64bit CPU
Up to 16GB RAM
UP to 40GB spare disk space
Operation system should up to Ubuntu12.04, it would be better if it is Ubuntu16.04
You could refer to Google file for more details: https://source.android.com/source/building
Software Requirement:
There are two methods for power supply:
Usually use 3.7V battery to solder on the back side of the development board.
After receiving the product, please put the antennas of the product from the position of Pic 1 to the
position of Pic 2 (or to the outside of the board), which can not be attached to the board so as not to
affect the signal.

Orange Pi User Manual Shenzhen Xunlong Software Co., Ltd
www.orangepi.org 6 www.xunlong.tv
Pic 1 Pic 2

Orange Pi User Manual Shenzhen Xunlong Software Co., Ltd
www.orangepi.org 7 www.xunlong.tv
III. Android Compilation Environment Construction
1. Download SDK compression package
Android 6.0
mkdir OrangePi_4G-IoT
tar zxvf OrangePi_4G-IoT_Android6.0_V1.0_2018_0126.tar.gz -C
OrangePi_4G-IoT
cd OrangePi_4G-IoT
Android 8.1
Create directory
mkdir OrangePi_4G-IOT_Android8.1
Copy compress package
cp -rf x00 x01 x02 ... x10
Merge compression package
cat x*>OrangePi_4G-IOT_Android8.1.tar.gz
Decompression
tar xzvf OrangePi_4G-IOT_Android8.tar.gz
2. Construct Compilation Environment
Install JDK
sudo apt-get install openjdk-7-jdk
Take OrangePi_4G-IoT_Android6.0_V1.0_2018_0126.tar.gz as an example, after get the original
compression package:
After downloaded compression package, you will have 11packages named x00, x01, x02,
x03 ...x10.Put packages on the same directory like the following:
It could also refer to Google file: http://source.android.com/source/initializing.html
Compilation of Android6.0 is based on JAVA7, it needs to first install OpenJDK before compilation.
Command for installing:
Configure environment variable of JAVA, here is the path for installation:

Orange Pi User Manual Shenzhen Xunlong Software Co., Ltd
www.orangepi.org 8 www.xunlong.tv
export JAVA_HOME=/usr/lib/jvm/java-7-openjdk-amd64
export PATH=$JAVA_HOME/bin:$PATH
export CLASSPATH=.:$JAVA_HOME/lib:$JAVA_HOME/lib/tools.jar
Install Software Package
sudo apt-get update
sudo apt-get install git-core gnupg flex bison ccache gperf libsdl1.2-dev
libesd0-dev libwxgtk2.6-dev build-essential zip curl libncurses5-dev
zlib1g-dev valgrind libc6-dev lib32ncurses5-dev x11proto-core-dev
libx11-dev lib32readline-gplv2-dev lib32z1-dev libgl1-mesa-dev gcc-4.4
g++-4.4 g++-4.4-multilib g++-multilib mingw32 tofrodos python-markdown
libxml2-utils xsltproc wine
sudo apt-get update
sudo apt-get install git-core gnupg flex bison ccache gperf libsdl1.2-dev
libesd0-dev libwxgtk2.8-dev build-essential zip curl libncurses5-dev
zlib1g-dev valgrind libc6-dev lib32ncurses5-dev x11proto-core-dev
libx11-dev lib32readline-gplv2-dev lib32z1-dev libgl1-mesa-dev
g++-multilib g++-4.8-multilib mingw32 tofrodos python-markdown
libxml2-utils xsltproc libc6-dev-i386 lib32z1 lib32ncurses5 lib32bz2-1.0
lib32readline-gplv2-dev wine
3. Compilation of SDK Source Code
Android 6.0
$ cd code/orangepi/scripts
$ ls
/usr/lib/jvm/java-7-openjdk-amd64
It could configure on the terminal with the following command:
For Ubuntu12.04:
For Ubuntu14.04:
We could process to SDK compilation after finished the above.
There are many compilation shell scripts for development.
The directory would be: SDK/code/orangepi/scripts

Orange Pi User Manual Shenzhen Xunlong Software Co., Ltd
www.orangepi.org 9 www.xunlong.tv
anr_LM.sh auto.sh clean.sh codegen.sh init_project.sh tar_img.sh
$ ./auto.sh IoT_bd6737m_35g_b_m0_op_smt_hd720_pcb_v2 v00 eng
Android 8.1
$ cd code/orangepi/scripts
$ ls
anr_LM.sh auto.sh clean.sh codegen.sh init_project.sh tar_img.sh
$ ./auto.sh IoT_k37mv1_bsp_ry_smt_hd720_pcb_v2 v00 eng
auto.sh is automatically compilation script
clean.sh automatically scavenging the compiled result script
On the directory of code/orangepi/scripts, execute the automatically compilation script:
The meaning of the parameter is:
#$1 project_info [eg: IoT_bd6737m_35g_b_m0_op_smt_hd720_pcb_v2]
#$2 version_info [eg: v00 v01 ...]
#$3 compile_mode [eng:user userdebug eng]
The directory would be: SDK/code/orangepi/scripts
auto.sh--scripts for automatic compilation
clean.sh--scripts for automatically cleaning the compiled result
On the directory of code/orangepi/scripts, execute automatic compilation scripts:
Definition of the three parameters:
#$1 project_info [eg: IoT_k37mv1_bsp_ry_smt_hd720_pcb_v2]
#$2 version_info [eg: v00 v01 ...]
#$3 compile_mode [eng:user userdebug eng]
Execute command to compile:
source build/envsetup.sh
luncher ------>full_k37mv1_bsp-eng
make -j4
Module compilation

Orange Pi User Manual Shenzhen Xunlong Software Co., Ltd
www.orangepi.org 10 www.xunlong.tv
4. Generated Firmware
Android6.0
$ tree IoT_op_smt_hd720_pcb_v2
IoT_op_smt_hd720_pcb_v2
├── images
│ ├── boot.img
│ ├── cache.img
│ ├── lk.bin
│ ├── logo.bin
│ ├── MT6737M_Android_scatter.txt
│ ├── preloader_bd6737m_35g_b_m0.bin
│ ├── recovery.img
│ ├── secro.img
│ ├── system.img
│ ├── trustzone.bin
│ └── userdata.img
└── modem
├── APDB_MT6735_S01_alps-mp-m0.mp1_W17.21
├── _APDB_MT6735_S01_alps-mp-m0.mp1_W17.21.check
└── APDB_MT6735_S01_alps-mp-m0.mp1_W17.21_ENUM
Android8.1
$ tree IoT_op_smt_hd720_pcb_v2
IoT_op_smt_hd720_pcb_v2
├── images
│ ├── boot.img
│ ├── cache.img
│ ├── lk.bin
│ ├── logo.bin
Here would take an example of only compilation launcer:
mm packages/apps/Launcher3/ or enter into directory of packages/apps/Launcher3/, execute mm
Please note that some modules depend on the relationship of package, you need to run mma.
After compiled, the firmware will gather in the directory of: code/IoT_op_smt_hd720_pcb_v2, pack it
and name it like the following: IoT_op_smt_hd720_pcb_v2_v00_eng_20180126140300.tar.gz
Except the above method, it could also be generated into update.image via Linux_Pack_Firmware.
After compiled, the firmware will gather in the directory of: code/IoT_ry_smt_hd720_pcb_v2, pack it
and name it like the following: IoT_ry_smt_hd720_pcb_v2_v09_eng_20180504163653.tar.gz

Orange Pi User Manual Shenzhen Xunlong Software Co., Ltd
www.orangepi.org 11 www.xunlong.tv
│ ├── MT6737M_Android_scatter.txt
│ ├── preloader_k37mv1_bsp.bin
│ ├── recovery.img
│ ├── secro.img
│ ├── system.img
│ ├── trustzone.bin
│ └── userdata.img
└── modem
├── APDB_MT6735_S01_alps-mp-m0.mp1_W18.04
├── _APDB_MT6735_S01_alps-mp-m0.mp1_W18.04.check
└── APDB_MT6735_S01_alps-mp-m0.mp1_W18.04_ENUM

Orange Pi User Manual Shenzhen Xunlong Software Co., Ltd
www.orangepi.org 12 www.xunlong.tv
IV.Android Firmware Flashing
Relevant keys and connectors for firmware flashing of Orange Pi 4G-IoT:
List of generated firmwares:
IoT_op_smt_hd720_pcb_v2
├── images
│ ├── boot.img
│ ├── cache.img
│ ├── lk.bin
│ ├── logo.bin
│ ├── MT6737M_Android_scatter.txt
│ ├── preloader_bd6737m_35g_b_m0.bin
│ ├── recovery.img
│ ├── secro.img
│ ├── system.img
│ ├── trustzone.bin
│ └── userdata.img
└── modem
├── APDB_MT6735_S01_alps-mp-m0.mp1_W17.21
├── _APDB_MT6735_S01_alps-mp-m0.mp1_W17.21.check
└── APDB_MT6735_S01_alps-mp-m0.mp1_W17.21_ENUM

Orange Pi User Manual Shenzhen Xunlong Software Co., Ltd
www.orangepi.org 13 www.xunlong.tv
Windows 10
Windows 7 (32/64 bit)
Windows 8 (32/64 bit)
Ubuntu10.04 / 12.04 / 14.04 (32/64bit)
1. Flash Tool Introduction
Using method for both Windows and Linux versions are same, here will illustrate with Linux version.
You could download the packed image partition files from the official website:
http://www.orangepi.org/downloadresources/
Unzip the file with the following command:
$ tar zxvf IoT_op_smt_hd720_pcb_v2_v00_eng_20180126140300.tar.gz
You could get the file which mentioned on the list of generated files, or you could also compile it by
yourself with reference of to the part of Android Compilation Environment Construction.
Supporting OS of PC:
You could download the Smart Phone Flash Tool on the download page of Orange Pi 4G-IoT part.本
There are tools for Windows and Linux version, you could select a suitable version according to your
PC environment.
Interface like the following:

Orange Pi User Manual Shenzhen Xunlong Software Co., Ltd
www.orangepi.org 14 www.xunlong.tv
2. Method for Image Flashing
Unzip and open flash tool
Enter into flash mode
a. Switch into Download page like the following:
$ unzip SP_Flash_Tool_v5.1644_Linux.zip
$ cd SP_Flash_Tool_v5.1644_Linux
$ sudo ./flash_tool.sh
If it is the first time you use this software, you might receive the warn like the following. It is normal
to receive this, you could click OK enter into the software. In the future you could manually specified
the path of Scatter File.

Orange Pi User Manual Shenzhen Xunlong Software Co., Ltd
www.orangepi.org 15 www.xunlong.tv
b. Click choose on the right side of Scatter-loading File and select the path of Scatter File like the
following:

Orange Pi User Manual Shenzhen Xunlong Software Co., Ltd
www.orangepi.org 16 www.xunlong.tv
c. After double click the selection, the partition information display section will automatically fill
d. In the top left corner of partition information display section, there would be a drop-down menu.
e. Use USB data cable to connect PC and Orange Pi, the right side of Orange Pi will be in red LED.
the path of each partition file and the absolute starting address to which they are to be flashed.
Three of this options:
Format All + Download // Format all information on the partitions and re-download the selected
partition
Firmware Upgrade // Update the difference on the selected partition
Download Only // Re-download no matter there is difference or not
Please note it: Usually update firmware you only need to select Firmware Upgrade, please do not
select Format All + Download
It you select Format All, you will lose the calibration information which we worked before sending
out products. If this situation is inadvertent, please contact the Orange Pi service and obtain the
calibration parameters through the machine code, and re-flash the calibration parameters.
In this case do not need to connect DC power supply.

Orange Pi User Manual Shenzhen Xunlong Software Co., Ltd
www.orangepi.org 17 www.xunlong.tv
f. Click Download button
g. The interface would show like the following after downloaded:
h. Take of the USB cable and insert DC power supply
3. FAQ
1. Configure Jack server before compilation
Wait around 5 seconds, it will display the charging interface of shutdown
When the Power button is loosened after 5 seconds, the system will start to enter the system
When the updated partition is more, the first boot will take a long time (the full partition update needs
8min), please be patient.
Android8.1 compilation tool chain uses the new Jack server to replace the old compilation tool
chain.
①Modify .jack file on the path of $HOME:

Orange Pi User Manual Shenzhen Xunlong Software Co., Ltd
www.orangepi.org 18 www.xunlong.tv
②Modify .jack-settings file on the path of $HOME:
(注:此处两个文件的 TCP 端口号必须是没有用过的,且两个文件的端口配置要相同!)
③code/prebuilts/sdk/tools/目录下,执行./jack-admin kill-server 和./jack-admin restart-server
2.Failed to contact Jack server
如果你在编译的过程中,出现了如下的问题:
FAILED: /bin/bash -c "(prebuilts/sdk/tools/jack-admin install-server
prebuilts/sdk/tools/jack-launcher.jar prebuilts/sdk/tools/jack-server-4.8.ALPHA.jar 2>&1 || (exit 0) )
&& (JACK_SERVER_VM_ARGUMENTS=\"-Dfile.encoding=UTF-8 -XX:+TieredCompilation\"
prebuilts/sdk/tools/jack-admin start-server 2>&1 || exit 0 ) && (prebuilts/sdk/tools/jack-admin update
server prebuilts/sdk/tools/jack-server-4.8.ALPHA.jar 4.8.ALPHA 2>&1 || exit 0 ) &&
(prebuilts/sdk/tools/jack-admin update jack prebuilts/sdk/tools/jacks/jack-2.28.RELEASE.jar
2.28.RELEASE || exit 47; prebuilts/sdk/tools/jack-admin update jack
prebuilts/sdk/tools/jacks/jack-3.36.CANDIDATE.jar 3.36.CANDIDATE || exit 47;

Orange Pi User Manual Shenzhen Xunlong Software Co., Ltd
www.orangepi.org 19 www.xunlong.tv
prebuilts/sdk/tools/jack-admin update jack prebuilts/sdk/tools/jacks/jack-4.7.BETA.jar 4.7.BETA ||
exit 47 )"
Writing client settings in /home/user3/.jack-settings
Installing jack server in "/home/user3/.jack-server"
修改:在 code/prebuilts/sdk/tools/目录下,执行./jack-admin kill-server 和./jack-admin restart-server,
然后重新编译。
3.Out of memory erro
(1)首先停止 jack server 的运行;
(2)去 prebuilts/sdk/tools 目录下执行 jack-admin kill-server 以杀死 Jack server;
( 3 ) 然 后 打 开 jack-admin 文 件 , 在 文 件 中 搜 索 JACK_SERVER_COMMAND , 然 后 将
JACK_SERVER_COMMAND="java -XX:MaxJavaStackTraceDepth=-1
-Djava.io.tmpdir=$TMPDIR $JACK_SERVER_VM_ARGUMENTS -cp $LAUNCHER_JAR
$LAUNCHER_NAME" , 改 为 JACK_SERVER_COMMAND="java -Xmx3g
-XX:MaxJavaStackTraceDepth=-1 -Djava.io.tmpdir=$TMPDIR
$JACK_SERVER_VM_ARGUMENTS -cp $LAUNCHER_JAR $LAUNCHER_NAME"。也就是添
加了-Xmx3g 选项。
4. FAILED: setup-jack-server
FAILED: setup-jack-server
Jack server installation not found
Solution: Execute the following command on the directory of prebuilts/sdk/tools: ./jack-admin
install-server jack-launcher.jar jack-server-4.11.ALPHA.jar
jack-launcher.jar,jack-server-4.11.ALPHA.jar 这两个文件的名字视 prebuilts/sdk/tools 目录下的
文件名而定。
5. Test Issue
When the sim card cannot be recognized, you need to format 卡不能识别的时候,需要格式化烧录。

Orange Pi User Manual Shenzhen Xunlong Software Co., Ltd
www.orangepi.org 20 www.xunlong.tv

Orange Pi User Manual Shenzhen Xunlong Software Co., Ltd
www.orangepi.org 21 www.xunlong.tv
 Loading...