

Page 1

公司名称:Shenzhen MTC Co.,LTD
产品名称:Wireless Router
产品型号:PW5002
PW5002
PLC 600Mbps
Wireless N 300Mbps Wi-Fi Router
User Guide
1
Page 2

Important Safety Instructions
1. Do not open this product or attempt to service it; it may expose you to dangerous high voltage or
other risks.
2. Do not operate this product near water.
3. Do not place or operate this product near a radiator or a heat register.
4. Do not expose this product to dampness, dust or corrosive liquids.
5. Do not connect this product or disconnect it from a wall socket during a lightning or a
thunderstorm.
6. Do not block the ventilation slots of this product, for insufficient airflow may harm it.
7. Do not put anything on this product.
8. Plug this product directly into a wall socket (100-240V~, 50/60Hz). Do not use an extension cord
between this product and the AC power source.
9. When plugging this product into a wall socket, make sure that the electrical socket is not
damaged, and that there is no gas leakage.
10. Place the connecting cables properly so that people won’t stumble or walk on it.
11. This product should be operated from the type of power indicated on the marking label. If you
are not sure of the type of power available, consult the qualified technician.
12. Unplug this product from the mains and refer the product to qualified service personnel for the
following conditions:
1) If liquid has been spilled on the product.
2) If the product has been exposed to rain or water.
13. Unplug this product from the wall socket before cleaning. Use a damp cloth for cleaning. Do
not use liquid cleaners or aerosol cleaners.
14. The specification of the fuse is for PW5002 to avoid damage, please do not change the fuse.
15. The Operating temperature is 0℃~40℃ (32℉~104℉). The Storage temperature is -40℃~70℃
(-40℉~158℉).
2
Page 3
ICON
Description
Note
This format is used to highlight information of
importance or special interest. Ignoring this type
of note may result in ineffective configurations,
loss of data or damage to device.
Tip
This format is used to highlight a procedure that
will save time or resources.
Knowledge Expansion
Description of fields on the device GUI.
Preface
Thank you for choosing MTC! Please read this user guide before you start! This user guide
instructs you to install and configure your device. This user guide applies to PW500X, The
PW5002 is used as an example throughout this user guide.
This user guide uses the following formats to highlight special messages:
3
Page 4

Contents
Important Safety Instructions .......................................................................................................................... 2
Preface ........................................................................................................................................................... 3
Contents .......................................................................................................................................................... 4
Chapter 1 Introduction .................................................................................................................................... 6
1.1 Product Overview .............................................................................................................................. 6
1.2 Product Feature ................................................................................................................................. 6
Chapter 2 Connecting Mechanism .................................................................................................................. 7
2.1 Appearance ....................................................................................................................................... 7
2.1.1 The products front panel ........................................................................................................ 7
2.1.2 The product rear panel ........................................................................................................... 8
2.2 System Requirement ......................................................................................................................... 8
2.3 Connection Instruction ...................................................................................................................... 9
2.3.1 Getting Prepared .................................................................................................................... 9
2.3.2 Installment Environment ...................................................................................................... 10
Chapter 3 Configuring the Device Manually ................................................................................................. 16
3.1 Log in the Router ............................................................................................................................. 16
3.2 Quick Setup ..................................................................................................................................... 20
3.3 System Status .................................................................................................................................. 22
3.3.1 System Status ....................................................................................................................... 22
3.3.2 WAN Status ........................................................................................................................... 23
3.3.3 LAN Status ............................................................................................................................ 24
3.3.4 Wireless Status ..................................................................................................................... 25
3.4 Network Settings ............................................................................................................................. 26
3.4.1 WAN Settings ........................................................................................................................ 26
3.4.2 WAN Parameters .................................................................................................................. 31
3.4.3 MAC Address Clone .............................................................................................................. 32
3.5 WLAN Settings ................................................................................................................................. 33
3.5.1 Basic Setting ......................................................................................................................... 33
3.5.2 Security Settings ................................................................................................................... 35
3.5.3 WPS Settings ......................................................................................................................... 38
3.5.4 Access Control ...................................................................................................................... 40
3.5.5 Connection Status ................................................................................................................ 42
3.6 LAN Settings .................................................................................................................................... 42
3.6.1LAN Settings .......................................................................................................................... 42
3.6.2DHCP Server .......................................................................................................................... 44
3.6.3 DHCP List & Binding .............................................................................................................. 45
3.7 Expert Settings ................................................................................................................................. 47
3.7.1 URL Filter .............................................................................................................................. 47
3.7.2 Port Range ............................................................................................................................ 49
3.7.3 DMZ Settings ........................................................................................................................ 50
3.7.4 DDNS Settings ....................................................................................................................... 51
4
Page 5

3.7.5 Remote WEB ......................................................................................................................... 53
3.7.6 WAN Ping .............................................................................................................................. 55
3.8 Routing ............................................................................................................................................ 55
3.9 Traffic Control .................................................................................................................................. 56
3.10 System Tools .................................................................................................................................. 57
3.10.1 Time Settings ...................................................................................................................... 57
3.10.2 Backup/Restore .................................................................................................................. 59
3.10.3 Restore to Factory .............................................................................................................. 60
3.10.4 Firmware Upgrade .............................................................................................................. 61
3.10.5 Reboot ................................................................................................................................ 62
3.10.6 Change Password ................................................................................................................ 62
3.10.7 System Log .......................................................................................................................... 63
Appendix ....................................................................................................................................................... 65
1 Configure PC TCP/IP Settings .............................................................................................................. 65
Windows 7 ..................................................................................................................................... 65
Windows XP ................................................................................................................................... 71
2 Troubleshooting .................................................................................................................................. 73
3 Factory default settings ...................................................................................................................... 74
4 Remove Wireless Network from Your PC ........................................................................................... 75
Windows 7 ..................................................................................................................................... 76
Windows XP ................................................................................................................................... 78
5 Safety and Emission Statement .......................................................................................................... 79
5
Page 6

Chapter 1 Introduction
1.1 Product Overview
Congratulations on your purchase of this outstanding 300Mbps Wi-Fi router. This device is not
only a router adapter which transforms your house’s existing electrical wiring into a ubiquitous
networking infrastructure, but also a 300Mbps Wi-Fi Access Point which creates a wireless
network allowing for greater range and mobility.
As a Wi-Fi Access Point, it can transmit wireless data at the rate of up to 300Mbps. With
multiple protection measures including SSID broadcast control, wireless LAN WEP encryption,
and Wi-Fi Protected Access (WPA2- PSK, WPA-PSK), the device delivers complete data privacy.
Conventions
The device mentioned in this User Guide stands for PW5002 300Mbps Wi-Fi Router without
any explanations. Parameters provided in the pictures are just references for setting up the
product. They may differ from the actual situation.
1.2 Product Feature
Support a WAN Port, a LAN port and support port adaptive.
Support Wireless up to 300M transfer rate.
Support IEEE 802.11b/g/n, IEEE 802.3/802.3u, IEEE 802.1X protocol.
Built-in DHCP Server and support static routing.
Support web page filtering, timing control on the Internet.
Support system log.
Support remote and web management.
6
Page 7
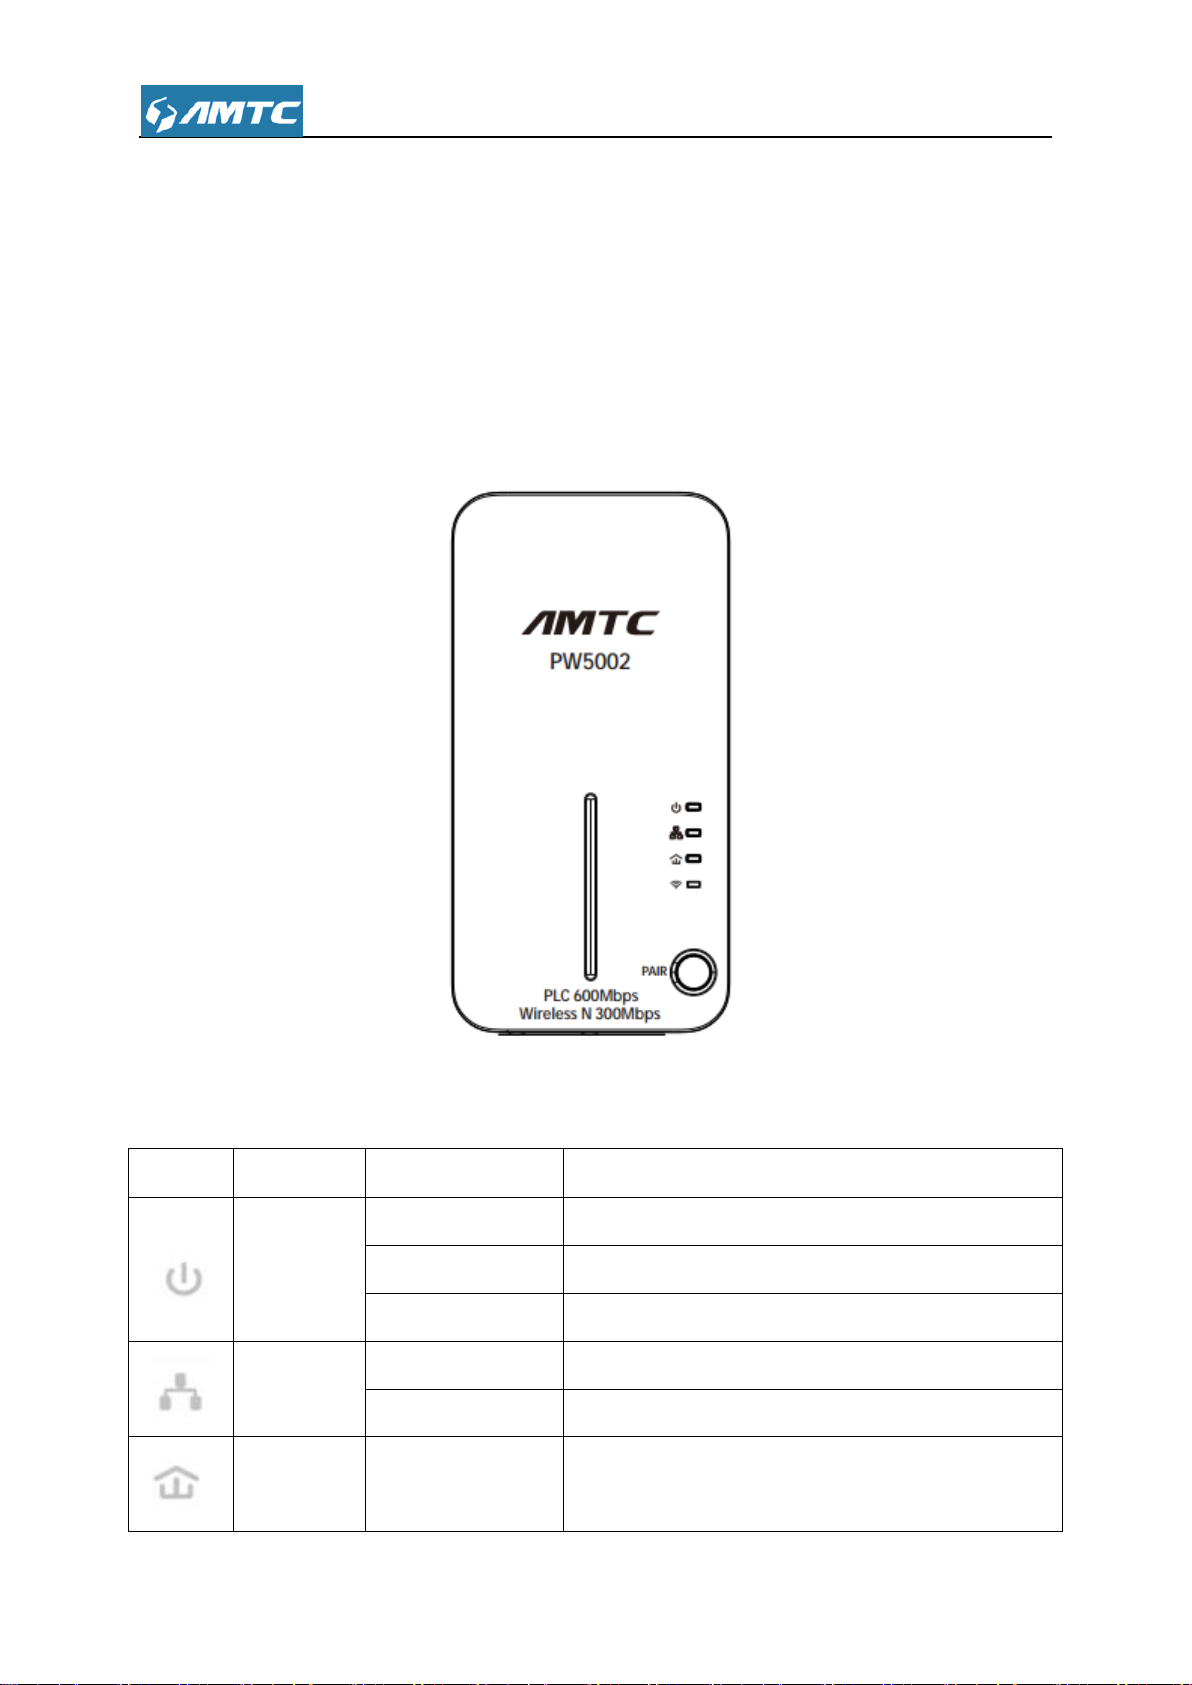
LEDs
Name
Status
Indications
Power LED
Solid
The device is on.
Off
The device is off.
Blinking
The device is in the pairing procedure.
Ethernet
LED
Solid
The Ethernet port is connected.
Off
The Ethernet port isn’t connected.
Router
LED
Solid
The device is connected to a router network, but there
is no data being transferred.
Chapter 2 Connecting Mechanism
2.1 Appearance
2.1.1 The products front panel
The LED indicator displays information about the device’s status.
7
Page 8

Off
The device isn’t connected to any router network
Blinking
The device is transferring data.
Wi-Fi/Wi-Fi
Clone
Off
The wireless function has been disabled.
Blinking Slow
The extender is cloning Wi-Fi settings from other
device.
Blinking Quickly
The wireless function has been enabled
2.1.2 The product rear panel
Button and Interface description (from right to left)
Reset: Under the electricity situation, press the button about five seconds, the router will
reboot, and after the reboot, the router will restore factory default. You can enter the router
use the default username and default password(username: admin, password: admin)
WAN Port: WAN port jack (RJ45), the port used to connect the Ethernet cable/xDSL
Modem/Cable Mode.
LAN Port: LAN jack (RJ45), used to connect LAN in hub, switch or installed network card
computer.
2.2 System Requirement
Internet service (Internet access through Ethernet cable or via xDSL/Cable Mode).
A modem with RJ45 port (use the Ethernet cable access directly do not need this equipment).
Every PC Ethernet connection device (wired internet card or wireless internet card and
8
Page 9

Item
Description
Router
Find it in your package.
PC
Should have installed IE8 or higher browser.
Gather ISP
Information
DHCP, PPOE or Static IP Internet Connection Type:
1. Ethernet Cable from the incoming Internet side: This is provided by your ISP
2. ISP Information: Your Internet service provider (ISP) should have provided
you with all of the information needed to connect to the Internet. If you cannot
locate this information, ask your ISP to provide it
If your ISP uses a PPOE Internet connection, you will need ISP login name
and password
If you use a DHCP Internet connection, no information is needed
If your ISP gives you a fixed or static IP address for Internet
connection, you will need to gather the following information:
1) IP Address
2) Subnet Mask
3) Gateway
4) DNS Server
5) Alternate DNS Server (Optional)
WISP Internet Access:
1. Remote AP's SSID, MAC address, security mode, cipher type and security
key
Ethernet cable).
TCP/IP network software (compatible with Window XP/Window 7/Window 8).
Internet Explorer 8 or higher versions or Firefox
2.3 Connection Instruction
2.3.1 Getting Prepared
Before you start the installation process, you need to prepare the following things:
9
Page 10
2. Internet connection information provided by the remote AP
3. Ethernet Cable: This can be found in the product package. You will need it
to connect your PC to this device
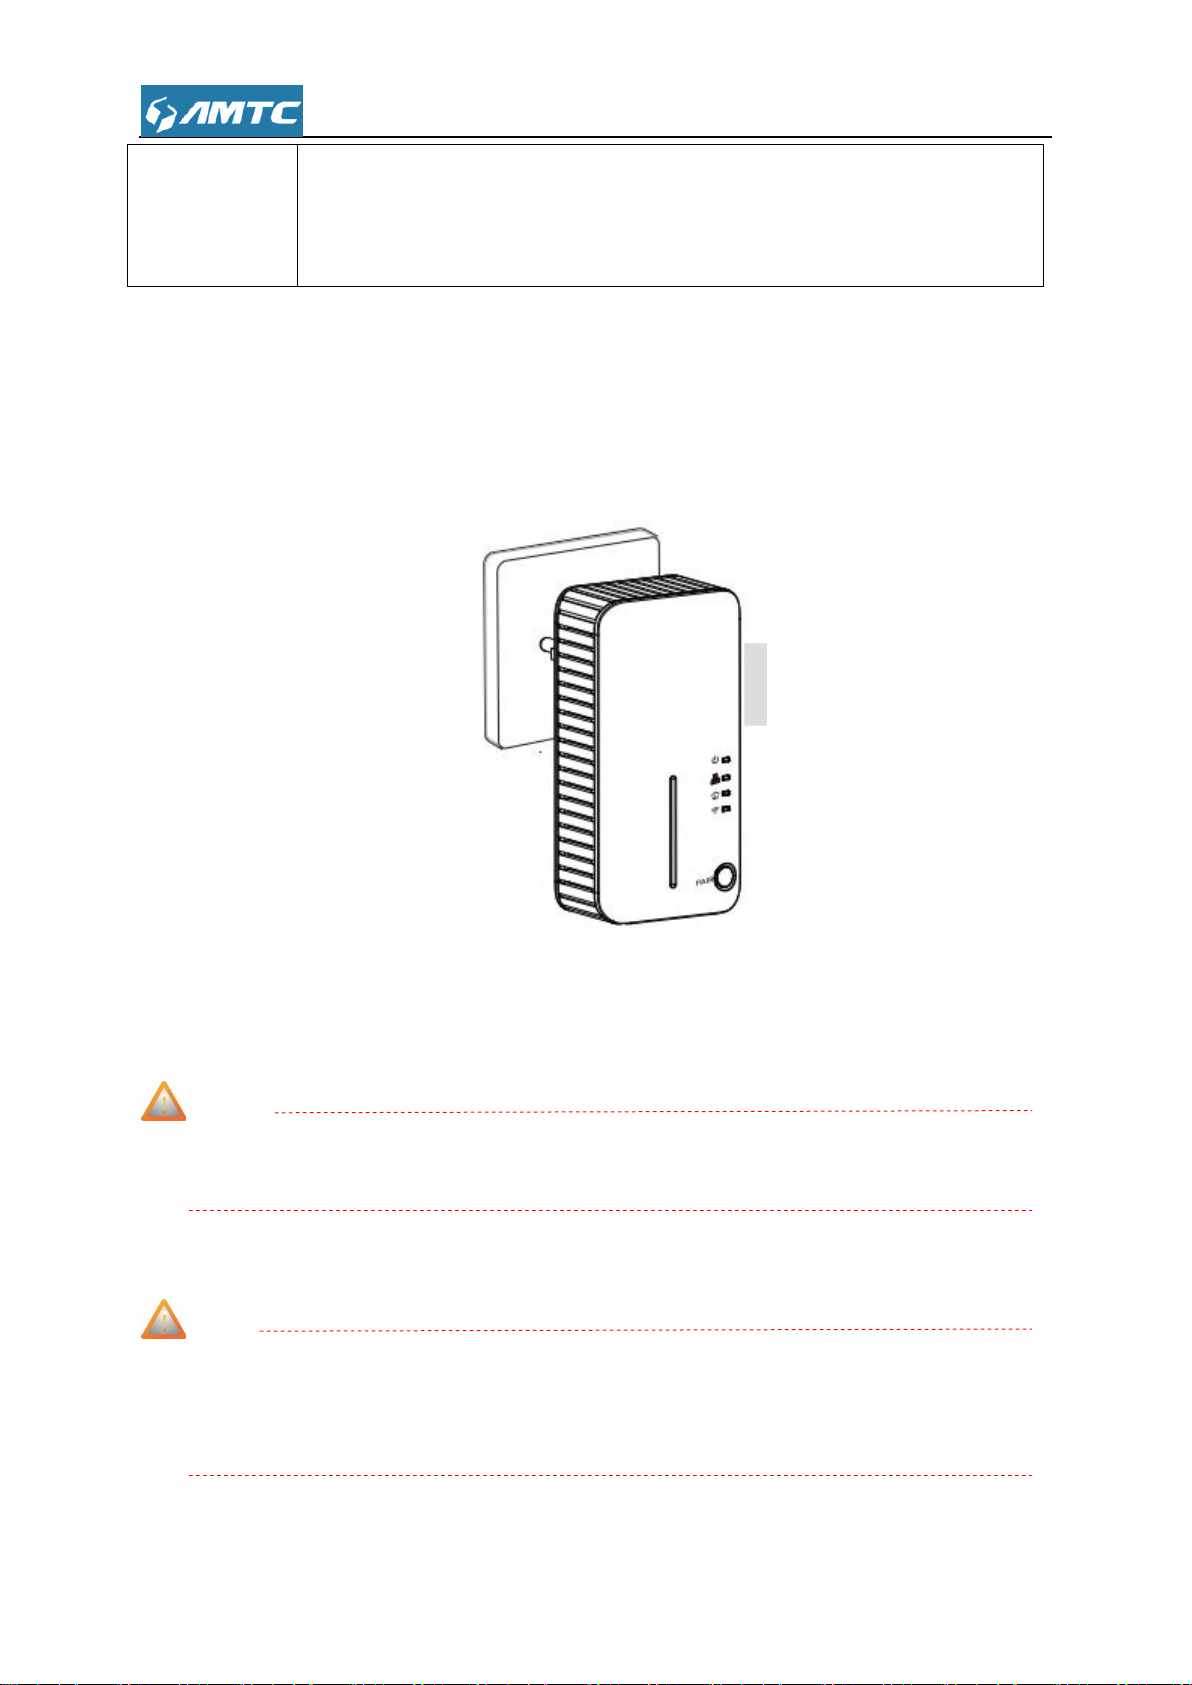
2.3.2 Installment Environment
Please follow these rules when install and use:
1. Plug the ranger extender directly into a wall socket but not the multiple sockets.
2. To take full advantage of the filter function of the Repeater and to improve data transmission in
the network, always plug the multiple sockets into the integrated electrical socket of the
Repeater.
Note
Environmental factor will have influence on the distance of wireless transmission.
2.3.3 Hardware Connection
Note
Before connecting, please make sure that you can surf the internet in your computer to use
the reticle provided by ISP.
There are two measures to connect your device:
10
Page 11

1) If you use ADSL connect the internet, please follow step 1-4 as graphical shown to connect
your device.
2) If you use Residential broadband, put the network line into the WAN port and follow the step
3-4 as graphical shown to connect your device.
Set Steps:
① Connect the modem.
② Please connect reticle what you ever connected to the computer with the router's WAN port.
③ Use another reticle to connect your computer Ethernet port with the router’s LAN port.
④ Connect the router’s power adapter. And the hardware connection is finished.
Note
Please use the matched power adapter otherwise it will damage the router.
2.4 Configure local PC TCP/IP Settings
Before you log in to the router, please make sure your computer set to “Obtain an IP address
automatically” and “Obtain DNS server address automatically” from the device.
① Click Start -> Control Panel.
11
Page 12
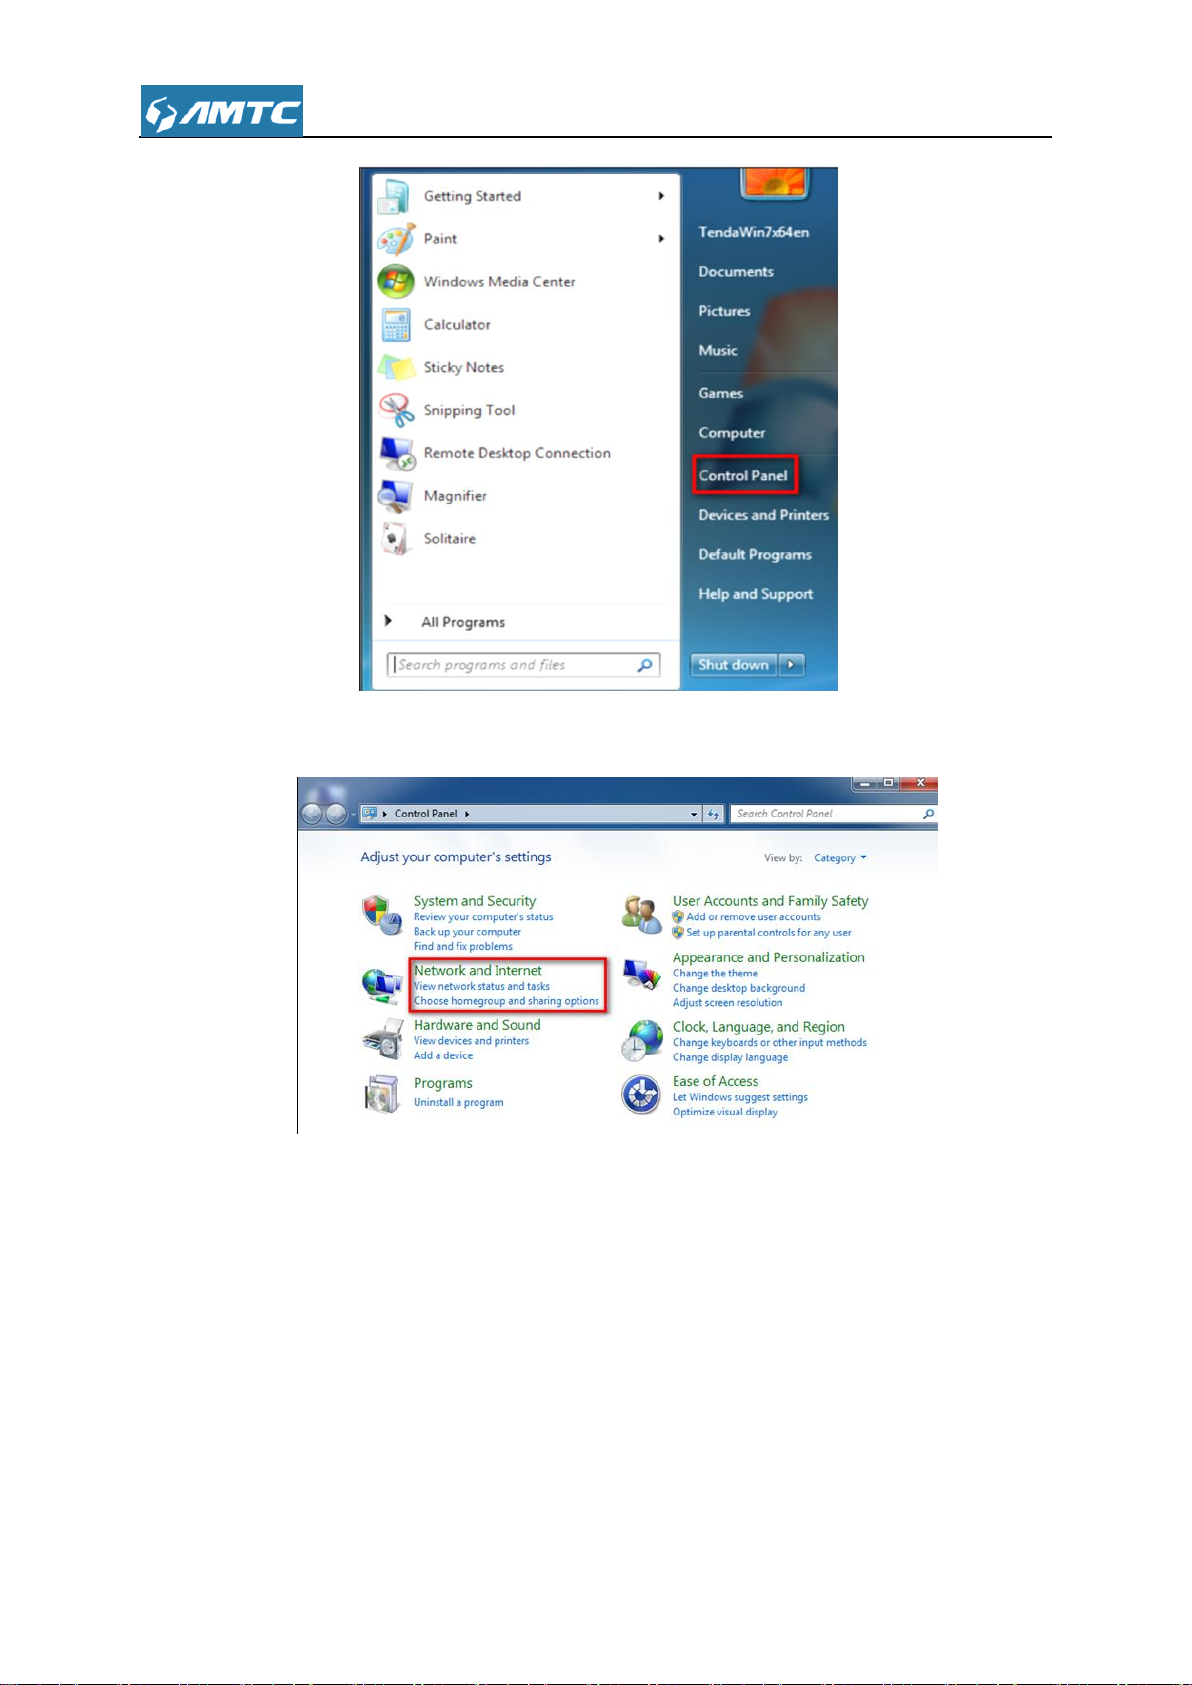
② Click Network and Internet.
③ Click Network and Sharing Center.
12
Page 13

④ Click Change adapter settings.
⑤ Click Local Area Connection and select Properties.
13
Page 14

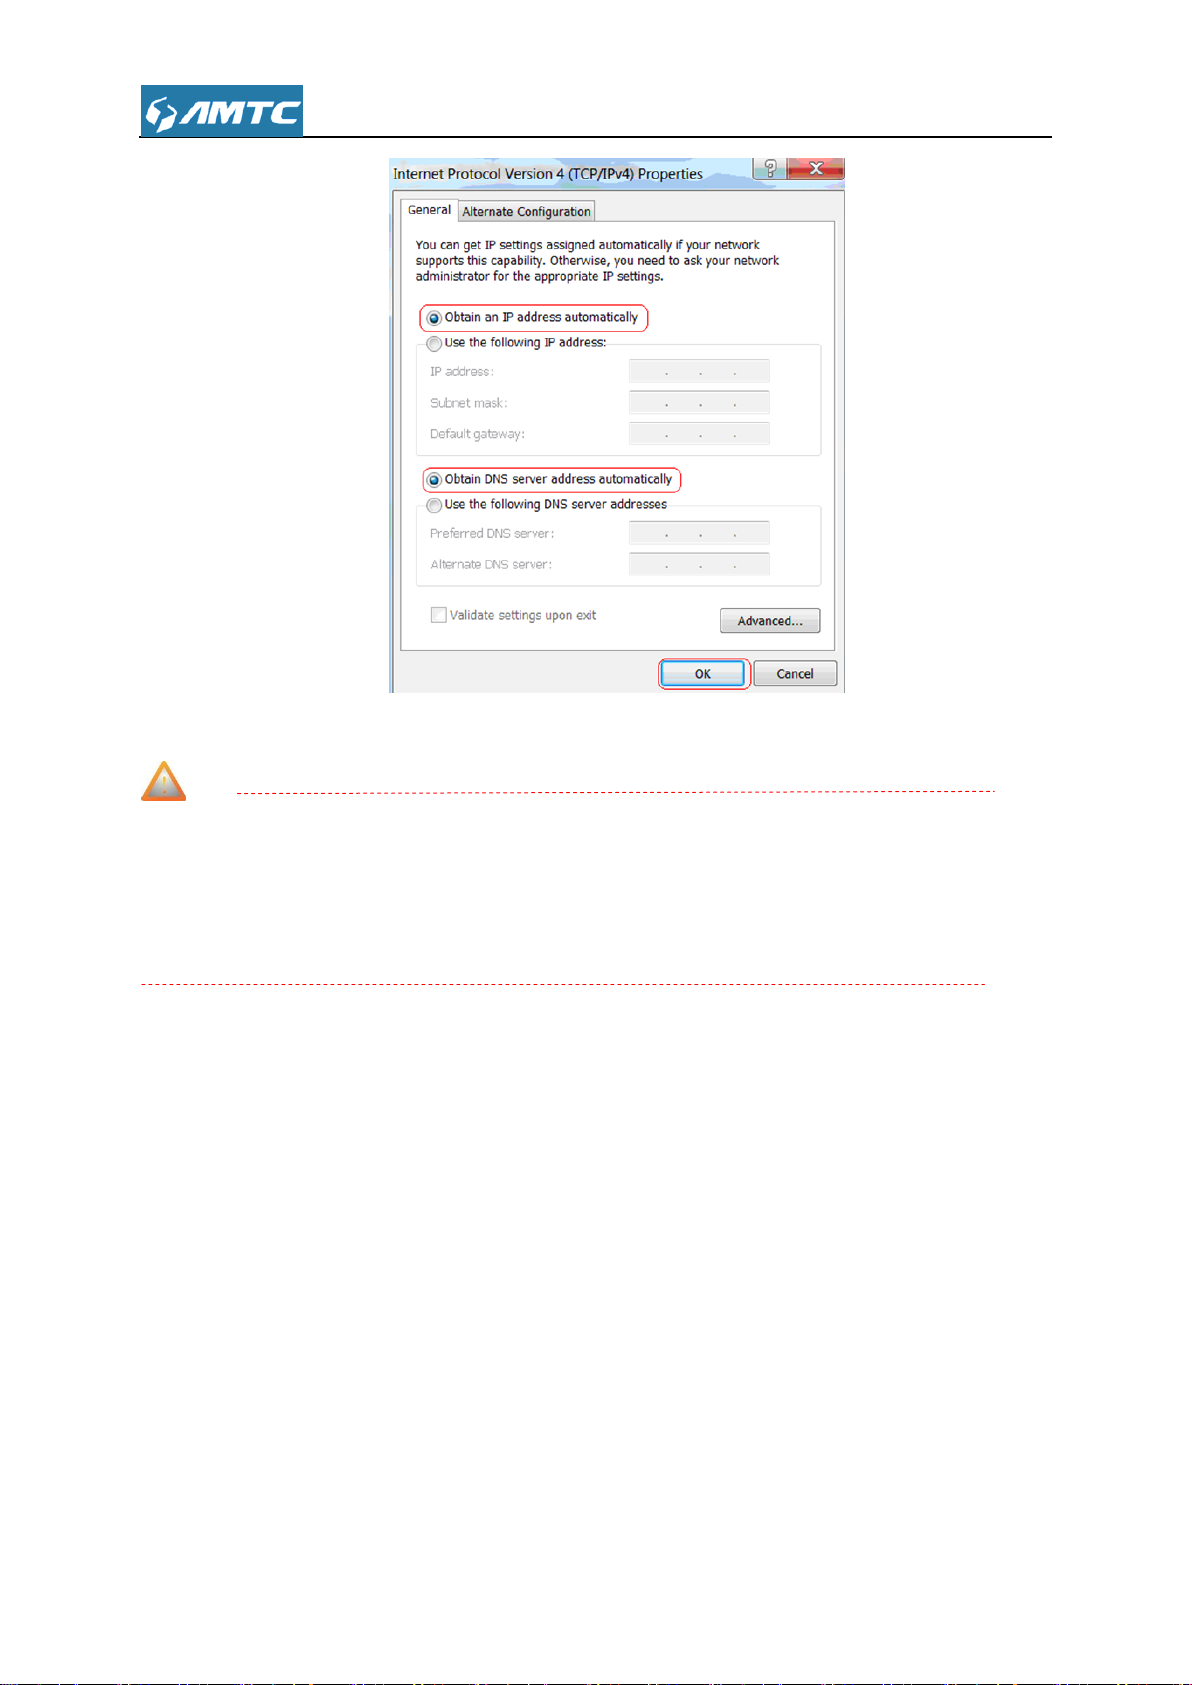
⑥ Select Internet Protocol Version 4 (TCP/IPv4) and click Properties.
⑦ Select Obtain an IP address automatically and click OK
⑧ Click OK on the Local Area Connection Properties window to save your settings
14
Page 15
Note
If you need to configure the IP address manually, please set the PC’s IP address and router IP
address in the same subnet, because the router’s default IP is 192.168.1.1, the subnet mask
is 255.255.255.0, so your IP should set 192.168.1.XXX; XXX cannot be 1.
15
Page 16
Chapter 3 Configuring the Device Manually
3.1 Log in the Router
1. To access the Router’s Web-based Utility, launch a web browser such as Internet Explorer or
Firefox.
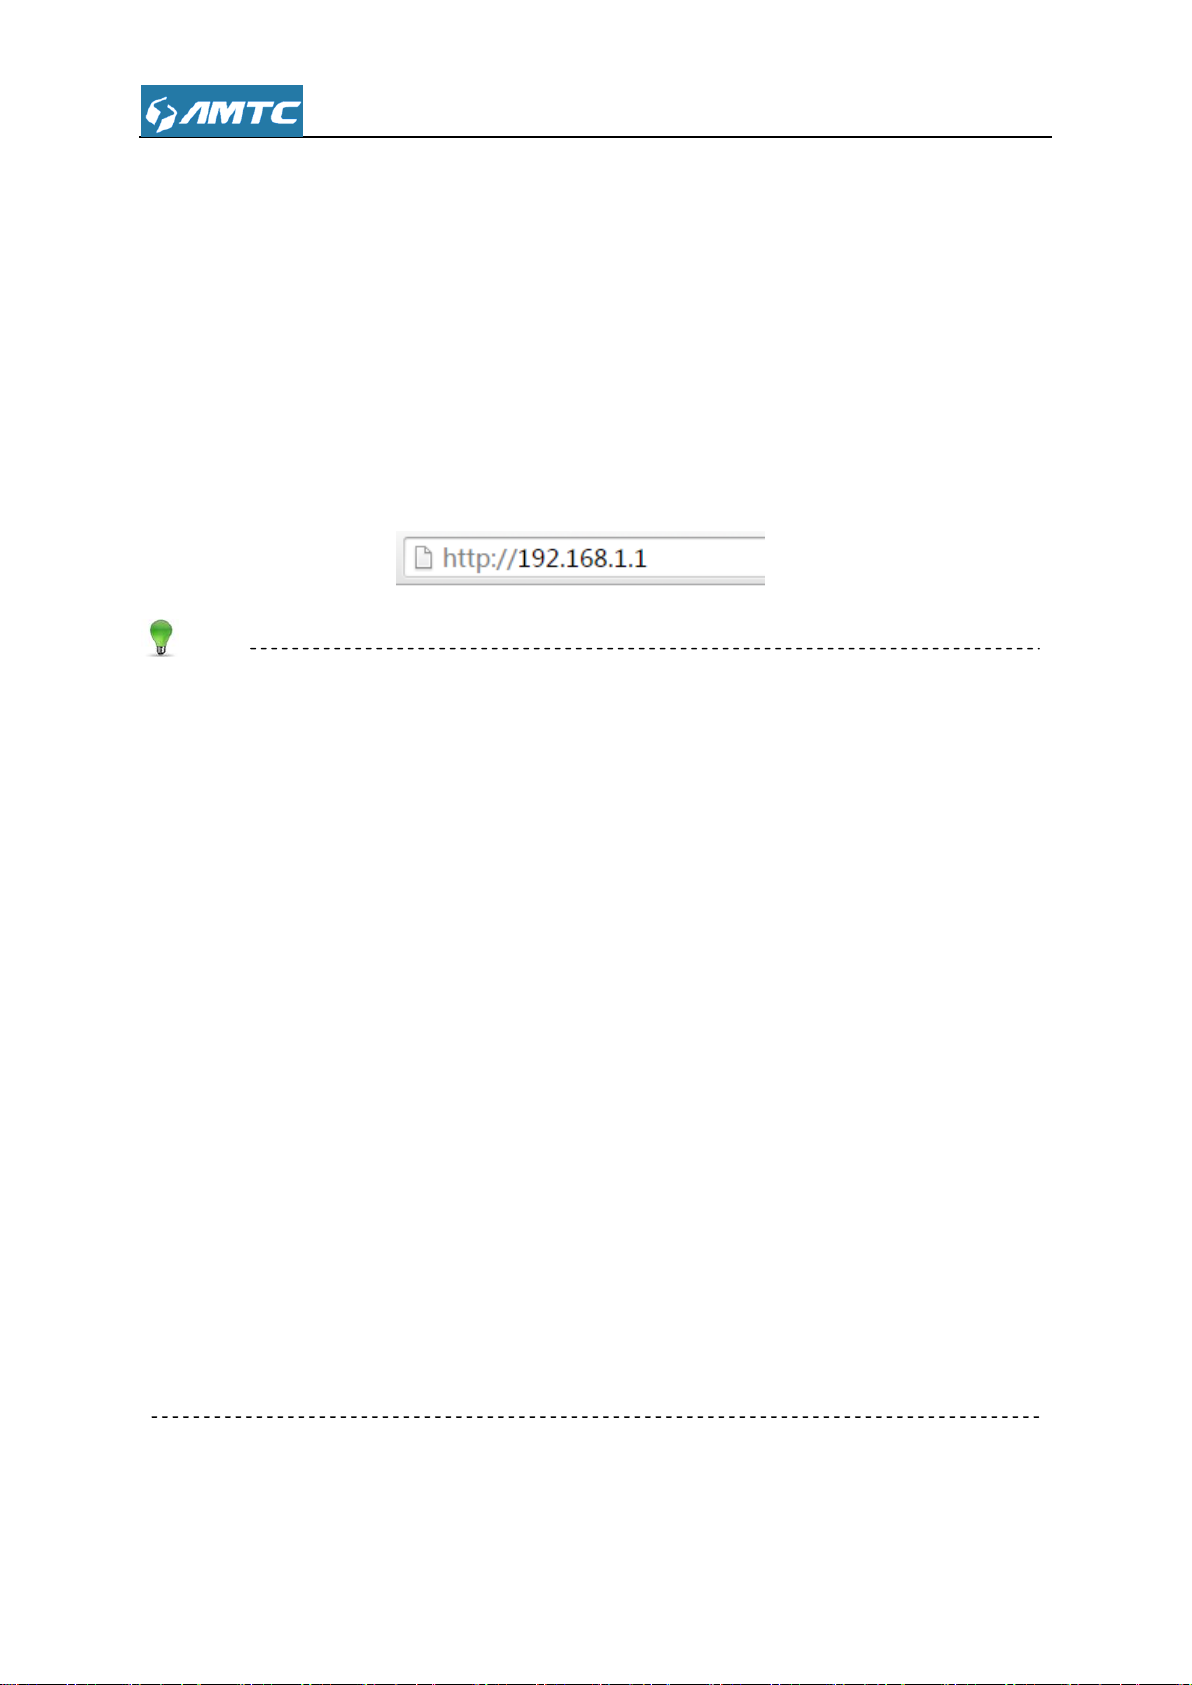
2. Enter http://192.168.1.1. Press “Enter”. (You can login to the device’s page through the
following two domains: “mtc.setup.cn” or “PW5002.setup.cn”)
Tips
PW5002 as a Wifi Router device, avoid abnormal of IP conflict in the same LAN, after this
device connected with up level router, it will adjust itself as follows:
1) If this device’s LAN IP and the up level router’s LAN IP at the same network segment, this
device will change its LAN IP automatically. For example: the up level router’s LAN IP is:
192.168.1.1, this device’s LAN IP will become 192.168.10.1.
2) If they are not in the same network segment, this device’s LAN IP will unchanged.
After this device connected with up level router, this device will get an IP from up level through
DHCP but this IP is unknown to the user (now this device has two IP addresses, 192.168.10.1
and the up level router assigned. both of them can login the web page.).
Because of the unknown IP address, you can login the web page through two measures as
below:
1) Launch a web browser inter “mtc.setup.cn”.
2) Launch a web browser inter “PW5002.setup.cn”.
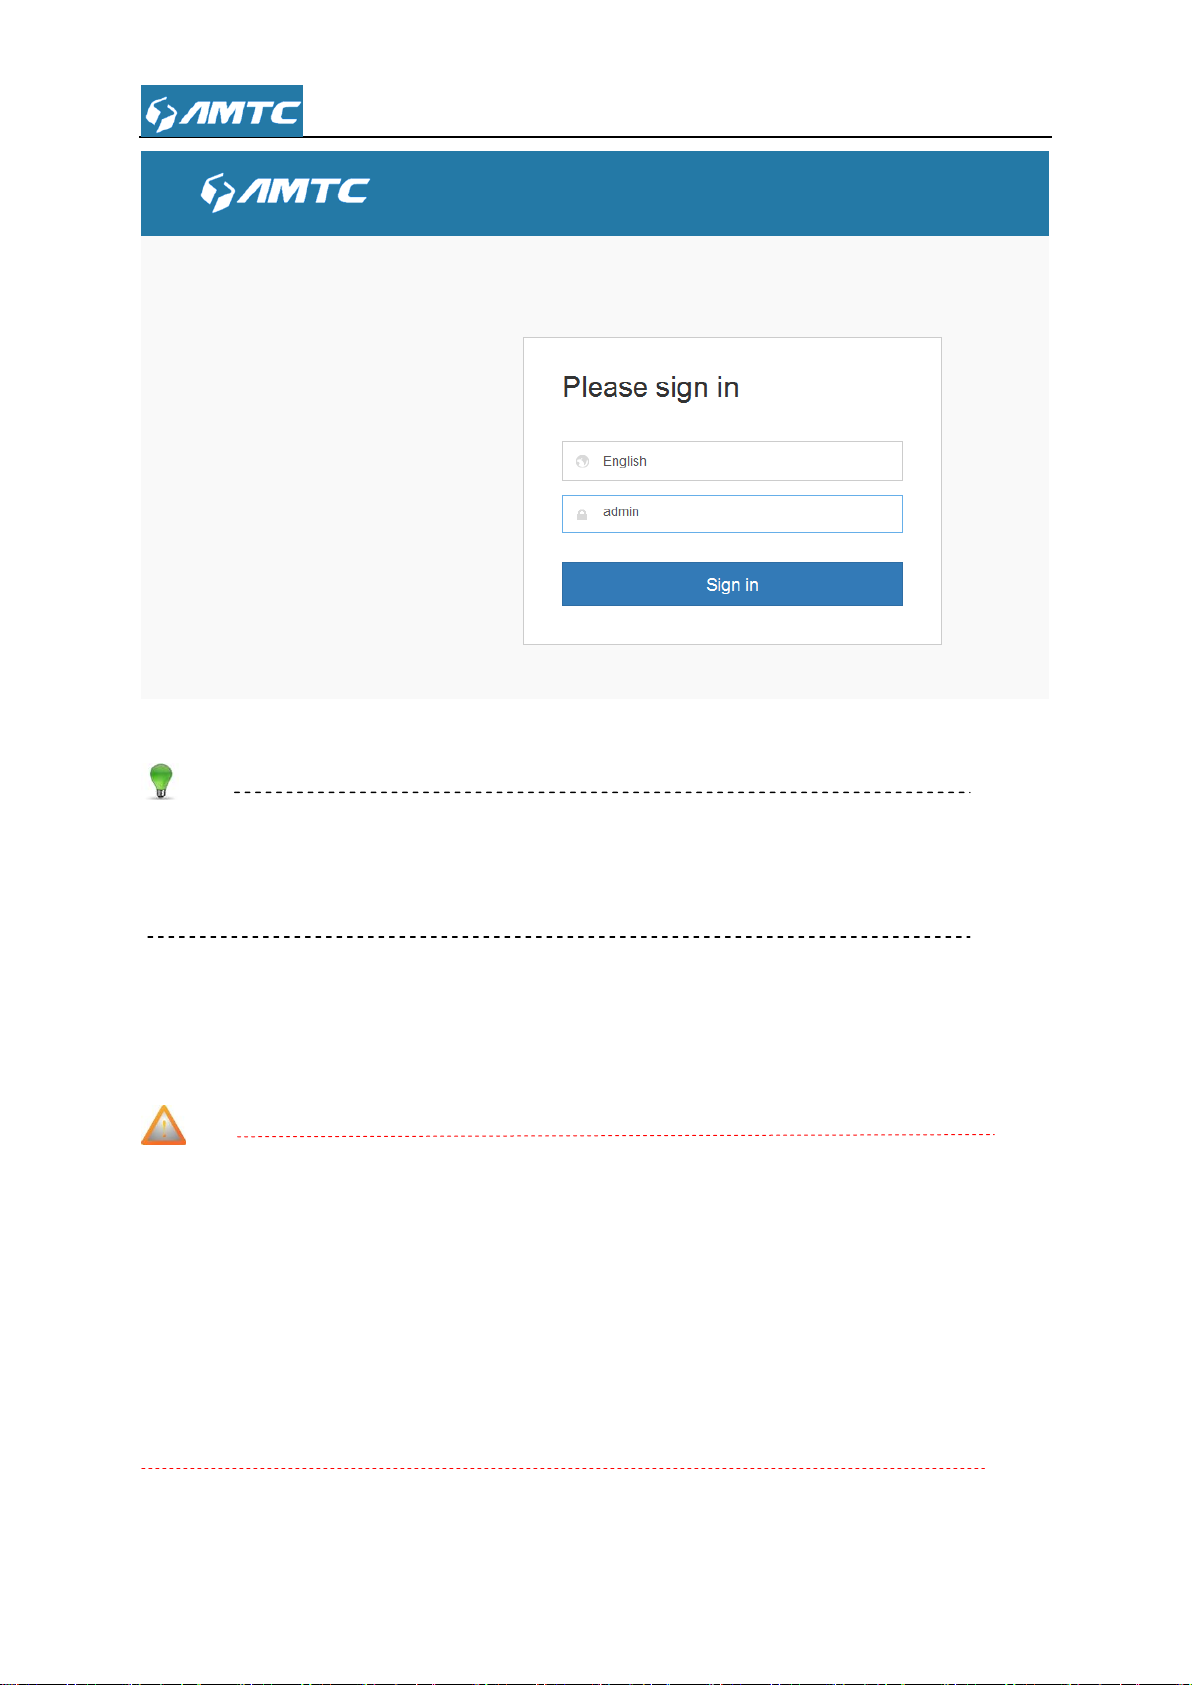
3. The system will automatically display the login page, please enter the correct password. Click
the “sign in” button or press “Enter” key.
16
Page 17
Tips
Default Password is “admin”
The default language is EN. You can change the language between English and French.
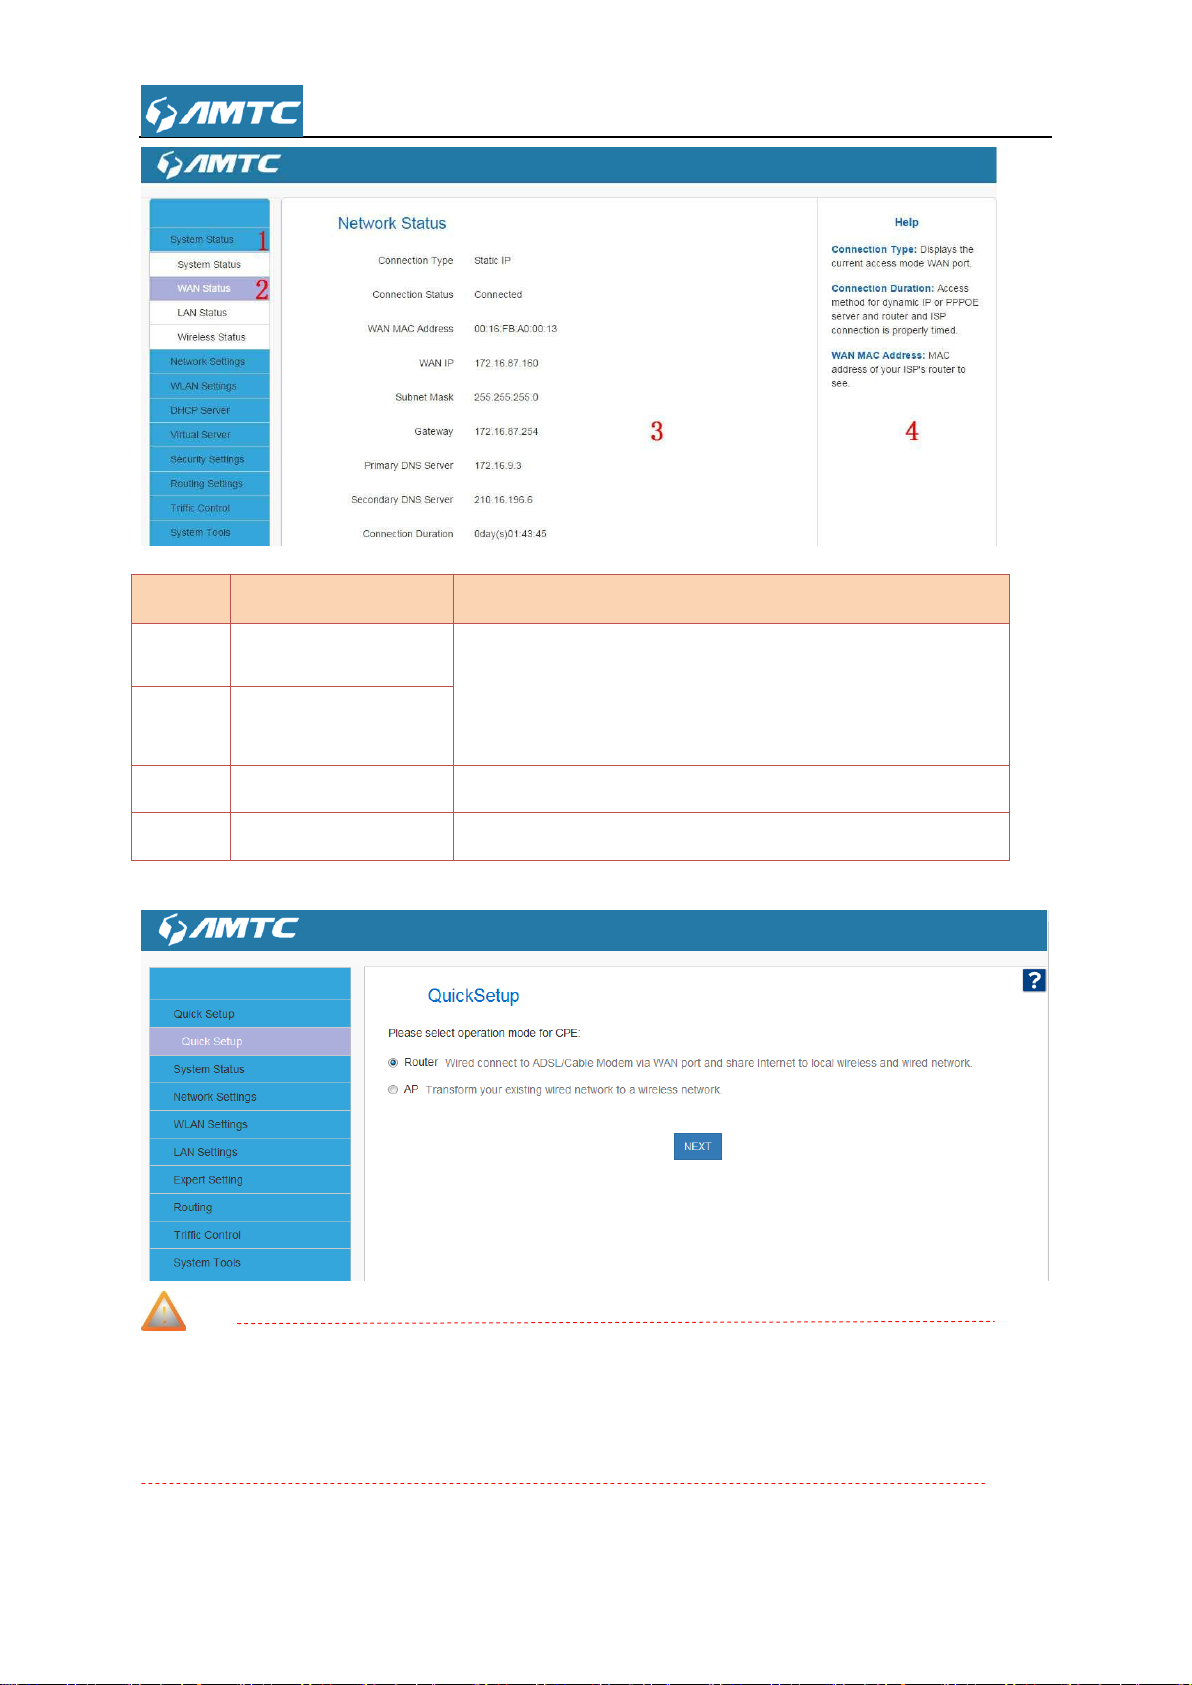
Web page layout
Web page have:primary & secondary navigation bar、configuration zone、help information zone
four parts,as shown:
Note
Device does not support web page, function display will appear abnormal, please refer to the
actual situation of equipment software.
Different browsers and the same browsers but different version the web page may different in
display.
Web page displayed as gray features or parameters, display device does not support or
immutable under the current configuration.
17
Page 18
No
Name
Description
1
Primary
User can easily Select functions in the navigation bar
menu, Select the results displayed in the configuration
section
2
Secondary
3
configuration zone
Configure and view area.
4
help information
The help information of current page
Note
Change the resolution of the screen the help information may become “ ? ” as above shown,
if you want to refer the help information please click the symbol.
18
Page 19
Common elements
Description
Scan the information automatically
Goto the configure page directly
Back to previous page
Scan the information automatically
Open Scan
Goto Configure
Back
Open Scan
Note
Change the resolution of the screen or login by small screen terminal, the “navigation bar menu”
may become “ ” as above shown, if you want to refer the “navigation bar menu” please click
the symbol.
Commonly used web page elements description
19
Page 20

Close the scan function
Application current page configuration
Cancel current page configuration
Save current page configuration
Refresh current page configuration
Add item
Delete item
resumed to not configured mode
Backup current information
Upgrade current information
Reboot the device
Clear current page information
Allow connection
Disallow connection
Enter the next configure page
Apply
Cancel
Save
Refresh
Add
Backup
Upgrade
Reboot
Clear
Delete
resetOOB
Connect
Disconnect
Close Scan
NEXT
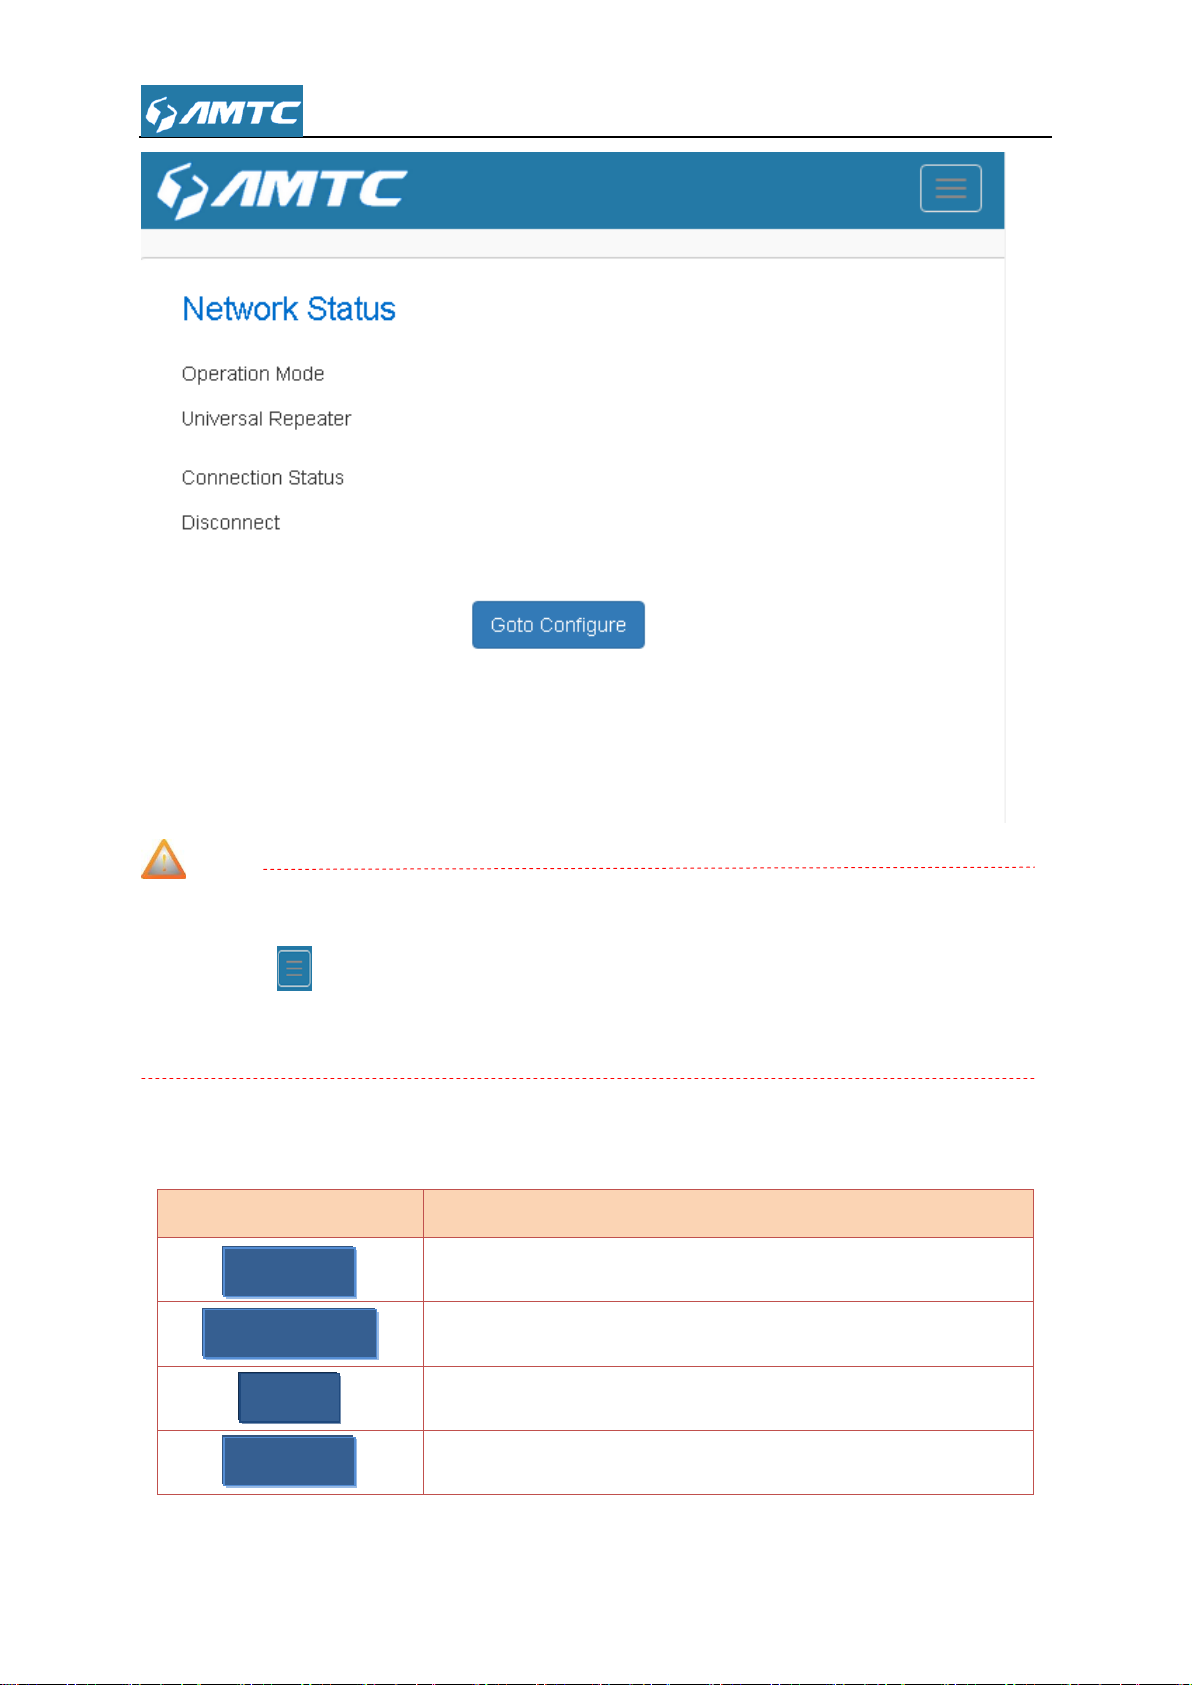
3.2 Quick Setup
In this page you can configure the mode of operation.
20
Page 21
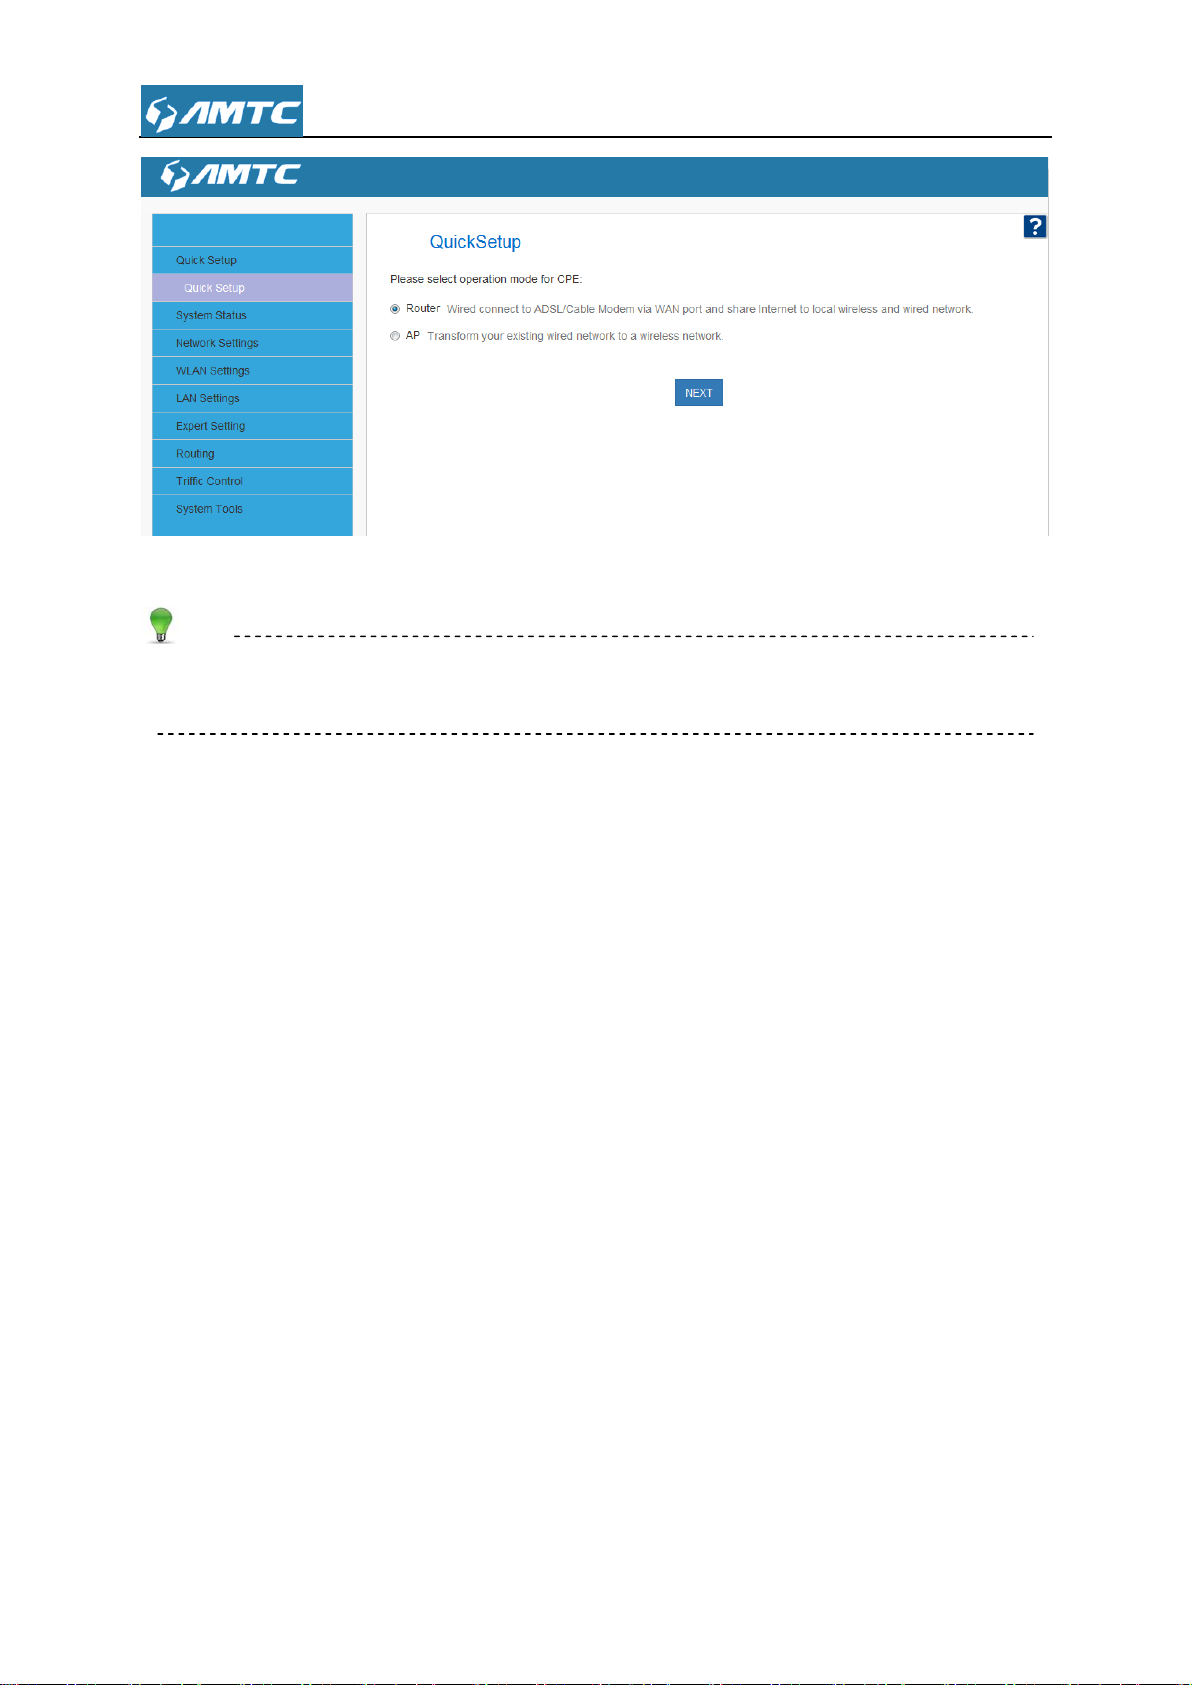
Here are two modes Router and AP:
Tips
The default mode is Router. You can change the operation mode on the quick setup page.
1) Router mode configure
Plug Internet cable to PW5002 WAN port.
Set steps:
① Select “Router”.
② Click “NEXT”.
③ You can select “Dynamic IP”, “Static IP”, “PPPOE” mode.
④ Click “NEXT” to configure the wireless information.
⑤ Click “NEXT”.
⑥ Click “Save” to confirm.
2) AP mode configure :
Set steps:
① Select “AP” mode and click “NEXT” button.
② Enter SSID, select channel
③ Select “Security Mode” and “WPA algorithms”
④ Enter the Pass Phrase.
⑤ Click “NEXT” enter the next page.
⑥ Click “Save” to confirm your settings.
21
Page 22
Knowledge Expansion
AP: The most basic mode of multi-function is Access Point. In this mode, the AP will act as a
central hotspot for different wireless LAN clients. In this mode, this device connect with up
level router via Ethernet cable, and after connected, this device send wireless signal, you can
surf the Internet through connection with the wireless signal.
Router: The Ethernet port will behave as a WAN port for wired connection to ADSL or Cable
modem. The NAT routing will be performed between the WAN and WLAN. Making IP sharing
possible
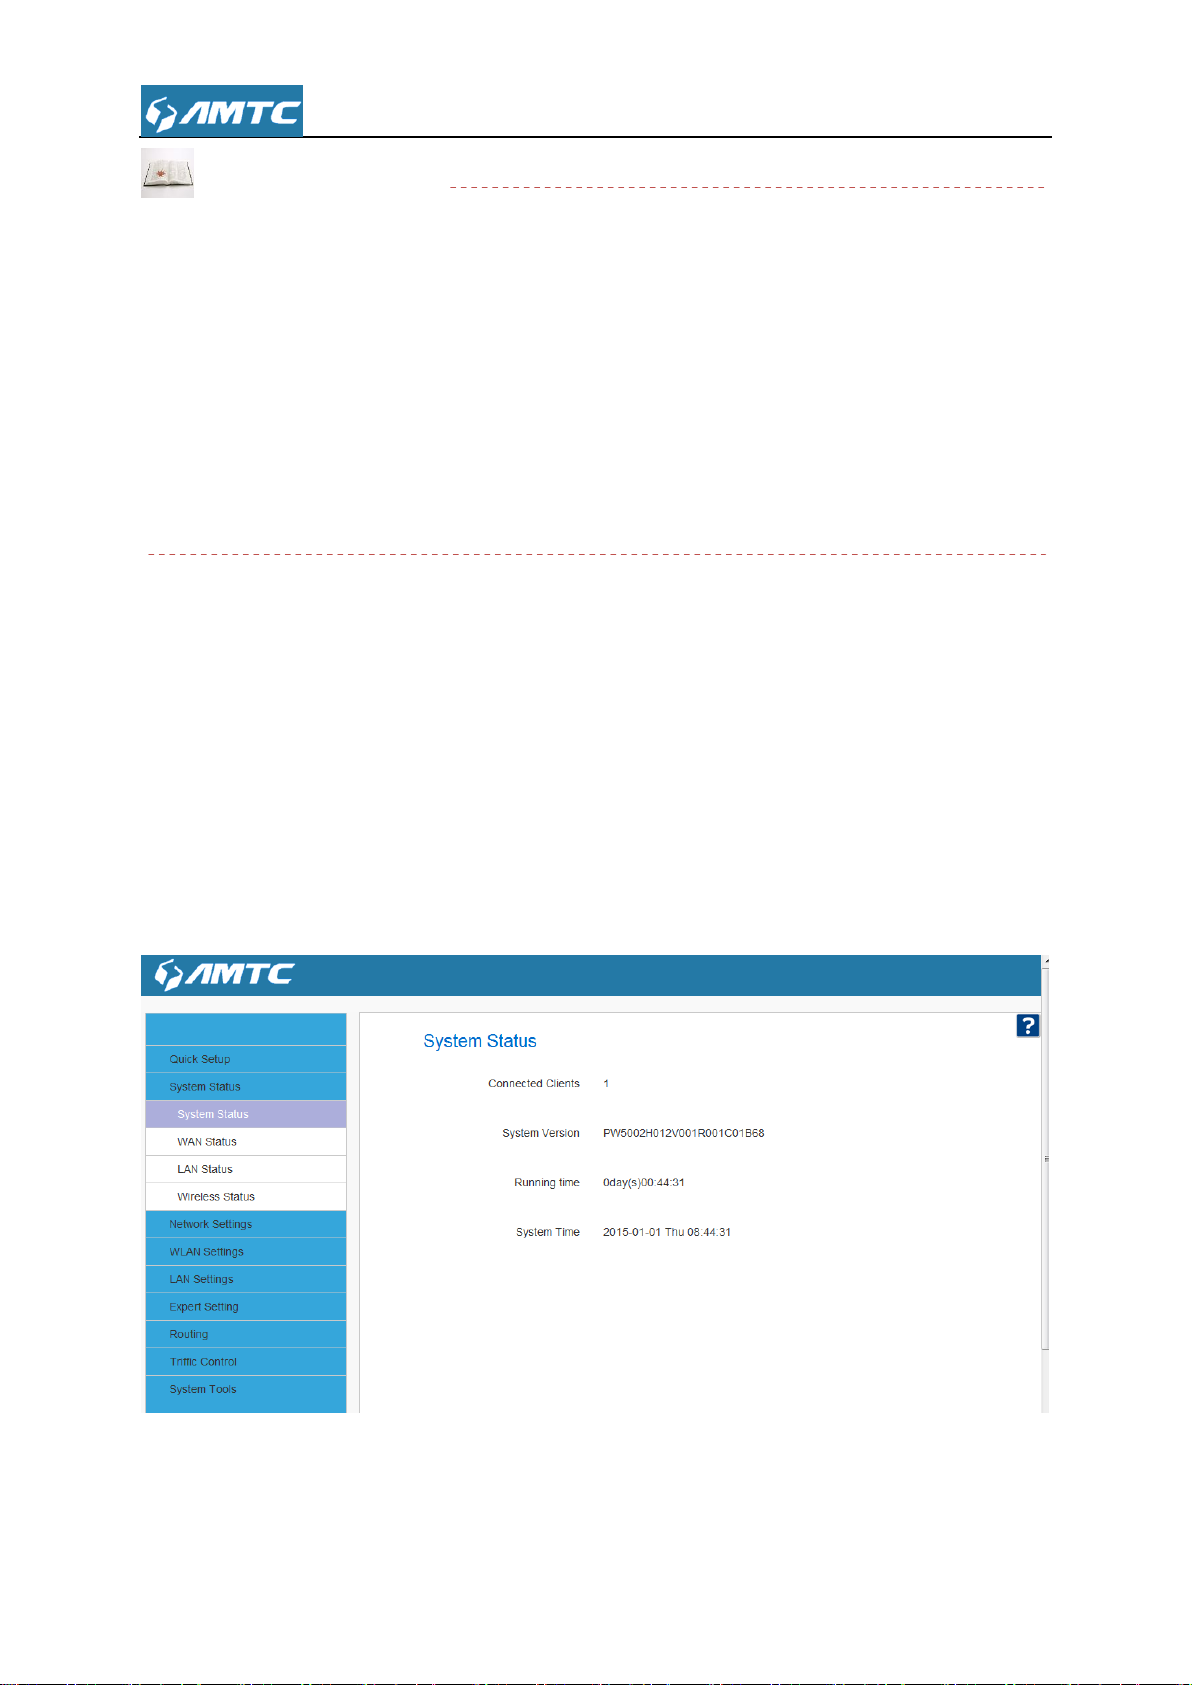
3.3 System Status
Click “System Status”, enter the system status web page, in this page you can see the
“System Status”, “WAN Status” ,” LAN Status”, “Wireless Status”.
3.3.1 System Status
This page displays Connected Clients, System Version, Running Time, System Time.
Parameters Specification:
Connection Clients: displays the number of DHCP clients.
22
Page 23
System Version: Firmware Version.
Running Time: Displays the time duration indicating how long the router has been up since
startup. Up time is recounted and renewed upon power off.
System Time: Current system time on this device. The device automatically synchronizes the
system time with Internet time servers.
Tips
Running time is total time the router is turned on
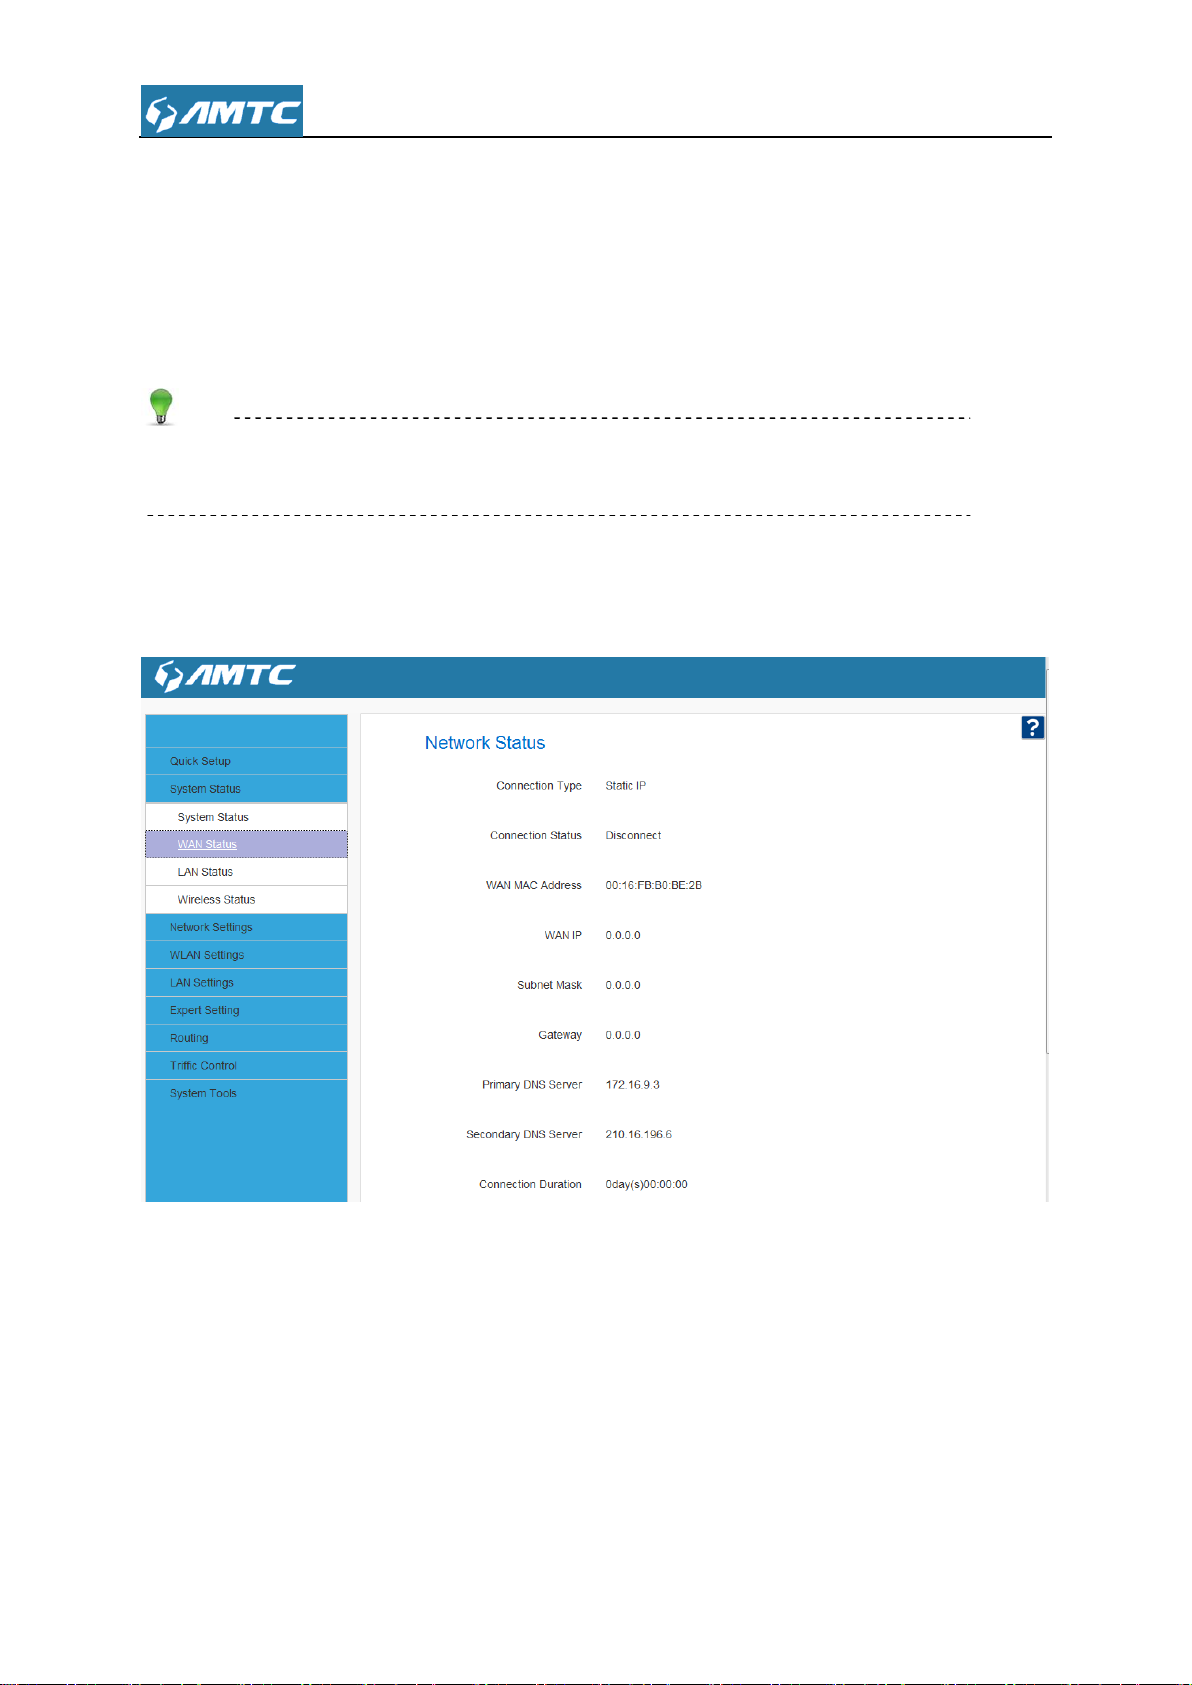
3.3.2 WAN Status
Parameters Specification:
Connection Type: It displays the current access mode of WAN port.
Connection Status: The network connection status.
WAN MAC Address: MAC address of your ISP's router to see.
WAN IP: IP address obtained from ISP.
Subnet Mask: Obtained from ISP.
Gateway: Obtained from ISP.
23
Page 24
Primary DNS Server: Obtained from ISP.
Secondary DNS Server: Obtained from ISP.
Connection Duration: Access method for dynamic IP or PPPOE server and router and ISP
connection is properly timed.
Tips
WAN IP/Subnet Mask/Gateway/Primary DNS Server/Secondary DNS Server: This types
of information appears only if the router successfully connects to Internet via a PPPoE or DHCP
(dynamic IP) connection. However if you connect the router to Internet with static IP settings
provided by your ISP, these fields will display the settings you entered whether the router
successfully connects to the Internet or not.
If nothing appears in the secondary DNS server field, there is no available secondary DNS server
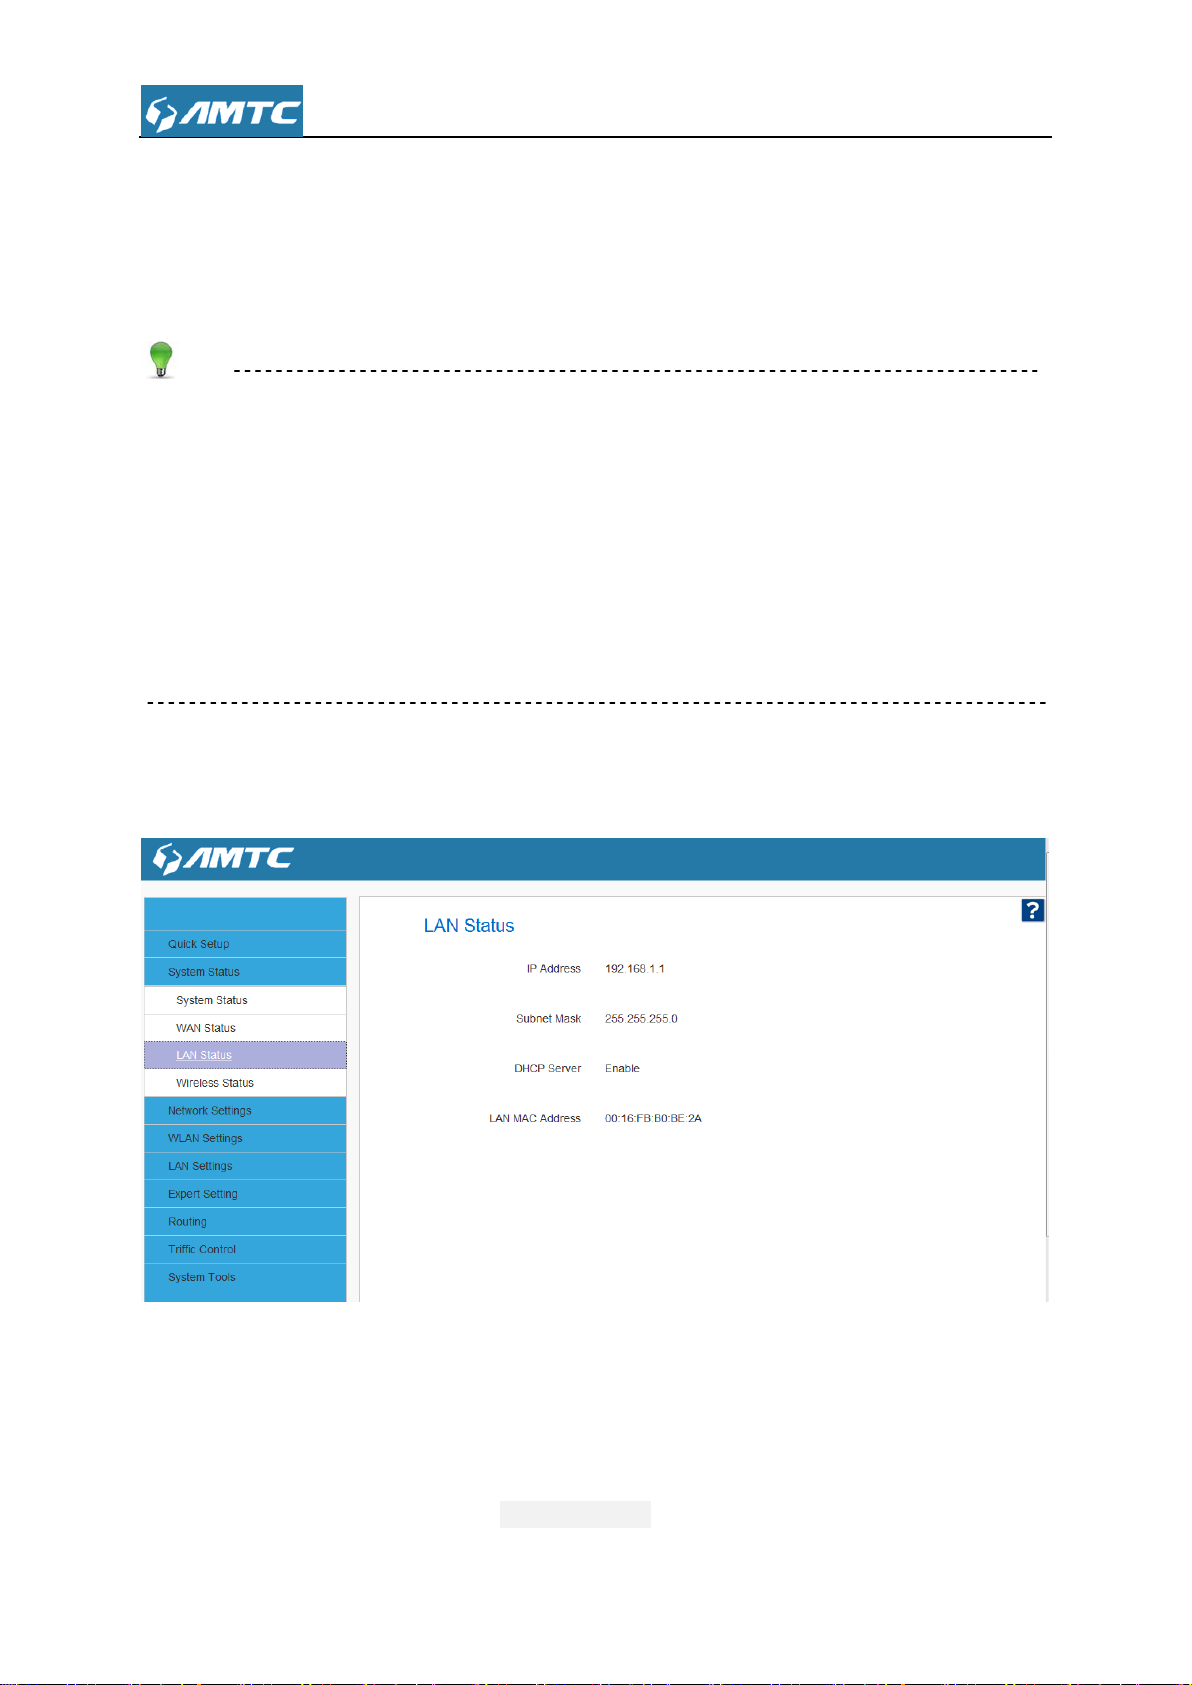
3.3.3 LAN Status
Parameters Specification:
IP Address: The Router’s LAN IP Address (not your PC’s IP address).
Subnet Mask: The Router’s LAN subnet mask.
DHCP Server: the status of DHCP server.
LAN MAC Address: The router’s physical address.
24
Page 25
Tips
The default IP address is 192.168.1.1.
The default Subnet mask value is 255.255.255.0
If the router as a DHCP server, here shown as enabled. Otherwise disabled
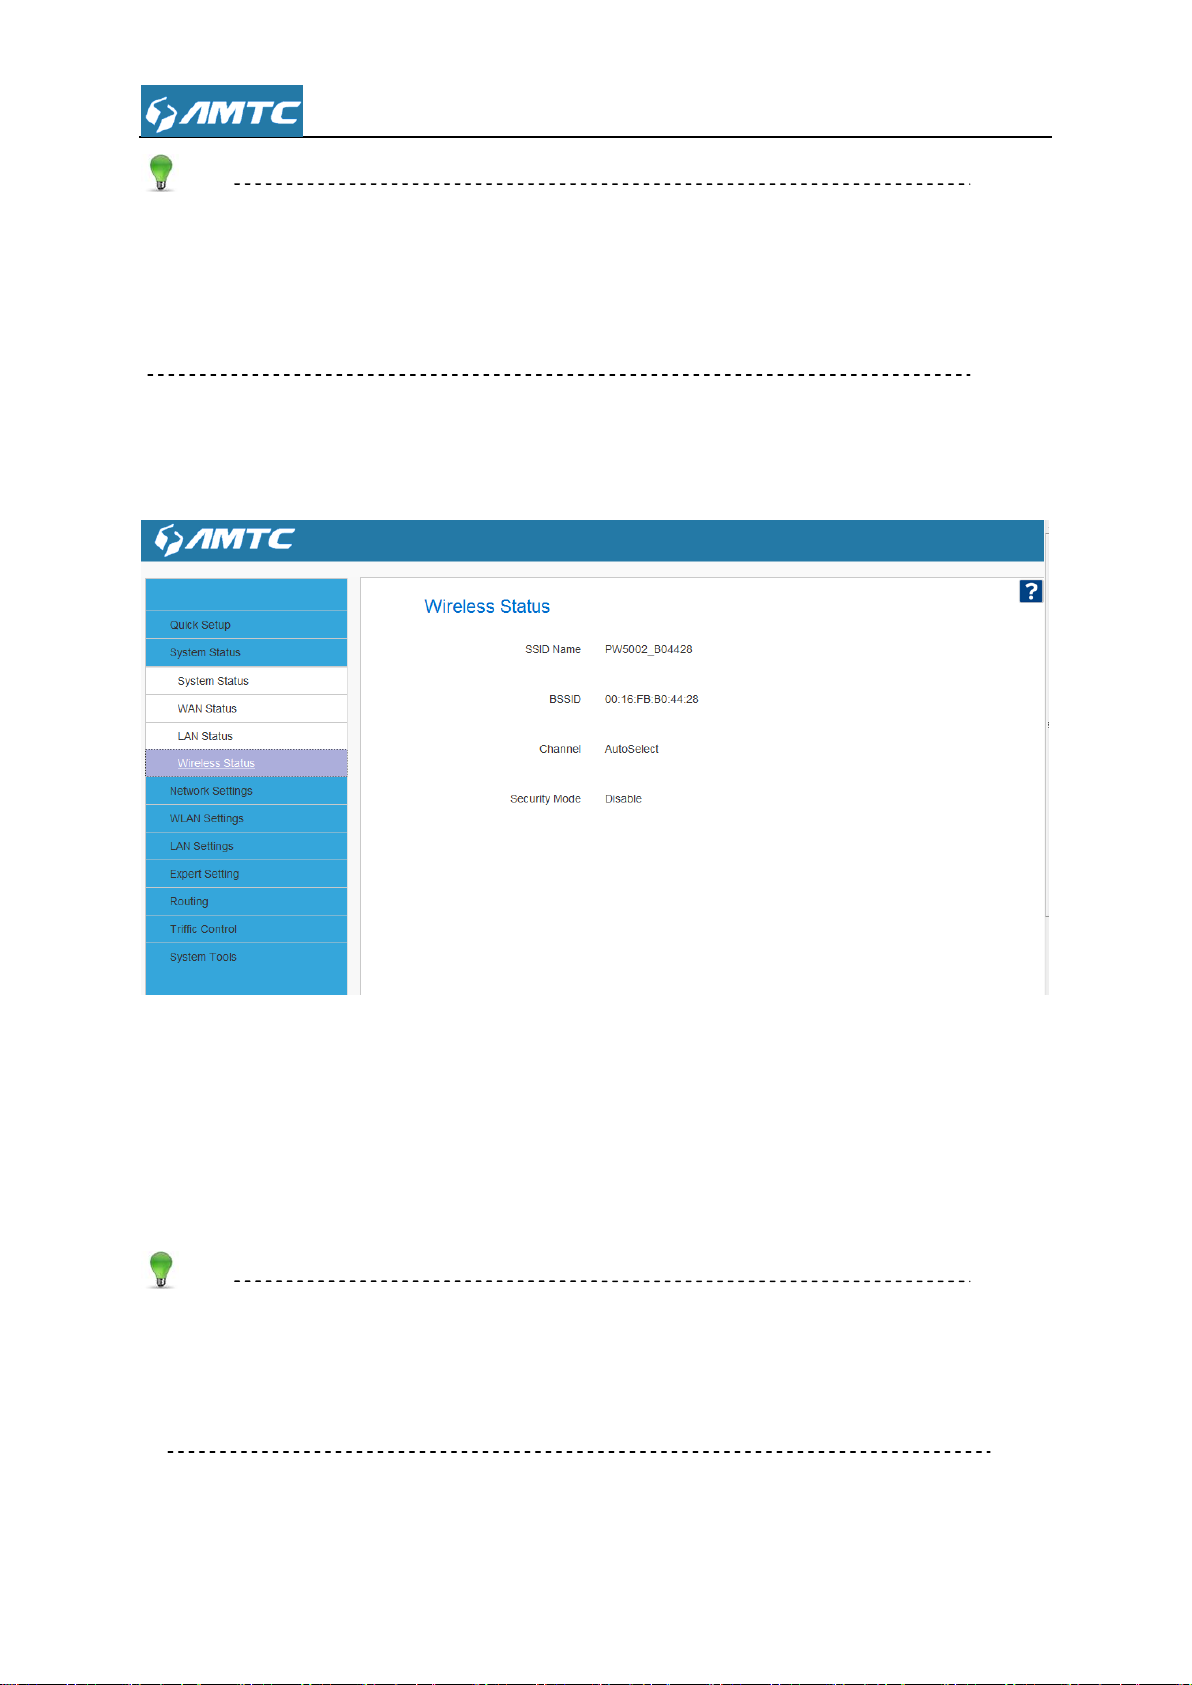
3.3.4 Wireless Status
Parameters Specification:
SSID Name:The name of Wireless.
BSSID: The MAC Address of Wireless.
Channel:The Channel of Wireless.
Security Mode: Encryption schemes.
Tips
The default SSID is PW5002_XXXXXX, where XXXXXX is the last six characters in the
device's MAC address. You can find it on the label attached on the bottom of the device.
Default channel is AutoSelect.
25
Page 26

Knowledge Expansion
AutoSelect: Under the “AutoSelect” the wireless signal will choice the user number is the
least channel to improve the efficiency of the signal, it works for most cases.
If you choice other mode, the channel will not change all the time not matter the channel is
good or bad.
3.4 Network Settings
Click “Network Settings” enter the Network setup web page,in this page you can set “WAN
Settings”, “WAN Parameters”, “MAC Address Clone”.
3.4.1 WAN Settings
Plug Internet cable to PW5002 WAN port.
Set Steps:
① Enter the web and Select “Network Settings”.
② Click the “WAN Settings”.
Parameters Specification:
Connection Type: It displays the routers mode.
26
Page 27

WAN Connection Type
Instruction
Static IP mode
If your ISP provides you with an Ethernet cable from the
incoming Internet side IP information (IP address, subnet
mask, gateway IP address, DNS server address), your ISP
uses a static IP connection.
Dynamic IP
If your ISP provides you with an Ethernet cable from the incoming
Internet side but no ISP login account or IP information, your ISP
uses a DHCP connection.
PPOE
If your ISP provides you with an Ethernet cable from the
incoming Internet side and ISP login account, your ISP uses a
PPOE connection.
1、Configuration the Internet access
Support Static IP mode、Dynamic IP(DHCP)、PPOE.
1.1> Static IP mode
Set Steps:
① Click “Network Settings”.
② Select “WAN Settings”.
③ Select Connection Type “Static IP”.
④ Enter IP, Subnet Mask, Gateway, MTU, DNS
⑤ Click “Save” to confirm.
27
Page 28

Parameters Specification:
Connection Type: Select Static IP.
IP Address/Subnet Mask/WAN subnet mask/Gateway/Primary DNS Server/Secondary
DNS Server: Enter the ISP information you gathered in Getting Prepared.
Click Save to save your settings.
Tips
MTU better to choose the default values.
1.2> Dynamic IP mode.
Set Steps:
① Click “Network Settings”.
② Select “WAN Settings”.
③ Select Connection Type “Dynamic IP”.
④ Click “Save” to confirm.
28
Page 29

Tips
MTU better to choose the default values.
1.3> PPOE
Set Steps:
① Click “Network Settings”.
② Select “WAN Settings”.
③ Select Connection Type “PPOE”.
④ Enter the ISP login UserName,the ISP login Password.
⑤ Click “Save” to confirm.
29
Page 30

MTU
Application
1500
Typical for connections that do not use PPOE or VPN.
1492
Used in PPOE environments.
1472
Maximum size to use for pinging. (Larger packets are fragmented.)
1468
Used in some DHCP environments.
1436
Used in PPTP environments or with VPN.
Knowledge Expansion
MTU: Maximum Transmission Unit. It is the size of the largest data packet that can be sent
over the network. The default value is 1500.
The common MTU sizes and applications are listed in the table below.
Note
A wrong/improper MTU value may cause Internet communication problems. For example, you
may be unable to access certain websites, frames within websites, secure login pages, or
FTP or POP servers.
Do not modify it unless necessary, but if a specific website or web application software cannot
open or be enabled, you can try to change the MTU value to 1500, 1400.
30
Page 31

3.4.2 WAN Parameters
Set Steps:
① Click “Network Settings”.
② Select “WAN Parameters”.
③ Select Negotiation Mode type.
④ Click “Save” to confirm.
Parameters Specification:
Negotiation mode: you can set the value to match with the status
Tips
1. The router operates in “Auto-negotiation” (or Auto) mode by default. Usually, it works for most
cases.
2. In some situations, you might need to change the port mode. For example, if the cable
connected to your router's WAN port is longer than 100m, you may need to use 10M full-duplex or
10M half-duplex for better performance. Ensure that your router's WAN port operates with the
same speed and duplex mode as the remote link partner. If not, your router's WAN port may not
receive and send data.
31
Page 32

3.4.3 MAC Address Clone
Some ISPs (Internet Service Providers) require end-user's MAC address to access their
network. This feature copies your current PC's MAC address to the router.
Set Steps:
① Click “Network Settings”.
② Click “MAC Address Clone”.
③ You can set this page from three methods:
1、 To Restore to Factory Default MAC
1> Click “Restore to factory Default MAC”
2> Click Save to save your settings.
2、 To clone the MAC address of the computer that you are now using to the router:
1> Click Clone My PC‟s MAC Address.
2> Click Save to save your settings.
3、To manually enter the MAC address allowed by your ISP:
1> Enter the MAC address allowed by your ISP.
2> Click Save to save your settings.
Parameters Specification:
MAC Address: The computer or broadband modem authorized by your ISP.
32
Page 33

Knowledge Expansion
1. Restore to Factory Default MAC: Reset the router’s WAN MAC to factory default.
2. Clone MAC: Clicking this button copies the MAC address of the computer that you are now
using to the router. Also, you can manually enter the MAC address that you want to use. You
have to use the computer whose MAC address is allowed by your ISP
3.5 WLAN Settings
Click “WLAN Settings” enter the configure page , here you can configure “Base Settings”,
“Security Settings”, “WPS Settings”, “Access Control”, “Connection Status”.
3.5.1 Basic Setting
Here you can configure the basic wireless settings of the router
Set Steps:
① Click “WLAN Settings”.
② Select “Basic Settings”.
③ Wireless Enable.
④ Select Network Mode
⑤ Enter SSID name (Default name is WR5002_XXXXXX).
⑥ Select “Channel”.
⑦ Select “Channel BandWidth”.
33
Page 34

Parameters Specification:
Wireless: wireless “Enable” or “Disable”.
SSID: It is the unique name of the wireless network and can be modified.
Broadcast (SSID): Select “Enable” to enable the router’ SSID to be scanned by wireless
devices. The default is enabled. If you disable it, the wireless devices must know the SSID for
communication.
BSSID: This is the MAC address of the device's wireless interface.
Channel: The currently used channel by the router. Select an effective channel of the
wireless network. The default is AutoSelect.
Channel Bandwidth: Select a proper channel bandwidth to enhance wireless performance.
This option is available only in 802.11b/g/n. Wireless speed in the channel bandwidth of 20/40
is 2 times in 20.
Extension Channel: This is used to ensure N speeds for 802.11n devices on the network.
This option is available only in 11b/g/n mixed mode with channel bandwidth of 20/40.
Note
The wireless Enable.
The SSID must be entered.
34
Page 35

Tips
1. The SSID is PW5002_XXXXXX by default, where XXXXXX is the last six characters in the
device's MAC address. You can find it on the label attached on the bottom of the device.
2. If you are not an advanced user, it is advisable to only change the SSID (name of the network)
and channel and leave other items unchanged.
Knowledge Expansion
Network Mode (802.11 Mode): Select a correct mode according to your wireless clients.
11b: This network mode delivers wireless speed up to 11Mbps and is only compatible with
11b wireless clients.
11g: This network mode delivers wireless speed up to 54Mbps and is only compatible with
11g wireless clients.
11b/g mixed: This network mode delivers wireless speed up to 54Mbps and is compatible
with 11b/g wireless clients.
11b/g/n mixed: This network mode delivers wireless speed up to 300Mbps and is compatible
with 11b/g/n wireless clients
3.5.2 Security Settings
With the wireless security function, you can prevent others from connecting to your wireless
network and using the network resources without your consent. Meanwhile, you can also block
illegal users from intercepting or intruding your wireless network
Set Steps:
① Click “Network Settings”.
② Select “Security Settings”.
③ Select “Security Mode”.
④ Click “Apply” to use you settings and click “Save” to save your settings.
35
Page 36

Security mode
Instruction
Disable
Not open this function
WPA – Personal
Support AES and TKIP cipher types
WPA2 – Personal
Support AES, TKIP and TKIP+AES cipher types
Mixed WPA/WPA2 – Personal
Both WPA-Personal and WPA2-Personal secured
wireless clients can join your wireless network.
Parameters Specification:
Security mode: WPA – Personal、WPA2 – Personal、Mixed WPA/WPA2 – Personal.
Note
WPA/WPA2-Personal: You can enable personal or mix mode, but you must make sure that
the wireless client also supports the selected encryption method.
36
Page 37

Parameters Specification:
WPA Algorithms: Wi-Fi Protected Access Algorithms.
Pass Phrase: The default is 123456.
Knowledge Expansion
1. WEP: (Wired Equivalent Privacy) is the wireless transmission of data between two devices for
encryption, to prevent illegal users wiretapping or invade the wireless network.
2. AES: (Advanced encryption standard) is an iterative, symmetric key group password. If
selected, wireless speed can reach up to300Mbps.
3. TKIP: (Temporal Key Integrity Protocol) Responsible for handling the wireless encryption part of
security issues, TKIP is in WEP password outermost layer of the existing “shell” If selected,
wireless speed can reach up to 54Mbps.
4. TKIP+AES: If Selected, both AES and TKIP secured wireless clients can join your wireless
network.
5. Key Renewal Interval: Enter a valid time period for the key to be changed.
37
Page 38

Tips
Recommended that you choice “WPA-Personal” + ”AES” mode , make sure the wireless
efficiency and ensure the security of wireless network. Meanwhile, avoid some kind of
wireless network card does not support security mode, cause cannot connect the wireless
network.
3.5.3 WPS Settings
Set Steps:
① Click “WLAN Settings”.
② Select “WPS Settings”.
Knowledge Expansion
WPS provides you with two main functions:
if your wireless network unencrypted,WPS can quickly encryption your wireless network.
If your wireless network encrypted, WPS can make you quickly connect your encrypted
wireless network.
Parameters Specification:
38
Page 39

The WPS provides two methods: PBC and PIN to achieve the function it provides
PBC: Using routers and physical or logical button on a wireless device to connect WPS.
PIN: Using routers and PIN for WPS connection on a wireless device.
You have four methods to connect WPS:
1、 Use the PBC function on the WPS management page to connect:
① Choice “PBC”
② Click “Save”
③ The router's WPS led flashes two minutes, during this time, in the wireless client devices use
the WPS/PBC connect to your wireless signal.
2、 Using the router WPS button on the rear panel for the PBC connection
① Click “Enable”
② Click “Save”
③ Hold the router on the rear panel of the WPS button for 3 seconds, then let go
④ The router's WPS led flashes two minutes, During this time, In the wireless client devices use
the WPS/PBC connect to your wireless signal
3、 Using wireless network card 8bit PIN code
① Click “Enable”
② Select “PIN”
③ Enter “PIN code”
④ Click “Save”
⑤ The router's WPS led flashes two minutes, During this time, In the wireless client devices use
the WPS/PBC connect to your wireless signal
4、 Using the 8bit code on router sticker on the back.
① Click “Enable”
② Select “PIN”
③ Enter “PIN code”
④ The router WPS/PIN function opened, In the wireless client devices use the WPS/PIN mode,
enter 8bit PIN code connect to your wireless signal
39
Page 40

Knowledge Expansion
resetOOB:
The router wireless SSID, safe mode resumed to not configured mode. Make the WPS reset
the SSID, Encryption and password, after the completion of the reset, the router’s SSID is
factory default, safe mode is unencrypted.
3.5.4 Access Control
Wireless access control is actually based on the MAC address to permit or forbid specified
clients to access the wireless network
Set Steps:
① Click “WLAN Settings”.
② Select “Access Control”.
Parameters Specification:
The Wireless Access Control is based on the MAC address of the wireless adapter
to determine whether it communicates with the Router or not;
1. Select “Off” to allow all wireless clients to join your wireless network.
40
Page 41

2. Select “Allow” allow ONLY the specified wireless clients to join your wireless network.
3. Select “Block” disallow ONLY the specified wireless clients to join your wireless network.
Wireless Access Control Application Example:
To only allow your own notebook at the MAC address of 00:12:35:EC:DF:25 to join your wireless
network
Set Steps:
① Select Allow.
② Enter the MAC address of the wireless device you want to restrict. Here in this example, enter
00:12:35:EC:DF:25.
③ Click Add to add the MAC address to the MAC address list.
④ Click Save to save your settings.
Tips
Up to 10 wireless MAC addresses can be configured
If you don't want to configure the complex wireless security settings and want to disallow
others to join your wireless network, you can configure a wireless access control rule to allow
only your own wireless device
41
Page 42

3.5.5 Connection Status
This page shows the current wireless access list
Click “Refresh” to update.
Tips
The bandwidth here refers to the channel bandwidth instead of wireless connection rate.
You can know whether there are unauthorized accesses to your wireless network by viewing
the wireless client list.
3.6 LAN Settings
Click “LAN Settings” enter the LAN Settings page, here you can configure LAN port info and
DHCP Server and DHCP List & Binding.
3.6.1LAN Settings
This page is to configure the basic parameters for LAN ports. This IP address is to be used to
access the device’s settings through a web browser. Be sure to make a note of any changes you
apply to this page.
42
Page 43

Set Steps:
① Click “Network Settings”.
② Select “LAN Settings”.
③ Enter IP Address,Subnet Mask.
④ Click “Save” and wait for the router reboot automatically.
Parameters Specification:
MAC Address:It displays the Router’s LAN MAC address.
IP Address:It displays the Router’s LAN IP address.
Subnet Mask: it displays the Router’s LAN subnet mask.
Tips
1. Default IP address and subnet mask are respectively 192.168.2.1 and 255.255.255.0.
2. Be sure to make a note of any changes you apply to this page. If you change the LAN IP
address of the router, you have to open a new connection to the new IP address and log in
again. Also, you have to set the default gateway addresses of all LAN PCs to this new IP
address.
3. The router's LAN IP address and WAN IP address cannot be on the same IP segment. If not,
the router will not be able to access Internet.
43
Page 44

3.6.2DHCP Server
Set Steps:
① Click “LAN Settings”.
② Select “DHCP Server”.
Parameters Specification:
DHCP Server: Select whether enable or disable the DHCP server feature.
Start IP Address and End IP Address: You can specify the starting and ending address of
the IP address pool here. These addresses should be part of the same IP address subnet as
the router’s LAN IP address.
Enter the Lease Time
Knowledge Expansion
DHCP (Dynamic Host Configuration Protocol) assigns an IP address to each device on the
LAN/private network.
When you enable the DHCP Server, the DHCP Server will automatically allocate an unused
IP address from the IP address pool specified in this screen to the requesting device as long
as the device is set to “Obtain an IP Address Automatically”.
If you disable this feature, you have to manually configure the TCP/IP settings for all PCs on
your LAN to access Internet.
Lease Time: is the length of the IP address lease before it is refreshed.
44
Page 45

Tips
By default, the router functions as a DHCP server. Do not disable the DHCP server feature
unless you want to manually configure the TCP/IP settings for all PCs on your LAN.
1. Lease time will be renewed automatically upon expiry. No additional configurations are
needed.
2. If you are not an advanced user, the default DHCP server settings are recommended.
In order to use the function of the router's DHCP server, LAN in the computer's TCP/IP protocol
must be set to “automatically obtain IP”.
3.6.3 DHCP List & Binding
Set Steps:
① Click “LAN Settings”.
② Select “DHCP List & Binding”.
Parameters Specification:
Enter the IP Address and MAC Address
Click “Add” add to the DHCP list
45
Page 46

Click “Refresh” to update the related DHCP client information.
Tips
You can know whether there are unauthorized accesses by viewing the client list.
Also, you can specify a reserved IP address for a PC in the LAN. That PC will always receive
the same IP address each time when it accesses the DHCP server. Reserved IP addresses
could be assigned to servers that require permanent IP settings.
Static Assignment Application Example:
To have a PC at the MAC address of 44:37:E6:4F:37:3B always receive the same IP address of
192.168.1.200
Parameters Specification:
Enter the last number of the IP address you want to reserve, for example, 200.
Enter the MAC address of 50:7B:9D:12:41:69
Click “Add”.
Click “Save” to save your settings.
Tips
1. If the IP address you have reserved for your PC is currently used by another client, then you will
not be able to obtain a new IP address from the device's DHCP server, instead, you must
manually specify a different IP address for your PC to access Internet.
46
Page 47

2. For PCs that has already obtained IP addresses, you may need to perform the Repair action to
activate the configured static IP addresses
3.7 Expert Settings
Click “Expert Settings” enter the Virtual Server configure page ,here you can set “URL Filter”,
“Port Range”, “DMZ Settings”, “DDNS”, “Remote WEB”, “WAN Ping”.
3.7.1 URL Filter
This section is to set URL filtering access. If you want to enable this function, please activate
the checkbox. Select one policy from the drop-down menu and enter a policy name in the field. Of
course, you can set the access restriction in details (e.g. the fixed IP range, URL, times and days).
Note: When time is 0:0~0:0, it express 24 hours.
Set Steps:
① Click “Expert Settings”.
② Select “Client Filter”.
47
Page 48

URL Filter Application Example:
To prevent your home PC (192.168.1.100) from accessing “YouTube” from 8:00 to 18:00 during
working days: Monday- Friday.
Set Steps:
① Enter a Policy Name
② Enter the Start IP and End IP here for example:192.168.1.100
③ Enter part of or the entire domain name of the web site you wish to restrict. Separate different
domain names or domain name key words with a comma, for example, "YouTube,
Hollywood.com"
④ Select time and day
⑤ Click “Save” to save your settings.
Tips
1. Different URL strings must be separated with a comma. To match all websites, use * (asterisk)
2. Up to 10 filter rules can be configured.
3. If you have not set up the system time for this device, click System Tools -> Time Settings to
set up correct time and date for the rules to be effective
48
Page 49

3.7.2 Port Range
You want to share resources on your PC with your friends who are not in your LAN. But, by default,
the router's firewall blocks inbound traffic from the Internet to your computers except replies to
your outbound traffic. You can use the Port Forwarding feature to create exceptions to this rule so
that your friends can access these files from external networks.
When accessing your PC from Internet, type "protocol://xxx.xxx.xxx.xxx:port number" into your
browser’s address or location field. The protocol and port are the ones used by the service and
"xxx.xxx.xxx.xxx" is the WAN IP address of your router. For example, a FTP server uses the ftp
protocol and 21 (standard port number).
Set Steps:
① Click “Expert Settings”.
② Select “Port Range”.
Application Example:
As shown in the figure above, your PC at 192.168.2.10 connects to the router and runs a FTP
server on port number 21. Your friends want to access this FTP server on your PC from external
network.
Tips
To successfully implement the port forwarding feature, note below:
1. Make sure your WAN IP address (Internet IP address) is a public IP address. Private IP
addresses are not routed on the Internet.
2. Make sure you enter correct service port numbers.
3. To ensure that your server computer always has the same IP address, assign a static IP
address to your PC.
4. Operating System built-in firewall and some anti-virus programs may block other PCs from
accessing resources on your PC. So it is advisable to disable them before using this feature.
49
Page 50

Parameters Specification:
Start/End Port: Enter the start/end port number which ranges the External ports used to set
the server or Internet applications. Here in this example, enter 21.
IP Address: Enter the IP address of the PC where you want to set the applications. Here in
this example, enter 192.168.1.100.
Protocol: Specify the protocol required for the service utilizing the port(s). Select the protocol
(TCP/UDP/Both) for the application.
“Enable” to apply this function, “Delete” cancel this host configure.
Click „Save‟ to save your settings.
If your WAN IP address is 192.168.1.100 when accessing your FTP server from external network,
your friends only need to enter ftp:// 192.168.1.100:21 in their browsers.
3.7.3 DMZ Settings
Set Steps:
① Click “Expert Settings”.
② Select “DMZ Settings”.
③ DMZ Host Enable
④ Add a DMZ Host IP among LAN IP.
50
Page 51

⑤ Click “Save” to confirm.
Tips
The DMZ Settings screen allows one local computer to be exposed to the Internet for use of a
special-purpose service such as Internet gaming or videoconferencing.
DMZ hosting forwards all the ports at the same time to one PC.
Note
1. DMZ host poses a security risk. A computer configured as the DMZ host loses much of the
protection of the firewall and becomes vulnerable to attacks from external networks.
2. Hackers may use the DMZ host computer to attack other computers on your network
3.7.4 DDNS Settings
The DDNS (Dynamic Domain Name System) is supported in this Router. It is used to assign a
fixed host and domain name to a dynamic Internet IP address. Every time you access the Internet,
the dynamic domain name software installed on your host will tell the ISP’S host server its
dynamic IP address by sending messages. And the server software is responsible for providing
DNS service and implementing dynamic domain name resolution.
51
Page 52

Set Steps:
① Click “Expert Settings”
② Select “DNNS”
③ DNNS Service Enable
④ Add “Serve provider”.
⑤ Enter the “User name” and “Password”
⑥ Enter “Domain Name”
⑦ Click “Save” to confirm.
Tips
1. To use the DDNS feature, you need to have an account with one of the Service Providers in the
drop-down menu first.
2. This router supports five DDNS service providers: DynDNS.com and 88ip.cn and 3322.com
Parameters Specification:
DDNS Service: Click the button to enable or disable the DDNS service.
Service provider: Select one from the drop-down list and click “Sign up” for registration.
Username: Enter the username that you use to register from the DDNS provider.
Password: Enter the password that you use to register from the DDNS provider.
52
Page 53

Domain name: Enter the effective registered domain name.
3.7.5 Remote WEB
This section is to allow the network administrator to manage the router remotely. If you want to
access the router remotely, please select “Enable”.
Set Steps:
① Click “Expert Settings”.
② Select “Remote WEB”.
③ Enter the Port
④ Click “Save” to confirm.
Parameters Specification:
Port: The management port to be open to outside access.
Tips
1. For better security, configure a port number (between 1025-65535) as remote web
management interface, do not use the number of any common service port (1-1024).
53
Page 54

2. Make sure your WAN IP address (Internet IP address) is a public IP address. Private IP
addresses are not routed on the Internet.
3. It is unsafe to make your router remotely accessible to all PCs on external network. For better
security, we suggest that only enter the IP address of the PC for remote management
Remote Web Management Application Example:
To access your router (WAN IP address: 172.16.87.160) at your home from the PC (210.16.87.154)
at your office via the port number 6060.
Set Steps:
① Management “Enable”.
② Enter the Port: 6060.
③ Enter the IP Address here for example: 210.16.87.154
④ Click “Save” to save your settings.
In the PC 210.16.87.154 Type “http:// 172.16.87.160:6060” into your browser’s address or location
field and you can access the router at your home remotely.
Knowledge Expansion
1. IP Address: Here you can specify the IP address for remote management (When set to 0.0.0.0,
the device becomes remotely accessible to all the PCs on Internet or other external networks).
54
Page 55

2. Port: This is the management port to be open to outside access. The default setting is 8080.
This can be changed
3.7.6 WAN Ping
The ping test is to check the status of your internet connection. When disabling the test, the
system would prevent the ping test from WAN.
Set Steps:
① Click “Expert Settings”
② Click “WAN Ping”
③ Ignore the Ping from WAN Enable
④ Click “Save” to confirm
3.8 Routing
In this page you can view the routing table information.
Click “Refresh” to update
55
Page 56

Destination IP: The IP address of the final destination. “0.0.0.0” indicates any network
segment.
Subnet Mask: The subnet mask for the specified destination.
Gateway: This is the next router on the same LAN segment as the router to reach.
Interface: The interface between your router and the final destination.
3.9 Traffic Control
Traffic control is used to limit communication speed in the LAN. Up to 20 entries can be
supported with the capability for at most 254 PCs' speed control, including for IP address range
configuration.
Set Steps:
① Click “Traffic Control” enter the configure page.
② Traffic Control Enable
③ Enter the IP Range, such as 192.168.101~192.168.101
④ Select Up/Down, Select up for example
⑤ Enter the Max Bandwidth, such as 1024
⑥ Select “Apply”
⑦ Click “Add”, the information you configured will show in the list.
56
Page 57

⑧ In the list table you can Edit or Delete the configure.
⑨ Click “Save” to save your settings.
Tips
1. 1M=128KByte/s.
2. The volume of uplink traffic/downlink traffic should not be larger than that allowed on your
router's WAN (Internet) port. You can ask your ISP to provide the volume of Internet traffic.
3. The bandwidth for ADSL/DSL line usually refers to the download bandwidth
3.10 System Tools
Click “System Tools” enter the configure page ,here you can set “Time Settings”,
“Backup/Restore”, “Restore to Factory”, “firmware Upgrade”, “Reboot”, “Change Password”,
“System Log”.
3.10.1 Time Settings
This section is to select the time zone for your location. If you turn off the router, the settings
for time
57
Page 58

Tips
Configured time and date info will be lost if the device gets disconnected from power supply.
However, it will be updated automatically when the device reconnects to Internet. To activate
time-based features (e.g. firewall), the time and date info shall be set correctly first, either
manually or automatically
Set Steps:
① Click “System Tools”.
② Select “Time Settings”.
③ Select Time Zone.
④ You can enter the time and date manually or click “Sync with your PC”, synchronize
automatically.
⑤ Click Save to save you settings.
Synchronize with your PC: Specify a time interval for periodic update of time and date
information from your host.
58
Page 59

Tips
If the router connected to the Internet, the device’s time and network time synchronization by
default.
3.10.2 Backup/Restore
Parameters Specification:
Backup: Click this button to back up the router's configurations.
Restore: Click this button to restore the router's configurations.
Set Steps:
① Click “System Tools”.
② Select “Back/Restore”.
③ “Backup” to keep parameters.
④ Click “Browse” to add an file
⑤ Click “Save”
Note
The default configuration file name is “RouterCfm.cfg”. Do include the file name suffix of
59
Page 60

“.cfg” when renaming the file name to avoid problem.
3.10.3 Restore to Factory
Set Steps:
① Click “System Tools”.
② Select “Restore to Factory”.
Parameters Specification:
This “Restore” button is to reset all configurations to the default values. It means the Range
Extender will lose all the settings you have set. So please note down the related settings if
necessary.
Default Password: admin
Subnet Mask:255.255.255.0
Default IP:192.168.1.1
Note
If you enable this option, all current settings will be deleted and be restored to factory default
values. You will have to reconfigure Internet connection settings and wireless settings.
60
Page 61

Do not restore factory default settings unless the following happens:
1> You need to join a different network or unfortunately forget the login password.
2> You cannot access Internet and your ISP or our technical support asks you to reset the
router.
DO NOT interrupt the power to the router when Restore to factory is in process otherwise the
router may be permanently damaged.
3.10.4 Firmware Upgrade
The router provides the firmware upgrade by clicking the “Upgrade” after browsing for the
firmware upgrade packet. After the upgrade is completed, the router will reboot automatically.
Set Steps:
① Click “System Tools”
② Select “Firmware Upgrade”
③ Click “Browse”, select the upgrade file
④ Click “Upgrade”, and wait for it to complete.
Note
1. Before you upgrade the firmware, make sure you are having a correct firmware. A wrong
61
Page 62

firmware may damage the device.
2. It is advisable that you upgrade the device's firmware over a wired connection. DO NOT
interrupt the power to the router when the upgrade is in process otherwise the router may be
permanently damaged.
3.10.5 Reboot
When a certain feature does not take effect or the device fails to function correctly, try
rebooting the device.
Rebooting the Wifi Router is to make the settings configured go into effect or to set the Range
Extender again if setting failure happens.
3.10.6 Change Password
You can change the password by this function
62
Page 63

Set Steps:
① Click “System Tools”
② Select “Change Password”
③ Enter “Old Password” “New Password” and “Confirm New Password”
④ Click “Save” to save you settings.
Tips
The default login password is admin.
The valid password must be between 3~12 characters and only include letters, numbers and
underscore
3.10.7 System Log
The section is to view the system log. Click the “Refresh” to update the log.
Click the “Clear” to clear the screen.
63
Page 64

Set Steps:
① Click “System Tools”
② Select “System Log”
③ Click “Refresh” can update the information
④ Click “Clear” to clear the screen
64
Page 65

Appendix
1 Configure PC TCP/IP Settings
Windows 7
① Click Start -> Control Panel.
65
Page 66

② Click Network and Internet.
③ Click Network and Sharing Center.
66
Page 67

④ Click Change adapter settings.
⑤ Click Local Area Connection and select Properties.
67
Page 68

⑥ Select Internet Protocol Version 4 (TCP/IPv4) and click Properties.
68
Page 69

⑦ Select Obtain an IP address automatically and click OK.
69
Page 70

⑧ Click OK on the Local Area Connection Properties window to save your settings.
70
Page 71

Windows XP
① Right-click My Network Places and select Properties.
② Right click Local Area Connection and select Properties.
71
Page 72

③ Select Internet Protocol Version 4 (TCP/IPv4) and click Properties.
④ Select Obtain an IP address automatically and click OK.
72
Page 73

⑤ Click OK on the Local Area Connection Properties window to save your settings.
2 Troubleshooting
The Troubleshooting provides answers to common problems regarding the Router Adapter:
1. The Power LED does not light up.
Ans. Check the following:
a) Make sure that the Router Adapter is properly plugged into a power outlet.
b) Make sure the power outlet is active (working) by plugging another electric device into it.
c) Re-plug the Router Adapter to the power outlet. If the Power LED is still failed to light up, contact
your local dealer for technical support.
2. The Ethernet LED does not light up.
Ans. Check the following:
a) Make sure that the Ethernet cable (RJ-45) is properly connected to the Router Adapter’s
73
Page 74

Item
Default settings
Router Login
Login IP Address
192.168.2.1
Login User Name
admin
Login Password
admin
Network Settings
Internet Connection Type
Mode Auto-switch Enabled
MTU
1492 (PPOE)
1500 (DHCP/Dynamic and
Static IP)
WAN Speed
Auto
DNS
Disable
IP Address
192.168.2.1
Ethernet port.
b) Make sure that the other end of the Ethernet cable (RJ-45) is properly connected to the
computer LAN card or to you Cable/xDSL Ethernet port.
c) Make sure your computer LAN card is properly installed and configured.
d) Make sure your Cable/xDSL broadband access is working and configured correctly.
e) Contact your local dealer for technical support if the Ethernet LED is still failed to light up after
the above procedures.
3. The Router LED does not light up.
Ans. Check the following:
a) Double click to enable the Management Utility and click the “Rescan” tab under the Network
configuration homepage. The Management Utility will automatically detect all other Router
Adapters on your router network.
b) Try to plug a second Router Adapter into a nearby power outlet and check whether the Router
LED lights up or not.
c) Contact your local dealer for technical support if the Router LED is still failed to light up after the
above procedures.
3 Factory default settings
The table below lists the factory default settings of your device.
74
Page 75

(LAN)
Subnet Mask
255.255.255.0
DHCP Server
Enabled
IP Pool
192.168.2.100~192.168.2.200
Time Zone
(GMT+08:00)Beijing,
Chongqing, Hong Kong,
Urumqi
Wireless
Wireless
Enabled
SSID
MTC_XXXXXX(where
XXXXXX is the last six
characters in the device's
MAC address)
You can find it on the label
attached to the device.
Network Mode
11b/g/n mixed
SSID Broadcast
Enabled
Channel
AutoSelect
Channel Bandwidth
20/40
Extension Channel
AutoSelect
Wireless Security
Disabled
Wireless Access Control
Disabled
Others
Remote Web Management
Disabled
Bandwidth Control
Disabled
DMZ Host
Disabled
UPnP
Enable
Internet Access
Management
Disabled
4 Remove Wireless Network from Your PC
If you change wireless settings on your wireless device, you must remove them accordingly from
75
Page 76

your PC; otherwise, you may not be able to wirelessly connect to this device. Below describes how
to remove a wireless network from your PC.
Windows 7
① Right-click the Network icon and select Properties.
② Select Manage Wireless Networks.
76
Page 77

③ Select the wireless network and click Remove network.
77
Page 78

Windows XP
① Right-click My Network Places and select Properties.
② Right click Wireless Network Connection and then select Properties.
78
Page 79

③ Click Wireless Networks, select the wireless network name under Preferred
networks and then click the Remove button.
5 Safety and Emission Statement
0359
CE Mark Warning
This is a Class B product in a domestic environment, this product may cause radio
interference, in which case the user may be required to take adequate measures. This
device complies with EU 1999/5/EC.
NOTE: (1) The manufacturer is not responsible for any radio or TV interference caused by
unauthorized modifications to this equipment. (2) To avoid unnecessary radiation
interference, it is recommended to use a shielded RJ45 cable
Hereby, Shenzhen MTC Co.,LTD declares that this Wireless Router(PW5002) is in compliance with
79
Page 80

the essential requirements and other relevant provision of Directive 1999/5/EC.
The declaration of monformity may be consult at Manufacture Name: Shenzhen MTC Co.,LTD
Manufacture Address: MTC Industry Park,1st Lilang Rd, Xialilang Community, Nanwan Street,
Longgang District, Shenzhen
FCC Statement
FCC ID: 2AHVHPW5002
This device complies with Part 15 of the FCC Rules. Operation is subject to the following two
conditions:
(1) This device may not cause harmful interference, and (2) this device must accept any
interference received, including interference that may cause undesired operation.
This equipment has been tested and found to comply with the limits for a Class B digital
device, pursuant to Part 15 of the FCC Rules. These limits are designed to provide
reasonable protection against harmful interference in a residential installation. This
equipment generates, uses and can radiate radio frequency energy and, if not installed and
used in accordance with the instructions, may cause harmful interference to radio
communications. However, there is no guarantee that interference will not occur in a
particular installation. If this equipment does cause harmful interference to radio or
television reception, which can be determined by turning the equipment off and on, the user
is encouraged to try to correct the interference by one of the following measures:
- Reorient or relocate the receiving antenna.
- Increase the separation between the equipment and receiver.
- Connect the equipment into an outlet on a circuit different from that
to which the receiver is connected.
- Consult the dealer or an experienced radio/TV technician for help.
FCC Caution: Any changes or modifications not expressly approved by the party responsible
for compliance could void the user's authority to operate this equipment.
This transmitter must not be co-located or operating in conjunction with any other antenna or
transmitter.
80
Page 81

The manufacturer is not responsible for any radio or TV interference caused by unauthorized
modifications to this equipment.
Radiation Exposure Statement
This equipment complies with FCC radiation exposure limits set forth for an uncontrolled
environment. This equipment should be installed and operated with minimum distance 20cm
between the radiator & your body.
NOTE:(1)The manufacturer is not responsible for any radio or TV interference caused by
unauthorized modifications to this equipment.(2) To avoid unnecessary radiation interference,
it is recommended to use a shielded RJ45 cable
81
 Loading...