


USER’S MANUAL
MANUEL DE L’UTILISATEUR
MANUAL DEL USUARIO
MUAV5801-6586A
CONTENTS
Important Safety Instructions 2
Safety Information 3
Preparation 4
What's Included
Rear View
Installing the Stand
Removing the Stand for Wall-Mounting
Wall-Mounting Screws
Remote Control
Connecting External Devices 9
Customizing TV Settings 10
Initial Setup
Streaming
My Media
Viewing Photos
Listening to Music
Watching Videos
TV Settings
General
Picture
Audio
Network
Channel
Time
Lock
APP settings
Source
Parental Control 21
Troubleshooting 23
Maintaining 24
25
OTT APP Service 26
En
1
IMPORTANT SAFETY INSTRUCTIONS
t Read these instructions – All the safety and
operating instructions should be read before this
product is operated.
t Keep these instructions – The safety and
operating instructions should be retained for future
reference.
t Heed all warnings – All warnings on the
appliance and in the operating instructions should
be adhered to.
t Follow all instructions – All operating and use
instructions should be followed.
t Do not use this apparatus near water – The
appliance should not be used near water or
moisture – for example, in a wet basement or near
a swimming pool, and the like.
Clean only with dry cloth.
t Do not block any ventilation openings. Install in
accordance with the manufacturer’s instructions.
t Do not install near any heat sources such
as radiators, heat registers, stoves, or other
t Do not defeat the safety purpose of the polarized
or grounding-type plug. A polarized plug has two
blades with one wider than the other. A groundingtype plug has two blades and a third grounding
prong. The wide blade or the third prong are
provided for your safety. If the provided plug does
replacement of the obsolete outlet.
Protect the power cord from being walked on
or pinched particularly at plugs, convenience
receptacles, and the point where they exit from the
apparatus.
the manufacturer.
Use only with the cart, stand, tripod, bracket, or
the apparatus. When a cart is used, use caution
when moving the cart/apparatus combination to
avoid injury from tip-over.
Unplug this apparatus during lightning storms or
when unused for long periods of time.
Servicing is required when the apparatus has been
damaged in any way, such as the power-supply
cord or plug is damaged, liquid has been spilled
or objects have fallen into the apparatus, the
apparatus has been exposed to rain or moisture,
does not operate normally, or has been dropped.
Please keep the unit in a well-ventilated
environment.
WARNING:
shock, do not expose this apparatus to rain or
moisture. The apparatus should not be exposed to
as vases should not be placed on apparatus.
WARNING: The batteries shall not be exposed to
WARNING: The mains plug is used as disconnect
device, the disconnect device shall remain readily
operable.
WARNING: To reduce the risk of electric shock, do
not remove cover (or back) as there are no user-
personnel.
within an equilateral triangle is intended to
alert the user to the presence of non-insulated
“dangerous voltage” within the product’s
to constitute a risk of electric shock.
The exclamation point within an equilateral
triangle is intended to alert the user to
the presence of important operating and
maintenance instructions in the literature
accompanying the appliance.
This equipment is a Class II or double
insulated electrical appliance. It has been
designed in such a way that it does not
require a safety connection to electrical earth.
This product contains electrical or electronic
materials. The presence of these materials
may,if not disposed of properly, have potential
adverse effects on the environment and
human health.
Presence of this label on the product means it
should not be disposed of as unsorted
waste and must be collectedseparately. As a
consumer, you are responsible for ensuring
that this product is disposed of properly.
En
2

SAFETY INFORMATION
To ensure reliable and safe operation of this equipment, please carefully read all the instructions in this
user guide, especially the safety information below.
Electrical Safety
The TV set should only be connected to a main power supply with voltage that matches the label at the
rear of the product.
To prevent overload, do not share the same power supply socket with too many other electronic
components.
Do not place any connecting wires where they may be stepped on or tripped over.
Do not place heavy items on any connecting wire, which may damage the wire.
Hold the main plug, not the wires, when removing from a socket.
During a thunderstorm or when not in using the television for long periods, turn off the power switch on
the back of the television.
Do not allow water or moisture to enter the TV or power adapter. Do NOT use in wet, moist areas, such
as bathrooms, steamy kitchens or near swimming pools.
Pull the plug out immediately, and seek professional help if the main plug or cable is damaged, liquid
is spilled onto the set, if the TV set accidentally exposed to water or moisture, if anything accidentally
penetrates the ventilation slots or if the TV set does not work normally.
Do not remove the safety covers. There are no user serviceable parts inside. Trying to service the unit
this apparatus.
To avoid a battery leakage, remove batteries from the remote control, when the remote is not use for long
period, or when the batteries are exhausted.
For best results, use type AAA (example-alkaline, carbon-zinc, etc.) batteries.
Install only new batteries of the same type in your product.
Failure to insert batteries in the correct polarity, as indicated in the battery compartment, may shorten the
life of the batteries or cause batteries to leak.
Do not mix old and new batteries.
Do not mix Alkaline, Standard (Carbon-Zinc) or Rechargeable (Nickel Cadmium) or (Nickel Metal
Hydride) batteries.
Batteries should be recycled or disposed of as per state and local guidelines.
Do not attempt to recharge disposable batteries.
Do not short circuit battery terminals.
Keep away from children.
Physical Safety
Do not block ventilation slots in the back cover. You may place the TV in a cabinet, but ensure at least
5cm (2’’) clearance all around.
Do not tap or shake the TV screen, or you may damage the internal circuits. Take good care of the
remote control.
Do not install near any heat sources such as radiators, heat registers, stoves or other apparatus (including
Do not defeat the safety purpose of the polarized or grounding-type plug. A polarized plug has two
blades with one wider than the other. A grounding plug has two blades and a third grounding prong, the
consult an electrician for replacement of the obsolete outlet.
Protect the power cord from being walked on or pinched particularly at plugs.
Unplug the apparatus during lightning storms or when unused for long periods.
normally or if the apparatus, including the power supply cord or pulg, has been damaged in any way.
Servicing is also required if liquid has been spilled, or objects have fallen into the apparatus; when the
apparatus has been exposed to rain or moisture; or if the apparatus has been dropped.
Always connect your television to a power outlet with protective ground connection.
The ventilation should not be impeded by covering the ventilation openings with items, such as
newspapers, table-cloths, curtains, etc.
d on the apparatus.
Attention should be drawn to the environmental aspects of battery disposal.
s required if the apparatus does not operate
ation.
En
3
PREPARATION
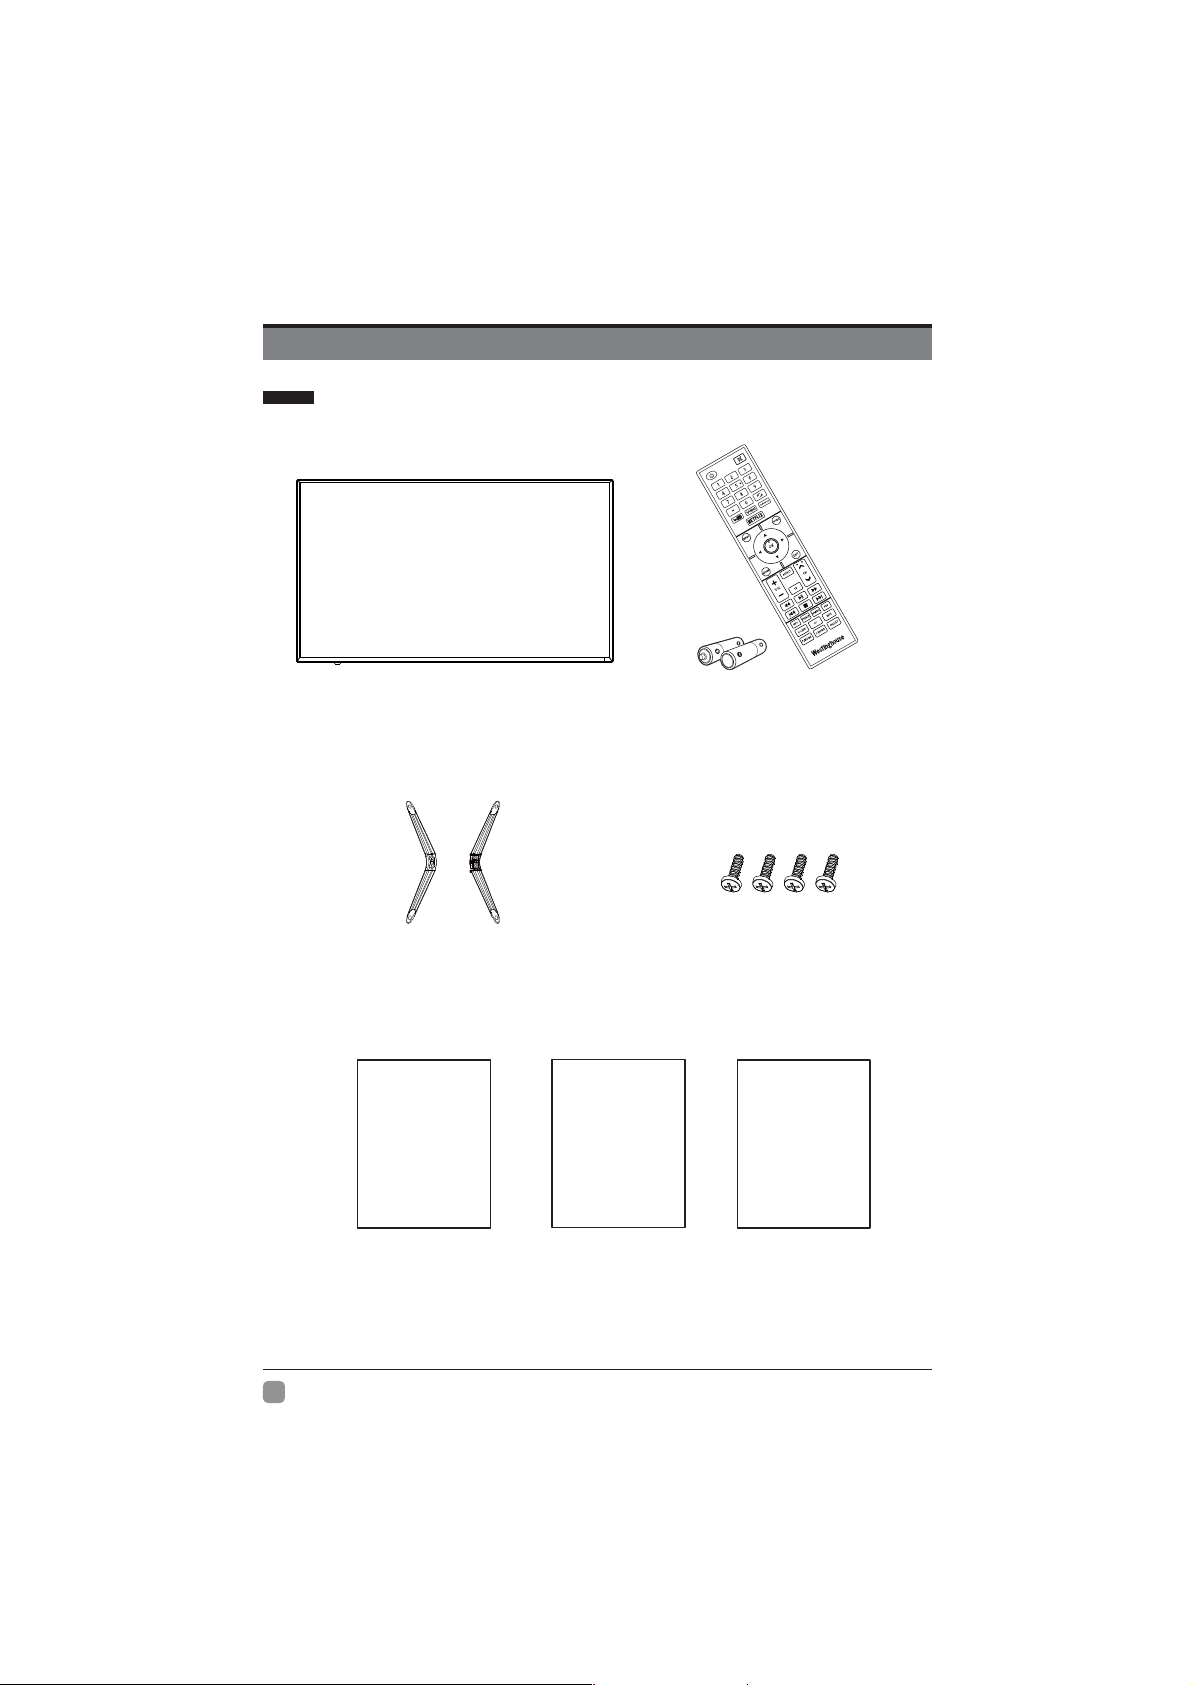
What's Included
TV Set
TV Stand
User Manual
User Manual
Quick
Connect
Guide
Quick Connect Guide
Remote Control with Batteries
Four Screws M4x14
Warranty
Card
Warranty Card
En
4

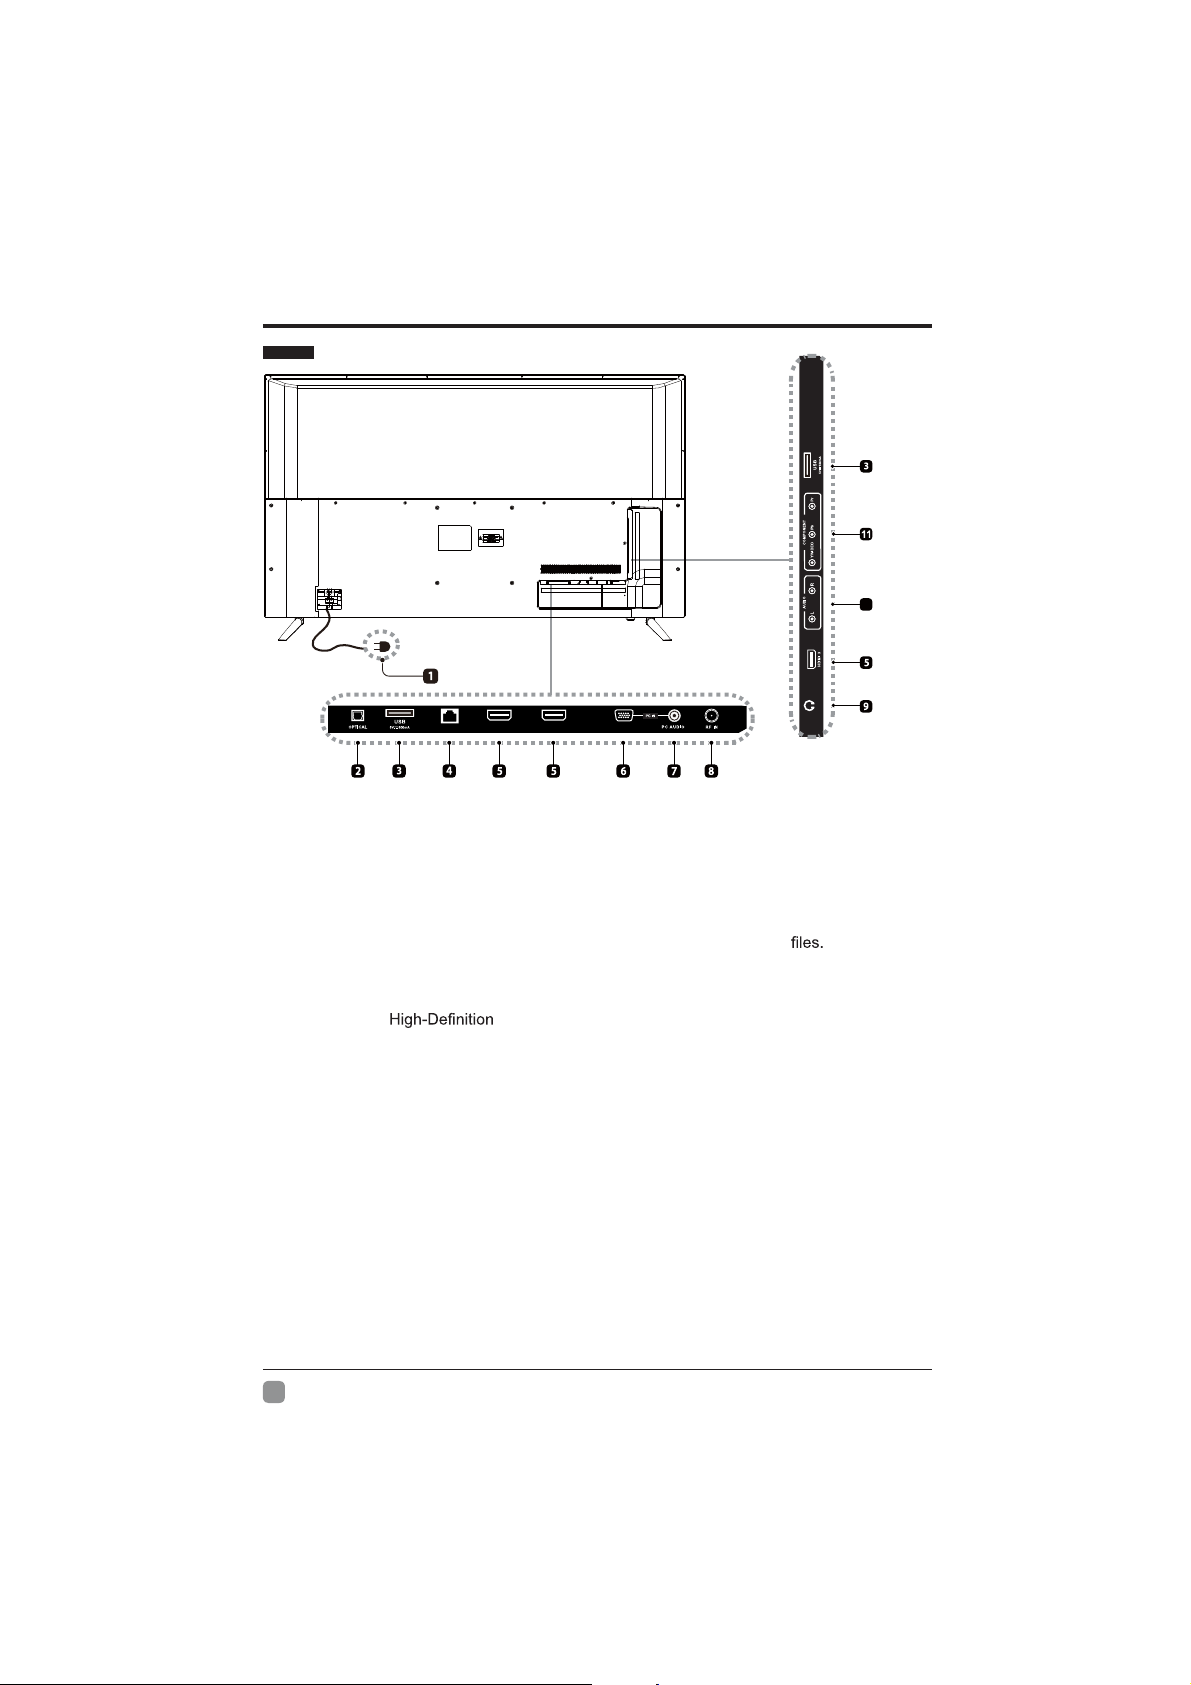
Rear View
4
5
PREPARATION
2
3 3
1
2
1. POWER
Switch the TV between On / Standby mode.
2. CH
-/+
Press to select a channel.
3. VOL -/+
Press to adjust the volume.
4. POWER Indicator
Illuminate none when the TV is turned on.
Illuminate white when the TV is in standby mode.
5. IR (Infrared Receiver)
Receive IR signals from the remote control.
En
5
PREPARATION
Rear View
10
(ARC)
LAN
VGA
HDMI 1
HDMI 2
1. Power Cord
Connect to AC power outlet.
2. OPTICAL Output
Connect a digital sound system to this
jack.
3. USB Port
Connect to a USB storage device to play compatible movie and photo
4. LAN
Network connection port.
5. HDMI Input
Connect to a
(HD) signal input device.
6. VGA Input
Connect to a computer or other devices with a VGA interface.
7. PC AUDIO Input
Connect to a computer audio output.
8. DTV/TV Input
Connect to the antenna (75Ω VHF/UHF) socket with the RF coaxial cable.
9. Headphone Socket
Connect to the Headphones.
10. AUDIO Input
Connect to the AUDIO (L/R) output sockets on external audio devices.
11. COMPOSITE/COMPONENT IN
Connect to AV devices with composite/component (Y/Pb/Pr) video and audio output sockets.
COMPOSITE VIDEO and COMPONENT(Y/PB/PR) share with AUDIO IN (L/R).
HEADPHONE
En
6
PREPARATION
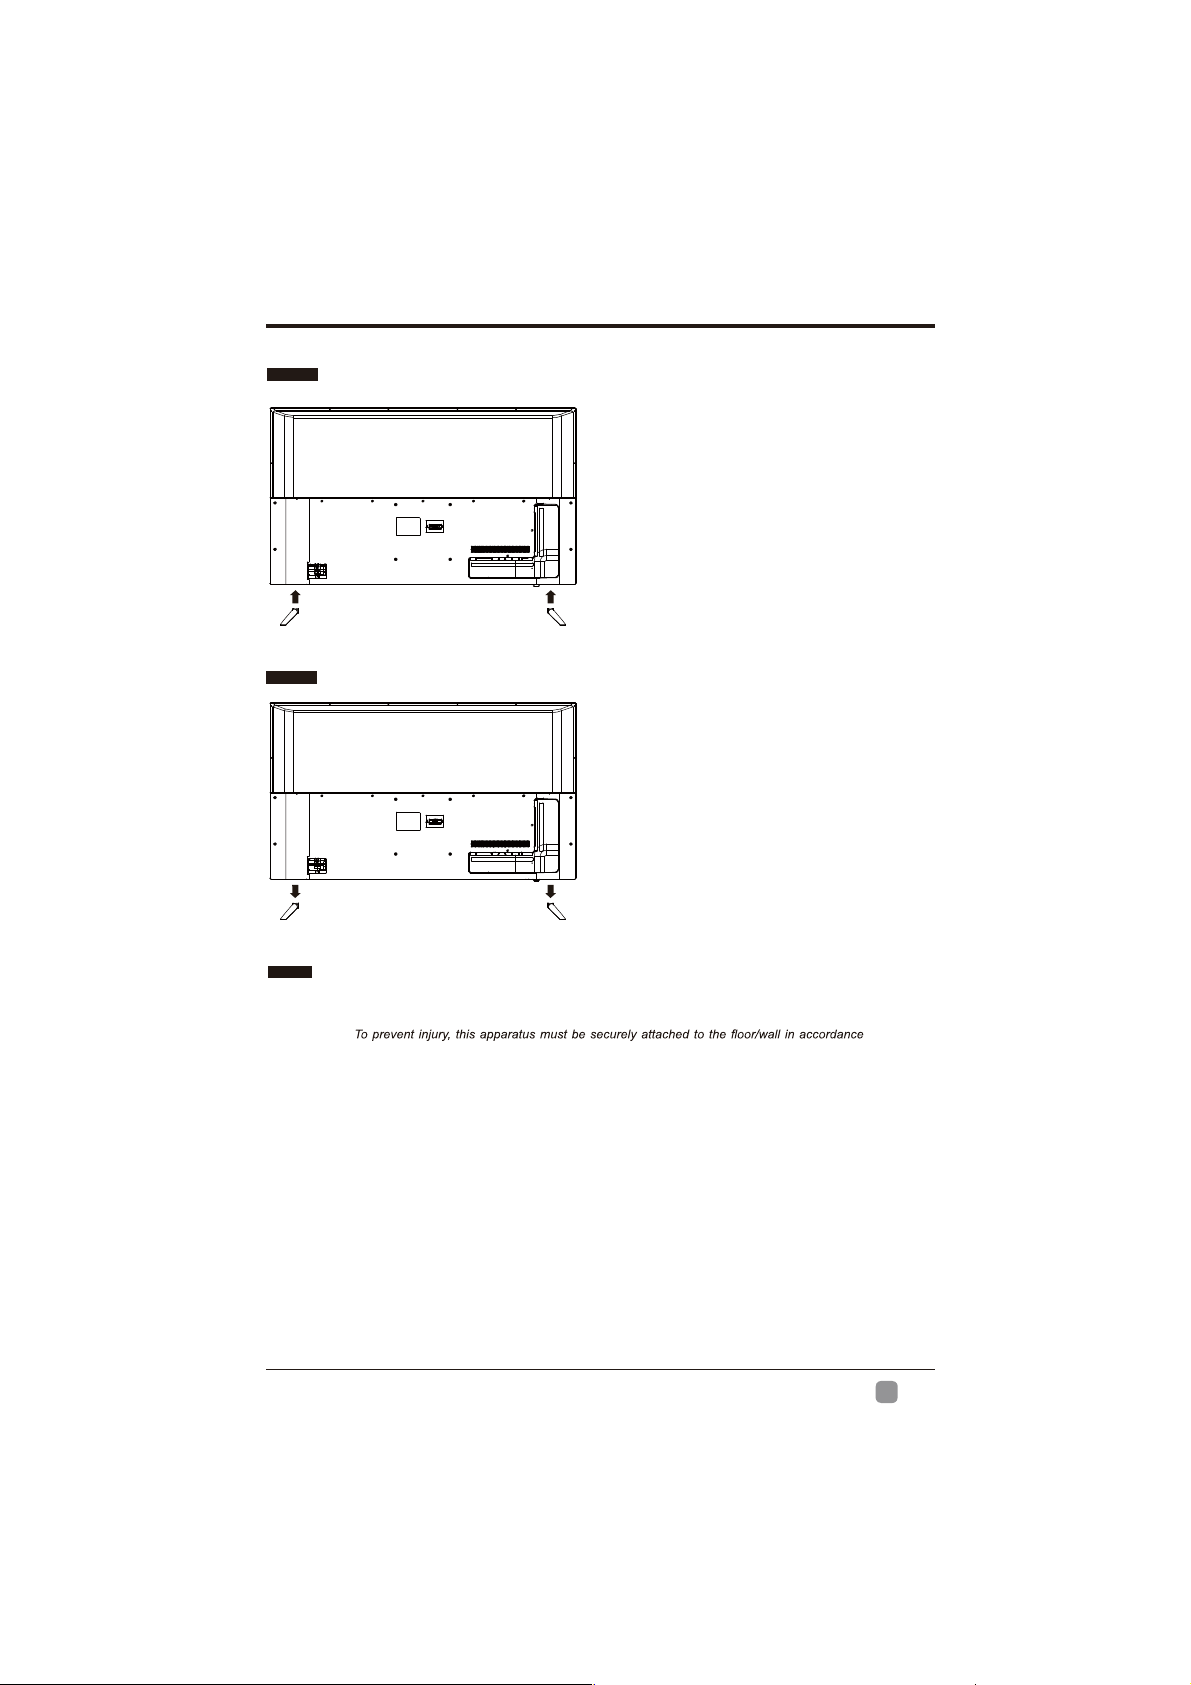
Installing the Stand
t 1. Lay the TV face down on a flat,
cushioned surface to avoid damaging
or scratching.
t 2. Fix the Left Base Stand to the main
unit using 2 pcs provided screws.
( M4x14)
t 3. Fix the Right Base Stand to the
main unit using 2 pcs provided screws.
( M4x14)
Removing the Stand for Wall-Mounting
t 1.Lay the TV face down on a flat,
cushioned surface to avoid damaging
or scratching.
t 2.Untighten the 4 pcs screws holding
the stand assembly and remove them.
t 3.Attach the wall-mount bracket to
the TV using the mounting holes on
the back of the TV. Mount this TV
according to the instructions included
in the wall-mount bracket.
Wall-Mounting Screws
Mount the VESA bracket using 4*M6*12 isometric threaded screws (not included).
WARNING:
with the installation instruction.
WARNING
Never place a television set in an unstable location. A television set may fall, causing serious personal injury
or death. Many injuries, particularly to children, can be acoided by taking simple precautions such as:
If your existing television set is being retained and relocated, the same considerations as above should be
applied.
:
-Using cabinets or stands recommended by the manufacturer of the television set.
-Only using furniture that can safely support the television set.
-Ensuring the television set is not overhanging the edge of the supporting furniture.
-Not placing the television set on tall furniture(for example, cupboards or bookcases) without anchoring
both the furniture and the television set to a suitable support.
-Not placing the television set on cloth or other materials that may be located between the television
set and supporting furniture.
-Educating children about the dangers of climbing on furniture to reach the television set or its controls.
En
7
PREPARATION
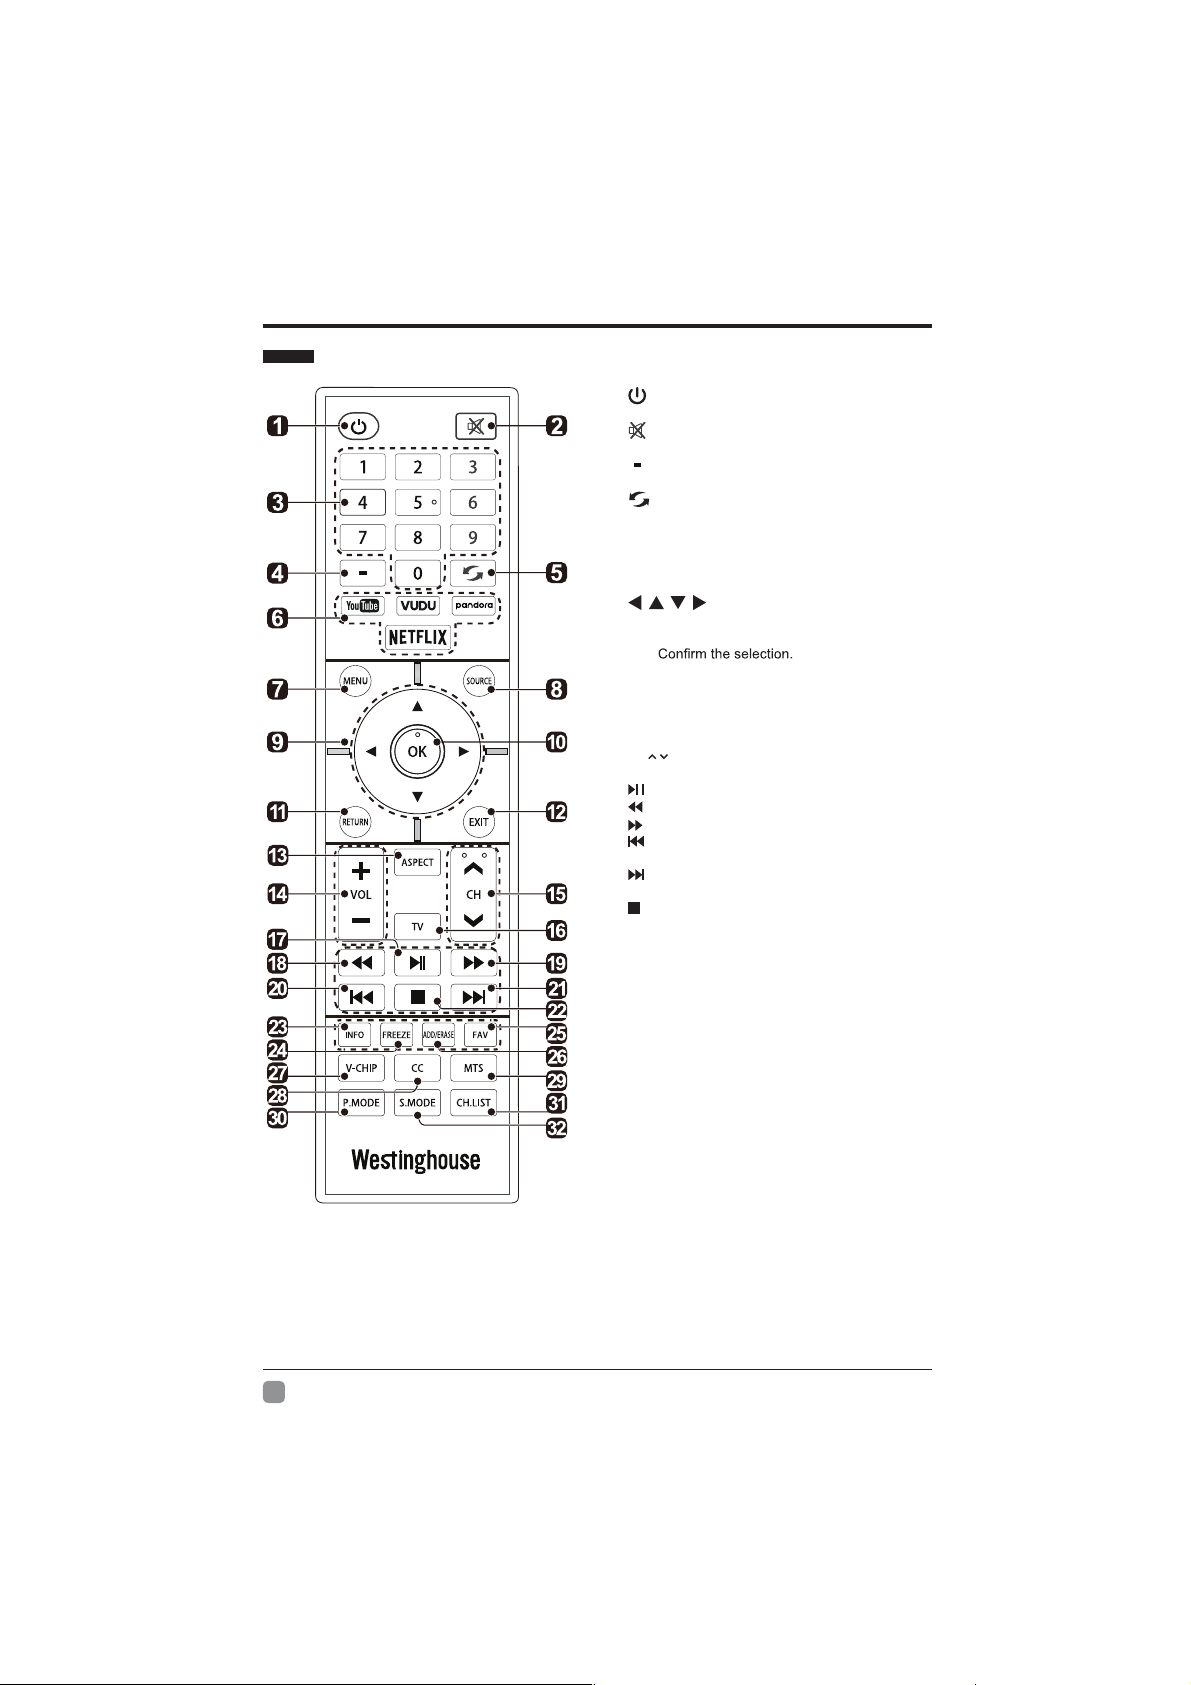
Remote Control
1. : Switch the TV between On and Standby
mode.
2. : Mute and restore TV sound.
3. 0~9: Select a program.(ATV/DTV mode)
4. : Enter multiple program channel number
such as 2-1.
5. : Return to the previous viewing channel.
6. APP: Press to select the desired APP.
7. MENU: Display the main menu.
8. SOURCE: Select among the different input
signal sources:TV/HDMI1/HDMI2/HDMI3/USB/
VGA/AV/Component.
9.
screen display menus and adjust the system
settings to your preference.
10. OK:
11. RETURN: Return to previous menu.
12. EXIT: Exit the on screen display menu.
ASPECT: Select the aspect ratio 13.
settings:standard/wide/wide zoom/zoom.
14. VOL+/-: Adjust the volume.
15. CH / : Select the channel.
16.
TV: Press to turn to TV mode.
17.
: Start playback or pause.
: Reverse playback rapidly.
18.
: Advance playback rapidly.
19.
: Skip to the beginning of the previous
20.
chapter/track/photo.
: Skip to the beginning of the next chapter/
21.
track/photo.
: Stop the playback.
22.
23.
INFO:
such as the current channel and input source.
24.
FREEZE:
25.
FAV:
26.
ADD/ERASE:
27.
V-CHIP:
CC: Closed Caption selection: ON/OFF/CC On
28.
Mute.
29. MTS: Switch among different audio channels:
STEREO/MONO/SAP.
P.MODE: Select picture mode: dynamic/movie/
30.
user/standard.
CH.LIST: Display program list.
31.
S.MODE: Select sound mode: standard/music/
32.
movie/user.
: Allows you to navigate the on
Display the present screen information
Freeze the picture.
Display the favorite channel list.
Add or delete Favorite channels.
Set up parental control.
En
8
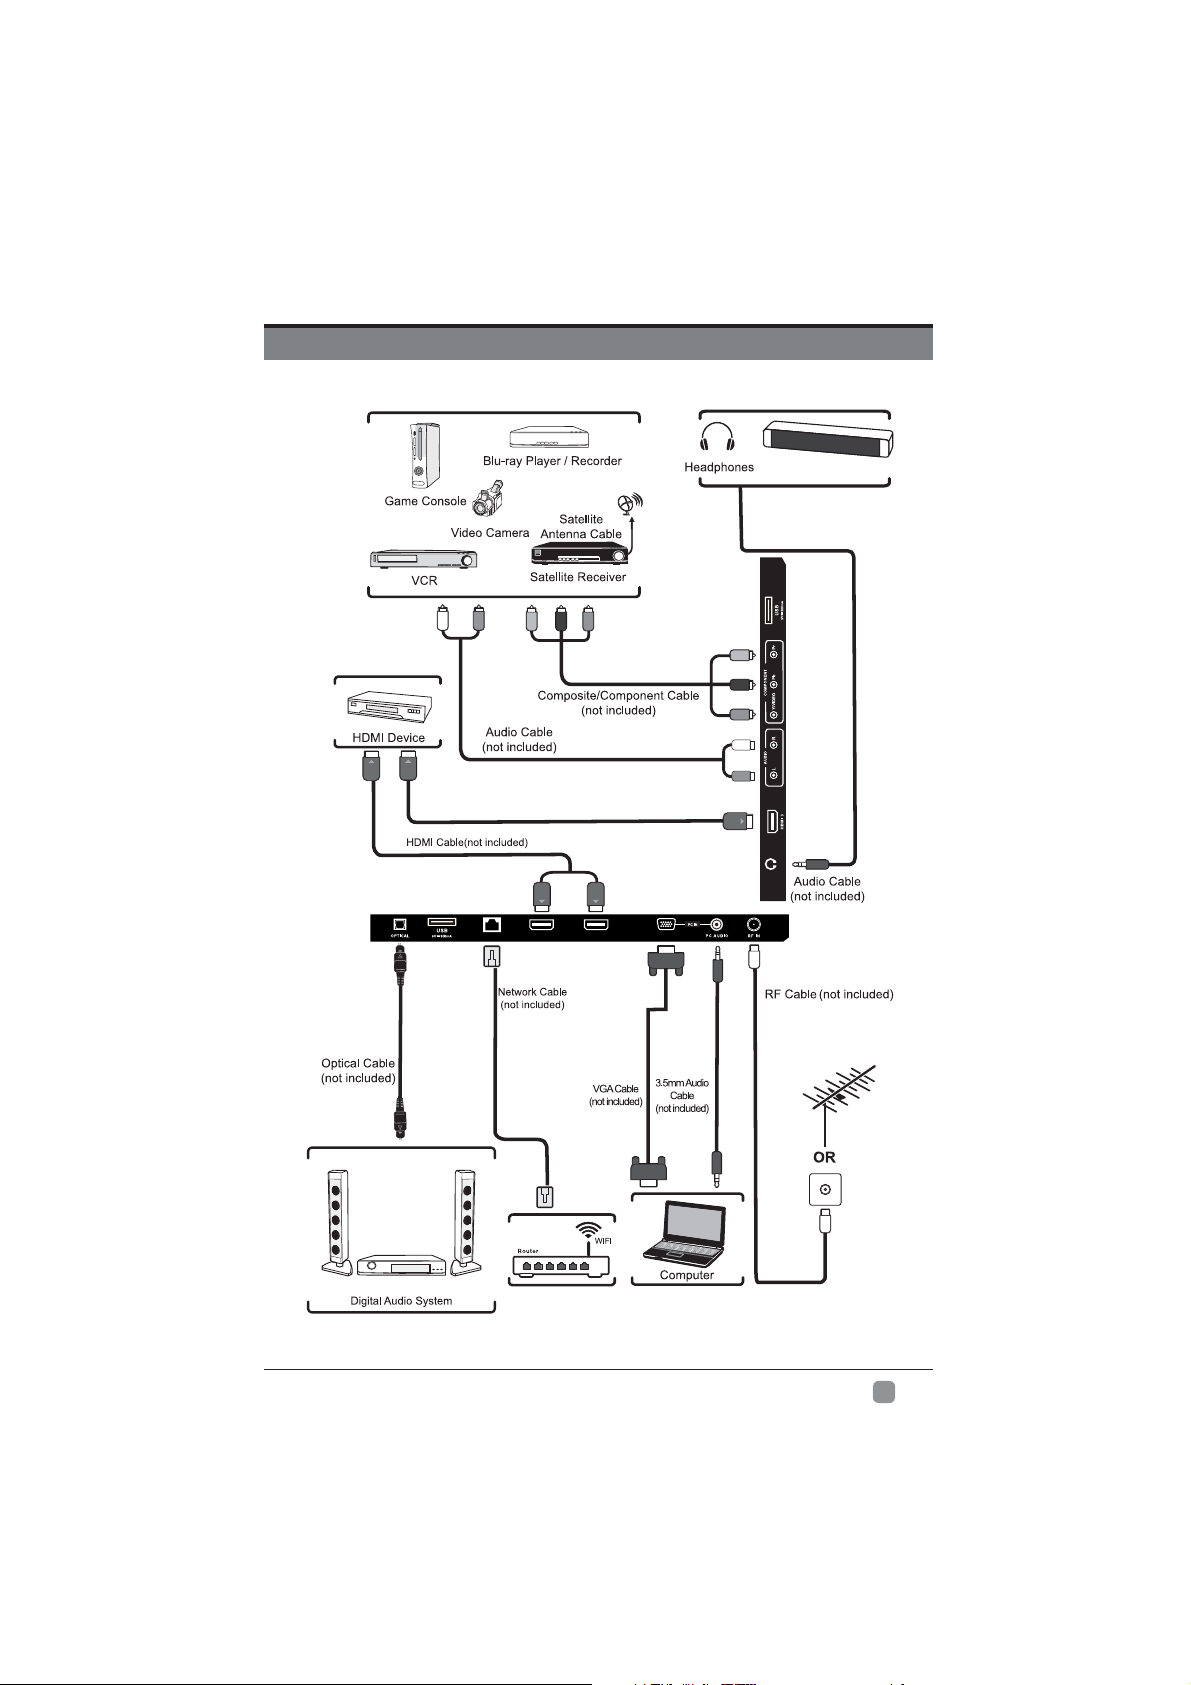
CONNECTING EXTERNAL DEVICES
HDMI 2
LAN
HDMI 1
VGA
Soundbar
(ARC)
HEADPHONE
En
9
CUSTOMIZING TV SETTINGS
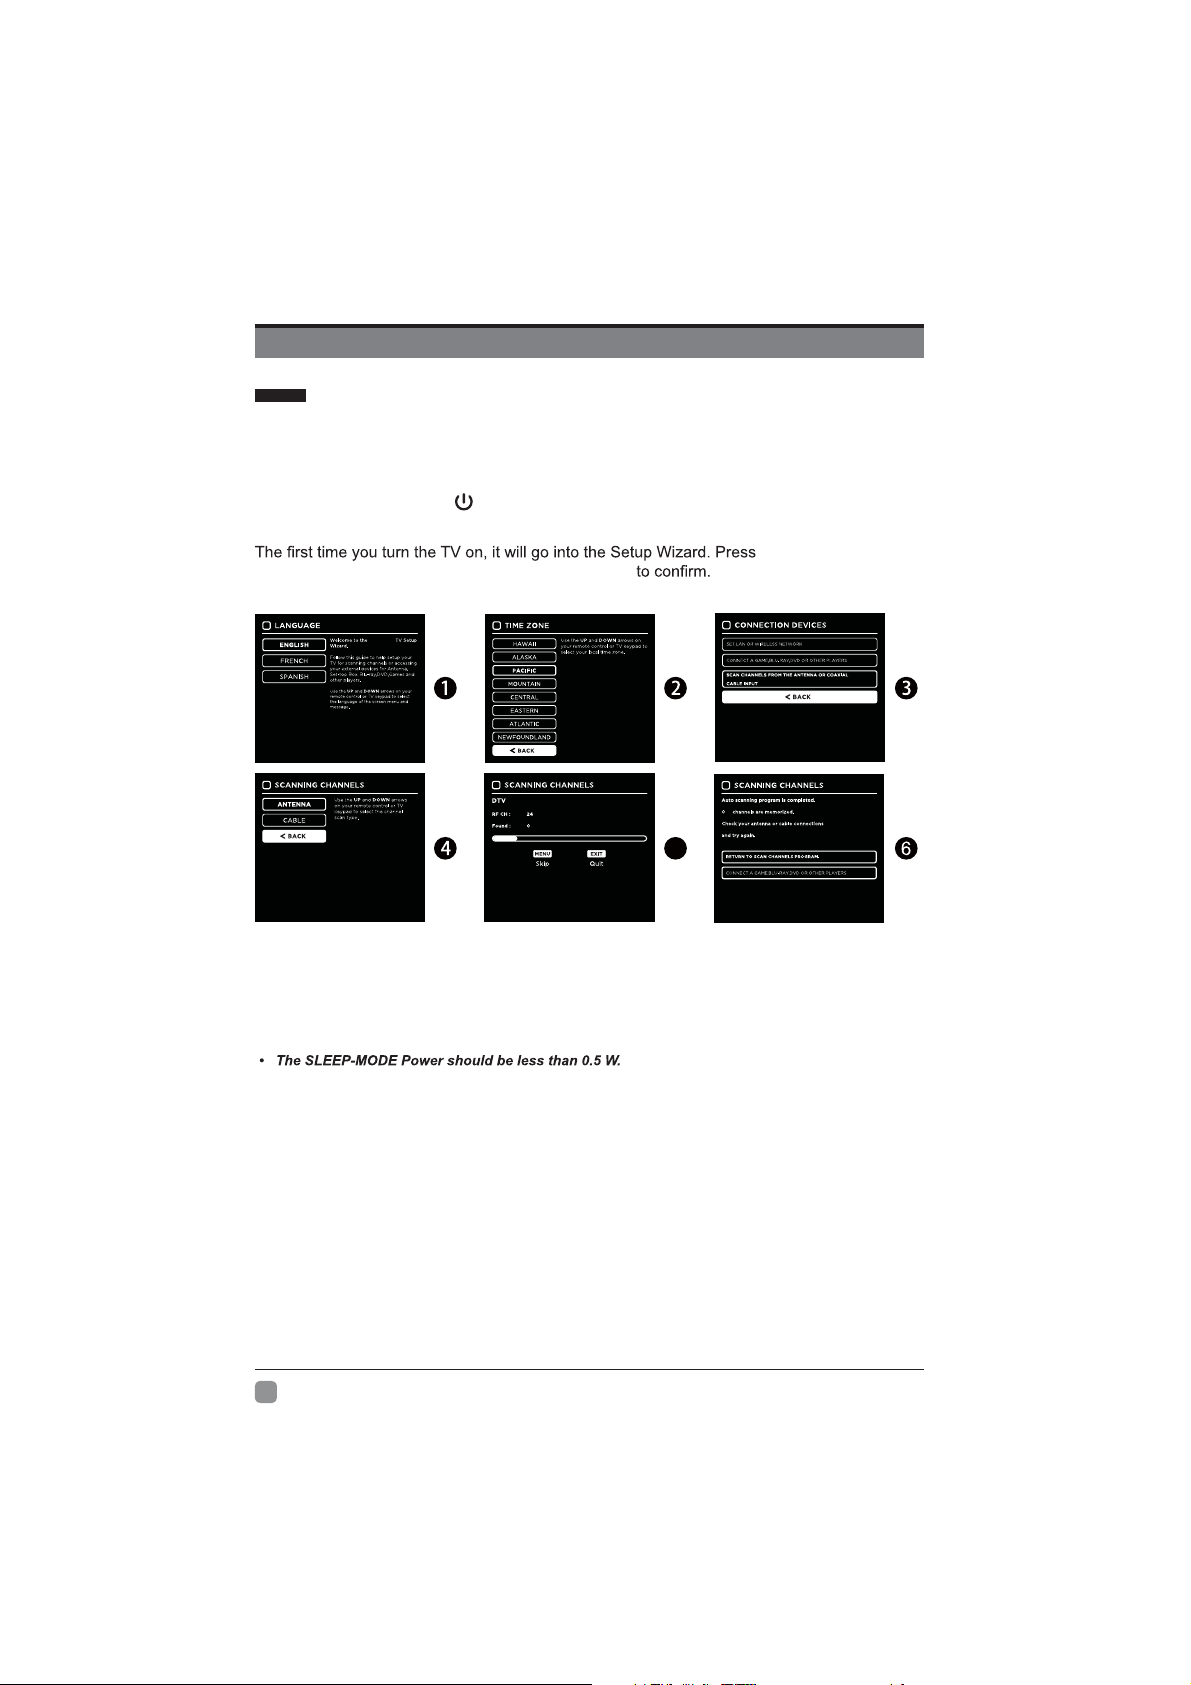
Initial Setup
Connect the power cord to the power socket after you have completed all the physical
connections. At this stage, the TV will enter Standby Mode and the red LED indicator will
illuminate.
In Standby Mode, press the
on. The red LED indicator will turn blue.
highlight and select your desired mode and press OK
Westinghouse
button on the main unit or on the remote control to turn the TV
the Arrow buttons to
5
En
If channels cannot be
found, this frame will be
displayed automatically.
10
CUSTOMIZING TV SETTINGS
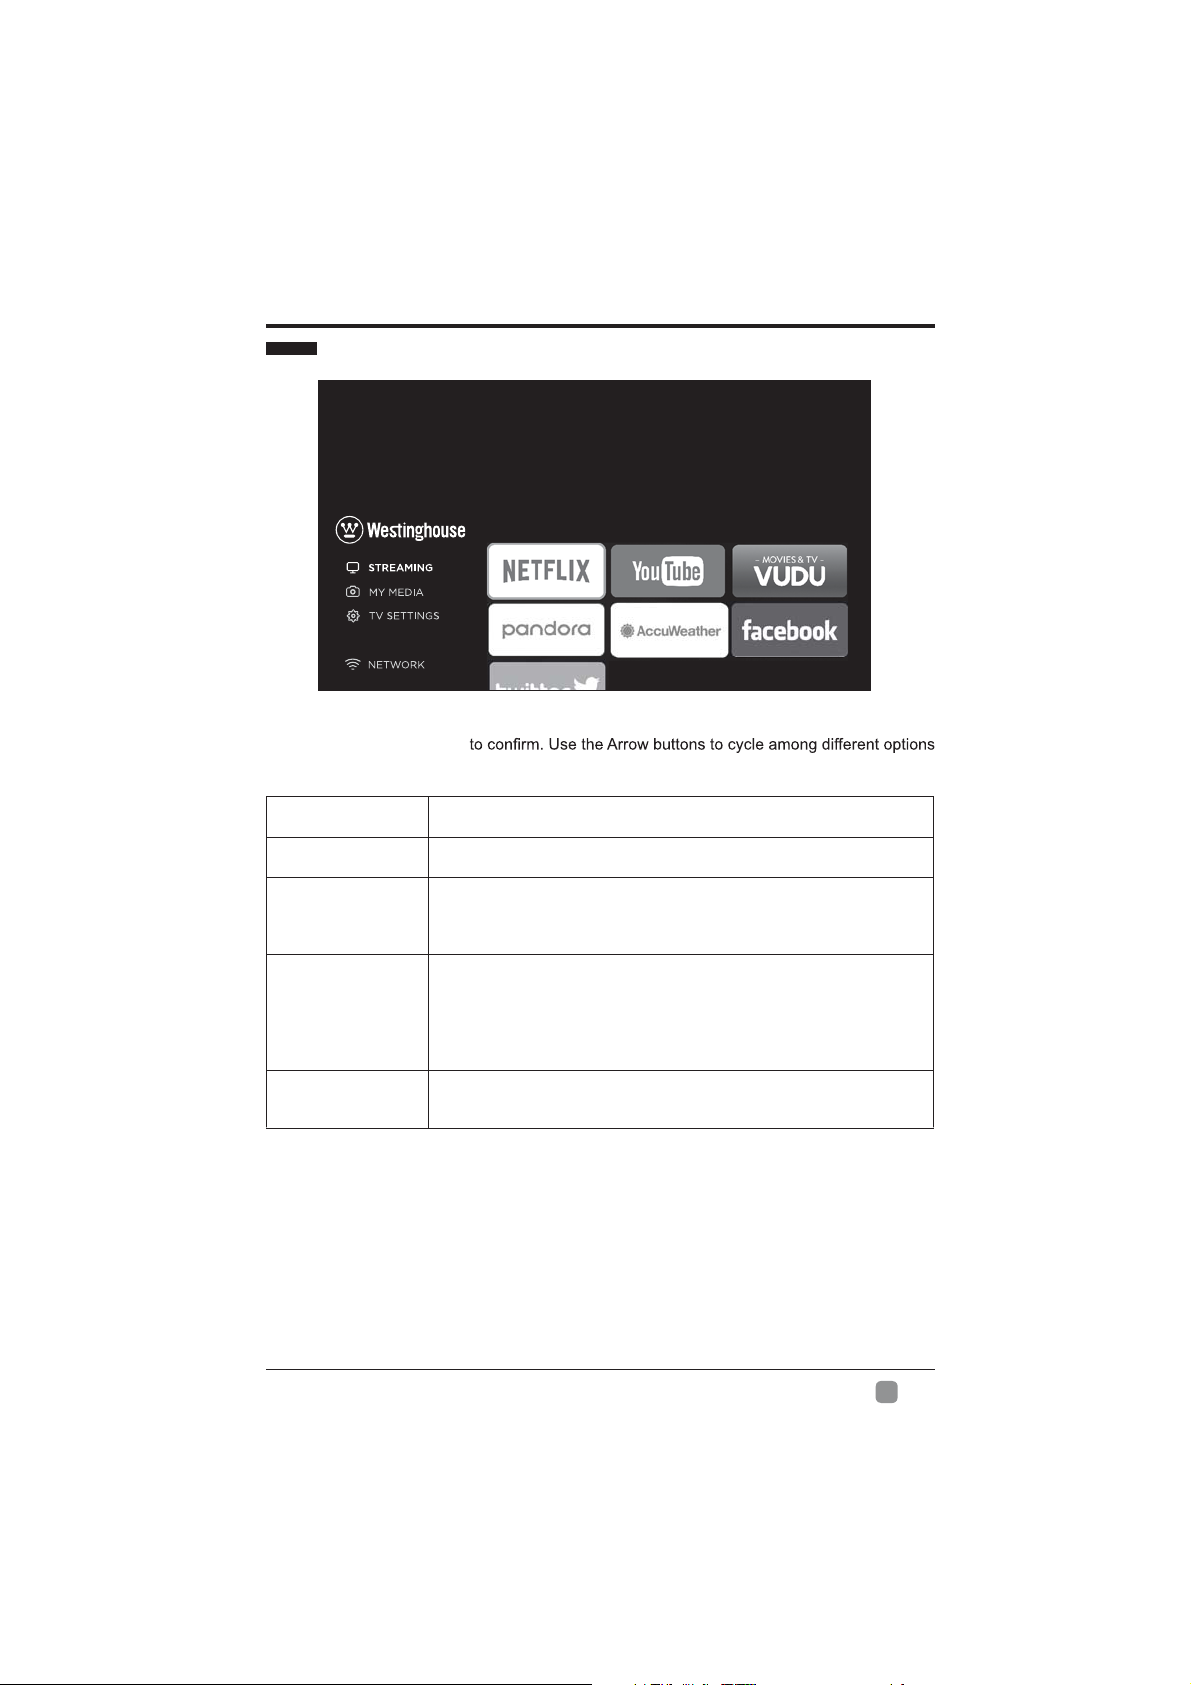
STREAMING
Press MENU to display the main interface, then use the Arrow buttons to highlight
STREAMING and press OK
and select desired apps to enter.
NETFLIX
YouTube
VUDU
Pandora
AccuWeather
To obtain the best result to watching the 4k video on your 4K TV:
1. you need a high-speed internet connection and make sure your network bandwidth meets
the 4k content provider's requirement.
2. access to the real 4K media; only 4K media can show the best image on 4K TV, FHD/1080p
media not as detailed as 4K media.
Enjoys TV shows & movies streamed instantly over the Internet.
YouTube your way on the best screen in your house.
Discover, watch and collect the latest movies and TV shows in
high quality 1080p. Free to sign up. No subscriptions, late fees or
commitments.
Free personalized radio that offers effortless and endless music
enjoyment and discovery. Just start with the name of one of your
favorite artists, songs, genres or composers and Pandora will do the
rest. It’s easy to create personalized stations that play only music
you’ll love
Displays the current weather conditions and the temperature
anywhere in the world in centigrade or Fahrenheit.
En
11
CUSTOMIZING TV SETTINGS
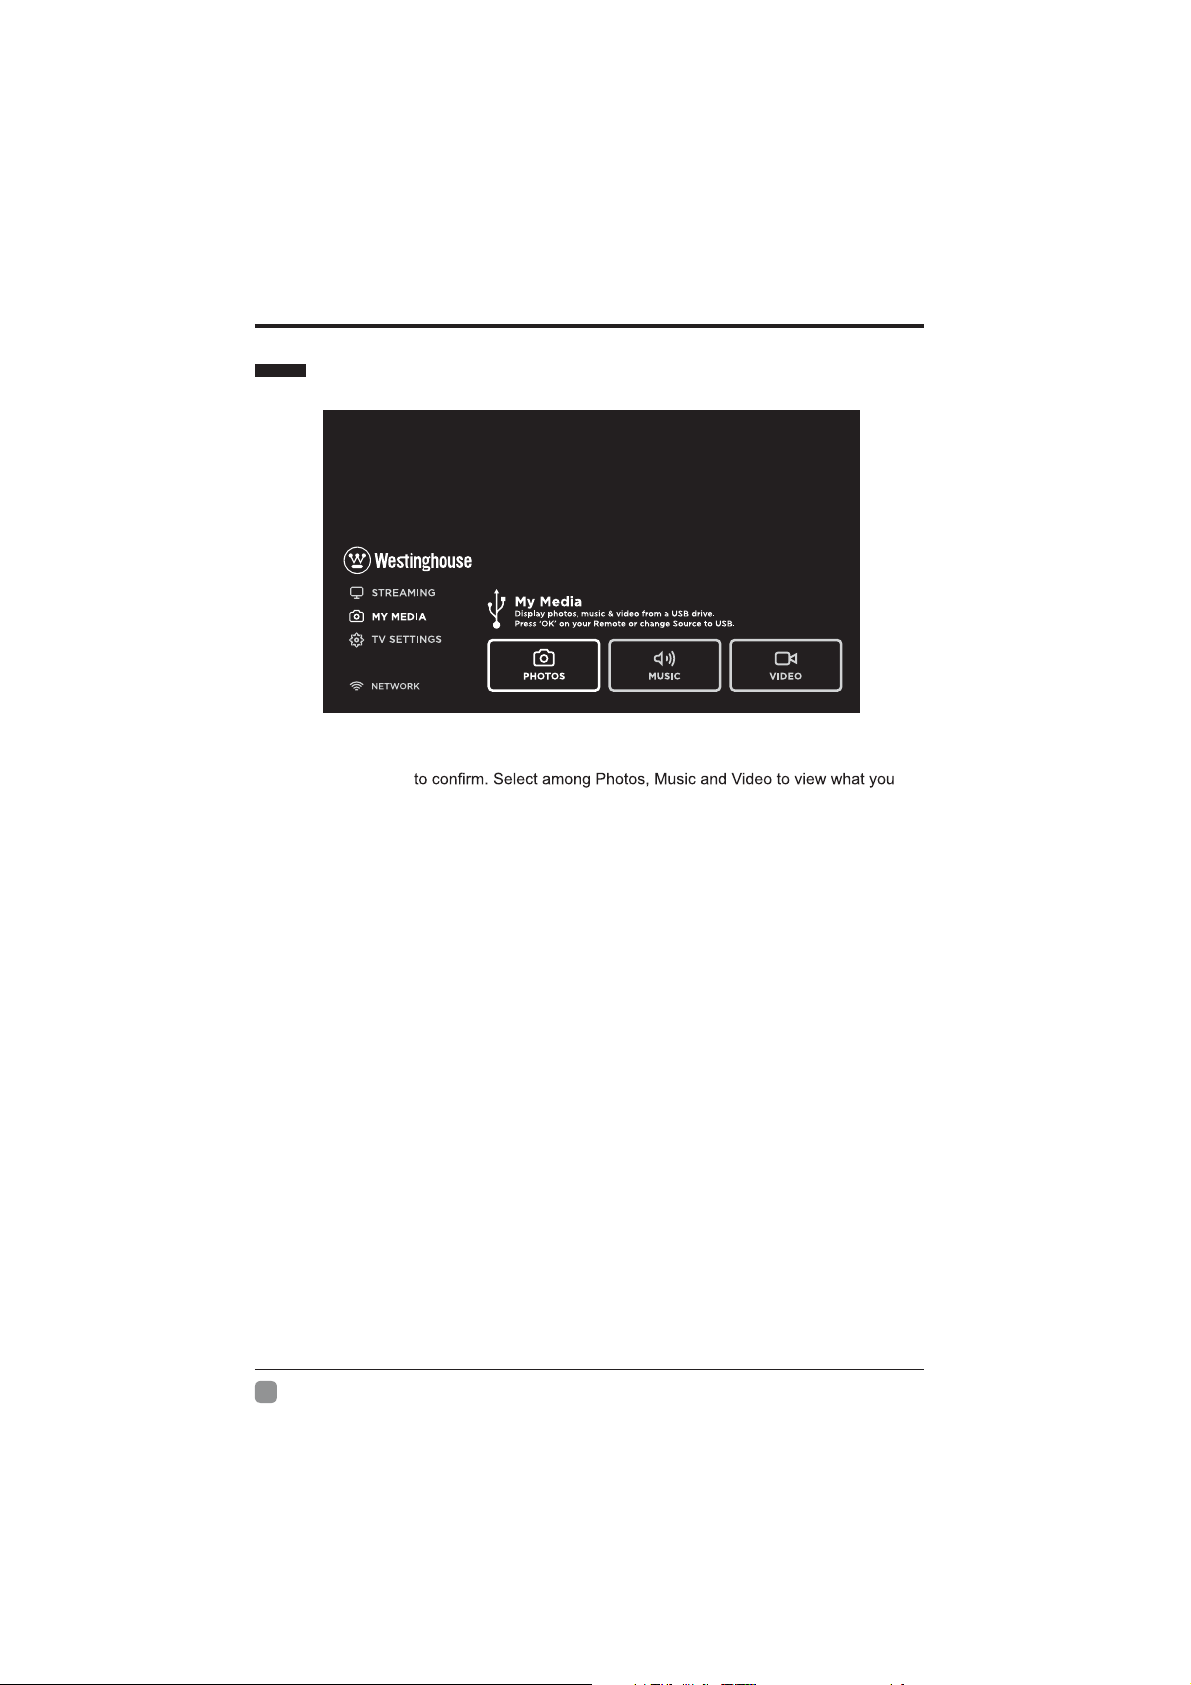
MY MEDIA
Press MENU button to display the main interface, then use the Arrow buttons to highlight MY
MEDIA and press OK
like.
Note: Portable drives should be inserted before entering MY MEDIA menu.
En
12
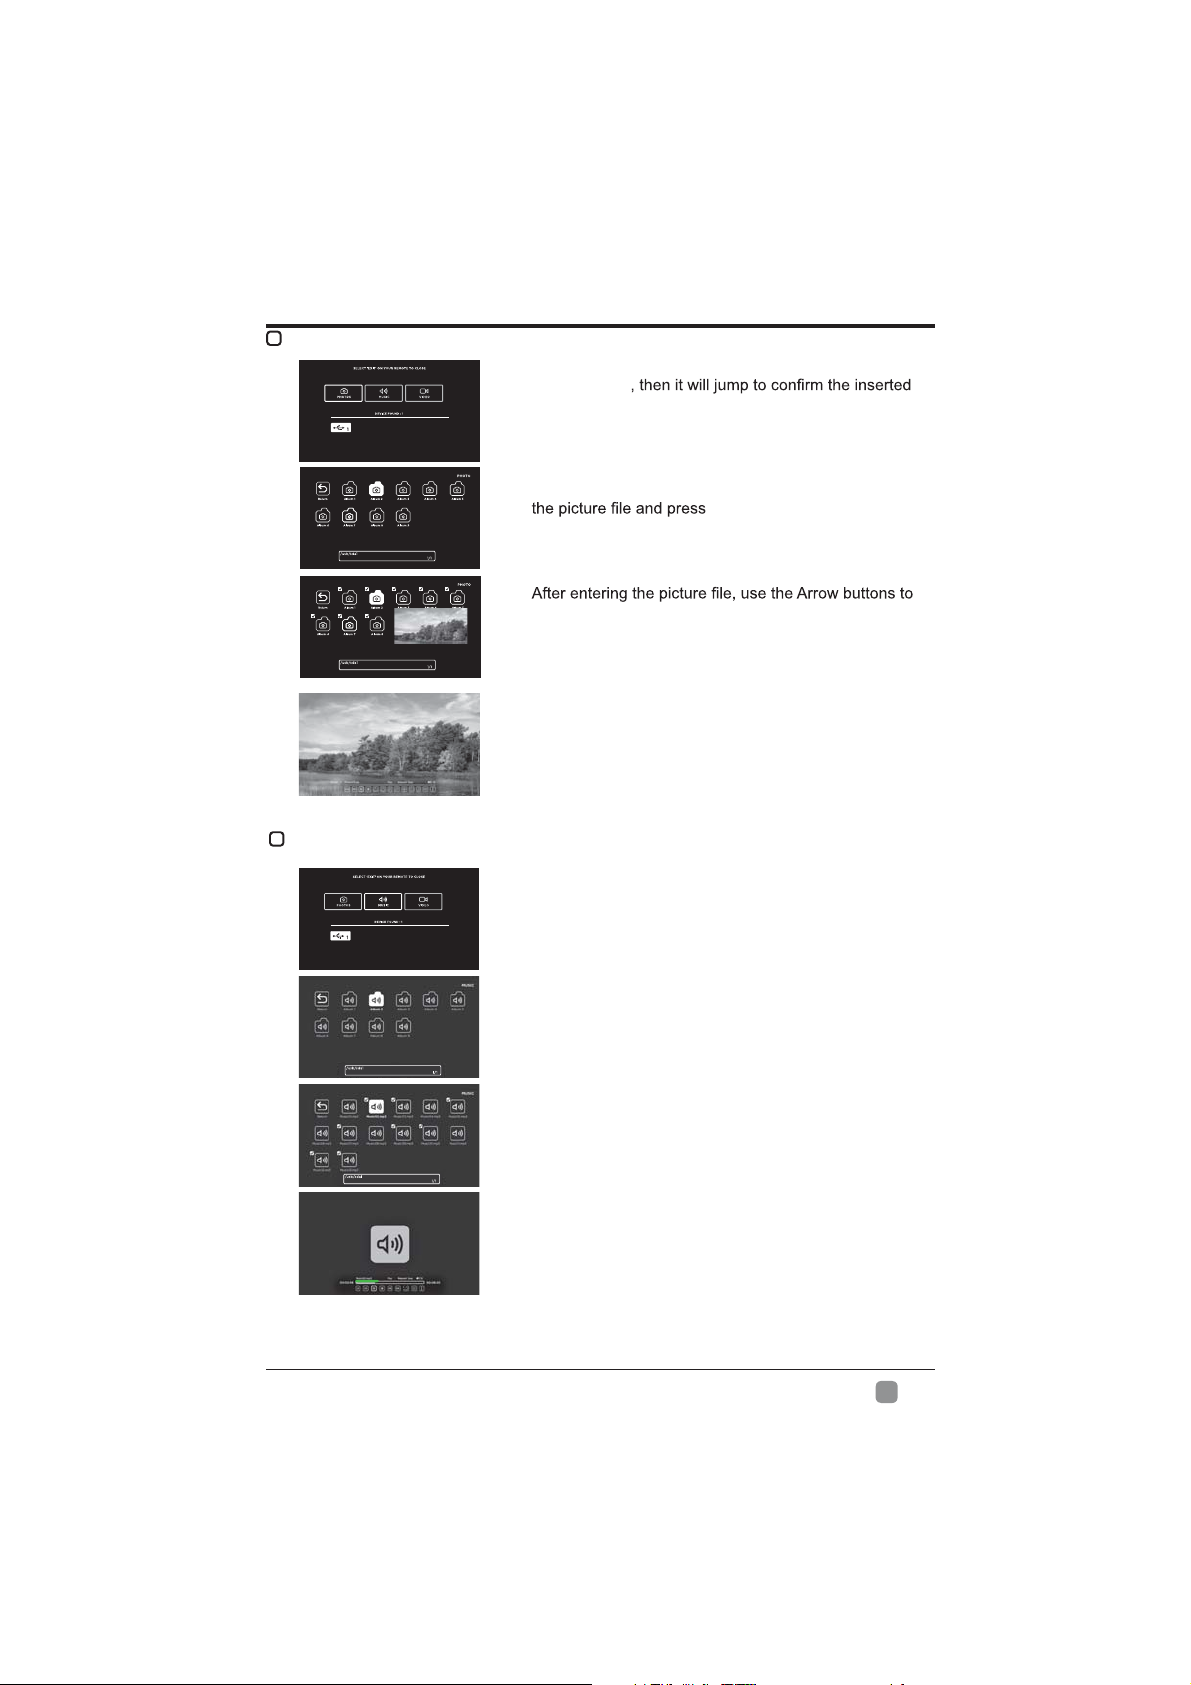
VIEWING PHOTOS
CUSTOMIZING TV SETTINGS
Use the Arrow buttons to highlight the PHOTO option
and press OK
drive, press OK to enter.
Directories:10
Files:0
Total:10
Directories:10
Files:0
Total:10
LISTENING TO MUSIC
Directories:10
Files:0
Total:10
After entering PHOTO, use the Arrow buttons to select
OK to enter.
select the desired picture, then press the playing button
to display.
When the picture is playing, the picture Function Bar
will be displayed. Use the Arrow buttons to select the
desired function available on the bar.
Use the Arrow buttons to highlight the MUSIC option
and press OK, then it will jump to confirm the inserted
drive, press OK to enter.
After entering MUSIC, use the Arrow buttons to select
the music file and press OK to enter.
Directories:10
After entering the music file, use the Arrow buttons
to select the desired music, then press the playing
button to display.
Files:0
Total:10
When the music is playing, the music Function Bar
will be displayed. Use the Arrow buttons to select the
desired function available on the bar.
En
13
CUSTOMIZING TV SETTINGS
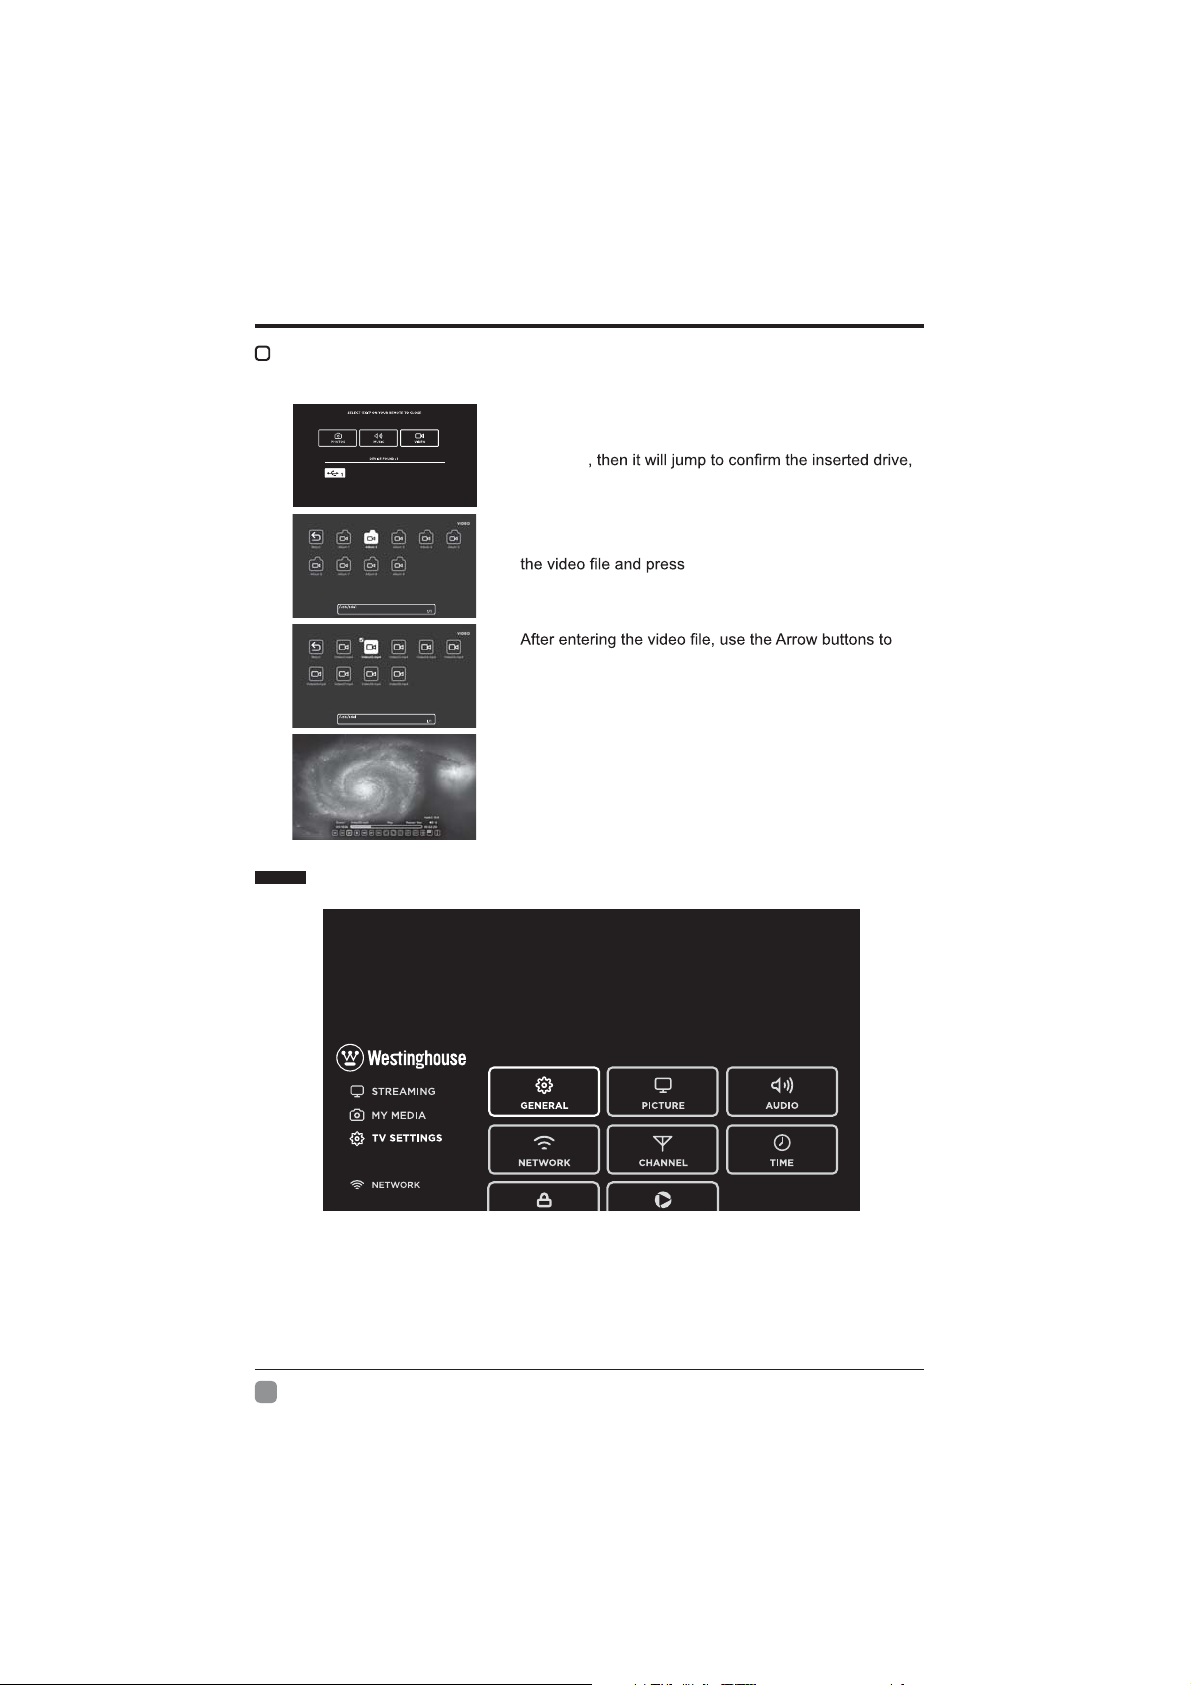
WATCHING VIDEOS
Use the Arrow buttons to highlight the VIDEO option and
press OK
press OK to enter.
Directories:10
Files:0
Total:10
Directories:10
Files:0
Total:10
TV SETTINGS
After entering VIDEO, use the Arrow buttons to select
OK to enter.
select the desired video, then press the playing button to
display.
When the video is playing, the video Function Bar will be
displayed. Use the Arrow buttons to select the desired
function available on the bar.
Press the MENU button on the main unit or on the remote control to display the main interface.
Then use the Arrow buttons to highlight TV Settings and press OK to enter. Then use the
Arrow buttons to cycle among the following options and select the desired one to enter.
En
14
GENERAL
WIDE
View End-User License
Software Update(Network)
Software Information
CUSTOMIZING TV SETTINGS
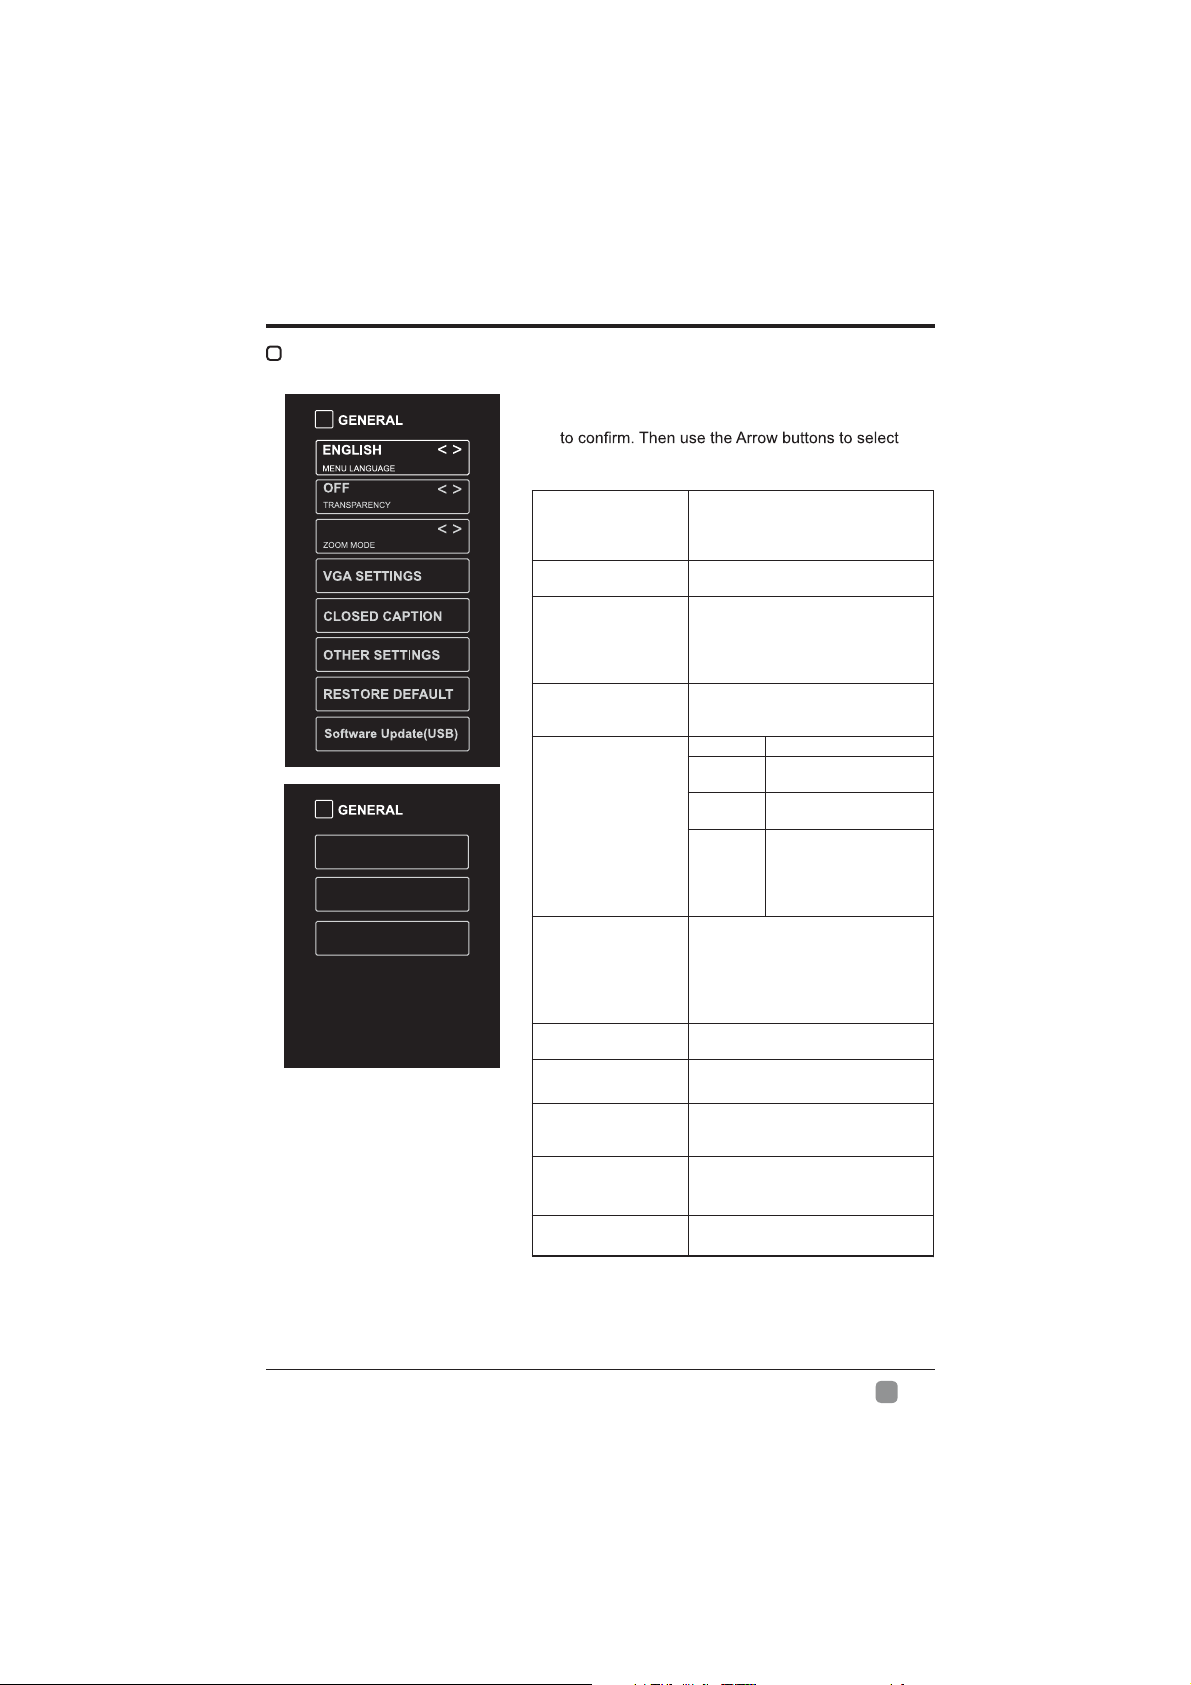
Press MENU to display the main interface, use the
Arrow buttons to highlight TV SETTINGS and press
OK
GENERAL to enter and adjust each option setting.
Select the menu language among
MENU LANGUAGE
TRANSPARENCY
ZOOM MODE
VGA SETTINGS
CLOSED CAPTION
OTHER SETTINGS
RESTORE DEFAULT
SOFTWARE
UPDATE (USB)
VIEW END-USER
LINCENSE
SOFTWARE
UPDATE
(NETWORK)
SOFTWARE
INFORMATION
English, Français or Español. The
default on-screen menu language is
English.
Select to turn On/Off transparency
function.
Select zoom mode:
Wide/Wide Zoom/Zoom/Just Scan/
Standard/Dot by Dot.
Note: With a different input source,
the zoom mode options may differ.
Adjust advanced option’s setting:
H-POS, V-POS, Clock, Phase or Auto.
(only available in VGA mode)
CC mode On/Off/CC on Mute.
Basic
Selection
Advanced
Selection
Option
HDMI EDID: Select the HDMI version:
Mode 1(HDMI 1.4)/Mode 2(HDMI 2.0).
Inlink: Set the options: Inlink Control,
Device Power Off, TV Power On,
Audio Receive, Inlink Device List,
Root Menu.
Restore the TV to factory default
settings.
Software Update In the case of a
USB device.
Choose "I have read the user
agreement" to select Accept or
Decline .
Software Update In the case of a
NETWORK device.
Check Module Software Version
NetReady Device ID.
CC1/CC2/CC3 CC4/
Text1/.../Text4/OFF.
Select from Service 1 to
Service 6.
Mode, Font Style, Font
Size, Font Edge Style,
Font Edge Color, FG_
Color, BG_Color, FG_
Opacity, BG_Opacity.
En
15

CUSTOMIZING TV SETTINGS
PICTURE
Press MENU to display the main interface, use the Arrow
buttons to highlight TV SETTINGS and press OK to
PICTURE
to enter and adjust each option setting.
AUTO
OPEN HDR
PICTURE MODE
BRIGHTNESS
CONTRAST
COLOR Control the color intensity.
SHARPNESS
TINT Adjust the balance between red and green levels.
COLOR
TEMPERATURE
ADVANCED
OPTION
OPEN HDR
Cycle among picture modes:
Dynamic/Standard/Movie/User.
Increase or decrease the amount of white in
the picture.
Adjust the difference between light and dark
levels in the pictures.
Adjust crispness level in edges between light
and dark areas of the picture.
Cycle among color temperatures: Normal/
Warm/Cool.
Set the following options:
Noise Reduction: Reduce the noise level of
the connected device: Off/Weak/Middle/Strong.
White Balance: Set the different options of
white balance.
Backlight: Set the value of backlight.
Cycle among picture modes:
OFF/AUTO/LOW/MIDDLE/HIGH.
En
16

AUDIO
CUSTOMIZING TV SETTINGS
Press MENU to display the main interface, use the
Arrow buttons to highlight TV SETTINGS and press OK
AUDIO
to enter and adjust each option setting.
OFF
AUTO VOLUME
NETWORK
NOT CONNECT
SOUND MODE
BASS
TREBLE
BALANCE
DIGITAL AUDIO
OUTPUT
SURROUND SOUND
AUTO VOLUME
AUDIO LANGUAGE
Allow the selection of an audioenhancement technique: Standard/
Music/Movie/User.
Control the relative intensity of lowerpitched sounds.
Control the relative intensity of higherpitched sounds.
Adjust the relative volume of the
speaker in a multiple speaker system.
Select the digital audio output mode
between PCM/RAW.
Turn On/Off to provide an enhanced
listening experience.
Turn On/Off to automatically control
volume levels.
Select audio language among:
English, French, Spanish.
Press MENU to display the main interface, use the
Arrow buttons to highlight TV SETTINGS and press
OK
NETWORK to enter and adjust each option setting.
Select
Wired and Wireless network, then
NETWORK TYPE
MY NETWORK
IP ADDRESS
connect the TV to the wired network or
search the wireless network through
Display the current network which you
connect to.
Display the current IP address
information.
En
17

CUSTOMIZING TV SETTINGS
CHANNEL
Press MENU to display the main interface, use the
Arrow buttons to highlight TV SETTINGS and press
OK
CHANNEL to enter and adjust each option setting.
AIR/CABLE
AUTO SCAN
FAVORITE
SHOW/HIDE Show/Hide the selected channel.
CHANNEL NUMBER Display the current channel number.
CHANNEL LABEL Display the current channel label.
Select antenna between Air and
Cable.
Select the Auto Scan feature to scan
your available cable channels.
Set the selected channel as a favorite
channel.
En
18

TIME
LOCK
CUSTOMIZING TV SETTINGS
Press MENU to display the main interface, use the
Arrow buttons to highlight TV SETTINGS and press OK
enter and adjust each option setting.
Select a period of time after which the
TV automatically switches to standby
mode:
SLEEP TIMER
OSD TIMER
TIME ZONE
DAYLIGHT SAVING
TIME
Off/5/10/…/180/240 min.
Alternative: You may press the SLEEP
button repeatedly to select the number
of minutes directly.
Set the OSD timer:
Off/15s/30s/60s/120s/240s.
Select a Time Zone:
Central/Mountain/Newfoundland.
Select to turn daylight saving time On/
Off.
Press MENU to display the main interface, use the
Arrow buttons to highlight TV SETTINGS and press OK
to enter and adjust each option setting.
TIME to
LOCK
Note: the default password is "0000".
CHANGE
PASSWORD
SYSTEM LOCK
USA
CANADA
RRT SETTING Set Rating Region Table.
RESET RRT Select to reset the RRT setting.
CLEAR LOCK Clear all lock settings.
Use 0-9 buttons to input the old password
and then input the new 4-digit password.
Select to turn system lock On/Off. The
following options (USA, Canada, RRT Setting
and Reset RRT) will only be accessible when
you turn the system lock on.
TV
MPAA
Canada
English
Canada
French
TV Rating: Press OK button to
lock or unlock TV rating.
Set the MPAA: N/A, G, PG, PG13,R, NC-17, X.
Select MPAA rating for Englishspeaking Canada : E, C, C8+, G,
PG, 14+, 18+.
Select MPAA rating for Quebec
Canada : E, G, 8 ans+, 13 ans+,
16 ans+, 18 ans+.
En
19

CUSTOMIZING TV SETTINGS
APP SETTINGS
Press MENU to display the main interface, use the
Arrow buttons to highlight TV SETTINGS and press OK
APP
SETTINGS to enter and adjust each option setting.
Exception while opening/reading file.
4.3.4.eab833d.2017072610.2017-08-23
NETFLIX VERSION
DEACTIVATE APP
DEACTIVATE APP
ESN Electronic Serial Number.
NETFLIX
VERSION
information.
Deactivate Vudu and clear the account
information.
Show Netflix Version.
SOURCE
Press SOURCE on the remote control or on the main unit to display the source
menu, then use the Arrow buttons to cycle among the different input sources: TV/AV/
COMPONENT/HDMI1/HDMI2/HDMI3/VGA/USB, then use the Arrow buttons to highlight
the desired source and press OK to confirm.
En
20

PARENTAL CONTROL
Press the MENU button on the main unit or on the remote control and then press buttons
to select LOCK menu. Use the 0-9 buttons to input the 4-digit password to enter the LOCK
menu. If used, this option feature can "block'' undesirable programming from appearing on
the TV.
Parental Control offers users a wide variety of options and settings that restrict or "block''
program rating they consider acceptable for a younger more sensitive viewer. It can be
General audience and children block should both be programmed into the TV memory.
both rating systems should be used and based on the ages of children.
Overview
To ensure complete coverage for all TV programs (movies and regular TV show) using the
Age Block option, choose a rating from both the MPAA and TV Parental Guideline tables on
the next page. In addition, you may wish to add other restrictions selected from the content
block menu and submenus.
Things to Consider before Setting up Parental Control
Determine which ratings you consider are acceptable for different viewers. For example, if
you choose TV-PG, more restrictive ratings will be automatically blocked; some viewers will
not be able to see: TV-PG, TV-14, or TV-MA rated programs. You may block the auxiliary
video source entirely.
Use the Content Blk option to block program Content based on individual parameters such
as: Strong Dialog, Bad Language, Sex Scenes, Violence Scenes or Fantasy.
Go into the Set Password option and use the numeric keys on the remote control to set a
secret password, then save the password, it is the only way to access the Parental Control
menu and change ratings setting, or turn off Parental Control.
You can set different Parental Control viewing restrictions for general audiences and for
children; both can be active at the same time;
Simply specifying one content block such as Sex Scenes, will not automatically restrict
the programming that appears from the video sources;
Even If you choose to leave the AUX Inputs unblocked, the ratings you specify will
automatically restrict the programming that appears from the video sources;
You cannot disable Parental Control by disconnecting the TV from power. Block hours will
En
21

PARENTAL CONTROL
t Motion Picture Association of America (MPAA) Rating System
Grade Meaning
G General Audiences Content not offensive to most viewers.
PG
PG-13
Parental Guidance
Suggested
Parents Strongly
Cautioned
R Restricted
NC-17
No children under
age 17
Content is such that parents may not want their
children to view the program.
Program is inappropriate for preteens, with a greater
degree of offensive material suggested than a PG
rated program.
Not for children under 17-contains strong element of
sex and/or violence.
Not for children under 17-under any circumstances.
Contains strong sexual content.
X Hard Core Films Same as NC-17 rating.
No Rating No Rating MPAA did not rate.
t TV Parental Guideline Rating System
Select LOCK option in the TV Settings, then use the
Arrow buttons to highlight USA and press OK button to
enter. Select TV to enter set TV parental guideline rating
system.
Grade Meaning
TV-Y All Children
TV-Y7
TV-G General Audience
TV-PG
TV-14
TV-MA
Canadian English is used throughout all English-speaking Canada (E, C, C8+, G, PG, 14+, 18+).
Canadian French is used in Quebec (E, G, 8 ans+, 13 ans+, 16 ans+, 18 ans+)
The V-Chip will automatically block certain categories that are "more restrictive". If you block TV-Y
category, then TV-Y7 will be automatically blocked. Similarly, if you block TV-G category, then all the
categories in the "young adult" will be blocked (TV-G, TV-PG, TV-14 and TV-MA).
TV-NO: The channel is not locked.
Directed to Older
Children
Parental Guidance
Suggested
Parents Strongly
Cautioned
Mature Audience
Only
Content not offensive to
most viewers.
Considered suitable for
children over 7- may
contain fantasy violence
scenes.
Considered suitable for all
audience; children may
watch unattended.
Suggested unsuitable
for younger childrenmay contain suggestive
language, bad language,
sex and violence scenes.
unsuitable for children
under 14 - may contain
strong language, bad
language, sex, and
violence scenes.
Adults only- may contain
strong language, bad
language, sex, and
violence scenes.
En
22

TROUBLESHOOTING
If your TV does not operate normally or cannot be turned on, please check the following
troubleshooting questions. Remember also to check any other connected electronic device,
such as a DVD or Blu-ray player to pinpoint the problem. If the TV still fails to operate
normally, please contact technical support.
The TV does not operate properly
The TV does not respond
when pressing any buttons
TV cannot be switched on
The remote control does not
work
Power is suddenly turned off
The video function does not work
No picture & no sound
Picture appears slowly after
switching on
No or poor color or poor
picture
Horizontal/Vertical bar or
picture shaking
Poor reception on some
channels
Lines or streaks in pictures Check antenna (change the position of the antenna.)
No pictures when connecting
HDMI
Pictures appear in wrong
ratio
The audio function does not work
Picture OK but no sound
No output from one of the
speakers
Unusual sound from inside
the TV
No sound when connecting
HDMI
Audio noise Keep the RF coaxial cable away from the other connected cables.
The TV may freeze up during use. Disconnect the power cord from
the power socket for a few minutes. Reconnect the power cord and
try to operate it again as usual.
Check that the TV is connected to the power supply.
Make sure all connected AV devices are switched off before switching
on your TV.
Check to see if there are any objects between the TV and the remote
control causing an obstruction. Ensure that you are pointing the
remote control directly at the TV.
Ensure that the batteries are installed with the correct polarity (+ to +,
- to -).
Install new batteries.
Check the power of the TV. The power supply maybe interrupted.
Check if the sleep timer is set.
Check whether the Auto Standby is activated.
Check whether the TV is switched on.
Try another channel. The problem may be caused by the broadcaster.
This is normal; the image is muted during the TV startup process.
Please contact your service centre if the picture has not appeared
after 5 minutes.
Adjust the settings in the Picture menu.
Try another channel. The problem may be caused by the broadcaster.
Check if video cables are connected properly.
Check for local interference such as an electrical appliance or power
tool.
The station or cable channel may be experiencing problems; tune to
another station.
Station signal may be weak, reposition the antenna for better
reception.
Check for sources of possible interference.
Check if the input source is HDMI1/HDMI2/HDMI3.
Adjust the Aspect Ratio settings in the SETUP menu or press the
ASPECT button on the remote control.
Press the VOL +/- buttons.
Sound muted? Press the MUTE button.
Try another channel. The problem may be caused by the broadcaster.
Adjust the Balance settings in the AUDIO menu.
A change in ambient humidity or temperature may result in an unusual
noise when the TV is switched on or off and does not indicate a fault
with the TV.
Check if the input source is HDMI1/HDMI2/HDMI3.
En
23

TROUBLESHOOTING
Password
Lost password
Select the SET PASSWORD setting in the LOCK menu, then enter
the following master password “8899”. The master password clears
your previous password and allows you to enter a new password.
There is a problem in PC mode
The signal is out of range
(invalid format)
Vertical bar or stripe on
background & Horizontal
Noise & Incorrect position
Screen color is unstable or
show a single color
Adjust the resolution, horizontal frequency, or vertical frequency.
Check the signal cable.
Reinstall the PC video card.
If the WIFI connection fails or APP has connection issue, please check the following
troubleshooting questions.
Check signal strength for WIFI connection, the TV may be too far
away from WIFI router.
Check "authentication" setting.
Make sure password is entered with correct upper or lower case
WIFI connection fails
Problems with video
streaming
has connection issue
Can't use Vudu and Pandora
letters.
Check if TV is connected correctly.
Try powering off and unplugging TV to reset TV.
Try resetting the WIFI router, and also check for interference or WIFI
channel problems.
Check if internet connection is fast enough for streaming HD or 4K
videos.
Vudu is only available in US and Pandora only avaliable in limited
countries.
Maintaining
Do not use your TV in areas that are too hot or too cold, because the cabinet may
warp or the screen may malfunction. Your TV works best in temperatures that are
comfortable to you.
Storage temperatures are 32° to 122°F(0° to 50°C).
Working temperatures are 32° to 95°F(0° to 35°C).
Do not place your TV in direct sunlight or near a heat source.
- the ventilation should not be impeded by covering the ventilation openings with
apparatus; items, such as newspapers, table-cloths, curtains, etc.;
-no naked flame sources,such as lighted candles,should be placed on the
apparatus;
- attention should be drawn to the environmental aspects of battery disposal.
En
24

SPECIFICATION
Panel Size 50 inch diagonally
Display Type LED
Panel Technology TFT
Panel 60 Hz Vs. 120 Hz 60 Hz
Display Resolution 3840 x 2160
HDMI Support 3840 x 2160 60Hz
Panel Resolution 3840 x 2160
Aspect Ratio 16:9
Dynamic Contrast Ratio-Panel 3500~5000:1
Response Time (G To G) 9.5 ms
Lamp Life (Typ. Hours) 30,000 hours
Horizontal Viewing Angle (At CR>10) 178
Vertical Viewing Angle (At CR>10) 178
Wall-mount(LxW-mm) 200*200 VESA(mm)
The FCC Wants You to Know
En
.
25

OTT APP SERVICE
If you want to know about these APP information or get more service. Please refer to following
content.
t
You can call the following telephone for more help: 866-579-7172
If y our matter is r egarding c ustomer service, p lease r efer to
alternative contact information.
t YouTube
You can browse the following website for more help:
https://productforums.google.com/forum/#!categories/youtube/smart-tvs
t VUDU
You can call the following telephone for more help: 888-554-8838
t Pandora
You can send E-mail to Pandora for more help: pandora-support@pandora.com
t AccuWeather
You can send E-mail to AccuWeather for more help: CustomerService@AccuWeather.com
f or
OBTAINING WARRANTY SERVICE
Please call Westinghouse E lectronics a t (800) 701-0680 f or t he l ocations o f the nearest
Westinghouse Electronics service center or to obtain in-home services.
En
26

CONTENU
Consignes de sécurité importantes
Renseignements sur la sécurité
Préparation
4
2
3
Éléments compris
Vue arrière
Installation du socle
Retrait du socle en vue d’un montage mural
Vis de montage mural
Télécommande
Connexion des appareils externes
9
Personnalisation des paramètres du téléviseur
Diffusion
MES MÉDIAS
Visionnement de photos
Écoute de musique
Regarder des vidéos
PARAMÉTRES TV
Géréral
Image
Audio
Réseau
Canal
Heure
Verrouillage
Paramétres de APP
Source
Contrôle parental
21
10
Dépannage
Entretien
Caractéristiques technique
23
24
25
OTT APP Service 26
Fr
1

CONSIGNES DE SÉCURITÉ IMPORTANTES
t Lisez ces consignes–Avant d’utiliser ce produit,
vous devez lire toutes les consignes liées à la
sécurité et au fonctionnement de l’appareil.
t Conservez ces consignes – Nous vous
conseillons de conserver les consignes liées à
sécurité et au fonctionnement de l’appareil pour
consultation future.
t Observez toutes les mises en garde–Vous
devez suivre toutes les consignes liées au
fonctionnement et à l’utilisation de l’appareil.
t Suivez toutes les consignes – Vous devez suivre
toutes les consignes liées au fonctionnement et à
l’utilisation de l’appareil.
t N’utilisez pas cet appareil près de l’eau –
L’appareil ne doit pas être utilisé près de l’eau ou
dans un lieu humide, par exemple dans un sous-
sol humide ou près d’une piscine et autres.
Nettoyez uniquement à l’aide d’un chiffon sec.
l’appareil conformément aux consignes du
fabriquant.
N’installez pas l’appareil à proximité d’une source
de chaleur comme un radiateur, une bouche
de chaleur, une cuisinière ou d’autres appareils
qui produisent de la chaleur (y compris les
Ne contournez pas le dispositif de sécurité de la
mise à la terre comporte deux lames, en plus
d’une broche de masse. La lame plus large ou la
broche de masse vise à assurer votre sécurité. Si
prise, adressez-vous à un électricien pour faire
remplacer la prise, qui est probablement désuète.
Protect the power cord from being walked on
or pinched particularly at plugs, convenience
receptacles, and the point where they exit from the
apparatus.
Placez le cordon d’alimentation de sorte
qu’il ne risque pas d’être piétiné ou coincé,
prise de courant, ainsi qu’au point de sortie de
l’appareil.
recommandés par le fabricant.
Utilisez l’appareil uniquement avec le chariot de
manutention, le support, le trépied ou la table
recommandé par le fabricant ou vendu avec
l’appareil. Si vous utilisez un chariot, déplacez- le
vous blesser.
Débranchez l’appareil en cas d’orage ou lorsqu’il
reste inutilisé pendant une période prolongée.
Une réparation est nécessaire si l’appareil a
été endommagé d’une manière ou d’une autre,
par exemple lorsque le cordon d’alimentation
renversé sur l’appareil, ou si des objets sont
tombés sur celui-ci, l'appareil a été exposé à la
pluie ou à l'humidité, s’il fonctionne mal ou s’il est
tombé. Please keep the unit in a well-ventilated
environment.
Veuillez installer l’appareil à un endroit bien aéré.
MISE EN GARDE: pour réduire les risques d’incendie
et de choc électrique, n’exposez pas cet appareil à la
pluie ou à l’humidité. Ne l’exposez pas non plus aux
égouttements ou aux éclaboussures. Ne placez pas
d’objets remplis de liquide, par exemple un vase, sur
le dessus de l’appareil.
MISE EN GARDE: n’exposez pas les piles à une
chaleur excessive comme celle induite par la lumière
du soleil, un feu ou autrement.
MISE EN GARDE: la prise secteur sert de dispositif
de désaccouplage; elle doit demeurer facilement
accessible.
MISE EN GARDE: AFIN DE RÉDUIRE LES
RISQUES D’ÉLECTROCUTION, RETIREZ PAS
LE COUVERCLE (OU LE PANNEAU ARRIÈRE),
CAR IL N’Y A AUCUNE PIÈCE RÉPARABLE PAR
L’UTILISATEUR À L’INTÉRIEUR. CONFIEZ LES
RÉPARATIONS À UN TECHNICIEN QUALIFIÉ.
Le symbole représentant un éclair terminé
équilatéral vise à avertir l’utilisateur du danger
de la presence d’une«tension dangereuse
»présentée pardes pièces non isolées à
l’intérieur de l’appareil, éventuellement
d’électrocution.
Le symbole de point d’exclamation à l’intérieur
un triangle équilatéral, vise à informer
l’utilisateur de la présence de consignes
de fonctionnement et de maintenance
importantes dans la documentation qui
accompagne l’appareil.
Cet équipement est un appareil électrique de
classe II ou à double isolation. Il a été conçu
de sorte àne pas nécessiter une connexion
de sécurité mise à la terre.
TCe produit contient des composants
électriques ou électroniques. S’ils ne
sont pas mis auxrebuts adéquatement,
ces composants pourraient nuire à
l’environnement ou à la santé des humains.
La présence de cette étiquette sur le produit
tantque déchet non trié, mais faire l’objet d’une
collecte sélective. Comme consommateur,
vous devez vous assurer que ce produit est
mis aux rebuts de la bonne manière.
Fr
2

RENSEIGNEMENTS SUR LA SÉCURITÉ
les consignes de ce guide d’utilisation, et plus particulièrement les renseignements ci-dessous portant
sur la sécurité.
SÉCURITÉ ÉLECTRIQUE
Le téléviseur ne doit être raccordé qu’à l’alimentation principale, à une tension correspondant à celle
indiquée sur l’étiquette à l’arrière de l’appareil.
Pour éviter les surcharges, ne branchez pas plusieurs autres appareils électroniques sur la prise utilisée
pour le téléviseu.
Pour éviter le piétinement et les chutes, ne placez pas les câbles de connexion à des endroits où les
gens circulent.
Pour éviter d’endommager les câbles de connexion, ne posez pas d’objets lourds sur ceux-ci.
En cas d’orage ou lorsque le téléviseur reste inutilisé pendant une période prolongée, fermez l’interrupteur
d’alimentation à l’arrière de l’appareil.
Évitez de laisser de l’eau ou de l’humidité pénétrer à l’intérieur du téléviseur ou de l’adaptateur de
courant. N’utilisez PAS l’appareil dans une pièce mouillée ou humide, comme une salle de bain ou une
cuisine pleine de vapeur, ou près d’une piscine.
Débranchez immédiatement l’appareil et demandez l’aide d’un pro
endommagé, si du liquide a été renversé sur le téléviseur, si celui-ci est exposé accidentellement à de
l’eau ou de l’humidité, si un objet quelconque pénètre dans les
si le téléviseur ne fonctionne pas normalement.
Laissez les couvercles de sécurité en place. Il n’y a aucune pièce réparable par l’utilisateur à l’intérieur. Il
est dangereux de tenter par vous-même de réparer l’appareil; en outre, cela pourrait annuler la garantie
Pour éviter qu’elles fuient, retirez les piles de la télécommande si vous ne l’utilisez pas pendant une
période prolongée ou si les piles sont épuisées.
N’ouvrez pas les piles et ne les jetez pas au feu lorsqu’elles sont épuisées.
Pour de meilleurs résultats , utilisez le type AAA ( exemple - alcalines , carbone - zinc , etc. ) batteries.
Installez uniquement des piles neuves du même type dans votre produit.
Le défaut d'insérer les piles en respectant la polarité , comme indiqué dans le compartiment de la
batterie , peut raccourcir la durée de vie des batteries ou piles risqueraient de fuir.
Ne pas mélanger piles neuves et anciennes.
Ne pas mélanger des piles alcalines , standard ( carbone - zinc) ou rechargeables ( nickel-cadmium ) ou (
nickel métal hydrure ) rechargeables.
Les batteries doivent être recyclées ou éliminées conformément aux lignes directrices nationales et
locales.
Ne tentez pas de recharger les piles jetables.
Ne pas les bornes de la batterie en court-circuit.
Gardez loin des enfant.
SÉCURITÉ PHYSIQUE
e. Vous pouvez placer le téléviseur dans
un meuble, mais assurez-vous de . laisser un espace de dégagement d’au moins 5 cm (2 po) tout
autour.
Ne tapez sur l’écran du téléviseur et ne le secouez pas; vous risqueriez d’endommager les circuits à
l’intérieur. Prenez bien soin de la télécommande.
Pour nettoyer le téléviseur, utilisez un chiffon doux sec. N’utilisez pas de solvants, ni de liquides à base
de pétrole.
N’installez pas l’appareil à proximité d’une source de chaleur comme un radiateur, une bouche de
terre comporte deux lames, en plus d’une broche de masse. La lame plus large ou la broche de masse
un électricien pour faire remplacer la prise, qui est probablement désuète.
Placez le cordon d’alimentation de sorte qu’il ne risque pas d’être piétiné ou coincé, particulièrement au
Débranchez l'appareil lors des orages ou inutilisés pendant de longues périodes.
mal ou s’il a été endommagé d’une manière ou d’une autre (y compris le cordon d’alimentation ou la
Une réparation est aussi nécessaire lorsqu’un liquide a été renversé sur l’appareil ou que des objets sont
tombés sur celui-ci, si l’appareil a été exposé à la pluie ou à l’humidité, ou s’il est tombé.
5cm distances minimales autour de l'appareil pour une ventilati
La ventilation ne doit pas être empêchée en couvrant les ouvertures de ventilation avec des objets tels
que des journaux, nappes, rideaux, etc.
No hay fuente de llamas, como una vela encendida, se deben colocar sobre el aparato.
L'attention doit être attirée sur les aspects environnementaux de l'élimination de la batterie.
he et non sur le câble.
appareil.
patible avec votre prise, adressez-vous à
est nécessaire si l’appareil fonctionne
Fr
3

PRÉPARATION
Éléments compris
Poste de télévision
Socle de télévision
Manuel
d’utilisation
Manuel d’utilisation
Télécommande et piles
Guide de
Connexion
Rapide
Guide de Connexion
Rapide
Four Vis
Garantie
Carte
Garantie Carte
(MB4x14)
Fr
4

Vue arrière
4
5
PRÉPARATION
2
3 3
1
2
1. MISE SOUS TENSION
Pour faire basculer le téléviseur entre les modes Sous tension et Veille.
2. CH
-/+
Appuyez sur cette touche pour choisir un canal.
3. VOL -/+
Appuyez sur cette touche pour régler le volume.
4. Témoin de mise sous tension
Apparaît en aucun lorsque le téléviseur est allumé.
Apparaît en white lorsque le téléviseur est en mode veille.
5. IR (Récepteur infrarouge)
Reçoit les signaux IR de la télécommande.
Fr
5

PRÉPARATION
Vue arrière
10
(ARC)
LAN
DMI 2 HDMI 1
H
VGA
HEADPHONE
1. Cordon d’alimentation
Se branche dans une prise de courant c.a.
2. OPTIQUE
Pour connecter un système de son numérique à cette prise.
3. Port USB
compatibles.
4. LAN
Le port de connexion de réseau.
5. Entrées HDMI
6. Entrée VGA
Se raccorde à un ordinateur ou à d’autres appareils dotés d’une interface VGA.
7. Entrée PC AUDIO
Se raccorde à la sortie audio d’un ordinateur.
8. Entrée DTV/TV
Se raccorde à la prise de l’antenne (75Ω VHF/UHF) à l’aide du câle coaxial RF.
9. Prise pour écouteurs
Se raccorde aux écouteurs.
10. Entrée Audio
Se raccorde à la prise AUDIO (L / R) de connecteurs de sortie des appareils audio
externes.
11. COMPOSITE/COMPOSANT IN
Se raccorde aux appareils AV avec prises de sortie vidéo et audio pour composite/composants (Y/Pb/
Pr). La vidéo composite/ composante(Y/PB/PR) partage avec l’entrée audio (D/G).
Fr
6

Installation du socle
Vis M
l
t 1. Couchez le téléviseur face vers le bas
sur une surface plate et coussinée pour
éviter de l’endommager ou de rayer l’écran.
t 2. Fixez le support de stand gauche à l'unité
principale en utilisant les 2 vis fournies .
( M4x14)
t 3. Fixez le support de stand droite à l'unité
principale en utilisant les 2 vis fournies .
( M4x14)
Retrait du socle en vue d’un montage mural
t 1. Couchez le téléviseur face vers le bas
sur une surface plate et coussinée pour
éviter de l’endommager ou de rayer l’écran.
t 2. Desserrez les 4 vis en tenant le socle,
puis retirez-les.
t 3. Fixez le support mural au téléviseur en
utilisant les trous de fixation à l’arrière du
téléviseur. Installez ce téléviseur en suivant
les consignes comprises avec le support
mural.
PRÉPARATION
MISE EN GARDE
les instructions d'installation.
ontage mura
4*M6*12
:
MISE EN GARDE:
Ne jamais placer un téléviseur dans un endroit instable.Un téléviseur pourrait tomber
et causer de graves blussures ou la mort.Plusieurs blessures,surtout
aux enfants,peuvent être évitées en prenant de simples pré cautions comme:
-Utiliser les supports recommandés par le fabricant du téléviseur.
-Utiliser uniquement des meubles pouvant supporter sécuritairement le téléviseur.
-Assurer que le téléviseur ne dépasse pas le bord du meuble.
-Ne pas installer le téléviseur sur les meubles élevés(par exemple,armoires ou
étagères
-Ne pas placer le téléviseur sur un linge ou d’autres matériaux qui pourraient être
situés entre le téléviseur et le meuble-support.
-Informer les enfants sur les dangers de monter sur les meubles pour toucher
au téléviseur ou régler les contrôles.
Si votre téléviseur actuel est est retenu ou déménagé,les mêmes
considérations mentionnées ci-haut s'appliquent.
à un support adéquat.
Fr
7

PRÉPARATION
TÉLÉCOMMANDE
1. : Pour basculer le téléviseur entre les modes
Sous tension et Veille.
2. : Pour activer ou désactiver le son du
téléviseur.
3. 0~9: Pour sélectionner un canal. (Mode ATV/
DTV)
4. : Pour entrer plusieurs numéros de canal, par
exemple 2-1.
: Pour revenir au canal précédent.
5.
6. APPS:Appuyez sur pour sélectionner l'APPS
souhaitée.
7. MEN U: Pour afficher le menu d’affichage à
l’écran.
8. SOURCE: Pour choisir parmi les différentes
sources du signal d’entrée. TV/HDMI1/HDMI2/
HDMI3/USB/VGA/AV/Component.
9.
système en fonction de vos préférences.
10. OK: Confirme la sélection dans les menus
11. RETURN:Retour au menu précédent.
12. EXIT: Pour quitter le menu OSD.
ASPECT: Pour sélectionner le format de l’image
13.
: standard/wide/wide zoom/zoom.
14. VOL+/-: Pour sélectionner un canal.
15. CH / : Pour régler le volume.
TV:Appuyez sur pour mettre en mode TV.
16.
17.
: Lancez la lecture ou mettre en pause.
: Inverser rapidement la lecture.
18.
19.
: Avancer rapidement la lecture.
: Passer au début de la précédente chapitre /
20.
piste / photo.
: P
21.
piste / photo.
22.
: Arrêter la lecture.
INFO:
23.
:Vous permet de naviguer dans les
asser au début de la prochaine chapitre /
24. FREEZE:
25. FAV:
26. ADD/ERASE:
27. V-CHIP:
28. CC: sélection du sous-titrage : ON/OFF/CC On
Mute(ACTIVÉ/DÉSACTIVÉ/ST activé sur son
désactivé).
29. MTS: Pour basculer entre les différents canaux
audio : STEREO/MONO/SAP.
.MODE: Pour sélectionner le mode de l’image :
30. P
31. CH.LIST:
32. S.MODE: Pour sélectionner le mode audio :
Fr
8
Le gel de la photo.
Afficher la chaîne préférée.

CONNEXION DES APPAREILS EXTERNES
HDMI 2
LAN
HDMI 1
VGA
Soundbar
(ARC)
HEADPHONE
Fr
9

PERSONNALISATION DES PARAMÈTRES DU TÉLÉVISEUR
initiale
Une fois toutes les connexions physiques établies, branchez le cordon d’alimentation
dans la prise de courant. À cette étape, le téléviseur passera en mode Veille et le
témoin DEL rouge s’allumera.
Une fois sous ce mode, appuyez sur la touches de l’appareil ou de la télécommande
pour allumer le téléviseur. Le témoin DEL rouge passera au bleu.
noitarugifnoc ed tnatsissa’l ,ruesivélét el zemulla
suov euq siof erèimerp aL
5
S’il est impossible de
trouver des canaux,
cette fenêtre s’affiche
automatiquement.
!"
Fr
10

PERSONNALISATION DES PARAMÈTRES DU TÉLÉVISEUR
Diffusion
Appuyez sur la touche MENU
boutons à souligner STREAMING
NETFLIX
YouTube
VUDU
Pandora
AccuWeather
pour obtenir le meilleur résultat pour regarder la vidéo sur votre 4k tv 4k.
1.tu as besoin d'une connexion internet à haute vitesse et assurez - vous que votre bande
passante répond à l'exigence de 4k du fournisseur de contenu.
2.l'accès à la vraie 4k médias; seulement 4k media peut montrer la meilleure image sur 4k tv,
fonds / 1080p médias médias n'est pas aussi détaillé que 4k.
continue sur Internet.
Visionnez vos contenus YouTube sur le meilleur écran de la maison.
les plus récents à haute qualité(1080p). Inscription gratuite. Aucun
abonnement, frais de retard ou engagement.
Radio gratuite et personnalisée offrant une écoute musicale
débuter avec le nom d'un artiste, d'une pièce, d'un genre ou d'un
compositeur que vous adorez, et Pandora fera le reste du travail
pour vous. Il est ainsi facile de créer des postes de radio qui ne
joueront que la musique que vous aimez.
Indique la température et les conditions météorologiques du moment
partout dans le monde en degrés Celsius ou Fahrenheit.
Fr
11

PERSONNALISATION DES PARAMÈTRES DU TÉLÉVISEUR
MES MÉDIAS
Appuyez sur le bouton MENU
Sélectionnez parmi les photos, musique et vidéo pour voir ce que vous aimez.
#$%Durs portables doivent être insérés avant d'entrer dans le menu MEDIA.
MES MÉDIAS et appuyez sur OK
Fr
12

PERSONNALISATION DES PARAMÈTRES DU TÉLÉVISEUR
VISIONNEMENT DE PHOTOS
l'option PHOTO et appuyez sur OK, puis il sautera
OK pour
entrer.
Directories:10
Files:0
Total:10
Directories:10
Files:0
Total:10
ÉCOUTER DE LA MUSIQUE
Directories:10
Files:0
Total:10
Après avoir entré PHOTO
OK
pour entrer.
Lorsque l'image est en cours, la barre image de la
sélectionner la fonction désirée disponible sur la barre.
Utilisez les touches fléches pour mettre en
surbrillance l'option MUSIC et appuyez sur OK, puis il
sautera pour confirmer le lecteur inséré, appuyez sur
OK pour entrer.
Après avoir entré MUSIC, utilisez les touches fléches
pour sélectionner le fichier musique et appuyez sur
OK pour entrer.
Directories:10
Après avoir entré le fichier musique, utilisez les
touches fléches pour sélectionner le musique
souhaitée, puis appuyez sur le bouton de lecture pour
Files:0
Total:10
afficher.
Lorsque le musique est en cours, la barre musique de
la fonction sera affiche. Utilisez les touches fléches
pour sélectionner la fonction désirée disponible sur la
barre.
Fr
13

PERSONNALISATION DES PARAMÈTRES DU TÉLÉVISEUR
REGARDER DES VIDÉOS
l'option VIDÉO et appuyez sur OK, puis il sautera pour
OK pour entrer.
Directories:10
Files:0
Total:10
Directories:10
Files:0
Total:10
PARAMÉTRES DE TV
Après avoir entré VIDÉO
OK
pour entrer.
Lorsque le vidéo est en cours, la barre vidéo de la
sélectionner la fonction désirée disponible sur la barre.
Appuyez sur MENU pour afficher l'interface principale, utilisez les touches fléches pour
mettre en évidence RÉGLAGES TV et appuyez sur OK pour confirmer. Alors, cycle entre
Général, Image, Audio, Réseau, Canal, Heure, Verro, Paramétres de App, et sélectionner
l'option désirée pour s'adapter.
Fr
14

GÉRÉRAL
PERSONNALISATION DES PARAMÈTRES DU TÉLÉVISEUR
Appuyez sur MENU
RÉGLAGES TV et appuyez sur OK
GÉRÉRAL pour entrer et ajuster chaque paramètre
d'option.
Pour sélectionner la langue des
LANGUE MENU
TRANSPARENCE
ZOOM MODE
VGA RÉGLAGE
SOUS-TITRAGE
DLC
AUTRES
PARAMÈTRES
RESTAURER DÉFAUT
menus: anglais, français ou espagnol.
le défaut langue des menus à l’écran
est l’anglais.
Pour activer ou désactiver la fonction
de transparence:arret/marche.
sélectionner le mode de zoom:
large/zoom grand/zoom/
automatique/norme / viens de
scanner/dot by dot
Remarque:Avec un Source d’entrée
différente, les
options du mode zoom peuvent varier
Pour régler les paramètres des
options avancées: H-POS,HPOS,
V-POS, Horloge, Phase ou Auto.
(Mode Source VGA seulement)
Mode CC
Sélection
de base
Sélection
avancée
Option
Sélectionnez cette option pour arret/
marche la fonction de commande
dynamique de la luminance
HDMI EDID: Select the HDMI version:
Mode 1(HDMI 1.4)/Mode 2(HDMI 2.0).
Inlink: Set the options: Inlink Control,
Device Power Off, TV Power On,
Audio Receive, Inlink Device List,
Root Menu.
Pour restaurer les paramètres par
défaut du téléviseur.
Arret/marche CC SUR
MUTE
CC1,CC2,CC3,CC4
TEXTE1,TEXTE2,
TEXTE3,TEXTE4,
Service1/Service2.../
Service6.
Mode, style de police,
taille de police, la police
Style de bordure, police
bord couleur, FG couleur,
bg_color, FG Opacity, BG
Opacité.
Fr
15

PERSONNALISATION DES PARAMÈTRES DU TÉLÉVISEUR
IMAGE
Appuyez sur MENU
RÉGLAGES TV et appuyez sur OK
IMAGE pour entrer et ajuster chaque paramètre d'option.
MODE D'IMAGE
ÉCRAN BLEU
LUMINOSITÉ
CONTRASTE
COULEUR Permet de régler l’intensité des couleurs.
NETTETÉ
TINTE
TEMPÉRATURE
DE COULEUR
RÉGLAGE
AVANCÉ
Cycle entre les modes d’image: Dynamique/
Norme/Film/Utilisateur.
signal est faible ou inexistant.
Permet d’accroître ou de diminuer la quantité de
blanc dans l’image.
Permet de régler l’écart entre les parties
éclairées et sombres de l’image.
Permet de régler le niveau de netteté des
contours entre les parties éclairées et sombres
de l’image.
Permet de régler l’équilibre entre les niveaux de
rouge etde.
Permet de basculer entre les températures de
couleur: Frod/Normale/Chaud
Fixer les options suivantes:
Réduction du bruit: Réduire le niveau de bruit
Gestion des couleurs:
options de couleur.
de l'appareil connecté: Off/Faible/Moyen/Fort.
Balance des blancs:
options de balance des blancs.
#&%
rétroéclairage.
Gamma:
2.0/2.2/2.4.
Remet: Réinitialiser l'option avancée.
Fr
16

AUDIO
PERSONNALISATION DES PARAMÈTRES DU TÉLÉVISEUR
Appuyez sur MENU
RÉGLAGES TV et appuyez sur OK
AUDIO pour entrer et ajuster chaque paramètre d'option.
MODE SAIN
BASS
TREBLE
BALANCE
SORTIE AUDIO
NUMÉRIQUE
AMBIOPHONIE
SOUND
AUTO VOLUME
LANGUE AUDIO
Permet de sélectionner une technique
d’amélioration audio : .RISATEVLTIU/
LE/FIUSIQUM/EMRON
Pour régler l’intensité relative des
sons plus graves.
Pour régler l’intensité relative des
sons plus aigus.
Pour régler le volume relatif des hautparleurs dans un système qui en
compte plusieurs.
Pour sélectionner le mode de sortie
audio numérique: RAW ou PCM.
ARRET/MARCHE pour fournir une
expérience d'écoute améliorée.
ARRET/MARCHE pour contrôler
automatiquement les niveaux de
volume.
Pour sélectionner la langue audio :
anglais, français, espagnol.
RÉSEAU
Appuyez sur MENU
RÉGLAGES TV et appuyez sur OK
RÉSEAU pour entrer et ajuster chaque paramètre
d'option.
TYPE DE RÉSEAU
MON RÉSEAU
ADRESSE DE IP
puis connectez le téléviseur au réseau
connectez.
Fr
17

PERSONNALISATION DES PARAMÈTRES DU TÉLÉVISEUR
La première fois lors de la connexion du réseau
et établir une connexion avec succès, le menu
CONFIGURATION DU RÉSEAU apparaîtra, et
confirmer NEXT pour entrer le menu PERMETTRE
TV INTERACTIVE. Ensuite, utilisez les touches
fléches pour sélectionner ACTIVER/DÉSACTIVER
la télévision interactive, et appuyez sur le bouton OK
pour confirmer.
Ensuite, vous entrerez le menu MAINTENANT VOUS
AVEZ TV INTERACTIVE, et utilisez la flèche HAUT
de la télécommande pour obtenir le maximum de
l'émission que vous regardez.
CANAL
Appuyez sur MENU
RÉGLAGES TV et appuyez sur OK
CANAL pour entrer et ajuster chaque paramètre
d'option.
AIR/CÂBLE
AUTO SCAN
FAVORIS
MONTRER/CACHER
NUMÉRO DE CANAL
ÉTIQUETTE DE
CANAL actuel.
RENSEIGNEMENTS
SUR LE SIGNAL
Fr
18
Pour sélectionner l’antenne : Air ou
Câble.
Sélectionnez la fonction Auto Scan
pour scanner vos chaînes câblées
disponibles.
comme canal favori.
sélectionné.
actuel.

HEURE
VERRO
PERSONNALISATION DES PARAMÈTRES DU TÉLÉVISEUR
Appuyez sur MENU
RÉGLAGES TV et appuyez sur OK
HEURE pour entrer et ajuster chaque paramètre
d'option.
Pour sélectionner une durée au
bout de laquelle le téléviseur passe
automatiquement en mode Veille:
TIMER DE VEILLE
OSD MINUTERIE
FUSEAU HORAIRE
HEURE AVANCÉE
Appuyez sur MENU
RÉGLAGES TV et appuyez sur OK
Désactivé/10/.../180/240 min.
Alternative: vous pouvez appuyer à
répétition sur la touche SLEEP pour
sélectionner le nombre de minutes
directement.
Off/15s/30s/60s/120s/240s.
Pour sélectionner un fuseau horaire:
Central/Mountain/
Newfoundland.
Pour activer ou désactiver l’heure
avancée.
vERRO pour entrer et ajuster chaque paramètre d'option.
#$%Le mot de passe par défaut est "0000".
CHANGE
PASSWORD
SYSTEM LOCK
USA
CANADA
PARAMÉTRES DE
RRT
RÉINITIALISATION
RRT
SERRURE CLAIR Effacer tous les paramètres de verrouillage.
Utilisez les touches 0 à 9 pour entrer l’ancien
mot de passe, puis entrez le nouveau mot de
passe à 4 chiffres. Entrez le nouveau mot de
Sélectionnez cette option pour activer ou
désactiver le verrouillage du système. Les
options suivantes [US, Canada, RRT Setting
and Reset RRT (USA, Canada, Réglage RRT
et Réinitialisation RRT)] ne seront accessibles
que lorsque vous activerez le verrouillage du
système.
Télévision
MPAA
Canada
Anglais
Canada
Français
Sélectionnez cette option pour réinitialiser le
réglage RRT.
Classement Télé: Appuyez sur
la touche OK pour verrouiller ou
déverrouiller le classement télé.
Sélectionner le classement de
la MPAA : N/A,G, PG, PG-13, R,
NC-17 ou X.
Permet de sélectionner le
classement de la MPAA pour les
anglophones
Permet de sélectionner le
classement de la MPAA pour le
Québec : E, G, 8 ans+, 13 ans+,
16 ans+, 18 ans+..
Fr
19

PERSONNALISATION DES PARAMÈTRES DU TÉLÉVISEUR
PARAMÉTRES DE APP
Appuyez sur MENU
RÉGLAGES TV et appuyez sur OK
PARAMÉTRES DE APP pour entrer et ajuster chaque
paramètre d'option.
DÉSACTIVER APP
DÉSACTIVER APP
PARAMÈTRES TV
INTERACTIVE
ESN Numéro de série électronique.
informations du compte.
Désactiver Vudu et effacer les
informations du compte.
différents programmes et spectacles de
la télévision Samba.
SOURCE
Appuyez sur SOURCE sur la télécommande ou sur l'appareil principal pour afficher le
menu de la source, puis utilisez les touches fléches pour faire défiler parmi les différentes
sources d'entrée:TV/AV/COMPONENT/HDMI1/HDMI2/HDMI3/VGA/USB, puis utilisez la
flèche pour mettre en surbrillance la source désirée, puis appuyez sur OK pour confirmer.
Fr
20

CONTRÔLE PARENTAL
Appuyez sur la touche MENU de l’appareil principal ou de la télécommande, puis sur les
touches pour sélectionner le menu VERRO. Utilisez les touches 0 à 9 pour entrer le mot
de passe à 4 chiffres qui vous permettra d’ouvrir le menu VERROU. Si vous utilisez cette
fonction, vous pouvez « bloquer » la diffusion de la programmation télévisuelle indésirable.
Contrôle parental offre aux utilisateurs une grande variété d'options et de paramètres
qui limitent ou "bloc '' la programmation qui peut apparaître sur le téléviseur. Contrôle
acceptable pour un spectateur plus sensible plus jeune. Il peut être préréglée et soit allumé
Audience générale et le bloc des enfants devraient tous deux être programmés dans la
et le mouvement image industrie; les deux systèmes de notation devraient être utilisés et
basés sur l'âge des enfants.
Vue d’ensemble
émission de télévision régulière) en utilisant l'option Bloquer l'âge, choisissez une note à la
fois la MPAA et de télévision tables indicatives des parents sur la page suivante. En outre,
vous pouvez ajouter d'autres restrictions choisies dans le menu bloc de contenu et de sousmenus.
Éléments dont il faut tenir compte avant de
Déterminer qui note que vous considérez sont acceptables pour différents téléspectateurs.
Par exemple, si vous choisissez TV-PG, les cotes plus restrictives sera automatiquement
bloqué; certains téléspectateurs ne seront pas en mesure de voir: TV-PG, TV-14 ou TV-MA
programmes notés. Vous pouvez bloquer la source vidéo auxiliaire entièrement.
Utilisez l'option de contenu Blk pour bloquer le programme contenu en fonction des
paramètres individuels tels que: forte de dialogue, Bad langue, Scènes de sexe, Scènes de
violence ou de fantaisie.
Allez dans l'option Set Password et utilisez les touches numériques de la télécommande
contrôle parental.
enfants; celles-ci peuvent être actives pour les deux types de téléspectateurs en même
temps.
Indiquer simplement un blocage de contenu, par exemple les scènes de sexe, ne
bloquera pas automatiquement la programmation issue des sources vidéo.
Même si vous décidez de ne pas bloquer les entrées AUX, les cotes que vous indiquez
bloqueront automatiquement la programmation issue des sources vidéo.
Vous ne pouvez pas désactiver le contrôle parental en débranchant le téléviseur
de la prise de courant. Si l’alimentation estcoupée, la plage d’heures bloquées sera
automatiquement réinitialisée à sa valeur par défaut.
le contrôle parental
Fr
21

CONTRÔLE PARENTAL
t Système de classement de la MPAA
Description
G Grand public
Surveillance
PG
parentale
recommandée
Accord parental
PG-13
fortement
recommandé
R Réservé aux adultes
NC-17
X
Aucun
classement
Interdit aux moins
de 17 ans
Films
pornographiques
Aucun classement La MPAA n’a pas attribué de cote à cette émission.
Le contenu n’offensera pas la majorité des
téléspectateurs.
Les parents pourraient vouloir empêcher leurs
enfants de regarder l’émission en raison de son
contenu.
L’émission est inappropriée pour les préadolescents;
son contenu est plus choquant que celui des
émissions avec une cote PG.
Not for children under 17-contains strong element of
sex and/or violence.
En aucun cas destiné aux enfants de moins de 17
ans. Présente du contenu sexuel explicite.
Équivalent à la cote NC-17.
t Système de classement TV Parental Guideline Rating System
Sélectionnez l'option VERRO dans les paramètres du
en surbrillance USA et appuyez sur le bouton OK pour
entrer. Sélectionnez TV pour entrer ensemble parental
système de classement de TV.
Description
TV-Y Tous les enfants
TV-Y7 Enfants de 7 ans
Le contenu n’offensera pas la
majorité des téléspectateurs
Jugé convenable pour les
enfants de plus de 7 ans;
peut contenir des scènes de
Convient à tous les auditoires;
TV-G Grand public
surveillance
TV-PG
parentale
recommandée
Accord parental
TV-14
fortement
recommandé
TV-MARéservé aux
adultes
Le classement canadien-anglais est utilisé dans tout le Canada anglophone (C, C8+,G, PG,14+, 18+).
Le classement canadien-français est utilisé au Québec (G,8 ans+, 13 ans+,16 ans+, 18 ans+).
La puce V-Chip bloquera automatiquement certaines catégories « plus restrictive ». Si vous bloquez la catégorie TV-Y,
la catégorie TV-Y7 sera alors automatiquement bloquée. De la même manière, si vous bloquez la catégorie TV-G, alors
toutes les catégories du groupe « jeunes adultes » seront bloquées (TV-G, TV-PG,TV-14 et TV-MA).
TV-NO: Le canal est pas verrouillé..
Fr
22
les enfants peuvent regarder
cette programmation sans
supervision.
Ne convient pas aux jeunes
enfants; peut contenir des
propos suggestifs, un langage
grossier et des scènes de
sexe et de violence.
Ne convient pas aux enfants
de moins de 14 ans; peut
contenir des propos abusifs,
un langage.
Adultes uniquement; peut
contenir des propos abusifs,
un langage grossier et
des scènes de sexe et de
violence.

DÉPANNAGE
Si votre téléviseur ne fonctionne pas normalement ou si vous n’arrivez pas à l’allumer,
DVD ou le lecteur Blu-ray. Si le téléviseur ne fonctionne toujours pas normalement, s'il vous
plaît contacter le support technique.
Le téléviseur ne fonctionne pas normalement
Le téléviseur ne répond pas
quand vous appuyez sur les
touches
Il est impossible d’allumer le
téléviseur
La télécommande ne
fonctionne pas
Le téléviseur s’éteint
subitement
La fonction vidéo est inopérante
Pas d’image et pas de son Essayez de changer de chaîne. Le problème provient peut-être du
L’image apparaît lentement
après avoir allumé le
téléviseur
Aucune couleur, ou couleur
ou image de piètre qualité
Barre horizontale ou
verticale, ou tremblement de
l’image
Mauvaise réception sur
certains canaux
Des lignes ou des stries
dans les images
Aucune image lors de la
connexion
Le format de l’image semble
incorrect
La fonction audio est inopérante
L’image est bonne, mais il n’y
a pas de son
Aucune sortie de l’un des
haut-parleurs
Son inhabituel depuis
l’intérieur du téléviseur
Aucune son lors de la
connexion HDMI
Audio noise Keep the RF coaxial cable away from the other connected cables.
le cordon d’alimentation de la prise de courant pendant quelque
minutes. Rebranchez l’appareil et tentez de l’utiliser de la manière
habituelle.
Assurez-vous que le téléviseur est branché dans la prise électrique
Assurez-vous que tous les appareils AV connectés sont éteints avant
d’allumer le téléviseur
peuvent bloquer le signal. Assurez-vous de viser directement le
téléviseur avec la télécommande.
-).
Installez de nouvelles piles.
coupée.
télédiffuseur.
C’est normal; l’image est cachée pendant le processus de démarrage
du téléviseur. Veuillez communiquer avec le service d’assistance si
l’image n’apparaît pas au bout de cinq minutes.
Réglez les paramètres dans le menu IMAGE.
Essayez de changer de chaîne. Le problème provient peut-être du
télédiffuseur.
Cherchez une source d’interférence locale, par exemple un appareil
ménager ou un outil électrique.
La station ou la chaîne câblée éprouvent peut-être des
Signal de la station peut être faible, repositionner l'antenne pour une
meilleure réception.
Recherchez des sources d'interférences possibles.
Réglez les paramètres de format d’image dans le menu
CONFIGURATION ou appuyez sur la touche ASPECT de la
télécommande.
Appuyez sur les touches VOL +/-.
Le son est-il désactivé? Appuyez sur la touche MUTE
Essayez de changer de chaîne. Le problème provient peut-être du
télédiffuseur.
Réglez les paramètres d’équilibrage dans le menu AUDIO
Un changement de l’humidité ou de la température ambiante peut
provoquer un bruit inhabituel au moment d’allumer ou d’éteindre le
téléviseur; cela n’indique pas une défaillance de l’appareil.
Fr
23

TROUBLESHOOTING
Mot de passe
Mot de passe perdu
There is a problem in PC mode
Le signal est hors de
portée(format non valide)
Barre verticale ou strie sur
l’arrière-plan, bruit horizontal
et position incorrecte
Couleur instable à l’écran ou
une seule couleur
Si la connexion WIFI échoue ou APP a problème de connexion, s'il vous plaît
les questions de dépannage suivantes.
Connexion échoue
Problèmes avec le streaming
vidéo
a problème de
connexion
Vous ne pouvez pas utiliser
Vudu et Pandora
dans le menu LOCK (VERROU), puis entrez le mot de passe
maître suivant : « 8899 ». Celui-ci ef face votre mot de passe
précédent et vous permet d’entrer un nouveau mot de passe.
Réglez la résolution, la fréquence horizontale ou la fréquence
verticale.
la position H/V
Réinstallez la carte vidéo du PC.
être trop loin du routeur WIFI.
Assurez-vous que le mot de passe est entré avec correctes lettres
majuscules ou minuscules.
Essayez d'éteindre et de débrancher la télévision pour réinitialiser la
télévision.
interférences ou canal WIFI problèmes.
vidéos 4K en streaming
Vudu est disponible uniquement aux États-Unis et Pandora disponible
uniquement dans les pays limités.
ENTRETIEN
Ne pas utiliser le téléviseur dans des endroits trop chauds ou trop froids, car le meuble
pourrait se gauchir ou l’écran pourrait ne pas fonctionner correctement. Le téléviseur
fonctionne de façon optimale à des températures dans lesquelles vous êtes à l’aise.
Conserver le téléviseur à une température variant entre 0 °C et 50 °C (soit entre 32 °F et
122 °F).
La température de fonctionnement varie entre 0 °C et 35 °C (soit entre 32 °F et 95 °F).
Ne pas installer le téléviseur dans un endroit exposé directement à la lumière du soleil ou
proche d’une source de chaleur.
proche d’une source de chaleur.
- la ventilation ne doit pas être empêchée en couvrant les ouvertures de ventilation avec des
objets tels que des journaux,nappes,rideaux,etc. ;
placés sur l'appareil
Fr
24

CARACTÉRISTIQUES TECHNIQUE
Taille de l’écran 50 pouces en diagonales
LED
Technologie de l’écran TFT
Écran 60 Hz ou 120 Hz 60 Hz
3840 x 2160
Soutien HDMI 3840 x 2160 60Hz
Résolution de l’écran 3840 x 2160
Format de l’image 16:9
Ratio de contraste dynamique de l’écran 3500~5000:1
Temps de réponse (G à G) 9.5 ms
Durée de vie de la lampe (Calculée en heures) 30,000 hours
Angle de visionnement horizontal À CR>10) 178
Angle de visionnement vertical À CR>10) 178
Montage mural (LxW-mm) 200*200 VESA(mm)
La FCC veut que vous sachiez
Cet appareil est conforme à la partie 15 des règlements FCC. Son fonctionnement est soumis aux deux
conditions suivantes : (1) l'appareil ne provoquera pas d'interférences nuisibles, et (2) il doit accepter les
interférences reçes, y compris celles pouvant provoquer un fonctionnement indésiré.
NOTE: Cet appareil a été testé et jugé conforme aux limitations des appareils numériques de classe B en
vertu de la section 15 des règlements de la FCC. Ces limitations sont conçues pour fournir une protection
raisonnable contre les interférences nocives dans un environnement domestique Cet équipement produit,
utilise et peut émettre de l’énergie radio électrique et, s’il n’est pas installé et utilisé conformément aux
présentes consignes, peut causer des interférences nuisibles aux communications radio. Il n’existe toutefois
aucune garantie que de telles interférences ne se produiront pas dans une installation particulière. Si cet
appareil cause des interférences nuisibles à la réception des signaux de radio ou de télévision, ce qui peut
être déterminé en allumant et en éteignant l’appareil, l’utilisateur peut tenter de résoudre le problème en
prenant une ou plusieurs des mesures suivantes: 1)réorienter ou déplacer l’antenne réceptrice; 2)augmenter
la distance séparant l’équipement du récepteur; 3)brancher l’appareil sur un circuit différent de celui du
Déclaration d'exposition aux rayonnements de la FCC
non contrôlé. Cet équipement doit être installé et utilisé à une distance minimale de 20 cm entre l'élément
rayonnant et votre corps.
Fr
25
 Loading...