


0
Mini1080 Media Player
User’s Manual
V2.1
(Please read this manual carefully and keep it for daily use)

1
Index
1. Precautions…………………………………………………………………2
2. Functions and features…………………………………………………..3
3. List of accessories………………………………………………………..3
4. Interfaces of the player……….………………………………………….4
5. Description of remotes …….…..………………………………………..5
6. Definition of remotes keys ….…………………..……………………….6
7. Connecting with display devices …...…………………………………7
8. Operating reference…………………………………………………...….10
8.1 Setup menu…………………………………………………………….10
8.2 Playing media files……….…………………………………………..11
8.2.1 Movie playback…………………………………………..……..11
8.2.2 Music playback….……………………………………….……..13
8.2.3 Photo playback…….……………………………………….…..15
8.3 File copy/delete functions…………………………………………..16
9. Trouble shooting ……………………………………………………..….17
10. Specifications………………..………………………………..………...18
11.Firmware Upgrade….……………………………………………………19

2
Precautions
1. Keep the player and power adapter/cables away from heat,
pressure, humidity.
2. When there is smoke or noise from the player , please cut down
Power for safety and consult seller for repair.
3.Apply wrong power adapter(other than 5V) to player may cause
Permanent damage to player, and warrantee will be invalid ;
4. Do not try to repair the player, warrantee will also be invalid if
you do so.
5. Do not suggest a using environment with vibration, bad heat
Sinking, pollution, or other which may cause player work
Unstable.
Functions and Features
USB storage:
Build in NAND flash enables it as a USB 2.0 storage,optional
0GB/4GB/8GB capacity, can be easily connect to any USB
2.0 HOST port, no external power needed.
USB HOST 2.0:
It can drive external USB storage devices such as USB
HDD or USB pen drive, support FAT/NTFS file sysytem.
SD/SDHC reader:
Directly read SD/SDHC card, and play or manage files on it.
Video formats:
RM, RMVB, AVI, DIVX, MKV, MOV, HDMOV,
MP4, M4V, PMP, AVC, FLV, VOB, MPG, DAT,
MPEG, TS, TP, M2TS, WMV,
H.264,H.263,WMV9/VC-1,MPEG1/2/4

3
Video definition:
1920x1080x60P,,up to 80Mbps
Audio formats:
MPEG1/2/4,MP3,WMA,OGG, AAC,FLAC,APE, AC3,D TS,ATRA.
Photo:
JPEG, TIF, PNG, BMP.
Playback function:
Power-on auto run, Resume/Repeat/Zoom/time
Choosing/FF/BF, R otate, background music
File management:
Delete or copy files
Dual power:
It can be powered by either 5V2A adapter, or USB;
Video out:
HDMI/ CVBS/ YPbPr, manually set or power-on auto setting.
Audio out:
Stereo L/R(AV port), S/PDIF optical(AV port,optional),HDMI
Dimension (net): 63x60x13 mm.
List of accessories
Remote controller x1
User’s manual x1
AC/DC Power adapter 5V2A x1
AV cable x1
4
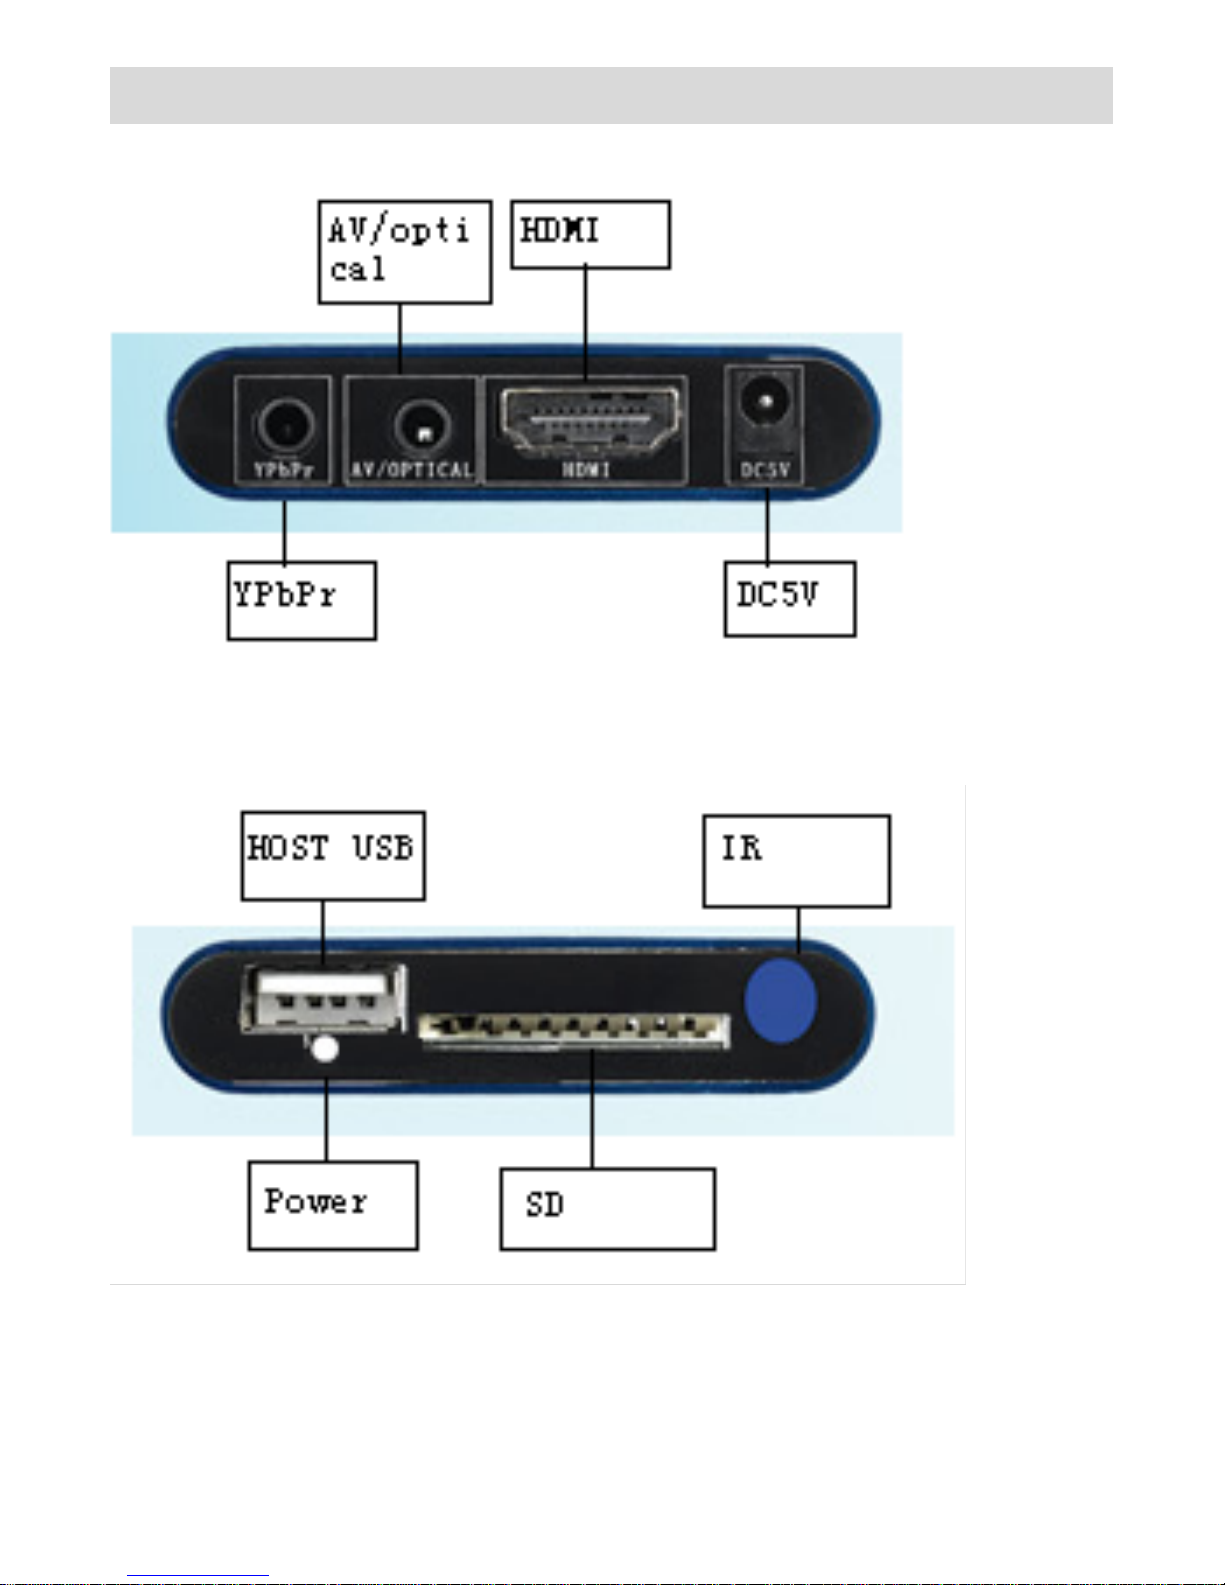
Interfaces of the player
5
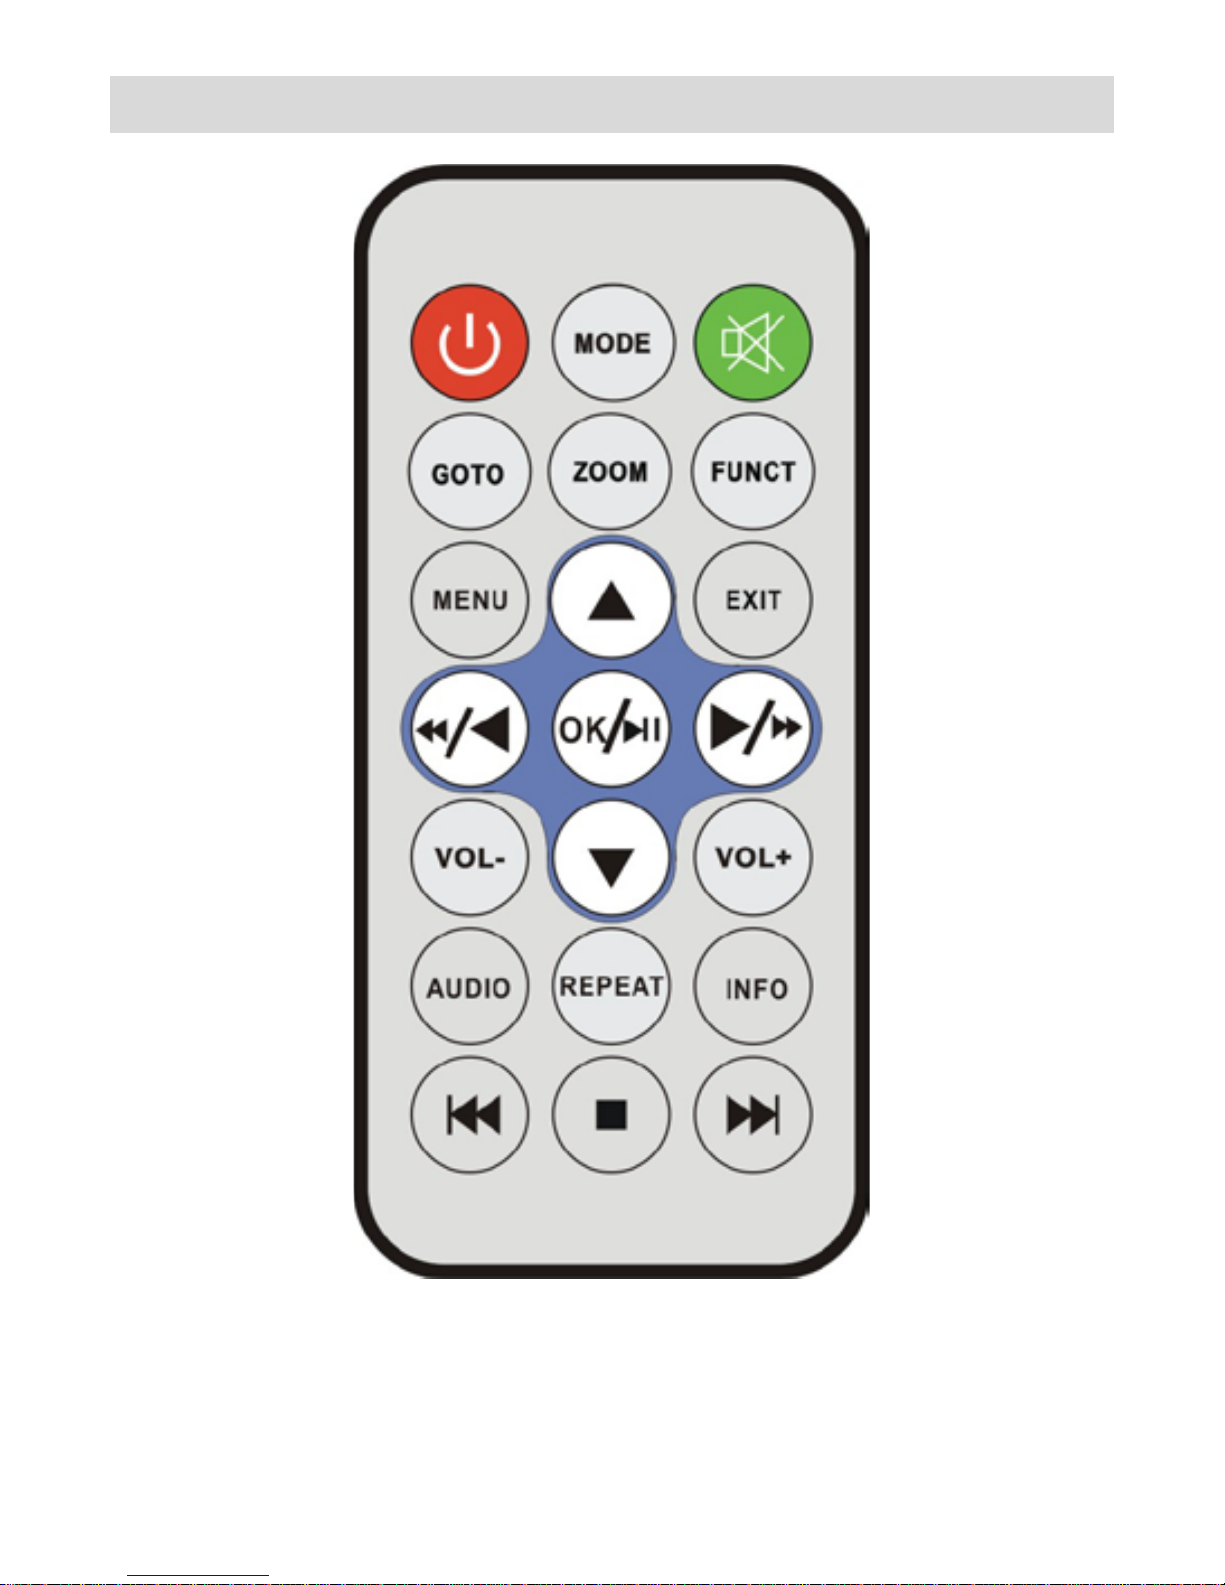
Description of remotes
6
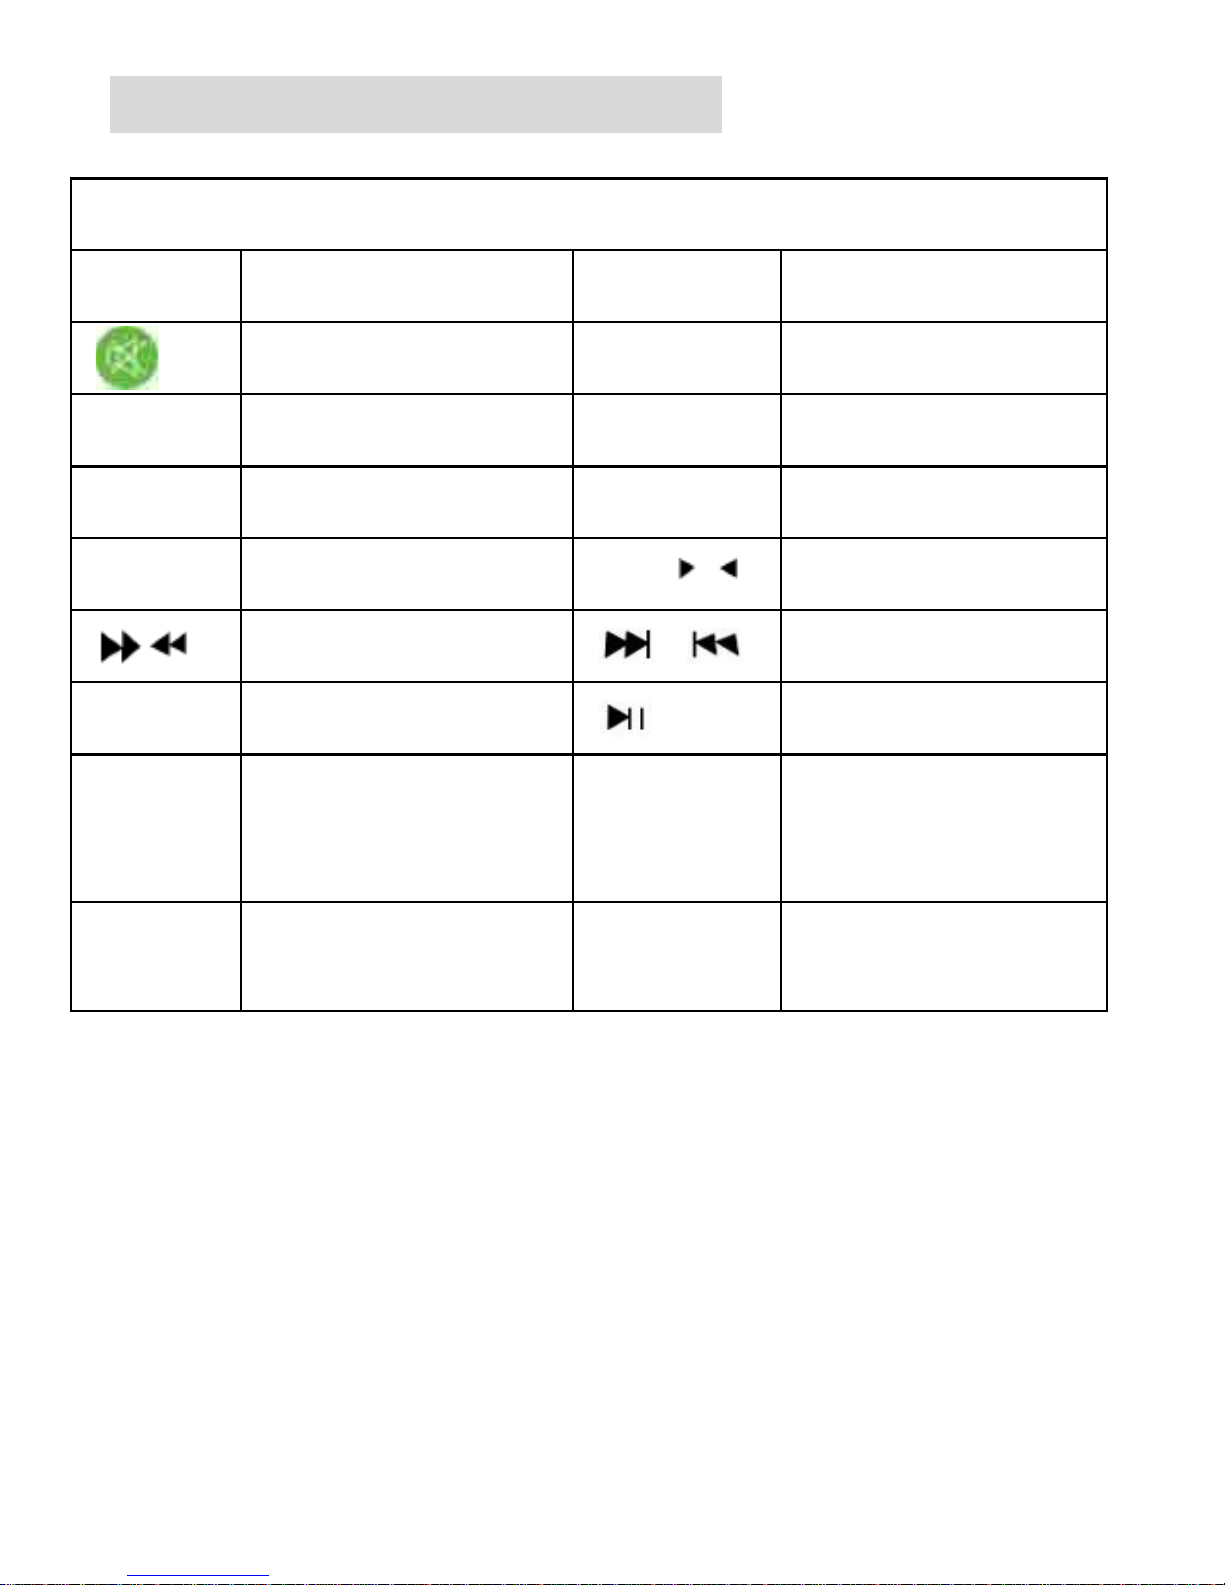
Definition of remotes keys
Function of remote key table
POWER
Power Standby
MODE
Change video
output mode
Mute
FUNCT
Special Function
ZOOM
Picture zoom in/out
MENU
Setting menu
EXIT
Return
OK
Confirm
VOL+/-
Volume up/down
▲ ▼
Up, Down, Right,
Left
Fast forward/backward
Skip to next/previous
█
S t o p
Play/Pause
GOTO
Time choosing
playback
INFO
File info
AUDIO
Audio setting
REPEAT
Repeat playback

7
Connecting with display devices
1. AV interface to TV
Use the AV cable to connect player with TV through AV interface.
(Refer to picture below)。
11

8
2. YPbPr interface to TV
Use the YPbPr cable to connect player with TV through the YPbPr
interface for video, also use the AV cable to connect player with TV
for audio(red, white) .(Refer to picture below)

9
3. HDMI interface to TV
Use HDMI cable to connect the player with a HDTV. (Refer to
picture below)
V i d e o o utput mode setting: the player can auto recognize
TV connecting mode and set to right mode when power on
is doing, you can also set output mode by pressing MODE
key
.
10
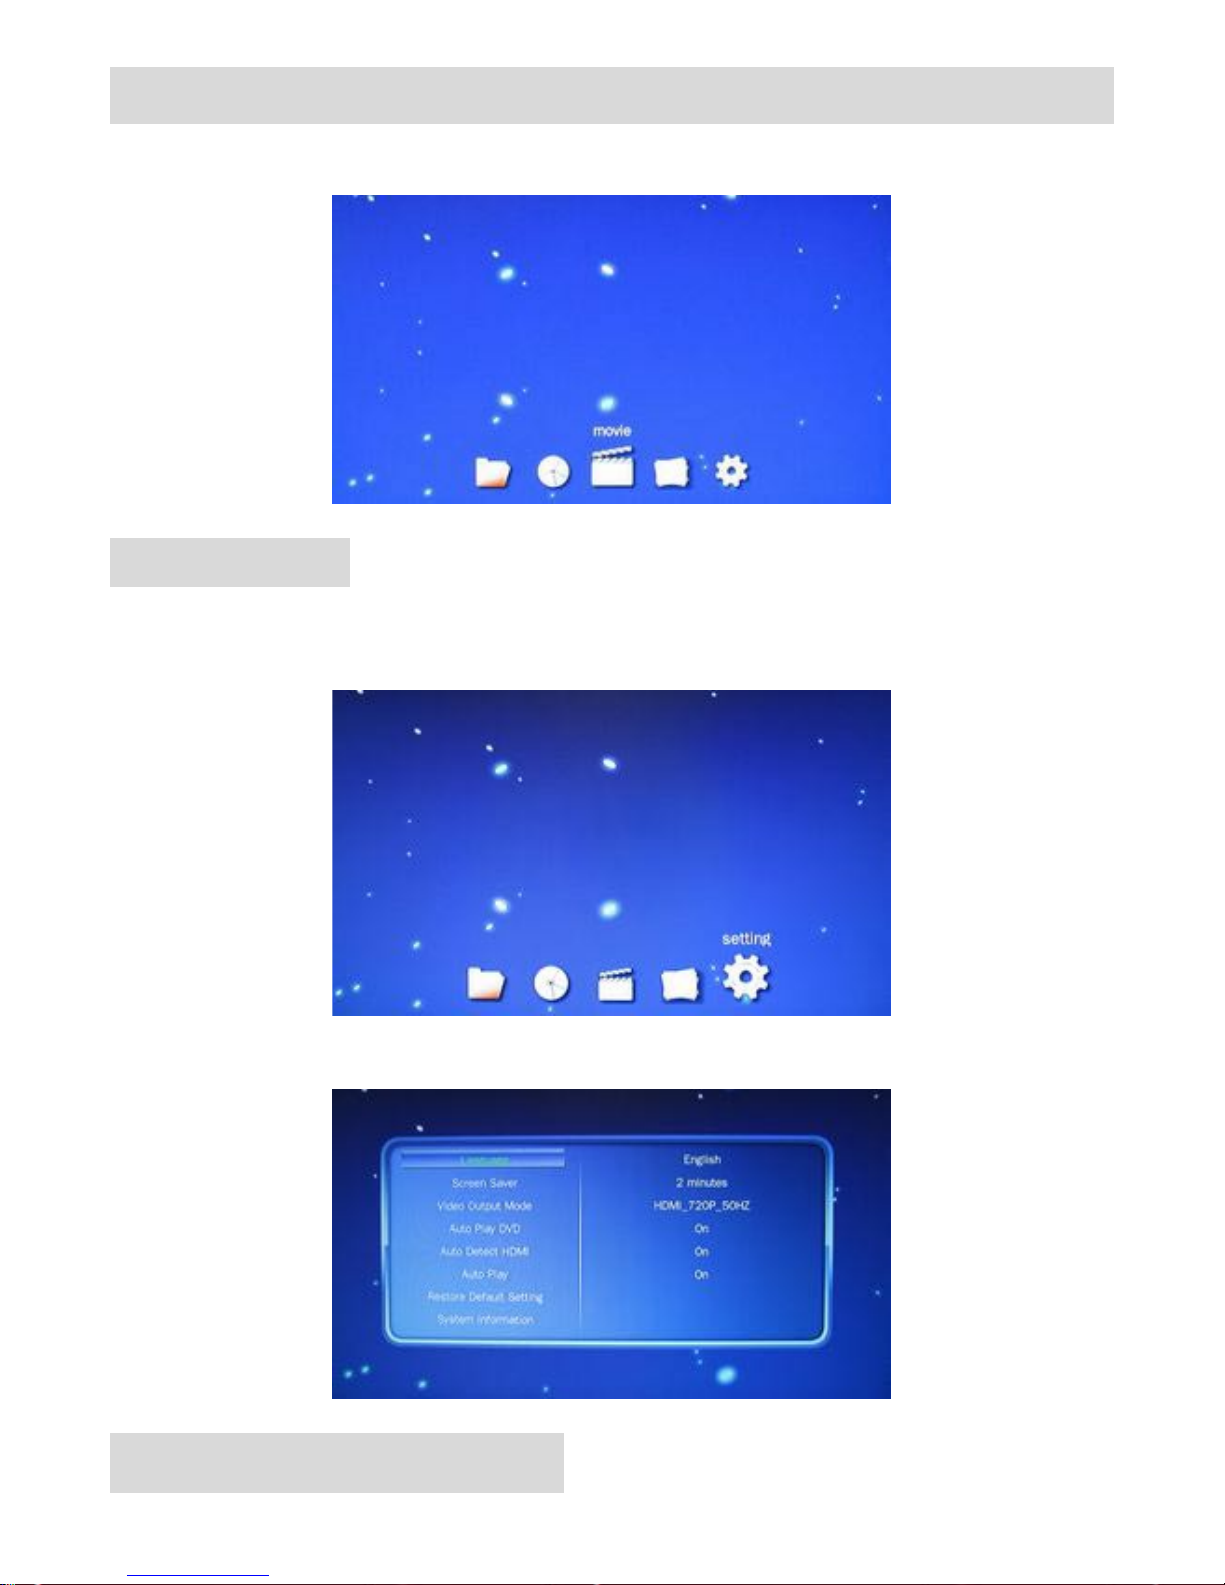
Operating reference
After power on, pla yer will enter main menu. (Refer to picture1)
Picture1
Setup menu
You can set up the player when first time using.
Select the SE TTING option by pressing the LEFT/RIGHT key in main
menu, then press the OK to confirm. (Refer to picture2, picture3)
Picture2
Picture3
Playing media files:

11
*M o v i e p l a y back
1、Select movie option by pressing the LEFT/RIGHT key in main menu,
then press the ENTER key to enter into the video interface. (Refer
to picture4)
Picture4
2. Select device in which movie files store, press ENTER key to
confirm, please refer to picture5.
Picture5
3、Press UP/DOWN key to choose movie, then press OK to confirm
To play.
Operations while playing movie
:
[Refer to remote]
“ ” press this key to fast forward play the current file. Press
OK to return to normal playing speed.
“ ” press this key to fast backward play the current file. Press
OK to return to normal playing speed
“ ” Press this key to play previous movie file.
“ ” Press this key to play next movie file.

12
“ ” press this key to pause , press again to continue playing file.
“ ” Press this key to stop playing.
Subtitle menu
Press FUNCT key to enter subtitle submenu.
Display spatial
Press ZOOM key to adjust display scale (4:3/16:9,full screen…)etc.
File info
Press INFO key to show the information of video file.
Other operations
Press GOTO key to time choosing time play.
Press REPEAT key to set the repeat function.
(Refer to picture 6)
Picture 6
Note:
1. In the menu, “” means item has been selected already ,
Press OK to confirm, EXIT to return back to the previous
menu.
2. Exit from a video file with power on, and enter again into the
same file, the system will ask you if your want to continue
from last break point.
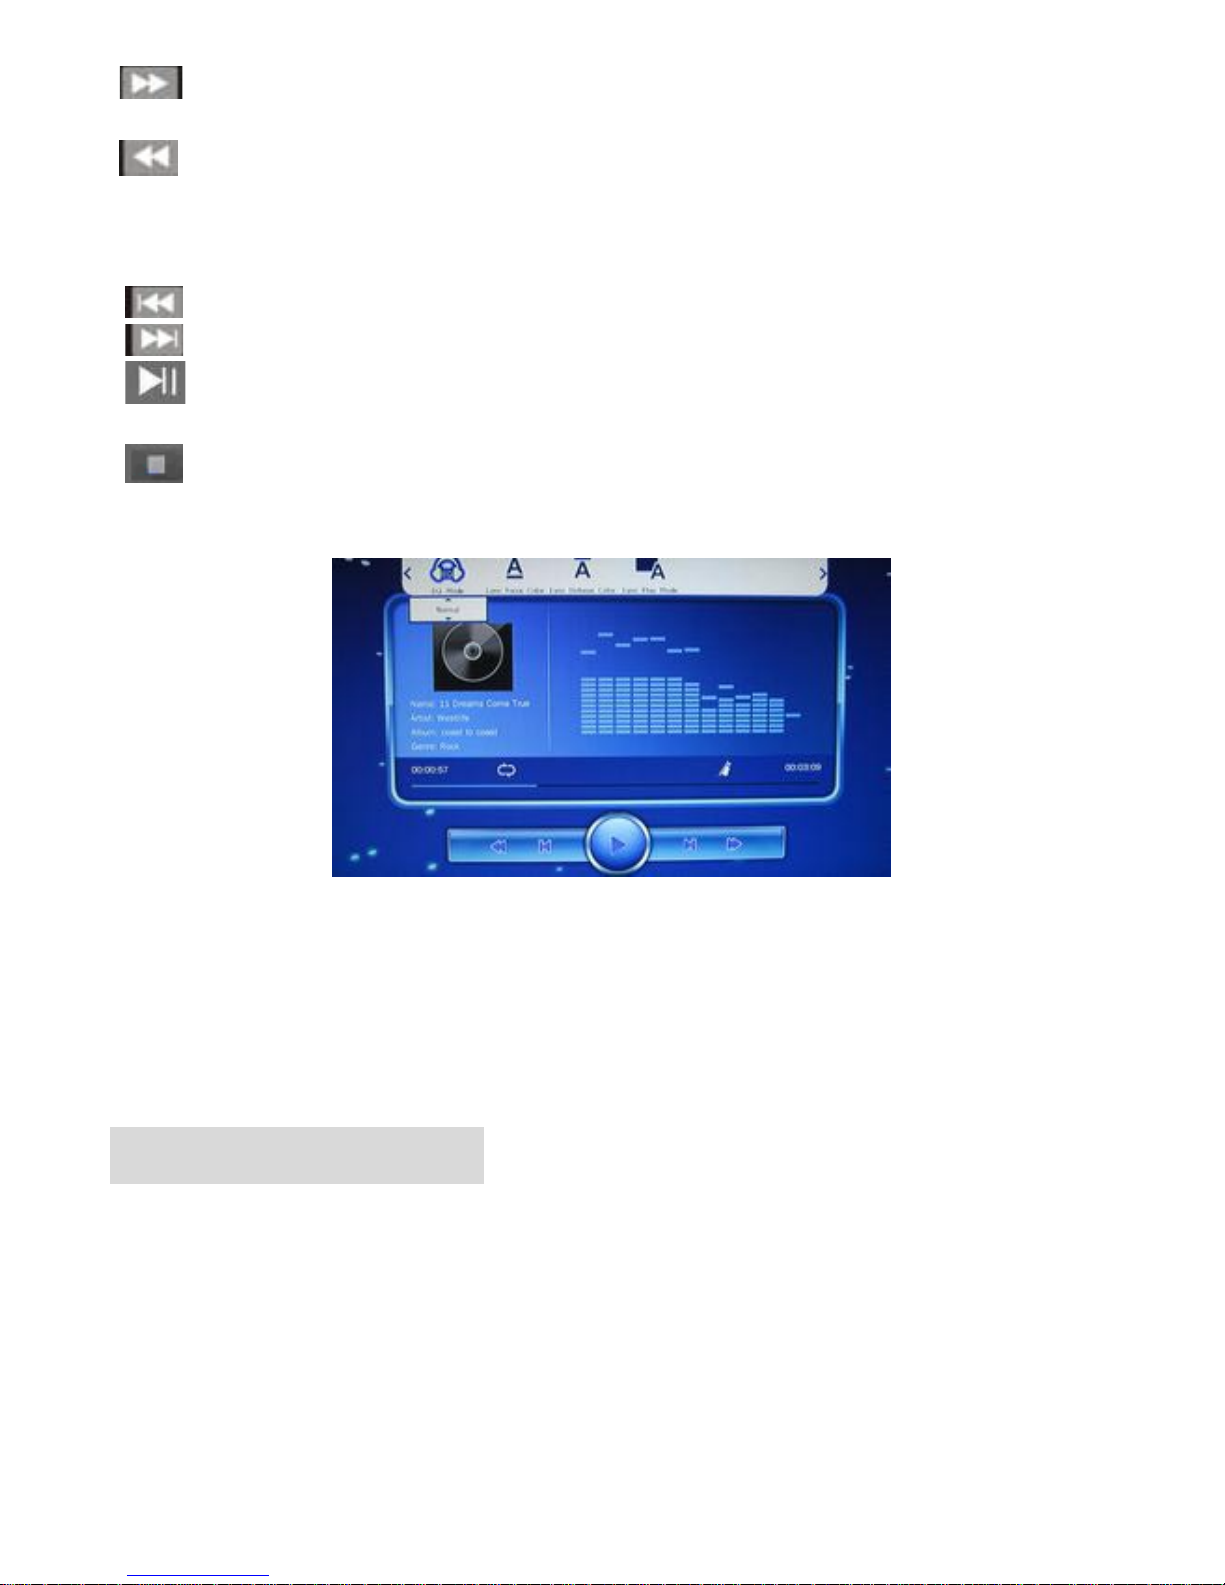
*Music playback
1. Select the MUSIC by pressing the LEFT/ RIGHT key in main me nu
interface, then press OK to enter the music . (Refer to picture 7)

13
Picture 7
2. In device list menu, select the device from which you prefer to play
the music, press OK to confirm, please refer to the picture 8.
、
Picture 8
3. Press UP/ DOWN key to choose music file, then press OK to
confirm. (Refer to picture 9)
Picture 9
Operations w h i l e playing music
:
[Refer to remote]
14
“ ”: In full screen playing status, press this key to fast forward play
current file. Press OK to return to normal playing speed.
“ ”: In full screen playing status, press this key to fast backward
play current file. Press OK to return to normal playing speed.
V o l u m e : In full screen playing status, press VOL+/VOL- to adjust
volume
“ ”: Press this key to play previous music file.
“ ”: Press this key to play next music file .
“ ”: In full screen playing status, press this key to pause ,
press again to continue current music file playing.
“ ”: Press this key to stop playing and quit.
Press FUNCT to enter submenu of music playing.
(Refer to picture10)
picture 10
Note:
1. In the menu, “”record means item has been selected already.
Press OK to confirm, EXIT to return to the previous menu.
2. Press the EXIT key to browse the pictures when playing the
music without pressing stop.
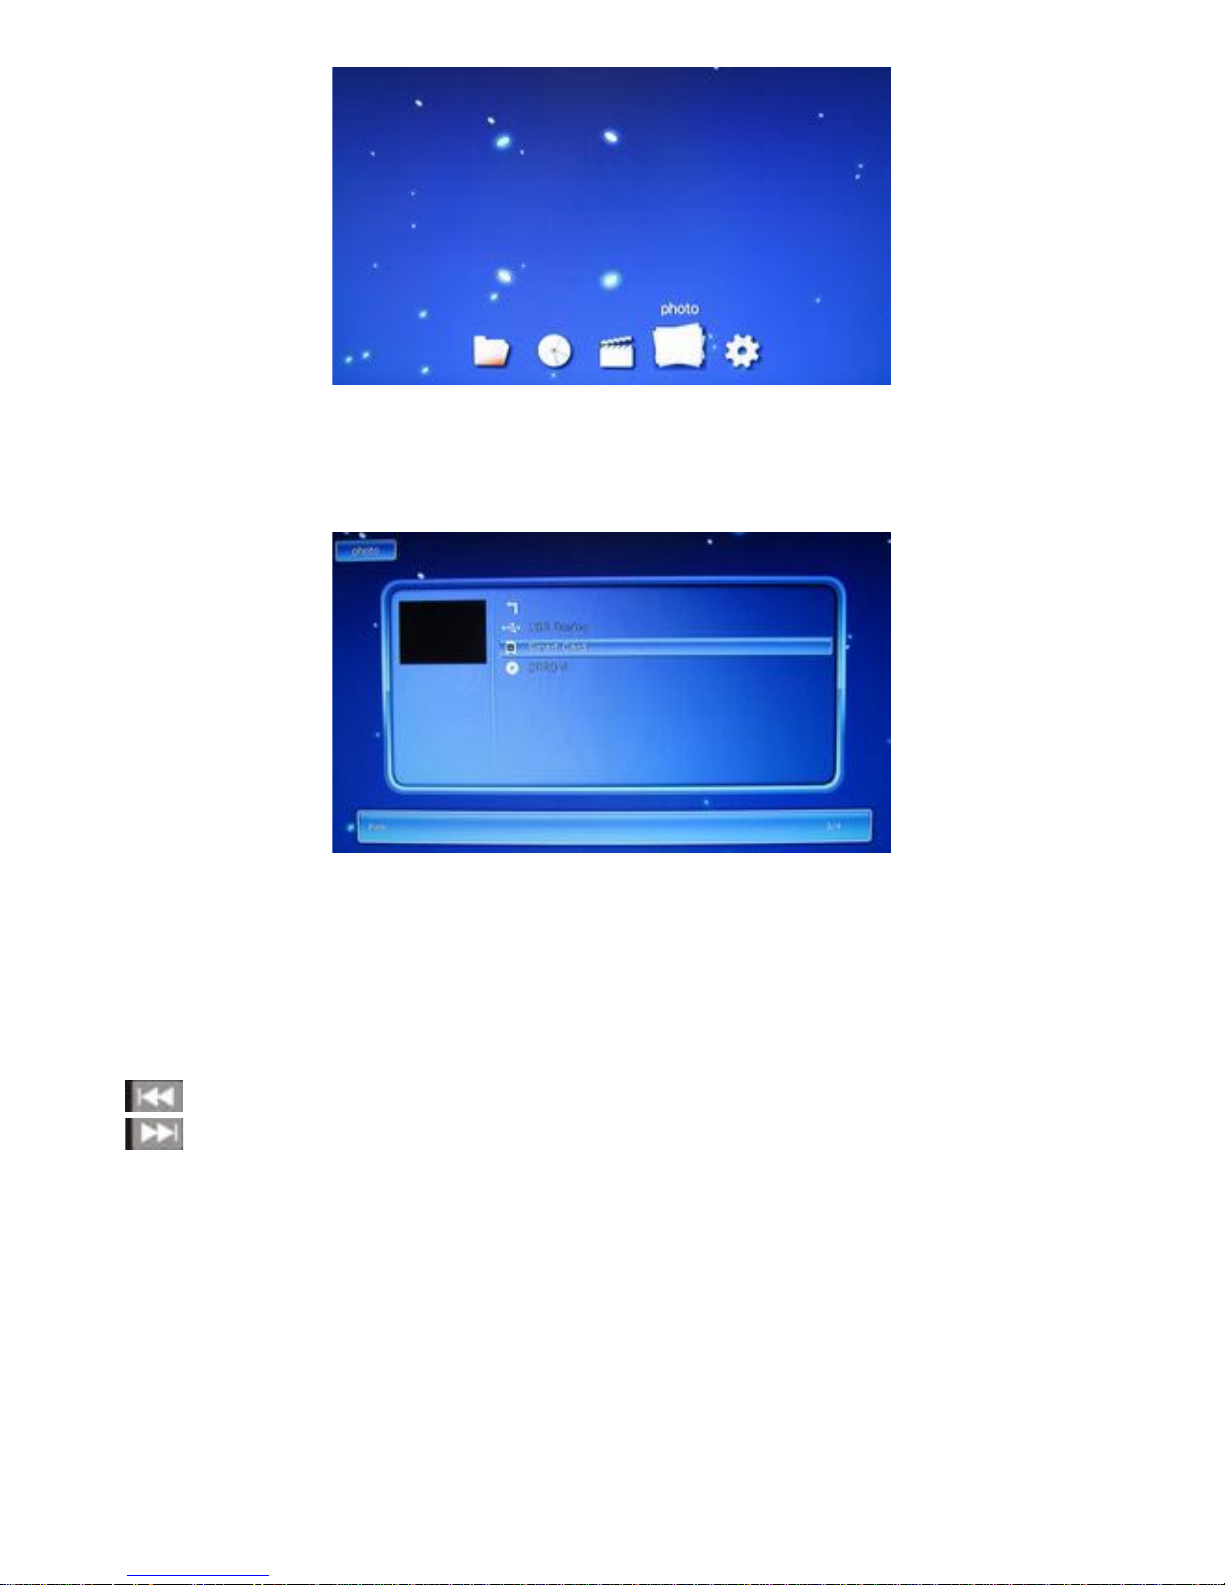
*Photo playback
1. Select PHOTO by pressing the LEFT/ RIGHT key in ma in menu
interface, then press OK to enter photo menu. (picture 11)
15
Picture 11
2. In PHOTO menu, select the device from which you prefer to play
Photo files, press OK to confirm. (Refer to picture12)
Picture 12
3. Press UP/ DOWN to choose the photo files, and press ENTER to
confirm.
Operations for showing photo
:
[Refer to remote]
“ ”press this key to show the previous photo
“ ”press this key to show the next photo
Press Left/Right to rotate photo
In PHOTO mode, press FUNCTION key to enter photo function
submenu. (Refer to picture 13)
16
Picture 13
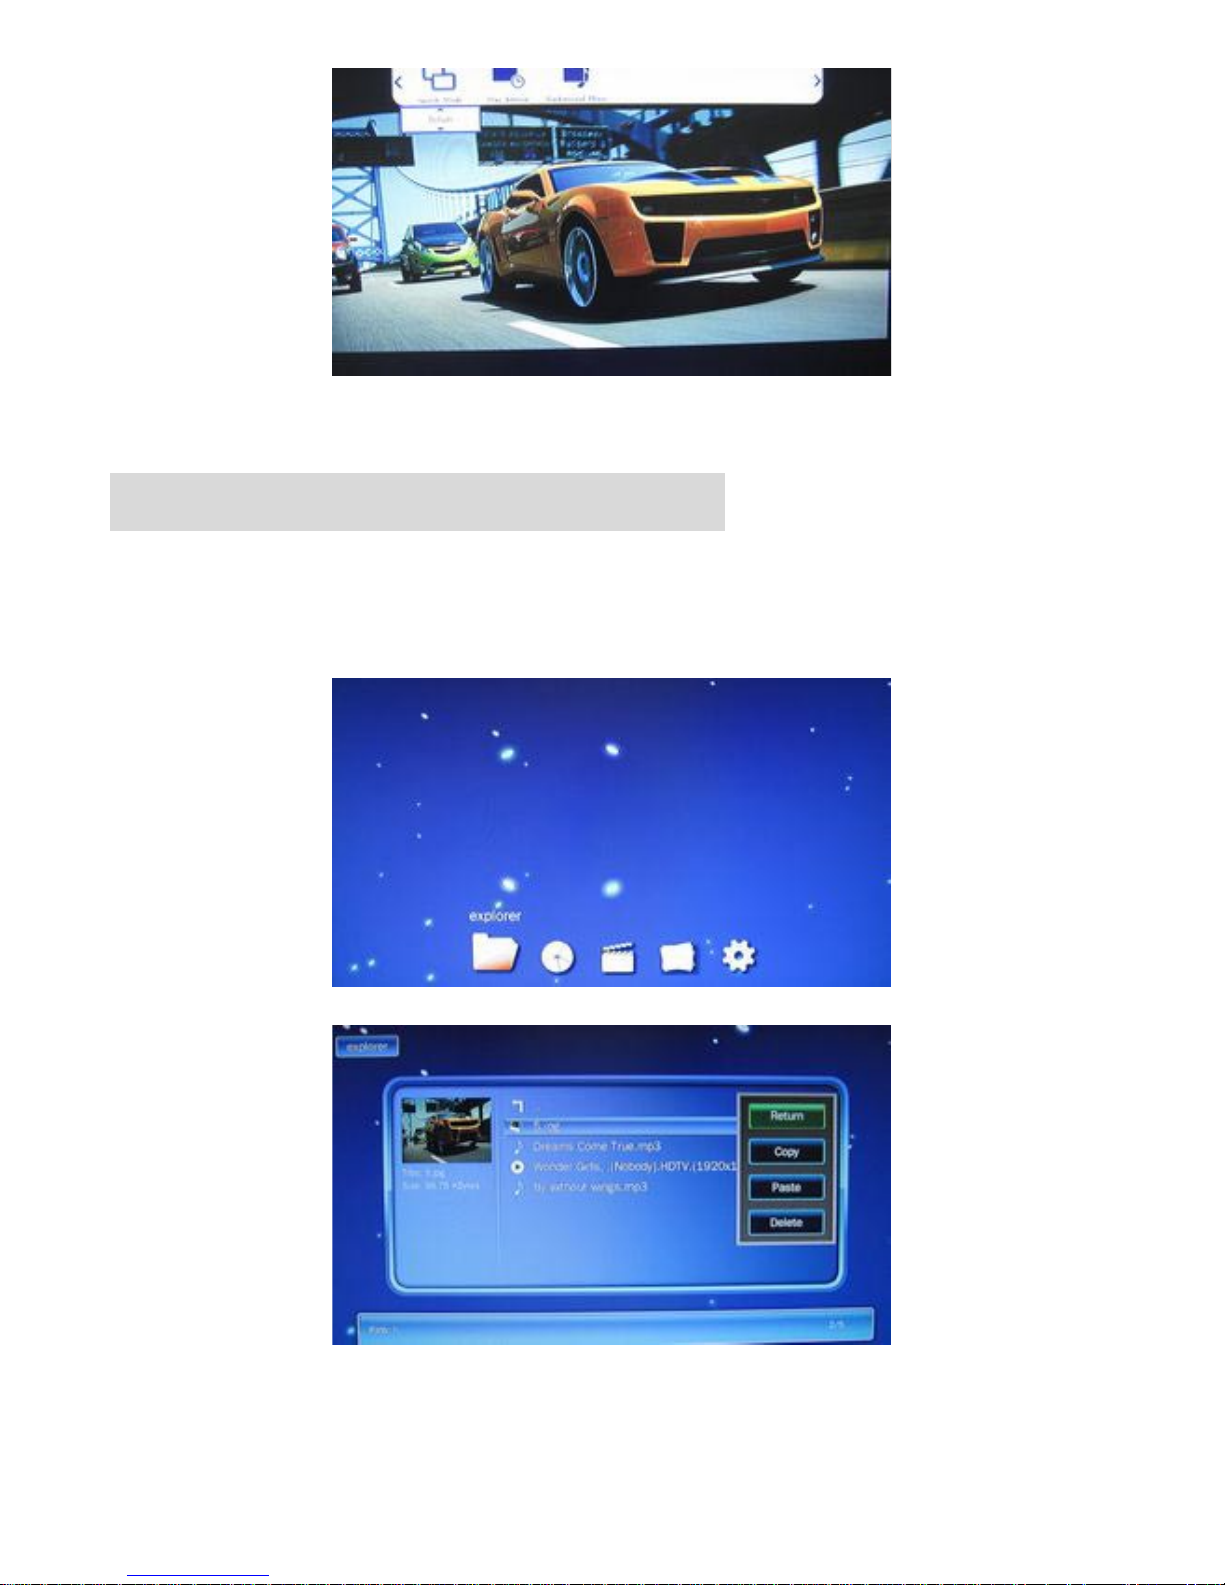
File Copy/Delete functions
1.Select one file in the EXPLORER submenu(Refer to Picture 14/15),
Press FUNCT key, COPY/DELETE/STICK options will appear.
Picture 14
Picture 15
2. T o c opy the file, please select COPY and press OK to confirm.
Then press EXIT to go to directory you want to copy to. By

1 7
Doing same way to enter COPY/DELETE/STICK options, and select
STICK to complete c o p y .
Trouble shooting
S y m p t o m
Possib le reasons
Possib le solving meth o ds
No power
Power s oc ket c on ta ct s
not w el l
Che ck and make sure D C p o w e r
contacts we ll w ith player socket.
P o w e r is on, but
Player wo rks
Wr o n g l y ,
Unclear reason
Plug off/on the power adapter
t o r e s t a r t
No i ma ge on
displ a y
Video out cable is not
con ne cte d c o r r e c t l y
Connect ca bl e a ccording to the
instr ucti ons in manual
The input of TV is n ot
set t o same mode as
p l a y e r ’s ou tpu t
Choose the right input mode by
press MODE k e y ; or change
TV input mode
The c ab le doe s no t
con ne ct w el l
Check and reconne ct it w el l
No sound
The audio cable is
not connecte d well
Try to connect again
Wrong or poor
display ima ge
Pla y e r output mode
does not match with TV
Go to set up menu, make right
setting then resta rt th e p layer
Ba d m o v i e file format
Choose the ri gh t m o v i e file
Remote control d o e s
not w o r k
Battery insulation
sheet is not removed
Remove the insulation sheet
The b a t t e r y is n ot
installed well
Check and re-s t a l l t h e b a t t e r y
The remotes doe s not
point directly to
p l a y e r receiver
window
point directly to player receiver
window
The distance is too far
or ang le is too wide
The Max working d i s t a n c e is
7m, angle is 60 degree
Cell ba ttery i s u sed up
Change with new cell battery

18
Specifications
Power Supply
DC 5.0V/2A
Power Consumption
≤500mA
Video System
CVBS(PAL/NTSC), YPbPr(1080P), HDMI(1080P)
Dimensions
63*60*13mm
Weight(net/packaged)
50g/220g
Video format
RM, RMVB, A V I , DIVX, MKV, MOV,
HDMOV, MP4,M4V, PMP, A V C , F L V ,
VOB, MPG, D A T , MPEG, TS, TP, M2TS, WMV
(H.264,H.263,WMV9/VC-1,MPEG1/2/4)
Audio format
MPEG1/2/4,MP3, WMA, OGG, AAC, FLAC, APE,
AC-3, DTS, A T R A
Photo format
BMP, JPG, PNG, GIF
Video Output
1Vp-p+/-(75 Ohm)
Audio Output
2.0Vrms+/-0.3V
Audio Signal Output
Characteristics
Frequency Response
20Hz-22kHz
SNR
> 90dB(1kHz 0dB)
Dynamic Scope
> 80dB(1kHz 0dB)
THD
< 0.04%
Crosstalk
> 80dB(1kHz 0dB)
Support Devices
Internal NAND,USB storage, SD/SDHC card
Remote Controller
Infrared,distance:7m,angle:30degree,
3.0V cell battery

19
Firmware upgrading
1. Use SD c a r d or USB s t o r a ge t h a t contains new f i r m w a r e t o upg r a d e.
2 .In E X P LO R E menu select the file name of f i r m w a r e ,a dialo g box will appear.
3. Select " Y E S " to confirm to upgrade fi rmware .
4. A f t e r showing "updating f i r m w a r e " for 1-2 m i n u t e , the display will l o s t signal,
Pls keep power on for 2 minutes more. Never plug power off at this time.
5. Up g r a d ing will be fin ished a f t e r 2 m i n u t e s , the player will auto-r e s t a r t .
 Loading...