

Page 1

Industrial Rugged Tablet
User Guide
FCC ID: 2ACHAT80
Page 2
User Guide
Thank you for using our industrial rugged tablet, this tablet is based on the Google Android
operating system.
Notice
• Before using the equipment, please read all the safety information in this guide, make sure
safe and proper use.
• A description of this specification based on the default setting of the device.
• Images and screenshots used in this manual may look different from the actual product.
• Some of the contents in this manual may differ from your device depending on the
software of the device or your service provider. Subject to change without notice.
• Available features and additional services may vary by device, software, or service
provider.
• Formatting and instructions for use based on the Google Android operating system, the
operating system may vary with the user.
• Applications and their functions may vary by country, region, or hardware specifications.
Our performance issues caused by third-party applications will not be responsible.
• The performance problems resulting from editing the registry settings or
incompatibilities are not responsible.
• The sound source, wallpapers and images provided of device, are licensed for limited use
between our and other respective owners. These citations are used and suitable for
commercial or other purposes, is in violation of copyright law. We take exception to such
copyright infringement situation
• Send and receive message, upload and download information, automatic synchronization
or use location services may have other costs. To avoid additional charges, please select
the appropriate data plan. For more information, please contact your service provider.
• Please keep all the printed guides for future reference.
Indictor
Before using, be familiarize with the icons in this manual:
Warning - could hurt themselves or others situation.
Caution - may damage the equipment or other devices.
Note – notes, usage tips, or additional information.
→ The next step - a step execution options that must be followed or the menu selection order.
For example: From the Home screen, open the application list and select Settings →
Wireless and Networks (represents select Settings, Next select Wireless and Networks).
[ ] Square brackets - device keys. For example: [①] (represents the Power On / Off / Lock
key)
Page 3
Only Google or our approved applications can be used. Pirated or illegal software may cause
damage or malfunction and the manufacturer will not accept the warranty due to this issue.
Articles provided may vary with your device, it's depending the software or accessories
supplied by your service provider on your region.
You can purchase additional accessories from us or our approved equipment manufacturers.
The supplied original accessories can provide the best performance for the device.
Other outside accessories provided may not be compatible with your device.
You must use a dedicated charger configured to charge. Unauthorized chargers may cause
batteries to explode or damage your device.
Users can not replacement the original equipped battery without our approval. Please contact
your service provider for battery replacement information.
Only use the charger to charge the battery.
When the battery is low, the device will emit a warning tone and display a low battery
message. The battery icon will appear blank. If the battery closest gone, the device will
automatically shut down. Users are required to charge the battery then device can be using.
If the battery is completely discharged, the device cannot turn on even if the connection to the
DC power adapter. So that users have to charge the depleted battery for a few minutes before
turn on.
Install
1.1 Accessories
Check the product Packaging Box whether the following items included:
Rugged tablet
Charger
Data cable
Bag
Hand strap
User guide
Digitizer pen
1.2 Battery Charge
The device is equipped with built-in lithium battery. You must charge the
battery before using the device for the first time.
Page 4
Continuously charging for first charge is recommended at least 10 hours, meanwhile to fully
complete the charge-discharge cycles for 3 or more times, in order to ensure the effective
activation.
Travel Charger improper connection may cause serious damage to the equipment or DC
power adapter. For any damage caused by misuse will not warranty.
·You can use the device while it is charging, but it will extend the time to fully charge the
battery.
·When the device is charging, the touch screen may be failure due to unstable power. If this
happens, unplug the DC power adapter from the electrical outlet, or disconnect the PC data
cable from the device.
·The device will become hot during charging. This is normal and will not affect the life or
performance of the device.
·Please send the device and charger back to us if it is not charging properly.
Please unplug the DC power adapter to conserve energy when not in use. When using, DC
power adapter should remain close to the outlet.
1. Put the charging plug is connected to the power strip, and then put the
DC charging cable into the DC power adapter and charging jack.
2. Put the DC power adapter into a standard power outlet.
3. When the battery is fully charged (the battery icon is no longer moving),
disconnect the DC power adapter and DC charging cable, and then
disconnect the DC power adapter from the power outlet.
It has to takes about 7 hours charging for not fully charging equipment.
Due to the battery is a consumable category and will gradually wear out,
therefore the charging time will be shortened. The initial charge capacity
of battery is 10,000 m/Ah.
1.2.1 Reduce Battery Consumption
If you start the automatic synchronization or WLAN functionality in the
background, the battery will be consumed faster. Turn off unnecessary
applications if to save battery power. You can also reduce the backlight
Page 5

time and the brightness of the display, or press [ ] to switch to sleep
mode when not using the device.
Page 6
For more comprehensive protection SIM card, this product is internal SIM card lock designed to
prevent damage of SIM card, you should always turn off the power before inserting or removing
SIM card.
Please safely uninstall or remove the memory card after power-off, it may cause system
problems if not follows the instruction. Put the facing down memory card contact area into the
slot, you will hear a click once the card locks.
1.2.2 The SIM Card Using
Insert & remove the SIM card.
1. Turn off the power;
2. Open the dust plugs;
3. Follow the direction sign, insert or remove the SIM card.
1.2.3 The Usage of Memory Card
1. Security unloads the memory card or turn off the power;
2. Open the dust plugs;
3. Insert or remove the memory card follow the direction sign.
2 Getting Started
2.1 Turn it On/ Off
For turning on,pressing[ ]power button for 5 seconds.
For turning off,pressing[ ]power button for 5 seconds,and then choose
Power Off → Confirm.
2.2 Knowing device
2.2.1 Map Display Function Details
Page 7
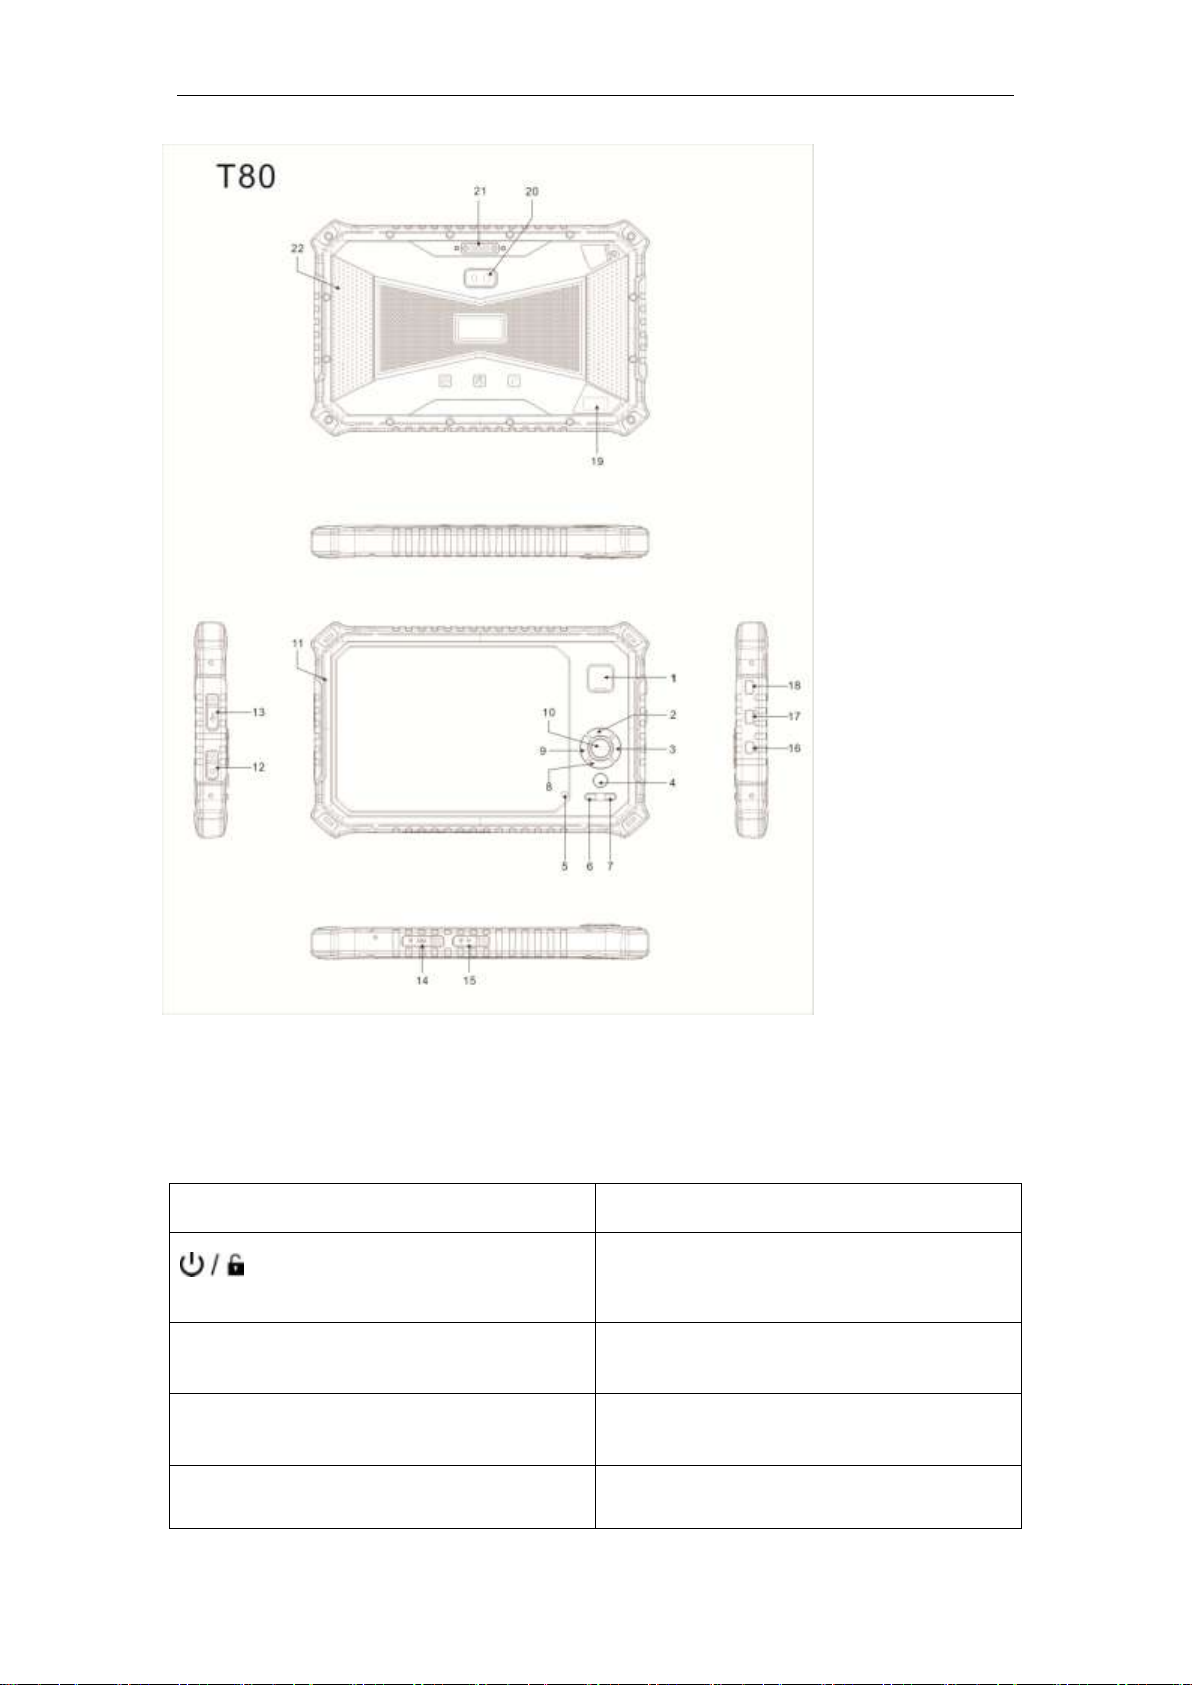
1: Sensing area ( Optional
module)
2: Up
3: Right
4: Back/ Scan Micro SD Slot
5: Sub Camera
6: Volume Down
7: Volume Up
8: Down
9: Left
10: Enter
11: MIC In
12: Earphone Button
13: Micro USB interface
14: SIM Card Slot
15: TF Card Slot
16: Reset Button
17: Camera shortcuts
18: Power on / off / lock
Button
19: 2D barcode scanning
20: Main Camera
21: External Serial
22: Speaker
Button
Function
Power on/off button
Power on(Press);Lock the touch
screen
+ Volume up button
Increase the Volume
- Volume down button
Decrease the Volume
▲ Up
Turn up
2.2.2 Buttons
Page 8
◀ Down
Turn down
▼ Left
Turn left
▶ Right
Turn right
Ω Mic In
Mic In
Camera shortcuts
Take photo
SIM
Put in SIM Card
TF
Put in TF Card
RET
Reset/ Shut down quickly
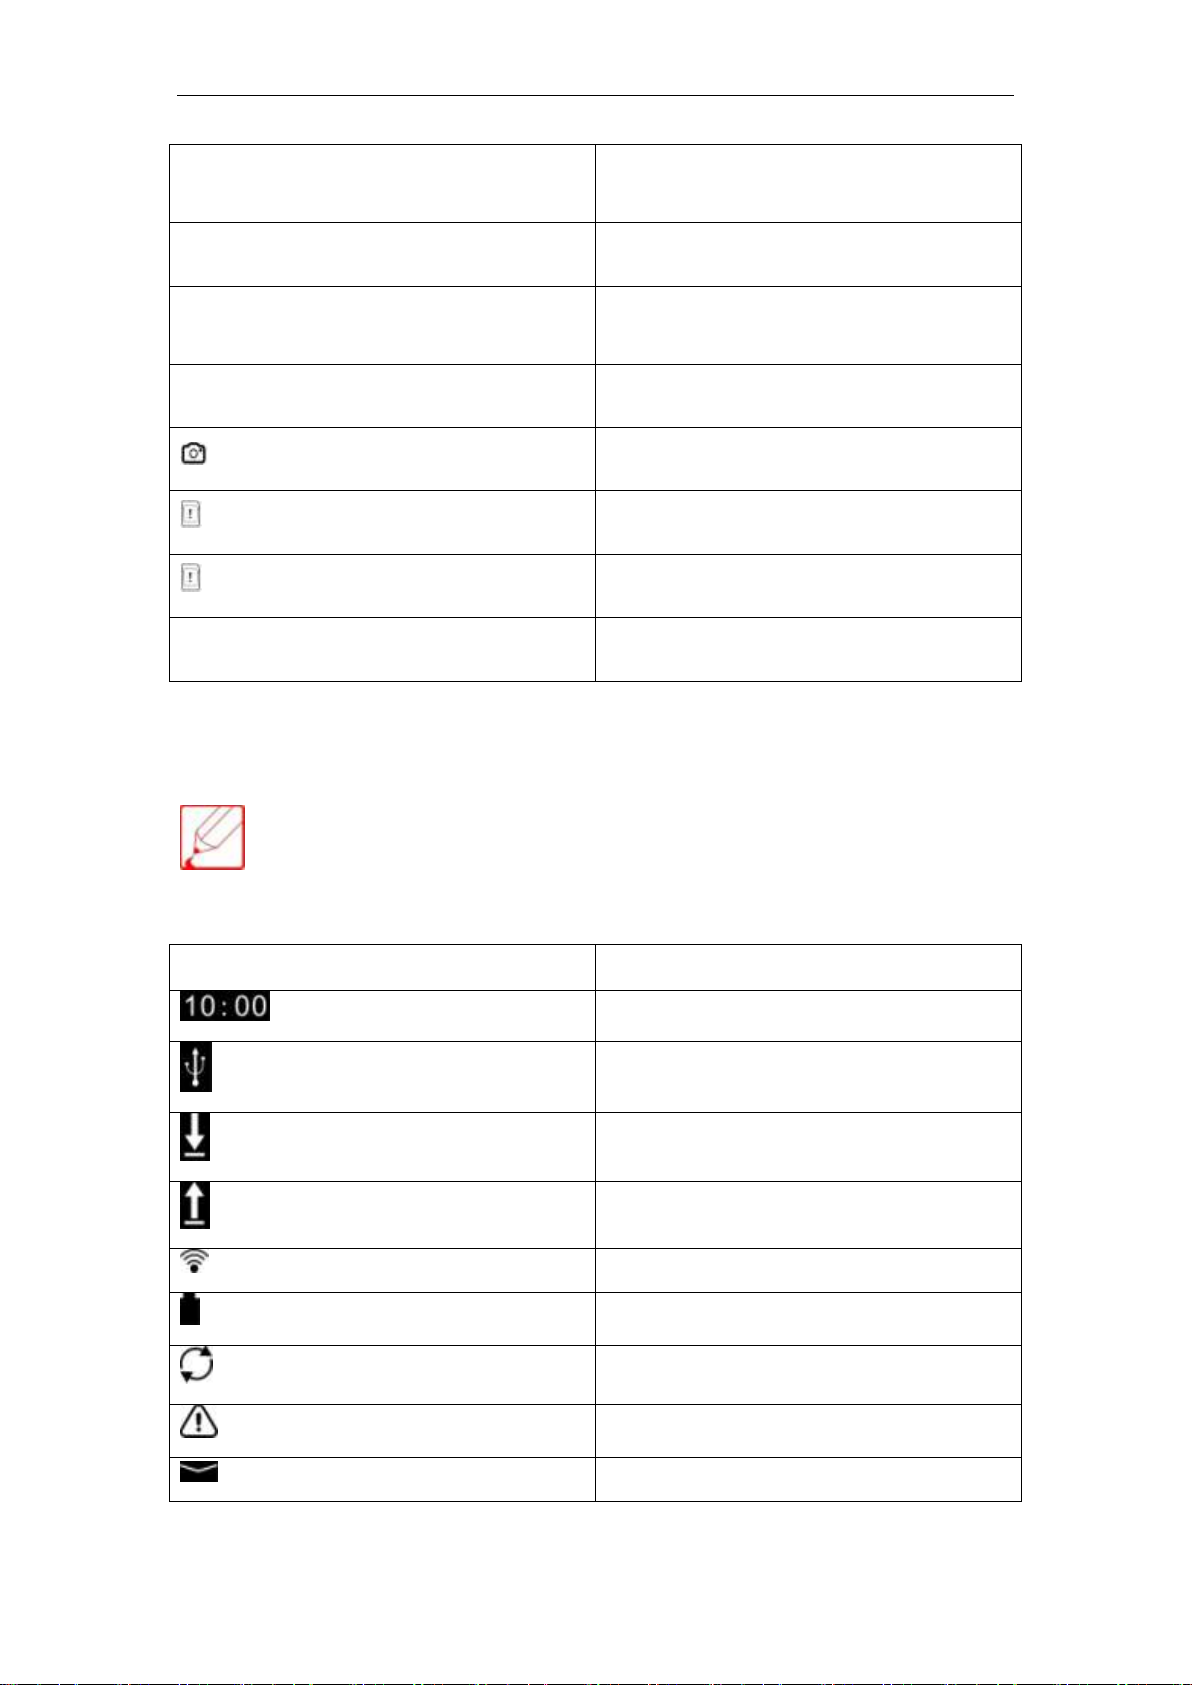
The icon on the display may differences depending on your region or service provider.
Icon
Definition
Current time
Connected to the computer
Downloading data
Uploading data
Connected to the WLAN
Battery level
Synchronized with Web
An error occurred or need attention
New E-mail Message
2.2.3 Indicator
Page 9
2.3 Using the digitizer pen
Nominal voltage
1.5V(AAAA dry
battery)
power source
AAAA dry battery
Rated power(1.5V)
<720uA
Charging function
No(Disposable
batteries)
Writing for full energy
250H
Battery capacity
500mAh
Weight (without
batteries)
10.5g(±1g)
Pressure return (income
method handwriting)
Level 256
Tip diameter
1.2mm(±0.2mm)
Minimum handwritten
weight
20g
Writting accuracy
≤2mm
REPORT RATE
100HZ
Writing angle
>30°
Operating frequency
(initial)
500kHz
Palm suppression
Yes
Rated standby power
consumption(1.5V)
<60uA
Key features
User-defined
2.3.1 Scope of application
This specification applies to active capacitive pen DAS-BB01-013 Product
2.3.2 Product appearance, structure
1. Size: This product is cylindrical , Diameter: 9.4mm
2. Main components: a cartridge, written, pen, Pen end caps, pens, T card, PCB board and
batterie.
3. Picture: Black (Pictures for reference only, please prevail in kind).
2.3.3 Using environment
1. At a high temperature 50ºC, relative humidity of 90%, could writting well; at
low ambient temperature -10 ℃ to be able to write properly.
2. With the new battery, in a state of full capacity can writting continuously for
250 hours without no appearance and draw-off phenomenon during the time.
3. Protective coating products
Page 10

To set the screen orientation remains unchanged, click Settings→Display→Auto-rotate screen.
Or through the desktop to quickly set up,turn off auto-rotate screen switch drop-down the Status Bar
above Screen→Automatically turn the screen
3.1 The coating adhesion test, on the surface of coating pen or cap blade with a
hundred cells draw 1m ㎡ small box, to test the product area depending on
the quantity of the small box , scratch through the coating material for the
bottom quasi depending on the depth of the scratch; using 3M 600 type tape
affixed to the small box, tape rolling belly with your fingers remove air
bubbles, then quickly pulled with a 45-degree angle from the tape, for three
times; a small box on the coating test position can’t fall off.
4. Drop Test
The capacitive pen (charged battery) from a height of 0.8m drops to portland
cement or marble floors three times, capacitive pen not appear disintegration,
written, cap, button is not loose, fall off; not a fracture tip, capacitive pen can
writing normally. (The test notes, tip not to fall directly to the ground.).
5. Button durable
Capacitive pen button pressed continuously 2PCS 20,000 times on the body, the
buttons can not appear damage, loss, buttons elastic normal, to be able to
rebound after pressing the reset.
2.3.4 Rotating Touch Screen
Equipment owned the built-in motion sensor which can detect the direction. If
you rotate the touch screen it will automatically rotate according to the
decryption device orientation.
Page 11
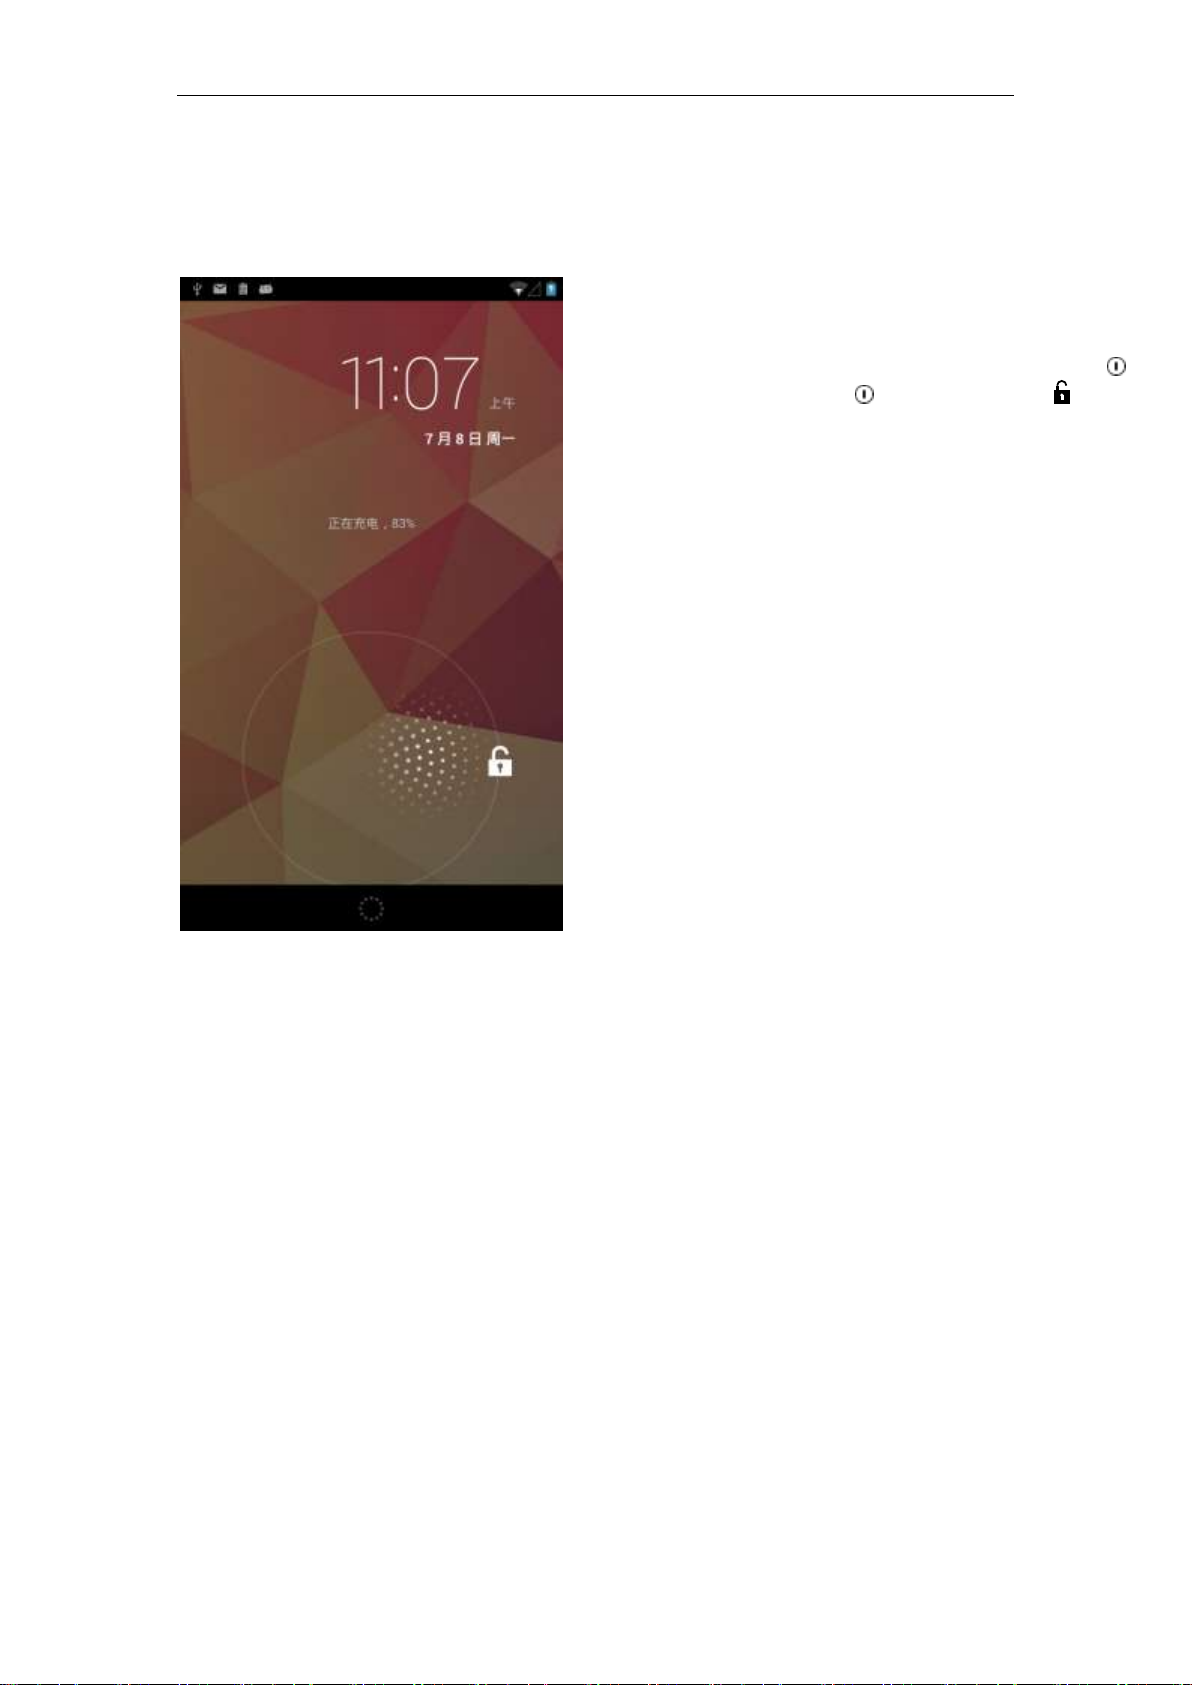
2.3.5 Lock & Unlock the Touch Screen
· If the equipment is not used for a specified period of
time, the device will standby and automatically lock
the touch screen to prevent accidental operation of the
device. To manually lock the touch screen, press [ ]
· To unlock, press [ ], and then drag in any
direction until it reaches the edge of the ring. If you
set a screen lock, you need to enter a password or
draw a pattern.
2.4 Understanding the home screen
After unlocked, enter the desktop, all your installed programs will be
displayed on the desktop. You can click the icon to open the corresponding
program; you can also press and drag the icon to sort. If you want to uninstall
the application, drag the icon to the top of the trash. When the device is in
standby mode, you can see the home screen. In the home screen, you can
view the device's status and access applications. Scroll left or right to select a
home screen panel.
Page 12
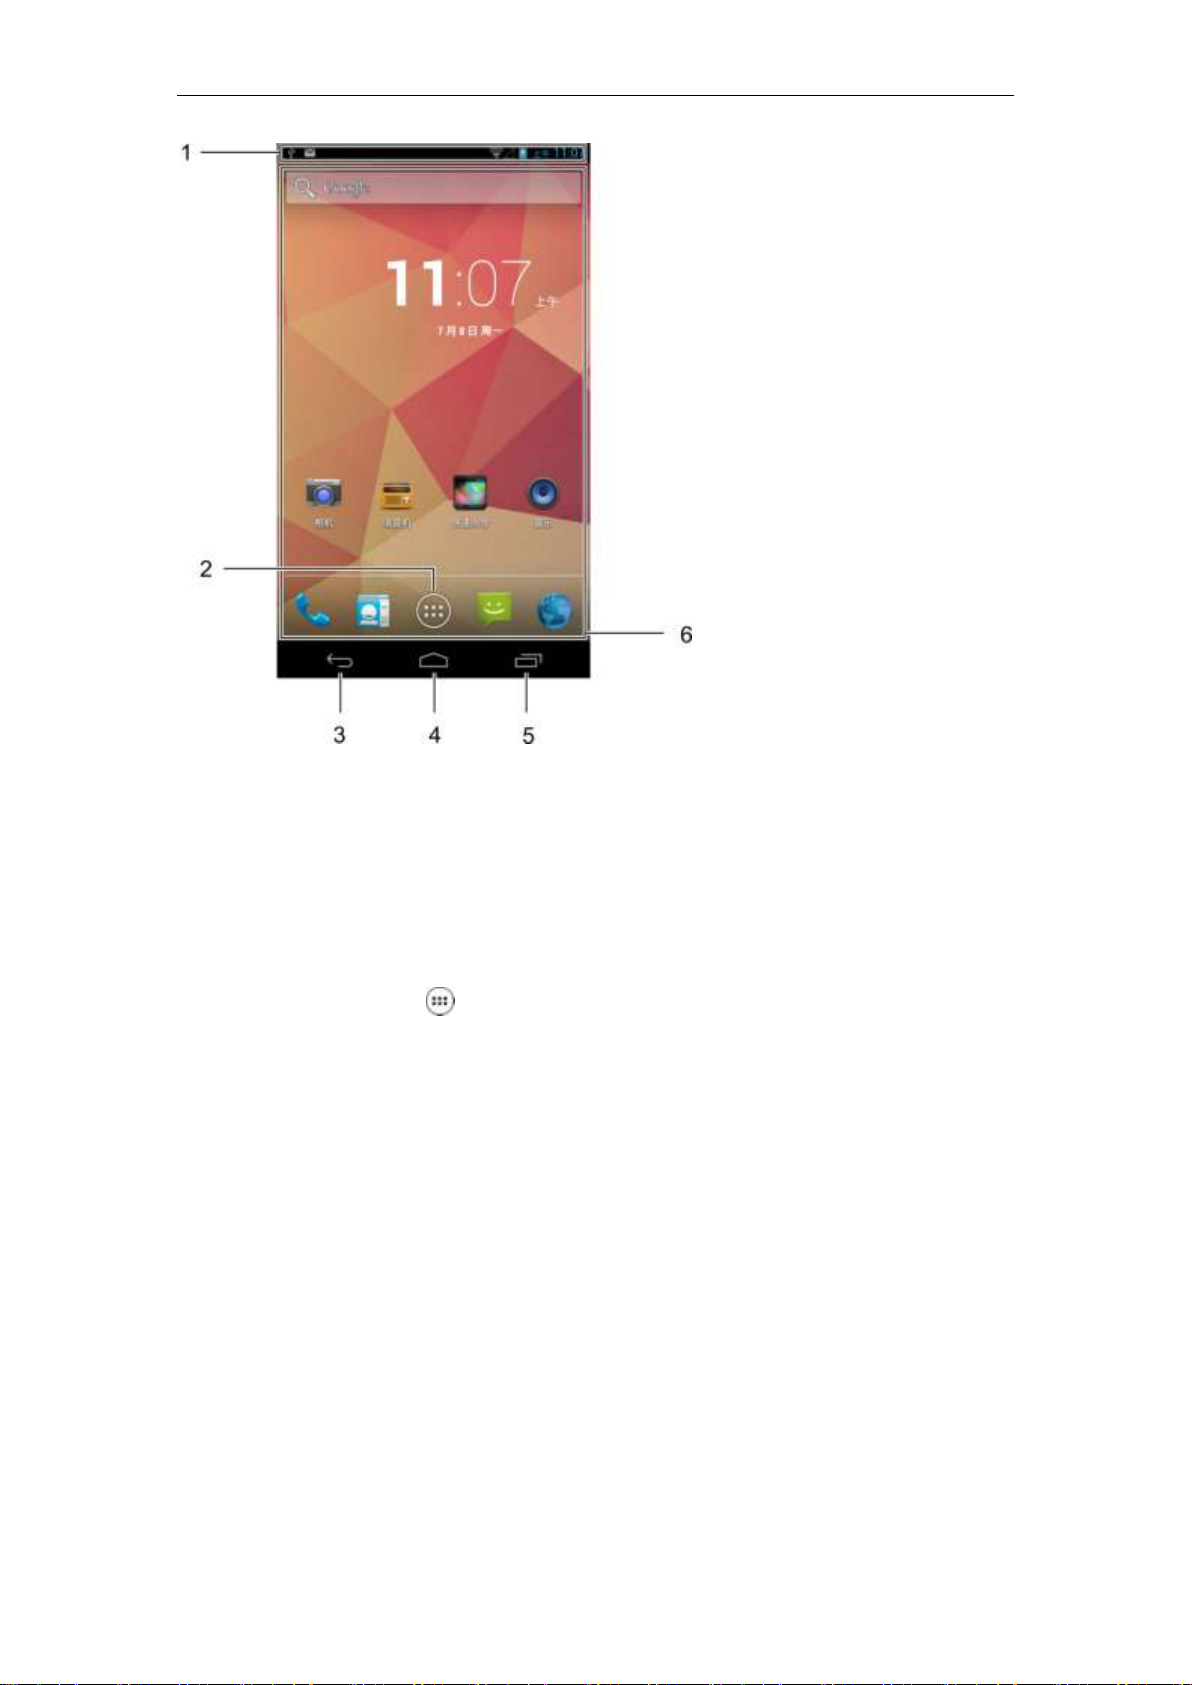
1: Status Bar
2: Open the Applications panel
3: Return key
4: Home key
5: Multi-task switching
6:Desktopcontrols,
shortcuts region
1. The main screen, tap , open up the application panel;
2. Select the item category;
• Application: On the home screen, add a shortcut to the application;
• Widgets: Widgets is an application that provides convenient functions and information on the main
screen;
3. Select the item you want to add to the home screen, long press, move to the corresponding position
according to the prompt.
2.4.1 Adding items to the home screen
You can add applications or application programs, shortcuts, widgets or
folders to customize the home screen.
To add items to the home screen:
2.4.2 Move items on the home screen
1 Long press the item, until the main screen appears grid;
2 Drag the item to the desired location.
2.4.3 Remove items from the Home screen
Page 13

1 Press the item you want to remove; Recycle Bin "X Remove"
logo appears on the main scre en edge;
2 Drag the item to the "X Remove" sign;
3 When the items and "X deleted" flag is discolored, release the
item.
2.4.4 Add shortcuts for applications
1 From the application list, tap and hold an application icon;
Shortcut icon for the application will be added to the main
screen;
2 Move the icon to the desired location or move it to another panel
of the main screen.
2.5 Access Applications
1. From the main screen, click [ ] to display the application list, click to open the
desired application;
2. To view the downloaded application, select Settings → Applications.
2.6 Custom Device
According to personal preferences custom device can realize more functions.
2.6.1 Change the Display Language
1. From the Home screen, open the application list and select Settings →
Language and input → language;
2. Select the desired language.
2.6.2 Set the current date and time
1. From the Home screen, open the application list and select Settings → Date and
Time;
Page 14

1. Long Press the Home screen blank, according to the pop-up menu, select the type of wallpaper
you need
2. Wallpaper: wallpaper is the built-in system wallpaper.
Live Wallpaper: The system automatically or self-installing live wallpaper.
Gallery: User-defined wallpaper.
2. Select your time zone, set the date and time, and change other options.
2.6.3 Open or close touch key tone
From the Home screen, open the application list and select Settings → Phone
profiles → Standard → touch tone;
2.6.4 Adjust the volume on the device
1. Open the Settings → Profiles → Standard → Volume;
2. Drag the slider to adjust the volume of the media and notification volume
2.6.5 Select the wallpaper of the Home screen.
For the preset image or wallpaper used in devices ,we will not be responsible.
2.6.6 Adjust the display brightness
1 From the Home screen, open the application list and select Settings → Display
→ Brightness;
2 Drag the slider to adjust the brightness level;
3 Select OK.
Display brightness level will affect the speed of the device consumes battery power.
2.6.7 Using Bluetooth devices
1. From the Home screen, open the application list and select Settings → Bluetooth
→ Open;
2. Click on available devices, search for devices, click pairing;
3. After the pairing is successful, you can use Bluetooth devices.
Page 15

2.6.8 Set up screen lock
You can lock the touch screen to prevent unauthorized use of the device using the
unlock pattern or password.
• Set up screen lock, when switch or unlock the touch screen you will be asked to enter the
unlock code.
• If you forget your password, the device needs to be sent back to us, we'll reset it for you.
Security code caused by the use of illegal software or private data loss or other damage, we
are not responsible for this.
Set an unlock pattern
1. From the Home screen, open the application list and select Settings → Security
→ Screen lock → pattern;
2. Note viewing screen prompts and examples patterns and select the next step;
3. Drag your finger to connect at least four points, draw patterns;
4. Select Continue;
5. Redraw the pattern to confirm;
6. Select OK;
Setting unlock password
1. From the Home screen, open the application list and select Settings → Security
→ Screen lock → Password;
2. Enter a new password (alphanumeric) and select Continue;
3. Enter the new password again and select OK;
2.7 Input text
You can select a character on the virtual keyboard to enter text.
Don’t support some languages.When texting, you need to change the writing language to
supported languages.
2.7.1 Use iFlyTek Input method
1. From the Home screen, open the application list and select Settings →
Language and input → default → iFlyTek input HD;
2. Use the virtual keyboard to enter text.
Page 16

1:Change Case
2: switch between digital / symbols
and text mode
3: Collapse virtual keyboard
4: Clear input
5: Complete
2.7.2 Copy and paste text
When entering text, you can use the copy and paste function to use text in other
applications.
1. Tap and hold the word;
2. Drag or to select the desired text;
3. Select Copy to copy, cut and paste text or select Cut to the clipboard;
4. In another application, tap and hold the text input field;
5. Select Paste texts from the clipboard into the text input field.
Page 17

2.8 Multi-task switching
Tablet support running multiple tasks
simultaneously, switch between multiple
tasks you only need to press the unlocked
state "main screen key" and select the
program you want to switch.
The first time, please choose to import contacts, support various ways to add contacts. You
can import SIM card, SD card contacts, or set up the synchronization account, you can also
create a new contact directly
2.9 Management of contacts
Page 18

2.10 Phone call
The dial keypad can be used to make calls,
it can also be used to search for contacts.
support search for a contact name phonetic
initials, part of the alphabet, spelling, and
phone number, the search results according to
the degree of matching and frequency of
contact have spent sorting. The missed calls
of the call history are in red logo, show the
number of rings; also through third-party
software to achieve a strange phone number
is displayed attribution.
You can add one or more recipients; message
content supports the sending of text or insert
images, expressions, contact information,
audio and video. Important message content,
you can long press to select favorite or
forwarded.
2.11 Write and send a text message
Page 19

Open the application supermarkets batch installation necessary procedures, support to share
new and interesting applications with friends
•If you need to access the internet or download data might otherwise produce costs. For
more information, please contact your service provider.
•Label web browser menu may be different, depending on the service provider.
• Available icons may vary due to different region or service provider.
• From the Home screen, open the application list and select the browser start page;
If you want to access a specific web page, select the URL input field, enter the web address,
and select GO.
• Open multiple pages
You can open multiple pages and switch between pages.
1 From the Home screen, open the application list and select the browser.
2 Select , click on the new tab page "+."
2.12 Use of Application Market
3 Networks
3.1 Browser
Learn how to serve your favorite pages and add them to bookmark. Scaling web
browser with a double-click or two fingers to toggle, quick access to frequently used
sites through site navigation, support for multi-tag, click on the tab to switch pages;
smart full screen, browsing area the best fit.
3.1.1 Browse the web
3.2 E-mail
Learn how to send or view email messages via personal or corporate e-mail account.
3.2.1 Set up an email account
1. From the Home screen, open the application list and select the e-mail;
Page 20

1. From the Home screen, open the
application list and select Email→ E-mail
accounts;
2. Select ;
3. Add the information recipient;
• manually enter email addresses separated
by a semicolon or a comma;
4. Select Add Cc / Bcc to add more
recipients;
5. Select the subject field and enter a subject;
6. Select the text input field and enter your
email text;
7. Select → To the attached file;
You can select a file from the file list;
8. Select Send to send the message.
2. Enter the e-mail address and password;
3. Select Next, enter the POP3 server settings, select Next, enter the outgoing server
settings. (Server settings, please consult the electronic mail service provider);
4. Follow the on-screen instructions;
5. To add more e-mail accounts, select → Settings → Add account, and then repeat
steps 2-4.
After completing the e-mail account settings, email messages will be downloaded to
the device. If you have created more than two accounts, you can switch between email
accounts; selection screen in the upper left domain identity, and then select the
account I want to extract the message.
3.2.2 Send e-mail
3.2.3 Check e-mail messages
After opening the e-mail account, you can view offline before retrieving e-mail, or
connect to your email server to check for new messages. After extracting the e-mail
message, you can view them offline.
1. From the Home screen, open the application list and select Email → email
account;
Page 21

Depending on the shooting scene or shooting conditions, the storage capacity may be
different.
2. Select to update the mailing list;
3. Select the e-mail message.
In the message view, use the following options:
• To reload the messages, select ;
• To create a new message, select ;
• To delete the message, select ;
• To mark the message as unread, select ;
• When you want to customize your account settings, select Settings → Select Account;
• To add a star to the message, select .
4 Entertainments
4.1 Camera
Learn how to capture and view photos and videos. Turn the camera program to take
high-quality photos, supports fast adjust the focus, support continuous shooting,
timing, effects, and more professional camera mode. Shooting video only switch to
shooting mode menu, supports 720P high quality video recording.
1. From the Home screen, open the application list and select Camera to turn on the camera;
2. Make any necessary adjustments;
3. Select to take pictures;
4. Photos are automatically saved;
After taking pictures, select the image viewer icon to view the photographs.
• To view more photos, scroll left or right. You can also click the bottom of the screen to view
photo thumbnails.
• To zoom in or out, place two fingers on the screen, and then release your finger (finger is
reduced display closed), or double-click on the screen.
• To start a slide show of images, select Menu → slideshow. Tap the screen to stop the
slideshow.
• To send a photo to others, select .
• To delete a photo, select .
• To view photo details, select Menu → Details.
• To rotate the picture, rotate to the left to select the menu →Rotate Left.
Page 22

Type
Format
Picture
bmp、gif、jpg、png
Video
rmvb、rm、mp4、avi、wmv、mkv、mov、flv、3gp
•Some file formats are not supported, depending on the device's software.
• If the file size exceeds the available memory, an error occurs when opening files
• To rotate the photo clockwise rotation Select Menu →Rotate right.
• To set the photo as wallpaper, select the menu → The picture settings.
• To crop an image from a photo, select Menu → crop.
• For photos into a simple treatment, select Menu → Edit.
4.2 Gallery
Learn how to view and play stored in the device memory photos and videos. Gallery supports
to view pictures by path folder, you can double-click or two fingers to zoom toggle a single
picture, you can slide around to switch to the previous or next image, single image to display
or hide the menu control project
4.2.1 Supported file formats
Page 23

4.2.2 View photos
1 From the Home screen, open the
application list and select Gallery;
2 Select the folder;
3 Select the photos you want to view;
When viewing a photo, use the following
options:
• To view more photos, scroll left or right.
You can also click the bottom of the
screen to view photo thumbnails.
• To zoom in or out, place two fingers on
the screen, and then release your finger
(finger is reduced display closed), or
double-click on the screen.
• To start a slide show of images, select
Menu → slideshow. Tap the screen to stop
the slideshow.
• To send a photo to others, select
• To delete a photo, select.
• To view photo details, select Menu →
Details.
• To rotate the picture, rotate
• to the left to select the menu →Rotate
Left.
• To rotate the photo clockwise rotation
Select Menu →Rotate right.
• To set the photo as wallpaper, select the
menu → The picture settings.
• To crop an image from a photo, select
Menu → crop.
• For photos into a simple treatment, select
Menu → Edit.
5 Connections
Use removable storage functionality
Before connecting the computer, make sure Settings → Developer Options → USB
debugging has been closed.
5.1 Connect with computer
1. Connect the equipment and computer with data lines;
2. Pull down the status bar at the top of the screen → USB is connected → Turn on USB
storage devices;
Page 24

WIFI running in the background will consume battery power.
1. From the Home screen, open the application list and select Setting → Wireless
and Networks → Other → Mobile networks.
2. Once set up, you can access the Internet via the 3G.
5.2 WIFI
Learn how to use your device's wireless networking capabilities to activate and
connect to comply with IEEE 802.11 b / g / n standard wireless LAN (WIFI).
You can connect to the Internet or other network access point or wireless hotspot devices
available.
5.2.1 Start WIFI function
1. From the Home screen, open the application list and select Settings → Wi-Fi → WIFI;
2. Open WIFI to start WIFI function.
5.2.2 Find and connect WIFI
1 From the Home screen, open the application list and select Settings → Wi-Fi → WLAN →
Open, the device will automatically search for available WIFI;
2 Select the network in WIFI network;
3 Enter the network password (if necessary);
4 Select the Connection.
5.2.3 Manually add WIFI
1 From the Home screen, open the application list and select Setting → Wi-Fi
→ WLAN → Open → Add Network "+".
2 Enter the SSID of the network and select the type of security.
3 Set the security settings depending on the selected type of security.
4 Select Save.
5.3 3G Connection
Learn how to use the device's 3G wireless network capabilities.
Page 25

Device has been configured with an Internet connection. If the internet is unable to access, you need
to edit the connection. If you are not sure the connection information which needs to enter, please
consult your service provider.
The RFID test function is only used to detect whether RFID module is able to work
properly in RFID tablet. If you need to develop related applications, please contact us to
obtain secondary development kit.
5.4 VPN Connection
You can create a virtual private network (VPN) and through a public network
such as the Internet, connect to your private network.
5.4.1 Setting up a VPN connection
1. From the Home screen, open the application list and select Settings →
Wireless & Networks → More → VPN → Add VPN.
2. Select a VPN type
3. Custom the connection information
4. Select Save when finished.
5.5 RFID Test Function
Learn how to use high frequency RFID testing, it can read the ID number of HF
RFID tags.
Page 26

1. After entering the main
interface, click on the link
button. The status bar above
the main interface displays
the "Connection successful",
it means the built-in HF RFID
Module started successfully.
2. After entering the main interface, click on the link button. The status bar above the main
interface will displays "Connection successful", it means the built-in HF RFID Module started
successfully.
3. After the successful launch of HF RFID, click the Find Card button, the device will
precede HF RFID tag reading work.
4. Click the Clear button, the record label will be empty.
5. Click the Disconnect button, the device will close the connection with HF RFID, and will
be displayed "has been disconnected" in the status bar.
6 Tools
6.1 Calculator
Learn how to perform mathematical calculations directly on the device.
1. Open the application list and select the calculator from the Home screen.
2. Use the keys that correspond to the calculator displayed to perform basic or
scientific computing.
6.2 File Browser
Page 27

Type
Format
Picture
BMP, GIF, JPG, PNG
Video
RMVB, RM, 3GP, MP4, AVI, WMV, FLV, MKV, MOV
Audio
MP3, WMA, OGG, APE, FLAC, AAC, WAV
Some file formats are not supported, it's depending the applications on the device.
If the file size exceeds the available memory, an error occurs when you open the file.
Learn how to quickly and easily access all images, video, music, sound clips, and
other types of files stored on the device.
6.2.1 File Formats Supported
6.2.2 Open the files
1. Open the application list and select ES file browser from the Home screen.
2. Select the folder.
To move up a level in the file directory, select .
3. Select a file to open.
6.2.3 Copy or move files
1. Open the application list and select ES File Browser from the Home
screen.
2. Click & long press the folder or file which needs copy or move until the
pop-up edit menu.
3. Select Copy or Cut.
4. Locate the folder and choose Edit → Paste.
6.2.4 Delete Files
1. Open the application list and select ES File Browser from the Home
screen.
2. Click & long press the folder or file which needs delete until the pop-up
edit menu.
3. Select Delete → Yes.
Page 28

7 Settings
Access Settings
1. Open the application list and select Settings from the Home screen.
2. Select Settings category, then select Options.
7.1 Wireless and Network
Change settings of Wi-Fi connection.
7.1.1 WIFI settings
WIFI: Turn on or Turn off the WLAN function.
Add Network: manually add WLAN access point.
Advanced Settings: Click Menu→Advanced. WIFI network notification,
sleep and other options can be setting.
7.1.2 Bluetooth
Settings and connect to Bluetooth devices.
7.1.3 Internet Data Usage
Check each network traffic, as well as internet browsing traffic usage of each
software.
7.1.4 VPN
Settings and connect to virtual private networks (VPN).
7.2 Sound
Change different sound settings.
Volume: Adjust the volume of media, alarm, and notification.
7.3 Display
Ringtone: Select a ringtone to alert events.
Touch Sounds: Set the device to sound when you select an application
or option on the touch screen.
Screen Lock Sound: Set the device to sound when you lock or unlock
the touch screen.
Page 29

Change the display settings.
Brightness: Set the brightness of the display.
Wallpaper: Set wallpaper.
Auto-rotate screen: Set whether to automatically rotate content when
you rotate the device.
Sleep: Set the length of waits time before closing the display backlight.
Font Size: Set the system font size.
7.4 Storage
Check the usage of memory space and SD card.
7.5 Battery
Check the battery usage.
7.6 Applications
Change the management settings of the application has been installed.
Downloaded: list of applications that access the device has been
installed & view application information.
Wallpaper: View service being used and access the service for
management.
All: View the built-in applications on this Tablet.
7.7 Accounts and sync
Change the automatic synchronization function settings or managing the
account you want to synchronize.
7.8 Location Services
Google's Location Service: Set to use the wireless network to view the
7.9 Security
Change the setting to protect the equipment.
location in your application.
Location and Google Search: Allows Google to use your location
information to improve search results.
Screen lock: Set the unlock security code.
Page 30

- No: Disable the screen lock.
- Slide: Drag the circle to the specified location to unlock.
- Pattern: Set unlock pattern for unlocking the screen.
- PIN: Set a password (numeric) to unlock the screen.
- Password: Set a password (numbers + letters) to unlock the screen.
Encryption Tablet: Set Tablet power on password.
Select the Device Manager: View Manager is installed on the device.
Bootable Device Manager to apply the new rules.
Unknown Sources: Select to download applications from any source. If
you do not select this option, the device can only download applications
from the Android Market.
Trusted Credentials: Use certificates and credentials to ensure the safe
use of various applications.
From the SD Card Installation: install the encryption certificate stored
in a USB storage device.
Clear Credentials: delete the contents of the device credentials and
reset the password.
7.10 Language & input
Change the text input settings.
Select Language: Select the display language for all menus and
applications.
Keyboard Settings:
- IFlyTek Input: This input can be entered in Chinese & English.
- Android Keyboard: This input can only be entered in English.
7.11 Voice
Text-to-Speech (TTS) output:
- Preferred engine: change the speech synthesis engine into voice text.
- Install voice data: Download and install speech synthesis required for
- Language: set the text-to-speech function of language to use.
- Speed: The play speed after convert text into speech.
- Listening Example: Listen to the spoken word as an example. Install
7.12 Backup and Reset
voice data
voice data for using text to speech conversion.
Page 31

If the battery is exhausted, the date and time will be reset.
Restore factory setting: the setting is reset to the default values and
delete all data.
7.13 Date and Time
Access and alter the following settings to control the display date and time:
Auto: When crossing time zones the date and time will update
automatically (Need network support).
Set date: manually set the current date.
Set time: manually set the current time.
Select time zone: set the local time zone.
Use the 24-hour clock: Set in 24-hour display time.
Select Date Format: To select the date format.
7.14 Accessibilities
System auxiliary settings.
7.15 Developer Options
Option is used when the developer debug the system.
When using third-party PC management software, you may need to turn
USB debugging option.
7.16 About Phone
Display related information, inspection equipment status etc.
8.0 Troubleshooting
8.1 Touch screen responds slowly or improperly
If the device touch screen is not responding properly, try the following:
Remove any protective covers from the touch screen. Protective covers may
prevent the device recognizes the input.
Make sure your fingers are clean and dry when tapping the touch screen.
Restart the device to clear any temporary bugs.
Ensure that the device applications are upgraded to the latest version.
If the touch screen is scratched or damaged, please send it back to us
Page 32

8.2 The device freezes or has fatal errors
If your device freezes or hangs, you may need to close programs or reset the
device to regain functionality. If the device is frozen and unresponsive, use a
sharp tool, press the Reset button, the device will automatically reboot. If the
problem persists, you can also perform a factory data reset. On the
Applications screen, tap Settings → Accounts → Factory data reset → Reset
device → Erase everything.
8.3 The device beeps and the battery icon is empty
Your battery is low. Recharge or replace the battery to continue using the
device.
8.4 The battery does not charge properly or the device turns off
If the battery no longer charging properly, please send it back to us.
8.5 The device displays network or services error messages
When you are in areas with weak signals or poor reception, you may lose
reception. Move to another area and try again.
You cannot access some options without a subscription. Contact your
service provider for more details. The touch screen responds slowly or
improperly.
8.6 The device is hot to the touch
When you use applications that require more power or use applications on your
device for an extended period of time, your device may feel hot to the touch.
This is normal and should not affect your device’s lifespan or performance.
8.7 Error messages appear when launching the camera
Your device must have sufficient available memory and battery power to
operate the camera application. If you receive error messages when launching
the camera, try the following:
Charge the battery.
Free some memory by transferring files to a computer or deleting files
from your device.
Restart the device. If you are still having trouble with the camera
application after trying these tips, contact our service center.
Page 33

8.8 Error messages appear when opening music files
Some music files may not play on your device for a variety of reasons. If you
receive error messages when opening music files on your device, try the
following:
Free some memory by transferring files to a computer or deleting files
from your device.
Ensure that the music file is not Digital Rights Management (DRM)-
protected. If the file is DRM-protected, ensure that you have the
appropriate license or key to play the file.
Ensure that your device supports the file type.
8.9 A connection is not established when you connect the device to a
computer
Ensure that the USB cable you are using is compatible with your device.
Ensure that you have the proper drivers installed and updated on your
computer.
9.0 Safety precautions
To protect yourself and others from harm or to protect your equipment from
damage, please read all of the following information before using your device.
9.1 Warning: Prevent electric shock, fire, and explosion!
Do not use damaged power cords or plugs, or loose electrical sockets
Do not touch the power cord with wet hands, or disconnect the charger by
pulling on the cord
Do not bend or damage the power cord
Do not use your device while charging or touch your device with wet hands
Do not short-circuit the charger or the battery
Do not drop or cause an impact to the charger or the battery
Do not charge the battery with chargers that are not approved by the
manufacturer
Do not use your device during a thunderstorm. Your device may malfunction
and your risk of electric shock is increased.
9.2 Do not use damaged power cords or plugs, or loose electrical sockets
Page 34

For safe disposal of batteries, please contact the nearest authorized service
center.
9.3 Handle and dispose of batteries and chargers with care
Use only Samsung-approved batteries and chargers specifically designed
for your device. Incompatible batteries and chargers can cause serious
injuries or damage to your device.
Never dispose of batteries or devices in a fire. Follow all local regulations
when disposing of used batteries or devices.
Never place batteries or devices on or in heating devices, such as
microwave ovens, stoves, or radiators. Batteries may explode when
overheated.
Never crush or puncture the battery. Avoid exposing the battery to high
external pressure, which can lead to an internal short circuit and
overheating.
9.4 Protect the device, batteries, and chargers from damage
Avoid exposing your device and batteries to very cold or very hot
temperatures.
Extreme temperatures can cause the deformation of the device and reduce
the charging capacity and life of your device and batteries.
Prevent batteries from contacting metal objects, as this can create a
connection between the + and – terminals of your batteries and lead to
temporary or permanent battery damage.
Never use a damaged charger or battery.
Note: When using the device in a restricted area, please observe all safety
warnings and regulations
9.5 Turn off your device where prohibited
Comply with all regulations that restrict the use of a mobile device in a
particular area.
9.6 Do not use your device near other electronic devices
Most electronic devices use radio frequency signals. Your device may interfere
with other electronic devices.
9.7 Do not use your device near a pacemaker
Avoid using your device within a 15 cm range of a pacemaker if possible,
as your device can interfere with the pacemaker.
Page 35

If you must use your device, keep at least 15 cm away from the
pacemaker.
To minimize the possible interference with a pacemaker, use your device
on the opposite side of your body from the pacemaker.
9.8 Do not use your device in a hospital or near medical equipment that can
be interfered with by radio frequency
If you personally use any medical equipment, contact the manufacturer of the
equipment to ensure the safety of your equipment from radio frequency.
9.9 If you are using a hearing aid, contact the manufacturer for information
about radio interference
Some hearing aids may be interfered with by the radio frequency of your
device. Contact the manufacturer to ensure the safety of your hearing aid.
9.10 Turn off the device in potentially explosive environments
Always comply with regulations, instructions and signs in potentially
explosive environments.
Do not use your device at refueling points (service stations), near fuels or
chemicals, and at blasting areas.
Do not store or carry flammable liquids, gases, or explosive materials in
the same compartment as the device, its parts, or accessories.
9.11Turn off your device when in an aircraft
Using your device in an aircraft is illegal. Your device may interfere with the
electronic navigation instruments of the aircraft.
9.12 Electronic devices in a motor vehicle may malfunction due to the radio
frequency of your device
Electronic devices in your car may malfunction due to radio frequency of your
device. Contact the manufacturer for more information.
10 Proper care and use of your mobile device
10.1 Keep your device dry
Humidity and all types of liquids may damage device parts or electronic
circuits.
Page 36

Do not turn on your device if it is wet. If your device is already on, turn it
off and remove the battery immediately (if the device cannot turn off or
you cannot remove the battery, leave it as-is). Then, dry the device with a
towel and take it to a service center.
Liquids will change the color of the label that indicates water damage
inside the device. Water damage to your device can void your
manufacturer’s warranty.
10.2 Do not use or store your device in dusty, dirty areas
Dust can cause your device to malfunction.
10.3 Do not put your device on slopes
If your device falls, it can be damaged.
10.4 Do not store your device in hot or cold areas.
Your device can explode if left inside a closed vehicle, as the inside
temperature can reach up to 50 °C.
Do not expose your device to direct sunlight for extended periods of time
(such as on the dashboard of a car).
10.5 Do not store your device with such metal objects as coins, keys and
necklaces
Your device may become deformed or malfunction.
If the battery terminals are in contact with metal objects, it may cause a
fire.
10.6 Do not store your device near magnetic fields
Your device may malfunction or the battery may discharge from exposure
to magnetic fields.
Magnetic stripe cards, including credit cards, phone cards, passbooks, and
boarding passes, may be damaged by magnetic fields.
Do not use carrying cases or accessories with magnetic closures or allow
your device to come in contact with magnetic fields for extended periods
of time.
10.7 Do not store your device near or in heaters, microwaves, hot cooking
equipment, or high pressure containers
The battery may leak.
Your device may overheat and cause a fire
Page 37

10.8 Do not drop your device or cause impacts to your device
The screen of your device may be damaged.
If bent or deformed, your device may be damaged or parts may
malfunction.
10.9 If your device has a camera flash or light, do not use it close to the eyes
of people or pets
Using a flash close to the eyes may cause temporary loss of vision or damage
to the eyes.
10.10 Use caution when exposed to flashing lights
While using your device, leave some lights on in the room and do not hold
the screen too close to your eyes.
Seizures or blackouts can occur when you are exposed to flashing lights
while watching videos or playing Flash-based games for extended periods.
If you feel any discomfort, stop using the device immediately.
10.11 Reduce the risk of repetitive motion injuries
When you repetitively perform actions, such as pressing keys, drawing
characters on a touch screen with your fingers, or playing games, you may
experience occasional discomfort in your hands, neck, shoulders, or other parts
of your body. When using your device for extended periods, hold the device
with a relaxed grip, press the keys lightly, and take frequent breaks. If you
continue to have discomfort during or after such use, stop use and see a
physician.
10.12 Ensure maximum battery and charger life
Avoid charging batteries for more than ten hour, as overcharging may
shorten battery life.
Over time, unused batteries will discharge and must be recharged before
use.
Disconnect chargers from power sources when not in use.
Use batteries only for their intended purposes.
10.13 Use manufacturer-approved batteries, chargers, accessories and
supplies
10.14 Do not bite or suck on the device or the battery
Doing so may damage the device or cause explosion.
If children use the device, make sure that they use the device properly.
Page 38

10.15 When speaking on the device:
Speak directly into the mouthpiece
Avoid contact with your device’s internal antenna. Touching the antenna
may reduce the call quality or cause the device to transmit more radio
frequency than necessary.
10.16 Protect your hearing and ears when using a headset
Excessive exposure to loud sounds can cause hearing damage.
Exposure to loud sounds while driving may distract your attention and
cause an accident.
Always turn the volume down before plugging the earphones into an
audio source and use only the minimum volume setting necessary to hear
your conversation or music.
In dry environments, static electricity can build up in the headset. Avoid
using headsets in dry environments or touch a metal object to discharge
static electricity before connecting a headset to the device
10.17 Use caution when using the device while walking or moving
Always be aware of your surroundings to avoid injury to yourself or others.
10.18 Do not carry your device in your back pockets or around your waist
You can be injured or damage the device if you fall.
10.19 Do not disassemble, modify, or repair your device
Any changes or modifications to your device can void your
manufacturer’s warranty. For service, take your device to our entre.
Do not disassemble or puncture the battery, as this can cause explosion or
fire.
10.20 Do not paint or put stickers on your device
Paint and stickers can clog moving parts and prevent proper operation. If you
are allergic to paint or metal parts of the product, you may experience itching,
eczema, or swelling of the skin. When this happens, stop using the product and
consult your physician.
10.21 When cleaning your device
Wipe your device or charger with a towel or a rubber.
Do not use chemicals or detergents.
10.22 Do not use the mobile phone if the screen is cracked or broken.
Page 39

Broken glass or acrylic could cause injury to your hands and face. Send the
device to our service center to have it repaired.
10.23 Do not use the device for anything other than its intended use.
10.24 Avoid disturbing others when using the device in public
10.25 Do not allow children to use your device
Your device is not a toy. Do not allow children to play with it as they could
hurt themselves and others, damage the device, or make calls that increase your
charges.
10.26 Install mobile devices and equipment with caution
Ensure that any mobile devices or related equipment installed in your
vehicle are securely mounted.
Avoid placing your device and accessories near or in an air bag
deployment area. Improperly installed wireless equipment can cause
serious injury when air bags inflate rapidly.
10.27 Allow only qualified personnel to service your device
Allowing unqualified personnel to service your device may result in damage to
your device and will void your manufacturer’s warranty.
10.28 Handle memory cards with care
Do not remove a card while the device is transferring or accessing
information, as this could result in loss of data and/or damage to the card
or device.
Protect cards from strong shocks, static electricity, and electrical noise
from other devices.
Do not touch gold-cultured contacts or terminals with your fingers or
metal objects. If dirty, wipe the card with a soft cloth.
10.29 Handle SIM cards with care
Prevent damage to the SIM card, you should always turn off the power
before inserting or removing the card
10.30 Keep your personal and important data safe
While using your device, be sure to back up important data. We are not
responsible for data loss.
When disposing of your device, back up all data and then reset your
device to prevent misuse of your personal information.
Page 40

10.31 Do not distribute copyright-protected material
Do not distribute copyright-protected material that you have recorded to
others without the permission of the content owners. Doing this may
violate copyright laws. The manufacturer is not liable for any legal issues
caused by the user’s illegal use of copyrighted material.
Page 41

Disclaimer
Except get expressly permitted by the application content or service provider,
otherwise, any content or service of this equipment displays, you may not modify,
copy, republish, upload, post, transmit, translate, sell, create derivative products,
development or distribute in any way.
User to use any third-party content and services, regardless of any purpose, we do
not provide any express or implied warranties on the content or service. We
expressly disclaims any implied warranties, or by statute, common law or
otherwise [including but not limited to merchantability or for a particular purpose
applicability] agreed terms or conditions. (Including negligence), under any
circumstances through this device use of any content or services provided by
third parties, even if the advance has been advised of the possibility of such
damages, whether in contract or tort, for any direct, indirect, incidental , special
or consequential loss or damage and compensation fees, attorneys fees, various
expenses or therefore arising any other loss or damage, or any information
contained in the connection, or by you or any third party to use any content or
service caused results, we do not provide assurance on its accuracy, validity,
timeliness, legality or completeness.
Third-party services may stop or interrupted at any time, our company is not
assuming any liability or guarantee for any period of our content or services that
can be used. Content and services are transmitted by third parties through the
network and transmission equipment which outside of our control. In addition to
the generality of this disclaimer, we also made it clear that we are not assume
any responsibility or liability any on any content or service used by any
interruption or delay.
Our company is neither responsible nor liable on customer service of third-party
design content and services. Any content or services related services requirements
should be made directly by the content or service provider.
Page 42

FCC RF EXPOSURE INFORMATION:
WARNING!! Read this information before using your phone
In August 1986 the Federal Communications Commission (FCC) of the United States with its action
in Report and Outer FCC 96-326 adopted an updated safety standard for human exposure to radio
frequency (RF) electromagnetic energy emitted by FCC regulated transmitters. Those guidelines are
consistent with the safety standard previously set by both U.S. and international standards bodies.
The design of this phone complies with the FCC guidelines and these international standards. Use
only the supplied or an approved antenna. Unauthorized antennas modifications, or attachments
could impair call quality, damage the phone, or result in violation of FCC regulations. Do not use the
phone with a damaged antenna. If a damaged antenna comes into contact with the skin, a minor burn
may result. Please contact your local dealer for replacement antenna.
BODY-WORN OPERATION:
This device was tested for typical body-worn operations with the back/front of the phone kept 0cm
from the body. To comply with FCC RF exposure requirements, a minimum separation distance of
0cm must be maintained between the user's body and the back/front of the phone, including the
antenna. Third-party belt-clips, holsters and similar accessories containing metallic components shall
not be used. Body-worn accessories
that cannot maintain 0cm separation distance between the user’s body and the back/front of the
phone, and have not been tested for typical body-worn operations may not comply with FCC RF
exposure limits and should be avoided.
For more information about RF exposure, please visit the FCC website at www.fcc.gov
Your wireless handheld portable telephone is a low power radio transmitter and receiver. When it is
ON, it receives and also sends out radio frequency (RF) signals. In August, 1996, the Federal
Communications Commissions (FCC) adopted RF exposure guidelines with safety levels for handheld wireless phones. Those guidelines are consistent with the safety standards previously set by
both U.S. and international standards bodies:
<ANSIC95.1> (1992) / <NCRP Report 86> (1986) / <ICNIRP> (1999)
Those standards were based on comprehensive and periodic evaluations of the relevant scientific
literature. For example, over 120 scientists, engineers, and physicians from universities, government
health agencies, and industry reviewed the available body of research to develop the ANSI Standard
(C95.1). Nevertheless, we recommend that you use a hands-free kit with your phone (such as an
earpiece or headset) to avoid potential exposure to RF energy. The design of your phone complies
with the FCC guidelines (and those standards).
Use only the supplied or an approved replacement antenna. Unauthorized antennas, modifications,
or attachments could damage the phone and may violate FCC regulations.
NORMAL POSITION:
Hold the phone as you would any other telephone with the antenna pointed up and over your
shoulder.
RF Exposure Information:
This product is compliance to FCC RF Exposure requirements and refers to FCC website
https://apps.fcc.gov/oetcf/eas/reports/GenericSearch.cfm search for FCC ID: 2ACHAT80 to
gain further information include SAR Values.
This device complies with part 15 of the FCC rules. Operation is subject to the following two
conditions:
(1) this device may not cause harmful interference, and
Page 43

(2) this device must accept any interference received, including interference that may cause
undesired operation.
NOTE: The manufacturer is not responsible for any radio or TV interference caused by unauthorized
modifications to this equipment. Such modifications could void the user’s authority to operate the
equipment.
NOTE: This equipment has been tested and found to comply with the limits for a Class B digital
device, pursuant to part 15 of the FCC Rules. These limits are designed to provide reasonable
protection against harmful interference in a residential installation. This equipment generates uses
and can radiate radio frequency energy and, if not installed and used in accordance with the
instructions, may cause harmful interference to radio communications. However, there is no
guarantee that interference will not occur in a particular installation. If this equipment does cause
harmful interference to radio or television reception, which can be determined by turning the
equipment off and on, the user is encouraged to try to correct the interference by one or more of the
following measures:
- Reorient or relocate the receiving antenna.
- Increase the separation between the equipment and receiver.
-Connect the equipment into an outlet on a circuit different from that to which the receiver is
connected.
-Consult the dealer or an experienced radio/TV technician for help
Do not use the device with the environment which below minimum -10℃ or over maximum 50℃,
the device may not work.
Changes or modifications to this unit not expressly approved by the party responsible for
compliance could void the user’s authority to operate the equipment.
Ad Hoc function is supported but not able to operate on non-US frequencies.
 Loading...