

Page 1
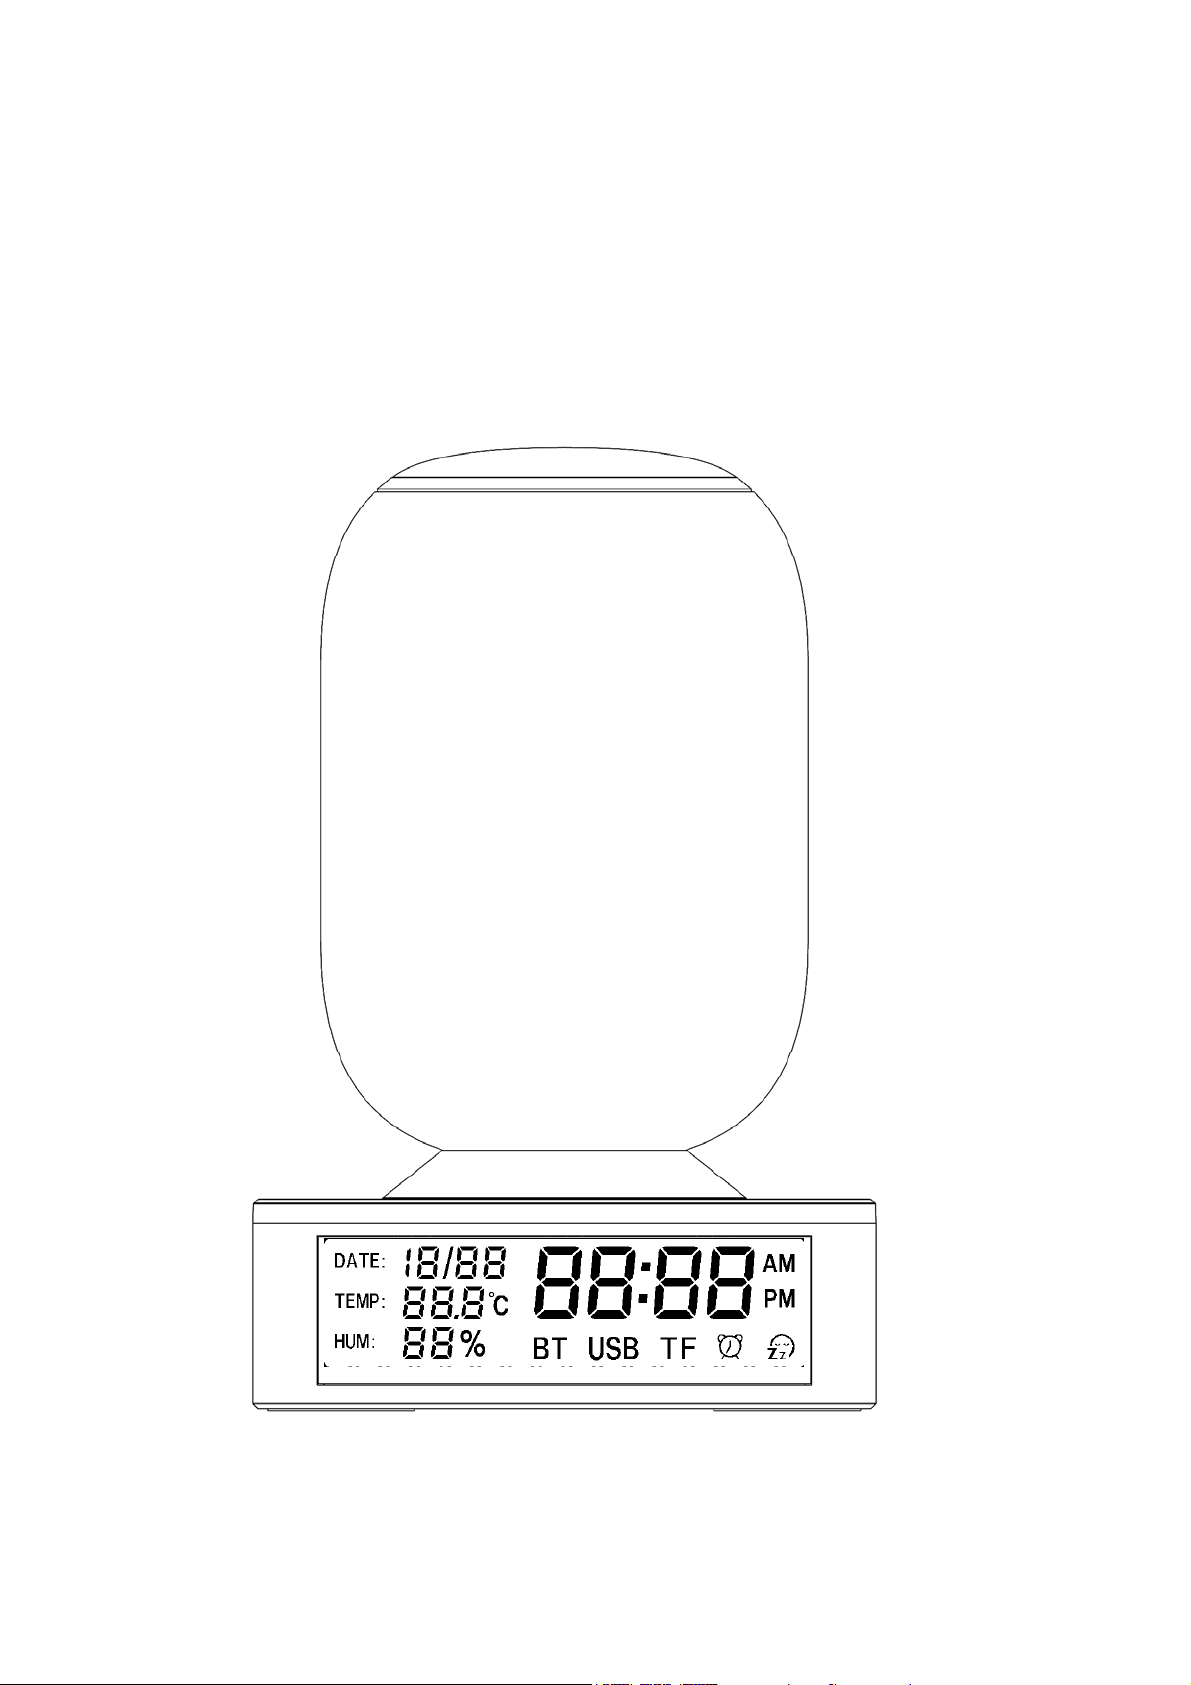
Smart Bedside Music Lamp
----
User Manual
Page 2

Model No.:
R5
Technical:
1.Bluetooth:
BT Specification:BT V4.2 controller,support dual modules(BR/EDR
+ AMP + Low Energy Controllers) ,including V2.1+ EDR and V3.0 + HS
Bluetooth Frequency:2.402GHz-2.48GHz
Transmission Range:≧10m
2.Light:
White Lighting Lumen Φ:≧550lm
Ra:≧80dB
LED color temperature(CCT):2700-3000K
Color Patterns: RGB 128×128×128
3.Speaker:
Rated Power: 3.5W 4Ω
Ra:≧80dB
Frequency Response:70Hz-20KHz
4.Supply:
Input:DC 12V 3A┉
Output:DC 5V 2000mA ┉ (standard USB cable charge to the peripheral)
5.Temperature & Humidity discrepancy:
Temperature Discrepancy:±1℃,Relative humidity discrepancy:±5%
6.Product:
Product Size:138mm×138mm×200mm(L×W×H)
Product Net Weight:455g
Unit Color Box Size:165mm×165mm×238mm(L×W×H)
Page 3

Operation Instruction
1、 Turn On/Off
Charge the device via the supplied adaptor(DC 12V 3A).┉ Turn on the hard switch 1 on the
back of the base. The device will be on standby mode while “ ” turns orange and the
color light blink once.
Long press the “ ”(3 seconds) to switch between the Power on mode (all the buttons are
blue) and standby mode(“ ”is orange and others are out)
2. White Light and RGB Light Control
In Power on or standby mode, long touch the top mesh ( 3 seconds )to switch between
white and RGB color mode. while at the RGB color mode, short touch the top mesh to
change the lighting colors(red,green,blue,green,pink,orange) and the rhythm of light(while
music playing) in order sequence to recyle. While at the white color mode, long touch the
top mesh to change between four lighting levels from dim to bright.
3. Bluetooth Connection and Music Playing
A.Bluetooth Connection.
Turn on the device R5 and touch the “M” button to switch to Bluetooth mode(prompt voice
“Bluetooth Mode”), “BT” signal will blink on the screen while unpaired with your device, it
stops blinking while paired successfully.
On your device, connect to the device R5 using Bluetooth. See your device’s
documentation for instructions on making a Bluetooth connection.
Note: IOS system devices will need to connect with both “R5” and “R5_ble”.
B. Music Playing Control
In Bluetooth model, control the music playing by touching the buttons on the device R5.
Long press “+” ”-” buttons to adjust the volume. Volume level will be displayed on the
screen (maximum at “U:31”).
Short press “+””-” to switch songs respectively.
Short press “ ”to play or pause.
4.TF Card, USB Disk, AUX Mode and USB speaker
Inserting TF Card/USB Disk into the corresponding slot can activate corresponding mode
(prompt voice “TF card playing” and “U-Disk playing”). User can also short press “M” button
to switch from different modes(the corresponding mode can’t be activated If the slot is
unoccupied). This device supports Hot-plug, the last inserted is prior to be read and
Page 4

played.
The device R5 supports Aux-in mode and USB speaker mode.
Note: While playing in TF Card/USB Disk mode, user can short press the “
switch single cycle (showing “LP1” on the screen) and list cycle (“LP0”).
5. Speaker Phone
In Bluetooth mode, the screen will display “C: In”. when phone rings, short touch the top
mesh to answer the call, the screen will display “C:HF”. Short touch the top mesh again to
end the call.
6. Date&Time Setting
A. In Power on mode, short press “M” button to switch to Date&time setting mode (prompt
voice ”Time setting”). In this mode, the “
to locate the position that needs to be adjusted. Short press “ ”to plus and “ ” to minus.
Short press “ ”to confirm the setting and then the device will enter into Bluetooth mode.
Note: The Date&Time setting is long-term effective. If there’s any error with the time, please
reset it again.
7. Alarm Clock Setting
A.In Power on mode. Short press “M”
” icon and DATE flash rapidly. Short press “ ”
button and switch to Alarm clock setting mode
” button to
(prompt voice”Alarm Setting”). In this mode, the “ ” icon and Time signal flash slowly.
Press “ ”to locate the position that needs to be adjusted. Short press “ ”to plus and “ ”
to minus. Short touch “ ” again to locate the position of the alarm sounds, Short press
“ ”or “ ” to choose your favorite alarm sounds. Then short press “ ”to confirm the
setting. Then, it will enter into Bluetooth mode with the “ ” icon in solid light.
Note: The wake up light will be on in 30 minutes before the alarm. The light gradually
increases from 0LM to 500LM in this period. The volume increases gradually once the
alarm is triggered. Long touch the top mesh to stop the alarm.
B. If the wake up light start working then it means it’s already enter into the alarm clock
mode. All buttons cannot work unless long press the top mesh to exit this mode.
C. The alarm will stop ringing after 3 minutes automatically.
D. Cancel alarm clock setting. In Power on mode, short touch “M” button and switch to
Alarm clock setting. In this mode, the “ ” icon and Time signals flash slowly. Short touch
the ” ” button to cancel the alarm.
8. Snooze Function
When alarm clock rings, short touch the top mesh to get the snooze time for 10
Page 5

minutes(long touch the top mesh to stop the alarm). Snooze only work three times, after the
fourth-time rings, the alarm will stop snoozing automatically.
9.White Noise and Aid-sleeping Light
A. In Power on mode, press the “M” button and switch to aid-sleeping mode with (prompt
voice”Aid-sleeping setting”). In this mode, white noise and aid-sleeping light will start
working to help users fall asleep.
“ ” icon flashes,
” to choose the suitable white noise.
“
“ ”icon will stop flashing and keep solid lighting.
Note: The aid-sleeping mode will last for 30minutes. When it’s triggered, white noise starts
and the orange aid-sleep light gets dimmer till totally off in 30 minutes. Users can adjust the
volume of white noise by long press
the device R5 will enter into standby mode automatically.
10. Setting up True Wireless Stereo(TWS)
If you have two devices R5 and a Bluetooth device, and only in Bluetooth mode or Aux-in
mode. Users can use True Wireless Stereo (TWS).
1. Power on the two speakers R5.
2. Long press the “ ” button of the first speaker R5 to make it the sender (prompt voice
“waiting for pairing”). The second speaker(the receiver) will attempt to pair with the sender.
3. When the sender speaker says “Pairing successfully” they are in stereo mode. It takes
about seven seconds for the sender to connect to the receiver.
4. On your device,connect to the sender speaker using Bluetooth. See your device’s
documents for instructions on making a Bluetooth connection.
5. To end stereo mode, turn off the receiver. The next time you turn on the speakers, they
will attempt to pair with each other.
To disconnect the TWS pairing, long press “ ” button of the sender. All previous pairing
information is cleared from the speaker.
11. Charge Function
There are two USB ports which can provide power to external devices. When the device is
in Power on or standby mode, it can charge external devices with DC 5V 2000mAh
standard.
12. R5 connect APP
With an intuitive drag-and-drop interface, the APP lets you easily control music playing, alarm
clock, LED lamp and aid-sleeping.
13. Legal Statement
The copyright of this document is owned by Shenzhen Allmart Electronic
Any of excerpt, copy or translate without allmart authorized that will be punish in accordance with
law.
also make improvements and/or changes in the products and/or the programs described in
Information
Short touch “ ” to locate the position of the white noise, Short press “ ” or
then press ” ” button to confirm setting. The
“ ” and ”. After 30 minutes, Aid-sleeping will be over,
published on
this
user
manual
Co.,Ltd.
is subject to
change
without
notice.Allmart
m
ay
Page 6

User manual at any time without notice. Allmart has the right to interpret.
the
FCC Caution:
Any Changes or modifications not expressly approved by the party responsible for
compliance could void the user's authority to operate the equipment.
This device complies with part 15 of the FCC Rules. Operation is subject to the following
two conditions: (1) This device may not cause harmful interference, and (2) this device
must accept any interference received, including interference that may cause undesired
operation.
IMPORTANT NOTE:
Note: This equipment has been tested and found to comply with the limits for a Class A digital
device, pursuant to part 15 of the FCC Rules. These limits are designed to provide reasonable
protection against harmful interference in a residential installation. This equipment generates,
uses and can radiate radio frequency energy and, if not installed and used in accordance with
the instructions, may cause harmful interference to radio communications. However, there is
no guarantee that interference will not occur in a particular installation. If this equipment does
cause harmful interference to radio or television reception, which can be determined by turning
the equipment off and on, the user is encouraged to try to correct the interference by one or
more of the following measures:
—Reorient or relocate the receiving antenna.
—Increase the separation between the equipment and receiver.
—Connect the equipment into an outlet on a circuit different from that to which the receiver is
connected.
—Consult the dealer or an experienced radio/TV technician for help
FCC Radiation Exposure Statement:
This equipment complies with FCC radiation exposure limits set forth for an
uncontrolled environment .This transmitter must not be co-located or operating in conjunction with any other
antenna or transmitter.
The equipment should be installed and operated with minimum distance 20cm between the radiator&your body
 Loading...