

Page 1
Medical Infrared Thermometer
PC809 / PC809EV / PC809V
User’s Manual
Version 2.0
2019.09.01
Page 2

Page 3

Contents
1.Introduction ..................................................................................1
2.Packing list .....................................................................................1
3.Product description........................................................................1
3.1 Overview...................................................................................1
3.2 Intended use............................................................................2
3.3 Principle.......................................................................................2
3.4 Features....................................................................................3
3.5 Components...............................................................................3
3.6 Product structure......................................................................4
3.7 LED display description..............................................................
4.Warnings and precautions.............................................................5
5.Directions for use...........................................................................7
5.1 Take your forehead temperature.............................................7
5.2 Take your ear temperature........................................................8
5.3 Recall saved readings................................................................10
5.4 ℃ and ℉ conversion...................................................................0
5.5 Turn on/off buzzer/speaker/vibration........................................11
5.6 Set threshold for low fever..........................................................11
5.7 Set threshold for high fever......................................................2
5.8 Shut down..................................................................................12
5.9 Replace batteries........................................................................12
6.Temperature-taking tips..................................................................3
7.Cleaning and disinfection..............................................................14
7.1 Cleaning.....................................................................................14
7.2 Disinfection................................................................................5
8.Troubleshooting..............................................................................16
9.Specifications..................................................................................17
10.Symbol descriptions.......................................................................7
11.Maintenance...................................................................................8
12.After-sales service .........................................................................18
13.Declaration ....................................................................................18
14.Appendix A: EMC Information - Guidance
and Manufacturer’s Declaration....................................................19
15.Manufacturer information..............................................................23
1
2
2
2
3
3
4
4
4
5
6
8
8
9
10
10
11
11
12
12
12
13
14
14
15
16
17
18
18
19
19
19
23
Page 4

1. Introduction
Dear customer, thank you for purchasing our Medical Infrared
Thermometer. This device can be used to measure human body
temperature by detecting infrared energy emitted from the
forehead or eardrum.
In order to obtain accurate readings, please read this manual
before use.
Keep this manual so that you may read it whenever necessary.
Models covered for this manual and their differences are as follows:
Model
PC809
PC809EV
PC809V
Aside from the above differences, the expected use of the three
models is exactly the same.
Note: Ear temperature measurement can only be applied to
people over the age of 3 months.
At the end of temperature measurement, the
buzzer gives a ‘beep’ cue.
At the end of temperature measurement, the
speaker broadcasts the temperature in English.
At the end of temperature measurement, the
instrument emits vibration feedback.
Difference
- 1 -
Page 5

2. Packing list
Medical infrared thermometer 1 pc
Storage bag 1 pc
User’s manual 1 pc
AAA dry cell battery (optional) 2 pcs
3. Product description
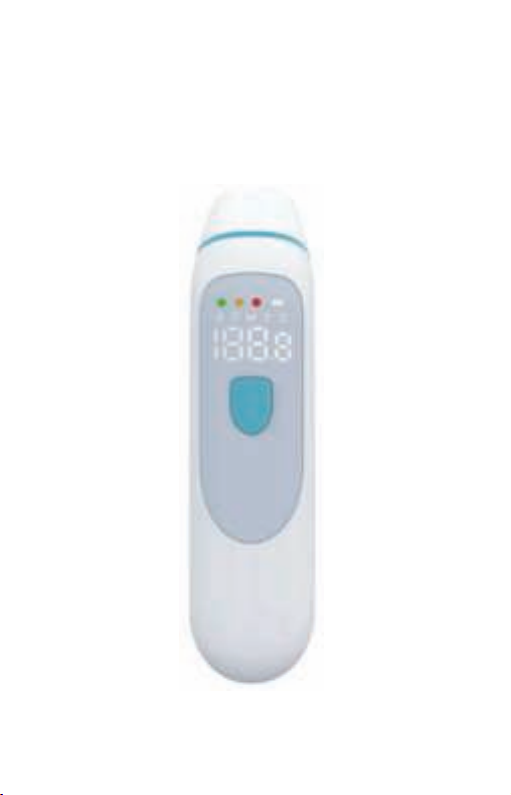
3.1 Overview
The Medical Infrared Thermometer measures body temperature
based on detecting infrared energy emitted from the eardrum or
forehead. Users can quickly obtain measurement results after
properly positioning the temperature probe in the ear canal or on
the forehead.
Normal body temperature has a range. The following table shows
that this range also varies by measuring temperature at different
sites. Therefore, readings from different sites should not be directly
compared. It is very important to tell your doctor which type of
thermometer you used and which part of the body you measured.
Also keep this in mind if you are diagnosing yourself.
Measuring siteNormal temperature range
Forehead36.1‒37.5℃ (97.0‒99.5℉)
Ear35.8‒38.0℃ (96.4‒100.4℉)
Mouth35.5‒37.5℃ (95.9‒99.5℉)
Anus36.6‒38.0℃ (97.9‒100.4℉)
Axilla34.7‒37.3℃ (94.5‒99.1℉)
- 2 -
Page 6
3.2 Intended use
The multifunctional infrared thermometer is intended for
measuring human body temperature. It has two measurement
modes: the forehead mode for people of all ages and the ear mode
for people above the age of three months.
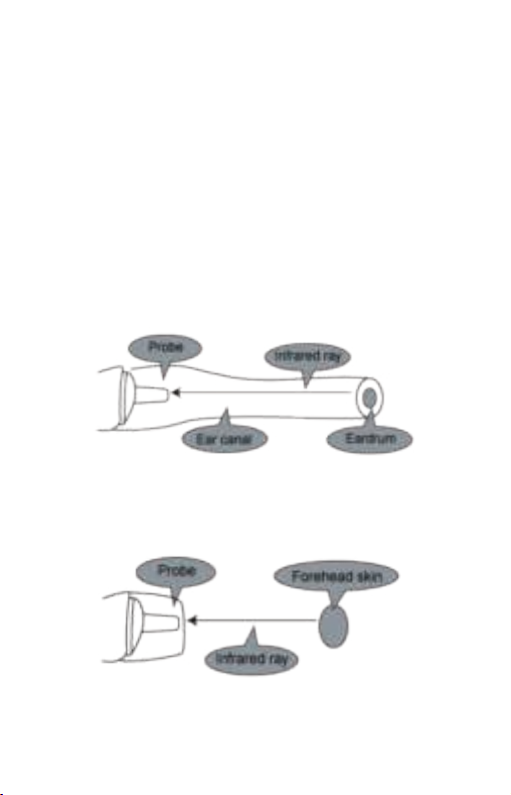
3.3 Principle
The infrared temperature sensor collects infrared energy emitted
by the eardrum in the ear canal or the skin of the forehead. After
being focused by a lens, the infrared energy is converted into a
temperature reading by the thermopiles and measurement circuits.
Fig. 1
Fig. 2
- 3 -
Page 7
3.4 Features
Quick measurement in just 1 second
Accurate and reliable
One button design, making it easy to operate
Both forehead and ear measurement modes
32 memory slots, making it easy to save and recall temperatures
Switch between Celsius (℃) and Fahrenheit (℉)
Turn on/off the buzzer/speaker/vibration function
Orange LED indicates an intelligent low fever alarm
Red LED indicates an intelligent high fever alarm
Automatic shutdown for energy conservation
3.5 Components
The infrared thermometer consists of a shell, LED display screen,
button, buzzer/speaker/vibration motor, probe with infrared sensor
inside, microprocessor, circuit board and measuring software.
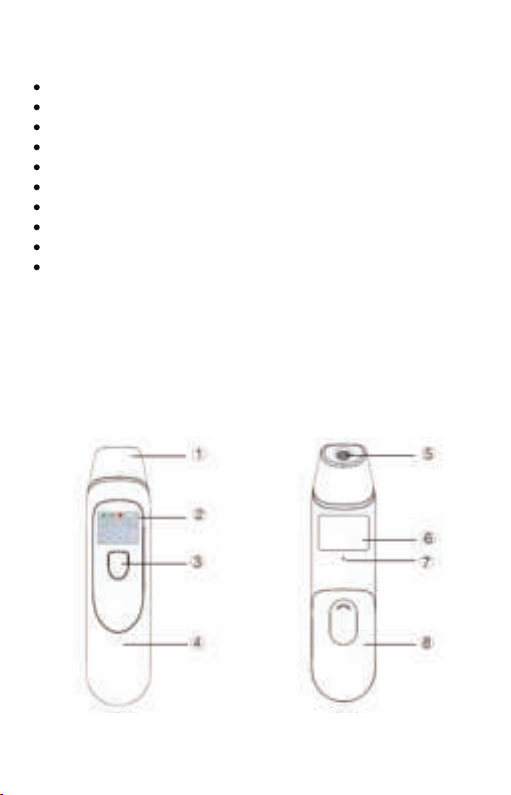
3.6 Product structure
Fig. 3Fig. 4
- 4 -
Page 8
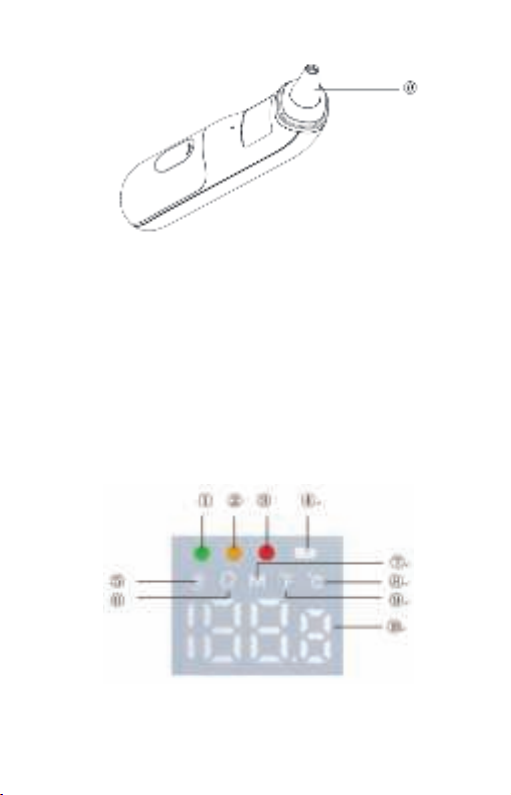
Fig. 5 (remove probe cover)
① Probe cover (remove it when measuring ear temperature)
② LED display screen
④ Top Cover
⑥ Label
⑧ Battery cover
③ Power/Measure/Set button
⑤ Infrared sensor
⑦ Buzzer/Speaker outlet
⑨ Probe
3.7 LED display description
Fig. 6
- 5 -
Page 9

① Green status light
③ Red status light
⑤ Ear temperature mode
⑦ Memory mode
⑨ Fahrenheit
② Orange status light
④ Low battery indicator
⑥ Forehead temperature mode
⑧ Celsius
⑩ Temperature value
4.Warnings and precautions
1) Keep out of reach of children under 12 years of age.
2) Never immerse the thermometer in water or other liquid (it is not
waterproof). For cleaning and disinfection, please follow the
instructions in the ‘Cleaning and disinfection’ section.
3) Never use the thermometer for purposes other than its intended
use. Please follow the general safety precautions when using it on
children.
4) Keep the thermometer out of direct sunlight in a dry, dust-free,
well-ventilated area at a temperature between 10.0‒40.0℃
(50.0‒104.0℉). Do not use the thermometer in a high humidity
environment (>85% RH).
5) Do not use the thermometer if there are signs of damage on the
infrared sensor lens or elsewhere on the instrument. If damaged,
never attempt to repair the instrument! Please contact the dealer
or manufacturer.
6) This thermometer consists of high precision parts. Do not drop
or twist the instrument or infrared sensor. Protect it from severe
impact and shock.
7) Please consult your doctor if you see such symptoms as
unexplained irritability, vomiting, diarrhea, dehydration, changes in
appetite or activity, seizure, muscle pain, shivering, stiff neck, pain
when urinating, etc., even in the absence of fever.
8) Those who exhibit a normal temperature may still need to
receive medical attention. When determining the severity of illness
of people on antibiotics, analgesics or antipyretics, temperature
readings should not be solely relied upon.
- 6 -
Page 10

9) Temperature elevation may signal a serious illness, especially in
adults who are elderly, frail or have a weakened immune system, or
neonates and infants. Please seek professional advice immediately
when there is a temperature elevation in a person who meets any
of the following criteria:
Over 60 years of age (fever may be dulled or even absent in
elderly patients)
Diagnosed with diabetes mellitus or a weakened immune
system (e.g. HIV positive, cancer, chemotherapy, chronic
steroid treatment, splenectomy)
Bedridden (e.g. nursing home patient, stroke, chronic illness)
A transplant patient (e.g. liver, heart, lung, kidney)
10) This thermometer is not intended for premature babies or small
for gestational age babies. It is not intended to measure hypother-
mic temperatures. Do not allow children to take their temperatures
unattended.
11) Use of this thermometer is not intended as a substitute for
consultation with your physician or pediatrician. It is for household
use only.
12) Clean the thermometer probe after each use.
13) Do not use the thermometer on newborns or for continuous
temperature monitoring purposes.
14) Do not take a measurement while or immediately after nursing
a baby.
15) Patients should not drink, eat, bathe or engage in physical
activity for 30 minutes before using the thermometer. After eating,
some organs have to work, such as the stomach, intestinal tract,
etc., generating extra heat which affects temperature accuracy.
- 7 -
Page 11

5. Directions for use
Please load the batteries before using the thermometer. Take the
batteries out if you will not use the thermometer for a long time,
such as over one month.
Additionally, referring to Part 3 in Fig. 3, this thermometer has a
one-button design, so when we describe the ‘Power button’,
‘Measure button’ and ‘Set button’ in this manual, we are referring
to the same button.
5.1 Take your forehead temperature
Press the Power button to power on.
Let the probe cover touch the middle of your forehead, then press
and release the button. About 1 second later, a beep will be heard
and the reading will be obtained. In Forehead Mode, the symbol
will be displayed on the screen.
Fig. 7
Note: forehead measurement is an indicative reading. Measured
forehead temperature can fluctuate up to 0.5℃/1℉ from your
actual body temperature. Please be aware of factors that influence
accuracy as described in the sections ‘Temperature-taking tips’
and ‘Warnings and Precautions’.
- 8 -
Page 12

In order to improve accuracy, please make sure that your
!
forehead is free from hair, sweat or dirt.
!
Make sure the probe sensor is clean before using the thermome-
ter.
Ensure that both the user and thermometer remain in the same
!
room with a stable airflow and a room temperature between
10.0‒40.0℃ (50.0‒104.0℉) for at least 30 minutes before using the
thermometer.
5.2 Take your ear temperature
Press the Power button to power on.
Take off the probe cover and fit the probe snuggly into the ear
canal, then press and release the button. About 1 second later, a
beep will be heard and the reading will be obtained. In Ear Mode,
the symbol will be displayed on the screen.
Fig. 8
Please make sure that your ear is clean and free from without
!
earwax or obstructions.
!
There is a slight difference in temperature between the left and
right ear. As such, please do not to compare the readings of the left
ear and right ear directly, but use the same ear each time.
Do not force the thermometer probe into the ear canal, or else
!
the ear canal may be injured.
- 9 -
Page 13

Be careful when taking the ear temperature of a child, as their
!
ear canals are small.
!
When taking the ear temperature of a child aged over 1 year or
an adult, gently pull the ear up and back to make the ear canal
straight, allowing the probe to receive infrared rays from the
eardrum.
5.3 Recall saved readings
The thermometer can store 32 sets of measurement data. When the
data is full, the last reading will always replace the first.
If you wish to review previous measurement data, when the
thermometer is shut down, press the Sets button for about 3
seconds until you see the ‘M’ symbol flicker on the screen, then
release the button.
When you press the button, you will see the number ‘1’ appear on
the right side of the screen; this means the first saved reading. The
number ‘1’ will then disappear quickly and the first saved
temperature reading will appear. By pressing the button, you can go
through all the saved temperature readings one by one. After
reviewing the saved readings, press the button for about 5 seconds
to automatically save the readings and shut down the thermometer.
5.4 ℃ and ℉ conversion
If you wish to convert ℃ to ℉ or ℉ to ℃, when the thermometer is
shut down, press the Set button for about 6 seconds until you see
the ‘℃’ symbol or the ‘℉’ symbol flicker on the screen, then
release the button. Press the button again and the ℃ symbol or ℉
symbol will be converted to the other.
Do not release the button when the “M” symbol appears, but only
release it when the ‘℃’ symbol or ‘℉’ symbol appears. After
finishing conversion, press the button for about 5 seconds to
automatically save the setting and shut down the thermometer.
- 10 -
Page 14

5.5 Turn on or off the buzzer/speaker/vibration
The PC809, PC809EV, PC809V models are different in how they
interact with users when measurement is complete: the PC809 uses
a buzzer to ‘beep’, the PC809EV communicates the temperature in
English through a speaker and the PC809V uses a motor to vibrate.
Please check the label on the back to determine which thermome-
ter model you are using.
If you want to turn on/off the buzzer/speaker/vibration, when the
thermometer is shut down, press the Set button for about 9
seconds until you see the ‘ON’ symbol or ‘OFF’ symbol appear
on the screen, then release the button. Press the Set button again
and the ‘ON’ symbol or ‘OFF’ symbol will be converted to the
other.
After selection, press the button for about 5 seconds to automati-
cally save the setting and shut down the thermometer.
5.6 Set threshold for low fever
This thermometer has 37.5℃/99.5℉ preset as an alarm temperature
for low fever. However, 37.5℃/99.5℉ is only a reference value. At
this temperature, different people feel different, with some feeling
uncomfortable and others feeling fine. If you do not agree with this
low fever threshold, after consulting your doctor, you can manually
change it to suit your own situation.
When the thermometer is shut down, press the Set button for about
12 seconds until you see the orange status light on the screen,
then release the button. Ignore the other symbols that appear in
the process.
By pressing the Set button, you can increase the threshold by 0.1
℃/0.2℉ each time. The adjustment range is from 37.5℃/99.5℉ to
37.9℃/100.2℉. Once it reaches the Max. value, press the button
again; it will return to the Min. value and the cycle will repeat.
After adjustment is complete, press the button for about 5 seconds
to automatically save the setting and shut down the thermometer.
- 11 -
Page 15

5.7 Set threshold for high fever
This thermometer has 38.0℃/100.4℉ preset as an alarm tempera-
ture for high fever. However, 38.0℃/100.4℉ is only a classic
reference value. At this temperature, different people feel different,
with some feeling bad and others not feeling too bad. If you do not
agree with this high fever threshold, after consulting your doctor,
you can manually change it to suit your own situation.
When the thermometer is shut down, press the Set button for about
15 seconds until you see the red status light on the screen, then
release the button. Ignore the other symbols that appear in the
process.
By pressing the Set button, you can increase the threshold by 0.1
℃/0.2℉ each time. The adjustment range is from 38.0℃/100.4℉ to
38.9℃/102.0℉. Once it reaches the Max. value, press the button
again; it will return to the Min. value and the cycle will repeat.
After adjustment is complete, press the button for about 5 seconds
to automatically save the setting and shut down the thermometer.
5.8 Shut down
When the thermometer is turned on, it will shut down automatically
when it is not used for 30 seconds. You can also press the Power
button for 5 seconds to shut down the device manually.
5.9 Replace batteries
When the low battery indicator appears on the screen, slide the
battery cover downward off the shell, take out the two old batteries
and insert two new AAA batteries into the battery compartment
correctly according to the marked polarity symbols. Then close the
battery cover and the thermometer will be restored to normal use.
!
Take out the batteries if the thermometer will not be used for
more than one month.
- 12 -
Page 16

6. Temperature-taking tips
1) It is important to know the normal temperature of each
individual when they are well. This is the only way to accurately
diagnose a fever. Record readings twice a day, once in the early
morning and once in the late afternoon. Take the average of these
two temperatures to obtain the normal oral equivalent tempera-
ture. As temperature readings may vary among different locations
on the forehead, always take the temperature in the same location.
2) The normal temperature of a child can be as high as 37.7℃/99.9
℉ or as low as 36.1℃/97.0℉. Please note that this thermometer
reads 0.5℃/0.9℉ lower than a rectal digital thermometer.
3) External factors may influence ear temperature, including when
an individual has:
a) been lying on one ear or the other;
b) earwax;
c) been exposed to a very hot or very cold environment;
d) just been swimming or bathing.
In these cases, return to normal condition by waiting quietly for 30
minutes before taking the reading.
If prescription ear drops or other ear medications have been placed
in the ear canal, use the untreated ear.
4) The person to be measured and the thermometer should stay in
a steady-state room condition for at least 30 minutes before taking
the reading.
5) Before placing the thermometer probe on the forehead, remove
hair, dirt or sweat from the measurement area. Wait 10 minutes
after cleaning before taking the reading.
6) Before taking the temperature of another person, clean the
sensor carefully with an alcohol swab and wait for 5 minutes.
Wiping the forehead with a warm or cool cloth may affect the
reading; in this case, it is advisable to wait 10 minutes before taking
the reading.
- 13 -
Page 17

7) In the following situations, it is recommended to measure 3‒5
times in the same location and take the highest temperature as the
reading:
a) Newborn infants in the first 100 days;
b) Children under 3 years of age with compromised immune
systems;
c) When the user is learning how to use the thermometer for the
first time, until he/she has familiarized him/herself with the
instrument and can obtain consistent readings.
7.Cleaning and disinfection
7.1 Cleaning
Wipe the thermometer shell with a slightly damp soft cloth, and
gently dry the body with a piece of tissue paper. Take care not to
scratch the surface of the LED display screen.
Only use cotton swabs dipped in anhydrous ethanol to clean the
infrared sensor lens.
Fig. 9
- 14 -
Page 18

Keep the infrared sensor lens away from water during the
!
cleaning process, or else it may be damaged.
The infrared sensor lens may be scratched if it is cleaned with a
!
piece of tissue paper, resulting in inaccurate readings.
Do not allow the infrared sensor lens to make contact with hard
!
objects.
Never use abrasive cleaning agents, thinners or benzene for
!
cleaning.
Never immerse any part of the thermometer in liquid, or allow
!
liquid to enter the device.
7.2 Disinfection
Disinfect the thermometer body and the area around the probe
with a soft cloth slightly moistened with 75% medical alcohol. Do
not use the same method to disinfect the infrared sensor, as 75%
medical alcohol contains water which may damage the lens.
Do not use hot steam or ultraviolet radiation for disinfection, or
!
else the thermometer may be damaged or quickly aged.
- 15 -
Page 19

8. Troubleshooting
SymptomPossible CauseSolution
Failed to
power on
Reading is
too low
Reading is
too high
Hi
Lo
Err
The battery level is too low
The polarities of the
batteries are reversed
The thermometer is damaged
The infrared sensor lens of
the probe is dirty
The distance between the
probe and the target is too
great
You have just come from a
cold environment
You have just come from a hot
environment
You are exposed to hot air
generated by an air
conditioner or heater
Low battery
Human body
temperature over
42.9℃/109.2℉
Human body
temperature below
32.0℃/89.6℉.
Environmental
temperature is not in
the 10.0‒40.0℃
(50.0‒104.0℉) range.
Replace the batteries.
Ensure that the batteries are
inserted correctly.
Contact the dealer or manufacturer.
Use cotton swabs dipped in
anhydrous ethanol to clean
the infrared sensor lens.
Let the probe cover touch
your forehead, or put the
probe into your ear canal.
Stay in a room between 10.0‒40.0
℃ (50.0‒104.0℉) for at least 30
minutes before taking a
temperature measurement.
Stay in a room between 10.0‒40.0
℃ (50.0‒104.0℉) for at least 30
minutes before taking a
temperature measurement.
Leave the environment for at
least 30 minutes before taking a
temperature measurement.
Replace the batteries.
1. First make sure that the probe is clean
and free from dirt.
2. If the environmental temperature is out
of range, then both patient and
thermometer should stay in a room
between 10.0‒40.0℃ (50.0‒104.0℉) for at
least 30 minutes before taking a
temperature measurement.
3. If the problem persists after trying the
above method, please contact the dealer
or manufacturer.
- 16 -
Page 20

9. Specifications
Product name
Product model
Applicable
regulations and laws
Power supply
Battery life
Low battery indicator
Measurement modes
Measurement time
Temperature units
Measurement range
Accuracy
Display resolution
Automatic shutdown
Memory
Operation environment
Storage and shipping
environment
Date of manufacture
Life
Net weight
Dimension
Medical Infrared Thermometer
PC809/PC809EV/PC809V
ASTM E 1965 / EN12470-5 / GB/T 19146
DC 3.0V (2 × AAA batteries)
More than 2,000 measurements
Appears on the screen when the voltage is
below 2.6V±0.1V
Forehead Mode and Ear Mode
1 second
℃ and ℉ (convertible)
32.0‒42.9℃ (89.6‒109.2℉)
±0.2℃/0.4℉
0.1℃/℉
30s±1s
32 saved reading slots
Temperature: 10.0‒40.0℃ (50.0‒104.0℉)
Humidity: 20‒85% RH, non-condensing
Atmospheric pressure: 86‒106kPa
Temperature: -20‒55℃ (-4‒131℉)
Humidity: 20‒93% RH, non-condensing
Atmospheric pressure: 86‒106 kPa
See label
5 years
70 g (not including batteries)
155 × 38 × 45 mm
- 17 -
Page 21

10. Symbol descriptions
Symbol
SN
LOT
Type BF applied part.
Information about the manufacturer, such as name and address.
Please read the instructions carefully.
Waste electrical materials should be sent to a
dedicated collection point for recycling.
Serial number
Batch number
Description
IMPORTANT
Inaccurate readings or thermometer damage may occur if
the thermometer is not correctly used.
11. Maintenance
1)After each use, clean the temperature probe as described in
‘Cleaning and disinfection’.
2)Store the thermometer in a dry, dust-free, well-ventilated area.
3)Ensure that the thermometer is not exposed to direct sunlight.
4)Ensure that the storage and transportation environments meet
the requirements.
5)Check for safety risks on a regular basis.
6)Remove the batteries if the thermometer will not be used for
more than one month.
- 18 -
Page 22

12. After-sales service
This device is under warranty for one year from the date of
acquisition. Applications for repairs should be presented during the
warranty period. Damage caused by improper use does not fall
under the scope of the warranty. Batteries and packaging are also
not covered by the warranty.
13. Declaration
The electromagnetic compatibility (EMC) of this product complies
with the IEC60601-1-2 standard. In compliance with ISO10993-1,
ISO10993-5 and ISO10993-10, the materials which come into
contact with the user are not toxic and have no effect on tissues.
14. Appendix A: EMC Information - Guidance and
Manufacturer’s Declaration
!
CAUTION!
• This Medical Infrared Thermometer requires special precautions
regarding EMC, and must be installed and put into service
according to the EMC information provided in the ACCOMPANYING
DOCUMENTS.
• Portable and mobile RF communications equipment can affect the
thermometer.
• This device should not be used adjacent to or stacked with other
electric equipment.
- 19 -
Page 23

Guidance and manufacturer’s declaration - electromagnetic
emissions - for all EQUIPMENT and SYSTEMS
Guidance and manufacturer’s declaration - electromagnetic emissions
The Medical Infrared Thermometer is intended for use in the
electromagnetic environment specified below. The customer or user of
the device should ensure that it is only used in such an environment.
Emissions
test
RF emissions
CISPR 11
RF emissions
CISPR 11
Compliance
Group 1
Class B
Electromagnetic environment - guidance
As this device only uses RF energy for its
internal functions, its RF emissions are very
low and not likely to cause any interference
to nearby electronic equipment.
The device is suitable for use in all
establishments, including domestic
establishments and those directly
connected to the public low-voltage power
supply network which supplies buildings for
domestic purposes.
Guidance and manufacture’s declaration - electromagnetic
immunity - for all EQUIPMENT and SYSTEMS
Guidance and manufacturer’s declaration - electromagnetic immunity
The Medical Infrared Thermometer is intended for use in the
electromagnetic environment specified below. The customer or user of
the device should ensure that it is only used in such an environment.
Immunity test
Electrostatic
discharge
(ESD)
IEC
61000-4-2
Power
frequency
(50/60 Hz)
magnetic
field
IEC 61000-4-8
IEC 60601
test level
±6KV
contact
±8KV air
Compliance
level
±6KV
contact
±8KV air
3 A/m3 A/m
Electromagnetic environment -
guidance
Floors should be wooden,
concrete or ceramic tile. If floors
are covered with synthetic
material, the relative humidity
should be at least 30%.
Power frequency magnetic
fields should be at levels
characteristic of a typical
location in a typical commercial
or hospital environment.
- 20 -
Page 24

Guidance and manufacturer’s declaration - electromagnetic
immunity - for EQUIPMENT and SYSTEMS that are not LIFE-SUP-
PORTING
Guidance and manufacturer’s declaration - electromagnetic immunity
The Medical Infrared Thermometer is intended for use in the
electromagnetic environment specified below. The customer or user of
the device should ensure that it is only used in such an environment.
Immunity
test
Radiated
RF
IEC
61000-4-3
IEC 60601
test level
3 V/m
80 MHz
To 2.5
GHz
Compliance
level
3 V/m
Electromagnetic environment -
guidance
Portable and mobile RF
communications equipment
should not be used closer to any
part pf the AT-FR401.
Infrared Thermometer, including cables,
than the recommended separation
distance calculated by the equation
applicable to the frequency of the
transmitter. Recommended separation
distance:
80 MHz to 800 MHz
Where P is the maximum output power
rating of the transmitter in watts (W)
according to the transmitter manufacturer,
and d is the recommended separation
distance in metres (m). b Field strengths
from mixed RF transmitters, as determined
by an electromagnetic site survey, a
should be less than the compliance level
in each frequency range. b interference
may occur in the vicinity of equipment
marked with the following symbol:
Note 1: At 80 MHz and 800 MHz, the higher frequency range applies.
Note 2: These guidelines may not apply in all situations. Electromagnetism is
affected by absorption and reflection from structures, objects and people.
Theoretically, the field strengths of such fixed transmitters as base stations for radio
(cellular/cordless) telephones and land mobile radios, amateur radios, AM and FM
radio signals and TV signals cannot be predicted with accuracy. To assess the
electromagnetic environment due to fixed RF transmitters, an electromagnetic site
survey should be considered. The field strength in the location in which the
thermometer is to be used should be measured to verify normal operation. If
abnormal performance is observed, additional measures may be necessary, such as
re-orienting or relocating the thermometer. Over the frequency range of 150 kHz to 80
MHz, the field strength should be less than 3 V/m.
800 MHz to 2.5 GHz
- 21 -
Page 25

Recommended separation distances between portable and
mobile RF communications equipment and the EQUIPMENT or
SYSTEM - for EQUIPMENT and SYSTEMS that are not LIFE-SUP-
PORTING
Recommended separation distances between portable and mobile RF
communications equipment and the Medical Infrared Thermometer.
The Infrared Thermometer is intended for use in an electromagnetic
environment in which radiated RF disturbances are controlled. The
customer or user of the infrared thermometer can help prevent
electromagnetic interference by maintaining a minimum distance
between portable and mobile RF communications equipment
(transmitters) and the thermometer as recommended below, according
to the maximum output power of the communications equipment.
Rated
maximum
output
power of
transmitter
W
Separation distance according to frequency of transmitter m
150 kHz to 80 MHz
80 MHz to 800 MHz800 MHz to 2.5 GHz
0.01
0.1
1
10
100
For transmitters rated at a maximum output power not listed above, the
recommended separation distance d in metres (m) can be estimated
using the equation applicable to the frequency of the transmitter, where
P is the maximum output power rating of the transmitter in watts (W)
according to the transmitter manufacturer.
Note 1: At 80 MHz and 800 MHz, the separation distance for the higher
frequency range applies.
Note 2: These guidelines may not apply in all situations. Electromagnetic
propagation is affected by absorption and reflection from structures,
objects and people.
/
/
/
/
/
0.12
0.38
1.2
3.8
12
0.23
0.73
2.3
7.3
23
- 22 -
Page 26

15. Manufacturer information
Shenzhen Pacom Medical Instruments Co., Ltd.
Add: Area B, 8/F, Building B, No. 5 Industrial Five Road, Jiangbian
Community, Songgang Subdistrict, Bao’an District, Shenzhen,
Guangdong 518105, CHINA
Tel: +86-755-32920339
Email: sales888@pacomsz.cn
- 23 -
Page 27

Page 28

 Loading...