

Page 1
HD VIDEO CONFERENCE CAMERA
User Manual
Page 2

Content
1. Precaution ................................................................................................... 3
2. Product Introduction ..................................................................................4
2.1 Camera Technical Parameters ................................................................... 4
2.2 Product Feature ........................................................................................ 5
3. Using Instructions ........................................................................................ 6
3.1 Camera Interface .......................................................................................6
3.2 RS232 Interface Specification ....................................................................7
3.3 Camera Dimension .................................................................................... 8
3.4 Remote Controller Specification ................................................................9
4. Operation Instruction ................................................................................. 10
4.1 Camera ID Select .....................................................................................10
4.2 Pan/Tilt Control ........................................................................................10
4.3 Focus ........................................................................................................ 11
4.4 Preset Setting ...........................................................................................12
4.5 Function of Touch Button ........................................................................ 12
5. Camera Setting ........................................................................................... 13
5.1 EXPOSURE................................................................................................. 13
5.2 COLOR .......................................................................................................14
5.3 PICTURE .................................................................................................... 14
5.4 P/T/Z ........................................................................................................ 15
5.5 Noice Reduction ....................................................................................... 15
5.6 Video Format ............................................................................................ 16
5.7 System Setting ..........................................................................................16
5.8 Restore Default ......................................................................................... 16
6. Network Connecting ................................................................................... 17
6.1 Mode of Connecting ................................................................................ 17
6.2 CGI /APK login .......................................................................................... 19
7. Installation Instruction ...............................................................................29
8. Maintenance Service Terms ....................................................................... 30
8.1 Warranty Policy ....................................................................................... 30
8.2 Warranty range ........................................................................................ 30
8.3 Warranty Condition ................................................................................30
8.4 Shipping cost of RMA or replaced ..........................................................30
8.5 Warranty .................................................................................................31
1. Precaution
Electrical Safety
Confirm country and local electrical safety standard when using or installing the
product. The product itself has no power switch. Please stop power supply or
plug out power socket when it is not in good working. Video wire and control wire
should be insulated and individual connected, can’t mix-up with other wires.
Transportation with Care
Product should be protected against extremes of stress, vibration and moisture in
transport, storage and installation. It is transported by integrated packing style.
Power Supply
Product supplies 12V DC power.
Installation with Care
Don’t turn camera head manually. Doing so may result in mechanical damage.
Product should be put on stable horizontal table, and does not be installed at a tilt,
or else, which may cause tilted image.
Don’t apply corrosive liquid, gas or solid, to avoid damaging the cover which is
made up of plastic material.
Make sure there is no obstacle with the camera’s rotational range when installing.
Never power on before installation has been completed.
Prohibited unauthorized disassemble
There is no part for users to disassemble voluntarily. PUAS is not responsible for any
unauthorized modification or dismantling.
2 3
Page 3
2. Product Introduction
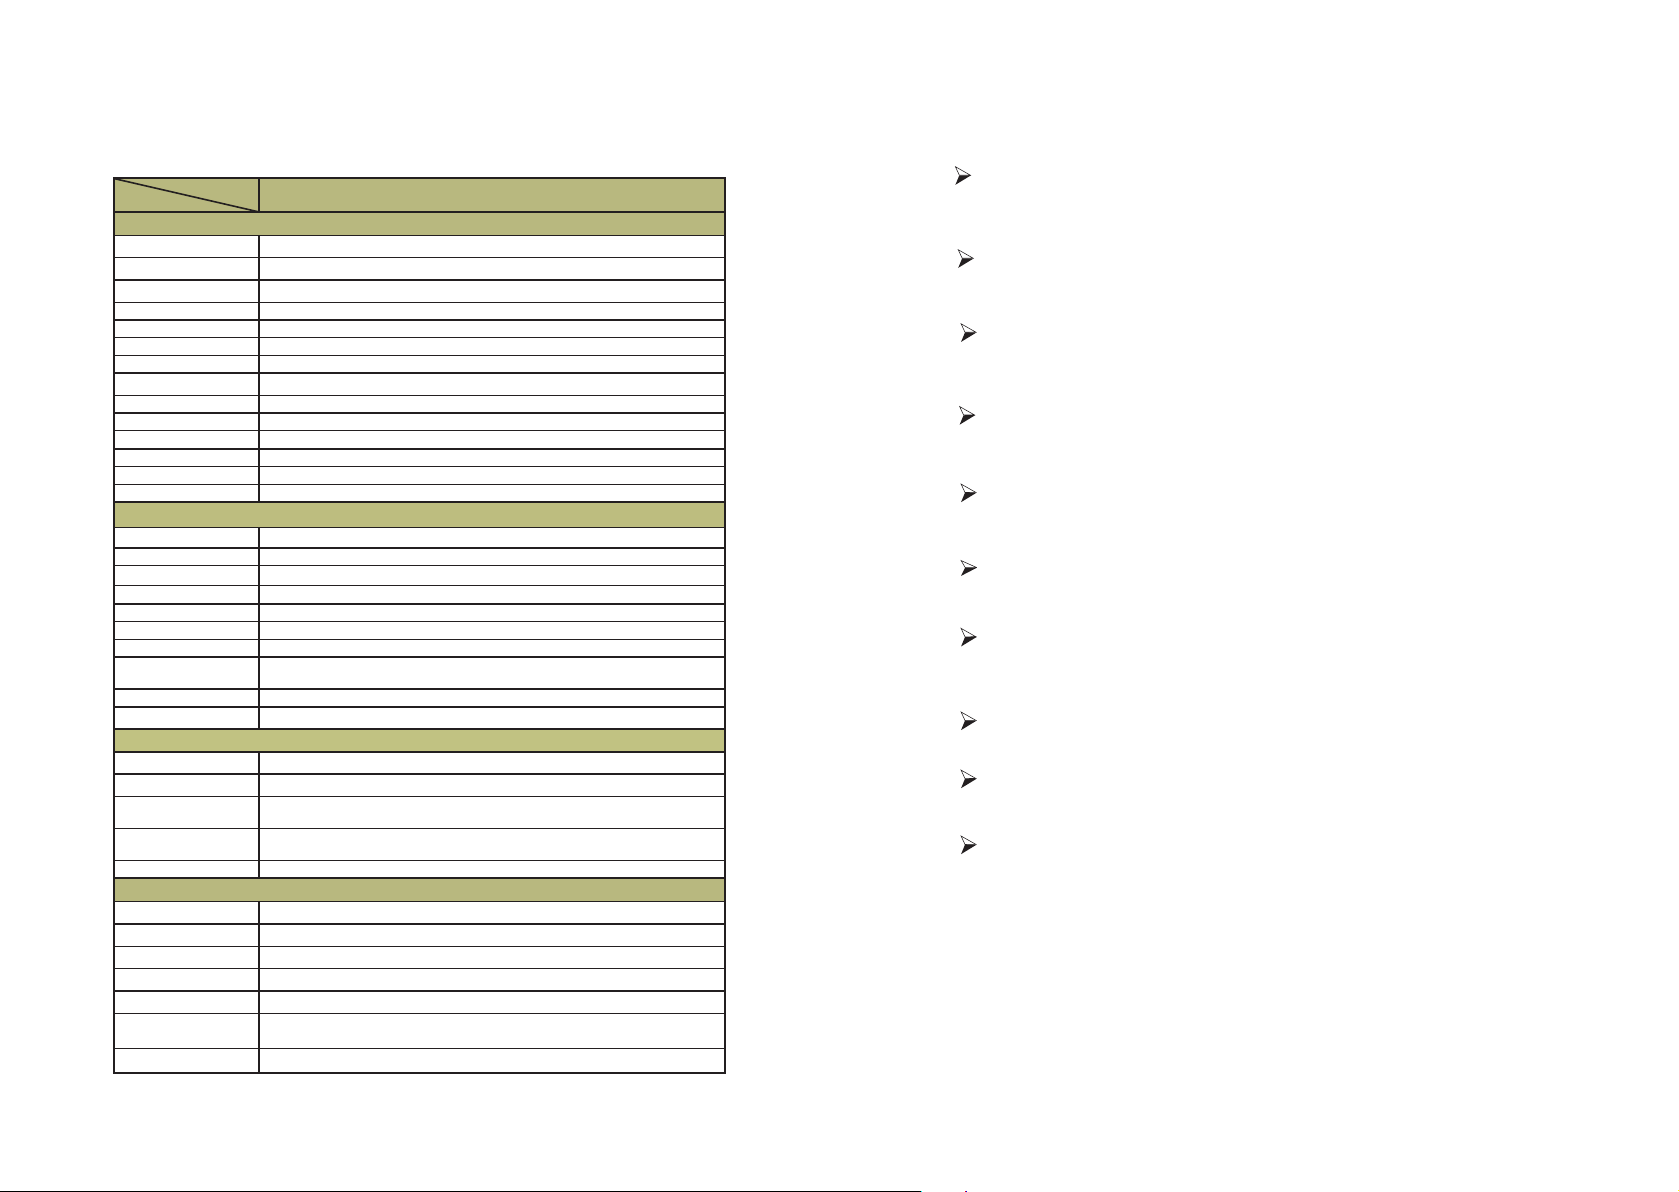
2.1 Camera Technical Parameters
Model
Specifications
Camera Parameters
CMOS Sensor 1/2.8”Exmor CMOS
Effective Pixels 2.38 Megapixels
Video Format 1080P60/59.94/50/30/29.97/25;1080i60/59.94/50;720P60/59.94/50/30/25
Optical Zoom 20x Optical
Focus f=4.7~94.0mm
Horizontal Field of View 3.2°(T) ~ 55.2°(W)
F-number F1.6 ~ F2.8
Min. Illumination 0.05Lux(F1.8,AGC:ON)
Digital Noise Reduction 2D&3D
White Balance Auto/Manual/Indoor/outdoor/White Balance/3000K/4000K/5000K/6500K
Focus Auto/Manual
Iris Auto/Manual
Backlight Compensation 1-7/Off
Control Panel Brightness, Hue, Saturation, Contrast, Sharpness
Interface Parameters
Video Output Interface HDMI,3G-SDI,RJ45
Video Network Coding H.264,H.265,MJPEG
Communication 1X RS232 IN, 1X RS232 Out, 1X RJ45, RS485
Control Protocol VISCA/PELCO-D/PELCO-P/Visca Over IP/ONVIF
Baud Rate 2400/4800/9600/115200
Audio Input Double Channel 3.5mm Linear Input
Audio Compression Format ACC,G711A,G711U
Network Interface
Network Protocol RTSP, RTMP, ONVIF, GB/T28181
Power Interface DC-038 outlet(DC12V)
Mechanical Parameters
Pan RotationAngle
Vertical Angle of View
Pan Speed Range
(per second)
Tilt Speed Range
(per second)
Presets 255
Other Parameters
Power Adapter AC100V~AC240V in, DC12V/2A out
Input Voltage DC 12V
Power Consumption 12W
Storage Environment -10°C ~ +60°C / 20% ~ 95%
Working Environment -10°C ~ +50°C / 20% ~ 80%
Standard Accessory
Optional Accessory Installing Bracket
100M internet access(10/100BASE-TX), supply network with
VISCA/PELCO-D/PELCO-P control protocol,ONVIF
-178°~ +178°
-30°~ +90°
0.1~180°/s
0.1~120°/s
Power adapter, RS232 pallet, 2-bit RS485terminal, Remote
controller, Instruction book, Guarantee card
HD320
2.2 Product Feature
1080P Full High-denition
1/2.8 inch high quality CMOS sensor, can reach maximum 1920 x 1080 resolutions and
output frame rate up to 60fps.
20X Optical Zoom with wide horizontal of view 55.2°
The camera with advanced video image processing technology & full HD 1/2.8" CMOS
Sensor, 20X Optical Zoom,Max resolution up to 3840*2160P@30fps.
Low Noise
High SNR of CMOS sensor, combined with 2D and 3D noise reduction algorithm, effectively
reduces the noise, even under low illumination conditions, to ensure that the picture can still
remain clean and clear.
Rich and Perfect Interface
Support to output High-definition HDMI, 3G-SDI and high-definition wired LAN. And could
simultaneously output three ways video with.
Quiet Pan and Tilt Movement
Using high-precision stepping motor and advance motor driven chip to make sure it rotates
stably under different speed and without any noise and howling.
Remote Control
Can remote control camera by using RS232, RS485 or internet. Support VISCA, PELCO-D and
PELCO-P protocol.
Presets Image Freezing
Support the function with only freezing preset images when transferring presets, which
could shield the image during transferring.
Multi-preset
Support as many as 255 presets. (Remote control can only set 9 presets.)
Multi-application Scenario
Education recorded, Remote conference, Remote medical treatment, Remote training, Trial
system, Command system, Webcast, etc.
Multiple Network Protocol
Support ONVIF, GB/T28181, RTSP, RTMP protocol, and also can be extended according to
users’ requirement
.
4 5
Page 4
3. Using Instructions
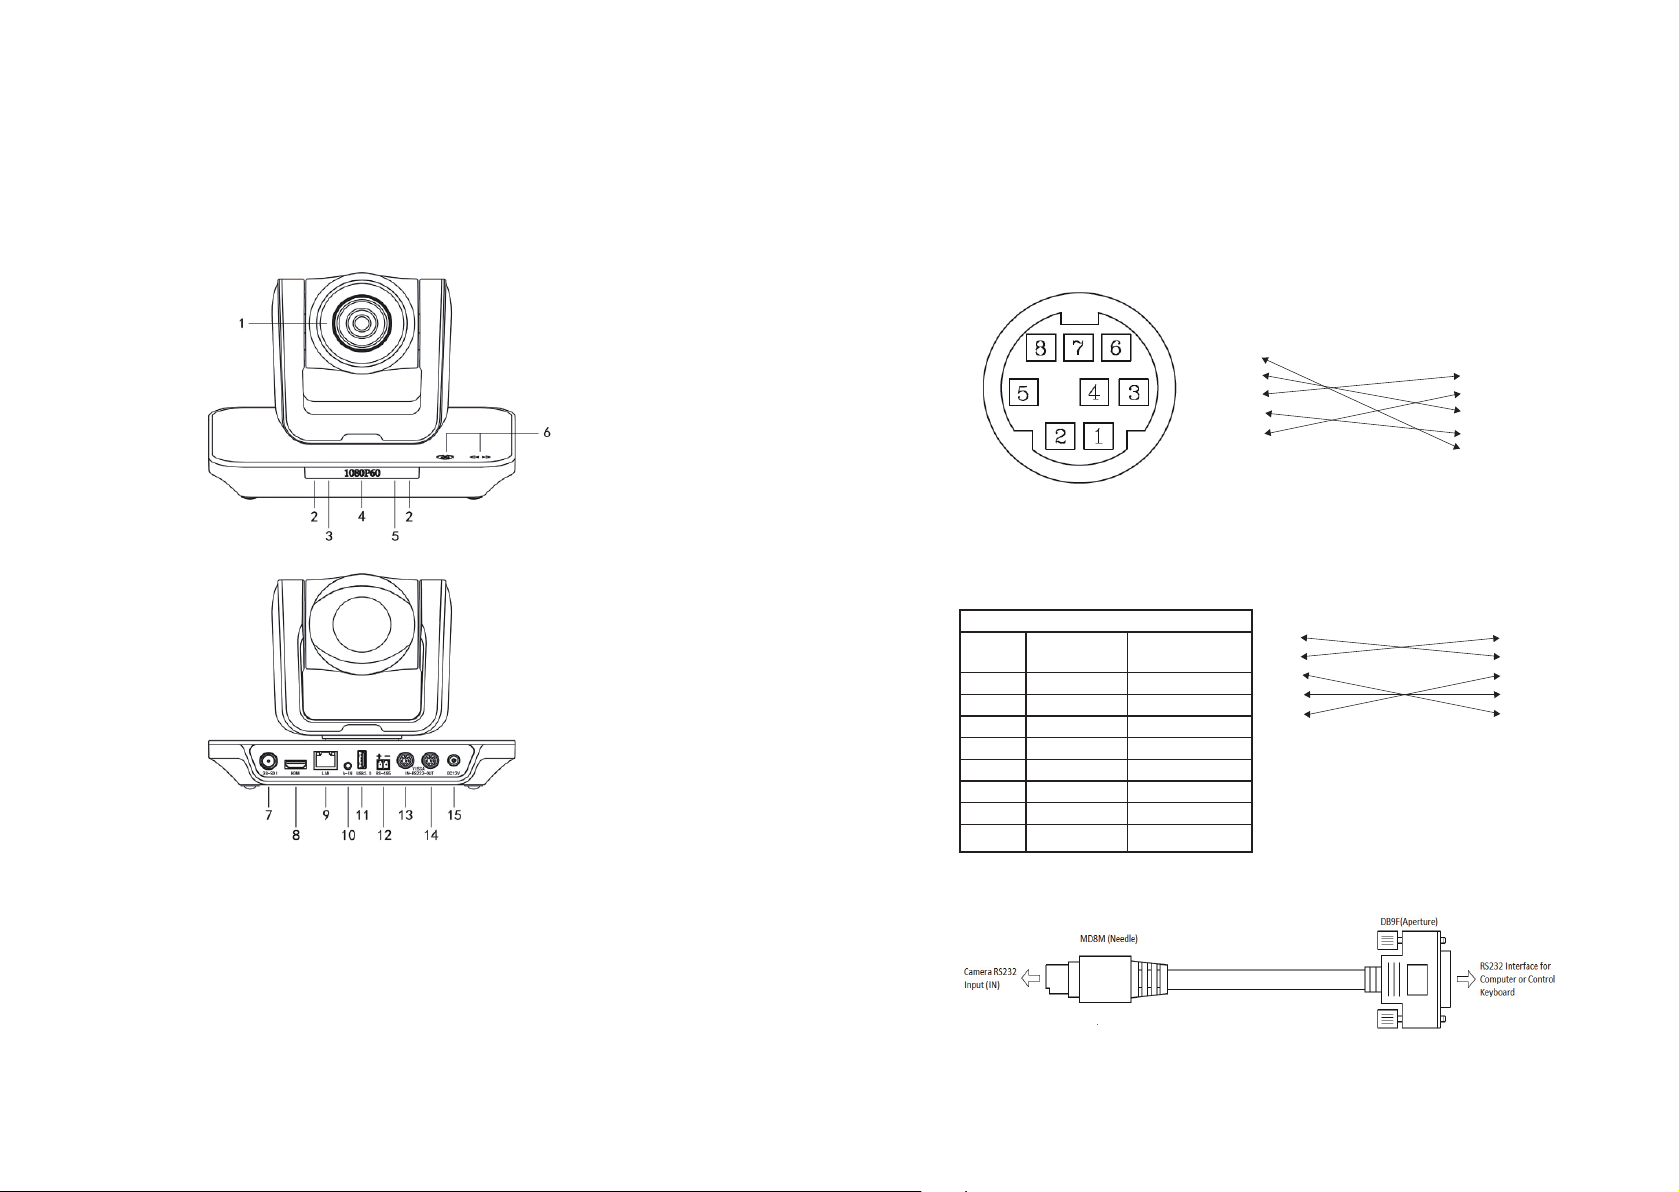
3.1 Camera Interface
3.2 RS232 Interface Speci cation
Connect Ways Between Computers Or
Control Keyboard and Camera
CAMETA WINDOWS DB-9
1.DTR 1. DCD
2.DSR 2. RXD
3.TXD 3. TXD
4.GND 4. DTR
5.RXD 5. GND
6.GND 6. DSR
7.IR OUT 7. RTS
8.NC 8. CTS
9. RI
1, Lens 6, Touch Panel 11, Storage Interface
2, IR Receiver 7, 3G-SDI Output 12, RS485 Interface
3, Power Led 8, HDMI Output 13, RS232 IN
4, OLED 9, LAN Interface 14, RS232 OUT
5, Standby Led 10, Audio Interface 15, DC12V Input
6 7
RS232INPUT
NO. Function Defi nition-
specifi cation
1 DTR Data Set Ready
2 DSR Data Set Ready
3 TXD Transmit Data
4 GND Ground
5 RXD Receive Data
6 GND Ground
7 IR OUT IR Signal Output
8 NC No Connec
CAMERA Mini DIN
1.DTR 1. DTR
2.DSR 2. DSR
3.TXD 3. TXD
4.GND 4. GND
5.RXD 5. RXD
6.GND 6. GND
7.IR OUT 7. NC
8.NC 8. NC
Page 5
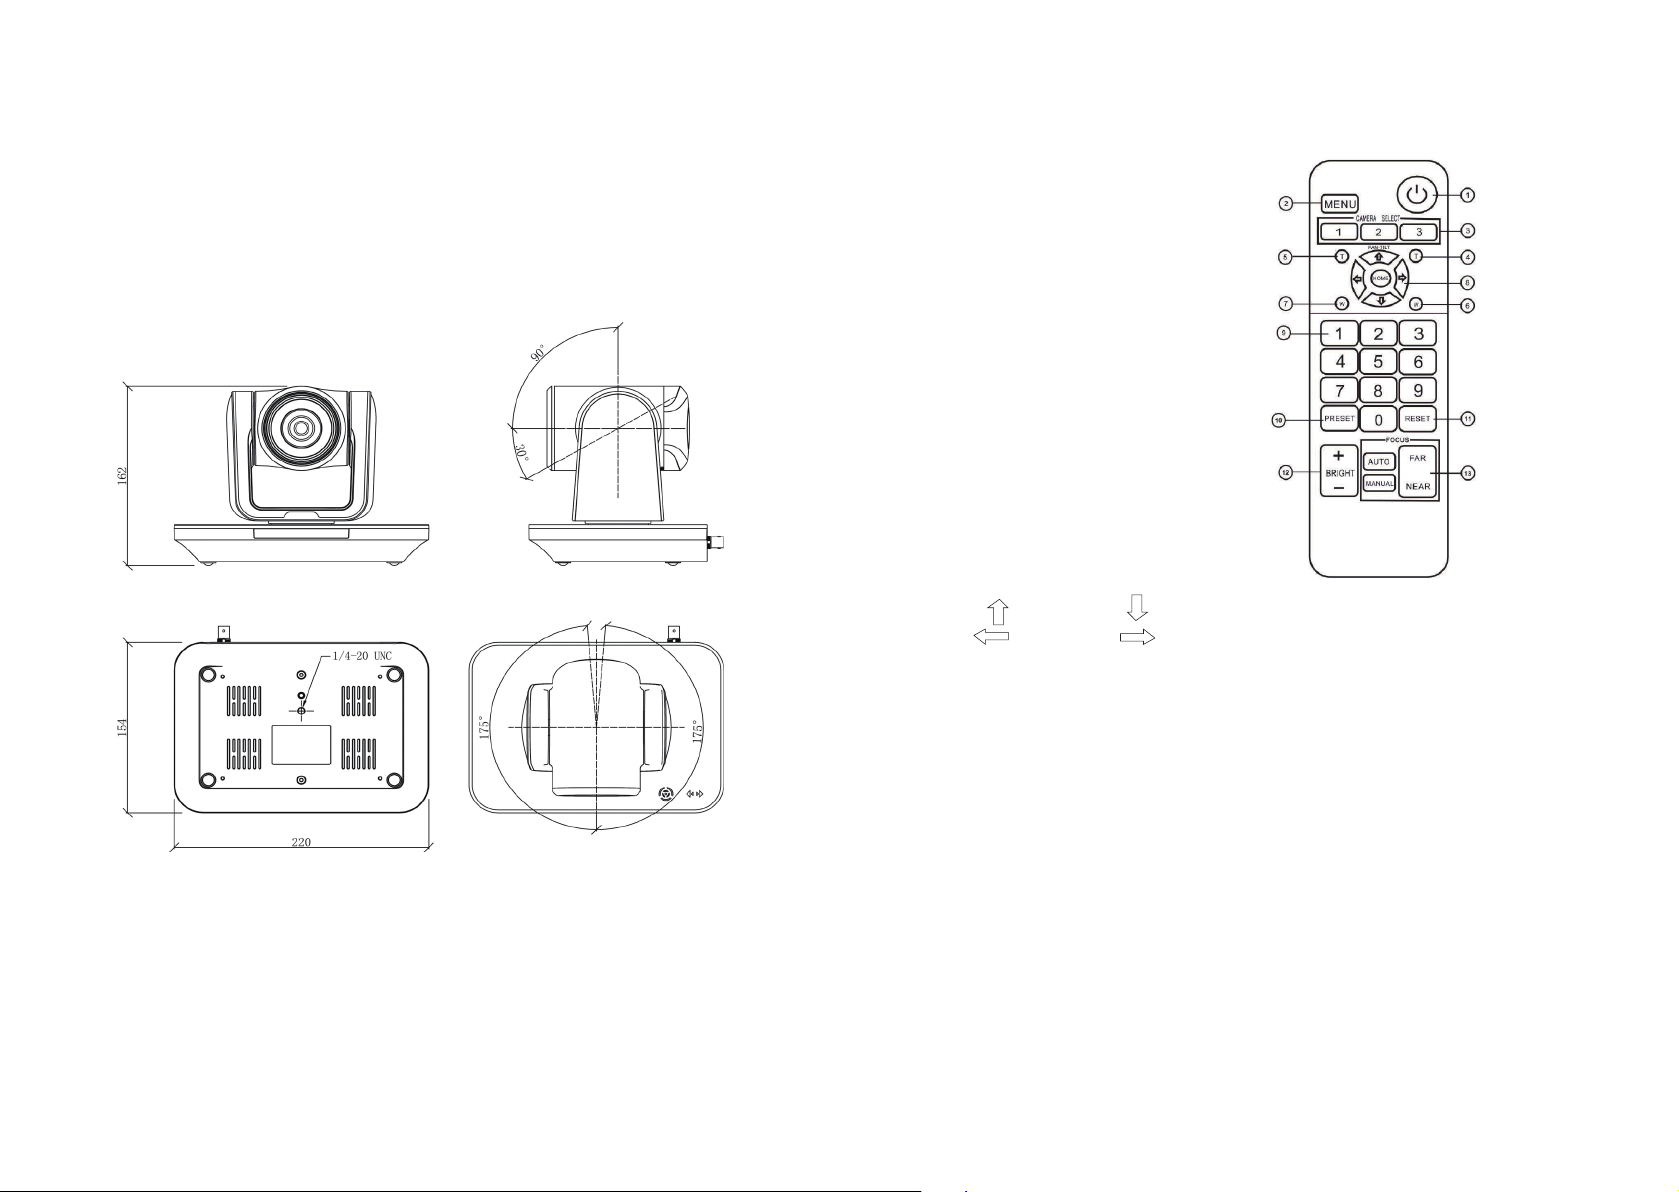
3.3 Camera Dimension
The Size for HD video conference camera is as below:
3.4 Remote Controller Specication
1.Standby Button
2.[MENU]: Enter/Exit the OSD menu
3.[CAMERA SELECT]: Camera ID select, select
the target camera you need.
4.[FAST T]: Swiftly adjust the lens to focus the
nearby object
5.[SLOW T]: Slightly adjust the lens to focus
the nearby object
6.[FAST W]: Swiftly adjust the lens to focus
the distant object
7.[SLOW W]: Slightly adjust the lens to focus
the distant object
8.PTZ Controller, PTZ turn according to the
arrow
Up Down
Left Right
[HOME]: Face the camera back to front
9.[Number Key]: Set or call the Presets of No.1-9
10.[PRESET]: PPRESET + Numeric button(1-9), set the presets you want
11.[RESET]: RESET + Number(1-9), reset the presets you want
12.[BRIGHT]: + increase, - decrease
13.[FOCUS]: Camera focus select
[AUTO]: Automatic focus
[MANNUAL]: Manual focus
[FAR]: Manual focus, make the far object clearer
[NEAR]: Manual focus, make the near object clearer
Note:
1.If the remote control does not work properly, please replace the
battery.
2.If there is object occlusion between the remote controller and the
remote control special sensor on the camera, the camera will not work
properly, so when using the remote controller, the remote controller will
directly towards the remote sensor of the front part of the camera.
8 9
Page 6

4. Operation Instructions
4.1 Camera ID Select
4.2 Pan/Tilt Control
Select the target camera ID (from No.1 to
No.3) When the camera ID is over 3, select
No.1
will enable you to operate the camera.
Turn up Press
Turn down Press
Turn left Press
Turn right Press
Reposition Press: [HOME] button
4.3 Focus
[AUTO]Enable camera automatically focus
[MANUAL] Switch to manually control mode
[FAR] Manually focus the distant object
[NEAR] Manually focus the nearby object
Backlight imaging
Strong background ray can make back-lighting objects engender shadow press [BRIGHT+] to
activate the back light mode. Quit the back light mode press [BRIGHT-]
Press the corresponding buttons to adjust the angle of the lens. Tip: Click on the direction
button will enable the camera rotating in a slow speed, while keep pressing the direction
button in a period of time will enable the camera rotating in a fast speed.
10 11
Zoom
Press the four [ZOOM] buttons to zoom the target object
Page 7

4.4 Preset Setting
5. Menu Setting
1, Save the preset press [PRESET] button first, then press any of the numbers you need (from1-
9) to save the preset.
Note: You can save at most 9 presets through the remote controller.
2, Call the preset press the saved preset number from1-9 will activate the
corresponding preset position.
Note: Call a preset number has not been saved will be invalid.
3, Reset the preset Press [RESET] button firstly, then press the number (from1-9) will clear the
corresponding preset.
4.5 Function of Touch Button
1, Double click the breathing light on the camera touch panel, and wake
up the touch button, the breathing light will keep lighting.
2, Click [ ◎ ]on the camera touch panel, select the parameters to modify, including: output
format, protocol, baud rate, address code
3, Click [ ]to modify parameters, and click [ ◎ ] to confi rm the change, at last restart the
camera to make settings take effect.
1, Operate remote controller, press the [MENU] button to
display the OSD menu.
2, Press the arrow keys to select the menu, press left and
right button to set the camera.
5.1 EXPOSURE
Press the [MENU] button to display the OSD menu, press
arrow keys to move to EXPOSURE and then press right
button to enter sub menu, as the right picture.
[AE MODE]: AUTO/SHUTTER/IRIS
[EXPOSURE SETTING]: Press right,button, for optional
as Follows
[AUTO]:N/A
[SHUTTER]: shutter priority mode:
1/1-1/10000
[IRIS]: iris priority mode: F1.6-F24
[EXPCOMP]: -3.5DB - 3.5DB, OFF
[BACKLIGHT]: 1-7/OFF
[FLICKER]: 50HZ, 60HZ, OFF
[GAMMA]:0-9
MAIN MENU
EXPOSURE
COLOR
PICTURE
P/T/Z
NOISE REDUCE
VIDEO OUT
SYSTEM SETUP
SEFAULT SETUP
EXIT
EXPOSURE
AE MODE: AUTO
AE LEVEL: N/A
EXPCOMP: OFF
BACKLIGHT: OFF
FLICKER: 50HZ
GAMMA: 5
BACK
EXIT
12 13
Page 8

5.2 COLOR
Press the [MENU] button to display the OSD menu, press
arrow keys to move to COLOR and then press right button
to enter sub menu, as the right picture.
[WB MODE]: AUTO/INDOOR/OUTDOOR/ONE-SHOT/
ATW/MUNUAL/3000K/4000K/5000K/6500K
[SATURATION]: 60%-200%
[COLOR HUE]: 0-14
[RED GAIN]: 0-255(only under MANUAL)
[BLUE GAIN]: 0-255(only under MANUAL)
COLOR
WB MODE: AUTO
SATURATION 100%
COLOR HUE: 7
BACK
EXIT
5.4 P/T/Z
Press the [MENU] button to display the OSD
menu, press the arrow keys to move to [P/T/
Z], press right button to the sub menu, as the
right picture shown.
[FILP]: ON/OFF
[L/R DIRECTION]: ON/OF
[AF MODE]: AUTO/MANUAL/ZOOM
[AF SENS]: NORMAL/LOW
[PRESET FREEZE]: ON/OFF
[D ZOOM]: ON/OFF
[P/T]:NORMAL/TRACING
[PRESET SPEED]:1-24
5.5 Noise Reduction
P / T / Z
FLIP: OFF
L/R DIRECTION: OFF
AF MODE: AUTO
AF SENS: NORMAL
PRESET FREEZE: OFF
D ZOOM: ON
P/T: NORMAL
PRESET SPEED: 24
BACK
EXIT
5.3 PICTURE
Press the [MENU] button to display the OSD menu, press
arrow keys to move to [PICTURE] and then press right
button to enter sub menu, as the right picture.
[BRIGHT] : 0-14
[CONTRAST] : 0-14
[SHARPNESS] : 0-15
[ICR] : COLOR/BLACK
[STYLE]: STANDARD/CLEAR/BRIGHT/RTSP/GENTAL
14 15
PICTURE
BRIGHT: 8
CONTRAST: 7
SHARPNESS: 5
ICR: COLOR
STYLE: STANDARD
BACK
EXIT
Press the [MENU] button to display the OSD
menu, press the arrow keys to move to [NOISE
REDUCTION], press right button to the sub
menu, as the right picture shown.
[2D NR]: 0-5 / OFF
[3D NR]: 0-5 / OFF
[DYN HOT PIXEL]: ON/OFF
NOISE REDUCE
2D NR: 2
3D NR: 3
DYN HOT PIXEL: OFF
BACK
EXIT
Page 9

5.6 Video Format
Press the [MENU] button to display the
OSD menu, press the arrow keys to move to
[VIDEOOUT], press right button to the sub
menu, as the right picture shown.
[VIDEO OUT] : 720P25,720P30,720P50,720P59,
720P60,1080I50,1080I59,1080I60,1080P25,1080
P29,1080P30,1080P50,1080P59,1080P60
5.7 System Setting
Press the [MENU] button to display the OSD
menu, press the arrow keys to move to
[SYSTEM SETTING], press right button to the
sub menu, as the right picture shown.
[SYSTEM INFO]: press right button to the sub
menu, as the right picture shown
[LANGUAGE]: CHINESE/ENGLISH
[ZOOM LEVEL]: ON/OFF
[PROTOCOL]: VISCA/PELCO-D/PELCO-P
[ADDRESS]: 1-255
[BAUDRATE]:2400/4800/9600/19200/38400
5.8 Restore Default
Press the [MENU] button to display the OSD
menu, press the arrow keys to move to
[DEFAULT], press right button to make the OSD
parameter return to the default.
VIDEO OUT
VIDEO OUT: 108030
RESTART
BACK
EXIT
SYSTEM SETUP
SYSTEM INFO
LANGUAGE: CHINESE
ZOOM LEVEL: ON
PROTOCOL: VISCA
ADDRESS: AUTO
IP: 192.168.1.162
BAUDRATE: 9600
BACK
EXIT
DEFAULT SETUP
FACTORY DEFAULT
BACK
6. Network Connecting
6.1 Mode of Connecting
Direct Mode: Connect camera with computer through network cable directly.
LAN Connecting Mode: Camera could connect to the Internet by router or interchanger then
users could log in through browser.
Note: Don’t put the wires and cables at somewhere easily touched by people for
fear that the quality of imaging is affected by unstable signaltransmission which
is caused by line contact problem.
There must be IP net segment for camera in the computer. It will be a phenomenon that
couldn’t log in if without net segment. For example, camera’s default IP is 192.168.1.162 then
the computer should add Network of 1.
Specific process as below: First, open [Properties] at computer’s local network, then select
“Internet Protocol Version 4(TCP/IPv4)” and double click or click its [Properties] and enter. And
then click [Advanced] to enter into Advanced TCP/IP Settings. Input IP to the [WINS server]
and click [Add] to finish. Users could change the camera IP address with relevant net segment.
Note: Don’t clash the IP with other computers or IP equipment when adding IP
address. Please make sure whether the IP you need is available or not before
adding.
Verify if the net segment works. Open [Start] on the computer and input cmd to “operation”
and click “enter” then input ping 192.168.1.245 to DOS commend window and press enter.
Then it comes up with the information as below picture that means the net segment works.
16 17
Page 10

After products finished self-checking, it could follow the steps as above to check if the network
works. For example, open DOS commend window and input ping 192.168.1.176 and press the
ENTER button. If it comes up with information as below picture, it means network working.
6.2 CGI /APK login
6.2.1 CGI /APK Login
Open the client software (before turning on the client software, first turn off the anti-virus
software such as 360, avoid being mistaken for viruses and be prohibited from running by
360). By default, admin login with user name and password can preview, record, screenshot,
PTZ control, audio and video. Operations such as encoding configuration. At present, this
version can be run on Windows7/32/64bits & windows 8 or higher. Multiple cameras are
supported in the LAN for simultaneous display (up to 9 devices at the same time).
The Menu language can supports Chinese and English.
6.2.2. CGI /APK Overviews
6.2.2.0 Interface Preview
After the login is successful, the system will be automatically searches for devices connected
to the LAN, and enters the management interface as shown in the following pictures.
6.2.2.1 Language
Chooses the drop-down menu to switch the language to Chinese/English.
6.2.2.2 Multi-Image Channel Display
This version of the software supports 1*CH, 4*CH, 6*CH, 9*CH, click on the interface software
icon , it also can support selection it by Click” Right” Button of Mouse.
18 19
Page 11

6.2.2.3 Search Device 6.2.2.11 RTSP Video Streaming
Click“Search Device” Button ,Refresh the online camera, the online camera is
displayed as a list. On the left side of the window, double-click a camera to operate the camera.
6.2.2.4 Play Video Streaming by RTSP
Click“PLAY” Button, The Current RTSP Streaming will be Play( Default was Automatically
Real-time Play).
Note: When recording, click this button is invalid.
6.2.2.5 Pause RTSP Video Streaming
Click“Pause” Button, The current of RTSP Streaming will be stop display.
Note: When recording, click this button is invalid.
6.2.2.6 Audio
Click“Voice” Button to Turn on/off Audio,( Default is ON)
Note: when the Streaming Mode is selection” Video Streaming” , the
Audio will not be output.
6.2.2.7 Voice Volume adjustment
Click the mouse to drag the Volume Slider to changed the Voice Volume.
6.2.2.8 Screenshot
Click“ Screenshot” Button to Select the saved path to save the current camera screen image.
Enter the RTSP stream address of the current camera in the display window;
Note: You can also enter others RTSP addresses into the input box and click to play the
RTSP video stream.
6.2.2.12 Pan, Tilt, Zoom In/Out Control
The PTZ control is as shown in the figure below. Double-click the camera searched in the list
to operate the current camera operations such as PTZ, zoom, focus, presets function.
6.2.2.12.1 PTZ Control
The PTZ control is as shown in the figure below. Double-
click the camera searched in the list to operate the
current camera operations such as PTZ, zoom, focus,
presets function.
6.2.2.12.2 Focus Mode
Click “Manual” or “Auto” to change the camera focus mode,
and click “Far ”and "near " button will be changes the focus
state of the camera during in Manual Mode.
6.2.2.13 Image Setting
The image settings are as shown below. Double-click the camera searched in the list to adjustment
the brightness and contrast,Chroma, saturation, sharpness, etc function of the current camera.
6.2.2.9 Video Record
Click“Record” Button to Select the saved path to save the current camera Video Output.
Note: Clicking the play and pause button during the recording process is invalid.
6.2.2.10 Full Screen Display
In single-Image or multi-Image display, double-click the screen in the video area to achieve
full-screen display. Double-click again to exit full-screen display.Or Click“Full-Screen” Button
can also achieve full screen display.
20 21
Page 12

6.2.2.13.1 Brightness Adjustment 6.2.2.13.11 Video Style
Click or drag the brightness control slider to change the brightness of the camera, and the
label on the right will display the value of the brightness.The range of brightness varies (0-14).
6.2.2.13.2 Contrast Adjustment 6.2.2.13.12 Mirror
Click or drag the Contrast control slider to change the contrast of the camera, and the label
on the right will display the value of the contrast.The range of brightness varies (0-14).
6.2.2.13.3 Chroma control 6.2.2.13.13 FLIP
Click or drag the Chroma control slider to change the chroma of the camera, and the label
on the right will display the value of the chroma.The range of brightness varies (0-14).
6.2.2.13.4 Saturation control 6.2.2.13.14 Save and default Restore
Click or drag the Saturation control slider to change the Saturation of the camera, and the label
on the right will display the value of the Saturation.The range of Saturation varies (60%-200%).
6.2.2.13.5 Sharpness control
Click or drag the Sharpness control slider to change the Sharpness of the camera, and the label
on the right will display the value of the Sharpness.The range of Sharpness varies (0-15).
6.2.2.13.6 HLC
Click or drag the HLC control slider to change the HLC of the camera, and the label on the right
will display the value of the HLC.The range of HLC varies (0-15).
6.2.2.13.7 BLC(Backlight Compensation)
Click or drag the BLC control slider to change the BLC of the camera, and the label on the right
will display the value of the BLC.The range of BLC varies (0-15).
6.2.2.13.8 2D Noise reduction control
Select 2D noise reduction by the drop-down menu, turn on noise reduction and select different
levels of noise reduction. Noise reduction level (1-5).
6.2.2.13.9 3D Noise reduction control
Select 3D noise reduction by the drop-down menu, turn on noise reduction and select different
levels of noise reduction. Noise reduction level (1-5).
6.2.2.13.10 Anti-icker control
Through the drop-down menu to select turn on /off the anti-flicker function and select 50Hz
or select 60Hz.
To Select different video styles through the drop-down menu, video style: standard, Bright,
RTSP, Soft styles.
Click left of the mirror button to turn on the mirror function ,Click again to turn off
the mirror function .
Click left of the Flip button to turn on the flip function ,Click again to turn off the
flip function .
click on the "Save" button to save all image settings information in the current camera "Image
Settings".
click on the "Restore Default" button, the system will restore the current camera "Image
Settings" factory defaults.
6.2.2.14 Audio & Video Setting
The encoding settings of audio and video are as shown in the figure below. Double-click the camera
searched in the list to setting encode the audio and video of the current camera.
22 23
Page 13

6.2.2.14.1 Main Streaming 6.2.2.14.2 Sub-Streaming
a.Streaming Frame Rate: Input 1-30 to setting Streaming Framer rate,default 30.
b.GOP:Input 1-60 to setting valued of Frame Interval,default 30.
c.Bit Rate:Input 1-10240to Setting Video Bite Rate,default 4096.
d.Resolution:Through drop-down menu to selection Resolution, default 1920.
e.Streaming Type:Through drop-down menu to selection Video Stream or Complex Stream,
default Complex Streaming.
Note: When select Video Stream, “Audio” will automatically select OFF.
f. Encode Type:“MJPEG”,“H.264”,“H.265”.
When Selection to“MJPEG”, The Encode level only available Base Profile.
When Selection to“H.264”or“H.265”, Encode level have “Base Profiles/Main Profile”,/High
Profile for selection.
g. Encode Level: “Base Profile”,“Main Profile”,“High Profile”.
According to “Encode Type” to Selection the Encode Level.
h. Bit rate type:“CBR”,“VBR”,“FIX QP”Representing "fixed Bit Rate","variable Bit Rate",
"coded bit Rate".
Note: When “CBR” is selected, “stream quality”, “IFrame”, “PFrame” cannot be selected and edited.
When “VBR” is selection, “IFrame”,“PFrame”can’t be edited.
When“FIX QP”is selection, “Quality”can be edited.
I.Streaming Quality:“High”, “Middle”, “Low”,Streaming quality only valid when the Bit Rate
type is“VBR”.
j. IFrame: Input 1-51 Volume to setting IFrame,default 30.
Note:IFrame only valid when the Bit Rate type is “FIX QP”.
k. PFrame: Input 1-51 Volume to Setting frame by frame quality, default 30.
Note:Pframe only valid when the Bit Rate type is“FIX QP”.
I.Audio:Through Drop-down Menu to Selection ON/OFF Audio Input.
Noted:When Selection “ON”,“Streaming Model”will be automatically to Complex Stream.
When Selection “OFF”,“Streaming Model”will be automatically to Video Stream.
m. Audio Encoding:“G.711A”,“G.711B”,“AAC_LC”.
n.Audio Input Type:“MIC”,“LINE”.
o.Input Volume:Through Drop-down menu“Mute” or 1-10 Grade to selection the Voice
Input Volume.
p.Output Volume:Through Drop-down menu“Mute” or 1-10 Grade to selection the Voice
Output Volume.
r. Save and default Restore.
Click“Saved”Button to saved the Main-Streaming Parameters.
Click“default Restore”Button to Restore the Main-streaming Parameters setting to default.
a. Streaming Frame Rate: Input 1-30 to setting Streaming Framer rate,default 30.
b.GOP:Input 1-60 to setting valued of Frame Interval,default 30.
c.Bit Rate:Input 1-10240 to Setting Video Bite Rate,default 4096.
d. Resolution:Through drop-down menu to selection Resolution, default 1920.
e.Streaming Type:Through drop-down menu to selection Video Stream or Complex Stream,
default Complex Streaming.
Note: When select Video Stream, “Audio” will automatically select OFF.
f. Encode Type:“MJPEG”,“H.264”,“H.265”
When Selection to“MJPEG”, The Encode level only available Base Profile.
When Selection to“H.264”or“H.265”, Encode level have “Base Profiles/Main Profile”, /High
Profile for selection.
g. Encode Level:“Base Profile”, “Main Profile”, “High Profile”, According to “Encode Type” to
Selection the Encode Level.
h. Bit rate type:“CBR”,“VBR”“FIX QP”Representing "fixed Bit Rate", "variable Bit Rate",
"coded bit Rate"
Note: When “CBR” is selected, “stream quality”, “IFrame”, “PFrame” cannot be selected and edited.
When “VBR” is selection, “IFrame”,“PFrame”can’t be edited.
When“FIX QP”is selection, “Quality”can be edited.
i. Streaming Quality:“High”, “Middle”, “Low”,Streaming quality only valid when the Bit Rate
type is“VBR”.
j. IFrame: Input 1-51 Volume to setting IFrame,default 30
Note:IFrame only valid when the Bit Rate type is “FIX QP”
k. PFrame: Input 1-51 Volume to Setting frame by frame quality, default 30.
Note:Pframe only valid when the Bit Rate type is“FIX QP”.
I.Audio:Through Drop-down Menu to Selection ON/OFF Audio Input.
Noted:When Selection “ON”,“Streaming Model”will be automatically to Complex Stream
When Selection “OFF”,“Streaming Model”will be automatically to Video Stream.
m. Audio Encoding:“G.711A”,“G.711B”,“AAC_LC”.
n.Audio Input Type:“MIC”,“LINE”.
o.Input Volume:Through Drop-down menu“Mute” or 1-10 Grade to selection the Voice
Input Volume .
p.Output Volume:Through Drop-down menu“Mute” or 1-10 Grade to selection the Voice
Output Volume.
r. Save and default Restore.
Click“Saved”Button to saved the Sub-Streaming Parameters.
Click“default Restore”Button to Restore the Sub-streaming Parameters setting to default.
24 25
Page 14

6.2.2.15 Internet Setting
The network configuration is as shown in the figure below. Double-click the camera in the
list to view the network setting & Information of the current camera.
6.2.2.15.1 IP,DNS Cong
a. IP Config
Supports automatic IP address and manual
configuration of IP.
The system defaults to manual mode.
IP:192.168.1.162 Mask:255.255.255.0 Gate
Way:192.168.1.1
b. DNS Config
Supports automatic DNS address and manual
configuration of IP.
The system defaults to manual mode.
DNS1:8.8.8.8 DNS2:8.8.4.4
c. Saved & Restore Default
Click“Save”button, to Saved current Camera setting of IP, DNS.
Click“default”Button,to restore default setting of Current Camera.
Noted: If you modify IP Network Segment, the Gateway also need to Revised, Otherwise,The
Video image can’t display.
6.2.2.15.2 Port Cong
a.MSG Port: default 8080
b.RTSP Port: default 554
c.RTMP Port: default 1935
d.HTTP Port: default 80
Note: Changing the port number requires restarting the camera to valid. In order to avoid
port conflicts, please be careful to modify.
6.2.2.15.3 PTZ Cong
a. PTZ Camera ID:(0-255)
b. Protocol:VISCA,Pelco-P,Pelco-D
c. Baud rate:2400,4800,9600,19200,38400
d. Left-Right Setting:Normal, Invert
e. PTZ Installation:Stand,Ceiling
f. Zoom Display:OFF,ON
g. Presets Freeze:OFF,ON
h. Saved & Restore Default
Click“Save”Button to saved the PTZ Parameters of Current Camera.
Click“default”Button to Restore PTZ Parameters of Current Camera.
6.2.2.15.4 RTSP Streaming address
Default Main Streaming:rtsp://192.168.50.190:554/0/0/0
Default Sub-Streaming:rtsp://192.168.50.190:554/0/0/1
6.2.2.15.5 RTMP Cong
a.RTMP Auth: Through the drop-down menu to Selection“OFF”“ON”RTMP function.
b.Stream type: Through the drop-down menu“Main Stream”, “Second Stream”.
c.Port: To Setting RTMP Port,default 1935.
d.RTMP Server address : default : rtmp://14.146.230.121/live/puas
e. Save & Restore default.
Click“Save”Button to Saved RTMP setting of current camera.
Click“Default” to Restore the default setting of RTMP of Camera.
6.2.2.15.6 ONVIF Cong
a.ONVIF Authentication: Authentication enable,default not Enable.
b.ONVIF Server Port: default 8554.
c.ONVIF RTSP Authentication: Authentication enable,default not Enable.
d.RTSP Port:ONVIF RTSP Port, default 8554.
e. Save & Restore default.
Click“Save” Button to Saved the ONVIF Parameters of Camera.
Click“default”Button to restore the ONVIF Parameter to default of Camera.
6.2.2.16 System Setting
The system settings are as shown below. Double-click the camera in the list to setting the
system parameters of the camera.
6.2.2.16.1 Device information
a. Device Name:Display name/model of current camera, Can modify.
b. MAC Address:Display MAC address.
c. Mask:Display the Mask information of Camera.
d. Gateway:Display Gateway of current of Camera.
e. Software Version:Display the Software Version of Camera.
f. S/N:Display the S/N of Camera.
g. Software burning date:Display the software burning date of camera.
26 27
Page 15

6.2.2.16.1 Reset Restart
a. Click “Restart”Button to Restart Camera.
b. Click“Restore setting”Button to restore default
parameters.
c.Firmware Upgrade:Click the "Browse" button to load
the upgrade file and click "Upgrade" to Start upgrade
the current camera.
The upgrade progress bar shows the current upgrade
status, showing 100%, indicating that the upgrade is
complete.
Note: Restart the camera after the upgrade is
complete.
6.2.2.16.2 Account Modify
a. Original:Input Original Account Name,default:admin
b. Original PIN:Input Original PIN,Default:admin
c. New Account:Input New Account Name
c. New PIN:Input New PASSWORD
Click“Modify” to saved the New Account information
Note: In the process of modifying the account and password, if the original account and
password are incorrect, the new account and password cannot be activated. The super
account that the system logs in: administrator Super password: 666666.
7. Installation Instruction
1. To drill 4 M4 screw hole inceiling (see below
sketch), use 4 pcs STP4x16 cross screws to fix
the upside-down installation board of video
conference camera on ceiling.
2. Use 4 pcs M3x4 cross screws to fi x the video
conference camera on the connection board,
showed as the below sketch.
(Ceiling / Wall Mount / Tripod
)
3. Hang the discreteness made in step2
on the installation board, showed as the
below sketch.
4. Use 3 pcs M3x4 cross screws to fix the
connection board and installation board,
showed as the below sketch.
28 29
Page 16

8. Warranty & Maintain Service Terms
8.5 Warranty
8.1 Warranty Policy
All of the products from PUAS with Three(3) Years Warranty.
All of the product with the quality problem, we will be direct provide new products for
replace for the first year.
We only provide RMA or free parts for maintain service for over one years products.
The products of exceed the warranty period, the company will charge maintenance fees or
in the form of sales accessories & parts
All of the date was calculated based by Series Number.
.
8.2 Warranty range
The products over warranty period, the same fault occurs within 3 months of paid
maintenance, and will be repaired free of charge.
Duo to force majure reason(Such as War, Earthquakes,Lightning, etc) or improper use,
Installation errors and other non-normal operation or accident by failure is not covered by
free warranty.
All of the products must be adopt split package and original packing materials transport. If
use overall assemble packaging damage caused by the type of product or did not use the
original packaging transport, doesn’t belong to the scope of free warranty.
Prohibit the user without permission to disassemble the machine, the user to disassemble
the repaired products, is not within the scope of free warranty. For the fault products
over the warranty period, the company implemented lifetime provide paid maintenance
services.
For the malfunction of products within the period of warranty, please fill in the form of
warranty information correctly. Describe the malfunction in detail. And provide original
sales invoice or its copy.
For the damage and loss which was caused by the user’s specifically application. Factory
won’t bear any risk and responsibility. The factory compensation made by breach of faith.
Negligence or tortuous won’t exceed the amount of products. The factory won’t bear any
responsibility for the special, Unexpected and continue damage caused by any others
reason.
The Company has the final right of explanation for the above terms.
8.3 Warranty Condition
The buyer need to send the malfunction products to our indicated address with the
warranty cards information.
PUAS only provides services directly to customers who purchase directly from the
company. Users need to consult local DEALER and distributors.
8.4 Shipping cost of RMA or replaced
The company only afford one way shipping cost from the manufacturer to Channel
distributor or purchaser. All of the end user direct return to our company, please contact
with our sales in advance or Consult local Dealer & Distributors.
All RMA products will be scheduled to return to customers within 7 days.
Warranty information Card
Customers Name Purchased Date
Add
Tel/Fax Post Code
Model Number S/N No.:
Malfunction Description
Distributor /
Company Chop
Signature
User files which was only one basic credential for warranty, please carefully fill in
& Save it properly.
SHENZHEN PUAS INDUSTRIAL CO.,LTD
Warranty Terms
Thanks for your purchase of our company's video PTZ camera products, we would
like to thank you again!
In order to protect your legitimate rights and interests, remove your worries, and to improve
customer service, specially formulated this warranty regulations, please read carefully and
provide valuable advice and suggestions.
1. The company's products from the date of sale, the warranty for one year, life-long
maintenance (parts not covered under warranty). For product warranty over the term of the
free warranty service, the Company will charge the cost of the part as appropriate for the
product fault condition.
2. Repair products, please properly packaged shipping, shipping process if destroyed or lost,
the company will not be responsible.
3. During the free warranty period, the following matters, the company reserves the right to
refuse services or charge materials, service fees, as appropriate.
a. Improper use of the user caused product failure or damage;
b. Electric shock or improper installation led to the accident of burning;
c. Non-repair service damage caused by the repair.
4. Before installation of the company's products, please read the product manual carefully.
5. The warranty card must be Chop by distributor company and indicate the sales date to
ensure that your rights.
30 31
 Loading...