

Page 1
User Manual
AARDWOLF PERFORMA 3X
APF-3X-92
IntelSocket LGA 1156 / 1155 / 1151 / 1150 / 775
AMD Socket FM2 /FM2+ /FM1 /AM3+ /AM3 /AM2+ /AM2 /AM4
ENGLISH
РУССКИЙ
УКРАЇНСЬКА
www.senjin-cn.com www.performa.cool
CPU COOLING SYSTEM
Page 2

English
WWW.SENJIN-CN.COM
2
English
WWW.SENJIN-CN.COM
2
1. Precautions
1) This model of processor cooling system must be used with 92 mm fan.
2) To prevent injury or damage to the fan or its blades, avoid moving objects or parts of
the body into the fan while fan it is operating.
3) Thermal Grease, which is included, is intended exclusively for installation of the system
on the processor and is not a food. Avoid touching of Thermal Grease with skin, eyes,
do not use inside, keep inaccessible for children and animals. If the Thermal Grease
has hit the skin, immediately rinse with water. If you come in or if you have other health
problems when using a Thermal Grease - immediately consult a doctor.
4) To prevent possible injures, gloves must be worn while handling this product.
5) It is advisable not to use force when fastening the fan and installing the system on the
processor, this can damage the parts of the device.
6) It is necessary to store and use the device in places not accessible to children.
7) Carefully read the setup and installation instructions before starting to work with the
device. If you find a discrepancy with the information provided, contact the seller of the
item to replace or complete.
8) When transporting a computer system, the cooler should be removed from the
motherboard. The Supplier is not responsible for the damage that occurred during the
transportation of the goods.
9) The appearance and completeness of the goods may be supplemented or modified in
order to improve or improve the quality of the goods.
10) The supplier is not responsible for damage to the processor cooling system and the
processor, as a result of the use of installing aggressive chemical thermal interfaces
not provided for by this instruction and manufactured by third parties.
Page 3
English
WWW.PERFORMA.COOL
3
English
WWW.PERFORMA.COOL
3
2. Specifications
CPU Cooling system Aardwolf Performa 3X (APF-3X-92)
Product code: APF-3X-92
IntelSocket LGA
1156 / 1155 / 1151 / 1150 / 775
AMD Socket
FM2 /FM2+ /FM1 /AM3+ /AM3 /AM2+ /AM2 /AM4
Моdel
APF-3X-92
Маterials
Pure Сopper /Aluminium /Plastic
Fan size
92 х 92 х 25 mm
Bearing type
Hydraulic
Fan RPM
1000 ~ 1600 rpm ± 10%
The surface area of the radiator plates
3 426,28 cm2
Speed Control
PWM Control, Auto Restart
Fan Noise
16 ~ 24 dBA ± 10%
Connector
4 Pin
Input voltage
12V
Static pressure
3,8 mm / H2O
Fan Performance
36,1 CFM
Current strength
0,23 А
Consumption
2,76 W
Dimension (with fan)
127(W) х 75,5(L) х 131 (H) mm
Dimension (without fan)
127(W) х 52(L) х 131 (H) mm
Weight (with fan)
326 g
Weight (without fan)
206 g
Gross Weight
440 g
Thermal Interface
1g, thermal grease Aardwolf AF-TG2 (plastic bag)
Page 4
English
WWW.SENJIN-CN.COM
4
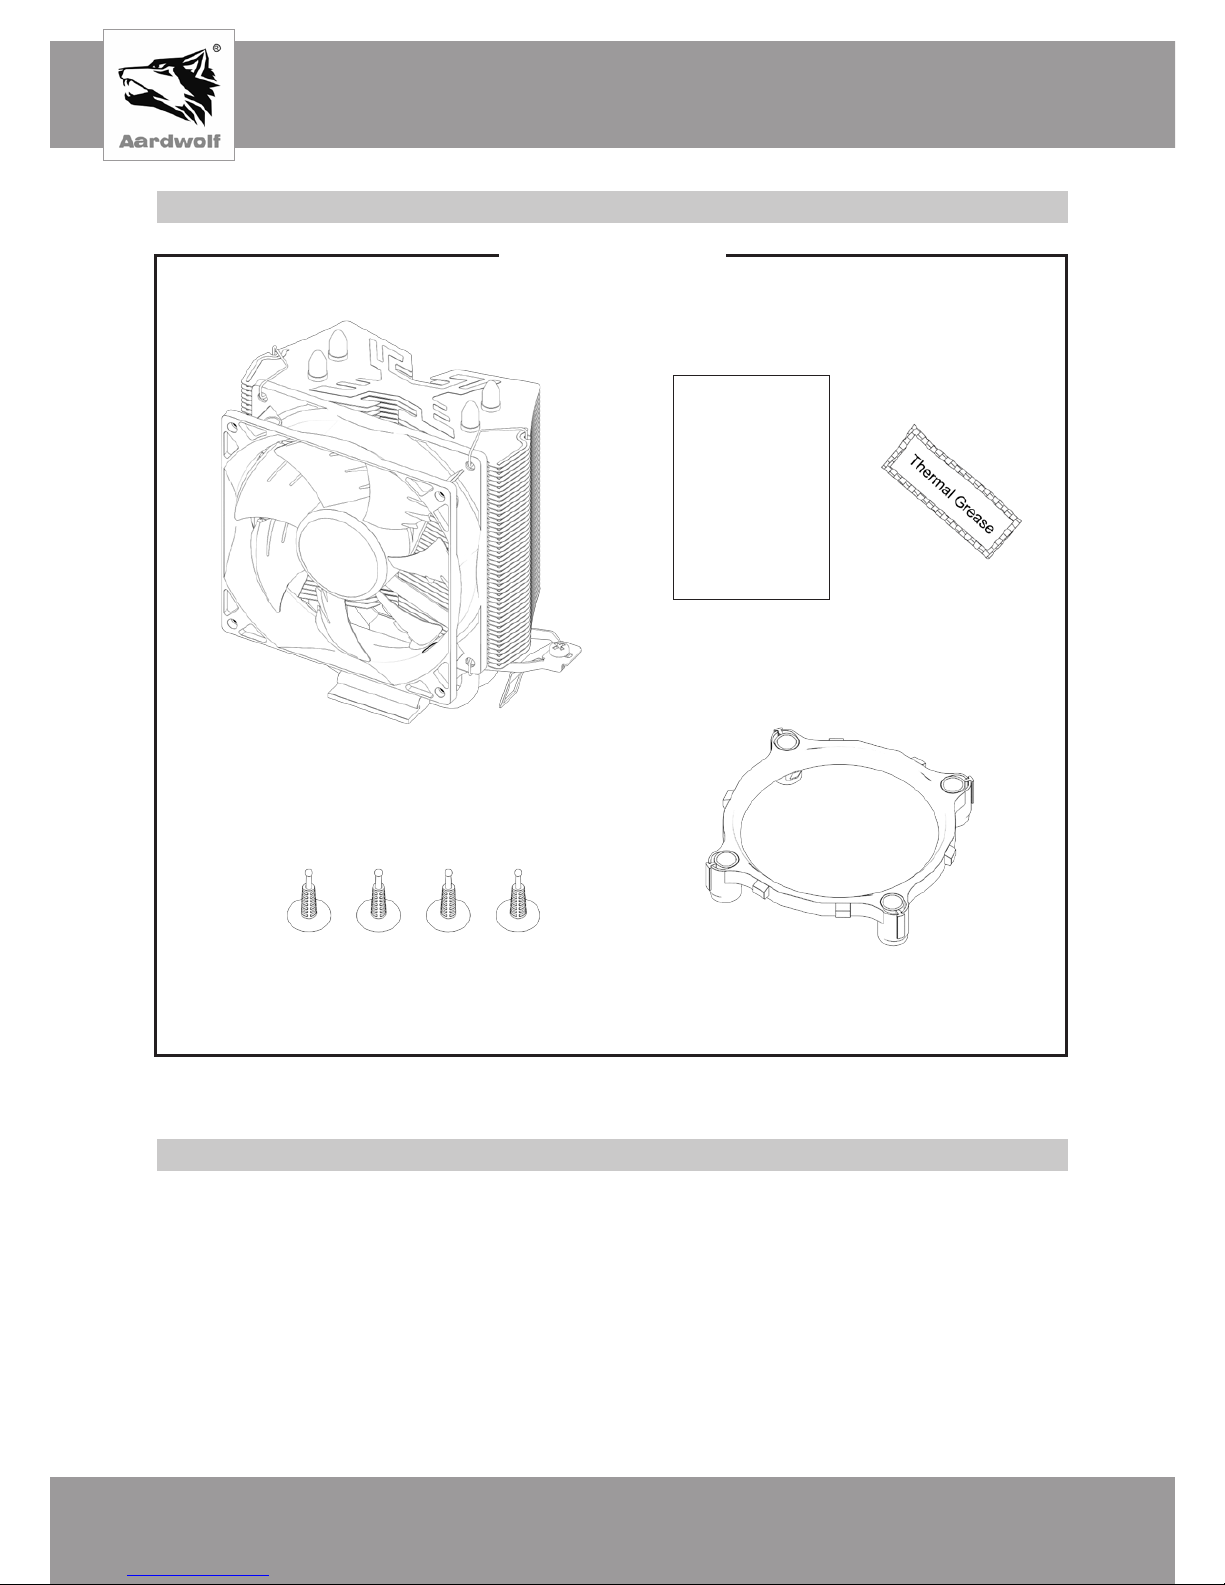
3. Components
Common components
Manual
Cooler with fan
User`s manual
Fastening clips
4. Installation requirements
Limitations on dimensions
It is recommended that before installing the CPU cooling system to try the device. Place the
radiator without fasteners on the processor cover. Make sure that the body panel is free to
close and does not touch the heat pipes, radiator or fan. The parts of the device should not
touch other components of the motherboard.
Thermal grease
(AF-TG2)
Mounting frame with bushings
Page 5
English
WWW.PERFORMA.COOL
5
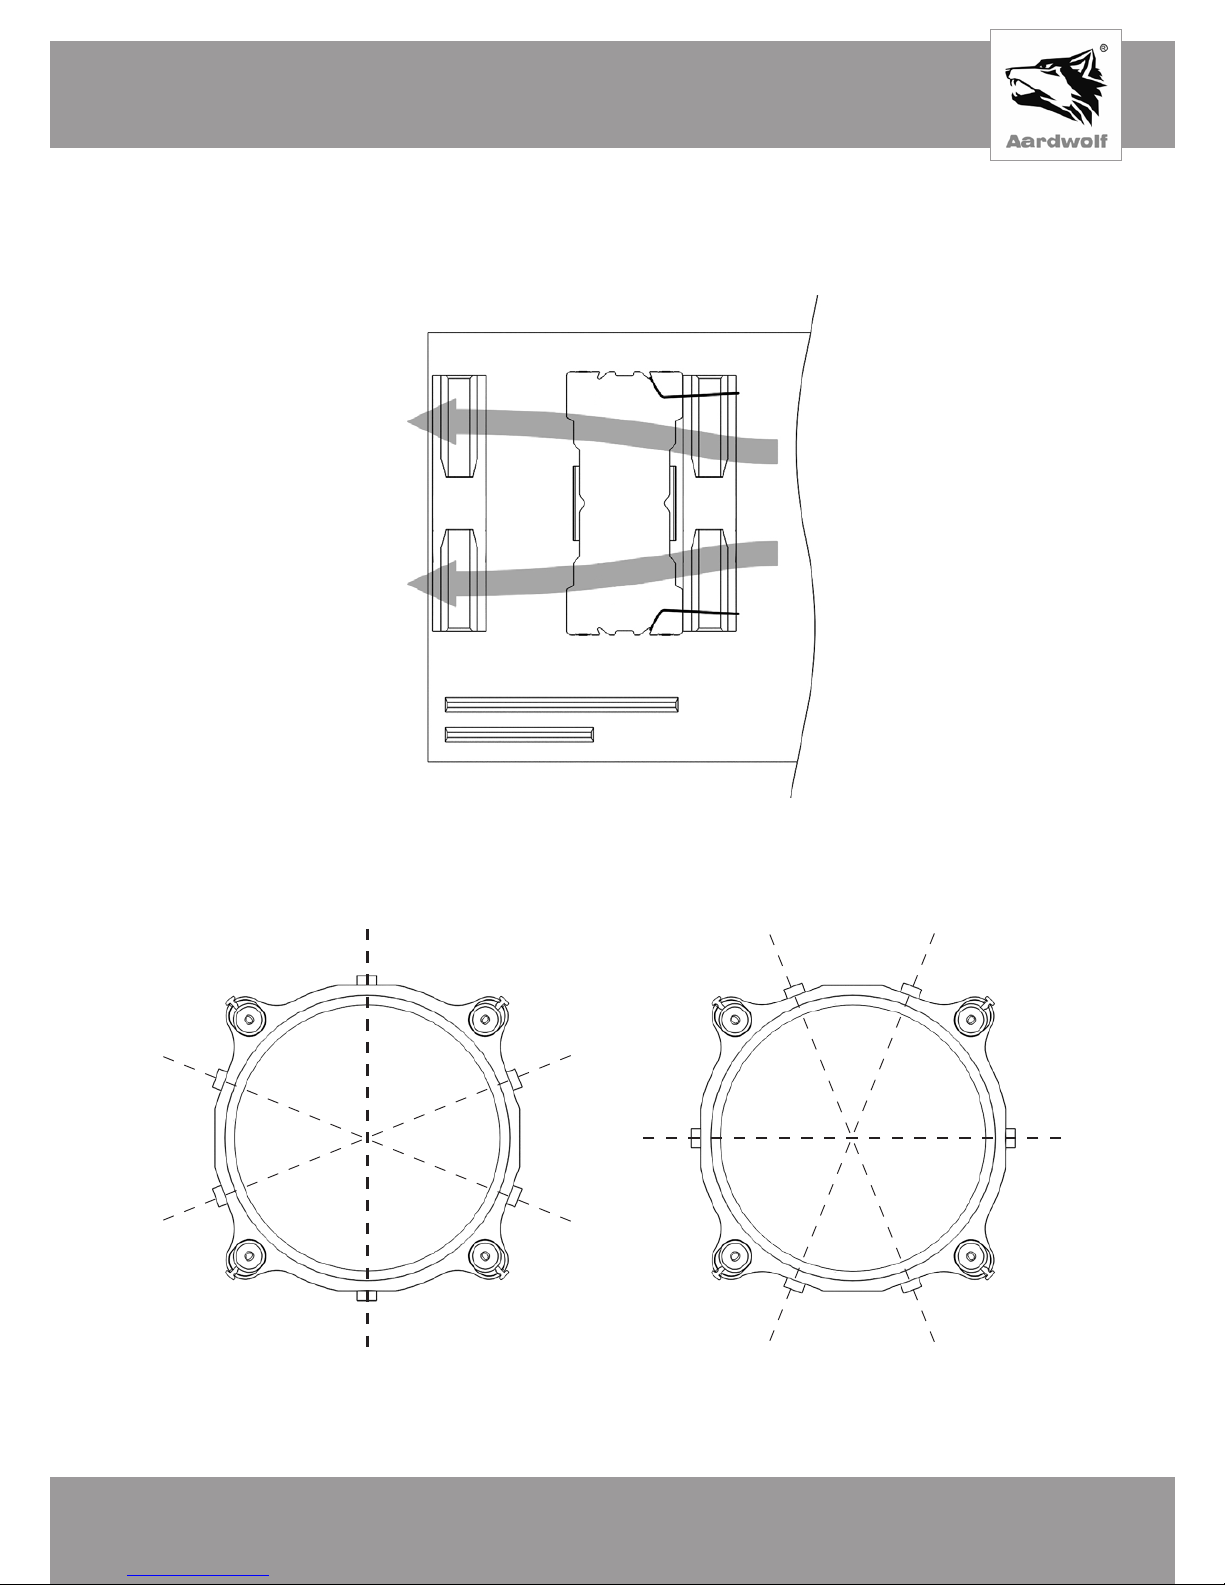
M/B
On Intel processor slots, the radiator can be rotated at a straight or sharp angle. For this
purpose, appropriate fastening frame turns before installation.
Location of the device
The air flow of the front cooling fan must be directed to the radiator.
vertical horizontal
90
о
0
о
-22
о
22
о
-68
о
68
о
Pic 1
Page 6
English
WWW.SENJIN-CN.COM
6
AMD on the CPU socket is permitted only vertically mounted radiator (Pic 2).
RAM
Before installing of CPU cooling system on the processor, it is necessary to measure the
height of the RAM modules, and to check whether they interfere with the installation of
CPU cooling.
Motherboard
Before installing of CPU cooling, make sure that the power rails of the power circuits of the
motherboard do not interfere with the design of the device. Make sure that the capacitors
of the chip and other elements of the motherboard do not conflict with the mounting of
processor cooling and do not interfere with its installation.
VGA
Before installing processor cooling, make sure that the device does not fall into the plane of
placement of the video adapter.
vertical
90
о
Pic 2
Page 7
English
WWW.PERFORMA.COOL
7
5. Installation
Socket Intel LGA installation 1156 /1155 /1151 /1150 /775
Assembling of the mounting frame
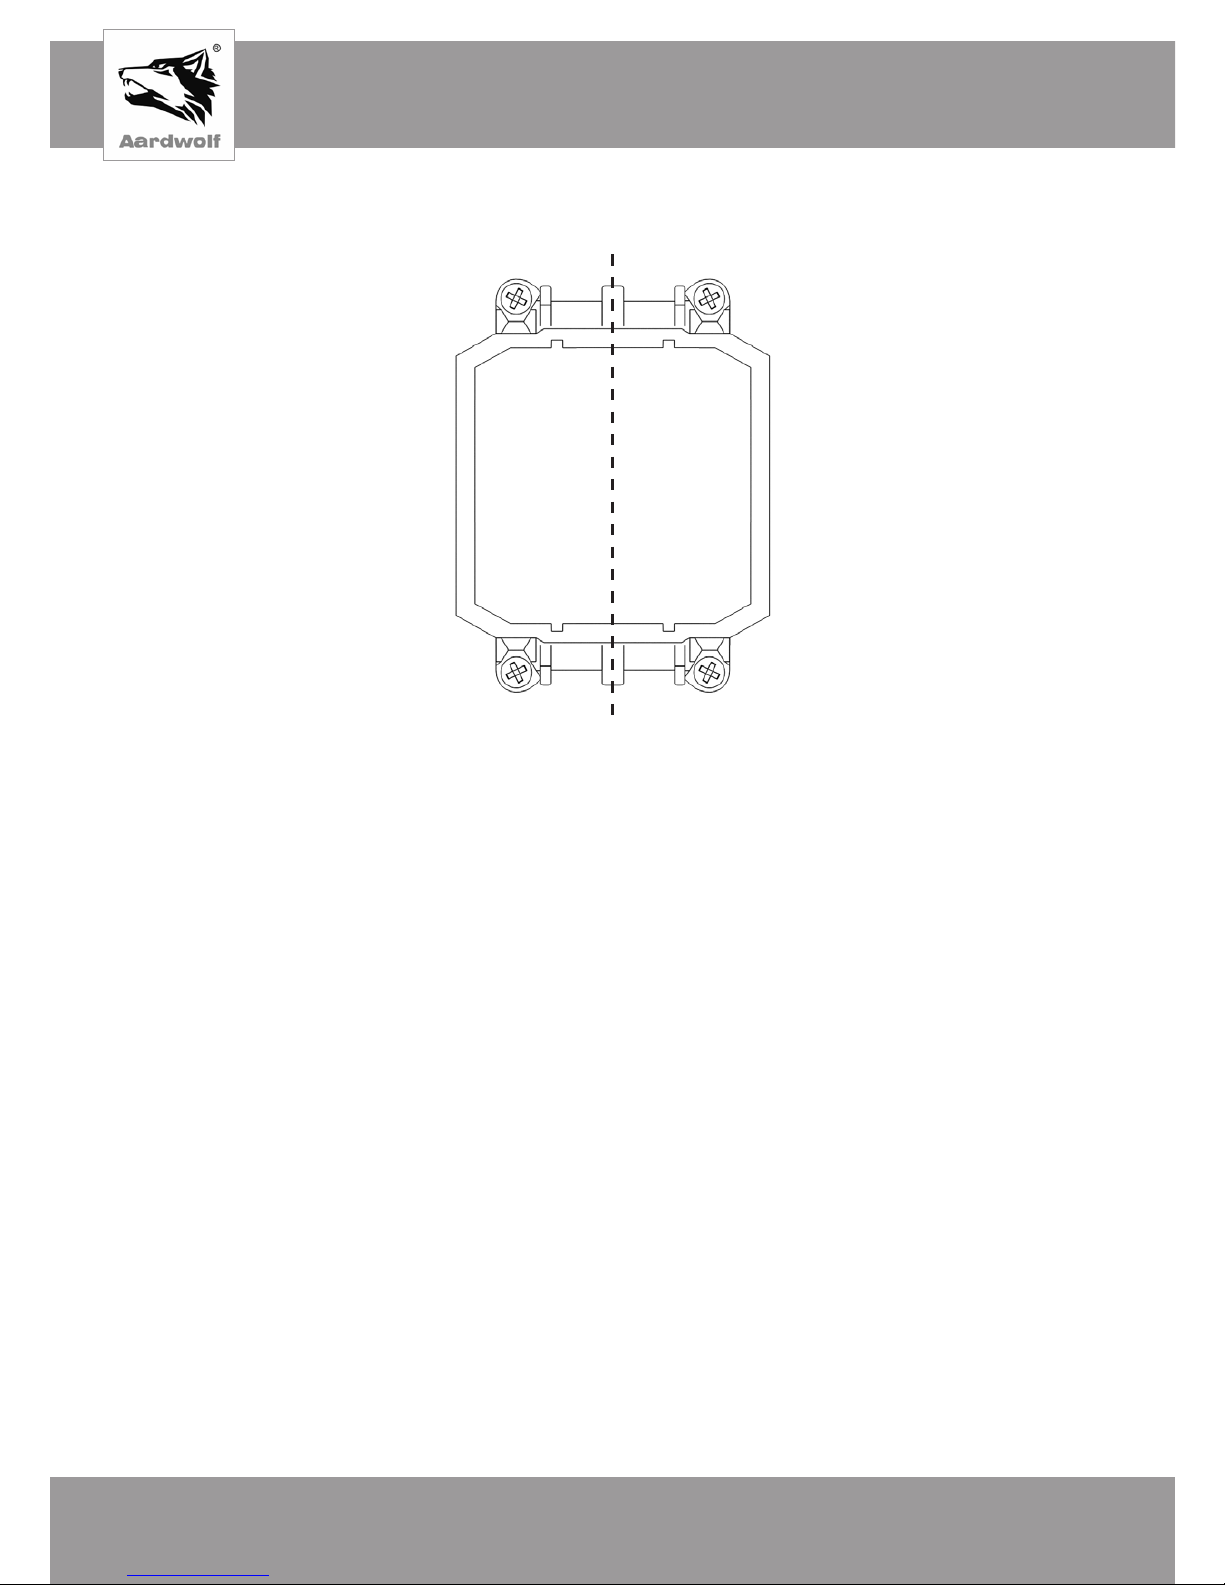
Place the transparent sleeve into the corresponding hole of the frame. Pay attention to the
position of the sleeve in the connector:
• - for sockets 1156 /1155 /1151 /1150 it should be located further from the conditional
center of the frame (Pic 3);
• - for socket 775 - will be located closer to the conditional center of the frame (Pic 4).
Pic 3 Pic 4
115x
775
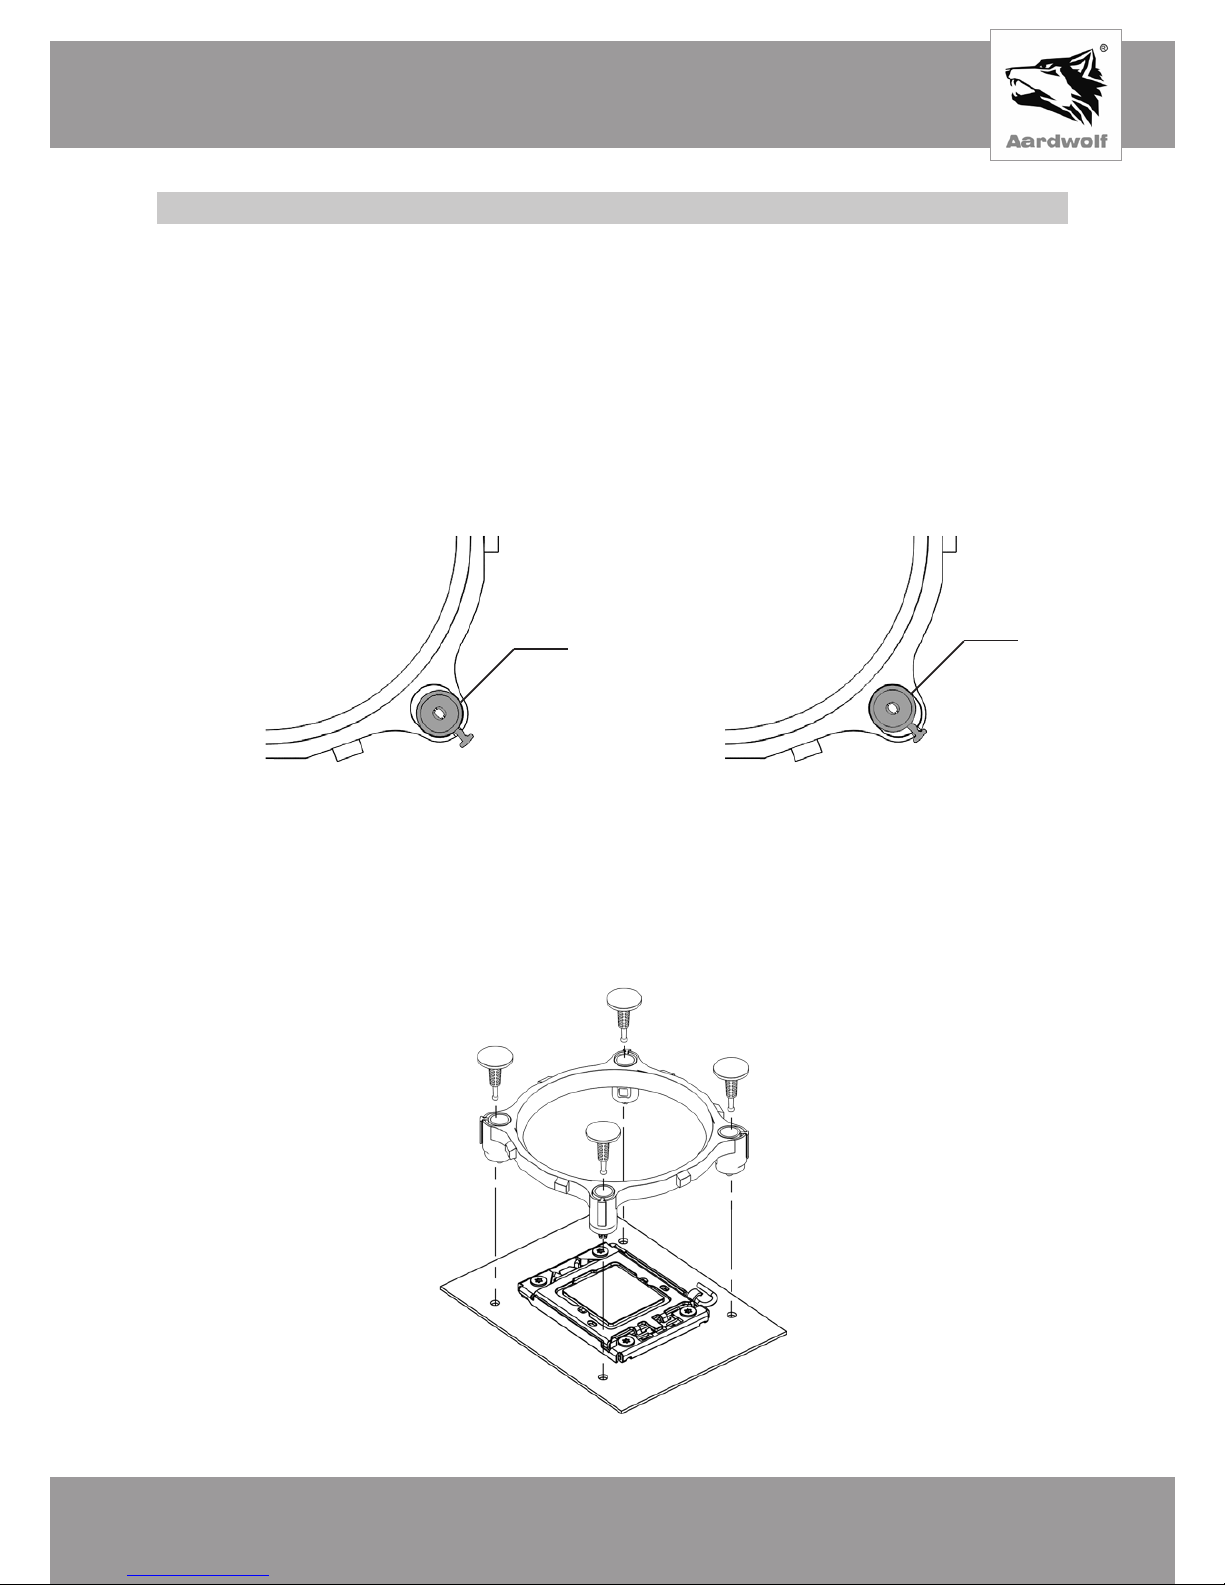
Installing of the mounting frame
Insert the assembled mounting frame into the corresponding holes on the motherboard.
Protrusions for securing the brackets must match the intended orientation of processor
cooling. Push the latches into the transparent sleeves until they stop. Make sure the frame
is firmly locked in place.
Pic 5
Page 8
English
WWW.SENJIN-CN.COM
8
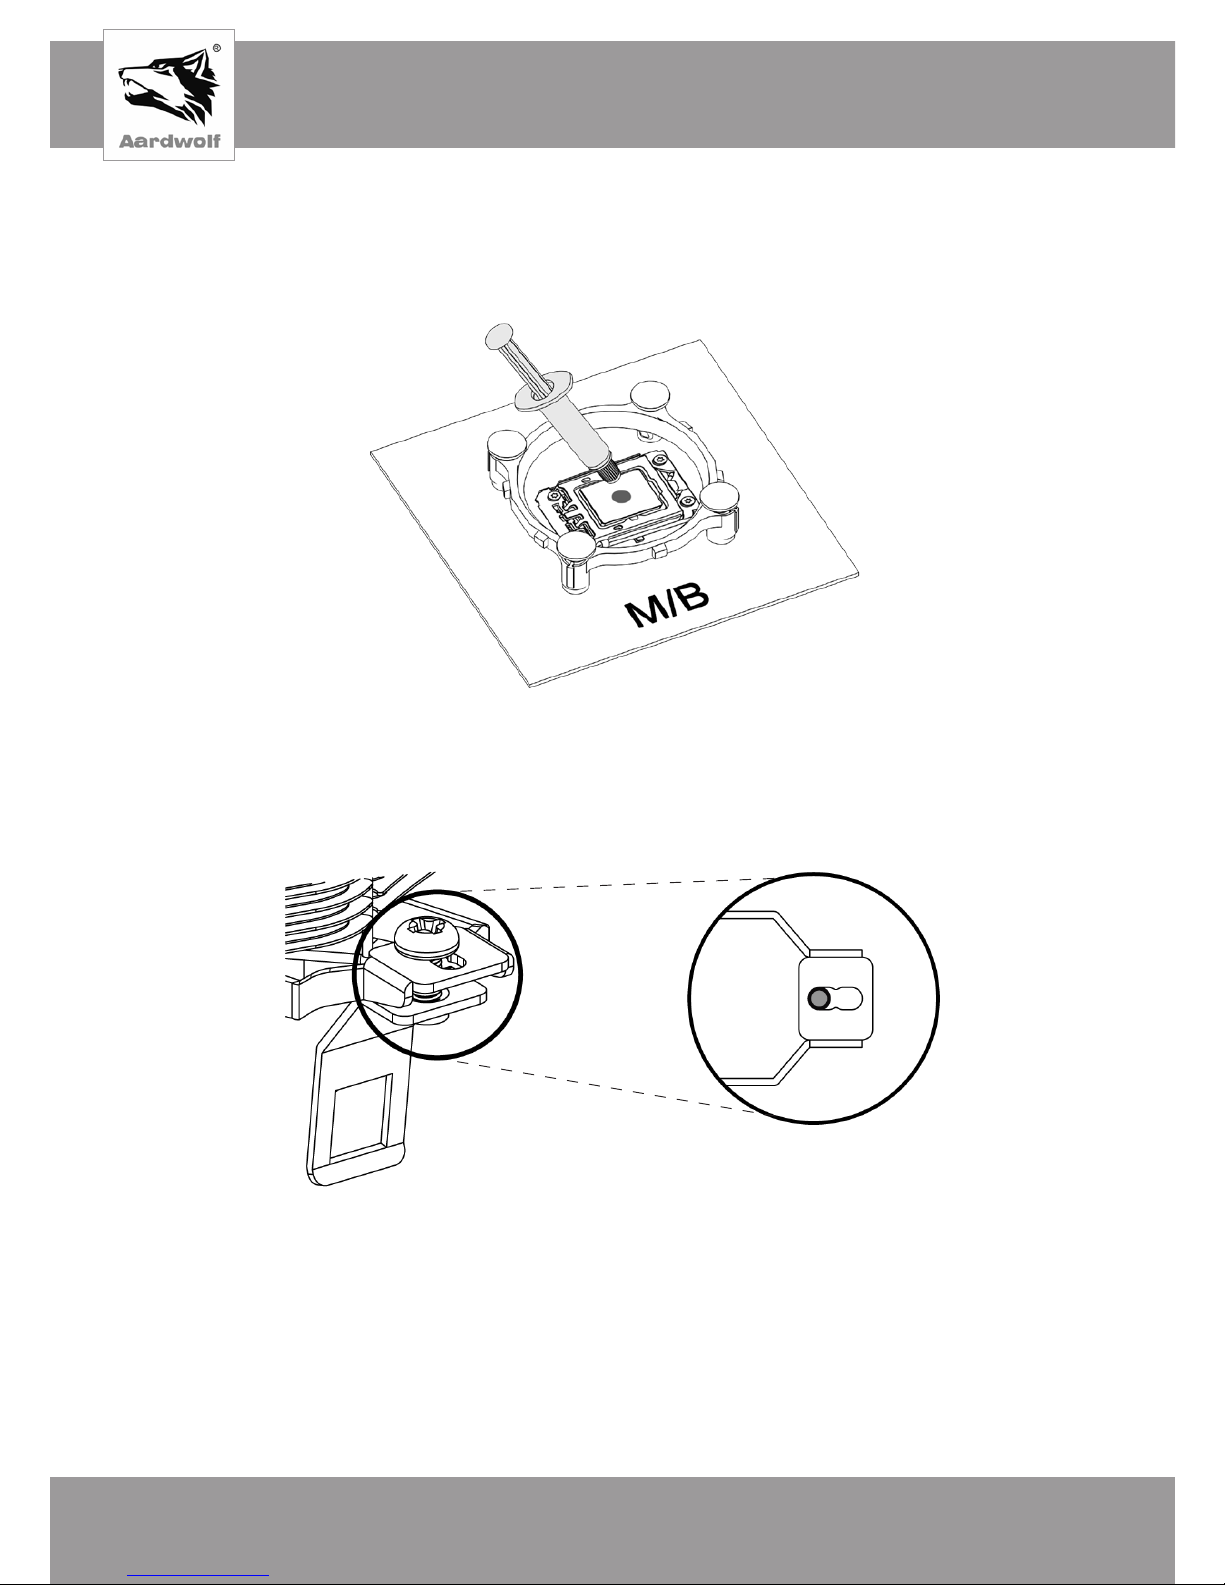
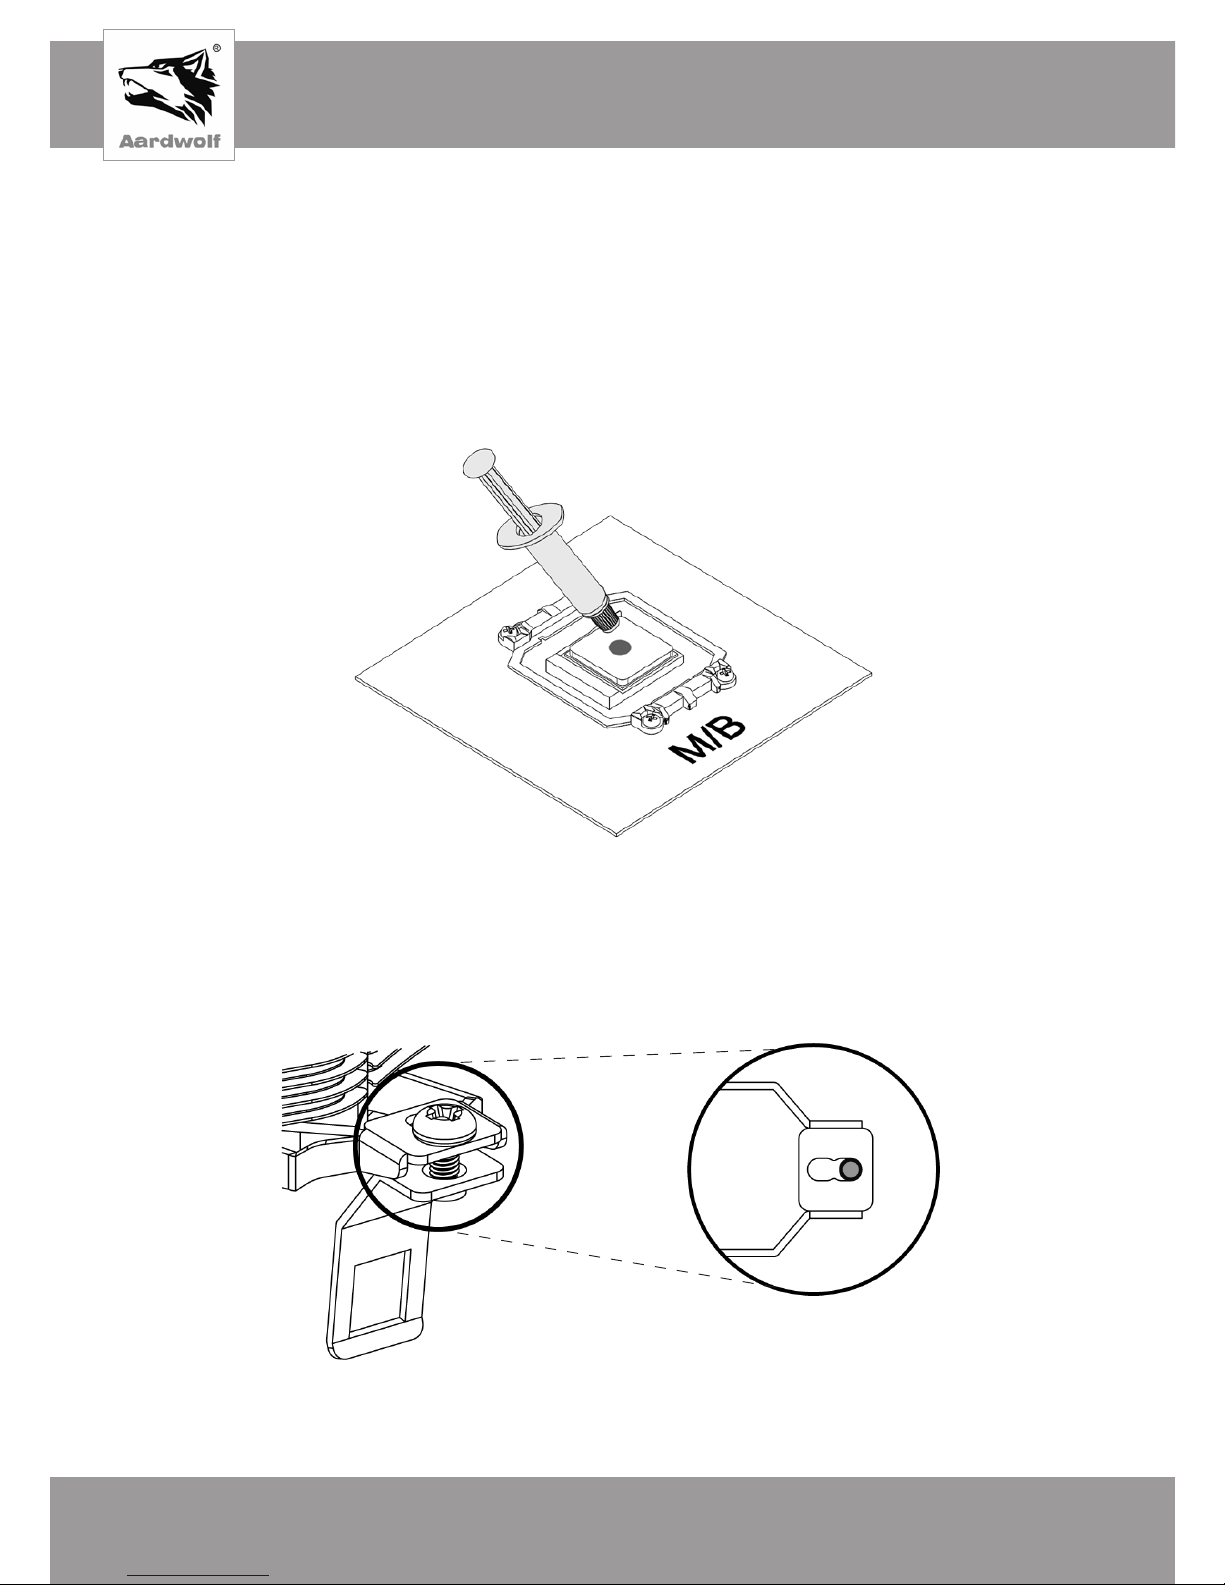
Mounting of CPU cooling
1) Apply a thermal interface to the processor, squeezing a small drop (diameter 4-5 mm) onto
its center.
Pic 6
2) Loosen the screws on the fixing feet of the cooler using a screwdriver. The screws
should be closer to the radiator when installed on Intel’s processor connectors.
Pic 7
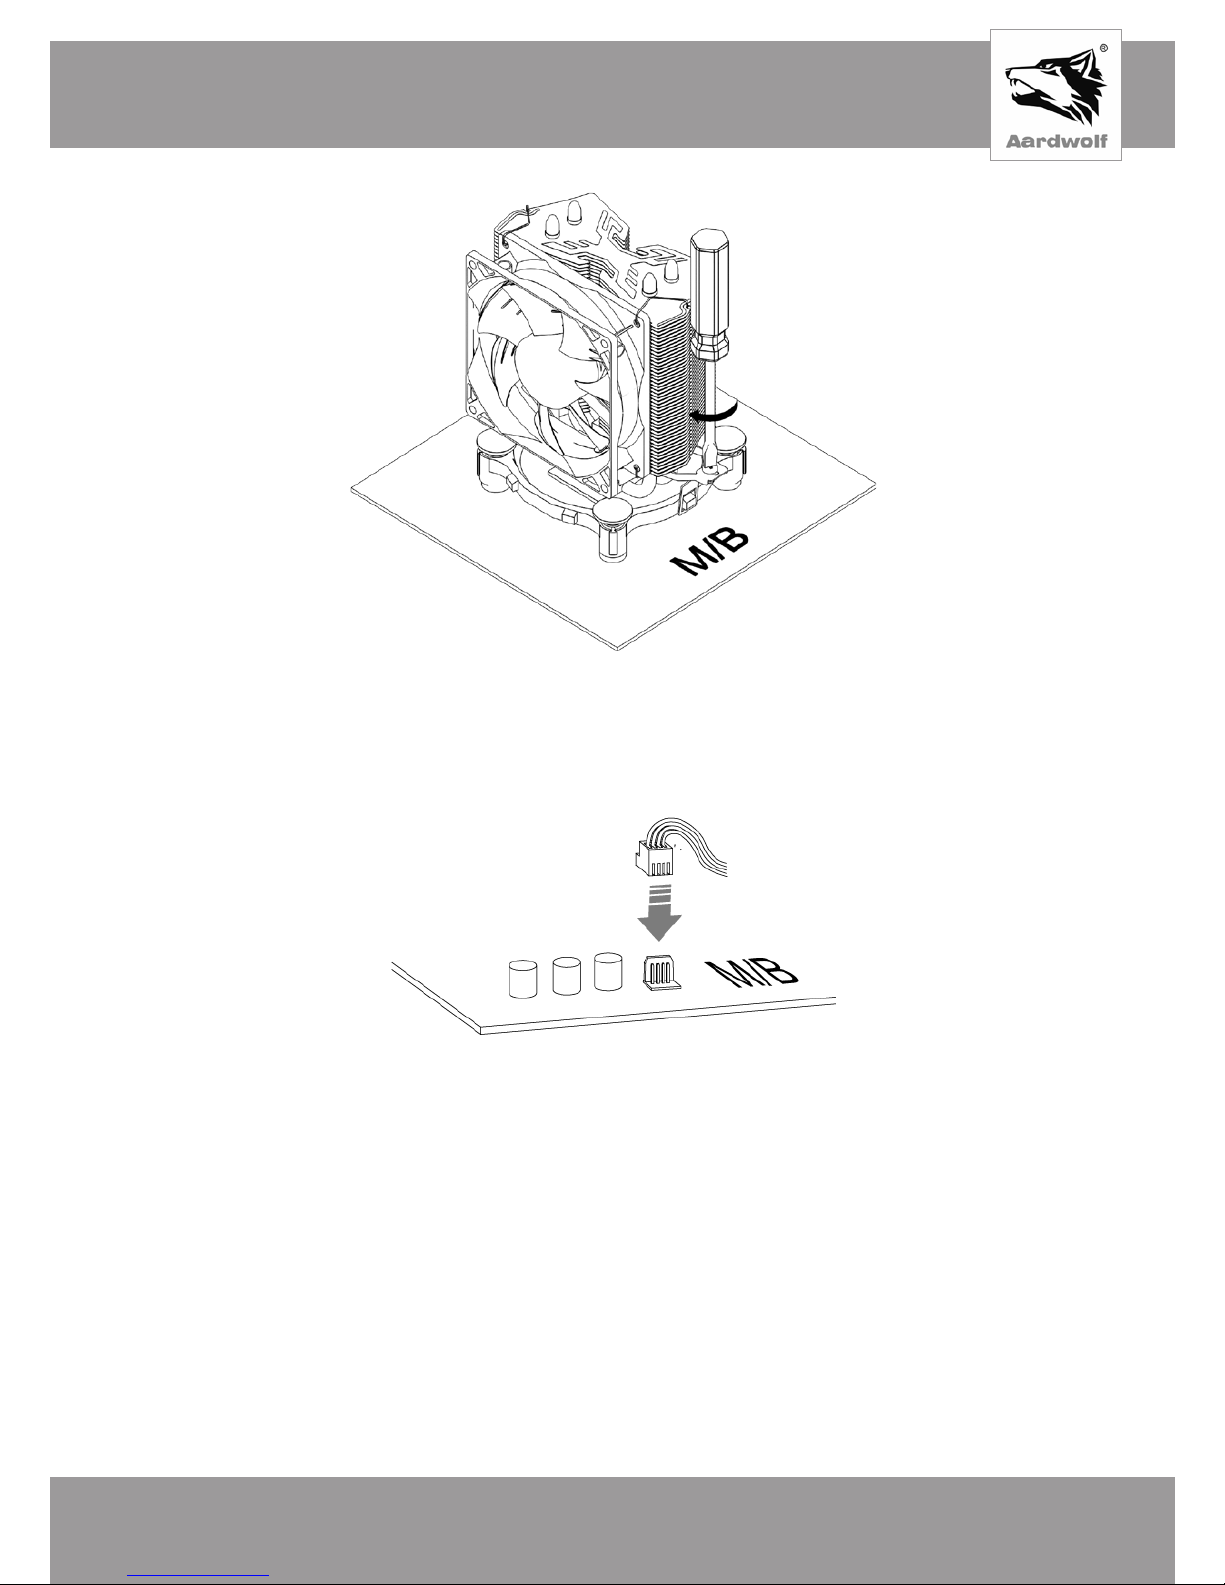
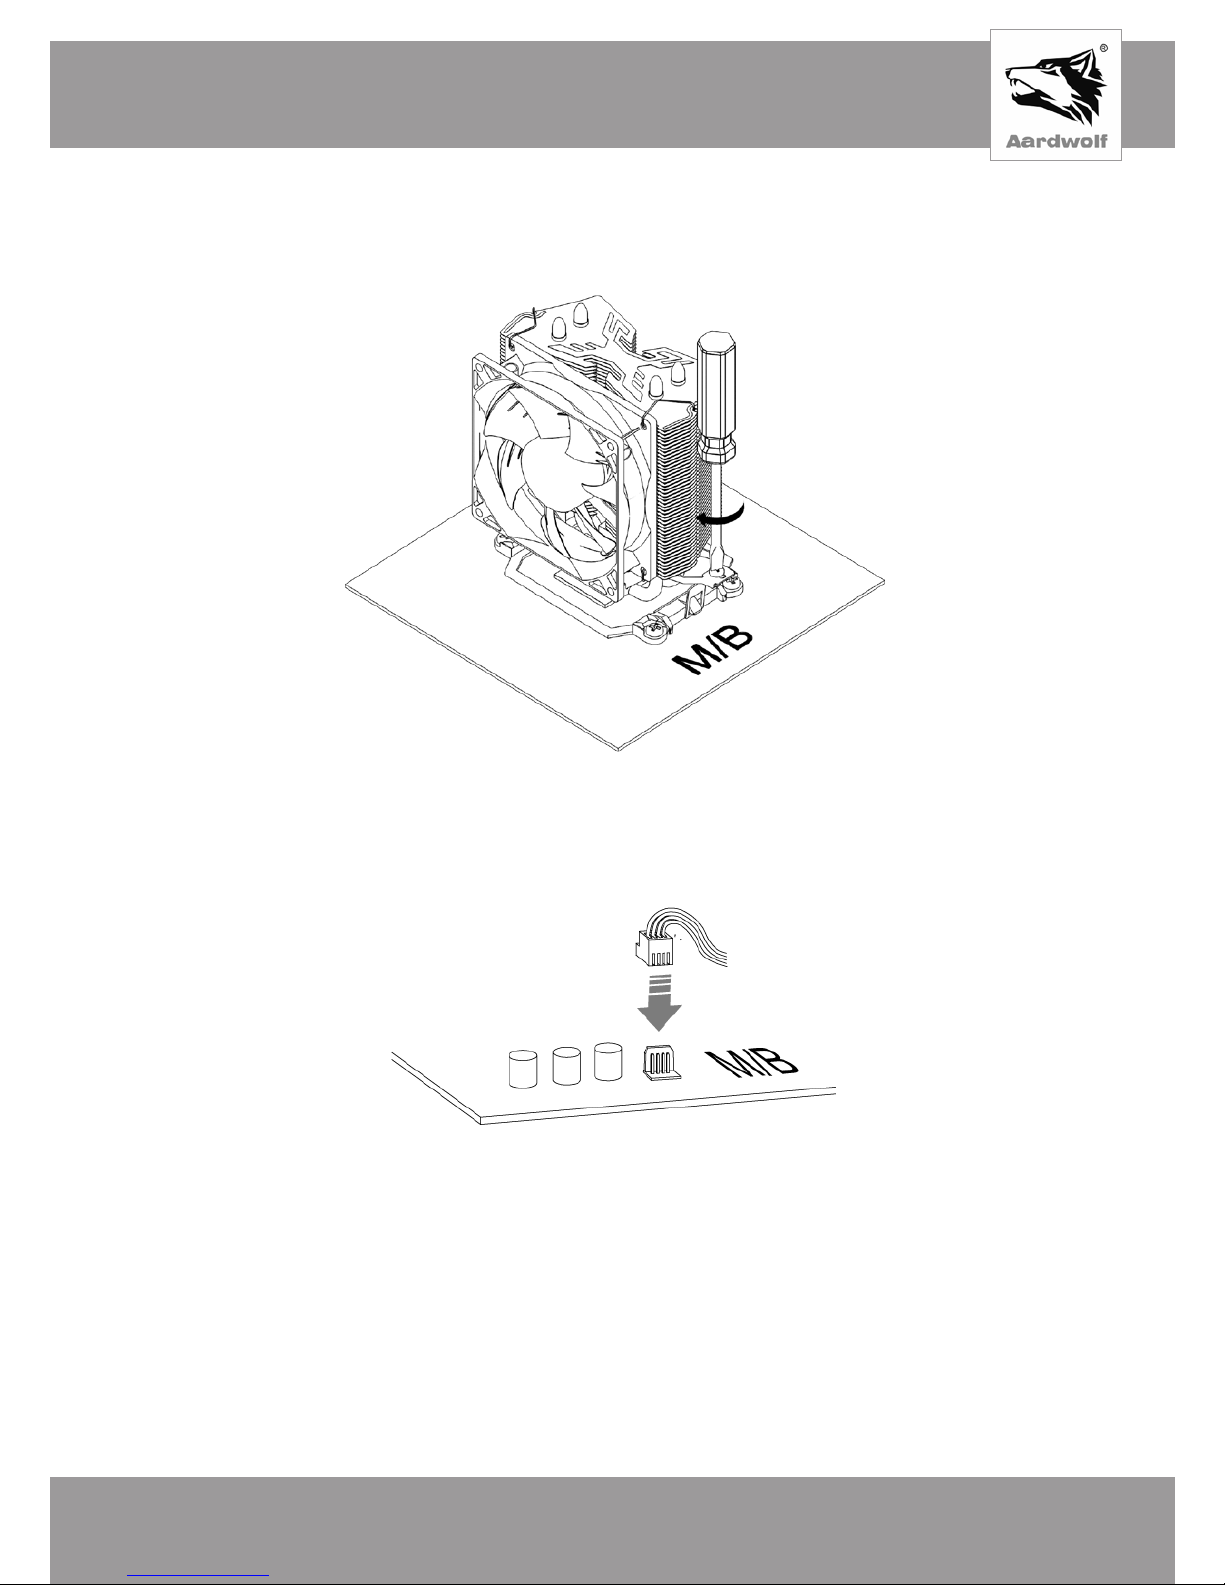
3) Install the heat sink on the processor cover in accordance with the desired orientation.
Hook the fixing brackets behind the tabs on the mounting frame. Screw the screws as far
as they will go.
Socket 1156 /1155 /1151
/1150 /775
Page 9
English
WWW.PERFORMA.COOL
9
4) Connect the fan power to the corresponding connector of the motherboard (CPU Fan).
Pic 8
Pic 9
Page 10
English
WWW.SENJIN-CN.COM
10
Pic 10
2) Loosen the screws on the fixing feet of the cooler using a screwdriver. Screws should
be located farther from the radiator when installed on AMD’s processor connectors.
Socket AMD Installation FM2/FM2+/FM1/AM3+/AM3/AM2+/AM2/AM4
Mounting of CPU cooling
For installation on the AMD socket, the motherboard’s own mounting frame is used.
Frame of a set of CPU cooling is not required.
1) Apply a thermal interface to the processor, squeezing a small drop (diameter 4-5 mm) onto
its center.
Pic 11
Socket FM2/FM2+/FM1/
AM3+/AM3/AM2+/AM2/AM4
Page 11
English
WWW.PERFORMA.COOL
11
Pic 12
3) Install the heat sink on the processor cover in accordance with the desired orientation.
Hook the brackets for the corresponding tabs on the mounting frame of the motherboard.
Tighten the screws.
4) Connect the fan power to the corresponding connector of the motherboard (CPU Fan).
Pic 13
Removal and replacement of fan
The design of processor cooling provides the possibility of dismounting and replacing the fan.
To do this, you must unplug the fan from the power connector, release the wire clips holding it
and remove the fan. The fan is installed in the reverse order to the dismantling. The fan is put
on the radiator, fixed with wire clips and connected to the power connector on the motherboard.
Page 12

English
WWW.SENJIN-CN.COM
12
6. Troubleshooting
1) When preparing for the installation of CPU cooling, check the completeness of the
product.
2) After installing of CPU cooling, the CPU temperature remains high:
– make sure that the temperature mode of the room and the system unit, in which the
CPU cooling is located at a normal level (optimum temperature +25 ° C, humidity not
more than 75%);
– check the processor settings in the BIOS / UEFI motherboard;
– read the instruction manual and pay attention to the correct installation of the
processor cooling;
– check the presence of the thermal interface and the substrate, for the presence of
elements.
3) Causes of a failure:
– the non-working fan must be inspected to prevent foreign objects from entering the
blades;
– the fan is not connected to the motherboard - check the correctness of the connection,
referring to the corresponding item in the instruction manual;
– the connection cable is broken or damaged - pay attention to the cable, if there are
no visible damages;
– the fan settings in the BIOS are set incorrectly - check the settings in the BIOS / UEFI
of the motherboard.
4) There are strange sounds during CPU cooling operation:
– check the reliability of the fixing of the CPU cooling or incorrect installation;
– avoid falling into the fan and the blades of objects or the probability that the blade can
affect components of the system during operation.
5) Fan works noisy:
– check and if necessary adjust the fan speed in the BIOS / UEFI of the motherboard;
– make sure that after adjusting the fan parameters, its speed is sufficient to maintain
the permissible temperature regime.
7. General limitations and safety
Storage, transportation and disposal considerations
This device should be stored in the warehouse or home and optionally transported to
existing retail package. If CPU cooling is installed in computer system, it must be removed
prior to transport and place in a single package.The place of storage (transportation) must be
inaccessible to moisture, direct sunlight and to exclude the possibility of mechanical damage.
This product is recommended to store at air temperature from + 5 ° С to + 40 ° С and humidity
up to 80%. Subject to the rules and conditions of storage, the warranty period for storage of the
device in the manufacturer’s original packaging is 10 years.
Page 13

English
WWW.PERFORMA.COOL
13
Using of cpu cooler after expiration date
The calculated minimum service life of the device provided by the manufacturer for the cooling
system for the CPU is 10 years old and works only if using the product exclusively for their own
needs, and if the consumer observes the rules of operation, storage and transportation products.
Provided careful handling of the product and compliance with the rules of operation, the actual
lifetime may exceed the design life set by the manufacturer. At the end of the product’s service
life, it is advisable to contact an authorized service center for preventive maintenance of the
product and determine its suitability for further operation.Work on preventive maintenance of the
product and its diagnostics are performed by authorized service centers for a fee.
Utilization and environmental protection
The rules for disposal of this product differ from the rules for disposing of household waste. In
contrast to household waste, the device must be handed over to the appropriate point for the
reception of electrical and electrical equipment for the purpose of disposal and processing.It
contributes to the preservation of natural resources. If you ensure independent disposal of the
product, you prevent possible negative consequences for the environment and human health,
as a result of improper processing.Transfer the device to a central waste disposal center or
contact the seller who purchased the cooling system for the processor. Competent organizations
for the disposal of this device will determine its safe environment for processing. For incorrect
disposal of waste provides for fines, according to the current legislation of the country
where the device was purchased.
8. Conforming to the standards and warranty of the manufacturer
Warranties of the manufacturer (seller)
If the user observes the operation rules, taking into account the precautions described in this
user manual, the device is safe to use and does not harm the environment, human and is
usable. The warranty period of the device is 12 months from the date of purchase and without
taking into account the period of being in repair (provided that the operating rules are observed).
The right to a guarantee is provided when filling in the information in the warranty card that is
issued upon the purchase of the goods.
The guarantee is a supplement to the rights that are granted in accordance with the current
consumer rights laws of the country to which the goods were purchased. These laws differ
in different countries. Read the full warranty information to get an understanding of consumer
rights and additional consumer protection features that are provided under the current device
warranty.
Page 14

Русский
WWW.SENJIN-CN.COM
14
Русский
WWW.SENJIN-CN.COM
14
1. Меры предосторожности
1) Данная модель системы процессорного охлаждения может быть использована
только с 92 мм вентилятором.
2) Для предотвращения травм и повреждения вентилятора или его лопастей,
избегайте попадания посторонних предметов или частей тела в вентилятор, пока
он находится в рабочем состоянии.
3) Термопаста, которая находится в комплекте, предназначена исключительно для
установки системы на процессор и не является пищевым продуктом. Избегайте
контакта термопасты с кожей, глазами, не употребляйте вовнутрь, берегите в
недоступном для детей и животных месте. Если термопаста попала на кожу,
немедленно смойте водой. При попадании во внутрь или при возникновении
других проблем со здоровьем при использовании термопасты – немедленно
обратитесь к врачу.
4) Рекомендуем, во время установки устройства на процессор, использовать
перчатки, чтобы не травмироваться и безопасно завершить работу.
5) Желательно не применять силу при закреплении вентилятора и установки
системы на процессор, так как это может привести к повреждению частей
устройства.
6) Необходимо хранить и использовать устройство в местах, недоступных для
детей.
7) Внимательно изучите комплектацию и инструкцию по установке перед началом
работы с устройством. Если вы нашли несоответствие с заявленной информацией,
обратитесь к продавцу товара, чтобы заменить или доукомплектовать.
8) При транспортировке компьютерной системы, кулер следует демонтировать
с материнской платы. Поставщик не несет ответственности за повреждения,
которые произошли во время транспортировки товара.
9) Внешний вид и комплектация товара могут быть дополнены или изменены с
целью его усовершенствования или улучшения качества товара.
10) Поставщик не несет ответственности за повреждение системы процессорного
охлаждения и процессора, в результате использования при установке
агрессивных химических термоинтерфейсов не предусмотренных данной
инструкцией и изготовленных сторонними производителями.
Page 15

Русский
WWW.PERFORMA.COOL
15
Русский
WWW.PERFORMA.COOL
15
2. Спецификация
Система охлаждения для процессора Aardwolf Performa 3X (APF-3X-92)
Код товара: APF-3X-92
IntelSocket LGA
1156 / 1155 / 1151 / 1150 / 775
AMD Socket
FM2 /FM2+ /FM1 /AM3+ /AM3 /AM2+ /AM2 /AM4
Модель
APF-3X-92
Материалы
Медь/Алюминий/Пластик
Размер вентилятора
92 х 92 х 25 мм
Тип подшипника
Гидравлический
Частота оборотов
1000 ~ 1600об/мин ± 10%
Площадь поверхности пластин радиатора
3 426,28 см
2
Контроль скорости вентилятора
ШИМ контроль, автоматический перезапуск
Уровень шума
16 ~ 24 дБА ± 10%
Коннектор
4 Пин
Напряжение питания
12В
Статическое давление
3,8 мм/ H2O
Производительность вентилятора
36,1 CFM
Сила тока
0,23 А
Потребление
2,76 Вт
Размер (с вентилятором)
127(Ш) х 75,5(Д) х 131 (В) мм
Размер (без вентилятора)
127(Ш) х 52(Д) х 131 (В) мм
Вес (с вентилятором)
326 г
Вес (без вентилятора)
206 г
Вес в упаковке
440 г
Термоинтерфейс
Термопаста Aardwolf AF-TG2 в пакете (1 г)
Page 16

Русский
WWW.SENJIN-CN.COM
16
3. Комплектация
Общие компоненты
Manual
Радиатор с вентилятором
Инструкция
пользователя
Крепежные фиксаторы
4. Требования по установке
Ограничения по габаритам
Рекомендуем, перед установкой системы процессорного охлаждения примерить
устройство. Поместите радиатор без креплений на крышку процессора. Убедитесь,
в том, что панель корпуса свободно закрывается и не касается тепловых трубок,
радиатора или вентилятора. Части устройства не должны задевать другие компоненты
материнской платы.
Термопаста
(AF-TG2)
Крепежная рамка с втулками
Page 17

Русский
WWW.PERFORMA.COOL
17
M/B
На процессорных разъемах Intel радиатор может быть повернут под прямым либо
острым углом. Для этого, соответствующим образом поворачивается крепежная
рамка перед установкой.
Расположение устройства
Поток воздуха переднего вентилятора системы охлаждения должен быть направлен
в радиатор.
вертикально горизонтально
90
о
0
о
-22
о
22
о
-68
о
68
о
Рис. 1
Page 18

Русский
WWW.SENJIN-CN.COM
18
На процессорных разъемах АМD допускается только вертикальная установка
радиатора (Рис. 2).
Оперативная память
Перед установкой системы охлаждения на процессор проверить, чтобы радиатор и
его крепления не мешали модулям оперативной памяти.
Материнская плата
Перед установкой процессорного охлаждения, убедитесь, что радиаторы силовых
цепей материнской платы не задевают конструкцию устройства. Удостоверьтесь, что
конденсаторы микросхемы и другие элементы материнской платы не конфликтуют с
креплением процессорного охлаждения и не создают помехи в процессе его монтажа.
Видеокарта
Перед установкой процессорного охлаждения, убедитесь, что устройство не попадает
в плоскость размещения видеоадаптера.
вертикально
90
о
Рис. 2
Page 19

Русский
WWW.PERFORMA.COOL
19
5. Установка
Установка на Socket Intel LGA 1156 /1155 /1151 /1150 /775
Сборка крепежной рамки
Установите прозрачные втулки в соответствующее отверстие рамки. Обратите
внимание на положение втулки в разъеме:
• - для сокетов 1156 / 1155 / 1151 / 1150 она должна будет находиться дальше от
условного центра рамки (Рис. 3);
• - для сокета 775 - будет располагаться ближе к условному центру рамки (Рис.4).
Рис. 3 Рис. 4
Установка крепежной рамки
Вставьте собранную крепежную рамку в соответствующие отверстия материнской
платы. Выступы для крепления скоб должны совпадать с предполагаемой ориентацией
процессорного охлаждения. Задвиньте фиксаторы в прозрачные втулки до упора.
Убедитесь в том, что рамка прочно зафиксирована на своем месте.
Рис. 5
115x
775
Page 20

Русский
WWW.SENJIN-CN.COM
20
Монтаж процессорного охлаждения
1) Нанесите термоинтерфейс на процессор, выдавив небольшую каплю (диаметр 4-5 мм)
на его центральную часть.
Рис. 6
2) Ослабить винты на крепежных лапах кулера при помощи отвертки. Винты должны
располагаться ближе к радиатору при установке на процессорные разъемы Intel.
Рис. 7
3) Установите радиатор на крышку процессора с соблюдением желаемой ориентации.
Зацепите крепежные скобы за выступы на крепежной рамке. Закрутите до упора
винты.
Socket 1156 /1155 /1151
/1150 /775
Page 21

Русский
WWW.PERFORMA.COOL
21
4) Подключите питание вентилятора к соответствующему разъему материнской платы
(CPU Fan).
Рис. 8
Рис. 9
Page 22

Русский
WWW.SENJIN-CN.COM
22
Рис. 10
2) Ослабить винты на крепежных лапах кулера при помощи отвертки. Винты должны
располагаться дальше от радиатора при установке на процессорные разъемы
AMD.
Установка на Socket AMD FM2/FM2+/FM1/AM3+/AM3/AM2+/AM2/AM4
Монтаж процессорного охлаждения
Для установки на сокет AMD используется собственная крепежная рамка
материнской платы. Рамка из комплекта процессорного охлаждения не
требуется.
1) Нанесите термоинтерфейс на процессор, выдавив небольшую каплю (диаметр 4-5 мм)
на его центральную часть.
Рис. 11
Socket FM2/FM2+/FM1/
AM3+/AM3/AM2+/AM2/AM4
Page 23

Русский
WWW.PERFORMA.COOL
23
Рис. 12
3) Установите радиатор на крышку процессора с соблюдением желаемой ориентации.
Зацепите крепежные скобы за соответствующие выступы на крепежной рамке
материнской платы. Затяните до упора винты.
4) Подключите питание вентилятора к соответствующему разъему материнской платы
(CPU Fan).
Рис. 13
Демонтаж и замена вентилятора
Конструкция процессорного охлаждения предусматривает возможность демонтажа и
замены вентилятора. Для этого необходимо отключить вентилятор от разъема питания,
освободите удерживающие его проволочные скобы и снимите вентилятор. Установка
вентилятора производится в порядке обратном к демонтажу. Вентилятор ставится на
радиатор, фиксируется проволочными скобами и подключается к разъему питания на
материнской плате.
Page 24

Русский
WWW.SENJIN-CN.COM
24
6. Устранение мелких неисправностей
1) При подготовке к установке процессорного охлаждения, проверьте комплектность
изделия.
2) После установки процессорного охлаждения температура процессора остается
высокой:
– убедитесь, что температурный режим помещения и системного блока, в который
размещается процессорное охлаждение на нормальном уровне (оптимальная
температура +25 °C, влажность не выше 75%);
– проверьте настройки процессора в БИОС/UEFI материнской платы;
– изучите инструкцию и обратите внимание на правильность установки
процессорного охлаждения;
– проверьте наличие термоинтерфейса и подложку, на предмет наличия
посторонних элементов.
3) Причины неисправности вентилятора:
– нерабочий вентилятор необходимо осмотреть, чтобы исключить попадание
посторонних предметов в лопастях;
– вентилятор не подключен к материнской плате – проверьте правильность
подключения, руководствуясь соответствующим пунктом в инструкции;
– перебит или поврежден кабель подключения – обратите ваше внимание на
кабель, нет ли видимых повреждений;
– неправильно выставлены настройки вентилятора в БИОСе – проверьте
установки в БИОС/UEFI материнской платы.
4) При работе процессорного охлаждения появились посторонние звуки:
– необходимо проверить надежность закрепления процессорного охлаждения и
правильность его установки;
– исключите возможность попадания в вентилятор и его лопасти посторонних
предметов или вероятности того, что лопасти могут задевать комплектующие
системы, во время работы.
5) Вентилятор шумно работает:
– необходимо проверить и при необходимости отрегулировать скорость вращения
вентилятора в БИОС/UEFI материнской платы;
– убедитесь, что после настройки параметров вентилятора, его скорость
достаточная для поддержки допустимого температурного режима.
7. Общие ограничения и безопасность. Условия хранения,
транспортировка и утилизация
Хранение и транспортировка
Данное устройство рекомендуется хранить в складских или домашних условиях и
при необходимости транспортировать в существующей розничной упаковке. Если
система процессорного охлаждения установлена, ее необходимо демонтировать перед
транспортировкой и поместить в отдельную упаковку. Место хранения (транспортировки),
должно быть недоступным для влаги, прямого солнечного света и исключать возможность
механических повреждений.Данный товар рекомендуется хранить при температуре
воздуха от+5°С до +40°С и влажности до 80%. При условии соблюдения правил и
условий хранения гарантийный срок хранения устройства в оригинальной упаковке
производителя составляет 10 лет.
Page 25

Русский
WWW.PERFORMA.COOL
25
Использование устройства после окончания срока годности
Рассчитанный минимальный срок службы устройства, установленный производителем
для системы охлаждения процессора составляет 10 лет и действует при условии
использования изделия исключительно для собственных потребностей, также при
соблюдении потребителем правил эксплуатации, хранения и транспортировки изделия.
При условии бережного обращения с изделием и соблюдения правил эксплуатации,
фактический срок службы может превышать расчетный срок службы, установленный
производителем. По окончанию срока службы изделия, желательно обратиться в
авторизированный сервисный центр для проведения профилактического обслуживания
изделия и определить его пригодность для дальнейшей эксплуатации. Работы
относительно профилактического обслуживания изделия и его диагностики, выполняются
авторизированными сервисными центрами на платной основе.
Утилизация и защита окружающей среды
Правила утилизации данного изделия отличаются от правил утилизации бытовых отходов.
В отличии от бытовых отходов, устройство необходимо сдать в соответствующий пункт
по приему электрического и электротехнического оборудования с целью утилизации
и переработки. Это способствует сохранению природных ресурсов. При обеспечении
независимой утилизации изделия, вы предотвращаете возможные негативные
последствия для окружающей среды и здоровья людей, как следствие неправильной
переработки. Сдайте устройство в централизованный центр по приему и утилизации
отходов или обратитесь к продавцу, у которого была приобретена система охлаждения
для процессора.Компетентные организации по утилизации этого устройства определят
его на безопасную для окружающей среды переработку. За неправильную утилизацию
отходов предусмотрены штрафы, соответственно действующего законодательства
страны, в которой это устройство было приобретено.
8. Соответствие стандартам и гарантия производителя
Гарантии производителя (продавца)
При соблюдении пользователем правил эксплуатации, с учетом мер предосторожностей,
изложенных в этой инструкции пользователя, устройство безопасное при использовании
и не наносит вреда окружающей среде, человеку и пригодно к эксплуатации. Гарантийный
срок эксплуатации устройства – 12 месяцев с момента приобретения и без учета периода
нахождения в ремонте (при условии соблюдения правил эксплуатации).
Право на гарантию предоставляется при заполнении информации в гарантийном
талоне, который выдается при приобретении товара. Для получения более детальной
информации о товаре, а также с вопросами и предложениями, обращайтесь по адресу,
указанному ниже.
Гарантия, является дополнениям к правам, которые предоставляются в соответствии
с действующими законами о правах потребителей страны, к которой был приобретен
товар. Эти законы отличаются в разных странах. Ознакомьтесь с полной информацией
о гарантии, чтобы иметь представление о правах потребителя и дополнительные
возможности по защите прав потребителей, которые предоставляются по действующей
гарантии на устройство.
Page 26

Українська
WWW.SENJIN-CN.COM
26
Українська
WWW.SENJIN-CN.COM
26
1. Заходи безпеки
1) Вище зазначена система процесорного охолодження може використовуватись
тiльки з 92 мм вентилятором.
2) Для запобiгання травм та пошкодження вентилятора чи його лопатей, уникайте
попадання стороннiх предметiв або частин тiла в вентилятор, поки вiн
знаходиться в робочому станi.
3) Термопаста, яка знаходиться в комплектi, призначена виключно для установки
системи на процесор i не є харчовим продуктом. Уникайте контакту термопасти
iз шкiрою, очима, не вживайте всередину, зберiгайте в недоступному для дiтей
та тварин мiсцi. Якщо термопаста потрапила на шкiру, негайно змийте водою.
При потрапляннi в органiзм або при виникненнi iнших проблем зi здоров’ям при
використаннi термопасти - негайно звернiться до лiкаря.
4) Рекомендуємо, пiд час установки пристрою на процесор, використовувати
рукавички, щоб не травмуватися i безпечно завершити роботу.
5) Бажано не застосовувати силу при закрiпленнi вентилятора i установки системи
на процесор - цеможе привести до пошкодження частин пристрою.
6) Необхiдно зберiгати i використовувати пристрiй в мiсцях, недоступних для дiтей.
7) Уважно вивчiть комплектацiю та iнструкцiю по установцi перед початком роботи
з пристроєм. Якщо ви знайшли невiдповiднiсть iз заявленою iнформацiєю,
звернiться до продавця товару, щоб замiнити або доукомплектувати.
8) При транспортуваннi комп’ютерної системи, кулер слiд демонтувати з материнської
плати. Постачальник не несе вiдповiдальностi за пошкодження, якi сталися пiд час
транспортування товару.
9) Зовнiшнiй вигляд i комплектацiя товару можуть бути доповненi або змiненi з
метою його удосконалення або полiпшення якостi товару.
10) Постачальник не несе вiдповiдальностi за пошкодження системи процесорного
охолодження i процесора, в результатi використання при установцi агресивних
хiмiчних термоiнтерфейсiв, не передбачених цiєю iнструкцiєю i виготовлених
стороннiми виробниками.
Page 27

Українська
WWW.PERFORMA.COOL
27
Українська
WWW.PERFORMA.COOL
27
2. Специфiкацiя
Система охолодження для процесора Aardwolf Performa 3X (APF-3X-92)
Код товара: APF-3X-92
IntelSocket LGA
1156 / 1155 / 1151 / 1150 / 775
AMD Socket
FM2 /FM2+ /FM1 /AM3+ /AM3 /AM2+ /AM2 /AM4
Модель
APF-3X-92
Матерiали
Мiдь/Алюмiнiй/Пластик
Розмiр вентилятора
92 х 92 х 25 мм
Тип пiдшипника
Гiдравлiчний
Частота обертiв
1000 ~ 1600об/хв ± 10%
Площа поверхнi пластин радiатора
3 426,28 см
2
Контроль швидкостi вентилятора
ШИМ контроль, автоматичний перезапуск
Рiвень шуму
16 ~ 24 дБА ± 10%
Коннектор
4 Пiн
Напруга живлення
12В
Статичний тиск
3,8 мм/ H2O
Продуктивнiсть вентилятора
36,1 CFM
Сила току
0,23 А
Споживання
2,76 Вт
Размiр (з вентилятором)
127(Ш) х 75,5(Г) х 131 (В) мм
Размiр (без вентилятора)
127(Ш) х 52(Г) х 131 (В) мм
Вага (з вентилятором)
326 г
Вага (без вентилятора)
206 г
Вага в упаковцi
440 г
Термоiнтерфейс
Термопаста Aardwolf AF-TG2 в пластиковому пакетi (1г)
Page 28

Українська
WWW.SENJIN-CN.COM
28
3. Комплектацiя
Загальнi компоненти
Manual
Радiатор з вентилятором
Iнструкцiя
користувача
Фiксатори крiплення
4. Вимоги пiд час установки
Обмеження за розмiрами
Рекомендуємо, перед установкою системи процесорного охолодження примiрити
пристрiй. Помiстiть радiатор без крiплень на кришку процесора. Переконайтеся, в тому,
що панель корпусу вiльно закривається i не торкається теплових трубок, радiатора
або вентилятора. Частини пристрою не повиннi заважати iншим компонентам
материнської плати.
Термопаста
(AF-TG2)
Рамка-крiплення з втулками
Page 29

Українська
WWW.PERFORMA.COOL
29
M/B
На процесорних роз’ємах Intel радiатор може бути розвернутий пiд прямим або
гострим кутом. Для цього, вiдповiдним чином повертається рамка крiплення перед
установкою.
Розташування пристрою
Потiк повiтря переднього вентилятора системи охолодження повинен бути
спрямований в радiатор.
вертикально горизонтально
90
о
0
о
-22
о
22
о
-68
о
68
о
Мал. 1
Page 30

Українська
WWW.SENJIN-CN.COM
30
На процесорних роз’ємах АМD допускається тiльки вертикальне розмiщення радiатора
(Мал. 2).
Оперативна пам’ять
Перед установкою системи охолодження на процесор перевiрити, щоб радiатор i його
крiплення не заважали модулям оперативної пам’ятi.
Материнська плата
Перед установкою процесорного охолодження, переконайтеся, що радiатори силових
ланцюгiв материнської плати не торкаються конструкцiї пристрою. Переконайтеся,
що конденсатори мiкросхеми та iншi елементи материнської плати не конфлiктують
з крiпленням процесорного охолодження i не створюють перешкоди в процесi його
монтажу.
Вiдеокарта
Перед установкою процесорного охолодження, переконайтеся, що пристрiй не
потрапляє в площину розмiщення вiдеоадаптера.
вертикально
90
о
Мал. 2
Page 31

Українська
WWW.PERFORMA.COOL
31
5. Установка
Установка на Socket Intel LGA 1156 /1155 /1151 /1150 /775
Зборка рамки крiплення
Вставте прозорi втулки в вiдповiднi отвори рамки. Звернiть увагу на положення
втулки в роз’ємi:
• - для сокетiв 1156/1155/1151/1150 вона повинна буде знаходитися далi вiд
умовного центру рамки (Мал. 3);
• - для сокета 775 - буде знаходитись ближче до умовного центру рамки (Мал.4).
Мал. 3 Мал. 4
Установка рамки крiплення
Вставте зiбрану крiпильну рамку у вiдповiднi отвори материнської плати. Виступи для
крiплення скоб повиннi збiгатися з можливою орiєнтацiєю процесорного охолодження.
Засуньте фiксатори в прозорi втулки до упору. Переконайтеся в тому, що рамка
надiйно зафiксована на своєму мiсцi.
Мал. 5
115x
775
Page 32

Українська
WWW.SENJIN-CN.COM
32
Монтаж процесорного охолодження
1) Нанесiть термоiнтерфейс на процесор, видавивши невелику краплю (дiаметр 4-5 мм)
на його центральну частину.
Мал. 6
2) Необхiдно послабити гвинти на крiпильних лапах кулера за допомогою викрутки. При
установцi на процесорнi роз’єми Intel, гвинти повиннi знаходитись ближче до радiатора.
Мал. 7
3) Встановiть радiатор на кришку процесора з дотриманням бажаної орiєнтацiї.
Зачепiть крiпильнi скоби за виступи крiпильної рамки. Закрутiть до упору гвинти.
Socket 1156 /1155 /1151
/1150 /775
Page 33

Українська
WWW.PERFORMA.COOL
33
4) Пiдключiть живлення вентилятора до вiдповiдного роз’єму материнської плати
(CPU Fan).
Мал. 8
Мал. 9
Page 34

Українська
WWW.SENJIN-CN.COM
34
Мал. 10
2) Послабити гвинти на крiпильних лапах кулера за допомогою викрутки. Гвинти
повиннi знаходиться далi вiд радiатора при установцi на процесорнi роз’єми
AMD.
Установка на Socket AMD FM2/FM2+/FM1/AM3+/AM3/AM2+/AM2/AM4
Монтаж процесорного охолодження
Для встановлення на сокет AMD використовується рамка для крiплення
материнської плати. Рамка з комплекту процесорного охолодження не потрiбна.
1) Нанесiть термоiнтерфейс на процесор, видавивши невелику краплю (дiаметр 4-5 мм)
на його центральну частину.
Мал. 11
Socket FM2/FM2+/FM1/
AM3+/AM3/AM2+/AM2/AM4
Page 35

Українська
WWW.PERFORMA.COOL
35
Мал. 12
3) Встановiть радiатор на кришку процесора з дотриманням бажаної орiєнтацiї.
Зачепiть крiпильнi скоби за вiдповiднi виступи рамки крiплення материнської плати.
Затягнiть до упору гвинти.
4) Пiдключiть живлення вентилятора до вiдповiдного роз’єму материнської плати
(CPU Fan).
Мал. 13
Демонтаж i замiна вентилятора
Конструкцiя процесорного охолодження передбачає можливiсть демонтажу i замiни
вентилятора. Для цього необхiдно вiдключити вентилятор вiд роз’єму живлення, звiльнити,
утримують його дротовi скоби i зняти вентилятор. Установка вентилятора проводиться
в порядку, зворотному до демонтажу. Вентилятор ставиться на радiатор, фiксується
дротяними скобами i пiдключається до вiдповiдного роз’єму на материнськiй платi.
Page 36

Українська
WWW.SENJIN-CN.COM
36
6. Усунення дрiбних несправностей
1) При пiдготовцi до установки процесорного охолодження, перевiрте комплектнiсть
виробу.
2) Пiсля установки процесорного охолодження температура процесора залишається
високою:
– переконайтесь, що температурний режим примiщення i системного блоку, в
якому росташоване процесорне охолодження на нормальному рiвнi (оптимальна
температура +25 ° C, вологiсть не вище 75%);
– перевiрте налаштування процесора в БIОС / UEFI материнської плати;
– уважно ознайомтесь з iнструкцiєю i звернiть увагу на правильнiсть установки
процесорного охолодження;
– перевiрте наявнiсть термоiнтерфейса i пiдложку, на предмет наявностi стороннiх
елементiв.
3) Причини несправностi вентилятора:
– непрацюючий вентилятор необхiдно оглянути, щоб виключити попадання
сторонiх предметiв в його лопастi;
– вентилятор не пiд’єднаний до материнської плати – перевiрте пiдключення,
керуючись вiдповiдним пунктом в iнструкцiї;
– перебитий або пошкоджений кабель пiдключення - звернiть вашу увагу на
кабель, чи немає видимих пошкоджень;
– невiрно виставленi настройки вентилятора в Бiосi - перевiрте установки в БIОС
/ UEFI материнської плати.
4) Пiд час роботи процесорного охолодження з’явилися стороннi звуки:
– необхiдно перевiрити надiйнiсть закрiплення процесорного охолодження i
правильнiсть його установки;
– виключiть можливiсть попадання в вентилятор i його лопастi стороннiх предметiв
або ймовiрнiсть того, що лопастi можуть торкатися комплектуючi системи, пiд час
роботи.
5) Вентилятор працює гучно:
– необхiдно перевiрити i при потребi вiдрегулювати швидкiсть обертання
вентилятора в БIОС / UEFI материнської плати;
– переконайтесь в тому, що пiсля налаштування параметрiв вентилятора, його
швидкiсть достатня для пiдтримки припустимого температурного режиму.
7. Загальнi обмеження i безпека. Умови зберiгання,
транспортування i утилiзацiя
Зберiгання i транспортування
Цей пристрiй рекомендується зберiгати в складських або домашнiх умовах i
при необхiдностi транспортувати в iснуючiй роздрiбнiй упаковцi. Якщо система
процесорного охолодження вже встановлена, її необхiдно демонтувати перед
транспортуванням i помiстити в окрему упаковку. Мiсце зберiгання (транспортування),
має бути недоступним для вологи, прямого сонячного промiння i виключати можливiсть
механiчних пошкоджень. Даний товар рекомендується зберiгати при температурi
повiтря вiд + 5 ° С до + 40 ° С i вологостi до 80%. За умови дотримання правил i умов
зберiгання гарантiйний термiн зберiгання пристрою в оригiнальнiй упаковцi виробника
становить 10 рокiв.
Page 37

Українська
WWW.PERFORMA.COOL
37
Використання пристрою пiсля закiнчення термiну придатностi
Розрахований мiнiмальний термiн служби пристрою, встановлений виробником для
системи охолодження для процесора становить 10 рокiв i дiє за умови використання
виробу виключно для власних потреб, також при дотриманнi споживачем правил
експлуатацiї, зберiгання i транспортування виробу. За умови дбайливого поводження з
виробом i дотримання правил експлуатацiї, фактичний термiн служби може перевищувати
розрахунковий термiн служби, встановлений виробником. По закiнченню термiну служби
виробу, бажано звернутися до авторизованого сервiсного центру для проведення
профiлактичного обслуговування виробу i визначити його придатнiсть для подальшої
експлуатацiї. Роботи щодо профiлактичного обслуговування виробу i його дiагностики,
виконуються авторизованими сервiсними центрами на платнiй основi.
Утилiзацiя та захист навколишнього середовища
На вiдмiну вiд побутових вiдходiв, пристрiй необхiдно повернути до вiдповiдного пункту
з прийому електричного та електротехнiчного устаткування з метою утилiзацiї та
переробки. Це сприяє збереженню природних ресурсiв. При забезпеченнi переробки
цього виробу, ви допоможете запобiгти можливим негативним наслiдкам для
навколишнього середовища i здоров’я людей, як наслiдок неправильної переробки.
Здайте пристрiй у централiзований центр з прийому та утилiзацiї вiдходiв або
звернiться до продавця, у якого була придбана система охолодження для процесора.
Компетентнi органiзацiї по утилiзацiї цього пристрою вiдправлять його на безпечну
для навколишнього середовища переробку. За неправильну утилiзацiю вiдходiв
передбаченi штрафи, вiдповiдно до чинного законодавства України.
8. Вiдповiднiсть стандартам i гарантiя виробника
Гарантiї виробника (продавця)
При дотриманнi користувачем правил експлуатацiї, з урахуванням запобiжних засобiв,
викладених в цiй iнструкцiї користувача, пристрiй безпечний при використаннi i не завдає
шкоди навколишньому середовищу, людинi i придатний до експлуатацiї. Гарантiйний
термiн експлуатацiї пристрою - 12 мiсяцiв з моменту придбання i без урахування перiоду
знаходження в ремонтi (за умови дотримання правил експлуатацiї).
Право на гарантiю надається при заповненнi iнформацiї в гарантiйному талонi, що
видається при отриманнi товару. Для отримання бiльш детальної iнформацiї про товар, а
також з питаннями i пропозицiями, звертайтеся за адресою, вказаною нижче.
Гарантiя, є доповненням до прав, якi надаються вiдповiдно до чинних законiв України про
права споживачiв.
Постачальник/Iмпортер в Україну: ТОВ «НВФ «ЕЛЕТЕК ЛТД»»
Адреса: вул.Дегтярiвська, 33а, м.Київ, Україна, 03057
тел/факс: +38 (44) 538-15-16
Page 38

Manufacturer: ShenZhen SenJing Technology Co., LTD
Address: Building A Tongle Science@Tech Garden,
Baolong 5th, Longgang District, ShenZhen, China
www.senjing-cn.com
Производитель: Шеньжень Сенджинг Ко., ЛТД
Адрес производителя: Строение А Тонгл Сайнс@Теч Гарден
Баолонг 5, Лонгганг Дистрикт, Шеньчжень, Китай
www.senjing-cn.com
Виробник: Шеньжень Сенджiнг Технолоджi Ко., ЛТД
Адреса: Будiвля А Тонгл Сайнс@Теч Гарден Баолонг 5,
Лонгганг Дiстрiкт, Шеньчжень, Китай
www.senjing-cn.com
 Loading...