


WiFi HUMIDITY AND TEMPERATURE
H&T
SENSOR
USER GUIDE
MOBILE APPLICATION FOR SHELLY
Step 3
- If using iOS: you will see the following screen (g. 4)
On your iOS device open Settings > WiFi and connect to the
®
WiFi network created by Shelly, e.g. ShellyHT-35FA58.
- If using Android (g. 5) your phone will automatically
scan and include all new Shelly devices in the WiFi network,
that you dened.
Upon successful Device Inclusion to the WiFi network you
will see the following pop-up:
Shelly® H&T by Allterco Robotics is intended to be placed
in a room/area in order to be aware of the humidity and temperature. Shelly H&T is battery powered, with battery life up
to 18 months. Shelly may work as a standalone device or as
an accessory to a home automation controller.
Specication
Battery Type:
3V DC - CR123A
Battery Life:
Up to 18 months
Electrical consumption:
• Static ≤70uA
• Awake ≤250mA
Humidity measurement
range:
0~100% (±5%)
Temperature measurement range:
-40°C ÷ 60 °C (± 1°C)
Working temperature:
-40°C ÷ 60 °C
Dimensions (HxWxL):
35x45x45 mm
Radio protocol:
WiFi 802.11 b/g/n
Frequency:
2400 – 2500 MHz;
Operational range:
• up to 50 m outdoors
• up to 30 m indoors
Radio signal power:
1mW
Complies with EU standards:
• RE Directive 2014/53/EU
• LVD 2014/35/EU
• EMC 2004/108/WE
• RoHS2 2011/65/UE
Installation Instructions
CAUTION! Before beginning the installation please read
the accompanying documentation carefully and completely.
Failure to follow recommended procedures could lead to
malfunction, danger to your life or violation of the law.
Allterco Robotics is not responsible for any loss or damage
in case of incorrect installation or operation of this device.
CAUTION! Use the Device only with batteries which comply with all applicable regulations. Inappropriate batteries
may cause a short circuit in the Device, which may damage it.
CAUTION! Do not allow children to play with the device,
especially with the Power Button. Keep the devices for re
mote control of Shelly (mobile phones, tablets, PCs) away
from children.
Control your home with your voice
All Shelly devices are compatible with Amazons’ Alexa and
Googles’ assistant. Please see our step-by-step guides on:
https://shelly.cloud/compatibility/Alexa
https://shelly.cloud/compatibility/Assistant
The Shelly Cloud mobile application
Shelly Cloud gives you opportunity to control and adjust all
Shelly® devices from anywhere in the world. The only thing
you need is connection to the Internet and our mobile application, installed on your smartphone or tablet. To install the
application please visit Google Play or App Store.
Registration
The rst time you open the Shelly Cloud mobile app, you
have to create an account which can manage all your
Shelly® devices.
Forgotten Password
In case you forget or lose your password, just enter the
e-mail address you have used in your registration. You will
then receive instructions on how to change your password.
WARNING! Be careful when you type your e-mail address
during the registration, as it will be used in case you forgot
your password.
After registering, create your rst
room (or rooms), where you are
going to add and use your Shelly
devices. Shelly Cloud allows easy
control and monitoring using a mobile phone, tablet or PC.
Step 4:
Approximately 30 seconds after discovery of any new devices оn the local WiFi network, а list will be displayed by
default in the “Discovered Devices” room.
Step 5:
Select Discovered Devices and choose the Shelly device you
want to include in your account.
Step 6:
Enter a name
for the Device. Choose
a Room, in
which the device has to be
positioned.
You can choose an icon or upload a picture to make it easier
to recognize. Press “Save Device”.
Device „Wake Up“
To open the device, twist the top and bottom part of the
case counter clockwise.
Press the Button. The LED should ash slowly. This means
that Shelly is in AP mode. Press the Button again and the
LED will turn off and Shelly will be in „sleep“ mode.
LED States
• LED ashing quickly - AP Mode
• LED ashing slowly - STA Mode (No Cloud)
• LED still - STA Mode (Connected to Cloud)
• LED ashing quickly - FW Update (STA mode connected Cloud)
Factory Reset
You can return your Shelly H&T to its Factory Settings by
pressing and holding the Button for 10 seconds. Upon suc-
cessful factory reset the LED will ash slowly.
Additional Features
Shelly allows control via HTTP from any other device, home
automation controller, mobile app or server.For more information about the REST control protocol, please visit:
www.shelly.cloud or send a request to developers@shelly.cloud
Device Inclusion
To add a new Shelly device, connect it to the power grid
following the Installation Instructions included with the
Device.
Step 1
Place your Shelly H&T in the room where you want to use it.
Press the Button - the LED should turn on and ash slowly.
WARNING: If the LED does not ash slowly, press and
hold the Button for at least 10 seconds. The LED should
then ash quickly. If not, please repeat or contact our customer support at: support@shelly.cloud
Step 2
Choose “Add Device”.
In order to add more devices later, use the Menu at the top
right corner of the main screen and click “Add Device”.
Type the name and password for the WiFi network, to which
you want to add Shelly.
Step 7:
To enable connection to the Shelly Cloud service for remote
control and monitoring of the Device, press “yes” on the
following pop-up.
Shelly Devices Settings
H&T
After your Shelly device is included in the
app, you can control
it, change its settings
and automate the
way it works.
To switch the device
on and off, use the
Power button.
To enter the details
menu of the device,
click on it’s name.
From there you may control the device, as well as edit its
appearance and settings.
Alarms
Low Temperature Alarm:
Receive a notication when
the temperature is less than
a predened value. Possible
range: -20 ~ 60°C
High Temperature Alarm:
Receive a notication when
the temperature is greater
than a predened value. Possible range: -20 ~ 60°C
Low Humidity Alarm:
Receive a notication when
the humidity is less than a
predened value.
Possible range: 1 ~ 100%
High Humidity Alarm:
Receive a notication when
the humidity is greater than a
predened value.
Possible range: 1 ~ 100%
Sensor settings
Temperature Units
Setting for change of the temperature units.
• Celsius
• Fahrenheit
Send Status Period: Dene the period (in hours), in which
Shelly H&T will report its’ status. Possible range: 1 ~ 24 h.
Temperature Threshold: Dene the temperature Threshold
in which Shelly H&T will “wake up” and send status. The val-
ue can be from 1° up to 5° or you can disable it.
Humidity Threshold: Dene the humidity Threshold in which
Shelly H&T will “wake up” and send status. The value can be
from 0.5 up to 50% or you can disable it.
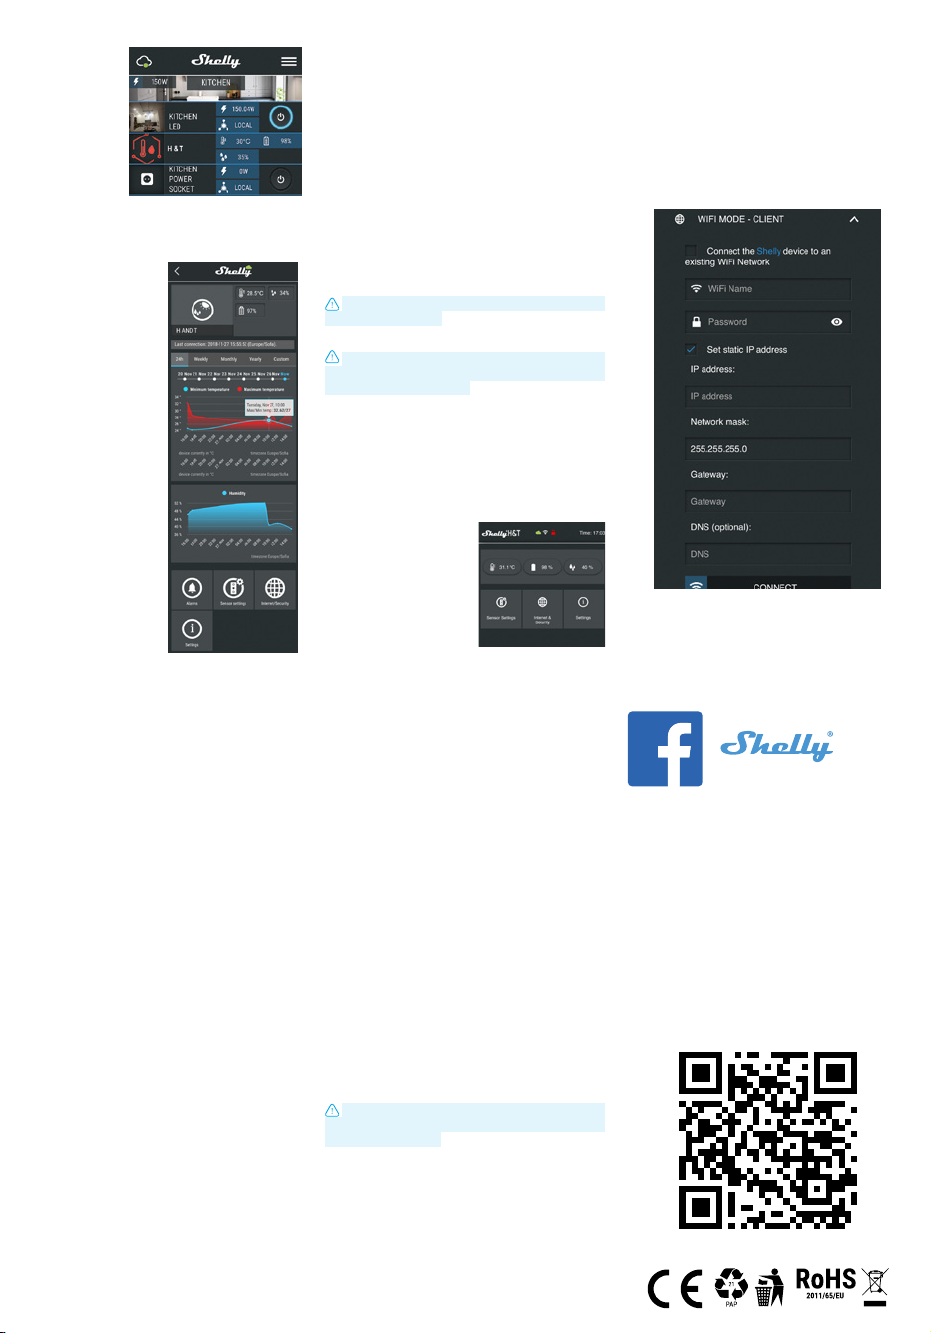
Internet/Security
WiFi Mode - Client: Allows the device to connect to an avail-
able WiFi network. After typing the details in the respective
elds, press Connect.
WiFi Mode - Access Point: Congure Shelly to create a Wi-
Fi Access point. After typing the details in the respective
elds, press Create Access Point.
Restrict Login: Restrict the web interface (IP in the Wi-Fi
network) of Shely with a Username and Password. After typing the details in the respective elds, press Restrict Login.
The Embedded Web Interface
Even without the mobile app Shelly can be set and controlled through a browser and connection of a mobile phone
or tablet.
Abbreviations used:
Shelly-ID – consists of 6 or more characters. It may include
numbers and letters, for example 35FA58.
SSID – the name of the WiFi network, created by the device,
for example ShellyHT-35FA58.
Access Point (AP) – in this mode in Shelly creates its own
WiFi network.
Client Mode (CM) – in this mode in Shelly connects to an-
other WiFi network.
Installation/Initial inclusion
Step 1
Place Shelly in the room where you want to use it. Open it
and press the Button. The LED should ash slowly.
To open the device, twist the top and bottom part of the
case counter clockwise.
CAUTION! If the LED does not ash slowly, press and
hold the Button for 10 seconds. Upon successful factory
reset, the LED will ash slowly.
Step 2
When the LED is ashing slowly, Shelly has created a WiFi
network, with name such as ShellyHT-35FA58. Connect to it.
Step 3
Type 192.168.33.1 into the address eld of your browser to
load the web interface of Shelly.
General - Home Page
This is the home page of the
embedded web interface. Here
you will see information about:
• Current Temperature
• Current Humidity
• Current battery percentage
• Connection to Cloud
• Present time
• Settings
Sensor Settings
Temperature Units: Setting for change of the temperature units.
• Celsius
• Fahrenheit
Send Status Period: Dene the period (in hours), in which
Shelly H&T will report its’ status. The value must be between
1 and 24.
Temperature Threshold: Dene the temperature Threshold
in which Shelly H&T will “wake up” and send status. The val-
ue can be from 1° up to 5° or you can disable it.
Humidity Threshold: Dene the humidity Threshold in which
Shelly H&T will “wake up” and send status. The value can be
from 0.5 up to 50% or you can disable it.
Internet/Security
WiFi Mode-Client:
WiFi network. After typing the details in the elds, press Connect.
WiFi Mode-Acess Point: Congure Shelly to create a Wi-Fi
Access point. After typing the details in the elds, press
Create Access Point.
Allows the device to connect to an available
Battery Life Recommendations
For the best battery life we recommend you the following
settings for Shelly H&T:
Sensor settings
• Send Status Period: 6 h
• Temperature Threshold: 1°
• Humidity Threshold: 10%
Set a static IP address in the Wi-Fi network for Shelly from
the ebmedded web interface. Go to Internet/Security ->
Sensor settings and press on Set static IP address. After
typing the details in the respective elds, press Connect.
Keep Shelly at the best distance possible to the Wi-Fi router.
Developers support
Our Facebook support group:
www.facebook.com/groups/1686781668087857
Our support e-mail:
support@shelly.cloud
Our website:
www.Shelly.cloud
Settings
Firmware Update
Update the rmware of Shelly, when a new version is released.
Time Zone and Geo-location
Enable or Disable the automatic detection of Time Zone and
Geo-location.
Factory Reset
Return Shelly to its factory default settings.
Device Information
Here you can see the:
• Device ID - Unique ID of Shelly
• Device IP - The IP of Shelly in your Wi-Fi network
Edit Device
From here you can edit:
• Device Name
• Device Room
• Device Picture
When you are done, press Save Device.
Restrict Login: Restrict the web interface of Shely with a
Username and Password. After typing the details in the re-
spective elds, press Restrict Shelly.
Advanced Developer Settings: Here you can change the
action execution:
• Via CoAP (CoIOT)
• Via MQTT
ATTENTION: To reset the device, press and hold the But-
ton for at least 10 seconds. Upon successful factory reset,
the LED will ash slowly.
Settings
Time Zone and Geo-location: Enable or Disable the auto-
matic detection of Time Zone and Geo-location. If Disabled
you can dene it manually.
Firmware Upgrade: Shows present rmware version. If a
newer version is available, you can update your Shelly by
clicking Upload to install it.
Factory reset: Return Shelly to its factory settings.
Device Reboot: Reboots the device.
You can nd the latest PDF version of this user
guide here:
(RoHSII Directive)
 Loading...