

Page 1

Sheldon Water
Purification Kit
Installation Guide
SWPK
SHELDON WATER PURIFICATION KIT
Page 2

SWPK INSTALLATION
Revised: May 8, 2014
Part Number (Guide): 9920698
Sheldon Manufacturing
300 N. 26th Ave
Cornelius, OR 97113
EMAIL: tech@shellab.com
PHONE 1-800-322-4897
(503) 640-3000
INTRODUCTION
The SWPK Sheldon Water Purification Kit is designed to remove particulates and calcium from
water sources for the SHC10, SCH10R, SHC28, and SHC28R Humidity Chambers and their 230
volt variants, as well as the SCO26H and SCO26H-2 Humidified CO2 Incubators*. The kit also
adjusts water pH and water resistance to levels that will not corrode the units’ interiors, or adversely
affect the performance of steamers and other major components. This installation guide covers how
to install the SWPK.
*These units were previously designated the HC9, HC9R, HC30, HC30R, and 2428H.
TAP WATER
This purification kit is intended to purify standard tap water. Do not connect it to a deionized water
source. Use of deionized water will likely cause corrosive damage to major functional components
and the metal interior surfaces of humidity chambers and humidified CO2 Incubators.
WATER OUTPUT EXPECTATION
18 megohm-cm of resistivity can be achieved with the SWPK. The Absorber filter removes free
chlorine, organics, phosphate complexes, and turbidity. The Universal filter removes ionizable
constituents, except free carbon dioxide and silica. The Universal filter reduces the ion
concentration level equivalent to a single distillation.
WATER PRESSURE
The SWPK is designed to work with tap water sources that provide 60 – 70 Pounds per Square
Inch of water pressure. Do not connect the SWPK to sources that exceed 120 PSI!
The regulator should be set to supply 5 PSI to the water filters.
2 | P a g e
Page 3
Component
Part Number*
Box Cover
5431008
4.57m (15ft) of Tubing, ¼ inch OD
8500516
Filter Cartridge Absorber
Assembly (Replacement)
2800534
Filter Cartridge Assembly
Universal (Replacement)
2800533
Push-to-Connect Fitting 1/8 Inch
NPT, for ¼ Inch OD Tubing
3100795
Push-to-Connect Fitting 1/4 Inch
NPT, for ¼ Inch OD Tubing
3100796
Push-to-Connect Elbow, 1/8 Inch
NPT Pipe, for ¼ Inch OD Tubing
3100791
2 Quick Release Pins
3800633
4 Self-Tapping Sheet Metal
Screws
7360536
Water Source
Regulator
Absorber
Filter
Universal
Filter
Push-to-Connect
Fitting
(Back of the Unit)
Valve
Water Flow
SWPK INSTALLATION
COMPONENTS
The SWPK Assembly comes provided with the following components:
Note: All parts numbers may be subject to future revisions.
WATER TUBING
The SWPK is provided with a length of approximately 4.57 meters (15 feet)
of black, 1/8 inch ID ¼ inch OD tubing. This tubing is intended to be cut by
the end-user. It should be used to connect the SPWK output to the push-toconnect adaptor on the incubator or humidity cabinet.
A section of the line can also be used to connect the chamber’s or
incubator’s condensation drain to a collection vessel or drainage system.
The end-user is responsible for providing an adaptor and tubing to connect
their water source to the SWPK’s ¼ inch push-to-connect regulator.
Please see the plumbing diagram on the next page.
3 | P a g e
Page 4
Replacement Line
SWPK INSTALLATION
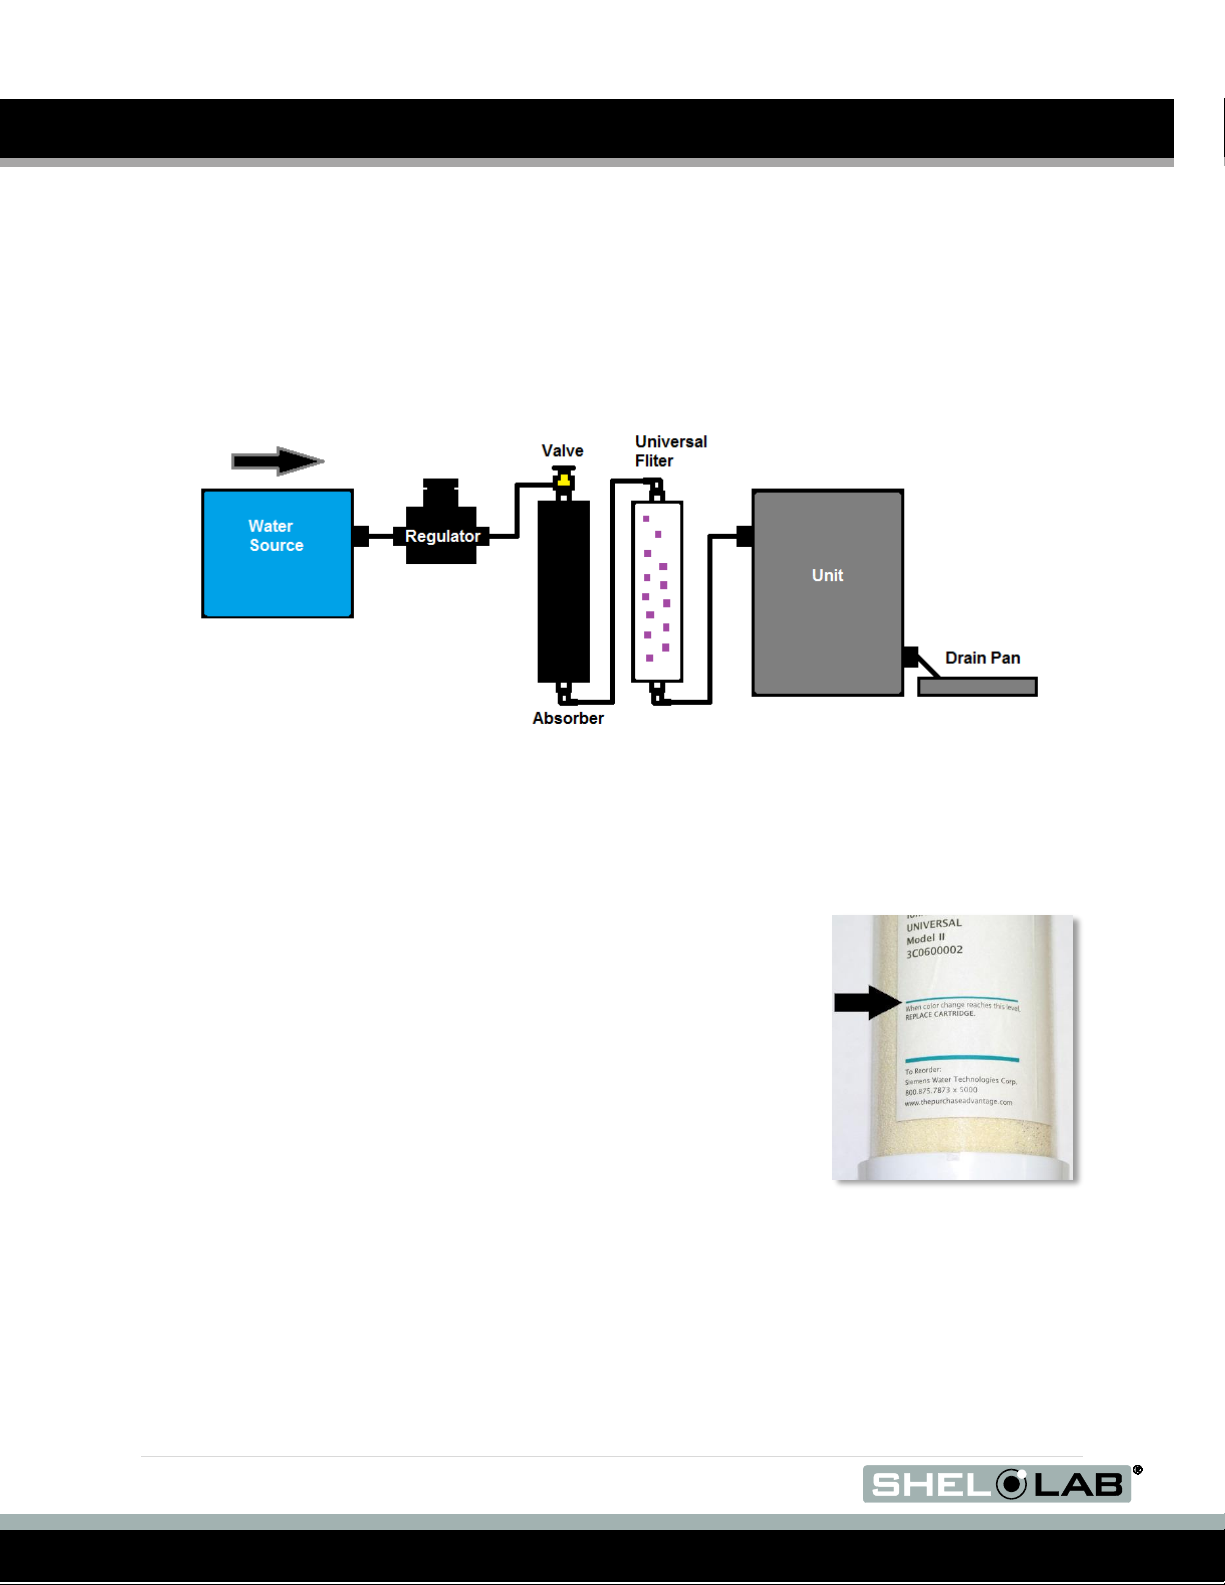
Plumbing Diagram
FILTER REPLACEMENT
The black Absorber filter is an active charcoal filter. It will last six (6)
months to (1) one year depending on the water quality of your laboratory or
workspace water source, and the humidity setting of the incubator or
humidity cabinet.
The mix-colored universal filter will gradually turn yellow, starting at the
top, and moving to the bottom while in use. The filter’s lifespan is highly
dependent on local water quality, and the filter should be replaced when it
has turned yellow down to the blue replacement line on the filter’s label.
4 | P a g e
Page 5

SWPK INSTALLATION
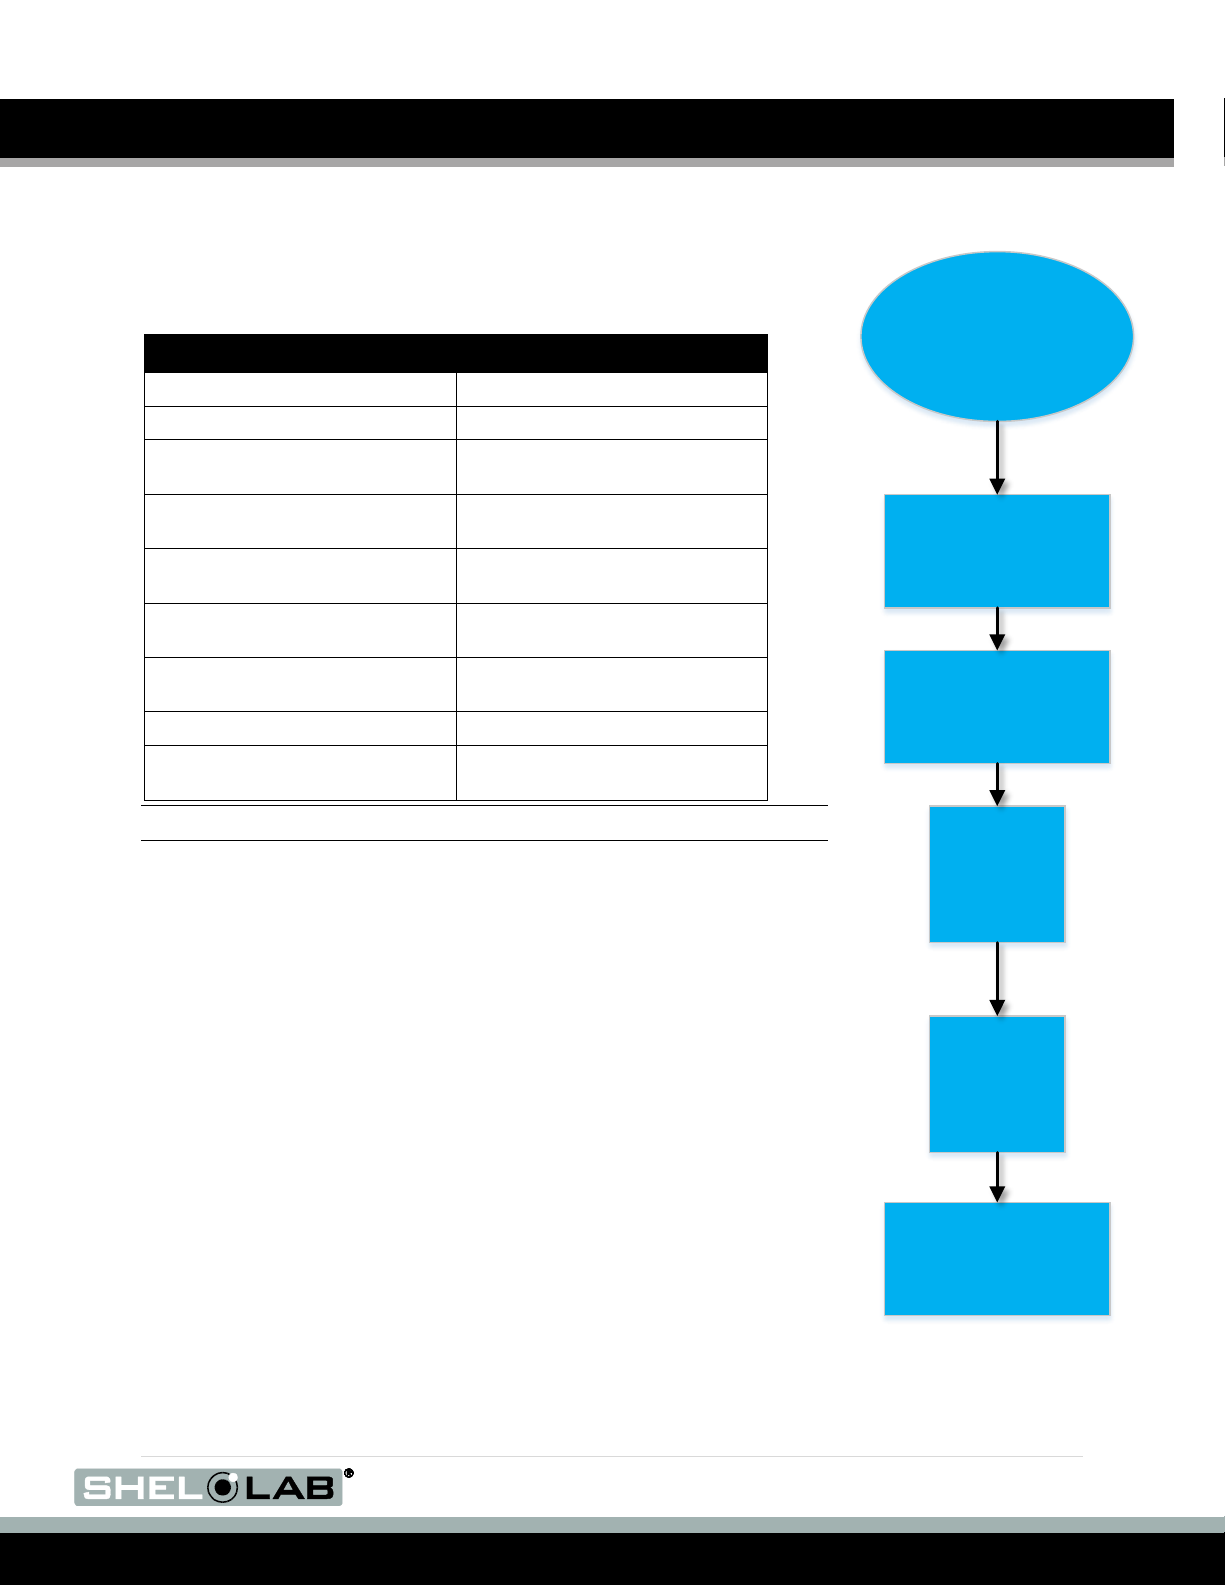
INSTALLATION PROCEDURE
Complete the steps below (described in detail on the following pages) to install the SWPK:
1. Install the Water Filters
2. Mount the SWPK Assembly on the Unit
3. Connect the Water Input Line to the Filter
4. Connect the Water Output Line to the Filter
5. Secure the Water Output Line
6. Threading the Water Input and Output Lines
7. Mount the Protective Box Cover
8. Secure the Protective Box Cover
9. Install a Push-To-Connect Fitting
10. Connect Output Line to Unit
11. Connect to Water Source
12. Connect the Condensation Drainage Line
5 | P a g e
Page 6

Figure 1: SWPK Assembly
Installing the Universal Filter
Steps 1 and 2
SWPK INSTALLATION
1) INSTALL THE WALTER FILTERS
Install the Walter Filters on the SPWK Assembly
1. Insert the top nipple of the light colored Universal Filter into
the receiving nut on the top right side of the SWPK
Assembly
Figure 2: Details of Step 1
2. Insert the bottom nipple of the Universal Filter into the
receiving slot at the bottom of the Assembly.
Figure 3: Details of Step 2 and 3
3. Turn the disk-shaped Finger Adjustment Nut on the bottom receiver clockwise. This will
exert pressure on the filter, mating the top and bottom nipples to their receivers. Tighten
using finger strength until the disk will no longer turn.
4. Repeat the above steps for installing the black Absorber Filter on the left side of the SWPK
Assembly.
6 | P a g e
Page 7

SWPK INSTALLATION
2) MOUNTING THE SWPK
The SWPK unit can be mounted on your laboratory or workspace wall, or on a Sheldon humidified
chamber or incubator. Four (4) self-tapping sheet metal screws are included with each SWPK for
mounting on Sheldon units. Verify that there are no critical components, electrical wires, or fluid
containment vessels beneath the drilling site. Always depower and unplug the unit prior to drilling.
If mounting on a wall or other alternative surface, please contact your facilities department for the
appropriate fasteners.
Figure 4: SWPK Assembly Mounted
(SCO26H / 2428H Incubator)
7 | P a g e
Page 8

SWPK INSTALLATION
3) CONNECT THE WATER INPUT LINE
1. Connect your water input line to the Regulator on the top of the Purification Kit.
Figure 5: Water Input Line Connected to Regulator
2. A section of the included ¼ inch outside dimension tubing may be used for this step.
3. Do not connect the input line to a water source, yet. This will be one of the final steps in the
installation process.
4) CONNECT THE WATER OUTPUT LINE
1. Connect your water output line to the compression fitting of the push-to-connect elbow on
the bottom of the Universal Water Filter body.
Note: Use of one hand to support the push connect elbow when inserting the water line into the
compression fitting is strongly recommended. Too much force may damage the elbow.
Figure 6: Output Line Connected
8 | P a g e
Page 9

SWPK INSTALLATION
2. A section of the included ¼ inch outside dimension tubing may be used for this step.
3. Do not connect the output line to a water source, yet. This will be one of the final steps in
the installation process.
5) SECURE THE WATER OUTPUT LINE
1. Feed the water output line into the support clip located on the left side of the water filter
assembly, adjacent to the Absorber Filter.
Figure 7: Water Output Line Secured
6) THREADING THE WATER INPUT AND OUTPUT LINES
Note: One person should hold the protective box cover of the SWPK near the mounted Filter
Assembly during this step. The other should thread the water lines through it.
1. Thread the water output and input lines through the hole in the protective cover box, on the
top left side of the box.
Figure 8: Water Lines Threaded
9 | P a g e
Page 10

Figure 10: Left Side QR Pin
SWPK INSTALLATION
7) MOUNT THE COVER BOX
1. Locate the slot on the top of the Cover Box.
2. Locate the mounting tab on the top of the SWPK Assembly.
3. Mate the slot on the Box to the tab on the Assembly, so that the Cover Box hangs off the
top of the SWPK Assembly.
Figure 9: Cover Box Mounted
8) SECURE THE COVER BOX
1. Insert the two (2) included Quick Release Pins into their mounting holes on the left and
right sides, at the bottom of the Cover Box.
2. The Pins should pass through both the holes in the Cover Box and the corresponding
mounting holes in the SWPK Assembly.
10 | P a g e
Page 11

Figure 11: Push-to-Connect
Fittings
Figure 12: Stabilizing the
Solenoid During Compression
Fitting Removal
SWPK INSTALLATION
9) INSTALL A PUSH-TO-CONNECT FITTING
The SWPK comes provided with two steel push-to-connect fittings to
replace the copper compression fitting on the back of your humidifier or
incubator. See Figure 11. The push-to-connect fittings allow the output
OD tubing from the water filter to be connected to the unit’s water
injection solenoid.
1. Remove the top cover of the chamber or incubator to access
the water injection solenoid in the control box (the space on top
of the unit where the major electrical components are housed.)
2. Use one wrench inside the control box to stabilize the solenoid.
At the same time, use a second wrench to loosen and remove
the exterior compression fitting that came with your unit. See
Figure 12.
3. Install the push-to-connect fitting (1) on the outside of the unit
that fits the solenoid.
a. Use of thread seal tape (aka PTFE thread tape) on
the threads of the push-to-connect fitting is
recommended to form a durable and tight seal.
b. Use two wrenches when tightening the push-to-
connect fitting. One to tighten, and one to stabilize
the solenoid in the control box.
10) CONNECT THE OUTPUT LINE TO UNIT
1. Make sure that the end of the SWPK’s OD output tubing is cut
so that it forms and even, straight end.
2. Insert the output line into the chamber or incubator’s newly installed exterior push-toconnect fitting.
Note: To remove the OD tubing from the push-to-connect fitting, hold down the sliding ring on the
end of the fitting that mates with the tubing. Then withdraw the line.
11) CONNECT TO WATER SOURCE
1. Connect the SWPK’s Water Input Line to your workspace tap water source.
Note: Do not connect to a deionized water source!
11 | P a g e
Page 12

SWPK INSTALLATION
12) CONNECT THE CONDENSATION DRAIN LINE
A section of the included ¼ inch OD tubing can be used to connect the chamber’s or incubator’s
condensation drain to a collection vessel or drainage system.
1. Connect a water line to the press-to-connect fitting located on the back of the unit.
2. Connect the line to a drainage collection vessel or drainage system.
3. The drain is gravity fed. It is important that the receiving receptacle is located below the
level of the incubator’s or cabinet’s drain valve, and the line travels downward. Otherwise
water will collect inside the unit.
Figure 13: Condensation Drain Compression Fitting
FINISHED
Step 12 concludes the SWPK installation procedure.
12 | P a g e
Page 13

 Loading...