

Page 1

SHAWDIGITAL PHONE
User Guide
24/7/365SERVICE
i
Page 2

Hello.
Hello.
Welcome to the
Welcome to the
wonderful world
wonderful world
of Shaw’s home
of Shaw’s home
phone service.
phone service.
2 *99
4 Voicemail
9 Call Forward
10 Call Waiting
11 Call Display
12 Busy Redial
12 Simultaneous Ring
13 Do Not Disturb
13 3-Way Calling
14 Call Return
14 Anonymous Call Blocking
15 Selective Call Blocking
16 Distinctive Ring
16 Long-Distance Calls
18 Customer Care
Phone Number:
Default Voicemail Password:
Voicemail Access Number:
This tiny book tells you every detail you need to know to use all of your new
phone features like a superstar. Inside you’ll find easy-to-follow instructions that
will help you use your phone service to its full potential. No matter which phone
plan you choose, your features are explained in here.
Convenience is what Shaw’s home phone service is all about, so we’re sure you’ll
find the whole experience to be quite… convenient. With three home phone
service plans, Shaw allows you to choose the plan that’s right for you.
For over 35 years, we’ve been working hard to provide you with an everincreasing range of entertainment and communication products, including Shaw
Digital TV, Shaw High-Speed Internet and Shaw’s home phone service. It’s quite a
collection for you to enjoy.
If you have any questions, a Shaw Customer Service Representative
will be happy to help. Please call 1.888.472.2222 or visit us online
at SHAW.CA/PHONE.
Page 3
*99.
THE *99 MENU IS YOUR MISSION
CONTROL HEADQUARTERS FOR
PHONE FEATURES.
The *99 menu is your home base – the main
menu. Just dial *99 and you can manage five
calling features in one place:
■ Voicemail status and number of rings before pickup
■ Busy Redial
■ Do Not Disturb
■ Anonymous Call Blocking
■ Simultaneous Ring
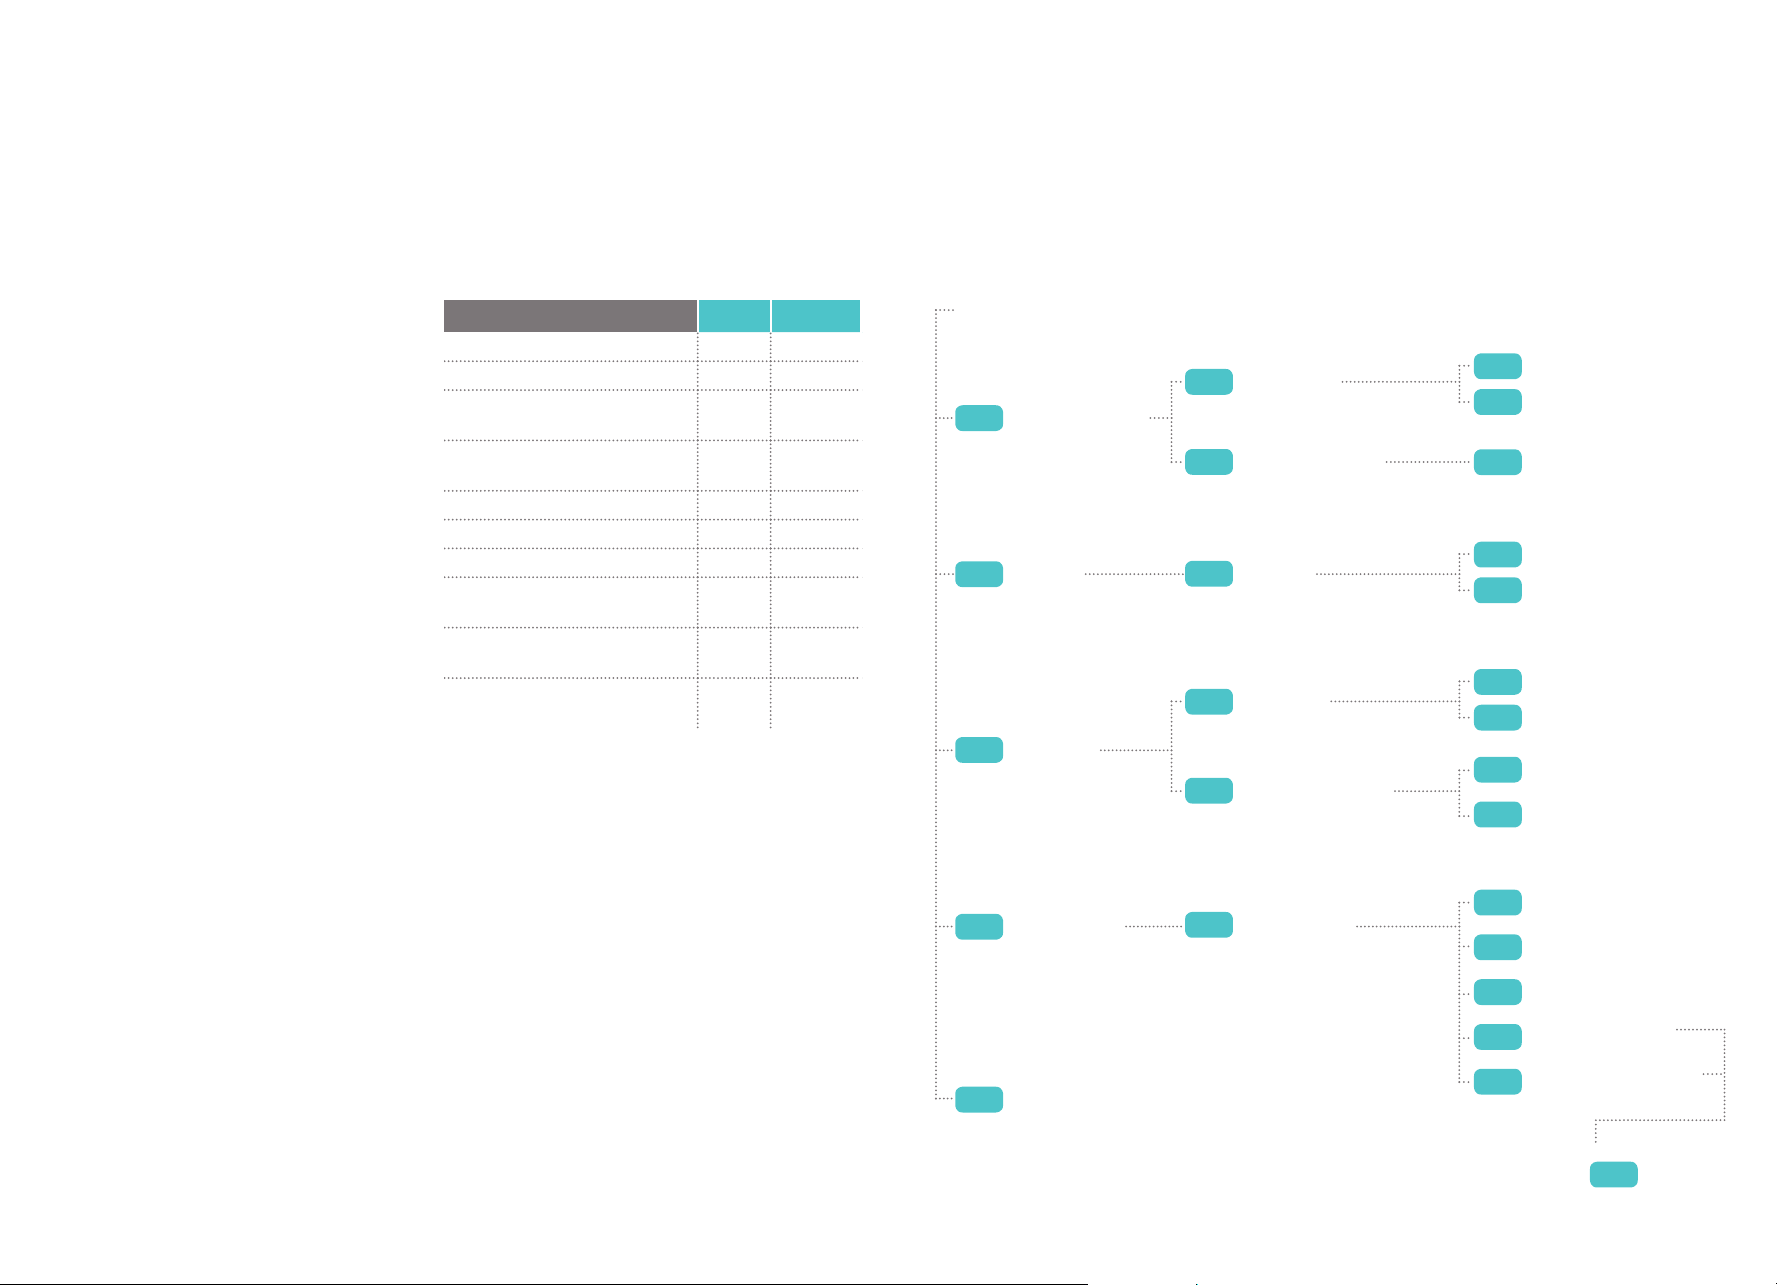
To see how the menu works, consult the
handy-dandy flow chart on the next page.
To activate and deactivate your phone features,
use the codes from the table on this page.
And for more detail on all the features, read
the following pages.
FEATURE ACTIVATE DEACTIVATE
Call Return *69
Call Forward *72 *73
Call Display Blocking – “Private Name”
and “Private Number” will be displayed
To display “Name” and “Telephone Number”
for a non-published telephone number
Disable Call Waiting for 1 call *70
Anonymous Call Blocking *77 *87
Voicemail Access *98
Call Trace – only to be used
for legal action
Selective Call Blocking – add and
remove numbers
Busy Redial – this feature needs to be
enabled through *99 first
*67
*82
*57
*60
*66
DIAL *99
TO MANAGE YOUR FEATURES
1
Voicemail Management
2
Call Settings
3
Privacy Setting
1
Voicemail status
Change number of rings
2
before Voicemail pickup
Busy Redial:
1
When you make a call and get
a busy signal, your phone will
monitor the line and let you know
as soon as the line is free.
Do Not Disturb:
1
Divert all calls to a recording that
says you do not wish to be disturbed.
Anonymous Call Blocking:
2
Avoid getting calls from numbers
that use Caller ID blocking or
other privacy features.
1
Enable Voicemail
2
Disable Voicemail
1-9
Number of rings is set
1
Enable Busy Redial
2
Disable Busy Redial
1
Enable Do Not Disturb
2
Disable Do Not Disturb
Enable Anonymous
1
Call Blocking
Disable Anonymous
2
Call Blocking
1
Enable Simultaneous Ring
Simultaneous Ring:
4
Find Me, Follow Me
9
List Currently Enabled Features
2
1
Have your phone ring on up to four
different lines at the same time;
cell phone, work, cabin, wherever.
2
Disable Simultaneous Ring
List telephone numbers in the
3
Simultaneous Ring group
Add a telephone number
4
to Simultaneous Ring
Remove a telephone number
5
from Simultaneous Ring
Enter phone number
and press
#
3
Page 4

VOICEMAIL.
BUSY? OUT?
LET VOICEMAIL GET THE CALL.
Voicemail answers your calls when you are
unable to answer the phone. Your personalized
greeting is played and the caller’s message is
recorded for you to listen to later. It’s your very
own personal assistant.
GETTING STARTED.
Before you can use Voicemail, you have
to set it up.
Step 1 – Access the system.
■ Lift the receiver and dial
home phone.
Step 2 – Enter your temporary password.
Shaw will provide you with a temporary
password for your first login.
■ Enter your temporary password and press
Note: If you enter an incorrect password, you will be asked
for your mailbox number (your 10-digit phone number),
followed by the password again.
■ The system will now prompt you to change your
temporary password and record your name and
greeting.
9 8 from your
*
#
.
Step 3 – Enter your new password.
For security reasons, please change your
password immediately. You may not reuse your
temporary password and it will no longer be
valid once you pick a new password. The new
password can be 4 to 19 digits long.
■ Enter your new password.
#
■ Press
■ Press
to finish.
to cancel.
*
The system will now prompt you to confirm
your new password.
■ Re-enter your new password.
#
■ Press
■ Press
to finish.
to cancel.
*
Step 4 – Identify your mailbox by recording your name
and/or telephone number.
The system will ask you to record your name
and/or telephone number at the tone.
Following that:
1
■ Press
■ Press
■ Press
to replay.
#
to accept.
to cancel.
*
Step 5 – Record your personal greeting.
The system will ask you to record your greeting
at the tone. When you are done:
#
■ Press
■ Press
■ Press
■ Press
to end the recording.
1
to replay.
#
to accept.
to cancel.
*
RETRIEVING YOUR MESSAGES.
When you have a new message waiting, you
will hear an interrupted dial tone when you
pick up the receiver, or your phone’s messagewaiting light will be flashing (if your phone
has a message-waiting light feature). You can
still make and receive calls when you hear the
interrupted dial tone.
To access your Voicemail from home:
■ Lift the receiver and dial
■ Enter your password when prompted.
Note: If you enter an incorrect password, you will be asked
for your mailbox number (your 10-digit phone number),
followed by the password again. If you have set up the
skip password feature, you will not be prompted for your
password. (See page 7 for instructions on how to set up
the skip password feature.)
To access your Voicemail while you are away from home:
■ Dial your phone number and press
personal greeting begins.
■ Enter your password.
Note: If you enter an incorrect password, you will be asked
for your mailbox number (your 10-digit phone number),
followed by the password again.
■ Follow the prompts to check for new or saved messages
9 8.
*
when your
*
To access your Voicemail without calling your
home phone:
■ Dial the Voicemail Access Number
(see SHAW.CA/VOICEMAIL) for the city where your phone
service is located.
■ Enter your mailbox number (your 10-digit phone number).
■ Enter your password.
■ Follow the prompts to check for new or saved messages.
To access your Voicemail from anywhere in Canada or the
U.S. using Shaw’s toll-free number:
■ Dial the toll-free number at 1.866.656.7429 or
1.866.677.7429 from anywhere in Canada or the U.S.
■ Enter your mailbox number (your 10-digit phone
number) followed by #.
■ Enter your password, followed by
■ Follow the prompts to check for new or saved messages.
#
.
To review your messages:
When you access your Voicemail, the system
will describe the message (new, saved, when
it was received, etc.), and will then play
the message. If you have expired messages
(messages older than seven days), the system
will prompt you with the following menu to
review or delete the expired messages before
proceeding to your new messages:
Press 0 for help.
Press 1 to review expired messages.
Press 2 to delete all expired messages.
Step 6 – Exit the system.
To complete your set-up session, just hang up.
4
5
Page 5

While listening to your new or saved messages,
use the following options:
Press 1 to hear new messages first.
Press 2 to delete all expired messages.
Press 3 to review other messages.
If listening to other messages, use the following options:
Press 1 to listen to your archived messages.
Press 2 to listen to messages deleted during your
current session.
Press 3 to listen to messages you have composed for
future delivery.
During playback:
Press 0 for help.
Press 1 to skip back 10 seconds.
Press 1 1 to skip back to the beginning.
Press 2 to pause playback.
Press 3 to skip ahead 10 seconds.
Press 3 3 to skip ahead to the end of the message.
Press 4 to decrease volume.
Press 5 for envelope information (who sent the
message, when and to whom).
Press 6 to increase volume.
Press # to skip the message.
Press 7 to delete the message.
Press 9 to save the message.
After playback:
Press 0 for help.
Press 5 for envelope information
(who sent the message, when and to whom).
Press 6 to forward this message.
Note: Messages can be forwarded to other Shaw Voicemail
system users only.
Press 7 to delete this message.
Press 9 to save this message.
Press # to skip this message.
Press * to cancel the message playback and return
to the previous menu.
YOU CAN ALSO CUSTOMIZE THE NUMBER
OF TIMES YOUR PHONE RINGS BEFORE
GOING TO VOICEMAIL.
Your phone can be set to ring as few as one
time, or if you wish, as many as nine times.
To set the number of rings:
■ Lift the receiver and dial
feature management menu.
1, 2
■ Press
■ You’ll be asked to press a number to select the number
.
of rings before Voicemail picks up.
■ You will hear confirmation of your settings.
To learn how to send voicemails to your email,
see page 19.
9 9 to access your
*
ONCE YOU GET USED TO VOICEMAIL,
TRY SOME ADVANCED FEATURES.
To customize your Voicemail service:
■ Lift the receiver and dial
main menu.
4
■ Press
■ Press
■ Press
■ Press
■ Press
■ Press
■ Press
for personal options.
0
for help.
1
to manage your personal greeting.
2
to change your password.
3
to manage your distribution lists.
4
to record your name.
to go back to the main menu.
*
To change your password:
■ Lift the receiver and dial
main menu.
4
■ Press
■ Press
■ Enter your new password. The password can be 4 to
for personal options.
2
to change your password.
19 digits long. You cannot reuse your old password.
■ To finish entering password press
■ At the prompt, confirm your new password
by re-entering it.
■ After confirming your password, press
■ You will hear a message that your new password
is confirmed.
9 8 to access the
*
9 8 to access the
*
#
.
#
to finish.
To skip the password prompt when accessing
Voicemail from your home phone:
■ Lift the receiver and dial
9 8 to access the
*
main menu.
4
■ Press
■ Press
■ Press
■ Press
6
for personal options.
2
to manage your password.
2
for the password prompt options.
1
to skip the password prompt.
7
Page 6

CALL FORWARD.
To reactivate the password prompt when accessing
Voicemail from your home phone:
■ Lift the receiver and dial
9 8 to access the
*
main menu.
4
■ Press
■ Press
■ Press
■ Press
for personal options.
2
to manage your password.
2
for password prompt options.
2
to reactivate the password prompt.
To change your pre-recorded name:
■ Lift the receiver and dial
9 8 to access the
*
main menu.
4
■ Press
■ Press
■ Record your new name at the tone.
■ Press
■ To accept the new name press
■ To replay press
■ To erase and re-record press
for personal options.
4
to record your name.
#
when finished.
1
.
#
.
.
*
To change your personal greeting:
■ Lift the receiver and dial
9 8 to access the
*
main menu.
4
■ Press
■ Press
■ Press
■ Record your greeting at the tone.
■ Press
■ Press
■ Press
■ Press
for personal options.
1
for personal greeting.
2
to record a personal greeting.
#
when finished.
#
to accept.
1
to replay.
to erase and re-record.
*
To manage outgoing Voicemail messages:
■ Lift the receiver and dial
9 8 to access the
*
main menu.
■ After listening to a message, press
6
to forward it
to another Shaw home phone service subscriber.
■ Record an introduction for your message. You can
pause the recording by pressing 1.
After the recording:
#
■ Press
■ Press
■ Press
■ Press
■ Follow the prompts to enter the address of your
to accept the recording.
1
to review the recording.
to erase and re-record.
*
2
to append to your recording.
message.
PERSONAL DISTRIBUTION LISTS.
Distribution lists contain the phone numbers
of other Shaw home phone service users. You
can use distribution lists to quickly forward
Voicemail messages to all users on the list.
■ Lift the receiver and dial
main menu.
4
■ Press
■ Press
for personal options.
3
to manage your personal distributions
lists.
0
■ Press
■ Press
■ Press
■ Press
■ Press
■ Press
for help.
1
to review your distribution lists.
2
to create distribution lists.
3
to delete distribution lists.
4
to modify existing distribution lists.
to return to the previous menu.
*
9 8 to access the
*
CALL FORWARD GIVES YOU THE FREEDOM
TO HAVE YOUR CALLS FOLLOW YOU.
Your calls will follow you anywhere you go when
you set up Call Forward. When people dial your
number, they will be redirected to any other
number you choose. So, go ahead. Go to a
friend’s house while you wait for some calls.
To set up Call Forward:
■ Lift the receiver and dial
■ When you hear the dial tone, dial the 10-digit number
where you want your calls forwarded. If you subscribe
to Voicemail and want calls forwarded to your
Voicemail, dial the Voicemail Access Number that
corresponds to the area you live in (see SHAW.CA/
VOICEMAIL).
■ Once your call is answered, you will hear a confirmation
tone and you can hang up. Call Forward is now in effect.
Note: Your call must connect in order for call forwarding to
be initialized.
If the line is busy, repeat the steps above
until your call is answered and you hear a
confirmation tone.
7 2.
*
To cancel Call Forward:
■ Lift the receiver and dial
■ When you hear a series of beeps, this indicates
7 3.
*
Call Forward has been cancelled.
■ You can only cancel Call Forward from the phone you
activated it with.
While Call Forward is in effect:
■ You may still make calls from your phone.
■ Callers will receive a busy signal when the number that
your calls are forwarded to is busy.
■ Calls that are unanswered at the forwarded number will
not route to your Voicemail.
■ Call Waiting is inoperable. You will not receive a
Call Waiting signal.
■ You will hear an announcement that “the feature is
already successfully activated” if you try to set up
Call Forward when it’s already in operation.
Long distance charges may apply.
8
9
Page 7

CALL WAITING.
CALL DISPLAY.
CALL WAITING LETS YOU ANSWER CALLS
EVEN WHEN YOU’RE ON THE PHONE.
When you get a call while you’re already on the
line, Call Waiting allows you to answer it. And if
you have a caller ID phone, you can see who’s
calling while you’re on the phone.
When you are on the phone and someone else is
calling you:
■ You’ll hear a single tone when another call is waiting.
If you have Call Waiting with Call Display, you will hear a
series of tones.
■ Press and release the receiver-disconnect (or link or
flash) button. Caller #1 is now on hold.
■ You can now speak privately to Caller #2.
■ Press the receiver-disconnect (or link or flash) button
again to return to Caller #1.
Note: Call Waiting will not work if a phone extension is in
use. Extension users must hang up during all switching
between calls.
To temporarily cancel Call Waiting:
■ Lift the receiver and dial
two beeps.
■ Listen until no further beeps are heard and make
your call.
■ Call Waiting will be restored when you hang up.
7 0. Listen for
*
What happens when using Call Waiting:
■ If you are already on the phone, callers will hear
a normal ring instead of a busy signal. If you have
temporarily turned Call Waiting off, the second
caller will hear a busy signal or will be routed to your
Voicemail, if you subscribe to Voicemail.
■ Waiting calls that are not answered will be routed to
Voicemail, if you subscribe to Voicemail. You can find
the telephone number of the second call by using the
Call Return service. (See page 14 for more information.)
■ If you lose a call, hang up. The phone will automatically
ring and the call will be re-established.
■ Call Waiting does not work when you are using 3-Way
Calling (see page 13 for more information). Additional
callers will be routed to Voicemail, if you subscribe to
Voicemail, or will receive a busy signal.
CALL DISPLAY MAKES YOU FEEL LIKE A
SUPER-SMART SPY WHO ALWAYS KNOWS
WHO’S CALLING.
See all and know all there is to know about
incoming phone calls, before you even answer.
Call Display will show the caller’s name and
telephone number (if available) on a caller
ID unit, or a caller ID–equipped phone. Call
Display really comes in handy when you’re in
the mood to screen phone calls or pretend to
be a spy.
To use Call Display:
You don’t need to do anything to use Call
Display – just watch the display screen on
your caller ID-equipped phone or caller ID unit
when a call comes in. After the first full ring,
the phone number and name of your caller will
appear if the call is from an area where Call
Display service is available.
“Unknown Number” and “Unknown Name”
will be displayed if the call is from a pay
phone, some cellular phones, areas where
Call Display features are not available, or an
operator-assisted call where operator-assisted
blocking was requested.
To use Call Display Blocking:
If you do not want your name and phone
number displayed when you make a call, you
can activate Call Display Blocking.
■ Lift the receiver and dial
a call.
■ “Private Number” and “Private Name” will be displayed if
the person you are calling has a caller ID phone or unit.
If you have a non-published telephone number,
but wish to display your name and telephone
number for one call, dial * 8 2 before
placing a call.
6 7 before placing
*
10
“Private Number” and “Private Name” will
be displayed if the caller has activated Call
Display Blocking or has an unlisted phone
number.
11
Page 8

MORE FEATURES.
BUSY SIGNALS ARE NO BIG DEAL
ANYMORE, THANKS TO BUSY REDIAL.
Picking up the phone and redialing over and
over isn’t necessary here. Just hang up and
you’ll be notified with a distinctive ring once
the line is free.
To enable Busy Redial:
■ Lift the receiver and dial
main menu.
2, 1, 1
■ Press
■ You’ll hear a recording confirming that Busy Redial has
been enabled.
To use Busy Redial:
■ When you get a busy signal, hang up the phone.
■ Lift the receiver and dial
■ You will hear a recording saying the system will check
the number for the next 30 minutes. Hang up the phone.
■ When the line is free, you will be notified with a
distinctive ring. When you pick up the phone, you will be
automatically connected.
If you no longer want to place the call, pick up
the phone and press * 8 6. You’ll hear a
message that Busy Redial has been disabled.
Note: Busy Redial won’t work on long-distance calls. If
Busy Redial does not get an open line within 30 minutes,
it will be cancelled automatically.
To disable Busy Redial:
■ Lift the receiver and dial
main menu.
2, 1, 2
■ Press
■ You’ll hear a recording confirming that Busy Redial has
been disabled.
12
9 9 to access the
*
.
6 6.
*
9 9 to access the
*
.
YOU HAVE MANY DIFFERENT PHONE LINES
IN DIFFERENT PLACES. MAKE ALL OF THEM
RING WITH SIMULTANEOUS RING.
Callers will just have to remember one phone
number, even though that magic number
can make up to four different phone lines
ring in four different places. So choose your
favourites. You can combine your work phone,
cell phone, home phone, car phone, laundry
phone, secret phone…
To use Simultaneous Ring:
Start by adding numbers to your Simultaneous
Ring list.
■ Lift the receiver and dial
main menu.
4, 1, 4
■ Press
You can add up to four different numbers.
To enable Simultaneous Ring:
■ Lift the receiver and dial
main menu.
4, 1, 1
■ Press
■ You’ll hear a recording confirming that Simultaneous
Ring has been enabled.
To disable Simultaneous Ring:
■ Lift the receiver and dial
main menu.
4, 1, 2
■ Press
■ You’ll hear a recording indicating that Simultaneous
Ring has been disabled.
9 9 to access the
*
and then enter the phone numbers.
9 9 to access the
*
.
9 9 to access the
*
.
To review which numbers are in your Simultaneous Ring list:
■ Lift the receiver and dial
9 9 to access the
*
main menu.
4, 1, 3
■ Press
■ You’ll hear a recording telling you which numbers are in
.
your Simultaneous Ring group.
To remove numbers from your Simultaneous Ring list:
■ Lift the receiver and dial
9 9 to access the
*
main menu.
4, 1, 5
■ Press
and then enter the phone numbers
you want to remove.
Long-distance charges may apply.
SO MANY WAYS TO BE ACCESSIBLE.
AND NOW ONE WAY TO NOT BE;
THE DO NOT DISTURB FEATURE.
The Do Not Disturb feature diverts callers to a
recording that politely lets them know you’re
not available to chat at the moment. You can
still make outgoing calls while Do Not Disturb
is enabled.
To turn on Do Not Disturb:
■ Lift the receiver and dial
main menu.
3, 1, 1
■ Press
■ You’ll hear a recording confirming that Do Not Disturb
has been turned on.
To turn off Do Not Disturb:
■ Lift the receiver and dial
main menu.
3, 1, 2
■ Press
■ You’ll hear a recording confirming that Do Not Disturb
has been turned off.
9 9 to access the
*
.
9 9 to access the
*
.
3-WAY CALLING ALLOWS YOU TO HAVE
CONFERENCE CALLS, BUT THEY DON’T
HAVE TO BE THE SERIOUS KIND.
You can talk with two other people at the
same time during one call. The three of you
can discuss gossip or even business. It’s really
up to you.
To use 3-Way Calling:
■ Phone the first person and explain that you’re going to
bring another participant in.
■ Press the receiver-disconnect (or link or flash) button to
place the first participant on hold.
■ When you hear the dial tone, call the next participant.
■ When the second participant answers, press the
receiver-disconnect (or link or flash) button again. All
three of you will be connected in one call.
3-Way Calling tips:
■ If you are unable to reach the second participant, press
the receiver-disconnect (or link or flash) button twice to
connect back to the first participant.
■ If you reach a participant’s Voicemail, press
times to disconnect.
■ As long as you remain on the line, either one of the
other participants can hang up and you can continue to
talk to the remaining person.
■ During 3-Way Calling, Call Waiting will not work. The
caller will receive a busy signal or will be routed to
Voicemail, if you subscribe to Voicemail.
■ All extension phones must be hung up in order to use
3-Way Calling.
*
three
13
Page 9

EVEN MORE FEATURES.
CALL RETURN GIVES YOU THE POWER
OF KNOWING WHO JUST CALLED.
Call Return lets you know the last number
that called you, whether you answered the
call or not. It’s great because you will always
know who is trying to get in touch with you.
To use Call Return:
■ Lift the receiver and dial
recording of the phone number of the last incoming call.
Note: Call Return will not work when calls are placed from
the following:
■ A private number, a blocked number or 1.800 or 1.900
numbers. In some cases, Call Return will not work
outside your local calling area.
■ A number that has Call Forward activated. In this case,
you will receive a message that Call Return does not
follow Call Forward.
■ Phones using Call Display Blocking features. You will
hear a voice message saying that the call was marked
“private.”
■ Some pay phones, business lines, cell phones,
long-distance connections and the operator.
6 9 to hear a
*
TRICK THE PEOPLE WHO TRY TO TRICK
YOU. USE ANONYMOUS CALL BLOCKING.
With Anonymous Call Blocking, you can avoid
getting calls from numbers that have a privacy
feature activated, like Caller ID Blocking. When
Anonymous Call Blocking is activated, your
phone won’t ring. Instead, the caller will hear a
recording that says you don’t accept calls from
blocked numbers. Boo hoo. These callers will
then have to hang up and unblock their number
before they can talk to you.
To use Anonymous Call Blocking:
■ Lift the receiver and dial
■ You will hear a recording confirming that Anonymous
Call Blocking is activated.
■ Anyone calling with a blocked number will hear a
recorded message indicating that your telephone line is
not accepting blocked calls.
To cancel Anonymous Call Blocking:
■ Lift the receiver and dial
■ You will hear a recording confirming that Anonymous
Call Blocking is deactivated.
Note: If you activate Anonymous Call Blocking, you may
not receive calls from health care institutions, such as
hospitals, as many of these numbers are blocked for
privacy reasons. Please consider this before activating
Anonymous Call Blocking. Anonymous Call Blocking can
also be activated and deactivated through * 9 9;
see page 2 for more details.
7 7.
*
8 7.
*
FILTER YOUR CALLS WITH SELECTIVE
CALL BLOCKING.
It’s no problem at all if you want some privacy
from certain callers. Selective Call Blocking
lets you enter up to 32 numbers that you don’t
want to receive calls from. Anyone trying to
call you from a number you have blocked will
get a recording telling them that you are not
presently accepting calls from their number.
To add numbers to the Selective Call Block List:
■ Lift the receiver and dial
command options menu.
3
■ Press
■ Press the
■ Enter the phone number you want to block (7 to 10 digit
to activate Selective Call Blocking.
#
sign.
local numbers or 1 + 10-digit long-distance numbers).
■ Press the
#
sign.
To review which numbers are on the Selective Call Block list:
■ Lift the receiver and dial
command options menu.
1
■ Press
to review numbers.
6 0 to enter the
*
6 0 to enter the
*
To remove numbers from the Selective Call Block List:
■ Lift the receiver and dial
6 0 to enter the
*
command options menu.
■ Press the
■ Follow the instructions to delete numbers one at a time
key.
*
or all at once.
Note: The number 1 is not required to remove a
long-distance number from the block list. Enter
long-distance numbers as 403.123.4567, not as
1.403.123.4567.
To block a number (including anonymous numbers)
from the last call received:
■ Lift the receiver and dial
6 0 to enter the
*
command options menu.
#, 0, 1, #
■ Key in
to recall the last incoming
number and automatically add it to the block list.
Note: In order to delete anonymous entries, you must delete
all entries in the list when prompted and then rebuild the
list with the numbers you want blocked. Please be aware
of this when blocking an anonymous number that you may
wish to remove later.
To deactivate Selective Call Blocking:
■ Lift the receiver and dial
6 0 to enter the
*
command options menu.
3
■ Press
to deactivate Selective Call Blocking.
14
15
Page 10

DISTINCTIVE RING
AND LONG DISTANCE.
KNOW WHO THE CALL IS FOR WITHOUT
EVEN LOOKING AT THE PHONE, OR TALKING
ON IT. TRY OUT DISTINCTIVE RING.
Okay, here’s how Distinctive Ring works:
You can give out up to three different phone
numbers, but they all go to one single phone
line. People who want to talk about leisure can
call one number, work-related callers can dial
another number and people who want to talk to
someone else in your house can call the third
number. How you divide it up is up to you.
You’ll know which number is being dialed by
the way your phone rings. It’s a good way to
know whether to answer in your friend-voice,
your work-voice, or to sit still and let someone
else get it.
To order Distinctive Ring, call 1.888.472.2222
or visit SHAW.CA/PHONE today.
FOR THE PRICE, SHAW LONG-DISTANCE
CALLS DON’T SEEM VERY LONG DISTANCE
AT ALL.
All of our phone plans provide you with
competitive long-distance rates and services
that will help you keep in touch with friends
and family around the world. With Shaw Digital
Phone you will receive 1,000 minutes every
month of no-charge calls to Shaw International
Calling Destinations in the U.K., Europe, Asia
Pacific and South America, plus unlimited
calling within Canada and to the U.S.*
With Shaw Digital Phone Lite and Shaw Digital
Phone Basic, you will benefit from our
4¢ per minute rate to Shaw International
Calling Destinations in the U.K., Europe, Asia
Pacific and South America, as well as Canada
and the U.S. And even better, you can call
China and Hong Kong for just 2¢ per minute, and
India for just 3¢ per minute.
SHAW INTERNATIONAL CALLING.
For calls to destinations outside of Canada,
the U.S., and Shaw’s 50 countries in the
U.K., Europe, Asia Pacific and South America,
Shaw offers the most competitive calling rates
available with no additional administration
fees. Find our current rates and dialing
information on SHAW.CA/PHONE.
SHAW’S PREPAID CALLING PLAN.
Shaw’s Prepaid Calling Plan lets you enjoy great
international calling rates even when you’re not
using Shaw’s home phone service. You can use
Shaw’s Prepaid Calling Plan from a cell phone,
a pay phone, a hotel room phone – virtually any
phone, from anywhere. Shaw’s Prepaid Calling
Plan allows you to prepay as much or as little
as you want, and the plan is activated instantly.
All of your prepaid amount goes towards your
long-distance usage. Our plan has no hidden
fees – no connection fee, no monthly fee, and
no minimum charge per call. Visit SHAW.CA/PHONE
to order a Prepaid Calling Plan today.
16
* Shaw Digital Phone includes 1,000 minutes of international calling per month and is
limited to the Shaw International Calling Destinations. Some mobile phone and outlying
territory terminations are excluded from the Shaw International Calling Destinations.
International calls placed outside of the international calling areas are subject to
regular Shaw international calling per-minute calling rates. See SHAW.CA/PHONE for
exclusions. Offer subject to change without notice.
17
Page 11

CUSTOMER CARE.
ONLINE CUSTOMER CARE.
Through Shaw’s Online Customer Care, you
can manage your calling features with your
computer. Along with reviewing and paying your
bill online, you can also manage your Internet
account and Digital Television programming.
Simply login to Online Customer Care at
SHAW.CA/OCC.
To register for Online Customer Care:
■ Go to Online Customer Care at SHAW.CA/OCC and click
on NOT REGISTERED YET?
■ Enter your Shaw Account Number (located on your
Shaw bill) and postal code.
■ Enter your phone number (with area code)
where prompted.
■ Create a Customer Care login name and password.
■ Optional: You may also create a password hint.
To login to Online Customer Care:
■ Go to Online Customer Care at SHAW.CA/OCC.
■ Enter your Customer Care login name and password and
click on SUBMIT.
To manage your calling features:
■ Click on MANAGE DIGITAL PHONE FEATURES.
The Manage Digital Phone Features page will
display the status (on or off) of several Digital
Phone features, such as Voicemail, Voicemail
to Email, Selective Call Blocking, Anonymous
Call Blocking, Busy Redial, Do Not Disturb and
Call Forward. A green button indicates that
the feature is currently enabled, or on, and a
red button indicates the feature is currently
disabled, or off. It also allows you to set the
number of rings before a call is forwarded to
Voicemail and reset your Voicemail password.
You can manage each feature by clicking on it
on the left-hand side of the page.
To manage multiple Shaw home phone service numbers:
If you have more than one phone number with
Shaw’s home phone service, you can manage
them all from the Manage Shaw Digital Phone
Features page with Online Customer Care.
■ Choose the Shaw home phone service number you want
to configure from the Manage features drop-down menu
at the top of the Manage Digital Phone Features page.
■ Proceed to manage any of the calling features for
that number.
Note: Distinctive Ring numbers cannot be managed through
this site.
To set the number of rings before a call is forwarded to
Voicemail:
You can easily program your Shaw Digital
Phone to have your calls transferred to
Voicemail after a specific number of rings from
the Manage Shaw Digital Phone Features page
with Online Customer Care. The standard is
four rings. You can set it to as few as one, or as
many as nine.
■ Click VOICEMAIL – RINGS on the left-hand side
of the page.
■ Choose a number of rings between 1 and 9 in the drop
down menu.
■ Click SAVE to submit your changes, or CANCEL to
start over.
To reset your Voicemail password:
Once you are logged in to the Manage Shaw
Digital Phone Features page with Online
Customer Care, you can reset or change your
Voicemail password. This is a convenient
feature if you forget your Voicemail password.
■ Click VOICEMAIL – PASSWORD on the left-hand
side of the page.
■ Enter your new password. Choose a 4 to 19 digit
password using the same numbers and characters
found on your telephone’s number pad (0 - 9,
#
and
).
■ Confirm your new password by re-entering it.
■ Click SAVE to submit your changes, or CANCEL to
*
start over.
To manage the Voicemail to Email feature:
Once logged in to the Manage Shaw Digital
Phone Features page with Online Customer
Care, Shaw‘s home phone service customers
can forward their Voicemail to any email
address.
■ To manage your Voicemail to Email options, click
VOICEMAIL TO EMAIL on the left-hand side of the
page.
■ Enable or disable the Voicemail to Email feature by
clicking ENABLE or DISABLE.
■ After Voicemail to Email is enabled, enter your email
address in the Forward to e-mail: box.
■ Confirm your email address by entering it again in the
Re-enter e-mail: box.
■ Click SAVE to submit your changes, or CANCEL to
start over.
To manage your directory listing information:
Once you are logged in to the Manage Directory
Listing Information page with Online Customer
Care, you can review or change the information
associated with your phone number that is
included in the printed directories or in the
directory assistance database.
■ Click on MANAGE DIRECTORY LISTING
INFORMATION.
■ The Manage Directory Listing Information wizard will walk
you through modifying your directory listing information.
Updates may take up to 10 days to process.
18
19
Page 12

FOR FURTHER INFORMATION.
24/7/365 SUPPORT.
Technical support is available 24 hours a day,
7 days a week, 365 days a year – and service
calls are complimentary. Simply dial 611 from
your Shaw home phone. If calling from another
phone, dial 1.888.472.2222.
Complimentary 411 lookup for numbers in Canada
and the U.S.
Calling directory assistance is even more
convenient with Shaw’s home phone service.
All calls to directory assistance to look
up numbers in Canada and the U.S. are
complimentary. Simply dial 411.
711 Message Relay Service.
To communicate over the phone via
teletypewriter, dial 711.
To find out more, call 1.888.472.2222 or visit
SHAW.CA/PHONE, where you’ll also find our
Terms and Conditions.
20
Page 13

Visit SHAW.CA/PHONE to find out more.
DP_USER_FEB10
TSX 60 / NYSE
 Loading...