

Page 1
ATLAS PVR Universal Remote Control
Users Guide
Page 2
TABLE OF CONTENTS
Introduction . . . . . . . . . . . . . . . . . . . . . . . . . . . . . . . . . . . . . . . . . . . .3
Features and Functions . . . . . . . . . . . . . . . . . . . . . . . . . . . . . . . . . . . 4
Key Charts. . . . . . . . . . . . . . . . . . . . . . . . . . . . . . . . . . . . . . . . . 5
Device Table . . . . . . . . . . . . . . . . . . . . . . . . . . . . . . . . . . . . . . .7
Installing Batteries . . . . . . . . . . . . . . . . . . . . . . . . . . . . . . . . . . . . . . .8
Programming Device Control. . . . . . . . . . . . . . . . . . . . . . . . . . . . . . . 8
Programming TV/VCR Combo Control . . . . . . . . . . . . . . . . . . . . . . .10
Searching for Your Code . . . . . . . . . . . . . . . . . . . . . . . . . . . . . . . . .11
Checking the Codes . . . . . . . . . . . . . . . . . . . . . . . . . . . . . . . . . . . . . 12
Using Learning . . . . . . . . . . . . . . . . . . . . . . . . . . . . . . . . . . . . . . . . .12
Learning Precautions . . . . . . . . . . . . . . . . . . . . . . . . . . . . . . .12
Programming a Learned Key . . . . . . . . . . . . . . . . . . . . . . . . .13
Deleting a Single Learning Key. . . . . . . . . . . . . . . . . . . . . . . .14
Deleting All Learned Keys in a Specific Mode . . . . . . . . . . . . 14
Programming Channel Control Lock . . . . . . . . . . . . . . . . . . . . . . . .15
Unlocking Channel Control. . . . . . . . . . . . . . . . . . . . . . . . . . .15
Locking Channel Control to CBL. . . . . . . . . . . . . . . . . . . . . . . 16
Changing Volume Lock . . . . . . . . . . . . . . . . . . . . . . . . . . . . . . . . . . .16
Unlocking Volume Control for a Single Device (Individual
Volume Unlock) . . . . . . . . . . . . . . . . . . . . . . . . . . . . . . . . .16
Unlocking All Volume Control (Global Volume Unlock) . . . . .17
Locking Volume Control To One Mode (Global Volume Lock) 17
Programming ID Lock. . . . . . . . . . . . . . . . . . . . . . . . . . . . . . . . . . . . 18
Using the Master Power Key. . . . . . . . . . . . . . . . . . . . . . . . . . . . . . . 18
Programming the Master Power Key . . . . . . . . . . . . . . . . . . . 19
Using the Master Power Key. . . . . . . . . . . . . . . . . . . . . . . . . .19
Clearing the Master Power Key . . . . . . . . . . . . . . . . . . . . . . . 19
Re-Assigning Device Keys. . . . . . . . . . . . . . . . . . . . . . . . . . . . . . . . . 20
Clearing Custom Programming . . . . . . . . . . . . . . . . . . . . . . . . . . . .21
Troubleshooting . . . . . . . . . . . . . . . . . . . . . . . . . . . . . . . . . . . . . . . .21
FCC Notice . . . . . . . . . . . . . . . . . . . . . . . . . . . . . . . . . . . . . . . . . . . .22
Additional Information . . . . . . . . . . . . . . . . . . . . . . . . . . . . . . . . . . . 23
Manufacturer’s Codes . . . . . . . . . . . . . . . . . . . . . . . . . . . . . . . . . . .24
Setup Codes for Audio Amplifiers. . . . . . . . . . . . . . . . . . . . . . 24
Setup Codes for Audio Amp/Tuners . . . . . . . . . . . . . . . . . . . . 25
Setup Codes for Miscellaneous Audio . . . . . . . . . . . . . . . . . . 28
Setup Codes for Cable Boxes/Converters . . . . . . . . . . . . . . . 28
Setup Codes for DVD Players . . . . . . . . . . . . . . . . . . . . . . . . . 29
Setup Codes for PVRs . . . . . . . . . . . . . . . . . . . . . . . . . . . . . . . 32
Setup Codes for Satellite Receivers . . . . . . . . . . . . . . . . . . . 33
Setup Codes for TVs . . . . . . . . . . . . . . . . . . . . . . . . . . . . . . . .34
Setup Codes for VCRs. . . . . . . . . . . . . . . . . . . . . . . . . . . . . . .39
Setup Codes for Video Accessories . . . . . . . . . . . . . . . . . . . .43
2
Page 3

INTRODUCTION
The Atlas PVR Universal Remote Control by Universal
Electronics is our latest generation universal remote
control. Its sophisticated technology allows you to
consolidate up to five of your original home
entertainment remote controls into one easy-to-use
product. Moreover, its packed with advanced features
such as:
• Preprogrammed control to operate the cable
converter supplied by your cable service provider
• Dedicated keys to control popular functions on your
DVR/PVR (Digital/Personal Video Recorder)
• Programmable Master Power key for master on/off
control of your home entertainment equipment with
a single keystroke
• Channel Lock to lock channel selection only to the
cable converter
• Volume Lock to lock volume controls to one mode or
individual modes
• Device Key Re-Assignment to remotely control a
second (duplicate) device
• Code Search to help program control of older or
discontinued components
• Color-coded keys to quickly locate popular
functions
• Code library for popular video and audio devices
Before using the product, you will need to install the
enclosed batteries and also perform some programming
to operate the specific home entertainment devices you
wish to control.
Please follow the instructions detailed in this manual to
set up the unit and then start enjoying your new remote
control and cable service.
3
Page 4

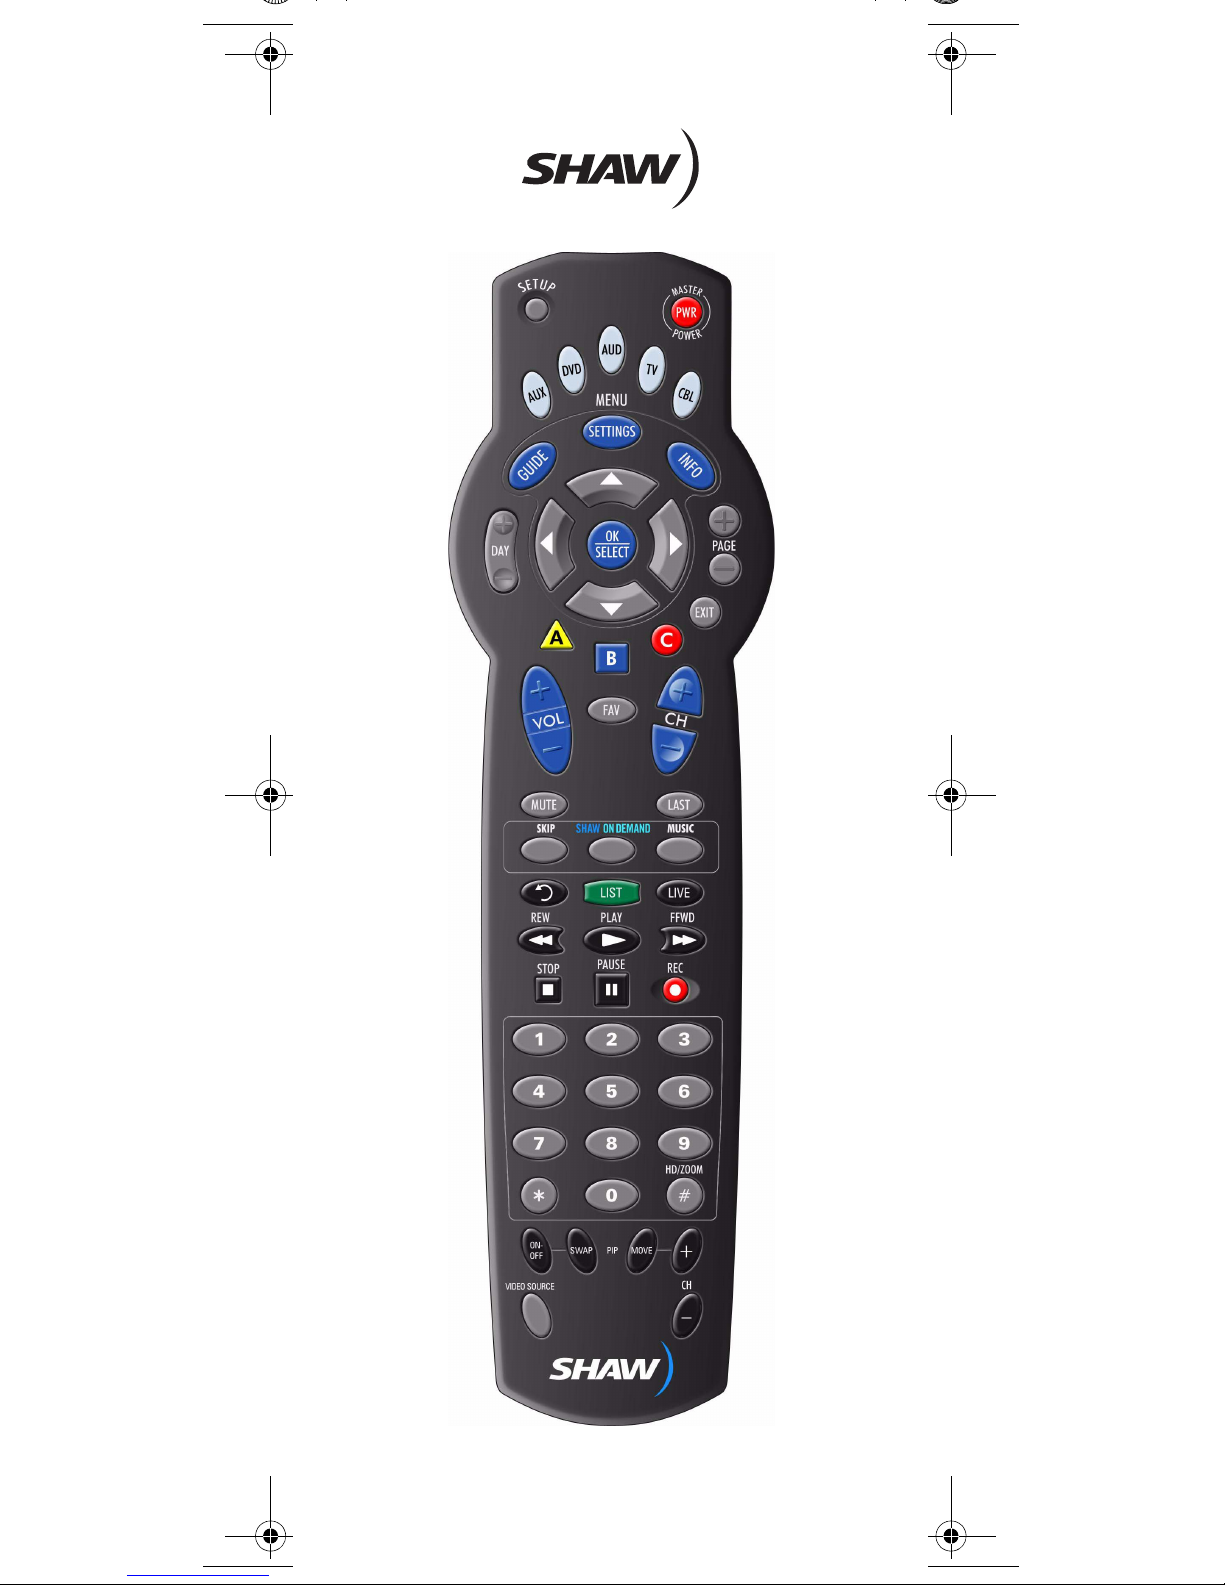
FEATURES AND FUNCTIONS
Use the illustration below to locate features on the Atlas
PVR Universal Remote Control and then study the Key
Charts (on the next three pages) to learn how they
function.
To find out what type of devices can be controlled by
each device key after programming, see “Device Table”
on page 7.
4
Page 5
Key Charts
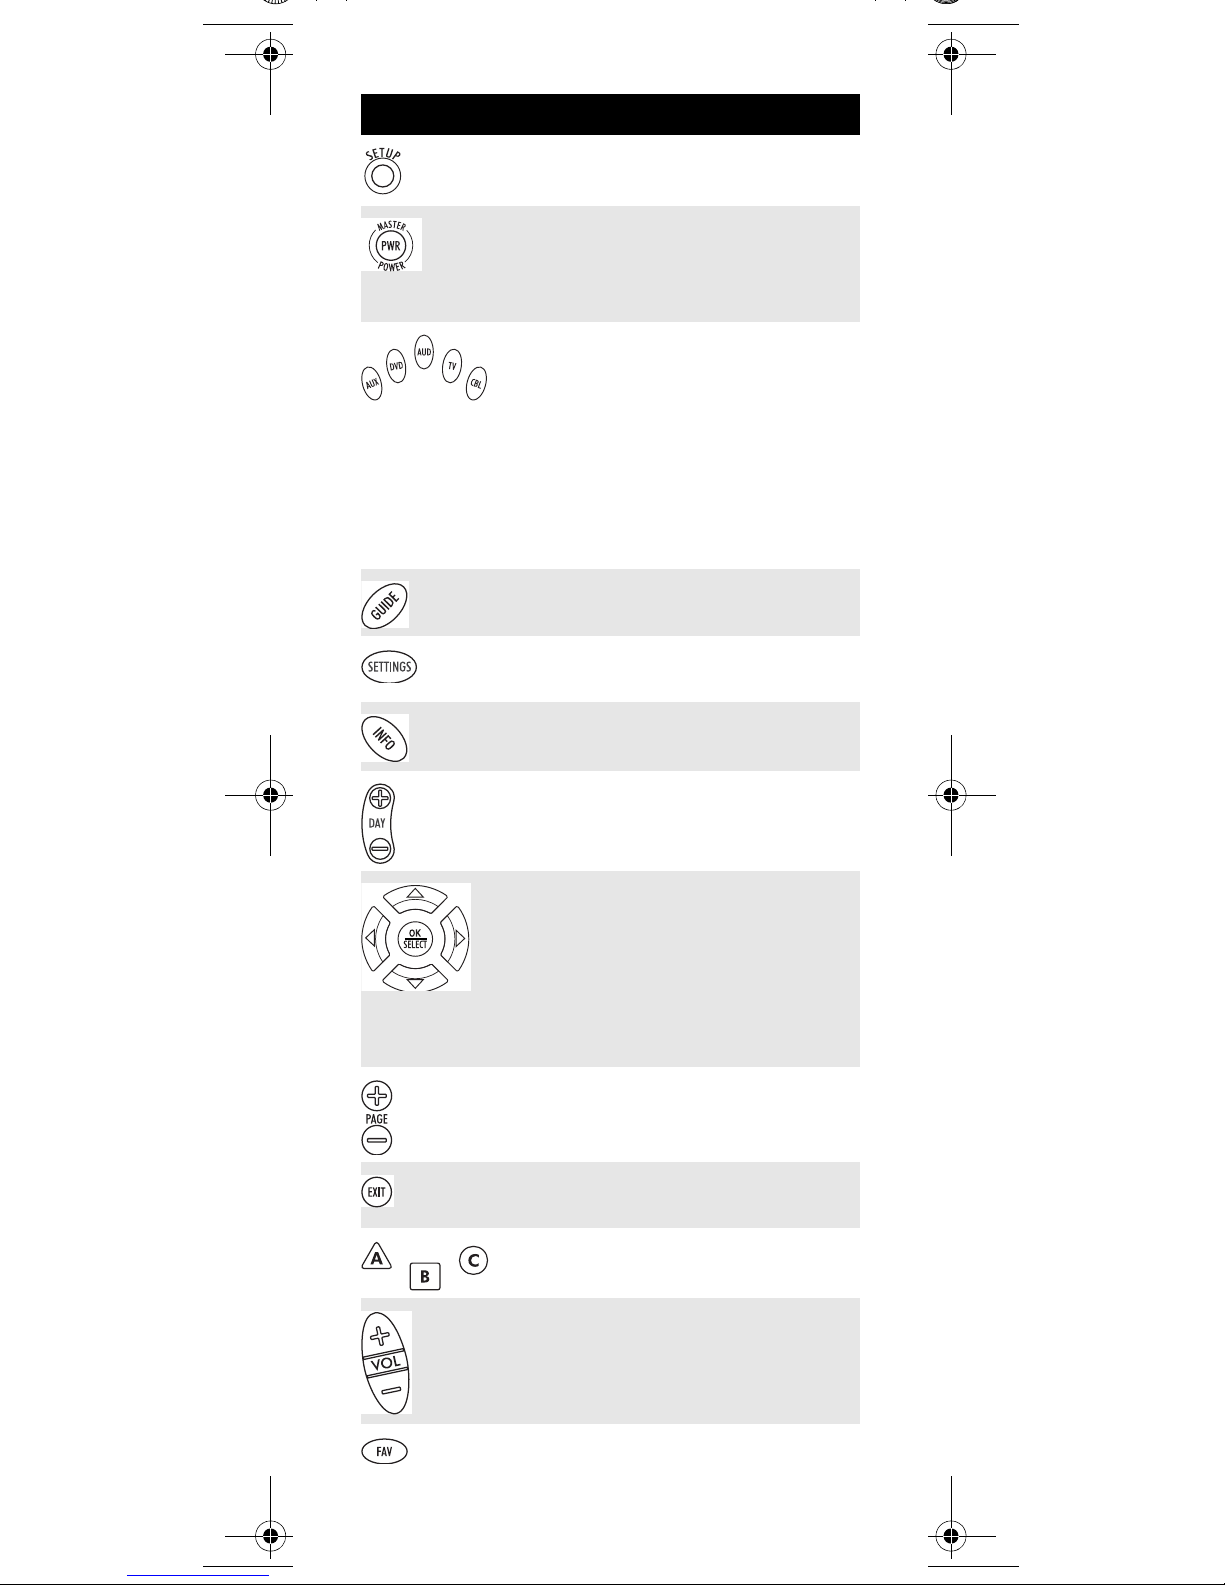
Key Function
Use SETUP for all programming
sequences.
Press PWR once to turn on or off a home
entertainment device. For MASTER
POWER control, see “Using the Master
Power Key” on page 18.
Press AUX, DVD, AUD, TV, or CBL once to
select a home entertainment device to
control. Also see “Device Table” on
page 7.
Each device key has an embedded LED
(red light) that blinks upon selection
and indicates the remote control is
working and (after programming) is
sending signals.
Use GUIDE to display the program
guide.
Press MENU/SETTINGS once to display
available menu options.
Use INFO to display the current channel
and program information.
Use DAY+ (or DAY-) to move a day
forward (or back) on your cable
converter’s program guide.
Use the Cursor keys to move the cursor
in the program guide and menu screens
and to navigate within the interactive
service.
Use OK/SELECT to choose options, PPV
events, and to tune programs from the
program guide.
Use PAGE+ (or PAGE-) to page up (or
page down) through menu screens and
the program guide.
Use EXIT to exit out of your cable
converters menu and guide.
Use A, B, or C to access additional cable
features (future functionality).
Use VOL+ (or VOL-) to raise (or lower)
the audio volume.
Use FAV to cycle through your favorite
channels stored in the program guide.
5
Page 6
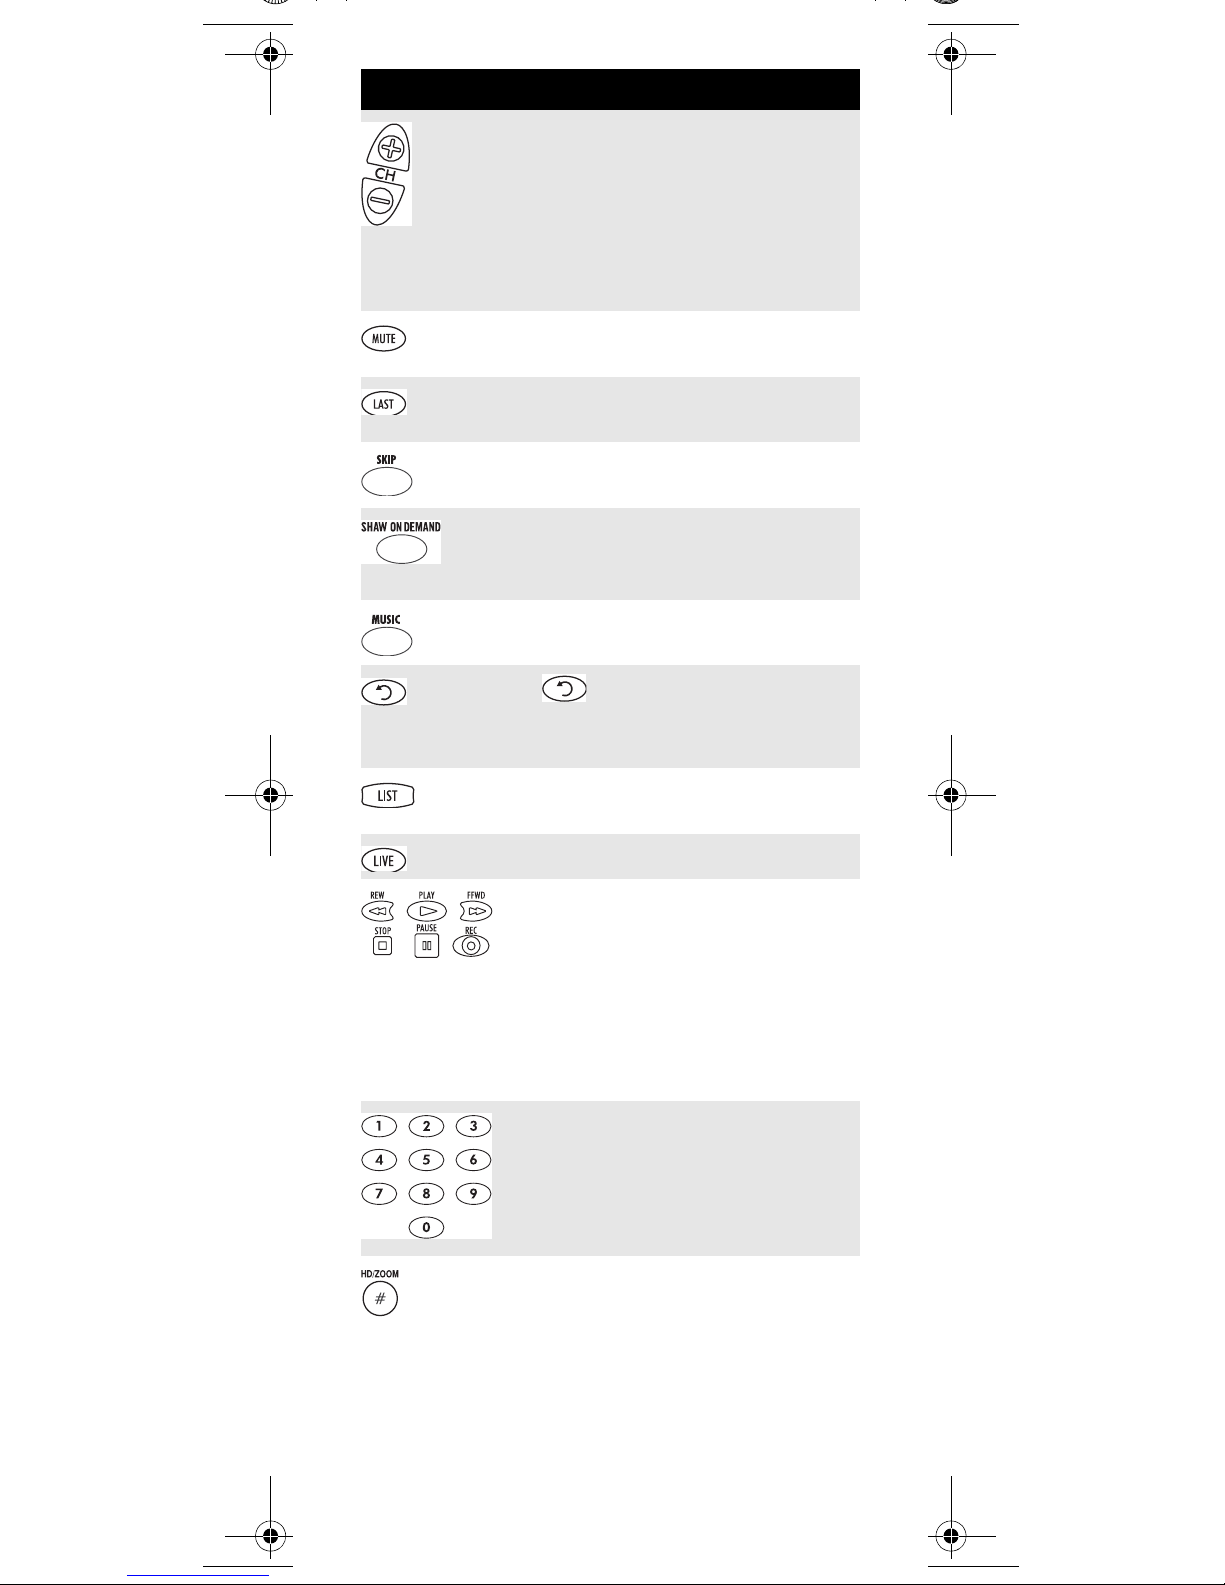
Key Function
Use CH+ (or CH-) to select the next
higher (or lower) channel.
For DVD players, use these keys to skip
forward (or reverse) through chapters.
For amplifiers/receivers, use these keys
to select the next higher (or lower)
preset station.
Press MUTE once to turn the sound off
or on.
Press LAST once to recall the last
channel.
Press SKIP to skip forward in
predetermined increments.
Press SHAWONDEMAND to access Shaw
Video On Demand VOD services.
Press MUSIC to access the available
Digital Music services.
Use to command your PVR to
instantly replay the last 15 seconds of a
program you are watching.
Press LIST once to display a list of
recorded shows on your PVR.
Press LIVE to return to watching live TV.
In all modes except CBL, use REW, PLAY,
FFWD, STOP, and PAUSE to control a
VCR, DVD player, or a PVR (after
selecting a desired device). To record in
the VCR mode, press REC twice.
In the CBL mode, use these keys to
control the DVR/PVR functions of the
set-top box.
Use the keypad numbers (1-9, and 0) to
directly tune channels (e.g., 009).
For amplifiers/receivers, use the keypad
numbers to select inputs 1 through 10.
P
ress
HD/ZOOM
once to change the aspect
ratio of the show you are watching. (Not
available on all set-top boxes)
.
6
Page 7
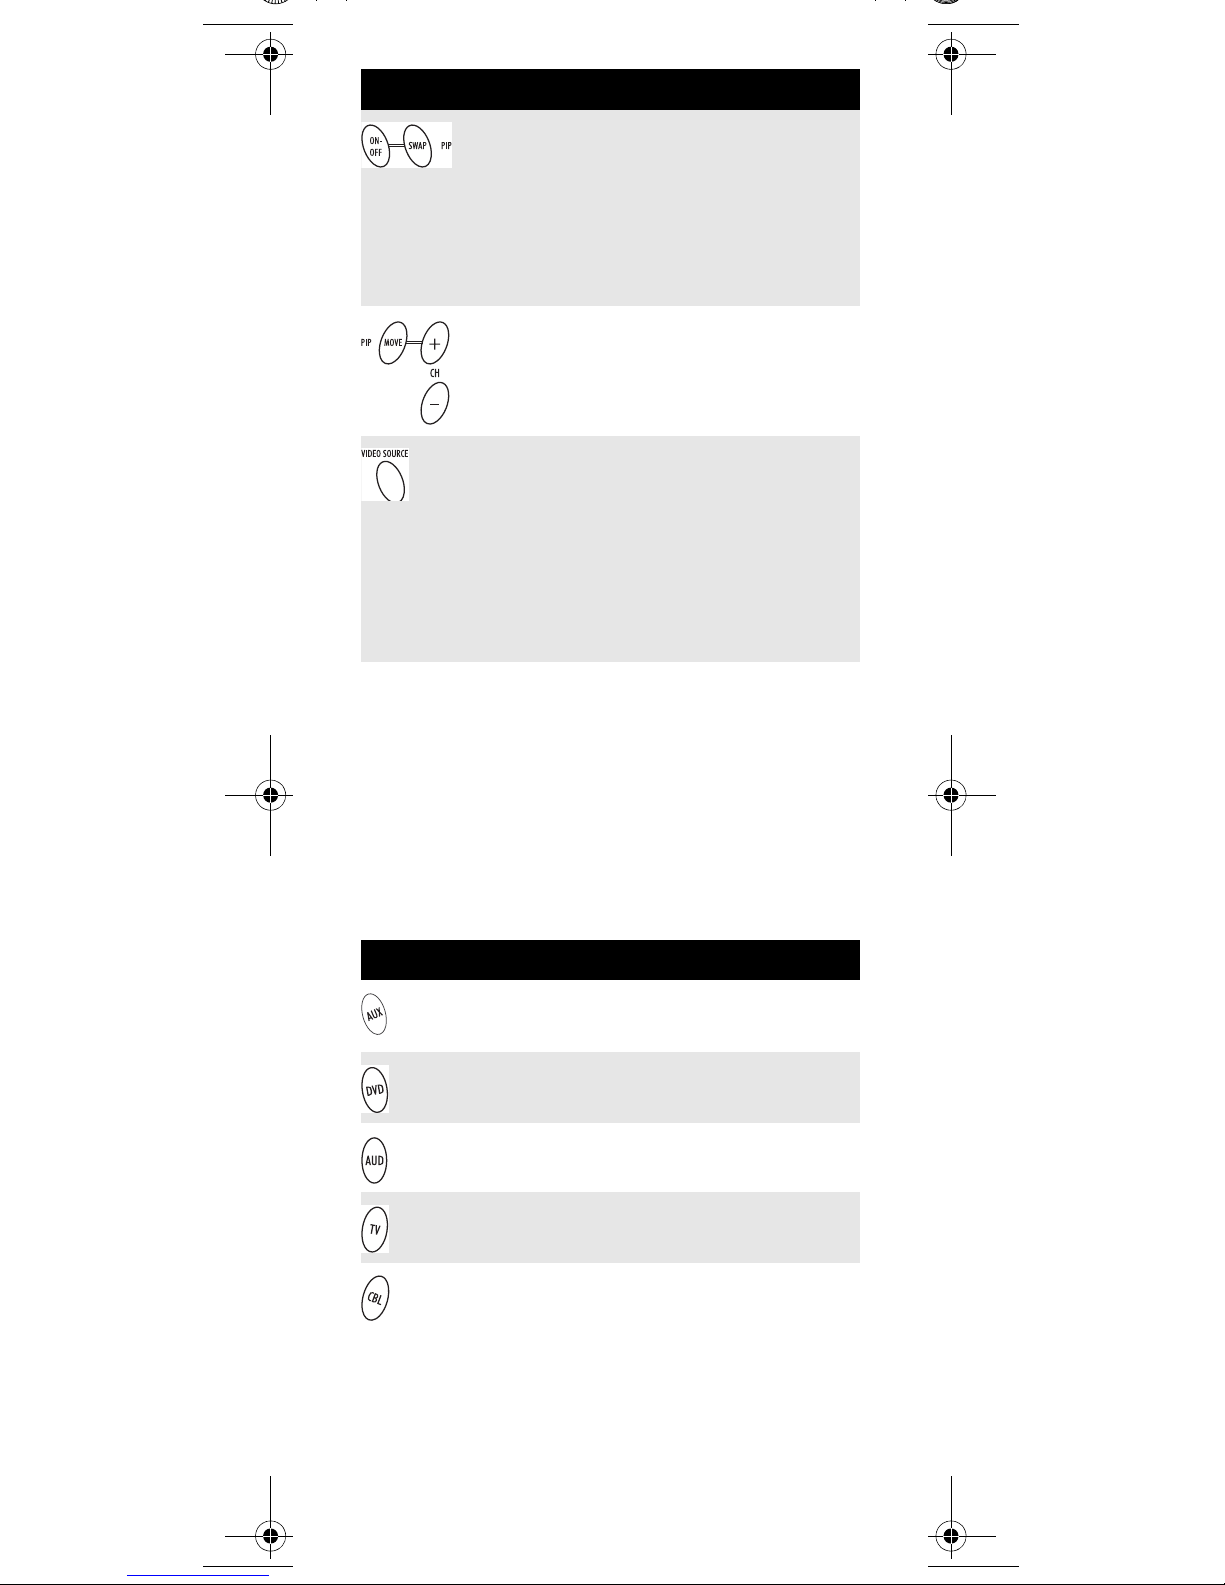
Key Function
Use PIP ON-OFF to switch the PictureIn-Picture feature on or off (if available
on your TV or cable service).
Use PIP SWAP to switch images and
sound between the main and window
pictures, or to swap tuners on dualtuner PVRs.
U
se
PIP MOVE
to move the window picture
to different positions in the main picture
Use PIP CH+ (or CH-) to select the next
higher (or lower) PIP channel.
In the CBL mode, use VIDEO SOURCE to
view other video sources (A or B)
instead of cable.
In all other modes, use VIDEO SOURCE
to watch TV or video programs on a
desired device.
For amplifiers/receivers, use VIDEO
SOURCE to select an input source.
.
Device Table
NOTE: Please refer to the table below when
performing the instructions in
“Programming Device Control” on page 8 or
“Programming TV/VCR Combo Control” on
page 10.
After programming, theAtlas PVR Universal Remote
Control will be able to control the following types of
devices:
Device Key Controls these types of devices
VCR, TV/VCR Combo, PVR (Personal
Video Recorder), or extra PVR Player
DVD Player
Audio Amplifier, Tuner, or Receiver
Te l e v i s i o n
Cable Box (Converter) or Satellite
Receiver, including PVR and VOD
controls
7
Page 8

INSTALLING BATTERIES
❶
❷
❸
1. On the back of the remote control, push the
tab and lift off the battery cover.
2. Locate the two (2) enclosed AA batteries.
Match the + and - marks with those in the
battery case, then insert them.
3. Align the cover’s keys with the case’s holes and
press the cover back into place. The tab should
click when the cover is locked.
4. Test the remote control by pressing any mode
key (e.g., TV). If the batteries are inserted
correctly, the LED (red light) will blink once.
NOTE: When batteries need replacement, the remote
control will cease to operate. Replace the
batteries and the unit will be restored to its
full functionality, complete with your favorite
settings.
PROGRAMMING DEVICE CONTROL
The Atlas PVR Universal Remote Control is
preprogrammed to operate the cable box (converter)
provided by your cable system, an RCA TV, a Toshiba
DVD player, an RCA VCR (as an AUX device), and a
Pioneer audio receiver. To control devices other than the
default brands, perform the following steps; otherwise
skip this section.
8
Page 9
NOTES: For TV/VCR Combo control, skip this section
and perform the instructions on “Programming TV/VCR Combo Control” on page 10.
Also refer to “Device Table” on page 7 to find
out which devices can be programmed onto
each device key.
If you have another brand of cable converter
or a satellite receiver you would like to control,
you’ll need to unlock the cable ID Lock before
changing the converter code (see “Programming ID Lock” on page 18).
1. Turn on a device and, if applicable, insert
video media, (e.g., cassette or disc).
NOTE: Please read steps 2 through 4 completely
before proceeding. Highlight or write down
the codes and device you wish to program
before moving on to step 2.
2. On the remote control, press a device key once
(i.e., AUX, DVD, AUD, TV, or CBL); it will blink
once. Then press and hold SETUP until the
selected mode key blinks twice.
3. Use the “Manufacturer’s Codes” starting on
page 24) to locate the type of device and
brand name and then enter the first four-digit
code for your device. If performed correctly,
the selected mode key will blink twice.
NOTE: If the selected mode key emits a long blink,
the entry is invalid. Repeat steps 2 through 3
and try entering the same code again.
4. Aim the remote control at the device and
press PWR once. The device should turn off. If
it does not, repeat steps 2 through 3, trying
each code for your brand until you find one
that works. If it still does not respond, try
searching for the code (see “Searching for
Your Code” on page 11).
NOTE: If the device does not have a PWR key, press
the(Play) key.
5. Repeat steps 1 through 4 for each device you
want the remote control to operate. For future
reference, write down each working device
code in the boxes on the following page.
AUX C ode
Device Type:___________________
9
Page 10

DVD Code
Device Type:___________________
AUD C ode
Device Type:___________________
CBL Code
Device Type:___________________
TV Code
Device Type:___________________
PROGRAMMING TV/VCR COMBO CONTROL
If you own a TV/VCR Combo, perform the following
instructions to control this device:
1. Turn on your TV/VCR Combo and insert a
video cassette.
2. On the remote control, press AUX once; it will
blink once. Then press and hold SETUP until
the AUX key blinks twice.
3. Use the “Manufacturer’s Codes” starting on
page 24 to locate the brand name and enter
the first four-digit code for your TV/VCR
Combo. If you perform this procedure
correctly, the AUX key will blink twice.
NOTE: If the AUX key did not blink twice after enter-
ing the codes last digit, repeat steps 2 through
3 and try entering the same code again.
If you’ve located a TV/VCR setup code that
works for your TV/VCR Combo and a separate
TV code is also listed, you’ll need to program
this code into the remote control to access volume control (see “Programming Device Control” starting on page 8).
10
Page 11
4. Aim the remote control at your TV/VCR
Combo and press PWR once. The device
should turn off. If it does not respond, repeat
steps 2 through 3, trying each code listed for
your brand until you find one that works. If it
still does not respond, try searching for the
code (“Searching for Your Code” starting on
page 11).
5. For future reference, write down each working
device code in the boxes below:
TV/VCR Code
TV Code (if used)
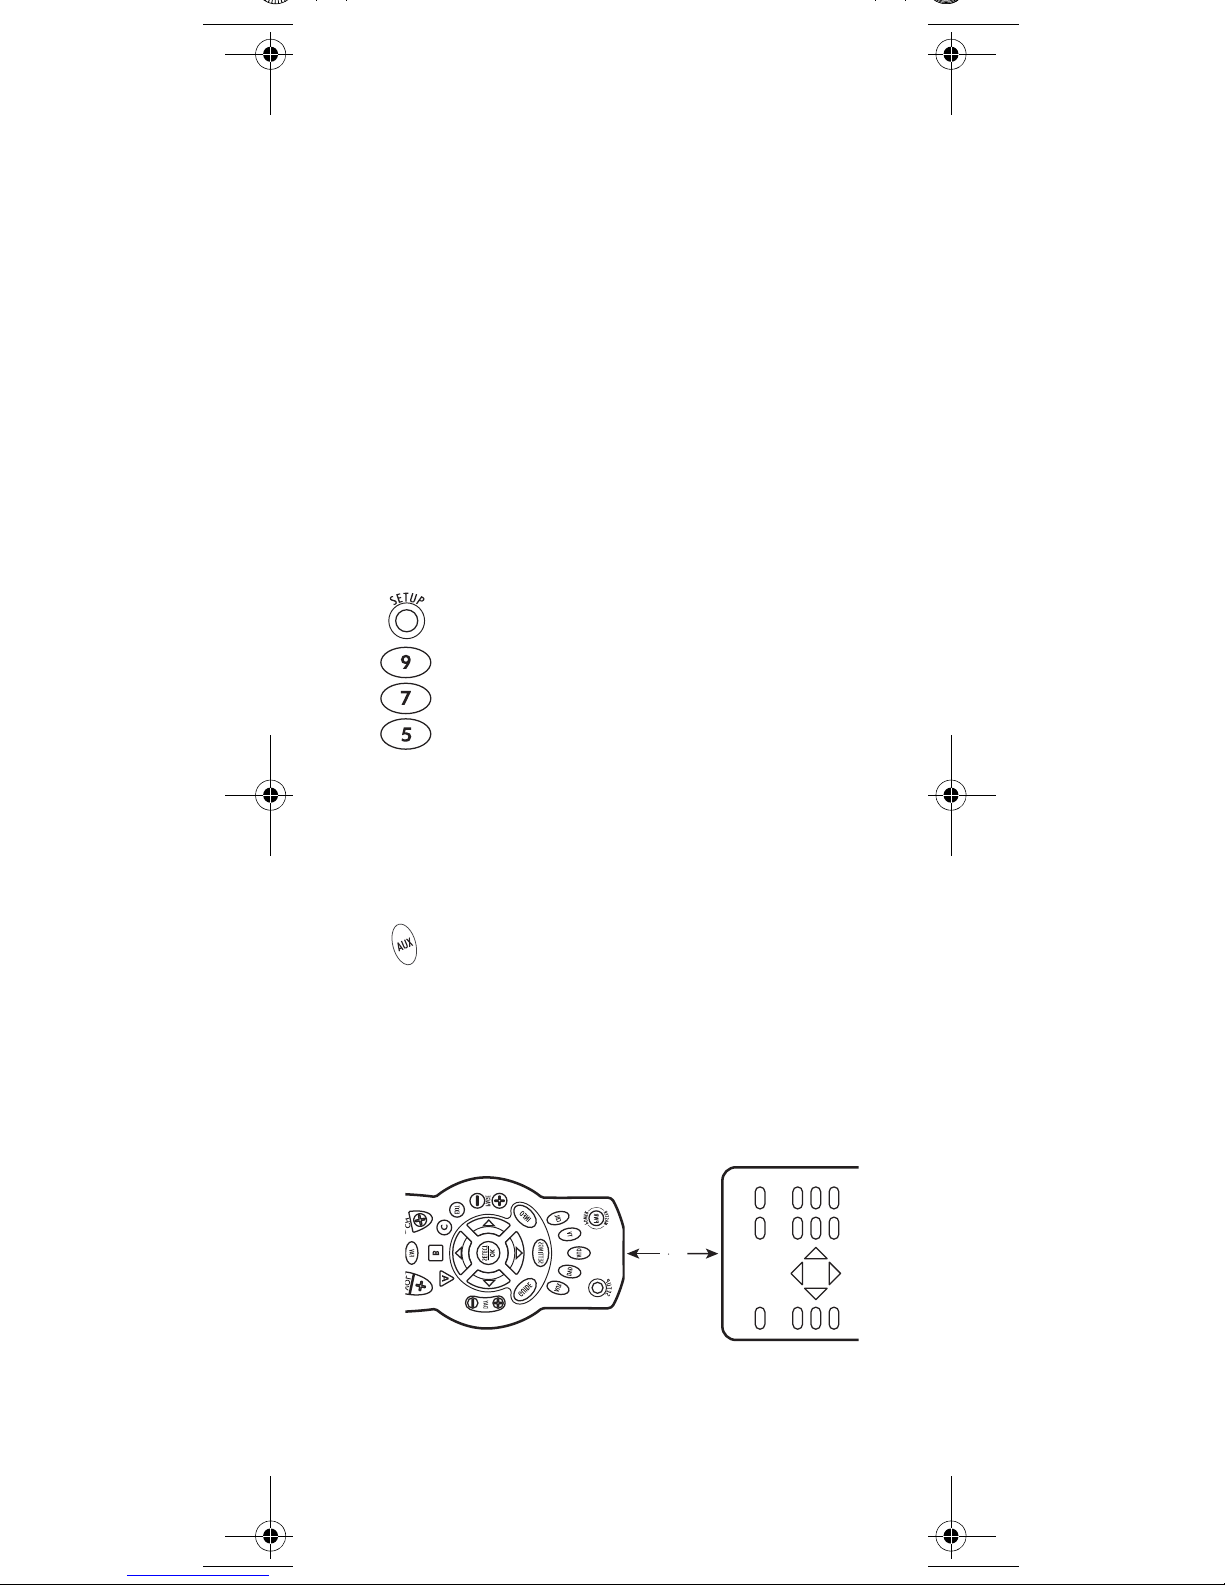
SEARCHING FOR YOUR CODE
If your home entertainment device does not respond to
theAtlas PVR Universal Remote Control after trying all
of the codes listed for your brand, or if your brand is not
listed at all, try searching for your code.
For example, to search for a code for your TV:
1. Turn on your TV.
2. On the remote control, press TV once; it will
blink once. Then press and hold SETUP until
the TV key blinks twice.
3. Enter 9 9 1. The TV key will blink twice.
4. Aim the remote control at the TV and press
PWR once.
5. Press CH+ one or more times and stop when
the TV turns off.
NOTE: In the search mode, the remote control will
6. Press SETUP once to lock in the code. The TV
send IR codes from its library to the selected
device, starting with the most popular code
first.
key will blink twice.
11
Page 12
7. To search for the codes of your other devices,
repeat steps 1 through 5, but substitute the
appropriate key (e.g., AUX, DVD, AUD, or CBL)
for the device you are searching for.
CHECKING THE CODES
If you have set up theAtlas PVR Universal Remote
Control by searching for your device code (on the
previous page), you may need to find out which fourdigit code is operating your equipment.
F
or example, to find out which code is operating your TV
1. On the remote control, press TV once; it will
blink once. Then press and hold SETUP until
the TV key blinks twice.
2. Enter 9 9 0. The TV key will blink twice.
:
3. To view the code for the first digit, press 1
once. Count the number of times the TV key
blinks (e.g., 3 blinks = 3) and write down the
number in the leftmost TV Code box on
page 10.
NOTE: If a code digit is 0, the selected mode key will
not blink.
4. Repeat step 3 three more times for the
remaining digits. Use 2 for the second digit, 3
for the third digit, and 4 for the fourth digit.
Finish writing down the code in the TV Code
boxes on page 10.
5. To check for other device codes, repeat steps 1
through 4, but substitute the appropriate key
(e.g., AUX, DVD, AUD, or CBL) for the device
you are checking. Write down the codes in the
appropriate boxes on page 10.
USING LEARNING
The Atlas PVR Universal Remote Control includes a
Learning feature so you can add functions that are
unique to your home entertainment devices (e.g.,VCR
T
racking Up or Down). However, there are some
considerations
.
Learning Precautions
• Your original remote controls must be in working
order for learning to work properly.
12
Page 13
• Learned keys are mode-specific, so each one can
store a unique function for each mode.
• Do not use the following keys for learning: Device
Keys, SETUP, Record (•), Tune-In Keys.
• Learning capacity is approximately 16 to 25 keys,
depending on the code being learned.
• Certain device functions are not learnable including
multi-frequency types, some high frequency ones,
and other unusual formats.
• For optimum learning, avoid high levels of ambient
light such as natural sunlight or energy-efficient
fluorescent lights.
NOTE: Please have your original remote controls
handy before programming learning.
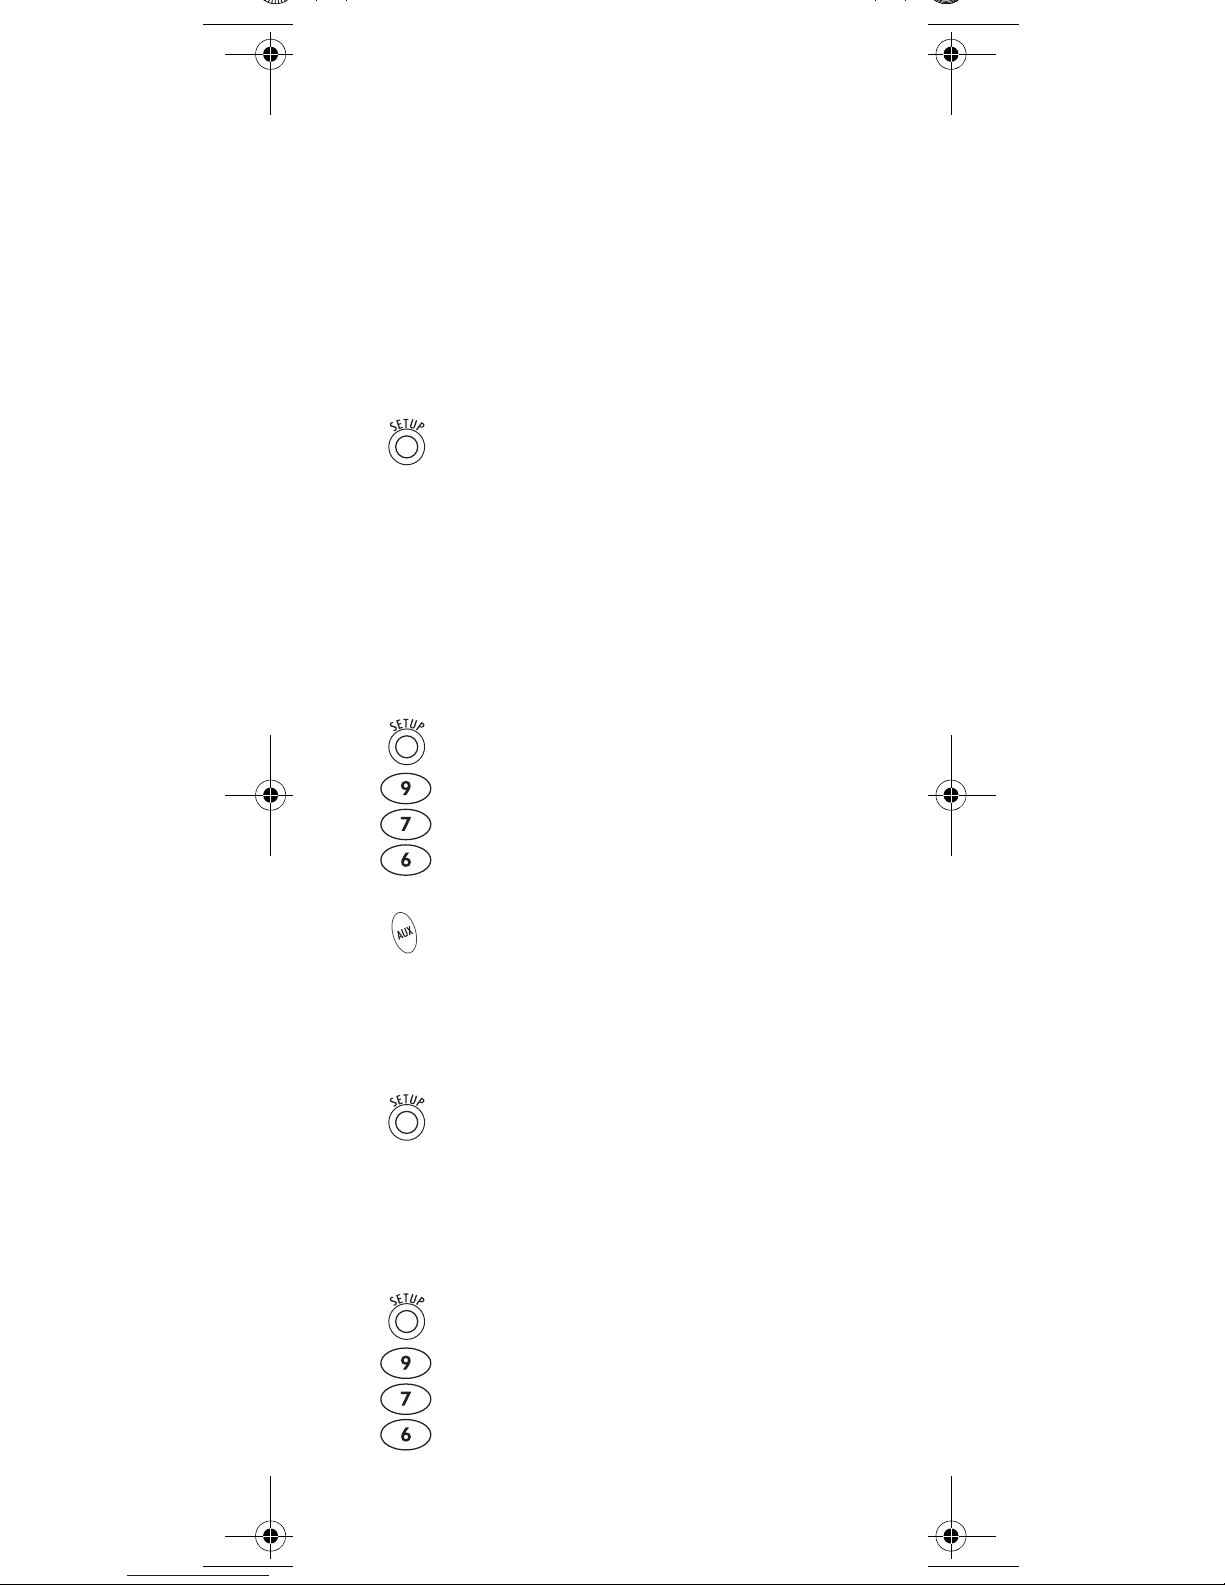
Programming a Learned Key
NOTE: If more than 15 seconds pass between key
presses, the remote exits programming.
1. Press and hold SETUP until the last-selected
mode key blinks twice, then press 9 7 5.
NOTE: If the LED displays one long flash instead,
either your batteries are low, or the Atlas PVR
Universal Remote Control has a memory fault.
In either case, the remote will not learn a new
key. See “Additional Information” on page 23.
2. Press a mode key once (i.e., AUX, DVD, AUD,
TV, or CBL) to assign a mode for learning, then
the key that will learn the new code.
3. Place the Atlas PVR Universal Remote Control
head-to-head (about 2" apart) from your
original remote control. Also locate the key
(on your original remote control) that you
want the Atlas PVR Universal Remote Control
to learn.
2"
4. On the original remote, press and hold the key
to be learned. The Atlas PVR Universal
Remote Control’s LED will blink rapidly, then
13
Page 14
turn off. Continue holding the key on the
original remote until the Atlas PVR Universal
Remote Control’s LED blinks twice.
NOTE: If the LED displays one long blink, a learning
error has occurred. Try repeating this step
again until a successful capture occurs. If the
function is still not captured, press and hold
SETUP to exit programming and review the
“Learning Precautions” on the previous page.
If needed, also see “Troubleshooting” on
page 21. After review, start programming
again at step 1.
5. Repeat steps 2 through 4 for another mode
and/or key or press and hold SETUP to exit
programming.
Deleting a Single Learning Key
T
his process returns the key to its original programmin
g
for the mode you select. You can also delete learned
programming by teaching a different function to the key
(see “Programming a Learned Key” on page 13)
NOTE: If more than 15 seconds pass between key
presses, the remote exits programming.
1. Press and hold SETUP until the last-selected
mode key blinks twice, then press 9 7 6.
2. Press a mode key once (i.e., AUX, DVD, AUD,
TV, or CBL).
3. Press the key containing the learned function
to be deleted twice. The remote will blink
twice.
4. Repeat steps 2 through 3 for another key or
press and hold SETUP to exit programming.
Deleting All Learned Keys in a Specific Mode
NOTE: If more than 15 seconds pass between key
presses, the remote exits programming.
1. Press and hold SETUP until the last-selected
mode key blinks twice, then press 9 7 6.
14
Page 15

2. Press a mode key twice (i.e., AUX, DVD, AUD,
TV, or CBL) to clear all the learned keys for
that mode. The LED blinks twice.
3. Repeat step 2 for another mode or press and
hold SETUP to exit programming.
PROGRAMMING CHANNEL CONTROL LOCK
By default, the remote control’s channel-control
capabilities are locked to the cable converter. The
affected keys
LAST. This will guarantee that you do not inadvertently
change a channel on your TV or VCR. However, you can
de-activate this feature to allow full access to these keys
in the TV and VCR modes.
*
NOTE: This feature does not affect the AUD mode.
Unlocking Channel Control
1. On the remote control, press CBL once; it will
*
are 1 through 0, CH+, CH-, ENTER, and
blink once. Press and hold SETUP until the
CBL key blinks twice.
2. Enter 9 7 3. The CBL key will blink twice.
3. Press CH- once. The CBL key will blink four
times.
Now the remote control will provide TV and VCR
channel-control capabilities while in the TV or VCR
mode.
15
Page 16

Locking Channel Control to CBL
1. On the remote control, press CBL once; it will
blink once. Press and hold SETUP until the
CBL key blinks twice.
2. Enter 9 7 3.The CBL key will blink twice.
3. Press CH+ once. The CBL key will blink twice.
Now, regardless of what mode you select (except AUD),
the channel keys will only change channels on your cable
converter.
CHANGING VOLUME LOCK
Volume Lock allows you to control the volume through
the device identified as having your primary speaker(s),
regardless of which mode you are using. On theAtlas
PVR Universal Remote Control, Global Volume Lock is
set to TV, so you can control TV volume while in the AUX,
DVD, TV or CBL mode. You can perform Individual
Volume Unlock on a selected device to set its volume
control for independent operation.
NOTE: The audio mode’s (AUD) volume controls are
active regardless of Volume Lock settings.
However, if you lock the volume controls to
the AUD mode, you will have control of the
audio device’s volume in all other modes (i.e.,
AUX, DVD, TV, and CBL). This can be an advan-
tage if, for example, you always listen to home
entertainment devices through your receiver’s
speakers.
Unlocking Volume Control for a Single Device
(Individual Volume Unlock)
1. Assuming Global Volume Lock is active, select
a mode on the remote control that you want to
unlock (e.g., CBL) and press it once. Next,
press and hold SETUP until the device key
blinks twice.
2. Enter 9 9 3. The last-selected device key will
blink twice.
16
Page 17

3. Press VOL- once. The last-selected device key
will blink four times.
4. Repeat steps 1 through 3 for each device you
want volume to be unlocked.
Now, after you select a device that has volume unlocked
(e.g., CBL), pressing VOL+, VOL-,or MUTE, will control
only that device’s volume.
Unlocking All Volume Control (Global Volume Unlock)
NOTE: Performing these instructions will set inde-
pendent volume control for all programmed
devices.
1. On the remote control, press and hold SETUP
until the last-selected device key blinks twice.
2. Enter 9 9 3. The last-selected device key will
blink twice.
3. Press VOL+ once. The last-selected device key
will blink four times.
Locking Volume Control To One Mode (Global
Volume Lock)
NOTE: The audio mode’s volume controls are active
regardless of Volume Lock settings. However,
if you lock the volume controls to the AUD
mode, you will control the audio device’s volume in all other modes (i.e., AUX, DVD, TV, or
CBL). This can be an advantage if, for example, you always listen to home entertainment
devices through your receiver’s speakers.
1. On the remote control, press and hold SETUP
until the last-selected device key blinks twice.
2. Enter 9 9 3. The last-selected device key will
blink twice.
3. Select a mode (e.g., TV or AUD) which you
Now, when you press VOL+, VOL-,or MUTE, the volume of
the selected device (e.g., TV) is controlled regardless of
mode.
want to use to control the volume. The
selected device key will blink twice.
17
Page 18

PROGRAMMING ID LOCK
TheAtlas PVR Universal Remote Control is locked at the
factory to operate a Motorola Digital Cable Terminal
(DCT). However, if you have another brand or model of
cable converter or satellite service that you would like to
control, then you’ll need to perform the following steps
to unlock the ID Lock, enter a new manufacturer’s code,
and lock the ID Lock again.
1. Turn on the cable converter.
2. On the remote control, press CBL once; it will
blink once. Then press and hold SETUP until
the CBL key blinks twice.
3. Enter 9 8 2. The CBL key will blink four
times, indicating ID Lock is unlocked.
4. Perform the instructions under
“Programming Device Control” on page 8 to
program device control for the desired cable
converter or satellite receiver.
When you are done, perform steps 5 and 6 on
this page to again lock the ID Lock.
5. On the remote control, press CBL once; it will
blink once. Then press and hold SETUP until
the CBL key blinks twice.
6. Enter 9 8 2. The CBL key will blink twice,
indicating ID Lock is again locked.
USING THE MASTER POWER KEY
The Atlas PVR Universal Remote Control has a unique
feature that allows you to sequentially turn up to five of
your home entertainment devices on or off with a single
key press.
NOTE: MASTER POWER (PWR) only works in the CBL
mode. If it is not programmed, only the cable
converter will turn on or off. In any other
mode, pressing MASTER POWER (PWR) once
will turn the selected device on or off.
18
Page 19

Programming the Master Power Key
1. On the remote control, press and hold SETUP
until the last-selected device key blinks twice.
2. Enter 9 9 5. The last-selected device key
blinks twice.
3. Press PWR once.
4. For the first device you want in the power on
sequence, press a device key (e.g., CBL) once.
Then press PWR once.
5. Repeat step 4 up to four more times to add the
second, third, fourth, and fifth device, as
desired.
6. To save the settings and exit the program:
a. Press CBL once.
b. Press and hold SETUP until the CBL key blinks
twice.
Using the Master Power Key
1. After programming, point the remote control
at the devices. Press CBL once.
Press
PWR
2.
once to sequentially turn the
programmed home entertainment devices on
or off.
You will see the devices turn on or off according to the
programmed sequence.
Clearing the Master Power Key
1. On the remote control, press and hold SETUP
until the last-selected device key blinks twice.
2. Enter 9 9 5. The last-selected device key
blinks twice.
3. Press and release the MASTER POWER key.
19
Page 20

4. Press and hold SETUP until the CBL key blinks
twice.
RE-ASSIGNING DEVICE KEYS
The Atlas PVR Universal Remote Control can be set up
to control a second device of an already-assigned type.
For example, to have the unit control a TV, a Cable
Converter, and two DVD players, re-assign the unused
AUX key to operate the second DVD Player as follows:
NOTE: AUX is preset at the factory to control an RCA
VCR. Performing the steps below will overwrite those settings.
1. On the remote control, press AUX once; it will
blink once. Then press and hold SETUP until
the AUX key blinks twice.
2. Enter 9 9 2. The AUX key will blink twice.
3. Press DVD once, then press AUX once. The AUX
key will blink twice.
The AUX key is now ready to be programmed for your
second DVD player. See “Programming Device Control”
on page 8. To re-assign other device keys, repeat these
and substitute the key sequence using the following
chart:
NOTE: Only one device can be assigned to an unused
device key at a time.
To Re-Assign Perform Key Sequence
AUX as 2nd
AUXÆSETUPÆ9Æ9Æ2ÆAUDÆAUX
AUD key
AUX as 2nd
AUXÆSETUPÆ9Æ9Æ2ÆTVÆAUX
TV key
AUX as 2nd
AUXÆSETUPÆ9Æ9Æ2ÆCBLÆAUX
CBL key
AUX back to
AU X
To re-assign another unused device key, substitute it for
the AUX key above and then perform the sequence. For
example, to re-assign an unused AUD key as a second
AUXÆSETUPÆ9Æ9Æ2ÆAUXÆAUX
20
Page 21

DVD key, perform
AUDÆSETUPÆ9Æ9ÆÆDVDÆAUD.
When a re-assignment is done, the selected device key
(e.g., AUD) will blink twice to confirm your choice. At
that time, you will need to program device control (see
“Programming Device Control” on page 8).
CLEARING CUSTOM PROGRAMMING
The Atlas PVR Universal Remote Control contains a
Custom Programming Reset program. You can use it to
remove all custom programming, except your setup
codes and reassigned device keys.
IMPORTANT: Executing this program will erase all cus-
tom settings for Volume Lock, Learned Keys,
Tune-In Keys, and Channel Lock. However,
your device programming remains.
1. On the remote control, press and hold SETUP
until the last-selected device key blinks twice.
2. Enter 9 8 0. The last-selected device key
blinks twice, pauses, and blinks twice again to
confirm that all custom programming is
cleared.
TROUBLESHOOTING
PROBLEM: Device key does not blink when you press a
key.
SOLUTION: Replace the batteries with two (2) new AA
alkaline batteries (see “Installing Batteries” on page 8).
PROBLEM: Device key blinks when you press a key, but
home entertainment device does not respond.
SOLUTION: Make sure you are aiming the remote control
at your home entertainment device and that you are
within 15 feet of the device you are trying to control.
PROBLEM: The remote control does not control home
entertainment devices or commands are not performing
properly.
SOLUTION: Try all listed codes for the device brand
being set up. Make sure all devices can be operated with
an infrared remote control.
PROBLEM: TV/VCR Combo does not respond properly.
SOLUTION: Use the VCR codes for your brand. Some
combo units may require both a TV code and a VCR
code for full operation (see page 10).
PROBLEM: No volume on a second TV.
SOLUTION: Follow instructions under “Changing
Volume Lock” on page 16.
21
Page 22

PROBLEM: PLAY and STOP keys do not work on a
Motorola DCT-2000 cable converter.
SOLUTION: Re-program the CBL key for cable code 0476
(see “Programming Device Control” on page 8).
PROBLEM: Tried Search Method and still could not find
a working code.
SOLUTION: Try the Search Method again after clearing
out the device key as follows:
a. Press and hold SETUP until device key blinks twice.
b. Enter 9 9 2.
c. Press and release the device key to be cleared twice.
PROBLEM: Remote control does not turn on Sony or
Sharp TV/VCR Combo.
SOLUTION: For power on, these products require
programming TV codes on the remote control. For Sony,
use TV code 0000 and VCR code 0032. For Sharp, use
TV code 0093 and VCR code 0048.
FCC NOTICE
This equipment has been tested and found to comply
with the limits for a class B digital device, pursuant to
part 15 of the FCC Rules. These limits are designed to
provide reasonable protection against harmful
interference in a residential installation. This equipment
generates, uses and can radiate radio frequency energy
and if not installed and used in accordance with the
instructions, may cause harmful interference to radio
communications.
However, there is no guarantee that interference will not
occur in a particular installation. If this equipment does
cause harmful interference to radio or television
reception, which can be determined by turning the
equipment off and on, the user is encouraged to try to
correct the interference by one or more of the following
measures:
• Reorient or relocate the receiving antenna.
• Increase the separation between the equipment and
receiver.
• Connect the equipment into an outlet on a circuit
different from that to which the receiver is
connected.
• Consult the dealer or an experienced radio/TV
technician for help.
• It is strongly recommended that the TV be plugged
into a separate wall outlet.
This equipment has been verified to comply with the
limits for a class B computing device, pursuant to FCC
Rules. In order to maintain compliance with FCC
regulations, shielded cables must be used with this
equipment. Operation with non-approved equipment or
22
Page 23

unshielded cables is likely to result in interference to
radio and TV reception. The user is cautioned that
changes and modifications made to the equipment
without the approval of manufacturer could void the
user’s authority to operate this equipment.
ADDITIONAL INFORMATION
This product does not have any user-serviceable parts.
Opening the case, except for the battery cover, may
cause permanent damage to your Atlas PVR Universal
Remote Control.
• For help via the Internet, visit us at:
www.urcsupport.com
• For information about Shaw services, visit us at:
www.shaw.ca
©Copyright 2005 by Universal Electronics Inc. No part
of this publication may be reproduced, transmitted,
transcribed, stored in any retrieval system, or translated
to any language, in any form or by any means,
electronic, mechanical, magnetic, optical, manual, or
otherwise, without prior written permission of
Universal Electronics Inc.
M11055 FS 08/05
23
Page 24

MANUFACTURER’S CODES
Setup Codes for Audio Amplifiers
Accuphase 0382
Acurus 0765
Adcom 1100, 0577
Aiwa 0406
Amstrad 0078
Aragon 0765
Arcam 0269
Audiolab 0269
AudioSource 0011
Biamp 0582
Bose 0674
Carver 0269
Cinema Sound 0160
Classe 1461, 1462
Conrad 0011
Curtis Mathes 0300
Denon 0160
Digital Audio Control 0085
Durabrand 1561
Elan 0647
Forte 0606
GE 0078
Genexxa 0395
GoldStar 0031
Grundig 0269
Harman/Kardon 0892, 0106
JVC 0331
Kenwood 0356
Klipsch 0765
Korsun 1483
Left Coast 0892
Lenoxx 1561
Linn 0269
Logitech 1408
Luxman 0165
Magnavox 0269
Marantz 0892, 0321, 0269
Mark Levinson 1483
McIntosh 0251
Memorex 0031
Micromega 0269
Mondial 0765
Myryad 0269
Nakamichi 0321
NEC 0264
Optimus 0395, 0300
24
Page 25

Panasonic 0308, 0521
Parasound 0246
Pass Labs 0269
Philips 0892, 0269
Pioneer 0300, 0013
Polk Audio 0892, 0269
RCA 0300
Realistic 0395
Revox 0269
Sansui 0321
Shure 0264
Sony 0689, 0220, 0815
Soundesign 0078, 0211
Technics 0521, 0308
SuperTech 0031
Technics 0308, 0521
Thorens 0269
Victor 0331
Wards 0078, 0013, 0211
Yamaha 0354, 0143, 0133, 0504
Setup Codes for Audio Amp/Tuners
ADC 0531
Adcom 0616
Aiwa 1405, 0158, 0189, 0121, 0405, 1388, 1243,
1641
Akai 1255, 0224, 0076, 1512
Alco 1390
AMC 1077
Amphion Media Works 1563
AMW 1563
Anam 1609, 1074
Apex Digital 1430, 1257
Arcam 1120
Audiotronic 1189
Audiovox 1390
Bose 1229, 0639, 1253
Cambridge Soundworks 1370
Capetronic 0531
Carver 1189, 0189, 0042, 0008, 0360
Casio 0195
Clarinette 0195
Classic 1352
Coby 1263, 1389
Compaq 1136
Criterion 1420
Curtis Mathes 0080
Daewoo 1250
Dell 1383
Denon 1360, 0004, 1142, 0771, 0273
25
Page 26

Emerson 0424
Fisher 0042, 1801, 0360, 0219
Garrard 0463, 0424
Gateway 1517
Glory Horse 1263
Go Video 1532
Harman/Kardon 0110, 0189, 0891
Hewlett Packard 1181
Hitachi 1273, 1801
Initial 1426
Inkel 0062
Integra 1298, 0135
JBL 0110, 1306
JVC 0074, 1263, 1495, 1374
Kenwood 1313, 1570, 1569, 0027, 0042, 0239, 0569,
0186, 0314, 1052, 0077, 0313, 1051
KLH 1390, 1428, 1412
Koss 1366, 0424
Lasonic 1798
Lenoxx 1437
Lexicon 1076
LG 1293
Linn 0189
Liquid Video 1497
Lloyd's 0195
LXI 0181
Magnavox 1189, 1269, 0189, 0531, 1514, 0128, 0391,
0195
Marantz 1189, 1269, 0039, 0189, 1289, 0128
McIntosh 1289
MCS 0039, 0346
Micromega 1189
Mitsubishi 1393
Modulaire 0195
Myryad 1189
NAD 0320
Nakamichi 0347, 0097, 1555
NEC 0235
Norcent 1389
Onkyo 0135, 1298, 0842, 0380, 1531
Optimus 1023, 1074, 0080, 0186, 0670, 0042, 0181,
0531, 0801, 0177, 0219, 0738
Oritron 1497, 1366
Panasonic 1518, 0039, 0518, 1764, 0367, 1316, 1763,
0309, 1288, 1548
Penney 0195
Philco 1390
Philips 1189, 1269, 0189, 0391, 1266, 1120
Pioneer 1023, 0080, 0531, 1384, 0014, 0244, 0150,
0630
26
Page 27

Polaroid 1508
Polk Audio 0189, 1289
Proscan 1254
Quasar 0039
RadioShack 1263
RCA 1023, 1609, 1254, 0054, 0360, 0346, 0531,
1154, 1511, 0080, 0530, 1074, 1390
Realistic 0163, 0195, 0181
Regent 1437
Rio 1869, 1383
Saba 1519
Samsung 1500, 1295
Sansui 0189, 0346, 0193
Sanyo 0219, 1469, 1251, 0801
Scott 0163, 0322
Sharp 1286, 0186
Sharper Image 1556, 1263
Sherwood 0062, 1077, 0502, 1653, 0491, 1423
Shinsonic 1426
Sonic Blue 1869, 1532, 1383
Sony 1058, 1441, 1258, 1759, 0158, 1042, 1349,
1442, 1758, 0474, 1658, 1858, 0168, 1406,
1558
Soundesign 0670
Stereophonics 1023
Sunfire 1313, 1052, 0314, 0313
Teac 0463, 1390, 0163, 1267, 1074, 1528
Technics 1308, 1518, 0039, 0208, 0518, 0309
Thorens 1189
Toshiba 0080, 0135
Venturer 1390
Victor 0074
Wards 0158, 0189, 0080, 0054, 0014
XM 1406
Yamaha 0176, 1331, 1176, 0186, 1375
Yorx 0195
Zenith 1293, 0857, 1869
27
Page 28

Setup Codes for Miscellaneous Audio
Aiwa 0010, 0159, 0404
Altec Lansing 1485
Cambridge Soundworks 1530
Fisher 0052
Imerge 1491
Jerrold 0520, 0459
JVC 0073
Marantz 1491
Motorola 1464
Omnifi 1605
Scientific Atlanta 0460
Sony 0010, 0159, 0576
Starcom 0459
Setup Codes for Cable Boxes/Converters
ABC 0003, 0008, 0014, 0017
Americast 0899
Bell & Howell 0014
Bell South 0899
Clearmaster 0883
ClearMax 0883
Comcast 1376
Coolmax 0883
Digi 0637
Director 0476
Dumont 0637
General Instrument 0476, 0810, 0276, 0003
GoldStar 0144
Hamlin 0009, 0273
Jerrold 0476, 0810, 0276, 0003, 0012, 0014
Media One 0305
Memorex 0000
Motorola 0476, 0810, 0276, 1254, 1106, 1376
MultiVision 0012
Pace 1877, 0237
Panasonic 0000, 0107
Panther 0637
Paragon 0000
Philips 0305, 0317
Pioneer 1877, 0877, 0144, 0533
Pulsar 0000
Quasar 0000
RadioShack 0883
Regal 0279, 0273
Runco 0000
Samsung 0144
Scientific Atlanta 1877, 0877, 0477, 0008, 0017
Sony 1006
Starcom 0003
28
Page 29

Supercable 0276
Supermax 0883
Time Warner 1877
Tocom 0012
Torx 0003
Toshiba 0000
Tristar 0883
V2 0883
Viewmaster 0883
Vision 0883
Vortex View 0883
Zenith 0000, 0525, 0899
Setup Codes for DVD Players
Adcom 1094
Advent 1016
Aiwa 0641, 1912
Akai 0899, 0770, 1975, 1089
Allegro 0869
Amphion Media Works 2016, 2001
AMW 0872, 2016, 2001
Anam 1913
Apex Digital 0672, 0717, 0830, 1056, 1915, 0755, 0797,
1020, 1100, 0796, 1004, 1061, 1937, 0794
Audiologic 0736
Audiovox 1041, 1121, 1072, 1071, 1122
Axion 1072, 1071
B & K 0655, 0662
Blaupunkt 0717
Blue Parade 0571
Broksonic 0868, 0695
California Audio Labs 0490
Cambridge Soundworks 1916
CAVS 1057
CineVision 0876, 0869
Classic 1917
Coby 1086, 0778, 1923, 1107
Criterion 2007
Curtis Mathes 1087
CyberHome 1024, 1023, 0816, 1117
Daewoo 0784, 1918, 0705, 0869, 0833
Daytek 0872
Denon 0490, 0634
Disney 0675
Dual 1068, 1085
DVD2000 0521
Emerson 0591, 0675, 0821
Enterprise 0591
Fisher 0670, 1919
Funai 0675
29
Page 30

Gateway 1073, 1077
GE 0522, 0815, 0717
Go Video 0744, 1044, 1970, 0869, 1099, 0715, 0833,
1075, 0783
Go Vision 1071, 1072
GPX 0769, 0699
Gradiente 0490
Greenhill 0717
Grundig 0539
Harman/Kardon 0702, 0582
Hitachi 0573, 0664, 1919
Hiteker 0672
Initial 0717, 1931
Integra 0627, 1924
Jamo 2003
Jaton 1078
JBL 0702, 1926
Jensen 1016
JVC 0558, 0623, 1901, 0867, 1940
jWin 1051, 1049
Kenwood 0490, 0534, 0737, 0682
KLH 0717, 1939, 1020
Konka 0720, 0719, 0711, 0721
Koss 0651
Landel 0826
Lasonic 0798
Lecson 1533
Lenoxx 1938
LG 0801
Liquid Video 1980
Lite-On 1058
Loewe 0511
Magnavox 0503, 1914, 0821, 0675, 1976
Malata 0782
Marantz 0539
McIntosh 1533
Memorex 0695
Microsoft 0522
Mintek 0839, 0717
Mitsubishi 1521, 0521
Momitsu 1082
NAD 0591, 0692
NEC 0785
Nesa 0717
Next Base 0826
Norcent 1003, 1107, 0872, 1923
Nova 1923
Onkyo 0503, 0627, 1985, 1924, 0792
Oritron 0651, 1980
30
Page 31

Panasonic 0490, 1490, 1908, 1925, 2017, 1462, 1907,
1910, 1990, 1362, 1762, 1909, 1986, 0632
Philco 2000
Philips 0503, 0539, 0646, 1914, 0885, 0854
PianoDisc 1024
Pioneer 0525, 0571, 0632, 1902
Polaroid 1086, 1061, 1998
Polk Audio 0539
Portland 0770
Prima 1016
Princeton 0674
Proceed 0672
Proscan 0522
ProVision 0778
Qwestar 0651
RCA 0522, 0571, 0717, 1022, 1974, 0822, 1965,
1913
Regent 1938
Rio 0869
Rotel 0623
Rowa 0823
Saba 1977
Sampo 0698, 0752
Samsung 0490, 0573, 0820, 1932, 1075, 0899, 1979
Sansui 0695
Sanyo 0670, 1967, 0873, 0695
Sharp 0630, 0752
Sharper Image 1117, 1995
Sherwood 1043, 0770, 0633, 1077
Shinsonic 0533, 0839, 1931
Sigma Designs 0674
Sonic Blue 0869, 1970, 1099
Sony 0533, 1533, 0864, 1981, 1934, 1033, 1904,
2020, 1903
Sova 1122
Sungale 1074
Superscan 0821
SVA 1105, 0860
Sylvania 0675, 0821
Symphonic 0675
Teac 0809, 1984
Technics 0490
Techwood 0692
Terapin 1031
Theta Digital 0571
Tivo 1996
Toshiba 0503, 1988, 1045, 2006, 0695, 1996
Tredex 0799, 0804, 0803, 0800
TYT 0705
Urban Concepts 0503
31
Page 32

US Logic 0839
V Inc. 1064
Vizio 1064
Vocopro 1027
Xbox 0522
Xwave 1001
Yamaha 0490, 0539, 0545
Yamakawa 0872
Zenith 0503, 0591, 0869, 2002, 1906
Setup Codes for PVRs
ABS 1972
Alienware 1972
CyberPower 1972
Dell 1972
DirecTV 0739, 1949, 1954, 1989
Dish Network System 1943, 1944, 1945, 1946
Dishpro 1943, 1944
Echostar 1943, 1944, 1945, 1946
Expressvu 1944
Gateway 1972
GOI 1944
Hauppauge 1992
Hewlett Packard 1972
Howard Computers 1972
HP 1972
HTS 1944
Hughes Network Systems0739, 1949
Humax 0739
Hush 1972
Hyundai 1951
iBUYPOWER 1972
JVC 1944, 1945
LG 2010
Linksys 1972
Media Center PC 1972
Microsoft 1972
Mind 1972
Niveus Media 1972
Northgate 1972
Panasonic 0616
Philips 0739, 0618
Proscan 1954
RCA 0880, 1954, 1989
ReplayTV 0616, 0614
Sonic Blue 0614, 0616
Sony 1972, 0636
Stack 9 1972
Systemax 1972
Tagar Systems 1972
32
Page 33

Tivo 0618, 0739, 0636
Toshiba 1972
Touch 1972
UltimateTV 1989
Viewsonic 1972
Voodoo 1972
ZT Group 1972
Setup Codes for Satellite Receivers
AlphaStar 0772
Channel Master 0212
Chaparral 0216, 0209, 0053
Crossdigital 1109
DirecTV 0392, 0566, 0639, 1639, 1142, 0247, 0749,
1749, 0724, 0819, 1856, 1076, 1109, 0099,
1392, 1444, 1443, 1640, 1442
Dish Network System 1005, 0775, 1775, 1505, 1170
Dishpro 1005, 0775, 1775, 1505
Echostar 1005, 0775, 0280, 1170, 0269, 1775, 0159,
1505
Expressvu 0775, 1775
GE 0566
General Instrument 0869
GOI 0775, 1775
Goodmans 1246
Hitachi 0819, 1250
Homecable 0238
HTS 0775, 1775
Hughes 0749, 1442, 1749
Hughes Network Systems1142, 0749, 1749, 1444, 1443, 1442
IQ 0210
IQ Prism 0210
Janeil 0152
JVC 0775, 1775, 1170
Jerrold 0869
Legend 0269
LG 1226
Magnavox 0724, 0722
Memorex 0724, 0269
Mitsubishi 0749
Motorola 0869
NEC 1270
Next Level 0869
Panasonic 0247, 0701, 0152
Paysat 0724
Philips 1142, 0749, 1749, 0724, 1076, 0722, 0099,
1442
Pioneer 1442
Proscan 0392, 0566
RadioShack 0869
RCA 0392, 0566, 0855, 0143, 1392
33
Page 34

Realistic 0052
Samsung 1276, 1109
Sanyo 1219
SKY 0856
Sony 0639, 1639, 1640
Star Choice 0869
Star Trak 0180
STS 0210
Tivo 1142, 1444, 1443, 1442
Toshiba 0749, 1749, 0790, 0082, 1285
UltimateTV 1392, 1640
Uniden 0724, 0722, 0074, 0052, 0238, 0076
Voom 0869
Zenith 0856, 1856
Setup Codes for TVs
A-Mark 0003
Abex 0032
Admiral 0093, 0463
Advent 0761, 0783, 0842, 0817, 0815, 1933
Adventura 0046
Aiko 0092
Aiwa 1914
Akai 0812, 0702, 0030, 0672, 1903
Alaron 0179
Albatron 0843, 0700
Ambassador 0177
America Action 0180
Ampro 0751
Anam 0180
Anam National 0055
AOC 0030, 0019, 0185, 0003, 0052
Apex Digital 0748, 0765, 0879, 0767, 1943
Archer 0003
Audiovox 0451, 0180, 0003, 0875, 1952, 0802, 1951,
0092, 0623, 1937
Aventura 0171
Axion 1937
Belcor 0019
Bell & Howell 0154, 0016
Bradford 0180
Brockwood 0019
Broksonic 0236, 0463, 0003, 1905, 1935, 1929, 1911,
1938
Candle 0030, 0056, 0046, 0186
Carnivale 0030
Carver 0054
CCE 0217
Celebrity 0000
Celera 0765
34
Page 35

Changhong 0765
Citizen 0060, 0030, 1928, 0039, 0280, 0056, 0186,
0046, 0092
Clairtone 0185
Clarion 0180
Colt 1906
Commercial Solutions 0047, 1447
Concerto 0056
Contec 0180, 0157, 0185
Craig 0180
Crosley 0054
Crown 0180, 0039
Curtis Mathes 0047, 0054, 0154, 0451, 0093, 0060, 0702,
0030, 0145, 0166, 0016, 1919, 0466, 1347,
0039, 0056, 1147
CXC 0180
Daewoo 0451, 1661, 0092, 0672, 1928, 0039, 0623,
1909, 0019
Dell 1178, 1454
Daytron 0019
Denon 0145, 0511
Denstar 0628
Dumont 0017, 0019
Durabrand 0463, 0180, 0178, 0171, 0003
Dwin 0774, 0720
Electroband 0000, 0185
Electrograph 1755
Electrohome 0381
Elektra 0017, 1661
Emerson 0154, 0236, 0463, 0180, 0178, 0171, 1909,
0038, 1929, 0185, 0282, 1905, 0019, 1928,
0280, 0623, 1911, 0039, 1944, 0177, 0179
Envision 0030, 0813
Epson 0840, 0833
ESA 0171, 0812
Fisher 0154, 0159
Fujitsu 0809, 0683, 0179, 0853
Funai 0180, 0171, 0179, 1904
Futuretech 0180
Gateway 1756, 1755
GE 0047, 0051, 0451, 0178, 1447, 0055, 0282,
1347, 1917, 0021, 1147, 1907, 1922, 0135,
1919, 0027
Gibralter 0017, 0030, 0019
GoldStar 0030, 0178, 0019, 0001, 0032, 1926
Goodmans 0360
Grunpy 0180, 0179
Grundig 0683
Haier 0768
Hallmark 0178
Harley Davidson 1904, 0179
35
Page 36

Harman/Kardon 0054
Harvard 0180
Havermy 0093
Helios 0865
Hello Kitty 0451
Himitsu 0180, 0628
Hisense 0748
Hitachi 1145, 0145, 0016, 0056, 0038, 0151, 0032,
1904
Hyundai 0849
Infinity 0054
Inteq 0017
Janeil 0046
JBL 0054
JCB 0000
Jensen 0761, 0817, 0815, 1933
JVC 0053, 1253, 1923
Kaypani 0052
KEC 0180
Kenwood 0030, 0019
KLH 0765, 0767
Kloss 0046, 0024
Konka 0628, 0703, 1940, 0638, 1939, 0632, 0707
KTV 0180, 0030, 0280, 0039, 0217, 0185
LG 1178, 0856, 0442
Lloyd's 1904
Loewe 0136
Logik 0016
Luxman 0056
LXI 0047, 0054, 0154, 0156, 0178
Magnasonic 1913, 1928
Magnavox 0054, 0030, 1454, 0706, 0179, 0386, 1931,
0024, 0096, 0187, 1254, 1913, 0020, 0186,
1904, 1944
Magnin 1907
Majestic 0016
Marantz 0054, 0030, 0854, 0704, 1154, 0855
Matsushita 0250, 0650
Maxent 1755
Megapower 0700
Megatron 0178, 0145, 0003
MEI 0185
Memorex 0154, 0463, 0150, 0178, 1911, 1926, 1924,
0179, 1920, 1927, 0016
MGA 0150, 0030, 0178, 1907, 0019
Midland 0047, 0017, 0051, 0039, 0135, 0032
Minutz 0021
Mitsubishi 0093, 0150, 1250, 0178, 0868, 0836, 1917,
0019
Monivision 0700, 0843
36
Page 37

Motorola 0093, 0055
MTC 0060, 0030, 0056, 0185, 0019
Multitech 0180, 0217
NAD 0156, 0178, 0866
NEC 0030, 0056, 1704, 0019, 0497
NetTV 1755
Nikko 0030, 0178, 0092
Norcent 0748, 0824
Noshi 0018
NTC 0092
Onwa 0180
Optimus 0154, 0250, 0166, 1924, 1913, 0650, 1927
Optonica 0093, 0165
Orion 0236, 0463, 1905, 1929, 1911, 0179
Panasonic 0250, 0051, 0650, 1924, 1946, 1919, 1941,
0055, 1410, 1927, 1947
Penney 0047, 0156, 0051, 0060, 0030, 0178, 0019,
0135, 1347, 0018, 1926, 0027, 0039, 0003,
1919, 0021, 0032, 1907
Philco 0054, 0030, 0019, 0020, 0096
Philips 0054, 1454, 0690, 1154
Pilot 0030, 0019, 0039
Pioneer 0166, 0038, 0866, 0679
Polaroid 0765, 0865
Portland 0019, 0092, 0039
Prima 0761, 0817, 0815, 0783, 1933
Princeton 0717, 0700
Prism 0051
Proscan 0047, 1447, 1347, 1922
Proton 0178, 0052, 0003, 0466
Pulsar 0017, 0019
Quasar 0250, 0051, 0055, 0650, 1924, 0165, 1919
RadioShack 0047, 0154, 0180, 0030, 0178, 0165, 1904,
0019, 0039, 0032, 0056, 1920
RCA 0047, 1447, 1147, 1917, 0019, 1948, 0090,
1047, 1347, 1907, 0018, 1922, 1958, 0679,
1247, 1547, 1919, 0038, 1953, 0135
Realistic 0154, 0180, 0030, 0178, 0056, 0019, 0039,
0165, 0032
Rhapsody 0185
Runco 0017, 0030, 0603, 0497
Sampo 0030, 0039, 0032, 1755, 0052
Samsung 0060, 0812, 0702, 0030, 0178, 0766, 1060,
0019, 0056, 0814, 0032, 1903
Samsux 0039
Sansui 0463, 1929, 1911, 1904
Sanyo 0154, 0088, 0159, 1907, 0146, 0799
Scimitsu 0019
Scotch 0178
Scott 0236, 0180, 0178, 0019, 0179
Sears 0047, 0054, 0154, 0156, 0178, 0171, 0146,
0159, 0179, 0056, 1926, 1904
37
Page 38

Sharp 0093, 0689, 0039, 0165, 0688, 1917, 0157,
0491, 0851, 0386
Sharper Image 1950
Sheng Chia 0093
Shogun 0019
Signature 0016
Simpson 0187, 0186
Sole 0813
Sony 1100, 0000, 0834, 1925, 0111, 1904, 0080
Soundesign 0180, 0178, 0186, 0179
Sova 1952
Spectricon 0003
Squareview 0171
SSS 0180, 0019
Starlite 0180
Studio Experience 0843
Superscan 0864
Supre-Macy 0046
Supreme 0000
SVA 0748, 0870, 0587, 0865, 0872, 0768, 0871
Sylvania 0054, 0030, 0171, 0020, 0096, 1931, 0381,
1944
Symphonic 0180, 0171, 1913, 1904
Tandy 0093
Tatung 0003, 1756, 0055
Technics 0250, 0051
Technol Ace 0179
Techview 0847
Techwood 0051, 0056, 0003
Teknika 0054, 0180, 0150, 0060, 0092, 0039, 0179,
0019, 0056, 0186, 0016
Telefunken 0702, 0056
Thomas 1904
TMK 0178, 0177, 0056
TNCi 0017
Toshiba 0154, 0156, 0060, 1256, 0832, 1704, 1936,
0650, 1156, 1656, 1935, 0845, 1356, 1918,
1945
Tosonic 0185
Totevision 0039
Trical 0157
TVS 0463
Universal 0027
V Inc. 0864, 1756
Vector Research 0030
Victor 0053
Vidikron 0054
Vidtech 0178, 0019
Viewsonic 1755, 0864, 0857
Viking 0046
38
Page 39

Wards 0054, 0030, 0178, 0080, 0165, 0866, 0019,
0027, 0056, 0111, 0179, 0016, 0021, 0096,
1156, 0020
Vizio 0864, 1756
Wards 0016, 0019, 0020, 0021, 0027, 0030, 0054,
0056, 0080, 0096, 0111, 0165, 0178, 0179,
0866, 1156
Waycon 0156
Westinghouse 0451
White Westinghouse 0463, 1909, 0623
Yamaha 0030, 0839, 0019, 0833, 0769
Zenith 0017, 0463, 0178, 0092, 1904, 1929, 1911,
0016, 1909
Zonda 0003
Setup Codes for VCRs
ABS 1972
Admiral 0048, 0209
Adventura 0000
Aiko 0278
Aiwa 0037, 0000, 0307, 0124
Akai 0041, 0106, 0061, 0175
Alienware 1972
America Action 0278
American High 0035
Asha 0240
Audiovox 0037, 0278
Beaumark 0240
Bell & Howell 0104
Broksonic 0184, 0121, 0209, 0002, 1479, 0479
Calix 0037
Canon 0035
Capehart 0020
Carver 0081
CCE 0072, 0278
Citizen 0037, 0278, 1278
Colt 0072
Craig 0037, 0047, 0240, 0072, 0271
Curtis Mathes 0060, 0035, 0162, 0041, 0760, 1035
Cybernex 0240
CyberPower 1972
Daewoo 0045, 0278, 0020, 0561, 1278
Daytron 0020
Dell 1972
Denon 0042
DirecTV 1949, 0739, 1989, 1954
Dish Network System 1943, 1946, 1945, 1944
Dishpro 1943, 1944
Durabrand 0039, 0038
Dynatech 0000
Echostar 1944, 1943, 1946, 1945
39
Page 40

Electrohome 0037
Electrophonic 0037
Emerex 0032
Emerson 0037, 0184, 0000, 0121, 0043, 0209, 0002,
0278, 0061, 0208, 0479, 1479, 1278, 0561,
1593
Euro1 1962
Expressvu 1944
Fisher 0047, 0104
Fuji 0035, 0033
Funai 0000, 1593
Garrard 0000
Gateway 1972
GE 0060, 0035, 0240, 0760, 1035, 0807, 0202,
0761, 1060
Go Video 0526, 0432
GOI 1944
GoldStar 0037, 0038, 1237
Gradiente 0000
Harley Davidson 0000
Harman/Kardon 0081, 0038
Harwood 0072
Hauppauge 1992
Headquarter 0046
Hewlett Packard 1972
HI-Q 0047
Hitachi 0000, 0042, 0041, 0089, 0105
Howard Computers 1972
HP 1972
HTS 1944
Hughes Network Systems0042, 0739, 1949
Humax 0739
Hush 1972
Hyundai 1951
iBUYPOWER 1972
Jensen 0041
JVC 0067, 0041, 1945, 0008, 1944
KEC 0037, 0278
Kenwood 0067, 0041, 0038
KLH 0072
Kodak 0035, 0037
LG 2010
Linksys 1972
Lloyd's 0000, 0208
Logik 0072
LXI 0037
Magnasonic 1278, 0593
Magnavox 0035, 0039, 0081, 0000, 0149, 1781, 0593,
0563
Magnin 0240
40
Page 41

Marantz 0035, 0081
Marta 0037
Matsushita 0035, 0162, 1162
Media Center PC 1972
MEI 0035
Memorex 0035, 0162, 0037, 0048, 0039, 0047, 0240,
0000, 0104, 0209, 1037, 1262, 0479, 1237,
0307, 0046, 1162
MGA 0240, 0043, 0061
MGN Technology 0240
Microsoft 1972
Mind 1972
Minolta 0042, 0105
Mitsubishi 0067, 0043, 0061, 0807
Motorola 0035, 0048
MTC 0240, 0000
Multitech 0000, 0072
NEC 0104, 0067, 0041, 0038
Nikko 0037
Niveus Media 1972
Noblex 0240
Northgate 1972
Olympus 0035
Onkyo 0222
Optimus 1062, 0162, 0037, 0048, 0104, 0432, 1048,
1262, 0593, 1162
Orion 0184, 0209, 0002, 1479, 0479
Panarex 1950
Panasonic 1062, 0035, 0162, 1035, 1262, 0616, 1162,
0225
Pansat 1950
Penney 0035, 0037, 0240, 0042, 0038, 1035, 1237
Pentax 0042, 0105
Philco 0035, 0479
Philips 0035, 0081, 0739, 1949, 0618, 1181, 1081
Pilot 0037
Pioneer 0067
Polk Audio 0081
Portland 0020
Profitronic 0240
Proscan 0060, 0202, 1060, 0761, 0760, 1954
Protec 0072
Pulsar 0039
Quarter 0046
Quartz 0046
Quasar 0035, 0162, 1162, 1035
RadioShack 0000, 1037
Radix 0037
Randex 0037
41
Page 42

RCA 0060, 0240, 0042, 0149, 0807, 1060, 1989,
0105, 0202, 0761, 1035, 1964, 0760, 0880,
1954, 0106
Realistic 0035, 0037, 0048, 0047, 0000, 0104, 0046
ReplayTV 0616, 0614
Ricavision 1972
Runco 0039
Samsung 0240, 0045, 1014
Sanky 0048, 0039
Sansui 0000, 0067, 0209, 0041, 1479, 0479, 0271
Sanyo 0047, 0240, 0104, 0159, 0046
Scott 0184, 0045, 0121, 0043
Sears 0035, 0037, 0047, 0000, 0042, 0104, 1237,
0046, 0105
Sharp 0048, 0807, 0848
Shintom 0072
Shogun 0240
Singer 0072
Sonic Blue 0616, 0614
Sony 0035, 0032, 0033, 0000, 1972, 1032, 1957,
0636, 1956, 1232
Stack 9 1972
STS 0042
Sylvania 0035, 0081, 0000, 0043, 0593, 1781, 1593
Symphonic 0000, 1593, 0593
Systemax 1972
Tagar Systems 1972
Tatung 0041
Teac 0000, 0041
Technics 0035, 0162
Teknika 0035, 0037, 0000
Thomas 0000
Tivo 0739, 1957, 0636, 1956, 0618, 1503
TMK 0240, 0208
Toshiba 0045, 0043, 1145, 1008, 1972, 0845, 1503
Totevision 0037, 0240
Touch 1972
UltimateTV 1989
Unitech 0240
Vector 0045
Vector Research 0038
Video Concepts 0045, 0061
Videomagic 0037
Videosonic 0240
Viewsonic 1972
Villain 0000
Voodoo 1972
Wards 0060, 0035, 0048, 0047, 0081, 0240, 0000,
0042, 0072, 0149, 0760
White Westinghouse 0209, 0072
42
Page 43

XR-1000 0035, 0000, 0072
Yamaha 0038
Zenith 0039, 0033, 0000, 0209, 1479, 0479
ZT Group 1972
Setup Codes for Video Accessories
ABS 1272
Alienware 1272
CyberPower 1272
Gateway 1272
Hewlett Packard 1272, 1267
Howard Computers 1272
HP 1272
Hush 1272
iBUYPOWER 1272
InterVideo 1393
Keyspan 1344
KWorld 1403
Linksys 1365
Macro Image Technology 1383
Media Center PC 1272
Microsoft 1272
Mind 1272
Motorola 1363
MyHD 1383
Niveus Media 1272
Northgate 1272
Panasonic 1120
Pinnacle Systems 1268
Pioneer 1010
Princeton 0113, 0295
Ricavision 1272
Samsung 1190, 1490
Sensory Science 1126
Sharp 1010
Sony 1272, 1324, 1364
Stack 9 1272
Streamzap 1309
Systemax 1272
Tagar Systems 1272
Toshiba 1272
Touch 1272
Viewsonic 1272, 1329
Vizio 1126
Voodoo 1272
ZT Group 1272
43
Page 44

M11055 FS
44
 Loading...