


USER MANUAL
200W Beam Moving Head Light
Please read over this manu before al operation the light

Maintenance
1. To reduce the risk of electrical shock or fire, do not expose this unit to rain or
moisture.
2. Intermittently using will extend this item’s service life
3. Please clear the fan ,fan net , and optical lens in order to keep good work state.
4. Do not use the alcohol or any other organic solvent to wipe the shell.
Statement
The product has perfect performance and integrity packing. All users should be
strictly complying with the warning and operating instructions as stated. Or we
aren’t in charge of any result by misusing. Any damage resulting by misuse is not
within the Company’s warranty. Any fault or problem caused by neglecting the
manual is also not in the charge of dealers.
Note: All information is subject to change without prior notice.
Safety Precaution
1. In order to guarantee the product’s life, please don’t put it in the damp places or
even the environment over 60degress.
2. Always mount this unit in safe and stable matter.
3. Install or dismantle should operate by professional engineer
4. Using lamp,the change rate of power voltage should be within±10%,If the
voltage is too high,it will shorten the light’s life; If it’s not enough, will influence
the effect
5. Please restart it 20 minutes later after turning off light , until full-cooling.
Frequent switching will reduce the life span of lamps and bulbs; intermittent
using will improve the life of bulbs and lamps。
6. In order to make sure the product is used well, please read the Manual
carefully.
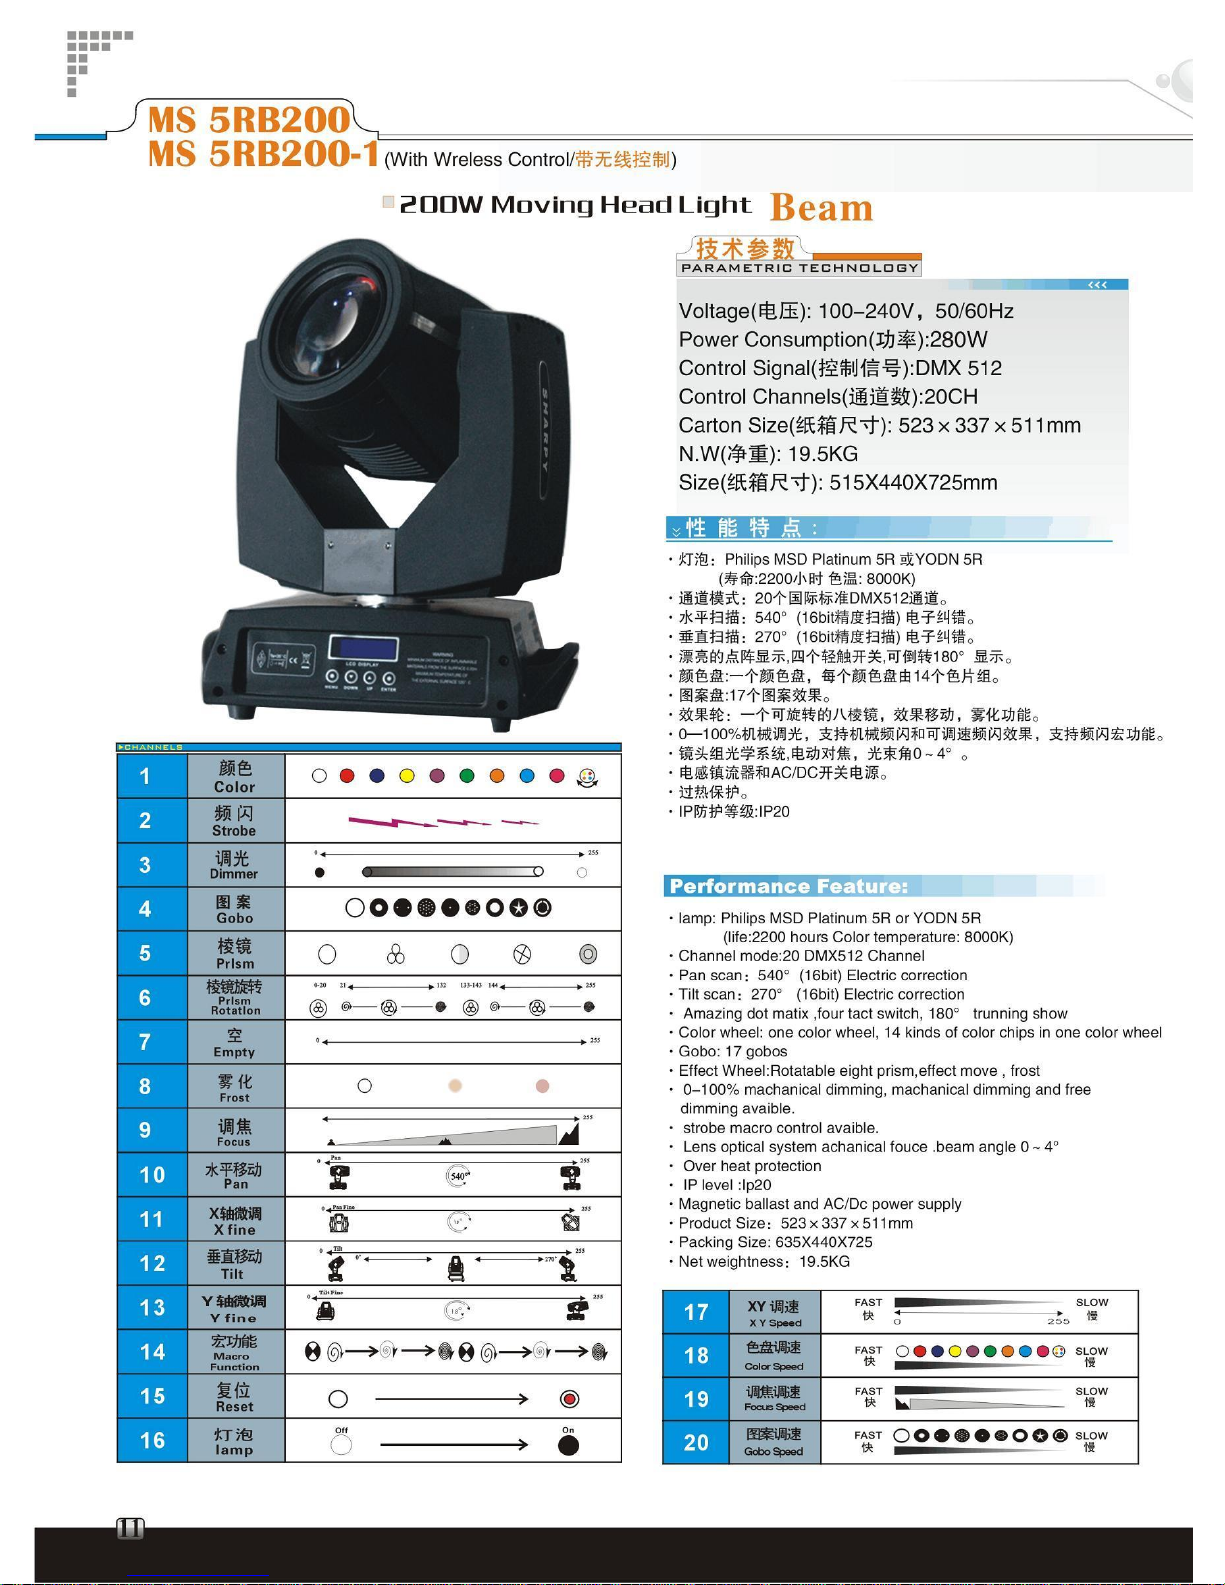
Product Instruction
·lamp: Philips MSD Platinum 5R or YODN 5R (life:2200 hours Color
temperature: 8000K)
· Channel mode:20 DMX512 Channel
· Pan scan:540°(16bit) Electric correction
1

· Tilt scan:270° (16bit) Electric correction
· Amazing dot matix, four tact switch, 180° turning show
· Color wheel: one color wheel, 14 kinds of color chips in one color wheel
· Gobo: 17 gobos
· Effect Wheel: Rotatable eight prism, effect move , frost
· 0-100% mechanical dimming, mechanical dimming and free dimming avaible.
strobe macro control avaible.
· Lens optical system achanical fouce .beam angle 0~4°
· Over heat protection
· Power: 100-240V,50/60Hz
· Comsued power:350W
· IP level :IP20
· Magnetic ballast and AC/Dc power supply
· Product Size:523×337×511mm
· Packing Size: 635X440X725
· Net weightness:19.5KG
Digital display setting:
DMX O
Audio O
ESC: function
ENTER: confirm
UP: increase
DOWN: decrease
ESC DOWN UP ENTER
DMX512
[Address set]
This function enables you to set program address.
1. Press “ESC” till to display “A001”. Press “up” or “down” to view other functions.
2. Press “ENTER”, Letter “A” disappear. Use “up” or “down” to select address “001-512”,
2

press “ENTER” to confirm or press “ ESC” to cancel.
Default
This function enables you to select different operations.
1. Press “up” or “down” to view other functions.
2. Press “ENTER” to enter, and press “up” or “down” to select nod.1 or nod.2, press
“ENTER” to confirm or press “ESC” to cancel.
Nod.1: (mode 1) normal channels control
Nod.2: (mode 2) a little channels control
3. While it operates on slave mode, it needs to be nod.1.
Test
This function enables you to performance the interior demo program without connecting
exterior console.
Press “up” or “down” to select other modes, and press “ENTER” to enter,
1. Nod 1 (Test mode 1),
Press “up” or “down” to select other modes, press “ENTER” to confirm, display “run” to
evaluate. Press “ESC” to quit.
2. Nod 2 (master control)
This function enables master to send signal to slave .Press “up” or “down” to select other
modes, and press “ENTER” to confirm. While displaying “on”, it means master send the signal,
otherwise, it displays “off”. Press “ENTER” to save, press “ESC” to cancel.
While it sets as “on”, you have to disconnect exterior DMX console and make sure no more
than two or above master on the public line.
Audi
This function enables sound to arouse test program.
1. Press “up” or “down” to view other functions.
2. Press “ENTER” to confirm, and press “up” or “down” to select “on” or “off”.
“On” means using sound controller, and “off” don’t.
r.Pan
This function enables horizontal movement or converse movement.
Press “ENTER” to confirm, and press “up” or “down”. If you need converse move, select “on”,
otherwise, select “off”. Press “ENTER” to save, or press “ESC” to quit.
r.Til
This function enables vertical movement or converse movement.
Press “ENTER” to confirm, and press “up” or “down”. If you need converse move, select “on”,
otherwise, select “off”. Press “ENTER” to save, or press “ESC” to quit.
r.set
This function enables the device to be the standard settings. Press “ENTER” to confirm.
3
Power Supply Mains
Use the provided plug to connect the main power to the projector paying
attention to the voltage and frequency marked on the panel of the projector. It is
recommended that each projector be supplied separately so that they may be
individually switched on and off.
IMPORTANT
It is essential that each projector is correctly earthed and that electrical installation
conforms to all relevant standards. Power consumption of this projector is
200VA.
The connection of Power cable between the led moving head lamp and
respectively led moving head lamp should use the three core shielded cable,
Power cable joint (at most 4pcs) in each other, this is the Connector picture
as below:
Important Notice:
In order to avoid overloading the power supply, the power cable can onl y
supply power for at most 4 light
4

Connecting
to the
control signal
line
(DMX):
Use a cab le
conforming
to
specifications
EIA
RS-485:
2-pole
twisted, shielded, 120Ohm
characteristic impedance,
22-24 AWG, low
capacity.
Do not use
microphone cable
or
other
cable
with
characteristics differing from those specified.
The end
connections must
be
made
using
XLR type 3 or
5-pin male/female connectors. A terminating
plug
must
be
inserted
into
the last
projector
with a
resistance
of
120Ohm (minimum
1/4 W)
between terminals
2 and 3 .
IMPORTANT:
The wires must not make
contact
with each other or with the metal
casing
of the
connectors.
The
casing
itself must be
connected
to the shield braid and to
pin 1 of the connectors.
Rigging(Optional)
This equipment can be positioned and fixed by clamp in every direction of the
stage. Locking system makes it easy to fasten to the bracket.
Attention! Two clamps is needed to fix the equipment. Every clamp is locked by
fastener of 1/4 kind. Fastener can only be locked clockwise.
Attention! Fasten a safety string to the additional hole of side aluminum piece. The
secondary accessory can not hang on the delivery handle. Nip the equipment on
bracket.
1, Check if rigging clamp (not including the one inside) damaged or not? If stand
ten times weight as the equipment. Make sure the architecture can stand ten
times weight as all the equipments, clamps, wirings and other additional fixtures.
2, Screws for clamping must be fixed firmly. Take one M12 screw (Grade 8.8 or
higher) to clamp bracket, and then screw the nuts.
3, Level the two hanging points at the bottom of clamp. Insert fastener to the
5

bottom, lock the two levers by 1/4 rotating clockwise; then install another clamp.
4 Install on safety string which stands at least ten times weight as equipment.
Terminal of the accessory is designed for clamps.
5 Make sure pan/tilt lock unlocked or not. Keep the distance more than 1M from
equipment to flammable material or lighting source.
Channel control
CH Name DMX Value Description
0-8 White
8-15 Color1
16-23 Color 2
24-31 Color3
32-39 Color4
40-47 Color5
48-55 Color6
56-63 Color7
CH 1 Color
64-71 Color8
6
72-79 Color9
80-87 Color10
88-95 Color11
96-103 Color12
104-111 Color 13
112-127 Color 14
128-191 Rainbow effect, positive rotation, fast to slow
192-255 Rainbow effect, reverse rotation, slow to fast
0- Close
1-50 OPEN
51--240 Slow strobe to fast strobe
CH 2 Strobe
241--255 OPEN
CH 3 Dimming 0-255 0-100%
0-6 White
7-13 Gobo1
14-20 Gobo2
21-27 Gobo3
28-34 Gobo4
35-41 Gobo5
42-48 Gobo6
49-55 Gobo7
56-62 Gobo8
63-69 Gobo9
70-76 Gobo10
77-83 Gobo11
84-90 Gobo12
CH 4 Gobo
91-97 Gobo13
7

98-104 Gobo14
105-111 Gobo15
112-118 Gobo16
119-127 Gobo17
128-191 Rainbow effect, positive rotation, fast to slow
192-255 Rainbow effect, reverse rotation, slow to fast
0-31 Not prism
CH 5 Prism
32-255 Prism
0-127 Angle 0
128-191 positive rotation, fast to slow
CH 6 Prism Rotate
192-255 reverse rotation, slow to fast
CH 7 Empty 0-255
CH 8 Frost 0-255 0-100% Frost
CH 9 Focus 0-255 0-100% Focus
CH 10 X 0-255 540°
CH 11 X fine 0-255 2.1°
CH 12 Y 0-255 270°
CH 13 Y fine 0-255 1.0°
0-11
12-14
25-37
38-50
51-62
CH 14
Macro
Function
63-255
0-254 Nothing
CH 15 Reset
255 Reset
CH 16 Lamp
100-105 Delay Off
8

200-205 Delay On
CH 17
Speed
adjustment
0-255 Fast to slow
0-127 The whole stepper and speed adjustment
CH 18
COLOUR
Effect
128-255 The micro stepper and speed adjustment
CH 19 BEAM TIME 0-255
0 No shake
1-191 Shake, slow to fast
CH 20
GOBO
Shake
192-255 Off to shake
9
 Loading...