

Page 1

SMP552
USER’S MANUAL
REPRODUCTOR MP4 CON PANTALLA TÁCTIL
MANUAL DEL USUARIO
Page 2

1
1. INTRODUCTION
2. GETTING TO KNOW THIS PLAYER
3. HOW TO CHARGE THIS PLAYER
4. BASIC OPERATION
4.1 POWER ON
4.2 POWER OFF
4.3 LOCK/UNLOCK THE KEYBOARD
4.4 TOUCH SCREEN
4.5 MEMORY EXPANSION
4.6 CONNECTING TO COMPUTER
4.7 REMOVING FROM COMPUTER
5. SYSTEM SETTINGS
5.1 LANGUAGE SETUP
5.2 PERSONAL SETUP
5.2.1 AUTO POWER OFF SETUP
5.2.2 SCREEN SAVER SETUP
5.2.3 BUTTON AUDIO
5.3 TIME SETUP
6. MUSIC AND VIDEO OPERATIONS
6.1 DOWNLOAD MP3 MUSIC ONTO THIS PLAYER
6.2 DOWNLOAD MP4 VIDEO FILES ONTO THIS PLAYER
6.3 PLAY MP3 MUSIC
6.4 PLAY MP4 VIDEOS
7. DOWNLOAD WEB VIDEO OPERATIONS
7.1 INSTALL VUÉ MEDIAMANAGER
7.2 DOWNLOAD VIDEOS
7.3 PLAY DOWNLOADED VIDEOS ON YOUR PLAYER
8. HOW TO CONVERT VIDEO FILES IN YOUR COMPUTER
9. ADDITIONAL FEATURES
9.1 AUDIO RECORDING
9.2 PHOTO VIEWER
9.3 GAME PLAYER
9.4 TEXT E-BOOK READER
9.5 DATE
10. ADDITIONAL FEATURES IN MEDIAMANAGER
11. SPECIFICATIONS AND SYSTEM REQUIREMENTS
12. SAFETY & UPKEEP
13. FCC PART 15 STATEMENT
14. TRADEMARK STATEMENT
INDEX
Page 3

2
1. INTRODUCTION
Thank you very much for purchasing our products. This player is an
all-in-one device that can function as an MP3 music player, MP4 video
player, web video player, Photo viewer, Audio recorder, Game player and
text e-book reader. The 2.8-inch touch-panel TFT-LCD screen allows you
to operate this player easily.
It is easy and safe to enjoy video playing now! In the package, you will
find a vué MediaManager software mini CD, which helps you to
download video clips and play in your player. You do not need to
download MP4 videos from unfamiliar Internet websites with
troublesome procedures with this player.
Before using your player, please make sure you check the contents
of your package. It should include the following accessories:
A USB cable
Ear buds
A Software mini CD
AC power charger, 100V~240V universal voltage
This user manual
Quick-start guide
A stylus (housed in player)
Please read this manual carefully to obtain the best possible
performance from this player. Please keep this manual for future
reference.
Page 4

3
2. GETTING TO KNOW THIS PLAYER
Page 5

4
3. HOW TO CHARGE THIS PLAYER
PLEASE FULLY CHARGE THIS PLAYER BEFORE FIRST TIME USE.
IT TAKES APPROXIMATELY 4 HOURS TO FULLY CHARGE.
3.1 You are able to charge your player from power outlet by using the
enclosed USB cable and AC adapter or charge from your computer by
using the USB cable only.
3.2 When battery is charging, the battery icon on the LCD screen will be
in running status.
3.3 This player is designed with an over-charging protection electronic
circuit. However we still recommed you remove it after it is fully charged.
4. BASIC OPERATIONS
4.1 POWER ON: Slide the master
power switch to the ON position and
press the power button for 3 seconds.
This will turn power ON.
4.2 POWER OFF: Press the power
button for 3 seconds to turn power OFF.
NOTE: Always slide the master power
switch to the OFF position after turning power off. This will enable longer
battery life to your player.
4.3 LOCK/UNLOCK THE KEYBOARD (When powered ON): Pressing
the power button will lock the keyboard. Press again to unlock it.
4.4 TOUCH SCREEN: This player features a 2.8-inch high sensitivity
touch-panel TFT-LCD screen. You are able to operate it by using the
stylus or your fingertip to click on the panel.
4.4.1 To select menu, click once.
4.4.2 To confirm any setup change, click twice.
NOTE:
- The accuracy and sensitivity may be interfered and affected
by temperature, humidity or other factors; you may need to
calibrate the LCD panel manually if the accuracy is not ideal.
Page 6

5
- The touch panel deploys the latest Pressure Sensor technology. To
detect, always click with some applied pressure for best performance.
TO CALIBRATE
- Click Calibrate button from main menu.
- The screen will display three pictures.
- Follow and tap each picture to complete calibration.
NOTE: In very rare cases if the LCD accuracy is not ideal and you are not
able to click the Calibrate button on screen, click any place on screen
and press the OK button for 3 seconds, the above screen will appear.
4.5 MEMORY EXPANSION: This player has a built-in 2GB internal
memory (there is around 1.8GB memory space available to store music
or video files). To expand the memory to increase the amount of music
and length of videos, use any MicroSD card, which can be purchased at
mass retail stores. This player supports MicroSD cards up to 8GB
capacity.
The internal memory and the MicroSD card is an independent memory
disk. The internal memory is set as C: disk and the MicroSD card (if
placed) is set as D: disk in this player. You can browse disk information
from the Files button on main menu. If this player is connected to your
computer, it works as a USB mass storage device and the memory disk
will become part of your computer memory disk.
INSERTING MEMORY CARD: Place the MicroSD card and slightly push
the card into the socket to use the card.
REMOVING MEMORY CARD: Slightly push the MicroSD card until it
clicks. The card will be ejected automatically.
Page 7

6
NOTE: Only insert and remove the MicroSD card when your player is
powered OFF. Otherwise it could cause a loss or damage of the files
stored in your player.
4.6 CONNECTING TO COMPUTER: This player works as a USB mass
storage device when connected to the USB port of your computer. When
connected to computer, a USB mass storage prompt will be activated
automatically. You can save the files from your player to the computer or
vice versa.
4.6.1 If the USB mass storage prompt is not activated automatically, you
can activate it from your desk manager.
4.6.2 THIS PLAYER PACKAGE CONTAINS VUÉ MEDIAMANAGER
AND MP4 TOOL SOFTWARE CD. WE HIGHLY RECOMMEND YOU
INSTALL THE SOFTWARE BEFORE YOUR FIRST TIME
CONNECTING TO YOUR COMPUTER.
Execute the vué MP4 PLAYER Setup program and install the vué
MediaManager software by following the Installation Wizard.
Page 8

7
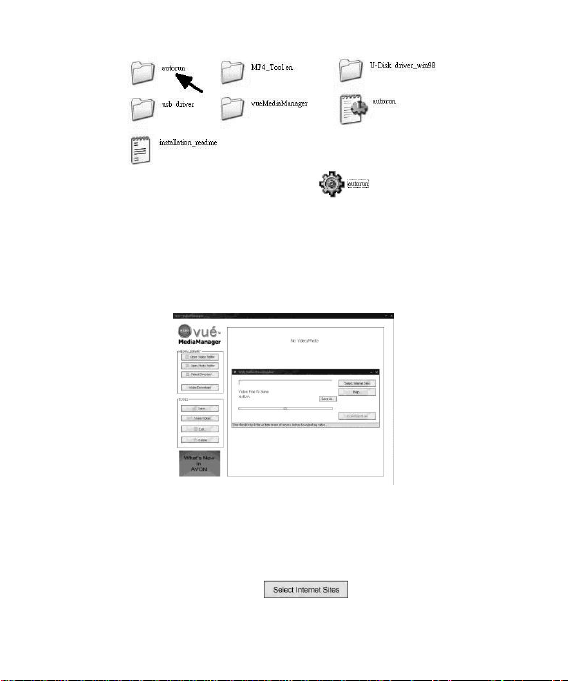
4.6.3 After the vué MediaManager is installed when the player is
connected to your computer, the vué MediaManager program will be
activated automatically. The software main screen is listed as below
figure.
4.7 REMOVING FROM COMPUTER: We recommend you to safely
remove your player each time, before you unplug the player from
computer. Otherwise you may cause unrecoverable corruption to the
player, its program files, or your data inside the player.
4.7.1 To “safely remove hardware”, point and
click on icon on the bottom (which is
located on the bottom right corner of your tool
bar). Right click on your mouse, and a USB
device list will appear on screen.
4.7.2 Highlight this device and click on the
STOP button, another prompt will appear to
confirm removal. Press OK to confirm. It is
now safe to unplug.
5. SYSTEM SETTINGS
5.1 LANGUAGE SETUP
Go to SETTINGS LANGUAGE SELECT menu. You can
select your preferred language from the list.
Page 9

8
5.2 PERSONAL SETUP
5.2.1 AUTO POWER OFF SETUP
Go to SETTINGS PERSONAL SETUP AUTO POWER OFF menu.
You can set up a preferred time that will automatically power off your
player. The factory default setting is to disable the auto power off function.
5.2.2 SCREEN SAVER SETUP
Go to SETTINGS PERSONAL SETUP SCREEN SAVER menu. You
can set up a preferred time that will automatically shut the LCD screen for
longer battery life performance. If the player is in screen saving mode,
clicking on the screen will activate the LCD screen. The factory default
setting is to disable the screen saver function.
5.2.3 BUTTON AUDIO
Go to SETTINGS PERSONAL SETUP BUTTON AUDIO menu. You
can turn the button audio on or off as you desire. The factory default
setting is to turn button audio on.
5.3 TIME SETUP
Go to SETTING PERSONAL SETUP TIME SETUP menu to set up
the time and date.
6. MUSIC & VIDEO OPERATIONS
YOU MUST HAVE MP3 MUSIC OR MP4 VIDEO FILES IN YOUR
COMPUTER. SOME VIDEO FILES MAY NOT BE ABLE TO BE
PLAYED IN YOUR PLAYER. THEREFORE WE STRONGLY
RECOMMEND YOU TO CONVERT YOUR MP4 VIDEO FILES BY
USING THE ENCLOSED MP4 SOFTWARE TOOL, BEFORE
DOWNLOADING THE VIDEO FILES TO YOUR PLAYER.
6.1 DOWNLOAD MP3 MUSIC ONTO THIS PLAYER: When
your player is connected to your computer, mass storage disk
function will automatically be activated. Copy the MP3 files in
your computer and transfer the files onto the AUDIO folder of
your player.
Page 10
9
6.2 DOWNLOAD MP4 VIDEO FILES ONTO THIS PLAYER:
When your player is connected to your computer, mass
storage disk function will be activated automatically. Copy the
MP4 video files in the computer and transfer the files onto the
VIDEO folder of your player.
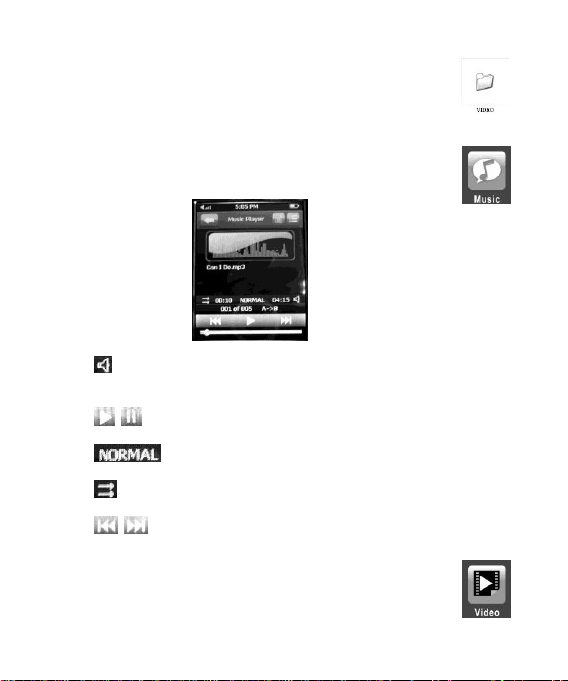
6.3 PLAY MP3 MUSIC: Click the Music icon on the LCD
screen to enter music menu. Select the song you want to play.
6.3.1 VOLUME UP/DOWN: Click the Speaker icon to enter volume
adjustment mode. Then drag the volume toolbar to adjust volume up or
down.
6.3.2 START/PAUSE: Click the Play icon to start music playing.
Click again to pause.
6.3.3 EQUALIZER: Click on the word to access equalizer.
There are 5 different modes NORMAL, CLASS, ROCK, POP, and JAZZ.
6.3.4 REPEAT MODE: Click on repeat mode. There are 4 different
modes.
6.3.5 PREVIOUS/NEXT: Click previous or next song.
NOTE: This player is built-in with high quality speakers. If earphones are
not plugged in, the sound will come out from the speaker.
6.4 PLAY MP4 VIDEO: Click the Video icon on the LCD
screen to enter video menu. Select the video you want to play.
Page 11

10
7. DOWNLOAD WEB VIDEO OPERATIONS
THIS PLAYER ALLOWS YOU TO DOWNLOAD VIDEO FROM SELECT
INTERNET SITES AND PLAY IN YOUR PLAYER. YOU ARE ABLE TO
DOWNLOAD VIDEO CLIPS BY USING THE VUÉ MEDIAMANAGER
SOFTWARE WHEN YOUR PLAYER CONNECTS TO YOUR
COMPUTER. *User should check web site terms of service before
downloading video.
7.1 INSTALL VUÉ MEDIAMANAGER
Connecting your player to computer, the vué MP4 PLAYER Setup Disk
prompt will be activated automatically. Execute the vué MP4 PLAYER
Setup program and install the vué MediaManager software by following
the Installation Wizard.
.
NOTE: If the vué MP4 PLAYER Setup Disk prompt is not activated
automatically, please start the installation procedure manually by using
the following steps,
Step 1: Enter the autorun directory of the software disk.
Page 12
11
Step 2: Double click the autorun.exe icon to activate installation
procedure.
7.2 DOWNLOAD VIDEOS
7.2.1 Once the software has been installed, connect your player to your
computer, and the vué MediaManager program will be activated
automatically.
NOTE: If you are not able to activate the vué MediaManager program,
please remove your player, reboot your computer and try again.
7.2.2 You are able to download video clips by following the instructions
listed below:
- Click the Select Internet Sites button.
- Copy the URL video link of the video you want to download from the
Page 13

12
streaming website and paste the URL video link to the video downloader.
- Click the Save as button to rename the video (if desired).
- Click the Download Now button to start.
NOTE: Clicking on the HELP button will also show you how to download.
7.2.3 Once done, the video will be stored in your player.
7.3 PLAY DOWNLOADED VIDEOS ON YOUR PLAYER
Disconnect your player from computer. Turn your player ON
and click to the VuéVideo icon in the main menu. You are able
to play the videos you have downloaded, anywhere, anytime,
NO VIDEO CONVERSION NEEDED!
8. HOW TO CONVERT VIDEO FILES IN YOUR COMPUTER
8.1 Install the MP4 Tool.
8.2 Activate the MP4 Tool program by clicking the MP4 Tool
icon on your computer screen or program list.
8.3 Click the “File” button on MP4 Tool program and click the “Convert”
button to start video conversion.
Page 14

13
8.4 After the MP4 video files converted, it will be stored in your computer.
You can download it to your player.
9. ADDITIONAL FEATURES
9.1 AUDIO RECORDING
9.1.1 Click the Record icon to enter audio recorder mode. You
can record voice into WAV audio file.
9.1.2 The recorded audio files will be saved in the
AUDIO/RECORD folder.
9.2 PHOTO VIEWER
This player is able to play JPEG photo files. Click the Photo
icon to play photos you stored in this player.
NOTE: the photo quality displayed may differ subject to photo resolution.
9.3 GAME PLAYER
This player is also a game player. Click the Games icon to
enter game player mode and then select the game you want to
play.
Page 15

14
9.4 TEXT E-BOOK READER
This player is also an text e-book reader. You can read text
files in this player.
9.5 DATE
This player also has view-only calendar feature.
10. ADDITIONAL FEATURES IN MEDIAMANAGER
10.1 PLAY VIDEOS STORED IN YOUR PLAYER
The vué MediaManager program allows you to play the videos stored in
your MP4 player. If you store videos in the VIDEO/RECORD directory of
your player, click the OPEN VIDEO FOLDER (or )
button, and the video thumbnails will be displayed automatically.
10.2 PLAY PHOTOS STORED IN YOUR PLAYER
The vué MediaManager program allows you to play the photos stored in
your MP4 player. If you store videos in the IMAGE/RECORD directory of
your player, and click the OPEN PHOTO FOLDER (or
) button, the photo thumbnails will be displayed automatically.
Page 16

15
10.3 PLAY VIDEOS OR PHOTOS IN YOUR COMPUTER
The vué MediaManager program allows you to play the videos and
photos stored in your computer. Click the SELECT DIRECTORY
Thumbnails of photo and video will be displayed automatically.
10.4 EDIT YOUR VIDEOS
The vué MediaManager program allows you to edit videos stored in your
MP4 player. Click EDIT (or ) button, and the video
editor will be activated.
Video Editor
Video Processing: to adjust brightness and contrast to the
Video Logo Effect: to add text logo on the selected video.
Video Trimming: use the pointer to set the video length
Click or to set video length.
Please note the edited video will be renamed as “original file
Click “Apply Video Effect & Save” to save the edited video.
10.5 EDIT YOUR PHOTOS
The vué MediaManager program allows you to edit photos stored in your
player. Click EDIT (or ) button to activate the
photo editor.
Photo Editor – this software helps you add versatile effects to your
photos. Each photo editing function has on-screen text description to
make your editing easy and fun.
10.6 TO SHARE YOUR VIDEOS TO YOUTUBE
The vué MediaManager program allows you to share your videos. Click
the SHARE VIDEOS button, and the video sharing
program will be activated. To proceed with video sharing, you must have
Internet connection on your computer. *User should refer to YouTube’s
button and select the directory you want to use.
selected video.
name + with Video Effect” unless you click “the Rename as…”
box to assign a different file name.
Page 17

16
terms of service.
Video upload
- Click the Online Video Sharing button to activate Online Video Sharing.
- Click the “Upload to YouTube” button to activate YouTube Uploader.
- Key in the User name and Password of your YouTube Account.
- Click the “Upload to YouTube” button, and the selected video will start
uploading to YouTube.
Page 18

17
NOTE:
- Please keep your internet connection online when uploading video to
YouTube.
- It will take time to upload video, especially for large size file. Please be
patient.
10.7 SHARE YOUR VIDEOS AND PHOTOS BY EMAIL
The vué MediaManager program allows you to share your videos and
photos by email. Click the Email Video Sharing button, and the Email
Video Sharing program will be activated.
Key in your account and the recipient’s e-mail account details, and click
“Send”.
Page 19

18
NOTE:
LCD display
2.8-inch TFT-LCD, touch-panel screen
Internal memory
2GB NAND flash memory chip. (The memory capacity
users can use is approx. 1.8GB and the actual capacity
will differ in every unit)
External memory
MicroSD card, up to 8GB capacity
Music format
MP3, WMA
Video format
Motion JPEG AVI, MPEG1/2/4 AVI, QuickTime, 3GP,
VOB, DAT, MOV
*Video conversion by the bundled MP4 Tool software is
needed
Photo format
JPEG
e-book format
TEXT
Power source
Built-in rechargeable Lithium-ion battery
Audio input
Built-in microphone
Audio output
3.5mm earphone port, speaker
USB port
Mini USB type, USB2.0
Dimension
3-5/8" x 2-3/16" x 9/16"
Net weight
Approx. 75g
1. If you do not know the SMTP server address of your email account,
please contact your email service provider. The port number is usually
fixed at 25, unless your service provider has a special assignment on
it.
2. We do not recommend you send video mail with a big video clip (i.e.
over 3MB), as some mail servers may not be able to handle larger
capacity emails.
11. SPECIFICATIONS AND SYSTEM REQUIREMENTS
SPECIFICATIONS
SYSTEM REQUIREMENTS
- Computer Operating System: Windows 2000, Windows XP, Windows
Vista (32bit), Windows 7 and Mac OS X 10.4.3 or higher
- The enclosed vué MediaManager software works with computers in
Windows 2000/XP/Vista (32bit) and Windows 7.
- USB port
- CD ROM (if installing software from the enclosed software CD)
Page 20

19
12. SAFETY AND UPKEEP
Never attempt to fix the device yourself by opening and disassembling
the unit as this will affect the service life of this product.
When cleaning the screen please use a soft dry cloth.
Do not expose the device to direct sunlight for long periods of time.
Do not expose the device to damp or moist conditions.
Do not dispose of this product in an incinerator. The battery inside this
product may explode or leak.
Do not place near sharp objects as the screen can be easily scratched.
When the device is not in use turn the power OFF to preserve the
battery power.
This device uses a Lithium battery. When the battery is low, please
charge the battery using the AC Power charger or USB cable supplied,
and to connect it to the USB port of a computer.
13. FCC PART 15 STATEMENT
This device complies with Part 15 of the FCC Rules. Operation and is subject
to the following two conditions:
(1) This device may not cause harmful interference, and
(2) This device must accept any interference received, including interference
that may cause undesired operation.
Warning: Changes or modifications to this unit not expressly approved by
the party responsible for compliance could void the user’s authority to
operate the equipment.
NOTE: This equipment has been tested and found to comply with the limits
for a Class B digital device, pursuant to Part 15 of the FCC Rules. These
limits are designed to provide reasonable protection against harmful
interference in a residential installation. This equipment generates, uses and
can radiate radio frequency energy and, if not installed and used in
accordance with the instructions, may cause harmful interference to radio
communications.
However, there is no guarantee that interference will not occur in a particular
Page 21

20
installation. If this equipment does cause harmful interference to radio or
television reception, which can be determined by turning the equipment off
and on, the user is encouraged to try to correct the interference by one or
more of the following measures:
Reorient or relocate the receiving antenna.
Increase the separation between the equipment and receiver.
Connect the equipment into an outlet on a circuit different from that to
Consult the dealer or an experienced radio/TV technician for help.
which the receiver is connected.
14. TRADEMARK STATEMENT
THE SHARPER IMAGE® name and logo are registered trademarks.
©The Sharper Image. All Rights Reserved.
YouTube™, YouTube Broadcast Yourself™ name and logo are registered
trademark of YouTube, LLC.
Page 22

21
1. INTRODUCCIÓN
2. FAMILIARÍCESE CON SU REPRODUCTOR
3. CÓMO CARGAR EL REPRODUCTOR
4. OPERACIONES BÁSICAS
4.1 ENCENDIDO
4.2 APAGADO
4.3 BLOQUEO Y DESBLOQUEO DEL TECLADO
4.4 PANTALLA TÁCTIL
4.5 AMPLIACIÓN DE LA MEMORIA
4.6 CÓMO CONECTARLO A LA COMPUTADORA
4.7 CÓMO DESCONECTARLO DE LA COMPUTADORA
5. AJUSTES DEL SISTEMA
5.1 CONFIGURACIÓN DEL IDIOMA
5.2 CONFIGURACIÓN PERSONAL
5.2.1 CONFIGURACIÓN DEL APAGADO AUTOMÁTICO
5.2.2 CONFIGURACIÓN DEL SALVAPANTALLAS
5.2.3 BOTÓN DE AUDIO
5.3 CONFIGURACIÓN DE FECHA Y HORA
6. OPERACIONES CON MÚSICA Y VIDEOS
6.1 DESCARGAR MÚSICA MP3
6.2 DESCARGAR VIDEOS MP4
6.3 REPRODUCIR MÚSICA MP3
6.4 REPRODUCIR VIDEOS MP4
7. DESCARGAR VIDEOS DE LA WEB
7.1 INSTALACIÓN DEL PROGRAMA VUÉ MEDIAMANAGER
7.2 DESCARGAR VIDEOS
7.3 REPRODUCIR VIDEOS DESCARAGADOS DE LA WEB
8. CÓMO CONVERTIR ARCHIVOS DE VIDEO EN LA COMPUTADORA
9. FUNCIONES ADICIONALES
9.1 GRABACIONES DE AUDIO
9.2 REPRODUCTOR DE FOTOS
9.3 JUEGOS
9.4 LECTOR DE LIBROS ELECTRÓNICOS
9.5 CALENDARIO
10. FUNCIONES ADICIONALES EN MEDIAMANAGER
11. ESPECIFICACIONES TÉCNICAS Y REQUISITOS DEL SISTEMA
12. SEGURIDAD Y MANTENIMIENTO
13. DECLARACIÓN DE LAS NORMAS DE LA FCC
14. DECLARACIÓN DE MARCA REGISTRADA
ÍNDICE
Page 23

22
1. INTRODUCCIÓN
Gracias por comprar nuestros productos. Este reproductor realiza varias
funciones: reproductor MP3 de música, reproductor MP4 de video,
reproductor de videos por Internet, visualización de fotos, grabadora de
audio, juegos y lector de libros electrónicos. La pantalla táctil de 2.8
pulgadas TFT-TLC permite un fácil manejo.
¡Ahora es muy fácil y seguro ver videos! En este paquete encontrará el
miniCD del programa vué MediaManager, que le ayudará a descargar
videos para verlos en su reproductor. Ya no tendrá que descargar videos
MP4 de sitios desconocidos de Internet con procedimientos complicados.
Antes de usar su reproductor, asegúrese del contenido del paquete.
Debe incluir los siguientes accesorios:
Cable de puerto USB
•
Audífonos
•
Un miniCD con el programa
•
Un cargador de corriente AC, voltaje universal de 100V~240V
•
Este manual de instrucciones
•
La guía rápida de uso
•
Un estilete (dentro del reproductor)
•
Por favor, lea detenidamente este manual para obtener resultados
óptimos de funcionamiento. Guarde este manual como guía de
referencia.
Page 24

23
2. FAMILIARÍCESE CON SU REPRODUCTOR
Page 25

24
3. CÓMO RECARGAR ESTE REPRODUCTOR
POR FAVOR, CARGUE COMPLETAMENTE ESTE REPRODUCTOR
ANTES DE USARLO POR PRIMERA VEZ. TOMA
APROXIMADAMENTE 4 HORAS.
3.1 Puede cargar su el reproductor desde un enchufe con el cable del
puerto USB y el adaptador de corriente AC que se adjuntan o desde su
computadora, sólo con el cable del puerto USB.
3.2 Cuando se esté cargando la batería, aparecerá el ícono de la batería
en la pantalla LCD.
3.3 Este reproductor está diseñado con un circuito de protección de
sobrecargas. No obstante, le recomendamos que lo desconecte una vez
que esté cargado por completo.
4. OPERACIONES BÁSICAS
4.1 ENCENDIDO: Deslice el botón
principal de encendido hacia la
posición de ON (encendido) y
presiónelo durante 3 segundos. El
reproductor se encenderá.
4.2 APAGADO: Presione el mismo
botón durante 3 segundos para apagarlo.
NOTA: Después de apagarlo, deslice siempre el botón principal hacia la
posición de OFF (apagado). Esto evitará que malgaste batería.
(Caption:) Presione el botón de encendido durante 3 segundos para
encenderlo (ON) o apagarlo (OFF).
4.3 BLOQUEAR/DESBLOQUEAR EL TECLADO (mientras el
reproductor está encendido (ON): Presione el botón de encendido para
bloquearlo. Presiónelo de nuevo para desbloquearlo.
4.4 PANTALLA TÁCTIL: Este reproductor tiene una pantalla táctil
TFT-LCD de 2.8 pulgadas y gran sensibilidad. Puede manejarlo haciendo
clic en la pantalla con el estilete o con la yema del dedo.
Page 26

25
4.4.1 Para seleccionar el menú, haga clic una vez.
4.4.2 Para confirmar cualquier cambio de ajuste, haga clic dos veces.
NOTA:
-La precisión y sensibilidad se pueden ver afectadas por la
temperatura, la humedad y otros factores similares; puede que
tenga que calibrar la pantalla LCD manualmente si la precisión
no es óptima.
-La pantalla táctil utiliza la tecnología de vanguardia Pressure Sensor.
Para obtener los mejores resultados, aplique siempre cierta presión al
hacer clic.
CÓMO CALIBRAR LA PANTALLA
-Haga clic en el botón de Calibrate en el menú principal.
-En la pantalla aparecerán tres imágenes.
-Haga clic en cada una para finalizar la calibración.
NOTA: En casos poco comunes, si la precisión de la pantalla LCD no es
la deseada y usted no puede hacer clic en el botón de Calibrate, haga
clic en cualquier parte de la pantalla y presione el botón de OK durante 3
segundos y aparecerán las imágenes.
4.5 AMPLIACIÓN DE LA MEMORIA: Este reproductor tiene una
memoria interna de 2GB (hay aproximadamente 1.8GB de espacio
disponible para guardar archivos de música o videos). Para ampliar la
memoria, aumentar la cantidad de música y alargar la duración de los
videos, use cualquier tarjeta MicroSD, que se puede comprar en la
tiendas especializadas. Este reproductor funciona con tarjetas MicroSD
de hasta 8GB de capacidad.
La memoria interna y la tarjeta MicroSD son discos independientes de
memoria. En este reproductor, la memoria interna se llama C: disk (disco
C:), y la tarjeta MicroSD (si la coloca) se llama D: disk (disco D:). Para
Page 27

26
obtener información sobre los discos, haga clic en el botón Files
(archivos) del menú principal. Si tiene el reproductor conectado a la
computadora, funciona igual que su sistema USB de almacén de
memoria, y el disco de memoria pasará a formar parte de la memoria de
su computadora.
CÓMO INSERTAR LA TARJETA DE MEMORIA: Coloque la tarjeta
MicroSD y deslícela suavemente en la ranura.
CÓMO SACAR LA TARJETA DE MEMORIA: Empuje suavemente la
tarjeta MicroSD hasta que haga “clic”. La tarjeta saldrá automáticamente.
NOTA: Inserte y saque la tarjeta de memoria MicroSD sólo cuando el
reproductor esté apagado (en OFF). De otro modo, podría perder o
dañar los archivos que ha guardado en su reproductor.
4.6 CÓMO CONECTARLO A LA COMPUTADORA: Este reproductor
funciona como un sistema USB de almacén de memoria cuando lo
conecta al puerto USB de la computadora. Una vez que conecte el
reproductor a la computadora, el sistema USB de almacén de memoria
se activará automáticamente. Puede pasar archivos del reproductor a la
computadora o viceversa.
4.6.1 Si el sistema USB de almacén de memoria no se activa
automáticamente, puede activarlo desde el menú del escritorio.
4.6.2 ESTE PAQUETE CONTIENE EL CD DEL PROGRAMA VUÉ
MEDIAMANAGER Y HERRAMIENTAS DEL MP4. LE
RECOMENDAMOS QUE INSTALE EL PROGRAMA ANTES DE
CONECTAR EL REPRODUCTOR A LA COMPUTADORA POR
PRIMERA VEZ.
Ejecute el programa de configuración de vué MP4 PLAYER e instale el
programa vué MediaManager siguiendo las instrucciones del Installation
Wizard.
Page 28

27
4.6.3 El programa vué MediaManager se activará automáticamente
una vez que conecte el reproductor a la computadora e instale dicho
programa. En la imagen de abajo se muestra la pantalla de inicio del
programa.
4.7 CÓMO DESCONECTARLO DE LA COMPUTADORA: Le
recomendamos que desconecte el reproductor de la computadora de
forma segura antes de apagarlo. De otro modo, podría causar daños
irreparables en la computadora y sus archivos, o en la información
almacenada en el reproductor.
Page 29

28
4.7.1 Para desconectarlo de forma segura,
haga clic en el ícono (está en la esquina
superior derecha de su barra de herramientas).
Haga clic con el lado derecho del ratón, y en la
pantalla aparecerá la lista de funciones del
sistema USB.
4.7.2 Seleccione con el ratón este sistema y
haga clic en el botón de STOP y aparecerá la
solicitud de confirmación de la desconexión.
Haga clic en OK para confirmarlo. Es ahora cuando puede desenchufar el
reproductor.
5. AJUSTES DEL SISTEMA
5.1 CONFIGURACIÓN DEL IDIOMA
Seleccione SETTINGS (Ajustes) LANGUAGE SELECT
(seleccionar idioma). Seleccione el idioma que desee de la
lista.
5.2 CONFIGURACIÓN PERSONAL
5.2.1 CONFIGURACIÓN DEL APAGADO AUTOMÁTICO
Seleccione SETTINGS (Ajustes) PERSONAL SETUP (configuración
personal) AUTOPOWER OFF (apagado automático). Puede configurar
la hora a la que desee que el reproductor se apague automáticamente. La
configuración de fábrica no tiene activada esta función.
5.2.2 CONFIGURACIÓN DEL SALVAPANTALLAS
Seleccione SETTINGS (Ajustes) PERSONAL SETUP (configuración
personal) SCREENSAVER (salvapantallas). Aquí podrá ajustar cada
cuánto tiempo desea que se apague la pantalla LCD para ahorrar batería.
Para volver a activar la pantalla LCD mientras el salvapantallas está
activo, sólo tiene que tocar la pantalla. La configuración de fábrica no
tiene activada esta función.
Page 30

29
5.2.3 BOTÓN DE AUDIO
Seleccione SETTINGS (Ajustes) PERSONAL SETUP (configuración
personal) BUTTON AUDIO (botón de audio). Puede activarlo o
desactivarlo cuando desee. La configuración de fábrica lo tiene activado.
5.3 CONFIGURACIÓN DE FECHA Y HORA
Seleccione SETTINGS (Ajustes) PERSONAL SETUP (configuración
personal) TIME SETUP (configuración de fecha y hora).
6. OPERACIONES CON MÚSICA Y VIDEOS
DEBE TENER LOS ARCHIVOS DE MÚSICA MP3 O DE VIDEO MP4 EN
LA COMPUTADORA. ES POSIBLE QUE NO PUEDA REPRODUCIR
ALGUNOS DE LOS ARCHIVOS DE VIDEO EN EL REPRODUCTOR.
POR LO TANTO, LE RECOMENDAMOS ENCARECIDAMENTE QUE,
ANTES DE DESCARGAR LOS VIDEOS A SU REPRODUCTOR,
CONVIERTA SUS ARCHIVOS DE VIDEO MP4 CON EL AUXILIAR DE
PROGRAMA MP4 QUE SE ADJUNTA.
6.1 DESCARGAR MÚSICA MP3 EN ESTE REPRODUCTOR:
Cuando su reproductor esté conectado a la computadora, se
activará automáticamente la función de almacén de datos.
Copie los archivos MP3 en su computadora y pase los
archivos a la carpeta de AUDIO de su reproductor.
6.2 DESCARGAR VIDEOS MP4: Cuando su reproductor esté
conectado a la computadora, se activará automáticamente la
función de almacén de datos. Copie los archivos de video MP4
en su computadora y pase los archivos a la carpeta de VIDEO
de su reproductor.
6.3 REPRODUCIR MÚSICA MP3: Haga clic en el ícono de
Music (música) para entrar en el menú de música. Seleccione
la canción que desee.
Page 31

30
6.3.1 SUBIR/BAJAR EL VOLUMEN: Haga clic en este ícono para
entrar en el menú del volumen. Deslice el dedo en la tabla de
herramientas para ajustar el volumen.
6.3.2 REPRODUCIR/PAUSA: Haga clic en este ícono para oír la
canción. Púlselo de nuevo para hacer una pausa.
6.3.3 ECUALIZADOR: Haga clic en el ícono de NORMAL
para acceder al ecualizador. Hay cuatro opciones: NORMAL, CLASS
(clásica), ROCK, POP y JAZZ.
6.3.4 MODO DE REPETICIÓN: Haga clic en este ícono para repetir
una de las 4 opciones.
6.3.5 ANTERIOR/SIGUIENTE: Haga clic en estos íconos para
oír la canción anterior o la siguiente a la seleccionada.
NOTA: Este reproductor trae un altavoz de alta calidad. Si no usa los
audífonos podrá escuchar la música por el altavoz.
6.4 REPRODUCIR VIDEOS MP4: Haga clic en el ícono de
Video de la pantalla LCD para acceder a esta función.
Seleccione el video que desee ver.
Page 32

31
7. DESCARGAR VIDEOS DE LA WEB
ESTE REPRODUCTOR LE PERMITE DESCARGAR ARCHIVOS DE
VIDEO DE DETERMINADOS SITIOS DE INTERNET Y
REPRODUCIRLOS EN EL MISMO. PUEDE DESCARGAR VIDEOS
USANDO EL PROGRAMA VUÉ MEDIAMANAGER UNA VEZ QUE
CONECTE EL REPRODUCTOR A LA COMPUTADORA.
*Recomendamos al usuario que revise los términos y requisitos del
servicio de dichos sitios web antes de descargar los videos.
7.1 INSTALACIÓN DEL PROGRAMA VUÉ MEDIAMANAGER
Una vez que conecte el reproductor a la computadora, el disco de
instalación del programa vué MP4 PLAYER se activará automáticamente.
Ejecute el programa vué MP4 PLAYER y siga las instrucciones de
Installation Wizzard para instalar el programa vué MediaManager.
NOTA:
Si el disco de instalación del programa vué MP4 PLAYER no se activa
automáticamente, por favor comience de nuevo el proceso de instalación,
esta vez manualmente, según los siguientes pasos:
Page 33

32
Paso 1: Escriba la información del directorio de autorun (reproducción
automática) que aparece en el disco del programa.
Paso 2: Haga clic dos veces en el ícono de autorun.exe para
comenzar la instalación.
7.2 DESCARGAR VIDEOS
7.2.1 Una vez que ha instalado el programa, conecte su reproductor a la
computadora. El programa vué MediaManager se activará
automáticamente.
NOTA: Si por alguna razón no se activa el programa vué MediaManager,
por favor desconecte su reproductor, apague la computadora y empiece
de nuevo todo el proceso.
Page 34

33
7.2.2. Para descargar videos, siga las siguientes instrucciones:
- Haga clic en el botón Select Internet Sites (seleccionar sitios de
Internet)
- Copie el enlace URL del video que quiere descargar desde el sitio de
Internet y péguelo en el campo designado del Web Video Downloader
(descarga de videos desde Internet).
- Haga clic en el botón de Save as (guardar como) para darle
un nombre distinto al video, si lo desea.
- Haga clic en el botón de Download now (descargar
ahora) para empezar.
NOTA: También puede obtener las instrucciones de descarga
presionando HELP (ayuda).
7.2.3. Una vez concluido el proceso, el video se archivará en su
reproductor.
7.3 REPRODUCIR VIDEOS DESCARGADOS DE LA WEB
Desconecte su reproductor de la computadora. Encienda su
reproductor (presione ON) y haga clic en el ícono de VuéVideo
en el menú principal. Ahora puede ver los videos que ha
descargado donde quiera y cuando quiera. ¡NO ES
NECESARIO CONVERTIRLOS A UN PROGRAMA DE VIDEO!
8. CÓMO CONVERTIR ARCHIVOS DE VIDEO EN LA
COMPUTADORA
8.1 Instale la herramienta del MP4.
Page 35

34
8.2 Active el programa de herramientas de MP4 haciendo clic en el ícono
de MP4 Tool que aparece en la lista de programas de su
computadora.
8.3 Haga clic en el botón “File” (archivo) del programa MP4 y después
haga clic en el botón de “Convert” (convertir), para empezar el proceso
de conversión del video.
8.4 Una vez que se hayan convertido los archivos de video MP4, se
guardarán en su computadora. Ahora puede descargarlos en su
reproductor.
Page 36

35
9. FUNCIONES ADICIONALES
9.1 GRABACIONES DE AUDIO
9.1.1 Haga clic en el ícono de Record (grabar) para iniciar el
modo de grabación. Puede grabar su voz mediante un archivo
de audio WAV.
9.1.2 Los archivos de audio que grabe se guardarán en el
archivo llamado AUDIO/RECORD (archivos/audio).
9.2 REPRODUCTOR DE FOTOS
Este reproductor reproduce fotos en formato JPEG. Haga clic
en el ícono de Photos (fotos) para ver las fotos que ha
guardado en este reproductor.
NOTA: La calidad de la foto reproducida variará según la
resolución de la foto.
9.3 JUEGOS
Este reproductor también viene con juegos programados.
Haga clic en el ícono de Games (juegos) y seleccione el juego
que desee.
9.4 LECTOR DE LIBROS ELECTRÓNICOS
Este reproductor es también un lector de libros electrónicos.
Con este reproductor, usted puede activar y leer libros
electrónicos.
9.5 CALENDARIO
Este reproductor le ofrece la opción de ver el calendario.
Page 37

36
10. FUNCIONES ADICIONALES EN MEDIAMANAGER
10.1 REPRODUCIR VIDEOS ARCHIVADOS EN SU REPRODUCTOR
El programa vué MediaManager le permite reproducir los videos que ha
archivado en su reproductor MP4. Si guarda los videos en el directorio de
VIDEO/RECORD de su reproductor, para verlos sólo tiene que hacer clic
en OPEN VIDEO FOLDER (abrir archivo de video) o en
el ícono . En la pantalla aparecerá la lista de sus videos.
10.2 REPRODUCIR FOTOS ARCHIVADAS EN SU REPRODUCTOR
El programa vué MediaManager le permite reproducir las fotos que ha
archivado en su reproductor MP4. Si guarda las fotos en el directorio de
IMAGE/RECORD de su reproductor, para ver las fotos sólo tiene que
hacer clic en el ícono de OPEN FOTO FOLDER (abrir
archivo de fotografía) o en el ícono .
10.3 REPRODUCIR VIDEOS O FOTOS EN SU COMPUTADORA
El programa vué MediaManager le permite reproducir los videos y las
fotos que ha archivado en su computadora. Haga clic en el botón de
SELECT/DIRECTORY (seleccionar directorio) y
seleccione el directorio que desee. El video o la foto se preproducirá
automáticamente.
Page 38

37
10.4 CÓMO EDITAR SUS VIDEOS
El programa vué MediaManager le permite editar los videos que ha
archivado en su reproductor MP4. Haga clic en el botón de EDIT
Editor de video
Video Processing (procesador de videos): para ajustar el brillo y el
contraste del video.
Video Logo Effect (efecto logotipo): para añadir texto al video
seleccionado.
Video Trimming (editor duración video): para ajustar la duración del
video.
Haga clic en para ajustar la duración.
Le advertimos que el video editado será llamado “nombre original del
video + with Video Effect” (con efectos) a no ser que seleccione
“Rename as…” (cambiar nombre).
Haga clic en “Apply Video Effect & Save” (aplicar efecto y guardar)
para archivar el video editado.
10.5 CÓMO EDITAR SUS FOTOS
El programa vué MediaManager le permite editar las fotos que ha
archivado en su reproductor MP4. Haga clic en el botón de EDIT
Editor de fotos: este programa le ayuda a añadir una serie de efectos a
las fotos. Cada función de edición de la foto viene con una descripción en
la pantalla, para que el proceso resulte fácil y divertido.
10.6 CÓMO CARGAR VIDEOS EN YOUTUBE
El programa vué MediaManager le permite cargar sus videos en Internet.
Haga clic en el botón de SHARE VIDEOS (cargar
videos) para activar esta función. Para realizar este proceso debe tener
su computadora conectada a Internet. *El usuario debe revisar los
términos y normas de YouTube.
o (editar) para activar esta función.
o (editar) para activar esta función.
Page 39

38
Cómo cargar sus videos en Internet:
- Haga clic en el botón de Online Video Sharing (carga de videos en
Internet) para activar esta función.
- Haga clic en “Upload to YouTube” (cargar en YouTube) para activar el
cargador de YouTube.
- Escriba el nombre y la contraseña de su cuenta de usuario en YouTube.
- Haga clic en el botón de “Upload to YouTube” para empezar a cargar
en YouTube el video que ha seleccionado.
Page 40

39
NOTA:
- Por favor, no se desconecte de Internet mientras esté cargando el video
en YouTube.
- El video tardará algún tiempo en cargarse, especialmente si el archivo
es muy grande. Por favor, tenga paciencia.
10.7 CÓMO ENVIAR SUS VIDEOS Y FOTOS POR CORREO
ELECTRÓNICO
El programa vué MediaManager le permite enviar sus videos y fotos por
correo electrónico. Haga clic en el botón de Email Video Sharing (enviar
videos por correo electrónico) para activar esta función.
Escriba la información del correo electrónico del remitente y el
destinatario y haga clic en “send” (enviar).
NOTA:
1. Si usted no sabe la dirección SMTP del servidor de su cuenta de
correo electrónico, póngase en contacto con el administrador de su
cuenta de correo electrónico. El número de puerto está fijado
normalmente en 25, a no ser que su administrador de servicio tenga otro
especialmente asignado para él.
2. No le recomendamos que envíe videos de gran tamaño por correo
electrónico (más de 3MB, por ejemplo), ya que muchos servidores no
tienen la capacidad necesaria para procesar archivos grandes.
Page 41

40
11. ESPECIFICACIONES TÉCNICAS
Pantalla LCD
2.8 pulgadas TFT-LCD, pantalla táctil
Memoria interna
Chip de 2GB NAND de memoria Flash. (La capacidad
disponible para uso es de aproximadamente 1.8GB, y la
capacidad real variará dependiendo de cada unidad)
Memoria externa
Tarjeta MicroSD, hasta 8GB de capacidad
Formato de música
MP3, WMA
Formato de video
Motion JPEG AVI, MPEG1/2/4 AVI, QuickTime, 3PG,
VOB, DAT, MOV
*Es necesario convertir los videos con la herramienta de
conversión de MP4 que se incluye
Formato de fotografía
JEPG
Formato de libro
electrónico
TEXT
Fuente de energía
Batería recargable de litio integrada
Entrada de audio
Micrófono integrado
Salida de audio
Conector de audífonos de 3.5 mm, altavoz
Puerto USB
Tipo mini USB, USB2.0
Dimensiones
3-5/8" x 2-3/16" x 9/16"
Peso neto
75 g. aproximadamente
REQUISITOS DEL SISTEMA
-Sistema operativo de computadoras: Windows 2000, Windows XP,
Windows Vista (32bit), Windows 7 y Mac OS X 10.4.3 o superior
-El programa vué MediaManager que se adjunta funciona con Windows
2000/Vista (32bit) y Windows 7
-Puerto USB
-CD ROM (si instala el programa con el CD que se adjunta)
12. SEGURIDAD Y MANTENIMIENTO
No intente arreglar el reproductor usted mismo abriéndolo y
desarmándolo; esto afectará a la durabilidad de este producto.
Por favor, use un paño suave y seco para limpiar la pantalla.
No exponga el reproductor directamente a la luz solar por largos
períodos de tiempo.
Mantenga el reproductor en un ambiente seco.
Page 42

41
No tire este reproductor a un incinerador. La batería que contiene
podría explotar o sufrir un escape.
No coloque el reproductor cerca de objetos afilados, ya que la pantalla
se ralla con facilidad.
Apague el reproductor cuando no lo esté usando, para ahorrar batería.
Este reproductor funciona con una batería de litio. Cuando la batería
necesite recargarse, por favor hágalo con el cargador de corriente AC
o el cable para el puerto USB que se adjunta, para conectarlo al puerto
USB de la computadora.
13. DECLARACIÓN DE NORMAS DE LA FCC (PARTE 15)
Este producto funciona de acuerdo a las normas de la FCC (Parte 15) y
está sujeto a las siguintes condiciones:
(1) Este producto no causará interferencias dañinas y
(2) Este producto deberá aceptar cualquier interferencia recibida,
incluyendo la interferencia causada por una operación realizada de
manera involuntaria.
Advertencia: Cualquier cambio o modificación de este producto que no
haya sido aprobado expresamente por la parte responsable de aceptar
las normas podría declarar nula la autoridad del usuario para operar
dicho producto.
NOTA: Este equipo ha sido sometido a pruebas que demuestran que
cumple con los límites de un aparato digital de Clase B, según la Parte 15
de las Normas de la FCC. Dichos límites se asignan para proporcionar
protección razonable contra interferencias dañinas en la instalación en la
vivienda. Este equipo genera, usa y puede emitir frecuencias de radio, y
si no se instala y usa de acuerdo a estas instrucciones puede causar
interferencias dañinas a las comunicaciones de radio.
No obstante, no existe garantía de que no ocurrirá ninguna interferencia
en una determinada instalación. Si este equipo causa interferencias
dañinas en la recepción de radio o la televisión, lo que se puede
determinar apagando el equipo y volviéndolo a encender, recomendamos
Page 43

42
que el usuario trate de corregir la interferencia mediante una o varias de
las siguientes opciones:
Mueva o coloque en un lugar diferente la antena de recepción de
ondas.
Aumente la separación entre el equipo y la zona de recepción.
Conecte el equipo a un enchufe o circuito de corriente diferente al que
tiene conectado el aparato receptor.
Consulte a un técnico o especialista en aparatos de radio y televisión.
14. DECLARACIÓN DE MARCA REGISTRADA
El nombre y el logotipo de THE SHARPER IMAGE® son marcas
registradas.
©The Sharper Image. Derechos reservados.
El nombre y el logotipo de YouTube™ y YouTube Broadcast Yourself™
son marcas registradas de YouTube, LLC.
 Loading...