

Page 1
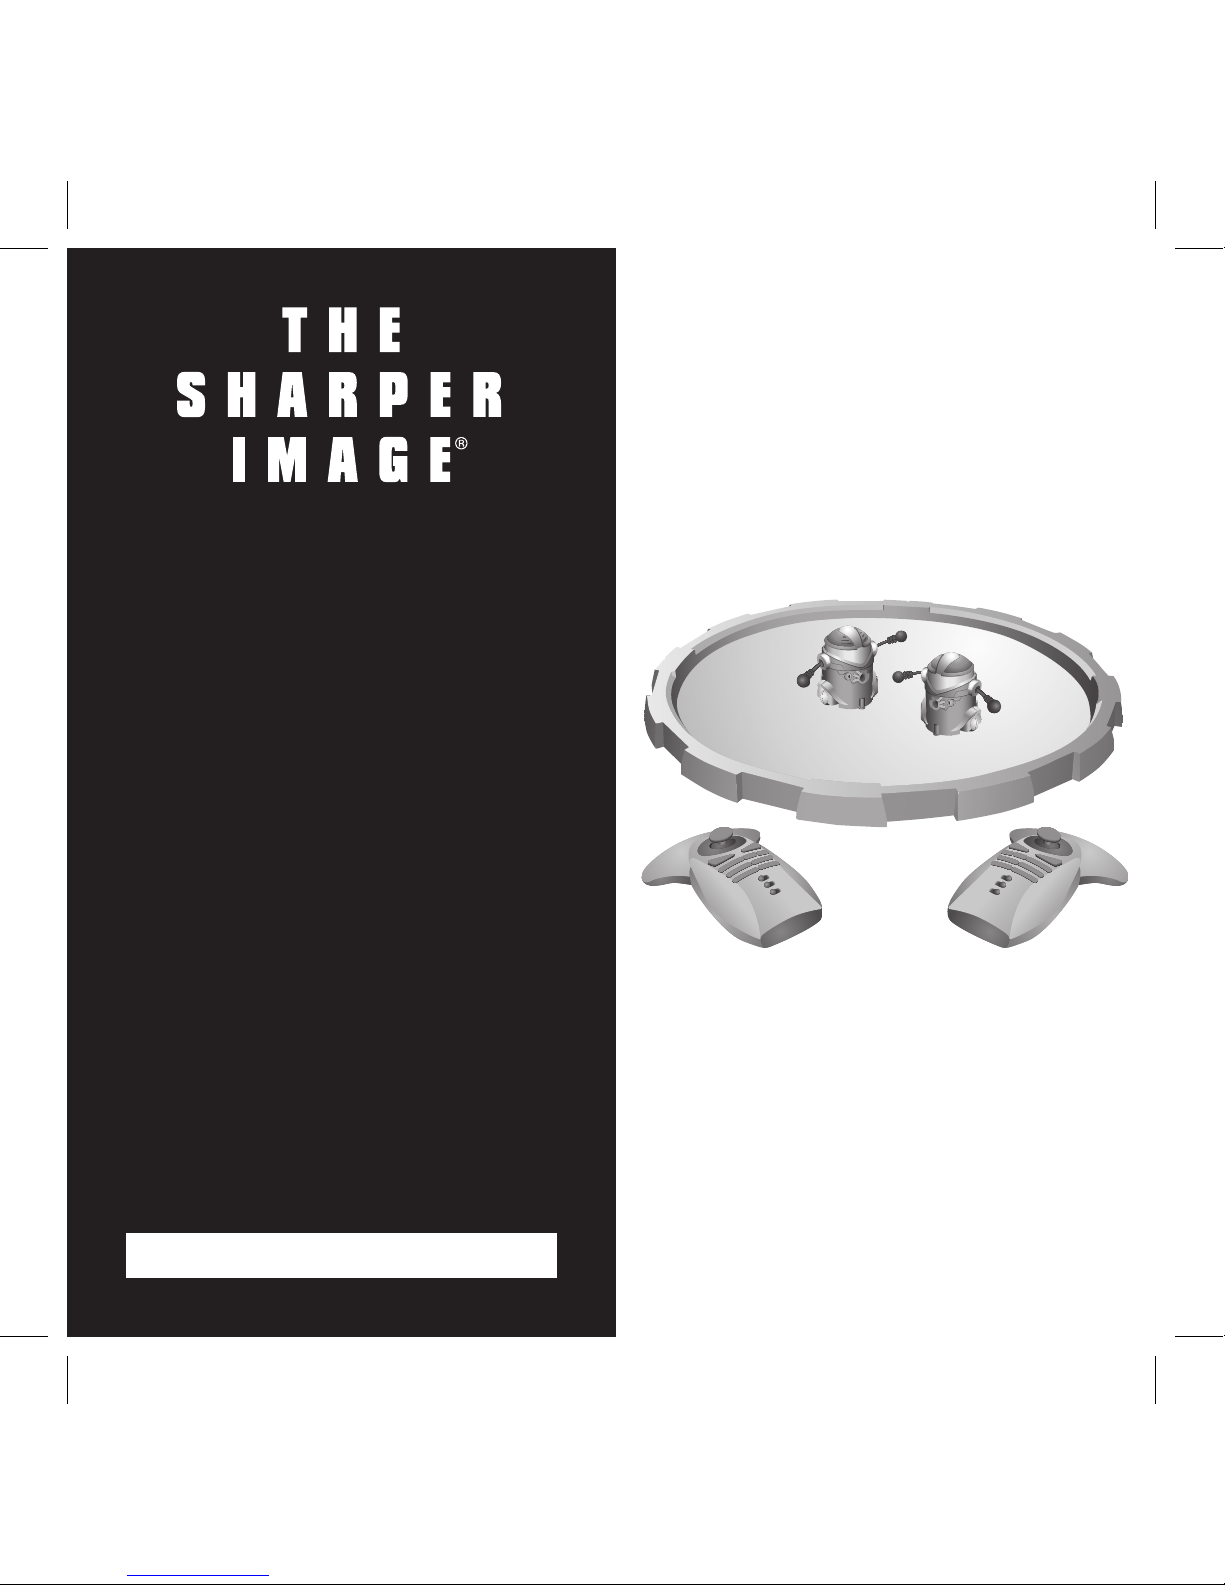
Sumo Robots
Two Robot Sumo Wrestlers
with Artificial Intelligence
SL001 Instructions
Read and save these instructions.
Page 2

Page 3

Table of Contents
Warnings ...................................................................................5
Important Battery Information
....................................................6
Battery Installation
.....................................................................7
Overview ...................................................................................9
Playing the Game
......................................................................9
Remote Control Operation
......................................................10
Commands and Maneuvers
.....................................................11
Keeping Score
..........................................................................14
Charger Operation
...................................................................15
The Dohyo
..............................................................................16
Game Modes
...........................................................................17
Two Player Mode
.....................................................................18
Artificial Intelligence vs. Artificial Intelligence (Demo. Mode)
....19
Remote Control vs. Artificial Intelligence (One-Player Mode)
...20
Stunt Action Upgrade
..............................................................21
Barcode Reader
.......................................................................22
Page 4

Warnings
Troubleshooting .......................................................................25
Care and Maintenance
............................................................27
Specifications ...........................................................................27
Statement of FCC Compliance
.................................................28
FCC Label Compliance Statement
............................................29
Table of Contents
Page 5
• Do not expose units to water or moisture.
• Do not expose units to extreme temperatures from any source.
• Do not drop or subject the units to excessive force or shock.
Warnings
5
Page 6

• Do not mix old and new batteries.
• Do not mix Alkaline, standard (Carbon Zinc) or rechargeable
(Nickel-Cadmium) batteries.
• Use only batteries of the same or equivalent type as
recommended.
• Due to small parts, an adult should install and replace batteries.
• Insert batteries, observing proper +/– polarities.
• Do not short-circuit the supply terminals.
• Do not recharge nonrechargeable batteries.
• Do not use rechargeable batteries.
• Do not dispose of batteries in fire. Batteries may explode or leak.
• Keep the packaging for future reference. It contains important
information.
• Always remove rechargeable batteries from remote controls and
charging station before charging.
Note: Robots’ rechargeable batteries are not replaceable.
Important Battery Information
6
Page 7
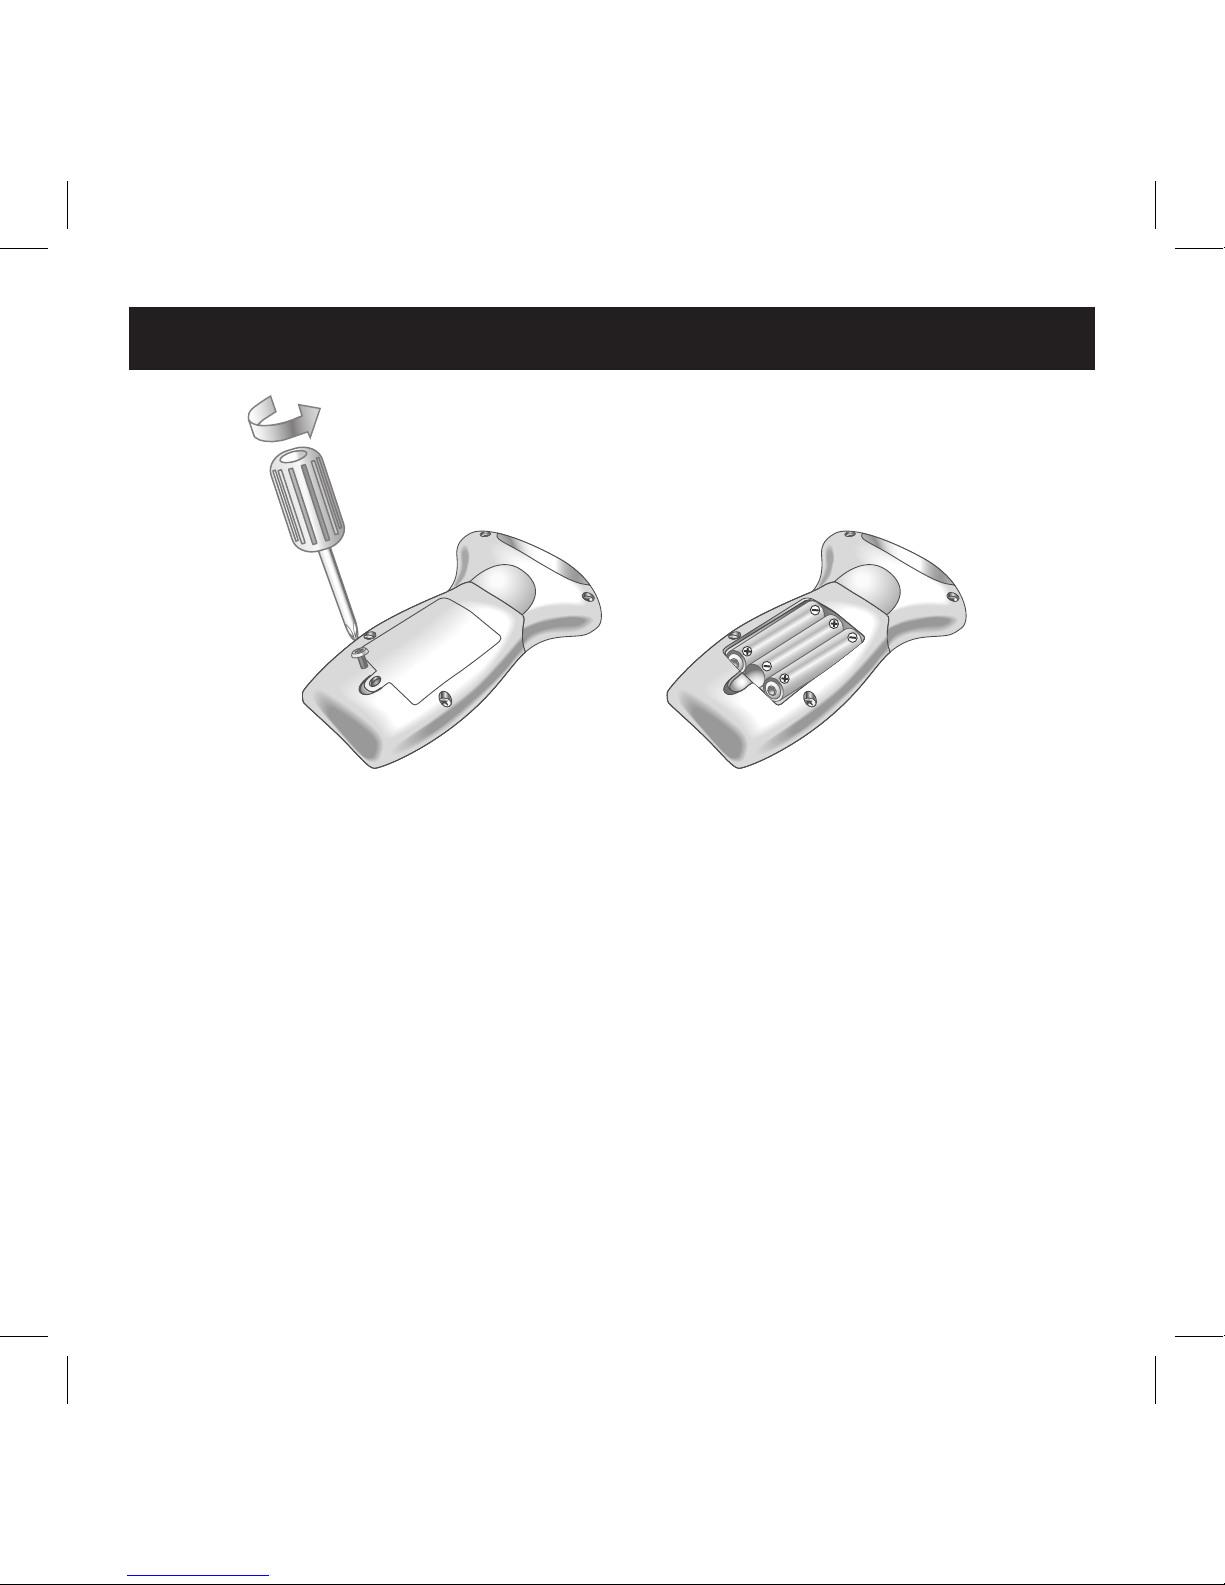
Remote Control
1. Ensure the power switch is in the OFF position.
2. To open the battery compartment on the remote control,
remove the screw using a Phillips screwdriver (not included),
then lift off the cover.
3. Install 3 AAA batteries (purchase separately) into the battery
compartment, observing proper +/– polarities as indicated.
4. Replace the cover, then reinstall the screw using a Phillips
screwdriver (not included).
Battery Installation
7
Page 8
Note: If remote control battery power is weak, the power LED
indicator flashes. Replace the batteries.
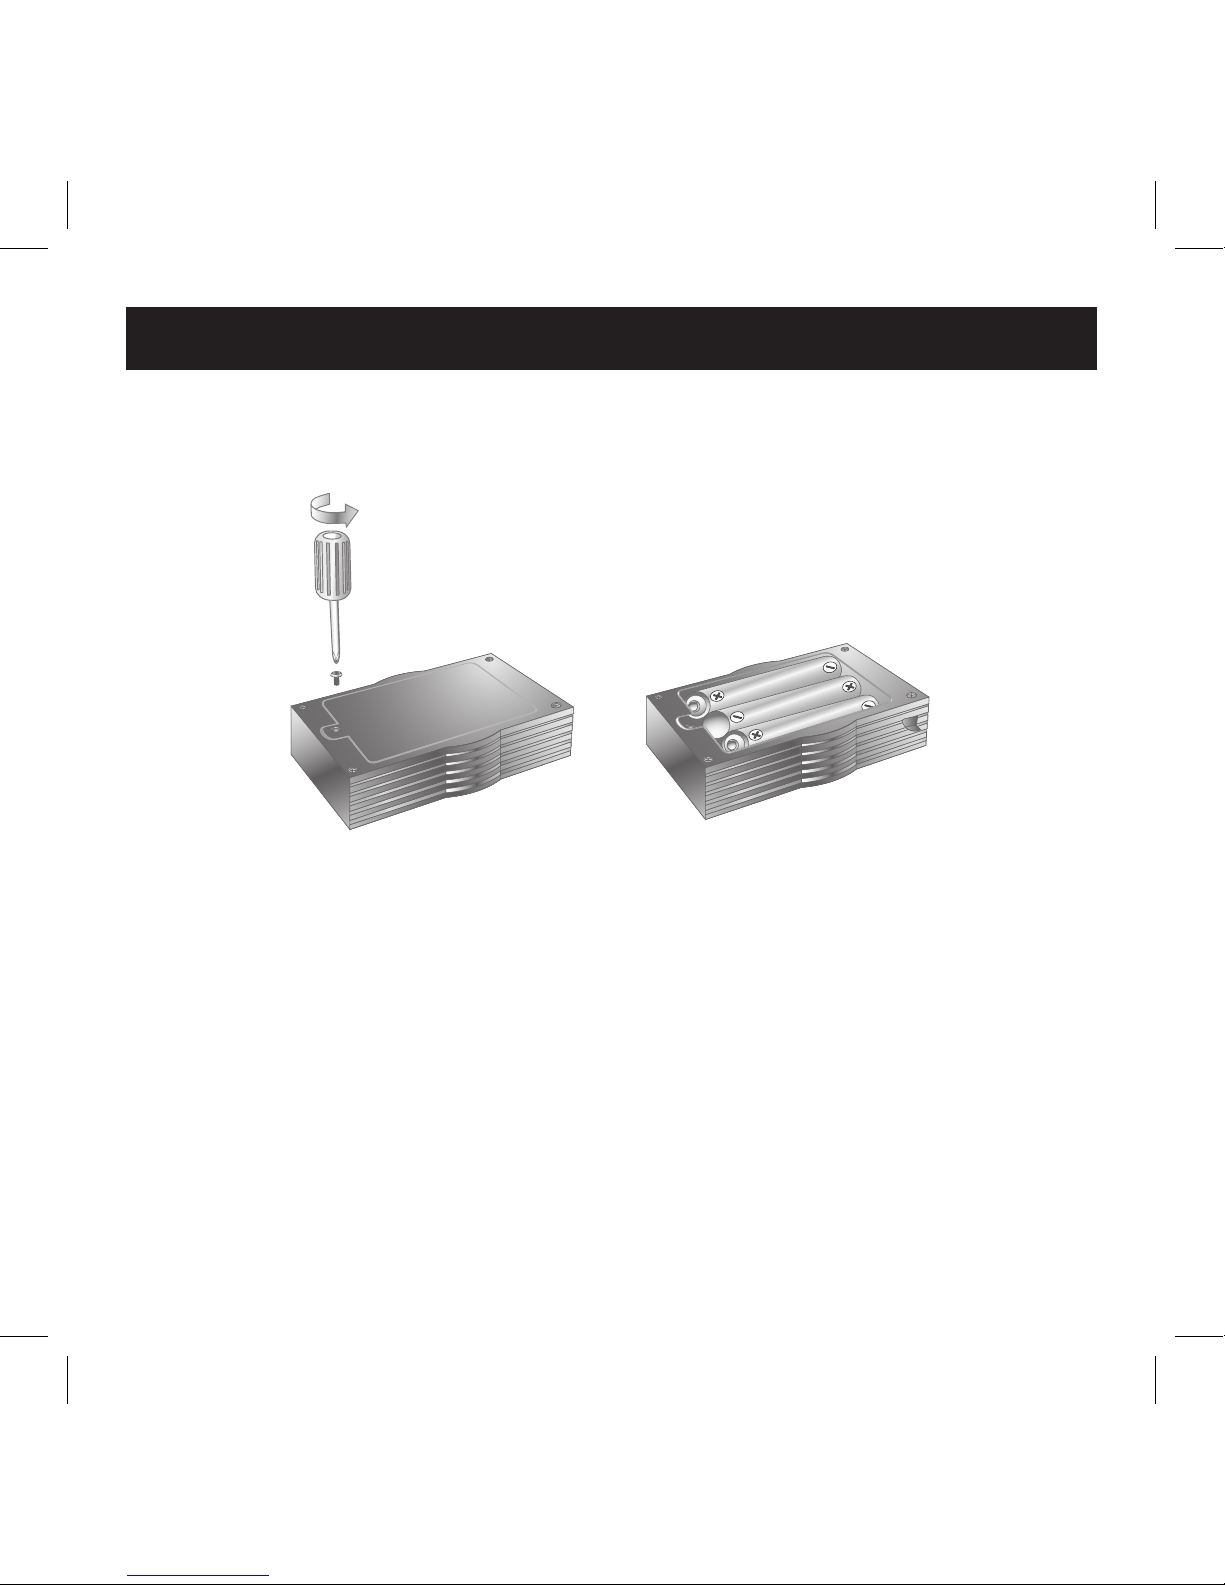
Charger
1. To open the battery compartment on the charger, remove the
screw using a Phillips screwdriver (not included), then lift off
the cover.
2. Install 3 AA batteries (purchase separately) into the battery
compartment, observing proper +/– polarities as indicated.
3. Replace the cover, then reinstall the screw using a Phillips
screwdriver (not included).
Battery Installation
8
Page 9

Overview
Inspired by Sumo wrestling, the goal of the game is to push your
robot Sumo opponent out of the Dohyo ring. Players use the
infrared remote controls to execute various offensive or evasive
maneuvers against an opponent, or a robot’s artificial intelli
gence. Advanced players may test their skill by creating exciting
new user-defined stunts for the robot Sumo wrestlers.
Playing the Game
One game consists of five matches; each match lasts approximately one minute. The winner is determined when:
• The opponent is pushed out of the Dohyo borderline.
• The opponent forfeits and leaves the Dohyo.
• The opponent is lifted up or knocked down in the Dohyo.
Notes:
• Before a match begins, ensure both robots are facing each other
in the shaded area of the Dohyo.
• To select a fighting posture, rotate the robots’ arms to the de
-
sired pose.
9
Page 10

Remote Control Operation
The remote controls drive two-player (two-player mode) and one
player vs. artificial intelligence (one-player mode).
Note: During A.I. (artificial intelligence) mode, all remote-control
functions are deactivated.
1. To use a remote control, after battery installation, the unit
must be calibrated.
2. To calibrate a remote control, move its joystick in a circular
motion around its outermost perimeter.
3. The remote controls have an operational range of approxi
mately six feet. Do not block or cover the infrared sensor
located on the front of the remote units as malfunctions
may occur.
10
Page 11

To perform individual commands and preprogrammed maneuvers
with the remote control, use the reference chart below.
11
Features Description
ACTION 1 • Single click — Front of Robot moves towards
the other one.
• Double click — Back of Robot moves to
-
wards the other one.
ACTION 2 (Level 2) • Single click — Counterclockwise 180° turn or
user-defined stunt action 1.**
• Double click: Clockwise 180° turn or userdefined stunt action 2.**
ACTION 3 (Level 2) • Single click — Spin and Rush forward or
user-defined stunt action 3.**
• Double click: Front of Robot moves towards
the Dohyo center
CHANNEL SELECTION • Infrared frequency selection corresponds to
individual robot.
LEVEL SELECTION • LEVEL 1 — Disables special attacks.
• LEVEL 2 — Enables special attacks.
Commands and Maneuvers
Page 12

ON/OFF • Powers the remote control on and off.
ATTACK 1 • Protective Shell — Repels opponent away with the
Dohyo barrier. No directional limitation.
ATTACK 2 • Thunder Shot — Opponent loses control and
shakes.
ATTACK 3 • Laser Beam — An attack to the challenger behind
you. Opponent is repelled away from you.
START/STOP • Start or stop the game.
• To start a new game and clear all match records,
press and hold the
START/STOP button.
BRAKE • Stops the current stunt or special attacks
immediately.
** See Stunt Action Upgrade section for user-defined stunts.
Note: To perform default action maneuvers such as circling from
the outside to attack or sudden forward movements, a player
may press the ACTION 1, 2 or 3 buttons. Advanced players may
create their own user-defined stunt actions using remote control
ACTION buttons 1, 2 and 3, when set at Level 2. (See Stunt
Action Upgrade section.)
Commands and Maneuvers
12
Page 13

Commands and Maneuvers
13
Page 14

Five LEDs on the front of each robot indicate matches played and
won. The first to win 3 out of 5 matches wins the game.
1. During the first match, the far left LED on both robots blinks
green and red. This indicates the match is in play.
2. When the match is finished, the LED blinks green on the
winning robot and red on the losing robot.
3. Steps one and two are repeated with the next LEDs in the
sequence until 3 out of 5 matches are completed.
4. The first LED illuminates green to indicate the first-match
winner; likewise, the first LED illuminates red to indicate the
first-match loser. This step is repeated on the next LEDs in the
sequence until 3 out of 5 matches are decided.
Keeping Score
14
Page 15

A full charge yields approximately 5-6 minutes of robot action.
A low battery is indicated when the robot’s second and fourth
LED blink rapidly.
1. Before charging, ensure the robot is switched off.
2. Place the robot on the charger. The front of the robot aligns
with the front of the charger.
3. Ensure two power connectors, two wheel slots and the bal
ance point connections align properly. All connections fit
together one way; do not force.
4. A red LED on the charger illuminates for about 2
1
⁄
2
minutes
while the robot is charging. When charging is complete, the
light turns off.
Charger Operation
15
Holes for Balance
Points
Charging Connections
Wheel Slots
Wheel Slots
LED Power
Indicator
Page 16

The Dohyo is a bordered circular area where game matches
are played. A match is won or lost when a robot is pushed out
of the Dohyo. For best results, always keep the Dohyo surface
clean and level. Any debris on the surface may impair the robot’s
localization system and cause a malfunction. For added stability,
we recommend taping down the outer border barrier around the
Dohyo.
The Dohyo
16
Borderline
Barrier
Dohyo
Page 17

There are three ways to play the game:
• Two player (two-player mode)
• One player vs. artificial intelligence (one-player mode)
• Artificial intelligence vs. artificial intelligence (demonstration
mode)
Robots “learn” and retain tactical strategies in memory as moves
are employed during a game. The more moves you use, the more
skillful the robots become with those moves. The robots execute
learned tactics during games using their artificial intelligence.
To select a play mode, slide the switch located on the back of the
robot to the desired setting (R/C2, R/C1, A.I., OFF).
Game Modes
17
Page 18

1. To select two-player mode, ensure each robot is set to a corresponding remote control frequency. For example, select
R/C1
to control a robot with the remote set to
CHANNEL 1; select
R/C2 to control a robot with the remote set to CHANNEL 2.
2. Place the robots in the shaded area of the Doyho, facing
each other.
3. To begin a match, press the
START/STOP button on each
remote control. Five LEDs on each robot blink to indicate
a countdown sequence.
4. During the match, a player may use all the remote-control
commands available to force the opponent from the Dohyo.
(See Commands and Maneuvers section.)
5. When a match is completed, the winning robot emits sounds
and displays an LED pattern. (See Keeping Score section.)
6. To begin a new match, repeat steps 3 and 4.
7. To start a new game and clear the previous record, press and
hold the
START/STOP button for two seconds. Red LEDs on
each robot flash.
Two Player (Two-Player Mode)
18
Page 19

1. To play a game in demonstration mode, slide the switch
located on the back of both robots to the A.I. (Artificial Intel
-
ligence) setting.
2. Place the robots in the shaded area of the Doyho, facing each
other. Infrared communication begins immediately. Five green
LEDs on each robot blink to indicate a countdown sequence.
The robots begin the match after the countdown.
3. During the match, the robots utilize tactical strategies and
maneuvers “learned” from previous exchanges to force the
opponent from the Dohyo’s borderline.
4. When a match is finished, the winning robot emits sounds
and displays an LED pattern. (See Keeping Score section.)
5. To begin the next match, lift up and set down the robots
facing each other in the shaded area of the Doyho.
Artificial Intelligence vs. Artificial Intelligence
(Demonstration Mode)
19
Page 20

1. To select one-player mode, ensure one robot is set to a corre-
sponding remote-control frequency. For example, select
R/C1
to control a robot with the remote set to
CHANNEL 1.
2. Ensure the second robot is set to A.I. mode.
3. Place the robots in the shaded area of the Doyho, facing
each other.
4. To activate the A.I. robot, lift it up and set it down.
5. To begin the countdown sequence, press the
START/STOP
button on the remote control. The robots begin the match at
the end of the countdown sequence.
6. During the match, a player may use all the remote control
commands available to force the opponent from the Dohyo’s
borderline. (See Commands and Maneuvers section.) The A.I.
robot utilizes tactical strategies and maneuvers “learned” from
previous exchanges to force your robot from the Dohyo’s
borderline.
7. When a match is completed, the winning robot emits sounds
and displays an LED pattern. (See Keeping Score section.)
Remote Control vs. Artificial Intelligence (One-Player Mode)
20
Page 21

8. To begin the next match, lift up and set down the robots facing
each other in the shaded area of the Doyho. Repeat step 5.
9. To start a new game and clear the previous record, press and
hold the
START/STOP button for two seconds. Red LEDs on
each robot flash.
Stunt Action Upgrade
You can create your own unique stunt action code to further
enhance robot abilities. To produce a user-defined barcode,
“Robot D.N.A. (SumoRobots) Stunt Creator” software is available
at www.silverlit.com. See Website for software instructions.
1. Once a barcode script is written, print it out. For best results,
we recommend using a laser-jet printer.
2. The barcode may be output as two individual strips.
3. Neatly cut the strips out of the surrounding gray area.
4. Tape the strips together (if necessary).
5. Write arrow direction and stunt description on the back
of the strip.
Remote Control vs. Artificial Intelligence (One-Player Mode)
21
Page 22

Barcode Reader
Barcode Reader Stand
Stunt Action Barcode
22
Page 23

Barcode Upload
1. Feed the barcode strip through the barcode reader stand,
ensuring the paper lays flat and straight in the reader.
2. Slide the strip through until barcode is entering the reader’s
focal point.
3. Secure the Barcode Reader Stand on top of the charger.
4. Secure the robot on top the Barcode Reader Stand.
5. Slide the
PLAY MODE switch, located on the back of the
robot from “
OFF,” to “R/C1” or “R/C2.”
Barcode Reader
23
Focal Point
Page 24

6. Pull the barcode through the stand, according to arrow direction, at a slow, steady rate, taking no more than five seconds.
The robot operates silently while scanning the code.
7. When the upload is complete, the robot sounds. If a sound is
not heard, the upload process was unsuccessful.
8. To restart, switch the robot off, then on. Begin the upload
process again.
9. After successful upload, trigger the new stunts using remote
control ACTION buttons 1, 2 and 3, on level 2.
Reset
When using the Stunt Action software, remote control ACTION
buttons 1, 2 and 3 are overwritten. To restore these three default
stunts, press the
RESET ACTIONS button located on the bottom
of the robot.
Barcode Reader
24
Page 25

Problem Cause Solution
Robot does not
respond or
responds poorly
to remote control.
• Infrared signal weak
ened by sunlight or
other bright light
source.
• Out of operating range.
• Interference with
infrared signal.
• Move away from light
source.
• Ensure remote is within
41⁄2 feet of robot.
• Recalibrate remote
control output. Move
the remote’s joystick
in a circular motion
around its outermost
perimeter.
Remote control
ability is lost.
• Remote control
CHANNEL not set to
corresponding robot
play mode.
• Both remote controls
set to the same R/C play
mode.
• Set remote to different
CHANNEL.
Troubleshooting
25
Page 26

Robot is slow,
erratic or does
not move.
• Robot batteries are
exhausted.
• Remote control batter
-
ies are exhausted.
• Remote control
power switch is in
OFF position.
• Debris (hair, carpet
fibers, dirt, etc.) is
trapped between the
robot’s wheels.
• Recharge the robot
with its charger.
• Replace batteries.
• Switch power to
ON
position.
• Carefully remove
foreign material from
wheels.
Robot does not
engage after
START command.
• Infrared signal not
accepted.
• Robot batteries are
exhausted.
• Remote control
batteries are exhausted.
• Place robots inside the
Dohyo borderline, facing
each other.
• Recharge the robot
with its charger.
• Replace batteries.
Troubleshooting
26
Problem Cause Solution
Page 27

• Clean all parts with a soft, dry cloth.
• If not being used, remove the batteries from the remote controls
and charging station.
Specifications
Power: Robot runs on two 1.2V rechargeable batteries (included).
Remote controls run on 3 AAA alkaline batteries each (purchase
separately). Charging station runs on 3 AA alkaline batteries
(purchase separately).
Dimensions (H x W x D): Robots measure approximately
3" x 2" x 3"; weighs 2
1
⁄
2
oz.
Remotes measure approximately 2" x 5" x 3"; weighs 2.7 oz.
Charging station measures approximately 1" x 4" x 2"; weighs 2 oz.
Care and Maintenance
27
Page 28

Statement of FCC Compliance
WARNING: Changes or modifications to this unit not expressly
approved by the party responsible for compliance could void the
user’s authority to operate the equipment.
This equipment has been tested and found to comply with the
limits for a Class B digital device, pursuant to Part 15 of the FCC
Rules. These limits are designed to provide reasonable protec
tion against harmful interference in a residential installation. This
equipment generates, uses, and can radiate radio frequency en
-
ergy and, if not installed and used in accordance with the instruc
tions, may cause harmful interference to radio communications.
However, there is no guarantee that interference will not occur in
a particular installation.
If this equipment does cause harmful interference to radio or
television reception, which can be determined by turning the
equipment off and on, the user is encouraged to try to correct the
interference by one or more of the following measures:
28
Page 29

Statement of FCC Compliance
• Reorient or relocate the receiving antenna.
• Increase the separation between the equipment and receiver.
• Connect the equipment into an outlet on a circuit different
from that to which the receiver is connected.
• Consult the dealer or an experienced radio/TV technician for
assistance.
FCC Label Compliance Statement
This device complies with Part 15 of the FCC Rules. Operation
is subject to the following two conditions: (1) This device may
not cause harmful interference, and (2) this device must accept
any interference received, including interference that may cause
undesired operation.
This product has been tested to the relevant standards and complies with the
requirements of the applicable EU directives.
29
Page 30

Page 31

Page 32

Warranty
What Is Covered
This warranty covers any defects in materials or workmanship, with the exceptions stated below.
How Long Coverage Lasts
This warranty runs for 90 days from the date of original purchase.
What Is Not Covered
This warranty does not cover damage caused by misuse or use other than as intended and described
in the product instruction manual, or loss or damage to batteries or removable parts.
What The Sharper Image Will Do
The Sharper Image will repair any defects in materials or workmanship. In the event repair is not
possible, The Sharper Image will either replace this product with one of similar features and price,
or refund the full purchase price of the product, whichever you prefer.
How to Obtain Service
Return the product and receipt, along with a brief explanation of the problem, to:
T.S.I. - Returns Department
2901-A West 60th Street
Little Rock, AR 72209
If you have questions please feel free to contact our customer service representatives at 1-800-344-5555
or by email at care@web.sharperimage.com.
This warranty gives you specific legal rights, and you may have other legal rights that vary from state to state.
© 2005 Sharper Image Corporation
Sharper Image Corporation
650 Davis St., San Francisco, CA 94111
(415) 445-6000
Shop online:
Due to continuing improvements, actual product may differ slightly from the product described herein.
V1 06/05
 Loading...