

Page 1
Hot+Cold
Mini Fridge
SI714 Instructions
Read and save these instructions.
Page 2

Dear Sharper Image Customer,
Thank you for your purchase of a Sharper Image product. We appreciate
your business very much.
Our goal is that you will be completely satisfied with this product’s
quality and performance. We offer generous return privileges and
excellent warranties on all our products.
Since 1977, The Sharper Image has shared the fun of discovering
innovative products that make life better and more enjoyable. We’ve
been in business a long time because we are an exciting place to shop
and — just as importantly — we strive to deliver outstanding customer
service that exceeds your expectations.
Enjoy your purchase!
Call 1-800-344-4444 for ordering and customer service, or visit
, our award-winning Website.
Page 3
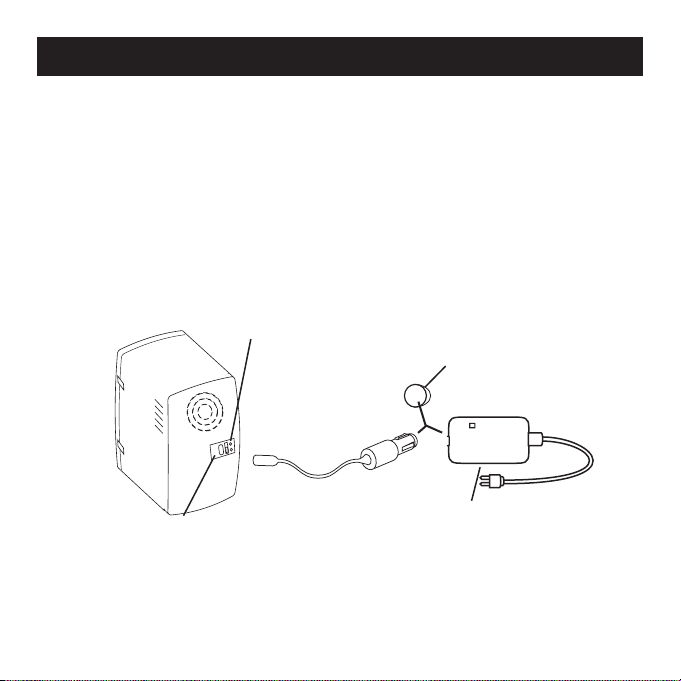
Description and Power
To power the Mini Fridge from your home or office 110V wall
outlet, connect the 12V DC power plug to the jack on the AC/DC
power converter.
Use the DC power plug to provide power directly from a 12V
vehicle accessory jack. (Do not overload car battery with multiple
appliances, including items such as a cell phone or other battery
chargers.)
12V DC
Power Jack
Power
Control
12V DC
Plug
110V AC/DC
Converter
Note: Do not leave the power plugged into a car accessory jack
when the car engine is not running. This may deplete the car
battery in some cars.
12V DC Car/Vehicle
Accessory Jack
Page 4

Controls
Switch POWER control to desired setting. A red LED
indicates the HOT setting and a green LED indicates the COLD
setting. The center position turns the unit off.
A substantial amount of heating or cooling is lost each time
the door is opened. Avoid unnecessary or frequent opening of
the door.
This product might release
an odor when new and the HOT
setting is used for the first time.
This odor will lessen
and disappear after the
first few uses.
Power
Control
Page 5

Operation
When the unit is plugged-in and the POWER CONTROL is in
either of the ON positions, the temperature selection is indicated
by the corresponding LED:
RED - HOT is selected GREEN - COLD is selected
The 12V DC plug is protected by a fuse.
If the unit fails to operate when using
the DC adapter, unscrew the end cap of
the adapter plug and check to see if the
fuse needs to be replaced. If the fuse has
blown, exchange it with a new 5 Amp
fuse and replace the cap.
End Cap
Unscrew to access
and replace fuse.
Page 6

Additional Information
The COLD setting can be used to keep cold items cold and to
make room-temperature items cold within a few hours.
The HOT setting can be used to warm precooked foods or store
food items that are already hot. The heat produced is not sufficient
enough for raw food items that require cooking temperatures for
safe preparation.
The interior shelf can be removed to allow tall items to be stored
upright.
The interior and exterior of this unit can be wiped clean using a
mild solution of hand dishwashing detergent.
Air Vents
Do not block the air vents or
otherwise obstruct airflow.
Handle
The Mini Fridge can be
lifted and moved by this
fold-up handle.
Page 7

Condensation Warning
It is normal for this unit to produce some condensation in either
the HOT or COLD setting. Do not place this product on any surface that could be damaged by water.
• When open containers are stored for several hours in the HOT
operation mode, condensation may build up and leak from the
edges of the door.
• When the unit is switched from COLD to HOT, or just turned
off after several days of COLD operation, ice that has built up
around the heating/cooling element will melt and puddle to the
bottom of the unit. Some of this water may leak from the edges
of the door.
Defrosting
Periodic defrosting of this product is required to eliminate build
up of ice:
Place the upright unit on a folded towel and operate on HOT
for 15-30 minutes, or unplug and allow to defrost overnight.
Empty the water and dry the interior with a towel. Do not place
on a surface that may be damaged by water leaking from the
unit as it defrosts.
Page 8

One-Year Warranty
What Is Covered
This warranty covers any defects in materials or workmanship, with the exceptions stated below.
How Long Coverage Lasts
This warranty runs for one year from the date of original purchase.
What Is Not Covered
This warranty does not cover damage caused by misuse or use other than as intended and described
in the product instruction manual, or loss or damage to batteries or removable parts.
What The Sharper Image Will Do
The Sharper Image warrants this product against defects in materials and workmanship. When repair
is not practical, The Sharper Image will have the option to replace the defective product with a fully
warranted, factory-reconditioned product that is the same or has similar functionality.
How to Obtain Service
Return the product and receipt, along with a brief explanation of the problem, to:
T.S.I. - Returns Department
2901-A West 60th Street
Little Rock, AR 72209
If you have questions please feel free to contact our customer service representatives at 1-800-344-5555
or by email at care@web.sharperimage.com.
This warranty gives you specific legal rights, and you may have other legal rights that vary from state to state.
© 2002, 2003, 2004, 2005, 2006, 2007 Sharper Image Corporation
Sharper Image Corporation
350 The Embarcadero, Sixth Floor
San Francisco, CA 94105-1218
Shop online:
Actual product may differ slightly from the product described herein.
V2 03/07
 Loading...