

Page 1

SI538 CD Shower Companion
TM
Instructions
Page 2
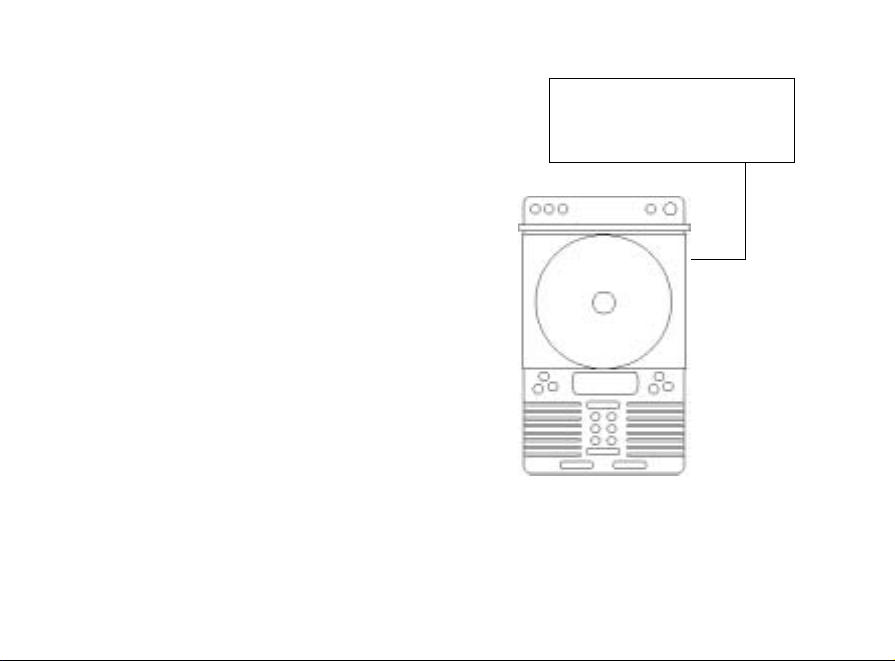
CD Cover
Do not leave open or open
while water is running.
Page 3

Shop our complete Internet catalog.
Online ordering is protected by
Secure Sockets Layer technology.
General Information
• Do not allow the interior of the CD player (the area behind the clear cover) to be exposed
to water. Do not change CDs, or open the CD cover while the water is running.
• It is generally more convenient to locate this unit directly outside of the shower, where it
is more accessible for use at other times.
• Avoid accidentally opening the CD cover and exposing the unit to possible water damage
while water is running.
• If the interior of the unit is exposed to water, remove the unit to a dry location and allow
it to dry overnight before operating again. (Leave the cover open to thoroughly dry.)
• Do not use an adapter to power this unit in the bathroom, near water, or outdoors.
• Remove the batteries when mostly using an external power supply.
Battery Installation
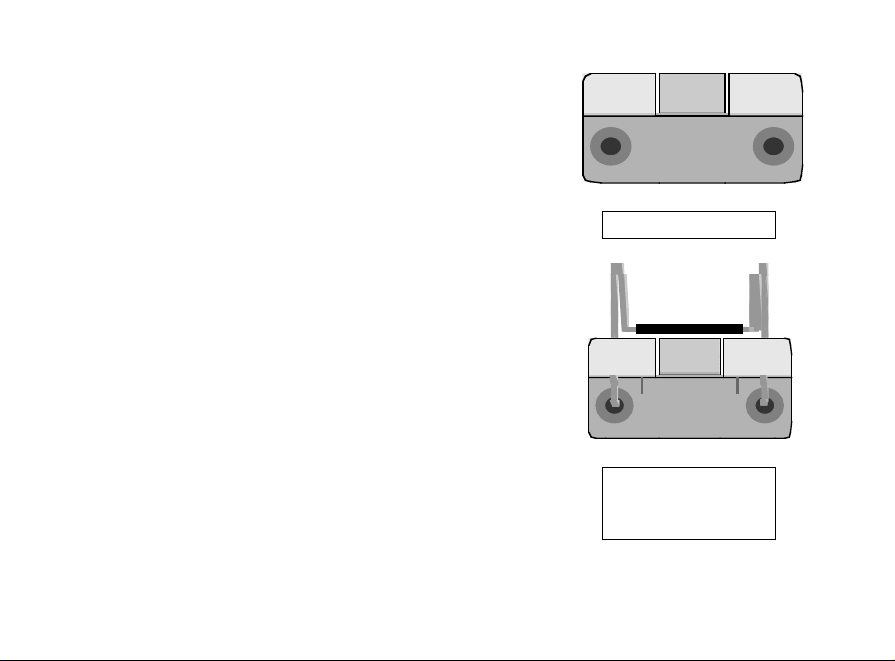
Locking-knob
Page 4
• The battery compartment is located on the back of the
unit. Do not remove the battery compartment cover in or
near water.
• Turn the battery compartment locking-knob counter-
clockwise.
• Remove battery compartment cover by lifting it away
from the back of the unit.
• Install four new alkaline C batteries in the direction indi-
cated by battery compartment diagram. Maintain current
time-setting by replacing only two batteries at a time.
• If desired, switch the 12H/24H control to display time in
either a twelve-hour (AM/PM) format, or a 24-hour (military) format.
• Next to the 12H/24H switch is a tuning switch for travel
and use in some countries outside the United States. For
normal operation and tuning of US radio broadcasts, it is
necessary that the switch remain in the 9K position.
Switch to the 10K position when in areas where required,
such as Europe.
• Replace the battery compartment cover, and lock into
Mounting Bracket
Mounting Bracket
with smaller of the
two wire hangers.
Page 5
place by turning the battery compartment lockingknob clockwise until it stops turning. (Avoid overtightening.)
• An optional AC adapter can also power the unit. The
power and earphone jacks are located on the side of
the unit and are protected by a removable cover. DO
NOT use an AC adapter when operating this unit in
or near water. The AC adapter jack is for indoor use
only, and only for areas that will not expose the
adapter or cord to water.
Mounting/Locating
• The best place to mount this unit is where it can be
easily accessed anytime you wish to operate it. Do not
locate the unit directly inside the shower if you wish
to listen to it at other times. This will also protect the
unit from accidental exposure to water when the CD
cover is open.
• Connect the unit to the included stand accessory to
stand upright on a vanity or table. Do not use to
stand the unit directly on the floor of the shower
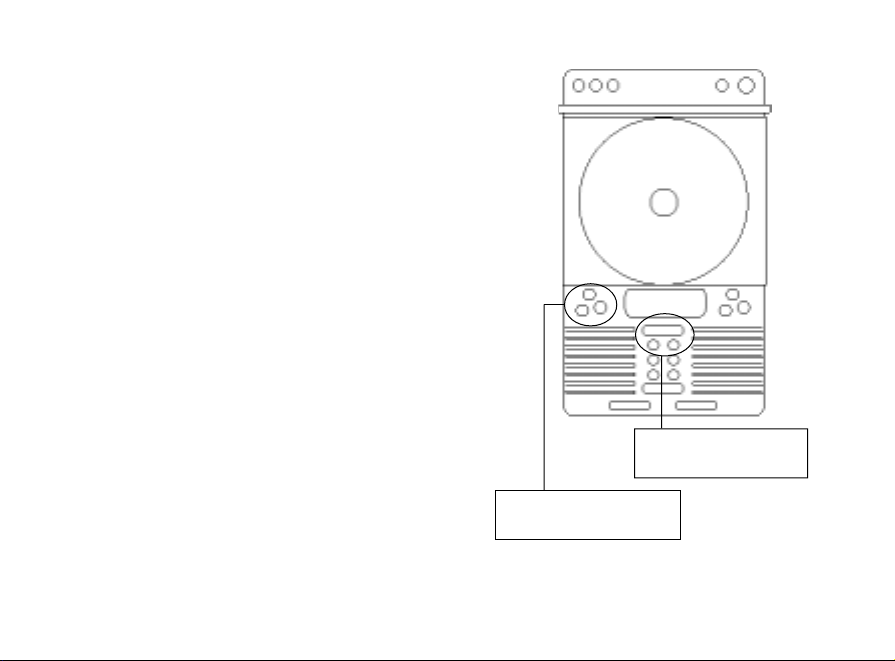
MEMORY/CLOCK
ADJUST
“–” Advance Minutes
“+” Advance Hours
Page 6

or bathtub.
• Secure mount the unit by screwing
the included bracket securely to the
wall. Slide the back of the unit over
the tabs on the bracket.
• Or, mount the unit temporarily using
either of the included wire hangers,
hanging the unit over a fixture door,
shower rod, or from the showerhead.
Attach the appropriate wire hanger to
the mounting bracket (same as used
for secure mount), by hooking the
two ends of the hanger into the
bracket holes.
• This temporary method of mounting
the unit is not secure. The unit
should be removed when not in use.
Setting the Time
• Press and release the
MEMORY/CLOCK
ADJUST
BAND
Switches time
display when
power is off.
Page 7

MEMORY/CLOCK ADJUST button. (The time display will flash.)
• Press the tuning button labeled “-” to increase the minute setting of
the clock display.
• Press the tuning button labeled “+” to increase the hour setting of the
clock display.
• Be certain that the display correctly shows “AM” or “PM”.
• To set the clock for an earlier time, continue to advance until it cycles back to the begin-
ning.
• If no buttons are pressed for a few seconds, the unit will save any changes you made, and
return to the standard clock display.
Displaying Secondary/Dual Time
• This clock can accept and display two separate time settings. An excellent feature for
travelers or those who hate to reset their clocks during daylight savings time. (The alarm
only works with the primary clock setting.)
ALARM ON/OFF
Page 8

• Switch between the Primary and the
Secondary/Dual display by pressing the BAND button when the audio power is off and the LCD shows
the time.
• While the Secondary/Dual time is displayed, adjust
the setting by following the same procedures used to
adjust the primary time setting.
Setting the Alarm
• The alarm will sound when the time set for the alarm
matches the time set for the primary clock and the
alarm-clock icon is displayed on the LCD screen.
• Press the ALM ON/OFF button to display the
alarm time setting. The display will flash and the
alarm-clock icon will blink.
• Adjust the minute setting up by pressing the tuning
“-” button. Adjust the hour setting up by pressing
the tuning “+” button.
POWER
Press to turn on and off
RADIO
BAND
And tuning buttons
Page 9

• Confirm that the display correctly shows “AM” or “PM” if using the 12-hour clock display.
• To set the clock display for an earlier time, continue to advance the appropriate setting
until it cycles back to the beginning.
• When no buttons are pressed for a few seconds, the unit will save any changes you made,
and return to the standard clock display. The alarm-clock icon will remain visible to indicate that the alarm is set to sound at the appropriate time.
• To cancel the alarm, press the ALM ON/OFF button twice. The
icon will no longer be displayed and the alarm will not sound. The
alarm time setting will remain as set.
• To turn off the alarm when it is sounding, press the ALM ON/OFF
button once to silence the alarm but reset it for the next day. Press
the ALM ON/OFF button twice to silence the alarm and turn it off
completely.
Audio Controls
• Note that this unit uses the international abbreviation “MW” instead of
“AM”. These instructions use the two abbreviations interchangeably.
Press the POWER button to turn the audio on. The unit will default
to the last audio source selected (CD, MW, FM, TV).
• To switch from CD to MW, FM, or TV, press the RADIO button
CD Controls
Page 10

while the power is on. Select between the audio choices by
pressing the BAND button.
• Press and release the tuning buttons to skip either up or
down by one digit.
• Press and hold the tuning buttons for one second to auto-
matically rapidly advance up or down. Press and release to
stop the automatic advance.
• To switch from Radio to CD, press the CD play button
located on the top of the unit.
• All CD functions except power are controlled by the but-
tons on the top of the unit, and displayed on the separate
LCD screen. Save batteries by turning the power off when
CD has finished playing.
Loading/Playing a CD (Power must be on to play a
CD)
• Open the CD cover by gently starting its slide down, the
cover will continue to open.
• Place a CD firmly on the spindle until it locks into place.
Close the cover by sliding back up until it locks into place.
MEMORY / CLOCK
ADJUST
5 One-Touch Presets
plus
5 Two-Button Presets
Page 11

• Never open the cover while there is a great deal of steam or moisture present.
CD Programming Features
• Press CD MODE while the unit is playing to toggle through the options for the repeat
feature. A “1 “on the display indicates a single track will replay continuously until STOP is
pressed. An “ALL” indicates that the entire CD will continue to repeat. Press CD MODE
one more time to cancel the replay feature.
• Press and hold CD MODE while the unit is stopped, until the display indicates “RND”.
Press play to begin. The unit will play the CD tracks in random order.
• Press CD MODE while the unit is stopped, until the display indicates “PROGRAM”.
Select a track to play by using the FORWARD (>>) or REVERSE (<<) buttons. Program
the track by pressing CD MODE. Continue until all desired tracks have been selected
and programmed. Press stop when selections are complete and to end programming.
Programming Radio Presets
• This unit can be programmed with up to 10 of your favorite AM (MW) and FM radio
stations preset for instant recall at the press of one or two buttons.
• Pressing the buttons numbered 1 to 5 accesses 5 single-touch presets. Pressing the +5
button followed by pressing one of the buttons numbered 1 to 5 accesses 5 additional
presets.
• The radio must be turned on to set the preset stations.
Page 12

• Tune to the desired radio station.
• Press the MEMORY/CLOCK ADJUST button.
• Press any one of the buttons numbered 1 to 5, or press the +5 button followed by any of
the buttons numbered 1 to 5.
• Press the MEMORY/CLOCK ADJUST button again. The preset is now locked into
memory.
• Repeat this procedure to preset a different station.
• Change any preset by programming over it with a new station’s frequency.
Antenna
• An optional wire antenna is included to help boost radio and TV reception.
• If needed, the antenna should be connected to the attachment screw on the rear of the
unit, near the bottom left side.
• If reception continues to need improvement, the wire antenna can be stretched to make
it longer. Use caution to make sure that the antenna does not hang in the way.
• Reception of some stations may not be possible in all areas. Relocating or redirecting the
antenna by changing its position will help strengthen some signals. Every FM radio and
TV signal has a “best” position for the antenna, and no single position is best for all.
• AM radio reception can be affected by the position of the radio itself. To change AM
reception, adjust the position of the radio.
Page 13

CLASS 1 LASER PRODUCT
CLASS 1 LASER PRODUCT
APPAREILA LASER DE CLASSE1
PRODUCTO LASER DE CLASE 1
PRODUTO LASER CLASSE1
CAUTION
INVISIBLE LASER RADIATION WHEN
OPEN AND INTERLOCKS DEFEAT-
ED.
This product contains a low power laser device.
Page 14

Additional Features
• This unit includes a jack to connect an AC adapter for use outside of the bathroom area.
The adapter can be purchased separately and must only be used indoors and in a dry area.
• There is also a jack to connect a set of headphones, earbuds or other external hearing
device. This connection is not designed for use around water.
• Keep jacks protected with the included cover over them when using this unit in water.
• Press the LIGHT button to turn the display screen light on. The light will automatically
turn itself off after a few seconds.
• Use the +/- VOLUME buttons to increase or decrease the listening volume. The alarm
volume is not adjustable.
MODEL: SI538
WARNING:
Changes or modifications to this unit not expressly approved by the party responsible for
compliance could void the user’s authority to operate the equipment.
NOTE:
This product complies with DHHS Rule 21 subchapter J at date of manufacture. This
equipment has been tested and found to comply with the limits for a Class B digital device,
pursuant to Part 15 of the FCC Rules. These limits are designed to provide reasonable
protection against harmful interference in a residential installation. This equipment
generates, uses, and can radiate radio frequency energy and, if not installed and used in
Page 15

accordance with the instructions, may cause harmful interference to radio communications.
However, there is no guarantee that interference will not occur in a particular installation
If this equipment does cause harmful interference to radio or television reception, which
can be determined by turning the equipment off and on, the user is encouraged to try to
correct the interference by one or more of the following measures:
•Reorient or relocate the receiving antenna.
•Increase the separation between the equipment and receiver.
•Consult the dealer or an experienced radio TV technician for assistance.
Page 16

WARRANTY
What Is Covered
This warranty covers any defects in materials or workmanship, with the exceptions stated below.
How Long Coverage Lasts
This warranty runs for 90 days from the date of original purchase.
What Is Not Covered
This warranty does not cover damage caused by misuse or use other than as intended and described in the product instruction manual, or loss or damage to batteries or removable parts.
What The Sharper Image Will Do
The Sharper Image will repair any defects in materials or workmanship. In the event repair is not possible, The Sharper
Image will either replace this product with one of similar features and price, or refund the full purchase price of the product,
whichever you prefer.
How to Obtain Service
Return the product and receipt, along with a brief explanation of the problem, to:
T.S.I. - Returns Department
2901-A West 60th Street
Little Rock, AR 72209
If you have questions please feel free to contact our customer service representatives at 1-800-344-5555 or by email at
care@sharperimage.com.
This warranty gives you specific legal rights, and you may have other legal rights that vary from state to state.
Sharper Image Corporation
650 Davis St., San Francisco, CA 94111
(415) 445-6000
Shop online: www.sharperimage.com
V1 0402
 Loading...