

Page 1
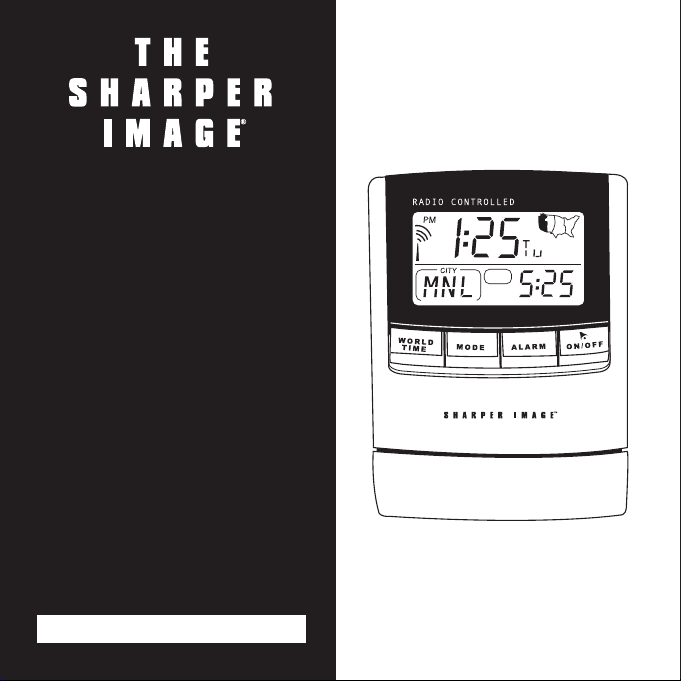
Radio-Controlled
Travel Clock
with 130-City
World Time
OQ314 Instructions
Read and save these instructions.
Page 2

Dear Sharper Image Customer,
Thank you for your purchase of a Sharper Image product. We appreciate
your business very much.
Please accept my personal assurance of your complete satisfaction with
this product’s quality and performance. We offer generous return
privileges and excellent warranties on all our products.
For more than 25 years, The Sharper Image has shared the fun of
discovering innovative products that make life easier and more enjoyable. We’ve been in business a long time because we are an exciting
place to shop and — just as importantly — we strive to deliver great
customer service that exceeds your expectations.
Enjoy your purchase!
Respectfully,
Richard Thalheimer
Founder, Chairman and Chief Executive Officer
Call 1-800-344-4444 for 24-7 ordering and customer service,
or go to , our complete online store.
Page 3

•Due to printing limitation, the displays shown in this manual
may differ from the actual display.
•The contents of this manual may not be reproduced without
the permission of the manufacturer.
•Do not disassemble the unit. This will void the warranty.
Maintenance
Here are a few product care instructions:
1. Do not immerse the unit in water. If the unit comes in con-
tact with water, dry it immediately with a soft lint-free cloth.
2. Do not clean the unit with alcohol, detergent, abrasive or
corrosive materials. Abrasive cleaning agents may scratch
the plastic parts and corrode the electronic circuit.
3. Do not subject the unit to excessive force, shock, dust,
temperature, or humidity. Such treatment may result in malfunction, a shorter electronic life span, damaged batteries,
or warped parts.
Caution
Page 4

4. Do not tamper with the unit’s internal components. Doing so
will void the unit’s warranty and may cause damage. The unit
contains no user-serviceable parts.
5. Only use new batteries as specified in this instruction manu-
al. Do not mix new and old batteries as the old batteries
may leak.
6. Read this instruction manual thoroughly before operating
the unit.
Quick Start
Battery Installation
1. Remove the battery compartment door.
2. Insert the included 2 AAA 1.5V batteries as shown, observing
proper +/- polarities.
3. Press RESET.
4. Replace the battery compartment door.
Key Lock
Before operation, slide the key-lock switch to the left to activate
all key operations.
Maintenance
Page 5

Manually Setting the Clock and Calendar
This clock is designed to automatically synchronize its current
time and date when brought within range of the radio signal
generated from the U.S. Atomic Clock. (See “About Radio
Reception.”) Until the clock synchronizes with the radio signal,
you may manually set the clock.
1. Press and hold MODE button for two seconds.
2. Use the UP or DOWN (ROTARY KNOB) button to scroll
through the four U.S. time zones (Pacific, Mountain, Central
or Eastern) or additional World City (ADD). To confirm, press
MODE.
3. If a world city is selected, “ADD” flashes. To select the city,
press UP or DOWN (ROTARY KNOB) button. For city name
abbreviations, refer to the section, "World Time Function." To
confirm, press MODE button.
4. Use the UP and DOWN (ROTARY KNOB) buttons to set the
hour, minute, year, month, day, day-of-the-week language,
and hourly-chime on/off.
5. To save the changes and exit, press MODE button.
Quick Start
Page 6

Note:
•For the day-of-the-week language, select "E" for English, "D"
for German, "F" for French, "I" for Italian or "S" for Spanish.
The day of the week can be expressed as an abbreviation
in five different languages.
• When changes are made to the minute, the seconds start from
zero. The unit also saves all changes and automatically returns
to normal display after the unit has been idle for a minute.
World Time Function
1. To view the time in one of the 130 world cities in the clock’s
database, press the WORLD TIME button. The World-Time
icon flashes.
2. To scroll through the list of world cities and times, rotate the
ROTARY KNOB up or down.
3. To select which world city you want to remain on the display,
press the WORLD TIME button. The World-Time icon stops
blinking.
Activating the Backlight
To turn on the backlight for 5 seconds, open the folding table
stand and press the SNOOZE/LIGHT button.
Quick Start
Page 7

This clock is designed to automatically synchronize its current
time and date when brought within range of the radio signal
generated from the U.S. Atomic Clock.
In addition to the local time and calendar display, you can also
display the corresponding time in 130 major world cities. The
clock features a multilingual day of the week display, EL backlight, hourly chime, single and weekday alarm with 8-minute
snooze and key-lock.
Introduction
Page 8

Front Panel Buttons
1. SNOOZE/LIGHT Button
• Open folding stand.
• Press to turn on the backlight for five seconds.
• Press to activate the Snooze function when the alarm time
is reached. Snooze indicator will sound for five seconds.
2. WORLD TIME Button
• Press to enter the world time setting mode.
Introduction
Page 9

3. MODE Button
• Press to switch between the clock and calendar display modes.
• Press and hold for two seconds to enter the clock and cal-
endar setting mode.
4. ALARM Button
• Press to toggle among the calendar, weekday alarm and sin-
gle alarm modes. Backlight must be off.
• Press and hold for two seconds to enter the alarm setting mode.
5. ALARM ON/OFF Button
•Press to activate/deactivate the alarm.
• Press and hold for three seconds to turn off the alarm when
the alarm time is reached.
Introduction
Page 10
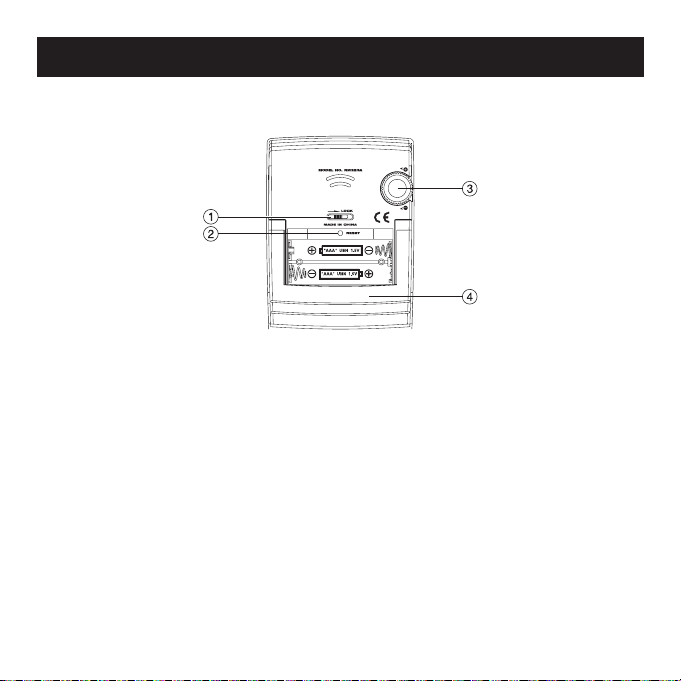
Rear Panel Buttons
1. KEY-LOCK SLIDE SWITCH
• Slide to lock the key functions.
2. RESET BUTTON (inside battery compartment)
• Press to return all settings to default values.
3. UP AND DOWN ROTARY KNOB
• Rotate up or down to increase/decrease the value of a setting.
4. FOLDING TABLE STAND
Introduction
Page 11

Before operating, slide the key-lock switch to the left to activate
all key operations.
Battery Installation
1. Remove the battery compartment door.
2. Insert the included 2 AAA 1.5V batteries as shown, observing
proper +/- polarities.
3. Press RESET.
4. Replace the battery compartment door.
Note: When the battery power level is low, the low battery indicator illuminates. Replace the batteries accordingly.
Key Lock
Page 12

Open the folding stand. To turn on the backlight for 5 seconds,
press the SNOOZE/LIGHT button.
Display Modes
To view the display modes in sequence, press the MODE button.
1. Current Time with Seconds
World City Name Abbreviation & Time
2. Current Time with Weekday
World City Name Abbreviation & Time
3. Calendar
World City Name Abbreviation & Time
About Radio Reception
This clock is designed to automatically synchronize its calendar
clock once it is brought within range of the U.S. Atomic Clock.
When the unit is within range, its radio-control mechanism override all manual settings unless auto-reception of radio signal is
manually deactivated.
Activating the Backlight
Page 13

When the clock is receiving a radio signal, the radio reception
icon starts to blink. A complete reception generally takes about
2 to 10 minutes, depending on the strength of the radio signal.
When the reception is complete, the radio reception icon stops
blinking. The strength of the reception for the last full hour is
indicated.
For better reception, place the unit away from metal objects and
electrical appliances to minimize interference.
Should you wish to deactivate the RF (radio-frequency) controlled
function, press and hold the DOWN ROTARY KNOB for 3 seconds
and the radio reception icon disappears. To reactivate the RF controlled function, press and hold the UP ROTARY KNOB button for
3 seconds again and the radio reception icon reappears.
Strong Signal
Weak Signal
No Reception
Receiving Signal
About Radio Reception
Page 14

This clock is designed to automatically synchronize its current
time and date when brought within range of the radio signal
generated from the U.S. Atomic Clock. (See "About Radio
Reception.") Until the clock synchronizes with the radio signal,
you may manually set the clock.
1. Press and hold MODE button for two seconds.
2. Use the UP or DOWN (ROTARY KNOB) button to scroll
through the four U.S. time zones (Pacific, Mountain, Central
or Eastern) or additional World City (ADD). To confirm, press
MODE.
3. If a world city is selected, “ADD” flashes. To select the city,
press UP or DOWN (ROTARY KNOB) button. For city name
abbreviations, refer to the section, "World Time Function." To
confirm, press MODE button.
4. Use the UP and DOWN (ROTARY KNOB) buttons to set the
hour, minute, year, month, day, day-of-the-week language,
and hourly-chime on/off.
5. To save the changes and exit, press MODE button.
Manually Setting the Clock and Calendar
Page 15

Note:
•For the day-of-the-week language, select "E" for English, "D"
for German, "F" for French, "I" for Italian or "S" for Spanish.
The day of the week can be expressed as an abbreviation
in five different languages.
•When changes are made to the minute, the seconds start
from zero. The unit also saves all changes and automatically
returns to normal display after the unit has been idle for a
minute.
The Hourly-Chime Function
When the Hourly-Chime is set to ON, the icon appears on
the display and a beep sounds at the beginning of each hour.
Manually Setting the Clock and Calendar
Language
English
German
French
Italian
Spanish
Monday Tuesday Wednesday Thursday Friday Saturday Sunday
Day-of-the-week
Page 16

This clock is equipped with 2 alarms: a Weekday Alarm and a
Single Alarm. The Weekday Alarm only sounds at the preset time
during weekdays (i.e., from Monday to Friday) and will automatically disable during the weekend (i.e., Saturday and Sunday).
The Single Alarm sounds out once at the preset time.
1. To select which alarm you would like to set, press ALARM
until the corresponding alarm icon appears on the display.
(= Weekday Alarm; = Single Alarm.)
2. To set the selected alarm, press and hold ALARM for
2 seconds.
3. To select the alarm hour, rotate the UP or DOWN (ROTARY
KNOB).
4. To confirm the alarm hour, press the ALARM button.
Minutes blink.
5. To select the alarm minutes, rotate the UP or DOWN
(ROTARY KNOB).
6. To confirm alarm setting and exit this mode, press the
ALARM button. The alarm is automatically activated after it is
set. The corresponding alarm-on indicator ( or ) appears
on the display. When the current time matches the alarm
Setting the Alarm
Page 17

time, the alarm sounds for 2 minutes in a two-step crescendo
pattern if undisturbed. The alarm-on indicator flashes and the
backlight activates for 5 seconds.
7. To turn off the alarm after it sounds, press any key except the
SNOOZE/LIGHT button.
8. To activate the snooze function, press the SNOOZE/LIGHT
button. The alarm is temporarily muted and sounds again in
8 minutes.
Notes: To deactivate the alarm after it is set, press ALARM until
the corresponding alarm icon appears on the display and then
press the ALARM ON/OFF button. “-: —” appears on the display
to indicate the alarm is deactivated.
To disable the snooze function after the alarm goes off, you can
press and hold the SNOOZE/LIGHT button for 3 seconds.
World Time Function
This clock features a World-Time display function so that you can
check the corresponding time of different places in the world
instantly with DST (Daylight Saving Time) automatically adjusted.
The names of the world cities are shown in an abbreviated
Setting the Alarm
Page 18

three-letter format. (See the “World City Abbreviation Table” for
a complete list of cities and abbreviations.)
1. To view the time in one of the 130 world cities in the clock’s
database, press the WORLD TIME button. The World-Time
icon flashes.
2. To scroll through the list of world cities and times, rotate the
ROTARY KNOB.
3. To select which world city you want to remain on the display,
press the WORLD TIME button. The World-Time icon stops
blinking.
World City Abbreviations Reference Table
Country Name City code Time Offset DST Period
(GMT = 0)
Addis Ababa, Ethiopia ADD 3 No DST
Adelaide, Australia ADL 9.5 From Last Sunday in October to
Last Sunday in March
Auckland, AKL 12 From 1st Sunday in October to
New Zealand 3rd Sunday in March
Ankara, Turkey AKR 2 From Last Sunday in March to Last
Sunday in October
World Time Function
Page 19

Country Name City code Time Offset DST Period
(GMT = 0)
Algiers, Algeria ALG 1 No DST
Amsterdam, AMS 1 From Last Sunday in March to
Netherlands Last Sunday in October
Anchorage AK, USA ANC -9 From 1st Sunday in April to Last
Sunday in October
Antananarivo, ANT 3 No DST
Madagascar
Asuncion, Paraguay ASU -4 From 1st Sunday in September to
1st Sunday in April
Athens, Greece ATH 2 From Last Sunday in March to Last
Sunday in October
Atlanta GA, USA ATL -5 From 1st Sunday in April to Last
Sunday in October
Abu Dhabi, U.A.E AUH 4 No DST
Bucharest, Romania BBU 2 From Last Sunday in March to Last
Sunday in October
Barcelona, Spain BCN 1 From Last Sunday in March to Last
Sunday in October
Baghdad, Iraq BDD 3 From 1st April to 1st October
Belgrade, Yugoslavia BEG 1 From Last Sunday in March to Last
Sunday in October
World City Abbreviations Reference Table
Page 20

Country Name City code Time Offset DST Period
(GMT = 0)
Beijing, China BEJ 8 No DST
Berlin, Germany BER 1 From Last Sunday in March to Last
Sunday in October
Beirut, Lebanon BEY 2 From Last Sunday in March to Last
Sunday in October
Bangkok, Thailand BKK 7 No DST
Brisbane, Australia BNE 10 No DST
Bogota, Colombia BOG -5 No DST
Boston MA, USA BOS -5 From 1st Sunday in April to Last
Sunday in October
Bern, Switzerland BRN 1 From Last Sunday in March to Last
Sunday in October
Brussels, Belgium BRU 1 From Last Sunday in March to Last
Sunday in October
Brasilia, Brazil BSB -3 From 2nd Sunday of October to
3rd Sunday of February
Buenos Aires, Argentina BUA -3 No DST
Budapest, Hungary BUD 1 From Last Sunday in March to Last
Sunday in October
Cairo, Egypt CAI 2 From Last Friday in April to Last
Friday in September
World City Abbreviations Reference Table
Page 21

Country Name City code Time Offset DST Period
(GMT = 0)
Casablanca, Marocco CAS 0 No DST
Canberra, Australia CBR 10 From Last Sunday in October to
Last Sunday in March
Caracas, Venezuela CCS -4 No DST
Calcutta, India CCU 5.5 No DST
Chicago IL, USA CGX -6 From 1st Sunday in April to Last
Sunday in October
Colombo, Sri Lanka CMB 6 No DST
Copenhagen, Denmark CPH 1 From Last Sunday in March to Last
Sunday in October
Cape Town, South Africa CPT 2 No DST
Dhaka, Bangladesh DAC 6 No DST
Damascus, Syria DAM 2 From 1st April to 1st October
New Delhi, India DEL 5.5 No DST
Detroit MI, USA DTW -5 From 1st Sunday in April to Last
Sunday in October
Dublin, Ireland DUB 0 From Last Sunday in March to Last
Sunday in October
Frankfurt, Germany FRA 1 From Last Sunday in March to Last
Sunday in October
World City Abbreviations Reference Table
Page 22

Country Name City code Time Offset DST Period
(GMT = 0)
Guatemala City, GuatemalaGUA -6 No DST
Geneva, Switzerland GVA 1 From Last Sunday in March to Last
Sunday in October
Hamburg, Germany HAM 1 From Last Sunday in March to Last
Sunday in October
Hanoi, Vietnam HAN 7 No DST
Havana, Cuba HAV -5 From 1st Sunday in April to Last
Sunday in October
Ho Chi Minh City, HCM 7 No DST
Vietnam
Helsinki, Finland HEL 2 From Last Sunday in March to Last
Sunday in October
Hong Kong, China HKG 8 No DST
Honolulu HI, USA HNL -10 No DST
Houston TX, USA HOU -6 From 1st Sunday in April to Last
Sunday in October
Indianapolis, IN, USA IND -5 No DST
Istanbul, Turkey IST 2 From Last Sunday in March to Last
Sunday in October
Jakarta, Indonesia JKT 7 No DST
Johannesburg, JNB 2 No DST
South Africa
World City Abbreviations Reference Table
Page 23

Country Name City code Time Offset DST Period
(GMT = 0)
Kabul, Afghanistan KBL 4.5 No DST
Khartoum, Sudan KHA 3 No DST
Kiev, Ukraine KIE 2 From Last Sunday in March to Last
Sunday in October
Kingston, Jamaica KIN -5 No DST
Kathmandu, Nepal KTM 5.75 No DST
Kuala Lumpur, Malaysia KUL 8 No DST
Kuwait City, Kuwait KWI 3 No DST
Las Vegas NV, USA LAS -8 From 1st Sunday in April to Last
Sunday in October
Los Angeles CA, USA LAX -8 From 1st Sunday in April to Last
Sunday in October
Lima, Peru LIM -5 No DST
Lisbon, Portugal LIS 0 From Last Sunday in March to Last
Sunday in October
London, UK LON 0 From Last Sunday in March to Last
Sunday in October
Lagos, Nigeria LOS 1 No DST
La Paz, Bolivia LPB -4 No DST
Luxembourg, LUX 1 From Last Sunday in March to
Luxembourg Last Sunday in October
World City Abbreviations Reference Table
Page 24

Country Name City code Time Offset DST Period
(GMT = 0)
Madrid, Spain MAD 1 From Last Sunday in March to Last
Sunday in October
Melbourne, Australia MEL 10 From Last Sunday in October to
Last Sunday in March
Mexico City, Mexico MEX -6 From 1st Sunday in April to Last
Sunday in October
Managua, Nicaragua MGA -6 No DST
Miami FL, USA MIA -5 From 1st Sunday in April to Last
Sunday in October
Milan, Italy MIL 1 From Last Sunday in March to Last
Sunday in October
Manama, Bahrain MNA 3 No DST
Manila, Philippines MNL 8 No DST
Montreal, Canada MON -5 From 1st Sunday in April to Last
Sunday in October
Moscow, Russia MOW 3 From Last Sunday in March to Last
Sunday in October
Montevideo, Uruguay MVD -3 No DST
Nassau, Bahamas NAS -5 From 1st Sunday in April to Last
Sunday in October
Nairobi, Kenya NRB 3 No DST
World City Abbreviations Reference Table
Page 25

Country Name City code Time Offset DST Period
(GMT = 0)
New York NY, USA NYC -5 From 1st Sunday in April to Last
Sunday in October
Oslo, Norway OSL 1 From Last Sunday in March to Last
Sunday in October
Ottawa, Canada OTW -5 From 1st Sunday in April to Last
Sunday in October
Port-au-Prince, Haiti PAP -5 No DST
Paris, France PAR 1 From Last Sunday in March to Last
Sunday in October
Perth, Australia PER 8 No DST
Phoenix, AZ, USA PHE -7 No DST
Phnom Penh, PNH 7 No DST
Cambodia
Port-Of-Spain, POS -4 No DST
Trinidad & Tobago
Papeete, PPT -10 No DST
French Polynesia
Prague, PRG 1 From Last Sunday in March to Last
Czech Republic Sunday in October
Portland OR, USA PTL -8 From 1st Sunday in April to Last
Sunday in October
World City Abbreviations Reference Table
Page 26

Country Name City code Time Offset DST Period
(GMT = 0)
Pretoria, South Africa PTR 2 No DST
Panama City, Panama PTY -5 No DST
Yangon, Myanmar RGN 6.5 No DST
Rio de Janeiro, Brazil RIO -3 From 2nd Sunday of October to
3rd Sunday of February
Reykjavik, Iceland RKV 0 No DST
Rome, Italy ROM 1 From Last Sunday in March to Last
Sunday in October
Riyadh, Saudi Arabia RUH 3 No DST
San Salvador, SAL -6 No DST
El Salvador
Santiago, Chile SCL -4 From 1st Sunday on or after 9th
October to 1st Sunday on or after
9th March
Seattle WA, USA SEA -8 From 1st Sunday in April to Last
Sunday in October
Seoul, South Korea SEL 9 No DST
San Francisco CA, USA SFO -8 From 1st Sunday in April to Last
Sunday in October
Shanghai, China SHA 8 No DST
Singapore, Singapore SIN 8 No DST
World City Abbreviations Reference Table
Page 27

Country Name City code Time Offset DST Period
(GMT = 0)
San Jose, Costa Rica SJO -6 No DST
San Juan, Puerto Rico SJU -4 No DST
Salt Lake City UT, USA SLC -7 From 1st Sunday in April to Last
Sunday in October
Sofia, Bulgaria SOF 2 From Last Sunday in March to Last
Sunday in October
Sao Paulo, Brazil SPL -3 From 2nd Sunday of October to
3rd Sunday of February
Stockholm, Sweden STH 1 From Last Sunday in March to Last
Sunday in October
Sydney, Australia SYD 10 From Last Sunday in October to
Last Sunday in March
Ta shkent, Uzbekistan TAS 5 No DST
Tokyo, Japan TKY 9 No DST
Ta ipei, Taiwan TPE 8 No DST
Tripoli, Libya TRP 2 No DST
To ronto, Canada TRT -5 From 1st Sunday in April to Last
Sunday in October
Quito, Ecuador UIO -5 No DST
Vancouver, Canada VAC -8 From 1st Sunday in April to Last
Sunday in October
World City Abbreviations Reference Table
Page 28

Country Name City code Time Offset DST Period
(GMT = 0)
Vienna, Austria VIE 1 From Last Sunday in March to Last
Sunday in October
Warsaw, Poland WAW 1 From Last Sunday in March to Last
Sunday in October
Washington DC, USA WDC -5 From 1st Sunday in April to Last
Sunday in October
Wellington, WLG 12 From 1st Sunday in October to
New Zealand 3rd Sunday in March
Zurich, Switzerland ZRH 1 From Last Sunday in March to Last
Sunday in October
Reset Button
The RESET button is used to enhance the synchronization of
radio signals after battery replacement or when the unit is malfunctioning.
To reset the unit, use a blunt stylus, such as a paperclip, to hold
down the RESET button inside the battery compartment. All settings return to their default values.
World City Abbreviations Reference Table
Page 29

To lock key-operation during transit, slide the KEY-LOCK switch
to the right lock position.
To unlock key-operation, slide the KEY-LOCK switch back to the
left.
Table Stand
This unit is designed stand upright on a table or desk.
Key-Lock Function
Page 30

Proposed operating range: 23.0°F to 122.0°F (-5.0°C to
+50.0°C)
Radio Control: Auto synchronize current time and date by radio
signal from the U.S. Atomic Clock.
Clock format: 12-hour format (hh:mm:ss)
Calendar format: Month-Day-Year
Alarm: Single and Weekday; 2-minute crescendo alarm with 8-
minute snooze function
Power: Runs on 2 AAA 1.5V batteries
Weight: 5.3 oz (without battery)
Dimensions with Carrying Pouch: 3
1
/2" (L) x 3" (W) x 1" (D)
Customer Service
Should you require assistance regarding this product and its operation, you may contact the manufacturer’s customer care department at (949) 608-2800 or via email at: helpme@oscientific.com.
Specifications
Page 31

Trouble
All function keys are
disabled.
Reception icon
“Antenna” is not shown.
Possible Cause
Rear slide switch is
locked.
Auto-reception of clock
radio signal has been
disabled.
Solution
Unlock the rear switch.
Enable this function by
following the instructions in the “About
Radio Reception” section of this manual.
Troubleshooting
Page 32

Trouble
Clock time is not correctly set; and/or the
“No-Reception” icon
appears on the display.
Possible Cause
The clock is not receiving a radio signal
because:
1. Electromagnetic
interference is present, or the clock is
located within reinforced concrete
walls or a shadowed
area.
2. Clock orientation is
not at optimum
position for reception of clock radio
signal.
Solution
1. Place the clock far
from a PC, mobile
phone, etc. For best
reults, keep near a
windowsill. Wait at
least 24 hours.
Note: the radio signal is stronger at
night, particularly
after rain.
2. The clock automatically searches for a
radio signal at 1:00,
2:00, 3:00, 9:00,
15:00, 21:00 every
day.
3. To force the signal
reception, please
refer to the “About
Radio Reception”
section of this manual.
Troubleshooting
Page 33

WARNING: Changes or modifications to this unit not expressly
approved by the party responsible for compliance could void the
user’s authority to operate the equipment.
NOTE: This product complies with DHHS Rule 21 subchapter J
at date of manufacture.
This equipment has been tested and found to comply with the
limits for a Class B digital device, pursuant to Part 15 of the FCC
Rules. These limits are designed to provide reasonable protection
against harmful interference in a residential installation. This
equipment generates, uses, and can radiate radio frequency
energy and, if not installed and used in accordance with the
instructions, may cause harmful interference to radio communications. However, there is no guarantee that interference will not
occur in a particular installation.
If this equipment does cause harmful interference to radio or television reception, which can be determined by turning the
equipment off and on, the user is encouraged to try to correct
the interference by one or more of the following measures:
•Reorient or relocate the receiving antenna.
•Increase the separation between the equipment and receiver.
Statement of FCC/DHHS Compliance
Page 34

Statement of FCC/DHHS Compliance
•Connect the equipment into an outlet on a circuit different
from that to which the receiver is connected.
•Consult the dealer or an experienced radio/TV technician for
assistance.
FCC Label Compliance Statement
This device complies with Part 15 of the FCC Rules. Operation is
subject to the following two conditions: (1) This device may not
cause harmful interference, and (2) this device must accept any
interference received, including interference that may cause
undesired operation.
Page 35

What Is Covered
This warranty covers any defects in materials or workmanship, with the exceptions stated below.
How Long Coverage Lasts
This warranty runs for 90 days from the date of original purchase.
What Is Not Covered
This warranty does not cover damage caused by misuse or use other than as intended and described in the
product instruction manual, or loss or damage to batteries or removable parts.
What The Sharper Image Will Do
The Sharper Image will repair any defects in materials or workmanship. In the event repair is not possible,
The Sharper Image will either replace this product with one of similar features and price, or refund the full
purchase price of the product, whichever you prefer.
How to Obtain Service
Return the product and receipt, along with a brief explanation of the problem, to:
T.S.I. - Returns Department
2901-A West 60th Street
Little Rock, AR 72209
If you have questions please feel free to contact our customer service representatives at 1-800-344-5555 or
by email at care@sharperimage.com.
This warranty gives you specific legal rights, and you may have other legal rights that vary from state to state.
Copyright 2003
Sharper Image Corporation
650 Davis St., San Francisco, CA 94111
(415) 445-6000
Shop online:
Due to continuing improvements, actual product may differ slightly from the product described herein.
V1 03/03
WARRANTY
 Loading...