

Page 1

FEATURES
LIGHTED DRONE
Owner’s Manual
Thank you for purchasing the Sharper Image Lighted Drone.
Please read these instructions prior to using this device for the first time.
In addition, please store this guide for future reference.
• Indoor/outdoor use
• Built-in gyroscope for smoother flights
• LED directional lights
• 164-ft. flight range
• Dimensions: 142mm L x 142mm
W x 37.5mm H
• Weight: 63g
• Powered by a rechargeable 3.7V 500mA
lithium battery (included)
TRANSMITTER DESCRIPTION
A. Power indicator LED
B. Speed button
C. Headless mode on/off
D. Throttle lever
E. Start/landing
• Transmitter requires 4 AAA batteries
(included)
• 360° rolls and stunt flips
• Headless mode (easier for beginners)
• Auto hover
• 2 speed modes (Hi/Low)
• Charge time 90 minutes
• Flight time 5 minutes
F. Power on/off
G. Stunt flip button
H. Front/back trimming
I. Left/right trimming
J. Directional lever
K. Button not used for this model
- 1 -
Page 2
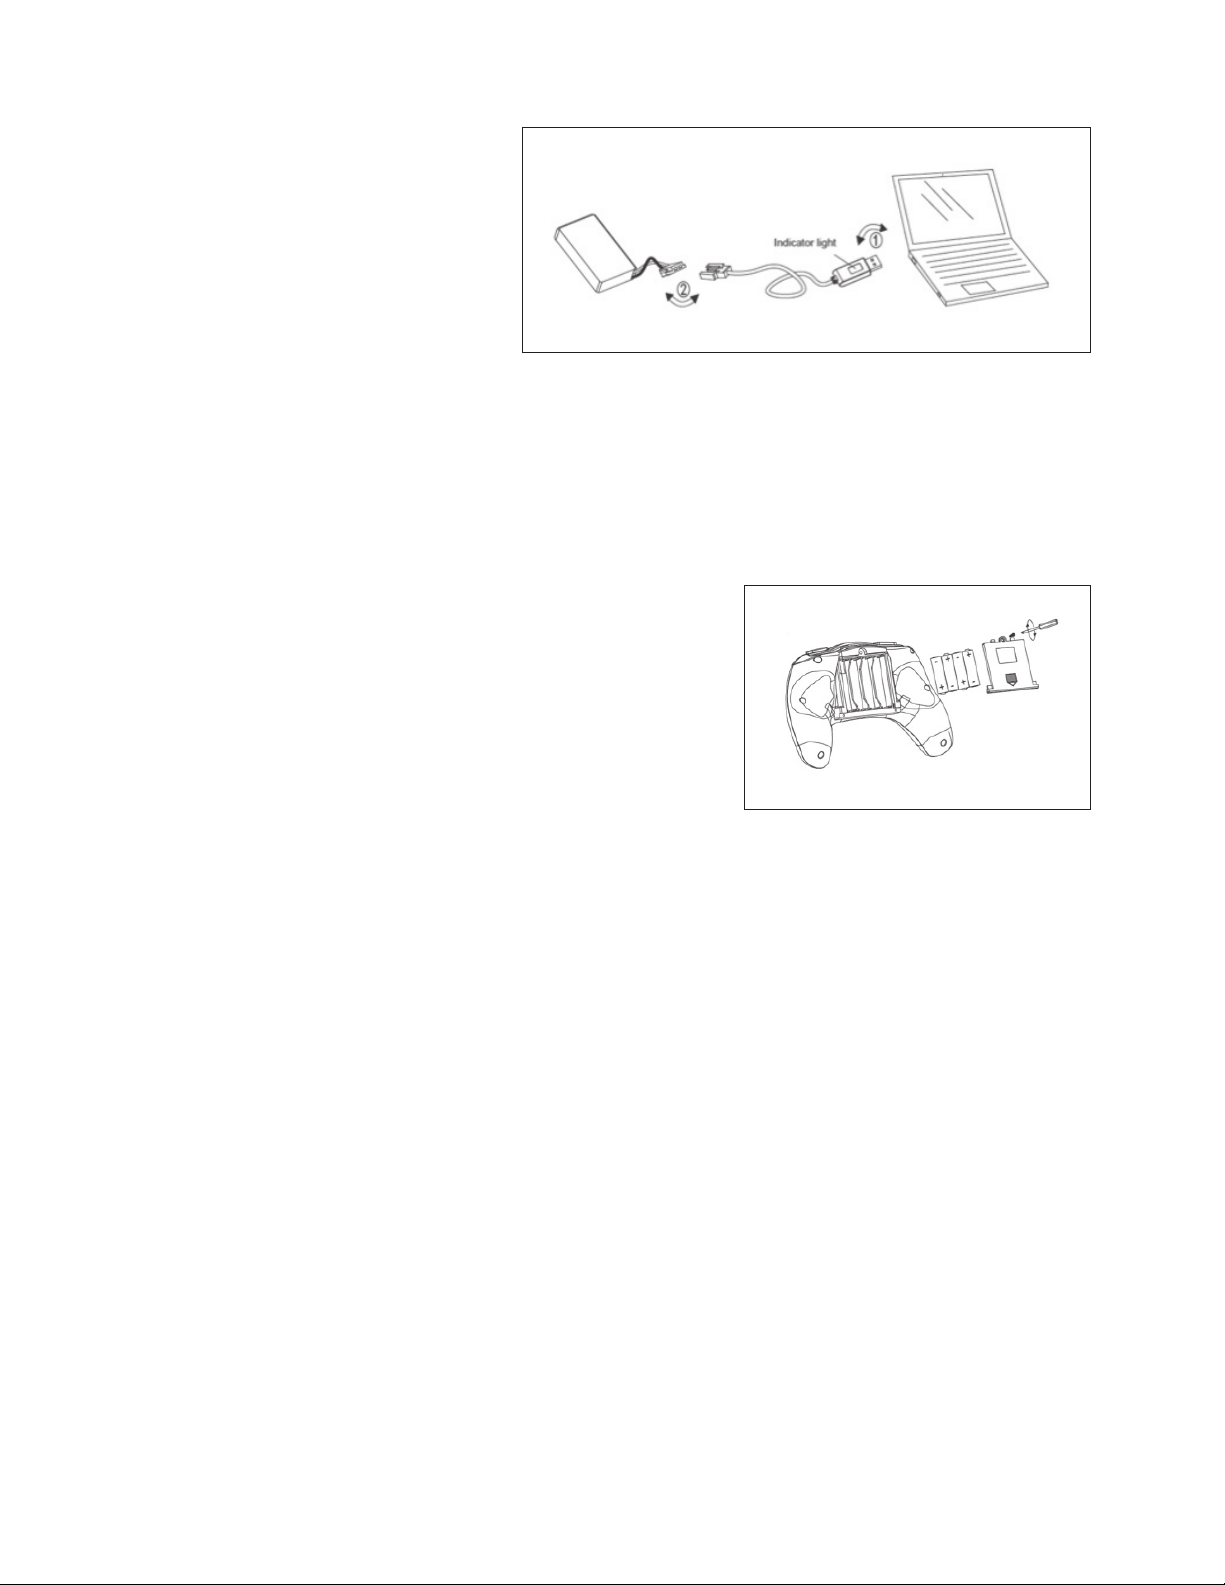
CHARGING THE DRONE BATTERY
1. Turn power off on the drone
(switch on bottom of aircraft).
2. Open the battery compartment
and carefully remove battery.
3. Disconnect the battery from the
battery cable.
4.
Connect the other end of the charging cable to a computer USB port.
Plug the USB charging cable into the battery. 5.
6. An LED on the charging cable will off, indicating that the battery is being charged.
7. When the battery is fully charged (about 1.5 hours), the LED will turn on.
8. Disconnect the battery from the charging cable when it is fully charged. Do not overcharge.
INSERT BATTERIES IN TRANSMITTER
1. Open the battery compartment on the transmitter.
2. Insert 4 AAA batteries (included), being careful to
follow the polarity diagrams inside the compartment
(“+” or “-”).
3. Close the compartment. NOTE: We recommend alkaline
batteries. Always use fresh batteries. For best results, do
not mix old and new batteries.
PAIRING THE DRONE WITH THE TRANSMITTER
1. Turn the drone power on.
2. Place the drone on a flat, level surface, with the tail end (green LEDs) pointed toward you.
3. Press the power button on the transmitter. You will hear a beep.
4. Push the throttle level (left stick) to the highest position, then pull it straight down
to the lowest position. You will hear one beep for each throttle movement.
5. When the drone LEDs stop flashing and remain on, you have successfully paired the
drone with the transmitter. NOTE: It is possible to fly two or more of these drones together,
however they must be paired one at a time.
LIFTOFF AND LANDING
1. To lift off, press the “START/LANDING” button to start the aircraft. At this time,
the motors of the aircraft will be running slowly. Push the throttle lever upward
to increase power and take off.
- 2 -
Page 3

(
LIFTOFF AND LANDING
EMERGENCY STOP: If you need to stop immediately,
pull the throttle lever down and to the left. At the same
time, pull the directional lever down and to the right.
The aircraft will stop quickly.
CONT.
)
HEADLESS MODE
Headless mode makes this drone easier for beginners to fly, because there is no specified
“front end” or “rear end.” In Headless Mode, when you bank left, the drone banks left. When you
bank right, the drone banks right, regardless of what direction the the colors are facing.
To turn on Headless Mode:
1. Start with the drone on a flat, level surface, with the green LEDs facing you.
2. Press the Headless Mode On/Off button.
3. You will hear continuous beeps. This means you are in Headless Mode. Now you may
liftoff as described earlier.
4. To exit Headless Mode, press the Headless Mode On/Off button once more. You will hear
one beep, and the drone will return to normal flight mode.
CONTROLLING THE DRONE
- 3 -
Page 4

ROLLING AND TUMBLING STUNT FLIPS
TRIMMING AND CALIBRATING THE DRONE
AUTO HOVER MODE
When you reach your desired altitude, release the throttle lever to maintain the altitude in auto
hover mode.
FCC STATEMENT
This device complies with Part 15 of the FCC Rules. Operation is subject to the following two
conditions: (1) This device may not cause harmful interference, and (2) this device must accept any
interference received, including interference that may cause undesired operation.
Note: This equipment has been tested and found to comply with the limits for a Class B digital
device, pursuant to part 15 of the FCC Rules. These limits are designed to provide reasonable
protection against harmful interference in a residential installation. This equipment generates,
- 4 -
Page 5

FCC STATEMENT
1. This device complies with Part 15 of the FCC Rules. Operation is subject to the following two
conditions:
(1) This device may not cause harmful interference, and
(2) This device must accept any interference received, including interference that may cause
undesired operation.
2. Changes or modifications not expressly approved by the party responsible for compliance could
void the user’s authority to operate the equipment.
This equipment has been tested and found to comply with the limits for a Class B digital device,
pursuant to part 15 of the FCC Rules. These limits are designed to provide reasonable protection
against harmful interference in a residential installation. This equipment generates, uses and can
radiate radio frequency energy and, if not installed and used in accordance with the instructions,
may cause harmful interference to radio communications. However, there is no guarantee that
interference will not occur in a particular installation. If this equipment does cause harmful
interference to radio or television reception, which can be determined by turning the equipment off
and on, the user is encouraged to try to correct the interference by one or more of the following
measures:
—Reorient or relocate the receiving antenna.
—Increase the separation between the equipment and receiver.
—Connect the equipment into an outlet on a circuit different from that to which the receiver is
connected.
—Consult the dealer or an experienced radio/ TV tec hn i cia n for help.
FCC Radiation Exposure Statement:
This equipment complies with FCC radiation exposurere quirement.
The device can be used in portable exposure condition without RF striction.
WARRANTY/CUSTOMER SERVICE
Sharper Image branded items purchased from SharperImage.com include a 60-day limited
replacement warranty. For Customer Service, please call 1(877) 210-3449.
 Loading...