

Sharper Image EVSI-UH201BK, EVSI-UH201PL, EVSI-UH201 Instruction Manual And Warranty Information
Page 1
Instruction Manual and
Warranty Information
Cool & Warm Mist
Ultrasonic Humidifier
El manual en
español empieza
en la página 15
GARANTÍA LIMITADA POR UN AÑO
SI PRODUCTS vende sus productos con el propósito de que no tengan defectos de fabricación
ni de mano de obra por un plazo de un año a partir de la fecha de compra original, con las
siguientes excepciones.
SI PRODUCTS garantiza que sus productos no tendrán defectos de material ni de mano de obra
bajo condiciones de uso y servicio normales. Esta garantía se extiende únicamente a consumidores y no a distribuidores.
Para obtener servicio de garantía en su producto Sharper Image, póngase en contacto con un
Representante de Relaciones con el Consumidor por el teléfono 1-888-856-6781 para obtener
asistencia. Asegúrese de tener a mano el número de modelo del producto.
No se aceptarán pagos contra entrega.
SI PRODUCTS no autoriza a nadie, incluyendo entre otros a distribuidores, posteriores
consumidores compradores del producto a un distribuidor, o compradores remotos, a obligar
a SI PRODUCTS de forma alguna más allá de las condiciones aquí establecidas. La garantía de
este producto no cubre daños causados por uso inadecuado o abuso, accidente, conexión de
cualquier accesorio no autorizado, alteración del producto, instalación inadecuada, reparaciones
o modificaciones no autorizadas, uso inadecuado de la fuente de energía/electricidad, cortes de
energía, caída del producto, funcionamiento incorrecto o daño de una pieza de funcionamiento
debido al no cumplimiento del mantenimiento recomendado por el fabricante, daños durante el
transporte, robo, negligencia, vandalismo, o condiciones climáticas, pérdida de uso en el período
durante el cual el producto está en una instalación de reparación o a la espera de piezas o
reparación, o cualquier otra condición, sin importar cual sea, que se encuentre fuera del control
de SI PRODUCTS.
Esta garantía es válida únicamente si el producto es comprado y operado en el país en el cual
se compró el producto. Un producto que requiera modificaciones o adaptación para habilitar su
funcionamiento en cualquier país que no sea aquel para el que fue diseñado, fabricado, aprobado
y/o autorizado, o la reparación de productos dañados por estas modificaciones no está cubierto
bajo esta garantía.
LA GARANTÍA AQUÍ ESTABLECIDA SERÁ LA ÚNICA Y EXCLUSIVA GARANTÍA. NO HABRÁ
NINGUNA OTRA GARANTÍA EXPRESA NI IMPLÍCITA, INCLUYENDO NINGUNA GARANTÍA DE
COMERCIALIZACIÓN O APTITUD NI NINGUNA OTRA OBLIGACIÓN POR PARTE DE LA COMPAÑÍA
CON RESPECTO A PRODUCTOS CUBIERTOS POR ESTA GARANTÍA. SI PRODUCTS NO TENDRÁ
RESPONSABILIDAD ALGUNA POR NINGÚN DAÑO INCIDENTAL, CONSECUENTE NI ESPECIAL. BAJO
NINGÚN CONCEPTO ESTA GARANTÍA REQUERIRÁ MÁS QUE LA REPARACIÓN O EL REEMPLAZO
DE ALGUNA PIEZA O PIEZAS QUE SE HALLEN DEFECTUOSAS DENTRO DEL PERÍODO DE VIGENCIA
DE LA GARANTÍA.
NO SE EFECTUARÁN REEMBOLSOS. SI NO HAY PIEZAS DE REPUESTO DISPONIBLES PARA LOS
MATERIALES DEFECTUOSOS, SI PRODUCTS SE RESERVA EL DERECHO DE REALIZAR SUSTITUCIONES DEL PRODUCTO EN LUGAR DE REPARARLO O CAMBIARLO.
Esta garantía no se extiende a la compra de productos abiertos, usados, reparados, embalados
otra vez y/o abiertos y vueltos a cerrar, incluyendo entre otras cosas la venta de dichos productos
en sitios de remate por Internet y/o la venta de dichos productos por revendedores o mayoristas.
Todas y cada una de las garantías cesarán y terminarán inmediatamente con respecto a
cualquier producto o pieza del mismo que sean reparados, cambiados, alterados o modificados
sin el consentimiento previo explícito y por escrito de SI PRODUCTS.
Esta garantía le proporciona derechos legales específicos. Es posible que usted tenga derechos
adicionales que pueden variar de un estado a otro. Debido a regulaciones particulares, es posible
que algunas de las limitaciones y exclusiones no se apliquen en su caso. Por más información
con respecto a nuestra línea de productos en los EE.UU., visítenos en: www.siproducts.com
THE SHARPER IMAGE ® nombre y el logotipo son marcas registradas.
Fabricado y comercializado por SI Products, LLC, bajo licencia.
©The Sharper Image. Todos los derechos reservados.
IB-EVSIUH201
Centro de servicio de
SI Products
1.888.856.6781
8:30a.m. – 7:00p.m. (EST)
lunes a viernes
correo electrónico:
cservice@siproducts.com
EVSI-UH201BK
EVSI-UH201PL
EVSI-UH201
P
l
e
a
s
e
T
a
k
e
A
M
o
m
e
n
t
N
o
w
Register
Your Product At:
www.sharperimageparts.com/
product-registration
Your valuable input regarding this
product will help us create
the products you will
want in the future.
Page 2

It’s the ultimate Cool and Warm Ultrasonic Humidier.
Thank you for purchasing The Sharper Image® Cool & Warm Mist Ultrasonic
Humidifier. This product, along with the entire The Sharper Image
®
collection,
connects innovation with cutting-edge design to provide you with years of
dependability and enjoyment. The stylish Cool & Warm Mist Ultrasonic Humidifier
is perfect for use in the home or office, providing a comfortable environment
during any season. What’s more, it performs silently to promote a restful
night’s sleep.
IMPORTANT SAFETY INSTRUCTIONS
WHEN USING ELECTRICAL PRODUCTS, ESPECIALLY WHEN CHILDREN ARE
PRESENT, BASIC SAFETY PRECAUTIONS SHOULD ALWAYS BE FOLLOWED,
INCLUDING THE FOLLOWING:
READ ALL INSTRUCTIONS BEFORE USING
DANGER
—TO REDUCE THE RISK OF ELECTRIC SHOCK:
• Always place humidifier on a firm, flat surface. A waterproof mat or pad is
recommended for use under the humidifier. Never place it on a rug or carpet, or on
a finished floor that may be damaged by exposure to water or moisture.
• Always unplug the unit from the electrical outlet immediately after using and before
cleaning
• DO NOT reach for a unit that has fallen into water. Unplug it immediately.
• DO NOT use while bathing or in the shower.
• DO NOT place or store the unit where it can fall or be pulled into a tub or sink.
• DO NOT place or drop into water or other liquids.
• DO NOT use water above 86° Fahrenheit.
WARNING
—TO REDUCE THE RISK OF BURNS,
FIRE, ELECTRIC SHOCK OR INJURY TO PERSONS:
• A unit should never be left unattended while plugged in.
• Close supervision is necessary when this unit is used by or near
children, invalids, or disabled persons.
• Use this unit only for its intended use as described in this manual.
Do not use attachments not recommended by Sharper Image;
specifically any attachments not provided with this unit.
• NEVER drop or insert any object into any opening.
• DO NOT operate where aerosol (spray) products are being used,
or where oxygen is being administered.
• Always hold the water tank firmly with both hands when carrying a
full tank of water.
• NEVER use the humidifier in an environment where explosive
gasses are present.
• DO NOT place the humidifier near heat sources, such as a stove,
and do not expose the humidifier to direct sunlight.
• DO NOT carry this unit by the power cord or use the power cord
as a handle.
• To disconnect, turn all controls to the “off” position, then remove
the plug from the outlet.
• This unit is designed for personal, non-professional use only.
• DO NOT use outdoors. For indoor use only.
Caution:
All servicing
of this product
must be
performed
by authorized
SI Products
Service
Personnel only.
2 3
Page 3

SAVE THESE INSTRUCTIONS
Caution—Please read all instructions carefully before operating.
• Never cover the unit while it is operating.
• Always keep the cord away from high temperature and fire.
• If the cord sustains damage, you must stop using this product immediately and
contact SI Products consumer relations (see Warranty section for consumer
relations contact information).
• Perform regular maintenance on the ultrasonic membrane.
• Never use detergent not recommended by the manufacturer to clean the ultrasonic
membrane.
• Never clean the ultrasonic membrane by scraping with a hard object.
• Do not attempt to adjust or repair the unit. Servicing must be performed by
professional or qualified personnel.
• Stop using this unit if there is an unusual noise or smell.
• Unplug this unit when not in use for a long period of time.
• Do not touch the water or any parts of the unit that are covered by water while the
unit is on or plugged in.
• Never operate without water in the tank.
• Only use water in the tank.
• Never use any additive in the water that is not produced by the manufacturer of this
unit.
• Do not wash, adjust, or move this unit without first unplugging it from the electrical
outlet.
• Keep this unit out of reach of children. Do not allow children to use this unit
without supervision.
Unique Features and Specifications
Ultrasonic Technology
This humidifier uses ultrasonic high frequency technology to convert the water
into 1–5 million super particles that are dispersed into the air evenly.
Programmable Humidistat
Create the perfect room environment with a customized level of humidity.
LED Digital Readout
Displays room humidity level, programmed humidity target and timer setting.
Built-In Timer
Programmable timer, up to 12 hours.
Auto Shut Off Protection
When the tank is empty the unit will shut off automatically.
Warm & Cool Mist Function
Choose either warm or cool mist for customized comfort.
Built-In Night Light
A useful night light feature is included for your convenience.
Voltage
110–120V/60Hz
Watts
101
Tank Capacity
1.7 gallon — 6.435 liter
4 5
Page 4
M
I
S
T
O
U
T
P
U
T
55
WARM
TIMER
HUMI SET
6 7
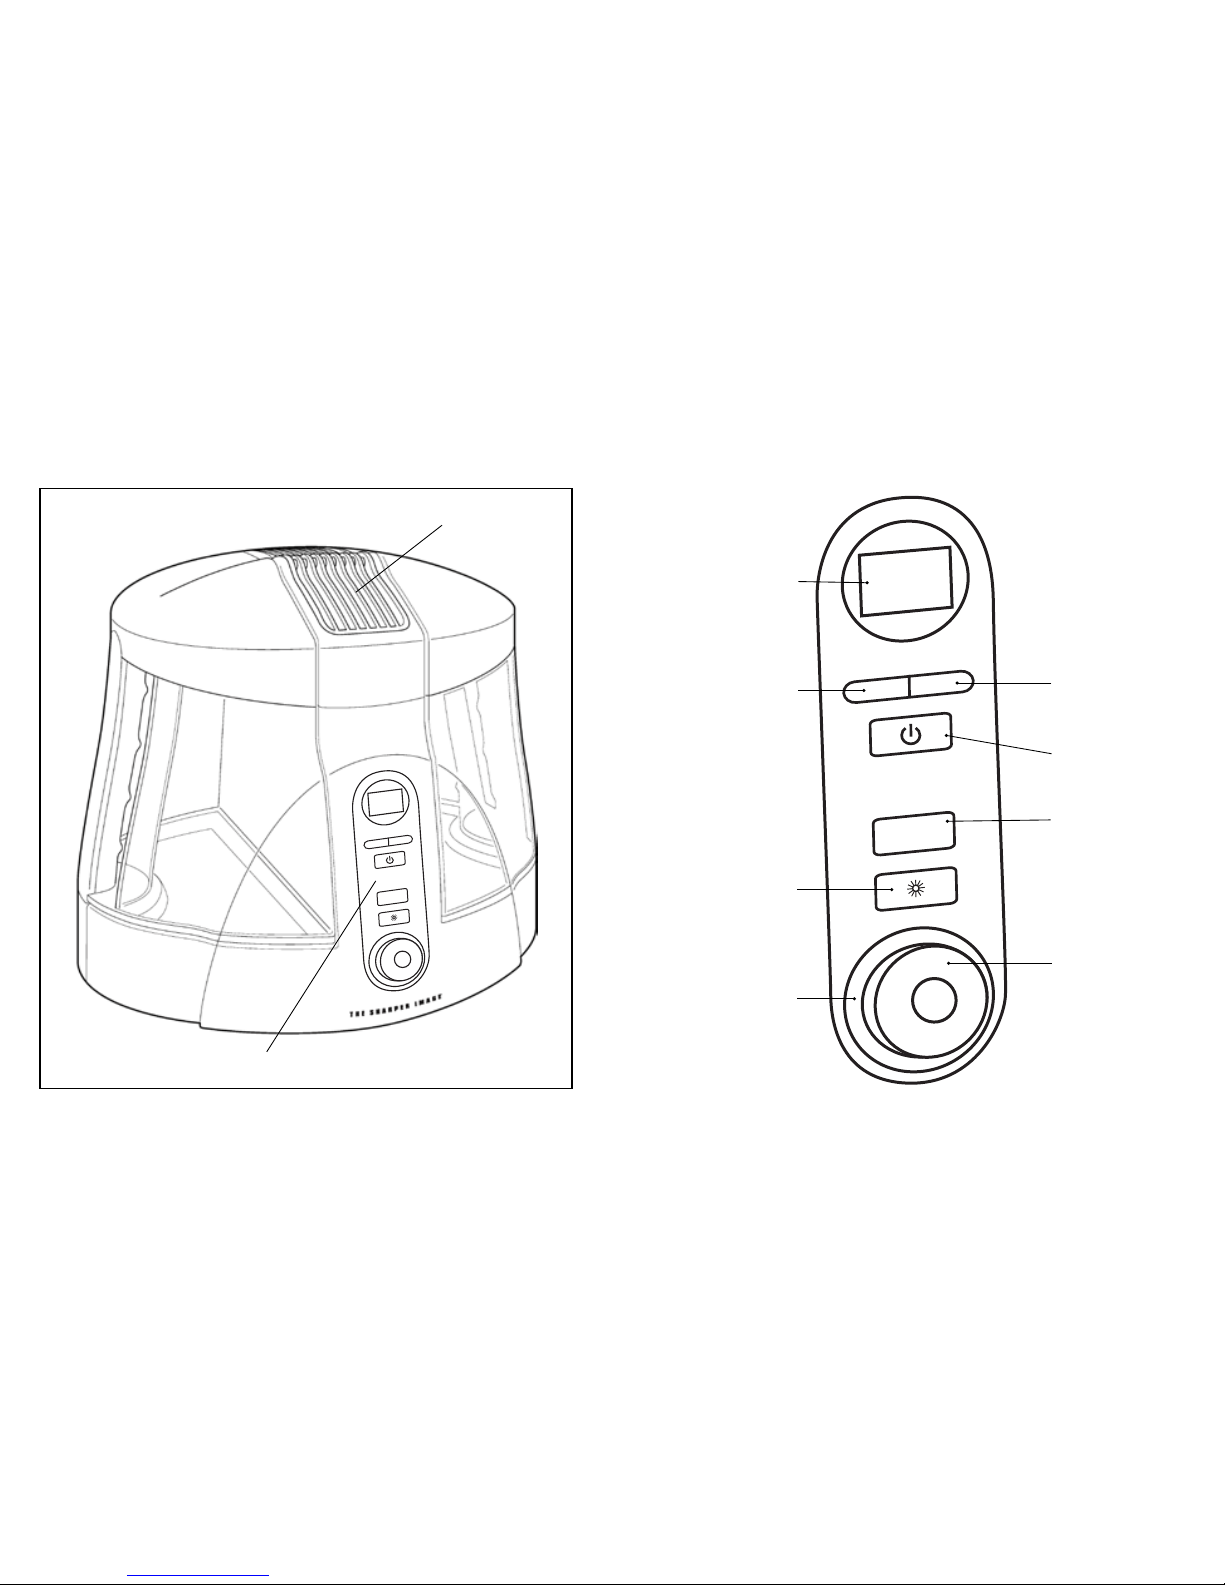
Cool & Warm Mist Ultrasonic Humidier
Fig. 1
Control Panel
Mist Spout
LED Display Current Humidity
Display/Humidistat
Setting Indicator/
Timer Setting
Indicator
Timer Set Button
Power ON/OFF Button
Humidity Set Button
Mist Temp Setting Button
Night Light
ON/OFF Button
Night Light
Illuminated Ring
Mist Output
Adjustment Button
Fig. 2
M
I
S
T
O
U
T
P
U
T
55
WARM
TIMER
HUMI SET
Page 5
Night Light
Press the NIGHT LIGHT button to turn on the Tank light. The light around the mist
knob will illuminate. Press the NIGHT LIGHT button again to turn the night light off.
Timer
The timer will cycle in 1HR increments from 1 – 12 Hours, then OFF. Press the TIMER
button to activate the timer. The timer setting indicator on the LED display will read “01”.
To select the desired timer setting, keep pressing the TIMER button until the desired
timer setting is lit on the timer setting indicator. The LED display will show the timer
setting for 3 seconds, then will default back to display the current room humidity. To
turn the timer OFF, press the TIMER button until “00” is read on the LED Display.
Using the Remote Control
BEFORE FIRST USE, REMOVE PLASTIC PULL TAB FROM BATTERY COMPARTMENT.
Battery Installation
One CR2032 3V battery is included with the remote control. To change the battery, remove
the battery door at the back of the remote by squeezing the tab and pulling the door away
from the back of the remote. Please insert the battery into the remote with the positive side
up as shown on the drawer.
NOTE:
Always keep the battery and remote control out of the reach of children.
BATTERY NOTE
• If the unit is not going to be used for a long period of time, remove batteries to
prevent damage due to possible battery leakage.
• Clean the battery contacts and also those of the device prior to battery installation.
• Remove used batteries promptly.
• Dispose of properly in accordance with all state, province, and country regulations.
• Do not dispose of batteries in fire. Batteries may explode or leak.
• Use only the size and type of batteries specified.
• When installing batteries, observe proper polarity +/-. Improper installation of batteries
may cause damage.
8 9
How to Use
To reduce the risk of electric shock, this appliance is equipped with a
polarized plug (one blade is wider than the other). This plug will only fit in a
polarized outlet. If it still does not fit, contact a qualified electrician to install
the proper outlet. Do not change the plug in any way.
Power ON/OFF Button
Plug unit in to a 120 volt AC electrical outlet. Press the POWER ON/OFF button
to turn unit on. Press the POWER ON/OFF button again to turn unit off.
ATTENTION: When the water in the water tank is almost empty the power to the
unit will shut off to indicate to the user to refill water.
Mist Adjustment Setting
Mist adjust to three levels: 1, 2, 3. To increase the mist output, press the MIST
OUTPUT adjustment button. The mist level will be displayed on the LED display.
When changing the mist level using the remote control, press the MIST level button
once to display the current mist setting. Press it again quickly to advance the mist
setting. The mist level will return to level 1 if advanced past level 3.
Mist Temperature Setting
When the humidifier is powered ON, it will operate on the default setting, Cool Mist. To
change the Mist Temperature from Cool Mist to Warm Mist, press the WARM MIST
WARM
button. The mist temperature will change to Warm Mist, and WARM MIST button
will blink red while the mist is warming. When the mist has warmed, the light in the
WARM MIST button with remain steady. To change the Mist Temperature back to Cool
Mist, press the WARM MIST button again. The mist temperature will change to Cool
Mist, and the light in the WARM MIST button will turn off.
Programmable Humidistat
This unit has a Programmable Humidistat that can be set in 5% increments from
35% - 65% humidity, then OFF. To program the humidity level, press the HUMIDITY
SET button. The humidity level will increase by 5% every time the button is pressed,
and will show on the LED display screen. Keep pressing the HUMIDITY SET button
until the desired humidity level setting is reached. The LED display will show the
set humidity level for 5 seconds, then will default back to display the current room
humidity. To cancel programmed humidity setting, keep pressing the HUMIDITY
SET until “- -“ is read on the LED display.
NOTE: When the set humidity level is reached, the humidifier will turn off. When
the humidity level in the room drops below the set humidity level, the unit will
automatically turn on.
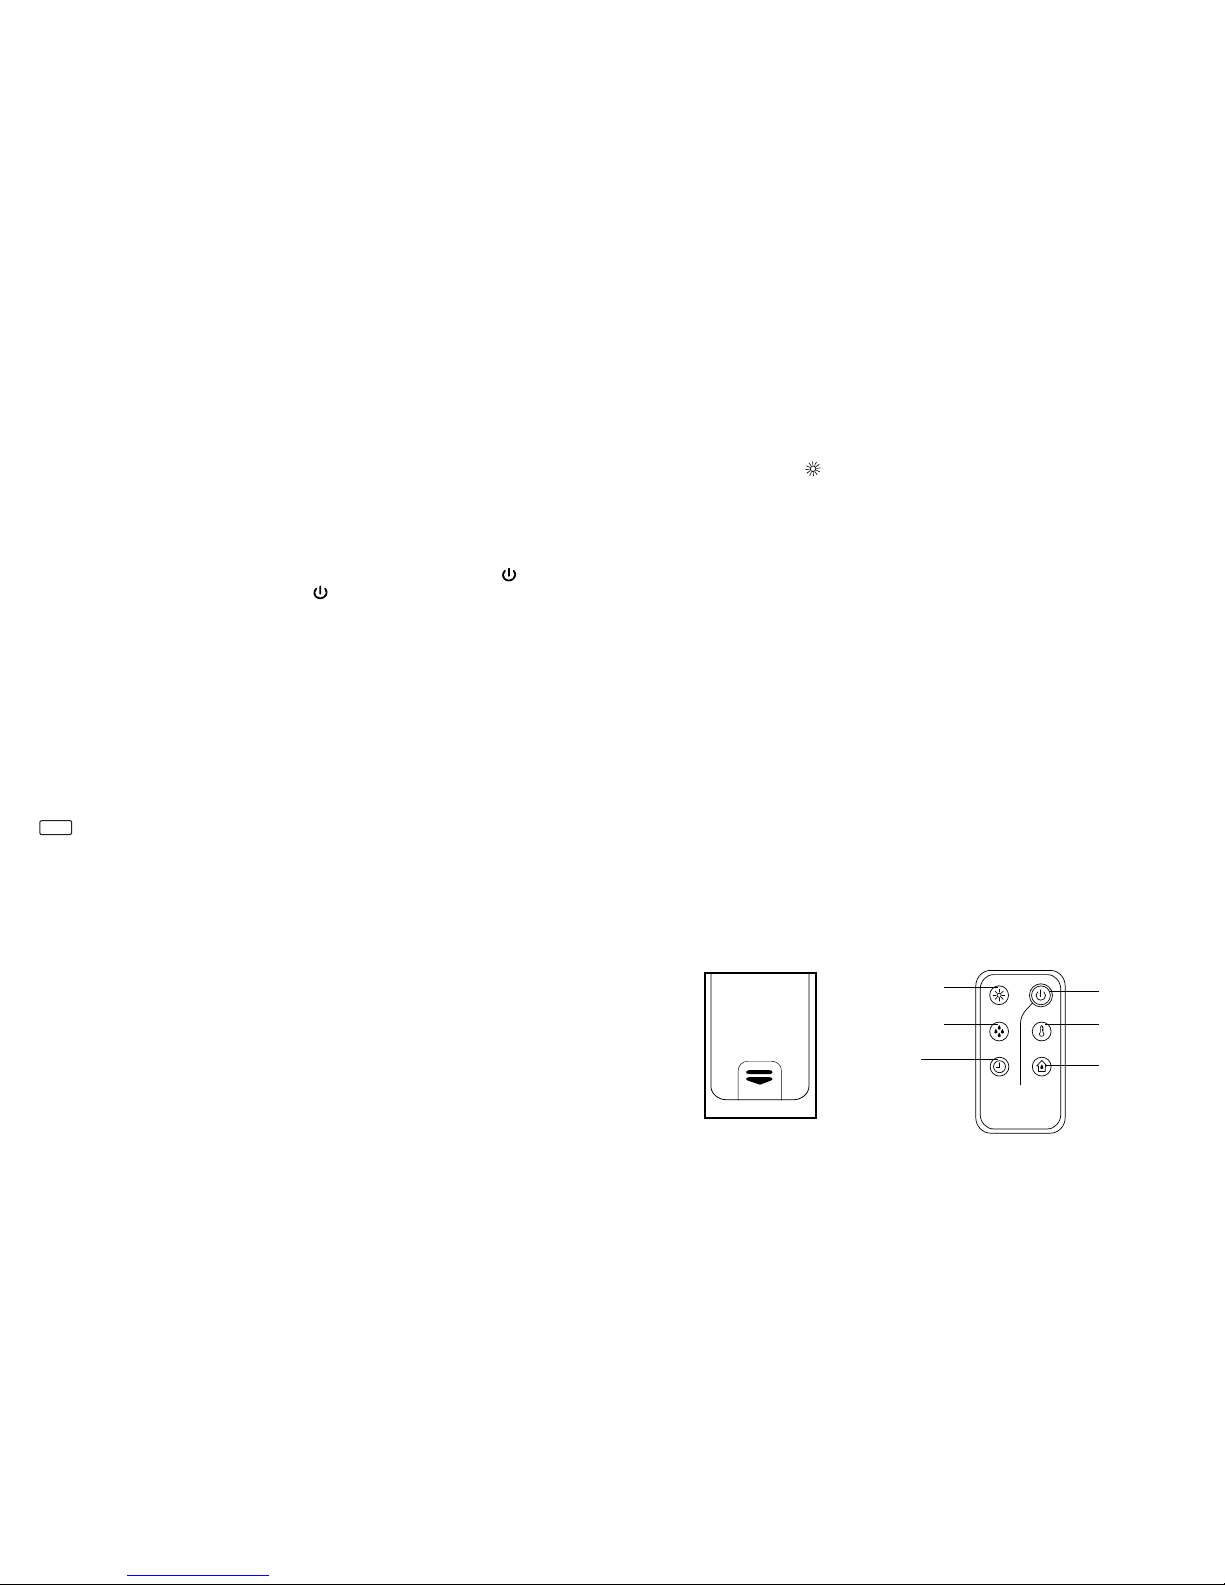
Bottom of Remote
Power ON/OFF
Timer
Humidistat
Warm Mist
Mist Level
Night Light
ON/OFF
SHARPER IMAGE
®
NIGHT LIGHT
HUMI. SET
L M H WM MIST
TIMER
Page 6

10 1 1
How to Fill
CAUTION: Before filling unit with water, turn power off and unplug unit from the outlet.
Note: Always use two hands to carry the water tank.
1. Grasp tank handles with both hands and lift
up from humidifier base. Remove only one
tank at a time (Fig. 3).
2. Turn the tank upside down and remove the
tank cap by turning it counter-clockwise
(Fig. 4).
3. Fill the water tank with clean, cool tap water.
We recommend using distilled water if you
live in a hard water area (Fig. 5).
4. Replace the tank cap by turning clockwise
until tight (Fig. 6).
5. Install both tanks back on the base of the unit.
Make sure the tanks are firmly seated (Fig. 7).
About White Dust
Use of high mineral content hard water may cause a white mineral residue to
accumulate on surfaces in the room near the humidifier. The mineral residue is
commonly called “white dust.” The higher the mineral content (or, the harder your
water is), the greater the potential for white dust. The white dust is not caused by
a defect in the humidifier. It is caused only by minerals suspended in the water.
Demineralization Cartridge
The Sharper Image demineralization cartridge will help reduce the potential
for white dust, a deposit of minerals left behind from using hard water in your
humidifier. The cartridge should be replaced every 30 – 40 fillings. The cartridge
may need to be replaced more often if you are using very hard water. Replace
the cartridge when you notice an increase in white dust build-up. If white dust
still forms around the humidifier after a new cartridge has been installed, consider
using distilled water. To purchase new demineralization cartridges, model
# EV-HDDC4-6CTM, go back to the retailer (where you purchased your
humidifier), or visit www.sharperimageparts.com. If you live in an area with
hard water, or use a water softener, we recommend using distilled
water for better results from your humidifier. Never use water
softening additives in your humidifier.
Installation Instructions:
1. Remove demineralization cartridge from packaging and let it soak in water for 10
minutes.
2. Remove the tank from humidifier base and turn it over.
3. Unscrew the tank cap by turning the cap counter-clockwise.
4. Fill the tank with water as shown in the How To Fill Section.
5. Place 1 blue demineralization cartridge into the tank.
6. Replace the tank cap by turning clockwise.
7. Place the tank back on the base, making sure the tank is firmly seated.
Fig. 3
Fig. 4
Fig. 5
Fig. 6
Fig. 7
Note: This unit uses water from one tank at a
time. It will use all the water from one tank before
beginning to pull water from the other tank.
Page 7

PROBLEM
POSSIBLE CAUSE SOLUTION
Power Light is off • Unit is not plugged in
• No power at outlet
• Plug unit in
• Press the POWER button to
turn the power on
• Check circuits, fuses, try a
different outlet
Peculiar Odor • If new unit
• If unit is in use, the odor
may be a dirty tank or old
tank water
• Open the water tank cap and
keep it in a shady and cool
place for 12 hours
• Empty the old water, clean the
tank and ll with clean water
Excessive Noise • Unit is not level
• Low water level
• Place unit on a at, even
surface
• Check the water level. Rell
the tank if the water is low
White Dust Accumulation • Hard water used
• Demineralization Cartridge
needs replacement
• Use distilled water and a
Demineralization Cartridge
• Replace Demineralization
Cartridge
Troubleshooting
To Clean the Water Tank:
Remove the tank from the humidifier base by lifting it
from the main unit. Unscrew the tank cap and rinse
inside the tank with clean water (Fig. 8).
To remove any scale or build-up, use a 50/50
mixture of vinegar and water to clean the inside of
the tank.
SUGGESTION: Clean the water tank once every
two to three weeks, depending on your water
conditions.
To Clean the Ultrasonic Membrane:
Put a small amount of mild dish soap on the surface
of the ultrasonic membrane, then pour in some water
and let soak for five minutes. Brush clean with a
soft-bristle brush (not included) and rinse (Fig. 9).
SUGGESTION: Clean the membrane once every
two to three weeks, depending on your water
conditions.
NOTE: Never submerge the base in water or any
liquid.
To Clean the Outer Surfaces:
Clean the surface of your humidifier with a clean,
damp, soft cloth as often as needed (Fig. 10).
12 13
Fig. 8
Fig. 9
Fig. 10
Page 8

Manual de instrucciones
e información de garantía
Frío y Caliente Humidificador
de vapor ultrasónico
THE SHARPER IMAGE ® name and logo are registered trademarks.
Manufactured and Marketed by SI Products, LLC under license.
©The Sharper Image. All rights reserved.
IB-EVSIUH2010
ONE YEAR LIMITED WARRANTY
SI PRODUCTS sells its products with the intent that they are free of defects in manufacture and
workmanship for a period of one year from the date of original purchase, except as noted below.
SI PRODUCTS warrants that its products will be free of defects in material and workmanship
under normal use and service. This warranty extends only to consumers and does not extend
to Retailers.
To obtain warranty service on your Sharper Image product, contact a consumer relations
representative by telephone at 1-888-856-6781 for assistance. Please make sure to have the
model number of the product available.
SI PRODUCTS does not authorize anyone, including, but not limited to, Retailers, the subsequent
consumer purchaser of the product from a Retailer or remote purchasers, to obligate SI
PRODUCTS in any way beyond the terms set forth herein. This warranty does not cover damage
caused by misuse or abuse; accident; the attachment of any unauthorized accessory; alteration
to the product; improper installation; unauthorized repairs or modifications; improper use of
electrical/power supply; loss of power; dropped product; malfunction or damage of an operating
part from failure to provide manufacturer’s recommended maintenance; transportation damage;
theft; neglect; vandalism; or environmental conditions; loss of use during the period the product
is at a repair facility or otherwise awaiting parts or repair; or any other conditions whatsoever
that are beyond the control of SI PRODUCTS.
This warranty is effective only if the product is purchased and operated in the country in
which the product is purchased. A product that requires modifications or adoption to enable
it to operate in any other country than the country for which it was designed, manufactured,
approved and/or authorized, or repair of products damaged by these modifications is not
covered under this warranty.
THE WARRANTY PROVIDED HEREIN SHALL BE THE SOLE AND EXCLUSIVE WARRANTY.
THERE SHALL BE NO OTHER WARRANTIES EXPRESS OR IMPLIED INCLUDING ANY IMPLIED
WARRANTY OF MERCHANTABILITY OR FITNESS OR ANY OTHER OBLIGATION ON THE
PART OF THE COMPANY WITH RESPECT TO PRODUCTS COVERED BY THIS WARRANTY. SI
PRODUCTS SHALL HAVE NO LIABILITY FOR ANY INCIDENTAL, CONSEQUENTIAL OR SPECIAL
DAMAGES. IN NO EVENT SHALL THIS WARRANTY REQUIRE MORE THAN THE REPAIR OR
REPLACEMENT OF ANY PART OR PARTS WHICH ARE FOUND TO BE DEFECTIVE WITHIN THE
EFFECTIVE PERIOD OF THE WARRANTY.
NO REFUNDS WILL BE GIVEN. IF REPLACEMENT PARTS FOR DEFECTIVE MATERIALS ARE
NOT AVAILABLE, SI PRODUCTS RESERVES THE RIGHT TO MAKE PRODUCT SUBSTITUTIONS
IN LIEU OF REPAIR OR REPLACEMENT.
This warranty does not extend to the purchase of opened, used, repaired, repackaged and/or
resealed products, including but not limited to sale of such products on Internet auction sites
and/or sales of such products by surplus or bulk resellers. Any and all warranties or guarantees
shall immediately cease and terminate as to any products or parts thereof which are repaired,
replaced, altered, or modified, without the prior express and written consent of SI PRODUCTS.
This warranty provides you with specific legal rights. You may have additional rights which may
vary from state to state. Because of individual regulations, some of the above limitations and
exclusions may not apply to you. For more information regarding our product line in the USA,
please visit: www.siproducts.com
SI Products
Service Center
1.888.856.6781
8:30a.m. – 7:00p.m. (EST)
M – F
e-mail:
cservice@siproducts.com
EVSI-UH201BK
EVSI-UH201PL
EVSI-UH201
T
ó
m
e
s
e
u
n
m
o
m
e
n
t
o
a
h
o
r
a
Registre
su producto en:
www.sharperimageparts.com/
product-registration
Su valioso aporte sobre este
producto nos ayudará a
crear los productos que
desee en el futuro.
Page 9

Es el humidicador ultrasónico ultra Frío y Caliente.
Gracias por comprar el humidificador ultrasónico de niebla fría y caliente The
Sharper Image®. Este producto, junto con toda la línea de productos de The
Sharper Image®, combina innovación con diseño de vanguardia para proporcionarle años de confiabilidad y disfrute. El elegante humidificador ultrasónico de
niebla fría y caliente es ideal para usar en el hogar o la oficina, y proporciona un
cómodo ambiente en cualquier estación. Y más aún, funciona de manera silenciosa para que usted pueda disfrutar de un sueño apacible.
INSTRUCCIONES IMPORTANTES DE SEGURIDAD
CUANDO UTILICE PRODUCTOS ELÉCTRICOS, ESPECIALMENTE CUANDO HAY
NIÑOS PRESENTES, SIEMPRE SE DEBEN CUMPLIR CIERTAS PRECAUCIONES
BÁSICAS DE SEGURIDAD, QUE INCLUYEN LO SIGUIENTE:
LEA TODAS LAS INSTRUCCIONES ANTES DE USAR EL PRODUCTO
PELIGRO
—PARA REDUCIR EL RIESGO DE CHOQUE ELÉCTRICO:
• Siempre coloque el humidificador sobre una superficie firme y plana. Se recomienda
colocar una alfombrilla o almohadilla impermeable debajo del humidificador. Nunca lo
coloque sobre un tapete o una alfombra, ni sobre un piso con una terminación que pueda
dañarse al ser expuesto al agua o la humedad.
• Siempre desenchufe la unidad del tomacorriente inmediatamente después de usarla y
antes de limpiarla.
• NO intente recoger una unidad que haya caído al agua. Desenchúfela de inmediato.
• NO utilice el humidificador mientras toma un baño o se ducha.
• NO coloque ni guarde la unidad en un lugar donde pueda caerse o ser empujada dentro
de una tina o lavabo.
• NO coloque el humidificador ni lo deje caer en agua u otros líquidos.
• NO use agua a una temperatura superior a 30 ºC (86 ºF).
ADVERTENCIA
—PARA REDUCIR EL RIESGO DE
QUEMADURAS, INCENDIO, CHOQUE ELÉCTRICO O
LESIONES A LAS PERSONAS:
• Nunca debe dejarse una unidad sin supervisión mientras esté
enchufada.
• Esta unidad requiere supervisión de cerca cuando es utilizada por
niños, personas minusválidas o personas con discapacidades, o
cerca de ellos.
• Use esta unidad solamente con el objetivo para el cual fue diseñada, tal como se describe en este manual. No use accesorios
que no estén recomendados por The Sharper Image; en especial,
cualquier accesorio que no se proporcione con esta unidad.
• NUNCA deje caer ni introduzca ningún objeto en ninguna abertura.
• NO haga funcionar el humidificador donde se utilicen productos de
rociado por aerosol ni donde se esté administrando oxígeno.
• Cuando transporte un tanque de agua lleno, sosténgalo siempre
firmemente con ambas manos.
• NUNCA use el humidificador en un ambiente en el que haya gases
explosivos.
• NO coloque el humidificador cerca de fuentes de calor, como una
estufa, y no lo exponga a la luz solar directa.
• NO lleve esta unidad tomada del cable de corriente, ni use el cable
como manija.
• Para desconectar la unidad, coloque todos los controles en la
posición “OFF” y luego quite el enchufe del tomacorriente.
• Esta unidad está diseñada únicamente para uso personal, no profesional.
• NO la use en exteriores. Sólo para uso en interiores.
Precaución:
Todo el
servicio de
este producto
debe ser
realizado
únicamente
por personal
de servicio
autorizado de
SI Products.
16 17
Page 10

GUARDE ESTAS INSTRUCCIONES
Precaución — lea todas las instrucciones con atención antes de poner en
funcionamiento la unidad.
• Nunca cubra la unidad mientras esté en funcionamiento.
• Siempre mantenga el cable alejado de las temperaturas altas y del fuego.
• Si el cable presenta daño, debe dejar de usar este producto de inmediato y ponerse
en contacto con el departamento de relaciones con el consumidor de SI Products
(vea la sección Garantía para obtener información de contacto del departamento de
relaciones con el consumidor).
• Dé mantenimiento con regularidad a la membrana ultrasónica.
• Nunca use un detergente que no esté recomendado por el fabricante para limpiar la
membrana ultrasónica.
• Nunca limpie la membrana ultrasónica raspándola con un objeto duro.
• No intente ajustar o reparar la unidad. El servicio debe ser prestado por personal
profesional o calificado.
• Deje de usar esta unidad si percibe ruido u olor inusuales.
• Desenchufe esta unidad cuando no la utilice durante un período de tiempo
prolongado.
• No toque el agua ni ninguna pieza de la unidad que esté cubierta de agua mientras
la unidad esté encendida o enchufada.
• Nunca haga funcionar la unidad sin agua dentro del tanque.
• Use solamente agua dentro del tanque.
• Nunca use aditivos en el agua que no hayan sido producidos por el fabricante de
esta unidad.
• No lave, ajuste ni mueva esta unidad sin primero desenchufarla del tomacorriente.
• Mantenga esta unidad fuera del alcance de los niños. No permita que los niños
usen esta unidad sin supervisión.
Características exclusivas y especicaciones
Tecnología ultrasónica
Este humidificador utiliza tecnología ultrasónica de alta frecuencia para convertir el
agua en 1 a 5 millones de súper partículas que se dispersan en el aire de forma
pareja.
Humidistato programable
Cree el ambiente perfecto en la habitación con un nivel personalizado de humedad.
Lectura digital LED
Muestra el nivel de humedad de la habitación, la humedad objetivo programada y
la configuración del temporizador.
Temporizador incorporado
Temporizador programable, hasta un máximo de 12 horas.
Protección de apagado automático
Cuando el tanque está vacío, la unidad se apaga automáticamente.
Función de niebla caliente y fría
Elija la niebla caliente o fría para una comodidad personalizada.
Luz de noche incorporada
Se incluye una característica útil de luz de noche para su conveniencia.
Voltaje
110–120V/60Hz
Vatios
101
Capacidad del tanque
1,7 galones — 6,435 litros
18 19
Page 11

M
I
S
T
O
U
T
P
U
T
55
WARM
TIMER
HUMI SET
20 2 1
Fig. 1
Pantalla LED Indicador de humedad
actual/Indicador de
conguración del
humidistato/Indicador
de conguración del
temporizador
Botón de
conguración del
temporizador
Botón de encendido/
apagado
Botón de conguración
de humedad
Botón de conguración
de temperatura de la
niebla
Botón de
encendido/
apagado de la
luz de noche
Aro iluminado
por la luz de
noche
Perilla de ajuste para
aumento/disminución
de niebla
Fig. 2
M
I
S
T
O
U
T
P
U
T
55
WARM
TIMER
HUMI SET
Humidicador ultrasónico de niebla fría y caliente
Panel de control
Salida de niebla
Page 12

Temporizador
El temporizador realizará un ciclo en incrementos de 1 hora de 1 a 12 horas, luego se
apagará. Presione el botón TIMER (temporizador) para activar el temporizador. El indicador
de configuración del temporizador de la pantalla LED mostrará “01”. Para seleccionar
la configuración de temporizador deseada, mantenga presionado el botón TIMER
(temporizador) hasta que se encienda la configuración de temporizador en el indicador de
configuración del temporizador. La pantalla LED mostrará la configuración de temporizador
durante 3 segundos, luego volverá por defecto a mostrar la humedad actual de la habitación.
Para apagar el temporizador, presione el botón TIMER (temporizador) hasta que se lea “00”
en la pantalla LED.
Uso del Control Remoto
ANTES DE USARLO POR PRIMERA VEZ, QUITE LA LENGÜETA PLÁSTICA DEL
COMPARTIMENTO DE LA BATERÍA.
Instalación de la batería
Se incluye una batería CR2032 de 3 voltios con el control remoto. Para cambiar la batería, retire
la tapa del compartimiento de la batería ubicada en la parte trasera del control
remoto presionando la lengüeta y jalando de la tapa hacia afuera de la parte
trasera del control remoto. Introduzca la batería en el control remoto con el lado
positivo hacia arriba, tal como se muestra en la gaveta.
NOTA:
Mantenga siempre la batería y el control remoto fuera del alcance de los
niños.
NOTA SOBRE BATERÍAS
• Si la unidad no se va a usar durante un período de tiempo prolongado,
22 23
Modo de uso
Para reducir el riesgo de choque eléctrico, este artefacto está equipado con
un enchufe polarizado (una paleta es más ancha que la otra). Este enchufe
encajará únicamente en un tomacorriente polarizado. Si aún así no encaja,
póngase en contacto con un electricista calificado para que instale el
tomacorriente adecuado. No modifique el enchufe de ninguna forma.
Botón ON/OFF (encendido/apagado)
Enchufe la unidad en un tomacorriente de 120 voltios de CA. Presione el botón POWER
ON/OFF
(encendido/apagado) para encender la unidad. Presione el botón POWER ON/
OFF
(encendido/apagado) nuevamente para apagar la unidad. ATENCIÓN: Cuando el
agua del tanque de agua esté casi vacía la unidad se apagará para indicar al usuario que
vuelva a llenar de agua.
Configuración de ajuste de niebla
La niebla se ajusta desde la emisión mínima a la más alta. Para aumentar la emisión de
niebla, gire la perilla “MIST” (niebla) hacia la derecha. Para disminuir la emisión de niebla, gire
la perilla “MIST” (niebla) hacia la izquierda.
Configuración de temperatura de la niebla
Cuando el humidificador esté encendido, estará funcionando en la configuración por
defecto, niebla fría. Para cambiar la temperatura de la niebla de niebla fría a niebla cálida,
presione el botón WARM MIST
WARM
(niebla cálida). La temperatura de la niebla cambiará
a niebla cálida y el botón WARM MIST parpadeará en rojo mientras se está calentando la
niebla. Cuando la niebla se haya calentado, la luz del botón WARM MIST permanecerá
encendida de continuo. Para volver a cambiar la temperatura de la niebla a niebla fría,
presione el botón WARM MIST (niebla cálida) nuevamente. La temperatura de la niebla
cambiará a niebla fría y la luz del botón WARM MIST se apagará.
Humidistato programable
Esta unidad tiene un humidistato programable que puede fijarse en incrementos de 5%, de
35% a 65% de humedad, y luego apagarse. Para programar el nivel de humedad, presione el
botón HUMIDITY SET (configuración de humedad). El nivel de humedad aumentará un 5%
cada vez que se presione el botón y se mostrará en la pantalla LED. Mantenga presionado
el botón HUMIDITY SET (configuración de humedad) hasta alcanzar la configuración del
nivel de humedad deseado. La pantalla LED mostrará el nivel de humedad configurado
durante 5 segundos, luego volverá por defecto a mostrar la humedad actual de la habitación.
Para cancelar la configuración de humedad programada, mantenga presionado el botón
HUMIDITY SET (configuración de humedad) hasta que se lea “- -” en la pantalla LED.
NOTA: el humidificador se apagará cuando se alcance el nivel de humedad establecido y
se encenderá automáticamente cuando el nivel de humedad en el ambiente descienda a un
valor inferior al establecido.
Luz de Noche
Presione el botón NIGHT LIGHT
(veladora) para encender la luz del tanque. Se iluminará
la luz que rodea la perilla de niebla. Presione el botón NIGHT LIGHT (veladora) nuevamente
para apagar la veladora.
Parte inferior del
control remoto
Encendido/
apagado
Temporizador
Niebla
Cálida
Humidistato
Nivel de niebla
Encendido/
apagado de la
luz de noche
SHARPER IMAGE
®
NIGHT LIGHT
HUMI. SET
L M H WM MIST
TIMER
retire las baterías para evitar daños debido a posibles
pérdidas de líquido de las baterías.
• Limpie los contactos de las baterías y también los
contactos del dispositivo antes de colocar las baterías.
• Retire las baterías usadas rápidamente.
• Deséchelas de forma adecuada de acuerdo con
todas las reglamentaciones estatales, provinciales y
del país.
• No arroje las baterías al fuego; pueden explotar o
perder líquido.
• Use únicamente el tamaño y el tipo de baterías
especificados.
• Cuando coloque las baterías, respete la posición
correcta de la polaridad +/-. La colocación incorrecta
de las baterías puede causar daños.
Page 13

24 2 5
Cómo llenar la unidad
PRECAUCIÓN: Antes de llenar la unidad con agua, apague la corriente y
desenchufe la unidad del tomacorriente.
Nota: use siempre las dos manos para transportar el tanque de agua.
Acerca del polvo blanco
El uso de agua dura con alto contenido de minerales puede formar un residuo mineral
blanco que se acumulará en superficies de la habitación cerca del humidificador.
El residuo de minerales se llama comúnmente “polvo blanco”. Cuanto más alto es
el contenido de minerales (o cuanto más dura es el agua), más posibilidades habrá
de que se forme el polvo blanco. El polvo blanco no es causado por un defecto del
humidificador, sino simplemente por minerales suspendidos en el agua.
Cartucho de desmineralización
El cartucho de desmineralización The Sharper Image ayudará a reducir la
probabilidad de que se forme polvo blanco, un depósito de minerales que deja el
agua dura que se usa en su humidificador. El cartucho debe reemplazarse cada
30 a 40 veces que se llena el humidificador. Es posible que deba reemplazar el
cartucho con mayor frecuencia si utiliza agua muy dura. Reemplace el cartucho
cuando note un aumento en la acumulación de polvo blanco. Si después
de colocar un cartucho nuevo sigue formándose polvo blanco alrededor del
humidificador, considere la posibilidad de utilizar agua destilada. Para comprar
cartuchos de desmineralización nuevos, n.º de modelo EV-HDDC4-6CTM,
vaya a la tienda minorista (donde compró su humidificador) o visite www.
sharperimageparts.com. Si vive en un área que tiene agua dura o usa un
ablandador de agua, recomendamos el uso de agua destilada para
obtener mejores resultados con su humidificador. Nunca use aditivos
para ablandar el agua en su humidificador.
Instrucciones de instalación
1. Retire el cartucho de desmineralización del envase y déjelo en remojo en agua
durante 10 minutos.
2. Retire el tanque de la base del humidificador y voltéelo.
3. Desenrosque la tapa del tanque girándola en sentido antihorario.
4. Llene el tanque con agua como se muestra en la sección “Cómo llenar la unidad”.
5. Agregue 1 cartucho de desmineralización azul dentro del tanque.
6. Vuelva a colocar la tapa del tanque girándola en sentido horario.
7. Coloque el tanque nuevamente en la base, asegurándose de que esté firmemente
asentado.
Fig. 3
Fig. 4
Fig. 5
Fig. 6
Fig. 7
1. Tome las manijas del tanque con
ambas manos y levántelo de la base del
humidificador. Extraiga sólo un tanque por
vez (Fig. 3).
2. Dé vuelta el tanque y quite la tapa del tanque
girándola en sentido antihorario (Fig. 4).
3. Llene el tanque de agua con agua limpia y
fresca del grifo. Recomendamos que use
agua destilada si vive en un área con agua
dura (Fig. 5).
4. Vuelva a colocar la tapa del tanque girándola
en sentido horario hasta que esté ajustada
(Fig. 6).
5. Vuelva a colocar ambos tanques en la base
de la unidad. Asegúrese de que los tanques
estén firmemente asentados (Fig. 7).
Nota: Esta unidad usa agua de un tanque a la
vez. Usará toda el agua de un tanque antes de
comenzar a extraer agua del otro tanque.
Page 14

PROBLEMA
CAUSA POSIBLE SOLUCION
La luz de encendido está
apagada
• La unidad no está enchufada
• No hay energía en el
tomacorrientes
• Enchufe la unidad.
• Presione el botón de
encendido/apagado para
encender la unidad.
• Revise los circuitos, los
fusibles; intente con otro
tomacorriente.
Olor extraño • Si la unidad es nueva.
• Si la unidad está en uso, el
olor puede provenir de un
tanque sucio o de agua vieja
en el tanque.
• Abra la tapa del tanque de
agua y déjela en un lugar
fresco y con sombra durante
12 horas.
• Vacíe el agua vieja, limpie el
tanque y llénelo
Ruido excesivo • La unidad no está nivelada.
• Bajo nivel de agua.
• Coloque la unidad sobre una
supercie plana y nivelada.
• Verique el nivel de agua.
Vuelva a llenar el tanque si el
nivel de agua es bajo.
Acumulación de polvo blanco • Se está usando agua dura.
• Se debe cambiar el cartucho
de desmineralización.
• Use agua destilada
y un cartucho de
desmineralización.
• Cambie el cartucho de
desmineralización.
Diagnóstico y resolución de problemas
Para limpiar el tanque de agua:
Retire el tanque de la base del humidificador
levantándolo de la unidad principal. Destornille la tapa
del tanque y enjuague el interior del tanque con agua
limpia (Fig. 8).
Para eliminar sarro o acumulación de desechos, use
una mezcla de vinagre y agua en partes iguales para
limpiar el interior del tanque.
SUGERENCIA: limpie el tanque de agua una vez
cada dos o tres semanas, según las condiciones del
agua.
Para limpiar la membrana ultrasónica:
Coloque una pequeña cantidad de detergente
suave para vajilla sobre la superficie de la membrana
ultrasónica, luego vierta un poco de agua y deje en
remojo durante 5 minutos. Limpie con un cepillo de
cerdas suaves (no incluido) y enjuague (Fig. 9).
SUGERENCIA: Limpie la membrana una vez cada
dos o tres semanas, según las condiciones del agua.
NOTA: nunca sumerja la base en agua o en cualquier
otro líquido.
Para limpiar las superficies exteriores:
Limpie la superficie de su humidificador con un paño
suave, limpio y húmedo tantas veces como sea
necesario (Fig. 10).
26
27
Fig. 8
Fig. 9
Fig. 10
 Loading...