

Page 1
I
Streaming 2.4GHz DX-4 HD VIDEO DRON
E
.
Streaming 2.4GHz DX-4 HD VIDEO DRONE
SHA
RPER
IMAG
E®
12+
SHARPE
R
IMAGE®
GETTING TO KNOW YOUR DRONE
PLEASE RE
AD ALL WARNINGS AND INSTRUCTIONS
I
PRIOR TO USE. KEEP THIS DOCUMENT AS IT CONTAINS
IMPORTANT INFORMATION ABOUT YO
UR DRONE.
.
1. CHARGI
NG
Drone must be charged before each use (U
SB Charge Cable included
)
• Indicator light wi
ll tu
rn off once full
y charged
· Insta
ll batteries in remot
e
2. PAIRIN
G
Before each flight pair the remote with the drone
:
1. Turn your dro
ne on an
d place
on a flat, level surfac
e
2. Turn on the remot
e on and move the le
ft joystick up, t
hen dow
n
3. The beep will indic
ate successful pairing
4. R
epeat steps 1 and 2 if necessary
3
. DIRECTIONAL LIGHT
S
White lights indica
te the front of the dron
e
• Red lights indicate the ba
ck of th
e dro
ne
• Not applicable in auto-orientation mode
4
. REMOTE CONTROL OVERVIEW
Practice flying your drone below 1 O feet a
nd at low speeds until comfortable with a
ll
controls to avoid unncessa
ry damage or inju
ry
Left joystick:
• Up/Down controls elevation
• Left/Right controls spin
Right joystick: controls flight directio
n
Direction Trim: use to eliminate drift
To cut power
to drone, move le
ft joystick to down positio
n
QUESTIONS OR CONCERNS
?
PLEASE GIVE US A CALL ... WE'RE HERE TO HEL
P
CUSTOMER SERVICE
(800) 37 4-2
7 44
Before callin
g please locate the 1
0-digi
t
cod
e printe
d on the back of your remote
@
&
CHOKING HAZARD -
S
MALL PARTS NOT FOR CHILDREN UND
ER 3 YEAR
S
ADULT SEMBLY REQUIR
ED
INTRODUCTIO
N
Congratulations on your purchase o
f
the Sharper Im
age Streaming 2
.4 GH
z
DX-4 HD Video Drone. Get ready t
o
soar to new heights. Master the art of
drone flyi
ng and stunts with remot
e
control maneuverability. Thi
s
lightweight stunt drone wi
ll provid
e
hours of fun.
SPECIFICATION
S
Drone Battery: 800 mAh Li-
po
Remote Controller Battery: 6 x 1.5V AA
Cha
rging Time: Approximately 120
minute
s
Maximum Recommended A ltitude 150 ft.
TABLE OF CONTENT
S
G
eneral Warnings
Contents and Remote Battery Installatio
n
Charging Battery and Replacing Propeller
s
Remote Overview
Operati
ng Drone
Modes
Tips
and FC
C W
arnin
g
Page 1
P
age
2
Page 3
Page4
P
age
5
Page
6
Page 7
Pagei
Page 2
I
,
~
Streami
ng 2.4GH ~DX-4 HD VIDEO DRON
E
·
S
H
A
R
P
E
e
.
I
M
A
G E.
REA
D A
LL WARNINGS AND PRECAUTIONS BEFORE USE.
ill
SAFETY WARNI
NGS
:
Not recommended for children unde
r
1
2
yours of nr,u. /\s with all electrical products, precautio
n
shoul
d be observed duri
ng handli
ng and use lo r
ochrc:o lho risk of electrical shock.
Adult supervision is requir
ed at all times
.
I
Before each use,
an adult should review t
he product onel batte
ry
1
0
dotermine that no dama
ge
or hazards exist.
DO NOT TOUCH SPINNING PROPELLERS.
Do not allow anythi
ng to intenti
onally make contact i
n any way with spinning pr
opellers
.
• Prevent contact with spinning blades by turning o
ff remote prior to handling drone
.
U
se caution and pay attention to your surroundings while operating drone.
Do not fly drone int
o animals, people, or inanimate objects
.
l<onp rlronn nwny from power lines, buildings, trees, public areas, a
nd any other potentiall
y
l11111111l
111
1r1
llllllll
l
/
.
I l11 11111 1rp11111
111 111 111111, I 1111 r
vy wlr"I, and or any type of severe weather.
I
l1111<11I
1111111111111111111w,11111
111
ICOh.
N11v111111111111
11 11ll11w nll1111
11 lo touch
r; 1111 wl1lli1 \ In llylnn
.
Alwuy11I
11111t11,1111111
11 wl1011 It Is no
t
i
n
w111
.
/\lw 1y1 lly 1111
11111
lit
lI11g
e ope
n areas.
N11v111 fly <11111111
11 ullov
o or near people
,
sudden
c
hanges In wl11!1 01
othn
r
condition
s could lead to
1
11111111111111111
111111 hos.
Alw11yt1111111 enutlon wh
en flyi
ng drone vehicles, obey retovent l11w11, 11111Jl!lt;l llie privacy an
d
1
111111111ly rlol1ts of others.
11111 clro110 shall never be modifie
d or used for anythtn
p oxcmpl Ito i11lo11cl1J<f pu1pw10.
PLEASE RECYCLE OR
DISPOSE OF ELECTRONICS
PROPERLY RECYCLING
INFORMATION IS AVAILABL
E A
T
WWW.MERCHSOURCE.COM
Invasion of Privacy Warning
Always be mindful of others privacy a
nd do no
t
rocord video or take images of others wit
hou
t
their consen
t. Check and comply with your
federal, state and local laws regarding privacy
.
l'Ulfll
I
Page 3

SHA
RPER
IMA&
r
SHARPER IMA&
r
CONTENT
S
DX-4 HD Vid
eo Drone
Drone Controller
Sma
rt Phone
Mount
9
C
n
-
,_J
0
,___
n
n
n
USO Oh11111" Cl111Jh
1
111,1111,, 111,11111
1
I·1111111ll111
•
+
I
I
+
I
J
+
+
+
REMOTE BATTERY INFORMATI
ON
1 . Slide ope
n batt
ery compartmen
t
2
. Insta
ll 6 "AA" batteries as shown in diagram
show
n abov
e
3. Replace and close battery compartmen
t
~LITHIUM-POLYME
R BATTERY WARNING
There is
a risk of fire and oerson
nl hI/111y 11II-l~
o
batte
ry is
punctured, darnaqml 111 111l111111oc
l
• Never expose batte
ry to oxI11I1111, I111,,porotures
or moisture
• Do not subject batte
ry IN 1111111111 h11pnct
s
• Alwa
ys keep batte
ry 11w11y I1111111111,nmable
materials
• Only use manutnouum 1111111 llli1tl l>nUer(ies),
charger(s), nncl/rn 1I1ll1pl111~, II upptlcnble,
s
ccctnoo
11y
ll111I11111111I,11 1111,
11
• 8'1II01y lu 1I
c-,
I
lilllVlc
111111!11
• I ot h11t1111y 111111111 '""''1 l11I,Ip111nllIre befor
e
1111111111
1111
Wlill11, 111111111111, 1111v11I l11,w
11 l1111l
llly l111nt1011tl11tl
• lltuy,l11"1dl~I"' ""ll1111l111y11oc:01tll11r,lc-,l111l
11111I
,
11
11111111111
1
l,
11
1
1
li,w
~
I I I I' I 11111 111,, 111111
I
Ii
1
11 M/1111111I I I 111111 I I I II NL
I
111\I II IIY WAIININ
<
Pag
e 2
CHARGING BATTERY
Note: The Battery Charge Cable will light up
when it i
s charging the batte
ry and tu
rn off
when the battery is fully charged. Charge time
is approximately 120 minutes
.
Turn off t
he drone before charging
.
Connec
t the Battery Charge Cable to the Micr
o
USB po
rt on the Drone.
Connect USB connector to power source.
Roplnol
nfl Prop< lie
1
1. I
ouo
w
dlogrw,
1
::>. 11omovo screw fr
om top of P1op11ll1
11
3
.
llornove broken Propeller 011<11opl111:11
with now Propelle
r
4. Mnl<o oure you installed the couoo;
11111<10. l-ach blade has a numbe
r
w,III011 on It. Match the blades with
lluI ornro:inondi
ng number on th
e
(hOIIII
5. 11111111 I 00I0w Into top of Propelle
r
DRONI! APP
ilnl,
111(1 Orono - First Time
I
l'IIHIR
11111 co
nnoot lo Wi-F
i
1111
1111
11
:• I
11ll11wll11,1111m,11,
111
I1111I1111ll1111•
1
Connect the USB Charg
e
Cable to the Dro
ne
Insert the USB
Charge Cabl
e
into a US
B
power sourc
e
Afte
r
Connecting Drone
1. Press the Stre
am Button to
b
egin streaming
2
.
Press the Alb
um Button t
o
review pictures and videos
Go to yoru 1Ipp 1110111 on your sma
rt phone and downlo
ad the "
360 Flight" application.
Pag
e 3
Page 4
S
H
A
R
P
E
R
I
M
A
G
E®
'
,
Streaming 2.4GHz DX-
4 HD VIDE
O DRON
E
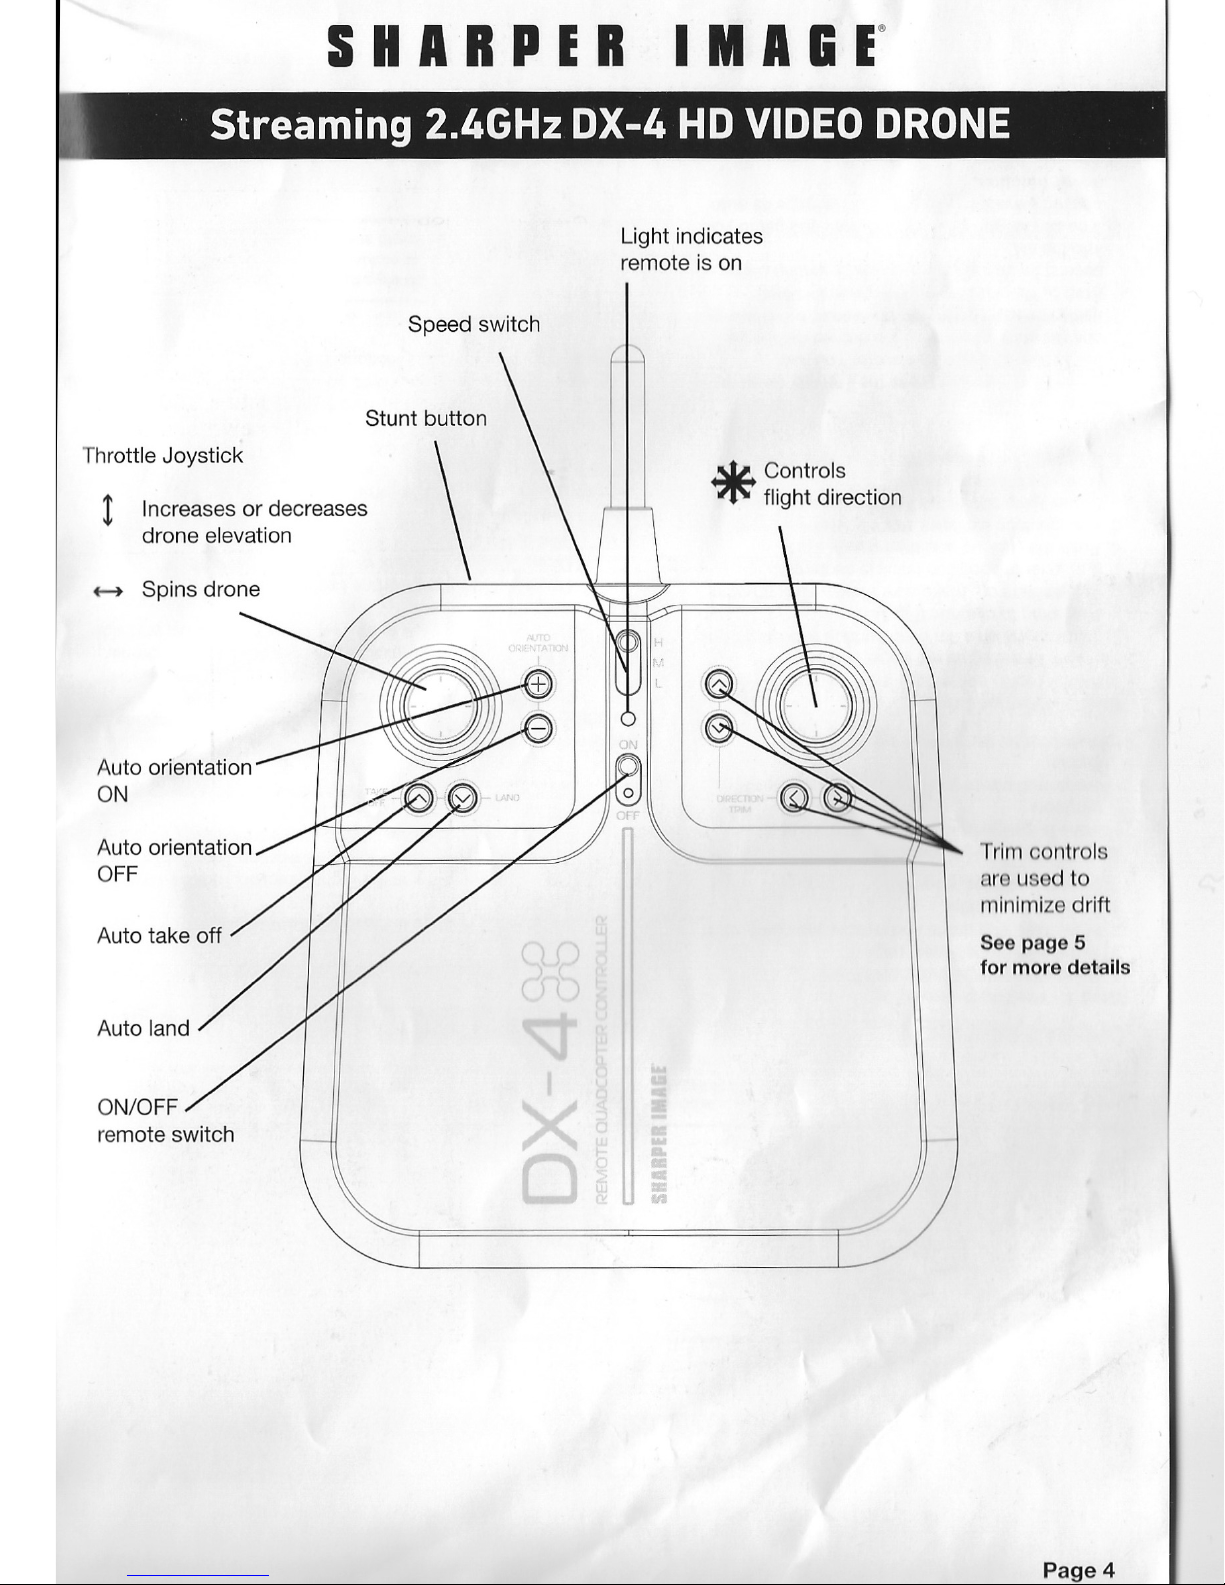
Light indicates
remote is on
Speed switch
Stunt butto
n
Throttle Joystick
!
Increases or decrease
s
drone elevation
Auto orientation
O
N
Aut
o orientation
O
FF
Auto take o
ff
Auto lan
d
ON/OF
F
remote switc
h
*
Control
s
flight direction
Trim control
a
r
L
I
d to
minimize dri
ft
See page 5
for more detail
s
Page4
Page 5

I
I
SHARPlB
I
M AGE"
\
SHARPER
IMA&r
Streami.
ng
2.4GHz DXt4 HD VIDEO' DRONE
.
;
Streamin
g
2.4GHz DX-4 HD VIDEO DRON
E
INSTALLING PHONE HOLDER
MODES
Insert ant
ena thro
ugh holo ot t
ho base of t
he
Smart Phone Mount
.
\ Alig
n hol
e on Mouril wit
h
hctu
In ont
ena
. Insert
screw to sec
ure Miiu11t tn ,ornoto.
Carefully slid
e phone into Mount by pulling
up
on top of Mo
unt. Adjust angle accordingly.
OPERATING DRON
E
Step 1 - Pre Flight Checklis
t
1. Read all warnings and instructions
.
2. Insta
ll remote batteries, page 2
.
3. Make sure that drone a
nd remote are pow r c off.
4. Install dron
e holder.
5. Charge batteries,
pag
e 3
.
Ste
p
2
-
Choosing a locatio
n
• Drone is designed to be flown in
doors and
outdoors
.
• Alwa
ys make sure you hav
e enough space to fly
drone.
• Always follo
w w
arnings, page 1
.
Step 3 - Starti
ng Dron
e
1. Making sure your remote is off, slide drone switch
to ON. Dro
ne lights will begin to flicker
.
2. Place drone
on a flat even surface with clearance
according to diagram (Fig 1)
.
3. Turn remote on. Make sure t
he le
ft stick (throttle)
is in a neutral position (stick is center
ed)
.
4. Push t
he stick up and then down.
5. A single to
ne indicates tha
t the drone is paired
.
Drone lights will flicker rapidly then turn o
n
permanently once p
aired.
U. If pairing is unsuccessful, r p nt t p
r: 3-4.
tep 4 - Lift Off
I. Slowly and caref
ully press the Throttk ,Joynll11l1
up. Drone will begin to elevate. You co
n
compensate for some of t
he drones drlltl
n J l>
y
usi
ng the Multi Directional Button o
r by f
ollow
lr 1 1
Step 5. Y
ou may n
eed to practice this top
v
eral times before successfully gett
ing cron
e
Into the air.
i
.
You can let go of the t
hrottl
e once you ge
t to you
r
d Ired elevation. T
he drone will engage it
s
aut
o
hover function.
Stop 5 - Drone Begins to Drift
F
ollow this st
ep if your dro
ne
begins to drift while tak
e o
ff or during
fligl,
t.
• Drone drifts backwards: Press the forward Direction Trim
Button.
• Dron drift forwards: Press the Backw
ards Direction Tri
m
Button
.
• Or
ono drifts left: Pre
ss the Right D
irection Trim Button.
• Dron dri , righ
t: Press the Le
ft Direction Trim Button
.
• Drone pin clockwise (viewing dro
ne from top): Press the
L, ~- 6
,.>in Trim Button
• ·orone spin counter-clockwise (viewin
g drone from top):
Press th
f-11 111 Spin Trim Butto
n
Step 6 -
Operating Dr
n In Flight
The drones rang I 1pp1(ixlmalely 450 feet or 150 feet of altitude:
• Read l1l I I 1<1 11w
II
o of
II warnings f
ound on Page 1
.
• Maintal
11 yt 11
11
t
It
1• Ir od I ovation by using the Throttle
.
• Push 11111 111111111,1 loyntlck to right
or le
ft to spin th
e drone.
• Us 111, 1111111 l11y11ll11l1 lo move forward backwards, and side
to nlch1
• R vh w ,t11p /1 II yo
111 (110110 b Ins to drift
.
· D1rn1
11 wlll l111uh11
11 hll
uk wl10
11 dr
ono In pnlr
od tor m
111111 l11
111111y l1t h1
w
Step 7 - L
11111lh1
11
I 1111
11
Thero rn,11w11 w11y 1
11 li111ol 11
111 ol11111
"
1. Prom11111, /\11h1I,111111111
111111 1111111111
1111 wi
ll cl11wly 1111111111111111111 II
111n 1111111
1 1,11u11
i. 111111111 v11111 1
11 1111, 111111111111 o11111111'
111111, 111,1111 11111 ll1nM11lll llll111
t111
1111I 111111,11
1
;> ! 111wly 111111, 1111,h,lly 11111 11
11 111111111, l11y 1
11 I· tl11w1111111111lt1111,
1
1111111 II 1111, 1111111
1 111111111 Ill ollltl, Y"'I' 1111 tll
ll 111
111111111i,111111111,
'
11111
11 11
11111
1 1111111111M11ll1111
1111 111111111 I lt1ll111
1
1111 I
/\lwuy 1 111
111 off ,0
111olo prior to rotrl vlng
or 1,loklno up dron . This wi
lt holp yo
u
ovoid occldontly activating propellers
.
Stunt Butt
on
Once you are comfortable flying th
e drone, use the Stunt Button to perform acrobatic stunts
.
1. Hov
er the drone t
o at least above 1
0 fee
t.
2. Press the Stunt Button. You will hear
beeping coming from t
he remote
3. Move t
he Multi Directional Button to the desired direction that you would like the drone to
fli
p
Auto Take O
ff Butto
n
€))
Once you are comfortable flyi
ng th
e drone, use th
e Auto Take O
ff Button for an easy take off.
1. T
urn remote ON
2. Pair remote t
o drone: Bring the Throttle all the way up the
n bri
ng it all the way down, remote will be
ep onc
e p
aired.
3. Press the Auto Take Off Button. Dr
one wi
ll
begin to elevate. Dro
ne wi
ll level out
around 5
ft off th
e ground a
nd
automatically enter into auto hover
.
4. Now the drone can be controlled using both the throttle and the multi-directional joystick
.
Auto Orientation Button ~
e
• Auto Orientation default setting is off. To enter this mo
de press Auto Orientation"+" button. Remot
e
will beep twice
.
After drone
i
s
successfully paired, the 2 white LED lights toward orientation will
be the original forw
ard orientation, when drone
is I
n aut
o orientation mode, the drone wi
ll orient to the user (remote), no matter what direction the drone is facing. Pushing the
right a lic
k
LIP
will send the dron
e away from the user, pushing it to the ri
ght wi
ll move the dro
ne right, etc.
llom to will beep every 6 seconds to indicate the drone is in Auto Orientation mode
.
I oxll mod , press the "-" button. Remote will sound 1 lo
ng beep indicatinq that it has exited Aut
o
Ori ntatlon m
ode
.
Auto Landi
ng Button
{9
Make sure you have achieved level, balancod lllflhl, wl1 ro lho dron I
n n
ouhor climbing nor descending.This mode allow
s you
10 nnf ly and slowly l
and yo
ur drono wlt110111 lmvl11n lo nontro!
lho npontl, 111,. done for yo
u automatically.
1110 lrlool auto landing l1ol(1l1t In ?b :10 I
I
I''" lrl t110 "v" lllllltlll I(:) 111
1111
1111111111111
1111 111111
1111
11 wl
ll lhltl
jl I tllilh111111111ly 1111111 y
111111xlt
llH IIUIO
land mode
.
I
ll 111111
11
lllo
(110
1111
d111l11
0
h111dl11u, 11111
llu, II ,111I111111111111111111111110 lu
i,
lr11H '111d 1110 UHH
IIII
I.
1111
1
II
11111 "v" !111111111 llljltl
ll Ill uxll 11111
11 ht11tllil\j llll1il11
N
II l'lnn , 11
111k1 •11111 tit, lh111ltl,
Inv
l
ie
II IN 111 lhn il11w
11 p11Alth
111 li11lrnn 11xltt11
111111l0 1,ncll
ng mod
e
,
111111 "' t11kh1
u p
lo 111
111" 11tul 11,
111
111111 vl1h•o
•
I 111,111,1
II ph 11
1111 11111 I 1111111111
II
1111111
1 111
fl
111111
II I t
I
1111\
tt
H jlli 1111,1
t.1«11111111 vlili111 11111
tt vhl1111l11111111111pp 1111111111l11h
1111 vhl11c
1
I 11 ,1111
1
ti
11, vlol111
I
Ii
1111 1111 lijljl 11\Jlil
ll
I
U
11top
II
cm, 1111111,
r, ,
,
1'111,
I
Page 6
SHA
R
P
E
R
I
M AGE®
I
Streaming 2.4GHz DX-4
HD VI
DE
O DRON
E
CUSTOMER SERVIC
E
(800) 374-274
4
TIP
S
Do not crash drone into san
d or dirt. Drone gears may becom
e clogged
• When first learning t
o fly, practice lifting off and hovering
Stay several feet from walls an
d buildings
• Always press throttle a
ll the way down after crashing or when som thin
g get
s stuck In propellers
• Never fly drones above or near people, sudden changes in wind or other condition
s could lea
d to unexpected crashes
.
• Always use caution when flyin
g drone vehicles,
obe
y relevant laws, respec
t the priva
cy and property rights of others
.
• The drone sha
ll never be modified or use
d for anything except Its Intended purpose.
WARNING: Changes or modifications to this unit not expressly approved by the party responsible for compliance could void the user'
s
authority to
operate the equipm nl.
TROUBLESHOOTING
:
When remote switch is turn
ed on, th r moto light does not lllumlna
t
1) Check that batterle In th remot aro Install d correctly OR
2) Replace with new battori
s
During drone flight, t
he remote LED Is fla hlng
:
1) Remote batteries are low; replace them wit
h new batterie
s
Drone and remote properly pair, but the drone will not lift-off:
1) Drone battery needs charging. Use the USB Charge Cable
to connect t
he drone to
power source
.
A
fter trimming the drone, the drone flight is ve
ry unstable and cannot fly properly
:
1) One or more blades are most likely damaged
;
2) Turn off the drone and remote
.
3) Replace with the proper number replacem
ent blade a
nd try flying again.
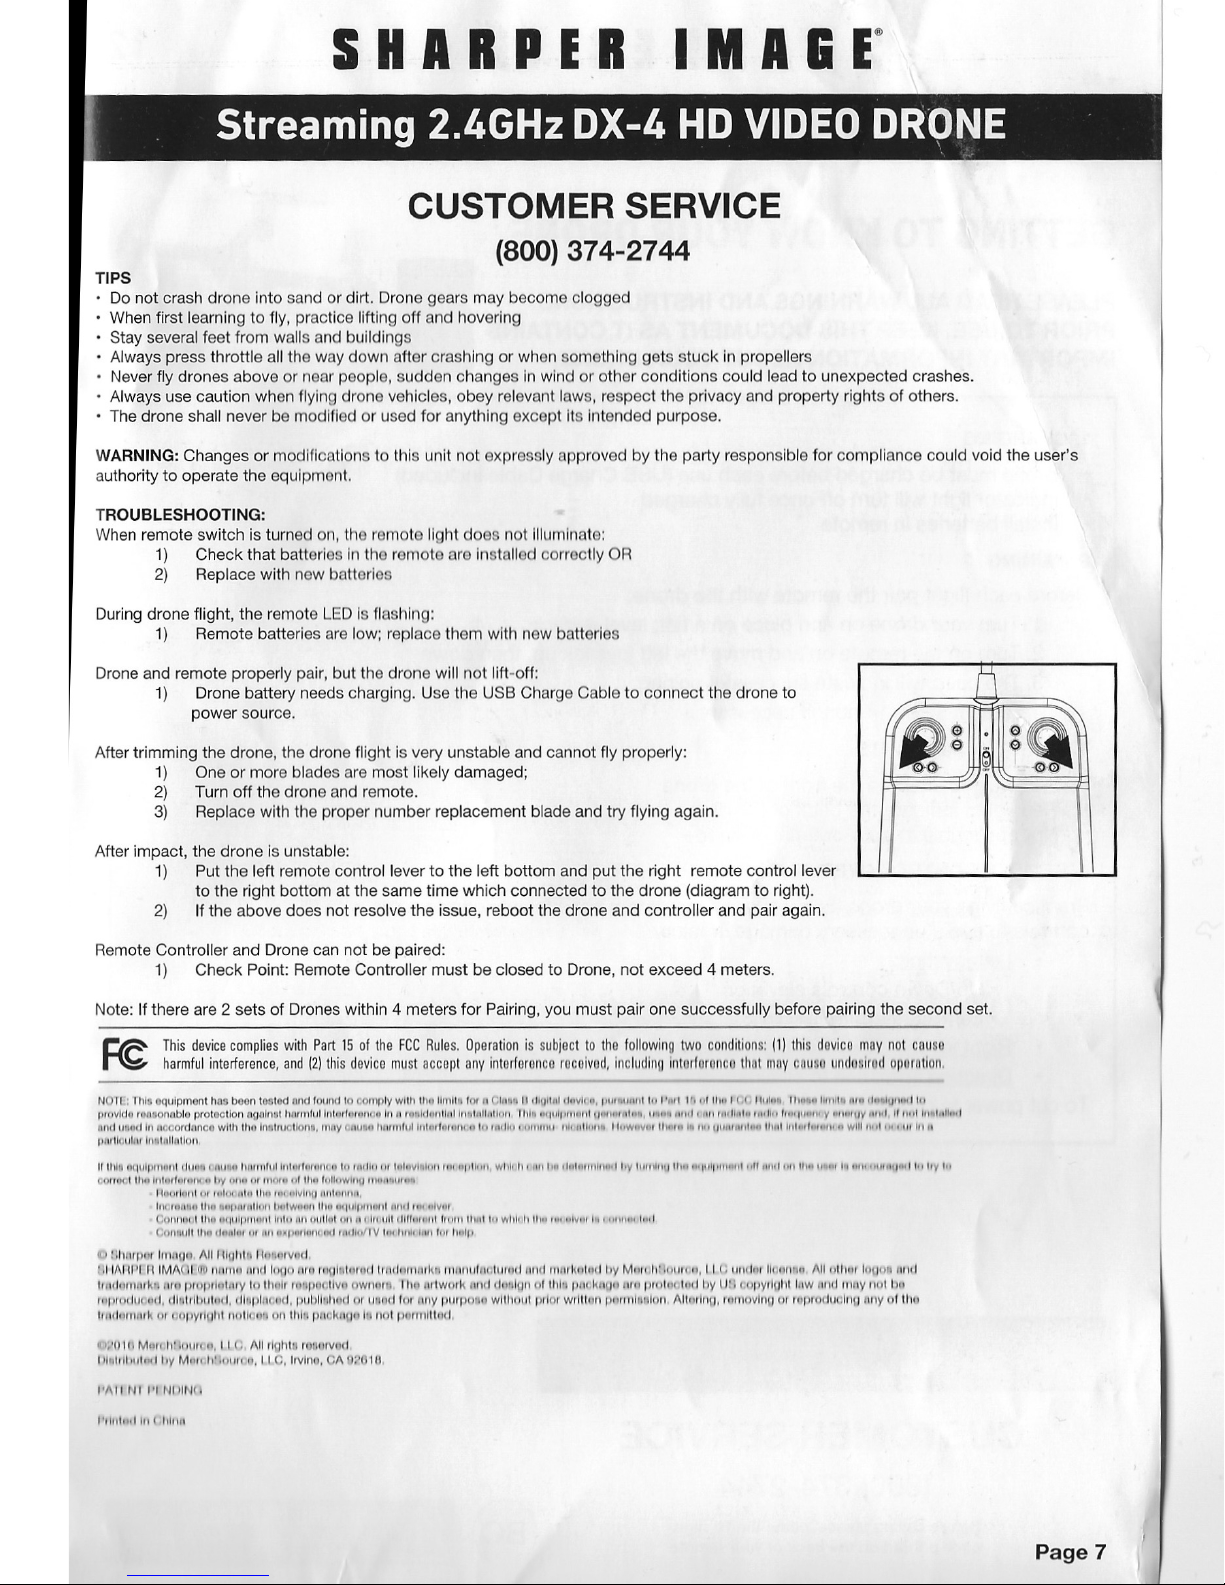
After impact, the drone is unstable
:
1) P
ut the l
eft remote control lever to the left bottom and put the right remote contro
l lever
to the rig
ht bottom at t
he same time which connecte
d to th
e drone (diagram to right)
.
2
) If the abov
e does n
ot resolve t
he issue, r
eboot t
he dro
ne and controller and pair again.
Remote Controller and Dro
ne can not
be paired:
1) Check Poin
t: Remote Controller must be closed
to Drone, not exceed 4 meters.
Note: If there ar
e 2 sets of Drones within 4 mete
rs for Pairing, you must pair one successfully befor
e pairing the second se
t.
~
,
j
,
g
, 1 $
•
@
e
®
~
This device complies with Pa
rt 15 of the FCC Rules. Operation i
s subject to tho following two conditions: {I) thi
s dovico may not c
aus
e
~
harmful interference
, and (2) thi
s device must accept any intorforo
nco rocuivud, incluillnu lntoduronco 1h01 mny causn 11nduulrotl npurntlon,
«ou
,
11111!1
o,qulpmool
hos t>oon
t091
od nnd round 10 vomply wlm 11111 !1
1111!11 frn
11 tt,,1111 II 1ll1Jlli.l 1hwh "· 11111111111111 to l'
ml 111 ul 11,,, It I llul,u1 lh" u 1~1111• "'"' 11,.•luuud 1,
1
1111,vlrlfl rn11
,oru1blo protoctlo
n aool11:
1t 110
1111!111 l11tmh•u11u •1 Ill u ro111kl11111ln
l lrn1t11ll,1U0!1 1111• 111111lp11m111 u1t1111111!111, 111111• 11111I
11,
11
rn•ll,11•
r11dl,,
'""Jl
1tt11• y "'""'II
Y
111"
1
111101 ln•h111,
..
,
11
ml
11•111(
1
In MOOfdlmce with 11\Q lntt1ru
lillm111, 1111,y 1
111,11
11
t11111rlh
~
lt1INt
111,111< 11111,,.1111,, ,,11111"1 ,~, nU1,111 I !,,w11111,,
ti ,• 111 no, u1111,111h
'* U1nl h1h ,11,.,.11, •• wm
,~,
t
1", 111 1,111
11111tl(ul11t lll•ll1IU1II011
II U1l14 m1ulp111111
1! 1hm• 1 11111111 h11i111!u
l l
ntuthl!,1111 o ltr ,mt1,111, l11ht11!-1!1111,1, "'''~''' wl1l1 h 1
111 I•• 1lhl1111nh11"l l,y 1!111111111111• ~11111,111.,,1, 1,/1 mul 1!11 11
1"1 ,, '" I 1 '"
''
,111111,,,.,
1
I
•• hy
t
,,
i::mr, 11h• 1,n111t""lf" 11
hv 111111111 ,.,.,,
a
1,11t11
r
l11ll11w111u 111,111•1111,•11
lllWrlu11t,111,IIHlll•1ltm,
n,jHM!lUlll!h1111u1
,
loc 111
11111111111
..,1,
111ntl1111l111twt1"l1111
11
,.,1ua
111nu11t 11ml ,,.. ,~11,
11
(.;
()111101 I lllfl !Mj\11111111111111,h,
!Ill 1111110111!114,
If, 11
lt 1111111
11 !II 1!11111111•11 t11 ¥rll
lt 11lt1t110,, 11l~t1r 1
11 t •!1111"' 111,
J
(,tHIHUll111Ctrl,.<1l111
,11Hllll•j1"1l1111t1>ol1,111i11/IVl0111111
1
l,u
l
l,1111,.1
11
c1:111u11rn
111111u11 Alllllfll1lt1lh111111v,,
1
llltAI
U
1
l
I
!
IM/\{ll
!Kl1H1111•t 1111tl l!!fltl 1uurool,t111,u
t
tr111tnm
111hr1 ,111u111lrn,1111111
I
1
111111111uk11l•
tt-l hy Mrn, h'hun, ,,, 1
1
!
,
unU!u II! 111m11
A
ll trlt1•11 loao
n
mid
lrnttm,uuk
'I uru
p111p1!11l1
uy
10 lht1
h
ru>tpm 1lv
11
nw,1,m,
lllft
urtwmk 1111
d dwllu11 ul 11111111111 kw111 w,1 p11Jh'4 11111 IJy 1111 t.opyduht
l,,w 1111(111111v 1101
hu
11 p1
rnl
rn
nd,
dl•1t11t1utncl, (llupl111 11d,
pulJIIHIMI m wunl I
m
11r1
y
p
111pm
111
wltt
111111
ptlt
H
wrlt11J11 p1•1
111lt11ilor1 A1t,,r1110, ru111ovl11(J
\JI
n,p11:xll10lrl
fJ
1111
y
6
11110
hmllu,u
uk mi 1,pyrl11ht 1
11111111·1 011 thlrt p111 kn
on IN r1011Jmmllh1<
I.
,10111M
ttll
h'hmn "·
1 t (:, All 1lgt11u IOtltlf\1(1(1
I !l11t11l111h>tl
t,
~
M
1111 ll'huuc u.11
C
.
1rvh10,
CA 0:10
10
l'l\
11 ti! l'I fll)IJ'll
l
Page 7
 Loading...