

Page 1

1
Manual
Video Grabber
Page 2
ata / power Cable
2
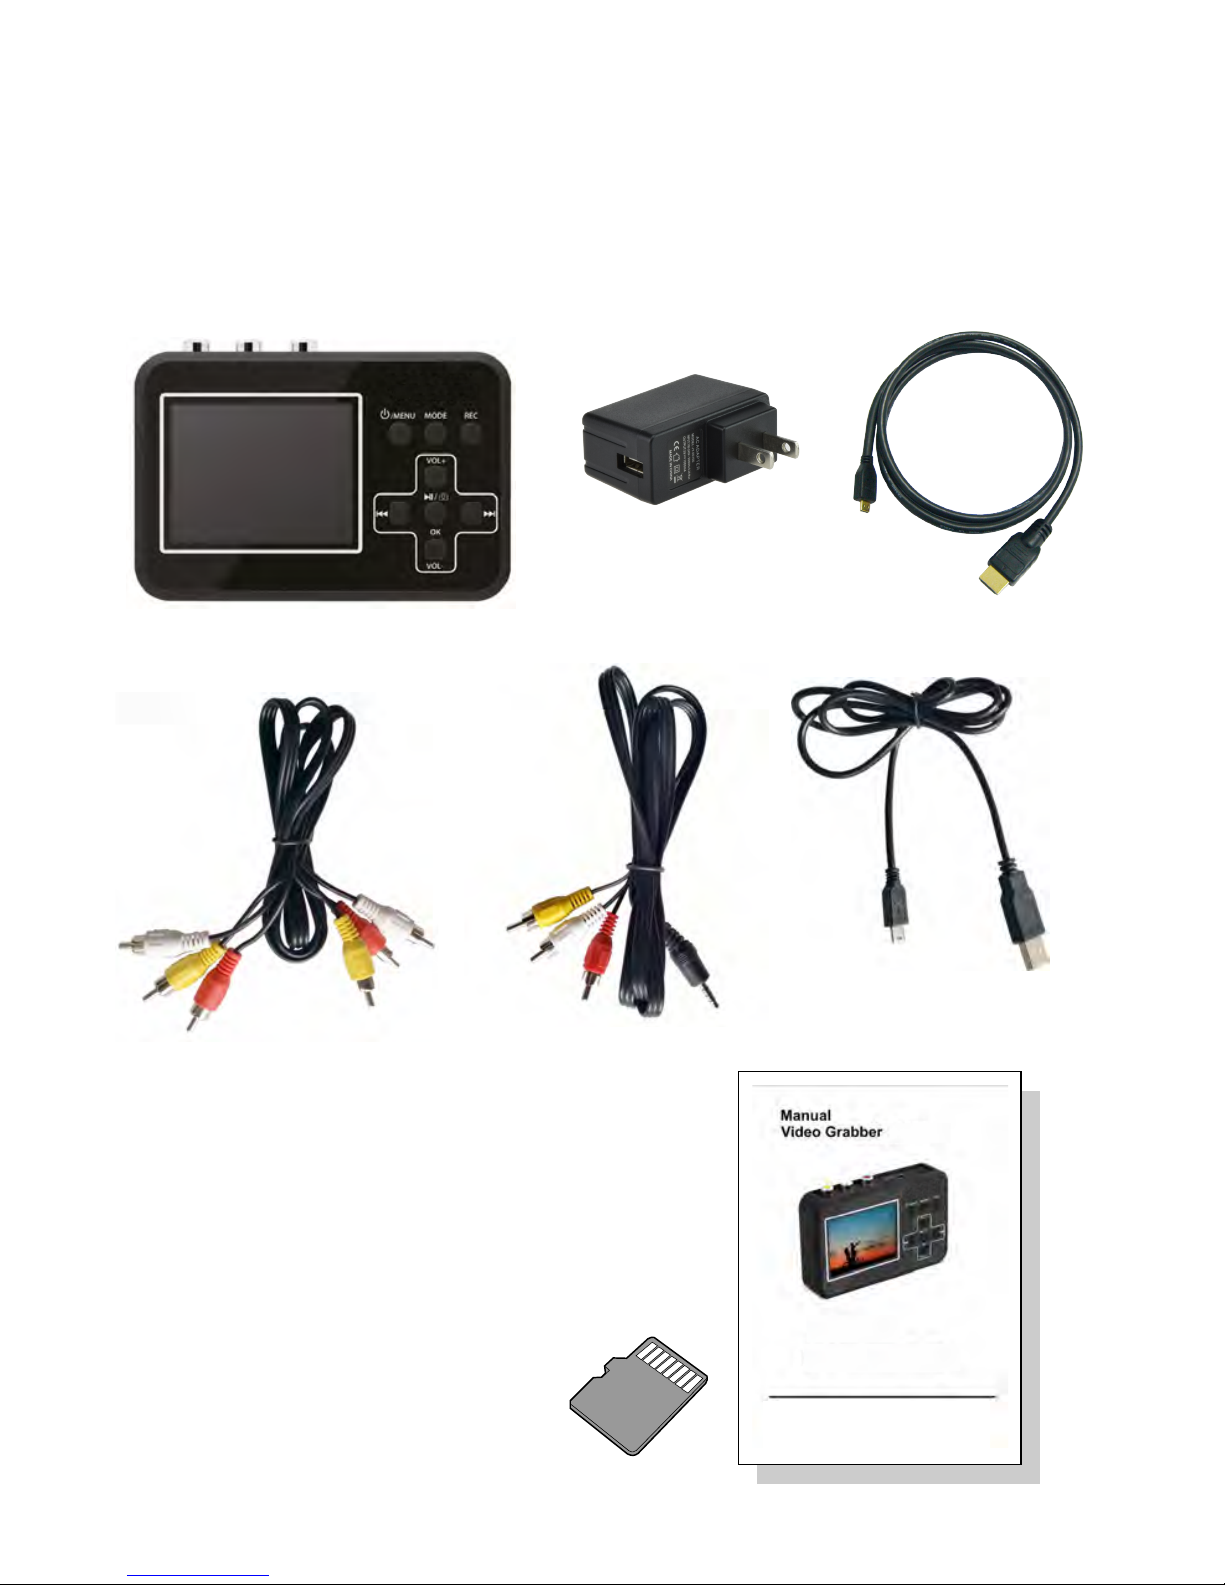
Your Package Contains:
1.
2. 3.
4. 5. 6.
7.
1. V
ideo Grabber
2. 5 V power adapter
3. H
4. RCA-cable
5. AV-cable
6. USB D
7. Manual
8 .4G TF Card inside
8 .
cableD MI
/
Page 3

storms or when it is not being used.
3
Safety Information:
1. Carefully read and follow the manufacturer's instructions in
this manual and save the manual for future reference.
2. Clean with a dry cloth only.
3. Do not use the product close to any heat source.
4. Unplug the product from the wall socket during lightning
5. Do not expose the product to moisture, as this poses a risk
of fire or electrical shock.
6. If the product is damaged, please refer all repairs to qualified
personnel.
N.B.! Do not connect the audio output from a high-power
amplifier to the product's audio input.
Use:
N.B.! Prior to the first use charge for 5 hours. When the battery
is completely depleted, it will need approximately 5 hours for a
full charge.
The Video Grabber allows you to record high-quality
video material from a range of video sources, such as
Video8, Hi8, SVHS, VHS and DVD. You can also take
snapshots while you record video material.
The memory card saves your recording in AVI format.
File size is 13-15 Mb per minute.
Any segments you record that are more than two hours
long will be divided into parts.
A serial number (0001, 0002 etc.) is automatically assigned
as the file name. The files can then be transferred to a
computer and be renamed.
Page 4
4
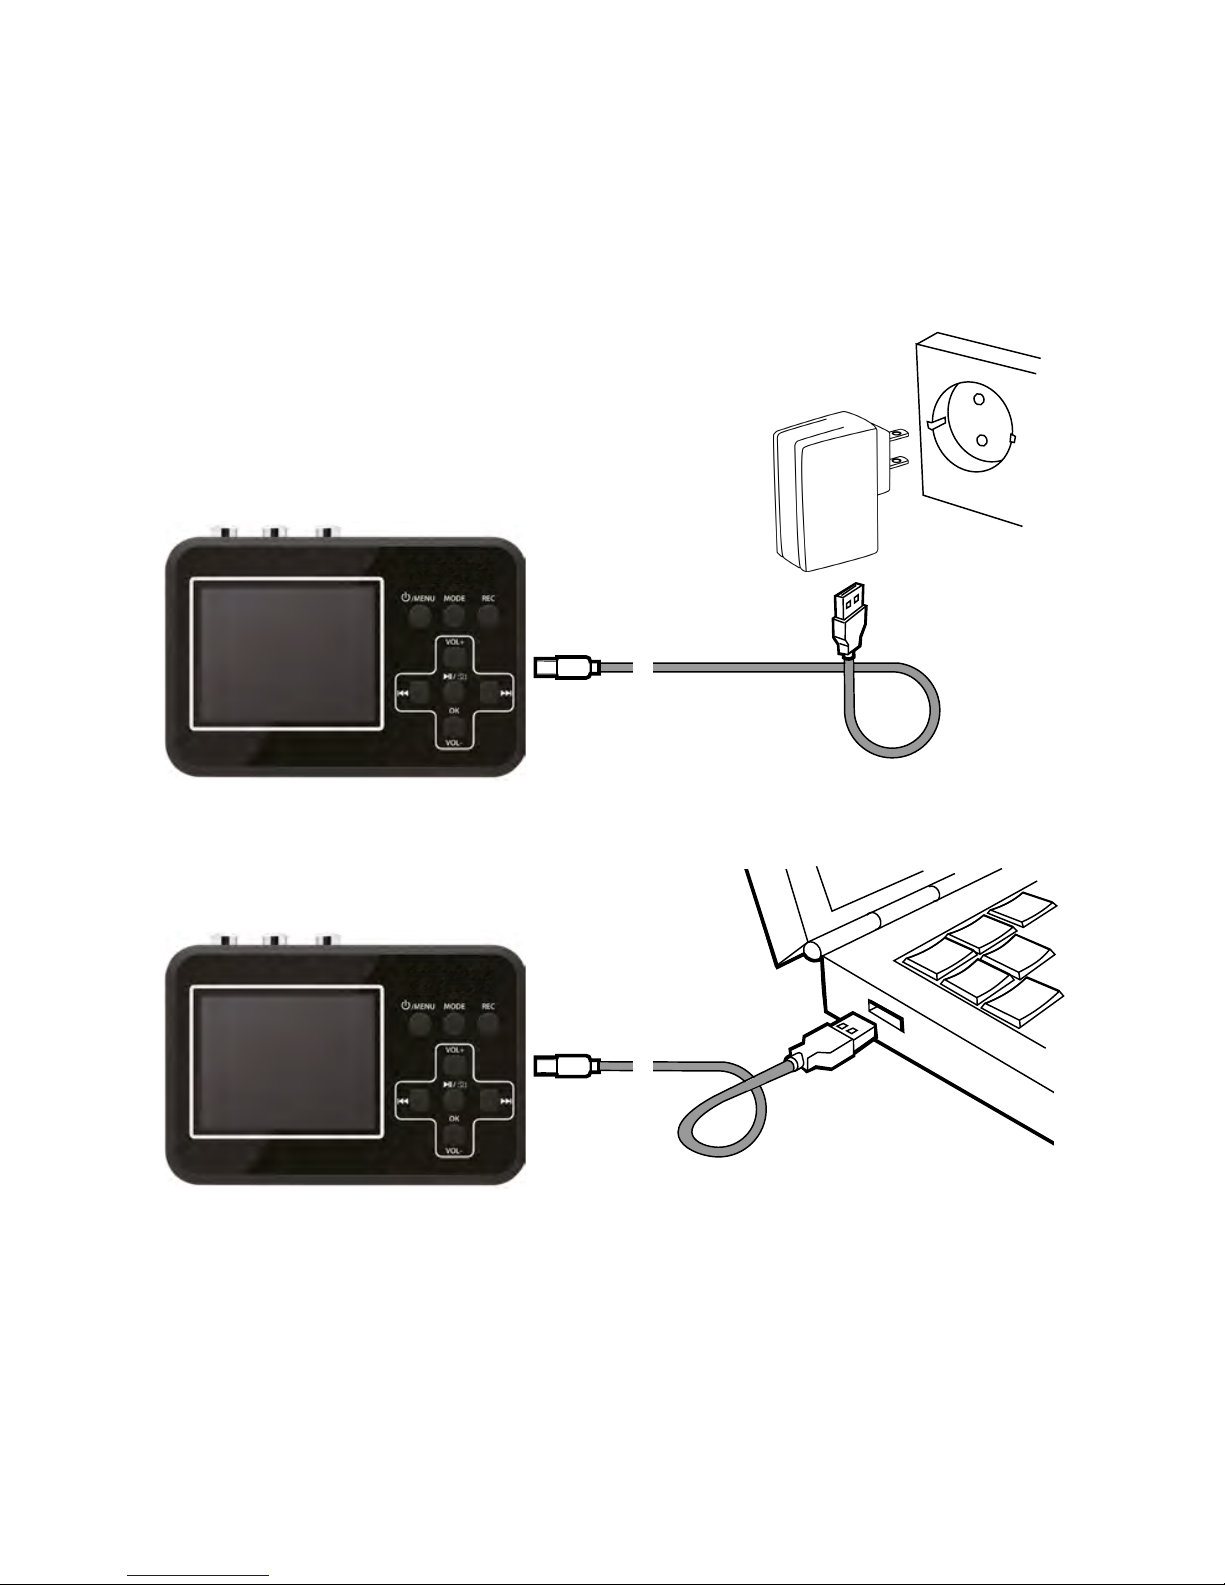
Charging the Battery:
B Via the computer's USB port
A Via the power mains
Charge your Video Grabber for at least three minutes
before turning it on.
The built-in battery can be charged in two ways:
2
6
6
Page 5
5
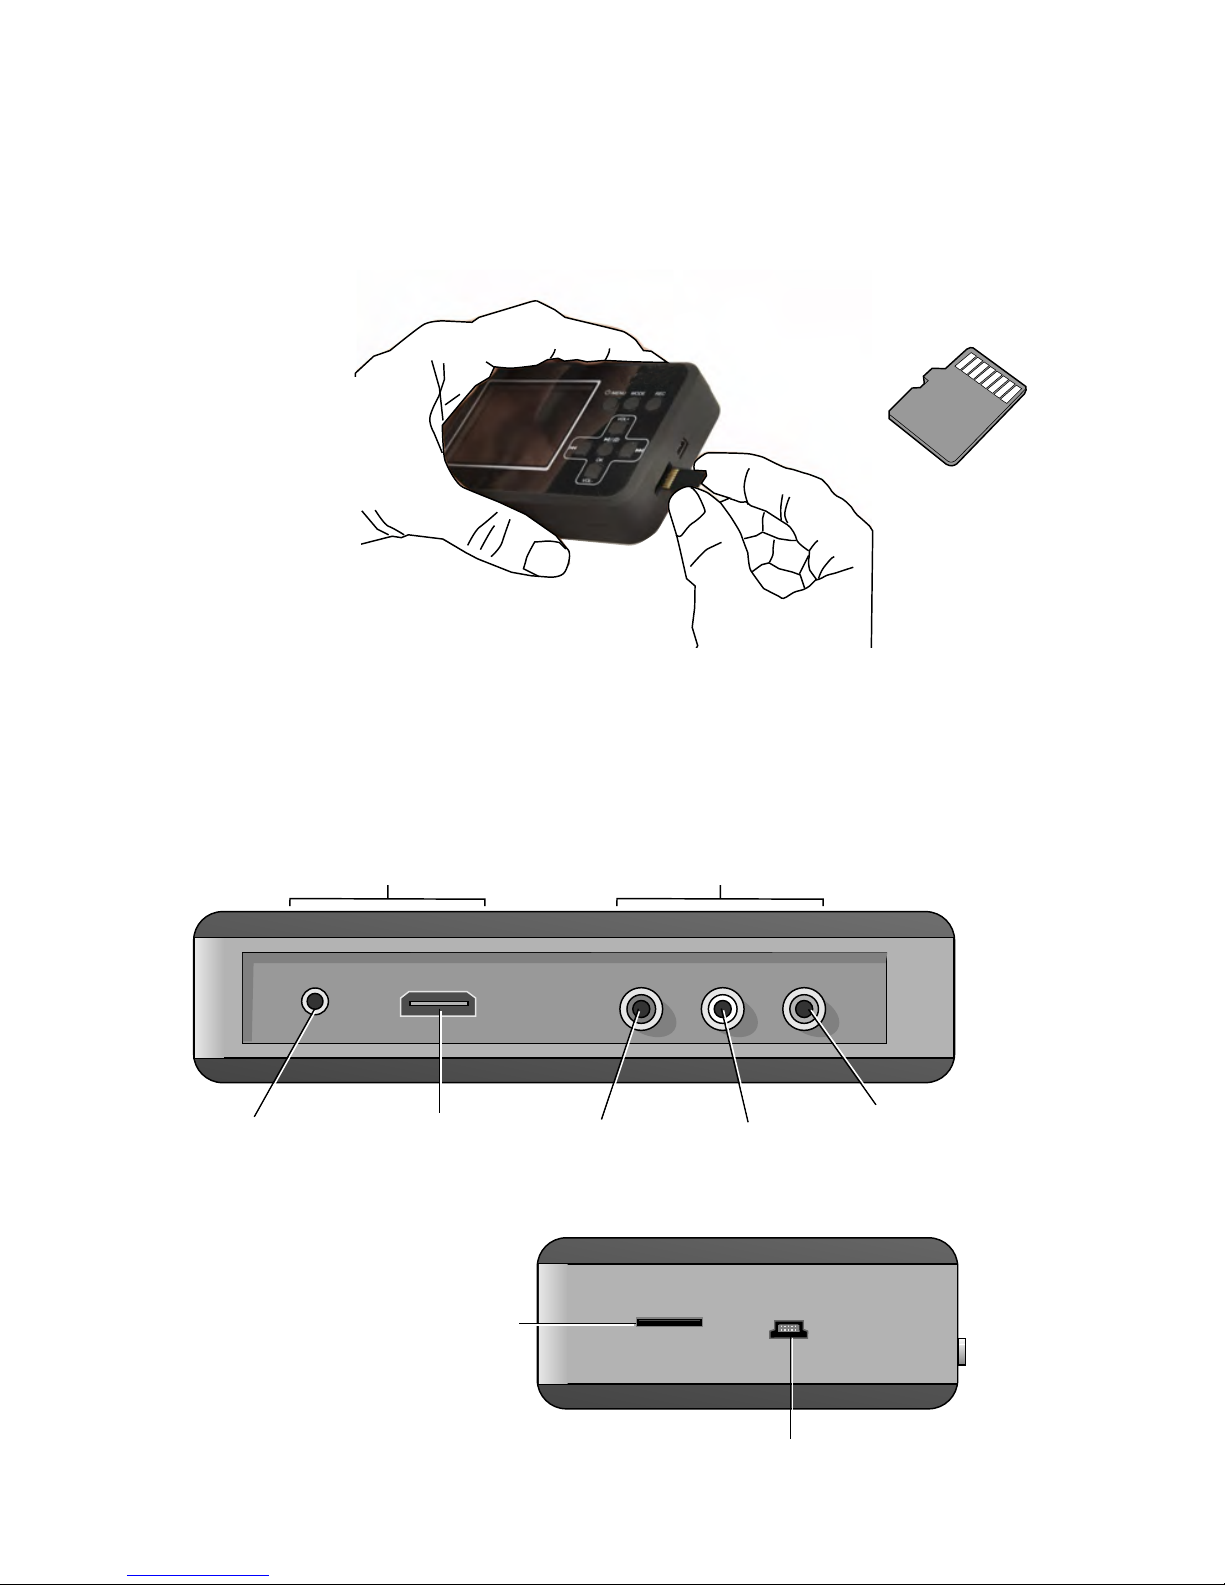
Installing the Memory Card:
In order to remove the memory card, gently press inward
and then carefully remove the card.
Connections
AV OUT HDMI OUT IN-R IN-L IN-V
3.5 mm
video output
HDMIoutput
LAUDIO
VIDEO
RAUDIO
Outputs
Inputs
Memory
card slot
Mini USB
TF card must be used.
For optimal results, a memory card with speed class 10
is recommended.
Page 6
6
OK
VOL-
VOL+
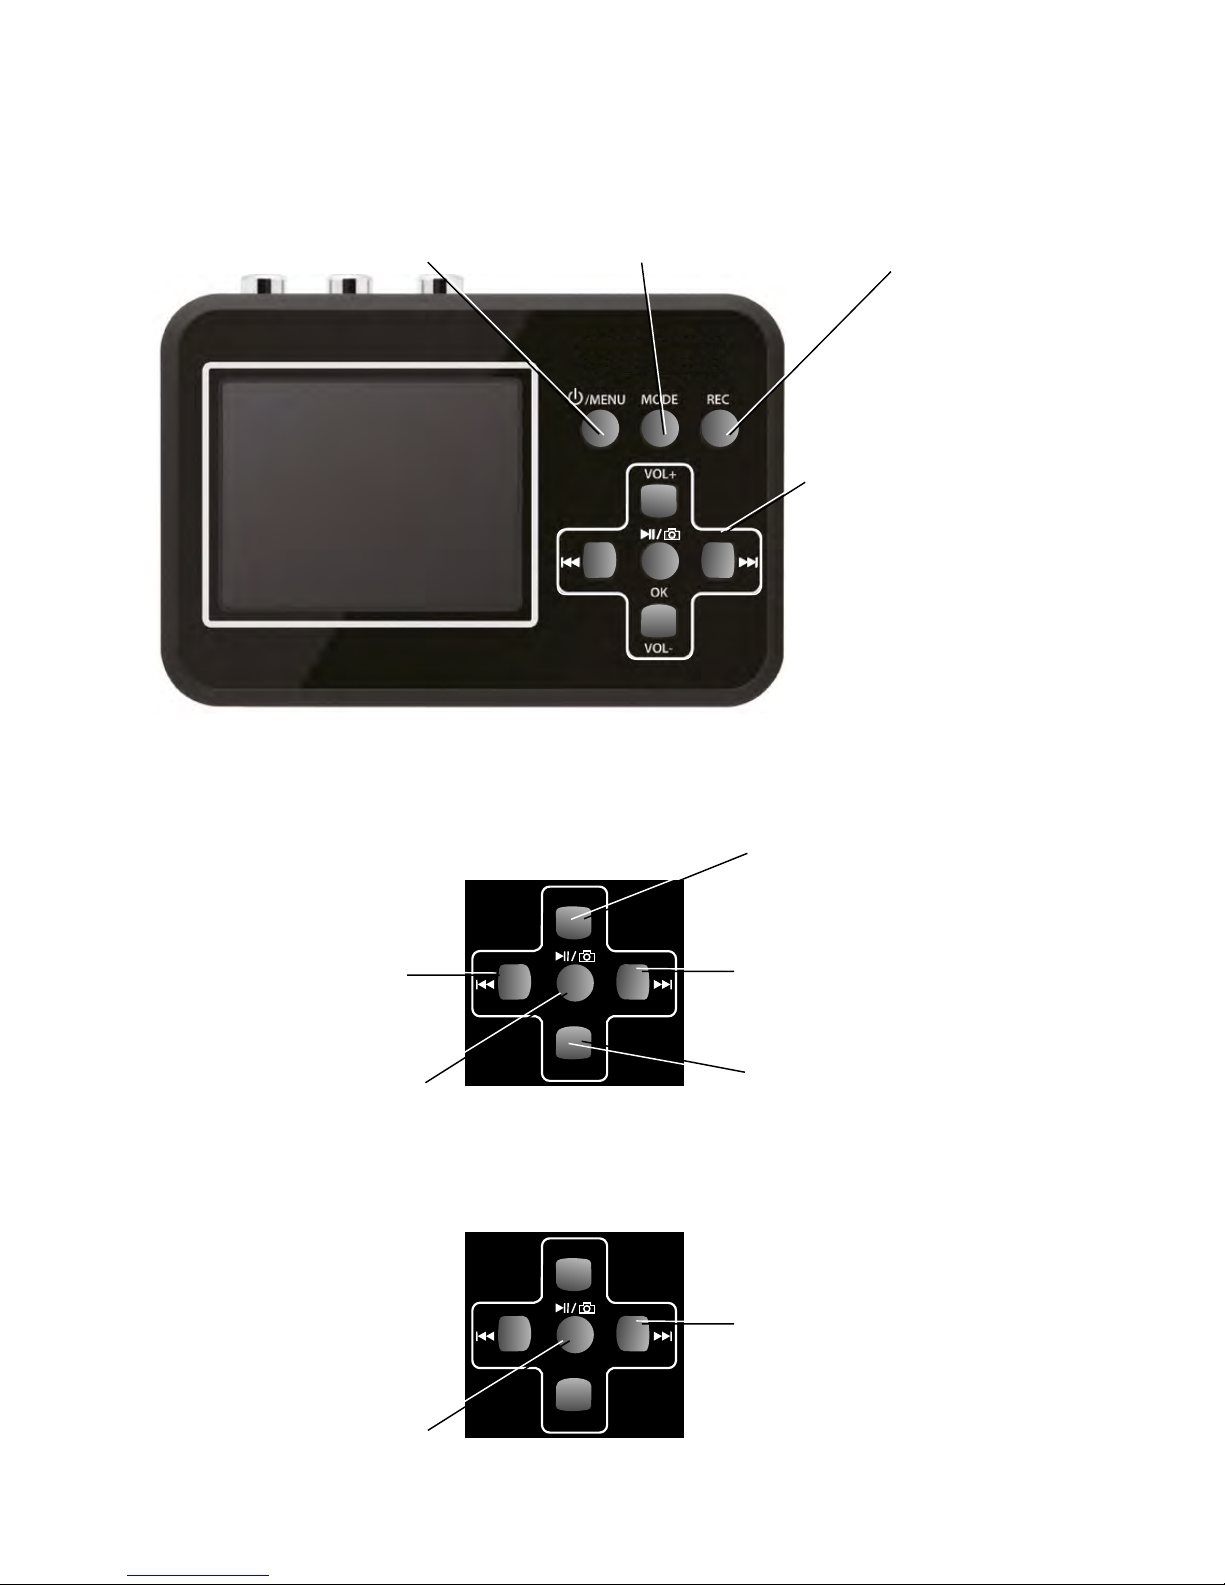
Operation:
On/Off
Menu
Select mode
Start/stop
recording
The buttons within the
cross perform different
functions depending on
the mode selected
Play mode:
Video recording mode:
OK
VOL-
VOL+
OK
VOL-
VOL+
Start/stop
recording
Go back in
the file list
Go forward in
the file list
Increase the volume
Lower the volume
Record without sound
Take a snapshot
Page 7

LCD Monitor
7
Connecting a Video Source:
Connect your Video Grabber to the video source in
one of the following ways:
OK
VOL-
VOL+
CVBS
Source
4.
AUDIO OUT - L
AUDIO OUT - R
Yellow
White
Red
OK
VOL-
VOL+
Source
5.
AV OUT
OK
VOL-
VOL+
Yellow
White
Red
Other cables and adapters may also be used; however,
such are not included with the Video Grabber.
Yellow
White
Red
Page 8

shown on the display:
video recording mode and the following information is
8
Starting Your Video Grabber:
Make sure that the battery is charged and that the memory
card is in place. Press the On/Off Menu button for
approximately three seconds.
OK
VOL-
VOL+
TF
VGA PAL
00:51:09
VOL 4
Upon being powered up, the Video Grabber starts off in
SD-card
in place
Video recording
mode
Video format
Time
Battery
charge
status
Volume level
N.B.! If no memory card is in place, the message
No Card appears on the display.
Page 9

9
M
OK
Settings in the Video Recording Mode
OK
VOL-
VOL+
TF
VGA PAL
00:51:09
VOL 4
Press the On/Off Menu button briefly once more to gain
access to the settings.
OK
VOL-
VOL+
TF
VGA PAL
00:51:09
VOL 4
Press OK to gain access to
the underlying menu.
N.B.! The selected alternative is shown in yellow in the
main menus; however, it appears in blue in the
underlying menus.
OK
VOL-
VOL+
Scroll between the various
menu alternatives by using
the VOL+ and VOL- buttons.
OK
VOL-
VOL+
Press OK to save the
selected alternative.
OK
VOL-
VOL+
TF
VGA PAL
00:51:09
VOL 4
Press the On/Off Menu
button to leave the settings
mode.
M
OK
Page 10

10
OK
VOL-
VOL+
Using the VOL- button,
scroll down to:
Date input Enter
OK
VOL-
VOL+
Press OK to reveal an
underlying menu.
OK
VOL-
VOL+
Using the VOL- button,
scroll down to: Set.
Please note that the blue
field is now highlighted.
OK
VOL-
VOL+
TF
VGA PAL
00:51:09
VOL 4
M
OK
M
OK
M
OK
Page 11

11
Then use the button to
scroll further to the month etc.
Press OK to save the settings
and return to the settings
menu.
OK
VOL-
VOL+
Using the button, scroll
down to the year.
OK
VOL-
VOL+
Set the correct year by using
the VOL- and VOL+ buttons.
OK
VOL-
VOL+
OK
VOL-
VOL+
OK
OK
OK
Setting the Date and Time
.
In the video recording mode, briefly press the On/Off
Menu button
Once all the settings are made, return to the video recording mode by pressing
the On/Off Menu button. The selected settings remain saved even if the device
is switched off.
Page 12

12
Other Settings
The other settings in the video recording menu are made
in the same way as you set the time and date.
The available settings are:
Input video format (Size) VGA or QVGA
Date and time visible on the recorded film (Time Stamp)
This time can be set independently of the time set in the
Vooni Video Grabber. For instance, if the video was
recorded in the summer of 1996, the date can be
inserted here.
Automatic shut-off (Auto off) can be set to Off or to 15, 30
or 45 minutes.
Language: Several languages can be selected.
Time and date (Date input) Refer to the previous page.
Sound On or Off.
Software version.
Page 13

13
Recording:
1. Connect your Video Grabber to the video source.
2. Turn on the video source.
3. Turn on your Video Grabber
4. Press the REC button to begin recording.
The counter in the top
right-hand corner of the
screen turns red.
5. Press PLAY on the video source to begin playing your
video. The film is now also visible on the screen on
your Video Grabber.
While your film is being recorded, you can do
the following:
a. Record the film without
sound.
b. Take snapshots
6. Press the REC button to stop and save the recording.
OK
VOL-
VOL+
TF
VGA PAL
00:51:09
VOL 4
Press the button.
Press it once more and the sound
is once again recorded.
OK
VOL-
VOL+
TF
VGA PAL
00:51:09
VOL 4
Press the button. The
snapshot is automatically given a
serial number as its file name.
OK
VOL-
VOL+
TF
VGA PAL
00:51:09
VOL 4
Page 14

14
Settings in Play Mode:
Press the MODE button to select the play mode.
OK
VOL-
VOL+
TF
VGA PAL
00:51:09
VOL 4
Your Video Grabber is now in play mode.
OK
VOL-
VOL+
Press the On/Off Menu button briefly once more to get to
the settings.
OK
VOL-
VOL+
TF
VGA PAL
00:51:09
VOL 4
OK
VOL-
VOL+
Scroll between the various
menu alternatives by using
the VOL+ and VOL- buttons.
M
OK
Page 15

15
Press OK to gain access to
the underlying menu.
OK
VOL-
VOL+
Using the VOL- button,
scroll down to your desired
alternative. Please note
that the blue field is now
highlighted.
OK
VOL-
VOL+
Press OK to save the
settings and return to the
settings menu.
OK
VOL-
VOL+
The following settings can be
made in play mode:
Delete removes the current film or snapshot.
Protect prevents the films from being deleted. You can
select single films, all of them or select from the
miniatures that are displayed. Protected files are
indicated with a padlock.
Format formats the memory card and deletes all the files,
even those that are protected.
Slide show presents the snapshots in the form of a
slide slow.
Volume sets the volume level between 1 and 8.
Software version.
M
OK
1 1 3
Page 16

16
Playback
1. Turn on your Video Grabber
2. Use the MODE button to select
the play mode.
Your Video Grabber is now in play mode.
OK
VOL-
VOL+
TF
VGA PAL
00:51:09
VOL 4
OK
VOL-
VOL+
3. Select the desired film using the or buttons.
4. Press OK to play the film.
OK
VOL-
VOL+
You can zoom in and out on snapshots in several steps
by pressing the OK or VOL+ button.
OK
VOL-
VOL+
Pressing the VOL- button will zoom back and ultimately
data about the image file are shown.
Page 17

3.
accompanying HDMI (3).
If you want to connect to the HDMI on your TV,use the
17
OK
VOL-
VOL+
You can connect your Video Grabber to a TV
receiver via the AV cable (5) or by using an HDMI cable
OK
VOL-
VOL+
TV
5.
Yellow
White
Red
CVBS
AUDIO IN - L
AUDIO IN - R
Showing Recordings on TV
3.5 mm video output
Video Grabber now turns black and you will see the film
on the TV screen instead.
LCD Monitor
Page 18

Grabber is connected to the computer. This may
N.B.! Do not playback video material while your Video
can process your recorded films and images on the
By connecting your Video Grabber to a computer,you
18
Copying to a Computer
6.
1. Start the Computer.
3. Your Video Grabber now appears as a
removable disc drive on the computer.
damage both your computer and your Video Grabber.
computer itself. A drive routine will automatically be
installed onto your computer the first time you connect
the device to your computer. Your Video Grabber
then appears as a removable disc drive on the computer,
so you can copy and rename, or delete your films.
How to copy your recordings onto your computer:
2. Connect your Video Grabber
to the computer by using the USB cable.
Page 19

1.Before pressing the REC button of the product, please make sure
reset by inserting a pin or similar object into the small hole
5.If the Video Grabber's software seizes up, the system can be
2.Make sure that the A/V cables are securely connected to both
the input sources and the device.
the input sources (DV, DVD player, VHS) is turned on and can
provide audio or video signal to the product.
19
Troubleshooting
Screen Symbols
TF
OK
M
Exit
OK Set
Press the On/Off Menu button
to leave the setting mode.
Available button alternatives
Film
Memory card
Press OK to save your
selected setting. .
Battery-charge indicator
Video recording
mode
Play mode
May 2015 Illustrerad Teknik AB
3.If the product crashes, please use a needle to push the mini
hole at the back of the product to reset the product.
4.Please use a TF card whose transfer speed is Class 10 or above.
found on the back of the device.
6.If the screen remains black in spite you having pressed the On/Off
Menu button for a protracted period, the battery may be dead.
Connect the charger and try again.
7.If you do not succeed in recording video material to your Video
Grabber, the cables may be incorrectly connected or be connect
too loosely.
http://www.digitnow.us
 Loading...