

Page 1
AERIAL ACROBAT VIDEO DRONE
Item No. 205982
User Guide
Thank you for purchasing the Sharper Image Aerial Acrobat Video Drone. Please read these
instructions prior to using this device for the first time.
FEATURES
• LED lights
• Glows in the dark
• Auto hover
• Headless mode (for beginners)
• 360° flips
• One-button launch
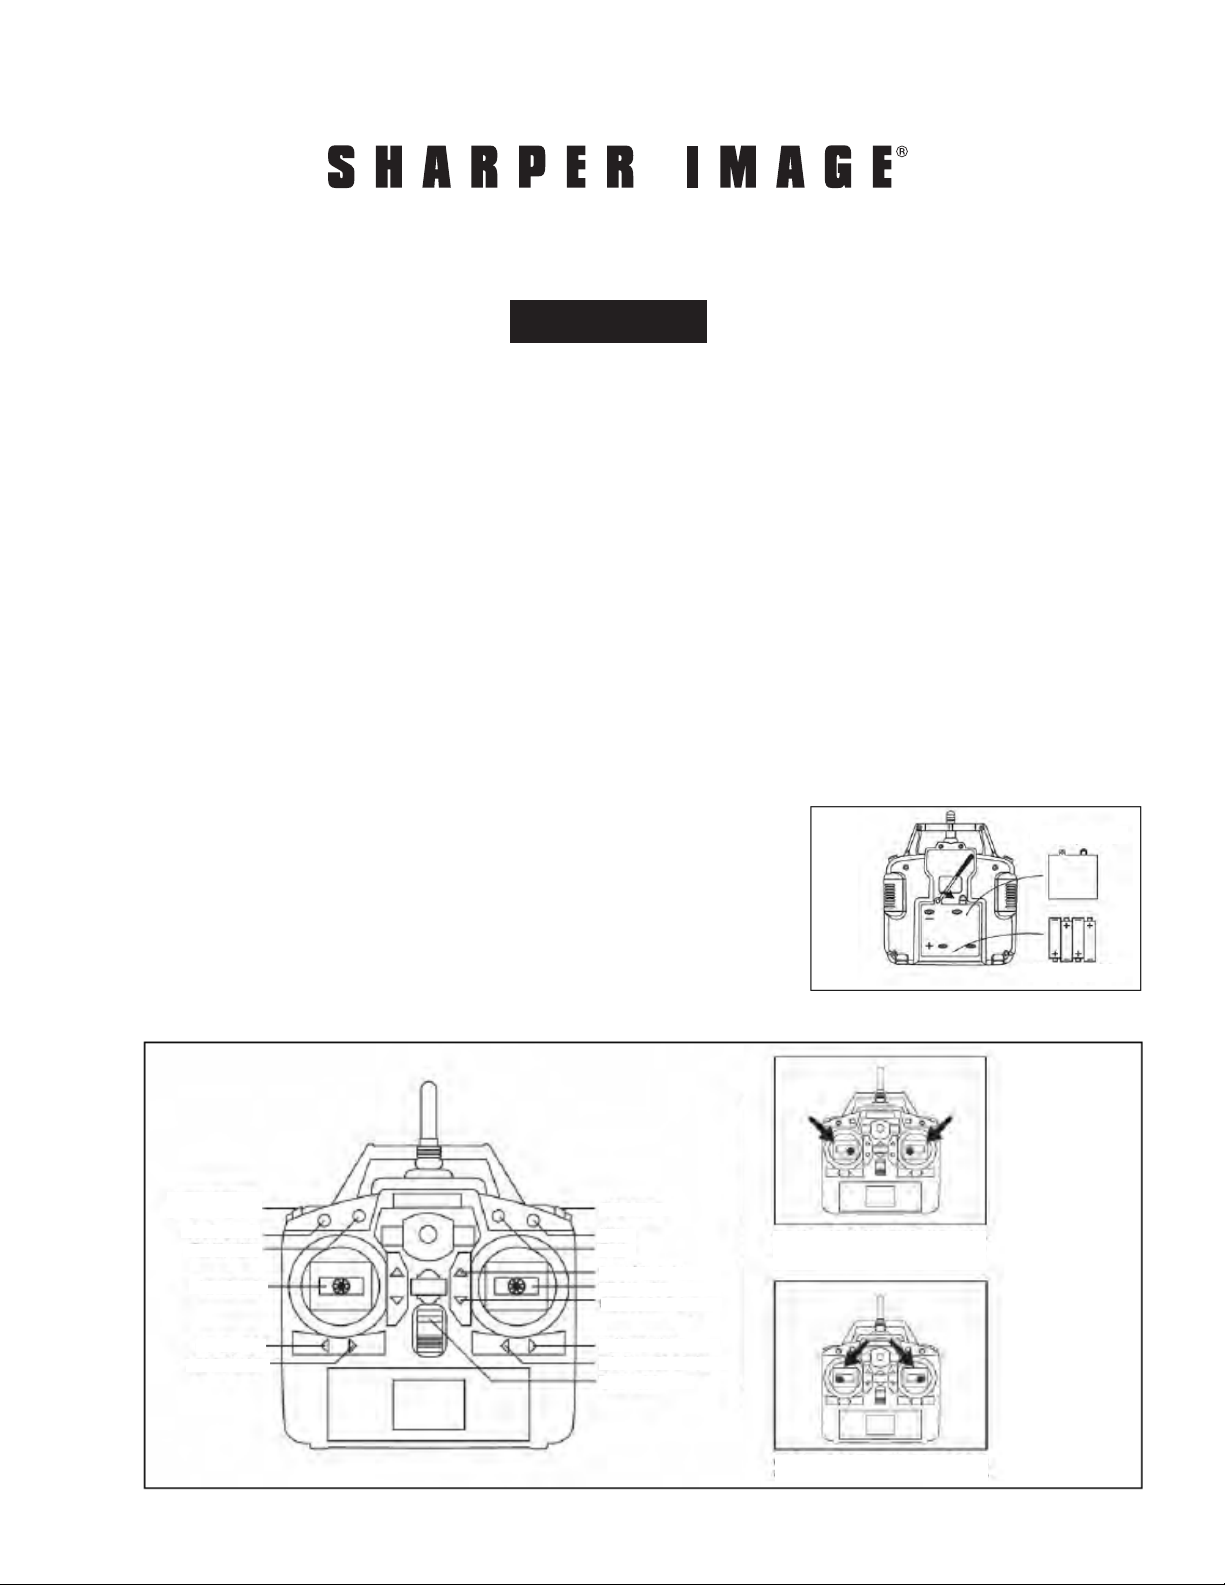
BATTERY INSTALLATION (TRANSMITTER
• One button return
• 3 speed modes
• Includes 4GB memory card (supports up to 32GB)
• Charge time: 90-120 minutes
• Flight time: 7 minutes
• Flight range: 98 ft.
)
• Open the battery cover and insert 4 AA batteries (included)
• Follow polarity diagrams inside the battery compartment
• Replace the battery cover
IDENTIFICATION OF PARTS (TRANSMITTER
)
BATTERY COVER
4 AA BATTERIES
3 SPEED ADJUSTABLE
LOW / MIDDLE / HIGH
HEADLESS MODE
ONE KEY RETURN
THROTTLE STICK
ONE KEY START
ONE KEY LANDING
3D EVERSION
VIDEO
PHOTO
FORWARD FINE-TUNING
DIRECTION STICK
BACKWARD FINE-TUNING
RIGHT FINE-TUNING
LEFT SIDEWARD FINE-TUNING
POWER SWITCH
- 1 -
AS SHOWN IN THE FIGURE. OPERATING THE RIGHT
AND LEFT CONTROL LEVER TO START CHECK GYRO.
AS SHOWN IN THE FIGURE. OPERATING THE RIGHT
AND LEFT CONTROL LEVER IS START / QUIET MODE.
Page 2
PAIRING THE TRANSMITTER AND DRONE
• Be sure the Transmitter has fresh batteries and
the drone is fully charged
• Turn on the Transmitter
• Power on the drone by plugging the battery cable
into the power outlet
• The drone will beep once and the lights will stop
blinking once it is paired with the remote
• Once paired, in order to fly, place the drone on
the ground and simultaneously push the throttle
stick and direction stick forward, then diagonal
down. This will get the propellers to start. Note:
If the drone lights are blinking the item is not
paired.
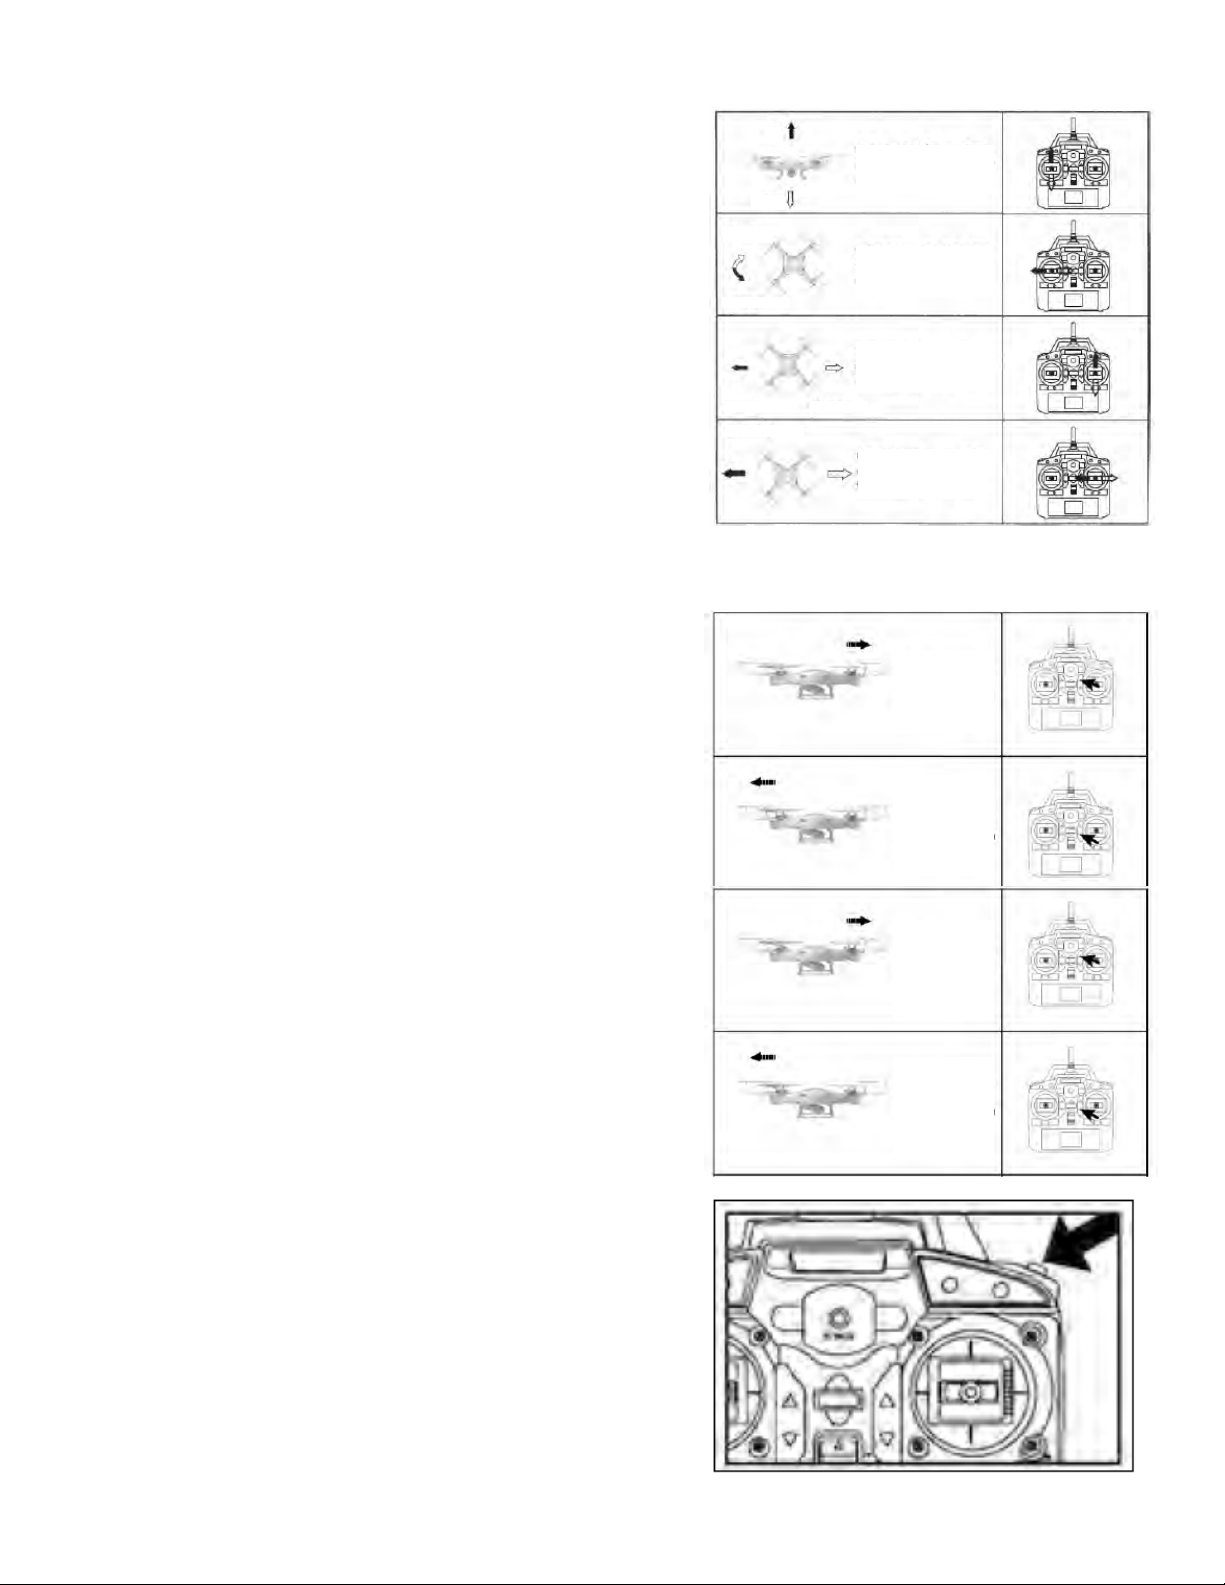
HOW TO CONTROL THE AIRCRAFT
UP
DOWN
TURN LEFT
TURN RIGHT
FORWARD BACKWARD
SIDEWARD FLY
PUSH THE THROTTLE UP OR
DOWN, THE QUADCOPTER FLIES
UPWARD OR DOWNWARD.
PULL THE THROTTLE LEFT OR
RIGHT THE QUADCOPTER TURNS
TO LEFT OR RIGHT.
PUSH DIRECTION ON LEVER UP
OR DOWN, THE QUADCOPTER
FLIES FORWARD OR BACKWARD.
PULL THE DIRECTION ON
LEVER LEFT OR RIGHT, THE
QUADCOPTER FLIES TO LEFT
OR RIGHT SIDE.
RESETTING THE GYROSCOPE
• If the vehicle is flying erratically, you may need to
reset the gyroscope
• Hold both control levers down and pointed to the
inside for 3 seconds
• The vehicle lights will turn solid when the
operation is complete
PROPER FLYING CONDITIONS
• This vehicle can fly indoors or outdoors
• Make sure ate there no obstacles nearby
(furniture, trees, power lines, etc.)
• When flying outdoors, fly in warm, sunny, calm
conditions
• Do not fly in rain, snow, hail or heavy wind
STUNT FLIPS: 360° TUMBLING ACTION
TRIM CONTROLS
WHEN THE
QUADCOPTER KEEPS
FLYING BACKWARD, YOU
CAN CORRECT IT BY
PRESSING THE FINETUNING BUTTON UP.
WHEN THE
QUADCOPTER KEEPS
FLYING FORWARD,
YOU CAN CORRECT
IT BY PRESSING THE
FINE-TUNING BUTTON
DOWN.
WHEN THE
QUADCOPTER KEEPS
FLYING BACKWARD, YOU
CAN CORRECT IT BY
PRESSING THE FINETUNING BUTTON UP.
WHEN THE
QUADCOPTER KEEPS
FLYING FORWARD,
YOU CAN CORRECT
IT BY PRESSING THE
FINE-TUNING BUTTON
DOWN.
• Fly the vehicle to a height of at least 3 meters (9
feet)
• Press the stunt button (upper right corner of
transmitter, shown). And then, Push the right
lever in any direction to do a forward tumble,
backward tumble, left tumble or right tumble
• If the vehicle crashes while attempting a stunt
flip, please reset the gyroscope
- 2 -
Page 3

AERIAL VIDEO AND PHOTOS
• Insert SD card into the slot until it clicks into place
• While drone is powered on, press Video to record
video. Press again to stop recording
• While drone is powered on, press Photo to take a
single image. (Picture cannot be taken during video
recording function.)
INDICATOR LIGHTS
Continuous flashing red: Recording video
Red light stops flashing: Stops recording video
Red flashes once: Taking digital photo
• To view videos and photos, power off the drone,
remove the SD card and insert it into the included
USB card reader. Then, insert the card reader into
your computer USB port
CHARGING THE DRONE
• The charging time is approximately 90-120 minutes
• Switch the drone power off, then open the battery
cover and remove battery
• Connect the USB cable (Port B) to the computer USB
port
• Connect the battery to USB cable (Port A), you will
see a red light turn off
• Allow the battery to charge until the red light turns
on again
• When the red light comes on, the drone is fully
charged
NOTES
• Disconnect the cable when battery is fully charged
• Do not leave a charging battery unsupervised
• Use only the charging cable that came in this package
PORT B
PORT A
NOTICE: CHARGING TIME IS AROUND 90 MINUTES.
WARNING
PLEASE TURN SWITCH TO OFF POSITION
WHEN IT ISN’T USED TO PROTECT THE
LIFE OF THE BATTERY.
• Wait until battery is cool before re-charging (about 30 minutes after flight)
• Do not throw this battery into a fire, as it may explode
• Do not short circuit this battery or expose it to some small metal parts, as this
may cause accidents
- 3 -
Page 4

HEADLESS MODE (EASY MODE
)
Headless mode makes this drone easier for beginners to fly, because there is no specified
“front end” or “rear end.” In Headless Mode, when you bank left, the drone banks left. When you
bank right, the drone banks right, regardless of what direction the quad is facing.
To turn on Headless Mode
1. Switch to Headless Mode (button is on upper left side of transmitter).
2. You will hear a short “beep” and the indicator light will begin flashing. Now, the drone is in
Headless Mode.
3. To turn off Headless Mode, press the Headless Mode button again. You will hear a short
“beep” and the indicator light will stop flashing and remain continuously on.
4. Correcting forward direction: If the drone crashes while in Headless Mode, the direction of
the aircraft’s indicator light will be the “forward” direction of the aircraft.
5. One key return: while in Headless Mode, press “one key return” and the aircraft will return
to the operator. Press it again to exit this feature and resume normal flight.
SPEED MODE: Press to select Low, Medium, and High.
AUTO HOVER MODE: When you reach your desired altitude, release the throttle lever to
maintain the altitude in auto hover mode.
ONE KEY LAUNCH: Press to begin with an automatic liftoff.
ONE KEY RETURN: Press to begin a slow descent and landing.
NOTE: As with all remote control toys, it may take some practice to become proficient in the
use of this drone. Please be patient and observe all local laws concerning drone flights. Do not
operate this vehicle in crowded areas. Do not operate this vehicle near streets, buildings, trees,
power lines or airports.
FCC STATEMENT
This device complies with Part 15 of the FCC Rules. Operation is subject to the following two
conditions:
(1) This device may not cause harmful interference
(2) this device must accept any interference received, including interference that may cause
undesired operation.
WARRANTY / CUSTOMER SERVICE
Sharper Image branded items purchased from SharperImage.com include a 1-year limited
replacement warranty. If you have any questions not covered in this guide, please call our
Customer Service department at 1 (877) 210-3449. Customer Service agents are available
Monday through Friday, 9:00 a.m. to 6:00 p.m. ET.
The SHARPER IMAGE® name and logo are registered trademarks.
©Sharper Image. All Rights Reserved.
- 4 -
 Loading...