

Page 1
Item No. 205826
DUAL RECORDING WINDSHIELD CAMERA
User Manual
Thank you for purchasing the Sharper Image Dual Recording Windshield Camera.
This device has many advanced features. Please take a few moments to
read this User Manual and store it for future reference.
- 1 -
• Records high-quality 720P HD video
• Shoots still photos
• Dual rotating cameras record front and rear views
- Left camera resolution 1280*720
- Right camera resolution 1280*720
- Dual recording resolution 1920*720
• Parking monitor mode
• Crash sensor automatically saves and locks video taken just before
and after a crash
• Override recording (old footage is erased to make room for new footage)
• Easily transfer files to PC or Mac via USB
• Includes suction cup windshield mount
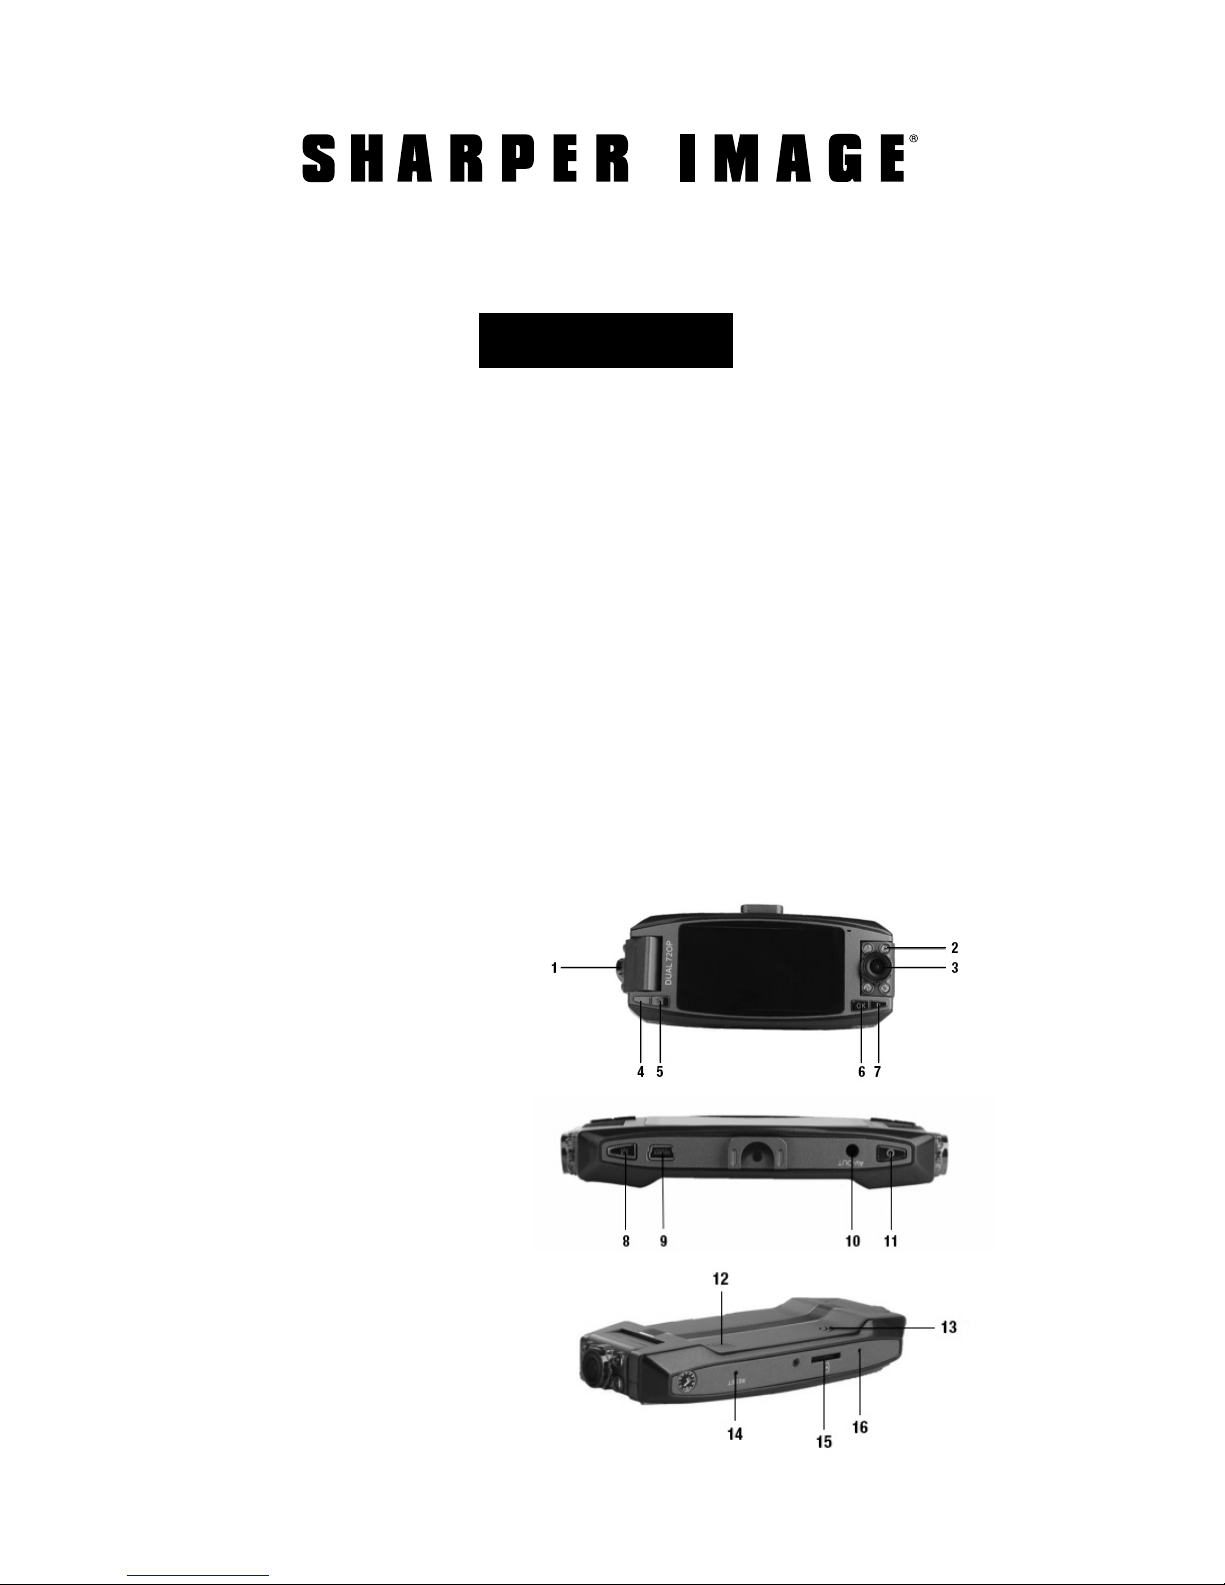
1. Left camera
2. Infrared lights
3. Right camera
4. Up button
5. Menu button
6. OK button
7. Down button
8. Mode button
9. USB port
10. TV out port (Note: TV cable
not included.)
11. Power button
12. Speaker
13. Speaker
14. Reset button
15. Memory card slot
16. Microphone
FEATURES
IDENTIFICATION OF PARTS
Page 2

A Micro SD memory card (a.k.a. “Trans Flash” or “TF” card) is required to use this device.
We recommend a high-speed card, Class 6 to Class 10. Place the card into the slot and
gently push it until it clicks into place. To remove the card, push down until it clicks and
pops out. NOTE: Do note operate this device without a memory card in place.
1. Mount the device on your windshield with the included suction cup mount.
2. Plug the device into your car’s 12V DC power outlet (a.k.a. the cigarette lighter).
NOTE: Although this device has a rechargeable battery, it is not designed to run on
battery power for long periods of time.
3. Turn on the power and adjust the lenses BEFORE you start to drive.
4. Press the OK button to begin recording. A red dot will flash on the LCD screen,
to indicate that video is being recorded.
5. Press the OK button to stop recording and save your file.
IMPORTANT: For your safety, and the safety of others, please make all adjustments
BEFORE you start driving.
A. Power button
Short press: Puts the device in video recording standby mode. The cameras are on, but
the device is NOT recording. While in video recording standby mode, short press Power
button again to turn the infrared lights on or off. (NOTE: Infrared lights are for night
driving. The human eye cannot see infrared light. You will know the infrared lights are on
by the icon on the LCD screen). Long press: Turns the device off.
B. OK button
The OK button has multiple functions.
Function 1: In video recording standby mode, short press the OK button to begin
recording. When video is being recorded, a red dot will flash on the LCD screen. Short
press the OK button again to stop video recording.
Function 2: In photo mode, short press the OK button to take a still photo.
Function 3: In playback mode, short press the OK button to play/pause video files.
Function 4: In various menu screens, press the OK button to confirm your selection(s).
C. Mode button
Short press the Mode button to cycle through the three different modes: video recording
mode, photo mode and playback mode.
INSERTING THE MEMORY CARD (NOTE: CARD NOT INCLUDED
)
MEMORY CARD CAPACITY
OPERATING YOUR DUAL RECORDING WINDSHIELD CAMERA
EXPLANATION OF BUTTONS
- 2 -
8GB approx. 30 min.
16GB approx. 2 hrs.
32GB approx. 4 hrs.
Page 3

D. Up button (left arrow)
The Up button has multiple functions.
• In menu screens, use the Up button to move to a different selection.
• In video recording mode or photo mode, use the Up button to zoom in on your subject.
E. Down button (right arrow)
The Down button has multiple functions.
• In menu screens, use the Down button to move to a different selection.
• In video recording mode or photo mode, use the Down button to zoom out from
your subject.
F. Menu button
The Menu button has multiple functions.
• In video recording standby mode, short press the Menu button to enter the video
recording menus. Short press once more to enter the setup menus. Short press again
to exit the menus and go back to video recording standby mode. TIP: In video recording
standby mode, press and hold the Menu button to change the camera views (left camera,
right camera or dual cameras).
In photo mode, short press the Menu button to switch between the left camera and the
right camera. (You cannot shoot a still photo with dual camera option.)
In playback mode, short press the Menu button to enter the playback menus. Short press
once more to enter the setup menus. Short press again to exit the menus and go back
to playback mode.
Use the Up/Down buttons to scroll through the menus. Press the OK button to confirm
your selections. Press the Menu button to EXIT the menus and go back to video recording
standby mode.
MP (Channel) - Selects left camera, right camera or dual cameras.
EV (Exposure Value) - Adjusts the brightness setting from -3 to +3.
AWB White Balance - Adjusts the white balance to obtain the truest colors based on the
light source: Auto / Daylight / Cloudy / Fluorescent / Incandescent. NOTE: In most cases,
the “Auto” white balance setting is sufficient.
Loop Recording - Selects how long you want each recording to last, before it is saved
and starts a new recording: off / 3 min. / 5 min. / 10 min.
Motion detection - When the motion detection is activated, the camera will record
10 seconds when it detects any change in the video image it is receiving. It will stop
recording when there is no change in the video image.
Record audio - Turns the built-in microphone on or off.
EXPLANATION OF BUTTONS (CONT.
)
VIDEO RECORDING MENU
- 3 -
Page 4

While you are in photo mode, long press the Mode button AND the OK button
SIMULTANEOUSLY for 2 seconds, then release both buttons, to enter the still photo
menus. Use the Up/Down buttons to scroll through the menus. Press the OK button to
confirm your selections. Press the Menu button to EXIT the menus and go back to photo
mode.
Capture mode – Single shot / 2 sec. timer / 5 sec. timer / 10 sec. timer.
Resolution – 12 M, 10 M, 8 M, 7M, 5 M, 3 M, 2 M, VGA.
EV (Exposure Value) - Adjusts the brightness setting from -3 to +3.
Continuous shot – Takes a burst of photos when you hold down the OK button (on / off).
G sensor - The G sensor automatically saves any footage immediately before and after
a crash. Use this menu to select the sensitivity of the sensor: off / high / medium / low.
In playback mode, short press the Menu button to enter the playback menus. Use the
Up/Down buttons to scroll through the menus. Press the OK button to confirm your
selections. Press the Menu button to EXIT the menus and go back to playback mode.
Delete – Delete current video or delete all images.
Protect – Lock current file / unlock current file / lock all / unlock all.
While you are in photo mode, short press the Mode button to enter photo playback mode.
Once you are in photo playback mode, you can access the photo playback menu:
Delete – Delete current image or delete all images.
Rotate – Rotate image 90° / 180° / 270° / cancel.
Protect – Lock current file / unlock current file / lock all / unlock all.
Slide show – Create a slide show of photos. Each photo will last 3 sec. / 5 sec. / 10 sec.
before moving on to the next photo.
Use the Up/Down buttons to scroll through the menus. Press the OK button to confirm
your selections. Press the Menu button to EXIT the menus and go back to standby mode.
Date – Turn the time stamp on or off, and set the current date.
Auto power off – To protect the device, this device shuts down when not in use (off / 1
min. / 3 min. / 5 min.)
STILL PHOTO MENU
VIDEO PLAYBACK MENU
PHOTO PLAYBACK MENU
SETUP MENU
- 4 -
VIDEO RECORDING MENU (CONT.
)
Page 5

Beep sound – Turns the beep on or off when you press the buttons.
Parking monitor – The parking monitor automatically starts video recording for 20
seconds when it senses a change in the surroundings. Use this menu to turn the parking
monitor on or off and adjust the sensitivity (off / low / medium / high). The device will
display “P” on the right of the screen when this feature is activated.
Language – Adjust the language (default language is English)
LCD protection – Screen saver (open / 30 sec. / 1 min. / 5 min.)
Frequency – Light source frequency (50 Hz or 60 Hz)
TV mode – Specify your TV system for video playback on a TV (NTSC=North America,
PAL=Europe/Asia). Note: TV cable not included.
Image rotation – This option flips the video image upside-down (180°) so you can mount
the device with the suction cup mount on the top or the bottom for unobstructed view
(On / Off).
Format – Delete all files on the card (NOTE: This cannot be reversed).
Default settings – Return device to original factory settings.
Version – Shows the current software version.
SETUP MENU (CONT.
)
SPECIFICATIONS
Lenses Dual ultra-wide angle glass lenses
Field of view 120°
Languages 13
Video format AVI
Photo format JPEG
Memory card slot Micro SD, Class 6 to Class 10 required. Supports up to 32GB.
Microphone Built-in
Power DC input 5V 1A
Battery Lithium polymer
System requirements Windows XP / Vista / Windows + / Mac iOS X 10.3.6
Screen 2.7” LCD
Lens full glass + high resolution
AV output HDMI HD video
Transmission speed USB 2.0
- 5 -
Page 6

Problem Suggestion
I cannot record any videos or take any photos.
Make sure the memory card is inserted, and that it has available capacity, and that it is not locked.
The recorder stops
unexpectedly.
Make sure the memory card is high speed, Class 6 or higher.
It should be marked C4 or C6.
I get the “Files Error”
message.
There is a storage error. Use the format function to re-format your memory card.
Videos/photos are
blurry.
Clean the lens with lens paper. Make sure there is no protective plastic film covering the lenses or LCD screen from the
factory.
Images of sky or water
appear black.
Scenes with a lot of contrast may trick the
automatic exposure function of this camera. Adjust the
exposure value (“EV”) in the settings menu to correct.
The color is off on
cloudy days.
Change the white balance setting according to the light
source.
There is a cross stripe
interference in the
image.
The wrong “light frequency” is selected. Change it to 50Hz or
60Hz in the Frequency settings menu.
Device has crashed. In the unlikely event of a system crash, press the
reset button on the bottom of the device with a
paper clip in order to perform a system reboot.
The SHARPER IMAGE® name and logo are registered trademarks.
©Sharper Image. All Rights Reserved.
Sharper Image branded items purchased from SharperImage.com include a 1-year
limited replacement warranty. For Customer Service, please call 1 (877) 210-3449.
WARRANTY / CUSTOMER SERVICE
TROUBLESHOOTING
- 6 -
 Loading...