

Page 1
Sharper Image branded drones and RC quadcopters purchased from
SharperImage.com include a 60-day limited replacement warranty.
If you have any questions not covered in this manual, please call
Sharper Image Customer Service at 1 (877) 210-3449.
The Sharper Image® name and logo are registered trademarks.
Manufactured and marketed by Camelot SI, LLC under license.
©Sharper Image All Rights Reserved.
VIDEO CAMERA DRONE WITH LED LIGHTS
Item No. 205096
Thank you for purchasing the Sharper Image Video Camera Drone with
LED Lights. Please read this manual carefully and store it for future
reference.
WARNING: Please exercise caution and common sense when you operate this drone. Improper use of this product can result in serious injury,
property damage or damage to the product. It is your responsibility
to comply with all applicable laws pertaining to remote controlled and
unmanned aerial vehicle flight regulations.
- 12 -
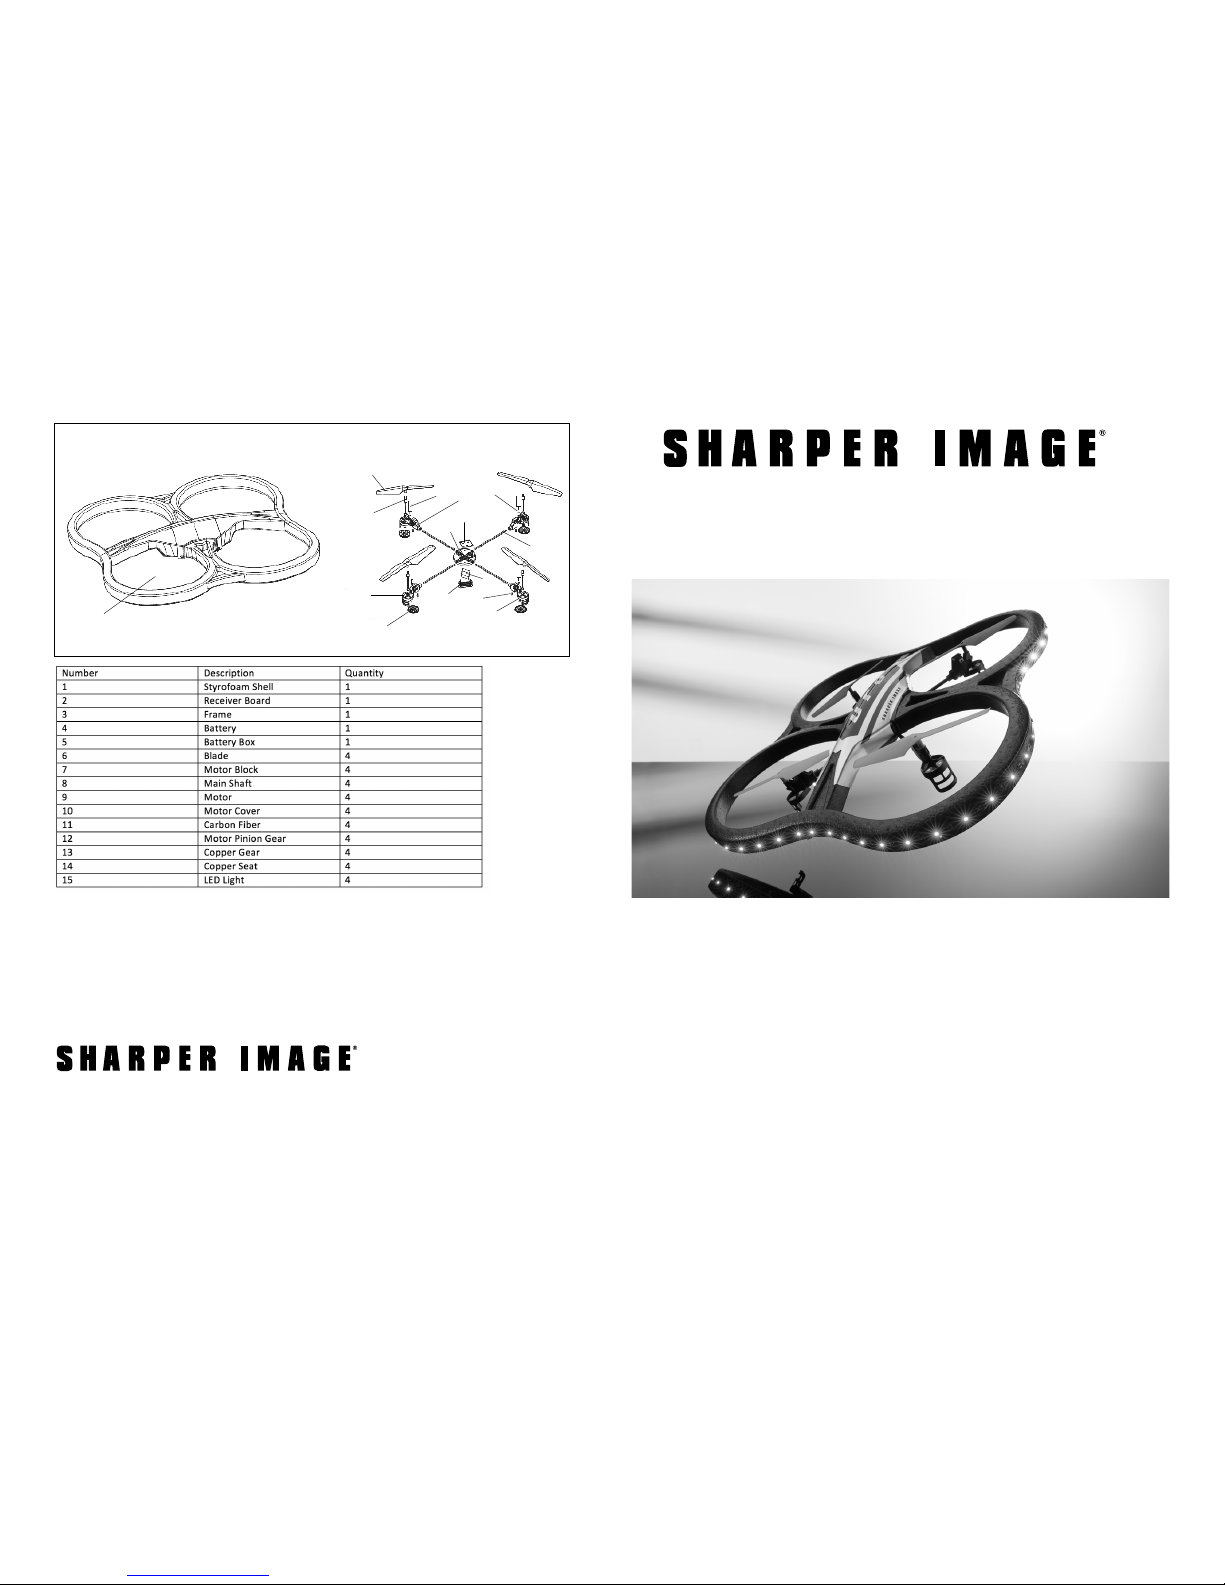
PARTS LIST
WARRANTY / CUSTOMER SERVICE
1
2
9 10
13
11
6
8
4
14
15
5
7
12
3
Page 2
INTRODUCTION
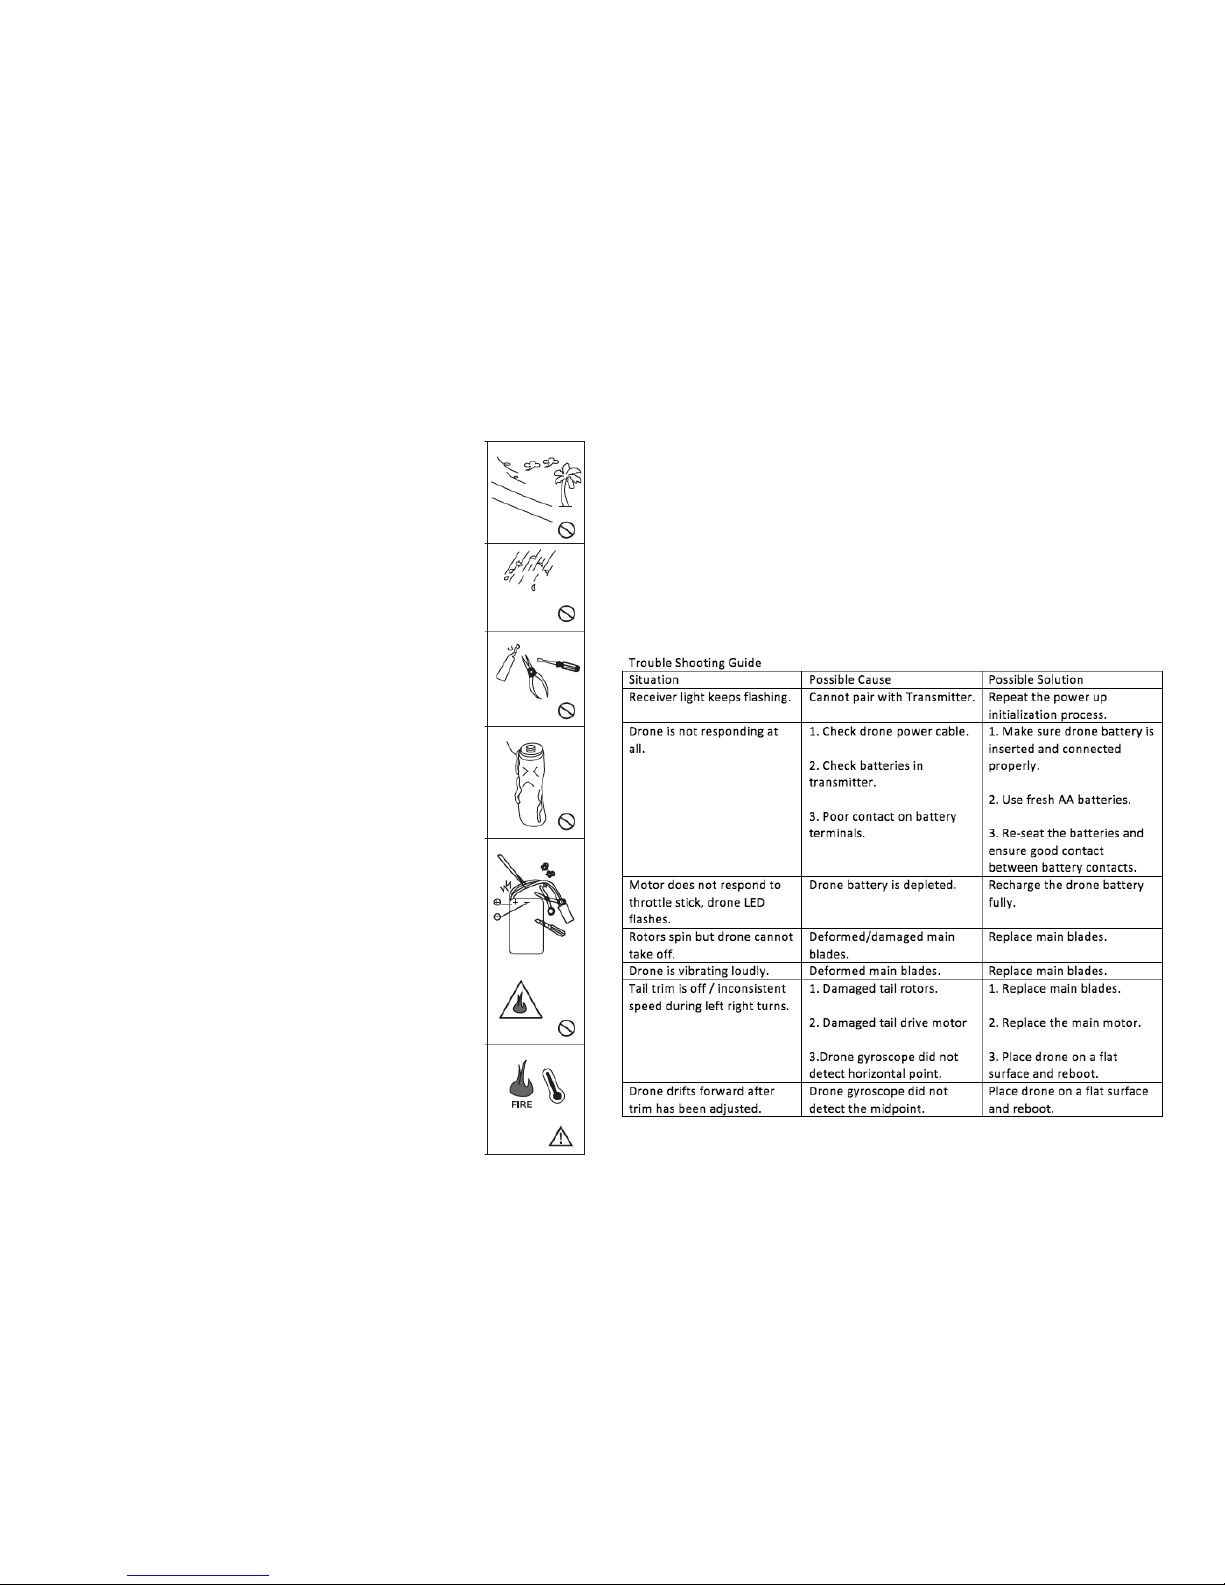
SAFETY WARNINGS
The Video Camera Drone with LED Lights is a
sophisticated hobby product, and not a toy. Although
it is small, it possesses certain risk factors that
should not be overlooked. Please follow the safety and
operation recommendations in this guide to ensure
correct operation of this aircraft. Do not use this
device for anything other than its intended purpose.
Sharper Image assumes no liability for accidental
damage due to abnormal wear of parts, improper
assembly or unsafe operation.
1. This product is suitable for indoor and outdoor use.
However, please do not fly if the wind level is over
Level 4 (moderate breeze). In addition, do not fly this
aircraft near crowds, power lines or other dangerous
obstacles. The pilot is solely responsible for any action,
damage or injury that occurs while flying this aircraft.
2. This aircraft is constructed with sophisticated
electronic components. Please to not expose it to any
type of moisture, water, rain, water vapor, etc.
3. For your safety, do not attempt to modify or upgrade
this aircraft. Use only the components included in this
package.
4. Make sure the transmitter batteries are installed
according to the correct polarity indicated on the case.
Do not mix old and new batteries. Do not mix different
types of batteries. If you are not going to use this
drone for a long period of time, remove the batteries to
avoid potential leakage and damage to the transmitter.
Always dispose of batteries in accordance with local
laws.
- 2 - - 11 -
USING THE ONBOARD
VIDEO CAMERA
[
CONT.
]
7. After inserting the card/card reader into your computer, go to the “NO
NAME” drive on your computer desktop. Open the DCIM folder and go into the
100DSCIM folder. The AVI files can be played back on many media players, such
as QuickTime. For faster playback, copy the files to your computer hard drive.
NOTE: If you have trouble with QuickTime, try a different media player or search
online for a free downloadable AVI player. All files on the Micro SD card can be
removed or erased without compromising the video camera. The video camera
will regenerate the DCIM and 100DSCIM folders if necessary.
Page 3

SAFETY WARNINGS [CONT.
]
STANDARD ACCESSORIES
PARTS OF THE
AIRCRAFT
5. When charging the drone, use only the charger included in this
package. To avoid fire hazards, do not crush, disassemble, burn or
reverse polarity of the lithium polymer (Li-Po) battery. If the battery
becomes unusually hot, stop charging immediately. Keep this battery
and the charger out of the reach of children at all times. Always
dispose of batteries in accordance with local laws.
6. Keep away from heat. Do not store this product near an oven or
heater. Store it indoors in a climate-controlled, room-temperature
environment.
Charger Blades (X4) Screwdriver Screws (X4)
A. Styrofoam Shell
B. Receiver Board
C. Blade
D. Motor
E. Frame
F. Motor Block
G. Carbon Fiber
- 3 -
- 10 -
360° STUNT FLIPS
USING THE ONBOARD VIDEO CAMERA
Once you have mastered the basic controls, it’s time to try a
stunt flip.
1. Be sure drone is at least 20 feet in the air.
2. Press and release the rolling control button to perform a 360°
barrel roll.
1. Insert the included Micro SD card into the video camera with the copper
contacts pointed down.
2. To make a video recording, press the Video Camera ON/OFF button located
on the left side of the transmitter.
3. A light under the video camera will glow GREEN when it is in standby mode.
The light will flash RED when the camera is recording video.
4. The light will flash RED AND GREEN CONTINUOUSLY when the Micro SD card
memory is full. The video recordings (AVI files) must be removed/deleted in
order to make room for new recordings. (Or, you may use a
different memory card.)
5. To view your recordings, remove the Micro SD card from the rear of the
video camera by slightly depressing the Micro SD card and allowing it to
spring out enough so you can grab it and remove it from the slot.
6. The Micro SD card can now be inserted intcomputer through a Micro
SD card slot or by using the included USB card reader adapter.
Page 4

- 4 -
PARTS OF THE TRANSMITTER
TRANSMITTER BATTERY INSTALLATION
Note: Do not disassemble the transmitter.
1. Unscrew the battery lid.
2. Insert 6 AA batteries, according to the polarity
(“+” or “-”) shown on the case.
3. Replace the battery lid and screw into place.
NOTE: Do not mix old and new batteries. Do not mix different types of batteries.
Step 1 Step 2
Step 3
CAUTION
DIRECTION CHANGE AND HOVERING PRACTICE
ADJUSTING THE TRIM
• If the nose of the drone moves, please lower the throttle stick
and land the vehicle. Then move your position diagonally behind
the drone 16 feet and continue practicing.
• If the drone flies too far away, please land the drone. Move your
position diagonally behind the drone 16 feet and continue practicing.
After you are familiar with the above
steps, stand at a side of
the drone and continue
practicing the steps above.
Then repeat this exercise
by standing in front of the
drone.
What to do if the nose of the
drone leans right or left:
• If it leans RIGHT: press the LEFT
trim button.
• If it leans LEFT: press the RIGHT
trim button.
NOTE: These trim buttons are on the
LEFT side of the transmitter, just below
the stick.
What to do if the drone drifts
forward or backward:
• If it drifts FORWARD: press the
BACKWARD trim button.
• If it drifts BACKWARD: press the
FORWARD trim button.
NOTE: These buttons are on the
RIGHT side of the transmitter, to the
left of the stick.
What to do if the drone drifts
right or left:
• If it drifts RIGHT: press the LEFT
trim button.
• If it drifts LEFT: press the RIGHT
trim button.
NOTE: These buttons are on the
RIGHT side of the transmitter, just
below the stick.
- 9 -
Video Camera
ON/OFF
Page 5

CHARGING THE DRONE
CAUTION: To avoid fire hazards, use only the charger included in this
package.
1. Connect the charging cable to the drone battery.
2. Plug the other end of the charging cable into an AC outlet.
3. While the battery is charging, the LED on the charger will
light up RED.
4. When the battery is fully charged, the LED on the charger will
light up GREEN.
SPECIFICATIONS
CHARGER
Input: 110-240V
Charging Current: 650MA
Full Voltage: 8.45 +/- 0.3V
LI-PO BATTERY
Battery Specification: 7.4V650mAh
Aircraft Flight Time: 10-12 minutes
Charge Time: Approx. 1.5 hours
AA BATTERIES
Battery Specification: 1.5V (GP 15G R6P)
Transmitter Operation Time: 18 hours
- 5 -
CAUTION
THROTTLE CONTROL PRACTICE
AILERON AND ELEVATOR
CONTROL PRACTICE
RUDDER CONTROL
PRACTICE PRACTICE
• Be sure that no people or obstructions are nearby as you practice.
• You must first practice hovering. (This is a basic flight action.)
“Hovering” means keeping the drone in mid-air in a fixed position.
• Please stand approximately 12 feet behind the drone while it is flying.
• When the vehicle begins to lift
off the ground, slowly reduce
the throttle to bring the flight
vehicle back down. Keep
practicing this skill until
you can control the throttle
smoothly.
• Raise the throttle stick slowly.
• Move the drone in any
direction: forward, back, left
and right. Slowly move the
Aileron and Elevator Sticks
in the opposite direction to fly
back to its original position.
• Slowly raise the throttle stick.
• Use the rudder stick to move the
nose of the drone to the right
or the left. Then, slowly move
the rudder stick in the opposite
direction to fly back to its original
position.
NOTE: After you are familiar with
the above actions, draw a circle on
the ground and practice within the
circle to increase your accuracy.
Reduce the size of the circle as you
become more advanced.
- 8 -
Page 6

- 6 -
PAIRING THE DRONE WITH THE TRANSMITTER
POWERING DOWN THE DRONE
Step 1: Place the drone on a flat
surface, with the tail end pointed
at you. Connect the drone battery
to the drone power wire. The LED
on the drone will start flashing.
(Be sure not to move the drone,
as the built-in gyroscope needs a
neutral starting point.)
Step 2. Turn on the Transmitter.
Step 3. Bring the throttle (the left
stick) all the way to the lowest
position and release. The drone
is now paired and ready to fly.
(Repeat these steps every time
you turn the drone on.)
Step 1: After the flight, disconnect
the drone battery from the drone
power wire.
WARNING: If the battery is not
disconnected after use, it could cause
the battery to discharge excessively,
and possibly cause a fire.
Step 2: Turn off the Transmitter.
If the transmitter is not going to
be used for an extended period of
time, please remove the batteries to
prevent possible leakage.
FLIGHT ADJUSTMENT AND SETTING
Before you can be proficient with this drone, we recommend you
practice your piloting skills. Before long, you will be an accomplished
flier, and the envy of your neighborhood.
1. Read all instructions carefully.
2. Be sure Transmitter has fresh batteries, and that the drone
is charged.
3. Be sure all screws are firmly tightened.
4. Place the drone in a clear, open field, with the tail end pointed
toward you.
5. Practice operating the throttle sticks for these motions
(see illustrations below):
- 7 -
Right – Left (Aileron)
Fly Forward – Fly Backward (Elevator)
Ascent – Descent (Throttle)
Turn Left – Turn Right (Rudder)
 Loading...