

Page 1
TV WIRELESS HEADPHONES
Item No. 204919
User Manual
Thank you for purchasing TV Wireless Headphones from Sharper Image. This new and
improved model is easy to set up, easy to use and even easier to charge than before.
These 2.4GHz digital wireless headphones utilize the latest technology, so you can enjoy
your favorite TV programs, day or night, without disturbing others.
FEATURES
• Reliable 2.4GHz digital technology
• Automatically finds the strongest signal (31-channel frequency hopping system)
• 100-ft. wireless range
• Operates approximately 14 hours (at 2/3 volume) on a full charge
• Comfortable padded design
• Simple “top charging” cradle
• Onboard volume control
• Low power alert
• Auto On / Off protects hardware and conserves battery power
• Can be used with any audio source (TV, stereo, MP3 player, etc.)
• Can be used as regular wired headphones with included 3.5mm cable
• 2 AAA size rechargeable batteries (included) can be replaced if necessary
- 1 -
Page 2
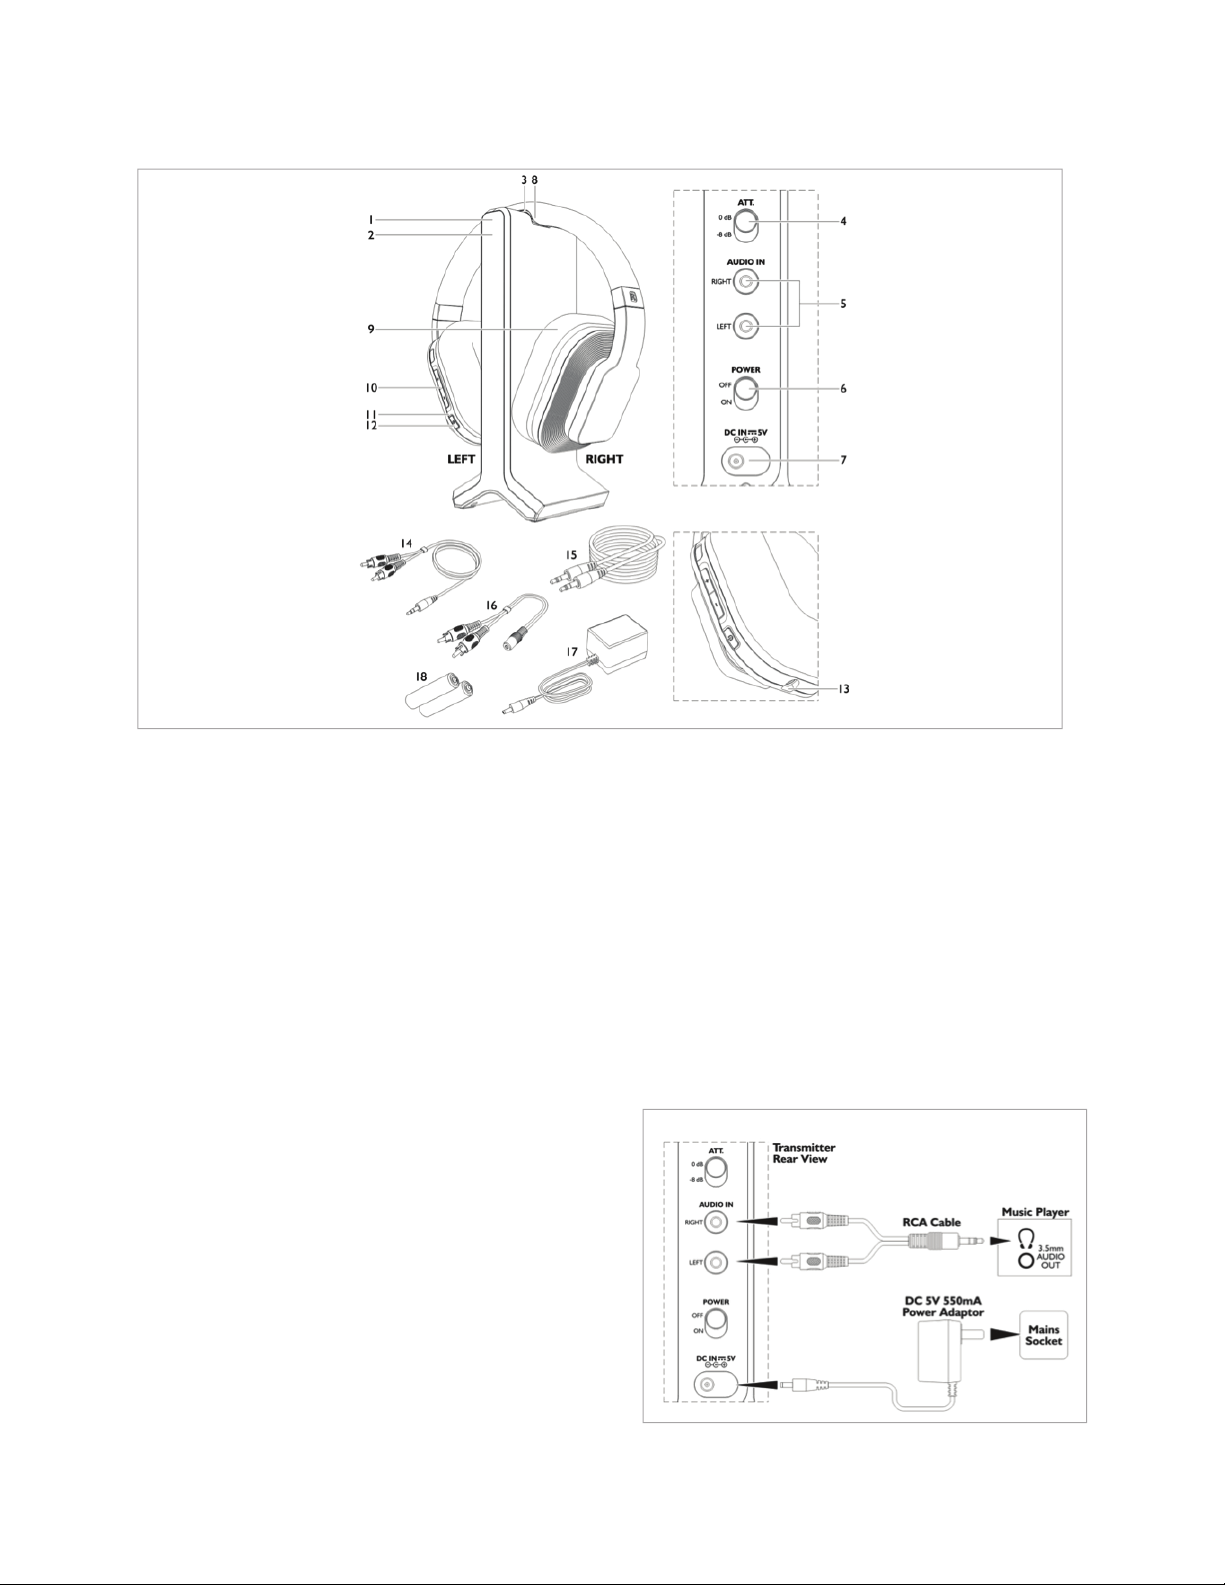
IDENTIFICATION OF PARTS
Base Unit
1. LED Charging Light
2. LED Power Light
3. Charging dock
4. Attenuation select switch
5. RCA Audio In jacks
6. Power On/Off switch
7. DC power conection
Headphones
8. Charging contacts
9. Battery Compartment (inside
right ear pad)
10. Volume controls
11. Power/Signal LED indicator
12. Power On/Off button
13. Direct line-in jack (bottom of
left ear pad)
INSTALLING THE BASE UNIT
• Plug the AC adapter into the DC power
connection at the rear of the Base Unit. Plug the
other end into an AC outlet. Now you are ready to
connect the Base Unit to the TV.
NOTE: This device must be used with the AC
adapter supplied in the package. If your AC
adapter is lost or damaged, please contact
Sharper Image Customer Service. Do not use any
other AC adapters or power cords.
Accessories
14. RCA-to-3.5mm cable
15. 3.5mm direct line-in cable
16. 3.5mm-to-RCA adapter
(short “Y-shaped”cable)
17. AC adapter
18. NiMH AAA size batteries for
Headphones (2 pcs.)
- 2 -
Page 3
INSTALLING THE BASE UNIT [CONT.]
• If your TV has a headphone jack, use the RCA-to-3.5mm cable. Plug the 3.5mm side (the single
black wire) into the TV headphone jack. Plug the red and white RCA plugs into the Audio In jacks
on the back of the Base Unit. Be sure to match red to red and white to white.
• If your TV does not have a headphone jack, use the included Y-shaped 3.5mm-to-RCA adapter.
Plug one set of red and white plugs into the AUDIO OUT jacks on the back of your TV. Plug the
other set of red and white RCA plugs into the Audio In jacks on the back of the Base Unit. Be sure
to match red to red and white to white.
• The Base Unit has an Attenuation select switch to give you the best sound from specifi c devices.
When connecting to a TV, DVD player or Stereo, slide the switch to “-8 dB.” When connecting to
portable devices such as a smartphone, tablet or MP3 player, slide the switch to “0 dB.”
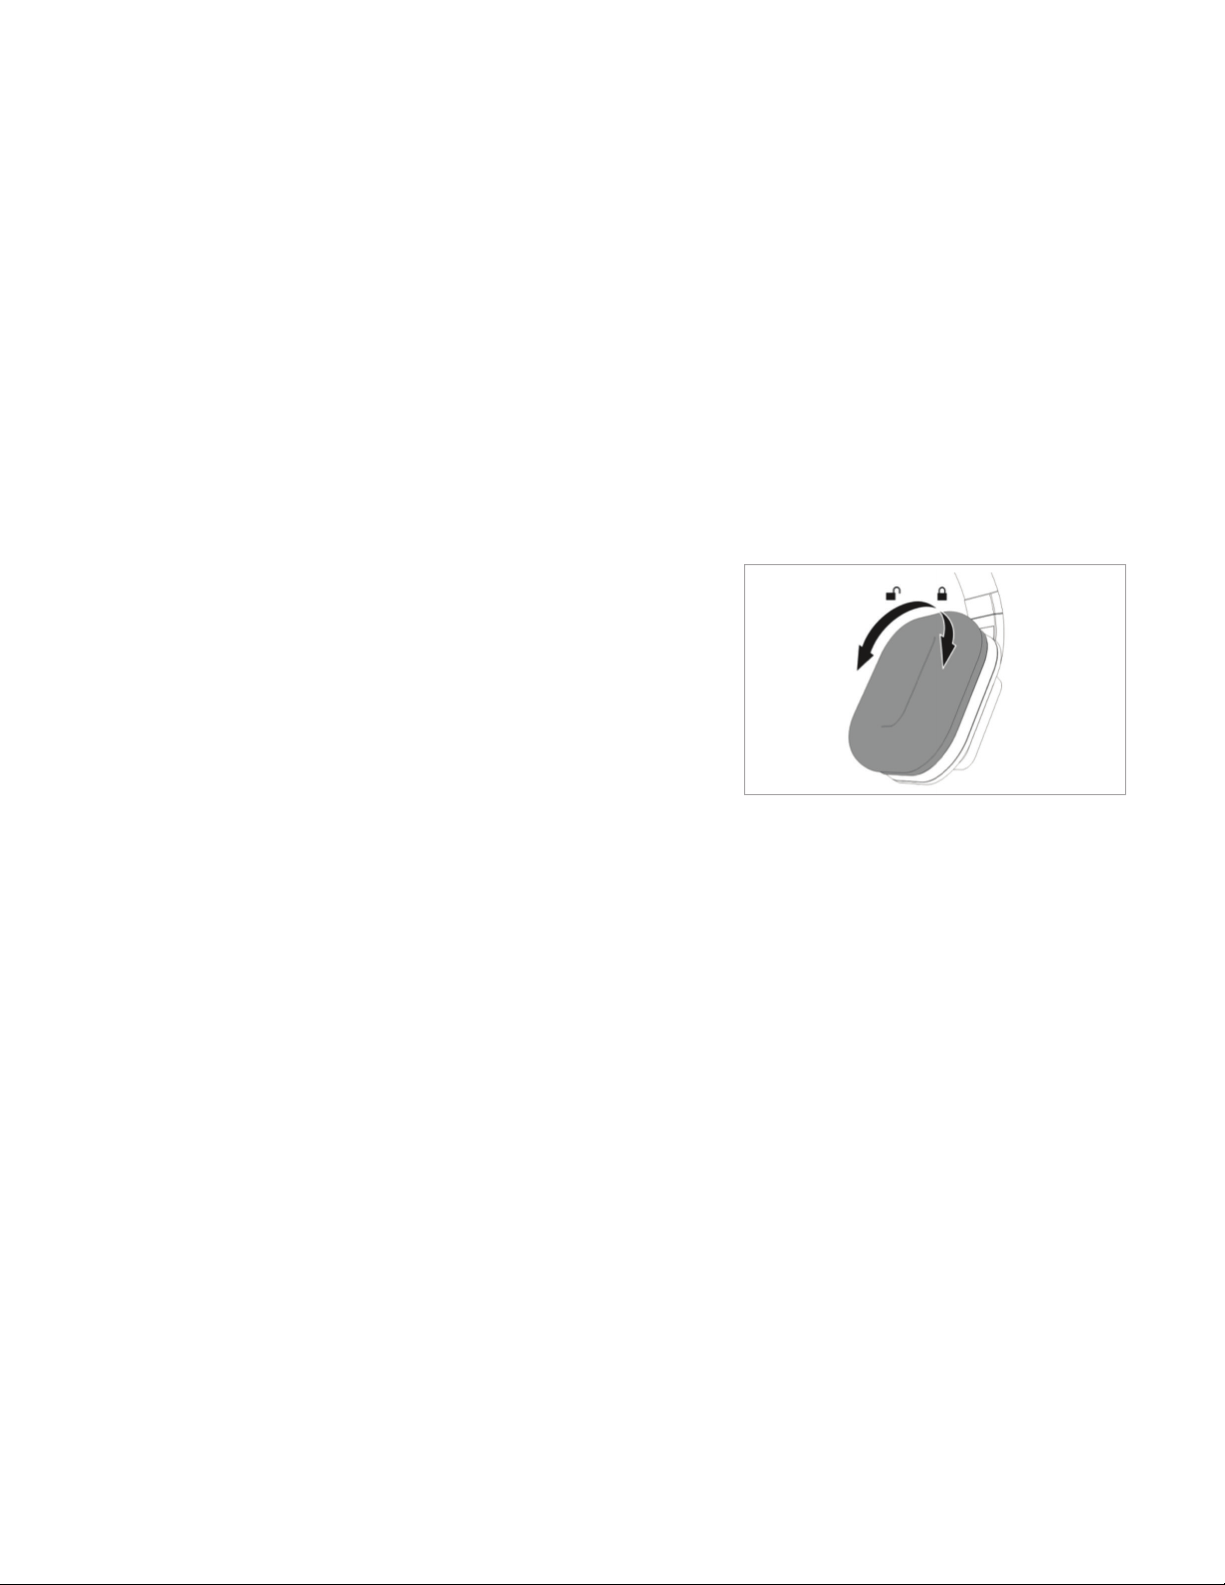
INSTALLING HEADPHONE BATTERIES
• To install the included rechargeable AAA batteries, carefully
twist the RIGHT ear pad counter-clockwise and remove
it from the headphone body.
• Insert 2 AAA size rechargeable batteries (supplied
in the package) into the Battery Compartment. Make sure
the batteries are positioned correctly, matching the polarity
(“+” and “-”) diagrammed in the Battery Compartment.
• Restore the ear pad to the headphone body after the
batteries are inserted.
• Twist the ear pad clockwise to lock it in place.
• Slide the Power On/Off Switch located on the rear of the Base Unit to ON.
• Place the Headphones on the Base Unit to charge. The LED Charging Light will
turn GREEN, indicating that your Headphones are charging.
• When fully charged, the green light will turn off .
Twist the right ear pad counter-clockwise
to unlock the Battery Compartment.
IMPORTANT: YOU MUST CHARGE YOUR HEADPHONES FULLY BEFORE THE INITIAL USE.
A FULL CHARGE CAN TAKE UP TO 5-7 HOURS.
OPEATING YOUR TV WIRELESS HEADPHONES
• After connecting the Base Unit and charging the Headphones, turn on your TV (or other
audio source).
• Make sure the Power On/Off Switch located on the rear of the Base Unit is ON.
• Remove Headphones from the Base Unit.
• The LED Power Light starts to fl ash BLUE for 8 to 9 seconds, then glows blue steadily.
The blue light means the unit is detecting an audio signal from the TV.
- 3 -
Page 4

OPEATING YOUR TV WIRELESS HEADPHONES [CONT.]
• Turn on the Headphones by pressing the Power On/Off
button for 2 seconds.
• The Power/Signal LED on the Headphones will light
up in RED, and then change to GREEN when an audio
signal link between the Base Unit and the Headphones is
established.
• If no audio signal is detected, this LED will glow red
constantly.
• Adjust the size of the headband, place the Headphones
on your head and adjust the Volume Control on the
Headphone.
• If interference or poor signal reception occurs, the
Headphones will be muted and the Power/Signal LED
will change to RED, while it automatically switches to
another wireless channel.
STAND-BY MODE
• To save power and protect the equipment, the Base Unit will go into Stand-by Mode if there is no
audio signal for 5 minutes, and the blue LED Power Light will turn off . The Headphones will also
switch off automatically if there is no signal from the Base Unit. When the audio signal resumes,
the Base Unit will switch on automatically and the LED will glow blue. You must switch on the
Headphones again to listen to your TV.
CHARGING THE HEADPHONES
• To charge the batteries in the Headphones, turn the
Headphones OFF by pressing the Power button for
about 2 seconds.
• Place the Headphones on the Base Unit. The charging
process begins automatically, and the LED Charging
Light on the Base Unit will glow GREEN.
• When the charging process is completed, the green
LED Charging Light will turn OFF.
LOW BATTERY WARNING
• When the Headphone batteries are at a low level,
the Power/Signal LED will blink RED. There will be a
beeping sound from the Headphones every minute to
indicate it has 5 minutes of power left. There will be 1
beep sound in each of the fi rst 4 minutes, and 2 beep
sounds in the last minute. Then it will automatically
switch OFF.
Before initial use, please charge the Headphone
batteries fully (approximately 5-7 hours). Store
headphones on the Base Unit when not in use.
Always make sure Headphone power is turned
OFF while charging.
- 4 -
Page 5

LINKING A SECOND PAIR OF HEADPHONES TO THE SAME BASE UNIT
• Install Headphone batteries as described above.
• Turn off the Base Unit.
• With the Base Unit powered OFF, press and hold the Power button on the Headphones
for about 10 seconds until the GREEN LED starts to blink.
• Then, turn on the Base Unit. The Base Unit and the second pair of Headphones
will be paired up automatically.
ALTERNATE USE OF HEADPHONES
These Headphones can also be used as regular wired
headphones (for your smartphone, tablet, MP3 player, etc.)
by connecting the included 3.5mm direct Line-In Cable to
the Direct Line In Jack as shown below.
TECHNICAL SPECIFICATIONS
Transmission Mode: UHF Stereo
Carrier Frequency: 2.4GHz Digital
Operation Voltage (Base Unit): DC 5V 550mA
Operation Voltage (Headphones): 2X AAA size Rechargeable
NiMH batteries (included)
Frequency Response: 30Hz~ 20KHz
Distortion: 0.5%
S/N Ratio: 70 dB
Operation distance: Up to 100 ft. (30m)
LEFT
FCC COMPLIANCE
This device complies with Part 15 of the FCC Rules. Operation of this device is subject
to the following two conditions: (1) This device may not cause harmful interference,
and (2) this device must accept any interference received, including interference that
may cause undesired operation.
WARNING
• Modifi cation of this device to receive cellular radio-telephone service signals is
prohibited under FCC rules and Federal Law.
• Changes or modifi cations to this unit not expressly approved by the party responsible
for compliance could void the user’s authority to operate the equipment.
• Do not use disposable or non-rechargeable batteries with this device.
• Do not expose this device or the batteries to fi re or excessive heat.
• Recycle rechargeable batteries in accordance with local laws.
• Prolonged exposure to excessive sound pressure from earphones and headphones
may cause hearing loss.
- 5 -
Page 6

TROUBLESHOOTING GUIDE
Problem Possible Solution
No sound coming from Headphones.
• Ensure the AC/DC adaptor is properly
plugged into the Base Unit and a working AC
outlet.
• Ensure the the Power Button at the back of
the Transmitter is switched ON.
• Ensure the Headphones are charged and
switched ON.
• Increase the Headphone volume.
• Ensure that the Base Unit is properly
connected to your TV.
• Ensure that you are in range. The wireless
range is about 100 ft. but may be less if
there are walls or doors between you and the
Base Unit.
• Ensure that the TV is on and that the volume
is turned up.
Sound is distorted, staticky or hissy.
Important: On some newer TV sets, it may be
necessary to turn on or increase the output
level of the headphone jack or the Audio
Out jacks. Normally, you can check this by
pressing the Menu button on your TV remote
control and entering the Settings or Set Up
menu. Consult your TV owner’s manual for
details.
• Ensure the volume level of headphone is set
to an appropriate level.
• The Headphones are too far from the
transmitter. Move them closer.
• The audio signal input level is too low.
Increase the volume of the audio source.
Important: On some newer TV sets, it may be
necessary to turn on or increase the output
- 6 -
Page 7

TROUBLESHOOTING GUIDE [CONT.]
Problem [Cont.] Possible Solution [Cont.]
Sound is distorted, staticky or hissy.
level of the headphone jack or the Audio
Out jacks. Normally, you can check this by
pressing the Menu button on your TV remote
control and entering the Settings or Set Up
menu. Consult your TV owner’s manual for
details.
• Ensure that the Base Unit is properly
connected to your TV.
• Ensure that you are in range. The wireless
range is about 100 ft. but may be less if
there are walls or doors between you and the
Base Unit.
• Ensure that the TV is on and that the volume
is turned up.
Important: On some newer TV sets, it may be
necessary to turn on or increase the output
level of the headphone jack or the Audio
Out jacks. Normally, you can check this by
pressing the Menu button on your TV remote
control and entering the Settings or Set Up
menu. Consult your TV owner’s manual for
details.
I can hear the TV through the Headphones
but now the TV itself is too loud.
I have tried everything suggested here,
but the Headphones still do not work.
Use your TV remote to turn down the volume
on your TV.
Connect TV Wireless Headphones to a
different TV in your house. The problem may
be with the internal settings of your TV.
Refer to your TV owner’s manual to adjust
the Audio Out and Headphone volume levels.
- 7 -
Page 8

CUSTOMER SERVICE
For other questions not covered in this guide,
please call Sharper Image Customer Service
at 1 (877) 210-3449. Customer Service agents
are available Monday through Friday, 9:00 a.m.
to 6:00 p.m. ET.
Sharper Image branded items purchased from
SharperImage.com include a 1-year limited
replacement warranty.
The Sharper Image® name and logo are registered trademarks. Manufactured and marketed by Camelot SI, LLC under license.
©Sharper Image All Rights Reserved.
- 8 -
Page 9

TV WIRELESS HEADPHONES QUICK START GUIDE
1. Plug the Base Unit into an AC outlet.
2. Connect the Base Unit to your TV.
• Using the included RCA-to-3.5mm cable, connect red and white RCA plugs to
the Base Unit.
• Plug the other end into the TV headphone jack.
• If your TV does NOT have a headphone jack, use the included Y-shaped adapter and
plug the cable into the red and white AUDIO OUT jacks on the back of your TV.
3. Insert batteries into the Headphones.
• Twist the right ear cup counter-clockwise to unlock the Battery Compartment.
• Insert the 2 included AAA batteries, following the polarity diagrams (“+” and “-”) inside
the Battery Compartment.
4. Place Headphones on top of the Base Unit to charge.
• The Charge LED light will glow GREEN. NOTE: The initial charge should take 5-7 hours.
• When the Headphones are fully charged, the LED Charging Light will go out.
5. Switch on the TV, the Base Unit and the Headphones (in that order).
• When the Base Unit detects an audio signal, the LED Power Light will glow BLUE.
• Adjust the Headphone volume with onboard controls.
6. Relax and enjoy your favorite TV programs — without disturbing your spouse or neighbors!
For more information, consult the complete Owner’s Guide in this package. If you require
additional assistance with your TV Wireless Headphones, please call:
Sharper Image Customer Service at 1 (877) 210-3449.
MADE IN CHINA
The Sharper Image® name and logo are registered trademarks. Manufactured and marketed
by Camelot SI, LLC under license. ©Sharper Image All Rights Reserved.
- 9 -
 Loading...