

Page 1
Wi-Fi Video Camera Sunglasses
Item No. 203785
Page 2
Thank you for purchasing the Sharper Image Wi-Fi Video Camera
Sunglasses. Please read this User’s Manual carefully, and save it
for future reference.
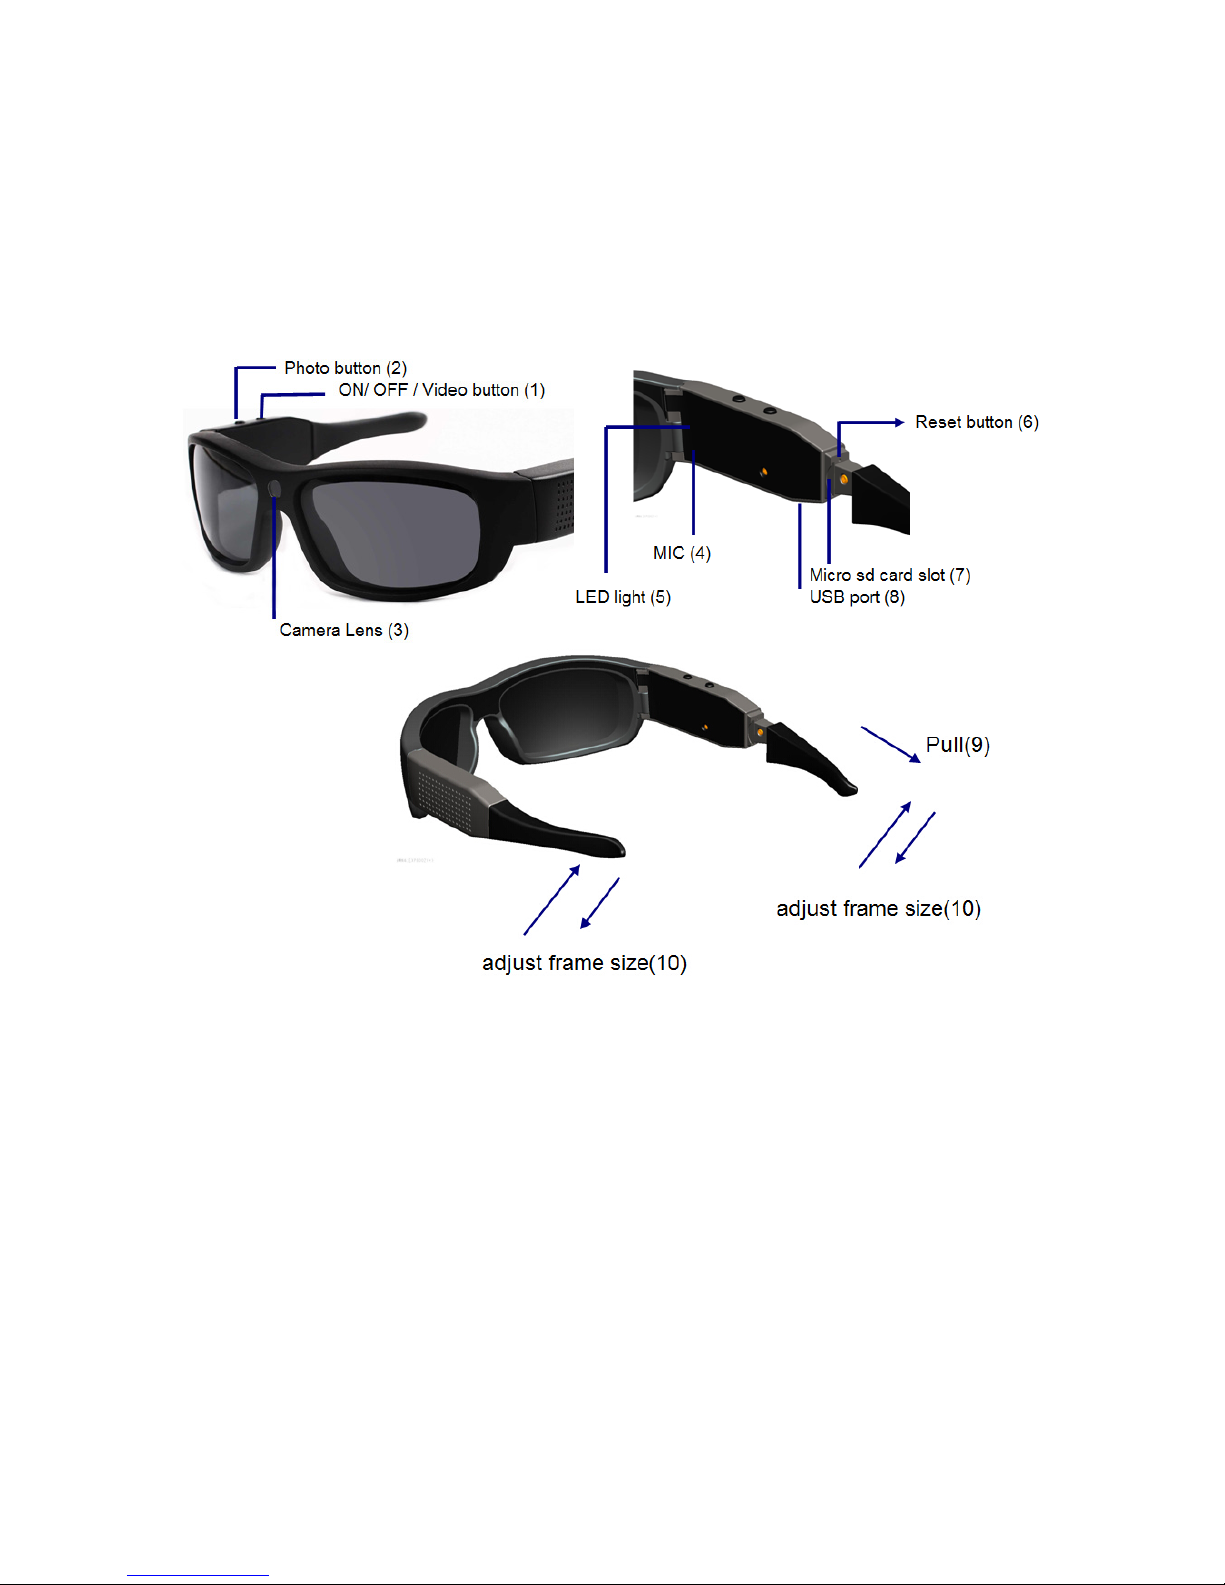
CONTROLS
1. ON / OFF / Video button
2. Photo button
3. Camera lens
4. MIC
5. LED light
6. Reset button
7. Micro SD card slot (pull back the silicone
part as shown above)
8. MINI 8-pin USB port
Page 3

9. Pull out the silicone part (9) to show the Micro SD
card slot (7) and reset button (6)
10. Push the silicone part to adjust frame size
SPECIFICATIONS
• 3 MP CMOS camera
• MOV format
• Full HD 1920 x 1080 pixel / 30 frames/sec.
• 1280 x 720 pixel / 60 frames/sec.
• 14 MP photo, JPEG
• Integrated Microphone
• Supports Micro SD cards up to 32GB
(card not included)
• Connection: USB 2.0
• Operating voltage: 3.6 V
• Rechargeable battery: 3.6 V 630 mAh
ACCESSORIES
Hard Case, Cleaning Cloth, USB Cable, User’s Manual
HOW TO OPERATE WI-FI VIDEO CAMERA SUNGLASSES
I. Preparation
1. First, insert a Micro SD card (up to 32GB) into the card
slot. Class 10 (or above) is recommended. Be sure to
turn off the glasses while inserting or removing a card.
2. The glasses have a built-in rechargeable lithium battery.
Use the USB cable for battery charging while the glasses
are turned off. The red, green and yellow indicator light
will alternately blink during charging.
Page 4

3. When the charging is finished, the LED indicator on the
glasses will turn solid green.
Notes:
• The device will not charge while it is in use.
• It is recommended to charge the battery one additional
hour after the LED light indicates it is fully charged.
• Glasses reach full charge after 3 hours and will run for 1
hour on a full charge.
II. Power ON /OFF
1. Power on: Press the ON / OFF / VIDEO button (1) for 3-5
seconds. The 7 color LED indicator will be flashing when
the camera system is starting, and then the indicator
light will be solid red, indicating the device is in standby
mode. Note: Wi-Fi mode will start when the glasses are
turned on.
2. Power Off: Press the ON / OFF / VIDEO button (1) for 3-5
seconds until the LED light turns off.
III. Shooting Videos and Photos (Non Wi-Fi Mode)
1. To Begin Recording: Turn on the glasses and the device
will be in standby mode. Press the ON/OFF/VIDEO
button once to begin video recording. The red indicator
light will flash while the device is recording.
Note: if the recording is not stopped, the file will
automatically save to the Micro SD card approximately
every 20 minutes.
2. To Stop Recording: To stop recording, press the ON
/ OFF / VIDEO button (1) once. The red indicator light
will stop blinking and go into standby mode. To resume
recording, press the ON / OFF / VIDEO button (1) once.
Page 5

Notes:
• Make sure there is adequate light in the surrounding area
and that the camera is not blocked.
• Keep the camera upright and stable.
• To ensure quality audio, do not block the microphone
hole.
• Videos may not properly record if the battery is low.
• When the camera resolution is changed to 720p or VGA,
the LED light will be green in standby mode; flashing
green when the camera is recording.
3. Take Pictures: While the glasses are in standby mode,
press the Photo button (2) to enter into photo standby
mode. The indicator light will be blue in photo standby
mode. Press the Photo button (2) once to take a photo.
The blue light will blink once, indicating a photo has been
taken.
Notes:
• Finish recording before taking photos.
• To enter recording standby mode after taking photos,
press the ON / OFF / VIDEO button (1)
IV. Viewing videos and pictures on your Computer
1. Turn the glasses on and connect the device to your
computer, using the supplied USB cable. The Micro SD
card will pop-up as an external drive. The photos and
videos can then be downloaded to watch or modify the
files.
2. Computer Camera: Without the external Micro SD card in
the glasses, plug the glasses into your computer with the
USB cable. The glasses will now function as a camera for
your computer, which can be used as a webcam.
Page 6

V. App Software Operation (Supports iOS & Android systems)
How to install the App on Android and iOS
1. Android system: Search the “WIFI Smart Glasses” in
Google Play and install the app onto your phone
or tablet.
Note: The “WiFi Smart Glasses” App icon will show
on the screen after it is installed successfully.
2. iOS system: Search for “WiFi Camera App” in the App
Store then install the app onto your phone or tablet.
Note: WiFi Camera App requires iOS 6.0 (or above). The
WiFi Camera Viewer icon will show on the screen after
it is installed successfully.
App in iOS
1. Place the Micro SD card into the device, and turn it on.
2. Search nearby Wi-Fi networks for “WiFi Smart Glasses”
and connect to the device (See the picture below).
3. When prompted to enter a password, enter
“1234567890”.
4. Open the app by clicking the icon on your
phone or tablet
Page 7

5. Below are the menu options in the app
Click the Local Album icon to view and edit video
saved in your iOS device.
Open: View video through your iOS device.
Share: Share a video via e-mail.
Delete: Remove current video from iOS device.
Cancel: Cancel and go back to previous page.
6. Press “Camera Control” to show the menu pictured below.
7. Press “Camera Settings” to set the camera’s video and
image resolution, as well as other details.
Note: Motion Detection function is not available for this
device.
A. Camera control
(Set the camera
specifications, such as
video size, photo size
etc.)
B. Camera Preview
(Operate and view video
recording through the
app)
C. Camera File Browser
(View files from the
glasses.)
D. Local Album (View
videos and photos saved
on your phone or tablet
through the app.)
A.
B.
C.
D.
Page 8

8. Click “Camera Preview” to see the menu pictured below.
9. In video mode you can begin recording through the app
by clicking “Camera Record” and stop recording by
clicking “Stop Recording”
10. To take snapshots, switch to “Image” mode and press
“Glasses Snapshot” to take photos.
Page 9

11. Click “Camera File Browser” to view the video and
snapshot image files stored in the Glasses micro SD card.
App in Android
1. Place the Micro SD card into the device, and turn it on.
2. Search nearby Wi-Fi networks for “WiFi Smart Glasses”
and connect to the device (See the picture below).
3. When prompted to enter a password, enter
“1234567890”.
A. Glasses Control (Set
the camera specifications,
such as video size, photo
size etc.)
B. Glasses Preview
(Operate and view video
recording through the app)
C. Glasses File Browser
(View files from the glasses.)
D. Local Album (View
videos and photos saved on
your phone or tablet through
the app)
A.
B.
C.
D.
Page 10

4. Click “Glasses Control” to show the menu pictured below.
5. Click “Glasses Settings” to set the camera’s video and
image resolution, as well as other details.
Note: Motion Detection function is not effective for this
device.
Page 11

6. Click “Glasses Preview” to see the menu pictured below.
7. In video mode you can begin recording through the app
by clicking “Glasses Record” and stop recording by
clicking “Glasses Stop Recording”.
8. Click “Glasses Snapshot” to take a snapshot image.
9. Click “Glasses File Browser” to view the video and
snapshot image files stored in the Glasses Micro SD
card.
10. Click Local Album to view the videos and snapshot
images saved into the Android device.
Notes:
1. If you want to record video or take photos, make sure
there is a Micro SD card in the glasses. If there’s no card
in the glasses, the phone app can monitor the camera,
but no video or photos can be captured.
2. The Android and iOS apps vary a little bit.
3. The Wi-Fi range is 10 to 30 meters, depending on
interference, walls, etc.
Page 12

TROUBLESHOOTING
The device cannot be switched on.
• Has the battery been fully charged?
• Make sure that the power charger is correctly
connected.
The device “freezes.”
• Press the Reset button
The white indicator is blinking.
• The SD Card is full. Change the SD Card or empty it
by copying the files to your computer.
The purple LED is blinking
• Recharge your battery.
CUSTOMER SERVICE
If you require any assistance with your Sharper Image Wi-Fi
Video Camera Sunglasses, please call 1 (877) 714-7444 and
select Option 3.
 Loading...