

Page 1
LED HOME ELECTROLYSIS KIT
Item No. 201622
Quick Start Guide
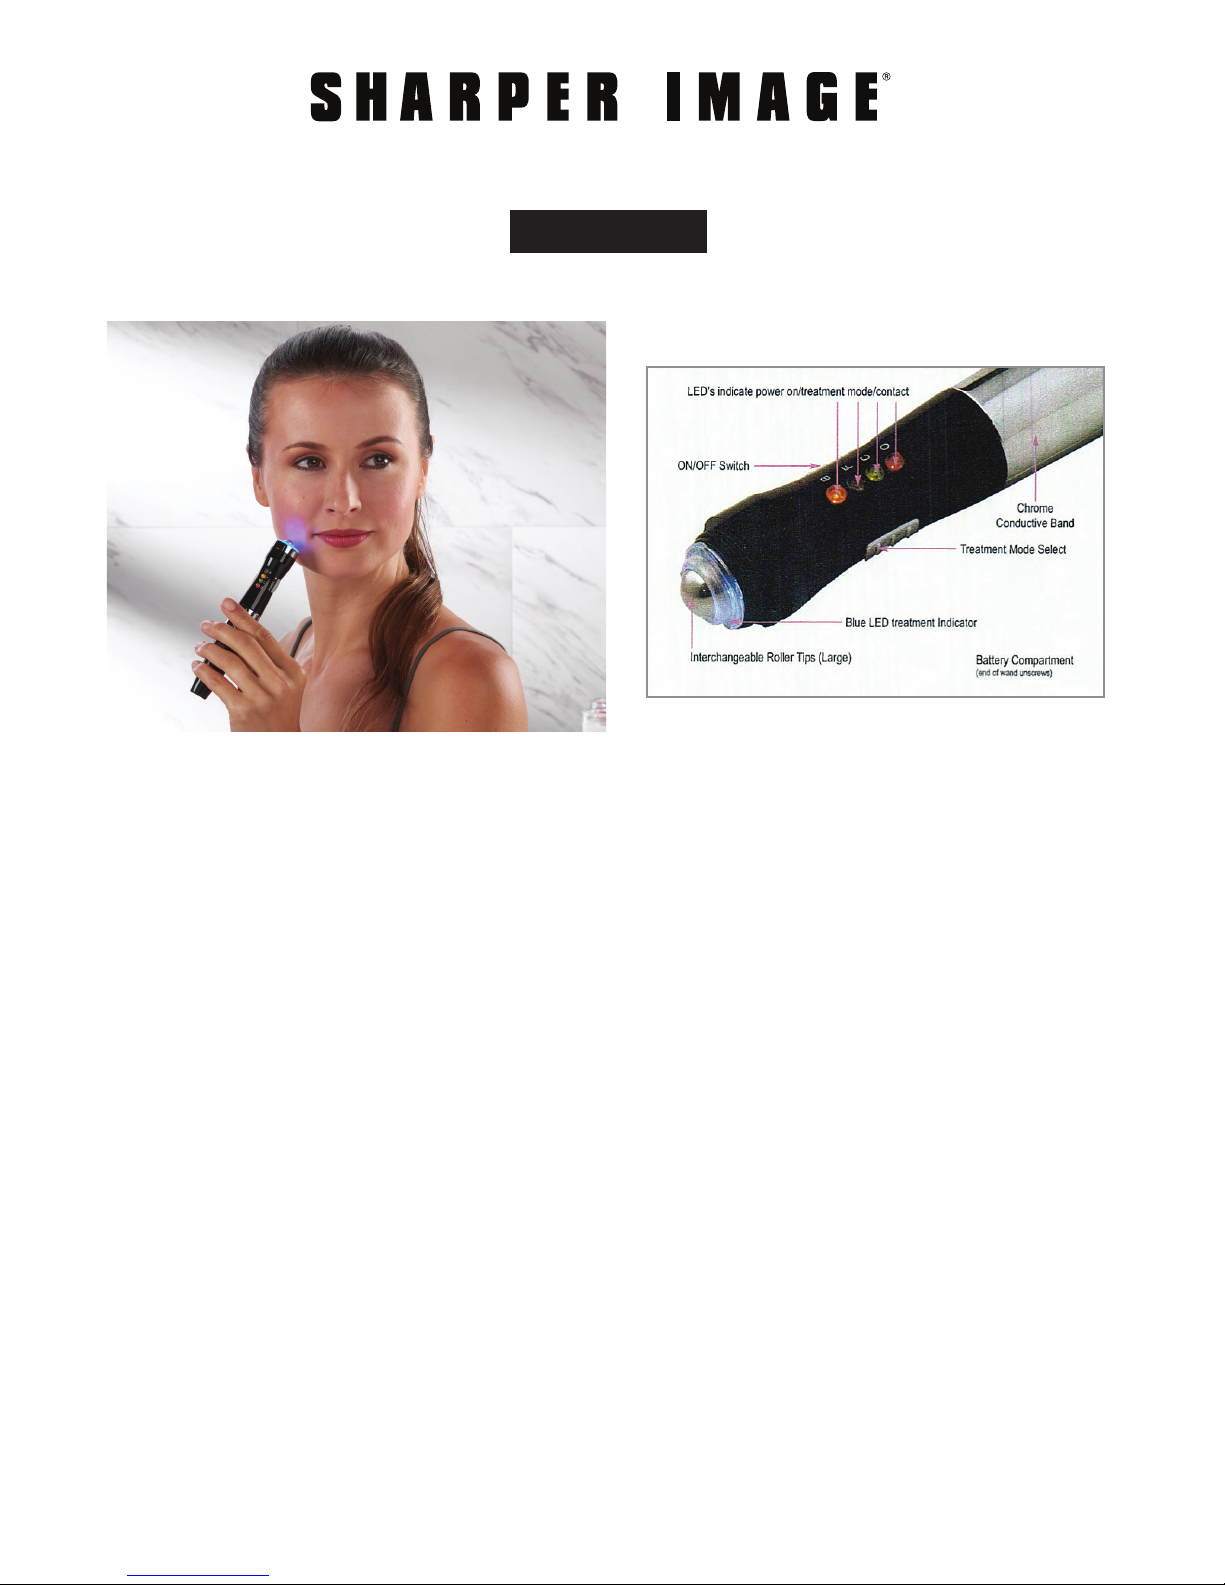
IDENTIFICATION OF PARTS
Thank you for choosing the LED Home
Electrolysis Kit from Sharper Image.
Please read this Quick Start Guide to get a
general idea of how this product works. For
additional instructions and important safety
information, be sure to read the entire user’s
manual in the package.
FEATURES
• Painless hair removal at home
• Safe for all skin tones and all hair types
• Cordless and portable
• Includes small roller tip for facial hair
and eyebrows
• Includes large roller tip for upper lip,
bikini line and other body hair
• Includes 3 self-adhesive gel pads (small,
large and upper lip) for treating larger
areas
• Includes treatment tweezers for
removing single hairs
• Includes conductive gel, cleanser and
carry case
• Operates on 2 included AAA batteries
BATTERY INSTALLATION
• Install the 2 AAA batteries (included)
by twisting the battery cap counter-
clockwise.
• Insert the batteries according to
the correct polarity (“+” or “-”).
• Replace the cap.
REMOVING FACIAL HAIR WITH
INTERCHANGEABLE ROLLER TIPS
Select one of the two included roller tips.
The SMALL roller tip is for facial hair and
unwanted eyebrow hair. The LARGE roller
tip is for the upper lip. To change tips,
hold the clear plastic ring and gently pull
toward you. Then insert the other tip into
the socket and press gently into place.
(The device comes with the large roller tip
already installed.)
1. Remove makeup and clean the area
thoroughly with the included pre epilation cleanser. Treatment is most
effective after a bath or shower.
-1-
Page 2

REMOVING FACIAL HAIR WITH
INTERCHANGEABLE ROLLER TIPS
[
CONT.
]
8. Apply your normal moisturizer after
treatment, as electrolysis can dry
your skin.
2. Apply a small amount of the included
conducive gel to area you will treat. This
area should be no more than 0.3-0.5
sq. in. (2-3 sq. cm).
3. Slide the Power switch to ON.
4. Slide the Treatment Mode switch
until “F” (for Face Mode) is illuminated
with a YELLOW LED.
5. Holding the
device in your
hand like a pen,
place the roller tip
on the area to be
treated. Make sure
your finger and
thumb or palm are
touching the
chrome conductive band on the device.
Gently roll the roller tip back and forth over
the area, making sure the roller tip does
not lose contact with the skin. One beep
will sound, indicating that proper contact
has been made. The GREEN contact
LEDs will light up, and the BLUE LEDs
around the roller tip will light up during
treatment. (The GREEN and BLUE LEDs will
flash while the device is in rest mode.)
The treatment cycle is as follows:
20 seconds on >> 10 seconds rest >>
20 seconds on >> 10 seconds rest >>
20 seconds on >> 10 seconds rest >>
3 beeps >> TURNS OFF AUTOMATICALLY
9. Remove the batteries and clean the roller
ball with a tissue or cotton ball. Wipe the
wand with a tissue or soft cloth. DO NOT
IMMERSE THE DEVICE OR THE ROLLER
TIPS IN WATER.
NOTE: For FACE MODE, the recommended
DAILY treatment is two 90-second cycles
per area, per day. Do not exceed this
daily amount. The recommended WEEKLY
treatment is two 90-second cycles per area,
per day, for up to 5 DAYS in a given week.
Do not exceed the weekly maximum of 10
cycles per week.
This versatile device also removes body
hair with the self-adhesive gel pads and
single hairs with the included treatment
tweezers. Consult your manual for additional
instructions and important safety warnings.
Remember, hair removal is a cumulative
process. The longer you use this product,
the more effective it will be. Hair grows in a
cycle of 8-12 weeks. With regular use, you
should see results in about 60 days.
CUSTOMER SERVICE
If you require any assistance with your
LED Home Electrolysis Kit, please call
1 (877) 210-3449.
NOTE: If you feel a slight tingling sensation,
or the GREEN LED does not light up, cleanse
the treatment area or add more conductive
gel.
6. Gently tweeze hairs in the direction of
growth.
7. After treating one area, move to another
area, following the steps above.
-2-
 Loading...