


PERATION MANUAL EDIENUNGSANLEITUNG ODE D'EMPLOI RUKSANVISNING ANUALE DI ISTRUZIONI ANUAL DE MANEJO EBRUIKSAANWIJZING ANUAL DE OPERAÇÃO

New HS (High-speed) mechanism


- Before using this Camcorder, read page 2.
- Vor der Verwendung des Camcorders die Seite 2 lesen.
- Avant d'employer cet appareil, veuillez lire la page 2 de ce mode d'emploi.
- •Läs sidan 2 innan denna kamerabandspelare används.
- Prima di usare questo camcorder, leggete pag. 2.
- •Lea la página 2 antes de utilizar esta videograbadora.
- Alvorens deze gebruiksaanwijzing door te lozen, zie eerst bladzijde 2.
- •Antes de usar esta Videocâmera, leia a página 2.

This apparatus complies with the requirements of EN 55014, 02.1987.
Dieses Gerät stimmt mit den Bedingungen der EN 55014, 02.1987 überein.
Cet appareil répond aux spécifications de la EN 55014, 02.1987.
Dit apparaat voldoet aan de vereiste EN 55014, 02.1987.
Apparatet opfylder kravene i EN 55014, 02.1987.
Questo apparecchio è stato prodotto in conformità alle EN 55014, 02.1987.
Este aparato cumple las especificaciones de la EN 55014, 02.1987.
Este aparelho responde às especificações da EN 55014, 02.1987.
Αύτή η συσκευή τηρεί τις προδιαγραφές της ΕΝ 55014, 02.1987.
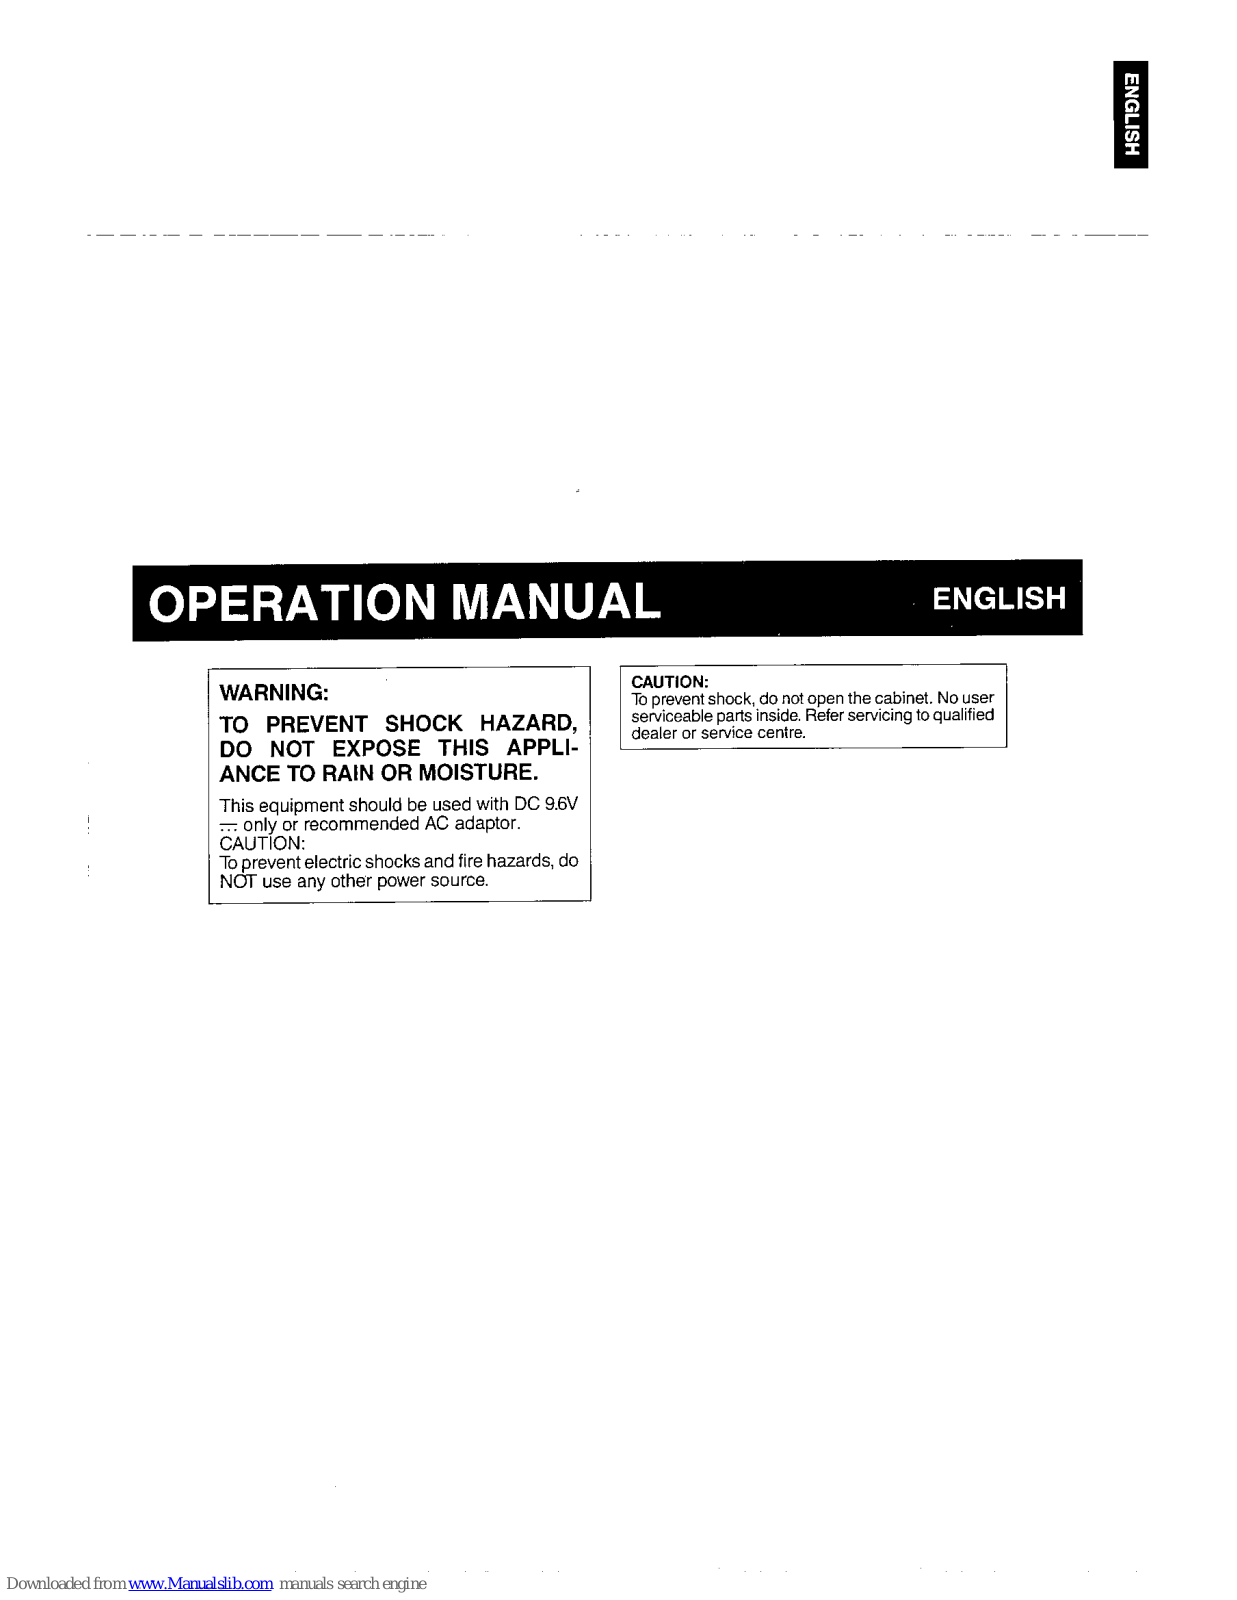
OPERATION MANUAL
WARNING:
TO PREVENT SHOCK HAZARD. DO NOT EXPOSE THIS APPLI-ANCE TO BAIN OR MOISTURE.
This equipment should be used with DC 9.6V This equipment should be used with DC 3.50 The second of the second be used with DC 3.50 The second be used with DC 3.50 The second be used with DC 3.50 The second be used with DC 3.50 The second be used with DC 3.50 The second be used with DC 3.50 The second be used with DC 3.50 The second be used with DC 3.50 The second be used with DC 3.50 The second be used with DC 3.50 The second be used with DC 3.50 The second be used with DC 3.50 The second be used with DC 3.50 The second be used with DC 3.50 The second be used with DC 3.50 The second be used with DC 3.50 The second be used with DC 3.50 The second be used with DC 3.50 The second be used with DC 3.50 The second be used with DC 3.50 The second be used with DC 3.50 The second be used with DC 3.50 The second be used with DC 3.50 The second be used with DC 3.50 The second be used with DC 3.50 The second be used with DC 3.50 The second be used with DC 3.50 The second be used with DC 3.50 The second be used with DC 3.50 The second be used with DC 3.50 The second be used with DC 3.50 The second be used with DC 3.50 The second be used with DC 3.50 The second be used with DC 3.50 The second be used with DC 3.50 The second be used with DC 3.50 The second be used with DC 3.50 The second be used with DC 3.50 The second be used with DC 3.50 The second be used with DC 3.50 The second be used with DC 3.50 The second be used with DC 3.50 The second be used with DC 3.50 The second be used with DC 3.50 The second be used with DC 3.50 The second be used with DC 3.50 The second be used with DC 3.50 The second be used with DC 3.50 The second be used with DC 3.50 The second be used with DC 3.50 The second be used with DC 3.50 The second be used with DC 3.50 The second be used with DC 3.50 The second be used with DC 3.50 The second be used with DC 3.50
NOT use any other power source.
CAUTION:
CAUTION: To prevent shock, do not open the cabinet. No user serviceable parts inside. Refer servicing to qualified dealer or service centre.
ENGLISH
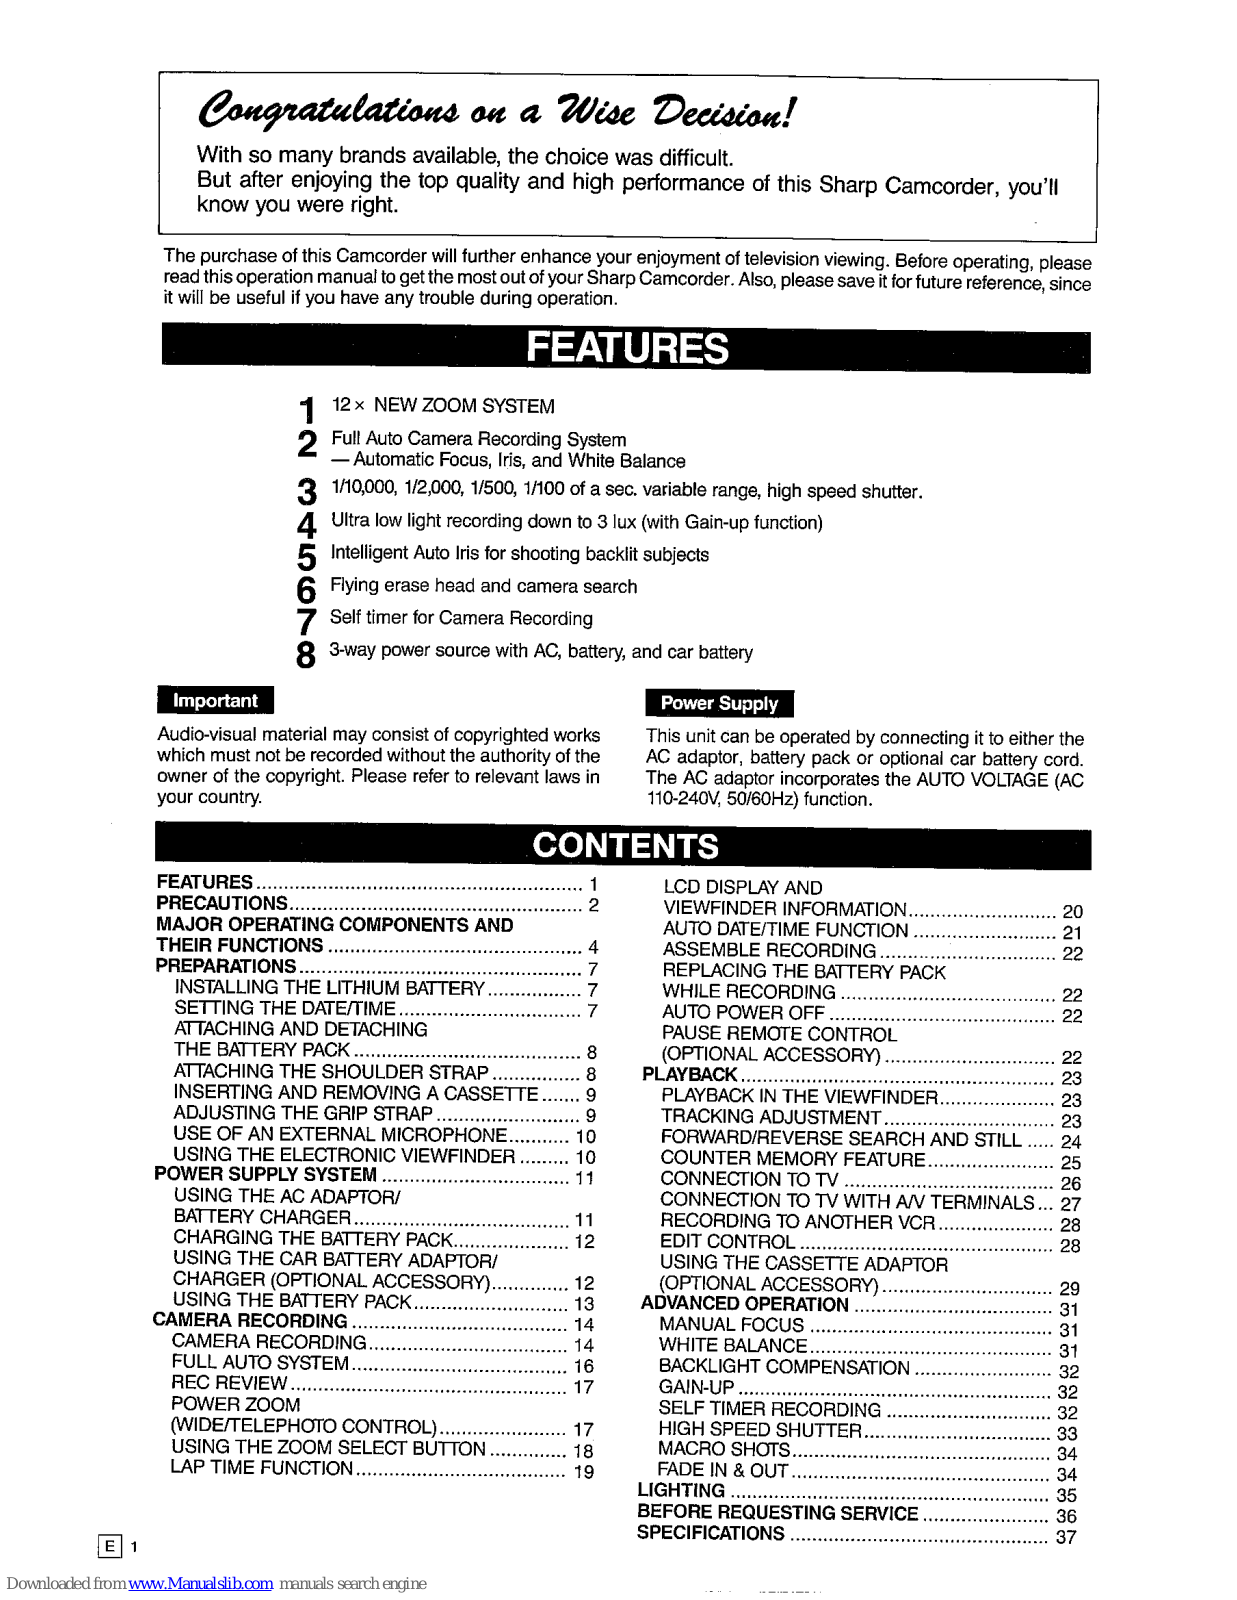
Congratulations on a Wise Decision!
With so many brands available, the choice was difficult. But after enjoying the top quality and high performance of this Sharp Camcorder, you'll know you were right.
The purchase of this Camcorder will further enhance your enjoyment of television viewing. Before operating, please read this operation manual to get the most out of your Sharp Camcorder. Also, please save it for future reference, since it will be useful if you have any trouble during operation.
FEATURES
- 12 × NEW ZOOM SYSTEM
- Full Auto Camera Becording System
- Automatic Focus, Iris, and White Balance
- 2 1/10,000, 1/2,000, 1/500, 1/100 of a sec. variable range, high speed shutter.
- Ultra low light recording down to 3 lux (with Gain-up function)
- 5 Intelligent Auto Iris for shooting backlit subjects
-
Flying erase head and camera search
- Self timer for Camera Recording
- 2 3-way power source with AC, battery, and car battery
Important
Audio-visual material may consist of copyrighted works which must not be recorded without the authority of the owner of the copyright. Please refer to relevant laws in your country.
Power Supply
This unit can be operated by connecting it to either the AC adaptor, battery pack or optional car battery cord. The AC adaptor incorporates the AUTO VOLTAGE (AC 110-240V, 50/60Hz) function.
CONTENTS
| FEATURES |
|---|
| PREPARALIUNS |
| INSTALLING THE LITHUM BAITERY |
| SETTING THE DATE/TIME |
| ALIACHING AND DE IACHING |
| THE BALLERY PACK 8 |
| ATTACHING THE SHOULDER STRAP 8 |
| INSERTING AND REMOVING A CASSETTE 9 |
| ADJUSTING THE GRIP STRAP 9 |
| USE OF AN EXTERNAL MICROPHONE |
| USING THE ELECTRONIC VIEWFINDER 10 |
| POWER SUPPLY SYSTEM 11 |
| USING THE AC ADAPTOR/ |
| BATTERY CHARGER 11 |
| CHARGING THE BATTERY PACK 12 |
| USING THE CAR BATTERY ADAPTOR/ |
| CHARGER (OPTIONAL ACCESSORY) 12 |
| USING THE BATTERY PACK 13 |
| CAMERA RECORDING |
| CAMERA RECORDING 14 |
| FULL AUTO SYSTEM |
| REC REVIEW |
| POWER ZOOM |
| (WIDE/TELEPHOTO CONTROL) 17 |
| USING THE ZOOM SELECT BUTTON 19 |
| AP TIME FUNCTION |
| = |
| LCD DISPLAY AND | |
|---|---|
| VIEWFINDER INFORMATION | 20 |
| AUTO DATE/TIME FUNCTION | 21 |
| ASSEMBLE RECORDING | 22 |
| REPLACING THE BATTERY PACK | |
| WHILE RECORDING | 22 |
| AUTO POWER OFF | 22 |
| PAUSE REMOTE CONTROL | |
| (OPTIONAL ACCESSORY) | 22 |
| PLAYBACK | 23 |
| PLAYBACK IN THE VIEWFINDER | 23 |
| TRACKING ADJUSTMENT | 23 |
| FORWARD/REVERSE SEARCH AND STILL | 24 |
| COUNTER MEMORY FEATURE | 25 |
| CONNECTION TO TV | 26 |
| CONNECTION TO TV WITH A/V TERMINALS | 27 |
| RECORDING TO ANOTHER VCR | 28 |
| EDIT CONTROL | 28 |
| USING THE CASSETTE ADAPTOR | 20 |
| (OPTIONAL ACCESSORY) | 29 |
| ADVANCED OPERATION | 31 |
| MANUAL FOCUS | 31 |
| WHITE BALANCE | 31 |
| BACKLIGHT COMPENSATION | 32 |
| GAIN-UP | 32 |
| SELF TIMER RECORDING | 32 |
| HIGH SPEED SHUTTER | 33 |
| MACRO SHOTS | 34 |
| FADE IN & OUT | 34 |
| 35 | |
| BEFORE REQUESTING SERVICE | 36 |
| SPECIFICATIONS | 37 |
| - |
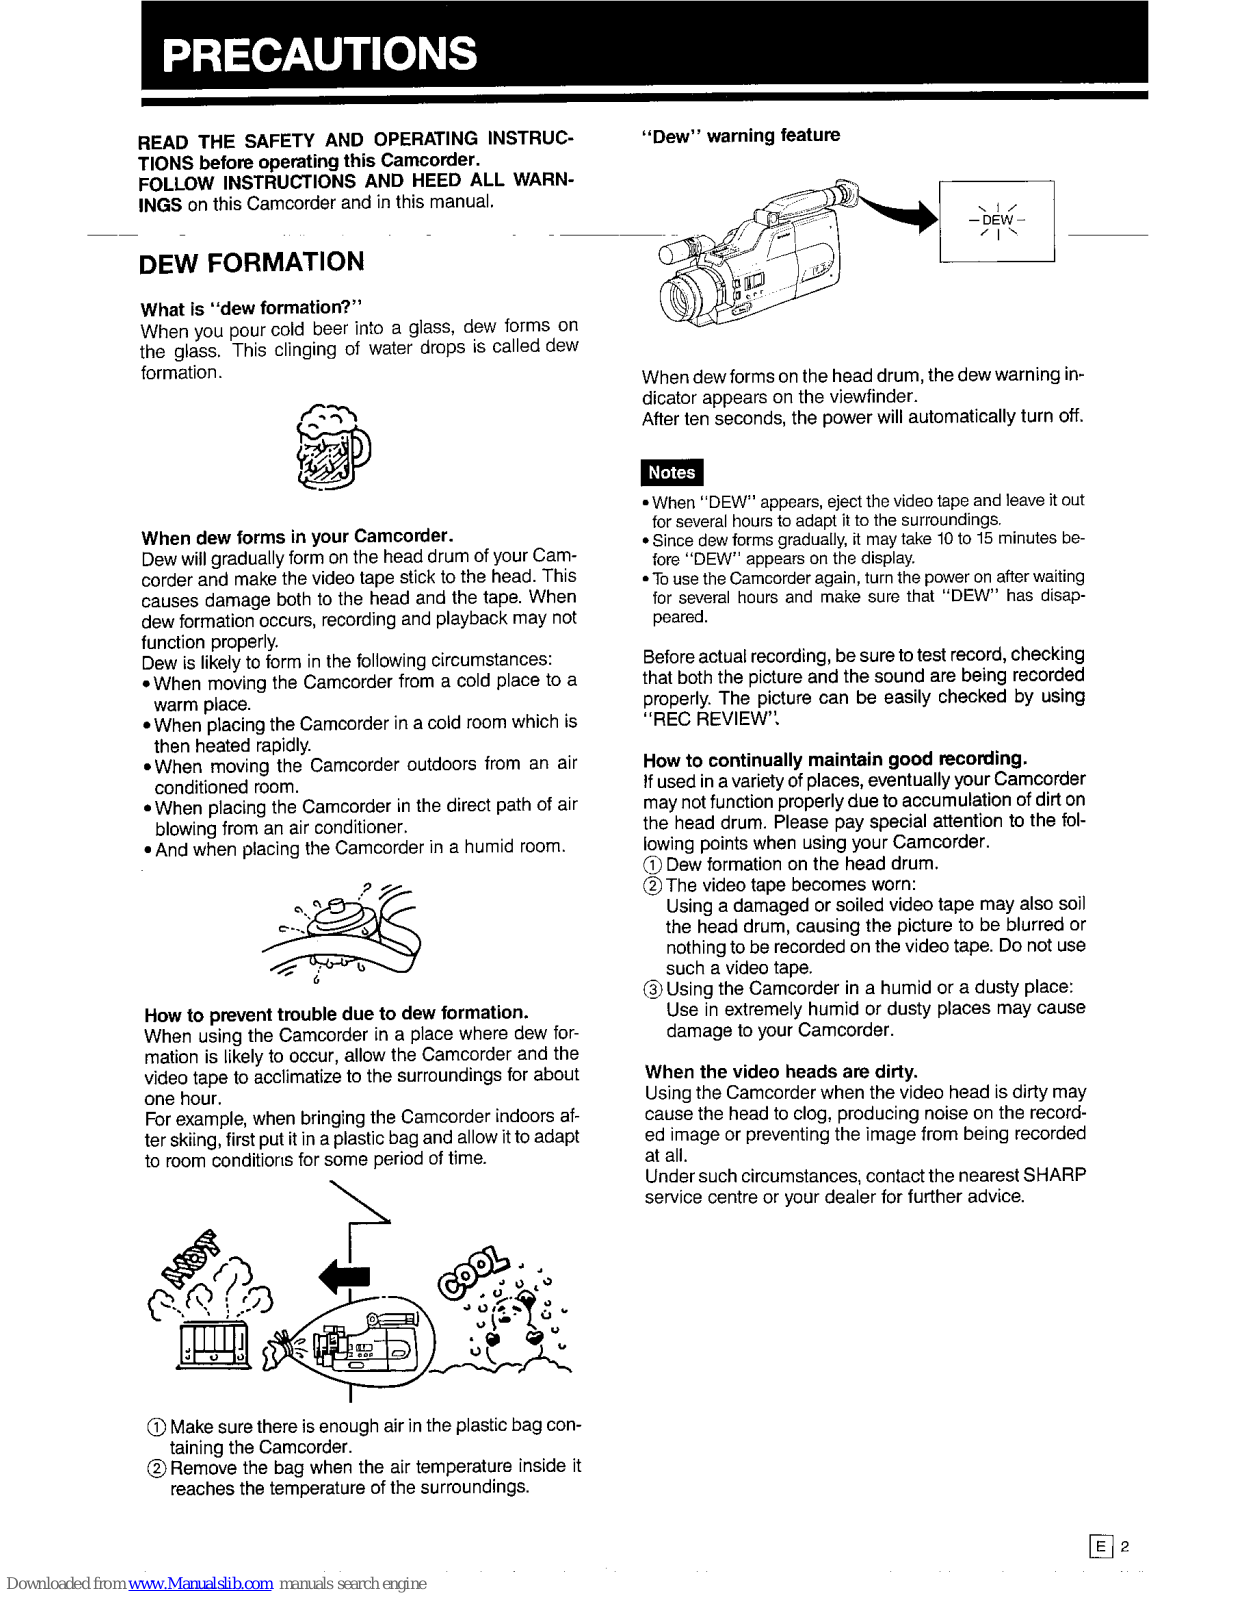
PRECAUTIONS
READ THE SAFETY AND OPERATING INCODE TIONS before operating this Camcorder FOLLOW INSTRUCTIONS AND HEED ALL WARN-INGS on this Camcorder and in this manual.
DEW FORMATION
What is "dew formation?"
When you pour cold beer into a class, dew forms on the glass. This clinging of water drops is called dew formation

When dew forms in your Camcorder.
Dew will gradually form on the head drum of your Camcorder and make the video tane stick to the head This causes damage both to the head and the tape. When dew formation occurs recording and playback may not function properly.
- Dew is likely to form in the following circumstances:
- When moving the Camcorder from a cold place to a warm place
- When placing the Camcorder in a cold room which is then heated rapidly
- •When moving the Camcorder outdoors from an air conditioned room.
- When placing the Camcorder in the direct path of air blowing from an air conditioner.
- And when placing the Camcorder in a humid room.

How to prevent trouble due to dew formation.
When using the Camcorder in a place where dew formation is likely to occur, allow the Camcorder and the video tape to acclimatize to the surroundings for about one hour.
For example, when bringing the Camcorder indoors after skiing, first put it in a plastic bag and allow it to adapt to room conditions for some period of time.

- (1) Make sure there is enough air in the plastic bag containing the Camcorder.
- (2) Remove the bag when the air temperature inside it reaches the temperature of the surroundings.
"Dow" warning feature

When dew forms on the head drum, the dew warning indicator appears on the viewfinder.
After ten seconds, the nower will automatically turn off.
Notes
- When "DEW" appears, eject the video tape and leave it out for several hours to adapt it to the surroundings
- Since dew forms gradually, it may take 10 to 15 minutes before "DEW" appears on the display.
- To use the Camcorder again, turn the power on after waiting for several hours and make sure that "DEW" has disapneared
Before actual recording, be sure to test record, checking that both the picture and the sound are being recorded properly. The picture can be easily checked by using BEC BEVIEW'
How to continually maintain good recording
If used in a variety of places, eventually your Camcorder may not function properly due to accumulation of dirt on the head drum. Please pay special attention to the following points when using your Camcorder.
- (1) Dew formation on the head drum. (2) The video tape becomes worn:
Using a damaged or soiled video tape may also soil the head drum, causing the picture to be blurred or nothing to be recorded on the video tape. Do not use such a video tape.
(3) Using the Camcorder in a humid or a dusty place: Use in extremely humid or dusty places may cause damage to your Camcorder.
When the video heads are dirty.
Using the Camcorder when the video head is dirty may cause the head to clog, producing noise on the recorded image or preventing the image from being recorded at all
Under such circumstances, contact the nearest SHARP service centre or your dealer for further advice.
For safety, strictly observe the following
- Take care to avoid flammables or other liquids and metal objects from entering the unit. Should this happen, switch the power off and have the Camcorder checked by qualified personnel
- •Do not disassemble or attempt to modify the unit.
- Do not operate the Camcorder during lightning storms. Unplug power cables of any connected equipment.
Avoid using the Camcorder under the following conditions
- Places of extreme humidity or excessive dust.
- Near electrical appliances generating strong magnetic fields (fluorescent lights, televisions, speakers).
- •Steamy or sooty places such as near a cooking stove.
- •Excessive mechanical shock or vibration.
- •Extremely hot locations such as near heating.
- •Wet locations, such as near swimming pools, bathtubs and the like.
Do not expose the Camcorder to extremely high or low temperatures for long periods
- Never leave this Camcorder in direct sunlight, in a closed car during summer or near a heater this will most likely deform the exterior and damage the internal parts of the Camcorder.
- Do not store the Camcorder in places over 60°C.
- Do not use the Camcorder in places over 40°C.
- Do not use the Camcorder in places below 0°C.
- Do not use the Carncorder in humid places over 80% RH.
Store the Camcorder in a location that stays between – 20°C and 60°C.
Take extra care when recording outdoors
- •Do not drop or allow it to strike any hard or rough surface. Protect from damage during transportation.
- Prevent the Camcorder from getting wet.
- At the beach, keep away from salt water or spray and prevent sand from entering the Camcorder.
- •Avoid aiming the lens at extremely bright objects like the sun or other strong lights.
- Do not direct the viewfinder evepiece at the sun.
- Stop using the Camcorder during lightning storms.
BEFORE DISCONNECTING A POWER SOURCE, ALWAYS SLIDE THE OPERATE SWITCH TO OFF --------------------------------
Handling the Camcorder
- Protect the microphone from damage.
- Keep the Camcorder horizontal during use, otherwise the tape may become slack and be damaged.
- Do not carry the Camcorder by the viewfinder. Loop the strap over your arm — should the Camcorder accidentally slip out of your hand, you will avoid damaging it.
- •Cap the lens after use. Remember to switch the power off.
- •Do not touch the focus ring while using Autofocus.
- •Before attaching any filter to the lens, switch to manual focus or switch the power off and remove the lens hood.
Cleaning the Camcorder
- Detach the battery pack or disconnect the power before cleaning the Camcorder.
- •Remove dust with a soft cloth. Use a soft cloth moistened with mild detergent to remove persistent dirt.
- Do not use strong cleaning agents such as PETROL, thinner or alcohol — they may damage the exterior.
- Keep the lens and viewfinder clean. Clean the lens by first blowing it free of dust, then gently wipe it with a soft brush or lens cleaning paper moistened with lens cleaning fluid.
MAJOR OPERATING COMPONENTS AND THEIR FUNCTIONS
FRONT VIEW

For details on the use of each control, refer to the page indicated in the brackets.
1 Microphone
3 Electronic Viewfinder/Monitor
Displays the photographic subject. Also functions as a convenient black-and-white monitor for playback of recorded material.
4 Diopter adjustment
Use this control to adjust the viewfinder focus to your evesight.
5 Zoom lever
Use this lever to manually zoom in and out on your subject.
6 Macro button
Use this control for shooting subjects positioned less than 1m from the Camcorder. (Autofocus does not function at this distance.) Press the MACRO button continuously while moving the Zoom lever to the "MACRO" position for focusing.
7 ZOOM SELECT button [18]
Use this button to instantly magnify (or reduce) the framed area in the viewfinder by 1.5 times.
8 AUTO/MANUAL FOCUS Select button
Set to "AUTO", the Camcorder will automatically focus on the subject even if it is moving. (Remember to use the macro focus feature to focus on subjects less than 1,1m away.) If, however, Autofocus does not function because of the prevailing shooting conditions, set this switch to "MANUAL" and focus manually.
9 WHITE BALANCE button [31]
Use this button to lock the white balance.
10 SHUTTER SPEED Select button [33] For a clear image replay of high speed motion in still mode (or slow mode with a regular VHS VCR).
- 11 FADE IN/OUT button [34]
- 12 FULL AUTO switch [16]
2 BLC (Back Light Compensation)/GAIN-UP button If the subject is darker than the background, the recorded subject may appear too dark and undefined. If this is the case, push this button for "BLC". When "LIGHT" is displayed in the viewfinder, the gain-up mode is engaged and the screen becomes brighter when this button is pressed.
REAR VIEW

- 13 Sub REC START/STOP button Press to start recording. Recording will be paused if pressed during the recording mode. Use when recording from a low angle.
- 14 TRACKING < control button [23]</td> DATE/TIME SET button [7]
- 15 TRACKING ► control button [23] DATE/TIME SELECT button [7]
- 16 DATE/TIME INITIAL button [7]
- 17 Power Zoom Wide/Telephoto control button Maximum telephoto with T (Tele) depressed (this is also called "zoom-in" or "zoom-up"). Maximum wide angle with W (Wide) depressed (this is also called "zoom-out" or "zoom-down"). You can vary the speed of the zoom from 6 seconds to 20 seconds by the degree of finger pressure on the Zoom buttons.
- 18 Battery Pack Compartment
- 19 External microphone jack
- 20 Eyelet tabs
Pull the shoulder strap through these eyelet tabs and adjust the length of the strap with the buckle.
- 21 DC input jack
- 22 Earphone jack
For plugging in an accessory earphone to monitor the sound during recording and playback.
23 COUNTER/COUNTER MEMORY/LAP TIME button
Used to select among Counter, Counter Memory, and Lap Time modes being indicated in the view-finder.
24 COUNTER/LAP TIME RESET button
Used to reset the Counter and Lap Time being indicated in the viewfinder.
- 25 REC START/STOP button Press to start recording. Recording will be paused if pressed during the recording mode.
- 26 Grip Strap
- 27 Battery release lever
Used to detach the battery pack.
28 SELF TIMER button/Talent Tally indicator The Talent Tally indicator will light up when the Camcorder begins recording, enabling the subject to determine whether the unit is recording or not. The SELF-TIMER button and Talent Tally indicator share the same function. When the button is pressed in the REC Pause mode, the indicator will blink for 10 seconds before the Self-timer starts recording.


29 EJECT button
Used to insert or remove the VIISE cassette.
30 CAMERA REC/VCR PLAY switch
When the Camcorder is recording, set this switch to the CAMERA REC position. (The Camcorder willthen automatically go into REC PAUSE mode.) When using the Camcorder as a VCR, set this switch to VCR PLAY.
(In this case, if in the REC PAUSE mode, the Camcorder will switch to Still mode; if recording, it will switch to Stop mode.)
- 31 CAMERA SEARCH dutton [17] REW/Reverse Search button [24] REC REVIEW button [17]
- 32 STOP button
-
33 DATE-TIME DISPLAY button Used to display either the date/time or date in a pic
- ture being recorded.
- 34 EDIT switch
Picture quality inevitably deteriorates each time you dub from the Camcorder to a VCR. Slide the EDIT switch on to minimize deterioration of picture quality. Use this while you edit your videos.
- 35 AV output terminal
- 36 OPERATE indicator
- 37 OPERATE on/off switch Turns power on and off.
- 38 CAMERA SEARCH ►► button [17] FF/Forward Search button [24]
- 39 PLAY button Press for playback. CAMERA SEARCH > button [17]
- 40 PAUSE/STILL button Use to view a still picture during playback.
- [41] REC SPEED LP/SP Select button Used to set recording to the LP (Long Play) or SP (Standard Play) mode. Recording time in the respective modes is as follows (VHS-C tape EC-30): LP mode....................................
- 42 Pause Remote Control jack For plugging in the Pause Remote Control VR-20ME (optional) to operate the Camcorder from a distance.
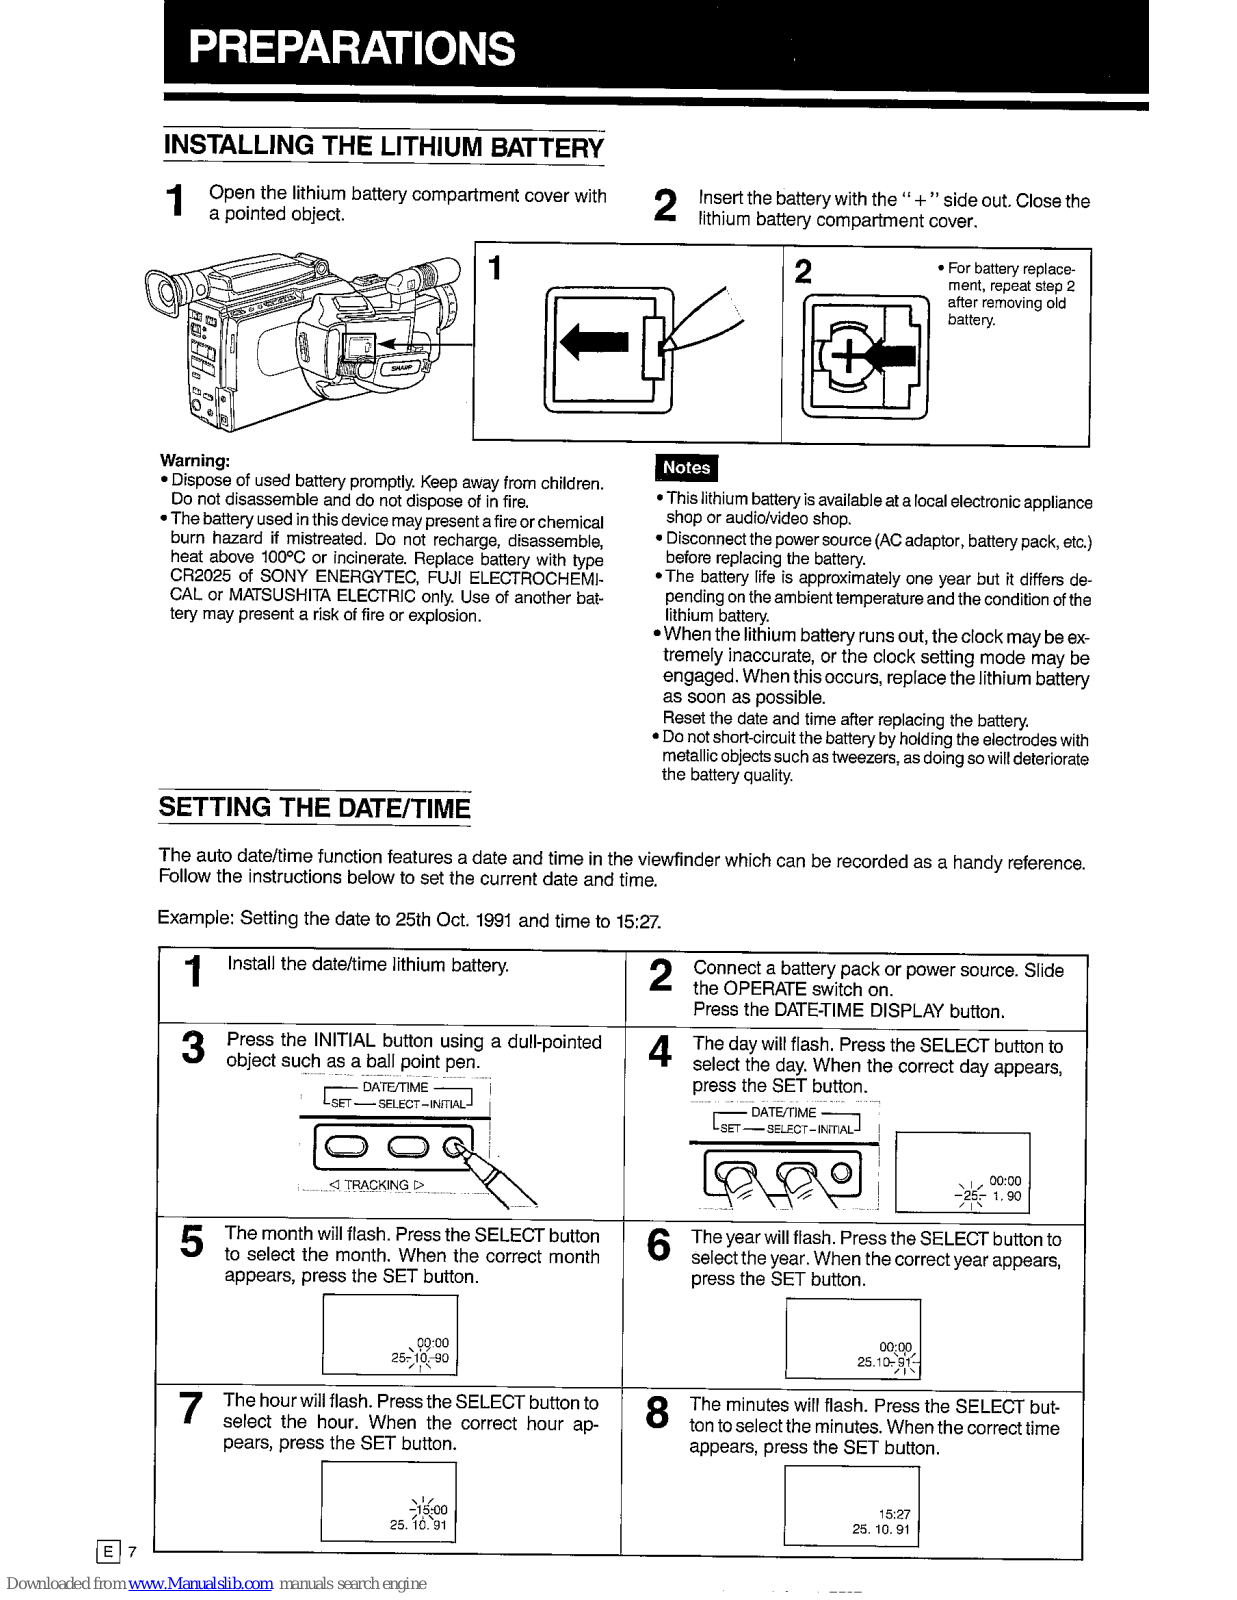
INSTALLING THE LITHIUM BATTERY
- 1 Open the lithium battery compartment cover with a pointed object.
- 2 Insert the battery with the "+" side out. Close the lithium battery compartment cover

Warning:
- Dispose of used battery promptly. Keep away from children. Do not disassemble and do not dispose of in fire.
- The battery used in this device may present a fire or chemical burn hazard if mistreated. Do not recharge, disassemble, heat above 100°C or incinerate. Replace battery with type CR2025 of SONY ENERGYTEC, FUJI ELECTROCHEMI-CAL or MATSUSHITA ELECTRIC only. Use of another battery may present a risk of fire or explosion.
Notes
- This lithium battery is available at a local electronic appliance shop or audio/video shop.
- Disconnect the power source (AC adaptor, battery pack, etc.) before replacing the battery.
- The battery life is approximately one year but it differs depending on the ambient temperature and the condition of the lithium battery.
- When the lithium battery runs out, the clock may be extremely inaccurate, or the clock setting mode may be engaged. When this occurs, replace the lithium battery as soon as possible.
- Reset the date and time after replacing the battery.
- Do not short-circuit the battery by holding the electrodes with metallic objects such as tweezers, as doing so will deteriorate the battery quality.
SETTING THE DATE/TIME
The auto date/time function features a date and time in the viewfinder which can be recorded as a handy reference. Follow the instructions below to set the current date and time.
Example: Setting the date to 25th Oct. 1991 and time to 15:27.

ATTACHING AND DETACHING THE BATTERY PACK
Attaching the Battery Pack

Detaching the Battery Pack

Note The battery pack is uncharged when shipped and must be charged before use.
ATTACHING THE SHOULDER STRAP

Note Before using the Camcorder, make sure that the shoulder strap is fastened tightly enough, and that no slack exists.
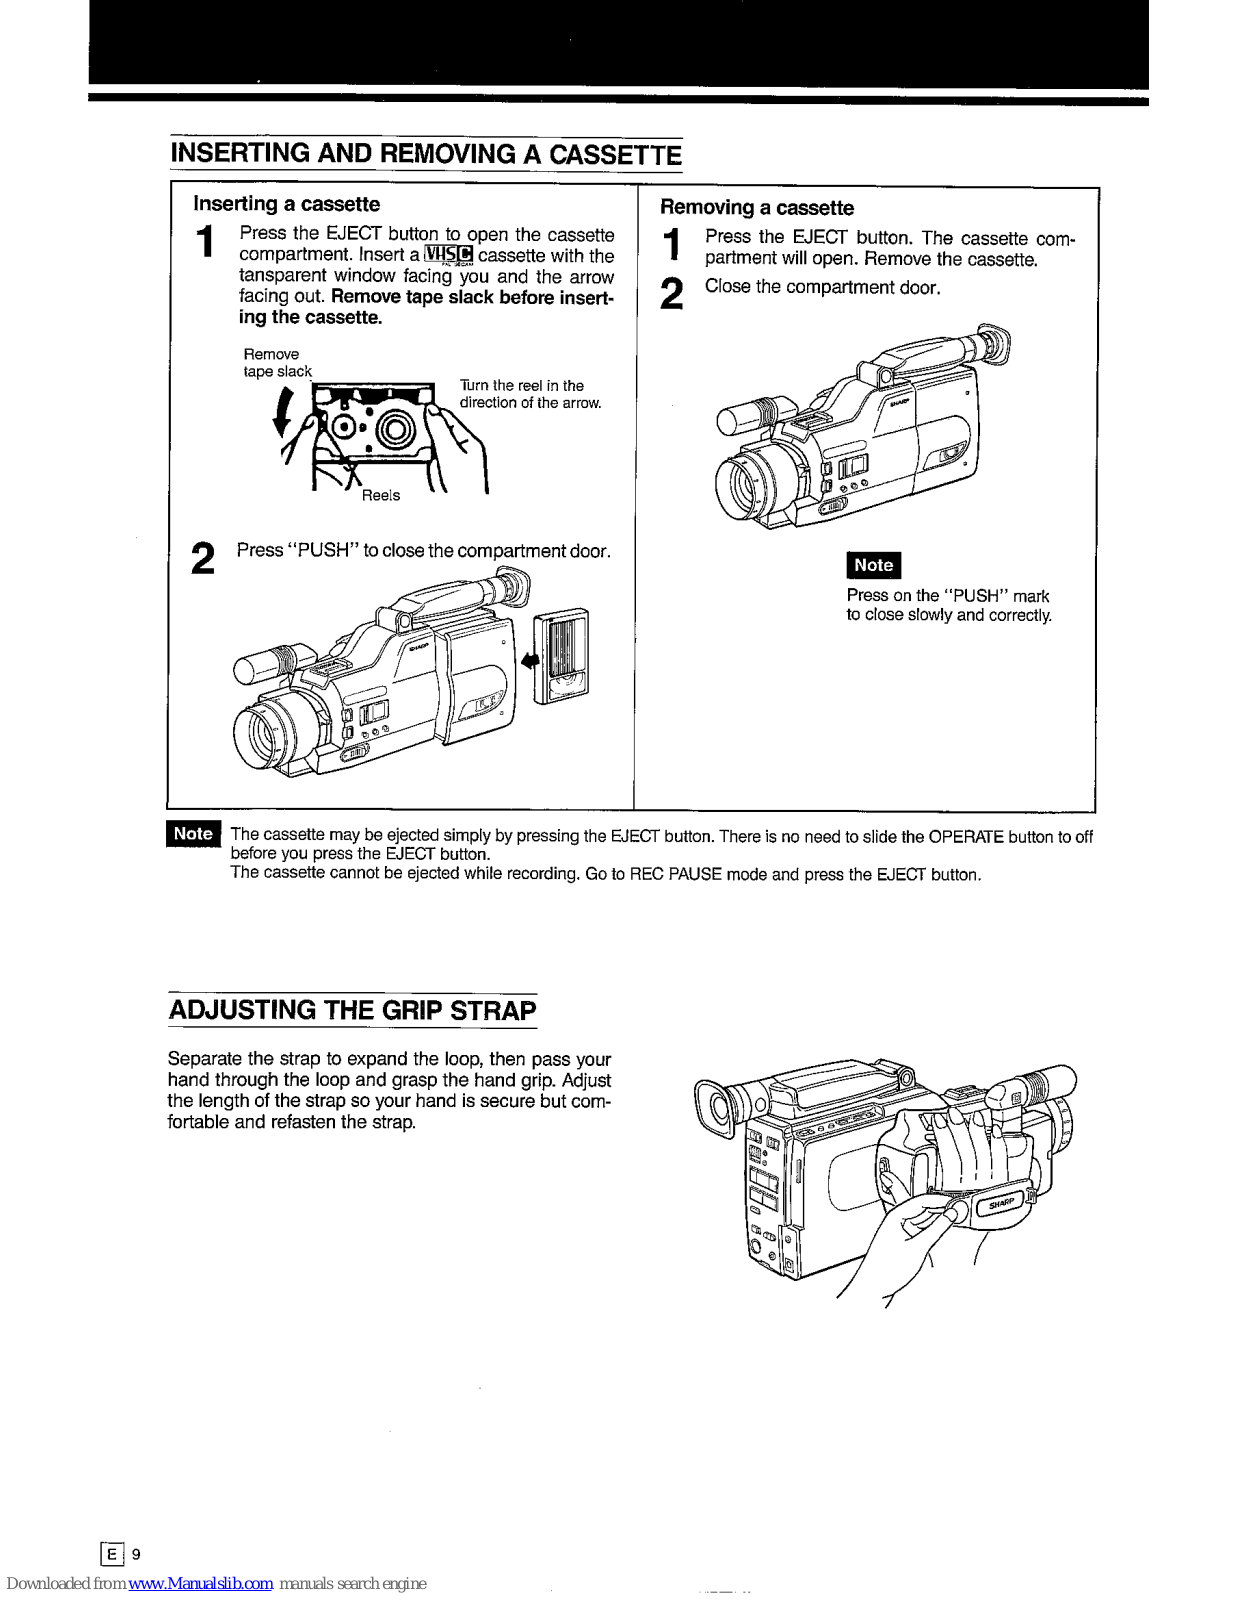
INSERTING AND REMOVING A CASSETTE

Note The cassette may be ejected simply by pressing the EJECT button. There is no need to slide the OPERATE button to off before you press the EJECT button.
The cassette cannot be ejected while recording. Go to REC PAUSE mode and press the EJECT button.
ADJUSTING THE GRIP STRAP
Separate the strap to expand the loop, then pass your hand through the loop and grasp the hand grip. Adjust the length of the strap so your hand is secure but comfortable and refasten the strap.

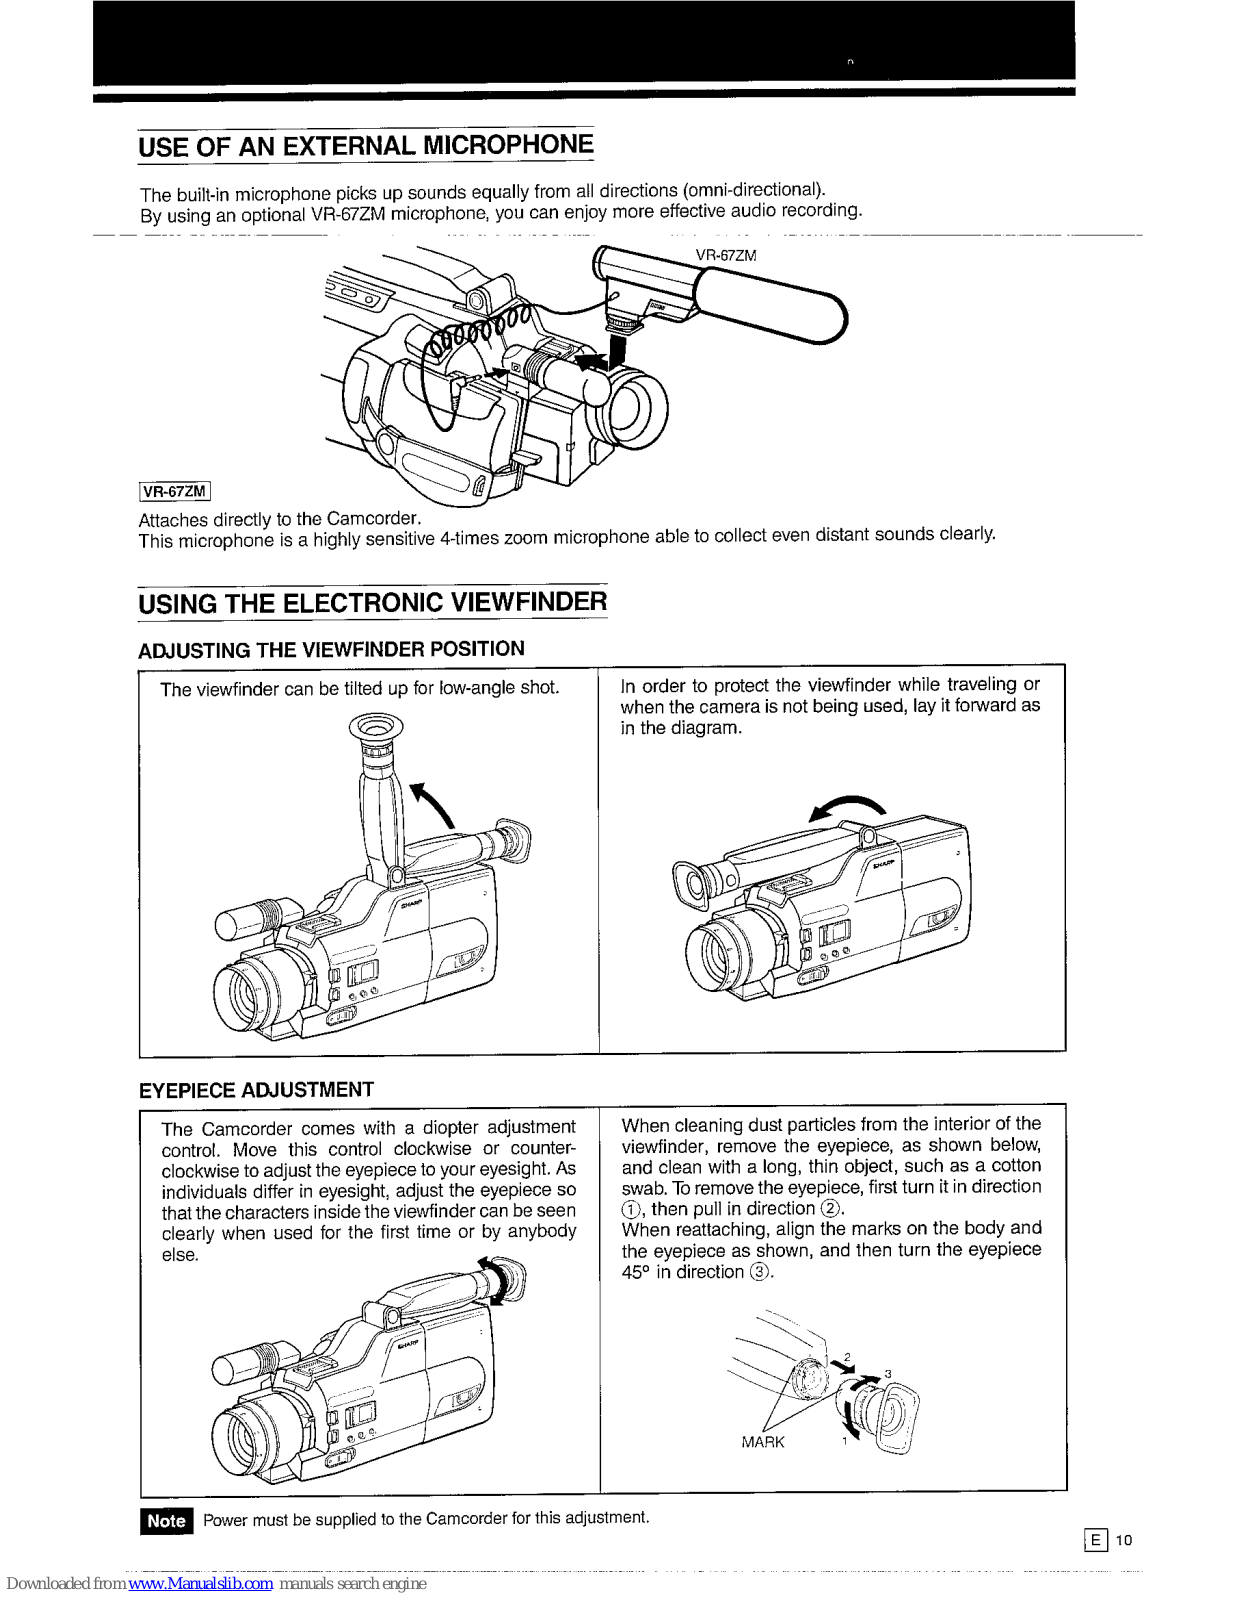
LISE OF AN EXTERNAL MICROPHONE
The built-in microphone picks up sounds equally from all directions (omni-directional). By using an optional VR-67ZM microphone, you can enjoy more effective audio recording.

VR-67ZM
Attaches directly to the Camcorder
This microphone is a highly sensitive 4-times zoom microphone able to collect even distant sounds clearly.
USING THE ELECTRONIC VIEWEINDER
ADJUSTING THE VIEWEINDER POSITION

EVEPIECE ADJUSTMENT

Note Power must be supplied to the Camcorder for this adjustment.
POWER SUPPLY SYSTEM
For portable and outdoor use, the supplied BT-75 battery pack is ideal. Indoors, the supplied AA-75S AC Adaptor/ Battery Charger and 2m DC OUT cable will be more useful. For extended outdoor use, the optional VR-P75CH Car Battery Adaptor/Charger may come in handy in remote locations.
Using the AC Adaptor/Battery Charger

Note
The optional SHARP VR-P75CH Car Battery Adaptor/Charger is like the AA-75S, but operates from a car battery
Precautions:
- The AC Adaptor/Battery Charger, if used near a radio, may cause interference.
- Prevent flammables, liquids or metal objects from entering the unit.
- The AA-75S is a sealed unit. Do not attempt to open or modify it.
- Do not damage or drop the unit or subject it to vibrations.
- Do not leave the unit in direct sunlight.
- Avoid using the unit in humid or extremely hot places.
USING THE AC ADAPTOR/BATTERY CHARGER
Use the supplied AA-75S AC Adaptor/Battery Charger and DC OUT cable.

Note The AA-75S AC Adaptor/Battery Charger will not supply power to the Camcorder through the DC OUT cable while charging a battery pack.
E 11
CHARGING THE BATTERY PACK
Use the supplied AA-75S AC Adaptor/Battery Charger. Outdoors, you can use the optional SHARP VR-P75CH Car Battery Adaptor/Charger.

3 When the battery pack is charged the CHARGE lamp will go off. Pull out the AC plug from the wall outlet and remove the battery pack by sliding it back.
Note
Normally the battery pack and charger are warm after charging.
CHARGING TIME of BT-75: 60 min. CHARGING TIME of BT-76: 80 min.
Note
The charging time depends on the ambient temperature and the condition of the battery pack.
USING THE CAR BATTERY ADAPTOR/CHARGER (OPTIONAL ACCESSORY)
To charge the battery pack or power the Camcorder in a car, use the optional SHARP VR-P75CH Car Battery Charger.

Note
The VR-P75CH Car Battery Adaptor/Charger will not supply power to the Camcorder through the DC OUT cable while charging a battery pack.
Caution:
The VR-P75CH Car Battery Charger can only be used with 12V or 24V negative-ground cars.
Do not use with 12V or 24V positive-ground cars. Check the car operation manual or consult your car dealer.
USING THE BATTERY PACK
The BT-75 is a nickel-cadmium battery and has the following characteristics
Recharging normally takes one hour at a room temperature of 20°C. The lower the temperature, the longer the recharging time.
Temperature Range

To avoid hazard:
- •Do not burn the battery pack.
- •Do not short circuit the terminals.
- •Do not disassemble or modify it.
- Use only recommended SHARP chargers: AC Adaptor/ tor/Battery Charger AA-75S or Car Battery Adaptor/ Charger VR-P75CH.
- To prevent damage and prolong battery life:
- Do not damage or drop the unit or subject it to mechanical vibration.
- Avoid repeated charging without discharge of the battery pack.
The battery pack has a limited life; when it begins to deliver less recording time per charge, purchase a replacement.
Note
The battery pack is normally warm after charging or use.
RECORDING TIME of BT-75: approx. 60min. RECORDING TIME of BT-76: approx. 80min.
The recording time of a fully charged battery pack is influenced by the amount of recording and standby time, use of the zoom lens and other factors.
Spare battery packs are available from your SHARP dealer. Have spare battery packs on hand, otherwise you may miss important video opportunities.
Nickel-cadmium batteries are best when maintained under the following conditions:
- 1. Full charging takes place between 10°C and 35°C. Charging takes longer at lower temperatures and charging may be incomplete at higher temperatures.
- Store battery packs in a cool dry place. Long exposure to high temperatures increases battery discharge and reduces battery life.
- 3. Total battery discharge may naturally occur during long storage. Discharge batteries before storing them this extends battery life.
- 4. Detach batteries from Camcorder or charger after use, otherwise battery discharge may continue.
CAMERA RECORDING
CAMERA RECORDING


FULL AUTO SYSTEM
Setting the FULL AUTO switch to "FULL AUTO" position sets the Focus and White Balance to the AUTO modes and the shutter speed to STANDARD mode. This makes it possible for anyone to make accurate Camcorder recordings. When the FULL AUTO switch is set to the "FULL AUTO" position, the FULL AUTO mark "For and " © " mark normally appear on the LCD display. However, if the "For and " © " start flashing, other alarm indicators may appear in the viewfinder. These indicators mean that camera recording is not possible for some reason, such as if a cassette with its tab removed has been loaded into the Camcorder.


Camera recording is possible in the FULL AUTO mode when the Formark and Com mark
Contioner
When any alarm indicator appears in the viewfinder follow the alarm immediately. (See page 20.)
AUTO FOCUS
Autofocus lets you concentrate on creating great videos, knowing they will be perfectly focused.
In the FULL AUTO position, the focus is continuously adjusted to maintain the best focus. There is a small area in the centre of the viewfinder which detects the subject distance and sets the focus. Try and keep the subject in the middle of the viewfinder.
Note
The autofocus may not be able to focus on a subject in the following situations. Manually focus the lens to obtain the correct focus.

- If the lens is dirty or obscured, accurate focusing may be difficult. Keep these clean at all times. If they become dirty, clean with a soft tissue and use lens cleaning fluid to clean the lens. Should condensation occur, dry by wiping with a soft cloth or wait until the condensation evaporates.
- When recording subjects that change rapidly, such as when zooming rapidly from wide-angle to telephoto, panning quickly from a distant scene to one nearby, etc., it sometimes takes a few seconds before the subject is in focus.

AUTO WHITE BALANCE
Your Camcorder is equipped with automatic white balance which ensures good colour in your videos. Correct colour balance is important for accurate colour reproduction.
The white balance is automatically adjusted to compensate for any changes in the colour temperature of the light.
REC REVIEW
While recording, press the REC START/STOP button to REC PAUSE ("----" will light in the viewfinder), and very briefly press the REC REVIEW button.
About the last 2 seconds of the recording are rewound and played back. The Camcorder is then ready to continue recording. If you hold down the REC REVIEW button, the CAMEBA SEABCH function will be engaged


CAMERA SEARCH
If, while recording, you have mistakenly recorded something you don't want, you can search for the location of the unnecessary portion while still in the CAMERA REC position.
- Press the REC START/STOP button to pause the recording.
- 2 While looking into the viewfinder, continue pressing the CAMERA SEARCH button to search for the location you wish to record over. The recorded picture appears in the viewfinder.
- 3 When the portion you wish to record over appears, release the CAMERA SEARCH button. (The REC PAUSE mode will resume after a 1 second long still frame has appeared.)
- 4 Press the REC START/STOP button to record over the unwanted section.

AN EXPLANATION OF BUTTON OPERATIONS
If you hold down the " D " button, images can be replayed in order at 3 times regular speed. (There will be no sound.)
If you hold down the " b " button, images can be replayed in order at regular speed. (With sound) If you hold down the " d " button, images can be replayed in reverse order at 3 times regular speed. (There will be no sound.)
Note If the Camcorder is in the LP mode, playback speed becomes 7 times regular speed.
POWER ZOOM (WIDE/TELEPHOTO CONTROL)
One of the best features of this Camcorder is the variable speed power zoom.
Press the power zoom buttons to zoom in and out on a subject. The pressure of your finger tips controls the zoom speed.
The zooming speed is controlled by your finger pressure, so the harder you press, the faster the zoom speed.
Press the power zoom buttons firmly to rapidly zoom in or out in 6 seconds, or press the power zoom buttons lightly to slowly zoom in or out in 20 seconds.
T(ele) brings things closer to you, while W(ide) makes things appear further away.

USING THE ZOOM SELECT BUTTON
This Camcorder is equipped with a 1.5 times extender function. Enlarge or reduce the image in the viewfinder instantly, for an entirely new kind of zoom effect. For example, when an interesting scene appears in the viewfinder, press the ZOOM SELECT button, and the image will be instantly enlarged 1.5 times.

Before the 1.5 times extender function is engaged, the viewfinder displays a square frame over the image. Locate the subject within the frame, press the ZOOM SELECT button and the image of the subject fills the viewfinder. In this example, the lens is set to standard magnification. Pressing the ZOOM SELECT button will make the frame in the viewfinder disappear and enlarge the image 1.5 times. Pressing the ZOOM SELECT button a second time returns the image to standard magnification (the frame reappears in the viewfinder).

Note
Relationship between zoom and extender operation.

The range of the variable zoom changes in the above way, according to the extender setting.
LAP TIME FUNCTION
This Camcorder has a LAP TIME function which counts the approximate recording time

LCD DISPLAY AND VIEWFINDER INFORMATION
The Camcorder provides information needed for camera recording on the LCD display and in the viewfinder.
| ALARM INDICATORS | ||||
|---|---|---|---|---|
|
1) DEW
Condensation on tape drum. The power will cut off in a few minutes. Wait several hours before resuming use. (See page 2.) |
4) Video cassette alarm
Recording cannot be carried out be- cause the video cassette has its tab re- moved or no video cassette is loaded. Load a video cassette with its tab intact. |
|||
|
(At this time, the OPERALE indicator
also blinks.) 2) Battery and alarm |
- TAPE END- |
5) Tape-end alarm
The tape will come to its end in about 3 minutes. Prepare a new video cas- |
||
| BATTERY | The battery is too low. The power will be cut off in a few seconds. Replace the battery pack. |
sette with an intact tab.
The tape has come to its end. Replace it with a new one with an intact tab. |
||
| LIGHT |
3) LIGHT
There is not enough light to make a good recording. Add supplementary lighting or move to a brighter location. |
6) Heads need cleaning
The heads need cleaning. Call for service. |
||
Note When the above indicators appear, the FULL AUTO mark and the em mark blink simultaneously.
| CONVENIENCE INDICATORS | ||||
|---|---|---|---|---|
| OFF T FULL AUTO I) FULL AUTO indicator The FULL AUTO indicator appears when the FULL AUTO switch is set to "FULL AUTO" position. This makes the Camcorder capable of proper camera recording. 2) Recording indicator When the REC START/STOP button is |
15:27
27.10.914) Date/Time This unit is equipped with an AUTO DATE/TIME function. The DATE-TIME display button is pressed to set the display to either the date/time or date. The set display can be recorded on the tape along with the picture.27.10.91 |
|||
| pressed and recording begins, ">>>>>" appears, moving in sequence from left to right. When the REC START/STOP button is pressed again, the Camcorder changes to REC PAUSE, and "" will appear. Note | 0231 5) Tape counter Continues to function even when the indicator is not shown in the viewfinder. The numbers in the tape counter continue to change as the tape travels. If the Counter memory is engaged, "M" appears to the left of the tape counter indicator. | |||
|
the CAMERA REC/VCR PLAY
switch is in the "CAMERA REC" position. 3) Recording mode |
6) Lap time counter The lap time is displayed in minutes and seconds during recording. (See page 19.) | |||
|
LP
Recording at the speed shown. "SP": Recording at the standard play speed. "LP": Recording at the long-play speed. |
1/10000 7) High Speed Shutter Recording When the SHUTTER SPEED button is pressed, the shutter speed changes as follows. 1/100 : 1/100 sec. 1/500 : 1/500 sec. 1/2000 : 1/2000 sec. 1/10000 : 1/1000 sec. 1/10000 : 1/1000 sec. 1/10000 : 1/10000 sec. 1/10000 : 1/10000 sec. No display: Standard mode (1/50 sec.) | |||

Note If you use a TV as a monitor, only the date or time appear in the viewfinder.
AUTO DATE/TIME FUNCTION
The auto date/time function features a date and time which can be recorded as a handy reference. Follow the procedures outlined below for recording the date or date/time along with the subject.
Note
If the date and time are not set, the DATE-TIME DISPLAY button will not function. (See page 7.)

- 1 Connect to a power source and slide the OPERATE switch to on. Slide the CAMERA REC/VCR PLAY switch to "CAMERA REC" and the Camcorder will change to REC PAUSE.
- 2 Press the DATE-TIME DISPLAY button. Either the date or date/time will be displayed in the viewfinder. Pressing this button changes the display in the viewfinder as follows, and either the date or date/time can be set.

3 Press the REC START/STOP button. The date or date/time displayed in the viewfinder will be recorded along with the subject.
ASSEMBLE RECORDING
To record on a partially recorded tape or produce an assembly recording:

REPLACING THE BATTERY PACK WHILE BECORDING
- 1. If BATTERY is blinking in the viewfinder while recording, press the REC START/STOP button to stop recording, then slide the OPERATE switch off
- 2. Replace the battery pack with a charged one.
- 3. Slide the OPERATE switch on. "-----" will be displayed in the viewfinder
- 4. Press the REC START/STOP button to continue recording from the same place as before.

Make sure the power is off — the OPERATE indicator should be off - before removing the battery pack.
ALITO POWER OFF
To protect the tape and conserve battery power, the Camcorder releases the tape tension and switches itself off when in BEC PAUSE mode ("-----" displayed in viewfinder) for more than 5 minutes.
|
Power
Supply |
CAMERA REC /
VCR PLAY position |
Operation
About 5 min. |
|---|---|---|
| Battery/AC | CAMERA REC | REC PAUSE → POWER off |
PAUSE REMOTE CONTROL (OPTIONAL ACCESSORY)
Use the optional 5m VR-20ME Pause Remote Control cable to pause while recording at a distance. It operates like the PAUSE/STILL button.
- Plug the Pause Remote Control cable into the REMOTE lack.
- Slide the CAMERA REC/VCR PLAY switch to "CAMERA REC"
- Check that "-----" is displayed in the viewfinder.
- To start recording, press the REC/PAUSE button on the Pause Remote Control. The indica-Λ tor in the viewfinder will move in sequence from left to right. Press the button again to pause.

PLAYBACK
The VL-C780S can playback VHS-C cassettes you have recorded. They can be played back on the viewfinder or a TV.
PLAYBACK IN THE VIEWFINDER

Note
The LP/SP select button may be in either mode. The recording speed is automatically sensed and the tape is played back at the correct speed.
TRACKING ADJUSTMENT
If noise bars are visible or if the picture is noisy, adjust the TRACKING control. Press either of the TRACKING buttons to reduce the picture noise. After playback, press both of the TRACKING buttons at the same time to return the tracking to the centre position.


Visual "Noise"
E 23
Clear

FORWARD/REVERSE SEARCH AND STILL
To quickly locate a point on a recorded tape, use the Forward and Reverse Search buttons.
Forward Search
Press the FF(ID) button during playback. This speeds playback up to 3 times faster than normal for an SP recorded tape and 7 times faster for an LP recorded tape
Reverse Search
Press the REW( ) button during playback. This speeds up reverse playback to 3 times faster than normal for an SP recorded tape and 7 times faster for an LP recorded tape.

Note There may be some picture noise during Forward/Reverse Search. This is normal. If the TV picture rolls vertically, adjust the TV vertical hold control. The picture may go monochrome during Forward/Reverse Search on a recorded tape. This is normal. Audio will not be heard.

Note
If the TV picture rolls vertically, adjust the TV vertical hold control.
To protect the tape, the Camcorder releases the tape tension and resumes STOP mode when left longer than 5 minutes in STILL mode during playback.
| About 5 min. | |
|---|---|
| STILL → STOP |
COUNTER MEMORY FEATURE
The 4-digit display acts as a handy reference to help you locate specific scenes. Use the tape counter memory to quickly return to a favourite scene
When the memory is on, the tape stops when the counter reads "M0000" during FF and REW.

- Slide the OPERATE switch to on. Set the CAMERA REC/VCR PLAY switch to "VCR PLAY".
- Press the COUNTER/COUNTER MEMORY/ LAP TIME button to display the tape counter in the viewfinder
- 3 Press the PLAY button to start praybuck. When the Camcorder is in STILL mode, press
- Press the RESET and COUNTER/COUNTER Δ MEMORY/LAP TIME button at the beginning of the scene.
- Press STOP at the end of the scene and then press the REW button. The tape will rewind to roughly "0000" and tape travel will stop.
Notes
- •The numbers in the counter will not change smoothly while fast forwarding or rewinding. However, this is not an indication of trouble.
- The tape counter will show "0000" and "M" will appear
- If the COUNTER/COUNTER MEMORY/LAP TIME button is pressed once more, the counter display will disappear and the memory feature will not function. (During the CAMERA REC mode, it is also possible to swit on the LAP TIME counter by pressing the COUNTER/ COUNTER MEMORY/LAP TIME button.)
- Tape travel will also stop at roughly "0000" when the tape is fast forwarded.
- Counter memory feature works only when the CAMERA REC/VCR PLAY switch is in the "VCR PLAY" position.


CONNECTION TO TV
To playback tapes recorded with your Camcorder on your TV, connect the optional RF Converter between your TV and the Camcorder
Connection to normal TV.

TV PLAYBACK
Tune the TV to the same channel as the RF converter (UHF CH30 ~ 39) and press the PLAY button.
To resume normal TV operation, slide the OPERATE switch off on the Camcorder or unplug the RF Converter cable from the Camcorder.

Precautions
• Use the optional RF converter only with the Carncorder.
- The RF converter is a sealed unit. Do not attempt to open or modify it. Do not damage or drop the unit or subject it to mechanical vibration.
- Unplug the RF converter during lightning storms.
OPERATION
Viewing a video cassette being played back with the VL-C780S:
To view video cassettes or to monitor the recording, set the TV channel selector to the channel corresponding to the RF output channel.
Viewing television programmes:
Slide the OPERATE switch to off or unplug the RF converter cable from the Camcorder.

If UHF channel 36 is an active broadcast channel in your area, any nonbroadcast channel from UHF channels 30 to 39 can be selected for viewing the Camcorder's output on TV.
Adjust the RF Converter Output Channel adjustor to any of those channels (UHF30-39), and tune your TV to the same one.
CONNECTION TO TV WITH A/V TERMINALS

TV Playback
Tune the TV to the VIDEO or A/V channel and press the PLAY button.
To resume normal TV operation, tune the TV to another channel.
RECORDING TO ANOTHER VCR
Your SHARP Camcorder can be connected as the playback source deck for dubbing and editing a tape with another VCR. Unnecessary scenes can be removed, the overall length shortened, scenes moved and rearranged, and other effects added to make your tapes more effective and enjoyable.

- 1 Plug the A/V OUTPUT cable into the AV OUT terminal on the rear of the Camcorder. Plug the 21-pin A/V OUTPUT connector into the A/V terminal on the rear of the VCR.
- 2 Monitor recording on a TV connected to the VCR.
- 3 Connect a power source to the Camcorder and slide the OPERATE switch to ON. Now turn on the VCR too.
- 4 Slide the Camcorder CAMERA REC/VCR PLAY switch to "VCR PLAY" and insert a recorded tape.
- 5 Insert a cassette tape with erasure protection tab intact into the VCR and put it into REC PAUSE mode.
-
6
Locate the scene to be copied from your Camcorder and press the PAUSE/STILL button.
- Slide the EDIT switch to ON.
- 8 Press the PAUSE/STILL button on your Camcorder and on the VCR to begin playback and dubbing.
Note
Picture quality inevitably deteriorates with each copy. The standard tape speed (SP) mode is therefore recommended when dubbing a tape.
EDIT CONTROL
Picture quality inevitably deteriorates each time you dub from the Camcorder to a VCR. Slide the EDIT switch on to minimize deterioration of picture quality. Use this while you edit your videos.

• Normally, the EDIT switch should be off.
E 28
USING THE CASSETTE ADAPTOR (OPTIONAL ACCESSORY)
The VHS compact video cassettes recorded with the VL-C780S can be played back with a standard VHS machine by using the optional VR-72CA Cassette Adaptor.
(A compact video cassette installed in the cassette adaptor is fully compatible with a standard VHS machine for both recording and playback.)
Inserting the Battery into the Cassette Adaptor The VR-72CA Cassette Adaptor is battery operated by one Type R6 (AA) battery

Inserting a Compact Video Cassette into the Cassette Adaptor.
If there is slack in the video tape when inserting the compact cassette into the adaptor, the tape may become damaged. Take up slack in the tape.

Caution:
Check the tape condition after inserting the cassette and tape loading is completed:
- 1. Check to see if there is any tape slack.
-
(Do not open the tape cover.)
- direction of the arrow.

Playing Back the Tape
- 1. Load the cassette adaptor into a VHS deck in the same way as you would load a regular VHS tape.
-
2. Operate the VHS deck as usual.
- Note that playback special effects can be performed using the VHS deck.
- If noise bars appear, adjust the tracking of the playback deck. Be sure to reset the tracking control to its normal position when you have finished playing back compact VHS tapes.
- Consult the VCR's operation manual for operation instructions.
Notes
- During special effects playback (slow motion, still frame, etc.) the picture may vibrate or noise bars may appear on the screen.
- The protruding safety catch indicates that loading of the tape has not been completed. In this condition, NEVER attempt to load the cassette adaptor into a VCR, as this could damage both.
- Do not load and unload the cassette adaptor into a VCR repeatedly without allowing the tape to run. This will slacken the tape and thereby damage it.
- The cassette adaptor cannot be loaded upside down.
- After use, remove the cassette from the adaptor.
Removing the Compact Video Cassette
Slide the latch to open the door, then push up on the cassette to remove it, pushing on the cassette with your finger through the hole in the bottom of the adaptor.

Notes
- This cassette adaptor is precision-manufactured. Avoid violent vibrations or shocks. Do not drop or disassemble or modify it, otherwise malfunctions may result.
- When placing the cassette adaptor into its case, slide the cassette adaptor into the case, safety catch end first.
Video Cassettes
- The VL-C780S employs only compact video cassettes carrying the VHSP mark.
- Recording onto prerecorded tapes automatically erases the previously recorded video and audio signals.
- An inverted cassette cannot be inserted.
- •Do not load and unload the cassette repeatedly without allowing the tape to run at all. This will slacken the tape and thereby damage it.
- •Make certain before loading the cassette that the tape is not slackened. If there is any slack, turn the gear on the cassette in the direction of the arrow to take up slack.
- The cassette is equipped with a safety tab to prevent accidental erasure. When the tab is removed, recording is impossible. If you wish to record on a cassette whose tab has been removed, use adhesive tape to reseal the slot.
- •To avoid excessive exposure to dust and fingerprints, do not open the front tape cover.

Storage of Cassettes
- Avoid exposing the cassettes to direct sunlight. Keep them away from heaters.
- •Avoid storing the cassettes in humid or dusty places.
- Do not drop the cassettes. Do not expose them to violent vibrations or shocks.
- Do not expose the cassettes to strong magnetic fields (near a motor, transformer or magnet).
- Place the cassettes in cassette cases and position them vertically.
ADVANCED OPERATION
MANUAL FOCUS
- In the following cases, it may be difficult to use the Autofocus, so you might want to focus the lens yourself.
- 1. When the object is not in the middle of the scene.
- 2. When you want the background or the front of the scene blurred.
- 3. When you want to have the beginning of the scene out-of-focus
USING THE MANUAL FOCUS
-
Turn off the FULL AUTO switch.
- Press T to zoom in on your subject.
- Press the FOCUS button to select MANUAL FOCUS
- Turn the focus ring until the subject is focused.
- Lightly press W and zoom out to compose the scene
WHITE BAL ANCE
White balance ensures that all the colours in a scene are correctly reproduced. In the auto mode, white balance is adjusted automatically
Using the White Balance Lock mode
Colour shift may occur when a solid coloured object is recorded, so that the viewfinder is filled with one colour, eq., when a close up of solid coloured paper is taken. The Auto White Balance mode is locked into place to avoid a colour shift in such situations. Follow the procedure described below to lock the Auto White Balance mode.
(1) When Quick Action is required.
Zoom out all the way on a subject that is not one solid colour. Under this condition, the proper white balance will be set automatically.
Press the WHITE RALANCE button to lock the white balance setting. "W/B" appears in the viewfinder. Colour shift can be avoided when the white balance is locked even when recording a close up of a solid coloured subject.
(2) When a very accurate white balance setting is required.
Focus on a white piece of paper so that the viewfinder is filled with it and keep focusing for about 2 seconds. Then the proper white balance will be set automatically. Turn off the FULL AUTO switch, and press the WHITE BALANCE button to lock the white balance setting. "W/B" appears in the viewfinder.
To disendade the White Balance Lock mode. press the WHITE BALANCE button, or slide the FULL AUTO switch to FULL AUTO mode to return to the Auto White Balance mode. The colour temperature of a light source varies. For instance, the colour temperature of sunlight will vary depending on the weather and time of day. Reset the White Balance Lock if the colour temperature changes

-
Notes. If power to the Camcorder is interrupted during White Balance Lock, if or the Camcorder is switched to the VCR mode. White Balance Lock will be canceled.
- Even through the White Balance Lock mode is on, the White Balance is not perfectly locked. Therefore the White Balance compensation function can adjust to small variations in colour temperature, giving your recordings more natural colour.
Under the following conditions Auto White Balance may not function correctly.
- •When mixing natural and artificial light. Beware of window scenes containing a mixture of artificial and natural light. Likewise all lighting should have the same colour temperature.
- •When using special effects lighting
- •When recording a subject against a background with an intense hue.
- •When there is insufficient light.
- •When the colour temperature of a scene changes too rapidly or there is too much contrast.
- •When the object is a solid colour.

In the manual focus mode, "M/E" is displayed in the viewfinder


In the White Balance Lock mode. "W/B" is displayed in the upper left of the viewfinder (If the White Balance Lock mode is disengaged. the display disappears.)
E 31
BACKLIGHT COMPENSATION
The Auto Iris in this Camcorder uses a new light measuring system to automatically control bleaching and adjust to backlit subjects. However, if the background is too bright and the subject appears dark press the BLC/GAIN-UP button to prevent the subject from appearing dark on the recording.
Note
The Camcorder will automatically return to the AUTO IRIS mode after you release the BLC/GAIN-UP button.
GAIN-UP
"LIGHT" is displayed in the viewfinder when recording a dark subject. If the BLC/GAIN-UP button is pressed, the scene becomes brighter.
"*LIGHT *" is displayed in the viewfinder to indicate that the dain-up mode is endaded.
When the subject becomes brighter. "*LIGHT*" disappears.
However memory of the gain-up mode remains.
In order to disengage the gain-up mode completely, press the BLC/GAIN-LIP button while "*LIGHT*" is displayed in the viewfinder.
Note
• In the gain-up mode, there will be more picture poise.
If nower is interrupted or the Camcorder is switched to the playback mode, the Gain-up mode will be canceled
SELE TIMER RECORDING
- Attach the battery pack.
- Press the EJECT button and open the cassette 2 holder. Insert a video cassette with its tab intact with its window facing outward.
Press the corner of the cassette holder marked "PUSH" until it clicks into place
Mount this Camcorder on a stable tripod designed for video use, then slide the OPERATE switch on.
- Set the CAMERA REC/VCR PLAY switch to the "CAMEBA BEC" position.
- Set the FULL AUTO switch to the "FULL AUTO" position and check that
- Pointing the Camcorder at the subject, press the 6
- Power Zoom button and adjust the angle of view.
- Press the SELE TIMER button
The talent tally indicator flashes for 10 seconds. then the Camcorder will record for 20 seconds, then change to REC PAUSE mode. If you wish to record for an extended time, press the SELF TIMER button twice in succession.
Note
If you press the SELF TIMER button three times, the SELF TIMER is cancelled.


If the gain-up mode is er gaged, "*LIGHT*" is displayed in the viewfinder
HIGH SPEED SHUTTER
Use the HIGH SPEED SHUTTER (1/10,000, 1/2,000, 1/500, 1/100 sec.) mode when recording fast moving objects like sports (tennis, golf, etc.). When you playback the scene on a 4-head VCR, the playback picture will be clear even in the STILL and SLOW modes.
USING THE HIGH SPEED SHUTTER
- 1 While in the REC PAUSE mode, turn off the FULL AUTO switch, and press the SHUTTER SPEED select button. Select the shutter speed desired. Shutter speeds change in the following order: 1/10,000 sec., 1/2,000 sec., 1/500 sec., 1/100 sec., standard (1/50 sec.), and back to 1/10,000 sec.
- 2 Press the REC START/STOP button to start recording as normal.
Since the High Speed Shutter is faster than normal, it requires more light. Use the High Speed Shutter in appropriate light (minimum required lighting is listed below)
1/10,000 sec.: 3,000 lux 1/2,000 sec.: 600 lux 1/500 sec.: 150 lux
1/100 sec : 30 lux
It is recommended to use the High Speed Shutter
outdoors or with extra light.
Notes
- Avoid using High Speed Shutter under fluorescent lighting as this will cause flickering in the picture.
- as this wine outset inversing in the picture. Recording with shutter speeds higher than 1/50 sec. (standard) tends to darken the picture. Record in bright locations when using other shutter speeds.
PLAYBACK OF SCENES RECORDED WITH THE HIGH SPEED SHUTTER MODE
- Place the recorded tape into the optional VHS cassette adaptor and then into a VHS 4-head video cassette recorder.
- 2 When watching scenes taken with the HIGH SPEED SHUTTER you can enjoy blur-free recordings even during STILL and SLOW mode playback.


E 33
MACRO SHOTS
Small plants, insects, even photos in the family album can be recorded using Macro and enlarged to fill the screen. You can also use Macro to record titles for your videos.
Normally the lens can only focus on subjects that are more than 1m away from the front of the Camcorder.
By setting the lens to Macro, you can manually focus on any subject within the macro range, 8mm-100cm, right up to the front of the lens.
Mount the Camcorder on a steady tripod as the smallest movement is magnified when shooting macro subjects.

FADE IN & OUT
With this Camcorder you can enjoy the special effect of fading in and out of the scenes in your recordings.

FADE IN
- With REC PAUSE on, press the FADE IN/OUT button. The viewfinder will display "FADER".
- 2 Press the REC START/STOP button to start recording. The viewfinder will turn black, and then gradually focus on the subject. ("FADE IN" will appear in the viewfinder.)

FADE OUT
- While recording, press the FADE IN/OUT button. The viewfinder will display "FADER".
- Press the REC START/STOP button. The viewfinder will slowly turn black creating a fade-out of the scene. ("FADE OUT" will appear in the viewfinder. If you select the REC PAUSE mode, the FADE will be cancelled.)

LIGHTING
LIGHTING
For clear good-quality pictures you will need between 500 and 100,000 lux — you can record in less light, however the picture quality may suffer. Adequate lighting is also essential for correct white balance.
| Brightness | Situation |
|---|---|
| Blue sky | |
| 100,000 (Lux) |
Clear day at noon (100,000)
Clear day at 10am (65,000) |
| 10,000 |
Clear day at 3pm (35,000)
Cloudy day at noon (32,000) Cloudy day at 10am (25,000) |
| 1,000 |
Cloudy day, one hour after sunrise (2,000)
Clear day, one hour before sunset (1,000) Fluorescent light near window (1,000) |
|
Factory floor (700-800)
Sales counter in department store (500-700) Bowling alley (500) Library (400-500) Office with fluorescent lighting (400-500) Fluorescent desk lamp (400) Flashlight at 1m (250) |
|
| 100 | Shop stairway (100) |
| 10 |
During intermission at movie theatre (15-35)
Cigarette lighter at 30cm (15-20) Candles on birthday cake at 20cm (10-15) |
| Candlelight |
|
Colour
Temperature |
Situation | Colour |
White Balance
Range |
|---|---|---|---|
|
10,000 ("K)
9,000 8,000 7,000 6,500 |
Clear day
Colour TV Cloudy day Rainy day Daylight fluorescent light |
Blue | |
|
6,000
5,500 |
Camera flashbulb | Α | |
|
5,000
4,500 3,500 |
Blue photolamp
White fluorescent light Off-white fluorescent light Tungsten photolamp |
White |
U
T |
|
3,200
2,800 2,500 |
Halogen lamp
Tungsten lamp lodine lamp Acetylene lamp |
Yellow | |
| 2,000 |
Kerosene lamp
Candlelight |
Red |
Notes
- These are approximations.
- For more precise colour balance check the picture on a colour monitor and adjust the white balance until the colour is natural.
Video Lighting
Lighting is one of the most important areas in home videos. Also one of the most overlooked. Good lighting can often mean the difference between a great picture and a poor quality one. And lighting is essential for correct white balance.
In most outdoor situations natural lighting is adequate for home videos. Indoors the situation becomes more complicated. Artificial lighting is required and tungsten (or quartz) lamps provide the most natural of artificial light sources, while providing a constant colour temperature over a long life.
• Auto White Balance should normally be used in the colour temperature range shown above. However it will satisfactorily operate from 2500°K up to 8000°K, but the picture may become redder or bluer, respectively.
Good lighting is difficult to achieve and there are many problems to catch the unwary. Simply mounting one light on or several lights either side of the camcorder will only make your subject look flat and two-dimensional. To make a subject more interesting, use the lighting to model your subject and to add or create emphasis in a scene.
BEFORE REQUESTING SERVICE
| ore calling for servicing | n please check the | following troubleshooting | table |
| SYMPTOM | POSSIBLE CAUSE | SUGGESTED SOLUTION | |
|---|---|---|---|
| • Power | •No power | Safety devices are functioning. | • Disconnect the AC adaptor cord, and then plug it into the wall socket again. |
| • The battery pack is not charged. | Charge the battery pack sufficiently. | ||
| • The power source unit is not correctly connected. | Connect the power source unit correctly. | ||
| Power switches off | Depleted battery pack. | • Use a fully charged battery pack. | |
| soon after coming on. | • Dew in Camcorder. | •Wait until dew disappears. | |
| Recording. |
Power on but no
image in viewfinder. |
• Lens cap on. | Remove the lens cap. |
| • Can't record | Recording prevention tab broken off from cassette. |
|
|
| • CAMERA REC/VCR PLAY switch is set to "VCR PLAY". |
Slide the CAMERA REC/VCR PLAY
switch to "CAMERA REC". |
||
| Poor colour | • TV not properly adjusted. | • Adjust the TV. | |
| Poor lighting. |
|
||
| • Fuzzy picture | • Dust or other foreign matter on lens. | • Clean the lens. | |
| Not properly focused. | Adjust the focus. | ||
|
Camera picture is too
dark |
The SHUTTER SPEED select
button is set to HIGH SPEED SHUTTER MODE. |
Set the SHUTTER SPEED select button to "STANDARD". | |
| Playback | •No image appears. |
|
Reconnect properly. |
|
The TV is not tuned to the RF
converter's output channel (UHF30-39) |
Tune the TV to the RF converter's out-
put channel (UHF30-39) |
||
|
• TV's TV/VIDEO switch is not at
TV position (if the TV is equipped with AV input terminal) |
Set TV's TV/VIDEO switch to TV position. | ||
|
Playback is in black and
white when the Cam- corder is connected to TV. |
|
Adjust the tracking. | |
| •Video noise in image. | •Old or worn tape. | • Use a new tape. | |
| Broken image |
|
Recharge the battery pack. | |
| • Cassette can't be inserted. |
Cassette is not right side up or
is backwards. Another cassette is in the unit |
Check cassette positioning and reinsert. Press the EJECT button and remove. | |
|
ovement in fast forward |
Tape is already completely
wound. |
Rewind to desired point. |
| No tape movement in rewind mode. |
|
Fast forward to desired point. | |
Note This unit is equipped with a microprocessor. Its performance could be adversely affected by external noise or interference. If this were to happen, turn off the power, and unplug this unit from the power source.
SPECIFICATIONS
Format Power source Power consumption Signal system Becording system Cassotto Tape speed Becording time Max )en S/N ratio Microphone input Pickup Minimum required illumination Lens
Viewfinder Colour temperature compensation Operating temperature co Operating humidity Storage temperature Weight Dimensions
85W PAI -type colour signal Example colour signar Luminance: FM recording Colour: Converted sub-carrier direct recording Conforms to VHS standard VHS-C cassette 2220 mm/sec 23.39 mm/sec 30 minutes (with EC-30 cassette) 60 minutes (with EC-30 cassette) 1.0 Vp-p. 75 ohms, unbalanced (via AV out connector) 46 dB (with Rohde & Schwarz noise meter) -8 dBs 1k-ohm (via AV out connector) - 65 dBs, high impedance, unbalanced 1/2"-format CCD 1/2"-format CCD 3 lux (at F 1.6, with Gain up) F16 f=8-64 mm/F2.4 f=12-96 mm. 8× power zoom lens with built-in extender function, auto iris control and macro position, filter diameter 46 mm. Electronic viewfinder with 0.7" black/white CRT Auto white balance with white balance lock 0°C to 40°C 35%~80% ~ 20°C to 60°C 1.2 kg (with viewfinder 126(W) × 151(H) × 322(D) mm (incl. viewfinder)
AC power adaptor/Battery charger specifications
Power requirement Rated output voltage Rated output current Charging system Dimensions Weight
AC 110V — 240V, ~50/60Hz DC 9.6V ----1.3A Constant current, peak detection, timer controlled 70/W) × 43/H) × 154(D) mm Approx. 380g
SUPPLIED ACCESSORIES
Standard battery pack (BT-75) AC nower adaptor/battery charger (AA-75S) DC output cable A/V output cable (21-pin Euro-SCART)
Shoulder stran Lithium battery
OPTIONAL ACCESSORIES
Car battery adaptor
charger (VR-P75CH)
Standard battery pack (BT-75)
Battery pack for extended use (BT-76) VHS cassette adaptor (VR-72CA)
RF converter (VR-S10RF)
Pause remote control (VR-20ME)
Zoom microphone (VR-67ZM)
Design and specifications are subject to change without notice.
SHARP CORPORATION Osaka, Japan
Printed in Japan In Japan gedruckt Imprimé au Japon Triykt i Japan Stampato in Giappone Impreso en Japón Gedrukt in Japan Impresso no Japão TINSL0014TAZZ T7429-A


 Loading...