

Page 1
User manual
YC-PC322A
Microwave oven
EN PTDE FR NLES PL IT
*Product images are for illustration purpose only. Actual product may vary.
Page 2

Page 3
Attention:
Your product
is marked with
this symbol.
It means that
used electrical
and electronic
products should
not be mixed
with general
household
waste. There is a
separate collec-
tion system for
these products.
www.sharpconsumer.com/
contact/
www.sharpconsumer.com/
support/
www.sharpconsumer.com/
documents-of-conformity/
EN
A. Information on Disposal for Users
(private households)
1. In the European Union
Attention: If you want to dispose of this equipment, please do not use the
ordinary dustbin!
Used electrical and electronic equipment must be treated separately and
in accordance with legislation that requires proper treatment, recovery and
recycling of used electrical and electronic equipment.
Following the implementation by member states, private households within
the EU states may return their used electrical and electronic equipment to
designated collection facilities free of charge*.
In some countries* your local retailer may also take back your old product
free of charge if you purchase a similar new one.
*) Please contact your local authority for further details.
If your used electrical or electronic equipment has batteries or
accumulators, please dispose of these separately beforehand according
to local requirements. By disposing of this product correctly you will help
ensure that the waste undergoes the necessary treatment, recovery and
recycling and thus prevent potential negative e ects on the environment
and human health which could otherwise arise due to inappropriate waste
handling.
2. In other Countries outside the EU
If you wish to discard this product, please contact your local authorities and
ask for the correct method of disposal.
For Switzerland: Used electrical or electronic equipment can be returned
free of charge to the dealer, even if you don't purchase a new product.
Further collection facilities are listed on the homepage of www.swico.ch or
www.sens.ch.
B. Information on Disposal for Business Users
1. In the European Union
If the product is used for business purposes and you want to discard it:
Please contact your SHARP dealer who will inform you about the take-back
of the product. You might be charged for the costs arising from take-back
and recycling. Small products (and small amounts) might be taken back by
your local collection facilities.
For Spain: Please contact the established collection system or your local
authority for take-back of your used products.
2. In other Countries outside the EU
If you wish to discard of this product, please contact your local authorities
and ask for the correct method of disposal.
For service, please refer to www.sharpconsumer.com/contact/, for your warranty rights go to
www.sharpconsumer.com/support/ or contact the retailer where you purchased your product.
Declarations of conformity are available from www.sharpconsumer.com/documents-of-conformity/
EN – 1
Page 4

PRECAUTIONS TO AVOID POSSIBLE EXPOSURE TO MICROWAVE ENERGY
1. Do not attempt to operate this oven with the door open as this can result in harmful exposure to microwave
energy. It is important not to defeat or tamper with the safety interlocks.
2. Do not insert anything between the oven front face and the door or allow debris or cleaner residue to accumulate
on sealing surfaces.
3. Do not operate the oven if it is damaged. It is very important that the oven door closes properly and that there is
no damage to the door, hinges, latches or door seals and sealing surfaces.
4. Do not attempt to repair or adjust the oven.
CONTENTS
IMPORTANT SAFETY INSTRUCTIONS .............................................................................................................................................................. 3
INSTALLATION .......................................................................................................................................................................................................10
RADIO INTERFERENCE .......................................................................................................................................................................................11
GROUNDING (EARTHING) INSTRUCTIONS..................................................................................................................................................11
SPECIFICATIONS ...................................................................................................................................................................................................11
OVEN AND ACCESSORIES .................................................................................................................................................................................12
CONTROL PANEL ..................................................................................................................................................................................................13
BEFORE USING THE OVEN .................................................................................................................................................................................13
SETTING THE CLOCK ........................................................................................................................................................................................... 13
MICROWAVE COOKING ......................................................................................................................................................................................14
QUICK START .........................................................................................................................................................................................................14
GRILL COOKING ....................................................................................................................................................................................................15
MICROWAVE + GRILL ..........................................................................................................................................................................................15
CONVECTION ........................................................................................................................................................................................................16
MICROWAVE + CONVECTION ..........................................................................................................................................................................16
AUTO MENU ..........................................................................................................................................................................................................17
AUTO DEFROST ....................................................................................................................................................................................................18
AUTO REHEAT........................................................................................................................................................................................................18
KITCHEN TIMER .....................................................................................................................................................................................................18
POWER SAVING FUNCTION ..............................................................................................................................................................................18
MUTE FUNCTION .................................................................................................................................................................................................19
SAFETY LOCK ........................................................................................................................................................................................................19
CHILD LOCK ...........................................................................................................................................................................................................19
AUTOMATIC PROTECTION MECHANISM .....................................................................................................................................................19
CLEANING AND CARE ........................................................................................................................................................................................20
SUITABLE OVENWARE ........................................................................................................................................................................................21
MICROWAVE COOKING ADVICE......................................................................................................................................................................22
DEFROSTING ADVICE .........................................................................................................................................................................................24
REHEATING ADVICE ............................................................................................................................................................................................25
TROUBLESHOOTING ...........................................................................................................................................................................................26
STICKING BUTTON PROTECTION ...................................................................................................................................................................27
BEFORE CALLING FOR ASSISTANCE ..............................................................................................................................................................27
EN – 2
Page 5

EN
IMPORTANT SAFETY INSTRUCTIONS
READ CAREFULLY AND KEEP FOR FUTURE REFERENCE
To avoid the danger of re. The microwave oven should
not be left unattended during operation. Power levels
that are too high, or cooking times that are too long, may
overheat foods resulting in a re.
This oven is designed to be used on a countertop only. It is not
designed to be built into a kitchen unit. Do not place the oven
in a cabinet. The electrical outlet must be readily accessible so
that the unit can be unplugged easily in an emergency.
The AC power supply must be 230-240 V, 50 Hz, with a
minimum 10 A distribution line fuse, or a minimum 10A
distribution circuit breaker. A separate circuit serving only this
appliance should be provided.
Do not place the oven in areas where heat is generated. For
example, close to a conventional oven. Do not install the oven
in an area of high humidity or where moisture may collect. Do
not store or use the oven outdoors.
If smoke is observed, switch off or unplug the oven and
keep the door closed in order to sti e any ames.
Use only microwave-safe containers and utensils. Utensils
should be checked to ensure that they are suitable for use
in microwave ovens.
When heating food in plastic or paper containers, keep an
eye on the oven due to the possibility of ignition.
Clean the waveguide cover and the oven cavity. These
must be dry and free from grease. Built up grease may
overheat and begin to smoke or catch re.
Do not place ammable materials near the oven or ventilation
openings. Do not block the ventilation openings.
EN – 3
Page 6

Remove all metallic seals, wire twists, etc., from food and food
packages. Arcing on metallic surfaces may cause a re.
Do not use the microwave oven to heat oil for deep frying. The
temperature cannot be controlled and the oil may catch re.
To make popcorn, use only special microwave popcorn makers.
Do not store food or any other items inside the oven.
Check the settings after you start the oven to ensure the oven
is operating as desired.
Do not leave the oven unattended while it is operating.
To avoid overheating and re, special care must be taken when
cooking or reheating foods with a high sugar or fat content,
for example, Sausage rolls, Pies or Christmas pudding. See the
corresponding hints in the user manual.
To avoid the possibility of injury. WARNING:
Do not operate the oven if it is damaged or malfunctioning.
Check the following before use:
a) Make sure the door closes properly and ensure it is not
misaligned or warped.
b) Check to make sure the hinges and safety door latches are
not broken or loose.
c) Ensure that the door seals and sealing surfaces have not
been damaged.
d) Make sure inside the oven cavity or on the door are no
dents.
e) Ensure that the power supply cord and plug are not
damaged.
If the door or door seals are damaged, the oven must not be
operated until it has been repaired by a competent person.
Never adjust, repair or modify the oven yourself. It is
hazardous for anyone other than a competent person to
carry out any service or repair operation which involves
EN – 4
Page 7

EN
the removal of a cover which gives protection against
exposure to microwave energy.
Do not operate the oven with the door open or alter the door
safety latches in any way. Do not operate the oven if there is an
object between the door seals and sealing surfaces.
Do not allow grease or dirt to build up on the door seals
and adjacent parts. Clean the oven at regular intervals and
remove any food deposits.
Follow the instructions for “Care and Cleaning”. Failure
to maintain the oven in a clean condition could lead to a
deterioration of the surface that could adversely aff ect
the life of the appliance and possibly result in a hazardous
situation.
Individuals with PACEMAKERS should check with their doctor or
the manufacturer of the pacemaker for precautions regarding
microwave ovens.
To avoid the possibility of electric shock.
• Under no circumstances should you remove the outer
cabinet.
• Never spill or insert any objects into the door lock openings
or ventilation openings. In the event of a spill, turn o and
unplug the oven immediately, and call an authorised SHARP
service agent.
• Do not immerse the power supply cord or plug in water or
any other liquid.
• Do not let the power supply cord hang over the edge of a
table or work surface.
• Keep the power supply cord away from heated surfaces,
including the rear of the oven.
• Keep the appliance and its cord out of reach of children less
than 8 years.
• Do not attempt to replace the oven lamp yourself or allow
EN – 5
Page 8

anyone who is not an electrician authorised by SHARP to do
so. If the oven lamp fails, please consult your dealer or an
authorised SHARP service agent.
• If the power supply cord is damaged, it must be replaced by
an authorised SHARP service agent.
WARNING: Liquids and other foods must not be heated
in sealed containers since they are liable to explode.
Microwave heating of beverages can result in delayed
eruptive boiling; therefore, care must be taken when
handling the container. To avoid the possibility of
explosion and sudden boiling:
Never use sealed containers. Remove seals and lids before use.
Sealed containers can explode due to a build-up of pressure
even after the oven has been turned o . Take care when
microwaving liquids. Use a wide mouthed container to allow
bubbles to escape.
Never heat liquids in narrow necked containers such as
baby bottles, as this may result in the contents erupting
from the container when heated and cause burns.
To prevent sudden eruption of boiling liquid and possible
scalding:
1. Do not use excessive amount of time.
2. Stir liquid prior to heating/reheating.
3. It is advisable to insert a glass rod or similar (not metal) into
the liquid whilst reheating.
4. Let liquid stand for at least 20 seconds in the oven at the
end of cooking time to prevent delayed eruptive boiling.
Do not cook eggs in their shells, and whole hard-boiled
eggs should not be heated in microwave ovens since they
may explode even after microwave cooking has ended.
To cook or reheat eggs which have not been scrambled or
EN – 6
Page 9

EN
mixed, pierce the yolks and the whites. Shell and slice hard
boiled eggs before reheating them in the microwave oven.
Pierce the skin of such foods as potatoes, sausages and fruit
before cooking, or they may explode.
WARNING: The contents of feeding bottles and baby
food jars must be stirred or shaken and the temperature
checked before consumption, in order to avoid burns. Use
pot holders or oven gloves when removing food from the
oven to prevent burns. To avoid the possibility of burns:
• Always open containers, popcorn makers, oven cooking
bags, etc., away from the face and hands to avoid steam
burns and eruption of boiling. To avoid burns, always test
food temperature and stir before serving and pay special
attention to the temperature of food and drink given to
babies, children or the elderly. Accessible parts may become
hot during use. Young children should be kept away.
• Temperature of the container is not a true indication of the
temperature of the food or drink; always check the food
temperature.
• Always stand back from the oven door when opening it to
avoid burns from escaping steam and heat.
• Slice stu ed baked foods after heating to release steam and
avoid burns.
• Keep children away from the door to prevent them burning
themselves.
WARNING: Only allow children aged from 8 years and
above to use the oven without supervision when adequate
instructions have been given so that the child is able to
use the oven in a safe way and understands the hazards of
improper use.
When the appliance is operated in the GRILL, MIX GRILL,
CONVECTION, MIX CONVECTION and AUTO MENU mode
EN – 7
Page 10

(mode applicable to model), children should only use the
oven under adult supervision due to the temperature
generated.
This appliance is not intended for use by persons
(including children) with reduced physical, sensory or
mental capabilities, or lack of experience and knowledge,
unless they have been given supervision or instruction
concerning use of the appliance by a person responsible
for their safety.
Children should be supervised to ensure that they do not
play with the appliance. Cleaning by children should be
monitored.
Models with Electronic touch panel are enabled with a
child lock mode.
Do not lean or swing on the oven door. Do not play with the
oven or use it as a toy.
Children should be taught all important safety instructions:
use of pot holders, careful removal of food coverings - paying
special attention to packaging (e.g., self-heating materials)
designed to make food crisp, as they may be extra hot.
Other warnings
Never modify the oven in any way.
Do not move the oven while it is in operation.
This appliance is intended to be used in household. This oven
is for home food preparation and may only be used for cooking
food and beverages. Drying of food or clothing and heating
of warming pads, slippers, sponges, damp cloth and similar
may lead to risk of injury, ignition or re. It is not suitable for
commercial or laboratory use.
EN – 8
Page 11

EN
To promote trouble-free use of your oven and avoid
damage.
Never operate the oven when it is empty. When using a
browning dish or self-heating material, always place a heatresistant insulator such as a porcelain plate under it to prevent
damage to the oven base due to heat stress. The preheating
time speci ed in the dish’s instructions must not be exceeded.
Do not use metal utensils, which re ect microwaves and may
cause electrical arcing. Do not put cans in the oven.
To prevent the turntable or base of the oven breaking:
a) Before cleaning with water, leave to cool.
b) Do not put hot or cold foods or hot utensils on a cold
turntable/oven base.
c) Do not place anything on the outer cabinet during
operation.
NOTE:
Do not use plastic containers for microwaving if the oven is still
hot from using a combination mode (oven model dependant)
because they may melt.
Plastic containers must not be used during above modes unless
the container manufacturer says they are suitable.
If you are unsure how to connect your oven, please consult an
authorised, quali ed electrician.
Neither the manufacturer nor the dealer can accept any liability
for damage to the oven or personal injury resulting from failure
to observe the correct electrical connection procedure.
Water vapour or drops may occasionally form on the oven walls
or around the door seals and sealing surfaces. This is a normal
occurrence and is not an indication of microwave leakage or a
malfunction.
This appliance is intended for use in household and similar
EN – 9
Page 12
applications such as; Kitchen areas reserved for sta in
stores, o ces and other professional environments / Farms
/ Use by clients of hotels, motels and other residential type
environments / Bed and breakfast type environments.
This symbol means that the surfaces are liable to get
hot during use.
INSTALLATION
1. Remove all packing materials from the inside of the oven cavity and remove any protective lm found on the
microwave oven cabinet surface.
2. Check the oven carefully for any signs of damage.
3. Place the oven on a secure, level surface, strong enough to take the oven weight, plus the heaviest item likely to
be cooked in the oven. Do not place the oven in a cabinet.
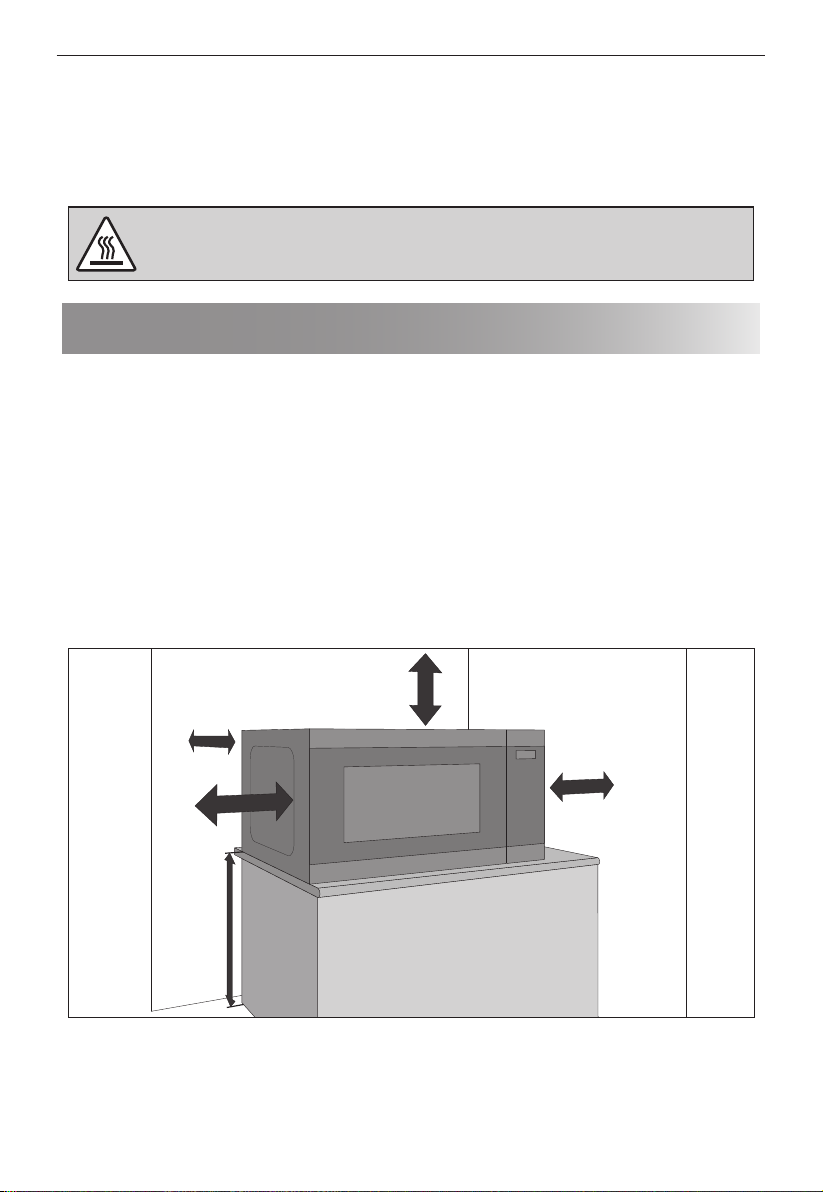
4. Select a level surface that provide enough open space for the intake and/or outlet vents. See picture on the rst
page. The rear surface of appliance can be placed against a wall.
• The minimum installation height is 85 cm.
• A minimum space of 20 cm is required between the sides of the microwave oven and any adjacent walls or objects.
• Leave a minimum space of 30 cm above the oven.
• Do not remove the feet from the bottom of the oven.
• Blocking the intake and/or outlet openings can damage the oven.
• Place the oven as far away from radios and TV as possible. Operation of microwave oven may cause interference to
your radio or TV reception.
30 cm
10 cm
20 cm
85 cm
5. Securely connect the plug of the oven to a standard earthed (grounded) household electrical outlet.
WARNING:
Do not place the oven where heat, moisture or high humidity are generated, (for example, near or above a
conventional oven) or near combustible materials (for example, curtains).
Do not block or obstruct air vent openings.
Do not place objects on top of the oven.
Do not touch the exterior of the microwave oven during or shortly after operation as it will be hot.
20 cm
EN – 10
Page 13
EN
RADIO INTERFERENCE
Operation of the microwave oven may cause interference to your radio, TV, or similar equipment. If there is
interference, it may be reduced or eliminated by taking the following measures:
1. Clean the door and cavity where they meet.
2. Change the direction of the receiving antenna of the radio or television.
3. Relocate the microwave oven with respect to the receiver.
4. Plug the microwave oven into a di erent outlet so that microwave oven and receiver are not on the same mains
feed.
GROUNDING (EARTHING) INSTRUCTIONS
This appliance must be grounded. This oven is equipped with a cord having a grounding wire with a grounding plug.
It must be plugged into a wall socket that has been properly installed and grounded. In the event of an electrical short
circuit, grounding reduces risk of electric shock by providing an escape wire for the electric current. It is recommended
that a separate circuit serving only the oven be provided.
WARNING: Improper use of the grounding plug can result in a risk of electric shock.
NOTE:
1. If you have any questions about the grounding or electrical instructions, consult a quali ed electrician or service
person.
2. Neither the manufacturer nor the dealer can accept any liability for damage to the oven or personal injury
resulting from failure to observe the electrical connection procedures.
The mains lead used in your microwave oven uses the following colour coded wires:
Green and Yellow = EARTH | Blue = NEUTRAL | Brown = LIVE
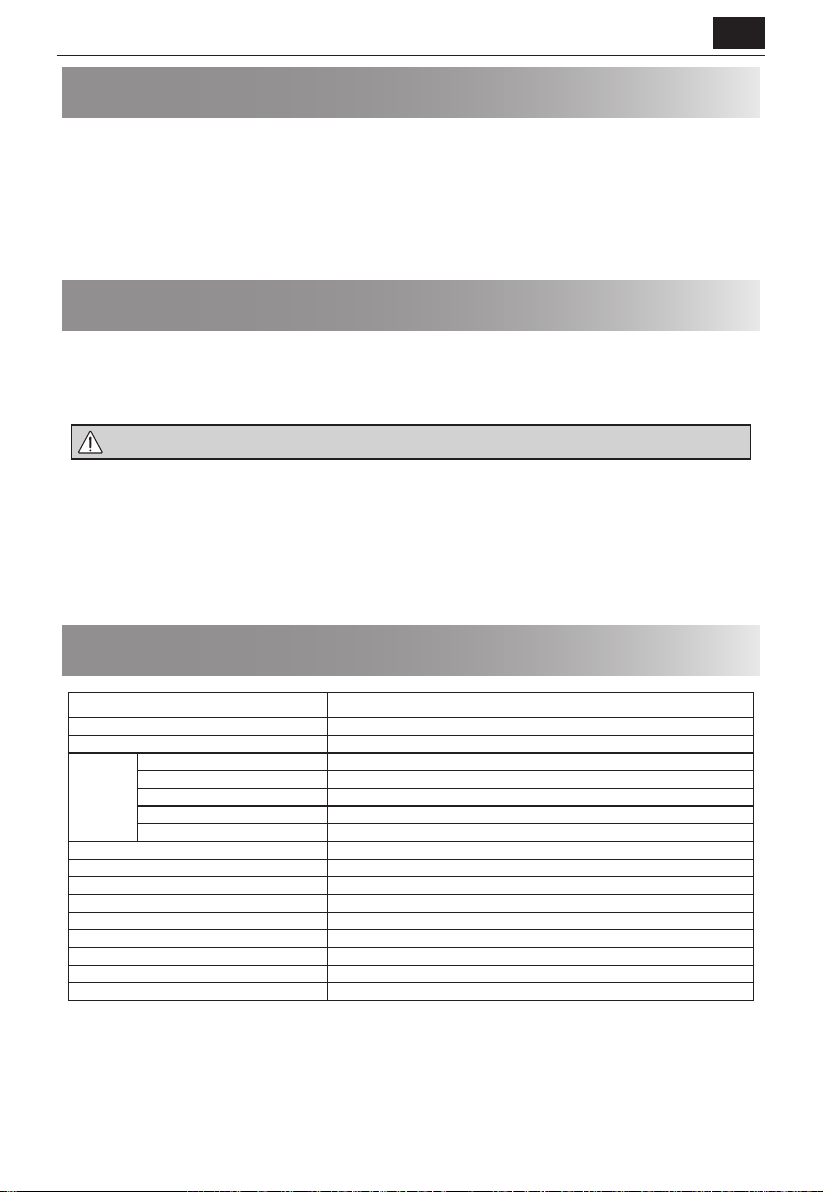
SPECIFICATIONS
Model name: YC-PC322A
AC Line Voltage 230~240 V, 50 Hz single phase
Distribution line fuse/circuit breaker 10 A
Power
Microwave Frequency 2450 MHz*
Outside Dimensions (W) x (H) x (D) mm 539 x 280 x 415
Cavity Dimensions (W) x (H) x (D)** mm 362 x 223 x 378
Glass Turntable Size (ø mm) 315
Oven Capacity 32 litres**
Baking Tray Size (Diameter x H in mm) 317 x 48
Grill Rack Size (Diameter x Height in mm) 255 x 80
Weight 21 kg
Oven Lamp (LED type) 1,5 W
* - This Product ful ls the requirement of the European standard EN55011. In conformity with this standard, this product is classi ed as
group 2 class B equipment.
Group 2 means that the equipment intentionally generates radio-frequency energy in the form of electromagnetic radiation for the heat
treatment of food.
Class B equipment means that the equipment is suitable to be used in domestic establishments.
** - Internal capacity is calculated by measuring maximum width, depth and height. Actual capacity for holding food is less.
AS PART OF A POLICY OF CONTINUOUS IMPROVEMENT, WE RESERVE THE RIGHT TO ALTER DESIGN AND SPECIFICATIONS
WITHOUT NOTICE.
Power Consumption 2300 W
Microwave Output Power 1000 W
Grill Output Power 1250 W
Convection Power 2300 W
O Mode Power <0.5 W
EN – 11
Page 14
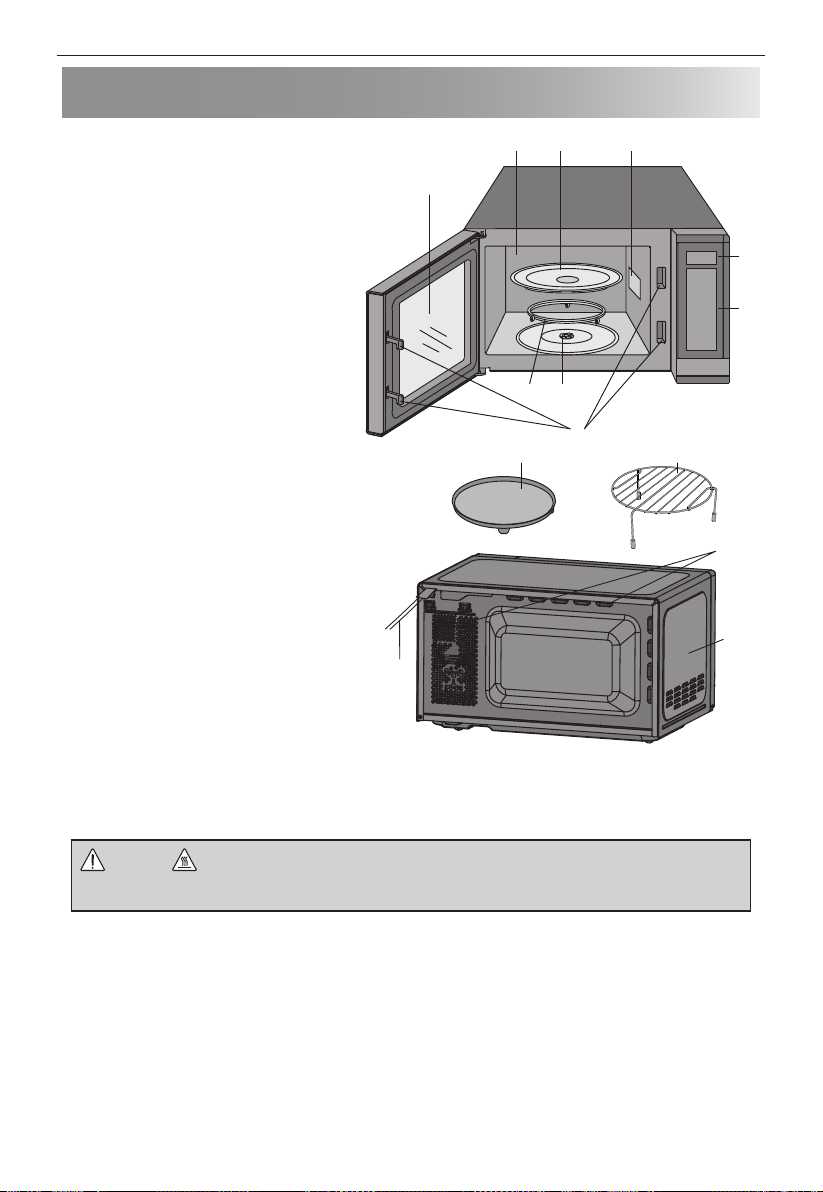
OVEN AND ACCESSORIES
1110
1. Door safety lock system
2. Oven window
3. Control Panel
4. Display
5. Oven cavity
6. Waveguide Cover (Do Not remove)
7. Glass Tray
8. Roller Ring
9. Turntable Coupling
10. Grill Rack
11. Baking Tray
12. Ventilation openings
13. Outer cabinet
14. Power supply cord
• The Grill Rack and Baking Tray are designed for
use with grill and convection ovens only. DO
NOT use any metal accessories when using the
microwave function.
• For use of the Grill Rack refer to the GRILL
sections of this User Manual.
Never touch the grill when it is hot.
NOTE: When you order accessories, please
mention two items: part name and model name.
NOTES:
• After cooking fatty foods without a cover,
always clean the cavity and any cooking
utensils thoroughly, these must be dry and
free from grease. Built-up grease may overheat
and begin to smoke or catch re.
• When microwaving, always place cookware on the turntable.
• DO NOT use the Grill Rack or Baking Tray while using the microwave function.
2
14
5
7
6
4
3
9
8
1
12
13
WARNING: This symbol means that the surfaces are liable to get hot during use. The door, outer
cabinet, oven cavity, accessories and dishes will become very hot during operation. To prevent burns,
always use thick oven gloves.
EN – 12
Page 15
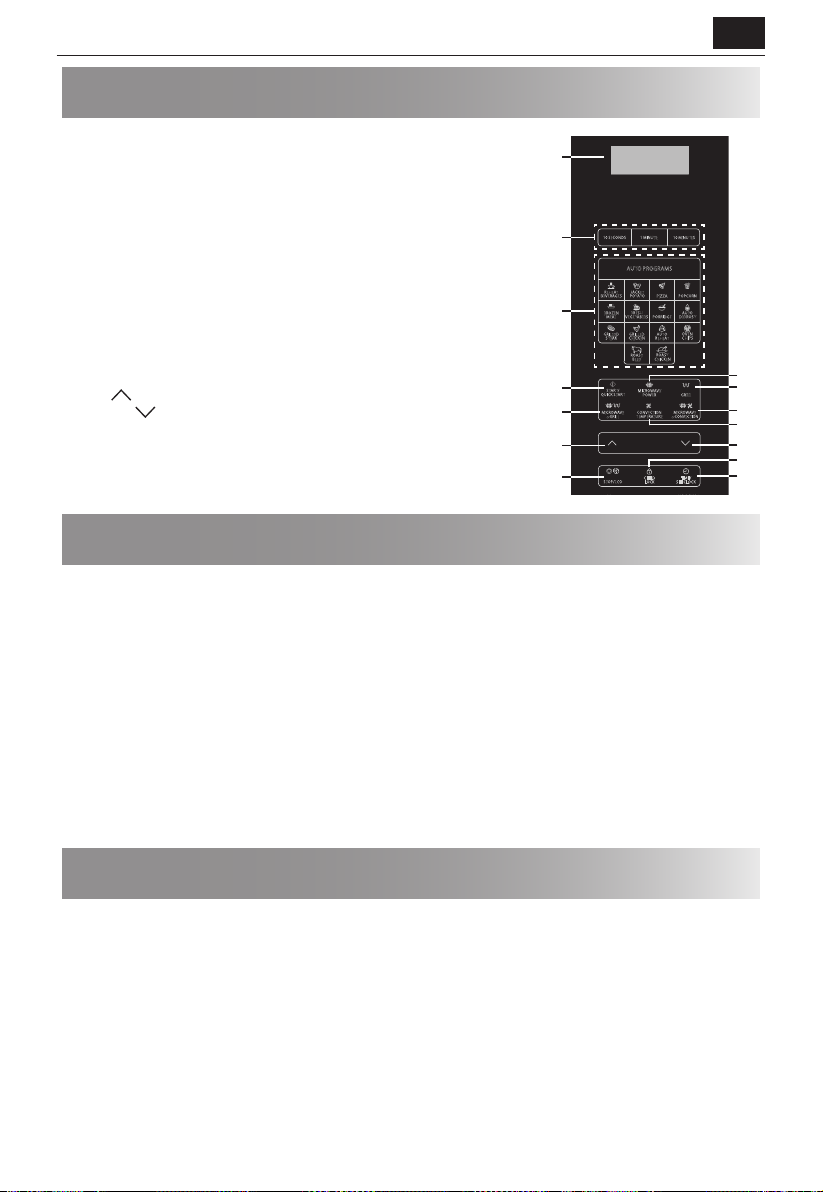
CONTROL PANEL
EN
1. DIGITAL DISPLAY – Cooking time, power, indicators and clock time are
displayed.
1
2. 10 SECONDS, 1 MINUTE, 10 MINUTES – Use to set time of cooking or the
clock.
3. AUTO MENU keys – Press to select auto cooking menu. (Refer to page 17
for advice on use).
4. START/QUICK START – (Page 14).
5. MICROWAVE POWER – Press to select microwave power level. (Page 14).
6. GRILL – Press to set grill cooking program. (Page 15).
7. MICROWAVE+GRILL – Press to set microwave and grill combination cooking
program. (Page 15).
8. CONVECTION TEMPERATURE – Press to select convection temperature.
9. MICROWAVE+CONVECTION – Press to select convection ombination
cooking.
10. UP
11. DOWN
– Press to set food weight or servings.
– Press to set food weight or servings.
12. STOP/ECO – Press once to temporarily stop cooking, or twice to cancel
cooking altogether. Use to set power saving mode. (Page 18).
13. CHILD LOCK – (Page 19).
14. TIME/SET CLOCK –
Use to set clock time. Use to set timer function. (Page 13).
10 SECONDS 1 MINUTE
2
REHEAT
BEVERAGES
3
FROZEN
MEAL
GRILLED
STEAK
4
START/
QUICK START
MICROWAVE
7
GRILL
+
10
12
STOP/ECO
AUTO PROGRAMS
JACKET
POTATO
FRESH
PORRIDGE
VEGETABLES
GRILLED
CHICKEN
ROAST
CHICKEN
EEF
B
MICROWAVE
POWER
CONVECTION
TEMPERATURE
CHILD
LOCK
10 MINUTES
POPCORN
PIZZA
AUTO
DEFROST
OVEN
AUTO
CHIPS
REHEAT
ROAST
GRILL
MICROWAVE
CONVECTION
+
TIME/
SET CLOCK
BEFORE USING THE OVEN
When the oven rst plugged in, beep will sound and the display will show "1:00". Note that the clock does not have to
be set for the oven to operate correctly. To set the clock, follow the instructions in the “Setting the Clock” section of
this User Manual.
When new, the very rst time the grill and/or convection is used, smoke and odors will be given o . To avoid this
happening when food is being cooked, use the grill and convection function without food for approx. 20 minutes.
• After opening and closing the door, the oven will enter the standby mode. If no buttons are press within 1 minute,
the display will remain on and the buttons will not operate. To enter standby mode again, open and close the door.
• During cooking, if the STOP/ECO button is pressed once, the cooking cycle will be paused. To restart cooking press
the START/QUICK START button. If the STOP/ECO button is pressed twice, cooking will be canceled.
• When programming the oven for a particular function and there is a pause between button presses of more than 30
seconds the oven will return to the standby mode.
• When a cooking cycle is completed, the display will show “End” and a tone will be heard every two minutes until a
button is pressed or the door is opened.
5
6
9
8
11
13
14
SETTING THE CLOCK
This oven has a clock which can be used in either 12- or 24-hour mode. To set the clock, follow the instructions as
below:
1. In standby mode, press and hold TIME/SET CLOCK button for at least 3 seconds to enter the clock setting mode.
2. Press the TIME/SET CLOCK button to select the 12- or 24-hour clock mode.
3. Use the 10 SECONDS, 1 MINUTE and 10 MINUTES buttons to set the desired hours and minutes.
4. Press the TIME/SET CLOCK button to store and exit the clock setting mode.
• It is not necessary to set the clock for the oven to work normally.
• While in the cook mode, press the TIME/SET CLOCK button to see the time of day (if set). The time of day will
change back to the cooking count down after 5 seconds. Note that the time of day can not be viewed if the kitchen
timer has been set.
EN – 13
Page 16
MICROWAVE COOKING
To use the microwave function, follow the insturcitons given below:
1. In standby mode, press the MICROWAVE POWER button to select power level. Each time this button is pressed,
the display will show the microwave power level.
2. Once the desired microwave power level has been selected, use the 10 SECONDS, 1 MINUTE and 10 MINUTES
buttons to select the time to cook.
3. Press the START/QUICK START button to start cooking.
4. When the cooking cycle is completed, the display will show “End” and a tone will be heard every two minutes until
a button is pressed or the door is opened.
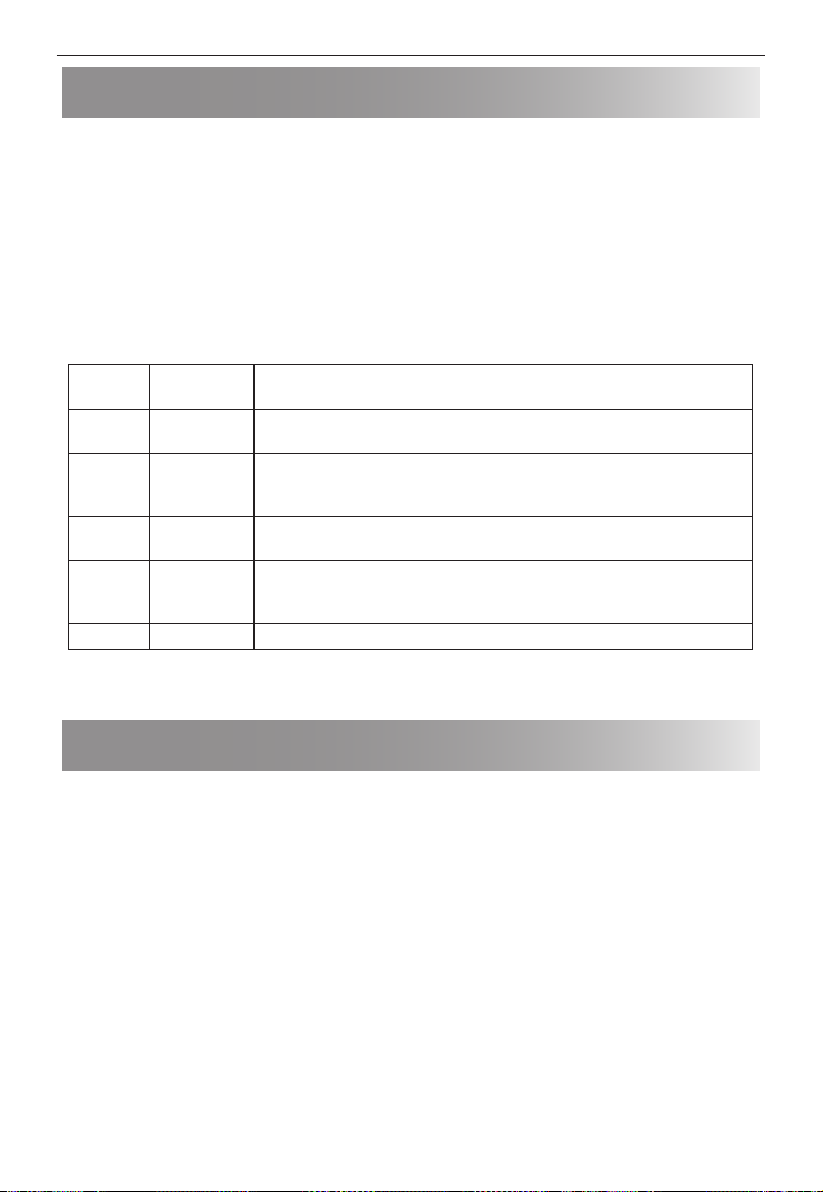
Note that the table below is for guidance. Your oven has 10 microwave power levels. These are 10%, 20%, 30%, 40%,
50%, 60%, 70%, 80%, 90% and 100%. The actual wattage output can be calculated by multiplying the microwave
power by the percentage.
Microwave Cooking Guide:
Display
P100 100%
P-80 80%
P-60 60%
P-40 40%
P-20 20% For gentle defrosting, e.g., cream gateaux or pastry.
• During cooking you can check the cooking power level by pressing and holing the MICROWAVE POWER button.
• The longest cooking time is 95 minutes.
Microwave
Power
Suggested Use
Use this setting for fast cooking or reheating e.g., for casseroles, hot beverages,
vegetables etc.
For dense foods which require a long cooking time when cooked conventionally,
e.g., beef dishes. It is advisable to use this power setting to ensure the meat will be
tender.
Used for longer cooking of dense foods such as roast joints, meat loaf and plated
meals, also for sensitive dishes such as cheese sauce and sponge cakes.
Defrost setting; select this power setting, to ensure that the dish defrosts evenly.
This setting is also ideal for simmering rice, pasta, dumplings and cooking egg
custard.
QUICK START
If you need to cook at 100% power level, just press the START/QUICK START button while in the standby mode. Each
time the START/QUICK START button is pressed, it will add 30 seconds to the cooking time.
EN – 14
Page 17
EN
GRILL COOKING
The Grill heating element at the top of the oven cavity has one power setting only, it is e cient and economical. The
grill is ideal for cooking bacon, gammon steak, sh ngers and tea cakes.
Use the Gill Rack for grilling small items of food such as bacon and sausages, turn over halfway through grilling. Food
can be placed directly on the rack or placed in a an dish or on a heat-resistant plate. To make sure that any fat or oil
which can drip from the food being cooked, ensure that a suitable tray is placed below the Grill Rack.
When browning and crisping the surface of foods in a casserole dish, the Grill Rack can be used if the container is
shallow enough. However, it is advisable to place such containers directly on the turntable allow a little extra time to
brown and crisp as desired. It is not possible to use the Grill Rack for grilling.
To use the grill function, follow the instructions below:
1. In standby mode, press the GRILL button to select the grill function. The display will show ”Grl”
2. use the 10 SECONDS, 1 MINUTE and 10 MINUTES buttons to select the time to cook.
3. Press the START/QUICK START button to start cooking.
4. When the cooking cycle is completed, the display will show “End” and a tone will be heard every 2 minutes until a
button is pressed or the door is opened.
MICROWAVE + GRILL
Using both the microwave and grill function it is possible to brown and cook the food quickly. To use the microwave
and grill function, follow the instruction as below:
1. In standby mode, press MICROWAVE + GRILL pad once or twice to select "Co-1" or "Co-2".
2. Use the 10 SECONDS, 1 MINUTE and 10 MINUTES buttons to set cooking time.
3. Press START/QUICK START button to start.
4. When the cooking cycle is completed, the display will show “End” and a tone will be heard every two minutes until
a button is pressed or the door is opened.
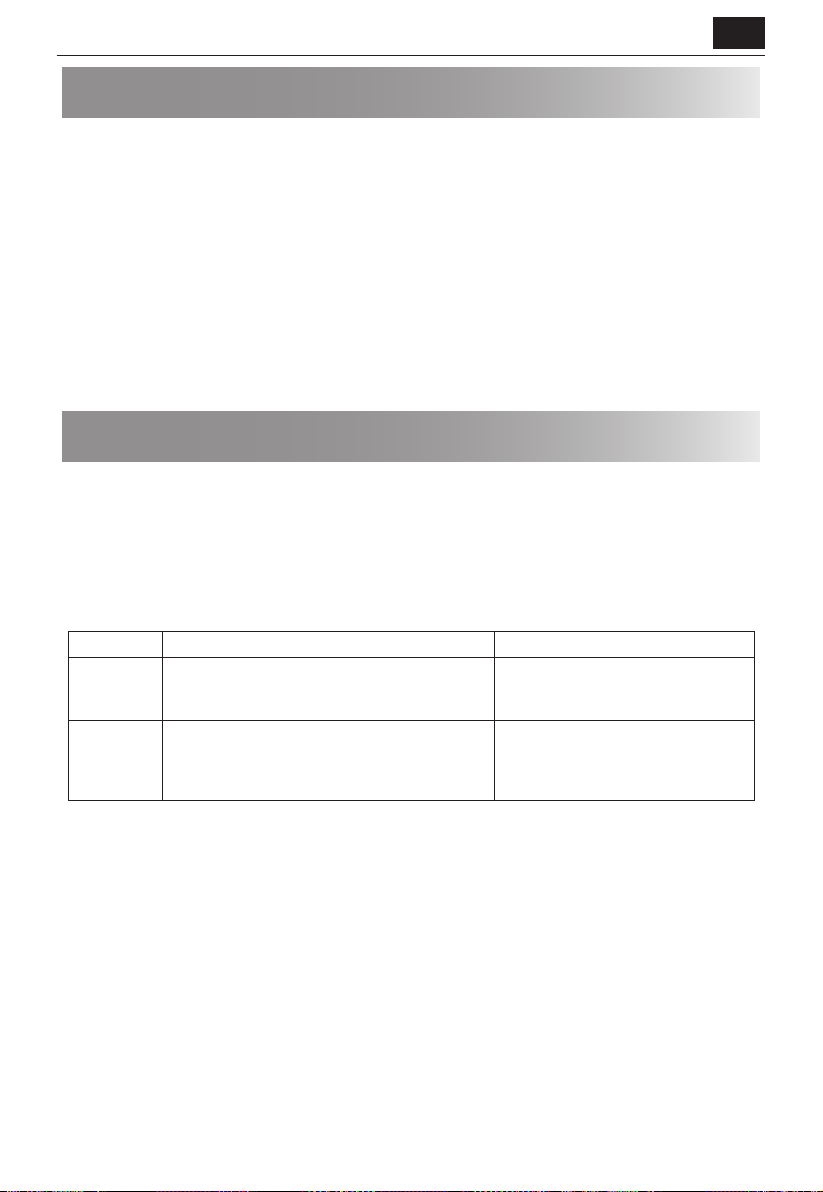
Microwave + Grill Function
Display Cooking Process Suggested Use
Co-1
Co-2
• Maximum cooking time with the grill is 95 minutes.
• During grilling allow smoke or smells to disperse by opening a window or switching on kitchen ventilation. This is
normal and not a fault with the oven.
• During cooking you can check the current combination cooking power by touching MICROWAVE + GRILL button.
• When using the grill function, the grill will turn on and o at regular intervals to prevent overheating.
• When using the MICROWAVE+GRILL function, food can be placed in a suitable container directly on the turntable.
WARNING: The door, outer cabinet, oven cavity, accessories and dishes will become very hot during operation. To
prevent burns, always use thick oven gloves.
The oven will cook in the following cycle:
Microwave 22 seconds, grill 11 seconds. this will
repeat until the end of the total time set.
The oven will cook in the following cycle:
Microwave on full power for 18 seconds then grill for
15 seconds. this will repeat until the end of the total
time set.
Chicken Pieces, Chicken Breast, Pork
Chops
Whole Chicken
EN – 15
Page 18
CONVECTION
During convection cooking, hot air is circulated throughout the oven cavity to brown and make crisp foods quickly
and evenly. This oven can be programmed for thirteen di erent cooking temperatures (200°C, 190°C, 180°C, 170°C,
160°C, 150°C, 140°C, 130°C, 120°C, 110°C).
It is recommended to preheat the oven before cooking in the convection mode. To preheat and cook using the
convection function, follow the instructions given below:
Your oven can be programmed to combine preheating and convection cooking operations.
1. In standby mode, press CONVECTION button repeatedly to select convection temperature.
2. Press START/QUICK START button to start the preheat function.
3. When the designated temperature is reached, the oven will bleep.
Once the oven has preheated and the bleep sounds:
1. Open the door and place container of food at the center of the atbed.
2. Use the 10 SECONDS, 1 MINUTE and 10 MINUTES buttons to set cooking time. The longest time is 95 minutes.
3. Press START/QUICK START button to start.
NOTE: When the convection preheat temperature is reached, the oven will bleep every two seconds. The preheat
temperature will be maintained for 30 minutes after which the oven will turn o ."
MICROWAVE + CONVECTION
The Microwave+Convection mode makes cooking easier and faster as it uses fast microwave cooking and convection
to crisp the food.
It is possible to cook at 4 di erent convection temperatures. To start the dual cook mode, follow the instrucitons as
below:
1. In standby mode, press MICROWAVE+CONVECTION repeatedly to select temperature (200°C, 170°C, 140°C,
110°C).
2. Press the 10 SECONDS, 1 MINUTE and 10 MINUTES buttons to set cooking time. The time ranges from 10
seconds to 95 minutes.
3. Press START/QUICK START button to start.
When using the Microwave + Convection function the timing of the microwave and convection cooking is as shown
below. Choose the most suitable option for cooking your food and making it crispy.
Display Cooking Process
200 °C
170 °C
140 °C
110 °C
10 second of microwave power, then 23 seconds of convection cooking. Cycle will repeat until
end of set cooking time.
15 second of microwave power, then 18 seconds of convection cooking. Cycle will repeat until
end of set cooking time.
19 second of microwave power, then 14 seconds of convection cooking. Cycle will repeat until
end of set cooking time.
24 second of microwave power, then 9 seconds of convection cooking. Cycle will repeat until
end of set cooking time.
EN – 16
Page 19
EN
AUTO MENU
For convience the Auto Programs allow food to be cooked quickly and e ecenlty with only a few button presses. It is
not necessary to program the duration and the cooking power, all that is required is to press the required auto cook
button, enter the weight/pieces by using the UP and DOWN buttons and then press START/QUICK START button.
For example, to cook two jacket potatoes.
1. Open the door and place the food inside the oven using suitable ovenware for the cook cycle being used.
2. Close the door.
3. Press the JACKET POTATO button once.
4. Use the UP and DOWN buttons to enter numbers of potatoes.
5. Press START/QUICK START button.
6. When the cooking cycle is completed, the display will show “End” and a tone will be heard every two minutes until
a button is pressed or the door is opened.
Auto cook menus:
Auto Menu Method to Select Weight or Pieces Size/Weight
Frozen Meal
Auto Defrost 100 to 1800g
Reheat Beverages
Jacket Potato
Popcorn
Fresh Vegetables 200 to 600g
Pizza 150g / 300g / 450g
Porridge 50 to 150g
Grilled Steak* 200 to 600g
Grilled Chicken* 200 to 600g
Auto Reheat* 200 to 800g
Oven Chips 200g
Roast Beef / Lamb 200 to 600g
Roast Chicken 800g to 1400g
• The result of auto cook depends on factors such as the shape and size of food, your personal preference as to the
doneness of certain foods and how the food is placed in the oven. If the resold of the cooking is not satifactory,
please adjust the cooking time to suit.
• For some of the auto cook programs, you may be requested to turn the food over. Open the door, turn the food,
close the door and then press the START/QUICK START button to resume cooking.
• Wear oven gloves (or similar) when turning food over.
Select the weight by using the UP and DOWN buttons control, then
press the START/QUICK START button to begin cooking.
Select the number of cups by using the UP and DOWN buttons, then
press the START/QUICK START button to begin cooking.
Select the number of potatoes by using the UP and DOWN buttons,
then press the START/QUICK START button to begin cooking.
Depending on the number of potatoes selected you may be asked to
rearrange the potatoes part way through the cooking cycle.
Select the weight by using the UP and DOWN buttons, then press the
START/QUICK START button to begin cooking.
200 to 800g
1 to 3 cups (200ml
each)
1 to 3 potatoes
(230g each)
100g
EN – 17
Page 20

AUTO DEFROST
Auto Defrost allows you to defrost food by weight. The defrosting time and power level are automatically set once the
food category and the weight are programmed. The frozen food weight ranges from 200 to 1800g.
1. In the standby mode, press the AUTO DEFROST button.
2. Use the UP and DOWN buttons to select weight of food to be defrosted.
3. Press the START/QUICK START button to start the defrost cycle.
4. If oven stops during the defrosting cycle, turn the food over to ensure uniform defrosting and then press START/
QUICK START to defrost for the remaining time.
5. When a defrost cycle is completed, the display will show “End” and a tone will be heard every two minutes until a
button is pressed or the door is opened.
AUTO REHEAT
The oven allows you to reheat food based on the weight entered by user. The defrosting time and power level are
automatically set once the food category and the weight are programmed. The reheat weight ranges from 200 to
800g.
1. In standby mode, press the AUTO REHEAT button.
2. Using the UP and DOWN buttons to select weight of food to be reheated
3. Press START/QUICK START.
4. When the cooking cycle is completed, the display will show “End” and a tone will be heard every two minutes until
a button is pressed or the door is opened.
KITCHEN TIMER
The oven is equipped with a kitchen timer which will count down from the time set.
1. While in the standby mode, press TIME/SET CLOCK button once.
2. Using the 10 SECONDS, 1 MINUTE and 10 MINUTES to set desired time. The longest time is 95 minutes.
3. Press START/QUICK START button to con rm.
4. Display will count down from the set time.
5. When the display reaches zero, a tone will sound.
It is also possible to use the kitchen timer while in the cook mode. To do this follow the steps as outline above while
your food is cooking. Once the kitchen timer is activated, it will appear on the display for ve seconds, then the display
will revert to to the countdown timer for the cooking cycle. To view the timer again press the TIME/SET CLOCK button
once and the kitchen timer will appear for ve seconds, then revert to the cooking countdown.
• To cancel the TIMER program press STOP/ECO button and the display shows the time.
• If a cooking cycle has been started, it is possible to start the kitchen timer by following the steps as above.
POWER SAVING FUNCTION
This feature allows power to be saved while the oven is not being used. To activate this feature while in the standby
mode, press and hold STOP/ECO button for 3 seconds, the display will turn o ; the oven will enter power saving
mode.
To cancel the power saving mode, press any button or open and close the oven door.
EN – 18
Page 21

EN
MUTE FUNCTION
It is possible to mute any tones from the microwave using the mute function. To set mute function press CHILD LOCK
button once the display will show "oFF" for 5 seconds. While in the mute mode, there will be no sound when buttons
are pressed.
To turn o the mute function, press the CHILD LOCK button once; the display will shows "on" for 5 seconds to
indicate the sound has been turned back on.
If the mute function is set and the oven is disconnected from the mains supply, it will be canceled when the mains is
reconnected.
SAFETY LOCK
This is an automatic function to prevent unsupervised operation of the oven by children. While in the standby mode,
if there is no operation within one minute, the oven will automatically enter Safety lock mode and "Loc" will appear
in the display. In the lock state, all buttons are disabled. Press any button, lock indication appears on the display for 5
seconds to remind user to cancel the Safety lock.
To turn the safety lock o simply open and close the door to the microwave and the keypad will become active again
and the lock indicator light will turn o .
CHILD LOCK
To set the CHILD LOCK, press and hold the CHILD LOCK button for 3 seconds, a long beep will be heard and the
display will indicate “Loc”. The oven is now in the CHILD LOCK mode. While in this mode, the display will show the
clock, if any key is pressed or the door is opened, “Loc” will be seen for 5 seconds.
To cancel the CHILD LOCK, press and hold the CHILD LOCK button for 3 seconds until a long beep sound is heard.
AUTOMATIC PROTECTION MECHANISM
OVERHEATING PROTECTION – When the oven senses a high temperature the display will indicate "E01" and stop
operating. This can be canceled by pressing the STOP/ECO button.
LOW TEMPERATURE PROTECTION – When the oven enters the low temperature protection mode, the display will
indicate "E02" and stop operating. This can be canceled by pressing the STOP/ECO button.
SENSOR MALFUNCTION PROTECTION – When the oven senses an issue with one of the sensors "E03" will be
displayed and the oven will stop operating. In addition, the oven will emit a warning tone. This can be canceled by
pressing the STOP/ECO button.
EN – 19
Page 22

CLEANING AND CARE
• Turn o the oven and unplug the power cord from the mains supply when cleaning.
• Keep the inside of the oven clean. When food splatters or spilled liquids adhere to oven sides, top base or turntable,
wipe with a damp cloth. Mild detergents may be used if the oven gets very dirty. Avoid using spray or other harsh
cleaners. They may stain, streak or dull the door surface.
• The outside of the oven should be cleaned with a damp cloth. To prevent damage to the operating parts inside the
oven, water should not be allowed to seep into the ventilation openings.
• Wipe the door and window on both sides, the door seals and adjacent parts frequently with a damp cloth to remove
any spills or spatters.
• Do not use abrasive cleaners.
• Do not steam cleaners.
• Do not allow the control panel to become wet. Clean with a soft, damp cloth. When cleaning the control panel, leave
oven door open to prevent oven from accidentally turning on.
• If steam accumulates inside or around the outside of the oven door, wipe with a soft cloth. This may occur when the
microwave oven is operated under high humidity condition. This is not a fault.
• The turntable should be cleaned regularly to avoid contamination and potential arcing/damage. Simply wipe the
bottom surface of the oven with mild detergent.
• Remove odors from your oven by combining a cup of water with the juice and skin of one lemon in a microwaveable
bowl. Microwave for 5 minutes. Wipe thoroughly and dry with a soft cloth.
• If the light bulb fails, please contact customer service for advice.
• The oven should be cleaned regularly and any food deposits should be removed. Failure to maintain the oven in
a clean condition could lead to deterioration of surface that could adversely a ect the life of the unit and could
possibly result in a hazardous situation.
• Please do not dispose of this appliance into the domestic rubbish bin; refer to your countries advice on disposal of
this type of product.
EN – 20
Page 23
EN
SUITABLE OVENWARE
1. The ideal material for a microwave utensil is transparent to microwave, it allows energy to pass through the
container and heat the food.
2. Microwave cannot penetrate metal, so metal utensils or dishes with metallic trim should not be used.
3. Do not use recycled paper products when microwave cooking, as they may contain small metal fragments which
may cause sparks and/or res.
4. Round /oval dishes rather than square/oblong ones are recommend, as food in corners tends to overcook.
5. Narrow strips of aluminum foil may be used to prevent overcooking of exposed areas. But be careful don’t use too
much and keep a distance of 2.54 cm between foil and cavity
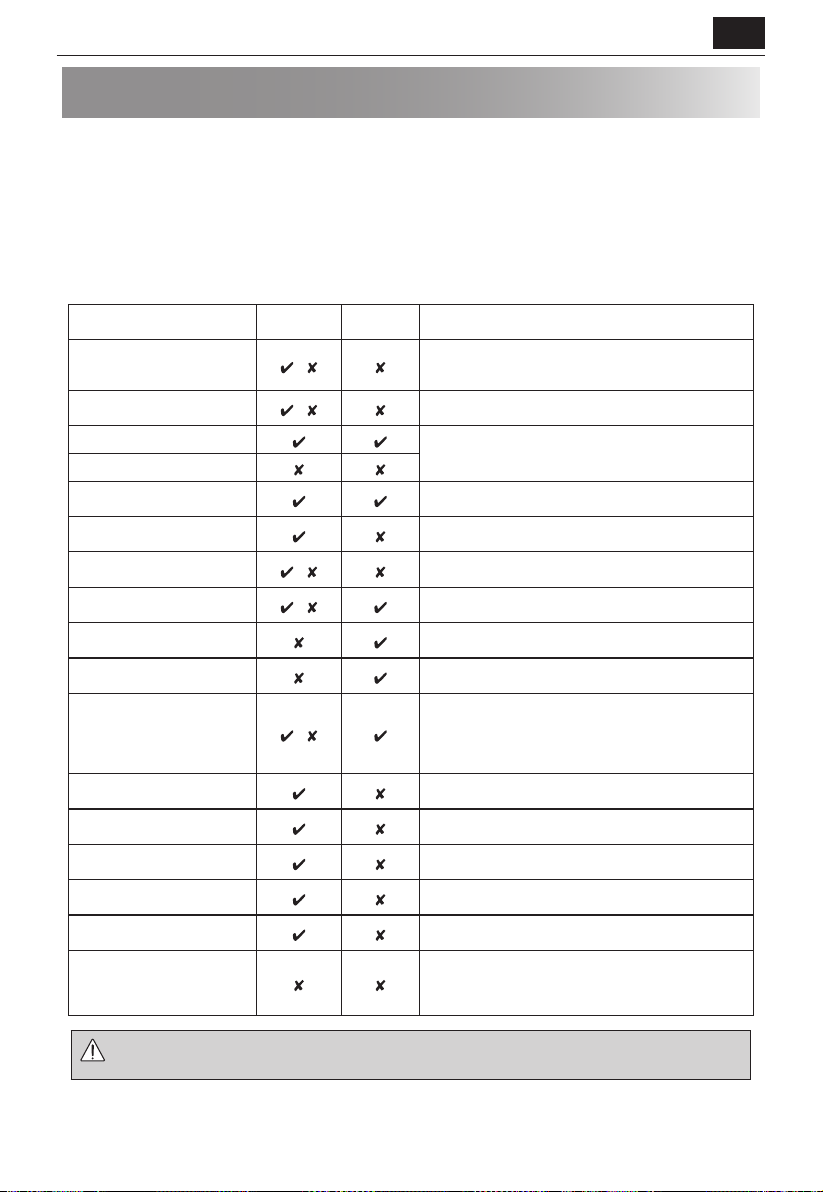
The list below is a general guide to help you select the correct utensils.
Cookware
Browning dishes
China and ceramics
Heat–Resistant Glass
Non Heat–Resistant Glass
Heat–Resistant Ceramics
Microwave–Safe Plastic Dish
Kitchen Paper
Glassware e.g. Pyrex®
Metal Tray
Metal Rack
Aluminium foil
Foil Containers
Cling lm
Plastic/Polystyrene e.g fast food
containers
Freezer/Roasting bags
Paper - Plates, cups and kitchen
paper
Straw and wooden Containers
Recycled paper and newspaper
Microwave
Safe
Grill/
Convection
/
/
/
/
/
Comment
Always follow the manufacturers instructions.
Do not exceed heating times given. Be very careful as these
dishes become very hot.
Porcelain, pottery, glazed earthenware and bone china are
usually suitable, except for those with metallic decoration.
Care should be taken to ensure that any glass cook ware is
suitable for use in a microwave oven.
Ensure that any ceramic material is not too thick or in high in
mineral content.
Always check that the plastic cook ware is suitable to be used in
a microwave oven.
Only use kitchen paper which is recommended for use in
microwave ovens.
Care should be taken if using ne glassware as it can break or
crack if heated suddenly.
It is not recommended to use metal cookware as it will arc,
which can lead to re.
It is not recommended to use metal cookware as it will arc,
which can lead to re.
Small pieces of aluminium foil can be used to shield food from
overheating. Keep foil at least 2.54 cm from the oven walls, as
arcing may occur.
Foil containers are not recommended unless speci ed by the
manufacturer, e.g. Microfoil®, follow instructions carefully.
It should not touch the food and must be pierced to let the
steam escape.
Care must be taken as some containers warp, melt or discolour
at high temperatures.
Must be pierced to let steam escape. Ensure bags are suitable
for microwave use.
Do not use plastic or metal ties, as they may melt or catch re
due to the metal ‘arcing’.
Only use for warming or to absorb moisture.
Care must be taken as overheating may cause re.
Always attend the oven when using these materials as
overheating may cause re.
May contain extracts of metal which will cause ‘arcing’ and may
lead to re.
WARNING: When heating food in plastic or paper containers, monitor the oven due to the possibility of
ignition.
NOTE: Do not leave your oven unattended while in use.
EN – 21
Page 24
MICROWAVE COOKING ADVICE
Microwaves cook food faster than conventional cooking. It is therefore essential that certain techniques are followed
to ensure good results. Many of the following techniques are similar to those used in conventional cooking.
WARNING: Liquids and foods must not be heated in sealed containers or jars/containers with lids on, as
COOKING ADVICE NOTES:
• Always attend the oven when in use.
• Ensure that the utensils are suitable for use in a microwave oven.
• Only use microwave popcorn within the recommended packaging (follow the manufacturers instructions). Never
use oil unless speci ed by the manufacturer and never cook for longer than instructed.
WARNING: If you exceed recommended cooking times and use power levels that are too high, food
pressure will build up inside and may cause the jar/container to explode.
may overheat, burn and, in extreme circumstances, catch re and damage the oven.
Arrange
Place the thickest parts of food towards the outside of the dish. e.g. Chicken drumsticks.
Foods that are placed towards the outside of the dish will receive more energy, so cook quicker, than those in the
centre.
Cover
Certain foods bene t from being covered during microwave cooking.
Use vented microwave cling lm or a suitable lid.
Pierce
Foods with a shell, skin or membrane must be pierced in several places before cooking or reheating as steam will build
up and may cause food to explode. e.g. Potatoes, Fish, Chicken, Sausages.
NOTE: Eggs should not be heated using microwave power as they may explode, even after cooking has ended. e.g.
poached, fried, hard boiled.
Stir, turn and rearrange
For even cooking it is essential to stir, turn and rearrange food during cooking. Always stir and rearrange from the
outside towards the centre.
Stand
Standing time is necessary after cooking so it enables the heat to disperse equally throughout the food.
EN – 22
Page 25
EN
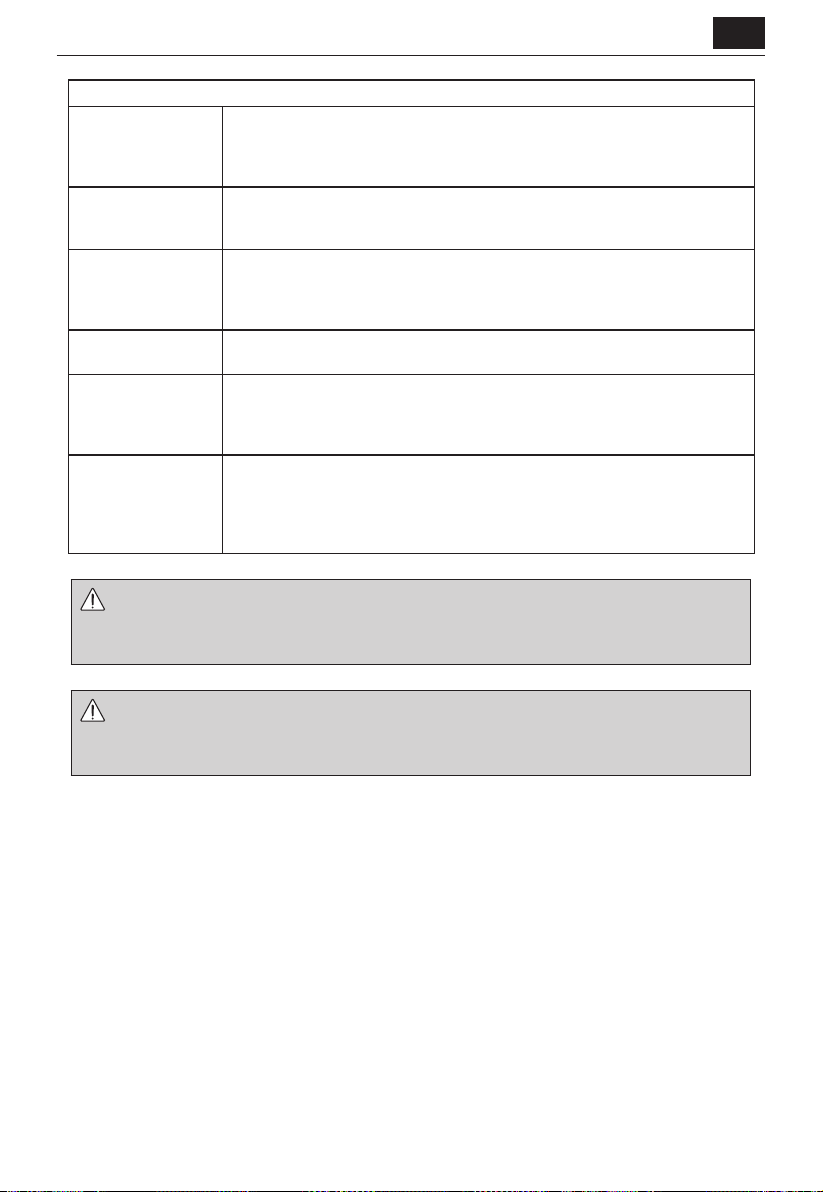
Food Characteristics
Composition Foods high in fat or sugar (e.g. Christmas pudding, mince pies) require less heating time.
Density Food density will a ect the amount of cooking time needed.
Quantity The number of microwaves in your oven remains the same regardless of how much food
Size Small foods and small pieces cook faster than large ones, as microwaves can penetrate
Shape Foods which are irregular in shape, such as chicken breasts or drumsticks, take longer to
Temperature of food The initial temperature of food a ects the amount of cooking time needed.
Care should be taken as overheating can lead to re.
Bones in food conduct heat, making the food cook more quickly. Care must be taken so
that the food is cooked evenly.
Light porous foods, such as cakes or bread, cook more quickly than heavy, dense foods,
such as roasts and casseroles.
is being cooked. The cooking time must be increased as the amount of food placed in
the oven increases.
e.g. Four potatoes will take longer to cook than two.
from all sides to the centre. For even cooking make all the pieces the same size.
cook in the thicker parts. For even cooking, place the thickest parts to the outside of the
dish where they will receive more energy.
Round shapes cook more evenly than square shapes when microwave cooking.
Chilled foods will take longer to cook than food at room temperature.
The temperature of the container is not a true indication of the temperature of the food
or drink. Cut into foods with llings, for example jam doughnuts, to release heat or
steam.
WARNING: Face and Hands: Always use oven gloves to remove food or cookware from the oven. Stand
WARNING: Check the temperature of food and drink, stir before serving. Take special care when
back when opening the oven door to allow heat or steam to disperse. When removing
covers (such as cling lm), opening roasting bags or popcorn packaging, direct steam away
from face and hands.
serving to babies, children or the elderly. The contents of feeding bottles and baby food
jars are to be stirred or shaken and the temperature is to be checked before consumption
to avoid burns.
EN – 23
Page 26

DEFROSTING ADVICE
Using your microwave oven is the quickest defrosting method. It is a simple process but the following instructions are
essential to ensure the food is thoroughly defrosted.
• Remove all packaging and wrapping before defrosting.
• To defrost food, use microwave power levels P-20 to P-40.
• Please refer to the further information below.
Rearrange
Foods that are placed towards the outside of the dish will defrost quicker than foods in the centre. It is therefore
essential that the food is rearranged up to 4 times during defrosting.
Move closely packed pieces from the outside to the centre and rearrange over-lapping areas.
This will ensure that all parts of the food defrosts evenly.
Separate
Foods may be stuck together when removed from the freezer. It is important to separate foods as soon as it is possible
during defrosting.
e.g. bacon rashers, chicken llets.
Shield
Some areas of food being defrosted may become warm. To prevent them becoming warmer and starting to cook,
these areas can be shielded with small pieces of foil, which re ect microwaves, e.g. legs and wings on a chicken.
Stand
Standing time is necessary to ensure food is thoroughly defrosted.
Defrosting is not complete once the food is removed from the microwave oven. Food must stand, covered, for a
length of time to ensure the centre has completely defrosted.
Turn over
It is essential that all foods are turned over up to 4 times during defrosting.
This is important to ensure thorough defrosting.
EN – 24
Page 27
EN
REHEATING ADVICE
For the reheating of foods, follow the advice and guidelines below to ensure food is thoroughly reheated before
serving.
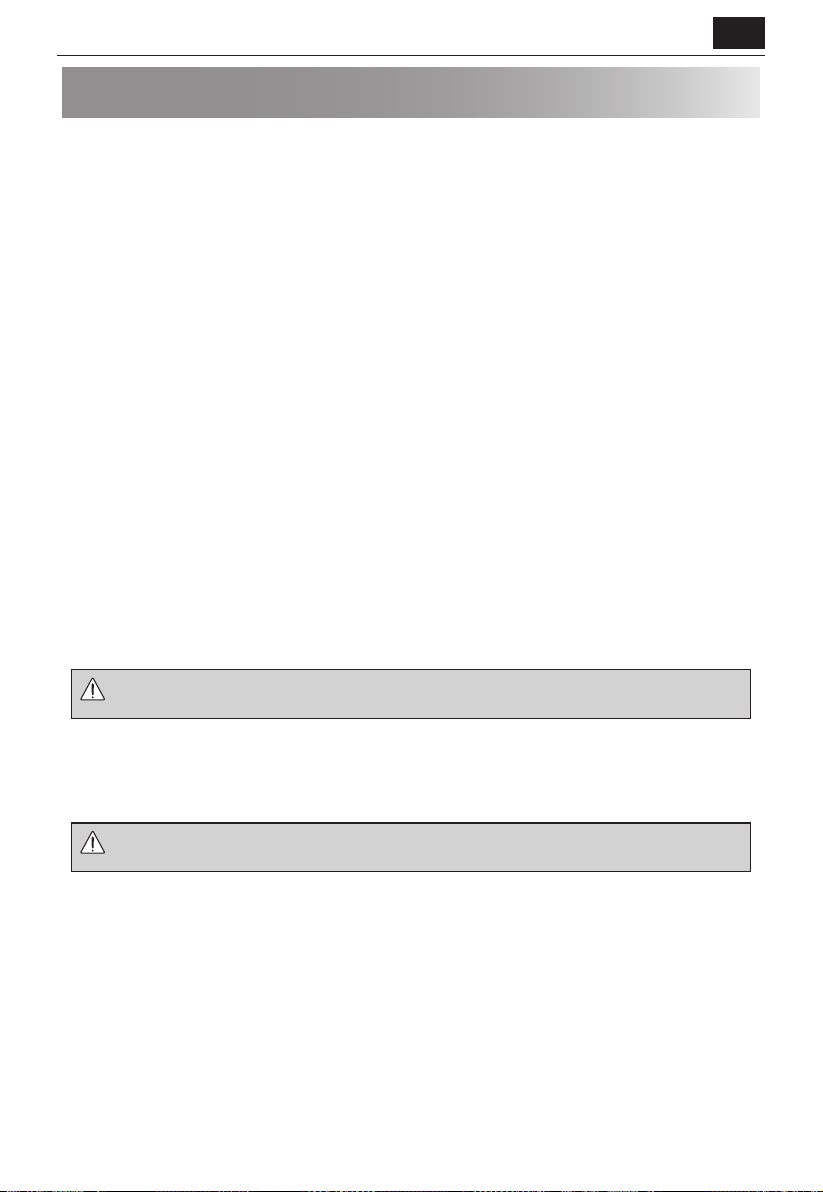
Plated meals
Remove any poultry or meat portions, reheat these separately, see below.
Place smaller items of food to the centre of the plate, larger and thicker foods to the edge. Cover with vented
microwave cling lm and reheat on power level P-50, stir/rearrange halfway through reheating.
NOTE: Ensure the food is thoroughly reheated before serving.
Sliced meat
Cover with vented microwave cling lm and reheat on power level P-60. Rearrange at least once to ensure even
reheating.
NOTE: Ensure the meat is thoroughly reheated before serving.
Poultry portions
Place thickest parts of the portions to the outside of the dish, cover with vented microwave cling lm and reheat on
power level P-70.
Turn over halfway through reheating.
NOTE: Ensure the poultry is thoroughly reheated before serving.
Casseroles
Cover with vented microwave cling lm or a suitable lid and reheat on power level P-50.
Stir frequently to ensure even reheating.
NOTE: Ensure the food is thoroughly reheated before serving.
To achieve the best results when reheating, select a suitable microwave power level appropriate to the type of food.
e.g. A bowl of vegetables can be reheated using power level P-100, while a lasagne which contains ingredients that
cannot be stirred, should be reheated using power level P-40.
NOTES:
• Remove food from foil or metal containers before reheating.
• Reheating times will be a ected by the shape, depth, quantity and temperature of food together with the size,
shape and material of the container.
WARNING: Never heat liquids in narrow-necked containers, as this could result in the contents erupting
• To avoid overheating and re, special care must be taken when reheating foods with a high sugar or fat content, e.g.
mince pies or Christmas pudding.
• Never heat oil or fat for deep frying as this may lead to overheating and re.
• Canned potatoes should not be heated in the microwave oven, follow the manufacturer’s instructions on the can.
WARNING: The contents of feeding bottles and baby food jars are to be stirred or shaken and the
from the container and may cause burns.
temperature is to be checked before consumption to avoid burns.
EN – 25
Page 28
TROUBLESHOOTING
If you think the oven is not working properly there are some simple checks you can carry out yourself before calling an
engineer. This will help prevent unnecessary service calls if the fault is something simple.
Follow this simple check below:
Place half a cup of water on the turntable and close the door. Set the timer know to cook for 1 minute using
microwave power level of P-100.
1. Does the oven lamp come on when it is cooking?
2. Does the cooling fan work? (Check by placing your hand above the air vent openings).
3. After 1 minute does the audible signal sound?
4. Is the water in the cup hot?
If you answer “NO” to any question rst check that the oven is plugged in properly and the fuse has not blown. If
there is no fault with either, check against the troubleshooting chart below.
WARNING: Never adjust, repair or modify the oven yourself. It is hazardous for anyone other than a
• The door seal stops microwave leakage during oven operation, but does not form an airtight seal. It is normal to see
drops of water, light or feel warm air around the oven door. Food with a high moisture content will release steam
and cause condensation inside the door which may drip from the oven.
• Repairs and Modi cations: Do not attempt to repair, modify or operate the oven if it is not working properly.
• Outer Cabinet and Lamp Access: Never remove the outer cabinet. This is very dangerous due to high voltage parts
inside which must never be touched, as this could be fatal.
Your oven is not tted with a lamp access cover. If the lamp fails, do not attempt to replace the lamp yourself, call a
SHARP approved service facility.
SHARP trained engineer to carry out servicing or repairs. This is important as it may involve
the removal of covers that provide protection against microwave energy.
TROUBLESHOOTING CHART
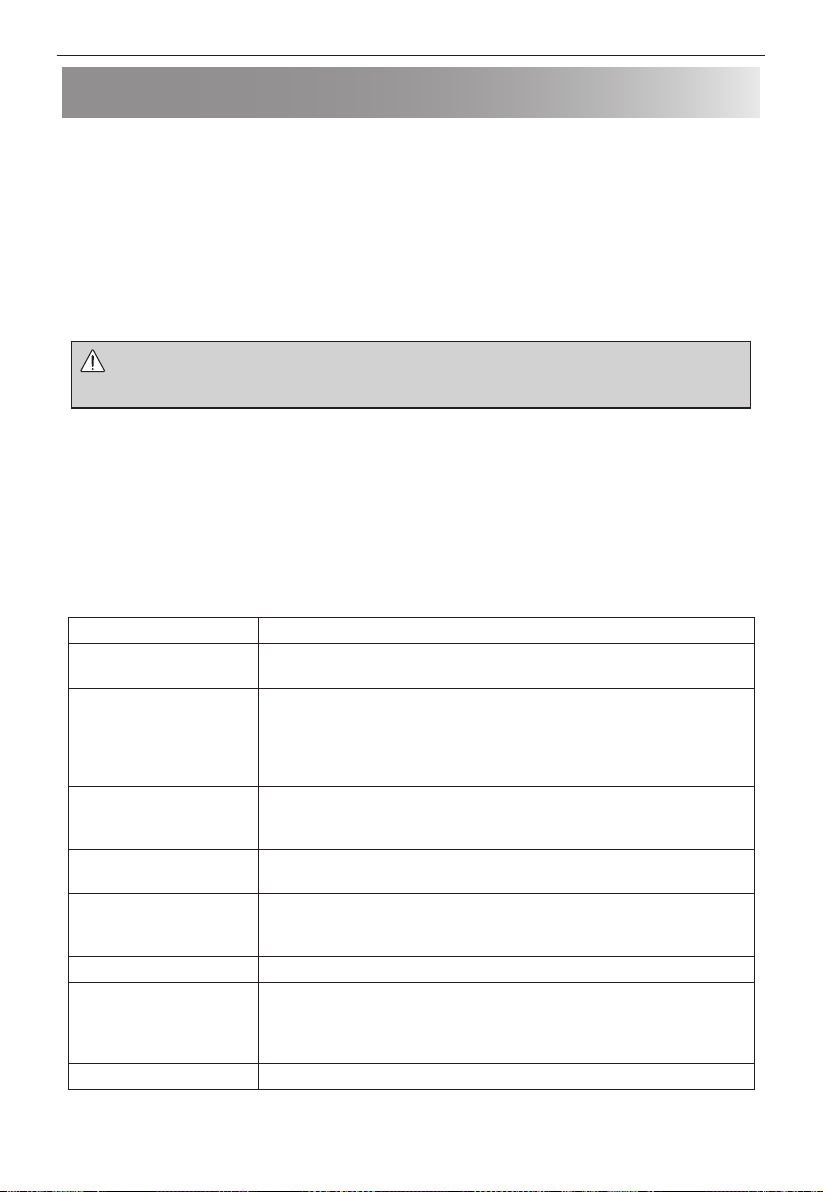
QUERY ANSWER
Draught circulates around
the door.
Condensation forms in the
oven, and may drip from the
door.
Flashing or arcing from within
the cavity when cooking.
Arcing potatoes. Ensure all “eyes” are removed from the potatoes and that they have been pierced,
Oven does not work when
the START/QUICK START
button is pressed.
Oven cooks too slowly. Ensure correct power level has been selected.
Oven makes a noise. The microwave energy pulses ON and OFF during cooking/defrosting.
Outer cabinet is hot. The cabinet may become warm to the touch - keep children away.
When the oven is working, air circulates within the cavity.
The door does not form an airtight seal so air may escape from the door.
The oven cavity will normally be colder than the food being cooked, and so steam
produced when cooking will condense on the colder surface.
The amount of steam produced depends on the water content of the food being
cooked. Some foods, such as potatoes have a high moisture content.
Condensation trapped in the door glass should clear after a few hours.
Arcing will occur when a metallic object comes into close proximity to the oven
cavity during cooking. This may possibly roughen the surface of the cavity, but
would not otherwise damage the oven.
place directly onto the turntable in a heat resistant an dish or similar.
Check the door is closed properly.
Bleep is heard from the oven every minute and the display indicates "Fail"
If the control panel buttons are pressed continuously for more than 1 minute this
error will occur.
EN – 26
Page 29

EN
STICKING BUTTON PROTECTION
In any state, if any button on the control panel is stuck for more than1 minute, the program stops working
immediately and the display shows "FAIL". The microwave will emit a bleep. If the button keeps sticking, bleep will
sound every one minute. After troubleshooting, press STOP/ECO button to return to standby mode.
BEFORE CALLING FOR ASSISTANCE
Before asking for service, please check each item below:
• Check to ensure that the oven is plugged in securely. If it is not, remove the plug from the outlet, wait 10 seconds,
and plug it in again securely.
• Check for a blown circuit fuse or a tripped main circuit breaker. If these seem to be operating properly, test the
outlet with another appliance.
• Check to ensure that the power and timer knobs are set correctly.
• Check to ensure that the door is securely closed engaging the door safety lock system. Otherwise, the microwave
energy will not ow into the oven
IF NONE OF THE ABOVE RECTIFIES THE SITUATION, THEN CONTACT A QUALIFIED TECHNICIAN. DO NOT TRY TO ADJUST
OR REPAIR THE OVEN YOURSELF.
EN – 27
Page 30
Achtung:
Ihr Produkt ist
mit diesem
Symbol gekenn-
zeichnet. Dies
bedeutet, dass
Elektro-Altge-
räte nicht mit
dem allgemei-
nen Hausmüll
vermischt
werden dürfen.
Es gibt ein sepa-
rates Sammel-
system für diese
Produkte.
www.sharpconsumer.com/
contact/
A. Entsorgungsinformationen
(für private Haushalte)
1. In der EU
Achtung: Bitte entsorgen Sie das Gerät nicht über den Hausmüll!
Elektro-Altgeräte müssen getrennt vom übrigen Abfall und gemäß den gültigen
gesetzlichen Vorschriften zur Entsorgung und zum Recycling elektrischer und
elektronischer Altgeräte behandelt werden.
Gemäß der Umsetzung der Altgeräterichtlinie seitens der Mitgliedsstaaten können
Privathaushalte in der Europäischen Union ihre elektrischen und elektronischen
Altgeräte an dafür vorgesehenen Entsorgungsstellen kostenlos abgeben.
In einigen Ländern* kann auch Ihr örtlicher Händler Ihr Altgerät kostenlos
entgegennehmen, wenn Sie ein vergleichbares Neugerät kaufen.
*) Kontaktieren Sie hierfür bitte Ihre örtlichen Behörden.
Wenn Ihr Elektroaltgerät Batterien oder Akkus enthält, sollten Sie diese vorher
getrennt entsorgen, gemäß den örtlichen Anforderungen. Wenn Sie dieses
Produkt korrekt entsorgen, tragen Sie zu einer korrekten Schadsto behandlung
und zu einem e zienten Recycling und im Ende ekt zum Umweltschutz und zur
Verhinderung von eventuellen Gesundheitsrisiken bei.
Informationen gültig für Deutschland
Altgeräte sind getrennt zu sammeln und zu entsorgen. Besitzer von Altgeräten
tragen damit zur sicheren Entsorgung bei und helfen, mögliche umwelt- oder
gesundheitsschädliche Folgen zu vermeiden.
Entnehmbare Lampen, die zerstörungsfrei zu entnehmen sind, sind vor der
Entsorgung zu entfernen und getrennt zu behandeln.
Informationen über gescha ene Sammel- bzw. Rückgabemöglichkeiten sowie
die Verp ichtungen des Handels/der Vertreiber gegenüber Endnutzern zur
kostenfreien Rücknahme von Altgeräten nden Sie auf der lokalen Website des
Herstellers des Produktes (www.sharpconsumer.eu), oder wenden Sie sich an den
Händler, von dem das Produkt bezogen wurde.
Die Verantwortung für das Löschen von personenbezogenen Daten, die sich auf
dem zu entsorgenden Gerät be nden, liegt beim Endnutzer.
Das Symbol mit der durchgestrichenen Mülltonne weist darauf hin, dass Produkte
und/oder Verpackungen getrennt vom Hausmüll gesammelt und entsorgt werden
müssen. Der schwarze Balken zeigt an, dass das Produkt nach dem 13. August 2005
auf den Markt gebracht wurde.
2. In Nicht-EU-Ländern
Bitte kontaktieren Sie Ihre örtlichen Behörden für mehr Informationen über die
korrekte Entsorgung Ihres Produkts.
Für die Schweiz: Gebrauchte elektrische und elektronische Geräte können beim
Händler kostenlos abgegeben werden, auch wenn kein neues Produkt gekauft
wird. Weitere Einrichtungen zur Entsorgung nden Sie auf der Homepage von
www.swico.ch oder www.sens.ch.
www.sharpconsumer.com/
support/
www.sharpconsumer.com/
documents-of-conformity/
Serviceleistungen nden Sie unter www.sharpconsumer.com/contact/, Ihre Garantierechte unter
www.sharpconsumer.com/support/ oder bei dem Händler, bei dem Sie das Produkt erworben haben.
Konformitätserklärungen nden Sie unter www.sharpconsumer.com/documents-of-conformity/
B. Entsorgungsinformationen für gewerbliche Nutzer
1. In der EU
Wenn das Produkt für gewerbliche Zwecke benutzt wurde und Sie es entsorgen
möchten:
Kontaktieren Sie bitte Ihren SHARP-Händler, der Sie über die Zurücknahme
des Produkts informieren wird. Es könnten Ihnen dabei Rücknahme- und
Recyclingkosten in Rechnung gestellt werden. Kleine Produkte (und kleine
Mengen) werden möglicherweise auch von ihrem örtlichen Recyclinghof
entgegengenommen.
In Spanien: Kontaktieren Sie bitte ihr örtliches Entsorgungsunternehmen oder die
örtlichen Behörden, um mehr über die Entsorgung Ihrer Altgeräte zu erfahren.
2. In Nicht-EU-Ländern
Bitte kontaktieren sie Ihre örtlichen Behörden für mehr Informationen über die
korrekte Entsorgung Ihres Produkts.
DE – 1
Page 31

DE
VORSICHTSMASSNAHMEN ZUR VERMEIDUNG EINER MÖGLICHEN
EXPOSITION GEGENÜBER MIKROWELLENENERGIE
1. Betreiben Sie diesen Ofen nicht mit geö neter Tür. Dies kann zu einer schädlichen Exposition gegenüber
Mikrowellenenergie führen. Es ist wichtig, dass Sie die Sicherheitsverriegelungen nicht umgehen oder
manipulieren.
2. Stecken Sie keine Gegenstände zwischen die Vorderseite des Ofens und die Tür und achten Sie darauf, dass sich
kein Schmutz und keine Reinigungsmittelreste auf den Dicht ächen ansammeln.
3. Bedienen Sie den Ofen nicht, wenn dieser beschädigt ist. Es ist besonders wichtig, dass die Gerätetür richtig
schließt und dass die Tür, Scharniere, Schlösser oder Türdichtungen und Dicht ächen unbeschädigt sind.
4. Sie sollten nicht versuchen, den Ofen zu reparieren oder zu verstellen.
INHALTSVERZEICHNIS
WICHTIGE SICHERHEITSHINWEISE................................................................................................................................................................... 3
EINBAU ....................................................................................................................................................................................................................12
FUNKSTÖRUNG ....................................................................................................................................................................................................13
ANWEISUNGEN ZUR ERDUNG ........................................................................................................................................................................13
TECHNISCHE DATEN ...........................................................................................................................................................................................13
GERÄT UND ZUBEHÖR .......................................................................................................................................................................................14
BEDIENFELD ..........................................................................................................................................................................................................15
VORBEREITUNG ....................................................................................................................................................................................................15
EINSTELLEN DER UHR ........................................................................................................................................................................................15
GAREN MIT DER MIKROWELLE ........................................................................................................................................................................16
SCHNELLSTART .....................................................................................................................................................................................................16
GRILLEN ...................................................................................................................................................................................................................17
MIKROWELLE + GRILL ........................................................................................................................................................................................17
HEISSLUFT ..............................................................................................................................................................................................................18
MIKROWELLE + HEISSLUFT ..............................................................................................................................................................................18
AUTO-MENÜ ..........................................................................................................................................................................................................19
AUTO DEFROST (AUTOMATISCHES AUFTAUEN) .......................................................................................................................................20
AUTOMATISCHES AUFWÄRMEN .....................................................................................................................................................................20
KÜCHENTIMER ......................................................................................................................................................................................................20
ENERGIESPARFUNKTION ...................................................................................................................................................................................20
STUMM-FUNKTION .............................................................................................................................................................................................21
SICHERHEITSVERRIEGELUNG ...........................................................................................................................................................................21
KINDERSICHERUNG:............................................................................................................................................................................................21
AUTOMATISCHER SCHUTZMECHANISMUS ................................................................................................................................................ 21
REINIGUNG UND WARTUNG ............................................................................................................................................................................22
PASSENDES OFENGESCHIRR ............................................................................................................................................................................23
MIKROWELLENGARTIPPS ..................................................................................................................................................................................24
AUFTAU-TIPPS .......................................................................................................................................................................................................26
AUFWÄRM-TIPPS ..................................................................................................................................................................................................27
FEHLERBEHEBUNG ..............................................................................................................................................................................................28
SCHUTZ VOR KLEMMENDEN TASTEN ...........................................................................................................................................................29
EHE SIE UNTERSTÜTZUNG ANFORDERN .....................................................................................................................................................29
DE – 2
Page 32

WICHTIGE SICHERHEITSHINWEISE
BITTE SORGFÄLTIG DURCHLESEN UND ZUM SPÄTEREN
NACHSCHLAGEN AUFBEWAHREN
Um die Gefahr eines Brandes auszuschließen. Mikrowellengeräte sollten während des Betriebs nicht unbeaufsichtigt gelassen werden. Zu hohe Leistungsstufen oder zu
lange Garzeiten können das Gargut überhitzen und Feuer
verursachen.
Dieses Gerät ist nur für den Einsatz auf einer Arbeits äche vorgesehen. Es ist nicht für den Einbau in einem Küchenschrank
konzipiert. Das Gerät nicht in einen Schrank stellen. Die Steckdose muss ständig zugänglich sein, sodass der Netzstecker im
Notfall einfach abgezogen werden kann.
Die Netzspannung muss 230-240 V Wechselstrom, 50 Hz betragen und sollte mit einer Sicherung von mindestens 10 A oder
einem Sicherungsautomaten von mindestens 10 A ausgestattet
sein. Ein getrennter, nur dem Betrieb dieses Geräts dienender
Stromkreis sollte vorgesehen werden.
Stellen Sie das Gerät nicht an einem Ort auf, an dem Hitze generiert wird, z. B. neben einem konventionellen Herd.
Das Gerät nicht an Orten aufstellen, an denen hohe Luftfeuchtigkeit vorhanden ist oder sich Kondenswasser bilden kann.
Das Gerät nicht im Freien aufbewahren oder aufstellen. Das
Gerät nicht im Freien aufbewahren oder aufstellen.
Wird Rauch festgestellt, ist das Gerät sofort auszuschalten
oder der Netzstecker abzuziehen und die Tür geschlossen
zu halten, damit eventuelle Flammen erstickt werden.
Nur mikrowellengeeignetes Geschirr verwenden. Geschirr
sollte überprüft werden, ob es für Mikrowellengeräte geeignet ist.
Beim Erhitzen von Lebensmitteln in Plastik- oder Papier-
DE – 3
Page 33

DE
behältern müssen Sie das Gerät überwachen, da sich diese
entzünden könnten.
Reinigen Sie die Abdeckung des Hohlleiters und den Garraum. Sie müssen trocken und frei von Fett sein. Angesammeltes Fett könnte sich überhitzen, zu rauchen anfangen
oder Feuer fangen.
Keine brennbaren Materialien in der Nähe desGerätes oder
den Lüftungsö nungen aufbewahren. Niemals die Lüftungsö nungen blockieren.
Alle Metallverschlüsse, Drähte usw. von Lebensmitteln und Verpackungen entfernen. Funkenbildung auf Metallober ächen
kann zu Feuer führen.
Das Mikrowellengerät nicht zum Frittierenvon Lebensmitteln
in Öl oder Fett verwenden.Die Temperatur kann nicht kontrolliert werden und das Fett kann sich entzünden.
Zum Herstellen von Popcorn sollte nur fürMikrowellengeräte
vorgesehenes Popcorn-Geschirr verwendet werden.
Keine Lebensmittel oder andere Gegenstände im Gerät lagern.
Die Einstellungen nach dem Starten des Gerätes überprüfen,
um sicherzustellen, dass das Gerät wie gewünscht arbeitet.
Lassen Sie den Ofen beim Betrieb nicht unbeaufsichtigt.
Zur Vermeidung von Überhitzung und Feuer sollte besonders
vorsichtig vorgegangen werden, wenn Lebensmittel mit einem
besonders hohen Zucker- oder Fettgehalt gegart oder aufgewärmt werden, wie z.B. Würstchen, Kuchen oder weihnachtliche Süßspeisen. Beachten Sie die entsprechenden Hinweise in
dieser Bedienungsanleitung.
Zur Vermeidung von Verletzungen. WARNUNG:
Das Gerät nicht betreiben, wenn es beschädigt ist oder Fehlfunktionen aufweist. Überprüfen Sie vor dem Betrieb die
folgenden Punkte:
DE – 4
Page 34

a) Vergewissern Sie sich, dass die Tür einwandfrei schließt
und dass sie nicht falsch ausgerichtet oder verzogen ist.
b) Vergewissern Sie sich, dass die Scharniere und Verriegelun-
gen der Sicherheitstüren nicht beschädigt oder lose sind.
c) Vergewissern Sie sich, dass die Türdichtungen und Dich-
tungsober ächen nicht beschädigt sind.
d) Vergewissern Sie sich, dass sich im Garraum und an der
Tür keine Dellen oder andere Beschädigungen vorhanden
sind.
e) Vergewissern Sie sich, dass das Netzkabel und der Stecker
nicht beschädigt sind.
Falls die Tür bzw. die Türdichtungen beschädigt sind, darf das
Gerät nicht weiter betrieben werden, bevor es durch eine
kompetente Person repariert wurde.
Nehmen Sie unter keinen Umständen Reparaturen oder
Änderungen an Ihrem Mikrowellengerät selbst vor. Reparaturen, insbesondere solche, bei denen die Abdeckung
des Geräts entfernt werden muss, dürfen ausschließlich
von entsprechend quali zierten Technikern vorgenommen werden.
Das Gerät nicht mit geö neter Türe betreiben oder verändern
Sie die Türsicherheitsverriegelung in keiner Weise. Gerät nicht
betreiben, wenn sich ein Objekt zwischen den Türdichtungen
und den Dichtungsober ächen be ndet.
Vermeiden Sie die Bildung von Schmutz oder Fett an
Türdichtungen und angrenzenden Teilen. Reinigen Sie
das Gerät in regelmäßigen Abständen und entfernen Sie
Lebensmittelrückstände.
Befolgen Sie die Hinweise im Kapitel „Reinigung und
P ege“. Wird das Gerät nicht in einem sauberen Zustand
gehalten, kann dies zu einer Beschädigung der Ober äche
führen, was die Gebrauchsdauer des Gerätes nachteilig
DE – 5
Page 35

DE
beein ussen und möglicherweise zu einer Gefahrensituation führen kann.
Personen mit HERZSCHRITTMACHERN sollten ihren Arzt oder
den Hersteller des Herzschrittmachers nach Vorsichtsmaßnahmen beim Umgang mit Mikrowellengeräten befragen.
Zur Vermeidung von Elektroschocks.
• Unter keinen Umständen sollte das äußere Gehäuse ent-
fernt werden.
• Niemals Flüssigkeiten in die Ö nungen der Türsicherheits-
verriegelung oder Lüftungsö nungen eintreten lassen, ferner keine Gegenstände in diese Ö nungen stecken. Wenn
größere Mengen Flüssigkeiten verschüttet werden, das
Gerät sofort ausschalten, den Netzstecker ziehen und den
SHARP-Kundendienst kontaktieren.
• Niemals das Netzkabel bzw. den Netzstecker in Wasser oder
andere Flüssigkeiten tauchen.
• Das Netzkabel nicht über scharfe Kanten eines Tisches oder
eine Arbeitsplatte führen.
• Das Netzkabel von erwärmten Ober ächen, einschließlich
der Geräterückseite, fernhalten.
• Das Gerät und Kabel von Kindern unter 8 Jahren fernhalten.
• Auf keinen Fall versuchen, die Garraumlampe selbst auszu-
wechseln, sondern nur von einem von SHARP autorisierten
Elektriker auswechseln lassen! Wenn die Garraumlampe ausfallen sollte, wenden Sie sich bitte an Ihren Elektrohändler
oder eine von SHARP autorisierte Kundendienststelle.
• Wenn das Netzkabel beschädigt wird, muss es von einem
autorisierten Servicetechniker von SHARP ersetzt werden.
WARNUNG: Speisen in üssiger und anderer Form dürfen
nicht in verschlossenen Gefäßen erhitzt werden, da diese
explodieren könnten. Die Erhitzung von Getränken durch
Mikrowellen kann verspätetes Aufwallen verursachen. Bei
der Handhabung der Gefäße ist daher Vorsicht geboten.
DE – 6
Page 36

Zur Vermeidung von Explosionen und plötzlichem Sieden:
Benutzen Sie niemals verschlossene Behälter. Verschlüsse und
Abdeckungen müssen entfernt werden. Verschlossene Behälter
können durch den Druckanstieg selbst nach dem Ausschalten
des Gerätes noch explodieren. Seien Sie beim Erhitzen von
Flüssigkeiten vorsichtig. Verwenden Sie Behälter mit einer großen Ö nung, damit entstehende Blasen entweichen können.
Niemals Flüssigkeiten in schmalen, hohen Gefäßen (z. B.
Saug aschen) erhitzen, da der Inhalt herausspritzen kann
und es zu Verbrennungen kommen könnte.
Vermeiden von plötzlichem Überkochen und möglichen Verbrühungen:
1. Stellen Sie keine extrem langen Garzeiten ein.
2. Die Flüssigkeiten vor dem Garen/Erhitzen umrühren.
3. Es wird empfohlen, während des erneuten Erhitzens einen
Glasstab oder einen ähnlichen Gegenstand (kein Metall) in
den Behälter zu stellen.
4. Nach dem Erhitzen die Flüssigkeiten noch mindestens 20
Sekunden im Gerät stehen lassen, um verspätetes Aufwallen
durch Siedeverzug zu verhindern.
Eier nicht mit der Schale kochen. Hartgekochte Eier dürfen nicht in Mikrowellengeräten erwärmt werden, da sie
selbst nach der Erwärmung explodieren können. Zum
Garen oder Aufwärmen von Eiern, die nicht verquirlt oder
verrührt wurden, das Eigelb und Eiweiß anstechen. Vor
dem Aufwärmen im Mikrowellengerät die Schale von gekochten Eiern entfernen und die Eier in Scheiben schneiden.
Die Schale von Lebensmitteln, wie z.B. Karto eln, Würstchen
oder Obst, vor dem Garen anstechen, damit der Dampf entweichen kann.
DE – 7
Page 37

DE
Der Inhalt von Saug aschen und Baby-Nahrungsbehältnissen muss vor dem Gebrauch geschüttelt bzw. gerührt
und die Temperatur muss vor dem Verzehr geprüft werden, um Verbrennungen zu vermeiden. Bei der Entnahme
von Gargut aus dem Garraum sollten Top appen oder
Ofenhandschuhe verwendet werden. Zur Vermeidung von
Verbrennungen:
• Behälter, Popcorngeschirr, Kochbeutel, usw. immer vom Ge-
sicht und den Händen abgewandt ö nen, um Verbrennungen durch Dampf und plötzliches Sieden zu vermeiden. Um
Verbrennungen zu vermeiden, immer die Lebensmitteltemperatur prüfen und umrühren, bevor Sie die Speisen servieren. Besondere Vorsicht ist geboten, wenn die Lebensmittel
oder Getränke für Babys, Kinder oder alte Menschen gedacht sind. Zugängliche Teile können während des Betriebs
heiß werden. Halten Sie Kinder deshalb von ihnen fern.
• Die Temperatur des Behälters ist kein Hinweis auf die tat-
sächliche Temperatur des Lebensmittels oder Getränks;
immer die Temperatur prüfen.
• Halten Sie beim Ö nen der Gerätetür ausreichenden Ab-
stand, um Verbrennungen durch austretende Hitze oder
Dampf zu vermeiden.
• Schneiden Sie gefüllte und gebackene Speisen nach dem
Garen in Scheiben, um den Dampf entweichen zu lassen
und Verbrennungen zu vermeiden.
• Kinder von der Tür fernhalten, um Verbrennungen zu ver-
meiden.
WARNUNG: Erlauben Sie Kindern über 8Jahren die Nutzung des Gerätes ohne Aufsicht nur, wenn ausreichende
Anweisungen gegeben wurden, sodass das Kind in der
Lage ist, das Gerät auf eine sichere Weise zu bedienen und
die Gefahren eines unsachgemäßen Gebrauchs versteht.
Wenn das Gerät in den Modi GRILL, MIX GRILL, KONVEK-
DE – 8
Page 38

TION, MIX-KONVEKTION und AUTO-MENÜ betrieben wird
(Modus gilt je nach Modell), sollten Kinder das Gerät wegen der hohen Temperaturen nur unter Aufsicht von Erwachsenen betreiben.
Dieses Gerät ist nicht für die Verwendung durch Personen
(einschließlich Kinder) mit eingeschränkten physischen,
sensorischen oder geistigen Fähigkeiten, oder Mangel an
Erfahrung und Wissen bestimmt, sofern sie keine angemessene Aufsicht oder ausführliche Anleitung zur Benutzung des Geräts durch eine verantwortliche Person für
ihre Sicherheit erhalten haben.
Kinder sollten beaufsichtigt werden, um sicherzustellen,
dass sie nicht mit dem Gerät spielen. Die Reinigung durch
Kinder sollte überwacht werden.
Modelle mit elektronischem Touchscreen haben einen
Kindersicherungsmodus.
Nicht an die Gerätetür lehnen oder hängen. Nicht mit dem Gerät spielen, oder es als Spielzeug verwenden.
Kinder sollten mit allen wichtigen Sicherheitshinweisen vertraut gemacht werden, wie z. B. Verwendung von Top appen
und vorsichtiges Abnehmen von Deckeln. Beachten Sie besonders Verpackungen, die Lebensmittel knusprig halten (z. B.
selbstbräunende Materialien), da diese besonders heiß werden.
Sonstige Warnungen
Niemals das Gerät in irgendeiner Weise modi zieren.
Das Gerät während des Betriebs nicht bewegen.
Dieses Gerät ist für den Einsatz im Haushalt bestimmt. Dieses
Gerät ist nur für den Hausgebrauch und darf nur zum Garen
von Lebensmitteln und das Erwärmen von Getränken verwendet werden. Das Trocknen von Lebensmitteln oder Kleidung
und das Erwärmen von Heizkissen, Panto eln, Schwämmen,
DE – 9
Page 39

DE
feuchten Tüchern und dergleichen kann zu Verletzungs-, Entzündungs- oder Brandgefahr führen. Es eignet sich nicht für
gewerbliche Zwecke oder den Gebrauch in einem Labor.
Zur Vermeidung von Fehlfunktionen und Beschädigungen
dieses Gerätes.
Das Gerät darf niemals im leeren Zustand betrieben werden.
Bei der Verwendung von Bräunungsgeschirr oder selbsterwärmenden Materialien muss eine hitzebeständige Isolierung (z.B.
ein Porzellanteller) zwischen Geschirr und Drehteller gestellt
werden. Dadurch werden Beschädigungen des Ofenbodens
durch Wärme vermieden. Die angegebene Aufheizzeit für das
Geschirr darf nicht überschritten werden.
Keine Metall-Utensilien verwenden, die Mikrowellen re ektieren, da dies Funkenbildung zur Folge haben kann. Stellen Sie
keine Konservendosen in das Gerät.
So verhindern Sie, dass der Drehteller oder Ofenboden bricht:
a) Vor der Reinigung mit Wasser: abkühlen lassen.
b) Stellen Sie keine heißen oder kalten Lebensmittel oder
Utensilien auf einen kalten Drehteller/Ofenboden.
c) Stellen Sie während des Betriebs keine anderen Gegenstän-
de auf das Gehäuse.
HINWEIS:
Benutzen Sie keine Kunststo behälter für die Mikrowelle, wenn
der Ofen nach einer Verwendung eines Kombinationsmodus (abhängig vom Ofenmodell) noch heiß ist– sie könnten
schmelzen.
Während der oben genannten Modi dürfen keine Plastikbehälter benutzt werden, außer der Hersteller dieser Behälter hat
ihre Eignung bestätigt.
Sollten Sie sich beim Anschluss des Gerätes nicht sicher sein, so
kontaktieren Sie bitte einen Fachmann.
DE – 10
Page 40
Weder der Hersteller noch der Händler übernimmt Haftung für
Schäden an Ofen oder Verletzungen, die infolge von Nichtbeachtung des elektrischen Anschlusses entstehen.
An den Innenwänden oder den Dichtungen und Dichtungsober ächen können Wasserdampf oder Tropfen entstehen.
Dies ist ein normaler Vorgang und kein Zeichen für eine Fehlfunktion der Mikrowelle.
Dieses Gerät ist für den Einsatz in Haushalten und ähnlichen
Anwendungsgebieten vorgesehen, wie z.B.; Küchenbereiche,
reserviert für das Personal in Geschäften, Büros und anderen
professionellen Umgebungen / Bauernhöfen / Nutzung von
Hotels, Motels und anderen Wohnumgebungen durch Kunden
/ Umgebungen wie ein Gästehaus.
Dieses Symbol besagt, dass die Ober ächen während
der Benutzung heiß werden können.
DE – 11
Page 41
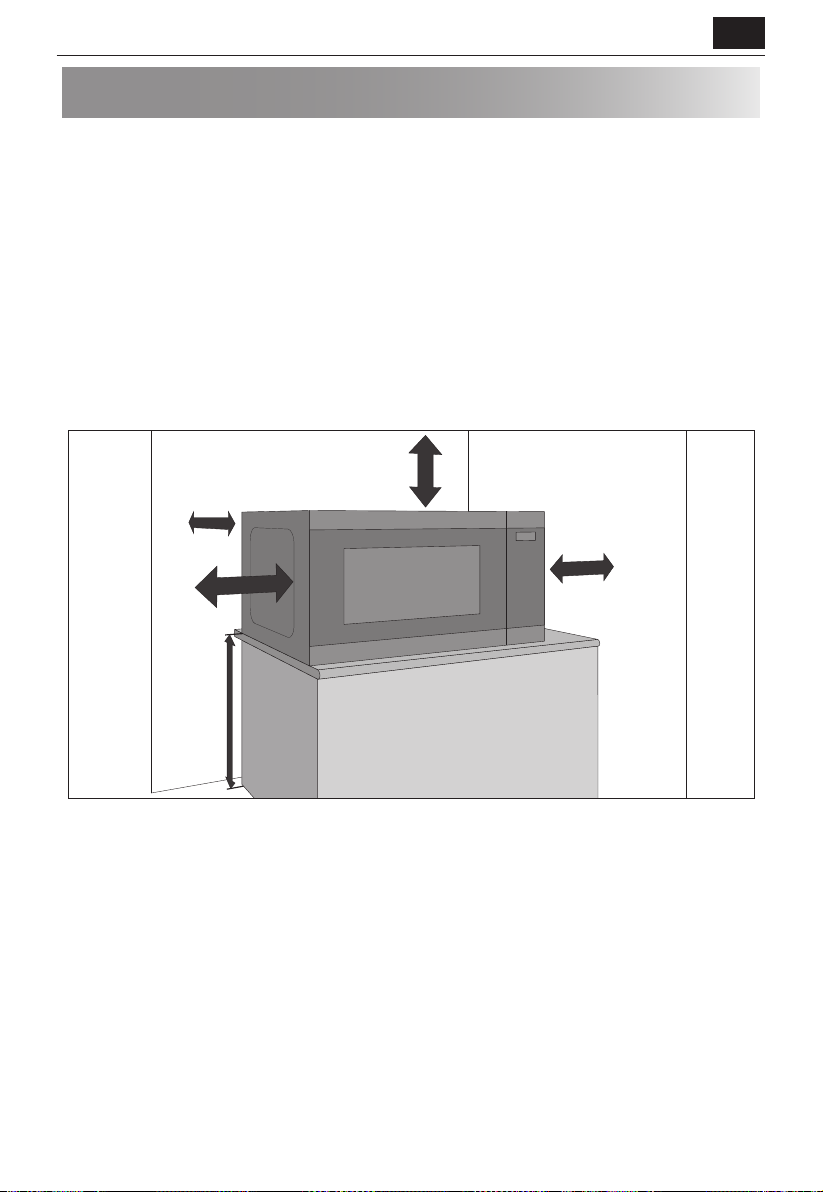
DE
EINBAU
1. Entfernen Sie jegliches Verpackungsmaterial von der Innenseite des Ofens und entfernen Sie die den Schutz lm
am Gehäuse der Mikrowelle.
2. Überprüfen Sie das Gerät auf eventuelle Beschädigungen.
3. Platzieren Sie das Gerät auf einer sicheren, ebenen Ober äche, die stabil genug ist, um das Gewicht des Gerätes
und der darin zubereiteten Lebensmittel zu tragen. Das Gerät nicht in einem Schrank aufstellen.
4. Wählen Sie eine ebene Fläche, die über genügend Freiraum für die Ein- und/oder Auslässe verfügt. Siehe Bild auf
der ersten Seite. Die Rückseite des Gerätes sollte an einer Wand platziert werden.
• Die minimale Installationshöhe sollte 85 cm betragen.
• Es muss ein Mindestabstand von 20 cm zwischen den Seiten des Mikrowellengeräts und allen angrenzenden Wän-
den eingehalten werden.
• Es ist ein Mindestabstand von 30 cm über dem Gerät einzuhalten.
• Nicht die Standfüße des Gerätes entfernen.
• Ein Blockieren der Ein- und/ oder Auslassö nungen kann das Gerät beschädigen.
• Platzieren Sie das Gerät so weit als möglich von Radios und TV-Geräten entfernt. Der Mikrowellenbetrieb kann den
Radio- oder TV-Empfang stören.
30 cm
10 cm
20 cm
85 cm
5. Den Netzstecker des Mikrowellengerätes mit einer normalen, geerdeten Steckdose verbinden.
20 cm
WARNUNG:
Das Gerät nicht an Orten an denen Hitze, Feuchtigkeit oder hohe Luftfeuchtigkeit (z. B. in der Nähe oder über einem
konventionellen Backofen) auftreten können, oder in der Nähe brennbarer Materialien (z. B. Vorhänge) aufstellen.
Lüftungsö nungen nicht blockieren oder versperren.
Nichts auf das Gerät stellen.
Berühren Sie die Außenseite des Mikrowellengeräts nicht beim Betrieb oder kurz danach, da sie heiß werden kann.
DE – 12
Page 42
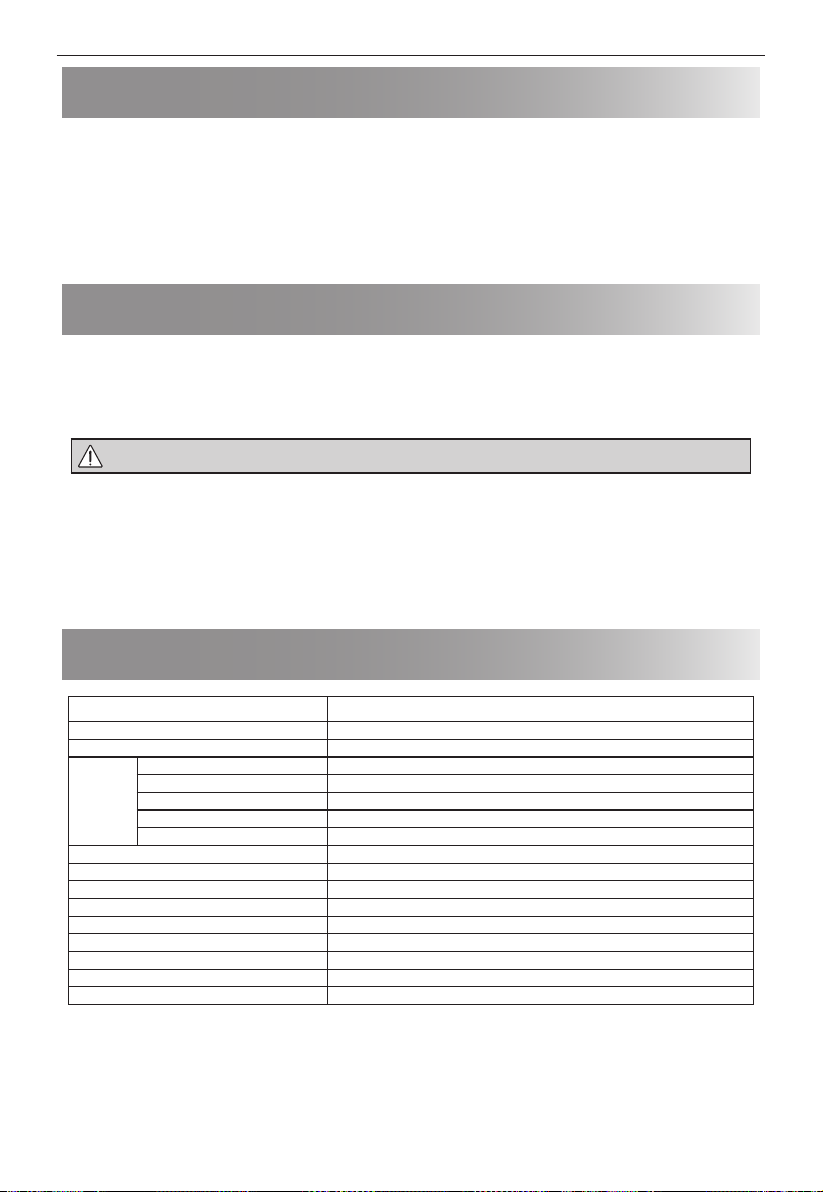
FUNKSTÖRUNG
Der Betrieb des Mikrowellengeräts kann Störungen bei Ihrem Radio, Fernseher oder bei ähnlichen Geräten
verursachen. Sollten Störungen auftreten, können sie durch folgende Maßnahmen eingedämmt oder beseitigt
werden:
1. Reinigen Sie die Tür und den Hohlraum, wo sie aufeinandertre en.
2. Ändern Sie die Ausrichtung der Empfangsantenne vom Radio oder Fernseher.
3. Stellen Sie das Mikrowellengerät im Verhältnis zum Empfänger neu auf.
4. Stecken Sie das Mikrowellengerät in eine andere Steckdose, damit das Mikrowellengerät und der Empfänger nicht
an der gleichen Netzleitung angeschlossen sind.
ANWEISUNGEN ZUR ERDUNG
Dieses Gerät muss geerdet sein. Dieser Ofen ist mit einem Kabel mit Erdungsdraht und Erdungsstecker ausgestattet.
Dieser muss an eine ordnungsgemäß installierte und geerdete Wandsteckdose angeschlossen werden. Im Falle
eines elektrischen Kurzschlusses verringert die Erdung das Risiko eines Stromschlags, indem ein Fluchtdraht für den
elektrischen Strom bereitgestellt wird. Es wird empfohlen, einen separaten Stromkreis bereitzustellen, der nur den
Ofen versorgt.
WARNUNG: Bei unsachgemäßer Verwendung des Erdungssteckers kann die Gefahr eines Stromschlags bestehen.
HINWEIS:
1. Wenn Sie Fragen zur Erdung oder zu den elektrischen Anweisungen haben, wenden Sie sich an einen
quali zierten Elektriker oder Servicetechniker.
2. Weder der Hersteller noch der Händler übernimmt Haftung für Schäden an Ofen oder Verletzungen, die infolge
von Nichtbeachtung des elektrischen Anschlusses entstehen.
Das in Ihrem Mikrowellenherd verwendete Netzkabel verwendet die folgenden farblich gekennzeichneten Drähte:
Grün und Gelb = ERDUNG | Blau = NEUTRAL | Braun = STROMFÜHREND
TECHNISCHE DATEN
Modellname: YC-PC322A
Wechselstromversorgung 230~240 V, 50 Hz einphasig
Sicherung/Sicherungsautomat 10 A
Stromstärke
Mikrowellenfrequenz 2450 MHz*
Außenabmessungen (B) x (H) x (T) mm 539 x 280 x 415
Garraumabmessungen (B) x (H) x (T )** mm 362 x 223 x 378
Drehteller aus Glas (ø mm) 315
Garraumkapazität 32 Liter**
Garblechgröße (Durchmesser x H in mm) 317 x 48
Grillgestell-Maße (Durchmesser x Höhe in mm) 255 x 80
Gewicht 21 kg
Garraumlampe (LED) 1,5 W
* - Dieses Produkt erfüllt die Anforderungen der europäischen Norm EN55011.
Gemäß dieser Norm ist dieses Gerät als Gerät der Gruppe 2 Klasse B eingestuft.
Gruppe 2 bedeutet, dass das Gerät zweckbestimmt hochfrequente Radioenergie in Form elektromagnetischer Strahlen zur Wärmebehandlung von Lebensmitteln erzeugt.
Klasse B bedeutet, das Gerät für den Einsatz im Haushalt geeignet ist.
** - Die interne Kapazität wird durch die Messung der maximalen Breite, Tiefe und Höhe berechnet. Die tatsächliche Kapazität zur Aufnahme von Lebensmitteln ist geringer.
IM RAHMEN EINES BESTREBENS NACH STÄNDIGER VERBESSERUNG BEHALTEN WIR UNS DAS RECHT VOR, JEDERZEIT
UND OHNE ANGABE VON GRÜNDEN, TECHNISCHE DATEN ODER DAS DESIGN ZU VERÄNDERN.
Stromverbrauch 2300 W
Mikrowellenausgangsleistung 1000 W
Grillausgangsleistung 1250 W
Heißluft-Stromstärke 2300 W
Aus-Modus-Stromstärke < 0,5W
DE – 13
Page 43
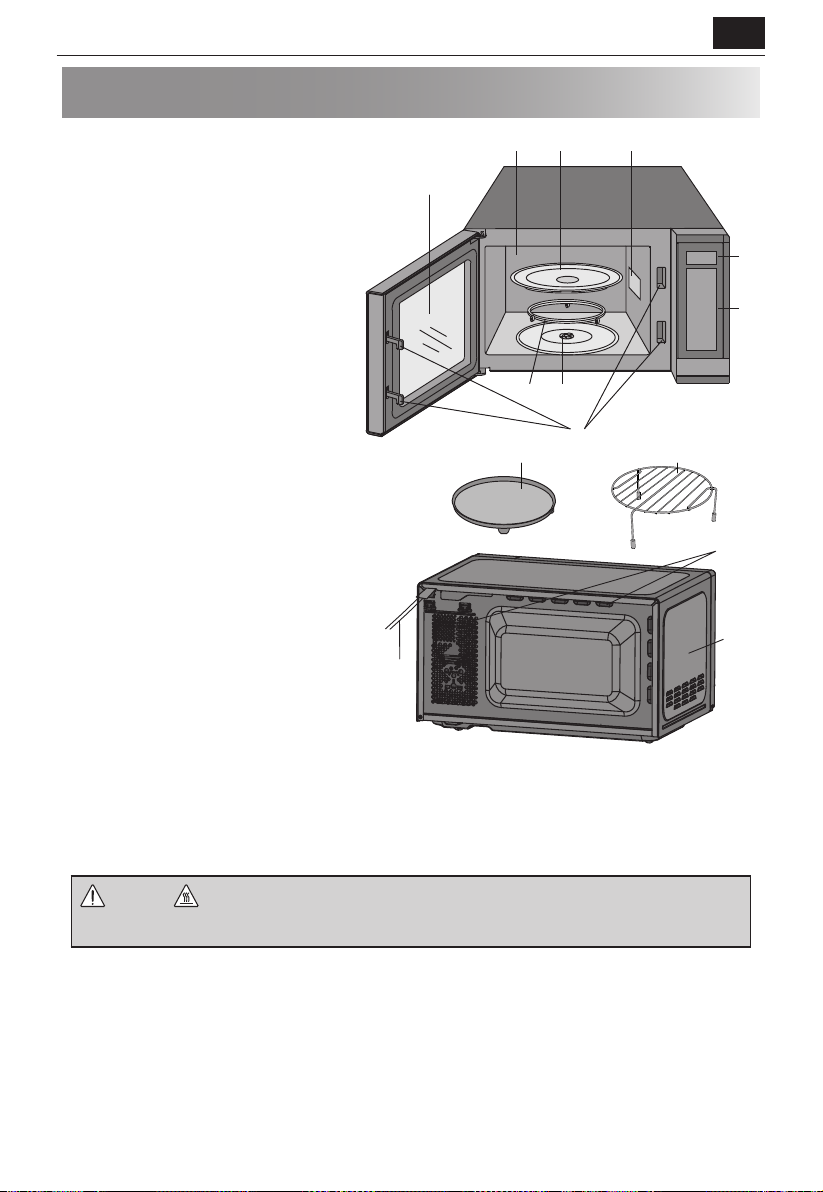
GERÄT UND ZUBEHÖR
1110
DE
1. Türverriegelungssystem
2. Gerätefenster
3. Bedienfeld
4. Display
5. Garraum
6. Abdeckung des Hohlleiters (Nicht entfernen)
7. Glasteller
8. Drehtellerring
9. Drehtellerkupplung
10. Grillgestell
11. Garblech
12. Lüftungsö nungen
13. Außenseite
14. Netzkabel
• Das Grillgestell und das Backblech sind
nur für die Verwendung mit Grill- und
Umluftöfen vorgesehen. Verwenden
Sie KEIN Metallzubehör, wenn Sie die
Mikrowellenfunktion nutzen.
• Informationen zur Verwendung des
Grillgestells nden Sie in den Abschnitten
GRILL in diesem Benutzerhandbuch.
Niemals den Grill berühren, wenn dieser
heiß ist.
HINWEIS: Bei der Bestellung von Zubehör teilen
Sie bitte folgende Angaben mit: Name des
Zubehörteils und Bezeichnung des Modells.
14
7
5
6
2
4
3
9
8
1
12
13
HINWEISE:
• Reinigen Sie den Garraum und alle Utensilien nach dem Garen von Lebensmitteln mit hohem Fettanteil und ohne
Abdeckhaube immer sehr gründlich. Dieses muss trocken und frei von Fettrückständen sein. Akkumuliertes Fett
kann sehr heiß werden und zu Rauch- oder Feuerentwicklung führen.
• Stellen Sie das Kochgeschirr bei der Verwendung der Mikrowelle immer auf den Drehteller.
• Verwenden Sie das Grillgestell oder das Backblech NICHT, während Sie die Mikrowellenfunktion nutzen.
ACHTUNG: Dieses Symbol besagt, dass die Ober ächen während der Benutzung heiß werden
können. Die Tür, das Gehäuse, der Garraum, Zubehör und Geschirr werden beim Betrieb sehr heiß.
Verwenden Sie immer dicke Ofenhandschuhe, um Verbrennungen zu vermeiden.
DE – 14
Page 44
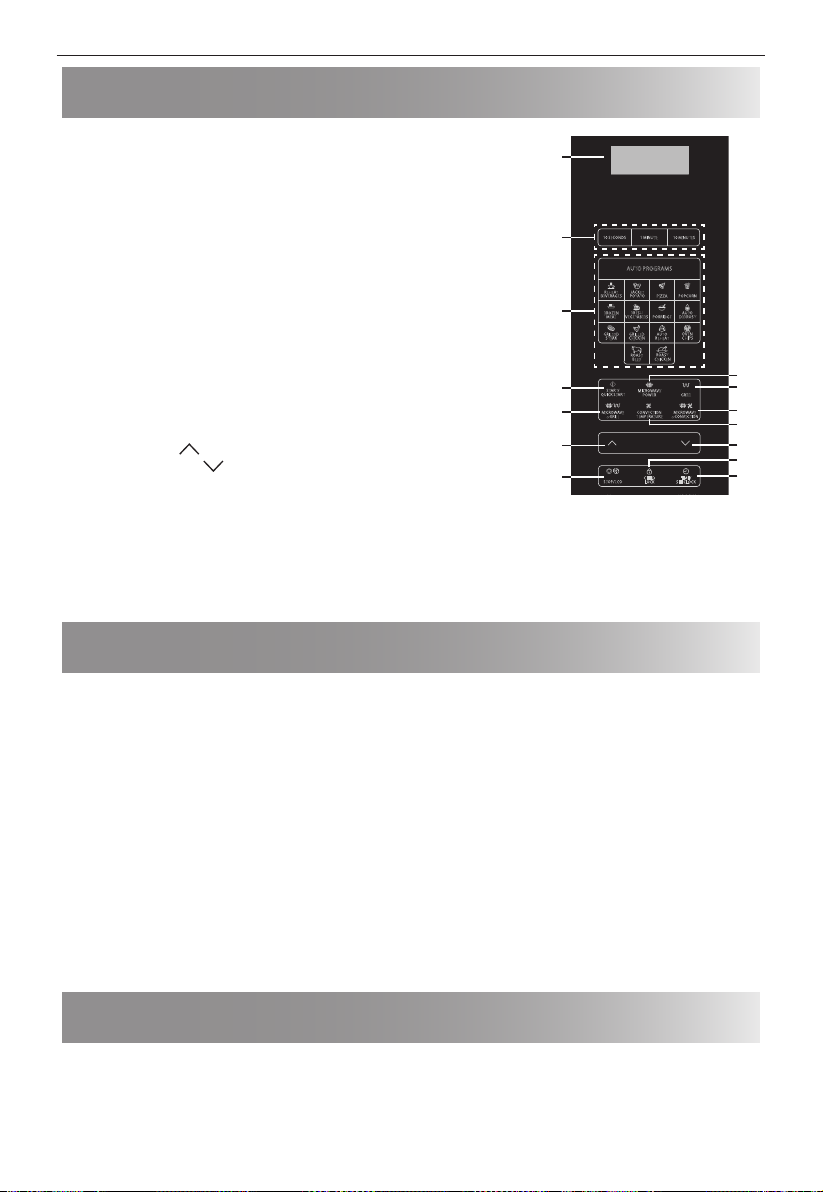
BEDIENFELD
1. DIGITALES DISPLAY (ANZEIGE)– Es werden Kochzeit, Leistung, Anzeigen
und Uhrzeit angezeigt.
1
2. 10 SECONDS, 1 MINUTE, 10 MINUTES – Zum Einstellen der Garzeit oder
Uhrzeit.
3. AUTO MENU-Tasten – Drücken, um Autogaren-Menü auszuwählen (siehe
Seite 19 für Nutzungshinweise).
4. START/SCHNELLSTART – (Seite 16).
5. MICROWAVE POWER (MIKROWELLE)– Drücken, um die Leistungsstufe der
Mikrowelle auszuwählen (Seite 16).
6. GRILL (GRILL)– Drücken, um das Grill-Garprogramm einzustellen (Seite
17).
7. MICROWAVE+GRILL (MIKROWELLE+GRILL)– Drücken, um das kombinierte
Mikrowellen- und Grill-Garprogramm einzustellen (Seite 17).
8. CONVECTION TEMPERATURE (HEISSLUFTTEMPERATUR)– Drücken, um
Heißlufttemperatur auszuwählen.
9. MICROWAVE+CONVECTION (MIKROWELLE+HEISSLUFT)– Drücken, um
kombiniertes Garen mit Heißluft auszuwählen.
10. UP (WENIGER)
11. DOWN (WENIGER)
– Drücken, um Gewicht oder Portionszahl auszuwählen.
– Drücken, um Gewicht oder Portionszahl
auszuwählen.
10 SECONDS 1 MINUTE
2
REHEAT
BEVERAGES
3
FROZEN
MEAL
GRILLED
STEAK
4
START/
QUICK START
MICROWAVE
7
GRILL
+
10
12
STOP/ECO
AUTO PROGRAMS
JACKET
POTATO
FRESH
PORRIDGE
VEGETABLES
GRILLED
CHICKEN
ROAST
CHICKEN
EEF
B
MICROWAVE
POWER
CONVECTION
TEMPERATURE
CHILD
LOCK
10 MINUTES
POPCORN
PIZZA
AUTO
DEFROST
OVEN
AUTO
CHIPS
REHEAT
ROAST
5
6
GRILL
MICROWAVE
CONVECTION
+
SET CLOCK
9
8
11
13
14
TIME/
12. STOP/ECO (STOPP/ÖKO)– Einmal drücken, um das Garen vorübergehend zu
unterbrechen, oder zweimal drücken, um das Garen ganz abzubrechen.
Mit dieser Taste können Sie den Energiesparmodus einstellen. (Seite 20).
13. CHILD LOCK (KINDERSICHERUNG) – (Seite 21).
14. TIME/SET CLOCK (UHRZEIT/UHRZEIT EINSTELLEN)–
Damit stellen Sie die Uhrzeit ein.
Damit stellen Sie die Timer-Funktion ein. (Seite 15).
VORBEREITUNG
Wenn der Backofen zum ersten Mal angeschlossen wird, ertönt ein Signalton und auf dem Display wird
„1:00"angezeigt. Beachten Sie, dass die Uhr nicht eingestellt sein muss, damit der Backofen richtig funktioniert. Um
die Uhr einzustellen, befolgen Sie die Anweisungen im Abschnitt „Uhrzeit einstellen” in diesem Benutzerhandbuch.
Wenn der Grill neu ist und zum ersten Mal benutzt wird, werden Rauch und Gerüche freigesetzt. Um dies beim Garen
von Speisen zu vermeiden, verwenden Sie die Grill- und Heißluftfunktion ca. 20 Minuten lang ohne Speisen.
• Nach dem Ö nen und Schließen der Tür schaltet der Backofen in den Standby-Modus. Wenn innerhalb von 1 Minute
keine Taste gedrückt wird, bleibt das Display eingeschaltet und die Tasten funktionieren nicht. Um wieder in den
Standby-Modus zu gelangen, ö nen und schließen Sie die Tür.
• Wenn während des Garvorgangs die Taste STOP/ECO einmal gedrückt wird, wird der Garvorgang unterbrochen.
Um den Garvorgang wieder aufzunehmen, drücken Sie die Taste START/QUICK START. Wenn die Taste STOP/ECO
zweimal gedrückt wird, wird der Garvorgang abgebrochen.
• Wenn der Backofen für eine bestimmte Funktion programmiert ist und zwischen den Tastendrücken eine Pause von
mehr als 30 Sekunden liegt, kehrt der Backofen in den Standby-Modus zurück.
• Nach Beendigung eines Garvorgangs wird auf dem Display „End” angezeigt und alle zwei Minuten ertönt ein Ton,
bis eine Taste gedrückt oder die Tür geö net wird.
EINSTELLEN DER UHR
Dieses Gerät verfügt über eine Uhr, die entweder im 12- oder 24-Stunden-Modus verwendet werden kann. Um die
Uhr einzustellen, befolgen Sie die nachstehenden Anweisungen:
1. Halten Sie im Standby-Modus die Taste TIME/SET CLOCK mindestens 3 Sekunden lang gedrückt, um in den
Modus zum Einstellen der Uhr zu gelangen.
2. Drücken Sie die Taste TIME/SET CLOCK, um den 12- oder 24-Stunden-Modus auszuwählen.
DE – 15
Page 45
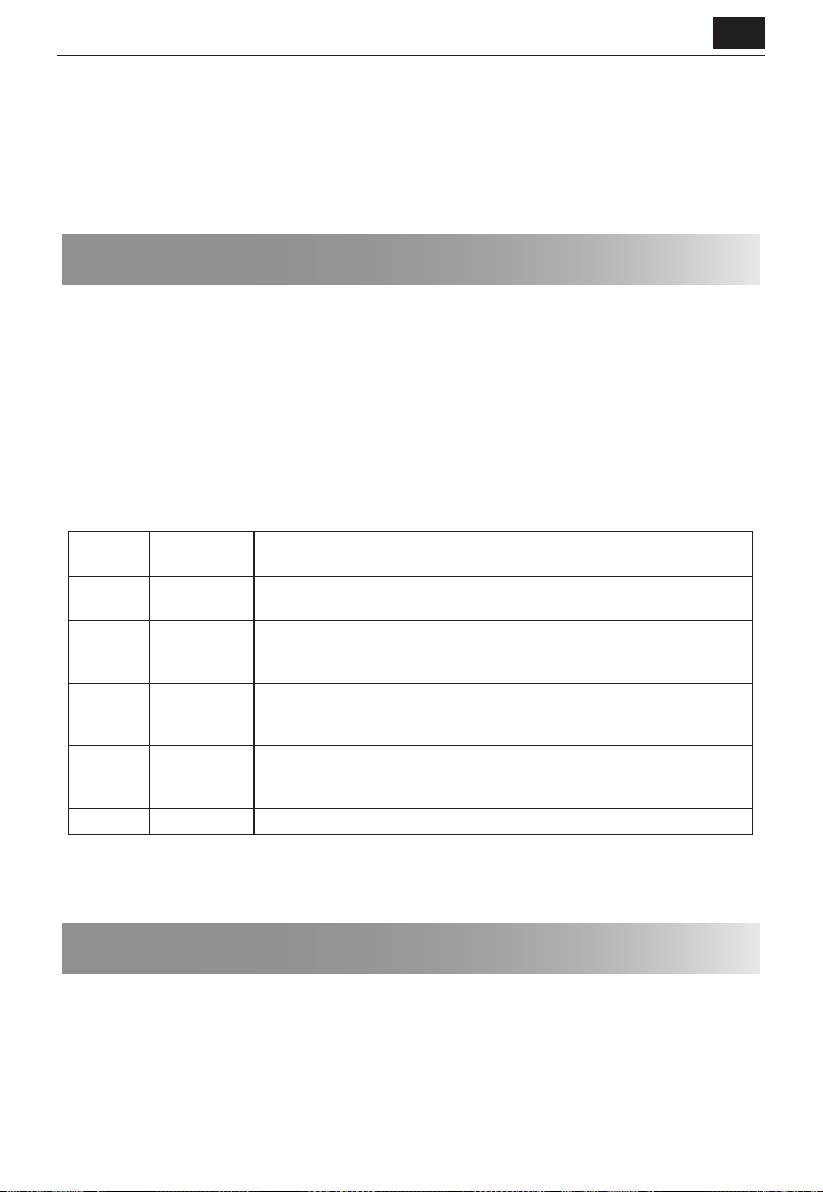
DE
3. Verwenden Sie die Tasten 10 SECONDS, 1 MINUTE und 10 MINUTES, um die gewünschte Stunden- und
Minutenzahl einzustellen.
4. Drücken Sie die Taste TIME/SET CLOCK, um die Einstellung zu speichern und den Einstellungsmodus zu verlassen.
• Es ist nicht notwendig, die Uhr einzustellen, damit das Gerät normal funktioniert.
• Drücken Sie im Garmodus die Taste TIME/SET CLOCK, um die Tageszeit (falls eingestellt) anzuzeigen. Die Uhrzeit
wechselt nach fünf Sekunden zurück zum Countdown des Garvorgangs. Beachten Sie, dass die Tageszeit nicht
angezeigt werden kann, wenn der Küchentimer eingestellt ist.
GAREN MIT DER MIKROWELLE
Um die Mikrowellenfunktion zu nutzen, befolgen Sie die nachstehenden Anweisungen:
1. Drücken Sie im Standby-Modus die Taste MICROWAVE POWER, um die Leistungsstufe zu wählen. Jedes Mal,
wenn diese Taste gedrückt wird, zeigt das Display die Leistungsstufe der Mikrowelle an.
2. Wenn Sie die gewünschte Leistungsstufe gewählt haben, verwenden Sie die Tasten 10 SECONDS, 1 MINUTE und
10 MINUTES, um die Garzeit einzustellen.
3. Drücken Sie die Taste START/QUICK START, um den Garvorgang zu starten.
4. Nach Beendigung des Garvorgangs wird auf dem Display „End” angezeigt und alle zwei Minuten ertönt ein Ton,
bis eine Taste gedrückt oder die Tür geö net wird.
Beachten Sie, dass die nachstehende Tabelle nur zur Orientierung dient. Ihr Gerät verfügt über
10Mikrowellenleistungsstufen. Diese sind 10%, 20%, 30%, 40%, 50%, 60%, 70%, 80%, 90% und 100%. Die tatsächliche
Wattzahl kann berechnet werden, indem die Mikrowellenleistung mit dem Prozentsatz multipliziert wird.
Mikrowellengaranleitung:
Display
P100 100 %
P-80 80 %
P-60 60 %
P-40 40 %
P-20 20 % Wird zum schonenden Auftauen für z. B. Sahnetorten oder Blätterteig verwendet.
• Während des Garvorgangs können Sie die Leistungsstufe durch Drücken und Halten der Taste MICROWAVE POWER
überprüfen.
• Die längste Garzeit beträgt 95 Minuten.
Mikrowellenleistung
Vorgeschlagene Nutzung
Nutzen Sie diese Einstellung für schnelles Garen oder Aufwärmen für z. B. Au äufe,
heiße Getränke, Gemüse usw. verwendet.
Für feste Lebensmittel, die eine lange Garzeit erfordern, wenn sie konventionell
gegart werden, wie z. B. Rind eisch, sollte diese Leistungseinstellung verwendet
werden, damit das Fleisch zart wird.
Zum längeren Garen von dichten Speisen wie Braten, Hackbraten und
Plattengerichten, aber auch für emp ndliche Gerichte wie Käsesauce und
Biskuitkuchen.
Auftaueinstellung; wird zum Auftauen verwendet, damit Speisen gleichmäßig
auftauen. Diese Stufe ist auch bestens geeignet, um Reis, Pasta und Klöße zu
sieden und Eiercreme zuzubereiten.
SCHNELLSTART
Wenn Sie mit 100 % Leistung kochen möchten, drücken Sie einfach die Taste START/QUICK START während Sie sich
im Standby-Modus be nden. Jedes Mal, wenn die Taste START/QUICK START gedrückt wird, verlängert sich die
Garzeit um 30 Sekunden.
DE – 16
Page 46
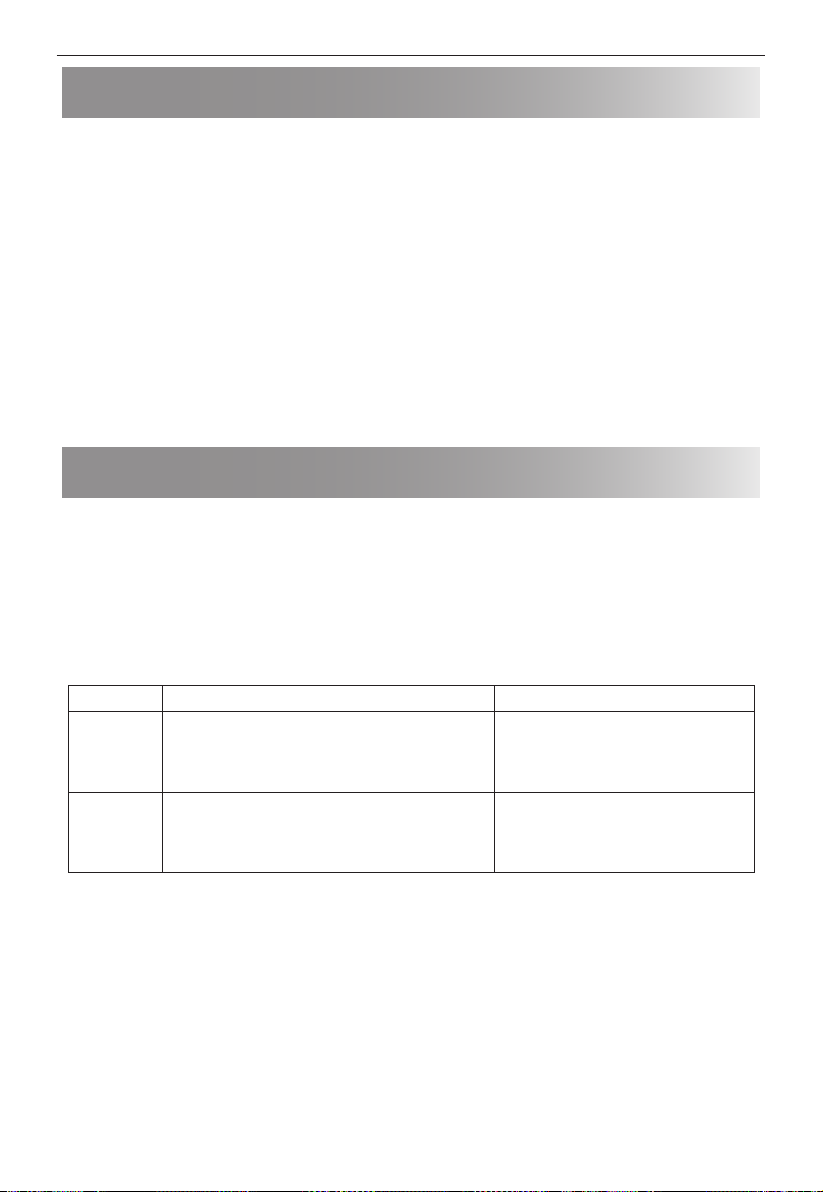
GRILLEN
Das Heizelement des Grills im oberen Teil des Garraums hat nur eine Leistungseinstellung und ist e zient und
sparsam. Der Grill ist ideal zum Garen von Speck, Gammonsteak, Fischstäbchen und Teegebäck.
Verwenden Sie das Grillgestell zum Grillen von kleinen Speisen wie Speck und Würstchen, die Sie nach der Hälfte
des Grillvorgangs umdrehen. Die Speisen können direkt auf das Rost gelegt werden oder in einer Tortenform oder
auf einer hitzebeständigen Platte platziert werden. Um sicherzustellen, dass kein Fett oder Öl vom Grillgut abtropfen
kann, stellen Sie eine geeignete Schale unter das Grillgestell.
Zum Anbraten und Knusprigmachen der Ober äche von Speisen in einer Au au orm kann das Grillgestell verwendet
werden, wenn der Behälter ach genug ist. Es ist jedoch ratsam, solche Behälter direkt auf den Drehteller zu stellen,
damit sie etwas länger bräunen und knusprig werden. Das Grillgestell kann nicht zum Grillen verwendet werden.
Um die Grillfunktion zu verwenden, befolgen Sie die nachstehenden Anweisungen:
1. Drücken Sie im Standby-Modus die Taste GRILL, m die Grillfunktion zu wählen. Auf dem Display wird „Grl”
angezeigt.
2. Verwenden Sie die Tasten 10 SECONDS, 1 MINUTE und 10 MINUTES, um die Garzeit auszuwählen.
3. Drücken Sie die Taste START/QUICK START, um den Garvorgang zu starten.
4. Nach Beendigung des Garvorgangs wird auf dem Display „End” angezeigt und alle zwei Minuten ertönt ein Ton,
bis eine Taste gedrückt oder die Tür geö net wird.
MIKROWELLE + GRILL
Mit der Mikrowellen- und der Grillfunktion können Sie die Speisen schnell bräunen und garen. Um die Mikrowellenund Grillfunktion zu verwenden, befolgen Sie die nachstehenden Anweisungen:
1. Drücken Sie im Stand-by-Modus einmal oder zweimal die Taste MICROWAVE + GRILL, um „Co-1“ (Kombination1)
oder „Co-2“ (Kombination2) auszuwählen.
2. Verwenden Sie die Tasten 10 SECONDS, 1 MINUTE und 10 MINUTES, um die Garzeit auszuwählen.
3. Drücken Sie zum Starten die Taste START/QUICK START.
4. Nach Beendigung des Garvorgangs wird auf dem Display „End” angezeigt und alle zwei Minuten ertönt ein Ton,
bis eine Taste gedrückt oder die Tür geö net wird.
Mikrowellen- und Grillfunktion
Display Garprozess Vorgeschlagene Nutzung
Das Gerät gart in folgendem Zyklus:
Co-1
Co-2
• Die maximale Garzeit beim Grillen beträgt 95 Minuten.
• Lassen Sie während des Grillens Rauch oder Gerüche abziehen, indem Sie ein Fenster ö nen oder die
Küchenlüftung einschalten. Dies ist normal und kein Gerätefehler.
• Während des Garens können Sie die aktuelle Kombinationsleistung überprüfen, indem Sie die Taste MICROWAVE +
GRILL berühren.
• Wenn Sie die Grillfunktion verwenden, schaltet sich der Grill in regelmäßigen Abständen ein und aus, um eine
Überhitzung zu vermeiden.
• Bei Verwendung der Funktion MICROWAVE+GRILL können die Speisen in einem geeigneten Gefäß direkt auf den
Drehteller gelegt werden.
WARNUNG: Die Tür, das Gehäuse, der Garraum, Zubehör und Geschirr werden beim Betrieb sehr heiß. Verwenden Sie
immer dicke Ofenhandschuhe, um Verbrennungen zu vermeiden.
Mikrowelle, 22 Sekunden, Grill für 11 Sekunden.
Dies wird bis zum Ende der eingestellten Gesamtzeit
wiederholt.
Das Gerät gart in folgendem Zyklus:
Mikrowelle auf voller Leistung für 18 Sekunden, dann
Grill für 15 Sekunden. Dies wird bis zum Ende der
eingestellten Gesamtzeit wiederholt.
Hähnchenstücke, Hähnchenbrust,
Schweinskoteletts
Ganzes Huhn
DE – 17
Page 47
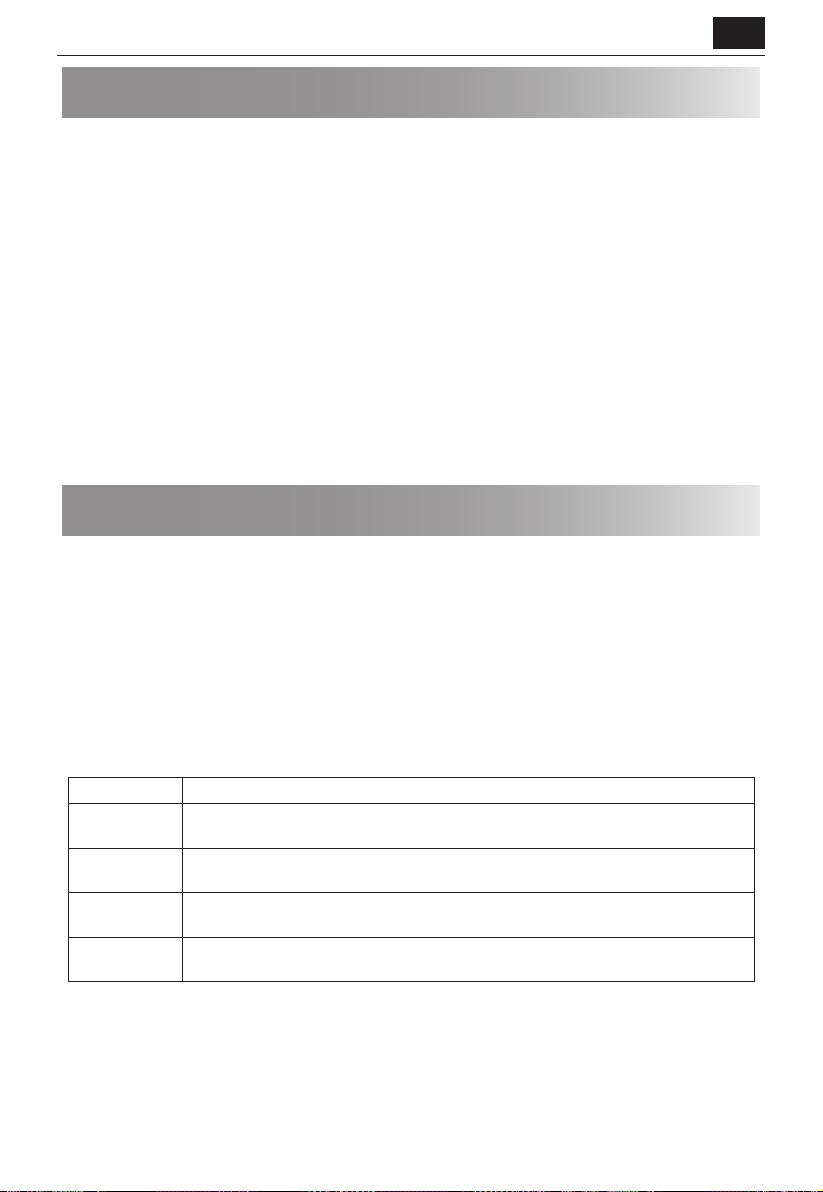
DE
HEISSLUFT
Beim Heißluftgaren zirkuliert heiße Luft im ganzen Garraum, um Gerichte schnell und gleichmäßig zu braunen und
ein knackiges Ergebnis zu liefern. Dieses Gerät kann für dreizehn verschiedene Gartemperaturen programmiert
werden (200°C, 190°C, 180°C, 170°C, 160°C, 150°C, 140°C, 130°C, 120°C, 110°C).
Wir empfehlen, das Gerät vor dem Garen im Heißluft-Modus vorzuheizen. Zum Vorheizen und Garen mit der
Heißluftfunktion befolgen Sie die nachstehenden Anweisungen:
Ihr Ofen kann programmiert werden, damit er Vorheiz- und Heißluftgarvorgänge kombiniert.
1. Drücken Sie im Stand-by-Modus wiederholt die Taste CONVECTION (HEISSLUFT), um die Heißluft-Temperatur
einzustellen.
2. Drücken Sie die START/SCHNELLSTART-Taste, um die Vorheizfunktion zu starten.
3. Wenn die gewünschte Temperatur erreicht ist, ertönt ein Piepton.
Sobald das Gerät vorgeheizt ist und der Signalton ertönt:
1. Ö nen Sie die Tür und stellen Sie in die Mitte des Flachbetts einen Behälter mit Lebensmitteln.
2. Verwenden Sie die Tasten 10 SECONDS, 1 MINUTE und 10 MINUTES, um die Garzeit auszuwählen. Die längste
mögliche Zeit ist 95 Minuten.
3. Drücken Sie zum Starten die Taste START/QUICK START.
HINWEIS: Wenn die Heißluft-Vorheiztemperatur erreicht ist, piept der Ofen alle zwei Sekunden. Die
Vorheiztemperatur wird 30 Minuten lang beibehalten.
MIKROWELLE + HEISSLUFT
Der Modus „Microwave+Convection“ (Mikrowelle+HEISSLUFT) erleichtert und beschleunigt das Garen, da sie das
schnelle Garen in der Mikrowelle und die Heißluft zum Bräunen der Speisen nutzt.
Es ist möglich, bei 4 verschiedenen Heißlufttemperaturen zu garen. Befolgen Sie zum Starten des dualen Garmodus
die nachstehenden Anweisungen:
1. Drücken Sie im Stand-by-Modus wiederholt die Taste MICROWAVE+CONVECTION, um die Temperatur
auszuwählen (200°C, 170°C, 140°C, 110°C).
2. Drücken Sie die Tasten 10 SECONDS, 1 MINUTE und 10 MINUTES, um die Garzeit auszuwählen. Die mögliche Zeit
liegt zwischen 10 Sekunden und 95 Minuten.
3. Drücken Sie zum Starten die Taste START/QUICK START.
Wenn Sie die Funktion Mikrowelle + Heißluft verwenden, ist der Zeitplan für das Garen in der Mikrowelle und mit
Heißluft wie unten dargestellt. Wählen Sie die Option, die am besten geeignet ist, um Ihre Speisen zu garen und
knusprig zu machen.
Display Garprozess
200 °C
170 °C
140 °C
110 °C
10 Sekunden Mikrowellenleistung, dann 23 Sekunden Heißluftgaren. Der Zyklus wird bis zum
Ende der eingestellten Garzeit wiederholt.
15 Sekunden Mikrowellenleistung, dann 18 Sekunden Heißluftgaren. Der Zyklus wird bis zum
Ende der eingestellten Garzeit wiederholt.
19 Sekunden Mikrowellenleistung, dann 14 Sekunden Heißluftgaren. Der Zyklus wird bis zum
Ende der eingestellten Garzeit wiederholt.
24 Sekunden Mikrowellenleistung, dann 9 Sekunden Heißluftgaren. Der Zyklus wird bis zum
Ende der eingestellten Garzeit wiederholt.
DE – 18
Page 48
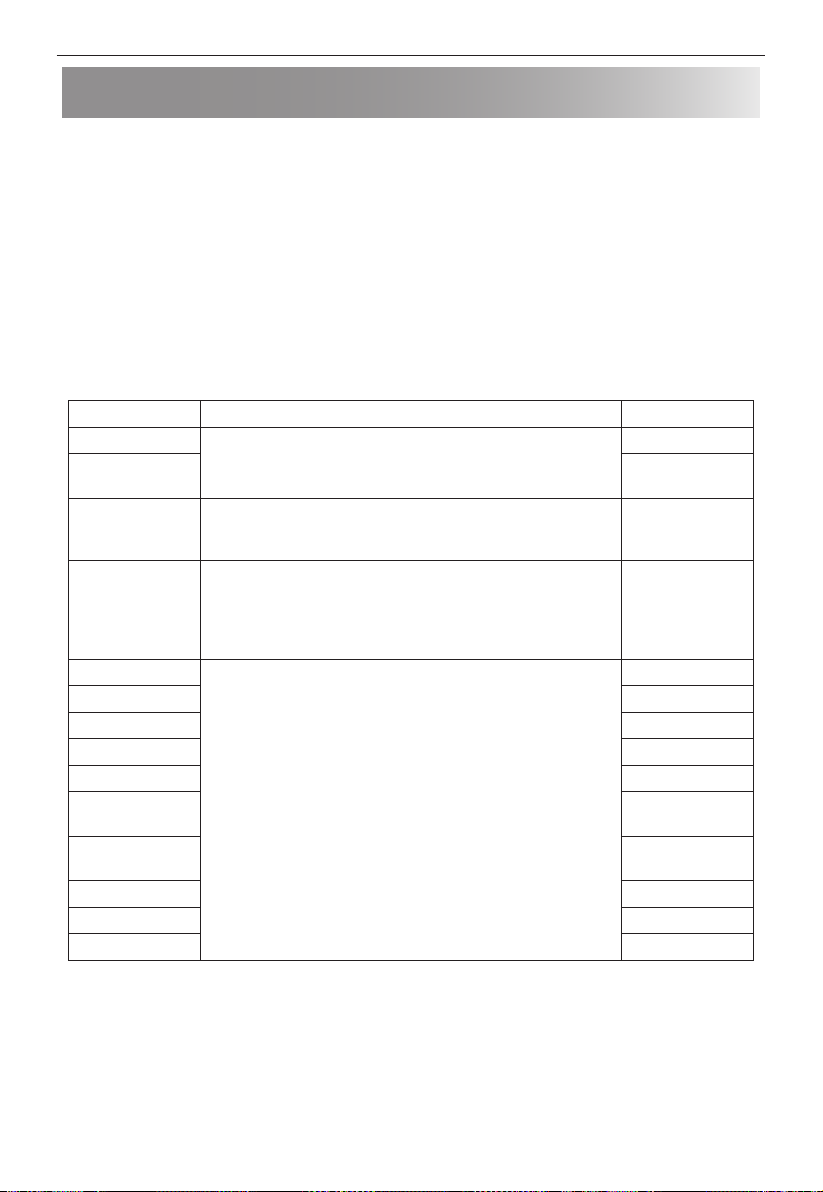
AUTO-MENÜ
Die Autoprogramme ermöglichen ein schnelles und e zientes Garen von Speisen mit nur wenigen Tastendrücken. Es
ist nicht notwendig, die Dauer und die Kochleistung zu programmieren. Es genügt, die gewünschte Autogaren-Taste
zu drücken, das Gewicht/die Stücke mit den Tasten UP und DOWN einzugeben und anschließend die Taste START/
QUICK START zu drücken.
Wenn Sie beispielsweise zwei Pellkartoff eln garen wollen.
1. Ö nen Sie die Tür und geben Sie das Gargut in den Ofen, wobei Sie ein für den jeweiligen Garzyklus geeignetes
Geschirr verwenden müssen.
2. Schließen Sie die Tür.
3. Drücken Sie einmal die Taste JACKET POTATO (PELLKARTOFFEL).
4. Verwenden Sie die Tasten UP und DOWN, um die Anzahl der Karto eln einzugeben.
5. Drücken Sie die Taste START/QUICK START.
6. Nach Beendigung des Garvorgangs wird auf dem Display „End” angezeigt und alle zwei Minuten ertönt ein Ton,
bis eine Taste gedrückt oder die Tür geö net wird.
Autogar-Menüs:
Auto-Menü Methode zur Auswahl von Gewicht oder Anzahl der Stücke Größe/Gewicht
Tiefkühlgericht
Automatisches
Entfrosten
Aufwärmen von
Getränken
Große Pellkarto el
Popcorn
Frisches Gemüse 200 bis 600 g
Pizza 150 g / 300g / 450 g
Haferbrei 50 bis 150 g
Gegrilltes Steak* 200 bis 600 g
Gegrilltes
Hähnchen*
Automatisches
Aufwärmen*
Backofen-Pommes 200 g
Roastbeef / Lamm 200 bis 600g
Brathähnchen 800g,1400g
• Das Ergebnis des automatischen Garvorgangs hängt von Faktoren wie Form und Größe des Garguts, Ihrer
persönlichen Vorliebe für den Gargrad bestimmter Speisen und der Art und Weise, wie das Gargut in den Ofen
geschoben wird, ab. Wenn das Ergebnis des Garvorgangs nicht zufriedenstellend ist, passen Sie bitte die Garzeit
entsprechend an.
• Für einige der Auto-Garprogramme werden Sie möglicherweise aufgefordert, das Essen umzudrehen. Ö nen Sie
die Tür, drehen Sie das Essen um, schließen Sie die Tür und drücken Sie anschließend auf die Taste START/QUICK
START, um den Garvorgang fortzusetzen.
• Tragen Sie beim Umdrehen von Lebensmitteln Ofenhandschuhe (oder ähnliches).
Wählen Sie das Gewicht über die Tasten UP und DOWN und drücken
Sie anschließend START/QUICK START, um den Gar vorgang zu
starten.
Wählen Sie die Anzahl der Tassen über die Tasten UP und DOWN und
drücken Sie anschließend START/QUICK START, um den Gar vorgang
zu starten.
Wählen Sie die Anzahl der Karto eln über die TastenUP und DOWN
und Drücken Sie anschließend die Taste START/QUICK START, um
den Garvorgang zu starten. Je nach Anzahl der gewählten Karto eln
werden Sie eventuell aufgefordert, die Karto eln während des
Garvorgangs umzuschichten.
Wählen Sie das Gewicht über die Tasten UP und DOWN und drücken
Sie anschließend START/QUICK START, um den Gar vorgang zu
starten.
200 bis 800 g
100 bis 1800 g
1 bis 3 Tassen
(jeweils 200 ml)
1 bis 3 Karto eln
(jeweils 230 g)
100g
200 bis 600 g
200 bis 800g
DE – 19
Page 49
AUTO DEFROST (AUTOMATISCHES AUFTAUEN)
Mit dem automatischen Auftauen können Sie Lebensmittel nach Gewicht auftauen. Die Auftaudauer und die
Leistungsstufe werden automatisch eingestellt, sobald die Lebensmittelkategorie und das Gewicht programmiert
sind. Der Gewichtsbereich für Gefriergut reicht von 200 g bis 1800 g.
1. Drücken Sie im Standby-Modus die Taste AUTO DEFROST.
2. Nutzen Sie die Tasten UP und DOWN, um das Gewicht des aufzutauenden Produkts einzustellen.
3. Drücken Sie die START/SCHNELLSTART-Taste, um das Auftauen zu beginnen.
4. Wenn das Gerät während des Auftauens stoppt, drehen Sie die Produkte um, um ein gleichmäßiges Auftauen
zu gewährleisten, und drücken Sie dann die Taste START/QUICK START, um das Auftauen für die restliche Zeit
fortzusetzen.
5. Nach Beendigung des Auftauvorgangs wird auf dem Display „End” angezeigt und alle zwei Minuten ertönt ein
Ton, bis eine Taste gedrückt oder die Tür geö net wird.
AUTOMATISCHES AUFWÄRMEN
Das Gerät ermöglicht das Aufwärmen von Speisen auf der Grundlage des vom Benutzer eingegebenen Gewichts.
Die Auftaudauer und die Leistungsstufe werden automatisch eingestellt, sobald die Lebensmittelkategorie und das
Gewicht programmiert sind. Das Aufwärmgewicht reicht von 200 g bis 800 g.
1. Drücken Sie im Standby-Modus die Taste AUTO REHEAT.
2. Nutzen Sie die Tasten UP und DOWN, um das Gewicht des aufzuwärmenden Produkts einzustellen.
3. Drücken Sie START/QUICK START.
4. Nach Beendigung des Garvorgangs wird auf dem Display „End” angezeigt und alle zwei Minuten ertönt ein Ton,
bis eine Taste gedrückt oder die Tür geö net wird.
KÜCHENTIMER
DE
Das Gerät ist mit einem Küchentimer ausgestattet, der ab der eingestellten Zeit herunterzählt.
1. Drücken Sie im Standby-Modus einmal die Taste TIME/SET CLOCK.
2. Verwenden Sie die Tasten10 SECONDS, 1 MINUTE und 10 MINUTES, um die gewünschte Zeit auszuwählen. Die
längste mögliche Zeit ist 95 Minuten.
3. Drücken Sie zum Bestätigen die Taste START/QUICK START.
4. Die Anzeige zählt die eingegebene Zeit herunter.
5. Wenn die Anzeige Null erreicht, ertönt ein Ton.
Es ist auch möglich, den Küchentimer im Garmodus zu verwenden. Führen Sie dazu die oben beschriebenen
Schritte aus, während Ihr Essen gart. Sobald der Küchentimer aktiviert ist, wird er fünf Sekunden lang auf dem
Display angezeigt, dann kehrt die Anzeige zum Countdown-Timer für den Kochzyklus zurück. Um den Timer wieder
anzuzeigen, drücken Sie einmal die Taste TIME/SET CLOCK und der Küchentimer erscheint fünf Sekunden lang, dann
wird wieder der Countdown für den Garvorgang angezeigt.
• Um das TIMER-Programm abzubrechen, drücken Sie die Taste STOP/ECO und die Anzeige zeigt die Zeit an.
• Wenn ein Kochzyklus gestartet wurde, kann der Küchentimer wie oben beschrieben gestartet werden.
ENERGIESPARFUNKTION
Mit dieser Funktion kann Strom gespart werden, wenn das Gerät nicht benutzt wird. Um diese Funktion im StandbyModus zu aktivieren, halten Sie die Taste STOP/ECO 3 Sekunden lang gedrückt; das Display schaltet sich aus; das Gerät
geht in den Energiesparmodus über.
Um den Energiesparmodus zu beenden, drücken Sie eine beliebige Taste oder ö nen und schließen Sie die Gerätetür.
DE – 20
Page 50

STUMM-FUNKTION
Mit der Stummschaltungsfunktion können Sie alle Töne des Mikrowellengeräts stummschalten. Um die
Stummschaltung zu aktivieren, drücken Sie einmal die Taste CHILD LOCK und auf dem Display wird 5 Sekunden lang
„OFF" angezeigt. Im Stummschaltungsmodus ertönt kein Ton, wenn Tasten gedrückt werden.
Um die Stummschaltung zu deaktivieren, drücken Sie einmal die Taste CHILD LOCK; auf dem Display wird 5 Sekunden
lang „ON" angezeigt, um anzuzeigen, dass der Ton wieder eingeschaltet wurde.
Wenn die Stummschaltfunktion eingestellt ist und das Gerät vom Stromnetz getrennt wird, wird sie aufgehoben,
sobald das Netz wieder angeschlossen wird.
SICHERHEITSVERRIEGELUNG
Dies ist eine automatische Funktion, die verhindert, dass Kinder das Gerät unbeaufsichtigt bedienen. Wenn sich
das Gerät im Standby-Modus be ndet und innerhalb einer Minute nicht bedient wird, schaltet es automatisch
in den Sicherheitsverriegelungsmodus und auf dem Display erscheint „Loc". Im Verriegelungszustand sind
alle Tasten deaktiviert. Wenn Sie eine beliebige Taste drücken, erscheint auf der Anzeige 5Sekunden lang die
Verriegelungsanzeige. Dies erinnert den Benutzer daran, die Verriegelungssperre aufzuheben.
Um die Sicherheitsverriegelung zu deaktivieren, ö nen und schließen Sie einfach die Tür der Mikrowelle. Dann wird
die Tastatur wieder aktiviert und die Anzeigeleuchte der Verriegelung schaltet sich ab.
KINDERSICHERUNG:
Um die KINDERSICHERUNG einzustellen, halten Sie die Taste CHILD LOCK 3Sekunden lang gedrückt– es ertönt
ein langer Piepton und auf der Anzeige erscheint „Loc”. Das Gerät be ndet sich jetzt im „CHILD LOCK“-Modus
(Kindersicherung). Das Display zeigt in diesem Modus die Uhr an– wenn eine Taste gedrückt oder die Tür geö net
wird, wird fünf Sekunden lang „Lo c” angezeigt.
Um die KINDERSICHERUNG abzuschalten, halten Sie die Taste CHILD LOCK 3Sekunden lang gedrückt, bis ein langer
Signalton erklingt.
AUTOMATISCHER SCHUTZMECHANISMUS
ÜBERHITZUNGSSCHUTZ – Wenn das Gerät eine hohe Temperatur feststellt, wird auf der Anzeige „E01" angezeigt
und das Gerät stellt den Betrieb ein. Dieser Vorgang kann abgebrochen werden, indem Sie die Taste STOP/ECO
drücken.
SCHUTZ BEI NIEDRIGER TEMPERATUR – Wenn das Gerät in den Schutzmodus bei niedriger Temperatur übergeht,
wird auf der Anzeige „E02" angezeigt und das Gerät stellt den Betrieb ein. Dieser Vorgang kann abgebrochen werden,
indem Sie die Taste STOP/ECO drücken.
SCHUTZ VOR SENSOR-FEHLFUNKTION – Wenn das Gerät bei einem der Sensoren ein Problem feststellt, wird „E03“
angezeigt und das Gerät stellt den Betrieb ein. Außerdem gibt das Gerät einen Warnton ab. Dieser Vorgang kann
abgebrochen werden, indem Sie die Taste STOP/ECO drücken.
DE – 21
Page 51

DE
REINIGUNG UND WARTUNG
• Schalten Sie das Gerät aus und ziehen Sie den Netzstecker aus der Wandsteckdose, wenn Sie das Gerät reinigen.
• Halten Sie das Innere des Ofens sauber. Sollten an den Seiten, an der Decke der Basisplatte oder auf dem Drehteller
Lebensmittelspritzer oder verschüttete Flüssigkeiten anhaften, wischen Sie diese mit einem feuchten Tuch ab. Wenn
das Gerät stark verschmutzt ist, können Sie milde Reinigungsmittel verwenden. Benutzen Sie keine Sprays und keine
anderen scharfen Reinigungsmittel. Durch sie können Flecken, Streifen oder Mattierungen auf der Türober äche
auftreten.
• Die Außenseite des Geräts sollte mit einem feuchten Tuch gereinigt werden. Damit keine Schäden an den
Betriebsteilen im Inneren des Ofens auftreten, darf kein Wasser in die Lüftungsö nungen eindringen.
• Wischen Sie die Tür und das Fenster auf beiden Seiten, die Türdichtungen und die anliegenden Teile regelmäßig mit
einem feuchten Tuch ab, um Spritzer oder Verunreinigungen zu entfernen.
• Verwenden Sie keine scheuernden Reinigungsmittel.
• Nicht dampfstrahlen.
• Achten Sie darauf, dass das Bedienfeld nicht nass wird. Reinigen Sie das Bedienfeld mit einem weichen, feuchten
Tuch. Lassen Sie die Gerätetür beim Reinigen des Bedienfelds o en, damit es nicht versehentlich eingeschaltet wird.
• Sollte sich Dampf innerhalb oder um die Außenseite der Ofentür herum ansammeln, wischen Sie mit einem
weichen Tuch nach. Dies kann passieren, wenn das Mikrowellengerät bei hoher Luftfeuchtigkeit betrieben wird.
Dies ist kein Defekt.
• Sie sollten den Drehteller regelmäßig reinigen, damit keine Verunreinigungen oder potenzielle Lichtbögen/Schäden
auftreten. Wischen Sie die Unterseite des Ofens einfach mit einem milden Reinigungsmittel ab.
• Sie können Gerüche aus Ihrem Gerät entfernen– vermischen Sie dazu eine Tasse Wasser mit dem Saft und der Schale
einer Zitrone in einer mikrowellengeeigneten Schale. Erhitzen Sie das Ganze 5 Minuten lang in der Mikrowelle.
Wischen Sie das Gerät anschließend gründlich ab und trocknen Sie es mit einem weichen Tuch.
• Wenn die Glühbirne defekt ist, wenden Sie sich bitte an den Kundendienst.
• Das Gerät sollte regelmäßig gereinigt werden. Außerdem sollten Lebensmittelrückstände regelmäßig entfernt
werden. Wird das Gerät nicht in einem sauberen Zustand gehalten, kann dies zu einer Beschädigung der
Ober äche führen, was die Gebrauchsdauer des Gerätes nachteilig beein ussen und möglicherweise zu einer
Gefahrensituation führen kann.
• Bitte entsorgen Sie dieses Gerät nicht über den Hausmüll, sondern beachten Sie die Hinweise Ihres Landes zur
Entsorgung dieser Art von Produkten.
DE – 22
Page 52
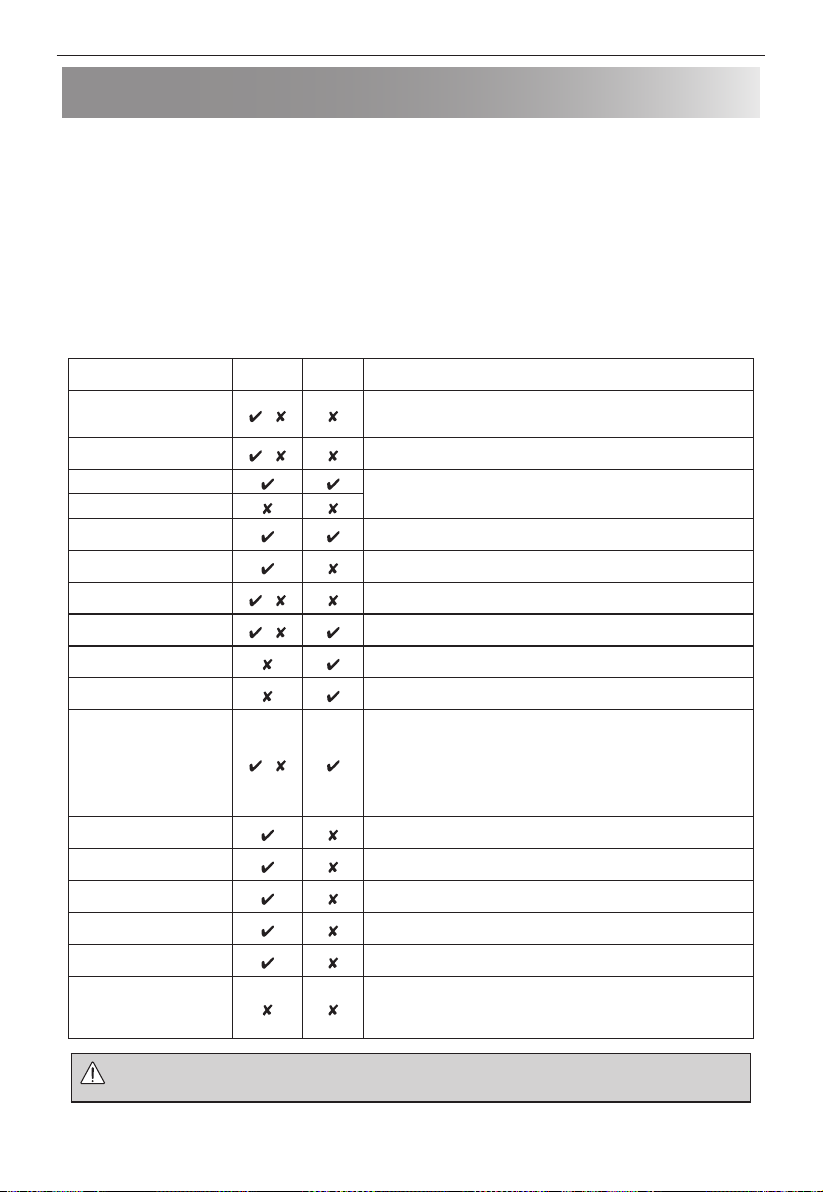
PASSENDES OFENGESCHIRR
1. Das ideale Material für ein Mikrowellengerät ist für Mikrowellen transparent. Es lässt Energie durch den Behälter
ießen und erhitzt die Lebensmittel.
2. Die Mikrowelle kann kein Metall durchdringen, daher sollten keine Metallutensilien oder Geschirr mit Metallrand
verwendet werden.
3. Verwenden Sie beim Garen in der Mikrowelle keine Recyclingpapierprodukte, da diese kleine Metallteile enthalten
können, die Funken und/oder Brände verursachen können.
4. Es wird eher rundes/ovales als quadratisches/längliches Geschirr empfohlen, da das Essen an den Ecken zum
Überkochen neigt.
5. Schmale Aluminiumfolienstreifen können verwendet werden, um ein Überkochen an freiliegenden Bereichen
zu verhindern. Verwenden Sie jedoch nicht zu viel und halten Sie einen Abstand von 2,54 cm zwischen Folie und
Hohlraum ein.
Die folgende Liste ist eine allgemeine Anleitung zur Auswahl der richtigen Utensilien.
Geschirr
Bräunungsgeschirr
Porzellan und Keramik
Hitzebeständiges Glas
Nicht-Hitzebeständiges Glas
Hitzebeständige Keramik
Mikrowellengeeignetes
Kunststo geschirr
Küchenpapier
Glas z.B. Pyrex®
Metalltablett
Metallrost
Alufolie
Folienbehälter
Klarsichtfolie
Plastik/Polystyrol, z. B.
Fastfood-Behälter
Gefrier-/Bratbeutel
Pappteller/-becher und
Küchenpapier
Behälter aus Stroh und Holz
Recyclingpapier und
Zeitungen
Mikrowelle
Fest
Grill/
Heißluft
/
/
/
/
/
Kommentar
Befolgen Sie immer die Anleitung des Herstellers.
Überschreiten Sie nicht die angegebenen Erwärmzeiten. Seien Sie sehr
vorsichtig, da dieses Geschirr sehr heiß wird.
Porzellan, Tongeschirr, glasiertes Steingut und feines Porzellan sind
grundsätzlich geeignet, sofern sie kein metallisches Dekor aufweisen.
Es sollte darauf geachtet werden, dass Glasgeschirr für die Verwendung in
einem Mikrowellenherd geeignet ist.
Achten Sie darauf, dass das keramische Material nicht zu dick ist oder einen
hohen Mineralgehalt hat.
Vergewissern Sie sich stets, dass das Kunststo geschirr für die Verwendung
in einem Mikrowellenherd geeignet ist.
Verwenden Sie nur Küchenpapier, das für die Verwendung in
Mikrowellenherden empfohlen wird.
Seien Sie vorsichtig bei der Verwendung von feinen Gläsern, diese können
beim plötzlichen Erwärmen zerspringen.
Verwenden Sie kein Metallgeschirr, da ein Lichtbogen entstehen und somit
ein Feuer verursacht werden kann.
Verwenden Sie kein Metallgeschirr, da ein Lichtbogen entstehen und somit
ein Feuer verursacht werden kann.
Kleine Stücke aus Aluminiumfolie können verwendet werden, um die
Lebensmittel vor Überhitzung zu schützen. Halten Sie die Folie mindestens
2,54 cm von den Wänden des Innenraums entfernt, da Lichtbögen auftreten
können.
Folienbehälter werden generell nicht empfohlen, außer vom Hersteller
anders angegeben, wie z.B. Microfoil®. Folgen Sie den Anweisungen
sorgfältig.
Sie sollten die Lebensmittel nicht berühren und stechen Sie in diese ein,
damit der Dampf entweichen kann.
Bitte beachten Sie, dass sich einige Behälter bei hohen Temperaturen
verformen, schmelzen oder ihre Farbe verändern.
Muss zum Auslass von Dampf angestochen werden. Stellen Sie sicher, dass
die verwendeten Beutel mikrowellengeeignet sind.
Verwenden Sie keine Kunststo - oder Metall-Bindungen, da diese schmelzen
können oder wegen "Lichtbögen" Feuer fangen können.
Nur zum Aufwärmen verwenden, oder um Feuchtigkeit zu absorbieren
Überhitzung kann zu Feuer führen.
Überwachen Sie das Gerät immer, wenn Sie diese Materialien verwenden, da
eine Überhitzung zu Bränden führen kann.
Kann metallische Bestandteile enthalten, die zu Lichtbögen und Bränden
führen können.
WARNUNG: Beim Erhitzen von Lebensmitteln in Plastik- oder Papierbehältern müssen Sie das Gerät
überwachen, da sich diese entzünden könnten.
HINWEIS: Lassen Sie das Gerät bei der Verwendung nicht unbeaufsichtigt.
DE – 23
Page 53
DE
MIKROWELLENGARTIPPS
Mikrowellen garen Speisen schneller als konventionelle Garweisen. Daher ist es wichtig, dass Sie bestimmte Techniken
anwenden, um gute Ergebnisse zu erzielen. Viele dieser Techniken ähneln jedoch jenen, die beim konventionellen
Garen verwendet werden.
WARNUNG: Flüssigkeiten oder Speisen dürfen nicht in geschlossenen Behältern oder Behältern/
GARHINWEISE:
• Lassen Sie das Gerät im Betrieb niemals unbeaufsichtigt.
• Stellen Sie sicher, dass das Verwendete Geschirr mikrowellengeeignet ist.
• Verwenden Sie nur Mikrowellen-Popcorn in seiner empfohlenen Verpackung (befolgen Sie die
Herstelleranweisungen). Verwenden Sie niemals Öl, außer der Hersteller emp ehlt dies ausdrücklich, und garen Sie
es nie länger als empfohlen.
WARNUNG: Wenn Sie die empfohlenen Garzeiten und zu hohe Leistungsstufen verwenden, können
Gläsern mit einem Deckel erhitzt werden, da sich darin Druck aufbauen kann. Dies kann
dazu führen, dass das Gefäß/der Behälter explodiert.
sich Lebensmittel überhitzen, brennen und unter Umständen Feuer fangen und das Gerät
beschädigen.
Anordnen
Platzieren Sie die dicksten Lebensmittel auf die Außenseite des Geschirrs, z.B. Hühnerbeine.
Lebensmittel, die auf der Außenseite des Geschirrs platziert sind, werden mehr Energie erhalten, somit schneller garen
als jene in der Mitte.
Abdecken
Bei manchen Speisen ist es vorteilhaft, sie während des Garens in der Mikrowelle abzudecken.
Verwenden Sie nur mikrowellengeeignete Frischhaltefolie oder einen geeigneten Deckel
Einstechen
Lebensmittel mit einer Schale, einer Haut oder einer Membran müssen an verschiedenen Stellen eingestochen
werden, bevor sie gegart oder aufgewärmt werden, denn dabei entsteht Dampf, der zum Platzen führen kann– z.B.
Karto eln, Fisch, Hühnchen, Würstchen.
HINWEIS: Eier sollten nicht mit Mikrowellenleistung erhitzt werden. Sie könnten auch nach dem Garen noch
explodieren– z.B. pochiert, gebraten, hartgekocht.
Umrühren, Wenden und Neuanordnen.
Für ein gleichmäßiges Garen ist Umrühren, Wenden und Neuanordnen von Speisen während des Garvorgangs
essenziell. Führen Sie dies immer vom Rand in die Mitte durch.
Ruhen
Nach dem Garen ist eine Ruhezeit nötig, damit sich die Hitze gleichmäßig in den Lebensmitteln verteilen kann.
DE – 24
Page 54
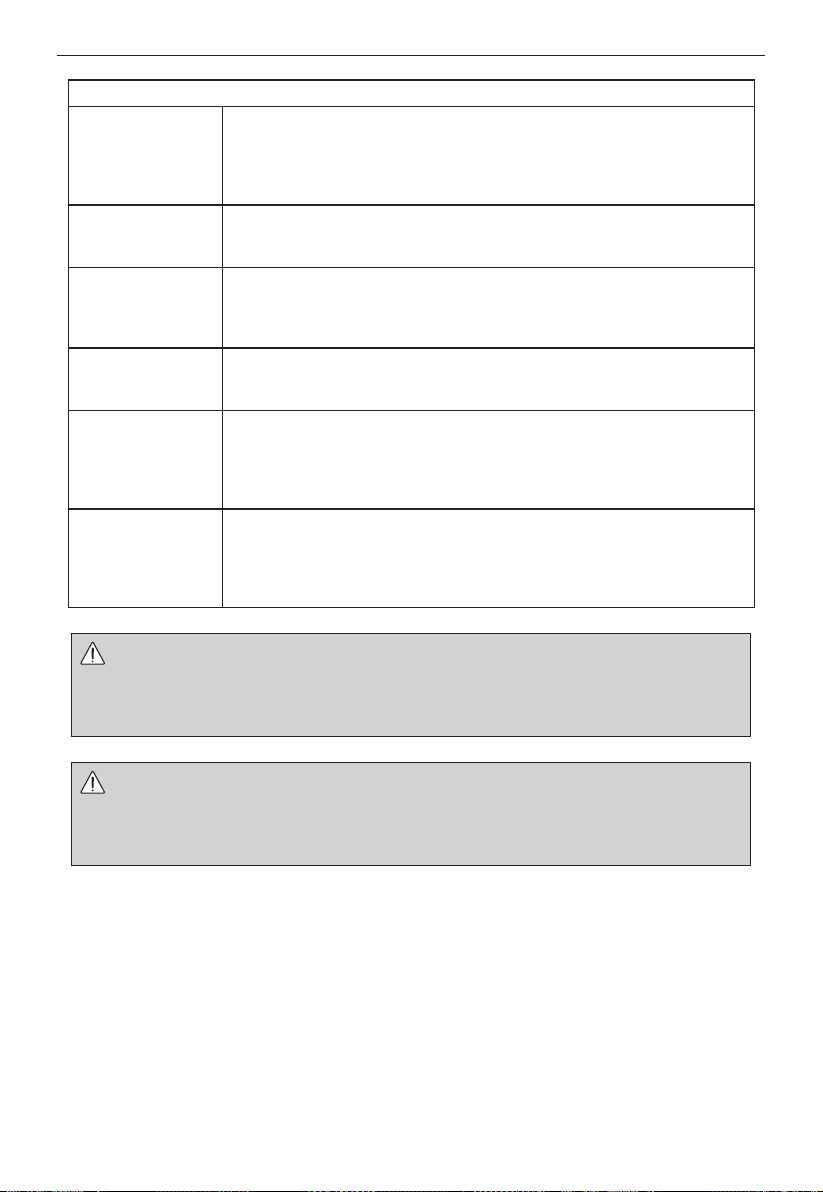
Lebensmittelmerkmale
Zusammensetzung Speisen mit einem hohen Zuckergehalt (z.B. Früchtepuddings oder gefülltes Gebäck)
Dichte Die Lebensmitteldichte beein usst die benötigte Garzeit.
Menge Die Anzahl der Mikrowellen in Ihrem Gerät bleibt dieselbe, egal wie viel Speisen gegart
Größe Kleine Lebensmittel und kleine Portionen garen schneller als größere, da die
Form Lebensmittel in unregelmäßiger Form, wie Hähnchenbrust oder Hühnerbeine,
Speisentemperatur Die Ausgangstemperatur der Lebensmittel beein usst die benötigte Garzeit
benötigen weniger Garzeit. Passen Sie also auf, denn Überhitzen kann zu Bränden
führen.
Knochen in Lebensmitteln sind Hitzeleiter, sodass das Lebensmittel schneller garen wird.
Passen Sie also auf, dass die Speisen gleichmäßig garen.
Leicht poröse Lebensmittel, wie Kuchen oder Brot, garen schneller als schwere und
dichte, wie z.B. Braten und Schmorgerichte.
werden. Die Garzeit muss daher erhöht werden, wenn die Lebensmittelmenge im Gerät
zunimmt.
Beispielsweise dauert das Garen von vier Karto eln länger als das von zwei Stück.
Mikrowellen von allen Seiten in ihr Inneres eindringen können. Für ein gleichmäßiges
Garen, teilen Sie alles in gleich große Portionen.
benötigen für ihre dickeren Teile eine längere Garzeit. Für ein gleichmäßiges Garen,
platzieren Sie die dickeren Teile auf den Rand des Geschirrs, sodass sie mehr Energie
abbekommen.
Runde Formen garen gleichmäßiger als viereckige Formen.
Gekühlte Lebensmittel brauchen länger zum Garen als solche mit Zimmertemperatur.
Die Temperatur des Behältnisses ist kein wirkliches Anzeichen für die Temperatur der
enthaltenen Speisen oder Getränken. Schneiden sie Speisen mit Füllungen auf, wie. z.B.
mit Marmelade gefüllte Donuts, um Hitze oder Dampf entweichen zu lassen.
WARNUNG: Gesicht und Hände: Benutzen Sie immer Ofenhandschuhe, um Speisen oder Geschirr aus
WARNUNG: Vor dem Servieren sollten Sie immer die Temperatur der Speisen und Getränke überprüfen
dem Gerät zu entnehmen. Treten Sie einen Schritt zurück, um Hitze und Dampf entweichen
zu lassen. Wenn Sie Abdeckungen entfernen (wie z.B. Klarsichtfolie), Bratbeutel oder
Popcorn-Packungen öff nen, sollten Sie den Dampf immer von Ihren Händen oder ihrem
Gesicht fernhalten.
und diese umrühren. Gehen Sie mit besonderer Vorsicht vor, wenn Sie sie Babys, Kindern
oder alten Menschen servieren. Der Inhalt von Baby äschchen und Babynahrungsgläsern
müssen besonders auf ihre Temperatur vor dem Verzehr überprüft sowie umgerührt oder
geschüttelt werden, um Verbrennungen zu verhindern.
DE – 25
Page 55

DE
AUFTAU-TIPPS
Die Verwendung Ihres Mikrowellengeräts ist die schnellste Methode zum Auftauen von Lebensmitteln. Es ist eine
einfache Methode, aber die folgenden Anweisungen sind essenziell, um zu gewährleisten, dass Speisen vollständig
aufgetaut werden.
• Entfernen Sie vor dem Auftauen die gesamte Verpackung.
• Um Lebensmittel aufzutauen, benutzen Sie die Mikrowellenleistungsstufen P-20 bis P-40.
• Beziehen Sie sich hierbei bitte unten auf die weiteren Informationen.
Neuanordnen
Lebensmittel, die am Rand des Geschirrs liegen, tauen schneller auf als jene in der Mitte. Deshalb sollte man sie bis zu
viermal neuanordnen.
Bewegen Sie eng nebeneinander liegende Stücke am Rand in die Mitte und ordnen Sie übereinander liegende Teile
neu an.
Dies wird dafür sorgen, dass alle Teile der Speisen gleichmäßig auftauen
Trennen
Lebensmittel können beim Einfrieren zusammengeklebt sein. Es ist wichtig, sie sobald wie möglich voneinander zu
trennen.
z.B. Baconscheiben oder Hühner lets.
Abschirmen
Manche Teile des aufzutauenden Lebensmittels können warm werden. Um zu verhindern, dass sie noch wärmer
werden und anfangen zu kochen, können sie mit kleinen Folienstücken abgeschirmt werden, die Mikrowellen
re ektieren. Beispiele hierfür wären z.B. Hühnerbeine und Chicken Wings.
Ruhen
Ruhezeit ist nötig, um zu gewährleisten, dass die Speisen vollständig aufgetaut sind.
Das Auftauen ist nicht abgeschlossen, wenn die Speisen aus dem Gerät entnommen sind. Die Speisen müssen
abgedeckt ruhen, um sicherzustellen, dass sie auch in der Mitte komplett aufgetaut sind.
Wenden
Es ist wichtig, dass alle Lebensmittel während des Auftauens bis zu 4Mal gewendet werden.
Dies ist wichtig, damit ein sorgfältiges Auftauen gewährleistet wird.
DE – 26
Page 56
AUFWÄRM-TIPPS
Für das Wiederaufwärmen von Speisen sollten Sie den unten angegebenen Ratschlägen und Hinweisen folgen, um
sicherzustellen, dass die Speisen vor dem Servieren vollständig erwärmt sind.
Tellergerichte
Entfernen Sie Ge ügel- oder Fleischstücke und erwärmen Sie diese separat, wie unten beschrieben.
Platzieren Sie kleinere Stücke in die Mitte des Tellers sowie größere und dickere an den Rand. Decken Sie sie mit
mikrowellengeeigneter Folie ab und erwärmen Sie die Speise auf Stufe P-50. Nach der Hälfte der Erwärmungszeit
sollten Sie es umrühren bzw. neuanordnen.
HINWEIS: Stellen Sie sicher, dass die Speisen vor dem Servieren vollständig erwärmt sind.
Geschnittenes Fleisch
Decken Sie sie mit mikrowellengeeigneter Frischhaltefolie ab und erwärmen Sie die Speise auf Stufe P-60. Mischen Sie
es mindestens einmal neu durch, um ein gleichmäßiges Erwärmen zu garantieren.
HINWEIS: Stellen Sie sicher, dass das Fleisch vor dem Servieren vollständig erwärmt ist.
Ge ügelportionen
Platzieren Sie die dicksten Teile der Portion an den Rand des Geschirrs, decken Sie sie mit mikrowellengeeigneter Folie
und erwärmen Sie sie bei Stufe P-70.
Wenden Sie die Ge ügelportionen nach der Hälfte der Aufwärmphase.
HINWEIS: Stellen Sie sicher, dass das Ge ügel vor dem Servieren vollständig erwärmt ist.
Schmorgerichte
Decken Sie die Schmorgerichte mit mikrowellengeeigneter Folie oder einem passenden Deckel ab sowie erwärmen
Sie diese Gerichte bei Stufe P-50.
Regelmäßig umrühren, um gleichmäßiges Erwärmen zu gewährleisten.
HINWEIS: Stellen Sie sicher, dass die Speisen vor dem Servieren vollständig erwärmt sind.
Um das beste Erwärmungsresultat zu erzielen, wählen Sie eine zum Speisentyp passende Mikrowellenleistungsstufe
aus. Beispielsweise sollte eine Schale Gemüse bei Stufe P-100 erwärmt werden, während eine Lasagne (die ja nicht
umgerührt werden kann) bei Stufe P-40 erwärmt werden sollte.
HINWEISE:
• Nehmen Sie die Speisen aus der Folie oder Metallbehältnissen heraus, bevor Sie sie erwärmen.
• Die Er wärmungszeiten werden von der Form, Tiefe, Menge und Temperatur der Speisen und der Größe, Form und
dem Material des Behälters ab.
WARNUNG: Erhitzen Sie niemals Flüssigkeiten in schmalen, hohen Gefäßen, da der Inhalt
• Zur Vermeidung von Überhitzung und Feuer sollte besonders vorsichtig vorgegangen werden, wenn Lebensmittel
mit einem besonders hohen Zucker- oder Fettgehalt, wie z. B. gefüllte Süßspeisen oder Früchtepuddings, gegart
oder aufgewärmt werden.
• Erhitzen sie niemals Fett oder Öl zum Frittieren, da dies zu Überhitzung oder Bränden führen kann.
• Dosenkarto eln sollte nicht in einem Mikrowellengerät erhitzt werden, befolgen Sie die Herstellerangaben auf der
Dose.
WARNUNG: Der Inhalt von Saug aschen und Babynahrungsgläser muss vor dem Gebrauch
herausspritzen und zu Verbrennungen führen könnte.
geschüttelt bzw. gerührt und die Temperatur muss vor dem Verzehr geprüft werden, um
Verbrennungen zu vermeiden.
DE – 27
Page 57
DE
FEHLERBEHEBUNG
Wenn Sie denken, dass das Gerät nicht ordentlich funktioniert, gibt es einige einfache Überprüfungen, die Sie selbst
durchführen können bevor Sie den Kundendienst rufen. Dies kann Ihnen viel Aufwand ersparen, wenn es sich um
einen einfachen Fehler handelt.
Führen Sie die folgende Überprüfung durch:
Geben Sie eine halbe Tasse Wasser auf den Drehteller und schließen Sie die Tür. Stellen Sie den Timer auf 1 Minute
Garzeit bei Stufe P-100.
1. Schaltet Sich die Gerätelampe beim Garen ein?
2. Funktioniert der Lüfter? (Überprüfen Sie dies, indem Sie Ihre Hand über die Lüftungsö nungen platzieren.)
3. Ertönt der Signalton nach einer Minute?
4. Ist das Wasser in der Tasse heiß?
Wenn die Antwort auf eine der Fragen „NEIN“ ist, überprüfen Sie, ob das Gerät richtig eingesteckt ist oder die
Sicherung durchgebrannt ist. Wenn dies nicht der Fall ist, konsultieren Sie die folgende Tabelle.
WARNUNG: Reparieren, modi zieren oder passen Sie das Gerät niemals selbst an. Die Durchführung
• Die Türabdichtung verhindert das Austreten von Mikrowellen während des Betriebs, aber stellt keine luftdichte
Dichtung dar. Daher ist es normal, Wassertropfen oder einen leichten lauwarmen Luftstrom im Türbereich zu
bemerken. Aus Lebensmitteln mit einem hohen Feuchtigkeitsgehalt tritt Dampf aus, der zu Kondenswasser im Gerät
führt, das aus dem Gerät heraustropfen kann.
• Reparaturen und Umbauten: Versuchen Sie nicht, das Gerät zu reparieren, zu verändern oder in Betrieb zu nehmen,
wenn es nicht richtig funktioniert.
• Zugri auf das Gehäuse und die Lampe: Entfernen Sie niemals das Gehäuse. Das ist extrem gefährlich, aufgrund der
Präsenz von elektrisch geladenen Teilen im Innern, deren Berührung tödlich sein kann.
Ihr Gerät ist nicht mit einer Lampenabdeckung versehen. Wenn die Lampe kaputtgeht, versuchen Sie nicht, sie
selbsttätig zu entfernen, rufen Sie den SHARP-Kundendienst.
von Reparaturarbeiten ist für alle Personen außer den ausgebildeten SHARP-Technikern
gefährlich. Dies ist insofern wichtig, da die Entfernung von Schutzabdeckungen zur
Freisetzung von Mikrowellen führen kann.
DE – 28
Page 58
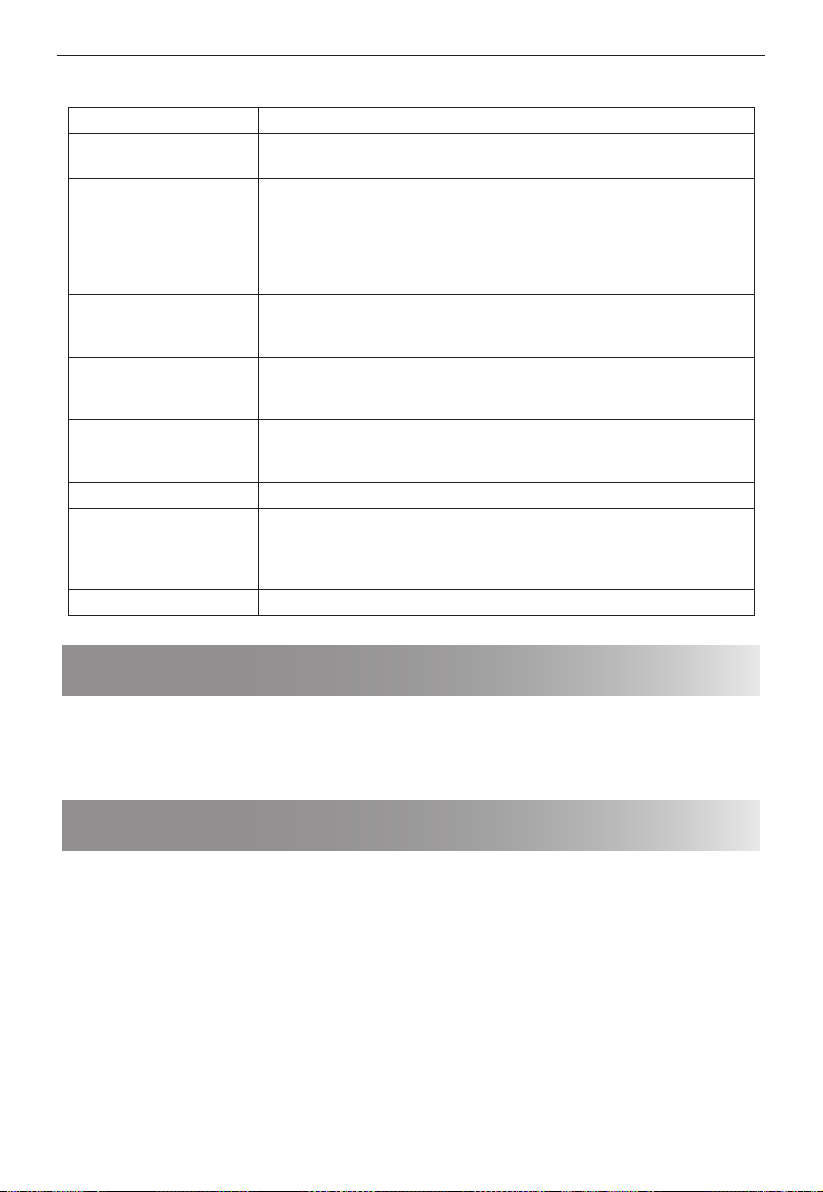
FEHLERBEHEBUNG-DIAGRAMM
FRAGE ANTWORT
Ein Luftzug tritt an der Tür
auf.
Kondenswasser sammelt sich
im Gerät an und kann aus der
Tür heraustropfen.
Blitz- oder Lichtbogenbildung
im Garraum beim Garen.
Lichtbogenbildung bei
Karto eln.
Das Gerät funktioniert nicht,
wenn die Taste START/QUICK
START gedrückt wird.
Gerät gart zu langsam. Überprüfen Sie die eingestellte Leistungsstufe.
Das Gerät produziert
Geräusche.
Das Gehäuse ist heiß. Das Gehäuse kann warm werden, halten Sie Kinder von ihm fern.
Wenn das Gerät in Betrieb ist, zirkuliert Luft im Garraum.
Die Tür ist nicht luftdicht abgeschlossen, daher kann Luft durch die Tür austreten.
Der Garraum wird normalerweise kälter als das Gargut sein und daher wird der
beim Garen entstehende Dampf auf der kälteren Ober äche kondensieren.
Die entstandene Dampfmenge hängt vom Wassergehalt des Garguts ab. Manche
Lebensmittel, z.B. Karto eln sind höchst wasserhaltig.
Das Kondenswasser in der Glastür sollte nach ein paar Stunden verschwunden
sein.
Ein Lichtbogen bildet sich, wenn ein Metallobjekt während des Garens dem
Garraum nahekommt. Dies kann möglicherweise die Garraumober äche aufrauen,
aber wird sonst das Gerät nicht beschädigen.
Stellen Sie sicher, dass Sie alle „Augen“ aus den Karto eln entfernt haben und die
Karto eln eingestochen haben, dann können Sie sie direkt auf den Drehteller in
eine hitzebeständige Au au orm o.ä. geben.
Überprüfen Sie, ob die Tür richtig geschlossen ist.
Die Mikrowellenenergie pulsiert währen des Garens/Auftauens.
Das Gerät gibt jede Minute einen Piepton ab und das Display zeigt „Fail" an.
Wenn die Tasten des Bedienfelds länger als 1 Minute ununterbrochen gedrückt
werden, tritt dieser Fehler auf.
SCHUTZ VOR KLEMMENDEN TASTEN
Wenn eine Taste auf dem Bedienfeld länger als 1 Minute gedrückt wird, stoppt das Programm sofort und das Display
zeigt „FAIL“ an. Das Mikrowellengerät gibt einen Signalton ab. Wenn die Taste weiterhin gedrückt bleibt, ertönt
der Signalton jede Minute. Drücken Sie nach der Fehlersuche die STOP/ECO-Taste, um in den Standby-Modus
zurückzukehren.
EHE SIE UNTERSTÜTZUNG ANFORDERN
Ehe Sie einen Service anfordern, überprüfen Sie bitte jeden der folgenden Punkte:
• Vergewissern Sie sich, dass das Gerät sicher eingesteckt ist. Wenn das nicht der Fall ist, ziehen Sie den Stecker aus
der Steckdose, warten Sie 10Sekunden lang und schließen das Gerät anschließend erneut ordnungsgemäß an.
• Vergewissern Sie sich, ob eine Sicherung des Stromkreises durchgebrannt ist oder ein Hauptstromkreisunterbrecher
ausgelöst wurde. Wenn diese einwandfrei zu funktionieren scheinen, überprüfen Sie die Steckdose mit einem
anderen Gerät.
• Vergewissern Sie sich, dass die Drehknöpfe für Leistung und Timer richtig eingestellt sind.
• Stellen Sie sicher, dass die Tür sicher geschlossen ist und in das Türsicherungssystem einrastet. Andernfalls ießt die
Mikrowellenenergie nicht in das Gerät.
WENN KEINER DER OBEN AUFGEFÜHRTEN PUNKTE DAS PROBLEM LÖSEN KANN, WENDEN SIE SICH AN EINEN
GESCHULTEN TECHNIKER. VERSUCHEN SIE NICHT, DAS GERÄT SELBST ZU MODIFIZIEREN ODER ZU REPARIEREN.
DE – 29
Page 59
Atención:
Su producto
está marcado con este
símbolo. Esto
signi ca que los
productos eléctricos y electró-
nicos usados
no deberían
mezclarse con
los residuos
domésticos ge-
nerales. Existe
un sistema de
recogida espe-
cial para estos
productos.
www.sharpconsumer.com/
contact/
ES
A. Información sobre eliminación
para particulares
1. En la Unión Europea
Atención: Si desea eliminar este equipo, no utilice el cubo de la basura
habitual.
Los equipos eléctricos y electrónicos usados deben tratarse por separado de
acuerdo con la legislación que requiere un tratamiento, una recuperación y
un reciclaje adecuados de los equipos eléctricos y electrónicos usados.
Tras la aplicación por parte de los estados miembros, los hogares de los
estados de la UE podrán devolver, sin coste alguno, sus equipos eléctricos o
electrónicos usados a las instalaciones para ello designadas.*
En algunos países* el establecimiento local puede recoger el producto sin
coste alguno por la compra uno nuevo similar.
*) Si desea más información, póngase en contacto con las autoridades
locales.
Si sus equipos eléctricos o electrónicos usados incorporan pilas o
acumuladores, elimínelos por separado con antelación siguiendo los
requisitos locales. La correcta eliminación de estos productos ayuda a
garantizar que los residuos sean sometidos a los procesos de tratamiento,
recuperación y reciclaje adecuados, así como a prevenir los efectos
negativos potenciales sobre el medio ambiente y la salud de los seres
humanos resultante de una manipulación inadecuada de los residuos.
2. Países no pertenecientes a la Unión Europea
Si desea eliminar este producto, póngase en contacto con las autoridades
locales para consultar el método correcto.
Para Suiza: los equipos eléctricos o electrónicos pueden devolverse al
vendedor sin coste alguno, incluso si no compra ningún producto nuevo.
Encontrará más información sobre los centros de recogida en la página de
inicio www.swico.ch o www.sens.ch.
B. Información sobre eliminación para empresas
1. En la Unión Europea
Si el producto es utilizado para nes empresariales y desea eliminarlo:
póngase en contacto con su distribuidor de SHARP, que le informará sobre
www.sharpconsumer.com/
support/
la retirada del producto. Es posible que deba sufragar los costes derivados
de la retirada y el reciclaje. También es posible que los centros de recogida
locales acepten los productos pequeños (y en cantidades pequeñas).
Para España: póngase en contacto con el sistema de recogida establecido
ocon la autoridad local para la retirada del producto usado.
2. Países no pertenecientes a la Unión Europea
www.sharpconsumer.com/
documents-of-conformity/
Para cuestiones de servicio, diríjase a www.sharpconsumer.com/contact/ y para conocer sus derechos de garantía,
diríjase www.sharpconsumer.com/support/ o póngase en contacto con el establecimiento en el que compró el
producto.
Las declaraciones de conformidad está disponibles en www.sharpconsumer.com/documents-of-conformity/
Si desea eliminar este producto, póngase en contacto con las autoridades
locales para consultar el método correcto de eliminación.
ES – 1
Page 60

PRECAUCIONES PARA EVITAR LA POSIBLE EXPOSICIÓN A LA ENERGÍA DE
MICROONDAS
1. No intente utilizar este horno con la puerta abierta, ya que, de hacerlo, podría resultar expuesto a la energía de
microondas. Es importante no eliminar ni manipular los cierres de seguridad,
2. No inserte ningún objeto entre la cara frontal y la puerta, ni permita que se acumulen residuos o desechos en la
super cies selladas.
3. No use el horno si está dañado. Es muy importante que la puerta del horno cierre correctamente, y que ni la
puerta, las bisagras, los cierres ni las juntas de la puerta y las super cies de sellado presenten daños.
4. No intente reparar ni ajustar el horno.
ÍNDICE
INSTRUCCIONES IMPORTANTES DE SEGURIDAD ....................................................................................................................................... 3
INSTALACIÓN ........................................................................................................................................................................................................11
INTERFERENCIAS DE RADIO .............................................................................................................................................................................12
INSTRUCCIONES DE TOMA DE TIERRA (MASA)..........................................................................................................................................12
ESPECIFICACIONES .............................................................................................................................................................................................12
HORNO Y ACCESORIOS ......................................................................................................................................................................................13
PANEL DE CONTROL ...........................................................................................................................................................................................14
ANTES DE UTILIZAR EL HORNO ......................................................................................................................................................................14
AJUSTE DEL RELOJ ..............................................................................................................................................................................................14
PREPARACIÓN DE ALIMENTOS CON LA FUNCIÓN DE MICROONDAS ..............................................................................................15
INICIO RÁPIDO ......................................................................................................................................................................................................15
PREPARACIÓN DE ALIMENTOS AL GRILL .....................................................................................................................................................16
MICRONDAS + GRILL ..........................................................................................................................................................................................16
CONVECCIÓN ........................................................................................................................................................................................................17
MICROONDAS + CONVECCIÓN ......................................................................................................................................................................17
MENÚ AUTOMÁTICO .......................................................................................................................................................................................... 18
DESCONGELAR AUTOMÁTICAMENTE........................................................................................................................................................... 19
RECALENTAR AUTOMÁTICAMENTE ...............................................................................................................................................................19
TEMPORIZADOR DE COCINA ...........................................................................................................................................................................19
FUNCIÓN DE AHORRO DE ENERGÍA .............................................................................................................................................................19
FUNCIÓN DE SILENCIO ......................................................................................................................................................................................20
BLOQUEO DE SEGURIDAD ................................................................................................................................................................................20
BLOQUEO PARA NIÑOS .....................................................................................................................................................................................20
MECANISMO DE PROTECCIÓN AUTOMÁTICO ...........................................................................................................................................20
LIMPIEZA Y MANTENIMIENTO .........................................................................................................................................................................21
UTENSILIOS ADECUADOS PARA EL HORNO...............................................................................................................................................22
CONSEJOS PARA PREPARAR ALIMENTOS CON EL MICROONDAS ......................................................................................................23
CONSEJOS PARA DESCONGELAR ...................................................................................................................................................................25
CONSEJOS PARA RECALENTAR ....................................................................................................................................................................... 26
RESOLUCIÓN DE PROBLEMAS .........................................................................................................................................................................27
PROTECCIÓN CONTRA LOS BOTONES ATASCADO ..................................................................................................................................28
ANTES DE LLAMAR AL SERVICIO TÉCNICO .................................................................................................................................................28
ES – 2
Page 61

ES
INSTRUCCIONES IMPORTANTES DE SEGURIDAD
LEA DETENIDAMENTE Y GUARDE PARA FUTURAS REFERENCIAS
Para prevenir incendios, no debe dejarse sin vigilancia el
horno microondas durante el proceso de preparación de
alimentos. Si se aplican niveles de potencia demasiado
altos o periodos de preparación demasiado largos, los alimentos pueden sobrecalentarse y provocar un incendio.
Este horno se ha diseñado para usarse únicamente sobre una
encimera. No se ha pensado para integrarse en una unidad de
cocina. No coloque el horno dentro de un armario. La toma de
corriente debe ser de fácil acceso para que la unidad pueda
desconectarse fácilmente en caso de emergencia.
La toma de alimentación de CA debe ser de 230-240V, 50Hz,
con un fusible de línea de distribución de 10A o un disyuntor
de corriente de 10A como mínimo. Se deberá utilizar un circuito eléctrico independiente solo para este aparato.
No coloque el horno en zonas donde se genere calor, como
cerca de un horno convencional. No instale el horno en áreas
de alta humedad o donde se pueda acumular humedad. No
guarde o use el horno en exteriores.
Si se observa humo, apague o desconecte el horno y mantenga la puerta cerrada con el n de sofocar las llamas.
Utilice solamente recipientes y utensilios aptos para microondas. Se deberán comprobar los utensilios para veri car que son aptos para su uso en hornos de microondas.
Al calentar alimentos en recipientes de papel o plástico,
vigile el horno debido a la posibilidad de ignición.
Limpie la cubierta del guiaondas y la cavidad del horno.
Estos elementos deben estar secos y no contener grasa.
La grasa acumulada puede recalentarse y provocar humo
ES – 3
Page 62

oincendios.
No coloque materiales in amables cerca del horno o los ori cios de ventilación. No bloquee los ori cios de ventilación.
Extraiga todos los sellos metálicos, cierres con alambre, etc., de
los alimentos y de los alimentos envasados. Los arcos eléctricos
en super cies metálicas pueden provocar incendios.
No use el horno microondas para calentar aceite para freír. La
temperatura no se puede controlar y el aceite puede incendiarse.
Cuando haga palomitas de maíz, utilice solamente fabricantes
especializados en palomitas para microondas.
No almacene alimentos u otros artículos dentro del horno.
Compruebe la con guración después de encender el horno
para asegurarse de que el aparato funciona como se desea.
No deje el horno sin atender mientras se usa.
Para evitar el calentamiento excesivo y un posible incendio, se
debe prestar atención especial al preparar o recalentar alimentos con un contenido alto de azúcar o grasa, por ejemplo, salchichas, pasteles o pudin de Navidad. Consulte las sugerencias
correspondientes en el manual de funcionamiento.
Para evitar la posibilidad de lesiones. ADVERTENCIA:
No use el horno si está dañado o no funciona correctamente.
Compruebe lo siguiente antes de usar:
a) Asegúrese de que la puerta está correctamente cerrada y
de que no esté desalineada o deformada.
b) Asegúrese de que las bisagras y las cerraduras de seguri-
dad de la puerta no están rotas ni sueltas.
c) Asegúrese de que las juntas de las puertas y super cies de
sellado no están dañadas.
d) Asegúrese de que interior de la cavidad del horno o la
puerta no presentan abolladuras.
ES – 4
Page 63

ES
e) Asegúrese de que el cable de alimentación y el enchufe no
estén dañados.
Si las juntas de la puerta o la puerta están dañadas, no debe
utilizarse el horno hasta que haya sido reparado por una persona competente.
No ajuste, repare ni modi que el horno. Es peligroso para
cualquier persona que no esté capacitada para llevar a
cabo operaciones de mantenimiento o reparación que
consistan en retirar una cubierta que sirva de protección
contra la exposición a la energía de microondas.
No utilice el horno con la puerta abierta ni modi que las cerraduras de seguridad de ninguna manera. No utilice el horno si
hay algún objeto entre las juntas de la puerta y las super cies
de sellado.
No permita que la grasa ni la suciedad se acumulen en las
juntas de las puertas y las partes adyacentes. Limpie el
horno con regularidad y elimine los depósitos de alimentos.
Siga las instrucciones de ''cuidado y limpieza''. No mantener el horno limpio podría dar lugar a que la super cie se
deteriore, y podría afectar negativamente a la vida útil del
aparato y originar situaciones de peligro.
Las personas con MARCAPASOS deben consultar a su médico o
al fabricante del marcapasos para tomar las precauciones debidas respecto a los hornos microondas.
Para evitar la posibilidad de una descarga eléctrica.
• Bajo ninguna circunstancia se deberá desmontar la carcasa
exterior.
• No derrame ni inserte objetos en las aberturas de cerradu-
ra de la puerta u ori cios de ventilación. En caso de que se
produzca un derrame, apague, desenchufe inmediatamente
el aparato y llame a un agente autorizado de servicio SHARP.
ES – 5
Page 64

• No sumerja el cable de alimentación ni el enchufe en agua u
otros líquidos.
• No deje que el cable de alimentación cuelgue sobre el bor-
de de una mesa o super cie de trabajo.
• Mantenga el cable de alimentación alejado de super cies
calientes, incluida la parte posterior del horno.
• Mantenga el aparato y el cable fuera del alcance de los ni-
ños menores de ocho años.
• No trate de cambiar la lámpara del horno personalmente ni
permita que ninguna persona no autorizada por SHARP lo
haga. Si la lámpara se estropea, consulte a su distribuidor o
un agente autorizado del servicio SHARP.
• Si el cable de alimentación presenta algún daño, deberá ser
sustituido por personal de servicio autorizado de SHARP.
ADVERTENCIA: Los líquidos y otros alimentos no deben
calentarse en recipientes cerrados, ya que podrían explotar. Calentar bebidas en el microondas puede retardar la
ebullición, por lo que se deberá tener cuidado al manejar
el recipiente. Para evitar la posibilidad de explosión y de
una ebullición repentina:
No utilice recipientes herméticos. Retire los cierres y las tapas
antes de utilizarlos. Los recipientes sellados pueden explotar
debido al aumento de la presión incluso una vez que el horno se haya apagado. Tenga mucho cuidado cuando caliente
líquidos. Use recipientes de boca ancha para dejar escapar las
burbujas.
No caliente nunca líquidos en recipientes de boca estrecha tales como biberones, ya que el contenido del envase
podría salir a chorros cuando se caliente y causar quemaduras.
Para prevenir la salida repentina del líquido hirviendo y posibles quemaduras:
ES – 6
Page 65

ES
1. No caliente durante una cantidad excesiva de tiempo.
2. Remueva el líquido antes de calentar o recalentar.
3. Es aconsejable introducir una varilla de cristal o un utensilio
similar (no metálico) en el líquido mientras se calienta.
4. Deje el líquido en reposo durante al menos 20segundos en
el horno al nal del tiempo de preparación para evitar ebulliciones posteriores.
No prepare huevos con cáscara ni caliente huevos duros
en el microondas, ya que pueden explotar incluso después de que el aparato haya terminado la preparación.
Para preparar o recalentar los huevos que no hayan sido
revueltos o mezclados, perfore las yemas y las claras. Pele
y corte los huevos duros antes de calentarlos en el horno
microondas.
Perfore la piel de alimentos como patatas, salchichas y frutas
antes de prepararlos, ya que pueden explotar.
ADVERTENCIA: Se debe revolver y agitar el contenido de
biberones y envases de alimentación para bebés, y revisar
la temperatura antes de su consumo con el n de evitar
quemaduras. Utilice agarradores o guantes de cocina
cuando saque los alimentos del horno para evitar quemaduras. Para evitar la posibilidad de quemaduras:
• Cuando abra recipientes, envases para preparar palomitas
de maíz, bolsas de cocinar al horno, etc., mantenga la cara y
las manos a una distancia prudencial para evitar quemaduras por vapor y erupción hirviente. Para evitar quemaduras,
compruebe siempre la temperatura de los alimentos, remueva antes de servir y preste especial atención a la temperatura de los alimentos y las bebidas destinados a bebés,
niños o ancianos. Las piezas accesibles pueden calentarse
durante el uso. Los niños pequeños deben permanecer a
una distancia prudencial.
ES – 7
Page 66

• La temperatura de los recipientes no es un indicador real
de la temperatura de los alimentos ni las bebidas; veri que
siempre la temperatura de los alimentos.
• Mantenga siempre la distancia de la puerta del horno cuan-
do se abra para evitar quemaduras por el vapor y el calor
que se escapa.
• Corte los alimentos rellenos horneados después de calentar
para liberar el vapor y evitar quemaduras.
• Mantenga a los niños lejos de la puerta para evitar que pue-
dan quemarse.
ADVERTENCIA: Solo permita que los niños a partir de ocho
años utilicen el horno sin supervisión cuando hayan recibido las instrucciones adecuadas para utilizarlo de una
forma segura y comprendan los peligros de un uso inadecuado.
Cuando se utilice el aparato en los modos GRILL, MIX GRILL, CONVECTION, MIX CONVECTION y AUTO MENU (modo
aplicable en función del modelo), los niños solo deben
utilizar el horno bajo la supervisión de un adulto debido a
la temperatura que se genera.
Este aparato no está diseñado para ser utilizado por personas (incluidos niños) con discapacidades físicas, sensoriales o mentales, con falta de experiencia y conocimiento,
a menos que una persona responsable de su seguridad les
supervise o instruya en su uso.
Se debe vigilar a los niños para asegurarse de que no jueguen con el electrodoméstico. La limpieza por parte de los
niños debe supervisarse.
Los modelos con panel táctil electrónico cuentan con un
modo de bloqueo.
No se apoye sobre la puerta del horno ni la balancee. No juegue con el horno ni lo utilice como un juguete.
ES – 8
Page 67

ES
Los niños deben aprender todas las instrucciones importantes
de seguridad: el uso de agarraderas de cocina, la extracción cuidadosa de las tapas de los alimentos y prestar especial atención
a los envases (por ejemplo, materiales de calentamiento automático) diseñados para hacer los alimentos crujientes, ya que
pueden estar muy calientes.
Otras advertencias
No modi que el horno de ninguna manera.
No mueva el horno mientras esté en funcionamiento.
Este electrodoméstico se ha diseñado para un uso doméstico.
Este horno se ha diseñado para preparar alimentos en el hogar
únicamente. No es apto para uso comercial ni en laboratorios.
Secar alimentos o ropa, y calentar almohadillas térmicas, zapatillas, esponjas, ropa húmeda u otros objetos similares puede
provocar lesiones, explosión o fuego. Este horno no es apto
para uso comercial ni de laboratorio.
Para fomentar el uso de su horno sin problemas y evitar
daños.
Nunca utilice el horno si está vacío. Cuando utilice un plato
para dorar o material de autocalentamiento, coloque siempre
un aislante resistente al calor, como un plato de porcelana
debajo para evitar daños en la base del horno debido al estrés
por calor. No se debe exceder el tiempo de precalentamiento
especi cado en las instrucciones de los platos.
No utilice utensilios de metal, pues re ejan las microondas y
pueden provocar arco eléctrico. No introduzca latas en el horno.
Para evitar que el plato giratorio o la base del horno se rompa:
a) Antes de limpiar con agua, deje se enfríe.
b) No coloque alimentos calientes o fríos, o utensilios calientes
en una base de horno o el plato giratorio frío.
ES – 9
Page 68
c) No coloque nada en el compartimiento exterior durante la
operación.
NOTA:
No utilice contenedores de plástico para calentar en el microondas si el horno está todavía caliente después de utilizarlo
en un modo de combinación (según el modelo del horno),
porque podrían derretirse.
No se deben utilizar contenedores de plástico con el horno en
estos modos, a menos que el fabricante del contenedor indique que resulta adecuado.
Si no está seguro de cómo conectar el horno, consulte a un
electricista autorizado y certi cado.
Ni el fabricante ni el distribuidor aceptan ninguna responsabilidad por averías en el horno o lesiones personales que resulten
del incumplimiento del procedimiento de conexión eléctrica
correcto.
Se puede formar vapor de agua o gotas de vez en cuando en
las paredes del horno o alrededor de los sellos de las puertas y
las super cies de sellado. Esto es normal y no un indicador de
fugas o mal funcionamiento del microondas.
Este aparato está destinado para su uso doméstico y aplicaciones similares, tales como: áreas de cocina reservadas para
personal en tiendas, o cinas y otros entornos profesionales,
granjas, uso por parte de clientes de hoteles, moteles y otros
entornos de tipo residencial, o de tipo pensión.
Este símbolo signi ca que las super cies pueden
calentarse durante el uso.
ES – 10
Page 69
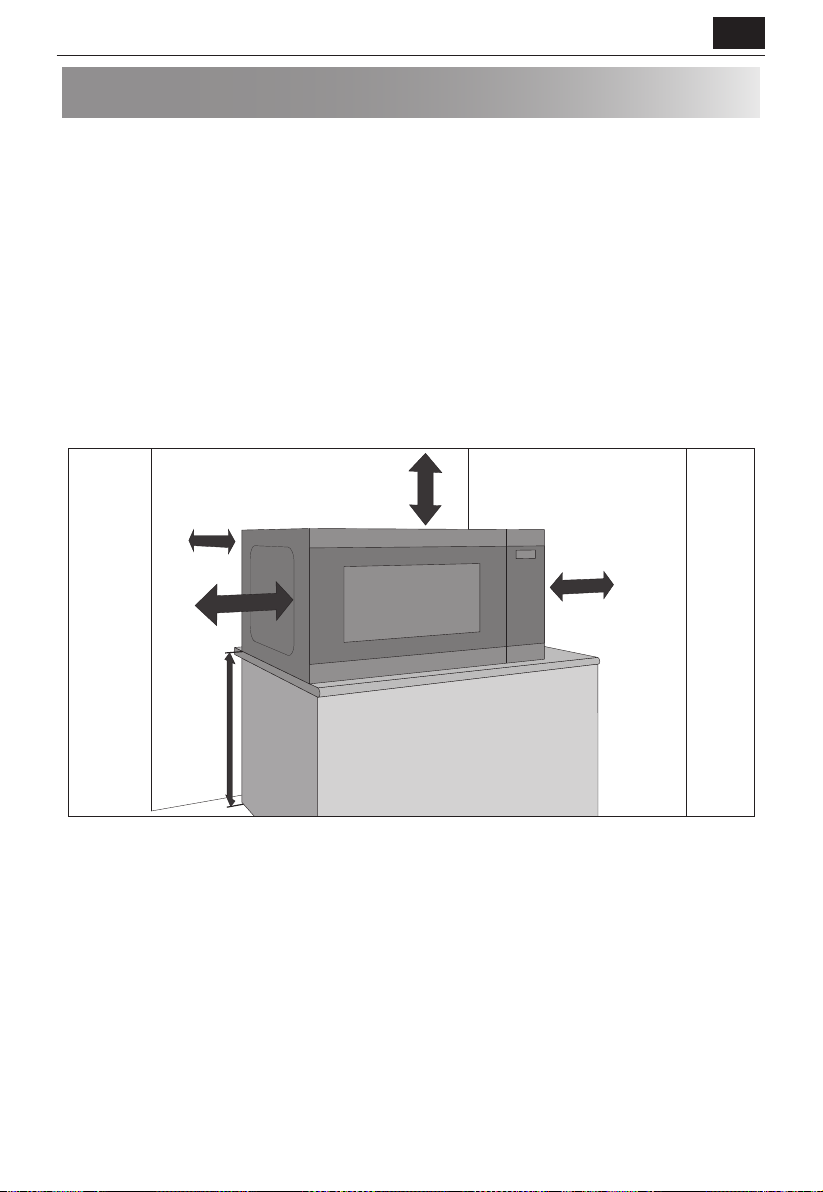
ES
INSTALACIÓN
1. Retire todos los materiales de embalaje del interior del horno y cualquier película protectora que se encuentre en
la super cie de la carcasa del horno microondas.
2. Revise detenidamente el horno para detectar cualquier signo de avería.
3. Coloque el horno en una super cie nivelada segura, lo su cientemente rme como para que pueda soportar el
peso del horno, sumándole el artículo más pesado posible para cocinar en el horno. No coloque el horno sobre un
armario.
4. Seleccione una super cie plana que proporcione su ciente espacio abierto para las rejillas de ventilación de
entrada o salida. Consulte la imagen de la primera página. La super cie posterior del aparato se debe colocar
contra una pared.
• La altura mínima de la instalación es de 85 cm.
• Se requiere un espacio mínimo de 20cm entre las paredes del horno y las paredes u objetos adyacentes.
• Deje un espacio de 30 cm como mínimo por encima del horno.
• No quite las patas de la parte inferior del horno.
• Bloquear los ori cios de entrada o de salida puede provocar daños en el horno.
• Sitúe el horno lo más alejado de la radio y la televisión como sea posible. El funcionamiento del horno de microon-
das puede provocar interferencias en la recepción de radio o televisión.
30 cm
10 cm
20 cm
85 cm
5. Conecte de forma segura el enchufe del horno a una toma de corriente eléctrica estándar conectada a tierra.
20 cm
ADVERTENCIA:
No coloque el horno en un lugar donde se genere calor, vaho o mucha humedad (por ejemplo, cerca o encima de un
horno convencional), o cerca de materiales combustibles (por ejemplo, cortinas).
No bloquee ni obstruya los ori cios de ventilación de aire.
No coloque objetos encima del horno.
No toque el exterior del microondas cuando esté en funcionamiento o poco después de utilizarlo porque estará
caliente.
ES – 11
Page 70
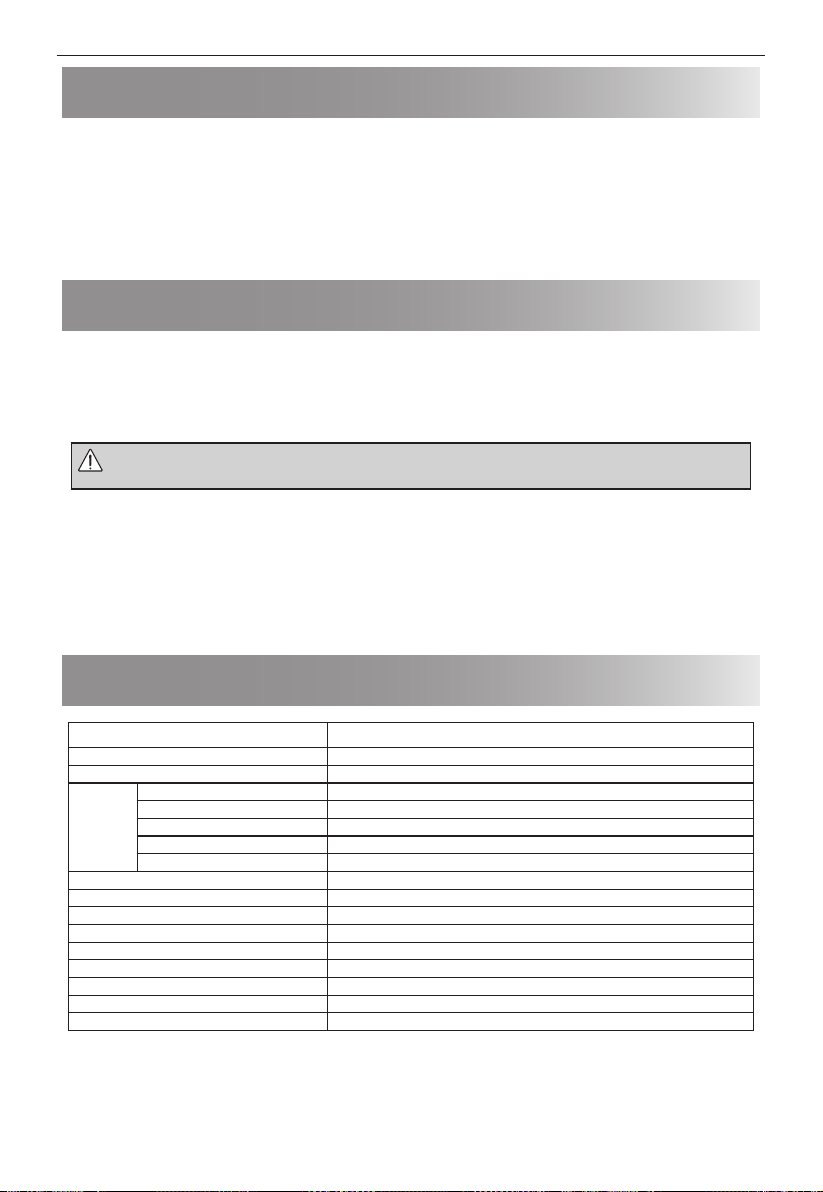
INTERFERENCIAS DE RADIO
El uso del microondas puede causar interferencias en aparatos de radio, televisores u otros equipos similares. Las
interferencias se pueden reducir adoptando las siguientes medidas:
1. Limpie la puerta y la cavidad en sus zonas de contacto.
2. Reoriente la dirección de la antena receptora de radio o televisión.
3. Reubique el horno con respecto al receptor.
4. Enchufe el microondas a una toma diferente de modo que el horno y el receptor no se encuentren en la misma
toma de electricidad.
INSTRUCCIONES DE TOMA DE TIERRA (MASA)
Este electrodoméstico debe contar con una toma a tierra. Este horno está equipado con un cable que incluye un
hilo de puesta a tierra con una patilla en el enchufe. El enchufe debe conectarse a una toma de pared correctamente
instalada y con puesta a tierra. En el caso de que se produzca un cortocircuito eléctrico, la puesta a tierra reduce el
riesgo de una descarga eléctrica a través de un cable de escape para la corriente eléctrica. Se recomienda utilizar un
circuito separado solo para el horno.
ADVERTENCIA: El uso inadecuado del enchufe de puesta a tierra puede dar como resultado una
descarga eléctrica.
NOTA:
1. Si tiene alguna duda sobre las instrucciones eléctricas o de puesta a tierra, consulte a un técnico o a un electricista
certi cado.
2. Ni el fabricante ni el distribuidor aceptan ninguna responsabilidad por averías en el horno o lesiones personales
resultantes del incumplimiento del procedimiento de conexión eléctrica.
El cable de alimentación utilizado en su horno microondas utiliza los siguientes cables de colores:
Verde y amarillo = TOMA DE TIERRA | Azul = NEUTRO | Marrón = FASE
ESPECIFICACIONES
Nombre del modelo: YC-PC322A
Tensión de línea de CA 230~240 V, 50 Hz monofásico
Fusible/interruptor del circuito de la línea de distribución
Potencia
Frecuencia de microondas 2450 MHz*
Dimensiones exteriores (An) x (Al) x (P)mm 539 x 280 x 415
Dimensiones de la cavidad (An) x (Al) x (P)**mm 362 x 223 x 378
Dimensiones del plato giratorio de cristal (ø mm) 315
Capacidad del horno 32 litros**
Dimensiones la bandeja para hornear (diámetro x H in mm)
Tamaño de la parrilla para grill (diámetro x altura en mm)
Peso 21 kg
Lámpara del horno (tipo LED) 1,5W
* - Este producto cumple los requisitos de la norma europea EN55011. De conformidad con esta norma, este producto se clasi ca como
equipo de grupo2 claseB.
Grupo2 signi ca que el equipo genera energía de radiofrecuencia intencionadamente en forma de radiación electromagnética para el
tratamiento térmico de los alimentos. ClaseB signi ca que el equipo se puede usar en entornos domésticos.
** - La capacidad interna se calcula midiendo la anchura, la profundidad y la altura máxima. La capacidad real de almacenaje de alimentos es inferior.
COMO PARTE DE UNA POLÍTICA DE MEJORA CONTINUA, NOS RESERVAMOS EL DERECHO DE CAMBIAR EL DISEÑO SIN
PREVIO AVISO.
Consumo 2300W
Potencia de salida de microondas 1000W
Potencia de salida de grill 1250 W
Potencia de convección 2300 W
Potencia en modo apagado <0,5W
ES – 12
10A
317 x 48
255 x 80
Page 71
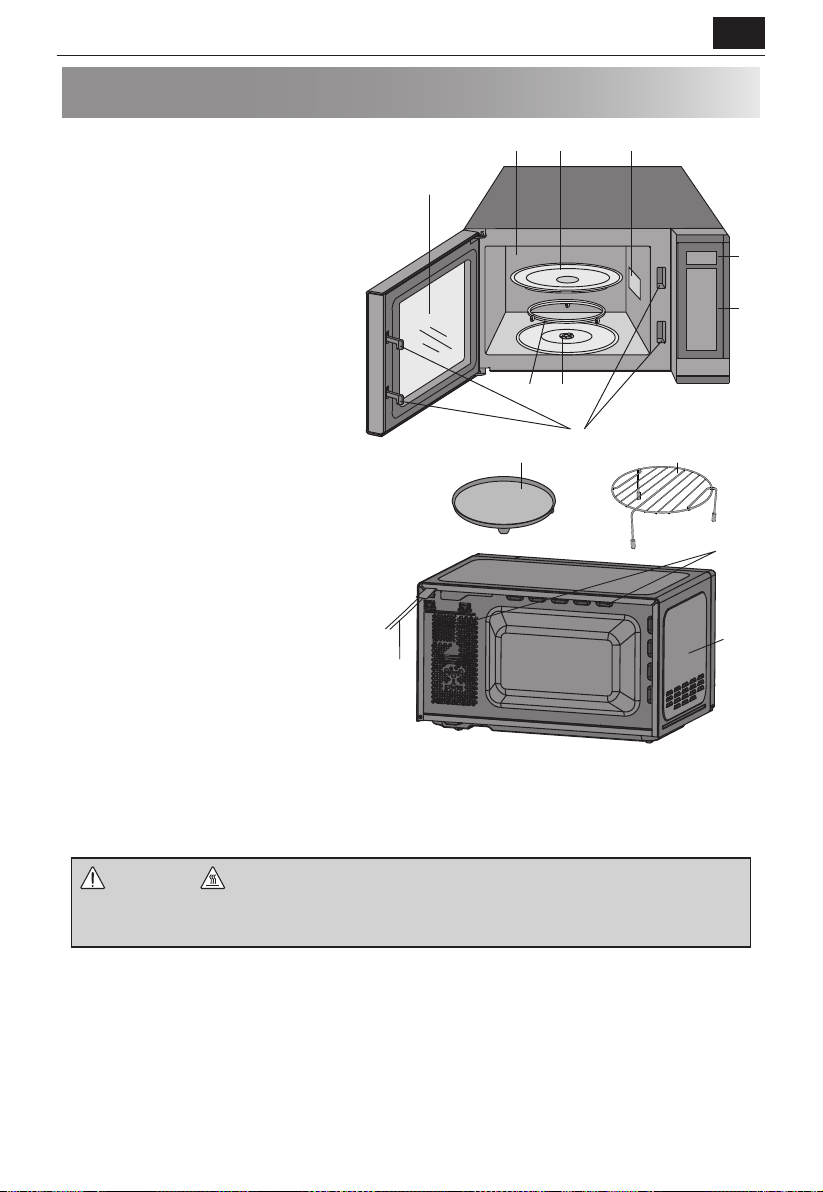
HORNO Y ACCESORIOS
1110
ES
1. Sistema de bloqueo de seguridad de la
puerta
2. Ventana del horno
3. Panel de control
4. Pantalla
5. Cavidad del horno
6. Tapa del emisor de ondas (no extraer)
7. Bandeja de cristal
8. Anillo de rodamiento
9. Acoplamiento del plato giratorio
10. Parrilla
11. Bandeja para hornear
12. Ori cios de ventilación
13. Mueble exterior
14. Cable de alimentación
2
7
5
9
8
6
1
• La parrilla y la bandeja para hornear se ha
diseñado solo para hornos con grill y sistema
de convección. NO utilice accesorios de metal
con la función de microondas.
• Para utilizar la parrilla consulte las secciones
dedicadas a la preparación de alimentos con la
función grill de este manual de usuario.
Nunca toque el grill cuando esté caliente.
NOTA: Cuando realice pedidos de accesorios,
mencione dos elementos: el nombre de la pieza
y el nombre del modelo.
14
NOTAS:
• Después de preparar alimentos grasos sin una
tapa, limpie bien siempre la cavidad y cualquier utensilio de cocina; estos elementos deben estar secos y libre de
grasas. La grasa acumulada puede recalentarse y causar humo o incendiarse.
• Cuando utilice el microondas, coloque siempre los utensilios en la placa giratoria.
• NO utilice la parrilla ni la bandeja para hornear mientras utiliza la función de microondas.
4
3
12
13
ADVERTENCIA: Este símbolo signi ca que las super cies pueden calentarse durante el uso.
La puerta, el armario exterior, el interior del horno, los accesorios y los platos pueden alcanzar altas
temperaturas durante el funcionamiento. Para prevenir quemaduras, utilice siempre guantes gruesos para
horno.
ES – 13
Page 72
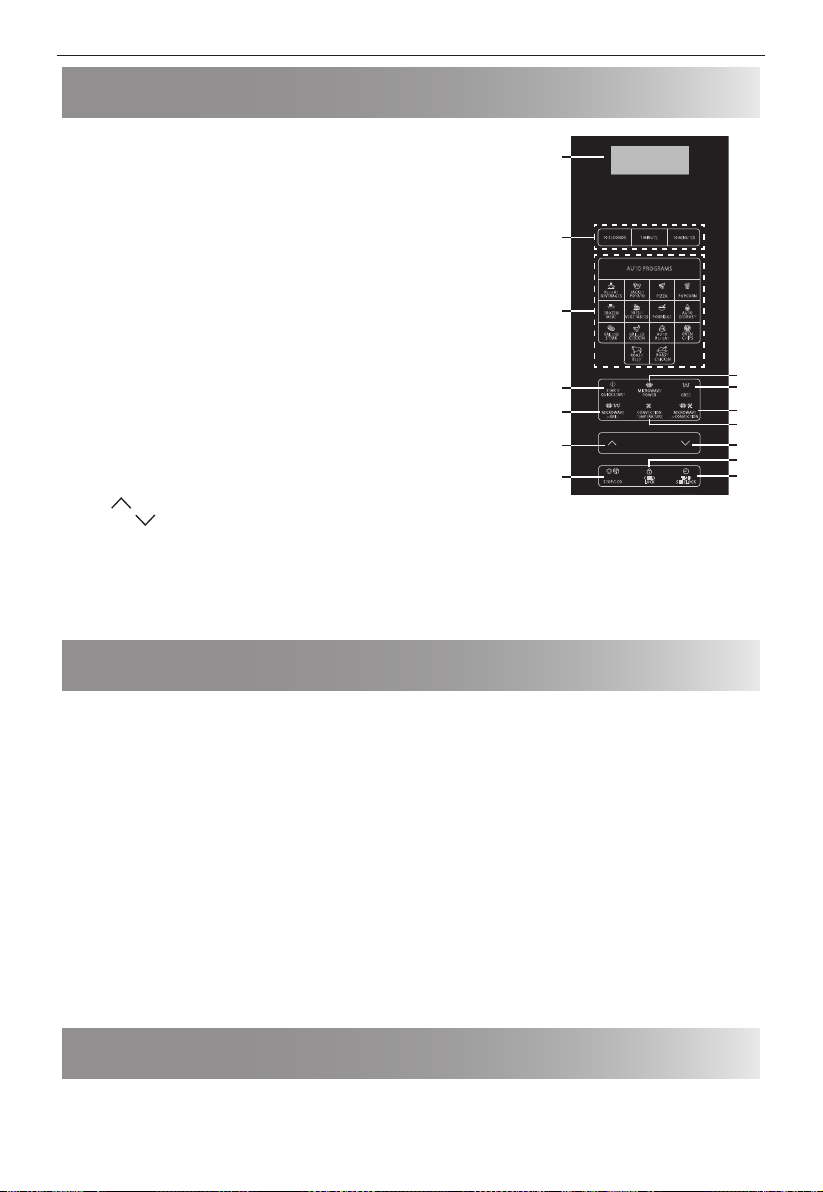
PANEL DE CONTROL
1. PANTALLA DIGITAL: muestra el tiempo de cocción, la potencia, el reloj e
otros indicadores.
1
2. 10 SECONDS, 1 MINUTE, 10 MINUTES (10 SEGUNDOS, 1 MINUTO,
10MINUTOS): permite establecer el tiempo de preparación de los alimentos
o el reloj.
3. Teclas de MENÚS AUTOMÁTICOS: pulse para seleccionar un menú de
preparación automática de los alimentos (consulte la página 18 para
obtener consejos sobre su uso).
4. START/QUICK START (INICIO/INICIO RÁPIDO): (página 15).
5. MICROWAVE POWER (POTENCIA DE MICROONDAS): pulse para seleccionar el
nivel de potencia del microondas. (Página 15).
6. GRILL pulse para establecer el programa de preparación de alimentos al grill.
(Página 16).
7. MICROWAVE+GRILL (MICROONDAS+GRILL): pulse para establecer el
programa de preparación combinada de alimentos con microondas y grill.
(Página 16).
8. CONVECTION TEMPERATURE (TEMPERATURA DE CONVECCIÓN): pulse para
seleccionar al temperatura de convección.
9. MICROWAVE+CONVECTION (MICROWAVE+CONVECCIÓN): pulse para
seleccionar la preparación de alimentos combina con convección.
10. UP
11. DOWN
: (ABAJO): pulse para establecer el peso de los alimentos o las raciones.
: (ABAJO): pulse para establecer el peso de los alimentos o las raciones.
10 SECONDS 1 MINUTE
2
REHEAT
BEVERAGES
3
FROZEN
MEAL
GRILLED
STEAK
4
START/
QUICK START
MICROWAVE
7
GRILL
+
10
12
STOP/ECO
AUTO PROGRAMS
JACKET
POTATO
FRESH
PORRIDGE
VEGETABLES
GRILLED
CHICKEN
ROAST
CHICKEN
EEF
B
MICROWAVE
POWER
CONVECTION
TEMPERATURE
CHILD
LOCK
10 MINUTES
POPCORN
PIZZA
AUTO
DEFROST
OVEN
AUTO
CHIPS
REHEAT
ROAST
GRILL
MICROWAVE
CONVECTION
+
TIME/
SET CLOCK
12. STOP/ECO (PARAR/MODO ECO): pulse una vez para detener temporalmente la preparación de alimentos o dos
veces para cancelarla completamente.
Permite establecer el modo de ahorro de energía. (Página 19).
13. CHILD LOCK (BLOQUEO PARA NIÑO): (Página 20).
14. TIME/SET CLOCK
(HORA/AJUSTE DEL RELOJ): permite establecer la hora y la función de temporizador. (Página 14).
ANTES DE UTILIZAR EL HORNO
Cuando el horno se enchufa por primera vez, se oirá un pitido y la pantalla mostrará "1:00". No es necesario ajustar el
reloj para que el horno funcione correctamente. Siga las instrucciones de la sección "Ajuste del reloj" de este manual
de instrucciones.
La primera vez que se utilice la función de grill y/o convección, el aparato puede despedir humo y olores. Para
evitar que esto ocurra cuando se están preparando alimentos, utilice la función de grill sin alimentos durante
aproximadamente 20minutos.
• Tras abrir y cerrar la puerta, el horno entrará en modo en espera. Si no se pulsa ningún botón durante un minuto,
la pantalla permanecerá encendida y los botones no funcionarán. Para volver al modo en espera, abra y cierre la
puerta.
• Durante la preparación de alimentos, si se presiona el botón STOP/ECO una vez, el ciclo de preparación de
alimentos se detendrá. Para reiniciar la preparación de alimentos, pulse el botón START/QUICK START. Si se pulsa el
botón STOP/ECO dos veces, la preparación de alimentos se detendrá.
• Cuando se programe el horno para una función particular y se produzca una pausa entre las pulsaciones de los
botones superior a 30segundos, el horno volver al modo en espera.
• Cuando se complete el ciclo de preparación de alimentos, la pantalla mostrará "End" (Final) y se oirá un todo cada
dos minutos hasta que se pulse un botón o se abra la puerta.
5
6
9
8
11
13
14
AJUSTE DEL RELOJ
Este horno incorpora un reloj que se puede usar en modo de 12 o de 24horas. Para ajustar el reloj, siga las
instrucciones que se indican a continuación:
1. En modo en espera, mantenga pulsado el botón TIME/SET CLOCK durante al menos 3segundos para acceder al
ES – 14
Page 73
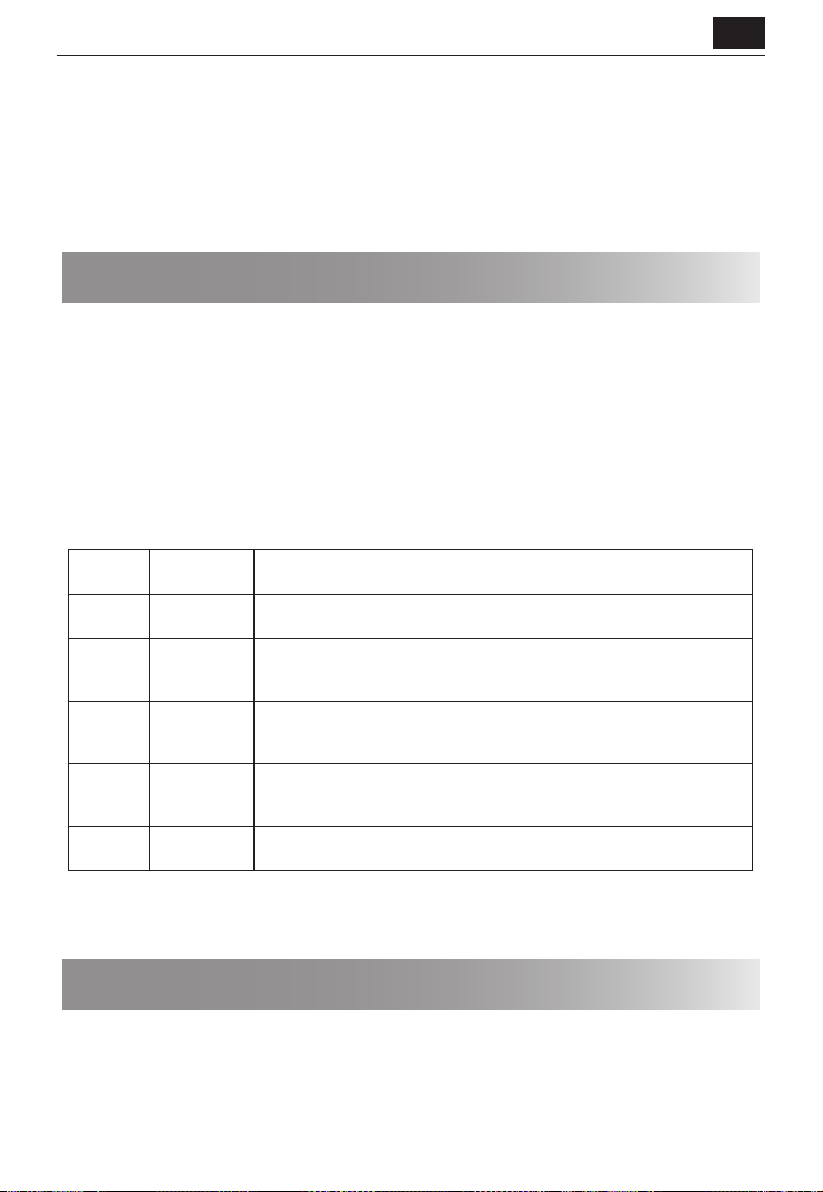
ES
modo de ajuste del reloj.
2. Pulse el botón TIME/SET CLOCK para elegir entre el modo de reloj de 12 o de 24horas.
3. Utilice los botones 10 SECONDS, 1 MINUTE y 10 MINUTES para establecer las horas y minutos deseados.
4. Pulse el botón TIME/SET CLOCK para almacenar y salir del modo de ajuste del reloj.
• No es necesario ajustar el reloj del horno para que funcione con normalidad.
• En el modo de preparación de alimentos, pulse el botón TIME/SET CLOCK para ver la hora del día (si se ha ajustado).
La hora del día volverá a la cuenta atrás de preparación de alimentos trascurridos cinco segundos. Tenga en cuenta
que la hora del día no se puede ver si se ha establecido el temporizador de la cocina.
PREPARACIÓN DE ALIMENTOS CON LA FUNCIÓN DE MICROONDAS
Para usar la función de microondas, siga las instrucciones que se indican a continuación:
1. En el modo en espera, pulse el botón MICROWAVE POWER para seleccionar el nivel de potencia. Cada vez se
pulse este botón, la pantalla mostrará el nivel de potencia del microondas.
2. Una vez seleccionado el nivel de potencia de microondas deseado, use los botones 10 SECONDS, 1 MINUTE y
10MINUTES para seleccionar el tiempo para preparar los alimentos.
3. Pulse el botón START/QUICK START para iniciar la preparación de alimentos.
4. Cuando se complete el ciclo de preparación de alimentos, la pantalla mostrará "End" (Final) y se oirá un tono cada
dos minutos hasta que se pulse un botón o la puerta se abra.
Tenga en cuenta las indicaciones de la tabla siguiente como guía. El horno tiene 10niveles de potencia de
microondas: 10%, 20%, 30%, 40%, 50%, 60%, 70%, 80%, 90% y 100%. La salida de tensión actual puede calcularse
multiplicando la potencia de microondas por el porcentaje.
Guía para preparar alimentos con el microondas:
Pantalla
P100 100 %
P-80 80 %
P-60 60 %
P-40 40 %
P-20 20 %
• Durante la preparación de alimentos, puede comprobar el nivel de potencia de cocción si mantiene pulsado el
botón MICROWAVE POWER.
• El tiempo máximo de cocción es de 95minutos.
Potencia de
microondas
Uso sugerido
Se utiliza para preparar o recalentar alimentos rápidamente, por ejemplo, guisos,
bebidas calientes, verduras, etc.
Para alimentos densos que requieren un periodo de preparación largo cuando se
preparan de manera convencional, por ejemplo, asados de carne, es recomendable
utilizar esta con guración de potencia para garantizar que la carne quede tierna.
Para la preparación durante más tiempo de alimentos densos como asados,
pasteles de carne y alimentos emplatados; también para platos sensibles como
salsa de queso y bizcochos.
Para asegurarse de que el plato se descongela de manera uniforme, seleccione
esta con guración de potencia. Este ajuste es ideal para preparar arroz, pasta,
albóndigas y an de huevo a fuego lento.
Para descongelar alimentos lentamente, por ejemplo, de pasteles de crema u
hojaldre.
INICIO RÁPIDO
Si necesita preparar alimentos a nivel de potencia 100%, pulse simplemente el botón START/QUICK START mientras
está en el modo en espera. Cada vez que pulse el botón START/QUICK START, se añadirán 30segundos al tiempo de
preparación de alimentos.
ES – 15
Page 74
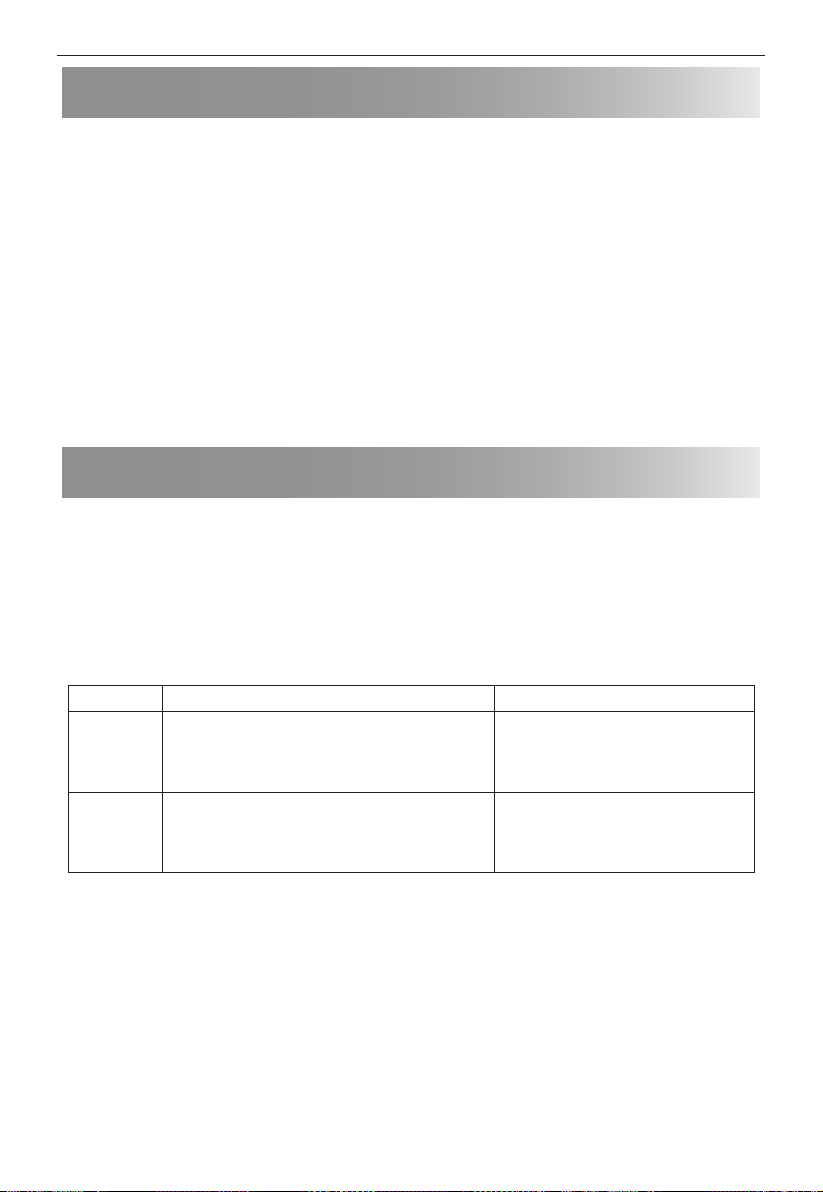
PREPARACIÓN DE ALIMENTOS AL GRILL
El elemento de calor del grill situado en la parte superior de la cavidad del horno solo tiene un ajuste de potencia, y es
e ciente y económico. El grill es ideal para preparar beicon, letes de jamón de cerdo, palitos de pescado y pasteles
de té.
Utilice la parrilla para asar pequeñas piezas de alimentos como beicon y salchichas, dándoles la vuelta a mitad de
preparación. Los alimentos se puede colocar directamente sobre la parrilla o sobre un plato de an o en un plato
resistente al calor. Para asegurarse de que no gotea grasa o aceite de los alimentos que se están preparando, coloque
una bandeja adecuada debajo de la parrilla.
Al dorar o tostar la super cie de alimentos en una cazuela, se puede utilizar la parrilla si el contenedor es lo
su cientemente plano. Sin embargo, se aconseja colocar este tipo de contenedores directamente sobre el plato
giratorio. Permita cierto tiempo adicional para dorar o tostar al gusto. No se debe usar la parrilla para asar.
Para usar la función de grill, siga las instrucciones que se indican a continuación:
1. En el modo en espera, pulse el botón GRILL para seleccionar la función de grill. La pantalla mostrará "Grl".
2. Utilice los botones 10 SECONDS, 1 MINUTE y 10 MINUTES para seleccionar el tiempo deseado.
3. Pulse el botón START/QUICK START para iniciar la preparación de alimentos.
4. Cuando se complete el ciclo de preparación de alimentos, la pantalla mostrará "End" (Final) y el tono se oirá cada
dos minutos hasta que se pulse un botón o la puerta se abra.
MICRONDAS + GRILL
El uso de la función de microondas y grill permite preparar alimentos y dorarlos rápidamente. Para usar la función de
microondas y grill, siga las instrucciones que se indican a continuación:
1. En modo en espera, pulse el botón MICROWAVE+GRILL una o dos veces para seleccionar "Co-1" o "Co-2".
2. Utilice los botones 10 SECONDS, 1 MINUTE y 10 MINUTES para establecer el tiempo de preparación de los
alimentos.
3. Pulse el botón START/QUICK START para comenzar.
4. Cuando se complete el ciclo de preparación de alimentos, la pantalla mostrará "End" (Final) y se oirá un tono cada
dos minutos hasta que se pulse un botón o la puerta se abra.
Función Microwave + Grill
Pantalla Proceso de preparación de alimentos Uso sugerido
El horno preparará los alimentos en el siguiente ciclo:
Co-1
Co-2
• El tiempo máximo de preparación con la función de asado es 95minutos.
• Durante la operación de asado permita que el humo y los olores se dispersen abriendo una ventana o encendiendo
la ventilación de la cocina. Esto es normal y no es indicativo de avería del horno.
• Durante la preparación de alimentos, puede comprobar la combinación actual de potencia de cocción tocando el
botón MICROWAVE + GRILL.
• Al utilizar la función de grill, el grill se activará y se desactivará a intervalos regulares para evitar el
sobrecalentamiento.
• Al utilizar la función MICROWAVE+GRILL, los alimentos se deben situar en un contenedor adecuado directamente
sobre el plato base del horno.
ADVERTENCIA: La puerta, el armario exterior, el interior del horno, los accesorios y los platos pueden calentarse
mucho durante el uso del aparato. Para prevenir quemaduras utilice siempre guantes gruesos para horno.
Microondas durante 22segundos y luego al grill
durante 11segundos. Este proceso se repetirá hasta
nal del tiempo total establecido.
El horno preparará los alimentos en el siguiente ciclo:
Microondas a potencia máxima durante 18segundos
y luego al grill durante 15segundos. Este proceso se
repetirá hasta nal del tiempo total establecido.
Despieces de pollo, pechugas de pollo y
chuletas de cerdo
Pollo entero
ES – 16
Page 75
ES
CONVECCIÓN
Durante la preparación de alimentos por convección, el aire caliente circula a través de la cavidad del horno para
dorar y preparar alimentos crujientes de forma rápida y uniforme. Este horno puede programarse a 13temperaturas
diferentes de preparación de alimentos (200°C, 190°C, 180°C, 170°C, 160°C, 150°C, 140°C, 130°C, 120°C, 110°C).
Se recomienda precalentar el horno antes de preparar los alimentos en el modo de convección. Para precalentar y
preparar los alimentos con ayuda de la función por convección, siga las instrucciones siguientes:
Este horno se puede programar para combinar las funciones de precalentamiento y cocción por convección.
1. En el modo en espera, pulse repetidamente el botón CONVECTION para seleccionar repetidamente la
temperatura por convección.
2. Pulse el botón START/QUICK START para iniciar el ciclo de precalentamiento.
3. Cuando se alcance la temperatura designada, el horno emitirá un pitido.
Cuando el horno se haya precalentado y haya sonado un pitido:
1. Abra el horno y coloque el recipiente de alimentos en el centro de la parte inferior de la cavidad.
2. Utilice los botones 10 SECONDS, 1 MINUTE y 10 MINUTES para establecer el tiempo de preparación de los
alimentos. El tiempo máximo es de 95minutos.
3. Pulse el botón START/QUICK START para comenzar.
NOTA: El horno pitará cada dos segundos cuando se alcance la temperatura de precalentamiento. La temperatura de
precalentamiento se mantendrá durante 30minutos después de que el horno se haya apagado.
MICROONDAS + CONVECCIÓN
El modo Microondas + Convección facilita y agiliza la preparación de alimentos porque utiliza la preparación rápida de
alimentos por microondas y convección para obtener resultados crujientes.
Es posible preparar los alimentos a cuatro temperaturas diferentes de convección. Para iniciar el modo de preparación
dual, siga las instrucciones siguientes:
1. En el modo en espera, pulse repetidamente el botón MICROWAVE+CONVECTION para seleccionar la
temperatura (200°C, 170°C, 140°C, 110°C).
2. Pulse los botones 10 SECONDS, 1 MINUTE y 10 MINUTES para establecer el tiempo de preparación de los
alimentos. El tiempo posible va de 10segundos a 95minutos.
3. Pulse el botón START/QUICK START para comenzar.
Cuando utilice la función Microwave + Convection, el tiempo entre la preparación de los alimentos por microondas y
por convección se distribuye como se muestra debajo. Seleccione la opción adecuada para preparar los alimentos y
que queden crujientes.
Pantalla Proceso de preparación de alimentos
200 °C
170 °C
140 °C
110 °C
10segundos en modo microondas y luego 23segundos en modo convección. El ciclo se
repetirá hasta el nal del tiempo de cocción.
15segundos en modo microondas y luego 18segundos en modo convección. El ciclo se
repetirá hasta el nal del tiempo de cocción.
19segundos en modo microondas y luego 14segundos en modo convección. El ciclo se
repetirá hasta el nal del tiempo de cocción.
24segundos en modo microondas y luego 9segundos en modo convección. El ciclo se repetirá
hasta el nal del tiempo de cocción.
ES – 17
Page 76
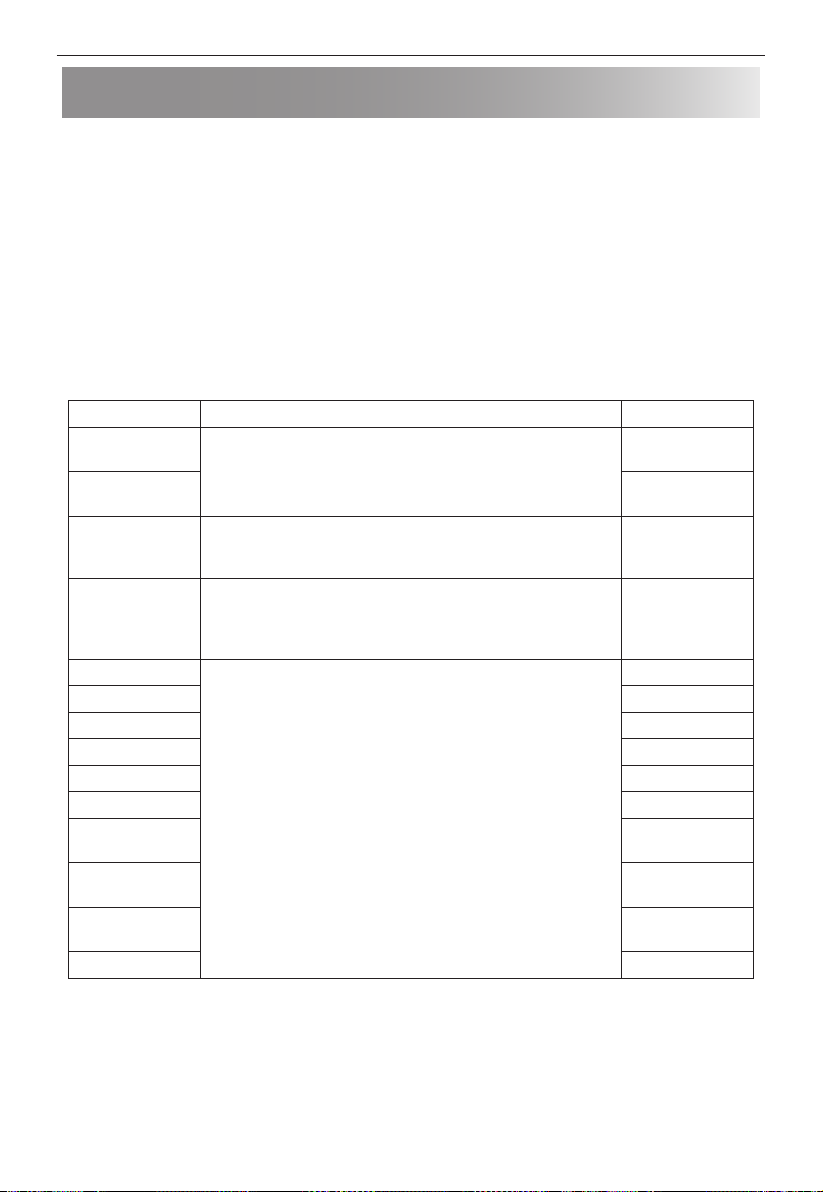
MENÚ AUTOMÁTICO
Para su comodidad, los programas automáticos permiten preparar alimentos de forma rápida y e ciente con la
pulsación de unos pocos botones. No es necesario programar la duración ni la potencia de cocción. Todo lo que
necesita hacer es pulsar el botón de preparación automática de alimentos, introducir el peso o las piezas con ayuda de
los botones el ARRIBA y ABAJO, y pulsar el botón START/QUICK START.
Por ejemplo, para preparar dos unidades de patatas asadas.
1. Abra la puerta y coloque los alimentos dentro del horno utilizando los contenedores adecuados para el ciclo de
cocción que se va a usar.
2. Cierre la puerta.
3. Pulse el botón JACKET POTATO (Patatas asadas).
4. Utilice los botones UP y DOWN para especi car el número de patatas.
5. Pulse el botón START/QUICK START.
6. Cuando se complete el ciclo de preparación de alimentos, la pantalla mostrará "End" (Final) y se oirá un tono cada
dos minutos hasta que se pulse un botón o la puerta se abra.
Menús de preparación automática de alimentos:
Menú automático Método para seleccionar el peso y las piezas Tamaño/peso
Alimentos
congelados (g)
Descongelar
automáticamente
Recalentar bebidas
Patatas asadas
Palomitas
Verduras frescas De 200 al 600g
Pizza 150g/300g/450g
Gachas De 50 al 150g
Bistec a la parrilla De 200 al 600g
Pollo a la parrilla* De 200 al 600g
Recalentar
automáticamente*
Patatas fritas al
horno
Asado de ternera/
cordero
Pollo asado De 800g a 1400g
• El resultado de la preparación automática depende de factores como la forma y el tamaño de los alimentos, su
preferencia personal y la forma en la que se dispongan los alimentos en el horno. Si descubre que el resultado no es
del todo satisfactorio, ajuste el tiempo de preparación en consecuencia.
• En algunos programas de cocción, puede que se solicite dar la vuelta a los alimentos. Abra la puerta, de la vuelta a
los alimentos, cierre la puerta y pulse el botón START/QUICK START para reanudar la cocción.
• Utilice guantes de horno (o utensilios similares) para dar la vuelta a los alimentos.
Seleccione el peso utilizando los botones UP y DOWN. A
continuación, pulse el botón START/QUICK START para empezar a
preparar los alimentos.
Seleccione el número de tazas mediante los botones UP y DOWN. A
continuación, pulse el botón START/QUICK START para empezar a
preparar los alimentos.
Seleccione el número de patatas mediante los botones UP y DOWN
y pulse el botón START/QUICK START para empezar a preparar los
alimentos. Dependiendo del número de patatas seleccionado puede
que se le pida que las recoloque a lo largo del ciclo de preparación.
Seleccione el peso mediante los botones UP y DOWN. A
continuación, pulse el botón START/QUICK START para empezar a
preparar los alimentos.
De 200 al 800g
De 100 al 1800g
De 1 a 3 tazas
(200ml cada una)
De 1 a 3 patatas
(230g cada una)
100g
De 200 al 800g
200 g
De 200 al 600g
ES – 18
Page 77
ES
DESCONGELAR AUTOMÁTICAMENTE
La función de descongelación automática le permite descongelar los alimentos en función del peso. El tiempo de
descongelación y el nivel de potencia se establecen automáticamente una vez que se programan la categoría de los
alimentos. El peso de los alimentos congelados varía de 200 a 1800g.
1. En el modo en espera, pulse el botón AUTO DEFROST.
2. Use los botones UP y DOWN para seleccionar el peso de los alimentos que desea descongelar.
3. Pulse el botón START/QUICK START para iniciar el ciclo de descongelación.
4. Si el horno se detienen durante el ciclo de descongelación, dé la vuelta a los alimentos para asegurarse de
descongelarlos de forma uniforme y pulse START/QUICK START para descongelar el tiempo restante.
5. Cuando se complete el ciclo de descongelado, la pantalla mostrará "End" (Final) y se oirá un todo cada dos
minutos hasta que se pulse un botón o se abra la puerta.
RECALENTAR AUTOMÁTICAMENTE
El horno le permite recalentar los alimentos en función del peso introducido por el usuario. El tiempo de
descongelación y el nivel de potencia se establecen automáticamente una vez que se programan la categoría de los
alimentos. El peso para recalentar varía de 200 a 800g.
1. En el modo espera, pulse el botón RECALENTAR AUTOMÁTICAMENTE.
2. Use los botones UP y DOWN para seleccionar el peso de los alimentos que desea recalentar
3. Pulse el botón START/QUICK START.
4. Cuando se complete el ciclo de preparación de alimentos, la pantalla mostrará "End" (Final) y se oirá un tono cada
dos minutos hasta que se pulse un botón o la puerta se abra.
TEMPORIZADOR DE COCINA
El horno incorpora un temporizador de cocina que cuenta hacia atrás a partir del tiempo establecido.
1. En el modo en espera, pulse una vez el botón TIME/SET CLOCK.
2. Utilice los botones 10 SECONDS, 1 MINUTE y 10 MINUTES para establecer el tiempo deseado de preparación de
los alimentos. El tiempo máximo es de 95minutos.
3. Pulse el botón START/QUICK START para con rmar.
4. Aparecerá la cuenta atrás en la pantalla durante el tiempo de cocción establecido.
5. Cuando la pantalla llegue a cero, se oirá un tono.
También se puede utilizar el temporizador de cocina durante el modo de preparación de alimentos. Para ello, siga
los pasos indicados anteriormente mientras se preparan los alimentos. Una vez activado el temporizador de cocina,
este aparecerá en la pantalla durante cinco segundos y luego revertirá al contador de cuenta atrás durante el ciclo
de preparación de alimentos. Para ver el temporizador, pulse el botón TIME/SET CLOCK una vez y el temporizador
de cocina aparecerá durante cinco segundos, después de lo cual revertirá a la cuenta atrás de preparación de los
alimentos.
• Para cancelar el programa del temporizador, pulse el botón STOP/ECO y la pantalla mostrar el tiempo.
• Si el ciclo de preparación de alimentos se ha iniciado, es posible iniciar el temporizador de cocina siguiendo los
pasos indicados arriba.
FUNCIÓN DE AHORRO DE ENERGÍA
Esta función permite ahorrar energía mientras el horno no se está utilizando. Para activar esta función en estado en
espera, mantenga pulsado el botón STOP/ECO durante tres segundos; la pantalla se apagará y el horno entrará en
modo de ahorro de energía.
Para cancelar el modo de ahorro de energía, pulse cualquier botón o abra y cierre la puerta del horno.
ES – 19
Page 78

FUNCIÓN DE SILENCIO
Es posible silenciar los tonos del microondas mediante la función de silencio. Para establecer la función de silencio,
pulse el botón CHILD LOCK una vez que la pantalla muestre "OFF" durante cinco segundos. En el modo de silencio,
no se escuchará ningún sonido cuando se pulsen los botones.
Para desactivar la función de silencio, pulse el botón CHILD LOCK una vez; la pantalla mostrará "ON" durante cinco
segundos para indicar que se activado de nuevo el sonido.
Si se establece la función y el horno se desconecta de la corriente, se cancelará cuando se vuelva a reconectar la
alimentación.
BLOQUEO DE SEGURIDAD
Esta es una función automática para evitar el uso del horno sin supervisión por niños. En el modo en espera, si no se
realiza ninguna operación en el transcurso de un minuto, el horno entrará en modo de bloqueo de seguridad y en
la pantalla aparecerá "Loc". En estado de bloqueo, se desactivan todos los botones. Si se pulsa un botón cualquiera,
aparecerá la indicación de bloqueo en la pantalla durante cinco segundos para recordar al usuario que cancele el
bloqueo de seguridad.
Para desactivar el bloqueo de seguridad, simplemente abra y cierre la puerta del microondas; el teclado numérico se
volverá a activar y el indicador luminoso del bloqueo se apagará.
BLOQUEO PARA NIÑOS
Para establecer la función de bloqueo para niños, mantenga pulsado el botón CHILD LOCK durante tres segundos.
Se oirá un pitido largo, la pantalla mostrará "Loc" y el horno pasará a modo de bloqueo para niños. En este modo, la
pantalla mostrará el reloj. Si se pulsa algún botón o se abre la puerta se mostrará "Loc" en la pantalla durante cinco
segundos.
Para cancelar la función de bloqueo para niños, mantenga pulsado el botón CHILD LOCK durante tres segundos hasta
que suene un pitido largo.
MECANISMO DE PROTECCIÓN AUTOMÁTICO
PROTECCIÓN CONTRA SOBRECALENTAMIENTO: si el horno siente una alta temperatura, la pantalla mostrará "E01"
y dejará de funcionar. Este estado se puede cancelar pulsando el botón STOP/ECO.
PROTECCIÓN CONTRA BAJA TEMPERATURA: si el horno entra en modo de protección de baja temperatura, la
pantalla mostrará "E02" y dejará de funcionar. Este estado se puede cancelar pulsando el botón STOP/ECO.
PROTECCIÓN POR AVERÍA DE UN SENSOR: si el horno detecta un problema con uno de los sensores, la pantalla
mostrará "E03" y el horno dejará de funcionar. Asimismo, el horno emitirá un tono de advertencia. Este estado se
puede cancelar pulsando el botón STOP/ECO.
ES – 20
Page 79

ES
LIMPIEZA Y MANTENIMIENTO
• Apague el horno y desconecte el cable de la toma de corriente cuando vaya a limpiarlo.
• Mantenga limpia la parte interior del horno. Limpie con un paño húmedo las paredes del horno si se producen
salpicaduras o se derraman líquidos de alimentos en los lados, la parte superior o el plato giratorio. Utilice
detergentes suaves si el horno se ensucia mucho. Evite utilizar limpiadores abrasivos o aerosoles, pues podrían dejar
manchas, rayar o deslustrar la super cie de la puerta.
• La par te exterior del horno debe limpiarse con un paño húmedo. Para evitar dañar los componentes internos del
horno, no debe ltrarse agua a través de las aperturas de ventilación.
• Limpie frecuentemente la puerta y la ventana en ambos lados, las juntas de la puerta y las partes adyacentes con un
paño húmedo para eliminar derramamientos y salpicaduras.
• No utilice un limpiador abrasivo.
• No utilice limpiadores a vapor
• No permita que el panel de control se humedezca. Limpie con un paño suave y húmedo. Cuando limpie el panel de
control, deje abierta la puerta para evitar que el horno se encienda accidentalmente.
• Si se acumula calor dentro o alrededor de la puerta del horno, límpielo con un paño suave. Esto puede ocurrir si el
horno es utilizado en entornos de alta humedad. No se trata de un fallo.
• El plato giratorio del horno debe limpiarse regularmente para evitar contaminación y posibles arcos voltaicos o
daños. Limpie simplemente la super cie inferior del horno con un detergente suave.
• Elimine los olores del horno mezclando una taza de agua con el zumo y la piel de un limón en un cuenco adecuado
para microondas. Caliente durante cinco minutos. A continuación, limpie y seque bien con un paño suave.
• Si la bombilla deja de brillar, póngase en contacto con el servicio técnico para recabar consejo.
• El horno debe limpiarse de manera regular y se deben eliminar todos los depósitos de alimentos. No mantener
el horno limpio podría dar lugar a un deterioro de la super cie, y podría afectar negativamente a la vida útil del
aparato y originar situaciones de peligro.
• No elimine este aparato con la basura doméstica; consulte las normas de eliminación para este tipo de productos
aplicables en su país.
ES – 21
Page 80
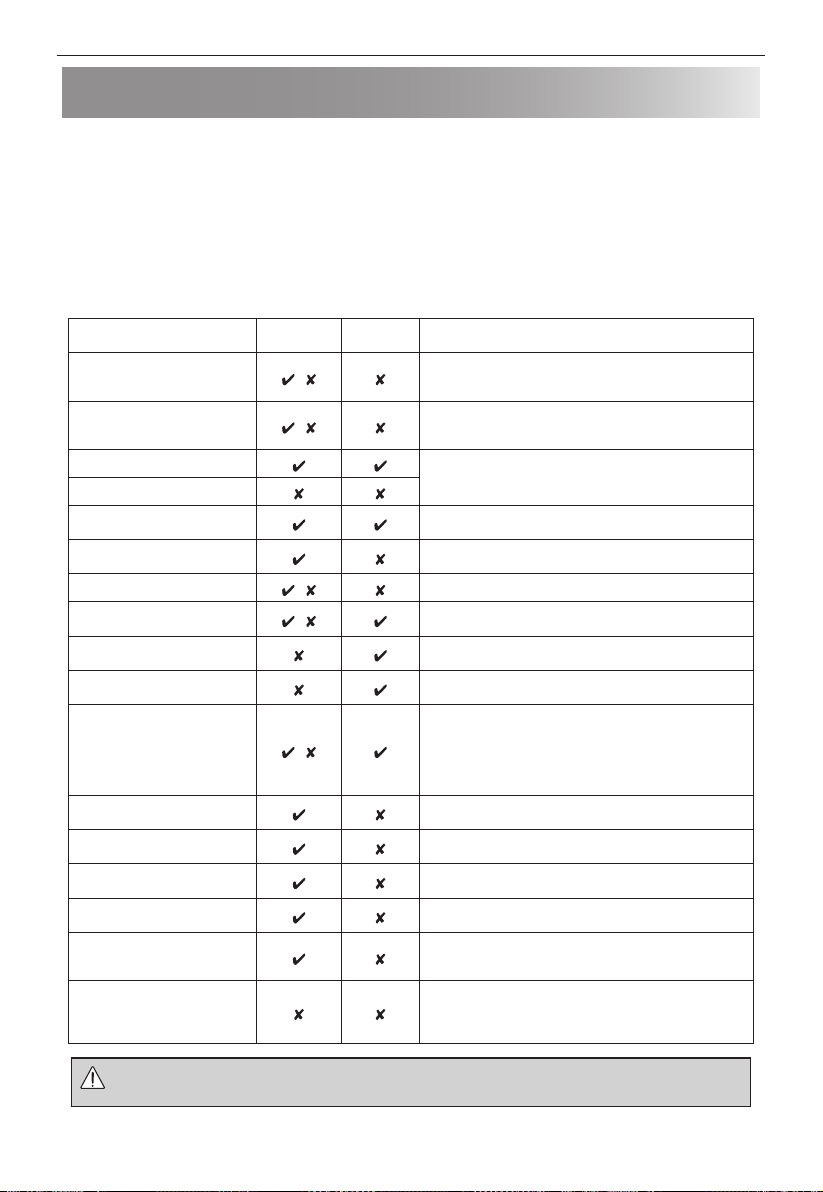
UTENSILIOS ADECUADOS PARA EL HORNO
1. El material ideal para los utensilios del microondas es transparente a las microondas, pues permite que la energía
traspase el contenedor y caliente el alimento.
2. Las microondas no pueden atravesar el metal, por lo que no deben utilizarse utensilios de metal ni platos con
acabado de metal.
3. No utilice productos de papel reciclado al cocinar con microondas, ya que pueden contener pequeños fragmentos
de metal que podrían causar chispas o un incendio.
4. Se recomienda el uso de platos redondos u ovalados en lugar de cuadrados o alargados, ya que los alimentos de
las esquinas tienden a cocerse en exceso.
5. Se pueden utilizar láminas de aluminio en tiras para evitar la cocción excesiva de áreas expuestas. Pero tenga
cuidado de utilizar demasiadas y de mantener una distancia de 2,54cm entre el aluminio y la cavidad.
La siguiente lista es una guía general para ayudarle a seleccionar los utensilios correctos.
Utensilios de cocina
Platos para dorar
Porcelana y cerámica
Cristal resistente al calor
Cristal no resistente al calor
Cerámicas no resistentes al calor
Plato de plástico seguro para su uso en
microondas
Papel de cocina
Cristalería, por ejemplo, Pyrex®
Bandeja de metal
Parrilla metálica
Papel de aluminio
Los recipientes de aluminio
Film transparente
Plástico/poliestireno, por ejemplo
recipientes de comida rápida
Bolsas para congelar/asar
Platos de papel, tazas y papel de cocina
Recipientes de madera y paja
Papel reciclado y periódicos
Microondas
Seguro
Grill/
Convección
/
/
/
/
/
Comentario
Siga siempre las instrucciones del fabricante.
No exceda los tiempos de calentamiento que se indican. Tenga mucho cuidado
ya que estos platos se calientan mucho.
Los utensilios de porcelana, cerámica, loza de barro esmaltada y porcelana
na son generalmente adecuados, a excepción de aquellas con decoración
metálica.
Asegúrese de utilizar cristalería adecuada para hornos microondas.
Asegúrese de que el material cerámico no es demasiado grueso o que
incorpore un alto contenido mineral.
Asegúrese siempre de que los utensilios de cocina de plástico son adecuados
para horno microondas.
Utilice solo papel de cocina recomendado para microondas.
Se debe tener cuidado si se utiliza cristalería na, ya que puede romperse o
agrietarse si se calienta bruscamente.
No se recomienda usar utensilios de metal, ya que crearían un arco eléctrico y
provocar un incendio.
No se recomienda usar utensilios de metal, ya que crearían un arco eléctrico y
provocar un incendio.
Se pueden utilizar trozos pequeños de papel de aluminio para proteger los
alimentos contra el sobrecalentamiento. Mantenga el papel al menos a 2,54 cm
de distancia de las paredes del horno, ya que puede producirse arco eléctrico.
Los recipientes de aluminio no son recomendables a menos que los
especi que el fabricante, por ejemplo, Microfoil®, siga las instrucciones
cuidadosamente.
No se deben tocar los alimentos y deben perforarse para permitir dejar salir
el vapor.
Se debe tener cuidado con algunos recipientes, ya que pueden deformarse,
derretirse o descolorarse con las altas temperaturas.
Se deben perforar para dejar salir el vapor. Asegúrese de que las bolsas son
adecuadas para su uso en microondas.
No utilice ataduras de plástico o metal, ya que pueden derretirse o incendiarse
debido al ‘arco eléctrico’.
Utilizar únicamente para calentar o para absorber la humedad.
Se debe tener cuidado, ya que el sobrecalentamiento puede provocar un
incendio.
Vigile siempre el horno cuando se utilizan estos materiales, ya que el
sobrecalentamiento puede ocasionar un incendio.
Puede contener extractos de metal que pueden causar "arco eléctrico" y puede
provocar un incendio.
ADVERTENCIA: Al calentar alimentos en recipientes de papel o plástico, vigile el horno debido a la
posibilidad de ignición.
NOTA: No deje el horno sin atender mientras lo usa.
ES – 22
Page 81
CONSEJOS PARA PREPARAR ALIMENTOS CON EL MICROONDAS
Los microondas preparan los alimentos de manera más rápida que los métodos convencionales de cocina. Por lo
tanto, es muy importante seguir determinadas técnicas para garantizar buenos resultados. Muchas de las técnicas
siguientes se parecen a las que se usan en los métodos convencionales de cocina.
ES
ADVERTENCIA: Los líquidos y alimentos no deben calentarse en recipientes sellados ni en tarros
NOTAS SOBRE LOS CONSEJOS PARA COCINAR:
• Vigile siempre el horno mientras lo utiliza.
• Asegúrese de que los utensilios sean adecuados para hornos microondas.
• Utilice exclusivamente palomitas para microondas en el envase recomendado (siga las instrucciones del fabricante).
Nunca debe utilizar aceite, a menos que el fabricante así lo indique, y nunca debe preparar las palomitas durante
más tiempo del recomendado.
ADVERTENCIA: Si supera los tiempos de cocción recomendados y utiliza niveles de potencia
orecipientes con la tapa puesta, ya que se acumulará presión en el interior, lo que
podría provocar la explosión del recipiente o tarro.
demasiado altos, los alimentos se podrían calentar en exceso o quemar, y en
situaciones extremas podrían incendiarse y dañar el horno.
Colocar
Coloque las partes más gruesas de los alimentos hacia el exterior del plato, p.ej., los muslos de pollo.
Los alimentos que se colocan hacia el exterior del plato reciben más energía y, por lo tanto, se preparan más
rápidamente que los alimentos colocados en el centro.
Tapar
Algunos alimentos se preparan mejor en el microondas si se tapan.
Utilice lm transparente ventilado de adherencia o una tapa adecuada.
Perforar
Los alimentos con cáscara, piel o membrana se deben perforar en varios puntos antes de cocinarlos o recalentarlos,
ya que, de lo contrario, se acumularía vapor y podrían explotar. Por ejemplo, de las patatas, el pescado, el pollo y las
salchichas.
NOTA: Los huevos no deben calentarse en el microondas porque podrían explotar, incluso después de prepararse,
p.ej., huevos escalfados, fritos o duros.
Remover, girar y volver a colocar
Para conseguir una cocción uniforme es muy importante remover, girar y volver a colocar los alimentos durante la
cocción. Siempre debe remover y volver a colocar desde el exterior hacia el centro.
Reposo
Deje un periodo de reposo tras la preparación para permitir que el calor se disperse de manera uniforme a través de
todos los alimentos.
ES – 23
Page 82
Características de los alimentos
Composición Los alimentos con un contenido alto en grasa o azúcares (p.ej., púdines o pasteles
Densidad La densidad de los alimentos in uye en el tiempo de cocción necesario.
Cantidad El número de microondas del horno es el mismo, sea cual sea la cantidad de alimentos
Tamaño Los alimentos y los trozos pequeños se preparan más rápidamente que los grandes,
Forma Los alimentos de forma irregular, como las pechugas o los muslos de pollo, tardan más
Temperatura de los
alimentos
rellenos) requieren menos tiempo para calentarse. Se debe tener cuidado con ellos, ya
que el sobrecalentamiento puede provocar un incendio.
Los huesos de los alimentos son conductores de calor y hacen que los alimentos se
cocinen más rápidamente. Se debe tener cuidado para que los alimentos se cocinen de
manera uniforme.
Los alimentos ligeros o porosos, como los bizcochos o el pan, se cuecen más
rápidamente que los alimentos pesados y densos, como los asados de carne y los guisos.
que se esté preparando. Se debe aumentar el tiempo de cocción a medida que aumente
la cantidad de alimentos;
por ejemplo, cuatro patatas tardan más tiempo en cocinarse que dos.
ya que las microondas pueden penetrar desde todos los lados hacia el centro. Para
conseguir una cocción uniforme, prepare todos los alimentos con el mismo tamaño.
tiempo en prepararse en las partes más gruesas. Para conseguir una cocción uniforme,
coloque las partes más gruesas en el exterior del plato, donde recibirán más energía.
Las formas redondas se preparan en el microondas de manera más uniforme que las
cuadradas.
La temperatura inicial de los alimentos in uye en el tiempo de cocción necesario.
Los alimentos fríos tardan más tiempo en cocinarse que los alimentos a temperatura
ambiente;
La temperatura del recipiente no es un parámetro able de la temperatura del alimento
o la bebida. Haga cortes en los alimentos rellenos, por ejemplo, un donut relleno de
mermelada, para liberar el calor o el vapor.
ADVERTENCIA: Rostro y manos: utilice siempre guantes de horno para retirar los alimentos o
ADVERTENCIA: Compruebe la temperatura de los alimentos y las bebidas, y remueva antes de servir.
recipientes del horno. Apártese al abrir la puerta del horno para que se disperse el
calor o vapor. Al quitar un recubrimiento (por ejemplo, lm transparente) o al abrir
bolsas de asado o envases de palomitas, aparte el rostro y las manos de la dirección del
vapor.
Tenga mucho cuidado con los alimentos para bebés, niños o personas mayores. Debe
remover o agitar el contenido de los biberones y los tarros de comida para bebés, y
debe comprobar la temperatura de los alimentos antes de consumirlos, para evitar
quemaduras.
ES – 24
Page 83

ES
CONSEJOS PARA DESCONGELAR
Usar el microondas es el método para descongelar más rápido. Es un proceso sencillo, pero es muy importante que
siga las instrucciones que se indican a continuación para garantizar que los alimentos se descongelen bien.
• Retire todos los envases y envoltorios antes de descongelar.
• Para descongelar alimentos, utilice los niveles de potencia del microondas P-20 o P-40.
• Consulte a continuación para obtener más información.
Recolocar
Los alimentos colocados hacia el exterior del plato se descongelan más rápidamente que los alimentos dispuestos en
el centro. Por lo tanto, es muy importante recolocar los alimentos hasta cuatro veces durante el descongelado.
Mueva los trozos que estén muy encajados desde el exterior hacia el centro, y recoloque las partes que se solapen.
De esta manera, todas las partes de los alimentos se descongelarán de manera uniforme.
Separar
Los alimentos pueden quedarse pegados al sacarlos del congelador. Es importante separar los alimentos lo antes
posible durante el descongelado,
p.ej., tiras de beicon o letes de pollo.
Cubrir
Algunas partes de los alimentos que se estén descongelando pueden calentarse. Para evitar que se calienten
demasiado y empiecen a cocerse, se pueden cubrir con papel de aluminio, que re ejan las microondas; p.ej., las patas
y las alas de pollo.
Reposo
Es necesario un tiempo de reposo para garantizar que los alimentos se descongelen bien.
La descongelación no naliza una vez que se retiran los alimentos del horno microondas. Los alimentos deben
permanecer, tapados, durante un tiempo para garantizar que el centro se descongele completamente.
Girar
Es muy importante girar todos los alimentos al menos cuatro veces durante el proceso de descongelación.
Esto es importante para garantizar una descongelación adecuada.
ES – 25
Page 84
CONSEJOS PARA RECALENTAR
Para recalentar alimentos, siga las instrucciones y recomendaciones que se indican a continuación, a n de garantizar
que los alimentos se calientan bien antes de servirlos.
Platos de comida
Retire cualquier pieza de ave o carne roja, y caliente esas piezas por separado (véase más abajo).
Coloque los trozos más pequeños en el centro del plato y los trozos más grandes y gruesos en el borde. Cubra los
alimentos con lm transparente ventilado para microondas y recaliéntelos a nivel P-50. Remueva o recoloque los
alimentos cuando haya transcurrido la mitad del tiempo.
NOTA: Asegúrese de que los alimentos se hayan calentado bien antes de servirlos.
Carne en lonchas
Tape la carne con lm transparente ventilado para microondas y caliente a nivel P-60. Recoloque la carne al menos
una vez para garantizar que se caliente de manera uniforme.
NOTA: Asegúrese de que la carne se haya calentado bien antes de servirla.
Porciones de ave
Coloque las partes más gruesas de las porciones en el exterior del plato, cúbralas con lm transparente ventilado para
microondas y caliente a nivel P-70.
Dé la vuelta hacia la mitad del proceso de calentamiento.
NOTA: Asegúrese de que la carne de ave se haya calentado bien antes de servirla.
Guisos
Cubra con lm transparente ventilado para microondas o con una tapa adecuada y caliente a nivel P-50.
Remueva con frecuencia para garantizar que los alimentos se calienten de manera uniforme.
NOTA: Asegúrese de que los alimentos se hayan calentado bien antes de servirlos.
Para conseguir los mejores resultados al recalentar, seleccione un nivel de potencia de microondas adecuado para
el tipo de alimento. Por ejemplo, un plato de verduras se puede calentar a nivel P-100, mientras que una lasaña, que
contiene ingredientes que no se pueden remover, se debe calentar a nivel P-40.
NOTAS:
• Antes de recalentar los alimentos, sáquelos de los recipientes metálicos o del papel de aluminio.
• En el tiempo de recalentamiento in uyen la forma, la profundidad, la cantidad y la temperatura de los alimentos, así
como el tamaño, la forma y el material del recipiente.
ADVERTENCIA: No caliente nunca líquidos en recipientes de boca estrecha, ya que el contenido podría
• Para evitar que los alimentos se calienten demasiado y que se produzcan incendios, se debe prestar especial
atención al preparar o recalentar alimentos con un contenido alto de azúcar o grasa, por pasteles rellenos o púdines.
• Nunca debe calentar aceite o grasa para freír, ya que se podrían producir un calentamiento excesivo y fuego.
• Las patatas en conserva no se deben calentar en un horno microondas; siga las instrucciones del envase.
ADVERTENCIA: El contenido de biberones y tarros de comida para bebés se debe remover o agitar, y se
salir a chorros del recipiente y causar quemaduras.
debe comprobar la temperatura de los alimentos antes de consumirlos a n de evitar
quemaduras.
ES – 26
Page 85
RESOLUCIÓN DE PROBLEMAS
Si cree que el horno no funciona correctamente, puede llevar a cabo una sencillas comprobaciones antes de llamar
a un técnico. De esta forma, puede evitar llamadas innecesarias al servicio, en caso de que el fallo se deba a algo
sencillo.
Siga estas sencillas comprobaciones:
Coloque una taza de agua en el plato giratorio y cierre la puerta. Establezca el temporizador para funcionar durante
1minuto a potencia P-100 del microondas.
1. ¿Se enciende la lámpara del horno cuando el agua cuece?
2. ¿Funciona el ventilador de refrigeración? (Compruébelo colocando la mano sobre las salidas de ventilación).
3. Transcurrido un minuto, ¿suena la señal acústica?
4. ¿Está caliente el agua de la taza?
Si la respuesta a alguna de estas preguntas es negativa, compruebe primero que el horno está enchufado
correctamente y que el fusible no se ha fundido. Si el cable está bien enchufado y el fusible no se ha fundido,
consulte la tabla de resolución de problemas siguiente.
ES
ADVERTENCIA: Nunca ajuste, repare o modi que el horno por su cuenta. Para cualquier persona que
• La junta de la puerta evita que se ltren líquidos del microondas durante el funcionamiento del horno, pero no
ofrece un sellado hermético. Es normal observar gotas de agua, luz o sentir aire caliente alrededor de la puerta del
horno. Los alimentos con un alto contenido de humedad despedirán vapor o generarán condensación dentro de la
puerta, lo que puede formar gotas fuera del horno.
• Reparaciones y modi caciones: no intente reparar, modi car ni utilizar el microondas si no funciona correctamente.
• Carcasa exterior y acceso a la lámpara: no retire nunca la carcasa exterior. Esto es muy peligroso debido a las piezas
de alta tensión internas que no deben tocarse nunca, porque su contacto podría causar la muerte
El horno no integra una cubierta de acceso a la lámpara. Si la lámpara falla, no intente sustituirla. Llame al servicio
técnico homologado de SHARP.
no tenga los conocimientos adecuados, es peligroso llevar a cabo operaciones de
mantenimiento o reparación. Esto es importante, ya que puede requerir la retirada de
cubiertas que proporcionan protección contra la energía de microondas.
ES – 27
Page 86
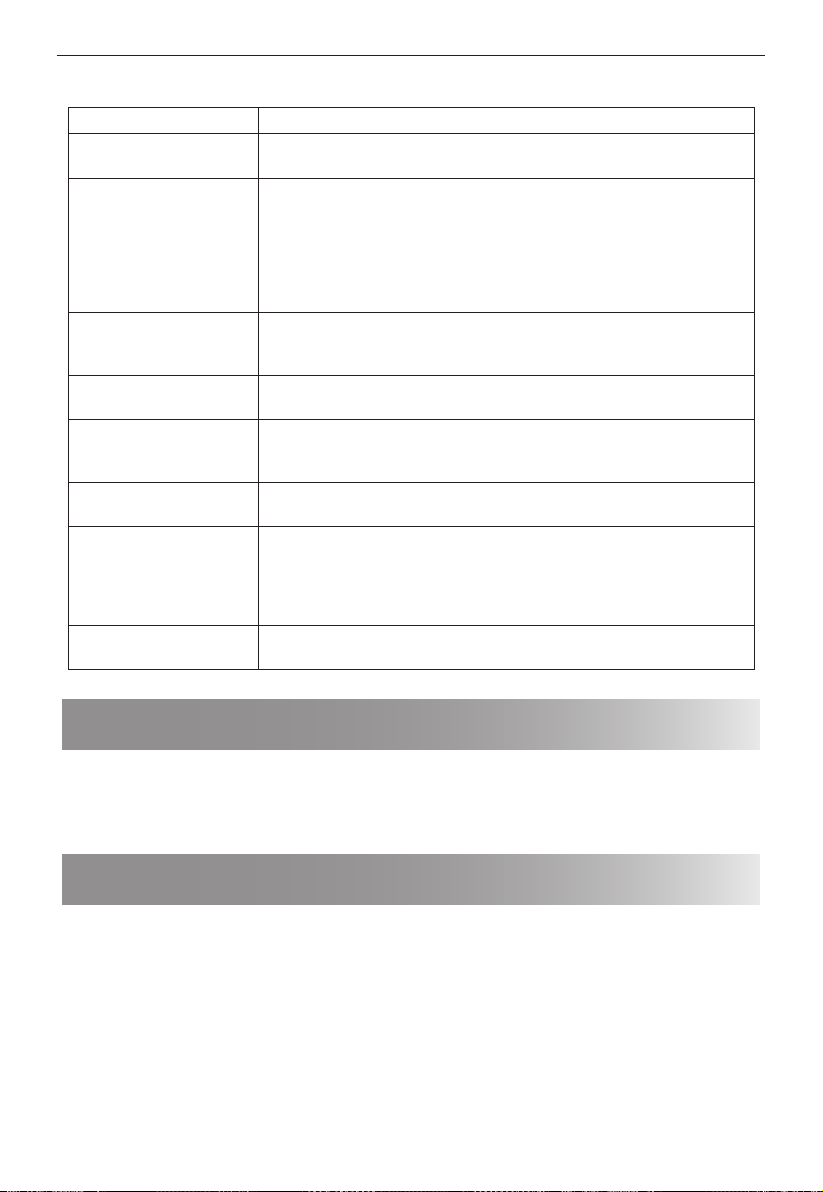
TABLA DE RESOLUCIÓN DE PROBLEMAS
CONSULTA RESPUESTA
Corrientes de aire alrededor
de la puerta.
En el horno se forma
condensación y puede dar
lugar a la formación de gotas
en la puerta.
Se observan destellos y arcos
voltaicos en la cavidad al
preparar los alimentos.
Asar patatas. Retire todas las raíces de las patatas, píchelas y colóquelas directamente sobre la
El horno no funciona cuando
se pulsa el botón START/
QUICK START.
El horno preara los alimentos
demasiado despacio.
El horno hace ruido. Los impulsos de la energía de microondas se activan y desactivan durante los
La carcasa exterior está
caliente.
Cuando el horno está en funcionamiento, el aire circula alrededor de la cavidad
La puerta no está sellada herméticamente, por lo que el aire puede escaparse.
Por lo general, la cavidad del horno estará más fría que los alimentos cocinados;
por lo tanto, el vapor generado al preparar alimentos se condensará en la
super cie más fría.
La cantidad de vapor generado depende del contenido en agua del alimento
preparado. Algunos alimentos, como las patatas, tienen un gran contenido en
humedad.
La condensación atrapada en el cristal de la puerta se disipará en unas horas.
Se producen arcos voltaicos cuando un objeto metálico se sitúa cerca de la
cavidad del horno durante la cocción. Esto puede causar abrasión de la super cie
de la cavidad, pero no producirá ningún daño al horno.
bandeja o en un recipiente plano resistente al calor o similar.
Asegúrese de que la puerta está correctamente cerrada.
Asegúrese de que corregir el nivel de potencia seleccionado.
procesos de cocción y descongelación.
El horno emitirá un pitido cada minuto y mostrará "Fail" (Error) en la pantalla
Si se pulsan los botones del panel de control continuamente durante más de un
minuto, se producirá este error.
La carcasa exterior puede calentarse al tacto. Mantenga a los niños a los niños
lejos.
PROTECCIÓN CONTRA LOS BOTONES ATASCADO
En cualquier estado, si un botón del panel de control se atasca durante más de un minuto, el programa dejará de
funcionar inmediatamente y mostrará el mensaje "FAIL" (ERROR). El microondas emitirá un pitido. Si el botón se sigue
atascando, el horno pitará cada minuto. Tras solucionarse el problema, pulse el botón STOP/ECO para volver al modo
en modo en espera.
ANTES DE LLAMAR AL SERVICIO TÉCNICO
Antes de solicitar asistencia, consulte los siguientes elementos:
• Asegúrese de que el horno está correctamente enchufado a la corriente. Si no es así, retire el enchufe, espere
10segundos, y vuelva a enchufarlo bien.
• Compruebe si hay algún fusible fundido o si saltó un disyuntor de corriente. Si estos elementos parecen no
presentar problemas, pruebe la toma con otro aparato.
• Asegúrese de que los mandos de potencia y del temporizador están correctamente establecidos.
• Asegúrese de que la puerta está bien cerrada con el sistema de bloqueo activado. De lo contrario, la energía del
microondas no uirá en el horno.
SI NO SE SOLUCIONA LA SITUACIÓN CON NINGUNA DE LAS ACCIONES ANTERIORES, PÓNGASE EN CONTACTO CON UN
TÉCNICO CERFICADO. NO INTENTE AJUSTAR NI REPARAR EL HORNO PERSONALMENTE.
ES – 28
Page 87
Atenção:
O seu produto
está marcado
com este símbolo. Signi ca
que os produtos
elétricos e ele-
trónicos usados
não devem ser
misturados com
o lixo doméstico geral. Existe
um sistema de
recolha especí-
co para estes
produtos.
www.sharpconsumer.com/
contact/
PT
A. Informações sobre a Eliminação para os
Utilizadores (particulares)
1. Na União Europeia
Atenção: Se quiser eliminar este equipamento, não use um caixote do lixo
comum!
O equipamento elétrico e eletrónico usado tem de ser tratado em separado
e de acordo com a legislação que requer um tratamento, recuperação e
reciclagem adequados de equipamento elétrico e eletrónico usado.
No seguimento da implementação pelos estados membros, os agregados
domésticos privados nos estados da UE devem entregar o seu equipamento
elétrico e eletrónico usado num local designado para a sua recolha, sem
qualquer custo*.
Em alguns países* o seu vendedor local pode também receber o seu
produto antigo, sem qualquer custo, se adquirir um outro semelhante.
*) Contacte as entidades locais para mais informações.
Se o seu equipamento elétrico ou eletrónico usado tiver pilhas ou pilhas
recarregáveis, elimine-as previamente em separado de acordo com as
exigências locais. Ao eliminar corretamente este produto estará a ajudar a
garantir que os resíduos recebem o tratamento, recuperação e reciclagem
necessários e, assim, evita potenciais efeitos negativos sobre o meio
ambiente e a saúde humana que, de outro modo, poderiam surgir devido
ao manuseamento incorreto dos resíduos.
2. Em outros países fora da UE
Se pretende desfazer-se deste produto, contacte, por favor, as suas
autoridades locais e informe-se sobre o método de eliminação correto.
Para a Suíça: O equipamento elétrico e eletrónico usado pode ser devolvido
ao comerciante, sem qualquer custo, mesmo que não adquira um novo
produto. Os locais de recolha adicionais encontram-se listados na página
principal de www.swico.ch ou www.sens.ch.
B. Informações sobre a Eliminação de Produtos para
Utilizadores-Empresas
1. Na União Europeia
Se o produto é utilizado para ns comerciais e se pretende desfazer-se dele:
www.sharpconsumer.com/
support/
Agradecemos que contacte o seu revendedor SHARP que o informará sobre
como devolver o produto. Podem ser-lhe cobrados custos resultantes da
devolução e reciclagem. Produtos pequenos (e pequenas quantidades)
podem ser devolvidos nos locais de recolha da sua zona.
Para a Espanha: Agradecemos que contacte o sistema de recolha instituído
ou a sua autoridade local para a devolução dos seus produtos usados.
www.sharpconsumer.com/
documents-of-conformity/
2. Em outros países fora da UE
Se pretende desfazer-se deste produto, contacte, por favor, as suas
autoridades locais e informe-se sobre o método de eliminação correto.
Para assistência técnica, veja www.sharpconsumer.com/contact/, para os seus direitos da garantia, vá a
www.sharpconsumer.com/support/ ou contacte o revendedor onde comprou o produto.
As declarações de conformidade encontram-se disponíveis a partir de
www.sharpconsumer.com/documents-of-conformity/
PT – 1
Page 88

PRECAUÇÕES PARA EVITAR POSSÍVEIS EXPOSIÇÕES À ENERGIA DAS MICROONDAS
1. Não tente usar este forno com a porta aberta, pois isso pode provocar uma exposição danosa à energia das micro-
ondas. É importante não derrotar ou adulterar os bloqueios de segurança..
2. Não insira nada entre a parte da frente do forno e a porta, nem permita a acumulação de sujidade ou resíduos do
produto de limpeza nas superfícies de vedação.
3. Não use o forno se estiver dani cado. É muito importante que a porta do forno se feche devidamente e que não
haja nenhum dano nas portas, dobradiças, fechos ou nas vedações da porta e superfícies de vedação.
4. Não tente reparar ou ajustar o forno.
CONTEÚDOS
INSTRUÇÕES DE SEGURANÇA IMPORTANTES .............................................................................................................................................3
INSTALAÇÃO ..........................................................................................................................................................................................................11
INTERFERÊNCIA DE RÁDIO ...............................................................................................................................................................................12
INSTRUÇÕES DE LIGAÇÃO À TERRA ..............................................................................................................................................................12
ESPECIFICAÇÕES ..................................................................................................................................................................................................12
FORNO E ACESSÓRIOS .......................................................................................................................................................................................13
PAINEL DE CONTROLO .......................................................................................................................................................................................14
ANTES DE USAR O FORNO ...............................................................................................................................................................................14
ACERTAR O RELÓGIO ..........................................................................................................................................................................................14
COZINHAR COM MICRO-ONDAS ...................................................................................................................................................................15
INÍCIO RÁPIDO ......................................................................................................................................................................................................15
COZINHAR COM O GRILL ..................................................................................................................................................................................16
MICRO-ONDAS+GRILL .......................................................................................................................................................................................16
CONVECÇÃO..........................................................................................................................................................................................................17
MICRO-ONDAS+CONVECÇÃO ........................................................................................................................................................................17
MENU AUTOMÁTICO .......................................................................................................................................................................................... 18
DESCONGELAR AUTOMÁTICO ........................................................................................................................................................................ 19
REAQUECER AUTOMÁTICO...............................................................................................................................................................................19
TEMPORIZADOR DE COZINHA ........................................................................................................................................................................19
FUNÇÃO DE POUPANÇA DE ENERGIA ..........................................................................................................................................................19
FUNÇÃO DE SILENCIAR .....................................................................................................................................................................................20
BLOQUEIO DE SEGURANÇA .............................................................................................................................................................................20
BLOQUEIO DE CRIANÇAS ..................................................................................................................................................................................20
MECANISMO DE PROTEÇÃO AUTOMÁTICA ............................................................................................................................................... 20
LIMPEZA E MANUTENÇÃO ...............................................................................................................................................................................21
LOIÇA PRÓPRIA PARA O FORNO.....................................................................................................................................................................22
CONSELHOS DE CULINÁRIA DO MICRO-ONDAS ......................................................................................................................................23
CONSELHOS SOBRE DESCONGELAR .............................................................................................................................................................25
CONSELHOS SOBRE REAQUECER ...................................................................................................................................................................26
RESOLUÇÃO DE PROBLEMAS ..........................................................................................................................................................................27
PROTEÇÃO CONTRA BOTÕES PRESOS .........................................................................................................................................................28
ANTES DE LIGAR À ASSISTÊNCIA TÉCNICA .................................................................................................................................................28
PT – 2
Page 89

PT
INSTRUÇÕES DE SEGURANÇA IMPORTANTES
LEIA COM ATENÇÃO E GUARDE PARA REFERÊNCIA FUTURA
Para evitar o perigo de incêndio. O forno micro-ondas não
deve ser deixado sem vigilância enquanto estiver a funcionar. Níveis de potência demasiado elevados ou tempo de
cozedura demasiado longo podem sobreaquecer os alimentos, provocando um incêndio.
Este forno foi projetado para ser usado apenas numa bancada.
Não foi projetado para ser encastrado numa unidade de cozinha. A tomada elétrica tem de estar acessível rapidamente,
para que a unidade possa ser facilmente desligada da corrente
em caso de emergência.
O cabo de alimentação CA deve ser de 230-240 V, 50 Hz, com
um mínimo de 10 A do fusível de distribuição ou um mínimo
de 10 A do disjuntor de distribuição. Deve ser fornecido um
circuito separado que sirva apenas este eletrodoméstico.
Não coloque o forno em zonas onde se produza muito calor,
por exemplo, junto a um forno tradicional. Não instale o forno
numa zona de grande humidade ou onde se possam acumular
gotas de água. Não guarde nem use o forno no exterior.
Caso se observe fumo, desligue ou desconecte da parede
o forno e mantenha a porta fechada, de forma a abafar
quaisquer chamas.
Use apenas recipientes e utensílios seguros para o micro-
-ondas. Os utensílios devem ser veri cados para garantir
que são adequados para o uso em fornos micro-ondas.
Quando aquecer alimentos em recipientes de plástico ou
papel, esteja atento ao forno devido à possibilidade de
ignição.
Limpe capa do guia de ondas e a cavidade do forno. Estas
devem estar secas e sem gordura. A gordura acumulada
PT – 3
Page 90

pode provocar sobreaquecimento e deitar fumo ou pegar
fogo.
Não coloque materiais in amáveis perto do forno ou das aberturas de ventilação. Não bloqueie as aberturas de ventilação.
Retire todos os selos metálicos, arames, etc., da comida e de
embalagens de comida. O arco elétrico nas superfícies metálicas pode provocar um incêndio.
Não use o forno micro-ondas para aquecer óleo para fritar.
A temperatura não pode ser controlada e o óleo pode pegar
fogo.
Para fazer pipocas, use apenas embalagens próprias para fazer
pipocas no micro-ondas.
Não guarde comida ou quaisquer outros objetos dentro do
forno.
Veri que as de nições quando iniciar o forno para ter a certeza
que o forno está a funcionar como desejado.
Não deixe o forno sem vigilância durante o funcionamento.
Para evitar sobreaquecimento e fogo é necessário ter cuidado
especial ao cozinhar ou reaquecer alimentos com muito açúcar
ou teor de gordura, por exemplo, salsichas, tartes ou pudins.
Veja as dicas correspondentes no manual de utilização.
Para evitar o risco de lesões. ATENÇÃO:
Não use o forno caso este esteja dani cado ou a funcionar
mal. Veri que o seguinte antes de o usar:
a) Certi que-se de que a porta se fecha devidamente e que
não está desalinhada ou deformada.
b) Veri que que as dobradiças e os fechos de segurança da
porta não estão partidos ou soltos.
c) Veja-se de que as vedações da porta e da superfície não
foram dani cadas.
PT – 4
Page 91

PT
d) Certi que-se de que no interior da cavidade do forno ou a
porta não há brechas.
e) Certi que-se de que o cabo de alimentação e a tomada
não estão dani cados.
Caso a porta ou as vedações da porta estejam dani cadas, o
forno não deve ser posto em funcionamento até ter sido reparado por uma pessoa competente.
Nunca ajuste, repare ou modi que o forno sozinho. É
arriscado para qualquer pessoa que não seja uma pessoa
competente para tal levar a cabo qualquer tipo de operação que envolva a remoção de uma capa que protege da
exposição a energia das micro-ondas.
Não opere o forno com a porta aberta nem altere os fechos de
segurança da porta de nenhum modo. Não opere o forno se
houver algum objeto entre as vedações da porta e as vedações
da superfície.
Não permita que se acumule gordura ou sujidade nas
vedações da porta e nas peças adjacentes. Limpe o forno
regularmente e remova todos os depósitos de comida.
Siga as instruções em "Cuidados e Manutenção". A falta
de limpeza do forno leva à deterioração da superfície que
afetará adversamente a vida da máquina e poderá criar
situações perigosas
Pessoas com PACEMAKERS devem aconselhar-se com o seu médico ou com o fabricante do pacemaker sobre regras de segurança com fornos micro-ondas.
Para evitar a possibilidade de choques elétricos
• Nunca em nenhum momento remova a cobertura exterior.
• Não derrame ou insira nenhum objeto nas ranhuras dos
ganchos da porta ou nas aberturas de ventilação. Em caso
de derrame, desligue e desconecte imediatamente o forno
PT – 5
Page 92

da corrente elétrica e chame um agente da assistência técnica autorizado SHARP.
• Não submerja o cabo de alimentação ou a tomada em água
ou qualquer outro líquido.
• Não deixe o cabo de alimentação pendurado à beira de uma
mesa ou superfície de trabalho.
• Mantenha o cabo de alimentação longe de superfícies
quentes, incluindo o motor do forno.
• Mantenha o aparelho e o cabo fora do alcance de crianças
com menos de 8 anos.
• Não tente substituir a lâmpada do forno sozinho e não permita que alguém que não seja um eletricista autorizado pela
SHARP o faça. Se a lâmpada do forno se fundir, por favor
contacte o seu revendedor ou a assistência técnica autorizada SHARP.
• Se o cabo de alimentação estiver dani cado, terá de ser
substituído por um agente autorizado da SHARP.
ATENÇÃO: Os líquidos e outros alimentos não devem ser
aquecidos em recipientes fechados, pois podem explodir.
O aquecimento de bebidas no micro-ondas pode provocar
uma erupção de ebulição tardia; por este motivo, deve ter-
-se cuidado ao manusear o recipiente. Para evitar a possibilidade de explosão e ebulição repentina:
Nunca use recipientes selados. Remova os selos e tampas antes
de usar. Os recipientes selados podem explodir devido à pressão criada, mesmo depois do forno ter sido desligado. Tenha
cuidado quando aquecer líquidos no micro-ondas. Use um recipiente com abertura larga para permitir que as bolhas saiam.
Nunca aqueça líquidos num recipiente com gargalo estreito, como biberons, pois isto pode provocar uma erupção
do conteúdo do recipiente quando estiver quente e provocar queimaduras.
PT – 6
Page 93

Para evitar uma erupção espontânea de um líquido a ferver e
eventuais queimaduras:
1. Não use tempo excessivo.
2. Mexa o líquido antes de o aquecer/reaquecer.
3. Aconselha-se a inserir uma vareta de vidro ou semelhante
(não metálica) dentro do líquido quando o reaquecer.
4. Deixe o líquido descansar por, pelo menos, 20 segundos
no forno após o m do tempo de cozedura para evitar uma
erupção de bolhas tardia.
Não cozinhe ovos com casca e igualmente ovos cozidos
não devem ser aquecidos no forno micro-ondas, pois podem explodir mesmo depois do forno ter parado de trabalhar. Para cozinhar ou reaquecer ovos que não tenham
sido mexidos, perfure a gema e a clara. Descasque e corte
os ovos cozidos antes de os reaquecer no forno micro-ondas.
PT
Perfure a pele de alimentos, tais como batatas, salsichas e fruta
antes de cozinhar, pois estes podem explodir.
ATENÇÃO: O conteúdo de biberons e boiões com comida
de bebé têm de ser mexidos ou agitados e a temperatura
tem de ser veri cada antes de ser consumida, para evitar
queimaduras. Use pegas ou luvas para o forno quando
remover os alimentos do forno para evitar queimaduras.
• Abra sempre os recipientes, sacos de pipocas, sacos para
cozinhar no forno, etc., longe do rosto e mãos para evitar
queimaduras por vapor e a erupção de ebulição. Para evitar
queimaduras, veri que sempre a temperatura dos alimentos
e mexa antes de servir. Preste especial atenção à temperatura dos alimentos e bebidas dados a bebés, crianças e idosos.
As peças acessíveis podem car quentes durante a utilização. As crianças pequenas devem ser mantidas à distância.
• A temperatura do recipiente não é a verdadeira temperatura
PT – 7
Page 94

da comida ou bebida; veri que sempre a temperatura da
comida.
• Afaste-se sempre quando abrir a porta do forno para evitar
queimaduras de vapor ou calor que saia do interior.
• Corte em fatias alimentos assados antes de os aquecer para
soltar o vapor e evitar queimaduras.
• Mantenha as crianças afastadas da porta para evitar que se
queimem.
ATENÇÃO: Permita às crianças com 8 ou mais anos usar o
forno sem supervisão apenas quando tenham sido dadas
instruções adequadas para que a criança consiga usar o
forno de forma segura e compreenda os perigos de uma
utilização imprópria.
Quando o eletrodoméstico for usado nos modos GRILL,
MIX GRILL, CONVECÇÃO, MIX CONVECÇÃO e MENU AUTOMÁTICO, as crianças só deverão usar o forno com supervisão de um adulto devido às temperaturas geradas.
Este aparelho não foi feito para ser usado por pessoas
(incluindo crianças) com capacidades físicas, sensoriais e
mentais reduzidas, ou com falta de experiência e conhecimentos, a não ser que esteja uma pessoa responsável pela
sua segurança a supervisionar ou a dar instruções relativas ao uso do aparelho.
As crianças devem ser supervisionadas de modo a garantir que não brincam com o aparelho. A limpeza feita por
crianças deve ser supervisionada.
Os modelos com painel tátil eletrónico vêm com um modo
de bloqueio de crianças.
Não se apoie ou balance na porta do forno. Não brinque com o
forno nem o utilize como um brinquedo.
Deve-se ensinar às crianças todas as instruções de segurança
importantes: o uso de pegas, o retirar com cuidado as cobertu-
PT – 8
Page 95

PT
ras dos alimentos, prestando especial atenção às embalagens
(por exemplo, materiais que se aquecem sozinhos) feitas para
tornar a comida estaladiça, pois podem estar particularmente
quentes.
Outros avisos
Nunca modi que o forno de nenhuma maneira.
Não mova o forno quando este estiver a funcionar.
Este forno destina-se apenas para ser usado num ambiente
doméstico. Destina-se à preparação de alimentos em casa e
apenas pode ser usado para cozinhar alimentos e bebidas. A
secagem de alimentos ou vestuário e o aquecimento de bolsas
térmicas, pantufas, esponjas, panos húmidos e semelhantes
pode levar ao risco de lesões, ignição ou fogo. Não é adequado
para uso comercial ou num laboratório.
Para promover o uso sem problemas do seu forno e evitar
problemas.
Nunca use o forno quando este estiver vazio. Quando usar um
prato de barro ou material que aqueça sozinho, coloque sempre por baixo um isolante resistente ao calor, como um prato
de porcelana, para prevenir danos na base do forno devido à
tensão do calor. O tempo de pré-aquecimento especi cado nas
instruções da loiça não deve ser excedido.
Não use utensílios metálicos, pois estes re ectem as micro-ondas e podem causar arcos elétricos. Não coloque latas dentro
do forno.
Para evitar que o prato giratório ou a base do forno se quebrem.
a) Antes de limpar com água, deixe arrefecer.
b) Não coloque alimentos quentes ou os, ou utensílios quen-
tes num prato giratório/base do forno frios.
c) Não coloque nada na parte exterior durante o funcionamen-
to.
PT – 9
Page 96
NOTA:
Não utilize recipientes de plástico para o micro-ondas se o forno ainda estiver quente depois da utilização de um modo combinado (depende do modelo do forno), pois podem derreter.
Os recipientes de plástico não devem ser utilizados nos modos
acima mencionados, a não ser que o produtor do recipiente
diga que são adequados.
Caso tenha dúvidas sobre a forma como ligar o seu forno, consulte um eletricista autorizado e quali cado.
Nem o fabricante, nem o revendedor podem aceitar qualquer
responsabilidade por estragos no forno ou danos pessoais
resultantes da inobservância dos procedimentos corretos de
ligação elétrica.
É possível que se forme ocasionalmente vapor ou gotas de
água nas paredes do forno ou à volta das vedações da porta e
da superfície. Isto é normal e não signi ca nenhuma falha ou
mal funcionamento do micro-ondas.
Este eletrodoméstico destina-se a ser usado num ambiente doméstico e aplicações semelhantes, tais como: áreas de cozinha
reservadas para o pessoal em lojas, escritórios e outros ambientes pro ssionais / quintas / uso de clientes em hotéis, motéis e
outros ambientes de tipo residencial / ambientes do estilo de
pousadas.
Este símbolo signi ca que as superfícies podem car
quentes durante o uso.
PT – 10
Page 97
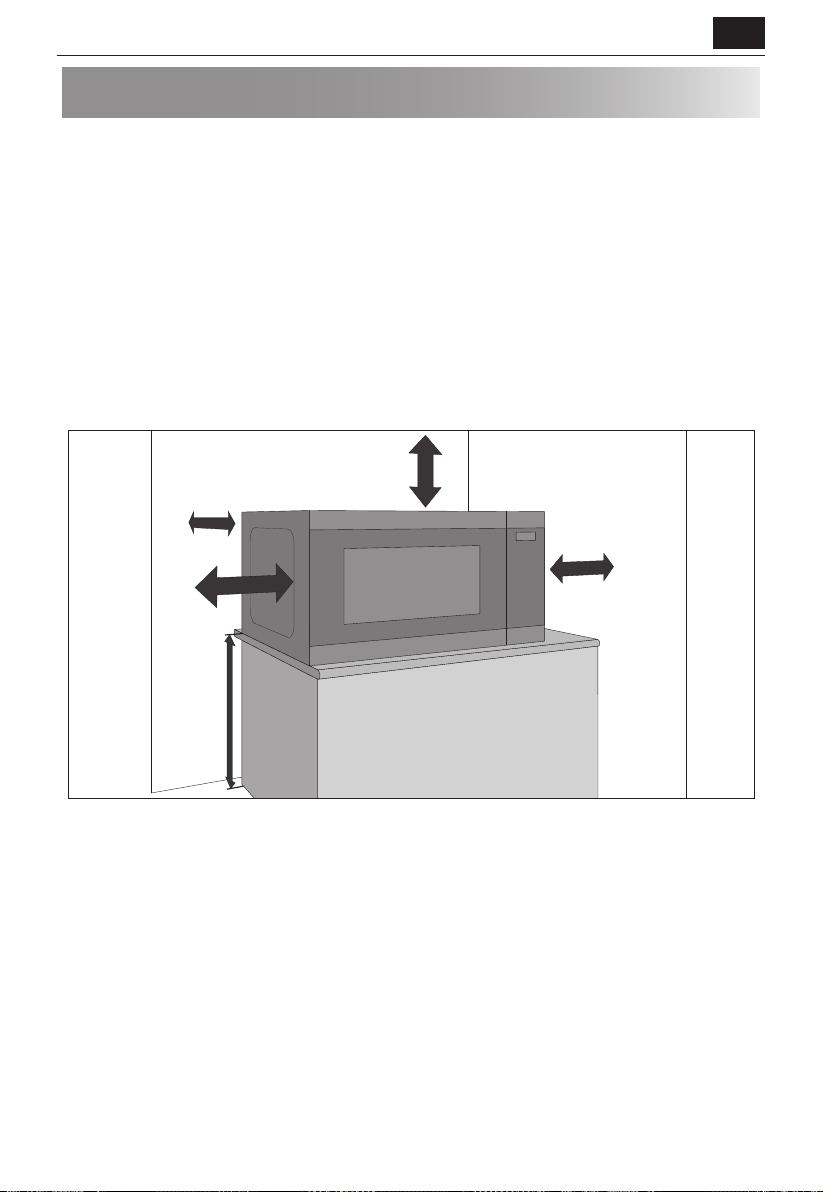
INSTALAÇÃO
1. Retire todo o tipo de embalagens de dentro da cavidade do forno e retire todas as películas de proteção que
encontrar na superfície da cabine do micro-ondas.
2. Veri que cuidadosamente se o forno tem sinais de estragos.
3. Coloque o forno numa superfície segura, nivelada e su cientemente forte para suportar o peso do forno junta-
mente com o da peça mais pesada que pensa cozinhar no forno. Não coloque o forno num recipiente fechado.
4. Escolha uma superfície nivelada com espaço su ciente para as entradas e/ou saídas de ar. Veja a imagem na
primeira página. A superfície traseira do aparelho deve ser colocada em frente a uma parede.
• A altura mínima de instalação é de 85 cm.
• É necessário haver um espaço mínimo de 20 cm entre os lados do forno micro-ondas e quaisquer paredes ou
objetos adjacentes.
• Deixe um espaço mínimo de 30 cm por cima do forno.
• Não remova os pés da base do forno.
• Bloquear a aber tura de entrada e/ou saída pode dani car o forno.
• Coloque o forno tão longe de rádios e televisores quanto possível. O funcionamento do forno micro-ondas pode
provocar interferências na receção de rádio ou televisão.
30 cm
10 cm
PT
20 cm
85 cm
5. Conecte de forma segura a cha do forno a uma tomada elétrica (com ligação à terra) normal de uso doméstico.
20 cm
ATENÇÃO:
Não coloque o forno em locais onde se gere calor, orvalho ou muita humidade (por exemplo, perto ou por baixo de
um forno convencional) ou perto de materiais combustíveis (por exemplo, cortinas).
Não bloqueie nem obstrua as aberturas da saída de ar.
Não coloque objetos em cima do forno.
Não toque no exterior do forno micro-ondas durante ou logo após o funcionamento, pois pode estar quente.
PT – 11
Page 98
INTERFERÊNCIA DE RÁDIO
A utilização do micro-ondas pode interferir com o seu rádio, televisor ou equipamento semelhante. Quando houver
interferência, esta pode ser reduzida ou eliminada seguinto as seguintes medidas:
1. Limpe a porta e a cavidade no sítio onde se juntam.
2. Mude a direção da antena de receção do rádio ou televisor.
3. Mude a localização do forno micro-ondas em relação ao recetor.
4. Ligue o forno micro-ondas a uma tomada diferente, para que este e o recetor não estejam no mesmo circuito de
corrente.
INSTRUÇÕES DE LIGAÇÃO À TERRA
Este eletrodoméstico tem de ter ligação à terra. Este forno vem equipado com um cabo com um o de ligação à terra,
com uma cha de ligação à terra. Tem de ser ligada a uma tomada que tenha sido devidamente instalada e ligada à
terra. No caso de haver um curto-circuito elétrico, a ligação à terra reduz o risco de choque elétrico, fornecendo um o
de escape para a corrente elétrica. Recomenda-se a instalação de um circuito separado apenas para o forno.
ATENÇÃO: A utilização inadequada da cha de ligação à terra pode provocar um risco de choque
elétrico.
NOTA:
1. Se tiver algumas questões sobre a ligação à terra ou as instruções elétricas, consulte um eletricista quali cado ou
uma pessoa da assistência técnica.
2. Nem o fabricante, nem o revendedor podem aceitar qualquer responsabilidade por estragos no forno ou lesões
pessoais resultantes da inobservância dos procedimentos corretos de ligação elétrica.
A ligação à rede usada no seu forno micro-ondas usa os com os seguintes códigos de cores:
Verde e amarelo = TERRA | Azul = NEUTRO | Castanho = ENERGIZADO
ESPECIFICAÇÕES
Nome do modelo: YC-PC322A
Tensão da Linha AC 230~240 V, 50 Hz monofásico
Fusível de linha de distribuição/disjuntor 10 A
Potência
Frequência das Micro-ondas 2450 MHz*
Dimensões Exteriores (L) x (A) x (P) mm 539 x 280 x 415
Dimensões da cavidade (L) x (A) x (P) mm 362 x 223 x 378
Tamanho do prato giratório de vidro (ø mm) 315
Capacidade do Forno 32 litros**
Tamanho do tabuleiro de assar (diâmetro x A em mm)
Tamanho da grelha do grill (diâmetro x altura em mm)
Peso 21 kg
Lâmpada do forno (de tipo LED) 1,5 W
* - Este produto cumpre os requisitos da norma europeia EN55011. Em conformidade com este requisito, o produto é classi cado como
equipamento do grupo 2 classe B. O grupo 2 signi ca que o equipamento gera intencionalmente energia com frequência de rádio, em
forma de radiação eletromagnética para o tratamento de alimentos por calor. Equipamento de classe B signi ca que o equipamento é
adequado para ser usado em ambientes domésticos.
** - A capacidade interna calcula-se medindo a largura, profundidade e altura máximas. A capacidade real para os alimentos é menor.
COMO PARTE DA POLÍTICA DE CONTÍNUAS MELHORIAS, RESERVAMO-NOS O DIREITO DE ALTERAR O DESENHO E AS
ESPECIFICAÇÕES SEM AVISO PRÉVIO.
Consumo energético 2300 W
Potência de saída do micro-ondas 1000 W
Potência de saída do grill 1250 W
Potência da convecção 2300 W
Potência no modo desligado <0,5 W
317 x 48
255 x 80
PT – 12
Page 99
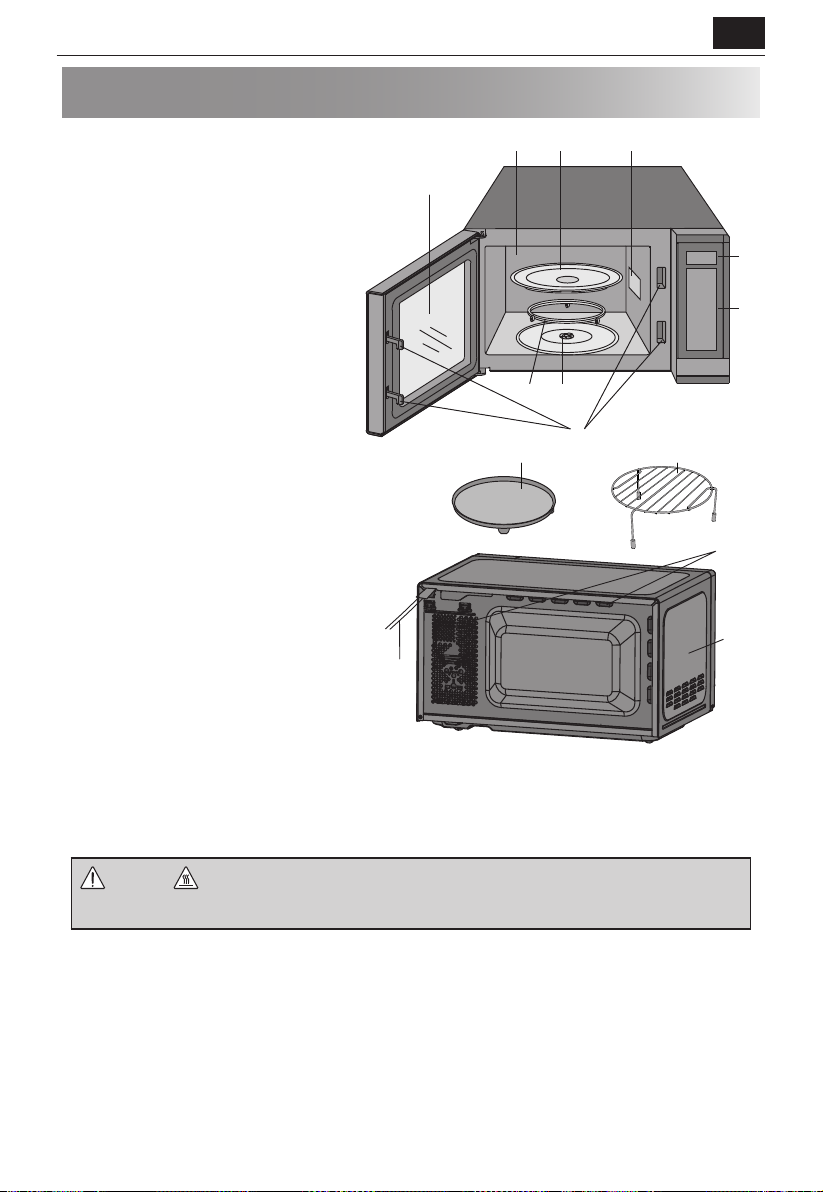
FORNO E ACESSÓRIOS
1110
PT
1. Sistema de bloqueio de segurança da porta
2. Janela do forno
3. Painel de controlo
4. Mostrador
5. Cavidade do forno
6. Capa da guia de ondas (não retirar)
7. Tabuleiro de vidro
8. Anel rolante
9. Acoplamento do prato giratório
10. Grelha do grill
11. Tabuleiro de assar
12. Aberturas de ventilação
13. Estrutura exterior
14. Cabo de alimentação
2
7
5
9
8
6
1
• A grelha do grill e o tabuleiro de assar foram
projetados para serem usados apenas em
fornos com grill e convecção. NÃO use
nenhuns acessórios metálicos quando usar a
função de micro-ondas.
• Sobre o uso da grelha do grill, veja a secção
GRILL no manual do utilizador.
Nunca toque no grill quando este estiver
quente
NOTA: Quando encomendar acessórios, re ra
estes dois itens: o nome da peça e o nome do
modelo.
14
NOTAS:
• Depois de cozinhar comida gordurosa sem
cobertura, limpe sempre devidamente a cavidade e quaisquer utensílios de cozinha. Estes deve estar secos e sem
gordura. A gordura acumulada pode causar sobreaquecimento e começar a deitar fumo ou a arder.
• Quando usar as micro-ondas, coloque sempre loiça no prato giratório.
• NÃO use a grelha do grill nem o tabuleiro de assar quando usar a função de micro-ondas.
4
3
12
13
ATENÇÃO: Este símbolo signi ca que as super fícies podem car quentes durante a utilização. A
porta, o compartimento exterior, a cavidade do forno, os acessórios e pratos carão muito quentes durante
a operação. Para evitar queimaduras, use sempre luvas almofadadas de cozinha.
PT – 13
Page 100
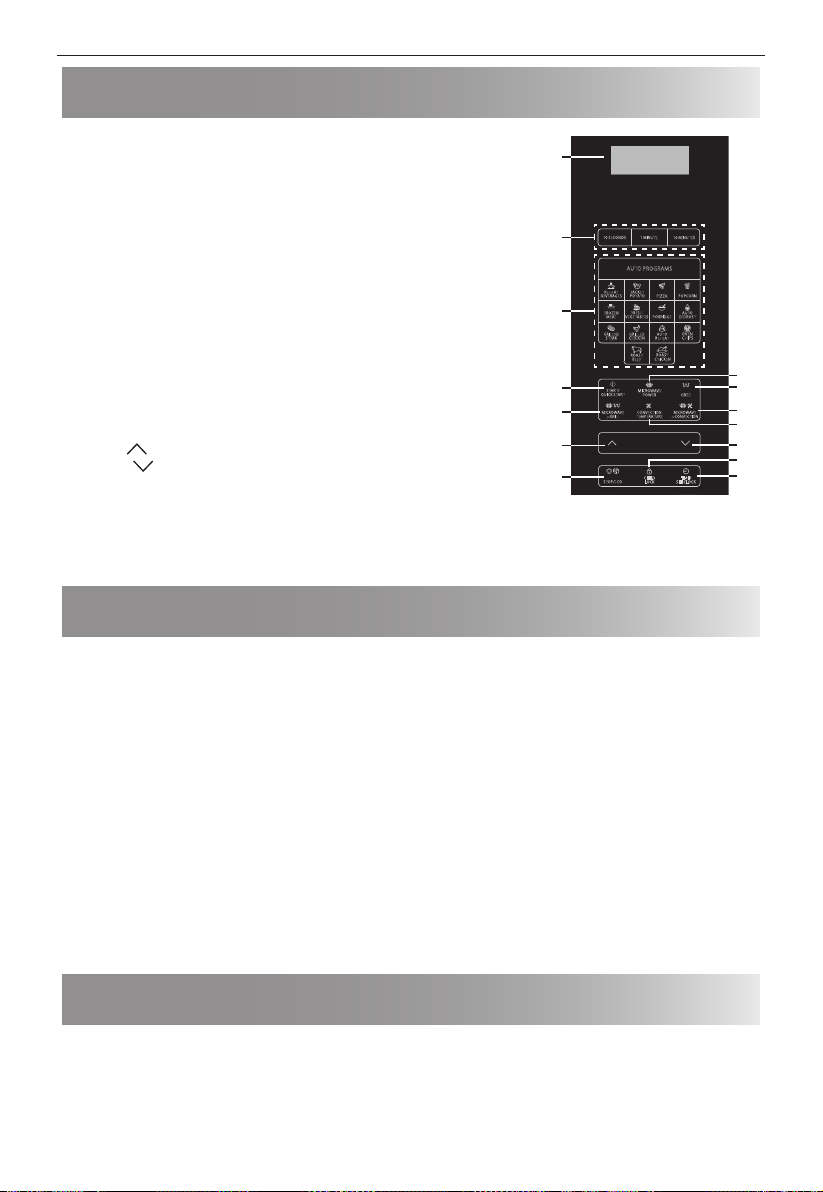
PAINEL DE CONTROLO
1. MOSTRADOR DIGITAL - São apresentados o tempo de cozedura, a potência,
os indicadores e a hora.
1
2. 10 SEGUNDOS, 1 MINUTO, 10 MINUTOS – Use para de nir a duração da
cozedura ou a hora do relógio.
3. Botões do MENU AUTOMÁTICO – Carregue para selecionar o menu de
cozedura automática. (Veja a página 18 para obter conselhos sobre como
usar).
4. INÍCIO/INÍCIO RÁPIDO – (Página 15).
5. POTÊNCIA DO MICRO-ONDAS - Carregue para selecionar o nível de potência
do micro-ondas. (Página 15).
6. GRILL - Carregue para de nir o programa de cozedura do grill. (Página 16).
7. MICRO-ONDAS+GRILL - Carregue para de nir o programa de cozedura
combinado de micro-ondas e grill. (Página 16).
8. TEMPERATURA DE CONVECÇÃO – Carregue para selecionar a temperatura
da convecção.
9. MICRO-ONDAS+CONVECÇÃO – Carregue para selecionar a combinação de
cozedura de convecção.
10. CIMA
11. BAIXO
– Carregue para de nir o peso ou as doses dos alimentos.
– Carregue para de nir o peso ou as doses dos alimentos.
12. STOP/ECO - Carregue uma vez para parar temporariamente de cozinhar, ou
10 SECONDS 1 MINUTE
2
REHEAT
BEVERAGES
3
FROZEN
MEAL
GRILLED
STEAK
4
START/
QUICK START
MICROWAVE
7
GRILL
+
10
12
STOP/ECO
AUTO PROGRAMS
JACKET
POTATO
FRESH
PORRIDGE
VEGETABLES
GRILLED
CHICKEN
ROAST
CHICKEN
EEF
B
MICROWAVE
POWER
CONVECTION
TEMPERATURE
CHILD
LOCK
10 MINUTES
POPCORN
PIZZA
AUTO
DEFROST
OVEN
AUTO
CHIPS
REHEAT
ROAST
GRILL
MICROWAVE
CONVECTION
+
TIME/
SET CLOCK
duas vezes para cancelar a cozedura de todo. Use para de nir o modo de
poupança de energia. (Página 19).
13. BLOQUEIO DE CRIANÇAS – (Página 20).
14. HORA/DEFINIR-
Use para acertar a hora. Use para de nir a função do temporizador. (Página 14)
ANTES DE USAR O FORNO
Quando o forno for ligado pela primeira vez, irá soar um sinal sonoro e o mostrador apresentará a indicação "1:00".
Tenha em conta que o relógio não precisa de estar acertado para o forno funcionar devidamente. Para acertar
orelógio, siga as instruções na secção “Acertar a hora” deste manual do utilizador.
Quando for novo, da primeira vez que for usado o grill e/ou a convecção serão produzidos fumo e cheiros. Para evitar
que isto aconteça quando estiverem a ser cozinhados alimentos, use a função do grill e da convecção sem alimentos
durante cerca de 20 minutos.
• Depois de abrir e fechar a porta, o forno entrará no modo de standby (espera). Se não se carregarem em nenhuns
botões durante 1 minuto, o mostrador continuará ligado e os botões não irão funcionar. Para voltar a entrar no
modo de standby, abra e feche a porta.
• Durante a cozedura, se o botão STOP/ECO for carregado uma vez, o ciclo de cozedura será parado. Para continuar
a cozinhar, carregue no botão INÍCIO/INÍCIO RÁPIDO. Se carregar duas vezes no botão STOP/ECO, a cozedura será
cancelada.
• Quando programar o forno para uma função concreta e houver uma pausa entre o carregar nos botões de mais de
30 segundos, o forno regressará ao modo de standby (espera).
• Quando um ciclo de cozedura terminar, o mostrador apresentará a indicação “End” e ouvir-se-á um sinal sonoro
acada 2 minutos, até se carregar em algum botão ou a porta ser aberta.
5
6
9
8
11
13
14
ACERTAR O RELÓGIO
Este forno tem um relógio que pode ser usado no modo de 12 ou 24 horas. Para acertar o relógio, siga as instruções
em baixo:
1. No modo standby (espera), carregue e mantenha o botão HORA/DEFINIR RELÓGIO durante pelo menos
3segundos para entrar no modo para acertar o relógio.
2. Carregue no botão HORA/DEFINIR RELÓGIO para selecionar o modo do relógio de 12 ou 24.
3. Use os botões 10 SEGUNDOS, 1 MINUTO e 10 MINUTOS para de nir as horas e minutos desejados.
PT – 14
 Loading...