

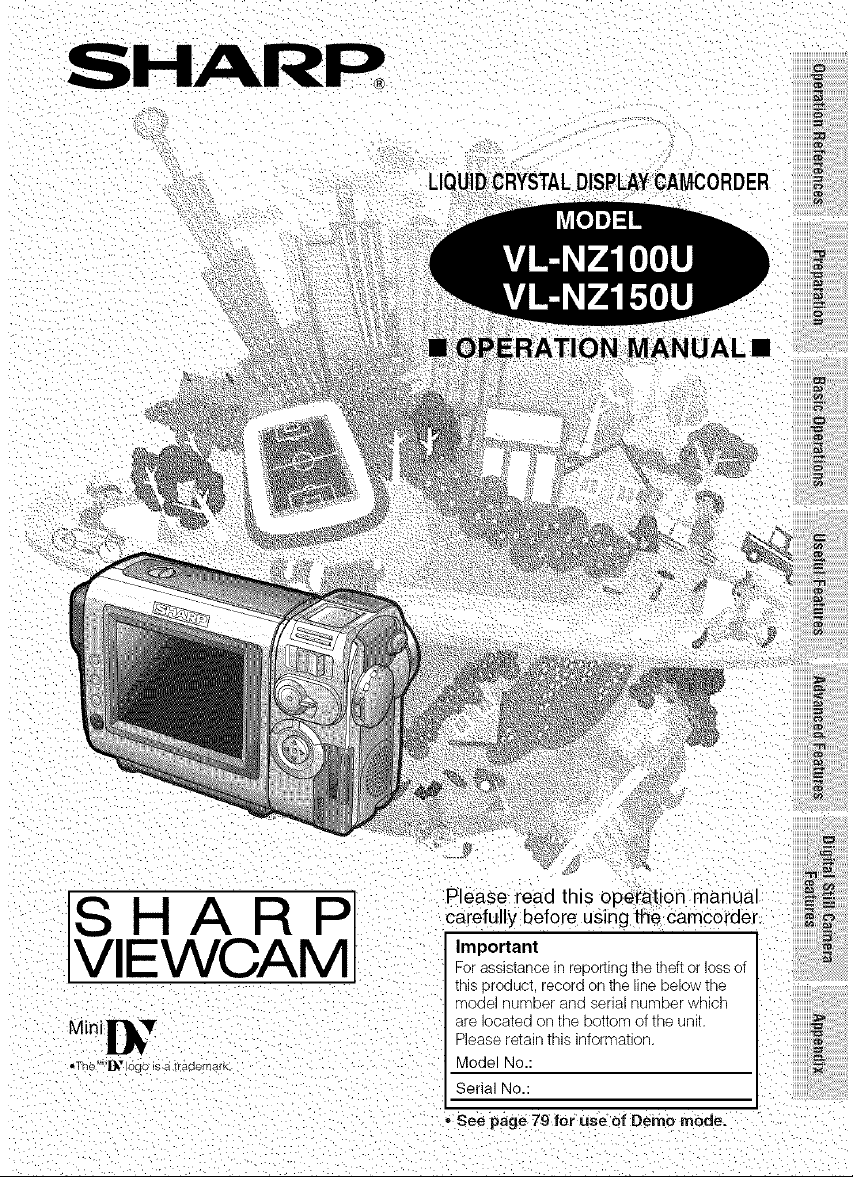
Page 1
Page 2

ThankyouforpurchasingthiscamcorderfromSHARP.
Thecamcorderwillenhanceyourhomevideoenjoymentandallowyoutocapturethose
specialmoments.Pleasereadthisoperationmanualtofamiliarizeyourselfwiththe
camcorder'sfeatures,sothatyouwillgetthemostoutofit.Thevideotechniquessectionwill
helpyoufullyenjoythemanyfeaturesthiscamcorderoffers,andexpandyourvideoworld.
Important Information for Consumers in the U.S.
I WARNING: TO REDUCE THE RISK OF FIRE OR ELECTRIC SHOCK, I
DO NOT EXPOSE THIS APPLIANCE TO RAIN OR
MOISTURE.
CAUTION:
TO REDUCE THE RISK OF ELEC-
TRIC SHOCK, DO NOT REMOVE
COVER. NO USER-SERVICEABLE
PARTS INSIDE. REFER SERVICING
TO QUALIFIED SERVICE PERSON-
NEL.
This symbol warns the user of uninsulated voltage within the
unit that can cause dangerous electric shocks.
This symbol alerts the user that there are important operating
and maintenance instructions in the literature accompanying
this unit.
CAUTION
(applies to the supplied AC adapter)
TO PREVENT ELECTRIC SHOCK,
MATCH WIDE BLADE OF PLUG TO
WIDE SLOT, FULLY INSERT.
CAUTION
If the AC adapter is misplaced or
needs to be replaced, obtain the
same type of adapter from a SHARP
service center of your dealer.
PRODUCT DISPOSAL
This Product utilizes tin-lead solder, and a fluorescent lamp containing a small
amount of mercury. Disposal of these materials may be regulated due to environ-
mental considerations. For disposal or recycling information, please contact your
local authorities or the Electronics Industries Alliance: www.eiae.org.
BATTERY DISPOSAL
CONTAINS LITHIUM-ION RECHARGEABLE BATTERY. MUST BE RECYCLED OR
DISPOSED OF PROPERLY. CONTACT LOCAL AGENCIES FOR INFORMATION ON
RECYCLING AND DISPOSAL PLANS IN YOUR AREA.
Page 3
WARNING FCC Regulations state that any unauthorized changes or modifica-
tions to this equipment not expressly approved by the manufacturer could void the
user's authority to operate this equipment.
iNFORMATiON
This equipment has been tested and found to comply with the limits for a Class B
digital device, pursuant to Part 15 of the FCC Rules. These limits are designed to
provide reasonable protection against harmful interference in a residential installa-
tion. This equipment generates, uses, and can radiate radio frequency energy and,
if not installed and used in accordance with the instructions, may cause harmful in-
terference to radio communications. However, there is no guarantee that interfer-
ence will not occur in a particular installation. If this equipment does cause harmful
interference to radio or television reception, which can be determined by turning the
equipment off and on, the user is encouraged to try to correct the interference by
one or more of the following measures:
Reorient or relocate the receiving antenna.
Increase the separation between the equipment and receiver.
Connect the equipment into an outlet on a circuit different from that to which the
receiver is connected.
Consult the dealer or an experienced radio/TV technician for help.
DECLARATION OF CONFORMITY
Sharp Camcorder
This device complies with Part 15 of the FCC Rules. Operation is subject to the follow-
ing two conditions: (1) This device may not cause harmful interference, and (2) this
device must accept any interference received, including interference that may cause
undesired operation.
RESPONSIBLE PARTY:
SHARP ELECTRONICS CORPORATION
Sharp Plaza, Mahwah, New Jersey 07430
Phone: 1-800-BE-SHARP
CAUTION ON LITHIUM BATTERY (MEMORY BACKUP BATTERY)
If a battery is reversed (positive end where the negative end belongs and vice
versa), it can overheat and rupture. This has happened when young children install
batteries backwards. Warn children notto take out batteries or install them. Parents
should install the lithium battery in the camcorde_
COPYRIGHTWARNING: It isthe intent of SHARP that this unit be used in full compliance with the
NOTE
The camcorder's LCD panel is a very high technology product with more than 120,000 thin-film tran-
sistors*, giving you fine picture detail. Occasionally, a pixel may appear on the screen as a fixed point
of blue, green, red, or black. Please note that this does not affect your camcorder's performance.
*Specifications are subject to change without notice.
Trademarks
" Microsoft and Windows are either registered trademarks or trademarks of Microsoft Corporation
in the United States and/or other countries.
- DPOF is a trademark of CANON INC., Eastman Kodak Company, Fuji Photo Film Co., Ltd. and
Matsushita Electric Industrial Co., Ltd.
- All other brand or product names are registered trademarks or trademarks of their respective
holders.
copyright laws of the Unked States and that prior permission be ob-
tained from copyright owners whenever necessary.
Page 4
iMPORTANT SA
1.
Read Instructions All the safety and
operating instructions should be read
before the product is operated.
2.
Retain Instructions The safety and
operating instructions should be
retained for future reference.
3.
Heed Warnings All warnings on the
product and in the operating instruc-
tions should be adhered to.
4.
Follow Instructions All operating and
use instructions should be followed.
5.
Cleaning UnpkJg this product from the
wall outlet before cleaning. Do not use 11.
liquid cleaners or aerosol cleaners. Use
a damp cloth for cleaning.
6.
Attachments Do not use attachments
not recommended by the product
manufacturer as they may cause
hazards.
7.
Water and Moisture Do not use this
product near water for example, near
a bath tub, wash bowl, kitchen sink, or 12.
laundry tub; in a wet basement; or near
a swimming pool; and the like.
8.
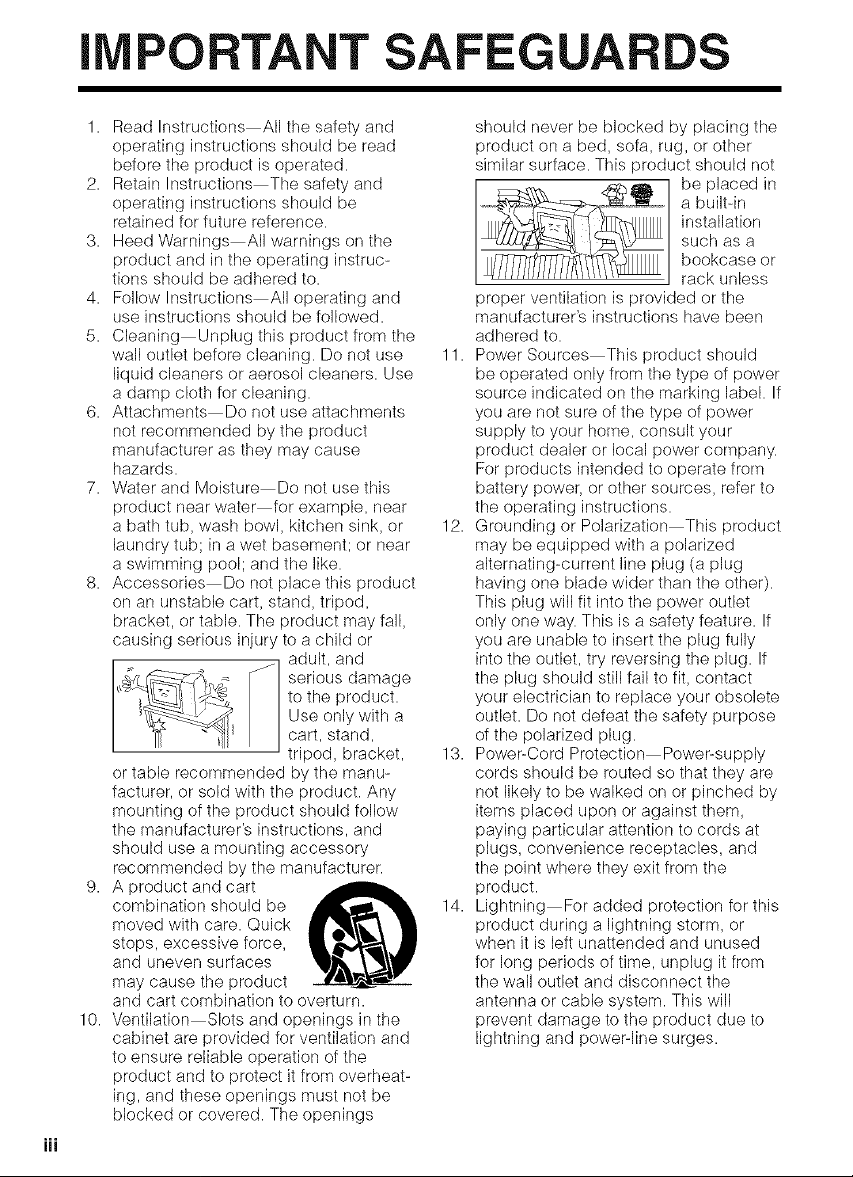
Accessories Do not place this product
on an unstable cart, stand, tripod,
bracket, or table. The product may fall,
causing serious injury to a child or
_J_'__ _"_" _ ¢/ serious damage
_ Use only with a
or table recommended by the manu-
facturer, or sold with the product. Any
mounting of the product should follow
the manufacturer's instructions, and
should use a mounting accessory
recommended by the manufacturer.
g.
A product and cart ._
moved with care. Quick
stops, excessive force,
and uneven surfaces
combination should be _ 14.
may cause the product
and cart combination to overturn.
10.
Ventilation Slots and openings in the
cabinet are provided for ventilation and
to ensure reliable operation of the
product and to protect it from overheat-
ing, and these openings must not be
blocked or covered. The openings
iii
adult, and
_1
cart, stand,
tripod, bracket, 13.
should never be blocked by placing the
product on a bed, sofa, rug, or other
similar surface. This product should not
be placed in
a bulk-in
installation
such as a
bookcase or
rack unless
proper ventilation is provided or the
manufacturer's instructions have been
adhered to.
Power Sources This product should
be operated only from the type of power
source indicated on the marking label. If
you are not sure of the type of power
supply to your home, consult your
product dealer or local power company.
For products intended to operate from
battery power, or other sources, refer to
the operating instructions.
Grounding or Polarization This product
may be equipped with a polarized
alternating-current line plug (a plug
having one blade wider than the other).
This plug will fit into the power outlet
only one way. This is a safety feature. If
you are unable to insert the plug fully
into the outlet, try reversing the plug. If
the plug should still fail to fit, contact
your electrician to replace your obsolete
outlet. Do not defeat the safety purpose
of the polarized plug.
Power-Cord Protection Power-supply
cords should be routed so that they are
not likely to be walked on or pinched by
items placed upon or against them,
paying particular attention to cords at
pkJgs, convenience receptacles, and
the point where they exit from the
product.
Lightning For added protection for this
product during a lightning storm, or
when it is left unattended and unused
for long periods of time, unplug it from
the wall outlet and disconnect the
antenna or cable system. This will
prevent damage to the product due to
lightning and power-line surges.
Page 5
15.PowerLinesAnoutsideantenna
systemshouldnotbelocatedinthe
vicinityofoverheadpowerlinesorother
electriclightorpowercircuks,orwhere
itcanfallintosuchpowerlinesor
circuits.Wheninstallinganoutside
antennasystem,extremecareshould
betakentokeepfromtouchingsuch
powerlinesorcircuitsascontactwith
themmightbefatal.
16.OverloadingDonotoverloadwall
outlets,extensioncords,orintegral
conveniencereceptaclesasthiscan
resukinariskoffireorelectricshock.
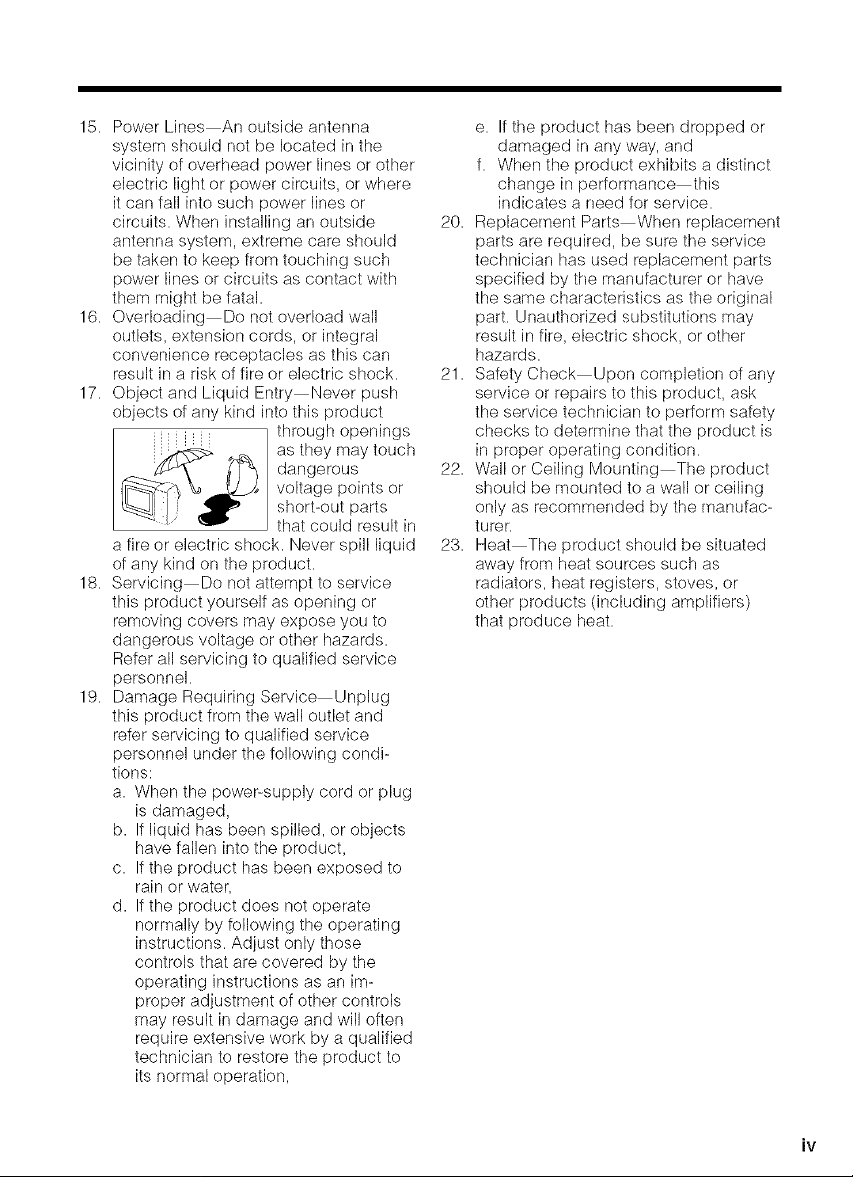
17.ObjectandLiquidEntryNeverpush
objectsofanykindintothisproduct
throughopenings
astheymaytouch
dangerous
voltagepointsor
short-outparts
thatcouldresultin
afireorelectricshock.Neverspillliquid
ofanykindontheproduct.
18.ServicingDonotattempttoservice
thisproductyourselfasopeningor
removingcoversmayexposeyouto
dangerousvoltageorotherhazards.
Referallservicingtoqualifiedservice
personnel.
19.DamageRequiringServiceUnplug
thisproductfromthewalloutletand
referservicingtoqualifiedservice
personnelunderthefollowingcondi-
tions:
a.Whenthepower-supplycordorplug
isdamaged,
b.Ifliquidhasbeenspilled,orobjects
havefallenintotheproduct,
c. Iftheproducthasbeenexposedto
rainorwater,
d.Iftheproductdoesnotoperate
normallybyfollowingtheoperating
instructions.Adjustonlythose
controlsthatarecoveredbythe
operatinginstructionsasanim-
properadjustmentofothercontrols
mayresultindamageandwilloften
requireextensiveworkbyaqualified
techniciantorestoretheproductto
itsnormaloperation,
e.Iftheproducthasbeendroppedor
damagedinanyway,and
f. Whentheproductexhibitsadistinct
changeinperformancethis
indicatesaneedforservice.
20.ReplacementPartsWhenreplacement
partsarerequired,besuretheservice
technicianhasusedreplacementparts
specifiedbythemanufacturerorhave
thesamecharacteristicsastheoriginal
part.Unauthorizedsubstitutionsmay
resultinfire,electricshock,orother
hazards.
21.SafetyCheckUponcompletionofany
serviceorrepairstothisproduct,ask
theservicetechniciantoperformsafety
checkstodeterminethattheproductis
inproperoperatingcondition.
22.WallorCeilingMountingTheproduct
shouldbemountedtoawallorceiling
onlyasrecommendedbythemanufac-
turer.
23.HeatTheproductshouldbesituated
awayfromheatsourcessuchas
radiators,heatregisters,stoves,or
otherproducts(includingamplifiers)
thatproduceheat.
Page 6
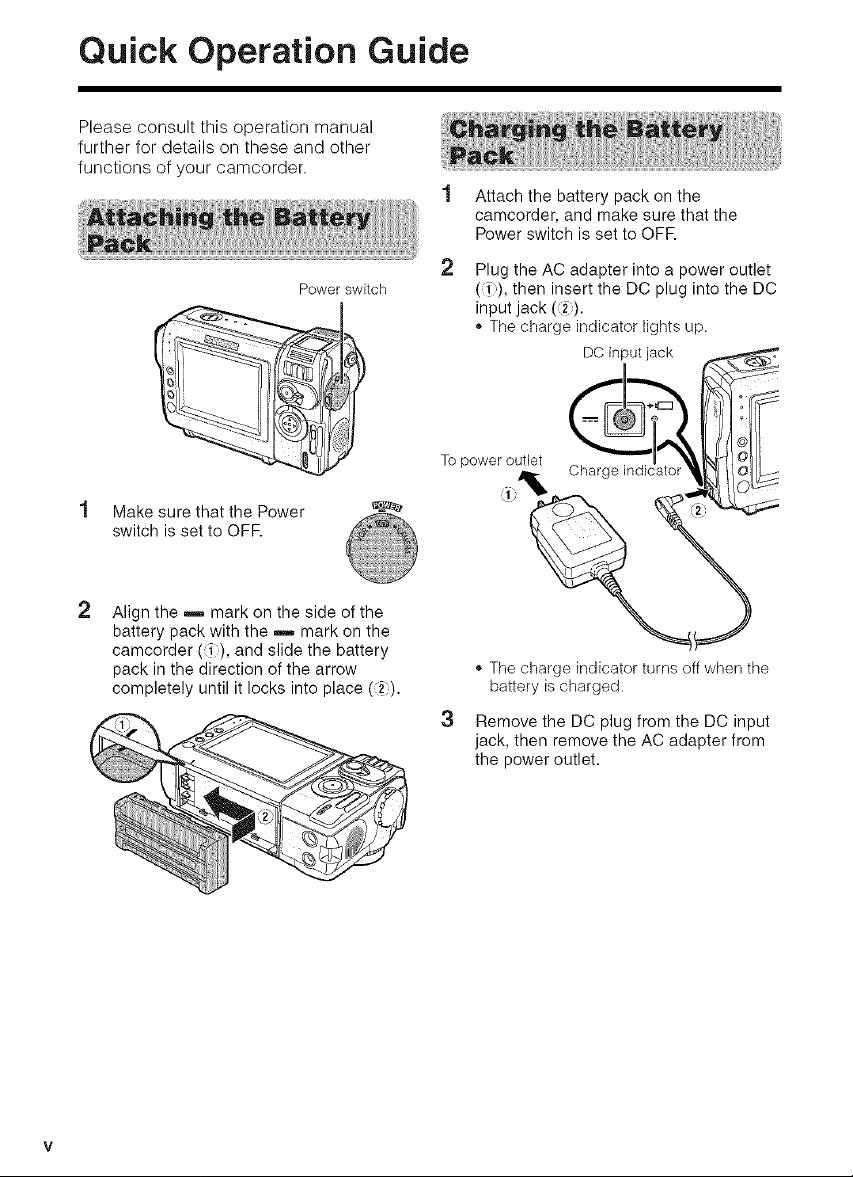
Quick Operation Guide
Please consult this operation manual
further for details on these and other
functions of your camcorder.
1 Attach the battery pack on the
2 Plug the AC adapter into a power outlet
Power switch
T° p°vver °u_rt Charge indicator _ [_-//_i _
Make sure that the Power
switch is set to OFF.
Align the m mark on the side of the
battery pack with the B mark on the
camcorder (_), and slide the battery
pack in the direction of the arrow
completely until it locks into place (2:).
3 Remove the DC plug from the DC input
camcorder, and make sure that the
Power switch is set to OFR
(_), then insert the DC plug into the DC
input jack (21).
,, The charge indicator lights up.
DC input jack
_,The charge indicator turns off when the
battery is charged.
jack, then remove the AC adapter from
the power outlet.
Page 7
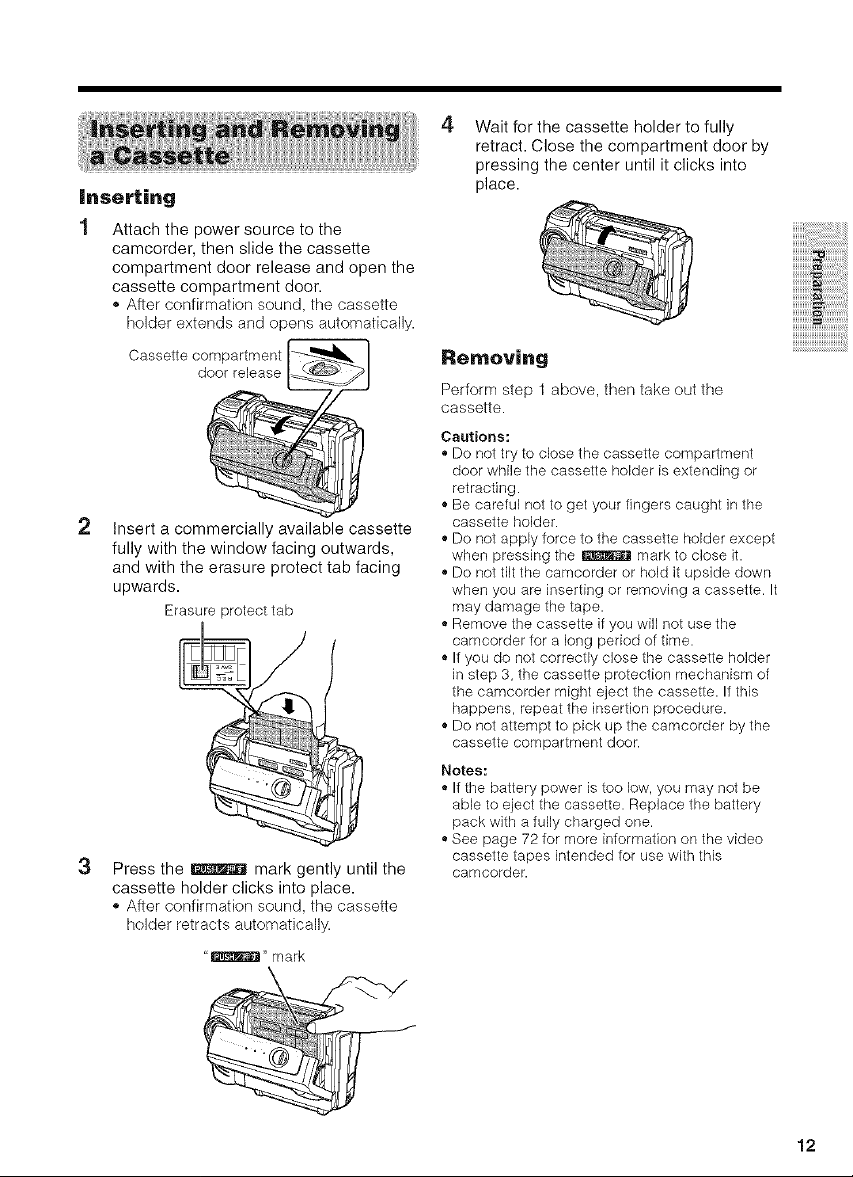
Attachthepowersourcetothe YeucarluseanSDMemoryCardora
camcorder,thenslidethecassette MulfiMediaCardforstoringstillimages.
compartmentdoorreleaseandopenthe
cassettecompartmentdoor. 1 MakesurethatthePowerswitchisset
,,Afterconfirmationsound,thecassette toOFR
holderextendsandopensautomatically.2 Slidethecardslotcoverreleaseand
Cassettecompartment openthecardslotcoverinthedirection
doorrelease ofthearrow.
Cardslotcoverrelease
Insertacommerciallyavailablecassette i
fullywiththewindowfacingoutwards, _',I
andwiththeerasureprotecttabfacing
upwards.
Erasureprotecttab 3
Insertacardintotheslotasshown
below,andpushitinasfarasitwillgo.
Write-protect
switch X
Pressthe_ markgentlyuntilthe
cassetteholderclicksintoplace.
,,Afterconfirmationsound,thecassette
holderretractsautomatically.
"_" mark
Waitforthecassetteholdertofully
retract.Closethecompartmentdoorby
pressingthecenteruntilitclicksinto
place.
Clipped corner
4
Close the card slot cover.
Note:
o You cannot use a SmartMedia TM card or
Memory Stick TM media, in this operation
manual, "card" refers to the SD Memory Card
or the MultiMediaCard.
vi
Page 8
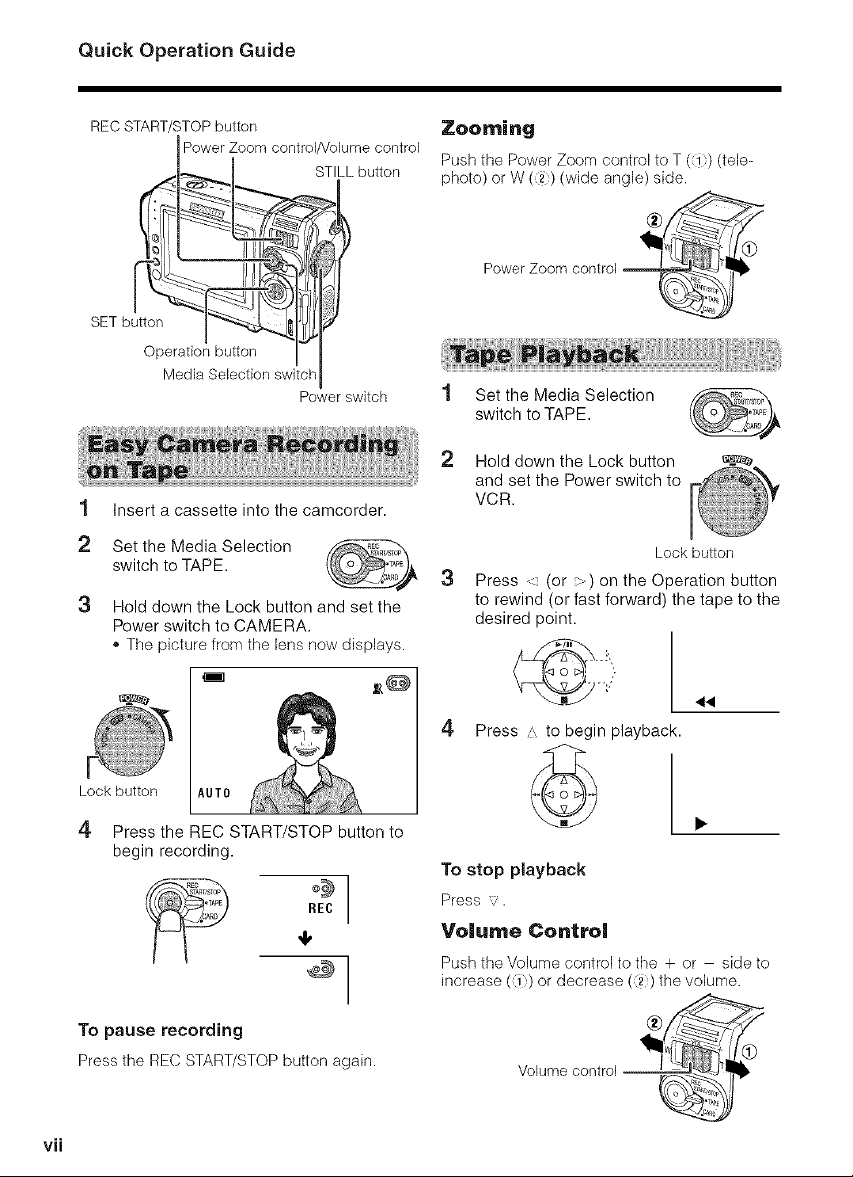
Quick Operation Guide
REC START/STOPbutton
Power Zoom control/Volume control
_I_I STILL button
Operation button I
Media Selection switch
Power switch
1
Insert a cassette into the camcorder.
2
Set the Media Selection
switch to TAPE.
Hold down the Lock button and set the
Power switch to CAMERA.
,, The picture from the lens now displays.
Zooming
Push the Power Zoom control to T (1) (tele-
photo) or W (_) (wide angle) side.
1 Set the Media Selection
switch to TAPE.
2 Hold down the Lock button
and set the Power switch to
VCR.
Lock button
3
Press <. (or >) on the Operation button
to rewind (or fast forward) the tape to the
desired point.
Lock button
4 Press the REC START/STOP button to
begin recording.
REC
To pause recording
Press the REC START/STOP button again.
vii
4
Press A to begin playback.
To stop playback
Press v'.
Volume Control
Push tile Volume control to the + or she to
increase (_) or decrease (_) the volume.
Volume control
Page 9
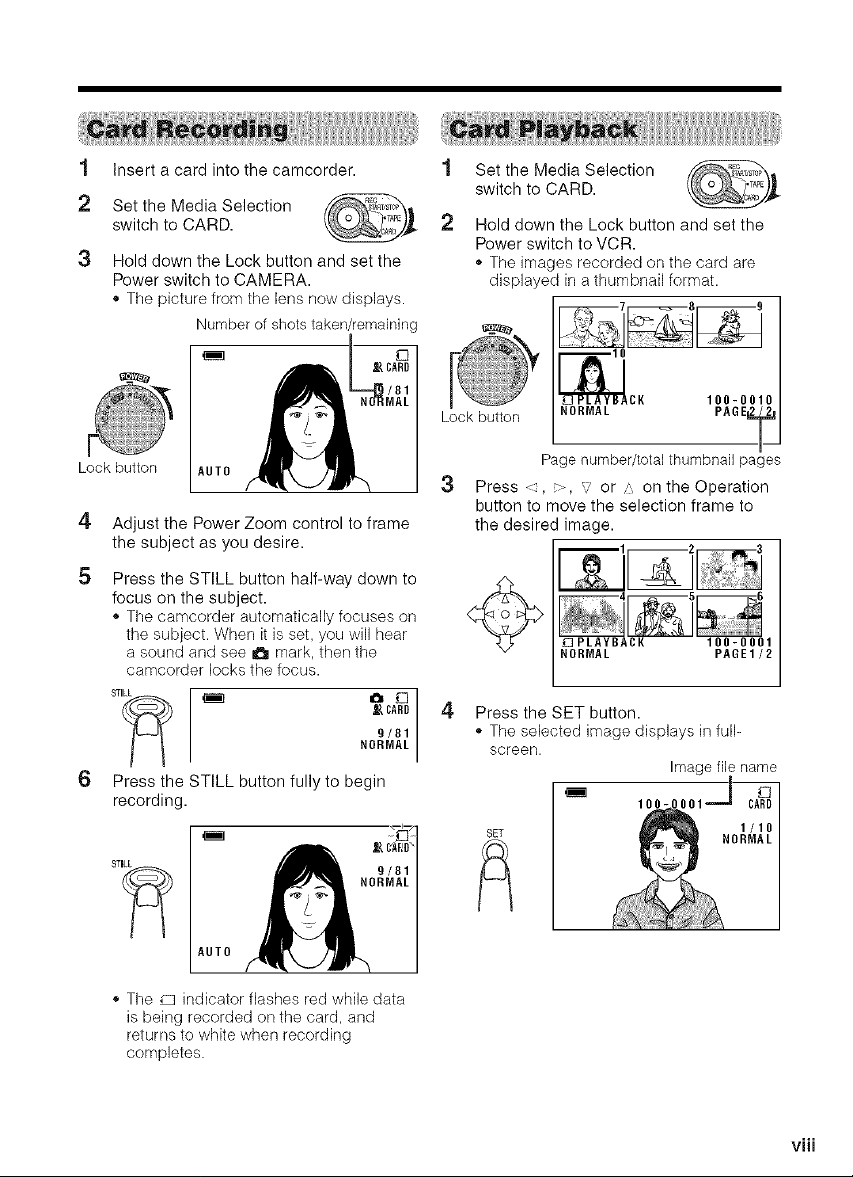
1 Insert a card into the camcorder.
2 Set the Media Selection
switch to CARD.
Hold down the Lock button and set the
Power switch to CAMERA.
,, The picture from the lens now displays.
Number of shots taken/remaining
I
Set the Media Selection
switch to CARD.
2
Hold down the Lock button and set the
Power switch to VCR.
* The images recorded on the card are
displayed in a thumbnail format.
Lock button
_ --=-_/01 I
AUTO "_,
4
Adjust the Power Zoom control to frame
the subject as you desire.
5
Press the STILL button half-way down to
focus on the subject.
,, The camcorder automatically focuses on
the subject. When it is set. you will hear
a sound and see 6 mark. then the
camcorder locks the focus.
Press the STILL button fully to begin
recording.
AUTO
NORMAL I
CARD
9/01
NORMAL
Lock button
CK 100-0010
NORMAL PAGE!__
Page number/total thumbnail pages
3
Press <, >, :/ or /,, on the Operation
button to move the selection frame to
the desired image.
_ PLAYBACK
NORMAL
4
Press the SET button.
* The selected image displays in full-
screen.
SET
100-0001
PAGE1/2
Image file name
* The D indicator flashes red while data
is being recorded on the card, and
returns to white when recording
completes.
viii
Page 10
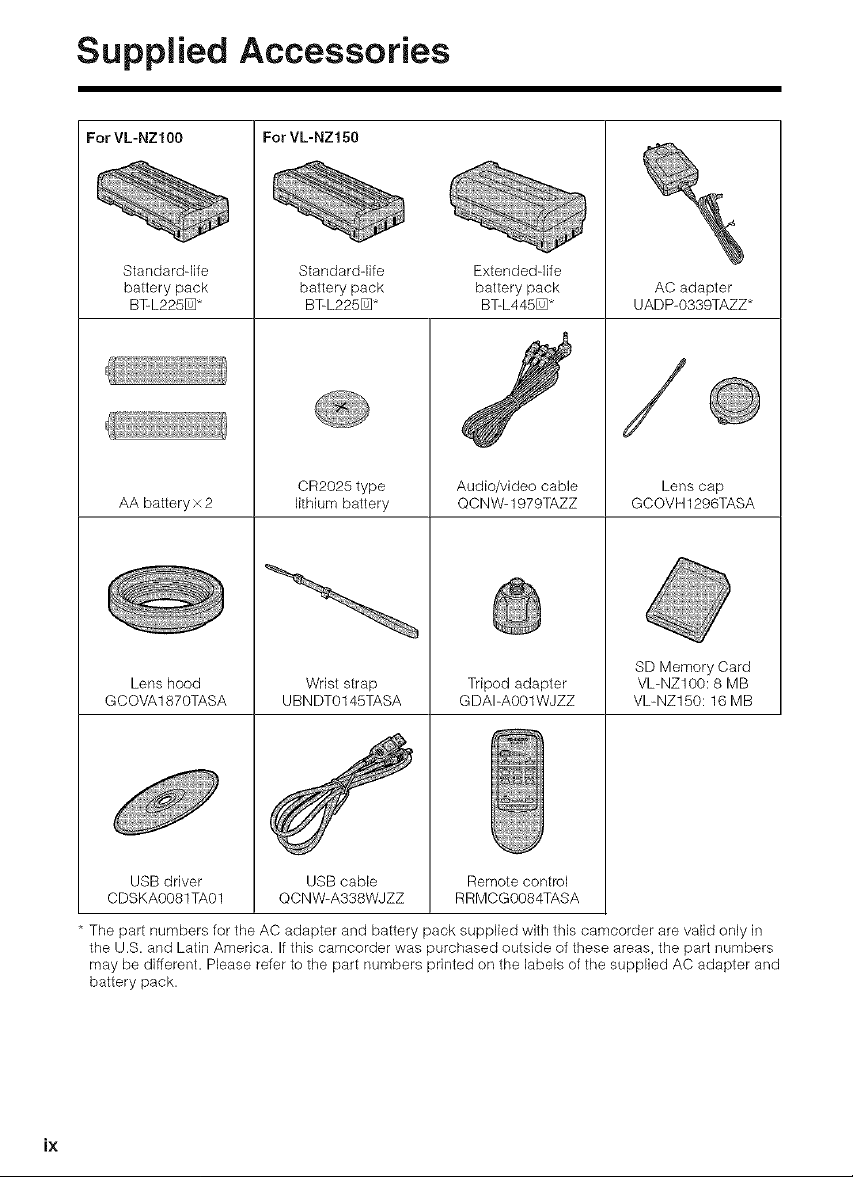
Supplied Accessories
For VL-NZ100
Standardqife
battery pack
BT-L225D*
AA battery x 2
Lens hood
GCOVA1870TASA
For VL-NZ150
Standard-life
battery pack
BT-L225D*
CR2025 type
lithium battery
Wrist strap
UBNDT0145TASA
Extended-life
battery pack
BT=L445[_*
Audio/video cable
QCNW- 1979TAZZ
Tripod adapter
GDAI=A001WJZZ
AC adapter
UADP-0339TAZZ*
Lens cap
GCOVH 1296TASA
SD Memory Card
VL=NZ100:8 MB
VL=NZ150:16 MB
USB driver
CDSKA0081TA01
The part numbers for the AC adapter and battery pack supplied with this camcorder are valid only in
the U.S. and Latin America. If this camcorder was purchased outside of these areas, the part numbers
may be different. Please refer to the part numbers printed on the labels of the supplied AC adapter and
battery pack.
ix
USB cable
QCNW-A338WJZZ
Remote control
RRMCG0084TASA
Page 11

Optional Accessories
Standard=life
battery pack
BT-L225D
Note:
o The listed model names are for U.S. accessories.
For optional and additional accessories, contact your local dealer, call the Sharp Accessories and
Supply Center at 1-800-642-2122, or visit SHARP's website (http:l/www.sharp-usa.com).
Extended-life
battery pack
BT-L445D
Page 12
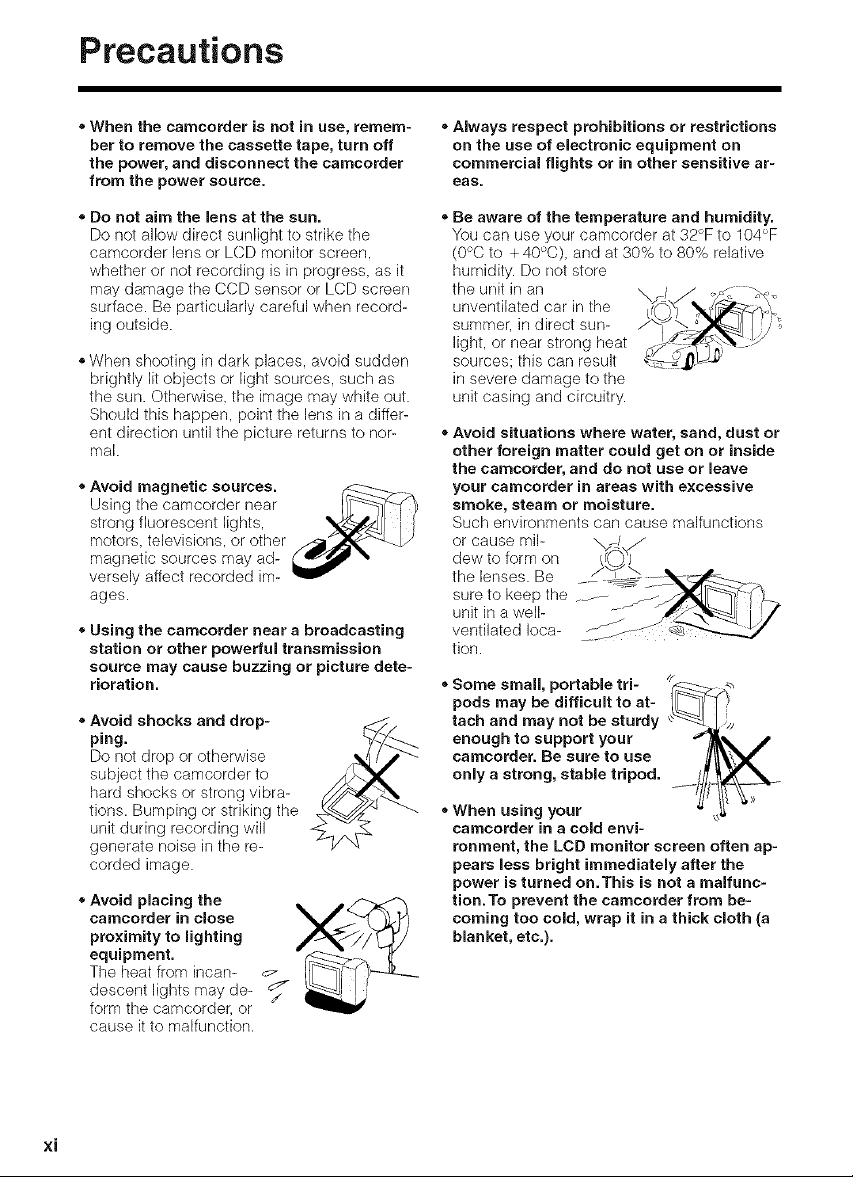
Precautions
• When the camcorder is not in use, remem-
ber to remove the cassette tape, turn off
the power, and disconnect the camcorder
from the power source.
- Do not aim the lens at the sun.
Do not allow direct sunlight to strike the
camcorder lens or LCD monitor screen,
whether or not recording is in progress, as it
may damage the CCD sensor or LCD screen
surface. Be particularly careful when record-
ing outside.
- When shooting in dark places, avoid sudden
brightly lit objects or light sources, such as
the sun. Otherwise, the image may white out.
Should this happen, point the lens in a differ-
ent direction until the picture returns to nor-
mal.
• Avoid magnetic sources, r_----_--___.
Using the camcorder near
strong fluorescent lights,
motors, televisions, or other
magnetic sources may ad-
versely affect recorded im-
ages.
• Using the camcorder near a broadcasting
station or other powerful transmission
source may cause buzzing or picture dete-
rioration.
- Avoid shocks and drop-
ping.
Do not drop or otherwise
subject the camcorder to
hard shocks or strong vibra-
tions. Bumping or striking the
unit during recording will
generate noise in the re-
corded image.
• Avoid placing the _ j,/'--z.<_
camcorder in close
proximity to lighting
equipment.
The heat from incan- r7 ____..
descent lights may de- _
form the camcorder, or
cause it to malfunction.
j,
- Always respect prohibitions or restrictions
on the use of electronic equipment on
commercial flights or in other sensitive ar-
eas.
- Be aware of the temperature and humidity.
You can use your camcorder at 32°F to 104°F
(0°C to + 40°C), and at 30% to 80% relative
humidity. Do not store
the unit in an
unventilated car in the
summer, in direct sun-
light, or near strong heat
sources: this can result
in severe damage to the
unit casing and circuitry.
- Avoid situations where water, sand, dust or
other foreign matter could get on or inside
the camcorder, and do not use or leave
your camcorder in areas with excessive
smoke_ steam or moisture.
Such environments can cause malfunctions
or cause mil- \
dew to form on
the lenses. Be
sure to keep the
unit in a well-
ventilated Ioca- _s-
tion.
- Some small, portable tri-
pods may be difficult to at-
tach and may not be sturdy
enough to support your
camcotder. Be sure to use
only a strong, stable tripod.
• When using your
camcorder in a cold envi-
ronment, the LCD monitor screen often ap-
pears less bright immediately after the
power is turned on.This is not a malfunc-
tion.To prevent the camcorder from be-
coming too cold, wrap it in a thick cloth (a
blanket, etc.).
×i
Page 13
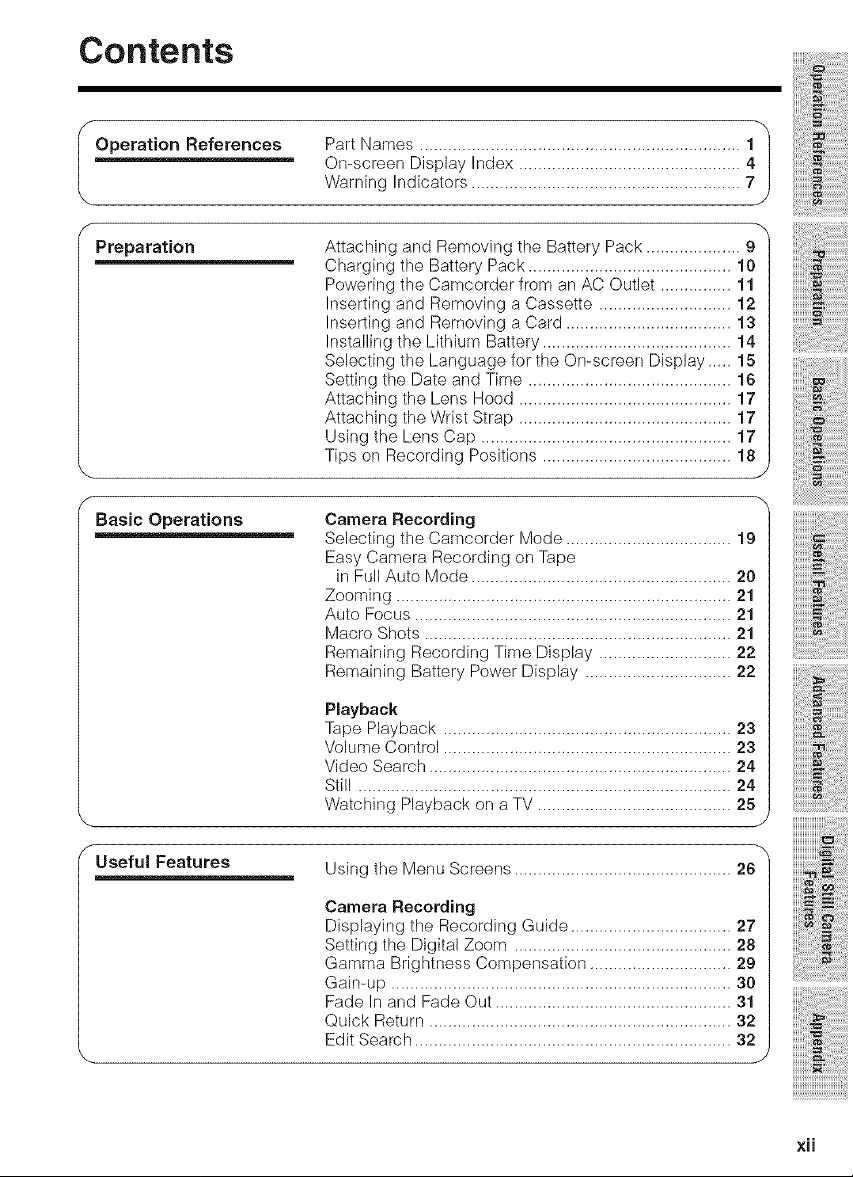
Contents
I Operation References Part Names .................................................................... 11
Preparation
Basic Operations
f
Useful Features Using the Menu Screens .............................................. 26
On-screen Display Index ............................................... 4
Warnhg Indicators ......................................................... 7
Attaching and Removing the Battery Pack .................... 9
Charging the Battery Pack ........................................... 10
Powering the Camcorder from an AC Outlet ............... 11
Inserting and Removing a Cassette ............................ 12
Inserting and Removing a Card ................................... 13
Installing the Lithium Battery ........................................ 14
Selecting the Language for the On-screen Display ..... 15
Setting the Date and Time ........................................... 16
Attaching the Lens Hood ............................................. 17
Attaching the Wrist Strap ............................................. 17
Ushg the Lens Cap ..................................................... 17
Tips on Recordhg Positions ........................................ 18
Camera Recording
Selecting the Camcorder Mode ................................... 19
Easy Camera Recording on Tape
in Full Auto Mode ....................................................... 20
Zooming ....................................................................... 21
Auto Focus ................................................................... 21
Macro Shots ................................................................. 21
Remaining Recording Time Display ............................ 22
Remaining Battery Power Display ............................... 22
Playback
Tape Playback ............................................................. 23
Volume Control ............................................................. 23
Video Search ................................................................ 24
Still ............................................................................... 24
Watching Playback on a TV ......................................... 25
J
J
Camera Recording
Displaying the Recording Guide .................................. 27
Setting the Digital Zoom .............................................. 28
Gamma Brightness Compensation .............................. 29
Gain-up ........................................................................ 30
Fade In and Fade Out .................................................. 31
Quick Return ................................................................ 32
Edit Search ................................................................... 32
J
xii
Page 14
Contents
f
Useful Features
Still Recording on Tape ................................................ 33
Attaching the Supplied Tripod Adapter ....................... 33
Wide Screen (16:9) ...................................................... 34
Digital Image Stabilization (DIS) .................................. 34
Self Recording ............................................................. 35
Recording in LP (Long Play Recording) Mode ............ 36
Selecting the 16-bk Audio Recording Mode ................ 37
Playback
Using the Remote Control ............................................ 38
Displaying the Date and Time of Recording ................ 39
Slow ............................................................................. 39
Gamma Playback ........................................................ 40
Copying an Image from Tape to Card ......................... 40
Picture Effect Playback ................................................ 41
J
Advanced Features
Camera Recording
Manual Focus .............................................................. 42
Manual Exposure ......................................................... 43
White Balance Lock ..................................................... 44
Setting the Camcorder to Full Auto Mode .................... 44
Digital Picture Effects ................................................... 45
Scene Menu (Program AE) .......................................... 46
Playback
Using the Time Code ................................................... 47
Edkklg .......................................................................... 48
Recording from an External Source ............................. 49
Using the Camcorder as a Converter .......................... 50
Edking with the DV Terminal (IEEE1394) ..................... 51
Selecting the Audio Playback Mode ............................ 52
Audio Dubbing Feature ................................................ 53
./
xiii
Page 15
f
Digital Still Camera
Features
Camera Recording
Card Recording ........................................................... 55
Selecting the Picture Quality ........................................ 56
Recording with the Self-timer ....................................... 57
Formatting a Card ........................................................ 58
Playback
Card Playback ............................................................. 59
Delete Protection .......................................................... 60
Deleting Stored Images ............................................... 61
Print Order .................................................................... 63
Transferring Data on Card to Computer ...................... 65
Installing the USB driver ......................................... 65
Slide Show PJayback ................................................... 67
Picture/Backlight Adjustments ..................................... 68_
Turning off the Confirmatiorl Sound ............................. 6g|
UsefuJ Information ........................................................ 70|
Demonstration Mode ................................................... 79|
I Appendix
Before Requesting Service .......................................... 80|
Specifications .............................................................. 82).., ...........................
"Guia de operacion rapids en espanol ..................................................................... 83
,,Visualizaciones en pantaHa en espaFiol ................................................................... 91
"Affichages sur ecran en francais .............................................................................. g3
xiv
Page 16
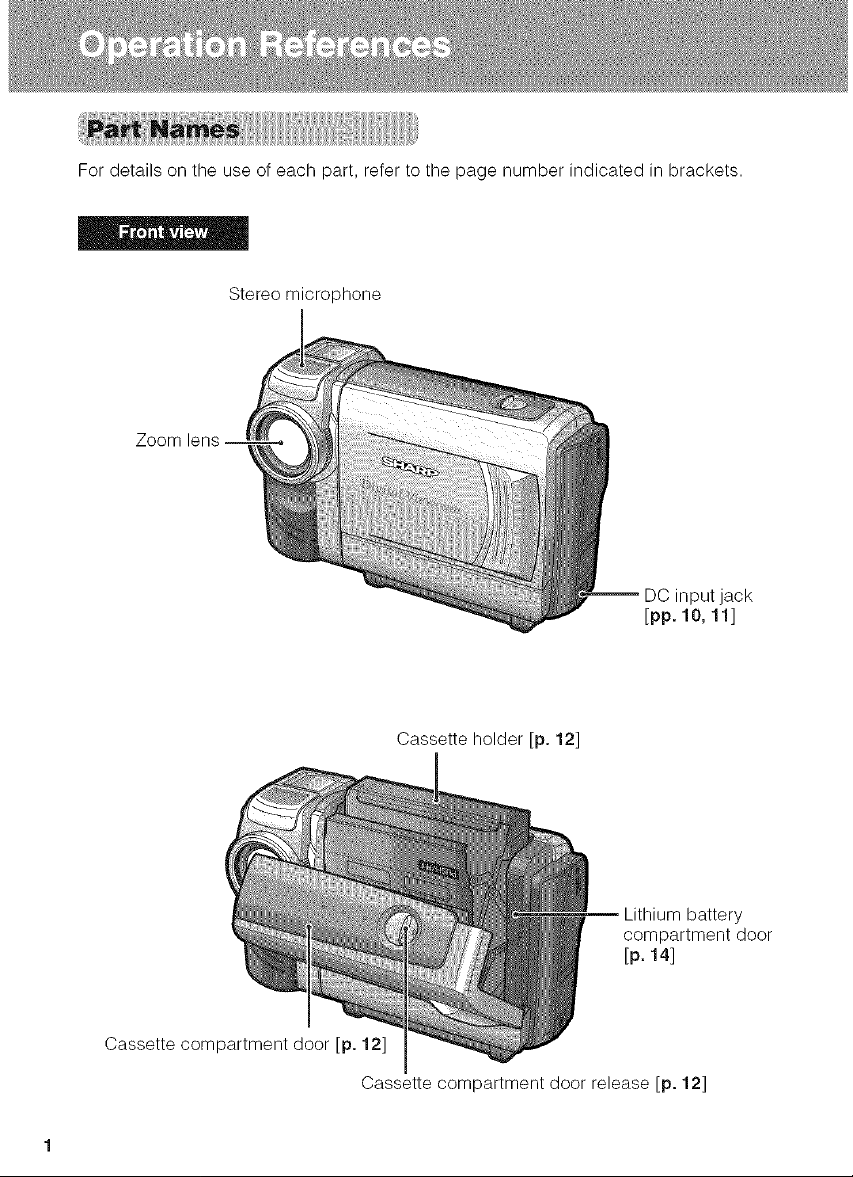
Fordetailsontheuseofeachpart,refertothepagenumberindicatedinbrackets.
Stereomicrophone
DCinputjack
[ppo10,11]
Cassetteholder[po12]
Cassettecompartmentdoor[p.12]
Cassettecompartmentdoorrelease[p.12]
Lithiumbattery
compartmentdoor
[p.14]
Page 17
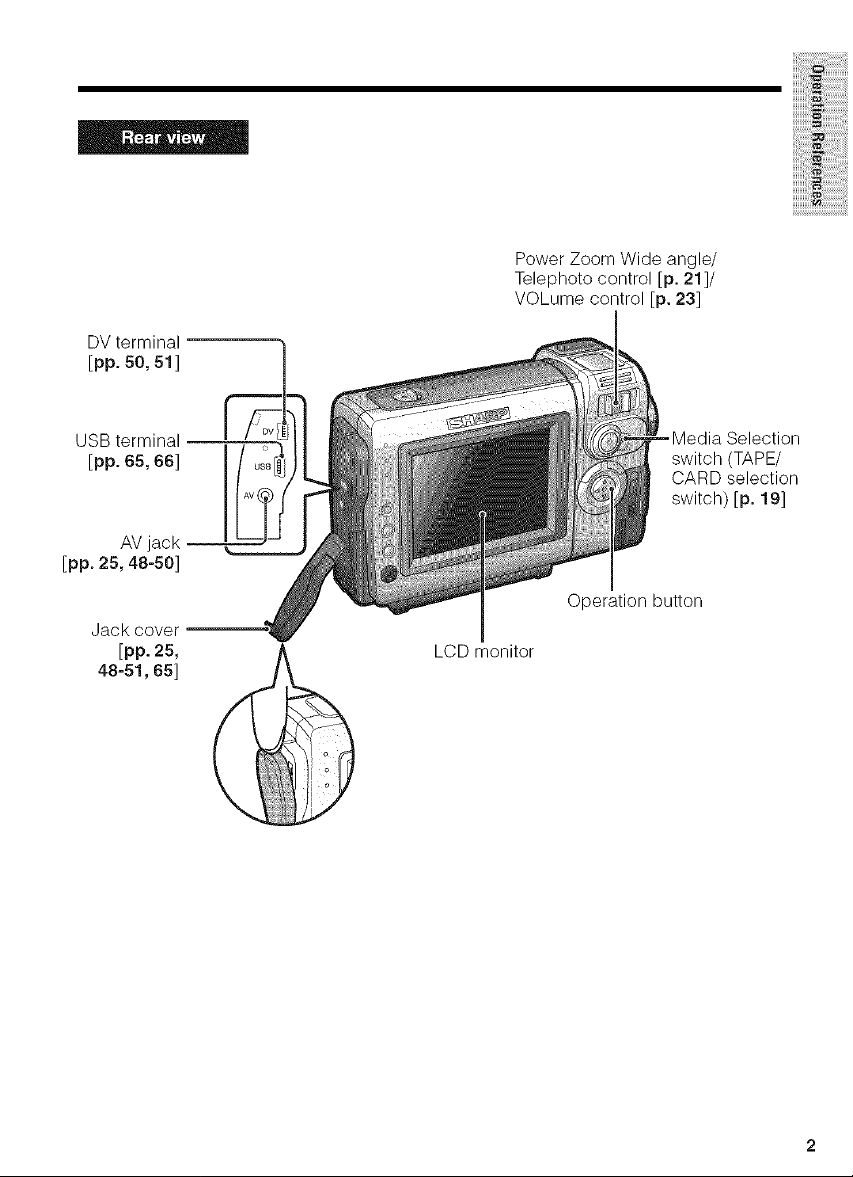
DVterminal
[pp.50,51]
iiiili_iiiii:ii!_iiiiiiiiiiiiiiil
iiii_!i;!ili!_iiiiiiii_
PowerZoomWideangle/
Telephotocontrol[p.21]/
VOLumecontrol[p.23]
-Media Selection
switch (TAPE/
CARD selection
switch) [p. 19]
Operation button
LCD monitor
Page 18
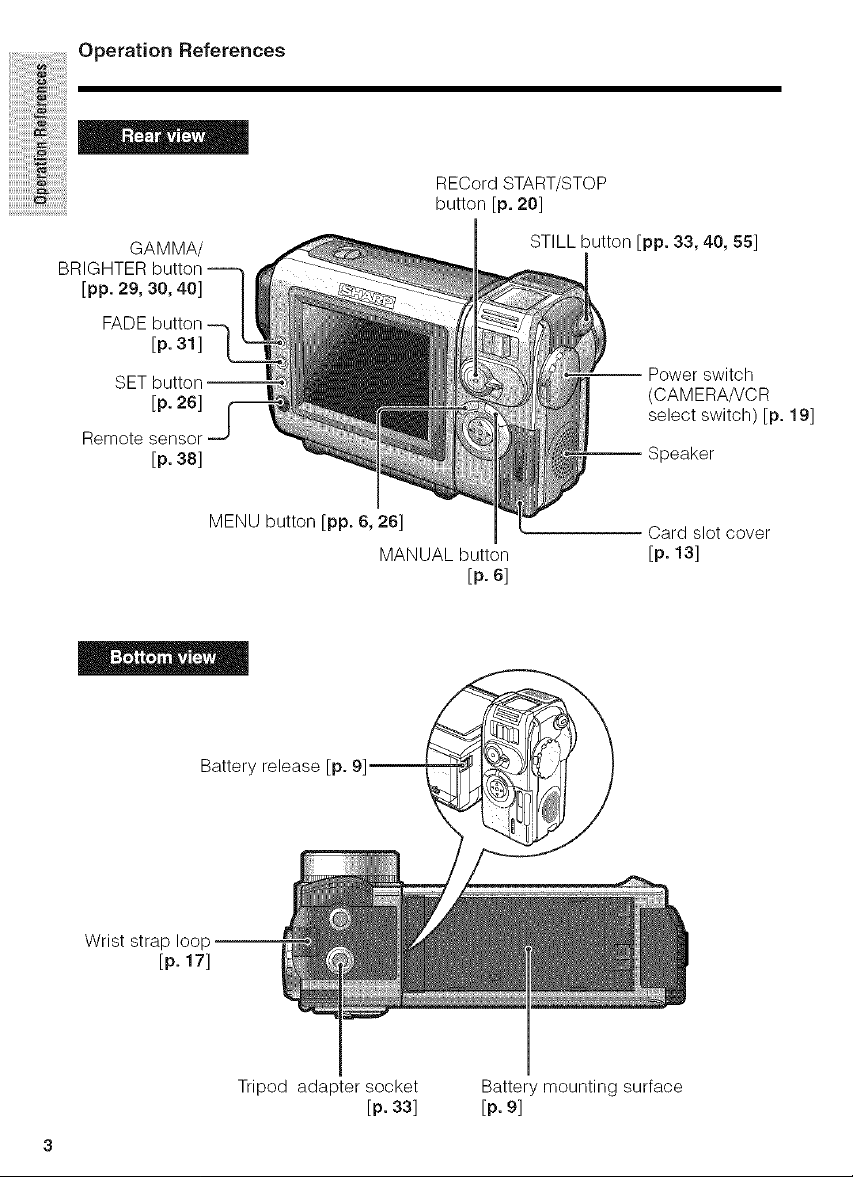
i iiiii
OperationReferences
RECord START/STOP
button [p. 20]
BRIGHTER button
GAMMA/
[pp. 29, 30, 40]
FADE button
[p. 31]
SET
[p. 26]
Remote sensor
[p. 38]
STILL button [pp. 33, 40, 55]
(CAMERA/VCR
select switch) [p. 19]
Speaker
MENU button [lop. 6, 26] , Card slot cover
MANUAL button [p. 13]
[p. 6]
Battery release [p. 9]
Wrist strap loop
[p. 17]
Tripod adapter socket
[p. 33]
Battery mounting surface
[p. 9]
Page 19
iiiili_iiiii:ii!_iiiiiiiiiiiiiiiiiii!iii!ij
NNNiii,X_i_iii!i!i!i!i!i!i!i!iiiiii
iiiiiiiiiii!_iiiilililililililiiiiii_ii
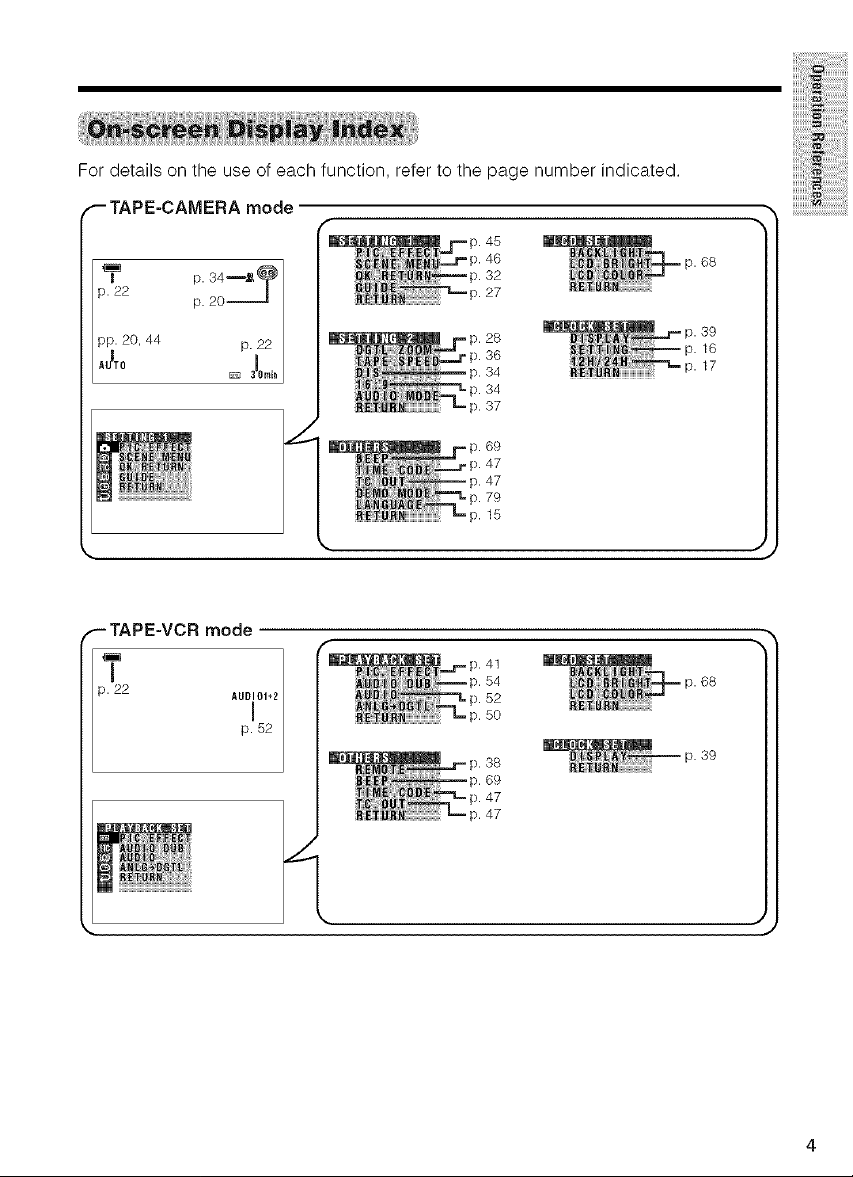
Fordetailsontheuseofeachfunction,refertothepagenumberindicated.
•_ TAPE-CAM ERA mode
_.46
_.32
_.27
_.36
_.34
_.34
p. 37
_.47
_.47
_.79
p. 15
-.- TAPE-VCR mode
_.41
p._22 AUDIO1*2
I
p. 52
_.54
_.52
). 50
). 38
). 69
_.47
p. 47
iiii_!i'i!i,l,i!_iiiiiiii!!_i!_i!_i!_?
68
39
16
17
68
39
)
J
Page 20
i iiiii
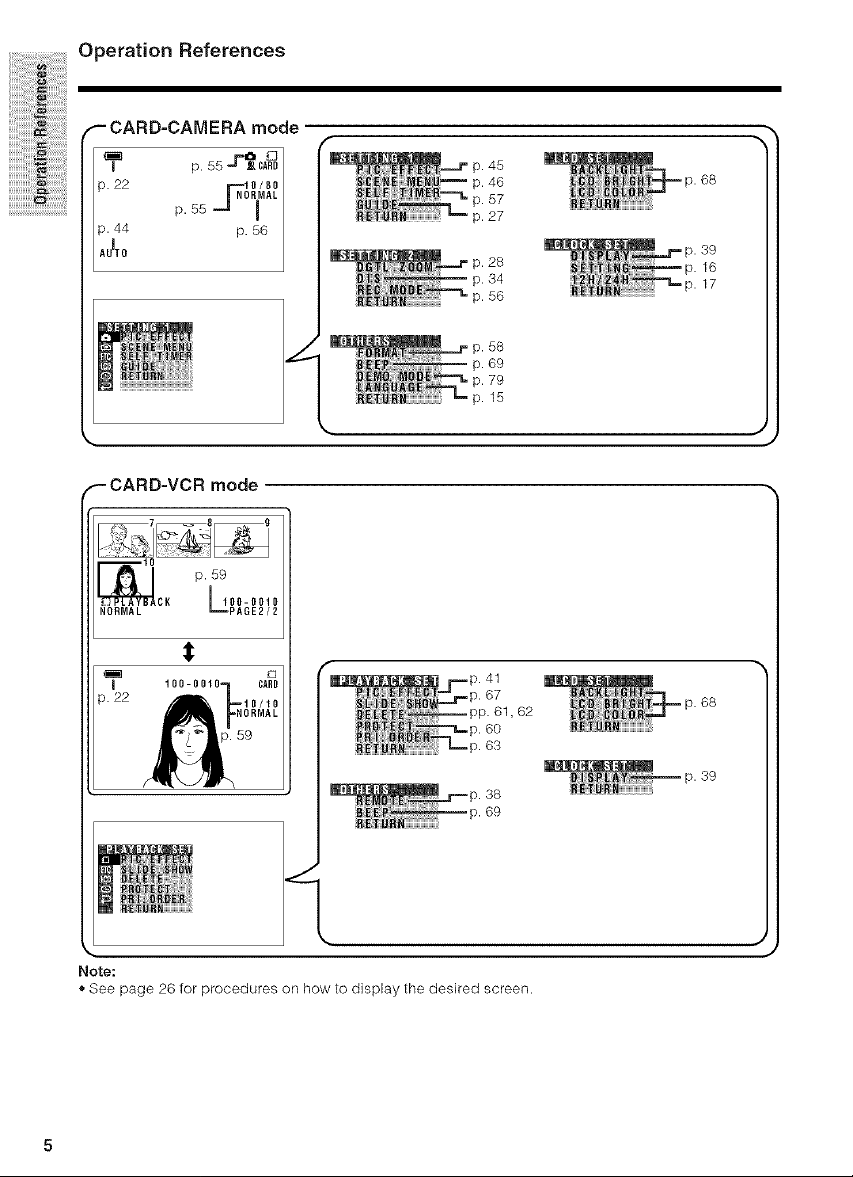
Operation References
_- CARD=CAMERA mode
p. 22 111 / 80
p. 44 6
p. 55 J'_CARD ]
p. 55 P.
[AJTO
,-- CARD-VCR mode
p. 59
CKNoRNALL 00-0010
PAGE2/2
t
J I00-0010_
p. 22
RMAL
!
.p. 67
). 60
). 63
). 38
). 69
45
46
57
27
28
34
56
58
69
79
15
61,62
68
39
16
17
J
68
39
Note:
, See page 26 for procedures or] how to display the desired screen.
Page 21
iiiili_iilii:ii!_iiiiiiiiiiiiiiil
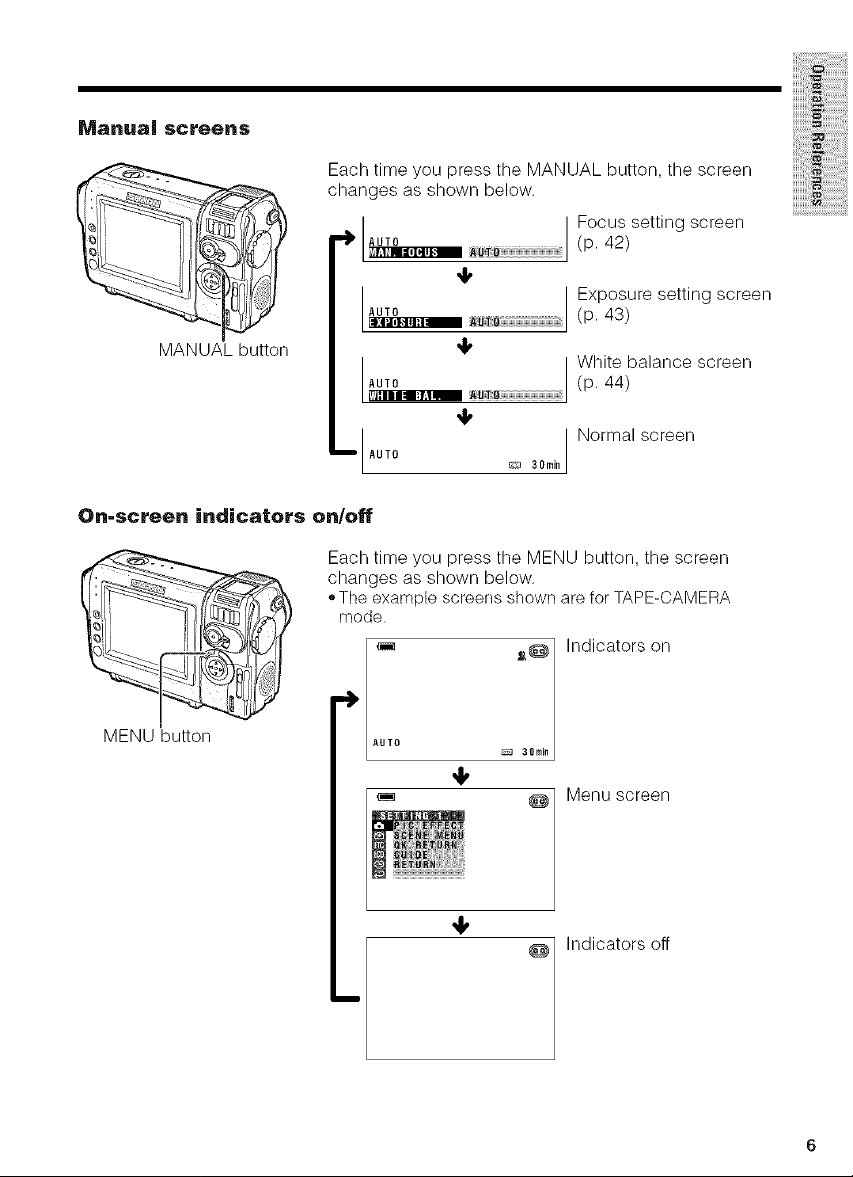
_anua| scveens
Each time you press the MANUAL button, the screen
changes as shown below.
-t_ AUTO_ (p.FOcus42)setting screen
MANUAL button
On-screen indicators on/off
Eachtime you pressthe MENU button, the screen
changes as shown below.
*The example screens shown areforTAPE-CAMERA
mode.
4,
(p. 43)
Exposure setting screen
4,
AUTO_ White(p.44)balance screen
screen
AUTO _ 30rain Normal
Indicators on
i!i i!i i!!ii!ii!ii!ii!ii!i!ii ii! iii!;iii!:i!;!ii i
MENU button
AUTO
Menu screen
4,
@ Indicators off
Page 22
Operation References
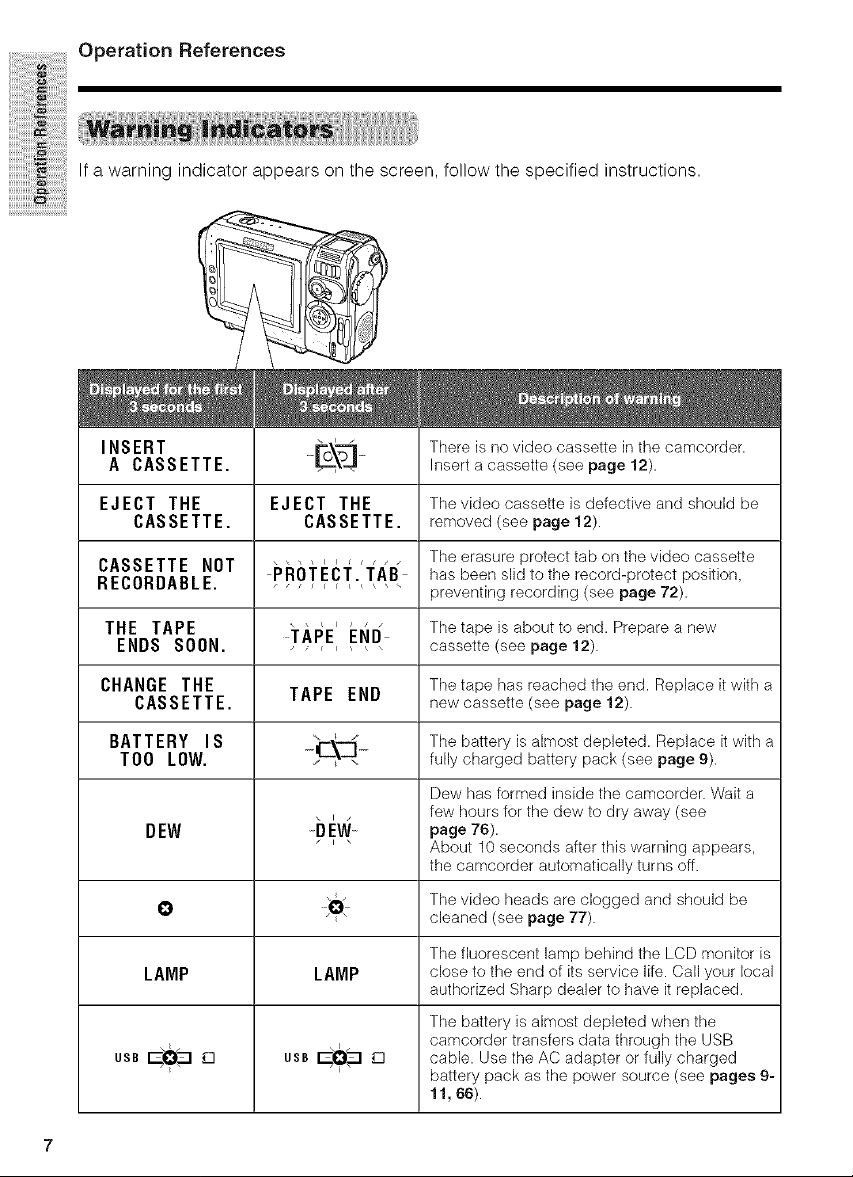
If a warning indicator appears on the screen, follow the specified instructions.
I NSERT ..r_\_,-_ There is no video cassette in the camcorder.
A CASSETTE. !,_-V-\_! Insert a cassette (see page 12).
EJ ECT THE EJECT THE The video cassette is defective and should be
CASSETTE. CASSETTE. removed (see page 12).
CASSETTE NOT ........ ' .... The erasure protect tab on the video cassette
RECOROABLE ........... , preventing recording (see page 72).
THE TAPE TAI_E ' I:NI) Thetapeisabouttoend. Preparea new
ENOS SOON ........ cassette (see page 12).
CHANGE THE The tape has reached the end. Replace it with a
PROTECT. TAB has been slid to the record-protect position,
CASSETTE. TAPE END newcassette(seepage12).
BAT T ERY I S "" ' " The battery is almost depleted. Replace it with a
TOO LOW. _,\q -
fully charged battery pack (see page 9).
Dew has formed inside the camcorder. Wait a
few hours for the dew to dry away (see
DEW b FW page76).
" ' " About 10 seconds after this warning appears,
, , The video heads are dogged and should be
0 "Q cleaned (see page 77).
LAMP LAMP close to the end of its service life. Call your local
, _, _,, oamoorder transfers data through the USB
USB [_0_ _-I USB I_,O_ D cable. Use the AC adapter or fullyoharged
the camcorder automatically turns off.
The fluorescent lamp behind the LCD monitor is
authorized Sharp dealer to have it replaced.
The battery is aJmost depleted when the
battery pack as the power source (see pages 9-
11, 66).
Page 23
NNNiii,X_i_iii!i!i!i!i!i!i!i!iiiiii
iiiiiiiiiii!_iiiiiiiiiiiiii_!i
iiiiiiiiiii_iiiiiiiiiiiiiiii!
iiii_!i'ii,l,i!_iiiiiiii!!_i!_i!_i!_]_
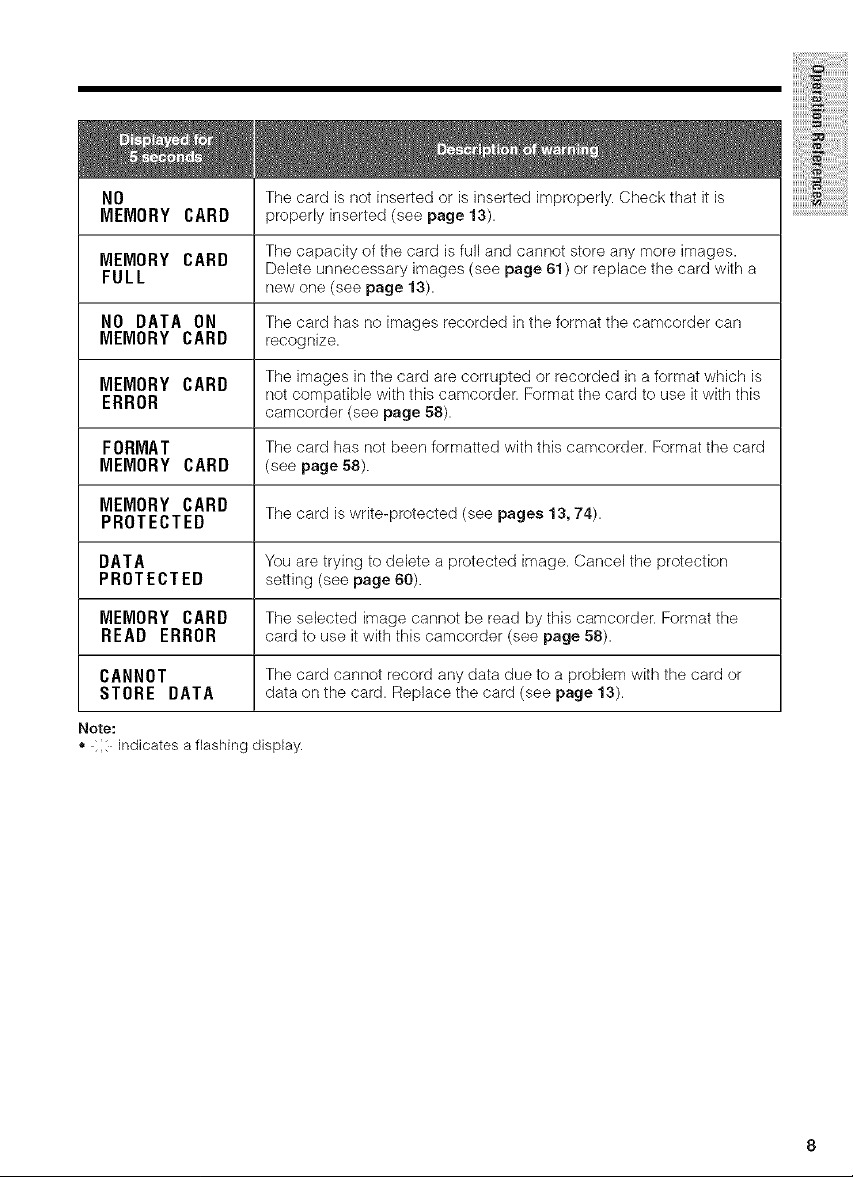
NO
MEMORYCARD
MEMORY CARD The capacity of the card is full and cannot store any more images.
FUL L Delete unnecessary images (see page 61) or replace the card with a
NO DATA ON The card has no images recorded in the format the camcorder can
MEMORY CARD recognize.
The card is not inserted or is inserted improperly. Check that it is
properly inserted (see page 13).
new one (see page 13).
MEMORYCARD The images in the card are corrupted or recorded in a format which is
ERROR not compatible with this camcorder. Format the card to use it with this
FORMAT The card has not been formatted with this camcorder. Format the card
MEMORY CARD (see page 58).
MEMORY CARD The card is wrke-protected (see pages 13, 74).
PROTECTED
DATA You are trying to delete a protected image. Cancel tile protection
PROTECTED setting (see page 60).
MEMORY CARD The selected image cannot be read by this camcorder. Format the
READ ERROR card to use it with this camcorder (see page 58).
CANNOT The card cannot record any data due to a problem with the card or
STORE DATA data on the card. Replace the card (see page 13).
Note:
o : indicates a flashing display.
camcorder (see page 58).
Page 24
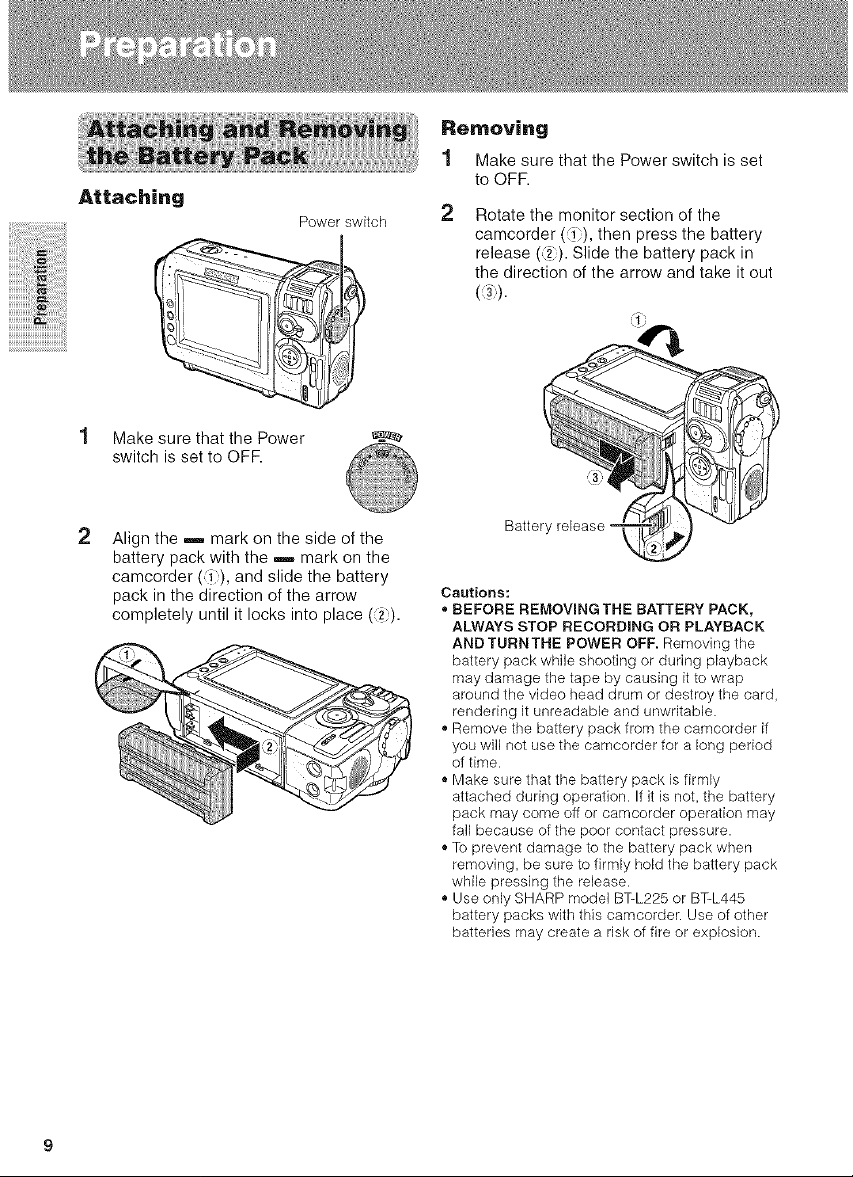
Attaching
iiii!!!iiii_iiiiii_iiiiiiiiiiiiii
iii!!_i_iiiiiiiiiiiiii
iiiiiiiiiiiiiiii_iiiiiiii!iiii
Power switch
i
Make sure that the Power
switch is set to OFR
Align the m mark on the side of the
battery pack with the ,=,,, mark on the
camcorder (_), and slide the battery
pack in the direction of the arrow
completely until it locks into place (2}).
Removing
1 Make sure that the Power switch is set
to OFR
2 Rotate the monitor section of the
camcorder (_), then press the battery
release (_). Slide the battery pack in
the direction of the arrow and take it out
(3).
Cautions:
,, BEFORE REMOVING THE BATTERY PACK,
ALWAYS STOP RECORDING OR PLAYBACK
AND TURNTHE POWER OFF. Removing the
battery pack while shooting or during playback
may damage the tape by causing it to wrap
around the video head drum or destroy the card.
rendering it unreadable and unwritable.
,, Remove the battery pack from the camcorder if
you will not use the camcorder for a long period
of time.
,, Make sure that the battery pack is firmly
attached during operation. If it is not, the battery
pack may come off or camcorder operation may
fall because of the poor contact pressure.
,, To prevent damage to the battery pack when
removing, be sure to firmly hold the battery pack
while pressing the release.
,, Use only SHARP model BT-L225 or BT-L445
battery packs with this camcorder. Use of other
batteries may create a risk of fire or explosion.
Page 25
1 Attachthebatterypackonthe
camcorder,andmakesurethatthe
PowerswitchissettoOFR
2 PlugtheACadapterintoapoweroutlet
(_),theninserttheDCplugintotheDC
inputjack(21).
,,Thechargeindicatorlightsup.
DCinputjack
T°p°wer;utleAl_t Charge ,r_ie!tor_ _L_ /_otII_
- The charge indicator turns off when the
battery is charged.
3 Remove the DC plug from the DC input
jack, then remove the AC adapter from
the power outlet.
Charging time and maximum continu-
ous recording and playback times in
TAPE modes
Notes:
" Charge the battery pack between 50°F and
86°F (10°C and 30°C). The battery pack may
not charge properly at temperatures too low
or too high.
,, The battery pack and charger become warm
during charging. This is not a malfunction.
, Using the zoom (see page 21) and other
functions or turning the power on and off
frequently will increase power consumption.
This may result in a decrease in the actual
recording time compared to the maximum
continuous recording time listed above.
, The charging time and recording time may
vary depending on the ambient temperature
and the condition of the battery pack.
" See page 75 for more information on using the
battery pack.
Caution:
,, Charge only SHARP model BT-L225 or BT=L445
battery packs. Other types of battery packs may
burst, causing personal injury and damage.
Extending battery pack life
Even when the battery pack is not used, the
capacity of the battery pack will naturally
deteriorate over time. To limit the deterioration
of the capacity, it is recommended to perform
the following procedure at least once every six
months:
Fully charge the battery pack.
2 Attach the battery pack to the camcorder,
and set the Power switch to CAMERA
without inserting a cassette. Allow the
battery power to fully discharge by leaving
it on the camcorder until the camcorder
power automatically turns off.
s Remove the battery pack and store it
between 50°F and 68°F (10°C and 20°C).
BT-L225 approx, approx, approx.
BT-L445 3hr.30min. 3hr. 3hr.
2hr. lhK30min. lhK30min.
approx, approx, approx.
10
Page 26
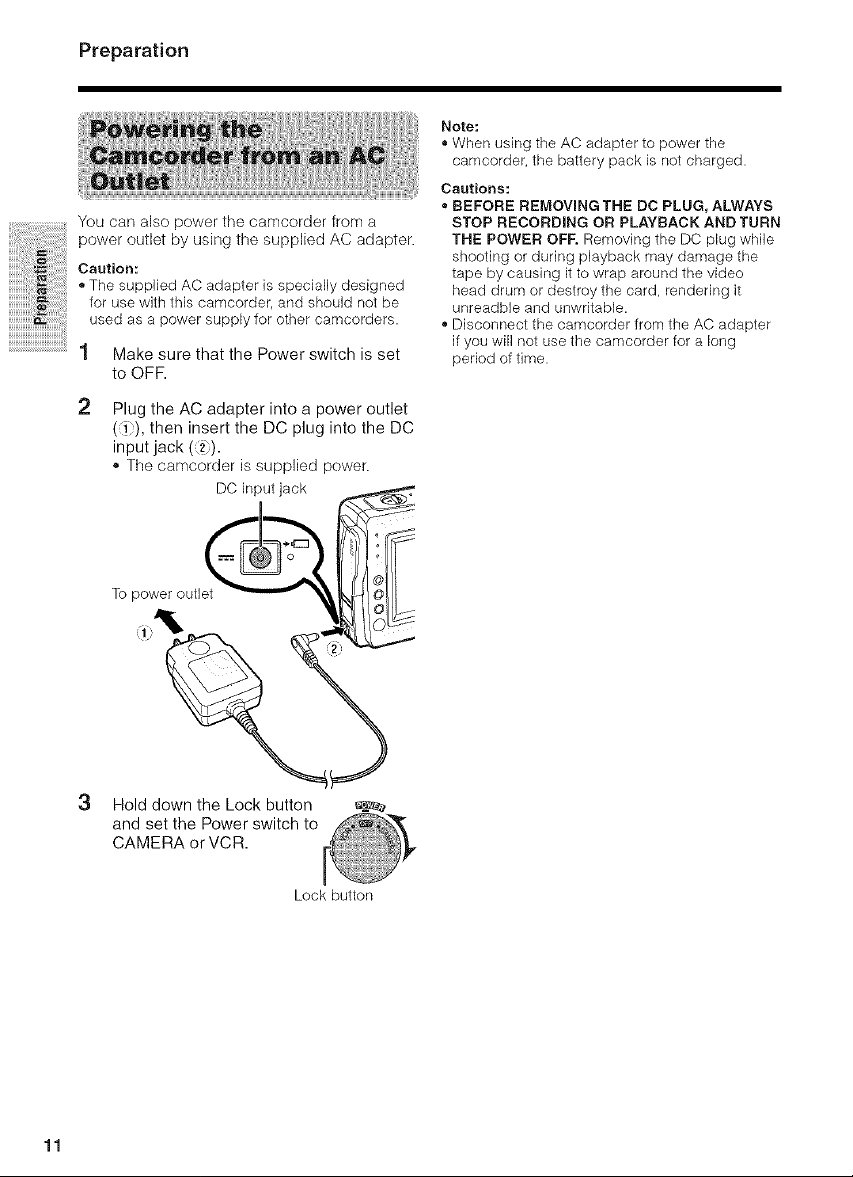
Preparation
You can also power the camcorder from a
power outlet by using the supplied AC adapter.
Caution:
,' The supplied AC adapter is specially designed
for use with this camcorder, and should not be
used as a power supply for other camcorders.
.................................................................1 Make sure that the Power switch is set
to OFR
Plug the AC adapter into a power outlet
(_), then insert the DC plug into the DC
input jack (21).
- The camcorder is supplied power.
DC inputjlck
Note:
o When using the AC adapter to power the
camcorder, the battery pack is not charged.
Cautions:
o BEFORE REMOVING THE DC PLUG, ALWAYS
STOP RECORDING OR PLAYBACK AND TURN
THE POWER OFF. Removing the DC plug while
shooting or during playback may damage the
tape by causing it to wrap around the video
head drum or destroy the card, rendering it
unreadble and unwritable.
o Disconnect the camcorder from the AC adapter
if you will not use the camcorder for a long
period of time.
11
Hold down the Lock button
and set the Power switch to
CAMERA or VCR.
Lock button
Page 27
inserting
Attach the power source to the
camcorder, then slide the cassette
compartment door release and open the
cassette compartment door.
,, After confirmation sound, the cassette
holder extends and opens automatically.
Cassette compartment
Insert a commercially available cassette
fully with the window facing outwards,
and with the erasure protect tab facing
upwards.
Press the _ mark gently until the
cassette holder clicks into place.
,, After confirmation sound, the cassette
holder retracts automatically.
door release
Erasure protect tab
"81mliZil" mark
4
Wait for the cassette holder to fully
retract. Close the compartment door by
pressing the center until it clicks into
place.
Removing
Perform step 1 above, then take out the
cassette.
Cautions:
,, Do not try to close the cassette compartment
door while the cassette holder is extending or
retracting.
,, Be careful not to get your fingers caught in the
cassette holder.
,, Do not apply force to the cassette holder except
when pressing the _ mark to close it.
,, Do not tilt the camcorder or hold it upside down
when you are inserting or removing a cassette. It
may damage the tape.
,, Remove the cassette if you will not use the
camcorder for a long period of time.
,, If you do not correctly close the cassette holder
in step 3, the cassette protection mechanism of
the camcorder might eject the cassette. If this
happens, repeat the insertion procedure.
,, Do not attempt to pick up the camcorder by the
cassette compartment door.
Notes:
" If the battery power is too low, you may not be
able to eject the cassette. Replace the battery
pack with a fully charged one.
,, See page 72 for more information on the video
cassette tapes intended for use with this
camcorder.
iiiiiil,ii i i iiiiiiiiiiiiiiiiiiiiiiiiiiiiiiii iiiiiiiiiii i i iiiii!!!!!
iiiiiiiiiiii_!ii!ii!ii!ii!ii!iill
12
Page 28

Preparation
You can use an SD Memory Card or a
MultiMediaCard for storing still images.
Remeving
Perform steps 1 and 2 above, push the card
('r) and pull the card straight out (_) as shown
below.
iiii!!!i!iii_iiiiii_iiiiiiiiiiiiiii
iiiiiiiiiiiiiiii_i;%iii
inserting
ii!!!_i_iiiiiiiiiiii!iii
1 Make sure that the Power switch is set
to OFR
Slide the card slot cover release and
open the card slot cover in the direction
of the arrow.
Insert a card into the slot as shown
below, and push it in as far as it will go.
Close the card slot cover.
Card slot cover release
Clipped corner
Notes:
" You can use only the SD Memory Card or the
MultiMediaCard (see page 71).
,, The supplied card is preformatted for immediate
use.
,, See pages 73 and 74 for more information on the
cards intended for use with this camcorder.
Caution:
,, Do not remove the card from the camcorder
while recording data on the card (D indicator
flashes during recording). This may delete the
recorded image or damage the card.
Abeut the wFite.pl'etect switch
SD Memory Card has a write-protect switch.
When the switch is set to the locked position.
you cannot record/delete data or format the
card. Set it to the unlocked position to record/
delete data or format the card.
Back view
Unlocked position
Locked position
13
Page 29
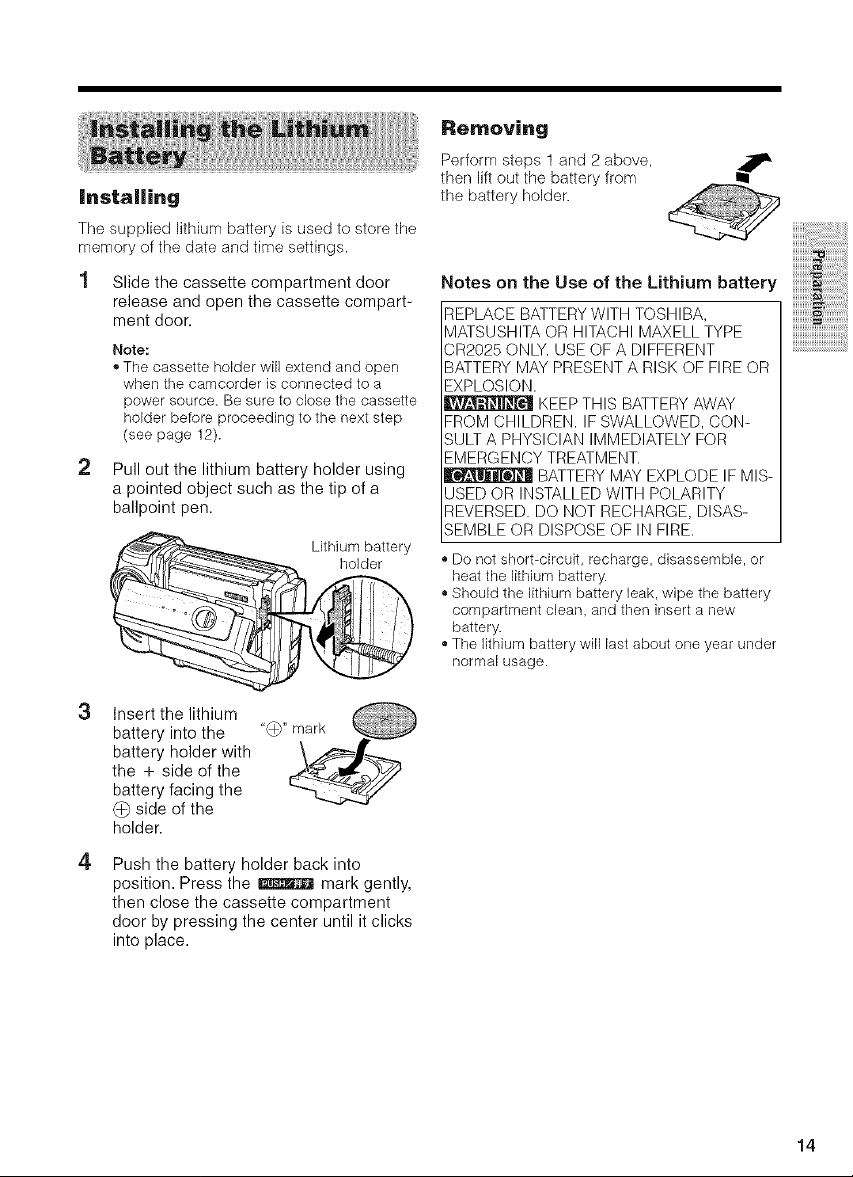
|nsta|iing
The supplied lithium battery is used to store the
memory of the date and time settings.
1 Slide the cassette compartment door
release and open the cassette compart-
ment door.
Note:
o The cassette holder will extend and open
when the camcorder is connected to a
power source. Be sure to close the cassette
holder before proceeding to the next step
(see page 12).
Pull out the lithium battery holder using
a pointed object such as the tip of a
ballpoint pen.
Lithium battery
Removing
Perform steps 1 and 2 above,
then lift out the battery from
i"
the battery holder.
Notes on the Use of the Lithium battery
REPLACE BATTERY WITH TOSHIBA,
MATSUSHITA OR HITACHI MAXELL TYPE
CR2025 ONLY. USE OF A DIFFERENT
BATTERY MAY PRESENT A RISK OF FIRE OR
EXPLOSION.
FROM CHILDREN. IF SWALLOWED, CON-
SULT A PHYSICIAN IMMEDIATELY FOR
EMERGENCY TREATMENT.
I!_ BATTERY MAY EXPLODE IF MIS-
USED OR INSTALLED WITH POLARITY
REVERSED. DO NOT RECHARGE, DISAS-
SEMBLE OR DISPOSE OF IN FIRE.
o Do not short-circuit, recharge, disassemble, or
heat the lithium battery.
o Should the lithium battery leak, wipe the battery
compartment clean, and then insert a new
battery.
o The lithium battery will last about one year under
normal usage.
KEEP THIS BATTERY AWAY
Insert the lithium
battery into the "_" mark
battery holder with
the + side of the
battery facing the
(_) side of the
holder.
Push the battery holder back into
position. Press the _ mark gently,
then close the cassette compartment
door by pressing the center until it clicks
into place.
14
Page 30
Preparation
Available modes:
This camcorder allows you to choose English,
French or Spanish as the on-screen display
iiiiiiiiiiiiiiii_iiiiiiiiiiii
language.
SET button _
Setting
When using the camcorder for the first time,
select your on-screen display language by
following the steps below.
1 Hold down the Lock button and set the
2 Press _/ or A on the operation button
TAPE-CAMERA, CARD-CAMERA
Power switch
MENU button
Operation button
Power switch to CAMERA.
• The language selection screen appears.
to select the desired language, then
press the SET button.
Changing
1 In TAPE-CAMERA or CARD-CAMERA
mode, press the MENU button until the
menu screen appears.
2
Press _yor z1_,on the operation button
to select ETC,then press the SET button.
3
Press ',/ or A to select "LANGUAGE"
("LANGUE" or "IDIOMA"), then press the
SET button.
- The language selection screen appears.
4
Press _/ or _ to select the desired
language, then press the SET button.
,, The menu screen displays in the
language selected.
@
15
AUTO
5 Press the MENU button to turn off the
menu screen.
Note:
" The operation procedures in the following
sections are based on using the English on-
screen displays.
Page 31

Available modes:
TAPE=CAMERA, CARD=CAMERA
Example: Setting the date to June 2. 2003
(JUN. 2. 2003) and the time to 10:30 am
(10:30 AM).
Power switch
MENU button
Operation button
Note:
o Before performing the steps below, make sure
that the lithium battery has been instaNed (see
page 14).
1 Hold down the Lock button
and set the Power switch to
CAMERA.
4 Press _/ or zi_to select "JUN" (month),
then press the SET button.
5
Press _/ or A to select "2" (day), then
press the SET button.
6
Press _/ or A to select"2003" (year),
then press the SET button.
7
Press _/ or ,,Ato select "10 AM" (hour),
then press the SET button.
8
Press V or z1_to select"30" (minute),
then press the SET button.
• The internal clock now starts operating.
Lock button
2 Press the MENU button until the menu
screen appears.
3 Press the SET button.
SET
9 Press the MENU button to turn off the
menu screen.
Note:
o If tile date and time have been set, the SETTING
1 screen (6) appears in step 2. Select
"SETTING" in the CLOCK SET screen (C_)) using
the Operation button and SET button.
16
Page 32

Preparation
Changing to the 24-hour Time
Mode
1 After performing step 8 above, press _/
or A to select "12H/24H', then press the
SET button.
2 Press _7or A to select"24H", then
press the SET button.
3 Press the MENU button to turn off the
menu screen.
Notes:
o The date and time, once set, are internally
recorded even when not displayed on the
screen.
o The menu screen automatically turns off if no
settings are made within five minutes.
Attach the wrist strap to the wrist strap loop as
shown below.
Lp loop
Caution:
o Do not swing the camcorder by the strap.
Attach the strap to the lens cap as shown
below.
(_:
When recording outdoors on a sunny day or in
a location with bright lighting, attach the
supplied lens hood to the camcorder. Turn the
lens hood in the direction of the arrow to attach
it.
To remove it, turn it in the opposite direction.
Notes:
o The lens cap can still be attached on top of the
lens hood.
o Filters and other accessories cannot be attached
on the top of the lens hood.
17
Attach the strap of the lens cap to the wrist
strap as shown below.
Page 33

Always attach the lens cap over the lens when
not using the camcorder.
<
When recording, hang the lens cap on the wrist
strap to keep the cap out of the way.
To create images that are easy to watch during
playback, try to record with an upright posture
and steady hand to prevent a shaky image.
Ho|ding the camcorder
Place your right thumb close to the REC
START/STOP button and Power Zoom control.
Place your left thumb on the thumb rest on the
left side of the screen.
Basic posture
Take care not to _=_!_
cover the lens or t_J
microphone with _ Place your elbows
your finger. _. against your sides
I II I Balanceyour
_,__ weight on both
_ legs.
Shooting from a high angle
Turn the LCD monitor so that the ._
screen faces downward. 1"-_
Shooting from a low angle
the screen faces upward.
Turn the LCD monitor so that
18
Page 34

This camcorder includes functions for use as both a video
camera for recording and playing back images on tapes and as
a digkal still camera for recording and playing back still images
on cards. One of the following camcorder modes needs to be
set before starting any operation.
Camcorder modes
Power switch
Media Selection switch
TAPE-CAMERA mode
For recording motion and still images on a
tape.
"1 Set the Media Selection
switch to TAPE.
Hold down the Lock button
and set the Power switch
to CAMERA.
Lock button
CARD-CAMERA mode
For recording still images on a
card.
Set the Media Selection
switch to CARD.
Hold down the Lock button
and set the Power switch
to CAMERA.
Lock button
TAPE-VCR mode
For playing back or editing motion and still
images recorded on a tape.
"1 Set the Media Selection
switch to TAPE.
2 Hold down the Lock
button and set the Power
switch to VCR.
Lock button
CARD=VCR mode
For playing back still images recorded on a
card.
Set the Media Selection
switch to CARD.
2 Hold down the Lock
button and set the Power
switch to VCR.
Lock buEon
Note:
o To turn the power off, set the Power switch to OFF without pressing the Lock button.
Caution:
" Do not change the carncorder mode by operating the Media Selection switch during recording or
playback, as this may cause damage to the tape or card.
19
Page 35

Available mode:
TAPE=CAMERA
- Before you start recording, perform the
operations described on pages 9 through 18
to prepare your camcorder for recording.
REC START/STOP button
Media Selection switch
1
Remove the lens cap.
2
Set the Media Selection
switch to TAPE.
Hold down the Lock button and set the
Power switch to CAMERA.
- The picture from the lens now displays.
- The camcorder is now ready to record
(Recording Standby mode).
To pause recording
Press the REC START/STOP button again.
Recording pauses, and the camcorder enters
Recording Standby mode.
@
PAUSE
,1,
@
To turn the power off
Set the Powerswitch to OFFwithout pressing
the Lock button.
Notes:
o Battery power is consumed in Recording
Standby mode. Turn off the power ifyou will not
be recording again soon.
o If the camcorder remains in Recording Standby
mode for more than 5 minutes in TAPE-CAMERA
mode, the power will automatically turn off to
save battery power and to protect the tape from
being damaged. To resume recording, set the
Power switch to OFF and then back to CAMERA.
(The camcorder will make a confirmation sound
when it is left in Recording Standby mode for
about 4 minutes.)
Maximum continuous recording and
actual recording times in TAPE-CAM-
ERA mode
Lock button
Note:
o If "AUTO" is not displayed at this time, set
the camcorder to Full Auto mode (see page
44).
Press the REC START/STOP button to
begin recording.
REC
,k
!
BT=L225 1hr. gOmin. 50rain.
BT=L445 3hr. 1hr. 40min.
Note:
e Using the zoom (see page 21) and other
functions or turning the power on and off
frequently will increase power consumption.
This may result in a decrease in the actual
recording time compared to the maximum
continuous recording time listed above.
approx, approx.
approx, approx.
2O
Page 36

Basic Operations
Camera Recording
Available modes:
TAPE-CAMERA, CARD-CAMERA
Zooming allows you to move visually closer to
or farther from a subject without physically
changing your position.
When using the optical zoom, you can enlarge
the subject up to 10x.
'T_oorni}_gi n (when you want te cen!eJr\_
attention on the subFect) /J
Wide
angle
Zooming out (when you want tO
includes the surroundings)
Zooming in
Push the Power Zoom control to the T (tele-
photo) side to get a close-up view ('1).
Zooming out
Push the Power Zoom control to the W (wide
angle) side to get a wide field of view (2).
®
Power Zoom control -- __.
Zoom range indicator _'<_ _---_II_-_'__t
Available modes:
TAPE-CAMERA, CARD-CAMERA
The camcorder is preset to Auto Focus mode,
which is designed to focus on most types of
subjects. In Auto Focus mode, the camcorder
automatically focuses on the subject in the
center of the scene. Always keep the subject in
the center of the scene.
Notes:
, If no subject is in the center of the scene, the
focus area wifl expand and the subject nearest
the center wifl be focused on.
,, If no subject is displayed, the camcorder will
automatically zoom out until a subject comes
into the frame.
,, Auto Focus may not work in the situations
described on page 42. In these situations, use
the manual focus function.
Available modes:
TAPE-CAMERA, CARD-CAMERA
This camcorder lets you shoot close-up images
of small objects such as flowers and insects, or
make title frames for your videos. When you
want to record a magnified image of a subject
which is within approximately 5 feet (1.5 m) of
the camcorder, do not zoom in on it. Instead,
zoom out all the way by pushing the Power
Zoom control to the W side, and then move the
camcorder closer to the subject until you obtain
the desired angle of view. The camcorder will
automatically focus on the subject when the
lens is set for the widest angle.
, The zoom range indicator shows you the current
zoom setting.
, The zoom speed depends on how far you push
the Power Zoom control.
Notes:
, The camcorder is unable to focus when zooming
in on subjects within 5 feet (1.5 m). The
camcorder will automatically zoom out until it is
able to focus on the subject.
,, See page 28 for how to use the digital zoom.
21
P°ntr_rl z°°m
Note:
, When you are recording a macro shot, be sure
that the subject receives sufficient iflumination.
Page 37

Availablemode:
TAPE=CAMERA
Available modes:
All modes
When the camcorder is recording in TAPE-
CAMERA mode, an on-screen indicator
displays the approximate remaining tape time
in minutes.
ording
Notes:
, The remaining recording time indicator
appears when the on-screen indicators turns
on,
, The remaining recording time indicator
appears 10 seconds after pressing the REC
START/STOP button to begin recording.
, The remaining recording time indicator only
shows the approximate time left. Also, it varies
slightly depending on the length of tape used.
(This function is based on the DVM60 tape
standard.)
When the remaining recording time reaches 1
minute, a warning indicator will appear.
Prepare a new cassette.
THE TAPE
ENDS SOON.
$ Lessthanl min.
TAPE END
When using the camcorder with the battery
pack as the power source, the remaining
battery power indicator is displayed. If the
battery power becomes very low, a warning
indicator appears. Replace the battery pack.
Remaining battery
power indicator
I_(Red)
BATTERY IS
TOO LOW.
Notes:
, The remaining battery power indicator
appears when the on-screen indicators turns
on,
, Use the remaining battery power indicator only
as an approximate indication.
, The remaining battery power indicator may
change to either a higher or lower level if you set
the Power switch to OFF and then back to
CAMERA or VCR.
, In cold environments, the red remaining battery
power indicator may appear sooner.
, Use of the zoom functions when the warning
indicator is displayed may cause the camcorder
to suddenly lose power.
Warning indicator
iiiiiiiiiii! iil;i!iiiililiiiii !i{{ ili
iiiiiiiiiiii_iiiiiiiiiiiiiiiii!
iiiiiiiiii_i{{{{{{{{{i{{{_,!
iiiiiiii#iii!ii!ii!ii!ii!ii!ii!ii!ii!ii!ii!i !i!i
CHANGE THE
CASSETTE. Thetapehasreached
theend.
TAPE END
22
Page 38

Available mode:
TAPE=VCR
The LCD monitor screen functions as a handy
playback monitor. Nothing needs to be
connected, allowing instant on-screen play-
back with the sound through the builtqn
speaker.
Media Selection switch
ii};iiiiilililililililililililili@ii!i}iiiiiiii
iiiiiiiiii_iiiiiii!!_!ilililililiiiiiiii!!!
iiiiiiiiiiiiii!_l}}}}}}}}_i_!i_i
1 Set the Media Selection
switch to TAPE.
Operation button
To stop playback
Press v'.
To turn the power off
Set tile Power switch to OFF without pressing
the Lock button.
Note:
,, The tape is automatically rewound when
playback reaches the end of the tape.
Available mode:
TAPE=VCR
When the camcorder is in TAPE-VCR mode,
push the Volume control to the + or side to
increase (i) or decrease (_) the volume.
2 Hold down the Lock button
and set the Power switch to
VCR.
Lock button
3 Press < (or >) on the Operation button
to rewind (or fast forward) the tape to the
desired point.
4 Press A to begin playback.
Note:
o Ifyou press the REC START/STOP button in
TAPE-VCR mode, the "_" mark appears and
the camcorder enters Recording Standby mode.
Ifyou do not intend to record, press ,/ to turn
the "@" mark off, then press /., to begin
playback. This will ensure your previous
recording is not erased (see pages 49, 51).
23
The volume level indicator will appear orsthe
LCD screen during adjustment only. Once the
Volume control is released, the volume level
indicator will disappear shortly afterwards.
Volume control
IIHIIBBBD VOLUME
Decrease _ Increase
[
Speaker
Page 39

Available mode:
TAPE=VCR
Available mode:
TAPE=VCR
The video search function makes it easy to
search for a desired scene on the tape.
Searching for a Scene Near
the Current Tape Position
1 During playback in TAPE-VCR mode,
press > (or <) on the Operation button.
• The playback picture fast forwards (or
reverses).
2 When you find the scene, press /,, to
return to normal playback.
Searching for a Scene Far from
the Current Tape Position
1 During fast forward (or rewind) in TAPE-
VCR mode, press and hold > (or <) on
the Operation button.
,, The fast forward (or rewind) picture
displays.
If the scene is still rather far from the
current tape position, release the
Operation button to normal fast forward
(or rewind).
3 Repeat steps 1 and 2 above until you
find the scene.
The still function allows you to pause playback
in TAPE-VCR mode.
During playback in TAPE-VCR mode, press A
on the Operation button.
@ ,,
To return to normal playback, press A again.
Notes:
o The sound is off in Still mode.
o To protect the tape, the camcorder automatically
returns to normal playback if it is left in Still mode
for more than 5 minutes.
4 Press /,, to begin normal playback.
Notes:
o The sound is off during search.
o You may experience picture noise during search.
This is not a malfunction.
24
Page 40

Basic Operations
Playback
Available modes:
TAPE-VCR, CARD-VCR
You can connect the camcorder to a TV to
allow a larger audience to enjoy playback.
Open the jack cover on the camcorder
(see page 2).
iil;ilililililililililililililiiiiiiiiiiiiiii!iiiili!!iiiiiiiii
iiiiiiiiii_iiiiiii!!_!ililililiiiiiiiiii!!!
iiiiiiiiiiiiii!_i:i:i:i:i:i:i:i:_i_!i_i
2 Connect the camcorder to your TV (or
VCR) with the supplied audio/video
cable, as shown.
Caution:
,, Check that the camcorder, TV, VCR and
other equipment to be used are turned off
before making any connections. Picture
noise or malfunction may occur if any of the
above is left on while making a connection.
3
Turn on the TV and set it to the "AV" or
"VIDEO" channel. (See the operation
manual of your TV.)
- When connecting to a TV via a VCR, turn
on the VCR and set it to the "AV" or
"LINE" input channel. Operate the TV as
you normally do to view the signal from
the VCR. (See the operation manuals of
your TV and VCR.)
4 Set the Power switch on the camcorder
to VCR, and begin playback (see page
23).
Notes:
e If your TV or VCR []as only one audio input jack,
use the white plug for the audio connection on
the TV or VCR.
o Close the jack cover after use.
White: To audio input (L) jack
Red: To audio input (R) jack
Yellow: To video input jack
I
Audio/video cable (supplied)
To AV jack
.,_,,,,.:The arrow shows the signal flow.
25
Page 41

Use the menu screens to adjust the various
camcorder settings.
Media Selection switch
Power switch
MENU button i i
Operation button
Set to the desired
camcorder mode
(see page 19).
* See pages 4 and 5
for the menu items
you can select in
each camcorder
mode.
Lock button
• Steps 2 to 5 show how to change the
DGTL ZOOM menu setting in TAPE-
CAMERA mode.
2 Press the MENU button until the menu
screen appears.
Example
Note:
o The menu screen does not appear during
recording.
3
Press V or A on the Operation button
to select the desired menu screen (¢_),
then press the SET button.
Example
• You can press >, instead of the SET
button.
4
Press V or /, to select the desired
menu item (DGTL ZOOM), then press
the SET button.
Example
• You can press >-, instead of the SET
button.
5 Press V or Zs to select the desired
menu setting, then press the SET
button.
• You can press >, klstead of the SET
button.
• To adjust another menu item. press v' or
..A,to select "RETURN" and press the
SET button, then perform steps 3 to 5.
To turn off the menu screen
Press the MENU button.
Notes:
o Certain menu items are common to a]]
camcorder modes. If the BEEPmenu kem, for
example, is set to "OFF" in TAPE-CAMERA
mode, it will be automaticaNy set to "OFF" in
other modes.
,, The menu screen automatically turns off if no
settings are made within five minutes.
,, Items that are not selectable are grayed out.
iiiii!i#i_i!i!ii!i!i!i_iii!iiii!iiiiiiiiiiiiiiiiiiiiiiiiiiiiiiiiiiiiil
]]i_iiiiiii_!_iiii!!iiiiiiiiiiiiiii_
iiiiiiiiiiiiiiiiiiiiiiiiiii'_'_'
26
Page 42

Available modes:
TAPE=CAMERA, CARD=CAMERA
This function helps you decide on the size of
the subject occupying the screen. Select one
of five recording guides.
- Types
Cross: A cross mark at
the center of the
screen for placirlg the
subject at the center.
Focus: Focus brackets
for guiding you to the
[]
focus area.
Turning on the recording guide
o The example screens shown are for TAPE-
CAMERA mode.
In TAPE-CAMERA or CARD-CAMERA
mode, press the MENU button until the
menu screen appears.
2
Press V or L on the operation button
to select e,_, then press the SET button.
3
Press V or A to select"GUIDE", then
press the SET button.
iiiii!iiiiiiiiiiiiii!i_iiiililiiiiiiiiii!ii
!i!i!i!i!i!i!i!i!i!i!i!i!_ii!_iii_ii_ii_ii_ii_ii_ii_ii!i;ii_!!
IIIIIIIIIIIIIII_SSSSSSSS!;jIIi
F
F
L
L
Landscape: Grid lines
dividing the screen
into 9 areas to help
you with the horizontal
and vertical composi-
tion.
Snapshot: For captur-
ing a small group of
friends irl a frame with
surrounding back-
ground.
Portrait: Green frame
fitting a full=body view
and yellow frame
fitting an upper-body
view.
4 Press V or _:_,to select"ON", then press
the SET button.
5 Press the MENU button to turn off the
menu screen.
Selecting the recordiug guide
Press v' or ?, on the Operation button. _/_
@
To turn off the recording guide
Select "OFF" in step 4 above, then press the
SET button.
Note:
o When using manual focus, you cannot
change the recording guide,
27
Page 43

Available modes:
TAPE=CAMERA, CARD=CAMERA
You can select three different zoom ranges: 1
10× (optical zoom), 1040× (digital zoom) or
10 300x (digital zoom). The digital zoom
allows you to record powerful close-up pictures
with the same operation as normal zooming.
Notes:
o The digital zoom is in addition to the optical
zoom giving a combined maximum zoom range
of 1 300×.
, As the image is enlarged digitally, the picture
quality decreases when higher digital zoom
settings are used.
1 In TAPE-CAMERA or CARD-CAMERA
mode, press the MENU button until the
menu screen appears.
2
Press V or /,_on the operation button
to select ¢Pl, then press the SET button.
3
Press V or A to select"DGTL ZOOM"
then press the SET button.
The "D" digital zoom indicator is displayed
during digital zooming.
WI._I-IT D-ZOOM 25
Dgta zoom nd cator
To use optical zoom only
Select "OFF"in step 4 above.
ii_i!_i_!_!!_!i_ii_i!_!_i!i!_!i_i_!_i_i!i_ii_ii_ii_iiiiiiii_iiiiiiiiiiiiiiii_
iiiii_iiiiiii_!_iiii!!iiiiiiiiiiiiiii_
iiiiiiiiiiiiiiiiiiiiiiiiiii,_,_,
Press V or A to select "40" or"300",
then press the SET button.
Press the MENU button to turn off the
menu screen.
28
Page 44

Useful features
Camera Recording
Available modes:
TAPE-CAMERA, CARD-CAMERA
When the subject is backlit, the image will
appear dark if it is recorded normally. The
gamma brightness compensation function
improves the picture by increasing the
brightness of the subject while leaving the
brighter portion of the image unaffected.
To obtain a brighter picture
Press the GAMMA/BRiGHTER button again.
- The [] indicator appears.
GAMMA /
BRIGHTER
Note:
o When the [] indicator is displayed, the
background will become slightly brighter.
T; f
GAMMA/BRIGHTER
button
i_i_i_i_i%i!ii!_!!!ii_ii_ii_iiiiiiiiiiiii!
!i!i!i!i!i!i!i!i!i!i!i!i!_ii!_!!i!i!i!i!i!i!iii_!i_!!
IIIIIIIIIIIIIII_SSSSSSSSjjIIi
in TAPE-CAMERA or CARD-CAMERA mode,
press the GAMMA/BRIGHTER button once.
- "GAMMA" appears, indicating that Gamma
Brightness Compensation is now working.
GAMMA/
BRIGHTER
9,
To cancel Gamma Brightness Compen-
sation
Press the GAMMA/BRIGHTER button until
"GAMMA" disappears.
!,
29
Page 45

Available modes:
TAPE=CAMERA, CARD=CAMERA
When you are recording in a dark or poorly
illuminated location, "LIGHT" is displayed on
the screen. Use the gain-up function to record
a brighter picture.
Note:
o At locations where lighting is adequate, "LIGHT"
will not appear. The gain=up function cannot be
used in this case.
GAMMA/BRIGHTER
button
In TAPE-CAMERA or CARD-CAMERA mode,
press the GAMMA/BRIGHTER button once.
- "GAMMA" appears, indicating that the gain-
up function is now working.
GAMMA/
BRIGHTER
To obtain a brighter picture
Press the GAMMA/BRIGHTER button again.
• The _]_[Y indicator appears.
GAMMA/
BRIGHTER
To cancel the gain-up function
Press the GAMMA/BRIGHTER button until
"GAMMA" disappears.
Notes:
e You may experience some picture noise in Gain-
up mode, which increases when the 'q[X[/
displays.
o When the _ indicator displays, you may get
a shadow image behind a subject that is moving
around a lot.
o Fine brightness adjustments are possible when
using manual exposure (see page 43).
,, Gain-up wiI] cancel if you aim the camcorder in a
bright location.
ii_i!_i_!_!!_!i_ii_i!_!_i!i!_!i_i_!_i_i!i_ii_ii_ii_iiiiiiii_iiiiiiiiiiiiiiii_
iiiii_iiii_!_ii!iiiiiiii_
ijljljljljljljljljljljljlji,,,
I,
3O
Page 46

Useful Features
Camera Recording
Available mode:
TAPE-CAMERA
The fade function allows you to gradually bring
the image and sound in or out at the beginnklg
or end of a scene for creating scene transi-
tions. This is especially effective in creating a
dramatic change in scenery.
RECSTART/STOP button
FADEbutton
2 Press the REC START/STOP button to
begin recording.
,, The picture turns white, and the image
and sound fade in.
=@
3
Press the REC START/STOP button at
the point where you wish to stop
recording.
,, The image and sound fade out as the
picture gradually turns white. The
camcorder then returns to Recording
Standb\ mode.
REC
iiiii!iiiiiiiiiiiiii!i_iiiililiiiiiiliiii!,!i
!i!i!i!i!i!i!i!i!i!i!i!i!_ii!_iii_ii_ii_ii_ii_ii_ii_ii!i_ii_!!
iiiiiiiiiiiiii!ii_ii!;!;!;!;!;!;!;!ii!
IIIIIIIIIIIIIII_SSSSSSSSjjIIi
Using
1 In TAPE-CAMERA mode, press the
FADE button.
,, "FADE" appears.
FADE
Fade in
Fade out
To cancel Fade mode
Press the FADE button again in Recording
Standby mode.
To use Fade Out only
1 During camera recording in TAPE-
CAMERA mode, press the FADE button
to display "FADE".
2 Press the REC START/STOP button at
the point where you wish to stop
recording.
Note:
" Fade mode automatically cancels after Fade
Out.
31
Page 47

Available mode:
TAPE=CAMERA
Available mode:
TAPE=CAMERA
If while playing back your tape you want to
quickly return to the last recorded scene and
start recording again, use the quick return
function.
1 Set the camcorder to TAPE-CAMERA
mode.
In Recording Standby mode, press the
MENU button until the menu screen
appears.
3
Press V or A on the operation button
to select 6, then press the SET button.
4
Press y or A to select "QK. RETURN",
then press the SET button.
SET
Press v or A to select "START", then
press the SET button.
,, "SEARCH" flashes, and the tape begins
fast forwarding or rewinding to the end
of the last recorded scene.
_iI_SE ARC H_,
,, When the tape reaches the end of the
last recorded scene, "FINISHED" is
displayed, and the camcorder enters
Recording Standby mode.
Press the MENU button to turn off the
menu screen.
Notes:
" To cancel the quick return function while
"SEARCH" is flashing, press the SET button
twice.
, Quick return will not work if you remove the
cassette and reload it after recording or if
nothing has been recorded since loading.
The edit search function lets you search,
without switching from TAPE-CAMERA mode to
TAPE-VCR mode. for the point on the tape
where you wish to start recording next.
Operation button
1 Set the camcorder to TAPE-CAMERA
mode.
2
In Recording Standby
mode, press and hold
down < (reverse edit
search) or :> (forward
edit search) on the
Operation button.
3
When you find the point where you want
to begin recording, release the button.
Notes:
o The sound is off during search.
o Forward edit search is performed at the same
speed as normal playback, and reverse edit
search at 5.5 times the normal playback.
o You may experience picture noise during reverse
edit search.
iiiii!iT!_!iiTii!i!i!i_iii!iiii!iiiiiiiiiiiiiiiiiiiiTiiiiiiiiiil
iTi!ii!iiii!!_iiiiiiiiiiiiiiiiiiiiiii!i!!!
]]Yliliiii_!_iiii!!iiiiiiiiiiiiiii_
iiiiiiiiiiiiiiiiiiiiiiiiiii'_?
32
Page 48

Useful Features
Camera Recording
Available mode:
TAPE-CAMERA
You can record continuous still images of
subjects.
1 Set the camcorder to TAPE-CAMERA
mode.
In Recording Standby mode, sT_
press the STILL button fully.
- A still image of the subject is
displayed.
Press the REC START/
STOP button.
- The still image of the
subject will be recorded.
17
Attach the supplied tripod adapter when using
a tripod with the camcorder.
Align the tripod adapter with the tripod
adapter socket on the bottom of the
camcorder, then rotate as shown below.
Tripod adapter socket
Tn od socket t_,,-_ I
Press the REC START/STOP button.
To cancel the still image
Press tile STILL button fully.
Notes:
oStill Recording can also be used during
recording by pressing the STILL button fully.
oThe picture quality in Still Recording function will
be slightly lower than normal pictures.
2 Attach tripod to tripod socket.
Note:
o You cannot use the supplied tripod adapter, if
the alignment pin is not retractable.
33
Page 49

Available mode:
TAPE=CAMERA
The wide screen function lets you record
scenes with the wide-screen feel of a movie
shown in a theater. The top and bottom of the
picture are masked with black bands to
produce an effective screen aspect ratio of
16:9.
Normal screen Wide screen
In TAPE-CAMERA mode, press the
MENU button until the menu screen
appears.
2
Press V or A on the operation button
to select r';h, then press the SET button.
3
Press V or A to select"16:9", then
press the SET button.
Available modes:
TAPE=CAMERA, CARD=CAMERA
The digkal image stabilization (DIS) function
allows you to stabilize the image by electroni-
cally compensating for relatively minor image
shaking that is often annoying in close-up
shots.
In TAPE-CAMERA or CARD-CAMERA
mode, press the MENU button until the
menu screen appears.
2
Press V or /,, on the operation button
to select rWq,then press the SET button.
3
Press V or A to select"DIS", then
press the SET button.
ii_i!_i_!_!!_!i_ii_i!_!_i!i!_!i_i_!_i_i!i_ii_ii_ii_iiiiiiii_iiiiiiiiiiiiiiii_!!
%iiii_i_iiiiiiiii!!_i
iiiii_iiiiiii_!_iiii!!iiiiiiiiiiiiiii_!!i
SET
Press V or A to select"ON", then press
the SET button.
,, The picture is displayed with the top and
bottom portions masked.
5 Press the MENU button to turn off the
menu screen.
To return to normal screen
Select "OFF" instep 4 above.
4 Press V or _, to select"ON", then press
the SET button.
5 Press the MENU button to turn off the
menu screen.
,, The DIS indicator only appears when the
on-screen indicators are turned on.
DIS indicator
To cancel DiS function
Select "OFF" in step 4 above. The £_ indicator
will disappear.
Notes:
" The DIS function cannot compensate for
excessive image shaking.
e When image shaking does not occur (e.g. when
using the camcorder on a tripod), turn off the DIS
function. The picture will appear more natural
when the DIS function is off.
34
Page 50

Useful Features
Camera Recording
Available modes:
TAPE-CAMERA, CARD-CAMERA
Rotate the LCD monitor 180 ° vertically so that
the screen faces the other way and the subject
carl monitor the shot while you are recording.
If the camcorder is steadied, you can record
yourself in the scene by watching yourself on
the LCD monitor. The remote control is useful
for such occasions.
iiiii!iiiiiiiiiiiii_i!iliiiiiiiii!ii
!i!i!i!i!i!i!i!i!i!i!i!i!_ii!_!i_ii_ii_ii_ii_ii_ii_ii!i_!i_!!
iiiiiiiiiiiiii!i_iiiiiiiiiii!
IIIIIIIIIIIIIII_SSSSSSSSjjIIi
1 Set the Media Selection switch to TAPE
or CARD.
Cautions:
o Do not rotate the monitor section to the self
recording position during recording or playback.
o For recording in Self Recording mode, be
sure to rotate the monitor section, NOT the
lens section, if you hold the camcorder
upside down with the lens at the bottom, the
subject will be recorded upside down.
More Information on Se|f Re-
cording
o Use the remote control to begin/stop recording
on tape.
o The screen image automatically inverts when the
monitor rotation is between 135 ° and 200 °. When
the monitor section is turned back to the normal
position, the image returns to normal.
o You can play back images while the monitor is in
the self recording position. Set the camcorder to
TAPE=VCR mode. The Operation button still
retains its function as during normal playback,
for example, /,, on the Operation button works
as the Play button.
2 Set the Power switch to CAMERA.
3 Rotate the monitor section 180 °
vertically.
,, A mirror image of the subject displays
on the LCD monitor.
4 Begin recording.
35
Page 51

Available mode:
TAPE=CAMERA
This camcorder allows you to record in LP
(Long Play Recording) mode for approximately
50% more recording time with the same picture
quality as that in SP (Standard Play Recording)
mode.
In TAPE-CAMERA mode, press the
MENU button until the menu screen
appears.
2
Press V or /,, on the operation button
to select if;h, then press the SET button.
3
Press V or A to select"TAPE SPEED",
then press the SET button.
Press V or /,, to select"LP", then press
the SET button.
Notes on the use of LP mode
• To record in LP mode. be sure to use a Mini
DV cassette labeled for use with LP mode.
- Frozen images, mosaic-pattern picture noise,
audio interruptions or audio loss may occur in
the following cases:
_hen using a tape which is not designated
for use with LP mode.
_hen a tape recorded in LP mode under
high temperature conditions is played
back.
_hen a tape recorded in LP mode with the
camcorder is played back on a Mini DV
player or camcorder from another manu-
facturer.
_hen a tape recorded in LP mode is
played back on a Mini DV player or
camcorder without an LP function.
- Audio dubbing is not possible with LP mode
recording.
ii_i!_i_!_!!_!i_ii_i!_!_i!i!_!i_i_!_i_i!i_ii_ii_ii_iiiiiiii_iiiiiiiiiiiiiiii_
Zii_iiiiiii_!_iiii!!iiiiiiiiiiiiiii_
iiiiiiiiiiiiiiiiiiiiiiiiiii,#
Press the MENU button to turn off the
menu screen.
- The long play recording mode indicator
only appears when the on-screen
indicators are turned on.
AUTO
Long play recording
mode indicator
To return to SP mode
Select "SP" in step 4 above.
_ 451nin
36
Page 52

Useful Features
Camera Recording
Available mode:
TAPE-CAMERA
The camcorder normally records audio in the
12-bit audio recording mode. For higher-quality
audio recording, select the 16-bit audio
recording mode.
1 In TAPE-CAMERA mode, press the
MENU button until the menu screen
appears.
2 Press _/ or ,_:,on the operation button
to select rWs, then press the SET button.
3 Press _/ or /,, to select"AUDIO MODE"
then press the SET button.
Press the MENU button to turn off the
menu screen.
* The 16-bit audio recording mode
indicator only appears when the on-
screen indicators are turned on.
16-bit audio recording
To return to 12=bit audio recording
mode
Select "12bit" in step 4 above.
Note:
', When using Audio Dubbing with 16-bit audio
recordings, both the dubbed and original
sounds will be recorded in mono (see page 53).
37
mode indicator
Page 53

Available modes:
TAPE=CAMERA, TAPE-VCR
Use the remote control to operate the
camcorder from a distance, such as when you
want to record yourself in a scene, or when the
camcorder is connected to a TV for use as a
VCR.
installing the Batteries
1 Open the battery compartment cover.
Insert the two supplied AA (R6 or UM/
SUM-3) batteries with the battery poles
positioned as indicated.
1 2
Place the cover.
4:
4 Press V or _1_,to select"ON", then press
the SET button.
5 Press the MENU button to turn off the
menu screen.
Operating
Aim tile remote control at the remote sensor of
the camcorder, and press the control buttons to
operate.
15°
0
REW button
i{ili!iii!i!!_!iiiii_i!i!ii!i!{i{ii!iiii!iiiiiiiiiiiiiiiiiiiiiiiiiiiiiiiiiiiiil
]]i_iiiiiii_!_iiii!!iiiiiiiiiiiiiii_
iiiiiiiiiiiiiiiiiiiiiiiiiii,_,_,
ActJvati.g
1 In TAPE-VCR (or CARD-VCR) mode,
press the MENU button until the menu
screen appears.
2 Press _7or z1_,on the operation button
to select ETC,then press the SET button.
3 Press V or A to select"REMOTE",
then press the SET button.
_.1_ ZOOM btt (W/T)
! _ _ u ons
f REC START/STOP utton
FF button
ILLFIsL°wbutton
LSTOP button'J°Lu_4E÷
VOLUME /÷ buttons
PAUSE/STILL button
Notes:
o Do not use old and new batteries together or
batteries of different brands together.
o Be careful not to expose the remote sensor to
direct sunlight or strong interior lighting, as this
may prevent the remote control from operating
properly.
,, Be sure that there are no obstacles between the
remote control and the remote sensor.
38
Page 54

Useful Features
Playback
Available modes:
All modes
Follow the procedure below to display the date,
or both the date and time, of recording on the
screen. You can display the date and time
during both recording and playback.
oThe example screens shown are for TAPE-
CAMERA mode.
1 Hold down the Lock button and set the
Power switch to CAMERA or VCR.
2 Press the MENU button until the menu
screen appears.
3 Press '.7 or z1:,on the operation button
toselectC_),thenpresstheSETbutton.
4 Press _7 or z1:,to select"DISPLAY", then
pressthe SETbutton.
Notes:
o The date (or date and time) appears when the
on-screen indicators are turned on,
o Before recording, make sure that the date and
time have been correctly set. If they have not
been set, the display will be left blank when
playing back the recording. (The display will also
be left blank for unrecorded or damaged
portions of the tape.)
o In TAPE-VCR or CARD-VCR mode, the current
date and time are displayed when the tape or
card is not being played back.
AvailabLe mode:
TAPE=VCR
This function allows you to play back images in
slow motion.
During playback in TAPE-VCR mode, press
SLOW button (_ ) ell the remote control.
_ARP
CD zoomCD
PLAYbutton
_ .........
_SLOW button
39
Press V or A to select"DATE" or
"DATE + TIME", then press the SET
button.
Press the MENU button until the date (or
date and time) displays.
JUN. 2. 2003AUTO IO:30AM
30rqin
Toreturnto normal playback, press PLAY
button (_ ).
Notes:
e The sound is off in Slow mode.
,, To protect the tape, the camcorder automatically
returns to normal playback if it is left in Slow
mode for more than 10 minutes.
Page 55

Available mode:
TAPE=VCR
The gamma playback function improves the
playback picture in TAPE-VCB mode by
increasklg the brightness of the subject while
leaving the brighter portions of the image
unaffected.
GAMMA BRIGHTER
button
During playback in TAPE-VCR mode, press the
GAMMA/BRIGHTER button once.
o "GAMMA1" appears, and the picture becomes
brighter.
GAMMA/
BRIGHTER
To obtain a brighter picture, press the GAMMA/
BRIGHTER button again.
o "GAMMA2" appears.
Available mode:
TAPE=VCR
You can capture your favorite image frame from
a video tape recording and save it on card.
1 Insert the recorded Mini DV cassette
and a card in the camcorder.
2 Set the camcorder toTAPE-VCR mode,
then begin tape playback.
3
Press A on the Operation button at the
point where the desired image appears.
" A still picture of the image isdisplayed.
Note:
o To cancel the still picture, press /,, again.
4 Press the STILL button to copy the
image to the card.
- The _ indbator flashes red while the
image is copied.
i@i!ii!i!i!i_@iiiiiiiiiiiiiiiiiiiil
ZBiiii_!_Biiiiiiii_
GAMMA/
BRIGHTER
To cancel Gamma Playback
Press tile GAMMA/BRIGHTER button until
"GAMMA1" and "GAMMA2" disappear.
Note:
oGamma Playback has no effect during still
playback.
/
Note:
" When displayir_g the image copied with this
function on the computer monitor, you may find
black bands around the image. This is caused
by the differences in how each media displays
images.
40
Page 56

Useful Features
Playback
Available modes:
TAPE-VCR, CARD-VCR
These picture effects let you play back images
with a more dramatic effect.
- Types
B/W: The picture is displayed in black-and-
white.
SEPIA: The picture is displayed in sepia
color similar to that of an old photograph.
SOLARI: The contrast of the subject is
enhanced, creating a unique artistic
image.
NEGA: The blacks and whites of the image
are reversed and colors of the image are
inverted.
BLUE: The picture is displayed with the
effect of playback through a blue filter.
iiiii!_iiiiiiiii!_i!iiiiiiiiiii!
!i!i!i!i!i!i!i!i!i!i!i!i!_ii!_!i_ii_ii_ii_ii_ii_ii_ii!i;ii_!!
iiiiiiiiiiiiii!i!_!i!iiiiiiiiii
IIIIIIIIIIIIIII_SSSSSSSS!;jIIi
_'The example screens shown are for TAPE-VCR
mode.
During playback in TAPE-VCR (or
CARD-VCR) mode, press the MENU
button until the menu screen appears.
4
Press V or /,, to select the desired
picture effect, then press the SET
button.
5 Press the MENU button to turn off the
menu screen.
To cancel Picture Effect Playback
Select "OFF" in step 4 above.
Notes:
o Images in Picture Effect Playback mode cannot
be transferred via DV cable to a personal
computer.
o You cannot use Picture Effect Playback with
Slide Show Playback.
Press V or /,, on the operation button
to select _ (or ,_), then press the SET
button.
3 Press V or z1_to select"PIC. EFFECT",
then press the SET button.
41
Page 57

Available modes:
TAPE=CAMERA, CARD=CAMERA
Auto Focus may not be able to focus on the
subject in the situations shown below. In such
situations, set the camcorder to Manual Focus
mode and focus manually.
Subject is too dark
Lack of contrast, eg snow
scene
In TAPE-CAMERA or CARD-CAMERA
mode, press the MANUAL button until
the focus setting screen appears.
2
Adjust the Power Zoom control to frame
the subject as you desire.
3
Press /,_ or V to focus on the subject.
P,_: To focus on a more distant subject
,,/: To focus on a closer subject
Fast-moving subject
Subject has horizontal stripes
Light reflects off the subject
Subject has fine, repeated
patterns
Fast-speed shutter being used
under fluorescent lighting
Background is too bright
Subject is being shot through
a dirty or wet window
Twosubjectsatdiffereni distances
0vedap[r/the sac s0ene
Subjects at different distance. _
appear in the center of the
scene at the same time
4
Press the MANUAL button until the
normal screen appears.
,, "MF" appears.
_ 30rain
Manual focus indicator
To return to Auto Focus mode
Press the SET button while the focus setting
screen is displayed.
Notes:
o The camcorder may not be able to focus
correctly if the subject is closer than approxi-
mately 5 feet (1.5 m). Set the zoom control to
wide angle, and try refocusing again.
o If the lens is dirty or fogged, the camcorder may
not be able to focus correctly.
o When "MF" is displayed, you can manually
adjust the focus by pressing v' or /,,, even if the
focus setting screen is not displayed.
iiiiiiiiiii!_iiiiiiiiiii
iii!iiiiiiiiiiiii_!i!i_!!!!
iiiiii!ii!iii_iiiiiiiil
42
Page 58

Advanced Features
Camera Recording
Available modes:
TAPE-CAMERA, CARD-CAMERA
The camcorder is preset to Auto Exposure
mode, which automatically selects the optimal
aperture. However. when there is too much
contrast in brightness between the subject and
background, you may not be able to record a
clear image. In this case, use the manual
exposure function to correct the exposure level.
Background is too bright and subject too
dark (backlit subject).
o Increase the exposure level to allow more light
through the lens.
Subject is too bright against background.
o Decrease the exposure level to allow less light
through the lens.
To return to Auto Exposure mode
Press the SET button while the exposure setting
screen is displayed.
Note:
o Manual Exposure mode will cancel if a scene
setting is selected thereafter.
43
In TAPE-CAMERA or CARD-CAMERA
mode, press the MANUAL button until
the exposure setting screen appears.
Press A or V to select the desired
exposure level.
- The number shown is the selected
exposure level. The adjustment range is
from 5 (least light) to + 5 (most light).
Exposure level
Press the MANUAL button until the
normal screen appears.
Page 59

Available modes:
TAPE-CAMERA, CARD-CAMERA
The color of the subject on the screen looks
different depending on lighting conditions.
Lock the White Balance ifthe Auto White
Balance does not work properly.
1 In TAPE-CAMERA or CARD-CAMERA
mode, press the MANUAL button until
the white balance setting screen
appears.
2 Aim the lens at a white object.
" Adjust the distance of the object so that
the entire screen is white.
White paper or white cloth
To return to Auto White Balance mode
Press the SET button while the white balance
setting screen is displayed.
Note:
o White Balance setting will cancel if a scene
setting is selected thereafter.
To easily record good-qualky images, perform
camera shooting in Full Auto mode. If "AUTO"
is not displayed on the screen, the camcorder
is in Manual mode. Perform the procedure
below to cancel all manual settings and set the
camcorder to Full Auto mode.
In TAPE-CAMERA or CARD-
CAMERA mode, press and hold
down the MANUAL button for 2
second.
,, "FULL AUTO" flashes, then stop
flashing when the camcorder is set to Full Auto
mode.
Gqq
Press the SET button to set the white
balance lock.
- "LOCK" flashes during the locking
procedure.
SET
Note:
o If you move the carncorder while "LOCK" is
flashing, "LOCK" may not stop flashing. If
this occurs, press the SET button to cancel
the procedure, and then repeat step 3.
Press the MANUAL button until the
normal screen appears.
iii!iiiiiiiiiiii_!i_!i_!!!!
iiiiii!ii!iii_iiiiiiiil
44
Page 60

Advanced Features
Camera Recording
Available modes:
TAPE-CAMERA, CARD-CAMERA
These digital picture effects let you record the
subject with a more dramatic effect.
- Types
B/W: To record in black-and-white.
SEPIA: To record in sepia color similar to
that of an old photograph.
SOLARI: To record with enhanced contrast,
creating a unique artistic image.
NEGA: To record a picture whose blacks
and whites of the image are reversed and
colors of the image are inverted.
BLUE: To record with the effect of recording
through a blue filter.
In TAPE-CAMERA or CARD-CAMERA
mode, press the MENU button until the
menu screen appears.
2 Press V or f_,on the operation button
to select 6, then press the SET button.
4
Press V or A to select the desired
digital picture effect, then press the SET
button.
,, The selected digkal picture effect
displays on the menu screen.
5 Press the MENU button to turn off the
menu screen.
To cancel the digital picture effect
Select "OFF" in step 4 above.
Note:
o Digital picture effects cannot be used when a
still image is displayed.
3 Press V or z:_to select"PIC. EFFECT",
then press the SET button.
45
Page 61

Available modes:
TAPE=CAMERA, CARD=CAMERA
You carl set the camcorder to the shooting
mode that will create the best results for a
specific situation. Just select one of four scene
settings shown below. The camcorder will
automatically set the exposure, white balance,
and shutter speed to produce the optimum
picture quality for the selected situation.
Types
SPORT: When you want to record a fast-
moving subject.
SUNLIGHT: When the background is very
bright.
DUSK: When you want to faithfully record
the red of the setting sun, and the
surrounding twilight.
PARTY: When the illumination is from a
spotlight or candle.
In TAPE-CAMERA or CARD-CAMERA
mode, press the MENU button until the
menu screen appears.
2
Press V or /,, on the operation button
to select 6, then press the SET button.
3
Press V or A to select"SCENE
MENU", then press the SET button.
4
Press V or A to select the scene
setting that best fits the recording
situation, then press the SET button.
- The selected scene setting displays on
the menu screen.
t lH] ]l] gl iAi iiiiiiii ll i iiiiiiiiiiiiiiiiiiiiiiiiiiiiiiiiiiiiiii ....
5
Press the MENU button to turn off the
menu screen.
- The selected scene setting indicator
displays when the on-screen indicators
are turned on.
Scene setting indicator
To cancel the scene setting
Select "OFF" in step 4 above.
Note:
. Scene settings cannot be used when
displaying a still image.
iiiiiiiiiii!_iiiiiiiiiii_!
46
Page 62

Available modes:
TAPE-VCR, TAPE-CAMERA
The time code shows the hour. minute and
second of recording, and the frame number
(1 frame = approx. 1/30 sec.). This is automati-
cally recorded along with the subject when you
are recording on the tape. You can display the
time code on the screen as an accurate
counter in both TAPE-VCR and TAPE-CAMERA
modes.
DispJay format
TCO: 00: 10:_2T_
T T T Frame nur'nber*
J |Second
J Minute * Displayed during still
Hour playback.
• The exampb screens shown are for TAPE-VCR
mode.
During playback or camera recording in
TAPE modes, press the MENU button
until the menu screen appears. 3
2
iii!!iiii;ii;ii;iiii_liiiiiiiii!ii!i{ili
iiiii!!iiiiiiiiiii_>>>>!liii
_ii311;!_£,i{{{{{{{i,!
iiiiiiiiiiiiiiiii_iii!i!lil!lil!l!i{ii
Press V or /,, on the operation button
to select ETC,then press the SET button.
3
Press V or ,,Ato select"TIME CODE",
then press the SET button.
5 Press the MENU button to turn off the
menu screen.
- The time code appears when the on-
screen indicators are turned on.
,BU
AUDIO1÷2
Time code
To turn off the time code
Select "DISP. OFF" in step 4 above.
Note:
o When the tape reaches an unrecorded section,
the time code returns to zero (TC0:00:00). Once
recorded, the time code cannot be changed.
DJspJaying the time code on a
TV during pJayback
"J In TAPE-VCR mode, press the MENU
button until the menu screen appears.
2
Press _y or z1_,on the operation button
to select ETC,then press the SET button.
Press V or A to select"TC OUT", then
press the SET button.
4 Press V or A to select"ON", then press
the SET button.
4 Press _7 or £ to select"DISR ON", then 5 Press the MENU button to turn off the
press the SET button, menu screen.
47
Page 63

Available mode:
TAPE-VCR
Video editing lets you refine your videos by
removing unwanted sequences from your tape,
or transposklg one sequence with another.
This camcorder lets you monitor the source
program on the built-kl LCD monitor without
having to connect it to an external TV or video
monitor.
Connect the camcorder to a VCR with the
supplied audio/video cable, as shown. 3
Recording
White: To audio input (L) jack
Red: To audio input (R) jack
___ Yellow: Tovideo input jack
Audio/video cable (supplied)
Playback
i
_--: The arrow shows the signal flow.
Notes:
e See page 2 for how to open the jack cover.
" If your VCR has only one audio input jack, use
the white plug for the audio connection on the
VCR.
Culling Unwanted Sequences
1 Play back the tape to be edited on the
camcorder, and locate the beginning
and end of the sequence you wish to
cut. Write down the time code reading at
the beginning and end of that sequence
(see page 47). Then, rewind the tape to
before the beginning of the portion that
you wish to keep.
2 Load a video cassette into the recording
VCR.
Press /,, on the camcorder to begin
playback, then press the Record button
on the VCR to begin recording.
Press the Pause/Still button on the VCR
to pause recording when the source
tape reaches the beginning of the
sequence to be cut.
5
Press the Pause/Still (or Record) button
on the VCR to resume recording when
the source tape reaches the end of the
sequence to be cut.
To stop editing
Press v' on the camcorder and press the Stop
button on the VCR.
Notes:
o Some of the transitions between edited
sequences may be slightly off.
,, There may be picture noise during video search
or still playback. This does not imply a detect in
the camcorder.
,, The time code display will be recorded along
with the edited sequences if the TC OUT menu
item is set to "ON". Set to "OFF" before editing
(see page 47).
iiiiiiiiiii!_ii!iiiiiiii_!
iii!iiiiiiiii_!i_!i_!!!!
iiiiii!ii!iii_iiiiiiiil
48
Page 64

Advanced Features
Playback
Available mode:
TAPE=VOR
You can use this camcorder to record or edit
videos from another source, such as a VCR, TV,
or video disc player.
Connect the camcorder to the source equip-
ment with the supplied audio/video cable, as
shown.
Recording
I To AV ja
LAudio/video cable (supplied)
I
To Record from an External
Source
1 Set the camcorder to TAPE-VCR mode,
and insert a Mini DV cassette.
2
Begin playback on the video equipment
connected to the camcorder.
,, Check the camcorder screen to see if
the picture is properly received.
3
Press the REC START/STOP button on
the camcorder.
,, The camcorder enters Recording
Standby mode.
4
Press A on the Operation button to
begin recording.
Notes:
o To pause recording, press /....Press /...agab] to
resume recording.
,, Tooperate by remote control, perform steps 1
and 2 above, and press the REC START/STOP
button, then press the PAUSE/STILL button (11).
" If "NO SIGNAL" is displayed on the camcorder
screen, check that the audio/video cable is
properly connected.
iii!!iiii{{{{iii_!iiiiiiii!iiiiili
iiiii!!iiiiiiiiii_>>>>!iiii
_ii311_i!_£,i;i;i;i;i;i;i{;!
XXtliii_iiiiiiiiiiiiiiiiiiiii_
iiiiiiiiiiiiiiiii_iiii!i@ili
Playback
TV with monitor output
_f==: The arrow shows the signal flow.
Notes:
o See page 2 for how to open the jack cover.
o If the source equipment has only one audio
output jack, use the white plug for the audio
connection on the source equipment. (The input
audio will only be recorded on the left channel of
the tape.)
49
-_ ellow: Tovideo output jackWhite: To audio output (L) jack
Red: To audio output (R) jack
VCR
To stop recording
Press s on the Operation button.
Cutting Unwanted Sequences
1 Press /,, to pause recording when the
source tape reaches the beginning of
the sequence to be cut.
2 Press /s to resume recording when the
source tape reaches the end of the
sequence to be cut.
Page 65

Available mode:
TAPE-VCR
You can use this camcorder to convert from
analog signal (e.g. video recorded on 8 mm or
Hi8 tapes) to digital signal.
Connect the audio/video cable and DV cable
as shown below.
1
Set the camcorder to TAPE-VCR mode,
and make sure that playback stops.
2
Press the MENU button to display the
menu screen.
3
Press V or A on the operation button
to select _, then press the SET button.
4
Press V or A to select"ANLG-cDGTI",
then press the SET button.
To DV terminal (digital equipment)
DV cable (commercially available)
Digital signal ...
I Recording
_::_ I e.g. computer
Toov
'u _ @
ToAVjack
Analog signal
Audio/video cable (supplied)
White: To audio output (L) jack
Yellow: To video output jack
Red: To audio output (R) jack
Playback
(analog equipment)
e.g. 8 mm or Hi8
camcorder
.,_,.: The arrow shows the signal flow.
Note:
o See page 2 for how to open the jack cover.
5 Press V or _, to select"ON", then press
the SET button.
6 Press the MENU button to turn off the
menu screen.
7
Press the Play button on the analog
equipment
- Check the monitor on the digital
equipment to see if the picture is being
properly received.
8 Press the Record button on the digital
equipment.
Notes:
o The camcorder is not guaranteed to work with all
digital/analog equipment. Contact the manufac-
turer of your equipment for advice.
e If the camcorder outputs a video recording with
a copyright signal, the digital equipment cannot
record or save it.
,, The camcorder may not convert some input
video recordings properly (e.g. discoloration,
picture noise, muted sound), depending on the
input condition.
iiiiiiiiiii!_iiiiiiiiii_!
iii!iiiiiiii_!i_!i!!!!
iiiiii!ii!iii_iiiiiiiil
5O
Page 66

Advanced Features
Playback
Available mode:
TAPE=VDR
This camcorder enables you to perform digital
video editing. Connect the camcorder to video
equipment with a DV terminal using a commer-
cially avaiiabb DV cabb. A DV cabb is abb to
transfer all dubbing signals including video
and audio.
To Record to Video Equipment
See "Cutting Unwanted Sequences" on page
48, using the video equipment as the recording
source.
Note:
o Make sure that the video equipment to which
you are recording can input dubbing signals via
the DV terminal.
-- DV cable (commercially available)
iii!!iiii{{{{iii_!iiiiiiii!ii!illili
iiiii!!iiiiiiiiiii_>>>>!iiii
_ii311_i!_£i;i;i;i;i;i;i{;!
iiiiiiiiiiiiiiiii_iiiii!i@ili
51
Video equipment
with DV terminal
To DV termi_ I
To DVterminal _ k_
(e.g. DV camcorder)
To Record from Video Equip-
merit
1 Set the camcorder to TAPE-VCR mode,
and insert a Mini DV cassette.
2
Begin playback on the video equipment
connected to the camcorder.
,, Check the camcorder screen to see if
the picture is properly received.
3
Press the REC START/STOP button on
the camcorder.
,, The camcorder enters Recording
Standby mode.
4
Press £ on the Operation button to
begin recording.
To stop recording
Press 'v' on the Operation button.
Cutting Unwanted Sequences
1 Press /,, to pause recording when the
source tape reaches the beginning of
the sequence to be cut.
2 Press /,, to resume recording when the
source tape reaches the end of the
sequence to be cut.
Notes:
e Make sure that the video equipment from which
you are recording can output dubbing signals
via the DV terminal.
,, If the video equipment is not set to playback
mode or the DV cable is not properly connected,
"NO SIGNAL" is displayed on the camcorder
screen.
,, If no picture or sound is input to the camcorder
even if the DV cable is properly connected and
you are playing back the source media from the
video equipment, set the Power switch on the
camcorder to OFF and then back to VCR, or
disconnect the DV cable and connect it again.
o If a digital video recording with a copyright
protection signal is used as the playback source,
"COPYRIGHT PROTECTED." appears on the
camcorder monitor and the recording function is
disabled (see page 72).
,, When displaying the playback picture on the
recording equipment, you may find black bands
around the image. This is caused by the
differences of the image display sizes.
,, You cannot output the picture playing back from
the DV terminal to an external monitor.
Page 67

Available mode:
TAPE-VDR
You can select any of the following audio
playback modes.
Audio 1 +2
6' 12-bit recording in stereo (Audio 1 and
Audio 2 channels)
6' 16-bk recording in stereo (left and right
channeb)
Audio 1 5
6' 12-bk recording in stereo (Audio 1 channel
only)
,, 16-bk recording in mono (left channel only)
Audio 2
6' 12-bk recording in stereo (Audio 2 channel
only) 6
6' 16-bit recording in mono (right channel
only)
1 Play back a Mini DV cassette with
dubbed audio.
2 Press the MENU button until the menu
screen appears.
3
Press V or A on the operation button
to select _, then press the SET button.
4
Press V or £ to select"AUDIO", then
press the SET button.
SET
Press V or /,, to select the desired
audio playback mode, then press the
SET button.
Press the MENU button to turn off the
menu screen.
- The selected audio playback mode
indbator only appears when the on-
screen indbators are turned on.
Audio playback mode indicator
Note:
o The audio playback mode indicator, "AUDIO",
displays in different coEorsdepending on the
recording mode (12- or 16-bit) used for the
recording being played back. A white display
indicates 12-bit recording mode, while a green
indicates 16-bit.
iiiiiiiiiii!_ii!iillllll_!
i;@ii_ilililililililil
iii!%_!i#!!!
iiiiii!iiiiii_iiiiiiiil
52
Page 68

Advanced Features
Playback
Available mode:
TAPE-VCR
You can add narration to recordings made with
this camcorder, while preserving the original
audio and video recordings.
Microphone for Audio Dubbing
You can use the built-in stereo microphone to
record narration.
Builtdn stereo microphone
Notes:
,,Audio dubbing does not function through the DV
terminal.
• You cannot use audio dubbing with recordings
made in LP mode.
,,You cannot use the built-in stereo microphone for
audio dubbing when the audio/video cable is
connected.
Audio Recording
in normal recording mode
12=bit audio recording
The audio is recorded in stereo on Audio 1.
Audio 1: Stereo (left and right) sound
Audio 2: No audio
16=bit audio recording
The audio is recorded in stereo with the left and
right sound on two separate channels.
Audio 1: Left sound
Audio 2: Right sound
in Audio Dubbing mode
12=bit audio recording
The dubbed audio is recorded on Audio 2.
Audio 1: Original stereo (left and right) sound
Audio 2: Dubbed stereo (left and right) sound
16=bit audio recording
The dubbed audio is recorded ors Audio 2 over
the original right sound. Both dubbed and
original sounds are mono.
Audio 1: Original left sound
Audio 2: Dubbed sound
Note:
,, You can select the 12=bit or 16-bit audio
recording mode by performing the procedure on
page 37.
_iii!_iii_i!_i,ii,ii,ii,ii,ii,ii,ii,ii,ii,ii,!
53
Page 69

Audio Dubbing
1 Play back the recorded Mini DV cassette
and locate the tape position where you
wish to start audio dubbing.
2 Press A to pause playback.
3 Press the MENU button until the menu
screen appears.
4 Press V or A on the operation button
to select _, then press the SET button.
5 Press V or A to select"AUDIO DUB",
then press the SET button.
,, The audio dubbing screen appears.
,!,
AUDIO DUB
AUDIO1+2
To pause audio dubbing
Press the SET button. To resume audio
dubbing, press the SET button again.
To cancel audio dubbing
Press the MENU button. The audio dubbing
screen disappears.
if you wish to change the
dubbed audio or dub additional
scenes
1 Press the MENU button to turn off the
audio dubbing screen.
2 Repeat steps 1 to6 above.
Notes:
o It is recommended that you use Audio Dubbing
only with recordings made with this camcorder.
Use of recordings made with other digital video
equipment may result in poor audio quality.
o Audio dubbing will automatically pause ifthe
original audio changes from 12-bit mode to 16-
bit mode or vice versa. Press the SET button to
resume operation.
o Audio dubbing will automatically stop if a portion
recorded in LP mode or an unrecorded portion
of the tape is encountered.
,, You can play back the dubbed audio and the
original audio together or separately (see page
52).
iiiiiiiiiii!_iiiiiiiiii_!
iii!%_!i_!i_!!!!
iiiiii!ii!iii_iiiiiiiil
6 Press the SET button to begin audio
dubbing. Record your narration.
54
Page 70

Available mode:
CARD=CAMERA
You can take a still picture in the same way as
you do with a standard camera and record that
image on the card.
STILL button
Power Zoom control
5
Adjust the Power Zoom control to frame
the subject as you desire.
6
Press the STILL button half-way down to
focus on the subject.
- The camcorder automatically focuses on
the subject. When it is set, you will hear
a sound and see a mark. then the
camcorder locks the focus.
7
Press the STILL button fully to begin
recording.
=_ CARD
9/81
NORMAL
Insert a card into the camcorder (see
page 13).
2
Remove the lens cap.
3
Set the Media Selection
switch to CARD.
Hold down the Lock button and set the
Power switch to CAMERA.
- The picture from the lens now displays.
iiiiiiiiiij!ii!iiiiiiii@iiiiiiiiiiiii!!ii
iiii!!!EiiiiiiiR{iiiiiiiiiiiiii
Lock button
@ii_jljii_iiii!iiiii!ijl
iiiii!!ilk_iiiiiiiiiiiiiiiiiiiiiii
iiiiiii!!_iiiiiiiiiiiiiijii!
_################_
Media Selection : /itc
Pow _rswitch
Number of shots taken/remaining
AUTO "_
-,,,_/81 I
NORMAL I
AUTO
,,The D indicator flashes red while data
is being recorded on the card, and
returns to white when recording
completes.
,, To record another image, release the
STILL button and make sure the picture
is not frozen in the monitor, then perform
steps 6 and 7.
Notes:
, Recording under insufficient lighting may result
in blurred images. It is recommended that you
use a tripod to record insufficiently illuminated
subjects.
,, Recording under the light of a fluorescent,
mercury, or sodium lamp may cause flickering in
the image and, depending on the timing of the
shot, may result in changes to color hue in the
image.
,, Set the BEEP menu item to "OFF" to turn off the
focus locking sound.
Caution:
, Do not turn the power off while the _ indicator
is flashing in step 7.
55
Page 71

Available mode:
CARD=CAMERA
The picture quality of still images recorded on
the card depends on the picture quality setting.
Select the appropriate setting to match your
recording objectives.
Types
NORMAL: Records images with standard
picture quality.
ECONOMY: Allows you to take more shots
than in NORMAL mode but with a lower
quality.
FINE: Records images with higher quality
than in NORMAL mode but with a lower
number of recordable images.
Approximate number of record-
able images with the supplied
card
In CARD-CAMERA mode, press the
MENU button until the menu screen
appears.
2
Press V or /,, on the operation button
to select ¢_, then press the SET button.
3
Press V or /\ to select"REC MODE",
then press the SET button.
4 Press V or A to select the desired
setting, then press the SET button.
5
Press the MENU button to turn off the
menu screen.
• The selected picture quality indicator
only appears when the on-screen
indicators are turned on.
NORMAl_ 90 200
ECONOMY 160 360
FINE 50 120
Note:
o The number of recordable images differs
depending on the combination of picture quality
settings used and the images shot.
10/150
Picture quality indicator
Note:
,, The picture quality indicator is also displayed in
CARD=VCRmode. The picture quality indicator
displayed during playback is based on the
amount of data for that recorded image. Since
the amount of data differs depending on factors
such as image detail, sometimes the picture
quality indicator displayed during playback may
not match the picture quality setting used during
recording.
!i!i!i!i!_ii!_!i_ijji
iiiiiiiiiiiiiiii_'........
56
Page 72

Digital Still Camera Features
Card Recording
Available mode:
CARD-CAMERA
4
Press the STILL button fully to set the
timer.
,, The self-timer operating indicator flashes
while the timer counts down.
Self=timer operating indicator
The self-timer function allows you to record
images after a time-lag of 10 seconds. This is
convenient when you want to record an image
of you and your friends together.
1 In CARD-CAMERA mode, press the
MENU button until the menu screen
appears.
2 Press V or /, on the operation button
to select 6, then press the SET button.
3 Press V or A to select"SELF TIMER",
then press the SET button.
CABD
10/80
NORMAL
AUTO
,_CARD
10/00
NORMAL
AUTO
,,The shutter automatically releases after
10 seconds, and a still image of the
subject is recorded.
Notes:
, When recording with the self-timer, stabilize the
camcorder in the horizontal plane by attaching it
to a tripod, etc.
, To cancel the self-timer, press the STILL button
fully again in step 4 above.
, Selfqimer mode cancels after recording one
image. Repeat steps 1 to 4 to record another
image with the self=timer.
Caution:
, Do not turn the power off or remove the card
once the self-timer operating indicator begins
flashing.
i;ii!iiii:i:i:!ii_j;_iiii_iiii!iiiii!i;ii!i
iiiii!!ii_iiiiiiiiiiiiiiiiiiiiiii
iiiiiii!!_iiiiiiiiiiiiiiiiii!
57
Page 73

Available mode:
CARD=CAMERA
Before using a commercially available card
with this camcorder, you must first have it
formatted. Also, if any of the following warning
indicators displays, you will need to format your
card.
- "FORMAT MEMORY CARD"
- "MEMORY CARD ERROR"
- "MEMORY CARD READ ERROR"
- "CANNOT STORE DATA"
Cautions:
o Formatting a card erases aH stored images,
including delete-protected images. Be sure to
backup important data on your computer or
other media before formatting the card (see
pages 65, 66).
o Do not remove the power source during
formatting, as this may cause damage to the
camcorder or card. It is recommended that you
use the AC outlet for the power supply.
1 Insert a card to be formatted into the
camcorder.
In CARD-CAMERA mode, press the
MENU button until the menu screen
appears.
Press _/ or _:, on the operation button
to select ETC,then press the SET button.
4
Press _/ or A to select"FORMAT", then
press the SET button.
- To cancel formatting, press ,7 or ..A,to
select "NO", then press the SET button.
FORMAT
ALL DATA WILL
BE ERASED.
5
Press _/ or A to select"YES", then
press the SET button to begin format-
ting.
- The menu screen displays when
formatting finishes.
6
Press the MENU button to turn off the
menu screen.
Notes:
o The supplied card is preformatted for immediate
use.
® Use this camcorder to format a card.The
camcorder may not recognize the images on
a card formatted by a computer or other
equipment.
!i!i!i!i!_ii!_!i_ijji
iiiiiiiiiiiiiiii_'........
58
Page 74

Available mode:
CARD-VCR
You can play back and view still images
recorded on a card on the LCD monitor.
SET button
1
Set the Media Selection
switch to CARD.
2
Hold down the Lock button and set the
Power switch to VCR.
- The images recorded on the card are
displayed in a thumbnail format.
Lock button
iiiiiiiiiiiiiii!iiiiiiiiiiiiiiiiiiiiiiiiiiiiiiiiiiii!!!iii
Press <, >, 'v' or /,, on the Operation
button to move the selection frame to
the desired image.
- Each time you press >, v' or ?,..the
iiiii!iilk_iiiiiiiiiiiiiiiiiiiiilil
iiiiiii!!_iiiiiiiiiiiiiiiiiiiiiiii!
_################_
selection frame moves as shown below.
Media Selection switch
Operation button
_ PLAYBACK 100-0010
NORMAL PAGE 2i!_
Page number/total thumbnail pages
Power switch
4 Press the SET button.
- The selected image displays in fulP
screen.
SET
Image fib name
1/10
£
Picture quality
Playback image number/
number of recordings
Available OpeYatJons during
Full-screen Display
- You can display the fuBscreen picture of the
previous or next image by pressing or >-.
-When holding down < or _--.you can search
through the images on the card. The search
can be very fast, so it is recommended that
the on-screen indicators turns ors to display
the image number.
• To return to a thumbnail of the images, press
the SET button again.
Notes:
o Dependbsg on the amount of data for the
recorded image, the picture quality indicator
displayed during playback may not match the
picture quality setting used during recording.
,, The images bigger than 640× 480, e.g. images
recorded on other equipment, display as
thumbnails, not full screen.
o Do not play back any card storing a defective
image (with noise and distortion) created on
other equipment. If you mistakingly play back
data on such a card, set the Power switch to
OFF, remove, and never use it with this
eamcorder.
indicator
PLAYBACK 100-0001
NORMAL PAGE1/2
Note:
59 of motion of the selection frame.
" Holding down < or -_ increases the speed
Page 75

Available mode:
CARD-VCR
You can prevent your important images
recorded on the card from accidental erasure.
1
In CARD-VCR mode, press the MENU
button until the menu screen appears.
2
Press _/ or L:, on the operation button
to select _, then press the SET button.
3
Press V or z?_to select"PROTECT",
then press the SET button.
- The PROTECT indicator appears.
4,
5 Press the SET button to set delete
protection.
• The _- indicator appears.
Delete protection indicator
SET
PROTECT 100-0003
NORMAL PAGE1/2
- If you want to protect another image,
repeat steps 4 and 5.
6 Press the MENU button to finish the
setting.
To cancel the protection set-
ting
"l Select the image for delete protection
cancellation in step 4 above.
2 Press the SET button to cancel the
protection.
- The indicator disappears.
SET
NORMAL PAGE1 /2
_PROTECT_ 100-0001
PROTECT indicator
Press 4, >, V or z?_to select the
image for delete protection.
_ PROTECT
NORMAL
100-0003
PAGE1/2
PROTECT 100-0003
NORMAL PAGE1/2
3 Press the MENU button to finish the
setting.
Note:
o Formatting a card erases all stored images,
including delete-protected images.
!i!i!i!i!_ii!_!i_ijji
iiiiiiiiiiiiiiii_'........
6O
Page 76

Digital StilJ Camera Features
PJayback
Available mode:
CARD=VCR
Deleting One Stored image
You can delete unwanted images to free up
memory of a card for new images.
Note:
e Deleted images cannot be restored. Check
whether or not you want the images before
performing the procedure below.
1 In CARD-VCR mode, press the MENU
button until the menu screen appears.
2 Press _7 or z1_,on the operation button
to select _, then press the SET button.
3 Press _7 or z1_,to select"DELETE", then
press the SET button.
4 Press V or /,, to select"ONE IMAGE",
then press the SET button.
* The DELETE indicator appears.
iiiiiiiiiiiiiii!iiiiiiiiiiiiiiiiiiiiiiiiiiiiiiiiiiiii!!ii
iiii!?!Eiiiiiiii;ilililililiiii
6
Press the SET button to set the image.
* To cancel deletion, press V or ;,_to
select "NO", then press the SET button.
7
Press V or /,, to select"YES", then
press the SET button to delete the
image.
100-0003
PAGE1/2
4,
DELETE 100-0004
NORMAL PAGE1/2
* If you want to delete another image,
repeat steps 5 to 7.
8 Press the MENU button to finish the
setting.
Note:
" The protected images cannot be deleted.
Cancel the protection setting to delete the image
(see page 60).
Caution:
" Do not turn the power off while deleting an
image.
iiiii!iii_iiiiiiiiiiiiiiiiiiliiii
iiiiiii!!_iiiiiiiiiiiiiiiiii!
5 Press <, >, V or Z_to select the
61
DELETE indicator
image to be deleted.
_ DELETE
NORMAL
100-0003
PAGE1/2
Page 77

Deleting AJ| Stored images
You can delete all stored images on a card in
one operation.
Notes:
o Deleted images cannot be restored. Check
whether or not you want the images before
performing the procedure below.
o If you want to keep some images on the card,
first delete-protect them (see page 60), and then
perform the procedure below.
1 In CARD-VCR mode, press the MENU
button until the menu screen appears.
2 Press _7 or /,, on the operation button
to select _, then press the SET button.
3 Press V or /,, to select"DELETE", then
press the SET button.
SET
4 Press _7 or z1_to select"ALL IMAGES",
then press the SET button.
* The DELETE ALL indicator appears.
4,
_DELETE ALL="""""=I 100-0001
NORMAL PAGE1 /2
DELETE ALL indicator
5
Press V or /,, to select"YES", then
press the SET button to delete all the
images.
* To cancel deletion, press ,,/ or ..A,to
select "NO". then press the SET button.
6 Press the MENU button to finish the
setting
Notes:
o The protected images cannot be deleted.
Cancel the protection setting to delete the image
(see page 60).
o If a print order is assigned to delete-protected
images and you perform the procedure above,
the print order will cancel (the protection setting
will not cancel).
o It may take several seconds to delete all images
from the card.
Caution:
o Do not turn the power off while deleting images. !i!i!i!i!_ii!_!i_ijji
iiiiiiiiiiiiiiii_'........
62
Page 78

Digital Still Camera Features
Playback
Available mode:
CARD-VCR
The print order function allows you to add print
information called DPOF to still images
recorded on a card.
About DPOF
DPOF (Digital Printing Order Format) defines
the print information for the specific images
and number of each image on memory cards.
In the near future you will be able to easily
make prints on a DPOF-compatible printer or
order copies at your local print shop.
Note:
" You can print an image even if no print order has
been assigned.
5 Press _, >, V or _, to select the
image to which you want to assign a
print order.
100-0003
6
Press the SET button, then press V or
/\ to select the number of printouts.
* 1 through 99 can be set for the number
of printouts.
PAGE1/2
Assigning Print Order to an
image
1 In CARD-VCR mode, press the MENU
button until the menu screen appears.
2 Press _7 or /,, on the operation button
to select ,_, then press the SET button.
3 Press V or z1_to select"PRI. ORDER",
then press the SET button.
iiiiiiiiiiiiiii!iiiiiiiiiiiiiiiiiiiiiiiiiiiiiiiiiiiii!!ii
4 Press V or /,, to select"PRI. SELECT",
then press the SET button.
iiiii!iii_iiiiiiiiiiiiiiiil
iiiiiii!!_iiiiiiiiiiiiiiiiii!
* The PRINT indicator appears.
_ pR i NT=.._
NORMAL /
PRINT indicator
100-0001
PAGE1 /2
Number of printouts
7
Press the SET button to set the print
order.
* The _ indicator appears.
SET
PRINT 100-0003
NORMAL PAGE1/2
* If you want to assign another print order,
repeat steps 5 to 7.
8
Press the MENU button to finish the
setting.
100-0003
indicator
63
Page 79

To cancel the print order for an image
1 Select the image for canceling out of
print order in step 5 above, then press
the SET button.
2 Press V to select"0", then press the
SET button.
" The _ indicator disappears.
0 100-0003
PAGE1/2
Assigning Print Order to All
images
1 Perform steps 1 to 3 in "Assigning Print
Order to an Image".
2 Press _7 or z1_,to select"PRI. ALL:', then
press the SET button.
4,
SET
PRINT 100-0003
NORMAL PAGE1/2
Press the MENU button to finish the
setting.
4,
PLAYBACK 100-0001
NORMAL PAGE1/2
To cancel the print order for all images
1 Perform steps 1 to 3 in "Assigning Print
Order to an Image".
2
Press Y or A to select"PRI. NONE",
then press the SET button to cancel the
print order for all images.
- The _ indicators are turned off.
SET
4,
!i!i!i!i!_ii!_iii_ijji
iiiiiiiiiiiiiiii_'........
PLAYBACK 100-0001
NORMAL PAGE1/2
64
Page 80

Digital Still Camera Features
Playback
Using the supplied USB cable, you carl
transfer still images to a computer.
System Requirements
o Microsoft Windows :_98, Windows :_ 98 Second
Edition, Windows :_ 2000 Professional, Windows :_
Me or Windows _ XP operating system
o USB terminal
o CD-ROM drive (for driver installation)
o Mouse or other pointing device
Preparation
1 Turnonthe PC.
2 Connect the camcorder to the PC with
the supplied USB cable as shown below.
To USB terminal
USB cable (supplied)
To USBterminal e
3 Set the Media Selection switch to CARD.
4 Hold down the Lock button and set the
Power switch to VCR.
Note:
• When you connect the USB cable for the first
time, you need to install the USB driver. The
installation procedure varies depending on your
PC operating system. Find your operating
system and follow the steps in "Installing the
USB driver".
|nstaJiing the USB driver
* In tire examples below tire CD-ROM drive
letter is taken as "R:". Select the correct drive
letter according to your operating environ-
ment.
Windows 98/98 SE
1 "Add New Hardware Wizard" appears
after performing "Preparation".
2 Insert the CD-ROM containing the USB
driver into the CD-ROM drive, then click
"Next".
3 Select "Search for the best driver for
your device.", then click "Next".
4 Select "Specify a location:", and specify
"R:\WlN98", then click "Next".
5 Check the message, then click "Next" to
begin installation.
6 Click "Finish" to complete the installa-
tion.
-- Windows 2000
For
installing the IJSB driver, you need to
log
in as the system administrator.
1
"Found New Hardware Wizard" appears
after performing "Preparation", then
click "Next".
2 Select "Search for a suitable driver for
my device", then click "Next".
3 Select "Specify a location", insert the
CD-ROM containing the USB driver into
the CD-R©M drive, then click "Next".
4 Specify"R:\WIN2KXP", then click"OK".
5 Check the message, then click "Next" to
begin installation.
Click "Finish" to complete the installa-
tion.
65
Page 81

- Windows ME
1 "Add New Hardware Wizard" appears
after performing "Preparation".
2 Select "Automatic search for a better
driver".
3 Insert the CD-ROM containing the USB
driver into the CD-ROM drive, then click
"Next".
Select "SHARP DVC USB Vet. 1.0"
located in the "WlNME" folder of the
CD-ROM drive, then click "OK" to begin
installation.
5 Click "Finish" to complete the installa-
tion.
Windows XP
For installing the USB driver, you need to
log in as the system administrator.
1 "Found New Hardware Wizard" appears
after performing "Preparation".
2 Select "Install from a list or specific
location".
3 Insert the CD-ROM containing the USB
driver into the CD-ROM drive, then click
"Next".
4 Select "Search for the best driver in
these locations." and "Include this
location in the search:".
5 Specify "R:\WIN2KXP", then click
"Next".
A warning window for hardware
installation appears. However, click
"Continue Anyway" to continue
installation.
7 Click "Finish" to complete the installa-
tion.
image Folders and File Names
Still images recorded usklg tire camcorder are
stored on a card as shown below.
h
DClM...... Folder of still image files
100SHARP _ Sub-folder of still
E_ DVC00001 .JPG -_ Still image
[_ DVC00002.JPG
Caution on transferring data
While transferring data. the transfer indicator
moves. Do not execute the operations below.
- Disconnecting the USB cable
- Switching the power on/off
- Turning off the PC or setting it to Standby
- Opening the card slot cover
USB [_ ;q
Note:
o In case of data transfer error, disconnect the
USB cable, then connect it again, or set the
Power switch to OFF,then set it to VCR again.
Disconnecting the USB cable
Refer to the operation manual and help files of
your PC for unplugging, and make sure that the
PC permits to unplug, then disconnect the USB
cable.
Notes:
" If you copy any data incompatible with this
camcorder to the card, the camcorder will not be
able to recognize it.
,, It is recommended to use the AC adapter as a
power source for extended periods of use.
images
Serial number
(100 to 999)
Transfer indicator
iiiiiiiiiiii_i_iiiii!i_:_
iiiiiiiiiiiiiii!!!!_iiii
iiiiiii_ii
ii{iii_ii{
!i!i!i!i!_ii!_iii_ijji
iiiiiiiiiiiiiiii_'........
66
Page 82

Digital StilJ Camera Features
PJayback
Available mode:
CARDWCR
You carl automatically play back consecutive
still images recorded on a card at intervals of 5
seconds. This is useful when confirming the
data recorded on a card.
1 Set the camcorder to CARD-VCR mode.
2 Press <, ->, V or ,{,, to select the
image from which you want to begin
slide show playback.
PLAYBACK 100-0003
NORMAL PAGE1/2
3 Press the MENU button until the menu
screen appears.
4 Press V or _:,to select ,_, then press
the SET button.
5
Press V or /\ to select"SLIDE SHOW",
then press the SET button.
,, Beginning from the image selected in
step 2, the recorded images will display
in fuIFscreen one after another in order
of recording.
SET
4,
,, After playing back all the images on the
card once. Slide Show Playback
automatically stops.
6
Press the MENU button to turn off the
menu screen, then press the SET button
to display a thumbnail of images.
iiiiiiiiiiiiiii!iiiiiiiiiiiiiiiiiiiiiiiiiiiiiiiiiiii!!!ii
iiiiiii!!_iiiiiiiiiiiiiiiiiiiiiiii!
67
To stop Slide Show Playback
During slide show playback, press the MENU
button twice, then press the SET button to
display a thumbnail of images.
Page 83

Available modes:
AIi modes
If the picture is difficult to see due to ambient
light or other factors, adjust the monitor picture
settings.
o The example screens shown are for TAPE-
CAMERA mode.
Adjusting the Picture
1 Press the MENU button until the menu
screen appears.
2 Press V or A on the operation button
to select LOB,then press the SET button.
3 Press ,./ or /,, to select"LCD BRIGHT"
or "LCD COLOR", then press the SET
button.
Press V or ,_,to adjust the item to the
desired setting.
I _''O_Oo_ I
Darker_-I_ Brighter
Adjusting the Backlight
1 Press the MENU button until the menu
screen appears.
2 Press V or A on the operation button
to select [0D, then press the SET button.
3 Press V or A to select"BACKLIGHT",
then press the BET button.
4
Press '..2or z1_,to select "AUTO",
"NORMAl", "BRIGHT" or "OFF", then
press the SET button.
AUTO: The camcorder automatically
switches between "NORMAL" and
"BRIGHT" depending on the ambient
light. This mode is only available in
TAPE-CAMERA or CARD-CAMERA
mode.
NORMAL: For use indoors or under
moderate lighting conditions.
BRIGHT: For use outdoors under
strong lighting conditions, such as
bright daylight.
OFF: The backlight turns off. To turn it
orsagain, press the MENU button.
5
Press the MENU button to turn off the
menu screen.
I
Press the SET button, then press the
MENU button to turn off the menu
screen.
Note:
oWhen adjusting the color, the picture on the LCD
monitor may differ from the picture actually
recorded. Do not change the color setting unless
necessary. (This adjustment only affects the
monitor picture, not the recorded image.)
68
Page 84

Appendix
Available modes:
All modes
A confirmation sound is made when you turn
on or off the Power swkch, press the REC
START/STOP button, or perform other desig-
nated operations. Use the procedure below to
turn off the confirmation sounds.
1 Press the MENU button until the menu
screen appears.
2 Press V or /,, on the operation button
to select ETC,then press the SET button.
3 Press V or /,, to select"BEEP", then
press the SET button.
4 Press _7 or z1_,to select"OFF", then
press the SET button.
5 Press the MENU button to turn off the
menu screen.
Note:
o Ifyou select "OFF", the focus confirmation sound
in CARD-CAMERA mode will turn off.
iiiililililililililililililili_i!iii_i_iiiiiiiii
69
Page 85

_ints for Better Shooting
- Position the subject in the center of the
scene. When using auto focus, whatever is in
the center of the scene is kept in focus.
Position the subject in Focus manually when you
the center, need to position the
subject off center (see
page 42).
• Avoid backNt subjects. For the best picture,
shoot with the light source behind you.
When the background is brighter than the
subject, the subject often becomes too dark.
If you have to record in this lighting, use
Gamma Brightness Compensation or correct
the exposure level to improve the picture (see
pages 29 and 43).
_\ // \ //
Light from behind Backlighting
- Before zooming, think about how to best
frame the shot. Frequent zooming produces
unattractive pictures. It also runs down the
battery more quickly.
• When image shaking is noticeable during
zoomed-in telephoto shooting, use a tripod or
push the Power Zoom control to the W side to
zoom out.
- Horizontal panning (lateral movement) and
tilting (vertical movement) should be done
slowly to emphasize the wide expanse of a
scene or the height of a building, and to
make scenes easy to watch during playback.
- Use a wide-angle setting for fast-moving
subjects.
Note:
e It may take longer to focus when zooming and
panning are used frequently.
ighting
For clear, good-quaNty recording, 500 to
100,000 lux is needed. Recording is possible
with less light, but the picture quality may
suffer. Adequate lighting is also essential for
correct white balance.
Bluesky A
100,000 Cleardayatn00n(100,000)
Cleardayat10am(65,000)
Cleardayat3pm(35,000)
Cloudydayatnoon(32,000)
Cloudydayat10am(25,000)
101000 Z
Cloudyday,onehouraftersunrise(2,000)
Clearday,onehourbeforesunset(1,000)
1,000 Fluorescentlightnearwindow(1,000)
Factoryfloor(700 800)
Salescounterindepartmentstore(500 700)
Bowlingalley(500)
Library(40(F500)
0fficew_thflu0rescentNghting(400_500)_ P
Fluorescentdesklamp(400)
Flashlightat3 ft (1m)(250)
100 Sh0pstairway(100)
Duringintermissionatmovietheater(15 35)
Cigarettelighterat1ft(30cm)(15 20)
Candleson birthdaycakeat8inches(20cm)
(10 15)
10
Candlelight
Note:
o The figures in the chart are approximations.
Tips on good lighting
In most outdoor, daytime scenes, natural
lighting is adequate for home videos. Indoors,
however, artificial lighting is usually required.
Video lights with halogen lamps provide the
most natural artificial light over a long operating
life.
70
Page 86

Appendix
Tech.ology
Digkal video (DV) is a revolutionary technology
that enables recording and playback of high
quality images with the use of special digital
features previously unavailable with conven-
tional analog formats.
DV and conventionaivideo easse_e
tapes
There are two kinds of DV-format video
cassette tapes: the Mini DV cassette and the
larger DV cassette used for extended playback
and recording. This camcorder only operates
with Mini DV cassettes. DV cassettes cannot
be used. Be sure to use Mini DV cassettes with
the _1,,,_, mark.
Mini DV cassette DV cassette
8 mm, VHS, and Beta cassettes cannot be
used for playback or recording with this
camcorder.
8 mm cassette VHS cassette Beta cassette
Note:
" This camcorder reproduces the highest picture
quality when used with an ME tape. It is
recommended you use an ME tape for high-
quality recording and playback.
This product incorporates copyright
protection technology that is protected by
method claims of certain U.S. patents and
other intellectual property rights owned by
Macrovision Corporation and other rights
owners. Use of this copyright protection
technology must be authorized by
Macrovision Corporation, and is intended
for home and other limited viewing uses
only unless otherwise authorized by
Macrovision Corporation. Reverse engineer-
ing or disassembly is prohibited.
71
Memory Card and
MultiMediaCard
SD Memory card and MultiMediaCard are
compact recording media just 1 V4inches (32
ram) long and _5/_6inches (24 ram) wide which
support the needs of the digital network society
where music, images, games and various other
provider services are offered.
.. You can use an SD Memory Card and a
MultiMediaCard for storing still images with
this camcorder, not a SmartMedia TM card or
Memory Stick TM media.
SD Memory Card MultiMediaCard
SmartMedia TM card Memory Stick TM media
.. An SD Memory Card is superior to a
MultiMediaCard in terms of copyright
protection functions and high speed transfer.
., The SD Memory Card is compatible with
MultiMediaCard, and data stored on
MultiMediaCard can be used with the SD
Memory Card.
Note:
" This camcorder is verified to work with the
following card types and capacities.
SD Memory Card: 128 MB or less
MultiMediaCard: 64 MB or less
Page 87

;UJnJ DV Cassette To protect recordings against acciden-
tal erasure
Slide the protect tab on the rear of the Mini DV
cassette to the "SAVE" position.
protect tab
Precautions when using a Mini DV
cassette
- Be sure to use only Mini DV cassettes with the
tvl r1 _'T mark.
- This camcorder can record and play back
using Mini DV cassettes with cassette
memory, but it cannot record or play back this
memory.
,,To record in LP mode, use a Mini DV cassette
labeled for use with LP mode.
- Do not insert anything into the holes on the
bottom of the Mini DV cassette or block them
in any way.
- Avoid placing the Mini DV cassette in an area
conducive to dust or mold.
- Do not place the Mini DV cassette near
magnetic sources such as electric clocks or
magnetic devices as this may adversely
affect recorded material.
- When a previously recorded Mini DV cassette
is used again for recording, the previously
recorded material will be automatically
erased.
- The Mini DV cassette will not operate if
inserted in the wrong direction.
- Do not repeatedly insert and eject the Mini DV
cassette without running the tape as this may
cause uneven tape winding and damage the
tape.
- Do not place the Mini DV cassette in direct
sunlight, near strong heat sources, or in areas
with excessive steam.
- Store the Mini DV cassette in its case and
stand it in an upright position.
- If the tape is not properly wound, rewind the
tape.
- Do not drop the Mini DV cassette or subject it
to excessive shocks.
To record over a previously recorded tape,
slide the protect tab to the "REC" position.
;_Opyright Protection
The digital VCR has far superior recording and
playback ability than the traditional analog
VCR, and in order to protect digital video
software copyrights, a system for managing
copyrights has been established. Some digital
video recording with pre-recorded copyright
protection signals can still be played back on
this camcorder. If you play a digital video
recording that has a copyright protection signal
on video equipment with a DV terminal and
attempt to record a copy of that software on
this camcorder, "COPYRIGHT PROTECTED."
appears on the screen and the recording is
disabled.
COPYRIGHT
PROTECTED.
72
Page 88

Appendix
ItiMediaCard
Improper handling of the Mu[tiMediaCard may
cause damage to the card or images on the
card. Follow the instructions below for correct
use.
....... Contacts
I I _'This is the part of the card that
I I makes contact with other equip-
I I ment. Do not touch with your
Precautions on handling
MultiMediaCards
• Be sure to insert the card in the correct
,,The card is a precision component. Do not
,, Do not put the card in your pocket or other
,, Do not expose the card to excessive heat or
Do not use or store the MultiMediaCard
in the following kinds of environment:
• Locations subject to electrical noise or
,, Locations exposed to direct sunlight.
,*Locations subject to high temperature or high
,, Locations where dust gathers in large
,,Corrosive environments.
,*Sunlit or enclosed spaces and other such
iiiililililililililililililili_i!ii_ii_iii_iiiii
i
fingers, scratch, smudge or
damage in anyway.
direction. Do not try to force the card in.
disassemble or modify it in any way. Take
care not to bend it, subject it to severe shock,
drop it, or allow it to get wet.
unprotected location as it may break due to
pressure applied when you sit.
fire.
powerful magnetic fields. Data on the card
may be destroyed (erased).
humidity.
amounts or blows through the air.
locations subject to high temperature.
Watch out for static electricity
• Do not let dirt or other foreign matter accumu-
late on the card contacts, or touch them with
your fingers, or rub or scrape them. Static
electricity may damage (erase) data on the
card. Clean the card by wiping it gently with a
soft, dry cloth.
• Carry and store the card in its original plastic
case to protect it from dirt, grime and static
electricity. (The polyethylene case is anti-
static.)
Watch out for condensation
• Moisture (condensation) may form inside and
outside the card if it is carried into an area
subject to sudden, large changes in tempera-
ture. Watch out for condensation, because it
can cause malfunctions.
,, When moisture condenses on the card, leave
it at the prevailing temperature until the water
evaporates naturally.
Your image data
,, It is best to copy your valuable image data
from the card onto some other medium
(personal computer, floppy disk, MO disk,
etc.) and make a backup.
Malfunction, repair, and so on can cause the
recorded images to disappear from the card.
,, Make absolutely sure not to remove the card
or turn the camcorder power off while the
card is recording data, erasing data, or
formatting (initializing). This can cause loss of
data and damage the card.
• Initializing the card will erase the data on it.
Make sure no important image data is
recorded on the card before you initialize it.
,, Please be aware that Sharp Corporation wi][
not be liable for any damages resulting from
loss of data caused by incorrect handling of
the card by you or a third party, or caused by
exposure to static electricity or electrical
noise or by malfunction.
73
Page 89

Memory card
Precautions on handling SD Memory
Cards
• After removing the card from the camcorder,
be sure to immediately store it in the card
case.
,, Do not disassemble or modify the card.
,, Do not strike, bend, drop, or allow the card to
become wet.
,, Do not touch the metal terminals with your
hands or metallic objects.
,, Do not peel off the label from the card.
,, Do not attach other labels or stickers to the
card.
,, Do not use or store the card in locations
directly exposed to sunlight, heat vents,
heating appliances, or other locations with
extremely high temperatures such as inside a
closed vehicle in the summer.
,, Do not use or store the card in humid or dusty
locations.
,, Do not use or store the card in locations
exposed to corrosive gases.
Protecting your data
Backview
Aeapte,,
• The AC adapter may interfere with reception if
used near a radio.
• Prevent flammables, liquids, and metal
objects from entering the adapter.
• The adapter is a sealed unk. Do not attempt
to open or modify it.
• Do not damage, drop, or subject the adapter
to vibration.
• Do not leave the adapter in direct sunlight.
• Avoid using the adapter in humid or ex-
tremely hot places.
_ep|acing the F|uorescent
Lamp
This camcorder uses a fluorescent lamp to
backlight the LCD monitor. If the monitor
becomes dark or difficult to view, the fluores-
cent lamp may need to be replaced. Contact
the nearest SHARP service center or your
dealer for further advice.
9rotect switch
,,Set the write-protect switch to "LOCK". Set
the switch to the unlocked side when you
want to record or edit the card again.
,, Do not remove the card or turn off the power
of the camcorder and peripheral equipment
while data is being read or written. Also do
not remove the power source from the
camcorder. These actions can cause data to
be destroyed. (Please be aware that Sharp
Corporation cannot be held liable for any data
loss or other loss directly or indirectly caused
by data loss.)
,, Make backup copies of your data wherever
possible.
74
Page 90

Appendix
; atte,'y p.ck
This camcorder uses a lithium-ion type battery
pack.
Charging
• Charge the battery pack immediately (or a
day) before use. The battery pack gradually
self-discharges even if stored in a fully
charged state.
- Charge the battery pack between 50°F and
86°F (10°C and 30°C).
- Fully charge the battery pack. Use of an
insufficiently charged battery pack will
shorten actual time of use.
- Refresh (discharging before charging) is
unnecessary.
Use
• To conserve battery power, be sure to turn off
the camcorder power when not in use.
- Battery consumption may vary depending on
the condition of use. Recording with many
starts and stops, frequent zooming, and
recording in low temperatures will shorten
actual recording times.
- Use of a weak battery pack may cause loss
of power while operating the camcorder. Use
a fully charged battery pack to protect both
the battery pack and the unit.
- It is recommended that you have enough
battery packs on hand to handle two or three
times your estimated recording time. See
page 20 for the approximate times of actual
recording for the battery packs.
Note:
,' Use only SHARP BT-L225 or BT=L445battery
packs. These are designed specifically for use
with this camcorder.
iiiililililililililililililili_i!ii_ii_iii_iiiii
75
Storage
• Store the battery pack in a fully discharged
state.
- Store the battery pack in a dry, cool place.
- When storing a fully charged battery pack,
put the cover on it so that the "CHARGE"
mark printed on the label is seen through the
window, as shown.
Window
When storing a battery pack that is not fully
charged, put the cover upside down so that
only the battery pack casing can be seen
through the window.
Cautions:
" Improper handling of the battery pack may
present a risk of fire or explosion. Pay close
attention to the following:
Do not allow metallic objects to come in
contact with the terminals. This can cause a
short circuit.
Do not disassemble or repair the battery pack
by yourself.
Do not use any battery charging equipment
other than that designed for use with these
battery packs.
Do not place the battery pack under direct
sunlight or in excessively hot places (over
140°F or 60°C) such as the dashboard of
cars.
Do not expose the battery pack to moisture or
water.
Do not drop the battery pack or subject it to
strong force.
Keep the battery pack out of reach of
children.
Dispose of used battery packs promptly. Do
not dispose of them in fire.
,, To protect the terminals, put the cover on the
battery pack when it is not in use.
Notes:
e The battery pack will become warm during
charging and use. This is not a malfunction.
,, The battery pack has a limited service life. If the
period of use becomes noticeably shorter with a
normal charge, the battery pack is at the end of
its service life. Replace it with a new battery pack.
,, If the terminals of the battery pack are dirty, wipe
the terminals with a soft, dry cloth.
Label
Battery pack
Cover
Page 91

Formation
• What is "dew formation"?
When cold water is poured into a glass, dew
drops form on the glass. This clinging of
water drops is called dew formation.
• When dew forms in your eameorder.
Dew wil[ gradually form on tile head drum of
your camcorder and make the video tape
stick to the head. This causes damage both
to the head and the tape. When dew forms,
recording and playback may not function
properly.
Dew is likely to form in the following circum-
stances:
When moving the camcorder from a cold
place to a warm place.
When placing the camcorder in a cold
room which is then heated rapidly.
When moving the camcorder outdoors from
an air conditioned room or car.
When placing the
camcorder inthe direct _'_Q 9 ,o
room.
- How to prevent trouble,
When using the camcorder in a place where
dew is likely to form, allow the camcorder and
the video tape to acclimate to the surround-
[ngs for about one hour.
For example, when bringing the camcorder
indoors after skiing, place it in a plastic bag.
- "Dew" warning feature
If dew forms, the word "DEW" flashes on the
screen, and the power will automatically turn
off in approximately 10 seconds.
If "DEW" flashes, remove the cassette,
leave the cassette compartment open, and
wait for a few hours to allow the camcorder
to acclimate to the surrounding tempera-
ture.
2To use the camcorder again, turn on the
power after waiting for a few hours. Be sure
that "DEW" has disappeared.
3Do not insert a cassette while "DEW" is
flashing; this may result in damage to the
tape.
_ Since dew forms gradually, it may take 10
to 15 minutes before the dew warning
feature engages.
Plastic bag
Be sure to tightly seal the plastic bag
containing the camcorder.
_ Remove the bag when the air temperature
inside it reaches the temperature of the
room.
76
Page 92

Appendix
; irty video Heads
When the video heads have become clogged
with dirt (dust and tape coating particles),
Striped noise Mosaic noise
- mosaic-like noise appears on the playback
picture. (see above illustration)
- playback pictures do not move.
- during playback, the whole screen becomes
blue.
Causes of video head clogging
- High-temperature and high-humidity environ-
ment
- A lot of dust in the air
- Damaged tape
- Worn tape
- Long-time use
- Dew formation
If the video heads become clogged, the
O indicator appears on the screen. Contact
the nearest SHARP service center or your
dealer for further advice.
Using a Cleaning Tape (Commercially
Available)
Available mode:
TAPE-VCR
You can clean the video head with a commer-
cially available cleaning tape.
Notes:
e Excessive use of the cleaning tape may cause
damage to the video heads. Please read the
instructions accompanying the cleaning tape
carefully before using it,
,, The fast forward and rewind functions cannot be
used when the cleaning tape is in the
oamcorder.
,, If the video heads again become clogged with
dirt soon after cleaning, this might be caused by
a damaged tape. In this case, stop using that
cassette immediately.
1 Insert a cleaning tape into the
camcorder.
2
Set the camcorder to TAPE-VCR mode.
- The video head cleaning screen
appears.
3
Press the SET button to begin video
head cleaning.
- "NOW CLEANING" flashes during
cleaning.
CLEANING
SET
- After about 20 seconds, video head
cleaning automatically finishes, and
"EJECT THE CASSETTE." displays.
4 Remove the cleaning tape.
--NOW CLEANING_
///_t\_\
iiiililililililililililililili_i!iii_i_iiiiiiiii
77
To cancel cleaning, press the SET button.
Page 93

_|eaning
• Many plastic parts are used in the camcorder
casing. Do not use thinner, benzene or other
strong chemical cleaners. These may cause
discoloration and damage to the casing.
,,Clean the casing with a soft, dry cloth. If the
casing is particularly dirty, wipe the casing
with a tightly wrung cloth dampened with a
diluted, neutral detergent. Then wipe it again
with a soft, dry cloth.
,, Use a soft cloth to wipe finger marks and
other smudges off the LCD screen.
,, Use a soft cloth, or compressed air and lens
paper designed for photographic lenses to
clean the lens.
:_Si.g Your Camcorder Abroad
Television signal standards and electrical
voltages and frequencies vary substantially
from country to country. When you are abroad,
check the sections below before using the AC
adapter or connecting the camcorder to a TV.
The supplied AC adapter is compatible with
50 Hz and 60 Hz electrical systems in the
range of 110 V to 240 V AC.
Use a commercially available AC plug adaptor,
if necessary, depending on the design of the
wall outlet.
__AC 110 240V
A commercially available
AC plug adaptor
In any country, you can always watch the video
picture by using the LCD monitor screen.
However, if you want to watch the picture on a
TV screen, the TV must be NTSC-M system
compatible. NTSC-M is used in the following
areas:
The Bahamas, Barbados, Bermuda, Myanmar
(previously Burma), Canada, Chile, Colombia,
Costa Rica, Cuba, the Dominican Republic,
Ecuador, El Salvador, Greenland, Guam,
Guatemala, Haiti, Honduras, Jamaica, Japan,
South Korea, Mexico, the Nethedand Antilles,
Nicaragua, Panama, Peru, the Philippines,
Puerto Rico, St. Kitts, St. Lucia, Surinam,
Taiwan, Trinidad, the U.S.A., Venezuela,
Southern Vietnam, and the Virgin Islands.
78
Page 94

Appendix
Available modes:
TAPE-CAMERA, CARD-CAMERA
You can watch a brief demonstration of the
special camcorder features in Demo mode.
If the demonstration appears on the screen
when you turn on the camcorder for the first
time. cancel the Demo mode to use your
camcorder.
Note:
o The demonstration is only displayed in English.
Watching the Demonstration
1 Remove the Mini DV cassette from the
camcorder (see page 12).
In TAPE-CAMERA or CARD-CAMERA
mode, press the MENU button until the
menu screen appears.
3
Press V or A. on the operation button
to select ETC,then press the SET button.
4
Press V or A to select"DEMO MODE",
then press the SET button.
Canceling Demo Mode
1 During the demonstration, press the
MENU button to pause the demonstra-
tion.
2
Press V or j_,,on the operation button
to select ETC,then press the SET button.
3
Press V or A to select"DEMO MODE"
then press the SET button.
4 Press V or A to select"OFF", then
press the SET button.
5 Press the MENU button to turn off the
menu screen.
Note:
" The demonstration will pause if you press the
MENU button. If you leave it for 60 seconds, or
turn the power off temporarily and then set the
Power switch to CAMERA, the demonstration will
begin again.
Press V or A to select"ON", then press
the SET button.
Set the Power switch to OFF, then hold
down the Lock button and set the Power
switch to CAMERA.
- The demonstration begins.
#iiii:iii!#iiiiii;iiiiii!i!!i!!i!_ii!i!iii!i!iii!i!ii_i_!_iiii
iiiililililililililililililili_i!iii_i_iiiiiiiii
79
Page 95

Before calling for service, please check the following troubleshooting table.
iiiiiiiiiiiiiiiiiiiiiiiiiiiiiiiiiiiiiiiii__ii_ii_ii_:___!_!_!_!_!_!_!_!_!_!_!_!_!_!_!_!_!_!_!_!_!_!_!_!_!_!_!_!_!_!_!_!_!_!_!_!_!_!_!_!_jj¸¸
iiiiiiiiiiNopower
iiiii_...........
iiiiiiiiiiiiiiiiREC START/STOP button
!!!!!!!!!!!!!!!!doesnotwork.
iiiiiiiiiiiiiiiiPowersuddenlyturnsoff.
Auto focus does not
work.
Bright subject produces Occurs when shooting subject with
wide vertical lines, strong contrast to the background.
Automatically zooms out
without operating Zoom
control.
Display automatically Camcorder is in Demo mode. Set DEMO MODE menu item to "OFF"
changes in TAPE-CAM- (p. 79).
ERA mode.
No image appears on Video input channel on TV or TV Select video input channel or TV
connected TV screen, channel is not selected properly, channel properly (p. 25).
_j!_iiiijli¸
No image from an exter- DV cable or audio/video cable is not Connect DV cable or audio/video
nal source appears on properly connected, cable properly. (pp. 49-51)
the camcorder screen.
Power source is not properly con-
nected.
Battery pack is not charged.
Dew in camcorder.
Safety function is in effect.
Erasure-protect tab on video cassette Close tab or use a new cassette
is open. (p. 72).
Camcorder left in Recording Standby Set Power switch to OFF and then
mode for 5 minutes in TAPE-CAMERA back to CAMERA.
mode.
Manual Focus mode is engaged.
Zoom used on close subject.
Subject has little contrast in bright-
ness, or is full of horizontal or vertical
stripes.
Does not indicate a malfunction.
Camcorder is unable to focus when
zooming in on subject within 5 feet
(1.5 m), and automatically zooms out
until it focuses on subiect.
No subject in the field of view. Direct lens to some subject, or set
Audio/video cable is not properly Connect audio/video cable properly
connected. (p. 25).
Connect power source properly
(pp. e, 11).
Charge battery pack sufficiently
(p. 10).
Wait until dew dries (p. 76).
Set Power switch to OFF and remove
battery pack. Wait for 2 seconds, then
reinstall battery pack and turn on
power (p. 9).
Set to Auto Focus mode (p. 42).
Zoom out from subject (p. 21).
Focus manually (p. 42).
zoom to widest angle before shooting
(p. 21).
8O
Page 96

Appendix
Cannot rewind or fast for-
ward tape.
Video noise in image.
iiii!iiiiiiiiiiiiiii!!i!
Cannot delete image on
card.
Cannot format card.
Cassette will not eject.
iiiiiiiiiiiii
iiiiiiiiiiiii
iiiiiiiiiiiii
iiiiiiiiiiiii
iiiiiiiiiiiii
iiiiiiiiiiiii
No image on monitor.
iiiiiiiiiiiii
iiiiiiiiiiiii
Monitor picture is hard to
see.
CHARGE indicator
flashes in red when
charging battery pack.
iiii!_iiiill
Cannot edit to connected
VCR.
iiiiiiiiiiiiiiii
iiiiiiiiiiiiiiii
Remote control does not
iiiiiiiiiiiiiiii
iiiiiiiiiiiiiiii
function.
Position at beginning or end of tape.
Dirty video heads.
Old or worn tape.
Image is delete-protected.
Power source is not properly con-
nected.
Battery pack is not charged.
Camcorder is recording.
Backlight has been turned off.
Fluorescent lamp has burned out.
Inappropriate picture adjustments.
AC adapter or battery pack may have
malfunctioned.
Audio/video cable is not properly
connected.
REMOTE menu item is set to "OFF".
Remote control battery has run down.
Remote control used beyond operat-
ing range.
Intense daylight falling on camcorder
remote sensoL
Obstacle between remote control and
camcorder remote sensor.
Rewind or fast forward tape to de-
sired point (p. 23).
Call for service (p. 82) or use a com-
mercially available cleaning tape
(p. 77).
Use a new cassette.
Cancel the protection setting (p. 60).
Contact your dealer for advise.
Connect power source properly
(pp. 9, 11).
Charge battery pack sufficiently
(p. 10).
Stop tape and try again (p. 20).
Turn on backlight (p. 68).
Call for service (p. 82).
Adjust picture (p. 68).
Call for service (p. 82).
Connect audio/video cable properly
(p. 48).
Set REMOTE menu item to "ON"
(p. 38).
Replace remote control battery with
new one (p. 38).
Use remote control within operating
range (p. 38).
Protect remote sensor from exposure
to intense daylight (p. 38).
Remove obstacle or use remote con-
trol from different angle (p. 38).
Notes:
,' This unit is equipped with a microprocessor. Its performance could be adversely affected by external
electrical noise or interference. If this should happen, turn off the power and disconnect the unit from
any power sources, including the lithium battery, etc. Then reconnect the power sources to resume
operation.
,, If the characters displayed on the monitor screen appear to malfunction, disconnect the power source
and remove the lithium battery, then reconnect the power source, insert the lithium battery, and turn the
power on again. The characters on the monitor should be normal. Set the date and time, then resume
operation.
81
Page 97

Cal_covdov
Signal System:
Recording System:
Recording/Playback Time:
Tape Speed:
Pickup Device:
Lens Filter Diameter:
Microphone:
Color Temperature Compensation:
Minimum Illumination:
Still Image Compression System:
Still Image Recording Format:
Still Image Recording Medium:
Power Requirement:
Power Consumption:
Operating Temperature:
Operating Humidity:
Storage Temperature:
Dimensions (approx.):
Weight (approx.):
AC Adapter (UADP-0339TAZZ)
Power Requirement:
DC Output:
Dimensions (approx.):
Weight (approx.):
SD Memory Card
Memory Capacity:
Power Requirement:
Operating Temperature:
Storage Temperature:
Cassette:
Lens:
Monitor:
NTSC standard
2 rotary heads, helical scanning system
Digital VCR Mini DV video cassette
90 minutes (DVM60, LP mode)
SP mode: 18.812 mm/second
LP mode: 12.555 mm/second
/_" (6.4 mm, effective size: 4.5 mm) CCD image sensor (with
approx. 460,000 pixels including optical black)
10× optical/300× digital power zoom lens (F1.8,
f=3.r_36.0 mm), full-range auto focus
27 mm
3" (7.5 cm) full-color LCD screen (TFT active matrix)
Electret stereo microphone
Auto white balance with white balance lock
1 lux (12 lux measured by EIA standard) (with gain-up, F1.8)
JPEG base line conformance
JPEG (Exif2.1)
SD Memory Card, MultiMediaCard
DC 7.4 V
4.3 W (during camera recording in Full Auto mode with zoom
motor off and backlight in normal mode)
32°F to 104°F (0°C to +40°C)
30% to 80%
4°F to 140°F ( 20°C to +60°C)
5 %6" (W) x 3 _/;_2"(H) x 2 %U' (D)
[141.1 mm (W) × 85.1 mm (H) × 58.5 mm (D)]
1.03 Ibs (465 g) (without battery pack, lithium battery, video
cassette, lens cap, lens hood, wrist strap and card)
AC 11(M240 V, 50/60 Hz
10V
1 3_/;S' (W) x 1 _A6"(H) x 2 1%2" (D)
[50.0 mm (W) x 27.0 mm (H) x 65.5 mm (D)]
0.22 Ibs (100 g)
8 MB (VL-NZ100U), 16MB (VL-NZ150U)
3V
32°F to 104°F (0°C to +40°C)
4°F to 149°F ( 20°C to +65°C)
Specifications are subject to change without notice.
SERVICE INFORMATION (For the U.S.)
For the location of the nearest Sharp Authorized Service, or to obtain product literature,
accessories, supplies or customer assistance, please call 1-800-BE SHARP (1-800-237-4277)
or visit SHARP's website (http://www.sharp-usa.com).
82
Page 98

informaci6n impor n para los consumidores de los EE.UU.
I ADVERTENCIA: PARA REDUClR EL RIESGO DECAUSAR UN INCENDIO I
O RECIBIRUNADESCARGAELECTRICA,NOEXPONGA
ESTEAPARATOA LA LLUVlA NIA LA HUMEDAD.
PRECAUCION:
PARAREDUCIREL RIESGODERECIBIR
UNADESCARGAEL£CTRICANORETIRE
LATAPA.ENELINTERIORNOHAYPARTES
QUE DEBA REPARAR EL USUARIO.
RIESGO DE SACUDIDA
ELECTRICA. NO ABRIR.
Este simbolo avisa al usuario de la presencia de tension sin
aislar en el interior del aparato que puede causar descargas
electricas peligrosas.
Este simbolo alerta al usuario de que existen instrucciones de
manejo y mantenimiento importantes en la informaciOn escrita
entregada con este aparato.
SOLICITE LAS REPARACIONES AL
PERSONALDESERVICIOCUALIFICADO.
PRECAUCION
(seaplica aladaptadorde CAsuministrado)
PARAIMPEDIRDESCARGASELECTRICAS,
INTRODUZCALAPATILLAANCHA EN LA
RANURAANCHA, EINTRODUZCA
COMPLETAMENTELACLAVIJA.
PRECAUCION
Si el adaptador de CA se extravia o
tiene que ser cambiado, adquiera
otro del mismo tipo en el centro de
servicio SHARP de su concesionario.
PARATIRAR EL PRODUCTO
Este producto utiliza soldadura de esta_o y plomo, y su lampara fiuorescente contiene
una peque[_a cantidad de mercurio. Debido a la conservacion del medio ambiente,
puede que para tirar estos matedales deban seguirse ciertos reglamentos. Para obtener
informacion sobre como tirar o reciclar estos materiales, pongase en contacto con las
autoridades de su Iocalidad o con Electronics Industries Alliance (Alianza de Industrias
de la Bectronica) en la direccion de Internet: www.eiae.org.
PARATIRAR LA BATER|A
CONTIENE BATERiA DE IONES DE LITIO. ESTADEBE RECICLARSE 0 TIRARSE DE LA
FORMA APROPIADA. PONGASE EN CONTACTO CON LAS AGENCIAS LOCALES
PERTINENTESPARA OBTENER INFORMACION SOBRE LOS PLANES DE RECICLADO Y
ELIMINACION EXISTENTESEN SU ZONA DE RESIDENCIA.
83
Page 99

Precauciones
• Cnando no ntilice la videoc&mara, no se
olvide de extraer el videocasete,
desconectar la alimentaci6n y desenchnfar
Ja videoc&mara de Jafuente de
alimentaci6n.
- No dirija el objetivo hacia el sol
No permita que la luz del sol directa llegue al
objetivo ni a la pantalla det monitor LCD de la
videocamara, tanto si esta realizando la
grabacion como si no, porque esto podria
da_ar el sensor de CCD o la superficie de la
pantaHa LCD. Tenga mucho cuidado
especialmente cuando grabe en exteriores.
- Cuando filme en lugares osouros, evite filmar
repenfinamente objetos muy iluminados o
fuentes de luz como, pot ejemplo, el sok De
Io contrado, la imagen desaparecera. En tal
caso, dirija el objetivo en otra direcciOn hasta
que la imagen recupere la normalidad.
• Evite los campos
magn_ticos.
La utilizaciOn de la
videocamara cerca de
lamparas fiuorescentes
fuertes, motores,
televisores u otros campos magneticos
puede afectar negativamente alas imagenes
grabadas.
• La utilizaci6n de la videocamara cerca de
una emisora n otra fuente potente de
transmisi6n pnede causar zumbidos o
deterioro en la imagen.
_,Evite golpearla o dejarla
caer,
No deje caer la videocamara
ni tampoco la someta a
golpes o vibraciones
intensas. Los golpes
producidos durante la
grabacion ocasionaran
ruidos en la imagen grabada.
• Evite poner la _'-_
videoc&mara cerea
de equipos de
ilnminaei6n.
El calor producido por _- /_-_"! l
las lutes
incandescentes
puede deformar la
videocamara o hacer que esta funcione mak
4"
• Respete siempre las prohibiciones o
restricciones relacionadas con la
utilizaci6n de eqnipos electr6nicos en
vnelos eomerciales o en otras areas
snsceptibles.
- Tenga cuidado con la temperatura y la
humedad.
Podra ufilizar su videocamara a temperaturas
de entre 32°F y 104°F (O°C y ÷ 40°C), con
una humedad relativa de entre el 30% y el
80%. Durante el verano, no deje el aparato
en el interior de un automOvil sin ventilacion;
no Io deje tampoco bajo la luz del sol directa
ni cerca de fuentes de
caJor intenso; esto
podda estropear
considerablemente la
caja del aparato y su
circuito.
• Evite situaciones en las qne el agua, la
arena, el polvo n otras sustancias extrahas
puedan entrar en la videoc_mara, y no
utilice ni deje sn videoc&mara en lugares
con excesivo humo, vapor o hnmedad.
En estos arnbientes pueden producirse fallos
en el funcionamiento o
se puede format moho
en el objetivo.
Asegurese de guardar
este aparato en un
lugar bien ventilado.
• Algunos tripodes
peqneSos y portatiles
quiz& se acoplen real a la
videocamara, y puede que
no sirvan de apoyo segnro.
Utilice siempre tripodes
fnertes y estables.
• Cnando utilice sn
videoc&mara en nn ambiente frio, la
pantalla del monitor LCD aparecer& a
menudo menos brillante inmediatamente
despu_s de conectar la alimentaci6n, Esto
no es ningl_n fallo de funcionamiento. Para
evitar qne la videocamara se enfrie
excesivamente, envu_lvala en nn paho
grueso (nna manta, etc.).
84
Page 100

85
1.
Lectura de las instrucciones_ntes de
utilizar este producto deberan leerse todas
las instrucciones de segundad y manejo.
2.
Conservaci0n de las instrucciones Las
instrucciones de seguridad y manejo
deberan guardarse para poder consukarlas
en futuro en easo de ser necesano.
Cumplimiento de las advertencias--
Deberan cumplirse todas las advertencias
del producto y de las instrucciones de
manejo.
4.
Cumplimiento de las instrucciones
Deberan seguirse todas las instrucciones
de manejo.
5.
Limpieza Desenchufe este producto de
la toma de cornente de la pared antes de 11.
limpiado. No utilice agentes de limpieza
liquidos ni en aerosol. Utilice un patio
h@medo para hacer la limpieza.
6.
Aditamentos--No utilice aditamentos que
no sean recomendados pot el fabricante del
producto, porque pueden causar peligros.
7.
Agua y humedad No utilice este producto
cerea del agua y la humedad como, por
ejemplo, cerca de una ba¢_era, lavabo,
fregadero de cocina o lavadora; no Ioutilice 12.
tampoco en un sotano humedo, cerca de
una piscina o en otros lugares similares.
Accesorios No coloque este producto
sobre un carrito, soporte, tripode, mensula o
mesa inestable. Ei producto podria caerse y
causar lesiones graves a un ni_/o o a un
aduko, y tambien podria estropearse.
_ ¢ soporte, tripode,
__ mensula o mesa
vendido con el producto. Cuando quiera
que monte el producto hagalo siguiendo las 13.
instrucciones del fabricante, y utilizando los
accesorios de montaje recomendado por el.
La combinaci0n del
producto y un carrito
debera moverse con
mucho cuidado. Las
paradas repenfinas, la 14.
fuerza excesiva y las
superficies irregulares
pueden set la causa de que la
combinaciOn del producto y el carrito se
vuelquen.
10.
Ventilaci0n Las ranuras y aberturas de la
caja sirven para la ventilaci0n del producto,
y para asegurar un funcionamiento fiable
del mismo y evitar que este se recaliente,
_ _ con un carrito,
_1 Utilicelo solamente
recomendado pot
el fabricante, o
@
pot Io tanto, estas no deberan taparse. Las
aberturas no deberan taparse nunca
colocando el producto en una cama, sofa,
alfombra u otras superficies similares. Este
ejemplo, un mueble libreria o una
estanteria, a menos que disponga de la
ventilaci0n apropiada o se cumplan las
instrucciones del fabricante.
Fuentes de alimentaciOn Este producto
sOlo deberd_ ser utilizado con el tipo de
fuente de alimentaciOn indicado en la
etiqueta de caracteristicas. Si no esta
seguro del tipo de alimentaci0n empleado
en su casa, consulte a su concesionario o
a la compa_ia electrica local. Para los
productos que van a ser utilizados con
energia de baterias u otras fuentes,
consulte las instrucciones de manejo.
Puesta a tierra o polarizaciOn Este
producto puede estar equipado con una
davija de alimentaciOn de corriente alterna
polarizada (una clavija con una patilla mas
ancha que la otra). Esta davija s01o entrara
en la toma de corriente de una forma, Io
que constituye una caracteristica de
seguridad. Si no puede introducir a fondo
la clavija en la toma de cordente, pruebe
invirfiendo la clavija. Si la clavija sigue sin
poder introducirse en la toma de cordente,
pongase en contacto con un electricista
para que le cambie la toma de corriente
obsoleta. No anule la caracteristica de
seguddad de la clavija polarizada.
ProtecciOn de cables de alimentaci0n Los
cables de alimentaci0n deberan instalarse
de forma que nadie camine sobre ellos ni
queden pellizcados pot objetos colocados
encima o contra ellos, poniendo mucha
atenciOn alas clavijas, receptaculos y al
punto donde entran y salen del producto.
Tormentas electricas Para que este
producto disponga de una mayor
protecci0n durante una tormenta electrica,
o para cuando se deje sin atender durante
un largo periodo de tiempo, desenchufelo
de la toma de corriente y desconecte la
antena o el sistema de cable. Esto
impedira que el producto se estropee
debido alas tormentas electrica o a la
sobretensi0n en la linea de alimentaci0n.
producto no
debera
colooarse en
una
instalaci0n
empotrada
como, por
 Loading...