

Page 1
SHARP
LIQUID CRYSTAL VIDEO CAMERA
OPERATION MANUAL
Before using this VIEWCAM, please read this manual
carefully, especially page 2.
PAL
Page 2
WARNING:
This Camcorder must be supplied with D.C. 3.6
the AC adaptor
CAUTION:
As there are no user-serviceable parts inside the Camcorder or AC adaptor, do NOT
remove their cabinets as touching parts inside could result in electric shock. Please refer
servicing to a qualified dealer or a Camcorder service centre approved by Sharp.
or the optional
volts only from a
or BT-l.11 battery,
car adaptor.
This
using other VCRs or audio dubbing cannot be played back on this unit.
Your
programmes prerecorded in LP mode.
If you record on a tape on which PCM sound has already been recorded, the audio track of the
new
VCR. If this occurs, set the VCR’s audio monitor select switch to the “STANDARD” position.
NOTE
This
The LCD Panel comprises of 89622 TFT Transistors. Due to the high density of transistors, it is
possible that some pixels may fail.
The Pixel appear on the screen like blue-, red-, green- or black dots. Please note that this has
no effect on the
does not have a PCM recording or playback function. PCM recording made
is designed to record in SP mode only. It will not perform normal playback for
recording may not come out when the tape is played back on a PCM-capable
is a high technology product.
functions.
Page 3
But after enjoying the top quality and
performance of this Sharp
you’ll know you were right.
The purchase of this
tion manual to get the most out of your Sharp
have any trouble during operation
2
FREE-ANGLE SHOOTING AND INSTANT REPLAY
will further enhance your home video enjoyment. Before operating, please read this opera-
WITH 10.2 cm COLOUR LCD MONITOR AND
BUILT-IN SPEAKER
3
EASY TV/VCR CONNECTION AND CONTINUOUS
CHARGING WITH VIEWCAMPORT UNIT
4
16x DIGITAL ZOOM (OPTICAL 8x POWER ZOOM)
5
DIGITAL 2x QUICK ZOOM (2x EXTEND ZOOM)
6
DIGITAL IMAGE
7
DIGITAL STILL/STROBE/SNAP RECORDING
8
Hi-Fi STEREO SOUND
9
NEURO AUTO EXPOSURE
10
DIGITAL AUTO WHITE BALANCE
11
DIGITAL FULL RANGE AUTO FOCUS
12
INFRARED REMOTE CONTROL
Important:
Copyright may exist in material you wish to record.
Copying such material without permission of the relevant
Sharp is not in a position to authorize the recording of
copyright works and nothing
should be read or implled at giving that authority
or owners of the copyright is prohibtted by law
this operation manual
Also, please save
14 PROGRAM SEARCH/QUICK RETURN
STANDARD
SPEED ELECTRONIC SHUTTER FOR BLUR-FREE
STILL IMAGES
17 FADE IN AND FADE OUT
18FLYING ERASE HEAD FOR EDITING
19 EDIT SEARCH
20 WARNING INDICATORS
LIGHT, TAPE END, ETC.
21 3-WAY POWER SOURCE: AC, RECHARGEABLE
BATTERY AND CAR BATTERY (WITH OPTIONAL
VR-410CH or VR-410CA)
Power Supply:
This unit can be operated by connecting it to
adaptor, battery pack or optional car battery adaptor/
charger. The AC adaptor incorporates the AUTO
AGE
IO-240V AC,
for future reference, since it
SWITCHABLE
LOW BATTERY, LOW
Hz) function.
be useful
AND
you
the AC
FEATURES
PRECAUTIONS..
PART NAMES ........................................
MONITOR DISPLAY.. ........................
DISPLAY LOCATIONS
WARNING INDICATOf%.
PREPARATION
REMOTE CONTROL..
THE AC ADAPTOR/BATTERY CHARGER
CHARGING ON THE VIEWCAMPORT UNIT.
POWERING THE
USING THE CAR BATTERY ADAPTOR/BATTERY
CHARGER (OPTIONAL ACCESSORY)
INSERTING AND REMOVING A BATTERY PACK
INSERTING AND REMOVING A CASSETTE
SETTING THE DATE AND TIME
WORLD CLOCK
PICTURE/VOLUME/BACKLIGHT ADJUSTMENTS
ATTACHING THE SHOULDER STRAP
USING THE HAND STRAP..
BASIC OPERATIONS
CAMERA RECORDING
EASY CAMERA RECORDING WITH FULL AUTO
ZOOMING.
DIGITAL 2x QUICK ZOOM (EXTEND ZOOM).
AUTO/MANUAL FOCUS
QUICK RETURN..
EDIT SEARCH
TIPS ON RECORDING
FOR BETTER
RECORDING THE DATE AND TlME.
REMAINING TAPE AND BATTERY
TURNING OFF THE LCD MONITOR BACKLIGHT
...................
...............
THE BATTERY IN THE
......................... ......
............
..........
...............
.............. ..............
...........
......................
FROM AN AC OUTLET
...............................
.........................
.........................
.......
......
..........
.............
......
...
....
.............
.................
1
....
..... 10
.........
......
.......
.......
.......
29
PLAYBACK..
PLAYBACK
6
PROGRAM SEARCH..
9
VIDEO SEARCH
9
STILL.
9
SLOW
TAPE COUNTER FEATURE
USING THE INFRARED REMOTE CONTROL..
USEFUL FEATURES FOR CAMERA RECORDING.
11
12
13
13
14
15
16
17
20
21
21
22
22
23
24
25
26
26
27
27
28
30
SELF RECORDING
USING THE DIGITAL IMAGE STABILIZATION (DIS)
FEATURE.
RECORDING A FIVE-SECOND STILL IMAGE
(SNAPSHOT RECORDING).
STILL AND STROBE RECORDING
BACKLIGHT COMPENSATION (BLC)
GAIN-UP (CAT’S EYE)
WHITE BALANCE LOCK.
HIGH-SPEED SHUTTER..
MACRO SHOTS
FADE IN AND FADE OUT
WIDE SCREEN..
LIGHTING..
CONNECTIONS FOR PLAYBACK
CONNECTION TO TV VIA
CONNECTION TO TV VIA VCR
USING THE AV PACK (OPTIONAL ACCESSORY).
CONNECTION TO TV WITHOUT
AUDIO/VIDEO JACKS.
EDITING
EDITING
RECORDING FROM AN EXTERNAL SOURCE
FLUORESCENT LAMP BACKLIGHT
BEFORE REQUESTING SERVICE..
SPECIFICATIONS..
...
............
... .....
........
............ ...................................
.............................
..............................................
.......................
.........
... ...
.....
.................
.............................
......
.......
............ ................52
.......................... ................
.....
..................
..........
......................
........................
........
31
31
32
33
33
33
34
36
37
38
38
39
40
40
41
42
43
43
44
45
46
46
46
47
48
49
49
50
5 1
51
53
Page 4
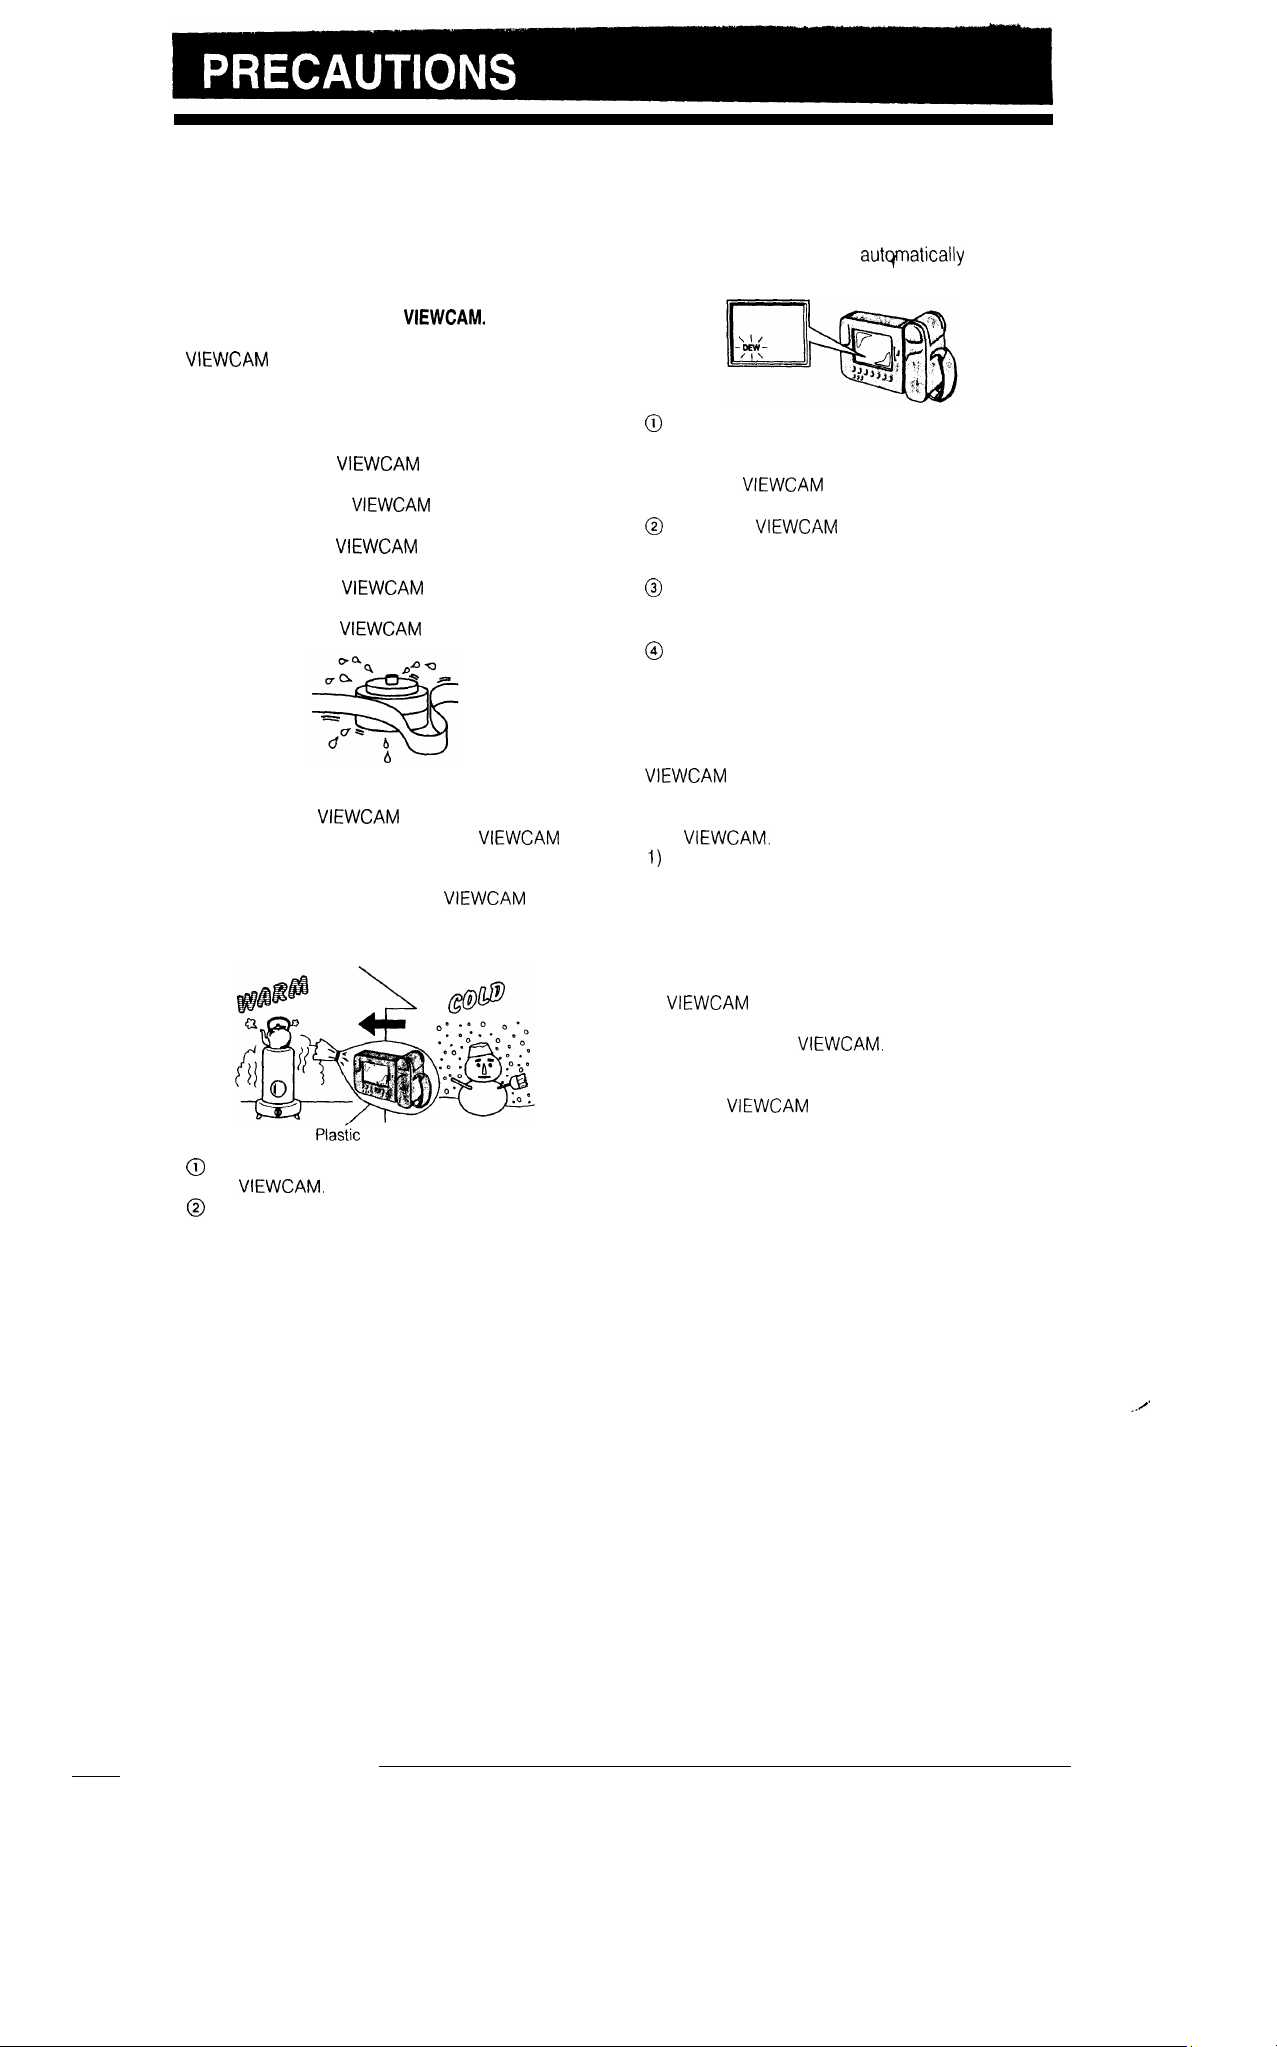
DEW FORMATION
l
What is “dew formation?”
When cold water is poured into a glass, dew drops
form on the glass. This clinging of water drops is
called dew formation.
l
When dew forms in your
Dew will gradually form on the head drum of your
and make the video cassette stick to the
head. This causes damage both to the head and
the tape. Recording and playback may not function
properly.
Dew is likely to form in the following circumstances:
*when moving the
a warm place,
l
when placing the
is then heated rapidly,
*when moving the
conditioned room,
l when placing the
air blowing from an air conditioner,
l
when placing the
l
How to prevent trouble due to dew formation.
When using the
formation is likely to occur, allow the
and the video cassette to acclimate to the
surroundings for about one hour.
For example, when bringing the
after skiing, place it in a plastic bag and allow it to
adapt to room conditions for some period of time.
from a cold place to
in a cold room which
outdoors from an air
in the direct path of
in a humid room.
in a place where dew
indoors
l
“Dew” warning feature
If dew forms, the word “DEW” flashes on the LCD
monitor, and the power will
turn off in
approximately 10 seconds.
If the word “DEW” flashes on the LCD monitor,
remove the video cassette, leave the cassette
compartment open, and wait several hours to
allow the
to acclimate to the
surrounding temperature.
To use the
again, turn on the power
after waiting for several hours. Be sure that the
word “DEW” has disappeared from the monitor.
Do not insert a video cassette while the word
“DEW” is flashing; this may result in damage to
the tape.
Since dew forms gradually, it may take 10 to 15
minutes until the word “DEW” appears on the
monitor
l
How to continually maintain good recording
If used in a variety of places, eventually your
may not function properly due to
accumulation of dirt on the head drum. Please pay
special attention to the following points when using
your
Dew formation on the head drum.
2) Worn video cassettes:
Using a damaged or soiled video cassette may
also soil the head drum, causing the picture to
be blurred or nothing to be recorded on the
video cassette. Do not use such a video
cassette
3)
extremely humid or dusty places may cause
damage to your
use in a humid or dusty place. Use in
l
When the video heads become clogged.
bag
Be sure to tightly seal the plastic bag containing
Using the
dirty may cause the head to clog, producing noise
on the recorded image or preventing the image
from being recorded at all.
when the video cassette is
the
Remove the bag when the air temperature
Under such circumstances, contact the nearest
inside it reaches the temperature of the SHARP service centre or your dealer for further
surroundings.
advice.
(Video head cleaning can be easily done by using
a commercially available cleaning tape. However,
excessive use of the cleaning tape may also cause
damage to the video heads. Please read the
instructions accompanying the cleaning tape
carefully, before using it.)
2
Page 5
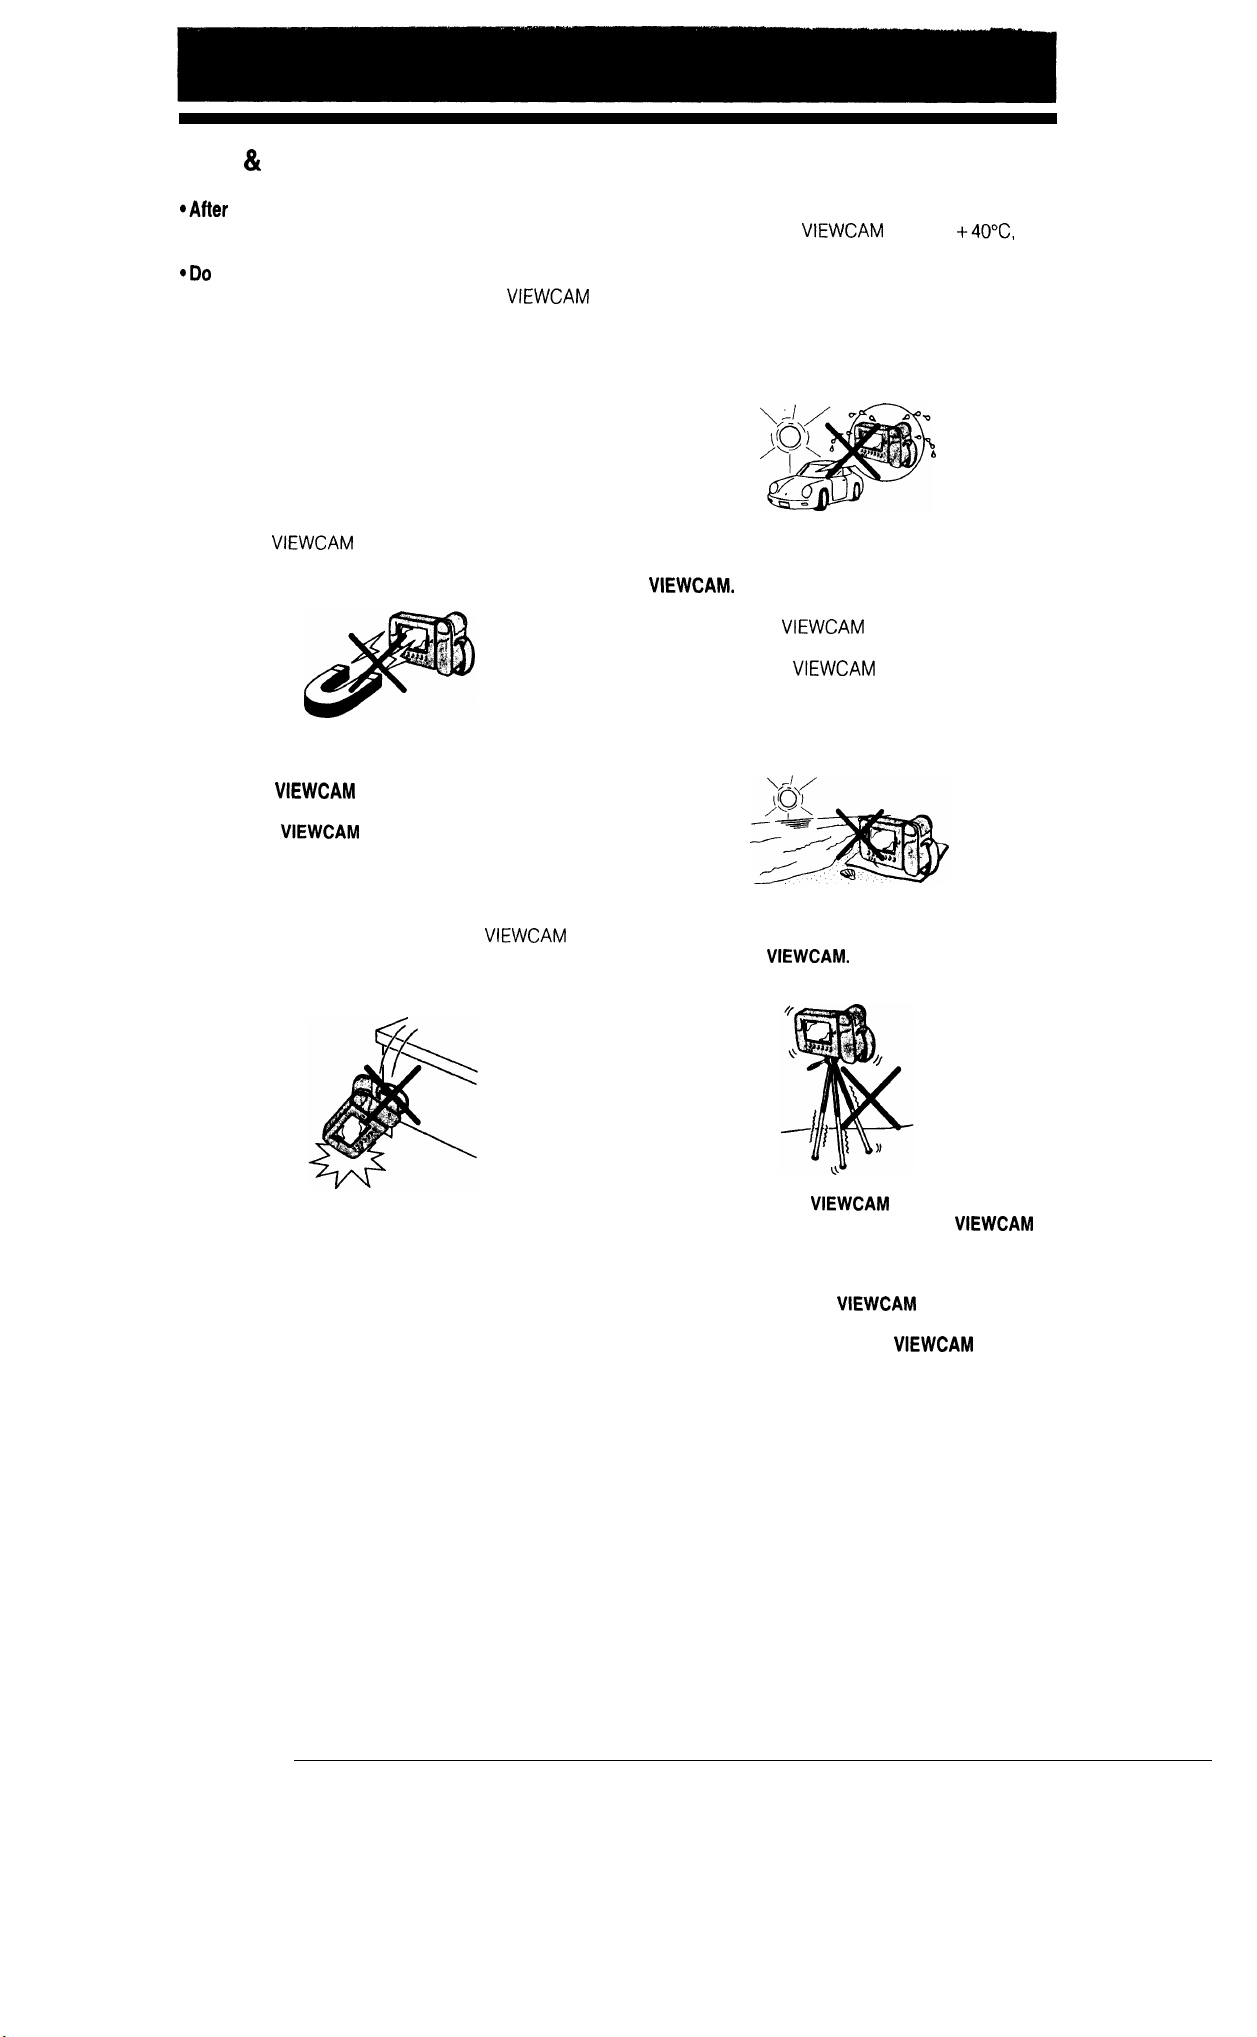
USE
CARE
operation, remove the battery pack from
the unit.
not aim the lens at the sun.
Do not allow direct sunlight to strike the
lens or LCD panel, whether recording is in
progress or not, as it may damage the CCD sensor
or LCD panel surface. Be particularly careful when
recording outside.
*When shooting in dark places, avoid sudden
brightly lit objects or light sources, such as the sun.
Otherwise, the image may white out. Should this
happen, point the camera in a different direction
until the picture returns to normal.
l
Avoid magnetic sources.
Using the
motors, televisions, or other magnetic sources may
adversely affect recorded images.
l
Remember to remove the video cassette, turn
near strong fluorescent lights,
off the power, and remove the battery pack
when the
is not in use.
l
Watch the temperature and humidity.
You can use your
at 0°C to
and
at 35% to 80% relative humidity. Do not store the
unit in an unventilated car in the summer, in direct
sunlight, or near strong heat sources; this can
result in severe damage to the unit’s casing and
circuitry. Be careful when handling the unit after it
has been left in a hot place, such as the ones
described above.
*Avoid situations where water, sand, dust or
other foreign matter could get on or inside the
Such substances could cause
malfunctions.
Do not use your
smoke or steam.
Do not leave your
excessive dust or moisture.
Such environments can cause mildew to form on
this unit’s lenses. Be sure to provide ample
ventilation.
in areas with excessive
in areas with
l
Using the
near a broadcasting
station or other powerful transmission source
may cause buzzing or picture deterioration.
l
Avoid shocks and dropping.
Do not drop or otherwise subject the
hard shocks or strong vibrations. Bumping or striking the unit during recording will generate noise in
the recorded image.
to
l
Some small, portable tripods may be diff icuit
to attach and may not be sturdy enough to
support your
Be sure to use only a
strong, stable tripod.
l
When you use the
at a ski resort or in
some other cold environments, the
may chill down enough that its LCD monitor
screen is less bright than normal for a while
after it is turned on. This is not a malfunction.
If this occurs, put the
in a warmer
location for some time before use. To prevent
excessive cooling, wrap the
in a thick
cloth (a blanket, etc.).
Page 6
CARE
Cleaning and maintenance
*Many plastic parts are used in the
cleaners. These may cause
casing. Do not use thinners, benzenes or other strong chemical
and damage to the casing.
the casing with a soft, dry cloth. If the casing is particularly dirty, wipe the casing with a tightly wrung
cloth dampened with a diluted, neutral detergent. Then wipe it again with a soft, dry cloth.
protector. Or, use the optional cleaning kit to clean the lens protector even better.
the lens needs cleaning, first remove the lens protector by turning it anti-clockwise. Then clean the lens
with the supplied cleaning cloth, the optional cleaning kit, or compressed air and lens papers designed for
photographic lenses.
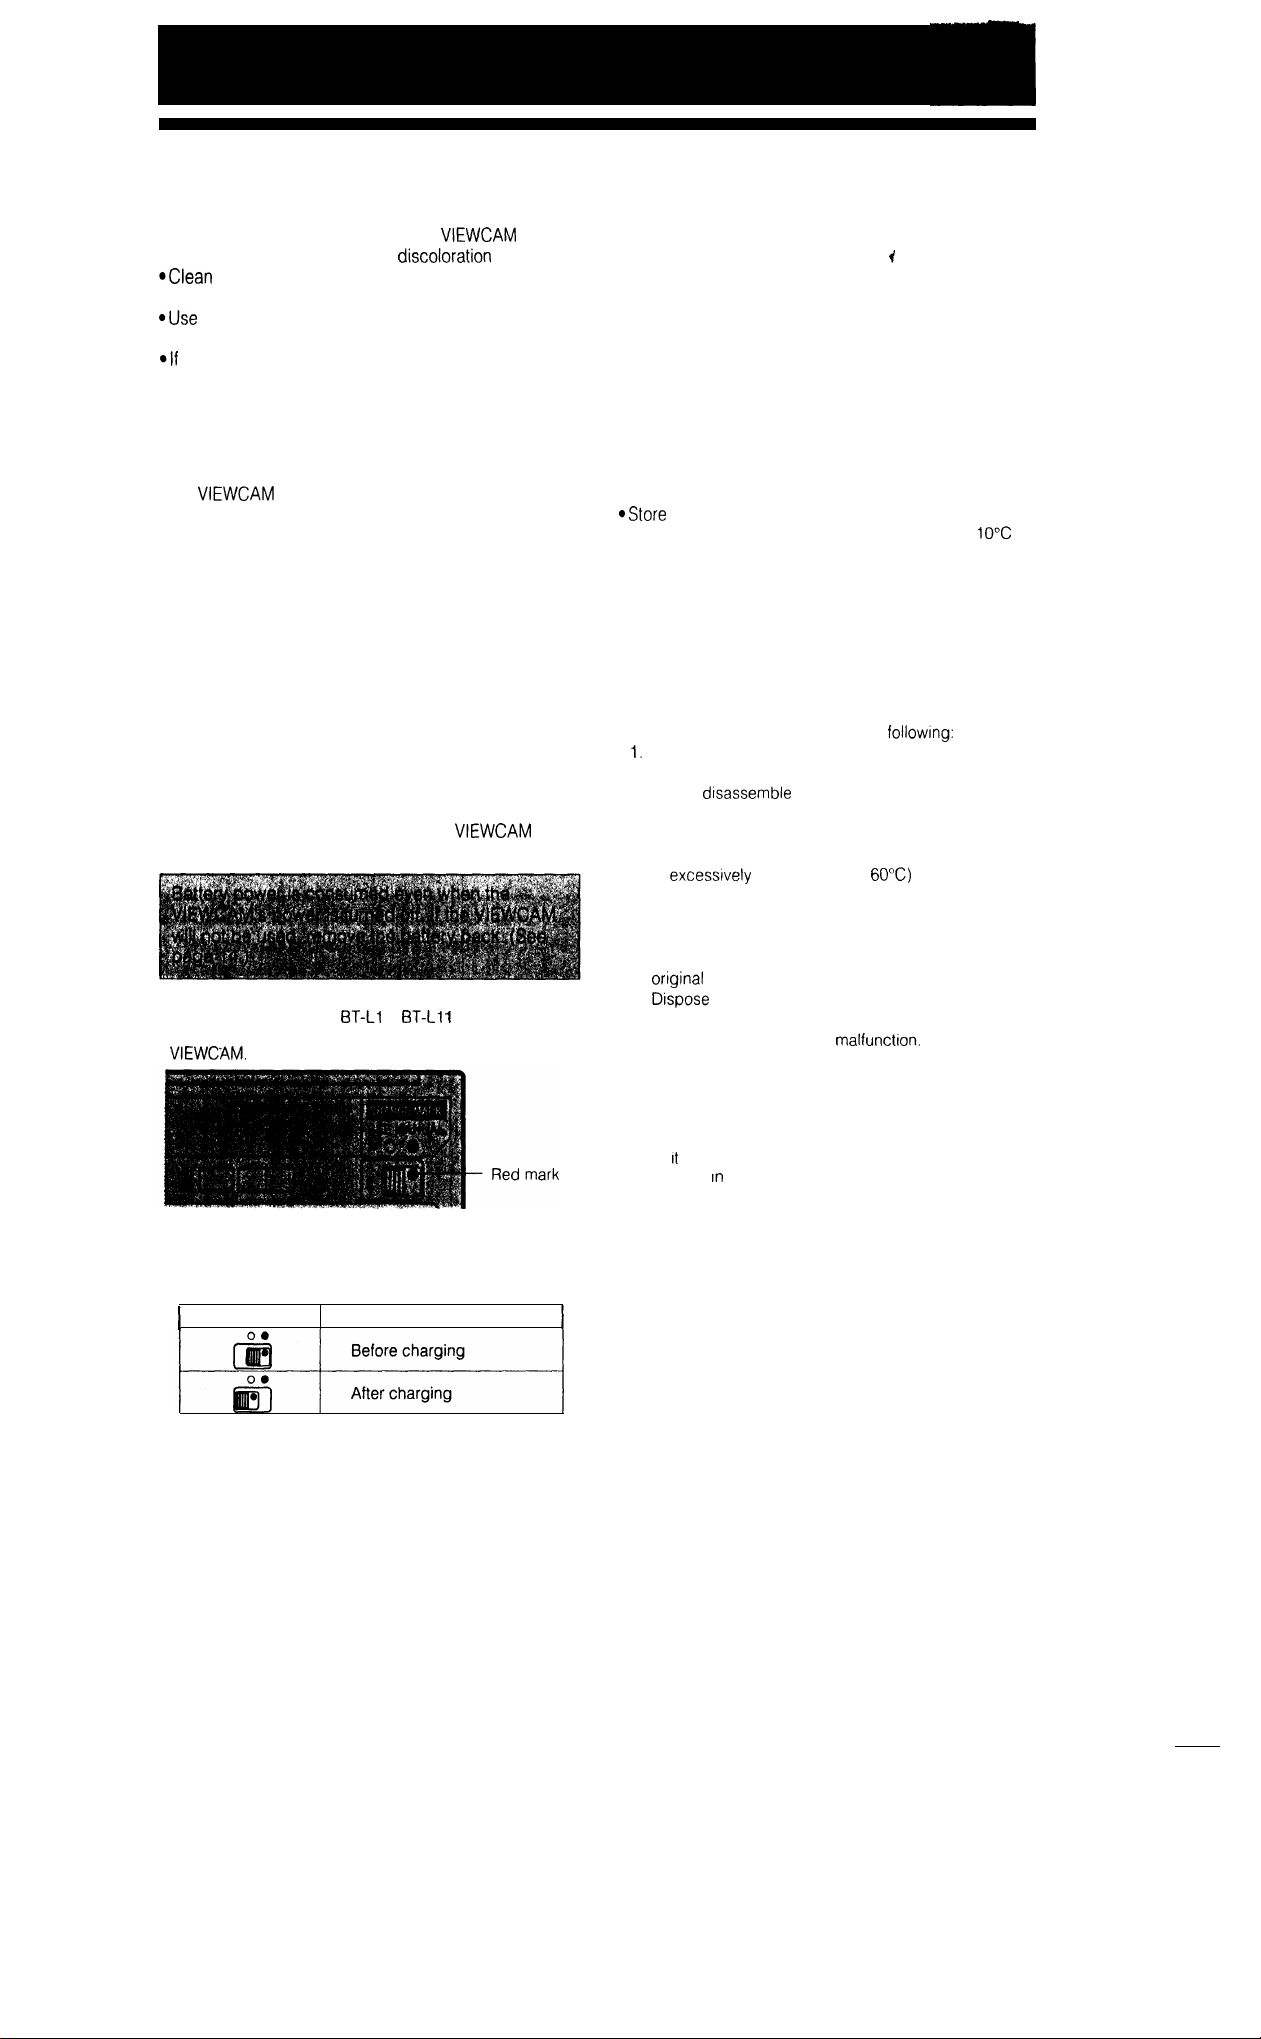
BATTERY PACK
This
uses a lithium-ion type battery pack.
It is not necessary to store the lithium-ion battery
pack in a full-discharged state. Also, if stored in the
charged state, the battery will self-discharge
naturally, resulting in decrease recording time.
Charge the battery pack soon (a day) before use.
Battery pack consumption
l Recording with many starts and stops, frequent
zooming, and recording in low temperatures will
somewhat shorten actual recording times.
Accordingly, be sure to turn off the power when not
recording. Use of an auxiliary battery pack is
recommended to prevent undesirable interruptions
in your recording.
l Do not use an insufficiently charged or weak
battery pack. Such battery packs may cause the
power to automatically stop during
operation.
Note:
Please use the SHARP
They are designed specifically for use with this
or
battery packs.
How to use the marker on the battery pack
The marker is provided to indicate the battery’s
charge condition. Slide the switch to indicate the
battery charge condition as follows:
Position
Charge conditions
Temperature during charging
the battery pack in a dry, cool place.
l Charge the battery pack at temperature of
30°C.
For long battery lifetime
*Charge the battery pack (lithium-ion type) at least
once every six months.
l Do not leave the battery pack being charged for
long periods of time.
Cautions:
l If the battery pack is misused, there is danger of fire or
explosion. Pay close attention to the followlng:
Do not dispose of in fire.
2.
Do not short-circuit the terminal by metallic contact.
3.
Do not disassemble or repair yourself.
4.
Do not use any battery charger other than those
designed for this battery pack.
Do not place the battery pack under direct sunlight or
5.
in excessively hot places (over 60%) such as the
dash board of cars.
6.
Do not expose to moisture, water or sea water.
7.
Do not drop or subject to strong force
Keep the battery pack out of reach of children and in
8.
9.
l The battery pack will become warm during charging and
use. This IS normal and not a malfunction.
l The battery pack has a limited service life. If the period of
use becomes noticeably shorter with a normal charge,
this indicates the end of the battery pack’s service life.
Replace it with a new battery pack.
l For safety, keep the battery pack in its protective cover
when
pack come
danger that a short circuit may occur.
. Do not carry the battery in your pocket or a bag together
with metal objects (keys, coins, jewelry, etc).
l Do not insert objects (metal etc.) into the battery
compartment of this product or into the rechargeable
battery.
Do not get the terminals dirty If the rechargeable
terminals are dirty, the operating time may be shortened
or it may not be possible to charge the battery.
of used batteries promptly.
is not being used. If the metal parts of the battery
contact with other metal items, there IS a
4
Page 7
VIDEO CASSETTE TAPES
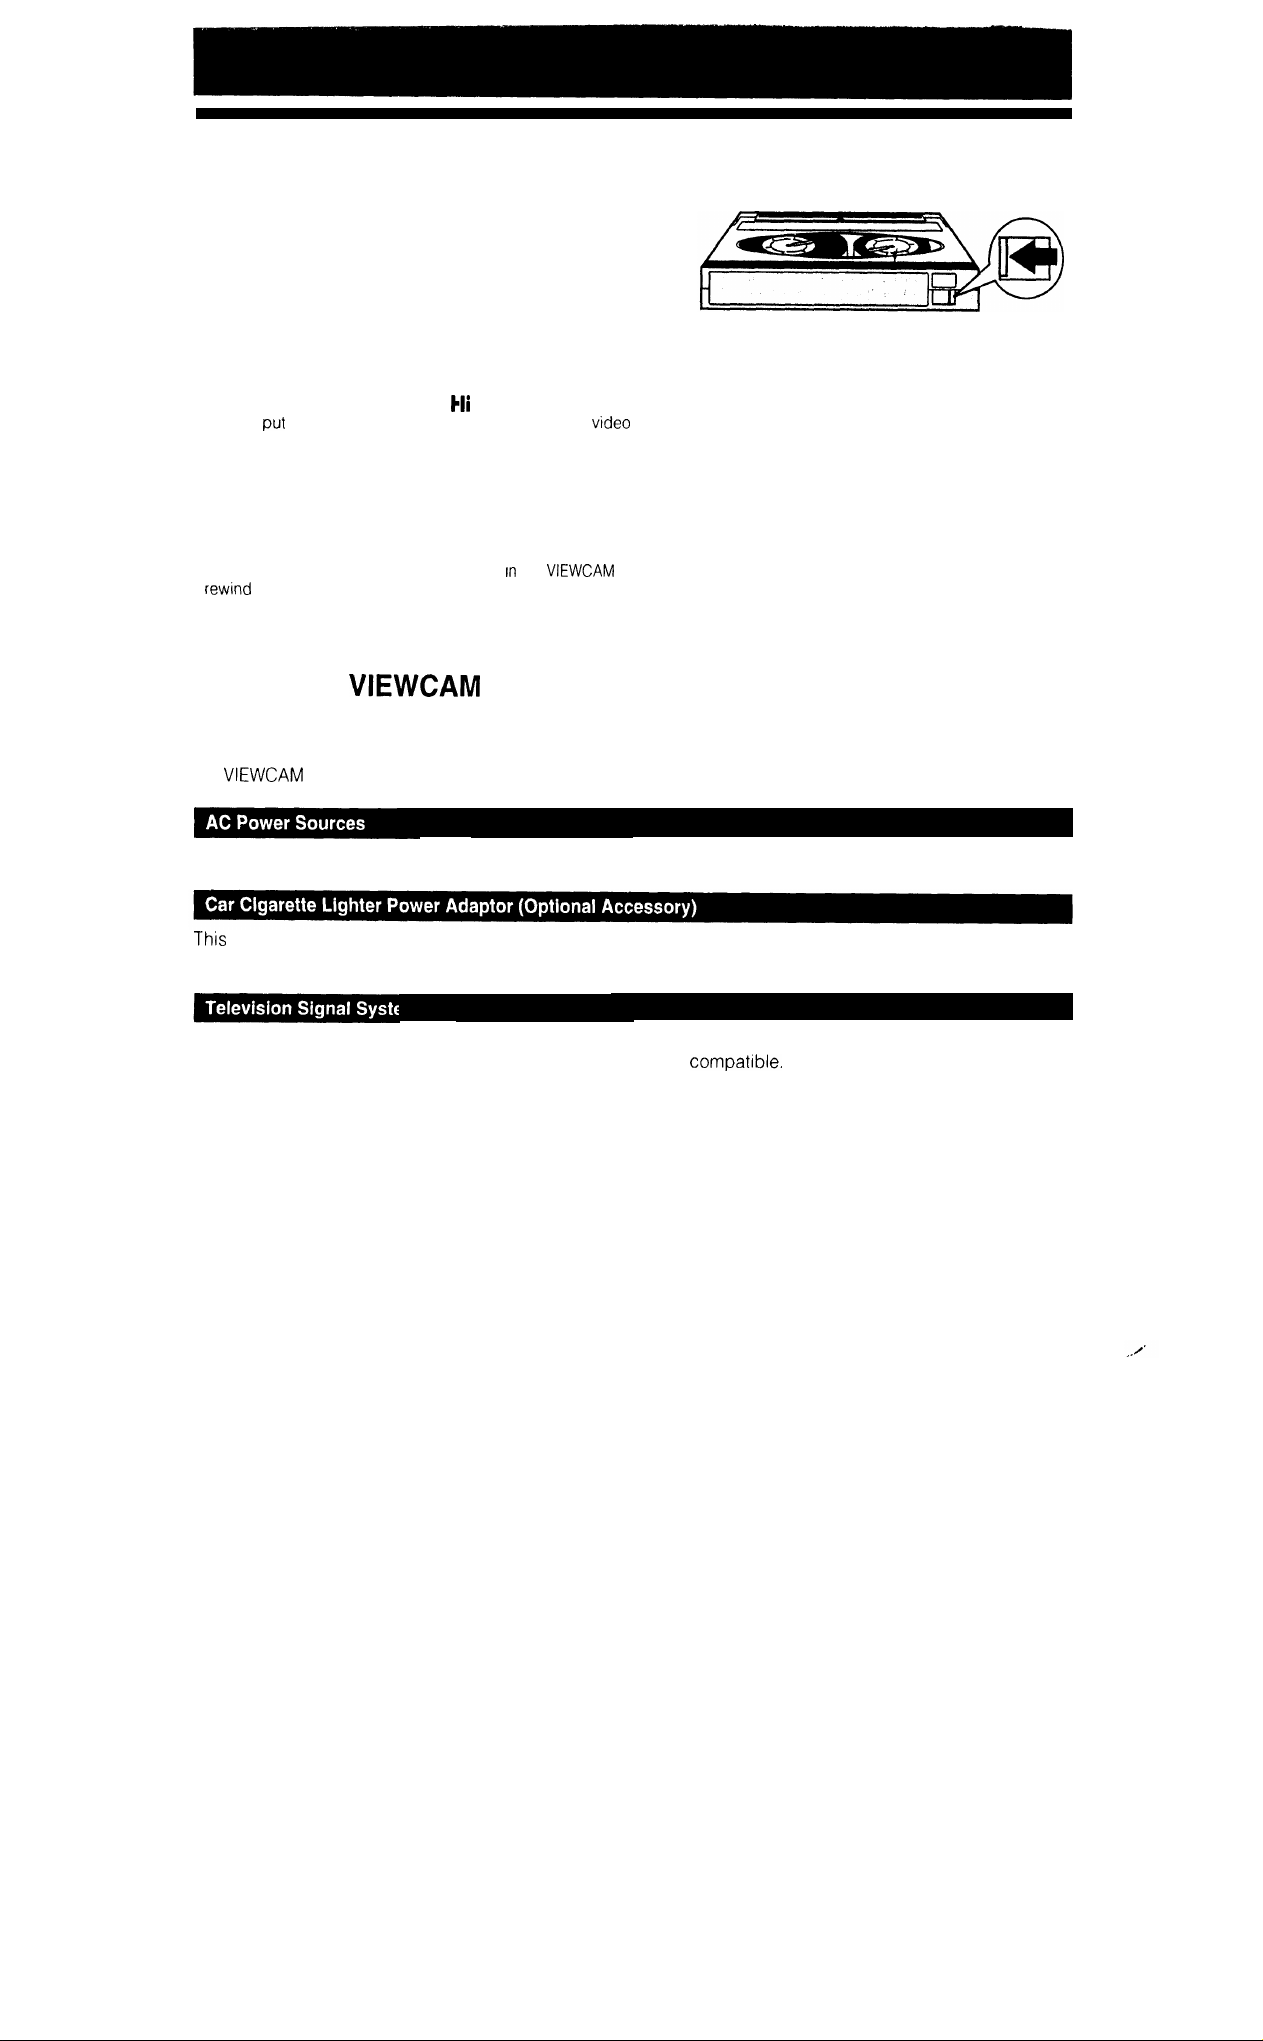
To protect recordings against erasure
When a previously recorded video cassette is used again for
recording, the previously recorded material is erased.
To protect a recording against accidental erasure, slide the
tab on the video cassette to cover the hole. (A red mark will
be exposed.) To record again, slide the tab to open the hole.
Notes:
l Do not insert anything into the erasure-protection hole in the
video cassette.
l
Only use those video cassettes with the
l Do not
cassette
l Do not store or place your video cassettes in direct sunlight, near
heaters, or in places with excessive moisture or dust
l Do not keep video cassettes near magnetic objects as they may
erase the recording
l
Do not drop or subject the
l Uneven tape winding will damage the video cassettes. If the video
anything into the holes on the bottom of the vtdeo
video cassettes
cassette is not properly wound, reinsert it
the
l Store the video cassettes in their cases and stand them on edge
tape.
q
or the
to excessive shocks.
the
q
mark.
and
Using Your
Abroad
Television system signals and electrical system voltages and frequencies vary substantially from country to
country When you are abroad, please check the sections below before using the AC adaptor or connecting
the
to a TV.
The AC adaptor is compatible with 50 Hz and 60 Hz electrical systems in the range of 110 V to 240 V AC
can be used with 12 V and 24 V negative-ground cars only. Do not use it with positive-ground electrical
systems.
In any country, you can always watch the video picture by using the LCD monitor. However, if you want to
watch the picture on a TV screen, the TV must be PAL system compatible. PAL is used in the following
countries:
Germany, Great Britain, Sweden, Denmark, Austria, Belgium, Switzerland, Italy, Spain, Holland, Finland,
Portugal, Norway, Hong Kong, Thailand, Australia, New Zealand, Singapore, Kuwait, China, etc.
Page 8
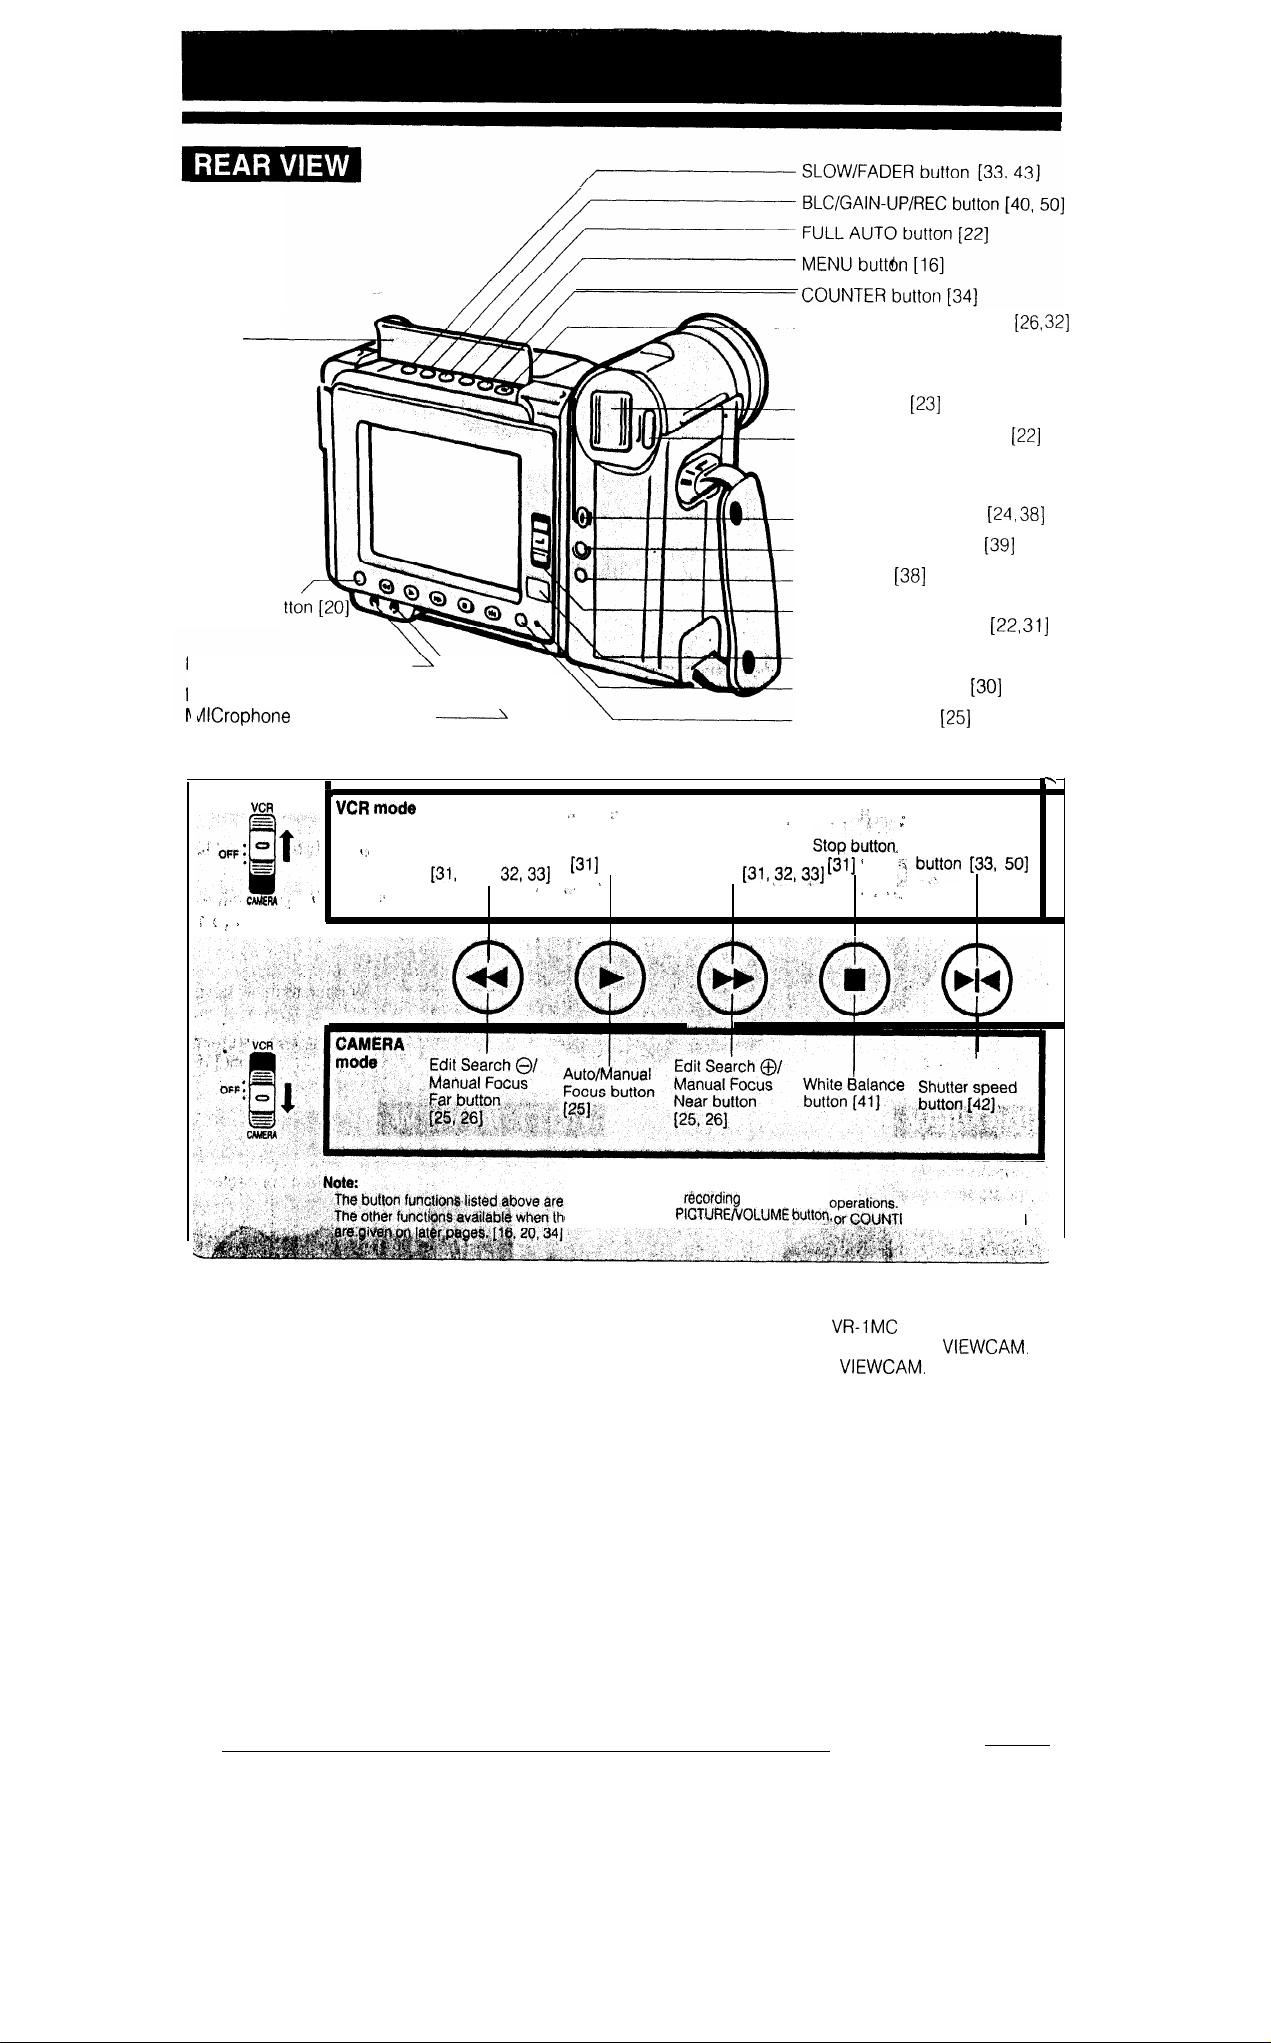
Cover
RETURN/SEARCH button
Zoom button
REC START/STOP button
PICTURE/
VOLUME bu
PHONES (Headphone) jack
PLUG IN POWER
jack (See below)
\
Rewind/Reverse
Search button
Play button
Fast Forward/
Forward Search
button
SNAP/EXTEND button
STILL/STROBE button
DIS button
Operate switch
(CAMERA/VCR select)
Photoreceptor
LAMP OFF indicator
MODE DISPLAY
Pause/Still
directly related to
e MENU button,
and playback
ER button is pressed
*About the PLUG IN POWER MIC Jack
This external microphone jack outputs a DC voltage of 4.0 V. It is for use with the
optional accessory or the microphone supplied with the sports case optional accessory for this
use of other types of microphones may result in damage to the microphone or the
7
stereo microphone
The
Page 9
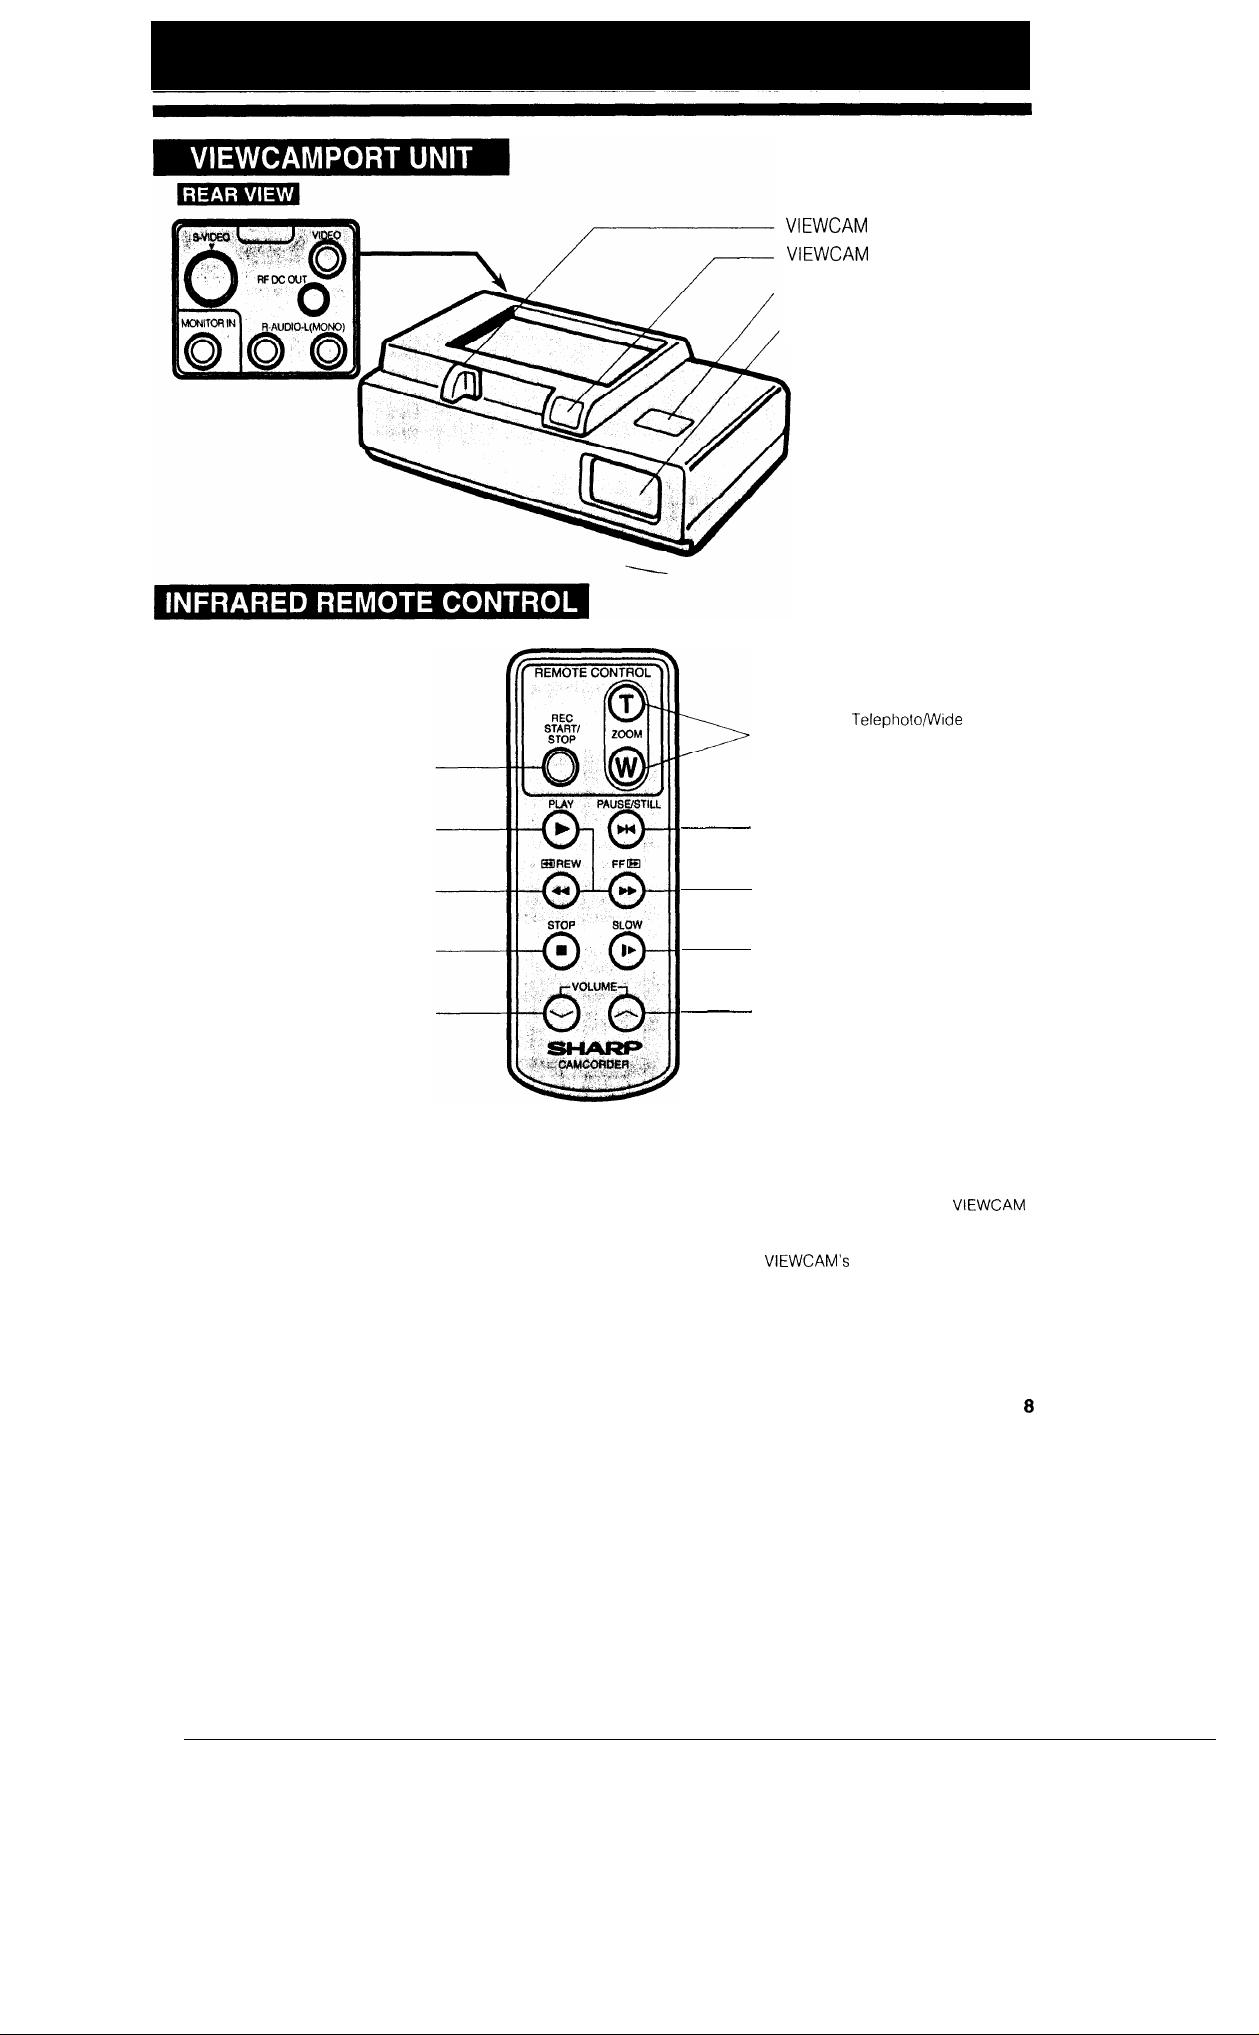
Record START/STOP
AC adaptor release button
LED-lamp window
Power Zoom Telephoto/Wide
control buttons
button
PLAY
Rewind/Reverse Search
STOP
VOLUME down
button
button
button
button
PAUSE/STILL button
Fast Forward/Forward Search
button
SLOW button
VOLUME up button
Notes:
l To use the infrared remote control, make sure that the
remote control menu item (“REMOTE”) is set to “ON” The
remote control cannot be used to operate the
when this item IS set to “OFF” See page 36
l
The REC START/STOP button on the remote control has
no effect when the
Operate switch is set to
VCR.
Page 10
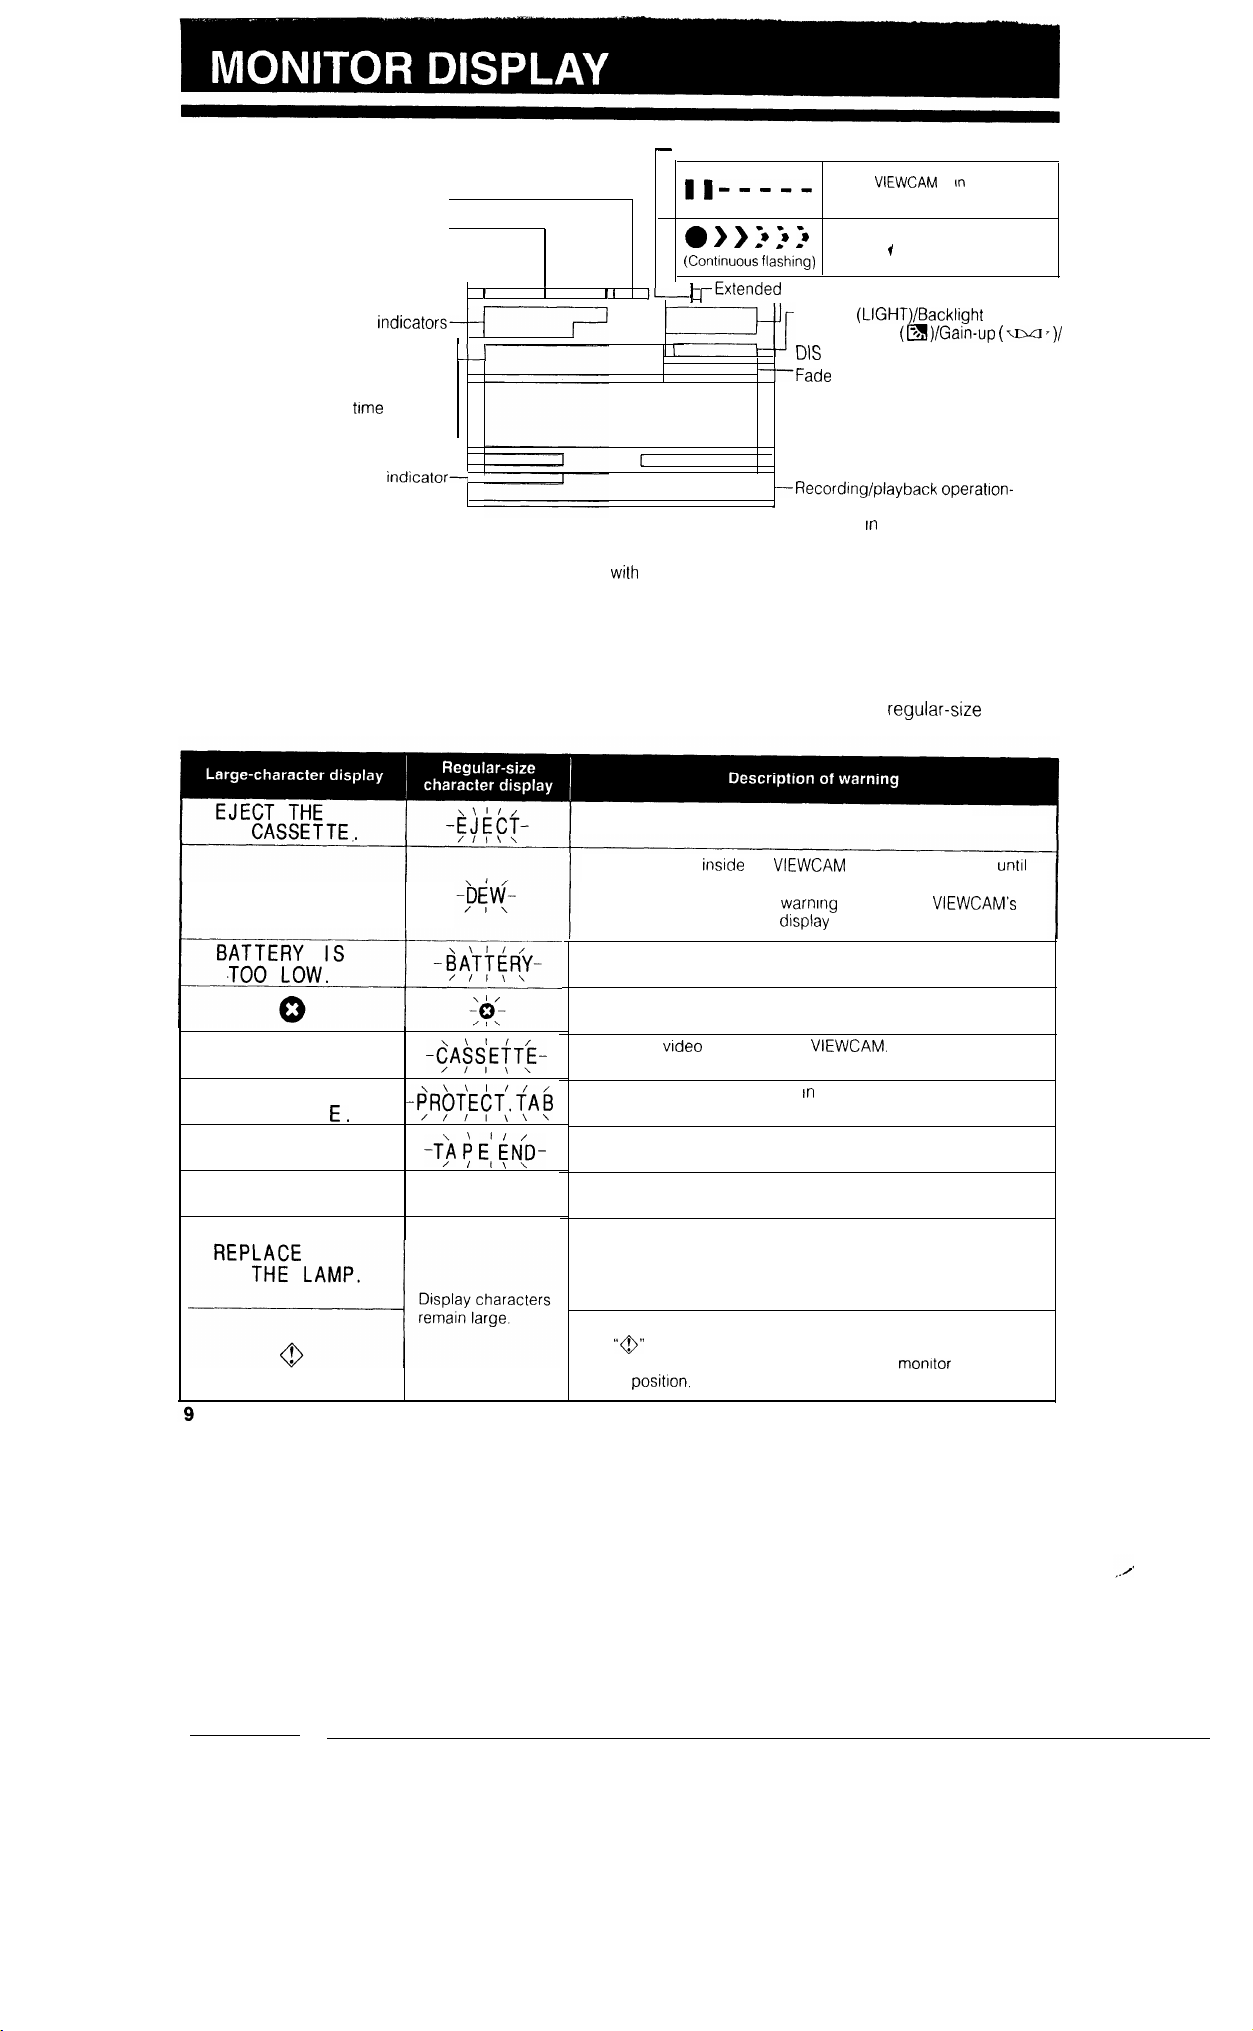
DISPLAY LOCATIONS
Hi8 indicator
Backlight-off indicators
World clock/Summer time indicator
Date/Time
Picture/Volume adjustment indicators
Zoom indicators
Tape warnings
Remaining recording time indicator
Clogged heads warning
Low battery/Dew warnings-+
FULL AUTO
Note:
Only the date/time indicators are recorded on the tape along
Recording mode indicators
zoom display
r
--Large-character warning
J---Tape counter display
the subject.
The
Standby mode, and is not recording
Lighting (LIGHT)/Backlight
compensation
indicator/EDIT indicators
indicators
displays/Quick Return Indicators
related button indicators are normally
displayed
displayed in green when selected
functions are operating. The
functions of each button are further
explained on later pages.
white. They are
is
Recording
operatlon-
Recording
WARNING INDICATORS
Except for the “CHANGE THE CASSETTE.” warning, the backlight warning, and warnings during Self Recording mode, the indicators light in large characters for the first 3 seconds, and then blink in regular-size
characters.
DEW
INSERT
A CASSETTE.
CASSETTE NOT
RECORDABL
THE TAPE
ENDS SOON.
CHANGE THE
CASSETTE.
TAPE END
The video cassette IS defective and should be removed.
Dew has formed
the dew disappears (see page 2).
About 10 seconds after this warning appears, the
power is turned off, and the display goes off too
The battery is almost depleted
Replace it with a fully charged battery
The video heads are clogged and should be cleaned
(see page 2)
There is no video cassette in the
Load a video cassette
The red erasure prevention tab
slid to the record-protect position, preventing recording.
The tape is about to end. Get ready to load a new video cassette
The tape has reached its end
Load a new video cassette
The fluorescent lamp behind the LCD monitor is close to the end
of its service life Replace it with a new one (see page 51)
The LCD monitor turns off about 1 minute after this warning IS
displayed.
During Self Recording mode, every warning indicator is replaced
by a
check the meaning of the warning, rotate the monitor back to the
normal
indicator displayed in the centre of the monitor. To
the
Wait for a few hours
the video cassette has been
Page 11
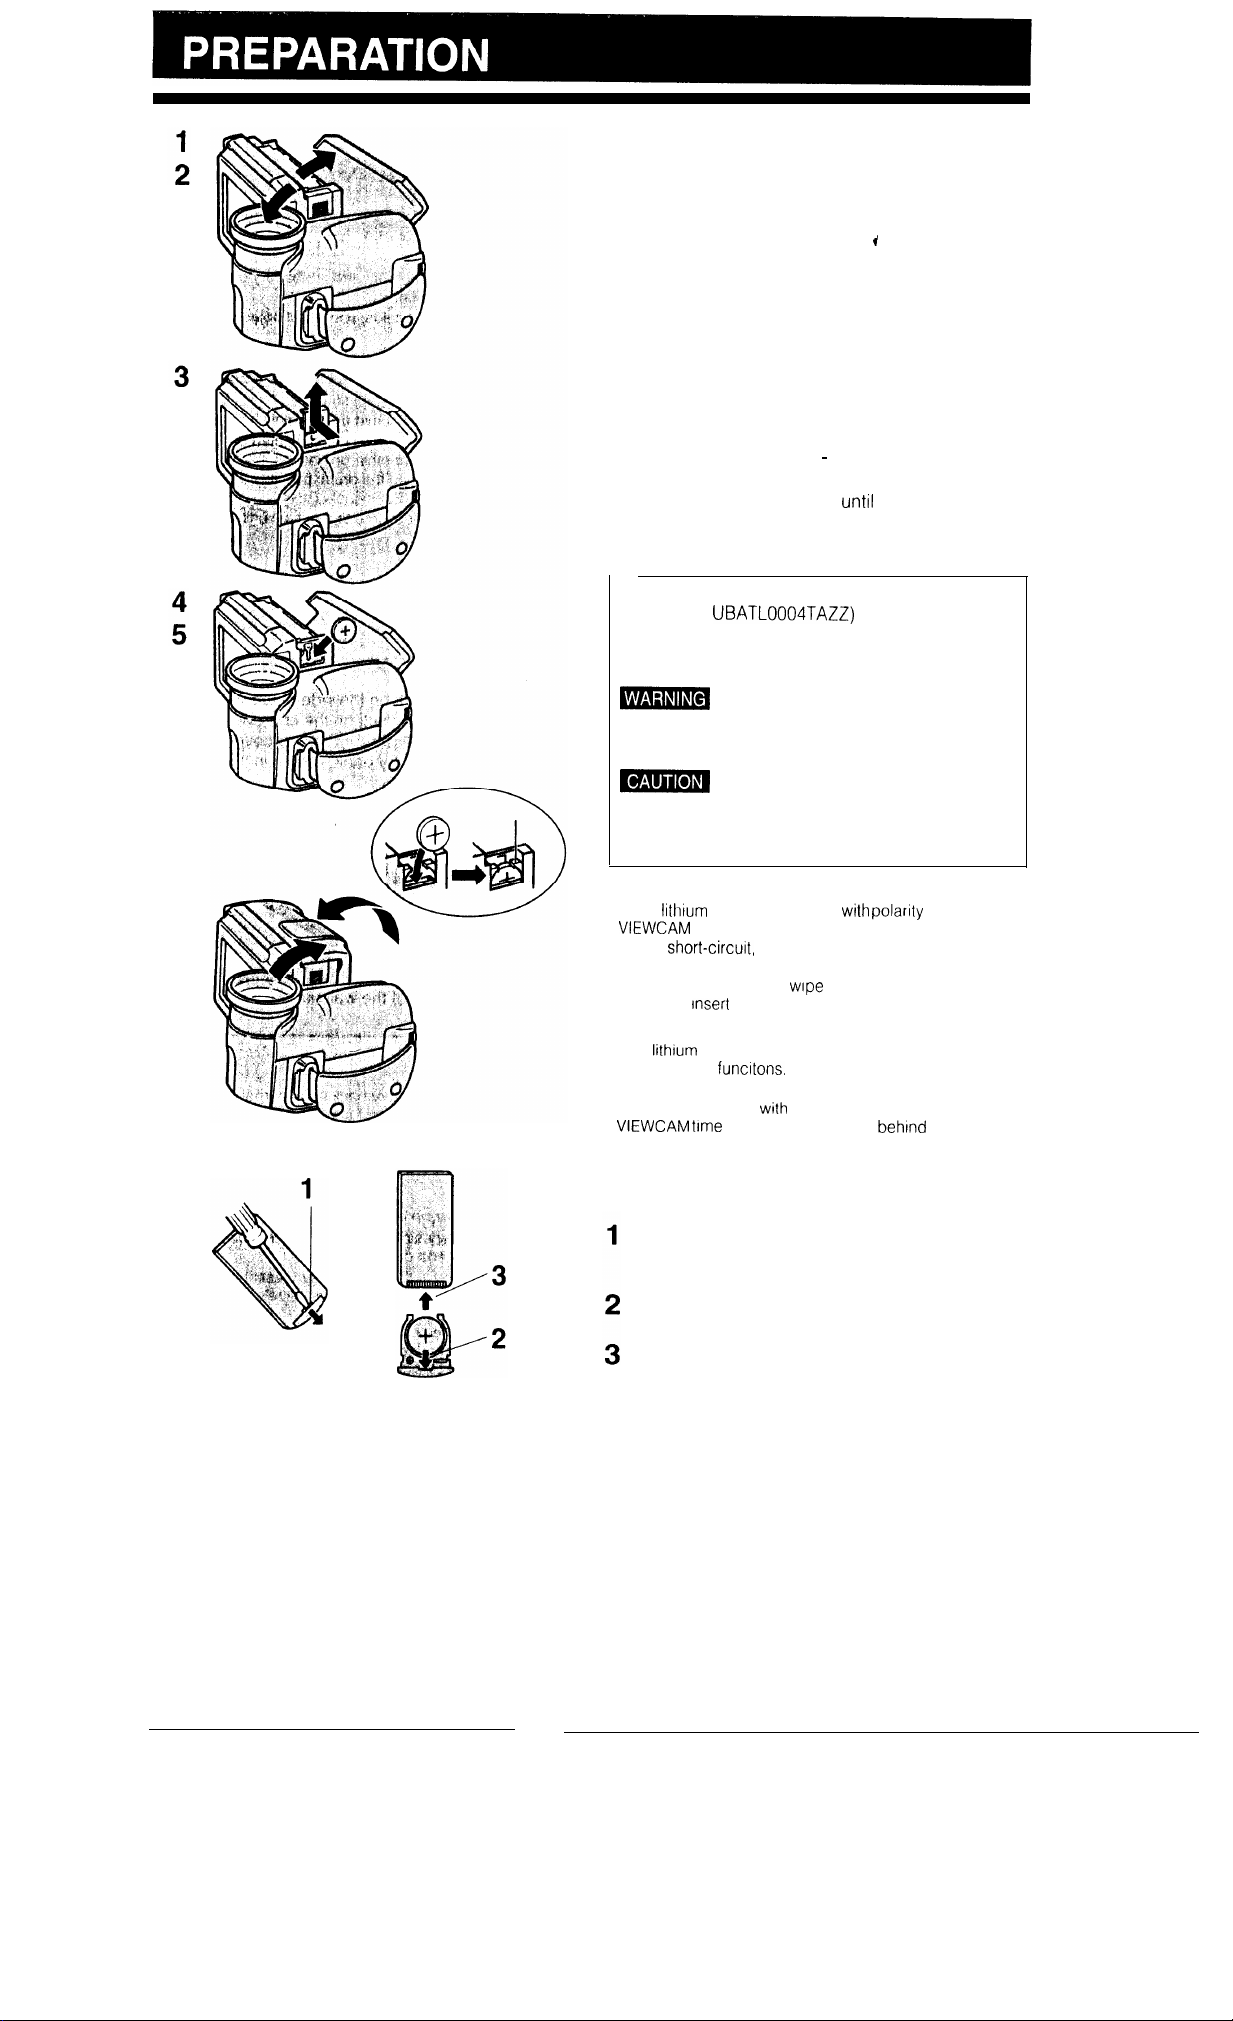
INSTALLING THE MEMORY
BACKUP BATTERY
The lithium battery is used to back up the calendar
and other memory functions.
Slide the OPEN release in the direction of the
1
arrow and open the cassette compartment door.
Holding the LCD monitor side towards you,
2
rotate the lens section vertical to the monitor
section.
Remove the lithium battery compartment cover in
3
the direction of the arrow.
Insert the lithium battery firmly into place with the
4
+ side facing out.
Be sure that the + and
5
oriented.
Reattach the cover firmly
6
Rotate the lens section and return it to the normal
position
_
REPLACE BATTERY WITH SHARP TYPE CR2025
(PART NO.
ENERGYTEC TYPE CR2025 ONLY. USE OF A
DIFFERENT BATTERY MAY PRESENT A RISK OF
FIRE OR EXPLOSION.
KEEP THIS BATTERY AWAY FROM
CHILDREN. IF SWALLOWED, CONSULT A
PHYSICIAN IMMEDIATELY FOR EMERGENCY
TREATMENT.
BATTERY MAY EXPLODE IF
MISTREATED OR INSTALLED WITH POLARITY
REVERSED DO NOT RECHARGE,
DISASSEMBLE OR DISPOSE OF IN FIRE
poles are correctly
it clicks into place
OR SONY
Cautions:
l If the
6
. Do not
battery
l Should the battery leak,
clean and
Notes:
l The
other memory
l The battery will last one year of normal usage
l Replace the battery
battery is installed
will not turn on.
recharge, disassemble or heat the
a new battery.
battery is used to back up the calendar and
a new CR2025 cell when the
time indicator starts to fall behind correct time
polanty reversed, the
the battery compartment
INSTALLING THE BATTERY IN
THE REMOTE CONTROL
Open the lid of the battery compartment by
sliding it out with an object such as a slotted
screwdriver.
Install the supplied CR2025 lithium battery with
the + side facing upward.
Replace the lid by sliding it in the direction of the
arrow.
10
Page 12
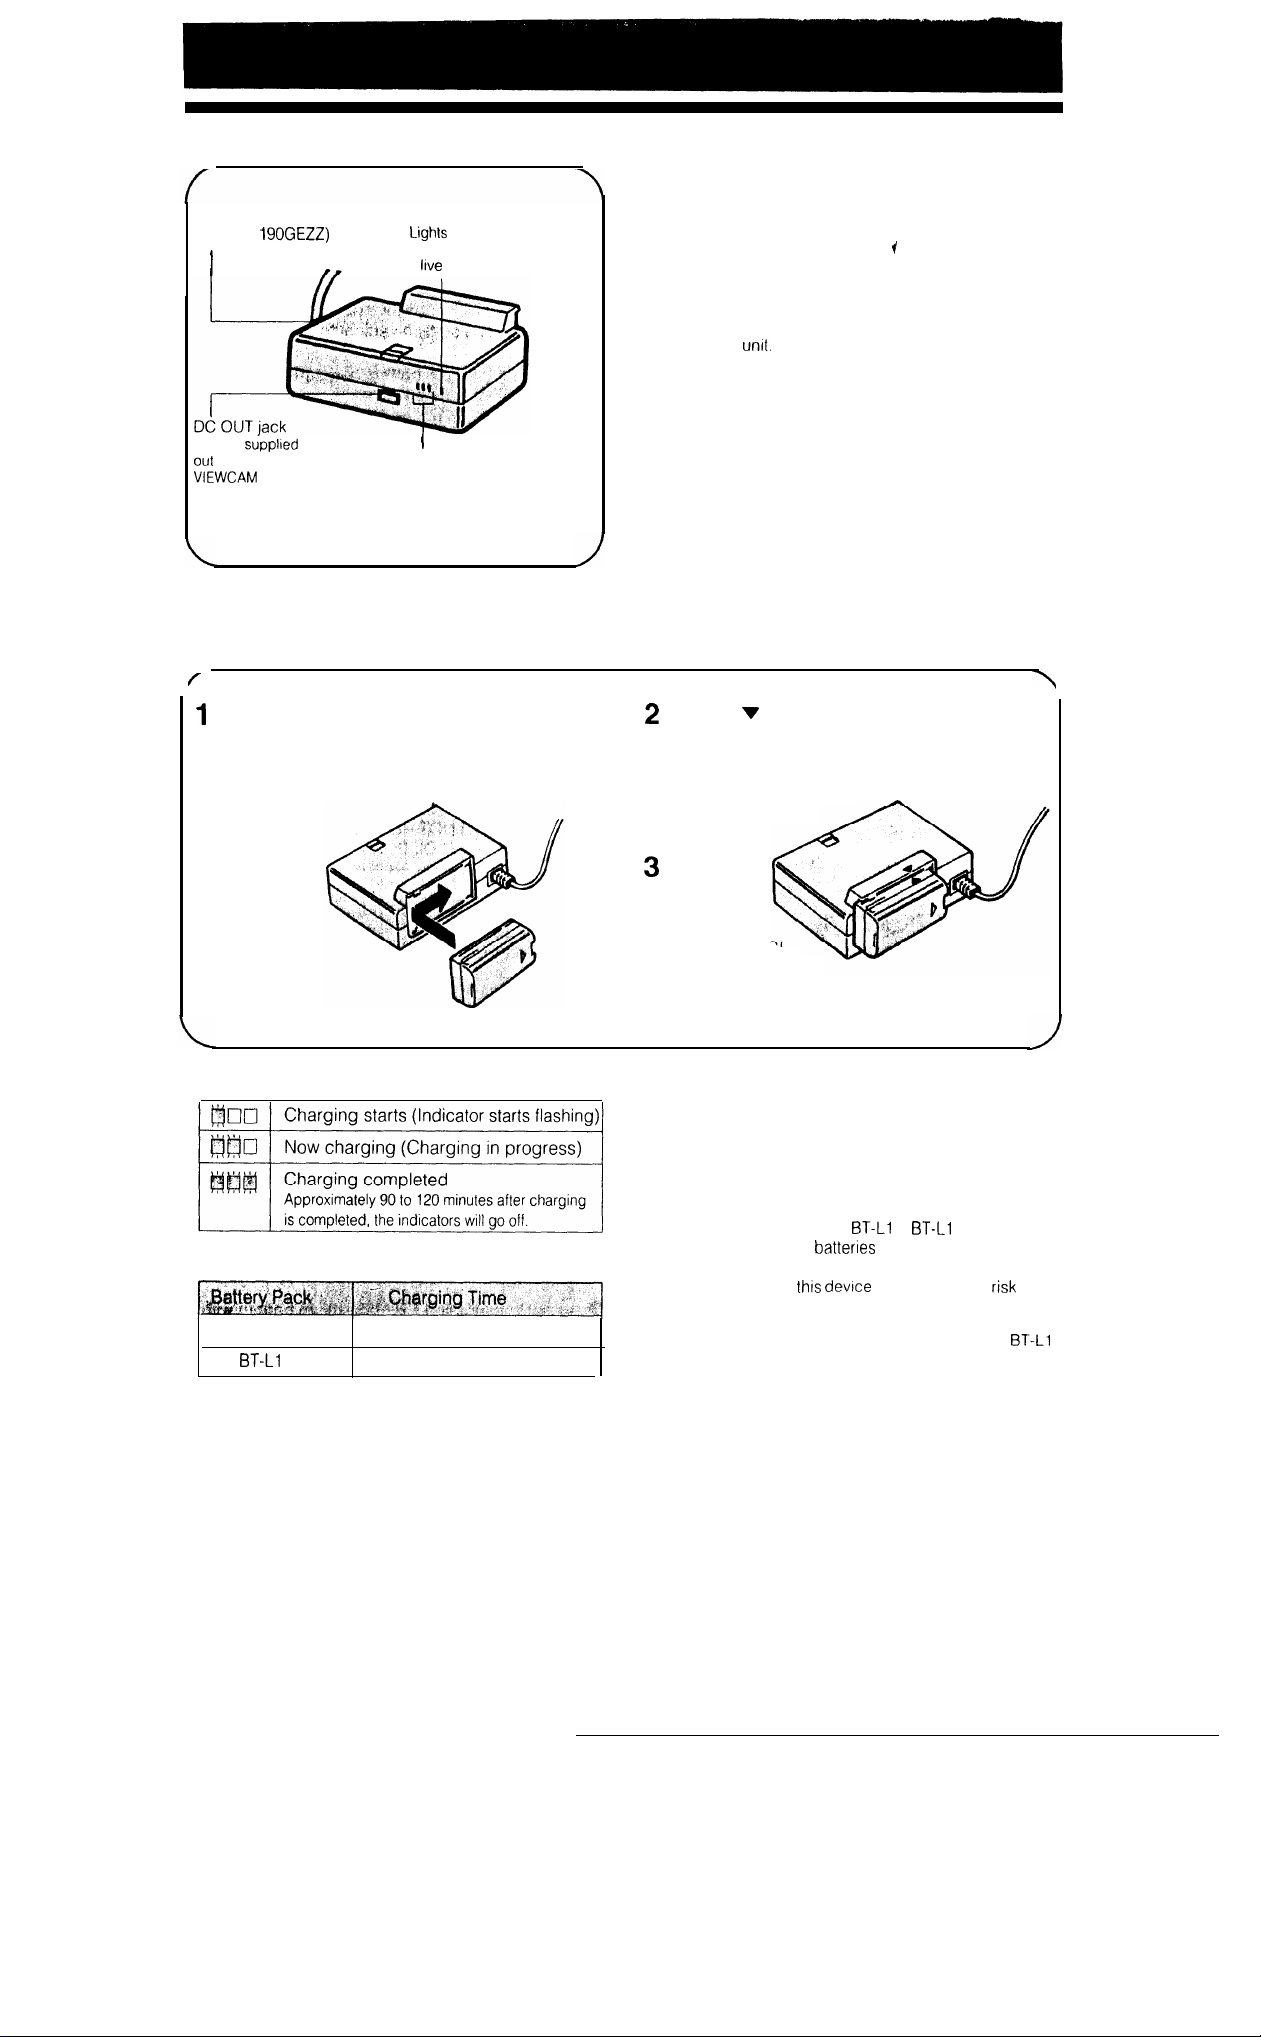
AC adaptor/battery charger
(UADP-0
Use the sdpplled
adaptor
2 m DC
cable to power the
OPERATE indicator
to indicate that the AC
power cord is connected to
a
power outlet
CHARGE indicator
Charging the Battery Pack
USING THE AC ADAPTOR/
BATTERY CHARGER
Precautions:
l If used near a radio, the AC adaptor/battery charger may
interfere with reception.
l Prevent flammables, liquids, and metal objects from
entering the
l This is a sealed unit. Do not attempt to open or modify it.
l Do not damage, drop, or subject the unit to vibration.
l Do not leave the unit in direct sunlight.
l Avoid using the unit in humid or extremely hot places.
l If the power source becomes disconnected during
recording, playback, or other operations, the tape will
remain wrapped around the drum, possibly causing
damage to the tape.
Reconnect the power source to the main unit
immediately.
if the DC OUT cable is connected to the AC
adaptor/battery charger, disconnect it.
Insert the AC plug into a wall outlet.
*The OPERATE indicator will light up.
CHARGE indicators and charging time
Charging time using AC adaptor/battery charger
BT-L 1
1
90 minutes approx.
120 minutes approx.
11
Align the
mark on the side of the battery
pack with the A mark on the charger, and
guide the battery pack into the groove.
Pressing the battery pack, slide it in the
direction of the arrow
until it locks into
place.
When the
battery
pack is
charged, all
three CHARGE
indicators will light
up. Remove the battery pack and then pull
the AC plug out of the wall outlet.
Notes:
l It is normal for the battery pack and charger to warm up
during charging. This is not a malfunction.
l Charging time depends on the ambient temperature and
the condition of the battery pack
Cautions:
l Charge only SHARP model
packs Other types of battenes may burst, causing
personal injury and damage
l The battery used in
device may present the
rise in surface temperature and/or the release of
flammable vapors.
Do not incinerate or mutilate. Replace battery with
and BT-L1 1 only. Use of another battery may present a
risk of fire or explosion.
or
1 battery
of a
Page 13
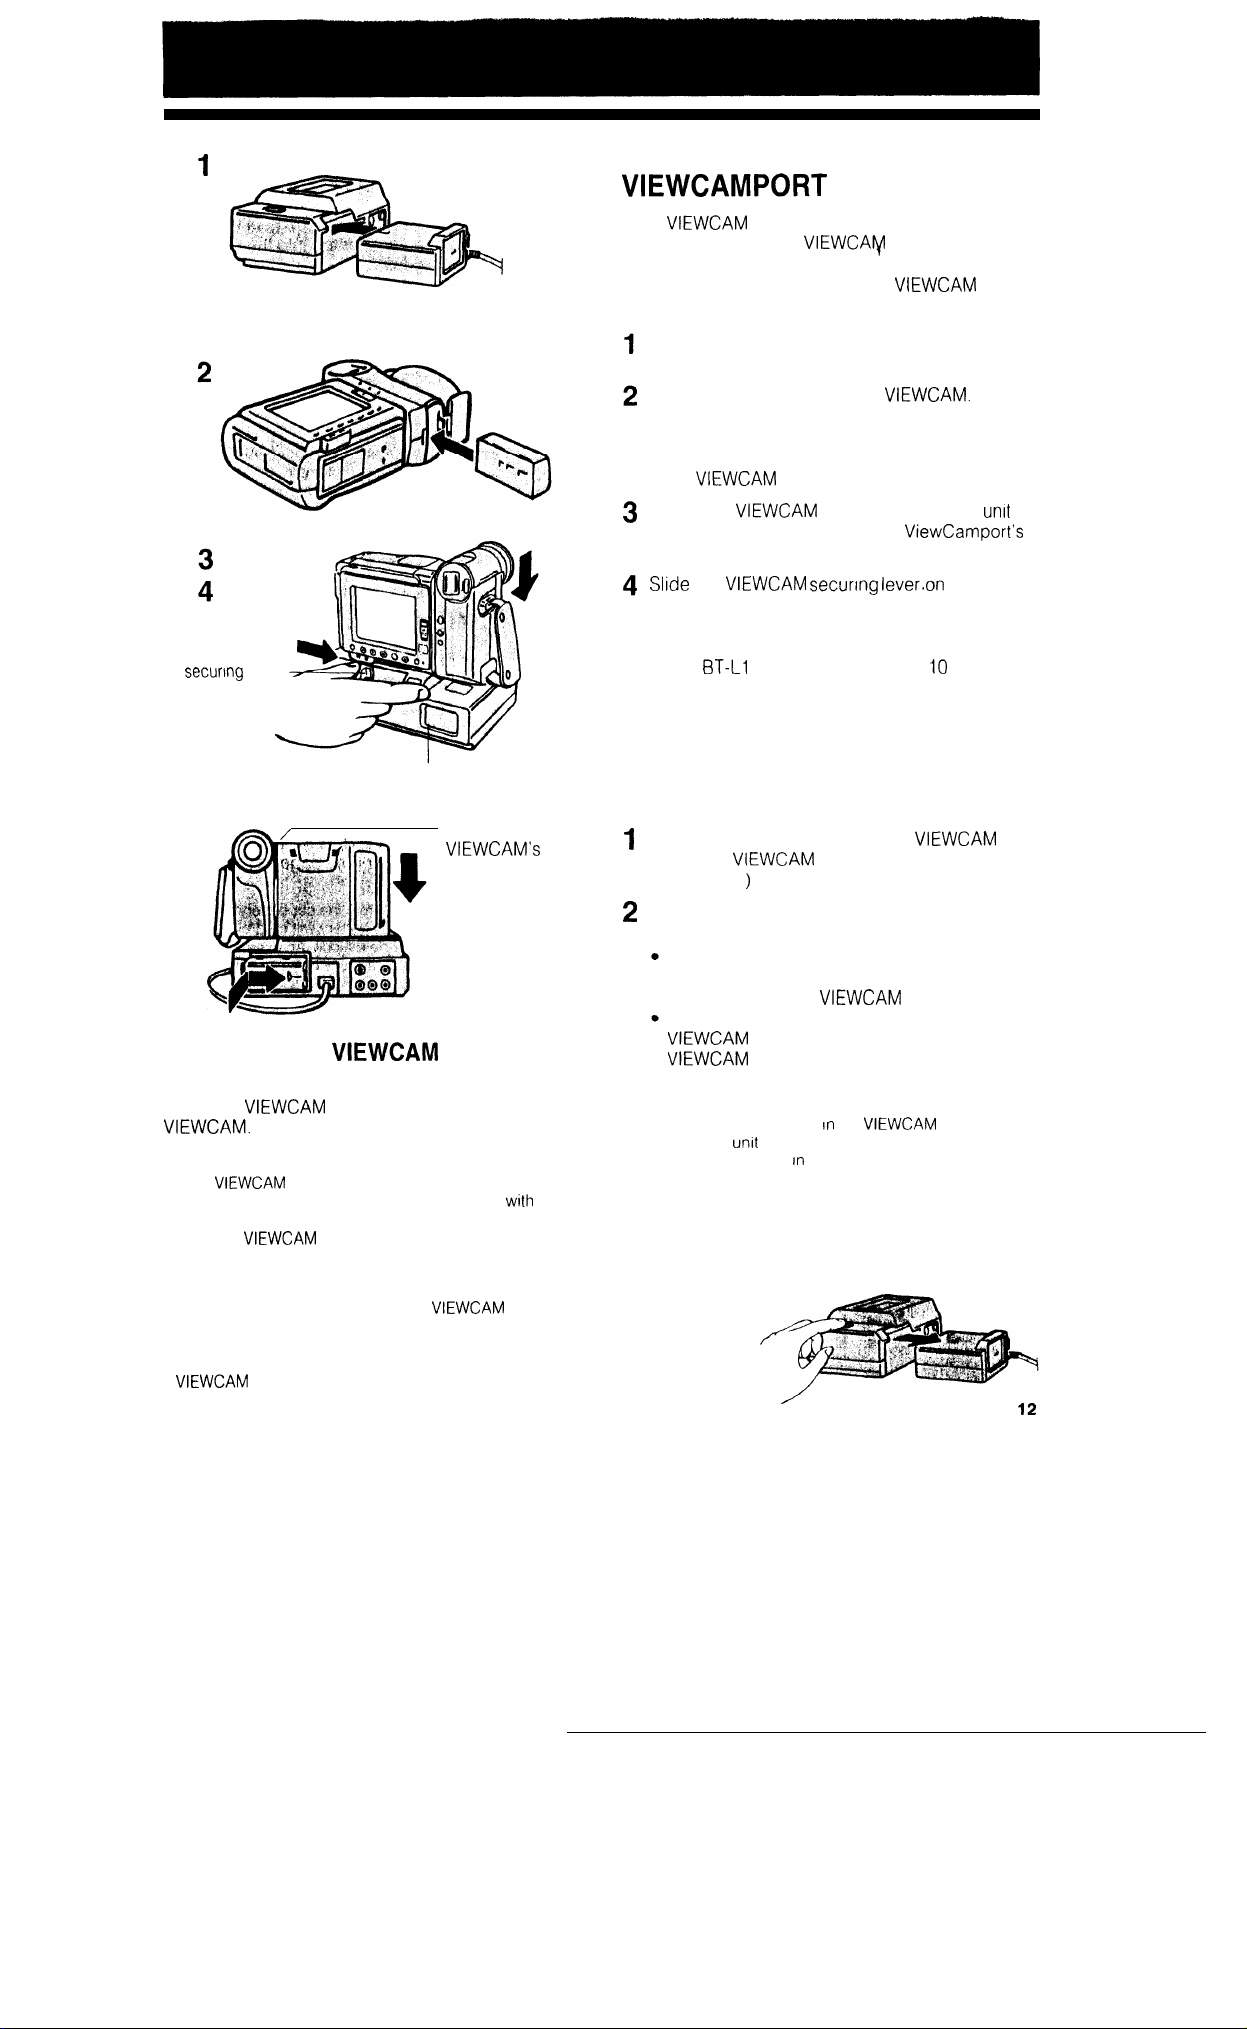
AC
adaptor
VI
EWCAM
lever
LED lamp window
Turn off the
power.
Removing the
from the
ViewCamport Unit
Press the
Note:
If the
the battery pack inside will naturally discharge
even after it has been fully charged We recommend you
place the
it is not in use.
Cautions:
l Do not use excessive force with the
ViewCamport unit. Doing so may cause damage or
malfunction.
l Do not move the ViewCamport unit by lifting the
while it is still attached to the ViewCamport
unit.
release button and remove the
is
removed from
on the ViewCamport unit even when
the ViewCamport unit,
time,
and/or
CHARGING ON THE
UNIT
If the
the battery pack in the
automatically and continuously.
The ViewCamport unit keeps your
to operate at any time.
Attach the AC adaptor to the ViewCamport unit
and insert the AC plug into a wall outlet.
Insert the battery pack in the
page 14.)
l Make sure that the Operate switch is set to
OFF, otherwise charging is not possible when
the
Attach the
with the LCD monitor facing the
LED lamp window side.
ViewCamport unit in the direction of the arrow to
the lock position. Charging starts automatically.
l
The charge indicator will not light up in this case
The
fully charge.
Charging Two Battery Packs
Successively
You can charge two battery packs successively with
the ViewCamport unit.
Insert the first battery pack in the
attach the
(See above
Attach the second battery pack to the AC
adaptor/battery charger as shown at left.
The battery pack on the AC adaptor/battery
charger will be charged first and then the
battery pack in the
The charge level of the battery pack in the
setting it to Camera or VCR mode.
Note:
Charging the battery pack
ViewCamport
AC adaptor. If you are
the AC adaptor.
Removing the AC Adaptor from the
ViewCamport Unit
Press the AC adaptor release button and pull out the
adaptor.
is attached to the ViewCamport unit,
can be charged
is in the VCR or CAMERA mode
to the ViewCamport
the
battery will take about
to the ViewCamport unit.
can be monitored by removing the
from the ViewCamport unit and
will take longer than charging by the
a hurry, we recommend you use
will be charged.
the
ready
(See
the
hours to
and
on the
Page 14
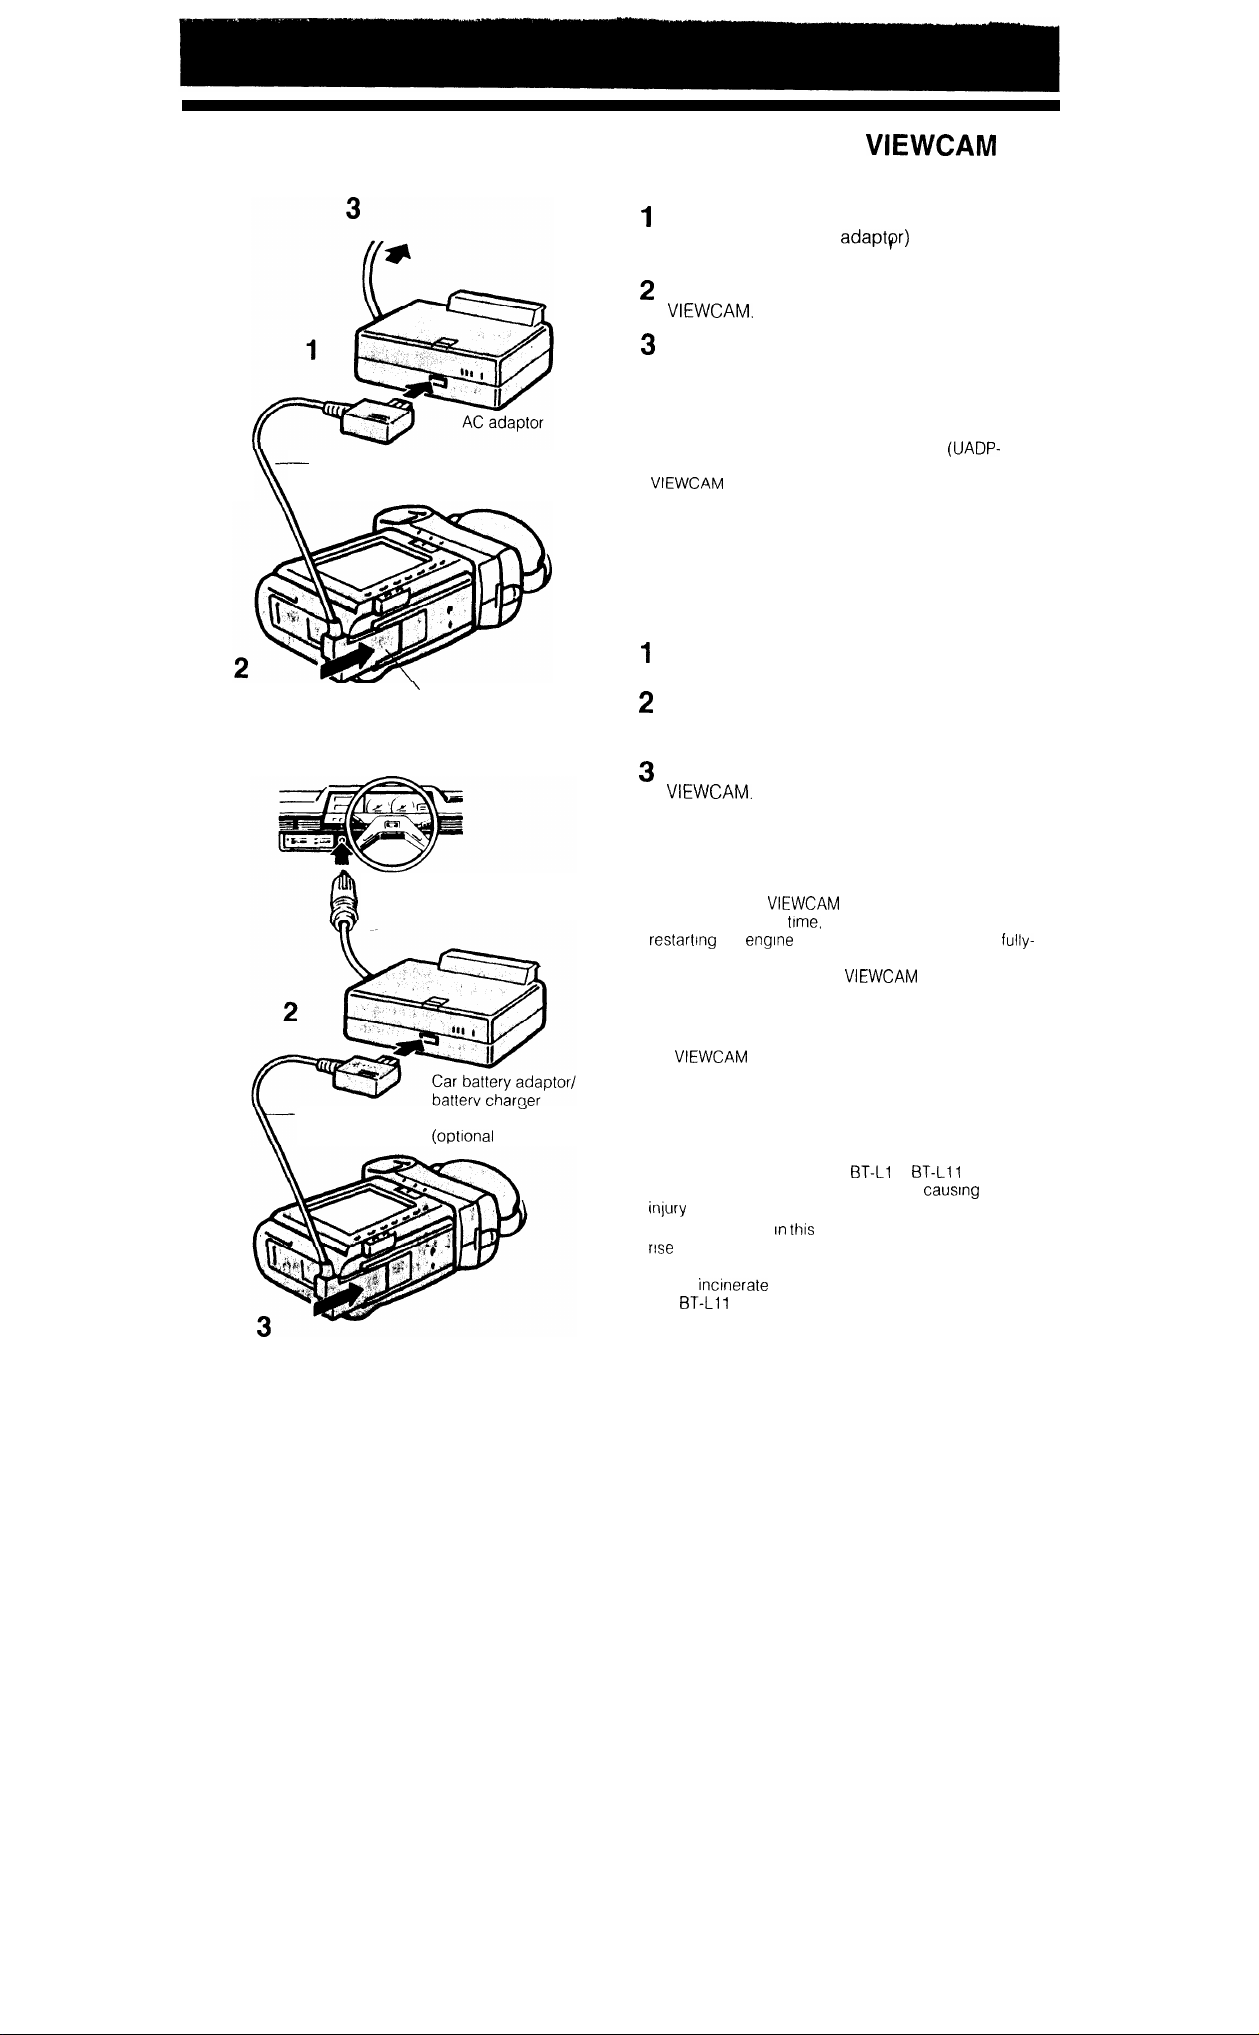
POWERING THE
FROM AN AC OUTLET
Plug the DC cable of the connecting plate
(supplied with the AC adaptpr) into the DC OUT
jack on the AC adaptor.
Mount the connecting plate on the bottom of the
Insert the AC plug into a wall outlet.
l The OPERATE indicator on the AC adaptor will
light up.
Caution:
DC cable
The supplied AC adaptor/battery charger
0190GEZZ) is specially designed for use with the
It should not be used as a power supply for
other camcorders
USING THE CAR BATTERY
ADAPTOR/BATTERY CHARGER
(OPTIONAL ACCESSORY)
Insert the plug into the cigarette lighter socket
Connecting plate
1
To cigarette lighter socket
DC cable
(supplied)
VR-41bCH
and the OPERATE indicator will light up.
Plug the DC cable from the connecting plate
(supplied) into the DC OUT jack on the car
battery adaptor/battery charger.
Mount the connecting plate on the bottom of the
The battery pack can be charged
using the car battery adaptor/battery charger in
basically the same manner as the AC
adaptor/battery charger (see page 11).
Note:
If you power the
extended period of
the engine may be difficult. An average
charged car battery has a capacity of 50 ampere-hours,
which will allow 20 hours of
leaving half the battery’s capacity
from the car battery for an
the battery will be drained and
usage while still
Cautions:
l Do not put the strong force to the DC cable connected to
the
l Use in with 12 V or 24 V DC negative ground system
cars
Posttive-ground car batteries CANNOT BE USED.
Check your car operation manual or consult a local car
dealer
l Charge only SHARP model
packs Other battery types may burst,
and damage
l The battery used
in surface temperature and/or the release of
flammable vapors.
Do not
and
risk of fire or explosion
as this will cause a malfunction.
or
device may present the risk of a
or mutilate. Replace battery with BT-L1
only. Use of another battery may present a
battery
personal
13
Page 15
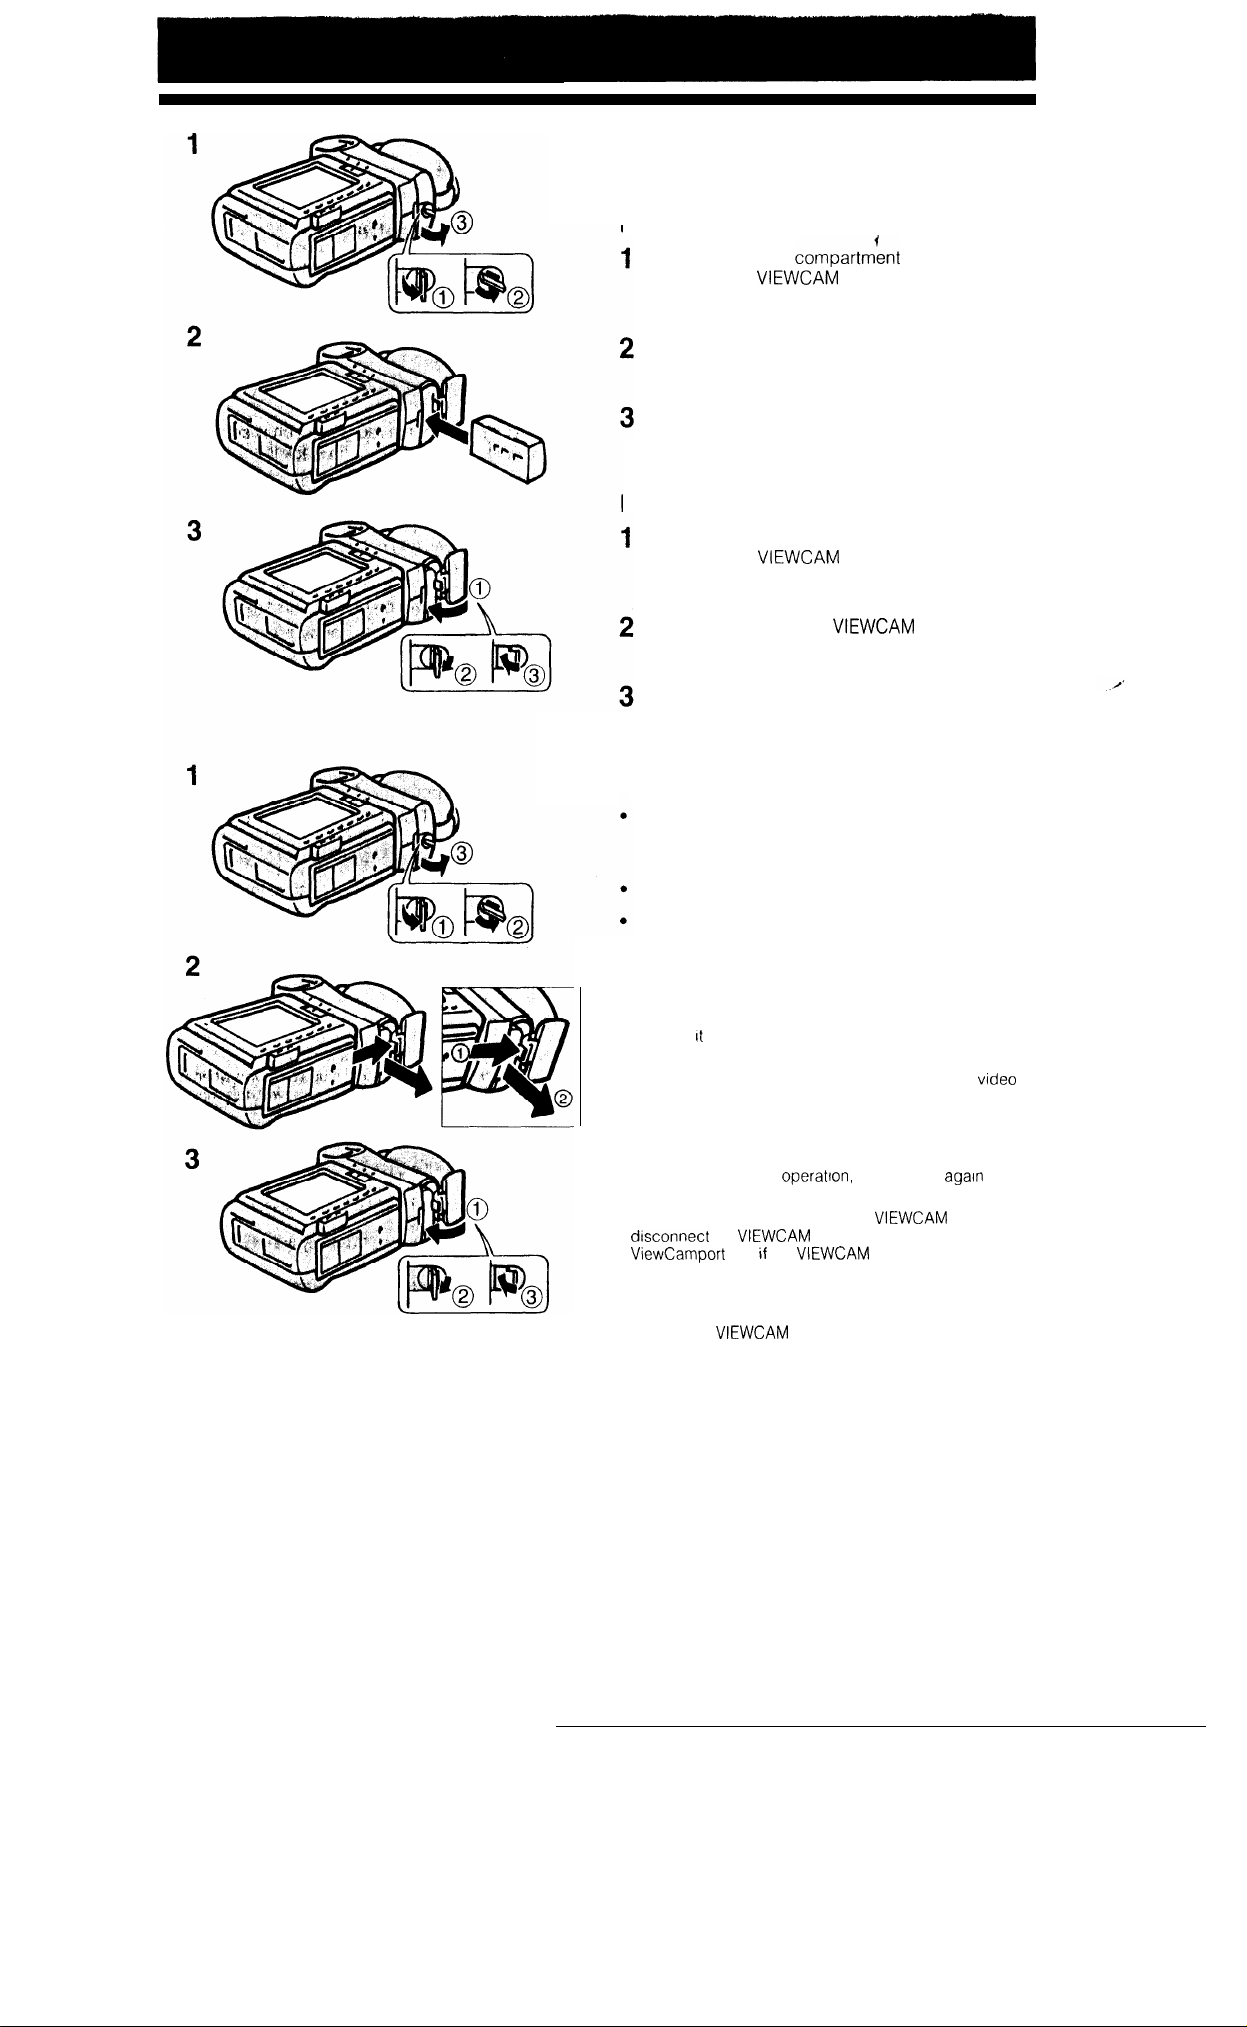
INSERTING AND REMOVING
THE BATTERY PACK
Inserting
Pull up the battery compartmknt latch on the
bottom of the
clockwise to open the battery compartment.
Insert the battery pack into the compartment and
push it until it clicks into the notch.
Close the cover and turn the latch clockwise to
secure it firmly.
Removing
Pull up the battery compartment latch on the
bottom of the
clockwise to open the battery compartment.
and turn it counter-
and turn it counter-
Press the notch, tilt the
so the opening
faces down and remove the battery pack.
Close the cover and turn the latch firmly
clockwise to secure it.
Battery pack handling
Make sure that you take enough battery packs
with you to provide two to three times your
estimated recording time.
Recording time will be reduced in cold weather
The battery will drain in the Recording Standby
mode. Turn off the power if you will not be
recording again soon.
Cautions:
l Do not expose the battery compartment cover to strong
force, as
l If you remove the battery pack durrng recording or
playback, the tape will remain wound around the
head drum and may be damaged.
BEFORE REMOVING THE BATTERY PACK, ALWAYS
STOP THE TAPE AND TURN THE POWER OFF
Should the power source (battery or adaptor) become
disconnected during
immediately.
l Remove the battery pack from the
long time.
. Be sure to close the battery compartment cover firmly,
especially during operations If not, the battery pack may
come off or
poor contact pressure.
may come off.
the
operation may fail because of the
reconnect it again
or
from the AC adaptor or
will not be used for a
14
Page 16
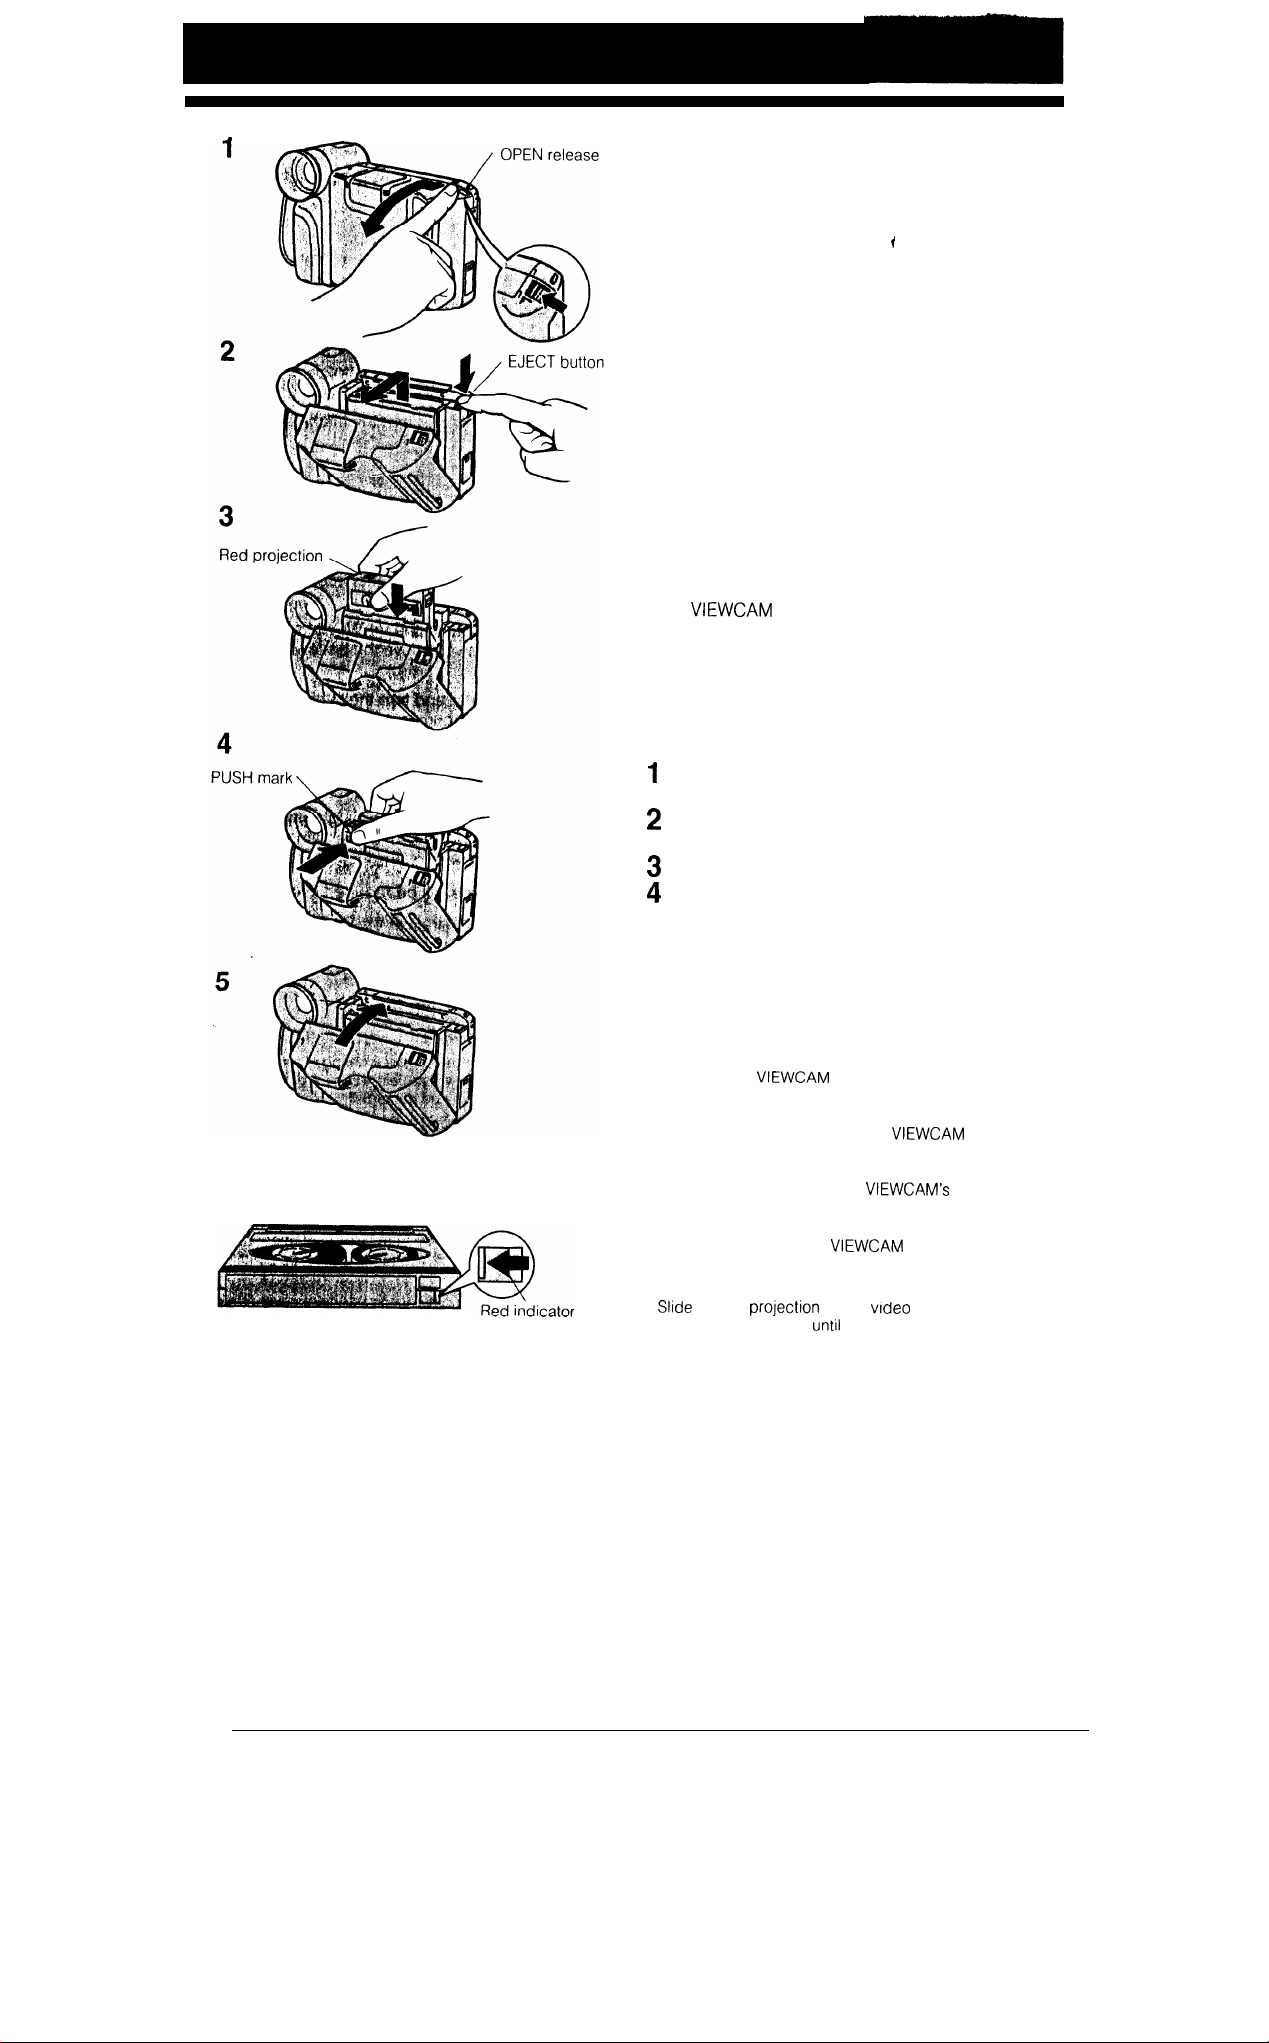
INSERTING AND REMOVING A
CASSETTE
Inserting a Cassette
Slide the OPEN release to open the cassette
1
compartment door.
Press the EJECT button.
2
l The cassette compartment extends
automatically.
Insert the video cassette with the window facing
3
outward.
l Make sure that the red projection is set to
OPEN and that there is no slack in the tape.
Press the “PUSH” mark until the compartment
4
clicks into place.
l The cassette compartment retracts
automatically. (Do not force the compartment
to close and avoid catching your fingers as the
compartment closes.) Do not turn the
Close the compartment door by pressing its
5
centre until the cover clicks into place.
l Make sure that the cassette compartment has
properly retracted before closing the door.
power on or off at this time.
15
Removing a Cassette
Slide the OPEN release to open the cassette
compartment door.
Press the EJECT button to extend the cassette
compartment.
Take out the cassette.
The cassette compartment retracts, then close
the compartment door.
Cautions:
l Do not try to close the door while the cassette
compartment is being extended or retracted.
l Be careful not to get your fingers caught in the cassette
compartment.
l Do not apply force to the cassette compartment except
when pressing the “PUSH” mark to close it.
l Do not tilt the
video cassette is being inserted or removed, this may
damage the video cassette.
l Remove the video cassette if the
used for a long time.
l If you do not press the cassette compartment closed
correctly in step 4 above, the
protectron mechanism might eject the cassette. Repeat
the Insertion procedure.
l Do not attempt to lift the
compartment door.
To protect recordings from accidental erasure
the red profection on the vrdeo cassette in the
direction of the arrow
To record on the tape again, slide the red projection in
the reverse directton.
or hold it upside-down when a
will not be
cassette
by the cassette
the red indicator IS visible
Page 17
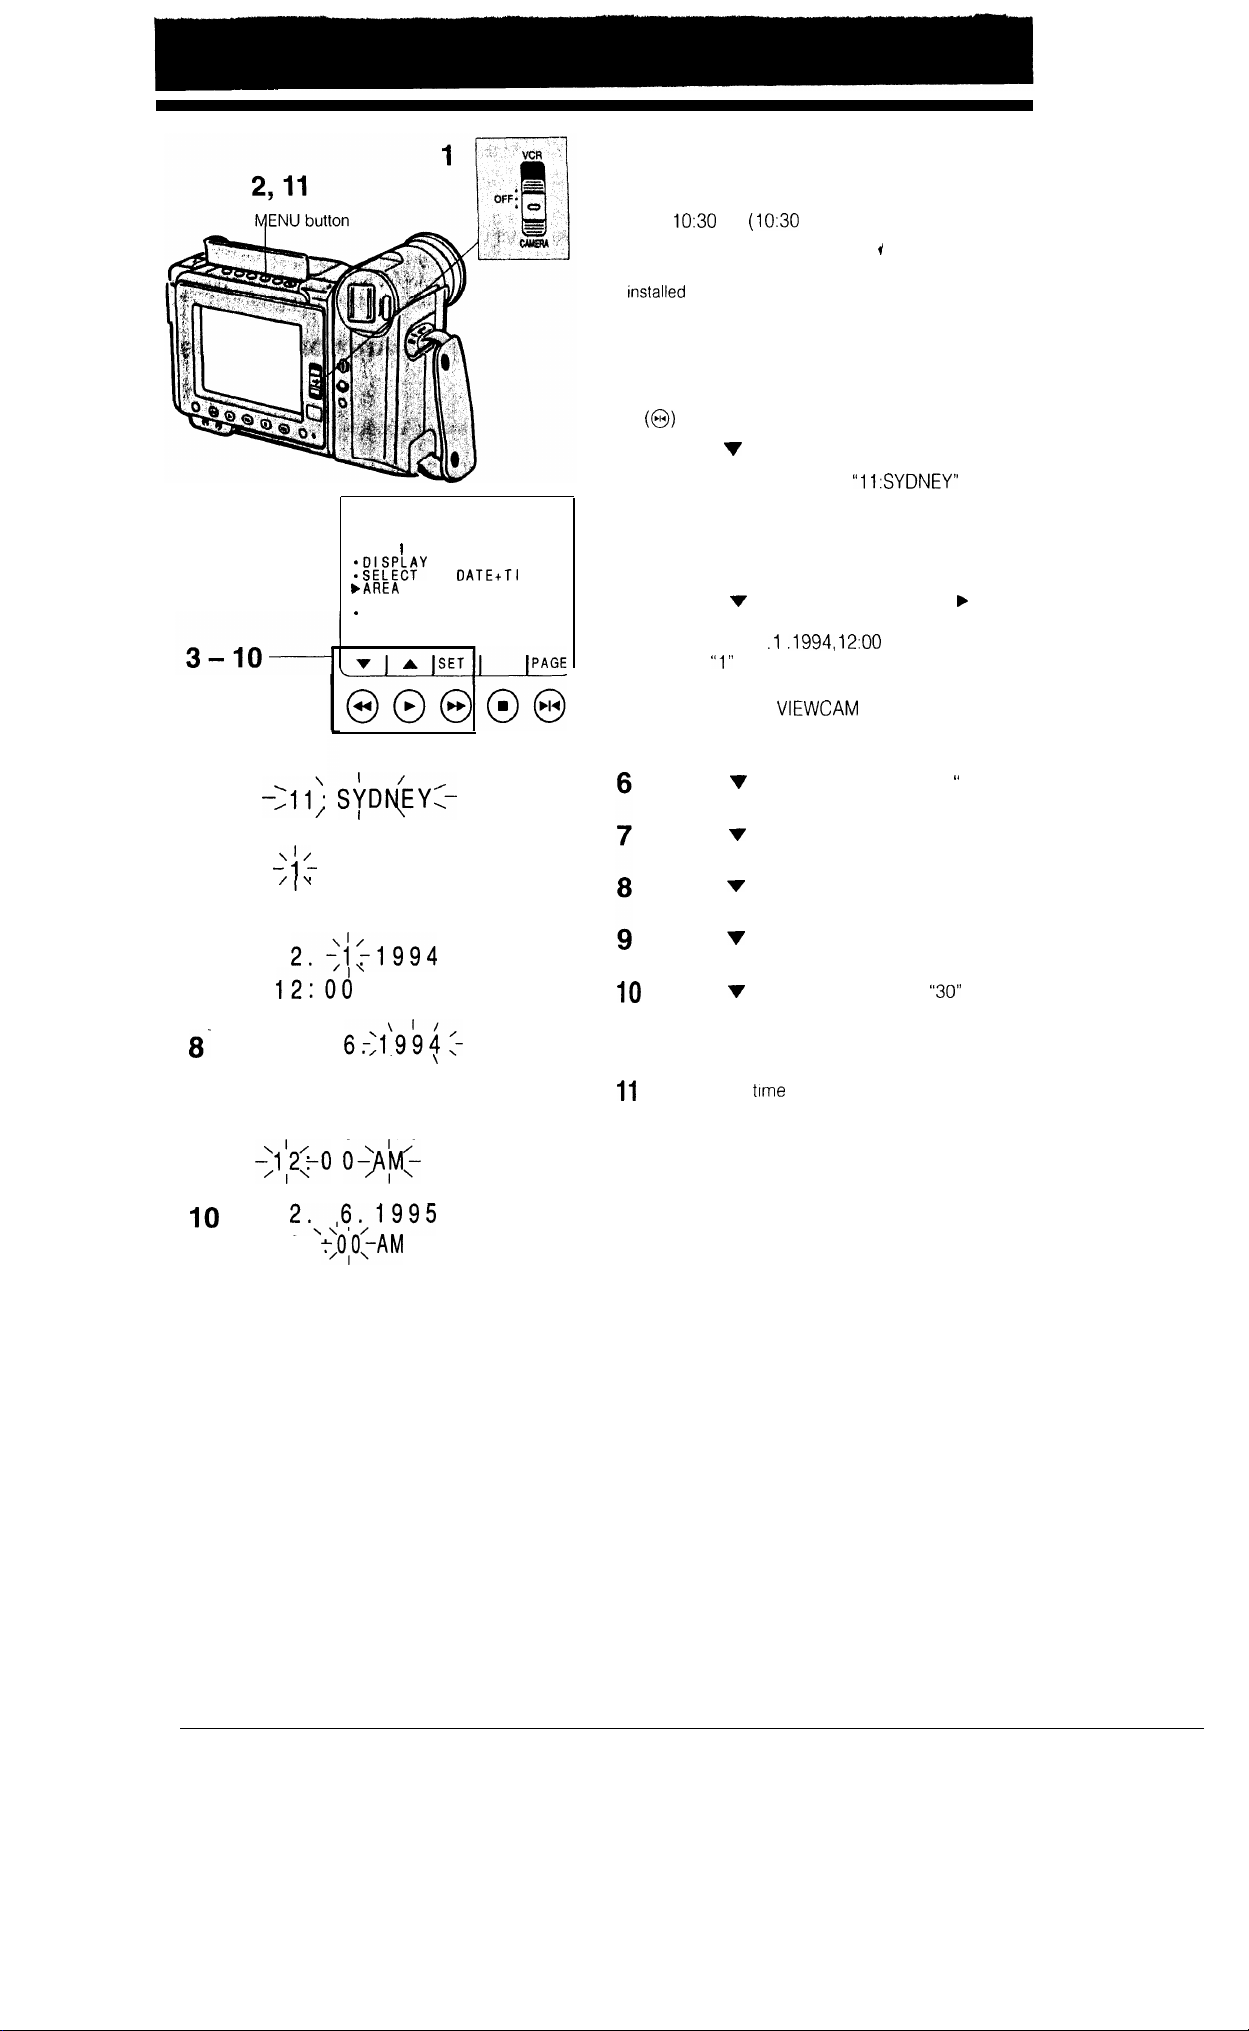
SETTING THE DATE AND TIME
Example:
Setting the date to 2 June 1995 (2. 6. 1995) and the
time to
Notes:
l Check that the memory backup lithium battery has been
l The date and time, once set, are stored in memory.
Set the Operate switch to CAMERA.
1
Press the MENU button to display MENU 1.
2
If MENU 2 is displayed, press the PAGE button
Press the
3
Press the SET button until “11:SYDNEY”
4
MENU 1
DATE/T
ME
l
SUMR TIME
SETT I NG
OFF
OFF
ME
4
6
1.1994
12:00 AM
7
AM
2.
12:00 A'M'
2.
9
6.1995
appears.
l
Press the
5
to “SETTING”, and then press the SET button.
(At this time, “1
with the
l When the memory backup is not operating,
Press the
and press the SET button.
Press the
and press the SET button.
Press the
(year), and press the SET button.
Press the
(hour), and press the SET button.
Press the
(minutes), and
l The internal clock starts operating when the
The date and
Press the MENU button, and the menu will
disappear from the monitor.
Note:
The menu display is automatically cancelled if no settings
are made within 5 minutes after the MENU button is
pressed.
1 0
am (IO:30 AM) in Sydney.
before setting the date and time.
to get MENU 1 on the monitor.
or A button to select AREA.
See the Time Zone Chart on page 19 for time
zone numbers and representative city for each
zone.
or A button to move the
flashing.)
e.g. when the
the factory, the pointer automatically points at
this item.
or A button to select “2.
or A button to select “6.” (month),
or A button to select “1995”
or A button to select “10 AM”
or A button to select
press the SET button.
SET button is pressed.
settings are now complete
AM” is displayed
is first received from
pointer
(day),
11
2.
10:
6.1995
30 AM
16
Page 18
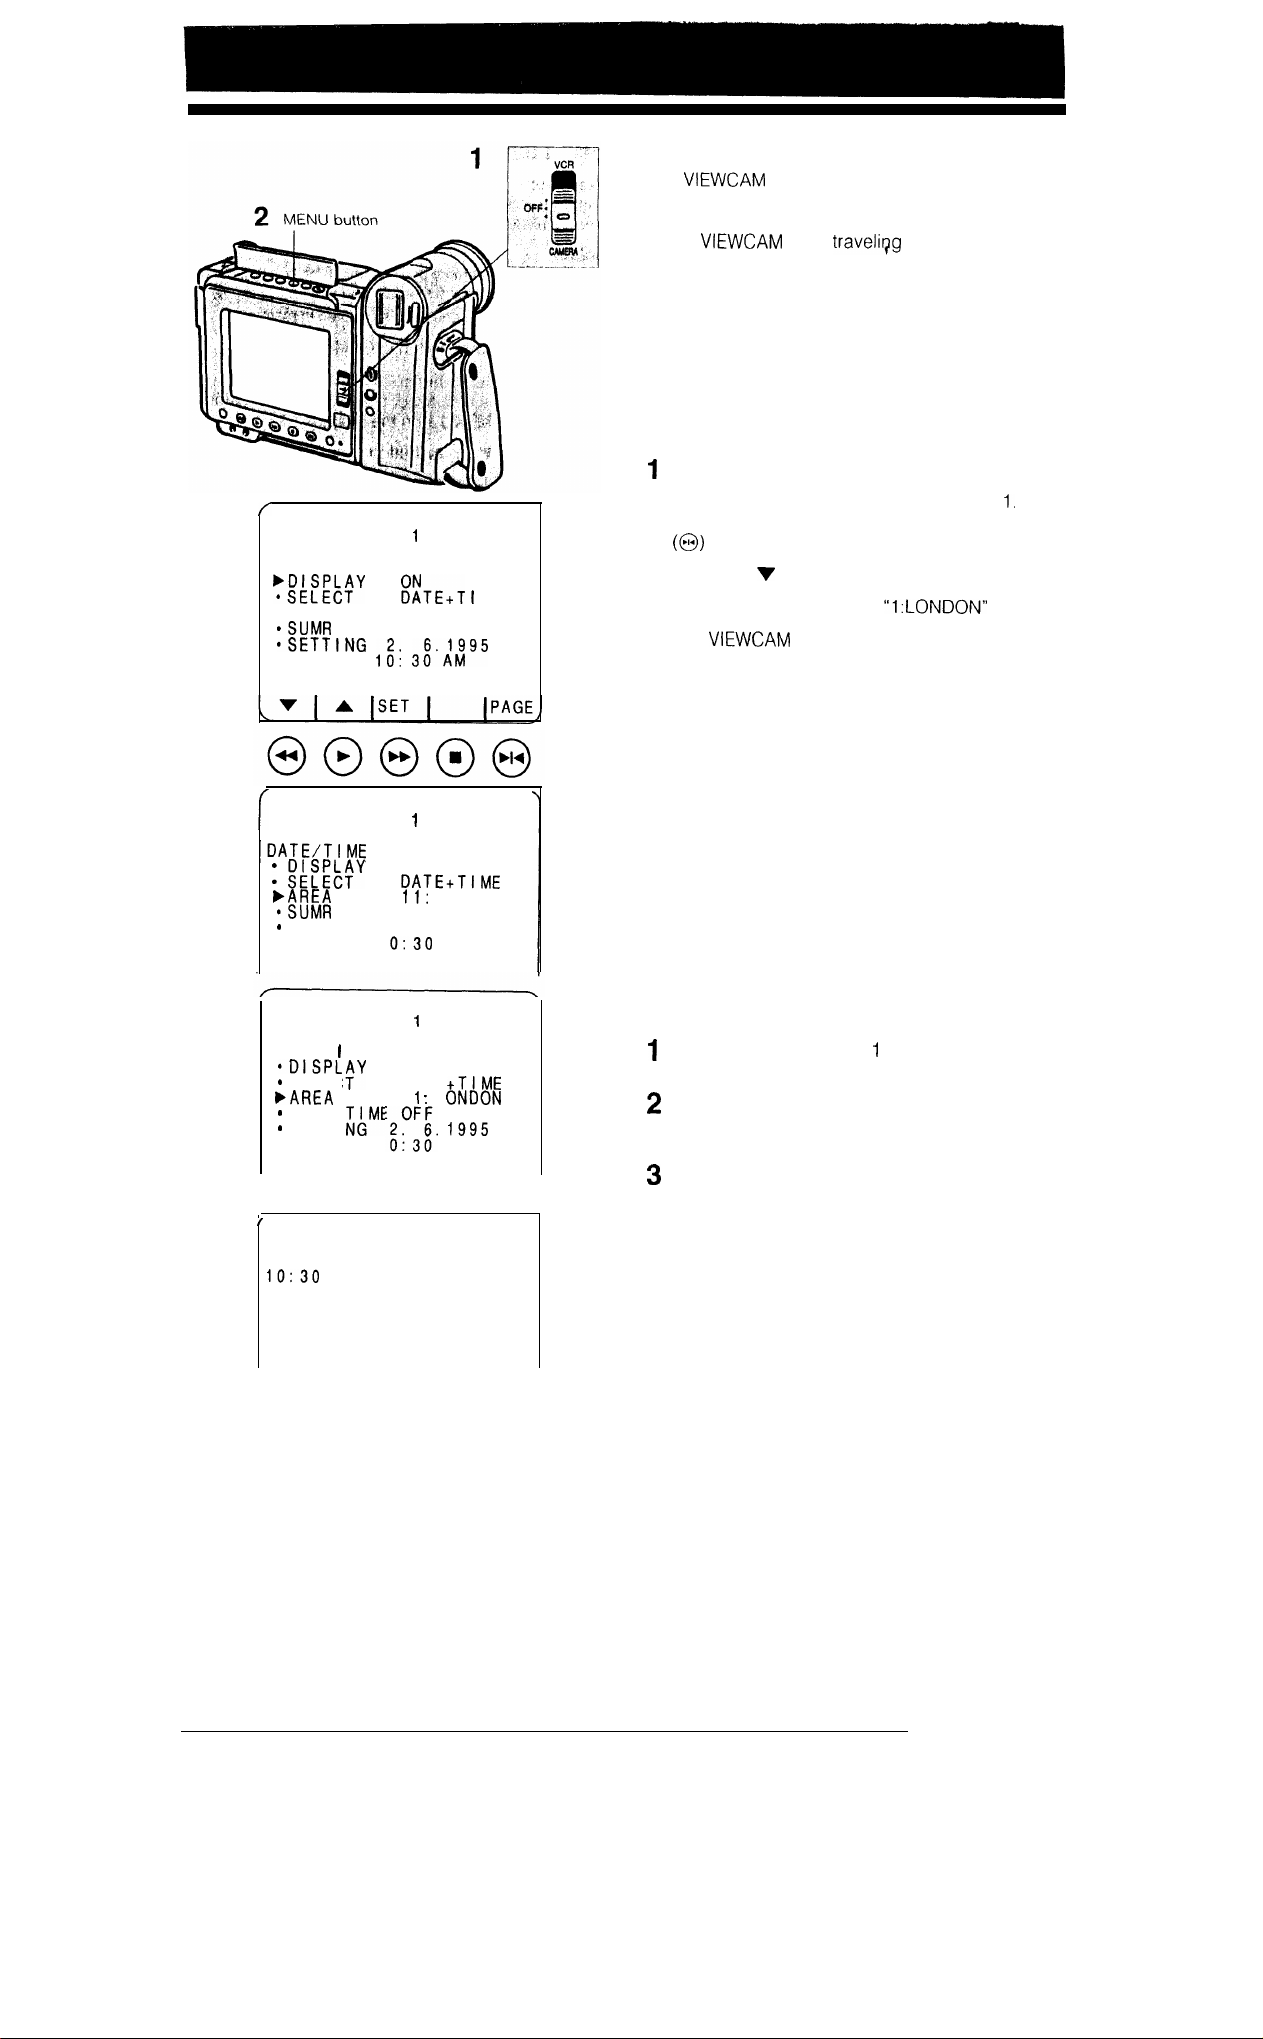
2
DATE/T I ME
l AREA
MENU
11: SYDNEY
ME
WORLD CLOCK
This
feature.
This allows you to easily adjust the time when you
use the
world outside your own time zone.
If you have not previously set the area, date and
time, see page 16 and set them first.
comes equipped with a World Clock
while traveliqg anywhere in the
Changing the Area of the Time
Zone
Example:
Changing the area to London.
Set the Operate switch to CAMERA.
Press the MENU button to display MENU
2
If MENU 2 is displayed, press the PAGE button
to get MENU 1 on the monitor.
Press the
3
Press the SET button until
4
The
5
time. Press the MENU button, and the menu will
disappear from the monitor.
The area name, time and date will appear on the
monitor.
or A button to select AREA.
appears.
is now set to the London, England
3
4
5
TIME
SETT I NG
DATE/T
SELEC
SUMR
SETT I
l:LONDON
2. 6. 1995
AM
MENU
1
MENU
ME
1
ON
SYDNEY
OFF
2. 6. 1995
AM
ON
DATE
L
AM
No Area Display
If you do not want to set any area (time zone), you
can leave the setting blank.
Select “AREA” in MENU
(after zone 24).
Set the local time of your home if necessary.
Set the “DISPLAY” to ON, OFF or AUTO as you
prefer.
Press the MENU button.
l The menu will disappears from the monitor.
When the date and time are displayed, they
are displayed without any time zone number or
city name.
and set it to blank
17
Page 19
DATE/T I ME
AREA
TIME OFF
*SETTING
DATE/T I ME
DISPLAY
TIME ON
*SETTING
MENU 1
ON
MENU 1
DATE+T I ME
ll:SYDNEY
I ME
11:
SYDNEY
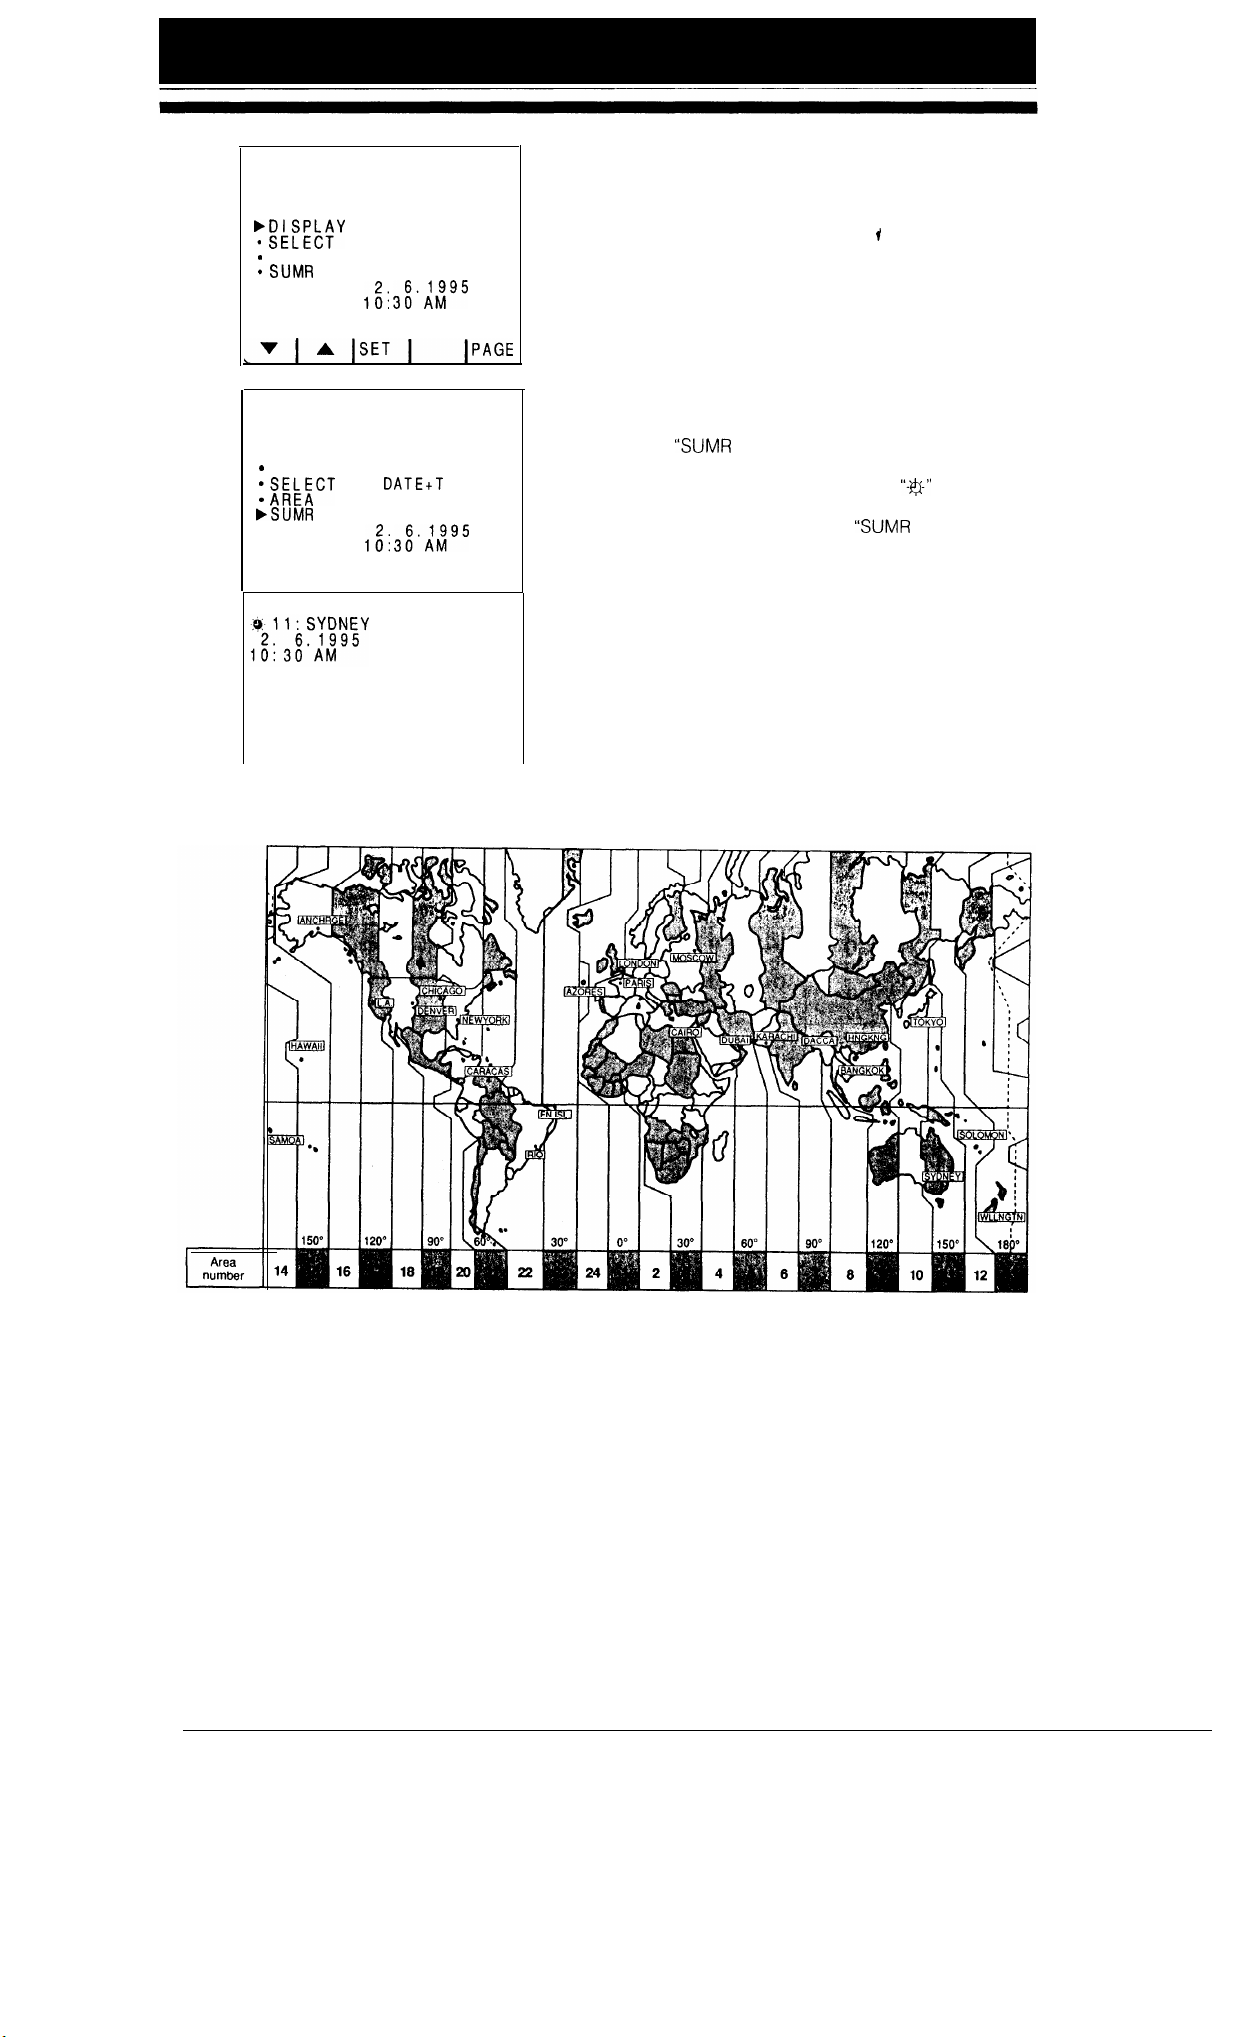
To Display Area, Date and Time on
the Monitor
Select “DISPLAY” on the MENU 1 and set it to ON.
The area, date and time will be displayed on the
monitor.
Setting Summer Time (Daylight
Saving Time)
Select
ON. The time automatically changes to summer
time (daylight saving time) and the
displayed on the monitor.
To reset to standard time, set
TIME” on the MENU 1 and set it to
mark is
TIME” to OFF.
Time
Zone Chart
18
Page 20
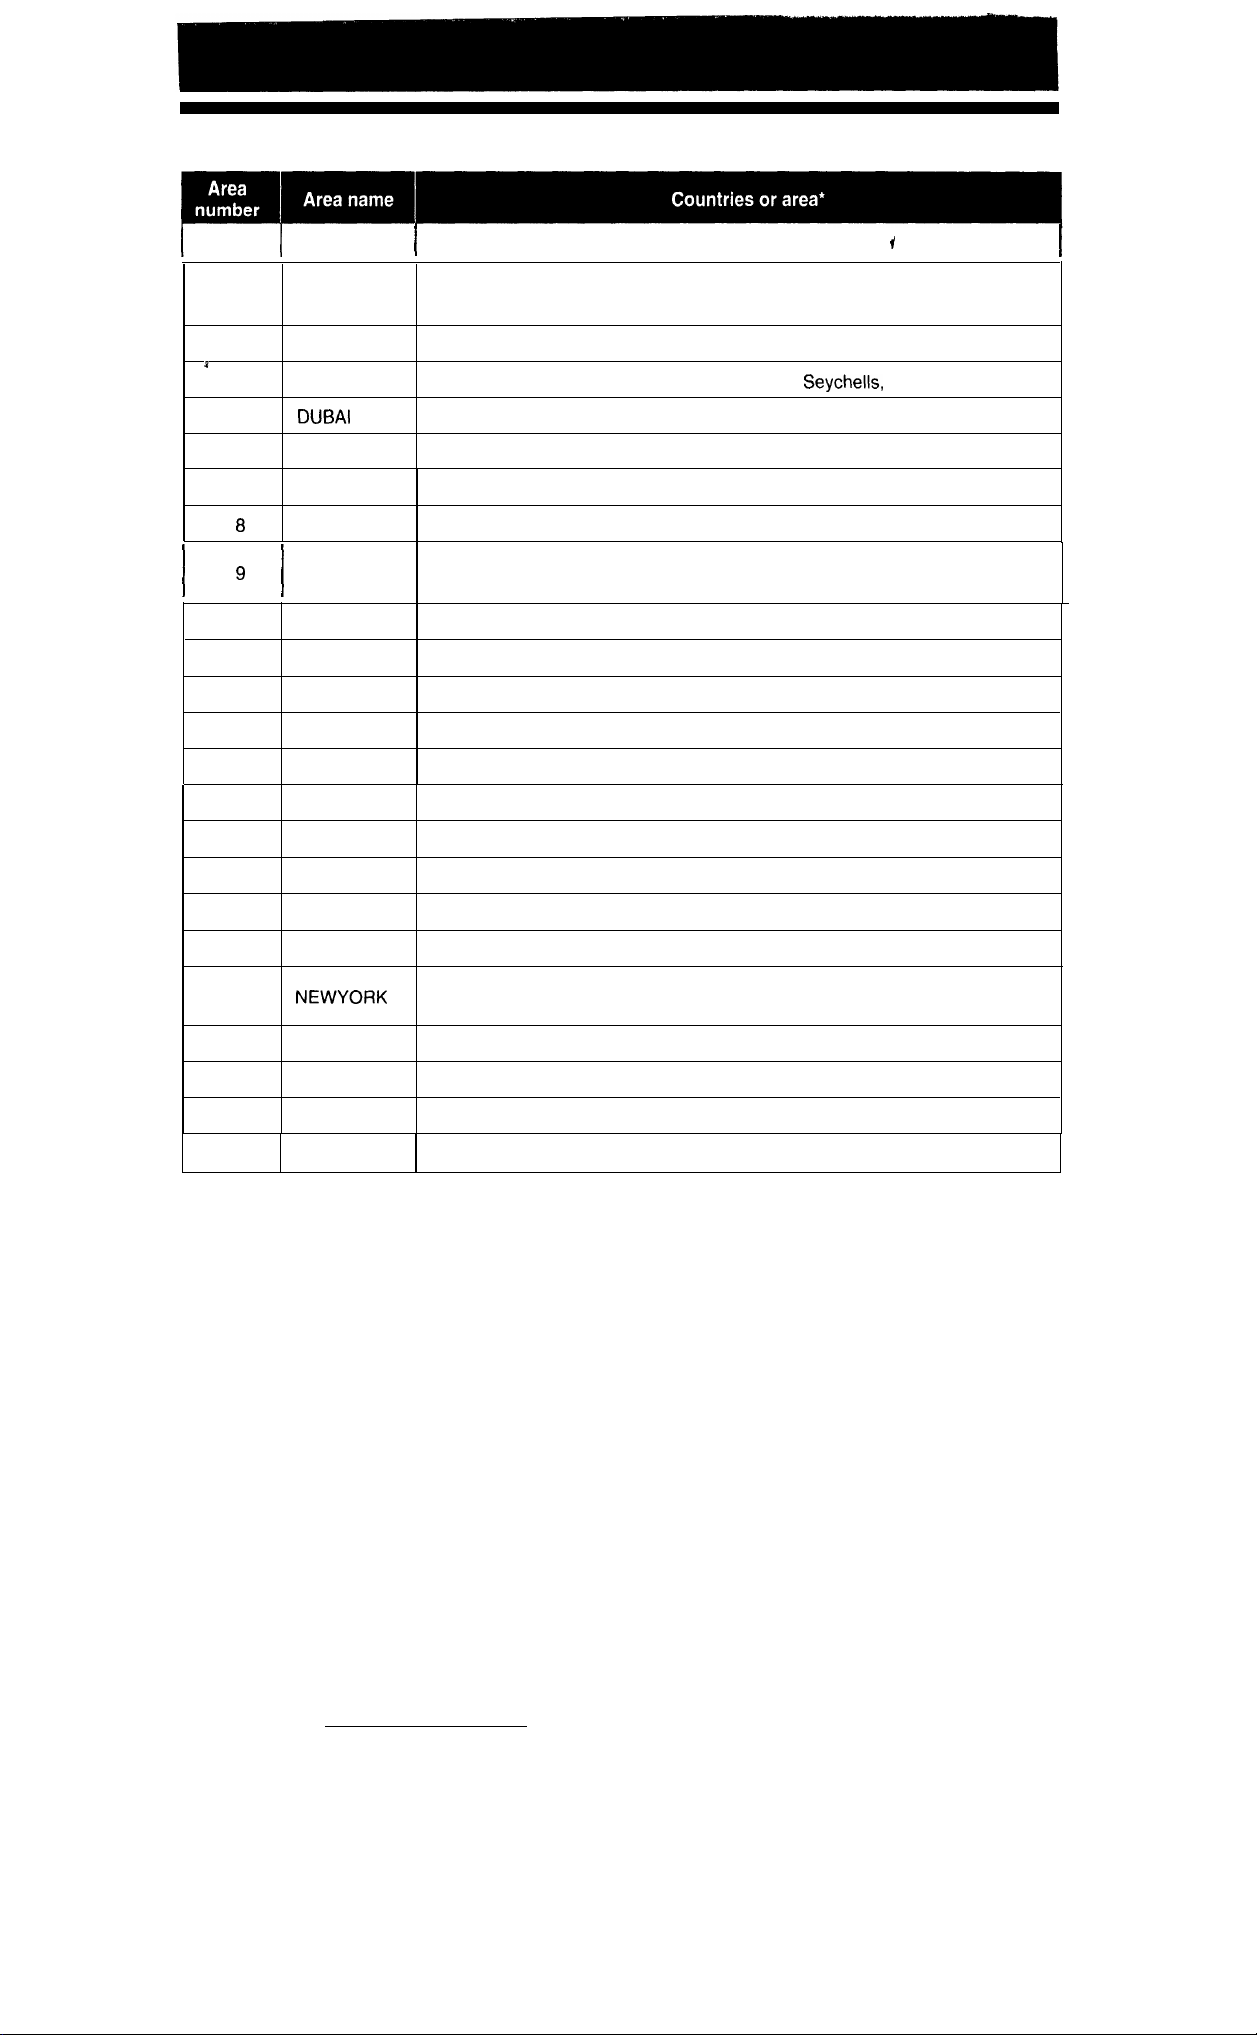
Using the World Clock
1
LONDON
England, Morocco, GMT (Greenwich mean time)
2
3
4
5
6
7
10
11
12
13
14
15
16
PARIS
CAIRO
MOSCOW
KARACHI
DACCA
BANGKOK
HNGKNG
TOKYO
SYDNEY
SOLOMON New Caledonia
WLLNGTN Fiji, New Zealand
SAMOA Western Samoa
HAWAII
ANCHRGE
Austria, France, Germany, Italy, Netherlands, Spain, Sweden, Switzerland,
Portugal, CST (Continental Standard Time), Tunisia
Egypt, Finland, Greece, Turkey
Ethiopia, Iraq, Kenya, Mauritius, Saudi Arabia,
United Arab Emirates
Moldives, Pakistan
Bangladesh, India, Myanmar
Cambodia, Indonesia (Jakarta), Thailand, Vietnam
Australia (Perth), China, Hong Kong, Indonesia (Borneo, Bali), Malaysia,
Philippines, Singapore, Taiwan
Japan, Korea
Australia (Sydney)
Hawaii I., Tahiti, HST (Hawaii Standard Time)
U.S.A. (Alaska), AST (Alaska Standard Time)
Russia (Moscow)
17
18
19
20
21
22
23
24
l These are common names. The formal may be different
19
L.A.
DENVER
CHICAGO
CARACAS
RIO
FN ISL. Fernando de Noronha
AZORES
U.S.A. (Los Angeles, San Francisco), PST (Pacific Standard Time)
U.S.A. (Denver), MST (Mountain Standard Time)
Mexico, U.S.A. (Chicago), CST (Central Standard Time)
Canada (Montreal), Jamaica, Peru, U.S.A. (New York, Washington D.C.),
EST (Eastern Standard Time)
Chile, Dominica, Venezuela
Argentina, Brazil, Uruguay
Azores Islands
Page 21
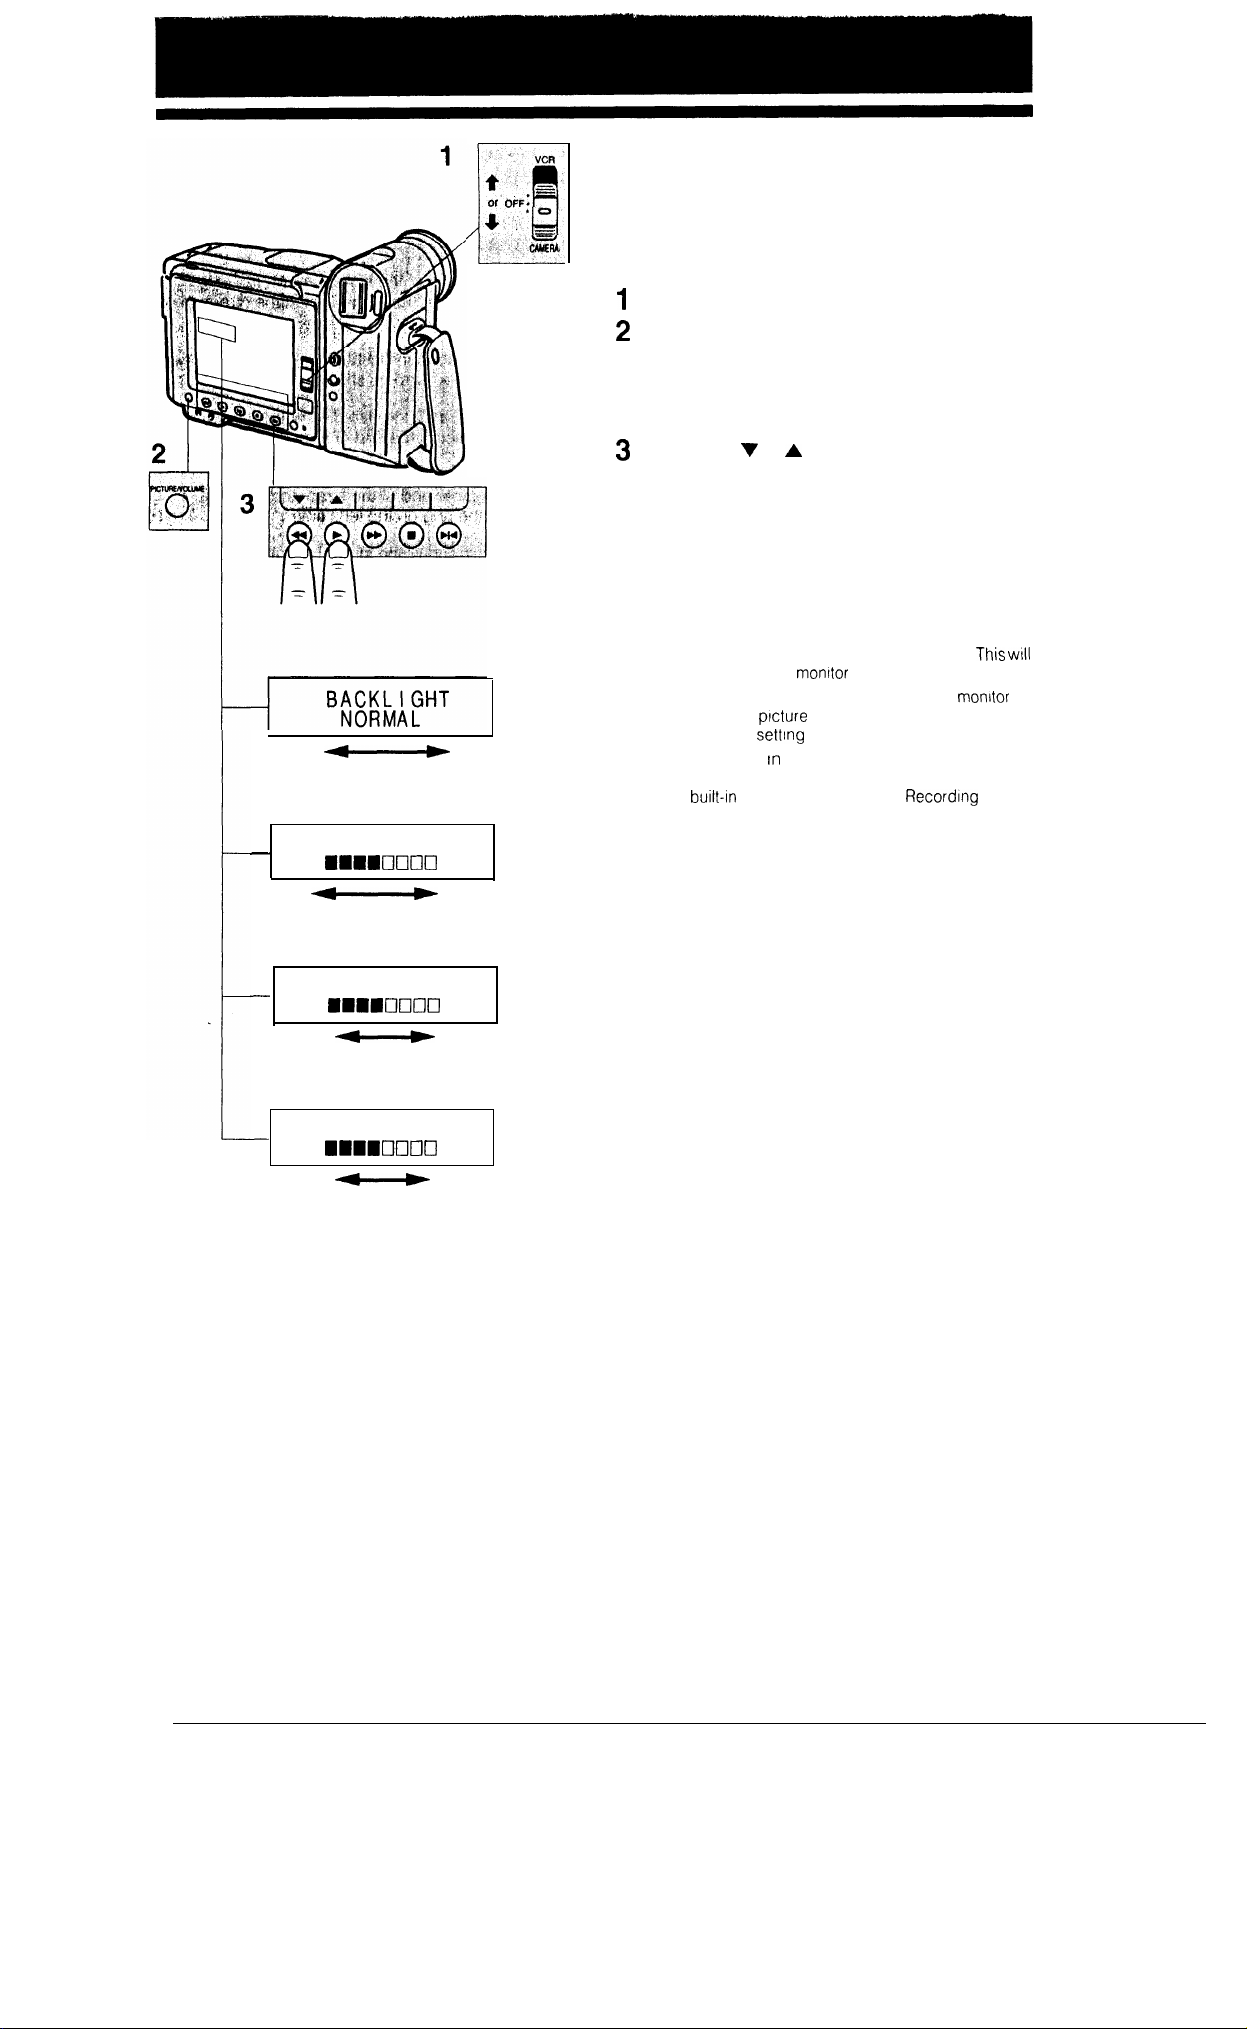
Normal
Bright
OFF:
PICTURE/VOLUME/BACKLIGHT
ADJUSTMENT
If the picture is difficult to watch due to ambient
lighting or the sound difficult to hear, adjust the
picture and volume.
Set the Operate switch to CAMERA or VCR.
Press the PICTURE/VOLUME button to display
the desired function to be adjusted.
l The monitor display will change in the order of
Backlight, Bright, Colour and Volume each
time you press the PICTURE/VOLUME button.
Press either
desired function to your preference.
l The monitor display will disappear
automatically if you do not press any button
within approximately 4 seconds after the
PICTURE/VOLUME button is pressed.
Notes:
l Picture adjustments have been factory preset to neutral
settings and the backlight mode to normal (“NORMAL”)
l In bright daylight, set the backlight to “BRIGHT”.
make the picture on the
l When the colour IS adjusted, the picture on the
will differ from the
change the colour
l Volume adjustment
headphone volume adjustment only No sound IS output
from the
or
button to adjust the
easier to watch.
actually recorded. Do not
unless it is necessary
the Camera Recording mode is for
speaker in the Camera
mode
Darker
Decrease
Decrease
BR I GHT
Brighter
COLOUR
Increase
VOLUME
Increase
20
Page 22
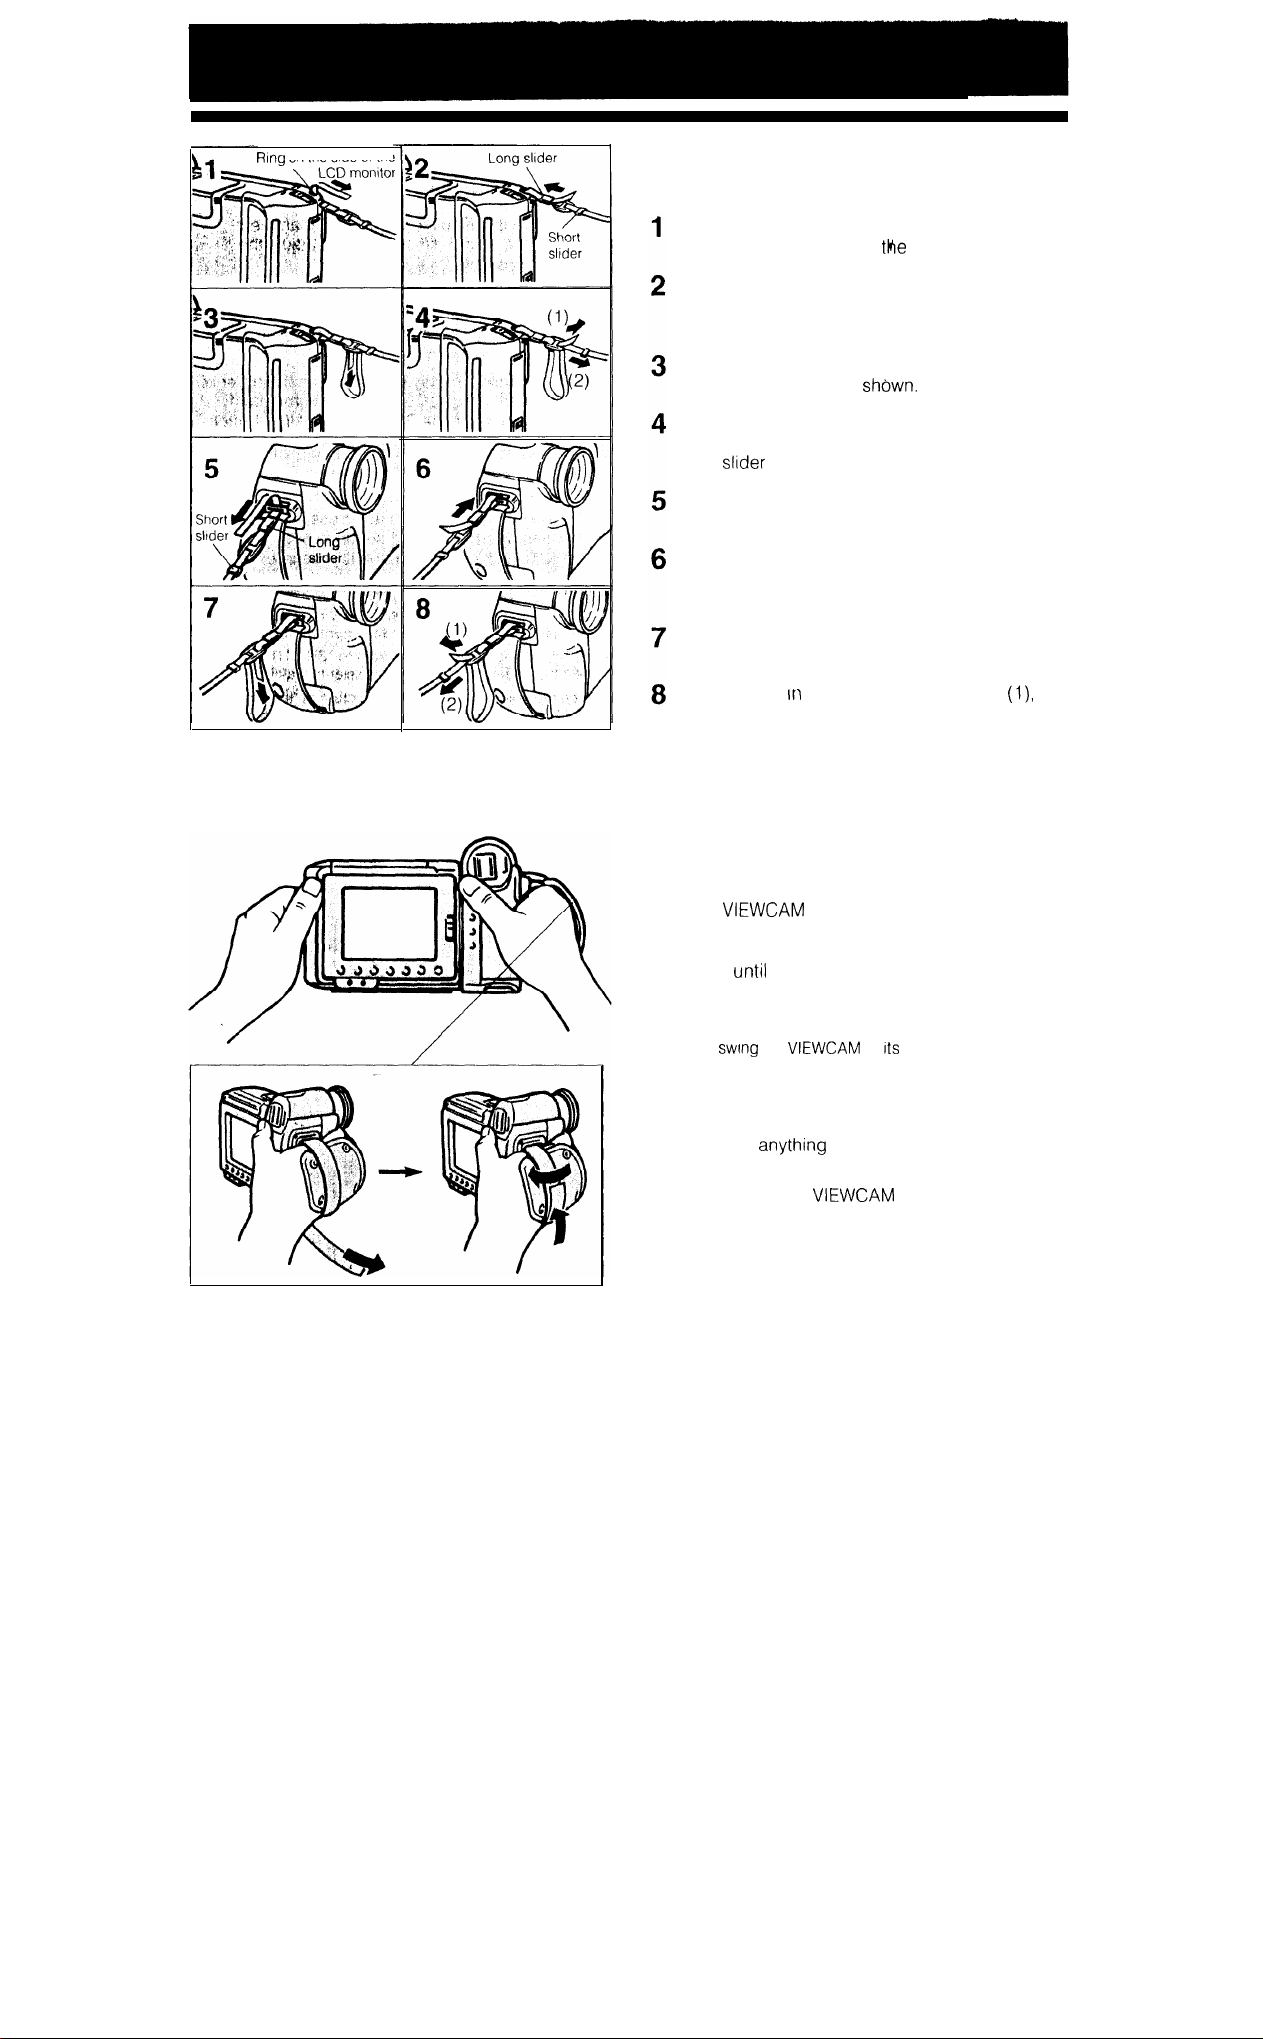
on
the
side of the
ATTACHING THE SHOULDER
STRAP
Hold the end cf the strap and thread it through
the ring on the left side of
Thread the end of the strap through the long
slider and move the long slider in the direction of
the arrow to secure.
Loosen the strap in the buckle, then feed through
the end of the strap as
Draw the strap in the direction of the arrow (I),
and then secure the end of the strap with the
short
Hold the other end of the strap and thread it
through the ring on the lens side.
Thread the end of the strap through the long
slider and move the long slider in the direction of
the arrow to secure.
Loosen the strap in the buckle, then feed through
the end of the strap as shown.
(2).
LCD monitor.
Pull the strap
and then secure the end of the strap with the
short slider (2).
the direction of the arrow
USING THE HAND STRAP
Fitting the hand strap to your hand
Hold the
strap down until the velcro patches open. Place
your thumb on the REC START/STOP button, pull the
strap tight
closures.
Caution:
Do not
HANDLING THE LCD MONITOR
l
Do not let
and do not expose it to shock, as it may break.
l
Do not place the
surface with the monitor facing down.
l
Use the cleaning cloth provided, or other soft
cloth, to clean the monitor.
l
The image may become blurred when the
monitor or areas adjacent to the monitor are
pressed.
towards your chest, and pull the
it fits snugly, and then seal the velcro
the
by
hand strap
press against the monitor,
on a table or other
21
Page 23
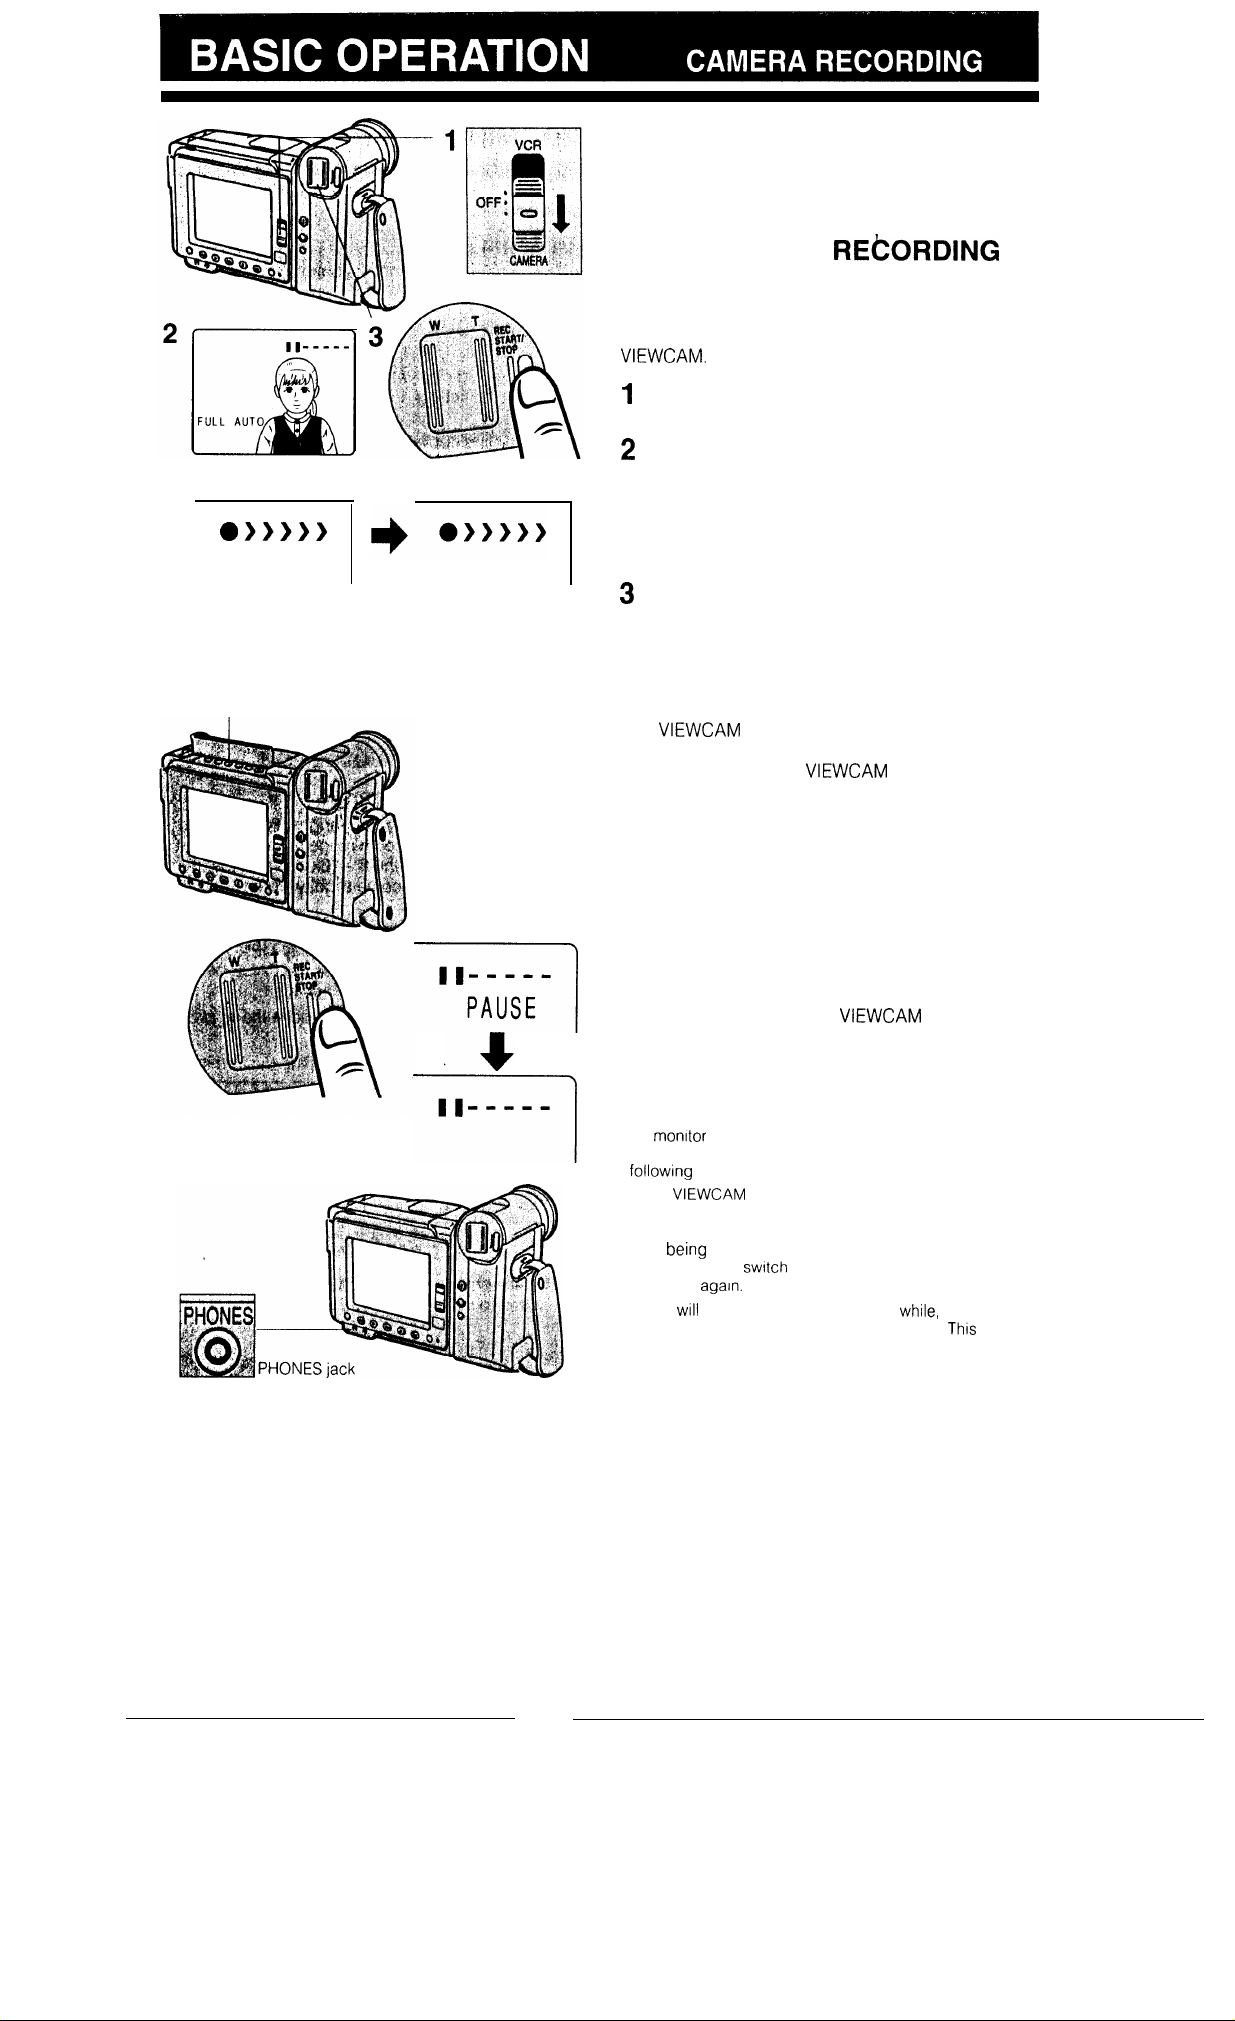
REC
FULL AUTO button
Unlike conventional camcorders, this model frees
you from having to peer into a small viewfinder. You
can watch the subject on the large LCD monitor for
easier, more enjoyable video-shooting.
EASY CAMERA REkORDING
WITH FULL AUTO
Before you start recording, perform the operations
described on pages 10 through 21 to prepare your
Set the Operate switch to CAMERA.
Make sure that the Full Auto mode indicator
“FULL AUTO” is displayed on the monitor.
Note:
If, at this time, “FULL AUTO” does not appear, press and
hold the FULL AUTO button for more than 1 second.
Press the REC START/STOP button to start
recording.
AUTO WHITE BALANCE AND
AUTOEXPOSURE
This
and auto exposure functions. By pressing the FULL
AUTO button to set the
colour and brightness controls are automatically
adjusted to their optimum settings, letting you make
beautiful recordings easily.
In particular, the auto white balance feature uses
fuzzy logic for light source discrimination, which
makes it possible to obtain truer colours.
is equipped with auto white balance
to Full Auto mode,
PAUSE
TO PAUSE RECORDING
Press the REC START/STOP button again.
Recording pauses, and the
Recording Standby mode.
Notes:
l To leave Camera mode, set the Operate switch to OFF.
l The speaker is turned off during recording
To
earphones into the PHONES jack. Adjust the volume by
l If the
more than 5 minutes, the power will be automatically
turned off to save battery power and to protect the tape
from being damaged. To continue recording after this,
set the Operate
CAMERA agarn.
l If you
power by sliding the Operate switch to OFF.
make the battery last longer.
the sound during recording, plug a pair of
the procedure described on page 20.
is kept in Recording Standby mode for
to OFF, and then back to
not be recording again for a
is in
turn off the
will
22
Page 24
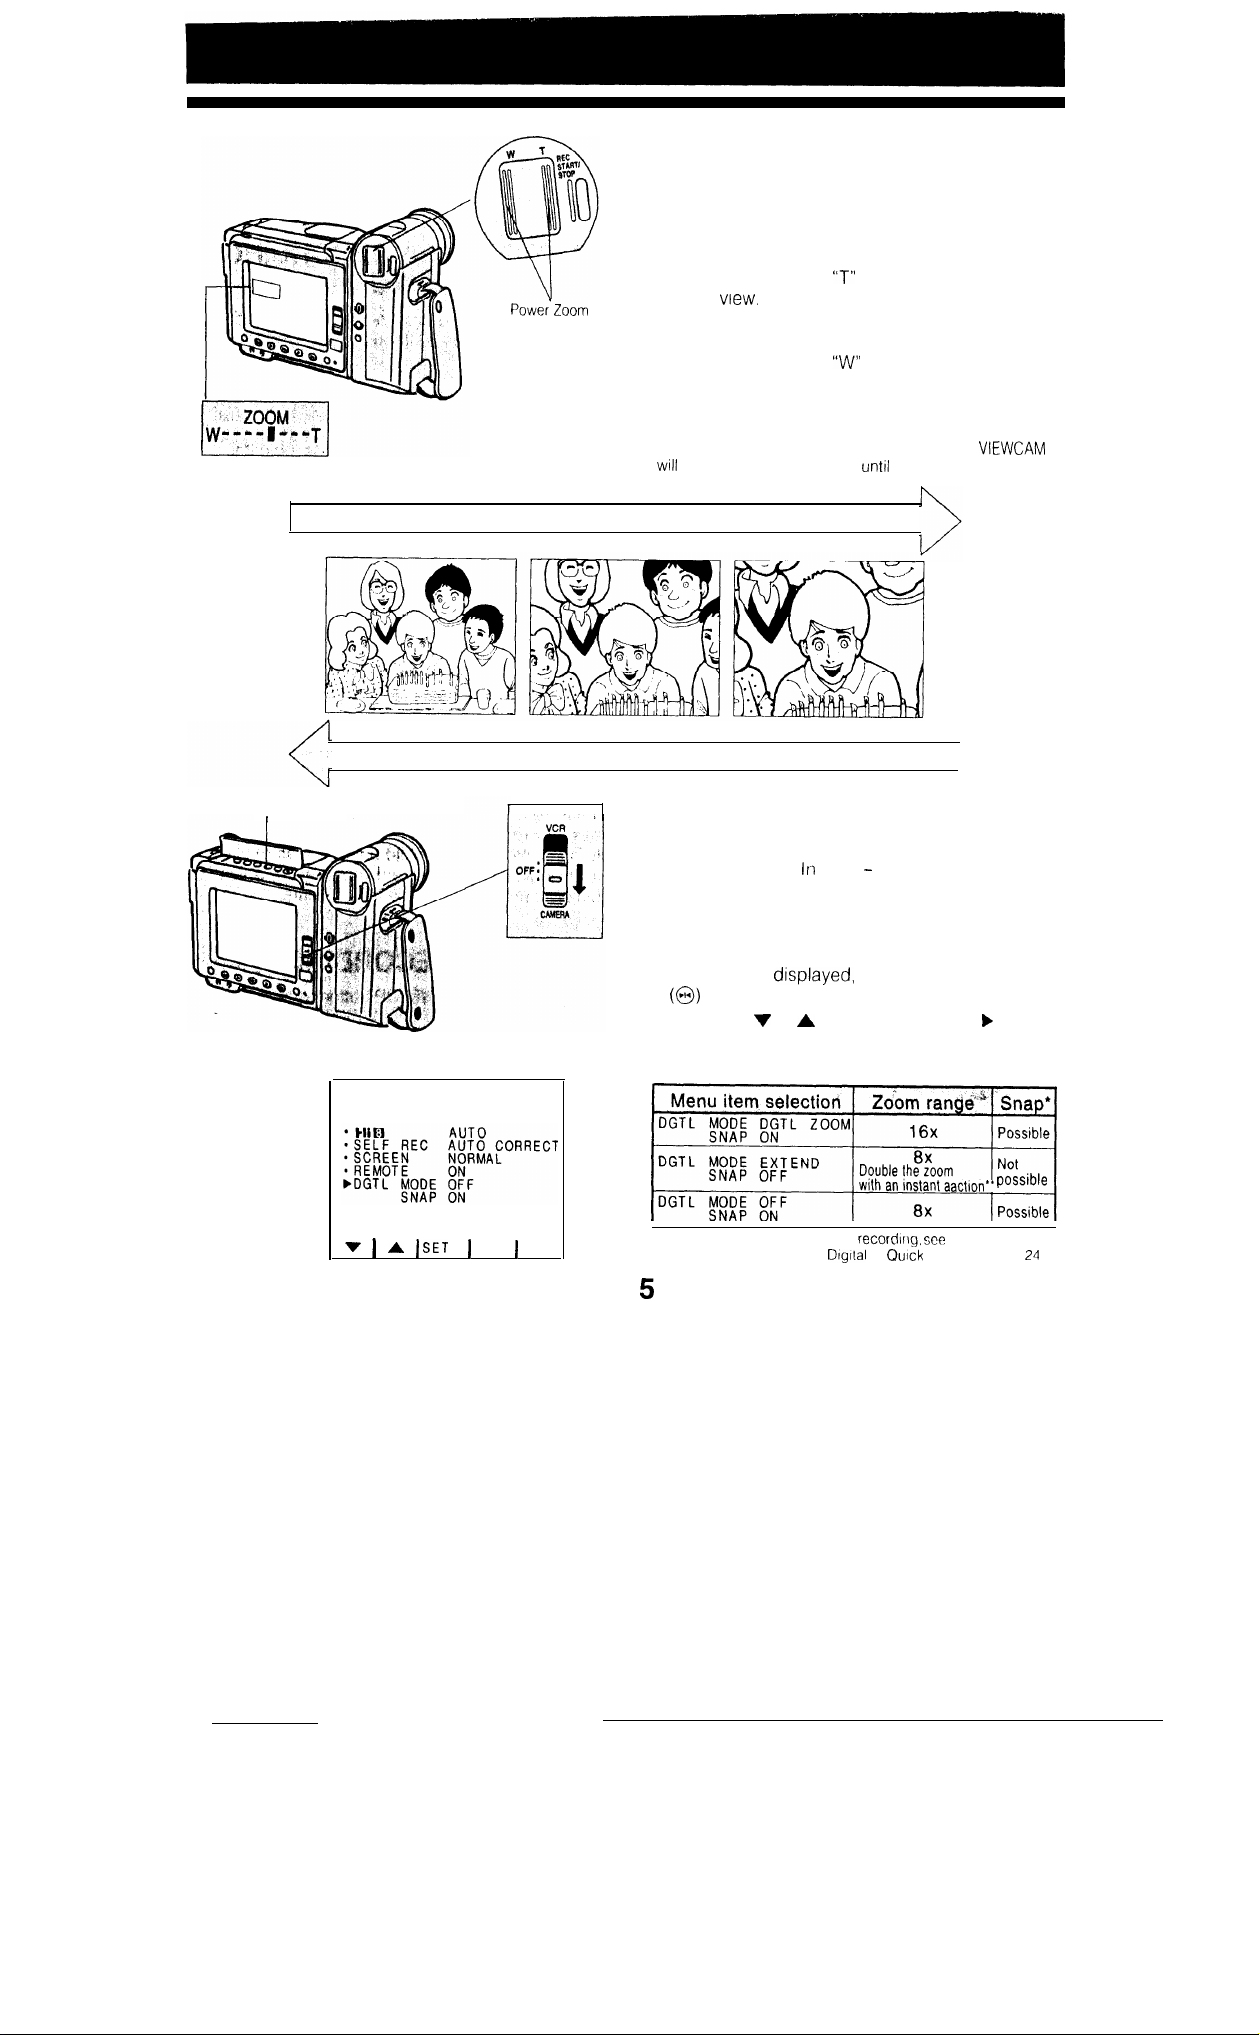
ZOOMING
Zooming allows you to move visually closer to or
farther from a subject without physically changing
your position.
To Zoom In
Press the Power Zoom
close-up
buttons
Zooming in (when you want to centre attention on the subject)
To
Zoom Out
Press the Power Zoom
get a wide field of view. The display will show the
current zoom setting.
Note:
If no
subject is displayed on the monitor, the
automatically zoom out
frame
f
(telephoto) button to get a
(wide angle) button to
a subject comes into
the
Wide angle
MENU
button
Zooming out (when you want to show the surroundings)
Setting the zoom range
You can select the two zoom ranges: 8x zoom and
16x digital zoom. The zoom range is factory-preset
MENU 2
at 16x digital zoom.
picture quality may become slightly worse.
Set the Operate switch to CAMERA.
1
Press the MENU button to display MENU 2.
2
If MENU 1 is
to get MENU 2 on the monitor.
Press the
3
to “DGTL MODE”.
Press the SET button to select the desired item
4
the 8
or
button to move the b pointer
Telephoto
1
16x zoom range, the
press the PAGE button
with an instant action” possible
23
PAGE
l For SNAP
l * For
When setting is completed, press the MENU
button to turn off the menu display.
2x
page 38
Zoom see page 24
Page 25
2
MENU button
1
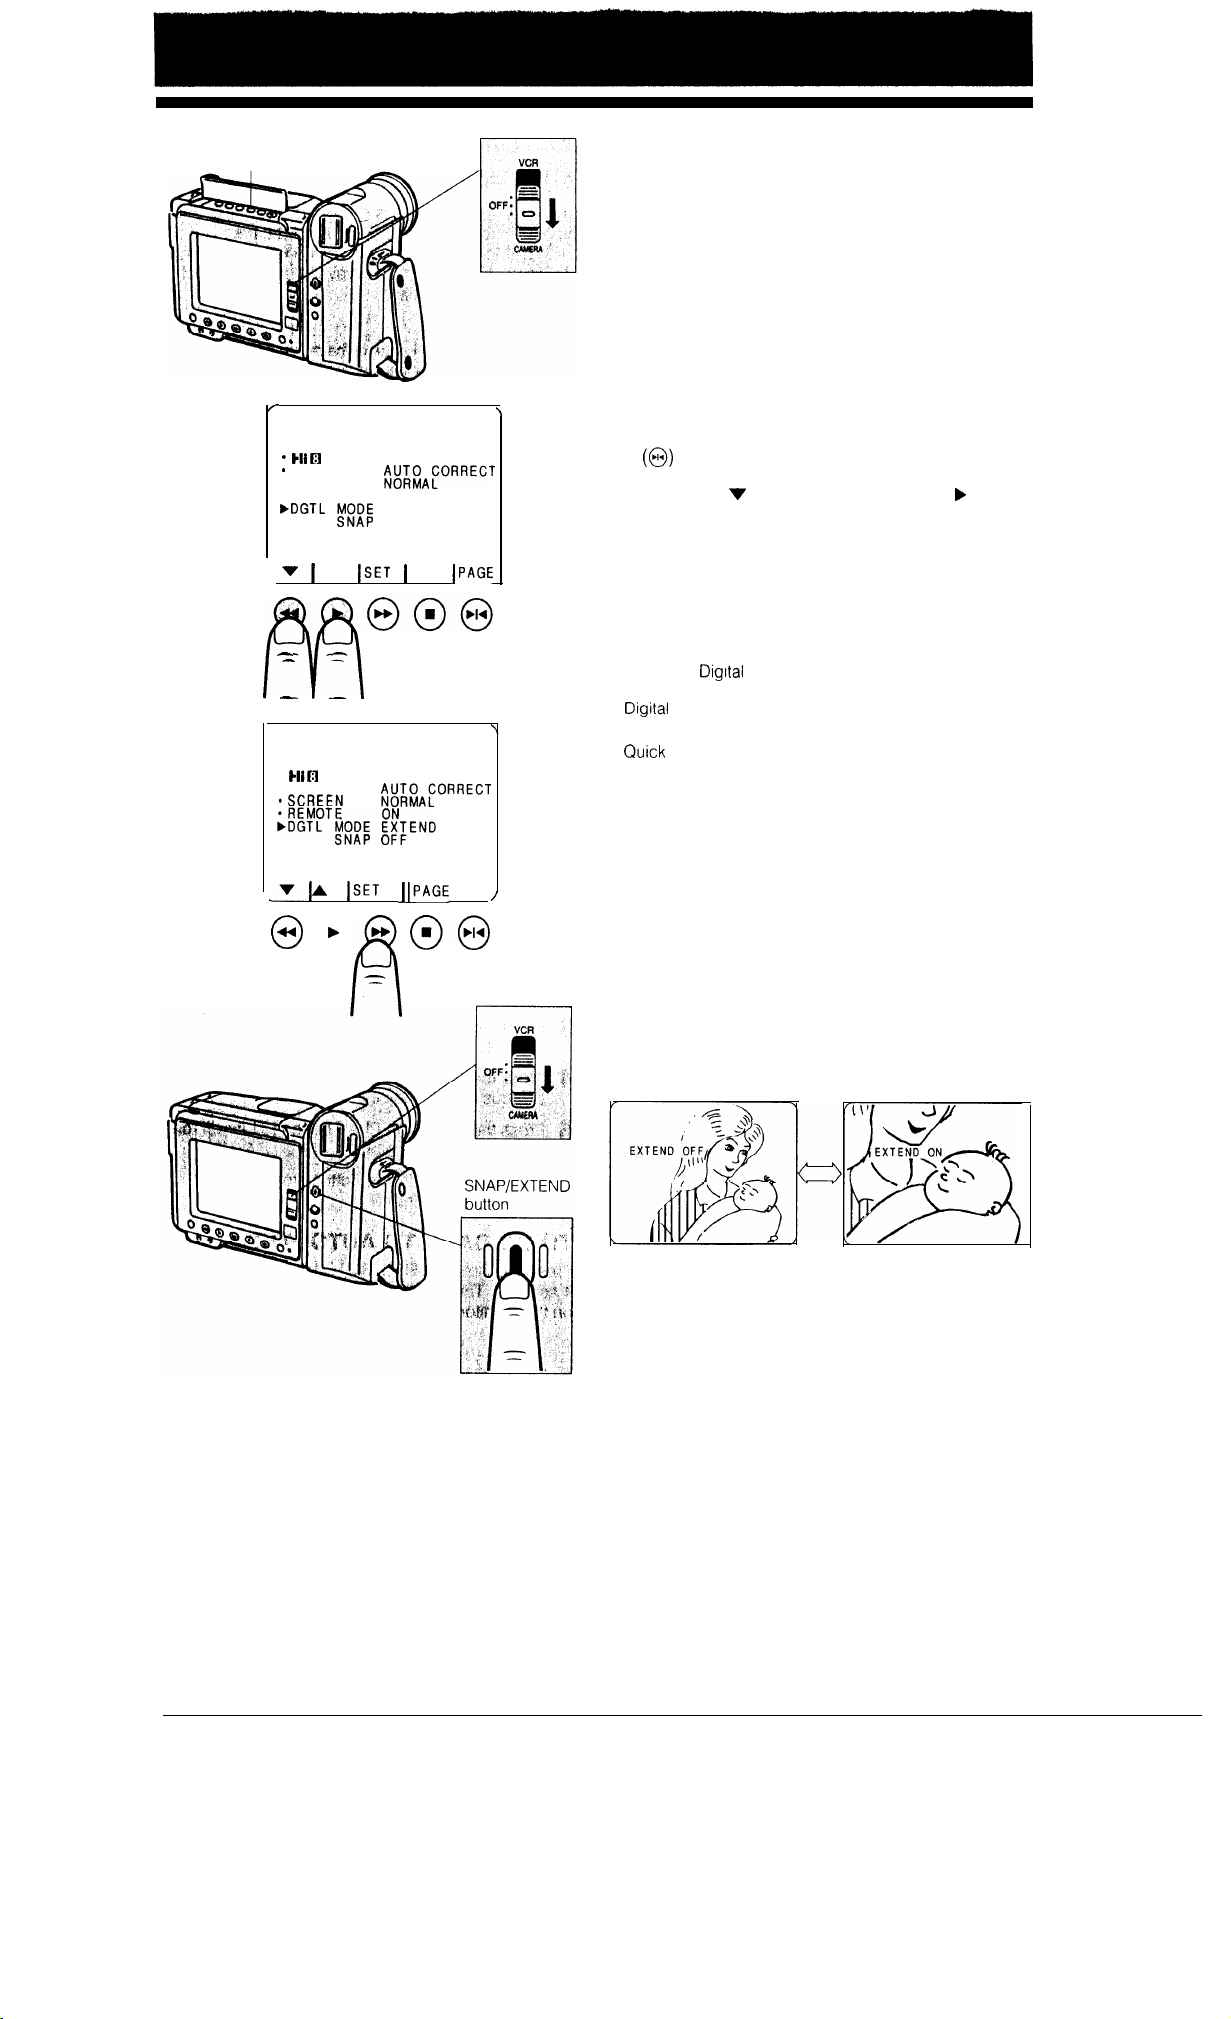
DIGITAL 2x QUICK ZOOM
(EXTEND ZOOM)
If you set the Digital 2x Quick Zoom function
(EXTEND), you can instantly zoom in the subject by
pressing the SNAP/EXTEND button. This is useful
when you want to emphasize a subject quickly.
Setting the DIGITAL 2x Quick Zoom
(Extend Zoom)
Set the Operate switch to CAMERA.
1
3
SELF REC
l SCREEN
l REMOTE
SMSK
A
MENU 2
AUTO
ON
DGTL ZOOM
ON
J
4
l
l SELF REC
0
MENU 2
AUTO
Press the MENU button to display MENU 2.
2
If MENU 1 is displayed, press the PAGE button
to get MENU 2 on the monitor.
Press the
3
to “DGTL MODE”
Press the SET button to select “EXTEND”
4
Press the MENU button to turn off the menu
5
display.
Notes:
l When the
recording is not possible. To use Snap, turn off the
2x Quick Zoom (Extend Zoom) function.
l Picture quality may slightly decrease when Digital 2x
Zoom function is used.
or A button to move the
2x Quick Zoom function is set, Snap
pointer
Using the DIGITAL 2x Quick Zoom
(Extend Zoom)
When the Digital 2x Quick Zoom function (EXTEND)
is set, pressing the SNAP/EXTEND button will allow
you to instantly zoom in the subject.
To return to previous magnification, press the
SNAP/EXTEND button again.
Extend Zoom off
Extend Zoom on
24
Page 26
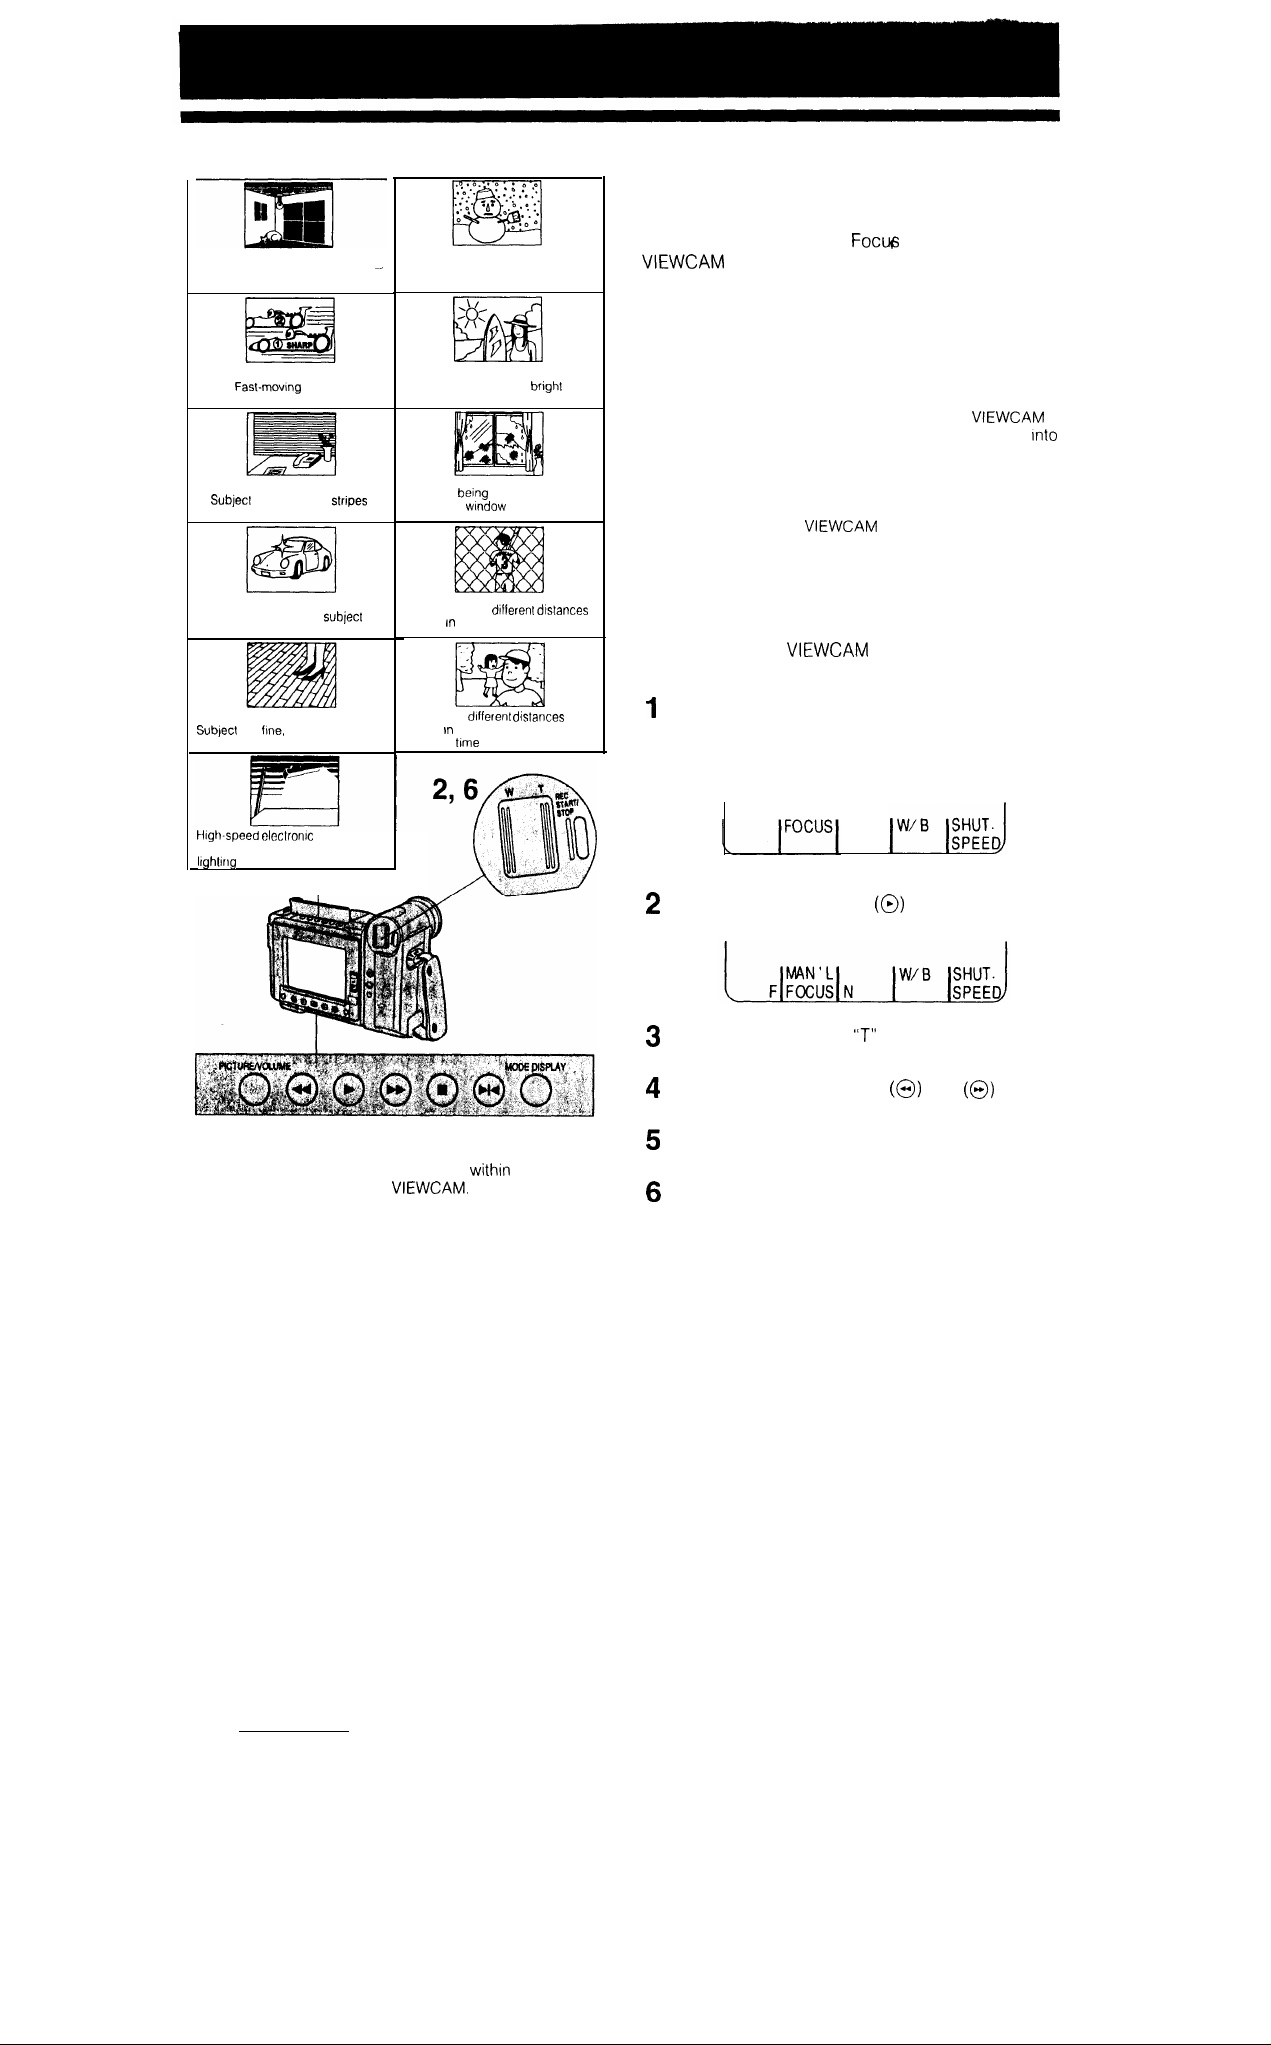
Situations where the Auto Focus may not focus on the subject
Subject IS loo dark
has horizontal stripes
Light reflects off the
Lack of contrast, e g snow scene
Background IS loo bright
Subject IS being shot through a
dirty or wet wlndow
Two subjects at diflerent dtstances
overlap
the same scene
AUTO/MANUAL FOCUS
AUTO FOCUS
The Auto Focus feature is designed to focus on most
types of subjects. In Auto
automatically focuses on whatever is in
the centre of the scene.
the centre of the monitor.
Notes:
l If no subject is in the centre of the monitor, the focus area
will expand and the subject nearest the centre will be
focused on.
l If no subject is displayed on the monitor, the
will automatically zoom out until some subject comes
the frame
l If the image being recorded IS not sharp, the auto focus
may not function and the image is left blurry. If this
happens, press the Power Zoom W (wide angle) button to
zoom out, or pan the
The auto focus will resume operation.
MANUAL FOCUS
The auto focus may not be able to focus on the
subject in the situations shown in the chart. In such
situations, set the
and focus manually.
mode, the
Always keep the subject in
to shoot another subject
to Manual Focus mode
Subjects at different distances
appear
has
repealed patterns
should be used under fluorescent
the centre of the scene al
the same
FULL AUTO button
Notes:
l While recording in Manual Focus mode, you may not be
able to focus correctly if the subject is
approximately 1.5 m of the
shift the zoom control toward wide angle, and then try
focusing again.
. If you focus on a subject without first setting the zoom
power to the maximum, the subject may go out of focus
when you zoom further in on it later.
l If the lens is dirty or fogged, you may not be able to
obtain correct focus.
l While the manual focus indicators are displayed on the
monitor, the Edit Search feature does not function. Press
the MODE DISPLAY button and turn off the indicators.
In such a case,
Press and hold the FULL AUTO button for more
than 1 second.
l The “FULL AUTO” indicator disappears and
the manual focus indicators appear on the
monitor.
Press the FOCUS button
to set the Manual
Focus mode (“MAN’L FOCUS”).
Press the Power Zoom
button to set the zoom
power to the maximum.
Press the MAN’L FOCUS F
or N
buttons
to focus on the subject.
Press the MODE DISPLAY button to turn off the
manual focus indicators.
Press the Power Zoom buttons to frame the
subject as you desire.
TO GO BACK TO AUTO FOCUS
Press and hold the FULL AUTO button for more than
1 second. The “FULL AUTO” indicator will appear
on the monitor.
25
Page 27
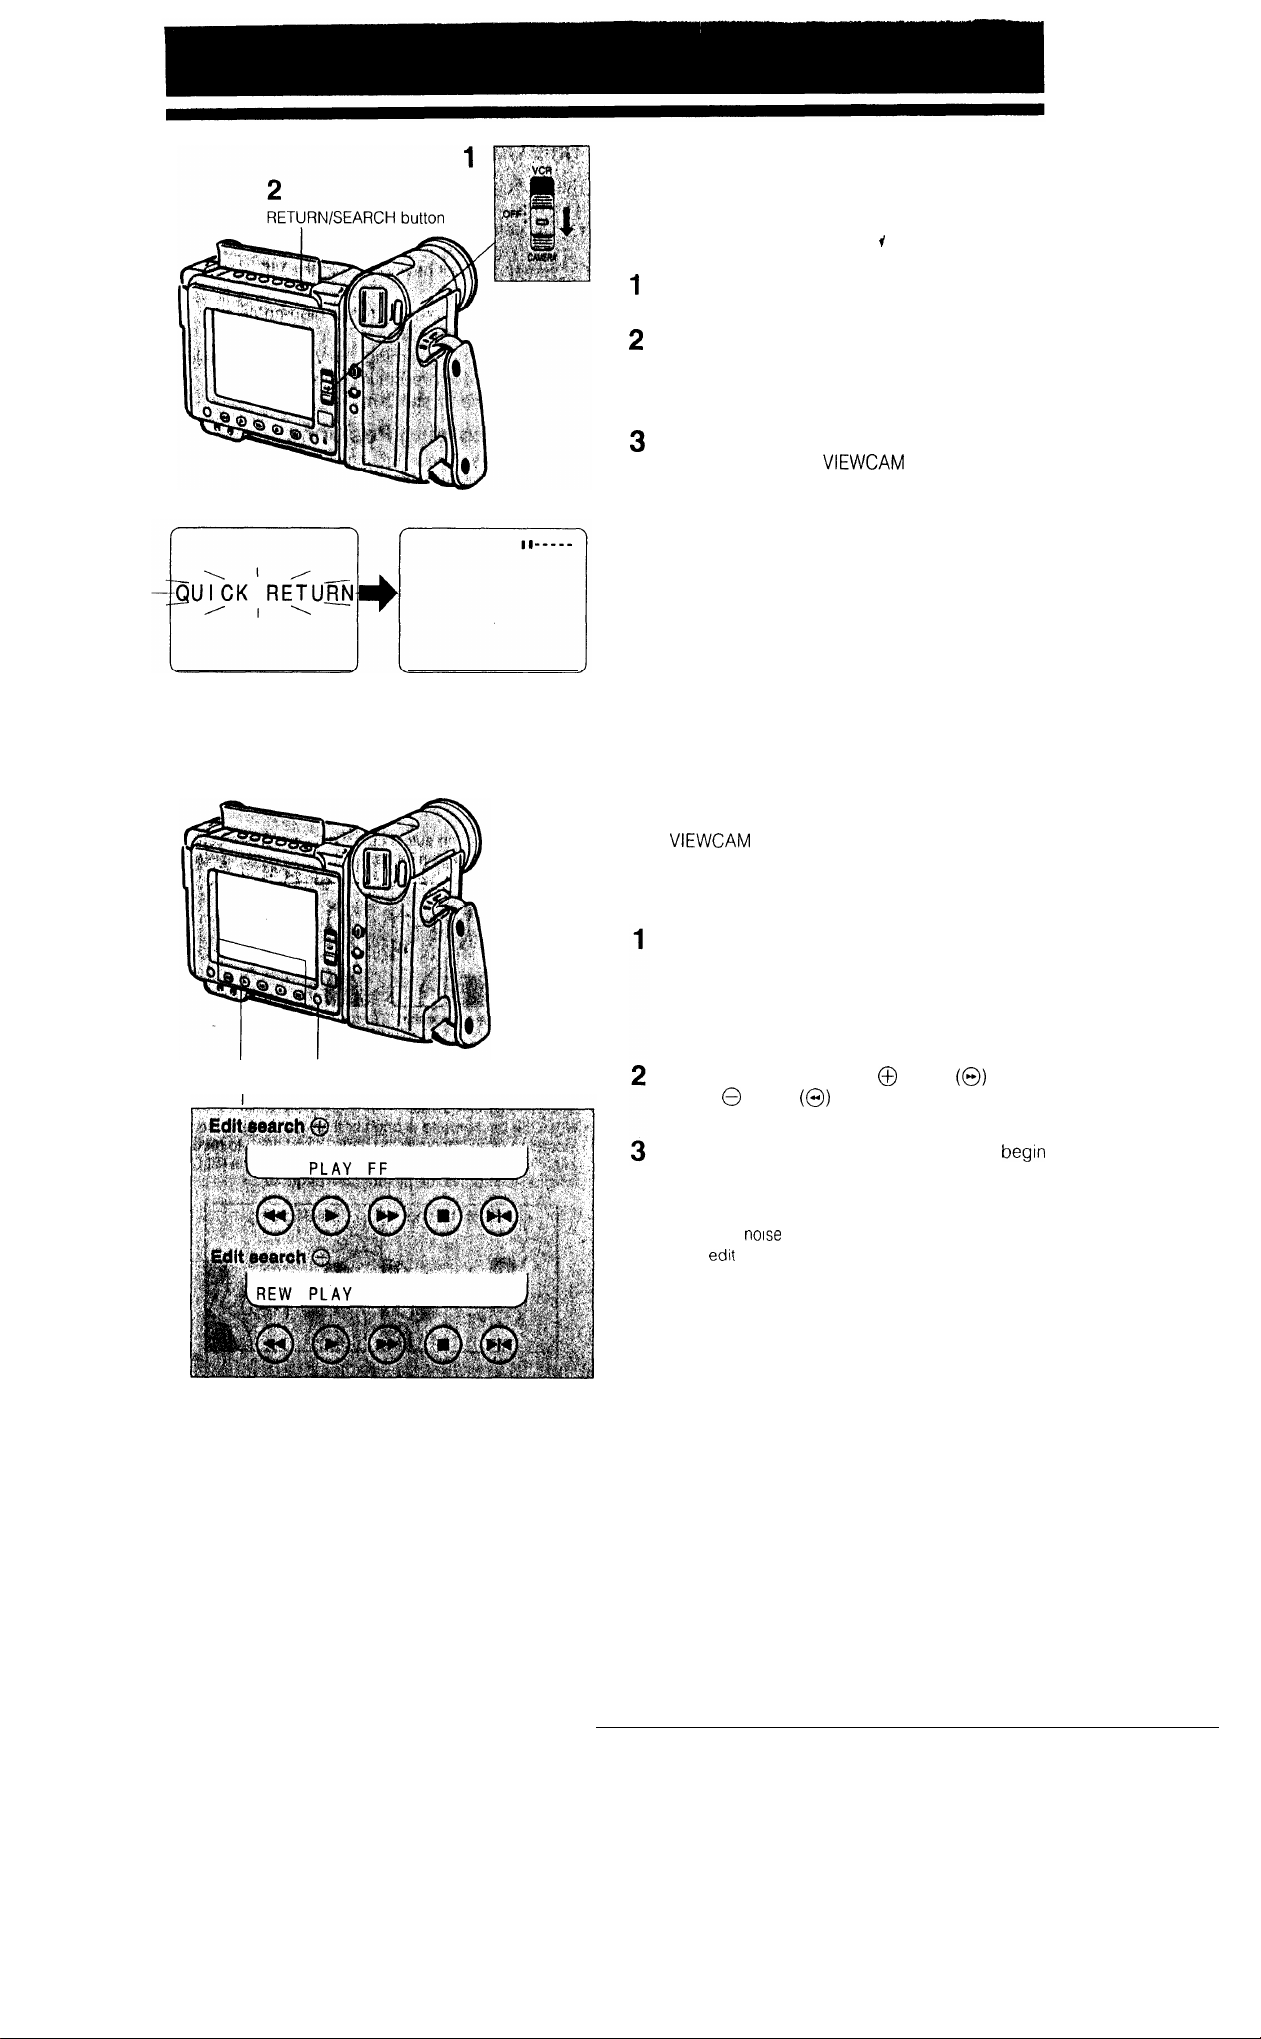
QUICK RETURN
When you have been playing back what you have
recorded, and wish to quickly return to the end of
the last recorded scene, use the quick-return
function.
Set the Operate switch to CAMERA.
Press the RETURN/SEARCH button.
l The tape begins winding or rewinding to the
end of the last recorded scene.
When the tape reaches the end of the last
recorded scene, the
Standby mode.
Note:
The Quick Return will not function if the video cassette
has been removed since the last recording, or if no
recording has been made since the video cassette was
loaded.
enters Recording
MODE DISPLAY button
EDIT SEARCH
This
from Camera Recording mode to VCR mode, for the
point on the tape where you wish to start recording
next.
In Recording Standby mode, make sure that the
auto/manual indicators or other operation
indicators are not displayed on the monitor.
(If they are displayed on the monitor, turn them
off by pressing the MODE DISPLAY button.)
Hold down the Edit Search
Search
When you find the point where you want to
recording, release the button.
Notes:
l Some picture
l Forward edit search is performed at the same speed as
normal playback, and reverse edit search at three times
the normal playback speed.
lets you search, without switching
button
button
for more than one second.
appears during reverse edit search.
or Edit
26
Page 28
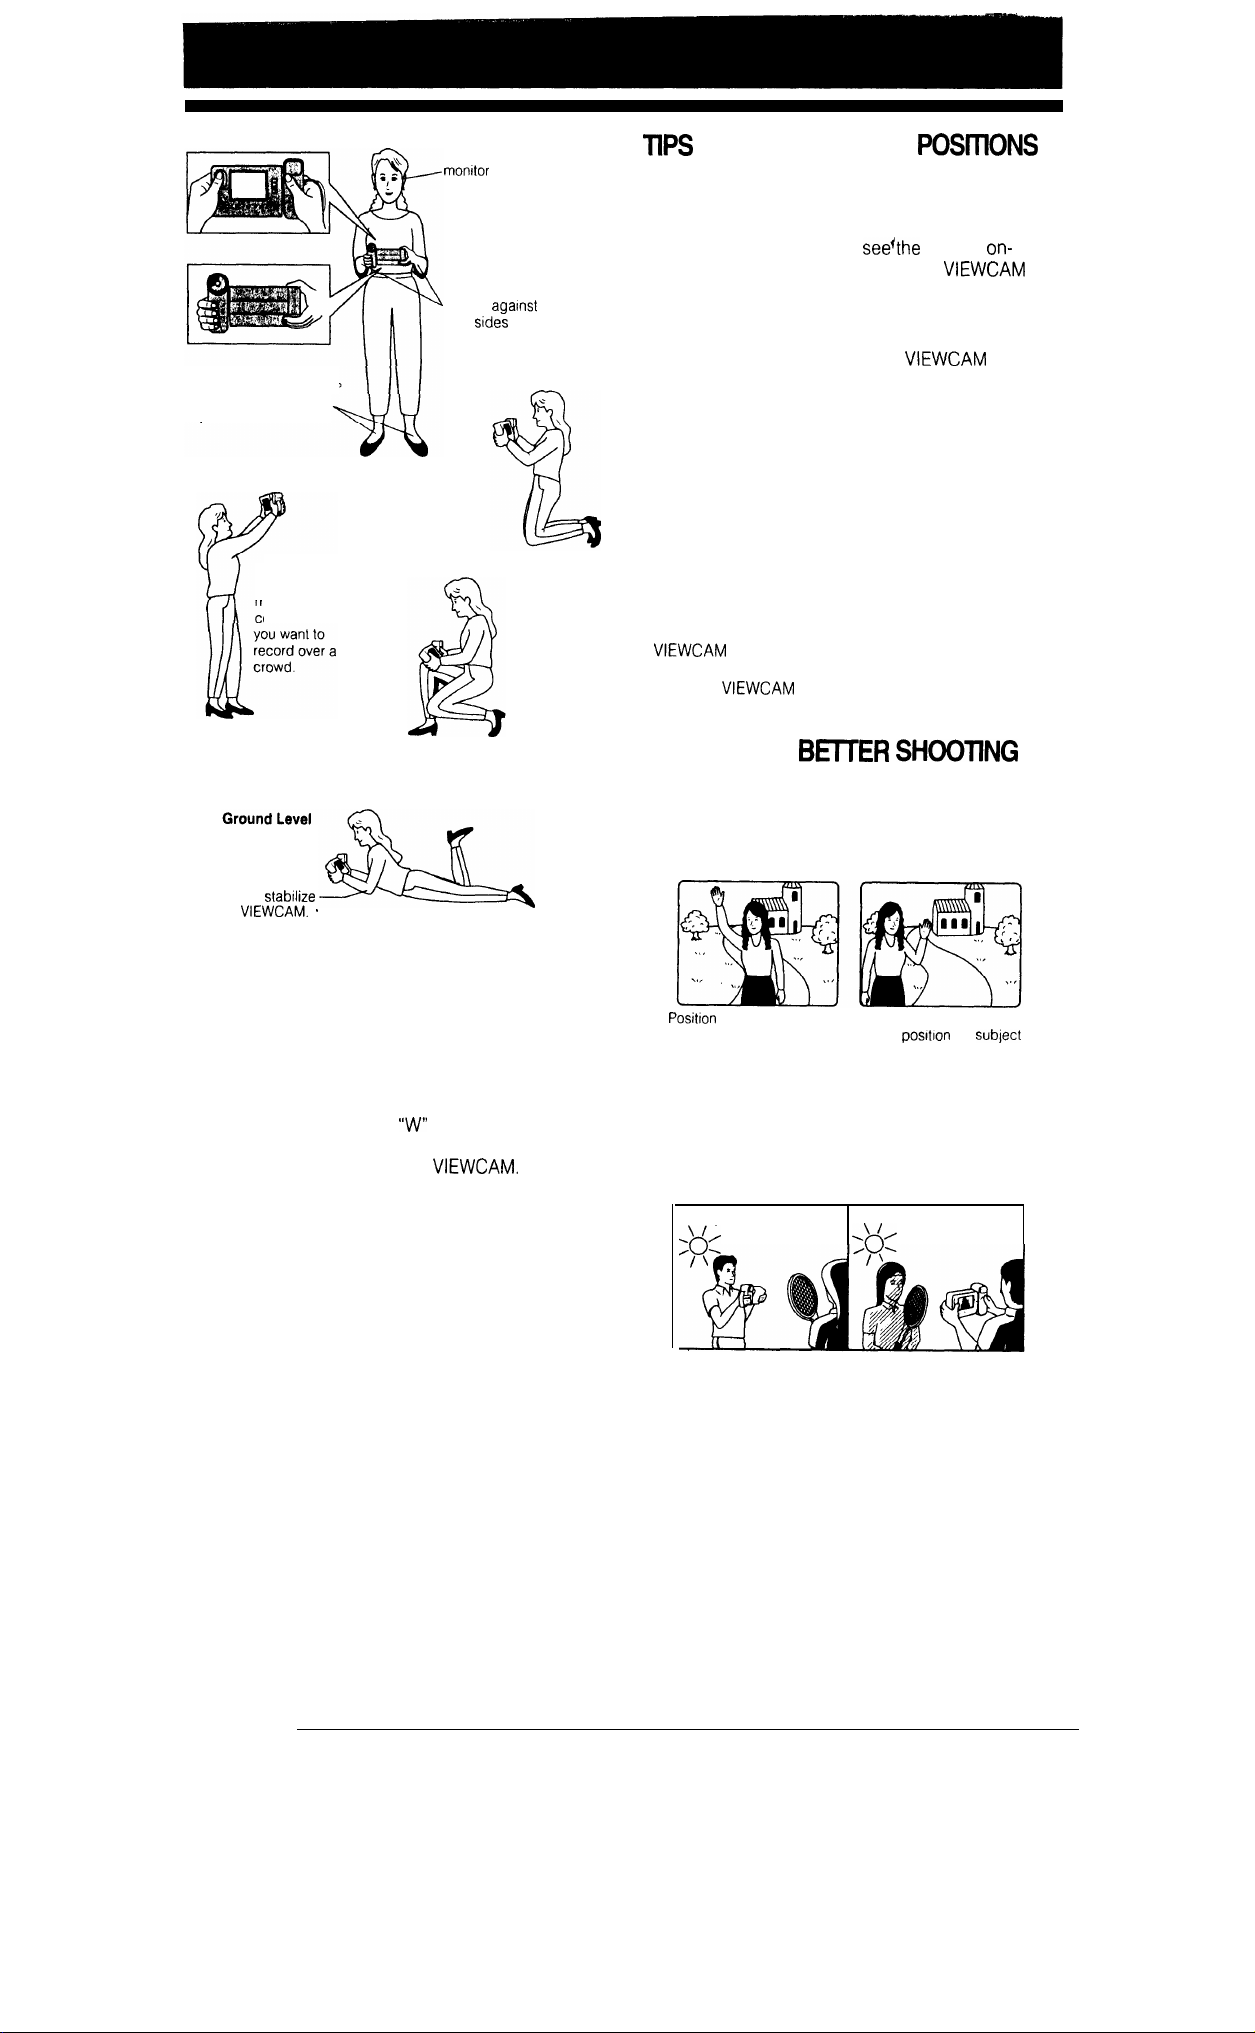
Place your feet at a
angle and take a firm
stance
High Angle
You can record
and still see the
monitor.
45”
This is
onventent when
Basic Posture
Low Angle
Look at the
both eyes.
Press your
elbows
your
Kneeling
ON RECORDING
The rotating LCD monitor lets you enjoy easy video
recording with a relaxed posture.
l
You can record using more natural body
postures since you can see’the subject
screen, without having to hold the VIEWCAM
against your eye.
l
The LCD monitor also makes high-angle and
low-angle shots easy.
l
For hand-held recording, the
be steadied to prevent image shake.
l
Use a tripod for stable recording.
Basic Recording Positions
Put the fingers of your right hand through the hand
strap, and place your right thumb close to the REC
START/STOP and Power Zoom buttons. Place your
left thumb in the indentation on the left side of the
LCD monitor.
Notes:
l Take care not to touch the monitor with your fingers, as
perspiration and dirt will smudge it.
l Unless you intend to create a special effect, keep the
l Take care not to touch the microphone with your fingers
when the
on the audio track
level with the horizontal plane.
is recording, as this will cause noise
should
When kneeling, put one
knee on the ground for
the best stability
Rest
on both
elbows to
the
More hints for shooting better videos
l Before zooming, think about how to best frame
the shot. Stop zooming when the shot is well
framed.
l When image shake is noticeable during
zoomed telephoto shooting, use a tripod, or
press the Power Zoom
to zoom out. Screw the tripod into the tripod
socket on the bottom of the
l Horizontal panning (lateral movement) and
tilting (vertical movement) should be done
slowly to emphasize the wide expanse of a
scene or the height of a building, and to make
them easy to watch on playback.
l
Use wide-angle settings for fast-moving subjects.
Note:
Focusing may take longer
panning are used frequently.
(wide angle) button
when zooming and
HINTS FOR
Position the subject in the centre of the monitor.
Notes:
l When you are using auto focus, the subject in the centre
of the screen is kept in focus.
the subject in the
centre.
l Avoid backlit subjects. For the best picture, have the
light source behind you.
l When the background is brighter than the subject, the
recording often becomes too dark. If you need to record
with this lighting, use the backlight compensation (BLC)
function to improve the picture (see page 40).
Light from behind
Focus manually when you
need to
off centre (see page 25)
the
Backlighting
27
Page 29
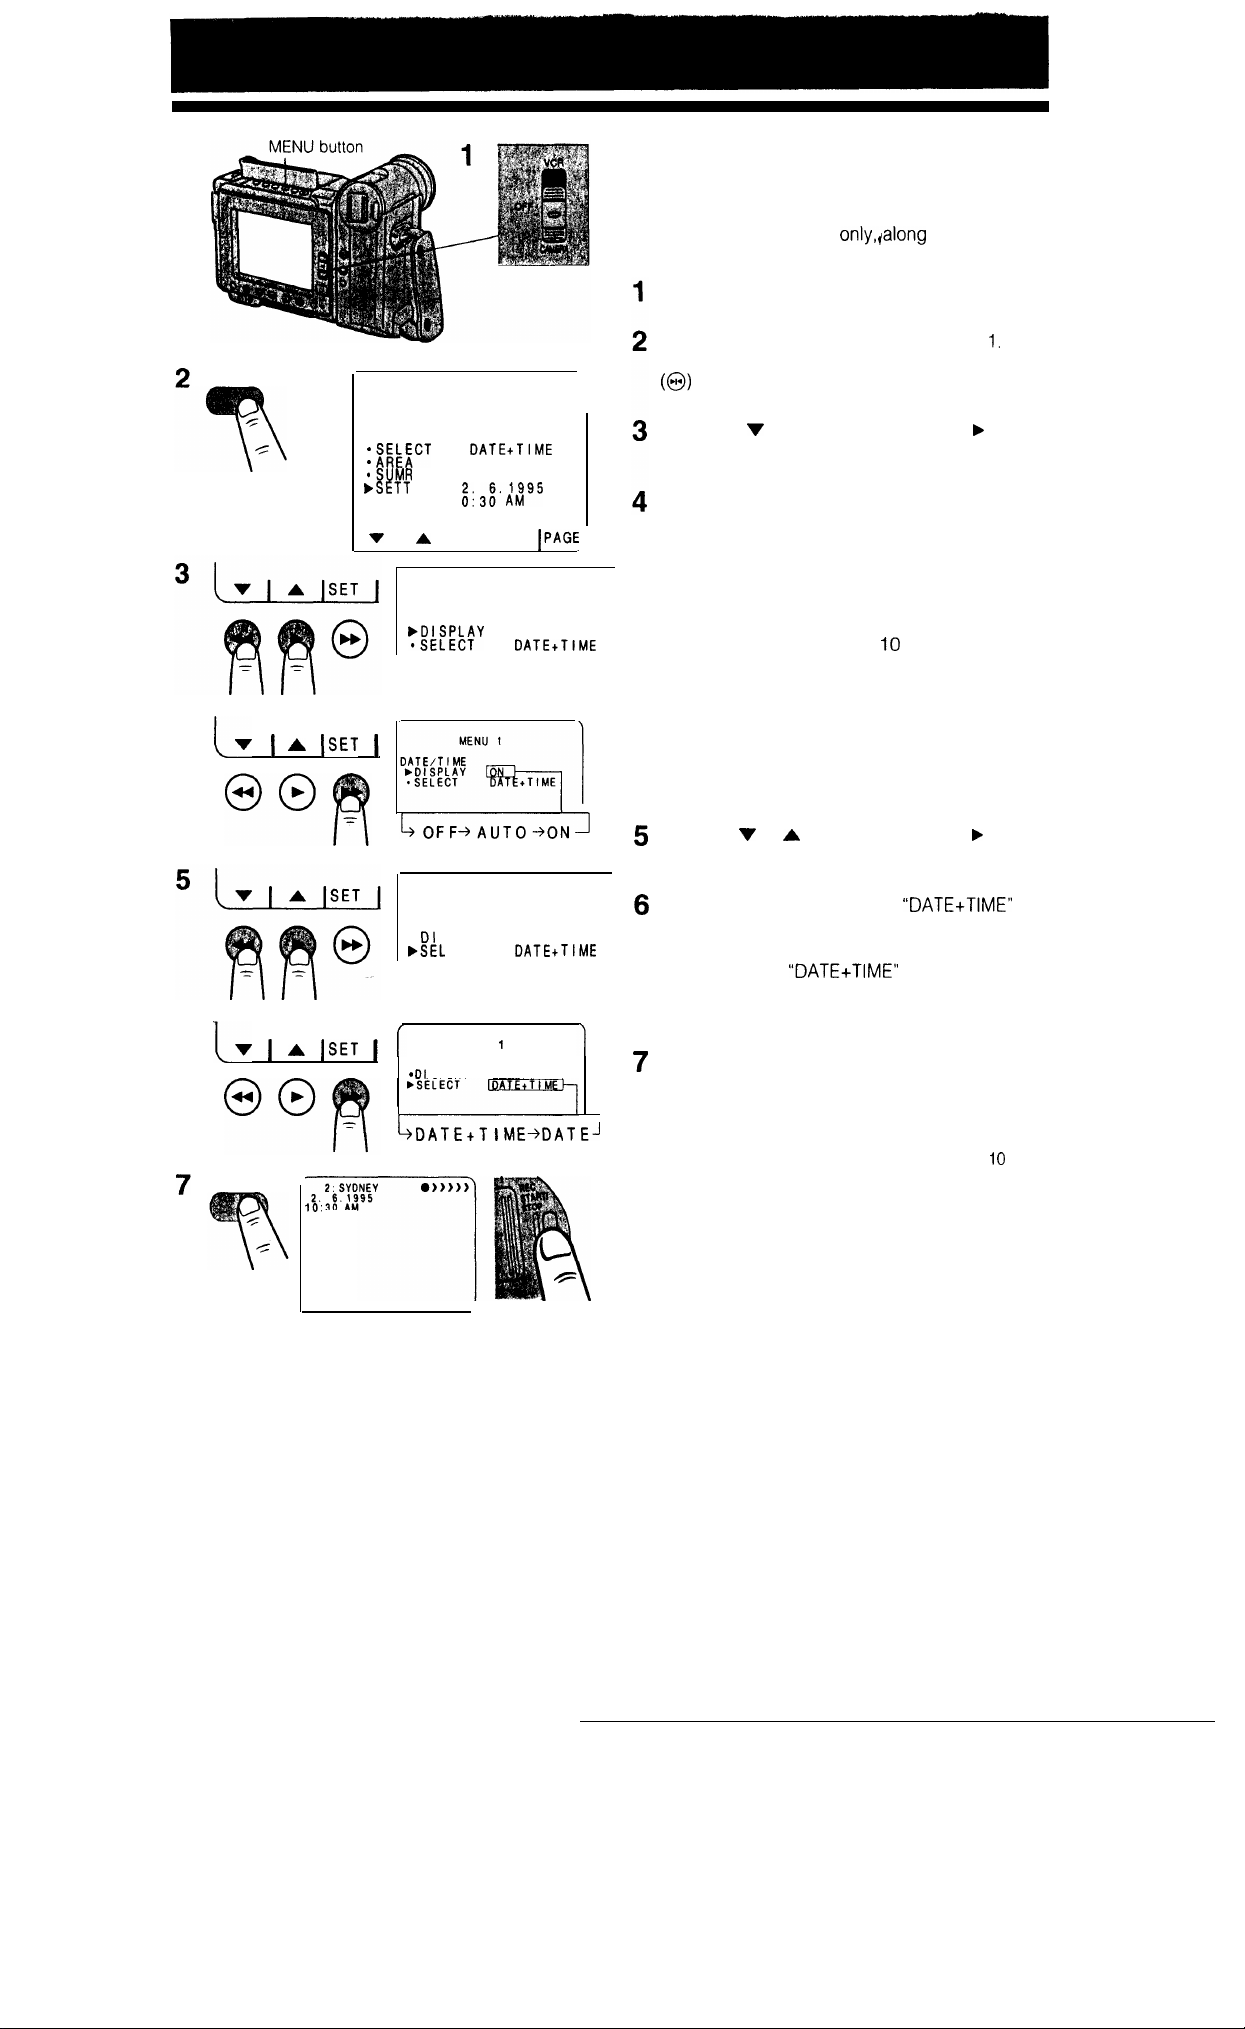
4
MENU
RECORDING THE DATE AND
TIME
Follow the procedure shown below to record the
date and time, or the date only,ialong with the
subject.
Set the Operate switch to CAMERA.
Press the MENU button to display MENU
If MENU 2 is displayed, press the PAGE button
MENU 1
DATE/T I ME
l DISPLAY
I NG
DATE/T I ME
SET
OFF
ll:SYDNEY
OFF
MENU 1
OFF
I
to get MENU 1 on the monitor.
Press the
or A button to move the
pointer
to “DISPLAY”.
Press the SET button to select “AUTO”, “ON”, or
“OFF”.
When “ON” is selected,
the date/time is
continuously displayed and recorded along with
the subject.
When “AUTO” is selected,
displayed and recorded for
the date/time is
seconds at the
beginning of the first recording that day.
When “OFF” is selected,
the date/time is
neither displayed nor recorded.
Note:
Select “AUTO” if continuous date/time display annoys you
during recording.
6
MENU
DATE/T I ME
l
SPLAY
MENU
DATE/T I ME
01 SPLAY
MENU 1
ON
ON
Press the
or
button to move the b pointer
to “SELECT”.
Press the SET button to select
“DATE”.
Both the date and the time are displayed and
recorded when
is selected; only
the date is displayed and recorded when “DATE”
is selected.
Press the MENU button to turn off the menu
display, and then press the REC START/STOP
button to start recording.
Notes:
l If you want to record the date and time again for
seconds after the date and time display disappears,
select “AUTO” again following the procedure 2 to 4
above.
l After 10 seconds of recording and display, even if the
date has changed, the date and time will not be
displayed or recorded. Select AUTO or ON again, as in
step 4 above.
or
28
Page 30
MODE DISPLAY button
1 min.-O min.
0 min.
(The tape has
reached its end.)
THE TAPE
ENDS SOON.
CHANGE THE
CASSETTE.
TAPE END
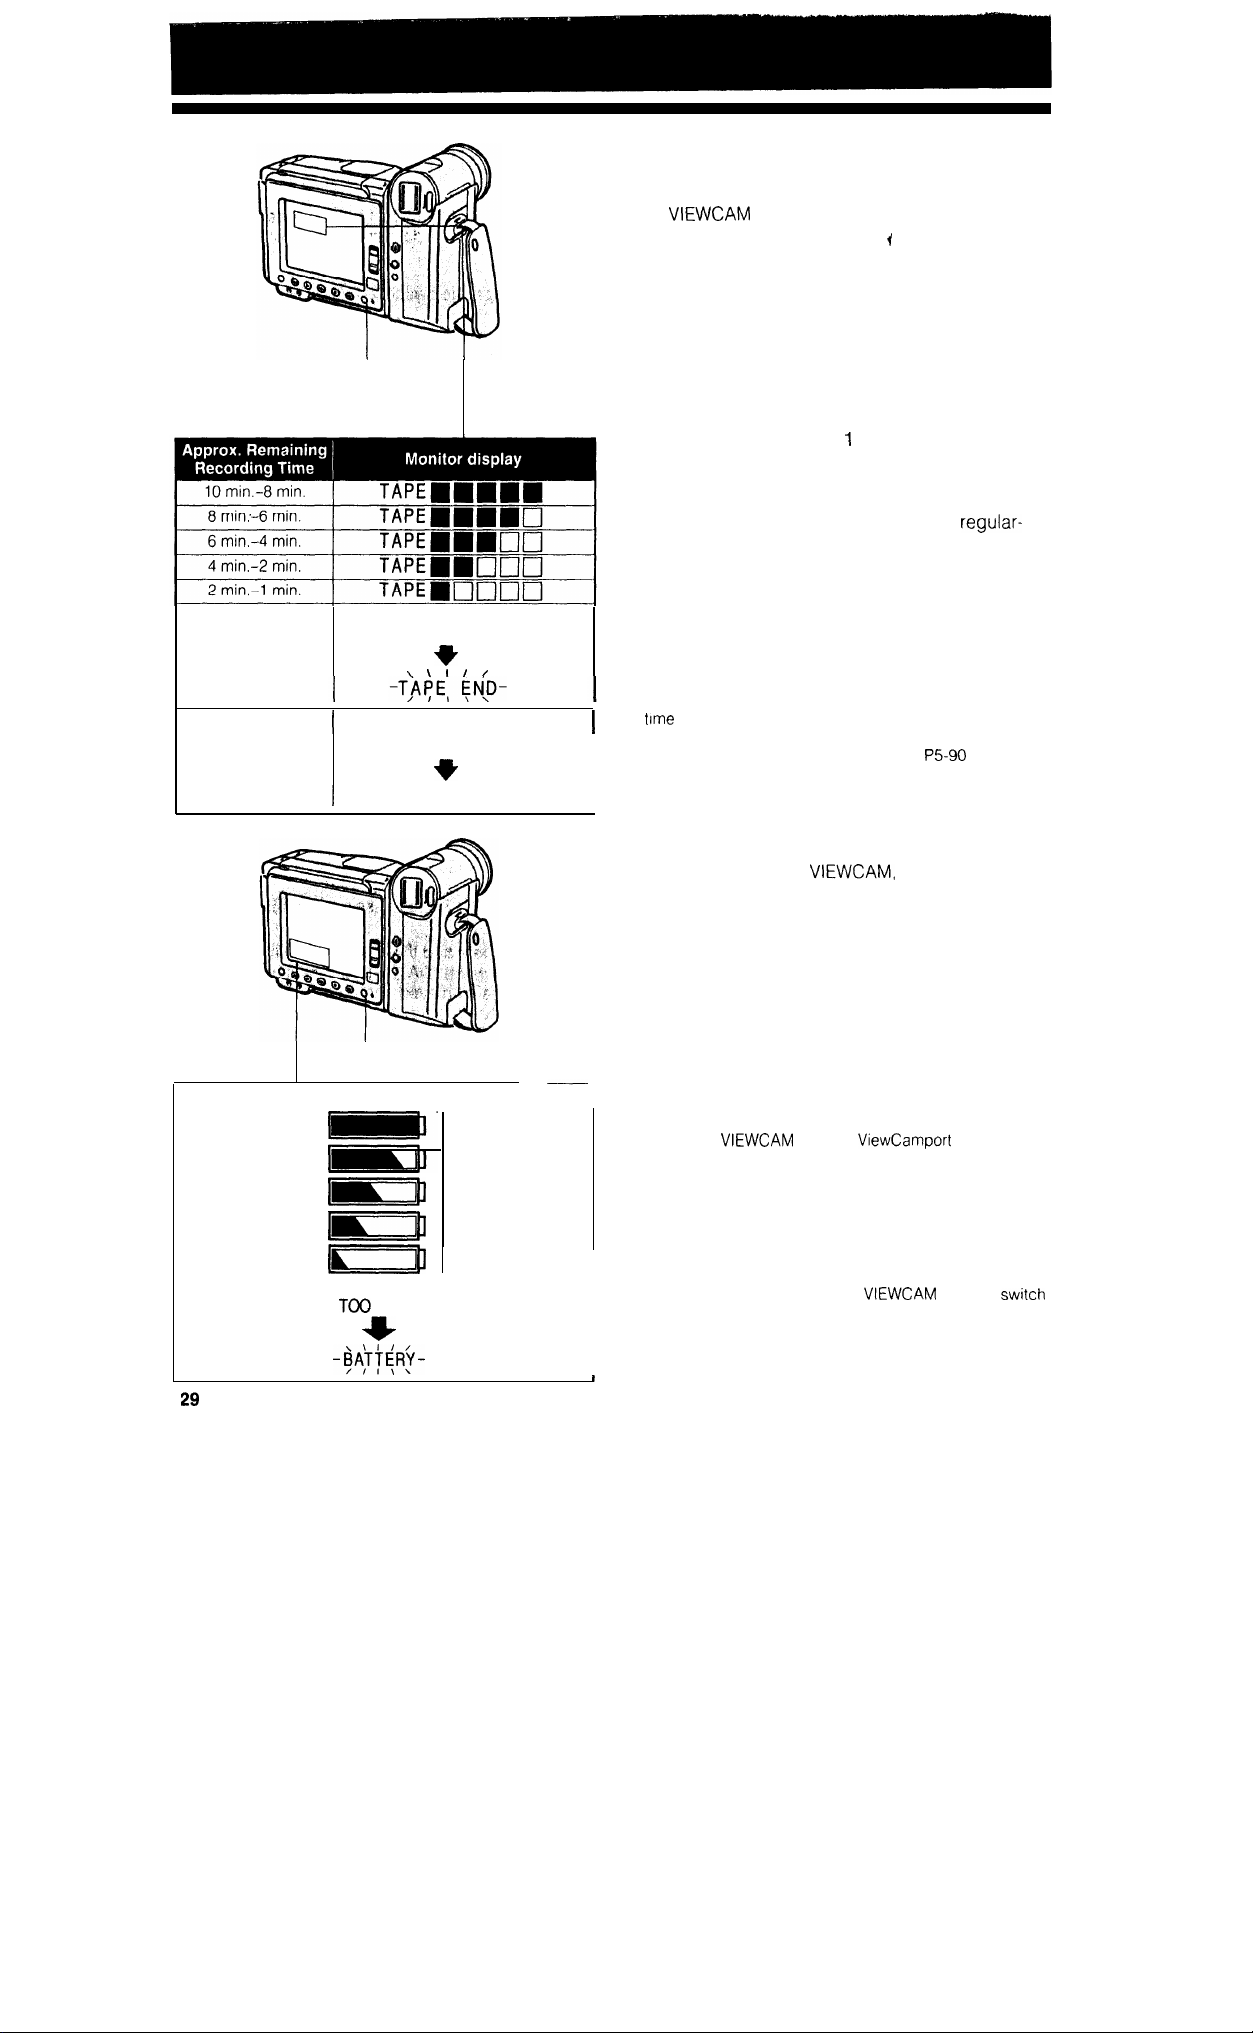
REMAINING TAPE AND
BATTERY
The
and recording time.
Remaining Recording lime Display
In the Camera mode, about 10 minutes before the
tape reaches its end, the tape remaining bar
indicator appears on the monitor and shows how
much time is left.
You might want to get a new tape ready at this time
From about 10 minutes to
ends, a bar indicator is displayed. About one
minute before the tape ends, a large “THE TAPE
ENDS SOON.” display appears, which, 3 seconds
later, changes to “TAPE END” in flashing
size characters. When the tape finally reaches the
end, “CHANGE THE CASSETTE.” is displayed in
large characters for 3 seconds, and then changes to
“TAPE END” in smaller characters.
l If you want to turn off the indicator, press the
MODE DISPLAY button.
Note:
The tape remaining bar Indicator only shows approximate
left. This varies slightly depending on the length of
tape used.
(This function is based on the standard
I
I
displays the remaining battery power
minute before the tape
tape.)
MODE DISPLAY button
Colour Battery Power Display
Green
Green
Green
5 level display
Yellow
Red
BATTERY IS
LOW.
Remaining Battery Power Display
When you turn on the
battery power display automatically appears. By
pressing the MODE DISPLAY button, the display can
be turned on and off.
The remaining power is displayed in five levels as
shown at left.
l If you want to turn off the indicator, press the
MODE DISPLAY button.
If the battery power is very low, a warning message
will appear. Replace the battery pack.
Notes:
l
When the
connected to the DC cable, rematning battery power IS
not displayed.
l Use the remaintng battery power display only as an
indication.
l Battery consumption may vary depending on the
condition of use.
l Remaining Battery Power Display may increase or
decrease with operation of the
is on the
the remaining
unit or
Operate
Page 31
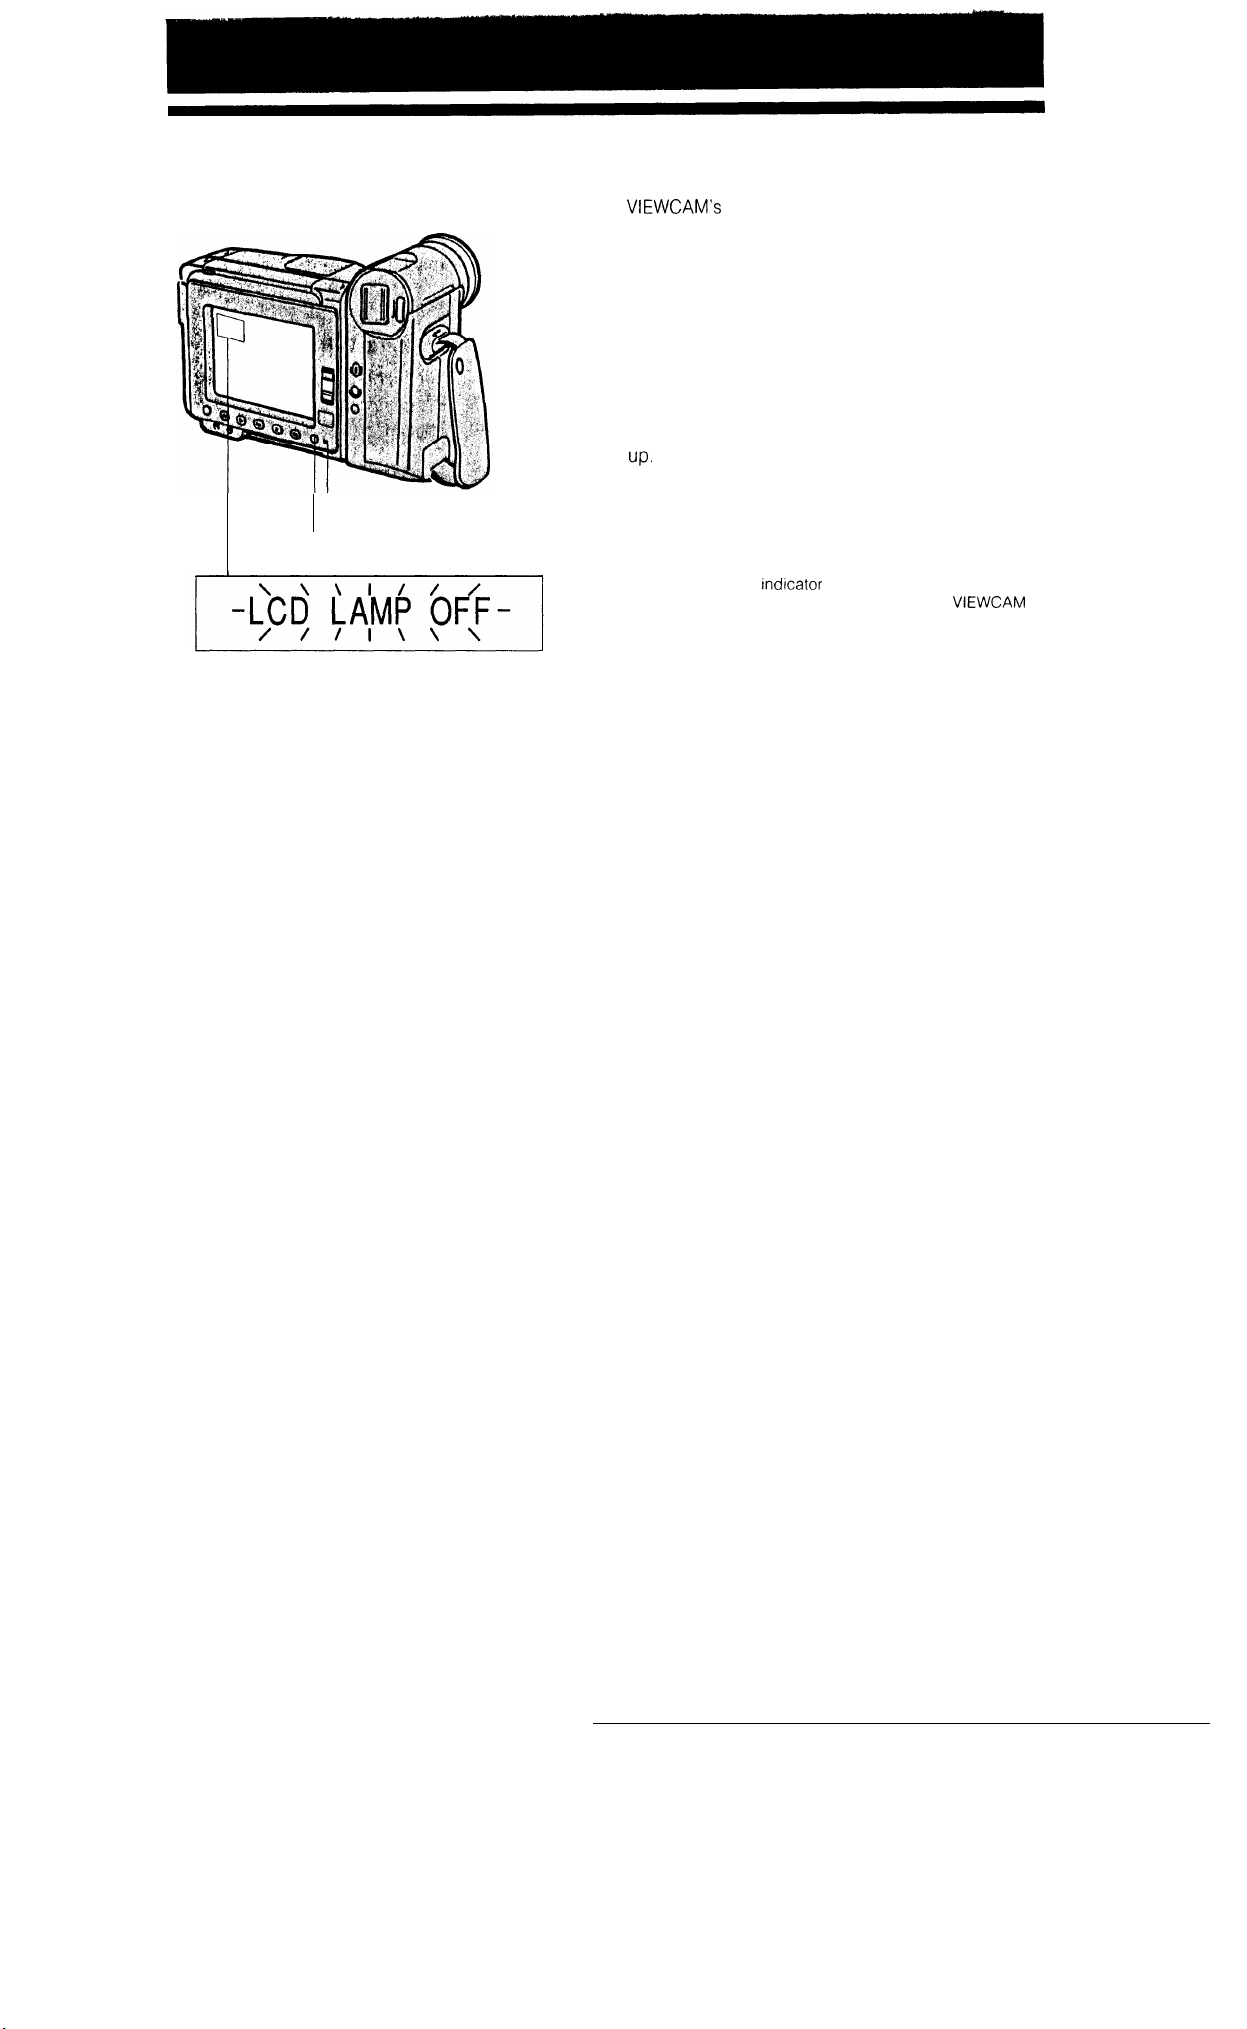
TURNING OFF THE LCD
MONITOR BACKLIGHT
LCD monitor uses a fluorescent lamp for
backlighting (see page 51).
You can turn off the lamp when backlighting is not
necessary; e.g. when you are watching a playback
picture on a connected TV screen. Turning off the
lamp will reduce power consumption.
In Camera or VCR mode, hold down the MODE
DISPLAY button. Two seconds later, “LCD LAMP
OFF” starts flashing on the monitor. Keep the MODE
DISPLAY button down for 3 more seconds, and the
backlight turns off and the LAMP OFF indicator lights
,
LAMP OFF indicator
MODE DISPLAY button
To turn on the backlight again, press the MODE
DISPLAY button or set the Operate switch to OFF
and then back to CAMERA or VCR.
Note:
If the LAMP OFF tndlcator starts flashing when the
backlight is turned off, this indicates that the
wants to display warning messages.
Press the MODE DISPLAY button to turn the backlight on
and check the warning messages.
30
Page 32
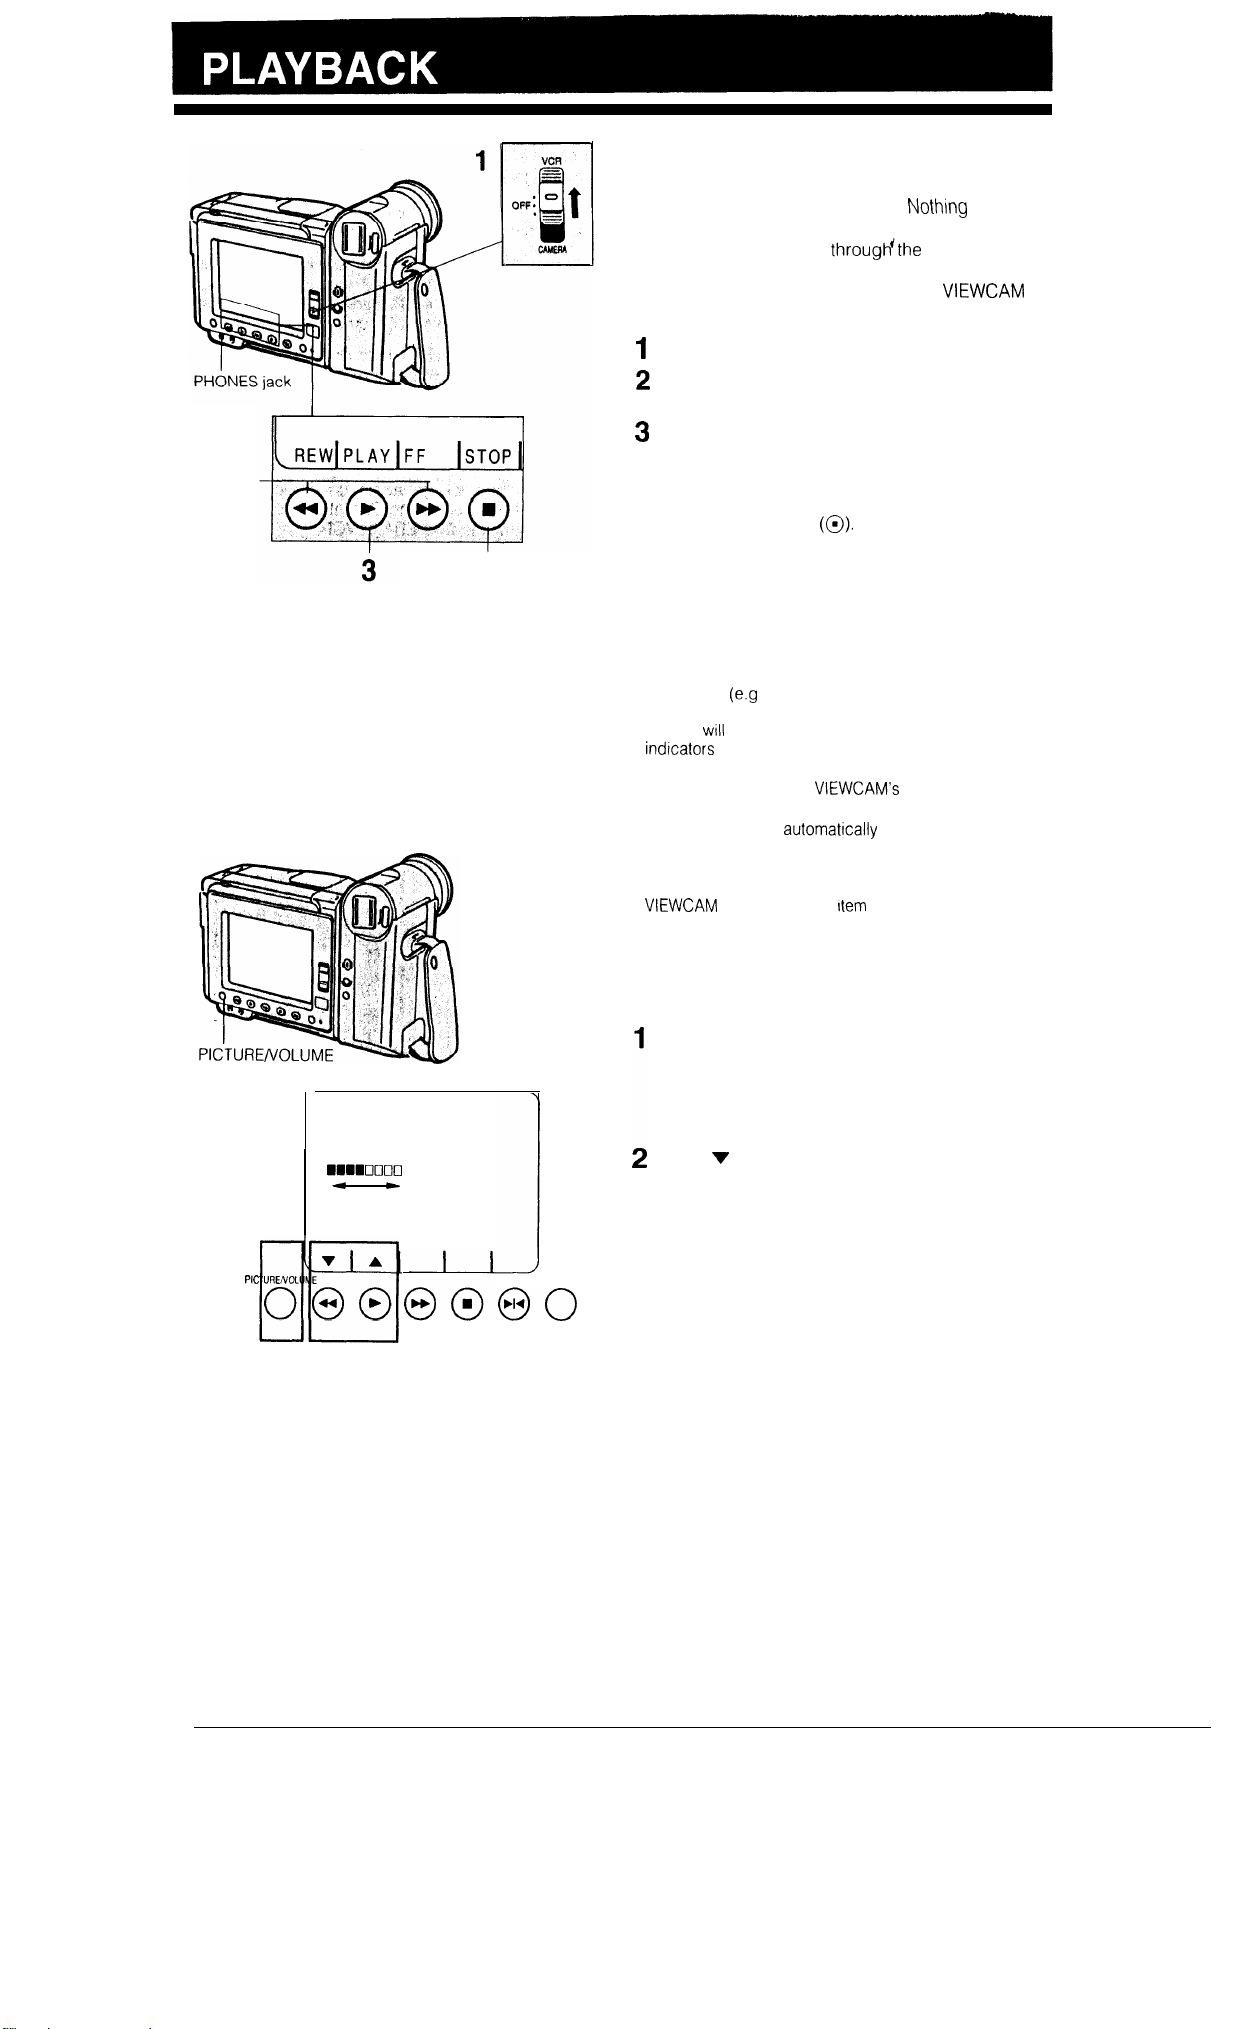
PLAYBACK
The LCD monitor makes it possible to playback and
see what
be connected, allowing instant on-screen playback.
You can hear the sound througHthe built-in speaker
or via your own earphone. You can also watch
prerecorded 8 mm video tapes on this
(“On-the-Go Playback”).
Set the Operate switch to VCR.
Press the REW (or FF) button to rewind (or fast
forward) the tape.
Press the PLAY button.
you have just recorded. Nothmg needs to
button
2
TO STOP PLAYBACK
Press the STOP button
STOP button
Auto Tape Rewind
The tape is automatically rewound when playback
reaches the end of the tape.
Notes:
l If you wish to turn off the operation button indicators on
the monitor
the picture), press the MODE DISPLAY button
buttons
l A pair of earphones with a 3.5 mm diameter plug can be
plugged directly into the
l When a pair of earphones IS plugged into the PHONES
tack, the speaker is automatrcally cut off.
l To use the infrared remote control, make sure that the
remote control menu item (“REMOTE”) is set to “ON”
The remote control cannot be used to operate the
page 36.
because they interfere with your view of
still function as indicated even after their
are turned off.
PHONES tack
when this menu
is set to “OFF”. See
The
VOLUME CONTROL
Press the PICTURE/VOLUME button until the
VOLUME indicators appear.
l The monitor display will change in the order of
Backlight, Bright, Colour and Volume each
VOLUME
Decrease Increase
time you
Press
press A button to increase the volume.
See page 20 for details.
press
the PICTURE/VOLUME button.
button to decrease the volume, or
31
URENOL
1 2
MODE DISPLAY
Page 33
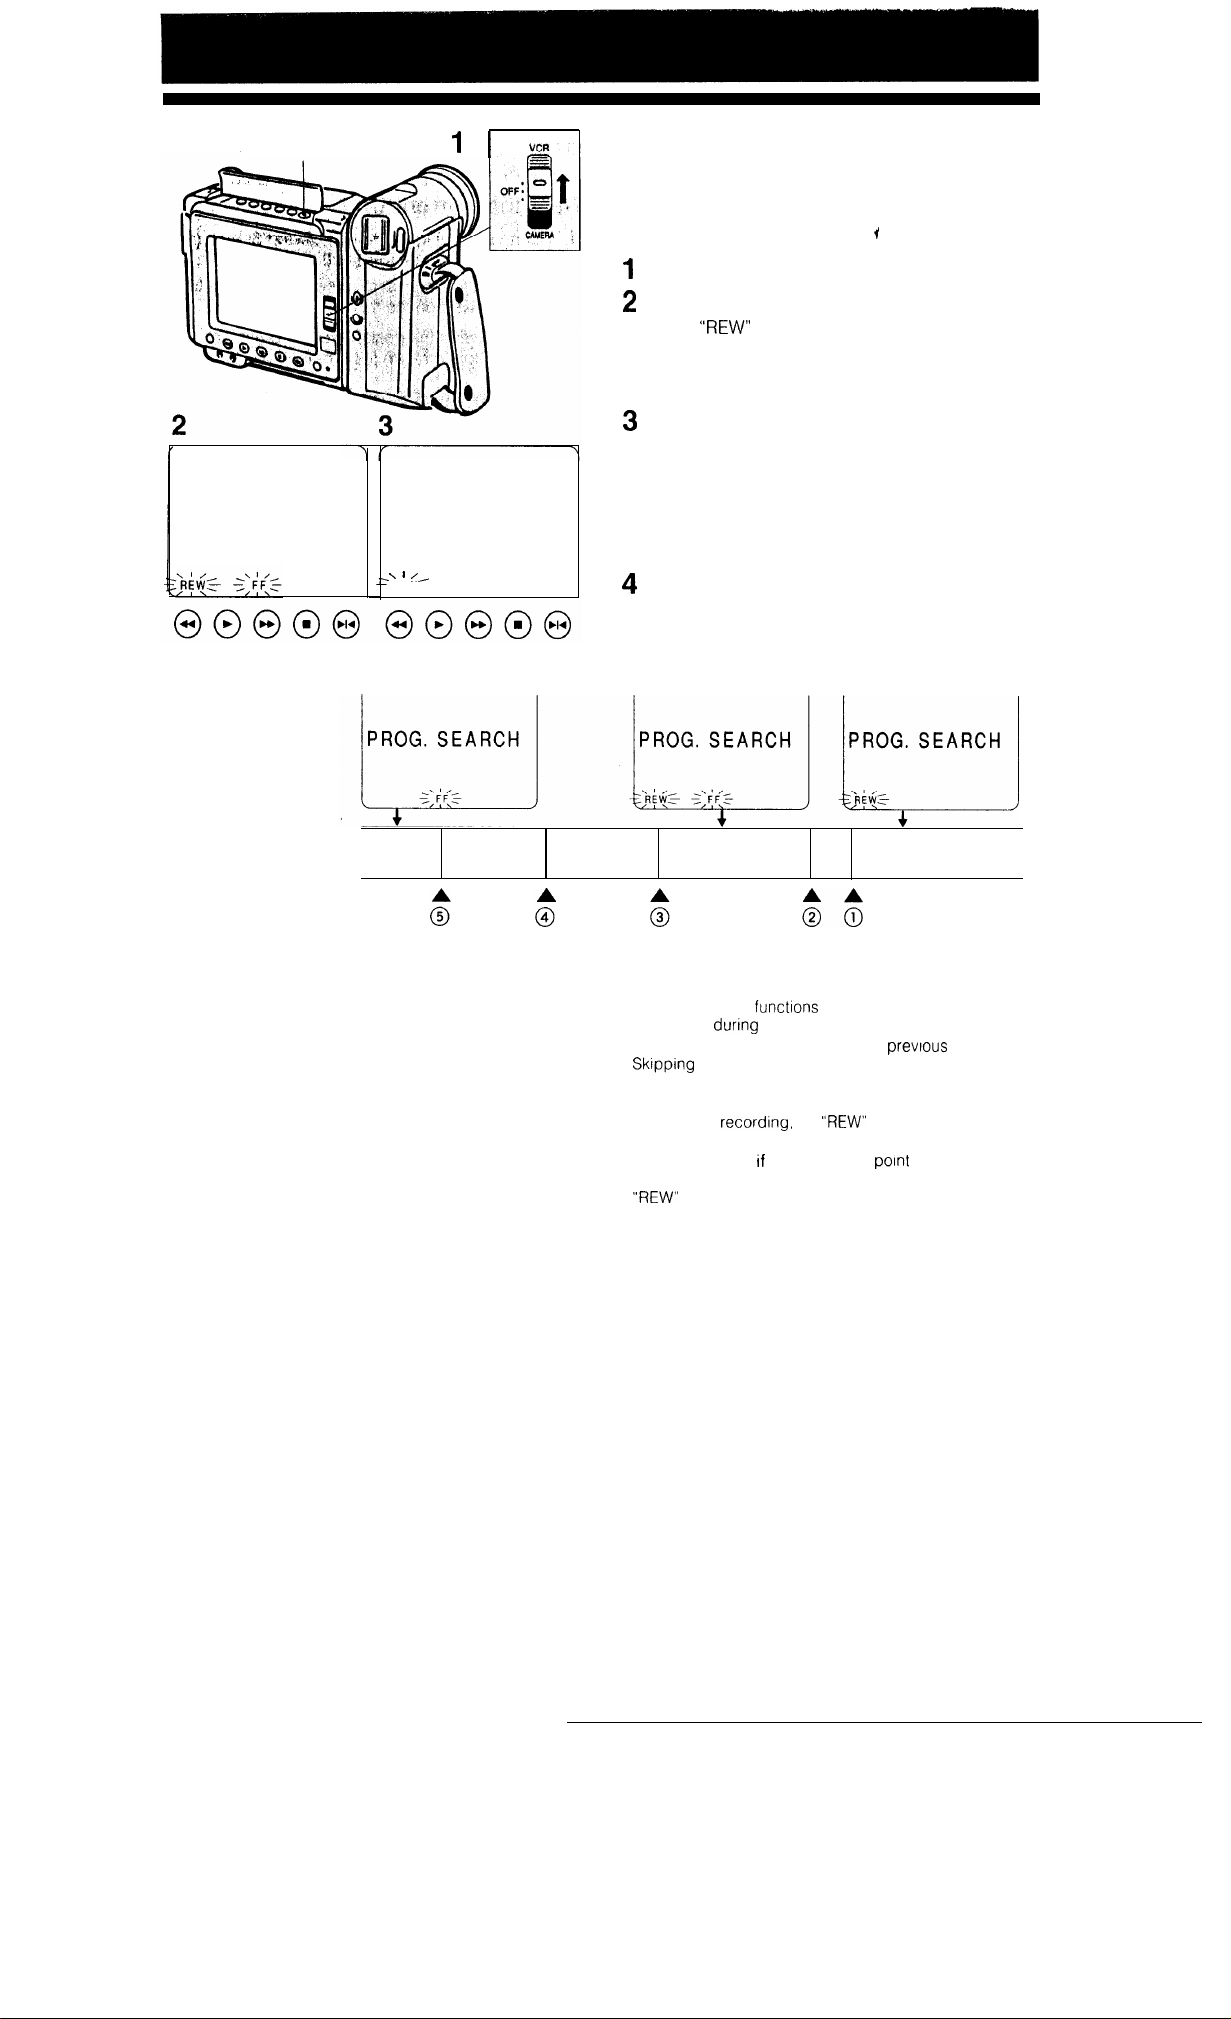
RETURN/SEARCH button
PROGRAM SEARCH
Program Search mode automatically returns the tape
to the beginning of a number of previously recorded
scenes A total of 10 different scenes can be found
on one tape
Set the Operate switch to VCR
Press the RETURN/SEARCH button.
l The
the monitor.
To cancel, press the RETURN/SEARCH button
again.
Press the REW or FF button
l
The tape rewinds or fast forwards to the
beginning of a recording.
Playback starts automatically when the
PROG. SEARCH PROG. SEARCH
beginning of the recording is found. The
indicators on the monitor automatically go off
after about 10 seconds.
REW,
To rewind the tape to the beginning of the
previous recording, press the REW button again
while the indicators are on.
Example: To rewind the tape to the beginning of five different recordings
or “FF” indicator starts flashing on
Monitor display
Tape position
(First recording) (Last recording)
Notes:
l Program Search
stopped or
l Returns the tape to the Immediately
the immediately previous recording is not
possible
l In steps 2 and 4, if the tape IS at a point ahead of the
most recent
the “FF” indicator will not appear.
l In steps 2 and 4,
recent recording, the “FF” indicator will flash and the
Indicator will not appear.
l Does not function with recordings that are shorter than 10
seconds.
. If the video cassette was removed after the recordings
were made, Program Search does not function
when the video cassette IS
playback.
the
the tape is at a point before the most
indicator will flash and
recording
32
Page 34
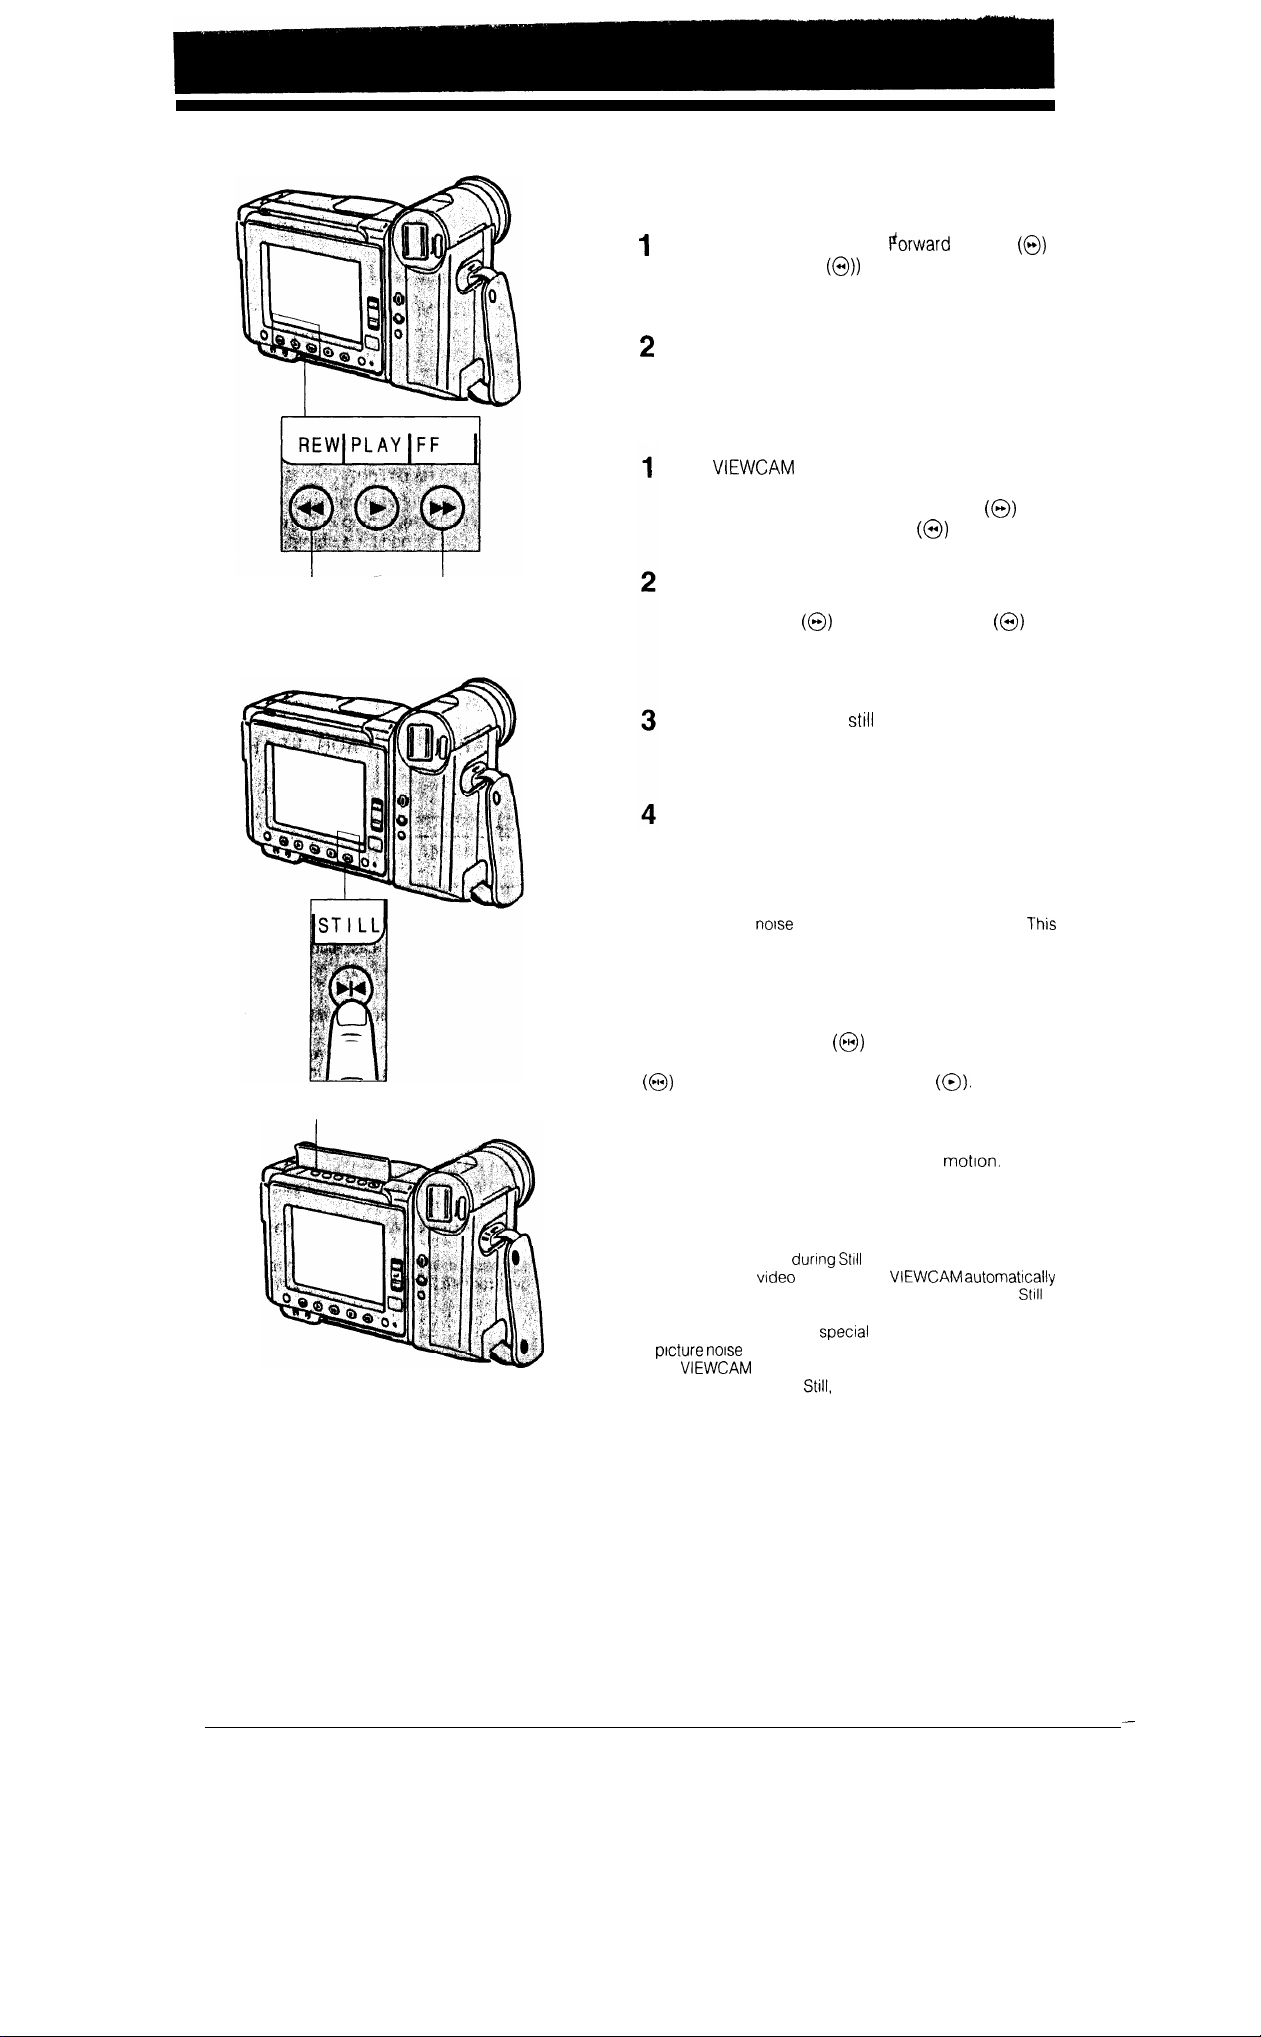
Reverse Search
button
Forward Search
button
VIDEO SEARCH
Search for and Play Back a Scene
Near the Current One
During playback, press the
(or Reverse Search
l
The fast forward (or
is displayed on the monitor.
When you find the desired scene, press the
PLAY button to return to normal playback.
button.
reverse) playback picture
Search for and Play Back a Scene
Far from the Current One
If the
STOP button to stop the tape. Depending on the
direction of search, press the FF button
fast forward or the REW button
tape.
When you estimate that the tape is near the
scene you want, press and hold down the
Forward Search
button.
l The fast forward (or reverse) playback picture
is displayed on the monitor.
If the desired scene is
release the Forward Search (or Reverse Search)
button to return to Fast Forward (or Rewind)
mode, and repeat the operation.
When you find the desired scene, press the
STOP button and then the PLAY button to start
normal playback.
Notes:
l Sound is turned off during these searches.
l Some picture
IS not a malfunction.
is in Playback mode, press the
(or Reverse Search
far from that point,
appears during these searches.
Search
to
to rewind the
33
SLOW/FADER button
STILL
This function freezes the picture.
Press the STILL button
during playback. To
return to normal playback, press the STILL button
again, or press the PLAY button
SLOW
This function allows playback in slow
the SLOW/FADER button during playback To return
to normal playback, press the PLAY button.
Notes:
l Sound IS turned off
l To protect the
returns to ordinary playback after about 5 minutes in
mode and about 40 seconds in Slow mode
l
The LCD monitor has a specral function that suppresses
the
the TV screen during
during still or slow playback. However, when
is connected to a TV, noise may appear on
cassette, the
and Slow modes
Slow or Search mode.
Press
Page 35
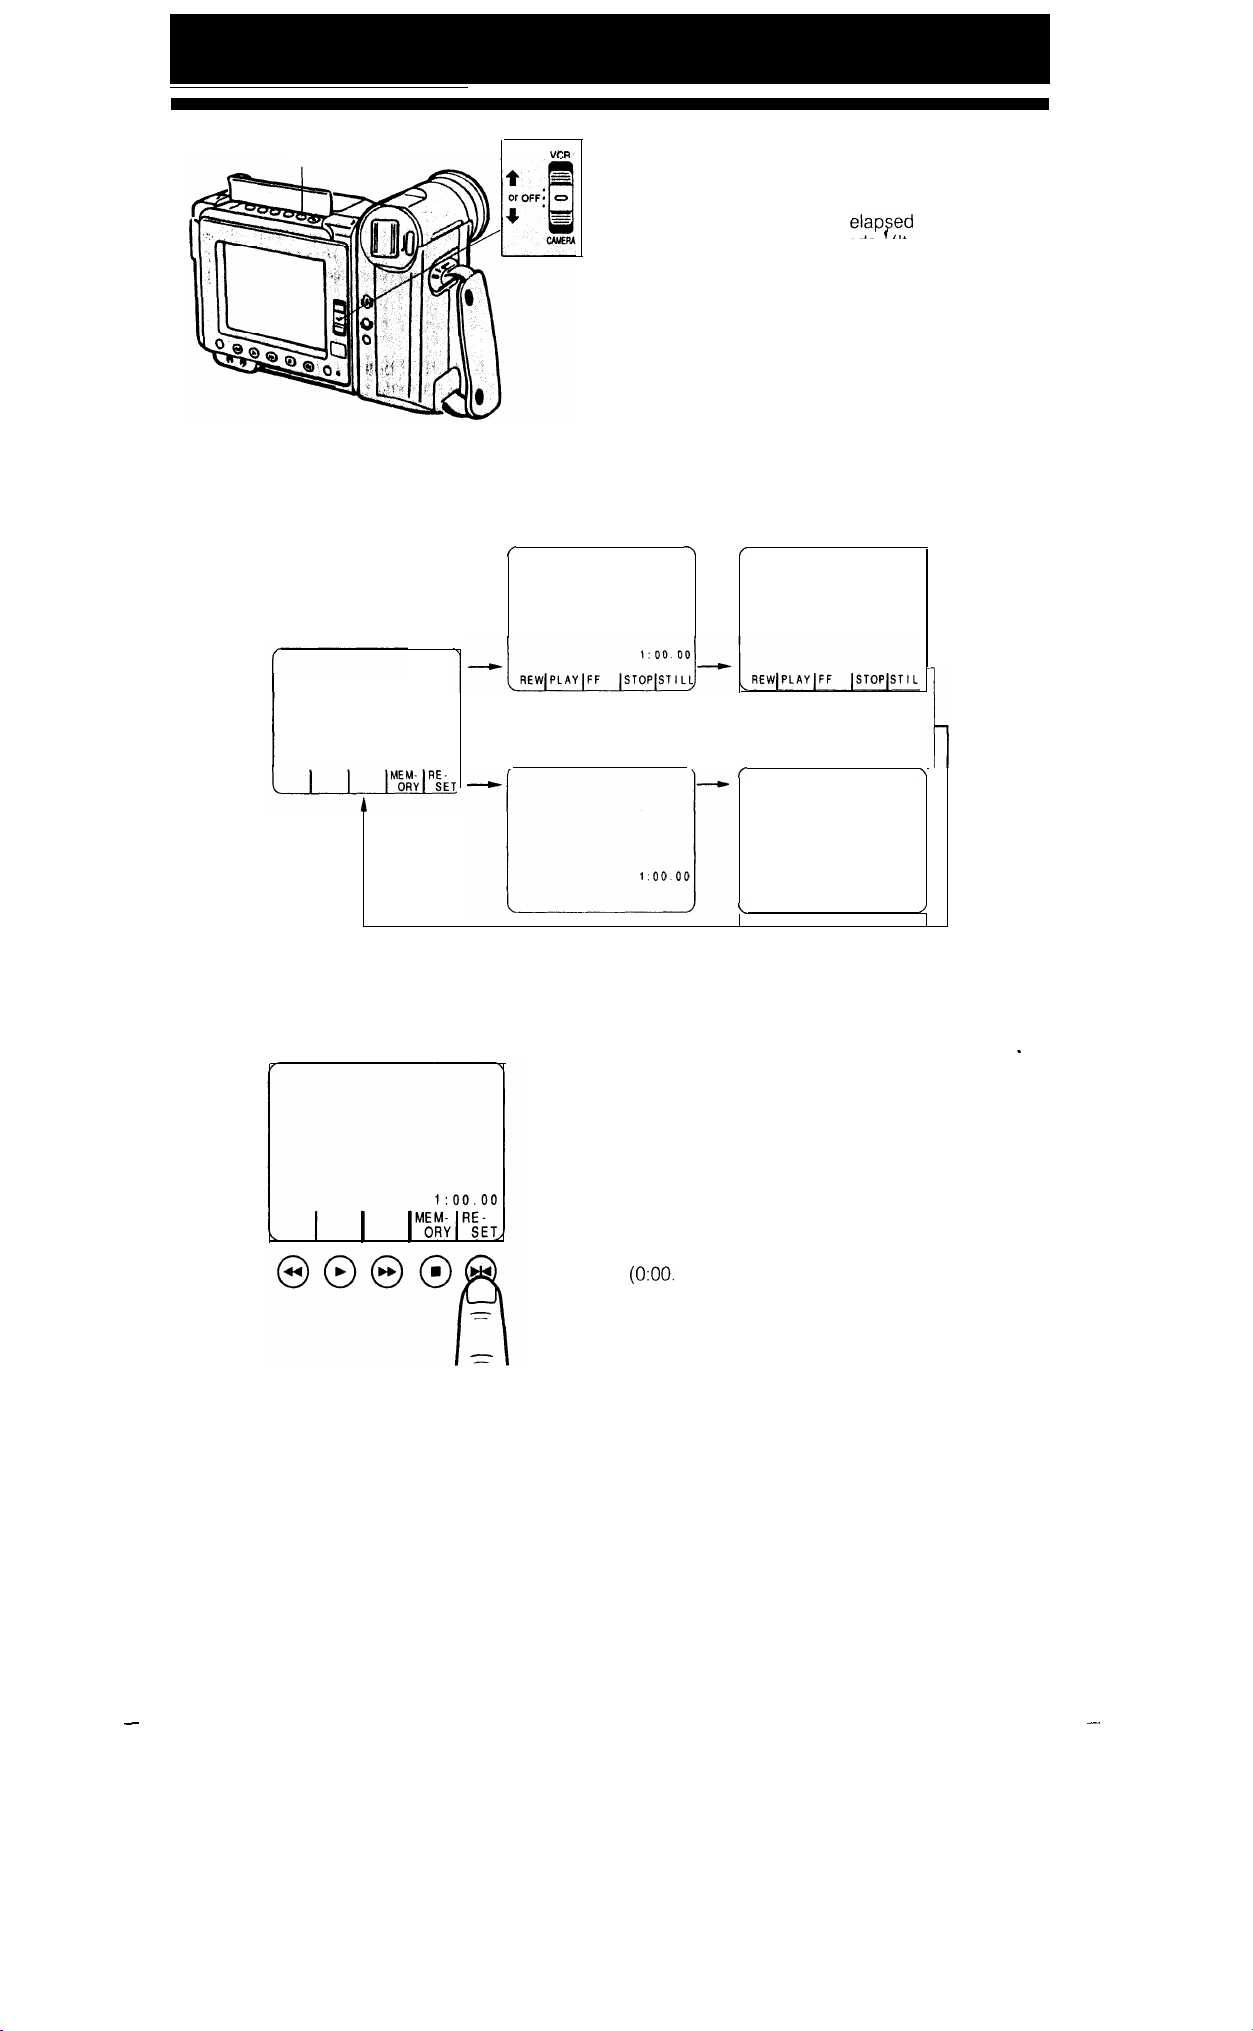
COUNTER button
Counter
TAPE COUNTER FEATURE
Counter Display
The counter display shows
in hours, minutes and seconds. (It continues to
count even when it is not displayed.) It is available
in both Camera and VCR modes.
Using the Counter
Press the COUNTER button to toggle the tape
counter display on or off on the monitor. The
counter display changes each time you press the
COUNTER button as shown below.
For easy, fast replay, during playback, write down
the counter readings of the scenes that you want to
return to later.
Counter display in VCR
mode
recording time
No display in VCR mode
l:oo 00
Counter display in
CAMERA mode
No display in CAMERA
mode
Note:
The counter reading may differ slightly from the actual
time. This is more noticeable when the tape has been
rewound or fast forwarded a number of times, in which
case there can be a difference of several seconds.
To Reset the Counter to Zero
Press the RESET button. (The RESET button
indicator is displayed only when the counter display
is on.)
During recording or playback, press the RESET
button when you want to reset the counter to zero
00). The counter can be reset in either
Ordinary Counter mode or Counter Memory mode
(see page 35).
34
Page 36
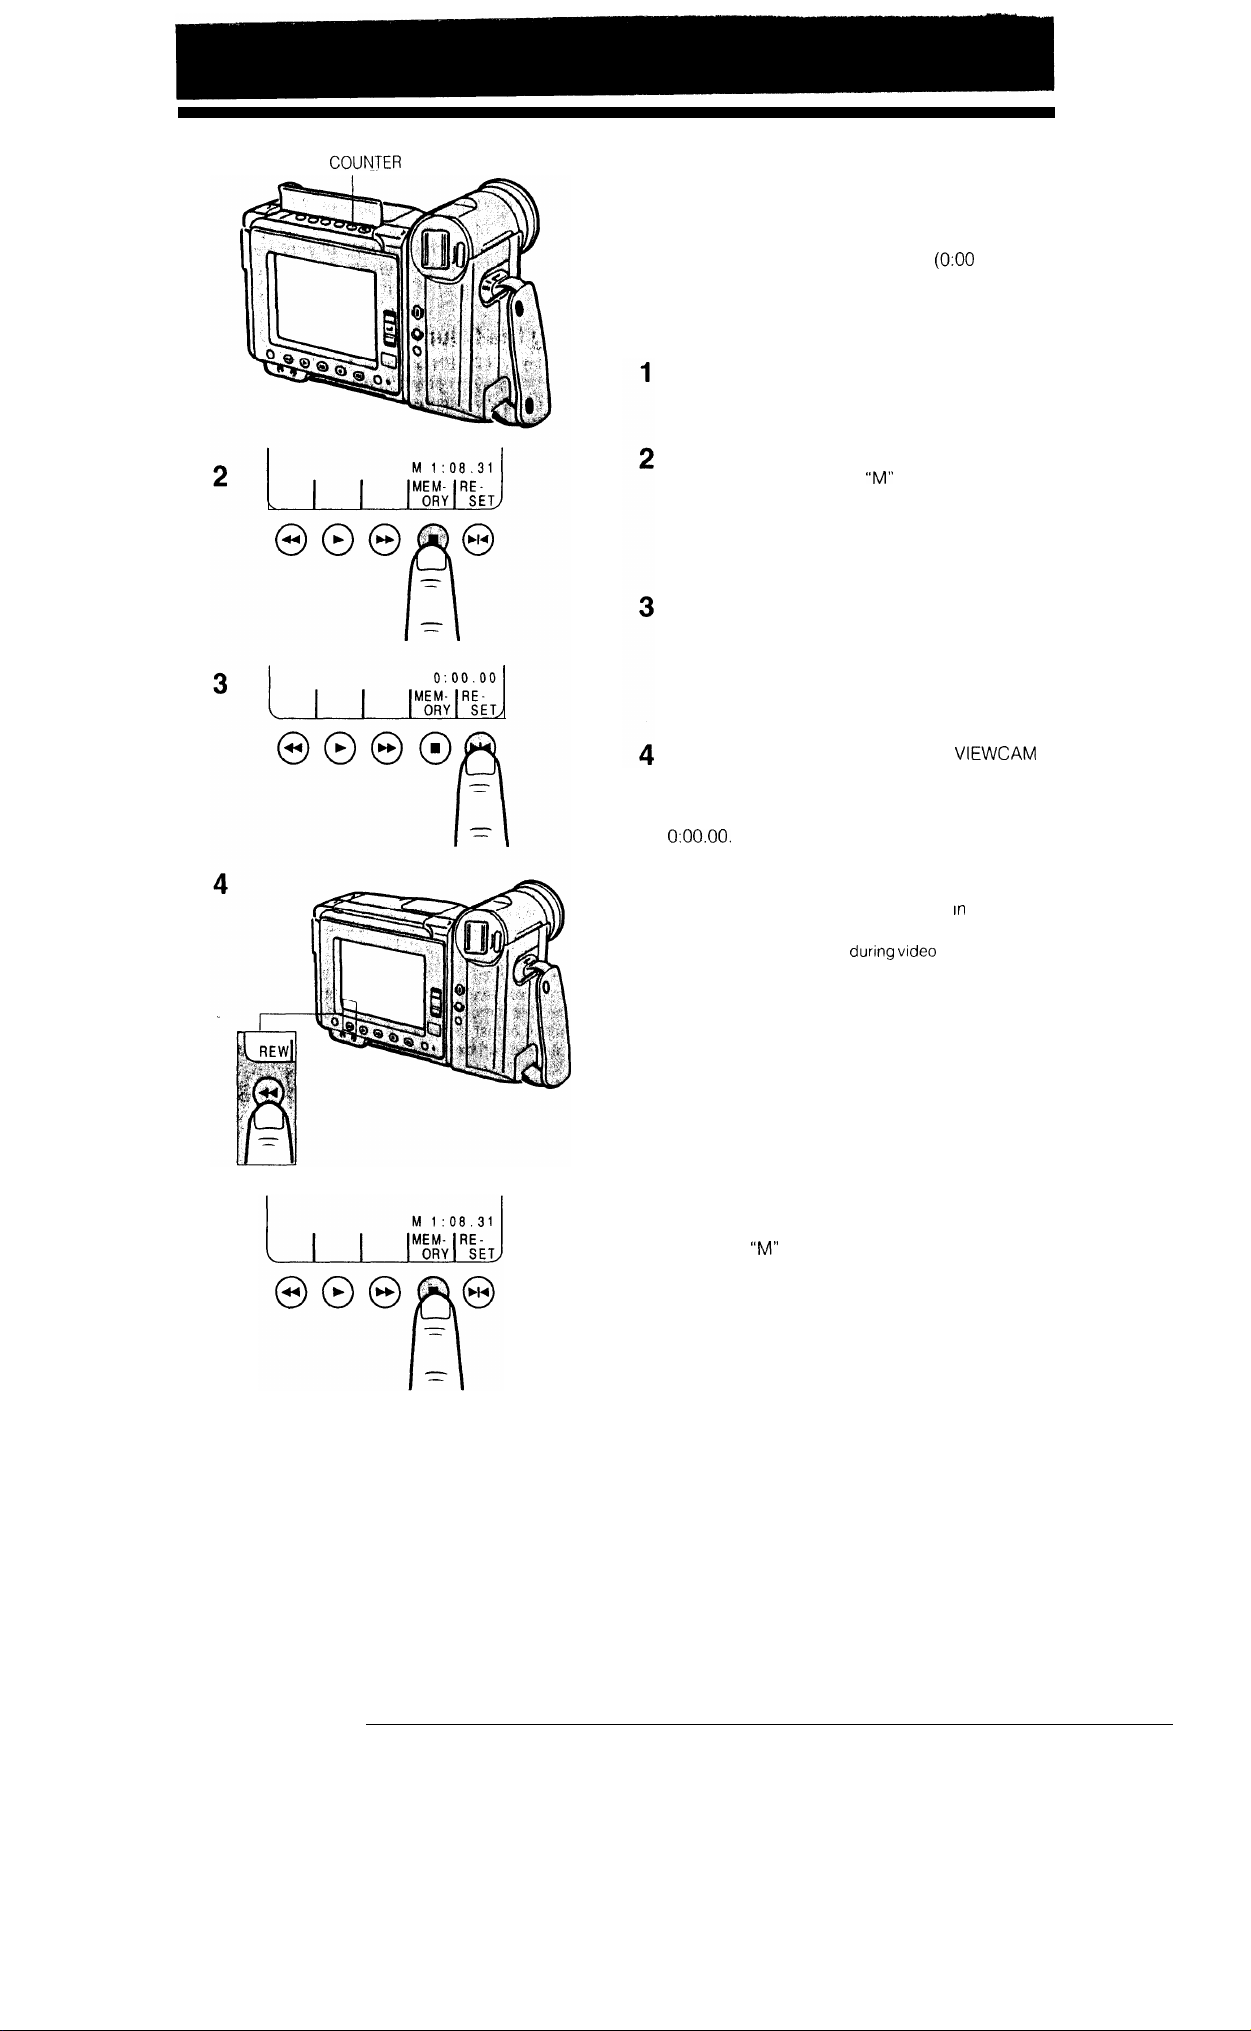
1
button
USING THE COUNTER
MEMORY
Use the counter memory when you want to return to
the beginning of a particular scene. The position
where the counter memory was reset
stored in memory to make it easier to return the tape
to that point.
Press the COUNTER button to make the counter
memory display appear on the monitor.
Press the MEMORY button to set the counter to
Counter Memory mode.
the left of the counter.
Then press the COUNTER button to turn off the
counter control button indicators.
During playback (or recording), press the RESET
button to reset the counter to zero at the
beginning of a scene that you want to return to
later. Then press the COUNTER button to turn
off the counter control button indicators.
will be displayed to
00) is
Stop playback (or recording). If the
in the Camera mode, set the Operate switch to
VCR. Then press the REW button. The tape will
automatically stop when the counter reaches
Press the PLAY button to view the
desired scene.
Notes:
l The FF (Fast Forward) button can be used
way.
l This functiori does not work during video searches.
the same
is
To Cancel Counter Memory Mode
Press the COUNTER button to make the counter
display appear and then press the MEMORY button
to turn off the
The Counter Memory mode is turned off, and the
counter returns to Ordinary Counter mode.
To turn off the Counter mode, press the COUNTER
button. The counter display will turn off.
to the left of the counter display.
35
Page 37
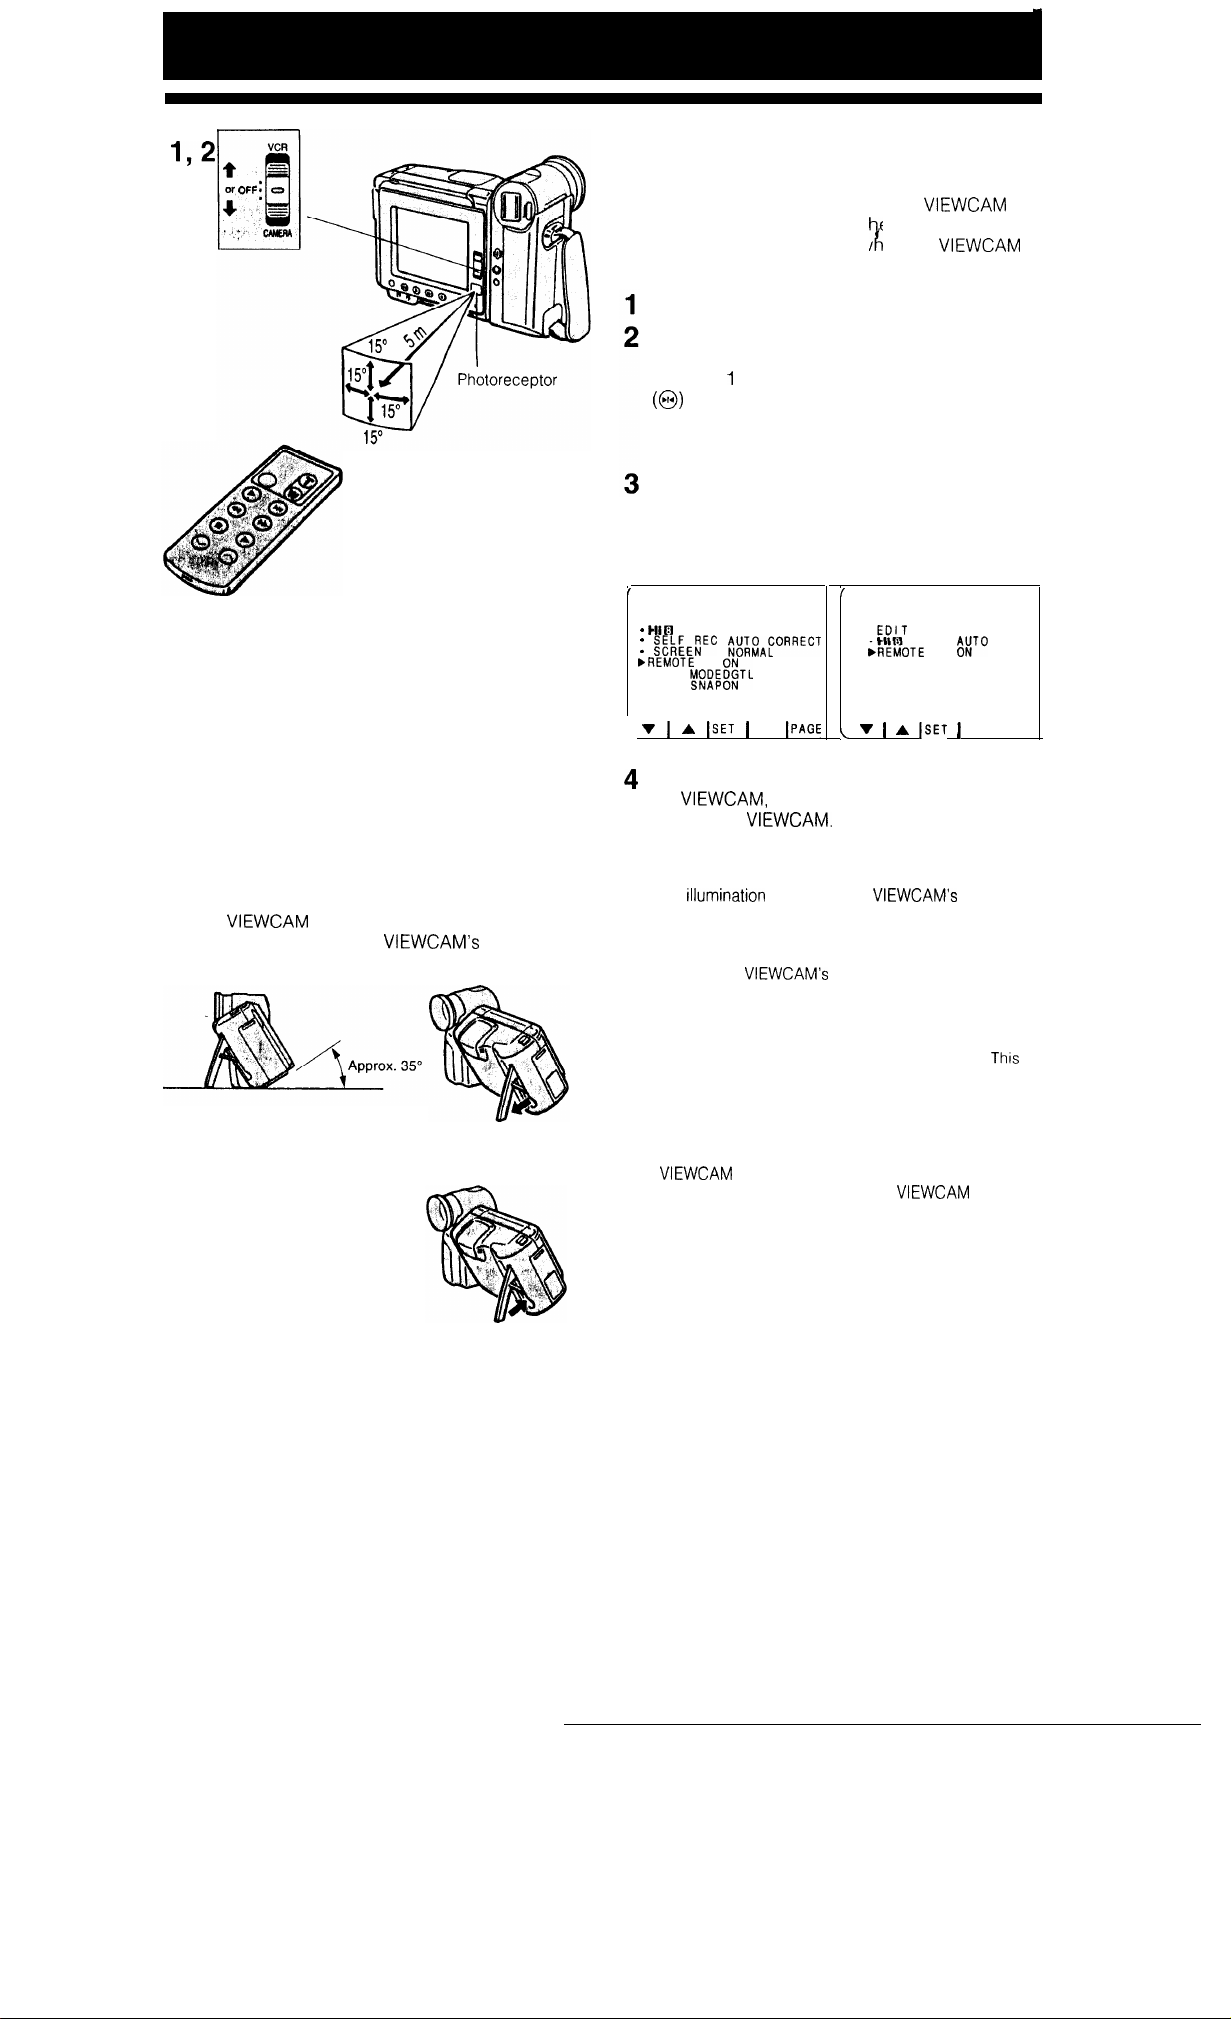
Approximate operating range
of remote control
USING THE INFRARED
REMOTE CONTROL
Use the remote control to operate the
from a distance, for example w
record yourself in a scene, or w en the VIEWCAM is
connected to a TV for use as a VCR.
Set the Operate switch to CAMERA or VCR.
When CAMERA is selected
Press the MENU button to display MENU 2.
If MENU
When VCR is selected
Press the MENU button to display the menu.
Make sure that the “REMOTE” menu item is set
to “ON”.
Press the MENU button to turn off the menu.
In the CAMERA mode In the VCR mode
is displayed, press the PAGE button
to get MENU 2 on the monitor.
en you want to
USING THE STAND
Pull out the stand and lock it into position when you
put the
For stability, make sure the
stands vertically, as shown.
Cautions:
l Protect the stand from strong forces. Otherwise it may
break.
l
When the stand is not in use,
fold it away to keep it from
breaking by pressing in the
direction of the arrow.
on a table or other flat surface.
camera part
l DGTL
MENU 2
AUTO
ZOOM
MENU
:
OFF
I
Aim the remote control at the photoreceptor of
the
and press the control buttons to
operate the
Notes:
l Be careful not to allow direct sunlight or bright light from
interior
photoreceptor, as this may prevent the remote control
from operating properly.
l Be sure that there are no obstacles between the remote
control and the
l When the “REMOTE” setting is changed in either Camera
or VCR mode, the setting for the other mode is
automatically set the same.
l The lithium battery normally lasts about 6 months.
time can be shorter under some operating conditions.
When the lithium battery is dead and the remote control
does not operate, replace the battery with a new one by
following the instructions on page 10.
l If “OFF” has been selected for “REMOTE” on the menu,
the
commands. Select “ON” to make the
to the remote control.
to fall onto the
photoreceptor.
will not respond to remote control
respond
36
Page 38
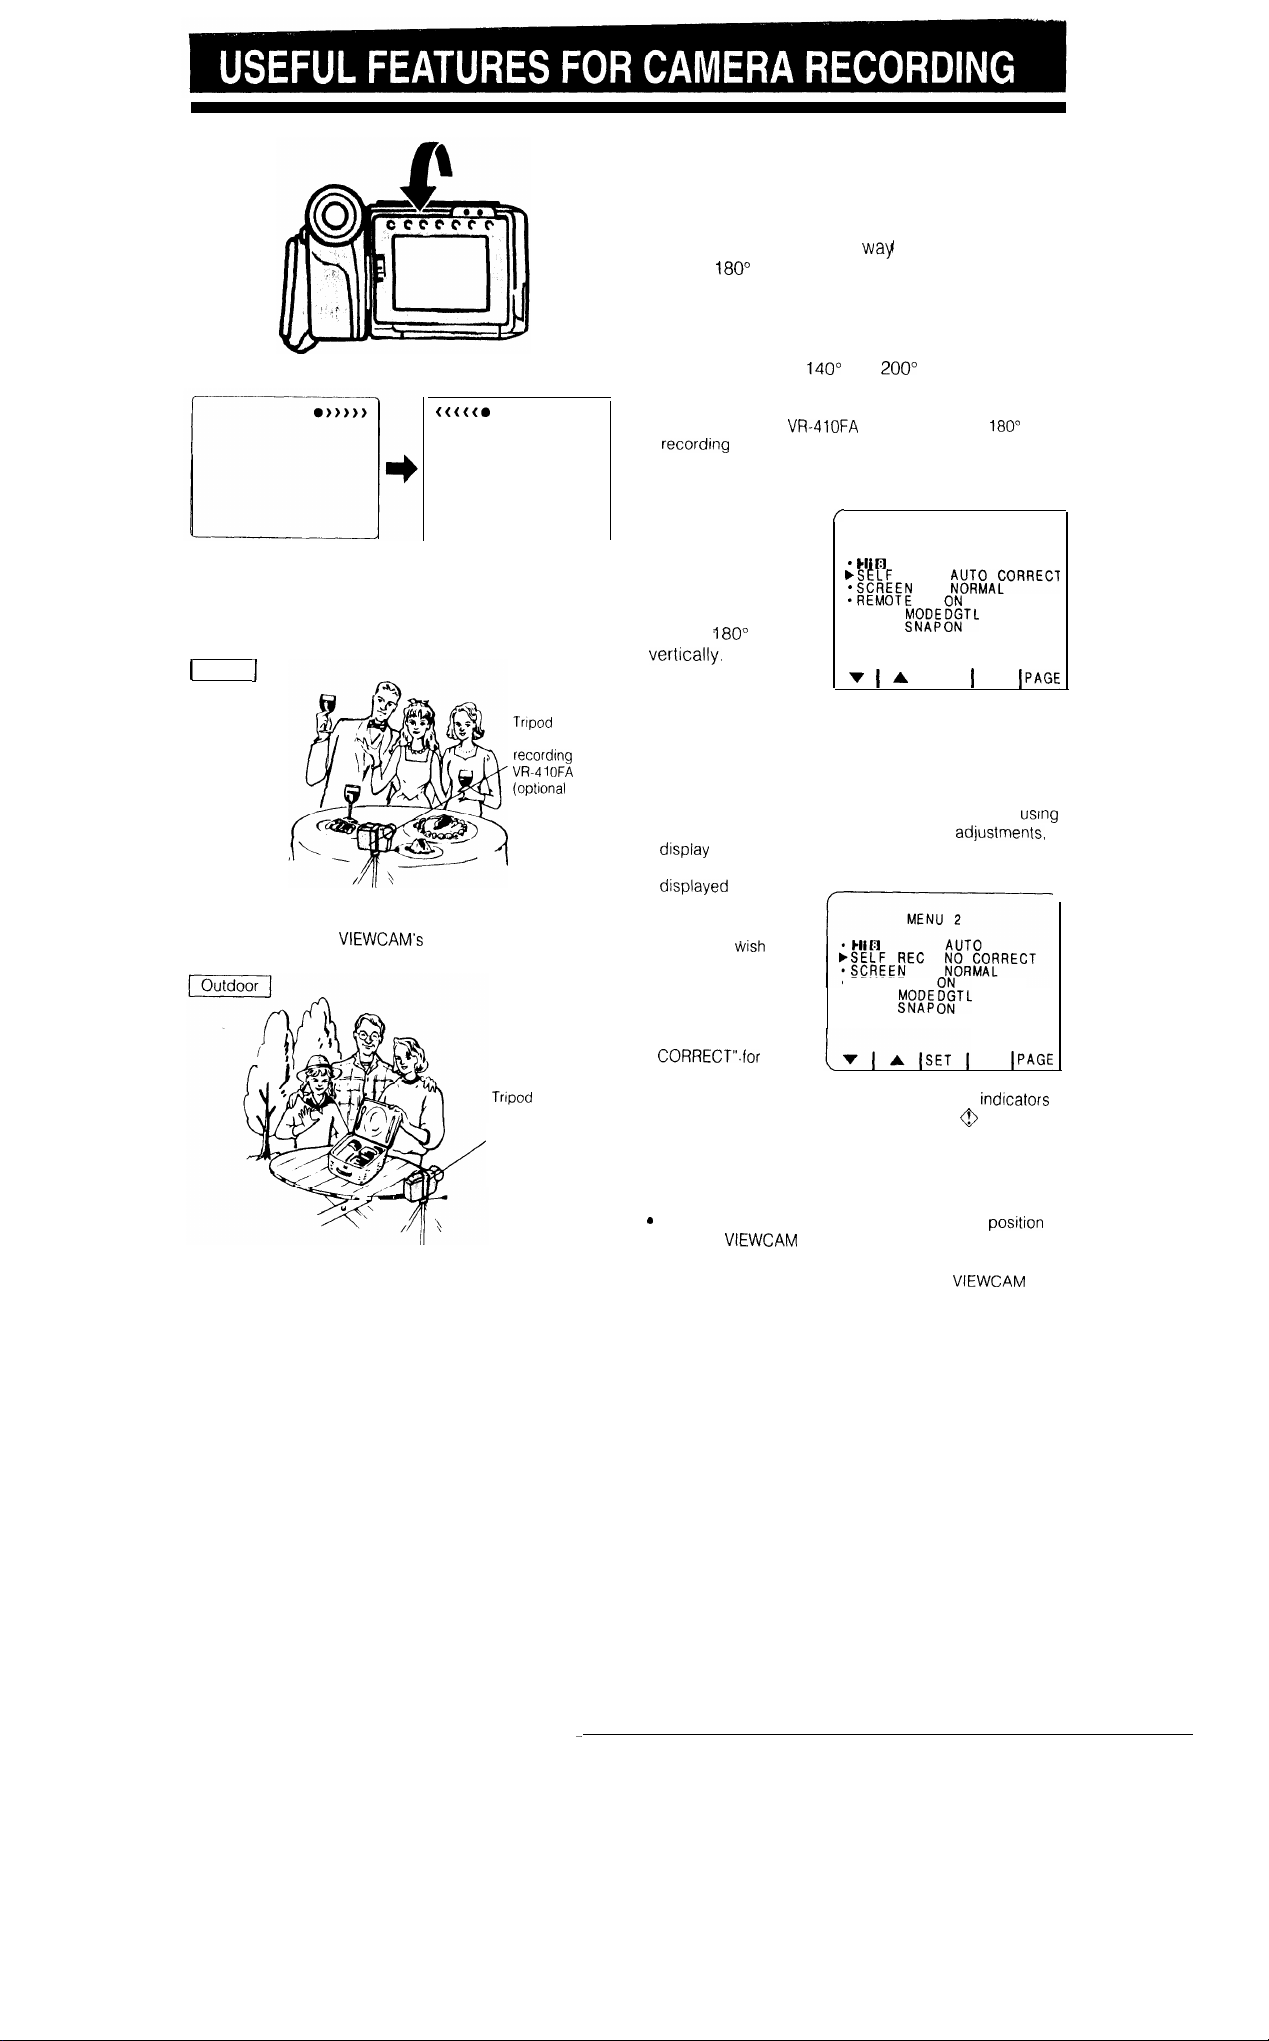
Normal Recording mode
Self Recording mode
Examples of recording in Self Recording mode
Indoor
adaptor
for 180”
OFA
accessory)
SELF RECORDING
The Self Recording function lets you monitor the
recording while you are part of the scene. Set the
“SELF REC” menu item to “AUTO CORRECT” to turn
the on-screen picture right way up. Then rotate the
monitor
camera lens.
When the monitor is turned back to the normal
position, the image returns to normal. The screen
image is automatically inverted when the monitor
rotation is between
Note:
You will need the VR410FA tripod adaptor for
recording in Self Recording mode.
Make sure that the
“SELF REC” item has
been set to “AUTO
CORRECT” on
MENU 2.
Rotate the LCD
monitor
screen image will be
inverted to show a
mirror image of the subject. When the monitor is
turned back to the normal position, the image
returns to normal.
Notes:
l In Self Recording mode, it IS not possible to record
manual recording modes, change picture
return feature Also, the recording mode Indicator IS
to face the same direction as the
and
(optional accessory) and a tripod when
MENU
2
REC
AUTO
l DGTL
The
menus, record the date and time, or use the quick
(SET
ZOOM
Recording yourself and your friends together at a
party, using the remote control, while monitoring
yourselves on the
Recording yourself and your family together on a
picnic, using the remote control
screen
for 180”
recording
VR-410FA
(opttonal
accessory)
37
image, as shown in
the illustration.
l
When you
keep the image
normal Instead of
Inverted even after
rotating the monitor,
select “NO
REC” on MENU 2.
l In Self Recording mode, all standard warning
on the monitor are replaced by a flashing @ indicator in
to
l DGTL
ZOOM
the centre of the monitor. To check the meaning of
the warning, turn the monitor back to the normal
position.
Cautions:
Do not rotate the monitor to the Self Recording
while the
l For recording in Self Recording mode, be sure to rotate
the monitor, NOT the lens If you hold the
upside-down with its lens at the bottom, the subject will
be recorded upside-down.
is recording or playing back
Page 39
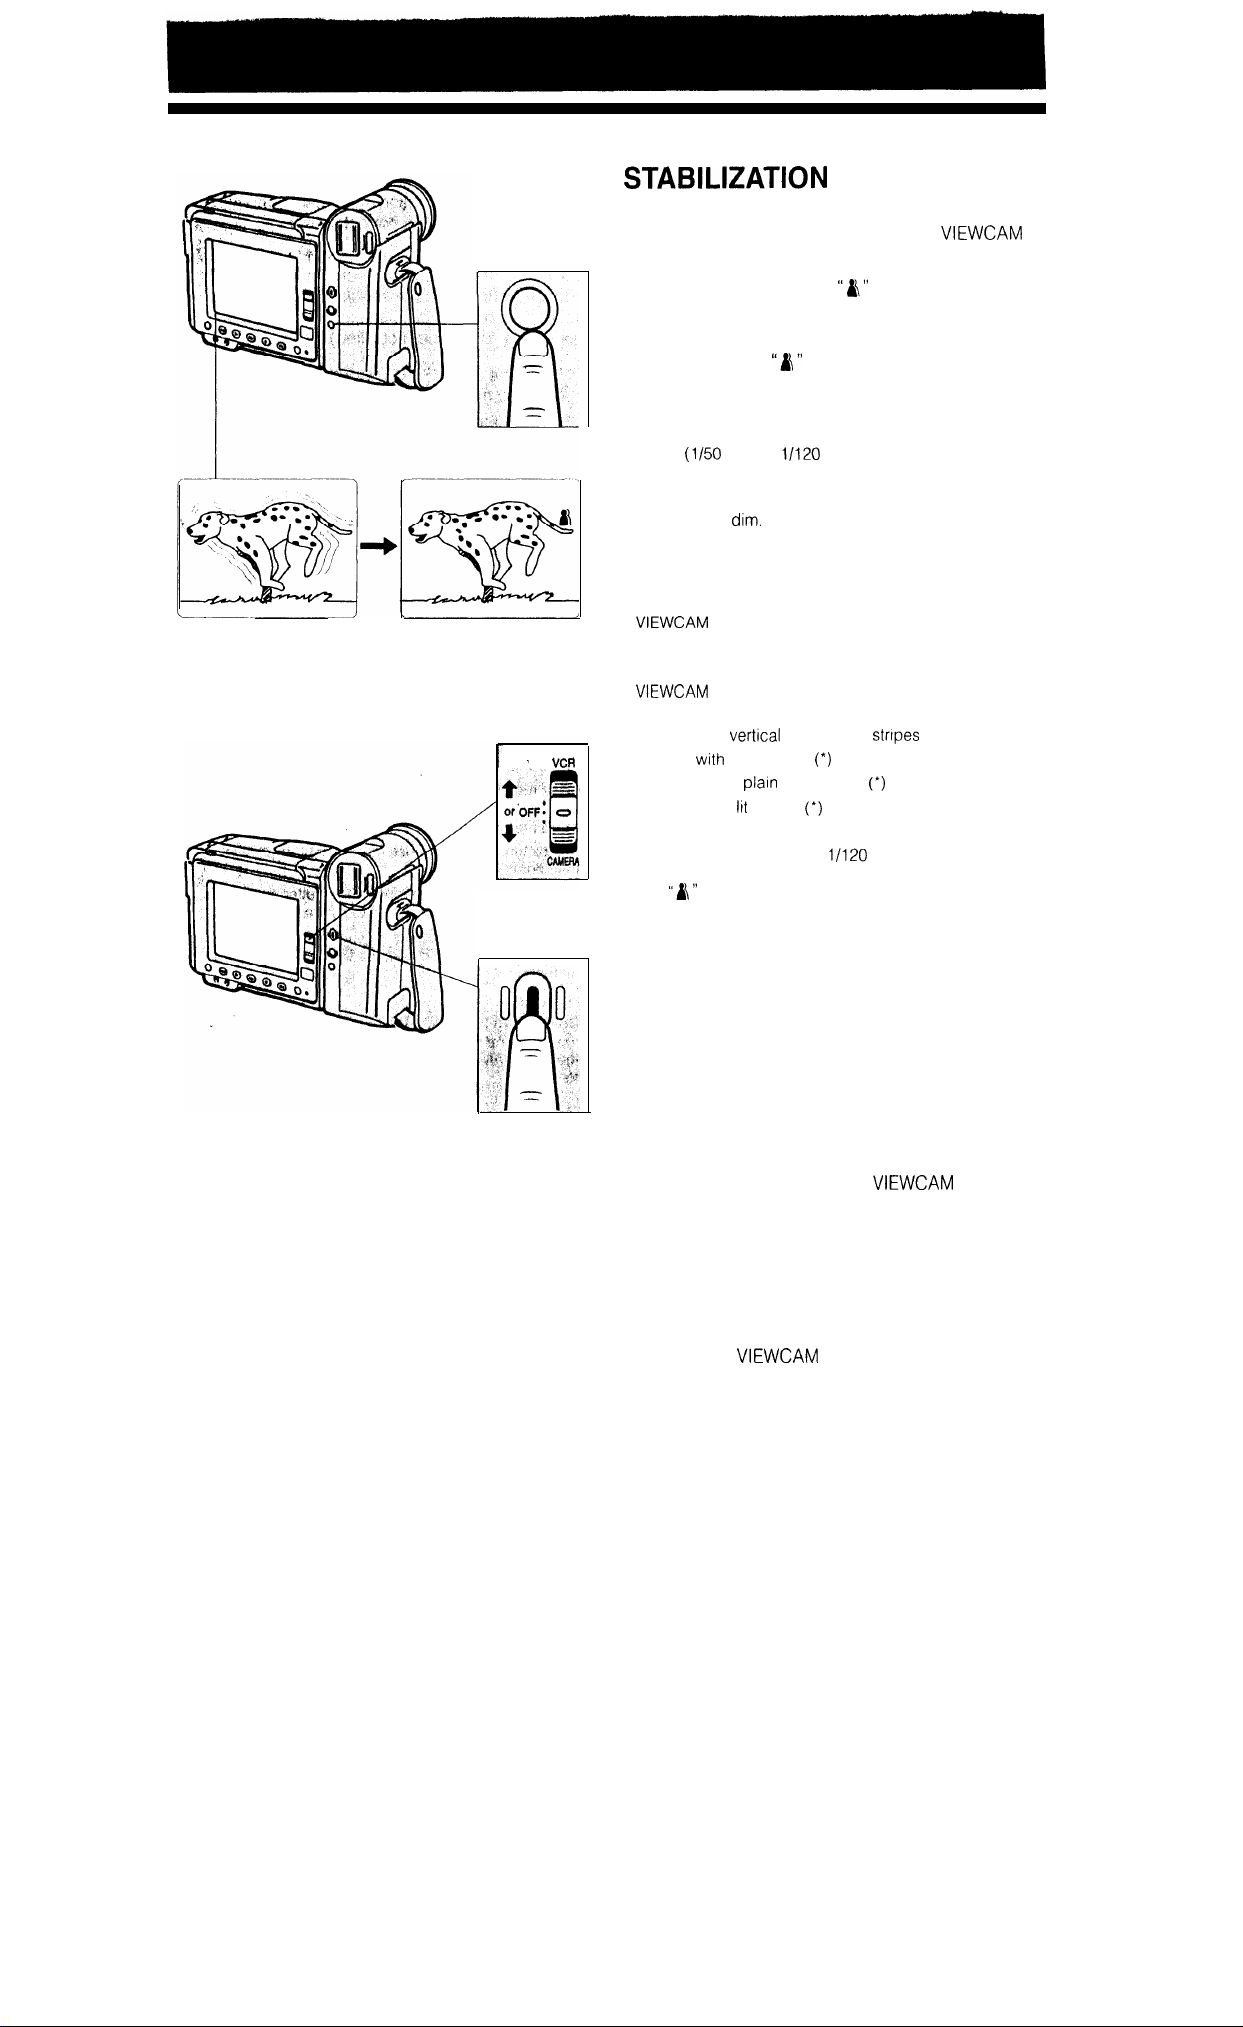
DIS button
USING THE DIGITAL IMAGE
(DIS) FEATURE
The DIS button lets you stabilize the image by
electronically cancelling relatively small
shakes that are often annoying in closeup shots.
Press the DIS button. The
appears at the right of the monitor.
To return to normal recording mode, press the DIS
button again. The
DIS indicator disappear.
Notes:
l The image on the monitor is slightly magnified, and the
shutter speed is automatically switched from the standard
speed
l Image resolution slightly decreases in the DIS mode.
l Under the light of fluorescent lamps, the picture may
brighten and
l During the Still Recording mode, the DIS feature does not
function.
l Battery consumption is larger in the DIS mode. We
recommend you not use the DIS mode when using the
sec.) to
on a tripod.
Caution:
The DIS function cannot compensate for excessive
described below:
l Subject with vertical or horizontal
l Subject
l Subject with a
l Dark or dimly
l Many moving subjects in a single frame
l A shutter speed other than
light of fluorescent lamps
The
shake, or for the subjects or situations
low contrast
background
subject
indicator will blink for (*) marked above.
(DIS) indicator
sec.
sec. is used under the
SNAP/EXTEND
button
Notes:
l If the electronic shutter is used with the snapshot
function, you can record a complete still image without
any blurring.
l The picture quality of the snapshot is slightly lower than
normal picture quality.
Caution:
If the Digital 2x Quick Zoom is set, Snapshot Recording
is not possible. Set the digital mode item in the Menu 2
to DGTL ZOOM or OFF. (See page 23).
RECORDING A FIVE-SECOND
STILL
You can record a still picture (snapshot) for about 5
seconds with normal sound simply by pressing the
SNAP/EXTEND button.
This is useful when you want to shot the scene like a
photograph.
Press the SNAP/EXTEND button in the Recording
Standby mode.
You can also make snapshot during Camera
recording. Press the SNAP/EXTEND button during
camera recording. When the snapshot has been
recorded, the
Recording Standby mode.
IMAGE
l A still image of the subject will be recorded for
(SNAPSHOTRECORDING)
about 5 seconds and the
automatically returns to the Recording Standby
mode.
l Image on the monitor will also be freezed
during the Snapshot recording.
automatically returns to the
38
Page 40
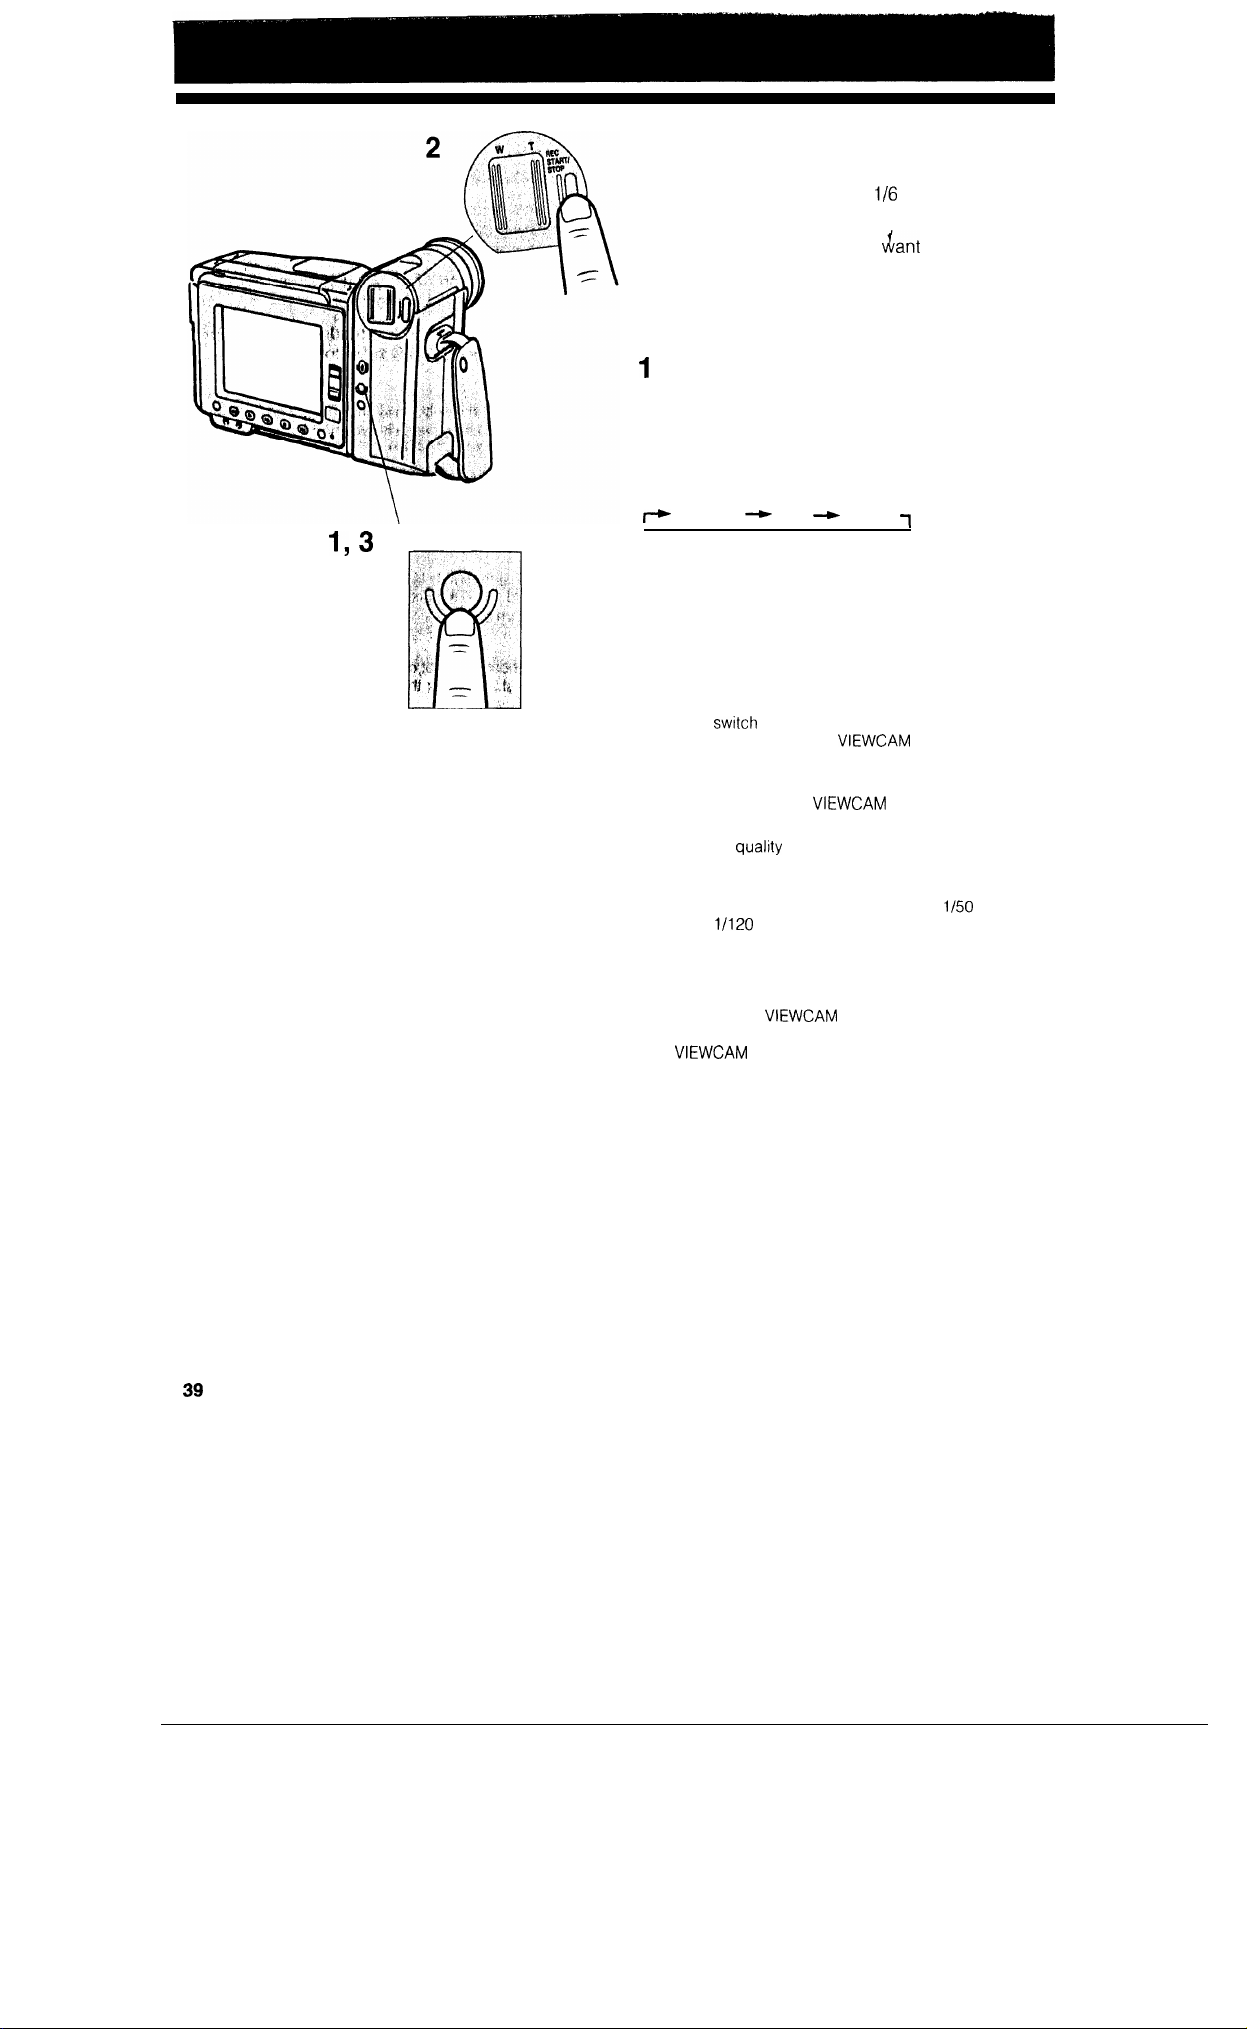
STILL/STROBE button
STILL/STROBE RECORDING
You can record still or strobe (still pictures that
capture continuous motion at
images of subjects with normal sound.
You will find it useful when you Aant to record a shot
of a tourist information board during sightseeing (Still
recording), or produce a special effect while
recording moving subjects such as your friends
waving at you (Strobe recording).
Press the STILL/STROBE button in the Recording
Standby mode:
Press the button once to select Still Recording
mode; twice to select Strobe Recording mode.
l Each time you press the button, the recording
mode changes as follows:
Normal
Press the REC START/STOP button to start Still
2
Still
or Strobe recording.
To return to normal recording, press the
3
STILL/STROBE button twice in the Still recording
mode; once in the Strobe recording mode.
Notes:
l You can
Recording mode while the
Recording Standby mode.
l Once the Still or Strobe Recording mode is set, unless
they are cancelled, the
those modes even after in the Recording Standby mode.
l The picture quality in those mode will be slightly lower
than normal pictures.
l In the Strobe Recording mode, the shutter speed is
automatically switched from the standard
speed to
l In the Still Recording mode, the DIS button does not
function.
between Still Recording mode and Strobe
sec.
Caution:
Do not keep the
too long. The monitor may hold an afterimage
the
to normal.
and wait for a while. The monitor will return
in the Still Recording mode
sec. intervals)
Strobe
is recording or in
continues to record in
sec.
Turn off
Page 41
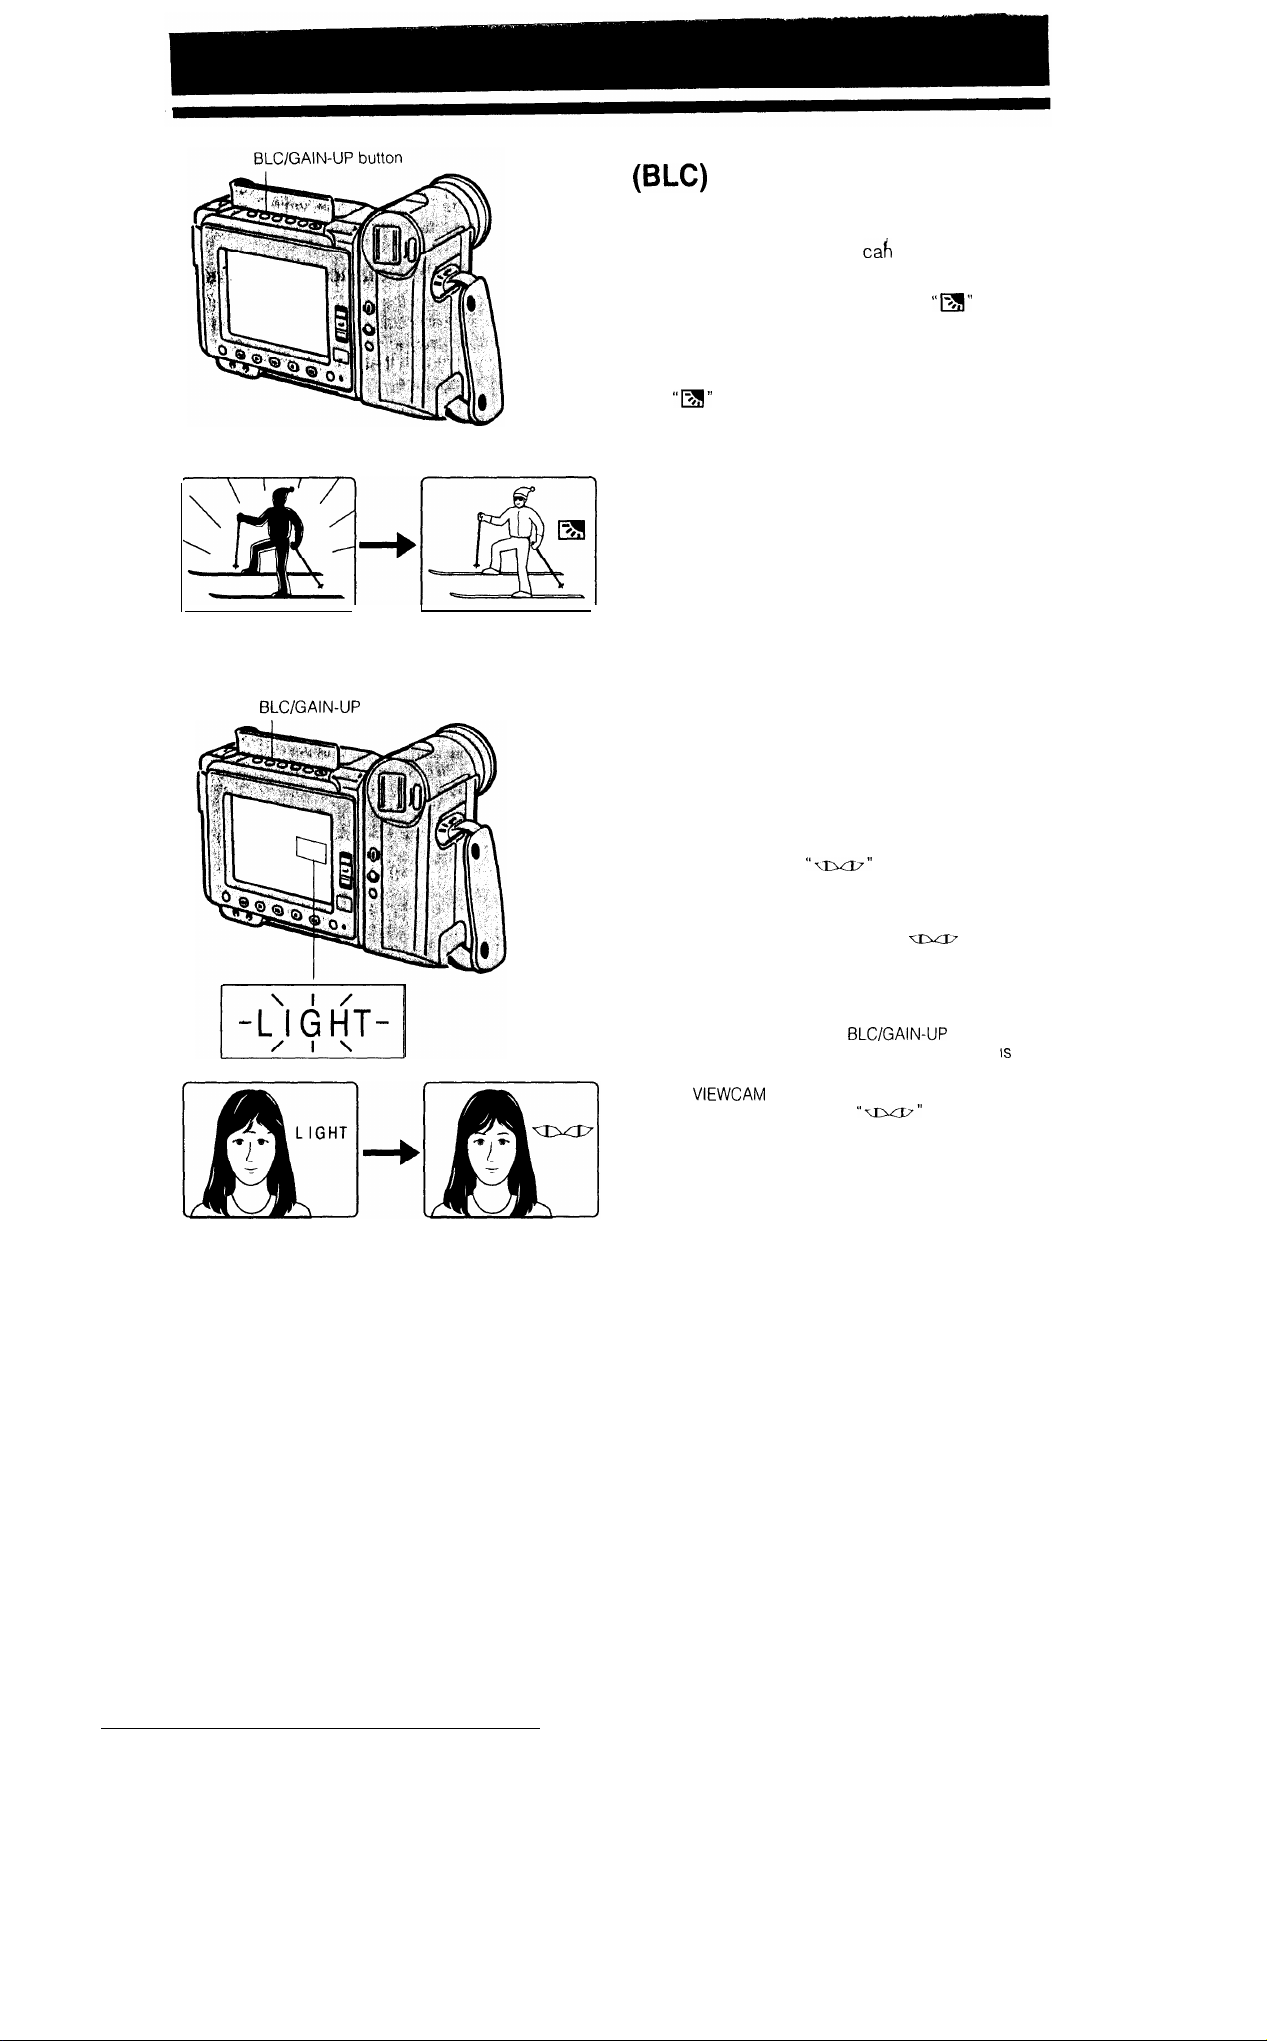
BACKLIGHT COMPENSATION
When the subject is backlit, the image will be
darkened if it is recorded normally. The backlight
compensation (BLC) feature
picture.
Press the BLC/GAlN-UP button. The
appears on the monitor.
To turn off the BLC function and return to the normal
exposure, press the BLC/GAIN-UP button again.
The
indicator disappears.
Note:
This function cannot be used when the “LIGHT” indicator
(warning of too little ambient illumination) is displayed on
the monitor
improve the
indicator
button
GAIN-UP (CAT’S EYE)
When you are recording in a dark or poorly
illuminated location, the “LIGHT” indicator (warning
of too little ambient illumination) is displayed on the
monitor. The gain-up function lets you record a
brighter picture.
Press the BLC/GAIN-UP button. The “LIGHT”
indicator changes to
that the gain-up function is now working.
To turn off the gain-up function, press the
BLC/GAIN-UP button again. The
changes to the “LIGHT” indicator.
Note:
. Make sure that the “LIGHT” indicator is displayed on the
monitor before pressing the
“LIGHT” indicator is not displayed and the button
pressed, the BLC feature functions.
l If the
set to the Gain-up mode, the
is moved to a bright location after being
disappears and the Gain-up mode is automatically
cancelled.
*There is more picture noise in the Gain-up mode.
l
An afterimage may remain when the Digital mode
is set to OFF on the Menu 2.
indicator, indicating
indicator
button. If the
indicator
40
Page 42
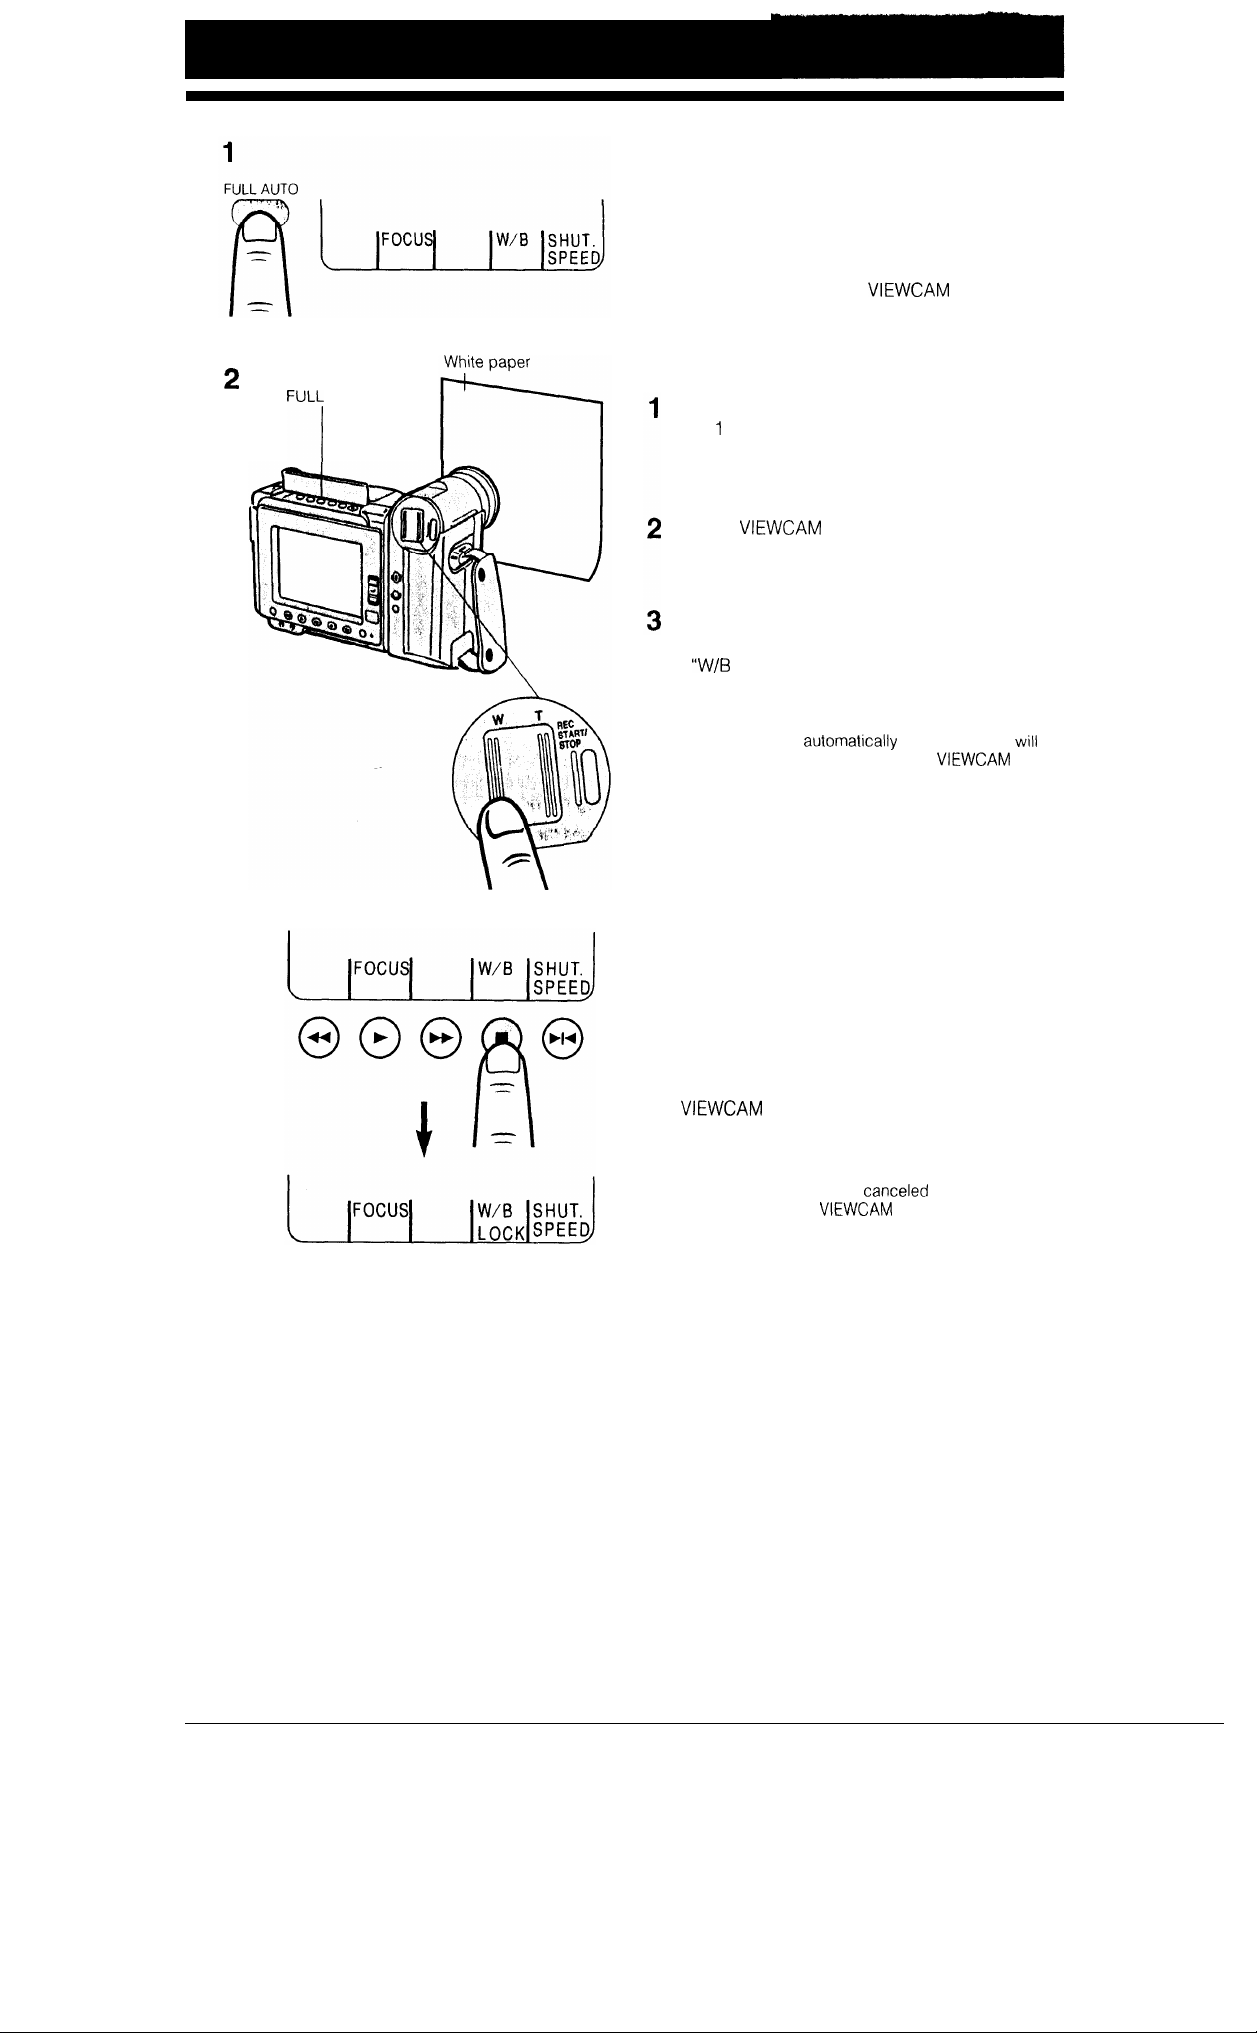
WHITE BALANCE LOCK
White balance ensures that colours are correctly
reproduced. In the Full Auto mode, white balance is
constantly adjusted automatically.
To Set the White Balance Lock Mode
Colours may shift when the
scene that has just one colour, e.g., if you take a
close-up of a solid orange sheet of paper. To
prevent colours shift with that kind of scene, lock in
the correct white balance.
Press and hold the FULL AUTO button for more
than
second.
l The “FULL AUTO” indicator disappears and
the manual focus indicators appear on the
monitor.
Aim the
at a solid white subject such
as a piece of white paper or cloth, and zoom in
until it fills the monitor for about 5 seconds or
more.
Press the W/B LOCK button.
l The “W/B” indicator on the monitor changes to
LOCK” indicator.
Note:
In step 2 above, if the white subject is small, the power
zoom may zoom out automatrcally and the monitor
be filled with white. In this case, set the
manual focus mode.
is filled with a
not
to
41
3
To Cancel the White Balance Lock
Mode
Press the W/B LOCK button, or hold down the FULL
AUTO button for more than 1 second until the “FULL
AUTO” indicator appears on the monitor.
The
mode.
Note:
l White Balance Lock mode is canceled when the power is
turned off, or when the
mode.
l Reset the White Balance Lock mode when the light
source has changed.
l Even after the white balance has been locked, white
balance shifts may occur due to slight changes in
illumination or depending on the subject.
will return to the Auto White Balance
is set to Playback
Page 43
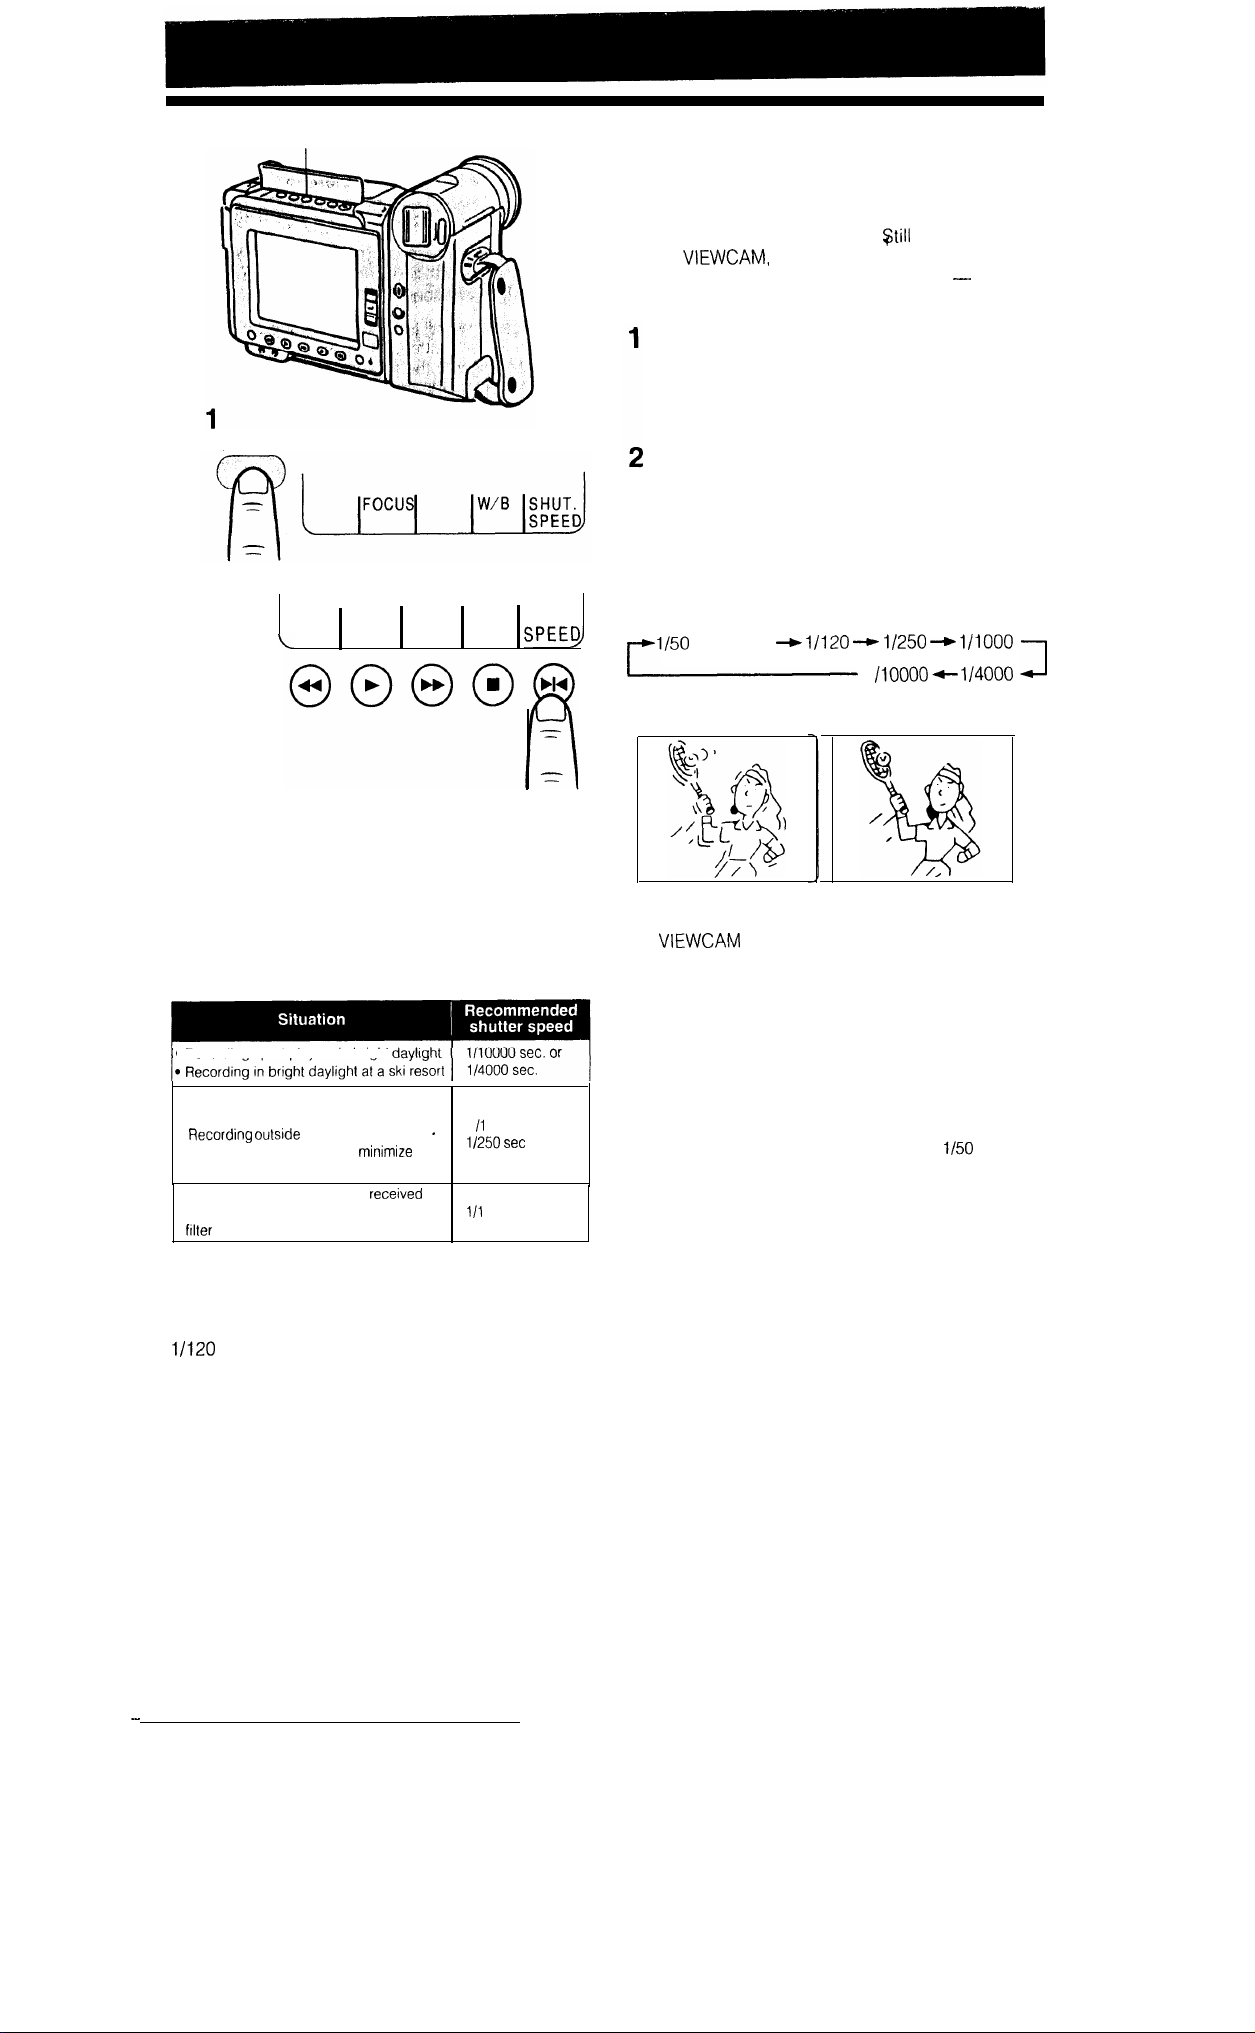
FULL AUTO
2
FULL AUTO button
FOCUS
W/B SHUT.
HIGH-SPEED SHUTTER
When you want to shoot fast-moving subjects such
as golfers swinging their clubs or tennis players
swinging their rackets, use a high shutter speed.
Playback the recorded scene in $till Picture mode
on the
VCR with still picture playback capability
enjoy clear, blur-free, frame-by-frame still pictures.
Press and hold down the FULL AUTO button for
more than 1 second.
l The “FULL AUTO” indicator disappears and
the manual operation indicators appear on the
monitor.
Select the shutter speed by pressing the SHUT.
SPEED button. Check that the desired shutter
speed is displayed on the monitor. You can now
start recording by following the same operating
procedure as usual.
Each time you press the SHUT. SPEED button,
the shutter speed indicator on the monitor
changes in the sequence shown below.
(Normal)
or playback a dubbed tape on a
you will
1 /10000
Recommended Shutter Speeds
The faster the shutter speed, the darker the picture
becomes. You need to select the most appropriate
shutter speed for the ambient light. The selected
shutter speed will be displayed on the monitor.
l
Recording sport players in bright
l
Recording outdoor sports on a somewhat
cloudy day
l
window, (When you want to
caused by camera shake.)
l
When you want to reduce the recerved
light by half Used as replacement of ND2
scene through a car
blurs
1
000
20 sec.
sec. or
Note on recording under fluorescent lighting
When you are recording under fluorescent lighting,
if the monitored picture flickers, you may be able to
normalize this by changing the shutter speed to
sec.
Normal mode
High speed shutter mode
The scenes recorded with the electronic high-speed
shutter can be played back in Still Picture mode on
the
or a VCR with still picture capability
You will enjoy seeing much more blur-free pictures,
as compared to those recorded with the normal
shutter speed.
Notes:
l Using fast shutter speeds under fluorescent lighting will
cause flickering in the picture and possibly periodic
colour shifts.
l Recording with shutter speeds higher than
(standard) tends to darken the picture. Record in bright
locations when you use higher shutter speeds.
l To return to the Full Auto mode, hold down the FULL
AUTO button for more than 1 second until the “FULL
AUTO” indicator appears on the monitor.
sec.
42
Page 44
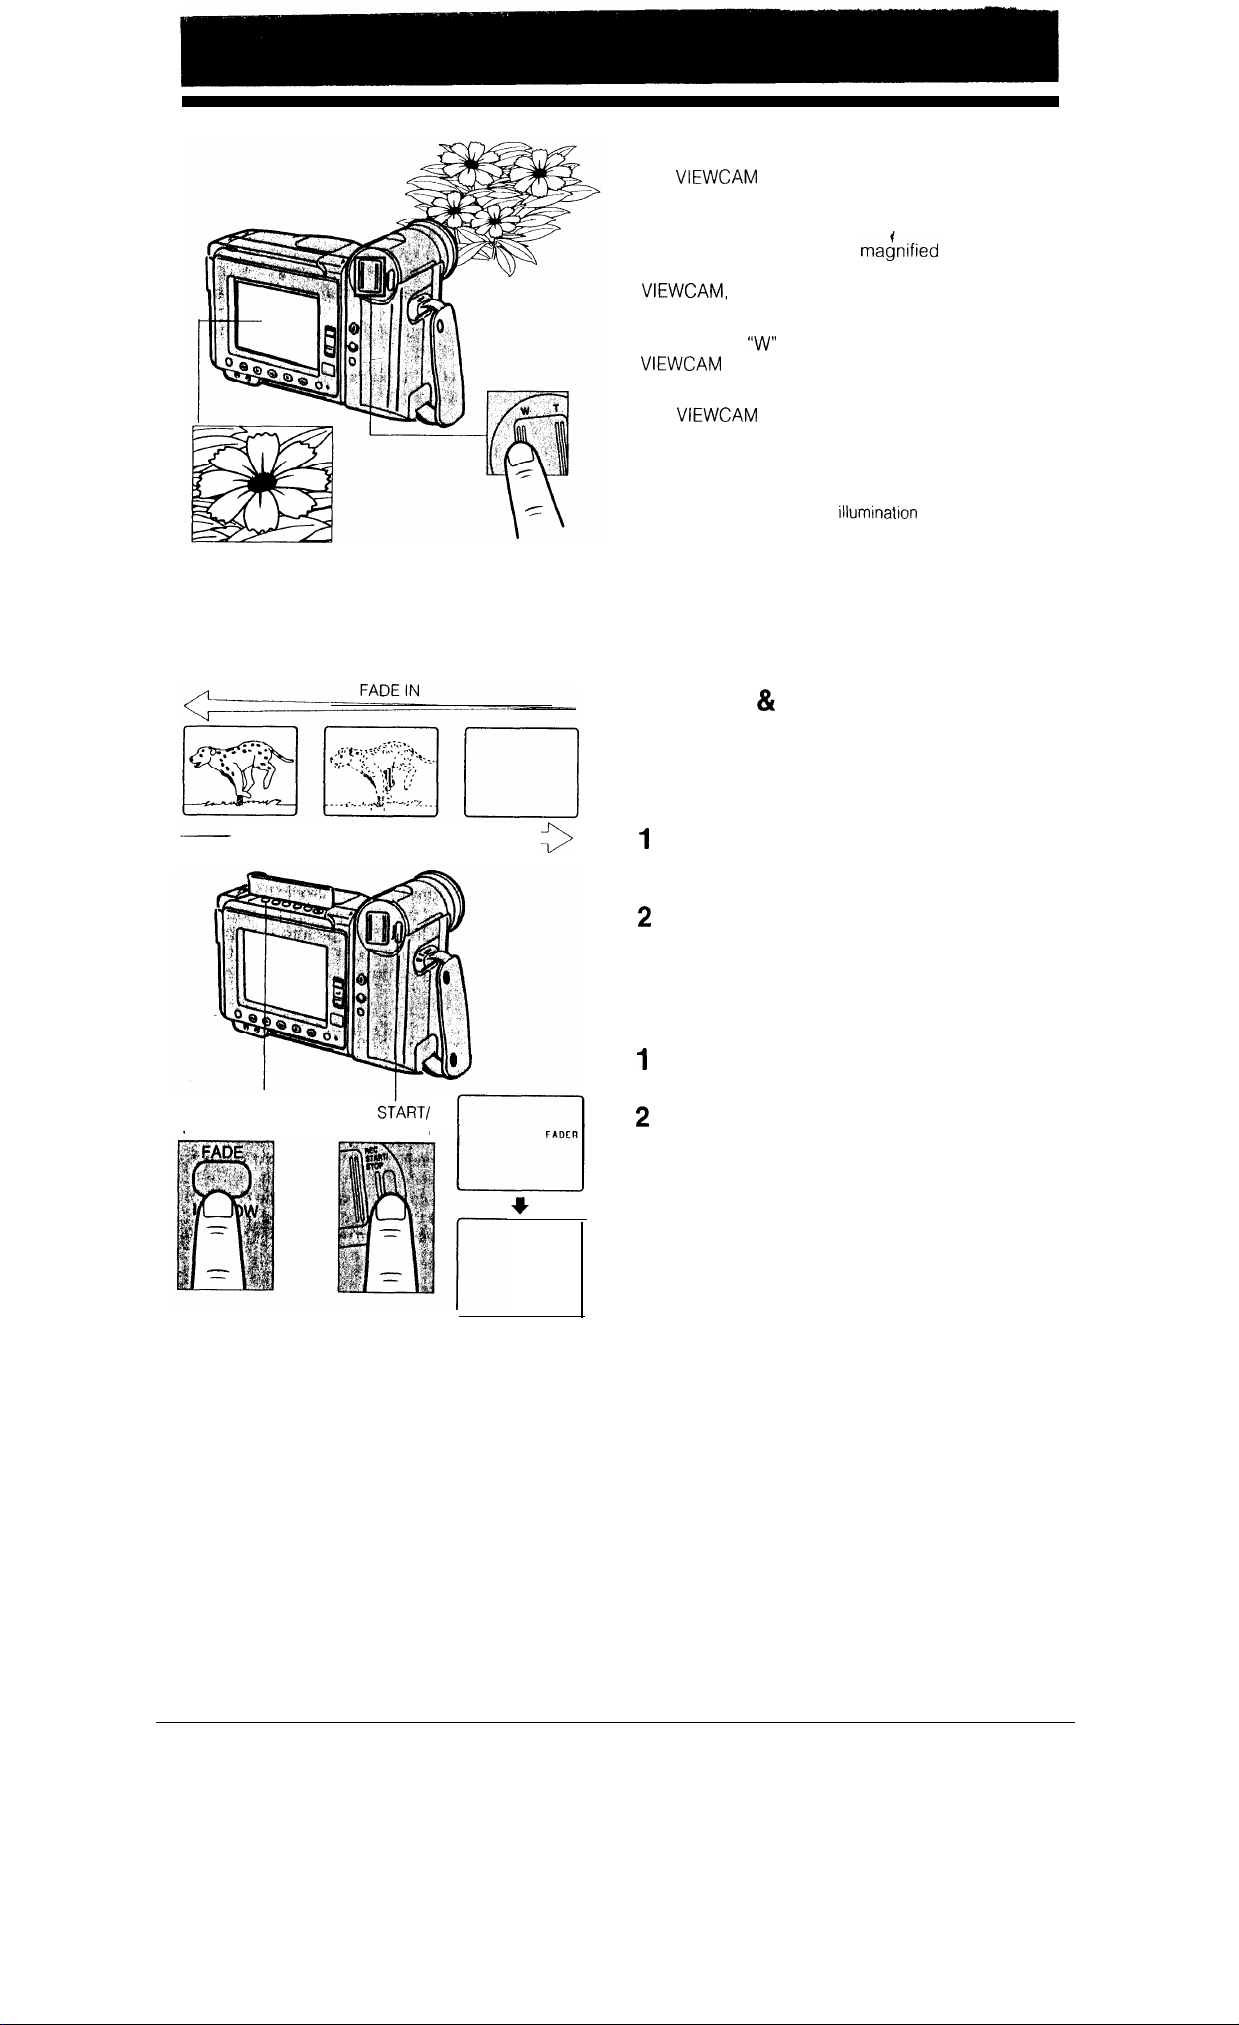
MACRO SHOTS
This
small objects such as flowers and insects, or make
title frames for your videos.
When you want to record a ma&rified image of a
subject which is within approximately 1.5 m of the
Instead, zoom out all the way by holding down the
Power Zoom
desired image on the monitor.
The
subject when the lens is set for the widest angle.
Notes:
. When you are recording a macro shot, see that the
subject receives sufficient illumination
l It is recommended that you use a tripod for recording
macro shots, to prevent camera shakes.
lets you shoot closeup images of
do not zoom in on the subject.
button, and then move the
closer to the subject until you obtain the
will automatically focus on the
SLOW/FA&R
button
FADE OUT
REC
STOP button
FADE IN
FADE IN
FADE OUT
Press the SLOW/FADER button to smoothly fade in
or fade out a scene.
FADE IN
Press the SLOW/FADER button in the Recording
Standby mode.
l “FADER” is displayed on the monitor.
Press the REC START/STOP button.
l “FADE IN” is displayed, the monitor becomes
white, and recording begins with a fade in of
the audio and the visual image
FADE OUT
Press the SLOW/FADER button during recording
l “FADER” is displayed on the monitor.
Press the REC START/STOP button.
l “FADE OUT” is displayed and recording
finishes with a fade out of both the audio and
the visual image.
43
Page 45
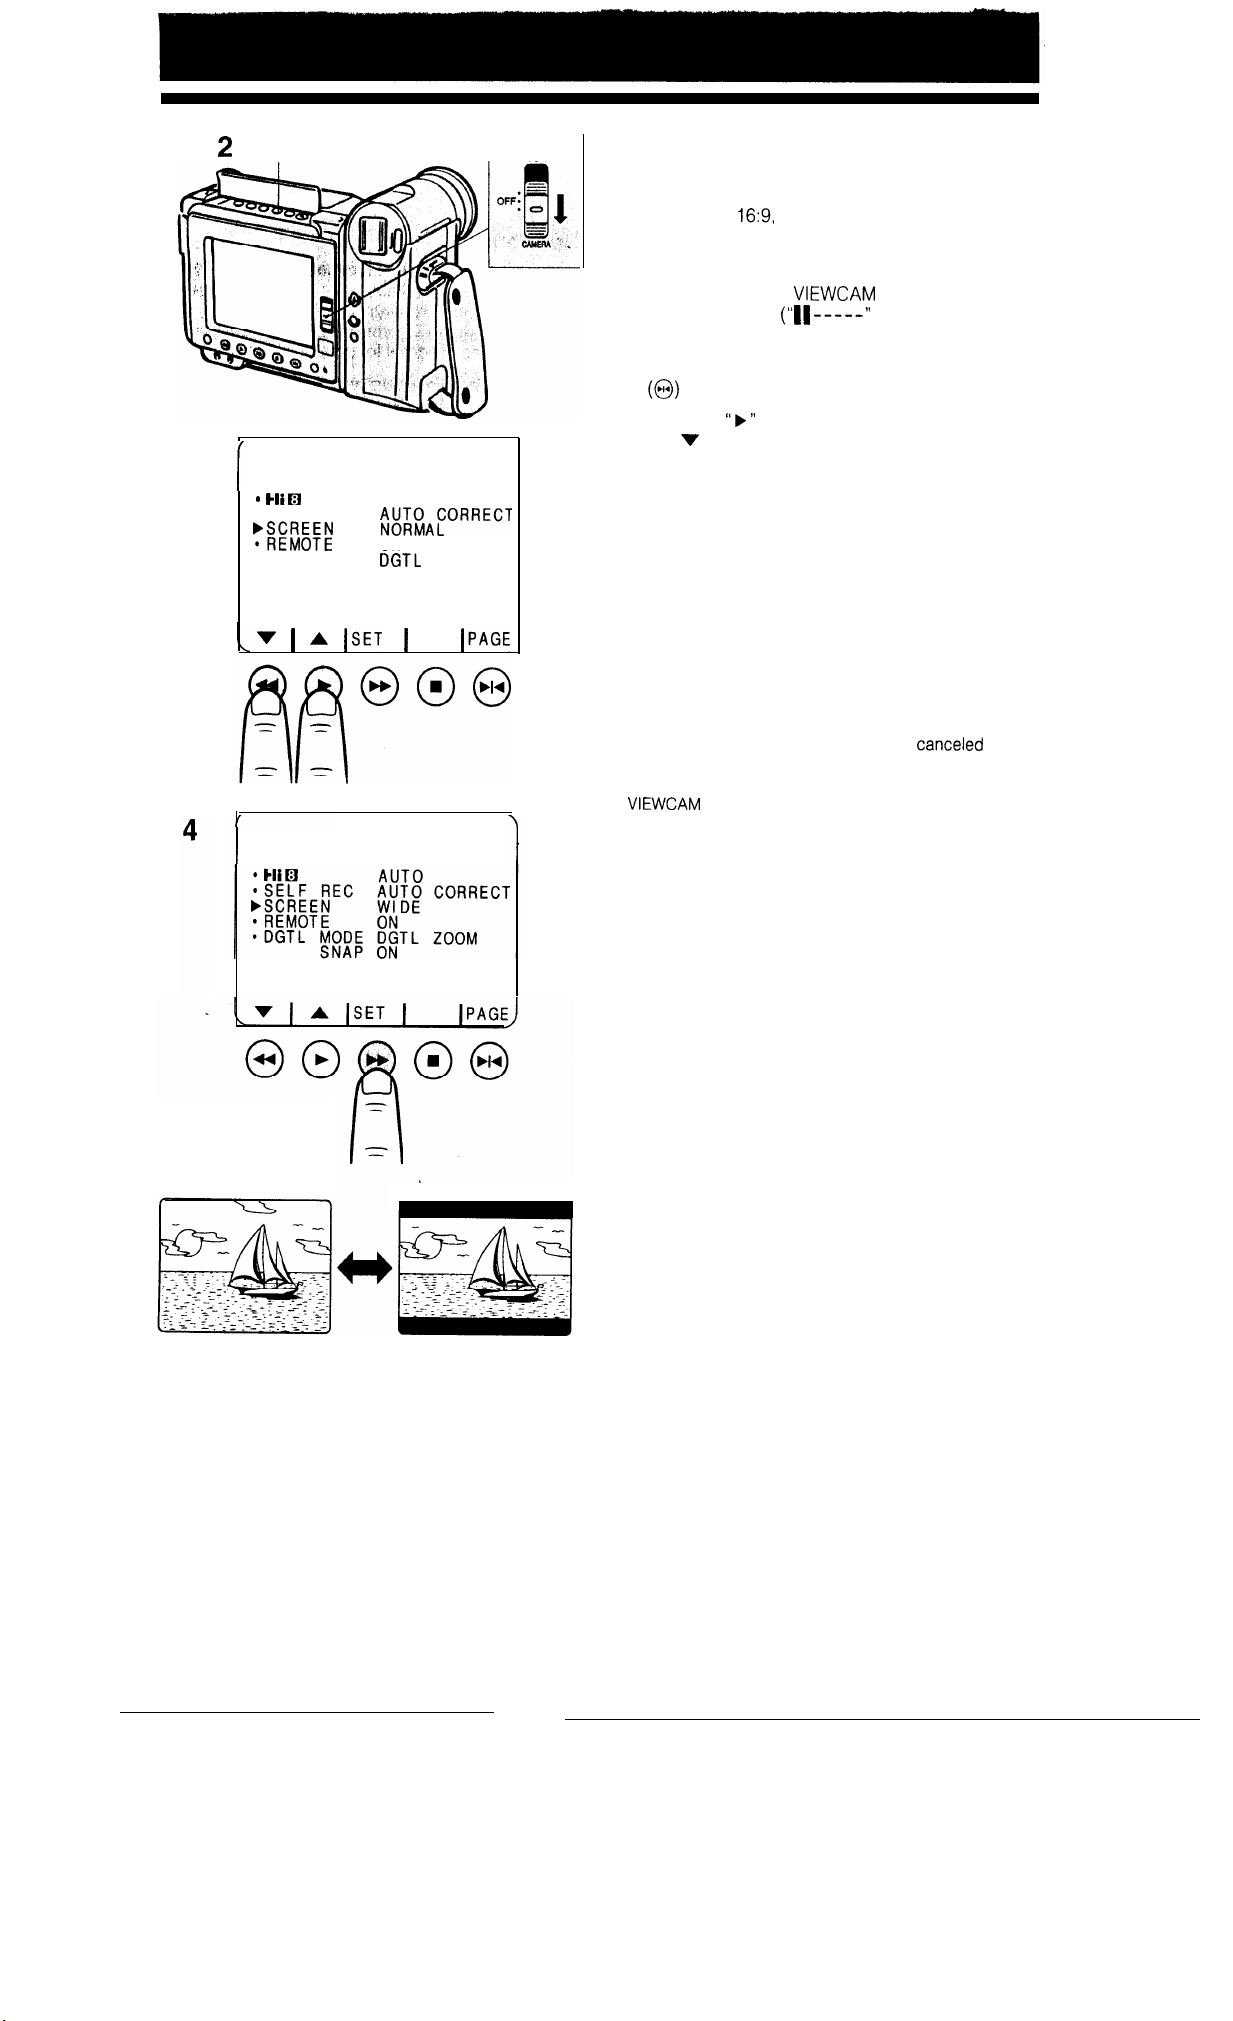
MENU button
3
MENU 2
*SELF REC
l
DGTL MODE
SNAP
AUTO
ON
ON
v-z--
ZOOM
WIDE SCREEN
The top and the bottom of the picture are masked
with black bands to produce an effective screen
aspect ratio of
of a movie shown in a theatre.
Make sure that the Operate switch is set to
1
CAMERA and the
Standby mode.
Press the MENU button to display the Menu 2.
2
If MENU 1 is displayed, press the PAGE button
to get MENU 2 on the monitor.
Move the
3
the
or A button.
Press the SET button to select “WIDE”.
4
Press the MENU button to turn off the menu.
5
l The monitor now displays the picture with the
top and bottom portions masked out.
which has the wide-screen feel
pointer to “SCREEN” by pressing
f
is in the Recording
is displayed.)
Normal mode
MENU
2
Wide Screen mode
To Return to Normal Picture
Display the MENU 2 on the monitor, and select
“NORMAL” for “SCREEN.”
Notes:
l The Wide Screen mode cannot be set or
camera recording.
l The Wide Screen function does not work when the
is in VCR mode.
during
44
Page 46
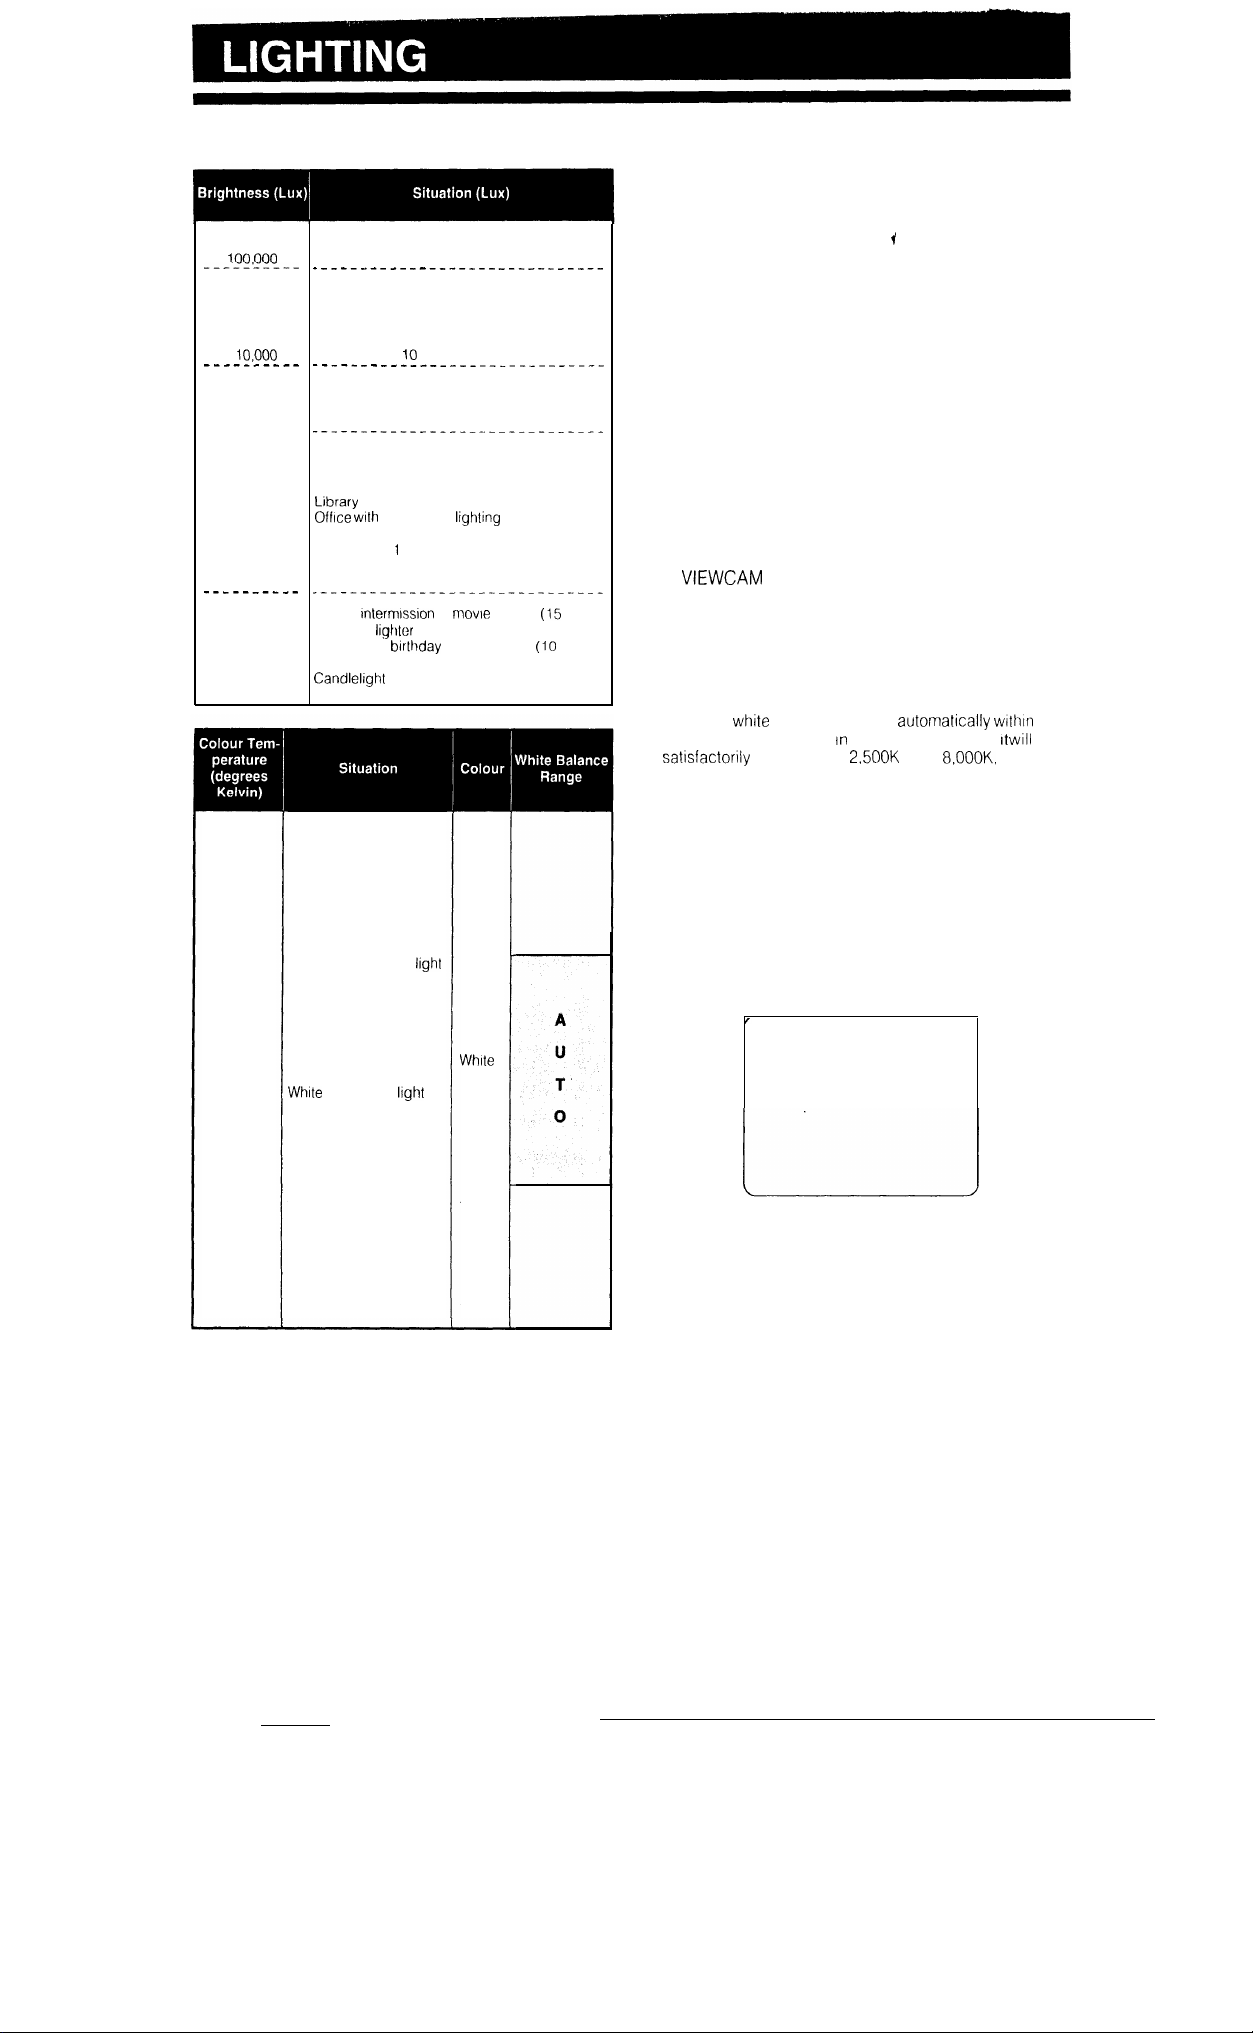
1,000
----------
100
10
Blue
sky
Clear day at noon (100,000)
Clear day at 10 am (65,000)
Clear day at 3 pm (35,000)
Cloudy day at noon (32,000)
Cloudy day at
Cloudy day, one hour after sunrise (2,000)
Clear day, one hour before sunset (1,000)
Fluorescent light near window (1,000)
Factory floor (700-800)
Sales counter in department store (500-700)
Bowling alley (500)
(400-500)
Fluorescent desk lamp (400)
Flashlight at
Shop stairway (100)
During
Cigarette
Candles on blrthday cake at 20 cm
am (25,000)
fluorescent
m (250)
at
al 30 cm (15 20)
(400-500)
theatre
35)
15)
For clear, good-quality recording, 500 to 100,000 lux
is needed. Recording is also possible with less
light, but the picture quality may suffer. Adequate
lighting is also essential for correct white balance.
Reference
Lighting is not only one of the most important areas
in producing home videos, but also one of the most
overlooked Good lighting can often mean the
difference between a great picture and a poor one
Lighting is also essential for correct white balance.
In most outdoor, daytime scenes, natural lighting is
adequate for home videos. indoors, the situation
becomes more complicated. Artificial lighting is
required, and halogen lamps provide the most
natural artificial light while maintaining a constant
colour temperature over a long operating life.
Good lighting is difficult to achieve. There are many
problems waiting to catch the unwary. Simply
mounting one light or several lights on either side of
the
and two-dimensional. To make a subject more
interesting, use the lighting to model your subject
and to add or create emphasis in a scene.
Notes:
l The figures in the charts are approximations
l The auto
range of “AUTO” shown
the picture may take on a red or blue tint
will only make your subject look flat
balance operates automatlcally
the chart However,
up to
although
the
15
10,000
9,000
8,000
7,000
6,500
6,000
5,500
5,000
4,500
3,500
3,200
2,800
2,500
2,000
Clear day
Cloudy day
Rainy day
Daylight fluorescent
Camera flashbulb
Blue photolamp
fluorescent
Off-white fluorescent light
Tungsten photolamp
Halogen lamp
Tungsten lamp
Iodine lamp
Acetylene lamp
Kerosene lamp
Candlelight
Blue
Yellow
Red
Lighting indicator (“LIGHT”)
When the “LIGHT” indicator appears on the monitor,
it means that there is not enough illumination for
recording. Either move to a brighter location, or
supply more light. You can also use the Gain-up
mode for recording (see page 40).
L I GHT
Page 47
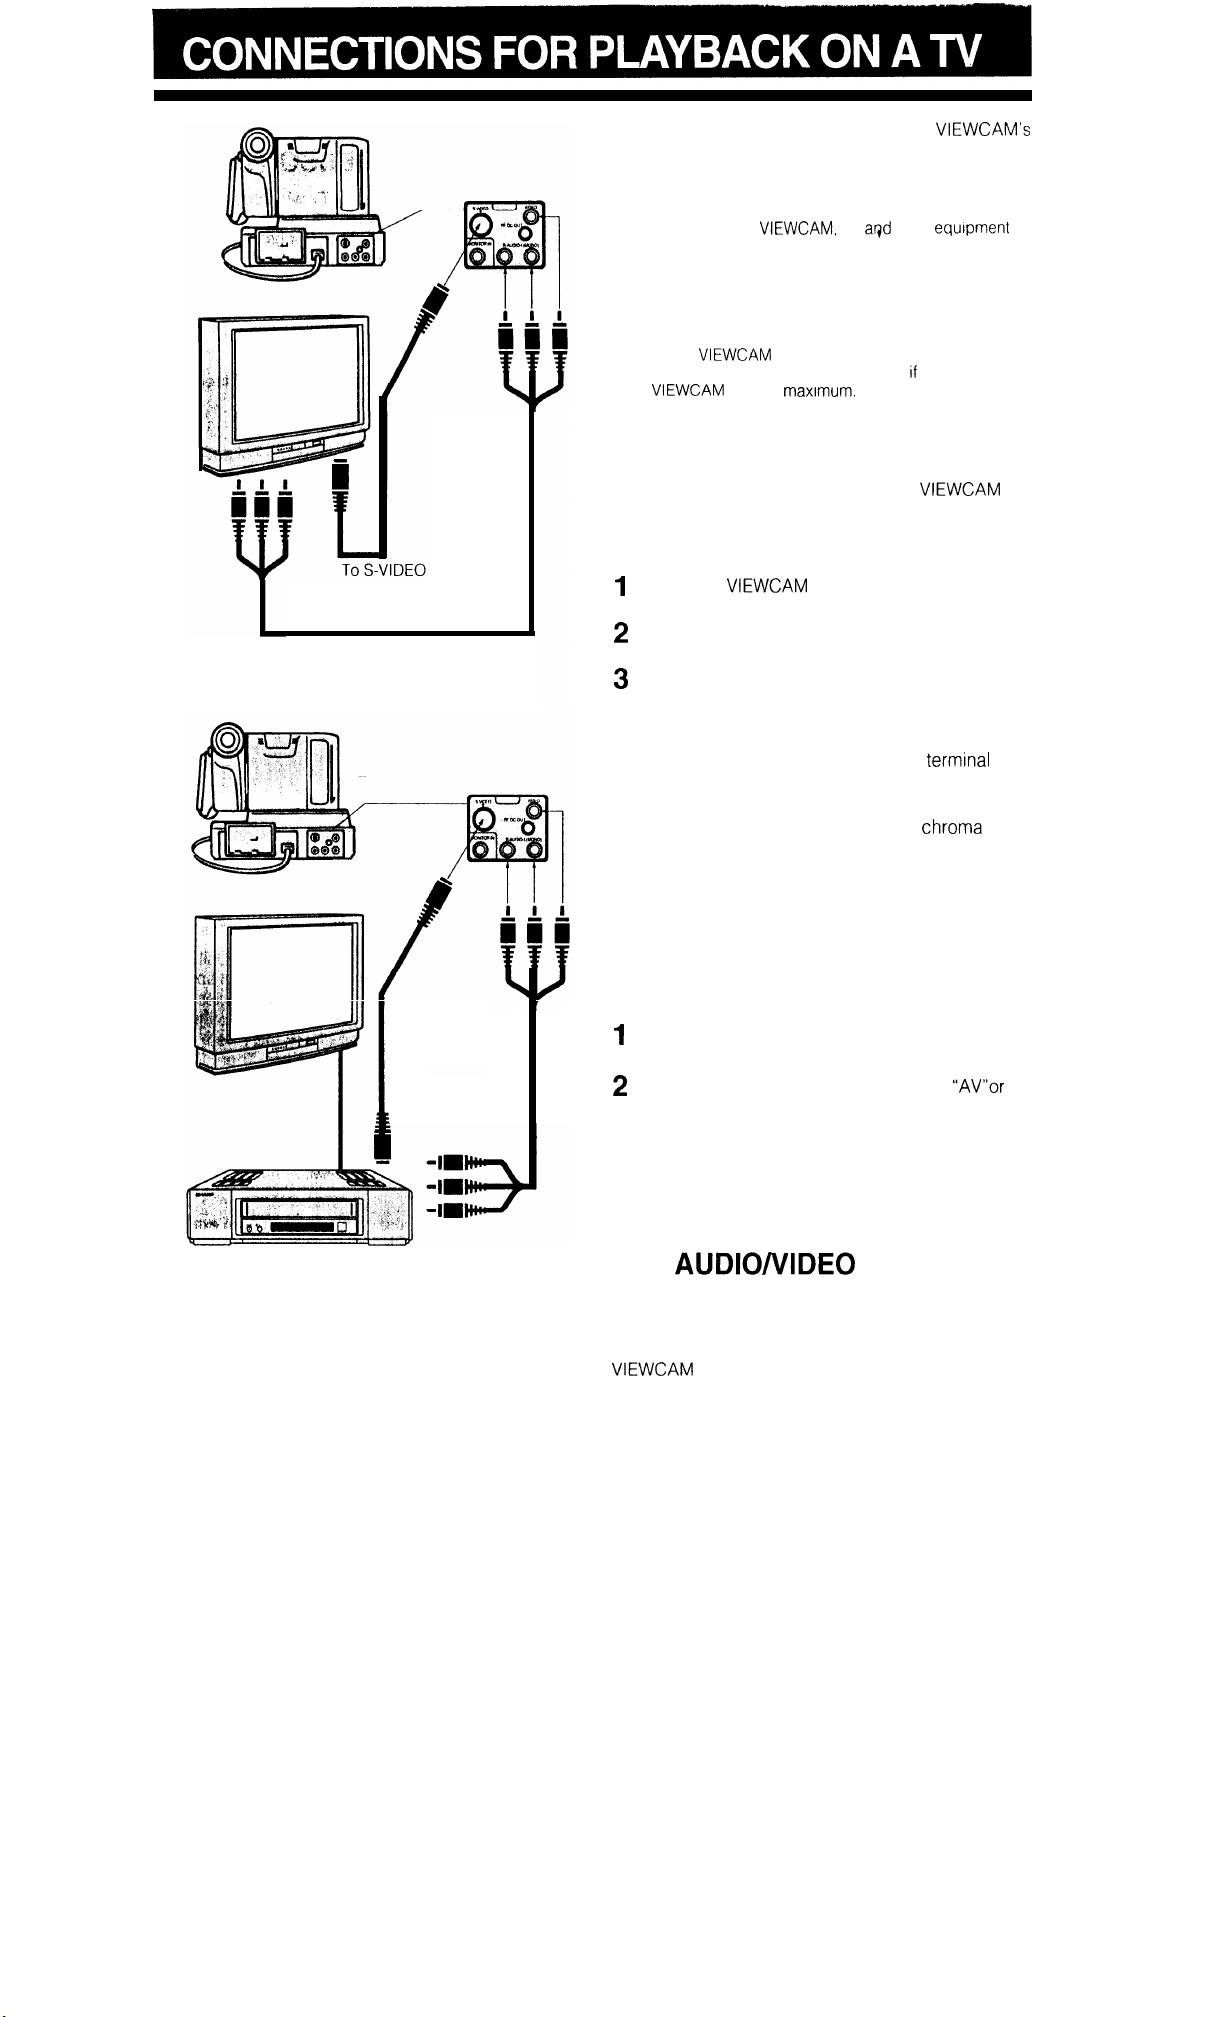
Although you can enjoy playback on the
LCD monitor, you can also watch played-back tapes
on
your
TV screen.
Caution:
Make sure that the
be connected have been turned off before you make
connections. Making connections with any of the
components left turned on may cause picture noise or
malfunction.
Note:
When the
the picture on the TV screen may flicker
the
the volume down.
IS connected to a TV for playback.
IS set to
TV
other equrpment to
Should this occur, turn
the volume on
CONNECTION TO TV
There are two methods to connect the
TV: using the ViewCamport unit and using AV pack.
to
terminal
input
Yellow: To VIDEO IN terminal
Red: To AUDIO IN (R) terminal
White: To AUDIO IN (L) terminal
To S-VIDEO
input terminal
Using the ViewCamport Unit
Attach the
(See page 12.)
Connect the ViewCamport unit to your TV with
the supplied audio/video cable, as shown.
Set the input select switch on the TV to “AV” or
“VIDEO”. (For details, consult the operation
manual supplied with your TV.)
If your TV has an S-video input terminal, connect
it to the ViewCamport unit’s S-video
the supplied S-video cable.
S-Video Terminal
S-video terminals are used to pass the
(colour) and luminance (brightness) components of
video signals separately. They serve to improve the
picture quality in both playback and recording.
If your TV has only one audio input terminal (for
monaural source), connect the white plug to the
terminal. Do not connect the red plug.
to the ViewCamport unit.
with
CONNECTION TO TV VIA VCR
Connect the ViewCamport unit to your VCR with
the supplied audio/video cable.
Set the input select switch on the TV to
“VIDEO”, and set the input select switch on the
VCR to “EXTERNAL SOURCE”.
If your VCR has an S-VIDEO input terminal,
connect it to the ViewCamport unit’s S-video
terminal with the supplied S-video cable.
Yellow: To VIDEO IN terminal
Red: To AUDIO IN (R) terminal
White: To AUDIO IN (L) terminal
AUTOMATIC SWITCHING OF
THE
JACK’S
INPUT/OUTPUT MODE
The AUDIO/VIDEO jack’s mode is normally set to
input. It automatically switches to output when the
is playing back.
46
Page 48
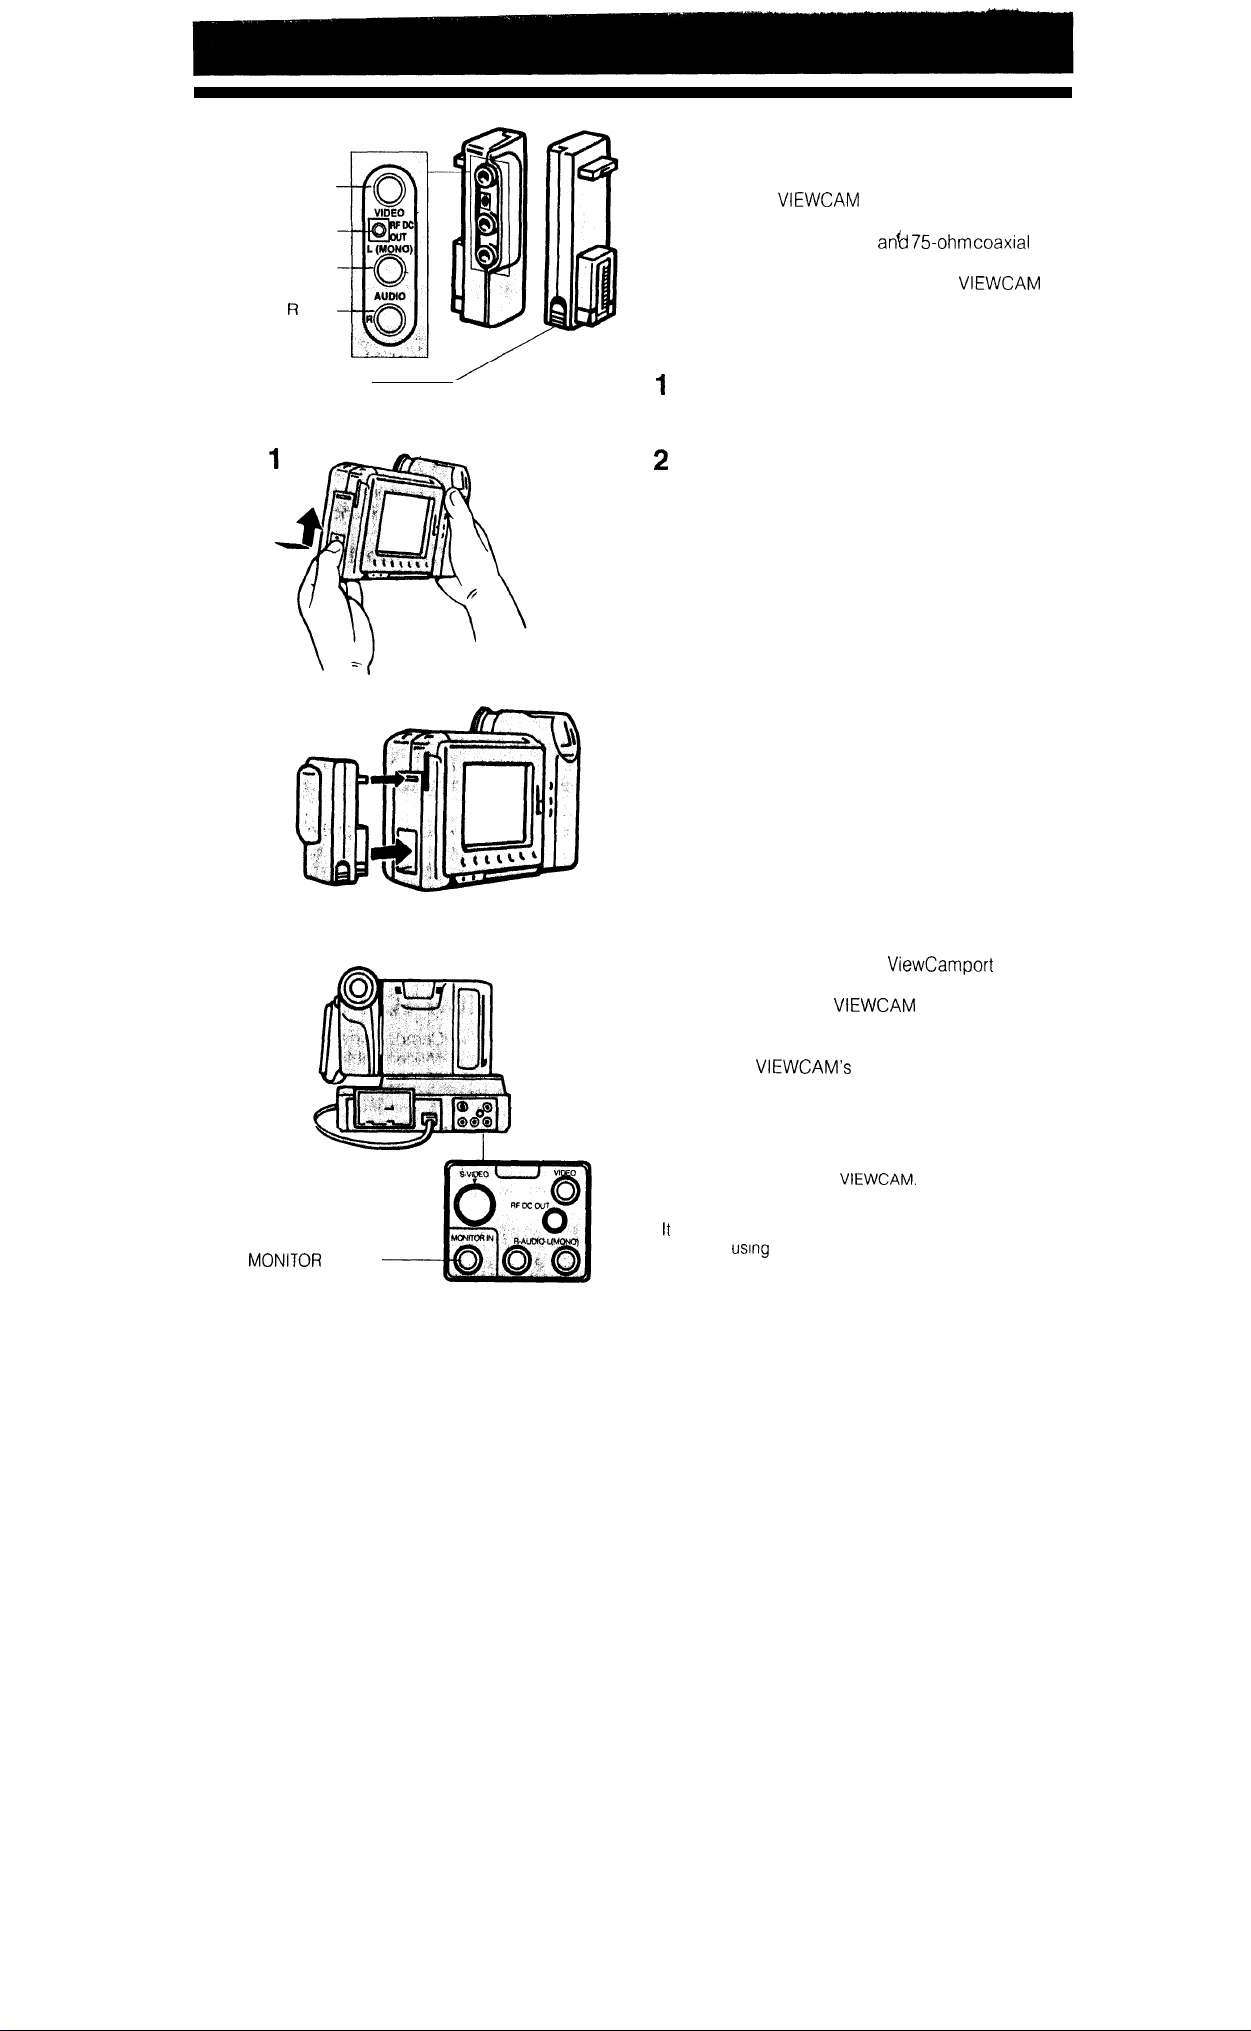
VIDEO jack
RF DC OUT jack
AUDIO L (MONO)
AUDIO
AV PACK EJECT button
jack
jack
USING THE AV PACK
(OPTIONAL ACCESSORY)
To connect the
have audio/video jacks, you must use the AV pack
as well as the RF converter
cable, available as optional accessories The AV
pack can also be used to connect the
a VCR for editing or to a TV with audio/video jacks,
Attaching the AV Pack
Slide the AV pack terminal cover in the direction
of the arrow and open.
Push the AV pack firmly against the AV pack
mounting section until it clicks into place.
Caution:
Do not use the AV pack as a handle, as this will cause
malfunctions.
Detaching the AV Pack
Pull out the AV pack vertically, pressing on the AV
PACK EJECT button on the AV pack.
to a TV which does not
75ohm
to
2
IN jack
MONITOR IN JACK
The MONITOR IN jack on the ViewCamport unit is
used to input video pictures from an external source
When you connect the
equipment (for example, a video printer for prints of
screen images, etc.), you can check the video
image on the
need to connect a TV or other external monitor.
Caution:
Do not leave a cable plugged into the MONITOR IN jack
when you watch played-back tapes on a TV or other
monitor connected to the
Notes:
l
is not possible to record video images from an external
source by
l The video input through the MONITOR IN jack takes
priority over played-back video and images from the lens.
Therefore, unplug the cable from the MONITOR IN jack
when it is not being used.
the MONITOR IN jack.
LCD monitor. There is no
to other video
47
Page 49
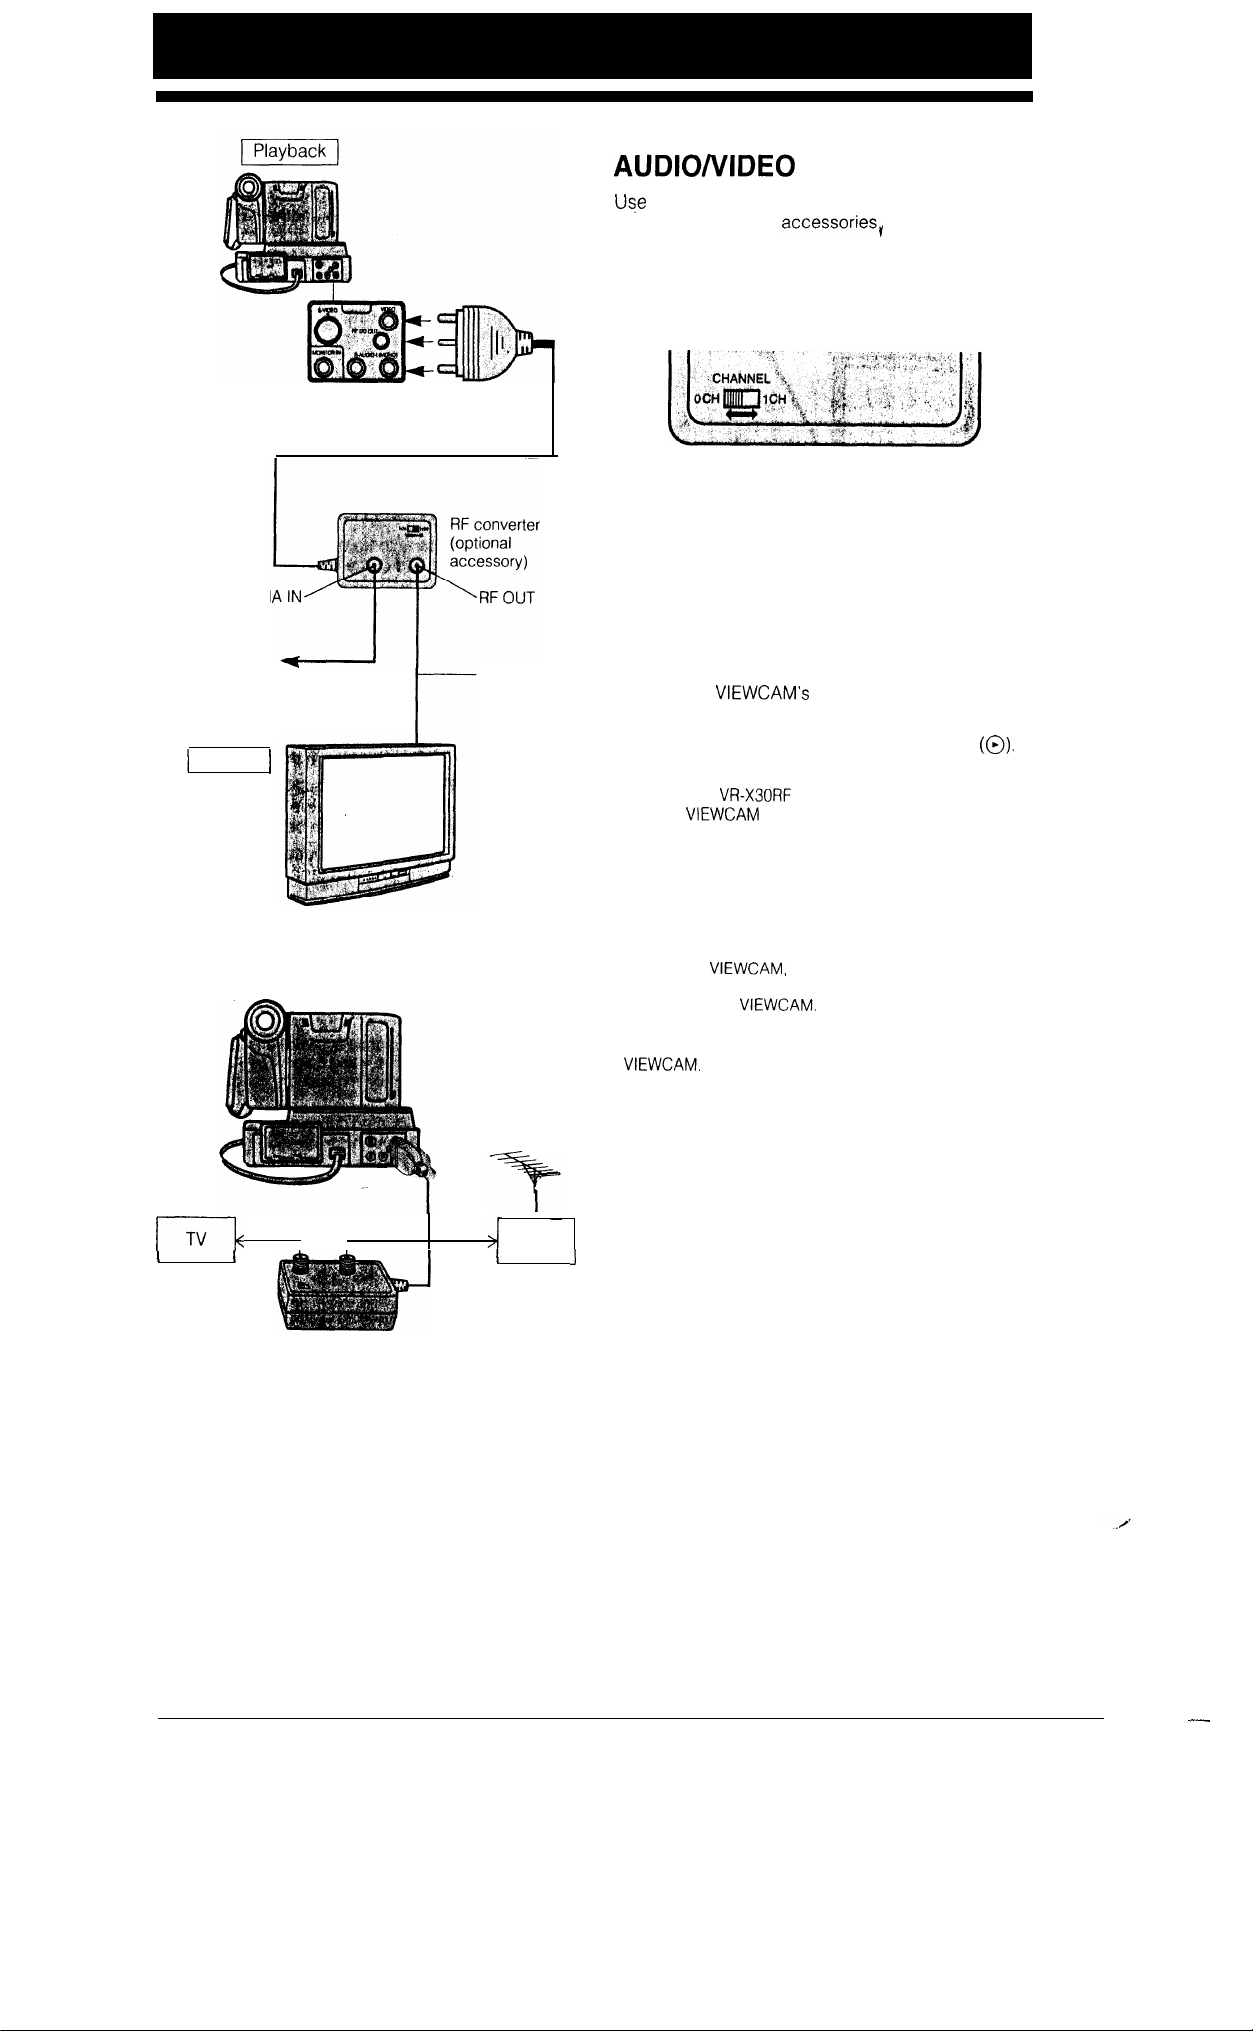
ANTENN
Connect to outdoor or indoor
antenna or cable
To ANTENNA IN
Coaxial cable
(optional
accessory)
Monitor
If your TV’s antenna input is connected to a VCR
Disconnect the cable between the TV and VCR, and insert
the RF converter between them, as shown below.
CONNECTION TO TV WITHOUT
JACKS
the RF converter and 75-ohm coaxial cable
available as optional accessoriesl
To view the output from your camcorder on the
1
TV, you must select an unused channel on your
TV and tune it to the output of the RF converter
(factory preset to channel 0).
Unplug the antenna cable from the TV and plug
2
it into the ANTENNA IN terminal on the RF
converter.
Plug the 75-ohm coaxial cable into RF OUT
3
terminal on the RF converter and the 75-ohm
coaxial antenna terminal on the TV.
Plug the RF converter cable into the audio and
4
video jacks on the ViewCamport unit or on the
AV pack.
Slide the
5
Load a video cassette (cassette window facing
6
outward), and then press the PLAY button
Cautions:
l Use only the VRX30RF RF converter (optional accessory)
with this
l The RF converter is a sealed unit. Do not attempt to open
or modify it. Do not damage, drop or subject the unit to
vibration.
l Unplug the RF converter during lightning storms.
Notes:
l To resume normal TV operation, set the Operate switch to
OFF on the
from the ViewCamport unit or the AV pack if it is still
mounted on the
l The picture may be disturbed during video search or still
picture playback. This does not imply a defect in the
Operate switch to VCR.
or unplug the RF converter cable
ANT
OUT,
I
VCR
48
Page 50
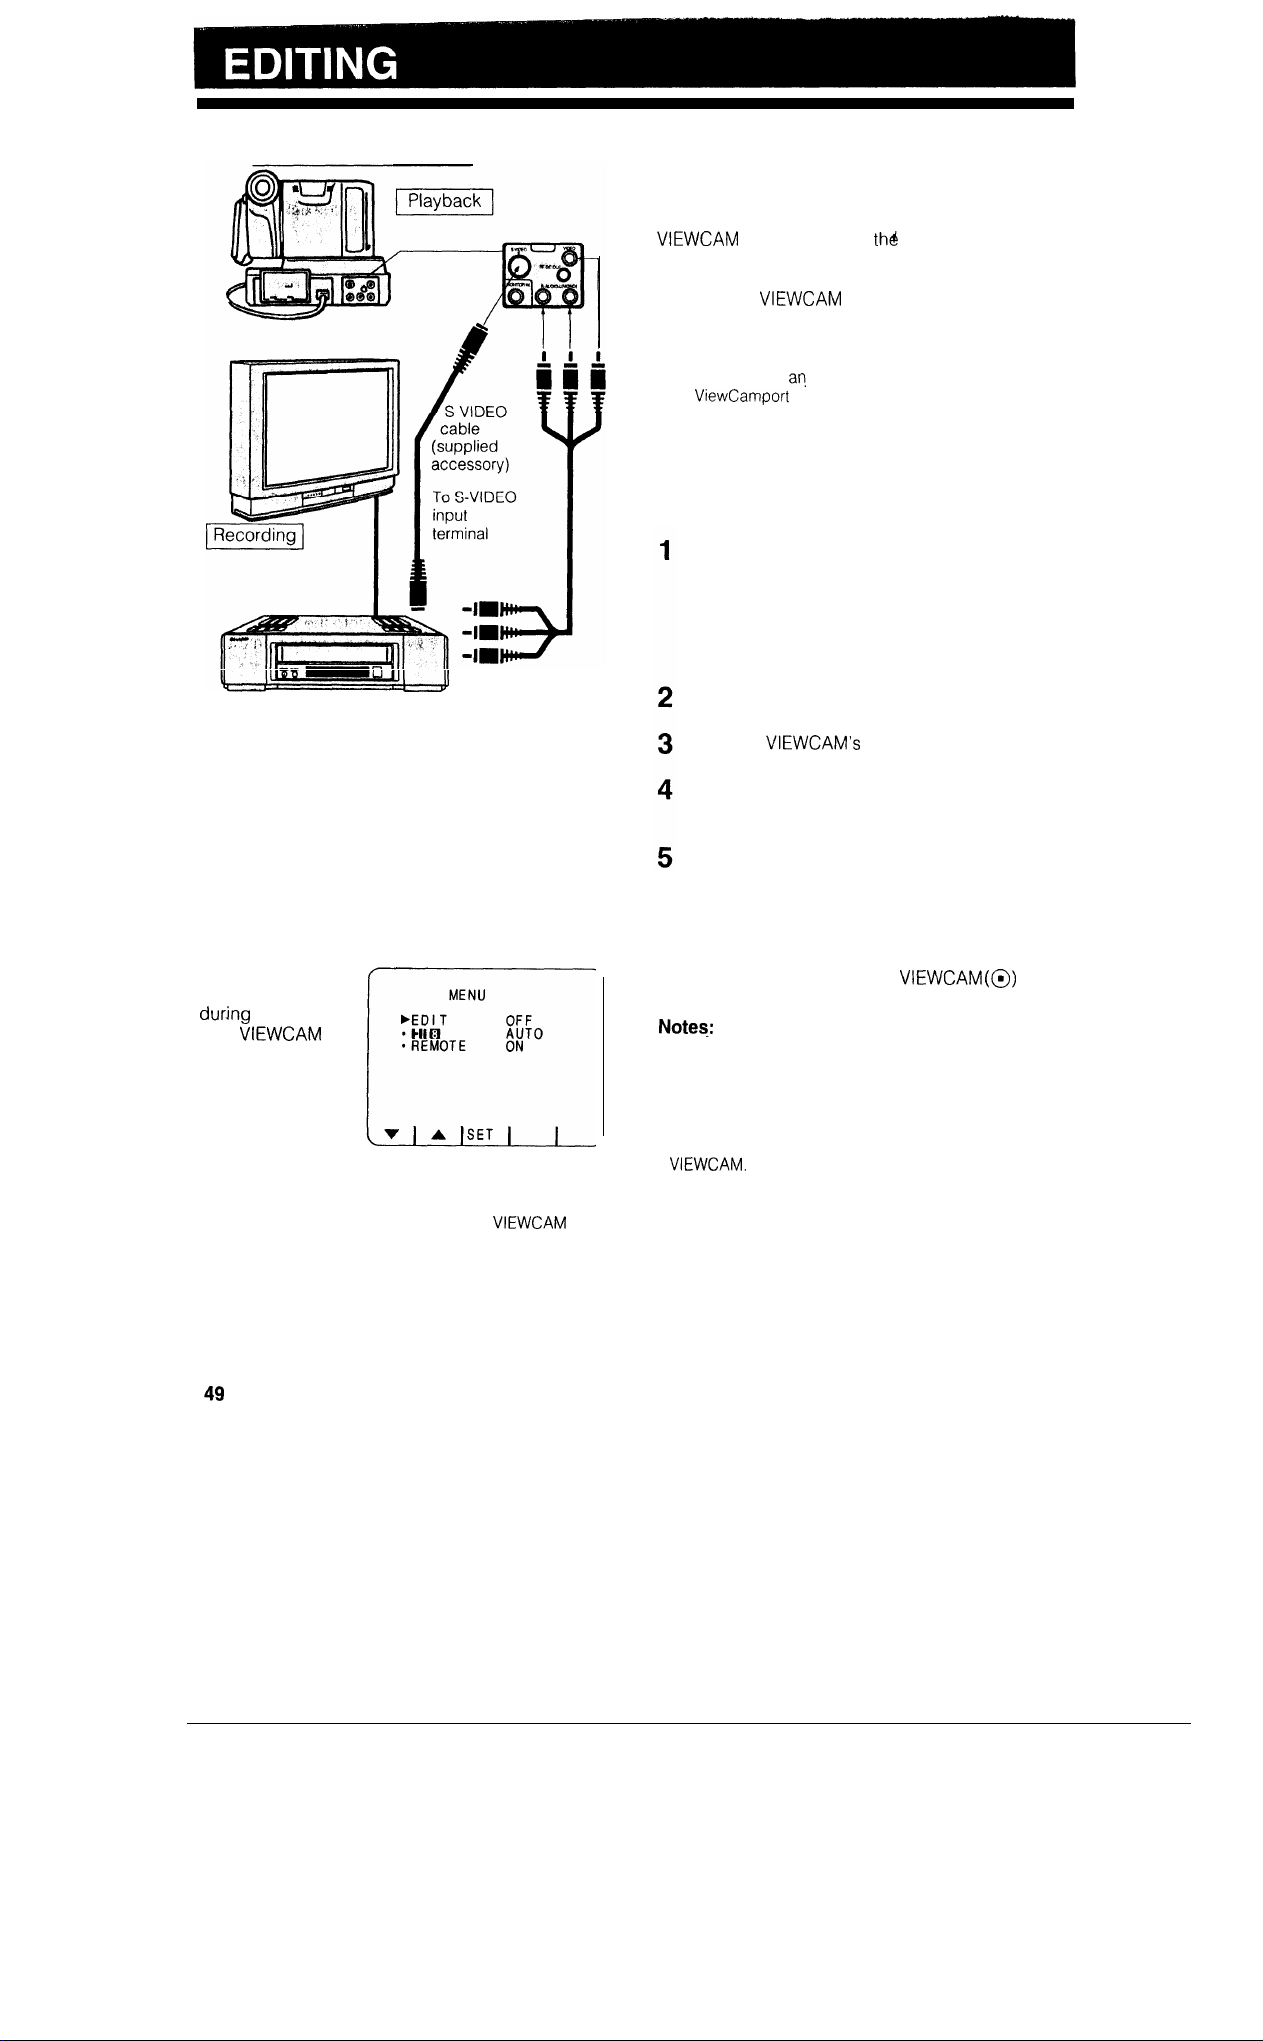
Set the
Operate
switch to VCR
Audio/video cable
(supplied accessory)
Yellow: To VIDEO IN terminal
Red: To AUDIO IN (R) terminal
White: To AUDIO IN (L) terminal
EDITING
Video editing lets you refine your videos by
removing unwanted sequences from your tape, or
transposing one sequence with another. This
on the built-in LCD monitor without having to
lets you monitor
connect it to an external TV or video monitor.
Connect the
audio/video cable, as shown.
Notes:
l If your VCR has
the ViewCamport unit’s S-VIDEO terminal with the
supplied S-video cable.
l If your TV set has only one audio input terminal (for
monaural source), connect the white plug to the terminal.
Do not connect the red plug.
S-video input terminal, connect it to
CUTTING UNWANTED SEQUENCES
Play back the tape to be edited, and locate the
beginning and end of the sequence you wish to
cut.
Write down the tape counter readings at the
beginning and end of that sequence. Then
rewind the tape to the beginning of the portion
that you wish to keep.
Load a blank video cassette into the recording
VCR.
Press the VIEWCAM’s PLAY button and the
VCR’s REC (Record) button at the same time.
Press the VCR’s Pause/Still button to pause
recording when the source tape reaches the
beginning of the sequence to be cut.
Press the VCR’s Pause/Still button to resume
recording when the source tape reaches the end
of the sequence to be cut.
source programme
to a VCR with the supplied
EDIT FUNCTION
Picture quality
inevitably declines
dubbing
from
VCR.
To minimize this
quality reduction,
set the “EDIT” item
on the Menu to
“ON”. Use this when editing videos.
Notes:
l The Edit function is ineffective when the
recording.
l When finished editing, set the “EDIT” menu item back to
“OFF”.
to a
is
TO STOP EDITING
Press the Stop buttons on the
the VCR.
l Make sure that you press the Pause/Still button at exactly
the right moments in steps 4 and 5 above. Otherwise,
some of the transitions between edited sequences may
be slightly off.
. The picture may be disturbed during video search or still
picture playback This does not imply a defect in the
and
Page 51
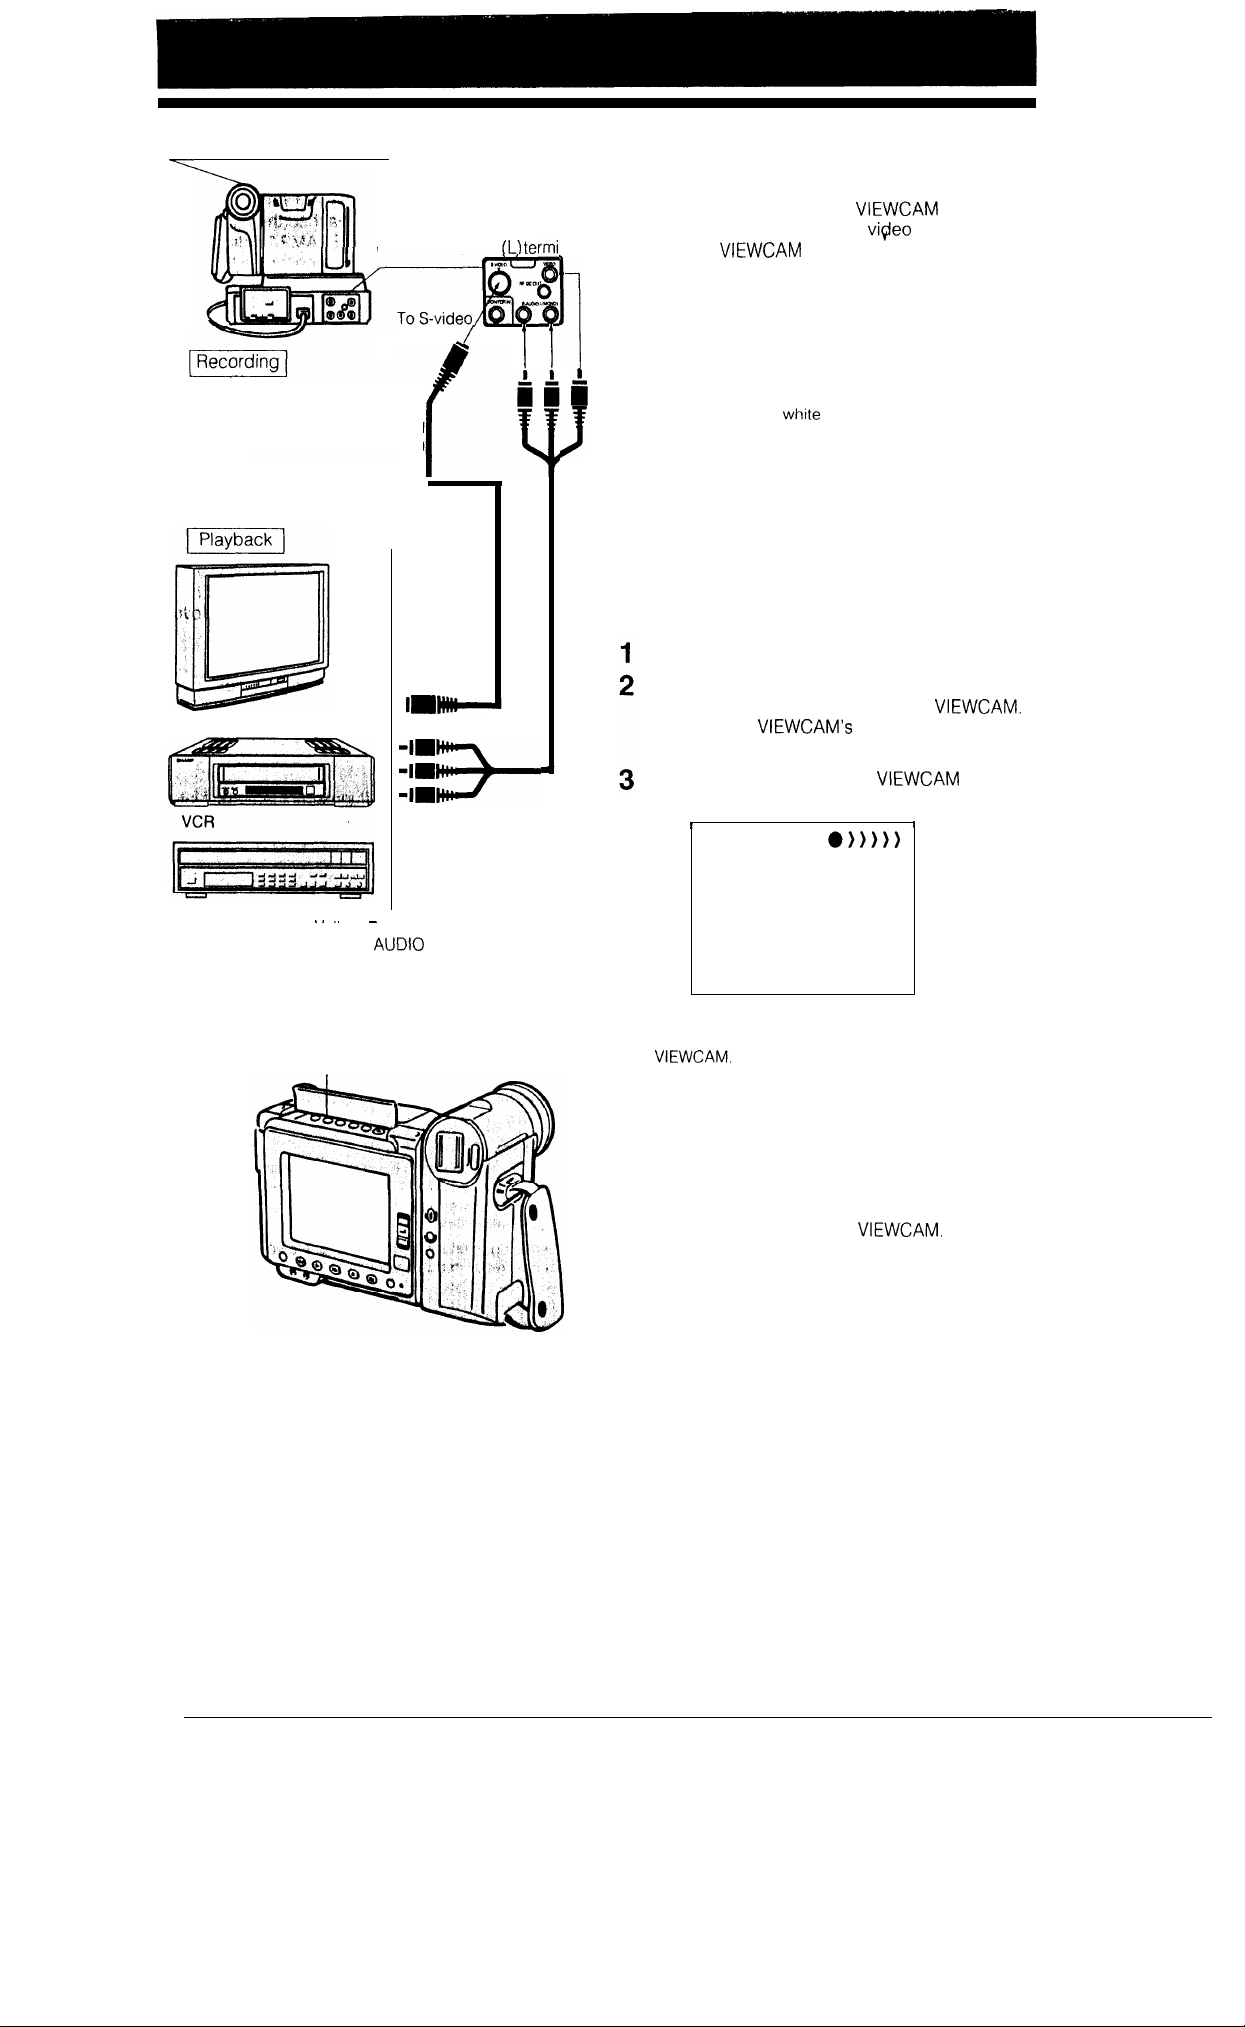
the OPERATE switch to VCR
Set
S-VIDEO cable (supplied
TV
Yellow: To VIDEO terminal
Red: To AUDIO (R) terminal
To AUDIO
White:
socket
accessory)
To S-VIDEO
input
terminal
Audio/video cable
(supplied accessory)
RECORDING FROM
AN
EXTERNAL SOURCE
You can record or edit on this
sources such as a VCR, TV, or
nal
Connect the
to the source equipment with
the supplied audio/video cable as shown to the left.
Notes:
l If the source equipment has an S-video output terminal,
connect it to the ViewCamport’s S-video socket with the
supplied S-video cable.
l If the source equipment has only one audio output
terminal, connect the
leave the red one unplugged.
. While the S-video cable is plugged into the
ViewCamport’s S-video socket, the VIDEO terminal does
not accept recording signals. (Audio signals can be
recorded.)
When you wish to record through the VIDEO terminal, be
sure to leave the S-video socket unplugged.
plug to that terminal, and
TO RECORD FROM AN EXTERNAL
SOURCE
Set the Operate switch to VCR.
Start sending audio/video signals from the
source equipment connected to the
Check on the
picture is properly received.
Press the REC button on the
recording.
disc player.
monitor to see if the
from other
to start
Video disc player
3
Yellow: 1 o VIDEO OUT terminal
Red: To AUDtO OUT (R) terminal
White: To AUDIO OUT (L) terminal
REC button
Note:
l To pause recording, press the PAUSE/STILL button on
the
resume recording.
Press the PAUSE/STILL button again to
TO STOP RECORDING
Press the STOP button on the
50
Page 52
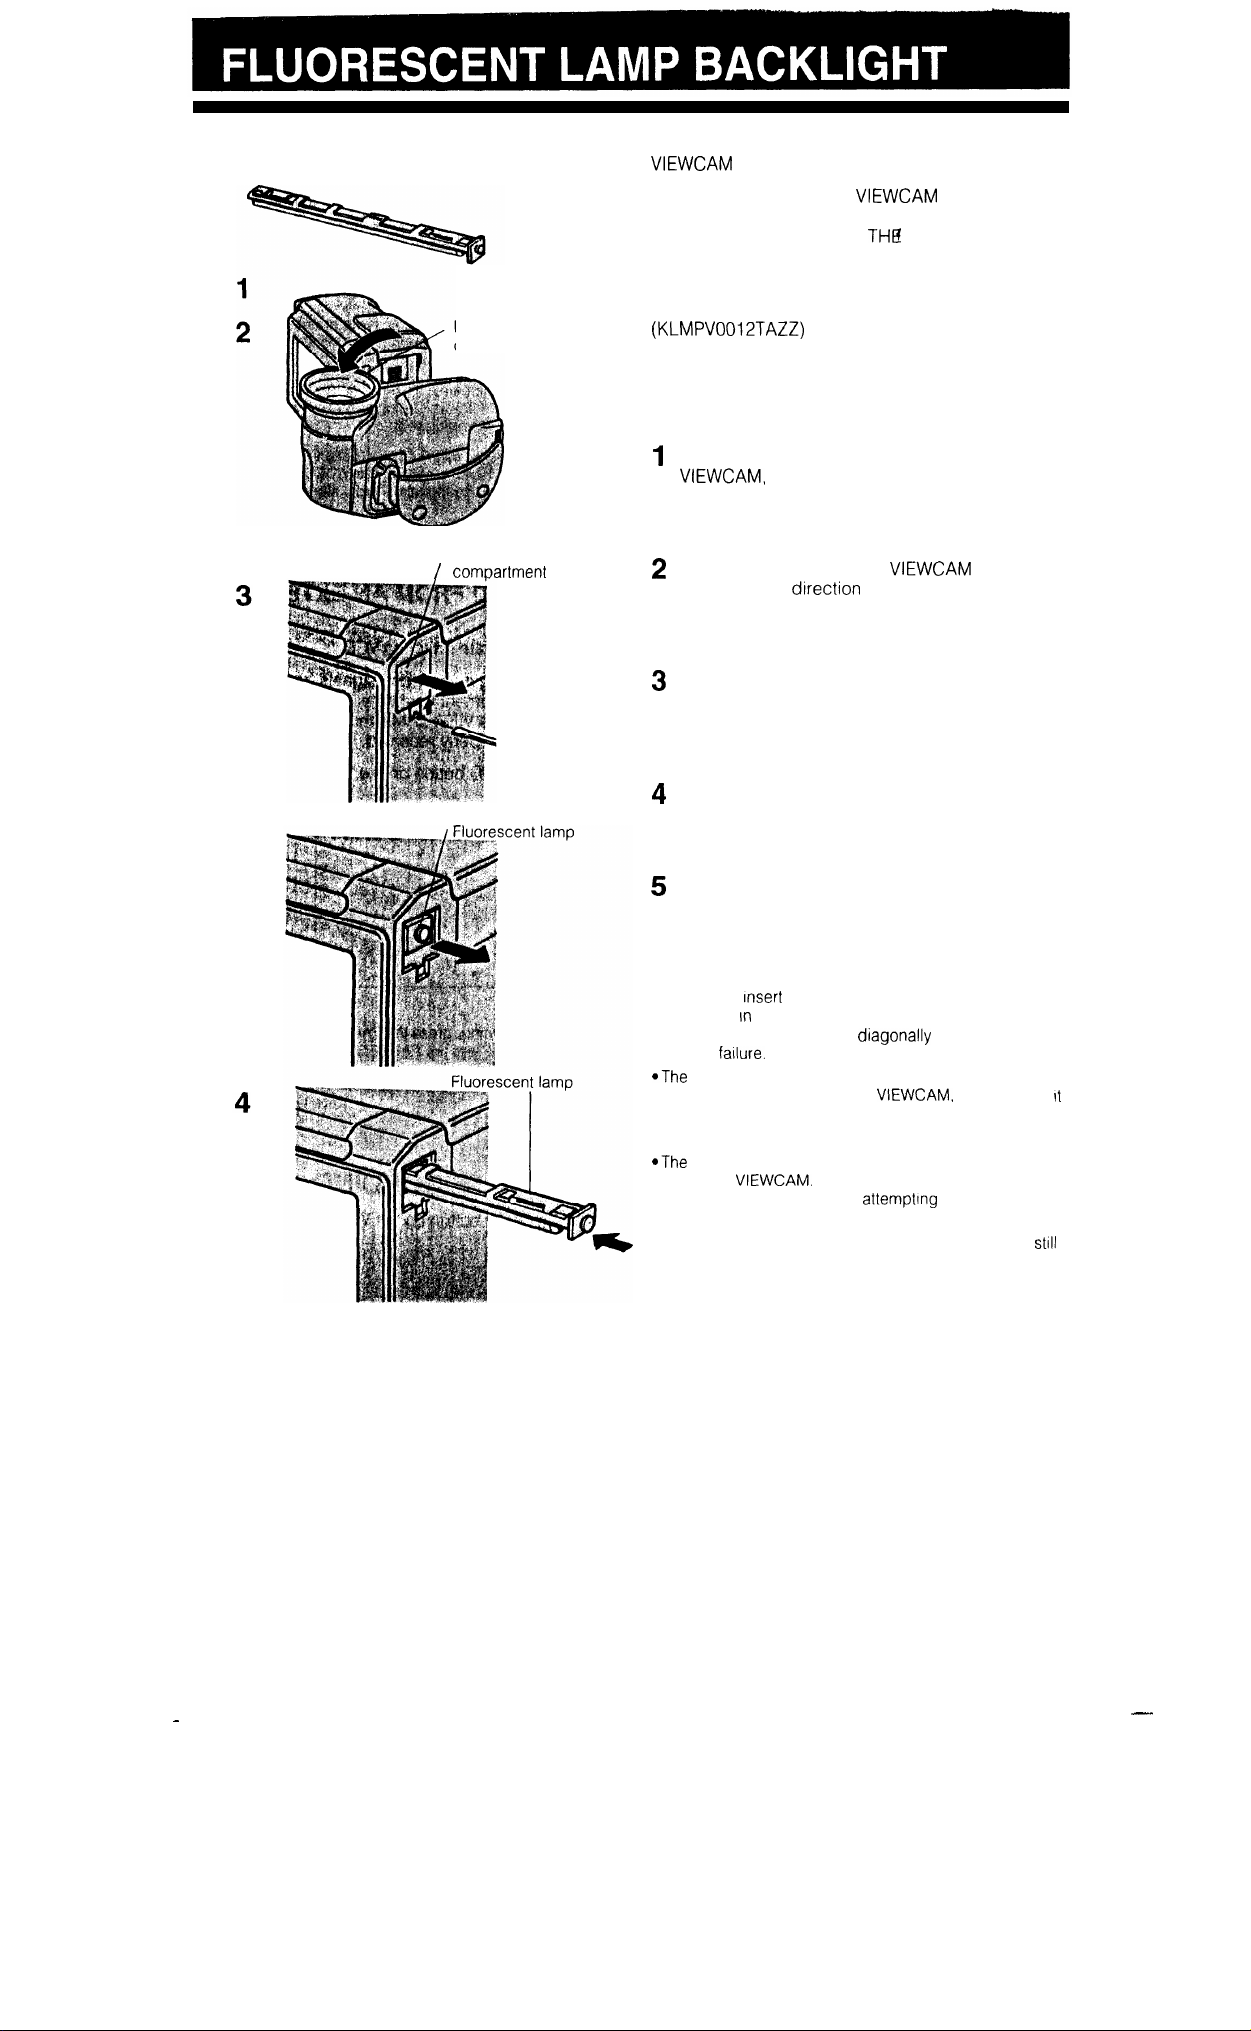
Fluorescent lamp
Fluorescent lamp
compartment cover
The fluorescent lamp backlight used in the
will eventually need replacing.
If you continue to use the
when the
fluorescent lamp has almost reached the end of its
service life, the “REPLACE
LAMP.” indicator will
appear on the monitor, and the monitor will turn off
approximately one minute later.
When this occurs, purchase a replacement lamp
Line Parts Distributor, and replace the old lamp.
REPLACING THE FLUORESCENT
LAMP BACKLIGHT
Set the Operate switch to OFF to turn off the
and wait about 15 minutes for the
lamp unit to cool down.
, Fluorescent lamp
Rotate the lens part of the
forward in the
of the arrow, and then
halfway
remove the fluorescent lamp compartment cover.
Carefully hold the end (white knob) of the
fluorescent lamp unit with tweezers, and pull the
lamp unit out.
Insert the replacement fluorescent lamp unit into
the compartment. See note below.
Replace the fluorescent lamp compartment
cover.
Notes:
l Be sure to
straight in,
compartment. Do not press dragonally as this may cause
contact
Should this occur, turn off the
on again.
the replacement fluorescent lamp
the direction of the arrow, into the
and then turn
Cautions:
fluorescent lamp is hot during and immediately after
use of the
turning the power off before attempttng to change the
lamp, to allow time for it to cool down.
@Attempting to change the fluorescent lamp while it IS
hot may result
Wait at least 15 minutes after
in burns or other injuries.
,
51
Page 53
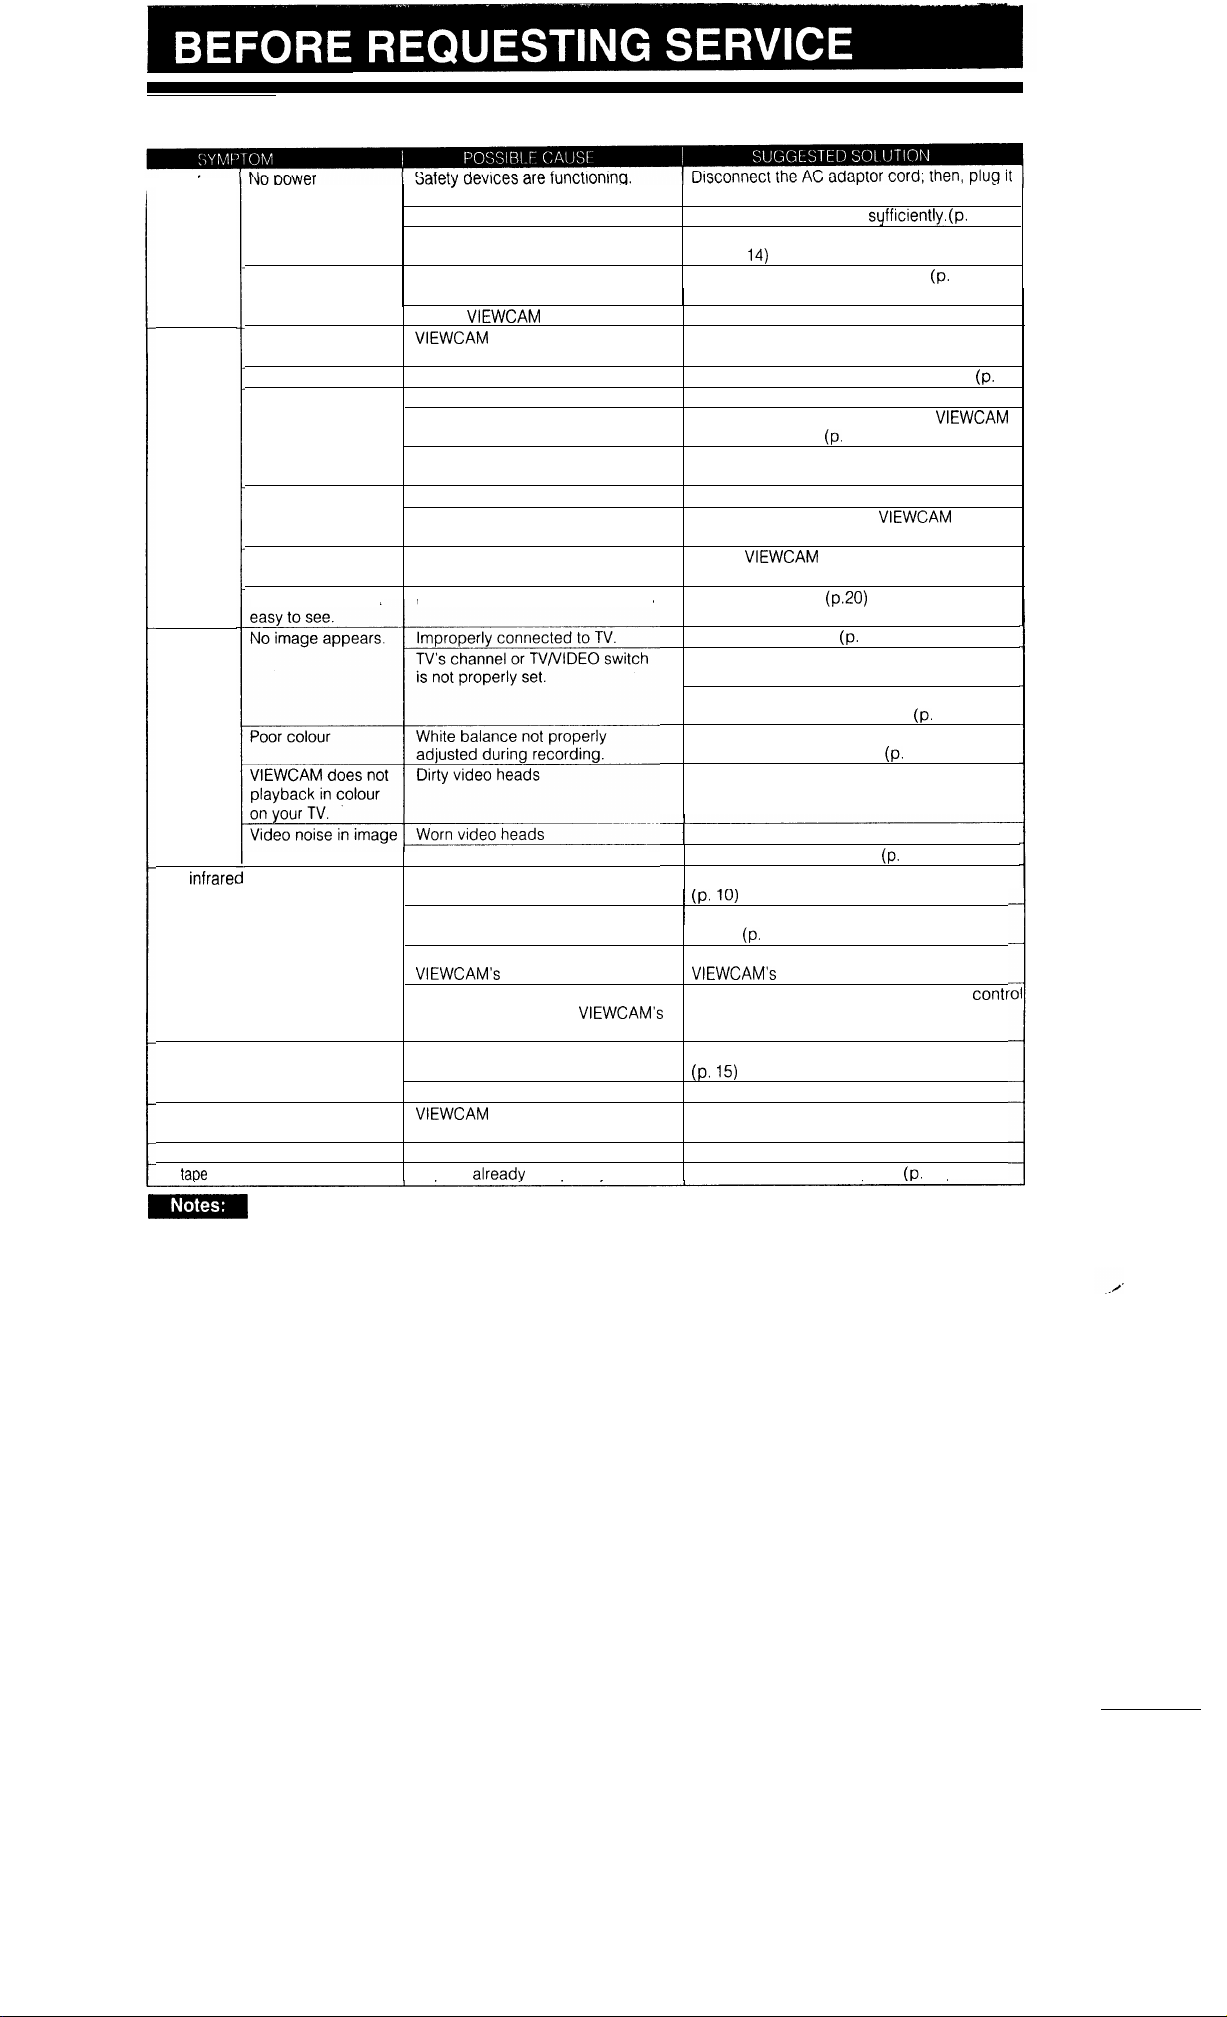
Before calling for service, please check the following troubleshooting table.
Power
Recording
Playback
Power goes off soon
after coming on.
Power on but no
image on the monitor.
Cannot record
Poor colour
Fuzzy picture
Monitor picture is
too
dark.
Monitor picture not
into the wall outlet again. (p. 11)
The battery pack is not charged.
The power source is not correctly
connected.
Depleted battery pack.
Dew in
is in VCR mode.
Erasure protection hole is covered.
TV not properly adjusted.
White balance is set improperly.
Charge the battery pack syfficiently.
Connect the power source’correctly.
(PP.139
Use a fully charged battery pack.
Wait until dew dries. (p. 2)
Slide the Operate switch to CAMERA. (p. 22)
Slide the red projection to open the hole.
Adjust the TV. (See TV operation manual.)
Reset the white balance or set the
to Full Auto mode.
Poor lighting.
Apply additional lighting or correct
temperature of lighting. (p.45)
Dust or other foreign matter on lens.
Not properly focused.
Clean the lens.
Adjust the focus or set the
Auto mode. (p.22)
High-speed shutter is set to high
speed
mode.
Set the
Inappropriate picture adjustments Adjust the picture.
Reconnect properly.
Tune TV to RF converter’s output channel
(VHF channel 0 or 1). (p.48)
Set TV’s TV/VIDEO switch to the VIDEO
position if the AV input is used.
Make sure the white balance is properly
adjusted during recording.
Call for service.
11)
11)
5)
22, 41)
to Full
to Full Auto mode. (p.22)
46)
46)
41)
Old or worn tape
The
remote control
The lithium battery has run down.
does not function.
The remote control is being used
beyond its operating range.
Intense daylight is falling on the
There is an obstacle between the
remote control and the
photoreceptor.
Cassette cannot be inserted.
Cassette is not right side up or is
backwards.
Another cassette is in the unit.
Cassette won’t eject.
mode. recording and try again. (p.22)
No tape movement in Fast Forward mode.
No
movement in Rewind mode. Tape
l This unit is equipped with a microprocessor. Its performance could be adversely affected by external
Tape is already completely wound.
noise or interference. If this should happen, turn off the power, and disconnect the unit from any power
sources, including lithium batteries, etc. Then reconnect the power sources (to resume operation).
l If the characters displayed on the monitor appear to malfunction, disconnect the power source and
remove the lithium battery, then reconnect the power source, insert the lithium battery, and turn the power
on again. When the characters on the monitor becomes normal, set the date and time; then resume
operation.
photoreceptor.
is in Camera Recording
is alreadv completely rewound.
Call for service.
Use a new
5)
Replace the lithium battery with a new one.
Use the remote control within its operating
range.
36)
Avoid letting intense daylight fall on the
photoreceptor. (p. 36)
Remove the obstacle or use the remote
from a different angle. (p.36)
Check cassette positioning and reinsert.
Press the EJECT button and remove. (p.15)
Press REC START/STOP button to stop
Rewind to desired point. (p. 31)
Fast forward to desired
point.
31)
52
Page 54
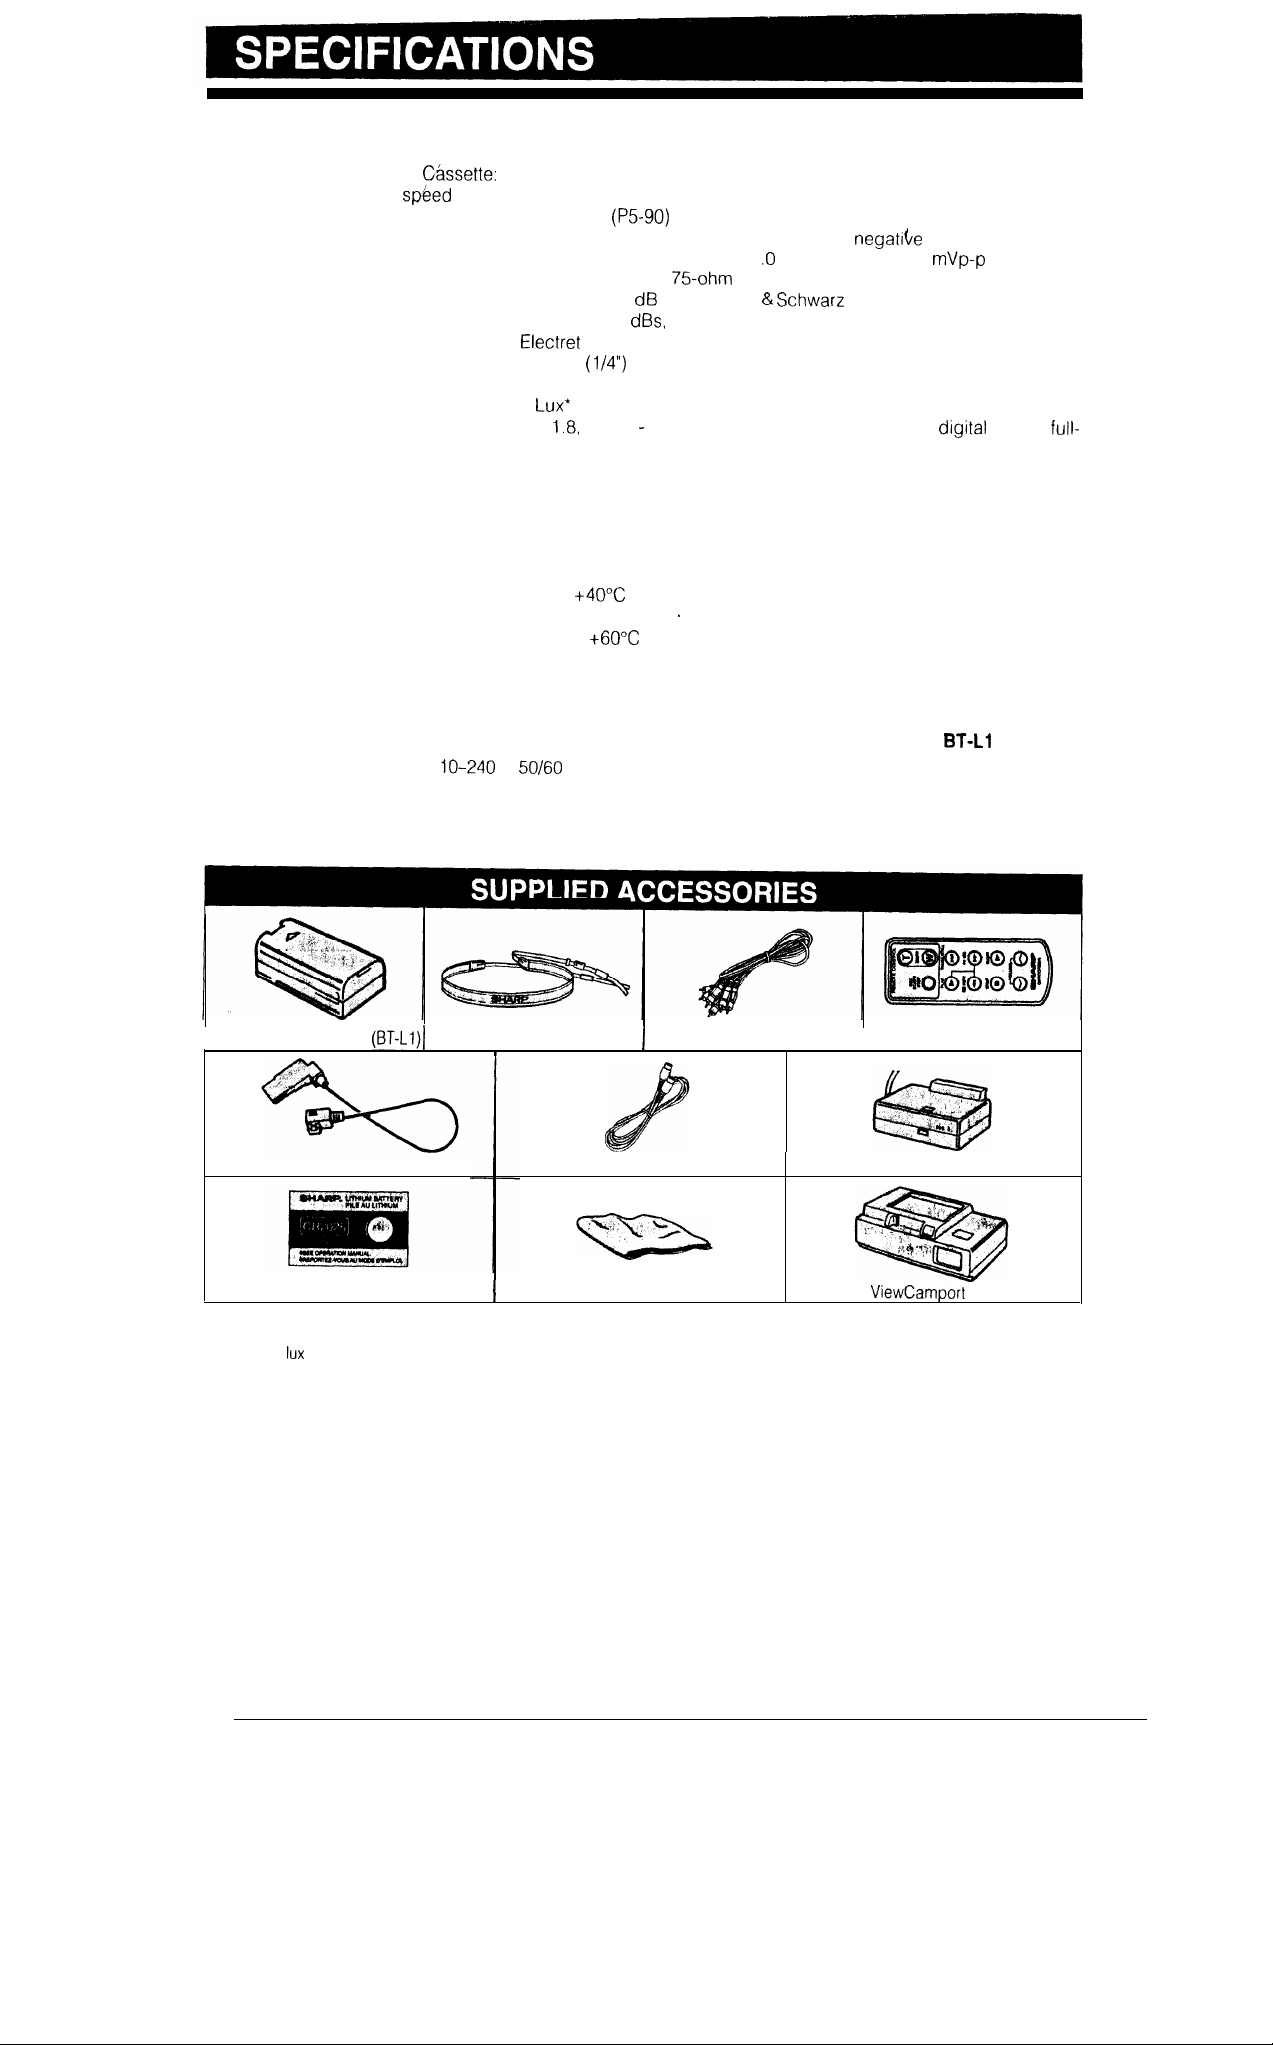
Signal system:
Recording system:
Tape spbed (SP):
Recording time max. (SP):
VIDEO:
AUDIO:
Microphone input:
Pickup:
Minimum required illumination:
Lens
Filter diameter:
Monitor:
Power source:
Power consumption:
Colour temperature compensation:
Operating temperature:
Operating humidity:
Storage temperature:
Dimensions (approx.):
Weight (approx.):
PAL type colour signals
8 mm format, 2 rotary heads, helical scanning FM system
8 mm video tape, MP type, or Hi8 MP, ME type
Approx 20.051 mm/second
90 minutes
output: 1 Vp-p, 75 ohms unbalanced, negatii/e sync: S-video
terminal, Y signal 1
Vp-p, C signal 286
(burst
signal), 75ohm unbalanced
S/N ratio:
output: -8
(with Rohde
impedance less than 2.2 kohms
noise meter)
48
condenser microphone, stereo type
6.4 mm
CCD image sensor (approx. 470,000 pixels, including
optical black)
6
(with gain-up)
F =
f = 4.5
36 mm, optical 8x power zoom (16x digital zoom),
range auto focus with macro function
37 mm
10.2 cm (4”) full-colour LCD screen (TFT active matrix)
DC 3.6 V
8.8 W during camera recording in Full Auto mode with Zoom motor off,
backlight in normal mode, and DIS function
Auto white balance with white balance lock
0°C to
35% to 80%
-20°C to
193 (W) x 139.5 (H) x 91.8 (D) mm
985 g (without battery pack, lithium battery, video cassette, and the
filter for protecting the lens)
AC Power Adaptor/Battery Charger
Power requirement:
DC output: 4.5 V
1
V,
Hz
Dimensions(approx.): 37.4 (W) x 25 (H) x
Power consumption: 27 W
Dimensions (approx.):
/Standard battery pack (BT-Ll)l
DC output cable
Lithium battery x 2
Design and specifications are subject to change without notice.
* Minimum illumination: Since there is no widely accepted testing procedure for determining minimum illumination
capability,
ratings are comparable only between models from the same manufacturer.
120.2 (W) x 51.0 (H) x 101.5 (D) mm
Shoulder strap
S-video cable
Cleaning cloth
Audio/Video cable
Battery Pack
DC output: 3.6 V
71.2 (D) mm
Weight (approx.): 100 g
Infrared remote control unit
AC power adaptor/battery charger
53
Page 55

SHARP
CORPORATION
Osaka, Japan
Printed in Japan
 Loading...