

Page 1
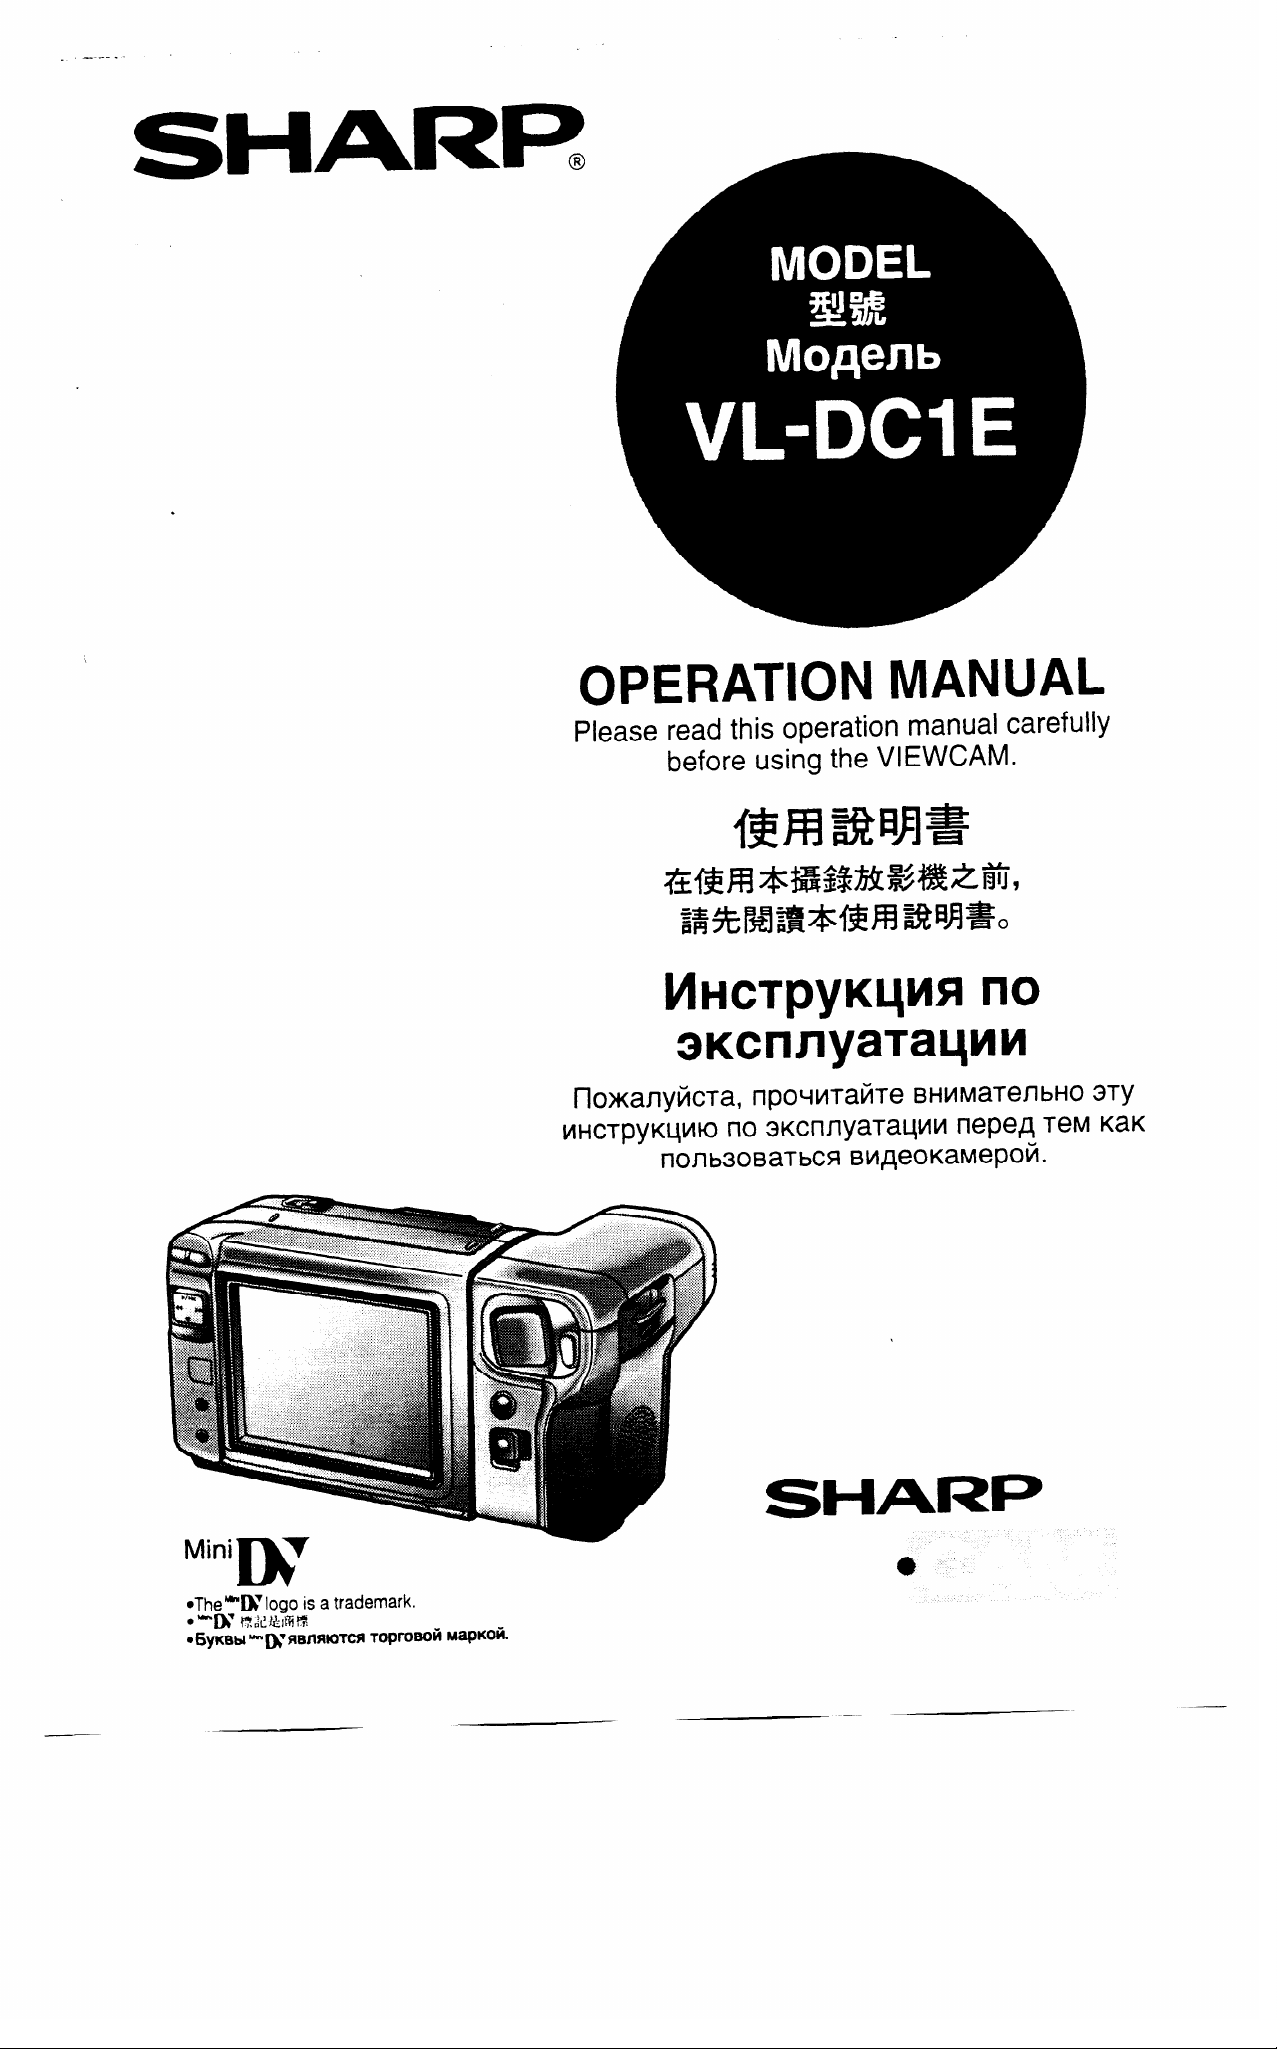
SHARP@
OPERATION MANUAL
Please read this operation manual carefully
before using the VIEWCAM.
bl~C~pyKLp45I no
flOXaflyiiCT& npOWlTatiTe BHMMaTenbHO 3TY
MHCTPYK4LNO IlO 3KCWlyaTa~MVl Wpep, TeM KaK
nOJlb30BaTbCS BVl#OKaMepOk
.
SHARP
e
Page 2
WARNING
TO PREVENT SHOCK
HAZARD, DO NOT EXPOSE
THIS APPLIANCE TO RAIN
OR MOISTURE.
This equipment should be used with
DC 3.6 V x only or recommended AC
adaptor.
CAUTION
To prevent electric shocks and fire
hazards, do NOT use any other power
source.
CAUTION
To prevent shock, do not open the
cabinet. No user serviceable parts
inside. Refer servicing to qualified
dealer or service centre.
Important:
Audio-visual material may consist of
copyrighted works which must not be
recorded without the authority of the
owner of the copyright. Please refer to
relevant laws in your country.
Your VIEWCAM is designed to record in SP mode only. It will not perform normal
playback for programmes prerecorded in LP mode.
NOTE
The VIEWCAM’s LCD panel is a very high technology product with more than
II 2,000 thin-film transistors*, giving you fine picture detail. Occasionally, a pixel may
appear on the screen as a fixed point of blue, green, red, or black. Please note that
this does not affect your VIEWCAM’s performance.
*Specifications are subject to change without notice.
Power supply:
This unit can be operated by
connecting it to either the AC adaptor,
battery pack, or optional car battery
adaptor/battery charger. The AC
adaptor incorporates the AUTO
VOLTAGE (AC 1 IO-240 V, 50/60 Hz)
function.
Page 3
Information for Australia/New Zealand Only
WARNING:
This Camcorder must be supplied with DC. 3.6 volts only from a B%L2 battery,
the AC adaptor or the optional VR-410CH car battery adaptor/battery charger or
the optional VR-410CA car battery adaptor.
CAUTION:
As there are no user-serviceable parts inside the Camcorder and AC adaptor,
do NOT remove their cabinets as touching parts inside could result in electric
shock. Please refer servicing to a qualified dealer or a Camcorder service
centre approved by Sharp.
NOTE
This VIEWCAM is a high technology product.
The LCD Panel comprises 112,320 TFT Transistors. Due to the high density of
transistors, it is possible’that some pixels may fail.
Important:
Copyright may exist in material you wish to record.
Copying such material without permission of the relevant licensees or owners of the
copyright is prohibited by law.
Sharp is not in a position to authorize the recording of copyright works and nothing
in this operation manual should be read or implied as giving that authority.
ii
Page 4
Contents
.............................
Mini DV Cassette
Part Names
Installing the Memory Backup Battery
Installing the Battery in the Remote Control.. ..... 13
Using the AC Adaptor/Battery Charger
Inserting and Removing the Battery Pack
Powering the VIEWCAM from an AC Outlet..
Powering the VIEWCAM from Your Car Battery
Inserting and Removing a Mini DV Cassette .....
Controlling the Monitor
Using the On-screen Menu .............................. 20
Warning Indicators ............................................. 22
Setting the Area, Date and Time ........................ 23
World Clock.. ...................................................... 24
Picture/Backlight Adjustments
Using the Hand Strap ........................................ 28
Attaching the Shoulder Strap ............................. 28
........................................................
..............................................
............... 13
............. 14
......... 15
....... 16
Display.. .................... 19
........................... 27
9
1 1
... 17
18
Auto Focus .........................................................
Backlight Compensation (BLC) .........................
Gain-up (Cat’s Eye) ............................................
Digital Image Stabilization (DIS) ........................
Macro Shots ....................................................... 33
Fade In and Fade Out..
Recording with the Wide Screen (16:9) .............
Quick Return
Edit Search.. .......................................................
Tips on Recording Positions .............................. 37
Hints for Better Shooting
Setting the VIEWCAM to Full Auto Mode
Remaining Recording Time Display
Remaining Battery Power Display .....................
Using the Infrared Remote Control
......................................................
................................. 34
.....
.................................... 37
........... 38
.................. 39
.................... 40
31
32
32
33
35
36
36
39
Page 5

Displaying the Date and T;m~~~.~ko;din,:
....................................................................
...........................................
Video Search
Still.. ....................................................................
......................................................
Slow
Frame Advance
Strobe Playback
Turning Off the LCD Monitor Backlight
Programme Search
Using the Time Code
Using the Tape Counter
Skip Playback ....................................................
..................................................
................................................. 43
.............. 43
............................................
.........................................
..................................... 46
.....
42
42
42
42
43
44
45
47
Manual Iris.. ........................................................
Strobe Recording
Recording a Five-second Still Image
(Snapshot)
Still Recording..
Lighting ..............................................................
Connect,ons for p,a&-.&k’ on. a_..v ../_;. . . . . . . . . . . . . .
(0
u Connection to TV without Audio/Video Jacks
“~~~io~~de~ ~~~~s . . . , . . . . . . . . . . . . . . . . . . . . . . . . . . . . . . . . . . . . . . t:
Connection to TV via VCR
Watching Played-back Tapes on a TV
Editing
................................................................ 61
...............................................
......................................................
.................................................
..................................
............... 60
55
55
56
56
57
.... 59
60
Page 6
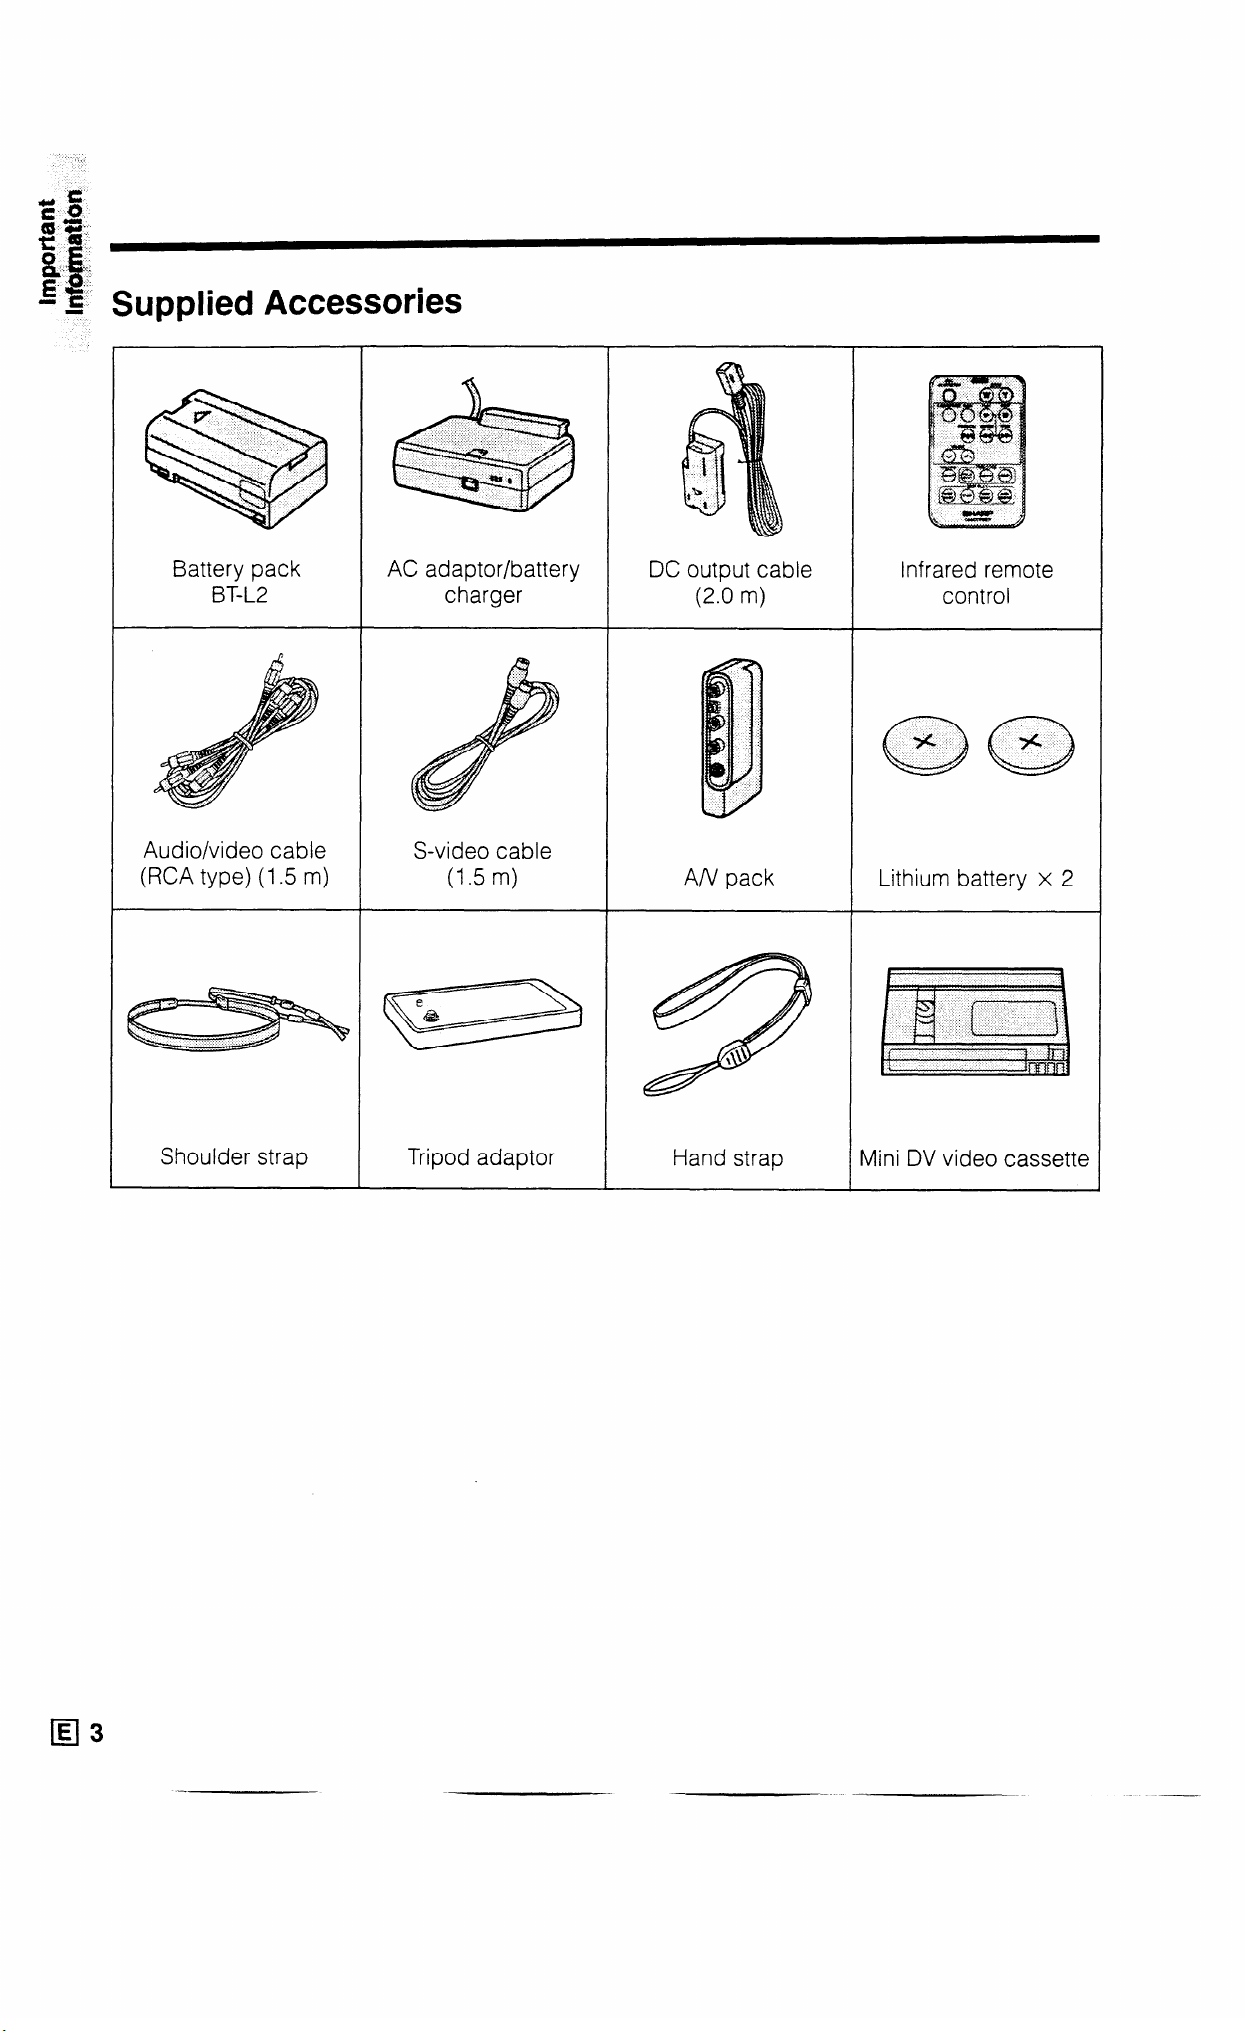
Supplied Accessories
Audio/video cable
(RCA type) (1.5 m)
S-video cable
Lithium battery x 2
E
cl3
- .-
Page 7
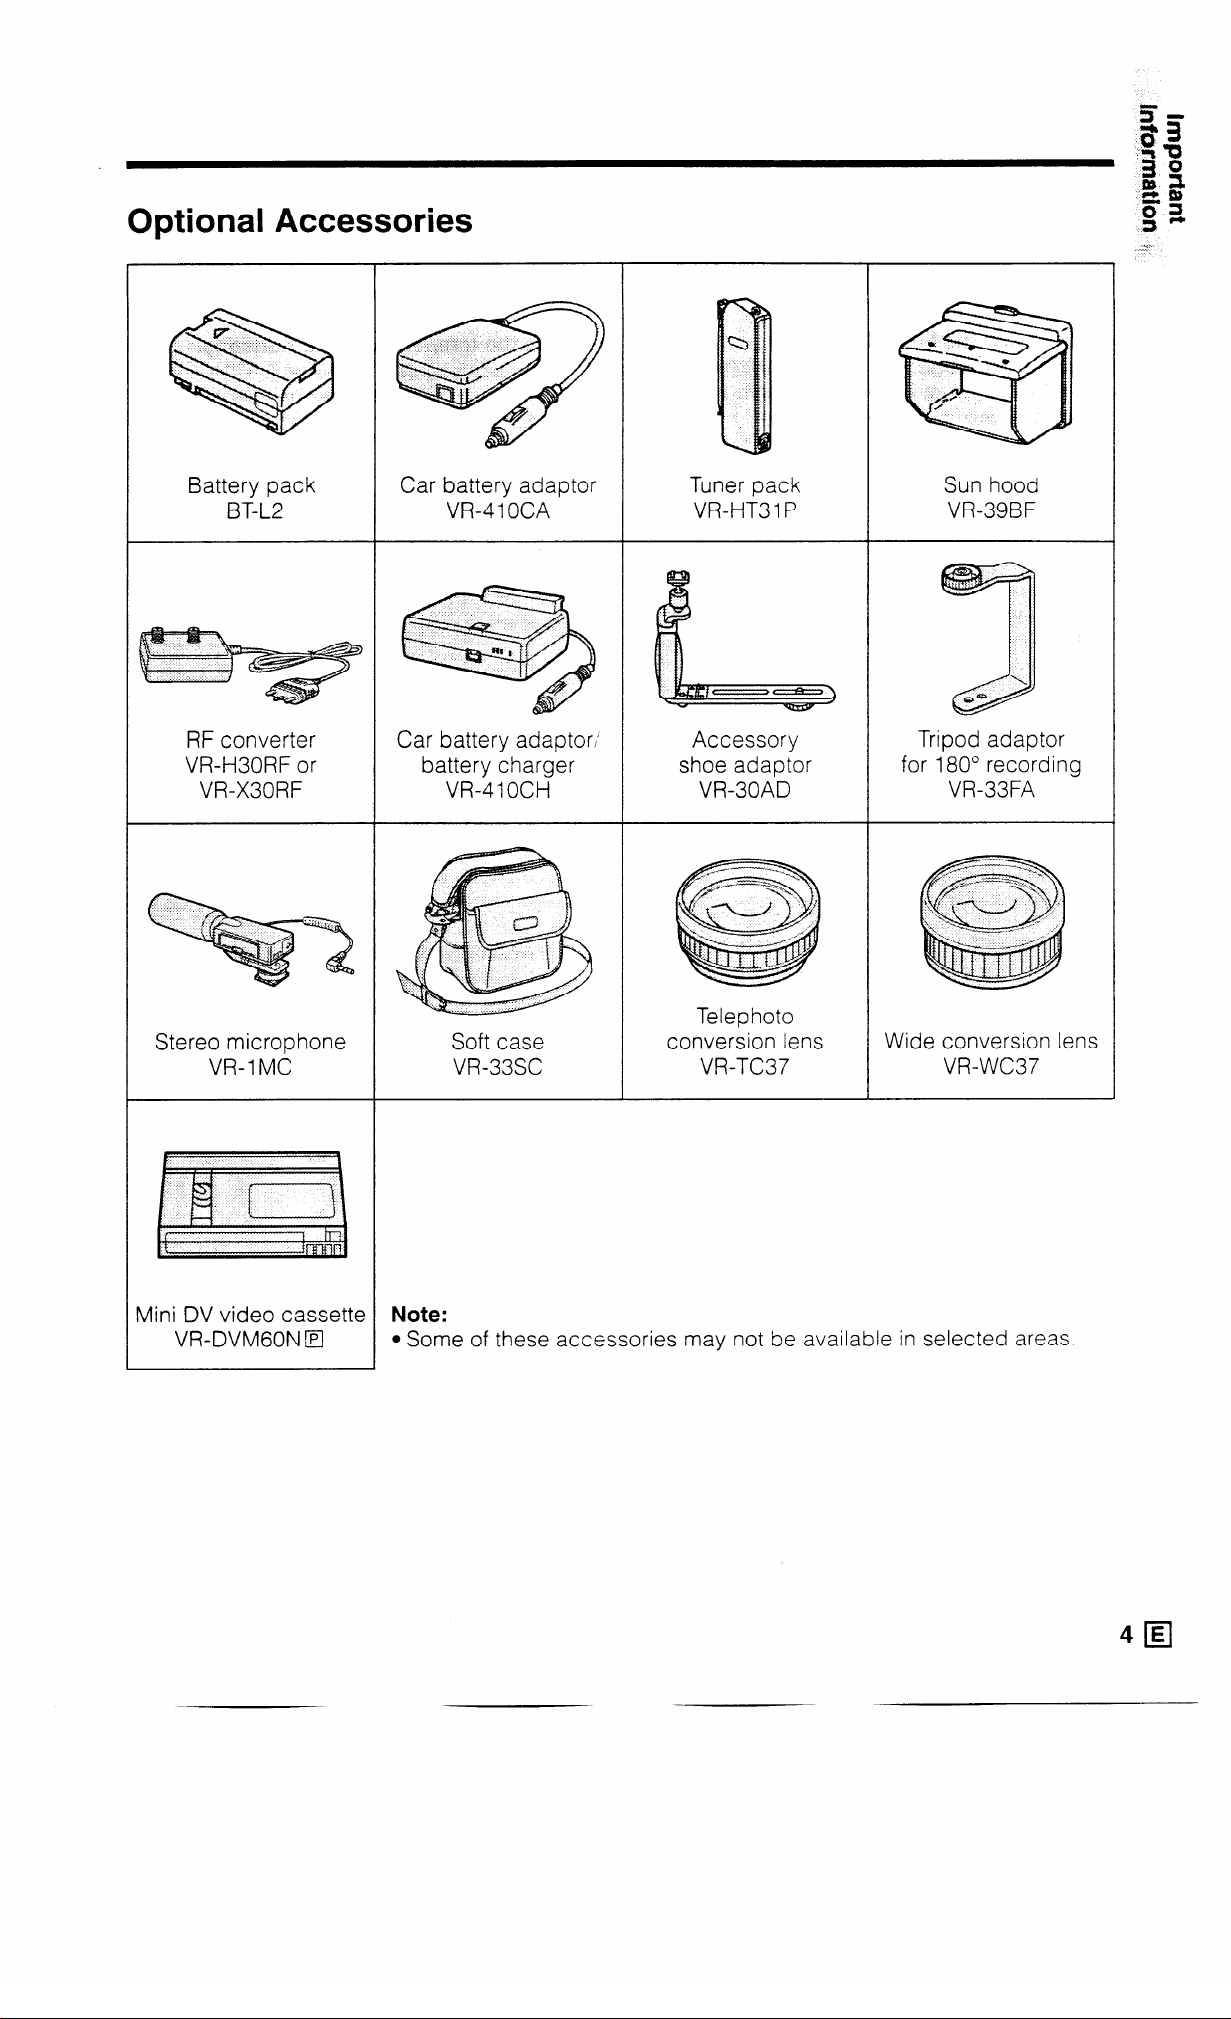
Optional Accessories
Battery pack
BT-L2
RF converter
VR-H30RF or
VR-X30RF
Stereo microphone
VR-1 MC
Car battery adaptor
VR-410CA
Car battery adaptor,
battery charger
VR-41 OCH
Soft case
VR-33SC
Tuner pack
VR-HT3 1 P
Accessory
shoe adaptor
VR-30AD
Telephoto
conversion lens
VR-TC37
Sun hood
VR-39BF
Tripod adaptor
for 180” recording
VR-33FA
Wide conversion lens
VR-WC37
Mini DV video cassette
VR-DVMGON IEI
Note:
l Some of these accessories may not be available in selected areas.
Page 8

Precautions
Use & Care
l After operation, remove the battery pack
from the unit.
l Do not aim the lens at the sun.
Do not allow direct sunlight to strike the
VIEWCAM lens or LCD panel. whether
recording is in progress or not, as it may
damage the CCD sensor or LCD panel
surface. Be particularly careful when
recording outside.
l When shooting in dark places, avoid sudden
brightly lit objects or light sources, such as
the sun. Otherwise. the image may white out.
Should this happen, point the camera in a
different direction until the picture returns to
normal.
l Avoid magnetic sources.
Using the VIEWCAM
near strong fluorescent
lights, motors, tele-
visions, or other mag-
netic sources may
adversely affect
recorded images.
l Remember to remove the cassette tape,
turn off the power, and remove the battery
pack when the VIEWCAM is not in use.
l Always respect prohibitions or restrictions
on the use of electronic equipment on
commercial flights or in other sensitive
areas.
l Watch the temperature and humidity.
You can use your VIEWCAM at 0°C to +4O”C
and at 30% to 80% relative humidity. Do not
store the unit in an unventilated car in the
summer. in direct sunlight, or near strong heat
sources; this can result in severe damage to
the unit’s casing and circuitry. Be careful when
handling the unit after it
has been left in a hot
place, such as the ones
described above.
l Avoid situations where water, sand, dust or
other foreign matter could get on or inside
the VIEWCAM. Such substances could
cause malfunctions.
Do not use your VIEWCAM in areas with excessive smoke or
steam.
10
Do not leave your VIEW- - - e
CAM in areas with
excessive dust or moisture.
Such environments can cause mildew to form
on this unit’s lenses. Be sure to provide ample
ventilation.
l Using the VIEWCAM near a broadcasting
station or other powerful transmission
source may cause buzzing or picture
deterioration.
l Avoid shocks and dropping.
Do not drop or otherwise
subject the VIEWCAM to hard
shocks or strong vibrations.
Bumping or striking the unit
during recording will generate
noise in the recorded image.
l Avoid placing theVlEWCAM in close
proximity to lighting equipment.
ihe heat from incandescent
lights,may deform the
VIEWCAM, or cause it to
malfunction.
l Some small, portable
tripods may be difficult to
attach and may not be
sturdy enough to support
your VIEWCAM. Be sure to
use only a strong, stable
tripod.
l When using your VIEWCAM in a cold
environment, the colour LCD view screen
may appear less bright.This often occurs
in cold environments immediately after the
power is turned on.This is not a
malfunction. If this occurs, put the
VIEWCAM in a warmer location for some
time before use.To prevent excessive
cooling, wrap the VIEWCAM in a thick cloth
(a blanket, etc.).
Page 9

Dew Formation
l What is “dew formation”?
When cold water is poured into a glass, dew
drops form on the glass, This clinging of
water drops is called dew formation.
l When dew forms in your VIEWCAM.
Dew will gradually form on the head drum of
your VIEWCAM and make the video tape stick
to the head. This causes damage both to the
head and the tape. When dew formation
occurs, recording and playback may not
function properly.
Dew is likely to form in the following circum-
stances:
l when moving the VIEWCAM from a cold
place to a warm place,
l when placing the VIEWCAM in a cold room
which is then heated rapidly,
l when moving the VIEWCAM outdoors from
an air conditioned room,
l when placing the
VIEWCAM in the direct d “,“q
path of air blowing from
an air conditioner,
l when placing the
VIEWCAM in a humid
room.
l How to prevent trouble due to dew
formation.
When using the VIEWCAM in a place where
dew formation is likely to occur, allow the
VIEWCAM and the video tape to acclimate to
the surroundings for about one hour.
For example, when bringing the VIEWCAM
indoors after skiing, place it in a plastic bag
and allow it to adapt to room conditions for
some period of time.
PD Q
l “Dew” warning feature
If dew forms, the word “DEW” flashes on the
LCD monitor, and the power will automatically
turn off in approximately 10 seconds.
If the word “DEW” flashes on the LCD
monitor, remove the cassette. leave the
cassette compartment open, and wait
several hours to allow the VIEWCAM to
acclimate to the surrounding temperature.
To use the VIEWCAM again. turn on the
power after waiting for several hours. Be
sure that the word “DEW” has disappeared
from the monitor screen.
Do not insert a cassette while the word
“DEW” is flashing; this may result in damage
to the tape.
Since dew forms gradually. it may take IO to
15 minutes before the dew warning feature
engages.
l How to continually maintain good recording.
If used in a variety of places eventually your
VIEWCAM may not function properly due to
accumulation of dirt on the head drum.
Please pay special attention to the following
points when using your VIEWCAM.
Dew formation on the head drum.
‘1 >
Worn video tapes:
2)
Using a damaged or soiled video tape
may also soil the head drum. causing the
picture to be blurred or nothing to be
recorded on the video tape. Do not use
such a video tape.
VIEWCAM use in a humid or dusty place.
3)
Use in extremely humid or dusty places
may cause damage to your VIEWCAM.
Plastic bag
I Be sure to tightly seal the plastic bag
containing the VIEWCAM.
5 Remove the bag when the air temperature
the temperature of the sur- inside it reac
hes
roundings.
l When the video heads become clogged.
Using the VIEWCAM when the video tape IS
dirty may cause the head to clog, producing
noise on the recorded image or preventing
the image from being recorded at all.
Under such circumstances, contact the
nearest SHARP service centre or your dealer
for further advice.
(Video head cleaning can be done by using a
commercially available cleaning tape.
However, excessive use of the cleaning tape
may also cause damage to the video heads.
Please read the instructions accompanying
the cleaning tape carefully, before using it.)
6IEI
Page 10
~ 8 Precautions
a%
ki=
&
31i
E
-S
Battery Pack
This VIEWCAM uses a lithium-ion type
battery pack. It is not necessary to store
the lithium-ion battery pack in a fully
discharged state. Also, if stored in the
charged state, the battery will gradually
self-discharge, resulting in decreased
recording time. Charge the battery pack
soon (a day) before use.
Battery pack consumption
oRecording with many starts and stops,
frequent zooming, and recording in low
temperatures will somewhat shorten
actual recording times. Accordingly, be
sure to turn off the power when not
recording. Use of an auxiliary battery
pack is recommended to prevent undesirable interruptions in your recording.
l Do not use an insufficiently charged or
weak battery pack. Such battery packs
may cause the power to automatically
stop during VIEWCAM operation to pro-
tect both the battery pack and the unit.
Battery power is consumed even when
the VIEWCAM’s power is turned off. If
you are not going to use your VIEWCAM immediately, remove the battery
pack. (See page 15.)
Note:
l Use only the SHARP BT-L2 battery pack. It is
designed specifically for use with this VIEW-
CAM.
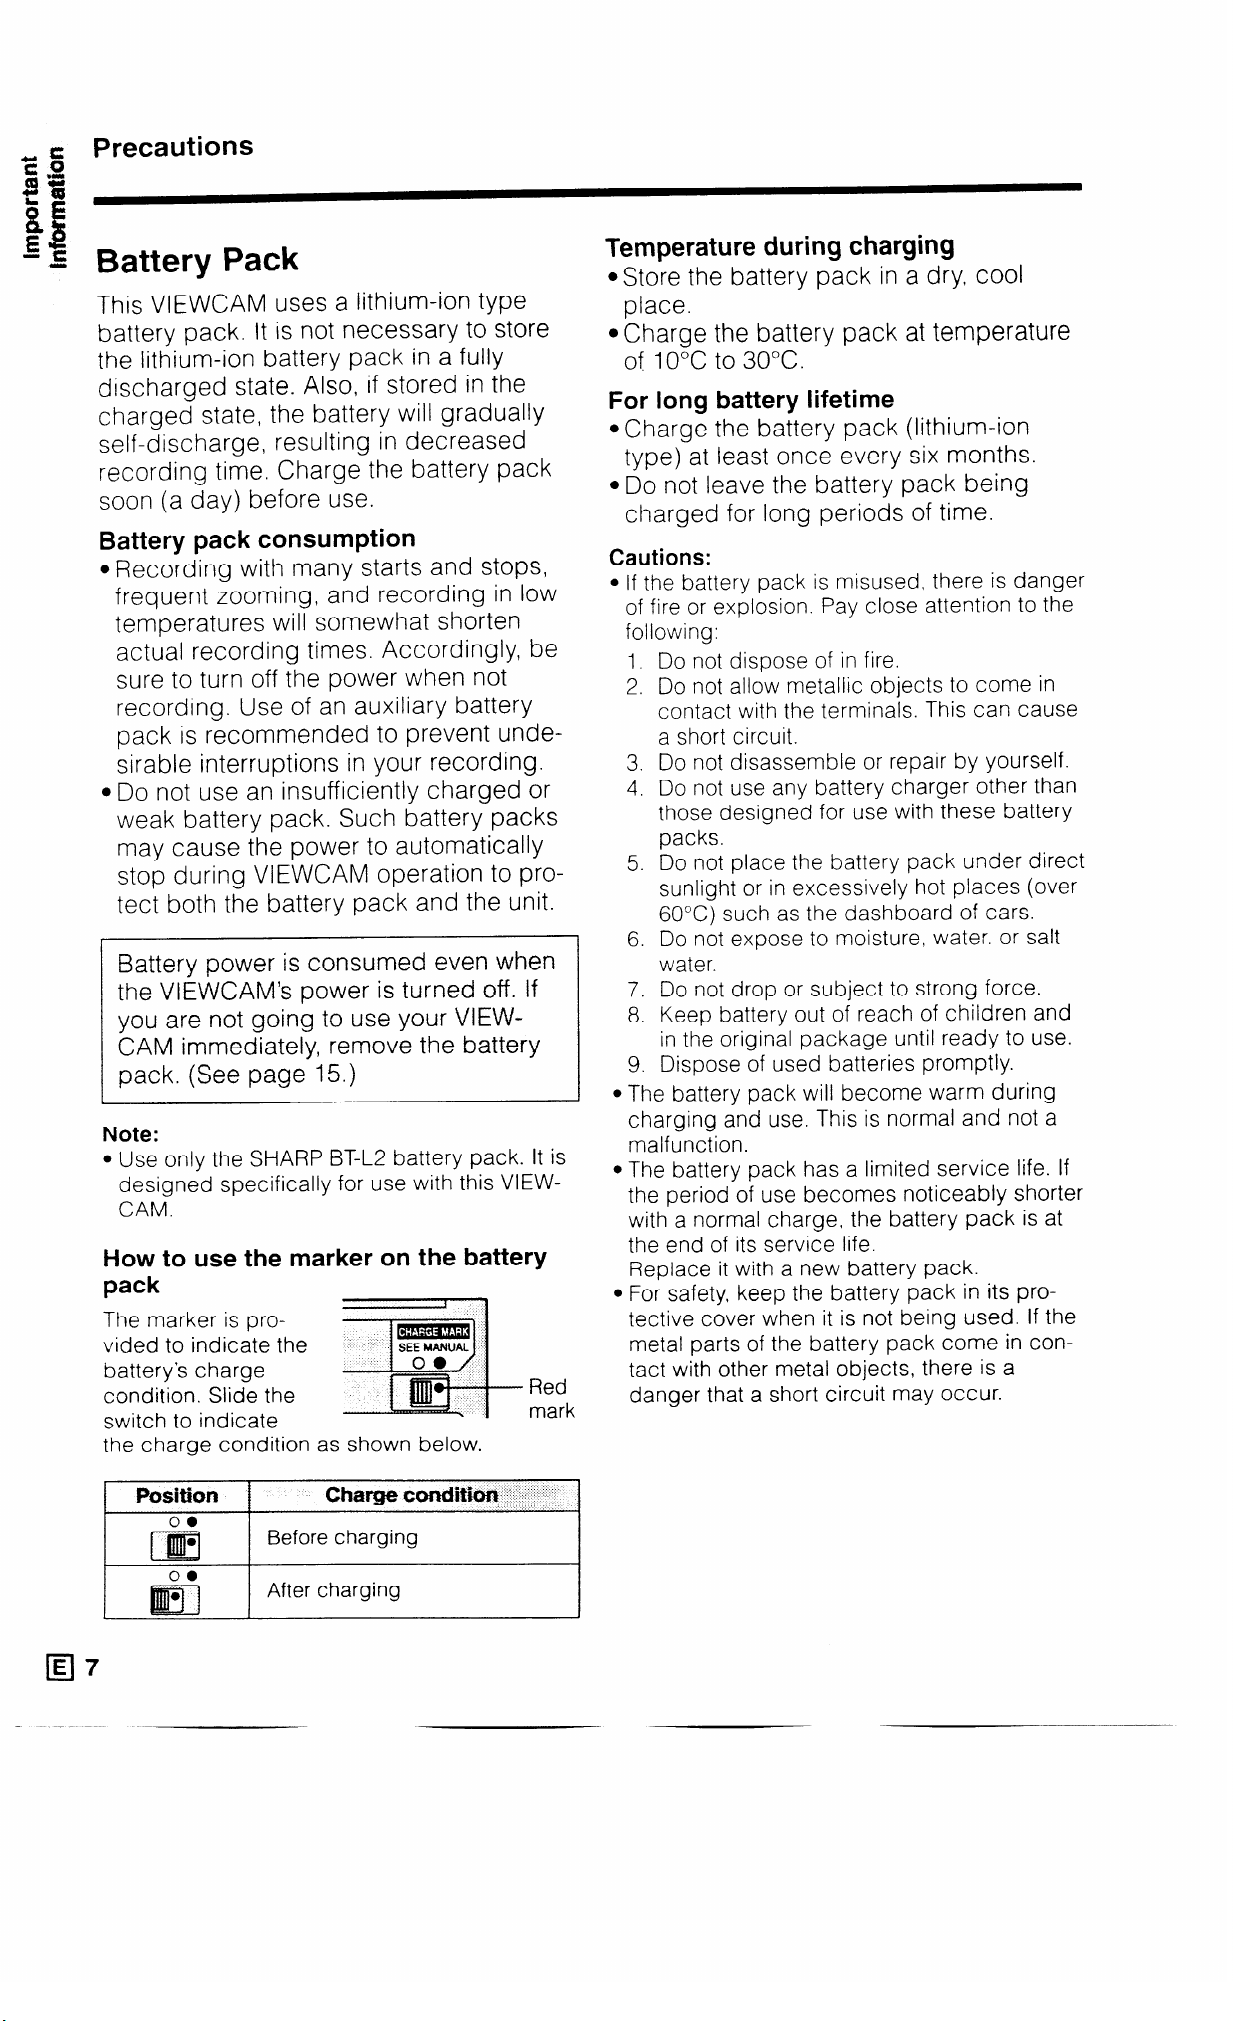
How to use the marker on the battery
pack
The marker is provided to indicate the
battery’s charge
condition. Slide the
switch to indicate
the charge condition as shown below.
Red
mark
Temperature during charging
@Store the battery pack in a dry, cool
place.
@Charge the battery pack at temperature
of 10°C to 30°C.
For long battery lifetime
l Charge the battery pack (lithium-ion
type) at least once every six months.
.Do not leave the battery pack being
charged for long periods of time.
Cautions:
l If the battery pack is misused, there is danger
of fire or explosion. Pay close attention to the
following:
1. Do not dispose of in fire.
2. Do not allow metallic objects to come in
contact with the terminals. This can cause
a short circuit.
3. Do not disassemble or repair by yourself.
4. Do not use any battery charger other than
those designed for use with these battery
packs.
5. Do not place the battery pack under direct
sunlight or in excessively hot places (over
60°C) such as the dashboard of cars.
6. Do not expose to moisture, water. or salt
water.
7. Do not drop or subject to strong force.
8. Keep battery out of reach of children and
in the original package until ready to use.
9. Dispose of used batteries promptly.
l The battery pack will become warm during
charging and use. This is normal and not a
malfunction.
l The battery pack has a limited service life. If
the period of use becomes noticeably shorter
with a normal charge, the battery pack is at
the end of its service life.
Replace it with a new battery pack.
l For safety, keep the battery pack in its pro-
tective cover when it is not being used. If the
metal parts of the battery pack come in con-
tact with other metal objects, there is a
danger that a short circuit may occur.
E 7
0
Page 11
About the DV (Digital VCR)
The “DV” trademark can only be used on digital
VCR products which have been evaluated and
have met the specifications set by the HD Digital
VCR Conference for Standardization of Consumer Use Digital VCR Formats.
High horizontal resolution
1.
Detailed, accurate images with the highest
level of horizontal resolution for home use.
Clear colour reproduction with virtually no
2.
colour contamination
Provides three times the colour resolution of
conventional VCRs (based on Sharp models).
Clear images with virtually no distracting colour
contamination (which usually appears as red).
Standard use of TBC (time base collector) to
3.
prevent jittery images
Ensures stable images with a high signal-tonoise ratio.
PCM digital recording
4.
PCM digital recording gives you high-quality
stereo sound that puts you in the middle of the
action.
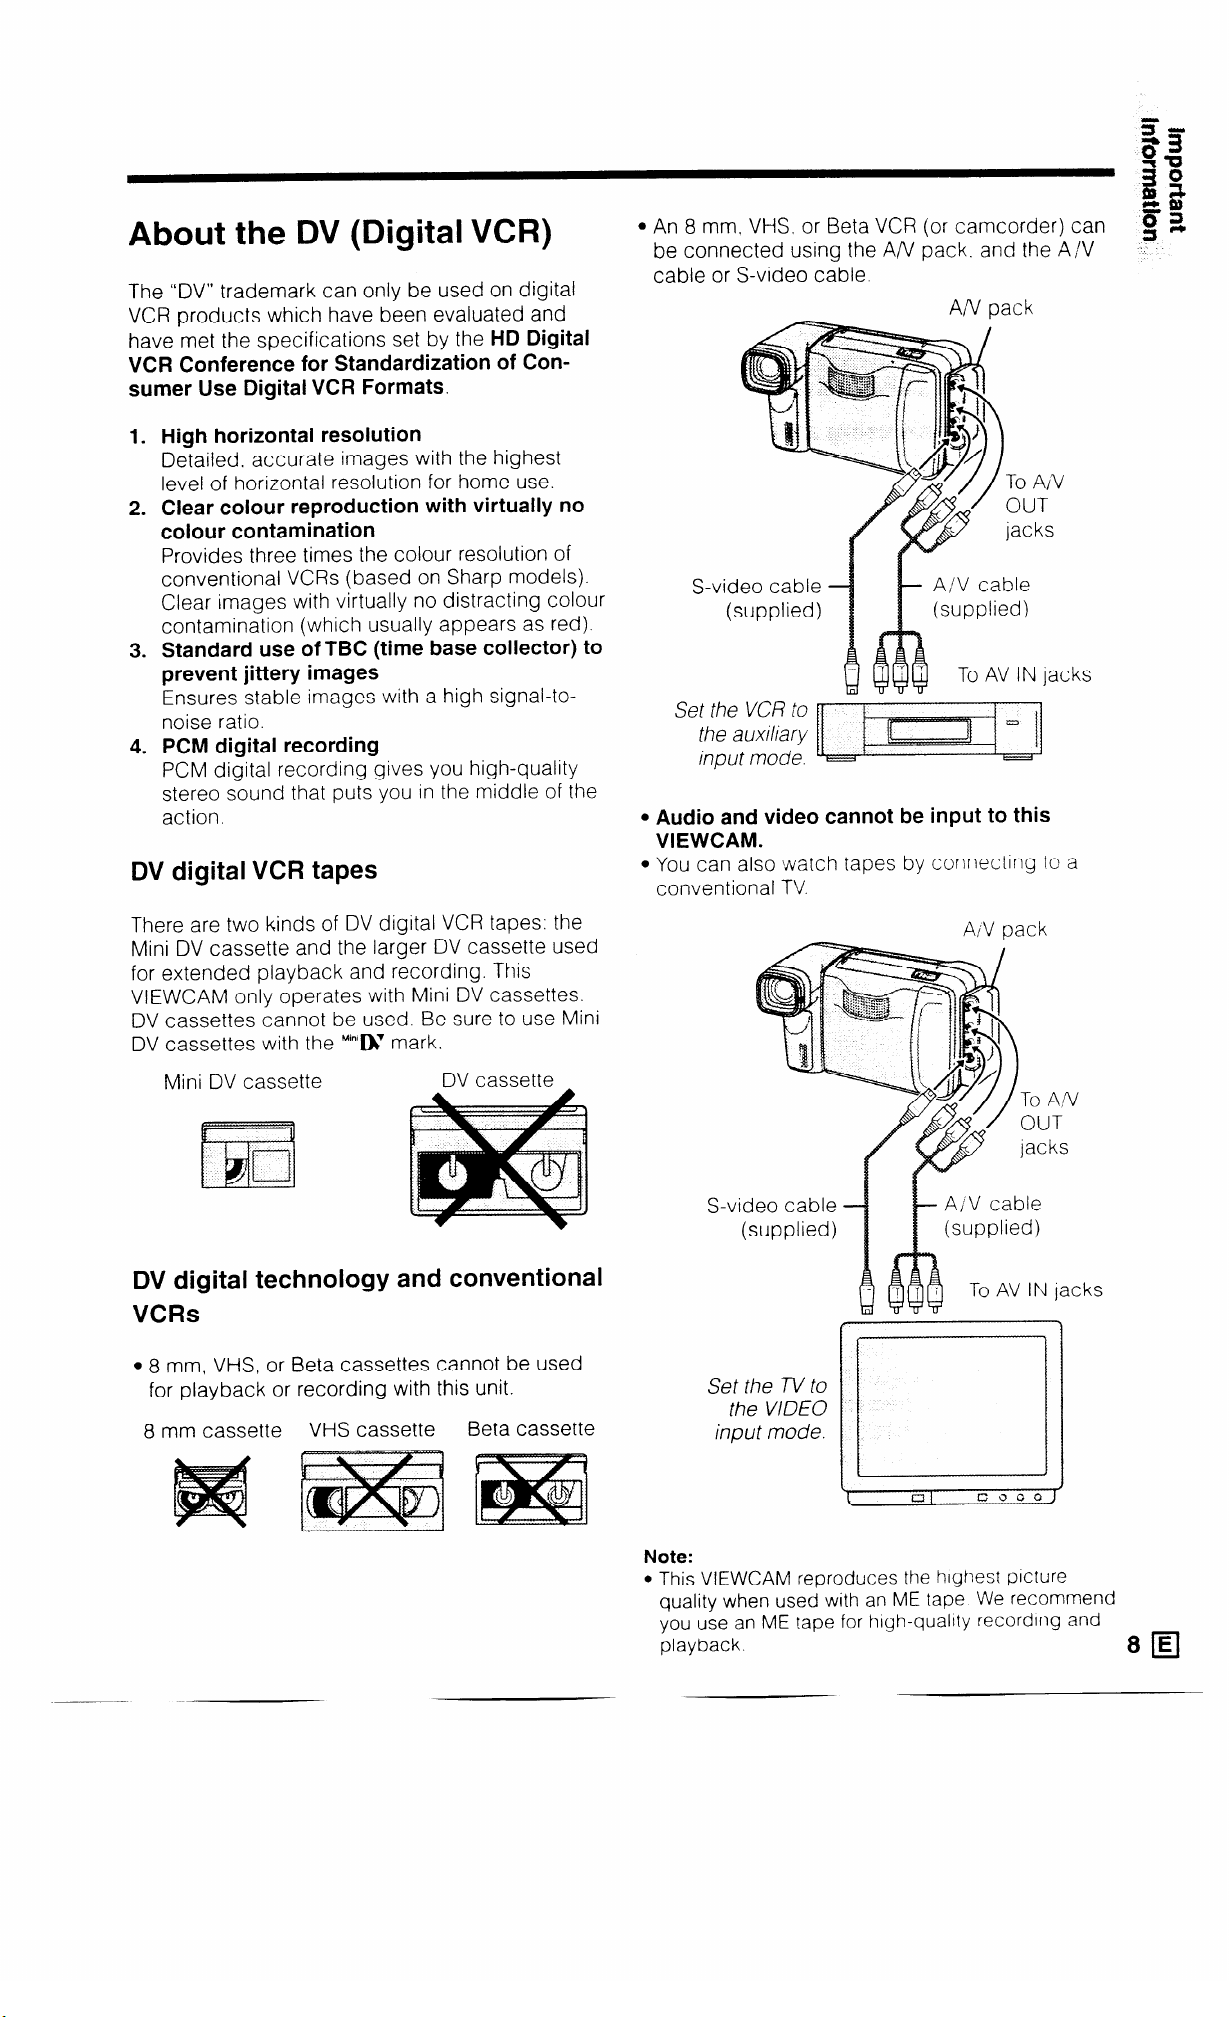
DV digital VCR tapes
l An 8 mm. VHS. or Beta VCR (or camcorder) can
be connected using the A/V pack. and the A/V
cable or S-video cable.
A/V pack
To A/V
OUT
jacks
S-video cable
(supplied)
A/V cable
(supplied)
To AV IN lacks
Set the VCR to
the auxiliary
input mode.
l Audio and video cannot be input to this
VIEWCAM.
l You can also watch tapes by connecting to a
conventional TV
There are two kinds of DV digital VCR tapes: the
Mini DV cassette and the larger DV cassette used
for extended playback and recording. This
VIEWCAM only operates with Mini DV cassettes.
DV cassettes cannot be used. Be sure to use Mini
DV cassettes with the M’“‘IXI mark.
Mini DV cassette
DV cassette
DV digital technology and conventional
VCRs
l 8 mm, VHS, or Beta cassettes cannot be used
for playback or recording with this unit.
8 mm cassette
VHS cassette
Beta cassette
S-video cable
(supplied)
Set the TV to
the VIDEO
input mode.
AiV pack
To An/
OUT
jacks
A/V cable
(supplied)
To AV IN jacks
Note:
l
This VIEWCAM reproduces the highest picture
quality when used with an ME tape We recommend
you use an ME tape for high-quality recording and
playback
Page 12
Precautions
Mini DV Cassette
Precautions when using a Mini DV cas-
sette
l Be sure to use only Mini DV cassettes
with the M’n’IX mark.
l This VIEWCAM can record and play
back with Mini DV cassettes with cassette memory, but it cannot record or
play back this memory.
08 mm, VHS, or Beta cassettes cannot
be used for playback or recording
with this unit.
8 mm cassette VHS cassette
Beta cassette
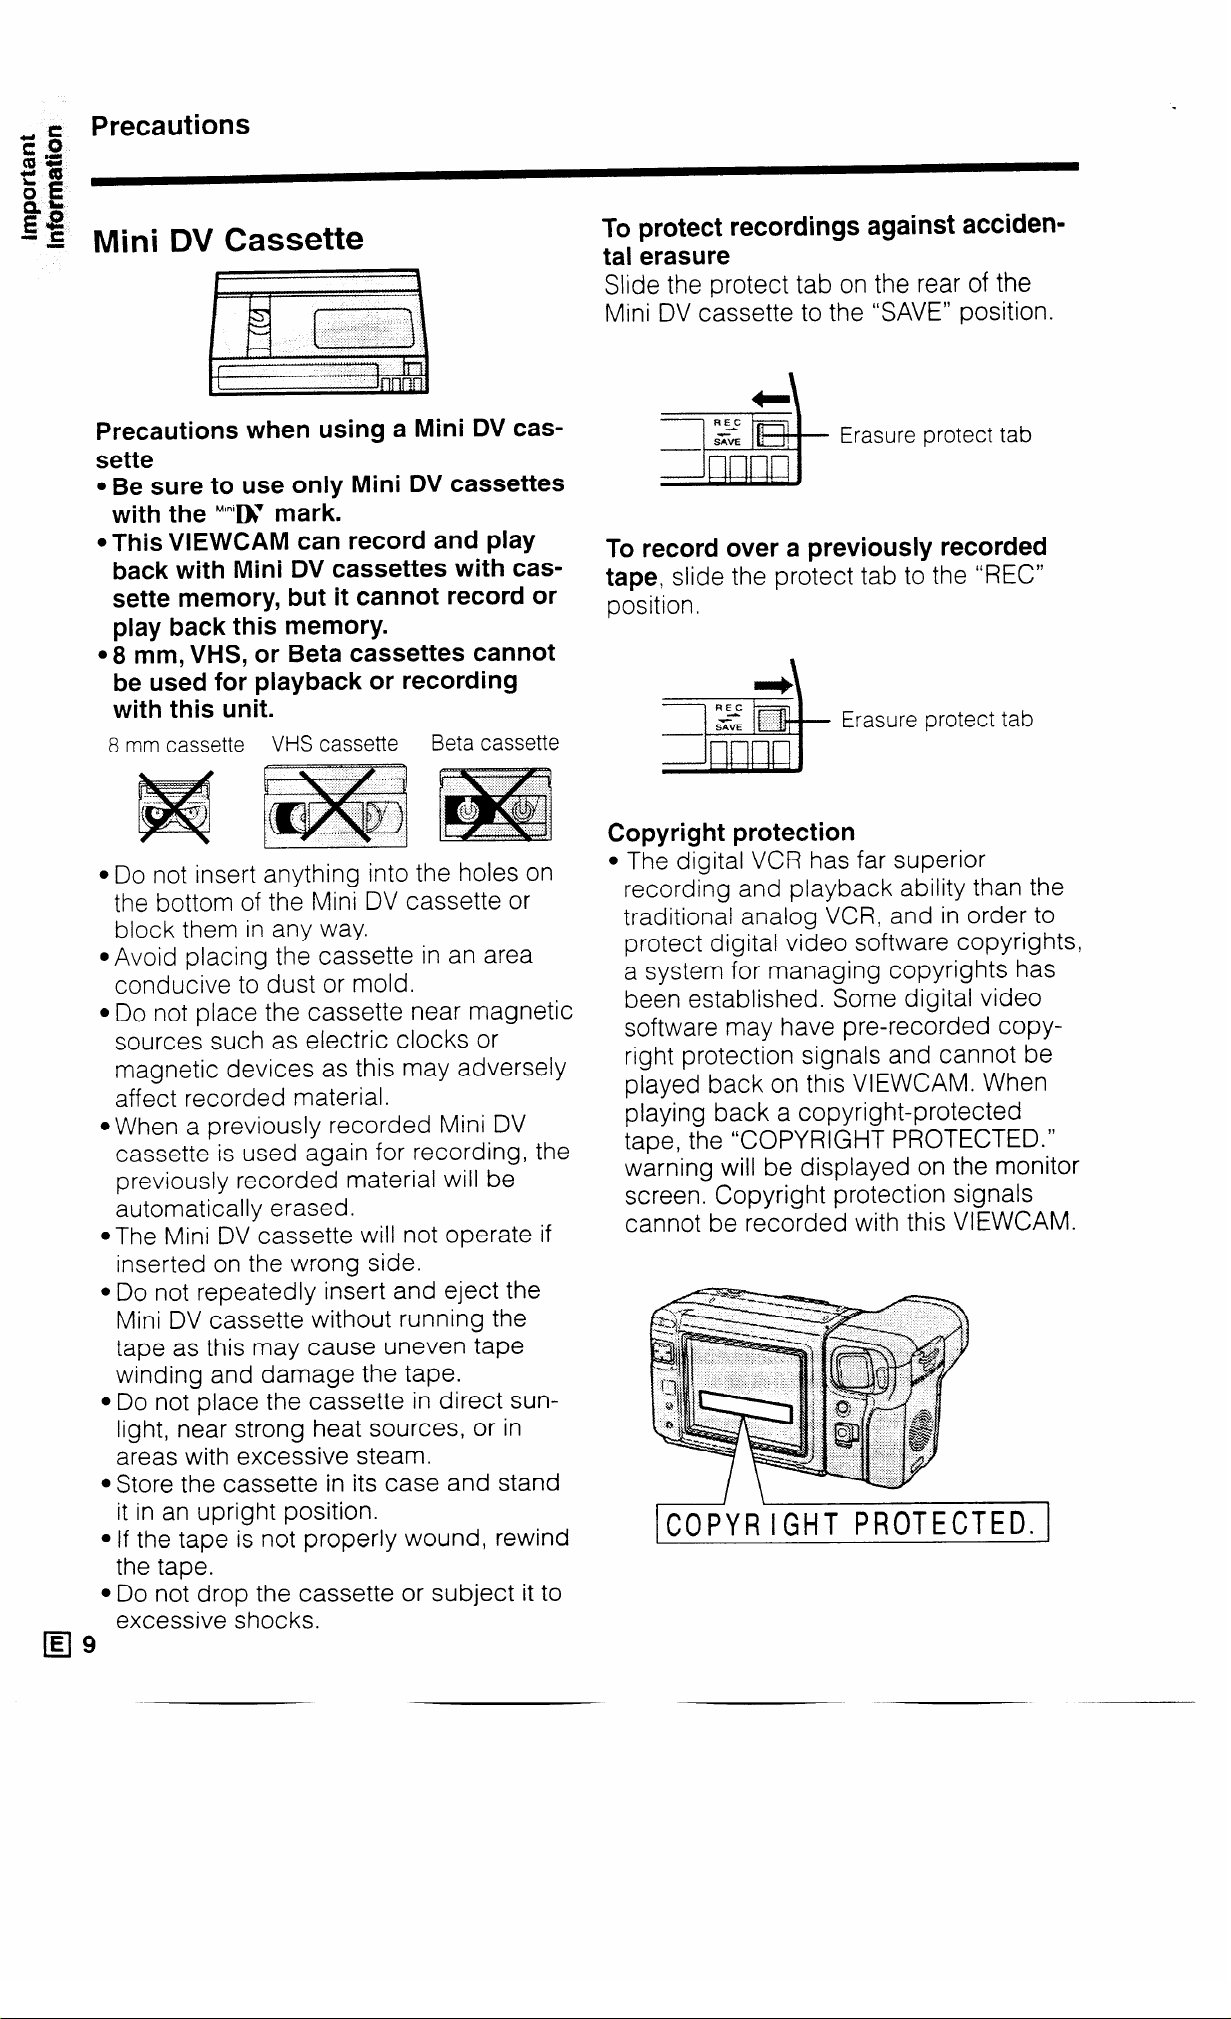
To protect recordings against acciden-
tal erasure
Slide the protect tab on the rear of the
Mini DV cassette to the ‘SAVE” position.
Erasure protect tab
To record over a previously recorded
tape, slide the protect tab to the “REC”
position.
I+\
Erasure protect tab
*
l Do not insert anything into the holes on
the bottom of the Mini DV cassette or
block them in any way.
mAvoid placing the cassette in an area
conducive to dust or mold.
@Do not place the cassette near magnetic
sources such as electric clocks or
magnetic devices as this may adversely
affect recorded material.
@When a previously recorded Mini DV
cassette is used again for recording, the
previously recorded material will be
automatically erased.
.The Mini DV cassette will not operate if
inserted on the wrong side.
l Do not repeatedly insert and eject the
Mini DV cassette without running the
tape as this may cause uneven tape
winding and damage the tape.
l Do not place the cassette in direct sun-
light, near strong heat sources, or in
areas with excessive steam.
@Store the cassette in its case and stand
it in an upright position.
l If the tape is not properly wound, rewind
the tape.
l Do not drop the cassette or subject it to
excessive shocks.
E
El9
Copyright protection
l The digital VCR has far superior
recording and playback ability than the
traditional analog VCR, and in order to
protect digital video software copyrights,
a system for managing copyrights has
been established. Some digital video
software may have pre-recorded copyright protection signals and cannot be
played back on this VIEWCAM. When
playing back a copyright-protected
tape, the “COPYRIGHT PROTECTED.”
warning will be displayed on the monitor
screen. Copyright protection signals
cannot be recorded with this VIEWCAM.
COPYRIGHT PROTECTED.]
r- ’
Page 13
Care
Using Your VIEWCAM Abroad
3-
$2
ii!”
ii
&
Cleaning and maintenance
l Many plastic parts are used in the
VIEWCAM casing. Do not use thinners,
benzenes or other strong chemical
cleaners. These may cause
discoloration and damage to the casing.
@Clean the casing with a soft, dry cloth. If
the casing is particularly dirty, wipe the
casing with a tightly wrung cloth
dampened with a diluted, neutral
detergent. Then wipe it again with a soft,
dry cloth.
*Use a cloth to wipe finger marks and
other soiling off the LCD monitor and
lens protector.
aIf the lens needs cleaning, first remove
the lens protector by turning it anticlockwise. Then clean the lens with a cloth, or
compressed air and lens papers
designed for photographic lenses.
Television system signals and electrical
system voltages and frequencies vary
substantially from country to country.
When you are abroad, please check the
sections below before using the AC adap-
tor or connecting the VIEWCAM to a TV.
The AC adaptor is compatible with 50 Hz
and 60 Hz electrical systems in the range
of 1 IO V to 240 V AC.
This can be used with 12 V and 24 V
negative-ground cars only. Do not use it
with positive-ground electrical systems.
In any country. you can always watch the
video picture by using the LCD monitor
screen. However, if you want to watch the
picture on a TV screen, the TV must be
PAL system compatible. PAL is used in
the following countries:
Germany, Great Britain Sweden, Denmark, Austria, Belgium, Switzerland, Italy.
Spain, Holland, Finland, Portugal, Norway,
Hong Kong, Thailand. Australia, New
Zealand, Singapore, Kuwait, China. etc.
Note:
To connect the VIEWCAM to a TV which
does not have audio/video jacks, you
must use the supplied A/V pack and the
optional VR-H30RF or VR-X30RF RF con-
verter (see page 59).
_
10 fEJ
--
Page 14
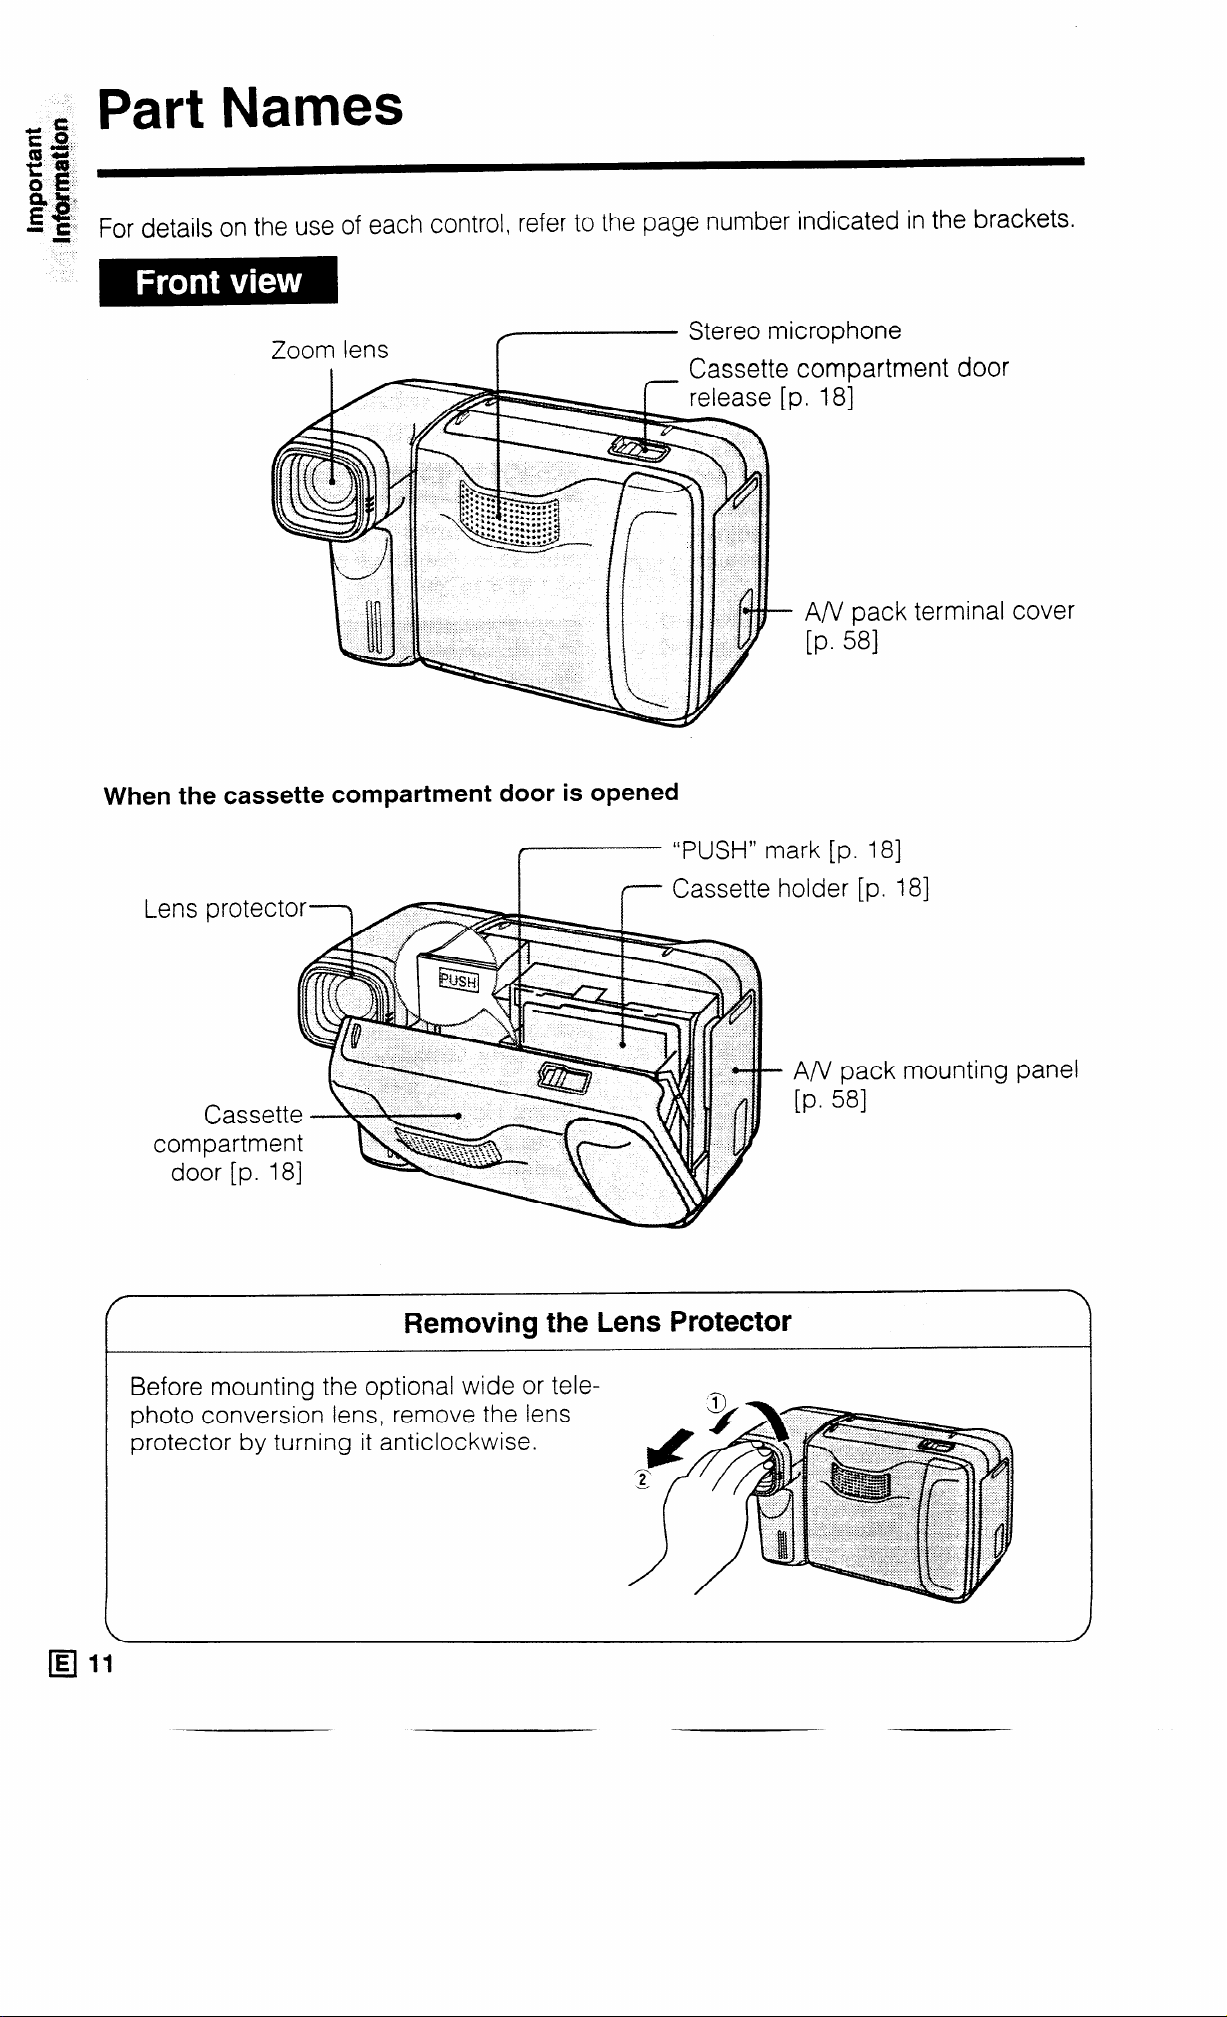
Part Names
For details on the use of each control, refer to the page number indicated in the brackets.
door
ninal cover
When the cassette compartment door is opened
.
.
I
7 Cassette
Removing the Lens Protector
“PI Iw” mark [p. 181
I WWI I I
holder [p. 181
A/V pack mounting panel
[P* 581
Before mounting the optional wide or telephoto conversion lens, remove the lens
protector by turning it anticlockwise.
Page 15
MENU button [p. 191
MODE DISPLAY bt
[Pm 211
Operation button
[P- 191
Photoreceptor
CP* 401
Power Zoom Wide/
Telephoto control
buttons [p. 301
VOLume control
LCD Monitor
I
buttons [p. 411
RECord START/STOP
button [p. 291
PLUG IN POWER
MICrophone jack
(*See note below.)
Cable notch cover [p. 161 SNAPshot button [p. 561
7
ta;PHONES jack [p. 411
Power switch (CAMERA/VCR
Shoulder strap/ban
strap loop [p. 281
select switch) [p. 191
*About the PLUG IN POWER MIC Jack
This external microphone jack outputs a DC voltage of 4.0 V. It is for use with the mrcrophone supplied
with the sports case optional accessory for this VIEWCAM, or with any 2.5-4.0 volt DC use condensertype microphone with a 3.5 mm diameter plug. The use of other types of microphones may result in
damage to the microphone or the VIEWCAM.
When camera module
is rotated
Tripod adaptor s ocket
Fluorescent lamp compartment [p. 621
d
Battery compartment latch
[P* 151
Memory backup battery
compartment [p. 131
Page 16

Preparation
Installing the Memory Backup
Battery
1 Pull out the battery holder from the
memory backup battery compartment on
the bottom of the VIEWCAM, using a
pointed object such as the point of a pen.
2 Insert the supplied lithium battery into the
holder with the + side facing outward.
CAUTION: Danger of explosion if battery is
incorrectly replaced. Replace only with the
same or equivalent type CR2025
recommended by the equipment manufacturer
B KEEP THIS BATTERY AWAY FROM
CHILDREN. IF SWALLOWED, CONSULT A
PHYSICIAN IMMEDIATELY FOR EMERGENCY
TREATMENT.
B BATTERY MAY EXPLODE IF MIS-
USED OR INSTALLED WITH POLARITY
REVERSED. DO NOT RECHARGE, DISAS-
SEMBLE OR DISPOSE OF IN FIRE.
Cautions:
l If the lithium battery is installed with polarity
reversed, the backup function will fail.
l Do not short-circuit. recharge, disassemble, or heat
the battery.
l Should the battery leak, wtpe the battery
compartment clean, and then insert a new battery.
Notes:
The lithtum battery is used to back up the calendar
and other memory functions.
The battery will last about one year of normal usage.
Replace the battery with a new CR2025 cell when
the VIEWCAM’s time indicator starts to fall behind
the correct time.
3 Insert the battery holder back into its
compartment and push it in completely.
installing the Battery in the
Remote Control
1
Hold the remote control
facing down, then pull
out the battery holder
while pressing the tab
toward the centre.
Install the supplied CR2025 lithium battery
2
with its + side matching the @ marked
side of the battery holder.
Insert the holder in the direction of the
3
arrow. Make sure that the @ side faces the
back of the remote control.
4
G?9
w
f
1
0
4
q l3
Page 17
Using the AC Adaptor/Battery
Charger
Precautions:
If used near a radio. the AC adaptor/battery charger
may interfere with reception.
Prevent flammables, liquids, and metal objects from
entering the unit.
This is a sealed unit. Do not attempt to open or
modify it.
Do not damage, drop, or subject the unit to
vibration.
Do not leave the unit in direct sunlight.
Avoid using the unit in humid or extremely hot
places.
If the power source becomes disconnected during
recording, playback, or other operations, the tape
vyill remain wrapped around the drum and may be
damaged. Reconnect the power source to the main
unit immediately.
The supplied AC adaptor/battery charger is
specially designed for use with the VIEWCAM. and
should not be used as a power supply for other
camcorders.
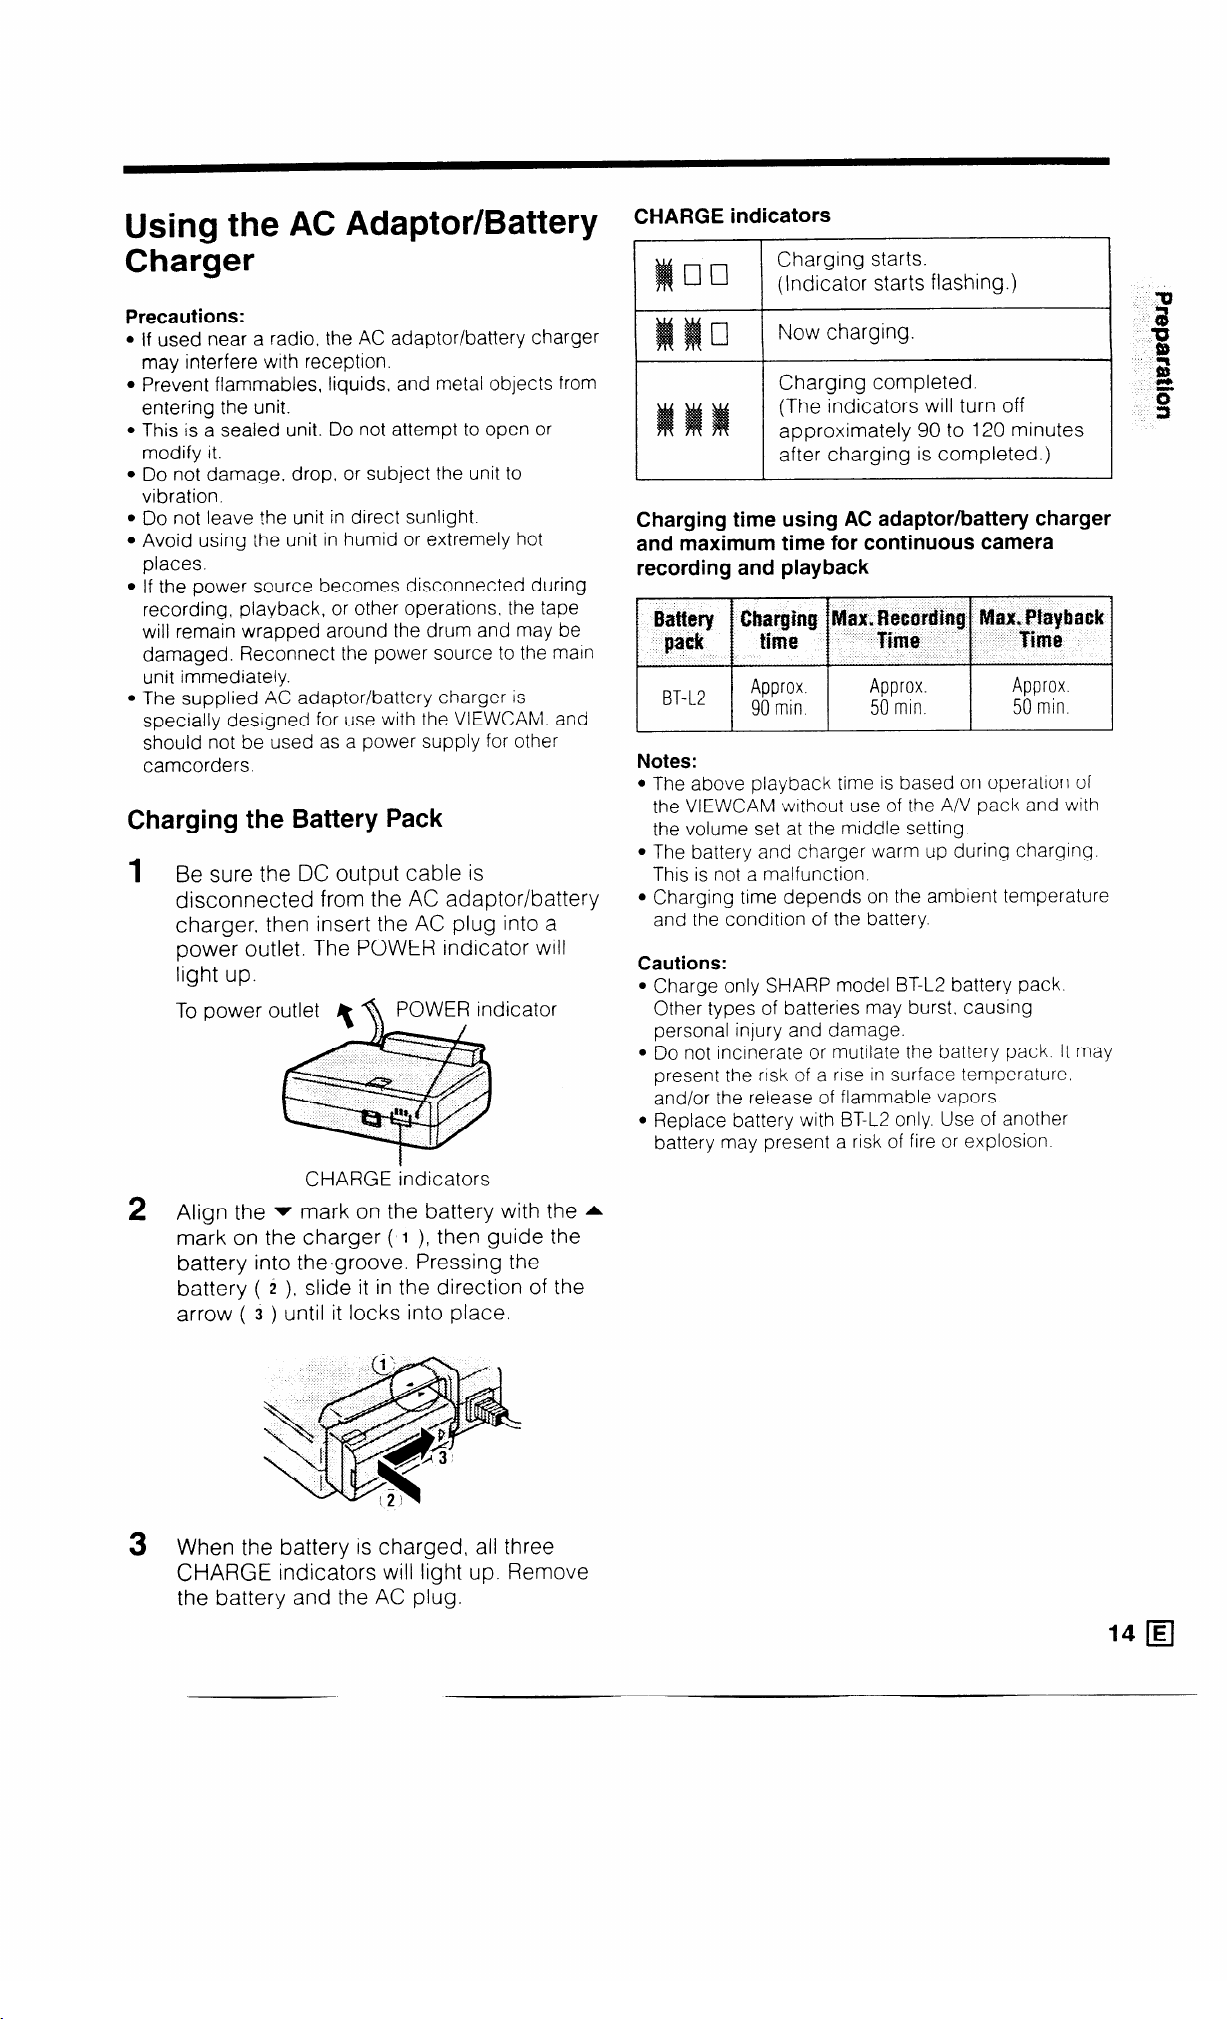
Charging the Battery Pack
1 B e sure the DC output cable is
disconnected from the AC adaptor/battery
charger, then insert the AC plug into a
power outlet. The POWER indicator will
light up.
To power outlet POWER indicator
.
CHARGE indicators
Charging starts.
(Indicator starts flashing.)
Now charging.
Charging completed
(The indicators will turn off
approximately 90 to 120 minutes
after charging is completed.)
Charging time using AC adaptor/battery charger
and maximum time for continuous camera
recording and playback
Notes:
l The above playback time is based on operation of
the VIEWCAM swithout use of the A/V pack and with
the volume set at the middle setting.
l The battery and charger warm up during charging
This is not a malfunction
l Charging time depends on the ambient temperature
and the condition of the battery.
Cautions:
l Charge only SHARP model BT-L2 battery pack.
Other types of batteries may burst, causing
personal injury and damage.
l Do not incinerate or mutilate the battery pack It may
present the rusk of a rise in surface temperature.
and/or the release of flammable vapors.
l Replace battery with BT-L2 only. Use of another
battery may present a risk of fire or explosion
CHARGE indicators
2 Align the v mark on the battery with the A
mark on the charger (‘1 ), then guide the
battery into the,groove. Pressing the
battery ( i ), slide it in the direction of the
arrow ( 3 ) until it locks into place.
3 When the battery is charged, all three
CHARGE indicators will light up. Remove
the battery and the AC plug.
Page 18

Preparation
Inserting and Removing the
Battery Pack
Inserting the Battery Pack
1 Raise the battery compartment latch
on the bottom of the VIEWCAM ( I ),
turn it anticlockwise ( z ) and open the
compartment door ( 3 ).
2 Insert the battery pack into the com-
partment, as shown, and push it in
completely.
3 Close the door ( I ), turn the latch
clockwise to secure it firmly ( C), and
then push down the latch ( 31).
Removing the Battery Pack
Perform step 1 above, then, with the
VIEWCAM facing down, press the battery
release ( 1 b) and remove the battery ($2 I).
Battery release
Cautions:
l BEFORE REMOVING THE BATTERY PACK,
ALWAYS STOP THE TAPE AND TURN THE
POWER OFF. If you remove the battery pack
during recording or playback, the tape will
remain wound around the video head drum and
may be damaged. Should the power source
(battery or adaptor) become disconnected
during operation, reconnect it again immediately.
l Do not expose the battery compartment door to
strong force, as it may come off.
l Be sure to close the battery compartment door
firmly. especially during operations. If you do not,
the battery pack may come off or VIEWCAM
operation may fail because of the poor contact
pressure.
l Remove the battery pack from the VIEWCAM or
disconnect the VIEWCAM from the AC adaptor if
the VIEWCAM will not be used for a long time.
l When removing the battery pack. do not tilt the
VIEWCAM so that the battery compartment faces
down. The battery pack may fall out.
Battery Pack Handling
q 15
4vlake sure that you take enough battery
packs with you to provide two to three
times your estimated recording time.
See page 29.
@Recording time will be reduced in cold
weather.
@The battery will drain in Recording
Standby mode. Turn off the power if you
will not be recording again soon.
Page 19
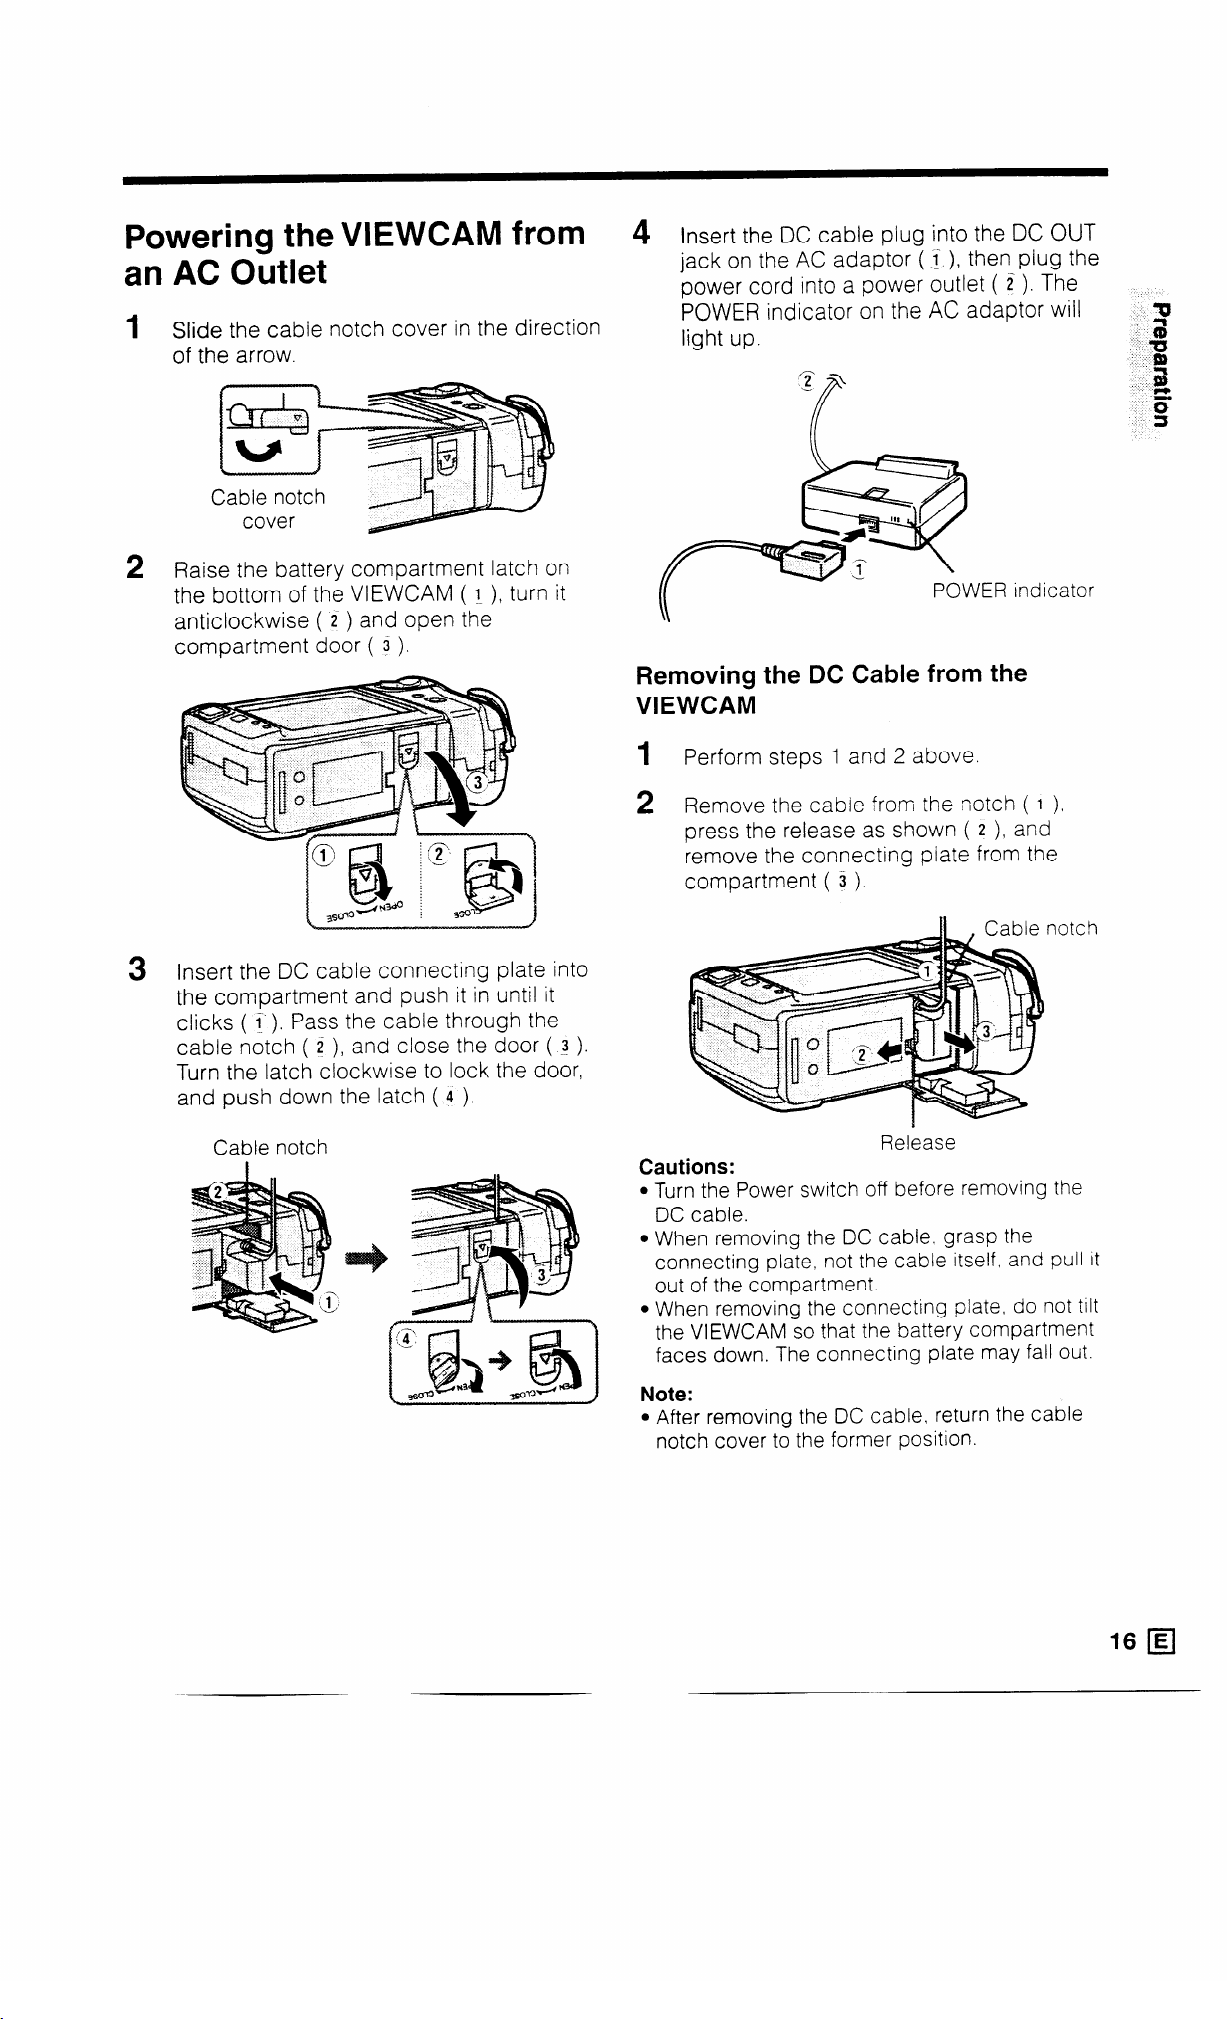
Powering the VIEWCAM from
an AC Outlet
Slide the cable notch cover in the direction
1
of the arrow.
2 Raise the battery compartment latch on
the bottom of the VIEWCAM ( l ), turn it
anticlockwise ( i ) and open the
compartment door ( 3 ).
Insert the DC cable plug into the DC OUT
4
jack on the AC adaptor (1 ), then plug the
power cord into a power outlet ( Z ). The
POWER indicator on the AC adaptor will
light up.
ER indicator
Removing the DC Cable from the
VIEWCAM
1 Perform steps 1 and 2 above.
3 Insert the DC cable connecting plate into
the compartment and push it in until it
clicks ( t ). Pass the cable through the
cable notch ( 2 ), and close the door ( ! ).
Turn the latch clockwise to lock the door,
and push down the latch ( 4 ).
Cable notch
2 Remove the cabie from the notch ( 1 )?
press the release as shown ( 2 ), and
remove the connecting plate from the
compartment ( 3 ).
Release
Cautions:
l Turn the Power switch off before removing the
DC cable.
l When removing the DC cable. grasp the
connecting plate, not the cable itself. and pull It
out of the compartment.
l When removing the connecting plate, do not tilt
the VIEWCAM so that the battery compartment
faces down. The connecting plate may fall out.
Note:
l After removing the DC cable, return the cable
notch cover to the former position.
__
16 q
Page 20
Preparation
Powering the VIEWCAM from
Your Car Battery
Use the optional VR-4 IOCH car battery adaptor/
battery charger (or the VW4 10CA car battery
adaptor) when you want to power the VIEWCAM
from the battery of your car while tt IS idling or
being driven
Slide the cable notch cover in the direction
1
of the arrow.
Cable notch
cover
2 Raise the battery compartment latch on
the bottom of the VIEWCAM ( I ), turn it
anticlockwise ( 2 ) and open the compartment door ( 3 ).
5 Start the car engine and leave it idling,
then insert the power cord plug of the car
battery adaptor into the
cigarette lighter socket.
(The POWER indicator
on the VR-41 OCH will
light up.)
DC cable
Lq
DC OUT jack
To cigarette
lighter socket
Car battery adaptor/
battery charger
*)
W-4 1 OCH
(optional accessory)
POWER indicator
t
or
q 17
Insert the DC cable connecting plate into
3
the compartment and push it in until it
clicks ( I ). Pass the cable through the
cable notch ( z ), and close the door ( 3 ).
Turn the latch clockwise to lock the door,
and push down the latch ( 4 ).
Cable notch
Insert the DC cable plug into the DC OUT
4
jack on the VR410CH (or VR410CA).
Notes:
l See the VR-4 1 OCH (or VR-4 1 OCA) operation
manual for details.
l You can recharge the battery pack by using the
VR-410CH in basically the same manner as the
supplied AC adaptor/battery charger (see page
14).
l The VR-410CA cannot be used to recharge
battery packs.
Cautions:
l Use in only DC 12 V or 24 V negative ground
system cars. Positive-ground car batteries
CANNOT BE USED. Check your car operation
manual or consult a local car dealer.
l Use the VR-410CH (or VR-410CA) only when the
car is idling or being driven. Otherwise, the car’s
battery will be drained.
l Charge only SHARP model BT-L2 battery pack.
Other types of batteries may burst, causing
personal injury and damage.
l Before starting the car engine, the VR-41OCH (or
VR-410CA) must be unplugged from the ciga-
rette lighter socket.
l Before removing either the DC plug or the ciga-
rette lighter plug, the VIEWCAM’s Power switch
should be set to OFF.
l Do not apply strong force to the DC cable
connected to the VIEWCAM as this will cause a
malfunction.
l The battery used in this device may present the
risk of a rise in surface temperature and/or the
release of flammable vapors. Do not incinerate
or mutilate. Replace battery with BT-L2 only. Use
of another battery may present a risk of fire or
explosion.
_
Page 21
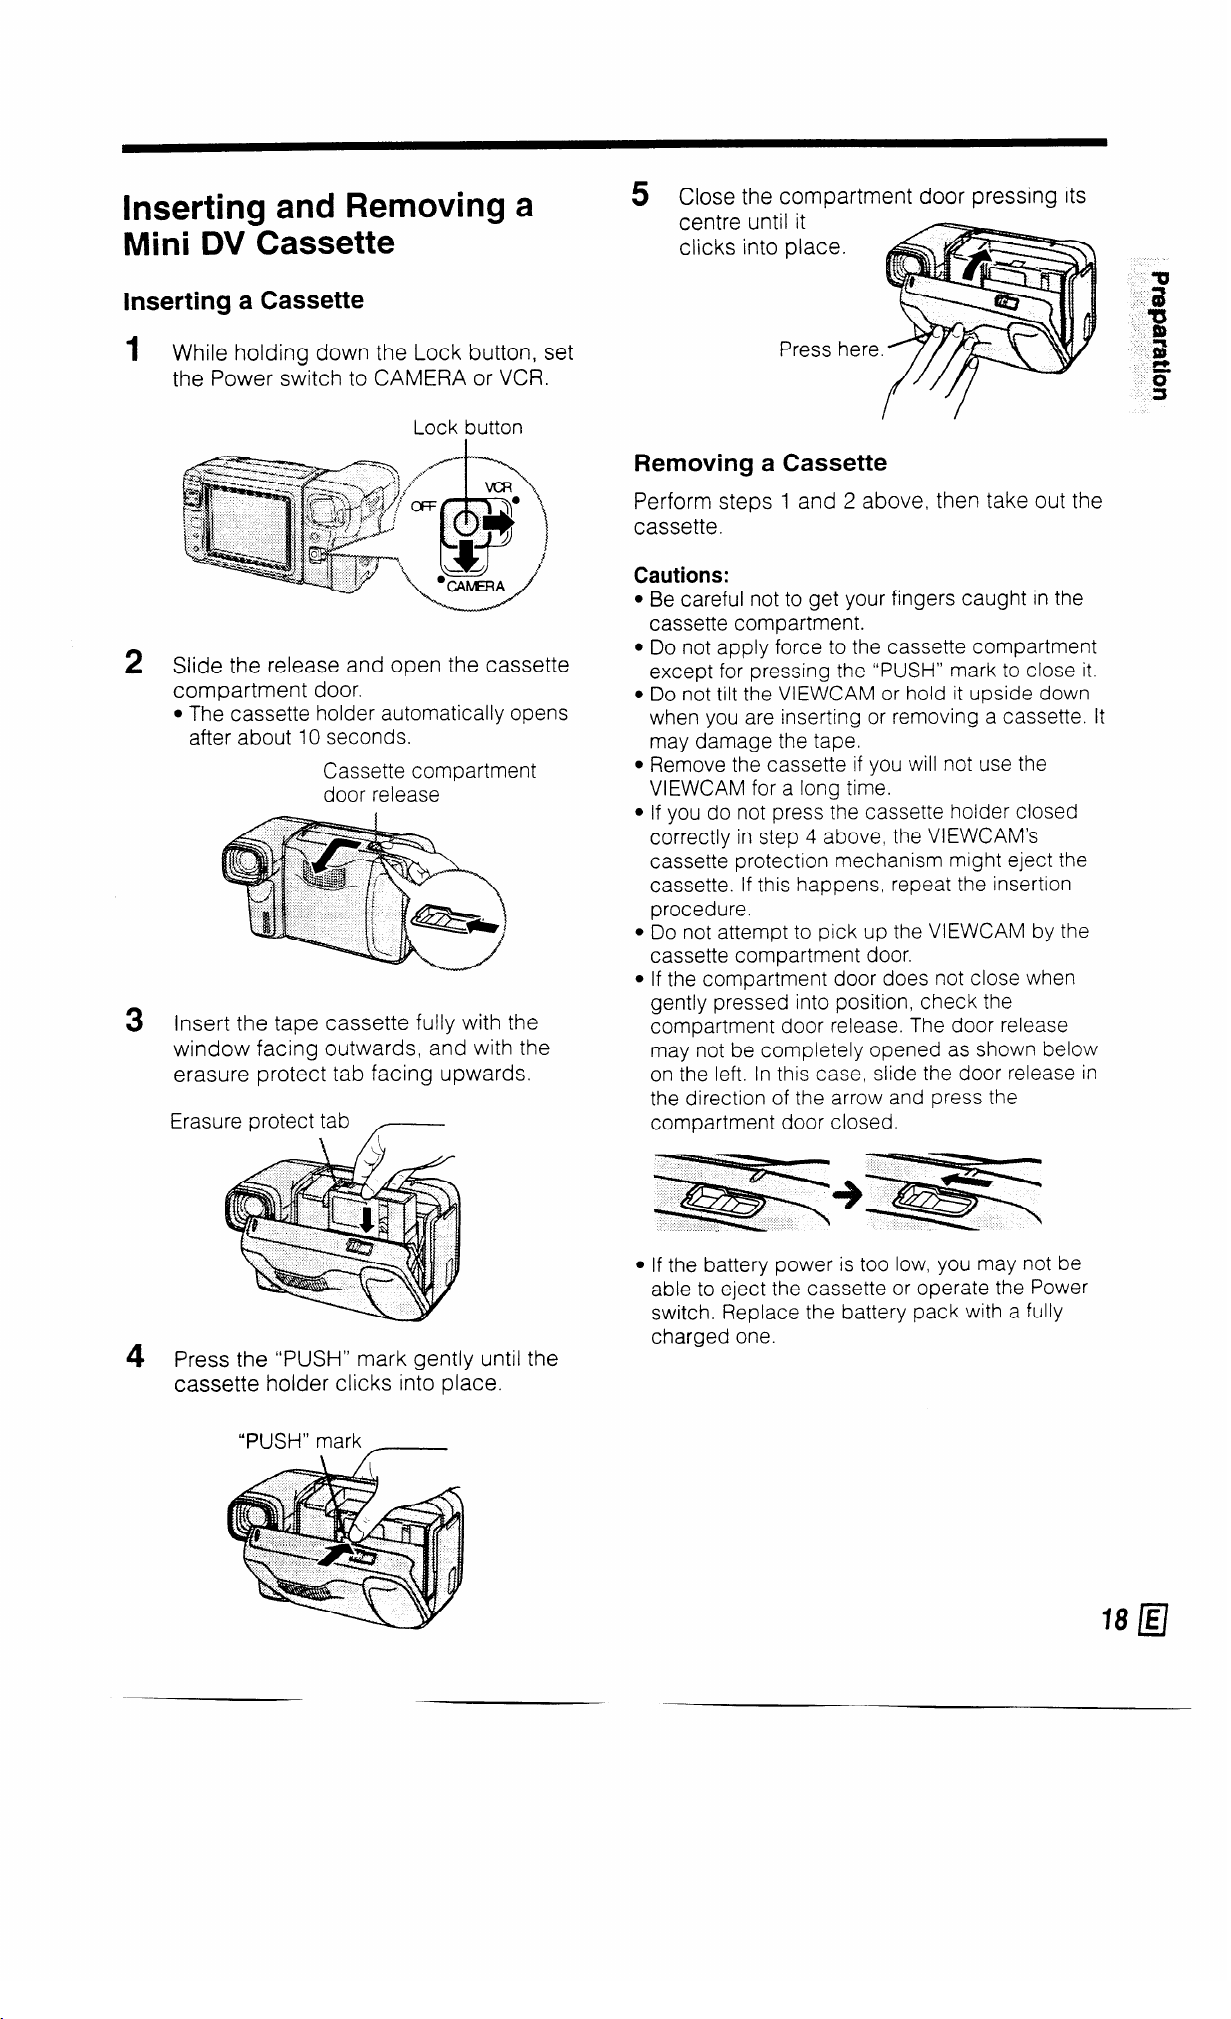
Inserting and Removing a
Mini DV Cassette
Inserting a Cassette
While holding down the Lock button, set
1
the Power switch to CAMERA or VCR.
Lot k button
Slide the release and open the cassette
2
compartment door.
l The cassette holder automatically opens
after about IO seconds.
Cassette compartment
door release
3 Insert the tape cassette fully with the
window facing outwards, and with the
erasure protect tab facing upwards.
Erasure protect tab
5 Close the compartment door pressing its
centre until it
clicks into place.
Removing a Cassette
Perform steps 1 and 2 above, then take out the
cassette.
Cautions:
Be careful not to get your fingers caught in the
cassette compartment.
Do not apply force to the cassette compartment
except for pressing the “PUSH” mark to close it.
Do not tilt the VIEWCAM or hold it upside down
when you are inserting or removing a cassette. It
may damage the tape.
Remove the cassette if you will not use the
VIEWCAM for a long time.
If you do not press the cassette holder closed
correctly in step 4 above, the VIEWCAM’s
cassette protection mechanism might eject the
cassette. If this happens, repeat the insertion
procedure.
Do not attempt to pick up the VIEWCAM by the
cassette compartment door.
If the compartment door does not close when
gently pressed into position, check the
compartment door release. The door release
may not be completely opened as shown below
on the left. In this case, slide the door release in
the direction of the arrow and press the
compartment door closed.
4 Press the “PUSH” mark gently until the
cassette holder clicks into place.
“PUSH” mark
_
l If the battery power is too low, you may not be
able to eject the cassette or operate the Power
switch. Replace the battery pack with a fully
charged one.
Page 22
Preparation
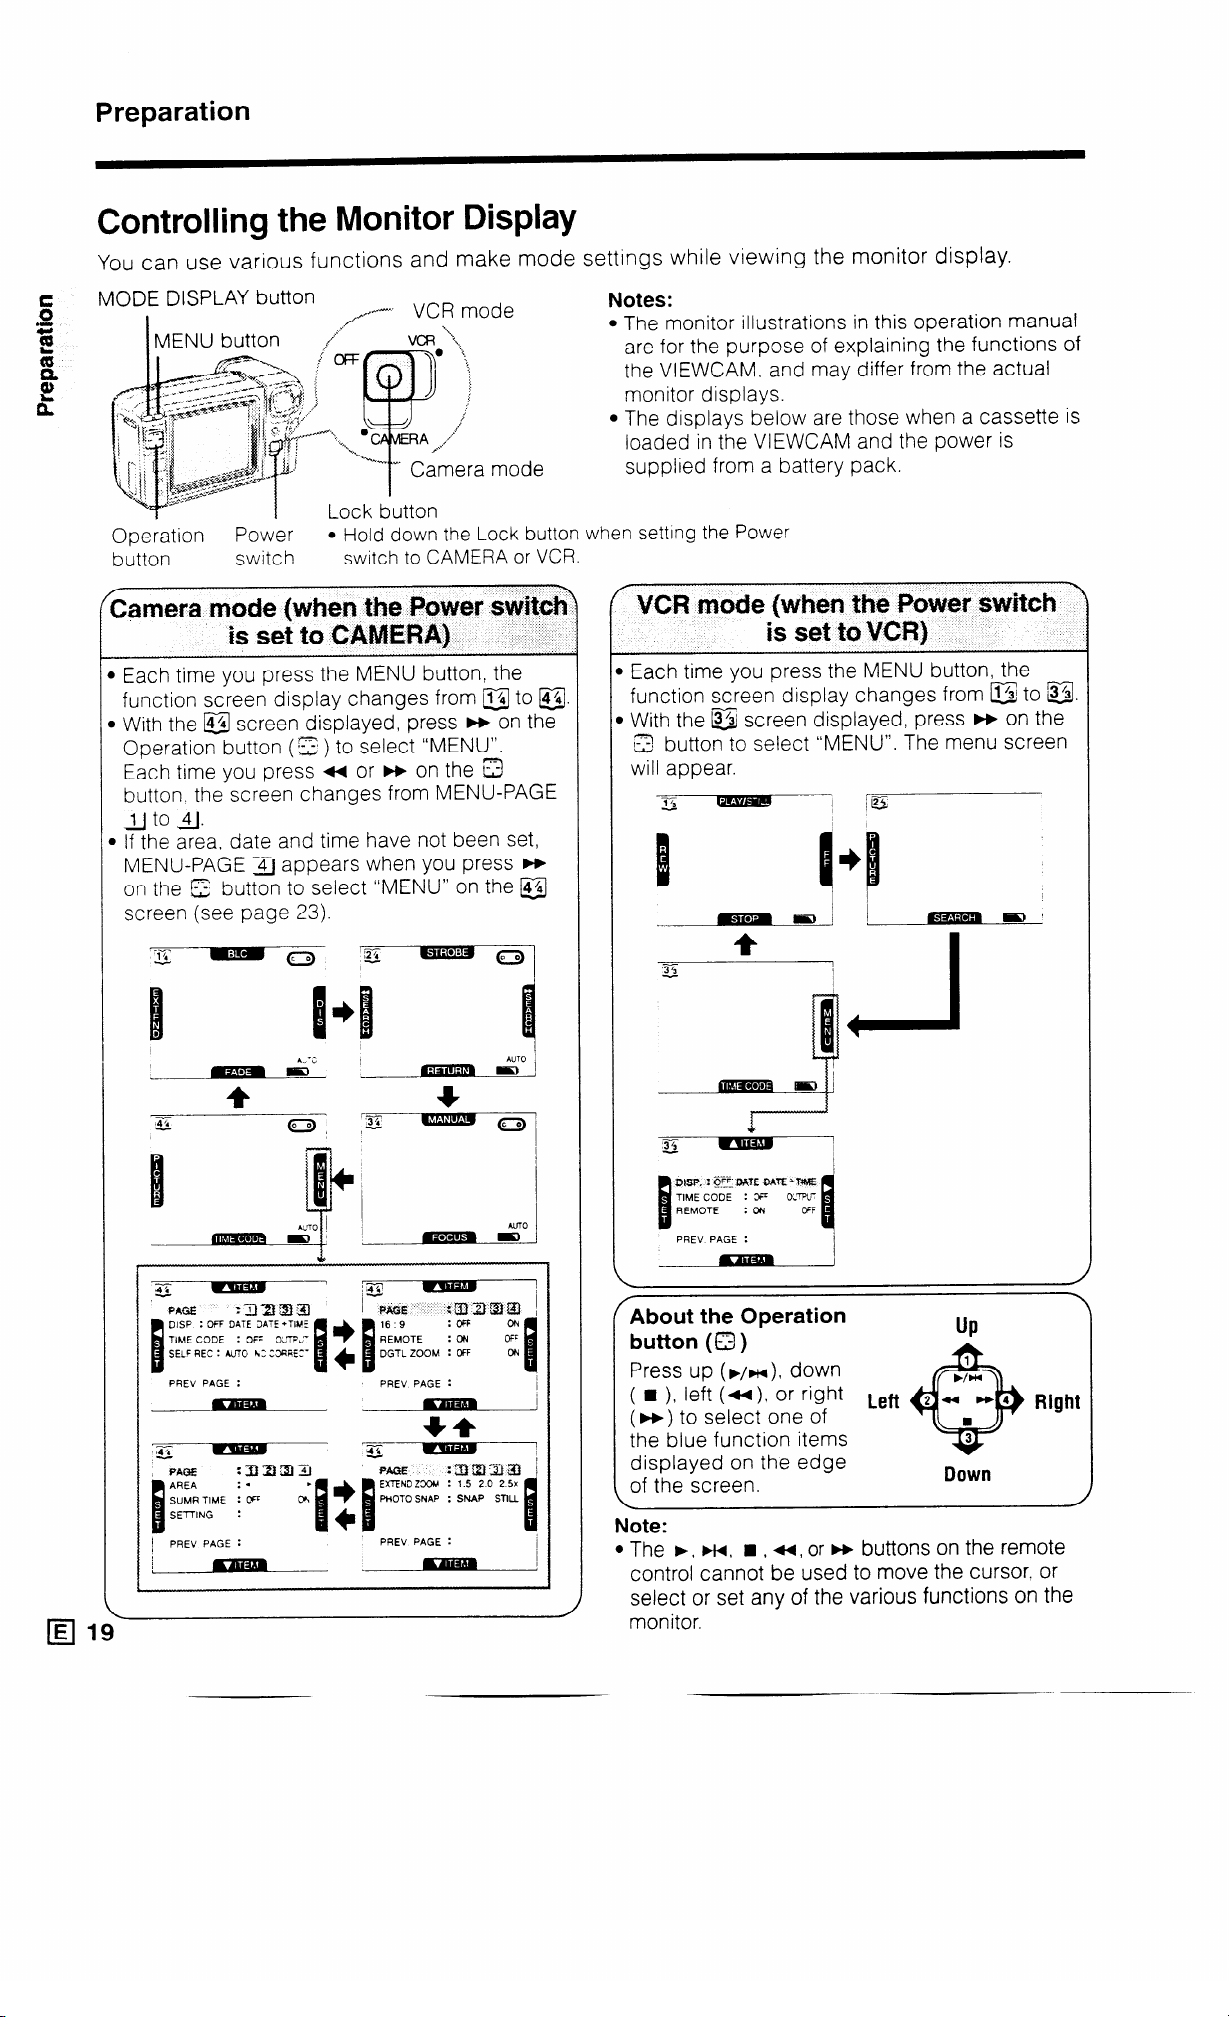
Controlling the Monitor Display
You can use various functions and make mode
settings while viewing the monitor display.
MODE DISPLAY button
I Lock button
Operation
button
/
Power l Hold down the Lock button when setting the Power
switch
switch to CAMERA or VCR.
Camera mode (when the Power swiG?
is set to CAMERA)
1 Each time you press the MENU button, the
function screen display changes from a to a.
) With the @ screen displayed, press m on the
Operation button (
Each time you press ++ or w on the 3
button. the screen changes from MENU-PAGE
lJ to 4j.
) If the area, date and time have not been set,
MENU-PAGE 41 appears when you press w
on the E button to select “MENU” on the @
screen (see page 23).
*z) to select “MENU”.
Notes:
l The monitor illustrations in this operation manual
are for the purpose of explaining the functions of
the VIEWCAM. and may differ from the actual
monitor displays.
l The displays below are those when a cassette is
loaded in the VIEWCAM and the power is
supplied from a battery pack.
Y
VCR mode (when the Power switch
is set to VCR}
Each time you press the MENU button, the
function screen display changes from B to @.
1 With the @ screen displayed, press w on the
12 button to select “MENU”. The menu screen
will appear.
I
lil
\
E 1~
El
PAEV PAGE :
PREV PAGE :
PREV PAGE :
FAbout the Operation
button (Q)
Press up (F/H), down
( n )l left (44 ). Or right Left
(w) to select one of
the blue function items
displayed on the edge
of the screen.
Note:
l The b, FH, H , u, or H buttons on the remote
Dcim
control cannot be used to move the cursor. or
select or set any of the various functions on the
monitor.
Page 23

Using the On-screen Menu
1 In Camera mode 1
1 To display the Camera
mode menu screen:
Hold down the Lock button OFF
and slide the Power switch
to CAMERA.
Then perform steps 2-4.
2 Press the MENU button until @j screen
appears on the monitor.
MODE
DISPLAY MENU
a2
sr
,.
C”‘ \.,
,!
i /
/ ;
:
Lock button
f-l-7
y”
4 Press left (a) or right (m) edge on the
Operation button (0 ) to change from
MENU-PAGE iiJ to 141.
MENU- 3
PAGEla !j
*:.. (
,’
:..$_ (
,_.--_._
’ ,‘.M \
id4 H
\. . ..r. . . . . . . ,/
p
Operation
button
MENUPAGE 12
DGTL ZOOM : OFF
MENUPAGE :a
: SNAP STILL
=u
=
g
3 Press w on the Operation button (a) to
select “MENU”. MENU-PAGE iiJ will
appear on the monitor.
I
Operation
button
Note:
l If the area, date and time have not been set,
MENU-PAGE i4) appears first. Refer to page
23 to set them.
PREV PAGE :
MENUPAGE &J
SUMR TIME : ;FF
SETTING :
PREV PAGE :
5 Press top (b/w) or bottom ( n ) edge on
the Q button to select the menu item
highlighted in light blue colour.
QISP. :#%F; DATE DATE ‘TIME
: OFF OUTPUT
SELF REC : AUTO NO CORRECT
PREV PAGE :
6 Press M or w on the 0 button to set the
desired mode.
l Each time you press the button. the [tern
setting changes as shown below
7 After completing the setting, press the
MENU button. The menu screen will
disappear.
Page 24

Preparation
e 1 To display the VCR
0
s
t
41
mode menu screen: ,
Hold down the Lock
button and slide the
Power switch to VCR.
Then perform steps
2 and 3.
2 Press the MENU button until &I screen
appears on the monitor.
OFF
Notes:
Certain menu items are common to both the Camera
and VCR modes. If the “REMOTE” menu item, for
example. is set to “OFF” in the Camera mode, it will
automatically be set to “OFF” in the VCR mode.
The menu screen cannot be displayed when the
VIEWCAM is recording.
To turn off the menu display, press the MENU button
or MODE DISPLAY button. When the MENU button
is pressed, the menu screen will disappear and the
@ screen will be displayed. When the MODE
DISPLAY button is pressed, operation indicators will
disappear. Press it again to display the indicators.
Returning to the Previous Screen
MODE
DISPLAY MENU
Press w on the Operation button (a) to
select “MENU”. The menu display will
appear on the monitor.
Operation
button
WSP. : @Ffl DATE DM’E+T#dE
TIME CODE : OFF OUTPUT
Press H on the Operation button 8 to select .
“PREV PAGE” and then press * or w to select
“SET” to return to the previous screen.
Ex. Camera mode
Operation
DISP : OFF DATE DATE +TIME
: OFF OUTPUT
SELF REC : AUTO NO CORRECT
IE/ 21
4 After completing the setting, press the
MENU button. The menu screen will
disappear.
Page 25

Warning Indicators
EJECTTHECASSE'llE. EJECTTHECASSEllE.
DEW
-b ii-
. ...*...
INSERTACASSEllE.
~ROT'ECT. GAB-
,' <.
THETAPEENDSSOON.
@zl
The video cassette is defective and should be
removed.
Dew has formed inside the VIEWCAM. Wait for a few
hours until the dew disappears (see page 6).
About 10 seconds after this warning appears, the
VIEWCAM turns off, and the display goes off too.
The battery is almost depleted.
Note: Operation of the zoom may interrupt the
VIEWCAM power. Replace the battery pack.
The video heads are clogged and should be
cleaned (see page 6).
There is no tape cassette in the VIEWCAM.
Load a cassette.
The red erasure protect tab in the video cassette
has been slid to the record-protect position, preventing recording.
The tape is about to end. Get ready to load a new
cassette.
CHANGETHECASSEllE.
TAPE END
REPLACETHELAMP. REPLACETHELAMP.
!
0
Note:
\I/
l -
- indicates a blinking display.
’ I x
0
!
The tape has reached its end.
Load a new cassette.
The fluorescent lamp behind the LCD monitor is
close to the end of its service life. Replace it with a
new one (see page 62). The LCD monitor turns off
about 1 minute after this warning is displayed.
During Self Recording mode, every warning indicator is replaced by a “@” indicator displayed in
the centre of the monitor. To check the meaning of
the warning, rotate the monitor back to the normal
position.
Page 26

Preparation
Setting the Area, Date and
Time
Example:
Setttng the date to 2 June 1997 (2.6.1997) and the
time to 10.30 am (10:30) in Hong Kong.
Notes:
l Check that the memory backup lithium battery has
been Installed before setting the date and time.
l The date and time, once set, are stored in memory.
1 Set the Power switch to CAMERA, then
press the MENU button until a appears
on the monitor (Camera mode).
L
__-
2 Press b on the Operation button (a ) to
select “MENU”. The MENU-PAGE 141
appears.
~~~~~
4 Press n on the 0 button to select
“SETTING” ( I ), then press w to select
“SET” ( 2 ).
PAGE
AREA
SUMR TIME : OFF
ISETTING’ : 1. 1.1996
s ----
:uuJJij,J
:-SHNGKNG l
ON
o:oo
s
2 ~/~~~;+%~qj
5 Press ww or n on the Q button to select
“2.” (day), and press W.
SETTING : 2.jl1996
0:oo
6 Press ./HI or n on the 0 button to select
“6.” (month), and press W.
SETTING : 2. s.b996]
0:oo
7 Press ./HI or n on the a button to select
“ 1997” (year), and press W.
Operation button
l If the date and time have been set, the
MENU-PAGE Ll appears. Press w on the
Q button to select PAGE ‘&.I.
3 Move the light blue highlighted bar to
“AREA” by pressing the n on the Opera-
tion button ( I ), then press ++ or w until
“9 HNGKNG” (Hong Kong) appears ( 2 ).
PAGE
nm3
SUMR TIME : OFF
l See the time zone chart on page 25 and
the area table on page 26 for area num-
bers and representative cities for each
time zone.
:UU2J&l
: 4.
i
Oh
d
SETTING : 2. 6.1997
[__Q 0 0
8 Press ./HI or n on the 0 button to select
“10” (hour), and press W.
SETTING : 2. 6.1997
10:~
9 Press WH or n on the 0 button to select
“30” (minutes), and press W.
The date and time settings are now complete.
ToTurn Off the Menu Display
Press the MENU button.
Notes:
l The internal clock starts operating when w on the
0 button is pressed in step 9 above.
l When the tape cassette is inside, if no settings are
made within 5 minutes after the menu display appears, the display is automatically cancelled.
Page 27

World Clock
This VIEWCAM is equipped with a world clock
feature. It allows you to easily adjust the time when
you use the VIEWCAM while travelling anywhere in
the world outside your home time zone.
Set the area, date and time if they are not already
set. (See page 23.)
MENU button
4 Press F+ on the Q button to select
PAGE 14.
Press n to select “AREA”.
5
Press ++ or m until “8 BANGKOK”
6
appears. The VIEWCAM is now set to
the Bangkok time.
Press the MENU button to turn off the
menu.
Operation button
Changing the Area of theTime Zone
Example:
Changing the area from Hong Kong to Bangkok.
1
Hold down the Lock
button and slide the
Lock button
oR
Power switch to
CAMERA.
Press the MENU button until l$3J appears
2
1 ,
\
on the monitor.
MODE
DISPLAY MENU
=Fj?
/ !
/ {‘
!
Blank Area Setting
If you do not want to set the area (time
zone), you can leave the setting blank.
In step 6 above, press ++ or m on the
a button until the area setting is blank
(after “24”).
To turn off the menu display
Press the MENU button.
Press m on the Operation button (0) to
3
select “MENU”.
24 q
Page 28

Preparation
To Display Area, Date and Time on the
Monitor
c
0
c,
(d
Q)
a’
1
3 2P
3
4 Press the MENU button to turn off the
Refer to page 20 to display function
screen a and select MENU-PAGE lj_J.
ress w on the Operation button (0 ) to
select “DISP.“.
Press w or w on the 0 button to select
“DATE” or “DATE+TIME”.
menu display. The area, date and time
will be displayed on the monitor.
Setting Summer Time (Daylight Saving
Time)
1 Refer to page 20 to display function
screen &/ and select MENU-PAGE IjJ.
Press w on the Operation button (Q ) to
select MENU-PAGE 14.
2 Press q on the 0 button to select
“SUMR TIME”.
3 Press w to select “ON”. The time auto-
matically changes to summer time.
DISPLAY MENU
Time Zone Chart
4 Press the MENU button to turn off the
menu display. The ” -:4. ” mark will be dis-
played to the left of the area indicator.
To reset to standard time, set the “SUMR
TIME” menu
item to “OFF”.
q 25
Area
Number
Page 29

Area Table
1
2
3 CAIRO Egypt, Finland. Greece, Turkey
4
I
5
6 KARACHI Maldives, Pakistan
7
8 BANGKOK Cambodia, Indonesia (Jakarta), Thailand. Vietnam
9
10 TOKYO Japan, Korea
11 SYDNEY
LONDON
PARIS
MOSCOW
I
DUBAI
DACCA
HNGKNG Australia (Perth), China, Hong Kong, Indonesia (Borneo, Bali), Malaysia,
England, Morocco, GMT (Greenwich mean time)
Austria, France. Germany, Italy. Netherlands, Spain, Sweden,
Switzerland, Portugal, CST (Continental Standard Time), Tunisia
Ethiopia, Iraq, Kenya, Mauritius, Saudi Arabia, Seychelles. Russia
(Moscow)
I
United Arab Emirates
Bangladesh, India, Myanmar
Philippines, Singapore, Taiwan
Australia (Sydney)
12 SOLOMON New Caledonia
13
14
15
16
17 L.A. U.S.A. (Los Angeles San Francisco), PST (Pacific Standard Time)
18
I
19
20
21
22
23
WLLNGTN Fiji, New Zealand
SAMOA Western Samoa
HAWAII
ANCHRGE U.S.A. (Alaska), AST (Alaska Standard Time)
DENVER
1 CHICAGO 1 Mexico, U.S.A. (Chicago), CST (Central Standard Time)
NEWYORK
CARACAS Chile, Dominica, Venezuela
RIO
FN ISL.
Hawaii Is., Tahiti, HST (Hawaii Standard Time)
U.S.A. (Denver), MST (Mountain Standard Time)
Canada (Montreal), Jamaica, Peru, U.S.A. (New York, Washington DC >,
EST (Eastern Standard Time)
Argentina, Brazil, Uruguay
Fernando de Noronha
24
* These are common names. The formal may be different.
AZORES
Azores Islands
26 q
Page 30

Preparation
Picture/Backlight Adjustments
MENU button
Operation button
If the picture is difficult to see due to ambient
lighting, etc., adjust the monitor picture.
ress
5 P
++ or FF to adjust the picture or
backlight to your preference.
1 Set the Power switch
oFFc-y*
to CAMERA.
‘1
‘1
1.
2 Press the MENU button until function
screen @ appears on the monitor.
MODE
DISPLAY MENU
3 Press t( on the Operation button (0) to
select “PICTURE”.
6 When you are finished, press the MENU
button to turn off the adjustment display.
When theVIEWCAM is in VCR Mode
Press the MENU button until @ appears on the
monitor. Then perform steps 3 through 6 shown
above.
Notes:
l In bright daylight, the monitor picture will be
easier to see if you set the backlight (“BACKLIGHT”) to “BRIGHT”.
l The picture adjustments have been factory pre-
set to neutral settings, and the backlight mode
(“BACKLIGHT”) has been factory preset to normal (“NORM.“).
l When the colour is adjusted, the picture on the
screen may differ from the picture actually
recorded. Do not change the colour settings
unless it is necessary.
4 Press n or ./HI on the 0 button to
select the menu item you wish to adjust.
PREV PAGE :
q 27
Page 31

Using the Hand Strap
1 Thread the narrow end of the
hand strap through the VIEWCAM’s hand strap eyelet.
Then pass the wide end of
the strap through the narrow
loop at the other end
2 Pull the
wide end
and tighten
the strap.
Fixing the Hand Strap on Your Wrist
Pass your right hand through the loop of the hand
strap. Then move the slider toward your wrist
until the strap
fits your wrist
snugly.
Caution:
l Be careful not to drop the VIEWCAM when
attaching the hand strap. or during operation
Slider
Attaching the Shoulder Strap
Hold one end of the strap and thread it
1
through the loop below the speaker on the
lens section.
Note:
l If the hand strap is attached to the loop.
remove it first.
Thread the end of the strap through the long
2
slider and move the long slider in the direction of the arrow to secure
Loosen the buckle, and then pass the strap
3
through it.
Draw the strap in the direction of
4
( 1 ). and then secure the end of
with the short slider ( 2 ).
r
a-8 Use the same procedure to at
other end of the stra
speaker.
;
u
3 to the loop above the
the arrow
the strap
tach the
Using the Tripod Adaptor
When you use the VIEWCAM with a tripod, you
must first attach the supplied tripod adaptor to
the VIEWCAM.
Raise the adaptor’s screw latch, and turn the
latch clockwise to firmly fix the screw into the
VIEWCAM’s tripod adaptor socket.
l To connect your tripod to the tripod adaptor,
firmly fix the mounting plate screw of your
tripod into the adaptor’s tripod socket. For
details, see the user’s manual for your tripod
Loop
6
Long
slider
Buckle
Short
slider
Screw latch-
Sirew
Caution:
- DO not connect your tripod to the VIEWCAM
without using the tripod adaptor. The tripod may
not balance properly and fall over, resulting in
serious damage to the VIEWCAM.
Handling the LCD Monitor
l DO not let anything press against the monitor
screen, and do not expose it to shock as it may
break.
l 00 not put the VIEWCAM on a table, or any other
surface, with the monitor screen facing down
l Use a soft cloth to clean the screerl
28 q
Page 32

Basic Operations
Camera Recording
l Refer to pages 19-21 on how to operate
the monitor display.
Unlike conventional camcorders, this model frees
you from having to peer into a small viewfinder.
You can watch the subject on the large LCD
monitor screen for easier. more enjoyable videoshooting.
Easy Camera Recording with
Full Auto
Before you start recording. perform the operations
Kz!
.G 2
58
%g 1
22
‘g E
mb
described on pages 13 through 28 to prepare your
VIEWCAM for recording.
Hold down the lock button and slide the
Power switch to CAMERA.
l The picture from the lens is now displayed
on the LCD monitor.
Function indicator
ToTurn the Power Off
Slide the Power switch to OFF
without pressing the Lock
button.
Notes:
l To leave Camera Recording mode, set the Power
switch to OFF
l Durrng Camera Recording mode, the speaker is off.
and the PHONES (earphones) jack cannot be used.
l If the VIEWCAM IS kept in Recording Standby mode
for more than approximately 5 mtnutes. the power
will automatrcally turn off to save battery power and
to protect the tape from being damaged To
continue recordrng after thrs, set the Power swrtch to
OFF. and then back to CAMERA again.
l If you WIII not be recording again for a while. turn the
power off This will make the battery last longer.
l The operation indicators can be turned off or back
on again with the MODE DISPLAY button
l The date and time, once set, will be internally
recorded even if they do not appear on the screen.
You can also turn them on or off on the screen. See
page 25 for details.
OTr
“AUTO” appears.
2 Press the REC START/STOP button to start
recording.
Note:
l When you set the Power switch to CAMERA, it
may take some time before the screen appears.
Wait until the screen appears, then start operation
To Pause Recording
Press the REC START/STOP button again.
Recording pauses, and the VIEWCAM enters
Recording Standby mode.
Maximum Time for Continuous Camera
Recording and Playback
BaUery pack Max. camera
tecotiing time
I
BT-L2 Approx 50 min.
Notes:
l The use of the zoom and other functions will
accelerate power consumption. The actual
recording time per battery pack may be 30%50% less than the maximum camera recording
time shown above.
l The above playback time is based on operation of
the VIEWCAM without use of the A/V pack and with
the volume set at the middle setting.
Approx. 50 min.
Page 33

Zooming
Zooming allows you to move visually closer to or
farther from a subject without physically changing
your position.
Zooming in (when you want to centre
attention on the subject)
Tele-
photo
Zooming out (when you want to
show the surroundings)
To Zoom In
Press the Power Zoom T (telephoto) button to get
a close-up view ( 1 ).
To Zoom Out
Press the Power Zoom W (wide angle) button to
wide field of view ( 2 )
get a
. . . ... . ... I__
1
Press the MENU button until function
screen @ appears on the monitor
(Camera mode).
MODE
DISPLAY MENU
2
Press w on the Operation button (0) to
/3J
select “MENU”.
Operation button
Press w on the 0 button to select
3
MENU-PAGE ia ( I ), then press n to
select “DGTL ZOOM” ( 2 ).
Qo)
$?m
3 ff:
95
I
1 w-
l The zoom speed changes depending on the
ZOOM 1
&.-x-.-T 1
Power Zoom
buttons
degree of pressure placed on the Power Zoom
buttons.
l The on-screen display will show you the current
zoom setting.
Notes:
l The VIEWCAM is unable to focus when zooming
in on subjects within 1.5 m. The VIEWCAM will
automatically zoom out until it focuses on the
subject.
l Frequent zooming produces unattractive
pictures. It also increases battery power
consumption
Setting the Digital Zoom
You can select between two different zoom
ranges: l-l 2 x optical zoom or 12-30 x digital
zoom. The 12-30 x digital zoom allows you to
record powerful close-up pictures with the same
operation as normal zooming. The zoom range
is factory preset to 1-12 x optical zoom. In the
12-30 x zoom range, the picture quality may
suffer slightly
16 9
REMOTE
DGTL ZOOM : :FF
4
Press w to select “ON”.
The digital zoom is now on. Press the
5
: 3FF
: ON
ON
OFF
ON
MENU button to turn off the menu.
To return to normal zoom, set “DGTL ZOOM”
to “OFF” in step 4 above.
Note:
l When the digital zoom is used, the picture quali-
ty may suffer. At maximum zoom. the horizontal
resolution decreases by a maximum of 60% of
the optical zoom.
Page 34

Basic Operations
Camera Recording
Digital Quick Zoom (Extend
Zoom)
Use the digital quick zoom function (extend zoom)
to instantly zoom in on a subject This is useful
when you want to Instantly capture a particular
subject.
Setting the Digital Quick Zoom
Ranges
Refer to page 20 to display function screen @
and select MENU-PAGE ‘3, and then press w on
the Operation button (0) to select “EXTEND
ZOOM”.
Press u or w on the 0 button to select “15’,
PHOTO SNAP
Using Digital Quick Zoom (Extend
Zoom)
1 Press the MENU button until @l appears on
the monitor
(Camera
mode).
Auto Focus
The auto focus feature is designed to focus on
most types of subjects. In Auto Focus mode,
the VIEWCAM automatically focuses on
whatever is in the centre of the scene. Always
keep the subject in the centre of the
screen.The auto focus may not be able to
focus on the subject in the situations shown in
the chart. In such situations, set the VIEWCAM
to Manual Focus mode and focus manually
(see page 52).
Fast r~~~vir~g subject
Subject lias vertical or
I lorlzontal strioes
Backgrourld is too bright
Subject IS being shot tllrough
a
dlrtv or wet wlndow
2 D
To return to the previous magnification, press
M on the 0 button to select “-ND” again.
Notes:
l When the digital quick zoom is used. the picture quality
l The digital quick zoom (extend zoom) function does not
l When the extend zoom is on with the optlcal zoom at
uring recording. press ++ on the
Operation button (a) to select “EXTEND”
when you want to instantly zoom in on a
subject.
Operation button I@
“EXTEND 1.5 x “,
“EXTEND 2.5 x ” is displayed.
decreases by a maximum of 60% of the optical zoom.
work in the dlgttal zoom (12-30 y ) range (“EXTEND” IS
faintly displayed.)
12x. 1.5x becomes 18y,2Oy becomes24x.and
2.5 x becomes 30 Y
I
“EXTEND 2.0 x ” or
H 31
:
w gJ?j
Llgllt reflects off the subject
Subject has fine. repeated
patterns
High speed shutter bemg
used under fluorescent
Itqhtmq
Notes:
If no subject IS in the centre of the monttor, the focus
area will expand and the subject nearest the centre
will be focused on.
If no subject is displayed on the monitor, the
VIEWCAM will automatically zoom out until some
subject comes into the frame.
If the image being recorded is not sharp, the auto
focus may not function and the Image will be blurred.
If this occurs, press the Power Zoom W button to
zoom out, or pan the VIEWCAM to shoot some other
subject The auto focus will resume operation.
rwo s(qects ai dlfferent dtstance:
overlap In the same scene
SXY=C!S a: different distances
,L
appear IIT the centre of the scene
a! tne same time
Page 35

Backlight Compensation
Gain-up (Cat’s Eye)
WC)
When the subject is backlit, the image will be
darkened if it is recorded normally. Use the
backlight compensation (BLC) feature to
improve the picture.
Press the MENU button until u appears
1
on the monitor (Camera mode).
Note:
l At locations where lighting is insufficient,
“LIGHT” appears on the monitor. “GAINUP” instead of “BLC” appears indicating
the BLC function cannot be used.
Press ,/~1 on the Operation button (a)
2
to select “BLC”. The backlight compen-
sation indicator I‘m” appears on the moni
tor, indicating that the BLC function is
now working.
When you are recording in a dark or poorly
illuminated location, “LIGHT” (warning of too
little ambient illumination) is displayed on the
monitor. Use the gain-up feature to record a
brighter picture.
1 Press the MENU button until @I appears on
the monitor (Camera mode).
Note:
l At locations where lighting is adequate. the
“LIGHT” indicator will not appear. “BLC”
instead of “GAIN-UP” appears indicating
the gain-up function cannot be used.
2 Press F/HI on the Operation button (Q )
to select “GAIN-UP”. The “LIGHT” display
changes to the gain-up (cat’s eye)
display “ :PB”,
function is now working.
indicating that the gain-up
+
:
0
D
a
B
m
Operation
button
To turn off the BLC function, press ä /HI on the
0 button to select “BLC” again. The I‘m” indi-
cator goes off.
F”Fd
a
LIGHT
Operation
button
To turn off the gain-up function press b/m on
the 8 button to select “GAIN-UP” again. The
“T;D(I~” display changes to the “LIGHT” display.
Notes:
l If the VIEWCAM is moved to a bright location
after it is engaged in Gain-up mode, the Gain-up
mode will disengage automatically.
l There is more picture noise in Gain-up mode
7
Page 36

Basic Operations
Camera Recording
Digital Image Stabilization
(DW
The DIS function lets you stabilize the image by
electronically cancelling relatively small image
shakes that are often annoying in close-up
shots.
1 Press the MENU button until u appears
on the monitor (Camera mode).
DISPLAY MENU
2 Press m on the Operation button (0 ) to
select “DIY. The ” Ii ” indicator appears
on the monitor, and the VIEWCAM enters
DIS mode.
Caution:
l The DIS function cannot compensate for excessive
Image shake. or for the subjects or situations
described below.
Subject with low contrast*
Subject with a plain background*
Dark or dimly lit subject*
Subject with vertical or horizontal stripes
Many moving subjects in a single frame
(*The ” ii ” Indicator blinks during these
condrtrons.)
Macro Shots
This VIEWCAM lets you shoot close-up images
of small objects such as flowers and insects, or
make title frames for your videos. When you
want to record a magnified image of a subject
which is within approximately 1.5 m of the
VIEWCAM, do not zoom in on the subject.
Instead, zoom out all the way by holding down
the Power Zoom W button, and then move the
VIEWCAM closer to the subject until you obtain
the desired angle of view. The VIEWCAM will
automatically focus on the subject when the
lens is set for the widest angle.
I
AUTO
Operation
button
To return to normal recording mode, press m
on the 0 button to select “DIS” again. The ” it ”
indicator will disappear.
Notes:
l While this function is in progress, the image on the
monitor is slightly magnified, and the shutter speed
is automatically switched from the standard speed
(XC sec.) to XX sec.
l Image resolution slightly decreases in DIS mode.
l Under the light of fluorescent lamps, the picture may
brighten and dim.
l The DIS feature does not work during Still Recording
mode.
l Battery consumption is larger in DIS mode. We
recommend that you not use the DIS feature when
using the VIEWCAM on a tripod.
Tri
Notes:
l When you are recording a macro shot, be sure that
the subject receives sufficient illumination.
l It is recommended that you use a tripod for
recording macro shots, to prevent image shake.
l Before you mount the VIEWCAM on a tripod, be sure
to connect the supplied tripod adaptor to the
VIEWCAM (see page 28).
q 33
Page 37

Fade In and Fade Out
With the fade function, it is possible to fade in or
fade out scenes smoothly. It is effective especially
for indicating a dramatic change in scenery.
Fade Out
Press the MENU button until a appears
1
on the monitor (Camera mode).
DISPLAY MENU
Fade out
Fade In
Press the MENU button until u appears
1
on the monitor (Camera mode).
Press w on the Operation button (a) to
2
select “FADE”.
l “FADE” appears on the monitor.
!
Press the REC START/STOP button to start
2
recording.
Press w on the Operation button (a) to
3
select “FADE”.
l “FADE” appears 011 the monitor.
AUTO
Operation
button
I
Press the REC START/STOP button.
3
“FADE” changes to “FADE IN”, and after
the screen turns white, recording begins
and the picture and sound fade into the
monitor screen.
@
FADE
:
F
(00)
D
d
Press the REC START/STOP button at the
4
point where you wish to stop recording.
“FADE” changes to “FADE OUT”, and the
picture and sound fade out as the screen
gradually turns white. The VIEWCAM then
returns to Recording Standby mode.
34 q
Page 38

Basic Operations
Camera Recording
Recording with the Wide
Screen (16:9)
This feature lets you record scenes with the
wide-screen feel of a movie shown in a theatre.
The top and the bottom of the picture are
masked with black bands to produce an effec-
tive screen aspect ratio of 16:9.
g _g Setting the Wide Screen
Press the MENU button
1
on the monitor (Camera
MODE
2 Press m on the Operation button (0) to
select “MENU”.
@
Mode
until @j
mode).
appears
5 To return to the normal picture, press 4
to select “OFF” in step 4 above.
Notes:
l
When using the fade function (see page 34) in the
Wide Screen mode, only the unmasked portion of
the screen will fade in or out.
You can only use the Wide Screen mode when the
VIEWCAM is in Camera mode.
DISP : OFF DATE DATE +TIME
SELF REC : AUTO NO CORRECT
Operation
button
3 Press m on the 0 button to select
MENU-PAGE [2J ( I ) and then press n to
select “16:9” ( 2 ).
4 Press m to select “ON”. Then, press the
MENU button to turn off the menu.
: OFF OUTPUT
q 35
Normal Screen mode
Wide Screen mode
Page 39

Quick Return
When you have been playing back what you
have recorded, and wish to quickly return to
recording again from the end of the last
recorded scene, use the quick return function
Note:
l If the cassette has been removed since the last
recording, or If no recording has been made since
the cassette was loaded. “RETURN” indicator will be
faintly displayed and the quick return function will
not operate.
1 Set the Power switch
to CAMERA.
ttor 2 Press the MENU bu
i until @j appears
on the monitor.
MODE
DISPLAY MENU
(a,-3
!
3 Press H on the Operation button (0) to
select “RETURN”. The tape will begin
winding or rewinding to the end of the last
recorded scene.
AUTO
Edit Search
The edit search fea.ture lets you search. without
switching from Camera Recording mode to
VCR mode, for the point on the tape where you
wish to start recording next.
1 In Recording Standby mode, press the
MENU button until @ appears on the
monitor.
2 Hold down ++ for reverse edit search or
m for forward edit search on the 0
button.
Bm
3:
4 is’
2
gg
0%
AUTO
Operation
button
l To cancel, press H on the 0 button to
select “RETURN” again.
4 When the tape reaches the end of the last
recorded scene, the VIEWCAM enters
Recording Standby mode.
Fltut~l3 D
gj-
-0:
m---l
AU ro
c
PAUSE
S
_ .‘a
. .
-_ . ,: R
t’ c
n
1
3 Wh
Notes:
Some picture noise appears dunng reverse edit
search.
Forward edit search is performed at the same speed
as normal playback, and reverse edit search IS
performed at five times the normal playback speed.
The sound is off during edit search
en you find the point where you want to
begin recording, release the button.
36 q
Page 40

Basic Operations
Camera Recording
Tips on Recording Positions
The rotating LCD monitor screen lets you enjoy
easy video recording in relaxed postures.
l You can record using more natural body pos-
tures since you can see the subject on-screen,
without having to hold the VIEWCAM against
your eye
l The LC[3\ monitor also makes high-angle and
low-angie shots easy
l In hand-held recording, the VIEWCAM has to be
steadied to prevent image shake.
l Use a tripod for very stable recording.
Basic Recording Positions
Basic Posture
Look at the
monitor with both
eyes.
Place you: right
thumb below the
Power Zoom
button, and your
left thumb below
the Operation
button.
Press your elbows
against your sides
Notes:
l Take care not to touch the monitor screen with
your fingers. as perspiration and dirt will smudge
It.
l Unless you intend to create a special effect,
keep the VIEWCAM level with the horizontal
plane
l Take care not to touch the microphone with your
fingers when the VIEWCAM is recording. It will
cause noise on the audio track.
Hints for Better Shooting
l Position the subject in the centre of the screen.
When you are using auto focus, whatever IS in
the centre of the screen is kept in focus.
Posttion the subject in
the centre.
l Avoid backlit subjects. For the best picture, have
the light source behind you. When the
background is brighter than the subject, the
subject often becomes too dark. If you need to
record with this lighting. correct the gain or iris to
improve the picture (see pages 32 and 55).
Focus manually when
you need to position the
subject off centre (see
page 52).
High Angle
You can record
and still see the
monitor screen.
This is convenient
when you want to
record over a
crowd.
Low Angle
Wh en kneeling,
one knee on
Put
the ground for
the best stability.
Rest on both
elbows to
stabilize the
VIEWCAM.
Self Recording
Rotate the
monitor 180”.
This is useful
when you want to
record your own
portrait by yourself, or record
yourself and your
friends together.
Ltght from
behind
l Before zooming, think about how to best frame
Backlighting
the shot. Stop zooming when the shot is well
framed.
l When image shake is noticeable during zoomed-
in telephoto shooting, use a tripod, or press the
Power Zoom W (wide angle) button to zoom out.
(See page 28 for the use of the tripod adaptor.)
l Horizontal panning (lateral movement) and tilting
(vertical movement) should be done slowly to
emphasize the wide expanse of a scene or the
height of a building, and to make them easy to
watch on playback.
l Use wide-angle settings for fast-moving
subjects.
Note:
l It may take longer to focus when zooming and
panning are used frequently.
Page 41

Setting theVIEWCAM to Full
Auto Mode
This VIEWCAM is equipped with auto focus, auto
white balance, auto exposure, and auto shutter
speed functions. Set the VIEWCAM to Full Auto
mode and you can record high-quality pictures
easily.
When “AUTO” is not displayed on the monitor, the
VIEWCAM is not in Full Auto mode. Perform the
procedure below to set the VIEWCAM to Full Auto
mode.
1 While the VIEWCAM is in Camera mode,
press the MENU button until &I appears.
Note:
l If the VIEWCAM is in Manual Focus mode
(“FOCUS” selected on @ screen), press
H on the 0 button to return to Auto Focus
mode (see page 52).
Press ä /HI on the Operation button (0 ) to
2
select “MANUAL”.
button
Select “CAMERA MODE” and then press 4
3
on the a button to select “AUTO”.
Press the MENU button until @j appears.
4
“AUTO” is displayed on the monitor. During
normal recording, use the a screen for the
Full Auto mode.
“AUTO” indicator
Page 42

Basic Operations
Camera Recording
Remaining Recording Time
Display
When the VIEWCAM is recording, an on-screen
indicator will begin to show how much time you
have left, as shown below. You might want to get a
new tape ready at this time.
To turn off the remaining recording time display,
press the MODE DISPLAY button.
MODE DISPLAY button
Approx. remaining
rec0rding the
Less than half of the
tape remaining
Monifat display
0
El
Remaining Battery Power
Display
When you turn on the VIEWCAM, the remaining
battery power display automatically appears on
the monitor. By pressing the MODE DISPLAY
button, you can turn the display on and off.
The remaining power is displayed in five levels, as
shown. If the battery power is very low, a warning
message will appear. Replace the battery pack.
MODE DISPLAY button
10 min.-8 min.
8 min.-6 min.
6 min.-4 min.
4 min.-2 min.
2 min.-l min.
El
El
Fllll
F[M
jiZql
11111
1111
THETAPEENDSSOON.
1 min.-O min.
0 min.
(The tape has
reached its end.)
Notes:
l The time-remaining indicators only show
approximate time left. Also, they vary slightly
depending on the length of tape used. (This
function’s design is based on the DVMGO tape
standard.)
l If you press the MODE DISPLAY button to turn
off the remaining recording time display, this
display will reappear after a short interval to
indicate the new time remaining.
. The time-remaining indicators above appear
CHANGETHECASSEllE.
after 5 seconds from the time you press the
REC START/STOP button to start recording.
+ (after 3 sec.)
/
- G3
-
L\7
/ : \
+ (after 3 sec.)
TAPEEND
BA'ITERYISTOOLOW.
+
xX
(/"
-Pi&-
J 8 "1.
Notes:
l Use the remaining battery power display only as
an indication.
l Battery consumption may vary depending on the
condition of use.
l The battery power display may change to either
a higher or lower level if you set the Power
switch to OFF and then back to CAMERA or VCR
again.
l Use of the zoom functions when the warning
message “BATTERY IS TOO LOW.” is displayed
may cause the VIEWCAM to suddenly lose
power. Replace the battery pack.
l Remaining battery power display will not be
displayed when the VIEWCAM is powered from
an AC outlet or a car battery.
Page 43

Using the Infrared Remote
Control
Use the remote control to operate the VIEWCAM
from a distance, such as when you want to record
yourself in a scene, or when the VIEWCAM is
connected to a TV for use as a VCR.
1 Set the Power switch
to CAMERA or VCR.
2 Press the MENU button until @J (Camera
mode) or &I (VCR mode) appears on the
monitor.
5 Aim the remote control at the photore-
ceptor of the VIEWCAM. and press the
control buttons for operation.
Approximate
operating range of
remote control
MODE
DISPLAY MENU
3 Press B+ on the Operation button (2) to
select “MENU”.
’ 44’
II
/ PAGE
DISP. : OFF DATE DATE+TIME
TIME CODE
SELF REC : AUTO NO CORRECT
D
:.3-J B:a 2
: OFF OUTPUT
I
Operation button
4 Press m on the Q button to select
MENU-PAGE 2) (s) and then press n to
select “REMOTE” ( 2_ ).
Make sure that “REMOTE” is set to “ON”.
(E
u
PAGE;
16 9
REMOTE
:g)agJa
: OFF
: ON
ON
OF;
Notes:
l Be careful not to allow direct sunlight or bright light
from interior illumination to fall onto the VIEWCAM’s
photoreceptor, as this may prevent the remote
control from operating properly.
l Be sure that there are no obstacles between the
remote control and the VIEWCAM’s photoreceptor.
l When the “REMOTE” setttng is changed in either
Camera or VCR mode, the setting for the other
mode is automatically set to the same.
l The lithium battery normally lasts about one year It
can be shorter under some operating conditions
When the lithium battery is dead and the remote
control does not operate. replace the battery wtth a
new one followng the instructions on page 13
l The b, ä . n u 3 or H buttons on the remote
control cannot be used to move the cursor, or se!ect
or set any of the various functions on the monttor.
REC START/STOP button
ZOOM buttons
gz
If “REMOTE” is set to “OFF”, press ++ to
select “ON”.
F. ADVLSTROBE button
40 q
Page 44

Basic Operations
Plavback
l Refer to pages 19-21 on how to operate the
monitor display.
Playback
The LCD monitor makes it possible to play back
and see what you have just recorded. Nothing
needs to be connected, allowing instant on-screen
playback. You can hear the sound through the
built-in speaker or via your own stereo earphones.
Hold down the Lock button
and slide the Power switch
to VCR.
l It may take some time before
the screen appears. Wait
until the screen appears,
then start operat Ion.
Press the MENU button until u appears
on the monitor.
If the tape is not at the desired point, press
4 or H on the Operation button (0 ) to
select “FF” ( I ) or “REW” ( i ).
oR
Lock button
l Stereo earphones
/JlifT a 3 5 mm
diameter plug can
3e plugged directly
:r\to the PHONES
jack When you use
tn~s jack, the
s;xaker automatltally turns off.
PHONES jack
Caution:
l Tc use the remote control, make sure that the remote
control menu item (“REMOTE”) is set to “ON”. The
remote control cannot be used to operate the
\/IEWCAM when this IS set to “OFF”. See page 40.
Volume Control
Whrle the VIEWCAM is in the VCR mode, press the
V3L A or v button to increase or decrease the
v3/ume to your preference.
The volume control indicator will appear on the
monitor. After adjusting the volume, if the Volume
control buttons are not pressed. the indicator will
disappear by itself shortly.
Operation button
Press F/H to select “PLAY”.
1
To Stop Playback
Press n on the 0 button to select “STOP”.
Auto Tape Rewind
The tape is automatically rewound when
playback reaches the end of the tape.
Notes:
l If you wish to turn off the operation indicators on the
monitor (e.g. because they interfere with your view
of the picture), press the MODE DISPLAY button.
The buttons will still function as indicated even after
their indicators are turned off.
Decrease CJ Increase
Note:
l The volume can also be adjusted with the remote
control.
Fast Forward and Rewind
During a stop mode, press M or 4 on the 0
button to select “FF” (Fast Forward) or “REW”
(Rewind) on the a screen (VCR mode).
Page 45

Displaying the Date and Time
of Recording
2 Wh
en you find the desired scene, press
./HI on the 0 button to select “PLAY” to
return to normal playback.
The date and time, once set, are stored in
memory. You can display them on the monitor
during playback even if they were off during
recording.
Display the menu screen (VCR mode)
1
using the MENU button and the Opera
button (0 ).
, . . . . . .
( *,w
j, Hi
: a ’
~~
Select “DISP.” and set it to “DATE” or
2
“DATE+TIME” using the 0 button.
,
.-----../
---.
IYS’. :OFF: DATE tJAl-E+TLMFZ
TIME CODE
REMOTE : ON OFF
: OFF OUTPUT
ion
c3
.
PLAY
i-I
Notes:
l The sound is off during search
l Some picture noise appears durtng search This is
not a malfunction.
Still
This function makes it possible to freeze the
picture. During playback, press b/w on the 0
button to select “STILL” on the @I screen (VCR
mode). To return to normal playback, press ./HI
to select “STILL” once again.
Notes:
l You can also display the date and time by pressing
the DATE DISPLAY ON/OFF button on the remote
control. (When the tape is not running, the current
date or time will be displayed.)
l If you wish to display the date and time during
playback, make sure, before recording, that the date
and time have been set correctly. If they are not set,
‘I
--.--.--” will be displayed. This will also be displayed
on blank or damaged portions of the tape
Video Search
This function makes it easy for you to searc
a scene near the current tape position.
During playback, press m on the Operation button (0 ) to select “FF” ( I ) (or + to
select “REW” [ 2 1) on the a screen (VCR
mode). The fast forward (or reverse) playback picture is displayed on-screen.
Operation button
7 for
Slow
This function makes it possible to play back in
slow motion. During playback, press the SLOW
button on the remote control. To return to
normal playback, press PLAY button on the
remote control to select “PLAY”.
SLOW button
SLOW
/..., -
:
,
--,..I I
:
/
/
i
:
ns
i
!
Notes:
l The sound is off during Still and Slow modes.
l To protect the tape, the VIEWCAM automatically
returns to ordinary playback if It is left in Still mode
for more than 5 minutes or in Slow mode for more
than about 40 seconds.
l Still image playback can also be operated with the
remote control. (See page 40 )
l If still or slow functions are used when connected to
a TV, noise WIII appear and distort the image
l Slow function cannot be operated from the VIEW-
CAM.
I
42 H
Page 46
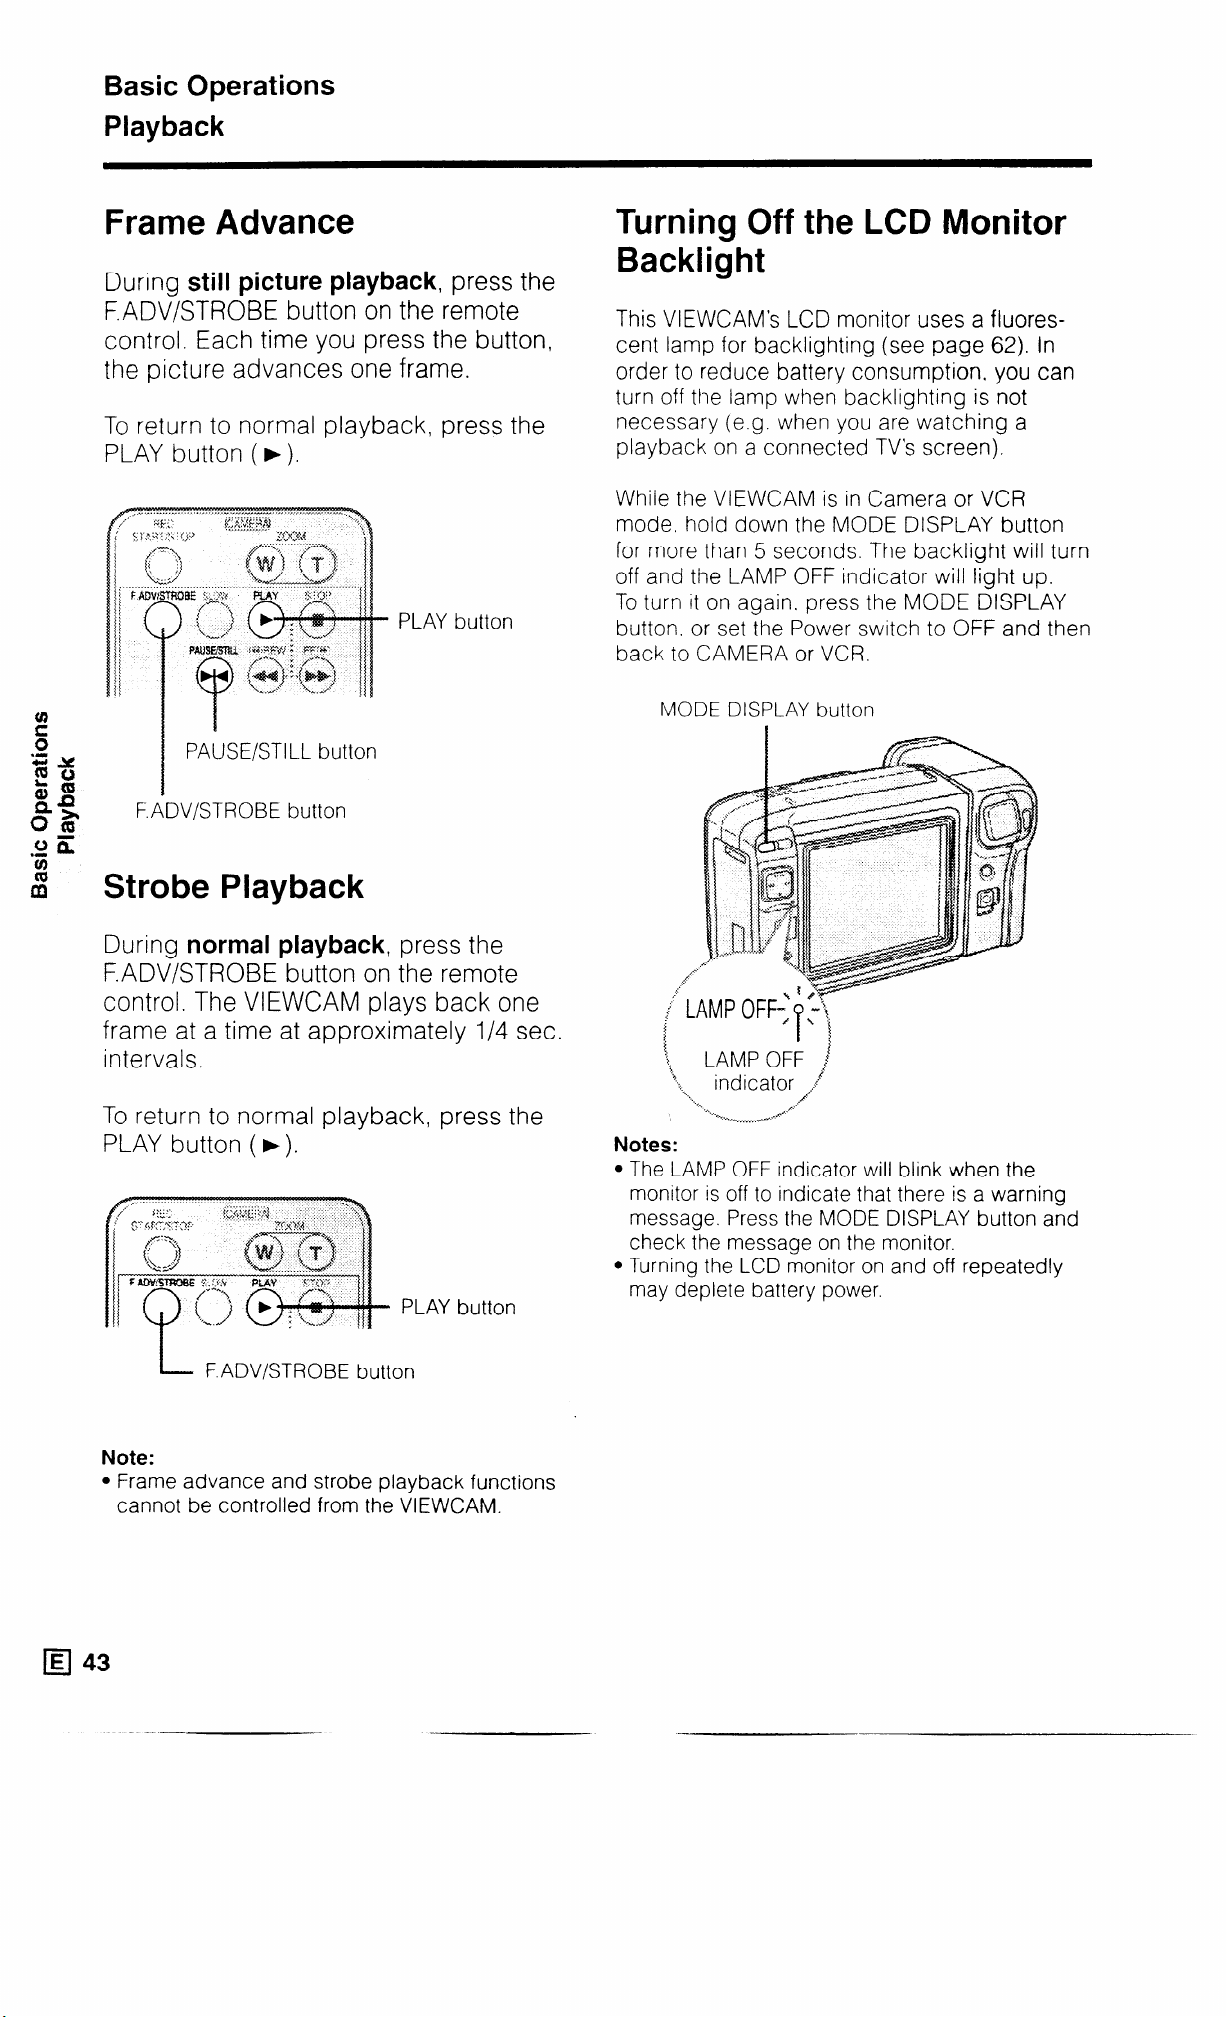
Basic Operations
Playback
Frame Advance
During still picture playback, press the
F.ADV/STROBE button on the remote
control. Each time you press the button,
the picture advances one frame.
To return to normal playback, press the
PLAY button ( F).
PLAY buttor
1 PAUSE/STILL button
Turning Off the LCD Monitor
Backlight
This VIEWCAM’s LCD monitor uses a fluores-
cent lamp for backlighting (see page 62).
order to reduce battery consumption. you
turn off the lamp when backlighting is not
necessary (e.g. when you are watching a
playback on a connected TV’s screen).
While the VIEWCAM is in Camera or VCR
mode. hold down the MODE DISPLAY button
for more than 5 seconds. The backlight will turn
off and the LAMP OFF indicator will light up.
To turn it on again, press the MODE DISPLAY
button. or set the Power switch to OFF and then
back to CAMERA or VCR.
MODE DISPLAY button
In
can
F.ADV/STROBE button
Strobe Playback
During normal playback, press the
F.ADV/STROBE button on the remote
control. The VIEWCAM plays back one
frame at a time at approximately l/4 set
intervals.
To return to normal playback, press the
PLAY button ( F).
- PLAY button
L- F.ADV/STROBE button
1.
;,
LAMP OFF j
‘,
‘?.
‘,
indicator /..f
‘...
Notes:
l The LAMP OFF indicator will blink when the
monitor is off to indicate that there is a warning
message. Press the MODE DISPLAY button and
check the message on the monitor.
l Turning the LCD monitor on and off repeatedly
may deplete battery power.
Note:
l Frame advance and strobe playback functions
cannot be controlled from the VIEWCAM.
Page 47

Programme Search
The programme search feature automatically finds
the beginning of a number of previously recorded
scenes. Up to 10 different scenes can be found on
one tape.
1
Set the Power switch
to VCR.
2
Press the MENU button until @ screen
appears on the monitor.
4
Press 4 on the 0 button to select “REW”
(or m to select “FF”). “SEARCH” will start
flashing. The tape rewinds (or fast forwards)
to the beginning of a scene immediately
before (or after) the current tape position;
playback then starts automatically.
The “REW” and “FF” indicators automatically
disappear after about 10 seconds.
/ RN&SUED m 1
To continue searching. press 4 to select
5
“REW” (or m to select “FF”) while the
“SEARCH” indicator is displayed.
Press n on the Operation button (0) to
select “SEARCH”. The VIEWCAM enters the
Programme Search mode. Both the “REW”
and “FF” indicators, or one of them will start
flashing.
To cancel. press n to select “SEARCH”
again.
Operation
button
Notes:
Example: To find the beginning of five different scenes.
Use this feature when the tape IS stopped or being
played back.
This function finds the beginning of the scene 4P
immediately before or after the current tape posItIon.
stopping at every scene It IS not possible to skip a
scene.
This functton cannot spot recordings that are shorter
than 10 seconds in length
In steps 3 and 5. If the tape is at a point ahead of
the most recent recording. only the “REW” Indicator
will flash. and the “FF” Indicator will not appear
In steps 3 and 5. if the tape IS at a point before the
oldest recording. only the “FF” indicator wtll flash,
and the “REW” indicator will not appear
This feature does not function if no recording has
been made since the cassette was loaded. or If the
cassette has been removed after the recordings
were made “SEARCH” is faintly displayed In this
case.
=P
1;~ 1
Monitor display
Current tape position
Video tape
Beginnings of scenes
-_.---- ._.x.......I.. - . . . .._. ---.I ..-.- _.-~
t-----
1 When you are at this position,
i Press ti on the a button to select “REW” to rewind the tape to 3 and begin playback.
1 Press m on the 0 button to select “FF” to forward the tape to 4 and begin playback
. . . . . . . . . . . . . . . . . . . . . . . . . . . . . . . . . . . . . . . . . . . . . . . . . . . . . . . . . . . . . . . . . . . . . . . . . . . . . . . . . . . . . . . . . . . . . . . . . . . . . . . . . . . . . . . . . . . . .
--+
-
3
(
4
Oldest recording
-~-_._-..___-_-_---.-...-_---. _,
,, ,,+
: . . i : :. . .
i
i
I
Most recent recording
:
; .
,_.________...__..__..........................
_. ________ ___ __
+
.._.
I
Page 48

Basic Operations
Playback
Using theTime Code
The time code allows you to record images
together with the hour, minute and second of
recording, and the frame number (1 frame =
approx. l/25 sec.). This can be displayed on the
screen when needed, and used as an accurate
counter.
Press the MENU button until @I appears
(VCR mode).
MODE
DISPLAY MENU
Press n on the Operation button (a) to
select “TIME CODE”. The time code
display appears.
Displaying theTime Code with the
Remote Control
Press the Time Code DISPLAY ON/OFF button
on the remote control to display and turn off
the time code.
Time Code
DISPLAY ON/OFF
button
Displaying the Time Code on Your TV
During Playback
1 Display the menu screen (VCR mode) on
the monitor using the MENU button and
the Q button.
MODE
1
DISPLAY MENU
When images are played back in Still or Frame
Advance mode, the time code is displayed for
each frame. (During normal playback, only the
hour, minute and second are displayed.)
B
Frame display
To turn off the time code display, press H on the
0 button again.
q 45
2 Select “TIME CODE” and set it to “OUT-
PUT” using the 0 button. (See pages 20
and 21 for menu setting.)
DISP : OFF DATE DATE +TIME
TlMEcooE :aFF ---
PREV PAGE :
Notes:
When the tape reaches an unrecorded section, the
time code returns to zero (TC 0:OO:OO). Once
recorded, the time code cannot be changed.
The time code will remain displayed even if you
press the MODE DISPLAY button to turn off the onscreen display.
Page 49

Using the Tape Counter
Counter Memory
Use the tape counter feature when you want to
know the playback or recording time.
1 Press the MENU button until a (VCR
mode) or @I (Camera mode) appears on
the monitor.
MODE
DISPLAY MENU
\
/
/ i
:
i
i
j
q
2 Press n on the Operation button (0) to
select “TIME CODE”. The time code dis-
play appears.
Use the counter memory when you want to return
to the beginning of a particular scene. The
position where the counter memory is reset
(0:OO:OO) is stored in memory to make it easier to
return the tape to that point.
1
During playback or
recording, display
the time code on
the monitor.
2
Press w on the 0 button to select “MEMORY”. The time code display changes to the
counter memory display.
3
Press w to select “RESET” at the beginning
of a scene you want to return to later The
counter is reset to “M O:OO.OO”
QC0 18 001
f
1
Time code
nii
X g
2
3 Press w on the Q button to select
‘RESET”. The time code display changes
to the tape counter.
4 B egin recording or playback. You can
check the recording or playback time on
the monitor.
H
- Tape counter
B
3
4
Stop the tape after playback. If you have
been recording, stop the tape and set the
Power switch to VCR
5
Rewind the tape. The tape WIII automatically
stop when the counter reaches O.OO:OO.
Start playback to view the desired scene.
6
To cancel the Counter Memory mode
Repeat step 1 and press 4 on the Q button to
select “MEMORY”. The counter memory display
will change to the normal time code display
Notes:
l The Fast Forward function can be used In the same
way.
l This function does not work during video searches
l In step 5 above, the tape may stop slightly ahead or
behind the point where you reset the counter to “M
0:00:00”.
Page 50

Basic Operations
Playback
Skip Playback
This feature automatically skips unwanted
sections during playback. Use the SKIP PLAY
operation buttons on the remote control to
perform skip playback.
Remote control
4
Press the MARK IN/OUT button at the end
of the section you wish to skip. The “MARK
OUT” display changes to “SKIP PLAY”
after about five seconds.
MARK OUT
Set the Power switch
to VCR.
D PLAY button
b STOP button
n FF button
REW button
SKIP PLAY
operation buttons
r
MARK
MARK
Skip Play
START button
MODE ON/OFF button
DELETE button
IN/OUT button
1
l
SKIP PLAY
Note:
l Repeat steps 3 and 4 to skip additional
scenes.
5
Rewind the tape to the beginning of the
playback section.
6
Press the Skip Play START button on the
remote control. Skip playback starts.
During the skipped section, “SEARCH
MARK” flashes on the screen.
Press the Skip Play MODE ON/OFF button
on the remote control. The VIEWCAM
enters the Skip Play mode, and “SKIP
PLAY” is displayed on the screen.
a -’
.
SKIP PLAY
c
3
During.playback, press the MARK IN/OUT
button at the beginning of the section you
wish to skip. The “SKIP PLAY” display
changes to “MARK IN”, which then
changes to the flashing “MARK OUT”
display after about five seconds.
To stop skip playback
Press n on the Operation button (0 ) or press
the STOP button on the remote control.
To disengage the Skip Play mode
Press the Skip Play MODE ON/OFF button on
the remote control. The “SKIP PLAY” display
disappears.
SKIP PLAY
- _
Page 51

Deleting Skip Marks
To change a skipped section
1 in Skip Play mode. rewind
or fast forward the tape to
the beginning of the
section with a skip mark.
2 Press the PLAY button to
start playback.
3 When “MARK IN” or “MARK OUT” is
PLAY
b
R
displayed, hold down the Skip Play MARK
DELETE button for two seconds.
l The red “DELETE MARK” display will
appear on the monitor, and the skip mark
will be deleted. The red “DELETE MARK”
display will then disappear, and the white
“SKIP PLAY” display will appear on the
monitor.
Delete the skip mark to be changed, then add
new skip marks, following steps 3 and 4 on
page 47.
Notes:
l The SKIP PLAY operation buttons work only after
the MODE ON/OFF button is pressed to engage
the Skip Play mode.
l Leave about ten seconds between skip marks. If
the interval between skip marks is less than ten
seconds, the skip playback function may not
operate correctly during playback.
l The skip playback function will not work with
tapes recorded with camcorders other than this
VIEWCAM.
l Skip marks cannot be added to a tape if the
erasure protect tab is in the “SAVE” position.
l Fast forward and other functions cannot be used
while the MARK IN/OUT signals are being
recorded (approx. 5 sec. after the MARK IN/OUT
button is pressed).
l Audio or video noise may occur when adding or
deleting skip marks. This does not indicate a
malfunction.
E
% Z=
so
==X
:s
x rt:
SKIP PLAY
Note:
l This VIEWCAM uses two standardized DV
(digital VCR) signals, Skip ID and Index ID. for
skip playback. When deleting skip marks Skip
ID and Index ID signals pre-recorded on the
tape may also be deleted.
Example of
Skip Playback
MARK IN 1
(beginning of skipped scene)
Tape
Playedback image
+
r- MARK OUT
(end of skipped scene)
f
During search, a still image of the last scene is displayed.
48 IE/
Page 52

Useful Features for Camera Recording
Self Recording
The LCD monitor can be rotated 180” vertically
so that the monitor screen faces the subject.
This lets you record yourself while watching
yourself on the screen.
Enjoy recording your own portrait by yourself,
or recording yourself and your friends together
at a party.
Example of Recording in Self Recording
Mode
Note:
l If the image on the monitor is upside-down,
return the monitor to the normal position and
display MENU-PAGE rl (Camera mode).
Press H on the Operation button (a) to select
“SELF REC” ( J ) and then press 4 to select
“AUTO” ( z ).
Operation button
i
_2
DISP. : OFF DATE DATE+TIME
2
Press 4 or b to select “WIDE ” or
:J_Jaa&j
: OFF OUTPUT
_-- ._
“TELE”.
Recording yourself and your friends together at a
party, using the remote control, while monitoring
yourselves on the VIEWCAM’s screen.
Cautions:
l Do not rotate the monitor to the self recording
position while the VIEWCAM IS recording or playing
back.
l For recording in Self Recording mode, be sure to
rotate the monitor, NOT the lens. If you hold the
VIEWCAM upside down with its lens at the bottom,
the subject will be recorded upside down.
Normal Self Recording
1 Rotate the VIEWCAM’s monitor section
180” vertically. The VIEWCAM will show
a mirror image of the subject. Playback
image will not be reversed even though
the monitor shows the mirror image
during self recording.
3
Press n to select “REC START”.
To pause record
ng, press n on the 8
button.
Page 53

Self Recording Message OSD
In Self Recording mode, by following some simple
instructions that appear on the monitor screen,
you can easily record a short video message for
somebody. This feature is especially convenient
for editing video letters.
l Perform step 1 of “Normal Self Recording” on
page 49, then perform the procedure below.
1 Press HI/* on the Operation button (Q) to
select “MESSAGE”. The instruction
“PRESS REC START FOR LEAVING YOUR
MESSAGE.” appears on the monitor, and
the “REC START” indicator starts flashing.
D
3 When the remaining recording time
reaches 5 seconds, “EXTEND” will flash.
l When you want to extend the recording
time, press w/d on the Q button to select
“EXTEND” within 5 seconds. After pressing
the button, you may record continuously
for 10 more seconds.
4 At the end of recording, the screen fades
out, and recording stops automatically.
The VIEWCAM returns to Recording
Standby mode, and “PRESS REC START
FOR LEAVING YOUR MESSAGE.”
appears again on the monitor screen.
s
I
/ PRESS REC START FOR 1
LEAVING YOUR MESSAGE
h
2 Press H on the Q button to select “REC
START”. Say your message while facing
the lens of the VIEWCAM.
l The recording time is preset for 20 sec-
onds.
l The remaining number of seconds IS dis-
played in the upper right hand corner of the
monitor screen.
LEAVING YOUR MESSAGE.
m
FdESSAGE
Operation
button
d
PRESS REC START FOR
I
1
1
Note:
l When you want to stop recording before mes-
sage recording stops automatically, press H
on the Q button to select “REC STOP”. The
screen fades out immediately and the VIEWCAM returns to Recording Standby mode.
MESSAt3E
MESSAGE
1
f20-15-10-5-4-3-2-l 1
(remaining number of seconds)
Page 54

Useful Features for Camera Recording
More Information on Self Recording
*The screen Image is automatically inverted
when the monitor rotation is between 140°
and 200”.
When the monitor is turned back to the
normal position. the image returns to
normal
l During Self Recording mode, only the REC
START/STOP, Zoom Wide and Telephoto
buttons function on the remote control (see
page 40)
Photoreceptor
l In Self Recording mode, it is not possible
to record using manual recording modes,
change picture adjustments, display
menus, record the date and time, or use
the quick return and some of the other
features.
l You can begin playback by setting the
Power switch to VCR, even while the
monitor is rotated 180”. The functions
displayed on the monitor during normal
playback still operate even though not
displayed. (For example, b/w on the
Operation button [o] works as the Play
button.)
After recording in Self Recording mode,
you can enjoy instant playback without
having to re-rotate the monitor. In this case,
the indicators will not be displayed on the
monitor.
l If you set “SELF REC” to “NO CORRECT”
on MENU-PAGE ‘_J (Camera mode), the
image on the monitor screen will be dis-
played upside down.
tons
mode
l In Self Recording mode, all standard
warning indicators on the monitor are
replaced by a flashing “@” indicator. To
check the meaning of the warning, turn the
monitor back to the normal position.
DISP : OFF DATE DATE +TlME
: OFF OUTPUT
SELF F?EC : AN-0 ii6 t6i%%
PREV PAGE :
q 51
Page 55

Manual Focus
To Return to Auto Focus Mode
The auto focus may not be able to focus on
the subject in the situations shown in the
chart on page 31. In such situations, set the
VIEWCAM to Manual Focus mode and focus
manually.
MENU button
Operation button
Setting the Manual Focus
1 Press the MENU button until @J appears
on the monitor (Camera mode).
Press n on the Operation buttor
select “FOCUS”.
(Q) to
Press n on the Q button to select “FOCUS”
in step 1.
Notes:
l When recording in the Manual Focus mode, you
may not be able to focus correctly if the subject
is within approximately 1.5 m of the VIEWCAM
In such a case, shift the zoom control toward
wide angle, and then try focusing again
l If you focus on a subject in wide angle and then
set the zoom to maximum, the subject may go
out of focus. First focus on the subject at maxrmum zoom setting and then shoot at the desired
zoom setting.
l If the lens is dirty or fogged, you may not be able
to obtain correct focus.
AUTO
2 Press ti or m on the 0 button to
select “NEAR’or “FAR”.
, ~...~;,..~4.. .\
i
;,“. “i :;::: ;
cl
. . . . ...-’
52 1Ej
Page 56

Useful Features for Camera Recording
Setting the Shutter Speed
MENt_ button
Operation button
Press the MENU button until @I appears on
the monitor (Camera mode).
Press ./H+ on the Operation button (f
select “MANUAL”.
El) to
To Return to the Standard Shutter
Speed
In step 4. press * on the 0 button to select
“NORMAL”.
To reset the VIEWCAM to Full Auto mode. press
b/w to select “CAMERA MODE” and then press
a to select “AUTO” in step 2.
Recommended Shutter Speeds
The faster the shutter speed, the darker the picture becomes. Select the most appropriate shutter
speed for the ambient light.
Sitmtian
l Recording sports action in
bright daylight
l Recording in bright day-
light at a ski resort
l/l 0000 sec.
I
l/l000 sec.
Select “CAMERA MODE” and then press m
2
to select “MANUAL”.
SHUT SPEED :
WHITE BALANCE :
IRIS
.
.
Press w to select “SHUT. SPEED”.
CAMERA MODE :
Note:
l Pressing n once again will select “WHITE
BALANCE”, not the “IRIS”.
4 P ress m or t( to select the desired shutter
speed.
l You can select from 6 shutter speed
settings from %,n (NORMAL) to V’IOO(K).
l Recording outdoor sports
on a somewhat cloudy day
l Recording an outside
scene through a car window (when you want to
1 /I 000 sec.
I
l/250 sec.
minimize blurs caused by
camera shake)
l When you want to reduce
the light by half. Use as a
11120 sec.
substitute for an ND2 filter.
Note on Recording under Fluorescent
Lighting
If the picture on the monitor flickers when
recording under fluorescent lighting, you may be
able to compensate by changing the shutter
speed to ‘/1x1 sec.
Notes:
l Using a fast shutter speed under fluorescent
lighting will cause flickering in the picture and
possibly periodic colour shifts.
l Recording with a shutter speed higher than l/j,
set (standard) tends to darken the picture.
Record in bright locations when you use a high
shutter speed.
c7 53
E
-
_..___............................__ . .._-A..... ._.^..._........_... _..._ . . . . . . . . _._____.__._
J!NMIMALj=jfm2m:~:/i000/=~]
Page 57
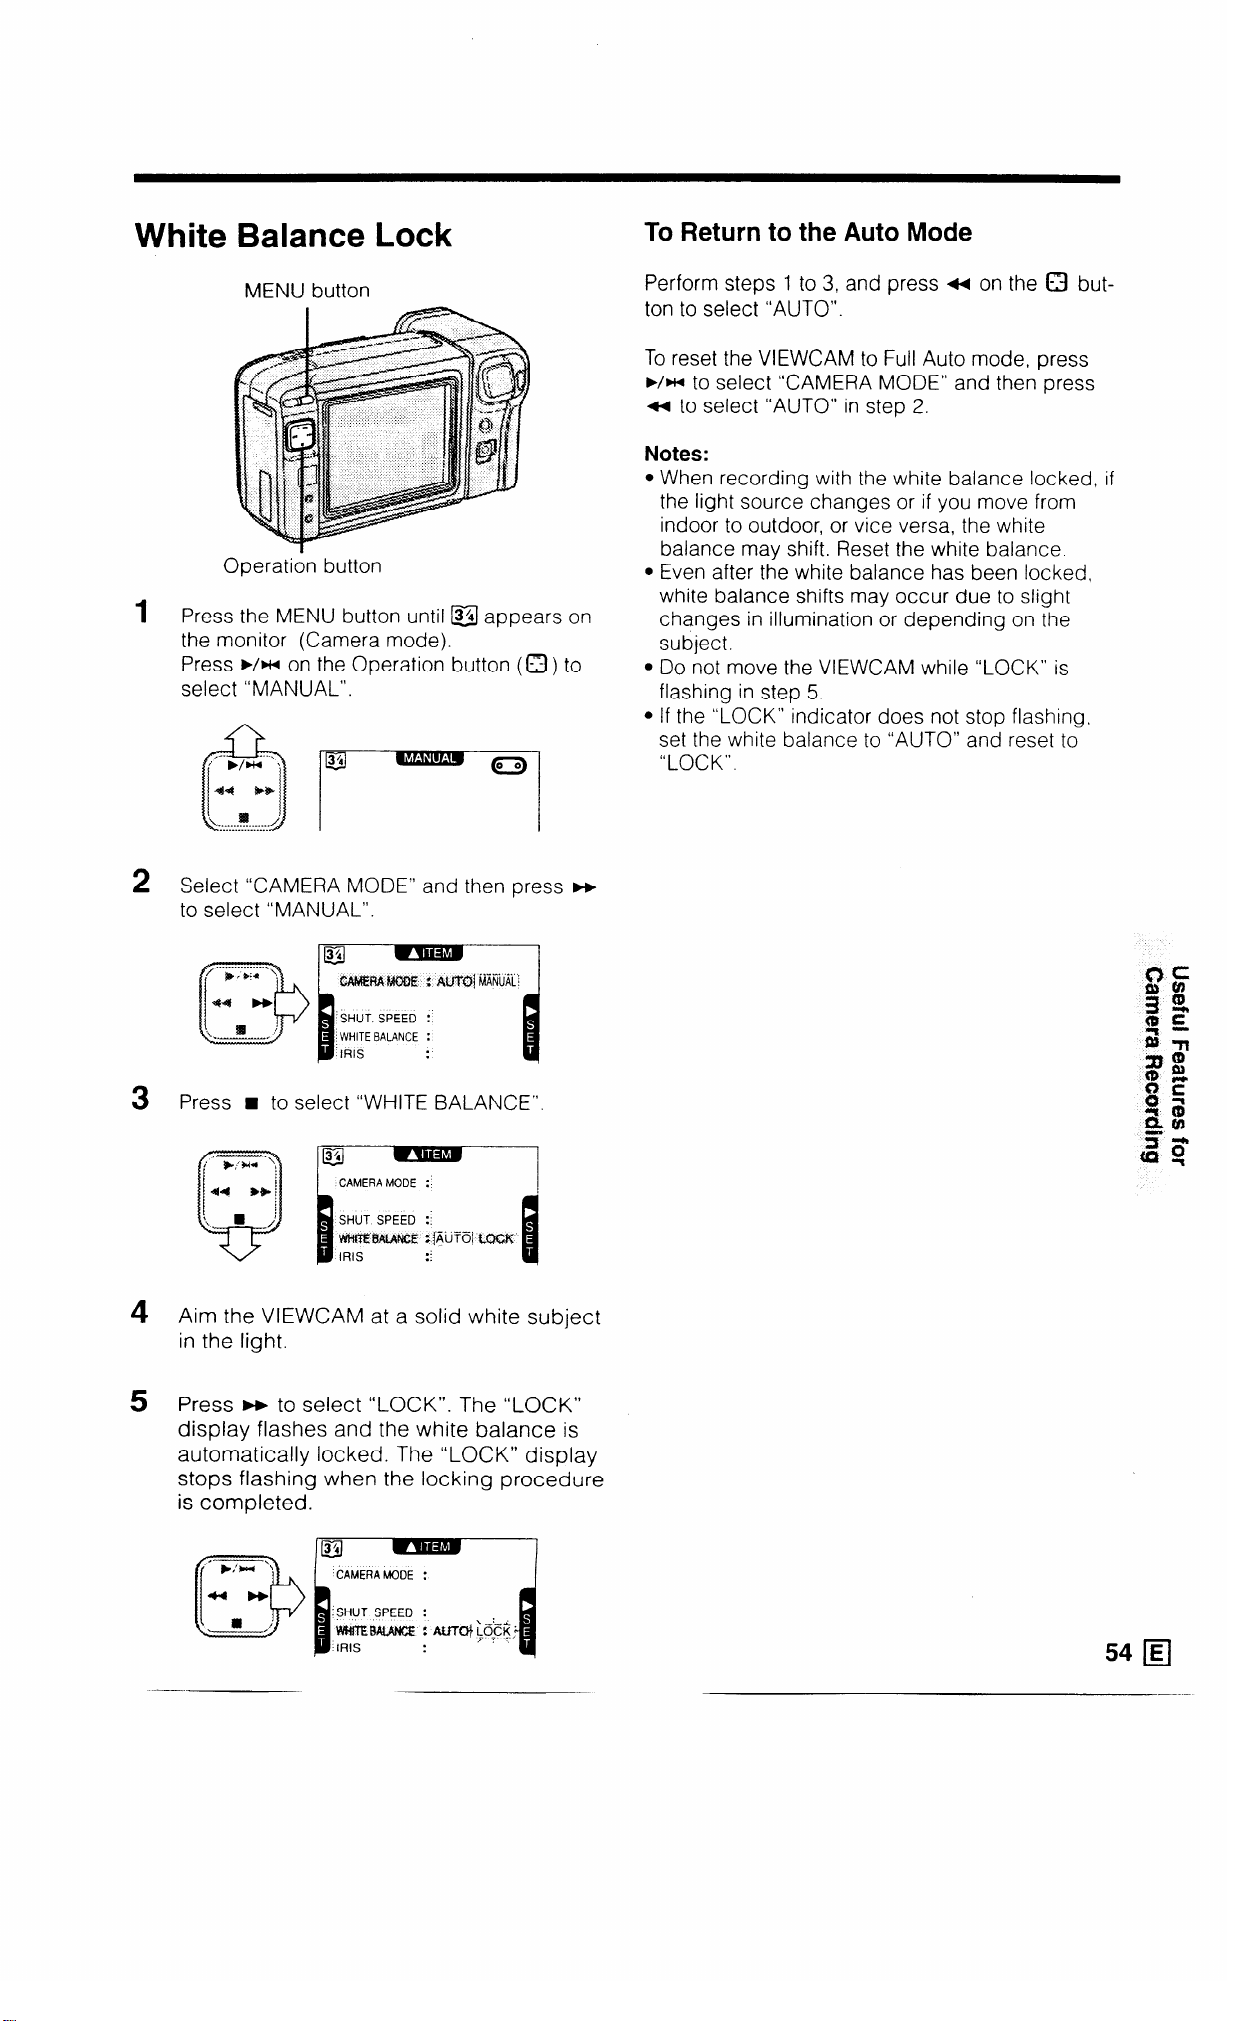
White Balance Lock
To Return to the Auto Mode
MENU button
Operation button
1 Press the MENU button until @l appears on
the monitor (Camera mode).
Press b/w on the Operation button (a) to
select “MANUAL”.
Perform steps 1 to 3, and press 4 on the Q button to select “AUTO”.
To reset the VIEWCAM to Full Auto mode, press
./HI to select “CAMERA MODE” and then press
4 to select “AUTO” in step 2.
Notes:
l When recording with the white balance locked, if
the light source changes or if you move from
indoor to outdoor, or vice versa, the white
balance may shift. Reset the white balance.
l Even after the white balance has been locked,
white balance shifts may occur due to slight
changes in illumination or depending on the
subject.
l Do not move the VIEWCAM while “LOCK” is
flashing in step 5.
l If the “LOCK” indicator does not stop flashing,
set the white balance to “AUTO” and reset to
“LOCK”.
Select “CAMERA MODE” and then press m
2
to select “MANUAL”.
lg
MfdERA MUOE i mai MANUAL I
SHUT SPEED :
WHITE BALANCE :
‘IRIS
P
Press n to select “WHITE BALANCE”.
3
Aim the VIEWCAM at a solid white subject
4
in the light.
5 Press w to select “LOCK”. The “LOCK”
display flashes and the white balance is
automatically locked. The “LOCK” display
stops flashing when the locking procedure
is completed.
..--. _. !
.
.
1 CAMERAMODE :
:SHUT SPEED :
I
54 q
Page 58

Useful Features for Camera Recording
Manual Iris
The VIEWCAM is normally set to Auto Iris
mode, which automatically chooses the optimal
aperture. When there is too much contrast in
brightness between the subject and background, however, you may not be able to
record a clear image. Correct iris to adjust the
aperture.
MENU button
Press ++ or m to select the desired value
4
setting.
l The number shows the selected aperture
value. The adjustable range is from -6
(least light) to + 6 (most light).
p’94-l ’
. :
I
s... ;
,’
: j44 H
. .
.;- ?
sf /
-.
r
CAMERA MODE :
I
To Return to the Auto Mode
In step 4. press t( or H on the 0 button to
select “0”.
Operation button
Press the MENU button until @ appears on
the monitor (Camera mode).
Press b/w on the Operation button (0) to
select “MANUAL”.
Select “CAMERA MODE” and then press F+
to select “MANUAL”.
SHUT SPEED :
WHITE BALANCE :
To reset the VIEWCAM to Full Auto mode, press
b/w to select “CAMERA MODE” and then press
a to select “AUTO” in step 2.
Strobe Recording
You can record strobe images (still pictures that
capture continuous motion at l/4 sec. intervals) of
subjects with normal sound. You will find it useful
when you want to produce a special effect while
recording moving subjects such as your friends
waving at you.
1 While the VIEWCAM is in Recording Standby
mode, display the @ screen (Camera mode)
and press b/w on the Operation button (Q )
to select “STROBE”.
Press n to select “IRIS”.
CAMERA MODE :
SHUT SPEED :
WHITE BALANCE :
$tqs
PREV PAGE :
_ fj/__._- . . . . &..-,.
l Each time you press ~/HI, the recording
mode switches between Normal and
Strobe.
2
Press the REC START/STOP button to begin
strobe recording.
3 To return to normal recording, press b/w on
the 0 button to select “STROBE” again.
Note:
l The picture quality in this mode will be slightly
lower than normal pictures.
Page 59

Recording a Five-second Still
Still Recording
Image (Snapshot)
You can record a still picture (snapshot) for about
5 seconds with normal sound simply by pressing
the SNAP button.
This is useful when you want to record a scene like
a photograph.
Refer to page 20 to display MENU-PAGE 31
1
(Camera mode).
Press w on the Operation button (a ) to
select “PHOTO SNAP” ( 1 ) and then press
a to select “SNAP” ( 2 ).
Press the MENU button to turn off the menu.
Operation
PREV PAGE :
You can record still images of subjects with normal
sound.
You will find it useful when you want to record a
shot of a tourist information board during
sightseeing.
1 Refer to page 20 to display MENU-PAGE Ia
(Camera mode).
Press n on the Operation button (a) to
select “PHOTO SNAP” ( I ) and then press
m to select “STILL” ( 2 ).
Press the MENU button to turn off the menu
._ __ . ___.,
f +;s:* ,
44 Hjl
, j
i
. . . ..----
7’“’
ip
.v 1 ,fp
.,I
.,,*
Press the SNAP button while the VIEWCAM is
2
EXTEND ZOOM
PREV PAGE
In Recording Standby mode.
: 15 20 25x
: SW STILL:
:
Press the SNAP button while the VIEWCAM is
2
in Recording Standby mode
SNAP
Press the REC START/STOP button.
3
l The /FJ indicator is displayed durtng
snapshot recording.
A still image of the subject will be recorded for
about 5 seconds, then the VIEWCAM automatically returns to Recording Standby mode.
Notes:
l The image on the rnonltor WIII be frozen during
snapshot recording
l If the electron/c high-speed shutter is used with the
snapshot functron, you can record a complete still
image without any blurring
l The picture quality of the snapshot IS slightly lower
than normal picture quality
Press the REC START/STOP button A still
3
image of the subject WI/I be recorded
Notes:
l Once the Still Recording mode IS set, the VIEW-
CAM will remain in that mode until It IS cancelled.
even when switched between Recording mode
and Recording Standby mode.
l The picture quality in this mode will be slightly
lower than normal pictures
Caution:
l Do not keep the VIEWCAM in Still Recording
mode too long. The monitor may hold an afterimage. Turn off the power and wait for a while.
The monitor will return to normal
To Pause Snapshot or Still Recording
Press the REC START/STOP button.
To Return to Normal Recording
Press the SNAP button to disengage the Snap/%11
mode.
56 q
Page 60

Useful Features for Camera Recording
Lighting
For clear, good-quality recording, 500 to 100,000
lux is needed Recording is also possible with less
light, but the picture quality may suffer. Adequate
lighting is also essential for correct white balance
Blue sky
100.000 Clear day at noon (100,000)
__________-----------
Clear day at 10 am (65,000)
Clear day at 3 pm (35,000)
Cloudy day at noon (32.000)
Cloudy day at 10 am (25,000)
10.000
-~-_._-~-----_-______
Cloudy day, one hour after sunrise (2,000)
Clear day. one hour before sunset (1,000)
1.000
-__-_---__-----_____
----~--------________
Reference
Lighting is not only one of the most important areas
in producing home videos, but also one of the most
overlooked. Good lighting can often mean the
difference between a great picture and a poor one.
Lighting is also essential for correct white balance.
In most outdoor, daytime scenes, natural lighting is
adequate for home videos. Indoors, the situation
becomes more complicated. Artificial lighting is required, and halogen lamps provide the most
natural artificial light while maintaining a constant
colour temperature over a long operating life.
Good lighting is difficult to achieve. There are many
problems waiting to catch the unwary. Simply
mounting one light or several lights on either side
of the VIEWCAM will only make your subject look
flat and two-dimensional. To make a subject more
interesting, use the lighting to model your subject
and to add or create emphasis in a scene.
Fluorescent light near window (1,000)
Factory floor (700-800)
Sales counter in department store (500-700)
Bowling alley (500)
Library (400-500)
Office with fluorescent lighting (400-500)
Fluorescent desk lamp (400)
Flashlight at 1 m (250)
100 Shop stairway (100)
During intermission at movie theatre (15-35)
Cigarette lighter at 30 cm (15-20)
Candles on birthday cake at 20 cm (10-15)
10
Candlelight
3ofout Ti?m
Pm*
(ttqnM!s
K$hrltt)
10,000
9.000
8.000
7.000
6,500
6,000
5.500
5.000
4.500
3.500
3.200
2.800
2,500
2.000 Candlelight
Clear day
Cloudy day
Rainy day
Daylight fluorescent light
Camera flashbulb
Blue photolamp
White fluorescent light
Off-white fluorescent light
Tungsten photolamp
Halogen lamp
Tungsten lamp
Iodine lamp
Acetylene lamp
Kerosene lamp
Notes:
l The figures in the charts are approximations.
l The auto white balance operates automatically
within the range of “AUTO” shown in the chart.
However. it will satisfactorily operate from 2,500 K
up to 8.000 K, although the picture may take on a
red or blue tint.
Lighting indicator (“LIGHT”)
When the “LIGHT” indicator appears on the monitor, it means that there is not enough illumination
for recording. Either move to a brighter location or
increase the light. You can also correct the problem by manually setting the gain (see page 32).
Blue
White
Yellow
Red
Page 61
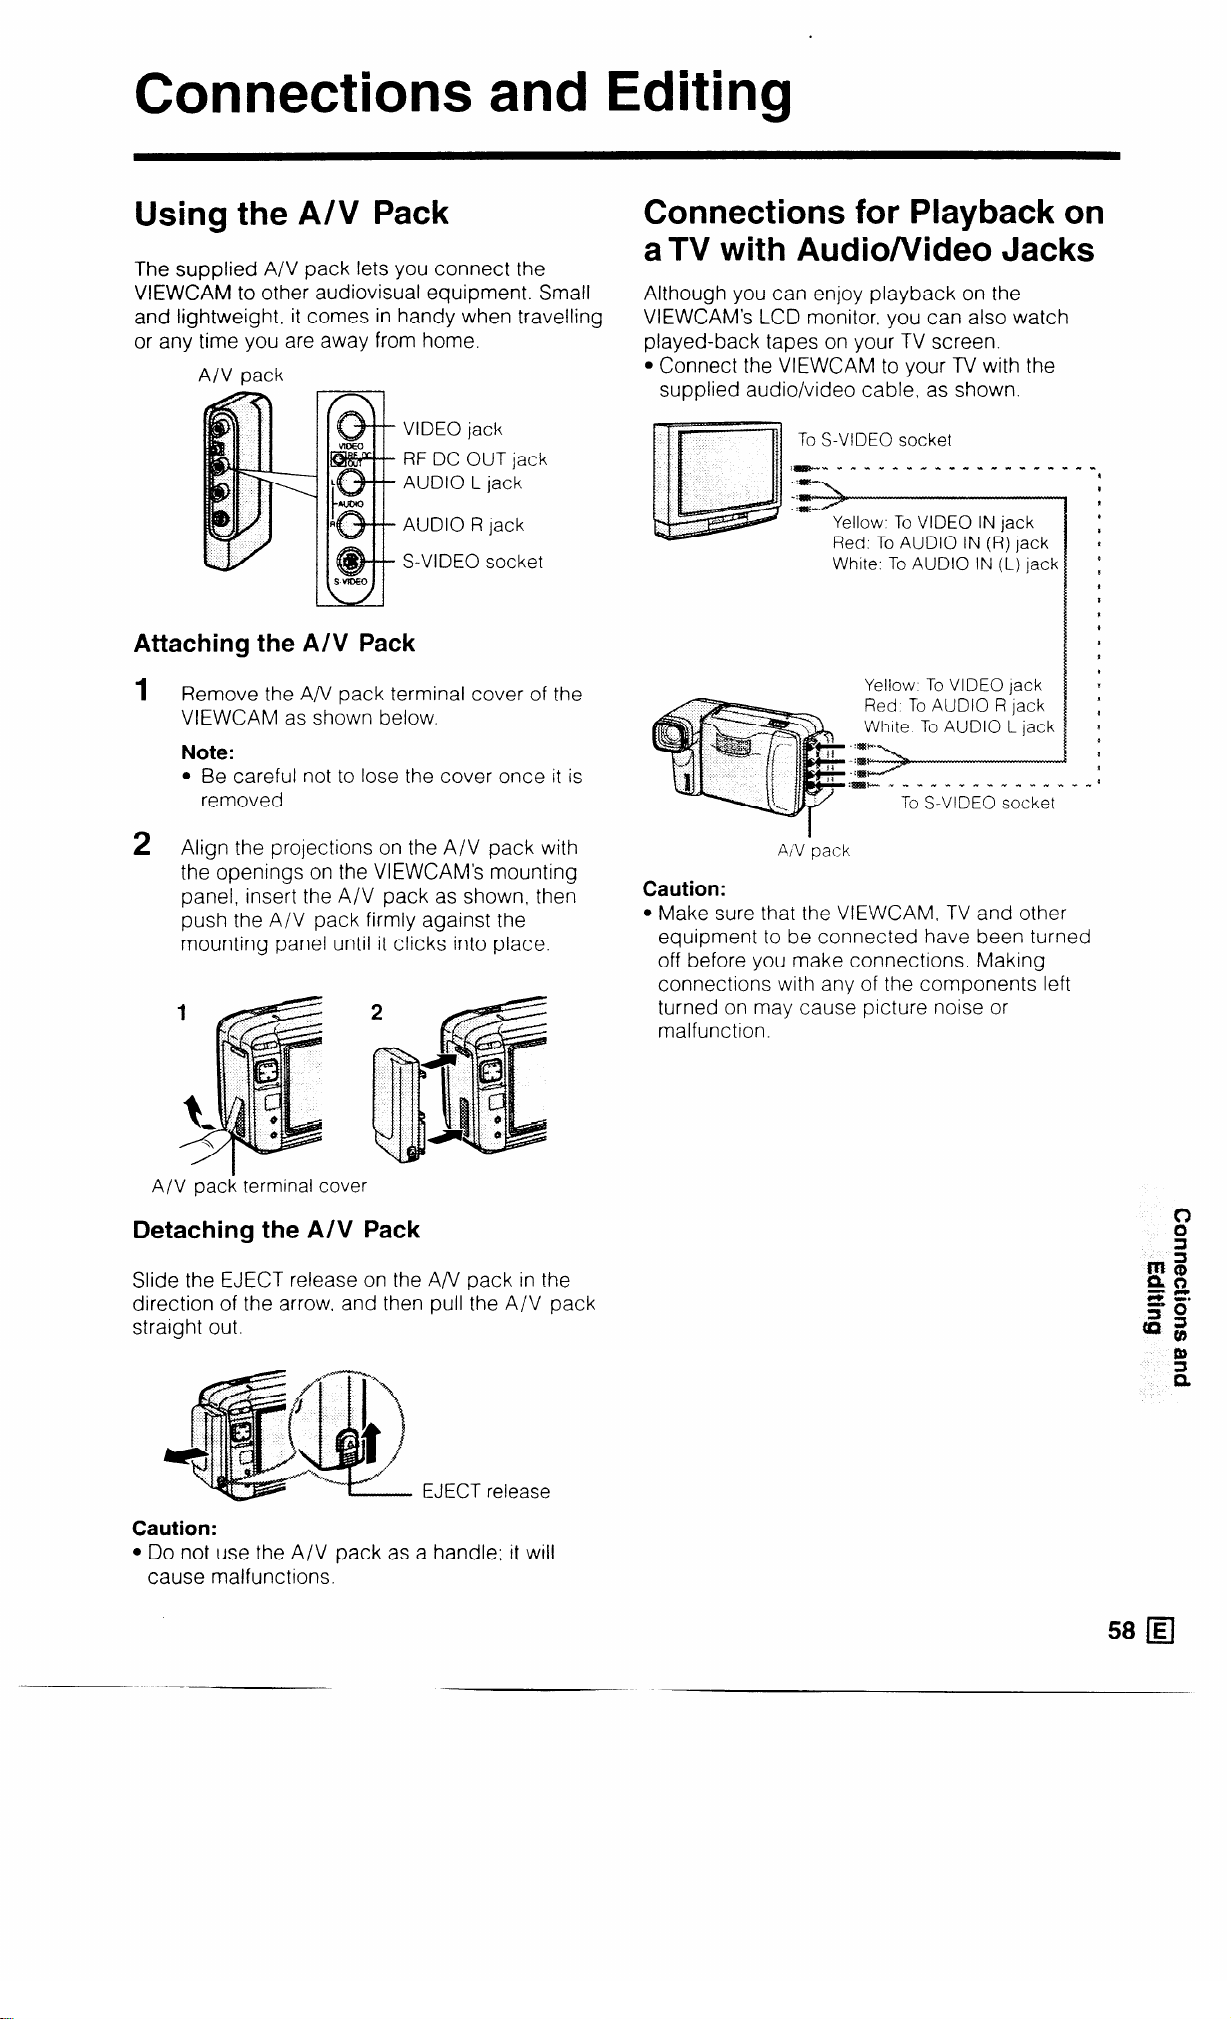
Connections and Editing
Using the A/V Pack
The supplied A/V pack lets you connect the
VIEWCAM to other audiovisual equipment. Small
and lightweight, it comes in handy when travelling
or any time you are away from home.
A/V pack
VIDEO jack
RF DC OUT jack
AUDIO L jack
AUDIO R lack
S-VIDEO socket
Attaching the AN Pack
1 Remove the A/V pack terminal cover of the
VIEWCAM as shown below.
Note:
l Be careful not to lose the cover once it is
removed.
Connections for Playback on
aTV with Audio/Video Jacks
Although you can enjoy playback on the
VIEWCAM’s LCD monitor. you can also watch
played-back tapes on your TV screen.
l Connect the VIEWCAM to your TV with the
supplied audio/video cable. as shown.
To S-VIDEO socket
Yellow. To VIDEO IN jack
Red. To AUDIO IN (R) jack
White, To AUDIO IN (L) jack
Yellow To VIDEO lack
Red To AUDIO R jack
White To AUDIO L jack
:m* ” . 1 I . I I .” ?. . .” *
To S-VIDEO socket
Align the projections on the A/V pack with
2
the openings on the VIEWCAM’s mounting
panel, insert the A/V pack as shown, then
push the A/V pack firmly against the
mounting panel until it clicks into place.
A/V pack terminal cover
Detaching the A/V Pack
Slide the EJECT release on the A/V pack in the
direction of the arrow. and then pull the A/V pack
straight out.
AI’V ‘pack
Caution:
l Make sure that the VIEWCAM, TV and other
equipment to be connected have been turned
off before you make connections. Making
connections with any of the components left
turned on may cause picture noise or
malfunction.
EJECT release
Caution:
l Do not use the A/V pack as a handle: it will
cause malfunctions.
58 q
Page 62
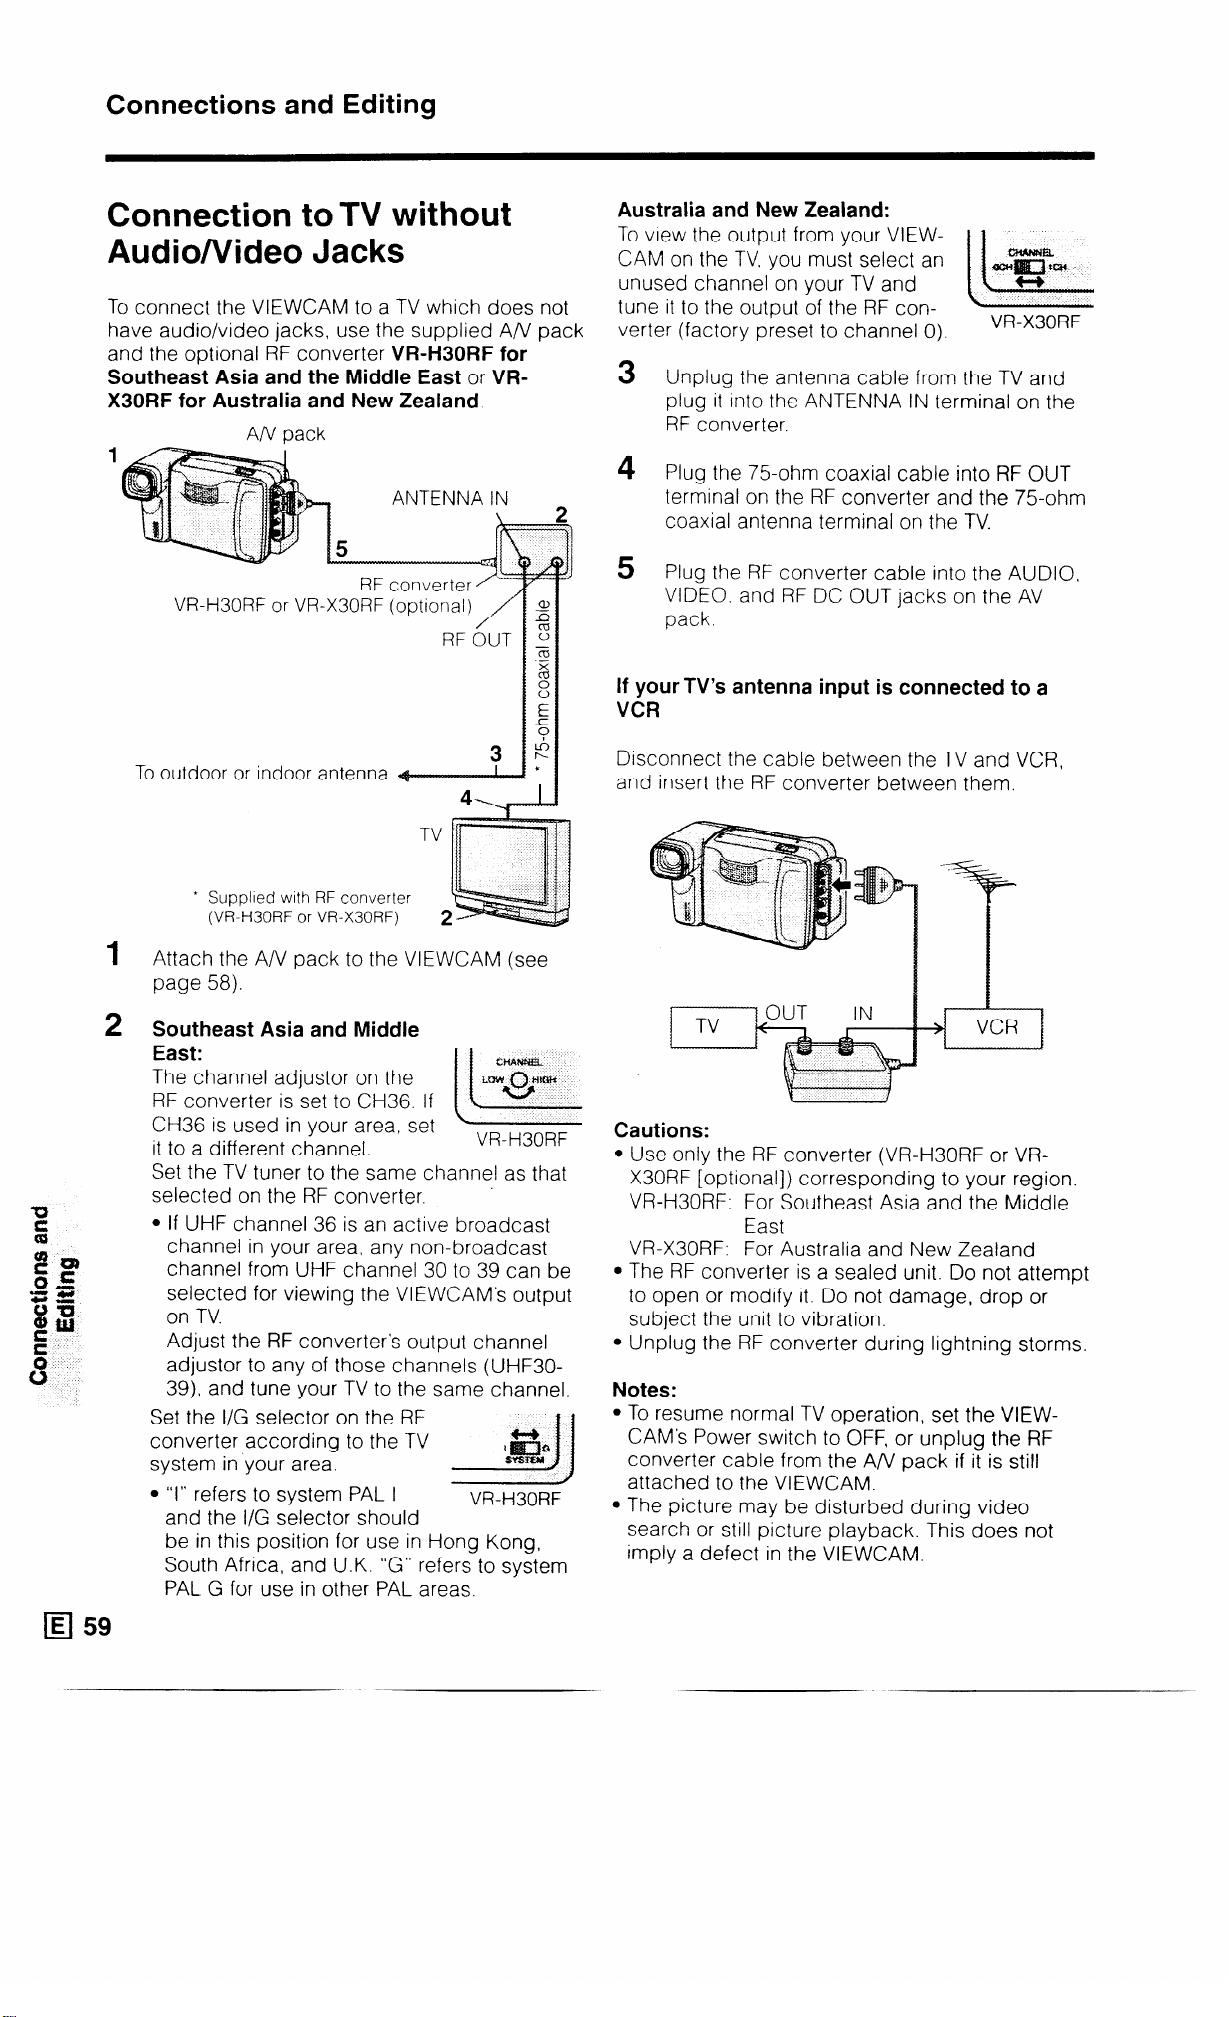
Connections and Editing
Connection to TV without
Audionlideo Jacks
To connect the VIEWCAM to a TV which does not
have audio/video jacks, use the supplied A/V pack
and the optional RF converter VR-H30RF for
Southeast Asia and the Middle East or VR-
X30RF for Australia and New Zealand
AIV pack
1
ANTENNA IN
VRH30RF or VRX30RF (optlonal)
To outdoor or indoor antenna
Australia and New Zealand:
To view the output from your VIEW- 1 1
CAM on the TV. you must select an
unused channel on your TV and
tune it to the output of the RF converter (factory preset to channel 0).
Unplug the antenna cable from the TV and
3
plug it Into the ANTENNA IN terminal on the
RF converter.
4 Plug the 75-ohm coaxial cable into RF OUT
terminal on the RF converter and the 75ohm
coaxial antenna terminal on the TV.
Plug the RF converter cable into the AUDIO.
5
VIDEO. and RF DC OUT jacks on the AV
pack.
VR-X30RF
If your TV’s antenna input is connected to a
VCR
Dtsconnect the cable between the TV and VCR,
and insert the RF converter between them.
’ Supplied with RF converter
(VRH30RF or VRX30RF)
Attach the A/V pack to the VIEWCAM (see
page 58).
Southeast Asia and Middle
East:
The channel adjustor on the
RF converter is set to CH36. If
CH36 is used in your area, set
it to a different channel.
Set the TV tuner to the same channel as that
selected on the RF converter.
l If UHF channel 36 is an active broadcast
channel in your area, any non-broadcast
cH.WWEL
““tr””
ii-
VR-H30RF
0
channel from UHF channel 30 to 39 can be
selected for viewing the VIEWCAM’s output
on TV.
Adjust the RF converter’s output channel
adjustor to any of those channels (UHF30-
39). and tune your TV to the same channel.
Set the I/G selector on the RF
converter according to the TV
system in your area.
l “I” refers to system PAL I
VR-H30RF
and the I/G selector should
be in this position for use in Hong Kong,
South Africa, and U.K. “G” refers to system
PAL G for use in other PAL areas.
Cautions:
l Use only the RF converter (VR-H30RF or VR-
X30RF [optional]) corresponding to your region.
VR-H30RF. For Southeast Asia and the Middle
tast
VR-X30RF: For Australia and New Zealand
l The RF converter is a sealed unit. Do not attempt
to open or modify it. Do not damage, drop or
subject the unit to vibration.
l Unplug the RF converter during lightning storms.
Notes:
l To resume normal TV operation, set the VIEW-
CAM’s Power switch to OFF, or unplug the RF
converter cable from the A/V pack if it is still
attached to the VIEWCAM.
l The picture may be disturbed during video
search or still picture playback. This does not
Imply a defect in the VIEWCAM.
Page 63

Connection to TV via VCR
Watching Played-back Tapes
1 c
2
onnect the A/V pack to your VCR with the
supplied audio/video cable.
Set the VCR to its “AV” or “LINE” input
channel. Operate the TV as you normally do
to see the signal from the VCR. (See the
operation manuals for your TV and VCR.)
l If your VCR has an S-video input socket,
connect it to the A/V pack’s S-VIDEO socket
with the supplied S-video cable.
Yellow. To VIDEO IN jack
Red: To AUDIO IN (R) jack
White: To AUDIO IN (L) jack’
To S-VIDEO
f socket
x
* If your VCR has only one
aidio mput jack, use the
white plugs for the audio
connectlon on the VCR and
VIEWCAhl
on aTV
1 T urn on your TV and set it to its “AV” or
“VIDEO” channel. (See the operation manual
for your TV.)
Turn on the VIEWCAM in the VCR mode, and
2
begin tape playback as you normally do (see
page 41).
Note:
l When the VIEWCAM is connected to a TV for
playback, the picture on the TV screen may
flicker if the volume on the VIEWCAM is set to
maximum. Should this occur, turn the volume
down (see page 41).
w. To VIDEO jack
Red: To AUDIO R jack
White: To AUDIO L jack*
About the S-video socket
S-video sockets are used to pass the chroma
(colour) and luminance (brightness) components
of video signals separately. They serve to improve
the picture quality in both recording and playback.
60 q
Page 64

Connections and Editing
Editing
Video editing lets you refine your videos by
removing unwanted sequences from your tape,
or transposing one sequence with another.
This VIEWCAM lets you monitor the source pro-
gramme on the built-in LCD monitor without
having to connect it to an external TV or video
monitor.
Connect the VIEWCAM to a VCR with the
supplied A/V pack and audio/video cable.
Yellow: To VIDEO IN jack
Recording
To S-VIDEO socket
*If your VCR has only one audio input
jack, use the white plugs for the audio
connection on the VCR and VIEWCAM.
: Playback
Red. To AUDIO IN (R) jack
White: To AUDIO IN (L) jack*
Cutting Unwanted Sequences
Play back the tape to be edited, and locate
1
the beginnIng and end of the sequence you
wish to cut Write down the time code or the
tape counter readings at the beginning and
end of that sequence (see pages 45 and 46).
Then rewind the tape to the beginning of the
portion that you wish to keep.
2
Load a blank tape cassette Into the recording
VCR
3
Set the Power switch to VCR. Press ./H on
the Operation button (a) to select “PLAY”
and press the VCR’s REC (Record) button at
the same ttme.
4
Press the VCR’s Pause/Still button to pause
recording when the source tape reaches the
beginning of the sequence to be cut.
Press the VCR’s Pause/Still (or Record)
5
button to resume
tape reaches the
cut
recording when the source
end of the sequence to be
c
Red, To AUDIO R jack
White: To AUDIO L jack*
Note:
l If your VCR has an S-video Input socket, connect it
to the S-VIDEO socket on the A/V pack with the
supplied S-video cable
To stop editing
Press n on the 0 button to select “STOP” on the
VCR @I screen and press the STOP button on the
VCR.
Notes:
Some of the transitions between edited sequences
may be slightly off.
The picture may be disturbed during video search
or still picture playback This does not imply a
defect in the VIEWCAM.
The time code display is convenient when cutting
unwanted sequences (see page 45).
Time code
display
We recommend that you set the “TIME CODE”
menu item to “OFF” If you set it to “OUTPUT”,
the time code will be recorded along with the
edited sequences.
q 61
Page 65

Fluorescent Lamp Backlight
The fluorescent lamp backlight used in this
VIEWCAM will eventually need replacing. If you
continue to use the VIEWCAM when the
fluorescent lamp has almost reached the end of its
service life, the “REPLACE THE LAMP.” indicator
will be displayed on the monitor for approximately
one minute. When this occurs, purchase a
replacement lamp (KLMPVOO18TAZZ) from your
dealer or a SHARP Full Line Parts Distributor, and
replace the old lamp.
jl Power switch
4
Carefully hold the end (white knob) of the
lamp unit with tweezers, and pull it out.
Fluorescent lamp unit
5
Insert the replacement lamp unit into the
compartment. See note below.
Fluorescent lamp unit
Replace the fluorescent lamp compartment
6
cover.
Replacing the Fluorescent
Lamp Backlight
1
Set the Power switch to OFF
to turn off the VIEWCAM, and
wait about 15 minutes for the
lamp unit to cool down.
2
Rotate the camera module
of the VIEWCAM halfway
forward as shown.
Remove the lamp compartment cover: insert
3
a pointed object such as the point of a pen
into the opening above the cover, push the
cover release ” f!l” down, and then pull off the
cover.
OFF
Lamp compartment cover
Notes:
l In step 5 above, be sure to insert the
replacement fluorescent lamp straight in, in the
direction of the arrow. into the compartment. Do
not press diagonally as it may cause contact
failure.
l The fluorescent light may flicker when first turned
on. Should this occur. turn off the VIEWCAM, and
then turn it on again.
l When used in cold locations, the fluorescent
lamp may lose some of its brightness.
l Remove the battery pack before replacing the
fluorescent lamp.
Caution:
l The fluorescent lamp is hot during and
immediately after use of the VIEWCAM. Wait
at least 15 minutes after turning the power off
before attempting to change the lamp, to
allow time for it to cool down. Attempting to
change the lamp unit while it is still hot may
result in burns or other injuries.
u L
~~
._
Lamp compartment cover
62 q
Page 66

Before Requesting Service
Before callmg for service, please check the following troubleshooting table.
Symptom
No power.
l Power source 1s not properly
Pussib~e cause
connected.
l Battery pack is not charged.
5
3:
l Dew In VIEWCAM. l Watt until dew dries (p 6)
t?
l Safety function is In effect
REC START/STOP button l Erasure protect tab on video
does not work
cassette is open
Power suddenly turns off l VIEWCAM left in Recording
Standby mode for ftve minutes
Monitor picture IS hard to
l Inappropriate picture adjustments.
see.
Auto focus does not
l Manual Focus mode is engaged.
work
l Zoom used on close subject. -
I
l Connect power source properly
Suggiested solutSon
(PP 15-17)
l Charge battery pack sufficiently.
(P. 14)
l Set Power switch to OFF and
remove battery pack, wait for two
seconds. then re-install battery
pack and turn on power (p. 15)
l Close tab or use a new cassette
(P 9)
l Set Power switch to OFF and then
back to CAMERA.
l Adjust picture (p 27)
l Set to Auto Focus mode. (p. 52)
l Zoom out on subject. (p 30)
:
1_
10,
Bright subject produces
8
wide vertical lines.
8
No audio from speaker
when recording.
Automatically zooms out
without operating Zoom
buttons.
Tape stops midway
through rewind or fast
forward.
Y .
4 No image appears on
connected TV screen.
G
X
l Subject has little contrast in
brightness, or is full of horizontal or
vertical stripes.
l Occurs when shooting subject with
strong contrast to the background.
Does not indicate a malfunction.
l Speaker does not work during
Camera mode. (Volume control in
Camera mode only affects
earphone volume.)
l VlEWCAM is unable to focus when
zooming in on subject within 1.5 m,
and automatically zooms out until it
focuses on subject.
l No subject in the field of view.
l Counter is in memory mode.
l Video input channel on TV or TV
channel is not selected properly.
l A/V cable is not properly connected
l An/ pack is not properly connected.
l Focus manually (p 52)
l Zoom out. (p. 30)
l Direct lens to some subject, or set
zoom to widest angle before
shooting (p. 30)
l Disengage memory mode. (p. 46)
l Select video input channel on TV or
TV channel properly (pp 58-60)
l Connect A/V cable properly.
(PP 58-60)
l Connect A/V pack properly. (p. 58)
Page 67

sjfnlptum fWsiMe cause
suggested sdufiotl
Cannot play back, rewind l Tape already wound or rewound
$$ or fast forward tape.
completely. desired point. (p. 41)
1$
g During playback, mosaic l Dirty video heads.
6, patterns appear or
picture disappears.
No power in VCR or
l Old or worn tape.
l Depleted battery pack.
Camera mode.
l AC adaptor cord removed from
power outlet.
~ Cassette will not eject.
z
%
l Power source is not properly
connected.
l Battery pack is not charged. l Charge battery pack sufficiently.
ii:
61)
f
B
No buttons operate.
8
OG
No image on monitor.
l VIEWCAM is recording.
l Dew in VIEWCAM.
l Backlight has been turned off l Press MODE DISPLAY button, or set
l Rewind or fast forward tape to
l Call for service.
l Use a new video cassette.
l Use fully charged battery pack.
(P. 14)
l Plug AC adaptor cord into power
outlet. (p. 16)
l Connect power source properly.
(pp. 15-17)
(P. 14)
l Stop tape and try again.
l Wait until dew dries (p. 6)
Power switch to OFF and then back
to CAMERA or VCR (p 43)
Cannot edit to connected
VCR.
Lens makes rattling sound
when VIEWCAM is moved in
VCR mode or with power off.
Remote control does not
function
l Fluorescent lamp IS burned out. l Replace with new fluorescent lamp
unit (p 62)
l A/V or S-video cable is not properly l Connect A/V or S-video cable
connected.
l A/V pack is not properly connected. l Connect A/V pack properly (p 58)
l Does not indicate a malfunction.
properly. (p. 58)
_~
l “REMOTE” menu item IS set to “OFF”.
l Remote control lithium battery has
run down.
l Remote control used beyond
l Set “REMOTE” menu Item to “ON” (p 40)
l Replace remote control lithium
battery with a new one (p 13)
l Use remote control wlthln operating
operating range. range. (p. 40)
l Intense daylight falling on l Protect photoreceptor from
VIEWCAM’s photoreceptor.
l Obstacle between remote control
and VIEWCAM’s photoreceptor.
exposure to intense daylight. (p 40)
l Remove obstacle or use remote
control from different angle (p. 40)
Notes:
This unit is equipped with a microprocessor. Its performance could be adversely affected by external electrical
noise or interference. If this should happen, turn off the power and disconnect the unit from any power
sources. including lithium batteries, etc. Then reconnect the power sources (to resume operation)
If the characters displayed on the monitor screen appear to malfunction, disconnect the power source and
remove the lithium battery, then reconnect the power source, Insert the lithium battery, and turn the power on
again. The characters on the monitor should be normal Set the date and time, then resume operation
64 H
_
Page 68

Specifications
Signal System:
Recording System:
Cassette:
Recording/Playback Time:
Tape Speed:
Pickup Device:
Lens.
Lens Filter Diameter:
Monitor:
Microphone:
Colour Temperature Compensation:
Minimum Illumination:
Video Output Level:
Audio Output Level:
Speaker Output:
External Microphone Input
Power Requirement:
Power Consumption:
Operating Temperature:
Operating Humidity:
Storage Temperature:
Dimensions (approx.):
Weight (approx.):
PAL standard
2 rotary heads, helical scanning system
Digital VCR Mini DV video cassette
60 minutes (DVMGO)
18.831 mm/second
‘/I” (6.4 mm, effective size: 4.5 mm) CCD image sensor (with
approx. 470,000 pixels including optical black)
12 x power zoom lens (F1.8, f = 4.2-50.4 mm), full-range auto
focus
37 mm
4” (10.1 cm)-full-colour LCD screen (TFT active matrix)
Electret stereo microphone
Auto white balance with white balance lock
6 lux’ (with gain-up, and digital zoom off)
1 .O Vp-p 75-ohm unbalanced
- 8 dBs, impedance less than 2.2 kohms
300 mW
3.5 mm diameter mini-plug, -66 dBs, output impedance 6.8
kohms, DC 4 V, for plug-in-power microphone use
DC 3.6 V
8.5 W (during camera recording in full auto mode with zoom
motor off, backlight in normal mode)
0°C to + 40°C
30% to 80%
- 20°C to + 60°C
181 mm (W) x 99 mm (H)x 88 mm (D)
690 g (without battery pack, lithium battery, video cassette)
AC Adaptor/Battery Charger
Power Requirement: AC 1 lo-240 V, 50/60 Hz
DC Output: 4.5 V
Power Consumption: 25 W
Dimensions (approx.): 120 mm (W) x 51 mm (H) x 101.5 mm (D)
Weight (approx.). For Asia/Middle East (UADP-0233 TAZZ): 3949
For Hong Kong (UADP-0219 TAZZ): 460g
For Australia/New Zealand (UADP-0216 TAZZ): 4209
For Russia (UADP-0235 TAZZ): 3949
Specifications are subject to change without notice.
*Minimum illumination: Since there is no widely accepted testing procedure for determining minimum
illumination capability, lux ratings are comparable only between models from the
same manufacturer.
__
Page 69

Easy Menu Reference Chart
Once you become familiar with the menu system, use this chart to guide
yourself through functions and setups.
Function
Paw
Functions
BLC/GAIN-UP
DIS
FADE
EXTEND
MANUAL
FOCUS
STROBE
SEARCH bb
RETURN
SEARCH 44
CAMERA MODE
PREV. PAGE
AUTO
MANUAL
i
SHUT. SPEED
WHITE BALANCE
IRIS
PREV. PAGE
Page 70

Easy Menu Reference Chart
(Camera mode)
Function
page
Functions
MENU
PAGE m
PAGE i21
PAGE i3J
PAGEa
DISP.
TIME CODE
SELF REC
PREV. PAGE
16:9
REMOTE
DGTL ZOOM
PREV. PAGE
EXTEND ZOOM
PHOTO SNAP
PREV. PAGE
AREA
SUMR TIME
SETTING
PREV. PAGE
TIME CODE
PICTURE
PREV. PAGE
RESET
TIME CODE
MEMORY
.
BACKLIGHT
BRIGHT
COLOUR
PREV. PAGE
Page 71

Function
paw
Functions
PLAY/STILL
FF
STOP
REW
SEARCH
PICTURE
BACKLIGHT
BRIGHT
COLOUR
PREV. PAGE
MENU
TIME CODE
DISP.
TIME CODE
REMOTE
PREV. PAGE
PREV. PAGE
RESET
TIME CODE
MEMORY
 Loading...