

Page 1

SHARR
Page 2
WARNING:
This Camcorder must be supplied with D.C. 9.6
volts only from a BT-75 battery, the AA-75X AC
adaptor or the optional VRP75CH car adaptor.
CAUTION:
As there are no serviceable controls inside the
Camcorder or AC adaptor, do NOT remove their
cabinets as touching parts inside could result
in electric shock. Please refer servicing to a
qualified dealer or a Camcorder service centre
approved by Sharp as shown in the enclosed
Directory of Service Centres.
CAUTION:
To prevent shock, do not open the cabinet. No user
serviceable parts inside. Refer servicing to qualified
dealer or service centre.
1
Page 3
With so many brands available, the choice was difficult.
But after enjoying the top quality and high performance of this Sharp Camcorder, you’ll
know you were right.
This Camcorder has outstanding features which allow
of your choice. Before using the unit, please read the operation manual carefully. Be sure to store this manual
for future use as it will come in handy if you encounter any problem with the unit.
1
12 x NEW ZOOM SYSTEM
2
Colour Viewfinder
3
Full Auto Camera Recording System
-
Automatic Focus, Iris, and White Balance
4
l/10,000, 114,000,
5
Ultra low light recording down to 3 lux (with Gain-up function)
6
Intelligent Auto Iris for shooting backlit subjects
l/1,000,
11250, 11100 of a sec. variable range, high speed shutter.
you
to relax and enjoy the home entertainment programmes
7 Flying erase head (picture insert)
8
Self timer for Camera Recording
9 3-way
10
Copyright may exist in material you wish to record.
Copying such material without permission of the
relevant licensees or owners of the copyright is
hibited by law. Sharp is not in a position to
the recording of copyright works and nothing in this
operation manual should be read or implied at giving
that authority.
power source with AC, battery, and car battery
Camera search
This unit can be operated by connecting it to either the
AC adaptor, battery pack or optional car battery adaptor/
pro-
authorize
charger. The AC adaptor incorporates the AUTO
VOLTAGE (AC
llO-24OV, 50/60
Hz) function.
FEATURES..
PRECAUTIONS..
MAJOR OPERATING COMPONENTS AND
THEIR FUNCTIONS
PREPARATIONS..
INSTALLING THE LITHIUM BATTERY..
SE-ITING
ATTACHING AND DETACHING
THE BATTERY PACK
ATACHING
INSERTING AND REMOVING A CASSETTE..
ADJUSTING THE GRIP STRAP..
USING
POWER SUPPLY SYSTEM
USING THE AC ADAPTOR/
BATTERY
CHARGING THE
USING
CHARGER (OPTIONAL ACCESSORY).
USING
CAMERA RECORDING
CAMERA RECORDING..
FULL AUTO SYSTEM..
REC
CAMERA SEARCH..........................................
POWER ZOOM
(WIDEITELEPHCTTO
USING THE ZOOM SELECT
LAP TIME FUNCTION
.........................................................
...................................................
..............................................
.................................................
...............
THE DATE/TIME..
THE SHOULDER STRAP..
THE
COLOUR
CHARGER.. .....................................
BATTERY
THE CAR BATTERY ADAPTOR/
THE
BA-TTERY
REVIEW.. ................................................
CONTROL).
...............................
.........................................
..............
........................
VIEWFINDER
..................................
PACK..
PACK..
.......................................
.....................................
......................................
..........................
..................................
BUl-i-ON
.............
...................
.............
......................
..............
.....
10
11
11
12
12
13
14
14
16
17
17
17
18
19
1
2
4
7
7
7
8
8
9
9
LCD DISPLAY AND
VIEWFINDER INFORMATION..
AUTO DATE/TIME FUNCTION
ASSEMBLE RECORDING
REPLACING THE BATTERY PACK
WHILE RECORDING
AUTO POWER OFF
PLAY BACK
PLAYBACK IN THE VIEWFINDER..
TRACKING ADJUSTMENT..
FORWARD/REVERSE SEARCH AND STILL
COUNTER MEMORY FEATURE..
CONNECTION TO TV
CONNECTION TO TV WITH A/V TERMINALS..
RECORDING TO ANOTHER VCR..
EDIT CONTROL
USING THE
ADVANCED OPERATION
MANUAL FOCUS
WHITE BALANCE..
BACKLIGHT COMPENSATION
GAIN-UP
SELF TIMER RECORDING
HIGH SPEED SHUTTER..
MACRO
FADE IN & OUT..
LIGHTING
BEFORE REQUESTING SERVICE
SPECIFICATIONS
.........................................................
..............................................
CASSETTE
.........................................................
SHOI-S..
..........................................................
.............................................
.............................................
...............................................
.........................
..........................
................................
.......................................
.........................................
...................
............ .
......................................
ADAPTOR
....................................
.............
..........................................
..............................
..............................
................................
...............
.....................
...................
..................
.........................
.......................
20
21
22
22
22
23
23
23
..... 24
25
26
.
27
28
28
29
31
31
31
32
32
32
33
34
34
35
36
37
Page 4
READ THE SAFETY AND OPERATING INSTRUCTIONS
FOLLOW INSTRUCTIONS AND HEED ALL
INGS
befoe
operating this Camcorder.
on this Camcorder and in this manual.
WARi+
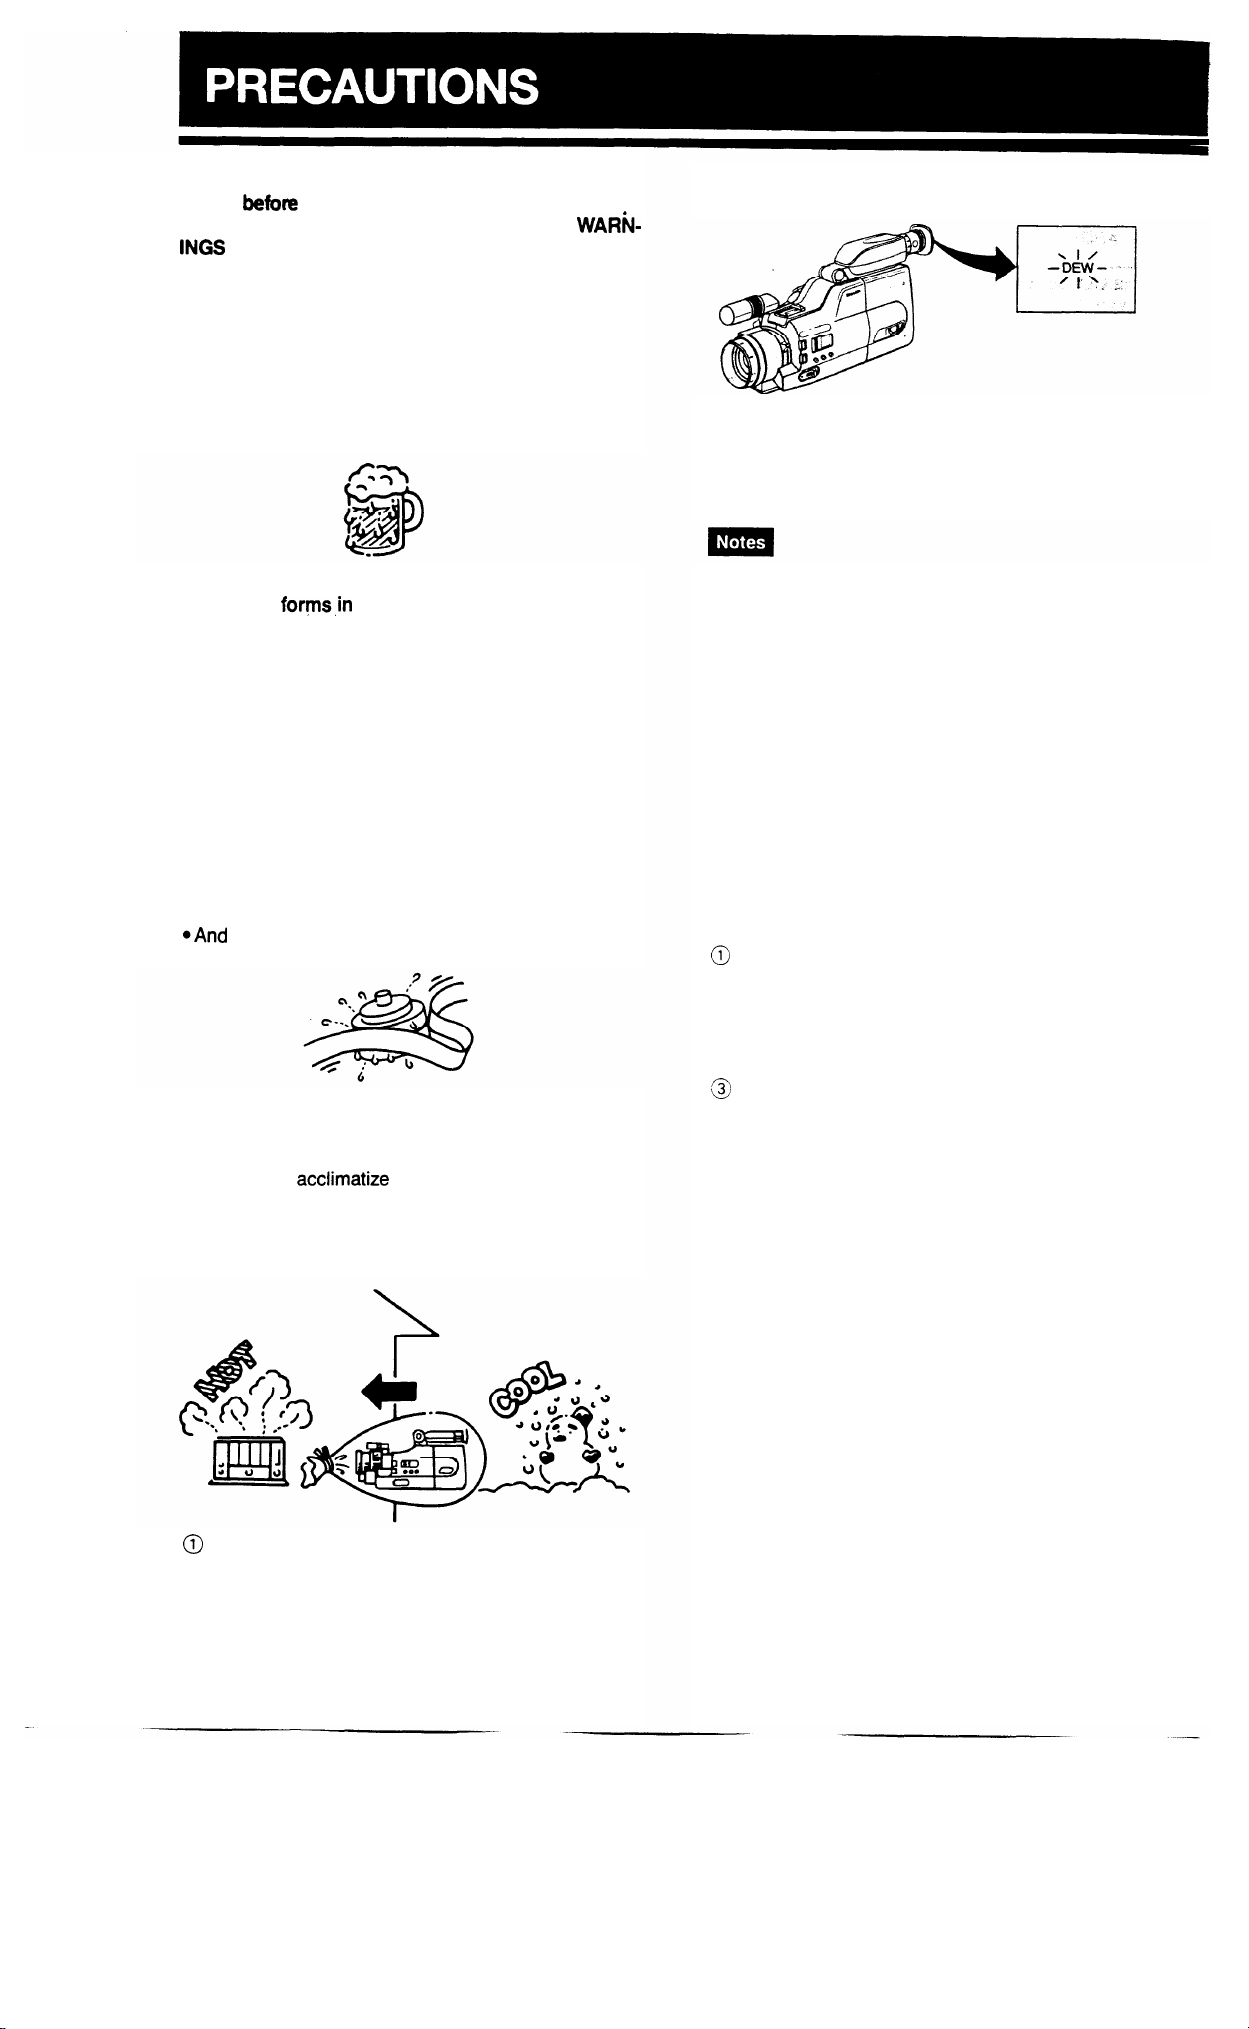
DEW FORMATION
What is “dew formation?”
When you pour cold beer into a glass, dew forms on
the glass. This clinging of water drops is called dew
formation.
When dew
Dew will gradually form on the head drum of your Camcorder and make the video tape stick to the head. This
causes damage both to the head and the tape. When
dew formation occurs, recording and playback may not
function properly.
Dew is likely to form in the following circumstances:
l When moving the Camcorder from a cold place to a
warm place.
l When placing the Camcorder in a cold room which is
then heated rapidly.
l When moving the Camcorder outdoors from an air
conditioned room.
l When placing the Camcorder in the direct path of air
blowing from an air conditioner.
@And
How to prevent trouble due to dew formation.
When using the Camcorder in a place where dew for-
mation is likely to occur, allow the Camcorder and the
video tape to
one hour.
For example, when bringing the Camcorder indoors after skiing, first put it in a plastic bag and allow it to adapt
to room conditions for some period of time.
forms,in
your Camcorder.
when placing the Camcorder in a humid room.
acclimatize
to the surroundings for about
“Dew” warning feature
When dew forms on the head drum, the dew warning indicator appears in the viewfinder.
After ten seconds, the power will automatically turn off.
l
When “DEW” appears, eject the video tape and leave it out
for several hours to adapt it to the surroundings.
l
Since dew forms gradually, it may take 10 to 15 minutes be-
fore “DEW” appears in the viewfinder.
l
To use the Camcorder again, turn the power on after waiting
for several hours and make sure that “DEW” has disappeared.
Before actual recording, be sure to test record, checking
that both the picture and the sound are being recorded
properly. The picture can be easily checked by using
“REC REVIEW’:
How to continually maintain good recording.
If used in a variety of places, eventually your Camcorder
may not function properly due to accumulation of dirt on
the head drum. Please pay special attention to the following points when using your Camcorder.
@
Dew formation on the head drum.
@The video tape becomes worn:
Using a damaged or soiled video tape may also soil
the head drum, causing the picture to be blurred or
nothing to be recorded on the video tape. Do not use
such a video tape.
3
Using the Camcorder in a humid or a dusty place:
Use in extremely humid or dusty places may cause
damage to your Camcorder.
When the video heads are dirty.
Using the Camcorder when the video head is dirty may
cause the head to clog, producing noise on the recorded image or preventing the image from being recorded
at all.
Under such circumstances, contact the nearest service
centre approved by SHARP or your dealer for further
advice.
@
Make sure there is enough air in the plastic bag con-
taining the Camcorder.
@Remove the bag when the air temperature inside it
reaches the temperature of the surroundings.
2
Page 5
For safety, strictly observe the following
.Do
not open the case.
@Take
care to avoid flammables or other liquids and
metal objects from entering the unit. Should this
happen, switch the power off and have the Camcorder
checked by qualified personnel.
*Do
not disassemble or attempt to modify the unit.
l Do not operate the Camcorder during lightning
storms. Unplug power cables of any connected
equipment.
Avoid using the Camcorder under the following
conditions
*Places of extreme humidity or excessive dust.
l Near electrical appliances generating strong mag-
netic fields (fluorescent lights, televisions, speakers).
@Steamy
stove.
*Excessive mechanical shock or vibration.
*Extremely hot locations such as near heating.
@Wet
bathtubs and the like.
DO not expose the Camcorder to extremely high
or low temperatures for long periods
l Never leave this Camcorder in direct sunlight, in a
closed car during summer or near a heater - this
will most likely deform the exterior and damage the
internal parts of the Camcorder.
l Do not store the Camcorder in places over
l Do not use the Camcorder in places over
l Do not use the Camcorder in places below 0%.
l Do not use the Camcorder in humid places over 80%
RH.
Store the Camcorder in a location that stays between
- 20°C
Take extra care when recording outdoors
@Do
surface. Protect from damage during transporta-
tion.
l Prevent the Camcorder from getting wet.
@At
prevent sand from entering the Camcorder.
@Avoid
like the sun or other strong lights.
*Do
l Stop using the Camcorder during lightning storms.
or sooty places such as near a cooking
locations, such as near swimming pools,
60°C.
40°C.
and
60°C.
not drop or allow it to strike any hard or rough
the beach, keep away from salt water or spray and
aiming the lens at extremely bright objects
not direct the viewfinder eyepiece at the sun.
Handling the Camcorder
l
Protect the microphone from damage.
l Keep the Camcorder horizontal during use, other-
wise the tape may become slack and be damaged.
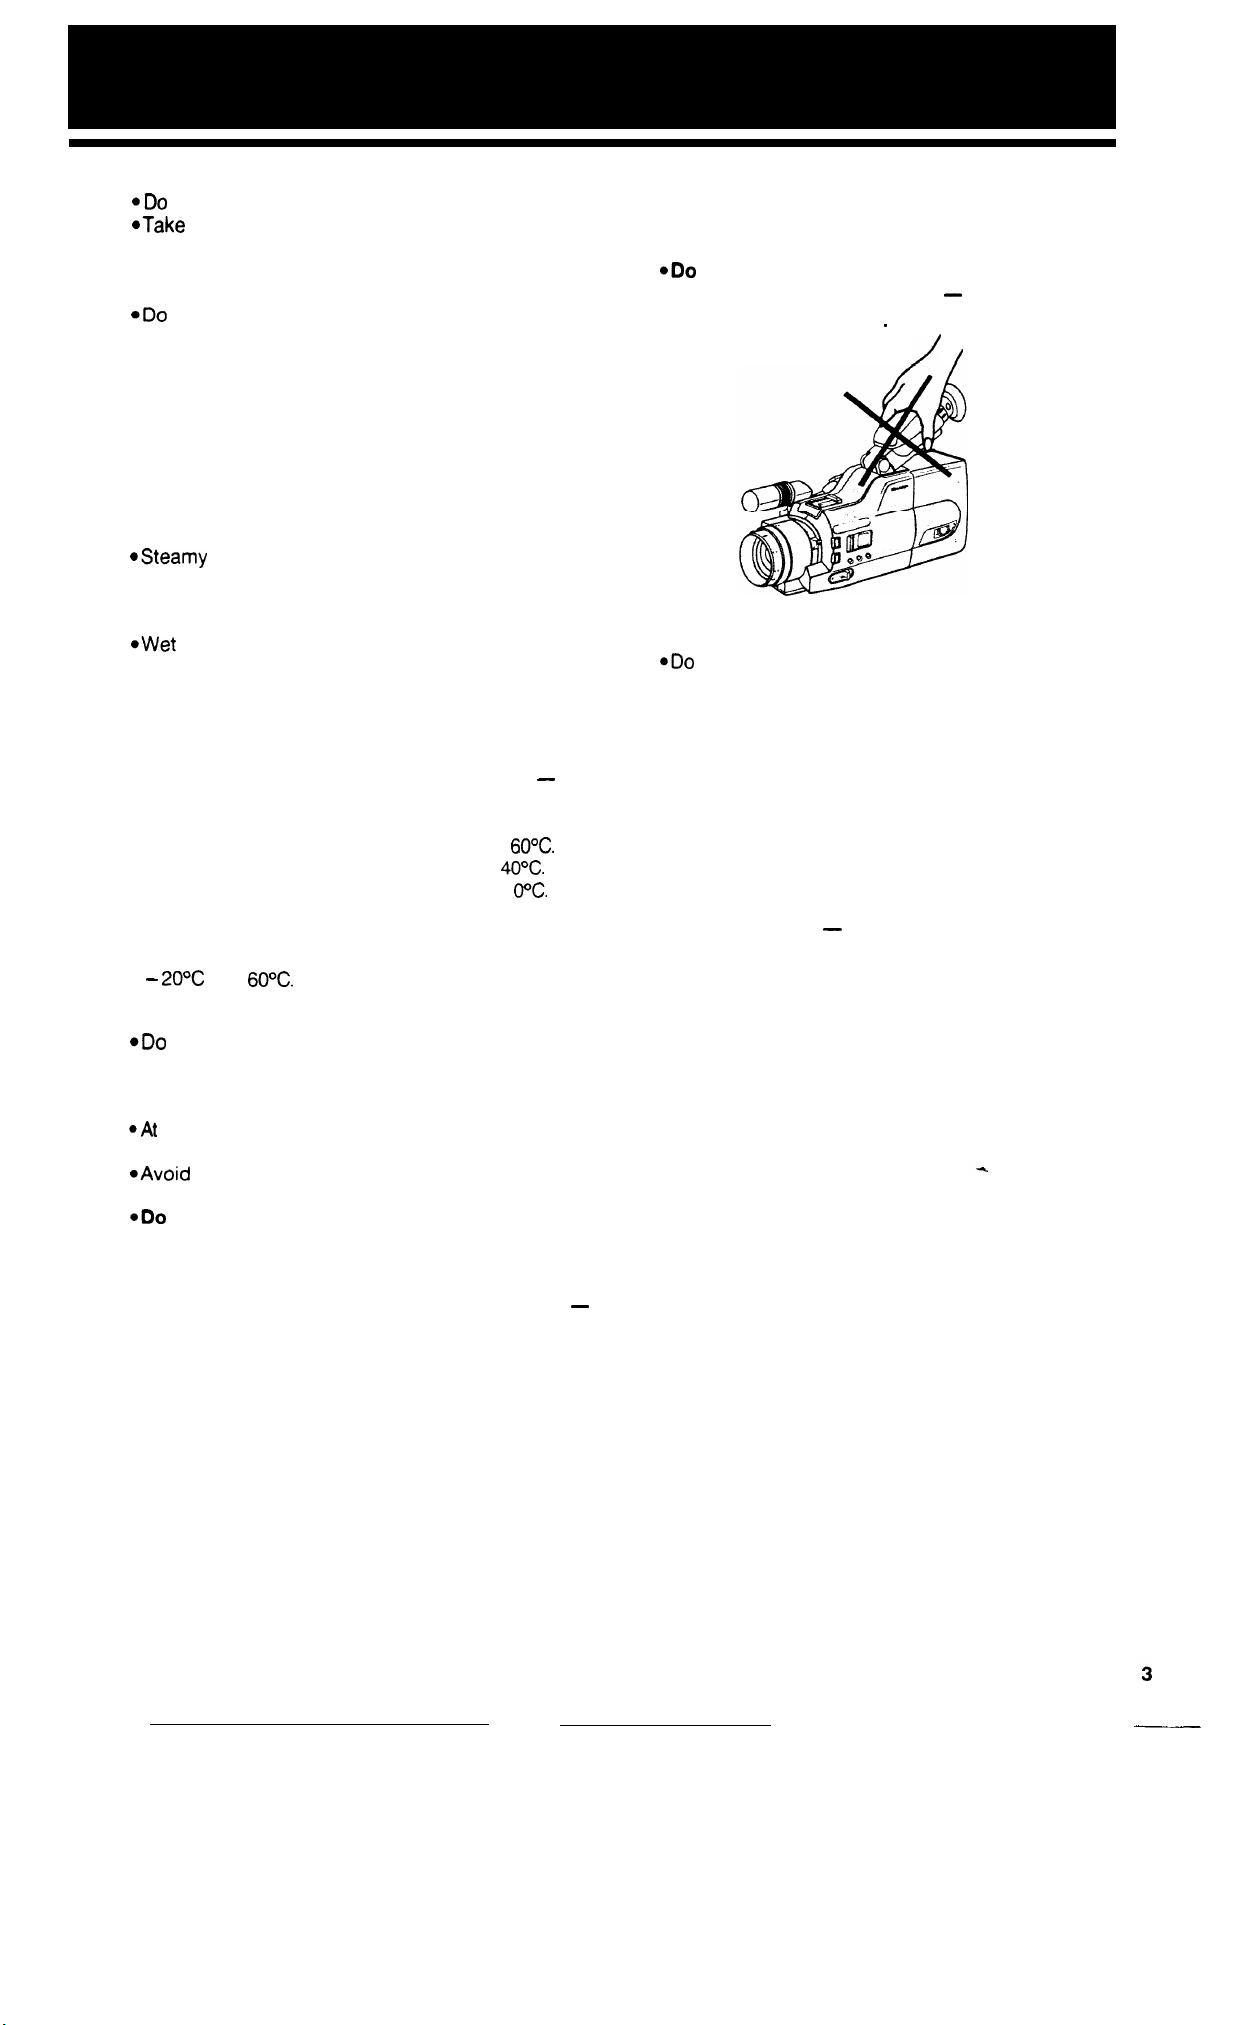
*Do not carry the Camcorder by the viewfinder.
Loop the strap over your arm - should the Camcorder accidentally slip out of
will avoid damaging it.
_
/
*Cap the lens after use. Remember to switch the
power off.
@Do
not touch the focus ring while using Autofocus.
*Before attaching any filter to the lens, switch to manual
focus or switch the power off and remove the lens
hood.
Cleaning the Camcorder
*Detach the battery pack or disconnect the power
before cleaning the Camcorder.
@Remove dust with a soft cloth. Use a soft cloth
moistened with mild detergent to remove persistent
dirt.
l Do not use strong cleaning agents such as PETROL,
thinner or alcohol
-
they may damage the exterior.
*Keep the lens and viewfinder clean. Clean the lens by
first blowing it free of dust, then gently wipe it with a soft
brush or lens cleaning paper moistened with lens
cleaning fluid.
your hand, you
/
BEFORE DISCONNECTING A POWER SOURCE,
ALWAYS SLIDE THE OPERATE SWITCH TO OFF
-
THE OPERATE INDICATOR WILL GO OUT.
Page 6
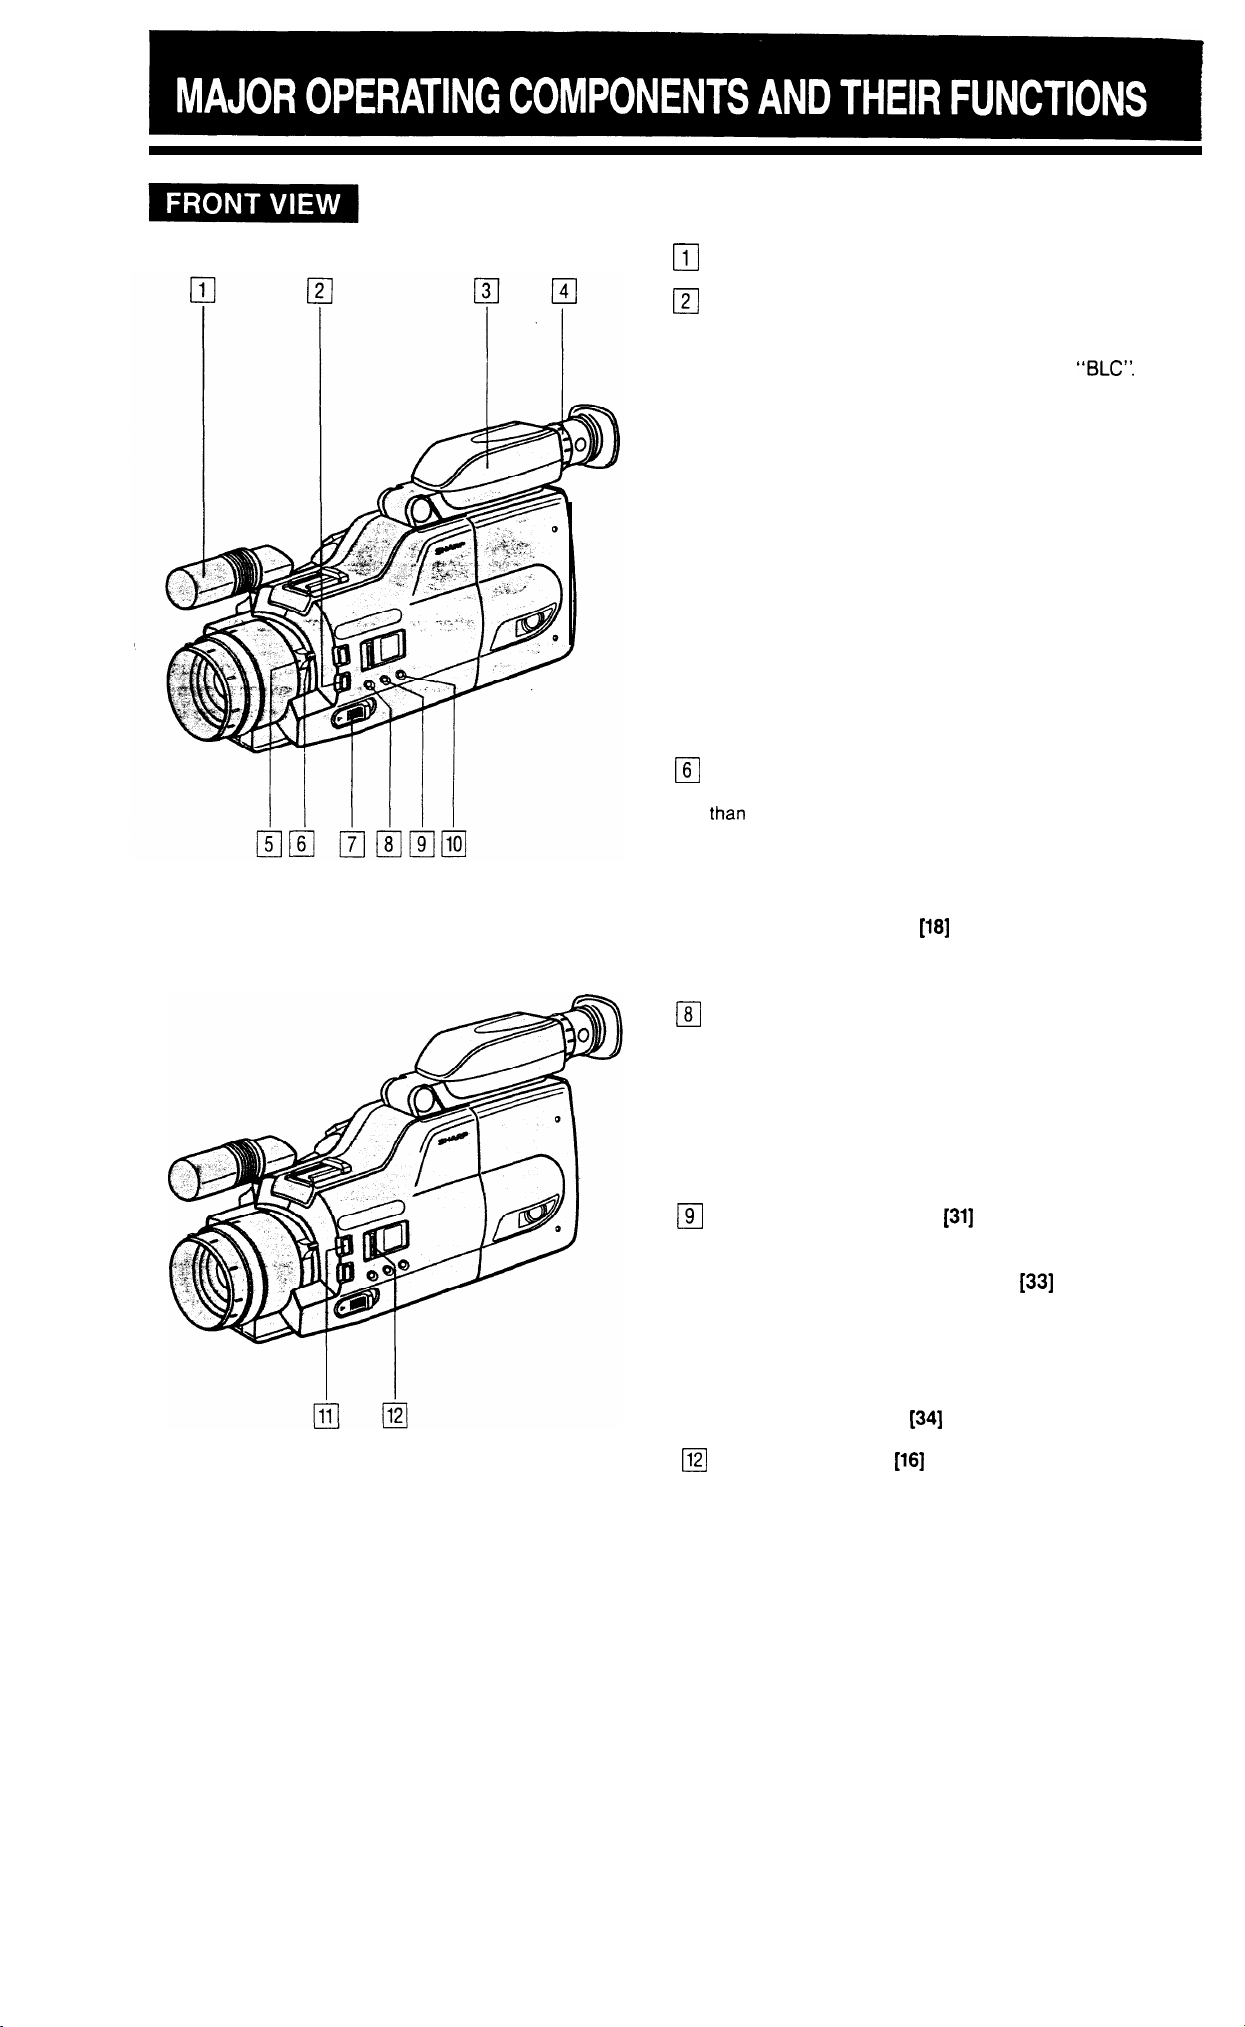
For details on the use of each control, refer to the page
indicated in the brackets.
1
Microphone
cl
2
BLC (Back Light Compensation)/GAIN-UP button
0
If the subject is darker than the background, the
recorded subject may appear too dark and undefined. If this is the case, push this button for “BLC”.
When “LIGHT” is displayed in the viewfinder, the
gain-up mode is engaged and the screen becomes
brighter when this button is pressed.
3
Colour Viewfinder/Monitor
cl
Displays the photographic subject in full colour.
Also functions as a convenient colour monitor for
playback of recorded material.
4
Diopter adjustment
cl
Use this control to adjust the viewfinder focus to your
eyesight.
5
Zoom lever
cl
Use this lever to manually zoom in and out on your
subject.
6
Macro button
0
Use this control for shooting subjects positioned less
L
+han
1.1 m from the Camcorder. (Autofocus does not
function at this distance.) Press the MACRO button
continuously while moving the Zoom lever to the
“MACRO” position for focusing.
7
ZOOM SELECT button
cl
Use this button to instantly magnify (or reduce) the
framed area in the viewfinder by 1.5 times.
8
AUTO/MANUAL FOCUS Select button
0
Set to “AUTO”, the Camcorder will automatically focus on the subject even if it is moving.
(Remember to use the macro focus feature to
focus on subjects less than 1.1 metre away.)
If, however, autofocus does not function because
of the prevailing shooting conditions, set this switch
to “MANUAL” and focus manually.
9
WHITE BALANCE button
0
Use this button to lock the white balance.
SHUTTER SPEED select button
10
cl
To select the appropriate high speed shutter during
recording for a clear image replay at high speed
motion in still or slow mode using a VHS VCR for
playback.
11
FADE IN/OUT button
cl
12
FULL AUTO switch
El
[18]
[31]
[33]
[34]
[16]
4
Page 7
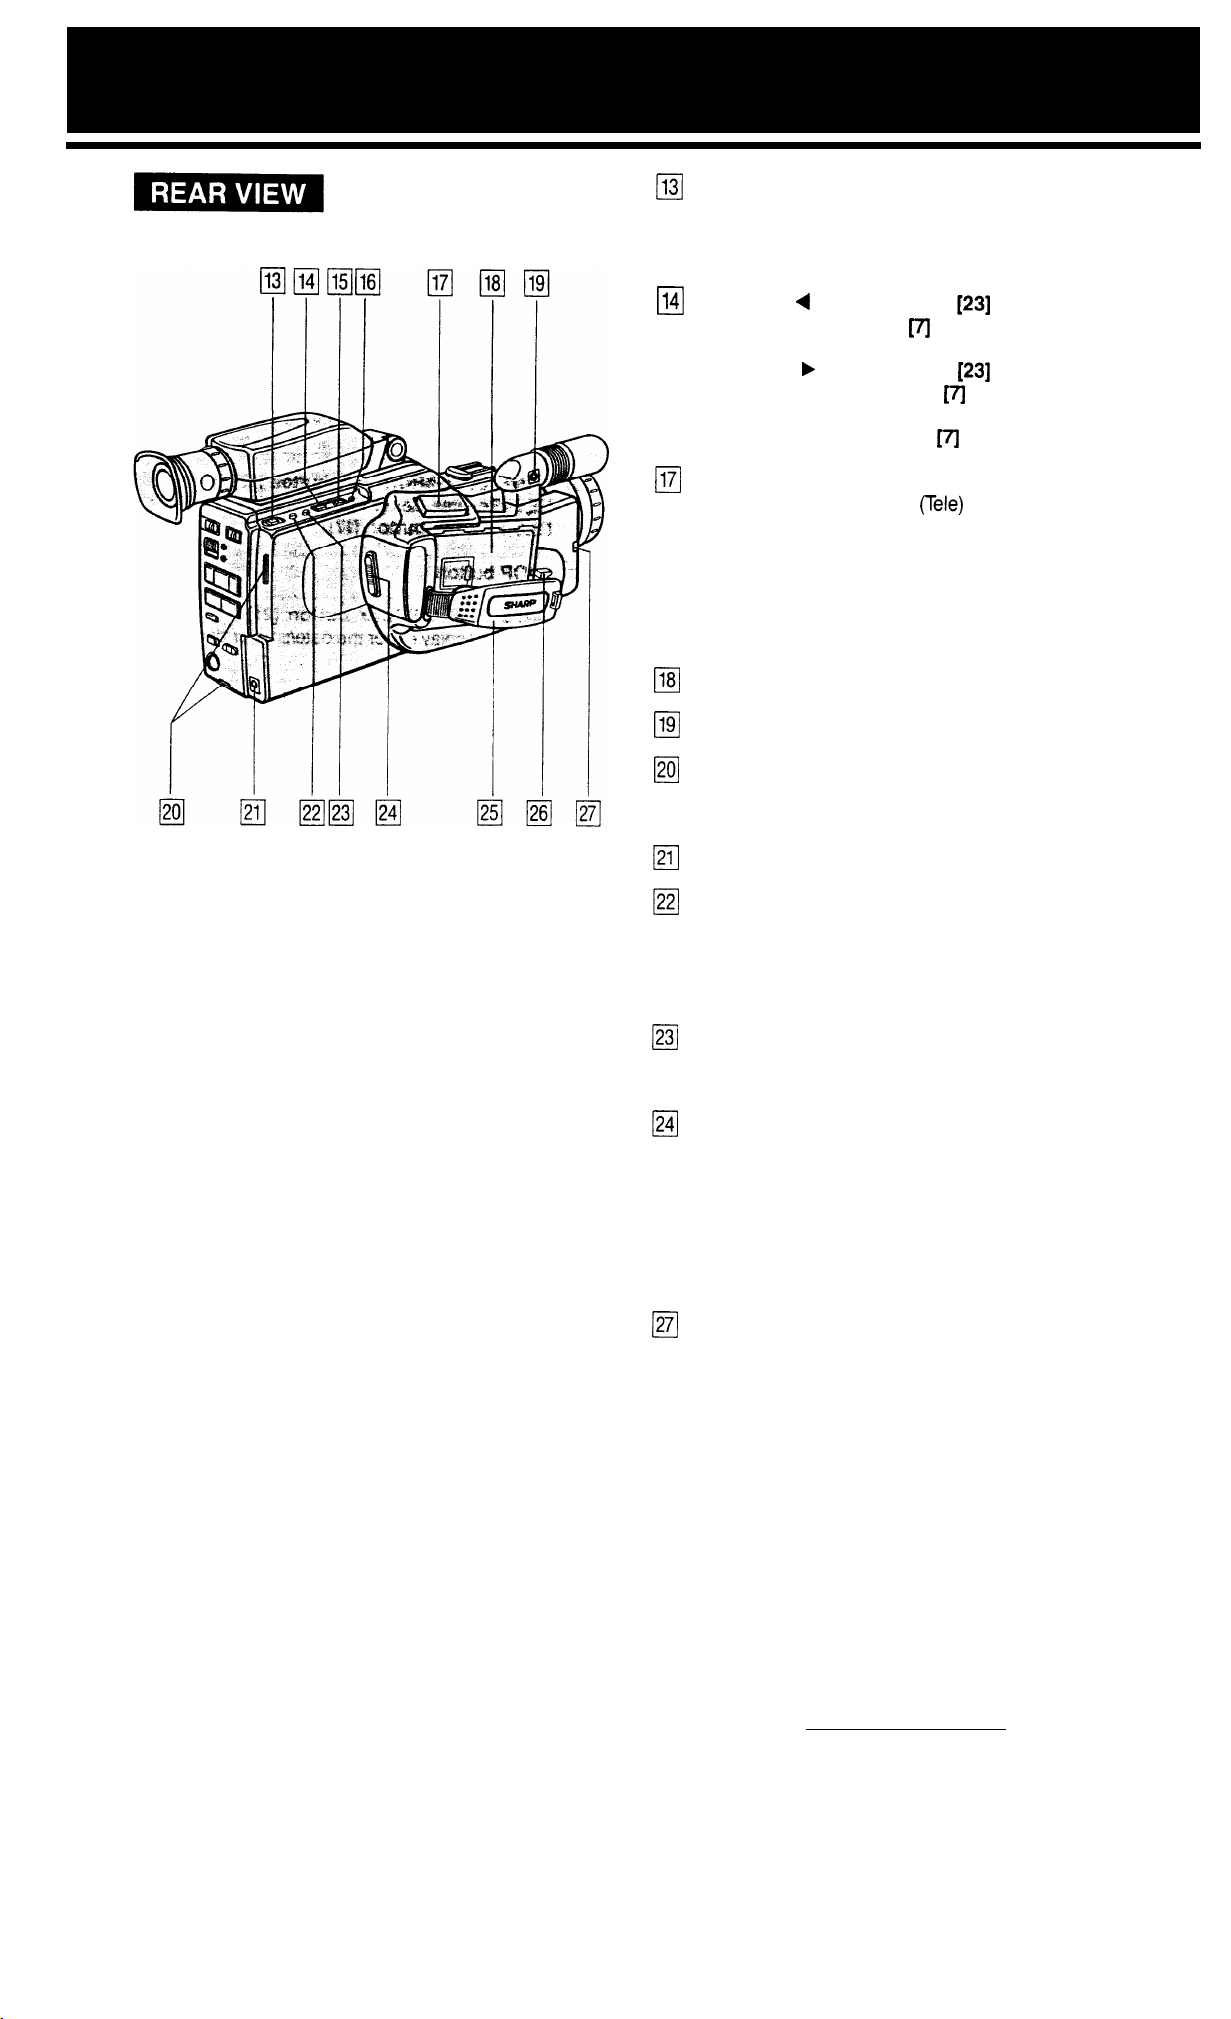
13
Sub REC START/STOP button
cl
Press to start recording. Recording will be paused if
pressed during the recording mode.
Use when recording from a low angle.
14
TRACKING
0
DATE/TIME SET button
15
TRACKING b control button
cl
DATE/TIME SELECT button
16
DATE/TIME INITIAL button
cl
17
Power Zoom Wide/Telephoto control button
II
Maximum telephoto with T
also called “zoom-in” or “zoom-up”). Maximum
wide angle with W (Wide) depressed (this is also
called “zoom-out” or “zoom-down”).
You can vary the speed of the zoom from 6
seconds to 20 seconds by the degree of finger
pressure on the Zoom buttons.
18
Battery Pack Compartment
0
19
External microphone jack
II
4
control button
m
[23]
[23]
m
m
rele)
depressed (this is
Eyelet tabs
20
0
Pull the shoulder strap through these eyelet tabs
and adjust the length of the strap with the buckle.
21
DC
0
22
II
23
0
24
Cl
25
cl
26
cl
27
0
input jack
COUNTER/COUNTER MEMORY/LAP TIME
button
Used to select among Counter, Counter Memory,
and Lap Time modes being indicated in the viewfinder.
COUNTER/LAP TIME RESET button
Used to reset the Counter and Lap Time being indi-
cated in the viewfinder.
REC START/STOP button
Press to start recording. Recording will be paused if
pressed during the recording mode.
Grip Strap
Battery release lever
Used to attach/detach the battery.
SELF TIMER button/Talent Tally indicator
The Talent Tally indicator will light up when the Camcorder begins recording, enabling the subject to
determine whether the unit is recording or not. The
SELF-TIMER button and Talent Tally indicator share
the same function. When the button is pressed in
the REC Pause mode, the indicator will blink for 10
seconds before the Self-timer starts recording.
Page 8
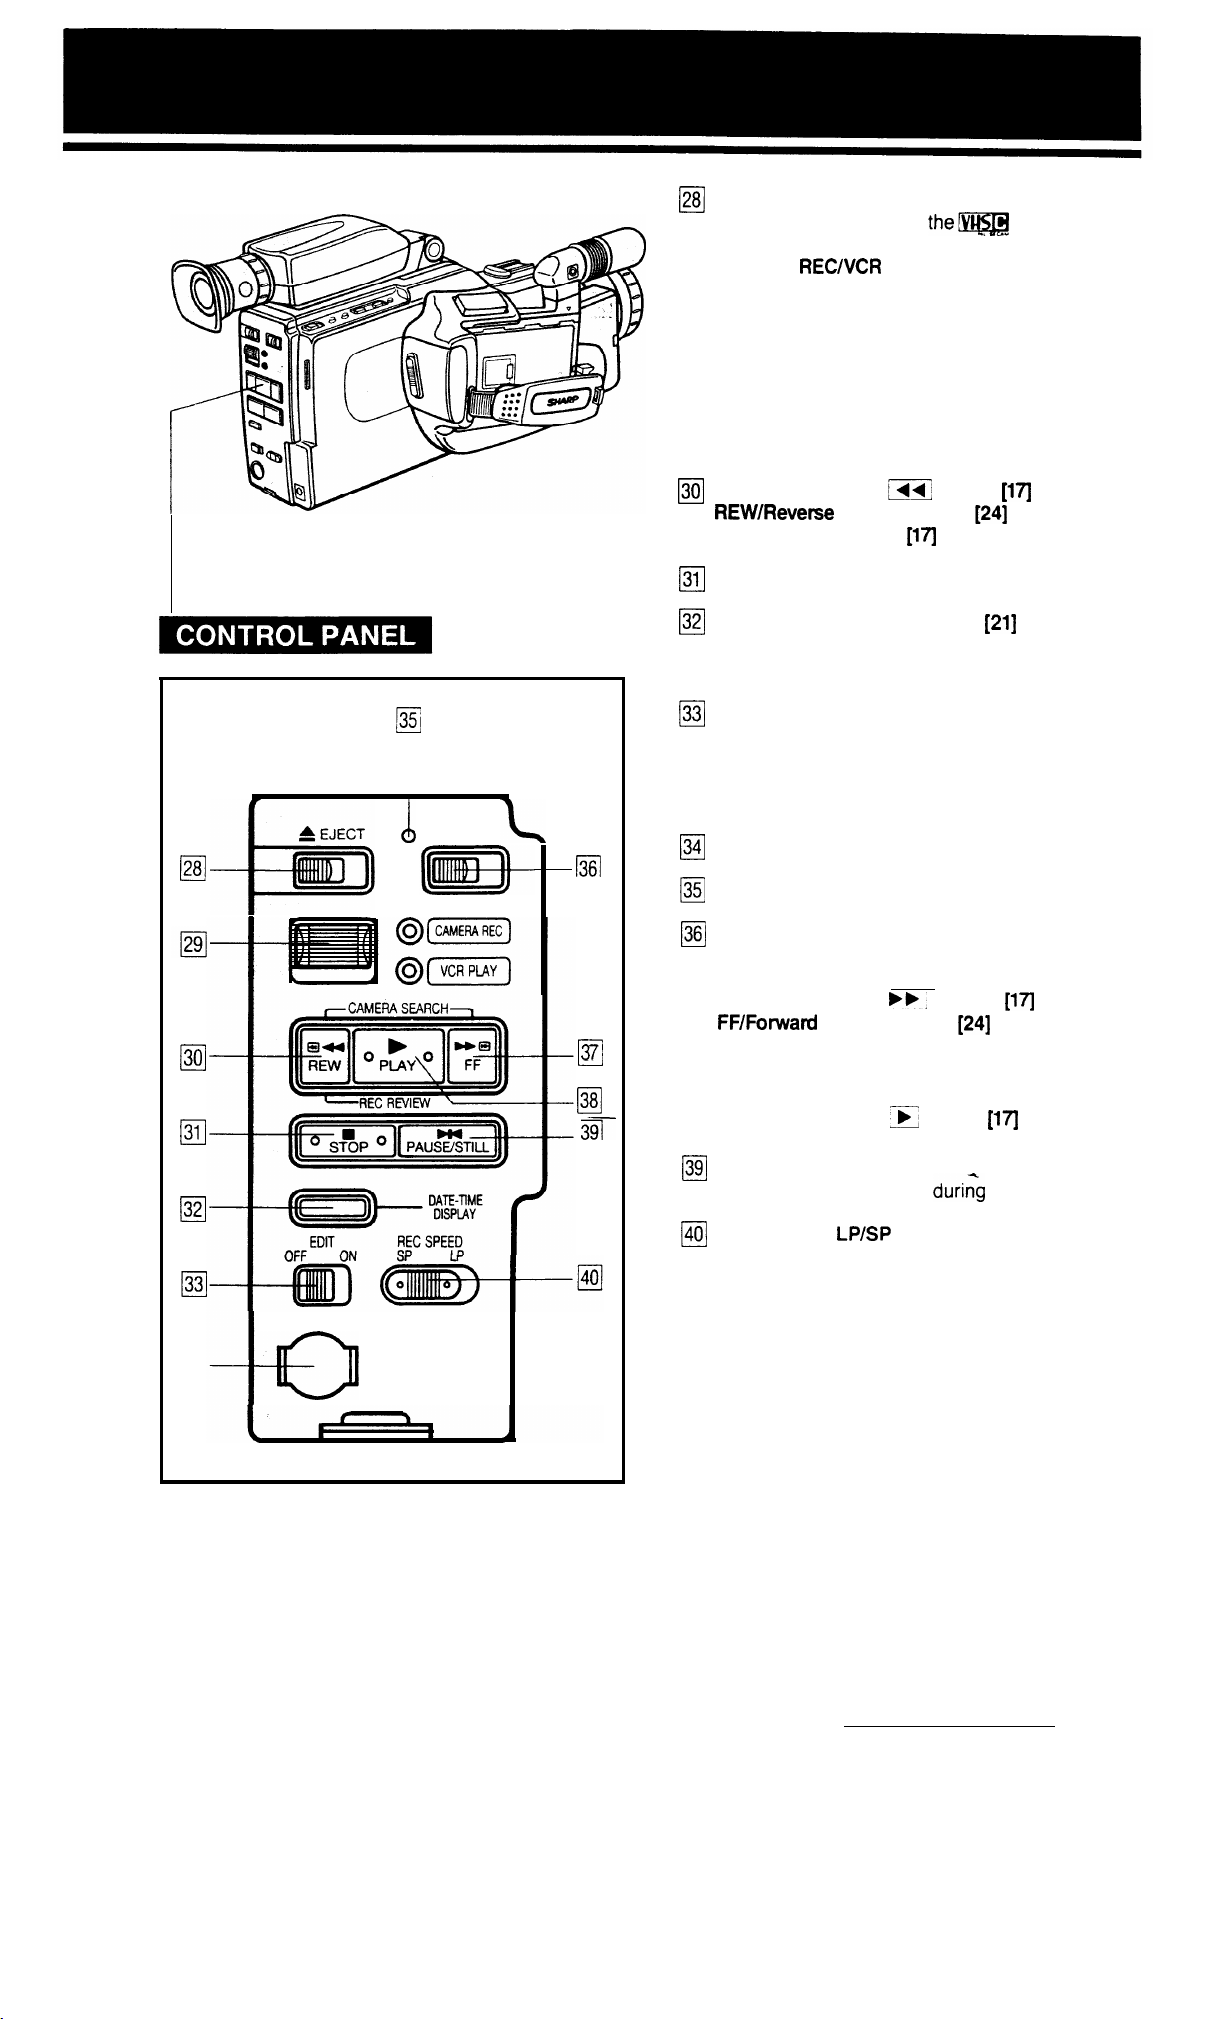
EJECT button
28
cl
Used to insert or remove
the@@@
cassette.
28
c!
+
EJECT
j35i
(/)
OPERATE
CAMERA
29
cl
To record with the Camcorder, set this switch to
the CAMERA REC position. (The Camcorder will
then automatically go into REC PAUSE mode.)
When using the Camcorder as a VCR, set this
switch to VCR PLAY.
(In this case, if in the REC PAUSE mode, the Cam-
corder will switch to Still mode; if recording, it will
switch to Stop mode.)
CAMERA SEARCH m button
30
0
REWIReverse
REC REVIEW button
STOP button
31
0
32
DATE-TIME DISPLAY button
0
Used to display either the date/time or date in a picture being recorded.
EDIT switch
33
0
Picture quality inevitably deteriorates each time you
dub from the Camcorder to a VCR. Slide the EDIT
switch to on to minimize deterioration of picture
quality. Use this while you edit your videos.
L
34
0
AV
RECNCR
Search button
output terminal
PLAY switch
[17]
[24]
[17]
[21]
1361
35
OPERATE indicator
~
0
OPERATE on/off switch
36
[7
Turns power on and off.
30
cl
31
cl
32
0
33
0
34
cl
a
AV OUT
37
cl
38-
cl
39
0
CAMERA SEARCH
37
cl
FF/Forward
PLAY button
38
q
Press for playback.
CAMERA SEARCH E button
PAUSE/STILL button
39
0
Use to view a still picture
40
REC SPEED
ci
Used to set recording to the LP (Long Play) or SP
(Standard Play) mode. Recording time in the
respective modes is as follows (VHS-C tape EC-30):
LP mode . . . . . . . . . . . 60 min.
SP mode . . . . . . . . . . . 30 min.
Search button
bb,
LP/SP
Select switch
button
[24]
duri;g
playback.
[17]
[17]
6
Page 9
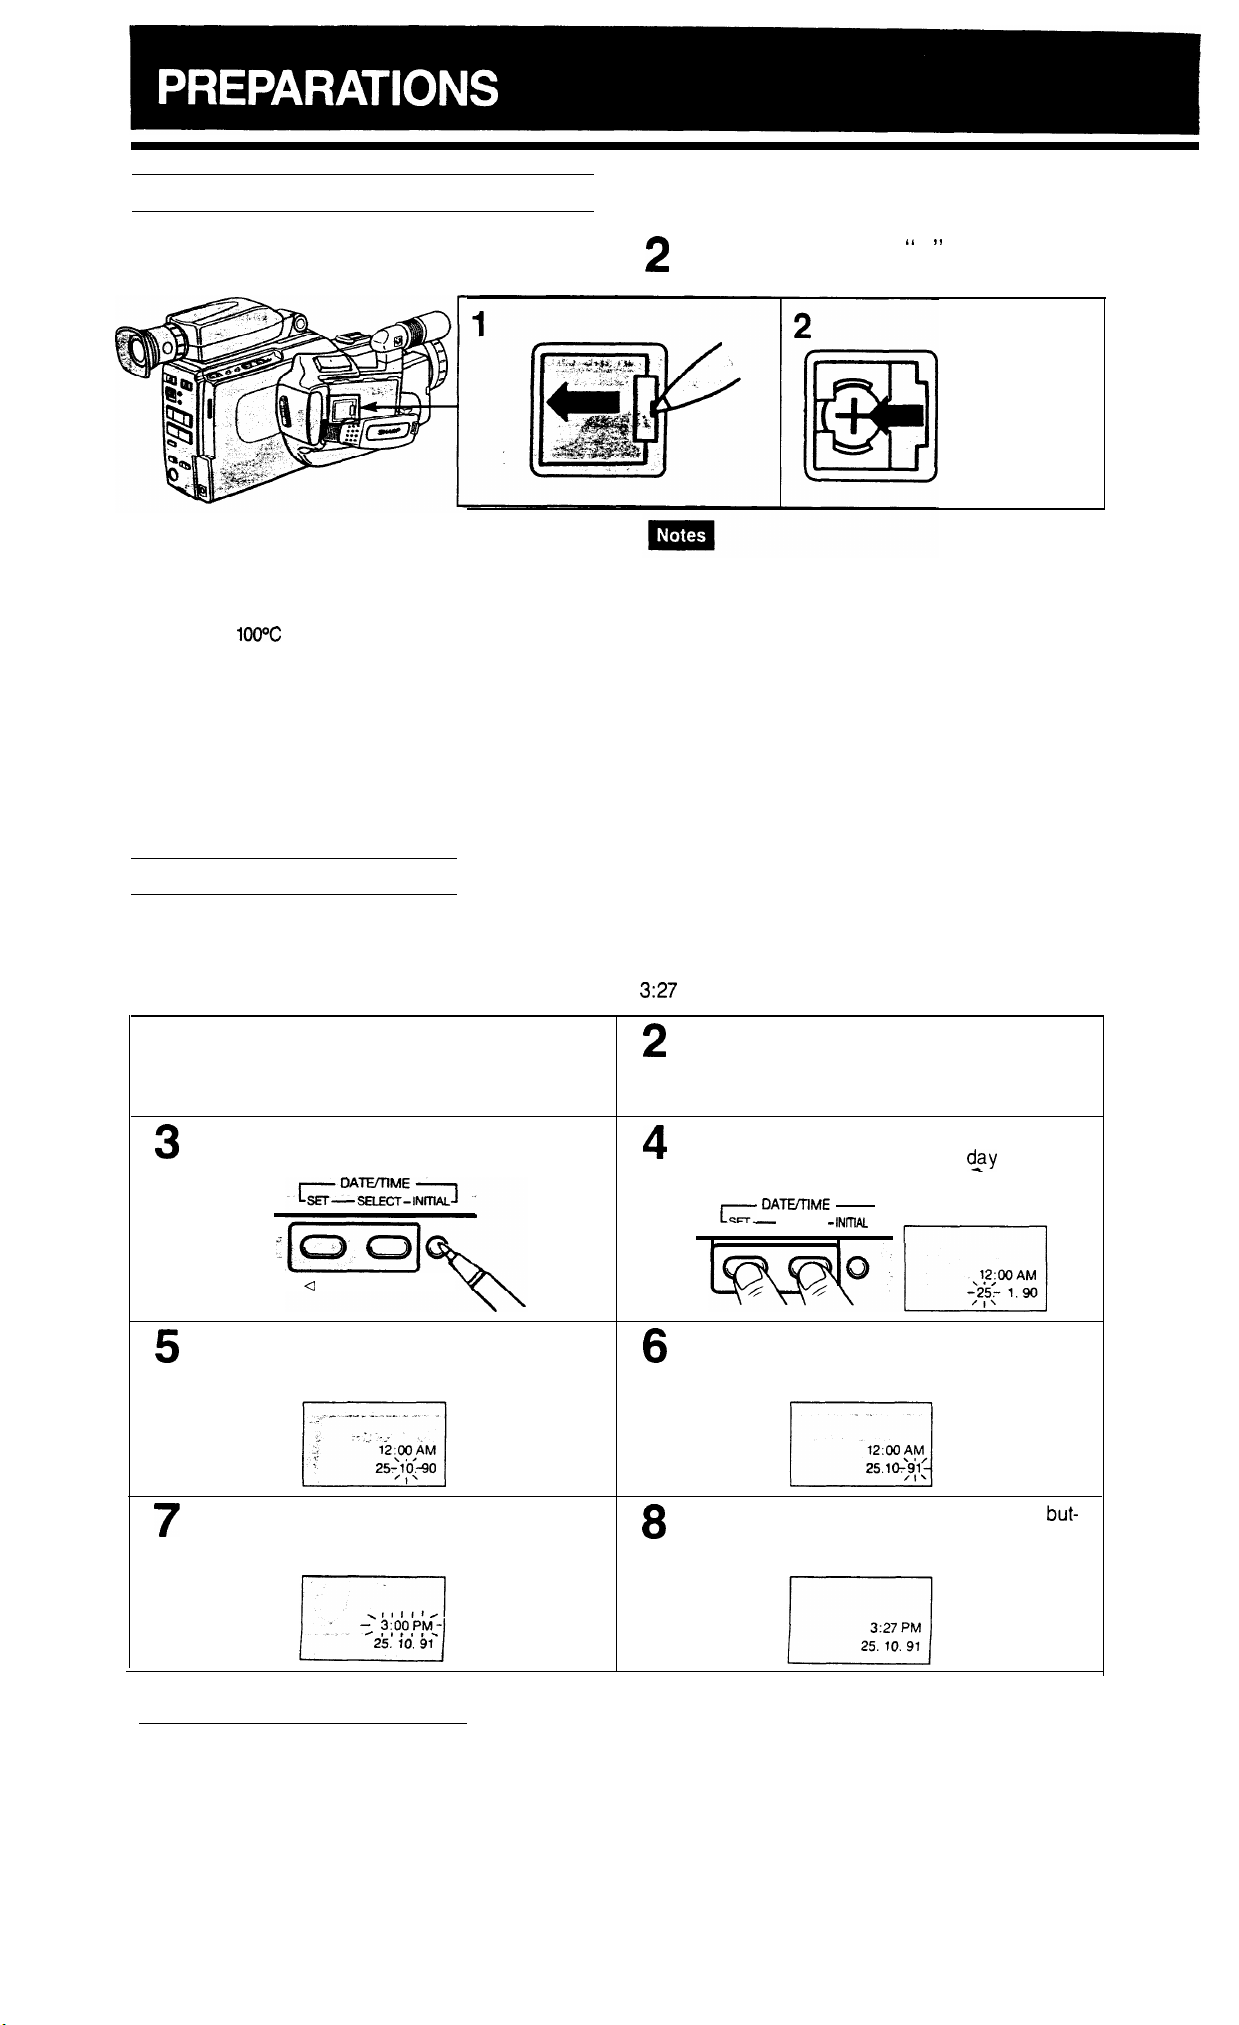
INSTALLING THE LITHIUM BATTERY
Open the lithium battery compartment cover with
1
a pointed object.
Warning:
l Dispose
Do not disassemble and do not dispose of in fire.
l
The battery used in this device may present a fire or chemical
burn hazard if mistreated. Do not recharge, disassemble,
heat above
CR2025 of SHARP CORPORATION, SONY ENERGYTEC,
FUJI ELECTROCHEMICAL or MATSUSHITA ELECTRIC
only. Use of another battery may present a risk of fire or
explosion.
of used battery
100°C
or incinerate. Replace battery with type
promptly. Keep
away from children.
SETTING THE DATE/TIME
Insert the battery with the “ + ” side out. Close the
2
lithium battery compartment cover.
l
For battery
ment, repeat step 2
after removing old
battery.
l
This lithium battery is available at a local electronic appliance
shop or audio/video shop.
l
Disconnect the power source
before replacing the battery.
l The battery life is approximately one year but it differs de-
pending on the ambient temperature and the condition of the
lithium battery.
l When the lithium battery runs out, the clock may be ex-
tremely inaccurate, or the clock setting mode may be
engaged. When this occurs, replace the lithium battery
as soon as possible.
Reset the date and time after replacing the battery.
l
Do not short-circuit the battery by holding the electrodes with
metallic objects such as tweezers, as doing so will deteriorate
the battery quality.
(AC
adaptor, battery pack, etc.)
replace-
The auto date/time function features a date and time in the viewfinder which can be recorded as a handy reference.
Follow
the instructions below to set the current date and time.
Example: Setting the date to 25th Oct. 1991 and time to
Install the date/time lithium battery.
1
Press the INITIAL button using a dull-pointed
3
object such as a ball point pen.
I
Q
TRACKING >
The month will flash. Press the SELECT button
5
to select the month. When the correct month
appears, press the SET button.
3:27
PM.
Connect a battery pack or power source. Slide
2
the OPERATE switch on.
Press the DATE-TIME DISPLAY button (See
page 6 No.33)
The day will flash. Press the SELECT button to
4
select the day. When the correct
press the SET button.
DATVnME
c-
SET - SELECT -
The year will flash. Press the SELECT button to
6
select the year. When the correct “tens” of the
year appears, press the SET button.
INmAL
d,ay
appears,
The hour will flash. Press the SELECT button to
7
select the hour (check for AM or PM). When
the correct hour appears, press the SET button.
The minutes will flash. Press the SELECT
8
ton to select the minutes. When the correct time
appears, press the SET button.
but-
7
Page 10
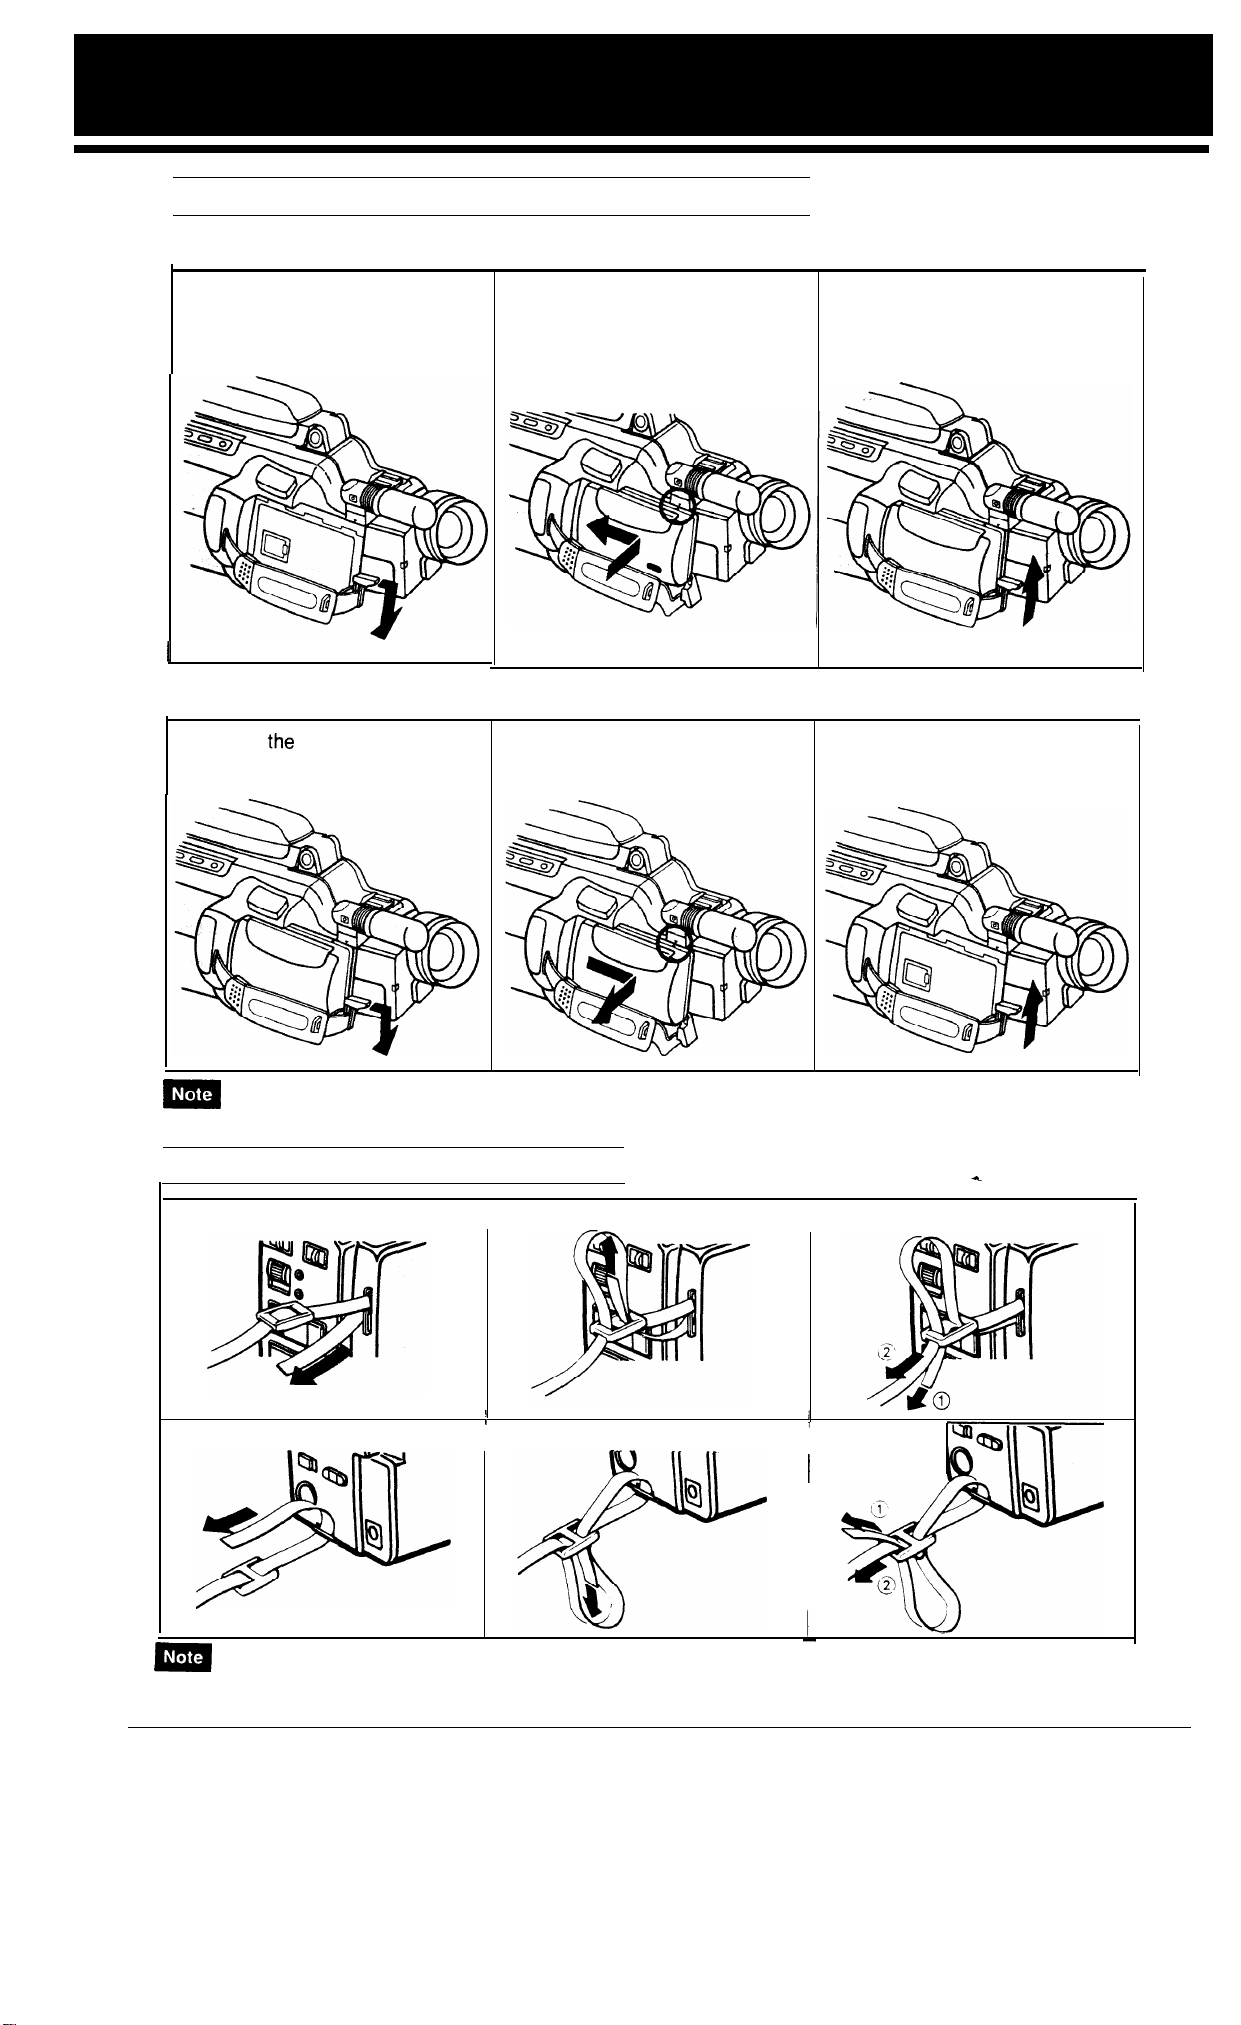
ATTACHING AND DETACHING THE BATTERY PACK
Attaching the Battery Pack
1. Lower the battery release lever
by pulling it forward.
I
Detaching the Battery Pack
1. Lower
the
battery release lever
by pulling it forward.
2. Align the “A” mark on the upper portion of the battery pack
with the mark on the camera,
and slide it in the direction of
the arrow.
2. Remove the battery pack by
sliding it in the direction of the
arrow.
3. Raise the battery release lever
until it locks into place.
3. Raise the battery release lever
until it locks into place.
. -
m
The battery pack is uncharged when shipped and must be charged before use.
ATTACHING THE SHOULDER STRAP
Loop the strap through the eyelet on top of the Camcorder.
I
Loop the strap through the eyelet at the bottom of the Camcorder.
m
Before
using the Camcorder, make sure that the shoulder strap is fastened tightly enough, and that no slack exists.
a
I
i
I
I
I
Page 11
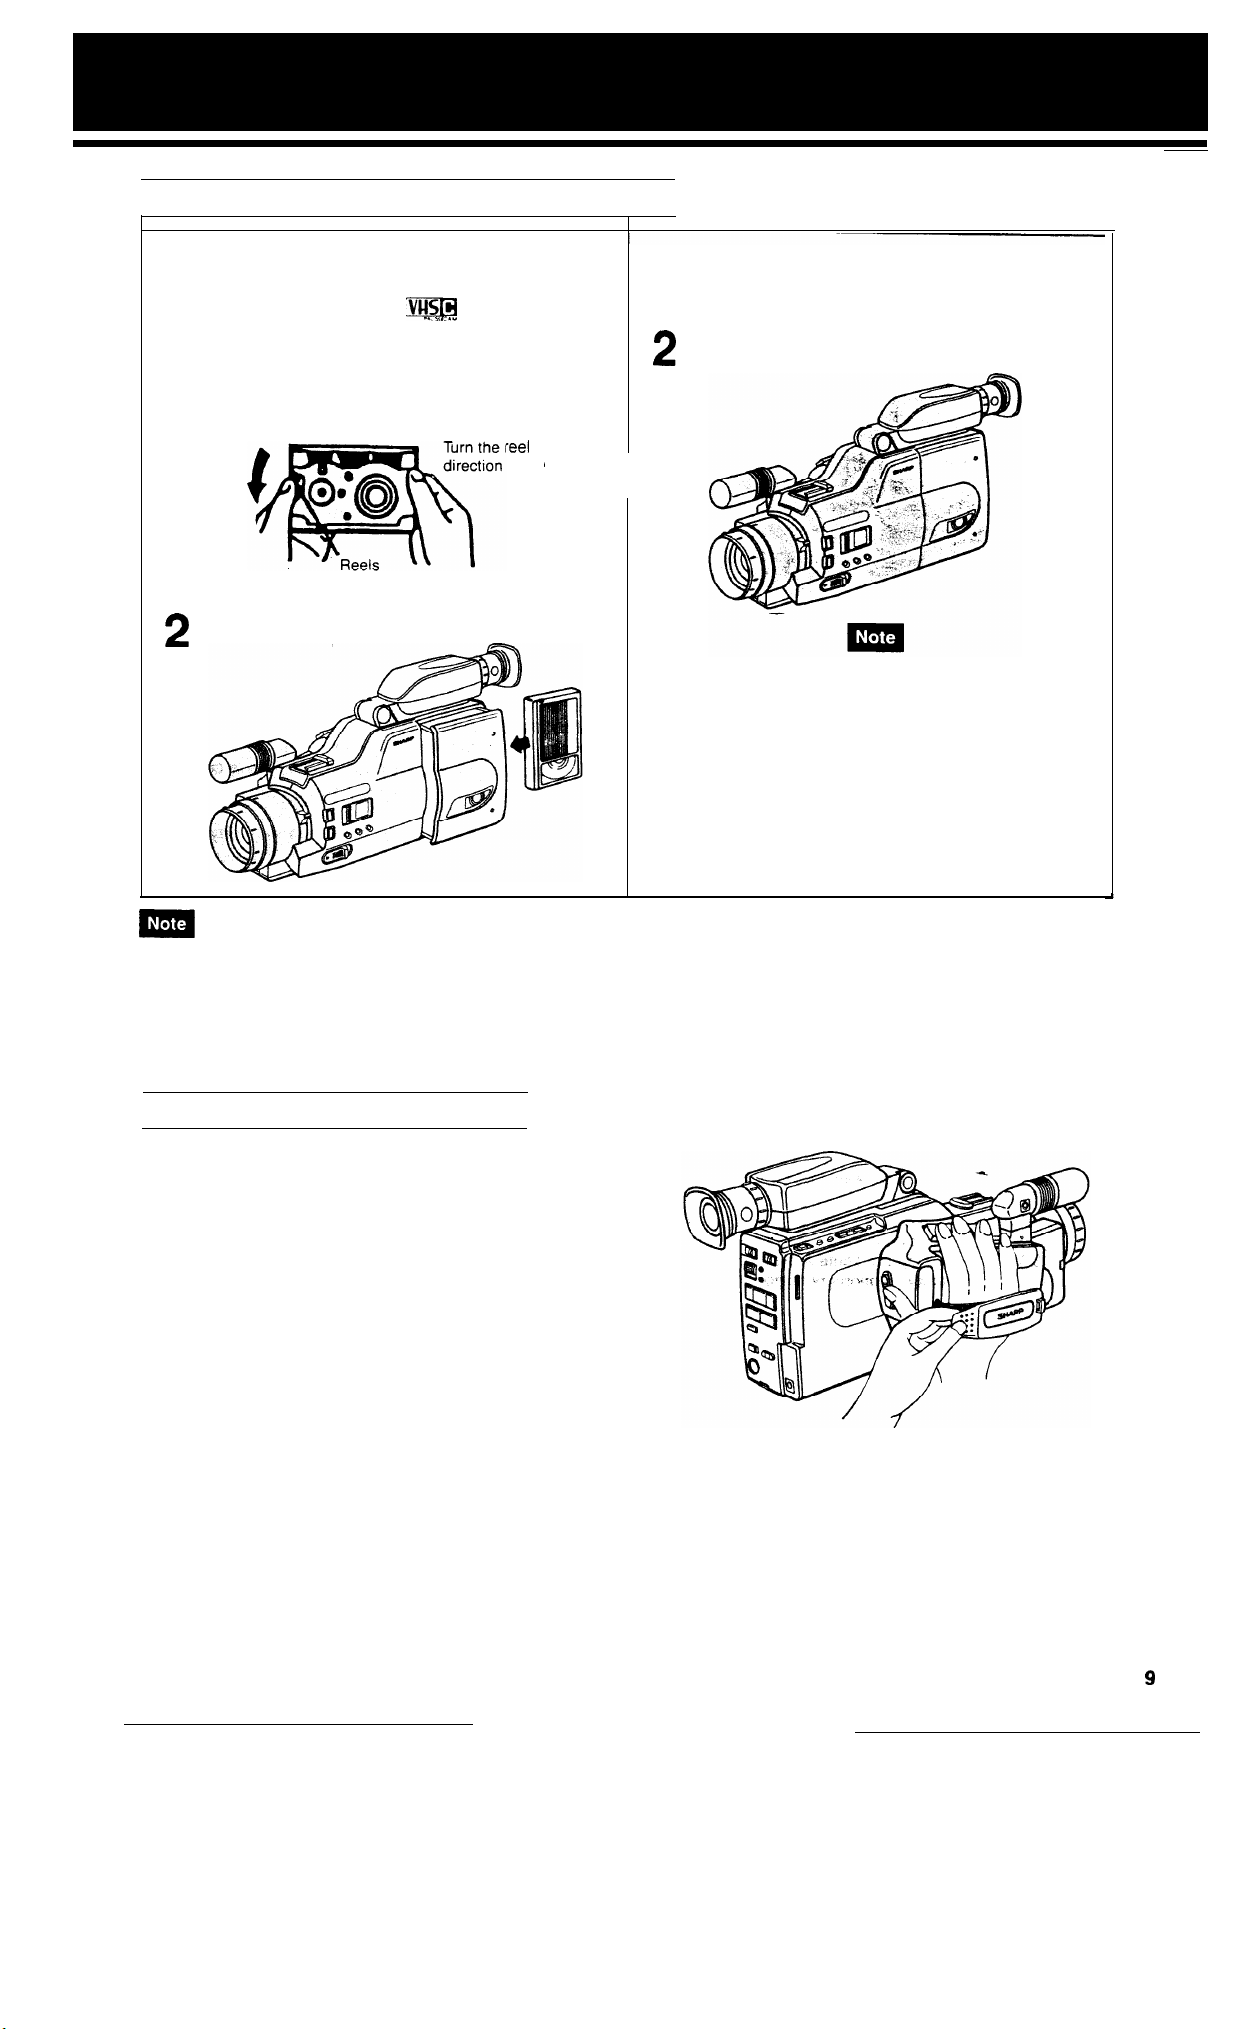
INSERTING AND REMOVING A CASSETTE
Inserting a cassette
Press the EJECT button to open the cassette
1
compartment. insert a ‘m cassette with the
transparent window facing you and the arrow
facing out.
ing the cassette.
Remove
tape
3
Press “PUSH” to close the compartment door.
Remove tape slack before inset-t-
slack
0. I Z.”
*eel
of the
in
1
arrow.
the
Removing a cassette
Press the EJECT button. The cassette com-
1
partment will open. Remove the cassette.
Close the compartment door.
2
Press on the “PUSH” mark
to close slowly and correctly.
m
The cassette may be ejected simply by pressing the EJECT button. There is no need to slide the OPERATE button to off
before you press the EJECT button.
The cassette cannot be ejected while recording. Go to REC PAUSE mode and press the EJECT button.
ADJUSTING THE GRIP STRAP
Separate the strap to expand the loop, then pass your
hand through the loop and grasp the hand grip. Adjust
the length of the strap so your hand is secure but comfortable and refasten the strap.
9
Page 12
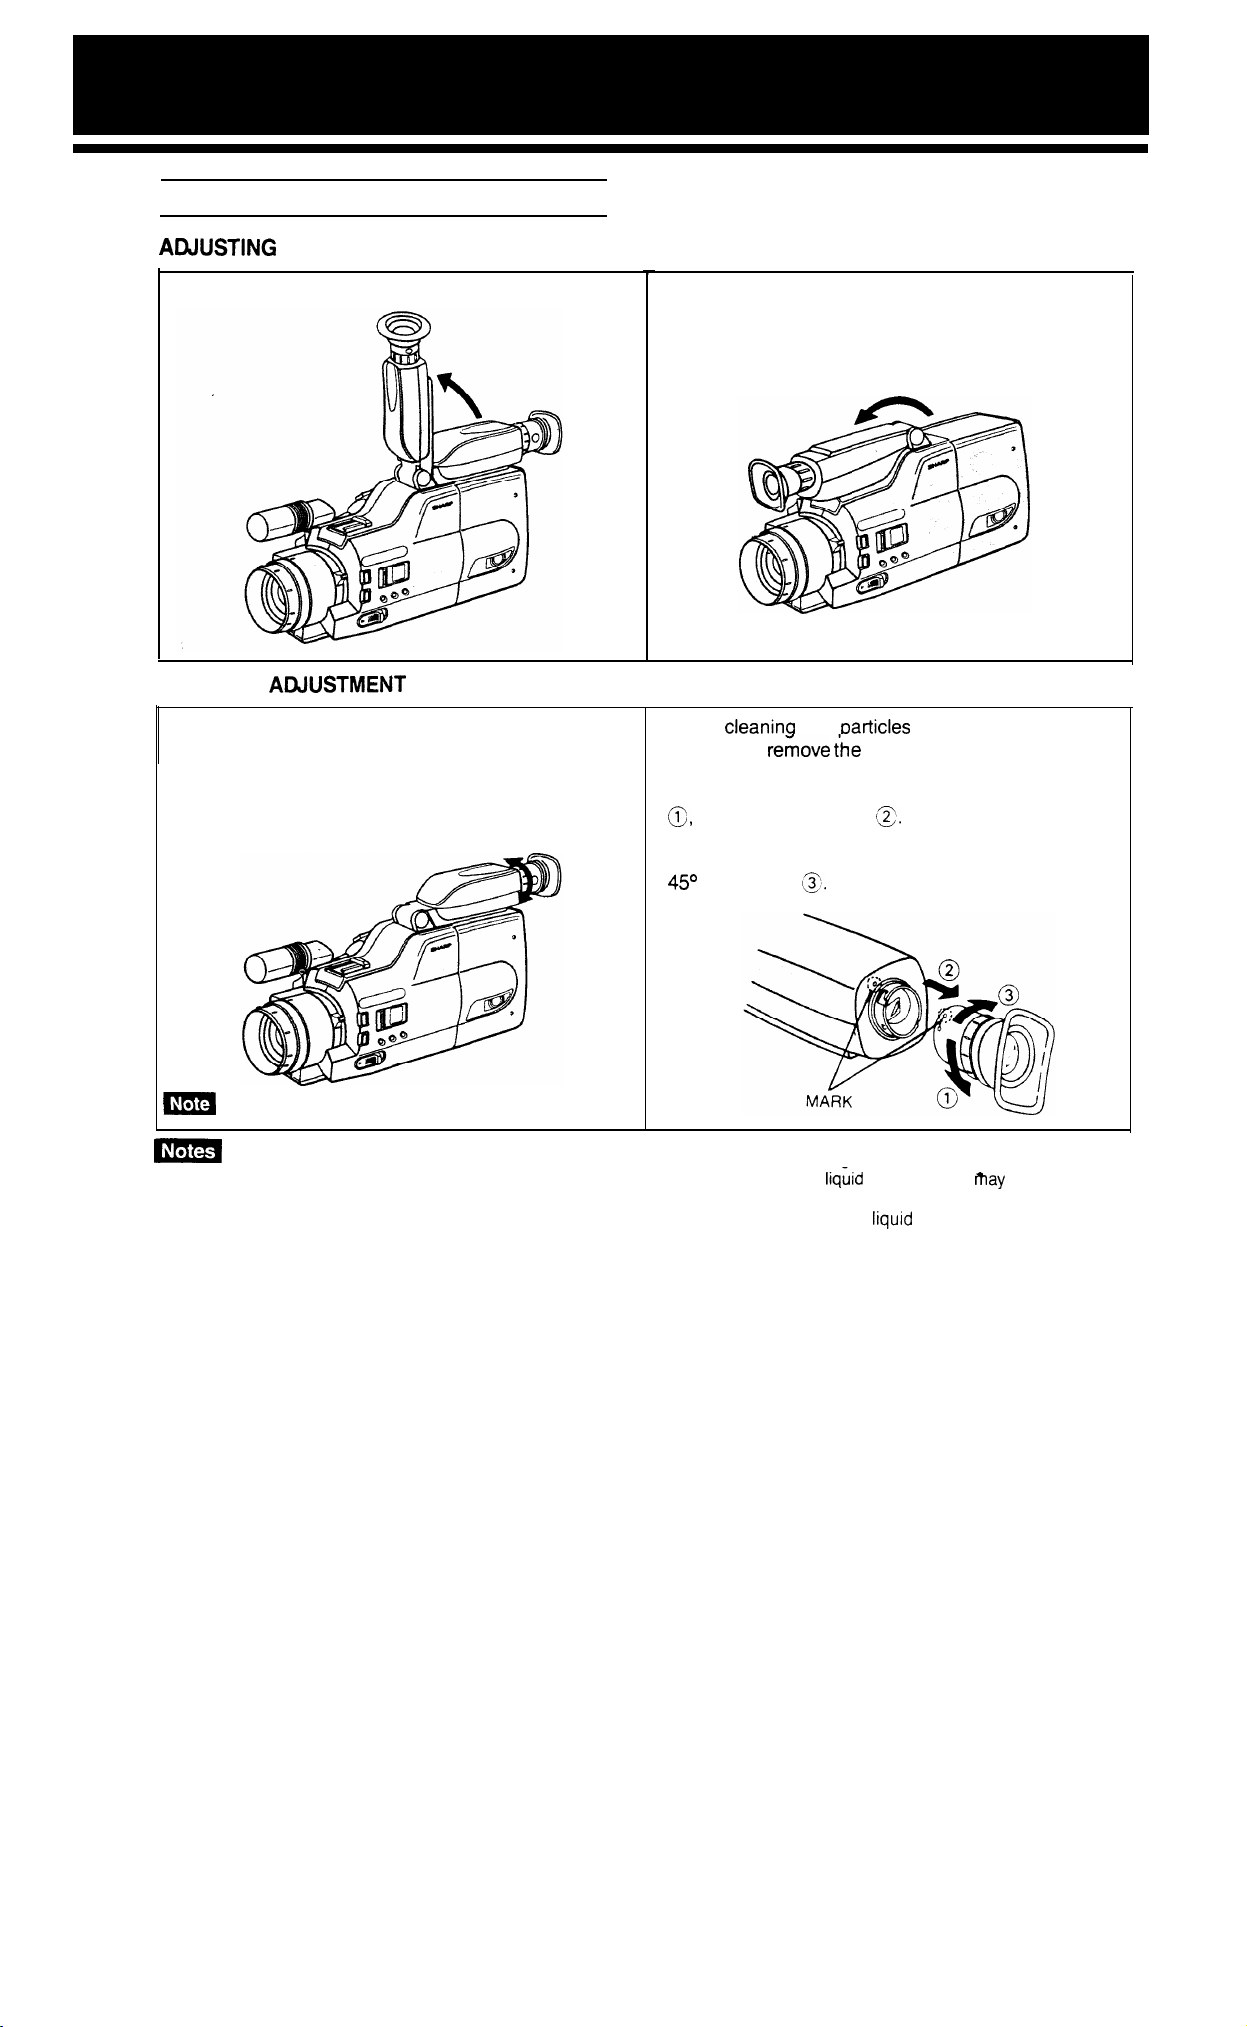
USING THE COLOUR VIEWFINDER
ARlUSTlNG THE VIEWFINDER POSITION
The viewfinder can be tilted up for low-angle shot.
EYEPIECE
The Camcorder comes with a diopter adjustment
control. Move this control clockwise or counterclockwise to adjust the eyepiece to your eyesight. As
individuals differ in eyesight, adjust the eyepiece so
that the characters inside the viewfinder can be seen
clearly when used for the first time or by anybody
else.
ABJUSTMENT
In order to protect the viewfinder while travelling or
when the camera is not being used, lay it forward as
in the diagram.
When
cleanina
viewfinder, rekove ihe eyepiece, as shown below,
and clean with a long, thin object, such as a cotton
swab. To remove the eyepiece, first turn it in direction
8,
then pull in direction
When reattaching, align the marks on the body and
the eyepiece as shown, and then turn the eyepiece
45O
in direction
dust
13.
oarticles
@.
from the interior of the
10
m
m
Power must be supplied to the Camcorder for this adjustment.
In order to use the viewfinder correctly, please pay attention to the following.
1. On some occasions, even though the Operate switch may be on, the colour
render a picture.
This does not indicate a defect in your Camcorder. Please wait a moment for the liquid crystal display to normalize.
2. Please do not subject the viewfinder to sharp impact.
3. When recording the same subject for a long period of time, the image may remain on the LCD viewfinderr. This
is a temporary phenomenon, not a malfunction.
liqiid
crystal display
may
not immediately
Page 13

For portable and outdoor use, the supplied BT-75 battery pack is ideal. Indoors, the supplied AA-75X AC Adaptor/
Battery Charger and 2m DC OUT cable will be more useful. For extended outdoor use, the optional
Car Battery Adaptor/Charger may come in handy in remote locations.
V/R-P75CH
Using the AC Adaptor/Battery Charger
. -
OPERATE
tights to indicate the power is on.
Use the suppIled 2m DC OUT cable to
L
CHARGE lamp (yellow)
Lights when a battery pack IS
The lamp goes off when the battery pack IS
charged or removed.
power the Camcorder from the
lamp
Battery Pack holder
(red)
betng
malns.
charged.
m
The optional
is like the AA-75X, but operates from a car battery.
Precautions:
@The
AC Adaptor/Battery Charger, if used near a radio,
may cause interference.
l Prevent flammables, liquids or metal objects from enter-
ing the unit.
*The
AA-75X is a sealed unit. Do not attempt to open or
modify it.
l
Do
not damage or drop the unit or subject it to vibrations.
l Do not leave the unit in direct sunlight.
l
Avoid using the unit in humid or extremely hot places.
SHARP
VRP75CH
.
Car Battery Adaptor/Charger
USING THE AC ADAPTOR/BATTERY CHARGER
Use the supplied AA-75X
Connect the DC OUT cable to the AC Adaptor
1
and Camcorder.
Insert the AC plug into a wall outlet. The
2
OPERATE lamp on the AC Adaptor will light up.
m
The AA-75X AC Adaptor/Battery Charger will not supply power to the Camcorder through the DC OUT cable while
charging a battery pack.
AC
Adaptor/Battery Charger and DC OUT
DC OUT cable
cable.
11
Page 14

CHARGING
THE BATTERY PACK
Use the supplied AA-75X AC Adaptor/Battery Charger.
Car Battery Adaptor/Charger.
Insert the AC plug in a power point.
1
The OPERATE lamp will light up.
Align the v mark on the side of the battery
2
pack with I mark on the charger and guide
the battery pack into the groove. Slide the
battery pack
The CHARGE lamp will light up.
fomard
until it locks in place.
Outdoors, you can use the optional SHARP
When the battery pack is charged the
3
CHARGE lamp will go off. Pull out the
AC plug from the wall outlet and remove
the battery pack by ‘sliding it back.
L
Normally the battery pack and charger are warm after
charging.
e -
m
The charging time depends on the
and the condition of the battery pack.
amblent
VR-P75CH
temperature
1
USING THE CAR BATTERY ADAPTOR/CHARGER (OPTIONAL ACCESSORY)
To charge the battery pack or power the Camcorder in a car, use the optional SHARP
Start the car engine and leave it
1
while using the Car Battery Charger.
Insert the plug into the car cigarette socket.
The OPERATE lamp will light up.
Connect the DC OUT cable to supply power
2
to the Camcorder.
The CHARGE lamp will be lit up while the
battery pack is charging. When charging
completed, the CHARGE lamp will go off,
and the DONE lamp will light up.
. -
m
The
VR-P75CH
supply power to the Camcorder through the DC
while charging a battery pack.
Car Battery Adaptor/Charger will not
idling
is
OUT cable
Caution:
The
VR-WSCH
with 12V or 24V negative-ground cars.
Do not use with 12V or 24V positive-ground cars. Check
the car operation manual or consult your car dealer.
Car Battery Charger can only be used
VR-P75CH
Car Battery Charger.
12
Page 15

USING THE BATTERY PACK
The BT-75 is a nickel-cadmium battery and has the following characteristics.
Recharging normally takes one hour at a room temperature of 20%. The lower the temperature, the longer the
recharging time.
Temperature Range
Charging
I
To avoid hazard:
l Do not burn the battery pack.
.Do
not short circuit the terminals.
.Do
not disassemble or modify it.
@Use
only recommended SHARP chargers: AC
torIBattery Charger AA-75X or Car Battery Adaptor/
Charger VRP75CH.
The battery pack has a limited life; when it begins to deliver less recording time per charge, purchase a replacement.
. -
m
The battery pack IS normally warm after charging or use.
Operating
I
I
Storage
Adap-
To prevent damage and prolong battery life:
l Do not damage or drop the unit or subject it to
mechanical vibration.
l Avoid repeated charging without discharge of the
tery pack.
bat-
The recording time of a fully charged battery pack is influenced by the amount of recording and standby time,
use of the zoom lens and other factors.
Spare battery packs are available from your SHARP dealer. Have spare battery packs on hand, otherwise ycu
may miss important video opportunities.
Nickel-cadmium batteries are best when maintained under the following conditions:
Full charging takes place between
1.
be incomplete at higher temperatures.
Store battery packs in a cool dry place. Long exposure to high temperatures increases bzttery discharge
2.
and reduces battery life.
Total battery discharge may naturally occur during long storage. Discharge batteries before storing them
3.
this extends battery life.
4.
Detach batteries from Camcorder or charger after use, otherwise battery discharge may continue.
10°C
and
35OC.
Charging takes longer at lower temperatures and
chargrng
may
-
13
Page 16

CAMERA RECORDING
Power up the Camcorder indoors using either
1
the supplied AC Adaptor and 2 metre DC OUT
cable when mains supply is available or the
battery pack for ease of movement. For outdoor
recording, use the optional car battery adaptor/
charger connected to a car cigarette lighter or
the battery pack.
the
Press
cassette with its tab intact and with its window
facing outward.
Press on the “PUSH” mark to close the compartment door.
Caution:
Before inserting the video cassette, be sure to check
that the tape is not slack. If there
reel in the direction of the arrow.
Position your hand properly to allow your
3
fingers to press the REC START/STOP button
and Power Zoom button. Then adjust the grip
strap to suit your hand.
button. insert a
is
tape
Lm
,.L Y .”
slack, turn the
video
14
Remove the lens cap and secure it to the grip
4
band. Then adjust the viewfinder eyepiece
ter) control clockwise or counterclockwise SO
the characters inside the viewfinder can be seen
clearly (see page 10).
(diop-
Page 17

Slide the REC Speed
5
select the tape speed and set the recording time.
This causes the selected recording mode to
appear in the viewfinder. Recording time on
the
m4
tape EG30 is as follows.
SP mode: 30 minutes
LP mode: 60 minutes
LP/SP
select switch to
Set the CAMERA
6
“CAMERA REC” position.
Set the FULL AUTO switch to “FULL AUTO” posi-
7
tion. Make certain that the “
marks appear in the LCD display.
and “
@GI ”
marks are flashing, an alarm indicator
will appear in the viewfinder. (See page 20.)
RECNCR
PLAY switch to
-1)”
and “ @a
If the “
CH’
”
FULL AUTO
swttch
Press the REC START/STOP button.
recording,
8
sequence from left to right.
. -
=
If recording for an extended
may become hot. However, this does not indicate malfunction.
If you wish to pause during recording, press
9
the REC START/STOP button again. Press the
button again to continue recording.
. -
=
If the Camcorder is in the REC PAUSE mode for more
than 5 minutes, it will switch itself off. To restart recording
just slide the OPERATE switch to ON.
“>>>>>”
in the viewfinder moves in
pertod
of time, the handgrip
While
15
Page 18

FULL AUTO SYSTEM
Setting the FULL AUTO switch to “FULL AUTO” position sets the Focus and White Balance to the AUTO modes and
the shutter
When the FULL AUTO switch is set to the “FULL AUTO” position, the FULL AUTO mark
normally appear on the LCD display. However, if the
pear in the viewfinder. These indicators mean that camera recording is not possible for some reason, such as if a cassette with its
speed to
STANDARD mode. This makes it possible for anyone to make accurate Camcorder recordings.
tab removed has
“
cII ”
and
been loaded into the Camcorder.
‘*-a”
and “ ti ” mark
“@a”
start flashing, other alarm indicators may ap-
FULL AUTO switch
AUTO FOCUS
Autofocus lets you concentrate on creating great videos,
knowing they will be perfectly focused.
In the FULL AUTO position, the focus is continuously
adjusted to maintain the best focus. There is a small
area in the centre of the viewfinder which detects the
subject distance and sets the focus. Try and keep the
subject in the middle of the viewfinder.
The autofocus may not be able to focus on a subject in the
lowing situations. Manually focus the lens to obtain the correct
focus.
Subject too dark.
Lack of contrast,
le.
,
_____
fol-
snow scene.
Camera recording IS
in the FULL AUTO mode when
*L^
- ---I- --3 &
Lflt: cm
appear.
lIltirK am
possible
mark
When any alarm indicator
appears in the viewfinder
follow the alarm immedial
(See page 20.)
Cautions:
l
Do not touch the focus ring while the autofocus mechanism
is operating.
l If the lens is dirty or obscured, accurate focusing may be
difficult. Keep these clean at all times. If they become dirty,
clean with a soft tissue and use lens cleaning fluid to clean the
lens. Should condensation occur, dry by wiping with a soft cloth
or wait until the condensation evaporates.
l
When recording subjects that change rapidly, such as when
zooming rapidly from wide-angle to telephoto, panning quickly
from a distant scene to one nearby, etc., it sometimes takes
a few seconds before the
Scene Includes objects at
uniform
distance apart
subiect
I
is in focus.
Light
reflects off the subject.
:ely.
overlap In the same scene.
Subfect
has
fine.
repeated patterns.
Sublect
IS
betng
or wet window.
shot through a
Into
background
Sublects at different
appear In the
at the same
1 High-speed electronic shutter
dirty
j used
under fluorescent
center
time
AUTO WHITE BALANCE
Your Camcorder is equipped with automatic white
balance which ensures good colour in your videos.
rect
colour balance is important for accurate colour
reproduction.
16
____
drstances
of the viewfinder
being
Ilghting.
Cor-
Fast-moving
Subrect
subject
has horizontal
stripes
Background IS too
Sublect
IS skewed
bright
We recommend that you start recording after focusing on a
The white balance is automatically adjusted to
compen-
sate for any changes in the colour temperature of the
light.
_
Page 19

REC REVIEW
Press the REC START/STOP button
REC PAUSE (‘ ‘
very briefly press the REC REVIEW button.
About the last 2 seconds of the recording are rewound
and played back. The Camcorder is then ready to
continue recording. If you hold down the REC REVIEW
button, the CAMERA SEARCH
engaged.
----- ”
will light in the viewfinder), and
while recording to
function will be
CAMERA SEARCH
If, while recording, you have mistakenly recorded something you don’t want, you can search for the location of
the unnecessary portion while still in the CAMERA REC
position.
Press the REC START/STOP button to pause the
1
recording.
While looking into the viewfinder, continue press-
2
ing the CAMERA SEARCH button to search for
the location you wish to record over. The recorded
picture appears in the viewfinder.
When the portion you wish to record over appears,
3
release the CAMERA SEARCH button. (The REC
PAUSE mode will resume after a 1 second long
still frame has appeared.)
Press the REC START/STOP button to record over
4
the unwanted section.
CAMERA SEARCH BUTTON OPERATION
If you hold down the
be replayed in order at 3 times regular speed.
(There will be no
If you hold down the
replayed in order at regular speed. (With sound)
If you hold down the “. 44 ” button, images can
be replayed in reverse order at 3 times regular
speed. (There will be no sound.)
“r”
sauna
I‘,”
,F
button, images can
button, images can be
--
POWER ZOOM (WIDE/TELEPHOTO CONTROL)
One of the best features of this Camcorder is the
variable speed power zoom.
Press the power zoom buttons to zoom in and out
on a subject. The pressure of your finger tips controls
the zoom speed.
Press the power zoom buttons firmly to rapidly zoom
in or out in 6 seconds, or press the power zoom
buttons lightly to slowly zoom in or out in 20 seconds.
T (telephoto) brings things closer to you and W (wide
angle) increases the width of the filming area but
makes things appear further away.
17
Page 20

USING THE ZOOM SELECT BUTTON
This Camcorder is equipped with a 1.5 times extender function. Enlarge or reduce the image in the viewfinder instantly,
for an entirely new kind of zoom effect. For example, when an interesting scene appears in the viewfinder, slide the
ZOOM SELECT button, and the image will be instantly enlarged 1.5 times.
(Display in viewfinder)
Extender function off
I
(Example) Standard
Before the
-x
1.5
times extender function is engaged,
I
Extender function on
1.5
1.5
X
the viewfinder displays a square frame over the
image. Locate the subject within the frame, slide
the
ZOOM SELECT button and the image of the
subject fills the viewfinder. In this example, the
lens is set tostandard magnification. Sliding the
ZOOM SELECT button will make the frame in the
viewfinder disappear and enlarge the image 1.5
times. Sliding the ZOOM SELECT button a second time returns the image to standard magnification (the frame reappears in the viewfinder).
Relationship between zoom and extender operation.
1,
With the extender off
f8
t,
\ \
\
f64
\
\
With the extender on
fA
\
‘\I
ZOOM SELECT
f96
Wide
Angle 11
The range of the variable zoom changes in the above way, according to the extender setting.
Telephoto
Page 21

LAP TIME FUNCTION
This Camcorder has a
Slide the OPERATE switch to on.
1
Slide the CAMERA
2
switch to “CAMERA REC”. The Camcorder will automatically switch to the
REC PAUSE mode.
Press the COUNTER/COUNTER MEMORY/
3
LAP TIME button and select LAP TIME.
will be displayed in the numbers).
Press the RESET button. (LAP TIME will reset
4
to
“O:OO”.)
Slide the REC SPEED
set the recording speed.
5
Set the FULL AUTO switch to “FULL AUTO”
position.
Press the REC START/STOP button (LAP TIME
starts).
6
To stop recording, press the REC START/
7
STOP button again (LAP TIME stops).
LAP
TIME function which counts the approximate recording time.
REC/VCR
LP/SP
PLAY
(“:”
select switch to
l
With the Lap Time mode you can know the approximate
time of the
“99:99” (99 min. 99 sec.).
@The LAP
(The
display in the viewfinder.)
l When the tape is ejected, the
automatically reset to
l
Even if you press the COUNTER/COUNTER MEMORY/
LAP
not be
(In this case COUNTER must be selected for the tape
counter.)
r&ording.
TIME counter counts only during recording.
LAP TIME mode is activated even if there is no
TIME button during playback, the LAP TIME will
displayed.
The counter’s maximum time is
LAP
“0:OO”.
TIME counter is
Vlewfmder
2530
Indicator
LP
Start
stop
LP
19
Page 22

LCD DISPLAY AND VIEWFINDER INFORMATION
The Camcorder provides information needed for camera recording on the LCD display and in the viewfinder.
1)
DEW
Condensation on head drum. The
power will cut off in a few seconds.
several hours before resuming use.
(See page 2.)
(At this time, the OPERATE indicator
also blinks.)
2)
Battery and alarm
The battery is too low. The power will
be cut off in a few seconds. Replace the
battery pack.
Wait
Recording cannot
cause the video cassette has its tab
moved or no video cassette is loaded.
Load a
video cassette with its tab intact.
Tape-end alarm
The tape will come to its end in about
3 minutes. Prepare a new video cassette with an intact tab.
The tape has come to its end. Replace
it with a new one with an intact tab.
be carried out
be-
re-
. -
ma
i_i
I
3) LIGHT
There is not enough light to make a
good recording. Add supplementary
lighting or move to a brighter location.
When the above indicators appear, the FULL
FULL AUTO indicator
The FULL AUTO indicator appears
when the FULL AUTO switch is set to
“FULL AUTO” position. This makes
the Camcorder capable of proper
camera recording.
Recording indicator
2)
)>))>
I__
SP
When the REC
pressed and recording begins,
appears, moving in sequence from left
to right.
When the REC
pressed again, the Camcorder
changes to REC PAUSE, and
will appear.
. -
ml
3) Recording mode
This indicator appears only when
the CAMERA
switch is in the “CAMERA REC”
position.
Recording at the speed shown.
“SP”: Recording at the standard play
speed.
“LP”: Recording at the long-play
speed.
STARTlSToP
START/STOP
RECNCR
AUTO
button is
“>>>>>”
button is
“-----”
PLAY
mark ~a and the
PM
3:27
10.27.91
El
I
!
m
J
0231
1027.91
12:45
mooo
6)
Heads need cleaning
The heads need cleaning.
Call for service.
@=I
mark blink simultaneously.
4) Date/lime
This unit is equipped with an
DATE/TIME function.
The DATE-TIME display button is
pressed to set the display to either the
date/time or date. The set display can
be recorded on the tape along with the
picture.
5)
Tape counter
Continues to function even when the
indicator is not shown in the viewfinder.
The numbers in the tape counter continue to change as the tape travels.
If the Counter memory is engaged,
“M” appears to the left of the tape
counter indicator.,
6)
Lap time counter
The lap time is displayed in
and seconds during recording.
(See page 19.)
7)
High Speed Shutter Recording
When the SHUTTER SPEED button is
pressed, the shutter speed changes as
follows.
l/100 :
l/250
l/1000
l/4000
1/10000
No display: Standard mode
l/100
:
l/250 sec.
:
l/1000
:
l/4000
:
l/10000
(l/50 sec.)
AUTO
mrnutes
sec.
sec.
sec.
sec.
20
Page 23

ck
mode is
appears when the
CE button is pressed.
m
If you use a TV as a monitor, only the date or date/time appear in the viewfinder.
en-
AUTO DATE/TIME FUNCTION
The auto date/time function features a date and time
which can be recorded as a handy reference.
Follow the procedures outlined below for recording the
date or date/time along with the subject.
If the date and time are not set, the DATE-TIME DISPLAY button will not function. (See page 7.)
ade stand-by mode
en the REC
pressed,
Fade in or Fade out is ob
mode is engaged.
ppears when the
pressed while
START/STOP
BLC/
is engaged.
button is
Connect to a power source and slide the OPERATE switch to on. Slide the CAMERA
1
“CAMERA REC” and the Camcorder will change to REC PAUSE.
Press the DATE-TIME DISPLAY button. Either the date or date/time will be displayed in the viewfinder. Pressing
2
this button changes the display in the viewfinder as follows, and either the date or date/time can be set.
PM327
10.27.91
Press the REC START/STOP button. The date or date/time displayed in the viewfinder will be
3
the subject.
+
b
10. 27. 91
,
RECNCR
I
recorJed
PLAY switch to
along with
21
Page 24

ASSEMBLE RECORDING
To record on a partially recorded tape or produce an assembly recording:
Slide the EJECT button and insert a cassette
1
with its tab in place.
(PICTURE
INSERT)
2
3
4
5
1.
2.
3.
4.
recorckng
Slide the CAMERA RECNCR
“VCR PLAY”.
Press the PLAY button and use the FF or
REW button to quickly locate the exact point,
then press the PAUSE/STILL button.
Slide the CAMERA RECNCR PLAY switch
from “VCR PLAY” to “CAMERA
Press the REC START/STOP button.
from the same place as
PLAY
REC.
Petore.
switch to
1
2
3
Make
sure the power is off -the OPERATE indicator should
be off - before removing the battery pack.
AUTO POWER OFF
To protect the tape and conserve battery power, the
Camcorder releases the tape tension and switches
itself off when in REC PAUSE mode
in viewfinder) for more than 5 minutes.
(“-----”
displayed
22
__~. .
Page 25

The VL-C8OOOX can playback VHS-C cassettes you have recorded.
They can be played back on the viewfinder or a TV.
PLAYBACK IN THE VIEWFINDER
Attach a Battery Pack or use the AC Adaptor/
1
Battery Charger.
Slide the OPERATE switch on -the OPERATE
2
indicator will light up.
Slide the CAMERA RECNCR
3
the “VCR PLAY” position.
Press the EJECT button and insert a video
4
cassette.
Remove any tape slack first.
Cue the tape to the scene you want to watch
5
by pressing the FF or the REW button. Then
press the
*When the tape reaches the end, the Camcorder
will rewind the tape automatically.
The
LP/SP
recording speed IS automatically sensed and the tape is
played back at the correct speed.
select switch may be in either mode. The
PLAY
button and playback starts.
PlAY
switch to
4
3
TRACKING ADJUSTMENT
If noise bars are visible or if the picture is noisy, adjust the
TRACKING control. Press either of the TRACKING buttons to reduce the picture noise. After playback, press
both of the TRACKING buttons at the same time to return
the tracking to the centre position.
Visual “Notse” Clear
23
Page 26

FORWARD/REVERSE SEARCH AND STILL
To quickly locate a point on a recorded tape, use the Forward and Reverse Search buttons.
Forward Search
Press the FF(
speeds playback up to 3 times faster than normal for
an SP recorded tape and 7 times faster for an LP
recorded tape.
Reverse Search
Press the REW(
speeds up reverse playback to 3 times faster than
normal for an SP recorded tape and 7 times faster
for an LP recorded tape.
. -
Em
There may be some picture noise during Forward/Reverse Search. This is normal. If the TV picture roils vertically, adjust
the TV vertical hold control. The picture may go monochrome during Forward/Reverse Search on a recorded tape. This
is normal. Audio will not be heard.
@I)
button during playback. This
@I)
button during playback. This
Still
Press the PAUSE/STILL
the picture. To resume
STILL button again.
If the TV picture rolls vertically, adjust the TV
control.
To protect the tape, the Camcorder releases the tape
tension and resumes STOP mode when left longer than 5
minutes in STILL mode during playback.
button during playback to still
playback, press the
vertrcal
PAUSE/
hold
24
Page 27

COUNTER MEMORY FEATURE
The 4-digit display acts as a handy reference to help you locate specific scenes. Use the tape counter memory
to quickly return to a favourite scene.
When the memory is on, the tape stops when the counter reads
“MOOOO”
during FF and REW.
Slide the OPERATE switch to on. Set the
CAMERA RECNCR
1
PLAY”.
Press the COUNTER/COUNTER MEMORY/
2
LAP TIME button to display the tape counter in
the viewfinder.
Press the
(When the Camcorder is in STILL mode, press
3
the STILL button).
Press the RESET and COUNTER/COUNTER
4
MEMORY/LAP TIME button at the beginning of
the scene.
PLAY
button to start playback.
PLAY
switch to “VCR
I
Viewfinder Indicator
COUNTER
c
MEMORY
LAP TIME RESET
I
Press STOP at the end of the scene and then
press the REW button. The tape will rewind to
5
roughly “0000” and tape travel will stop.
.The
numbers tn the counter will not change smoothly
while fast forwarding or rewinding. However, this is not
an indication of trouble.
l The tape counter will show “0000” and
l
If the COUNTER/COUNTER MEMORY/LAP TIME button is
pressed once more, the counter display will disappear and
the memory feature will not function.
(During the CAMERA REC mode, it is also possible to switch
on the
LAP
COUNTER MEMORY/LAP TIME button.)
l Counter memory feature works only when the CAMERA
RECNCR PLAY switch is in the “VCR
TIME counter by pressing the COUNTER/
“M”
will appear.
PLAY”
position.
4
25
Page 28

CONNECTION TO TV
To playback tapes recorded with your Camcorder on your TV, connect the supplied RF Converter between your TV and
the Camcorder.
Connection to normal TV.
The supplied RF converter permits playback of video/audio
signals through a normal TV. The
to CHO.
Connected to outdoor
or
indoor antenna or cable
RF
convener is factory set
AV out terminal
@
1
i
TV PLAYBACK
To view the output from your Camcorder on the TV,
you must select an unused channel on your TV and
tune to the output of the supplied RF converter
(factory preset to CHO).
Remove the antenna cable from your TV
1
and then connect the supplied RF converter
between the Camcorder and the TV as
shown above and then plug the antenna
cable into the ANTENNA IN terminal on
the RF converter.
Q
I
Set the Camcorder CAMERA RECNCR
2
PLAY
switch to the VCR PLAY position and
slide the OPERATE switch to ON.
Press the EJECT button and insert a record-
3
ed video cassette and press the PLAY
button.
Select an unused channel on the TV and
4
tune it to the output of the RF converter
(factory preset to CHO) until a good coloured
playback picture of the inserted video tape
is obtained.
To resume normal broadcast viewing on
5
the TV, slide the OPERATE switch to OFF
on the Camcorder and select the normal
channels on the TV tuner.
. .
6
-.
RF converter (supplied)
cl
.
J
RF
converter channel select switch
.The
RF unit permits playback of video and audio recordings
through a TV receiver. The signals from the RF unit are
viewed through a vacant channel not used for broadcast-
ing in your area.
*The RF converter is factory preset to CHO. If
in your area, set the CHANNEL switch on the RF converter
to the CH1 position and then retune your TV as shown
above.
CH0
is used
26
Page 29

CONNECTION TO TV WITH A/V TERMINALS
Plug the supplied A/V OUTPUT cable into the
1
AV out terminal on the Camcorder.
Plug the VIDEO OUT and AUDIO OUT connec-
2
tors on the cable into the VIDEO IN and AUDIO
IN terminals on the TV.
Set the television TV/VIDEO switch to the VIDEO
3
position.
Slide the OPERATE switch to on.
4
Slide the CAMERA RECNCR PLAY switch to the
“VCR PLAY” position.
Press the EJECT button and insert a video cas-
5
sette. Press the PLAY button.
AV out lack
il
To resume normal TV operation, set the television
TV/VIDEO switch to TV and select the channel to
be viewed on the television.
to AUDIO IN
t
27
_
--
Page 30

RECORDING TO ANOTHER VCR
Your SHARP Camcorder can be connected as the playback source deck for dubbing and editing a tape with
another VCR. Unnecessary scenes can be removed, the overall length shortened, scenes moved and rearranged,
and other effects added to make your tapes more effective and enjoyable.
AV OUT terminal
Plug the A/V OUTPUT cable into the AV out
I
terminal on the rear of the Camcorder. Plug the
VIDEO OUT and AUDIO OUT connectors into
the VIDEO IN and AUDIO IN terminals on the
rear of the VCR.
Monitor recording on a IV connected to the
2
VCR.
Connect a power source to the Camcorder and
slide
3
the OPERATE switch to ON. Now turn on the
VCR too.
Recording
To
RF OUT terminal
r
Monitor
2
To RF in
(antenna in)
Slide the Camcorder CAMERA
4
switch to “VCR PLAY” and insert a recorded tape.
Insert a cassette tape with erasure protection
tab intact into the VCR and put it into REC
5
PAUSE mode.
Locate the scene to be copied from your Cam-
corder and press the PAUSE/STILL button.
6
Slide the EDIT switch to ON.
RECNCR
PLAY
7
Press the PAUSE/STILL button on your Cam-
8
corder and on the VCR to begin playback and
dubbing.
Picture quality inevitably deteriorates with each copy. The
standard tape speed (SP) mode is therefore recommended
on the recording VCR when dubbing a tape.
EDIT CONTROL
Picture quality inevitably deteriorates each time you
dub from the Camcorder to a VCR. Slide the EDIT
switch on to minimize deterioration of picture quality.
Use this while you edit your videos.
4
7-
28
PAUSE/STILL
button
l Normally, the EDIT switch should be off.
Page 31

USING THE CASSETTE ADAPTOR
The VHS compact video cassettes recorded with the
VLC8000Xcan
VCR
by using the provided
(A compact video cassette installed in the cassette
adaptor is fully compatibie with a standard VHS
VCR for both recording and playback.)
Providing your standard VHS VCR is capable of playing back LP recordings if the compact cassette is
recorded in the LP mode.
be played back with a standard VHS
VR72CA
Cassette Adaptor.
Inserting the Battery into the Cassette Adaptor
The VR-72CA Cassette Adaptor is battery operated
ry
one “Type R6 (AA)” battery.
Remove the battery cover by sliding it up.
Install one “Type R6 (AA)” battery and reattach
the cover.
Inserting a Compact Video Cassette into the Cassette Adaptor.
If there is slack in the video tape when inserting the compact cassette into the adaptor, the tape may become
damaged. Take up slack in the tape.
Push the sliding latch in the directlon of the
1
arrow to open the door.
Slldrng
latch
*The compartment door opens.
Close the compartment door.
3
Insert the cassette as illustrated.
2
I
l Be sure to insert it squarely, not tilted.
l Be sure there is no slack in the tape.
l
Do not touch the tape when inserting a compact
cassette into the cassette adaptor.
The safety catch will retract. This indicates
4
that the tape threading is completed.
l
The tape will be threaded automatically.
Caution:
During tape loading and unloading, do not touch
the cassette’s reels for safety and tape protection.
29
Page 32

Caution:
Check the tape condition after inserting the cassette and
tape loading is completed:
1. Check to see if there is any tape slack.
(Do not open the tape cover.)
2. If there is tape slack,
direction of the arrow.
h&7
During tape loading and unloading, do not touch this
reel for safety and tape protection.
0
remove it by turning
Tape cover
the
reel in
the
Removing the Compact Video
Cassette
Slide the latch to open the door, then push up on the
cassette to remove it, pushing on the cassette with
your finger through the hole in the bottom of the
adaptor.
l This cassette adaptor is precision-manufactured.
violent vibrations or shocks. Do not drop or disassemble
or modify it, otherwise malfunctions may result.
l
When placing the cassette adaptor into its case, slide the
cassette
adaptor into the case, safety catch
end first.
Avoid
Playing Back the Tape
1.2.Load the cassette adaptor into a VHS deck in the
same way as you would load a regular VHS tape.
Operate the VHS deck as usual.
*Note that playback special effects can be per-
formed using the VHS deck.
l if noise bars appear, adjust the tracking of the
playback deck. Be sure to reset the tracking
control to its normal position when you have
finished playing back compact VHS tapes.
l Consult the VCR’s operation manual for operation
instructions.
l During special effects playback (slow motion, still frame,
etc.) the picture may vibrate or noise bars may appear
on the screen.
l
The protruding safety catch Indicates that loading of the
tape has not been completed. In this condition, NEVER
attempt to load the cassette adaptor
could damage both.
@Do
not load and unload the cassette adaptor
VCR repeatedly without allowing the tape to run.
slacken the tape and thereby damage rt.
@The
cassette adaptor cannot be loaded upside down.
*After
use, remove the cassette from the adaptor.
Into
a VCR, as this
Into
Thts
will
a
Video Cassettes
l The VL-C8OOOX employs only compact video cassettes
carrying the
ORecording
erases the previously recorded video and audio
signals.
*An inverted cassette cannot be inserted.
@Do
not load and unload the cassette repeatedly
without allowing the tape to run at all. This will
slacken the tape and thereby damage it.
*Make certain before loading the cassette that the
&pe
is not slackened. If there is any slack, turn the
@ar
on the cassette in the direction of the arrow to
take
upslack.
__-
*The
cassette is equipped with a safety tab to pre-
vent accidental erasure. When the tab is removed,
recording is impossible. If you wish to record on a
cassette whose tab has been
sive tape to reseal the slot.
*To
avoid excessive exposure to dust and finger-
prints, do not open the front tape cover.
‘wq
mark.
onto’ tirerecorded tapes automatically
__-
--
______--
removed,
use adhe-
--
30
Storage of Cassettes
l Avoid exposing the cassettes to
Keep them away from heaters.
@Avoid
storing the cassettes in humid or dusty
places.
*Do not drop the cassettes. Do not expose them to
violent vibrations or shocks.
*Do not expose the cassettes to strong
fidds
(near a
l
Place
them vertically.
motor, transformer or
the
cassettes in cassette cases
drrect
sunlight.
magnetk
magnet).
and position
Page 33

MANUAL FOCUS
In the following cases, it may be difficult to use the Autofocus, so you might want to focus the lens yourself.
1. When the object is not in the middle of the scene.
2. When you want the background or the front of the scene blurred.
3. When you want to have the beginning of the scene out-of-focus.
USING THE MANUAL FOCUS
Slide the FULL AUTO switch to OFF
1
Press T to zoom in on your subject.
2
9
Press the FOCUS button to select MANUAL
a
FOCUS.
Turn the focus ring until the subject is focused.
4
Lightly press W and
5
scene.
zoom out to compose the
’
FOCUS
3
M/F
WHITE BALANCE
White balance ensures that all the colours in a scene are correctly reproduced. In the auto
mode, white balance is adjusted automatically.
Using the White Balance Lock mode
Colour shift may occur when a solid coloured object is recorded, so that the viewfinder is
filled with one colour, eg., when a close up of solid coloured paper is taken. The Auto
White Balance mode is locked into place to avoid a colour shift in such situations. Follow
the procedure described below to lock the Auto White Balance mode.
(1) When Quick Action is required.
Zoom out all the way on a subject that is not one solid colour. Under this condition, the
proper white balance will be set automatically.
Press the WHITE BALANCE button to lock the white balance setting. “W/B” appears in
the viewfinder. Colour shift can be avoided when the white balance is locked even when
recording a close up of a solid coloured subject.
(2) When a very accurate white balance setting is required.
Focus on a white piece of paper so that the viewfinder is filled with it and keep focusing
for about 2 seconds. Then the proper white balance will be set automatically. Slide the
FULL AUTO switch to OFF, and press the WHITE BALANCE button to lock the white
balance setting.
To disengage the White Balance Lock mode, press the WHITE BALANCE button, or slide
the FULL AUTO switch to FULL AUTO mode to return to the Auto White Balance mode.
The colour temperature of a light source varies. For instance, the colour temperature of
sunlight will vary depending on the weather and time of day. Reset the White Balance
Lock if the colour temperature changes.
mi
l
l Even if the White Balance Lock mode is on, the White Balance is not perfectly
“W/B” appears in the viewfinder.
If power to the Camcorder is interrupted during White Balance Lock, if or the Camcorder
is switched to the VCR mode, White Balance Lock will be cancelled.
locked. Therefore the White Balance compensation function can adjust to small
tions in colour temperature, giving your recordings more natural colour.
varia-
I
In the
manual
“M/F” IS displayed In the
viewfinder.
\
WHITE
BALANCE
W/B
In the
White
mode, “W/B” IS displayed
the upper left of the
finder. (If the White Balance
Lock mode IS disengaged.
the display disappears.)
Balance Lock
I
focus mode,
view-
In
Under the following conditions Auto White Balance may not function correctly.
*When mixing natural and artificial light. Beware of window scenes containing a mixture of artificial and natural light.
Likewise all lighting should have the same colour temperature.
l When using special effects lighting.
@When
recording a subject against a background with an intense hue.
*When there is insufficient light.
l When the colour temperature of a scene changes too rapidly or there is too much contrast,
*When the object is a solid colour.
-
31
Page 34

BACKLIGHT COMPENSATION
The Auto Iris in this Camcorder uses a new light meas-
uring system to automatically control bleaching and ad-
just to backlit subjects. However, if the background is too
bright and the subject appears dark, press the
BLCIGAIN-UP
pearing dark on the recording.
0 -
=
The Camcorder will automatically return to the AUTO IRIS
mode
after you
button to prevent the subject from ap-
release the
BLC/GAIN-UP
button.
GAIN-UP
BLClGAlN-lJP
“LIGHT” is displayed in the viewfinder when recording a dark subject. If the BLCGAIN-
UP button is pressed, the scene becomes brighter.
“ *
LIGHT * ” is displayed in the viewfinder to indicate that the gain-up mode is engaged.
When the subject becomes brighter, “ * LIGHT * ” disappears.
However, memory of the gain-up mode remains.
In order to disengage the gain-up mode completely, press the BLC/GAIN-UP button while
“*LIGHT*”
the lens.
l In the gain-up mode, there will be more picture noise in low light.
l
If power is interrupted or the Camcorder is switched to the playback mode, the Gain-up mode will
be cancelled.
is displayed in the viewfinder. “*LIGHT*” can be displayed by capping
SELF TIMER RECORDING
Attach the battery pack.
1
Press the EJECT button and open the cassette
2
holder. Insert a video cassette with its tab intact
with its window facing outward.
Press the corner of the cassette holder marked
“PUSH” until it clicks into place.
Mount this Camcorder on a stable tripod designed
3
for video use, then slide the OPERATE switch on.
Set the CAMERA RECNCR PLAY switch to the
4
“CAMERA REC” position.
Set the FULL AUTO switch to the “FULL AUTO”
5
position, and check that I= and %r are displayed
in the LCD.
Pointing the Camcorder at the subject, press the
6
Power Zoom button and adjust the angle of view.
Press the SELF TIMER button.
7
The talent tally indicator flashes for 10 seconds,
then the Camcorder will record for 20 seconds,
then change to REC PAUSE mode. If you wish to
record for an extended time, press the SELF
TIMER button twice in succession.
4
-
1
I
J
IID
If the gain-up mode IS engaged.
“ *
played in the viewfinder
LIGHT *
”
IS
dis-
If you press the SELF TIMER button three times, the SELF
TIMER is cancelled.
32
Page 35

HIGH SPEED SHUTTER
Use the HIGH SPEED SHUTTER (l/10,000,
111000, 11250, 11100 sec.) mode when recording fast
moving objects like sports (tennis, golf, etc.). When you
playback the scene on a 4-head VCR, the playback
picture will be clear even in the STILL and SLOW
modes.
l/4000,
USING THE HIGH SPEED SHUTTER
While in the REC PAUSE mode, slide the FULL
1
AUTO switch to off, and press the SHUTTER
SPEED select button. Select the shutter speed
desired. Shutter speeds change in the following
order:
back to
Press the REC START/STOP button to start record-
2
ing as normal.
Since the High Speed Shutter is faster than normal, it requires more light. Use the High Speed
Shutter in appropriate light (minimum required
lighting is listed below.)
l/10,000
l/4,000
l/1,000
l/250 sec.
11100 sec.:
It is recommended to use the High Speed Shutter
outdoors or with extra light.
l/10,000
l/250 sec.,
l/10,000
sec.: 3,000 lux
sec.: 1,200 lux
sec.: 300 lux
sec.,
l/4,000
sec., 111,000 sec.,
l/100
sec., standard (l/50 sec.), and
sec.
:
75 lux
30 lux
The selected shutter speed is
indicated in the viewfinder.
l Avoid using
as
this will cause flickering in the picture.
l
Recording with shutter speeds higher than 1150 sec. (standard) tends to darken the picture. Record in bright locations
when using other shutter speeds.
High Speed Shutter under fluorescent lighting
PLAYBACK OF SCENES RECORDED WITH THE HIGH SPEED SHUTTER MODE
Place the recorded tape into the supplied m cas-
1
sette adaptor and then into a
cassette recorder.
When watching scenes take
2
SPEED SHUTTER you can enjoy blur-free recordings even during STILL and SLOW mode
playback.
STILL button
33
Page 36

MACRO SHOTS
Small plants, insects, even photos in the family
album can be recorded using Macro and enlarged to
fill the screen. You can also use Macro to record
titles for your videos.
Normally the lens can only focus on subjects that are
more than 1.1 m away from the front of the Camcorder.
Set the FOCUS button to MANUAL.
1
Hold the MACRO button down and turn and
2
lock the zoom lever in the MACRO position.
Focus by slowly turning the zoom lever.
3
@Turn
the zoom lever back to the normal
you have finished with Macro.
l
When recording a solid coloured object such as a
petal, the colour may shift. In this event, use
balance
FADE IN
lock mode. (See page 31.)
-&-OUT
focus range
flower
the
when
white
By setting the lens to Macro, you can manually focus on
any subject within the macro range, lOmm-llOcm, right
up to the front of the lens.
Mount the Camcorder on a steady tripod as the
smallest movement is magnified when shooting
macro subjects.
1
23
9
With this Camcorder you can enjoy the special effect of fading in and out of the scenes in your recordings.
I
FADE IN
FADE IN FADE OUT
With REC PAUSE on, press the FADE IN/OUT
1
button. The viewfinder will display “FADER”.
Press the REC START/STOP button to start record-
2
ing. The viewfinder will turn black, and then
ally focus on the subject. (“FADE IN” will appear
in the viewfinder.)
gradu-
While recording, press the FADE
1
The viewfinder will display “FADER”.
Press the REC START/STOP button. The view-
2
finder will slowly turn black creating a fadeout of
the scene. (“FADE OUT” will appear in the viewfinder. If you select the REC PAUSE mode, the
FADE will be cancelled.)
IN/OUT
button.
34
FADER
Page 37

LIGHTING
For clear good-quality pictures you will need between 500 and 100,000 lux
-
you can record in less light, however
the picture quality may suffer. Adequate lighting is also essential for correct white balance.
Brightness
100,000 (Lux)
10,000
1,000
100
10
Situation
Blue sky
Clear day at noon
Clear day at loam (65.000)
Clear day at 3pm (35.000)
Cloudy day at noon (32,000)
Cloudy day at loam (25,000)
Cloudy day, one hour after
Clear day, one hour before sunset (1,000)
Fluorescent
Factory floor (700-800)
Sales counter rn department store (500-700)
Bowling alley (500)
Library (400-500)
Offlce wtth
Fluorescent desk lamp (400)
Flashlight at lm (250)
Shop stairway (100)
During lntermlsson at
Cigarette lighter at 30cm (15-20)
Candles on birthday cake at 20cm (1 O-l 5)
(100,000)
sunnse (2.000)
light
near
wmdow
(1,000)
fluorescent lighting (400-500)
movie
theatre (15-35)
Colour
Temperature
10,000
(“K)
9.000
8,000
7,000 Rainy
6,500 Dayllght
6,000 Camera flashbulb
5,500
5.000
4.500
3,500
3,200 Halogen lamp
2.800
Situation Colour
Clear day
Colour
TV
Cloudy day
day
fluorescent light
Blue photolamp
White
fluorescent
Off-white fluorescent
Tungsten photolamp
Tungsten lamp
Iodine lamp
light
light
Yellow
Blue
White
White Balance
Range
A
U
T
Candlelight
l
These are approximations.
*Auto White Balance should normally be used
in the colour
temperature range shown above. However it will satisfactorily operate from
2500°K
up to
8000°K,
but the picture may
become redder or bluer, respectively.
Video Lighting
Lighting is one of the most important areas in
home videos. Also one of the most overlooked.
Good lighting can often mean the difference between a great picture and a poor quality one. And
lighting is essential for correct white balance.
In most outdoor situations natural lighting is
adequate for home videos. Indoors the situation
becomes more complicated. Artificial lighting is required and tungsten (or quartz) lamps provide the
most natural of artificial light sources, while provid-
ing a constant colour temperature over a long life.
Good lighting is difficult to achieve-and there are
many problems to catch the unwary. Simply
mounting one light on or several lights either side
of the camcorder will only make your subject look
flat and two-dimensional. To make a subject more
interesting, use the lighting to model your subject
and to add or create emphasis in a scene.
35
Page 38

Before calling for servicing, please check
the
following troubleshooting table.
SYMPTOM
l
Power
.No
power l Safety devices are functioning.
*Power switches off
soon after coming on.
l
Recording.
l
Power on but no
image in viewfinder.
l
Can’t record
l
Poor colour
l
Fuzzy picture
.Camera
picture is too
dark
l
Playback
l
No image appears.
l
Playback is in black and
white
I
when the Cam-
corder is connected to
-Iv.
*Video noise In image.
l
Broken image
*Cassette can’t be inserted.
l No tape movement in fast forward
mode.
*No
tape movement in rewind mode.
POSSIBLE CAUSE
l Disconnect
*The battery pack is not charged.
*The power source unit is not
*Charge the battery pack sufficiently.
l Connect the power source
correctly connected.
l
Depleted battery pack.
r
@Dew
in Camcorder.
l
Lens cap on.
/
l Use a fully charged battery pack.
l
I
/
*Remove the lens cap.
1
l
Recording prevention tab broken
/ @Cover
off from cassette.
,
/
*CAMERA
I
is set to “VCR PLAY”.
l
REC/VCR PlAY
n/ not properly adjusted.
1 *Poor lighting.
switch
prevention tab Intact.
’
@Slide
/
switch to “CAMERA REC”.
1 *Adjust the TV.
I
1 *Apply additional lighting or correct
’
*Dust or other foreign matter on
lens.
l
Not properly focused.
.The SHUTTER
SPEED select
button is set to HIGH SPEED
SHUTTER MODE.
.Improperly
.The
connected to TV.
TV is not tuned to the RF
1 converter’s output channel
(VHF OCH or
.lV’s
TV/VIDEO switch IS not at
1
TV
position (if the TV IS equipped position.
/
with
AV
l
Tracking not properly adjusted.
Input
1CH).
terminal)
*Clean the lens.
i *Adjust the focus.
.Set
/
l
/
l Tune the TV to the RF converter’s
.Set
l
,
I
*Old
or worn tape.
l Insufficient battery capacity.
*Cassette is not
right
side up or
is backwards.
*Another cassette IS in the unit.
*Tape is already completely
wound.
*Tape is already completely
rewound.
l
/
l
l Check cassette p@&oning and reinsert.
l
oRewind
l Fast forward to desired point.
SUGGESTED SOLUTION
the AC adaptor cord, and
then plug it into the power point again.
unit
correctly.
Walt until
or
dew disappears.
the tab hole
Insert
a cassette
with
adhesive tape
with Its
recording
the CAMERA RECNCR PLAY
colour temperature of lighting.
the SHUTTER SPEED select button
to “STANDARD”.
Reconnect properly.
out-
put channel (VHF OCH or
TV’s
lVNlDE0
switch to TV
1CH).
Adjust the tracking.
Use a new tape.
Recharge the battery pack.
Press the EJECT button and remove.
to desired point.
36
m
This unit is
If
this were to
equipped
happen,
with a microprocessor. Its performance could be adversely affected by external RF
turn off the
power, and unplug this unit
from
the power source.
noise Or
Interference.
Page 39

Format
Power source
Power consumption
Signal system
Recording system
Cassette
Tape speed
Recording time Max. (SP)
VIDEO Output
SIN ratio
AUDIO Output
Microphone input
Pickup
Minimum required illumination
Lens
Viewfinder
Colour temperature compensation
Operating temperature
Operating humidity
Storage temperature
Weight
Dimensions
AC
power
adaptor/Battery charger
Power requirement
Rated output voltage
Rated output current
Charging system
Dimensions
Weight
(SP)
(LP)
(LP)
VHS standard
DC
9.6V :
9.2w
PAL-type colour signal
Luminance: FM recording
Colour: Converted subcarrier direct recording
Conforms to VHS standard
VHS-C cassette
23.39
11.69
30 minutes (with EC-30
60
minutes (with EC-30 cassette)
1.0 Vpp, 75 ohms, unbalanced (via AV out connector)
46 dB (with Rohde &
-
8
dBs,
-
65
dBs,
12.5 mm-format CCD
3 lux (at F 1.6, with Gain-up)
F1.6, f =
function,
Colour viewfinder (Approx. 254mm LCD)
Auto white balance with white balance lock
0% to
35% - 80%
- 20°C
1.2 kg (with viewfinder)
126(W) x 160(H) x
specifications
AC
11OV - 24OV, -5016OHz
DC
96V =
1.3A
Constant current, peak detection, timer controlled
70(W)
x43(H) x 154(D) mm
Approx.
mm&x
mm/set
lk-ohm (via AV out connector)
high impedance, unbalanced
8-64mmIF2.4,
auto
iris control and macro position, filter diameter 46 mm.
4o”c
to
60°C
3809
cassette)
Schwarz
f = 12-96 mm, 8 x power zoom lens with built-in extender
326(D)mm (incl.
noise meter)
viewfinder)
RF converter specifications
Output channel
Initial channel setting
Power source
Dimensions
Cable length
Weight
VHS
Cassette Adaptor specifications
Type
Dimensions
Weight
Accessory
SUPPLIED ACCESSORIES
Standard battery pack
-
AC power adaptor/battery charger (w-75X)
A/V output cable
RF converter
75 ohm coaxial cable
OPTIONAL ACCESSORIES
Standard battery pack (BT75)
Car battery adaptor/
charger (VRP75CH)
Design and specifications are subject to change without notice.
(BT-75)
Channel 0 or 1 (switchable)
Channel 0
DC
9.6V-45 mA
56(W) x 23(H) x 80(D)mm
1.2m
Approx.
VHS cassette adaptor
188 (W) x 25 (H) x 104 (D)mm
2359
Type R6 (AA) battery x 1
RF converter
VHS cassette adaptor
1209
Shoulder strap VHS cassette adaptor
DC output cable
Lithium battery
Compact video cassette
(EC30SD)
(VR-XlORF)
(from CAMCORDER)
(VRZZCA)
(excl.
cable)
Type R6 (AA) battery for VHS cassette
adaptor
(VR-72CA)
4
37
_--_
Page 40

SHARP CORPORATION
Osaka,
Japan
Printed in Japan
TINSE0092TAZi
T7852-A
 Loading...