

Page 1
Preparation
Preparation
Inserting and Removing the
Battery Pack
Inserting the Battery Pack
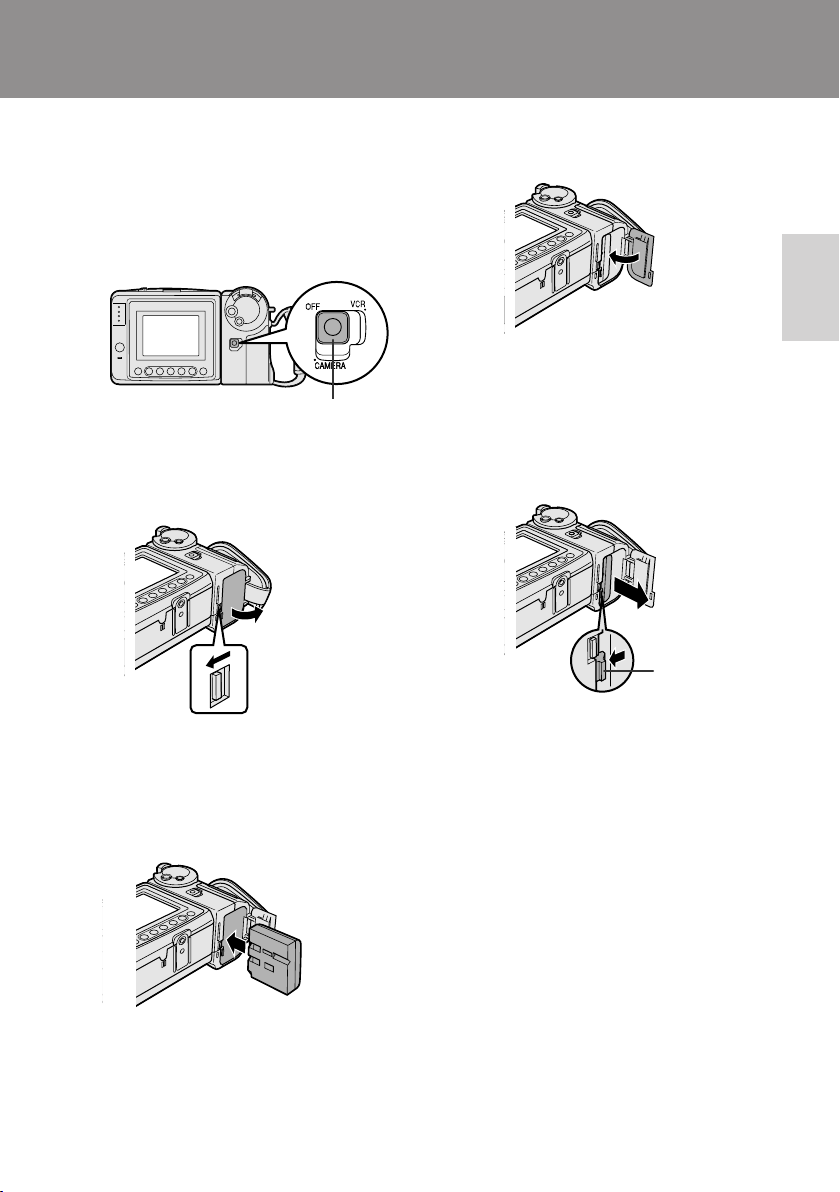
1 Make sure that the Power switch is set
to OFF.
Power switch
2 Slide the battery compartment door
release on the bottom of the VIEWCAM
in the direction of the arrow to open the
battery compartment door.
Battery
compartment
door release
4 Close the door, pressing it firmly in the
centre until it clicks.
Preparation
Removing the Battery Pack
1 Perform steps 1 and 2 above.
2 Press the battery release as shown to
remove the battery pack.
Battery release
3 Insert the battery pack into the com-
partment as shown, and push it in completely until it locks into place.
Caution:
• Do not force the battery pack into the
battery compartment if it does not go in
easily.
Cautions:
• BEFORE REMOVING THE BATTERY PACK,
ALWAYS STOP THE TAPE AND TURN THE
POWER OFF. If you remove the battery pack
during recording or playback, the tape will
remain wound around the video head drum,
potentially causing damage to the tape.
• Make sure the battery compartment door is
closed firmly during operation. If it is not, the
battery pack may fall out or VIEWCAM operation
may fail because of the poor contact pressure.
• Remove the battery pack from the VIEWCAM if
the VIEWCAM will not be used for a long period
of time.
• When removing the battery pack, do not tilt
the VIEWCAM so that the battery compartment faces down. The battery pack may fall
out.
• Do not expose the battery compartment door to
strong force, as it may come off.
• Use only SHARP model BT-H22 or BT-H32
battery packs with this VIEWCAM. Use of other
batteries may present a risk of fire or explosion.
8
Page 2
Preparation
Charging the Battery Pack
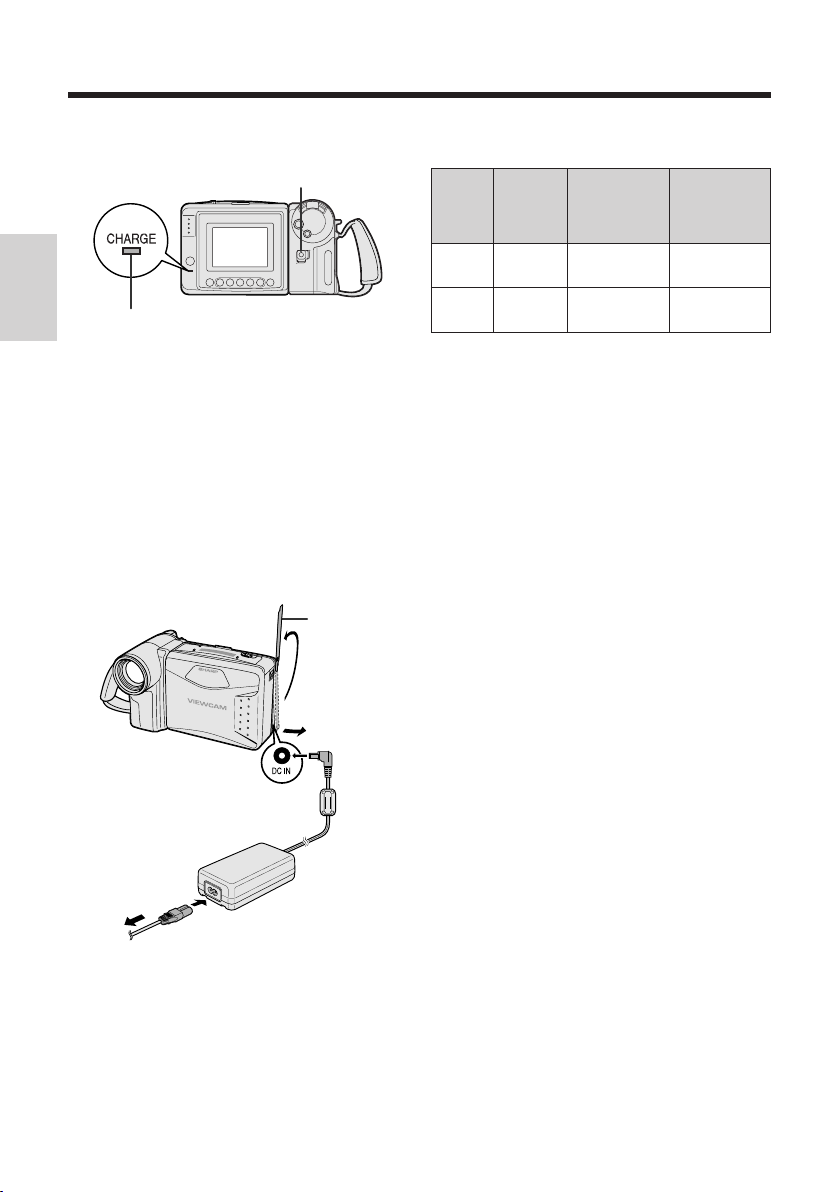
Power switch
CHARGE indicator
Preparation
1 Insert the battery pack into the VIEWCAM
(see page 8). Make sure that the Power
switch is set to OFF.
• The battery pack will not charge when the
Power switch is set to CAMERA or VCR.
2 Connect the power cord to the AC adapter,
then insert the AC plug into a power outlet.
3 Open the terminal cover on the VIEWCAM
and insert the DC plug of the AC adapter
into the DC IN jack on the VIEWCAM.
• The CHARGE indicator will light up in red.
Terminal cover
Charging time and maximum continuous
recording and playback times
Battery
BT-H22
BT-H32
Notes:
• Using the zoom (see page 17) and other
• The charging time and recording time may vary
• It is recommended that you have enough battery
• See page 50 for more information on using the
Caution:
• Charge only SHARP model BT-H22 or BT-H32
Charging
pack
functions or turning the power on and off
frequently will increase power consumption.
This may result in a decrease of more than 50%
in the actual recording time compared to the
maximum continuous recording time listed
above.
depending on the ambient temperature and the
condition of the battery pack.
packs on hand to provide two to three times your
estimated recording time.
battery pack.
battery packs. Other types of battery packs may
burst, causing personal injury and damage.
time
approx.
3 hr.
approx.
6 hr.
Max.
continuous
recording
time
approx.
1 hr. 40 min.
approx.
3 hr. 20 min.
Max.
continuous
playback
time
approx.
1 hr. 40 min.
approx.
3 hr. 20 min.
DC IN jack
To power
outlet
4 When the battery is fully charged, the
CHARGE indicator will light up in green.
Remove the DC plug from the VIEWCAM,
and close the terminal cover.
Caution:
• When removing the plugs, grasp the plug, not the
cable.
9
Page 3
Powering the VIEWCAM from
an AC Outlet
Caution:
• The supplied AC adapter is specially designed
for use with this VIEWCAM, and should not be
used as a power supply for other camcorders.
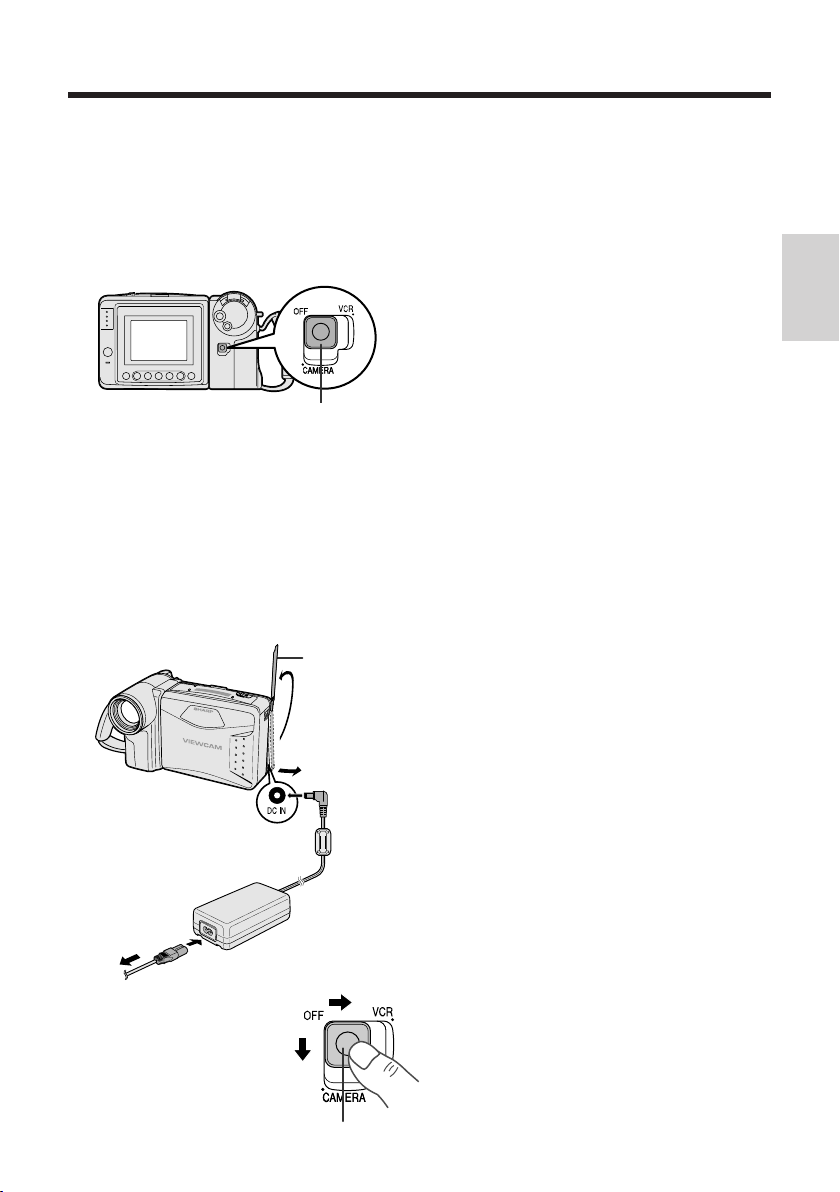
Power switch
1 Connect the power cord to the AC
adapter, then insert the AC plug into a
power outlet.
2 Make sure that the Power switch is set
to OFF.
3 Open the terminal cover and insert the
DC plug of the AC adapter into the DC
IN jack on the VIEWCAM.
Terminal cover
Cautions:
• BEFORE REMOVING THE DC PLUG, ALWAYS
STOP THE TAPE AND TURN THE POWER OFF.
If you remove the DC plug during recording or
playback, the tape will remain wound around the
video head drum, potentially causing damage to
the tape.
• Remove the DC plug from the VIEWCAM if you
will not use the VIEWCAM for a long period of
time.
• When removing the plugs, grasp the plug, not
the cable.
Note:
• Close the terminal cover after use.
Preparation
DC IN jack
To power
outlet
4 Hold down the Lock
button and slide the
Power switch to
CAMERA or VCR.
Lock button
10
Page 4

Preparation
Inserting and Removing a
Cassette
Inserting a Cassette
1 Supply power to the VIEWCAM, then
slide the release and open the cassette
compartment door.
• The cassette holder extends and opens
Preparation
automatically.
Cassette compartment
door release
2 Insert the cassette fully with the window
facing outwards, and with the erasure
protect tab facing upwards.
Erasure protect tab
4 Wait for the cassette holder to fully
retract. Close the compartment door by
pressing the centre until it clicks into
place.
Removing a Cassette
Perform step 1 above, then take out the
cassette.
Cautions:
• Do not try to close the cassette compartment
door while the cassette holder is extending or
retracting.
• Be careful not to get your fingers caught in the
cassette holder.
• Do not apply force to the cassette holder except
when pressing the PUSH mark to close it.
• Do not tilt the VIEWCAM or hold it upside down
when you are inserting or removing a cassette. It
may damage the tape.
• Remove the cassette if you will not use the
VIEWCAM for a long period of time.
• If you do not correctly close the cassette holder
in step 3, the VIEWCAM’s cassette protection
mechanism might eject the cassette. If this
happens, repeat the insertion procedure.
• Do not attempt to pick up the VIEWCAM by the
cassette compartment door.
3 Press the PUSH mark gently until the
cassette holder clicks into place.
• The cassette holder retracts
automatically.
PUSH mark
11
Notes:
• If the battery power is too low, you may not be
able to eject the cassette. Replace the battery
pack with a fully charged one.
• See page 51 for more information on the video
cassette tapes for use with this VIEWCAM.
Page 5

Installing the Lithium
Memory Battery
The supplied lithium battery is used to store the
memory of the date and time settings.
1 Slide the cassette compartment door
release and open the cassette
compartment door.
5 Close the cassette compartment door by
pressing the centre until it clicks into
place.
Preparation
Cassette compartment
door release
Note: The cassette holder will extend and
open when the VIEWCAM is connected to a
power source. Be sure to close the cassette
holder before proceeding to the next step
(see page 11).
2 Pull out the lithium battery holder using
a pointed object such as the tip of a
ballpoint pen.
Lithium battery holder
3 Insert the lithium battery
into the battery holder with
the ` side of the battery
facing the j side of the
holder.
Removing the Lithium Battery
Perform steps 1 and 2 above, then lift out the
battery from the battery holder.
Note:
• Replace the battery with a new CR2025 battery
when the date and time indicator starts to fall
behind the correct time.
Notes on the Use of the Lithium
Battery
CAUTION: Danger of explosion if battery is
incorrectly replaced. Replace only with the
same or equivalent type CR2025 recommended
by the equipment manufacturer.
WARNING KEEP THIS BATTERY AWAY FROM
CHILDREN. IF SWALLOWED, CONSULT A
PHYSICIAN IMMEDIATELY FOR EMERGENCY
TREATMENT.
CAUTION BATTERY MAY EXPLODE IF MIS-
USED OR INSTALLED WITH POLARITY
REVERSED. DO NOT RECHARGE, DISASSEMBLE OR DISPOSE OF IN FIRE.
• Do not short-circuit, recharge, disassemble,
or heat the lithium battery.
• Should the lithium battery leak, wipe the
battery compartment and holder clean, and
then insert a new battery.
• The lithium battery will last about one year of
normal usage.
4 Push the battery holder back
into position.
j mark
12
Page 6

Preparation
2
000
1 2002
SETTI NG
2
000
6 2003
SETTI NG
2
10 00
6 2003
SETTI NG
2
10 30
6 2003
SETTI NG
Setting the Date and Time
Example: Setting the date to 2 June 2003 (2. 6.
2003) and the time to 10:30 am (10:30).
Note:
• Check that the lithium memory battery has been
installed before setting the date and time.
Power switch
Preparation
MENU button
DISPLAY button
1 Hold down the Lock
Lock button
button and slide the
Power switch to
CAMERA.
2 Press the MENU button until
(MENU 2) appears.
MENU
DATE
TIME/
DI SPLAY OFF
SELECT DATE TIME
SETTING
12H 24H
• If MENU 1 appears on the screen,
press the PAGE button ( ) to display
MENU 2.
24H
/
SET
3 Press the SET button (B).
MENU
DATE
SET
TIME/
DI SPLAY OFF
SELECT DATE TIME
SETTING
12H 24H
24H
/
SET
2
1
000
PIC
2
1
000
PIC
+
1 2002
PAGETURE
+
1 2002
PAGETURE
4 Press the 쑽 or 쒀 button (C or D) to
select “2” (day), and press the SET
button.
5 Press the 쑽 or 쒀 button to select “6”
(month), and press the SET button.
2
SETTI NG
6 2002
000
6 Press the 쑽 or 쒀 button to select
“2003” (year), and press the SET button.
7 Press the 쑽 or 쒀 button to select “10”
(hour), and press the SET button.
8 Press the 쑽 or 쒀 button to select “30”
(minute), and press the SET button.
• The internal clock now starts operating.
9 Press the DISPLAY button to turn off the
SET
.
DATE
DI SPLAY OFF
SELECT DATE TIME
SETTING
12H 24H
2
MENU
TIME/
/
10 30 AM
12H
SET
2
PIC
+
6 2003
PAGETURE
menu screen
Changing to the 12-hour Time Mode
After performing step 8 above, press the 쑽 or
쒀 button (Q) to select “12H/24H”, then press
the SET button (B) (W) to select “12H”.
Notes:
• The date and time, once set, are stored in
memory.
• The menu screen automatically turns off if no
settings are made within 5 minutes.
13
• When changing the date and time settings,
press the 쑽 or 쒀 button (C or D) to
select “SETTING”, then press the SET
button.
Page 7

Using the Hand Strap and the
Lens Cap
1 Open the hand strap flap (Q) and grip
strap (W).
Hand strap flap
Grip strap
2 Pass your hand through the hand strap
and put your thumb close to the Power
Zoom control. Then pull the grip strap
tight until it fits snugly, seal the Velcro
closures (Q), and close the hand strap
flap (W).
®
Notes:
• Always replace the
lens cap on the lens
when the VIEWCAM is
not in use.
• Attach the lens cap to
the hand strap so it will
not get in the way
during recording.
Attaching the Shoulder Strap
1 Hold one end of the strap and thread it
through the loop on the left side of the
LCD screen.
2 Loosen the strap in the buckle, then feed
the end of the strap through the buckle,
as shown.
3 Draw the strap in the direction of the
arrow to secure.
4–6 Use the same procedure to attach the
other end of the strap to the loop on
the lens side.
Preparation
Caution:
• Do not swing the VIEWCAM by the hand strap.
Attaching and Removing the Lens Cap
When attaching or removing the lens cap,
press both tabs on the sides of the cap.
Press both tabs.
LCD screen side Lens side
14
2
Buckle
3
5
Buckle
6
14
Page 8

Preparation
Using the Sun Hood
It is recommended that you use the supplied
sun hood when recording outdoors on a sunny
day or at a brightly illuminated location.
Attaching the Sun Hood
Fit the bottom clip on the sun hood into the slot
below the LCD screen (Q), and align the top
clip with the ridge above the LCD screen (W).
Preparation
Then press the sun hood until it clicks into
place.
Top clip
Bottom clip
Opening the Sun Hood
Open the sun hood by lifting the top cover in
the direction of the arrow. (The side covers will
open automatically.)
Top cover
Closing the Sun Hood
1 Fold in both side covers while holding the
top cover open.
2 Close the top cover by gently pressing the
mark down until the cover clicks into
place.
Removing the Sun Hood
Carefully lift the top clip up with your thumb
while supporting the sun hood with your hand
(Q). Then pull the sun hood in the direction of
the arrow (W) to release the bottom clip.
Side covers
Note:
• You can operate the Operation buttons below the
LCD screen with the sun hood attached.
15
Cautions:
• Be sure to close the sun hood before transporting the VIEWCAM. If the VIEWCAM is transported with the sun hood open, the sun hood
may fall off or become damaged.
• Do not leave the sun hood in an unventilated car
in direct sunlight. The high temperature may
cause a deformation of the casing.
 Loading...