

Page 1
LIQUID CRYSTAL DISPLAY CAMCORDER
OPERATION MANUAL
Operation Summary
NTSC
MODEL
VL-A110U
Preparation
Camera Recording
Basic Operations
Basic Operations
Playback
Useful Features
Please read this operation manual
carefully before using the VIEWCAM.
Important
For assistance in reporting the theft or
this product, record on the line
model number and serial number which
are located on the bottom of the unit.
Please retain this information.
Model No.:
Serial No.:
• See page 54 for use of Demo mode.
loss of
below the
Advanced Features
References
Page 2
Thank you for purchasing this VIEWCAM from SHARP.
The VIEWCAM will enhance your home video enjoyment and allow you to capture those
special moments. Please read this operation manual to familiarize yourself with the
VIEWCAM’s features, so that you will get the most out of it. The video techniques section will
help you fully enjoy the many features this VIEWCAM offers, and expand your video world.
Important Information for Consumers in the U.S.
WARNING: TO REDUCE THE RISK OF FIRE OR ELECTRIC SHOCK,
DO NOT EXPOSE THIS APPLIANCE TO RAIN OR
MOISTURE.
CAUTION:
TO REDUCE THE RISK OF ELECTRIC SHOCK, DO NOT REMOVE
CAUTION
RISK OF ELECTRIC SHOCK
DO NOT OPEN
This symbol warns the user of uninsulated voltage within the
unit that can cause dangerous electric shocks.
This symbol alerts the user that there are important operating
and maintenance instructions in the literature accompanying
this unit.
CAUTION
(applies to the supplied AC adapter)
TO PREVENT ELECTRIC SHOCK,
MATCH WIDE BLADE OF PLUG TO
WIDE SLOT, FULLY INSERT.
COVER. NO USER-SERVICEABLE
PARTS INSIDE. REFER SERVICING
TO QUALIFIED SERVICE PERSONNEL.
CAUTION
If the AC adapter is misplaced or
needs to be replaced, obtain the
same type of adapter from a SHARP
service center of your dealer.
PRODUCT DISPOSAL
This Product utilizes tin-lead solder, and a fluorescent lamp containing a small
amount of mercury. Disposal of these materials may be regulated due to environmental considerations. For disposal or recycling information, please contact your
local authorities or the Electronics Industries Alliance: www.eiae.org.
BATTERY DISPOSAL
CONTAINS NICKEL-METAL HYDRIDE RECHARGEABLE BATTERY. MUST BE
RECYCLED OR DISPOSED OF PROPERLY. CONTACT LOCAL AGENCIES FOR
INFORMATION ON RECYCLING AND DISPOSAL PLANS IN YOUR AREA.
i
Page 3

WARNING—FCC Regulations state that any unauthorized changes or
modifications to this equipment not expressly approved by the manufacturer could
void the user’s authority to operate this equipment.
This device complies with Part 15 of the FCC Rules. Operation is subject to the
following two conditions: (1) This device may not cause harmful interference, and (2)
this device must accept any interference received, including interference that may
cause undesired operation.
INFORMATION
This equipment has been tested and found to comply with the limits for a Class B
digital device, pursuant to Part 15 of the FCC Rules. These limits are designed to
provide reasonable protection against harmful interference in a residential
installation. This equipment generates, uses, and can radiate radio frequency
energy and, if not installed and used in accordance with the instructions, may cause
harmful interference to radio communications. However, there is no guarantee that
interference will not occur in a particular installation. If this equipment does cause
harmful interference to radio or television reception, which can be determined by
turning the equipment off and on, the user is encouraged to try to correct the
interference by one or more of the following measures:
—Reorient or relocate the receiving antenna.
—Increase the separation between the equipment and receiver.
—Connect the equipment into an outlet on a circuit different from that to which the
receiver is connected.
—Consult the dealer or an experienced radio/TV technician for help.
CAUTION ON LITHIUM BATTERY (MEMORY BACKUP BATTERY)
If a battery is reversed (positive end where the negative end belongs and vice
versa), it can overheat and rupture. This has happened when young children install
not
batteries backwards. Warn children
to take out batteries or install them.
should install the lithium battery in the VIEWCAM.
Parents
Your VIEWCAM is designed to record in SP mode only. It will not perform normal
playback for programs prerecorded in LP mode.
This VIEWCAM does not have a PCM recording or playback function. PCM recordings made using
other VCRs or audio dubbing cannot be played back on this unit.
If you record on a tape on which PCM sound has already been recorded, the audio track of the
new VIEWCAM recording may not come out if the tape is played back on a PCM-capable VCR. If
this occurs, set the VCR’s audio monitor select switch to the “STANDARD” position.
COPYRIGHT WARNING: It is the intent of SHARP that this unit be used in full compliance with the
copyright laws of the United States and that prior permission be
obtained from copyright owners whenever necessary.
NOTE
The VIEWCAM’s LCD panel is a very high technology product with close to 90,000 thin-film
transistors*, giving you fine picture detail. Occasionally, a pixel may appear on the screen as a
fixed point of blue, green, red, or black. Please note that this does not affect your VIEWCAM’s
performance.
*Specifications are subject to change without notice.
ii
Page 4

IMPORTANT SAFEGUARDS
1. Read Instructions—All the safety and
operating instructions should be read
before the product is operated.
2. Retain Instructions—The safety and
operating instructions should be
retained for future reference.
3. Heed Warnings—All warnings on the
product and in the operating instructions should be adhered to.
4. Follow Instructions—All operating and
use instructions should be followed.
5. Cleaning—Unplug this product from the
wall outlet before cleaning. Do not use
liquid cleaners or aerosol cleaners. Use
a damp cloth for cleaning.
6. Attachments—Do not use attachments
not recommended by the product
manufacturer as they may cause
hazards.
7. Water and Moisture—Do not use this
product near water—for example, near
a bath tub, wash bowl, kitchen sink, or
laundry tub; in a wet basement; or near
a swimming pool; and the like.
8. Accessories—Do not place this product
on an unstable cart, stand, tripod,
bracket, or table. The product may fall,
causing serious injury to a child or
or table recommended by the manufacturer, or sold with the product. Any
mounting of the product should follow
the manufacturer’s instructions, and
should use a mounting accessory
recommended by the manufacturer.
9. A product and cart
combination should be
moved with care. Quick
stops, excessive force,
and uneven surfaces
may cause the product
and cart combination to overturn.
10. Ventilation—Slots and openings in the
cabinet are provided for ventilation and
to ensure reliable operation of the
product and to protect it from overheating, and these openings must not be
blocked or covered. The openings
iii
should never be blocked by placing the
adult, and
serious damage
to the product.
Use only with a
cart, stand,
tripod, bracket,
product on a bed, sofa, rug, or other
similar surface. This product should not
be placed in a built-in installation such
as a
bookcase
or rack
unless
proper
ventilation is
provided or the manufacturer’s instruc-
tions have been adhered to.
11. Power Sources—This product should
be operated only from the type of power
source indicated on the marking label. If
you are not sure of the type of power
supply to your home, consult your
product dealer or local power company.
For products intended to operate from
battery power, or other sources, refer to
the operating instructions.
12. Grounding or Polarization—This product
may be equipped with a polarized
alternating-current line plug (a plug
having one blade wider than the other).
This plug will fit into the power outlet
only one way. This is a safety feature. If
you are unable to insert the plug fully
into the outlet, try reversing the plug. If
the plug should still fail to fit, contact
your electrician to replace your obsolete
outlet. Do not defeat the safety purpose
of the polarized plug.
13. Power-Cord Protection—Power-supply
cords should be routed so that they are
not likely to be walked on or pinched by
items placed upon or against them,
paying particular attention to cords at
plugs, convenience receptacles, and
the point where they exit from the
product.
14. Lightning—For added protection for this
product during a lightning storm, or
when it is left unattended and unused
for long periods of time, unplug it from
the wall outlet and disconnect the
antenna or cable system. This will
prevent damage to the product due to
lightning and power-line surges.
Page 5

15. Power Lines—An outside antenna
system should not be located in the
vicinity of overhead power lines or other
electric light or power circuits, or where
it can fall into such power lines or
circuits. When installing an outside
antenna system, extreme care should
be taken to keep from touching such
power lines or circuits as contact with
them might be fatal.
16. Overloading—Do not overload wall
outlets, extension cords, or integral
convenience receptacles as this can
result in a risk of fire or electric shock.
17. Object and Liquid Entry—Never push
objects of any kind into this product
through openings
as they may touch
dangerous
voltage points or
short-out parts
that could result in
a fire or electric shock. Never spill liquid
of any kind on the product.
18. Servicing—Do not attempt to service
this product yourself as opening or
removing covers may expose you to
dangerous voltage or other hazards.
Refer all servicing to qualified service
personnel.
19. Damage Requiring Service—Unplug
this product from the wall outlet and
refer servicing to qualified service
personnel under the following conditions:
a. When the power-supply cord or plug
is damaged,
b. If liquid has been spilled, or objects
have fallen into the product,
c. If the product has been exposed to
rain or water,
d. If the product does not operate
normally by following the operating
instructions. Adjust only those
controls that are covered by the
operating instructions as an improper adjustment of other controls
may result in damage and will often
require extensive work by a qualified
technician to restore the product to
its normal operation,
e. If the product has been dropped or
damaged in any way, and
f. When the product exhibits a distinct
change in performance—this
indicates a need for service.
20. Replacement Parts—When replacement
parts are required, be sure the service
technician has used replacement parts
specified by the manufacturer or have
the same characteristics as the original
part. Unauthorized substitutions may
result in fire, electric shock, or other
hazards.
21. Safety Check—Upon completion of any
service or repairs to this product, ask
the service technician to perform safety
checks to determine that the product is
in proper operating condition.
22. Wall or Ceiling Mounting—The product
should be mounted to a wall or ceiling
only as recommended by the manufacturer.
23. Heat—The product should be situated
away from heat sources such as
radiators, heat registers, stoves, or
other products (including amplifiers)
that produce heat.
iv
Page 6

Precautions
• When the VIEWCAM is not in use,
remember to remove the cassette tape,
turn off the power, and disconnect the
VIEWCAM from the power source.
• Do not aim the lens at the sun.
Do not allow direct sunlight to strike the
VIEWCAM lens or LCD monitor screen,
whether or not recording is in progress, as it
may damage the CCD sensor or LCD screen
surface. Be particularly careful when
recording outside.
• When shooting in dark places, avoid sudden
brightly lit objects or light sources, such as
the sun. Otherwise, the image may white out.
Should this happen, point the lens in a
different direction until the picture returns to
normal.
• Avoid magnetic
sources.
Using the VIEWCAM
near strong fluorescent
lights, motors,
televisions, or other
magnetic sources may adversely affect
recorded images.
• Using the VIEWCAM near a broadcasting
station or other powerful transmission
source may cause buzzing or picture
deterioration.
• Avoid shocks and
dropping.
Do not drop or otherwise
subject the VIEWCAM to hard
shocks or strong vibrations.
Bumping or striking the unit
during recording will
generate noise in the
recorded image.
• Avoid placing the
VIEWCAM in close
proximity to lighting
equipment.
The heat from
incandescent lights
may deform the
VIEWCAM, or cause it
to malfunction.
• Always respect prohibitions or restrictions
on the use of electronic equipment on
commercial flights or in other sensitive
areas.
• Be aware of the temperature and humidity.
You can use your VIEWCAM at 0⬚ C to Ⳮ40⬚ C
(32⬚F to 104⬚F), and at 30% to 80% relative
humidity. Do not store the unit in an
unventilated car in the
summer, in direct
sunlight, or near strong
heat sources; this can
result in severe damage
to the unit casing and
circuitry.
• Avoid situations where water, sand, dust or
other foreign matter could get on or inside
the VIEWCAM, and do not use or leave
your VIEWCAM in areas with excessive
smoke, steam or moisture.
Such environments can
cause malfunctions or
cause mildew to form
on the lenses. Be sure
to keep the unit in a
well-ventilated location.
• Some small, portable
tripods may be difficult to
attach and may not be
sturdy enough to support
your VIEWCAM. Be sure to
use only a strong, stable
tripod.
• When using your VIEWCAM in a cold
environment, the LCD monitor screen often
appears less bright immediately after the
power is turned on. This is not a
malfunction. To prevent the VIEWCAM from
becoming too cold, wrap it in a thick cloth
(a blanket, etc.).
v
Page 7

AC Adapter
• The AC adapter may interfere with reception if
used near a radio.
• Prevent flammables, liquids, and metal
objects from entering the adapter.
• The adapter is a sealed unit. Do not attempt
to open or modify it.
• Do not damage, drop, or subject the adapter
to vibration.
• Do not leave the adapter in direct sunlight.
• Avoid using the adapter in humid or
extremely hot places.
Cleaning
• Many plastic parts are used in the VIEWCAM
casing. Do not use thinner, benzene or other
strong chemical cleaners. These may cause
discoloration and damage to the casing.
• Clean the casing with a soft, dry cloth. If the
casing is particularly dirty, wipe the casing
with a tightly wrung cloth dampened with a
diluted, neutral detergent. Then wipe it again
with a soft, dry cloth.
• Use a soft cloth to wipe finger marks and
other soiling off the LCD screen.
• Use a soft cloth, or compressed air and lens
paper designed for photographic lenses to
clean the lens.
LCD Monitor Screen
The VIEWCAM is equipped with a large LCD
monitor screen that allows you to record
scenes while comfortably holding the
camcorder. The LCD monitor screen can be
rotated for easy recording at high or low
angles. It also functions as a handy playback
monitor so you can enjoy what you have just
recorded.
Cautions:
• Do not apply pressure to the screen.
• Do not expose the screen to shocks, as it may
break.
• Do not place the VIEWCAM with the screen
facing down.
Note:
• Use a soft cloth to clean the screen.
vi
Page 8

Supplied Accessories
Battery pack
*BT-H22
CR2025 type
lithium battery
*Note: The part numbers for the AC adapter and battery pack supplied with this VIEWCAM are valid
only in the U.S. and Latin America. If this VIEWCAM was purchased outside of these areas, the part
numbers may be different. Please refer to the part numbers printed on the labels of the supplied AC
adapter and battery pack.
AC adapter
*UADP-0312TAZZ
Shoulder strap
UBNDS0010TASA
Infrared remote control
RRMCG0085TASA
Lens cap
GCOVH1225TASA
Audio/video cable
QCNW-1448TAZZ
or QCNW-1295TAZZ
AA battery for
remote control ⳯ 2
vii
Page 9

Optional Accessories
Standard type
battery pack
BT-H22
Tripod adapter
for 180° recording
VR-33FAN
Note: The listed model names are for U.S. accessories.
For optional and additional accessories, contact your local dealer, call the Sharp
Accessories and Supply Center at 1-800-642-2122, or visit SHARP’s website
(http://www.sharp-usa.com).
Extended type
battery pack
BT-H32
Sun hood
VR-60BFN
Accessory
shoe adapter
VR-30ADN
viii
Page 10

Contents
Operation Summary Part Names .......................................................... 3
Quick Reference Index ........................................ 5
Warning Indicators............................................... 6
Preparation
Basic Operations
Inserting and Removing the Battery Pack ........... 7
Charging the Battery Pack................................... 8
Powering the VIEWCAM from an AC Outlet........... 9
Inserting and Removing a Cassette .................. 10
Installing the Lithium Memory Battery................ 11
Selecting the Language for the On-screen
Display............................................................. 12
Setting the Date and Time ................................. 16
Using the Hand Strap and the Lens Cap........... 17
Attaching the Shoulder Strap............................. 17
Camera Recording
Easy Camera Recording with Full Auto Mode ... 18
Zooming ............................................................. 19
Tips on Recording Positions .............................. 19
Remaining Recording Time Display .................. 20
Remaining Battery Power Display ..................... 20
Playback
Playback ............................................................ 21
Volume Control ................................................... 21
Watching the Playback on a TV......................... 22
Video Search...................................................... 23
Still...................................................................... 23
1
Page 11

Operation Summary
Useful Features
Advanced Features
Operations of the On-screen Controls
Using the Control Buttons............................... 24
Selecting the Mode/Menu Screens ................ 24
Adjusting the Menu Settings........................... 25
Recording the Date and Time............................ 26
Fade In and Fade Out........................................ 27
Quick Review ..................................................... 28
Quick Return ...................................................... 29
Edit Search......................................................... 29
Gamma Brightness Compensation.................... 30
Gain-up (Cat’s Eye)............................................ 31
Wide Screen (16:9) ........................................... 32
Macro Shots ....................................................... 32
Removing the Lens Hood .................................. 32
Self Recording ................................................... 33
Setting the VIEWCAM to Full Auto Mode ........... 35
Program Search ................................................. 36
Tape Counter Feature ........................................ 37
Using the Remote Control.................................. 39
Digital Picture Effects......................................... 40
Scene Menu (Program AE) ................................ 41
Superimposing a Title ........................................ 42
Changing the Preset Titles................................. 43
Auto/Manual Focus ............................................ 44
White Balance Lock ........................................... 45
Manual Exposure ............................................... 46
Picture/Backlight Adjustments ........................... 47
Gamma Playback............................................... 48
Turning Off the LCD Monitor Backlight .............. 48
Editing ................................................................ 49
Preparation
Camera Recording
Basic Operations
Basic Operations
Playback
Useful Features
References Useful Information .............................................. 50
Demonstration Mode.......................................... 54
Before Requesting Service ................................ 55
Specifications..................................................... 57
• Guía de operación rápida en español ..........................................................58
Advanced Features
References
2
Page 12

Operation Summary
Part Names
For details on the use of each part, refer to the page number indicated in the
brackets.
Operation Summary
Front view
Terminal cover
Microphone
Zoom lens
AUDIO/VIDEO jack
[pp. 22, 49]
DC IN jack [pp. 8, 9]
Speaker
When the cassette compartment door is open
Cassette holder [p. 10]
Lens hood [p. 32]
Cassette compartment door
[p. 10]
3
Cassette compartment door
release [p. 10]
Shoulder strap loop
[p. 17]
Lithium battery holder
[p. 11]
Page 13

Rear view
Operation Summary
RECord START/STOP button [p. 18]
Remote sensor
[p. 39]
CHARGE indicator
[p. 8]
MENU button
[p. 24]
Operation buttons [p. 24]
Bottom view
LCD monitor screen
DISPLAY button [p. 24]
Power Zoom Wide angle/
Telephoto control [p. 19]
VOLume control [p. 21]
Shoulder strap
loop [p. 17]
FADE button [p. 27]
Hand strap [p. 17]
Power switch (CAMERA/VCR
select switch) [pp. 18, 21]
Battery compartment door release
[p. 7]
Battery compartment door
[p. 7]
Tripod socket
4
Page 14

Operation Summary
Quick Reference Index
This index lists some example uses of the VIEWCAM’s features.
Operation Summary
• To quickly check what you have just recorded.
• To quickly return the tape to the end of the last recorded scene after playback.
• To locate the point on the tape where to begin recording while in Camera mode.
• To record a backlit subject.
• To record in a dark or poorly-illuminated location.
• To record yourself while monitoring the shot.
• To record a short video message for somebody.
• To find the beginning of a recorded scene to be played back.
• To display the elapsed recording or playback time.
• To focus on an off-centered subject.
—See page 28 (Quick Review)
—See page 29 (Quick Return)
—See page 29 (Edit Search)
—See page 30 (Gamma Brightness Compensation) or page 46 (Manual
Exposure)
—See page 31 (Gain-up)
—See page 33 (Self Recording)
—See page 34 (Self-recording Message)
—See page 36 (Program Search)
—See page 37 (Tape Counter Feature)
—See page 44 (Manual Focus)
• To increase the brightness of the subject during playback.
5
—See page 48 (Gamma Playback)
Page 15

Warning Indicators
Operation Summary
Displayed for the first
3 seconds
Displayed after
3 seconds
Description of warning
The video cassette is defective and should be
removed (see page 10).
Dew has formed inside the VIEWCAM. Wait for a few
hours until the dew disappears (see page 51).
About 10 seconds after this warning appears, the
VIEWCAM automatically turns off.
The battery is almost depleted. Replace it with a
fully charged battery pack (see page 7).
The video heads are clogged and should be
cleaned (see page 51).
There is no video cassette in the VIEWCAM. Insert a
cassette (see page 10).
The erasure protect tab on the video cassette has
been slid to the record-protect position, preventing
recording (see page 53).
The tape is about to end. Prepare a new cassette
(see page 10).
The tape has reached the end. Replace it with a
new cassette (see page 10).
Note: indicates a flashing display.
In Self Recording mode, all warnings will be
indicated by displayed in the center of the
monitor. To check the type of warning, rotate the
monitor back to the normal position.
6
Page 16

Preparation
Preparation
Preparation
Inserting and Removing the
Battery Pack
Inserting the Battery Pack
1 Make sure that the Power switch is set
to OFF.
Preparation
Power switch
2 Slide the battery compartment door
release on the bottom of the VIEWCAM
in the direction of the arrow to open the
battery compartment door.
Battery
compartment
door release
4 Close the door, pressing it firmly in the
center until it clicks.
Removing the Battery Pack
1 Perform steps 1 and 2 above.
2 Press the battery release as shown to
remove the battery pack.
Battery release
3 Insert the battery pack into the com-
partment as shown, and push it in completely until it locks into place.
Caution:
• Do not force the battery pack into the
battery compartment if it does not go in
easily.
7
Cautions:
• BEFORE REMOVING THE BATTERY PACK,
ALWAYS STOP THE TAPE AND TURN THE
POWER OFF. If you remove the battery pack
during recording or playback, the tape will
remain wound around the video head drum,
potentially causing damage to the tape.
• Make sure the battery compartment door is
closed firmly during operation. If it is not, the
battery pack may fall out or VIEWCAM operation
may fail because of the poor contact pressure.
• Remove the battery pack from the VIEWCAM if
the VIEWCAM will not be used for a long period
of time.
• When removing the battery pack, do not tilt
the VIEWCAM so that the battery compartment faces down. The battery pack may fall
out.
• Do not expose the battery compartment door to
strong force, as it may come off.
• Use only SHARP model BT-H22 or BT-H32
battery packs with this VIEWCAM. Use of other
batteries may present a risk of fire or explosion.
Page 17

Charging the Battery Pack
Power switch
CHARGE indicator
Charging time and maximum continuous
recording and playback times
Battery
pack
BT-H22
BT-H32
Charging
time
approx.
3 hr.
approx.
6 hr.
Max.
continuous
recording
time
approx.
1 hr. 35 min.
approx.
3 hr. 10 min.
Max.
continuous
playback
time
approx.
1 hr. 35 min.
approx.
3 hr. 10 min.
Preparation
1 Insert the battery pack into the VIEWCAM
(see page 7). Make sure that the Power
switch is set to OFF.
• The battery pack will not charge when the
Power switch is set to CAMERA or VCR.
2 Insert the AC plug of the AC adapter into a
power outlet.
3 Open the terminal cover on the VIEWCAM
and insert the DC plug of the AC adapter
into the DC IN jack on the VIEWCAM.
• The CHARGE indicator will light up in red.
Terminal cover
DC IN jack
To power
outlet
4 When the battery is fully charged, the
CHARGE indicator will light up in green.
Remove the DC plug from the VIEWCAM,
and close the terminal cover.
Notes:
• Using the zoom (see page 19) and other
functions or turning the power on and off
frequently will increase power consumption.
This may result in a decrease of more than 50%
in the actual recording time compared to the
maximum continuous recording time listed
above.
• The charging time and recording time may vary
depending on the ambient temperature and the
condition of the battery pack.
• It is recommended that you have enough battery
packs on hand to provide two to three times your
estimated recording time.
• See page 52 for more information on using the
battery pack.
Caution:
• Charge only SHARP model BT-H22 or BT-H32
battery packs. Other types of battery packs may
burst, causing personal injury and damage.
Caution:
• When removing the plugs, grasp the plug, not the
cable.
8
Page 18

Preparation
Powering the VIEWCAM from
an AC Outlet
Caution:
• The supplied AC adapter is specially designed
for use with this VIEWCAM, and should not be
used as a power supply for other camcorders.
Preparation
Power switch
1 Insert the AC plug of the AC adapter into
a power outlet.
2 Make sure that the Power switch is set
to OFF.
3 Open the terminal cover and insert the
DC plug of the AC adapter into the DC
IN jack on the VIEWCAM.
Terminal cover
Cautions:
• BEFORE REMOVING THE DC PLUG, ALWAYS
STOP THE TAPE AND TURN THE POWER OFF.
If you remove the DC plug during recording or
playback, the tape will remain wound around the
video head drum, potentially causing damage to
the tape.
• Remove the DC plug from the VIEWCAM if you
will not use the VIEWCAM for a long period of
time.
• When removing the plugs, grasp the plug, not
the cable.
Note:
• Close the terminal cover after use.
To power
outlet
4 Hold down the Lock
button and slide the
Power switch to
CAMERA or VCR.
9
DC IN jack
Lock button
Page 19
Inserting and Removing a
Cassette
Inserting a Cassette
4 Wait for the cassette holder to fully
retract. Close the compartment door by
pressing the center until it clicks into
place.
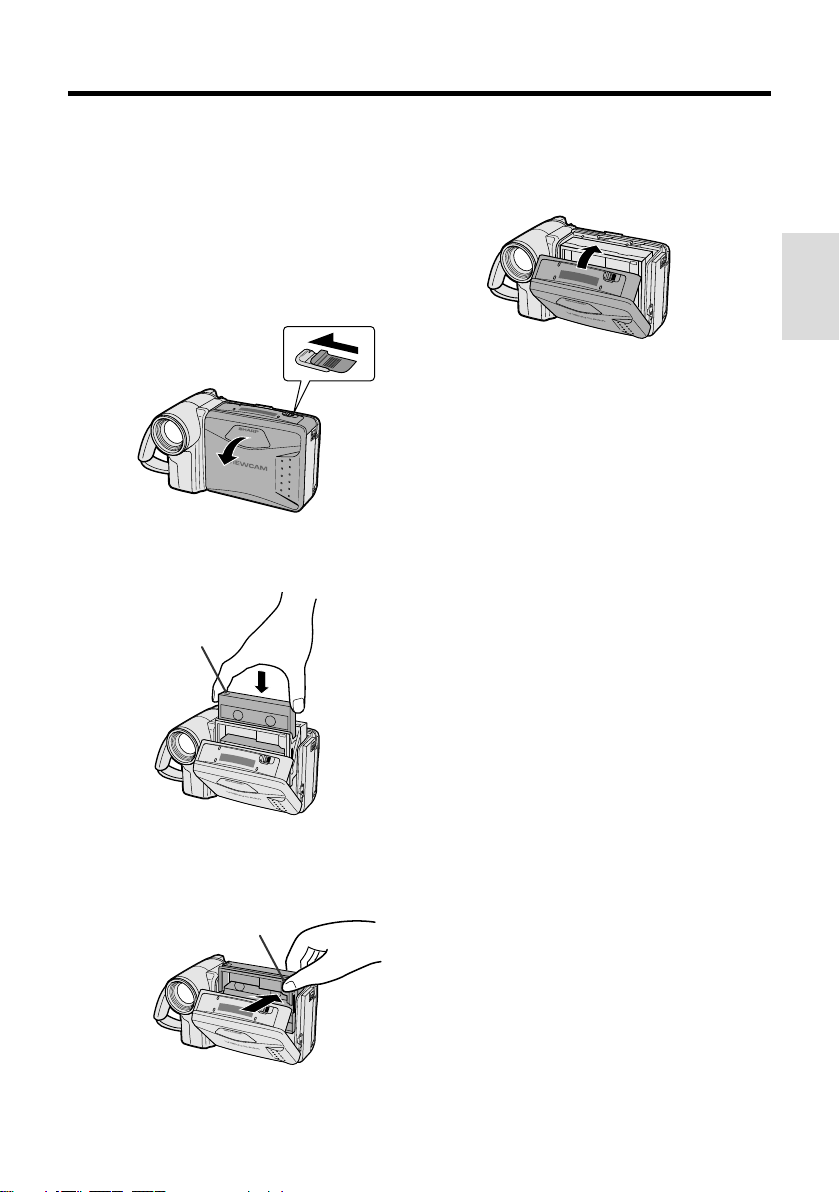
1 Supply power to the VIEWCAM, then
slide the release and open the cassette
compartment door.
• The cassette holder extends and opens
automatically.
Cassette compartment
door release
2 Insert the cassette fully with the window
facing outwards, and with the erasure
protect tab facing upwards.
Erasure protect tab
3 Press the PUSH mark gently until the
cassette holder clicks into place.
• The cassette holder retracts
automatically.
PUSH mark
Preparation
Removing a Cassette
Perform step 1 above, then take out the
cassette.
Cautions:
• Do not try to close the cassette compartment
door while the cassette holder is extending or
retracting.
• Be careful not to get your fingers caught in the
cassette holder.
• Do not apply force to the cassette holder except
when pressing the PUSH mark to close it.
• Do not tilt the VIEWCAM or hold it upside down
when you are inserting or removing a cassette. It
may damage the tape.
• Remove the cassette if you will not use the
VIEWCAM for a long period of time.
• If you do not correctly close the cassette holder
in step 3, the VIEWCAM’s cassette protection
mechanism might eject the cassette. If this
happens, repeat the insertion procedure.
• Do not attempt to pick up the VIEWCAM by the
cassette compartment door.
Notes:
• If the battery power is too low, you may not be
able to eject the cassette. Replace the battery
pack with a fully charged one.
• See page 53 for more information on the video
cassette tapes for use with this VIEWCAM.
10
Page 20

Preparation
Installing the Lithium
Memory Battery
The supplied lithium battery is used to store the
memory of the date and time settings.
1 Slide the cassette compartment door
release and open the cassette
compartment door.
Preparation
Cassette compartment
door release
Note: The cassette holder will extend and
open when the VIEWCAM is connected to a
power source. Be sure to close the cassette
holder before proceeding to the next step
(see page 10).
2 Pull out the lithium battery holder using
a pointed object such as the tip of a
ballpoint pen.
5 Close the cassette compartment door by
pressing the center until it clicks into
place.
Removing the Lithium Battery
Perform steps 1 and 2 above, then lift out the
battery from the battery holder.
Note:
• Replace the battery with a new CR2025 battery
when the date and time indicator starts to fall
behind the correct time.
Notes on the Use of the Lithium
Battery
REPLACE BATTERY WITH TOSHIBA,
MATSUSHITA OR HITACHI MAXELL TYPE
CR2025 ONLY. USE OF A DIFFERENT
BATTERY MAY PRESENT A RISK OF FIRE OR
EXPLOSION.
WARNING KEEP THIS BATTERY AWAY FROM
CHILDREN. IF SWALLOWED, CONSULT A
PHYSICIAN IMMEDIATELY FOR EMERGENCY
TREATMENT.
CAUTION BATTERY MAY EXPLODE IF MIS-
USED OR INSTALLED WITH POLARITY
REVERSED. DO NOT RECHARGE, DISASSEMBLE OR DISPOSE OF IN FIRE.
Lithium battery holder
3 Insert the lithium battery
into the battery holder with
the ` side of the battery
facing the j side of the
holder.
4 Push the battery holder back
into position.
11
• Do not short-circuit, recharge, disassemble,
or heat the lithium battery.
• Should the lithium battery leak, wipe the
battery compartment and holder clean, and
then insert a new battery.
• The lithium battery will last about one year of
normal usage.
j mark
Page 21

Selecting the Language for
the On-screen Display
This VIEWCAM allows you to choose from
among English, French or Spanish for the onscreen display language.
Power switch
MENU button
Operation buttons
Setting the Language
When using the VIEWCAM for the first time,
select the desired language for the on-screen
display by performing the procedure below.
1 Hold down the Lock
button and slide the
Power switch to
CAMERA.
• The language selection
screen appears.
Lock button
2 Press the 쑽 or 쒀 button (C or D) (Q)
to select the desired language, then
press the SET (REGLAGE or AJUSTE)
button (B) (W).
Changing the Language
1 In Recording Standby mode, press the
MENU button until
appears.
2 Press the PAGE (PAGE or PAGINA)
button (
) to display MENU 1.
3 Press the 쑽 or 쒀 button (Q) to select
“LANGUAGE” (“LANGUE” or “IDIOMA”),
then press the SET (REGLAGE or
AJUSTE) button (B) (W).
• The language selection screen appears.
MENU
1
SET
FADE
REMOTE
DEMO MODE OFF
LANGUAGE
SET
NORMAL
ON
PIC
PAGETURE
4 Press the 쑽 or 쒀 button (C or D) (Q)
to select the desired language, then
press the AJUSTE (SET or REGLAGE)
button (B) (W).
• The menu screen is displayed in the
language selected.
IDIOMA
AJUS
TE
ENGL I SH
FRANÇAIS
ESPAÑOL
Preparation
SET
LANGUAGE
ENGL I SH
FRANÇAIS
ESPAÑOL
PIC
EFF
SET
GAMA
EFF
EF
IMA
5 Press the DISPLAY button to turn off the
menu screen.
Note:
• The operation procedures in the following
sections of this operation manual are based
on the use of on-screen displays in English.
QK
REW
EF
GAM
REV
RAP
12
Page 22
Preparation
English On-screen Displays
The following on-screen displays appear when “ENGLISH” is selected as the on-screen
display language (see page 12).
Camera Mode
Preparation
1
GAMA
PIC
EFF
COU
NTER
-
-
TI
RE
TLE
TURN
16 9
EFF
-
WH I TE EXPO
BAL.
SCENE
MENU
QK
SUREFOCUS
REW
MENU
FADE
REMOTE
DEMO MODE OFF
LANGUAGE
DATE
DI SPLAY OFF
SELECT DATE TIME
SETTING
12H 24H
NORMAL
ON
PIC
SET
MENU
2
TIME/
/
SET
JA
12 AM00
12H
+
N 1 2000
PIC
PAGETURE
PAGETURE
VCR Mode
REW PLAY STOP ST I LLFF
-
COU
GAMA
NTER
EFF.
13
Note: See pages 24 and 25 for the procedure to display the desired screen.
SE
ARCH
-
ED I T
REMOTE
MENU
SET
OFF
ON
PIC
TURE
-
Page 23

French On-screen Displays
The following on-screen displays appear when “FRANÇAIS” is selected as the onscreen display language (see page 12).
Camera Mode
TI
TRE
VCR Mode
Preparation
1
EFF.
MENU
IMAGE
COMP
TEUR
-
-
RE
TOUR
16 9
GAMM
BAL.
BLANC
MENU
SCENE
REVU
RAP.
EXPO
SIT.FOCUS
MENU
FONDU
TELECOM.
MODE DEM O OFF
LANGUE
DATE
AFF ICHAGE OFF
SEL ECT I ON DAT E HEURE
REG LAGE
12H 24H
NORMAL
ON
-
REG
IMAGE
LAGE
MENU
2
HEURE/
/
REG
LAGE
+
JA
N 1 2000
12 AM00
12H
-
IMAGE
PAGE
PAGE
REM
BOBIN
EFF.
GAMM
-
AV.
LEC
-
TURE
COMP
TEUR
RAP.
ARRET
FIXE
RECH
ERCHE
-
MENU
MON T A GE
TELECOM.
REG
LAGE
-
OFF
ON
IMAGE
14
Page 24

Preparation
Spanish On-screen Displays
The following on-screen displays appear when “ESPAÑOL” is selected as the onscreen display language (see page 12).
Camera Mode
Preparation
1
MENU
/
MENU
HORA/
NORMAL
ENCENDIDO
AJUS
IMA
TE
2
EN
E 1 2000
12 AM00
12H
AJUS IMA
GEN
TE
DESVANECER
D I STANCI A
MODO DEMOS. APAGADO
IDIOMA
FECHA
V I SUAL I. APAGADO
SE LE CCION FECH A HORA
AJUSTE
12H 24H
TI
TULO
-
EF.
IMA.
ENFO
QUE
RE
TOR.
EF.
REV.
RAP.
GAM.
CON
-
TAD.
-
BAL. EX
-
16 9
BCO
MENU
ESCE.
PO.
-PAGINAGEN
+
PA
GINA
-
15
VCR Mode
RE
BO.
EF.
GAM.
-
RE-AVA.
PRO. PARAR F I J ARAP.
-
CON
TAD.
BUS
CAR
MENU
EDI C ION
DISTANCIA
-
APAGADO
ENCENDI DO
AJUS
TE
IMA
GEN
-
Page 25

Setting the Date and Time
Example: Setting the date to June 2, 2001
(JUN. 2. 2001) and the time to 10:30 am (10:30
AM).
Note:
• Check that the lithium memory battery has been
installed before setting the date and time.
Power switch
MENU button
DISPLAY button
1 Hold down the Lock
Lock button
button and slide the
Power switch to
CAMERA.
2 Press the MENU button until
(MENU 2) appears.
2
MENU
TIME/
DATE
DI SPLAY OFF
SELECT DATE T IME
SETTING
/
12H 24H
• If MENU 1 appears on the screen,
press the PAGE button ( ) to display
MENU 2.
SET
JA
12 AM00
12H
+
N 1 2000
PIC
PAGETURE
3 Press the SET button (B).
MENU
2
DATE
SET
TIME/
DI SPLAY OFF
SELECT DATE T IME
SETTING
12H 24H
/
SET
JA
12 AM00
12H
+
N 1 2000
PIC
PAGETURE
4 Press the 쑽 or 쒀 button (C or D) to
select “JUN” (month), and press the
SET button.
JU
N 1 2000
12 00 AM
5 Press the 쑽 or 쒀 button to select “2”
(day), and press the SET button.
JU
N 2 2000
12 00 AM
6 Press the 쑽 or 쒀 button to select
“2001” (year), and press the SET button.
JU
N 2 2001
12 00 AM
7 Press the 쑽 or 쒀 button to select “10
AM” (hour), and press the SET button.
JU
N 2 2001
10 00 AM
8 Press the 쑽 or 쒀 button to select “30”
(minute), and press the SET button.
• The internal clock now starts operating.
JU
N 2 2001
10 30 AM
9 Press the DISPLAY button to turn off the
SET
.
DATE
2
MENU
TIME/
DI SPLAY OFF
SELECT DATE T IME
SETTING
/
12H 24H
SET
+
JU
N 2 2001
10 30
24H
PIC
PAGETURE
menu screen
Changing to the 24-hour Time Mode
After performing step 8 above, press the 쑽 or
쒀 button (Q) to select “12H/24H”, then press
the SET button (B) (W) to select “24H”.
Notes:
• The date and time, once set, are stored in
memory.
• The menu screen automatically turns off if no
settings are made within 5 minutes.
Preparation
• When changing the date and time settings,
press the 쑽 or 쒀 button (C or D) to
select “SETTING”, then press the SET
button.
16
Page 26

Preparation
Using the Hand Strap and the
Lens Cap
1 Open the hand strap flap (Q) and grip
strap (W), and pass the grip strap
through the loop at the end of the lens
cap cord (E).
Hand strap flap
Preparation
Grip strap
2 Pass your hand through the hand strap
and put your thumb close to the Power
Zoom control. Then pull the grip strap
tight until it fits snugly, seal the Velcro
closures (Q), and close the hand strap
flap (W).
Caution:
• Do not swing the VIEWCAM by the hand strap.
Notes:
• Always replace the
lens cap on the lens
when the VIEWCAM is
not in use.
• Attach the lens cap to
the hand strap so it will
not get in the way
during recording.
Attaching the Shoulder Strap
1 Hold one end of the strap and thread it
through the loop on the left side of the
LCD screen.
2 Loosen the strap in the buckle, then feed
the end of the strap through the buckle,
®
as shown.
3 Draw the strap in the direction of the
arrow to secure.
4–6 Use the same procedure to attach the
other end of the strap to the loop on
the lens side.
LCD screen side Lens side
14
Attaching and Removing the Lens Cap
When attaching or removing the lens cap,
press both tabs on the sides of the cap.
Press both tabs.
17
2
Buckle
3
5
Buckle
6
Page 27

Basic Operations
Camera Recording
Easy Camera Recording with
Full Auto Mode
Before you start recording, perform the operations
described on pages 7 through 17 to prepare your
VIEWCAM for recording.
REC START/STOP button
LCD monitor screen
Power switch
1 Remove the lens cap (see page 17).
2 Hold down the Lock button and slide the
Power switch to CAMERA.
• The picture from the lens is now
displayed on the LCD monitor screen.
• The VIEWCAM is now ready to record
(Recording Standby mode).
Lock button
AUTO
Note:
• When recording at the beginning of a tape, advance
the tape about 15 seconds before you begin
recording. This will prevent the beginning of the
recording being cut off when it is played back.
To Pause Recording
Press the REC START/STOP button again.
Recording pauses, and the VIEWCAM enters
the Recording Standby mode.
PAUSE
To Turn the Power Off
Slide the Power switch to
OFF.
Notes:
• The speaker is off in Camera mode.
• Battery power is consumed in Recording Standby
mode. Turn off the power if you will not be recording
again soon.
• If the VIEWCAM is kept in Recording Standby mode
for more than approximately 5 minutes, the power
will automatically turn off to save battery power and
to protect the tape from being damaged. To
continue recording after this, set the Power switch to
OFF, and then back to CAMERA.
Camera Recording
Basic Operations
Full Auto mode indicator
Note: If, at this time, “AUTO” does not appear,
set the VIEWCAM to Full Auto mode by following
the procedure described on page 35.
3 Press the REC START/STOP button to
begin recording.
REC
Maximum Continuous Recording and
Actual Recording Times
Battery
pack
BT-H22
BT-H32
Note:
• Using the zoom (see page 19) and other functions
or turning the power on and off frequently will
increase power consumption. This may result in a
decrease of more than 50% in the actual
recording time compared to the maximum
continuous recording time listed above.
Max. continuous
recording time
approx.
1 hr. 35 min.
approx.
3 hr. 10 min.
Actual recording
time
approx.
45 min.
approx.
1 hr. 30 min.
18
Page 28

Basic Operations
Camera Recording
Zooming
Zooming allows you to move visually closer to
or farther from a subject without physically
changing your position.
Zooming in (when you want to center
attention on the subject)
Wide
angle
Zooming out (when you want to
show the surroundings)
To Zoom In
Push the Power Zoom control to the T
(telephoto) side to get a close-up view (Q).
Basic Operations
Camera Recording
To Zoom Out
Push the Power Zoom control to the W (wide
angle) side to get a wide field of view (W).
Power Zoom
control
Zoom range indicator
• The on-screen display shows you the current
zoom setting.
• The zoom speed changes depending on how far
you push the Power Zoom control.
Note:
• The VIEWCAM is unable to focus when zooming
in on subjects within 5 feet (1.5 m). The
VIEWCAM will automatically zoom out until it is
able to focus on the subject. (See page 32 for
recording macro shots.)
Tips on Recording Positions
The rotating LCD monitor screen lets you enjoy
easy video recording in a more relaxed posture
without having to hold the VIEWCAM up to your
eye. The LCD monitor also makes it easier to
record high-angle and low-angle shots.
Holding the VIEWCAM
Tele-
Put the fingers of your right hand through the hand
photo
strap, and place your right thumb close to the REC
START/STOP button and Power Zoom control.
Place your left thumb on the thumb rest on the left
side of the LCD monitor.
Basic Posture
Place your feet at a
45° angle and
balance your weight
on both legs.
High Angle
You can record while still
viewing the screen. This is
convenient when you want
to record over a crowd.
Low Angle
Put one knee on the
ground for the best
stability.
Notes:
• In hand-held recording, the VIEWCAM has to be
steadied to prevent image shakes. For very
stable recording, use a tripod.
• Take care not to touch the microphone with your
fingers during recording. It will cause noise on
the audio track.
Press your elbows
against your sides.
19
Page 29

Remaining Recording Time
Display
Remaining Battery Power
Display
When the VIEWCAM is recording in Camera
mode, about 10 minutes before the tape
reaches the end, an on-screen indicator
displays the approximate remaining recording
time.
DISPLAY button
Approx. remaining
recording time
10 min.–8 min.
8 min.–6 min.
6 min.–4 min.
4 min.–2 min.
2 min.–1 min.
1 min.–0 min.
0 min.
(The tape has
reached the end.)
To turn off the remaining recording time display,
press the DISPLAY button.
Notes:
• The remaining recording time displays only show
the approximate time left. Also, they vary slightly
depending on the length of tape used. (This
function’s design is based on the P6-120 tape
standard.)
• If you turn off the remaining recording time
display, it will reappear after a short interval to
indicate the new time remaining.
• The remaining recording time display appears
5 seconds after pressing the REC START/
STOP button to begin recording.
On-screen
indicator
TAP E
TAPE
TAPE
TAPE
TAPE
When using the VIEWCAM with the battery
pack as the power source, you can turn on and
off the remaining battery power display by
pressing the DISPLAY button.
If the battery power becomes very low, a
warning indicator will appear. Replace the
battery pack.
DISPLAY button
(Green)
(Green)
(Red)
Notes:
• Use the remaining battery power display only as
an approximate indication.
• The battery power display may change to either
a higher or lower level if you set the Power
switch to OFF and then back to CAMERA or
VCR.
• In cold environments, the red remaining battery
power display may appear sooner. The battery
pack, however, can be used until the warning
indicator appears. Replace the battery pack at
this time.
• Battery consumption may vary depending on the
condition of use.
• Use of the zoom function when the warning
indicator is displayed may cause the VIEWCAM
to suddenly lose power.
Remaining battery
power display
Warning indicator
Camera Recording
Basic Operations
20
Page 30

Basic Operations
Playback
Playback
The LCD monitor screen makes it possible to
play back and see what you have just
recorded. Nothing needs to be connected,
allowing instant on-screen playback with the
sound through the built-in speaker.
LCD monitor screen
Power switch
DISPLAY button
1 Hold down the Lock
button and slide the
Power switch
to VCR.
• The screen appears.
Playback
Basic Operations
Lock button
2 Press the REW (C) (or FF [B]) button
to rewind (or fast forward) the tape to the
desired point.
REW PLAY STOP ST I L LFF
To Stop Playback
Press the STOP
button (A).
Notes:
• If you wish to turn the Operation button
indicators on or off, press the DISPLAY button.
The playback operation buttons will still function
as indicated even after the indicators are turned
off.
• To use the infrared remote control, make sure
that the REMOTE menu item is set to “ON” (see
page 39).
REW PLAY STOP ST I L LFF
Auto T ape Rewind
The tape is automatically rewound when
playback reaches the end of the tape.
To Turn the Power Off
Slide the Power switch to OFF.
Volume Control
While the VIEWCAM is in VCR mode, push the
Volume control to the Ⳮ or ⳮ side to increase
(Q) or decrease (W) the volume to your
preference.
The volume level indicator will appear on the
screen during adjustment only. When the
Volume control is released, the volume level
indicator will disappear shortly afterwards.
3 Press the PLAY button (D) to begin
playback.
REW PLAY STOP ST I L LFF
21
Volume control
IncreaseDecrease
Page 31

Watching the Playback on a
TV
You can also connect the VIEWCAM to a TV to
allow a larger audience to enjoy video
playback.
1 Lift up the terminal cover on the
VIEWCAM (
W).
(
Q) and rotate it to the right
Terminal cover
2 Connect the VIEWCAM to your TV (or
VCR) with the supplied audio/video
cable, as shown.
CHANNEL
PAUSE
/STILL
PLAY
STOP/
POWER
EJECT
REC
TV/VCRSET UP
3 Turn on the TV and set it to the “AV” or
“VIDEO” channel. (See the operation
manual of your TV.)
• When connecting to a TV via a VCR, turn on
the VCR and set it to the “AV” or “LINE”
input channel. Operate the TV as you
normally do to see the signal from the VCR.
(See the operation manuals of your TV and
VCR.)
4 Turn on the VIEWCAM in VCR mode,
and begin tape playback (see page 21).
Caution:
• Make sure that the VIEWCAM, TV, VCR and other
equipment to be connected have been turned
off before you make connections. Making connections with any of the components left turned
on may cause picture noise or a malfunction.
Notes:
• This VIEWCAM does not have an S-video
socket.
• When the VIEWCAM is connected to a TV for
playback, the picture on the TV screen may
flicker if the volume on the VIEWCAM is set to
maximum. Should this occur, turn the volume
down (see page 21).
• Close the terminal cover after use.
Basic Operations
Playback
Yellow: To VIDEO IN jack
White: To AUDIO IN (L) jack
Audio/video cable
(supplied)
To AUDIO/VIDEO jack
22
Page 32

Basic Operations
Playback
Video Search
The video search function makes it easy to
search for a desired scene on the tape.
Searching for a Scene Near the Current
Tape Position
1 During playback, press the Forward
Search (B) (or Reverse Search [C])
button.
• The playback picture fast forwards (or
reverses).
REW PLAY STOP ST I LLFF
Forward Search button
Reverse Search button
2 When you find the desired scene, press
the PLAY button (D) to return to normal
playback.
Playback
Basic Operations
Searching for a Scene Far from the
Current T ape Position
1 During fast forward (or rewind), press
and hold down the Forward Search (B)
(or Reverse Search [C]) button.
• The fast forward (or reverse) playback
picture is displayed.
2 If the desired scene is still rather far
from the current tape position, release
the button to return to normal fast
forward (or rewind).
3 Repeat steps 1 and 2 above until you
find the desired scene.
4 Press the STOP button (A) and then
the PLAY button (D) to begin normal
playback.
Still
The still function makes it possible to pause
playback.
During playback, press the STILL button ( ).
REW PLAY STOP ST I L LFF
To return to normal playback, press the
STILL button again or press the PLAY
button (D).
Notes:
• The sound is off during Still mode.
• To protect the tape, the VIEWCAM automatically
returns to normal playback if it is left in Still mode
for more than 5 minutes.
• If the still function is used when connected to a
TV, noise will appear and distort the playback
image.
Notes:
• The sound is off during search.
• Some picture noise appears during search. This
is not a malfunction.
23
Page 33

Useful Features
Useful Features
Operations of the On-screen
Controls
Using the Control Buttons
The following buttons on the VIEWCAM can be
used to control the various functions, settings
and on-screen displays.
MENU button
DISPLAY button
Operation buttons
MENU button
Each time you press the MENU button,
the mode/menu screen changes from
to in Camera mode and from
to in VCR mode.
DISPLAY button
Press the DISPLAY button to turn the
mode/menu screens and on-screen
indicators on or off.
Note:
• The warning indicators and some other
indicators cannot be turned off by pressing the
DISPLAY button.
Selecting the Mode/Menu
Screens
You can use the mode screens to select
various functions and the menu screens to
adjust various settings. Follow the procedure
below to display the mode/menu screen with
the indicator of the desired function/setting.
1 Hold down the Lock
button and slide the
Power switch to
CAMERA (Camera
mode) or VCR (VCR
mode).
Lock button
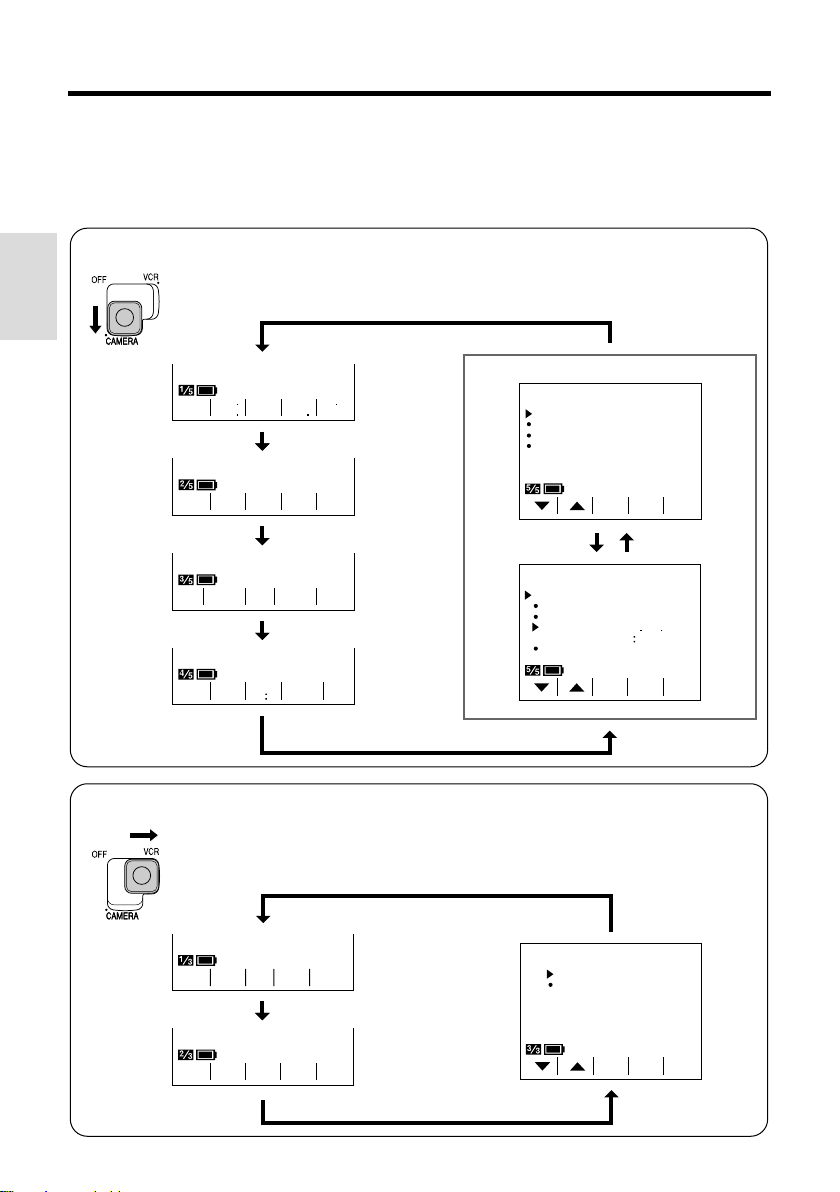
2 Press the MENU button until the desired
screen appears.
Camera mode
5
PIC
EFF
-
TI
RE
TLE
TURN
-
COU
NTER
16 9
-
GAMA
QK
REW
EFF
WHI TE EXPO
SUREFOCUS
BAL.
SCENE
MENU
Useful Features
Operation buttons
Press the Operation button corresponding to
the indicator of the desired function displayed
on the screen.
Note:
• The Operation button indicators are normally
displayed in blue or gray. When a function is
selected, its indicator is displayed in yellow.
VCR mode
REW PLAY STOP STI L LFF
COU
GAMA
NTER
EFF.
3
3
-
PIC
SET
PIC
TURE
PAGETURE
-
SE
ARCH
-
SET
-
24
Page 34

Useful Features
Adjusting the Menu Settings
Follow the procedure below to adjust the
desired menu settings.
Camera mode
1 Hold down the Lock button and slide the
Power switch to CAMERA.
2 Press the MENU button until
appears.
PIC
-
SET
PAGETURE
3 Press the PAGE button ( ) to display the
desired menu screen.
• Each time you press the PAGE button,
the screen changes between MENU 1
and MENU 2.
1
MENU
SET
NORMAL
ON
PIC
PAGETURE
PAGE
FADE
REMOTE
DEMO MODE OFF
LANGUAGE
5 Press the SET button (B) to select the
desired setting.
• Each time you press the SET button, the
setting changes.
Example
MENU
MODE
1
NORMAL
ON
OFF
LODIAYH
SET
FADE
REMOTE
DEMO
ROAMLN
TRDHAYIB
6 Press the DISPLAY button to turn off the
menu screen.
VCR mode
1 Hold down the Lock button and slide the
Power switch to VCR.
2 Press the MENU button until
appears.
MENU
ED I T
REMOTE
3
3
SET
OFF
ON
PIC
TURE
-
MENU
DATE
TIME/
Useful Features
DI SPLAY OFF
SELECT DATE TIME
SETTING
12H 24H
/
4 Press the 쑽 or 쒀 button (C or D) to
select the desired menu item.
Example
SET
25
MENU
FADE
REMOTE
DEMO MODE OFF
LANGUAGE
SET
2
+
JU
N 2 2001
10 AM30
12H
-
PIC
1
NORMAL
ON
3 Perform steps 4 to 6 above.
Notes:
• Certain menu items are common in both Camera
and VCR modes. If the REMOTE menu item, for
PAGETURE
example, is set to “OFF” in Camera mode, it will
be automatically set to “OFF” in VCR mode.
• The menu screen automatically turns off if no
settings are made within 5 minutes.
Page 35

Recording the Date and Time
Follow the procedure shown below to record
the date and time, or the date only, along with
the subject.
Note:
• Before performing the procedure below, make
sure that the date and time have been correctly
set (see page 16).
1 In Recording Standby mode, press the
MENU button until
appears.
(MENU 1)
2 Press the PAGE button ( ) to display
MENU 2.
2
MENU
TIME/
DATE
PAGE
DI SPLAY OFF
SELECT DATE TIME
SETTING
/
12H 24H
5
SET
+
JU
N 2 2001
10 AM30
12H
PIC
PAGETURE
3 Press the 쑽 or 쒀 button to select
“DISPLAY”.
MENU
SET
DATE
DI SPLAY OFF
SELECT DATE TIME
SETTING
12H 24H
/
2
TIME/
+
JU
N 2 2001
10 AM30
12H
4 Press the SET button (B) to select
“AUTO”, “ON”, or “OFF”.
2
SET
MENU
TIME/
DATE
DI SPLAY OFF
SELECT DATE TIME
+
When “AUTO” is selected, the date/time
is displayed and recorded for 10
seconds at the beginning of the first
recording of each day.
When “ON” is selected, the date/time is
continuously displayed and recorded.
When “OFF” is selected, the date/time is
neither displayed nor recorded.
Note: In “AUTO”, if you wish to record the
date/time a second time that day, repeat the
procedure above and re-select “AUTO”.
5 Press the 쑽 button to select “SELECT”.
2
SET
MENU
DATE
TIME/
DI SP LAY AUTO
SELECT DATE TIME
SETTING
12H 24H
/
+
JU
N 2 2001
10 AM30
12H
6 Press the SET button (B) to select
“DATE+TIME” or “DATE”.
MENU
SET
DATE
DI SPLAY AUTO
SELECT DATE TIME
2
TIME/
+
When “DATE+TIME” is selected, both the
date and the time are displayed and
recorded.
When “DATE” is selected, only the date
is displayed and recorded.
7 Press the DISPLAY button to turn off the
menu screen, and then press the REC
START/STOP button to begin recording.
JU
N 2 2001
10 30 AM
Useful Features
26
Page 36

Useful Features
DA
BIRTHDAY
GAMA
REW
QK
EFF
PIC
EFF
Fade In and Fade Out
The fade function allows you to gradually bring
the image and sound in or out at the beginning
or end of a scene to create a scene transition.
This VIEWCAM features one normal and two
animated fade modes.
Type of Fade Modes
NORMAL: The picture fades in from and out to
white.
HOLIDAY: The picture fades in from an
animated firework sequence with the title
“HAPPY HOLIDAYS!”, and fades out to white.
HAPPY HOL I DAYS !HAPPY HOHOL I DA YS !HAPP Y HO L I DA YS !
HAPPY HOL I DAYS !HAPPY HOL I DA YS !HAPP Y HO L I DA YS !
BIRTHDAY: The picture fades in from an
animated birthday cake sequence with the
title “HAPPY BIRTHDAY!”, and fades out to
white.
Useful Features
HAPPY BIRTH DAY!HAPPY BIRTHDAY!
HAPPY HOL I DAYS !HAPPY HOL I DA YS !HAPP Y HO L I DA YS !
HAPPY HOL I DAYS !HAPPY HOL I DA
HAPPY BIRTH DAY!HAPPY BIRTHDAY!
YS !HAPP Y HO L I DA Y S !
Selecting Fade Mode
1 In Recording Standby mode, press the
MENU button until
appears.
(MENU 1)
MENU
SET
NORMAL
ON
FADE
REMOTE
DEMO MODE OFF
LANGUAGE
1
-
PIC
PAGETURE
2 Press the 쑽 or 쒀 button (Q) to select
“FADE”, then press the SET button (B)
(W) to select the desired fade mode.
MENU
MODE
1
ON
LODIAYH
TRDHAYIB
SET
FADE NORMAL
REMOTE
DEMO OFF
ROAMLN
3 Press the DISPLAY button to turn off the
menu screen.
Using Fade Mode
1 In Recording Standby mode, press the
FADE button.
• The selected fade mode indicator
appears. (“FADE” is displayed for the
NORMAL fade mode indicator.)
Fade mode indicator
27
HAPPY BIRTH DAY!HAPPY BIRTHDAY!
HAPPY BIRTH DAY!HAPPY BIRTHDAY!
Page 37

2 Press the REC START/STOP button to
AP
GAMA
QK
OUT
GAMA
QK
begin recording.
• The picture and sound fade in with the
selected fade mode.
Quick Review
The quick review function lets you check the
last 5 seconds of tape just recorded without
switching to VCR mode, to make sure that the
recording has come out right.
HAP
PY B I R THDAY!HAPPY B I RTHDAY!
F ADEFADE
QK
QK
GAMA
PIC
P I C
EFF
EFF
GAMA
EFF
EFF
3 Press the REC START/STOP button at
the point where you wish to stop
recording.
• The picture and sound fade out as the
screen gradually turns white. The
VIEWCAM then returns to Recording
Standby mode.
F ADE OUTFADE
QK
QK
GAMA
GAMA
EFF
EFF
To cancel Fade mode
Press the FADE button.
PIC
P I C
EFF
EFF
1 In Recording Standby mode, press the
MENU button until
appears.
PIC
EFF
2 Press the QK. REW button ( ).
• The tape rewinds to the point of 5
seconds before the current tape position;
playback then starts automatically.
REREW
REW
OUT
REREW
REW
QK
REW
1
5
PIC
EFF
After 5 seconds of playback, the
VIEWCAM enters the Recording Standby
mode.
GAMA
EFF
GAMA
EFF
QK
REW
QK
REW
Useful Features
To use fade out only
1 During recording, press the FADE
button.
2 Press the REC START/STOP button at
the point where you wish to stop
recording.
28
Page 38

Useful Features
Quick Return
When you have been playing back what you
have recorded, and wish to quickly return to
recording again from the end of the last
recorded scene, use the quick return function.
1 In Recording Standby mode, press the
-
TI
TLE
appears.
-
RE
TURN
16 9
SCENE
MENU
MENU button until
2 Press the RETURN button (D).
•“QUICK RETURN” flashes, and the tape
will begin fast forwarding or rewinding to
the end of the last recorded scene.
RE
-
TURN
QU I CK RETURN
TI
RE
-
-
TLE
TURN
When the tape reaches the end of the last
recorded scene, the VIEWCAM enters the
Recording Standby mode.
16 9
SCENE
MENU
Edit Search
The edit search function lets you search,
without switching from Camera mode to VCR
mode, for the point on the tape where you wish
to start recording next.
Reverse Edit
Search button
DISPLAY button
Forward Edit Search button
1 In Recording Standby mode, make sure
that no Operation button indicators are
displayed on the monitor.
• If they are displayed, turn them off by
pressing the DISPLAY button.
2 Press and hold down the Forward Edit
Search button (B) or Reverse Edit
Search button (C).
Forward edit
search
Notes:
• To cancel the quick return function, press the
RETURN button again in step 2.
• If the cassette has been removed since the last
Useful Features
recording, if no recording has been made since
the cassette was loaded, or if the power source
has been interrupted, the RETURN button
indicator will not appear and the quick return
function cannot be used.
29
Reverse edit
search
3 When you find the point where you want
to begin recording, release the button.
Notes:
• The sound is off during search.
• Some picture noise appears during reverse edit
search.
• Forward edit search is performed at the same
speed as normal playback, and reverse edit
search at three times the normal playback
speed.
Page 39

Gamma Brightness
GAMA
QK
GAMA
QK
GAMA
QK
Compensation
When the subject is backlit, the image will be
darkened if it is recorded normally. The gamma
brightness compensation function improves the
picture by increasing the brightness of the
subject while leaving the brighter portions of
the image unaffected.
1 Press the MENU button until
appears (Camera mode).
2 Press the GAMA EFF. button (A) once.
•“GAMMA” appears, indicating that the
Gamma Brightness Compensation is
now working.
GAMA
EFF.
GAMA
GAMA
PIC
P I C
EFF
EFF
EFF
EFF
QK
QK
REW
REREW
To obtain a brighter picture
Press the GAMA EFF. button (A) again.
• The indicator appears.
GAMA
EFF.
PIC
P I C
EFF
EFF
GAMMAGAMMA
GAMA
GAMA
EFF
EFF
Note:
• When the indicator is displayed, the
background will become slightly brighter.
To cancel Gamma Brightness
Compensation
Press the GAMA EFF. button until “GAMMA”
disappears.
QK
QK
REW
REW
GAMMAGAMMA
GAMA
GAMA
PIC
P I C
EFF
EFF
EFF
EFF
QK
QK
Note:
• The gamma brightness compensation function
can also be used during playback. See page 48,
“Gamma Playback”.
REW
REREW
Useful Features
30
Page 40

Useful Features
GAMA
GAMA
GAMA
Gain-up (Cat’s Eye)
When you are recording in a dark or poorlyilluminated location, “LIGHT” is displayed on
the screen. Use the gain-up function to record
a brighter picture.
1 Press the MENU button until
appears (Camera mode).
2 Press the GAMA EFF. button (A) once.
•“GAMMA” appears, indicating that the
gain-up function is now working.
GAMA
EFF.
L I GHTLIGHT
PIC
P I C
EFF
EFF
L I GHTLIGHT
PIC
P I C
EFF
EFF
GAMMAGAMMA
GAMA
GAMA
EFF
EFF
GAMA
GAMA
EFF
EFF
QK
QK
QK
QK
REW
REREW
REW
REREW
To cancel the gain-up function
Press the GAMA EFF. button until “GAMMA”
disappears.
Notes:
• The Gain-up mode will disengage and the
indicator will disappear automatically if the
VIEWCAM is moved to a bright location.
• Some picture noise appears in Gain-up mode.
The picture noise increases when the
indicator is displayed.
To obtain a brighter picture
Press the GAMA EFF. button (A) again.
Useful Features
• The indicator appears.
GAMA
EFF.
PIC
P I C
EFF
EFF
31
GAMMAGAMMA
GAMA
GAMA
EFF
EFF
QK
QK
REW
REREW
Page 41

Wide Screen (16:9)
Macro Shots
The wide screen function lets you record
scenes with the wide-screen feel of a movie
shown in a theater. The top and bottom of the
picture are masked with black bands to
produce an effective screen aspect ratio of
16:9.
1 Press the MENU button until
appears (Camera mode).
-
-
TI
RE
TLE
TURN
2 Press the 16:9 button (B).
• The monitor now displays the
16 9
SCENE
MENU
FADE16: 9
picture with the top and bottom
portions masked.
3 Press the DISPLAY button to turn off the
Operation button indicators.
Normal Screen mode Wide Screen mode
To return to normal picture
Perform step 1 above, and press the 16:9 button.
Note:
• You can only use the wide screen function when
the VIEWCAM is in Camera mode.
This VIEWCAM lets you shoot close-up images
of small objects such as flowers and insects, or
make title frames for your videos. When you
want to record a magnified image of a subject
which is within approximately 5 feet (1.5 m) of
the VIEWCAM, do not zoom in on it. Instead,
zoom out all the way by pushing the Power
Zoom control to the W side, and then move the
VIEWCAM closer to the subject until you obtain
the desired angle of view. The VIEWCAM will
automatically focus on the subject when the
lens is set for the widest angle.
Power Zoom control
Tripod
Useful Features
Notes:
• When you are recording a macro shot, be sure
that the subject receives sufficient illumination.
• It is recommended that you use a tripod for
recording macro shots, to prevent image shakes.
Removing the Lens Hood
The lens hood can be removed (e.g. for
cleaning the lens) by rotating it in a
counterclockwise direction (Q) and then gently
pulling it off (W).
32
Page 42

Useful Features
MES
-
SAGE START
REC
Self Recording
The LCD monitor can be rotated 180° vertically
so that the monitor screen faces the subject.
This lets you record yourself while watching
your image on the screen.
You can enjoy recording a portrait of yourself,
or recording yourself and your friends together
at a party, using the remote control.
VR-33FAN
tripod adapter
(optional)
Normal Self Recording
1 Set the Power switch to CAMERA.
2 Rotate the monitor section 180°
vertically.
• The screen image will be inverted to
show a mirror image of the subject, and
the self-recording mode screen appears.
Useful Features
MES
-
SAGE START
REC
3 Press the Power Zoom
control to obtain the
desired angle of view.
4 Press the REC START button (B) to
begin recording.
To pause recording, press the REC STOP
button (B).
Cautions:
• Do not rotate the monitor to the self recording
position during recording or playback.
• For recording in Self Recording mode, be sure to
rotate the monitor, NOT the lens. If you hold the
VIEWCAM upside down with the lens at the bottom,
the subject will be recorded upside down.
Notes:
• You will need the VR-33FAN tripod adapter for 180°
recording (optional accessory) if you want to use a
tripod when recording in Self Recording mode.
• In Self Recording mode, only the REC START/STOP
button and the Power Zoom control buttons can be
used on the remote control.
More Information on Self Recording
• The screen image is automatically inverted when
the monitor rotation is between 135° and 200°.
When the monitor is turned back to the normal
position, the image returns to normal.
• In Self Recording mode, all standard warning
indicators on the screen are replaced by the
flashing indicator. To check the type of
warning, rotate the monitor back to the normal
position.
• In Self Recording mode, it is not possible to
record using manual recording modes, change
picture adjustments, display menus, record the
date and time, or use the Quick Return and
some of the other functions.
• You can play back images even while the
monitor is in the self recording position. Set the
Power switch to VCR. The Operation buttons still
retain their functions as during normal playback,
even though the button indicators are not
displayed. (For example, the J button still works
as the Play button.)
33
Page 43

Self-recording Message
In Self Recording mode, you can record a short
video message for somebody. This feature is
convenient for editing video letters.
• Complete steps 1 to 3 of “Normal Self
Recording” on page 33, then perform the
procedure below.
EXTEND button
REC START/
MESSAGE button
REC STOP button
1 Press the MESSAGE button ( ) to
display the self-recording message
screen.
MES
SAGE
-
MES
-
SAGE START
PRESS
REC START FOR
LE A V I NG YOUR MESSAG E .
REC
3 When the remaining recording time
reaches 5 seconds, “EXTEND” will
begin flashing.
• When you want to extend the recording
time, press the EXTEND button (A)
within 5 seconds. You may record
continuously for 10 more seconds.
MES
EX
-
-
SAGE
TEND
5
At the end of the recording, the screen
fades out, and the VIEWCAM returns to
Recording Standby mode.
Note:
• When you want to stop recording before
message recording stops automatically, press
the REC STOP button (B).
REC
STOP
Useful Features
• To cancel, press the MESSAGE button
again.
2 Press the REC START button (B) to
begin recording. Record your message
while facing the lens of the VIEWCAM.
• The recording time is preset for 20
seconds.
• The bar on the screen indicates the
remaining recording time.
MES
-
SAGE
PLEASE START SPEAK I NG.
REC
START
02
REC
STOP
34
Page 44

Useful Features
AUTO
Setting the VIEWCAM to Full
Auto Mode
This VIEWCAM is equipped with auto focus,
auto white balance, and auto exposure
functions. For easy, high-quality camerarecording, record subjects in Full Auto mode.
If “AUTO” is not displayed even when the
DISPLAY button is pressed, perform the
procedure below to set the VIEWCAM to Full
Auto mode.
1 In Recording Standby mode, press the
MENU button until
EFF.” is not displayed above the D
button, press this button until “PIC. EFF.”
appears.
B/W
EFF
appears. If “PIC.
PIC
EFF
2 Press the MENU button until ap-
pears. If “MAN’L FOCUS” is displayed,
press the D button to change it to
“FOCUS”.
MAN’ L
FOCUS
Useful Features
3 If “WHITE BAL.” is displayed in yellow,
press the WHITE BAL. button
•“WHITE BAL.” returns to blue.
WH I TE
BAL.
GAMA
QK
REW
EFF
WHI TE EXPO
SUREFOCUS
BAL.
(A).
4 If “EXPOSURE” is displayed in yellow,
press the EXPOSURE button (
display the exposure setting screen,
then press the AUTO button (B).
• The exposure setting screen turns off
and “EXPOSURE” returns to blue.
EXPO
SURE
AUTO
EXPOSURE
) to
EXI TAUTO
Blue
WHI TE EXPO
BAL.
5 Press the MENU button until
appears. If “SCENE MENU” is not
displayed above the A button, press
this button until “SCENE MENU”
appears.
SPORT
TI
RE
-
-
TLE
TURN
16 9
SCENE
MENU
6 Press the DISPLAY button.
• The Operation button indicators
disappear, and “AUTO” is displayed on
the screen.
SUREFOCUS
35
Blue
WHI TE EXPO
SUREFOCUS
BAL.
Full Auto mode indicator
Page 45

Program Search
The program search function automatically
finds and plays back the beginning of a
number of previously recorded scenes. Up to
10 different scenes can be found on one tape.
3 Press the REW (C) (or FF [B])
button.
• The tape rewinds (or fast forwards) to the
beginning of a scene immediately before
(or after) the current tape position;
playback then starts automatically.
Note:
• This function does not work if no recording has
been made since the cassette was loaded, if the
cassette has been removed after the recordings
were made, or if the power source has been
interrupted.
1 Press the MENU button until
appears (VCR mode).
GAMA
EFF.
COU
NTER
-
SE
ARCH
-
2 Press the SEARCH button ( ).
•“PROG. SEARCH” is displayed and one
of or both “REW” and “FF” will start
flashing.
-
SE
ARCH
PROG. SEARCH
-
SE
REW FF
• To cancel, press the SEARCH button
again.
Example: When using a tape with five different scenes.
ARCH
REW
PROG. SEARCH
SE
-
REW
FF
ARCH
4 To continue searching, press the REW
(or FF) button while “REW” (or “FF”) is
still displayed.
Notes:
• Use this function when the tape is stopped or
being played back.
• This function finds the beginning of each scene
immediately before or after the current tape
position. It is not possible to skip a scene.
• This function cannot spot recordings that are
shorter than 10 seconds in length.
• In steps 2 and 4, if the tape is at a point ahead of
the last (or before the first) recording, the FF (or
REW) indicator will not appear.
Useful Features
Monitor display
PROG. SE ARCH PROG. SEARCH PROG. SE ARCH
SE
-
REWREW FF FFFF REW
ARCH
SE
ARCH
Current tape position
Video tape
Beginning of each scene
First recording Last recording
When you are at this position:
Press the REW button (C) to rewind the tape to E and begin playback.
Press the FF button (B) to forward the tape to R and begin playback.
SE
ARCH
-
36
Page 46

Useful Features
Tape Counter Feature
The tape counter shows elapsed playback or
recording time in hours, minutes and seconds.
(The counter continues to count internally even
while it is not being displayed.) This feature can
be set and used in both VCR and Camera
modes.
Using the Counter
VCR mode
1 Press the MENU button until
appears.
-
COU
GAMA
NTER
EFF.
2 Press the COUNTER button (D) to
display the tape counter.
COU
-
NTER
Tape counter
-
-
COU
NTER
MEM
ORY
GAMA
EFF.
3 Press the MENU button until
appears, then begin playback.
• You can check the playback time with
Useful Features
the tape counter.
01120
-
RE
SET
Camera mode
1 Press the MENU button until
appears.
2 Press the COUNTER button (B) to
display the tape counter.
3 Press the REC START/STOP button to
begin recording.
• You can check the recording time with
the tape counter.
Notes:
• The counter reading may differ slightly from the
actual time. This is especially noticeable when
the tape has been rewound or fast forwarded a
number of times, in which case there can be a
-
SE
ARCH
SE
ARCH
difference of several seconds.
• The tape counter feature will be canceled if the
power source is interrupted.
To turn off the tape counter
Perform step 1 above, and press the
COUNTER button.
To reset the counter to zero
During playback (or recording), perform steps
-
1 and 2 above, then press the RESET button at
the point where you wish to reset the counter to
zero. The counter will indicate 0:00.00.
VCR mode
RE
-
SE T
37
REW PLAY STOP STI LLFF
01124
GAMA
EFF.
COU
NTER
MEM
ORY
-
00000
-
RE
SET
SE
ARCH
-
-
Page 47

Using the Counter Memory
Use the counter memory feature when you
want to return to the beginning of a particular
scene. The position where the counter was
reset (0:00.00) is stored in memory to make it
easier to return to that point on the tape.
VCR mode
1 During playback, press the MENU
button until
appears.
5 Press the REW button (C).
• The tape will automatically stop when the
counter reaches 0:00.00.
0M1124
REW PLAY STOP STI LLFF
GAMA
EFF.
COU
NTER
-
MEM
ORY
-
RE
01800
-
SET
• If “MEMORY” is not displayed, press the
COUNTER button.
2 Press the MEMORY button to set the
counter to Counter Memory mode.
•“M” will be displayed to the left of the
counter.
-
MEM
ORY
Memory indicator
GAMA
EFF.
COU
NTER
-
MEM
ORY
-
RE
SET
0M1831
-
3 Press the RESET button to reset the
counter to zero at the beginning of the
scene that you want to return to later.
RE
-
SE T
GAMA
EFF.
COU
NTER
-
MEM
ORY
-
RE
SET
0M0000
-
4 Press the MENU button until
appears. When you are ready to finish
playback, press the STOP button (A).
SE
ARCH
-
REW PLAY STOP STI LLFF
Notes:
• The FF button (B) can be used in the
same way.
• The tape may stop slightly ahead or behind
the point where you reset the counter to
“M 0:00.00”.
6 Press the PLAY button (D) to view the
desired scene.
Camera mode
1 During recording, press the MENU
SE
ARCH
-
• If “MEMORY” is not displayed, press the
COUNTER button.
button until
appears.
2 Perform steps 2 and 3 above.
3 When you are ready to finish recording,
press the REC START/STOP button.
4 Set the Power switch to VCR, then
perform steps 5 and 6 above.
-
SE
To cancel Counter Memory mode
ARCH
Perform step 1 above, and press the MEMORY
button. “M” will disappear from the screen.
Note:
• This feature does not work during video search.
0M0000
Useful Features
38
Page 48

Useful Features
Using the Remote Control
Use the remote control to operate the VIEWCAM from a distance, such as when you want
to record yourself in a scene, or when the
VIEWCAM is connected to a TV for use as a
VCR.
Installing the Batteries in the Remote
Control
1 Open the battery compartment cover.
2 Insert the two supplied AA (R6 or UM/
SUM-3) batteries with the battery poles
positioned as indicated.
1 2
3 Replace the cover.
Caution:
• Do not use old and new batteries together or
batteries of different brands together.
Turning On the Remote Control Mode
Useful Features
1 Press the MENU button until appears
(VCR mode).
Operating the Remote Control
Aim the remote control at the remote sensor of
the VIEWCAM, and press the control buttons for
operation.
Remote sensor
16 ft
(5 m)
Approximate operating
range of remote control
REWind/Reverse Search button
RECord START/STOP button
Power Zoom Telephoto/
Wide angle control
buttons
Fast Forward/
Forward Search button
PLAY button
STOP button
VOLUME buttons
PAUSE/STILL button
2 Press the 쑽 or 쒀 button (Q) to select
“REMOTE”, then press the SET button
(B) (W) to select “ON” .
MENU
ED I T
SET
REMOTE
3 Press the DISPLAY button to turn off the
menu screen.
39
SET
OFF
ON
PIC
TURE
Notes:
• Be careful not to allow direct sunlight or bright
light from interior illumination to fall onto the
VIEWCAM remote sensor, as this may prevent
the remote control from operating properly.
• Be sure that there are no obstacles between the
remote control and the VIEWCAM remote sensor.
• The remote control cannot be used to move the
pointer, or select or set any of the various
-
functions on the monitor.
• When the batteries are depleted and the remote
control does not operate, replace them with new
AA (R6 or UM/SUM-3) batteries.
• You can also turn on the Remote Control mode
on the (MENU 1) screen in Camera mode.
Page 49

Advanced Features
Digital Picture Effects
These digital picture effects let you record the
subject with a more dramatic effect.
Type of Digital Picture Effects
B/W EFF.: The picture is recorded in black-
and-white.
SEPA EFF.: The picture is recorded in sepia
color similar to that of an old photograph.
SOLARI: The contrast of the subject is
enhanced, creating a unique artistic image.
NEGA EFF.: The blacks and whites of the
image are reversed and colors of the image
are inverted.
1 In Recording Standby mode, press the
MENU button until
appears.
PIC
EFF
GAMA
EFF
QK
REW
2 Press the D button to select the desired
digital picture effect.
• Each time you press the D button, the
digital picture effect changes as shown
below.
PIC
EFF
To cancel the digital picture effect
Select “PIC. EFF.” in step 2 above.
Note:
• The digital picture effect will be canceled if the
power source is interrupted.
GAMA
QK
REW
EFF
SEPAPIC
EFF
-
EFF
NEGA
EFF
PIC
EFF
B/W
EFF
SO
LAR I
3 Press the DISPLAY button to turn off the
Operation button indicators.
Advanced Features
40
Page 50

Advanced Features
Scene Menu (Program AE)
You can set the VIEWCAM to the shooting
mode that will create the best results for a
specific type of shooting situation. Just select
one of the four scene settings shown below.
The VIEWCAM will automatically set the
exposure, white balance, and shutter speed to
produce the optimum picture quality for the
selected situation.
Type of Scene Settings
SPORT: When you want to record a fast-
moving subject.
SUNLIGHT: When the background is very
bright.
DUSK: When you want to faithfully record the
red of the setting sun, and the surrounding
twilight.
PARTY: When the illumination is from a
spotlight or candles.
1 In Recording Standby mode, press the
-
TI
TLE
appears.
-
RE
TURN
16 9
SCENE
MENU
MENU button until
To cancel the scene setting
Select “SCENE MENU” in step 2 above.
Notes:
• Even after you turn off the scene setting
indicator, the selected scene setting will remain
in effect.
• When “SPORT” is selected, recording under
the light of fluorescent lamps, mercury lamps,
or sodium lamps may cause color shifts or
fluctuations in picture brightness.
• When “DUSK” is selected, the picture may not
be satisfactory if the lighting is very dim.
• It is recommended that you select “SCENE
MENU” to record outdoor parties.
• The scene setting will be canceled if the power
source is interrupted.
2 Press theAbutton to select the scene
setting that best fits the recording
situation.
• Each time you press theAbutton, the
scene setting changes as shown below.
SCENE
MENU
-
-
TI
RE
TLE
TURN
16 9
Advanced Features
41
SCENE
MENU
OPTRS
TRYAPKSUD
SCENE
MENU
SUN
LIGHT
Page 51

Superimposing a Title
NEW
Use the title feature to superimpose titles on
your videos when recording. There are eight
titles preset for your convenience which you
can choose from.
1 In Recording Standby mode, press the
-
TI
TLE
appears.
-
RE
TURN
16 9
SCENE
MENU
MENU button until
2 Press the TITLE button (C) to display
the title selection screen.
3 Press the or button (Q) to select
the desired title, then press the SET
button (B) (W) to superimpose it.
TI T LE SUPERSTAR!
HAPPY BI RTHDAY !
SET
HAPPY HOL I DAYS !
WEDDI NG DAY
CONGRAT U LAT IONS
NEW BABY
OUR VACAT I ON
THE END
NEW BABYNEW BABY
RE
EXI TSET
SET
-
TI
-
TLE
TITLE SUPERSTAR!
HAPPY BI RTHDAY !
HAPPY HOL I DAYS !
WEDD ING DAY
CONGRAT U LAT IONS
NEW BABY
OUR VACAT I ON
THE END
EXI TSET
TI
-
TLE
Notes:
• If you wish to cancel the title selection
screen without setting the title, press the
EXIT button () instead of the SET button.
-
RE
SET
• If you wish to delete the superimposed title
from the screen, press the TITLE button.
4 Press the REC START/STOP button to
begin recording with the title.
• The title will be displayed and recorded
for about 10 seconds after recording
begins.
NEW
-
TI
TLE
Note:
• When the title is displayed on the screen, the
date and time will not be displayed or recorded.
RE
TURN
RE
TURN
-
-
BA BYNEW B A B Y
16 9
16 9
SCENE
MENU
SCENE
MENU
Advanced Features
42
Page 52

Advanced Features
Changing the Preset Titles
You can make a new title of your own by
changing any of the eight preset titles. The
maximum number of title characters is fifteen.
Example: Changing “WEDDING DAY” to “IN
HAWAII”.
1 Press the MENU button until
appears, and then press the TITLE
button (C) to display the title selection
screen.
TI
-
TLE
TITLE SUPERSTAR!
HAPPY BI RTHDAY !
HAPPY HOL I DAYS !
WEDDI NG DAY
CONGRAT U LAT IONS
NEW BABY
OUR VACAT I ON
THE END
EXI TSET
RE
2 Press the or button to select the
title that you wish to change.
TI T LE SUPERSTAR!
HAPPY BI RTHDAY !
HAPPY HOL I DAYS !
WEDD ING DAY
CONGRAT U LAT IONS
NEW BABY
OUR VACAT I ON
THE END
RE
EXI TSET
4 Press the © or ß button (Q) to select
the desired character (or “
space) and press the SELECT button
() (W).
• The selected character will appear at the
top of the screen and the cursor will
automatically move to the right.
Note: If you input the wrong character, press
the button to move the cursor to that
character and perform step 4.
SET
-
5 Repeat step 4 until you finish the title,
then press the SET button (
title will be displayed on the title
selection screen.
-
SET
” for
-
SE
LECT
SET
). The new
Note: If you want to cancel the title selection
screen, press the EXIT button ().
3 Press the RESET button ( ) to display
the title input screen.
-
RE
SET
Advanced Features
43
SE
LECT
Note: To change another title, perform steps
2 to 5 again.
6 If you wish to record the new title
immediately, press the SET button (B).
If you wish to record the new title at a
later time, press the EXIT button () to
SET
go back to the normal
screen.
Page 53

Auto/Manual Focus
Auto Focus
The auto focus function is designed to focus on
most types of subjects. In Auto Focus mode,
the VIEWCAM automatically focuses on whatever is in the center of the scene. Always keep
the subject in the center of the screen.
Notes:
• If no subject is in the center of the screen, the
focus area will expand and the subject nearest
the center will be focused on.
• If no subject is displayed on the screen, the
VIEWCAM will automatically zoom out until a
subject comes into the frame.
Manual Focus
The Auto Focus may not be able to focus on
the subject in the situations shown below. In
such situations, set the VIEWCAM to Manual
Focus mode and focus manually.
1 In Recording Standby mode, press the
MENU button until
appears.
WHI TE E X PO
SUREFOCUS
BAL.
2 Press the FOCUS button (D) to set the
VIEWCAM to Manual Focus mode
(“MAN’L FOCUS”).
FOCUS
F
MAN’ L
WHI TE EXPO
N
BAL.
SUREFOCUS
3 Push the Power Zoom control to frame
the subject as you desire.
4 Press the F (C) or N (B) button to
focus on the subject.
Subject is too dark.
Fast-moving subject. Background is too bright.
Subject has
horizontal stripes.
Light reflects off the subject.
Subject has fine, repeated
patterns.
Lack of contrast, e.g. snow
scene.
Subject is being shot through
a dirty or wet window.
Two subjects at different distances
overlap in the same scene.
Subjects at different distances
appear in the center of the scene
at the same time.
MAN’ L
WHI TE EXPO
NF
BAL.
SUREFOCUS
To cancel Manual Focus mode
Perform step 1 above, and press the D button
to set the VIEWCAM to Auto Focus mode
(“FOCUS”).
Notes:
• The VIEWCAM may not be able to focus
correctly if the subject is within approximately 5
feet (1.5 m). Set the zoom control to wide angle,
and then try refocusing.
• If the lens is dirty or fogged, the VIEWCAM may
not be able to correctly focus.
• The Manual Focus mode will be canceled if the
power source is interrupted.
Advanced Features
44
Page 54

Advanced Features
White Balance Lock
The color of the subject on the screen tends to
look different depending on the lighting
condition. The VIEWCAM is preset to Auto
White Balance mode, which automatically
adjusts the hue of the picture for the current
lighting condition.
The auto white balance may not work properly
for the following subjects. In this case, use the
white balance lock function.
• Subjects with one dominant color or subjects
against background with one dominant color
• Subjects under very bright light source, e.g.
video lights
• Subjects under light source with red hue, e.g.
glow of sunset
• Close-up images of small objects
1 In Recording Standby mode, press the
MENU button until
appears.
WHI TE E X PO
SUREFOCUS
BAL.
2 Aim the lens at a white object.
• Adjust the distance of the object so that
the entire screen is white.
White paper or white cloth
3 Press the WHITE BAL. button (A).
• “WHITE BAL.” changes from blue to
yellow and begins flashing.
WH I TE
BAL.
WHI TE EXPO
SUREFOCUS
BAL.
• “WHITE BAL.” stops flashing when the
locking procedure is completed.
4 Aim the lens at the desired subject and
press the REC START/STOP button to
begin recording.
To cancel White Balance Lock
Press the WHITE BAL. button. “WHITE BAL.”
returns to blue.
Notes:
• If the light source changes or if you move from
indoors to outdoors, or vice versa, when
recording with the white balance locked, the
white balance may shift. Reset the white
balance.
• Even after the white balance has been locked,
white balance shifts may occur due to slight
changes in illumination or depending on the
subject.
• Do not move the VIEWCAM while “WHITE BAL.”
is flashing in step 3.
• If “WHITE BAL.” does not stop flashing in step 3,
press the WHITE BAL. button to cancel the
locking procedure and repeat step 3.
• The White Balance Lock will be canceled if the
power source is interrupted.
• The White Balance Lock will be canceled if a
scene setting is selected thereafter.
Advanced Features
45
Page 55

Manual Exposure
The VIEWCAM is preset to Auto Exposure
mode, which automatically chooses the optimal
aperture. When there is too much contrast in
brightness between the subject and
background, however, you may not be able to
record a clear image. In this case, use the
manual exposure function to correct the
exposure level.
Background is too bright and subject too
dark (backlit subject).
• Increase the exposure level to allow more light
through the lens.
Subject is too bright against background.
• Decrease the exposure level to allow less light
through the lens.
1 In Recording Standby mode, press the
MENU button until
appears.
3 Press the or button to select the
desired exposure level.
• The bar indicates the selected exposure
level.
EXPOSURE
EXI TAUTO
EXPOSURE
Less light More light
4 Press the EXIT button (A) to turn off
the exposure setting screen.
To cancel Manual Exposure mode
Perform steps 1 and 2 above, then press the
AUTO button (B).
Notes:
• The Manual Exposure mode will be canceled if
the power source is interrupted.
• The Manual Exposure mode will be canceled
if a scene setting is selected thereafter.
WHIT E EXPO
BAL.
2 Press the EXPOSURE button ( ) to
display the exposure setting screen.
EXPO
SURE
EXPOSURE
EXI TAUTO
SUREFOCUS
Advanced Features
46
Page 56

Advanced Features
Picture/Backlight
Adjustments
If the monitor picture is difficult to see due to
ambient lighting, etc., adjust the picture
settings. This feature can be adjusted in both
Camera and VCR modes.
• The example screens for this feature are for
Camera mode.
1 Press the MENU button until
(Camera mode) or (VCR mode)
appears.
-
PIC
SET
PAGETURE
2 Press the PICTURE button () to display
the adjustment screen. Then press the
SELECT button (B) until the item you
wish to adjust appears.
PIC
-
TURE
BACKLI GHT
AUTO
SE
LECT
EXIT
3 Press the or button to adjust the
picture or backlight to the desired
setting.
Darker Brighter
Decrease Increase
GreenRed
Type of Backlight Modes
AUTO: The VIEWCAM automatically switches
between “NORMAL” and “BRIGHT”
depending on the ambient lighting. This
mode is only available in Camera mode.
NORMAL: For use indoors or under moderate
lighting conditions.
BRIGHT: For use outdoors under strong
lighting conditions, such as bright daylight.
Advanced Features
47
4 Press the EXIT button () to turn off the
adjustment screen.
Notes:
• If you set the backlight (“BACKLIGHT”) to
“AUTO” in Camera mode and then set the
VIEWCAM to VCR mode, the backlight mode
automatically changes to “NORMAL”.
• When the color or tint is adjusted, the picture on
the screen may differ from the picture actually
recorded. Do not change the color and tint
settings unless it is necessary. (These
adjustments only affect the monitor picture, not
the recorded image.)
Page 57

Gamma Playback
SE
SE
The gamma playback function improves the
picture by increasing the brightness of the
subject while leaving the brighter portions of
the image unaffected.
1 During playback, press the MENU
button until
appears.
GAMA
EFF.
COU
NTER
-
2 Press the GAMA EFF. button (C).
• “GAMMA” appears and the picture
becomes brighter.
GAMA
EFF.
COU
GAMA
COU
GAMA
-
-
NTNTER
EFF.
NTER
EFF.
Turning Off the LCD Monitor
Backlight
The LCD monitor uses a fluorescent lamp for
backlighting (see page 52). In order to reduce
battery consumption, you can turn off the lamp
when backlighting is not necessary (e.g. when
you are recording a fixed scene).
Hold down the DISPLAY button. Three seconds
later, “LCD LAMP OFF” starts flashing on the
monitor. Keep the DISPLAY button down for
three more seconds, and the backlight will turn
-
SE
ARCH
off.
Power switch
-
-
SE
SE
ARCH
ARCH
To turn on the backlight again, press the
DISPLAY button or set the Power switch to OFF
and then back to CAMERA or VCR.
DISPLAY button
GAMMAGAMMA
-
-
COU
COU
GAMA
GAMA
EFF.
EFF.
NTNTER
NTER
SE
SE
ARCH
ARCH
To cancel Gamma Playback
Press the GAMA EFF. button again. “GAMMA”
disappears.
Note:
• Turning the backlight on and off repeatedly may
deplete the battery power.
-
-
Advanced Features
48
Page 58

Advanced Features
Editing
Video editing lets you refine your videos by
removing unwanted sequences from your tape,
or transposing one sequence with another.
This VIEWCAM lets you monitor the source program on the built-in LCD monitor without
having to connect it to an external TV or video
monitor.
Connect the VIEWCAM to a VCR with the supplied audio/video cable, as shown.
Yellow: To VIDEO IN jack
Recording
POWER
Playback
White: To AUDIO IN (L) jack
CHANNEL
PAUSE
/STILL
PLAY
STOP/
EJECT
REC
TV/VCRSET UP
Audio/video cable
To AUDIO/VIDEO jack
(supplied)
4 Press the Pause/Still button on the VCR to
pause recording when the source tape
reaches the beginning of the sequence to
be cut.
5 Press the Pause/Still or Record button on
the VCR to resume recording when the
source tape reaches the end of the
sequence to be cut.
To stop editing
Press the Stop buttons on the VIEWCAM and
the VCR.
Notes:
• Some of the transitions between edited sequences
may be slightly off.
• There may be picture noise during video search or
still picture playback. This does not imply a defect in
the VIEWCAM.
Setting Edit Mode
Picture quality inevitably decreases when
dubbing from the VIEWCAM to a VCR. To
minimize the quality reduction, set the
VIEWCAM to Edit mode.
1 Set the Power switch to VCR, then press
the MENU button until appears.
MENU
ED I T
REMOTE
OFF
ON
Cutting Unwanted Sequences
1 Play back the tape to be edited, and locate
the beginning and end of the sequence
you wish to cut. Write down the tape
counter readings at the beginning and end
of that sequence (see page 37). Then
rewind the tape to the beginning of the
portion that you wish to keep.
Advanced Features
2 Load a video cassette into the recording
VCR.
3 Set the Power switch on the VIEWCAM to
VCR. Press the PLAY button (D) on the
VIEWCAM and the Record button on the
VCR at the same time.
49
3
3
SET
PIC
TURE
-
2 Press the 쑽 or 쒀 button (Q) to select
“EDIT”, then press the SET button (B)
(W) to select “ON”.
SET
Notes:
• The EDIT mode does not function when the
VIEWCAM is recording.
• After you finish editing, set the EDIT menu item back
to “OFF”.
MENU
ED I T
REMOTEONON
SET
PIC
TURE
-
Page 59

References
Useful Information
Hints for Better Shooting
• Position the subject in the center of the
screen. When you are using auto focus,
whatever is in the center of the screen is kept
in focus.
Position the subject in
the center.
• Avoid backlit subjects. For the best picture,
shoot with the light source behind you.
When the background is brighter than the
subject, the subject often becomes too dark.
If you have to record with this lighting, use the
Gamma Brightness Compensation or correct
the exposure level to improve the picture (see
pages 30 and 46).
Light from behind Backlighting
• Before zooming, think about how to best
frame the shot. Frequent zooming produces
unattractive pictures. It also increases the
battery power consumption.
• When image shakes are noticeable during
zoomed-in telephoto shooting, use a tripod,
or push the Power Zoom control to the W side
to zoom out.
• Horizontal panning (lateral movement) and
tilting (vertical movement) should be done
slowly to emphasize the wide expanse of a
scene or the height of a building, and to
make scenes easy to watch during playback.
• Use a wide-angle setting for fast-moving
subjects.
Note:
• It may take longer to focus when zooming and
panning are used frequently.
Focus manually when
you need to position
the subject off center
(see page 44).
Lighting
For clear, good-quality recording, 500 to
100,000 lux is needed. Recording is possible
with less light, but the picture quality may
suffer. Adequate lighting is also essential for
correct white balance.
Brightness
(Lux)
Blue sky
100,000
○ ○ ○ ○ ○ ○ ○ ○ ○ ○ ○ ○ ○ ○ ○ ○ ○ ○ ○
○ ○ ○ ○ ○ ○ ○ ○ ○ ○ ○ ○ ○ ○ ○ ○ ○ ○ ○
○ ○ ○ ○ ○ ○ ○ ○ ○ ○ ○ ○ ○ ○ ○ ○ ○ ○ ○
○ ○ ○ ○ ○ ○ ○ ○ ○ ○ ○ ○ ○ ○ ○ ○ ○ ○ ○ ○ ○
Note: The figures in the chart are approximations.
Clear day at noon (100,000)
Clear day at 10 am (65,000)
Clear day at 3 pm (35,000)
Cloudy day at noon (32,000)
Cloudy day at 10 am (25,000)
10,000
Cloudy day, one hour after sunrise (2,000)
Clear day, one hour before sunset (1,000)
1,000
Fluorescent light near window (1,000)
Factory floor (700–800)
Sales counter in department store (500–700)
Bowling alley (500)
Library (400–500)
Office with fluorescent lighting (400–500)
○ ○ ○ ○ ○ ○ ○ ○ ○ ○ ○ ○ ○ ○ ○ ○ ○
Fluorescent desk lamp (400)
Flashlight at 3 ft (1 m) (250)
100
Shop stairway (100)
During intermission at movie theater (15–35)
Cigarette lighter at 1 ft (30 cm) (15–20)
Candles on birthday cake at 8 inches (20 cm) (10–15)
10
Candlelight
Tips on Good Lighting
In most outdoor, daytime scenes, natural
lighting is adequate for home videos. Indoors,
however, artificial lighting is usually required.
Video lights with halogen lamps provide the
most natural artificial light over a long operating
life.
Situation (Lux)
Optimal lighting range
References
50
Page 60

References
Dew Formation
• What is “dew formation”?
When cold water is poured into a glass, dew
drops form on the glass. This clinging of
water drops is called dew formation.
• When dew forms in your VIEWCAM.
Dew will gradually form on the head drum of
your VIEWCAM and make the video tape stick
to the head. This causes damage both to the
head and the tape. When dew formation
occurs, recording and playback may not
function properly.
Dew is likely to form in the following circumstances:
• When moving the VIEWCAM from a cold
place to a warm place.
• When placing the VIEWCAM in a cold room
which is then heated rapidly.
• When moving the VIEWCAM outdoors from
an air conditioned room.
• When placing the
VIEWCAM in the direct
path of air blowing from
an air conditioner.
• When placing the
VIEWCAM in a humid
room.
• How to prevent trouble due to dew
formation.
When using the VIEWCAM in a place where
dew formation is likely to occur, allow the
VIEWCAM and the video tape to acclimate to
the surroundings for about one hour.
For example, when bringing the VIEWCAM
indoors after skiing, place it in a plastic bag.
• “Dew” warning feature
If dew forms, the word “DEW” flashes on the
LCD monitor, and the power will automatically
turn off in approximately 10 seconds.
Q If “DEW” flashes on the LCD monitor,
remove the cassette, leave the cassette
compartment open, and wait for a few hours
to allow the VIEWCAM to acclimate to the
surrounding temperature.
W To use the VIEWCAM again, turn on the
power after waiting for a few hours. Be sure
that “DEW” has disappeared from the
monitor.
E Do not insert a cassette while “DEW” is
flashing; this may result in damage to the
tape.
R Since dew forms gradually, it may take 10 to
15 minutes before the dew warning feature
engages.
Dirty Video Heads
Using the VIEWCAM when the video tape is
dirty may cause the heads to clog, producing
noise on the recorded image or preventing the
image from being recorded at all.
If the video heads become clogged, the
indicator appears on the screen. Contact the
nearest SHARP service center or your dealer
for further advice.
Plastic bag
Q Be sure to tightly seal the plastic bag
containing the VIEWCAM.
W Remove the bag when the air temperature
inside it reaches the temperature of the
room.
References
51
Note:
• Video head cleaning can be done by using a
commercially-available cleaning tape. However,
excessive use of the cleaning tape may also
cause damage to the video heads. Please read
the instructions accompanying the cleaning tape
carefully, before using it.
Page 61

Replacing the Fluorescent Lamp
CHARGE
This VIEWCAM uses a fluorescent lamp to
backlight the LCD monitor. If the monitor
becomes dark or difficult to view, the
fluorescent lamp may need to be replaced.
Contact the nearest SHARP service center or
your dealer for further advice.
Battery Pack
Battery pack consumption
• Recording with many starts and stops,
frequent zooming, and recording in low
temperatures will shorten actual recording
times. Accordingly, be sure to turn off the
power when not recording. Use of an auxiliary
battery pack is recommended to prevent
undesirable interruptions in your recording.
• Do not use an insufficiently charged or weak
battery pack. Use of such battery packs may
cause the power to automatically stop during
VIEWCAM operation to protect both the
battery pack and the unit.
Note:
• This VIEWCAM uses a Ni-MH (nickel-metal
hydride) type battery pack. Use only the
SHARP BT-H22 or BT-H32 battery packs.
They are designed specifically for use with
this VIEWCAM.
Battery pack life
The battery pack has a limited service life. If
the period of use becomes noticeably
shorter with a normal charge, the battery
pack is at the end of its service life. Replace
it with a new battery pack.
Extending battery pack life
• It is recommended that you use the battery
pack until its charge is fully drained and the
VIEWCAM is inoperable before recharging
the pack.
• Recharge the battery pack right before
recording. A battery pack stored for an
extended time will naturally wear down,
resulting in decreased recording time.
• Do not try to recharge a fully charged battery
pack before it has been discharged, as this
will cause deterioration of the battery’s
capacity.
• Store the battery pack in a dry, cool place.
How to use the battery pack cover
• When storing a fully charged battery pack,
put the cover on it so that the “CHARGE”
mark printed on the label is seen through the
window, as shown.
Battery
pack
Label
• When storing a battery pack that is not fully
charged, put the cover upside down so that
only the battery pack casing is seen through
the window.
Caution:
• For safety reasons, put the cover on the
battery pack when it is not being used. If the
metal parts of the battery pack come in
contact with other metal items, there is a
danger that a short circuit may occur.
Battery power is consumed even when the
VIEWCAM’s power is turned off. If you are not
going to use your VIEWCAM immediately,
remove the battery pack (see page 7).
Window
Cover
Temperature during charging
• The Ni-MH (nickel-metal hydride) type BT-H22
and BT-H32 battery packs can be charged at
a temperature of 15°C to 30°C (59°F to 86°F).
References
52
Page 62

References
Video Cassette Tapes
Use only tapes with the mark with this
VIEWCAM.
To protect recordings against erasure
When a previously recorded cassette is used
again for recording, the previously recorded
material is erased. To protect a recording
against accidental erasure, slide the tab on the
cassette to cover the opening. (A red mark will
be exposed.) To record, slide the tab to open
the opening.
Notes:
• Do not insert anything into the erasure-protection
opening in the cassette.
• Do not put anything into the holes on the bottom
of the cassette.
• Do not store or place your video tapes in direct
sunlight, near heaters, or in places with
excessive moisture or dust.
• Do not keep video tapes near magnetic objects
as they may erase the recording.
• Do not drop or subject the tapes to excessive
shocks.
• Uneven tape winding will damage the tape. If the
tape is not properly wound, reinsert it in the
VIEWCAM and rewind the tape.
• Store the cassettes in their cases and stand
them upright.
Using Y our VIEWCAM Abroad
Television signal standards and electrical
voltages and frequencies vary substantially
from country to country. When you are abroad,
check the sections below before using the AC
adapter or connecting the VIEWCAM to a TV.
AC Adapter (Supplied Accessory)
The supplied AC adapter is compatible with
50 Hz and 60 Hz electrical systems in the
range of 110 V to 240 V AC.
An AC plug adapter may be required
depending on the design of the electrical
outlet.
Suitable AC plug adapter
Television Signal Standards
In any country, you can always watch the video
picture by using the LCD monitor screen.
However, if you want to watch the picture on a
TV screen, the TV must be NTSC-M system
compatible. NTSC-M is used in the following
areas:
The Bahamas, Barbados, Bermuda, Myanmar
(previously Burma), Canada, Chile, Colombia,
Costa Rica, Cuba, the Dominican Republic,
Ecuador, El Salvador, Greenland, Guam,
Guatemala, Haiti, Honduras, Jamaica, Japan,
South Korea, Mexico, the Netherland Antilles,
Nicaragua, Panama, Peru, the Philippines,
Puerto Rico, St. Kitts, St. Lucia, Surinam,
Taiwan, Trinidad, the U.S.A., Venezuela,
Southern Vietnam, and the Virgin Islands.
AC 110–240 V
References
53
Page 63

Demonstration Mode
Canceling Demo Mode
You can watch a brief demonstration of the
special VIEWCAM features in Demo mode.
If the demonstration appears on the screen
when you turn on the VIEWCAM for the first
time, cancel the Demo mode to use your
VIEWCAM.
Power switch
MENU button
Operation buttons
Watching the Demonstration
1 Make sure that there is no video
cassette in the VIEWCAM.
• If a cassette is in the VIEWCAM, Demo
mode does not work. Perform the
procedure on page 10 to remove it.
2 Hold down the Lock
button and slide the
Power switch to
CAMERA.
Lock button
1 During the demonstration, perform step
3 above.
2 Press 쑽 or 쒀 button (Q) to select
“DEMO MODE”, then press the SET
button (B) (W) to select “OFF”.
MENU
SET
FADE
REMOTE
DEMO MODE OFF
LANGUAGE
1
NORMAL
ON
3 Press the DISPLAY button to turn off the
menu screen.
Note:
• The demonstration will stop if you press the
MENU button. If you leave it for 60 seconds, or
turn the power off temporarily and then set the
Power switch to CAMERA, the demonstration will
begin again.
3 Press the MENU button until
appears.
• If MENU 2 appears on the screen,
press the PAGE button ( ) to display
MENU 1.
4 Press 쑽 or 쒀 (C or D) button (Q) to
select “DEMO MODE”, then press the
SET button (B) (W) to select “ON”.
• The demonstration begins.
MENU
SET
FADE
REMOTE
DEMO MODE ON
LANGUAGE
1
NORMAL
ON
References
54
Page 64

References
Before Requesting Service
Before calling for service, please check the following troubleshooting table.
Symptom
No power.
Power
REC START/STOP button
does not work.
Power suddenly turns off.
Auto focus does not
work.
Bright subject produces
wide vertical lines.
CAMERA mode
Automatically zooms out
without operating Zoom
control.
Display automatically
changes in Camera
mode.
Tape stops during rewind
or fast forward.
Possible cause
Power source is not properly
connected.
Battery pack is not charged.
Dew in VIEWCAM.
Safety function is in effect.
Erasure-protect tab on video cassette
is closed.
VIEWCAM left in Recording Standby
mode for 5 minutes.
Manual Focus mode is engaged.
Zoom used on close subject.
Subject has little contrast in
brightness, or is full of horizontal or
vertical stripes.
Occurs when shooting subject with
strong contrast to the background.
Does not indicate a malfunction.
VIEWCAM is unable to focus when
zooming in on subject within 5 feet
(1.5 m), and automatically zooms out
until it focuses on subject.
No subject in the field of view.
VIEWCAM is in Demo mode.
Counter is in memory mode.
Suggested solution
Connect power source properly
(pp. 7, 9).
Charge battery pack sufficiently
(p. 8).
Wait until dew dries (p. 51).
Set Power switch to OFF and remove
battery pack; wait for 2 seconds, then
reinstall battery pack and turn on
power (p. 7).
Open tab or use a new cassette
(p. 53).
Set Power switch to OFF and then
back to CAMERA.
Set to Auto Focus mode (p. 44).
Zoom out from subject (p. 19).
Focus manually (p. 44).
——
——
Direct lens to some subject, or set
zoom to widest angle before shooting
(p. 19).
Set DEMO MODE menu item to “OFF”
(p. 54).
Disengage the memory mode
(p. 38).
References
55
No image appears on
connected TV screen.
VCR mode
Video input channel on TV or TV
channel is not selected properly.
Audio/video cable is not properly
connected.
Select video input channel or TV
channel properly (p. 22).
Connect audio/video cable properly
(p. 22).
Page 65

Symptom
Cannot play back, rewind
or fast forward tape.
Video noise in image.
VCR mode
Cassette will not eject.
No image on monitor.
Monitor picture is hard to
see.
CHARGE indicator
flashes in red when
charging battery pack.
Cannot edit to connected
VCR.
General
Lens makes rattling
sound when VIEWCAM is
moved in VCR mode or
with power off.
Remote control does not
function.
Possible cause
Position at beginning or end of tape.
Dirty video heads.
Old or worn tape.
Power source is not properly
connected.
Battery pack is not charged.
VIEWCAM is recording.
Backlight has been turned off.
Fluorescent lamp is burned out.
Inappropriate picture adjustments.
AC adapter or battery pack may have
malfunctioned.
Audio/video cable is not properly
connected.
Does not indicate a malfunction.
REMOTE menu item is set to “OFF”.
Remote control batteries have run
down.
Remote control used beyond
operating range.
Intense daylight falling on VIEWCAM
remote sensor.
Obstacle between remote control and
VIEWCAM remote sensor.
Suggested solution
Rewind or fast forward tape to
desired point (p.21).
Call for service (p. 57).
Use a new cassette.
Connect power source properly
(pp. 7, 9).
Charge battery pack sufficiently
(p. 8).
Stop tape and try again (p. 18).
Turn on backlight (p. 48).
Call for service (p. 57).
Adjust picture (p. 47).
Call for service (p. 57).
Connect audio/video cable properly
(p. 49).
——
Set REMOTE menu item to “ON”
(p. 39).
Replace remote control batteries with
new ones (p. 39).
Use remote control within operating
range (p. 39).
Protect remote sensor from exposure
to intense daylight (p. 39).
Remove obstacle or use remote
control from different angle (p. 39).
Notes:
• This unit is equipped with a microprocessor. Its performance could be adversely affected by external electrical
noise or interference. If this should happen, turn off the power and disconnect the unit from any power sources,
including the lithium battery, etc. Then reconnect the power sources to resume operation.
• If the characters displayed on the monitor screen appear to malfunction, disconnect the power source and
remove the lithium battery, then reconnect the power source, insert the lithium battery, and turn the power on
again. The characters on the monitor should be normal. Set the date and time, then resume operation.
References
56
Page 66

References
Specifications
VIEWCAM
Signal System: NTSC standard
Recording System: 2 rotary heads, helical scanning system
Recording/Playback Time: 120 minutes (P6-120)
Lens Filter Diameter: 46 mm
Color Temperature Compensation: Auto white balance with white balance lock
Minimum Illumination: 0.8 lux (5 lux measured by EIA standard) (with gain-up, F1.4)
Video Output Level: 1.0 Vp-p 75-ohm unbalanced
Audio Output Level: 8 dBs, impedance less than 2.2 kohms
Power Requirement: DC 3.6 V (with battery pack)
Power Consumption: 5.1 W (during camera recording in full auto mode with zoom
Operating Temperature: 0C to 40C (32F to 104F)
Operating Humidity: 30% to 80%
Storage Temperature: 20C to 60C (4F to 140F)
Dimensions (approx.): 7 7⁄32 (W) 4 9⁄32 (H) 3 7⁄8 (D)
Cassette: 8 mm video tape, MP type
Tape Speed: 14.345 mm/second
Pickup Device:1⁄4 (6.4 mm, effective size: 4.5 mm) CCD image sensor (with
approx. 270,000 pixels including optical black)
Lens: 16 power zoom lens (F1.4, f4.0–64.0 mm), and full-range
auto focus
Monitor: 3 (7.5 cm) full-color LCD screen (TFT active matrix)
Microphone: Electret monaural microphone
Speaker Output: 200 mW
DC 7.0 V (with AC adapter)
motor off and backlight in normal mode)
[183 mm (W) 109 mm (H) 99 mm (D)]
Weight (approx.): 1.57 lbs (710 g) (without battery pack, lithium battery, video
cassette, and lens cap)
AC Adapter (UADP-0312TAZZ)
Power Requirement: AC 110–240 V, 50/60 Hz
Power Consumption: 15 W
Dimensions (approx.): 2 11⁄16 (W) 1 15⁄32 (H) 513⁄32 (D) [68 mm (W) 37 mm (H) 137 mm (D)]
Battery Pack (BT-H22)
Dimensions (approx.): 2 1⁄8 (W) 3⁄4 (H) 27⁄32 (D) [54 mm (W) 19 mm (H) 56 mm (D)]
Specifications are subject to change without notice.
DC Output: 7.0 V
Weight (approx.): 0.68 lbs (308 g)
DC Output: 3.6 V
Weight (approx.): 0.30 lbs (136 g)
SERVICE INFORMATION (For the U.S.)
For the location of the nearest Sharp Authorized Service, or to obtain product literature, accessories,
supplies or customer assistance, please call 1-800-BE SHARP (1-800-237-4277) or visit SHARP’s
website (http://www.sharp-usa.com).
References
57
Page 67

Guía de operación rápida en español
Inserción y extracción de la
batería
Inserción de la batería
1 Asegúrese de que el interruptor de
alimentación esté en la posición OFF.
Interruptor de
alimentación
2 Deslice el control de abertura de la
puerta del compartimiento de la batería,
situado en la parte inferior de la
VIEWCAM, en la dirección de la flecha
para abrir la puerta del compartimietno
de la batería.
Control de abertura de
la puerta del
compartimiento de la
batería
3 Introduzca la batería en el
compartimiento como se muestra, y
empújela completamente hacia adentro
hasta que quede bloqueada en su lugar.
Precaución:
• No meta a la fuerza la batería en su
compartimiento si es que ésta no entra
fácilmente.
4 Cierre la puerta presionándola
firmemente en el centro hasta que haga
un ruido seco.
Extracción de la batería
1 Realice los pasos 1 y 2 de arriba.
2 Presione el control de liberación de la
batería como se muestra para quitar la
batería.
Control de liberación
de la batería
Precauciones:
• ANTES DE QUITAR LA BATERÍA, PARE
SIEMPRE LA CINTA Y DESCONECTE LA
ALIMENTACIÓN. Si quita la batería durante la
grabación o la reproducción, la cinta quedará
enrollada alrededor del tambor de las cabezas
de vídeo y tal vez se estropee.
• Asegúrese de cerrar firmemente la puerta del
compartimiento de la batería, especialmente
durante las operaciones. Si no lo hace así, la
batería tal vez se desprenda o la operación de la
VIEWCAM puede que falle porque la presión de
contacto no será adecuada.
• Quite la batería de la VIEWCAM si la VIEWCAM
no va a ser utilizada durante mucho tiempo.
• Cuando quite la batería, no incline la VIEW-
CAM para que el compartimiento de la batería
quede hacia abajo. La batería podría caerse.
• No exponga la puerta del compartimiento de la
batería a una fuerza excesiva porque podría
desprenderse.
• Utilice solamente baterías SHARP modelo
BT-H22 o BT-H32 con esta VIEWCAM. La
utilización de otras baterías puede causar un
riesgo de incendio o explosión.
58
Page 68

Guía de operación rápida en español
Carga de la batería
Interruptor de alimentación
Indicador CHARGE
1 Inserte la batería en la VIEWCAM
(consulte la página 58). Asegúrese de que
el interruptor de alimentación esté en la
posición OFF.
• La batería no se carga cuando el
interruptor de alimentación está en la
posición CAMERA o VCR.
2 Inserte la clavija de alimentación de CA del
adaptador de CA en una toma de
corriente.
3 Abra la tapa de terminales de la VIEWCAM
e inserte la clavija de CC del adaptador de
CA en la toma DC IN de la VIEWCAM.
• El indicador CHARGE se encenderá en
rojo.
Tapa de
terminales
Toma DC IN
Selección de idioma para la
visualización en pantalla
Esta VIEWCAM le permite elegir el idioma
inglés, francés o español para la visualización
en pantalla.
Interruptor de alimentación
Botón MENU
Botones de operación
Cuando utilice la VIEWCAM por primera vez,
seleccione el idioma deseado en la
visualización en pantalla siguiendo el
procedimiento de abajo.
1 Mantenga pulsado el
Botón de bloqueo
botón de bloqueo y
deslice el interruptor
de alimentación hasta
CAMERA.
• La pantalla de selección
de idioma aparece.
2 Pulse el botón 쑽 o 쒀 (C o D) (Q) para
seleccionar el idioma deseado, y luego
pulse el botón SET (REGLAGE o
AJUSTE) (B) (W).
LANGUAGE
ENGL I SH
FRANÇAIS
SET
ESPAÑOL
A la toma de
corriente
4 Cuando la batería esté completamente
cargada, el indicador CHARGE se
encenderá en verde. Desconecte la clavija
de CC de la VIEWCAM y cierre la tapa de
terminales.
Precaución:
• Cuando desconecte las clavijas, sujete las clavijas y
tire de ellas, no del cable.
59
SET
GAMA
PIC
EFF
Notas:
• Los procedimientos de operación de las secciones
siguientes de este manual de operación se basan
en el uso de visualizaciones en pantalla en inglés.
• Consulte la página 15 para utilizar las
visualizaciones en pantalla en español.
EFF
QK
REW
Page 69

Inserción y extracción de un
videocasete
Inserción de un videocasete
1 Suministre alimentación a la VIEWCAM,
y luego deslice el control de abertura y
abra la puerta del compartimiento del
videocasete.
• El portavideocasete se extiende y abre
automáticamente.
Control de abertura de la
puerta del compartimiento
del videocasete
2 Inserte completamente el videocasete
con la ventanilla hacia afuera y con la
lengüeta de protección contra borrado
hacia la parte superior.
Lengüeta de protección
contra borrado
4 Espere a que el portavideocasete se
pliegue completamente. Cierre la puerta
del compartimiento presionando sobre
la parte central hasta que se coloque en
su lugar haciendo un ruido seco.
Extracción de un videocasete
Realice el paso 1 de arriba y luego saque el
videocasete.
Precauciones:
• No intente cerrar la puerta del compartimiento
del videocasete mientras el videocasete se
extiende o se pliega.
• Tenga cuidado de no pillarse los dedos en el
portavideocasete.
• No aplique fuerza al portavideocasete, excepto
cuando presione la marca PUSH para cerrarlo.
• No incline la VIEWCAM ni la tome al revés
cuando inserte o extraiga un videocasete. Esto
podría estropear la cinta.
• Extraiga el videocasete si no piensa utilizar la
VIEWCAM durante mucho tiempo.
• Si no cierra correctamente el portavideocasete
en el paso 3 anterior, el mecanismo de
protección de la VIEWCAM tal vez expulse el
videocasete. Si pasa esto, repita el
procedimiento de inserción.
• No intente tomar la VIEWCAM por la puerta del
compartimiento del videocasete.
3 Presione suavemente la marca PUSH
hasta que el portavideocasete se
coloque en su lugar haciendo un ruido
seco.
• El portavideocasete se pliega
automáticamente.
Marca PUSH
Nota:
• Si la energía de la batería es demasiado baja, tal
vez no pueda extraer el videocasete.
Reemplace la batería por otra completamente
cargada.
60
Page 70

Guía de operación rápida en español
Grabación sencilla con
videocámara en el modo
completamente automático
Antes de empezar a grabar, realice las
operaciones descritas en las páginas 58 a 60
para preparar su VIEWCAM para la grabación.
Botón REC START/STOP
Pantalla del monitor LCD
Interruptor de alimentación
1 Quite la tapa del objetivo.
2 Mantenga pulsado el botón de bloqueo
y deslice el interruptor de alimentación
hasta CAMERA.
•La imagen captada por el objetivo se
visualiza en la pantalla del monitor LCD.
•La VIEWCAM está ahora lista para
grabar (modo de espera de grabación).
Botón de
bloqueo
AUTO
Nota:
• Cuando grabe al principio de una cinta, avance la
cinta unos 15 segundos antes de empezar a grabar.
Esto impedirá que el principio de la grabación
quede cortado al hacer la reproducción.
Para hacer una pausa en la grabación
Pulse de nuevo el
botón REC START/
STOP. La grabación
hará una pausa y la
VIEWCAM se pondrá
en el modo de espera
de grabación.
PAUSE
Para desconectar la alimentación
Deslice el interruptor de
alimentación hasta OFF.
Notas:
• El altavoz se apaga en el modo de videocámara.
• En el modo de espera de grabación se consume
energía de la batería. Desconecte la alimentación si
no va a grabar pronto.
• Si la VIEWCAM se deja en el modo de espera de
grabación durante más de 5 minutos, la
alimentación se desconectará automáticamente
para ahorrar energía de la batería y proteger la cinta
para que no se estropee. Para continuar grabando
después de esto, ponga el interruptor de
alimentación en OFF y luego en CAMERA.
Tiempo máximo de grabación continua
y tiempo de grabación real
Indicador del modo
completamente
automático
Nota: Si, en este momento, no aparece “AUTO”,
ponga la VIEWCAM en el modo completamente
automático.
3 Pulse el botón REC START/STOP para
iniciar la grabación.
REC
61
Batería
BT-H22
BT-H32
Nota:
• La utilización del zoom y otras funciones o la
conexión y la desconexión frecuente de la
alimentación aumentarán el consumo de energía.
Esto puede causar una reducción de más del
50% en el tiempo de grabación real si se
compara con el tiempo máximo de grabación
continua indicado arriba.
Tiempo máximo de
grabación continua
1 hr y 35 min
aprox.
3 hr y 10 min
aprox.
Tiempo de
grabación real
45 min
aprox.
1 hr y 30 min
aprox.
Page 71

Reproducción
La pantalla del monitor LCD hace posible
reproducir y ver lo que usted acaba de grabar.
No es necesario conectar nada, pudiéndose
realizar la reproducción instantánea en pantalla
oyendo el sonido a través del altavoz
incorporado.
Interruptor de alimentación
Pantalla del monitor LCD
Botón DISPLAY
1 Mantenga pulsado el
botón de bloqueo y
deslice el interruptor de
alimentación hasta
VCR.
• Aparece la pantalla
.
Botón de bloqueo
2 Pulse el botón REW (C) (o FF [B])
para rebobinar (o avanzar rápidamente)
la cinta hasta el punto deseado.
REW PLAY STOP ST I L LFF
Para detener la reproducción
Pulse el botón
STOP (A).
Notas:
• Si desea encender o apagar los indicadores de
los botones de operación, pulse el botón
DISPLAY. Los botones de operación de
reproducción seguirán funcionando como se ha
indicado incluso después de apagarse los
indicadores.
• Para utilizar el control remoto por infrarrojos,
asegúrese de que el ítem del menú REMOTE
esté en “ON”.
REW PLAY STOP ST I L LFF
Rebobinado automático de la cinta
La cinta se rebobinará automáticamente
cuando llegue al final durante la reproducción.
Para desconectar la alimentación
Deslice el interruptor de alimentación hasta
OFF.
Control de volumen
Mientras la VIEWCAM está en el modo de
vídeo, empuje el control de volumen hacia el
lado ⫹ o ⫺ para aumentar (Q) o disminuir (W)
el volumen según sus preferencias.
El indicador de nivel del sonido aparecerá en
la pantalla durante el ajuste solamente.
Cuando se suelte el control de volumen, el
indicador de nivel del sonido desaparecerá
poco después.
3 Pulse el botón PLAY (D) para iniciar la
reproducción.
REW PLAY STOP ST I L LFF
Control de
volumen
AumentaDisminuye
62
Page 72

LIQUID CRYSTAL DISPLAY CAMCORDER
OPERATION MANUAL
Valid for warranty service in the U.S. only
NTSC
CONSUMER LIMITED WARRANTY
SHARP ELECTRONICS CORPORATION warrants to the first consumer purchaser that this Sharp brand
product (the “Product”), when shipped in its original container, will be free from defective workmanship
and materials, and agrees that it will, at its option, either repair the defect or replace the defective
Product or part thereof with a new or remanufactured equivalent at no charge to the purchaser for parts
or labor for the period(s) set forth below.
This warranty does not apply to any appearance items of the Product nor to the additional excluded
item(s) set forth below nor to any Product the exterior of which has been damaged or defaced, which
has been subjected to improper voltage or other misuse, abnormal service or handling, or which has
been altered or modified in design or construction.
In order to enforce the rights under this limited warranty, the purchaser should follow the steps set forth
below and provide proof of purchase to the servicer.
The limited warranty described herein is in addition to whatever implied warranties may be granted to
purchasers by law. ALL IMPLIED WARRANTIES INCLUDING THE WARRANTIES OF MERCHANTABILITY
AND FITNESS FOR USE ARE LIMITED TO THE PERIOD(S) FROM THE DATE OF PURCHASE SET FORTH
BELOW. Some states do not allow limitations on how long an implied warranty lasts, so the above
limitation may not apply to you.
Neither the sales personnel of the seller nor any other person is authorized to make any warranties other
than those described herein, or to extend the duration of any warranties beyond the time period
described herein on behalf of Sharp.
The warranties described herein shall be the sole and exclusive warranties granted by Sharp and shall
be the sole and exclusive remedy available to the purchaser. Correction of defects, in the manner and
for the period of time described herein, shall constitute complete fulfillment of all liabilities and
responsibilities of Sharp to the purchaser with respect to the Product, and shall constitute full
satisfaction of all claims, whether based on contract, negligence, strict liability or otherwise. In no event
shall Sharp be liable, or in any way responsible, for any damages or defects in the Product which were
caused by repairs or attempted repairs performed by anyone other than an authorized servicer. Nor
shall Sharp be liable or in any way responsible for any incidental or consequential economic or property
damage. Some states do not allow the exclusion of incidental or consequential damages, so the above
exclusion may not apply to you.
THIS WARRANTY GIVES YOU SPECIFIC LEGAL RIGHTS. YOU MAY ALSO HAVE OTHER RIGHTS
WHICH VARY FROM STATE TO STATE.
Model Specific Section
Your Product Model
Number & Description:
Warranty Period for this Product:
Additional Item(s) Excluded
from Warranty Coverage (if any):
Where to Obtain Service:
What to do to Obtain Service:
TO OBTAIN SUPPLY, ACCESSORY OR PRODUCT INFORMATION, GO TO OUR WEBSITE AT www.sharp-usa.com
VL-A110U Camcorder
(Be sure to have this information available when you need service
for your Product.)
One (1) year parts and ninety (90) days labor from date of purchase except for the rechargeable battery incorporated in this Product which is warranted for thirty (30) days from date of purchase.
Non-rechargeable batteries.
From a Sharp Authorized Servicer located in the United States. To
find the location of the nearest Sharp Authorized Servicer, call Sharp
toll free at 1-800-BE-SHARP.
Ship prepaid or carry in your Product to a Sharp Authorized Servicer.
Be sure to have Proof of Purchase available. If you ship the Product, be sure it is insured and packaged securely.
OR CALL 1-800-BE-SHARP
SHARP ELECTRONICS CORPORATION
Sharp Plaza, Mahwah, New Jersey 07430-2135
SHARP CORPORATION
Osaka, Japan
Printed in Malaysia
TINSE0397TAZZ
01P02-M-G
 Loading...