

Sharp LV-Z301D, VL-Z501D, Viewcam Z LV-Z301D, Viewcam Z VL-Z501D Operation Manual


Before using the camcorder, please read this operation manual
carefully, especially page vi.
OPERATION MANUAL
WARNING
To prevent fire or shock hazard,
do not expose this apparatus to
dripping or splashing. No
objects filled with liquids, such
as vases, should be placed on
the apparatus.
This equipment should be used
with the recommended AC
adapter or battery pack.
CAUTION
To prevent electric shocks and
fire hazards, do NOT use any
other power source.
CAUTION
To prevent shock, do not open the
cabinet. No user serviceable parts
inside. Refer servicing to qualified
dealer or service centre.
CAUTION
To prevent fire, never place any
type of candle or naked flames on
the top or near the apparatus.
ENGLISH
Important:
Audio-visual material may consist
of copyrighted works which must
not be recorded without the
authority of the owner of the
copyright. Please refer to relevant
laws in your country.
NOTE
The LCD panel of this camcorder is a very high technology product with
more than 215,000 thin-film transistors*, giving you fine picture detail.
Occasionally, a pixel may appear on the screen as a fixed point of blue,
green, red, or black. Please note that this does not affect the
performance of your camcorder.
*Specifications are subject to change without notice.
Trademarks
• Microsoft and Windows are either registered trademarks or trademarks of Microsoft
Corporation in the United States and/or other countries.
• DPOF is a trademark of CANON INC., Eastman Kodak Company, Fuji Photo Film
Co., Ltd. and Matsushita Electric Industrial Co., Ltd.
• All other brand or product names are registered trademarks or trademarks of their
respective holders.
Power supply:
This unit can be operated by
connecting it to either the AC
adapter or battery pack. The AC
adapter incorporates the AUTO
VOLTAGE (AC 110–240 V,
50/60 Hz) function.
i

Contents
Supplied Accessories ......................................................................................... v
Optional Accessories .......................................................................................... v
Precautions ........................................................................................................ vi
Operation References
Preparation
Part Names ............................................................. 1
Warning Indicators ..................................................4
Attaching and Removing the Battery Pack ............. 6
Charging the Battery Pack ......................................8
Powering the Camcorder from an AC Outlet .......... 9
Inserting and Removing a Cassette ..................... 10
Inserting and Removing a Card ............................11
Installing the Lithium Batteries .............................. 12
Selecting the Language for the On-screen
Display ................................................................ 13
Setting the Date and Time .................................... 14
Using the Lens Cap .............................................. 15
Adjusting the Hand Strap ..................................... 16
Using the Grip .......................................................16
Detaching the Lens Hood ..................................... 17
Using the Viewfinder ............................................. 17
Using the LCD Monitor ......................................... 19
Tips on Recording Positions ................................. 20
Basic Operations
Camera Recording
Selecting the Camcorder Mode ............................21
Easy Camera Recording on Tape in
Full Auto Mode ...................................................22
Zooming ................................................................23
Power Standby Mode ........................................... 24
Turning on/off the Backlight .................................. 24
Auto Focus ............................................................25
Macro Shots .......................................................... 25
Remaining Recording Time Display ..................... 26
Remaining Battery Power Display ........................ 26
Playback
Tape Playback ...................................................... 27
Volume Control ......................................................28
Still ........................................................................ 28
Video Search......................................................... 28
Using Earphones
(Commercially Available, VL-Z501D only) .......... 29
Adjusting the Phones Volume (VL-Z501D only) ....29
Watching Playback on a TV .................................. 30
ii

Useful Features
Control Buttons ..................................................... 31
Using the Mode Screens ...................................... 31
Using the Menu Screens....................................... 32
Camera Recording
Setting the Digital Zoom ....................................... 33
Backlight Compensation (BLC) ............................ 34
Gain-up ................................................................. 35
Fade in and Fade out ............................................36
Quick Return ......................................................... 37
Edit Search............................................................ 38
Still Recording on Tape .........................................38
Digital Image Stabilization (DIS) ........................... 39
Self Recording ...................................................... 40
Wide Screen (16:9) ............................................... 42
Recording in LP (Long Play Recording) Mode .....43
Windbreak .............................................................44
Selecting the 16-bit Audio Recording Mode......... 45
Playback
Using the Remote Control
(Only supplied with VL-Z501D) .......................... 46
Tape Playback Functions with the Remote
Control (Only supplied with VL-Z501D) .............. 47
Selecting the Date and Time of Recording
Display ................................................................ 48
Picture Effect Playback ......................................... 49
Rotate Playback .................................................... 50
Copying an Image from Tape to Card .................. 51
Advanced Features
Camera Recording
Manual Focus ....................................................... 52
Returning to Auto Focus ....................................... 53
Displaying the Manual Setting Screen ..................53
White Balance Lock .............................................. 54
Manual Iris ............................................................ 55
Manual Gain ..........................................................56
Setting the Camcorder to Full Auto Mode............. 57
Scene Menu (Program AE) ................................... 58
iii

Contents
Advanced Features
Digital Still Camera
Features
Playback
Using the Time Code ............................................ 59
Audio Dubbing Feature......................................... 60
Selecting the Audio Playback Mode .....................62
Editing ................................................................... 63
Recording from an External Source ......................64
Editing with the DV Terminal (IEEE1394) .............. 66
Using the Camcorder as a Converter ................... 68
Camera Recording
Card Recording .................................................... 70
Selecting the Picture Quality .................................71
Recording with the Self-timer ................................72
Formatting a Card .................................................73
Setting the File Numbering Method ...................... 74
Playback
Card Playback ...................................................... 75
Playback Zoom with the Remote Control (Only
supplied with VL-Z501D) ....................................76
Delete Protection................................................... 77
Deleting Stored Images ........................................ 78
Print Order............................................................. 80
Transferring Data on Card to Computer ............... 82
Installing the USB Driver ................................... 82
Slide Show Playback ............................................ 85
Appendix
Note:
• Before requesting service, please read “Troubleshooting” carefully. (See pages 97–
100.)
iv
Picture/Backlight Adjustments .............................. 86
Turning off the Confirmation Sound ...................... 88
Setting the Camcorder to Factory Presettings ......89
Demonstration Mode ............................................ 90
Useful Information ................................................. 91
Troubleshooting .................................................... 97
Specifications ..................................................... 101
On-screen Display Index .................................... 102
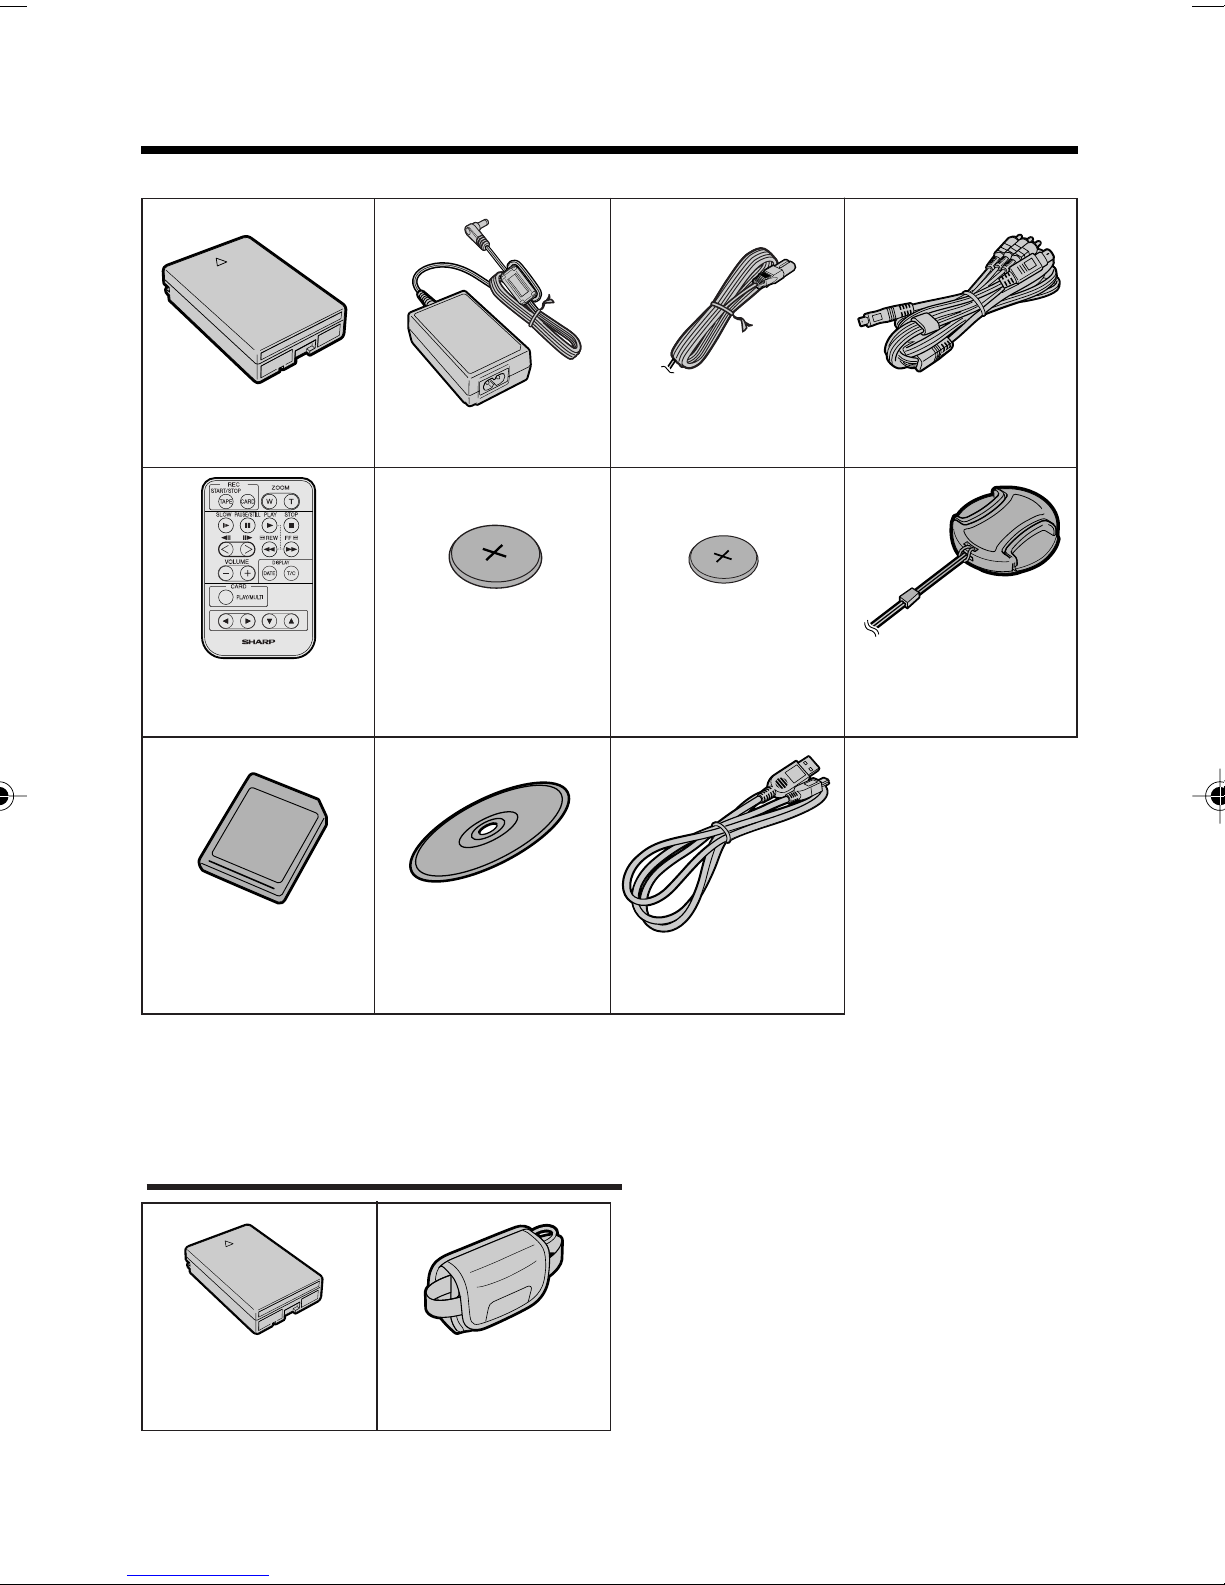
Supplied Accessories
Battery pack
BT-L226
*
Remote control
*
8 MB SD Memory Card
AC adapter
*
CR2025 type
lithium battery
for remote control
CD-ROM
Audio/video/S-video
Power cord
CR1216 type
lithium battery
for camcorder Lens cap
USB cable
cable
The accessories with * mark are not supplied with VL-Z301D (only
supplied with VL-Z501D).
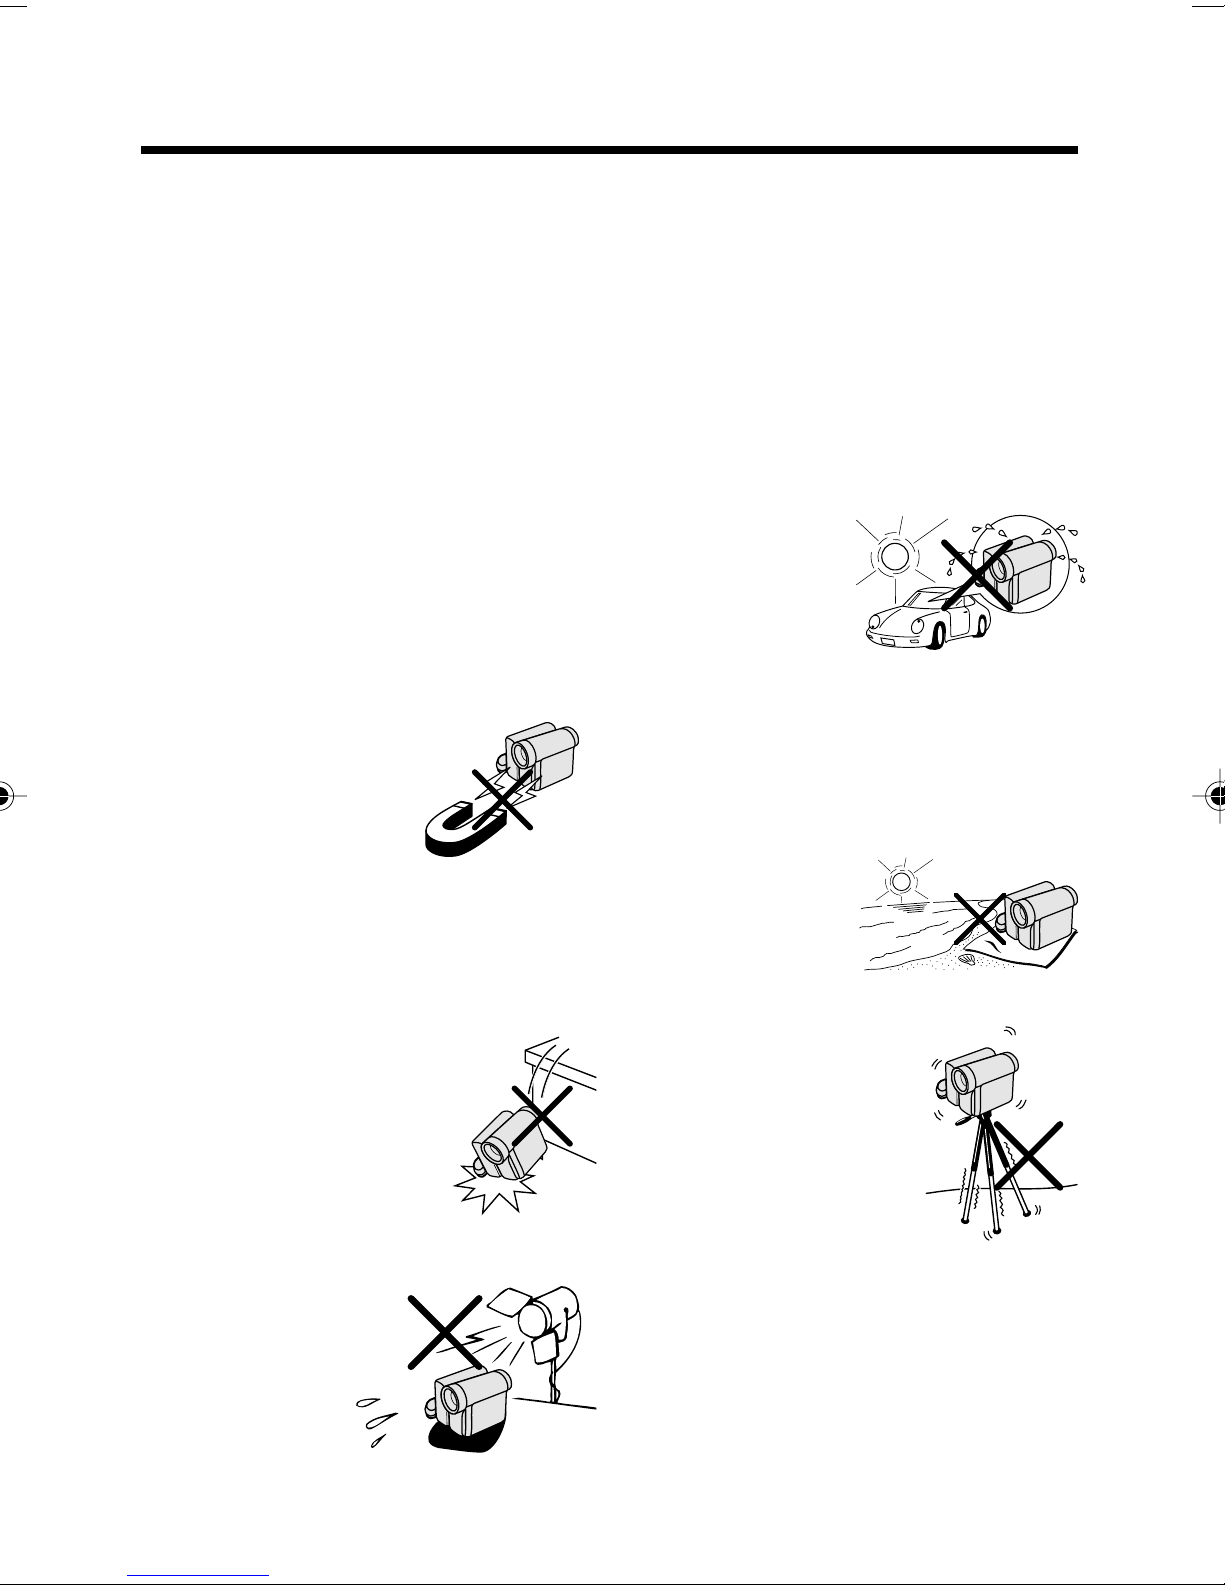
Optional Accessories
Standard-life
battery pack
BT-L226
Note:
• Some of these accessories may not be available in selected areas.
External battery with
hand strap
BT-LCA1
v
Precautions
• Before recording an important scene,
please perform the recording test, then
playback to check if the scene was recorded properly. If noise occurs, use a
commercially available cleaning tape to
clean the video heads (see page viii).
• When the camcorder is not in use, remember to remove the cassette tape,
turn off the power, and disconnect the
camcorder from the power source.
• Do not aim the lens at the sun.
Do not allow direct sunlight to strike the
camcorder lens, whether or not recording
is in progress, as it may damage the CCD
sensor. Be particularly careful when recording outside.
• Avoid magnetic sources.
Using the camcorder near
strong fluorescent lights,
motors, televisions, or
other magnetic sources
may adversely affect recorded images.
• Using the camcorder near a broad-
casting station or other powerful transmission source may cause buzzing or
picture deterioration.
• Always respect prohibitions or restrictions on the use of electronic equipment
on commercial flights or in other sensitive areas.
• Be aware of the temperature and humidity.
You can use your camcorder at 0°C to
L40°C, and at 30% to 80% relative humidity. Do not store the unit in an
unventilated car in the summer, in direct
sunlight, or near
strong heat
sources; this can
result in severe
damage to the unit
casing and circuitry.
• Avoid situations where water, sand, dust
or other foreign matter could get on or
inside the camcorder, and do not use or
leave your camcorder in areas with excessive smoke, steam or moisture.
Such environments can cause malfunctions or cause mildew to form on the
lenses. Be sure to
keep the unit in a
well-ventilated location.
• Avoid shocks and dropping.
Do not drop or otherwise subject the camcorder to hard
shocks or strong vibrations.
Bumping or striking the unit
during recording will generate noise in the recorded
image.
• Avoid placing the
camcorder in close
proximity to lighting
equipment.
The heat from incandescent lights
may deform the
camcorder, or cause
it to malfunction.
vi
• Some small, portable tripods may be difficult to
attach and may not be
sturdy enough to support your camcorder. Be
sure to use only a
strong, stable tripod.
• When using your camcorder in a cold
environment, the LCD monitor screen often appears less bright immediately after the power is turned on. This is not a
malfunction. To prevent the camcorder
from becoming too cold, wrap it in a
thick cloth (a blanket, etc.).
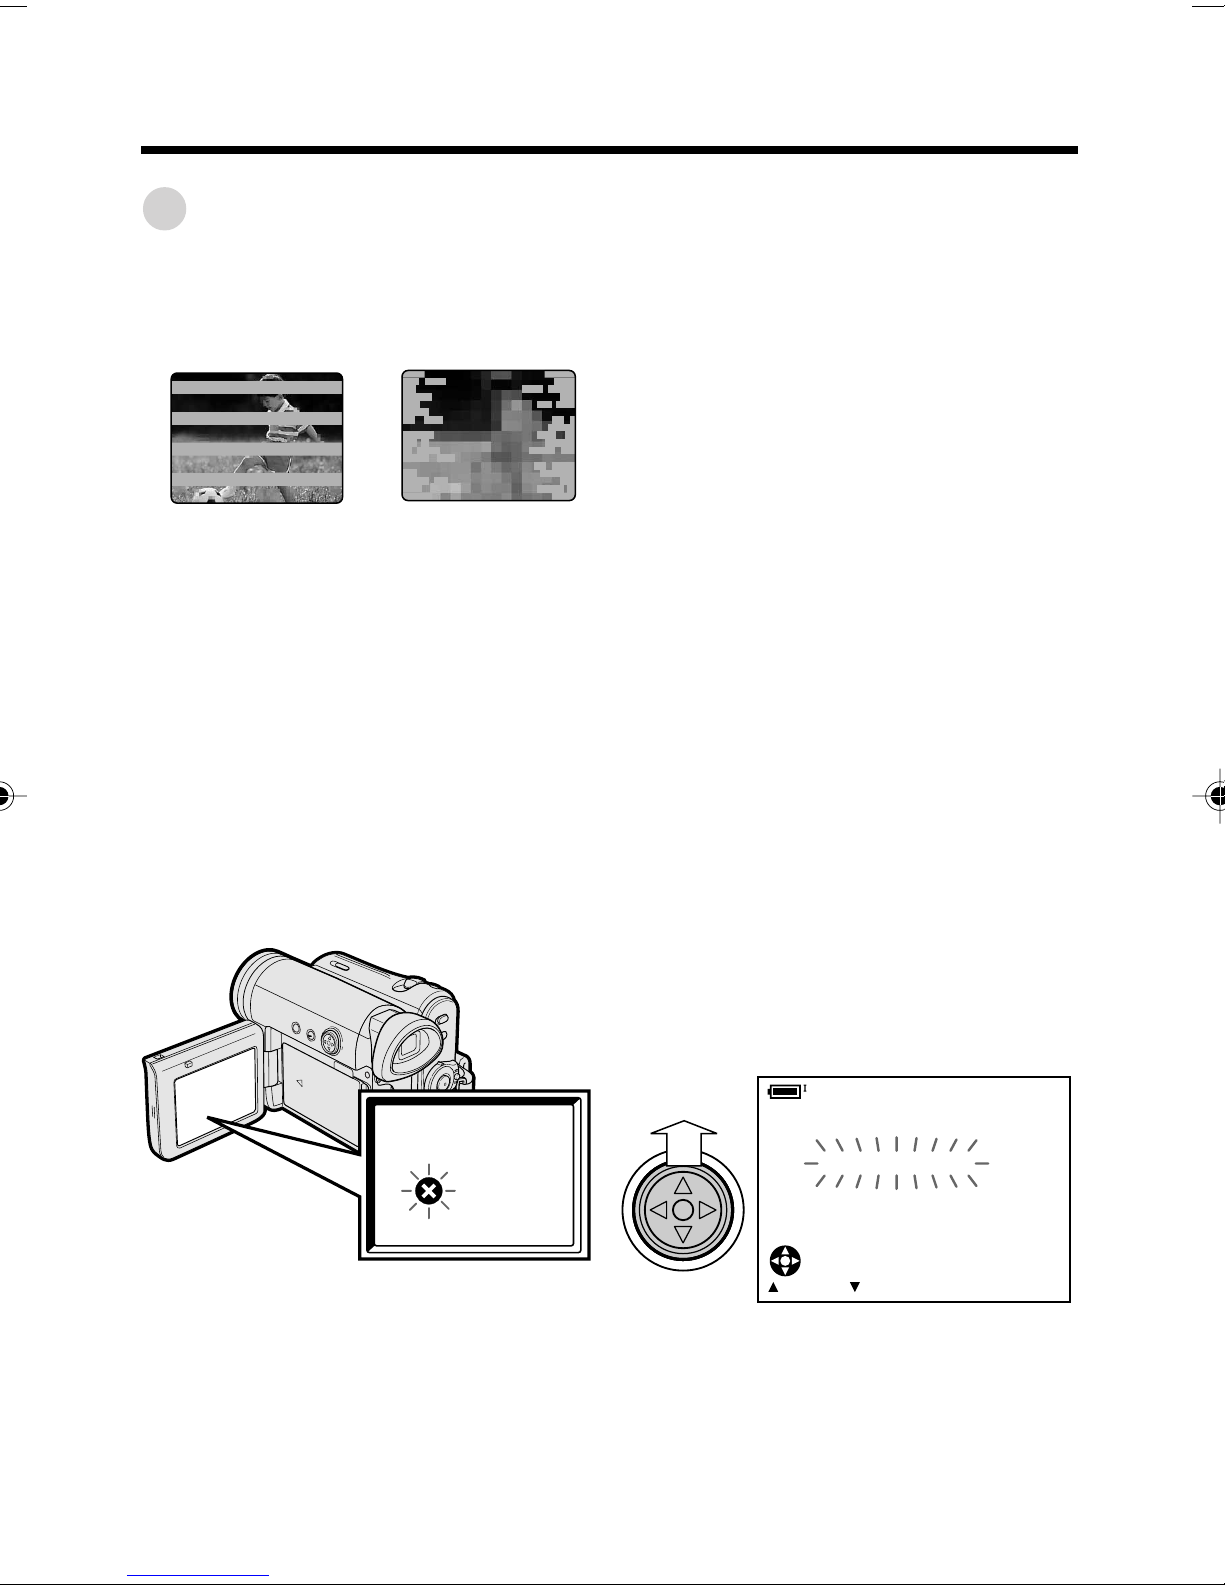
Dew Formation
• What is “dew formation”?
When cold water is poured into a glass,
dew drops form on the glass. This clinging
of water drops is called dew formation.
• When dew forms in your camcorder.
Dew will gradually form on the head drum
of your camcorder and make the video
tape stick to the head. This causes
damage both to the head and the tape.
When dew forms, recording and playback
may not function properly.
For example, when bringing the
camcorder indoors after skiing, place it in
a plastic bag.
Plastic bag
Dew is likely to form in the following
circumstances:
— When moving the camcorder from a
cold place to a warm place.
— When placing the camcorder in a cold
room which is then heated rapidly.
— When moving the camcorder outdoors
from an air conditioned room or car.
— When placing the camcorder in the
direct path of air
blowing from an air
conditioner.
— When placing the
camcorder in a
humid room.
• How to prevent trouble.
When using the camcorder in a place
where dew is likely to form, allow the
camcorder and the video tape to
acclimatise to the surroundings for about
one hour.
1 Be sure to tightly seal the plastic bag
containing the camcorder.
2 Remove the bag when the air tem-
perature inside it reaches the temperature of the room.
• “Dew” warning feature
If dew forms, the word “DEW” flashes on
the screen, and the power will automatically turn off in approximately 10 seconds.
1 If “DEW” flashes, remove the cassette,
leave the cassette compartment open,
and wait for a few hours to allow the
camcorder to acclimatise to the
surrounding temperature.
2 To use the camcorder again, turn on the
power after waiting for a few hours. Be
sure that “DEW” has disappeared.
3 Do not insert a cassette while “DEW” is
flashing; this may result in damage to
the tape.
4 Since dew forms gradually, it may take
10 to 15 minutes before the dew
warning feature engages.
vii
Precautions
Dirty Video Heads
When the video heads have become
clogged with dirt (dust and tape coating
particles),
Striped noise
• mosaic-like noise appears on the
playback picture. (see illustrations above)
• playback pictures do not move.
• during playback, the whole screen
becomes blue.
Causes of video head clogging
• High-temperature and high-humidity
environment
• A lot of dust in the air
• Damaged tape
• Worn tape
• Long-time use
• Dew formation
Mosaic noise
Using a Cleaning Tape (Commercially Available)
Available mode:
Tape Playback
You can clean the video head with a
commercially available cleaning tape.
Notes:
• Excessive use of the cleaning tape may
cause damage to the video heads. Please
read the instructions accompanying the
cleaning tape carefully before using it.
• The fast forward and rewind functions cannot
be used when the cleaning tape is in the
camcorder.
• If the video heads again become clogged
with dirt soon after cleaning, this might be
caused by a damaged tape. In this case,
stop using that cassette immediately.
1 Insert a cleaning tape into the
camcorder.
2 Set the camcorder to Tape Playback
mode.
• The video head cleaning screen
appears.
If the video heads become clogged, the
v indicator appears on the screen. Contact
the nearest SHARP service centre or your
dealer for further advice.
3 Press m on the Operation button to
begin video head cleaning.
• “NOW CLEANING” flashes during
cleaning.
CLEANI NG
CLEANINGNOW
STOPSTART
• After about 20 seconds, video head
cleaning automatically finishes, and
“EJECT THE CASSETTE.” displays.
4 Remove the cleaning tape.
To cancel cleaning, press l.
viii

Operation References
Part Names
For details on the use of each part, refer to the page number indicated in
parentheses.
Front view
Operation button (p. 31)
Zoom lens
Operation References
Stereo microphone
DISPLAY button (p. 31)
LCD LAMP button (p. 24)
1
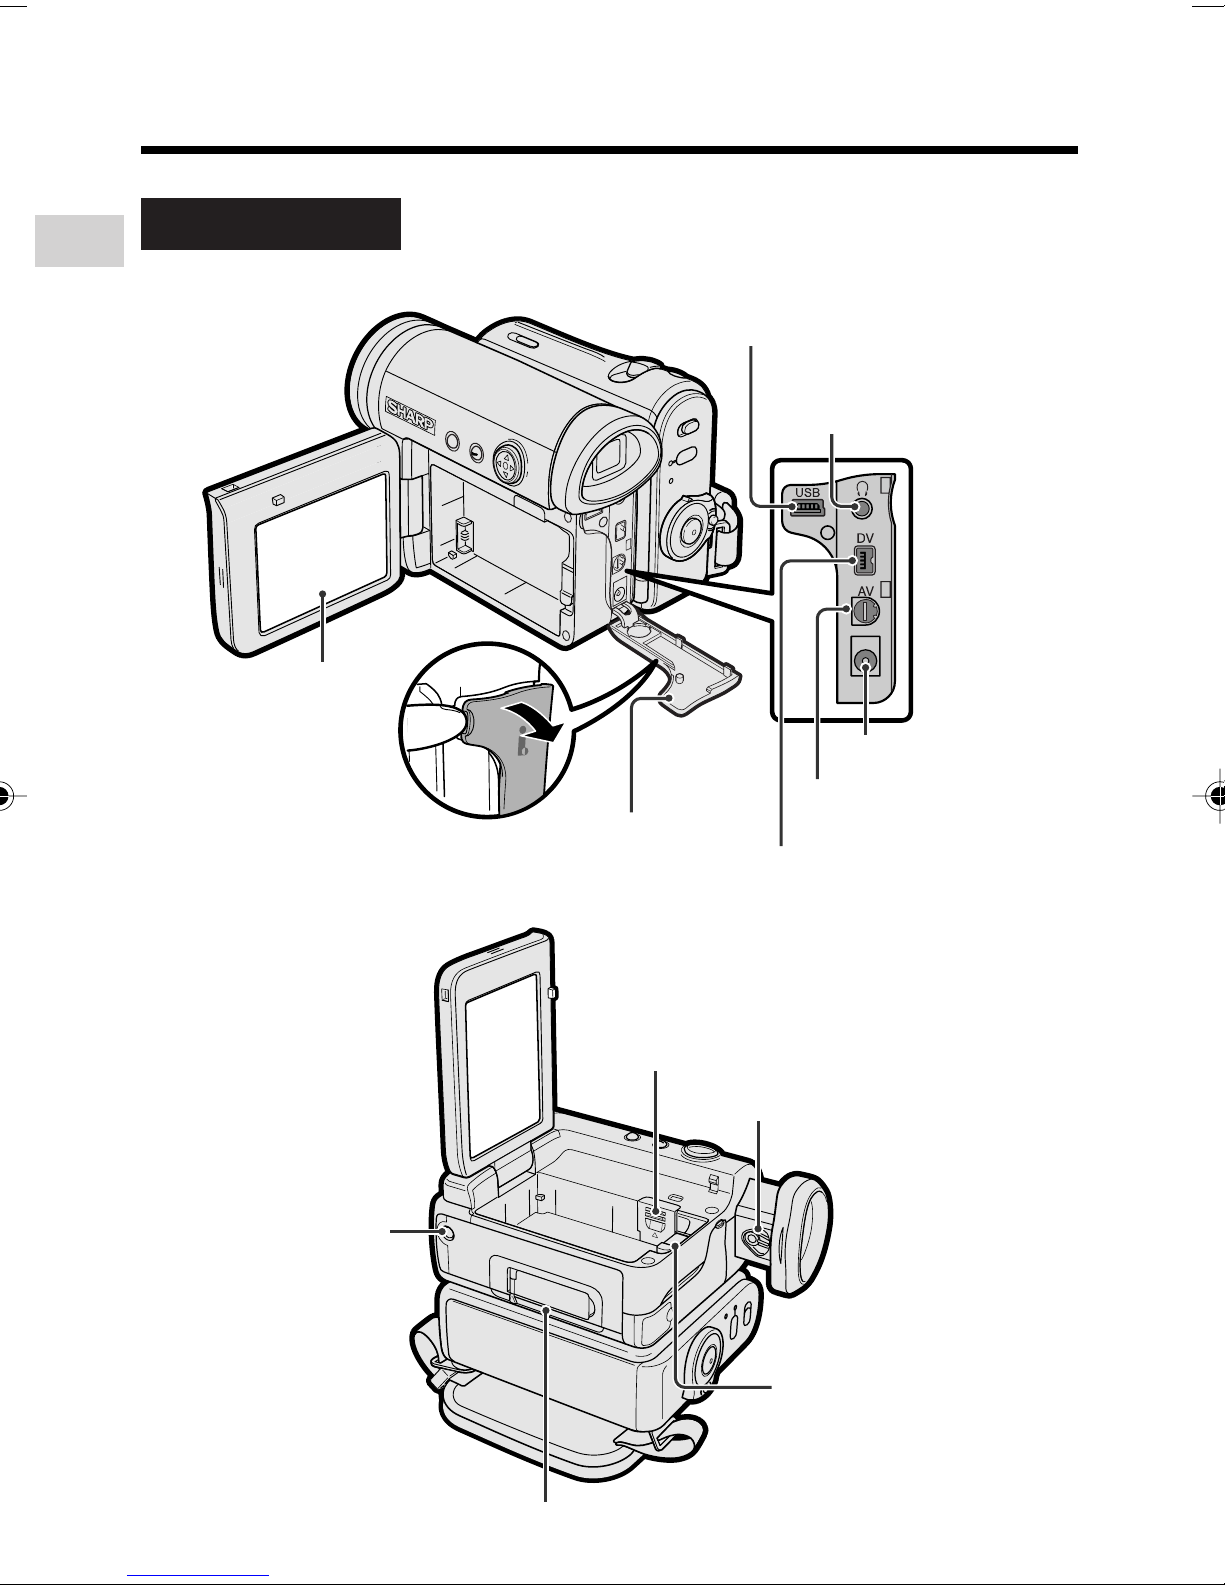
Operation References
Left view
Operation References
USB terminal (p. 83)
Earphones jack
(VL-Z501D only) (p. 29)
LCD monitor
(p. 19)
Tripod socket*
Terminal cover
(pp. 29, 30, 63, 64, 66, 68, 83)
Lithium battery cover (p. 12)
Dioptre adjustment dial (p. 18)
DC IN jack (pp. 8, 9)
AV terminal
(pp. 30, 63, 64, 68)
DV terminal (pp. 66, 68)
* When attaching a tripod
with a guide pin, do not
attach the pin to the bottom
of the camcorder.
2
Battery release (pp. 7, 12)
Card slot cover (p. 11)
Right view
Operation References
Window cleaning cover
Viewfinder (pp. 17, 18)
STANDBY indicator
(p. 24)
POWER/CHARGE
(RED) indicator
(pp. 8, 9, 22)
DC IN jack cover
(pp. 8, 9)
Record Start/Stop button
(p. 22)
Power switch (v Camera
Recording mode/w Playback
mode select switch) (p. 21)
(p. 95)
PHOTO button
(pp. 38, 51, 70)
Power Zoom Wide angle/
Telephoto control (p. 23)/
VOLume control (p. 28)
Media Selection
switch (V Tape
mode/u Card
mode selection
switch) (p. 21)
STANDBY button
(p. 24)
Speaker
Hand strap (p. 16)
Cassette holder (p. 10)
Cassette compartment
door release (p. 10)
Cassette compartment door (p. 10)
3
Operation References
Warning Indicators
If a warning indicator appears on the screen, follow the specified instructions.
Operation References
Displayed for the
first 3 seconds
INSERT
A CASSETTE.
EJECT THE
CASSETTE.
CASSETTE NOT
RECORDABLE.
THE
TAPE
ENDS SOON.
CHANGE THE
CASSETTE.
BATTERY IS
TOO LOW.
DEW
Displayed after
3 seconds
EJECT THE
CASSETTE.
PROTECT. TAB
TAPE END
TAPE END
DEW
Description of warning
There is no video cassette in the camcorder.
Insert a cassette (see page 10).
The video cassette is defective and should be
removed (see page 10).
The erasure protect tab on the video cassette
has been slid to the record-protect position,
preventing recording (see page 92).
The tape is about to end. Prepare a new
cassette.
The tape has reached the end. Replace it with a
new cassette (see page 10).
The battery is almost depleted. Replace it with
a fully charged battery pack (see pages 6, 7).
Dew has formed inside the camcorder. Wait a
few hours for the dew to dry away (see page vii).
About 10 seconds after this warning appears,
the camcorder automatically turns off.
LAMP
USB
USB
4
LAMP
The video heads are clogged and should be
cleaned (see page viii).
The fluorescent lamp behind the LCD monitor is
close to the end of its service life. Call your local
authorized Sharp dealer to have it replaced.
The battery is almost depleted when the
camcorder transfers data through the USB
cable. Use the AC adapter or fully charged
battery pack as the power source (see pages
6–9, 84).

Displayed for
5 seconds
Description of warning
Operation References
NO
MEMORY CARD
MEMORY
CARD
FULL
NO DA TA ON
MEMORY CARD
MEMORY CARD
ERROR
FORMAT
MEMORY CARD
MEMORY CARD
PROTECTED
DATA
PROTECTED
The card is not inserted or is inserted improperly. Check that it is
properly inserted (see page 11).
The capacity of the card is full and cannot store any more images.
Delete unnecessary images (see page 78) or replace the card with
a new one (see page 11).
The card has no images recorded in the format the camcorder can
recognize.
The images in the card are corrupted or recorded in a format
which is not compatible with this camcorder. Format the card to
use it with this camcorder (see page 73)*.
The card has not been formatted with this camcorder. Format the
card (see page 73)*.
The card is write-protected (see page 11).
You are trying to delete a protected image. Cancel the protection
setting (see page 77).
MEMORY CARD
RE AD ERROR
CANNOT
STORE DATA
PLEASE USE
PHOTO BUTTON
MA X I MUM
The selected image cannot be read by this camcorder. Format the
card to use it with this camcorder (see page 73)*.
The card cannot record any data due to a problem with the card or
data on the card. Replace the card (see page 11).
The camcorder cannot record with the Record Start/Stop button in
Card Recording mode. Press the PHOTO button (see page 70).
The print order cannot be set to more than 999 images.
9 99 IMAGE S
You cannot record any image with a file number bigger than 999–
MA X I MUM
F ILE NUMBER
9999. Set FILE NO. menu item to “RESET” (see page 74), then
format the card (see page 73)* or replace the card with a new one
(see page 11).
* Formatting a card erases all stored images, including delete-protected images. Be sure to
backup important data on your computer or other media before formatting the card.
Note:
• N indicates a flashing display.
5
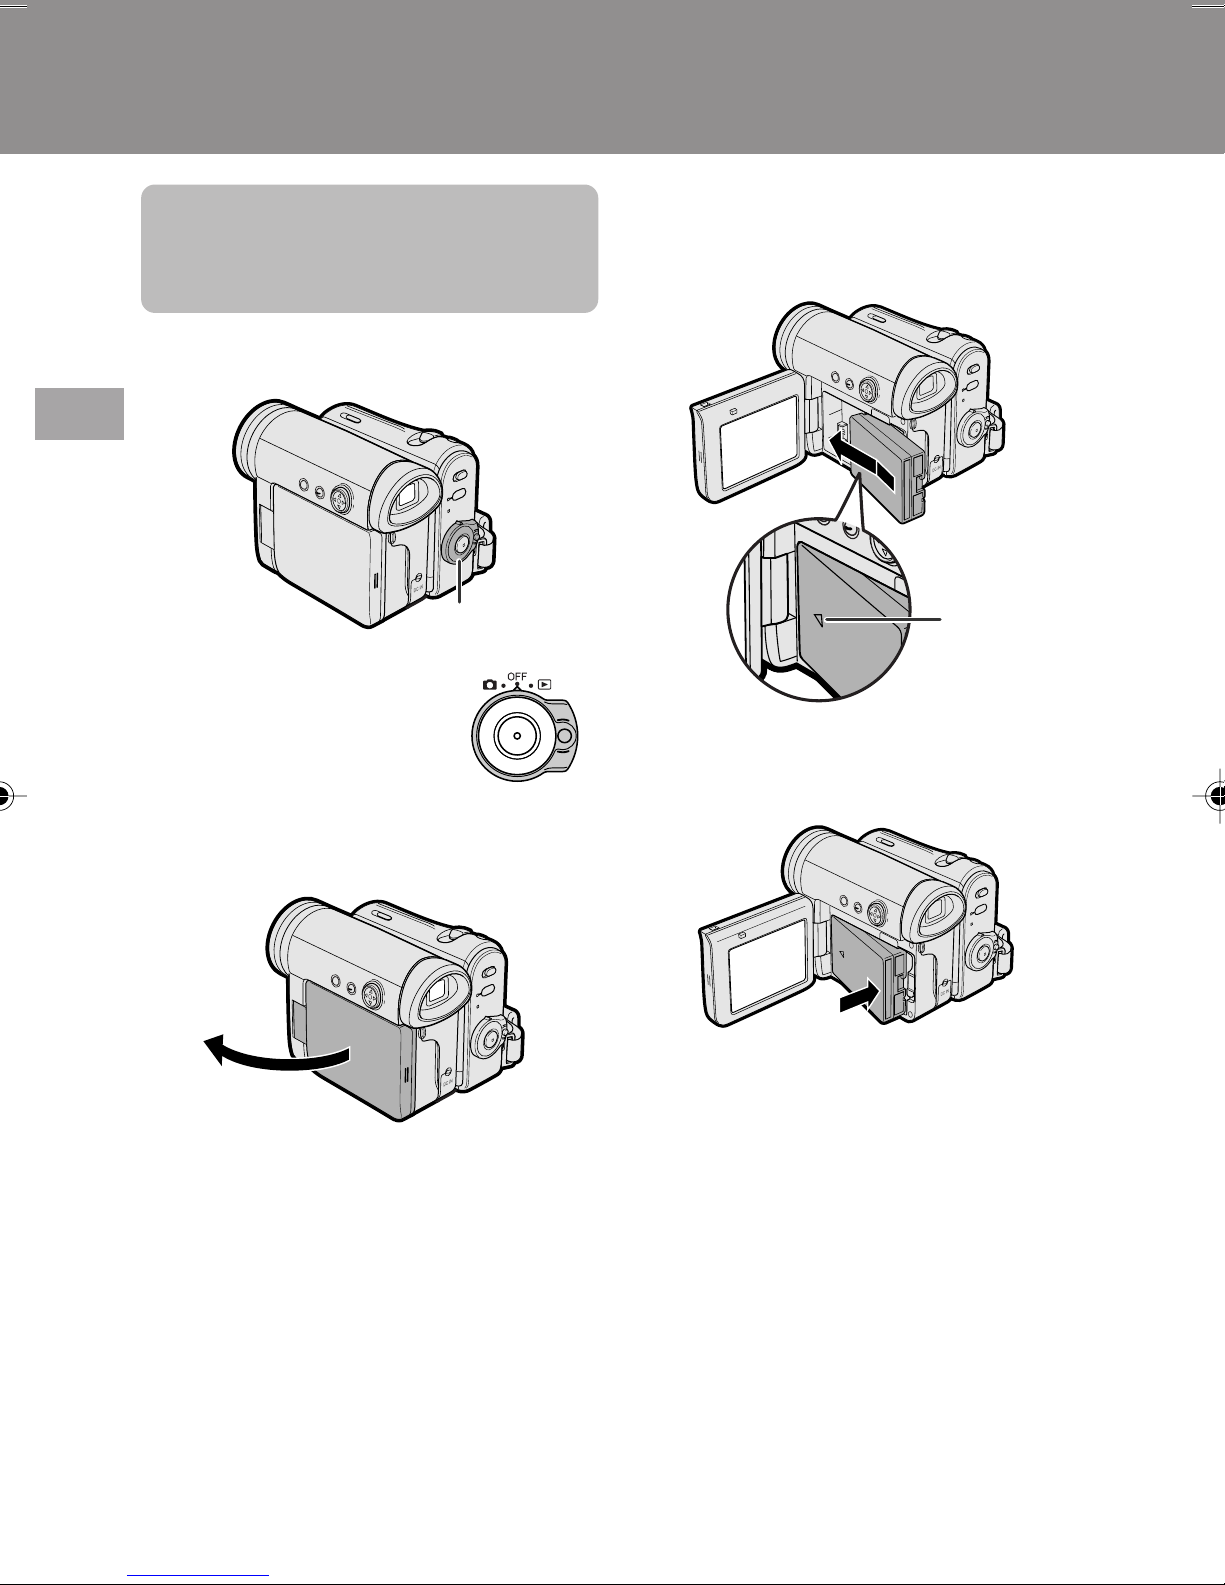
Preparation
Preparation
Attaching and
Removing the Battery
Pack
Attaching
Preparation
1 Make sure that the Power
switch is set to OFF.
Power switch
3 Slide the battery pack in the direction
of the arrow with the “m” mark facing
out.
“m” mark
4 Push the battery pack in the direction
of the arrow until it clicks.
2 Open the LCD monitor to a 90° angle
to the camcorder body.
90˚
6
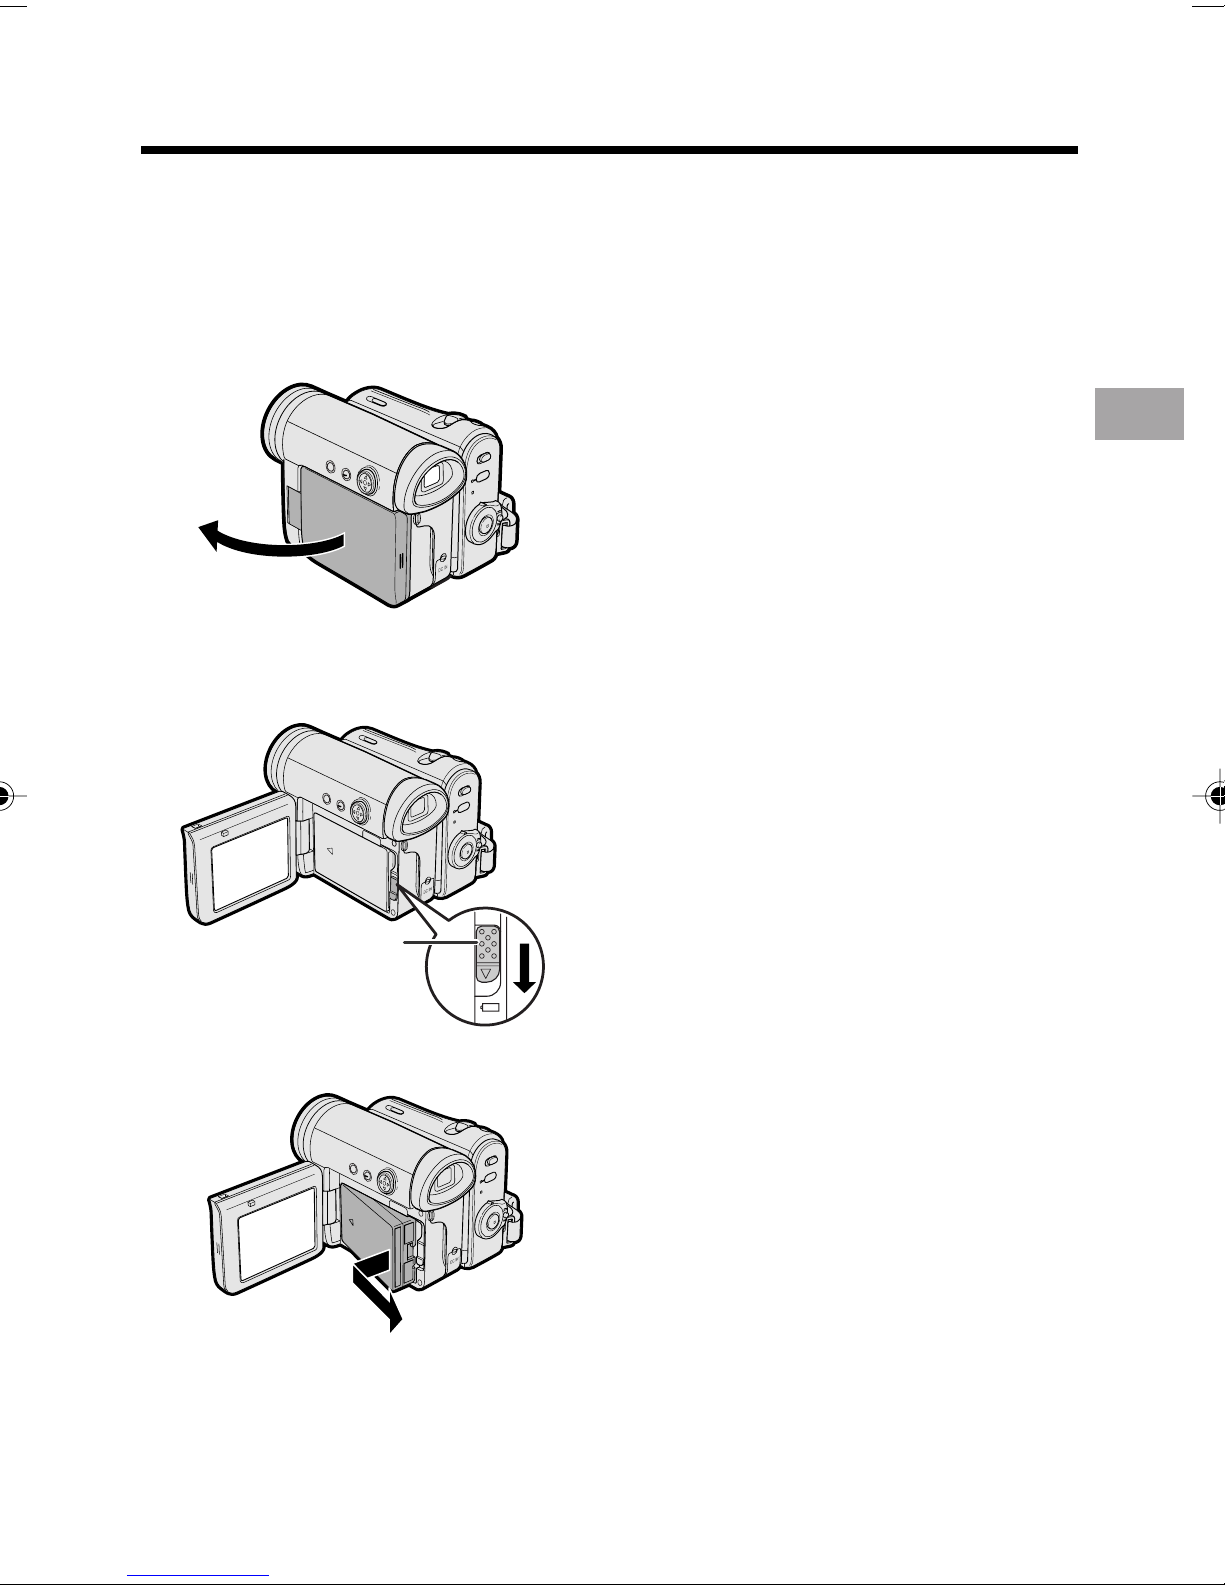
Removing
1 Make sure that the Power switch is
set to OFF, then open the LCD
monitor to a 90° angle to the
camcorder body.
90˚
2 Slide the battery release in the
direction of the arrow.
Notes:
• BEFORE REMOVING THE BATTERY PACK,
ALWAYS STOP RECORDING OR PLAYBACK AND TURN THE POWER OFF.
Removing the battery pack while shooting or
during playback may damage the tape by
causing it to wrap around the video head
drum or destroy the card, rendering it
unreadable and unwritable.
• Remove the battery pack from the camcorder
if you will not use the camcorder for a long
period of time.
• Make sure that the battery pack is firmly
attached during operation. If it is not, the
battery pack may come off or camcorder
operation may fail because of the poor
contact pressure.
• To prevent damage to the battery pack when
removing, be sure to firmly hold the battery
pack while pressing the release.
• Use only SHARP model BT-L226 battery
packs with this camcorder. Use of other
batteries may create a risk of fire or
explosion.
• Before closing the LCD monitor, make sure
the battery pack is properly attached to the
camcorder, otherwise the monitor may be
damaged.
Preparation
Battery release
3 Take the battery pack out.
7
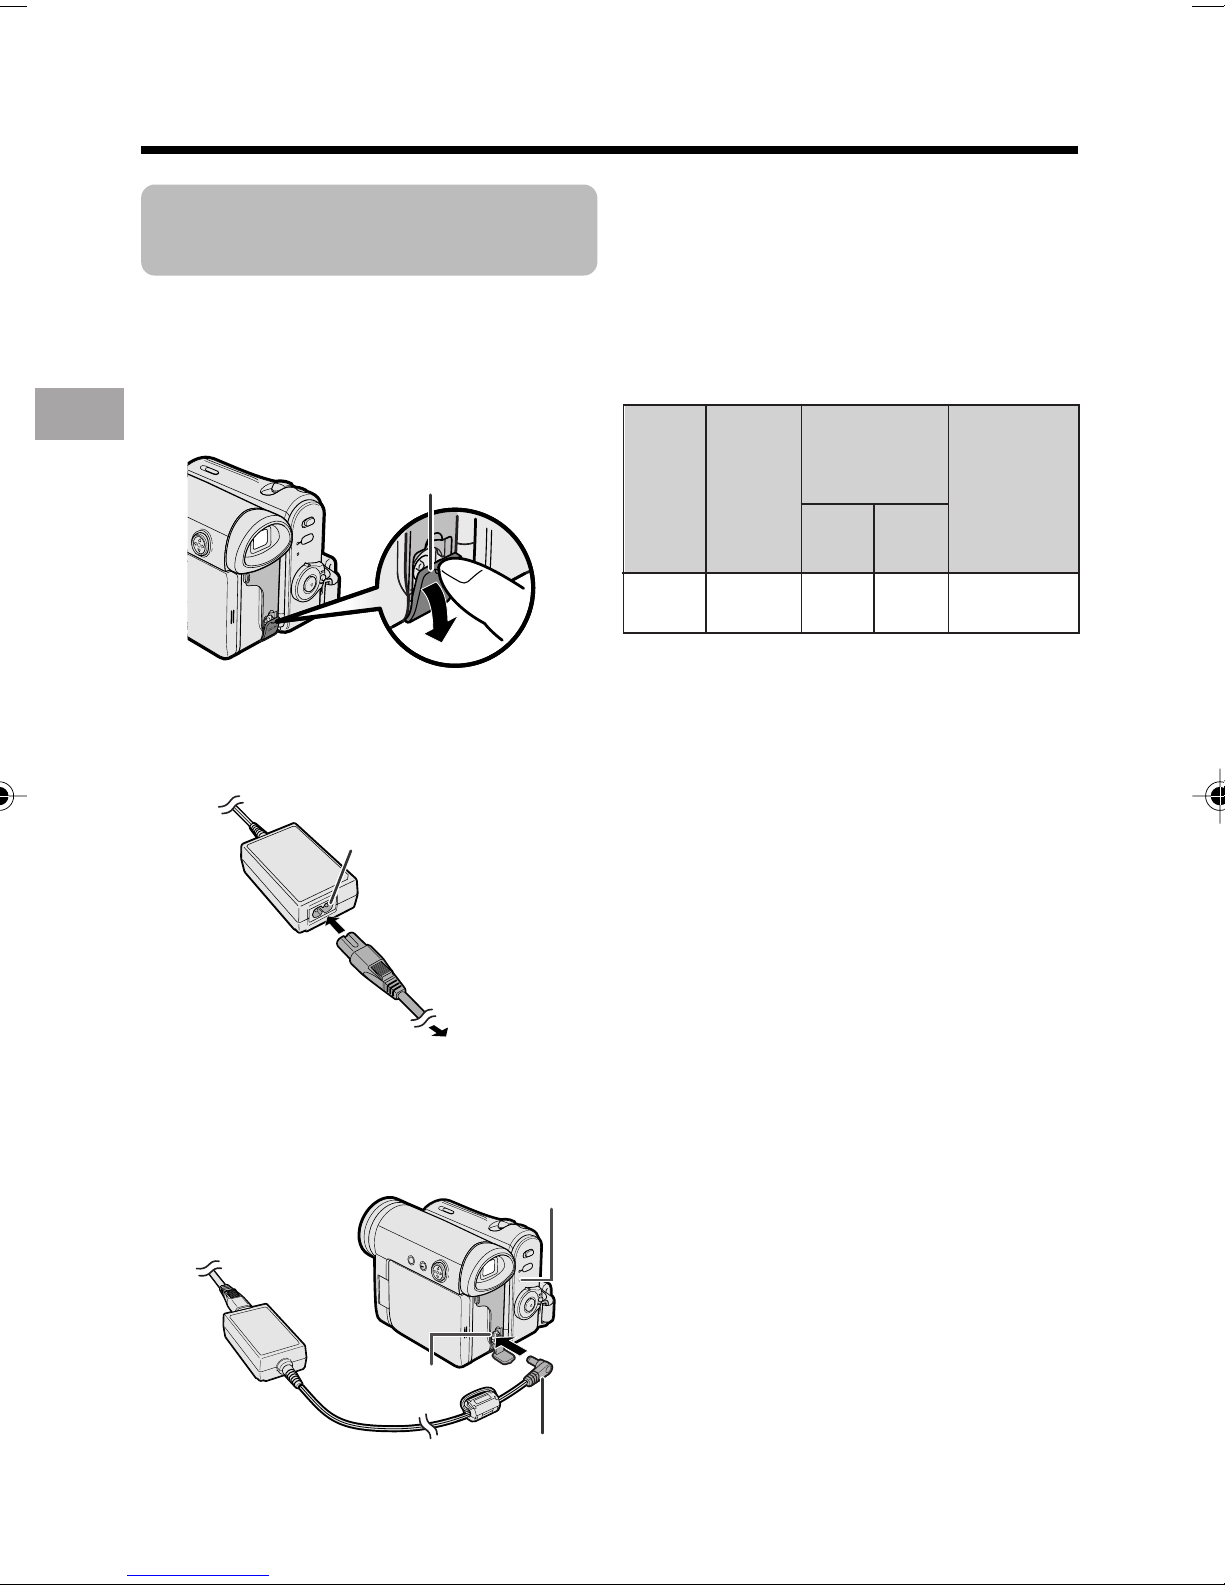
Preparation
Charging the Battery
Pack
1
Attach the battery pack on the
camcorder, and make sure that the
Power switch is set to OFF.
2 Open the DC IN jack cover.
DC IN jack cover
Preparation
3 Connect the supplied power cord to
the AC power socket on the AC
adapter, and insert the AC plug into a
power outlet.
AC power socket
To power
4 Insert the DC plug into the DC IN
jack of the camcorder.
• The POWER/CHARGE (RED)
indicator lights up red.
POWER/CHARGE (RED)
outlet
indicator
4 Remove the DC plug from the DC IN
jack, then remove the AC adapter
from the power outlet.
Charging time and maximum
continuous recording and playback
times in Tape modes
Max.
continuous
Battery
pack
BT-L226
• The chart specifies the approximate times in
minutes.
Notes:
• Charge the battery pack between 10°C and
30°C. The battery pack may not charge
properly at temperatures too low or too
high.
• The battery pack and AC adapter become
warm during charging. This is not a
malfunction.
• Using the zoom (see page 23) and other
functions or turning the power on and off
frequently will increase power consumption. This may result in a decrease in the
actual recording time compared to the
maximum continuous recording time
listed above.
• The charging time and recording time may
vary depending on the ambient temperature and the condition of the battery pack.
• See pages 94 and 95 for more information on
using the battery pack.
• Charge only SHARP model BT-L226 battery
packs. Other types of battery packs may
burst, causing personal injury and damage.
• When attaching the supplied audio/video/Svideo cable or USB cable, remove the DC
plug, open the terminal cover and connect it.
Charging
time
120
recording time
LCD
closed
120 105
LCD
open
105
Max.
continuous
playback time
on LCD
DC IN jack
• The POWER/CHARGE (RED)
indicator turns off when the battery is
8
charged.
DC plug
Powering the
Camcorder from an
AC Outlet
You can also power the camcorder from a
power outlet by using the supplied AC
adapter.
4 Insert the DC plug into the DC IN
jack of the camcorder.
POWER/CHARGE (RED)
indicator
Note:
• The supplied AC adapter is specially
designed for use with this camcorder, and
should not be used as a power supply for
other camcorders.
1 Make sure that the Power switch is
set to OFF.
2 Open the DC IN jack cover.
DC IN jack cover
3 Connect the supplied power cord to
the AC power socket on the AC
adapter, and insert the AC plug into a
power outlet.
Preparation
DC IN jack
DC plug
5 Hold down the Lock button and set
the Power switch to v or w.
• The POWER/CHARGE (RED)
indicator lights up green.
Notes:
• BEFORE REMOVING THE DC PLUG,
ALWAYS STOP RECORDING OR PLAYBACK AND TURN THE POWER OFF.
Removing the DC plug while shooting or
during playback may damage the tape by
causing it to wrap around the video head
drum or destroy the card, rendering it
unreadable and unwritable.
• Disconnect the AC adapter from the
camcorder if you will not use the camcorder
for a long period of time.
AC power socket
To power
outlet
9

Preparation
Inserting and
Removing a Cassette
Inserting
1 Attach the power source to the
camcorder, then slide and hold the
cassette compartment door release
as you open the cassette compartment door.
• After confirmation sound, the
cassette holder extends and opens
Preparation
automatically.
Cassette compartment door release
2 Insert a commercially available Mini
DV cassette fully with the window
facing outwards, and with the erasure
protect tab facing upwards.
Erasure protect tab
SAVE
REC
3 Press the “PUSH” mark gently until
the cassette holder clicks into place.
• The cassette holder retracts
automatically.
4 Wait for the cassette holder to fully
retract. Close the compartment door
by pressing its centre until it clicks
into place.
Removing
Perform step 1 above, then take out the
cassette.
Notes:
• Do not try to close the cassette compartment
door while the cassette holder is extending or
retracting.
• Be careful not to get your fingers caught in
the cassette holder.
• Do not apply force to the cassette holder
except when pressing the “PUSH” mark to
close it.
• Do not tilt the camcorder or hold it upside
down when you are inserting or removing a
cassette. It may damage the tape.
• Remove the cassette if you will not use the
camcorder for a long period of time.
• If you do not correctly close the cassette
holder in step 3, the cassette protection
mechanism of the camcorder might eject the
cassette. If this happens, repeat the insertion
procedure.
• Do not attempt to pick up the camcorder by
the cassette compartment door.
• If the battery power is too low, you may not
be able to eject the cassette. Replace the
battery pack with a fully charged one.
• You can only use Mini DV cassettes. Large
DV cassettes cannot be used. Be sure to use
Mini DV cassettes with the i
• See page 92 for more information on the
video cassette tapes intended for use with
this camcorder.
mark.
10
“PUSH” mark
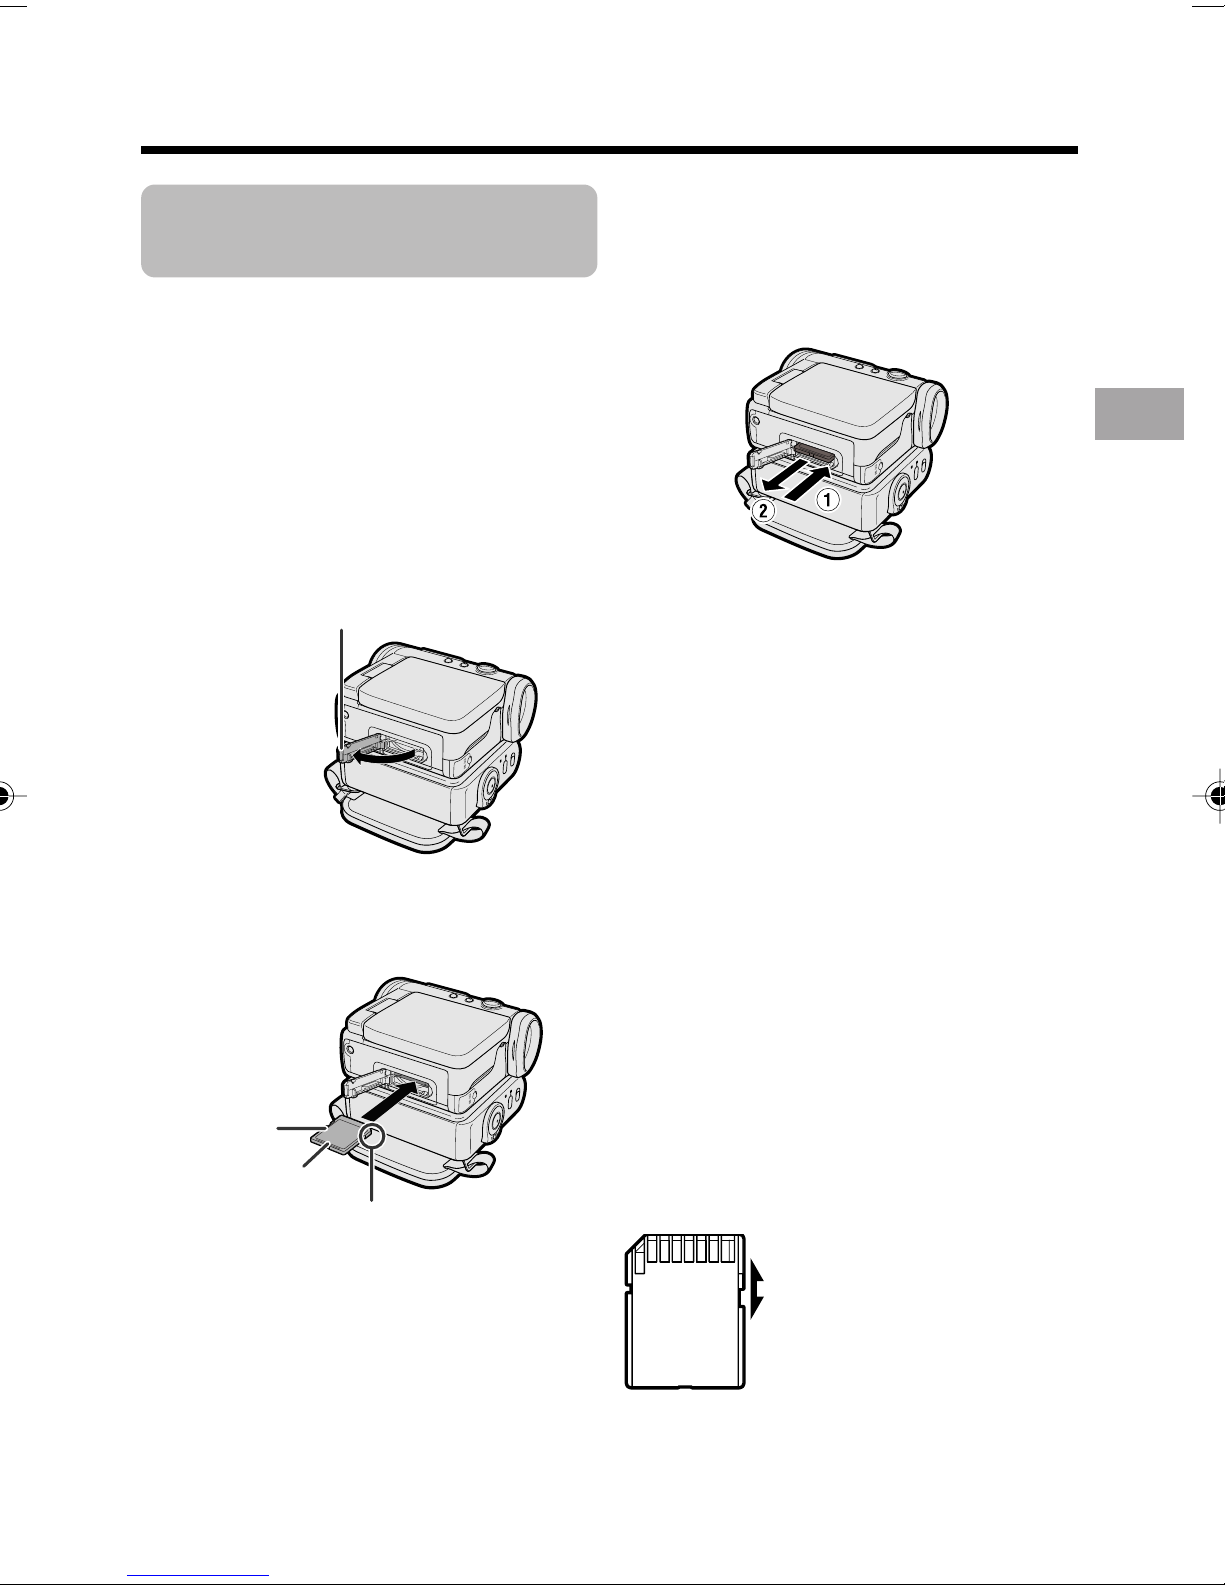
Inserting and
Removing
Removing a Card
You can use an SD Memory Card (supplied
with VL-Z501D) or a MultiMediaCard
(commercially available) for storing still
images.
Inserting
1 Make sure that the Power switch is
set to OFF.
2 Open the card slot cover.
Card slot cover
3 Insert a card into the slot as shown
below, and push it in fully.
Perform steps 1 and 2 above, push the card
and release slowly (1). Then pull the card
straight out (2) as shown below.
Preparation
Notes:
• You can use only the SD Memory Card or the
MultiMediaCard (see page 93).
• The card supplied with VL-Z501D is
preformatted for immediate use.
• See page 93 for more information on the
cards intended for use with this camcorder.
• Do not remove the card from the
camcorder while recording data on the
card (S indicator flashes during recording). This may delete the recorded image
or damage the card.
• You cannot insert or remove the card when
using a tripod.
Write-protect
switch
Label
Clipped corner
4 Close the card slot cover securely.
About the write-protect
switch
SD Memory Card has a write-protect switch.
When the switch is set to the locked
position, you cannot record/delete data or
format the card. Set it to the unlocked
position to record/delete data or format the
card.
Back view
Unlocked position
Locked position
11
Preparation
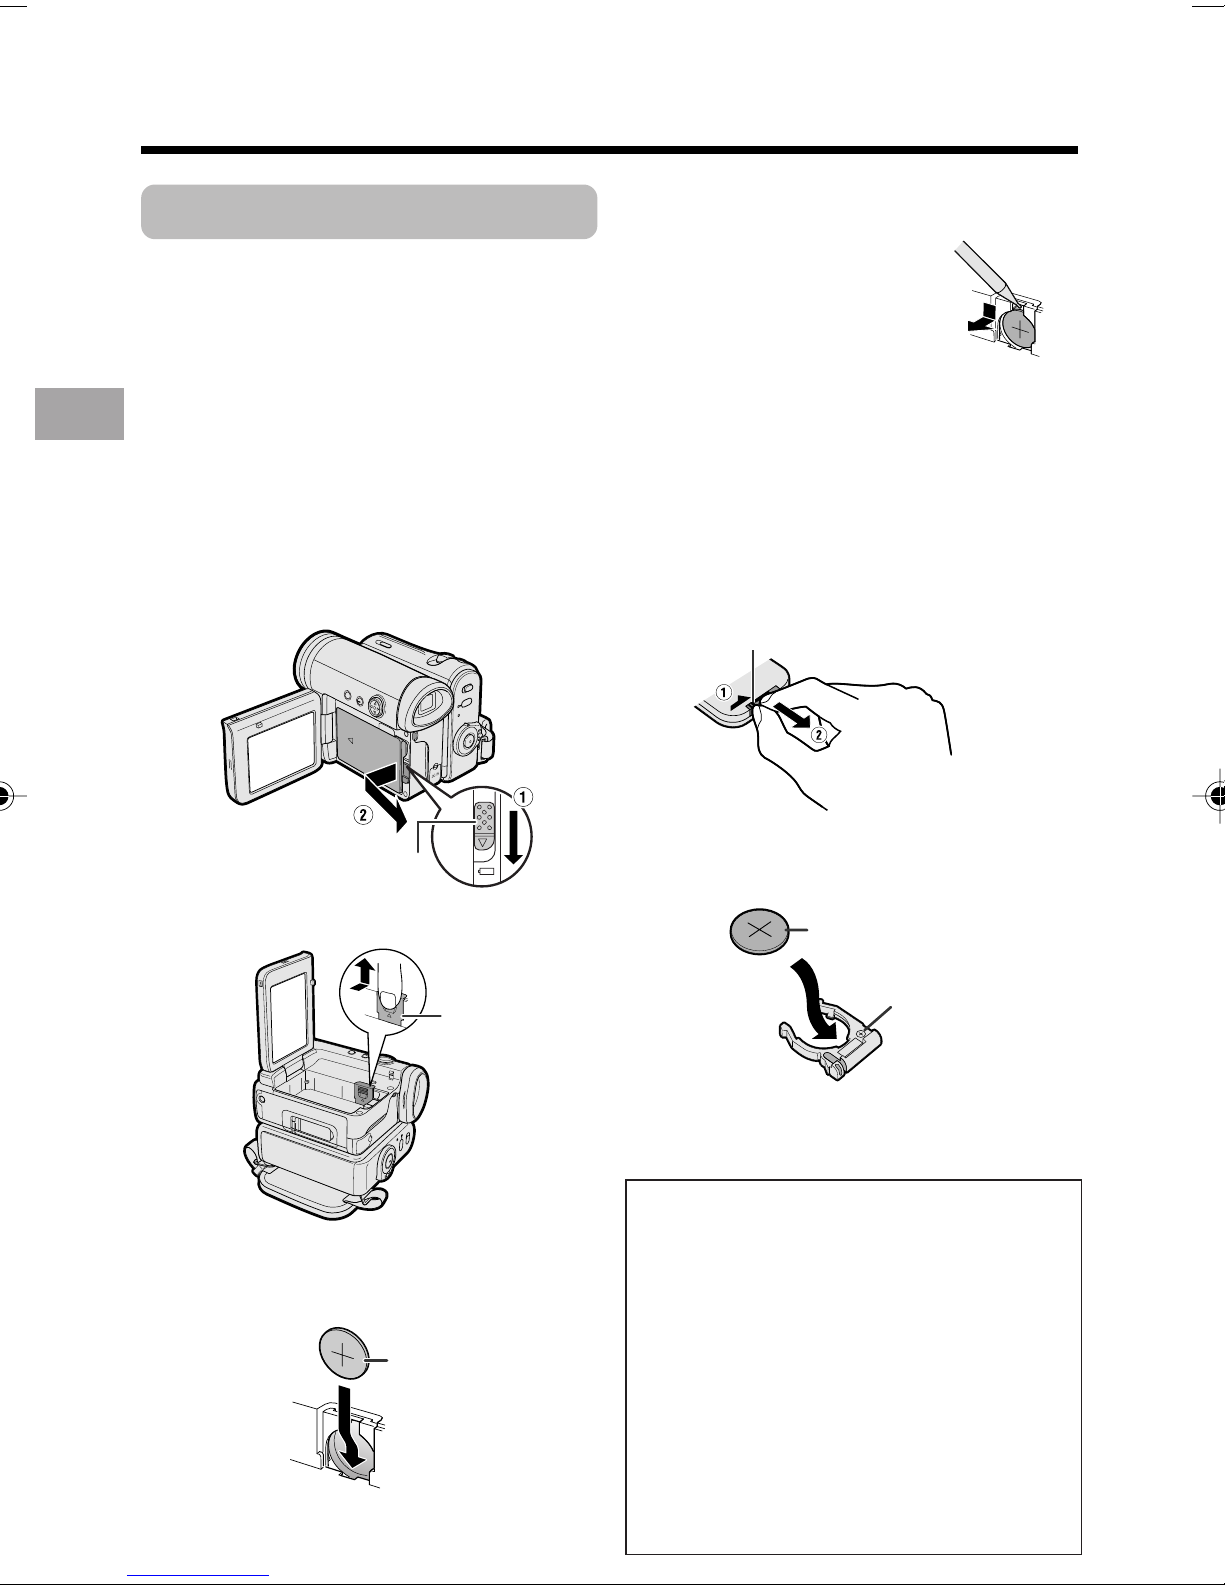
Installing the Lithium Batteries
Installing the Memory Battery
The supplied CR 1216 type lithium battery is
used to store the memory of the date and
time settings.
1 Make sure that the Power switch is
set to OFF.
2 Open the LCD monitor to a 90° angle
to the camcorder body.
3 Slide the battery release in the
Preparation
direction of the arrow, then take the
battery pack out.
Removing the Memory Battery
Perform steps 1 to 4 above,
then lift out the battery by
using a pointed object such as
the tip of a ballpoint pen.
Installing the Battery to
Remote Control (VL-Z501D only)
The CR 2025 type lithium battery
supplied with VL-Z501D is used to power
the remote control unit.
1 Hold the remote control facing down,
and pull out the battery holder while
pressing the tab toward the centre.
Ta b
Battery release
4 Pull out the lithium battery cover in
the direction of the arrow.
5 Insert the smaller lithium battery into
the compartment with the H side of
the battery facing out.
CR 1216 type
lithium battery
6 Close the lithium battery cover firmly
12
until it clicks into place.
Lithium
battery cover
2 Insert the larger lithium battery into the
battery holder with the H side of the
battery facing the m side of the holder.
H side, CR 2025 type
lithium battery
“m” side
3 Insert the battery holder back into
position.
Notes on the Use of the Lithium battery
CAUTION:
incorrectly replaced. For camcorder, replace
only with same or equivalent type CR1216, for
remote control unit, replace only with same or
equivalent type CR2025, both recommended
by the equipment manufacturer.
X KEEP THIS BATTERY AWAY
FROM CHILDREN. IF SWALLOWED,
CONSULT A PHYSICIAN IMMEDIATELY
FOR EMERGENCY TREATMENT.
Z BATTERY MAY EXPLODE IF
MISUSED OR INSTALLED WITH POLARITY REVERSED. DO NOT RECHARGE,
DISASSEMBLE OR DISPOSE OF IN FIRE.
Danger of explosion if battery is
• Do not short-circuit, recharge, disassemble,
or heat the lithium battery.
• Should the lithium battery leak, wipe the
battery compartment clean, and then insert a
new battery.
• The lithium batteries will last about one year
under normal usage.
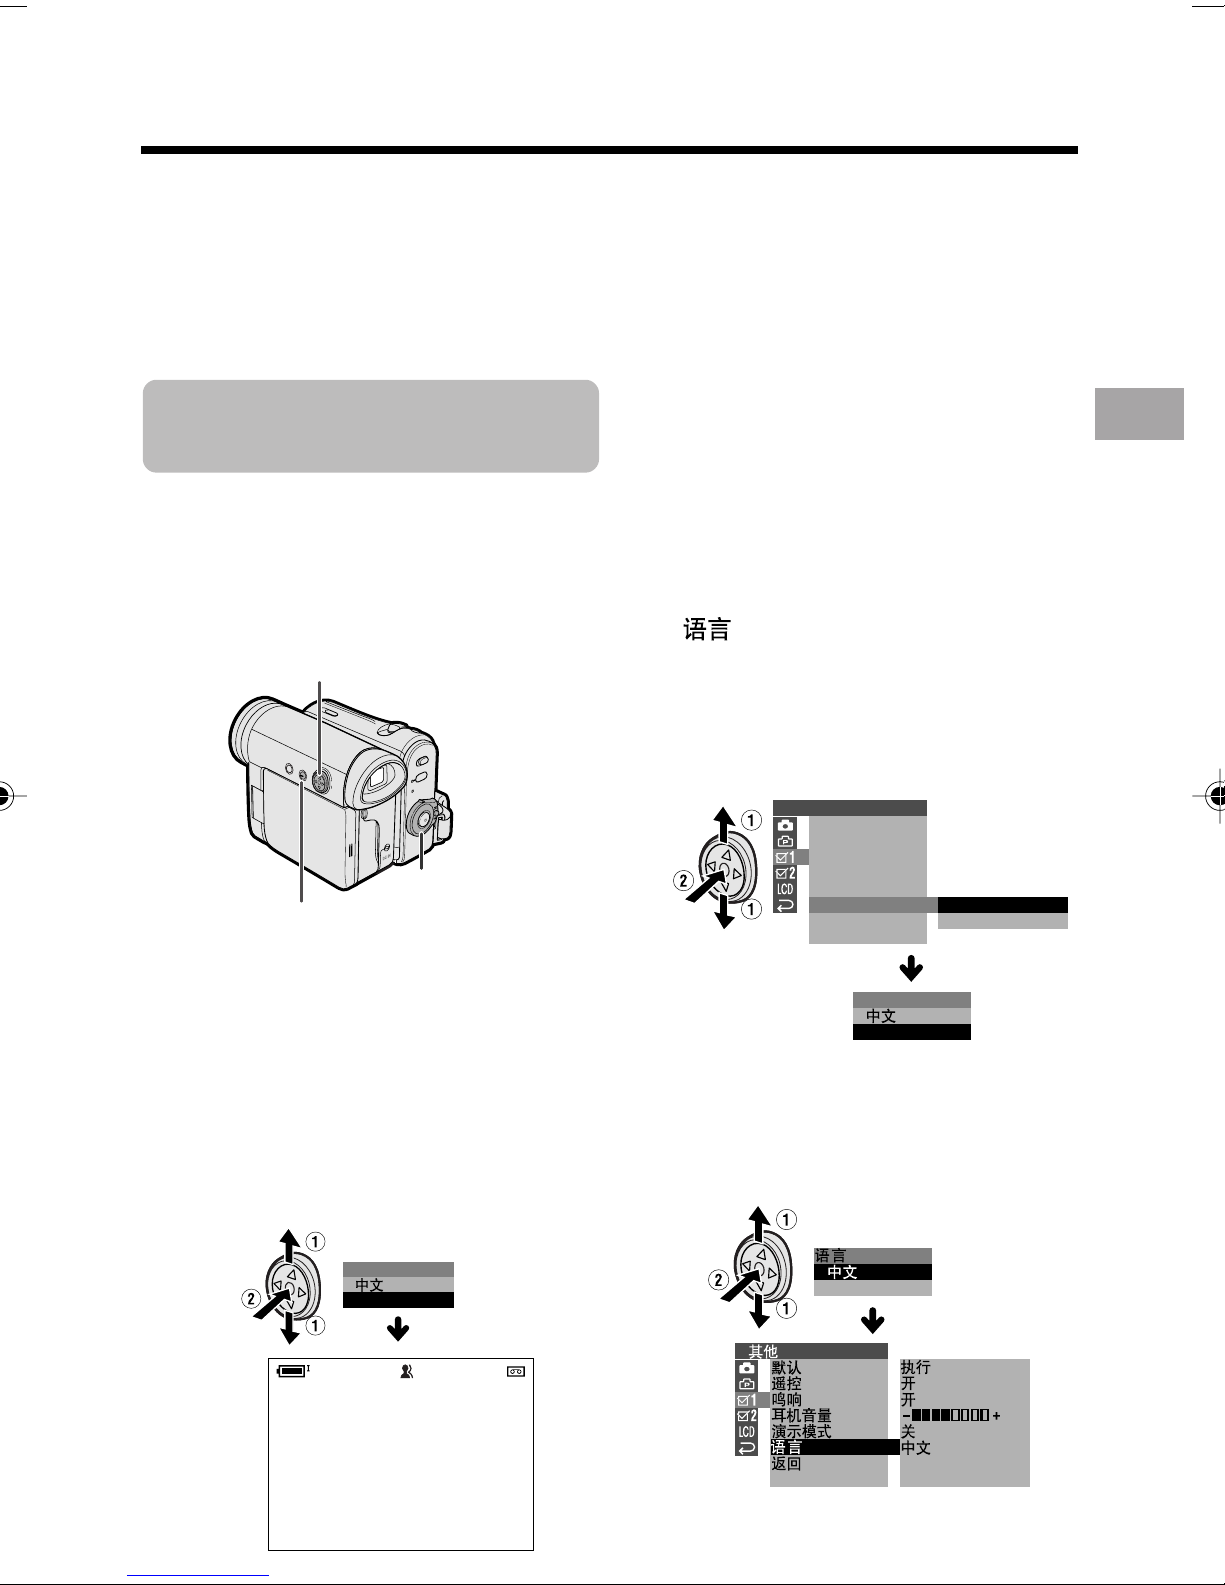
Selecting the Language for
the On-screen Display
Available modes:
Tape Camera, Card Camera
This camcorder allows you to choose
Chinese or English as the on-screen display
language.
Operation button
Power switch
DISPLAY button
Setting
Changing
1 In Tape Camera or Card Camera
mode, press the DISPLAY button until
the mode screen appears.
2 Press l or m on the Operation
button to select “MENU”, then press
the centre of the Operation button.
3 Press l or m to select “EXECUTE”,
then press the centre of the Operation
button.
4 Press l or m to select Z, then press
the centre of the Operation button.
5 Press l or m to select “LANGUAGE”
(“ ”), then press the centre of the
Operation button.
6 Press l or m to select “EXECUTE”,
then press the centre of the Operation
button.
•
The language selection screen appears.
OTHERS 1
DEFAULT
REMOTE
BEEP
PHONES VOL
DEMO MO DE
LANGUAGE
RETURN
EXECUTE
RETURN
Preparation
1 Hold down the Lock button and set
the Power switch to v.
• The language selection screen
appears.
2 Press l or m on the Operation
button to select the desired language,
then press the center of the Operation
button.
LANGUAGE
ENGL I SH
AU TOAUTO
LANGUAGE
ENGL I SH
7 Press l or m to select the desired
language, then press the centre of the
Operation button.
• The menu screen displays in the
language selected.
ENGL I SH
1
8 Press the DISPLAY button to turn off
the menu screen.
13
Preparation
OTHERS 2
RETURN
T IME CODE OFF
OFFTC OUT
SETTING
12H 24H/
24H
.1120
000:
03.
2.
000
:
1 2003.
SETT ING
SETT ING
2.
000
:
6 2003.
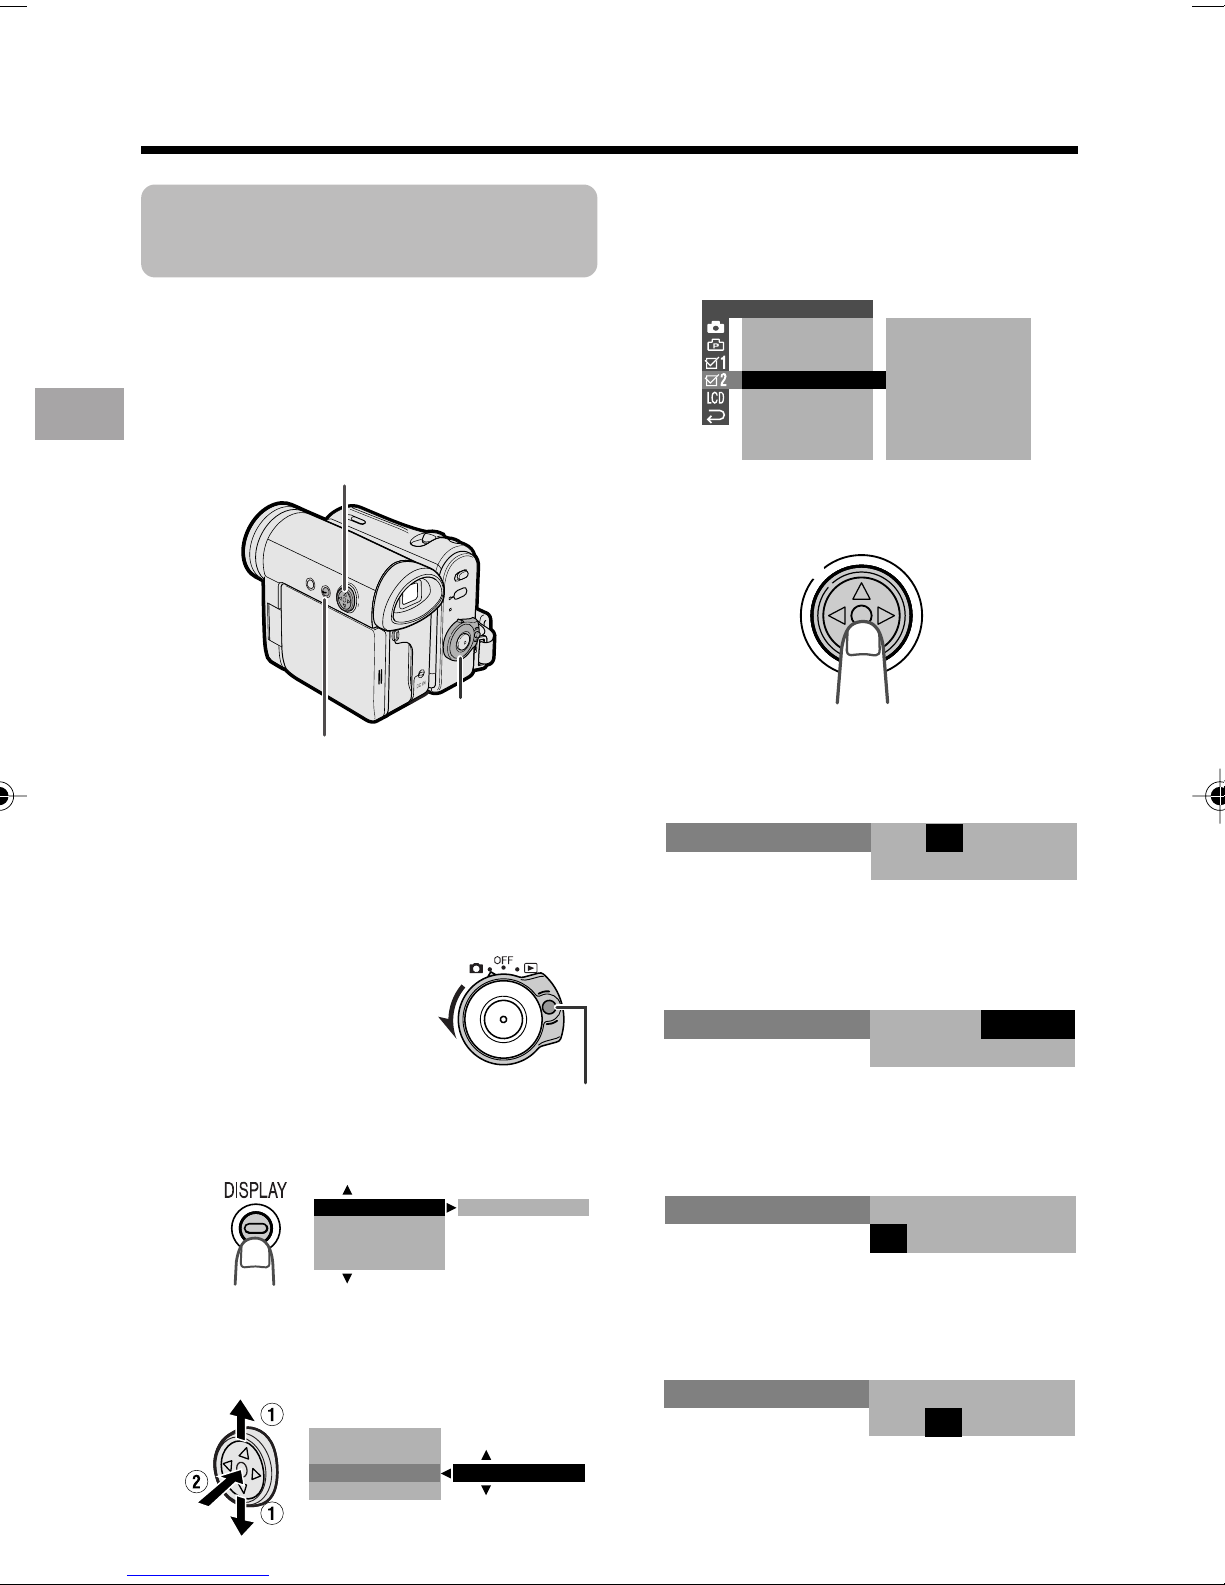
Setting the Date and
Time
Available modes:
Tape Camera, Card Camera
Example: Setting the date to 2 June 2004
(2. 6. 2004) and the time to 10:30 am
(10:30).
Operation button
Preparation
Power switch
DISPLAY button
Note:
• Before performing the steps below, make
sure that the CR1216 type lithium battery has
been installed (see page 12).
4 Press l or m to select “EXECUTE”,
then press the centre of the Operation
button.
5 Press the centre of the Operation
button.
6 Press m or l to select “2” (day),
then press the centre of the Operation
button.
• The example screens shown are for Tape
Camera mode.
1 Hold down the Lock
button and set the
Power switch to v.
2 Press the DISPLAY button until the
mode screen appears.
BLC GA IN/ OFF
FADE
M
ENU
SCENE
M
3 Press l or m on the Operation
button to select “MENU”, then press
the centre of the Operation button.
14
BLC GA IN/
FADE
M
ENU
SCENEMENU
ENU
Lock button
EXECUTE
7 Press m or l to select “6” (month),
then press the centre of the Operation
button.
8 Press m or l to select “2004” (year),
then press the centre of the Operation
button.
SETT ING
2.
6 2004.
:
0 00
9 Press m or l to select “10” (hour),
then press the centre of the Operation
button.
2.
SETT ING
6 2004.
:
01 00
10
Press m or l to select “30” (minute),
then press the centre of the Operation
button.
SETT ING
• The internal clock now starts
operating with the seconds display.
11
Press the DISPLAY button to turn off
2.
6 2004.
0130:00
:
the menu screen.
Note:
• If the date and time have been set, the
SETTING 1 screen (T) appears in step 4.
Select “SETTING” in the OTHERS 2 screen
(~) using the Operation button.
Changing to the 12-hour
Time Mode
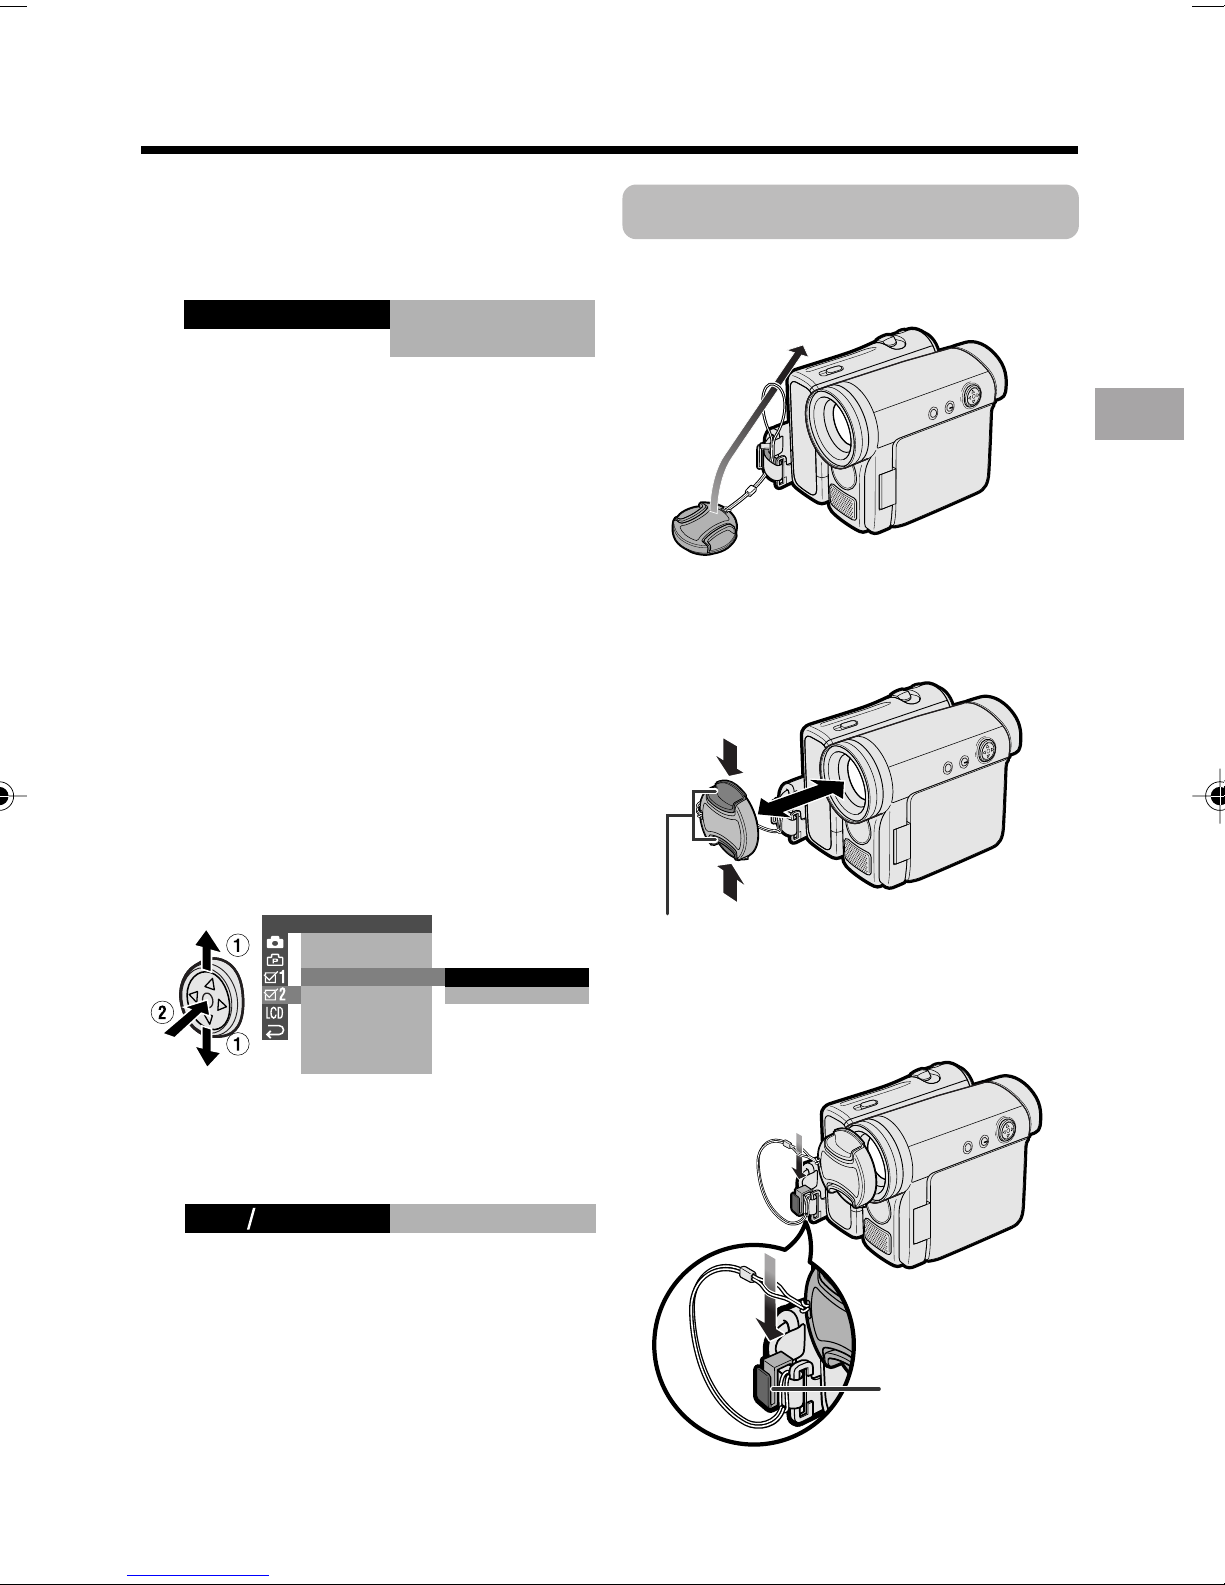
Using the Lens Cap
Attach the strap of the lens cap to the hand
strap as shown below.
Preparation
When attaching or removing the lens cap,
grasp the indents on both sides of the cap.
1 After performing step 10 above, press
l or m to select “12H/24H”, then
press the centre of the Operation
button.
OTHERS 2
T IME CODE
TC OUT
12H 24H/
SETTING
RETURN
2 Press l or m to select “12H”, then
press the centre of the Operation
button.
21H24H
12H
3 Press the DISPLAY button to turn off
the menu screen.
Notes:
• The date and time, once set, are internally
recorded even when not displayed on the
screen.
• The menu screen automatically turns off if no
settings are made within 5 minutes.
24
Indents
H
H12
When recording, remove the lens cap and
attach the lens cap cord to the fastener so
that the cap will not get in the way.
Fastener
Note:
• Always attach the lens cap over the lens
when not using the camcorder.
15
Preparation
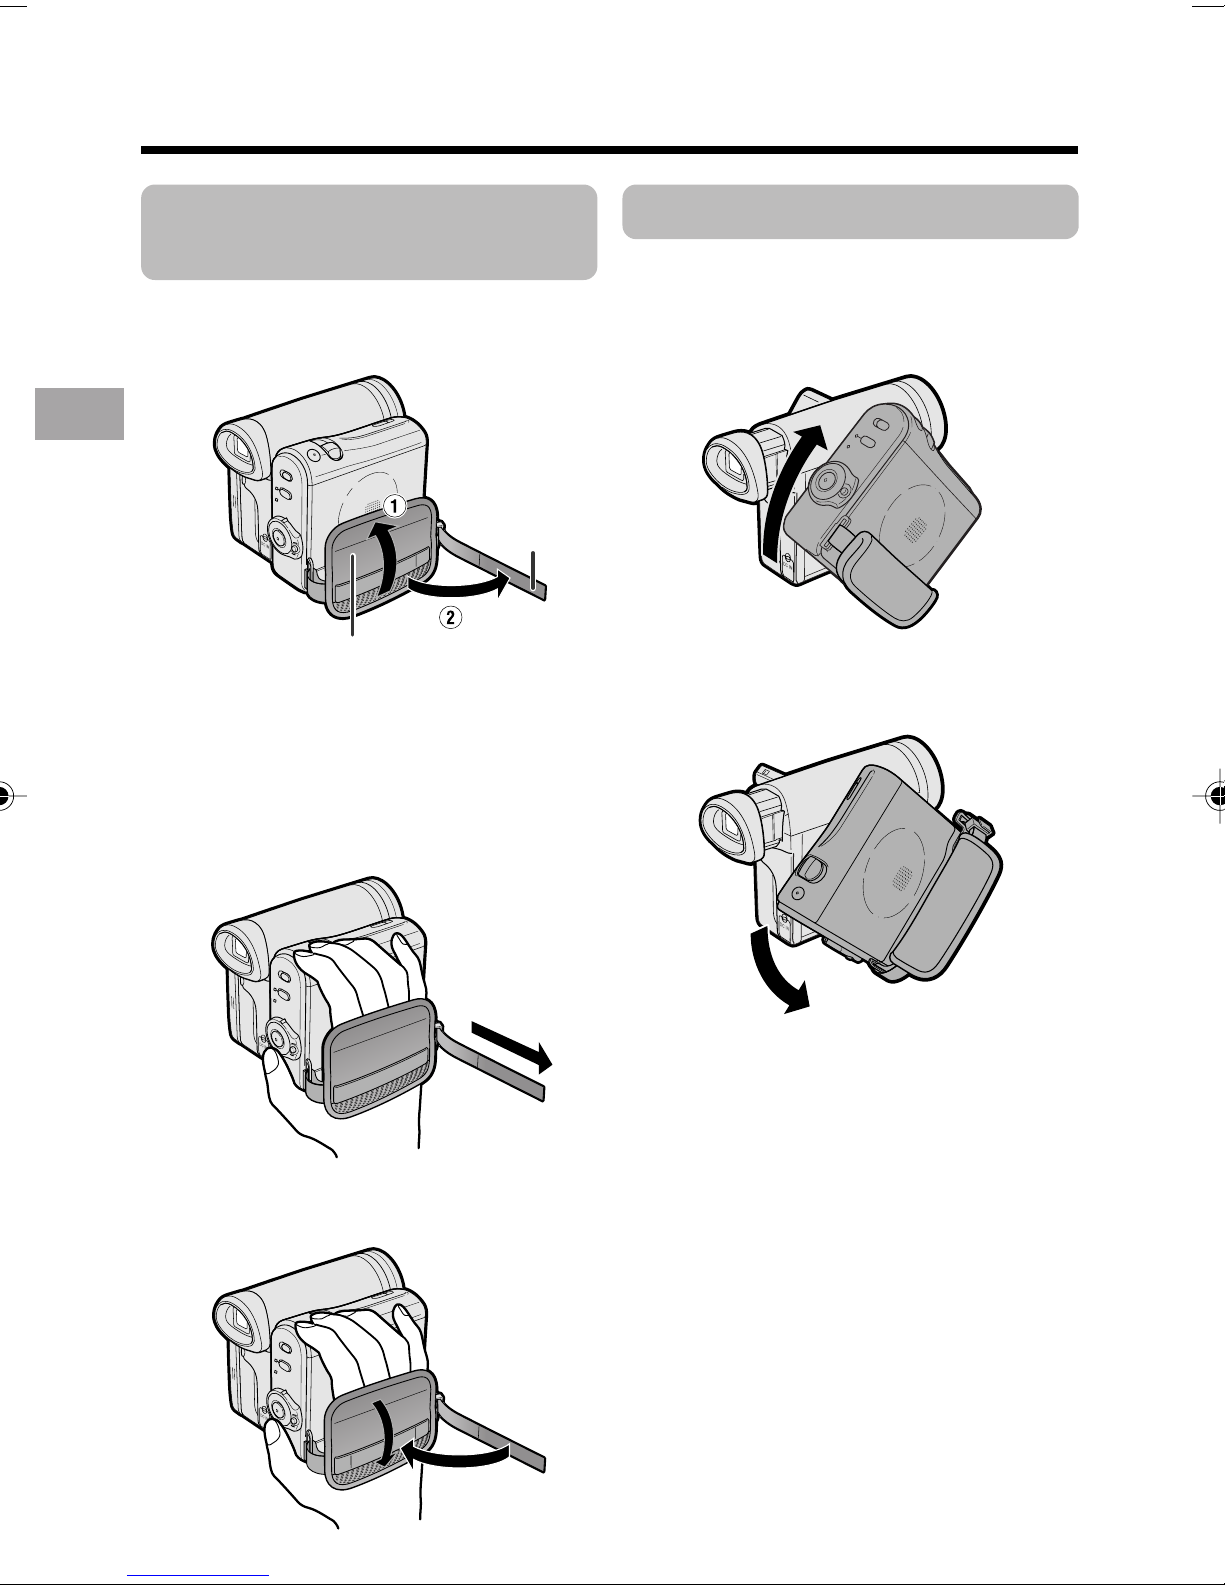
Adjusting the Hand
Strap
Open the hand strap flap (1) and grip
1
strap (2).
Preparation
Hand strap flap
2 Loosen the grip strap, pass your right
hand through the hand strap, and put
your thumb close to the Record Start/
Stop button and your middle finger on
the Power Zoom control. Then, pull
the grip strap tight until it fits snugly.
Grip strap
Using the Grip
Rotate the grip 135° forward or 90°
downward so that you can record images
easily from high or low angle (see page 20).
135°
3 Seal the Velcro
strap and the hand strap flap.
®
fasteners of the grip
16
90°
Note:
• The grip cannot rotate when a tripod is
attached.

Detaching the Lens
Using the Viewfinder
Hood
Before using a commercially available
conversion lens, detach the lens hood as
shown below.
Note:
• You cannot attach the supplied lens hood or
lens cap to a conversion lens.
You can record the subject using the
electronic viewfinder. You can also watch
playback through the viewfinder.
Viewfinder
Preparation
Power switch
1 Pull out the viewfinder completely.
2 Hold down the Lock
button and set the
Power switch to v or
w.
(Continued on the next page)
Lock button
17
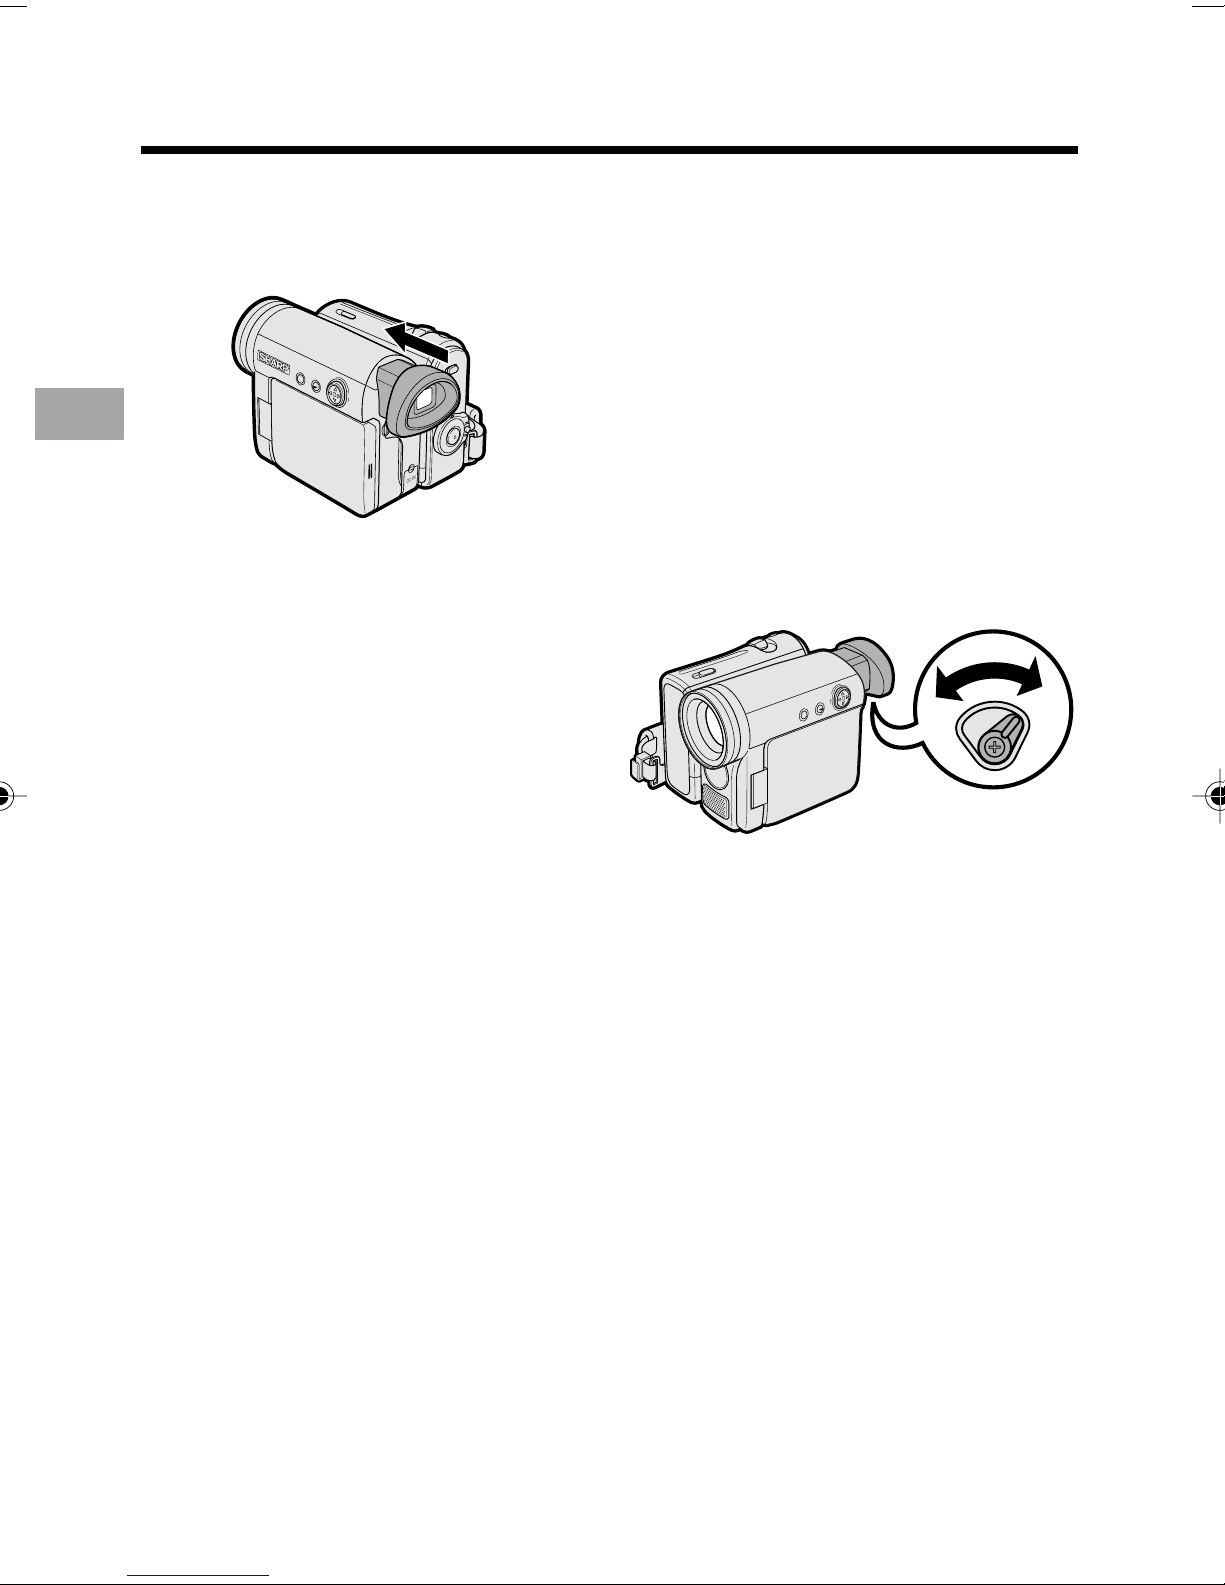
Preparation
Closing the viewfinder
Push in the viewfinder completely.
Notes:
Preparation
• Do not use excessive force when moving
the viewfinder.
• Do not pick up the camcorder by the
viewfinder.
• The viewfinder automatically turns off when
the LCD monitor is opened. If the vertical
rotation of the monitor is 180° when in Tape
Camera or Card Camera mode, however, the
viewfinder is on and the subject is displayed
both in the viewfinder and on the monitor
(see page 40).
• You can adjust the settings on the MENU
screen through the viewfinder by using the
Operation button (see page 31 for use of the
Operation button).
• Be sure to close the viewfinder after use.
Adjusting the dioptre
Adjust the dioptre according to your
eyesight when the picture in the viewfinder
or the characters on the on-screen display
is not clear.
1 Pull out the viewfinder completely.
2 Hold down the Lock button and set
the Power switch to v.
3 While looking through the viewfinder,
turn the dioptre adjustment dial until
the indicators in the viewfinder are
clearly visible.
Dioptre adjustment dial
Note:
• For cleaning the viewfinder, see page 95.
18
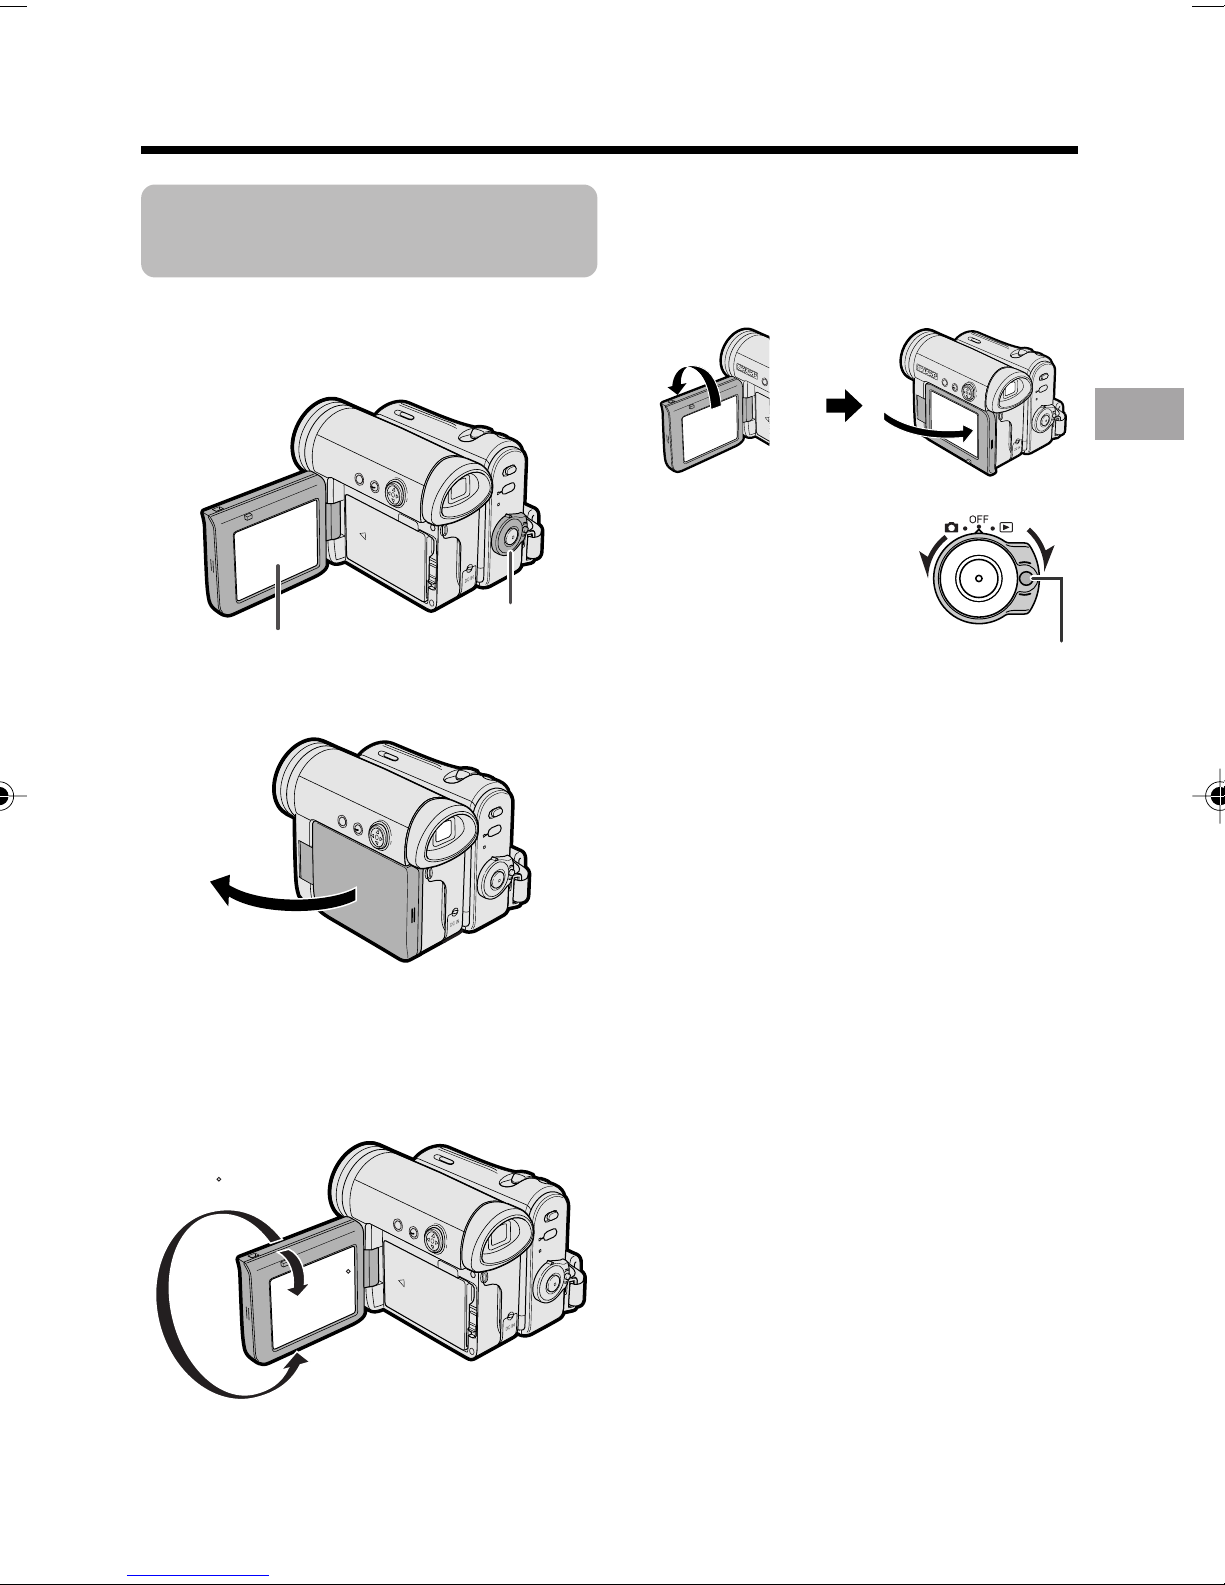
Using the LCD
Monitor
You can use the LCD monitor to play back
recordings that you have made or to watch
the subject during recording.
Power switch
LCD monitor
1 Open the LCD monitor to a 90° angle
to the camcorder body.
• You can also fold the LCD monitor
into the camcorder with the screen
facing out for watching playback on
the monitor.
3 Hold down the Lock
button and set the
Power switch to v or
w.
• A picture displays on
the LCD monitor.
Note:
• Battery consumption is larger when the LCD
monitor is opened. Use the viewfinder instead
of the LCD monitor when you want to save
the battery power.
Lock button
Preparation
90˚
2 Adjust the LCD monitor to an angle
that allow easy viewing of the onscreen picture.
• The LCD monitor rotates 270°
vertically.
180
90
Note: Do not try to rotate the LCD
monitor vertically until the monitor is
completely opened.
Closing the LCD monitor
Return the LCD monitor to the vertical 90°
position with the screen facing in, and fold it
into the camcorder into place.
Notes:
• Do not use excessive force when moving
the LCD monitor.
• When closing the LCD monitor, do not tilt
it; otherwise the monitor may not close
properly and may become damaged.
• Do not pick up the camcorder by the LCD
monitor.
• Do not place the camcorder with the LCD
monitor screen facing down.
• Close the LCD monitor completely with the
screen facing in when not in use.
• Before closing the LCD monitor, make sure
the battery pack is properly attached to the
camcorder, otherwise the monitor may be
damaged.
19
Preparation
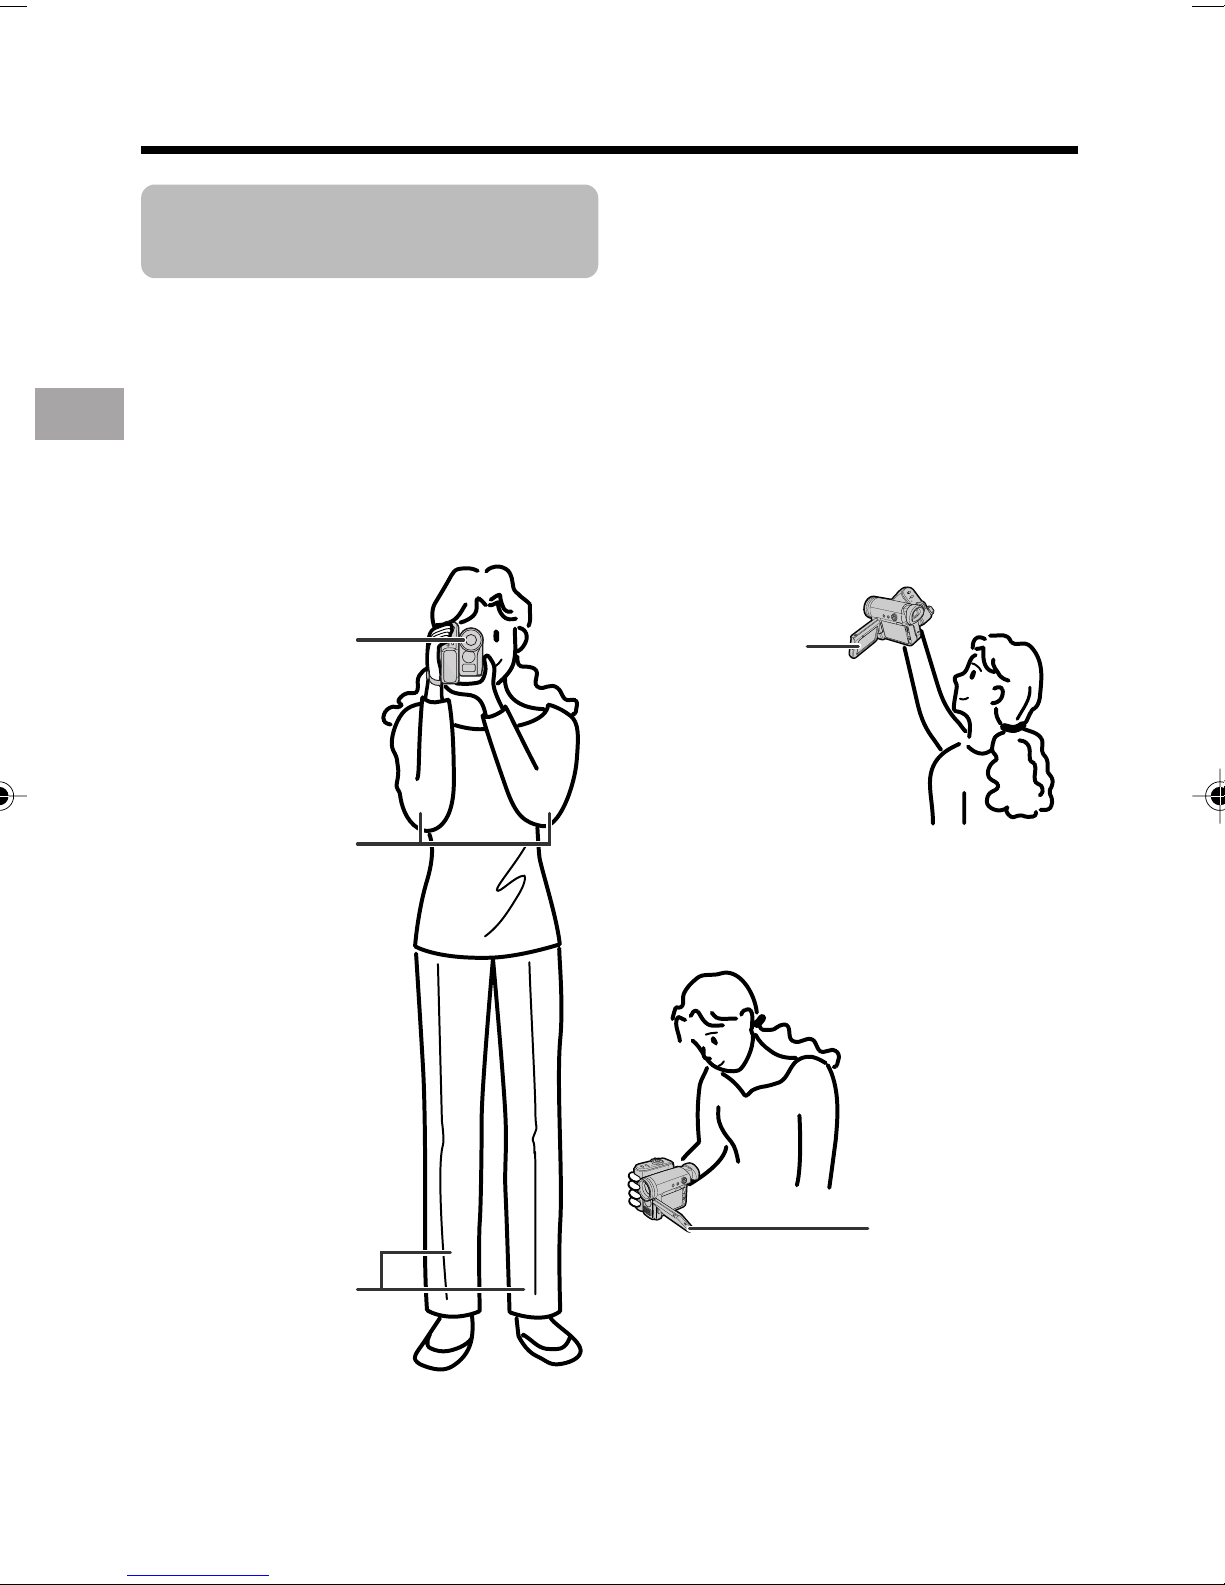
Tips on Recording
Positions
To create images that are easy to watch during playback, try to record with an upright
posture and steady hands to prevent a shaky image.
Holding the camcorder
Put your right hand through the hand strap, and place your left hand under the camcorder
for support.
Basic posture
Preparation
Place the viewfinder
eyecup firmly against
Place your elbows
against your sides.
your eye.
Shooting from a high angle
Turn the LCD
monitor so that the
screen faces
downward.
Shooting from a low angle
Balance your
weight on both
legs.
Note:
• Take care not to touch the microphone with your fingers during recording. It will cause noise on
the audio track.
20
Turn the LCD
monitor so that the
screen faces
upward.
Basic Operations
Camera Recording
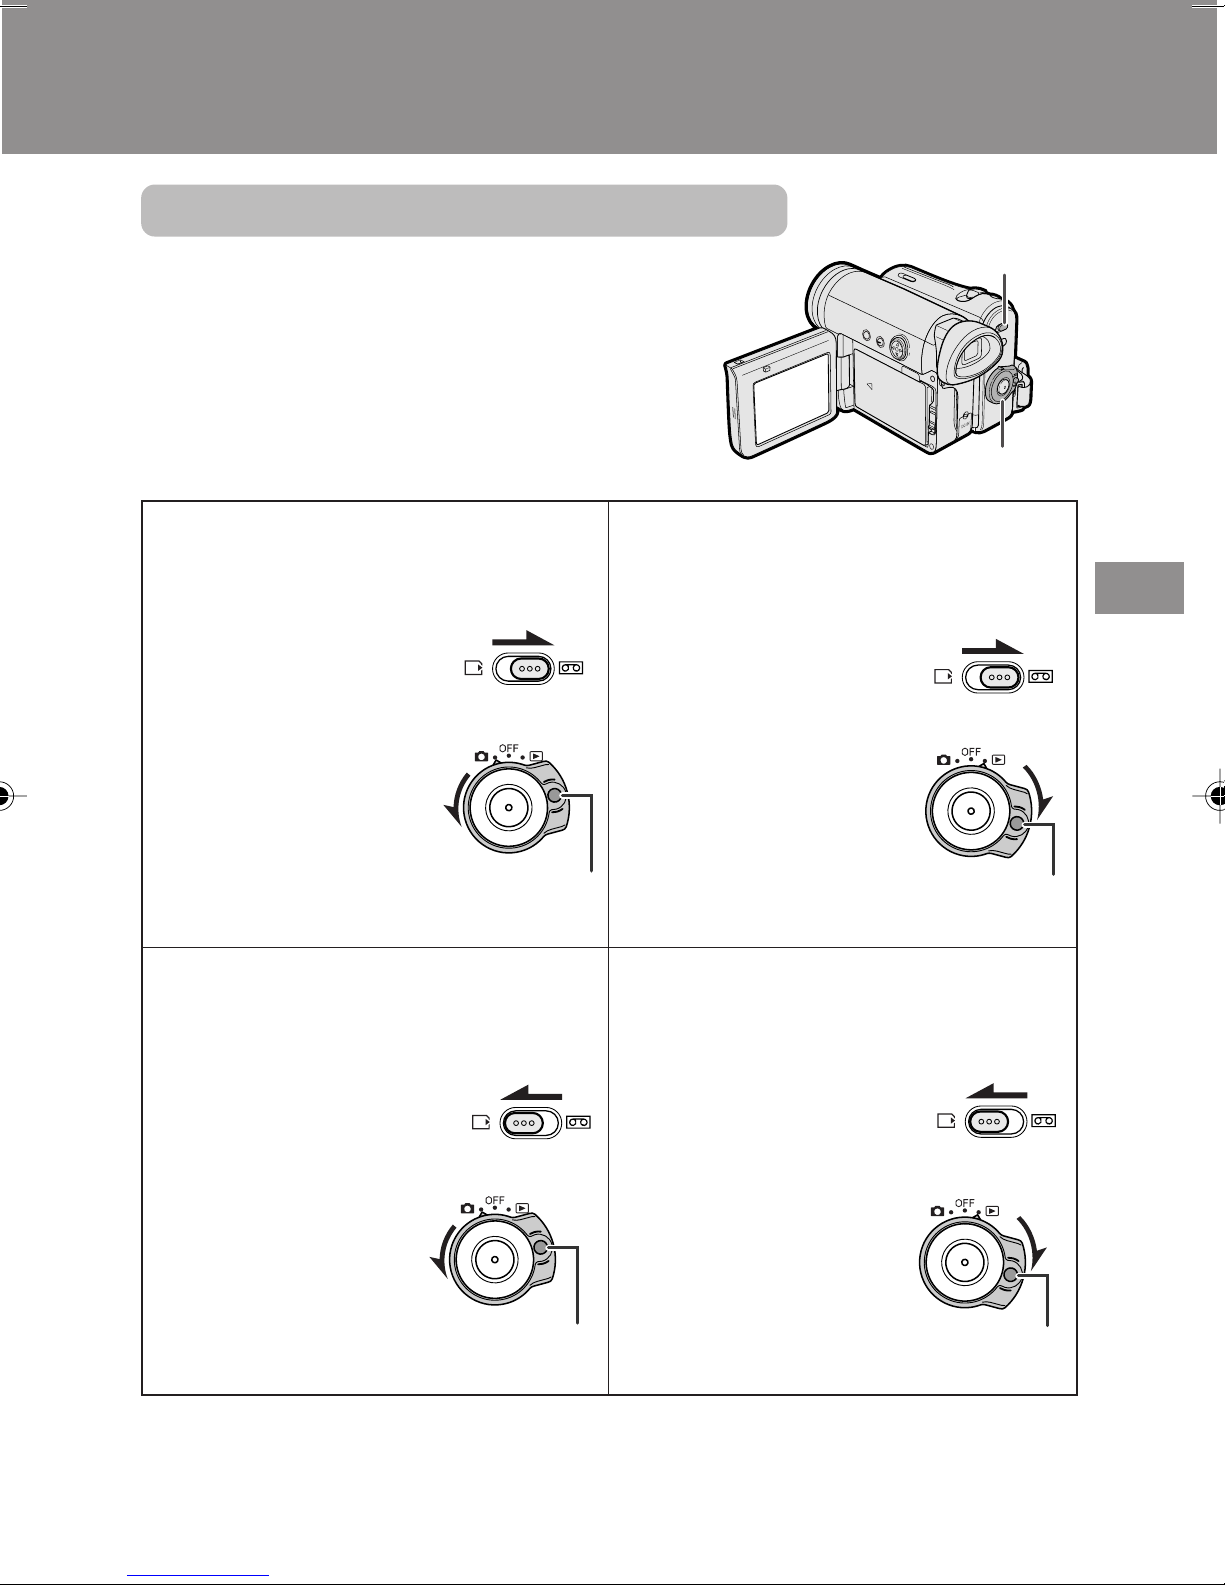
Selecting the Camcorder Mode
This camcorder includes functions for use as both a
video camera for recording and playing back images
on tapes and as a digital still camera for recording and
playing back still images on cards. One of the following
camcorder modes needs to be set before starting any
operation.
Media Selection
switch
Camcorder modes
Tape Camera mode
For recording motion and still images on
a tape.
1 Set the Media
Selection switch to V.
2 Hold down the Lock
button and set the
Power switch to v.
Lock button
Card Camera mode
For recording still images on a card.
Power switch
Tape Playback mode
For playing back or editing motion and still
images recorded on a tape.
Basic Operations
1 Set the Media Selection
switch to V.
2 Hold down the Lock
button and set the
Power switch to w.
Lock button
Card Playback mode
For playing back still images recorded on
a card.
1 Set the Media Selection
switch to u.
2 Hold down the Lock
button and set the
Power switch to v.
Notes:
• To turn the power off, set the Power switch to OFF without pressing the Lock button.
• Do not change the camcorder mode by operating the Media Selection switch during recording
or playback, as this may cause damage to the tape or card.
Lock button
1 Set the Media Selection
switch to u.
2 Hold down the Lock
button and set the
Power switch to w.
Lock button
21
 Loading...