

Page 1
MODEL
UX-460
FACSIMILE
OPERATION MANUAL
1. Installation
2. Using the Answering Machine
3. Sending Documents
4. Receiving Documents
5. Making Copies
6. Making Telephone Calls
7. Special Functions
8. Option Settings
9. Printing Reports and Lists
10. Maintenance
11. Troubleshooting
Page 2
WARNING FCC Regulations state that any unauthorized changes or m odifications to this equipment
not expressly approved by the manufacturer could void the user’s authority to operate this
equipment.
Not e: This equipment has been tested and found to comply with the limits for a Class B digital device,
pursuant to Part 15 of the FCC Rules.
These limits a re designed to p rovide reasonable pro te ction ag ainst h armful interfere nce in a residential
inst allati on.
This equipment g enerates, uses an d can radiate ra dio frequency ene rgy and, if not instal led and used in
accordance with the instructions, may cause harmful interference to radio communications. However, there
is no guarantee that interference will not occur in a particular installation. If this equipment does cause harmful
interference to radio or television reception, which can be determined by turning the equipment off and on,
the user is encouraged to try to correct the interference by one or more of the following measu res:
Reorient or relocate the receiving antenna.
Increase the separation between the equipment and the receiver.
Connect the equipment into an outlet on a circuit different from that to which the receiver is connected.
Consult the dealer or an experienced radio/TV technician for help.
ABOUT THE TELEPHONE CONSUMER PROTECTION ACT OF 1991
"The Tele phon e Con sume r Pro te ction Act o f 199 1 make s it u nlawfu l f or a ny p erson to use a com p uter o r
other electronic device to send any message via a telephone facsimile machine unless such message clearly
contain s in a ma rgi n at the top or bottom of each tra nsmitted pa ge or on the fir st pag e of th e tran smi s sion
the following information:
(1) The date and time of tran sm is sion .
(2) Identification of either the business, business entity or individual sending the message.
(3) Telephon e numb er of eit he r the sendi ng machin e, busine ss, busine ss enti t y or individu al.
In order to program this information into your facsimile machine, please refer to the appropriate instructions
in the operation manua l."
As an ENERGY STAR
min ed th at t his pro du ct me et s th e
guidelines for energy efficiency.
®
partner, SHARP h as deter-
ENERGY STAR
®
FOR YOUR RECORDS
Please record the model number and serial number below, for easy reference, in case of loss
or theft. These nu mbers are locate d on the rear side of the unit.
Space is also provided for other relevant information.
Mo del Number_______ ____ ____ ________ ____ ________ ____ ____ ________ ____ ______
Serial Number _____________________________________________________________
Date of Purchase________ ____ ____ __ ____ ____ ____ ____ __ ____ ____ ____ __ ____ ____ _
Place of Purchase ____________ ________ ____ ____ ____ ____ ________ ____ ____ ____ __
Page 3
Introduction
Welcome, and thank you for
choosing a Sharp facsimile!
The features an d
specifications of your new
Sharp fax are shown below.
Automatic dialing Rapid Key Dialing: 5 numbers
Spee d Dia li ng: 40 numbers
Imagi n g fi lm
Initial starter roll (included wit h fax machi ne ):
32 ft. (10 m) rol l (appro x. 30 letter- siz e pages)
Replacement roll:
UX-3CR 98 ft. (30 m) roll (two ro lls in
package, one roll yields ap prox . 100 lett er size pages)
Automa tic document
feeder
Memor y siz e* : 512 KB (appro x. 30 average page s with no voice
Modem speed 9600 bps with automatic fallback to 7200, 4800,
Transmissi on ti me * Approx . 15 seconds (Sha rp spe cial mode)
Recepti on mode s TEL/FAX/ TAD
10 sheets m ax .
message s record ed, or 24 minut es of voice messages (including OGMs) with no documents in
memory)
or 2400 bps
Resolutio n
Note: The facsimile machine is Year 2000 compliant.
* Based on ITU- T Te st Char t #1 at sta nda rd re solut ion in Sha r p speci a l mode,
excluding time for protocol signals (i.e., ITU-T phase C time only).
Horizontal:
203 pels/inch (8 pels/m m )
Vertical:
Standard: 98 lines/inch (3. 85 lines/mm)
Fine /Half tone:
196 li nes/inch (7.7 lines/mm)
Super fine :
391 li nes/inch (15.4 lines/m m)
1
Page 4

Display 16-digit LCD di spla y
Recordi ng syste m Thermal transf er reco rdi ng
Paper tray capacity
(16- to 20-lb. paper)
Letter : 60 sh eets
Legal: 30 sheets
Halft one (g ray scal e) 64 leve ls
Applicable tele phone line Public switche d telephon e networ k
Compatibili ty IT U-T (CCIT T ) G3 mode
Compression sche me MH, MR, Sharp
Scanning method Sheet-feede r CIS (Co ntact Image Sensor)
Effective printing width 8.3" (208 mm) m ax.
Input document size
Automatic feeding:
Wid th: 5. 8 to 8. 5 " (148 to 216 m m)
Length : 5.5 to 11" (140 to 279 mm)
Manual feeding:
Wid th: 5. 8 to 8. 5 " (148 to 216 m m)
Length : 5.5 to 23.6" (140 to 600 mm)
Effective scanning width 8.3" (210 mm) m ax.
Contrast contro l Automatic/ Dar k selec table
Copy function Standa rd
Telephone function Standa rd (cann ot be used if power fail s)
Power requirements 120 V AC, 60 Hz
Operating temperature 41 to 95°F (5 to 35°C)
Humidity Maximum : 85 %
Power consumption Stand-by: 4.2 W
Maximum : 100 W
Dimensio ns Width: 13 .5 " (343 m m)
Depth: 10.1" (256 mm)
Height : 7.2" (182 mm)
Weight Approx. 7.3 lbs. (3.3 kg)
As a part of our pol i cy of continuous imp ro vem ent, SHARP rese r ves th e r ig ht to ma ke
design and specification changes for product improvement without prior notice. The
performance specification figures indicated are nominal values of production units.
There may be some deviations from these values in individual units.
2
Page 5

Important safety information
• Do not disassemble this ma chine or attempt any procedures not described
in this manual. Refer all servicing to qualified service personnel.
• This machine must only be connected to a 120 V, 60 Hz, grounded
(3-prong) outlet. Connecting it to any other kind of outlet will damage
the machine and invalidate the warranty.
• Do not install or use the machine near water, or when yo u are wet. Take
care not to spill any li qui ds on t he ma chine.
• Unplug the machine from the power outlet and telephone jack and consult
a qualified s ervice representati ve if any of the foll owing situati ons occur:
- Liquid has been spilled into the machine or the ma chine has been
exposed to rain or water.
- The machine produces odors, smoke, or unusu al noises.
- The power cord is frayed or damaged.
- The machine has been dropped or the housin g damaged.
• Do not allow anything to rest on the power c ord, and do not install the
machine where people may walk on the power cord.
• Never insert objects of any kind into slots or openings on the machine.
This could create a risk of fire or electri c shock. If an object falls into t he
machine that you cannot remove, unplug the machine and consult a
qualified service representati ve.
• Do not place this m achine on an un stable cart, stand or table. The machi ne
could be seriously damaged if it falls.
• Never install telephone wiri ng during a lightning storm.
• Never install telephone jacks in wet locations unless the jack is specifi-
cally design ed for wet locat ion s.
• Never touch bare telephone wires or terminals unless the telephone line
has been disconnected at th e network inte rface.
3
Page 6

• Use caution when installing or modifying telephone lines.
• Avoid using a telephone (ot her than a cordless typ e) during an electri cal
storm. There may be a remote risk of electric shock from lightn ing .
• Do not use a telephone to report a gas leak in the vicinit y of the leak.
• The power outlet must be installed near the equipment and must be easily
accessible.
Impor tant:
•• This fac simile machi ne is not designe d for use on a line whic h ha s call
waiting, call forwarding, or certain other spe cial serv ices off ered by your
telephon e comp any . If you atte m pt to use the fa x mac hin e in conjunction
with any of these se rvi ces, yo u may experience errors dur ing transm ission
and reception of facsimile messages.
•• This facsimile machine is not compatible with digital telephone systems.
4
Page 7

Table of Contents
1 Installation 7
Unpacking Checklist. . . . . . . . . . . . . . . . . . . . . . . . . . . . . . . . . . . . . . . . 7
A Look at the Operation Panel . . . . . . . . . . . . . . . . . . . . . . . . . . . . . . . . 8
Connections. . . . . . . . . . . . . . . . . . . . . . . . . . . . . . . . . . . . . . . . . . . . . . 11
Loading the Imaging Film. . . . . . . . . . . . . . . . . . . . . . . . . . . . . . . . . . . 17
Loading Printing Paper . . . . . . . . . . . . . . . . . . . . . . . . . . . . . . . . . . . . . 22
Entering Your Name an d Fax Numb er. . . . . . . . . . . . . . . . . . . . . . . . . 25
Setting t he Date and Time. . . . . . . . . . . . . . . . . . . . . . . . . . . . . . . . . . . 28
Selectin g the Reception M ode . . . . . . . . . . . . . . . . . . . . . . . . . . . . . . . 31
Volume Adj ust ment . . . . . . . . . . . . . . . . . . . . . . . . . . . . . . . . . . . . . . . 32
2 Using the Answering Machine 34
Recording an Outgoin g Message . . . . . . . . . . . . . . . . . . . . . . . . . . . . . 34
Operating the Answering Machine. . . . . . . . . . . . . . . . . . . . . . . . . . . . 37
Optional Answering Machine Setti ngs. . . . . . . . . . . . . . . . . . . . . . . . . 41
Transfer Functi on . . . . . . . . . . . . . . . . . . . . . . . . . . . . . . . . . . . . . . . . . 45
Override Ringing. . . . . . . . . . . . . . . . . . . . . . . . . . . . . . . . . . . . . . . . . . 48
Remote Operations . . . . . . . . . . . . . . . . . . . . . . . . . . . . . . . . . . . . . . . . 50
3 Sending Documents 59
Transmittable Docum ents. . . . . . . . . . . . . . . . . . . . . . . . . . . . . . . . . . . 59
Loading the Document . . . . . . . . . . . . . . . . . . . . . . . . . . . . . . . . . . . . . 61
Resolutio n and Contrast . . . . . . . . . . . . . . . . . . . . . . . . . . . . . . . . . . . . 63
Sending a Fax by Normal Diali ng. . . . . . . . . . . . . . . . . . . . . . . . . . . . . 65
Sendin g a Fax by Automat ic Diali ng . . . . . . . . . . . . . . . . . . . . . . . . . . 67
4 Receiving Documents 76
Using FAX Mode . . . . . . . . . . . . . . . . . . . . . . . . . . . . . . . . . . . . . . . . . 76
Using TEL Mod e. . . . . . . . . . . . . . . . . . . . . . . . . . . . . . . . . . . . . . . . . . 77
Substitut e Reception to Memory. . . . . . . . . . . . . . . . . . . . . . . . . . . . . . 81
5 Making Copies 82
6 Making Telephone Calls 85
5
Page 8

7 Special Functions 88
Caller ID (Requires Subscri ption from Telephone Com pany). . . . . . . 88
Distinctiv e Ring (Requires S ubscrip tion from Telephone Com pany). 93
Broadcasting . . . . . . . . . . . . . . . . . . . . . . . . . . . . . . . . . . . . . . . . . . . . . 95
Cover Sheet. . . . . . . . . . . . . . . . . . . . . . . . . . . . . . . . . . . . . . . . . . . . . . 97
Batch Page Numbering. . . . . . . . . . . . . . . . . . . . . . . . . . . . . . . . . . . . 100
Blocking Reception of Unwanted Faxes . . . . . . . . . . . . . . . . . . . . . . 102
Sending Docu ments From Memory . . . . . . . . . . . . . . . . . . . . . . . . . . 104
Polling (Req uesti ng a Fax Transm iss ion ). . . . . . . . . . . . . . . . . . . . . . 106
Timer Operations . . . . . . . . . . . . . . . . . . . . . . . . . . . . . . . . . . . . . . . . 109
8 Option Settings 111
9 Printing Reports and Lists 118
10 Maintenance 125
11 Troubleshooting 129
Problems and Sol ut ions. . . . . . . . . . . . . . . . . . . . . . . . . . . . . . . . . . . . 129
Messages and Signals . . . . . . . . . . . . . . . . . . . . . . . . . . . . . . . . . . . . . 134
Clearing Paper Jams . . . . . . . . . . . . . . . . . . . . . . . . . . . . . . . . . . . . . . 137
Ordering Part s 140
FCC Regulatory Information 141
Index 144
6
Page 9
1
Chapter
Installation
Unpacking Checklist
1. Installation
Original
document
support
Handset
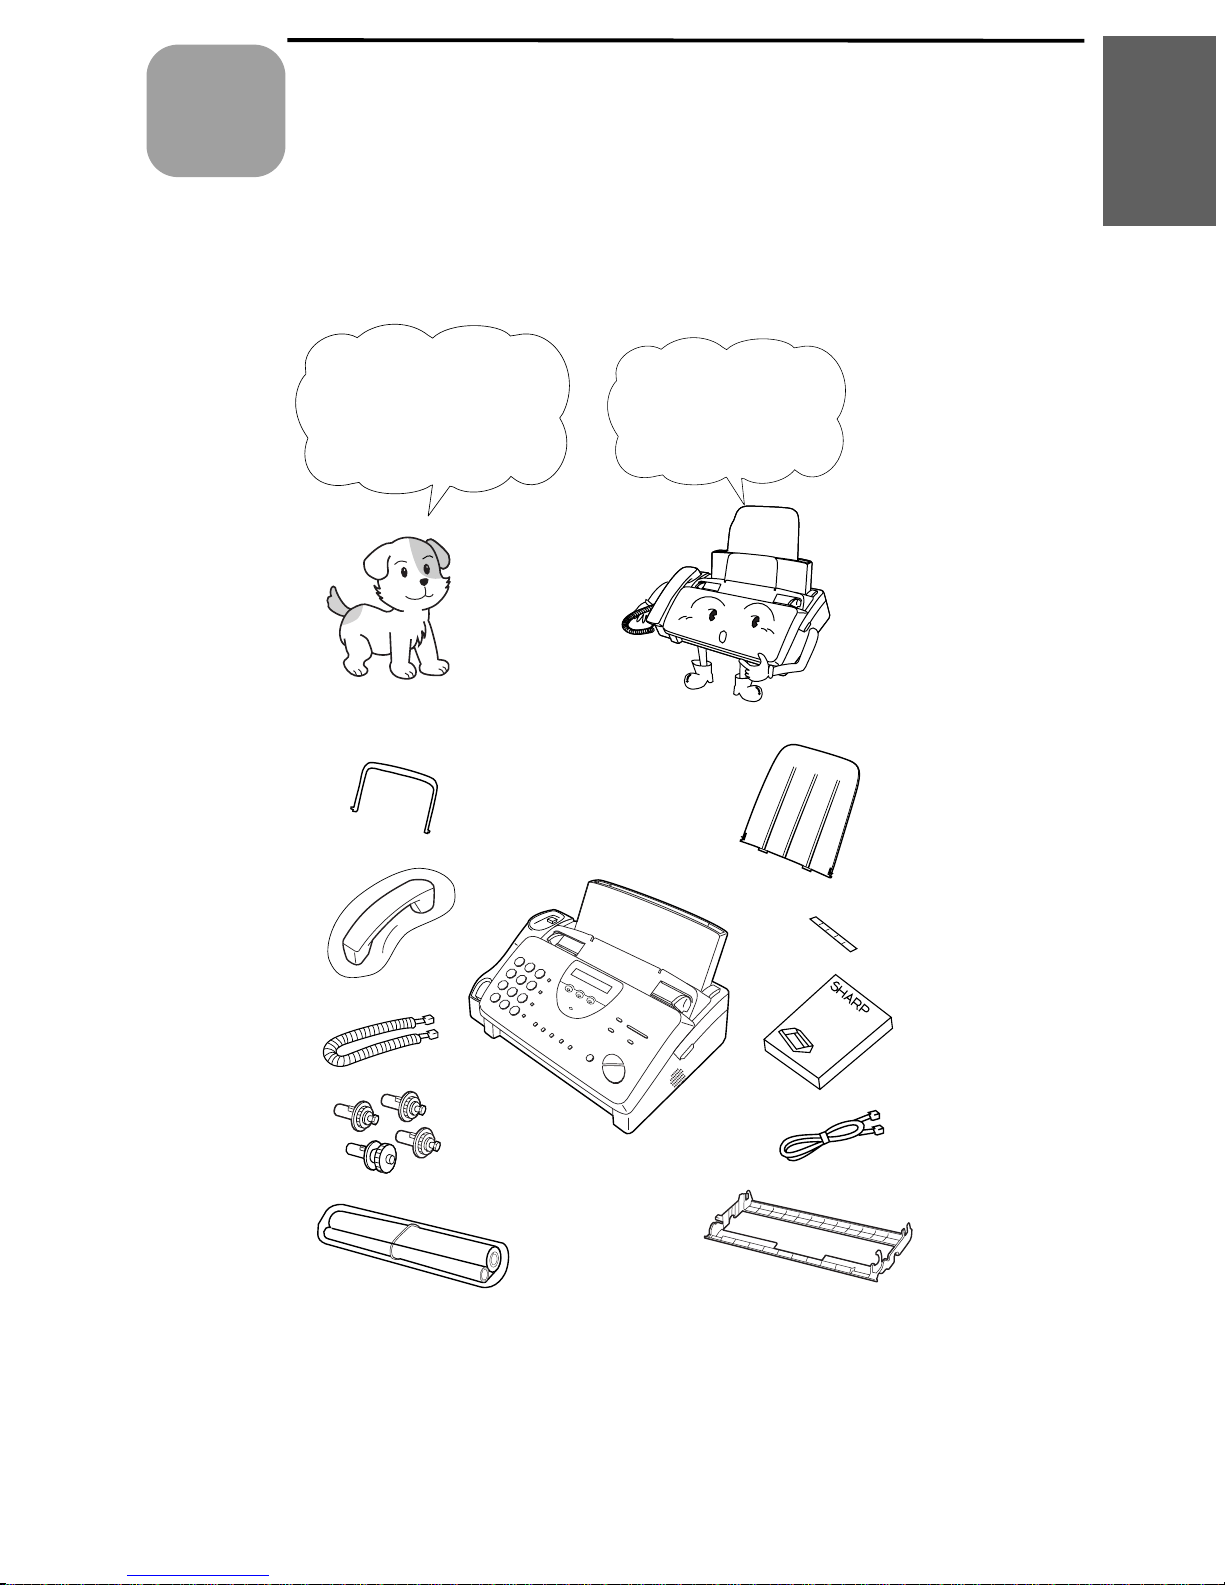
Before sett ing up,
make sure you ha ve
all of the following
items.
If any are missing,
contact your dea le r
or retailer.
Paper tray
extension
Rapid key
labels
Handset
cord
Gears (4)
Imaging film
(initial starter
roll)
Opera tion
manual
Telephone
line cord
Imaging
film
cartridge
7
Page 10
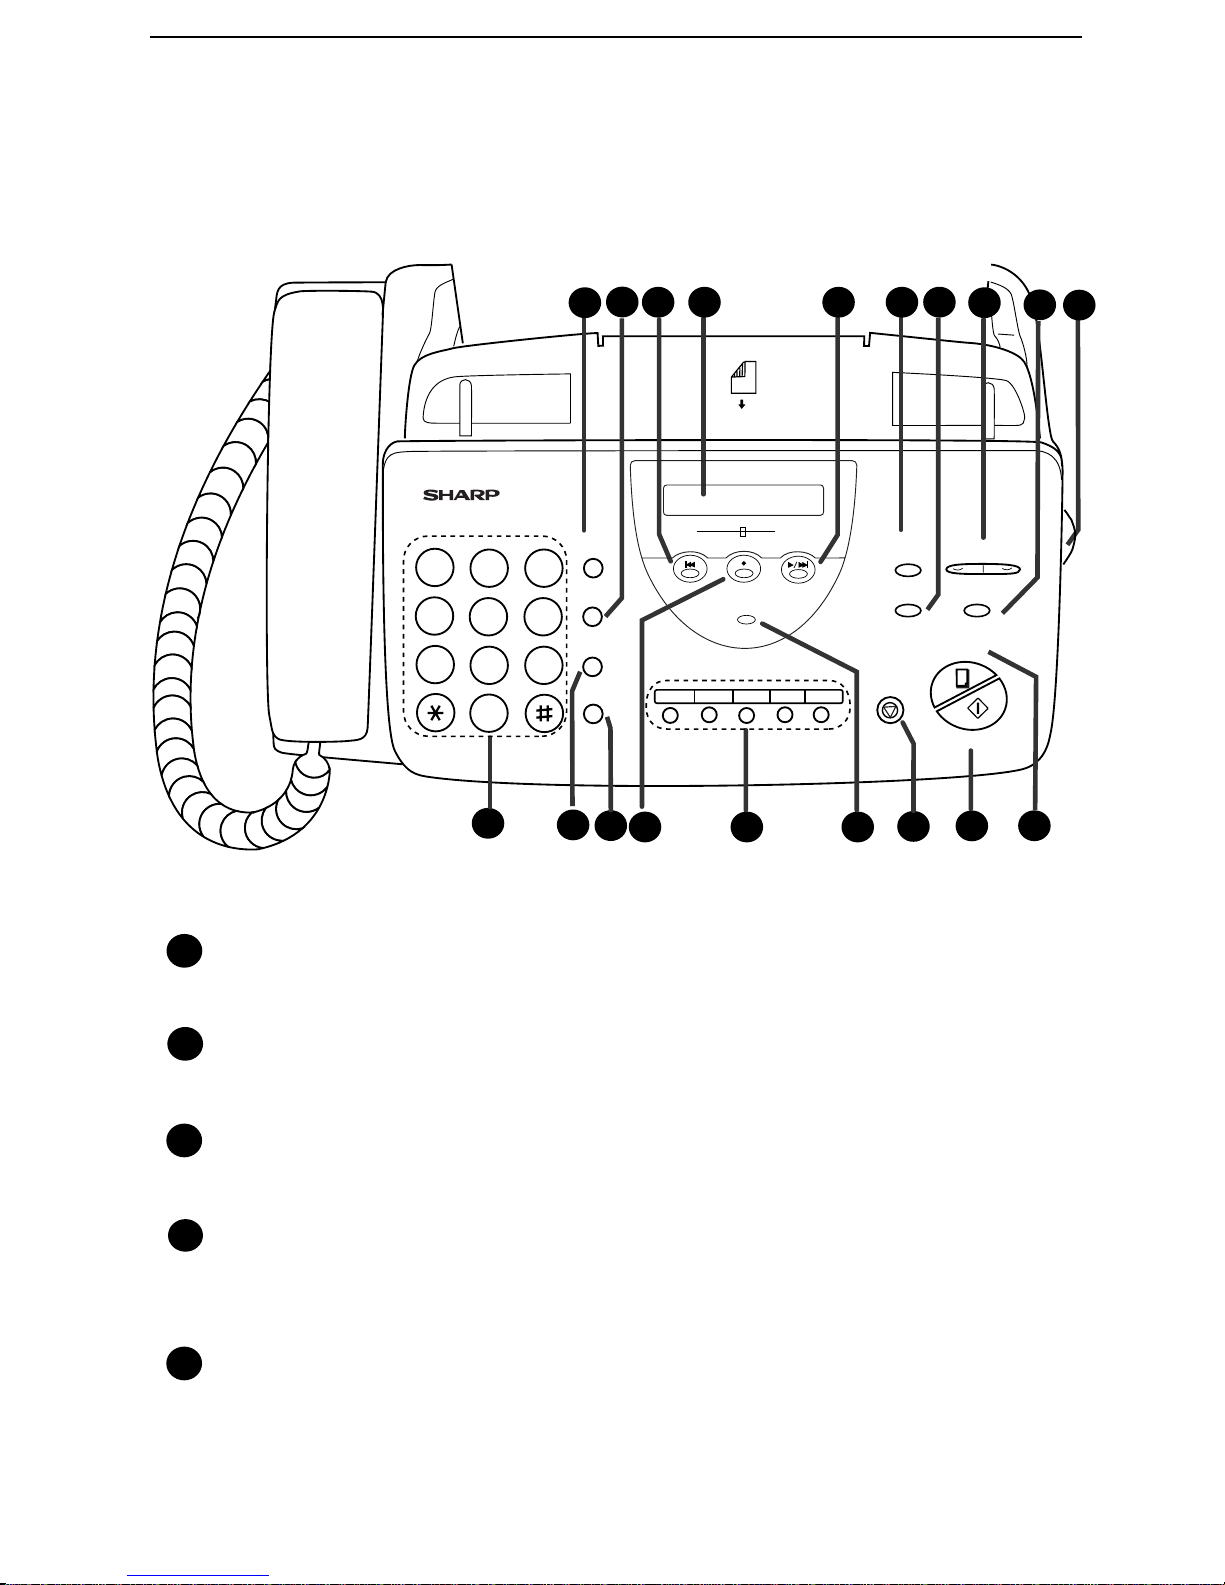
A Look at the Operation Panel
A Look at the Operation Panel
GHI
PQRS
2
1
ABC
DEF
1
2
JKL
MNO
4
5
WXYZ
TUV
7
8
SPEED
DIAL
3
REDIAL
6
HOLD/
SEARCH
9
SPEAKER
43
TEL FAX
ANSWERING
DIGITAL
REPEAT REC/MEMO PLAY/SKIP
SYSTEM
DELETE
5 6
TAD
RESOLUTION FUNCTION
05/POLL04030201
RECEPTION
MODE
STOP
7
VOLUME
DOWN UP
COPY/HELP
8
9
10
0
START/MEMORY
11
12
13
14 16
15
17
18
19
1
SPEED DIAL key
Press this key to dial a 2-digi t Spe ed Dial num ber.
2
REDIAL key
Press this key to automati c ally redial the last numb er dialed.
3
REPEAT key
Press this key to repeat playback of a message.
4
Displ ay
This displays m essages an d prompts du ring op eration and
programming.
5
PLAY/SKIP k ey
Press this key to play recorded messages. Durin g playback, press it to
skip forward to the next message.
8
Page 11
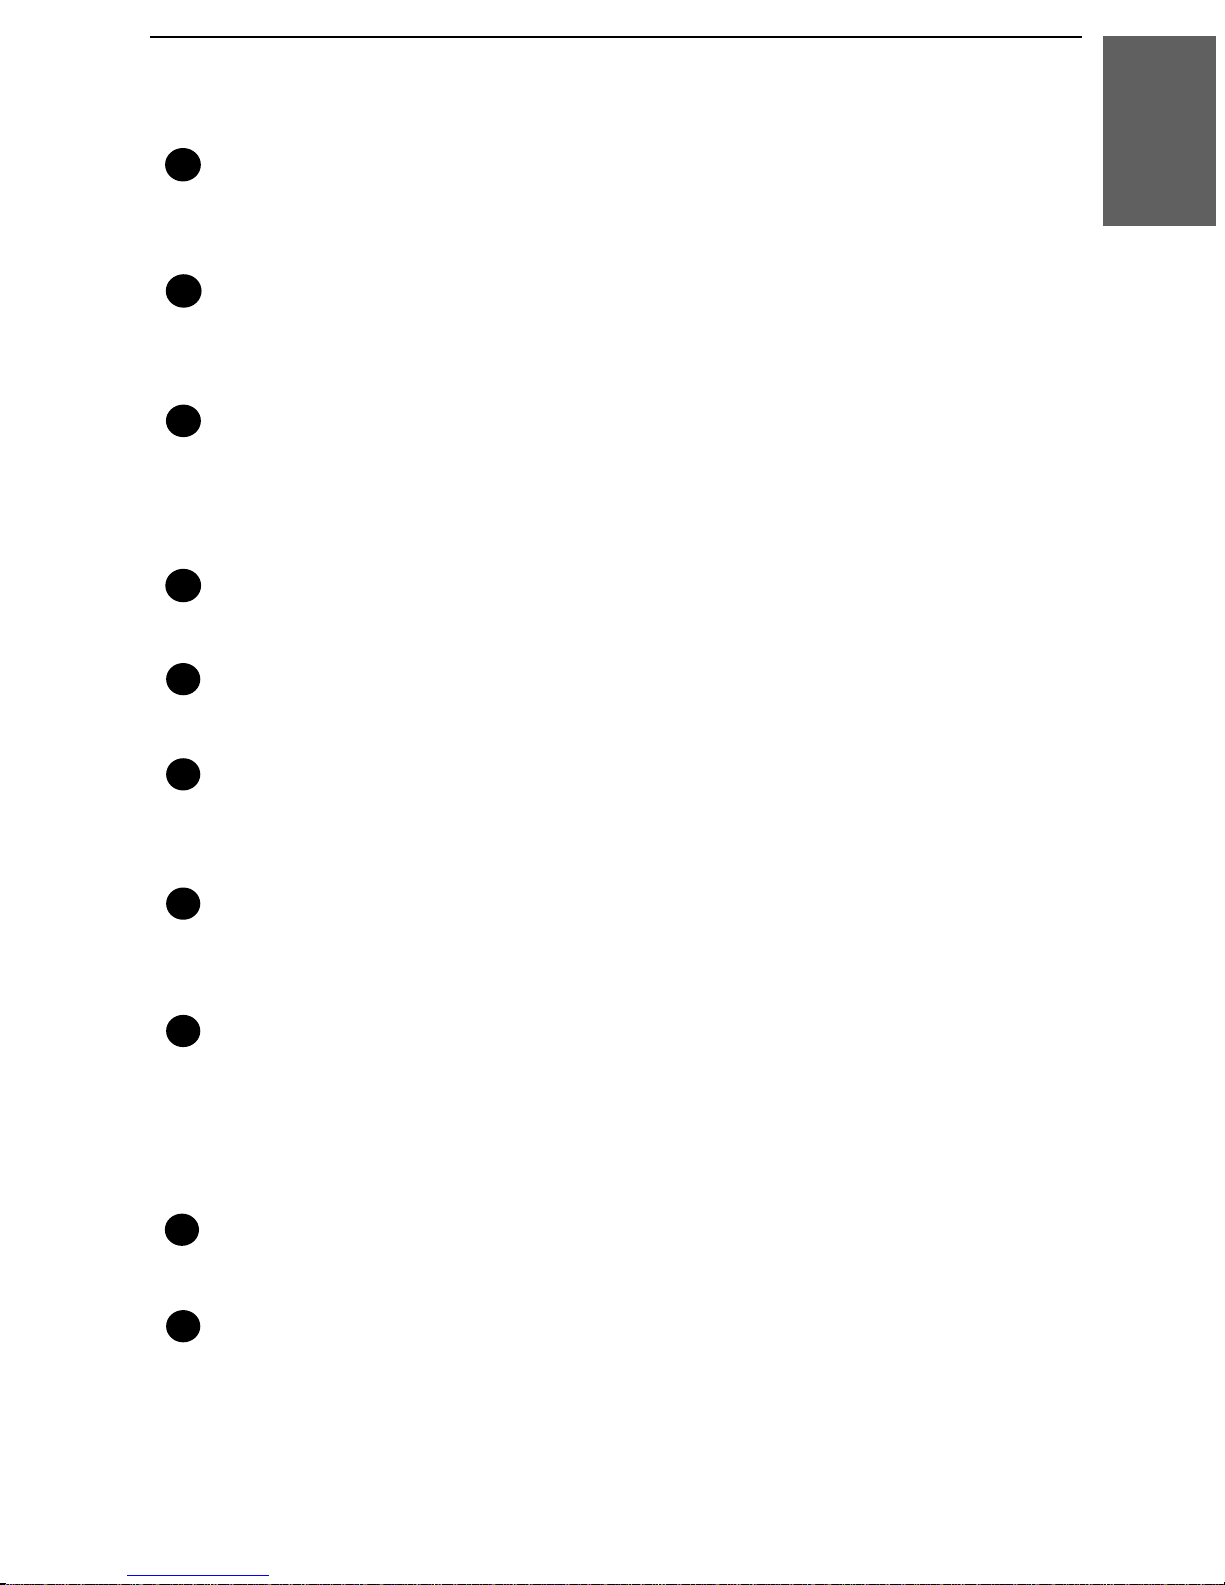
A Look at the Operation Panel
6
RECEPTIO N MODE k e y
Press this key to select the reception mode. An ar row in the displa y
will point to the currently selected reception mode.
7
RESOLUTION key
Press this key to adjust the resolut ion and contrast before sendin g or
copying a document.
8
VOLUME keys
Press these keys to adjust the vol ume of the hands et when the handset
is lifted, the volume of t he s p e aker when the SPEAKER key has been
pressed, or the volu me of the ringer at all other tim es.
9
FUNCTION key
Press this key to select various special functions.
1. Installation
10
Pan el release
Grasp this finger hold and pull toward you to open the operation panel.
11
Number keys
Use these keys to dial numbers, and enter numb ers and l etters duri ng
number/name storing procedures.
12
HOLD/SE ARCH ke y
Press this key to search for an automatic dialing number, or, during a
phone conversation , press this key to put the other party on hold.
13
SPEAKE R key
Press this key to hear the line and fax tones throug h the speaker when
sending a document.
Note: This i s not a speakerph one. You must pick up the handset to
talk with the oth er party.
14
REC/MEMO key
Press this key to record a phone conversation or a message.
15
Rapid Dial keys
Press one of these keys to dial a fax or voice number automaticall y.
(Note that you mu st atta ch the Rapid K ey labels.)
9
Page 12

A Look at the Operation Panel
16
DELETE k ey
Press this key to erase recorded messages.
STOP ke y
17
Press this key to cancel operat ion s before th ey are compl eted.
18
START/MEMORY ke y
Press this key to send or receive a document, or to scan a document
into memory b efore sendi ng i t.
19
COPY/HELP key
When a document is in the feeder, press this key to make a copy. At
any other time, press thi s key to print out the Help List , a quick
reference guide to the operation of your fax.
10
Page 13
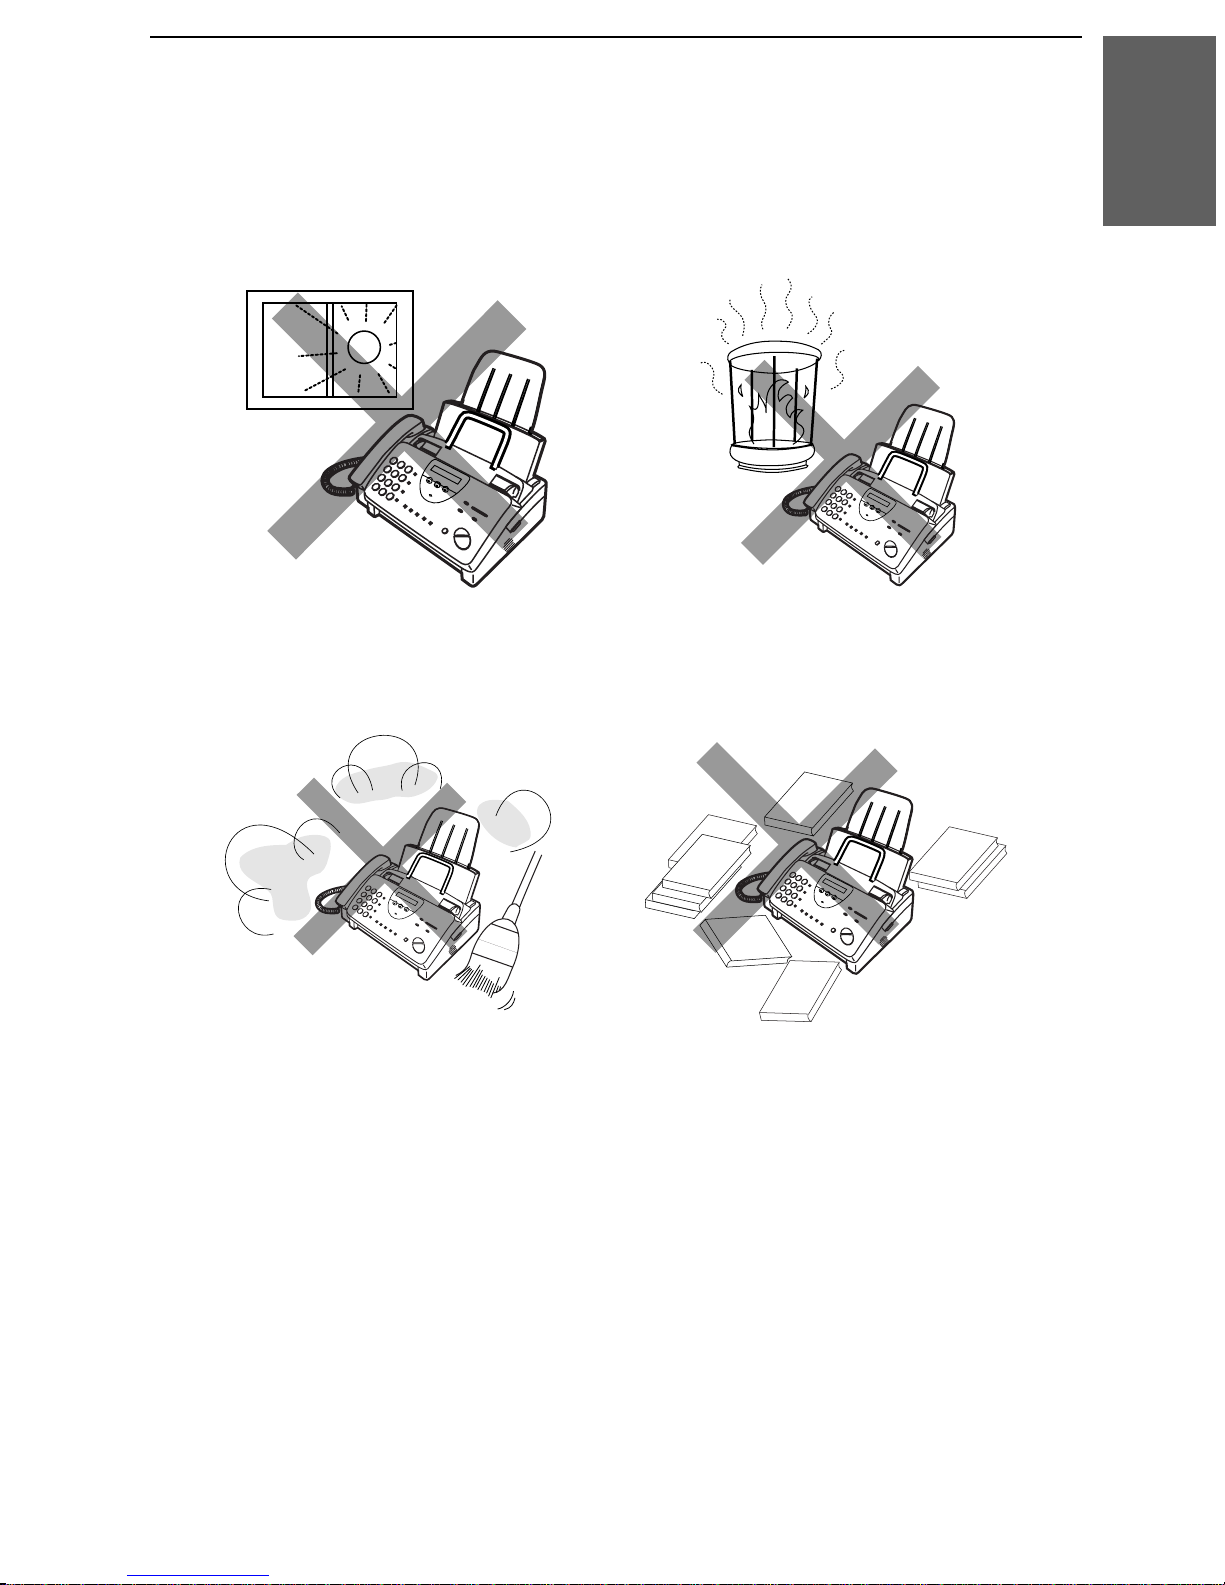
Connections
Connections
Points to keep in mi nd when s etting up
Do not place the machine in
direct sunlight.
Do not place the machine near
heaters or air conditioners.
1. Installation
Keep dust away from the
machine.
About condensa tion
If the machine is moved from a cold to a warm place, it is possibl e that
condensatio n may form on the scanning glass, preventing prop er
scanning of documents for transmiss ion . To remove the condensation,
turn on the power and wait approximately t wo hours before usin g the
machine.
Keep the area around the
machine clear.
11
Page 14
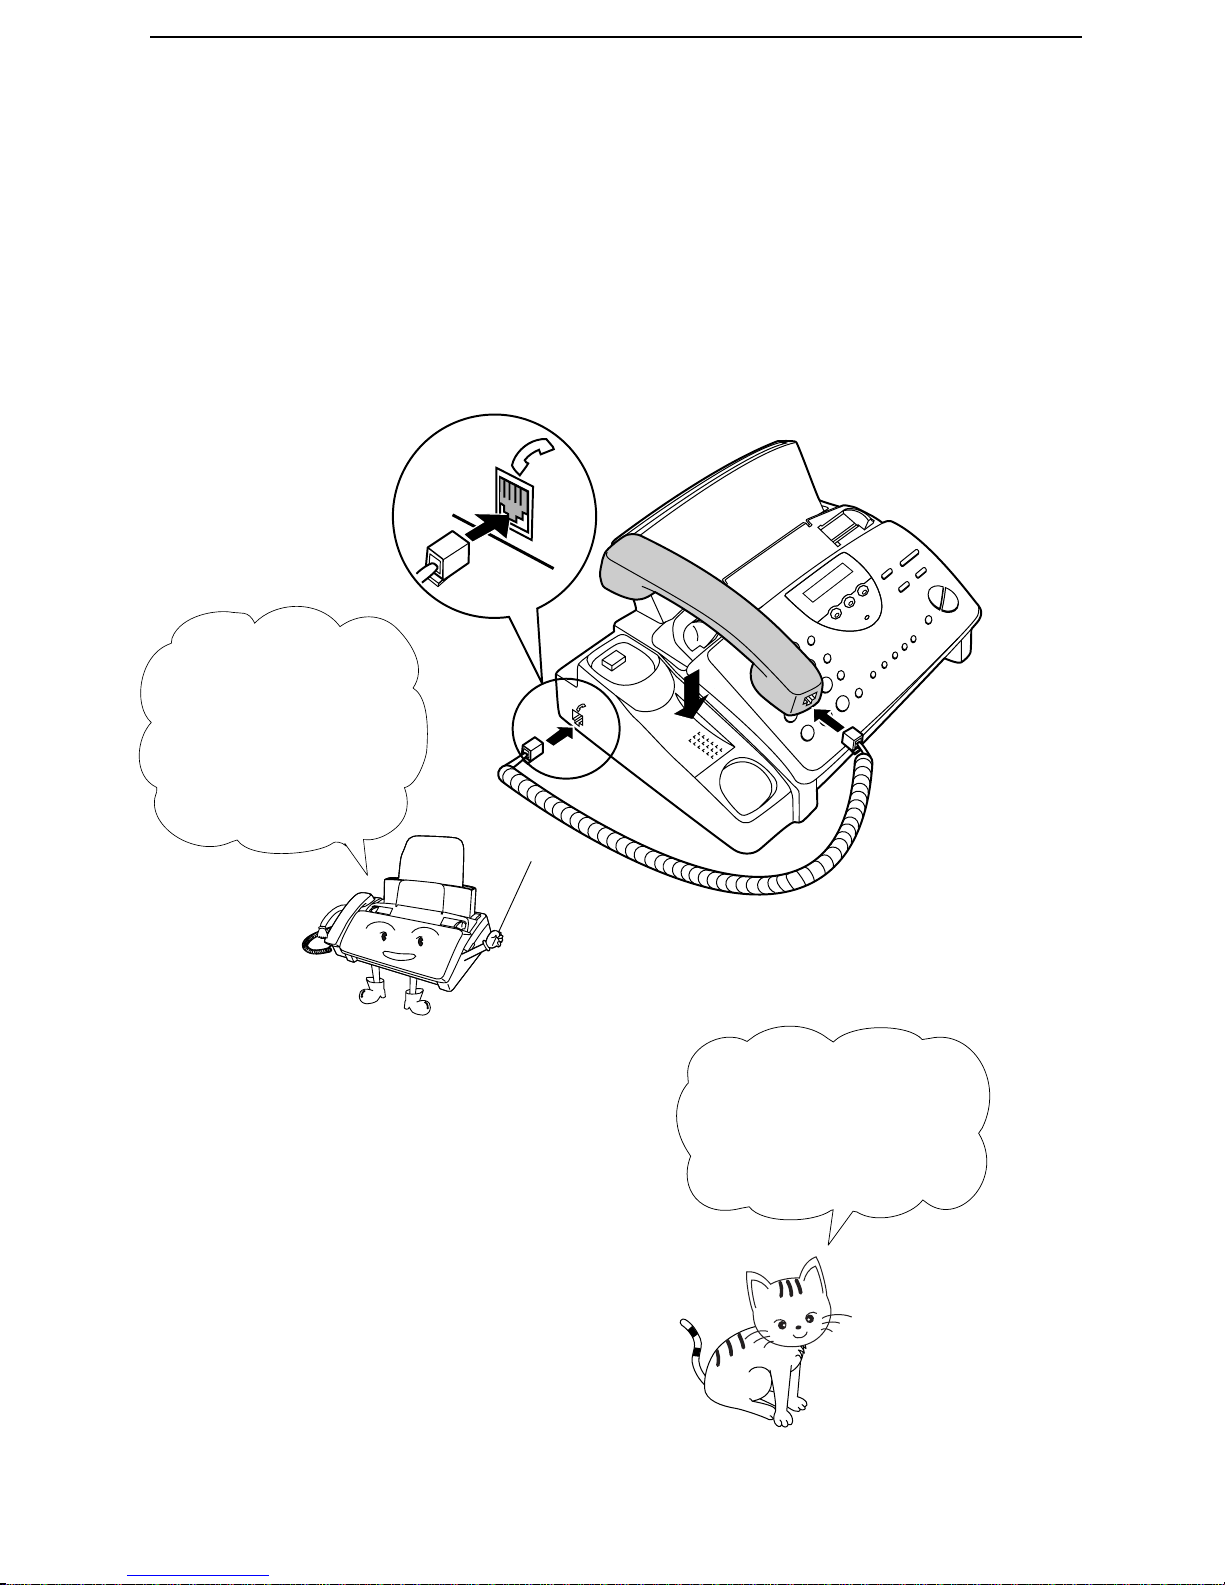
Connections
Handset
Conne ct the handset as shown and pl a ce it on the handset r est.
♦ The ends of the handset cord are identical, so they will go into
either jack.
Make sure the
handset cord goes
into the jack marked
with a handset
symbol on the side
of the machine!
Use the handset to
make ordinary phone
calls, or to transmit
and receive
documents manual l y .
12
Page 15
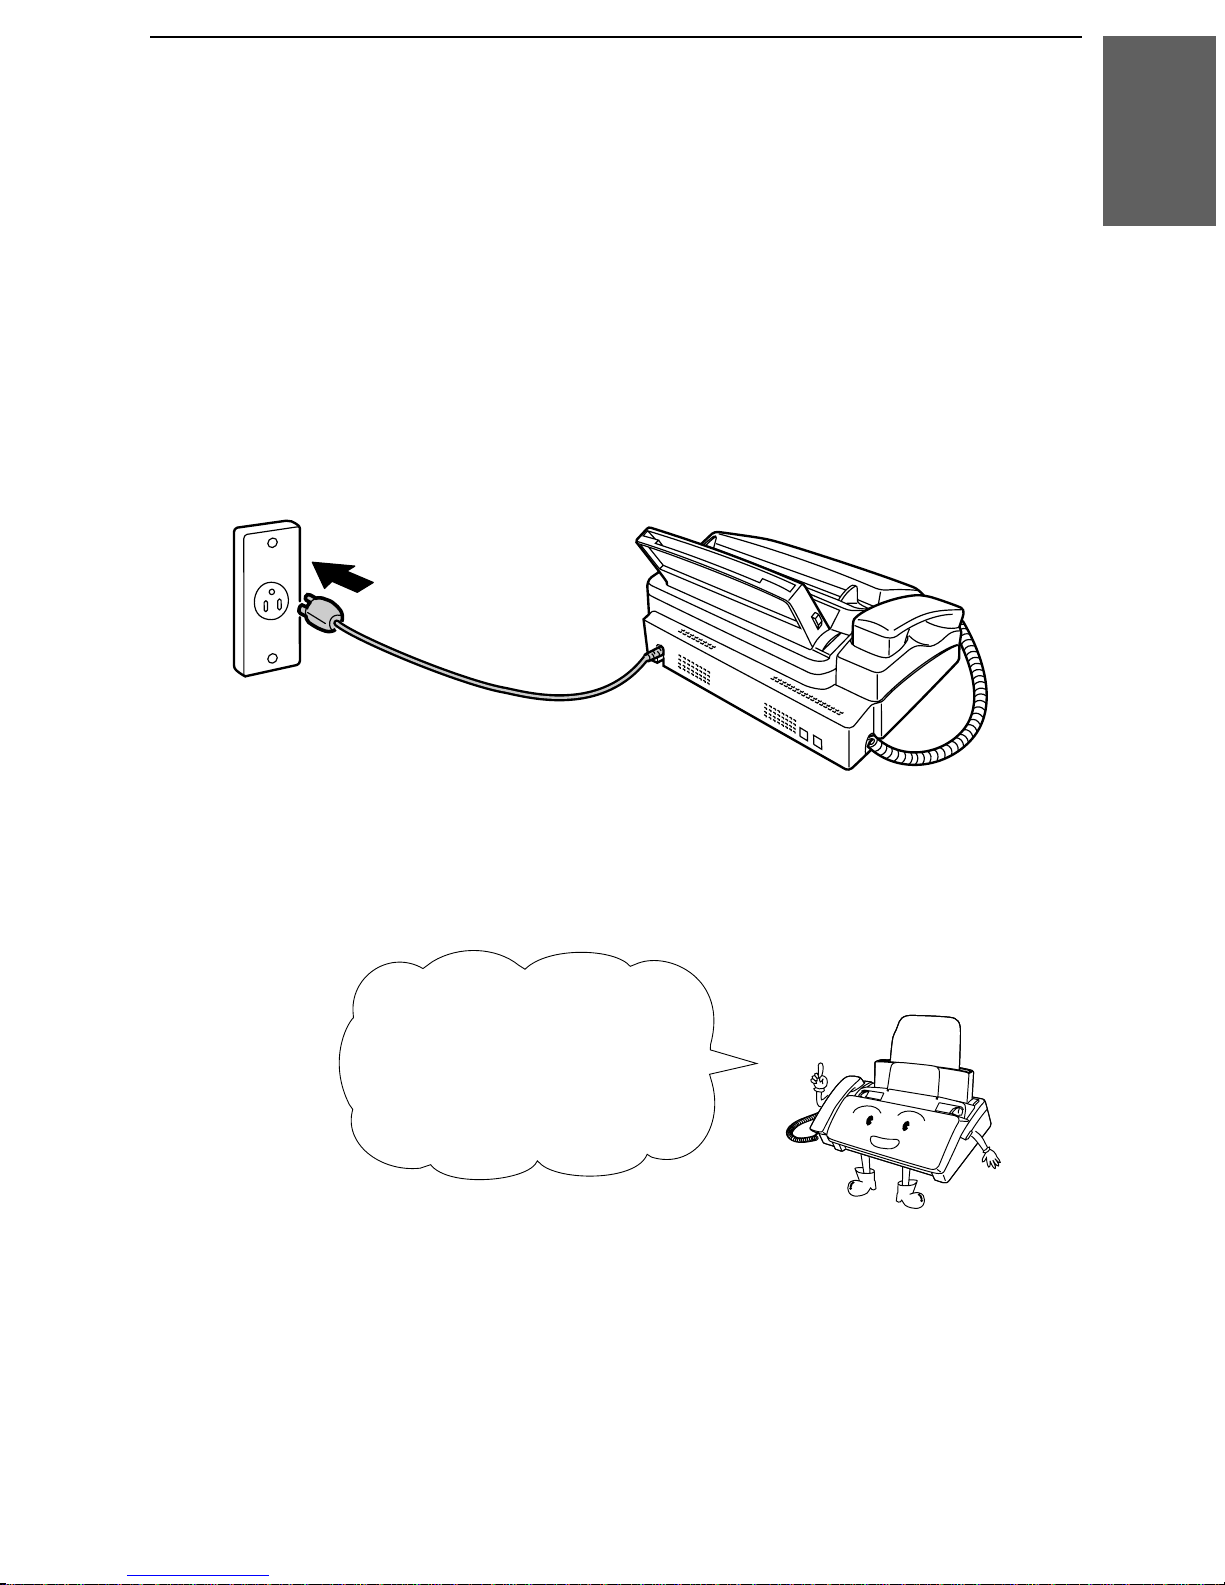
Powe r c ord
Plug the pow er cord into a 120 V, 60 Hz, grounded (3-prong) AC
outl et.
Caution!
Do not plug the power cord into any other kind of outlet. This will
damage the machine and is not covered under the warranty.
Connections
1. Installation
The machine does not
have a power on/off switch,
so the power is turned on
and off by simply plugging
in or unplugging the power
cord.
Note: If your area experiences a high incidence of lightn ing or power
surges, we recommend that you install surge protectors for the power and
telephone lines. Surge protectors can be purchase d a t most telephon e
specialty stores.
13
Page 16
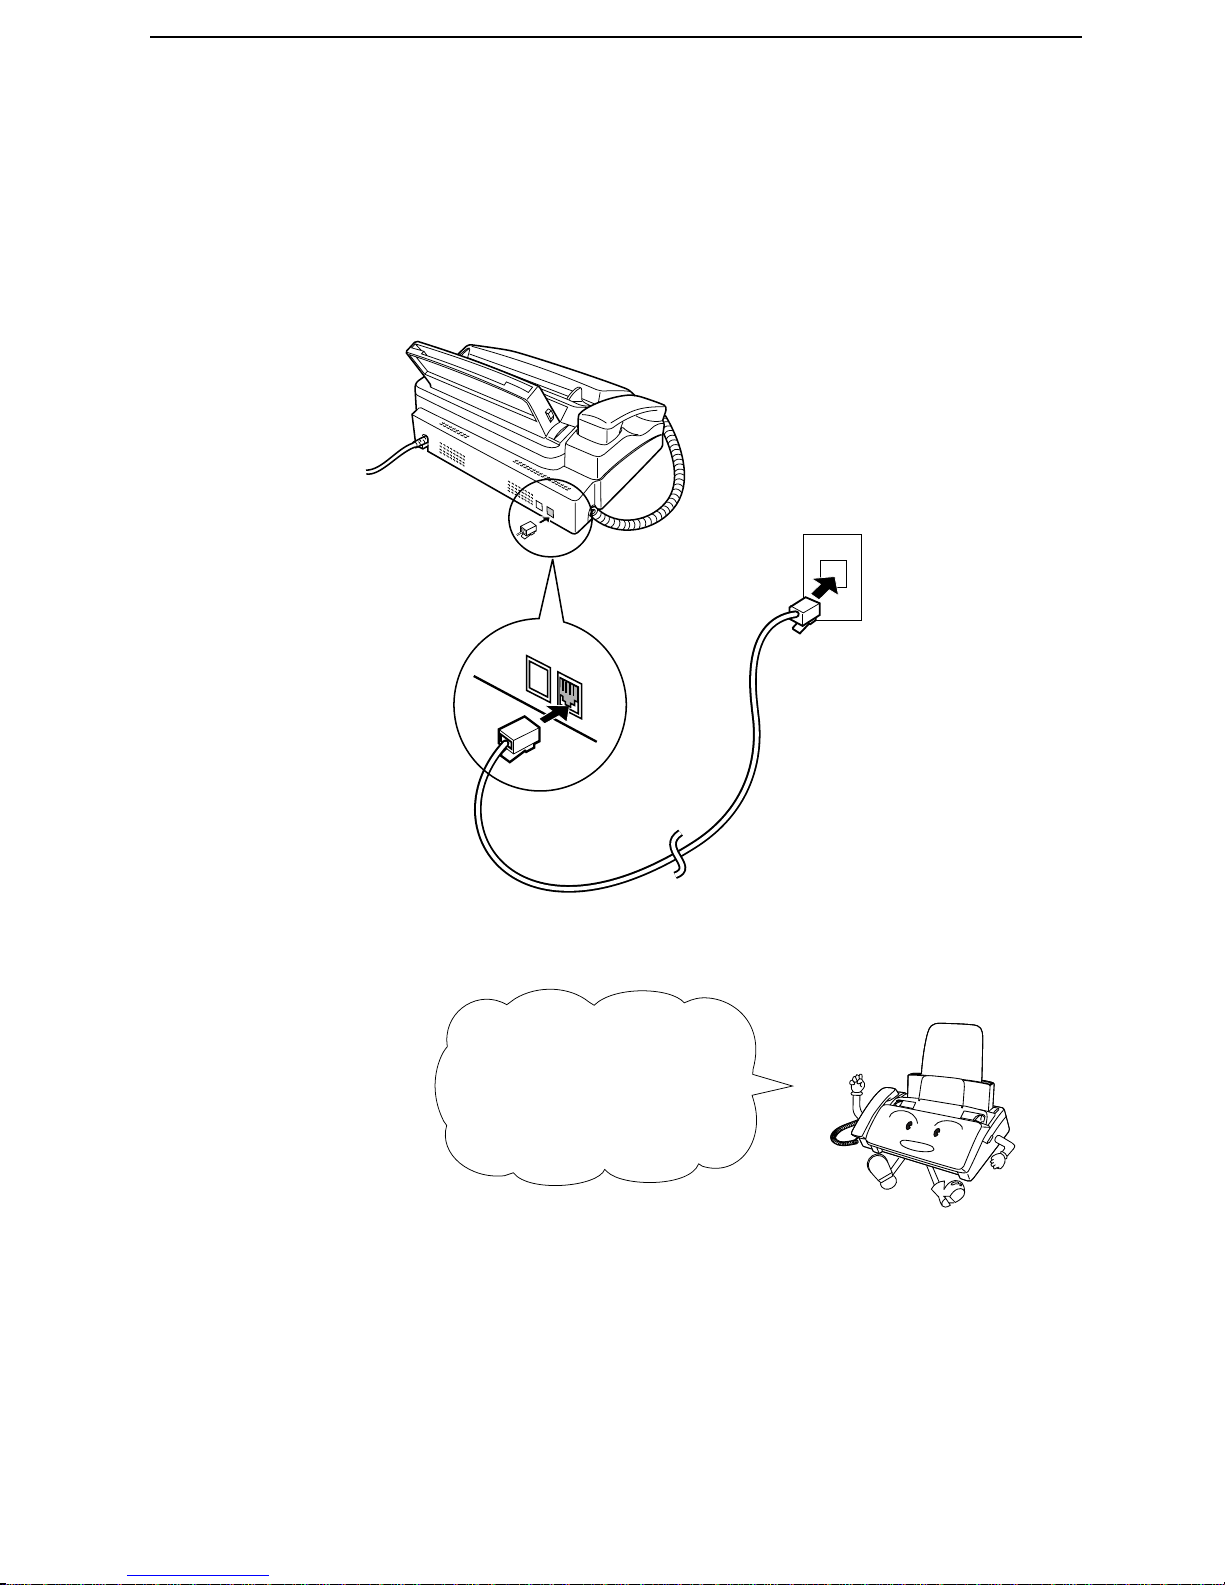
Connections
Tel ephone li ne c ord
Insert one end of the line cord into the jack on the back of the machine
marked TE L. LINE. Insert the other end into a standard (RJ11C)
single-li ne wall telep hone jack.
TEL.
SET
TEL.
LINE
Comm ents:
•• Your fa x is set for t ouc h-t one dia ling. If you are on a pulse di al (rotar y) li ne ,
you must set t he fax for pulse diali ng by cha ngi ng Opt ion Sett in g 8. Thi s
proced ure is desc ri bed in Chapter 8, Option Settings.
•• If you inte nd t o use a comput er fax modem on the sam e ph one line, you must
reset Optio n Set ti ng 10 (Fa x Sig nal Rec eive ) to NO in orde r to preve nt
transmissi on a nd recepti on errors. This proc edu re is desc rib ed in Cha pter 8,
Option Settings .
14
Be sure to insert the
telephone line cord into
the
TEL. LINE jack.
Do not insert it into the
TEL. SET jack!
Page 17
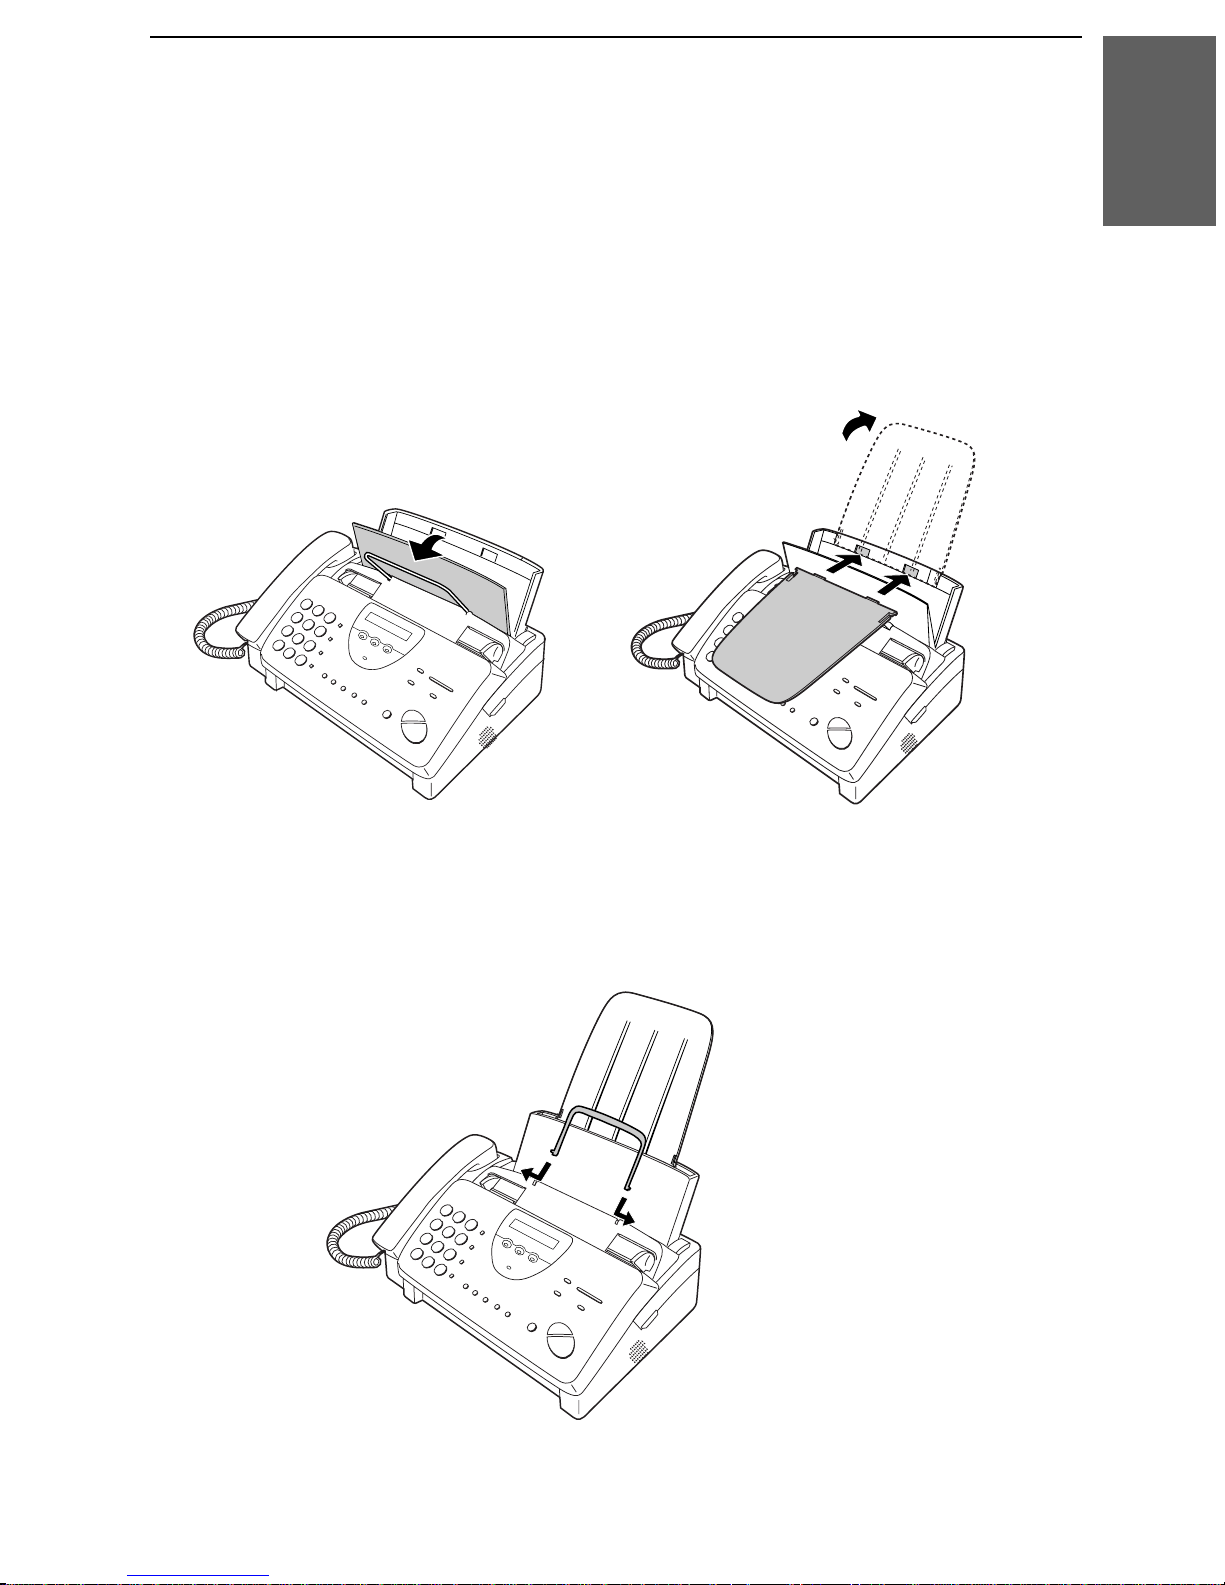
Trays
Connections
1. Installation
Attach the paper tray extension.
♦ Pull the paper release plate forward. Insert the paper tray
extension horizontally into the notches in the paper tray. Rotate
the paper tray exte nsion up until it snaps into place.
Attach the original docum en t support.
Note: The original
document support
has a top side and a
bottom side. If you
cannot insert the tabs
on the support into
the holes, turn the
support over.
15
Page 18
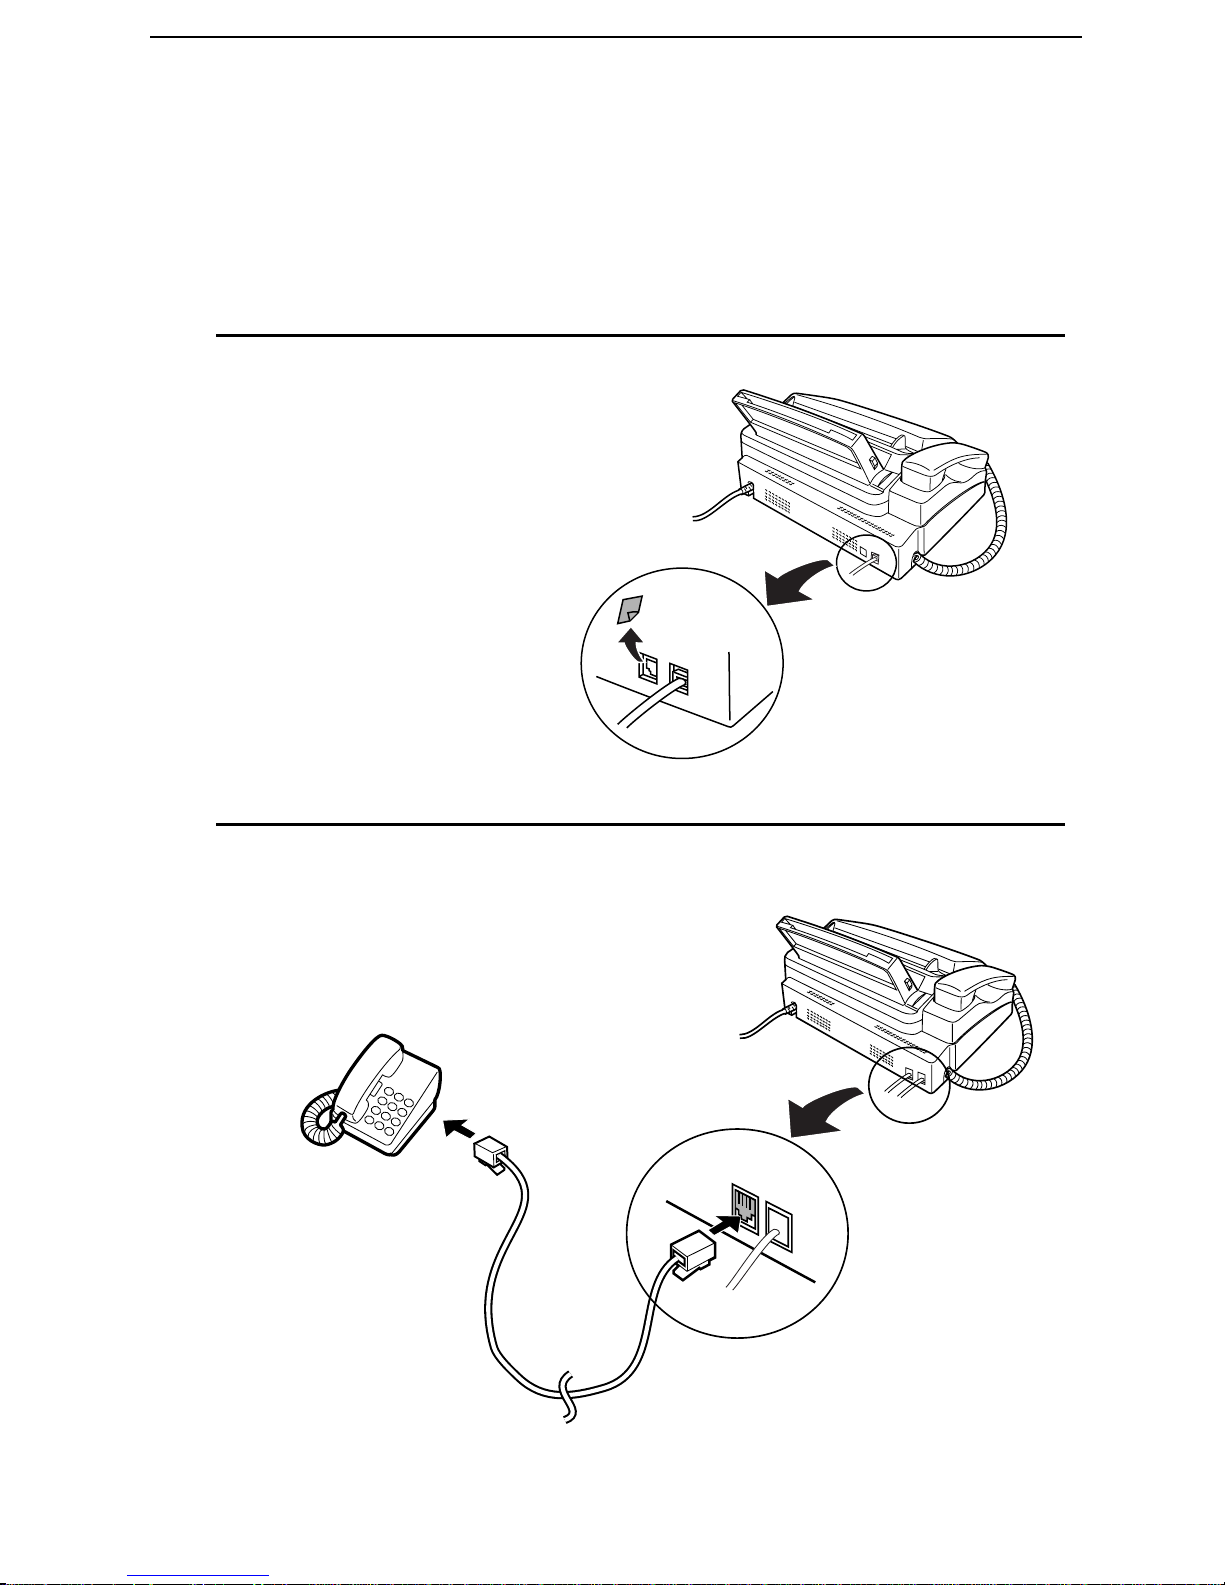
Connections
Extension phone (optional)
If desired, you can connect an extensi on ph one to the TEL. SET jack
on the fax.
1
Remove the seal covering the TEL.
SET jack.
2
Connect the extension phone line to
the TEL. SET jack.
TEL.
SET
TEL.
LINE
16
Page 19
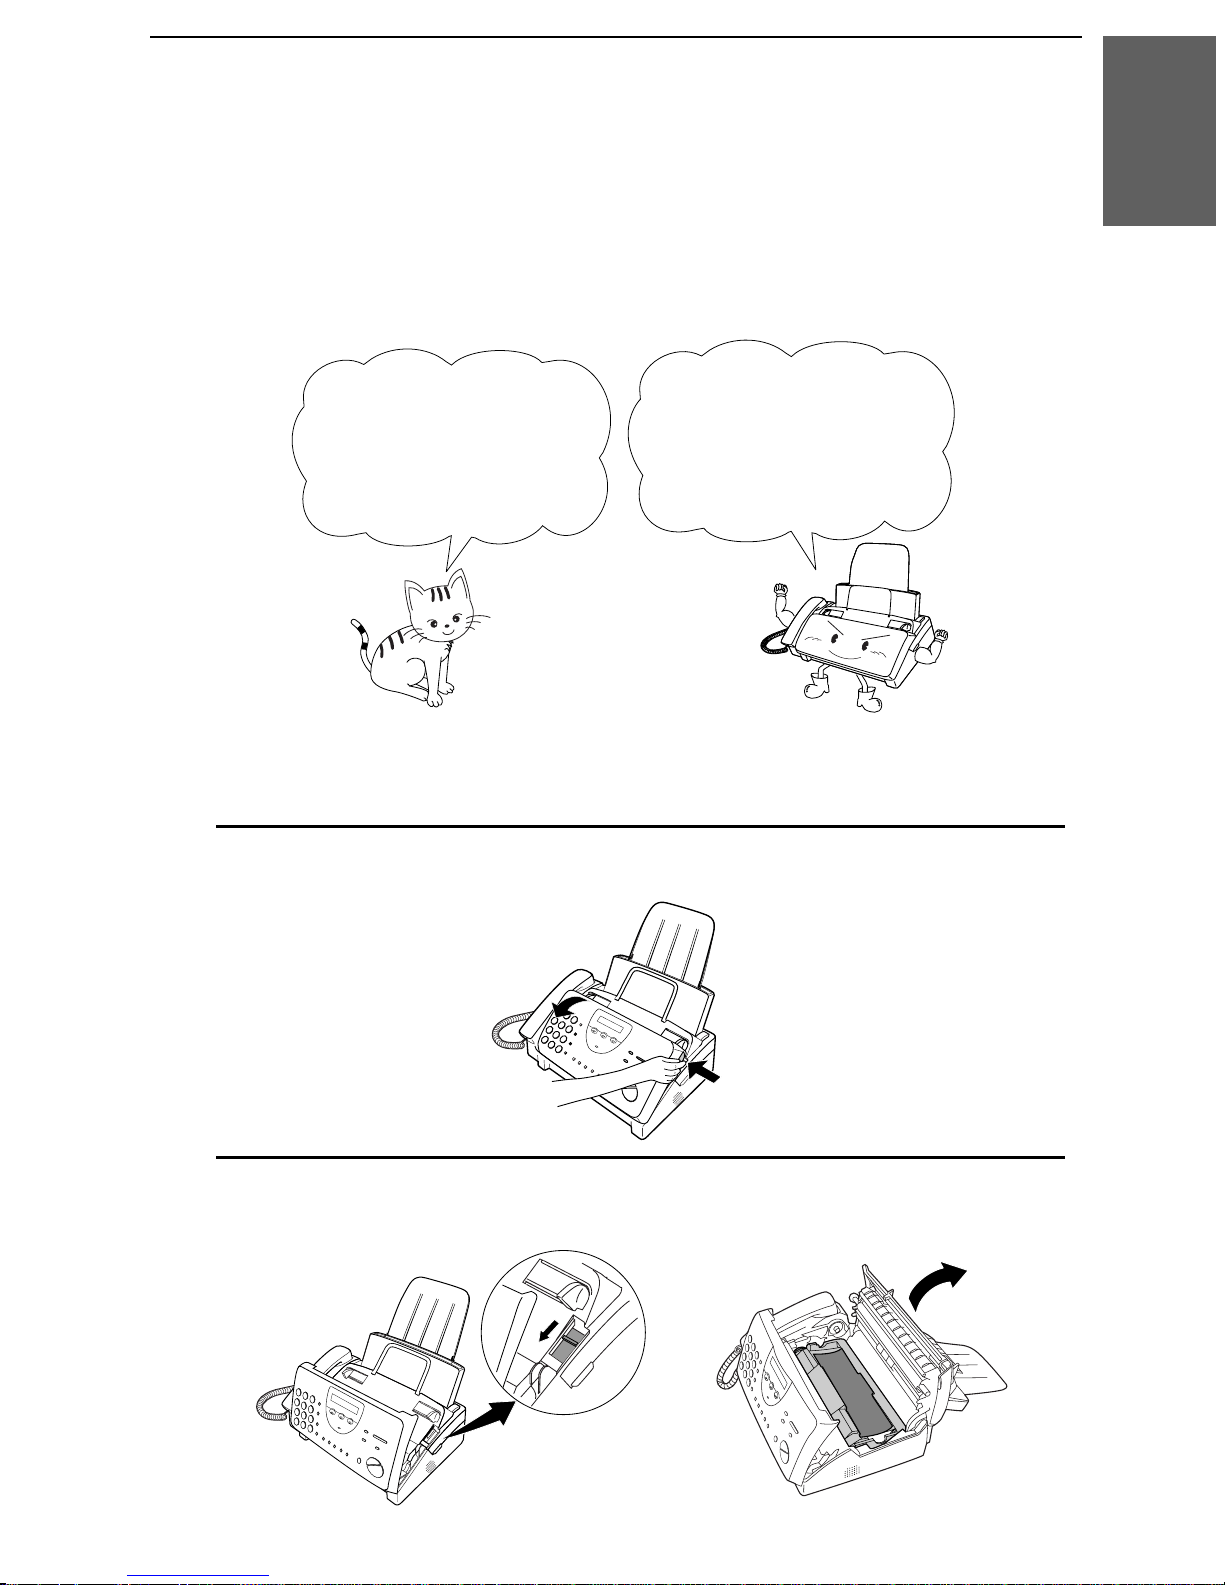
Loading the Imaging Film
Loading the Imaging Film
Your fax uses a roll of imaging film to create printed text and images.
The print head in the fax applies heat to the imaging film to transfer
ink to the paper. Follow the steps below to load or replace the film.
The initial starter roll
of imaging film
included with your fax
can print about 30
letter-size pages.
Note: If there is paper in the paper tray, pull the paper release plate forward
and remove the paper before loading the imaging film.
1. Installation
When replacing the
film, use a roll of Sharp
UX-3CR imaging film.
One roll can print about
100 letter-size pages.
1
Open the operation panel by grasping the finger hold and pulling up.
2
Pull the green release on the right side of the machine forward, and
open the print compartment cover.
17
Page 20
Loading the Imaging Film
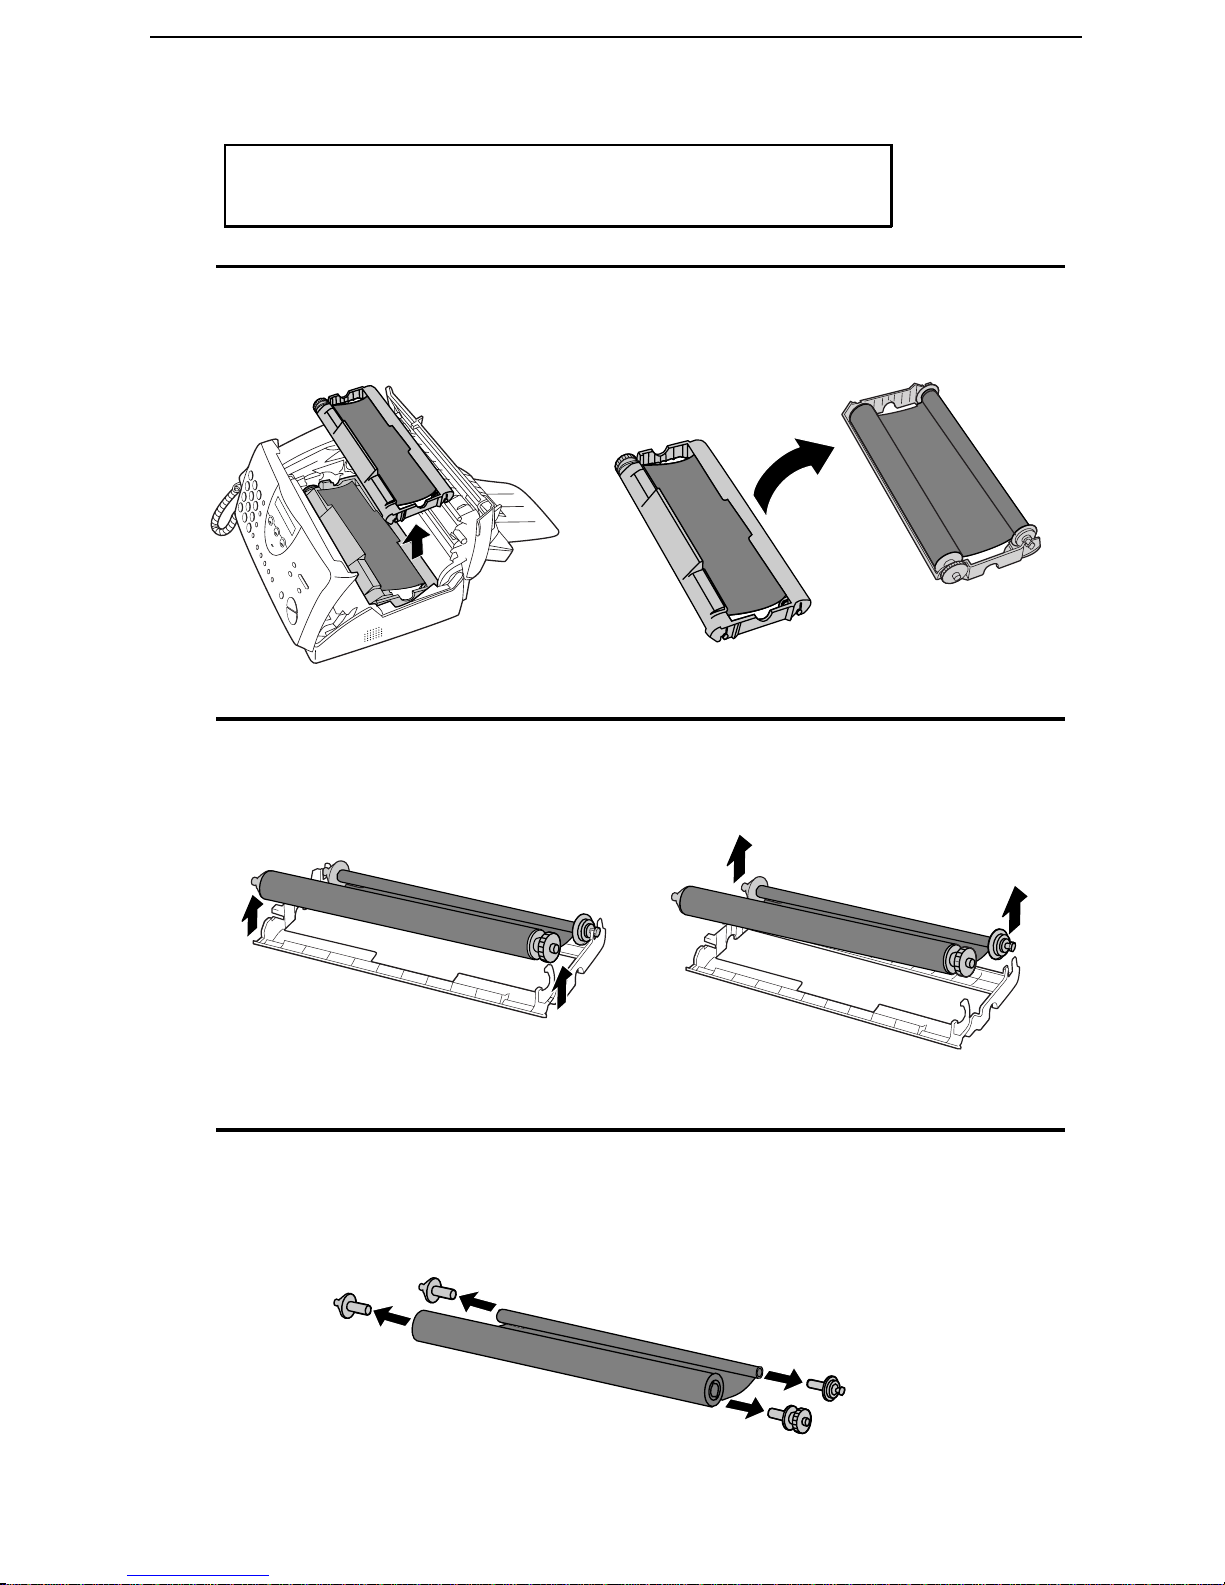
If you are install ing the i magi ng f ilm for t he first
time, go to Step 6.
3
Remove the imaging film cartridge from the print compartment
(grasp the handle at the front of the cartridge) and turn it over.
4
Remove the used film from the cartridge.
5
Remove the four green gears from the used film.
DO NOT DISCARD THE F OUR GREEN GEARS!
18
Page 21
Loading the Imaging Film
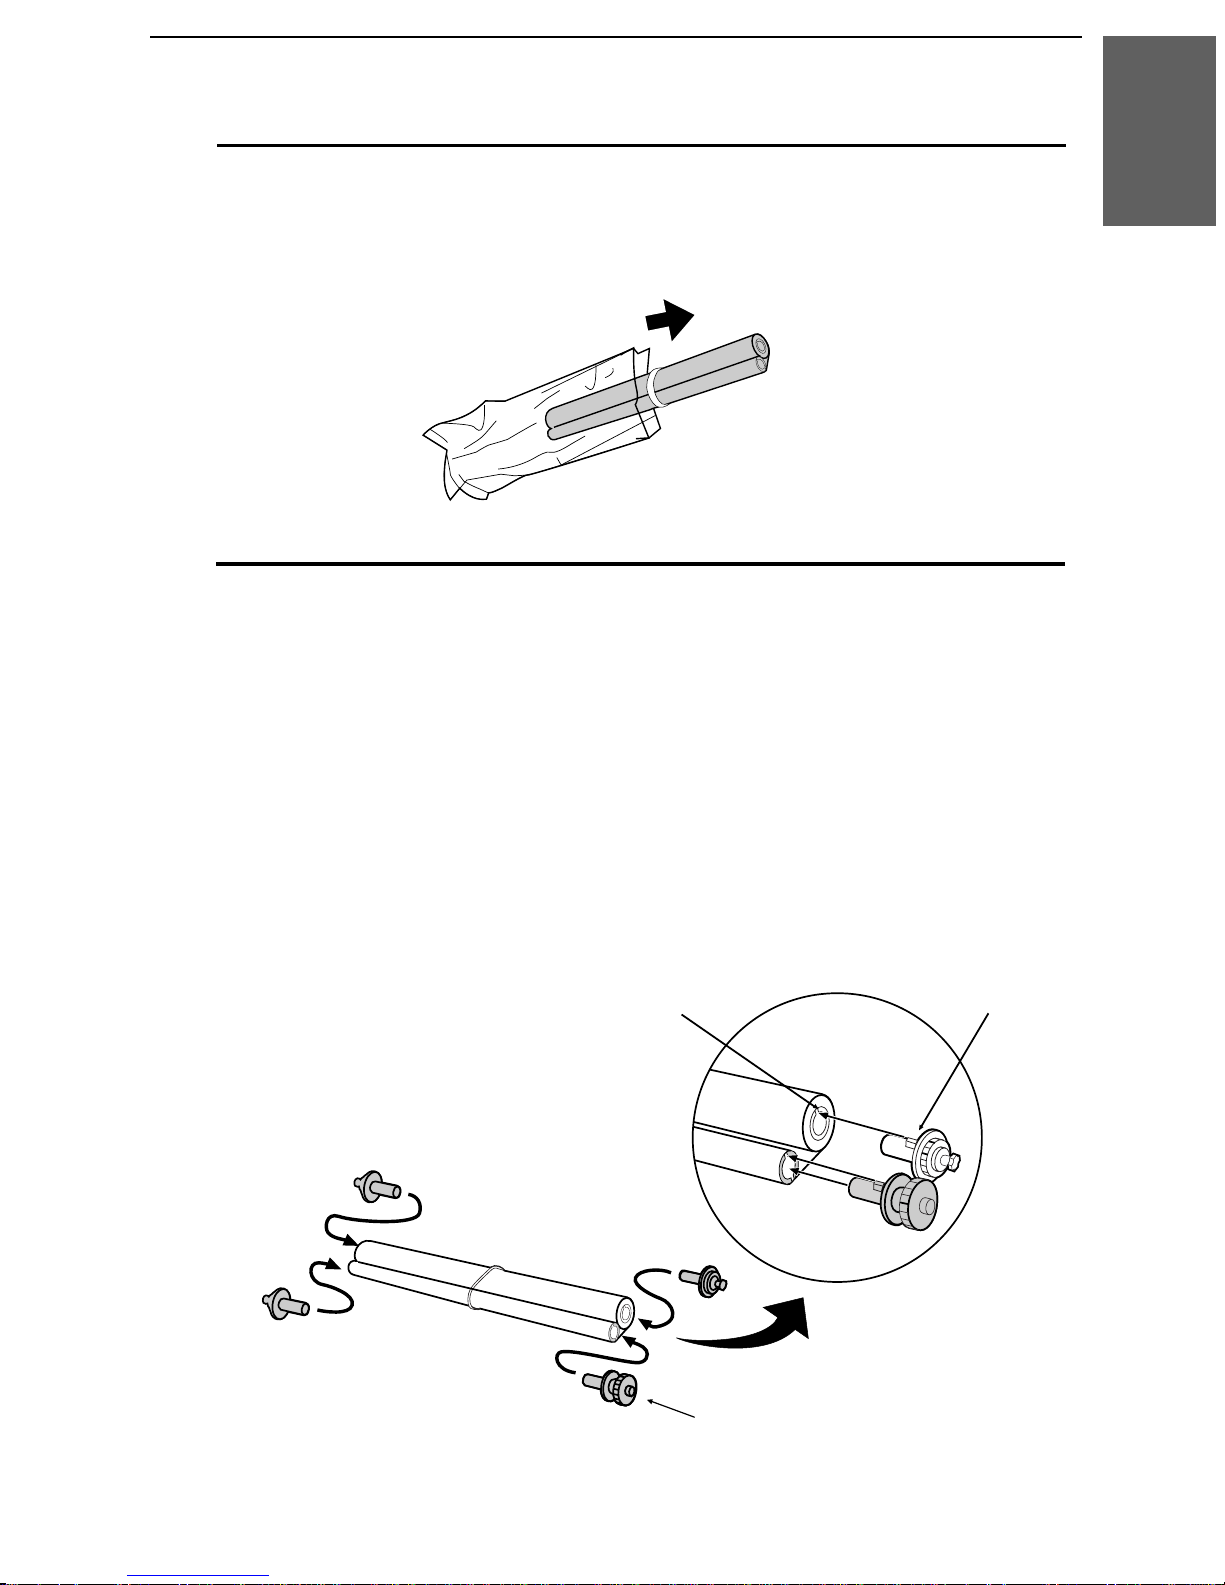
6
Remove the new roll of imaging f ilm from its packaging.
•• Do not yet remove the band that holds the rolls together.
7
Insert the large gear into the green end of the empty spool. Make
sure the two protrusions on the large gear fit firmly into the slots in
1. Installation
the end of the spool.
Insert the remaining three gears into the spools, making sure the
protrusion on each gear fits firmly into one of the slots in the end of
each spool.
•• If needed, pull the spools apart slightly to allow the gears to fit (the
band will stretch).
Slot
Protrusion
Large gear
19
Page 22
Loading the Imaging Film
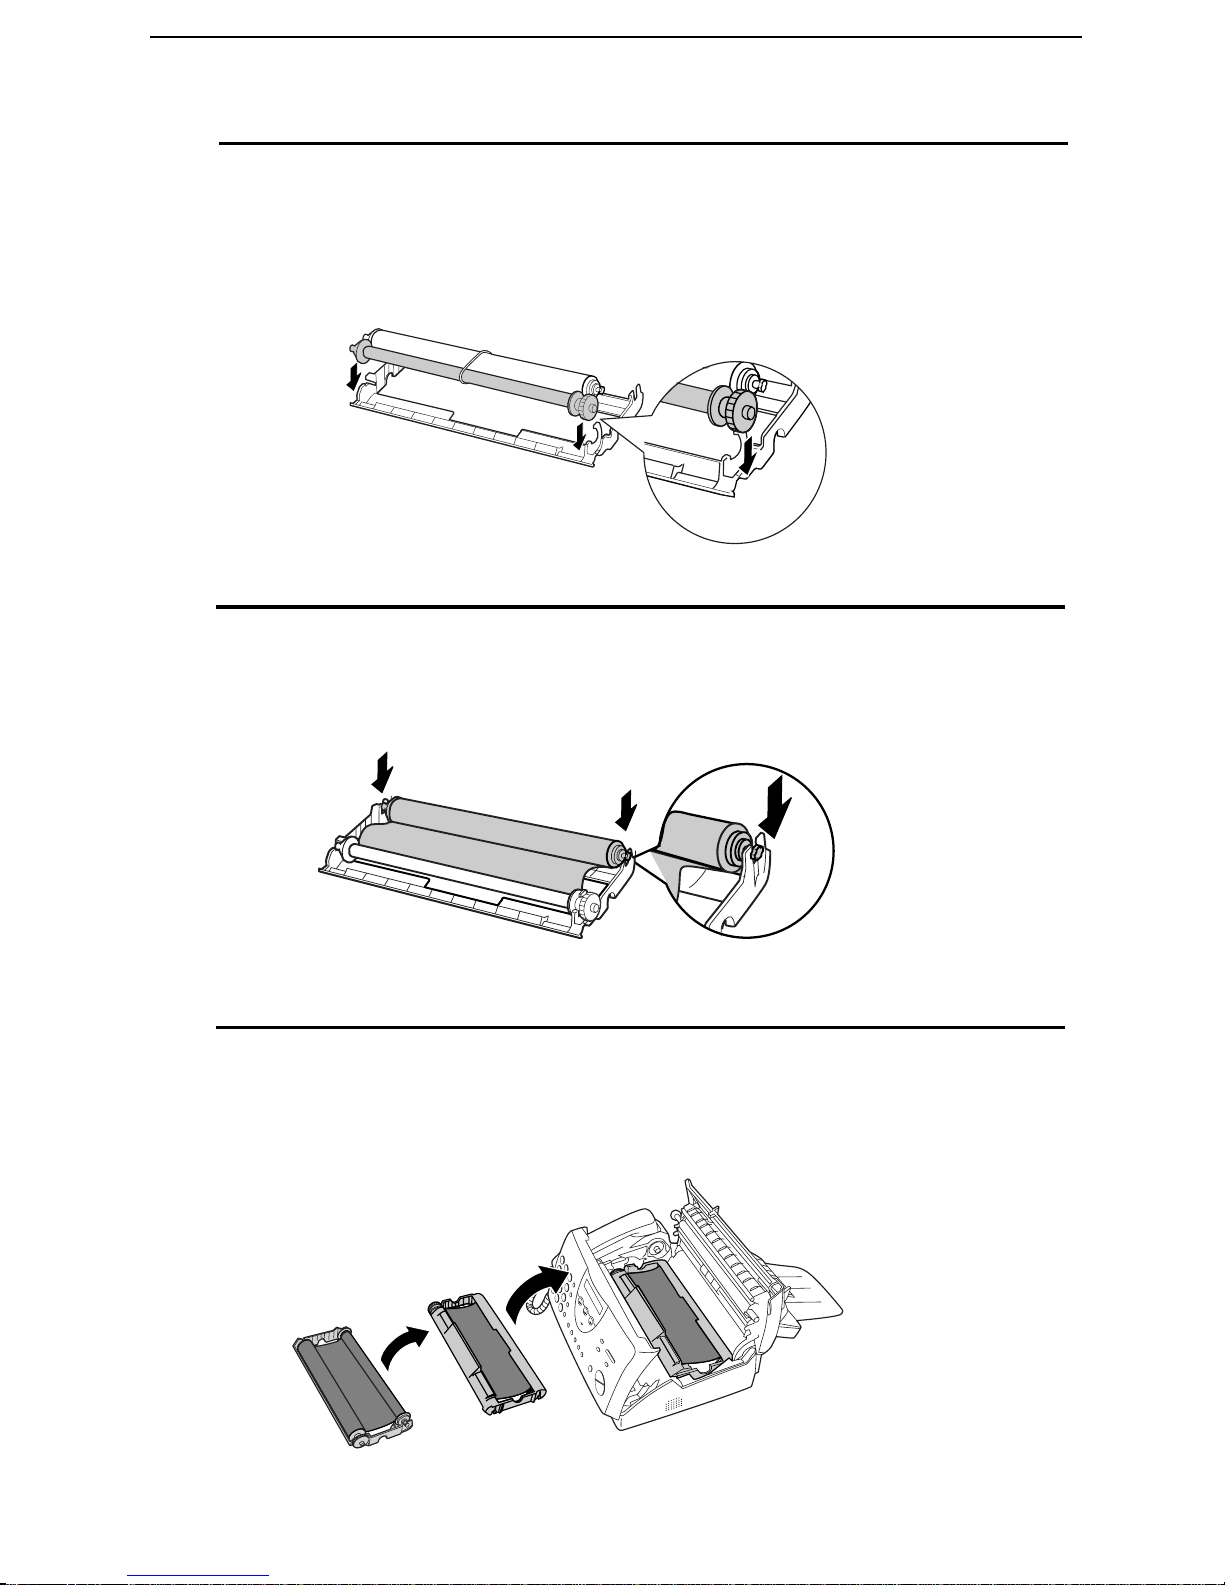
8
Insert the large gear into the large holder on the imaging film
cartridge (make sure it clicks into place), and then insert the small
gear on the other end of the spool into its holder.
9
10
Cut the band that holds the two spools together. Unroll the film
slightly and insert the small gears into their holders.
Turn the cartridge over, grasp the handle, and insert the cartridge
into the print compartment.
20
Page 23
Loading the Imaging Film
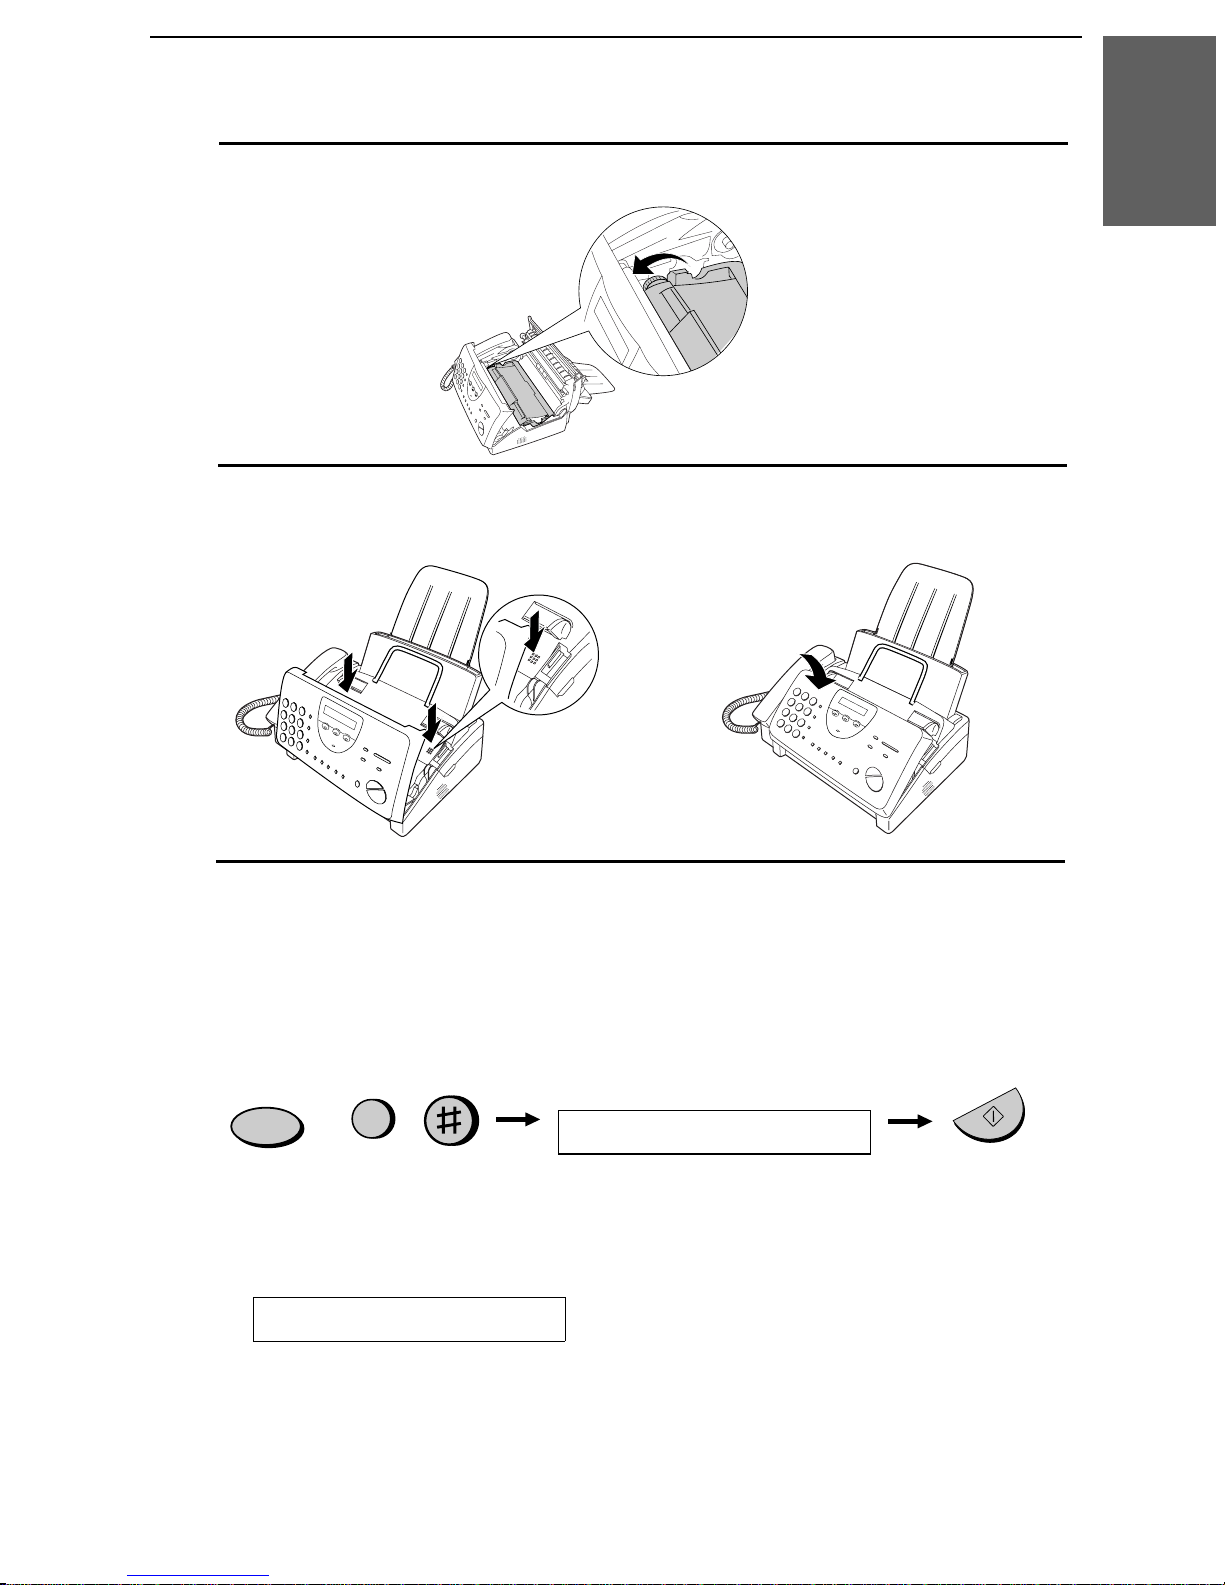
11
12
Rotate the large gear to wa rd you until the film is tau t.
Close the p rint compartment cover (press down on both sides to
make sure it clicks into place), and then close the operation panel.
1. Installation
Click!
13
Load paper in the paper tray and then press the following keys to
initialize the film.
Note: Paper must be loaded before the film can be initialized. To load
paper, see the following section, L oading the Printing Paper.
FUNCTION
6
Display shows:
INITIALIZE FILM
When to replac e the ima ging film
Replace the imaging film when the display sh ows:
FILM END
START/MEMORY
Use the following imaging fil m, whi ch is available from your dealer or
retailer:
Sharp UX-3CR Imaging Film
21
Page 24
Loading Printing Paper
Loading Printing Paper
You can load lette r or legal size paper in the paper tray. The maximum
number of sheets depend s on the weight and siz e of the paper you are
loading.
♦ Paper from 16 to 2 0 lbs. (60 to 75 g/m
2
):
Letter siz e : 60 shee t s Legal size: 30 shee ts
♦ Paper from 20 to 2 4 lbs. (75 to 90 g/m
2
):
Letter siz e : 50 shee t s Legal size: 25 shee ts
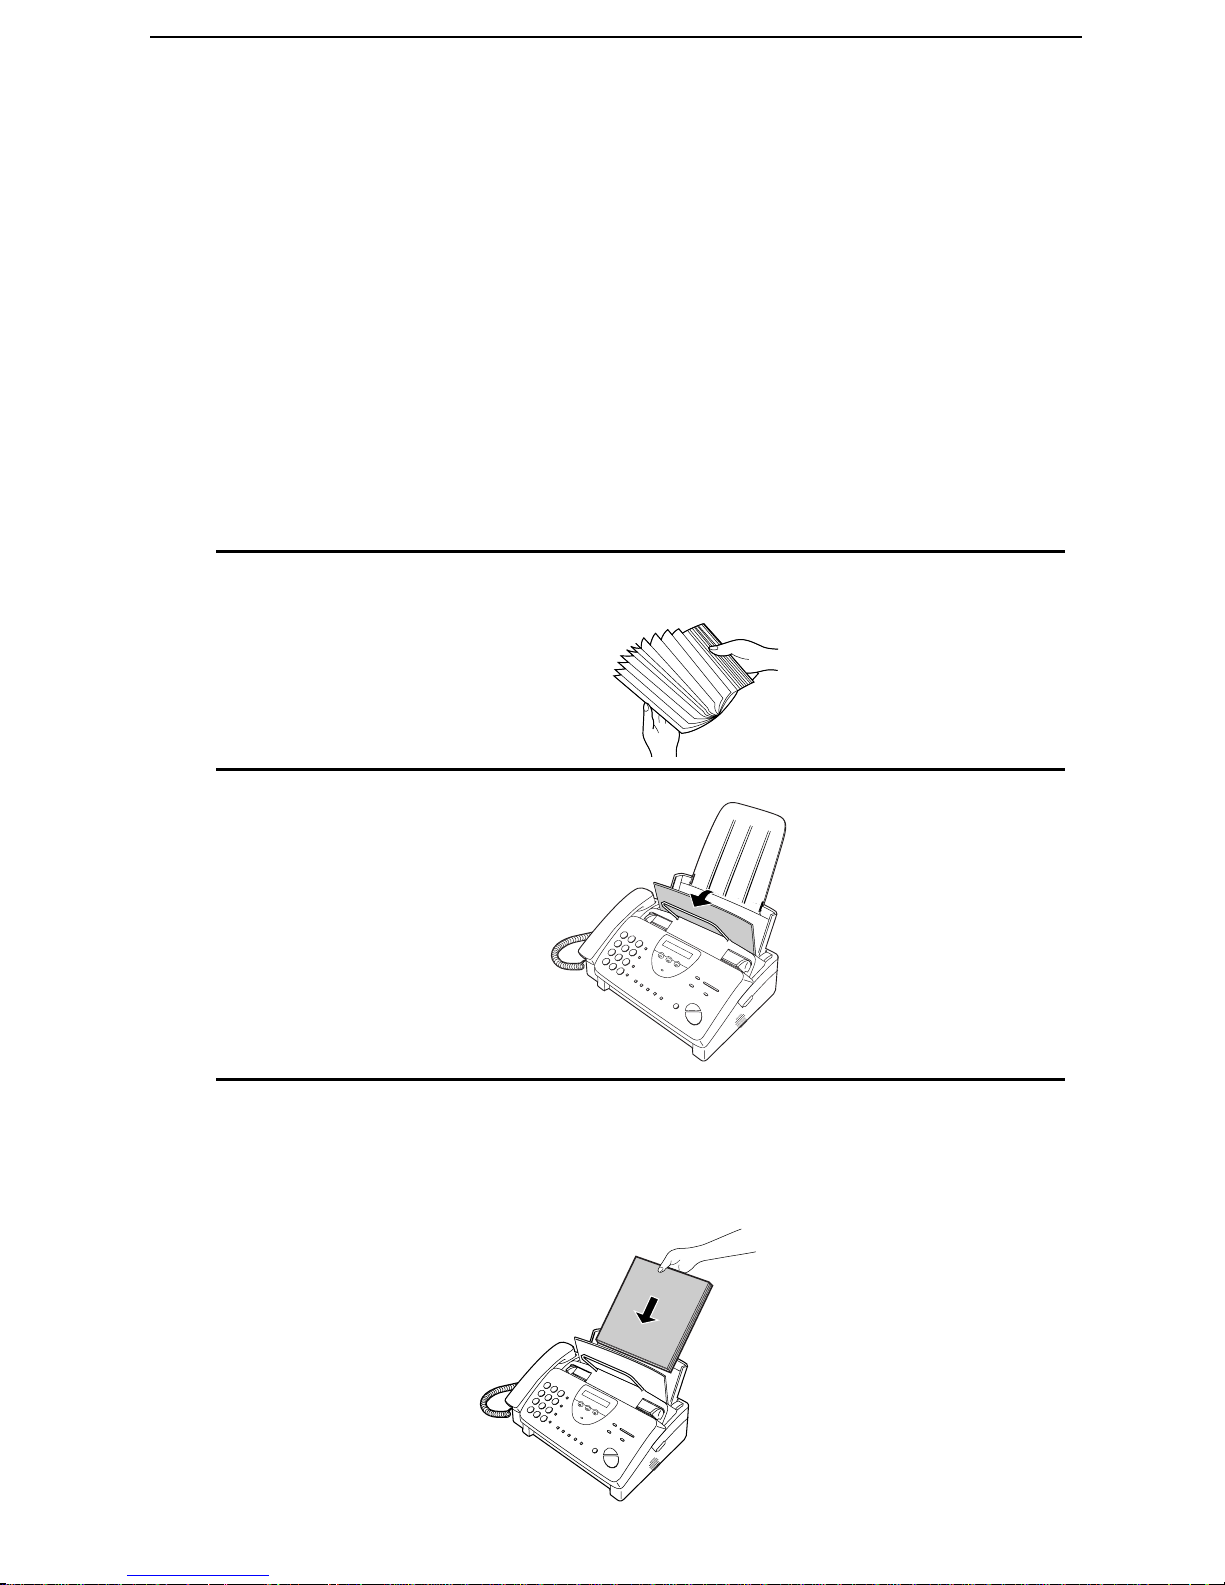
1
Fan the paper, and then tap the edge against a flat surfac e to even the
stack.
2
Pull the paper release plate toward you.
3
Insert the stack of paper into the tray, print side down.
•• If paper remains in the tray, take it out and combine it into a single
stack with the new paper before adding the new paper.
22
Be sure to load the
paper so that
printing takes place
on the
the paper. Printing
on the reverse side
may result in poor
print quality.
print side of
Page 25
Loading Printing Paper
4
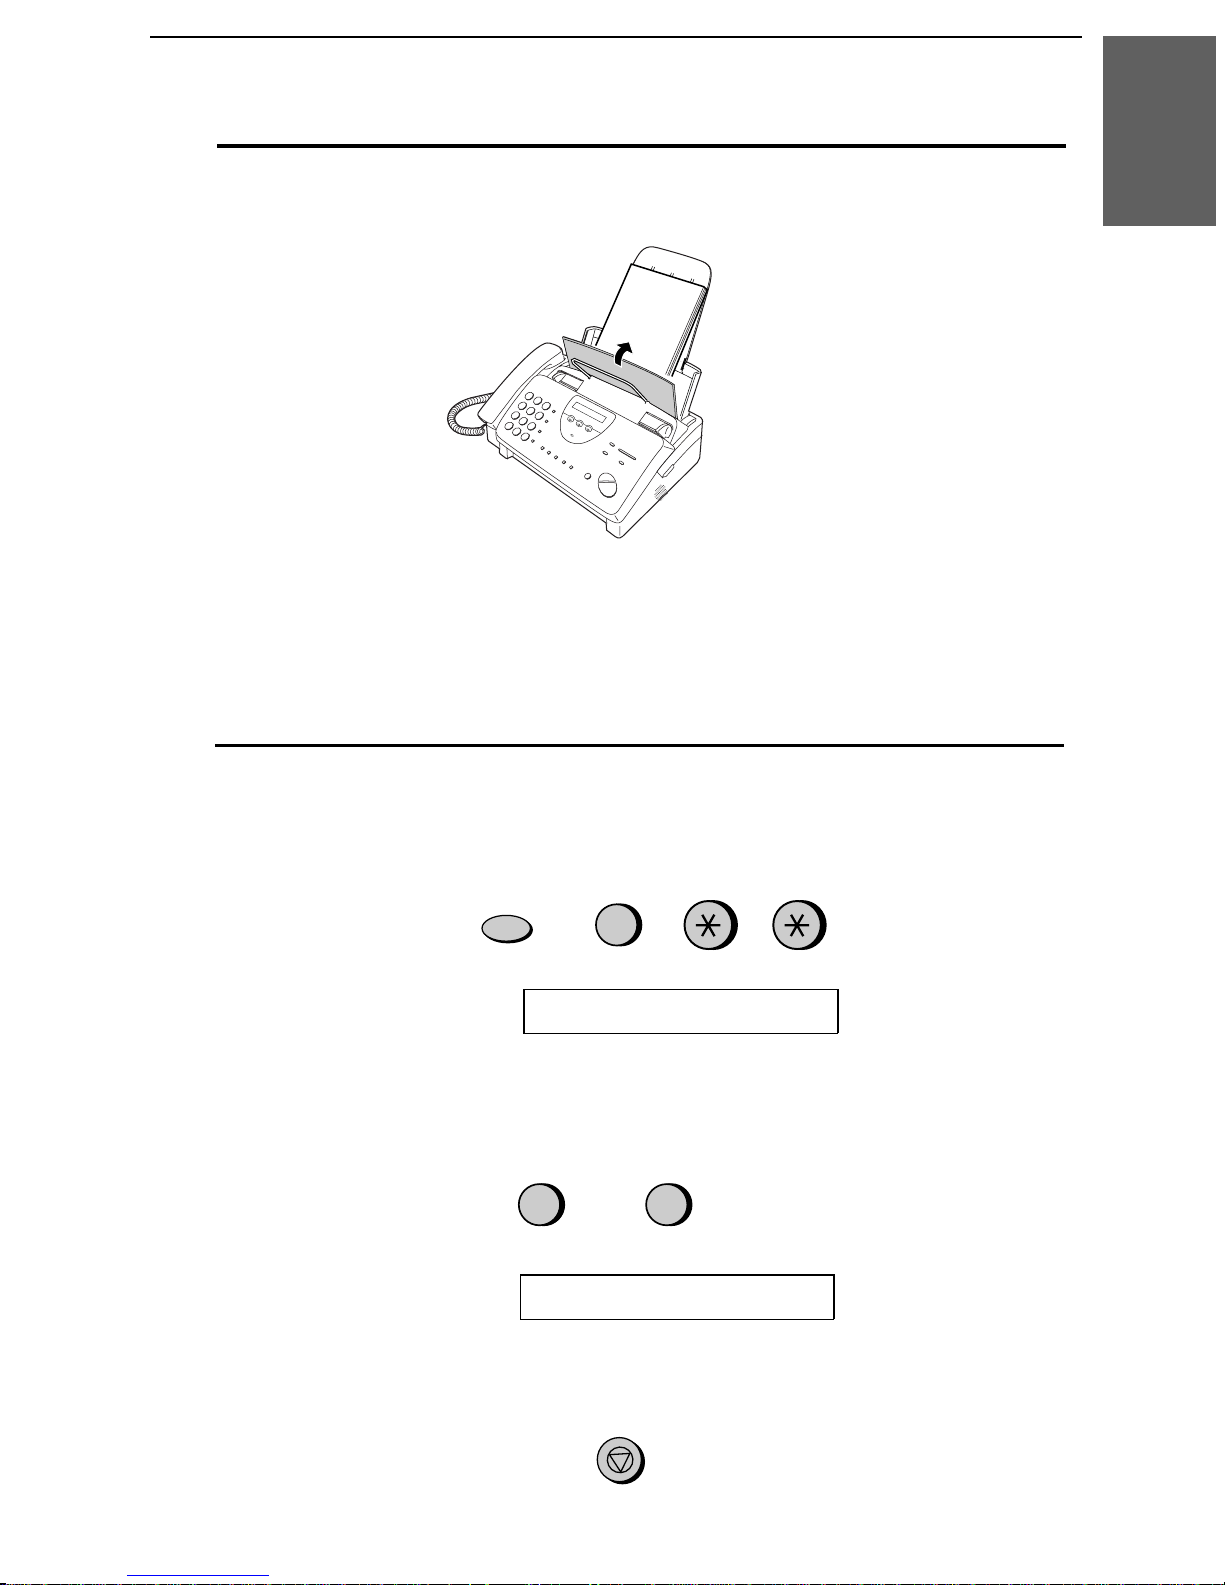
Push the paper release plate back down.
If the paper release
plate is not pushed
down, paper feed
errors will result.
Note: When receiving f axes or copying documents , do n ot allow a large
number of pages to accumulate in the output tray. This may obstruct the
outlet and cause paper jams.
1. Installation
5
The fax has been set at the factory to scale th e size of received faxes
to letter size paper. If you have loaded legal paper, you must change
the paper size setting to legal. Press these keys:
FUNCTION
6
The display will show:
PAPER SIZE SET
Press 1 to select LETTER or 2 to select LEGAL.
LETTER LEGAL
The display will show:
1 2
COPY CUT -OFF
or
Press the STOP key to return to the date and time display.
STOP
23
Page 26
Loading Printing Paper
6
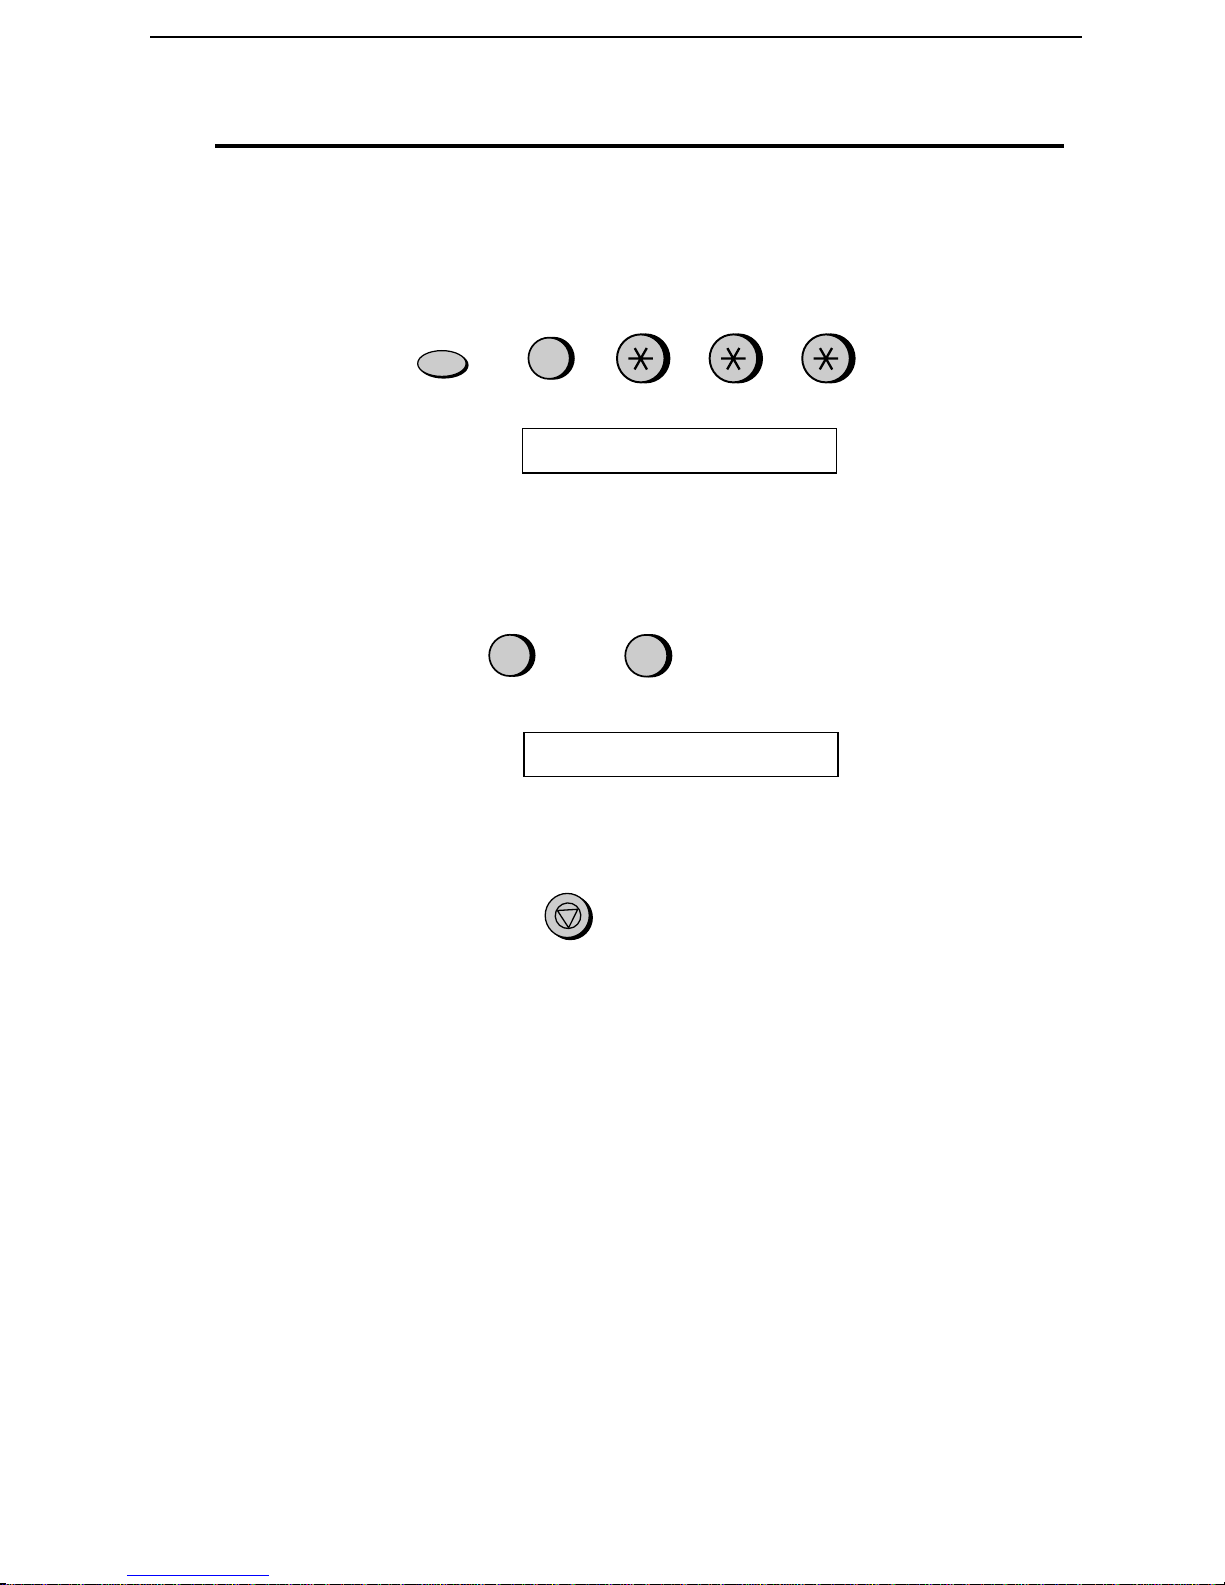
Your fax has been set at the factory to print at normal contrast.
Depending on the type of paper you have loaded, you may find that
you obtain better print quality by changing the setting to LIGHT.
Press these keys:
FUNCTION
6
The display will show:
PRINT CONTRA ST
Press 1 to select NORMAL or 2 to select LIGHT.
NORMAL LIGHT
1
The display will show :
or
PAPER SIZE SET
2
Press the STOP key to return to the date and time display.
STOP
24
Page 27
Entering Your Name and Fax Number
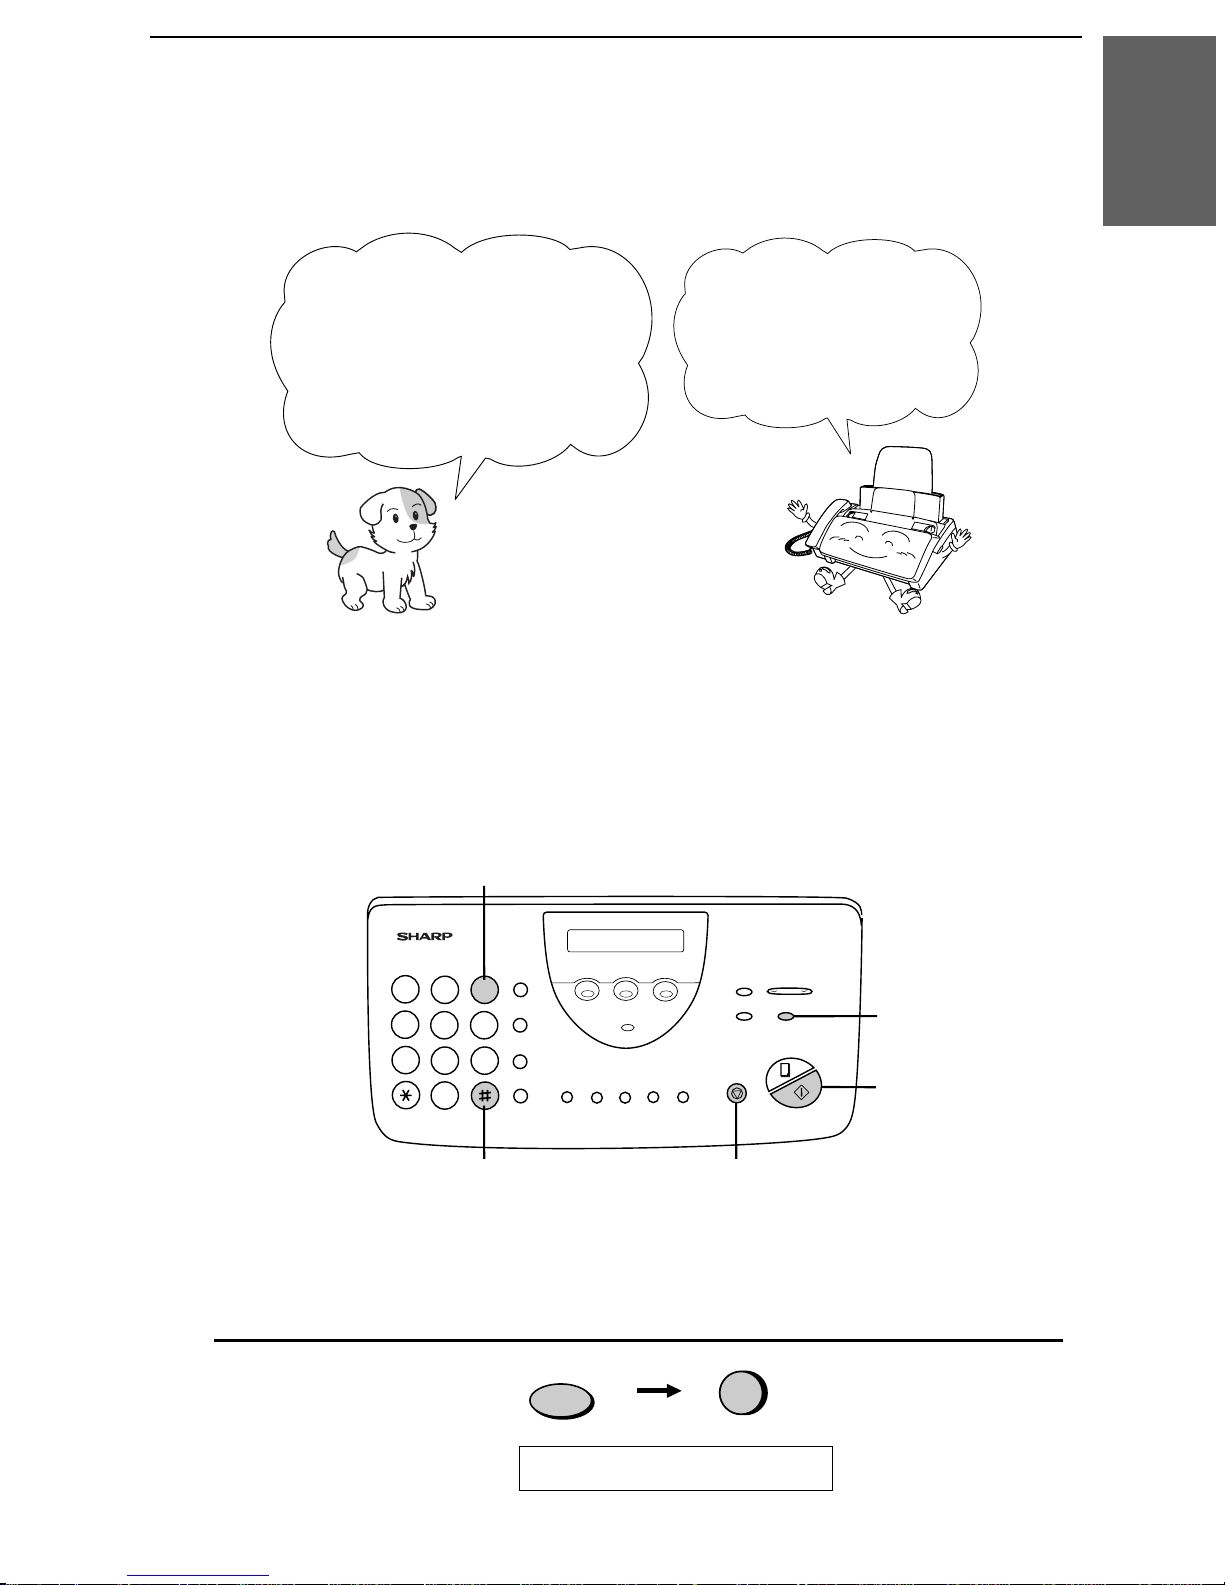
Entering Your Name and Fax Number
Before you can begin using
your fax, you need to enter
your name and the
telephone number of your
fax. You also need to set
the date and time.
Important!
The law requires that your name, telephone/fax number, and the date and
time appear on each fax message you send. Enter your name and fax
number here and set the date and time as explained in the following section
to have your fax include this information automatically at the top of your
fax messages.
Once you enter this
information, it will
automatically appear
at the top of each fax
page you send.
1. Installation
3 key
213
4
5 6
7
9
8
0
FUNCTION key
START/MEMORY
key
# key
STOP key
Note: The imaging film and printing paper must be loaded before your
name and fax number can be entered.
1
Press these keys:
FUNCTION
3
The display will show :
ENTRY MODE
25
Page 28
Entering Your Name and Fax Number
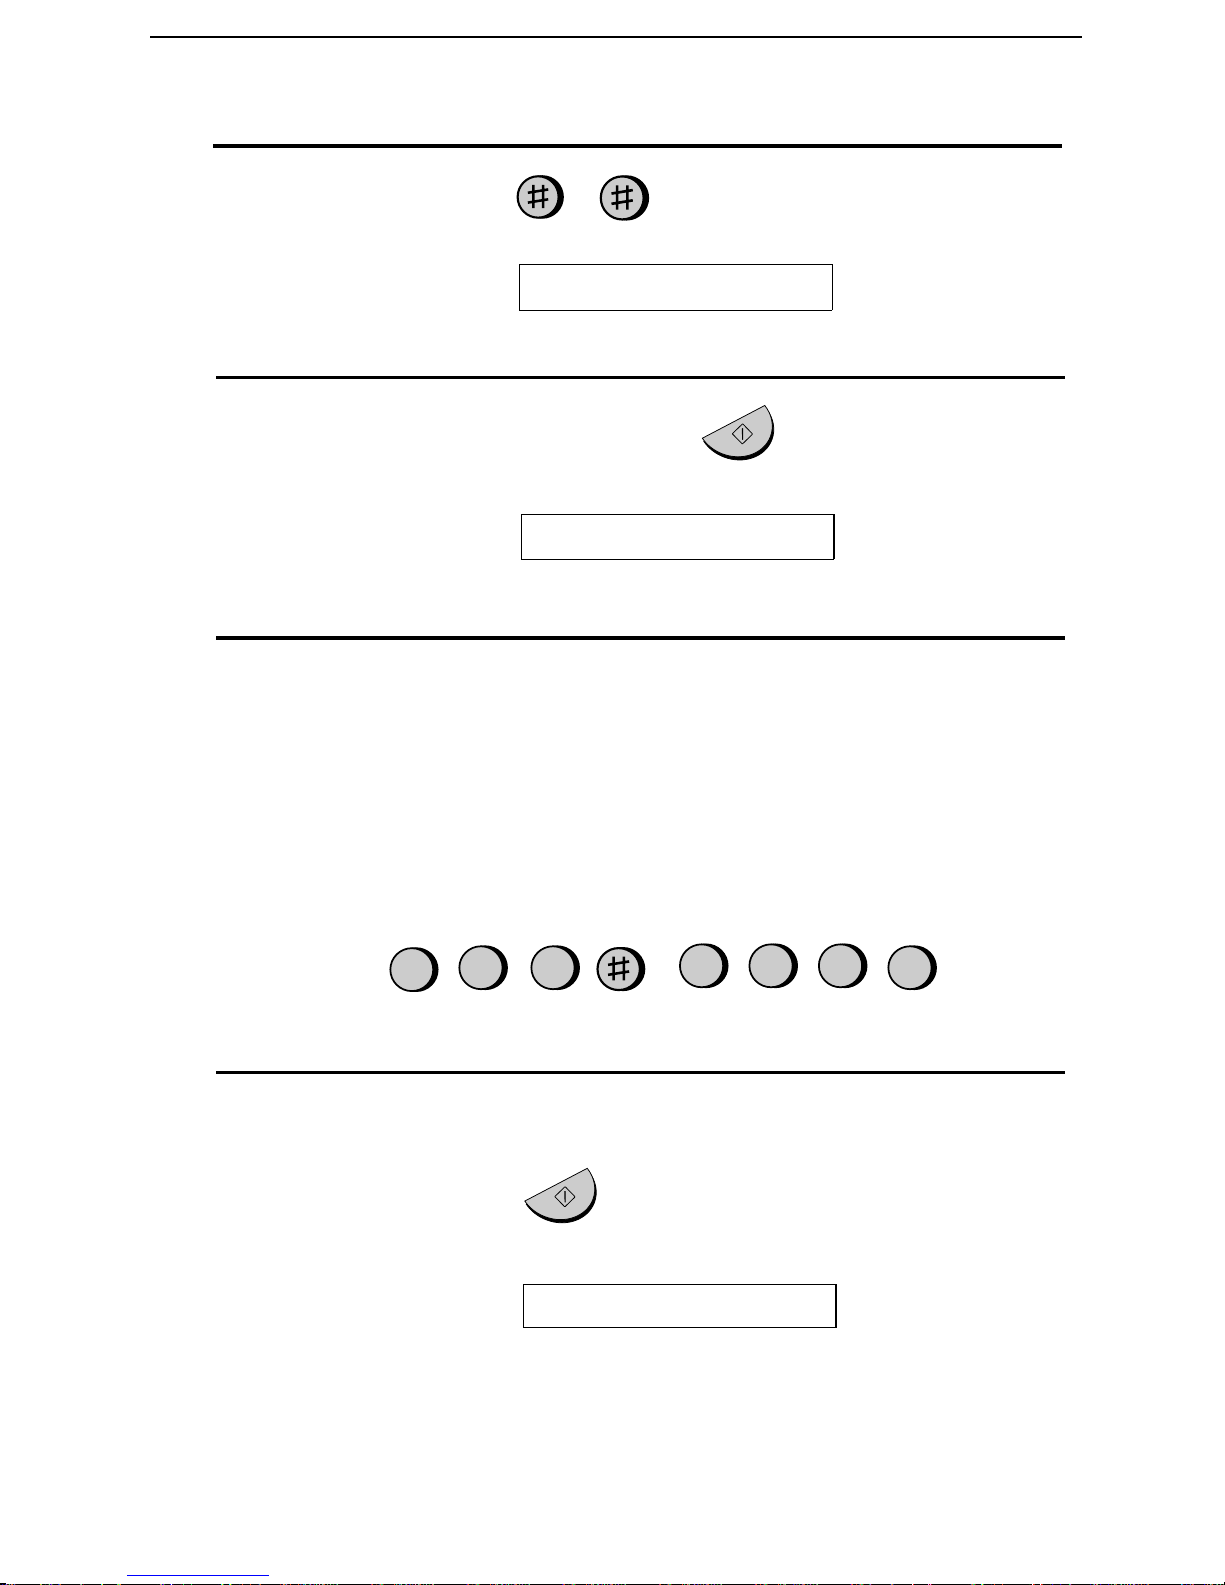
2
Press the # key twice:
The display will show :
3
Press the START/MEMORY key.
The display will show :
4
Enter your fax number by pressing the number keys. Up to 20 digits
OWN NUMBER SET
START/MEMORY
ENTER FAX #
can be entered.
•• To ins ert a space between digits, press the # key.
•• If you make a mistake, press the HOLD/SEARCH key to move
the cursor back to the mistake and then enter the correct number.
The new number will replace the old number.
Example:
5
Press the START/MEMORY key to enter the fax numbe r in
5
55
21
3
4
memory.
START/MEMORY
The display will show : ENTER YOUR NAM E
Cursor: A dar k squ are mark in the display that indicates where a number
or letter will be entered.
26
Page 29
Entering Your Name and Fax Number
6
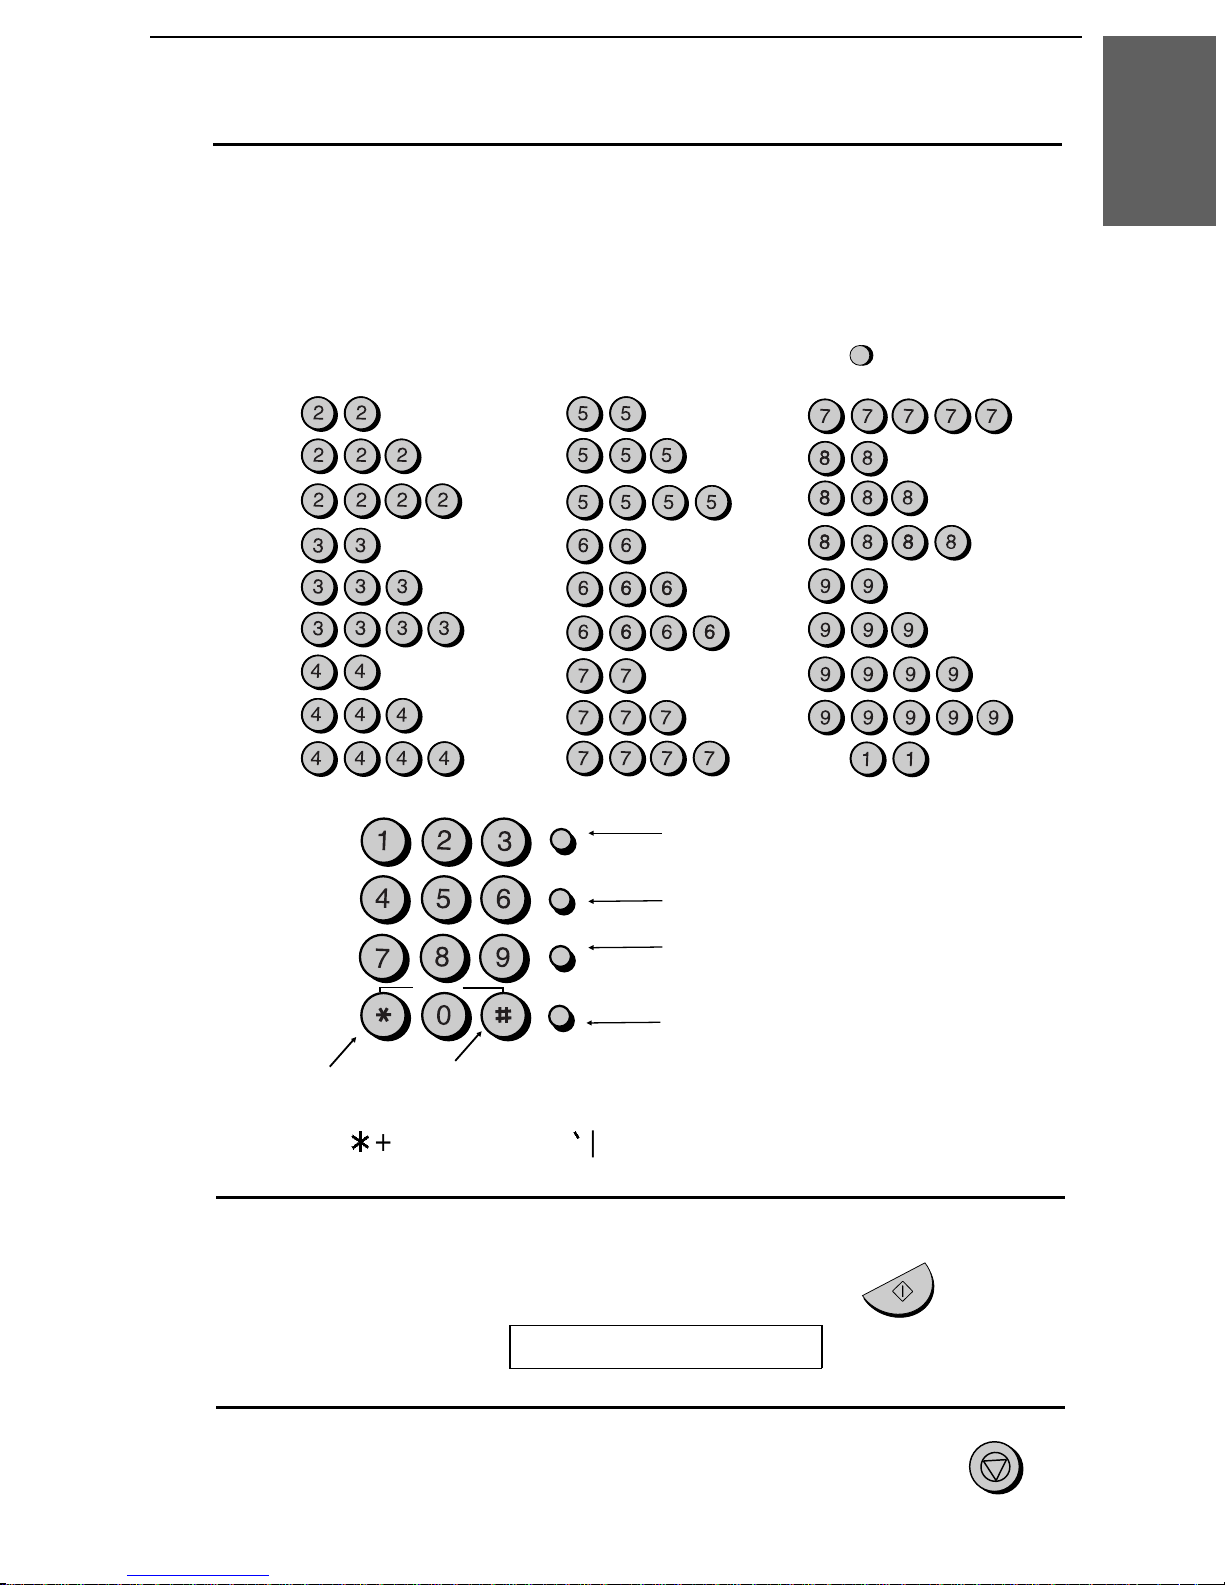
Enter your name by pressing the number keys as shown in the chart
below. Up to 24 characters can be entered.
•• To enter two letters in succession that require the same key, press
the SPEAKER key after entering the first letter.
Example: SHARP = 7 7 7 7 7 4 4 4 2 2 7 7 7 7 7 7
SPEAKER
1. Installation
A =
B =
C =
D =
E =
F =
G =
H =
I =
GHI
PQRS
ABC
JKL
TUV
SYMBOLS
DEF
MNO
WXYZ
J =
K =
L =
M =
N =
O =
P =
Q =
R =
SPEED DIAL
SEARCH
SPEAKER
REDIAL
HOLD/
Press either key repeatedly to select
one of the following symbols:
./!"#$%&’()++,-:;<=>?@[ ¥]^_p{|}→←
S =
T =
U =
V =
W =
X =
Y =
Z =
SPACE =
Press this key to delete the letter
highlighted by the cursor.
Press this key to change case.
Press this key to move
the cursor to the left.
Press this key to move
the cursor to the right.
7
Press the START/MEMORY key to save your name in memory.
The display will show:
8
Press the STOP key to return to the date and time display.
START/MEMORY
SECURITY SELECT
STOP
27
Page 30
Setting the Date and Time
Setting the Date and Time
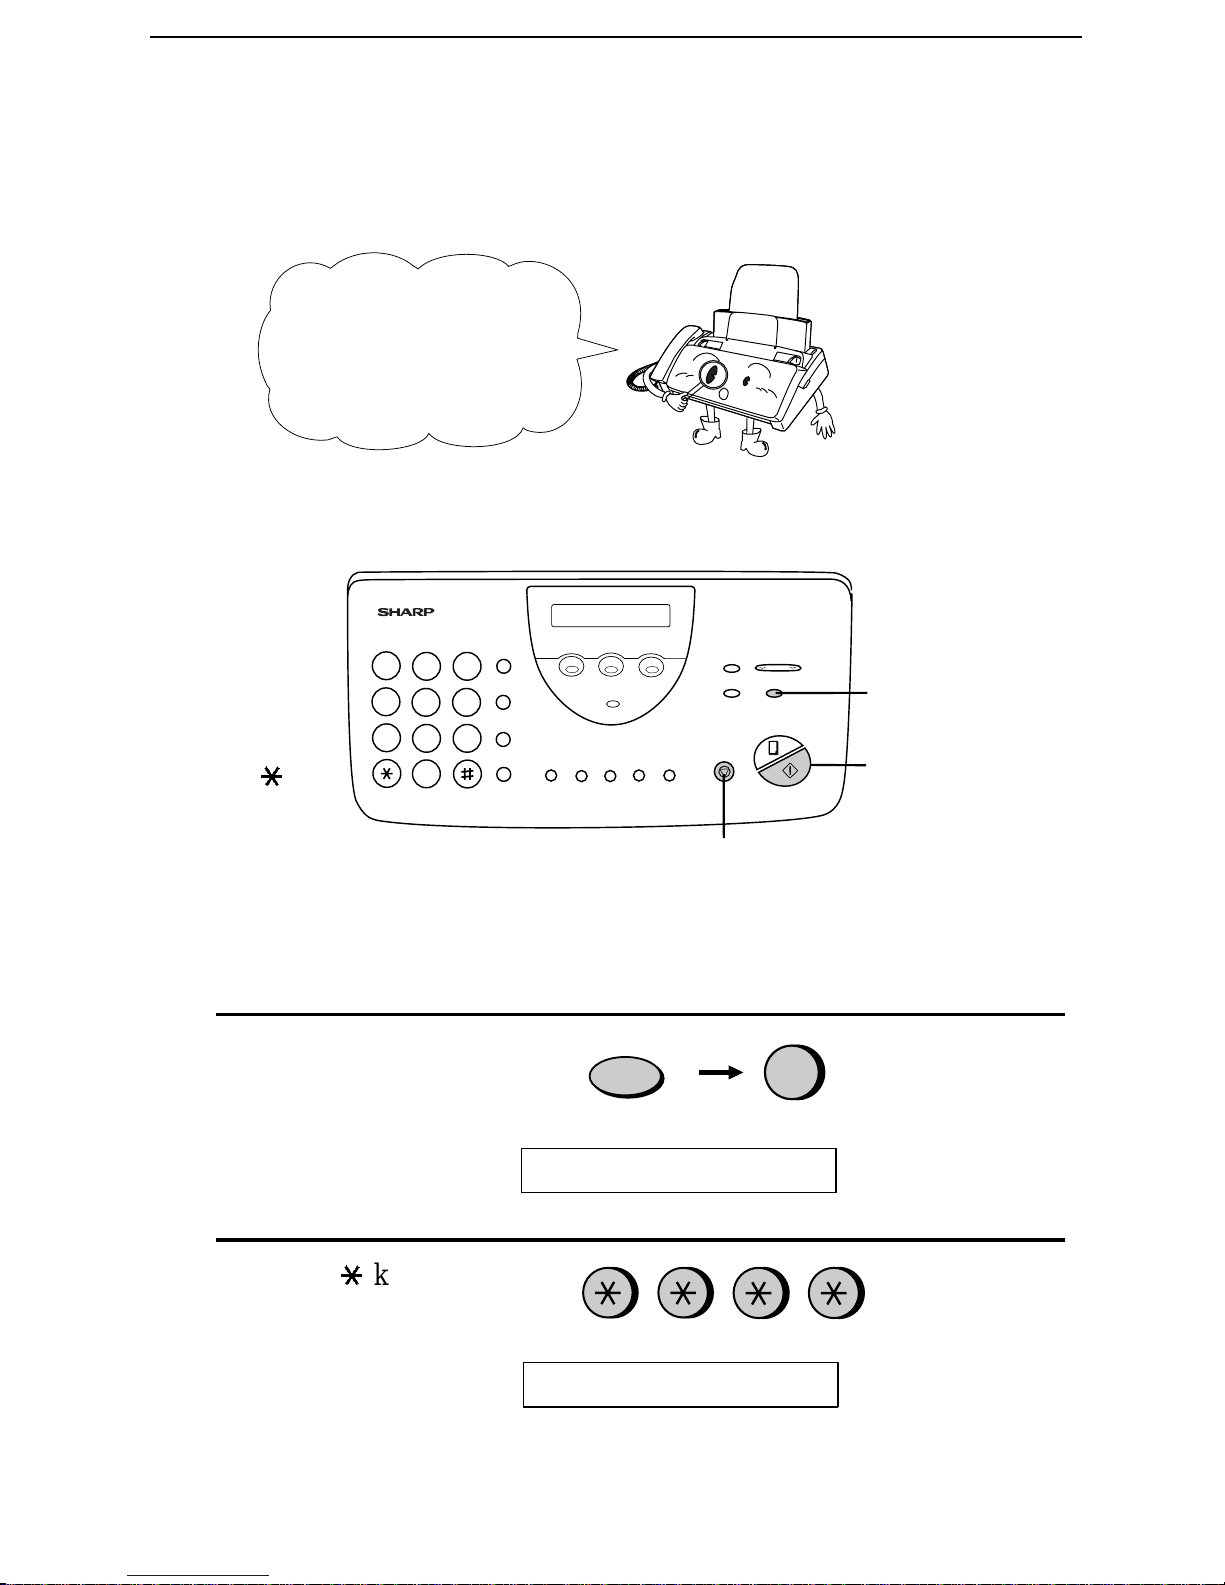
The date and time
appear in the display
and reports, and are
printed at t he top of
every page you fax.
3 key
213
*
key
4
5 6
7
9
8
0
FUNCTION key
START/MEMORY
key
STOP key
Note: The imaging film and printing paper must be loaded before the date
and time can be set.
1
Press these keys:
FUNCTION
3
The display will show:
ENTRY MODE
2
Press the * key four times.
The display will show :
Note: The fax is Year 2000 compliant.
28
DATE & TIME SET
Page 31
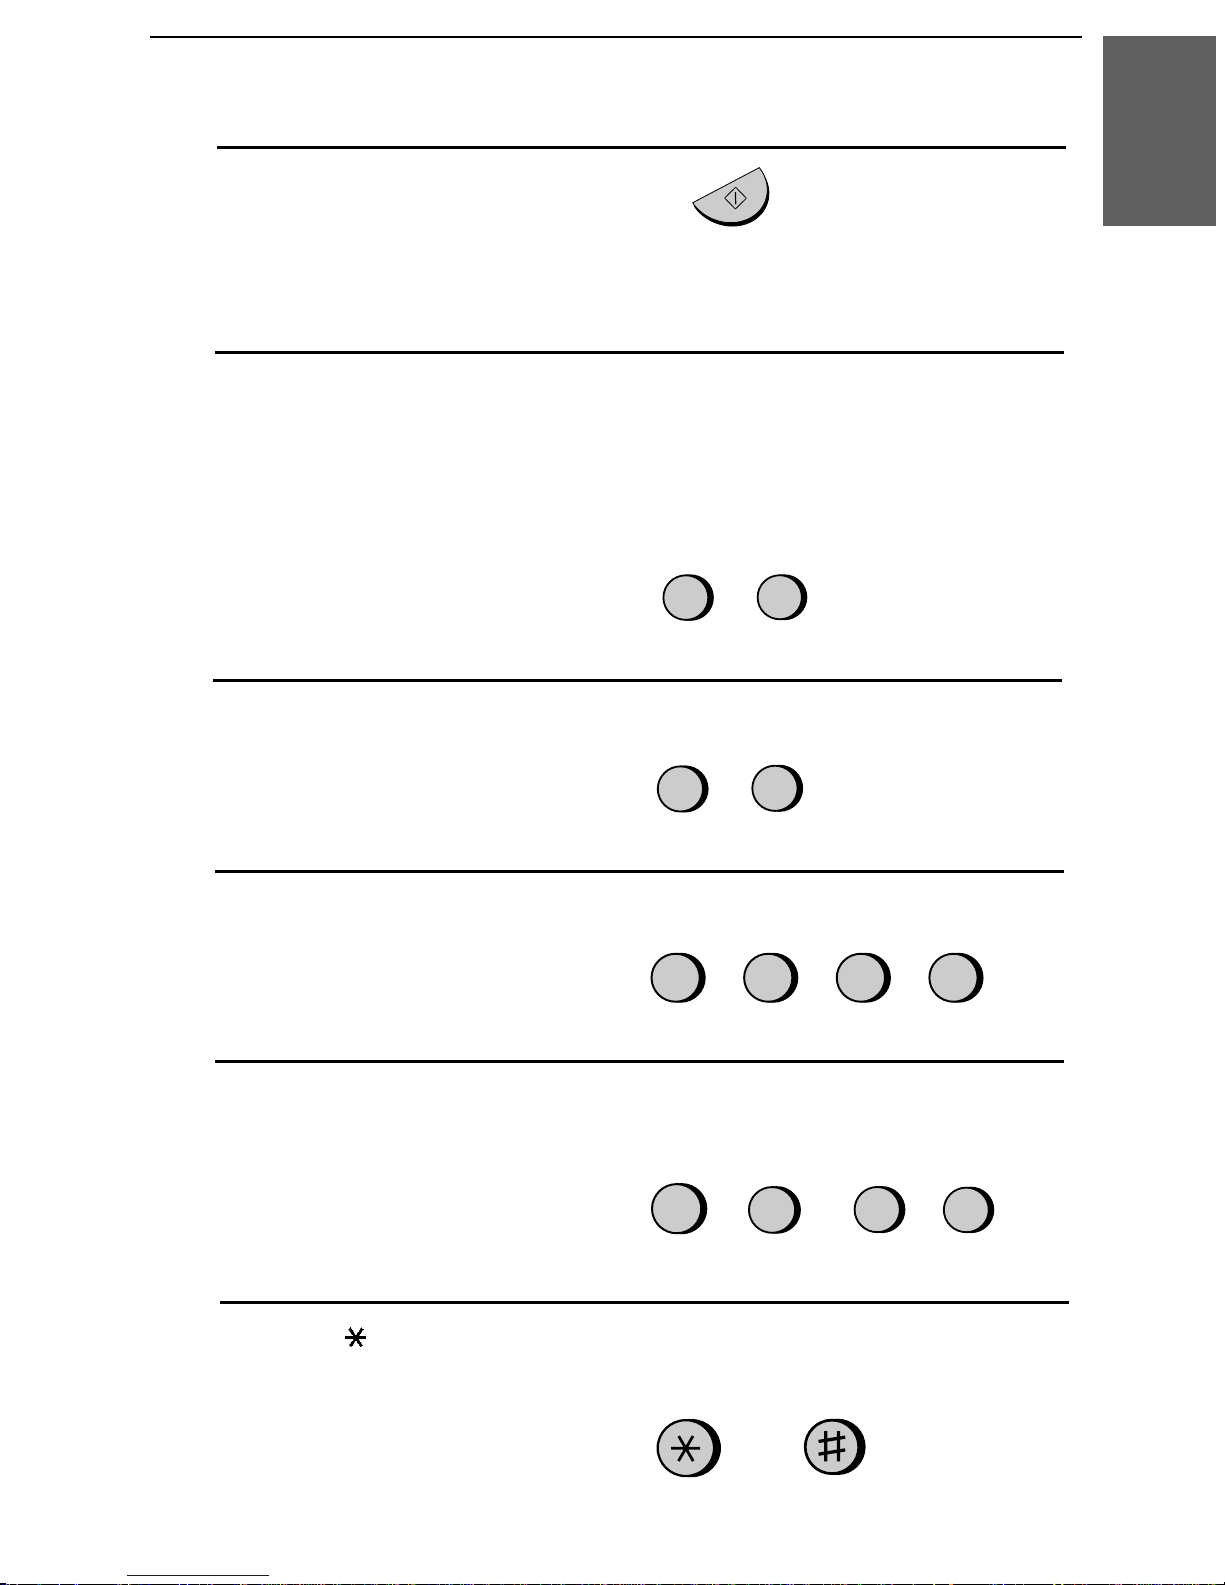
Setting the Date and Time
3
Press the START/MEMORY key.
START/MEMORY
•• The currently set date will appear in the display.
4
Enter a two-digit number for the month ("01" for January, "02" for
February, "12" for December, etc.).
•• To correct a mistake, press the SPEED DIAL key to move the
cursor back to the mistake, and then enter the correct number.
1. Installation
Example: January
5
Enter a two-digit number for the day ("01" to "31").
Example: the 5th
6
Enter the year (four digits).
Example: 1999
7
Enter a two-digit number f or the hour ("01" to "12") and a two-digit
number for the minute ("00" to "59").
0
0
1
5
9 91
9
8
Press the * key to select A.M. or the # key t o select P.M.
Example: 9:25
0
A.M. P.M.
9
or
2
5
29
Page 32
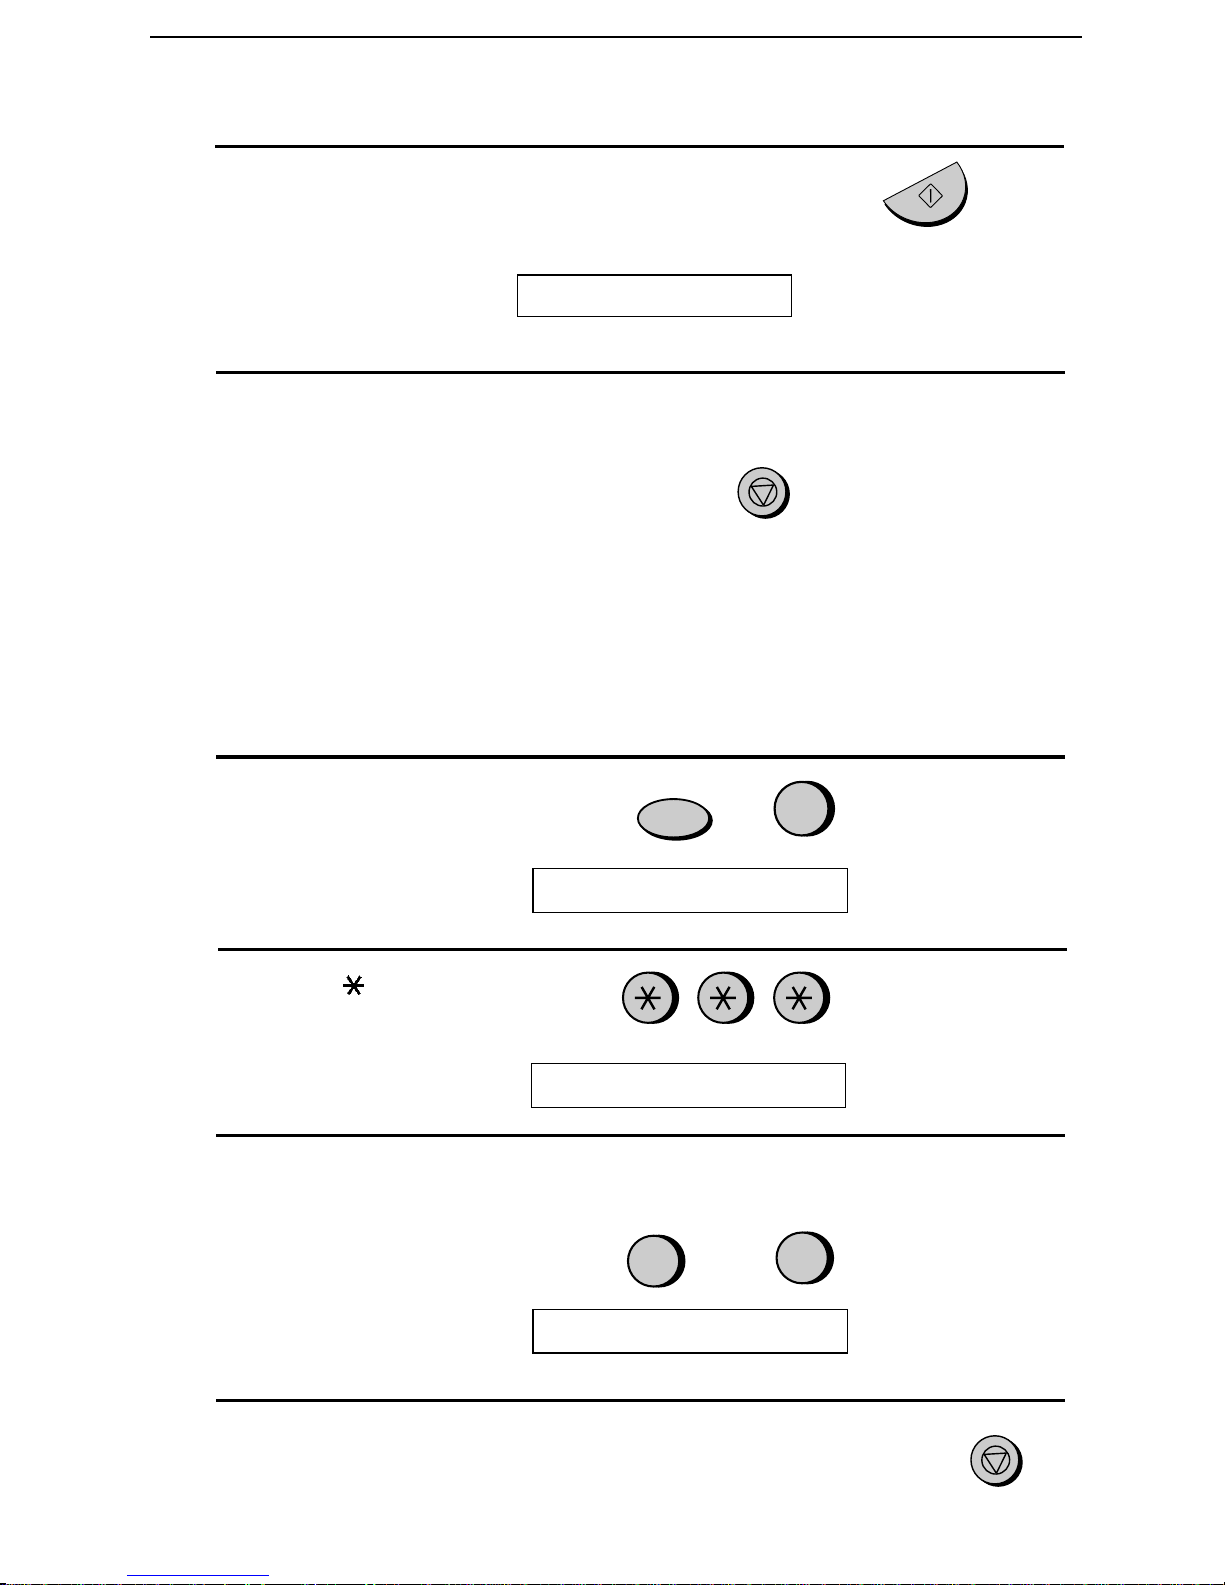
Setting the Date and Time
9
Press the START/MEMORY key to start the clock.
START/MEMORY
The display will show :
10
Press the STOP key to return to the date and time display.
Daylight Saving Time
If desired, you can have the clock move forward and backw ard
autom aticall y at th e beginni ng and end of Dayli ght Savi ng Ti me. To
turn on this functio n, press the panel keys as follows:
1
Press these keys:
DAY LIGHT SAVING
STOP
FUNCTION
3
The display will show:
2
Press the * key three times.
The display will show :
3
Press 1 to turn on the Day light Saving Time function, or 2 to turn it
off.
The display will show :
4
Press the STOP key to return to the date and time display.
ENTRY MODE
DAY LIGHT SAVI NG
YES
1
STORE JUNK #
or
NO
2
STOP
30
Page 33
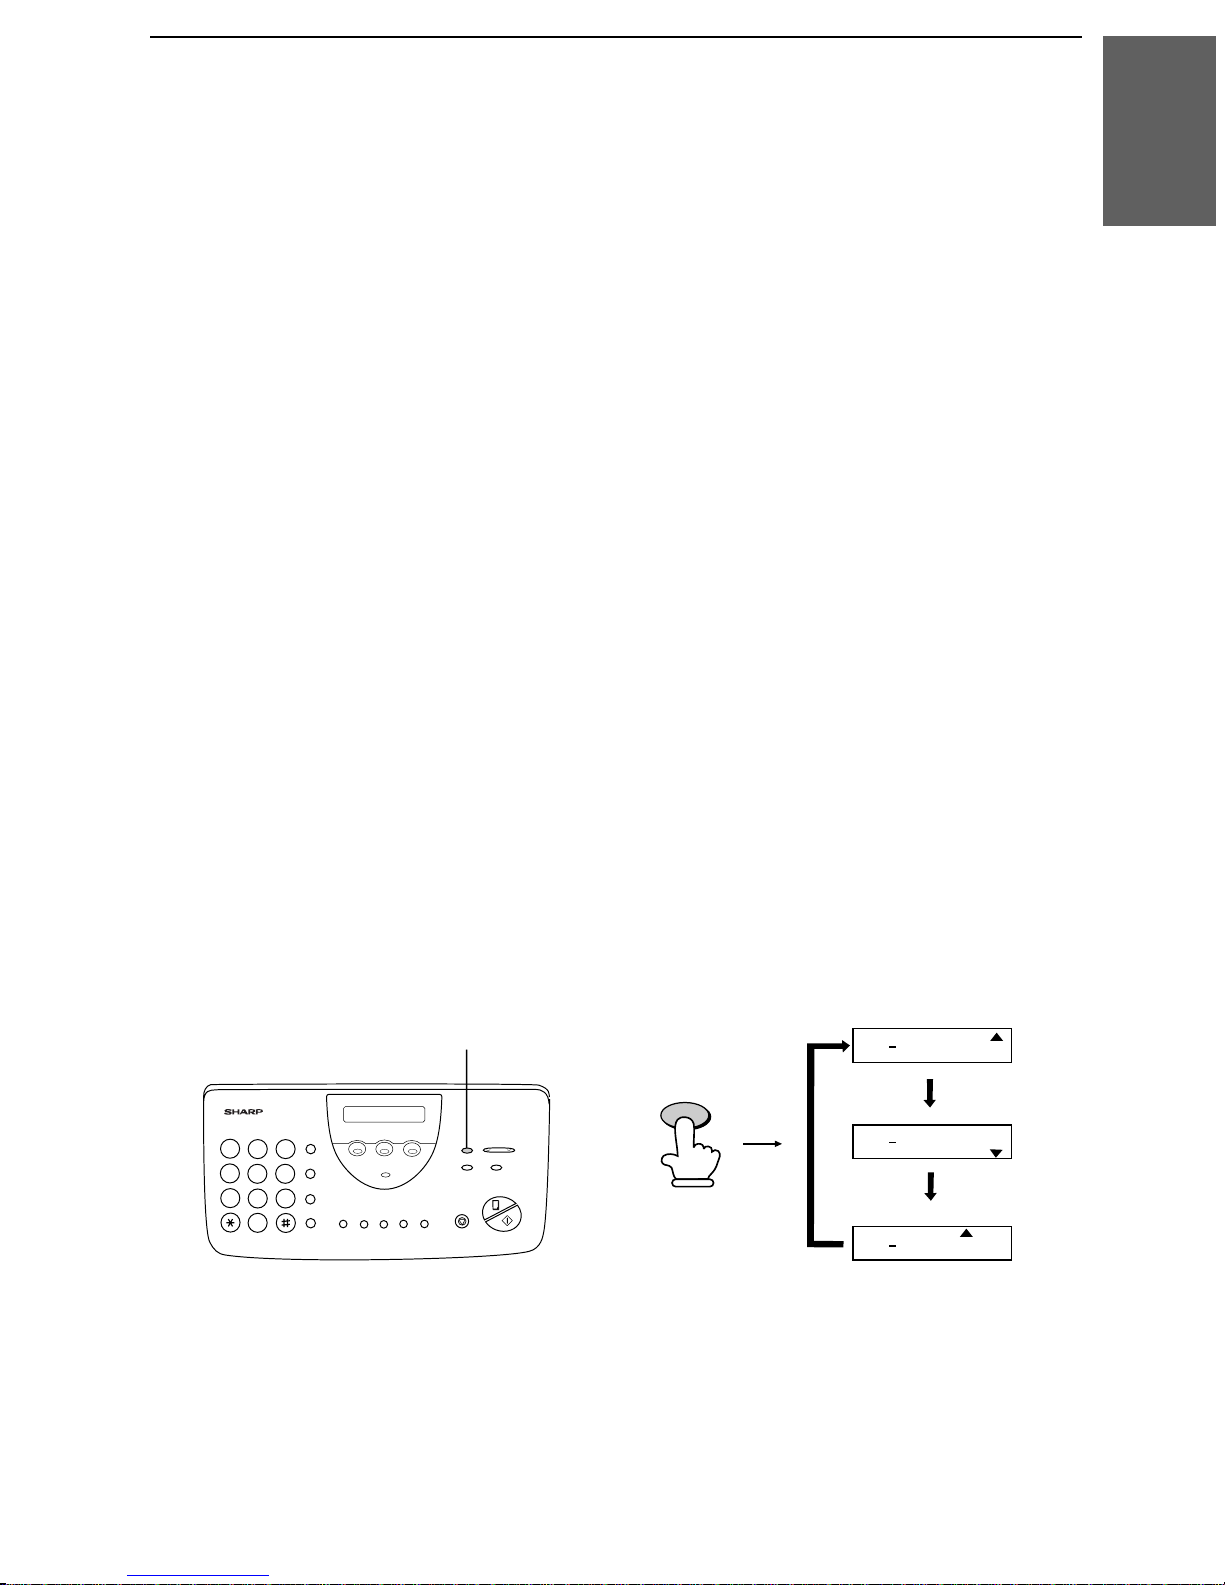
Selecting the Reception Mode
Selecting the Reception Mode
Your fax has three modes for receiving incom in g calls and faxes:
TEL mo de:
Select this mode when you want to receive both phone calls and faxes
on the line connected to the fax ma chine. All calls, including faxes,
must be answ ered by pick ing u p the fax mach ine’s h an dset or an
extension phone co nnected to the same line.
FAX mode:
Select this mod e when you only want to receive faxes on your line.
The fax machine will automatical ly answer all calls on four rings and
receive incoming faxes.
TAD mode:
Select this mod e when you are out and want the built-in answerin g
machine to answer all calls. Voice messages will be recorded, and fax
1. Installation
messages will be received automati cally. ("TAD" is an acronym for
"Telephone Answering Devic e".)
Setting the reception mode
Press the RECEPTION MODE key until the arrow in the display
points to the desired mode.
RECEPTION MODE key
213
4
5 6
7
9
8
0
Note: TAD mode cannot be selected unless a general outgoi ng
RECEPTION
MODE
FEB 1 10:30
FEB 1 10:30
FEB 1 10:30
TEL
TEL
TEL
FAX
TAD
FAX
TAD
FAX
TAD
message has been recorded as explained in Chapter 2.
For more info rmati on on r eceiving faxes in TEL and FAX modes, see
Chapter 4, Receiving Documents. For more information on using TAD
mode, se e Chapter 2, Using the Answering Machine.
31
Page 34
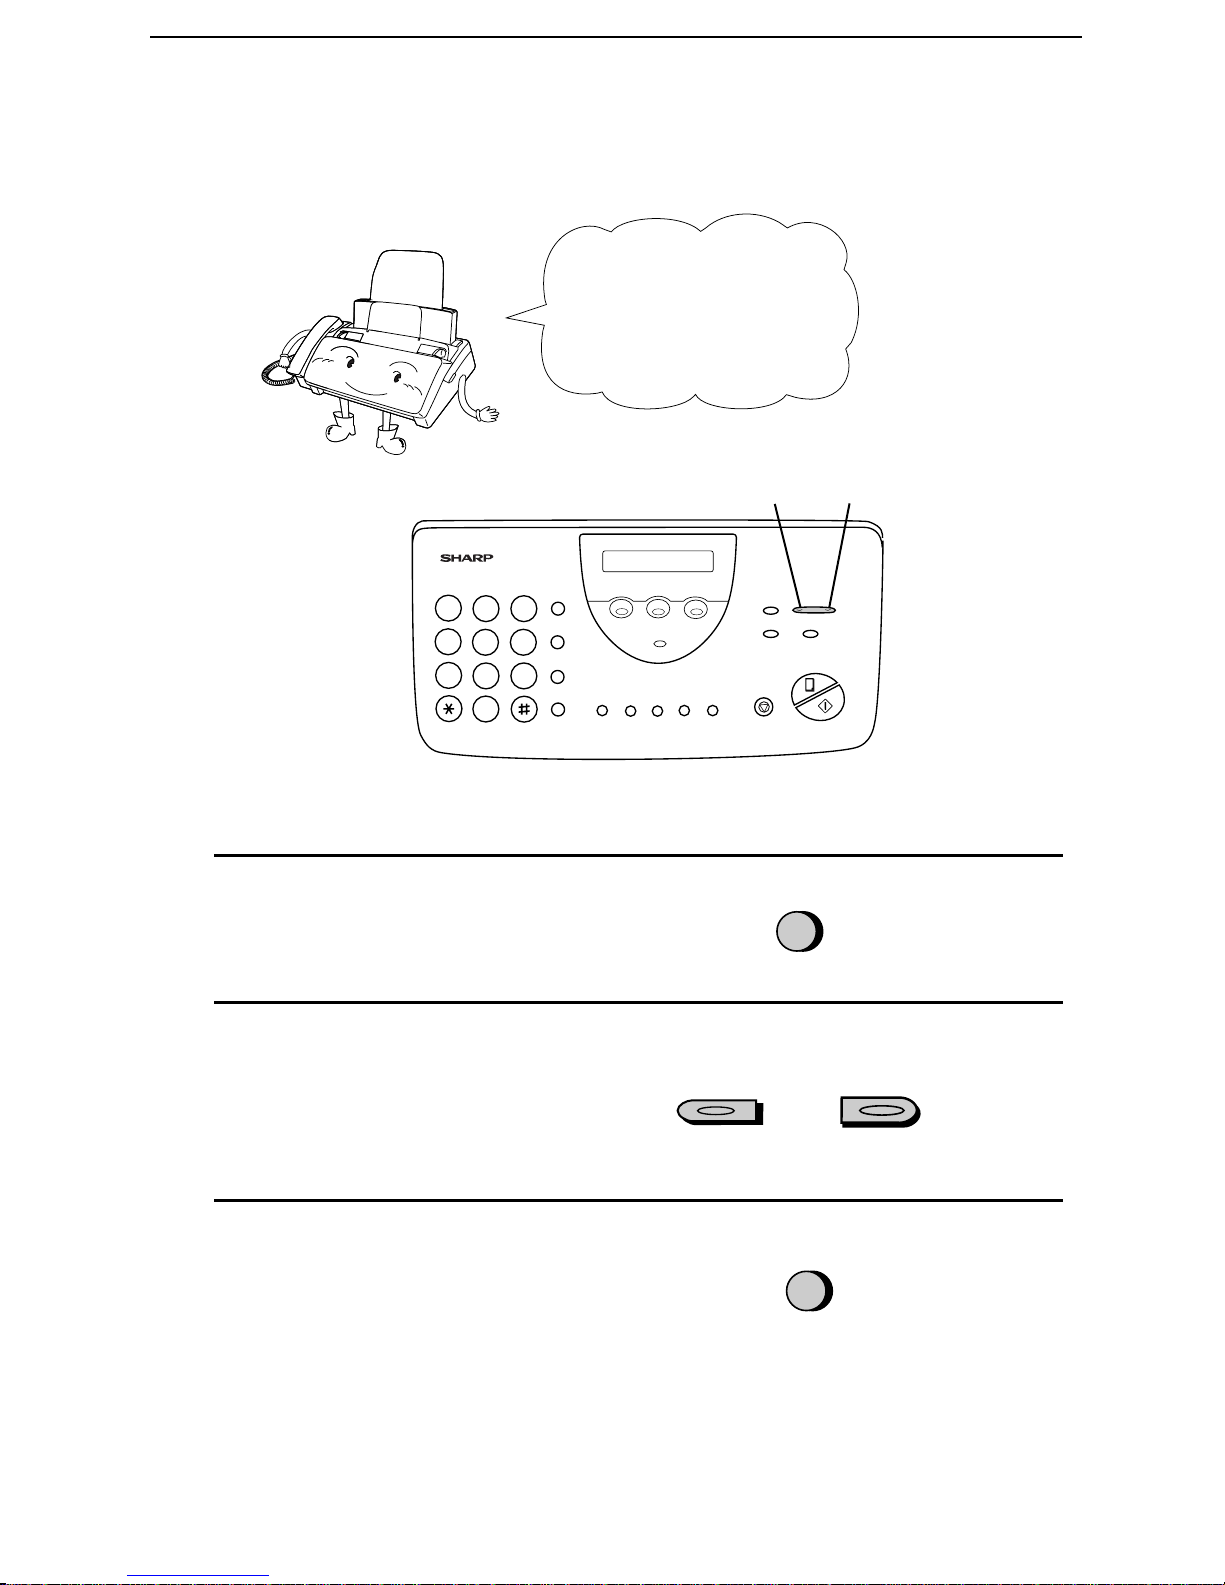
Volume Adjustment
Volume Adjustment
You can adjust the
volume of the speaker,
handset, and ringer
using the
UP and
DOWN keys.
Speaker
1
Press the SPEAKER key.
2
Press the UP or DOWN key.
DOWN key
213
4
5 6
7
9
8
0
SPEAKER
UP key
3
When the display shows the desired
volume level, press the SPEAKER
key to turn off the speaker.
32
DOWN
or
SPEAKER
UP
Page 35
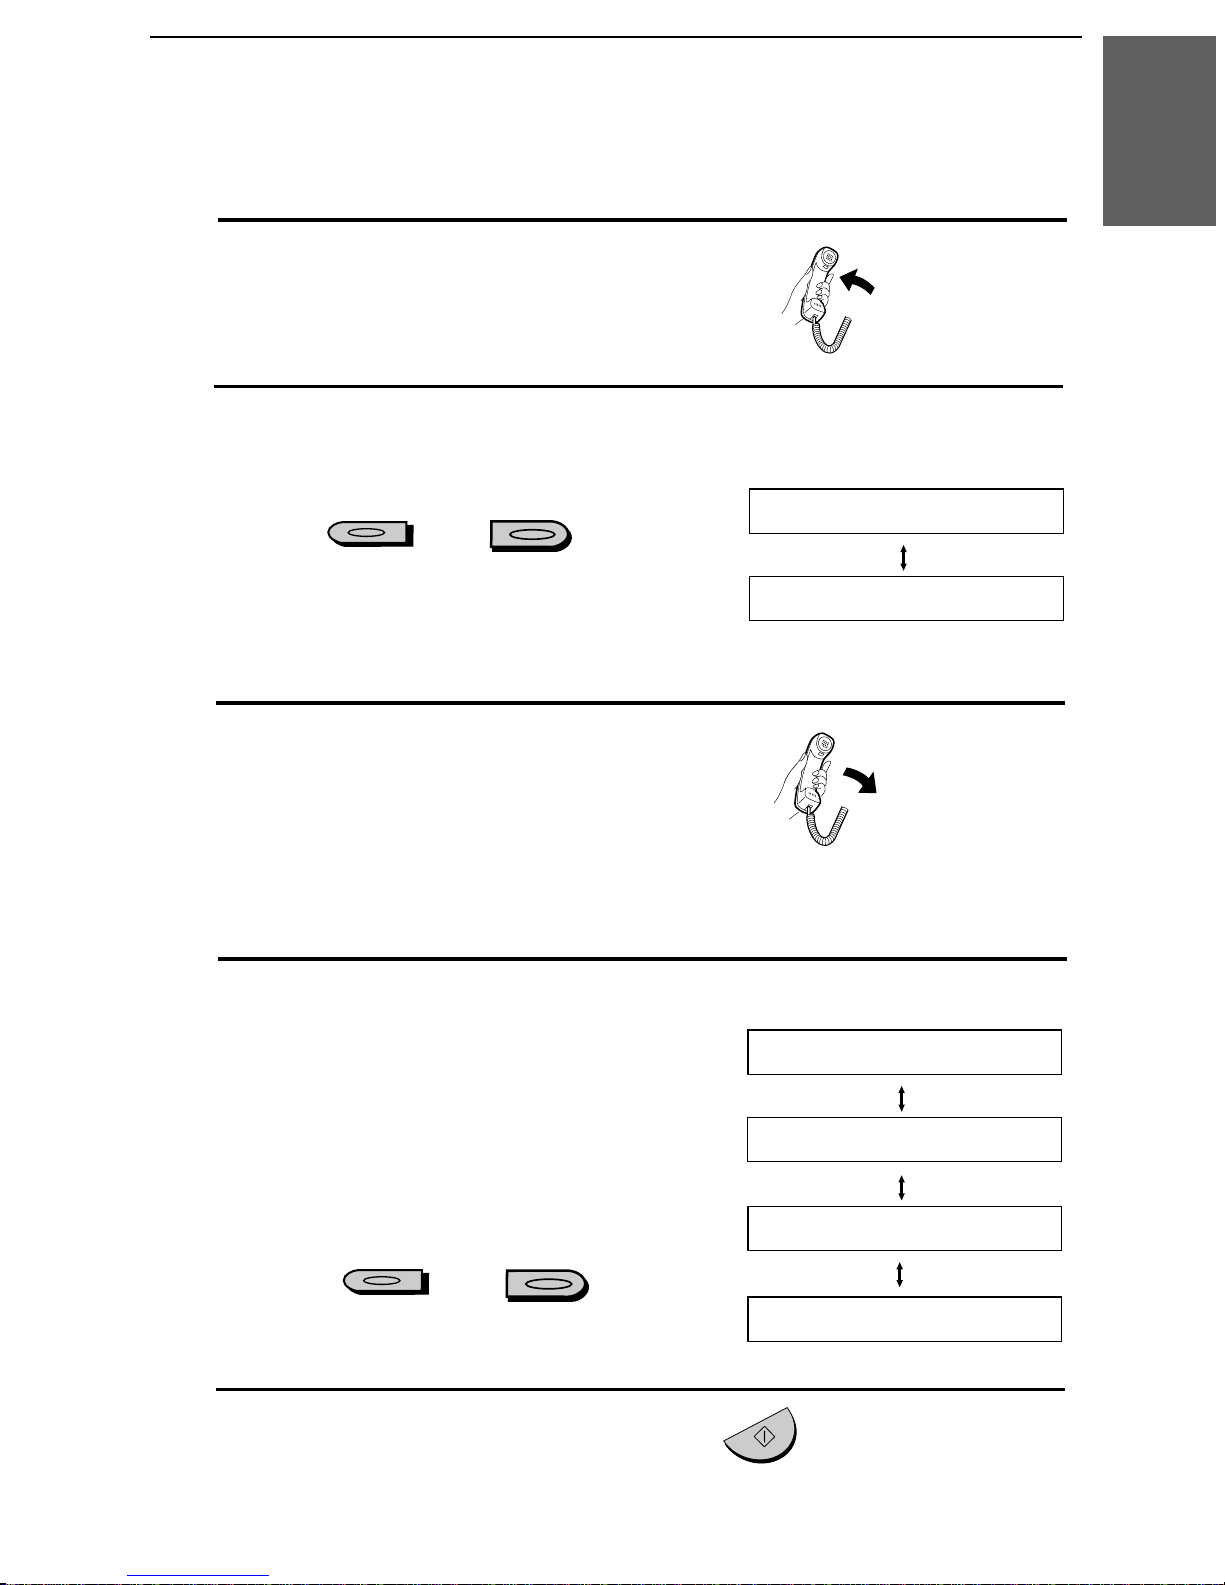
Handset
1
Lift the handset.
2
Press the UP or DOWN key.
DOWN
or
UP
Volume Adjustment
1. Installation
Display:
RECEIV ER: HIG H
RECEIVER: MIDDLE
3
When the display shows the desired
volume level, replace the handset.
Ringer
1
Press the UP or DOWN key. (M ake
sure the SPEAKER key has no t been
pressed and the handset is not lifted.)
•• The ringer will ring once at the
selected level, then the date and
time will re appear in the displa y.
DOWN
or
UP
Display:
RING ER: HIG H
RINGER: MIDDLE
RING ER: LO W
2
If you selected RINGER OFF: OK?,
press the START/MEMORY key.
RINGER:OFF OK?
STAR T/MEMOR Y
33
Page 36
Using the
2
Chapter
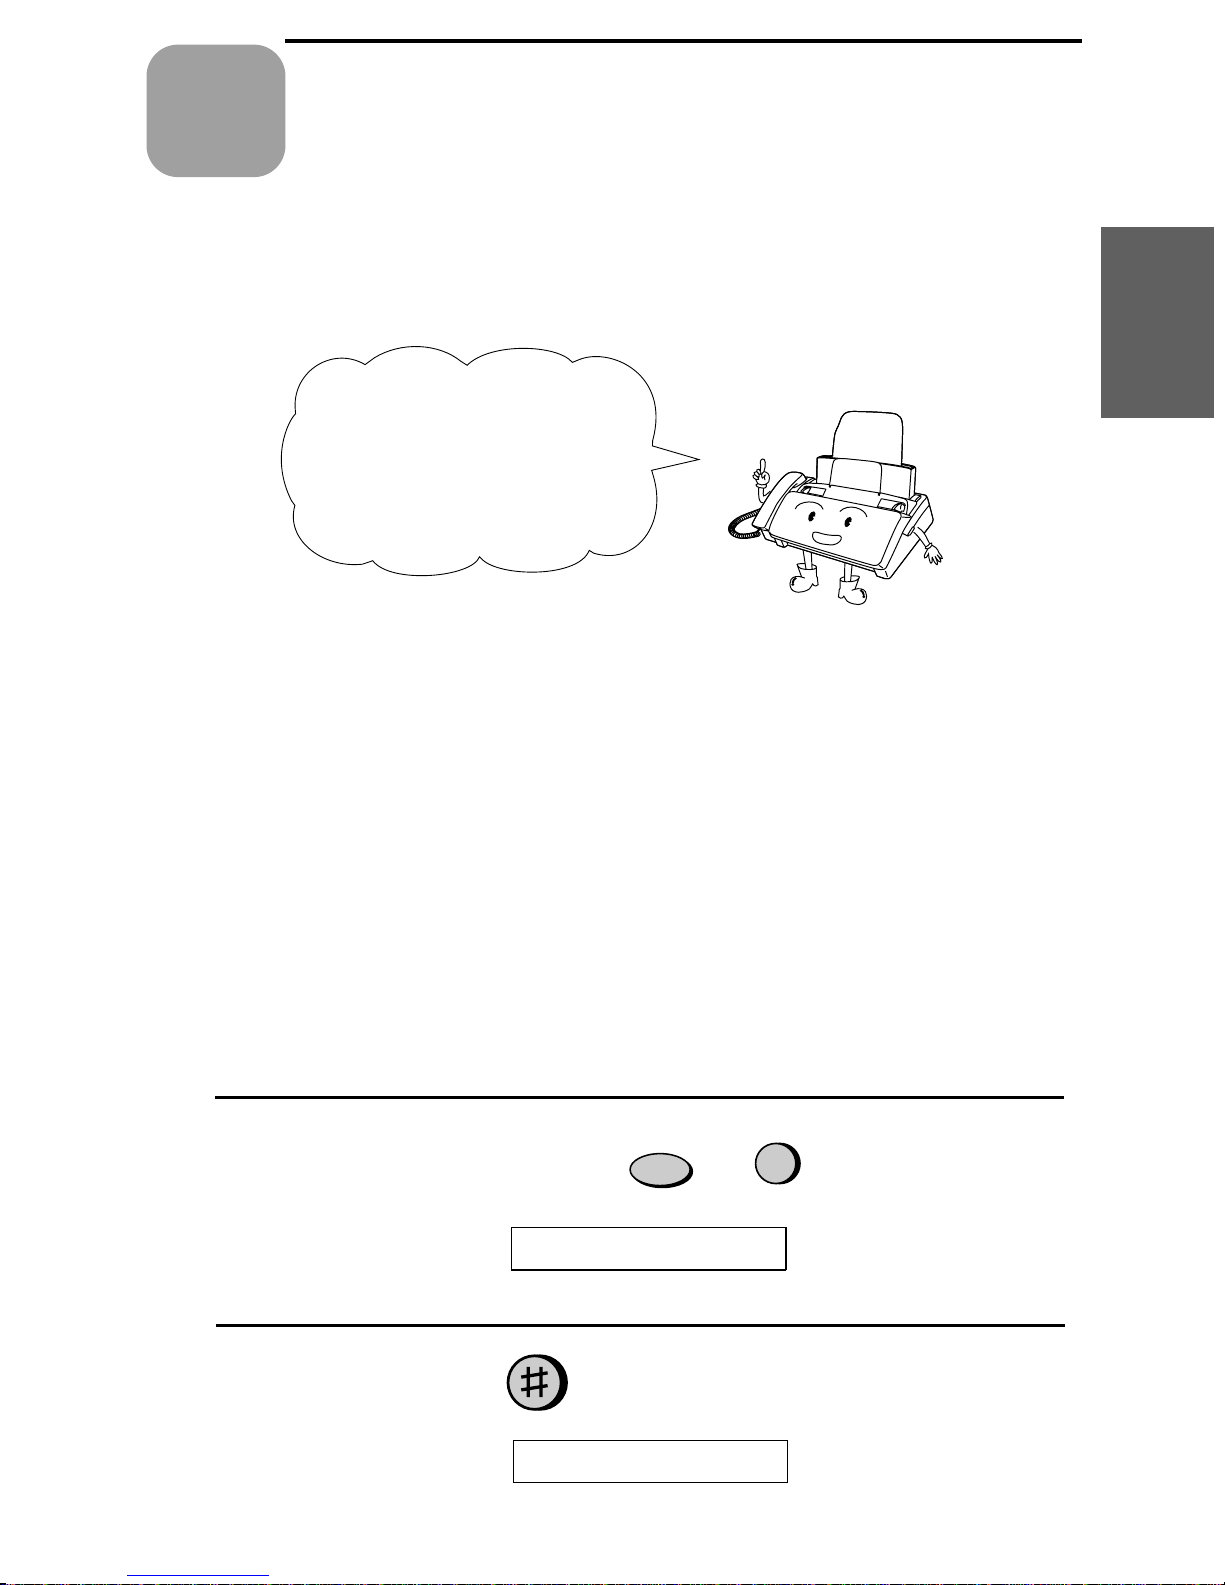
The UX-460’s built-in answering machine all ows you to receive both
voice messages and fax transmis sio ns while you a re out.
Answering Mach ine
To use the answering
machine, record an
outgoing message and
then set the reception
mode to TAD when you
go out.
Machine
2. Answe ring
Recording an Outgoing Message
The outgoing message (OGM) is the greeting that the machine plays
after answering a call to inform callers that they can leave a message
or send a fax.
Example:
"Hello. You’ve reached the ABC company. No one is available to take
your call right now. Please le ave a message after the beep or press
your facsimile Sta rt key to send a fax. Thank you for calling. "
1
Press these keys:
The display will show:
T.A.D. SETTING S
FUNCTION
0
2
Press the # key.
The display will show:
34
OGM RECORDING
Page 37
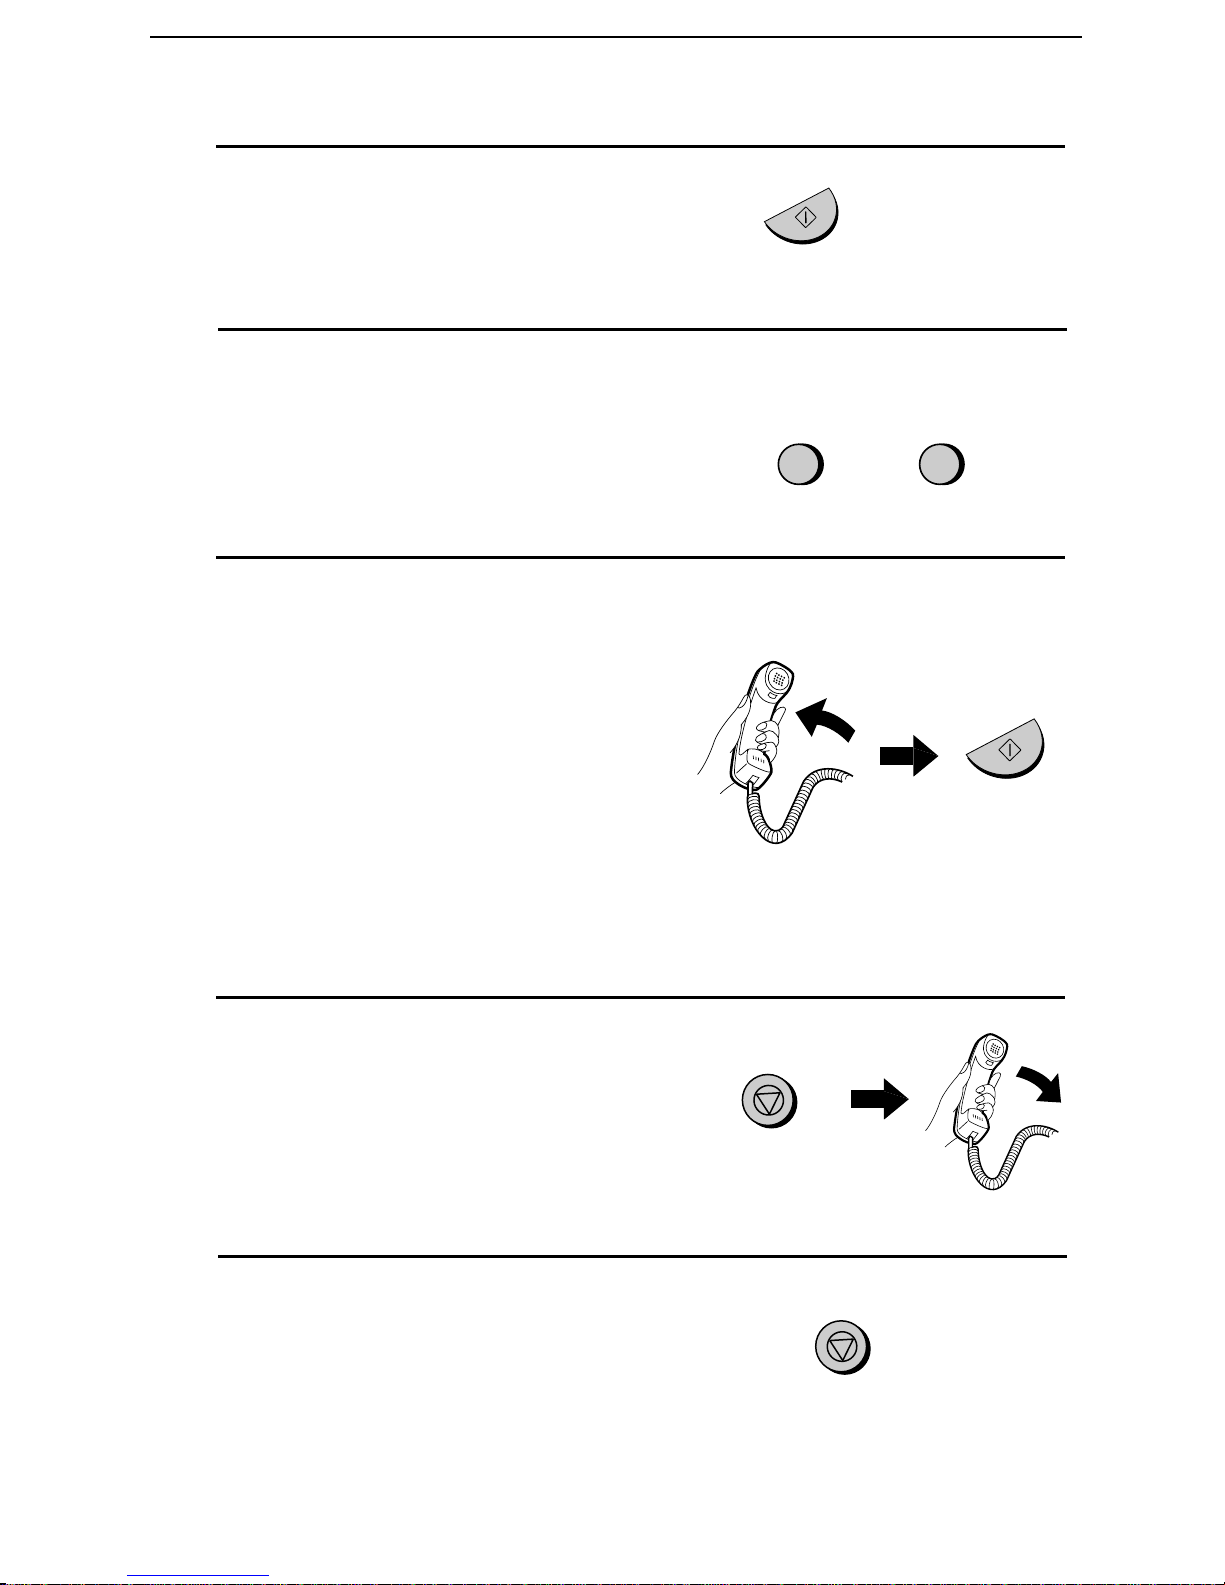
3
Press the START/MEMORY key.
4
Press 1 to select GENERAL. (If you
Recording an Outgoing M essage
STAR T/MEMORY
are recording a message for the
Transfer function explained later in
this chapter, press 2 for TRANSFER.)
5
Pick up the handset, press the
START/MEMORY key, and speak
into the handset.
•• The outgoing message can be up to
60 seconds long. The outgo ing
message for the Transfer function
can be up to 15 seconds long.
•• While recording, the display will
show the time remaining to record.
GENERAL
1
TRANSFER
or
2
START/MEMORY
6
When finished, press the STOP key
and then replace the handset.
7
Press the STOP key to return to the
date and time display.
STOP
STOP
35
Page 38

Recording an Outgoing M essage
To listen to or erase an outgoing message
To listen to or erase an outgoing m es sage, fol low Steps 1 through 4 of
the above procedure to select the message, and then press the
PLAY/S K IP key to list en to i t, or the DEL ET E key to erase it. To
return to the dat e and t ime display, press the STOP key twice. Note
that the general ou tgo ing message cannot be erased. If you need to
change it, simply repeat the recording procedure.
Note: If an extens ion phone is connected to the UX -460, an outgoing
message cannot be recorded, played, or deleted while the extension phone
is being used (while LINE IS IN USE appears in the display).
36
Page 39
Operating the Answering Machine
Operating the Answering Machine
Activating the a nsw ering ma c hine
Activate the answering machine b efore you go out as follows :
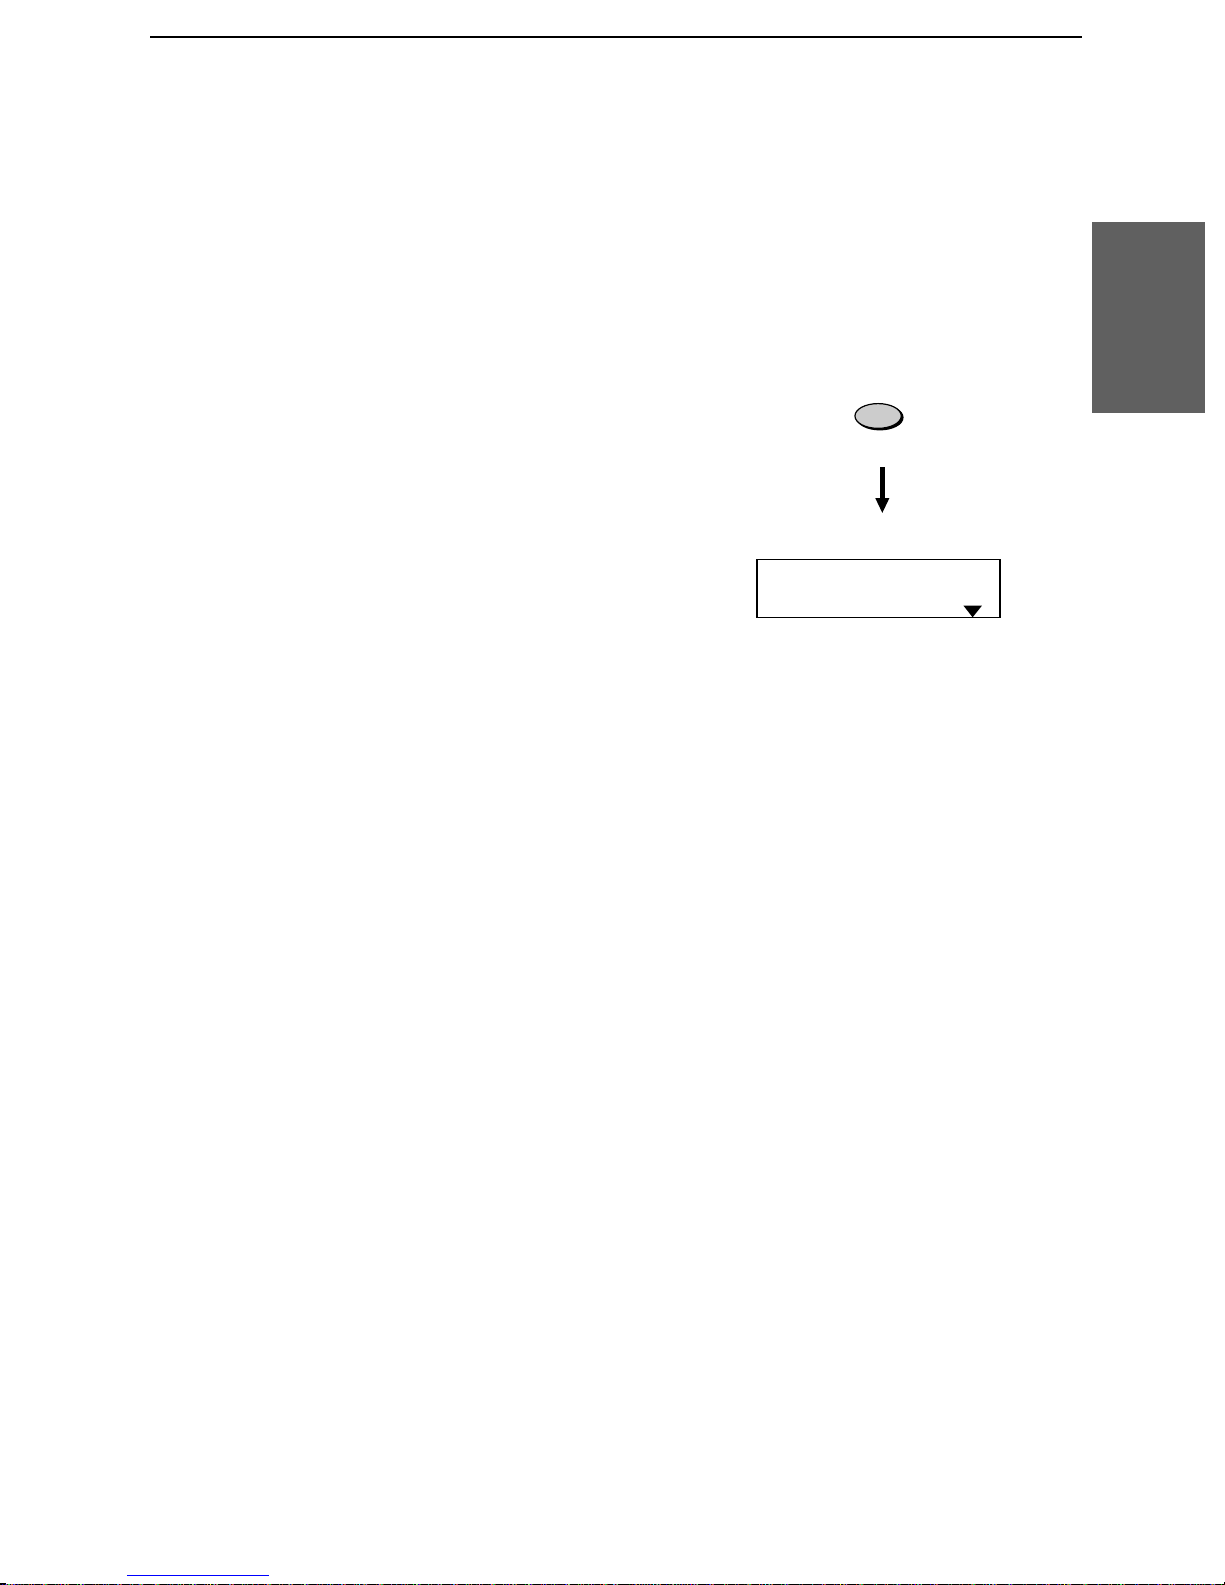
Press the RECEPTION MODE key
RECEPTION
until the ar row in the display points to
MODE
TAD.
•• The outgoing message will play
(you can stop playback by pressing
FAX
the STOP key).
TEL
•• It will not be possible to set the
reception mode to TAD if a general
TAD
outgoing message has not been
recorded.
When the reception mode is set to TAD, the UX-460 will answer
incoming calls after two rings if it has received at least one incoming
message, or after four rings if no messages have been received. (For
more information, see Toll Saver in Remot e Operati ons in this
chapter.)
Machine
2. Answe ring
Note: If the memory is full from messages previously recorded, MEMORY
IS FULL will appear in the display. To set the reception mode to TAD, you
must first erase some or all of the stored messages.
Note: In TAD mode, the machine will automatically switch to fax
reception if it detects a period of silence longer than six seconds after
answering a call. For this reason, if a caller pauses for this length of time
while leaving a message, they will be cut off .
37
Page 40
Operating the Answering Machine
Listening to received messages
When you return, the dis play wi ll show th e number of messages
recorded. Listen to the messages as follows:
1
Press the PLAY/SKIP key.
•• If you only want to listen to new
messages (messages not previously
listened to), continu e to hold the
PLAY/SKIP key down for at least
two seconds.
2
The messages will play.
PLAY/SKIP
•• As each message plays, the date and
time of recording will appear briefly
in the display. If no messages were
received, NO MESSAGES will
appear.
•• To liste n to a messa ge a second
time, pres s the REPEAT key be fore
play back of that message ends.
•• To mov e back to the previous
message, press the REPEAT key
within 3 seconds of the beginning of
the current message.
•• To sk ip forward to the next
message, press the PLAY/SKIP key.
REPEAT
REPEAT
PLAY/SKIP
Note: Playback will stop if you receive a call, lift the handset, press the
STOP key.
38
Page 41
Eras ing rece ive d mes sage s
It is important to erase received messages after you listen to them to
ensure that the memory does no t become full .
Operating the Answering Machine
•• Era sing all messages: To erase al l
messages, press and hold down the
DELETE key for at least 2 seconds.
•• Era sing a single message: To erase
only a single message, press the
DELETE key while the message is
being played.
Using the REC/MEMO key
You can use the REC/ME MO key to record telephone conversations
and messages for other users of the UX-460. These will be played
back togeth er with any in co mi ng mess ages when the PLAY/ SK IP key
is pressed.
•• Recording message s: To record a
message, press the REC/MEMO
DELETE
Machine
2. Answe ring
REC/MEMO
key for at least 1 second, and then
pick up the handset, press the
START/MEMORY key, and speak
into the h andset. When you have
finished speaking, replace the
handset or press the STOP key.
•• Recor ding phone conversations:
To record a phone conversation,
hold down the REC/MEMO key
during the conversation you want to
record. When you are finished,
release the key.
39
Page 42
Operating the Answering Machine
Date and time of ICMs
You can check the date and time of your received messages by
pressing the panel keys as shown below.
♦ The dates and times are also shown in the Message List, which
can be printed out as described in Chapter 9.
1
Press these keys:
The display will show: T.A. D. SET T ING S
2
Press these keys:
The display will show:
3
Press the START/MEMORY key.
ICM CONFIRMATION
The number of messages recorded will
appear in the display.
FUNCTION
0
START/MEMORY
4
Press # or * one or more times to
show the date and time of each of the
messages.
•• The message number will appear
first, and then the date and time
several seconds later.
5
Press the STOP key.
Note: The recorded dates and times are cleared each time you erase the
messages.
40
or
STOP
Page 43
Optional Answering M achine Settings
Optional Answering Machine Settings
Setting ICM time
Incoming messages (ICMs) are the messages which cal lers leave for
you on the built-in answering machine. The answering machine is set
at the factory to allow each caller a maximum of 4 minutes to leave a
message. If desired, you can chan ge thi s setting to 15, 30, or 60
seconds.
1
Press these keys:
FUNCTION
The display will show: T.A. D. SET T ING S
2
Press these keys:
The display will show:
3
Press a numeric key to select the
ICM RECORD TIME
desired ICM recording time:
•• 1: 15 se conds
•• 2: 30 se conds
1
2
0
•• 3: 60 se conds
•• 4: 4 minute s
4
Press the STOP key.
3
4
STOP
41
Page 44
Optional Answering Machine Settings
Fax rece ption on TAD failure
If the memory for recording incoming messages becomes ful l while
you are out, the answering machine will no longer be able to record
messages. The ON TAD FAILURE sett ing is used to choose th e
response of the machine to incomin g calls when this happens:
♦ Automatic fax reception NO: The UX-460 w ill answer after 20
rings, after which it will wait to receive a remote command. Most
callers will hang up before it answers; however, when you call the
UX-460 from a remote location, you can wait until it answers,
list en to your mess ages, and then e r a se them (see Remote
Operations in this chapter).
♦ Automatic fax reception YES: The reception mode will switch to
FAX mode, allowing the UX-460 to continue to receive faxes
automatic ally. With this se tting, you can still use the remote
commands to listen to your messages and erase the message
memory (see Remote Operations in this chapter).
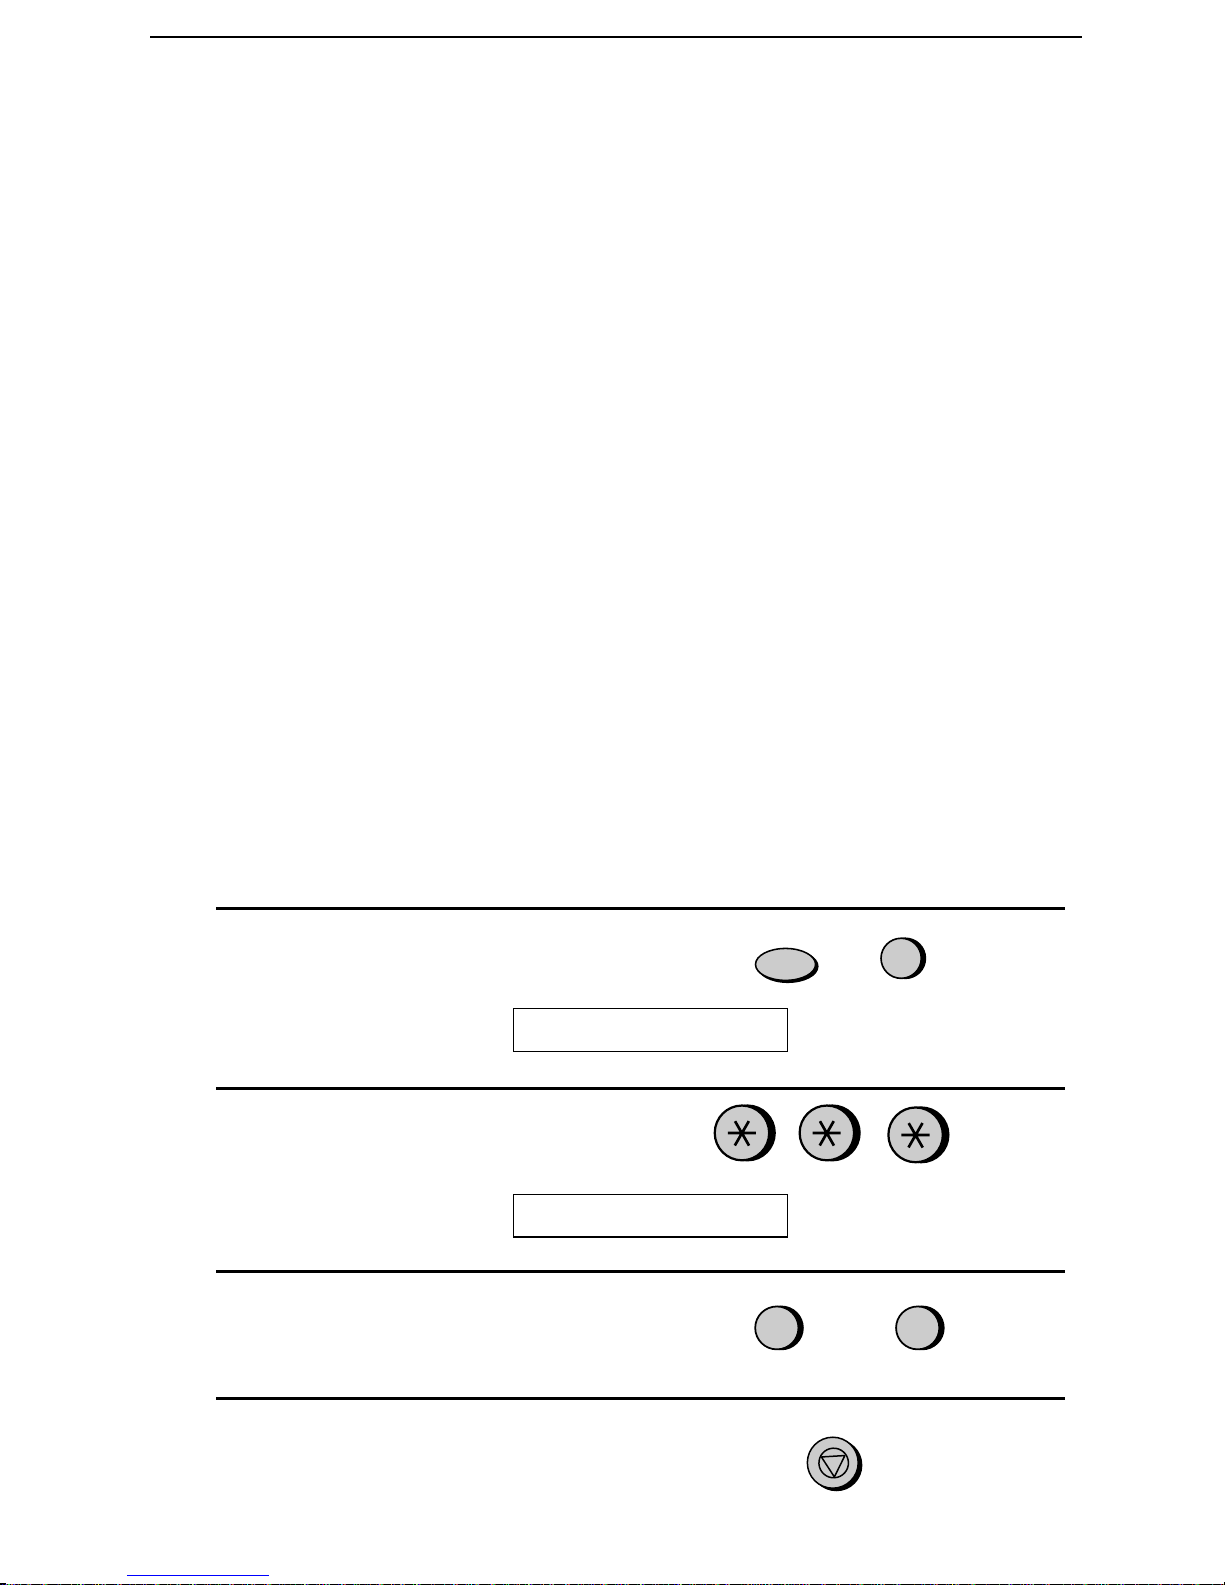
Automati c fax reception is set to NO at the factory before shipping. If
you want to set it to YES, press the panel keys as follows:
1
Press these keys:
The display will show:
2
Press these keys:
The display will show:
T.A.D. SETTING S
ON TAD FAILURE
FUNCTION
0
3
Press 1 to turn automatic fax reception
on, or 2 to turn it off.
4
Press the STOP key.
42
1 2
or
STOP
Page 45
Calling Party Control detection
When a caller hangs up, the central telephone exchange will issue a
signal called a Call ing Party Cont ro l (CPC) si gnal. The bui lt -in
answering machi ne has been set to detect this sign al, and this allo ws it
to immediately stop recording when a caller hangs up, thereby saving
memory space and freeing you fro m having to listen to long periods of
silence when you play back your messag es.
Howev er, if you ar e a subscribe r to such telephone services as Call
Waiting or Call Forwarding, sign als used by these services may be
mistaken for a CPC sign al, causing t he ma chine to hang up duri ng a
call. In this case, follo w the steps below to turn off CPC detection.
Note: CPC detection may not operate proper ly in some telephone
exchanges. For this reason, periods of s ilence and/or telephone company
signals may be recorded even if CPC detection is turned on .
Optional Answering M achine Settings
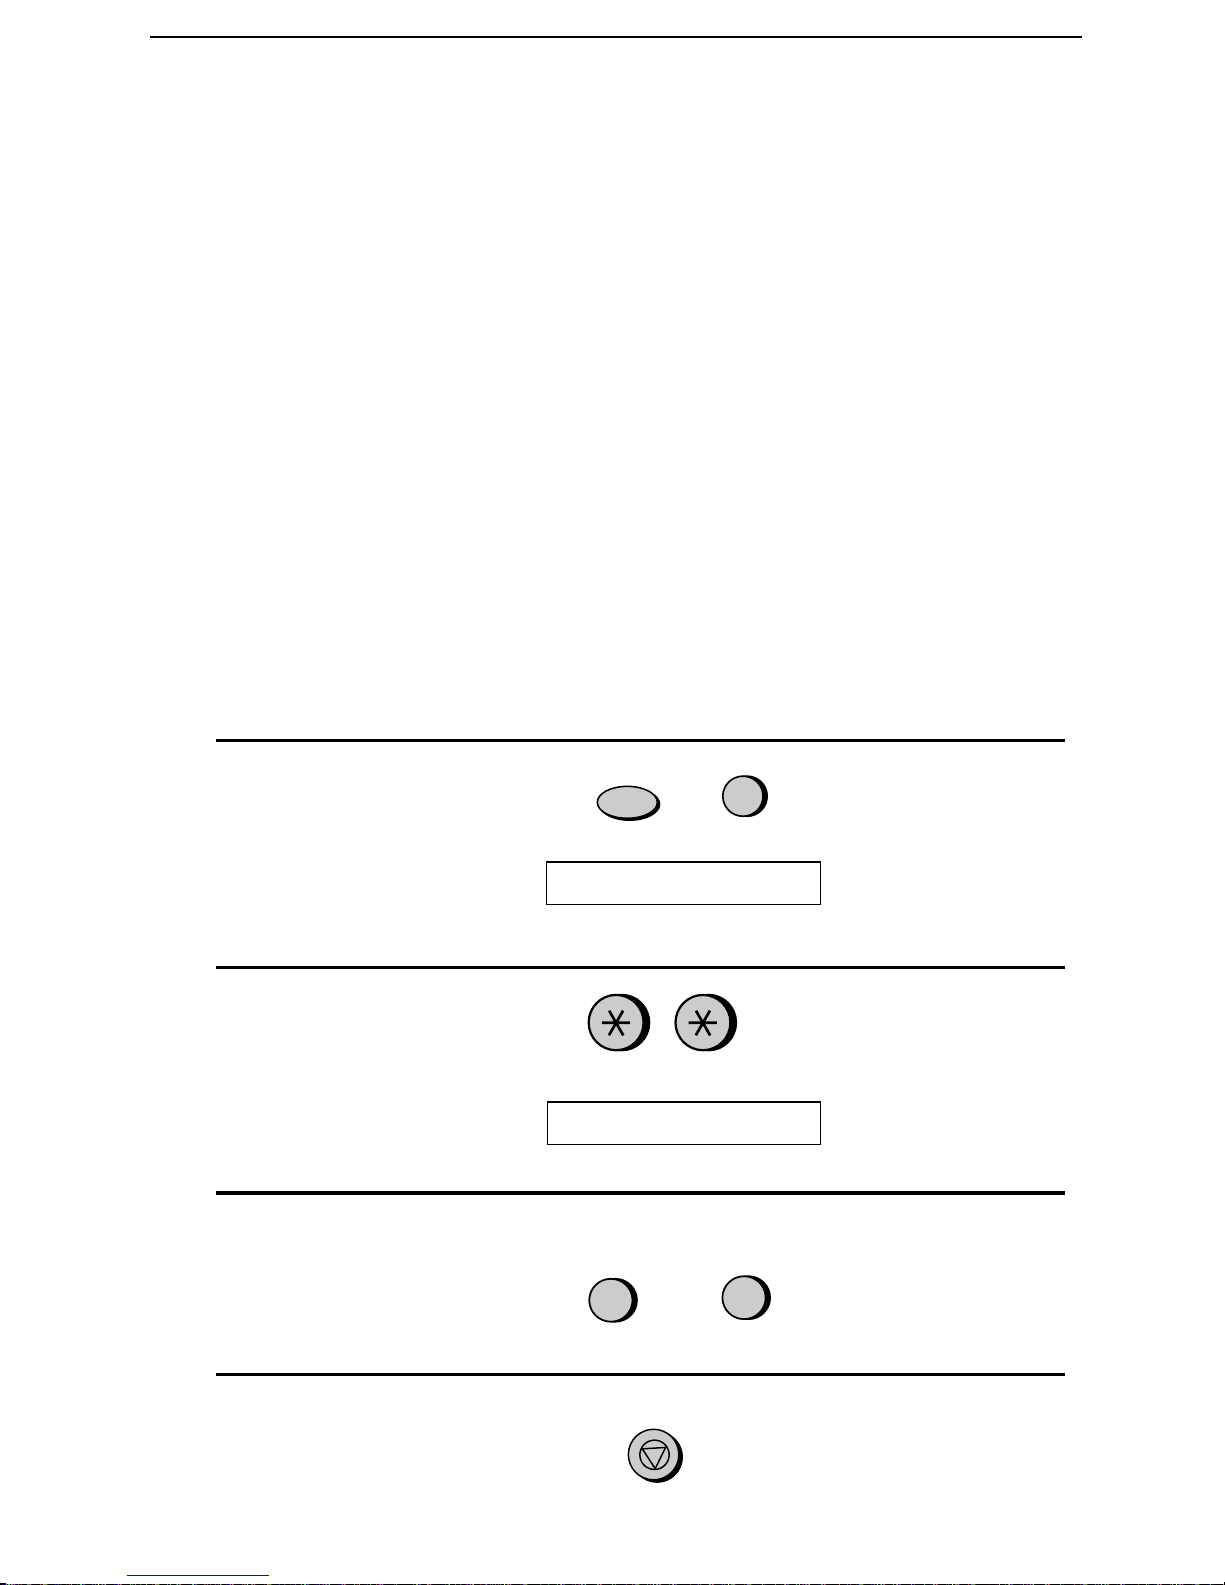
1
Press these keys:
The display will show:
2
Press these keys:
The display will show:
3
Press "1" to turn CPC detection on, or
T.A.D. SETTING S
CPC DETECTION
"2" to turn it off.
FUNCTION
1
or
0
2
4
Press the STOP key.
STOP
43
Page 46
Optional Answering Machine Settings
OGM only mode
If needed, you can turn of f recording of incoming m essages. In this
case, your out going message will play, but callers will not be able to
leave a message. (The machine will stil l receive faxes sent by
autom at ic di al in g. )
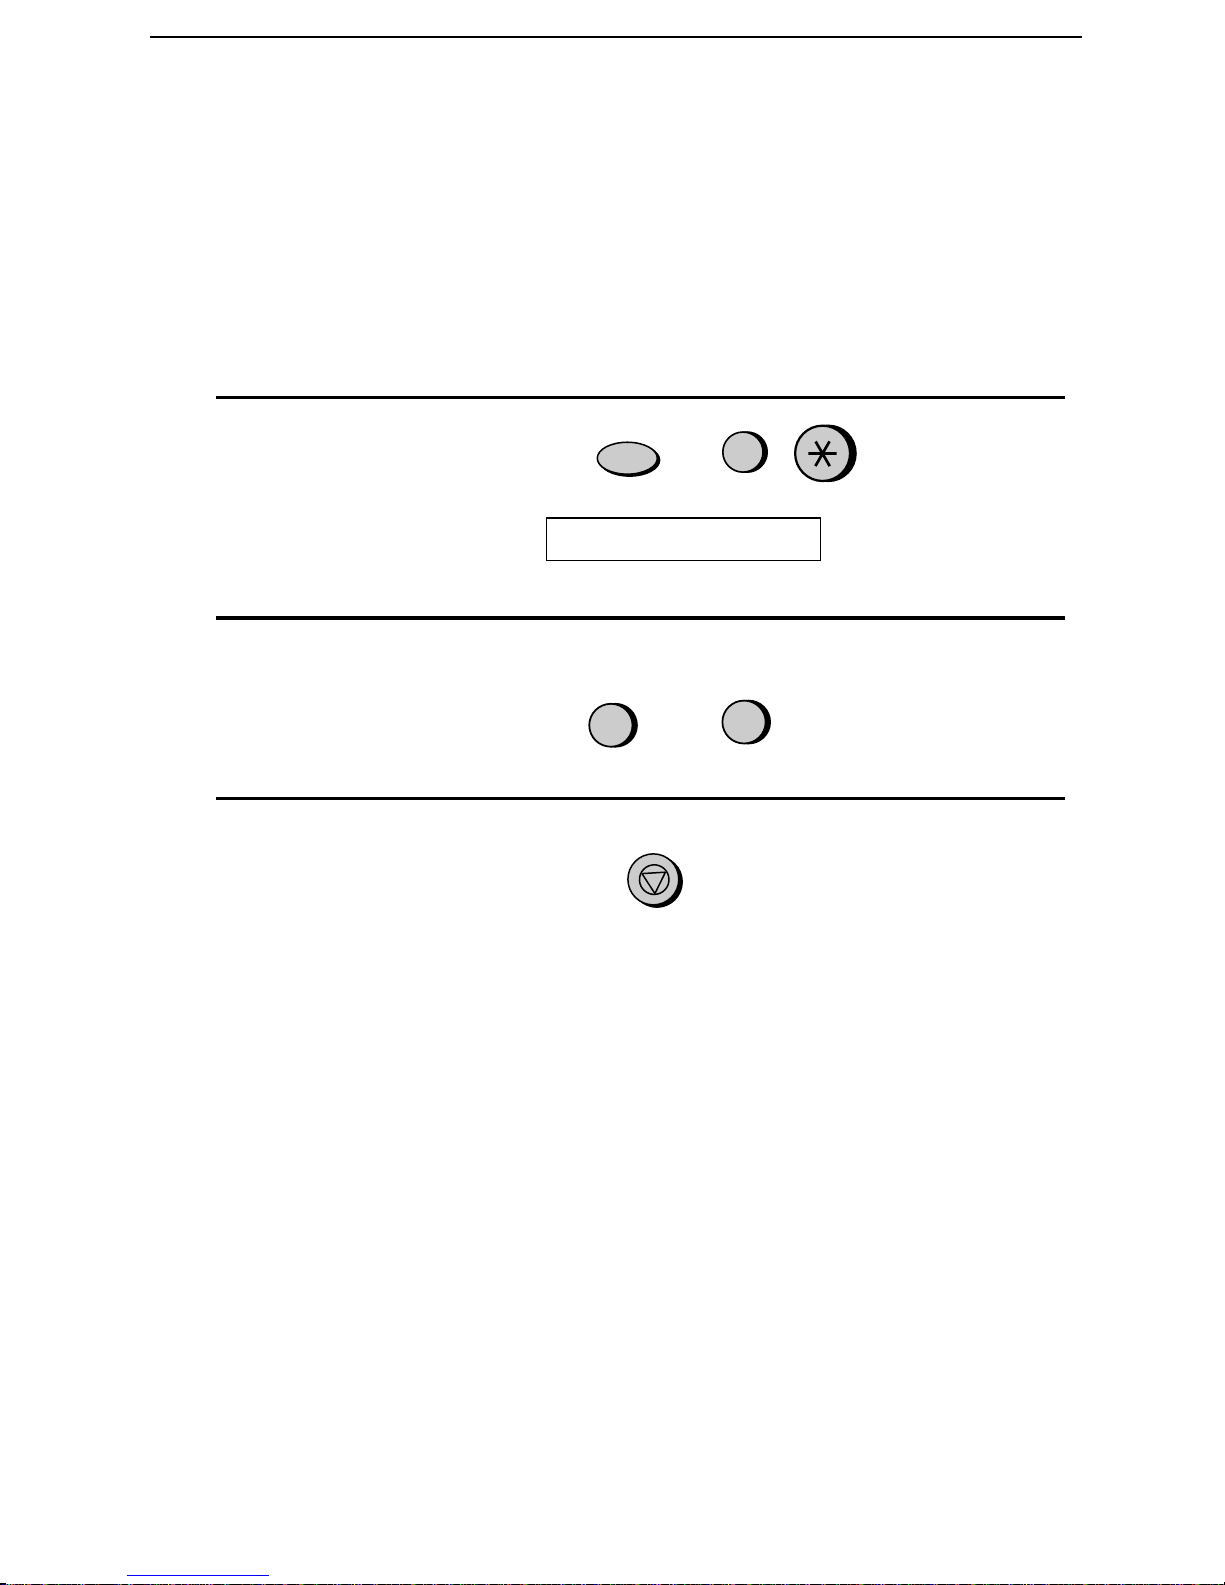
1
Press these keys:
The display will show:
2
Press 1 to turn on OGM only mod e, or
OGM ONLY MODE
2 to turn it off .
3
Press the STOP key.
FUNCTION
1
STOP
or
0
2
44
Page 47
Transfer Function
The Transfer function is used to make the UX-460 automaticall y c all
you at a specified number every tim e it receives an incoming m essage.
This lets you hear your messages immedi at ely after they come in, even
Transfer Function
when you are at a remote locat ion .
When you answer the telephone, you will hear your recorded message
tellin g you that th e call is a trans fer call. Ent er "#", your remote code
number, and "#". The answering machine will then pl ay back your
messages. You can also perform any of the remote operations
described in the previous section.
Note: When you hang up after a trans fer call, the UX-460 will not
immediately resume normal operation. If you want the UX-460 to accept
calls immediately after a transfer call, enter "*" twice before hanging up
(if you want to hang up during message playback, first enter " 0" and " #"
to stop playback, then enter "*" twice).
Programming the transfer number
To use the Transfer functi on, you must first gi ve the UX-460 t he
number to call (the transfer number). This is done by pressing th e
Machine
2. Answe ring
panel keys as follows:
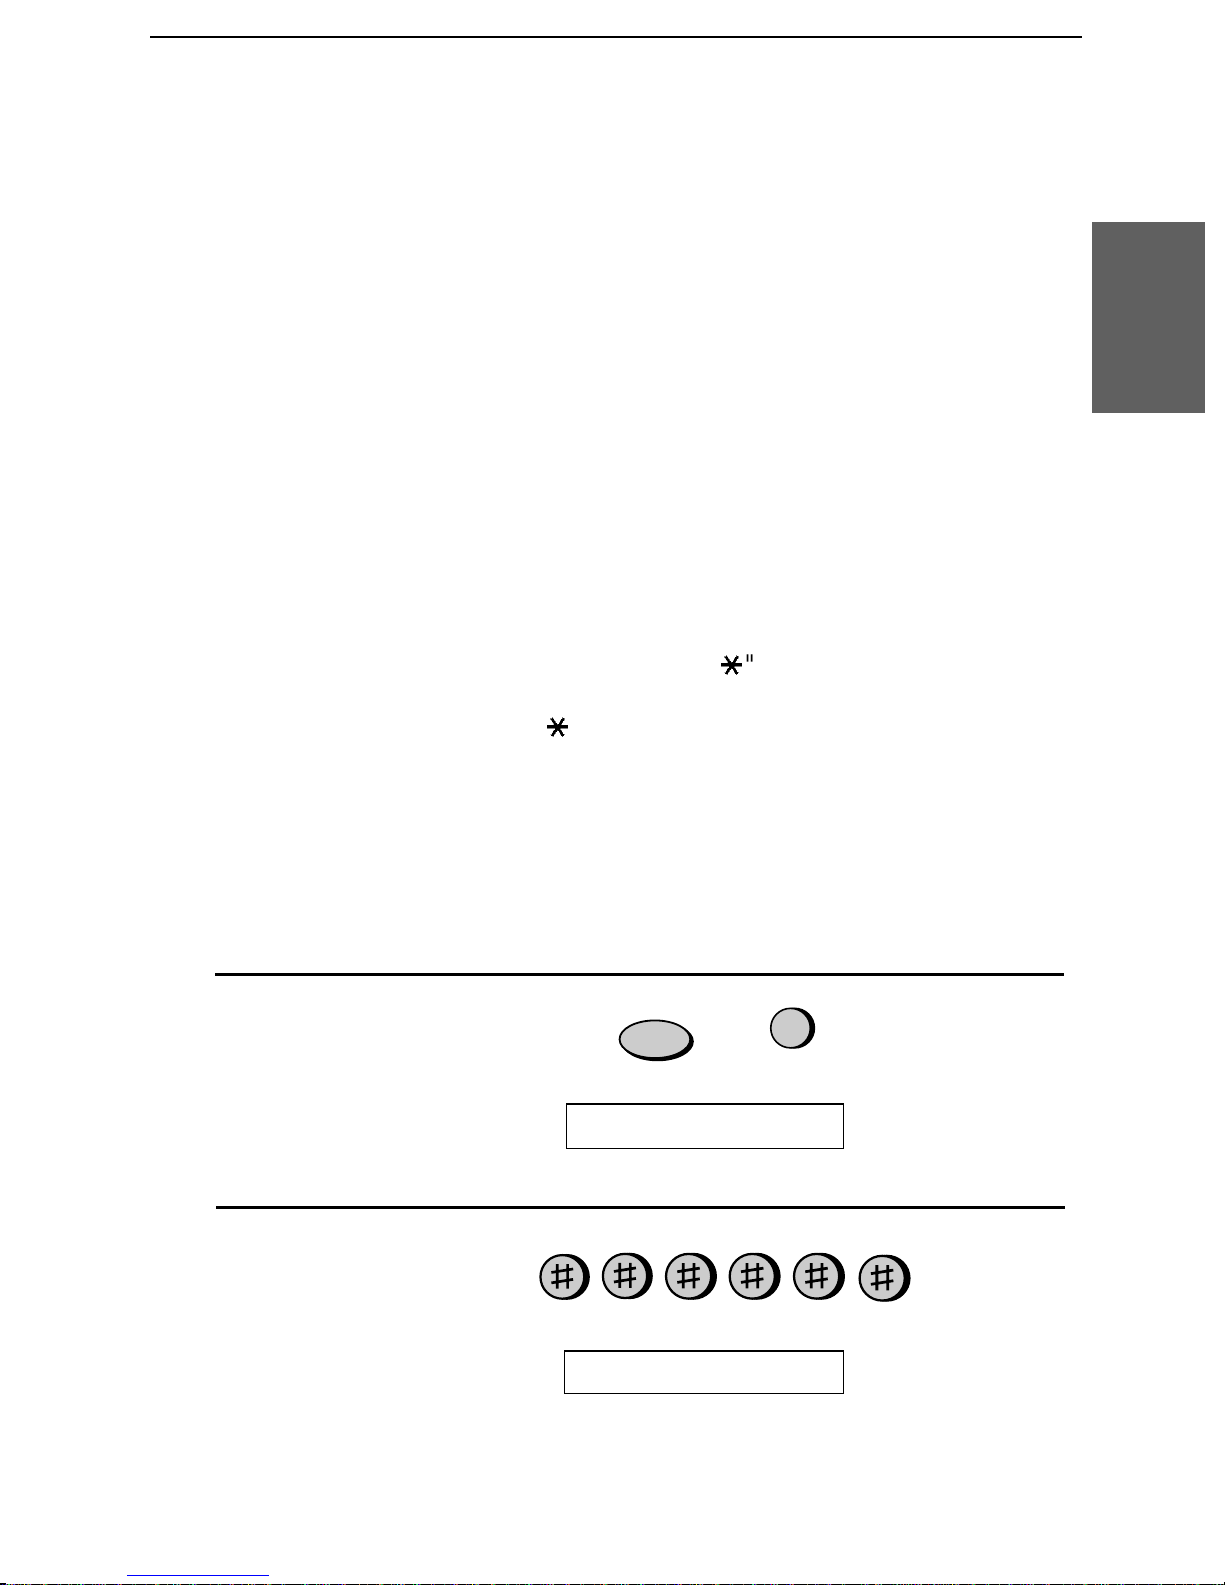
1
Press these keys:
The display will show:
2
Press these keys:
The display will show:
FUNCTION
0
T.A.D. SETTINGS
TRANSFER # ENTRY
45
Page 48
Transfer Function
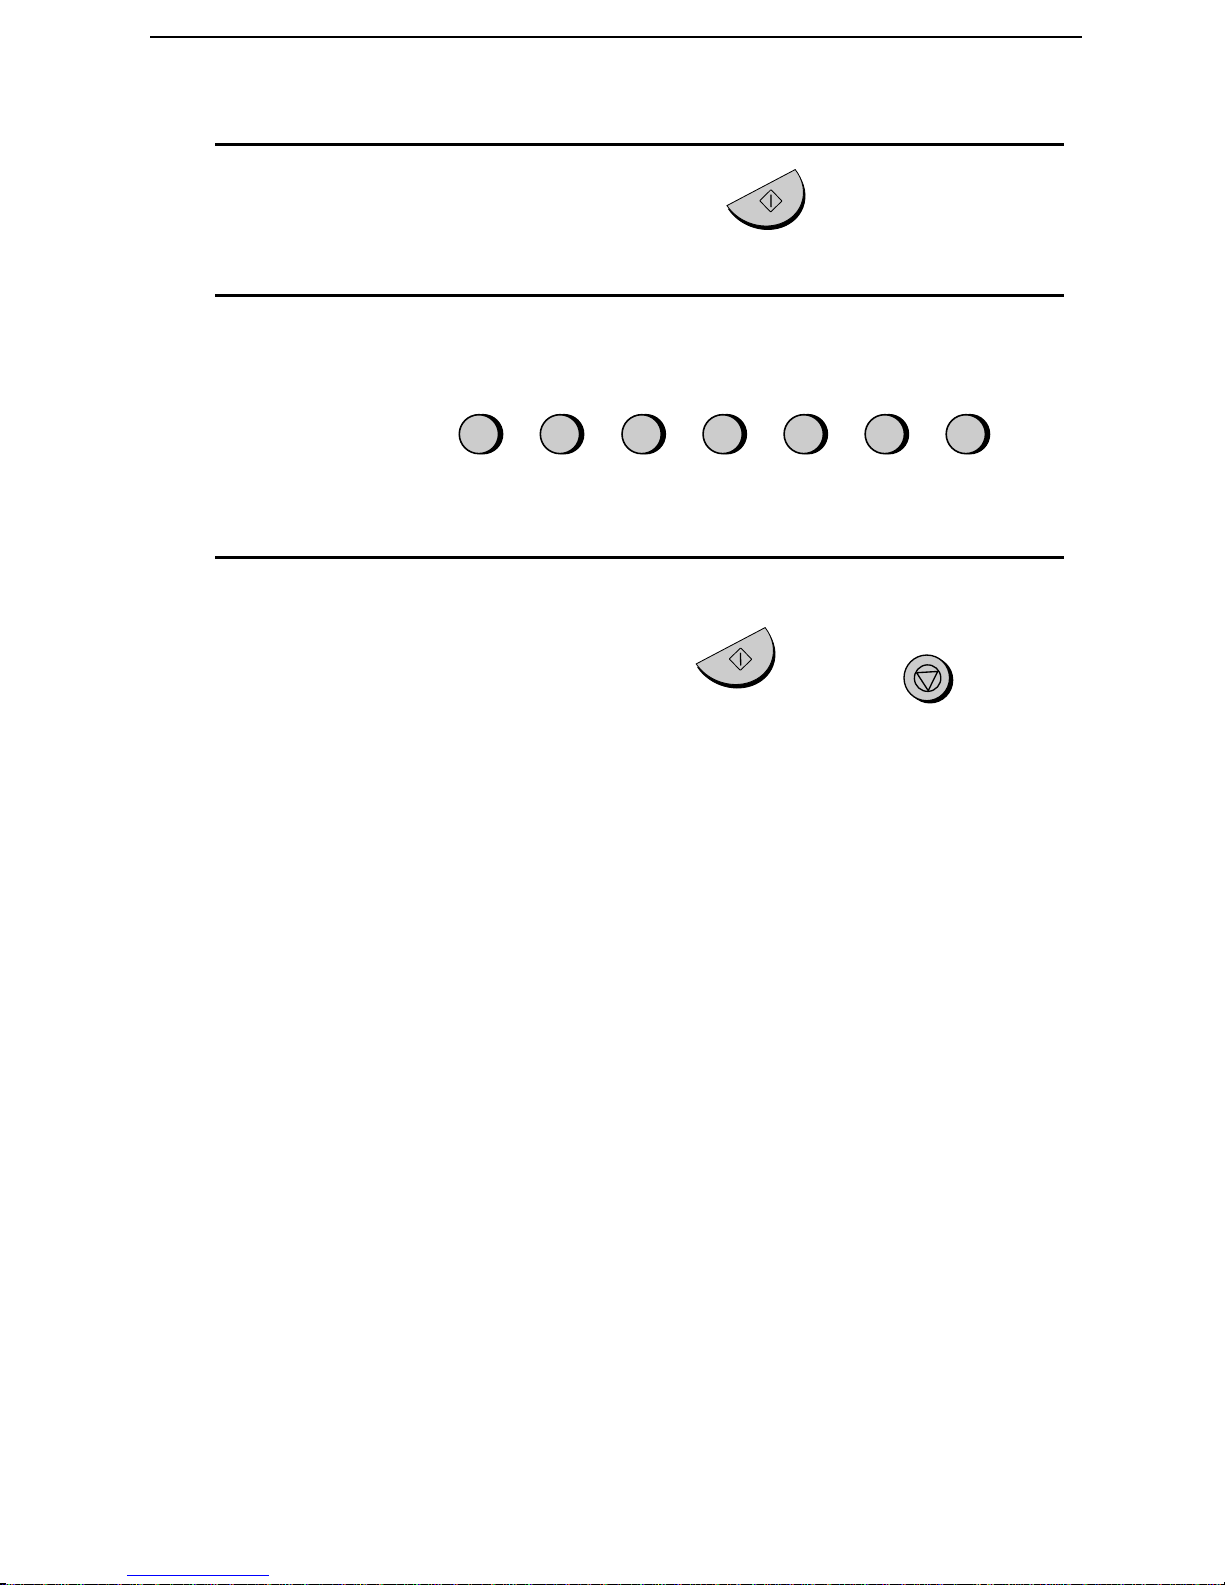
3
Press the START/MEMORY key.
4
Enter a transfer number (max . of 32
digits including pauses) by pressing
the number keys.
5
Press the START/MEMORY key and
START/MEMORY
5 5 215 43
(Example)
then the STOP key.
Recording the transfer message
The transfer message plays when you answer the telephon e, and
informs you that th e call is a transfer call. It c an be up to 15 seconds
long. To record a transfer message, follow the steps described in
Recording an Outgoi ng Message in this chapter. The followi ng is an
example:
"Hello. This is a transfer call for (YOUR NAME). Enter your remote
code number now."
STOP
START/MEMORY
46
Page 49
Turning the Tra nsfe r function on and off
Transfer Function
1
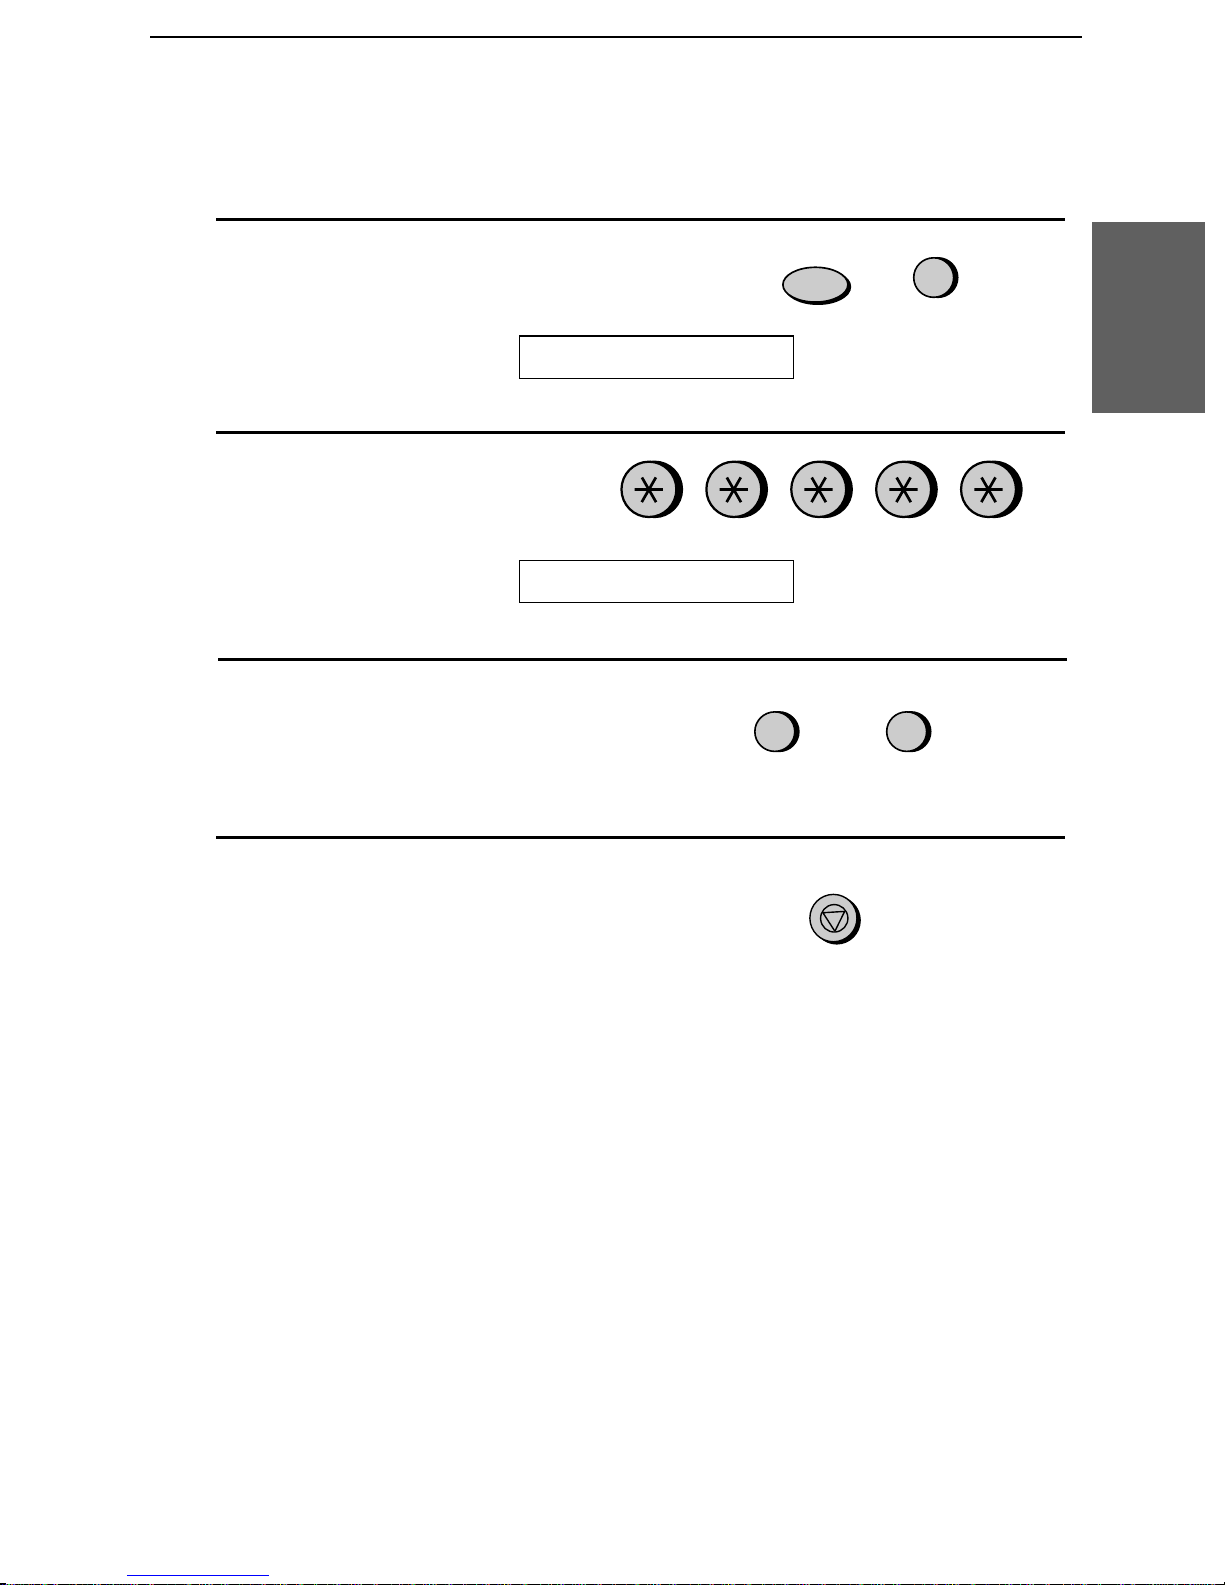
Press these keys:
The display will show: T.A.D. SETTING S
2
Press these keys:
The display will show:
3
Press 1 to turn the Transfer function
TRANSFER FUNC
on, or 2 to turn it off.
FUNCTION
1 2
or
0
Machine
2. Answe ring
4
Press the STOP key.
STOP
47
Page 50
Override Ringing
Override Ringing
This functio n allo ws selected c allers usi ng a ton e dial tel ep hone to
override the answering machine’s outgoi ng message and cause the
UX-460 to make a special ringing sou nd, ale rtin g you that th ey are
calling. This is useful when you are near the machine but only want to
talk with certain callers, taking all other calls on the answering
machine.
Programming the override code
To override the answering machine, your callers must enter a 3-digit
override code from their telephone. This code has been set to "009" at
the factory. If you want to change it, press the panel keys as shown
below.
Important!
•• Make sure the over rid e code i s diff ere nt from the rem ot e code used for
remote operations.
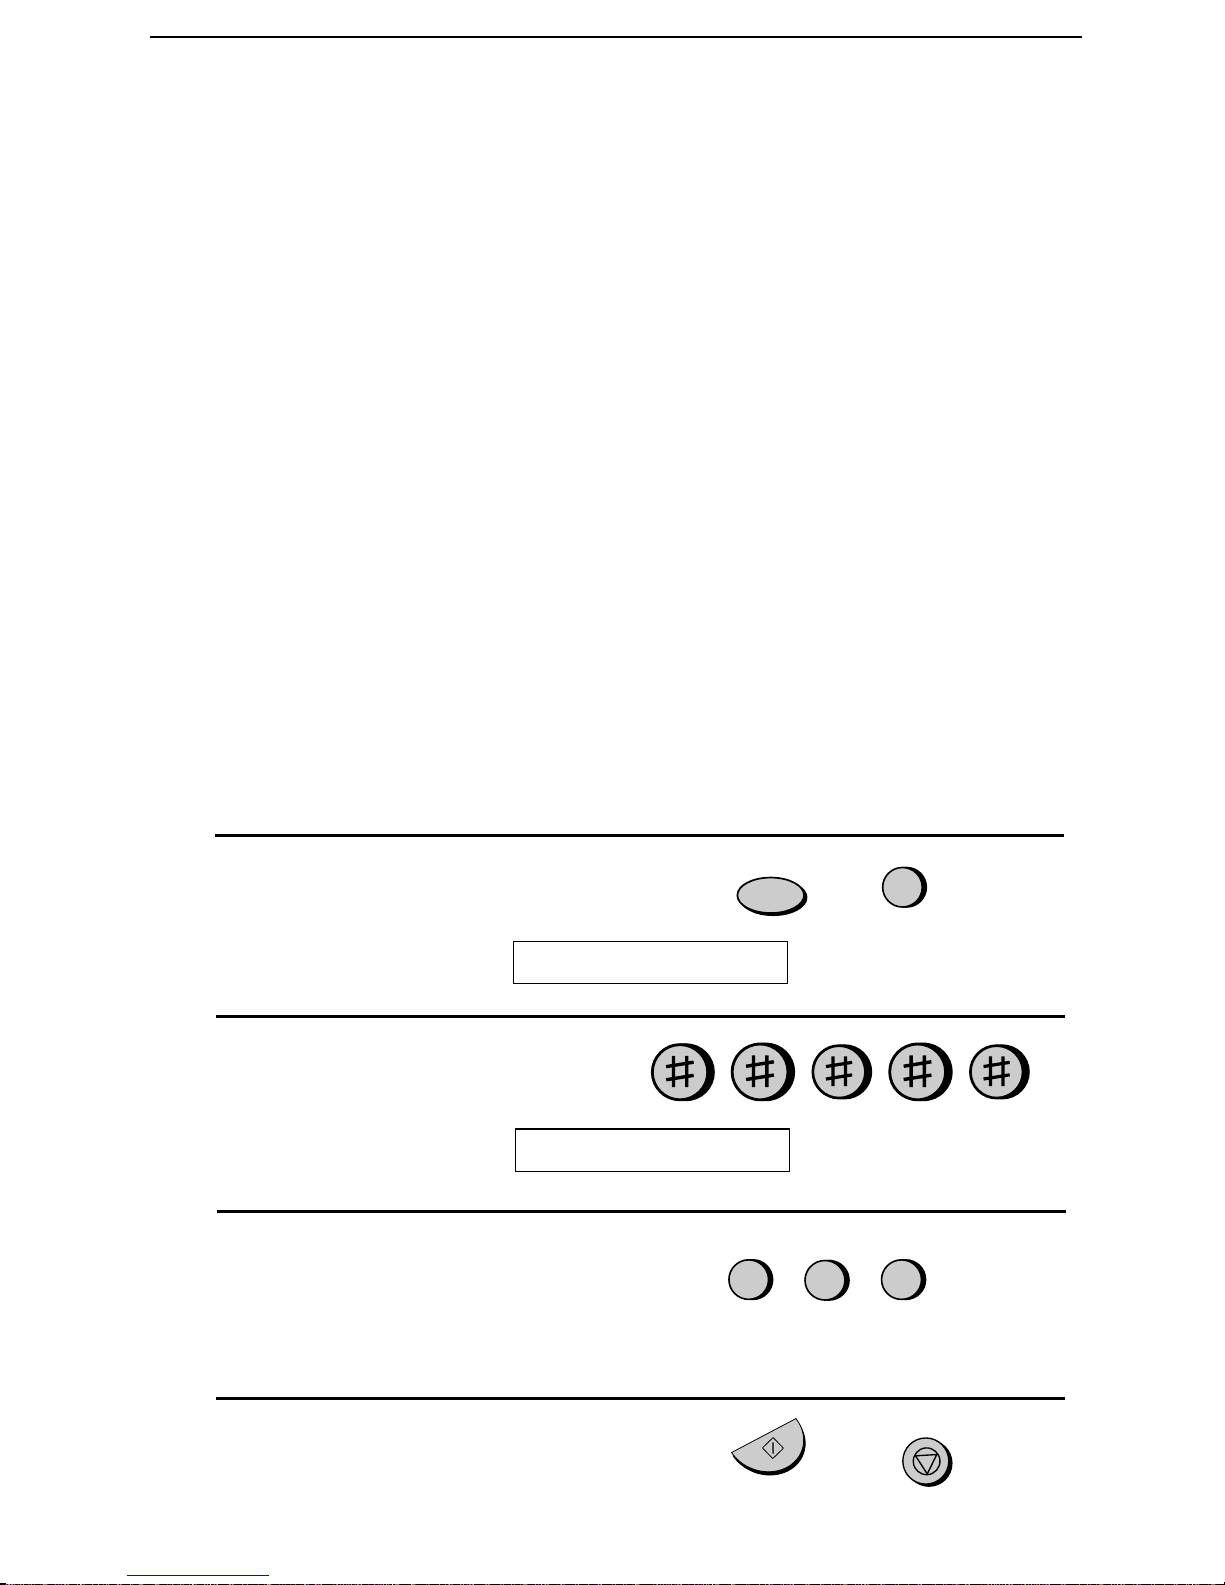
1
Press these keys:
The display will show:
2
Press these keys:
T.A.D. SETTING S
The display will show: OVERRIDE CODE
FUNCTION
0
3
Enter a 3-digit code number by
pressing the number keys.
4
Press the START/MEMORY key a nd
then the STOP key.
48
5
START/MEMORY
5
4
(Example)
STOP
Page 51
Overri ding the ans w er ing ma c hine
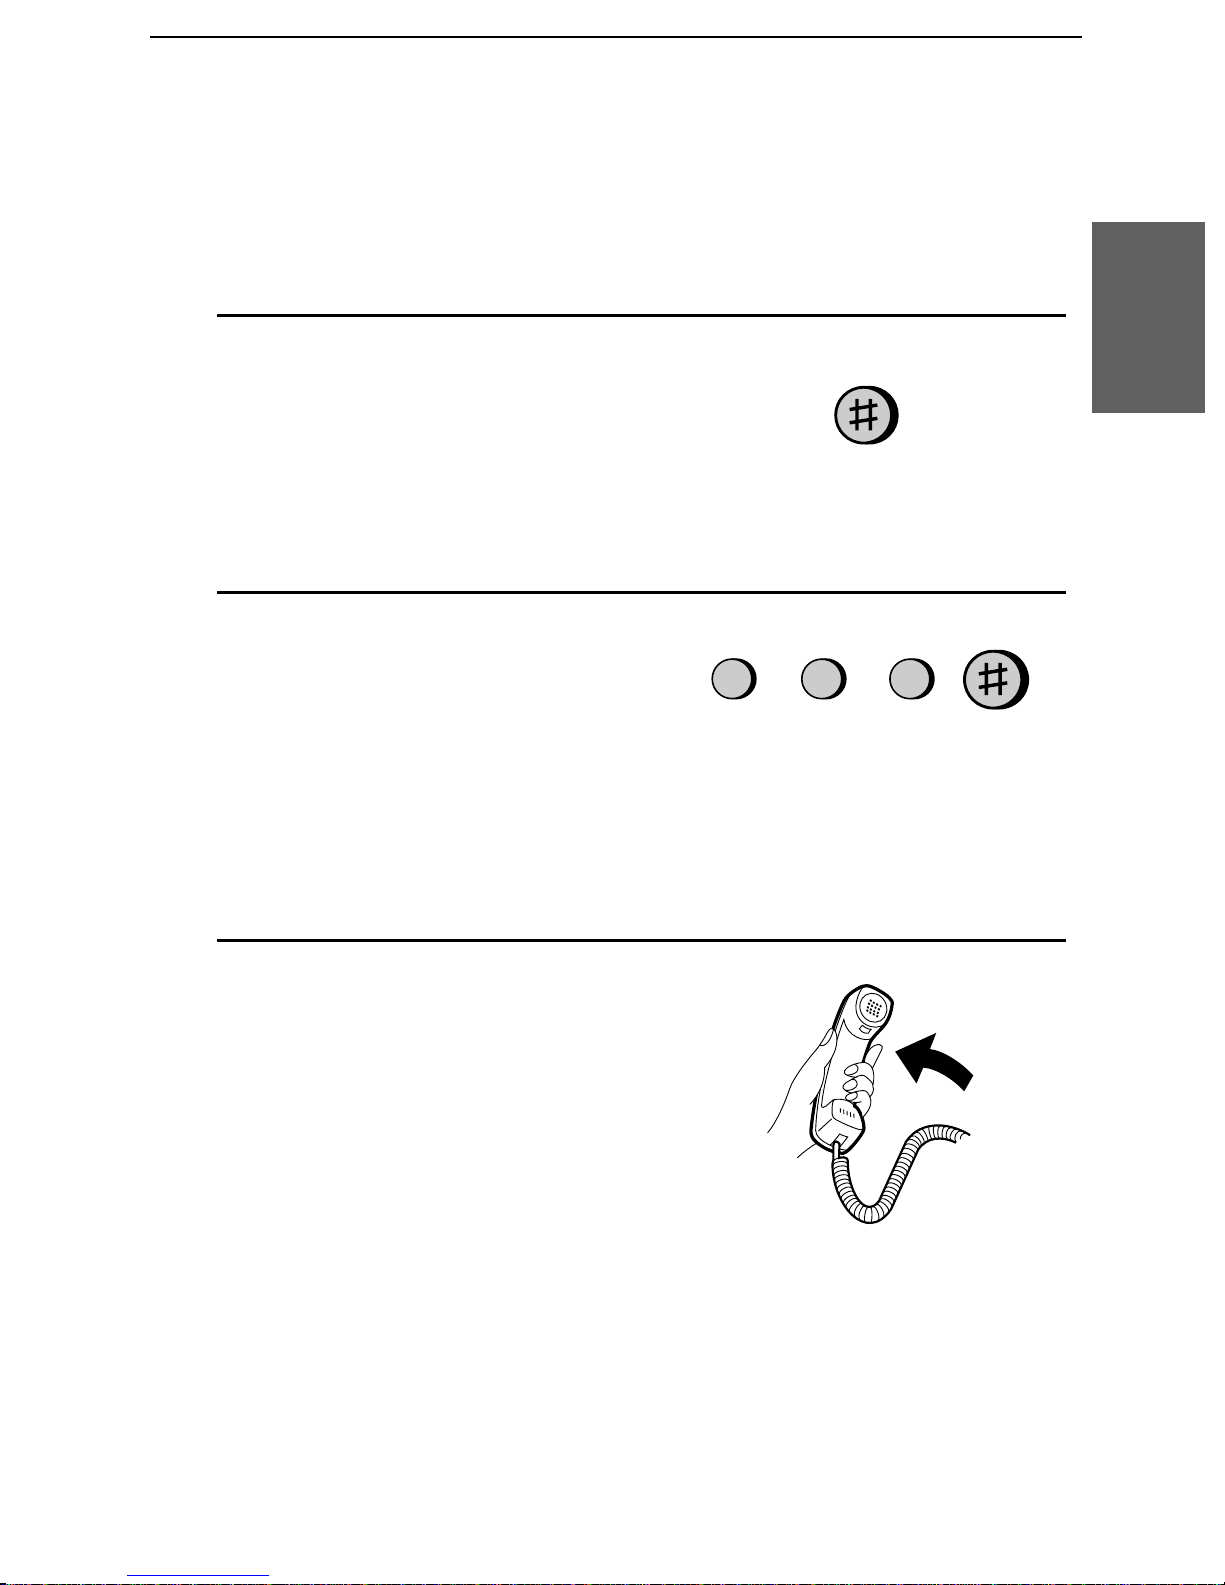
Your callers should follow t he steps bel ow to overrid e the answering
machine.
1
Your caller calls the UX-460 from a
tone dial telephone. When the
outgoing message begins, they should
press the "#" key o n their telephone.
•• The caller will hear a short beep,
and the outgoing message will stop.
2
The caller should enter the override
Override Ringing
Machine
2. Answe ring
code and "#" by pressing the
appropriate keys on their telephone.
•• If an inco rrect code is entered, the
caller will hear four beeps. He or
she must re-enter the correc t code
within 10 sec onds or the line will be
disconnected.
3
The UX-460 will make a sp ecial
ringing sou nd. Pick up the handset to
answer the call. (Note that an
extension telephone connecte d to the
same line will not ring.)
•• If you do not answer within 30
seconds, the outgoing message will
play again and the caller can then
5
45
(Example)
leave a message.
49
Page 52
Remote Operations
Remote Operations
You can call the UX-460 from any touch-tone telepho ne and play back
your messages usin g the remote commands . You can also use these
commands to change the reception mode and other settings.
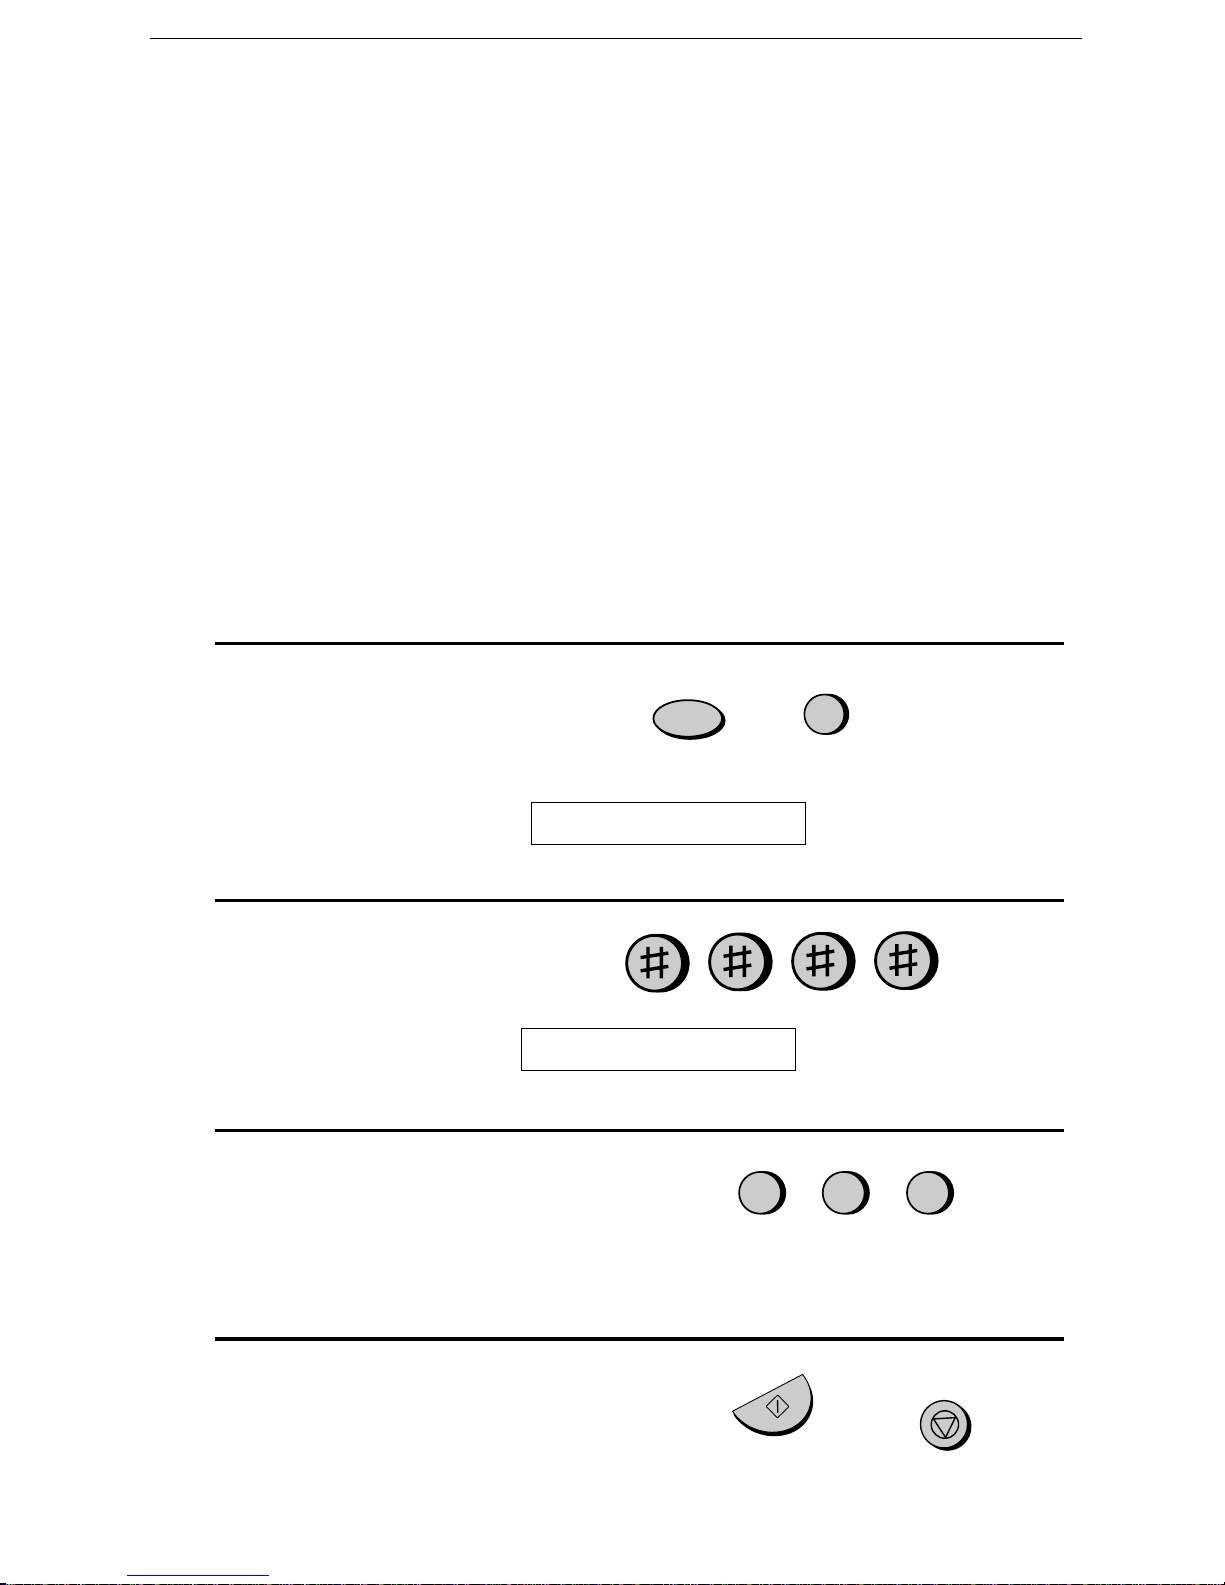
Remote code numbe r
To perform remote operations, you must first program a remote code
number. This numb er is used to prevent unauthorized people from
listening to your mess ages or changing the settings of your machine.
The remote code number has been set to "001 " at the factory. If you
want to change it, press the panel keys as shown belo w.
1
Press these keys:
The display will show: T.A.D. SETTING S
2
Press these keys:
The display will show:
3
Enter a 3-digit number by pressing the
REMOTE CODE
number keys.
FUNCTION
0
2 2
2
4
Press the START/MEMORY key and
then the STOP key.
50
(Example)
STOP
START/MEMORY
Page 53
Toll Saver
When you call the UX-460 to listen to your messages, it will answer
after two rings if it has received at least one messag e, or after four
rings if it has not received any messages.
Remote Operations
This allows you to save money on telephone charges, particul arly if
you are calling long distance. If the machine does not answer after the
second ring, you can simply hang up before it answers, saving
yourself the cost of that call.
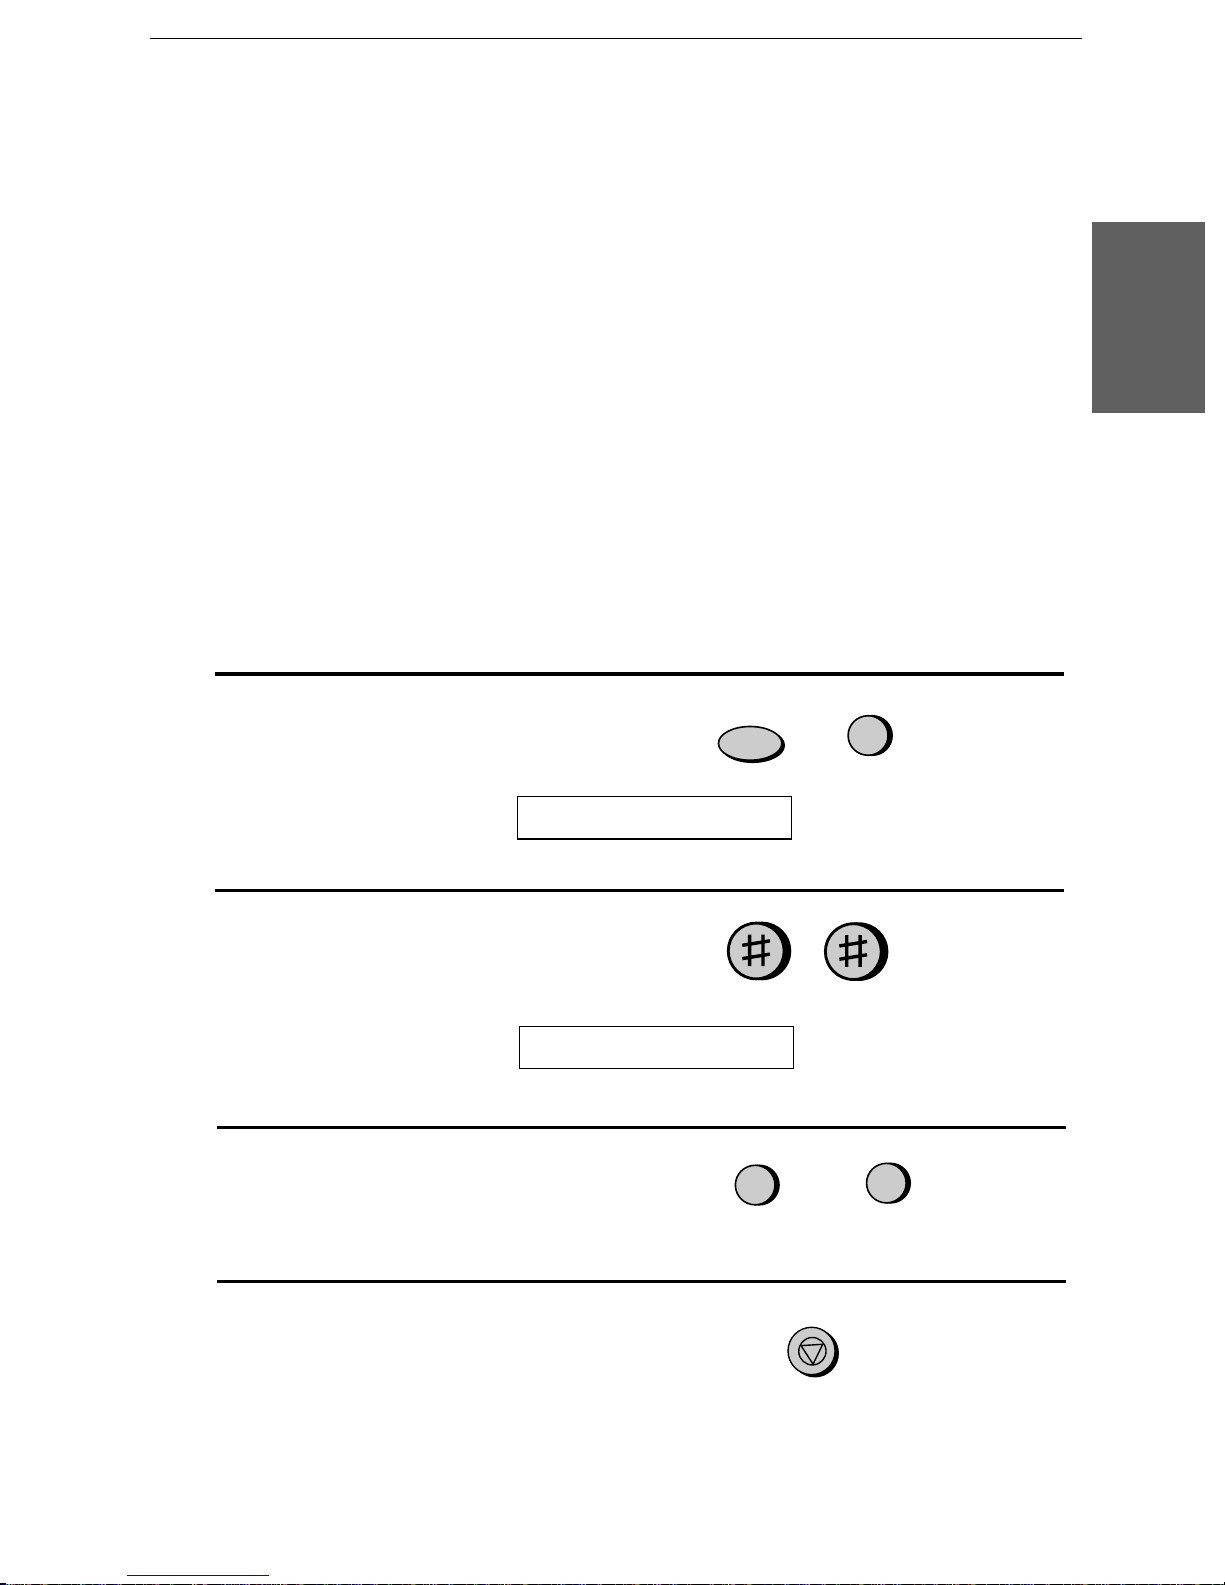
If you do not want to use the Toll Saver function, you can turn it off
by following the steps below. In this case, the UX-460 will answer
after the number of rings set with Opti on Set ti ng 2 (see Chapter 8), the
ring setting for FAX reception mode.
1
Press these keys:
FUNCTION
0
The display will show: T.A.D. SETTING S
2
Press these keys:
Machine
2. Answe ring
The display will show:
3
Press 1 to turn Toll Saver on, or 2 to
turn it off.
4
Press the STOP key.
TOLL SAVER
1
or
STOP
2
51
Page 54
Remote Operations
Retrieving your messages
Note: You can also access the UX-460 for remote operation when the
reception mode is set to FA X. In this case, call the UX-460, press the "#"
key immediately after it answers (before you hear the fax tone), and then
continue from Step 2 below.
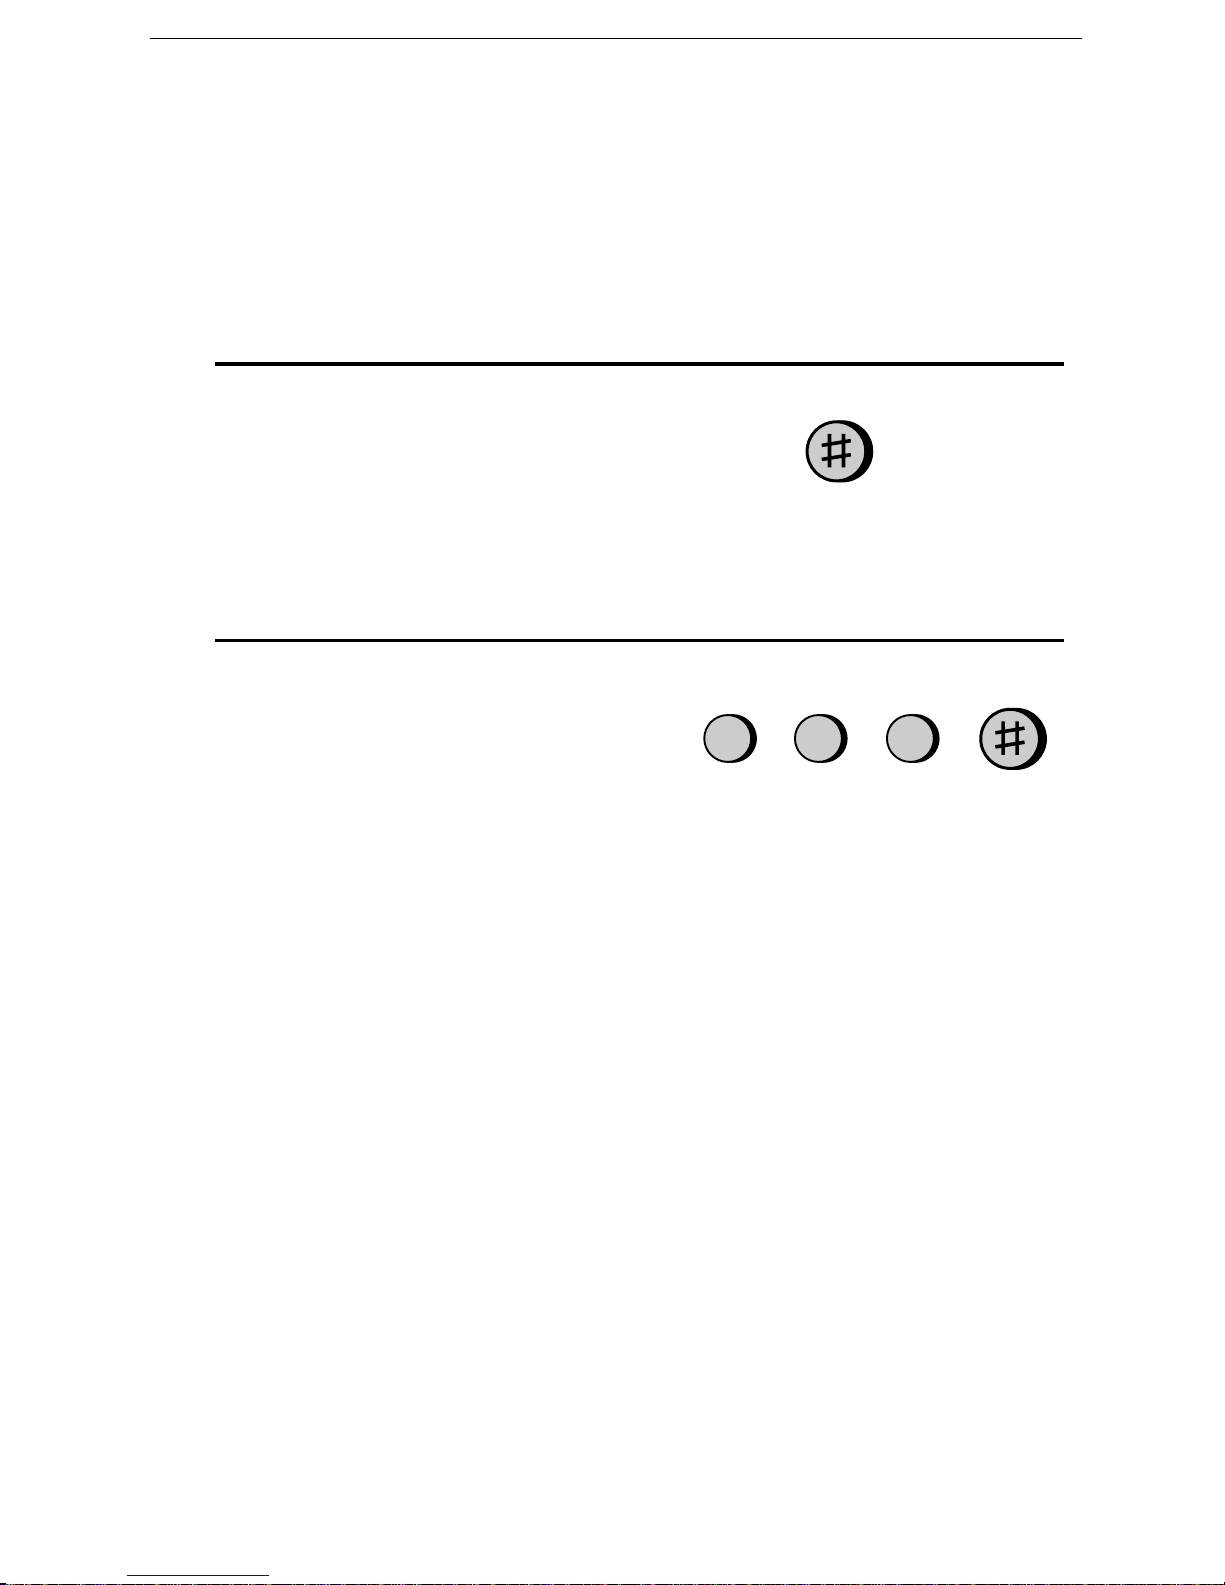
1
Call the UX-460 from a touch-tone
telepho ne. When your outgoing
message begins, press the "#" key on
the telephone.
•• You will hear a short beep, and the
outgoing message will stop.
2
Enter your remote code number and
then # by pressing the keys on the
telephone.
•• You will hear a series of beeps
equal to the number of messages
recorded, or one long beep if four or
more messages have been received.
The machine will then pla y back the
messages, beeping once at the end
of each message. When all
messages have been played back,
you will hear a long beep.
•• If no messages have been received,
you will hear a short beep. You can
either hang up, or perform any of
the operations described in the
22
(Example)
2
following section Other remote
operations .
52
Page 55
3
While the messages are playing, you
can do any of the following:
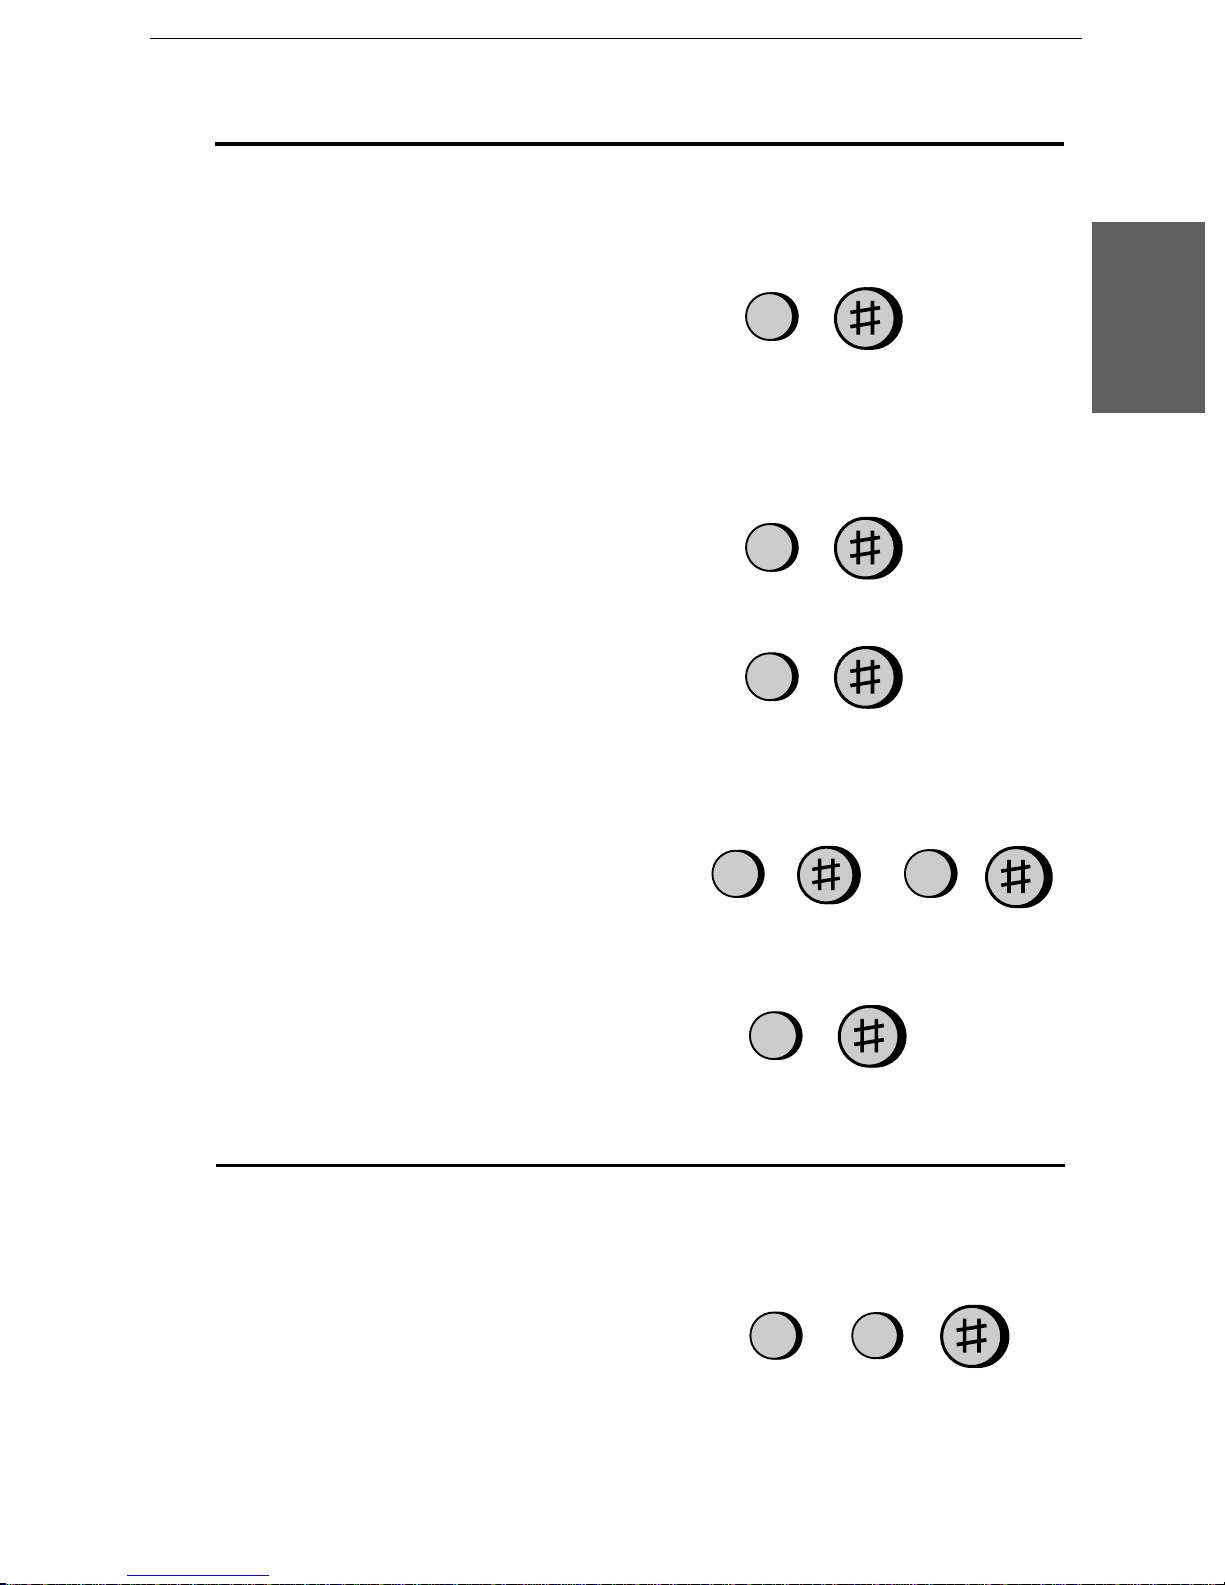
•• Repeat: To listen to a messa ge a
Remote Operations
second time, press "2" and "#" on
the telephone before that messa ge
ends. To move back to the previous
message, press "2" and "#" within
the first 3 seconds of the current
message.
•• Skip forward: To skip forwar d to
the next message, press "5" and "#"
on the telephone.
•• Stop: To stop playback, press "0"
and "#" on the telephone. After this,
you can enter any of the commands
described in the following section,
"Other remote operations".
•• Play new messages: To listen to
only your new messages, first stop
0
2
Machine
2. Answe ring
5
0
6
playback by pressing "0" and "#",
and then press "6" and "#".
•• Erase a message: To erase the
message you are currently listening
to, press "3" and "#" before it ends.
5
When you have finished listening to
your messages, you can do any of the
following:
•• Erase all messages: To erase all of
your messages, press "3", "3", and
"#".
3
3
3
53
Page 56
Remote Operations
•• Re peat playback: To listen to your
messages again, press "7" and "#".
•• Perform other operations: You
can enter any of the commands
described in the following section,
Other remote operations.
•• Hang up: If you do not erase your
messages first, they will be saved
and any new messages will be
recorded after the m. If you want the
UX-460 to resume normal operation
immediately, press "*" twice
before hanging up (in some cases,
7
particularly when the Transfer
function is used, the UX-460 may
not accept new calls for one or two
minutes after you hang up unless
you first press "*" twice).
Comments:
•• When a remot e command is accepted by th e machine, you will hear one beep.
If an inco rrect command is ent ered, you wi ll he ar f our beeps. In th e latter
case, re-enter the c orrect com mand.
•• When entering a com mand, do not pause longer than 10 seconds b et ween
each digit. If you do, a 4-beep error signal will be i ssued and the di gits
entered up to that point w ill b e disregarded. In this case, re-enter the
command fr om the beginning.
•• If you m ak e two errors (causing two 4-b eep signals to be issued) w h ile
entering y o ur remot e cod e number, the line w ill be disconn ec te d. T h is
preven ts unautho riz e d peo ple from attempting to gue ss your rem ot e co de
number.
•• If y ou pause for longe r than 10 second s b efore entering a com mand, you will
be disc o nn e ct ed.
54
Page 57
Other remote opera tions
After listening to your messages, you can do any of the operations
described below by pressing the appropriate keys on the telepho ne.
Note: The following commands cannot be entered while messages are
being played back. If you do not want to wait until playback ends to enter a
command, first stop playback by pressing "0" and "#", and then enter the
command.
Changing the fax rece ption mode
Select a new reception mode by
pressing the keys as follows:
Remote Operations
Machine
2. Answe ring
•• TA D mode: "8", "1", and "#".
•• FAX mode: "8", "2", and "#".
•• TEL mode: "8", "3", and "#".
Caution: In TEL mode, you will
not be able to further change the
reception mode.
Recording a new outgoing message
1
Press "4" and "*" on the telephone.
8
4
1
(Example)
55
Page 58
Remote Operations
2
When you hear a short beep, sp eak
into the telephone to record the new
message.
•• The message can be up to 15
seconds long. After 15 seconds (or
earlier if the machine detects
silence after you finish speaking),
you will hear a beep, and the new
message will be played back.
Turning the Transfer functi on on or off
To turn Transfer on: Press "9", "1",
and "#" on the te lephone.
To turn Transfer off: Press "9", "2",
and "#" on the te lephone.
Changing the transfer telephone number
1
Press "9", "0", and "#" on the telephone.
9
9
1
(Example)
0
2
After you hear a short beep, enter the
new telephone number. When
finished, press "#".
•• To insert a pause between any two
digits of the number, press "*".
56
5
6
4
1
1
(Example)
4
3
Page 59
Recording a new transfer message
1
Press "9", "3", and "#" on the
telephone.
2
When you hear a short beep, speak into
the telephone to record the new
message.
•• The time for the transfer message is
fixed at 15 seconds. After 15
seconds (or earlier if the machine
detects silenc e a fter you finish
Remote Operations
39
Machine
2. Answe ring
speaking), you will hear a beep, and
the new message will be played
back automatically.
Recording a "Memo"
You can record a "memo" for yourself or other users of the UX-460.
The memo will be played back when incom ing messages are listened
to.
1
Press "*" and "#" on th e telephone.
2
When you hear a short beep, speak into
the telephone to record the memo.
3
When you ar e finished, press "0" and
"#".
•• If the UX- 460 detects a certain
period of silence, it will stop
recording automatically.
0
57
Page 60
Remote Operations
OGM only mode
To turn on OGM only mode, press "1",
"1", and "#". ( Your outgoing message
will play, but callers will not be able to
recor d a message. Faxes sent by
automatic dialling will be received).
To turn off OGM only mode, press
"1", "2", and "#".
11
21
58
Page 61
Sending
3
Chapter
Transmittable Documents
Size and weight
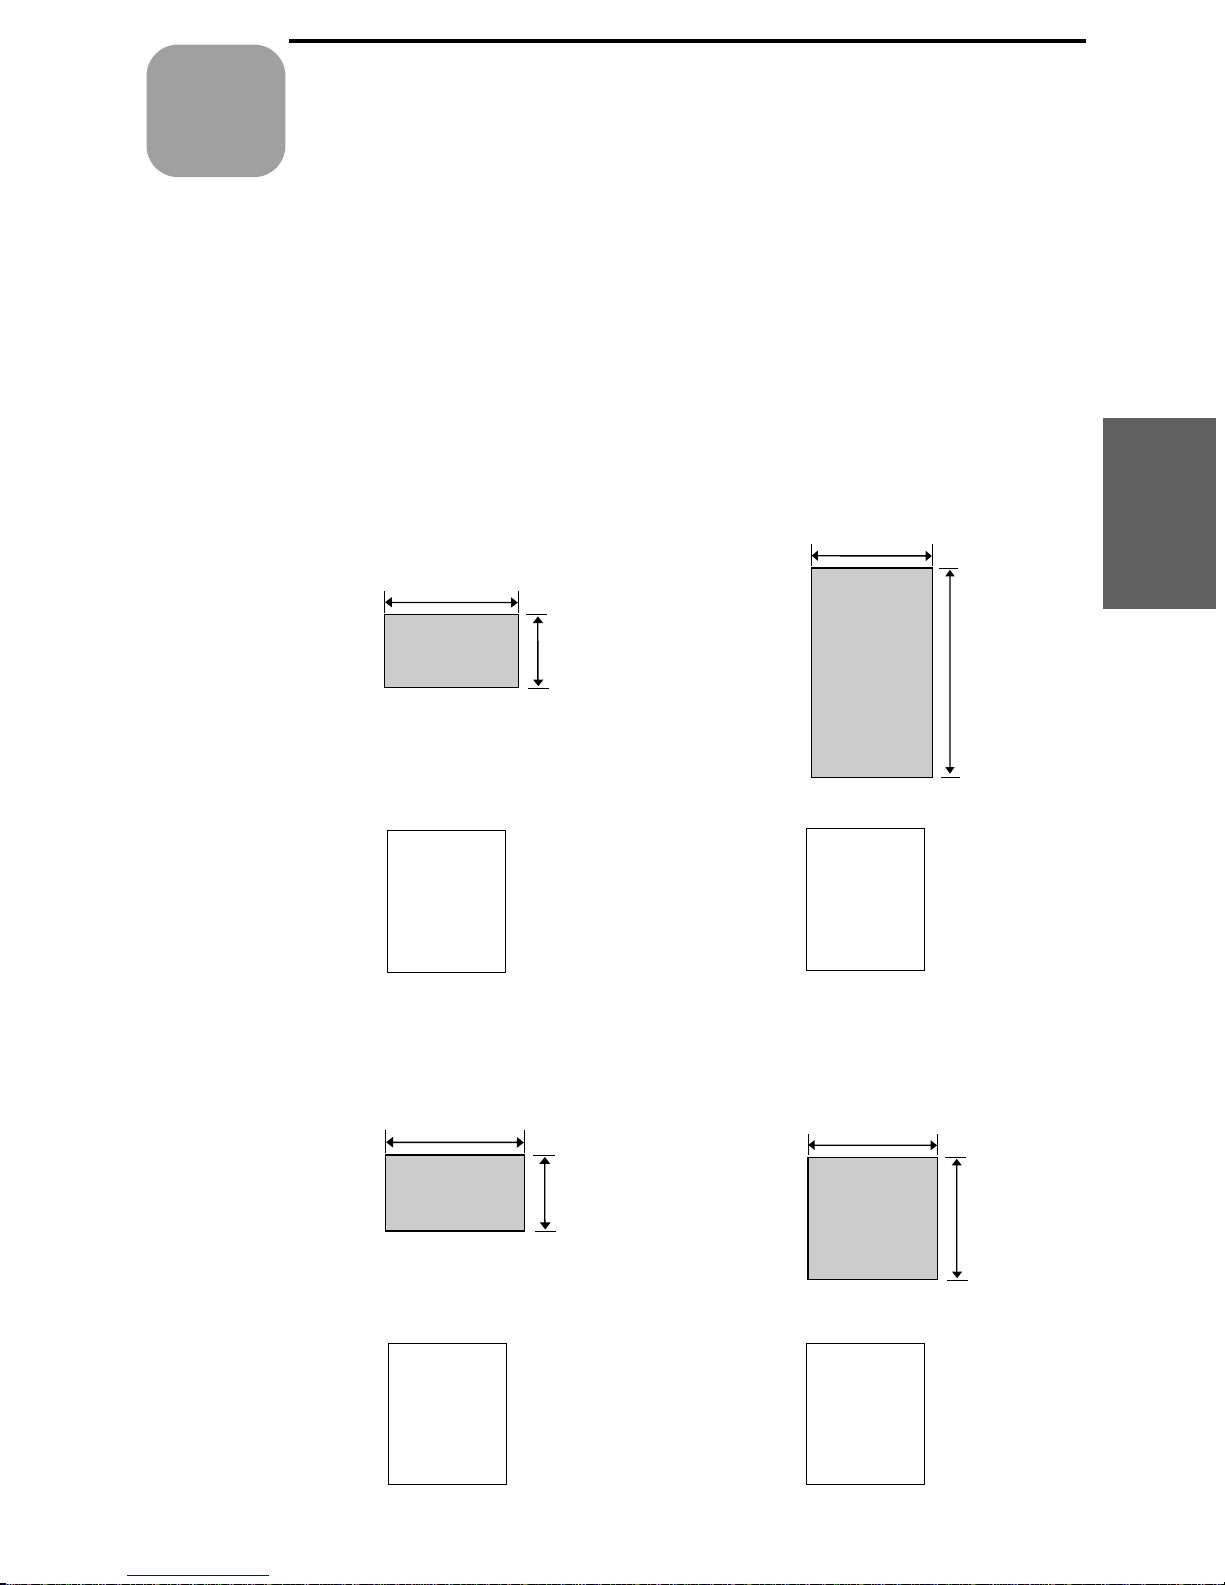
The size and weight of documents that you can load in the document
feeder depend on whether you load one page at a time or several pages
at once.
Loadin g one page at a time :
Documents
Minimum
size
148 mm
Maximum
size
216 mm
3. Sending
Document s
140 mm
Minimum
weight
52 g/m²
Loading several pages at once:
Minimum
size
148 mm
140 mm
Maximum
weight
Maximum
size
600 mm
157 g/m²
216 mm
297 mm
Minimum
weigh t
52 g/m²
Maximum
weight
80 g/m²
59
Page 62
Transmittable Documents
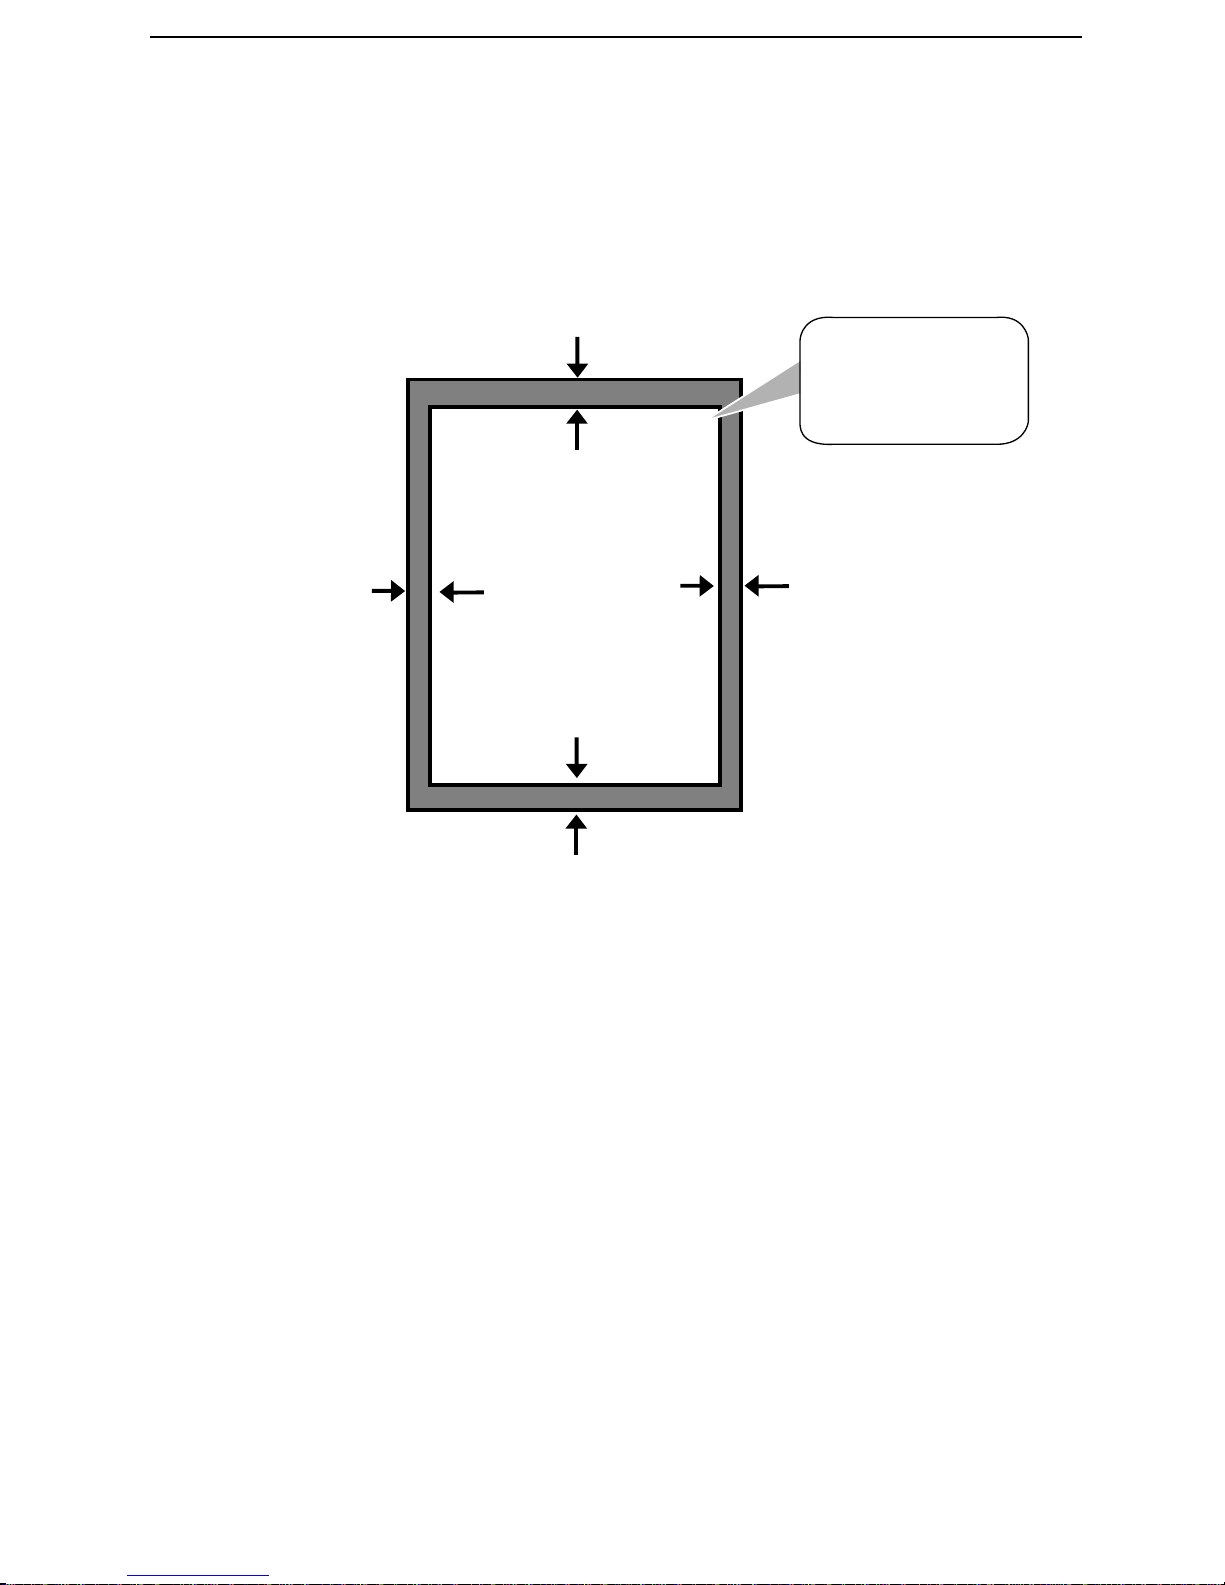
Note: Letters or graphics on th e edges of a document will not be scanned.
5 mm
Letters in the
shaded area will
not be scanned.
4 mm
Other restrictions
♦ The scanner cannot recognize yellow, greenish yellow, or light
blue ink.
♦ Ink, glue, and correcting fluid on documents must be dry before
they pass through the document feeder.
4 mm
5 mm
♦ All clips, staples, and pins must be removed from documents
before loading in the feeder. If these are not removed, they may
damage the machine.
♦ Documents which are patched, taped, torn, smaller than the
minimum size, carbon backed, or easily smudged should be
photocopied, and the copy loaded in the feeder.
60
Page 63
Loading the Document
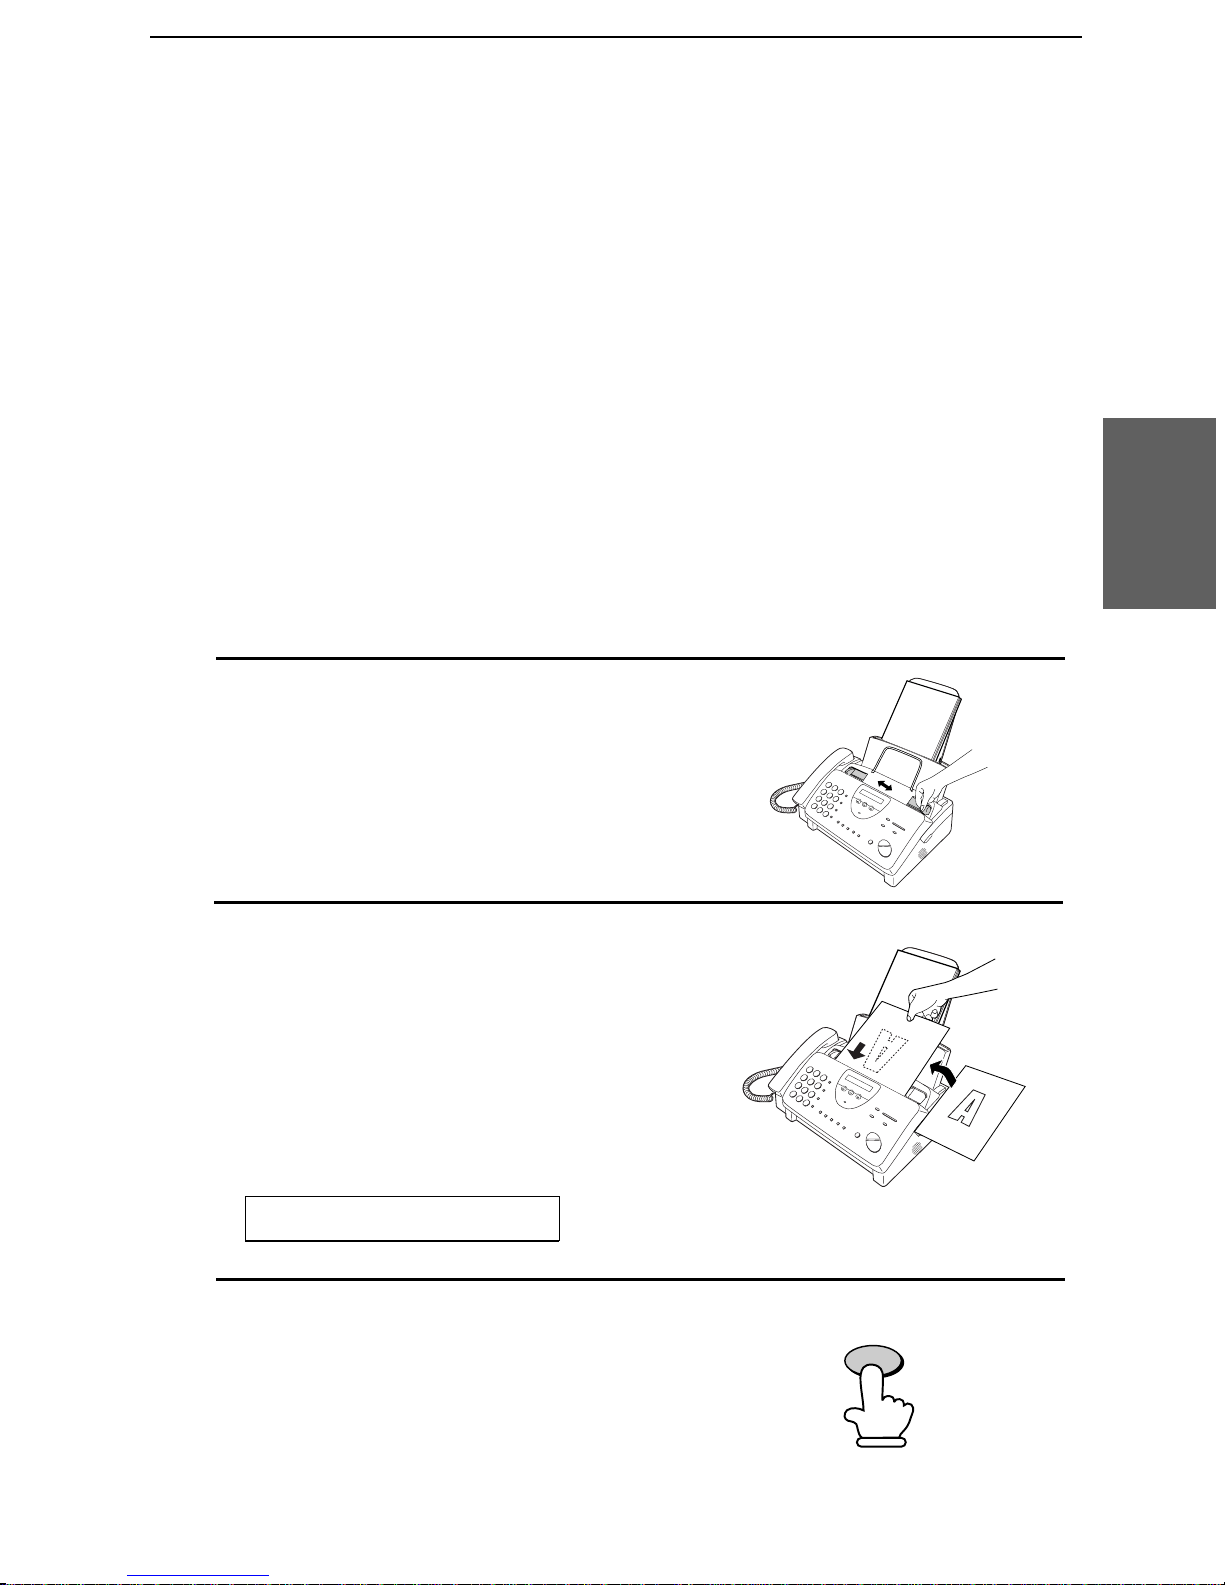
Up to 10 pages can be placed in the feeder at one time. The pages will
automat icall y feed into the machine startin g from the botto m page.
♦ If you need to send or copy more than 10 pages, place the
additional pages gently and carefully in the feeder just before the
last page is scanned. Do not try to force them in, as this may cause
double-feeding or jamming.
♦ If your document consists of several large or thick pages w hich
must be loaded one at a time, insert each page into the feeder as
the previous page is being scanned. Insert gently to prevent
double-feeding.
Loading the Document
3. Sending
Document s
1
Adjust the d ocument guides to the
width of your document.
2
Place the document face down and
push it gently into the document
feeder. The top edge of the document
should enter the machine first.
•• The feeder will draw the leading
edge of the document into the
machine. The display will show:
READY TO SEND
3
Adjust the resolution a nd/or contrast
setting (if desired) as explained in the
section Resolution and Contrast, then
dial the receiving machine as explained
in Sending a Fax by Normal Dialing.
RESOLUTION
61
Page 64
Loading the Document
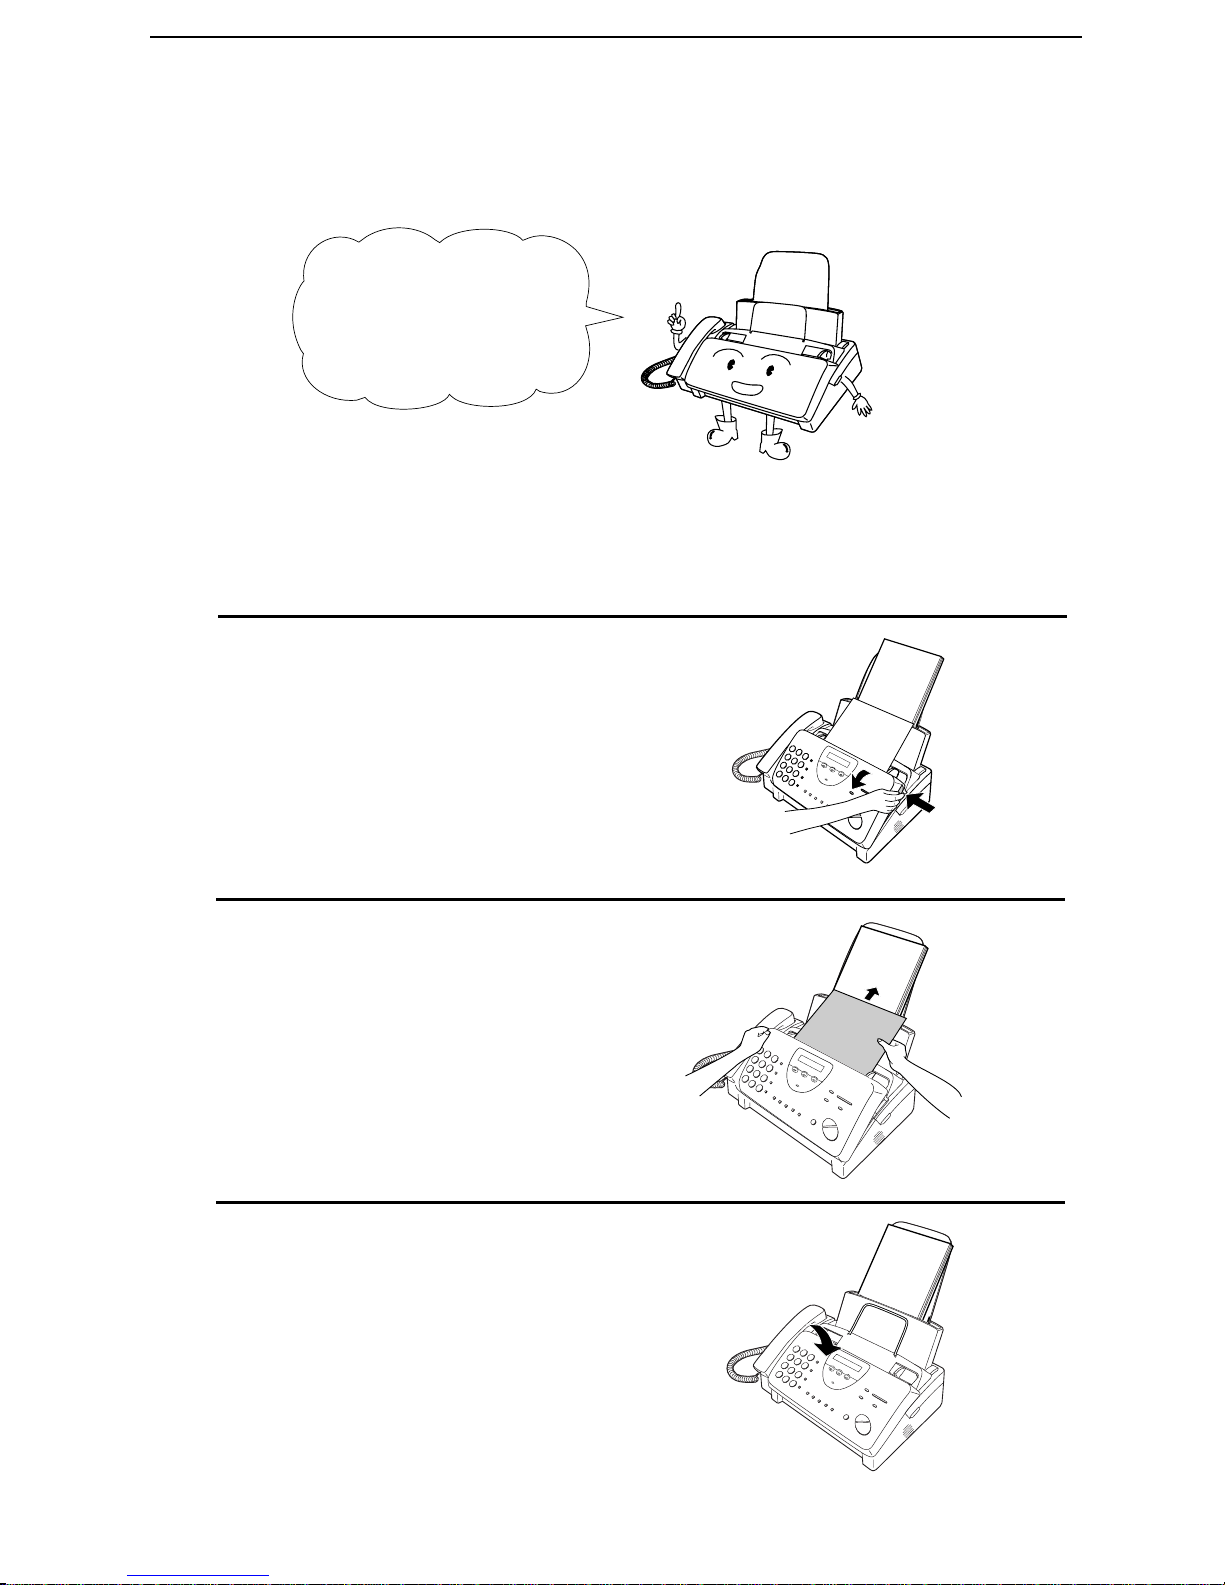
Rem ovi ng a docum e n t from the feede r
If you need to
remove a document
from the feeder, open
the operation panel.
Important:
Do not try to remove a document without opening the operation
panel. This may damage the feeder mechanism.
1
Open the operation panel by grasping
the finger hold and pulling up.
2
Remove the document.
3
Close the operation panel, making sure
it clicks into place.
62
Click!
Page 65
Resolution and Contrast
If desired, you can adjust the resolution and contrast before sending a
document.
Resolution and Contrast
The default resolutio n
setting is STANDARD
and the defa ult
contrast setting is
AUTO.
Note: The resolution and contrast settings are only effective for
transmitting and copying a document. They are not eff ective for receiving
a document.
Resolution settings
STANDARD: Use STANDARD for ordinary documents. T his
You must adjust the
settings each time
you don’t want to use
the default settings.
setting gives you the fastest and most economical
transmission.
3. Sending
Document s
FINE: Use FINE for documents containing small letters
SUPER FINE: Use SUPER FINE for documents containing very
HALF TONE: Use HALF TONE for photographs and
Contrast settings
AUTO Use AUTO for normal documents.
DARK Use DARK for faint documents.
or fine drawings.
small letters or very fine drawings.
illustrations. The or iginal will be reproduced in 64
shades of gray.
63
Page 66
Resolution and Contrast
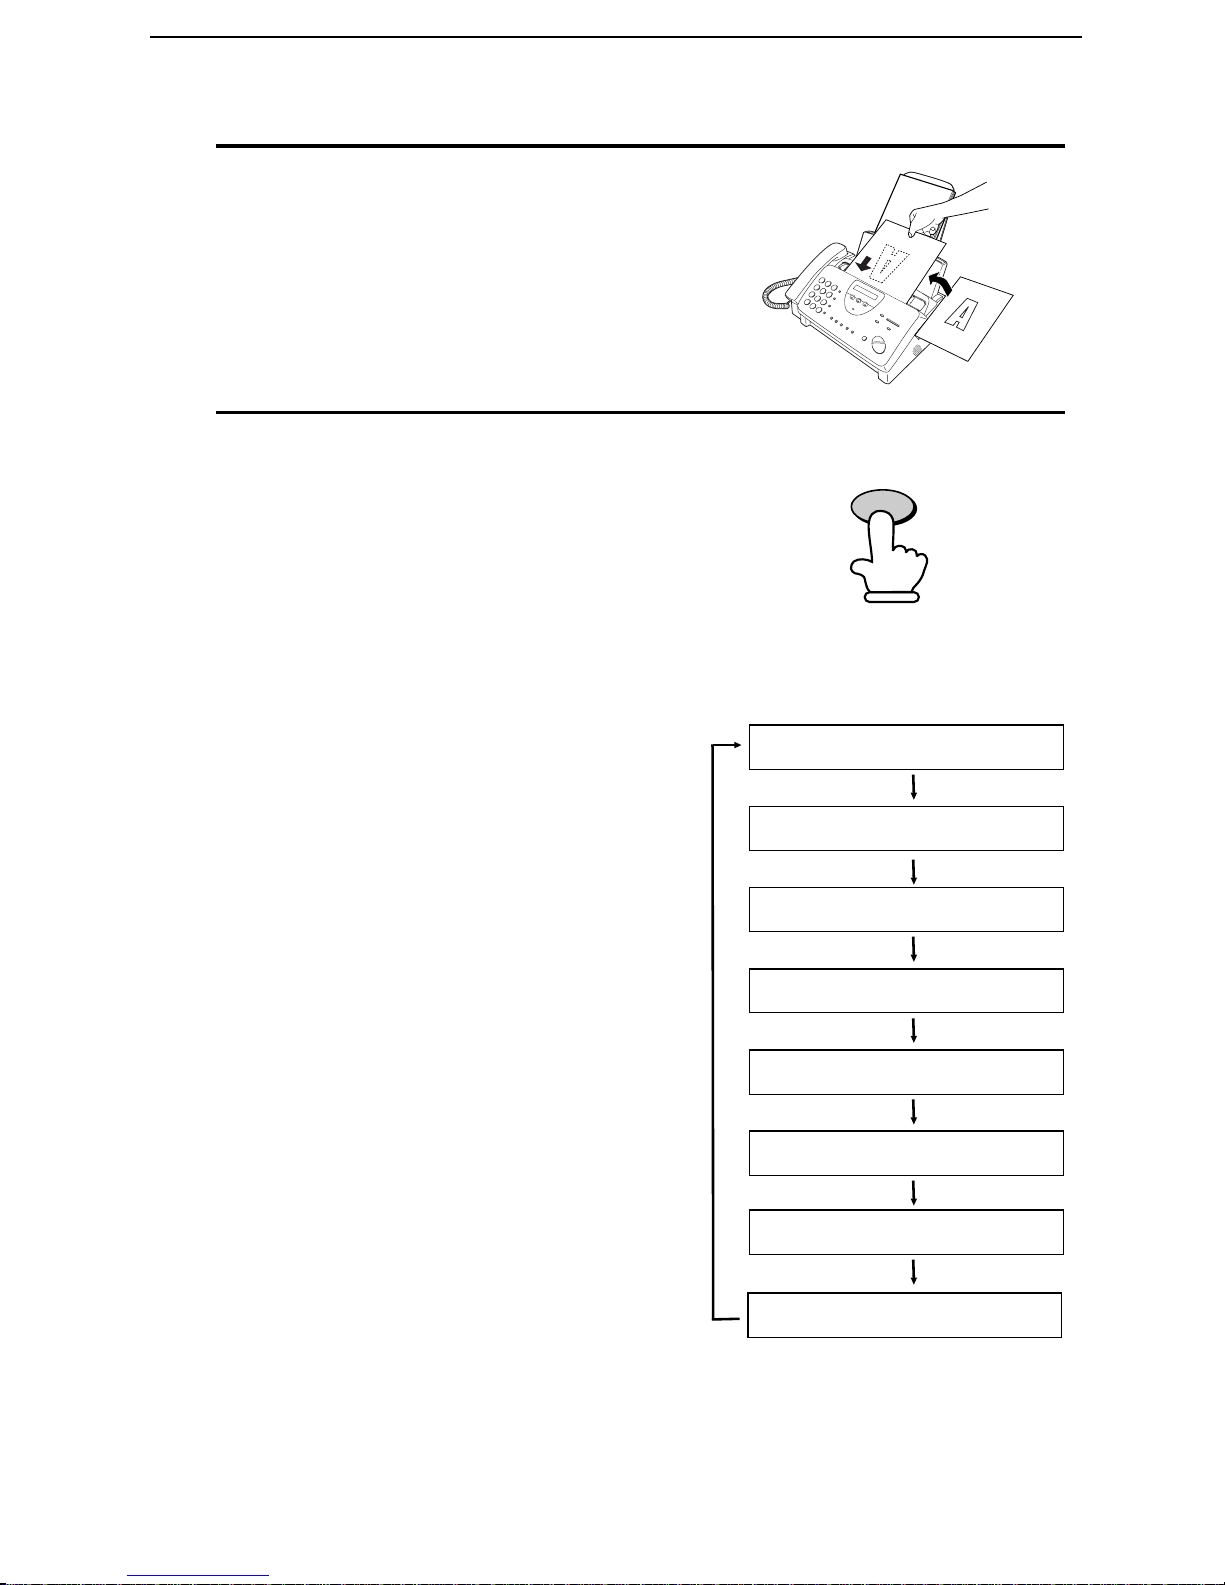
1
Load the document(s).
•• The document must be loaded
before the resolution and contrast
can be adjusted.
2
Press the RESOLUTION key one or
more times until the desired resolution
and contrast settings appear in the
display.
•• The first time you move through the
list of resolution settings, the
RESOLUTION
contrast setting AUTO will appear
next to each resolution setting . The
second time you move through the
list, the contrast setting DARK will
appear.
Display:
STANDARD :AUTO
FINE :AUTO
SUPER FINE :AUT O
HALF T ONE :AUTO
STANDARD :DARK
FINE :DARK
SUPER FINE :DARK
Note: In order to transmit in SUPER FINE resolution, the receiving fax
machine must also have that resolution. If it doesn’t, your machine will
automatically step down to the next best available setting.
64
HALF TONE :DARK
Page 67
Sending a Fax by Normal Dialing
Sending a Fax by Normal Dialing
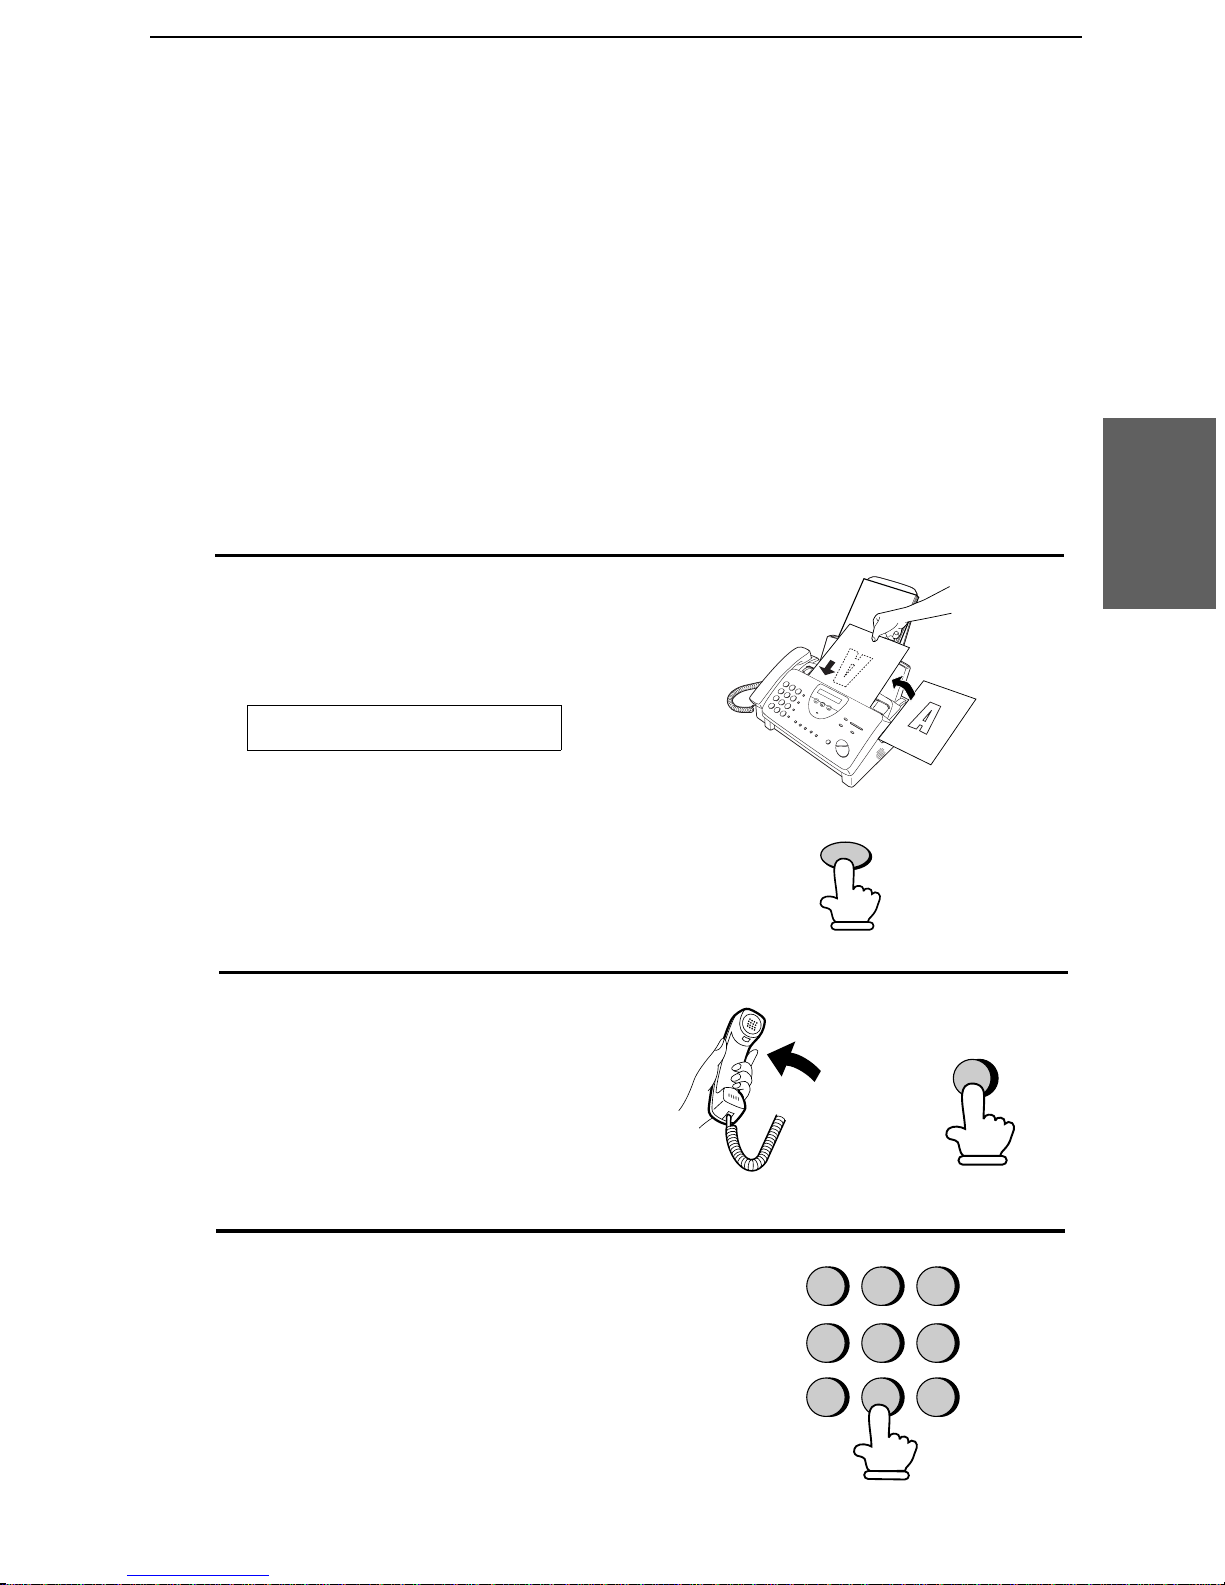
With Normal Dial ing , you pick up the handset (or press the
SPEAKE R key) and dial by pressing the number keys.
♦ If a person answers, you can talk with them through the handset
before sending the fax. (If you pressed the SPEAKER key, you
must pick up the handset to talk.)
♦ Normal Dialing allows you to listen to the line and make sure the
other fax machine is r esponding.
1
Load the document(s).
3. Sending
Document s
The display will show :
READY TO SEND
Set the resolution a nd/or contrast if
••
desired.
2
Pick up the handset or press the
SPEAKER key. Listen for the dial
tone.
RESOLUTION
SPEAKER
or
3
Dial the number of the receiving
machine by pressing the number keys.
GHI
PQRS
ABC
DEF
3
2
1
JKL
MNO
4
TUV
7
6
5
WXYZ
9
8
65
Page 68
Sending a Fax by Normal Dialing
4
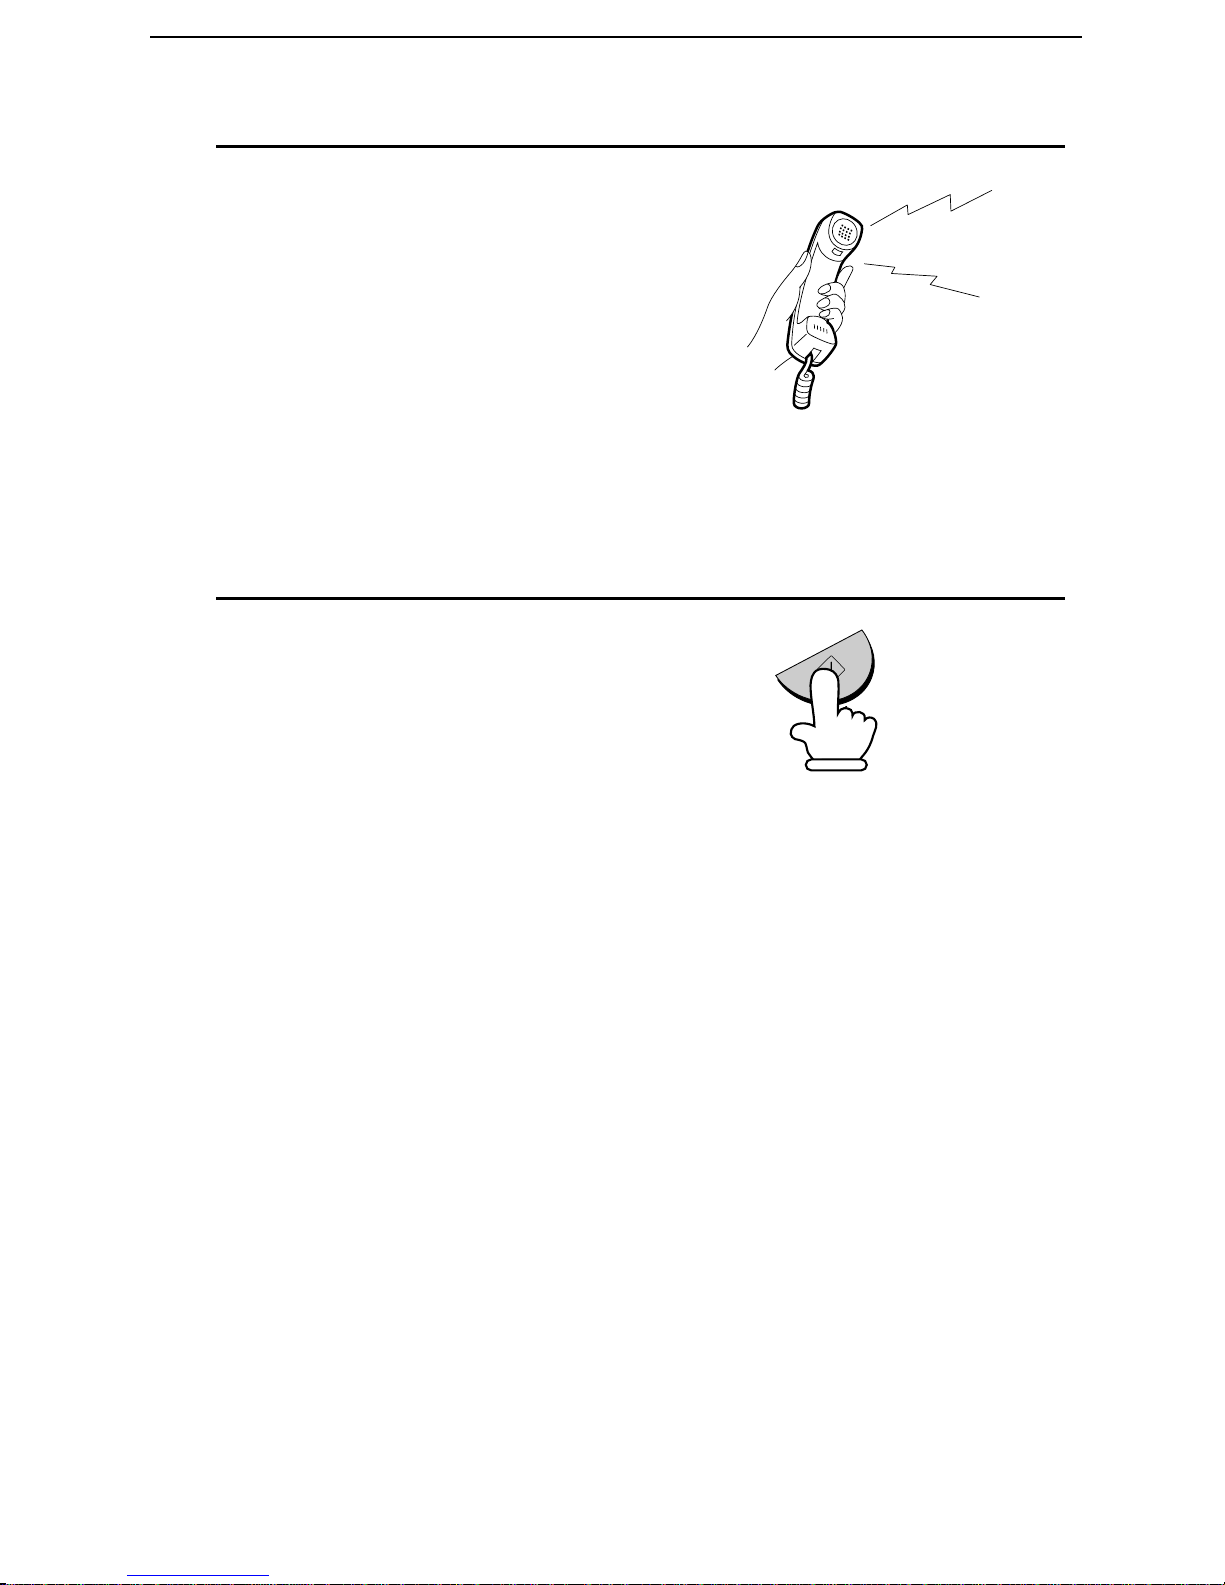
Wait for the connection. Depending on
the setting of the re ceiving machine,
you will either hear a facsimile
reception tone or the other person will
answer.
•• If the other party answers, ask them
to press their Start key (if you
pressed the SPEAKER key, pick up
the handset to speak with them).
This causes the receiving machine
to issue a reception tone.
5
When you hear the reception tone,
Beep
press the START/MEMORY key.
Replace the handset if you used i t.
•• When transmission is completed,
the fax will beep once.
Using the REDI AL ke y
You can press the REDIAL key to redi al the last number dialed. To
send a document, proceed from Step 4 of Normal Dialing. Note that
the speaker will be automatical ly activated when you press the
REDIAL key.
START/MEMORY
Facsimile reception tone: This is a pronounced, high-pit ched tone
that the receiving machine sends to the transmit ting machi ne to
indic ate that it is ready to receive.
66
Page 69
Sending a Fax by Automatic Dialing
Sending a Fax by Automatic Dialing
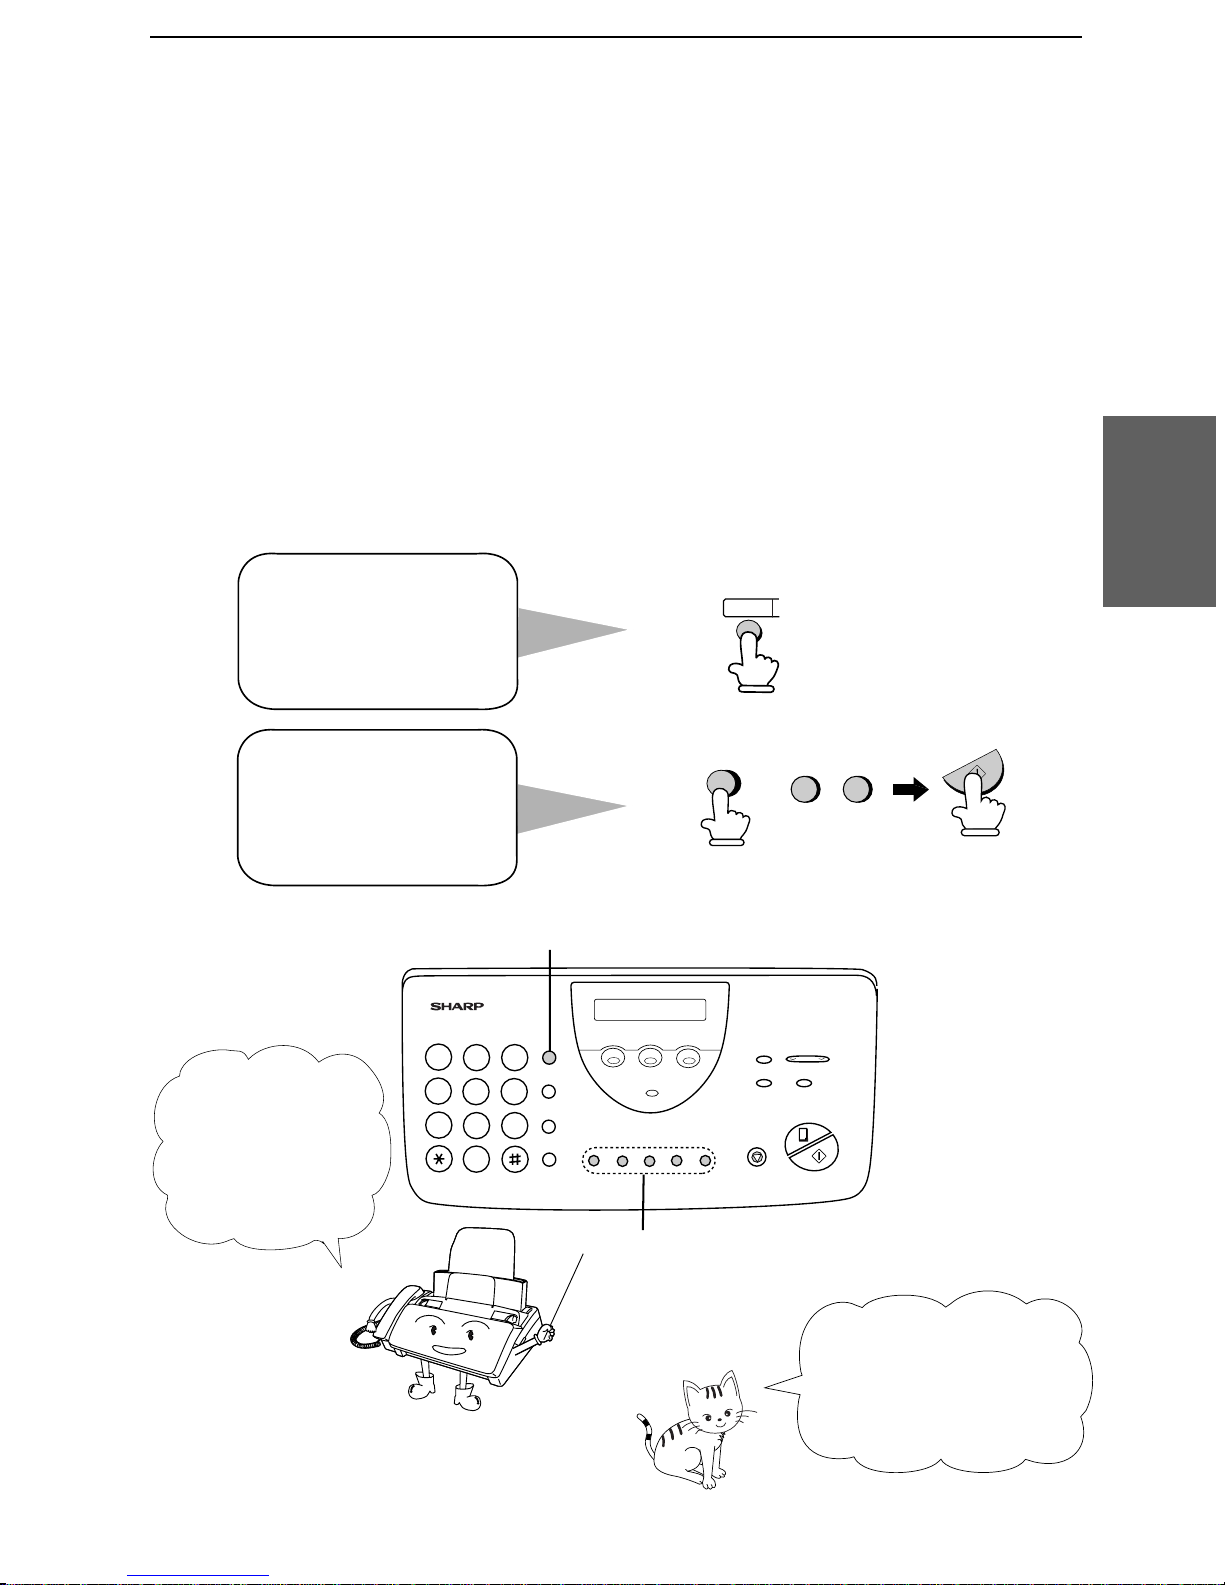
You can dial a fax or telephone num ber by sim pl y pr essin g a Rapid
Key, or by pressing the SPEED DIAL key and ente ring a two-di gi t
number.
♦ To use Automatic Dialing, you must first store the full fax or
telephone number in your f ax machine.
♦ When you store a fax or telephone number, you select a two-digit
Speed Dial number for it. 45 Speed Dial numbers are available.
Speed Dial numbers
01 through 05 are for
Rapid Key
(one-touch) Dialing.
01
3. Sending
Document s
Speed Dial numbers
06 through 45 are for
dialing with the
SPEED DIAL key.
Attach the strip
of Rapid Key
labels above the
Rapid Keys.
SPEED DIAL
1 1
START/MEMORY
SPEED DIAL key
213
4
5 6
7
9
8
0
Rapid keys
When you store a
number in a Rapid
Key, write the name
of the party on the
label.
67
Page 70
Sending a Fax by Automatic Dialing
Storing fax and telephone numbers for Automatic Dialing
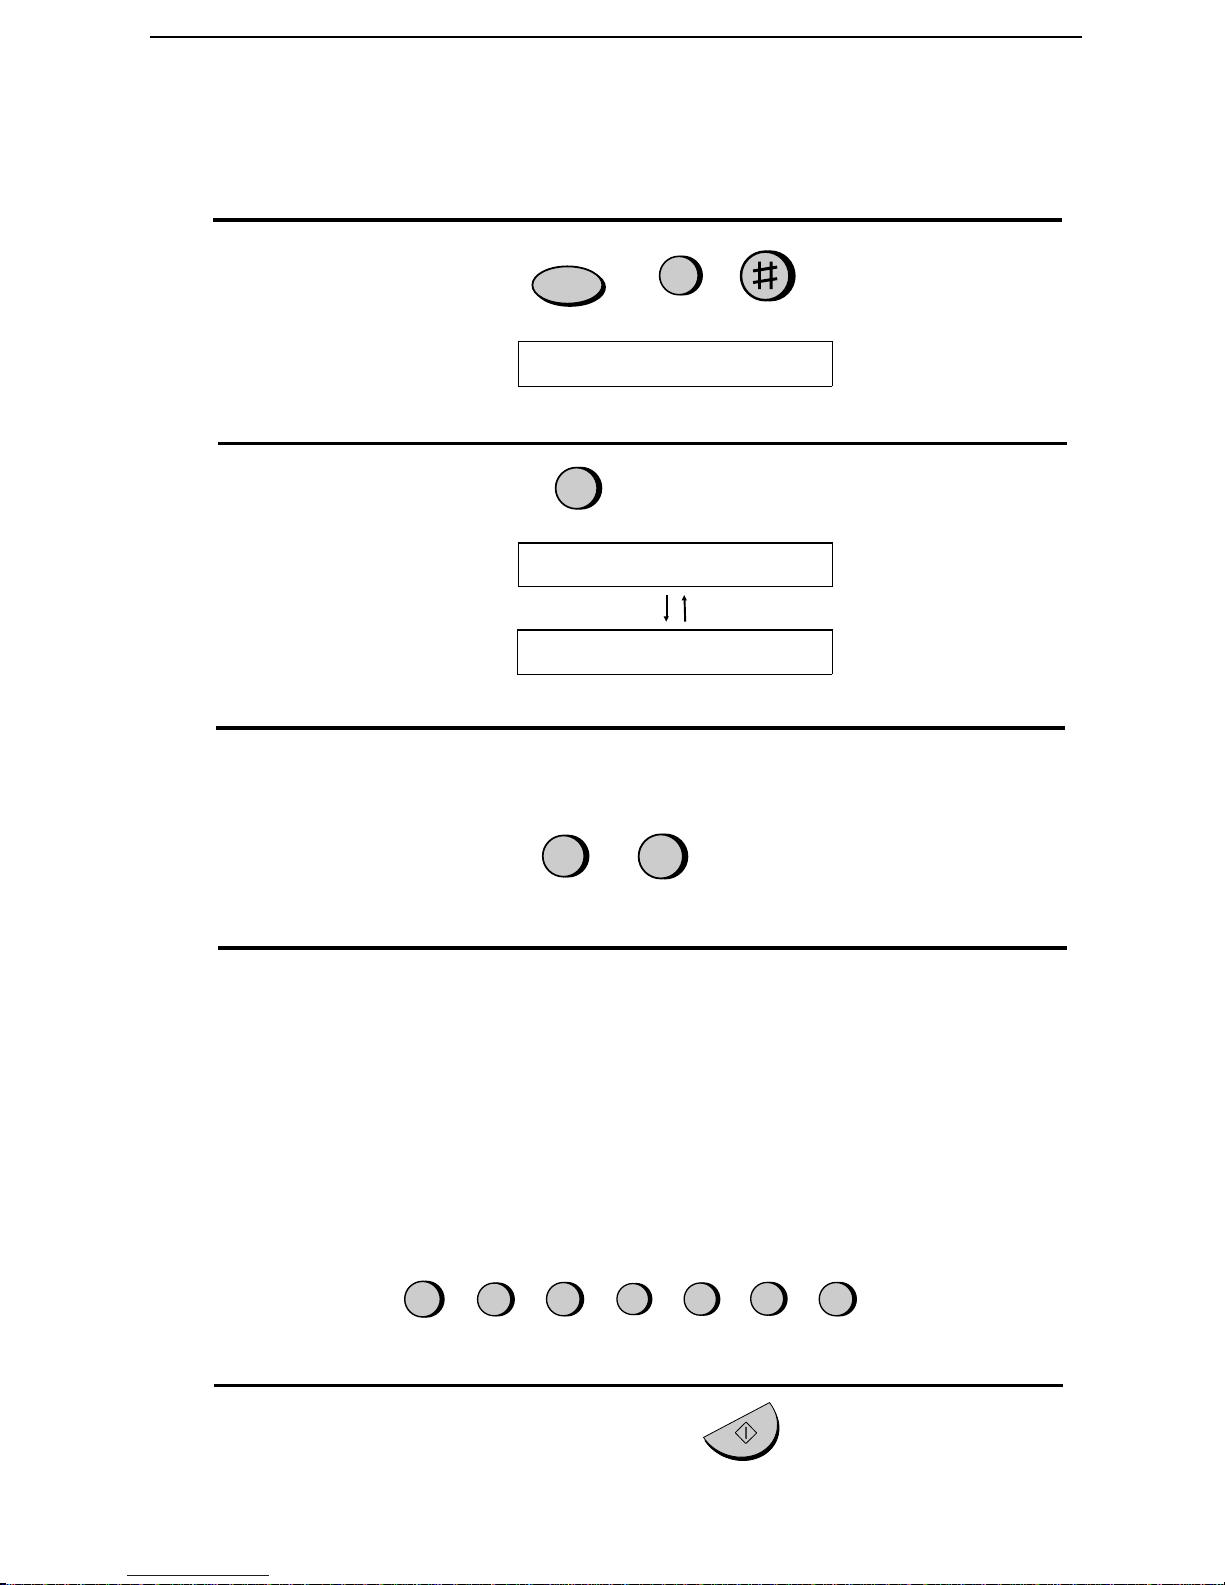
1
Press these keys:
The display will show:
2
Press 1 to select SET.
The display will show :
3
Enter a two-dig it Speed Dial number by pressing the number keys
FUNCTION
3
FAX/TEL # MODE
1
FAX/TEL # SET
ENTER SPEED #
(01 to 05 for Rapid Key Dialing, 06 to 45 for Speed Dialing).
0
4
Enter the fax or voice number by pressing the number keys (max. of
1
(Example)
32 digits including pauses). (Note: A space cannot be entered.)
•• Pr ess the SPEED DI AL key to clear a mistake.
•• If a pause is required betwee n any of th e digi t s to access a spe ci al
service or an outside line, press the REDIAL key (two seconds
per pause). The pause will appear as a hyphen. Several pauses can
be entered in a row.
5
5
Press the START/MEMORY key.
5
5
1
2
3
4
(Example)
68
START/MEMORY
Page 71
Sending a Fax by Automatic Dialing
6
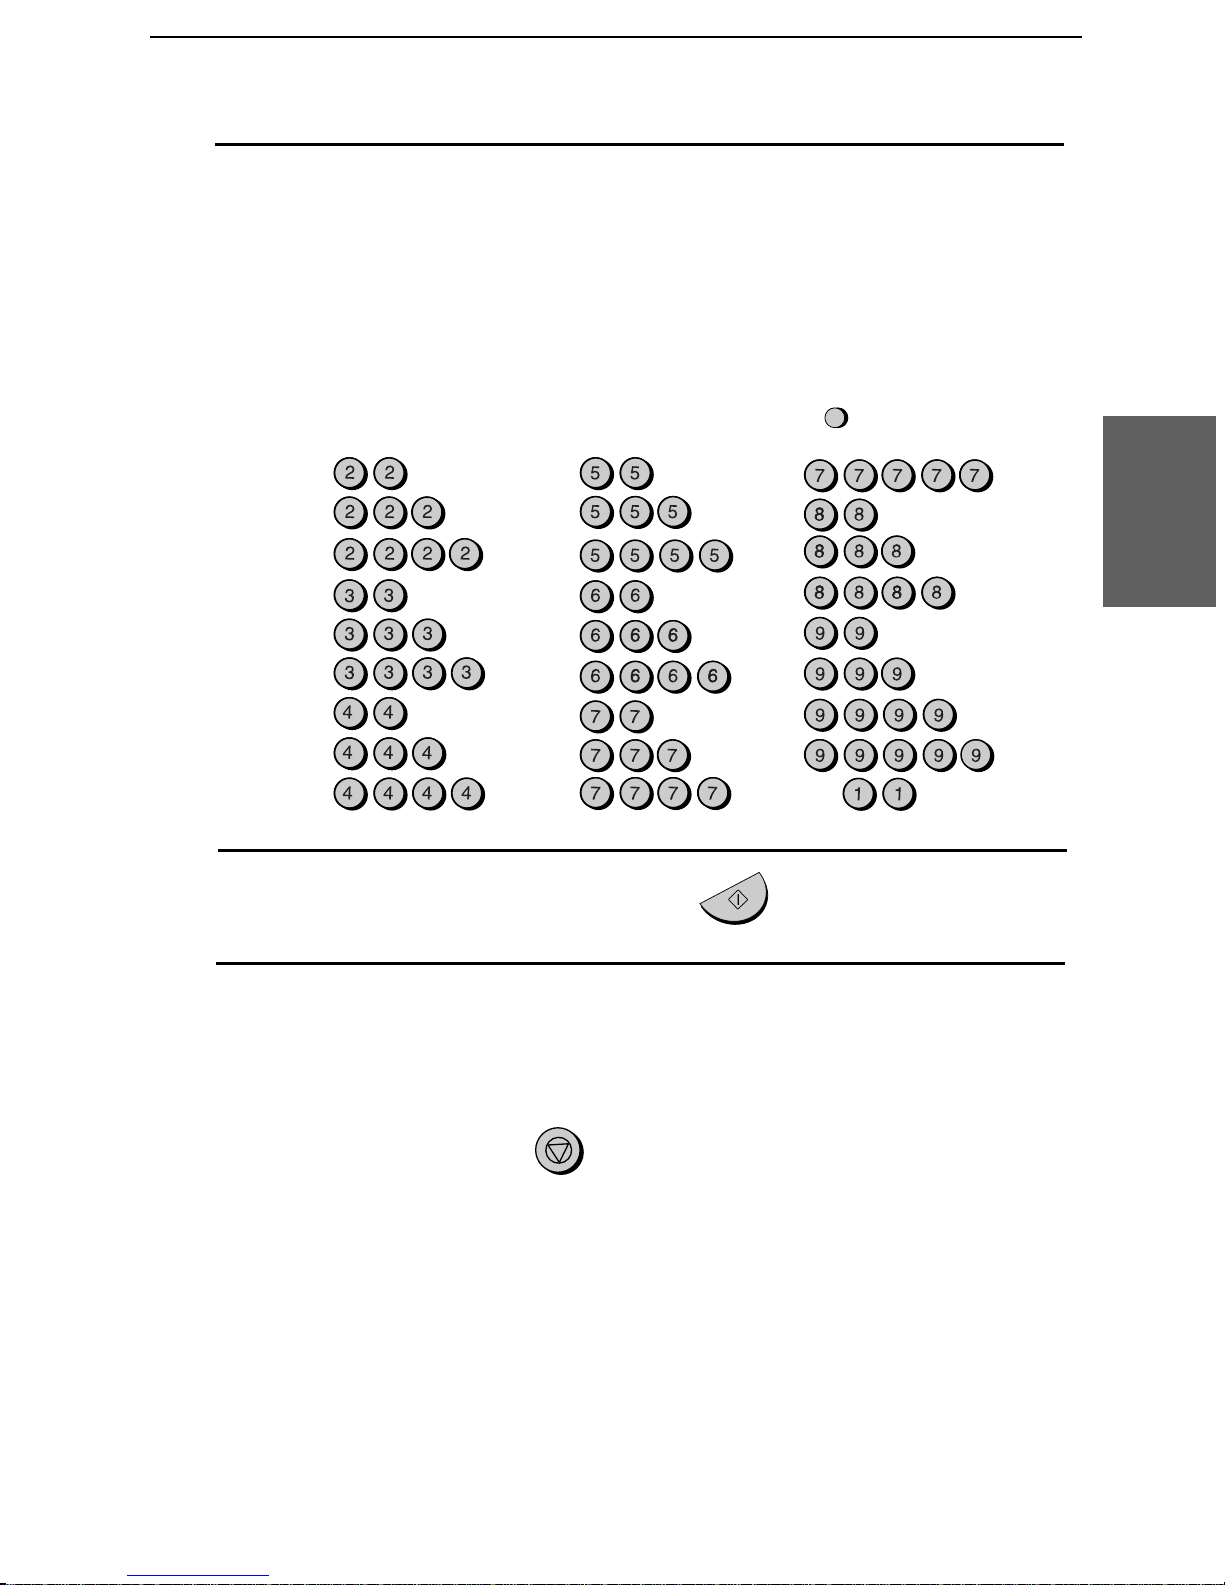
Enter the name of the party by pressing the number keys as shown in
the chart below. Up to 20 characters can be entered.
•• If you don’t want to enter a name, skip this step.
•• To enter two letters in succession that require the same key, press
the SPEAKER key after entering the first letter.
Example: SHARP = 7 7 7 7 7 4 4 4 2 2 7 7 7 7 7 7
A =
B =
C =
D =
E =
F =
G =
H =
I =
7
Press the START/MEMORY key.
J =
K =
L =
M =
N =
O =
P =
Q =
R =
START/MEMORY
SPEAKER
S =
T =
U =
V =
W =
X =
Y =
Z =
SPACE =
3. Sending
Document s
8
Return to Step 3 to store an other number, or press STOP to exit. If
the number will be used for Rapid Key Dialing, you can write the
name on the appropriate Rapid Key label.
Step 3 or
Storing are a codes and a cce s s codes
You can also store an area code or access code in a Rapid Key or
Speed Dial numb er. To use this num ber to dial, see Chain Dialing in
Chapter 5, Making Telephone Calls.
Note: An area code or access code stored in a Rapid Key or Speed Dial
number can only be used if the handset is lifted or the SPEAKER key
pressed before dialing.
STOP
69
Page 72
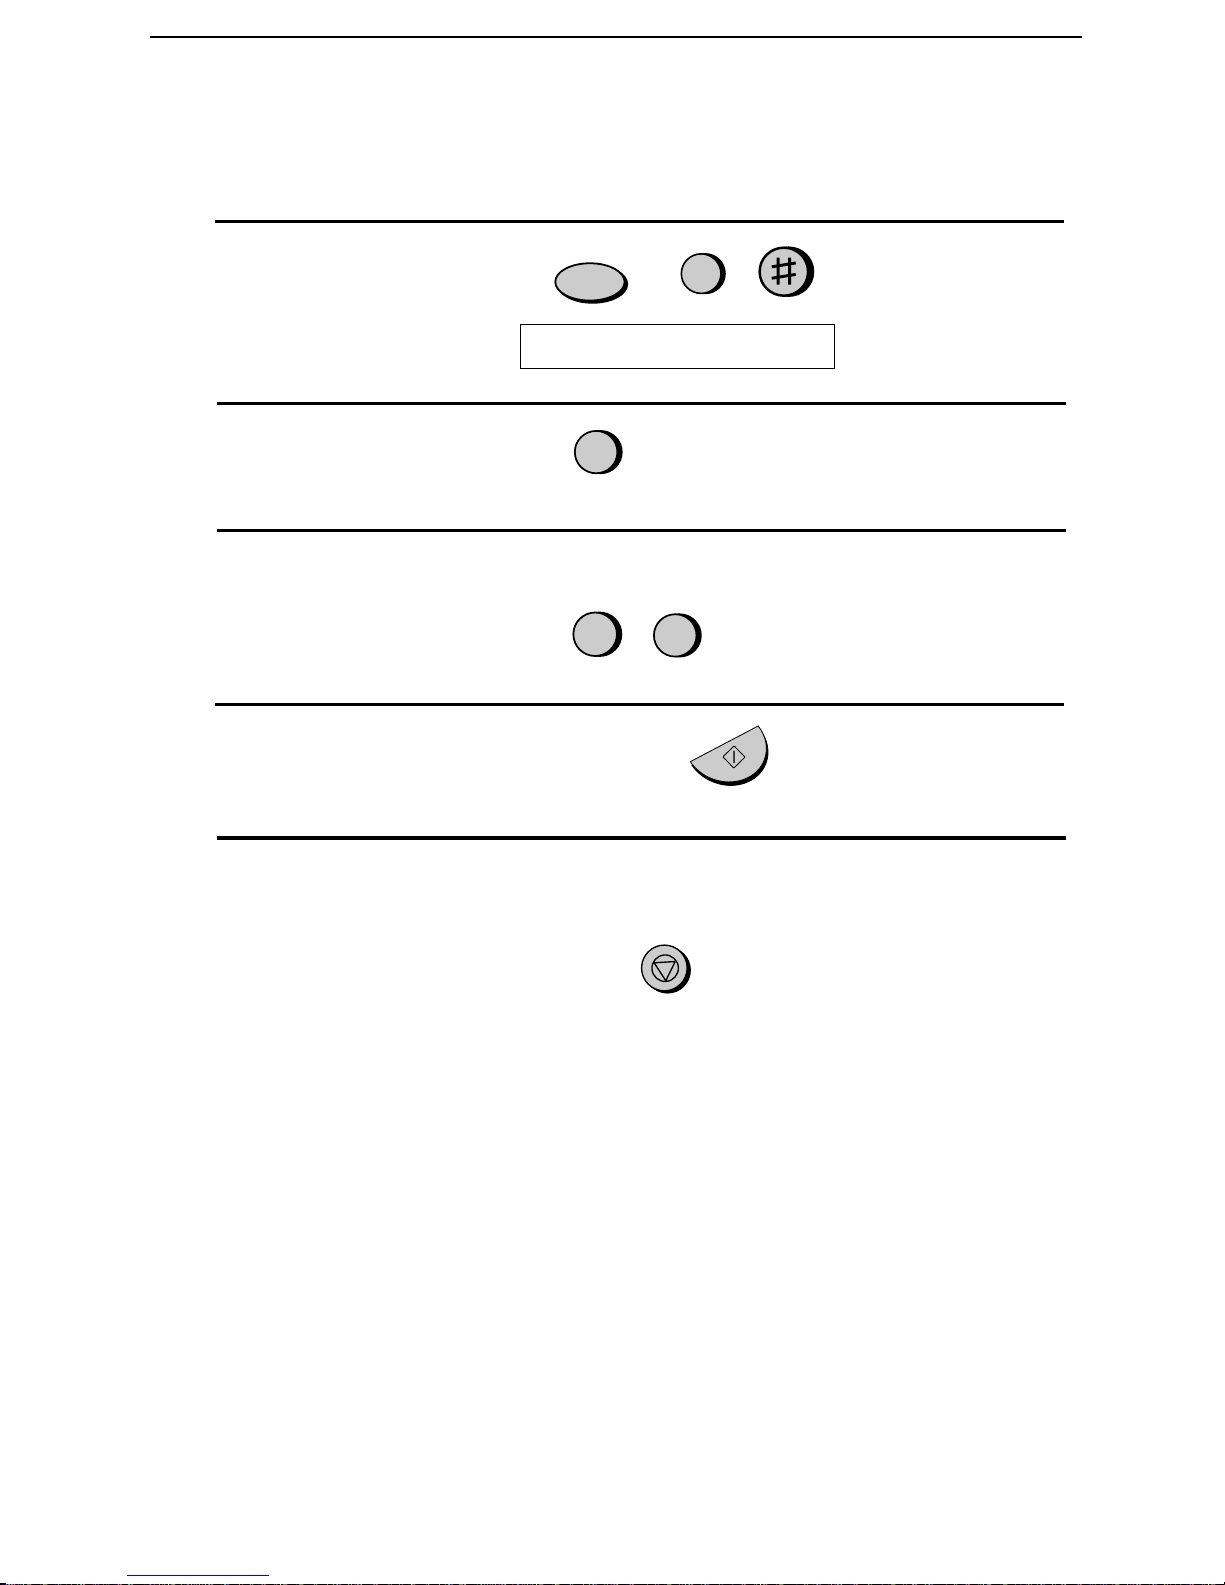
Sending a Fax by Automatic Dialing
Clearing numbe rs
1
Press these keys:
The display will show:
2
Press 2 to select CLEAR.
3
Enter the Speed Dial number that you want to clear by pressing the
FUNCTION
3
FAX/TEL # MODE
2
number keys.
4
Press the START/MEMORY key.
0
1
(Example)
STAR T/MEMORY
5
Return to Step 3 to clear another number, or press STOP to ex it.
STOP
Step 3 or
Making c hange s
To make changes in a number previously stored, repeat the storing
procedure. Sel ect the Speed Dial num ber for which you want to make
changes in Step 3, and then change the number and/or name when they
appear in the disp lay (St eps 4 and 6, respect ivel y).
♦ A lithium battery kee ps autom ati c dialing numbe rs i n memor y
The mac hin e uses a lithium battery t o kee p au tomatic di al ing num bers and
other progra m med da ta in mem ory when the power i s turn ed off. Battery
power is consumed primaril y when the power is off. With th e power kept
continuou sly off, the life of the ba tter y is ab out 5 years. If the bat tery di es,
have your deale r or retail er repl ace it. Do not try to repla ce it yourse lf.
70
Page 73
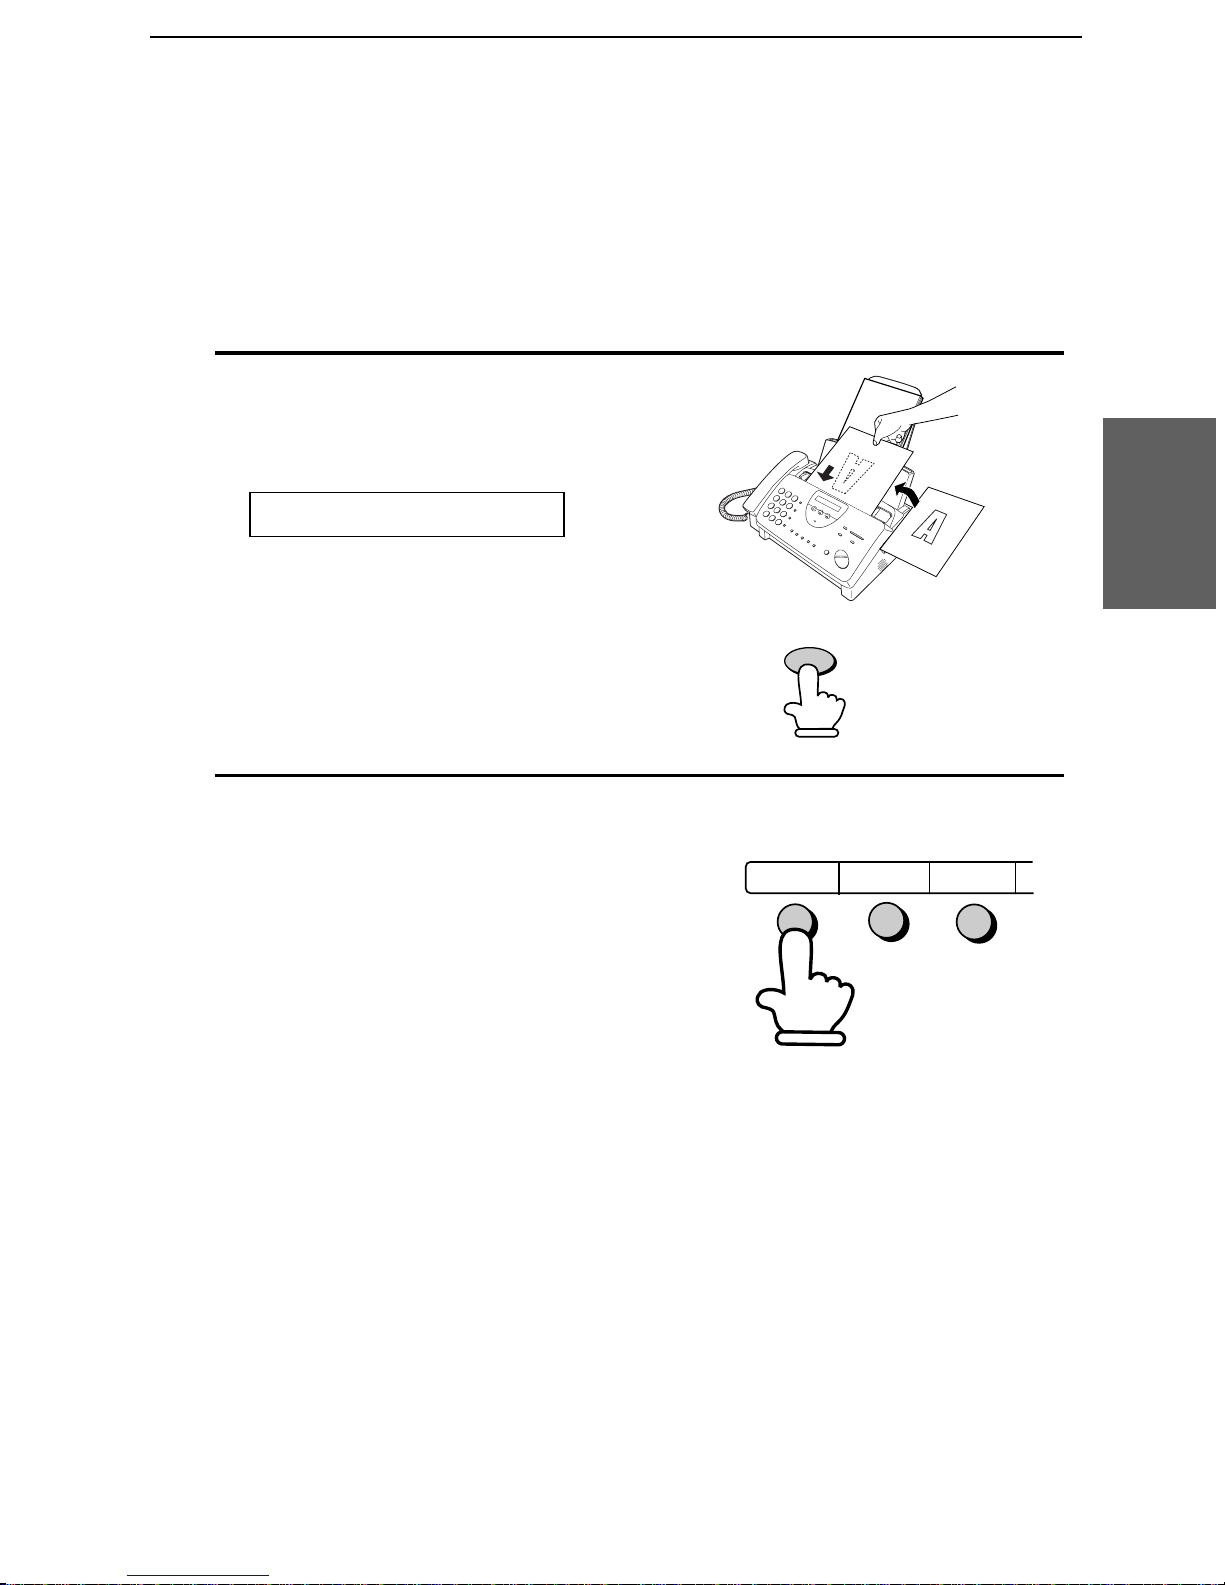
Rapid Key Dialing
If the number you want to dial has been stored for Autom ati c Dialin g
as a Speed Dial number from 01 to 05, you can dial it by pressing the
corresponding Rapid Key.
1
Load the document(s).
The display will show :
READY TO SEND
••
Set the resolution a nd/or contrast if
Sending a Fax by Automatic Dialing
3. Sending
Document s
desired.
2
Press the Rapid Key corresponding to
the desired Speed Dial number.
•• The name of the receiving party will
appear in the display. If no name
was stored, the fax number will
appear . (If the name or number is
incorrect, press the STOP key.)
•• The document will be automatically
transmitted once the connection is
made.
RESOLUTION
01 02 03
Example: To dial Speed
Dial number 01, press
Rapid Key 01.
71
Page 74
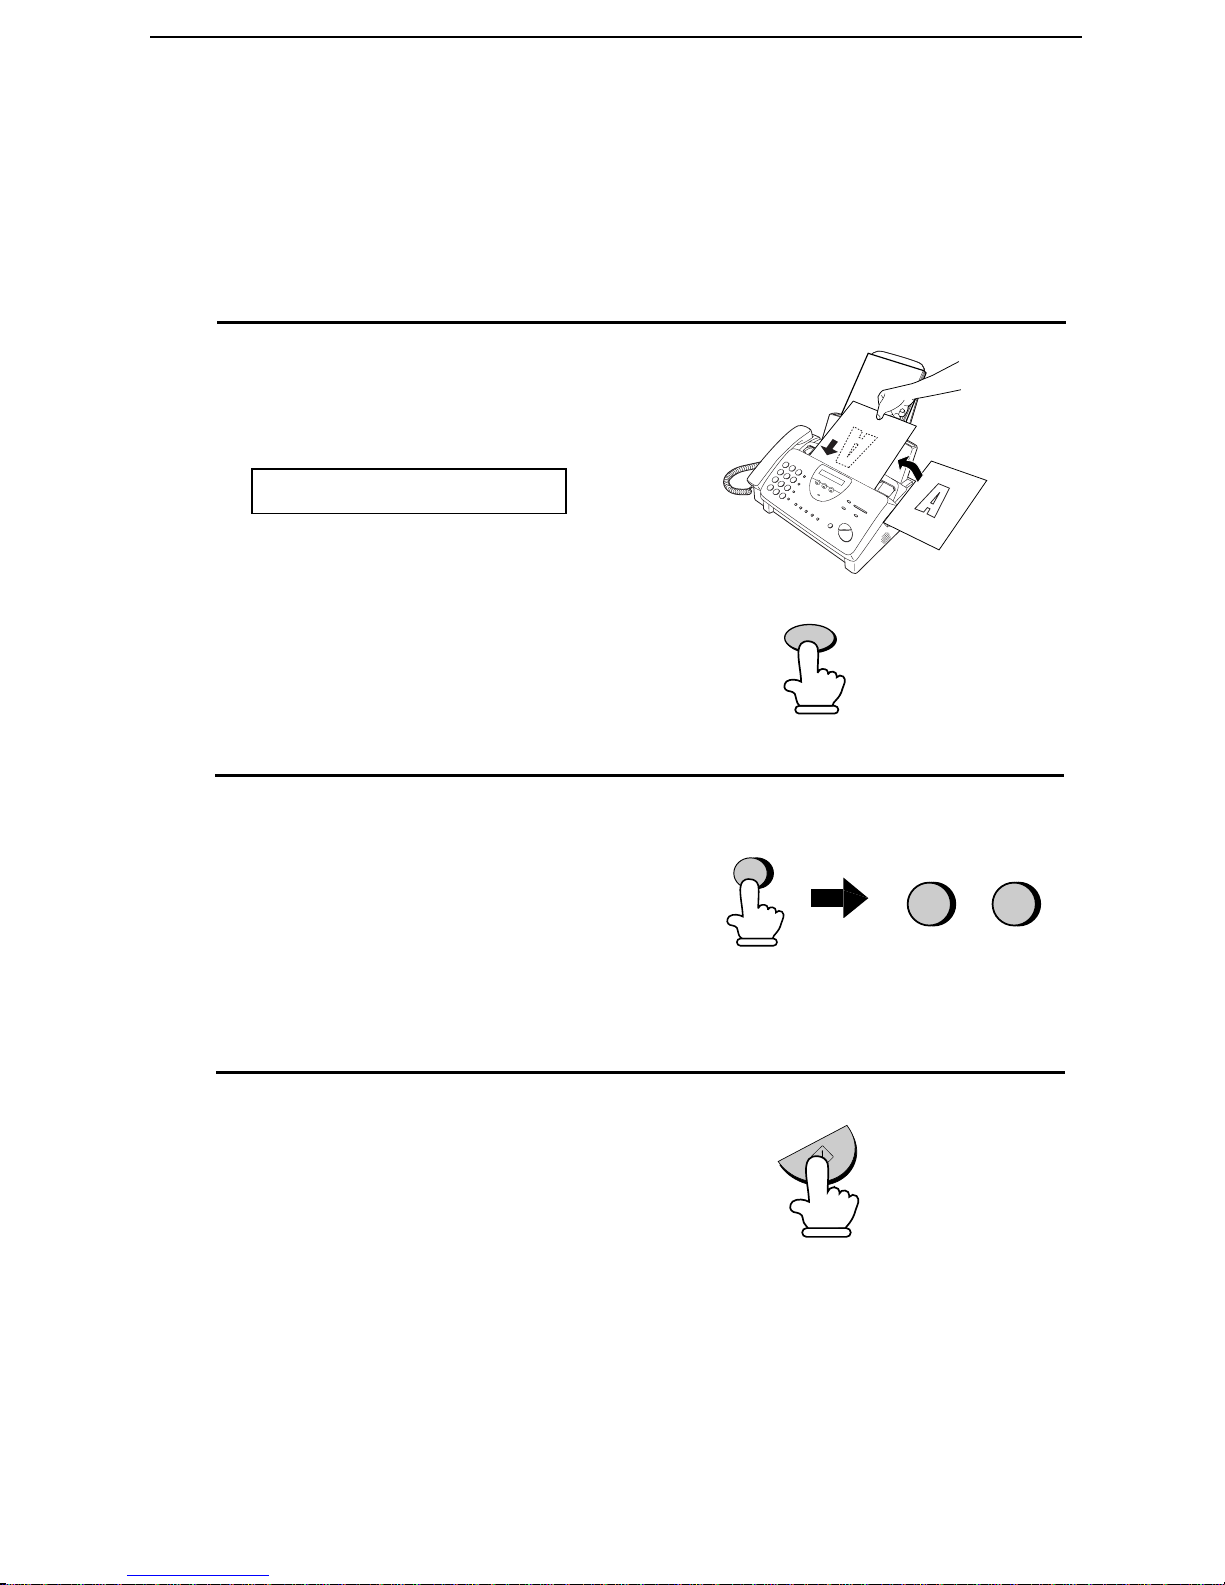
Sending a Fax by Automatic Dialing
Spee d Dia ling
Speed Dialing can be used to dial any num ber that has been sto red for
Automat ic Dial ing .
1
Load the document(s).
The display will show :
READY TO SEND
Set the resolution a nd/or contrast if
••
desired.
RESOLUTION
2
Press the SPEED DIAL key and then
enter the two digits of the Speed Dial
number by pressing the number keys.
•• To enter numbe rs 1 through 9, first
enter 0 and then the number.
3
Check the display. If the name or
number shown is correct, press the
START/MEMORY key. (If not,
press the STOP key and then repeat
Step 2.)
SPEED DIAL
2 0
(Example)
ST AR T/MEMORY
72
Page 75
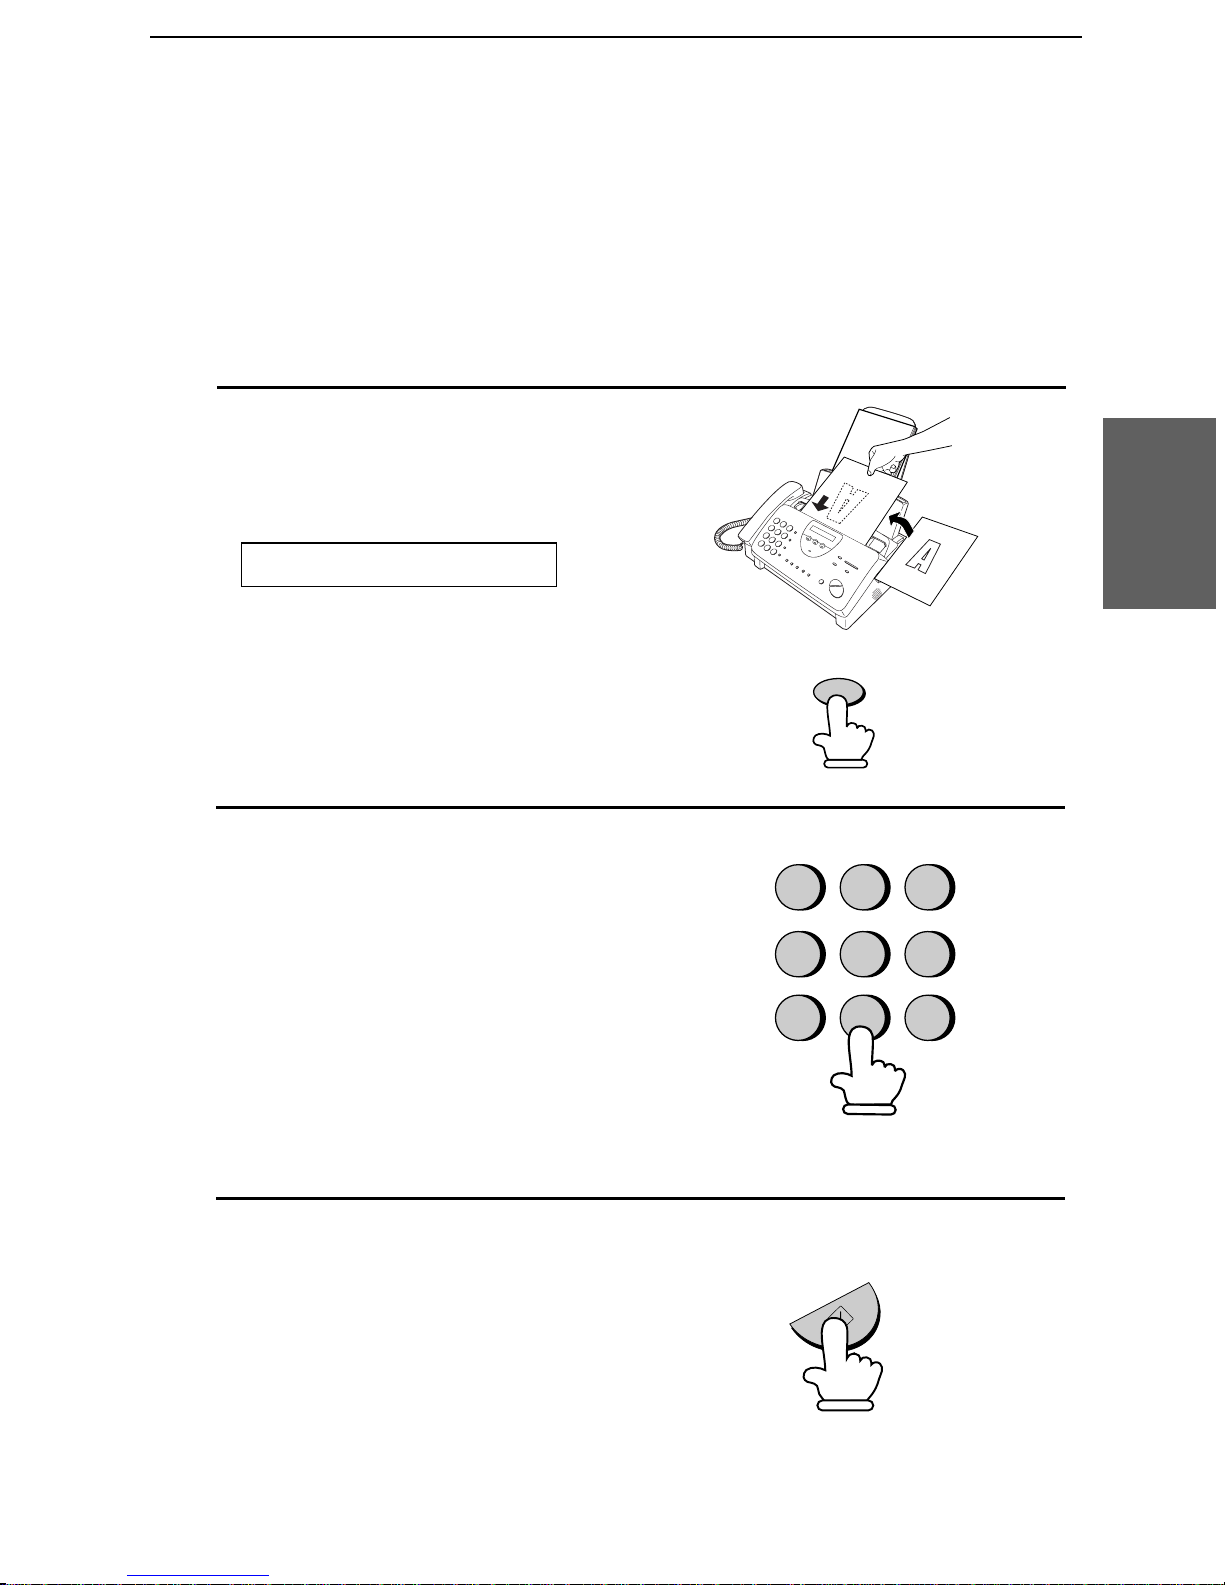
Direct Keypad Dialing
You can also enter a full number wit h the number keys and th en press
the START/MEMORY key to begin di ali ng. You can use this
method to dial a full number when you don’t need to speak to the
other party before faxing .
1
Load the document(s).
The display will show :
READY TO SEND
Sending a Fax by Automatic Dialing
3. Sending
Document s
••
Set the resolution a nd/or contrast if
desired.
2
Enter the number of the receiving
machine by pressing the number keys.
•• If a pause is required between any
of the digits to access a special
service or an outside line, press the
REDIAL key (two seconds per
pause). The pause will appear as a
hyphen. Several pauses can be
entered in a row .
3
Check the display. If the number of the
RESOLUTION
1
GHI
4
PQRS
7
ABC
JKL
TUV
2
5
8
DEF
3
MNO
6
WXYZ
9
receiving machine shown is correct,
press the START/MEMORY key.
•• If it is not correct, press the STOP
key to backspace and clear one digit
at a time, and then re-enter the
correct digit(s).
ST AR T/MEMORY
73
Page 76
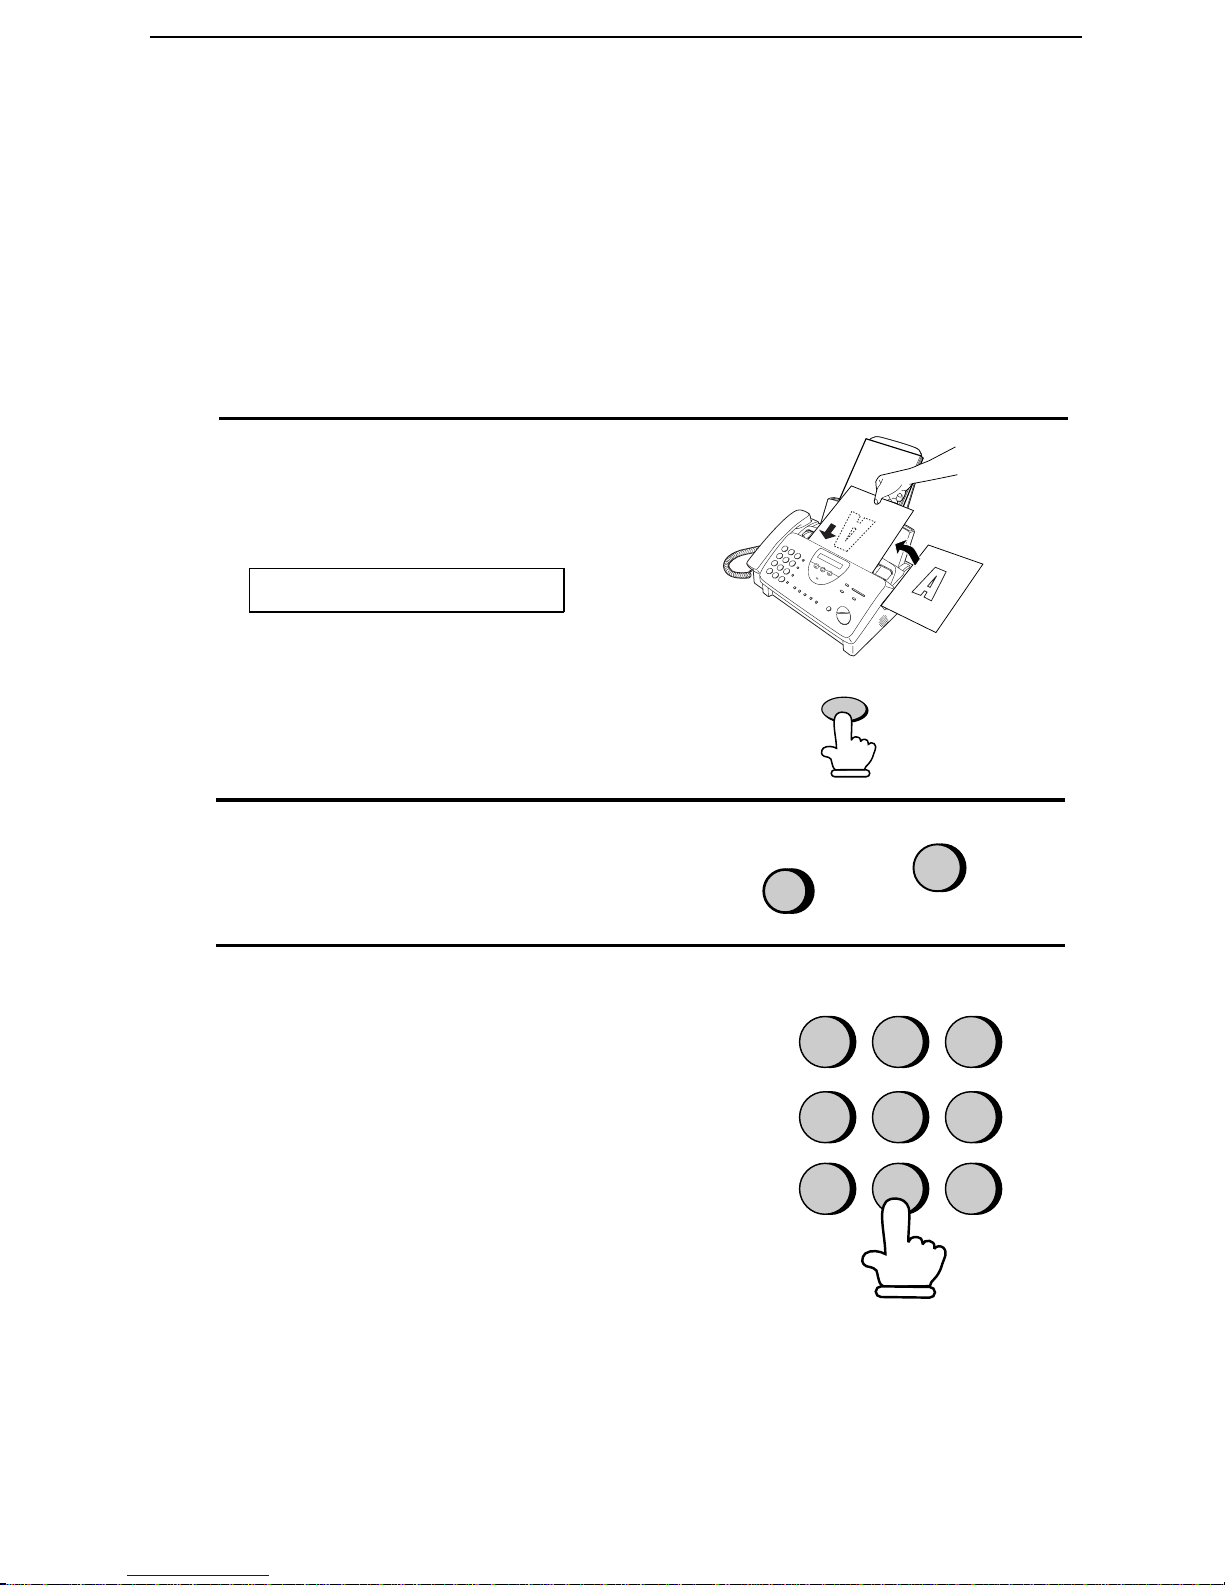
Sending a Fax by Automatic Dialing
Using the HOLD/ SEARCH ke y
If you don’t remember the Rapi d Key or Speed Dial number in whic h
you have stored a particular fax numb er, you can search for the
number by followi ng th e steps belo w. Once you have found the
number, you can dial it and transm it the lo ad ed document by simpl y
pressing the START/ MEMORY key.
1
Load the document(s).
The display will show :
READY TO SEND
••
Set the resolution a nd/or contrast if
desired.
2
Press the HOLD/SEARCH key and
then the 1 key.
3
Enter the first letter of the stored name
by pressing the appropriate number
key (the key below the marked letter)
one or mor e times until the letter
appears in the display. If the name
begins with a special character or
number, press 1.
•• If you don’t remember the first
RESOLUTION
HOLD/
SEARCH
1
GHI
4
PQRS
7
ABC
JKL
TUV
2
5
8
1
DEF
3
MNO
6
WXYZ
9
letter, go to Step 4 (you will scroll
through th e list from the beginning).
•• If a name wasn’t stored for the
number, press 0. This will cause
numbers, not names, to app ear when
you scroll.
74
Page 77
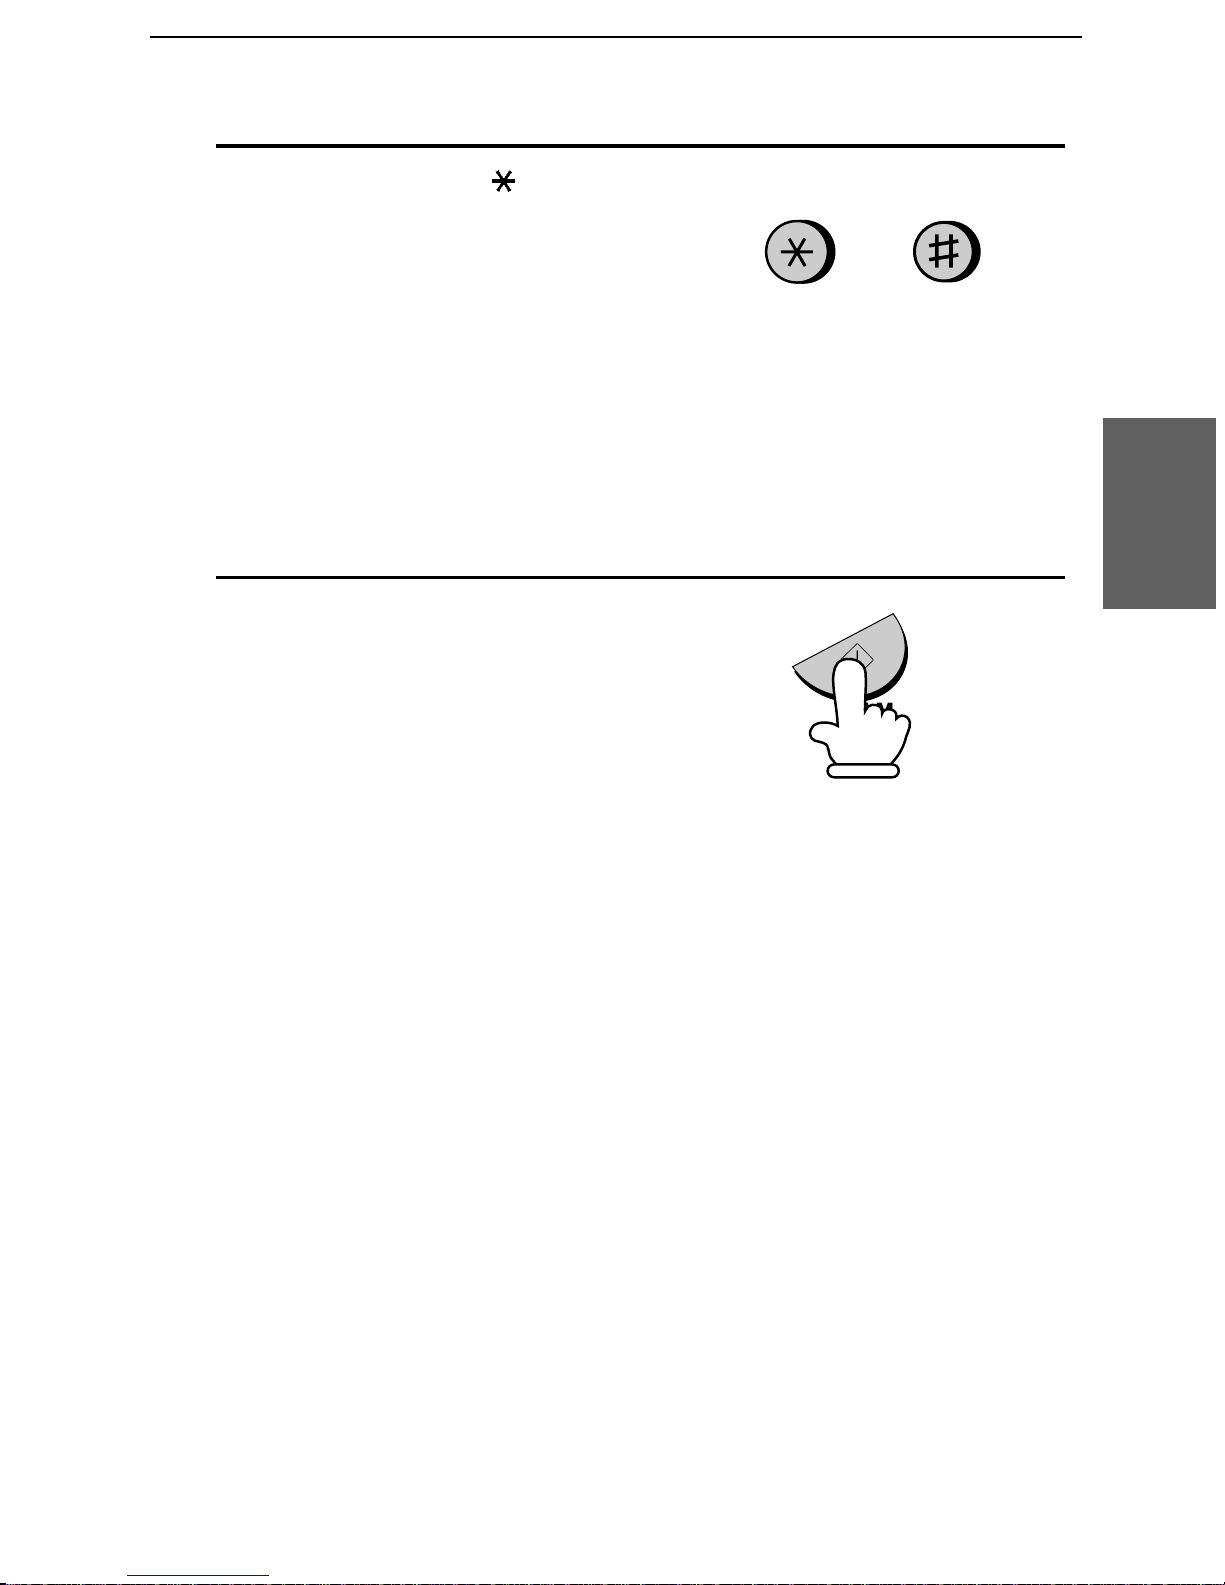
4
Press the # key or the * key to scroll
through the names (numbers if you
Sending a Fax by Automatic Dialing
pressed 0). Stop when the desired
name appears in the display.
•• If no names have been stored tha t
begin with the entered letter, you
will scroll from the next name, in
alphabetical order, in the list. If no
names/numbers have been stored at
all, NO DATA will appear.
5
Press the START/MEMORY key.
The document will be automatically
transmitted once the connection is
made.
or
START/MEMORY
3. Sending
Document s
Automatic re diali ng
If you use automati c diali ng (in cludi ng Di rect Keypad Dial in g) and
the line is busy, the ma chine wil l aut omat icall y redial th e number. The
machine has been set at the factory to make 2 redialing attemp ts at
intervals of 5 minutes.
♦ To stop automatic redialing, press the STOP key.
♦ If desired, you can change the number of times the machine
redials with Option Setting 4, and the interval at which redialing
takes place with Option Setting 3. See Chapter 8, Option Settings.
75
Page 78
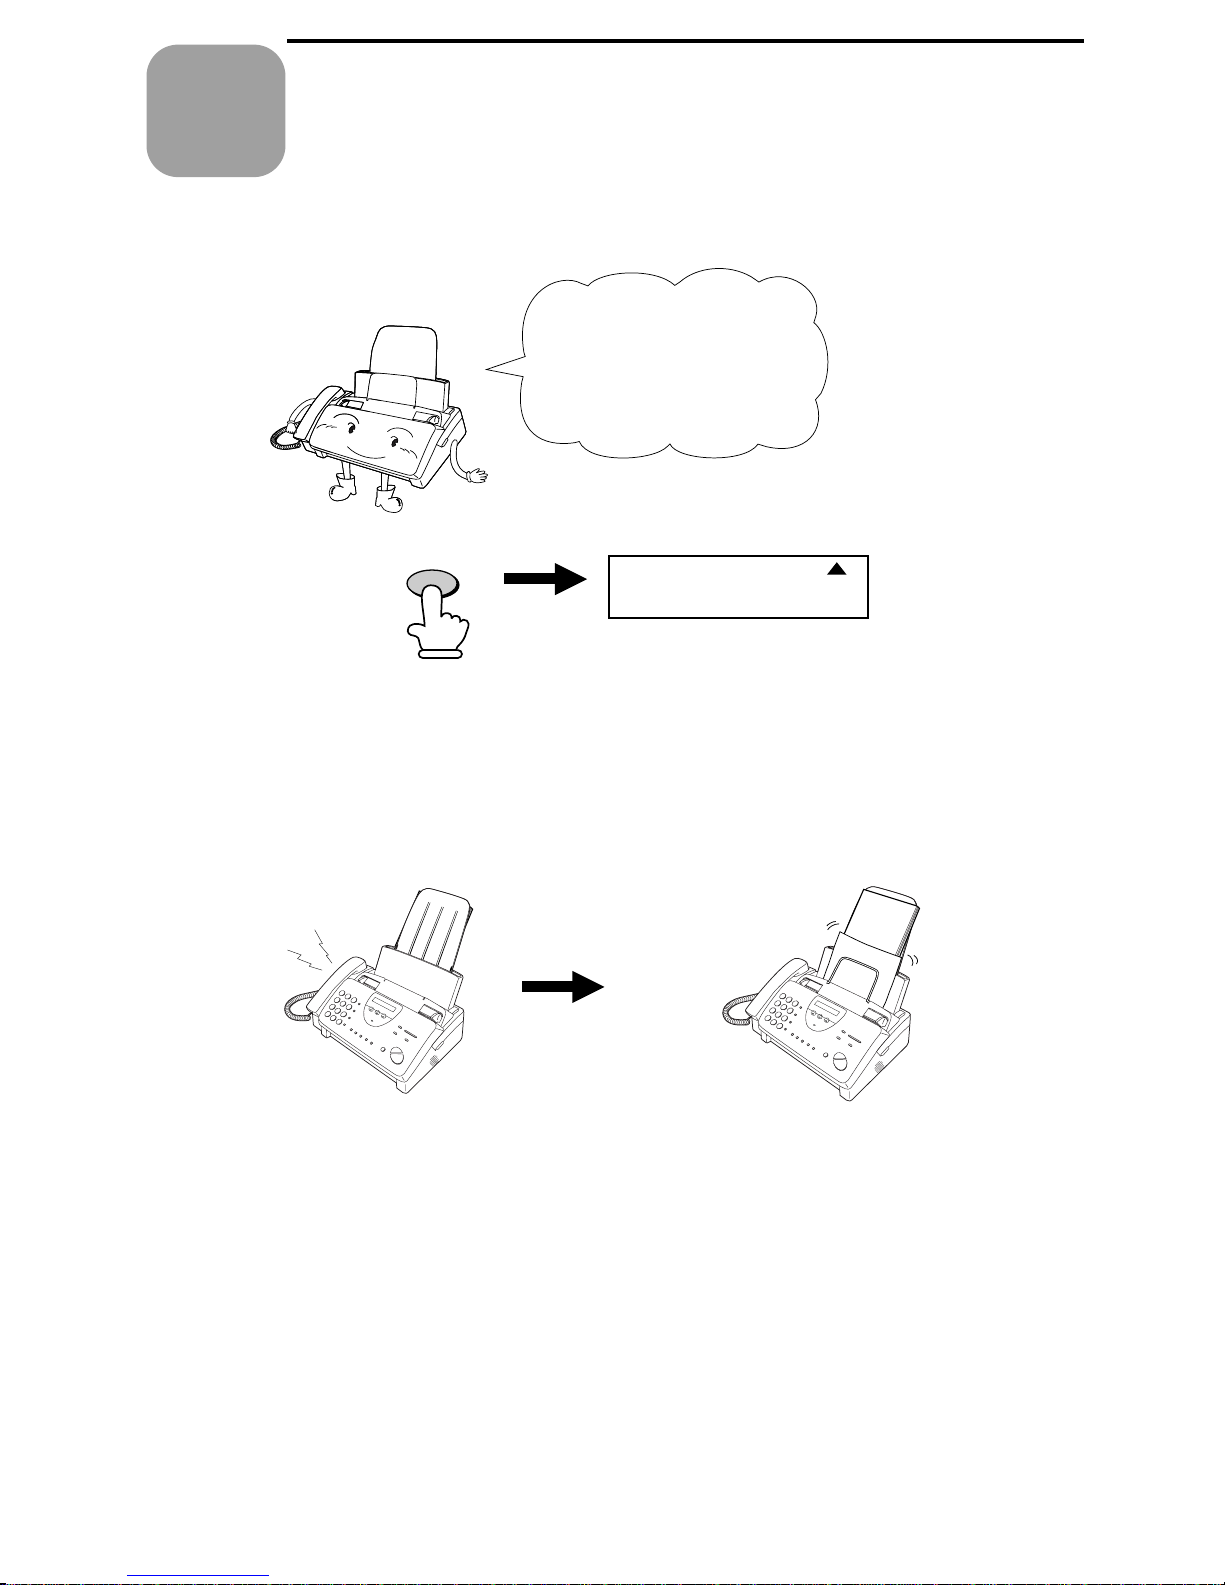
Receiving
4
Chapter
Using FAX Mode
Documents
Press the
RECEPTION MODE
key until the arrow in
the display points to
FAX.
RECEPTION
MODE
When the reception mode is set to FAX, the machine wil l
automat icall y answer all calls on four rings and recei ve incoming
faxes.
4 rings Fax reception
TEL
FAX
TAD
♦
You can change the number of rings on which the machine
answers calls by changing Option Setting 2. (See Chapter 8,
Option Settings.)
♦ If you pick up the handset before the machine answers, you can
talk to the other party and/or receive a document as described in
Using TEL mode.
Note: If you are using distinctive ring, the machine will answer incoming
calls after two rings regardless of the setting o f Option Setting 2.
76
Page 79
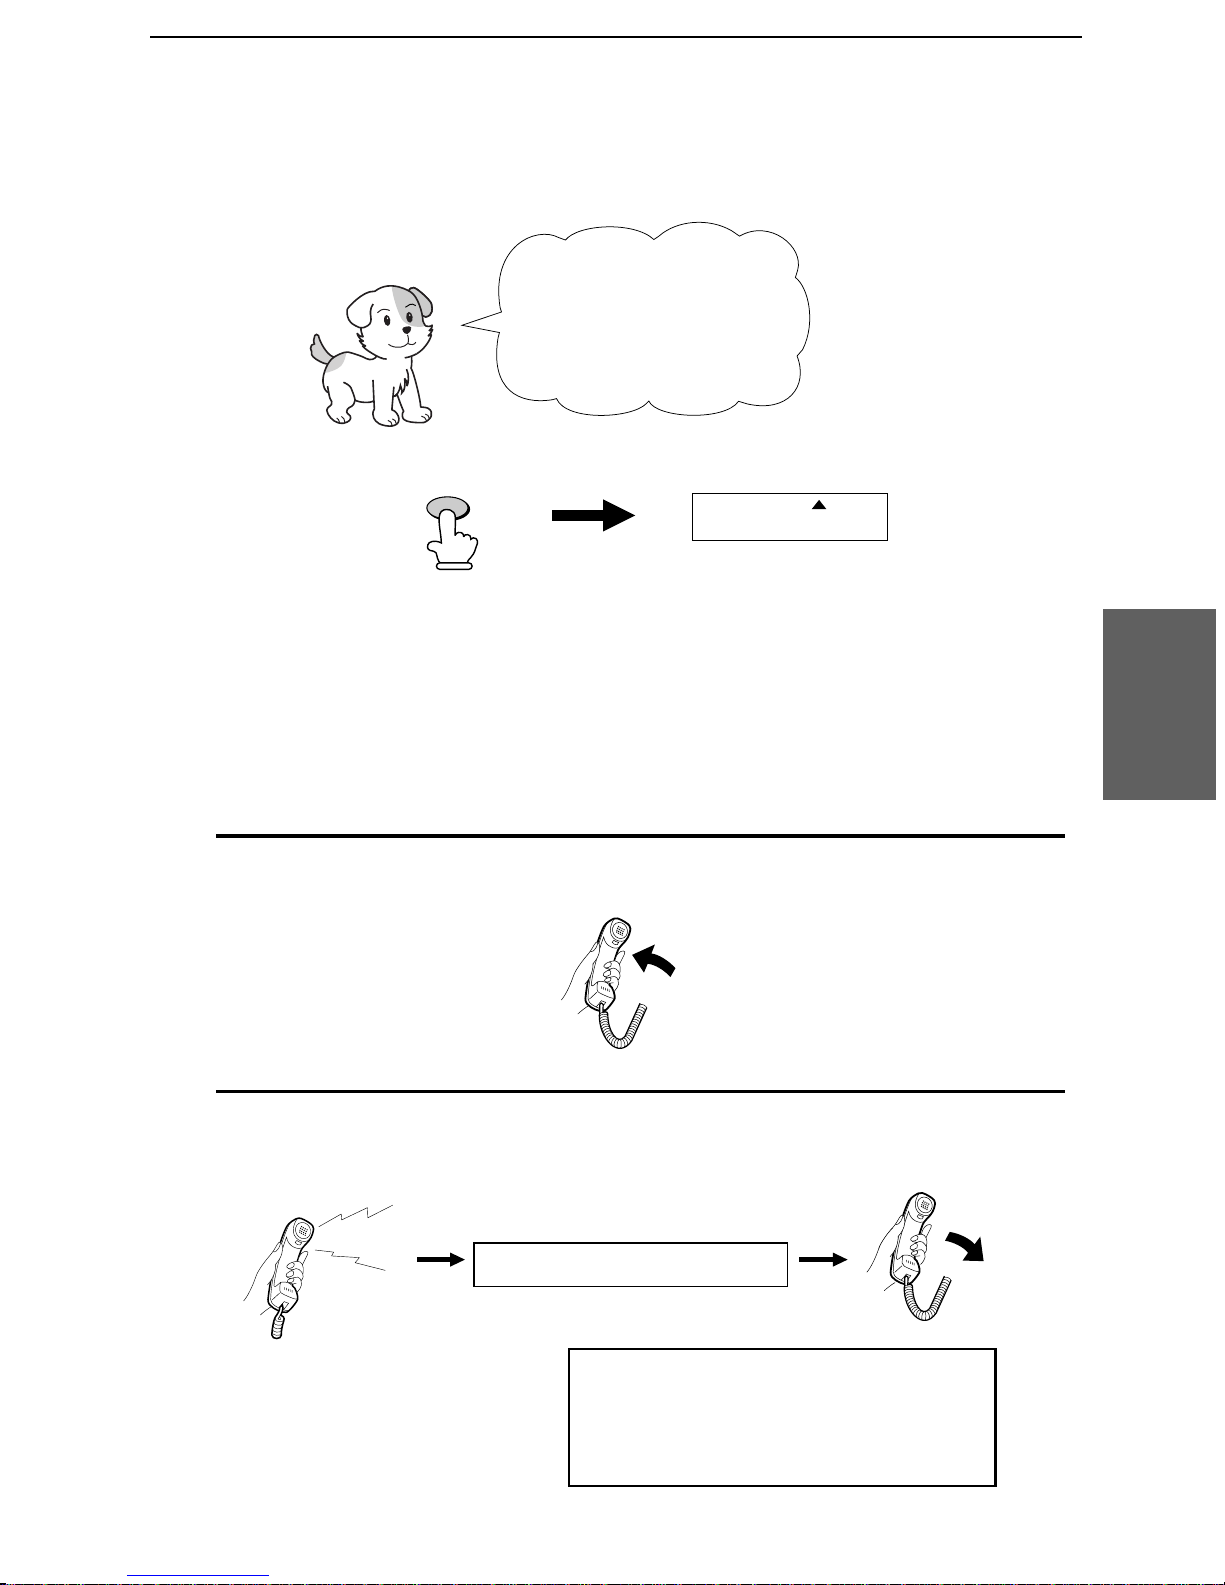
Using TEL Mode
Receiving Documents
Press the
RECEPTION MODE
key until the arrow in
the display points to
TEL.
RECEPTION
MODE
When the reception mode is set to TEL, you must answer all calls
using the f ax machine’s hands et or an extensio n phone connect ed to
the same line.
Answ ering wi th the fax ’ s ha ndse t
1
Pick up the handset when the machine rings.
TEL
FAX
TAD
Documen ts
4. Rece ivin g
2
If you hear a fax tone, wait until the display shows RECE IVING and
then replace the handset.
Beep
RECEIVING
Note: If you have set Option
Setting 10 (Fax signal receive) to
NO, press the
key to begin reception.
START/M EMORY
77
Page 80
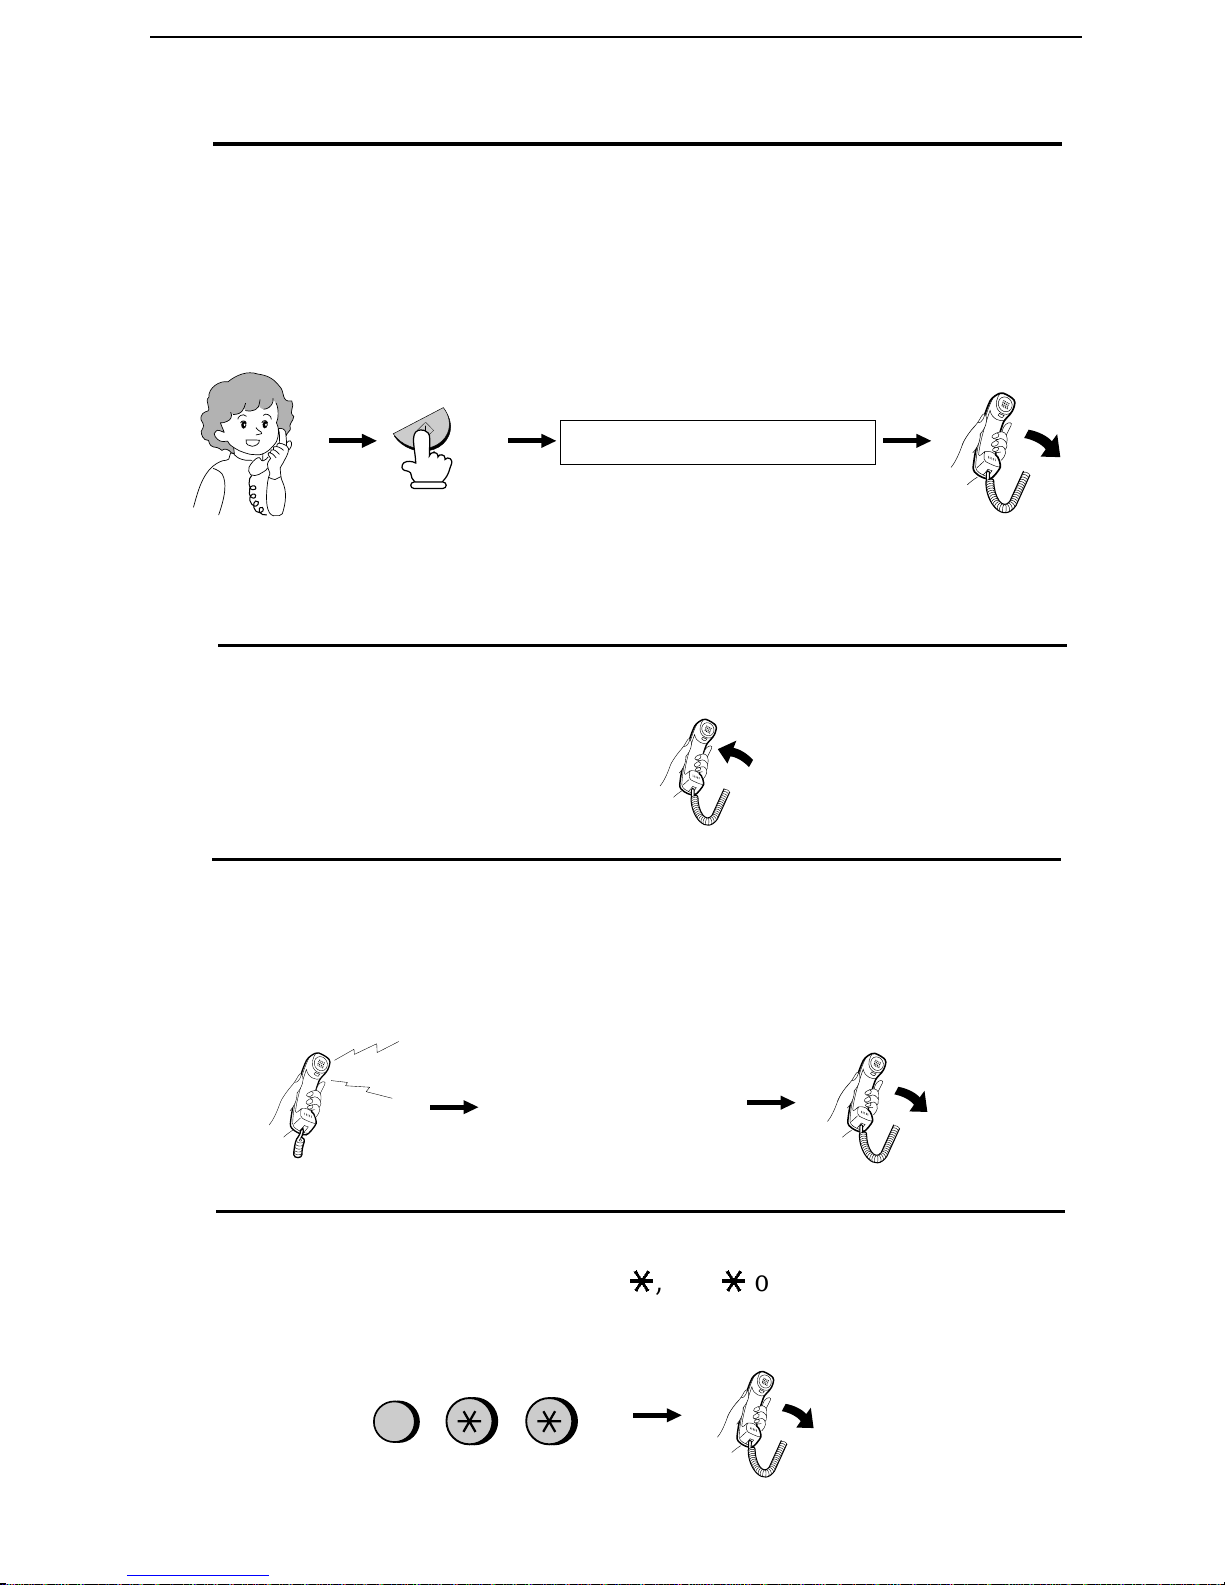
Receiving Documents
3
If the other party first talks and then wants to send a fax, press the
START/MEMORY key after speaking (press your
START/MEMORY key before the sender presses their Start key).
•• Make sure that the display shows RECEIVING, then replace the
handset.
START/MEMORY
RECEIVING
Answer ing wi th an extension phone
1
Answer the extension phone when it rings.
2
If you hear a soft fax tone, wait until your fax responds (the
extension phone will go dead if it is connected to you r fax, or you
will hear pronounced, high-pitched tones if the phone is connected to
a separate wall jack), then hang up.
Beep
3
If the fax doesn’t respond, or if the other p ar ty first talks to you and
then wants to send a fax, press 5, *, and * on the extension phone
(only on a tone dial phone). This sig nals the fax to begin reception.
Hang up.
5
78
Phone goes dead
or pronounced,
high-pitched tones
Page 81
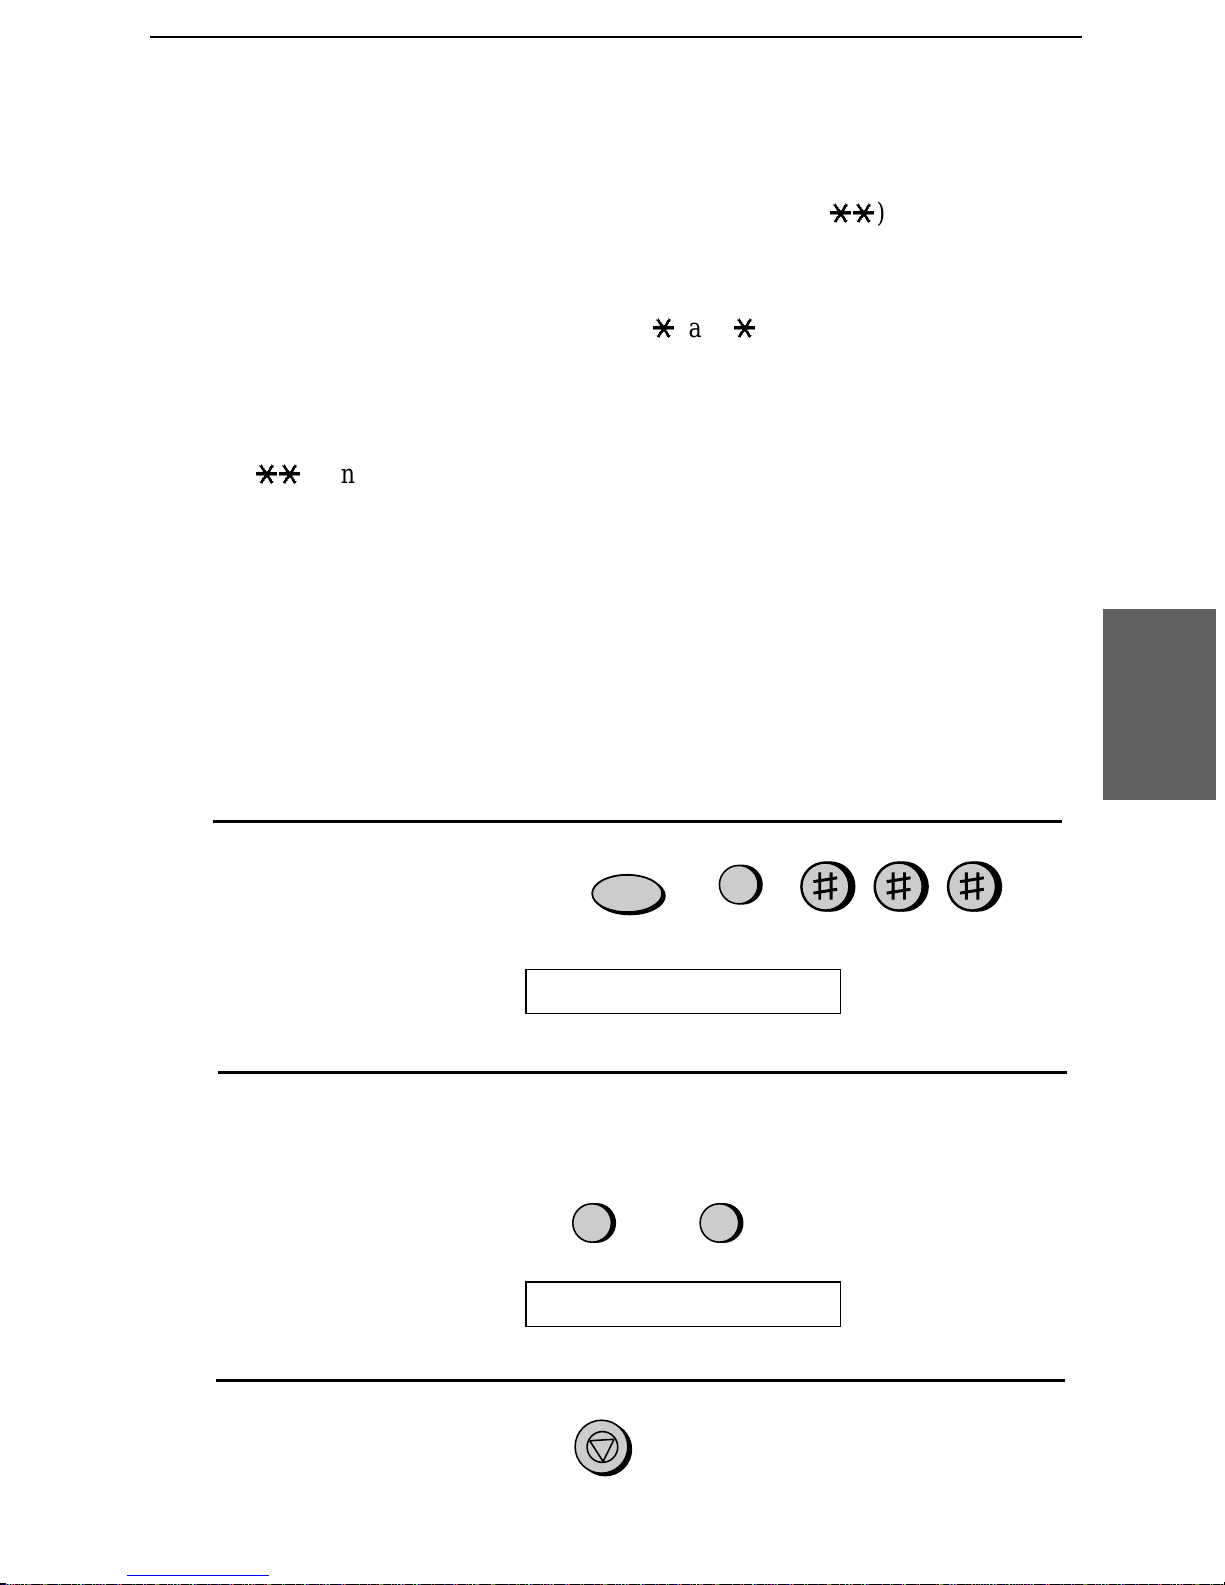
Comments:
Receiving Documents
•• Your fax will not acce pt the signa l to beg in rece pt ion (5
loade d in its feed er.
**
) if a document is
•• If you have set Opti on Set ting 10 to NO and hear a fax tone when you answer
the extensio n phone, you m ust press 5, *, and * if you are on a touch-tone
phone, or wa lk over to the fax, pick up the han dset , and press th e
START/MEMORY ke y if you ar e on a pulse dial ph one .
•• The code used to activat e fax recep ti on fro m a touc h-t one exten sion phone
(5
**
) can be change d if desired. See Option Setting 5 (Tel/ Fax Rem ot e
Number) in Chapter 8, Option Settin gs.
2 in 1 Print
To save paper, you can have the size of your incomin g faxes reduced
by 55%. This will allow you t o receive, for example, a 2-page
document on one page (note that th is may not be possib le if the
document pages are longer than you r printing paper). To turn on th is
function, foll ow the st eps below.
Documen ts
4. Rece ivin g
1
Press these keys:
The display will show :
2
Press 1 to turn on the function, or 2 to turn it off.
The display will show :
3
Press the STOP key.
FUNCTION
2 IN 1 PRINT
YES NO
1 2
PRINT CONTRA ST
STOP
or
6
79
Page 82
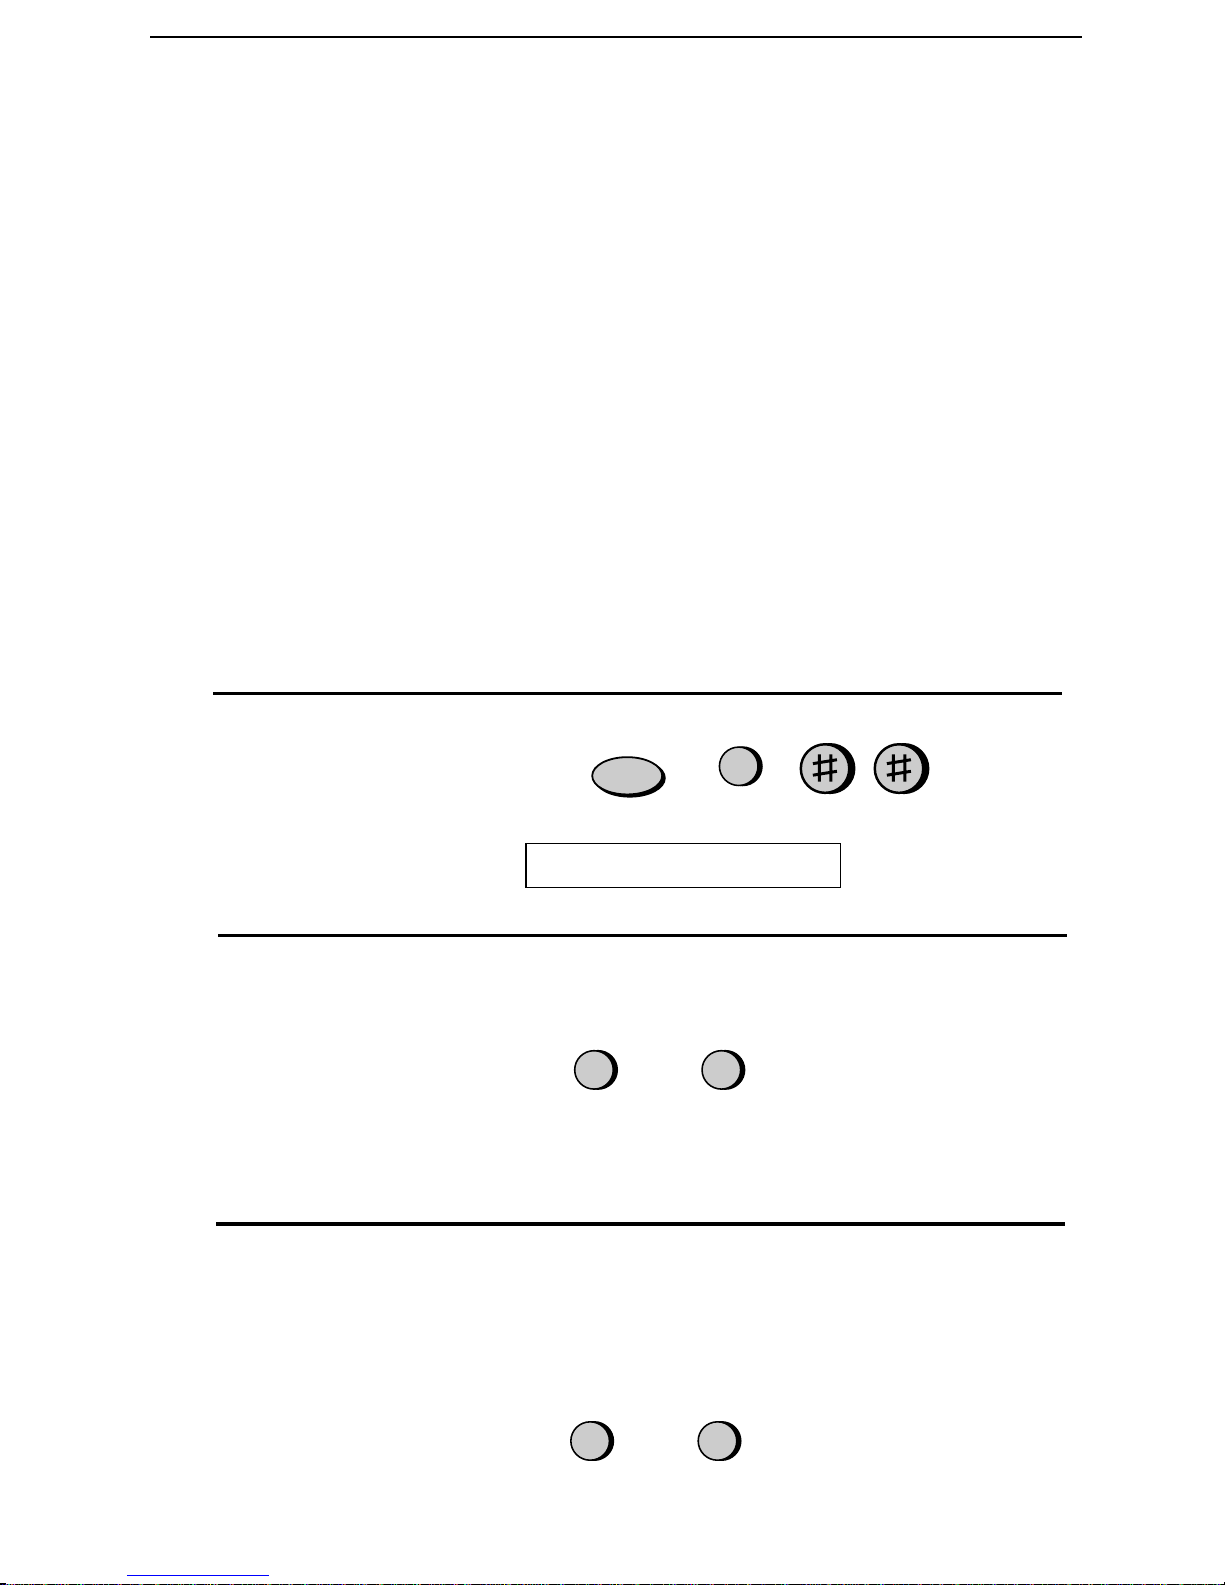
Receiving Documents
Reception Ratio
The fax has been set at the factory to autom aticall y redu ce the size of
received documents to fit the size of the printing paper. Thi s ensures
that data on the edges of the document a re not cut off. If desired, you
can turn this function off and have received documents printed at full
size.
Note: If a document is too long to fit on the printing paper, the remainder
will be printed on a second page. In this case, the cut-off point may occur
in the middle of a line.
Note: Automatic reduction may not be possible if the received document is
too large, contains too many fine graphics or images, or is sent at high
resolution. In this case, the remainder of the document will be printed on a
second page.
1
Press these keys:
The display will show :
2
Press 1 to turn automatic reduction on, or 2 to turn it off.
FUNCTION
6
RECEPTION RATIO
AUTO 100%
1 2
or
If you selected AUTO, go to Step 3. If you selected 100%, go to Step
4.
3
If you selec ted AUTO, select the reception ratio to be used in the
event that the memory becomes full (automatic reduction is not
possible when the memory is full). Press 1 for 93% or 2 for 100%.
80
93% 100%
1 2
or
Page 83

4
Press the STOP key.
STOP
Substitute Reception to Memory
In situatio ns where printing is not possibl e, such as when you r fax runs
out of paper, the imaging fil m needs replacement, or the paper jams,
incoming faxes will be received to memory.
When you have received a document in memory, FAX RX IN
MEMORY wil l appear in the display, alte rnatin g with OUT OF
Receiving Documents
PAPER, FILM END, or PAPER JAM. When you add paper, replac e
the imaging film, or clear the jam, the stored document s will
automaticall y prin t out.
♦ If you received docume nts in memory because the fax ran out of
paper, be sure to add paper which is the same size as the paper
previously used. If not, the document print-out size ma y not match
the size of the printing paper.
Documen ts
4. Rece ivin g
81
Page 84
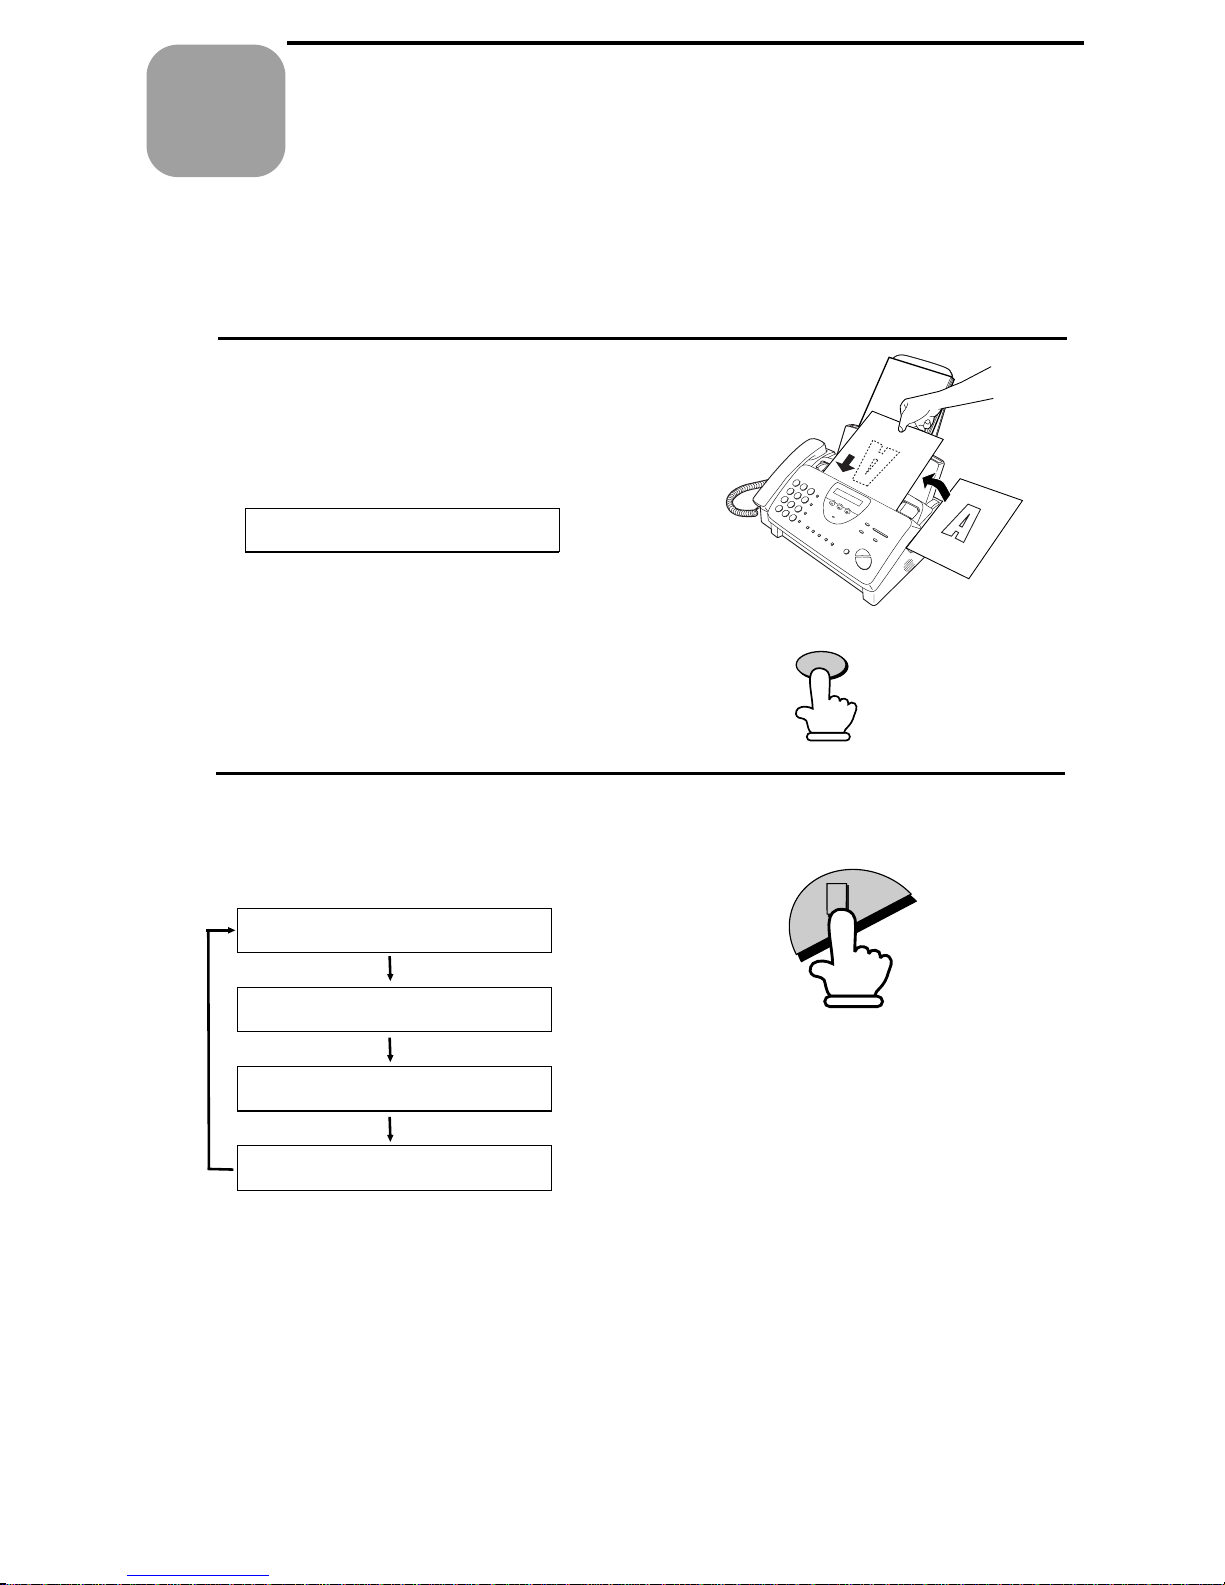
Making
5
Chapter
Your fax can also be used to make copies. Single and mul tipl e copies
(up to 99 per original) can be made, enabling your fax to double as a
convenience office copier.
1
Load the document(s) face down.
(Maximum of 10 pages.)
The display will show:
READY TO SEND
Copies
•• Set the resolution and/or contrast if
desired. (The default setting for
copying is SUPER FINE.)
2
Press the COPY/HELP key.
The display will show :
COPY MO DE
1: MULTI COPY
2: SORT COPY
START: COPY
RESOLUTION
COPY/HELP
♦ If you are only making one copy of the original (or of each
original) and don’t wa nt to make a reduction or enlargement
setting, press the START/MEMORY key tw ice. Copying will
begin.
♦ If you are only making one copy of the original (or of each
original) and want to make an enlargement or reduction setting,
pres s the START/MEMORY key and go to Step 5.
82
Page 85
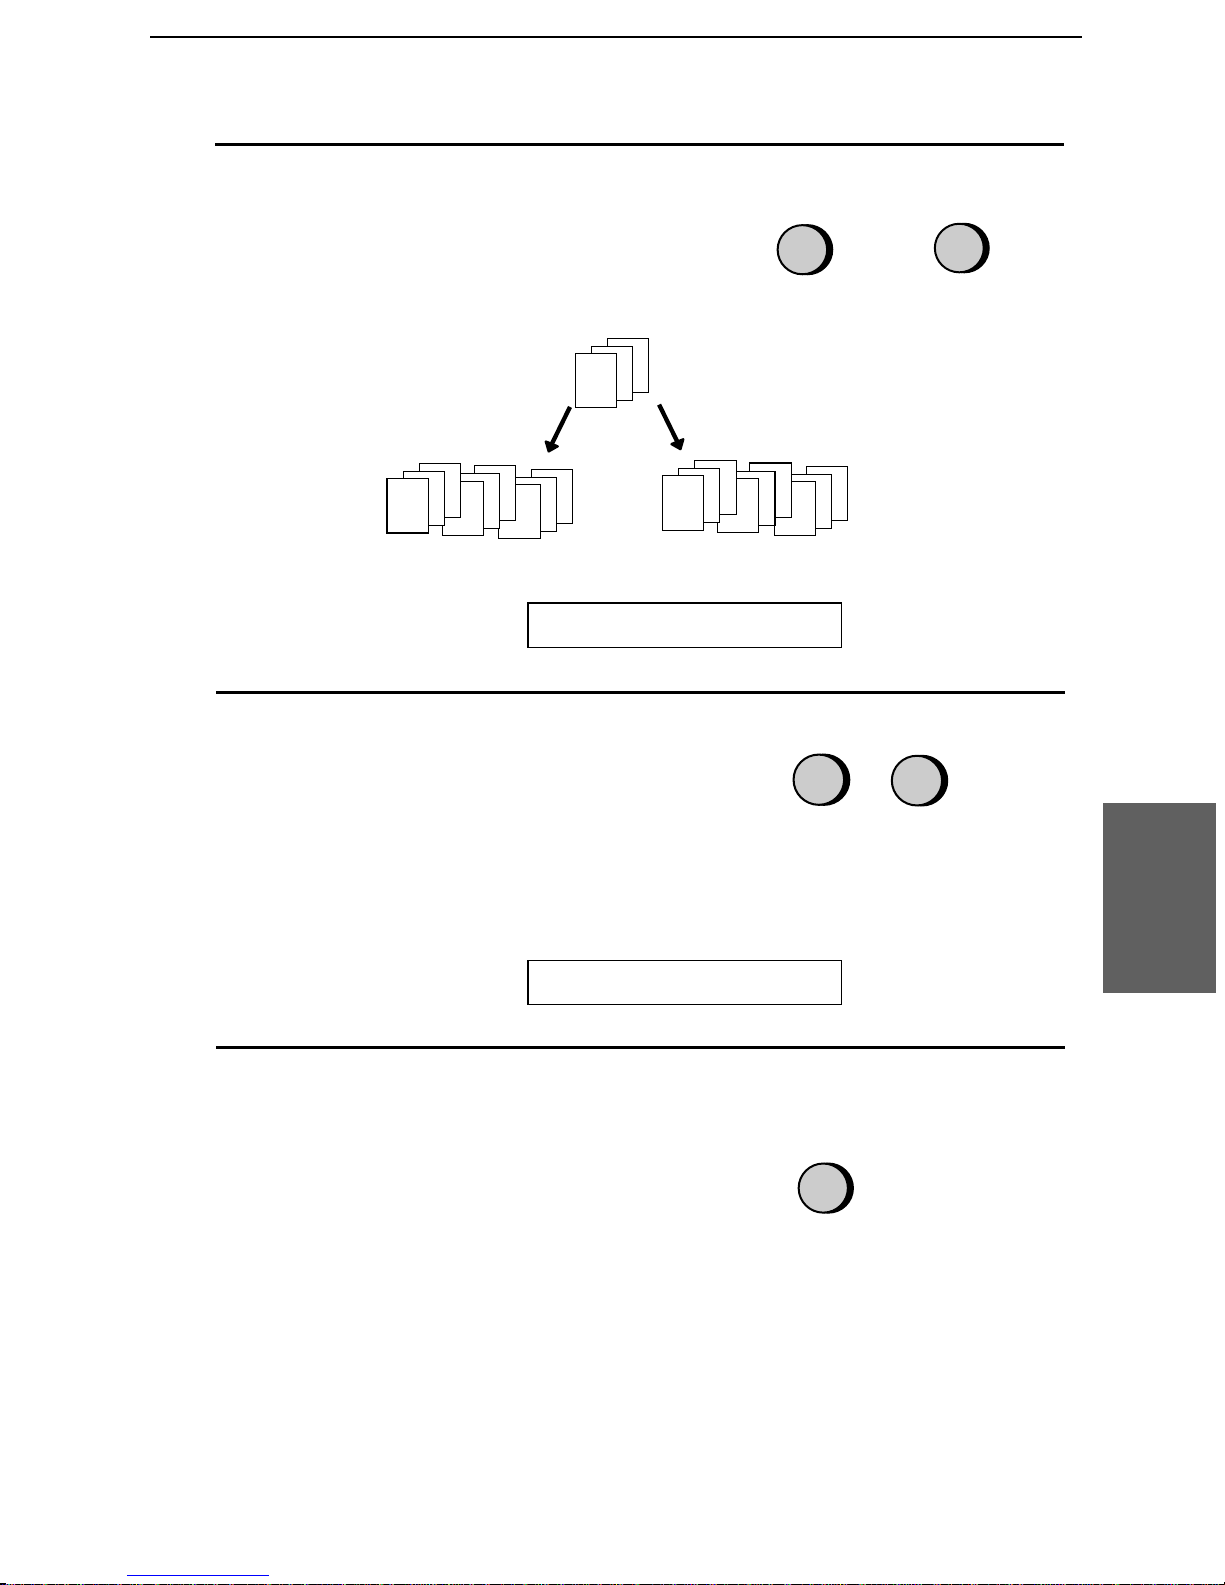
3
Press 1 (MULTI COPY) if you do not
want the copies sorted. Pres s 2 (SORT
COPY) if you want the copie s sorted.
Example of three
copies each of three
originals
Making Copies
or
SORT
2
MULTI
1
Originals
C
B
A
Sorted
The display will show :
4
If you are making one copy per
(SORT COPY)
C
B
A
C
B
A
C
B
A
ENTER # (01-99)
original, press the START/MEMORY
key. If you are making multiple copies
per original, enter the number of copies
per original (if the number is less than
10, enter a "0" before the number) .
The display will show :
COPY RATIO
Not sorted
A
A
A
B
B
(MULTI COPY)
B
C
C
C
0
9
Example: Nine
copies per original
Copies
5. Making
5
Set the amount of reduction or
enlargement by entering a number
from 1 to 5 as shown below (or press
the START/MEMORY key to
automatically select 100%). Copying
will begin.
1: AUTO (a utomatic size adjustment to
match the size of the printing paper)
2: 50%
3: 100% (no reduction or enlargement)
4: 125%
5: 135%
2
Example: 50%
83
Page 86
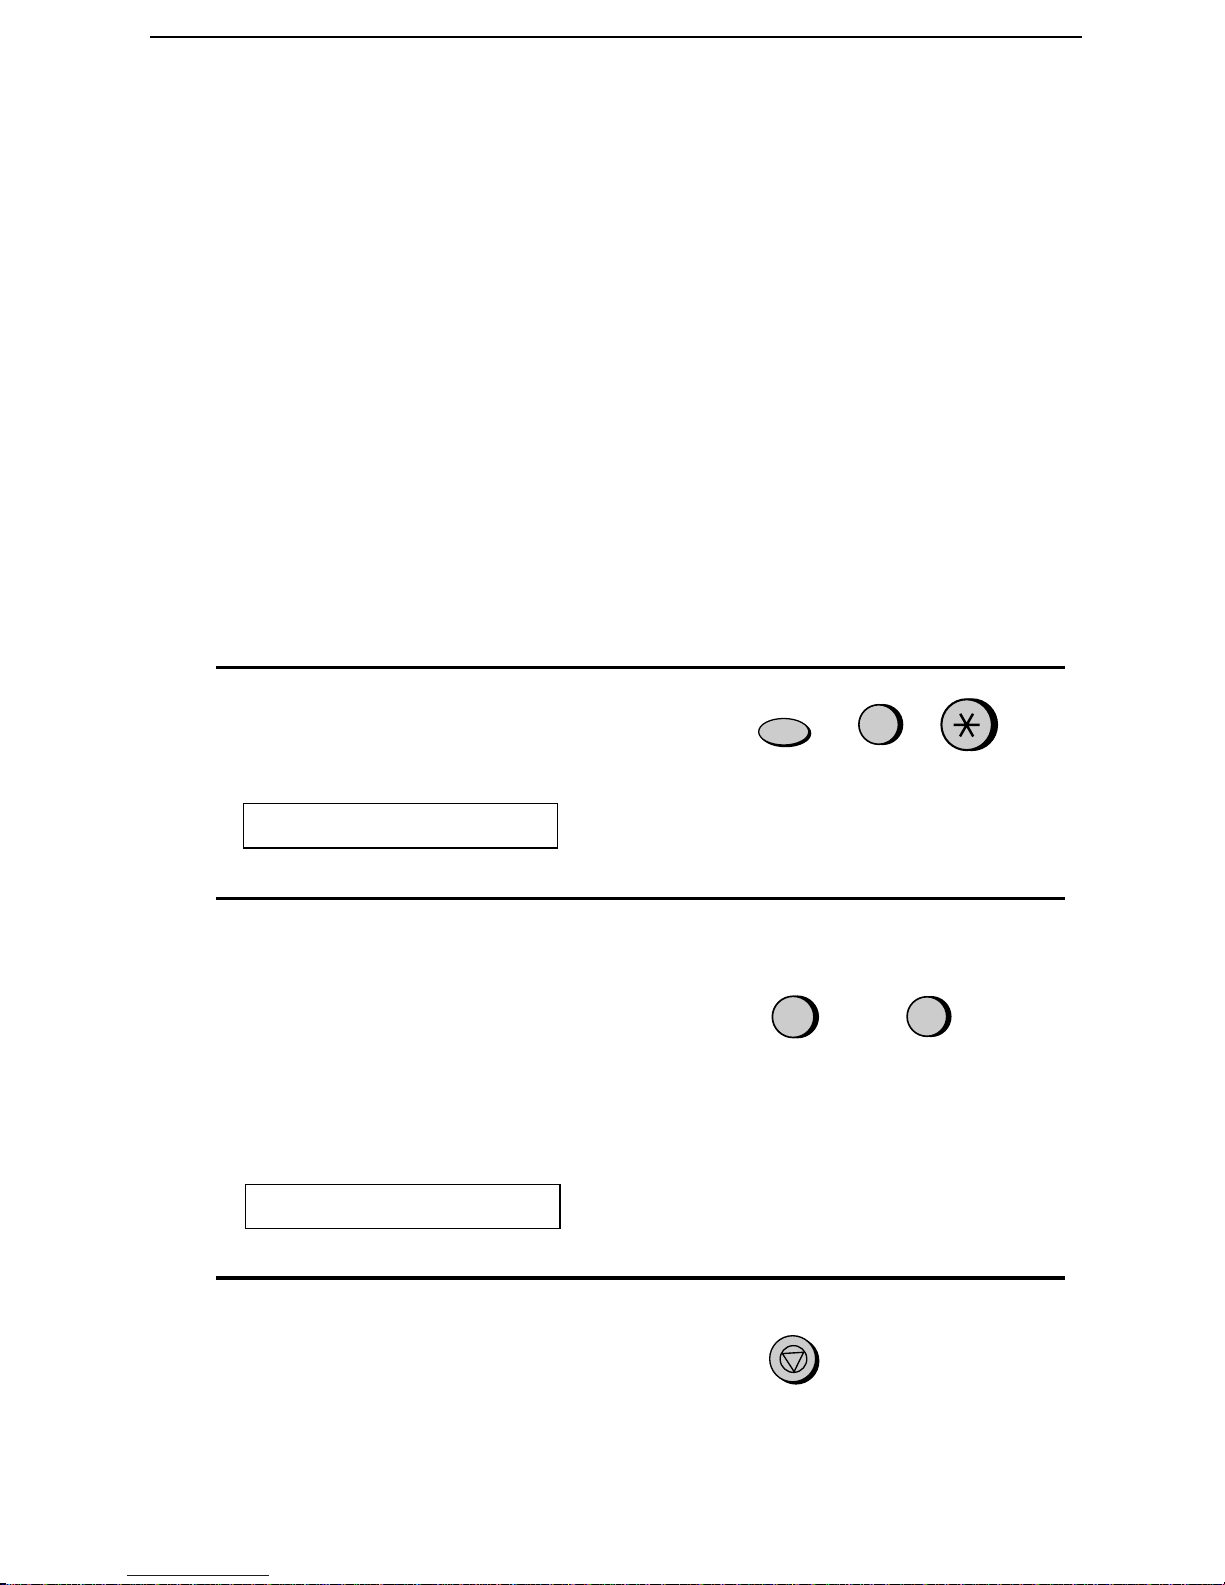
Making Copies
Note: If you place a large number of originals in the feeder, the memory
may become full before all of them can be scanned (MEMORY IS FULL
will appear in the display). If this happens, press the START/MEMORY
key to copy the originals which have been scanned, and then repeat the
copy procedure for the remaining originals, including the original which
was being scanned when the memory became full.
Copy Cut-off
When making a copy of a document that is longer than the printing
paper, use the copy cut -off settin g to select whether the rem aini ng part
of the document will be cut off or printed on a second page. The intial
setting i s YES (cut off the remaind er). To change the setting, foll ow
the steps below.
1
Press these keys:
The display will show:
COPY CUT -OFF
2
Press 1 to set copy cut-off to YES (the
remaining part of the document will
not be printed), or 2 to set copy cut-off
to NO (the r emaining part will be
printed on a second pa ge).
The display will show :
INITIALIZE FILM
FUNCTION
YES
1
or
6
NO
2
3
Press the STOP key to return to the
date and time display.
84
STOP
Page 87
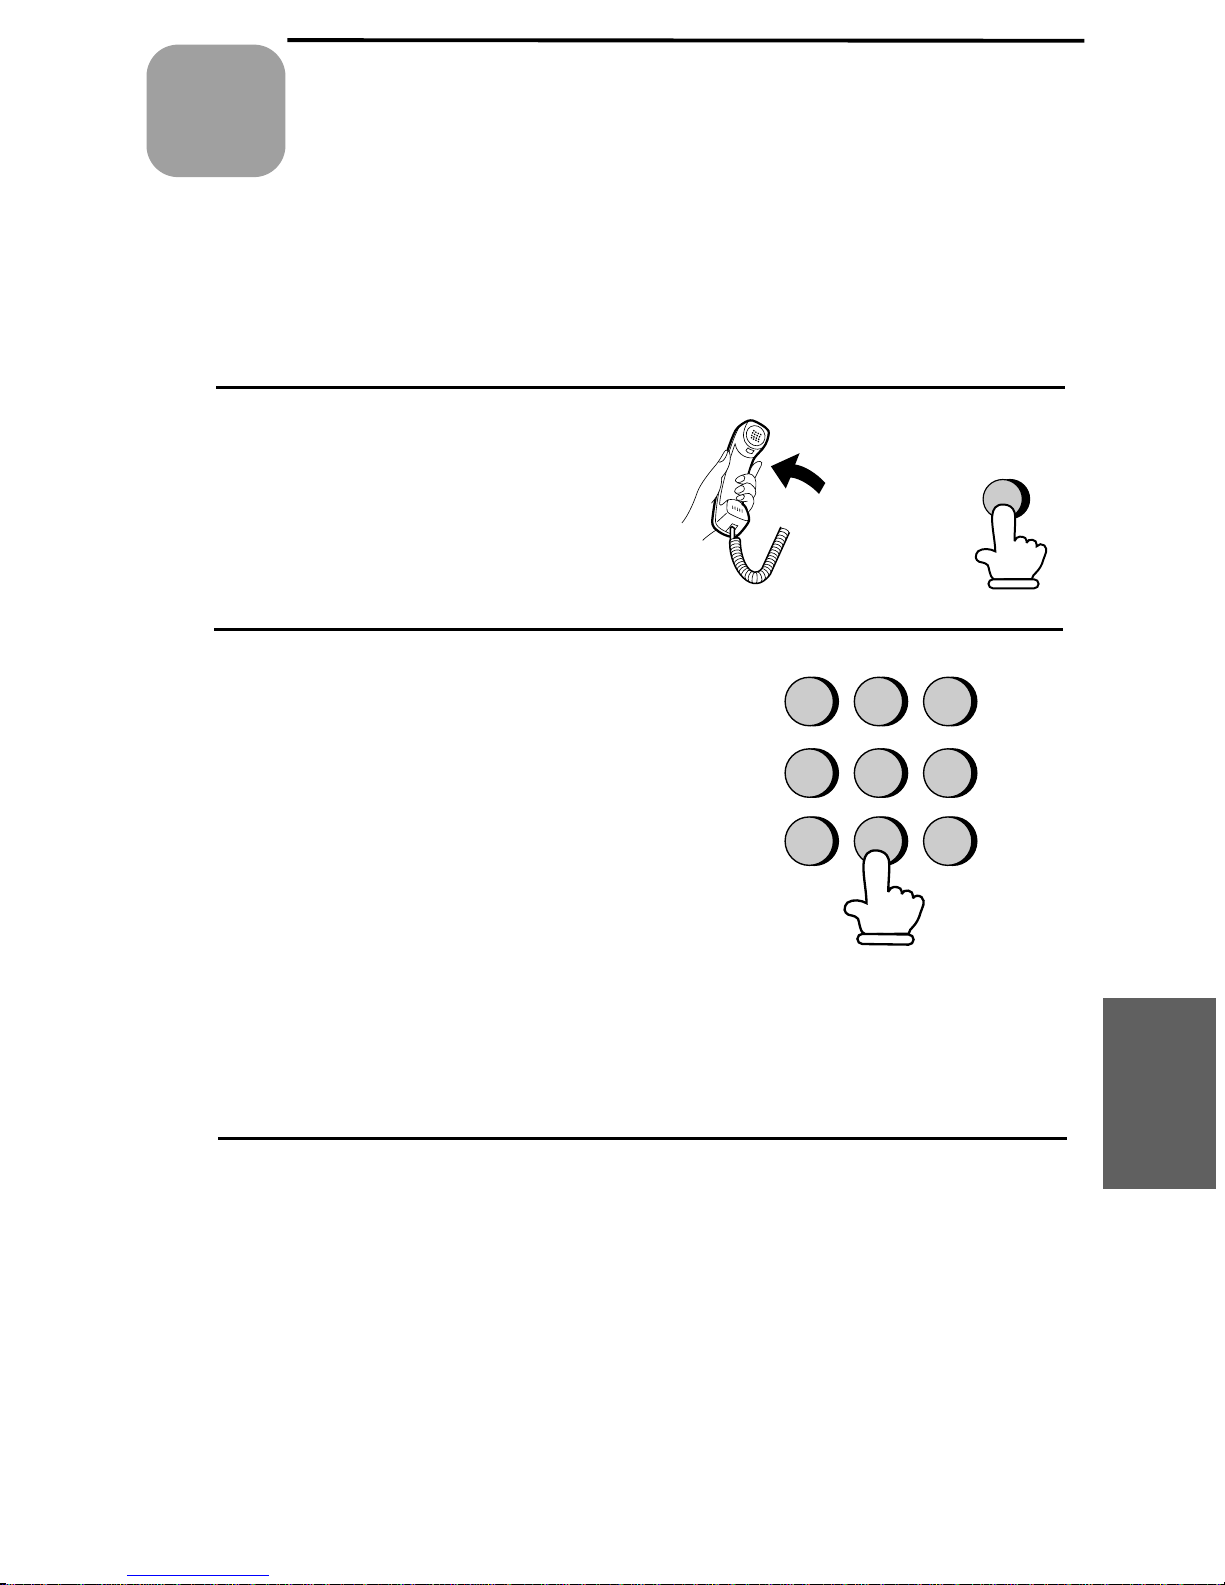
Making
6
Chapter
Your fax can be used like a regular telephone to make and receive
voice calls .
♦ To make or receive a phone call, the power must be on.
1
Pick up the handset or press the
Telephone Calls
SPEAKER key. Listen for the dial
tone.
2
Dial the number using one of the
following methods:
•• Normal Dialing: Enter the full
telephone number with the numeric
keys.
•• Rapid Key Dialing: Press the
appropriate Rapid Ke y.
•• Speed Dialing: Press the SPEED
DIAL key, and enter the 2-digit
Speed Dial number with the
GHI
PQRS
1
4
7
ABC
JKL
TUV
or
2
5
8
SPEAKER
DEF
3
MNO
6
WXYZ
9
numeric ke ys.
3
Speak with the other party when they
answer.
•• If you pressed the SPEAKER key,
pick up the handset to talk.
6. Making
Phone Calls
85
Page 88

Making Telephone Calls
Comments:
•• While the handse t of the fax is lifted (off hook), an exten sion phone
connect ed dire ct ly to th e fax cannot be used to spea k with the oth er pa rt y.
•• The fax may interru pt a voic e call rece ived on an ext ension phone if the
rece pt ion mod e is se t to TAD and there is a period of silen ce duri ng th e
conversation. If you are on a touch -to ne ph one , yo u can pre ven t this by
pressi ng any thr ee keys on the phone imm ediat ely af ter you a nswer . (Note:
Do not enter the code to activate fax reception: 5, *, *.)
Chain Dia li ng
After lifting the handset , you can dial any combinat ion of Normal
Dialing, Rap id Key Dialing and Speed Dialing numbers. For example,
if you have stored an area code or an access code for a special service
in a Rapid Key, you can press the Rapid Key for that area code or
access code, then dial the remaind er of the number by pressing a
Rapid Key, pressing numb er keys, or pressin g the SPEED DIAL key
and entering a two-digit Speed Dial number.
Using the HOLD/ SEARCH k ey
You can use the HOLD/S EARCH key to search for a Rapid Key or
Speed Dial num ber. F irst search for the numbe r as described in Using
the HOLD/SEARCH key in Sen din g a Fax by Automatic Dia ling in
Chapter 2, then pick up the handset or press the SPEAKE R key. The
number will be dialed aut omat icall y (do not press the
START/MEMO RY key).
Redial
The last number called can be redialed by pressi ng the REDIAL key
(it is not necessary to pick up the handset or press the SPEAKE R
key). When the other party answers, pick up the handset t o talk .
86
Page 89

Hold
Making Telephone Calls
You can put the other party on hold during a conversation by pressing
the HOLD/S EARCH key. When this is done, they cannot hear you.
You can put the handset back in the cradle without breaking th e
connection. When you a re ready to speak with them again, pi ck up the
handset. If you did not put the handset back in the cradle, press t he
HOLD/S EARCH key again to resume conversation.
6. Making
Phone Calls
87
Page 90
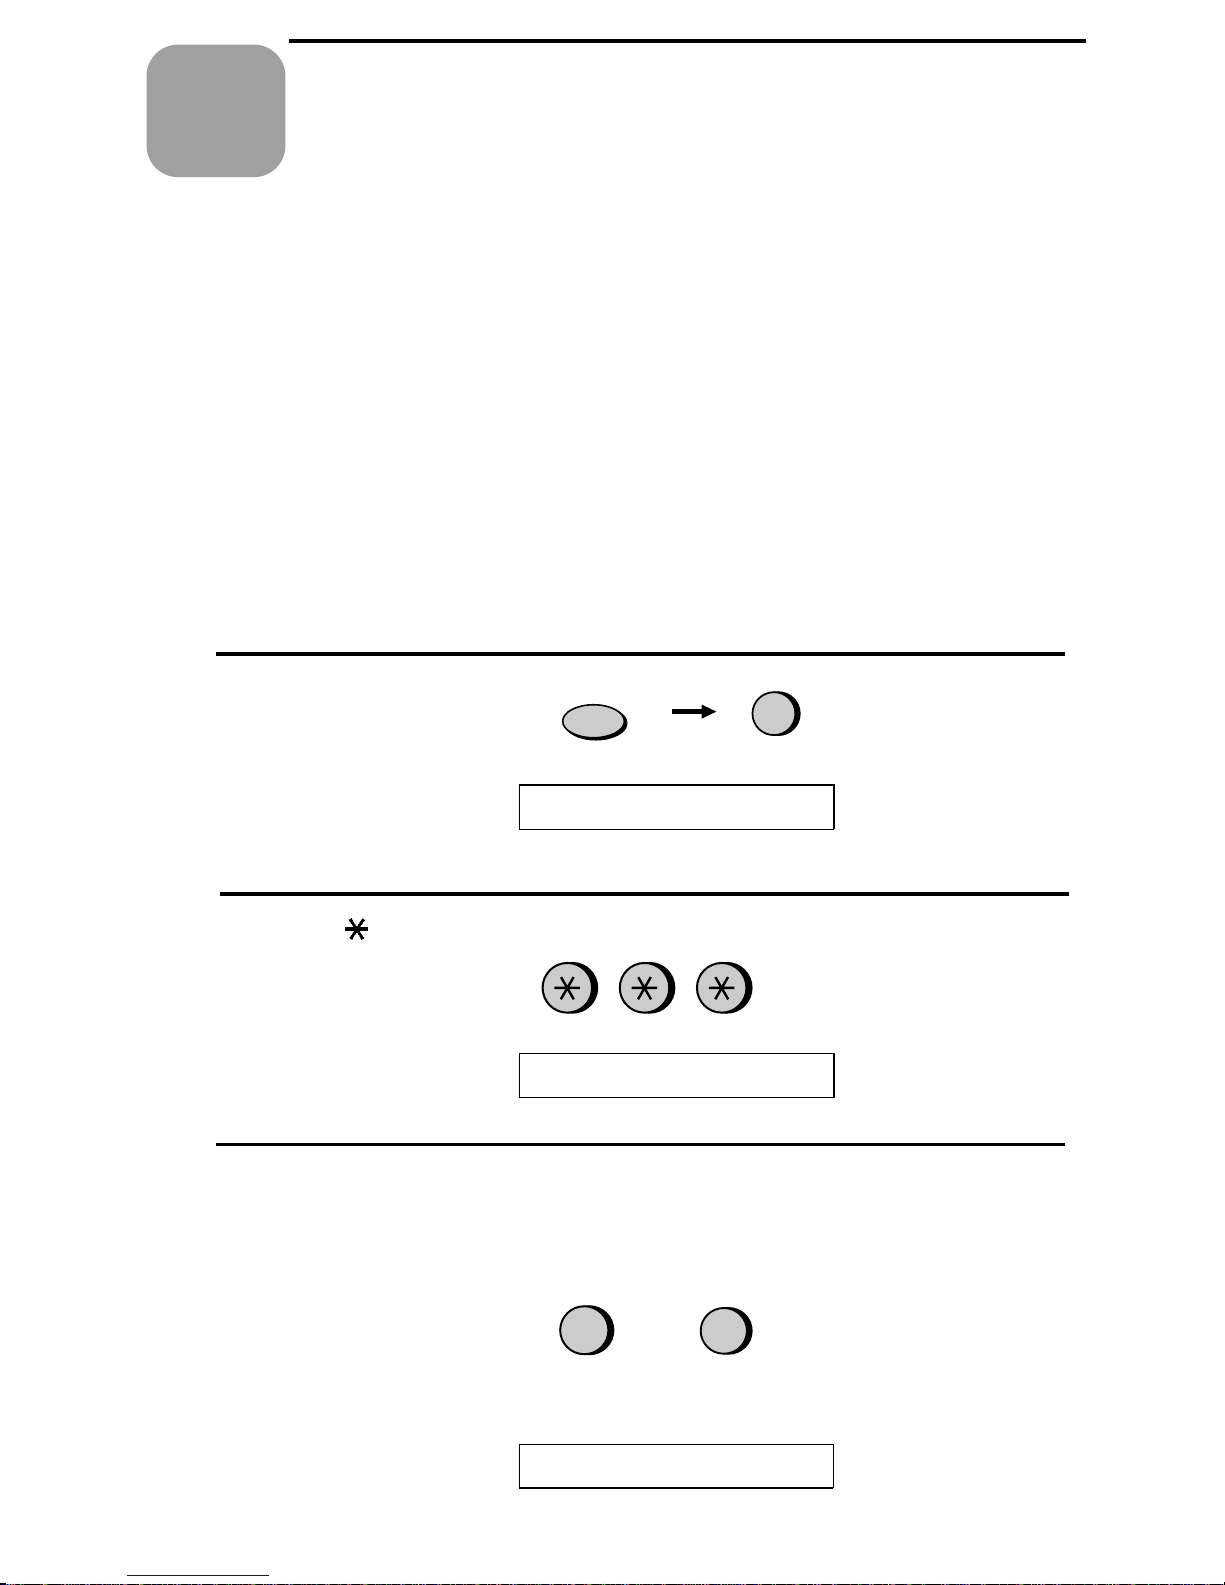
7
Chapter
Special
Functions
Caller ID
If you subscribe to a caller identificatio n service from your telephone
company, you can set your fax to display t he nam e and number of the
caller while the fax rings.
Important:
•• To use this function, you must sub sc ribe to a caller identificati on
service from your telephone compa ny.
•• Your fax may not be compatible wit h some caller identi fic atio n
services.
1
Press these keys:
The display will show :
(Requires Subscription from Telephone Company)
FUNCTION
4
OPTION SETTING
2
Press the * key three times.
The display will show:
3
Press 1 to turn on Caller ID, or 2 to turn
it off. (If you selected 2 (NO), go to
Step 7.)
CALLER-ID
YES
1
If you selected 1 (YES), the display
will show:
AREA CODE # MODE
or
NO
2
88
Page 91
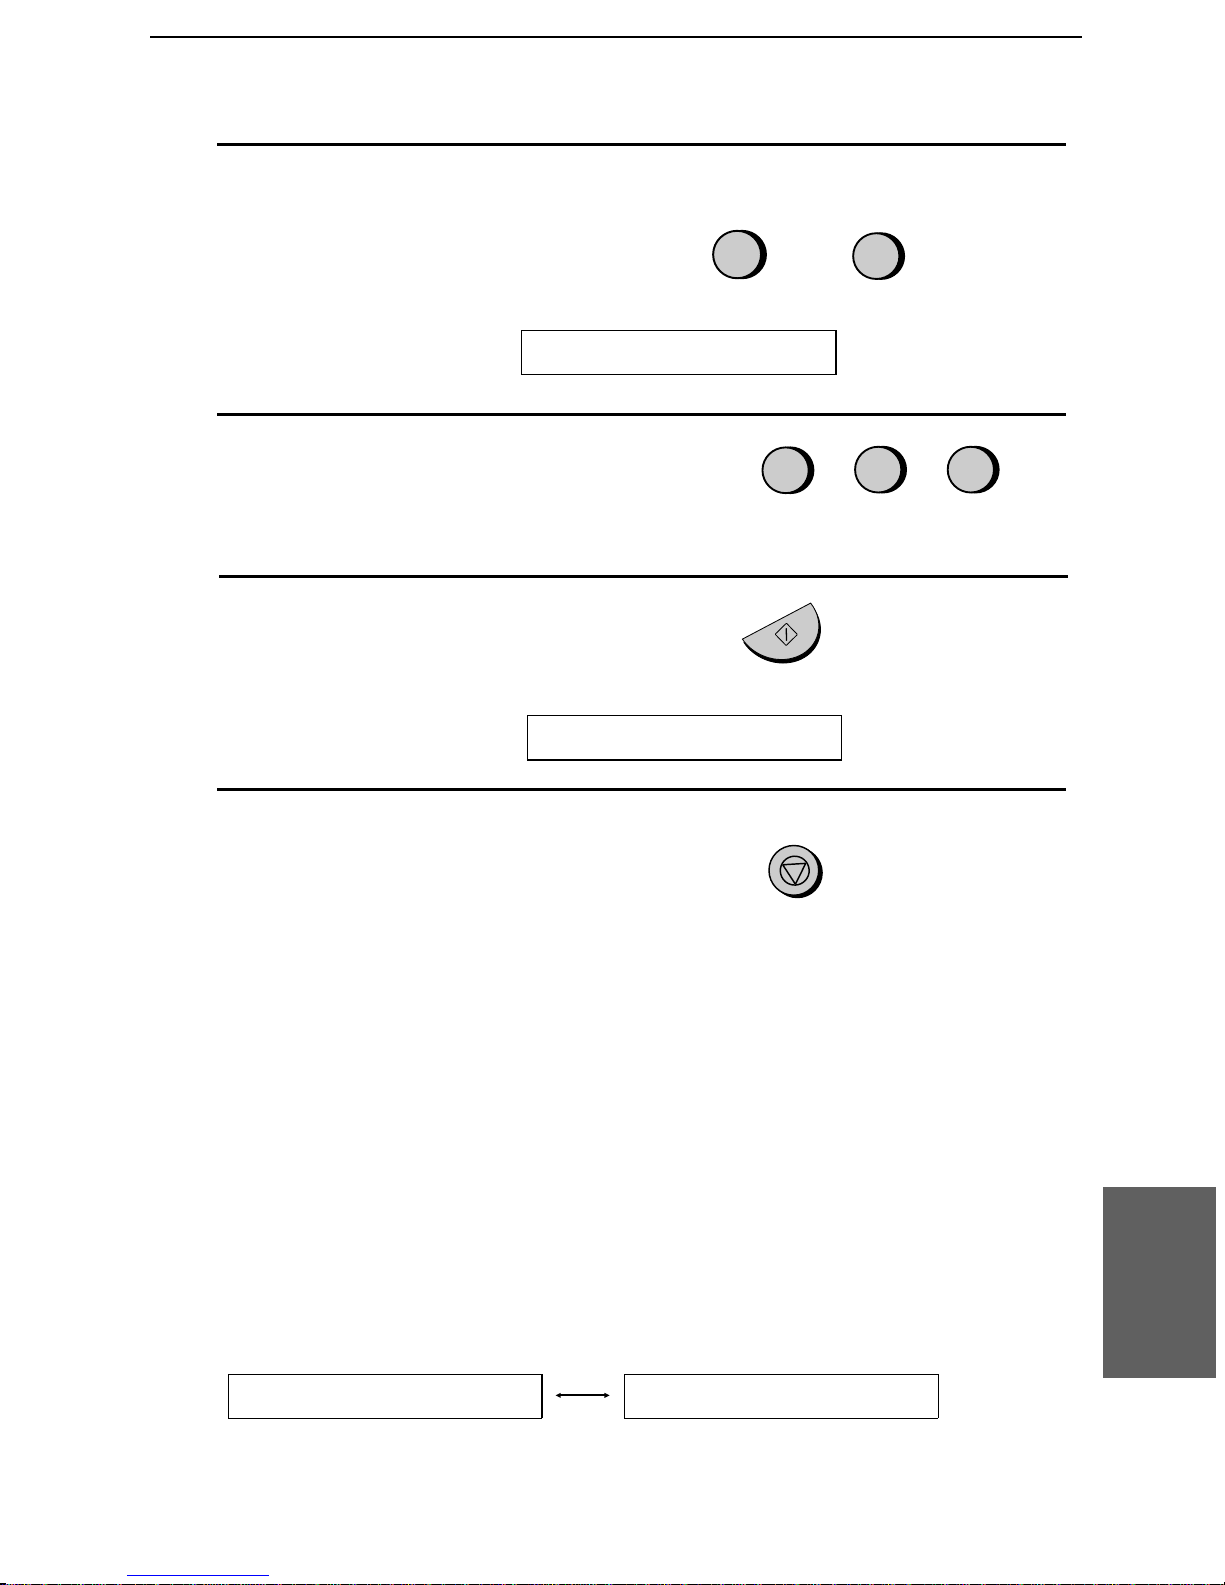
4
Press 1 to select SET. (To cle ar a
previo usly programmed area code,
SET
Caller ID
CLEAR
press 2 and go to Step 7.)
The display will show :
5
Enter the three digits of your area code.
6
Press the START/MEMORY key t o
ENTER AREA COD E
store your area code.
The display will show :
7
Press the STOP key to return to the
COVER SHEET
date and time display.
1
2
START/MEMORY
STOP
or
2
50
(Example)
•• Set Optio n Setti ng 2 (Number of Rings to Answer) to 2 or more rings
(see Chapter 8).
How Calle r ID oper ate s
When you receive a call, the name and phone number of the caller will
alternately appear in the display, begin nin g just before the second ring.
The information wi ll conti nue to be displ ay ed unti l you pick up the
handset, or unt il the fax answers automati c ally if it is in FAX mode.
Note: Some caller ID services may not provide the name of the caller. In
this case, only the phone number will appear.
Display example:
DOE JOHN 444-555-6666
Caller’s name Caller’s number
Functions
7. Special
89
Page 92
Caller ID
Disp lay messages
One of the following messages will appear while the fax rings if caller
information is not availab le.
NO SERVICE No caller information was received from your
telephone company. Make sure that the telephone
company has activated your service.
CALLER-ID
ERROR
Noise on the telephone line prevented reception
of caller information.
OUT OF AREA The call was made from an area which does not
have a caller identification service, or the calle r’s
service is not compatible with that of your local
phone compa ny.
PRIVATE CALL Caller information was not provided by the
tele phone company at the caller’s re quest.
Viewing the Ca ll er ID list
If you subscribe to a Caller ID service and have turned on the Caller
ID function, your fax machine will keep informat ion on the most
recent 20 calls and faxes you have received. You can view this
information, which consi sts of the name and num ber of each caller, in
the Caller ID List.
♦ After you have received 20 calls, each new call will delete the
oldest call.
Follow the st eps below t o view the Cal ler ID List in the di spl ay . If
desired, you can immedi ately di al a numb er when it appe ars.
To print out the list, see Chapt er 9, Printi ng Report s and Li sts .
1
Press these keys:
The display will show :
90
HOLD/
SEARCH
2
REVIEWING CALLS
Page 93
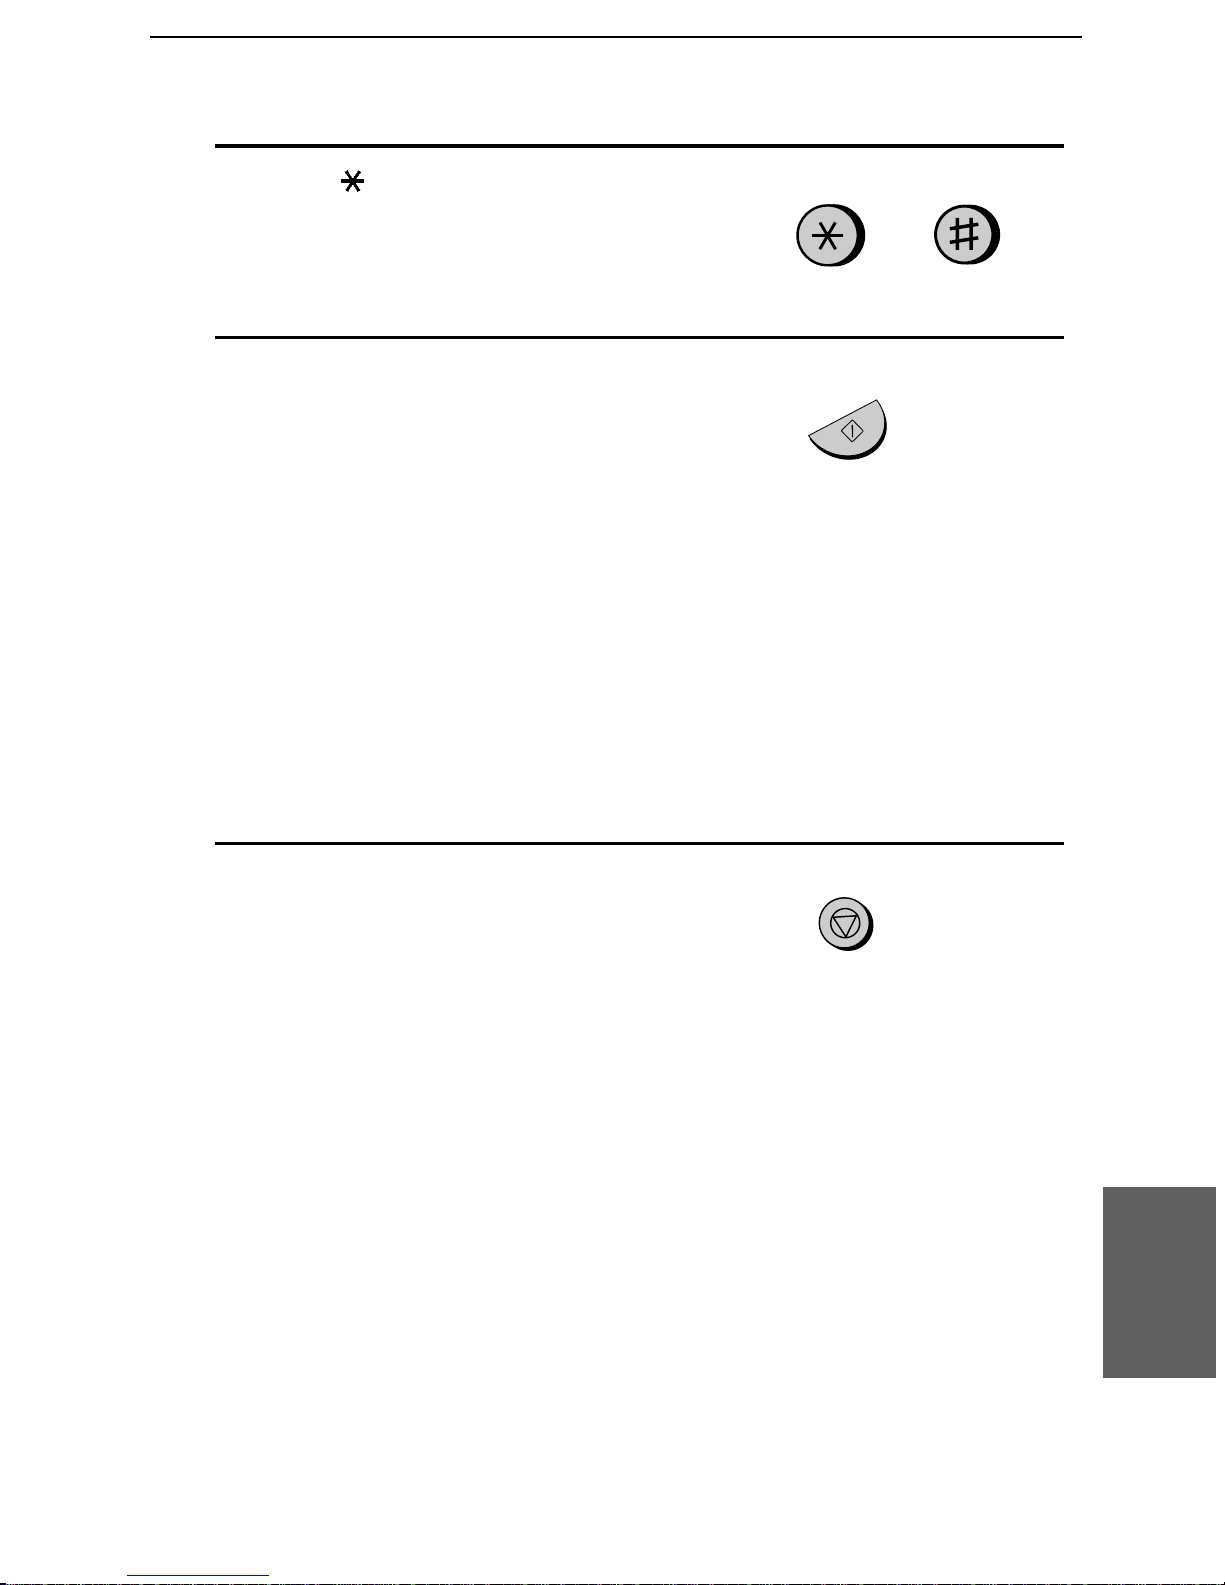
2
Press the * key to scroll through the
Caller ID
list from the most recent c all, or the #
key to scr oll through the list from the
oldest call.
3
If you w ant to dial one of the numbers
in the list, scroll through the list until
the number appears in the display.
•• If you want to send a fax, load the
doc ument a nd then press the
START/MEMORY key.
•• If you want to make a voic e call,
pick up the handset or press the
SPEAKER key. Dialing will begin
automatically. (If you pres s ed th e
SPEAKER key, pick up the ha ndset
when the other party answers.)
or
START/MEMORY
4
Press the STOP key when you have
finished viewing the list.
To delete call s from the Ca ller ID list
If you want to delete a single call from the caller list, press the 0 key
while the call appears in the display. If you want to delete all calls
from the list, hold t he 0 key down for at least 3 seconds while you are
viewing any num ber in the list .
Priori ty Cal l
If desired, you can set your fax to make a special ringing sound when
you receive a call from a designated pho ne numb er. This lets yo u
know immed iatel y who is calling without havin g to look at t he disp lay.
To use this function, enter the desi red phone num be r by following the
steps below (only one phon e number can be entered).
STOP
Functions
7. Special
91
Page 94
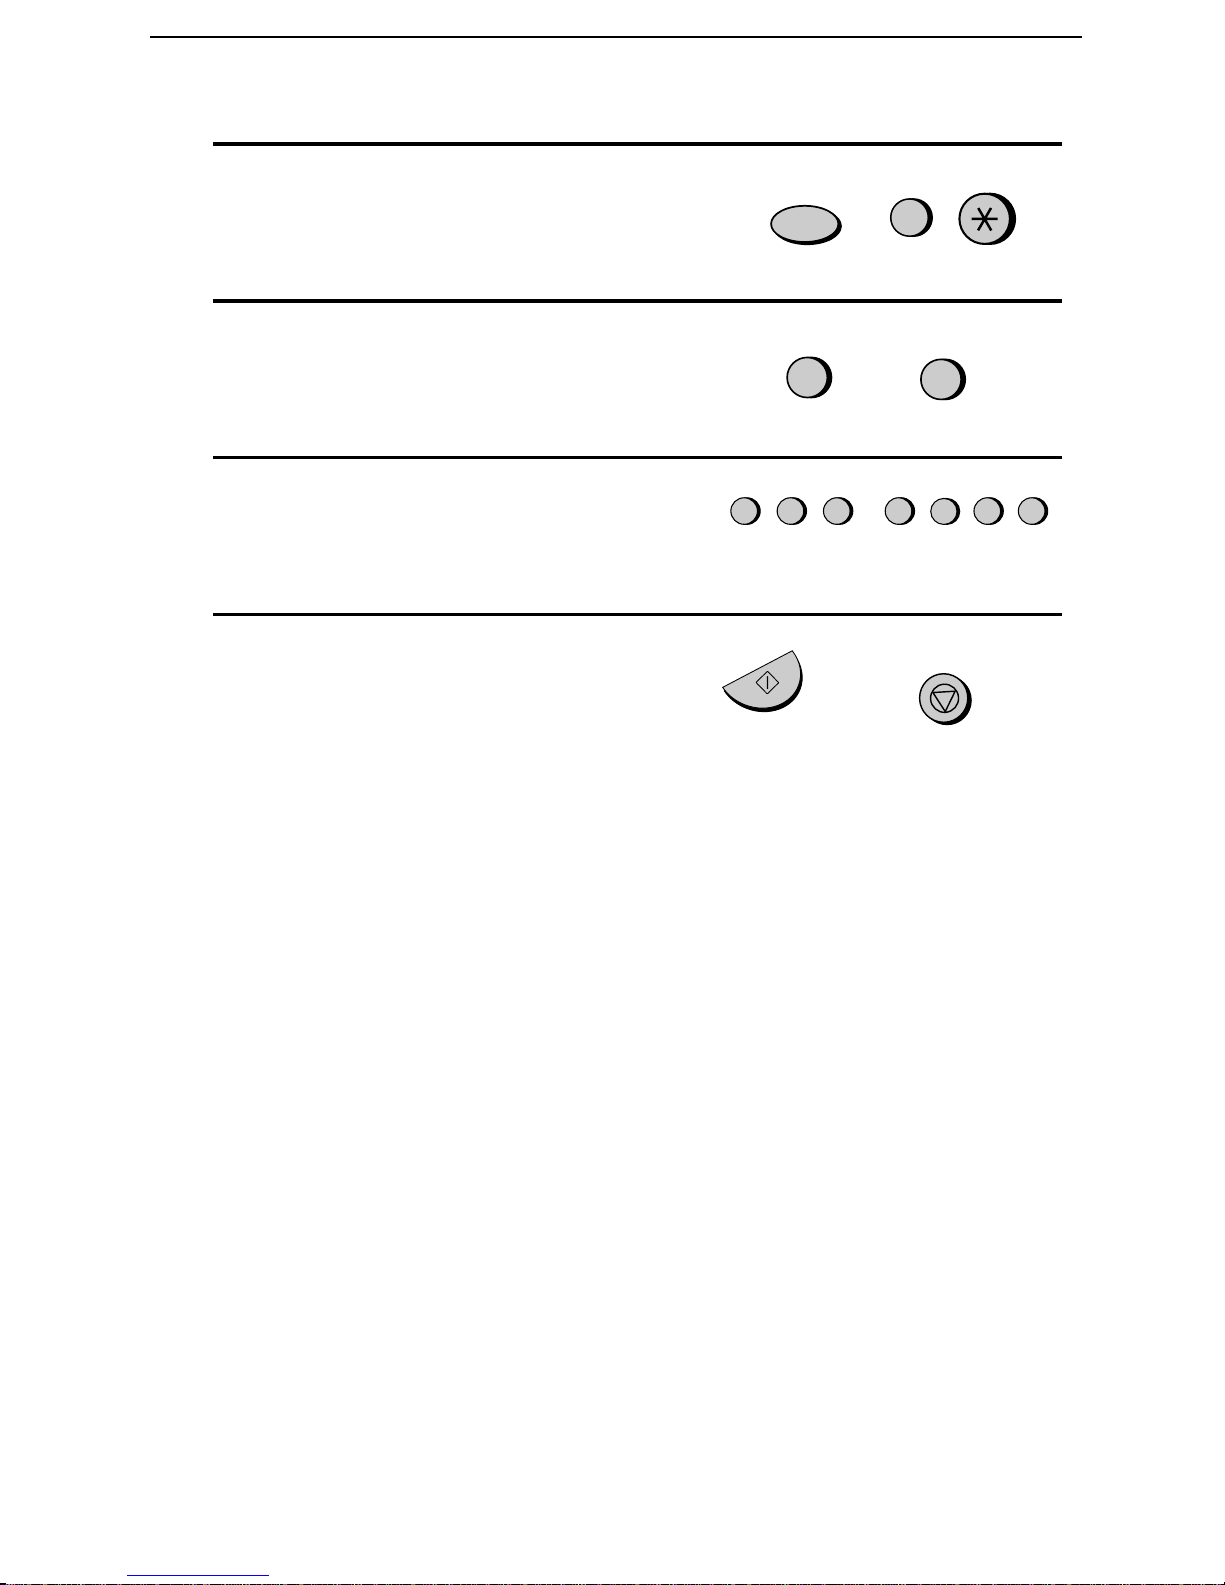
Caller ID
1
Press the keys shown at right.
PRIORITY CALL # w ill appear in the
display.
2
Press 1 to enter a number, or 2 to clear
FUNCTION
3
a number. (If you pre ssed 2, go to Step
4.)
3
Enter the phone number, including the
area code , by pressing the number keys
(max. of 2 0 digits).
4
Press the START/MEMORY key and
then the STOP key.
Blocking voice calls
With Caller ID turned on, you can use the Ant i Junk Fax funct ion
1
5
5 5 1
START/MEMORY
or
2
3 5
2
(Example)
STOP
92
described in Blocking Reception of Unwanted Faxes in this chapt er to
block voice call s as well as fax receptions (the Anti Junk F ax functio n
normall y only bl ocks fax es).
In this case, when a voice call or a fax transmission comes in from a
numb er you have speci fi ed as a "Junk Num ber", your fax will br eak
the connecti on as soon as it receives the calling pho ne numb er from
the caller ID service (before the second ring).
To use this function, set Option Settin g 11 to YES as described in
Chapter 8, Option Set ti ngs, and then ente r the number in the Anti Junk
Number List as explain ed in Blocking Reception of Unwanted Faxes
in this chapter.
Note: This function cannot be used if you are using the Distinctive Ring
function.
Page 95
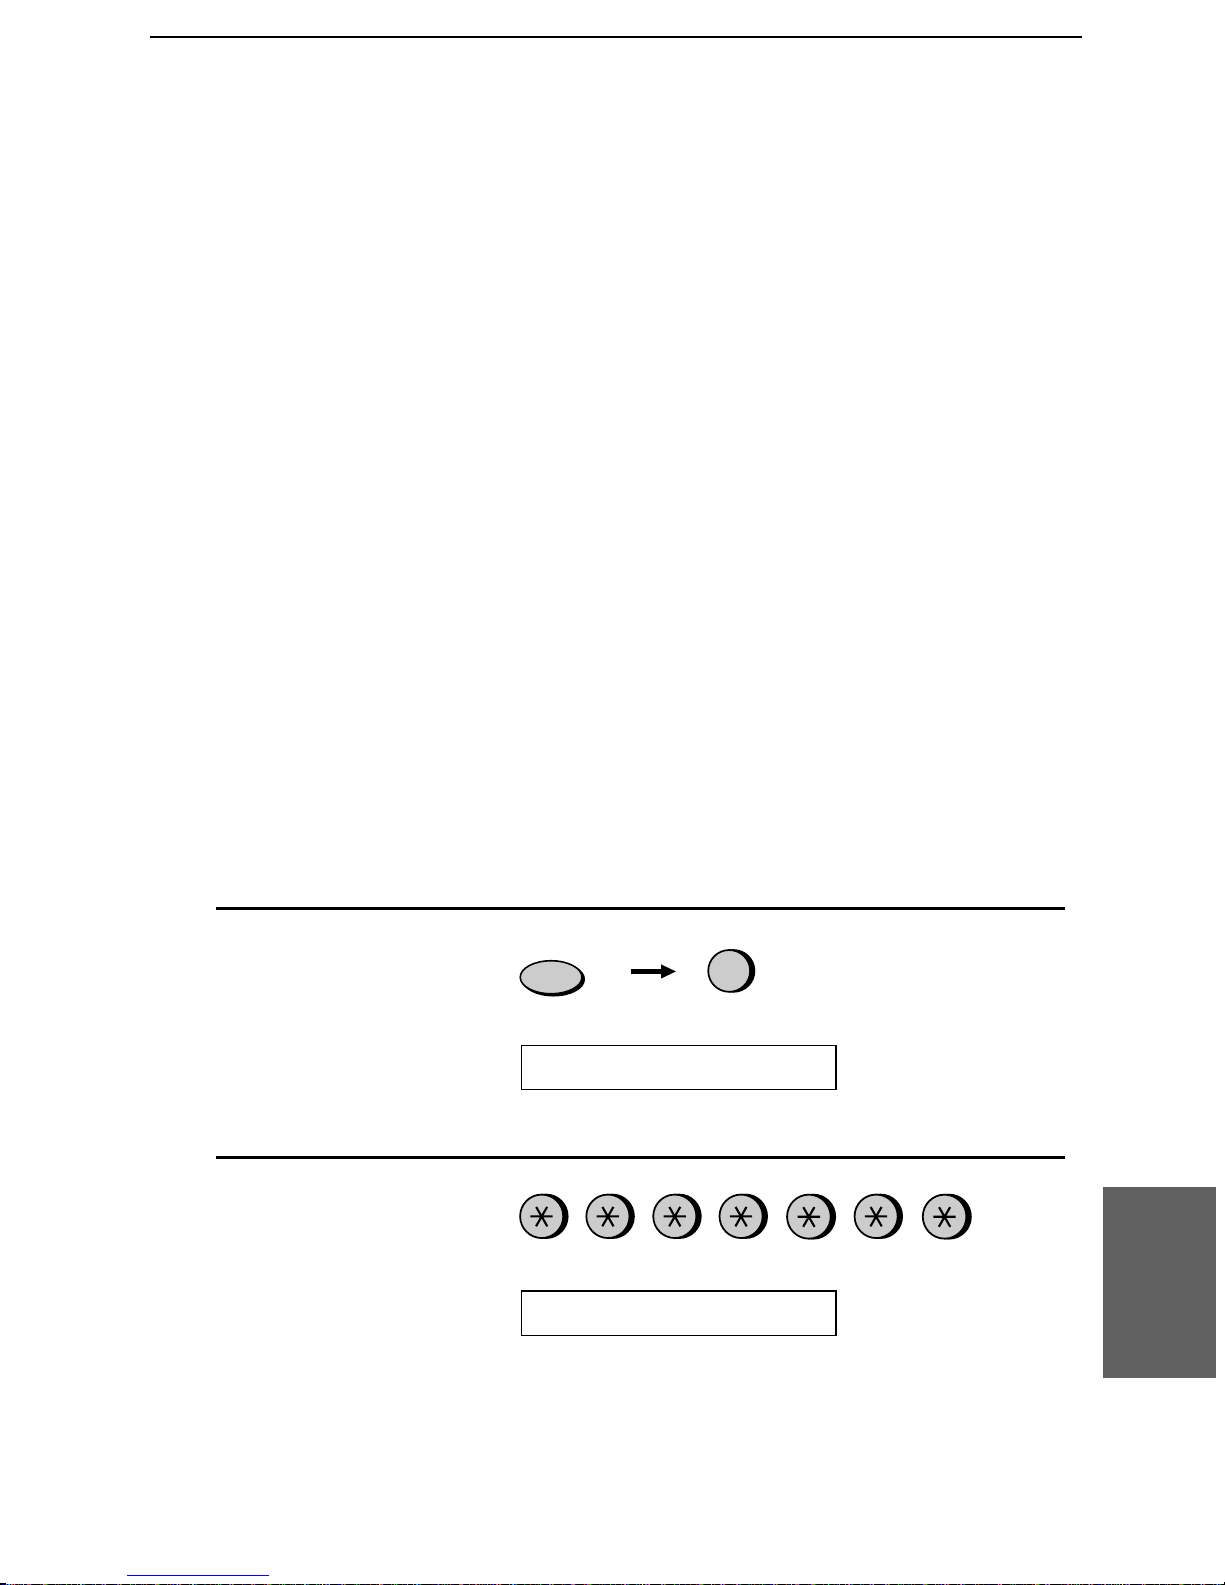
Distinctive R ing
Distinctive Ring
(Requires Subscription from Telephone Company)
Important:
•• To use distinctive rin g, you mus t subscrib e to a distincti ve ring
service from your local phone company. Do not turn on this
function if you do not subscrib e to a distincti ve ring service.
•• Your fax may not be compatible wit h som e dist inct ive ring servic es.
Distin ctiv e ring is a service offered by some local telephone
companies whereby they assign an additio nal second nu mber to your
regular single line. The second nu mber rings differently from your
normal number.
If you subscribe to a distinctive ring service, you can set the fax
machine to automatical ly answer when your second number is called.
This allows you to use the se cond num ber as an exclusive f ax numb er.
To have your fax automatically answer when your second numbe r is
called, foll ow the st eps below:
1
Press these keys:
FUNCTION
4
The display will show :
2
Press these keys:
OPTION SETTING
The display will show:
DISTINCTIVE RING
93
Functions
7. Special
Page 96
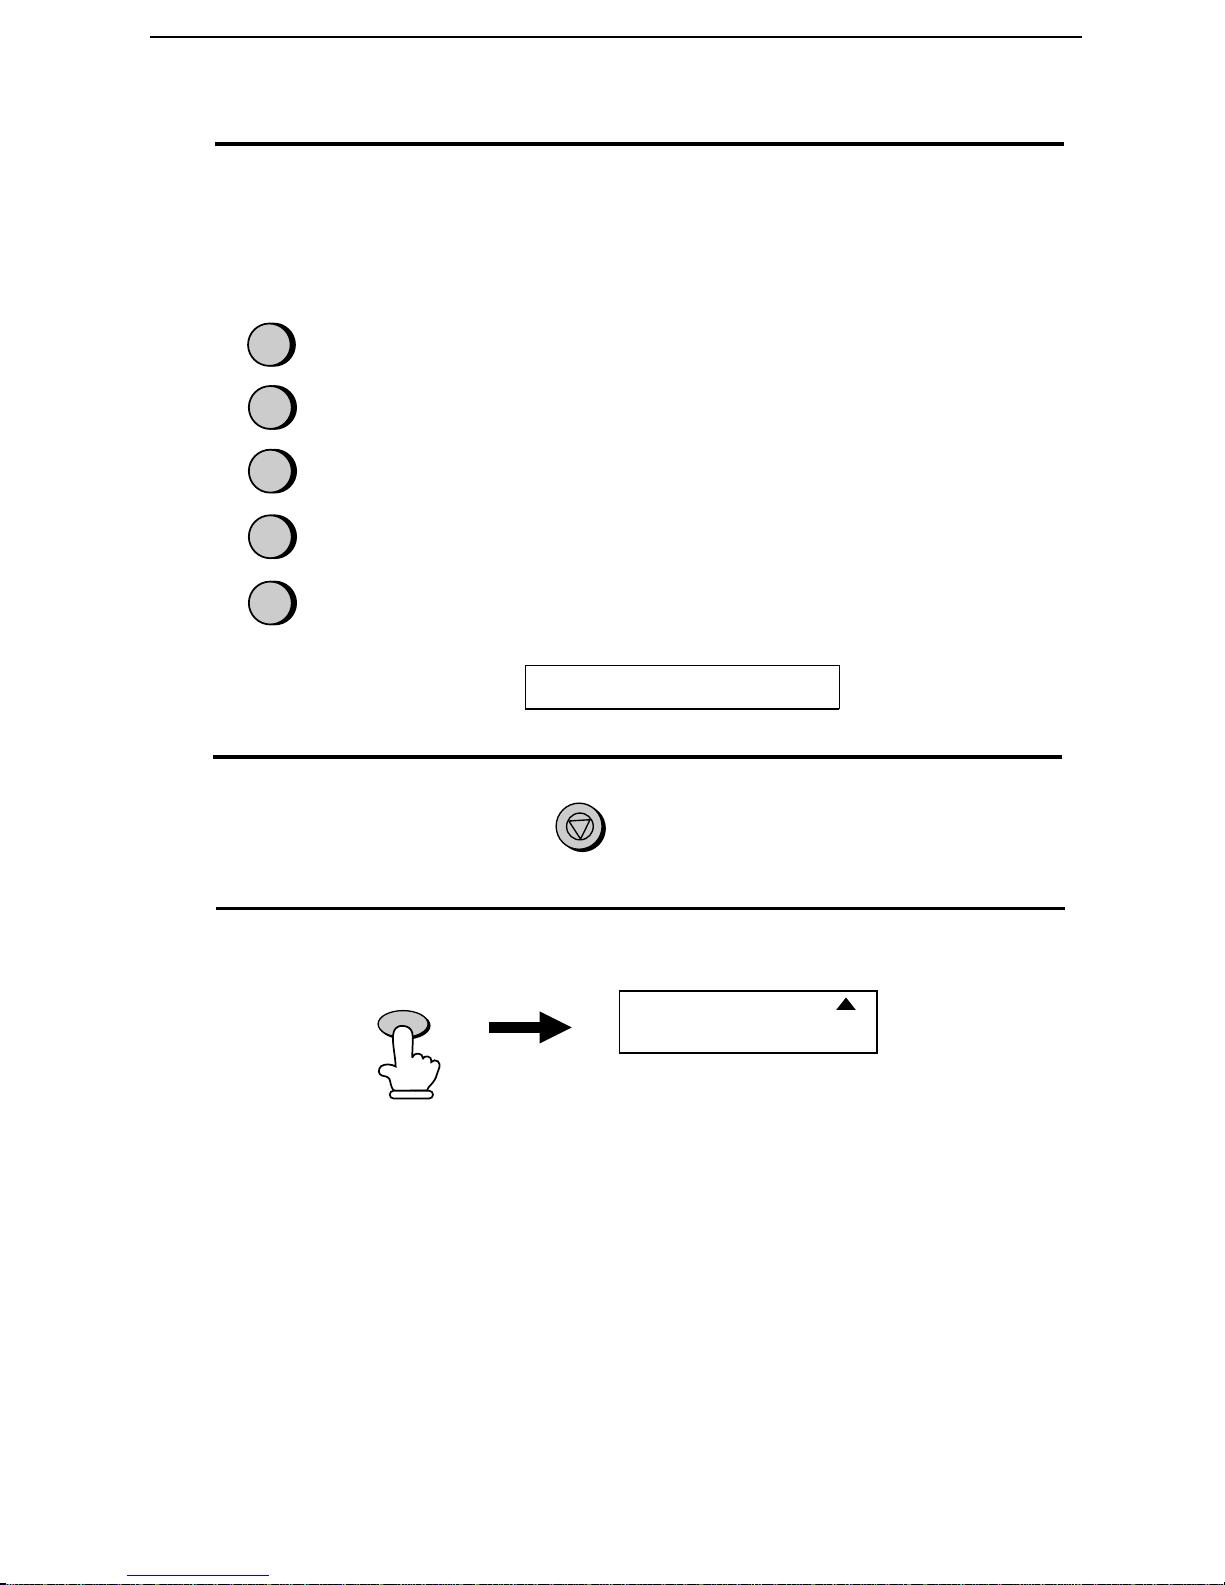
Distinctive Ring
3
Press a number from 1 to 3 to se lect the ring pattern below that
matches your second number’s ring pattern. Or, press 4 to have your
fax automatically answer your normal telephone number. Press 5 to
turn off the distinctive ring function.
1
2
3
4
5
RING PATTERN 1: Two short rings.
RING PATTERN 2: One short, one long, and one short ring.
RING PATTERN 3: Two short rings and one long ring.
STANDARD RING: Your standard (normal) ring pattern.
OFF SETTING: Turn distinctive ring off.
The display will show :
4
Press the STOP key.
FAX SIGNAL RX
STOP
5
Set the reception mode to FAX.
FAX
RECEPTION
MODE
TEL
TAD
When using distin ctiv e ring, you must set the reception mode of your
fax to FAX. When your designated f ax number is dialed, your fax will
automat icall y answer and begin receptio n after two rings. Note that
other devices on the same line will also ring until your fax answers. If
one of your other numbers is dialed, the fax will ring; however, it will
not answer.
Note: If you are using an answering machine with your distinctive ring
service, the answering machine must be connected to a separ ate wall jack.
Do not connect it directly to your fax.
94
Page 97
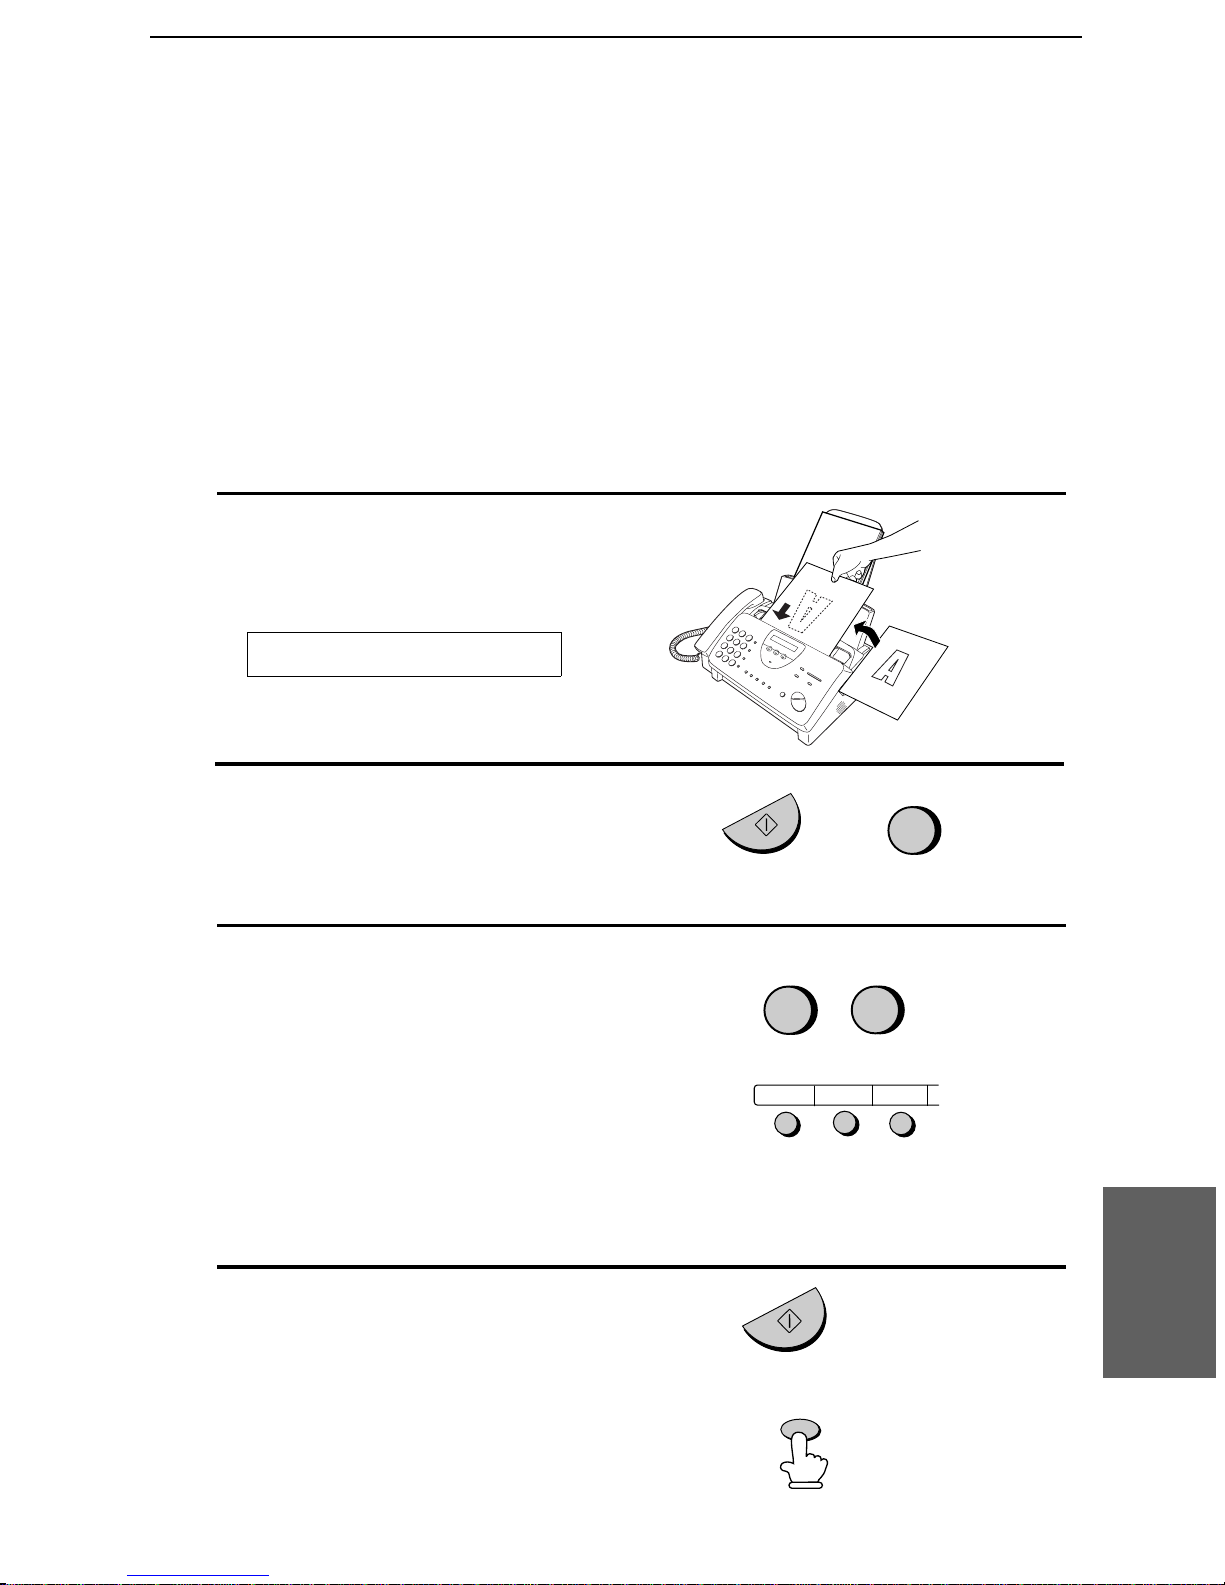
Broadcasting
This functio n allo ws you t o send th e same document to as many as 20
different locations with just one operation. First st or e the document in
memory, then enter the numb ers of the receiving machines. The
document will be transmit ted t o each location .
♦ You can only use Rapid Keys or Speed Dial numbers to dial the
numbers of the receiving machines.
1
Load the document(s).
The display will show:
Broadcasting
READY TO SEND
2
Press the START/MEMORY key and
then 2.
3
Dial the receiving machines
(maximum of 20) using one or both of
the following methods:
•• Enter one or more Speed Dial
numbers by pressing the number
keys.
•• Press one or more Rapid Keys.
START/MEMORY
2
01 02 03
2
2
(Example)
4
Press the START/MEMORY key.
••
Set the resolution and/or contrast if
desired.
START/MEMORY
RESOLUTION
95
Functions
7. Special
Page 98

Broadcasting
5
Press the START/MEMORY key.
Transmission will begin.
•• A Transaction Report is
automatically printed out after
Broadcasting is completed. Check
the "Note" column of the report to
see if a ny of the locations are
marked "Busy" or have a
communication error code. If so,
send the document to those locations
again.
START/MEMORY
96
Page 99
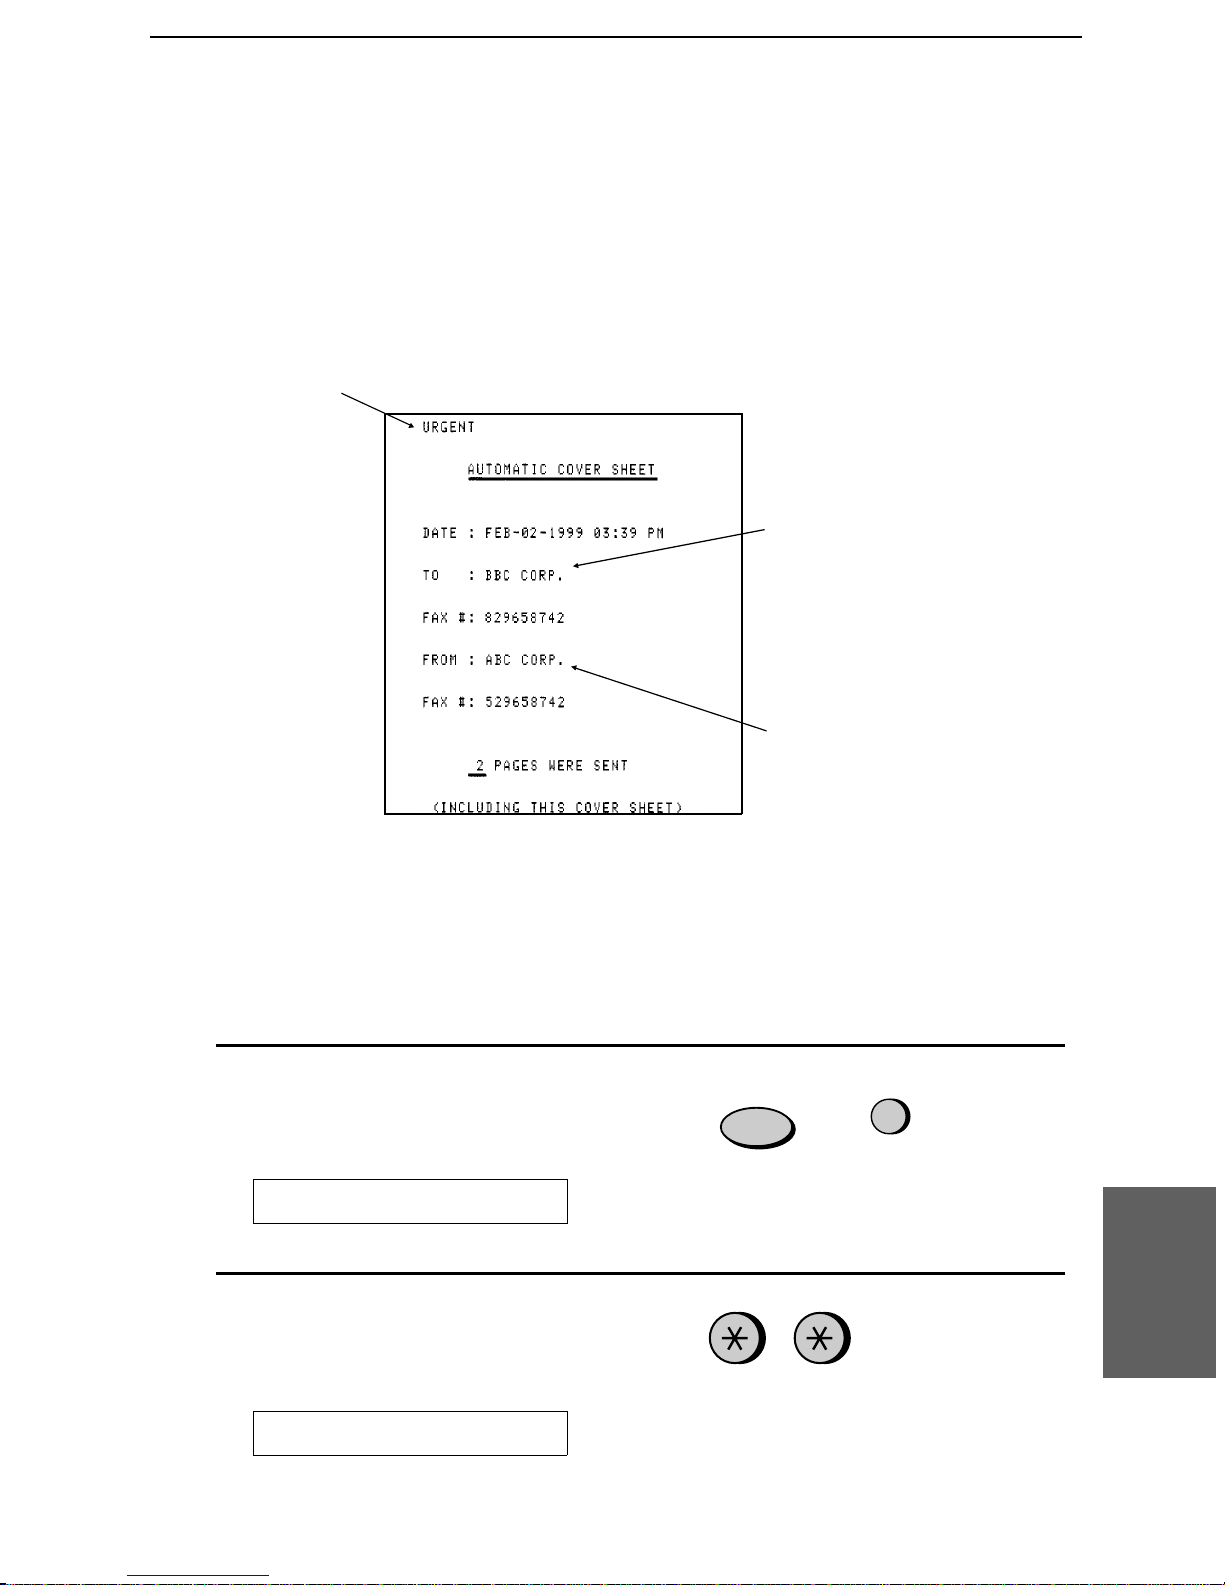
Cover Sheet
You can have the fax generate a cover sheet and send it as the last
page of each of your fax transm issions.
You can select a
message.
Cover Sheet
For the recipient’s name
to appear, you must dial
using a Speed Dial or
Rapid Key number with
the name progr ammed.
Your name and number
must be programmed as
explained in Chapter 1.
Follow the steps below to turn on the cover sheet function . Once the
cover sheet function is turned on, cover sheets will be included wit h all
tranmi ssi ons un ti l you turn it off.
1
Press these keys:
FUNCTION
4
The display will show:
OPTIO N SET T ING
2
Press these keys:
Functions
7. Special
The display will show:
COVER SHEET
97
Page 100
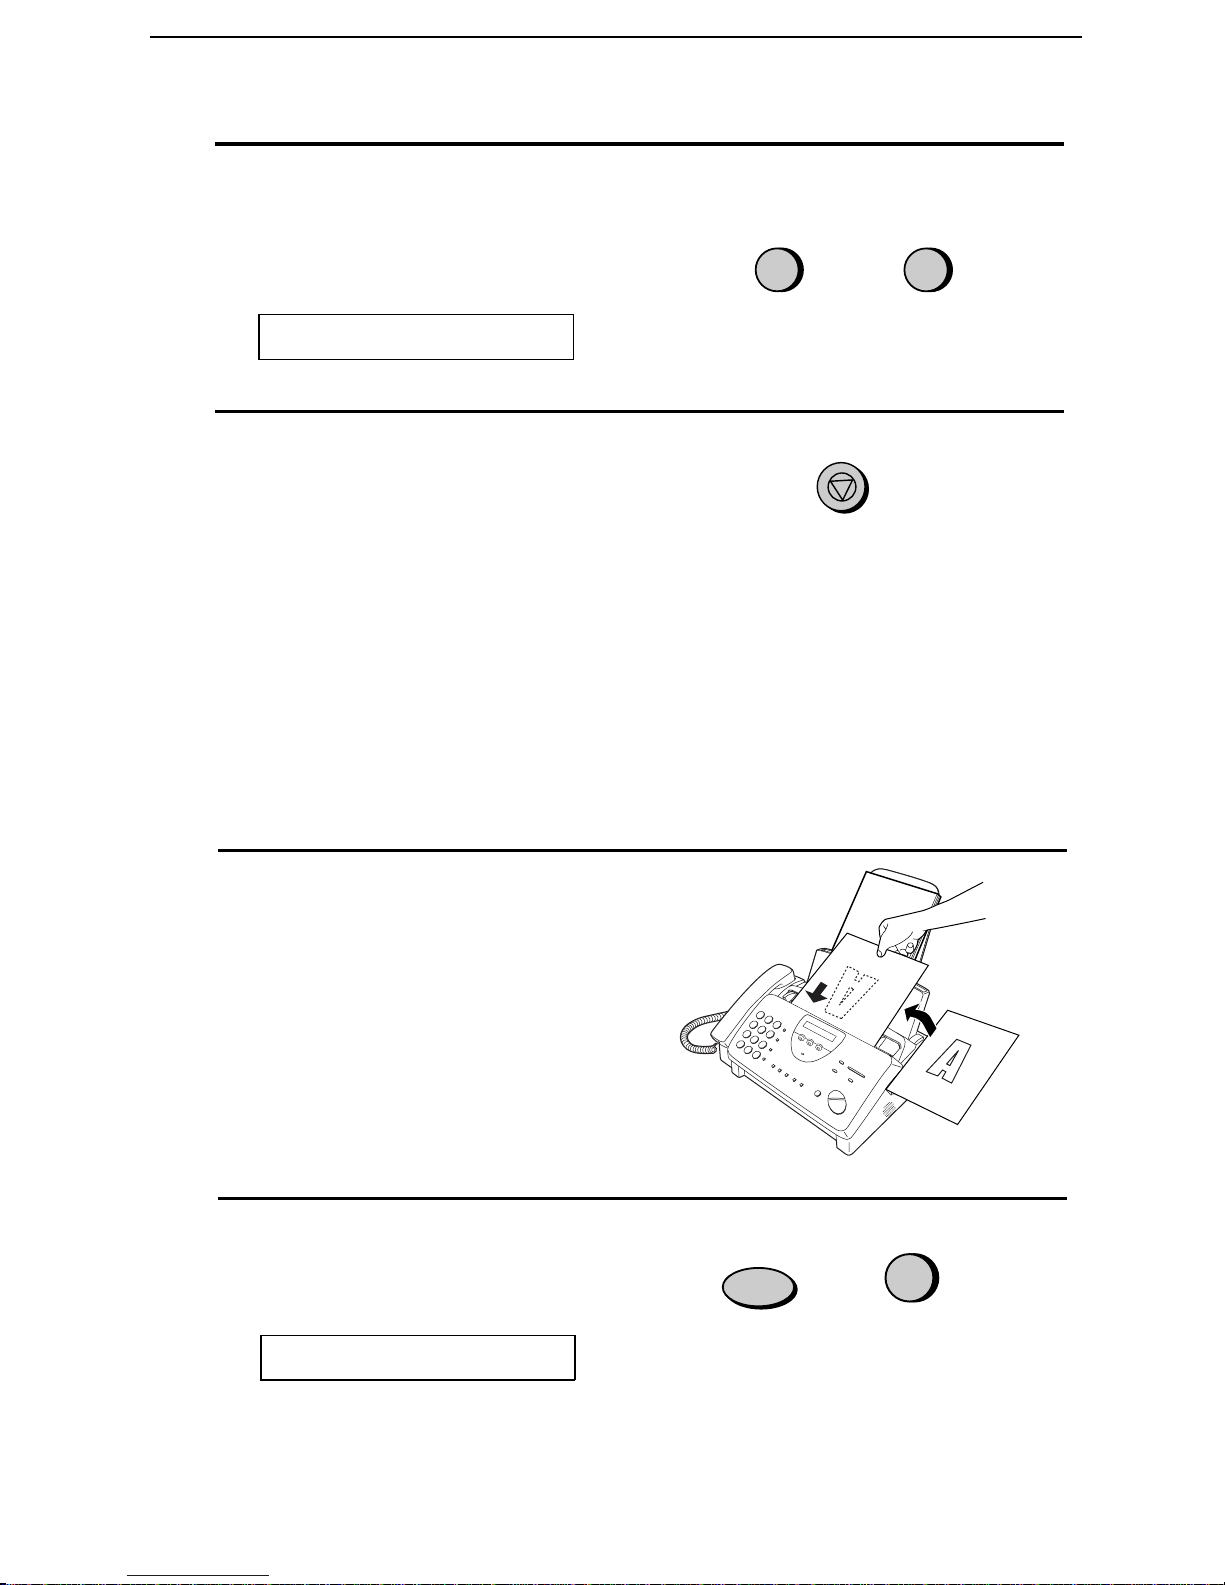
Cover Sheet
3
Press 1 (YES) to turn on the cover
sheet function, or 2 (NO) to turn it off .
The display will show:
AUTO PRINT OUT
4
Press the STOP key to return to the
date and time display.
Selecting a header message (optional)
When the cover sheet function is turned on, you can also select a
message which will appear as a header at the top of the cover sheet.
YES NO
1
or
STOP
2
Note that the message selecti on is only effective for one transmission .
1
Load the document(s).
•• The document must be loaded
before a message can be selected.
•• The cover sheet function must be
turned on.
2
Press these keys:
FUNCTION
5
The display will show:
COVER SHEET HEAD
98
 Loading...