

Page 1

Introduction
Congratulations on your new Sharp SX663 phone.
About This User Guide
This user guide is carefully designed to help you learn about
your phone’s features and operations quickly and effectively.
NOTICE
• We strongly recommend that you keep separate permanent
written records of all important data. Data may be lost or
altered in virtually any electronic memory product under
certain circumstances. Therefore, we assume no
responsibility for data lost or otherwise rendered unusable,
whether as a result of improper use, repairs, defects, battery
replacement, use after the specified battery life has expired
or any other cause.
• We assume no responsibility, directly or indirectly, for
financial losses or claims from third parties resulting from
the use of this product and any of its functions, such as
stolen credit card numbers, the loss or alteration of stored
data, etc.
• All company and/or product names are trademarks and/or
registered trademarks of their respective holders.
• Screen layout may differ from that illustrated in this user
guide.
The information described in this user guide is subject to
change without notice.
• All the functions described in this user guide may not be
supported by all networks.
• We assume no responsibility for downloaded contents,
information, etc. from the network.
Intellectual Property Rights
According to copyright laws, the reproduction, alteration and
use of material which is protected by copyright (music,
pictures, etc.) is only permitted for personal or private use. If
the user is not in possession of more extensive copyright or has
not received the explicit permission from the copyright owner
to reproduce, alter or use a copy which has been made or
modified in this way, this is considered to be a violation of the
copyright laws and gives the copyright owner the right to claim
for damages. For this reason, avoid the illegal use of material
which is protected by copyright.
Windows is a registered trademark of Microsoft Corporation in
the United States and/or other countries.
Introduction 1
Page 2
Powered by JBlend™ Copyright 1997-2005 Aplix
Corporation. All rights reserved.
JBlend and all JBlend-based trademarks and logos
are trademarks or registered trademarks of Aplix
Corporation in Japan and other countries.
microSD™ is a trademark of the SD Card Association.
Bluetooth is a trademark of the Bluetooth SIG, Inc.
Powered by Mascot Capsule
Mascot Capsule
©2002-2007 HI Corporation. All Rights Reserved.
Licensed by Inter Digital Technology Corporation under one or more of the
following United States Patents and/or their domestic or foreign
counterparts and other patents pending, including U.S. Patents:
4,675,863: 4,779,262: 4,785,450: 4,811,420: 5,228,056: 5,420,896:
5,799,010: 5,166,951: 5,179,571 & 5,345,467
T9 Text Input is covered by the Hong Kong Standard Patent No.
HK0940329 and HK1010924.
T9 Text Input is licensed under one or more of the following: U.S. Pat. Nos.
5,818,437, 5,953,541, 5,187,480, 5,945,928, and 6,011,554;
Australian Pat. No. 727539; Canadian Pat. No. 1,331,057; United
Kingdom Pat. No. 2238414B; Hong Kong Standard Pat. No. HK0940329;
Republic of Singapore Pat. No. 51383; Euro. Pat. No. 0 842 463
(96927260.8) DE/DK, FI, FR, IT, NL,PT.ES,SE,GB; Republic of Korea Pat.
Nos. KR201211B1 and KR226206B1; and additional patents are pending
worldwide.
®
®
/Micro3D Edition™
is a registered trademark of HI Corporation
CP8 PATENT
2 Introduction
The Bluetooth word mark and logos are owned by the Bluetooth SIG, Inc.
and any use of such marks by Sharp is under license. Other trademarks
and trade names are those of their respective owners.
Licensed by QUALCOMM Incorporated under one or more of the following
United States Patents and/or their counterparts in other nations ;
4,901,307 5,490,165 5,056,109 5,504,773 5,101,501
5,506,865 5,109,390 5,511,073 5,228,054 5,535,239
5,267,261 5,544,196 5,267,262 5,568,483 5,337,338
5,600,754 5,414,796 5,657,420 5,416,797 5,659,569
5,710,784 5,778,338
Page 3
This product contains NetFront Browser and NetFront Messaging Client of
ACCESS CO.,LTD.
ACCESS and NetFront are trademarks or registered trademarks of ACCESS CO.,
LTD. in Japan and other countries.
NetFront Browser © Copyright 1996-2007 ACCESS CO., LTD.
NetFront Messaging Client © Copyright 2000-2007 ACCESS CO., LTD.
This software is based in part on the work of the Independent JPEG Group.
This product is licensed under the MPEG-4 Visual Patent Portfolio License for
the personal and non-commercial use of a consumer to (i) encode video in
compliance with the MPEG-4 Video Standard (“MPEG-4 Video”) and/or (ii)
decode MPEG-4 Video that was encoded by a consumer engaged in a
personal and non-commercial activity and/or was obtained from a licensed
video provider. No license is granted or implied for any other use. Additional
information may be obtained from MPEG LA.
See http://www.mpegla.com.
This product is licensed under the MPEG-4 Systems Patent Portfolio License
for encoding in compliance with the MPEG-4 Systems Standard, except that
an additional license and payment of royalties are necessary for encoding in
connection with (i) data stored or replicated in physical media which is paid
for on a title by title basis and/or (ii) data which is paid for on a title by title
basis and is transmitted to an end user for permanent storage and/or use.
Such additional license may be obtained from MPEG LA, LLC.
See http://www.mpegla.com for additional details.
MPEG Layer-3 audio coding technology licensed from Fraunhofer IIS and
Thomson.
Useful Functions and Services
Your phone offers you the following features:
• Video Calling. You can talk while viewing each other on respective screens.
• 3D and colour Java™ games. You can also download various games and
applications from SmarTone-Vodafone via the mobile Internet.
• Thin Film Transistor (TFT) colour LCD display with images that are clearer and
easier to view.
• A built-in digital camera with an auto focus func tion for taking pictures and video
clips.
• A message function for reading and c reating SMS messages.
• MMS (Multimedia Messaging Services) for sending picture, sound and video
messages to brighten someon e’s day.
• Email for sending up to 300 KB and receiving mail with attachments.
• A colour WAP browser for accessing information on the mobile Internet.
• Your own ringtones and ring video clip s. You can use sound or video clip files as
a ringtone or ring video clip.
• A music player that can play back MP3, MPEG-4 and 3GPP format sound files
(supported codec of MPEG-4 or 3GPP are AMR, AAC, AAC+, and AAC+e).
• Playback of downloaded sound and video clip files.
• A voice recorder function for recording and playing back voice clips.
•A
• A schedule alarm for creating and sending schedule entries with alarm settings.
• A microSD™ memory card slot that expands connectivity with a PC using the
®
Bluetooth
wireless technology interface for establishing contact and
transmitting data with certain devices. You can transmit pictures, sounds, and
video clips to OBEX-enabled phones.
memory card.
Introduction 3
Page 4

Contents
Introduction .............................................................. 1
List of Menu Functions ............................................ 6
Getting Started ......................................................... 8
Inserting/Removing the SIM/USIM Card and the
Battery ............................................................ 11
Charging the Battery ........................................ 13
Inserting/Removing the Memory Card ............... 14
Connecting the Handsfree Kit ........................... 15
Turning Your Phone On and Off ........................ 16
Slide Functions and Keypad Lock ...................... 17
Display Indicators ............................................ 18
Navigating Functions ............................................. 20
Voice Call/Video Calling Functions ........................ 21
Entering Characters ............................................... 30
Changing the Input Language ........................... 31
Changing the Input Method .............................. 31
Chinese User Dictionary ................................... 36
Using Templates .............................................. 39
Copying, Cutting and Pasting Text .................... 39
Insert Phonebook Entries ..................................39
4 Contents
Using the Menu .......................................................40
Main Menu ......................................................40
Shortcut Keys ..................................................40
Call Manager ...........................................................41
Sending a Message from the Phonebook ...........44
Multimedia ..............................................................51
Camera ....................................................................58
Taking Pictures ................................................58
Recording Video Clips .......................................59
Common Functions in the Photo and Video Camera
Modes .............................................................59
Functions in Photo Camera Mode ......................62
Functions in Video Camera Mode ...................... 65
Messages ................................................................66
SMS ................................................................66
MMS ...............................................................66
Email ...............................................................66
Area Info ..........................................................74
Browser ...................................................................79
Navigating a WAP or Web Page ........................80
Page 5

Gallery ..................................................................... 84
Games & Applications ............................................ 92
Organiser ................................................................ 97
SIM Application .................................................... 109
Settings ................................................................ 110
Call Log .................................................................133
Connectivity .......................................................... 135
Bluetooth ...................................................... 135
Mass Storage ................................................ 138
USB Charge ................................................... 138
Card Settings ................................................. 138
Off Line Mode ................................................ 139
Backup/Restore ............................................. 139
Connecting SX663 to Your PC ..............................140
System Requirements .................................... 140
3G/GSM Modem ............................................140
Handset Manager .......................................... 142
Music Manager ............................................. 143
Sync Manager ............................................... 145
Troubleshooting ...................................................146
Safety Precautions and Conditions of Use .......... 148
Conditions of Use ........................................... 148
Environment .................................................. 151
Precautions Concerning Vehicle Use ................151
SAR ...............................................................151
FCC NOTICE ...................................................152
Out of Warranty List ..............................................154
Index .....................................................................155
Contents 5
Page 6

List of Menu Functions
SX663 functions are listed below.
See relevant page for details of each function. The menu’s corresponding number is used for shortcuts. For details, see page 40.
1 Games & Applications
1 GSX™ & Java™
Gallery
2 Java™ Settings
3 Java™
Information
2 Browser
1 Homepage
2 Go to URL
3 Bookmarks
4 Alert Inbox
5 My Saved Page
6 Access History
7 Browser Settings
8 www
9 PLUS
10 News
11 Music
12 Games
13 Sports
14 Email
p. 92
p. 94
p. 96
p. 79
p. 79
p. 79
p. 79
p. 79
p. 79
p. 81
6 List of Menu Functions
–
–
–
–
–
–
–
3 Organiser
(Tab 1: Organiser)
1 Calendar
2 Alarms
3 Stopwatch
4 Tasks
5 World Clock
6 Countdown Timer
(Tab 2: Utilities)
1 Calculator
2 Voice Recorder
3 Expenses Memo
4 Phone Help
p. 97
p. 100
p. 102
p. 102
p. 105
p. 105
p. 106
p. 107
p. 108
p. 108
4 Messages
1 Create Message
2 Inbox
3 Alert Inbox
4 Drafts
5 Te mp lat es
6 Sent
7 Outbox
8 Voice Mail
9 Cell Broadcasts
10 Area Info
11 Messaging
Settings
12 Memory Status
5 Camera
p. 66
p. 70
–
p. 70
p. 39
p. 67
p. 69
–
p. 73
p. 74
p. 74
–
p. 58
6 Gallery
1 Pictures
2 Videos
3 SD Videos
4 Music and Sounds
5 Themes
6 GSX™ & Java™
7 Te xt Temp lat es
8 Other Documents
9 Memory Status
7 Multimedia
1 Video Player
2 Streaming Player
3 Music Player
4 FM Radio
p. 84
p. 85
p. 85
p. 86
p. 86
p. 92
p. 87
p. 88
p. 91
p. 51
p. 53
p. 54
p. 56
Page 7

8 Call Manager
(Tab 1: Phonebook)
1 Phonebook
2 Add New
3 My Card
(Tab 2: Services)
1 Call Voicemail
2 Speed Dial List
3 Service Dialling
*
Number
*
4 FDN
(Tab 3: Phonebook
Settings)
1 Manage Groups
2 Message Groups
3 Phonebook
Settings
4 Advanced
p. 41
p. 41
p. 42
p. 50
p. 43
p. 44
p. 45
p. 49
p. 41
p. 48
–
9 Settings
(Tab 1: Profiles)
1 Normal
2 Meeting
3 Activity
4 Car
5 Headset
6 Silent
(Tab 2: Phone Settings)
1 Display Settings
2 Sound Settings
3 Slider Settings
4 Date & Time
5 Language
6 Shortcuts
7 Ringer Volume
8 Earpiece Volume
9 Master Reset
(Tab 3: Other Settings)
1 Call Settings
2 Video Calling
Settings
3 Security Settings
4 Internet Settings
5 Network Settings
p. 110
p. 110
p. 110
p. 110
p. 110
p. 110
p. 115
p. 118
p. 118
p. 119
p. 120
p. 120
–
–
p. 121
p. 121
p. 126
p. 127
p. 129
p. 131
10 SIM Application
11 Call Log
1 All Calls
2 Dialled Numbers
3 Missed Calls
4 Received Calls
5 Call Timers
6 Call Costs
7 Data Counter
*
*
p. 109
p. 133
p. 133
p. 133
p. 133
p. 133
p. 134
p. 134
12 Connectivity
1 Bluetooth
2 Mass Storage
3 USB Charge
4 Card Settings
5 Off Line Mode
6 Backup/Restore
* Depends on SIM/USIM card
contents.
p. 135
p. 138
p. 138
p. 138
p. 139
p. 139
List of Menu Functions 7
Page 8
Getting Started
1
2
3
4
5
6
7
8
9
8 Getting Started
10
11
12
12
1313
14
15
16
17
18
19
20
21
22
23
24
25
26
27
Page 9

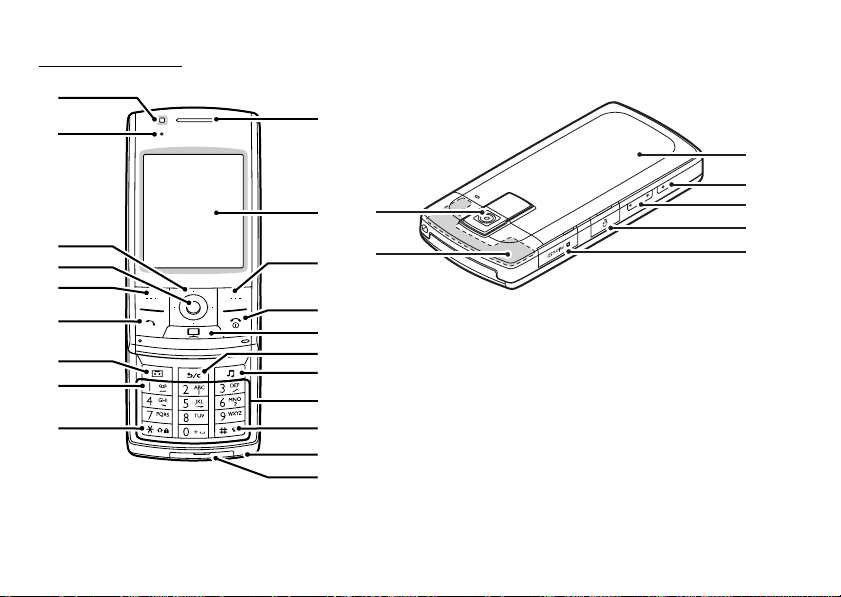
1. Sub Camera
2. Small Light:
Flashes when an incoming call or a new message is
received or missed, if Event Light or Status Light (p. 114) is
enabled.
3. Navigation Keys (Arrow Keys): abcd
Moves cursor to highlight a menu item, etc.*
Up arrow key (a) displays the Bookmarks when pressed
in standby.
Down arrow key (b) displays the Phonebook entries when
pressed in standby.
Left arrow key (c) displays the list of GSX™ & Java™
Gallery when pressed in standby.
Right arrow key (d) displays Gallery when pressed in
standby.
4. Centre Key: B
Displays Main menu in standby, and executes functions.
Long press in standby to initiate video camera.
5. Left Soft Key: A
Executes the function in the lower left of the screen.
Displays Messaging menu in standby.
Long press in standby to initiate keypad lock.
Long press when keypad is locked to unlock.
6. Send/Redial Key: D
Makes voice calls or accepts calls, and displays the call
logs in standby.
Long press in standby to make video callings.
7. Voice Recorder Key: S
Activates voice recorder.
8. Voicemail Key: G
Long press to connect to the Voicemail centre. (Depending
on the SIM/USIM card.)
9. * /Shift Key: P
Switches character input method as follows on the text
entry screen.
In English mode: Abc, ABC, abc and 123. In T9 mode, T9
Abc, T9 ABC, T9 abc and 123.
In Traditional Chinese mode: Abc, ABC, abc, 123, and T9
Stroke
In Simplified Chinese mode: Abc, ABC, abc, 123, T9
PinYin, and T9 Stroke
Press to enter P, ? or * in standby.
Long press in standby to lock the keypad.
10.Earpiece/Speaker
11.Display
Getting Started 9
Page 10

12.Right Soft Key: C
Executes the function in the lower right of the screen.
Accesses “SmarTone
iN!
” by opening the browser in
standby.*
13.End/Power Key: F
Ends a call and turns power on/off.
14.Mobile TV Key: T
Activates Mobile TV.
15.Clear/Back Key: U
Clears the characters before the cursor, returns to the
previous screen, etc.
16.Music Key: E
Displays Music menu in standby.
17.Keypad
18.#/Silent Key: R
Displays symbol screen on the text entry screen.
Long press to switch languages on the text entry screen.
Long press in standby to switch Profiles settings between
the mode most recently activated and Silent mode.
19.Microphone
20.External Connector:
Used to connect either the charger or a USB data cable.
21.Main Camera
10 Getting Started
22.Built-in Aerial:
Warning: Do not cover the top of the phone with your hand
when in use as this may interfere with the performance of
the built-in aerial.
23.Battery Cover
24.Camera Key: X
Long press in standby to activate the camera.
Takes a picture or starts recording video when the camera
is active.
25.Side Keys: VW
Press in standby or during a call to increase or decrease
the earpiece volume.
Press during incoming call to mute the ringer or disable
vibration mode (if active).
Press while listening to music (or video) to increase or
decrease the earpiece volume.
26.Handsfree Kit/Microphone Connector
27.microSD Card Slot
* Default standby assignment can be changed via the
Shortcuts menu. See “Shortcuts” on page 120.
Page 11
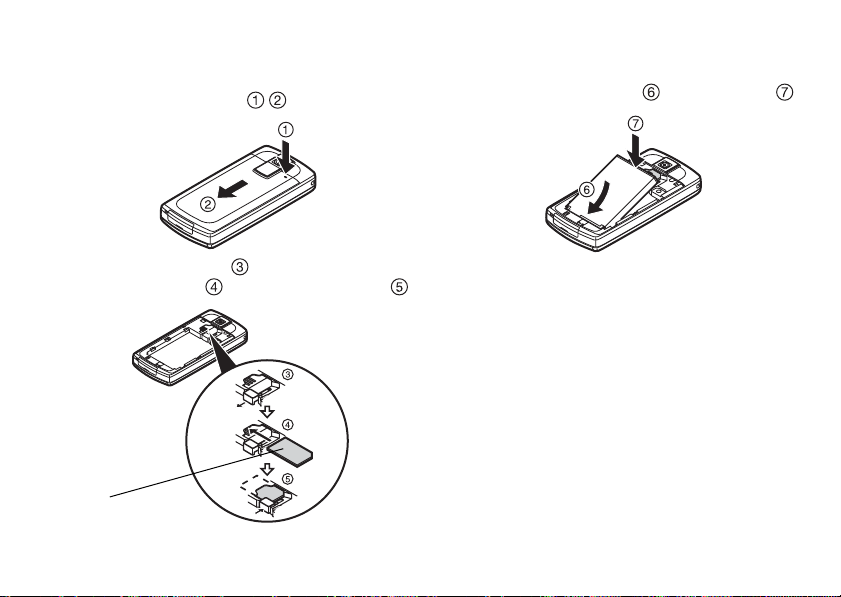
Inserting/Removing the SIM/USIM Card and the Battery
1. Slide off the battery cover ( ).
2.
Unlock the SIM/USIM lock , slide the SIM/USIM card into
the SIM/USIM holder , and lock the SIM/USIM lock .
SIM/USIM card
3. Hold the battery so that the metal contacts of the battery
are facing down, slide the guides on the top of the
battery into the battery slots , and then insert it .
4. Replace the battery cover.
Note
• Make sure that only 3V SIM/USIM cards are used.
• Make sure that the standard accessory battery is used.
Getting Started 11
Page 12

Battery Disposal
The device is battery-powered. In order to protect the
environment, please read the following points concerning
battery disposal:
• Take the used battery to your local waste depot, dealer or
customer service centre for recycling.
• Do not expose the used battery to a naked flame, immerse
in water or dispose with the household waste.
12 Getting Started
Page 13
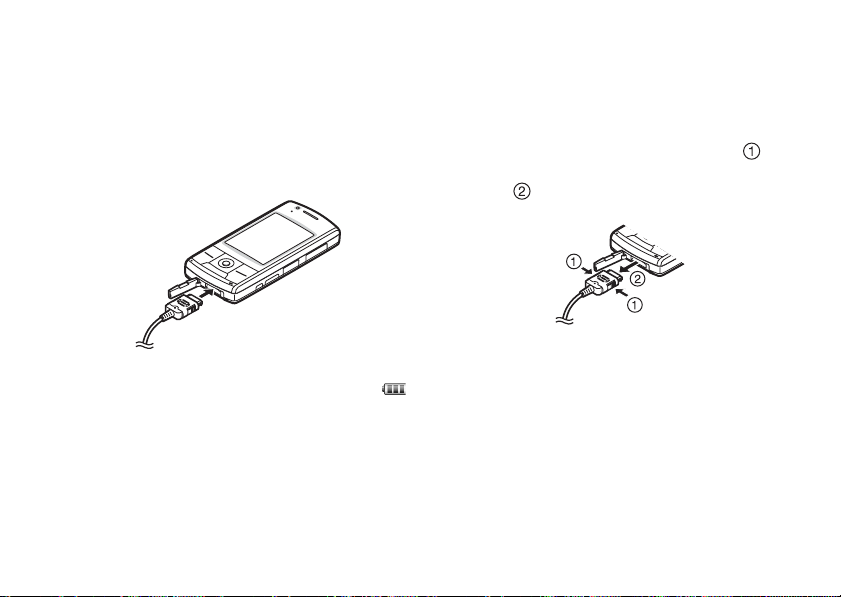
Charging the Battery
You must charge the battery for at least 150 minutes before
using your phone for the first time.
Using the Charger
1. Open the cover of the external connector, and connect
the charger horizontally to the external socket located at
the bottom of the phone until it clicks.
To Disconnect the Charger
When charging is completed, the battery indicator icon displays
the full charge status. The Small Light also turns off when
completed.
1. Unplug the charger from the AC outlet.
2. Push and hold the side buttons of the charger , then
disconnect the charger from the external socket of the
phone .
2. Connect the charger to an AC outlet.
When the phone is charging, the battery status icon ( )
displays the current status. The Small Light also lights up.
Standard charging time: Approx. 150 minutes
Note
• Charging time may vary depending on the state of the battery
and other conditions. (See “Battery” on page 149.)
3. Close the cover.
Note
• Do not use any no n-approved chargers as th ey may damage
your phone and invalidate any warranties, see “Battery” on
page 149 for details.
• Forcibly disconnecting the charger may cause malfunction.
Getting Started 13
Page 14
To Charge Using the Cigarette Lighter Charger
The optional cigarette lighter charger supplies power for
charging from the cigarette lighter socket of a car.
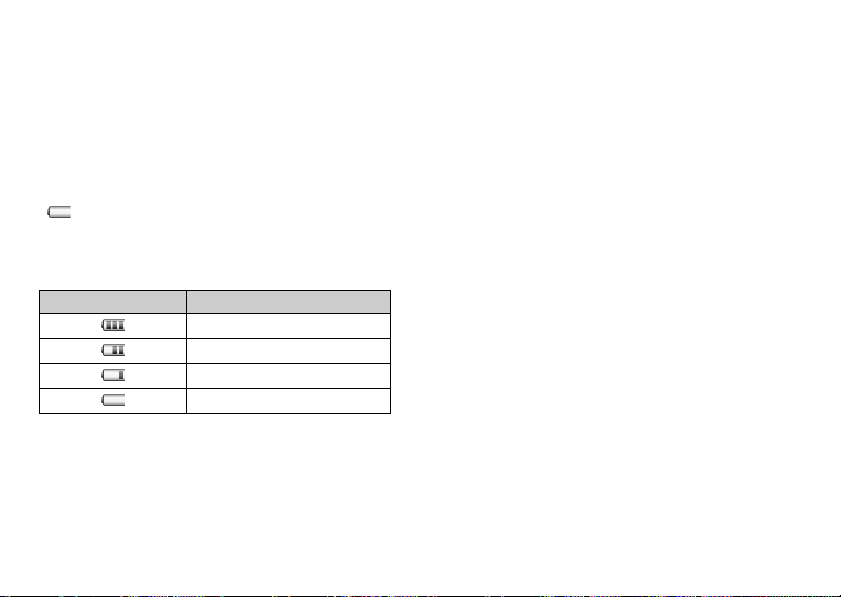
Battery Level Indicator
The current battery level is displayed in the upper right of the
screen.
Low Battery during Use
When the battery is running low, an alarm will sound and
“ ” is displayed on the screen.
If you are using your phone and you hear the low battery alarm,
attach your charger as soon as possible. The phone may not be
able to continue normal operation if you continue to use it.
Battery Indicators Charge Level
Sufficiently charged
Charging recommended
Charging required
Empty
14 Getting Started
Inserting/Removing the Memory Card
Note
• Make sure that the phone is turned off before inserting/
removing the memory card.
• Be sure to insert the card in the correct direction and
orientation.
• Keep all memory cards out of the reach of small children.
1. Turn off the phone.
2. Open the microSD card slot cover.
Page 15
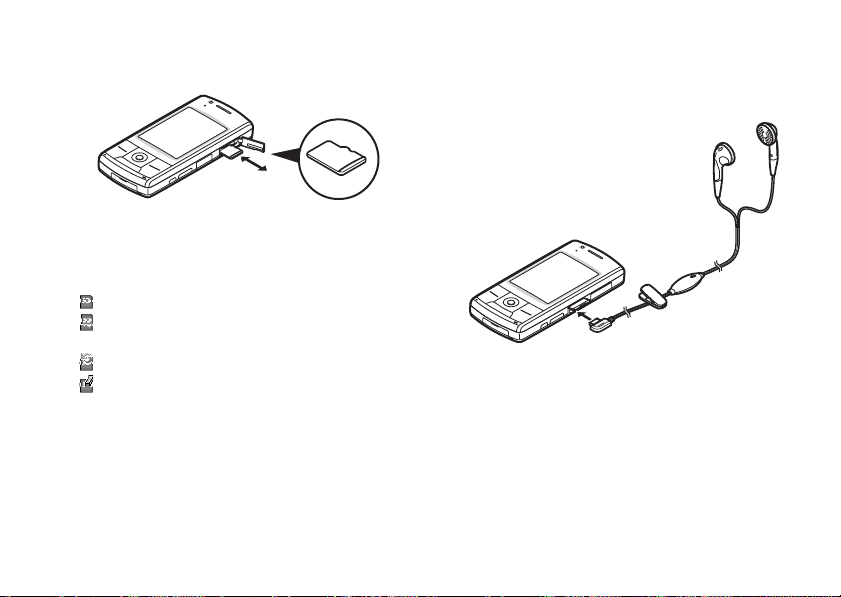
3. Insert the memory card until it clicks. (To remove the
memory card, push the memory card until it clicks.)
4. Close the cover.
Tip
• You see the following indicators when the memory card is in
use:
: Appears when the card is inserted.
: Appears when the card is damaged or unusable. Make
sure the card is properly inserted.
: Appears when the card is being written to or read.
: Appears when the card is being formatted.
Connecting the Handsfree Kit
1. Open the connector cover.
2. Connect the handsfree kit.
Getting Started 15
Page 16

Turning Your Phone On and Off
To turn the power on or off, long press F for approximately 2
seconds.
To Enter the PIN Code
If the PIN (Personal Identification Number) code is enabled you
are asked to enter the PIN code each time the phone is
switched on. For details on setting the PIN code, see “Enabling/
Disabling the PIN Code” on page 127.
1. Enter your PIN code.
The PIN code is 4 to 8 digits.
2. Press B.
Note
• If your PIN code is entered incorrectly three times in a row,
the SIM/USIM card is locked. See “Enabling/Disabling the
PIN Code” on page 127.
• If the clock settings have n ot been entered, the date and time
entry screen is displayed (p. 119).
16 Getting Started
To Copy All Phonebook Entries from the SIM/USIM Card
When you insert the SIM/USIM card into your phone for the first
time and start the Phonebook application, you are asked
whether you wish to copy Phonebook entries on the SIM/USIM
card. Follow the on-screen instructions, or you can do it later
using the Phonebook menu as follows:
→
“Call Manager”
“Advanced”
“Phonebook Settings” tab →
→
“Copy All Entries”
1. Select “From SIM to Handset”.
Page 17
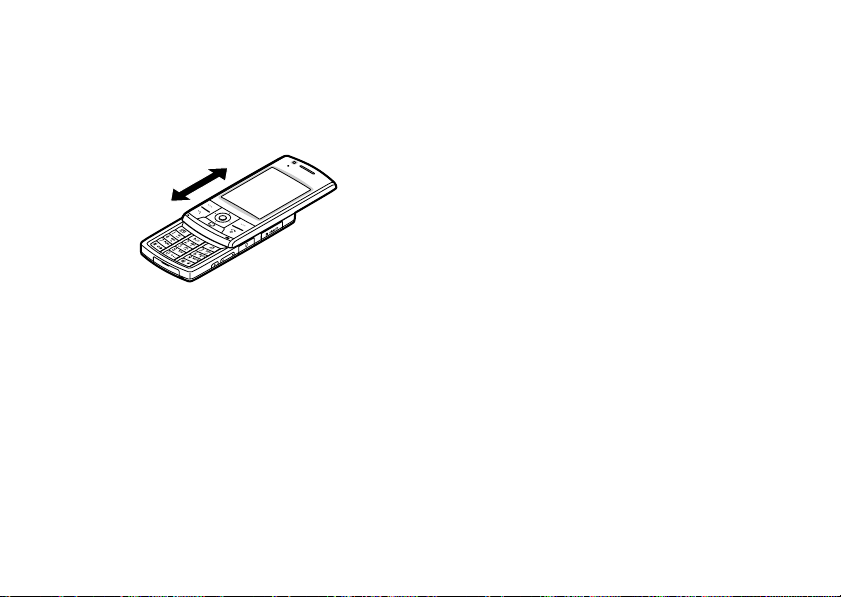
Slide Functions and Keypad Lock
When your phone is on, you can make a call or answer an
incoming call by sliding open your phone.
You can terminate the call and lock the keypad to prevent it
from being pressed accidentally by sliding close your phone.
You can also operate the following actions by sliding open/
close your phone.
When opened:
• The display and keypad light up.
• The keypad is unlocked.
• Incoming calls can be answered.
See “Slider Settings” on page 118.
When closed:
• The handset sends a busy tone to the caller.
• Calls are terminated.
See “Slider Settings” on page 118.
Note
• You can use some applications even when your phone is
closed.
• Some Java™ applications are suspended when your phone
is closed.
• Do not stick items on the back of the LCD display when the
slider is open.
Getting Started 17
Page 18

Display Indicators
18 Getting Started
Indicator area
1. / : Strength of received signal/Service out of
range
: HSDPA
: EDGE
: 3G (UMTS)/GPRS
/ : GPRS enabled/GPRS disabled
: Roaming outside network
2. / : Connection to the server [established/
3. / : Voice call [incoming/in progress]
4. / / : Video calling communication mode enabled
5. / : Alerts [text message and multimedia
Right soft keyCentre keyLeft soft key
6. / / : Mailbox full [SIM/USIM card only/handset
7. : “Voice Calls” diverts set to “Always”
8. ////:
communicating]
[voice/video/voice and video]
message/Email]
only/both SIM/USIM card and handset]
Connection status
[USB cable/
[enabled (in standby)/exchanging
information/talking with the Bluetooth
headset/Hide my phone]]
Bluetooth
wireless setting
Page 19
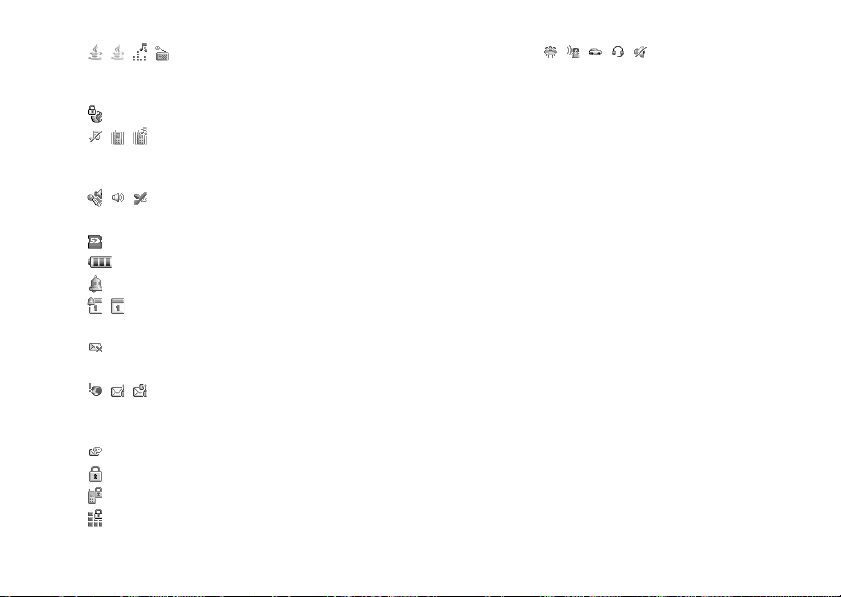
9. ///:
Java™ application [executed (colour)/
suspended (grey)]/Music player/FM Radio
10. : Secure WAP page displayed
11. / / :
Silent/vibration setting [silent/vibration
enabled/silent and vibration enabled]
12. / / : Speaker mode [speaker phone/speaker
activated/microphone muted]
13. : Memory card inserted
14. : Battery level
15. : Daily alarm enabled
16. / : Schedule entry enabled [with/without
reminder alarm]
17. : Outbox contains unsent messages [text
message/multimedia/Email]
18. / / : WAP/OTA provis ioning alerts [WAP alert/OTA
provisioning alert/WAP and OTA provisioning
alerts]
19. : Voicemail message alert
20. : “Show Secret Data” set to “On”
21. : Function Lock enabled
22. : Keypad Lock enabled
23.(No display)/////:
Current profile [Normal/Meeting/Activity/Car/
Headset/Silent]
Getting Started 19
Page 20

Navigating Functions
All applications are accessed from the Main menu. To open the
Main menu, press the centre key B in standby.
To launch applications, you will need to highlight menu items,
and make selections. To select a menu item (indicated in
quotation marks), move the cursor using a, b, c and d,
and press B to select.
In certain procedures, you will need to press one of the soft
keys (indicated in square brackets), which are displayed in the
lower left and right of the screen. Press the corresponding soft
key (A or C).
To return to the previous screen, press the right soft key if it
Back
displays
if it displays
Each section in this user guide starts with a list of items you will
need to select in order (indicated in italics) before performing
the procedures shown. Select each item to reveal the next set
of items that you have to choose from. Open subsection items
after opening those listed in the main section.
Example:
“Games & Applications”
20 Navigating Functions
. To close the Main menu, press the right soft key
Back
.
→
“Java™ Settings”
The following menus have tabs - Organiser, Call Manager and
Settings.
You can select the desired tab with the c/d key, and after
that you can select the item you wish to set in the selected tab
with the a/b key.
Example:
→
“Call Manager”
“Advanced”
“Phonebook Settings” tab →
Page 21

Voice Call/Video Calling Functions
For details on setting call functions, see “Call Log” on
page 133.
Making a Voice Call
1. Enter the area code and the phone number you wish to
dial and press D to dial.
If you enter the wrong number, press U to delete the
number to the left of the cursor.
Emergency Calls
1. Enter 999 or 911 (international emergency number)
using the keypad and press D to dial.
Note
• Emergency calls may not be able to be made on all mobile
phone networks when certain network services and/or
phone features are in use. Contact your service provider for
more information.
• This emergency number can normally be used to make an
emergency call in any country, with or without a SIM/USIM
card inserted, if a 3G (UMTS)/GSM network is within range.
International Calls
1. Long press Q until a + (international dialling prefix)
sign is displayed.
2. Enter the country code, followed by the area code
(without the leading zero) and the phone number, and
press D to dial.
Adding an Entered Phone Number to the Phonebook
1. After entering a phone number, press [Options] and
select “Save Number”.
For details on creating a new entry, see “Adding a New
Entry” on page 41.
Showing or Hiding My Phone Number on the Display of
the Called Party
1. After entering a phone number, press [Options], select
“Show My ID” or “Hide My ID” and press D to dial.
Voice Call/Video Calling Functions 21
Page 22

Speed Dialling
Up to 8 phone numbers from the Phonebook memory (Handset
and SIM/USIM) can be assigned to speed dials. You can call the
numbers using the digit keys (G to O). The phone number
of the Voicemail centre is assigned to G.
For details on setting the speed dial list, see “Speed Dial List”
on page 50.
1. To dial a number using the speed dial, long press any of
the digit keys (G to O).
The phone number saved in the speed dial list is dialled.
Redialling
You can redial numbers in the call log. Select from specific
categories or “All Calls”. Specific categories contain up to 30
numbers and the “All Calls” list contains up to 90.
1. Press D in standby.
2. Select the category from “All Calls”, “Dialled Numbers”,
“Missed Calls” or “Received Calls”.
To switch logs, press c or d.
3. Highlight the phone number you wish to call.
4. Press D to redial a voice call or long press D to redial
a video calling.
22 Voice Call/Video Calling Functions
Answering a Voice Call
When an incoming call is detected, the phone rings.
1. Press D, B or press [Options] and select “Answer” to
answer the call.
Or press any key except F, [Options] or [Busy] when the
“Any Key Answer” function is enabled. Set the Any Key
Answer function in the profile of each mode (p. 115).
You can answer an incoming call by sliding open your
phone if “Calls on Open” is set to “Accept Call” in Slider
Settings (p. 118).
Tip
• If you have subscribed to the Calling Line Identification (CLI)
service and the caller’s network sends the number, the
caller’s number is displayed on the screen. If the caller’s
name and number are saved in the Phonebook, the caller’s
name is displayed on the screen.
• If the number is a restricted number, the display shows
“Withheld”.
• When you receive a call from the person whose picture is
registered in the Phonebook, the picture and name are
displayed.
Page 23

Rejecting an Incoming Call
1. Press F while the phone is ringing to reject a call you
do not wish to answer.
Letting the Caller Know You are Unavailable
1. Press [Busy] while the phone is ringing to send a busy
tone to the caller.
In Call Menu (Voice Call)
Your phone has additional functions available while a call is in
progress.
Adjusting the Earpiece Volume
You can adjust the earpiece volume (and handsfree kit volume,
if connected) to five levels.
1.
Press V or W to display the Earpiece Volume screen.
2. Press V (or a/d) to increase the volume of the call or
press W (or b/c) to decrease the volume.
3. Press B when the volume is set to the desired level.
Turning the Speaker On and Off
You can talk via the loudspeaker on the phone when it is on.
1. During a call, press [Options] and select “Loudspeaker
On”.
Putting a Call on Hold
This function allows you to manage two calls at the same time.
If you wish to make another call while you are talking to
someone, you can put the current call on hold to call someone
else.
To Make Another Call during a Call
1. During a call, press [Options] and select “Hold”.
The current call is put on hold.
2. Press [Options] and select “Dial New Number”.
3. Enter the phone number you wish to make another call
to, then press D.
Tip
• You can also make another call by entering the phone
number during a call instead of step 1. The current call is
automatically put on hold.
Voice Call/Video Calling Functions 23
Page 24

Accessing SMS/MMS Menu during a Call
1. During a call, press [Options] and select “Messages”.
The following options are available: “Create Message” to
make an SMS and MMS, or “Inbox”, “Sent” or “Drafts” to
access these folders. For details on SMS and MMS, see
“SMS” and “MMS” on page 66.
Call Waiting
This service notifies you of another incoming call while you
have a call in progress.
1. During a call, press [Options] and select “Hold &
Answer” to answer the second call.
The first call is put on hold and you can now talk to the
second caller.
You can also answer the second call by pressing D.
Note
• You need to set “Call Waiting” to “On” if you wish to use the
Call Waiting service (p. 123).
• Call Waiting service may not be available on all networks.
Contact your service provider for more information.
• If you do not wish to answer the second call, press [Options]
and select “Busy” in step 1. If “Reject” is selected, the log of
the second call is saved as a missed call.
24 Voice Call/Video Calling Functions
Conference Call
Conference call is a call with more than 2 participants. You may
include up to 5 participants in a conference call.
To Make a Conference Call
You must have one active call and one held call.
1. During a call, press [Options] and select “Conference
All” to join the conference call.
2. Press F to end the conference call.
Note
• The conference call service may not be available on all
networks. Contact your service provider for more
information.
• To end the call with all participants, press [Options] and
select “End All Call(s)”.
• To reject adding more participants to the current party, press
[Options] and select “Reject”, or you can send the busy tone
by selecting “Busy”.
• You have more o ptions for the Conference call after selecting
“Conference All” in step 1:
To put all participants on hold, select “Hold All”.
•
•
To put all participants except the current call on hold,
select “Private”.
Page 25

To Add New Participants to the Conference Call
1. Press [Options] and select “Dial New Number”.
2. Enter the number you wish to include in the conference
call and press D to dial.
3. Press [Options] and select “Conference All” to join the
conference call.
If you wish to add other participants, repeat steps 1 to 3.
To End the Call with a Conference Call Participant
1. During a conference call, highlight the person that you
wish to disconnect from the conference call.
2. Press [Options] and select “End This Call”.
To Have a Private Conversation with One of the Participants
If you wish to have a private conversation with one of the
participants, you may select the participant from the
conference list and put the other participants on hold.
1. During a conference call, select the person that you wish
to talk to.
2. Press [Options] and select “Private”.
3. Once you have finished the private conversation, press
[Options] and select “Conference All” to return to the
conference call.
Muting the Microphone
1. During a call, press [Mute].
To use the microphone again, press [Unmute].
Voice Call/Video Calling Functions 25
Page 26

Making a Video Calling
Note
• Video callings can only be made and received if both parties
have 3G capable phones and 3G coverage. See “Display
Indicators” on page 18.
• Make sure that the battery is fully charged and the signal is
strong before using this function.
• Turn the loudspeaker on or use a handsfree kit so that you
can talk while looking at the video calling screen on the
display.
Making a Video Calling
To Make a Video Calling by Entering the Phone Number First
1. Enter the area code and the phone number you wish to
dial.
2. Press [Options] and select “Video Calling” to dial.
If you enter the wrong number, press U to delete the
number to the left of the cursor.
When connected, the image of the called party is displayed
in the upper part of the screen and yours in the lower left.
Tip
• If the called party’s phone is not video calling enabled, you
can press F and enter the phone number again to make a
voice call.
26 Voice Call/Video Calling Functions
Answering a Video Calling
When an incoming call is detected, the phone rings.
1. Press D to answer the call with video or press [Options]
and select “Hide Picture” to answer with voice only.
If the slider is closed, you can answer the call (with video)
by sliding open the phone when the “Calls on Open”
function is enabled.
Tip
• If you have subscribed to the Calling Line Identification (CLI)
service and the caller’s network sends the number, the
caller’s number is displayed on the screen. If the caller’s
name and number are saved in the Phonebook, the caller’s
name is displayed on the screen.
Rejecting an Incoming Call
1. Press F while the phone is ringing to reject a call you
do not wish to answer.
You can reject an incoming call by sliding close your phone
if “Calls on Close” is set to “End Call” in Slider Settings
(p. 118).
Letting the Caller Know You are Unavailable
1. Press [Busy] while the phone is ringing to send a busy
tone to the caller of an incoming call letting them know
that you cannot answer the call.
Page 27

In Call Menu (Video Calling)
Muting the Microphone
1. During a video calling, press [Mute].
To use the microphone again, press [Unmute].
Swapping Images
You can swap images between the main and sub screens.
1. During a video calling, press [Options] and select
“Switch Images”.
Changing the Image of Yourself
1. During a video calling, press [Options] and select
“Camera Picture”.
2. Select “Internal Camera”, “External Camera” or
“Alternative Image”.
“Internal Camera”: The image through the sub
camera is displayed and sent to
the receiver.
“External Camera”: The image through the camera
is displayed and sent to the
receiver.
“Alternative Image”: The camera is turned off and the
image selected in “Alternative
Image” of “Video Calling
Settings” is used.
Turning the Speaker On and Off
You can talk via the loudspeaker on the phone when it is on.
1. During a video calling, press [Options] and select
“Loudspeaker On”.
Note
• In a high-noise environment, you may not be able to
continue a call, or make a clear call. We recommend that you
use the handsfree kit.
• With this option, there may be interruption if you increase the
earpiece volume. We recommend that you decrease the
earpiece volume or use the handsfree kit.
Voice Call/Video Calling Functions 27
Page 28

Video Calling Settings
To Adjust the Quality of the Incoming or Outgoing Image
You can adjust the quality of the called party’s or caller’s
image.
1. During a video calling, press [Options] and select “Video
Calling Settings”.
2. Select “Incoming Picture Quality” or “Outgoing Picture
Quality”.
3. Select “Normal”, “Quality Priority” or “Frame Rate
Priority”.
“Normal”: The standard quality is used.
“Quality Priority”: The quality of the picture takes
Frame Rate Priority
“
To Turn the Backlight On or Off
You can turn on the backlight of your screen.
precedence over the frame rate.
”: The frame rate takes
precedence over the quality.
1. During a video calling, press [Options] and select “Video
Calling Settings”.
2. Select “Backlight”.
28 Voice Call/Video Calling Functions
3. Select “Always On”, “Always Off” or “As Normal
Setting”.
When “Always On” is selected, the backlight will always be
on during a video calling.
When “As Normal Setting” is selected, the backlight will
time out depending on the Backlight setting (p. 117).
To Adjust the Video Exposure
1. During a video calling, press [Options] and select “Video
Calling Settings”.
2. Select “Exposure”.
3. Press a (Light) or b (Dark).
Page 29

Mirror Image
During a video calling, you can reverse your image on the sub
screen.
1. During a video calling, press [Options] and select “Video
Calling Settings”.
2. Select “Mirror Image”.
3. Select “On” or “Off”.
To Change the Sub Camera Image to the Alternative Image
During a video calling, you can switch the image shown to the
caller between the sub camera image and an alternative image
or display an image while putting a call on hold from the saved
picture files.
1. During a video calling, press [Options] and select
“Camera Picture”.
2. Select “Internal Camera”, “External Camera” or
“Alternative Image”.
If “Alternative Image” is selected, select “Preset Picture” or
“Pictures”.
Voice Call/Video Calling Functions 29
Page 30

Entering Characters
When entering characters to create Phonebook entries, text
messages or multimedia messages, etc., press the
corresponding keys.
In multi-tap input method, press each key until the desired
character is displayed. For example, press H once for the
letter A or twice for the letter B.
Press the following keys to:
:Enter:
G
. (full-stop) , (comma) ? ! : ; ' (apostrophe) " / 1
:Enter:
Q
(space)+ = < > € £ $ ¥ % &0
: Switch character case among four modes:
P
Abc, ABC, abc and 123.
: Enter other characters.
R
30 Entering Characters
Long press the following keys to:
: Enter 1 - 9 numbers.
-
G
O
: Enter space in Numeric mode or to enter 0 in
Q
: Shift between multi-tap and T9 mode.
P
: Display the language options screen.
R
other modes.
Page 31

Changing the Input Language
1. On the text entry screen, press [Options] and select
“Input Language”.
2. Select the desired language.
Changing the Input Method
1. On the text entry screen, press [Options].
2. Select “Input Method”.
3. Select the input method you wish to use.
Abc
ABC
abc
Input Language
= Traditional
Chinese
T9 Stroke
ABC
Numeric
Input Method
T9 Mode
Multi-tap mode
Others Symbol Table Symbol Table Symbol Table
Input Language
= English
T9 Abc
T9 ABC
T9 abc
Numeric
Abc
abc
Input Language
= Simplified
Chinese
T9 PinYin
T9 Stroke
Abc
ABC
abc
Numeric
Tip
In T9 or multi-tap mode, you can switch input mode as follows
by pressing P.
English/T9 mode
English/Multi-tap mode
Traditional Chinese/T9 mode
Entering Characters 31
Page 32

Simplified Chinese/T9 mode
T9 English Mode
Using T9 English Mode
T9 text input method is a shortcut to enter text easily and
quickly.
1. On the text entry screen, press [Options].
2. Select “Input Method”.
3. Select the T9 mode (T9 Abc, T9 ABC, T9 abc) you wish
to change. “ ” is displayed on the main display.
4. Press the keys to enter characters.
5. Press a or b to select the word you wish to input.
6. If you wish to clear the word, highlight it and long press
U.
7. Press B or select [Options] and “Done” to complete the
selection.
32 Entering Characters
Tip
• If you press Q instead of step 6, a space is inserted next
to the selected word.
User Dictionary
You can create your own English words for T9 Alphabet text
input.
Note
• This function is only available when “Input Language” is set
to “English”.
1. On the text entry screen in T9 mode, press [Options] and
select “User Dictionary”.
2. Select “Add New Word” and enter a new word.
To edit a word in the list
1. On the text entry screen in T9 mode, press [Options] and
select “User Dictionary”.
2. Highlight the desired word.
3. Press [Options] and select “Edit”.
4. Modify the word.
Page 33

T9 PinYin and T9 Stroke Mode
In T9 PinYin and T9 Stroke mode, keys are as follows.
T9 PinYin and T9 Stroke Mode keys
Key Stroke PinYin
G
H
I
J
K
L
M
N
O
P
Q
R
Wildcard mno
Change Input Method
Go to the FullWidth Symbols screen.
abc
def
ghi
jkl
pqrs
tuv
wxyz
Space
G-O: Long press to input corresponding Chinese
character displayed in the candidate field.
P: Long press to enter tones “ ” in
T9 PinYin mode.
R: Long press to display the Input Language
screen.
Changing the Input Method between Stroke and PinYin
“Changing the Input Method” on page 31
See
.
Entering Characters 33
Page 34

Using Stroke Mode (Traditional)
The following is an example of entering “ ”.
1. Change the input mode to T9
Stroke mode.
2. Press IGJ to display the
corresponding stroke for “ ”.
3. Long press the corresponding key
to complete the selection (in this
case, M).
Note
• Each Traditional/Simplified Chinese mode has own T9
Stroke mode. The screen examples in steps 1 to 3 are
displayed when you select “Traditional Chinese” in the Input
Language option.
34 Entering Characters
Using PinYin Mode
Input field
Long press the
corresponding numeric key
to select the desired
character directly from the
Candidate field.
Candidate field
The following is an example of entering “ ”.
1. Press K for the first l etter of the reading, then highli ght
“l”.
Page 35

2. Press J for the vowel of the first letter, then highlight
“li”.
Characters with the same reading are displayed in the
Candidate field.
3. Select the desired character.
4. Long press corresponding numeric key to enter the
desired character (in this case, H).
Tip
• When the cursor is placed after the first character, the
Candidate field displays characters most likely to follow.
• If you want to use tone options, long
press P instead of step 3 to
display the desired character.
The tone symbols are displayed in
the Candidate field.
Press the corresponding numeric
key (H).
Entering Characters 35
Page 36

Chinese User Dictionary
You can create your own word list for T9 Chinese input.
You can enter Chinese characters, alphabet, symbols and
numbers. Only capital letters can be used for acronyms.
Note
• This function is only available when “Input Language” is set
to “Traditional Chinese” or “Simplified Chinese”.
Creating a New Entry
1. On the text entry screen, press [Options] and select
“Chinese User Dictionary”.
2. Select “Add New Word”.
3. Enter new word.
4. Enter acronym.
Editing a Word in the List
1. On the text entry screen, press [Options] and select
“Chinese User Dictionary”.
2. Highlight the desired word.
3. Press [Options] and select “Edit”.
4. Modify the entry word.
5. Modify the acronym.
36 Entering Characters
Deleting a Word
1. On the text entry screen, press [Options] and select
“Chinese User Dictionary”.
2. Highlight the desired word.
3. Press [Options] and select “Delete”.
4. Press [Yes] or [No].
Page 37

To Call the Entry
Examples of entry words and acronyms:
The illustration below assumes that the example entry words
and acronyms are already stored.
1. Press M and highlight “S”.
If you long press G, “ ” will
be entered.
You can also select the other
words starting with the same
acronym by pressing b.
This example is using
T9 PinYin mode
Press b
2. Press H and highlight “SB”.
If you long press G, “ ”
will be entered.
Note
• Acronyms are available for T9 PinYin mode only.
• You can also enjoy word completion or predictive input of the
words stored in the Chinese User Dictionary.
When the first three characters of a word are entered, the
whole word appears at once.
The following is an example of predictive input and word
completion. This example uses words stored in the last section.
1. Press H, K, I and long
press H to enter “ ”.
2. The character “ ” appears at
.
(Candidates and are taken
from the Chinese User
Dictionary.)
This example is using
Stroke input method
for Simplified
Entering Characters 37
Page 38

3. Long press N to enter “ ”.
4. Long press O to enter “ ”.
The sentence is completed
automatically.
Note
• Word completion does not take place if the entry word has
less than four Chinese characters.
• Predictive characters from the Chinese User Dictionary
appear at , so you only have to press O to enter the
characters.
If there are entry words which start with the same characters
such as “ ” and “ ”, candidates “ ” and “ ”
appear at or , depending on the sequence in which the
words are saved.
38 Entering Characters
Symbols and Punctuations
1. On the text entry screen, press [Options].
2. Select “Add Symbol”.
The first symbol page is displayed.
In Chinese input mode, the FullWidth Symbols screen is
displayed.
3. Press a or b to switch pages (HalfWidth Symbol and
FullWidth Symbol Pages), or use the numeric keys G
or H.
Tip
• R is a shortcut to launch Symbol Tables.
Page 39

Using Templates
You can use the phrases registered in Text Templates when
entering characters.
For details on creating the text template, see “Adding Phrases
to Text Templates” on page 87.
1. On the text entry screen, move the cursor to the point
you wish to insert the template.
2. Press [Options] and select “Advanced”.
3. Select “Insert Template”.
4. Select the desired text template.
Copying, Cutting and Pasting Text
1. On the text entry screen, press [Options] and select
“Advanced”.
2. Select “Copy” or “Cut”.
3. Move the cursor to the first letter to be copied or to be
cut, then press B.
4. Move the cursor to the last letter to highlight the area,
then press B.
5. Move the cursor to the point you wish to paste the
letters.
6. Press [Options] and select “Advanced”.
7. Select “Paste”.
Insert Phonebook Entries
You can insert the entries registered in Phonebook when
entering characters.
For details on creating the Phonebook entries, see “Call
Manager” on page 41.
1. On the text entry screen, move the cursor to the point
you wish to insert the Phonebook Entry.
2. Press [Options] and select “Advanced”.
3. Select “Insert Phonebook Entry”.
4. Select the desired Phonebook Entry.
The selected entry is inserted.
Entering Characters 39
Page 40

Using the Menu
Main Menu
1. Press B in standby.
The Main menu is displayed.
2. Press a, b, c or d to highlight the desired menu,
then press B to access the function.
For details on the menu options, see “List of Menu
Functions” on page 6.
40 Using the Menu
Shortcut Keys
You can access menus by pressing B and digit keys for the
corresponding number on the Main menu. For numbers 10 to
12, press B and P (10), Q (11) or R (12). For menus
with tabs, press d (or c when necessary) to select the
desired tab before pressing the digit keys. See “List of Menu
Functions” on page 6.
Shortcuts are listed in the headings of this user guide.
Example (p. 49): To Access “Manage Groups” Sub Menu
Manage Groups
“Call Manager”
“Manage Groups”
Press BN and d twice for the “Phonebook Settings” tab,
then press G.
Example (p. 102): To Access “Tasks” Sub Menu
(M 3-4)
Tasks
Press BIJ.
Note
• The shortcut keys work for the first three menu levels only.
(M 8-d-d-1)
→
“Phonebook Settings” tab →
Page 41

Call Manager
You can store the phone numbers and Email addresses of your
friends, family and colleagues in the Phonebook.
Your phone can store up to 750 entries. For each e ntry, you can
enter information including up to 3 phone numbers and 3 Email
addresses. There is a limit to the number of characters that can
be entered for each item. The character limit differs for the
handset memory and SIM/USIM card memory.
(M 8)
Adding a New Entry
The amount of phone numbers that you can store to the SIM/
USIM card is dependent on its capacity. Contact your service
provider for details.
Selecting the Storage Memory
You can choose either the phone or SIM/USIM card memory
locations to store the new entry.
→
“Call Manager”
“Phonebook Settings” → “Save to”
“Phonebook Settings” tab →
1. Select from “Handset”, “SIM” or “Choice”.
If the selected location is different from the list displayed, a
confirmation message is displayed.
Tip
• “Choice” prompts you to choose the memory every time you
save a new entry.
(M 8-d-d-3-2)
Registering a New Entry
“Call Manager”
If you select the “Choice” option for the memory to be used, the
selection is between “To Handset” and “To SIM”.
(M 8-2)
→
“Phonebook” tab → “Add New”
1. Select the field you wish to fill in, and enter the relevant
information.
2. Press [Save], when finished.
Tip
• To create an entry, at least one field must be filled (“Last
Name”, “First Name”, “Add Phone Number” or “Add Email
Address” for the handset memory; “Name”, “Add Phone
Number” or “Add Email Address” for the USIM memory;
“Name” or “Add Phone Number” for the SIM memory).
Call Manager 41
Page 42

Saving an Unregistered Number
d-d
After the call ends, you can have the confirmation screen
asking you if you wish to register the number to the Phonebook.
→
“Call Manager”
“Phonebook Settings” → “Save Unregistered”
“Phonebook Settings” tab →
(M 8-d-d-3-5)
1. Select “Incoming Call” or “Outgoing Call”.
2. Select “On” or “Off”.
Registering My Card
You can register and edit your own contact as with other
Phonebook entries.
“Call Manager”
(M 8-3)
→
“Phonebook” tab → “My Card”
Searching for an Entry
You can search for the desired entry by entering the first few
letters of the name or by sorting the entries.
Changing the List Displayed
“Call Manager”
“Phonebook Settings”
→
(M 8-
“Phonebook Settings” tab →
→
“Source”
1. Select from “Handset”, “SIM” or “Both”.
If the selected location is different from the Phonebook
storage memory, a confirmation message is displayed.
42 Call Manager
-3-1)
Finding a Name
“Call Manager”
→
“Phonebook” tab → “Phonebook”
1. Enter the first few letters of the name.
The first name corresponding to the entered letters is
highlighted.
Tip
• You can select the Phonebook location from “Handset”,
“SIM” or “Both” before searching.
Page 43

Sorting the Phonebook List Order
You can change the listing order of the Phonebook entries to
pinyin order or by different groups.
→
“Call Manager”
“Phonebook Settings” → “View Phonebook”
“Phonebook Settings” tab →
(M 8-d-d-3-3)
1. Select “By PinYin” or “By Group”.
Selecting the Search Mode
“Call Manager”
“Phonebook Settings” → “Search Mode”
→
(M 8-d-d-3-4)
“Phonebook Settings” tab →
1. Select “English Search”, “PinYin Search” or “Character
Search”.
Dialling from the Phonebook
“Call Manager” → “Phonebook” tab → “Phonebook”
1. Highlight the desired entry and press D (voice call) or
long press D (video calling).
Tip
• If more than one phone number is registered for the entry,
highlight the desired phone number after step 1 and press
D (voice call) or long press D (video calling).
• You can also dial from the details screen of the Phonebook.
On the details screen, select the desired phone number and
press D (voice call) or long press D (video calling).
Dialling a Service Phone Number
Certain SIM/USIM cards contain service phone numbers that
can be dialled. Contact your SIM/USIM card vendor for more
information. On the Phonebook screen, “Service Dialling No.”
is displayed at the bottom of the list.
→
“Call Manager”
Number”
“Services” tab → “Service Dialling
(M 8-d-3)
1. Select the desired service phone number.
Tip
• If the SIM/USIM card contains only one service phone
number, you can dial it in step 1 by pressing B.
• If no service phone number is stored in the SIM/USIM card,
this menu is not selected.
Call Manager 43
Page 44

Fixed Dialling Numbers
This option is available on most SIM/USIM cards for mobile
phones. It allows you to configure a SIM/USIM card so that it
can only be used to make calls to numbers on a predefined list.
Note
• This service depends on the SIM/USIM card.
To Enable Fixed Dialling Numbers
“Call Manager”
(M 8-d-4)
→
“Services” tab → “FDN”
1. Enter your PIN2 code.
2. Select “Switch On/Off”.
3. Select “On” to enable this function.
To Add a New Name
“Call Manager”
→
“Services” tab → “FDN”
1. Enter your PIN2 code.
2. Select “Edit Dial List”.
3. Highlight an entry, press [Options], then select “Add
New”.
4. Add a name and a phone number.
For details on adding a name and phone number, see
“Adding a New Entry” on page 41.
5. Press [Save].
44 Call Manager
Sending a Message from the Phonebook
“Call Manager” → “Phonebook” tab → “Phonebook”
1. Select the desired entry including the phone number or
Email address you wish to use.
2. Highlight the desired phone number or Email address.
3. Press [Options] and select “Create Message”.
For further procedures, see “Creating a New Message” on
page 66.
Page 45

Sending a Voice Clip Message or Video Clip Message
Using an Address from the Phonebook
“Call Manager”
→
“Phonebook” tab → “Phonebook”
1. Select the desired entry including the phone number or
Email address you wish to use.
2. Highlight the desired phone number or Email address.
3. Press [Options] and select “Create Message”.
For further procedures, see “Creating a New Message” on
page 66.
Using Mailing Lists
You can create a mailing list to send the same message to a
group of recipients at once. Up to 5 groups can be registered.
To Create a New Mailing List
“Call Manager”
“Message Groups”
(M 8-d-d-2)
→
“Phonebook Settings” tab →
→
“Add New Group”
1. Enter the group name.
The new group name is displayed following the last group
on the Group List screen.
To Add Recipients to a Group
Up to 20 recipients can be registered in each list.
“Call Manager”
“Message Groups”
→
“Phonebook Settings” tab →
1. Highlight the desired group name.
2. Press [Options] and select “View”.
3. Select “Assign New Entry”.
4. Select the desired entry.
The detailed screen is displayed.
5. Select the desired phone number or Email address.
Tip
• If you modify the entry assigned in the group, you need to
re-assign it to the group. Highlight the entry, press
[Options], then select “Re-assign Entry” in step 3.
• To remove an entry from the group, highlight the entry, press
[Options], then select “Remove Entry” in step 3.
• To remove a group, highlight a group name and press
[Options] and then select “Delete” in step 2.
Call Manager 45
Page 46

To Send a Message Using a Mailing List
“Call Manager”
“Message Groups”
→
“Phonebook Settings” tab →
1. Highlight the desired group name.
2. Press [Options] and select “Create Message”.
For further procedures, see “Creating a New Message” on
page 66.
Editing Phonebook Entries
“Call Manager” → “Phonebook” tab → “Phonebook”
1. Highlight the entry you wish to edit.
2. Press [Options] and select “Edit”.
3. Modify the information.
4. Press [Save] when finished.
46 Call Manager
Adding a Thumbnail to Entries
Only Phonebook entries saved to the handset can have
Thumbnails attached to them.
→
“Call Manager”
“Phonebook” tab → “Phonebook”
1. Highlight the desired entry.
2. Press [Options] and select “Edit”.
3. Select “Picture”.
4. Select “Assign Picture”.
5. Select the desired picture.
6. Press [Save] when finished.
Note
• If you delete a picture in the handset memory, the
corresponding thumbnail is also deleted.
• To store a picture right after it was taken, select “Take
Picture” in step 4.
Page 47

Assigning a Ringtone or a Ring Video Clip to Each Entry
“Call Manager”
→
“Phonebook” tab → “Phonebook”
1. Highlight the desired entry.
2. Press [Options] and select “Edit”.
3. Select “Assign Tone/Video”.
4. Select “For Voice Call”, “For Video Calling” or “For New
Message”.
5. Select “Assign Tone” or “Assign Video”.
When selecting “Assign Video”, go to step 7.
6. Select “Preset Sounds” or “Music and Sounds”.
7. Select the desired tone or video clip.
For details on selecting a ringtone or a ring video clip, see
“Assigning a Ringtone for an Incoming Call” on page 111
or “Assigning a Ring Video Clip for an Incoming Call” on
page 112.
8. Press [Save] when finished.
Registering Birthday Item to Calendar
A birthday entered in a Phonebook entry can be registered to
the calendar.
→
“Call Manager”
“Phonebook” tab → “Phonebook”
1. Highlight the desired entry.
2. Press [Options] and select “View”.
3. Press d to display the second tab.
4. Press b to highlight the birthday entry.
5. Press [Options] and select “Set Reminder”.
Tip
• After registration, the data in Calendar can be customised.
For details on customising a schedule entry, see “To Change
the Settings” and etc. on page 97.
• If the Calendar memory is full, “Set Reminder” is not
displayed in step 5.
Call Manager 47
Page 48

Deleting Phonebook Entries
Deleting All Phonebook Entries
“Call Manager” → “Phonebook Settings” tab →
“Advanced”
→
“Delete All Entries”
1. Select from “Handset Entries”, “SIM Entries” or “Both
Entries”.
2. Enter your handset code.
For details on the handset code, see “Changing the
Handset Code” on page 129.
Deleting a Phonebook Entry
“Call Manager”
→
“Phonebook” tab → “Phonebook”
1. Highlight the desired entry.
2. Press [Options] and select “Delete”.
48 Call Manager
(M 8-d-d-4-3)
Managing the Phonebook
Copying Phonebook Entries between SIM/USIM Card
and Handset
“Call Manager”
“Advanced”
1. Select “From SIM to Handset” or “From Handset to
Note
• When you insert the SIM/USIM card into your phone for the
first time and start the Phonebook application, the
confirmation screen is displayed automatically, asking you if
you wish to copy or not. The number of Phonebook entries to
be copied varies depending on the SIM/USIM capacity.
• If the memory space is not enough to save all entries, you
cannot complete copying.
SIM”.
(M 8-d-d-4-1)
→
“Phonebook Settings” tab →
→
“Copy All Entries”
Page 49

Sending a Phonebook Entry
“Call Manager”
→
“Phonebook” tab → “Phonebook”
1. Highlight the desired entry.
2. Press [Options] and select “Send Phonebook”.
3. Select “As Message” or “Via Bluetooth”.
For “As Message”
For details, see “MMS” on page 66.
For “Via Bluetooth”
For details, see “Bluetooth” on page 135.
Receiving a Phonebook Entry
When the phone receives a Phonebook entry, a confirmation
message is displayed in standby.
1. Press [Yes].
The received entry is saved in the Phonebook. Press [No]
to reject.
Tip
• For details on entering Bluetooth wireless settings, see
“Connectivity” on page 135.
Manage Groups
Different ringtones can be set for each category. If you do not
change a category ringtone, the ringtone assigned in the
Profiles menu is used.
“Call Manager”
“Manage Groups”
(M 8-d-d-1)
→
“Phonebook Settings” tab →
1. Highlight the desired category.
2. Press [Options] and select “Assign Tone/Video”.
3. Select “For Voice Call”, “For Video Calling” or “For New
Message”.
4. Select “Assign Tone” or “Assign Video”.
When selecting “Assign Video”, go to step 6.
5. Select “Preset Sounds” or “Music and Sounds”.
6. Select the desired tone or video clip.
For details on selecting a ringtone or a ring video clip, see
“Assigning a Ringtone for an Incoming Call” on page 111
or “Assigning a Ring Video Clip for an Incoming Call” on
page 112.
Call Manager 49
Page 50

Editing the Category Name
d-d
You can edit category names to be assigned to the Phonebook
entries.
→
“Call Manager”
“Manage Groups”
“Phonebook Settings” tab →
1. Highlight the desired category name.
2. Press [Options] and select “Edit Name”.
3. Modify the name.
Speed Dial List
You can set a maximum of 8 phone numbers in the Speed Dial
list (p. 22).
Setting Phonebook Entries in the Speed Dial List
“Call Manager”
(M 8-d-2)
→
“Services” tab → “Speed Dial List”
1. Select the desired entry.
2. Highlight the desired phone number.
3. Press [Options] and select “Assign”.
4. Select the desired location.
Tip
• The nine digit keys (G - O) correspond to Speed Dial
list numbers.
• When the list is empty, select “Assign” in step 1.
50 Call Manager
To Edit the Speed Dial List
→
“Call Manager”
“Services” tab → “Speed Dial List”
1. Highlight the entry you wish to edit.
2. Press [Options] and select “Re-Assign” (or “Assign”).
Memory Status
This function helps you to check the memory used in the
Phonebook.
“Call Manager”
“Advanced” → “Memory Status”
(M 8-
→
“Phonebook Settings” tab →
-4-2)
Page 51

Multimedia
Video Player
Playing Back Video Clip Files
“Multimedia”
(M 7)
(M 7-1)
(M 7-1-2)
→
“Video Player” → “My Videos”
1. Select “All Videos” or the desired playlist.
2. Select the desired file.
To pause playback, press B.
To stop playback, press U.
Tip
• You can control the Video Player by using the following keys:
: Increases or decreases the volume.
a/b
b
(long press): Mutes.
d
: Jumps to the next file.
c
: Returns to the start of the current file.
cc
: Jumps to the previous file.
d
(long press): Fast-forwards.
c
(long press): Rewinds.
The side keys are always available to change the volume
level.
• Pressing H changes the size of the video display in the
following order: Original, Enlarged, Full Screen, Original and
so on. Note that this does not change the Display Size
setting.
• Pressing Q displays this help information.
Searching a File to Be Played Back
→
“Multimedia”
“Video Player” → “My Videos”
1. Select “All Videos” or the desired playlist.
2. Press [Options] and select “Search”.
3. Enter a few letters of the title.
Search results are displayed in alphabetical order and the
matching file is highlighted. The search will match the
entered text with any part of the title.
Adding a File to the Playlist
You can add files to a playlist by doing the following.
→
“Multimedia”
“Video Player” → “My Videos”
1. Select “All Videos” or the desired playlist.
2. Highlight the file you wish to add to the playlist.
3. Press [Options] and select “Add to Playlist”.
The playlists are displayed. For details on creating a
playlist, see “Adding a New Playlist” on page 52.
Multimedia 51
Page 52

4. Select the desired playlist.
The file highlighted in step 3 is saved.
To delete files from the playlist, highlight the file in the
playlist and press [Options]. Then select “Delete from
Playlist”.
Adding a New Playlist
You can create a playlist and register desired files in it.
→
“Multimedia”
“Video Player” → “My Videos”
1. Press [Options] and select “Add New Playlist”.
2. Enter the desired playlist name.
3. Press B.
Note
• To delete the playlist, highlight the playlist and press
[Options]. Then select “Delete Playlist”.
Settings
You can select a play mode for “Playback Pattern”, “Backlight”,
“Display Size” and “Sound Effect” when playing back video clip
files.
→
“Multimedia”
“Video Player” → “Settings”
1. Select from “Playback Pattern”, “Backlight”, “Display
Size” or “Sound Effect”.
52 Multimedia
2. Select from the following:
• “Playback Pattern”
“Normal”: Plays back all files in the
selected folder once and stops
playback.
“Repeat”: Continues playback of selected
file in the selected folder.
“Repeat All”: Plays back all files in the
selected folder.
“Random”: Plays back files in the selected
folder at random.
• “Backlight”
“Always On”: Lit while the file is played back.
“Always Off”: Unlit while the file is played back
even if a key is pressed.
“Normal Settings”: Works with the main backlight
setting (p. 117).
Page 53

•“Display Size”
“Original Size”: Displays the file in its original
“Enlarge”: Displays the file in an enlarged
“Full Screen”: Displays the file on the full
• “Sound Effect”
“Surround”: Plays back file with surround
“Bass”: Plays back file with emphasised
Downloading Video Clip Files
→
“Multimedia”
The video clip file download site is displayed.
Playing Back the Video Clip Files
To Play Back the Last File
“Multimedia”
“Video Player” → “Download Videos”
→
“Video Player” → “Last Played Video”
size.
size.
screen.
sound.
bass sound.
(M 7-3-4)
(M 7-1-1)
Streaming Player
You can play back video clip files while downloading them from
the mobile network.
You can also register the address of the Web site as a
bookmark.
“Multimedia”
(M 7-2)
→
“Streaming Player”
1. Select “Last Played”, “Enter URL”, “Favourites”,
“Access Log” or “Settings”.
“Last Played”: Shows the last streaming file.
“Enter URL”: Enter the desired address of the Web
“Favourites”: The address of the Web site is
“Access Log”: Shows a log of the Web sites you have
“Settings”: The backlight and display size settings.
site. The browser opens, starts
downloading and plays back.
registered.
accessed.
Multimedia 53
Page 54

Music Player
Music Player supports MP3, MPEG-4 and 3GPP format sound
files. You can access other menus while listening to sound files.
Creating a New Playlist
You can create your own playlist, storing and managing your
favourite tracks and the order of tracks.
→
“My Music” → “Playlists”
E
(M 7-3)
1. Press [Options] and select “Add New Playlist”.
2. Enter the desired playlist name.
Note
• To delete the playlist, highlight the playlist and press
[Options]. Then select “Delete Playlist”.
• You can create up to 99 playlists.
Playing Back Sound Files
→
“My Music”
E
1. Select the item you wish to play back.
• “All Music”:
All sound files are displayed.
54 Multimedia
• “Artists”:
The names of all artists are displayed.
When an artist is selected, all of their albums are
displayed.
When an album is selected, all of the sound files in the
selected album are displayed.
• “Albums”:
The names of all albums are displayed.
When an album is selected, all of the sound files in the
selected album are displayed.
• “Playlists”:
All playlists are displayed.
When any playlist is selected, all of the sound files in the
selected playlist are displayed.
2. Select the desired sound file.
To pause playback, press B.
To stop playback, press F and go back to standby, then
press F again. Select “Yes” when the pop-up appears.
Page 55

Note
• Select “My Music” to update the list of available music
tracks.
• You are asked whether or not to play sounds when the Silent
mode is activated.
• To play the last played file, select “Last Played Music”.
“Currently Playing” is displayed when a file is being played
back.
• When you receive a call, playback of the current file is
paused, and you can receive the call. After the call ends, the
paused playback resumes automatically in the background.
Tip
• You can return to the Main menu screen while playing back
the file in the background.
• You can create your playlist by listing only the desired files
(p. 54).
• Sound files in both the handset and the memory card are
displayed in a single view.
• You can select the playback pattern in step 2. Press
[Options] and select “Playback Pattern”.
“Normal”: P lays back all files in the selected folder on ce
and stops playback.
“Repeat”: Continues playback of selected file in the
selected folder.
“Repeat All”: Plays back all files in the selected folder.
“Random”: Plays back files in the selected folder at
random.
• While in the Music Player, the player can be controlled by
using the following keys:
: Increases or decreases the volume.
a/ b
b
(long press): Mutes.
d
: Jumps to the next file.
c
: Returns to the start of the current file.
cc
: Jumps to the previous file.
d
(long press): Fast-forwards.
c
(long press): Rewinds.
F
: Plays back the file in the background.
The side keys are always available to change the volume
level.
Sorting Files
→
“My Music” → “All Music”
E
1. Press [Options] and select “Sort”.
2. Select “By Title”, “By Artist”, “By Album” or “By Genre”.
Sort results are displayed.
Multimedia 55
Page 56

Adding a File to the Playlist
You can add files to a playlist by doing the following.
E
→
“My Music” → “All Music”
1. Highlight the file you wish to add to the playlist.
2. Press [Options] and select “Add to Playlist”.
The playlists are displayed. For details on adding a playlist,
see “Creating a New Playlist” on page 54.
3. Select the desired folder.
The file highlighted in step 1 is saved.
To delete files from the playlist, highlight the file in the
playlist and press [Options]. Then select “Delete from
Playlist”.
Note
• You can store up to 99 files in one playlist. However, the total
number of files stored on your phone cannot exceed 350
files.
Downloading Music Files
→
“Download Music”
E
The music file download site is displayed.
56 Multimedia
(M 7-3-3)
FM Radio
You can connect to the FM Radio service.
Selecting a Radio Station
“Multimedia”
(M 7-4)
→
“FM Radio”
1. Press [Options] and select “Select Station”.
2. Highlight the desired radio station and press B.
Tip
• You can play back the program in the background. Press
[Options] and select “Play in Background” while the program
is played back.
• A headset radio aerial is necessary to use this service.
Saving a Radio Station
→
“Multimedia”
“FM Radio”
1. Press [Options] and select “Save Station”.
2. Press [Options] and select “Assign”.
Page 57

Searching for Stations
“Multimedia”
→
“FM Radio”
1. Press [Options] and select “Search”.
2. Select “Auto Search”.
3. Select “Search Upwards” or “Search downwards”.
Note
• You need to plug in the headset when using the FM Radio.
Tip
• You can scan and save the stations automatically by
selecting “Update station list” in step 2.
• You can also select the desired station by entering the
frequency directly. Select “Enter Frequency” in step 2.
Setting FM Radio Playback
→
“Multimedia”
To Switch the Output
“FM Radio”
1. Press [Options] and select “Detailed settings”.
2. Select “Sound output settings”.
3. Select “Headset” or “Loudspeaker”.
To Activate the Auto Switch Off
1. Press [Options] and select “Detailed settings”.
2. Select “Auto Switch Off”.
3. Select the desired option.
To Switch between Stereo and Monaural
1. Press [Options] and select “Detailed settings”.
2. Select “Switch to Stereo”.
To Switch the Station List
1. Press [Options] and select “Detailed settings”.
2. Select “Switch station list”.
3. Select the desired list.
Mobile TV
You can connect to the Mobile TV service by pressing T.
Note
• To use Mobile TV on your phone, you need to be in an area
of 3G coverage.
• To use Mobile TV on your phone, you need to purchase a
subscription package from your operator.
Multimedia 57
Page 58

Camera
Your phone has a built-in digital camera that allows you to take
pictures and record video clips wherever you are. This section
starts with basic functions and operational procedures to take,
save and send pictures and video clips, followed by common
and unique functions to camera and video modes.
(M 5)
Taking Pictures
“Camera”
1. Press B to take the picture.
The shutter sounds and the still image of the taken picture
is displayed.
2. Press [Save].
The taken picture is saved in Gallery.
To cancel, press [Cancel].
To send the taken picture, press B in step 2.
58 Camera
Note
• When the video camera is launched, press [Options] and
select “Go to Photo Camera”, or press c.
• When you try to send a picture that has too large a file size,
the picture size is resized for the message. The original sized
picture is saved in Gallery.
Tip
• You can activate the camera by long pressing X in
standby. Simply press X to take pictures, and start and
stop recording.
• You can lock the focus by pressing D or pressing X
halfway before taking a picture or recording a video clip.
Page 59

Recording Video Clips
You can record a video clip with your phone.
“Camera”
The preview is displayed on the screen.
When in photo camera mode, press d to switch to video
camera mode.
1. Press B.
2. To stop recording, press B.
3. Select “Save”.
The video clip is saved in Gallery.
To view the preview before saving, select “Preview”.
To send the video clip, select “Save and Send”.
For further procedures, see “Creating a New Message” on
page 66.
Note
• You can only send video clips when “For Message” is
selected for the recording time. For details, see “Selecting
the Recording Time and Picture Size” on page 65.
Common Functions in the Photo and Video Camera Modes
Using the Digital Zoom Function
To Adjust the Zooming Ratio
1. Press a or b.
Once the phone has returned to standby, the zoom settings
return to default.
Adjusting the Exposure
→
“Camera”
1. Press a (Bright) or b (Dark).
Once the phone has returned to standby, the brightness
settings return to default.
[Options] → “Exposure”
: (Bright → Normal → Dark)
Camera 59
Page 60

Selecting the Picture or Video Quality
Select the appropriate option.
“Camera”
“Camera”
→
[Options] → “Picture Quality”
→
[Options] → “Video Quality”
1. Select the desired picture or video quality.
: Super Fine
:Fine
:Normal
Note
• The better quality you select, the larger the file size
becomes.
Using the Self-Timer
Select the appropriate option.
→
“Camera”
[Options] → “Modes” → “Self-timer”
1. Select “2sec”, “5sec” or “10sec”.
When you select one of these options, the corresponding
indicator (“ ”, “ ”, or “ “) is displayed on the screen.
Select “Off” to cancel the self-timer.
60 Camera
Switching the Focus Mode
→
“Camera”
[Options] → “Modes” → “Focus”
1. Select the desired option.
:Auto Focus
: Manual Focus
:Macro
Switching the Display Direction
You can switch the display direction between portrait and
landscape.
→
“Camera”
Landscape”
[Options] → “Settings” → “Portrait /
Page 61

Selecting the Storage Memory
Select the appropriate option.
“Camera”
Pictures”
“Camera”
Videos”
→
[Options] → “Settings” → “Save New
→
[Options] → “Settings” → “Save New
1. Select the desired location from “To Handset Memory”,
“To Memory Card” or “Choice”.
Note
• If you select “Choice”, select the desired location every time
you save.
Auto Save
You can set the phone to save pictures and video clips
automatically.
→
“Camera”
[Options] → “Settings” → “Auto Save”
1. Select “On” or “Off”.
Selecting the Anti-flicker Mode
“Camera”
→
[Options] → “Settings” → “Anti-flicker”
1. Select “Mode 1: 50Hz” or “Mode 2: 60Hz”.
Note
• Vertical stripes may occur on the picture due to the light
source. Change the anti-flicker mode to rectify.
Switching between the Photo and Video Camera Modes
You can switch between the photo and video camera modes by
pressing c or d.
Select the appropriate option.
→
“Camera”
“Camera”
You can also switch between the Internal (sub) camera and
External (main) camera.
Using the Help Function
“Camera”
[Options] → “Go to Video Camera”
→
[Options] → “Go to Photo Camera”
→
[Options] → “Help”
Camera 61
Page 62

Common Shortcut Keys
If multiple options exist, they switch each time you press each
of the following keys.
Photo Camera Video Camera
D Focus Lock
G Zoom Max/Min
H Switches between internal and external cameras
I Focus
J Save New Pictures Save New Videos
K Picture Size Picture Size
L Microphone
M Picture Quality Video Quality
N Self-timer
O Switches between Portrait and Landscape
Q Switches Viewfinder
between with and without
indicators
P Exposure
62 Camera
Switches the display
modes in the Preview
screen
Note
• The “Switches the display modes” option is available in
“Preview” before you save a video clip. See “Recording Video
Clips” on page 59.
Functions in Photo Camera Mode
Selecting the Picture Size
You can select the size of pictures. All taken pictures are saved
in the JPEG format.
→
“Camera”
1. Select the desired size.
(External Camera) 1200 × 1600 dots/
(Internal Camera) 240 × 320 dots/120 × 160 dots
[Options] → “Picture Size”
960 × 1280 dots/
768 × 1024 dots/480 × 640 dots/
240 × 320 dots/120 × 160 dots
Page 63

Continuous Shoot
There are various modes for taking continuous shots.
“Camera”
Shoot”
→
[Options] → “Modes” → “Continuous
1. Select the desired mode.
The following continuous shoot modes are available:
“Off”: The continuous shoots are
“4 Pictures”/“9 Pictures” ( / ):
“Overlapped” ( ): Overlaps continuous pictures
Note
• When you select “Manual” to take continuous pictures,
press B manually at the desired speed.
• When the Timer and Continuous Shoot functions are
simultaneously set, “ ” and “ ” (for “2sec” and “4
Pictures”, for example) are alternately displayed.
cancelled.
Takes 4 or 9 pictures
continuously.
After selecting this mode, select
from “Fast”, “Normal”, “Slow”
or “Manual”.
into one picture and makes an
afterimage.
After selecting this mode, select
“Fast” or “Normal”.
• You cannot use the Continuous Shoot function for picture
sizes larger than 480
“Overlapped” are not available for picture sizes larger than
×
320 dots.
240
Camera Effects
You can select from various camera effects.
“Camera”
Effects”
→
×
640 dots. “9 Pictures” and
[Options] → “Modes” → “Camera
1. Select from “Sepia”, “Monochrome”, “Negative” or
“Sketch”.
Note
• You cannot use the Camera Effects function for picture sizes
larger than 240
×
320 dots.
Camera 63
Page 64

Selecting a Frame
You can select the frame from preset patterns or Pictures.
“Camera”
→
[Options] → “Modes” → “Add Frame”
1. Select “Preset Frames” or “Pictures”.
2. Select the desired frame.
The selected frame is confirmed on the display.
3. Press B.
Note
• Images larger than 240 dots [W]
used.
Using the Full Screen
You can display the preview on the full screen without the soft
key area and indicator area.
→
“Camera”
[Options] → “Settings”
×
320 dots [H] cannot be
1. Select “Full Viewfinder”.
To return to the normal viewfinder, select “Normal
Viewfinder”.
64 Camera
Selecting the Shutter Sound
“Camera”
Sound”
→
[Options] → “Settings” → “Shutter
1. Select the desired shutter sound from 3 preset patterns.
To play back the shutter sound, press [Play] in step 1.
Note
• Continuous Shoot uses the specialised shutter sound that
cannot be changed using the above settings.
• The shutter sound remains active even when “General
Volume” (p. 110) is set to “Silent” to prevent unauthorised
use.
Page 65

Functions in Video Camera Mode
Selecting the Recording Time and Picture Size
“Camera”
1. Select “For Message” or “Extended Video”.
2. Select the desired picture size.
Note
• If you select “For Message” for the recording time, the file
• “Save and Send” is not displayed after recording in the
→
[Options] → “Record Time”
For Message ( ): Limits the size to send a
Extended Video ( ): Less than 30 minutes
If “For Message” is selected, select “Large(QCIF)” or
“Small(SubQCIF)”.
If “Extended Video” is selected, select “Large(QCIF)” or
“Small(SubQCIF)”. When using the external camera,
“QVGA(asf)” is also available.
size is limited depending on the service provider. Therefore,
the quality is also limited for the setting.
Extended Video mode.
message depending on service
providers.
(depending on the memory).
Recording Video Clips with Sound
To record a video clip with sound, the microphone needs to be
activated.
→
“Camera”
[Options] → “Settings” → “Microphone”
1. Select “On” or “Off”.
Note
• The microphone is already turned on in the default setting.
Select “Off” to record a video clip without the sound.
• The file size of a video clip can be reduced if the sound is not
recorded.
Video Encoding
→
“Camera”
Encode”
[Options] → “Settings” → “Video
1. Select the appropriate format.
Camera 65
Page 66

Messages
Your phone allo ws you to send and receive text, multimed ia and
Email. It is compatible with most POP3 Email providers.
(M 4)
SMS
SMS allows you to send text messages up to 765 characters
long. If you send a message of more than 160 characters, it is
split into several segments.
MMS
With MMS, you can send images, sound or video to brighten
someone’s day. Messages of up to 300 KB with images,
sound, or video clips can be sent and received.
Email allows you to send messages of up to 300 KB.
Note
• Some MMS functions may not always be available
depending on yo ur network. Contact your serv ice provider for
more information.
• Maximum message size varies depending o n the restrictions
set by the service provider.
66 Messages
Creating a New Message
(SMS/MMS)
“Messages”
(Email)
“Messages”
→
“Create Message” → “Message”
→
“Create Message” → “E-Mail”
(M 4-1)
1. Select the recipient field.
2. Select the desired method to enter the recipient’s
details.
3. For MMS, enter or select the Email address or phone
number from the Phonebook. For SMS, enter or select a
phone number. For Email, enter or select an Email
address.
• To add multiple Email addresses or phone numbers,
highlight the recipient field, press [Options], and then
select “Add Recipient”. Enter or select the Email
address or phone number from the existing Phonebook.
• To change the recipient types, press [Options], select
“Add Recipient” and highlight the desired recipient.
Press [Options] and select “Change to To”, “Change to
Cc” or “Change to Bcc”.
Page 67

• To add a subject, highlight the subject field and press
B. Then enter the subject in the subject entry screen
and press B.
4. Place the cursor in the message field.
5. Press B to display the message entry screen.
Enter the message and press B.
6. Press [Options] and select “Send”.
“Send” is not available when no recipients are set.
After the message is sent, the message is moved to the
Sent box.
Note
• When you create an SMS/MMS message, the mode is
automatically switched to MMS in the following cases:
•When “Enter Email Address” in [Options] is selected for
recipient fields.
•When a subject is entered.
•When the size of entered text has exceeded the SMS size
limit.
Tip
• To send the same message to a group of recipients, select
“Select Message Group” in step 2, then select the desired
group name. For details on creating a mailing list, see “To
Create a New Mailing List” on page 45.
To Add a Slide Show
1. Perform steps 1 to 5 in “Creating a New Message” on
page 66.
2. Press a to highlight your message or other inserted
item such as a picture or sound file.
3. Press [Options] and select “Add Slide”.
4. Select “Add Slide After” or “Add Slide Before”.
5. Enter another message.
If you wish to set the duration of each slide, highlight your
message or other inserted item such as a picture or sound
file. Press [Options] and select “Sl ide Duration”, then select
the desired duration. Repeat steps 2 to 4 to add more
slides.
Tip
• You can create messages up to 300 KB. Each slide can
contain one picture and/or one sound file or video clip.
Messages 67
Page 68

To Attach Data
1. In step 6 in “Creating a New Message” on page 66,
press [Options] and select “Insert Item”.
2. Select “Picture”, “Sound”, “Video”, “Attach Contact”,
“Attach Appointment” or “Others”.
When selecting “Attach Contact” or “Attach Appointment”,
go to step 4.
3. Select the desired option and then select the desired file.
If you wish to attach pictures, sounds or video clips that are
saved, select “Saved Picture”, “Saved Sound” or “Saved
Video”.
If you wish to take new pictures, record sounds or video
clips, select “Take Picture”, “Record Voice” or “Record
Video”.
4. Select the desired data.
If you wish to select your own Phonebook entry, select “My
Card”.
When attaching an appointment, select the desired day
including a schedule entry you wish to add and select the
desired schedule entry.
Note
• When attaching JPEG files, select the appropriate resize
option, as the maximum message size for sending varies
depending on the service provider.
68 Messages
To Remove or Replace Attachments
1. In step 6 in “Creating a New Message” on page 66,
press [Options] and select the corresponding remove
option for each attachment.
Page 69

Using the Sending Options
You can use the message sending options for each type of
message.
1. Press [Options] and select “Messaging Settings”.
• “Delivery Report” (“On”, “Off”) (SMS/MMS): Enables or
disables Delivery Report when the message is
successfully sent to the recipient.
• “Expiry Time” (“Maximum”, “1 hour”, “12 hours”, “1
day”, “1 week”) (SMS/MMS): Sets Expiry Time for a
message to be saved in the server.
• “Priority” (“High”, “Normal”, “Low”): Prioritises
composed messages.
• “Read Report” (“On”, “Off”) (SMS/MMS): Confirms
whether or not a report is sent notifying the sender that
the message has been read.
2. Press [Options] and select “Send”.
After the message is sent, the message is moved to the
Sent box.
Note
• The current message size displayed while you are creating
the message is an approximation.
• If a message cannot be sent for some reason, the message
stays in the Outbox and the “ ” is displayed in standby.
Tip
• To save the message without sending, press [Options] and
select “Save to Drafts” in step 4 in “Creating a New
Message” on page 66.
• You can send the following items attached to multimedia
messages. Details are given in the following sections.
• Gallery data
• Phonebook entry
• Schedule entry created by Calendar, etc.
• You can use the template option to help you compose
messages. For details on using this option, see “Using
Templates” on page 39.
Messages 69
Page 70

Sending a Message in the Drafts Box
“Messages”
→
“Drafts”
(M 4-4)
1. Select the desired tab, SMS/MMS or Email.
2. Press [Options] and select “Edit & Send”.
3. Modify the message, if necessary.
4. Press [Options] and select “Send”.
“Send” is not available when no recipients are set.
Sending a Voice Clip Message or Video Clip Message
You can record a new voice or video clip when creating a new
message.
Select the appropriate option.
→
“Messages”
“Messages”
“Create Message” → “Voice Message”
→
“Create Message” → “Video Message”
1. Press B to start recording.
2. Press B to stop recording.
3. Select “Accept” to attach to the new message.
4. Select “To Handset Memory” or “To Memory Card” as
the destination to save.
For further procedures, see “Creating a New Message” on
page 66.
Tip
• You can play back voice or video clips from Gallery.
70 Messages
Reading a Message
Messages you receive are saved in the Inbox.
→
“Messages”
“Inbox”
1. Select the desired tab, SMS/MMS or Email.
2. Select the message you wish to view.
Page 71

Storing the Phone Number of a Sender in the Phonebook
“Messages”
→
“Inbox”
1. Select the desired tab, SMS/MMS or Email.
2. Highlight the message from which you wish to store the
phone number or Email address.
3. Press [Options] and select “Save Address”.
The new Phonebook entry screen including the phone
number is displayed. For details on creating a new
Phonebook entry, see “Adding a New Entry” on page 41.
Calling the Phone Number of a Sender Embedded in the
Message
→
“Messages”
“Inbox”
1. Select the desired tab, SMS/MMS or Email.
2. Highlight the message containing the phone number you
wish to dial.
3. Press [Options] and select “Call Sender”.
Downloading a Single MMS
“Messages”
→
“Inbox”
1. Select the SMS/MMS tab.
2. Highlight the message alert ( ) you wish to download.
3. Press [Options] and select “Download”.
Tip
• You can download multiple messages at the same time. See
“Downloading Multiple MMS”.
Downloading Multiple MMS
→
“Messages”
“Inbox”
1. Press [Options] and select “Multiple Select”.
2. Select the desired message alerts, press [Options] and
select “Select” or “Select All”.
3. Press [Options] and select “Download”.
The selected messages are downloaded at the same time.
Messages 71
Page 72

Replying to a Message or to All Addresses
“Messages”
→
“Inbox”
1. Select the desired tab, SMS/MMS or Email.
2. Highlight the message the sender of which you wish to
reply to.
3. Press [Options] and select “Reply” (to sender only) or
“Reply All” (to all other recipients listed in the original To
or Cc lists).
4. Select “Reply” or “Reply with History”.
5. Enter the message.
6. Press [Options] and select “Send”.
“Send” is not available when no recipients are set.
Forwarding a Message
“Messages”
→
“Inbox”
1. Select the desired tab, SMS/MMS or Email.
2. Highlight the message you wish to forward.
3. Press [Options] and select “Forward”.
4. Perform steps 1 to 5 in “Creating a New Message” on
page 66.
72 Messages
Sorting the Messages in the List
“Messages”
→
“Inbox”
1. Select the desired tab, SMS/MMS or Email.
2. Press [Options] and select “View Settings”.
3. Select “Sort”.
4. Select the desired sort option.
Page 73

Cell Broadcasts
You can receive cell broadcast messages or general messages
such as weather forecasts and traffic reports. This information
is broadcast to subscribers in certain network areas.
This function may not be available on all mobile phone
networks. Contact your service provider for more information.
Enabling/Disabling Cell Broadcasts
“Messages”
(M 4-9)
→
“Cell Broadcasts” → “Switch On/Off”
1. Select “On” or “Off”.
Reading Cell Broadcast Messages
“Messages”
→
“Cell Broadcasts” → “Read Messages”
1. Select the desired subject.
2. Scroll the screen to read the message.
3. Press U.
Setting Languages for Cell Broadcast Messages
“Messages”
“Language”
The current language is displayed.
→
“Cell Broadcasts” → “Settings” →
1. Press B to check.
2. Press [Save].
Subscribing to Cell Broadcasts
Select the page of the cell broadcast message that you want.
“Messages”
Info Subjects”
→
“Cell Broadcasts” → “Settings” → “Set
1. Press [Options] and select “Add/Remove”.
2. Select the desired subject.
3. Press [Save].
Tip
• If the desired subject is not in the list that appears in step 2,
select “Create Subject” in step 1, then enter the subject code
to add a page. For details on the subject code, contact your
service provider.
Messages 73
Page 74

Area Info
The Area Info is the message information that operators send
to subscribers in certain areas.
When you receive Area Info, the message (area code) is
displayed in standby.
Enabling/Disabling Area Info
“Messages”
(M 4-10) (M 4-11)
→
“Area Info”
1. Select “On” or “Off”.
Note
• This function may not be available on all mobile phone
networks. Contact your service provider for more
information.
• If Area Info is set to “On”, the standby time will decrease.
74 Messages
Messaging Settings
General Settings
“Messages”
“General Settings”
1. Select the item you wish to set up.
• “Signature”:
• “Auto Delete”:
• “Message List View”:
• “Scroll Unit”:
• “Message Type”:
→
“Messaging Settings” →
Enables or disables “Auto Insert”. Select “Edit” to edit
current signature.
Deletes the oldest message automatically, when the
Inbox, Sent or Both (Inbox and Sent) is full.
Switches the mailbox listing (“Two-line”, “One-line”).
Scroll through messages by “Single Line”, “Half Page”
or “Whole Page”.
Sets the type of message to send by default when a
message is composed. When set to “Free”, the
message is se nt automatically either as an SMS or MMS
as appropriate.
Page 75

SMS Settings
“Messages”
→
“Messaging Settings” →
“SMS Settings”
1. Select the item you wish to set up.
• “Delivery Report”:
Enables or disables Delivery Report request.
•“Signature”:
Enables or disables “Auto Insert”. Select “Edit” to edit
current signature.
• “Automatic Resend”:
Tries to resend the failed SMS/MMS message up to two
times (“On” or “Off” selection).
• “Expiry Time”:
This indicates the number of days and hours for which
a message you send may remain undelivered to the
message recipient. During this period, the message
service centre will continually try to deliver the message
to the recipient.
• “Message Centre”:
Enter the me ssage centre number. U p to 2 numbers can
be registered.
If you wish to enter a country code for a message to an
international number, long press Q until a + sign is
displayed.
• “Message Format”:
Sets the message format to be used when creating a
new message.
•“Reply Path”:
Enables or disables adding a reply path to the message.
• “Optimisation”:
When set “On” (default), double-byte characters such
as European characters with an accent are converted
into single-byte characters and sent.
When “Off”, double-byte characters are sent as
displayed.
Please note that you may be charged double for doublebyte characters sent in an SM S when Optimisation is set
“Off”.
• “Connection Type”:
Sets the preferred connection type (“GPRS Preferred”,
“CSD Preferred”).
Messages 75
Page 76

MMS Settings
“Messages”
→
“Messaging Settings” →
“MMS Settings”
1. Select the item you wish to set up.
• “MMS Accounts”:
Select the desired account or select “Create New” to
enter the following settings.
“Profile Name”: MMS profile name (Unique
name)
“Proxy”: Proxy setting for MMS
“Relay Server URL”: MMS relay server
•“Home Download”:
Controls the message download timing inside your
network area.
“Always Download”: Downloads messages
immediately from the server.
“Always Defer”: Defers message download.
• “Roaming Download”:
Controls the message download timing when roaming
outside of your network.
“Always Download”: Downloads messages
immediately from the server.
“Always Defer”: Defers message download.
76 Messages
• “Delivery Report”:
Enables or disables Delivery Report request.
• “Signature”:
Enables or disables “Auto Insert”. Select “Edit” to edit
current signature.
• “Automatic Resend”:
Tries to resend the failed SMS/MMS message up to two
times (“On” or “Off” selection).
• “Delivery Report Allow”:
Confirms whether or not a report is sent notifying the
sender when you receive a message.
•“Read Report”:
Enables or disables Read Report request.
• “Read Report Allow”:
Enables or disables Read Report Allow when the
recipient is required to inform the sender that the
message has been read.
Page 77

• “Expiry Time”:
This indicates the number of days and hours for which
a message you send may remain undelivered to the
message recipient. During this period, the message
service centre will continually try to deliver the message
to the recipient.
•“Slide Duration”:
Sets the duration of the slide.
• “Slide Auto Play”:
Enables or disables Slide Auto Play.
• “Send File Settings”:
Sets whether or not to send and save the file settings.
• “Max Message Size”:
Sets the maximum message size for sending and
disables sending MMS messages exceeding that size.
• “Creation Mode”:
When set to “Free”, you can attach files of any format to
the mail. When set to “Restricted”, only certain formats
and message sizes can be attached. The “Restricted”
setting has priority over “Max Message Size”.
• “Emoticons”:
Enables or disables the Emoticons when entering text.
•“Hide Number”:
Sets whether to show or hide the sender’s address.
• “Delivery Time” (“Immediate”, “1 hour”, “12 hours”, “1
day”, “1 week”):
Sets the time the message is delivered after the Send
key is pressed.
• “Anonymous Rejection”:
Enables or disables the rejection of messages from
anonymous senders.
To Activate the MMS Account Profile
1. Select “MMS Accounts”.
2. Select the desired profile you wish to activate.
Messages 77
Page 78

Email Settings
“Messages”
“Email Settings”
To Set an Email Account
→
“Messaging Settings” →
1. Select “Email Accounts” and highlight the preset Email
account.
You can also create a new account.
2. Press [Options] and select “Edit”.
3. Select the item you wish to set up.
“Account Name”: Email account name (Unique
“Incoming Server”: Server name, user ID, password,
“Outgoing Server”: Server name, user ID, password,
“Access Point”: Access point for Email
“Email Address”: Email address
78 Messages
name)
port number, APOP
authentication and encryption
for the incoming server
port number, SMTP
authentication and encryption
for the outgoing server
“Advanced Settings”: Your name, signature, download
interval, download
configuration, maximum
download limit, save sent
messages
To Activate the Email Account Profile
1. Select “Email Accounts”.
2. Select the desired profile you wish to activate.
Page 79

Browser
Your phone is already configured to access SmarTone
the mobile internet.
SmarTone
to a new world of information, games, music and services.
Because your phone uses 3G (UMTS), it has a system that is
faster than previous ways of getting mobile information. Also,
the connection is ‘always on’ which means there is no need to
wait for dialling up. You only have to pay for the data you send
or receive, not how long you’re connected.
Your phone contains a WAP browser used for surfing on the
Mobile Internet, where you can get a lot of useful information.
Normally, pages are designed for a mobile phone.
Your phone is already setup to SmarTone
Settings.
(M 2)
iN!
is a mobile internet portal which is your gateway
iN!
site for WAP/MMS
iN!
and
Main Menu
→
“Browser”
The SmarTone
“Browser”
The URL entry screen is displayed. You can type in the URL of
a site directly.
“Browser”
See page 80.
“Browser”
WAP Push alerts are displayed.
“Browser”
You can view all the screenshots that have been saved onto the
handset memory.
“Browser”
The history of pages you have recently browsed is displayed.
“Browser”
See page 81.
“Homepage”
iN!
service page is displayed.
→
“Go to URL”
→
“Bookmarks”
→
“Alert Inbox”
→
“My Saved Page”
→
“Access History”
→
“Browser Settings”
Browser 79
Page 80

Navigating a WAP or Web Page
• a b c d: Moves the highlight around in the screen.
• A: Launches the option menu if it has not
• B: Executes the highlighted item in the
• C: Visits “SmarTone
• F (short press): Exits the browser.
(long press): Turns off the phone.
80 Browser
been launched.
Used to select an option from the option
menu.
screen.
iN!
browser when in standby.
Moves to previous page when the
browser is active.
” by opening the
Editing Bookmarks
“Browser”
(M 2-3)
→
“Bookmarks”
1. Select the desired URL, and press [Options].
You can edit the list of Bookmarks by the following options:
(When a bookmark is highlighted)
“Open”: Opens a bookmark.
“Edit”: Edits URL address of the
“Add New Bookmark”: Creates new bookmarks.
“Create Folder”: Creates new folders.
“Send via SMS”: Sends the URL address to
“Move”: Moves bookmarks to another
“Details”: Displays detailed information of
“Delete”: Deletes a bookmark.
“Delete All”: Deletes all bookmarks.
bookmark.
recipients.
location or into a folder.
the WAP/web page.
Page 81

(When a folder is highlighted)
“Select”: Selects the folder.
“Add New Bookmark”: Creates new bookmarks.
“Create Folder”: Creates new folders.
“Move”: Moves folder and bookmarks in
the folder to another location.
“Rename Folder”: Renames the folder.
“Delete”: Deletes the folder and
bookmarks in the folder.
“Delete All”: Deletes all folders and
bookmarks.
(When there are no bookmarks)
“Add New Bookmark”: Creates new bookmarks.
“Create Folder”: Creates new folders.
Browser Settings
“Browser”
(M 2-7)
→
“Browser Settings”
“Font Size”: Sets the font size for browsing.
“Scroll Step”: Sets the speed of scrolling.
“Send Referrer”: Enables or disables the
notification of the referrer.
“Cookies”: Adjusts the setting of cookies.
“Downloads”: Sets whether or not to show
images when accessing the
WAP/web page.
“Security”: Adjusts the security prompt
level.
“WAP Push”: Sets whether you need
confirmation for push message.
“Download to”: Sets the download preferred
location.
Browser 81
Page 82

Browser Options when Online
You can use the various options of the browser.
C
→
[Options]
“Select”: Selects a WAP page.
“Open This Frame”: Opens the selected frame.
(This option is available only
when a frame page is
displayed.)
“Home”: Goes to the homepage.
“Forward”: Goes to the next page.
“Reload Page”: Reloads the WAP page to get
updated information.
“Bookmarks”: See page 80.
“Save This Page”: Saves the currently viewed
browser screenshots to the
handset memory.
“Save Items”: Saves items from the browsing
pages.
“Go to URL”: Allows you to type in the URL of
a site directly. Handset browser
will go to the web/WAP page
that you entered.
82 Browser
“Access History”: Shows the history where you
have browsed.
Complete Page Display
“
”: Allows the browser to display in
complete page mode or Virtual
Screen mode.
“Zoom In/Out”: Zooms in on or out from the
browsing page. (This option is
available only when “Complete
Page Display” is set to “ON”.)
“Advanced”: Displays the advanced option
menu of the browser.
“Page Over View”: Shrinks the view of the browsing
page and displays the entire
page. To display a specific area
in normal view, use a/b/c/
d to move to the desired
location and press B.
“Help”: Displays the browser help.
“Exit”: Exits the browser.
Page 83

The Advanced Options
C
→
[Options] → “Advanced”
Send URL via SMS
“
”: Sends the URL of this WAP/web
page via SMS.
“Details”: Shows detailed information of
the WAP/web page.
“Delete Browser Data”: Deletes the browser data. You
can clear the cache/cookies/
history/authentication
information.
“Search This Page”: Searches for specific words in
the WAP/web page.
“Jump to Top”: Jumps to the top of the WAP/
web page.
“Jump to Bottom”: Jumps to the bottom of the
WAP/web page.
“Copy Text”: Copies the text on the WAP/web
page.
“Browser Settings”: Displays the settings menus
(p. 81).
Browser 83
Page 84

Gallery
Gallery contains all your pictures, music and videos. Also
included in Gallery are Text Templates. You can also transmit
pictures, sounds and video clips via
technology to other Bluetooth-enabled devices.
Pictures
Pictures that are taken by your cameraphone or images that
are downloaded from mobile Internet sites can be viewed,
edited and organised.
Viewing Pictures
“Gallery”
(M 6)
(M 6-1)
→
“Pictures”
Bluetooth
wireless
1. Select the file you wish to view.
The selected picture is displayed.
Note
• To switch betw een viewing handset or me mory card content,
select the first item in the options menu.
Tip
• You can scroll through your pictures with P and R.
• To change the default view of pictures (list or grid), press
[Options], select “Manage Items” and then select “Change
List View”.
84 Gallery
Using Images as Wallpaper
→
“Gallery”
“Pictures”
1. Highlight the file you wish to use as wallpaper.
2. Press [Options] and select “Set as Wallpaper”.
Editing Pictures
“Gallery”
→
“Pictures”
1. Highlight the file you wish to edit.
2. Press [Options] and select “Edit”.
3. Select “Picture editor” or “Composite”.
4. Select the desired option.
Note
• “Picture editor” may not be available depending on the
original picture and copyright issued.
Page 85

Saving an Image to Phonebook Entries
This option can be only used for pictures saved in the handset
memory.
→
“Gallery”
“Pictures”
1. Highlight the file you wish to add to Phonebook.
2. Press [Options] and select “Add to Contacts”.
To overwrite, select the data you wish to save.
To save as a new entry, select “<As New Contact>”.
For details on entering a name, see “Adding a New Entry”
on page 41.
Downloading Picture Files
→
“Gallery”
The picture file download site, SmarTone
Videos
Video clips that are recorded by your phone’s video camera or
video clips that are downloaded from mobile Internet sites can
be viewed and organised.
Playing Back Video Clip Files
“Gallery”
“Pictures” → “Download More”
(M 6-2)
→
“Videos”
iN!
, is displayed.
1. Select the file you wish to play back.
To pause playback, press B.
To resume, press B again.
To stop playback, press U.
Note
• To switch betw een viewing handset or me mory card content,
select the first item in the options menu.
Using a Video Clip as a Ring Video Clip
You can set your video clip to play back when the phone rings.
→
“Gallery”
“Videos”
1. Highlight the desired video clip.
2. Press [Options] and select “Set as Ring Video”.
Tip
• For other option menus, see “Common Option Menus” on
page 88.
Downloading Video Clip Files
→
“Gallery”
The video clip file download site, SmarTone
SD Videos
Video clips with the “ASF” format that are recorded by a video
camera or downloaded from mobile Internet sites can also be
managed with SD Videos.
“Gallery”
“Videos” → “Download More”
(M 6-3)
→
“SD Videos”
iN!
, is displayed.
1. Select the desired file.
To pause playback, press B.
To resume, press B again.
To delete a file, highlight the file, press [Options] and select
“Delete”.
Gallery 85
Page 86

Note
• In order to manage video clips with SD Videos, perform
recording as follows:
→
[Options]
“QVGA(asf)”.
Music and Sounds
The downloaded sound files and the AMR data recorded by
Voice Recorder are managed in Music and Sounds. The default
ringtones are not contained within Music and Sounds. Only the
sound files that can be played back on the phone are stored in
Music and Sounds.
Playing Back Sound Files
“Gallery”
“Record Time” → “Extended Video” →
(M 6-4)
→
“Music and Sounds”
1. Select the file you wish to play back.
To stop playback, press U.
Note
• Playback may not be available for some sound files.
• To switch betw een viewing handset or me mory card content,
select the first item in the options menu.
Using the Sound Files as a Ringtone
→
“Gallery”
“Music and Sounds”
1. Highlight the file you wish to use as a ringtone.
2. Press [Options] and select “Set as ringtone”.
86 Gallery
Tip
• For other option menus, see “Common Option Menus” on
page 88.
Downloading Sound Files
→
“Gallery”
The sound file download site, SmarTone
Themes
You can easily customise the display by using the theme files.
Viewing Previews
“Gallery”
“Music and Sounds” → “Download More”
iN!
, is displayed.
(M 6-5)
→
“Themes”
1. Highlight the theme file you wish to preview.
2. Press B.
The selected theme file is displayed.
Note
• To switch be tween viewing handset or memory card content,
select the first item in the options menu.
Page 87

Setting Theme
“Gallery”
→
“Themes”
1. Select the desired theme file.
The selected theme file is set as the default theme.
Tip
• Even after a theme is set, you can set a wallpaper regardless
of the set theme. In this case, the other items follow the set
theme.
• For other option menus, see “Common Option Menus” on
page 88.
Downloading Theme Files
→
“Gallery”
The theme file download site, SmarTone
“Themes” → “Download More”
iN!
, is displayed.
Editing Text Templates
“Gallery”
→
“Text Templates”
1. Highlight the text template you wish to edit.
2. Press [Options] and select “Edit”.
To view the text template, press B.
To delete the text template, press [Options] and select
“Delete”.
3. Modify the text and press B.
Sending Text Templates
“Gallery”
→
“Text Templates”
1. Highlight the text template you wish to send.
2. Press [Options] and select “Send Template”.
Text Templates
You can register up to 50 text templates for use in text
messages and multimedia messages. The maximum capacity
of the text templates is 256 characters.
Adding Phrases to Text Templates
“Gallery”
→
(M 6-7)
“Text Templates” → “Add New Template”
1. Enter the text and press B.
Gallery 87
Page 88

Other Documents
Some types of files are stored in the Other Documents folder of
the phone. You can edit and use these files as Gallery data.
Opening a Document File
“Gallery”
→
(M 6-8)
“Other Documents”
1. Select the desired file.
Note
• To switch betw een viewing handset or me mory card content,
select the first item in the options menu.
Tip
• For other option menus, see “Common Option Menus”.
88 Gallery
Common Option Menus
For using the desired file type, first select the appropriate folder
in the Gallery menu. Gallery contains the following folders.
“Gallery”
“Gallery”
“Gallery”
“Gallery”
“Gallery”
“Gallery”
“Gallery”
“Gallery”
Activating Files with Copyright Protection (DRM)
Some pictures, sound files, video clips and theme files have a
digital copy protection program, which is called DRM (Digital
Rights Management). You need to activate the digital licence
permission to open the files. Files protected with DRM are
displayed with .
1. Select the appropriate folder for the desired file type.
2. Highlight the file you wish to activate.
3. Press [Options] and select “Get Contents Key”.
Note
• Some pictures with DRM may not be opened even when an
→
“Pictures”
→
“Videos”
→
“SD Videos”
→
“Music and Sounds”
→
“Themes”
→
“GSX™ & Java™”
→
“Text Templates”
→
“Other Documents”
attempt is made to activate it.
Page 89

Sending Gallery Data
For details on
“Connectivity” on page 135.
Bluetooth
wireless technology, see
1. Select the appropriate folder for the desired file type.
2. Highlight the desired file.
3. Press [Options] and select “Send”.
4. Select “As Message” or “Bluetooth”.
Tip
• For details on creating a message, see “Creating a New
Message” on page 66.
• For details on Bluetooth settings, see “Bluetooth” on
page 135.
Note
• Pictures/Sounds/Video clips protected by copyright cannot
be sent attached to a message, with the exception of
Separate Delivery files.
• Theme files can only be sent via Bluetooth. Select
“Bluetooth” in step 4.
• When pairing, you need to enter your passcode when
establishing contact with a Bluetooth wireless technology
enabled device for the first time.
Receiving Gallery Data
When the phone receives Gallery data, a confirmation message
is displayed in standby.
1. Press [Yes].
The received data is saved in the corresponding Gallery
folder.
Tip
• For details on Bluetooth wireless settings, see “Connectivity”
on page 135.
Gallery 89
Page 90

Using Gallery Data
You can copy, move, sort, rename, and delete the saved Gallery
data.
1. Select the appropriate folder for the desired file type
(page 88).
2. Highlight the desired file.
3. Press [Options] and select “Manage Items”.
4. Select the desired option.
“Sort”: Sorts files according to a
specific sequence.
“Rename”: Renames the file or folder.
Select the desired file or folder
to rename.
“Create Folder”: Creates a new folder.
“Change List View”: Changes the list view.
“Delete all”: Deletes all files in the folder.
Note
• “Manage Items” is not available for “GSX™ & Java™” and
“Text Templates”.
90 Gallery
To Delete the File
1. Select the appropriate folder for the desired file type
(page 88).
2. Highlight the desired file.
3. Press [Options] and select “Delete”.
To See the Gallery Details
1. Select the appropriate folder for the desired file type
(page 88).
2. Highlight the file you wish to view the details of.
3. Press [Options] and select “Details”.
Page 91

Selecting Multiple Files
You can select more than one item from Gallery for moving,
copying, managing and deleting.
Note
• The following procedure applies except when the “Download
More” function is highlighted.
1. Select the appropriate folder for the desired file type
(p. 88).
2. Highlight the file you wish to select.
3. Press [Options] and select “Check”.
4. Repeat steps 2 and 3 until you select all the desired files.
Tip
• To remove the check, highlight the file again and select
“Uncheck” in step 3.
• If you wish to unselect all, select “Manage Items” in step 3
and select “Uncheck All”.
• You can quickly check, uncheck, check all or uncheck all
items by using the H, J and L keys.
H: Check/uncheck currently highlighted item
J: Checks all items in the current folder
L: Unchecks all checked items in the current folder
Memory Status
This function helps you to check the memory status of the
handset memory or memory card. Memory status covers the
following.
Handset Memory: Applications, Pictures, Videos,
Memory Card: Pictures, Videos, Sounds, Themes,
“Gallery”
(M 6-9)
Sounds, Themes, Others, Used and
Free
Others, Used and Free
→
“Memory Status”
1. Select “Handset Memory” or “Memory Card”.
Gallery 91
Page 92

Games & Applications
GSX™ & Java™ Gallery
The list of Java™ applications is displayed.
Downloaded applications are displayed in order starting from
the latest one.
Downloading Applications
“Games & Applications”
→
“Download More”
(M 1)
(M 1-1)
→
“GSX™ & Java™ Gallery”
1. Select the desired application.
Before downloading the application you are asked to
confirm what you are about to receive. After checking the
information on the confirmation screen, the application can
be downloaded.
2. Press B to start downloading.
3. Press B when finished.
Note
• User authentication may be required before downloading the
application on some information screens.
92 Games & Applications
Executing Applications
→
“Games & Applications”
“GSX™ & Java™ Gallery”
1. Select the title of the application you wish to execute.
The selected application is executed. When using network
connection type applications, connection to the network
can be selected.
2. To end the application, press F and select “End”.
Setting as a Screensaver for the Display
“Games & Applications”
→
“GSX™ & Java™ Gallery”
1. Highlight the file you wish to use as a screensaver.
2. Press [Options] and select “Set as Screensaver”.
Page 93

Setting Permission
You can set permission for selected Java™ applications.
“Games & Applications”
→
“GSX™ & Java™ Gallery”
1. Highlight the desired Java™ application.
2. Press [Options] and select “Permission”.
3. Select one of the following options:
“Phone Call”: Sets permission to make voice
“Network Access”: Sets permission to access the
“Messaging”: Sets permission to perform SMS
“Autorun”: Sets permission to perform the
“Local Connection”: Sets p ermission to connect to local
“Read User Data”: Sets permission to read user data,
“Write User Data”: Sets permission to write entries in
“Use Multimedia”: Sets permission to use the
calls.
network.
messaging.
Autorun function.
devices.
such as Phonebook entries,
mailbox (Inbox) and Gallery data.
your phone, such as Phonebook
entries, mailbox (Inbox) and
Gallery data.
multimedia recording.
4. Select one of the following options:
“Session”: The confirmation message is not
displayed until you exit the
application, while execution of
network access is authorised.
“Ask Once”: The confirmation message is
displayed every time network
access is executed.
“Blanket”: The confirmation message is not
displayed until the application is
deleted or you change the
settings, while execution of
network access is authorised.
“No”: Execution of network access is not
authorised.
Note
• To clear all the permission settings, select “Reset” in step 3.
• Some permissions are not available for some Java™
applications.
• “Read User Data” and “Write User Data” may not be
available in step 3.
Games & Applications 93
Page 94

Viewing Application Information
You can check the information of Java™ applications.
“Games & Applications”
→
“GSX™ & Java™ Gallery”
1. Highlight the desired Java™ application.
2. Press [Options] and select “Information”.
Deleting an Application
You can delete an application in the folder.
→
“Games & Applications”
“GSX™ & Java™ Gallery”
1. Highlight the desired Java™ application.
2. Press [Options] and select “Delete”.
94 Games & Applications
Java™ Settings
Application Volume
You can set the volume of the application such as the sound
effect to one of the five levels or silent. When the profile is set
to “Silent”, the “General Volume” setting (p. 110) has priority.
“Games & Applications”
“Application Volume”
(M 1-2)
→
“Java™ Settings” →
1. Press a (or d) to increase the volume or press b (or
c) to decrease the volume and then press B.
Backlight
→
“Games & Applications”
“Backlight”
→
“Switch On/Off”
“Java™ Settings” →
1. Select from “Always On”, “Always Off” or “Normal
Settings”.
“Always On”: Lit while the application is
“Always Off”: Unlit while the application is
“Normal Settings”: Works with the main backlight
operated.
operated even if a key is pressed.
setting (p. 117).
Page 95

To Set the Blinking Operation
This setting enables the backlight to be controlled by the
application. If set to “Off”, the backlight cannot be turned on
from the application.
→
“Games & Applications”
“Backlight”
→
“Blink”
“Java™ Settings” →
1. Select “On” or “Off”.
Vibration
When the vibrator is set in the application, you can choose
whether the operation is enabled or disabled.
→
“Games & Applications”
“Vibration”
“Java™ Settings” →
1. Select “On” or “Off”.
Calls & Alarms
You can set the priority of incoming calls and alarms while an
application is operating.
→
“Games & Applications”
& Alarms”
“Java™ Settings” → “Calls
1. Select “Voice Call”, “Video Calling”, “Incoming
Message” or “Alarm”.
2. Select the desired method.
• “Call Priority”, “Message Priority” or “Alarm Priority”:
The application is suspended automatically, and you
can receive a call or a message, or the alarm will sound.
After finishing the call or sending the message, or when
the alarm ends, the suspend indicator ( ) is displayed
letting you know there is a suspended application.
• “Call Notice”, “Message Notice” or “Alarm Notice”:
The marquee (character scrolls) is displayed on the first
line of the screen while the application continues. If you
press D, the application is suspended, and you can
receive a call. After finishing the call or sending the
message, the suspend indicator ( ) is displayed letting
you know there is a suspended application.
Games & Applications 95
Page 96

Set Java™ Wallpaper
You can set Java™ Wallpaper for the standby screen.
To Switch the Java™ Wallpaper On or Off
→
“Games & Applications”
Java™ Wallpaper”
“Java™ Settings” → “Set
→
“Switch On/Off”
1. Select “On” or “Off”.
To Set the Activation Time
“Games & Applications”
Java™ Wallpaper”
→
“Java™ Settings” → “Set
→
“Activation Time”
1. Enter the activation time in two digits using the keypad.
To Set the Suspend Time
“Games & Applications”
Java™ Wallpaper” → “Suspend Time”
→
“Java™ Settings” → “Set
1. Set the desired time per iod from “after 1 5 min.” to “after
6 hours”.
96 Games & Applications
Default Settings
“Games & Applications”
to Default”
→
“Java™ Settings” → “Set
1. Enter your handset code.
For details on the handset code, see “Changing the
Handset Code” on page 129.
Clearing All Memory
→
“Games & Applications”
“Memory All Clear”
“Java™ Settings” →
1. Enter your handset code.
For details on the handset code, see “Changing the
Handset Code” on page 129.
Java™ Information
“Games & Applications” → “Java™ Information”
The information about the licences belonging to Java™ is
displayed.
(M 1-3)
Page 97

Organiser
Calendar
The calendar allows you to easily schedule appointments.
These entries can also be sent via
technology to a PC to share the same schedules. When you
exchange entries with other devices, the date and time
displayed may be different to that of the original data
depending on the data format of the receiving device.
Creating a New Entry
“Organiser”
(M 3)
(M 3-1)
Bluetooth
→
“Organiser” tab → “Calendar”
wireless
1. Select the desired day to which you want to add an
event.
2. Select “Add New Entry”.
3. Enter the subject.
4. Enter the start date and time.
5. Select the reminder time.
When selecting “Other”, enter the desired reminder date
and time.
6. Select the desired category.
7. Press [Save].
Note
• If the date and time settings have not been entered, the date
and time entry screen is displayed (p. 119).
• The reminder will not sound when “General Volume” (p. 110)
is set to “Silent”.
• Quick Entry is available if you press N in the Calendar
screen. Select the desired category and press [Select].
To Change the Settings
1. Select the item you wish to change in the New Entry
screen.
• “Reminder”: Sets options including “Reminder
Time”, “Assign Tone/Video” and
“Duration” for the reminder.
• “Repeat”: Sets the number of times the
reminder sounds.
• “Location”: Sets the location for the schedule
entry.
• “Description”: Enables entering a memo for the
schedule entry.
• “Secret”: Sets to show or hide the schedule
entry. Set to “On” to make the data
secret or select “Off” to leave it as it
is.
Organiser 97
Page 98

Viewing a Schedule Entry
“Organiser”
→
“Organiser” tab → “Calendar”
1. Select the day you wish to view.
2. Select the desired entry.
To Search by Date
1. In any view, press [Options] and select “Go to”.
2. Select “Today” to display today or “Enter Date” to enter
the desired date.
Tip
• In the monthly, 2-month or weekly view, you can control the
view by using the following:
Monthly or 2-month view
P: Displays the previous month.
R: Displays the next month.
Q: Switches the view.
K: Moves the cursor to today.
c/d: Moves the cursor to left (the previous day) or to
a/b: Moves the cursor upward (last week) or
98 Organiser
right (the next day).
downward (next week).
Weekly view
P: Displays the previous week.
R: Displays the next week.
Q: Switches the view.
K: Moves the cursor to today.
c/d: Moves the cursor to left (the previous day) or to
a/b: Moves the week ly view up or down (the previous
Setting a Holiday
In the weekly or monthly view, you can highlight a date or days
of the week with seven colour options.
“Organiser”
For Date Colour
right (the next day).
hour or next hour).
→
“Organiser” tab → “Calendar”
1. Highlight the day you wish to set.
2. Press [Options] and select “Set Holiday”.
3. Select “By Date” and then select the desired colour.
Page 99

For Days of the Week Colour Setting
1. Press [Options] and select “Set Holiday”.
2. Select “By Week” and then select days of the week you
wish to colour.
3. Select the desired colour.
Tip
• The selected date/days are also highlighted on the calendar
on the standby screen.
Note
• If the same date is set with both a date colour and
a day of the week colour, the date is highlighted in the date
colour.
• Up to 100 days can be set for the highlights.
Finding a Schedule Entry
→
“Organiser”
“Organiser” tab → “Calendar”
1. In any view, press [Options] and select “Find”.
2. Enter a few letters of the subject.
Search results are displayed in time order.
Editing a Schedule Entry
“Organiser”
→
“Organiser” tab → “Calendar”
1. Select the day you wish to edit.
2. Highlight the entry you wish to edit, press [Options], then
select “Add New Entry”.
3. Select the desired item and modify the entry.
4. Press [Save].
Deleting Schedule Entries
1. In any view, press [Options] and select “Delete”.
2. Select the desired option.
“This Appointment” (daily view):
Deletes the selected entry.
“All This Day” (weekly, monthly and 2-month view):
Deletes all entries for the selected
day.
“All This Month” (monthly view):
Deletes all entries for the selected
month.
“Last two months” (2-month view):
Deletes all entries for the selected
two months.
“Up to Last Month” (monthly view):
Deletes all entries before the selected
month.
“All Appointments” (monthly and 2-month view):
Deletes all entries in this application.
Organiser 99
Page 100

Sending a Schedule Entry
“Organiser”
→
“Organiser” tab → “Calendar”
1. Select the day including schedule entries you wish to
send.
2. Highlight the entry you wish to send, press [Options],
then select “Send”.
3. Select “As Message” or “Via Bluetooth”.
For “Via Bluetooth”
For details, see “Bluetooth” on page 135.
Note
• When pairing, you need to enter your passcode when
establishing contact with a Bluetooth wireless technology
enabled device for the first time.
Receiving a Schedule Entry
When the phone receives a schedule entry, a confirmation
message is displayed in standby.
1. Press [Yes].
The received entry is saved in the Calendar.
Press [No] to reject.
Tip
• For details on entering Bluetooth wireless settings, see
“Connectivity” on page 135.
100 Organiser
Viewing the Memory Status
1. In any view, press [Options] and select “Memory
Status”.
Alarms
(M 3-2)
Setting the Alarms
The alarm function allows you to be alerted at a specified time.
Note that you need to set the current date and time before
setting the alarm function if it has not been done already.
“Organiser”
1.
→
Select the blank line (--:--) you wish to set an alarm to.
“Organiser” tab → “Alarms”
2. Enter the desired time.
3. Press [Save].
 Loading...