

Page 1
\
‘\
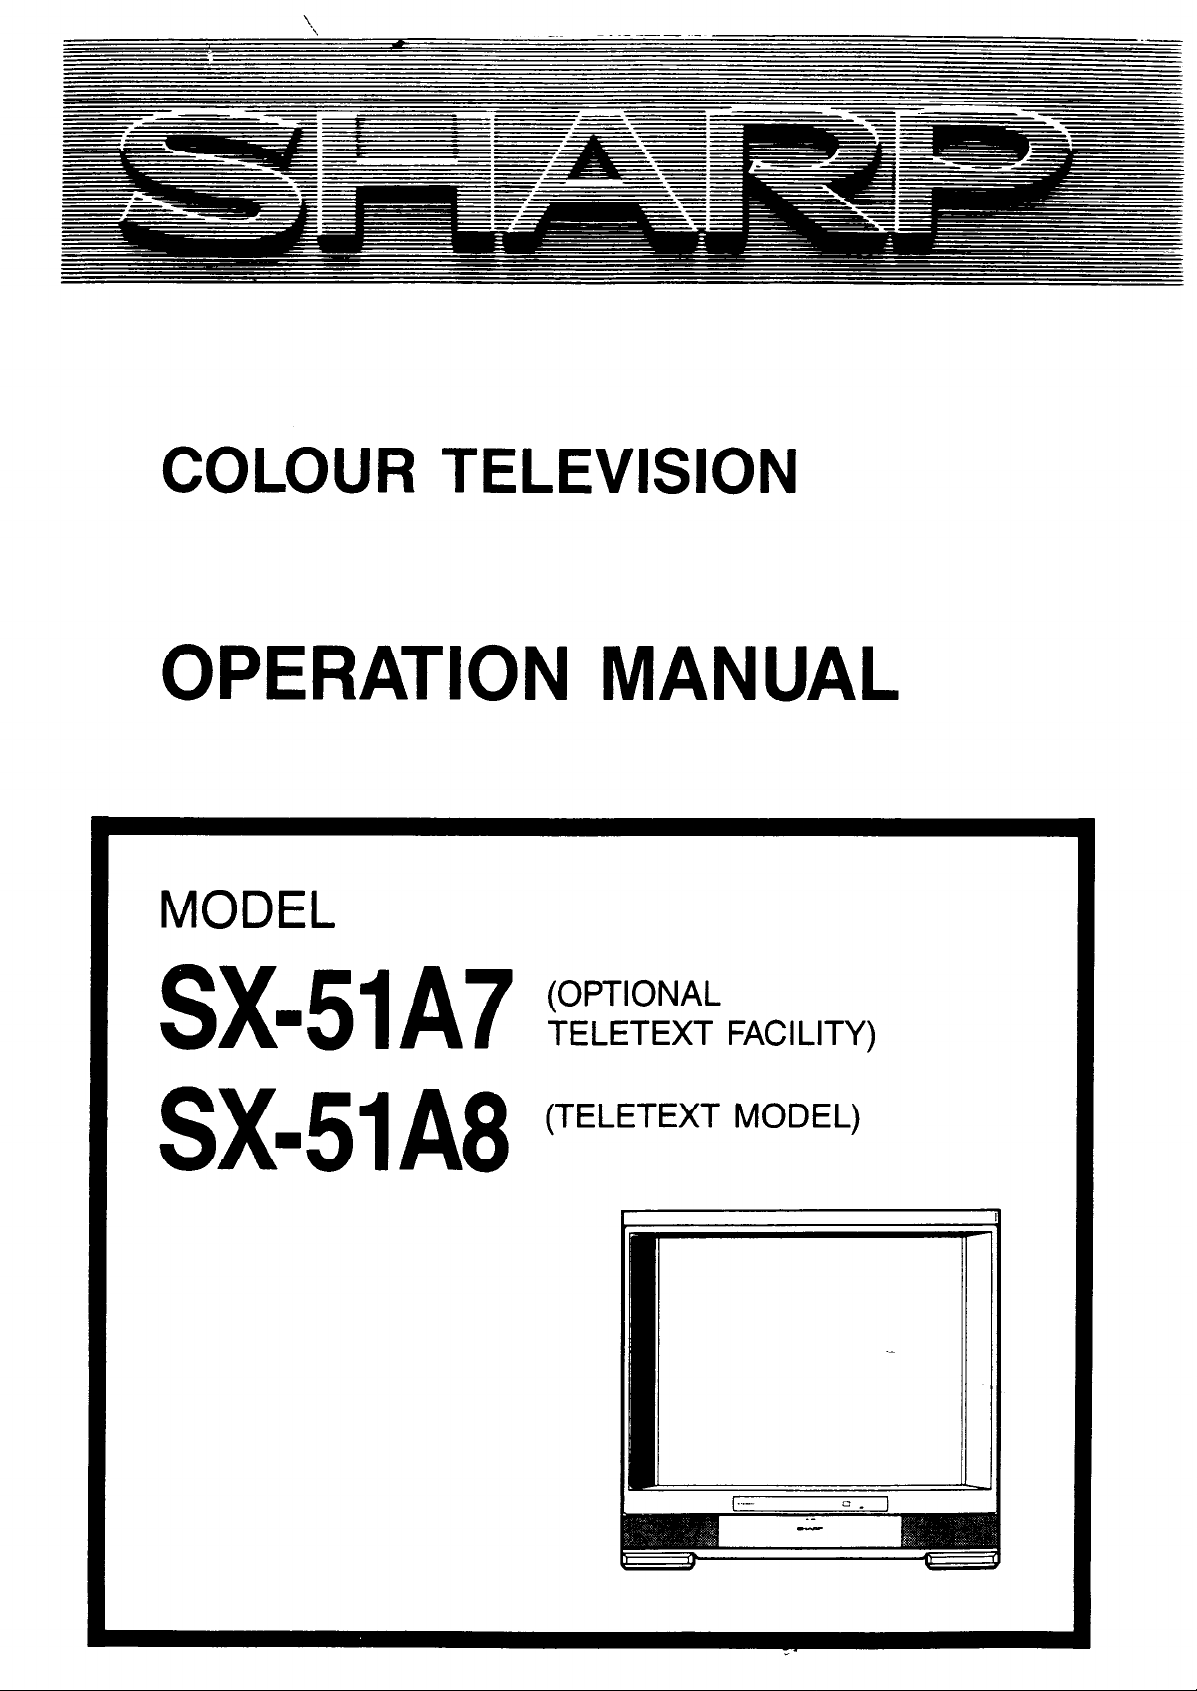
COLOUR TELEVISION
OPERATION MANUAL
MODEL
(OPTIONAL
IA7
TELETEXT FACILITY)
(TELETEXT MODEL)
sx-51A8
Page 2
Dear SHARP Customers
a radio receiver.
Before using this COLOUR TELEVISION RECEIVER please read this Operation Manual carefully. Be
sure to save this manual for future use, especially SX51A7 owners that may update to the Teletext option.
This manual covers two models, the SX51A8 which is fitted with teletext facilities and the SX51A7 which
is sold without the Teletext facilities but can be updated to the SX51A8 model with Teletext at a later
date by purchasing the Teletext kit (No. AN222TX) from the retailer and having it installed for a fee
at a SHARP service centre.
NOTE: As purchased, the SX51A7 remote control Teletext buttons will be inoperative until the Teletext
kit has been installed in your TV.
Page 3
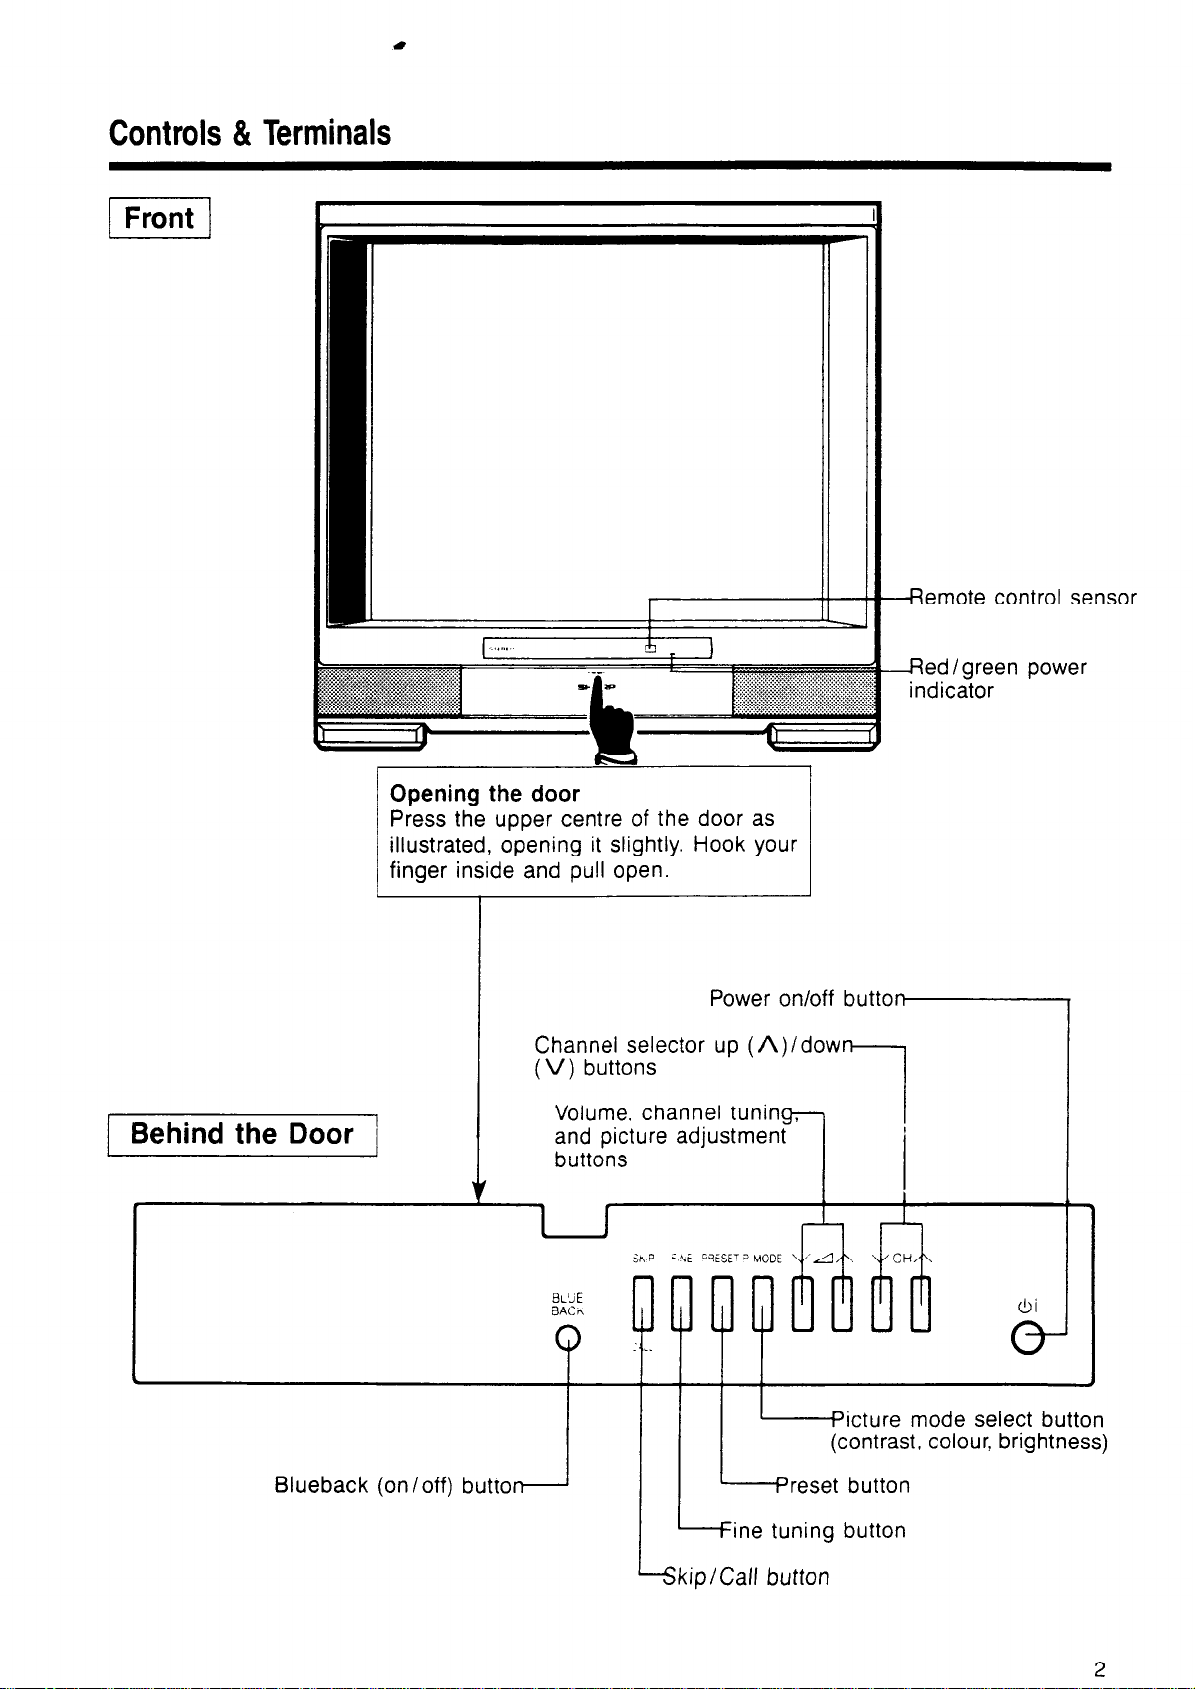
Controls & Terminals
C
-Remote control sensor
Red I green power
indicator
1 Behind the Door 1
I
1
Opening the door
Press the upper centre of the door as
illustrated, opening it slightly. Hook your
finger inside and pull open.
Power on/off butto-
Channel selector up (A)/dow
(V) buttons
Volume. channel tunin
I
and picture adjustment
buttons
1 I
i *.i QESET 3 MODE \.‘A/\ \/CH/\
Sh P
BL’JE
t3ACh
Q
I I
Oi
I
Blueback (on /off) butrow
Picture mode select button
(contrast, colour, brightness)
Preset button
Fine tuning button
kip/Call button
2
Page 4
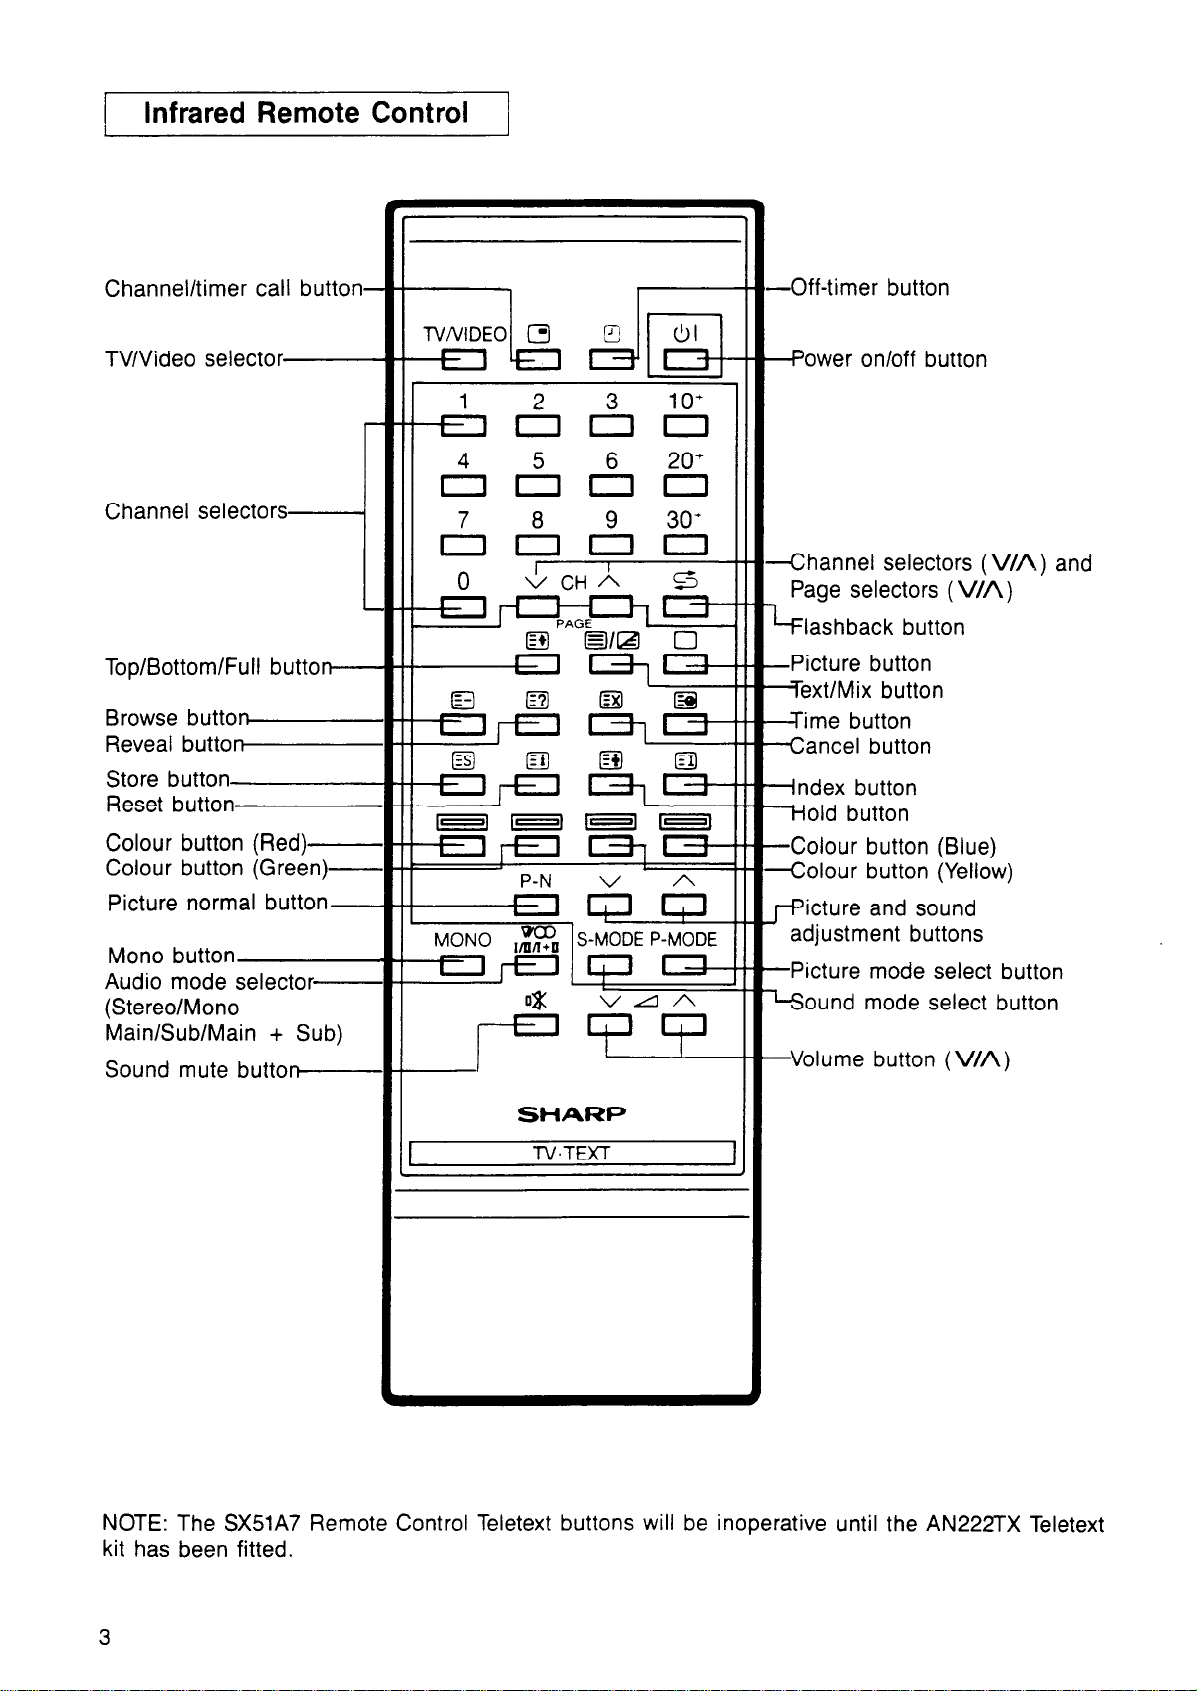
1 Infrared Remote Control
Channel/timer call button-
TV/Video selector
Channel selectors
d
Top/Bottom/Full button---
Browse buttoReveal buttor+----
Store button
Reset button
Colour button (Red)Colour button (Green)-
Picture normal button-
Mono button
Audio mode selector(Stereo/Mono
Main/Sub/Main + Sub)
Sound mute button---
J
-Off-timer button
--Power on/off button
-Channel selectors (V/A) and
Page selectors (V/A)
4
lashback button
-Picture button
IextlMix button
-Time button
-Cancel button
--Index button
Hold button
-Colour button (Blue)
-Colour button (Yellow)
picture and sound
adjustment buttons
-Picture mode select button
‘Sound mode select button
I
I
-Volume button (V/A)
SHARP
TV.TEXT
I
NOTE: The SX51A7 Remote Control Teletext buttons will be inoperative until the AN222TX Teletext
kit has been fitted.
3
Page 5
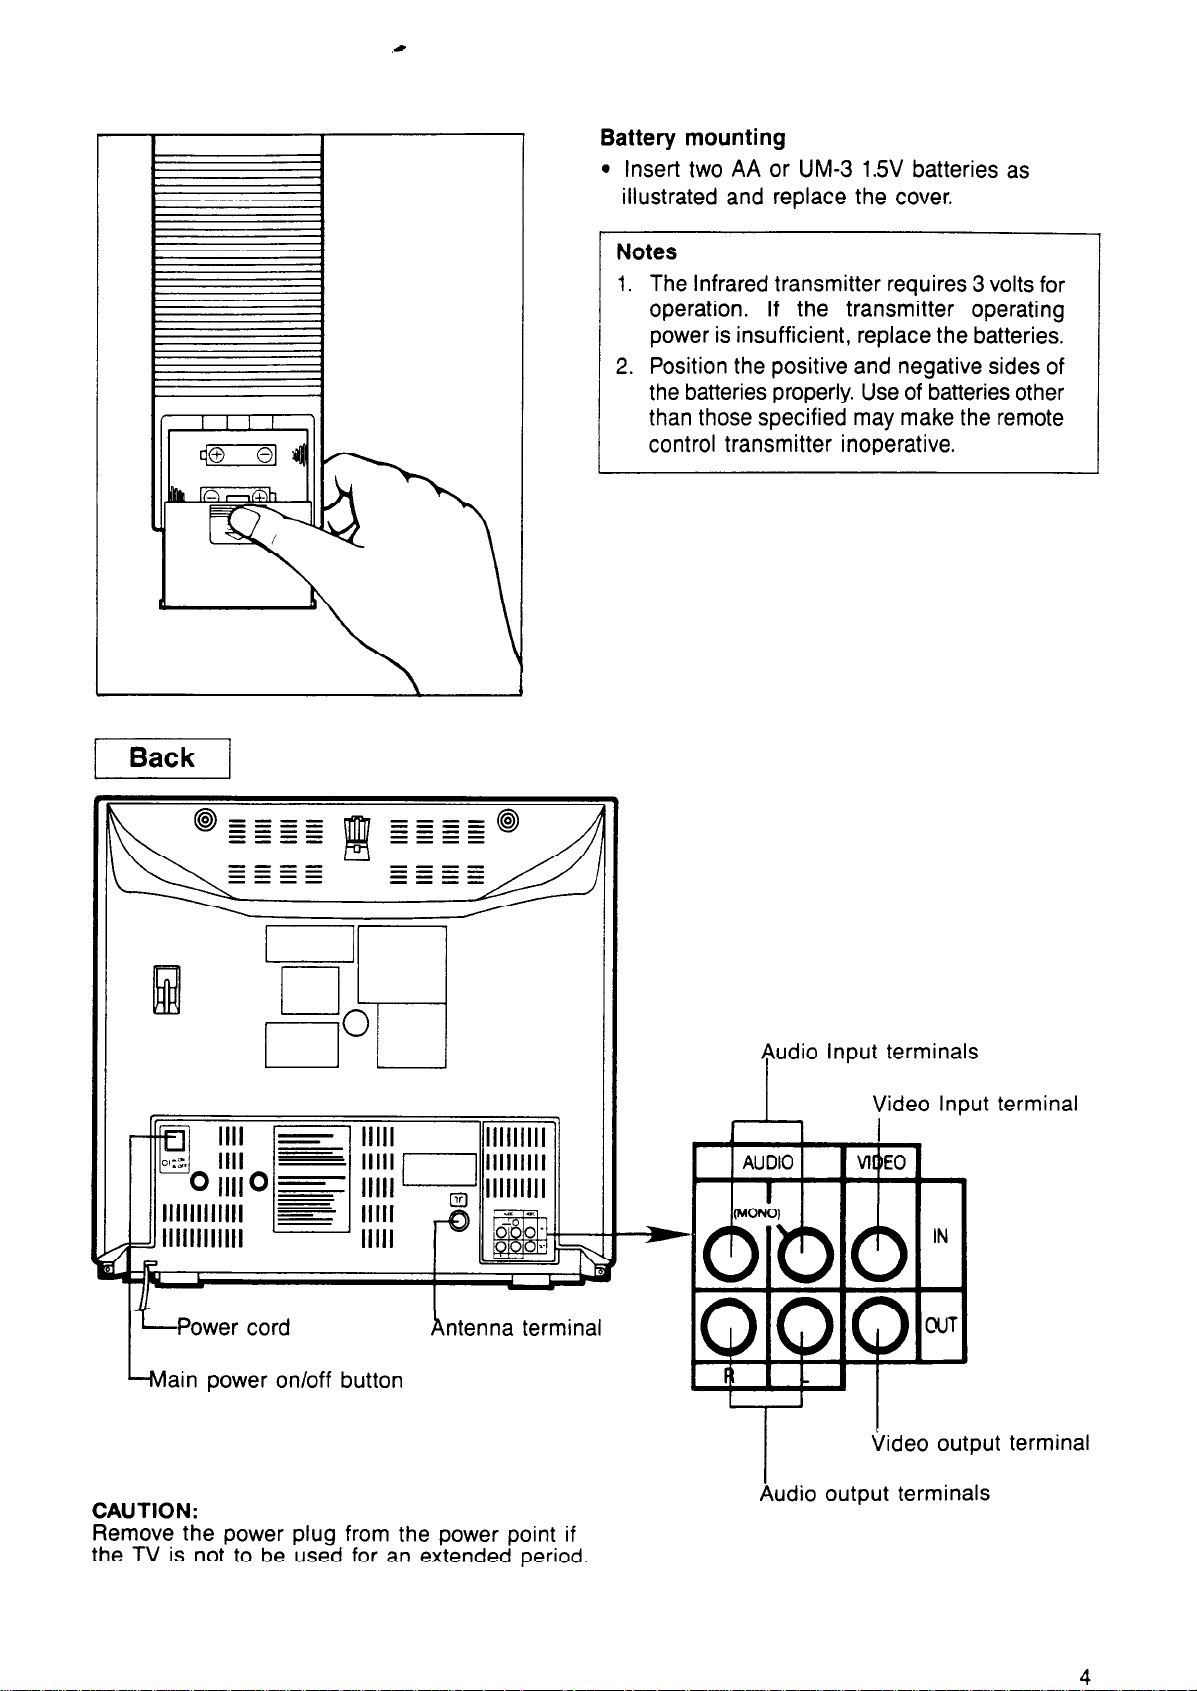
0
Battery mounting
. Insert two AA or UM-3 1.W batteries as
illustrated and replace the cover.
1 Back 1
==--
---_
====
----
----
---_
====
----
Notes
1.
The infrared transmitter requires 3 volts for
operation. If the transmitter operating
power is insufficient, replace the batteries.
2.
Position the positive and negative sides of
the batteries properly. Use of batteries other
than those specified may make the remote
control transmitter inoperative.
1
ntenna terminal
ain power on/off button
CAUTION:
Remove the power plug from the power point if
the TV is not to be used for an extended period.
)‘ideo
Video output terminal
Input terminal
I
Audio output terminals
4
Page 6
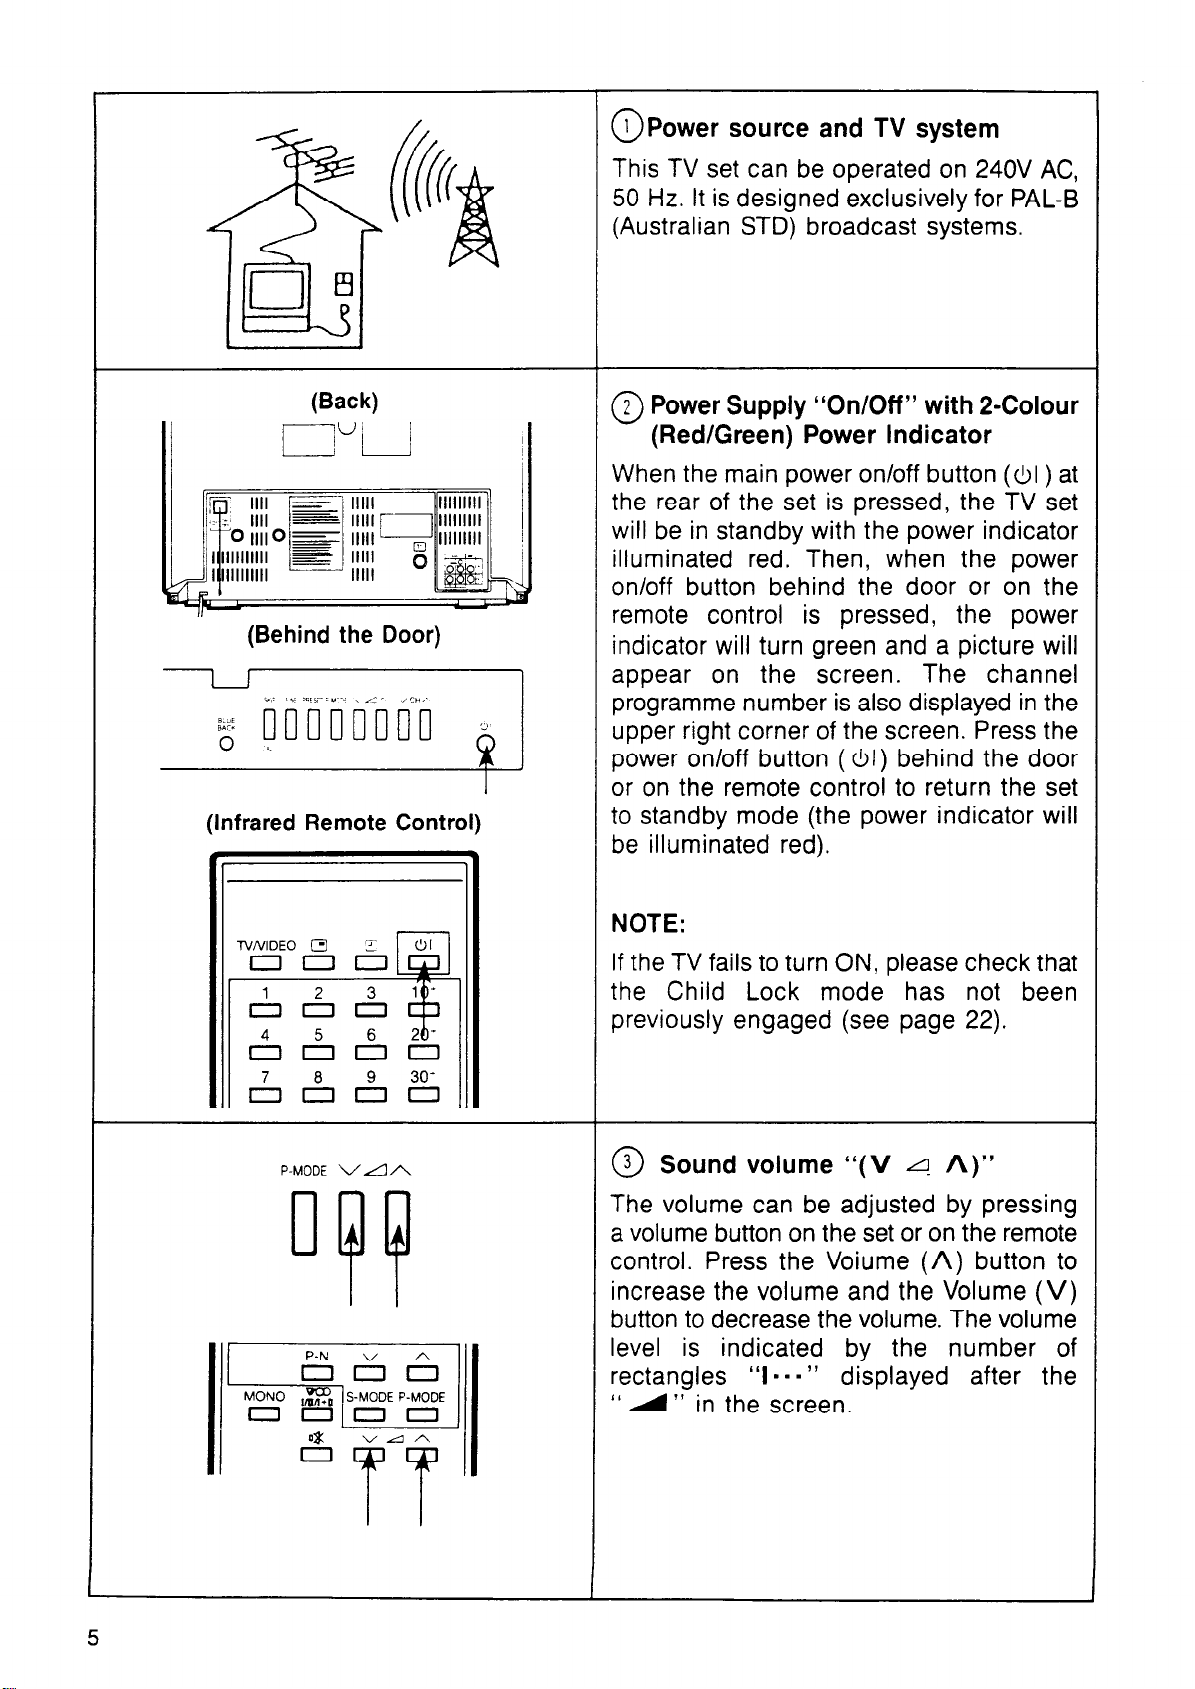
@Power source and TV system
This TV set can be operated on 240V AC,
50 Hz. It is designed exclusively for PAL-B
(Australian STD) broadcast systems.
(Back)
(Behind the Door)
(Infrared Remote Control)
4
TV/VIDEO 0
on&i
&&&I
&A&
#
@ Power Supply “On/Off” with 2-Colour
(Red/Green) Power Indicator
When the main power on/off button (&I ) at
the rear of the set is pressed, the TV set
will be in standby with the power indicator
illuminated red. Then, when the power
on/off button behind the door or on the
remote control is pressed, the power
indicator will turn green and a picture will
appear on the screen. The channel
programme number is also displayed in the
upper right corner of the screen. Press the
power on/off button (01) behind the door
or on the remote control to return the set
to standby mode (the power indicator will
be illuminated red).
NOTE:
If the TV fails to turn ON, please check that
the Child Lock mode has not been
previously engaged (see page 22).
ISAGiEl
P-MODE V/IA
@ Sound volume “(V 4 A)”
The volume can be adjusted by pressing
a volume button on the set or on the remote
control. Press the Voiume (A) button to
increase the volume and the Volume (V)
button to decrease the volume. The volume
level is indicated by the number of
rectangles “I n . . ”
displayed after the
“ 4 ” in the screen.
VAA
&
5
Page 7

VCHA
4 Channel Selection “ V CH A”
0
The channel number is displayed on the
screen when the Channel selector Up (A)
99
I I
button or Down (V) button is pressed on the
set or on the remote control.
When the Channel (A) button is pressed, the
channel number will change as follows:
1.2.3...38.39.1.2... Each time the Channel (V)
Channel
select
buttons
AiS&&
AA&&
lSA6z5
V CH A
A &I
&
button is pressed, the channel number will
change as follows: 39.38.37 . . . . 2.1.39.38 . . . . .
The Channel selector buttons on the
remote control can also be pressed to
directly select the desired channel. If the
factory preset channel frequencies do not
match your local channel frequencies, refer
to Presetting the Channels.
_------------_--___------------------~~
Channel Selection Using the Infrared Remote Control
Channel to be selected Channel selector button to be pressed.
Channel 1 - 9
Channel 10 - 19
Channel 20 - 29
Channel 30 - 39
Press the & - & buttons.
Press the
then the& - & button.
Note: Be sure to press the buttons within 5 seconds after the
& button is pressed. because the & button is
Press the ‘O’
then the&e& button.
Note: Refer to the note for Channel 10 - 19.
Press the & button (“3-” displayed for about 6 seconds on the
screen), and then the ,$-A button.
Note: Refer to the note for Channel 10 - 19.
& button (“l-”
cancelled in about 6 seconds.
button (‘12-” displayed for about 6 seconds), and
displayed for about 6 seconds), and
Notes:
11) The selected channel number will appear on the screen for about 3 seconds before it
disappears and the TV screen returns to its normal state.
12) When the Channel selector (A) or (V) button on the TV set or on the remote control
is held down, the channel number changes once per second. Release the Channel (A)
or (Vj button when the desired channel number appears on the screen.
1.
SKIP FINE PRESET P-MODE
@ - @ Presetting the Channels
(AUTO SEARCH TUNING SYSTEM)
oop
CALL
(ON SCREEN)
VHF-L 111.. . . . . . . . . .
T
M mory TV
station
Band lndicato
(VHF-L, VHF-H, UHF)
“1 1
1
Channel
Number
Note: Most channels are preset at the factory.
To avoid unnecessary resetting, check the
tuning of all channels before resetting them.
1. Press the Preset button behind the door
and the band, VHF or UHF, that you wish to
preset. Press the button once for the VHF
band. Press again for the UHF band. Press
again when you have finished presetting the
channel. (VHF-L l-5, VHF-H 5a-11, UHF
28-69).
Page 8
2.
VCHA
:hannel
elect
uttons
UHF 111 . . . . . . . .
,,39 I
UHF
(green- red- green)
111 I . . . . . . ..-
t
1
2. Select the channel number (l-39) you
wish to store with the Channel selector
(A) button on the TV or the remote
control.
3. Next press the Volume up (A) or down,
4
(V) button on the TV. The band
indicator will turn red and the TV will
begin to search for a television
broadcast. The band indicator will turn
green when television broadcast has
been found.
4. Repeat steps 2 and 3 to preset the
other channels.
5. Press the reset button to return to the
normal mode. A green channel number
will be displayed on the screen for a
short period.
SKIP FINE PRESET P-MODE
SKIP FINE PRESET P-MODE V/1/Y VCHA
a- @ Fine tuning
When receiving a channel that is weak
the signal can sometimes be improved
by turning off the Automatic Fine
Tuning (AFT). By pressing the FINE
button and at the same time pressing
either the (A) or (V) volume buttons.
Fine tune the channel to your
preference. The AFT will now be turned
off and this will be indicated by the
channel turning yellow. To turn the AFT
back on first press the preset button
until the band indicator and the picture
is visible, then press both the FINE and
either the (A) or (V) volume buttons
momentarily. Press the preset switch
until the band indicator disappears.
The AFT will now be turned on and this
will be indicated by the channel
number turning green.
7
Page 9

3.
5
SKIP FINE PRESET P-MODE
oopn
CALL
SKIP FINE PRESET P-MODE
000
LL
a
SKIP FINE PRESET P-MODE
1
4.
@ - @ Skipping Channels
The Channel selector (A) button and (V
button on the set and remote control normally
cycle through all the channels, 1 through 39
If you wish, you can set the TV so that onl)
selected channels are tuned in while other
perhaps empty channels, are skipped.
1.
Press the Preset button.
2.
Select a channel number you wish to skif
with the Channel selector (A) or (V
button on the TV set or remote control.
3.
Press the Skip button. The displayed than
nel number will turn from green to red.
4.
Repeat steps 2 and 3 if you wish to skip
other channels.
5.
Press the Preset button again to return tc
normal mode. A green channel number wili
be displayed on the screen.
Note:
If you select the channels to be skipped with the
Channel select buttons on the remote control,
the channel number will be displayed in red.
1.
2.
3
5.
SKIP FINE PRESET P-MODE
CALL
.I
VCHA
Pp
SKIP FINE PRESET P-MODE
ml
SKIP FINE PRESET P-MODE
00~0
CALL
I
@ - @ Resetting Skipped Channels
1.
Press the Reset button.
2.
Select a skipped channel number, displayed
in red, with the Channel selector (A) or (V)
button on the set or on the remote
control.
3.
Press the Skip button, the displayed
I
4.
I
channel number will turn green, and the
channel will no longer be skipped.
4.
Repeat steps 2 and 3 for any other
channels you wish to stop skipping.
Press the Preset button again to return
5.
to normal mode.
Notes:
1) It is most practical to start this process at
channel number 1, and repeat as needed up
to channel number 39.
2) The n/ will return to normal mode if you do
not proceed to the next step within about 10
seconds after pressing the Preset button. If it
does, press the Preset button again to execute
the following step.
3. When the received broadcast signal is weak,
the picture may appear in black and white only
or you may be able to preset the channel. In
this case, please check the antenna or consul?
your appliance store.
Page 10

1.2
FINE PRESET P-MODE
mJ
I
6 Additional Picture Adjustments
0
(Contrast, Colour, Brightness)
1.
Press the Picture mode (P-MODE) button
behind the door or the Picture mode
(P-MODE) button on the remote control.
l ON-SCREEN
3.
(ON SCREEN)
Contrast Mark
4
Decrease Increase
P-MODE V/1A
f---e
Contrast Mark
Colour Mark
@ -99 Red
@ n -- Green
Brightness Mark -lG.- l mm Green
When you press the Picture mode
2
(P-MODE) button two times the Colour
Mark will change from green to RED; when
You
press the Picture
mode
(P-MODE) button three times the
Brightness Mark will change from green to
RED.
Press the P-mode control until the control
3.
you wish to adjust is red in colour. Press
the volume (A) or (V) or the (A) or the
(V) button on the remote control to adjust
the picture to your liking.
Note:
The display will disappear after about 6 seconds.
Adjust the mode you selected with the Mode
button within this time.
Colour Mark
4
f---e
Decrease Increase
Brightness Mark
(ON SCREEN)
Contrast Mark
4
@ I I I I I I I I I ¤==~.==.‘=
----_)
Decrease Increase
4. When you press only the Adjustment (I‘ V
or (A”) buttons without pressing the
Picture mode (P-MODE) button on the
remote control you can adjust the
contrast with one touch).
9
Page 11

Treble Mark
Decrease Increase
2.3
Bass Mark
Decrease Increase
Balance Mark
JI
[14 . . . . . . . .
Left Speaker Right Speaker
Volume Mark
II P-N ” A
P-N ” A
1 [ i . . . . . . . . . .
--
Low High
@ Additional Sound Adjustments
(Treble, Bass, Balance, Volume)
1.
Press the Sound mode (S-MODE) button
on the remote control.
l ON-SCREEN
Treble Mark
Bass Mark
Balances Mark e, 4.. . Green
Volume Mark A-9 Green
Treble 6 and Bass 7
Low sounds are adjusted by the bass
control and high sounds by the treble
control according to the required sound
quality.
Balance
Select the balance control mode by
pressing the sound mode button. Press the
adjustment (“V or A”) buttons to balance
the sound from the left and right speakers.
2.
When you press the Sound Mode
(S-MODE) button two times the Bass Mark
will change from green to RED; when you
press the Sound Mode (S-MODE) button
three times the Balance Mark will change
from green to RED; when you press the
Sound Mode (S-MODE) button four times
the Volume Mark will change from green
to RED.
Adjust the RED Mark to the position you
3
desire and press the Adjustment (W or
A”) buttons to set the sound to your liking.
Note:
The display will disappear after about 6 seconds.
Adjust the mode you selected with the Mode
button within this time.
--Q Red
$...
Green
Blueback
sign (blue)
BLUE
BACK
Q
(ON SCREEN)
cl
(BLUEBACK
PUSH ON
PUSH OFF)
I
8 Blueback
0
By pushing this Blueback button, there are
no fears of wasting power if you were to fall
asleep watching television. When the TV
broadcasting ends at night, sound is muted
and the screen turns blue in 5 seconds.
Fifteen minutes later, the TV set will
automatically go into standby, so power is
saved. If broadcasting restarts while the
screen is blue, the TV will resume displaying
pictures and producing sound.
10
Page 12

SKIP FINE PRESET
Lm
;. iL
1
l-V/VIDEO B
f
9
~ OCh
~ The channel number and the mode, if the
channel is broadcasting in stereo or bilingual,
is displayed on the screen by pressing the
Channel/Timer call button. Press the button
again and the display will disappear.
If the Channel/Timer call button is pressed
while the Off-Timer is set, the time remaining
on the Off-Timer, the channel number and the
I
mode, if the channel is broadcasting in stereo
or bilingual is displayed.
annel/Timer call button (1) ( @ )
J
0
23 M
Operation of Infrared Remote Control
If the button is pressed again, the Off-Timer
will disappear leaving the channel number
and the mode, if the channel is broadcasting
in stereo or bilingual. Press the button again
and the display will disappear.
@ Normal button (P-N)
(Contrast, Colour, Brightness)
Pressing this button cancels any previous
contrast, colour, and brightness adjustments,
and resets these to the original factory
standard settings.
@ Off-Timer Button ([‘)
The TV can be turned off automatically after
120, 90, 60 or 30 minutes by using the Off-
Timer button. When the Off-Timer button is
pressed once while watching TV, a El 120 M
display will appear, indicating that the TV will
be turned off automatically after 120 minutes.
Press the button twice for 90 minutes, three
times for 60 minutes, and four times for 30
minutes. When the button is pressed five
times, the mode is cancelled, and nothing will
appear on the screen.
Page 13

J
0
120 M
I
39 1. When the Off-Timer is set the remaining
Notes:
time until the TV is turned off, is displayed
in 5-minute increments on the screen.
2. When a channel is preset after the OffTimer is activated, the timer countdown
stops until the TV is put into the normal
mode.
@Sound Mute Button ( 0% )
I
I&&&&
&&A&
IS&&&
0
0%
v
SHARP
TV.TEXl
v CH A
VAA
00
When this button is pressed, the sound is
muted and the mute indicator mark “ 0% “,
is displayed on the screen.
Press the button again to restore the sound
level.
*
@ Flashback Button (5 )
Pressing this button selects the channel that
was tuned immediately before the one being
watched. For example if channels were
selected in the order of Ch2, Ch3, then Ch6,
s
pressing the button returns tuning to Ch3.
Press the button again to return to Ch6.
AV
@ TV/VIDEO selector (TV/VIDEO)
When you press the TV/VIDEO selector, the
TV is switched to receive Audio/Video signals
through the A/V terminals, and “AV”
(Audio/Video Indicator) will be displayed for
about 3 seconds in the upper corner of the
I
/
screen. When the TV/VIDEO selector is
pressed again, the set is switched to receive
on-air TV broadcasting, and the channel
programme number will be displayed for
about 3 seconds in the upper right corner of
the screen.
12
Page 14

l-
MONO
0
P-N
3 Audio Mode Selector ( I$‘a )
ihe audio mode selector is used to select the
nain, sub or main t sub audio modes of
)ilingual broadcasting, and to select the
;tereo or mono mode while receiving stereo
signals.
f this button is pressed during the main audio
node, reception switches over to the sub
audio mode. If it is pressed again, reception
iwitches over to the main t sub audio mode.
f it is pressed a third time reception returns
3 the main audio mode. When this button is
bressed while receiving stereo signals, the
nono mode will be selected. When this button
5 pressed a second time, the stereo mode will
be selected.
lath audio mode indicator will be displayed
In the screen as shown below.
1
MONO
P
Audio Mode On Screen Display
Main audio
Sub audio
Main + sub audio 1 MAIN + SUB
Stereo
Mono
3Mono button (MONO)
f a stereo broadcast suffers from annoying
loise and the stereo indicator (on the screen)
s blinking, press the mono button to change
he audio to the mono mode.
?I switch the mode back to stereo, press this
jutton again.
NOTE:
If you press the mono button when receiving
a bilingual programme, the audio channel is
switched to the main channel.
MAIN
1 SUB
STEREO
MONO
I
I
13
“MAIN”, “SUB”, or “MAIN + SUB” on the
screen will go off. To switch back the audio
channel into the original mode, press the
button again. (The built-in stereo decoder
uses the Australian system.)
Page 15

&-PP-t~.
a
IO
@
n?!n
o??l~~
NES3==
OIII
&j-qpJ&
a
3
@
IcJOll
lc”I---
InI1
v CH A
@I El/c3 0
m
0
‘4 CH A
I3 OK3 0
II
@j
oc!l
a
ELI
@I
EII
TELETEXT MODE (SX51A8 ONLY)
[
Text/Mix Button ( ‘_1 / @J )
l When the Text/Mix button is pressed the
first time, the initial position (the text page
number memorized in the red block of a
Teletext broadcast will be displayed on the
screen.
l When the Text/Mix button is pressed the
second time, a Teletext broadcast will be
superimposed on the TV programme.
Press the button again to return to a Teletext
broadcast only.
Top/Bottom/Full Button ( @J )
l When the Top/Bottom/Full bu#on is pressed
the first time, the top half of the Teletext
page will be magnified and displayed on
the screen.
l When the Top/Bottom/Full button is pressed
the second time, the bottom half of the
Teletext page will be magnified and dis-
played on the screen.
l When the Top/Bottom/Full button is pressed
the third time, the Bottom mode will be
cancelled and the Full Teletext page will
appear on the screen. Press the button
again to return to theTop mode.
1
G-Psh~
II
a @I
11111El
EJ
OOOII
I~I-~
I1I1
Am&
III
V CH A
@I s/c3 0
@
a
a
?
v CH A
I3 331LZl 0
Picture Button ( 0 )
l When the Picture button is pressed in the
Text or Mix mode, the mode will be changed
to an ordinary TV programme screen.
Press the Text/Mix button again to return
to the Teletext page previously displayed on
the screen.
Reveal Button ( @ )
l When the Reveal button is pressed the first
time, any hidden information such as the
answer to a quiz will be revealed on the
screen.
l When the Reveal button is pressed the
second time, the information will disappear.
Press the button again to reveal the
information.
NOTE: If the REVEAL BUTTON is pressed when
in Television mode, the receiver will scan through
the channels and stop at the channel that you
were viewing when the REVEAL BUTTON was
pressed.
14
Page 16

irowse Button ( a )
When the Browse button is pressed, a
random Teletext page may be displayed on
the screen.
Notes:
1. The above random Teletext page selection
depends on the broadcasting station’s
programming.
2. This button is only effective for pages with
consecutive page numbers, e.g. 111, 112,
113 and 114.
‘ime Button ( @ )/Cancel Button ( @ )
T
l
When timer setting is required for some
Teletext page, press the Time button, and
then input the time%as required. Press the
Cancel button to return to an ordinary TV
programme. When the Time button is
pressed while viewing a TV programme,
the current time appears on the screen for
approximately 6 seconds.
r
Notes:
1. When the Time button is pressed again
after timer setting, the timer setting will be
/
cancelled.
2. The Teletext page must have timer setting
I
signals transmitted from the Teletext
broadcasting station.
I
L
S
4ore Button ( @ )
a
First input the desired Teletext page number into the red, green, yellow, and/or blue
block, then press the Store button for a
second. The block will change to white for
a second, then will change back to the
original colour. The page numbers are now
stored in the corresponding page
memories.
75
Page 17

Reset Button ( a )
l When the Reset button is pressed in the
Teletext mode, previously set Teletext
functions except the page number memory
will be reset and an ordinary TV
programme will apear while the Teletext
decoder is set up to display the initial
position (the page number stored in the red
block) of a Teletext broadcast.
Hold Button ( m )
l Any Teletext page can be held on the
screen by pressing the Hold button when
watching a Teletext broadcast. Press the
button again to cancel the hold mode.
Index Button ( a )
l Used to recall the page number you stored
yourself.
When this button is pressed, the page
number stored in the red block will be
displayed on the screen.
Colour Button (l----I)
(Red, Green, Yellow, Blue)
l When any of these colour buttons is
pressed, the block will move to the position
that corresponds to the pressed button,
where you can input the page number you
want to store. (See store button).
l When each colour button is pressed after
storing your desired page number, each
stored Teletext page number will be
displayed on the screen.
Text Page Selector (V/A)
l These buttons allow sequential selection of
16
Page 18

How to Make 16-Programme 4-Page
Number Memory Setting
In channel positions 1 to 16, four Teletext
pages can be stored in each channel, a total
of 64 pages. Initially the channel that
transmits Teletext in your area i.e. channel
7 in Sydney, must be preset into channels
1 to 16 (see page 6) or a channel for each
set of four pages required.
Preset the channels 1 to 16 to the
1.
channel transmitting Teletext
in your
area.
Select channel 1.
2.
1
Then, press the yellow colour button.
Input the desired page number into the
yellow block.
Then, press the blue colour button. Input
the desired page number into the blue
block.
Finally, press and hold the store button
until every coloured block changes to
white. Four page numbers have now
been stored in the page number memory
at the same time.
5.
Press the Picture button to set the TV
mode.
Select programme position “2” by
pressing the channel selector button “2”.
Then, repeat steps 2 and 3 again.
6.
For programme positions 1 to 16 repeat
the same procedure as explained above.
Press the Text/Mix button to
3.
set the
Teletext mode.
For 4-page number memory setting, first
4.
press the red colour button. Input the
desired Teletext page number into the red
block in the lower area of the screen.
Then, press the green colour button.
Input the desired page number into the
green block.
Example:
P300
NOTE:
1.
It is only possible to store teletext pages
in positions l-16.
2.
Stored Teletext page numbers remain
stored even when the power is turned off.
If there is no page that matches the page
numbers that are stored, the stored
number will blink.
Page 19

Audio/Video In/Out Terminals
udio Input terminals
Video Output terminal
L-
Audio Output terminals
ideo Input terminal
Enjoy the stunning visuals of a VCR or a video disk by connecting them to this unit through
the AUDIO/VIDEO IN terminals.
You can also bask in dynamic sound by connecting an amplifier through the AUDIO OUT
terminals.
NOTES:
1. With this TV, you can play back stereo-recorded video cassettes in stereo.
2. For monaural audio input, connect the external source to the AUDIO Input Left terminal (AUDIO
IN L (MONO)) to hear the same sound from both speakers.
3. If monaural equipment is connected to the AUDIO Input Right terminal, you will hear sound
from only one of the speakers. Connect monaural audio to the Left AUDIO Input terminal.
r-AUDIO IN L (MONO)
v
AUDIO OUT
v
18
Page 20

VCRlCTV or DlSClCTV Combinations
Note:
As this Colour TV set has only 1 set of Audio/
/ Visual input terminals, either a-VCR or a VIDEO
DISC player can be connected, but not both.
(AN
TENNA)
Y
IN (ANTENNA)
IN (ANTENNA)
AUDIO OUT
r-
VIDEO/AUDIO IN
VIDEO/AUDI
OUT
I\+--JJp&
D
O- - ’ VIDEO OUT
(VCR)
AUDIO OUT
I--------
(DISC)
AUDIO IN
VIDEO IN
(Portable VCR without tuner)
--- -- -
VIDEO OUT
19
Reception System
l PAL-B (Australian STD)
-’
Page 21

Before Calling for Service
The following conditions do not always denote trouble. Therefore, perform the checks described
below before calling for service.
If the cause of the problem cannot be corrected by the use of this guide, pull the power plug
from the electric outlet, and call for service.
[7 Problems 1
I No Sound l
I No Picture
I No Picture
I Excessive
l Check that the brightness or Contrast control has
l Check if the aerial wire is disconnected or
noise on
picture
l Check if the tuning control is properly adjusted.
I Bad picture
Checking Points
Check if the power plug is disconnected from the
electrical outlet.
Check if the Power on/off button is in the off
position (power supply is interrupted).
Check if child lock has been set (see page 22).
not been completely turned down.
shortcircuited.
n Ghost
I Spotted
picture
n Striped
picture
l Ghosting is due to reflected waves which are
produced by mountains, large buildings or trees
located nearby. Therefore, try to change the
direction or height of the aerial.
l Check if the set receives noise produced by motor
cars, trucks or neon signs. Install your aerial in
a place as far as possible from roads or neon
signs.
l A striped picture may be due to interference by
other stations or neighbouring television sets. The
interference can be reduced to some extent by
adjusting the direction or height of the aerial.
(If a twinlead type feeder is used, try replacing
it with a coaxial cable).
I
20
Page 22

Further Hints
Ventilation
When setting up the TV receiver, make sure that the ventilation holes in the bottom and rear
panel allow free access of air. Therefore do not place the receiver on a pillowlike surface, on
sponge rubber or plastic foam mats, or on any similar material which could block the ventilation
holes. The upper ventilation grills of the rear panel must not be covered up at any point. The
placing within the vicinity of radiators or other heating devices should be avoided.
NOTE: Antenna Connections
1. FOR YOUR SAFETY INSTALL ANY EXTERNAL
300 to 75 ohm
FLAT RIBBON
AERIAL TO AS 1417.1*
2. Antenna connections
75 OHM COAXIAL CABLE: Connect the cable
from the antenna to a standard DIN 45325 plug
(IEC 169-2) and plug direct into the socket at the
rear of the television receiver.
300 OHM FLAT RIBBON FEEDER.
Connect the feeder from the antenna to the
Balun, for VHF/UHF etc.
Coaxial Cable 75R
ACCESSORIES SUPPLIED: Operation manual, remote control handset, batteries, service centre
directory.
SPECIFICATIONS
Receiving system:
Receiving channel:
Antenna:
Semiconductors:
Speaker:
Audio Output:
Power Source:
Power Consumption:
Weight:
Dimensions:
PAL System, (Australian Standard)
VHF: 0-llch UHF: 28-69ch
VHF/UHF: 75 ohm
16 ICs, 51 Transistors, 106 Diodes, 1 LED
9 x 5 cm Oval x 2
4.OW t 4.OW (MPO)
230-24OV, AC 50Hz
105W at 24OV, AC 50 Hz
Approx. 23 kg
516(W) x 4i7(H) x 482(D) mm
The manufacturer reserves the right to vary specifications and design, or use alternative materials
as may be deemed necessary or desirable at any time, and such change or variation being of
a kind as not to reduce the quality, performance or appearance substantially.
21
Page 23

Child Lock
Main power switch
(on the rear)
Your television can be electronically locked to
prevent the children viewing it instead of doing
their homework.
ENGAGING THE CHILD LOCK MODE
1.
Ensure the MAIN POWER switch on the rear
of the TV is in the “OFF” position.
2.
Simultaneously press the two VOLUME
buttons (behind the door) and press the MAIN
POWER switch (on the rear) to the “ON”
position.
Release the buttons and “ - - ” will be
3.
displayed on the screen.
4.
Using the numerical channel buttons on the
Remote control, select two numbers e.g. 99.
Push the MAIN POWER switch (on the rear)
5.
to “OFF” and then back to “ON”.
CHANNEL
DISPLAY
/
To turn on the TV whilst the Child Lock is
6.
activated, just select your two numbers on the
numerical channel number buttons on the
Remote control and the TV will automatically
turn ON.
NOTE: The MAIN POWER switch must be in the
“ON” position for the Child Lock mode to operate
after being engaged.
DISENGAGING THE CHILD LOCK MODE
To disengage the Child Lock mode, carry out
steps 1 to 5 above but do not enter any numbers
in step 4.
NOTE: Ensure step 5 is carried out when both
engaging and disengaging the Child Lock
otherwise some modes on your TV may not
operate.
22
Page 24

r-SHARPS-q
e’
WARRANTY
Congratulations on Your Purchase!
This Sharp product is warranted against faulty materials and labour for a
period of twelve (12)'months from the date of original purchase.
If service is required during the warranty period, please contact your nearest
Sharp Approved Service Centre. These repairs would be carried out at no
charge to the owner, subject to the conditions specified herein.
The owner is responsible for any transportation and insurance costs if the
product has to be returned for repair.
This warranty does not extend to accessories or defects or injuries caused
by or resulting from causes not attributable to faulty parts or the manufacture of the product, including but not limited to, defect or injury caused by or
resulting from misuse, abuse, neglect, accidental damage, improper voltage,
liquid spillage, vermin infestation, software, or any alterations made to the
product which are not authorised by Sharp.
Please retain your sales documentation, as this should be produced to
validate a warranty claim.
This warranty is in addition to and in no way limits, varies or excludes any
express and implied rights and remedies under the Trade Practices Act.
IMPORTANT
PLEASE RETAIN THIS SHEET FOR YOUR OWN REFERENCE
For your reference, please enter the particulars of your purchase below
retain, with your purchase documentation.
and
A
A
Model No.
Serial No.
Date of Purchase
Retailer
IMPORTANT NOTICE: This warranty apph Only to products sold in Australia. TINS-4676CEZZ
 Loading...