

Page 1

SL-6000L/SL-6000N
Page 2

In the U.S.A.
Declaration of Conformity
Personal Mobile Tool: SL-6000L/SL-6000N
This device complies with Part 15 of the FCC Rules. Operation is subject to the following two
conditions: (1) This device may not cause harmful interference, and (2) this device must
accept any interference received, including interference that may cause undesired operation.
Responsible Party:
SHARP ELECTRONICS CORPORATION
Sharp Plaza, Mahwah, New Jersey 07430-1163
TEL: 1-800-BE-SHARP
Tested To Comply With FCC Standards
FOR HOME OR OFFICE USE
WARNING - FCC Regulations state that any unauthorized changes or modifications to this
equipment not expressly approved by the manufacturer could void the user’s authority to
operate this equipment.
Note: This equipment has been tested and found to comply with the limits for a Class B digital
device, pursuant to Part 15 of the FCC Rules.
These limits are designed to provide reasonable protection against harmful interference in a
residential installation. This equipment generates, uses, and can radiate radio frequency
energy and, if not installed and used in accordance with the instructions, may cause harmful
interference to radio communications.
However, there is no guarantee that interference will not occur in a particular installation. If
this equipment does cause harmful interference to radio or television reception, which can
be determined by turning the equipment off and on, the user is encouraged to try to correct
the interference by one or more of the following measures:
—Reorient or relocate the receiving antenna.
—Increase the separation between the equipment and receiver.
—Connect the equipment into an outlet on a circuit different from that to which the receiver
is connected.
—Consult the dealer or an experienced radio/TV technician for help.
Note: A shielded interface cable is required to ensure compliance with FCC regulations for
Class B certification.
FOR YOUR RECORDS...
For your assistance in reporting this product in case of loss or theft,
please record the model number and serial number (located on the
bottom of the unit) below.
Please retain this information.
Model Number
Serial Number
Date of Purchase
Place of Purchase
Page 3

SAR
The available scientific evidence does not show that any health problems are
associated with using low power wireless devices. There is no proof, however, that
these low power wireless devices are absolutely safe. Low power Wireless devices
emit low levels of radio frequency energy (RF) in the microwave range while being
used. Whereas high levels of RF can produce health effects (by heating tissue),
exposure to low level RF that does not produce heating effects causes no known
adverse health effects. Many studies of low level RF exposures have not found any
biological effects. Some studies have suggested that some biological effects might
occur, but such findings have not been confirmed by additional research. The SL6000L has been tested and found to comply with the Federal Communications
Commission (FCC) guidelines on radio frequency energy (RF) exposures. The
maximum SAR levels tested for the SL-6000L has been shown to be 0.195 W/kg at
Body.
FCC WARNING
Changes or modifications not expressly approved by the party responsible for
compliance could void the user's authority to operate the equipment.
1
Page 4

2 Introduction
Introduction
Congratulations and thank you for purchasing the Personal Mobile Tool.
Read this Start-up Guide first. Then, refer to the Operation Manual on the CD-ROM
for more details.
NOTICE:
• SHARP strongly recommends that you keep separate permanent written records
of all important data. Data may be lost or altered in virtually any electronic memory
product under certain circumstances. Therefore, SHARP assumes no
responsibility for data lost or otherwise rendered unusable, whether as a result of
improper use, repairs, defects, battery replacement or any other cause.
• SHARP assumes no responsibility, directly or indirectly, for financial losses or
claims from third parties resulting from the use of this product and any of its
functions, such as stolen credit card numbers, the loss or alteration of stored data,
etc.
• Built with very high precision technology, the Liquid Crystal Display (LCD) panel
has 99.99% or more effective pixels, with 0.01% or fewer pixels failing to light or
remaining lit at all times.
• Some of the accessories described in the Zaurus manuals may not be available at
the time you purchase this product.
• The screens on the Zaurus may differ from the screens in the manuals. If you would
like to change the screen appearance on the Zaurus, please use the “Appearance”
application (See the “Setting the Appearance (Appearance)” section in the
Operation Manual on the CD-ROM).
• The information and screen shots provided in the manuals are subject to change
without notice.
• All company and/or product names are trademarks and/or registered trademarks
of their respective holders.
Copyright
It is the intent of SHARP that this product be used in full compliance with the
applicable copyright laws and that prior permission be obtained from copyright
owners whenever necessary.
Page 5
Introduction 3
Conditions for using SHARP original software
SHARP CORPORATION (hereafter referred to as “SHARP”), under the following
conditions, grants to the customer a non-exclusive license to use the SHARP
original software for PCs, that accompanies this product. Use of the software by the
customer indicates agreement to the following conditions:
1. SHARP will make no compensation for damages to the customer caused by the
use of this software, except for compensation required by law.
2. SHARP may change the specifications of this software at any time without
advance notice.
• CompactFlash is a trademark of SanDisk Corporation.
• SD logo is a trademark.
• Java, PersonalJava and J2ME are trademarks of Sun Microsystems, Inc.
• Metrowerks and OpenPDA are trademarks of Metrowerks Corporation.
• Linux is a registered trademark owned by Linus Torvalds.
• Trolltech™, Qt™, Qtopia™ and the Trolltech logo are registered trademarks of
Trolltech.
• Opera™ is a trademark of Opera Software ASA.
• Hancom™ is a trademark of HancomLinux, Inc.
• Microsoft, PowerPoint, Outlook, and Windows are either registered trademarks
or trademarks of Microsoft Corporation in the United States and/or other
countries.
• Intel is a trademark or registered trademark of Intel Corporation.
• This product includes software developed by the University of California,
Berkeley and its contributors.
• Licensed under one or more of U.S. Pat. 4,972,484; 5,214,678; 5,323,396;
5,530,655; 5,539,829; 5,544,247; 5,606,618; 5,610,985; 5,740,317; 5,777,992;
5,878,080; 5,960,037.
Page 6

4 Contents
Contents
Introduction..........................................................................2
Contents ...............................................................................4
Organization of the Operation Manuals ............................................... 5
Cheking the contents ..........................................................6
Getting Started.....................................................................8
Step 1: Inserting and charging the battery ........................................... 8
Step 2: Pulling out the stylus.............................................................. 10
Step 3: Initial settings......................................................................... 11
Step 4: Installing the Software on Your PC........................................ 15
Adding or Removing PC Software ..................................................... 20
About Your Zaurus ............................................................21
Useful Functions and Services of the SL-6000L/SL-6000N............... 21
Part names and functions .................................................................. 25
Display protection cover..................................................................... 29
Removing/Attaching the Display protection cover.............................. 29
Opening or closing the keyboard ....................................................... 30
Charging/Using the Docking Station .................................................. 30
Connecting the Zaurus to your PC..................................................... 32
Basic Operations ...............................................................33
Turning the unit on and off ................................................................. 33
Operating methods ............................................................................ 34
Home Screen ..................................................................................... 35
Files Home Screen ............................................................................ 37
Reorganizing Your Files..................................................................... 39
Basics of Using Applications.............................................................. 45
Entering Characters ........................................................................... 62
Adjusting the Volume ......................................................................... 74
Checking the battery level.................................................................. 75
Using memory expansion .................................................................. 76
Using Help ......................................................................................... 78
How to Install Applications on Your Zaurus ...................80
Step 1: Copying the Software to the Zaurus ...................................... 80
Step 2: Installing the Software for Use on the Zaurus ....................... 82
Appendix.............................................................................84
What to do if a problem occurs .......................................................... 84
Maintaining Your System ................................................................... 87
Replacing the Battery......................................................................... 90
Conditions of Use............................................................................... 91
Troubleshooting ................................................................................. 95
Specifications ..................................................................................... 99
Product Support ............................................................................... 101
Page 7

Contents 5
Organization of the Operation Manuals
This operation manual describes both the SL-6000L and SL-6000N. The SL-6000L
is equipped with an internal wireless LAN module. The SL-6000N does not come
equipped with an internal wireless LAN module. “Zaurus” is used when describing
both models, otherwise the model name is used.
The Zaurus operation manuals are organized as follows:
Please refer to the appropriate manual as required.
Quick Start Guide.........................Zaurus setup for experienced users of PCs or
handheld PDAs.
Start-up Guide (this manual).....Detailed explanations including setup,
software installation and basic operations of
the Zaurus.
Operation Manual.........................Detailed information about the Zaurus. This
online manual is stored in PDF format on the
accompanying CD-ROM.
Online Manuals.............................The following manuals are stored in PDF
format on the accompanying CD-ROM.
Zaurus File Transfer Application Operation Manual
Backup/Restore Application Operation Manual
Intellisync for Zaurus Operation Manual
Qtopia Desktop for Zaurus Operation Manual
HancomMobileOffice Operation Manual
Digital Camera Manual (for add-on software)
Terminal Manual (for add-on software)
File Manager Manual (for add-on software)
Troubleshooting Guide
How to View Online Manuals
The online manuals are stored on the accompanying CD-ROM. When that CD-ROM
is inserted into the CD drive of your PC, a menu screen will be displayed. On that
screen, click “Online Manuals.”
The online manuals are also installed when the software is installed on your PC. You
can view them on your PC after the software has been installed.
In order to read the online manuals, Adobe Acrobat Reader Version 5 or higher must
be installed on the PC you are using. If Adobe Acrobat Reader is not installed on
your PC, click on the “Install Adobe
Copyright © 2003 Adobe Systems Incorporated. All rights reserved.
Acrobat Reader™” from the menu screen.
Page 8

6 Cheking the contents
Cheking the contents
Personal Mobile Tool
with Display protection cover
Rechargeable
Lithium-Ion Battery
(EA-BL09)
AC Adapter (EA-70) and
(Specified Charger)
Stylus (inserted
in the unit)
AC Power Cord
CF Slot Protection
Card (inserted in the
unit)
Docking Station
(CE-ST10)
Page 9

Cheking the contents 7
CD-ROM
Start-up Guide (this book)
(Software and Online
Manuals, etc.)
Note: The AC power cord plug may differ in some countries.
Page 10
8 Getting Started
Getting Started
Step 1:
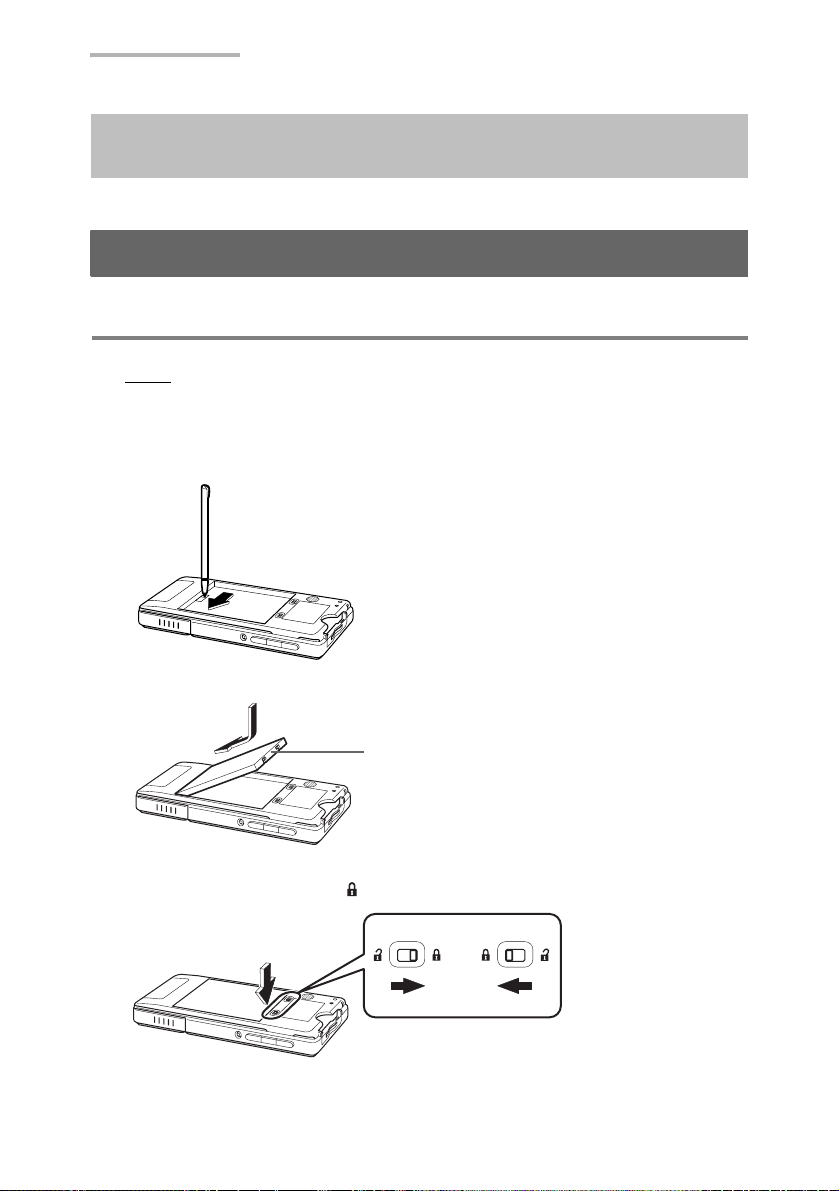
Inserting and charging the battery
Inserting the battery
Note: Only use the “EA-BL09” rechargeable battery (supplied).
1. Attach the battery on the back of the unit.
Make sure to slide the switch on the back of the unit to the “ON” position by using the
stylus pen before inserting the battery.
Insert the battery.
Terminal
2. Push and hold the battery in the direction of the arrow while sliding the battery
replacement switch to the “ ” position.
Page 11
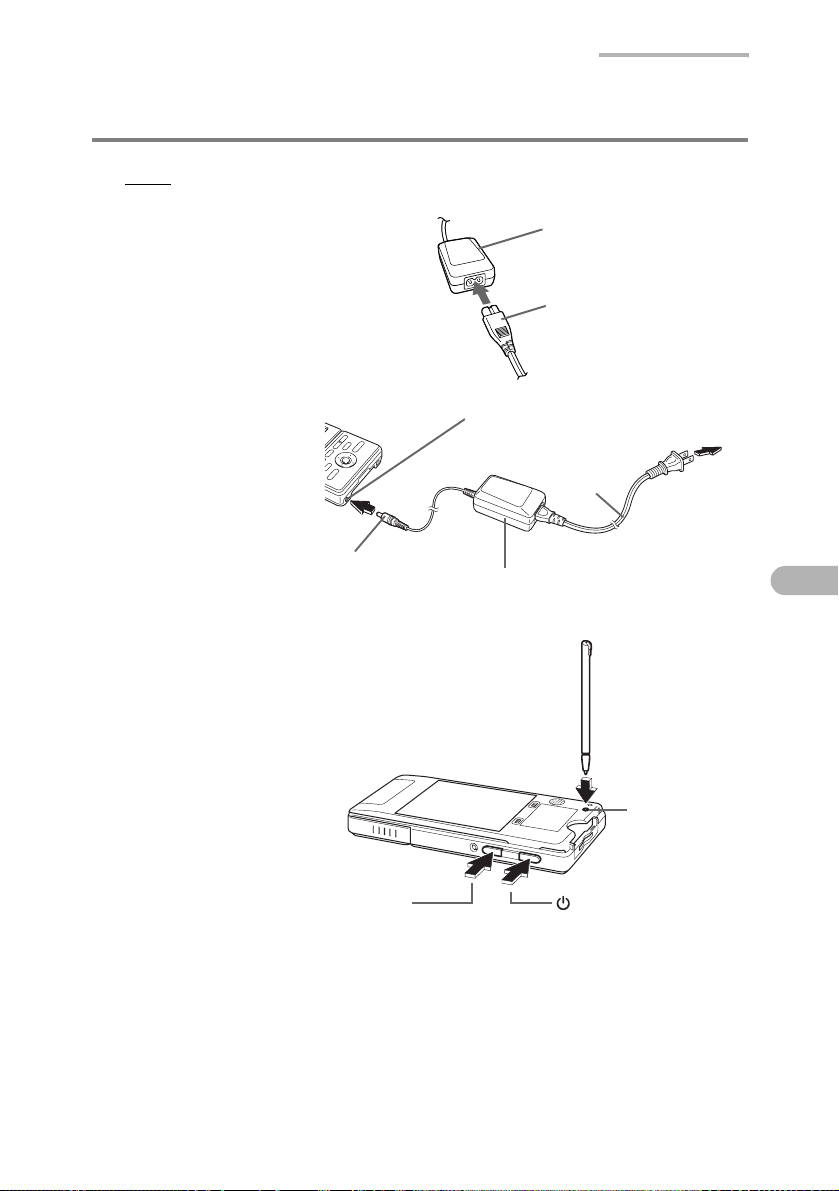
Charging the battery using the AC adapter
Note: Only use the “EA-70” AC adapter (supplied).
Getting Started 9
1. Connect the AC power
cord to the AC adapter.
2. Plug the AC adapter
connector into the
unit with the battery
inserted.
AC adapter jack
AC adapter
connector
AC adapter
AC power
cord
To AC
outlet
AC power
cord
AC adapter
3. Plug the AC power cord into an AC outlet.
4. Make sure the Zaurus
is off. Press the reset
switch with the supplied
stylus pen while holding
the Rec and POWER
keys.
The charge light lit and
starts charging.
Reset switch
Standard charging time
is approximately 4
hours (depending on
the temperature and
Rec key key
usage conditions).
5. When charging has been completed, the charge light will turn off. Unplug the
AC power cord from the AC outlet, then unplug the AC adapter connector from
the unit.
Page 12
10 Getting Started
Note:
• Charge the battery to its full capacity until the charge light turns off.
• Be sure to slide the battery replacement switch to the “ ” position before
charging.
• If a charging error occurs, the charge light will blink. Make sure that the AC
power cord and the AC adapter are connected correctly, remove and reinsert
the battery, then perform steps 1 to 3 above again. If the error persists, there
is something wrong with the battery, Zaurus, etc. Contact your local SHARP
dealer for repair.
• The AC power cord plug may differ in some countries.
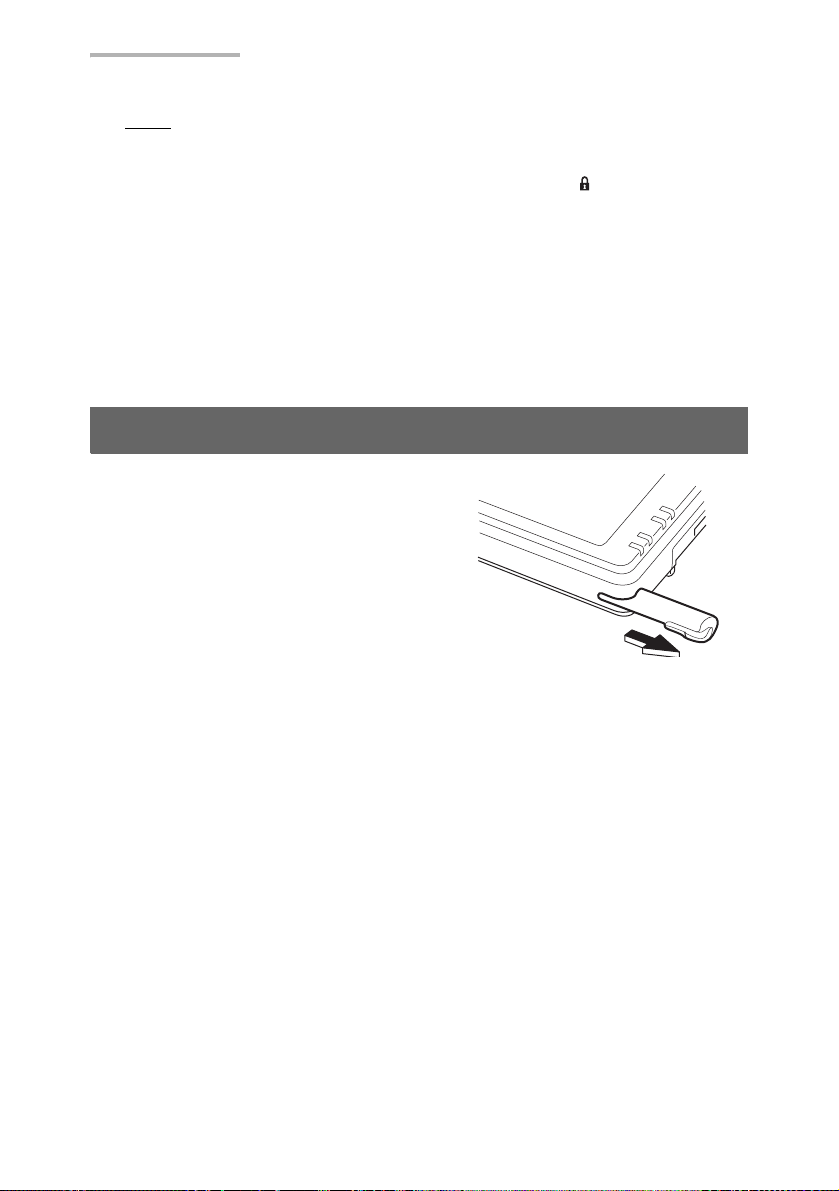
Step 2:
This unit comes equipped with a stylus to
select items and enter various kinds of
information, etc.
Pull out the stylus as shown. To replace it,
insert it so that the protruding part of the
stylus locks into place.
Touch the button displayed on the screen
one time to open, select an item, etc.
Pulling out the stylus
Page 13

Getting Started 11
Step 3:
Open the Display protection cover (see page 29) and carry out the initial setup of the
Zaurus after completing the battery charge.
Initial settings
Turning the unit on
1. Press to turn the power on.
The Welcome screen will appear after a few minutes.
Then, follow the next steps to complete the initial settings.
Note:
• If the power will not turn on after charging the battery, disconnect the AC
adapter and remove the battery. After approximately 10 seconds, replace the
battery, perform the reset operation and then recharge the battery again (See
page 85 and 90).
• If the Welcome screen does not appear, try to Format the Zaurus (See page
89).
Also make sure that the battery replacement switch is set to “ ” and the
battery is inserted correctly.
• During the initial settings, if you do not operate the Zaurus, the power will
automatically turn off after 8 hours (with AC adapter connected) or 10 minutes
(without AC adapter). Turn the power on, then proceed to the next step.
• If the battery level is low, the power will not turn on even if you attach the AC
adapter. Charge the battery to its full capacity.
Adjusting the touch panel
1. On the Welcome screen, tap anywhere on the screen.
The Calibration screen will appear.
2. Tap the cross hairs firmly one by one.
When you have completed adjustment of the touch panel, the Set System Time
screen will appear.
Then, follow the next step.
Page 14
12 Getting Started
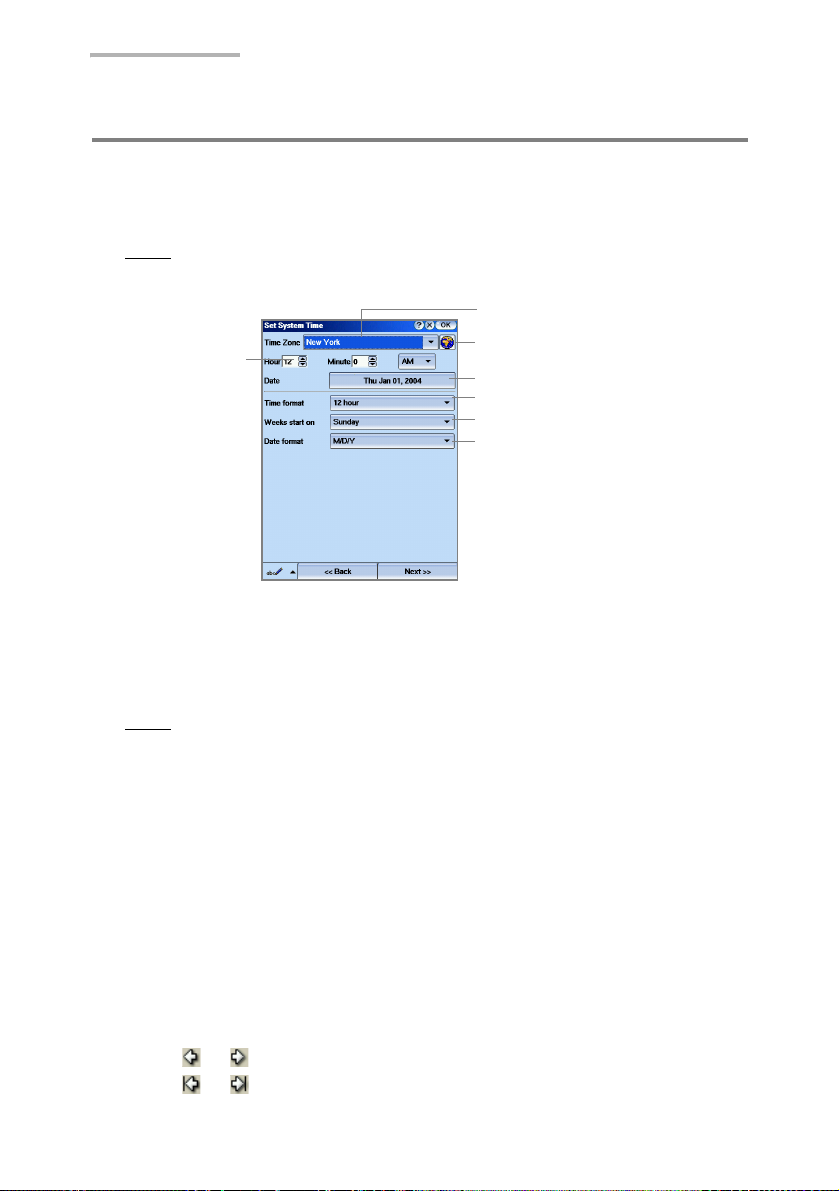
Setting the date and time
For the time-critical functions to work properly, the built-in clock must be set to the
current date and time.
Note:
For detailed information on how to enter characters, see page 62,
“Entering Characters”.
Time Zone drop-down list button
Hour and Minute
spinboxes
City Time button
Date button
Time format drop-down list button
Weeks start on drop-down list button
Date format drop-down list button
1. Tap the Time Zone drop-down list button.
Six city names will be displayed by default.
2. Select your time zone.
If your time zone is not listed, go to step 3. You can change the time zone
Note:
later using the Date/Time application (For details, see the Operation
Manual on the CD-ROM).
3. Tap the Time format drop-down list button and select the 12 hour or 24 hour
option.
4. Tap the up and down arrows on the Hour and Minute spinboxes to set the
correct time.
5. If you select the 12-hour format in step 3, select AM or PM by tapping the drop-
down list.
6. Tap the Date button and then tap your current date on the mini-calendar that
appears.
• Tap the up and down arrows of the year spinbox to set the current year.
• Tap the month drop-down list button and select the current month.
• Tap or to change the setting month by month.
• Tap or to select the first month (January) or the last month
(December).
Page 15

Getting Started 13
7. Tap the Weeks start on drop-down list button and then select Sunday or
Monday to begin the week.
8. Tap the Date format drop-down list button and then tap the desired format.
The selected format applies to the Date column displayed on the Index screen
of the application, etc.
M/D/Y (example, 12/26/04)
D.M.Y (example, 26.12.04)
Y-M-D (example, 04-12-26)
D/M/Y (example, 26/12/04)
Note:
These Date formats and long date formats (for example, December 26,
2004) will not be applied to some applications.
9. Tap “Next” or to save the setting.
The display will turn to the Edit Owner Information screen.
Follow the next step.
Registering your personal information
To skip entering your information now, tap “Next” or . You can enter it later
using the Address Book application.
1. Enter your information on the Edit Owner Information screen and then tap “Next”
or to save it.
Tapping “Back” will return the screen to the previous Set System Time screen.
Page 16
14 Getting Started
Note: You will not be able to select or enter the category name on this screen.
Follow the next procedure.
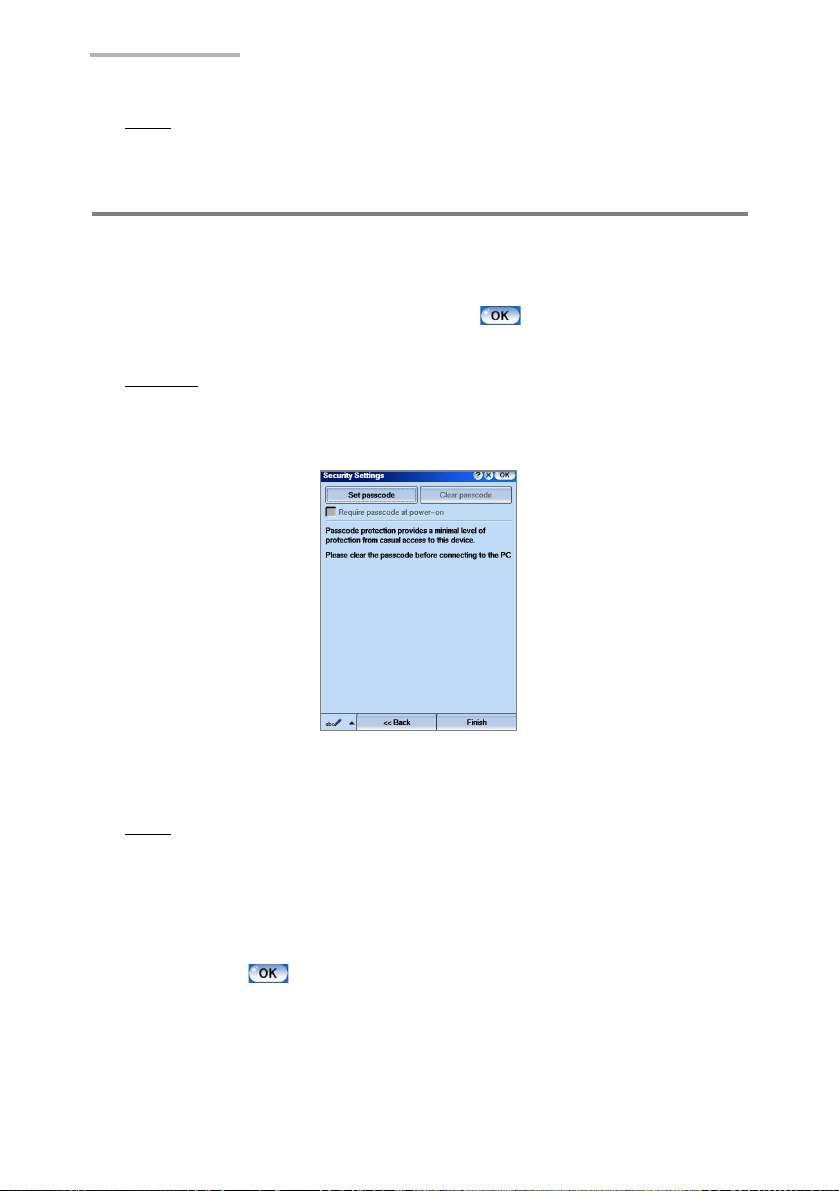
Setting your passcode
By setting your own passcode in the Zaurus, you can protect your Zaurus from
unauthorized use. Once you set the passcode enables the Require passcode at
power-on setting. You will be required to enter it every time you turn the Zaurus on.
To skip setting the passcode now, tap “Finish” or . You can enter it later using
the Security application (See the Operation Manual on the CD-ROM).
Caution:
Use this function with care. If you forget your passcode, you will need
to carry out the “Format” in the Maintenance menu. You will lose all
data created and saved as well as any add-on software installed on
the Zaurus.
1. Tap the “Set passcode” button.
2. Enter your passcode and then tap “OK”.
Note:
You can enter passcode using number keys on the screen or alphabets
using the keyboard. Alphabets are distinguished between upper case
and lower case.
3. Enter the same passcode again and then tap “OK”.
To make the Zaurus ask for the passcode at start-up every time you turn it on,
tap the “Require passcode at power-on” checkbox to turn it on.
4. Tap “Finish” or to complete the initial settings.
Once the initial settings are completed, the Home screen will be displayed.
• If you turned on the “Require passcode at power-on” option in step 3, the
passcode entry screen will appear asking for your passcode. Entering the
correct passcode will display the Home screen.
Next, install the software for your PC and the Zaurus from the CD-ROM.
Page 17

Getting Started 15
Step 4:
Installing the Software on Your PC
Checking the Operating Environment
Minimum System Requirements
• 100% IBM Compatible PC
• Microsoft Windows 98/98SE/2000 Professional/Me/XP
• Pentium 200MHz or higher for Microsoft Windows 98/98SE/2000 Professional/
Me, Pentium/Celeron
• 80MB Available Hard Disk Space for installation
• 64MB RAM (Recommend 128MB RAM) for Microsoft Windows 98/98SE/2000
Professional/Me, 128MB RAM (Recommend 192MB RAM) for Microsoft
Windows XP
• CD-ROM Drive
• 1 Available USB Port or Serial Port with Optional Serial Cable CE-170TS
• Mouse or Compatible Pointing Device
• 800 × 600 or Higher Resolution Monitor
Note:
Proper operation cannot be guaranteed on the following types of PCs:
• Self-built PCs
• PCs upgraded from Windows 95
• When the customer has installed USB ports on a PC did not include USB
ports in the original configuration from the PC manufacturer.
* This software is not guaranteed to operate on all PCs that have the
recommended environment.
300MHz or higher for Microsoft Windows XP
Page 18

16 Getting Started
About USB Ports
• Activating the power saving mode (such as suspend, resume, or sleep function)
of some PCs may result in the USB port not functioning properly. In this case,
disable the power saving mode.
• The software may not operate properly when using a commercially available USB
card installed in a PCI slot.
• If the USB port on your PC or the USB hub connected to the Zaurus does not
operate properly, perform the following steps.
- When your PC comes equipped with several USB ports, connect the Zaurus to
another USB port.
- When other USB devices are connected to your PC and used simultaneously,
disconnect them from your PC.
• If the USB driver does not operate properly when you connect the Zaurus to your
PC via the USB hub, connect it directly to the USB port on your PC. Using the
USB extension cable may result in the USB driver not operating properly.
• Do not remove and connect the USB cable from/to the PC in a short time.
Limitations When Using with Windows XP and Windows 2000
Windows XP
• Log on using an account on the PC that has administrator privileges. The software
cannot be installed when logged onto a restricted account. When using the
software, log on as an administrator. To do this, click [Start], then [Log Off], select
an administrator account for the PC from the displayed screen, and log on.
Windows 2000
• Log on as the Administrator when installing the software. Also log on as the
Administrator when using the software. When using a PC in a company or similar
place, contact the administrator of the PC about an Administrator account.
Page 19

Getting Started 17
Installing the PC Software and the USB Driver onto your PC
Using the accompanying CD-ROM, “Intellisync for Zaurus,” “Backup/Restore
application” etc. can all be installed at one time.
Preparation for Installation
1. When installing this software in Windows XP/2000, check the limitations on the
previous page.
2. Close all applications on your PC.
3. Insert the accompanied CD-ROM into your CD-ROM drive.
A menu screen will be displayed automatically.
If the CD-ROM does not launch automatically, open D: setup.exe (use your
CD-ROM drive letter),
Caution
: Do not connect the USB cable between the Zaurus and the PC until
instructed to do so by the software.
Installing the PC software
Click “Install PC Software”, then confirm the displayed contents and click “OK”.
4.
Installation of the software will begin.
Note:
• You can confirm the installation procedures by clicking “Installation Notes”
under “Install PC Software”.
• If the PC Software has already been installed, additional installation or
uninstallation screens will be displayed (See page 20).
Page 20
18 Getting Started
• If the software for the former SL-models has been installed, a confirmation
dialog box for uninstallation of the software will be displayed.
Confirm the message to uninstall the software. After uninstallation, repeat the
procedure from step 3.
5. Follow the on-screen instructions and complete the installation.
Note:
• To install the add-on software or data onto the Zaurus at a later time (See
page 80), be sure to install the “Zaurus File Transfer” beforehand.
• Other software files can be installed later (See page 20).
• Continue the installation even if you receive warning dialog boxes which state
“Software Installation” and “Digital Signature Not Found” if you are using
Windows XP/2000. These are standard error messages which are received
when attaching or unattaching a USB device using Windows XP/2000.
6. When the installation is completed, reboot your PC.
Next, connect the Zaurus to your PC.
7. Connect the AC adapter to the Docking Station, and plug the AC power cord into
an AC outlet.
8. Remove the SHARP I/O PORT cover of the Zaurus, and slide the Zaurus into
the Docking Station.
Note: As for steps 7 and 8, see steps 1 to 4 on page 30 and 31 (“Charging/
Using the Docking Station”).
9. Turn on the Zaurus.
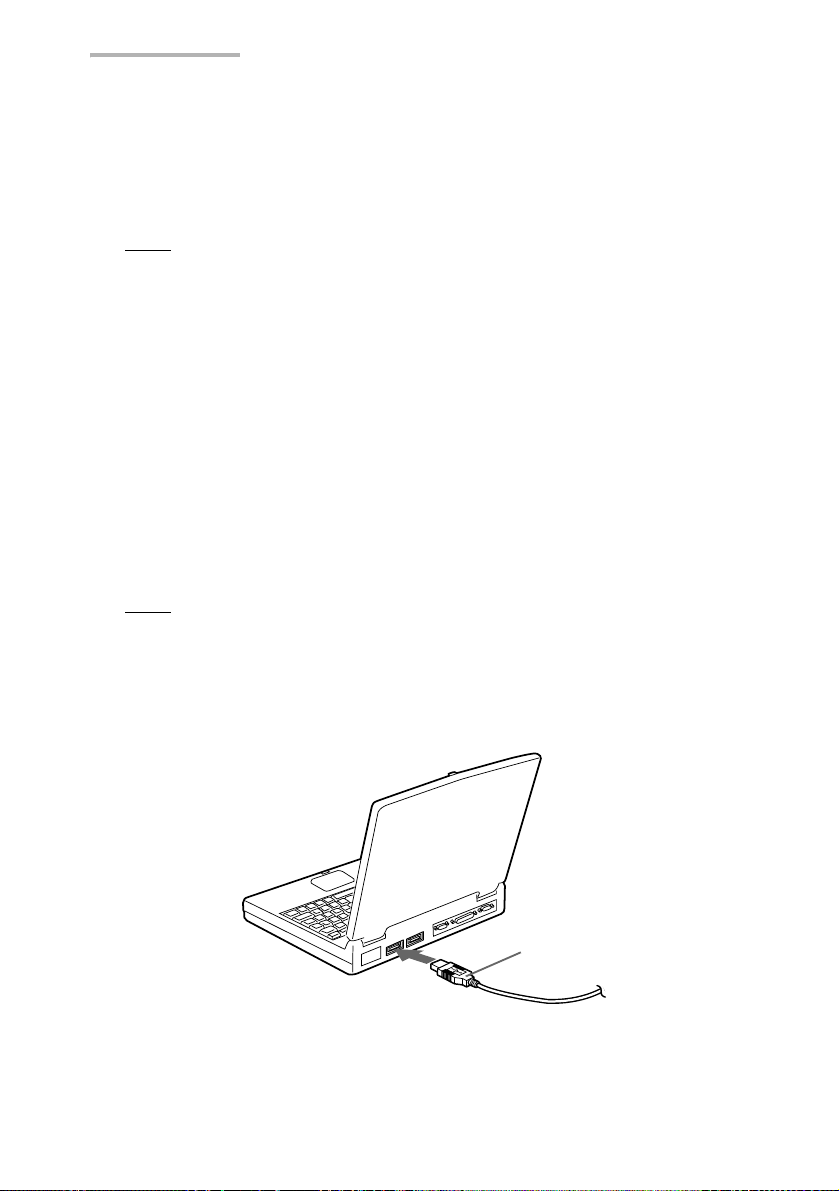
10.
Eject the CD-ROM from your PC and plug the USB connector of the Docking
Station into the USB port of your PC. (Prior to plugging in the USB connector,
turn your PC power on.)
PC
USB port
USB connector
Page 21

Getting Started 19
11.
The connection will be established. If a new hardware wizard dialog box
appears, follow the wizard until the USB driver is installed.
Note: In the “Hardware Installation Wizard” dialog box, confirm “SL Series Ver
3 (WDM)” as its target hardware, and click “Continue Anyway”.
Next, set the PC Link options on the Zaurus.
12.
Tap the “PC Link” icon on the Settings Home screen.
13.
Select “USB-I/O (default)” or “Serial” as the connection.
14.
Tap .
You are now ready to use your Zaurus and the PC software.
Page 22
20 Getting Started
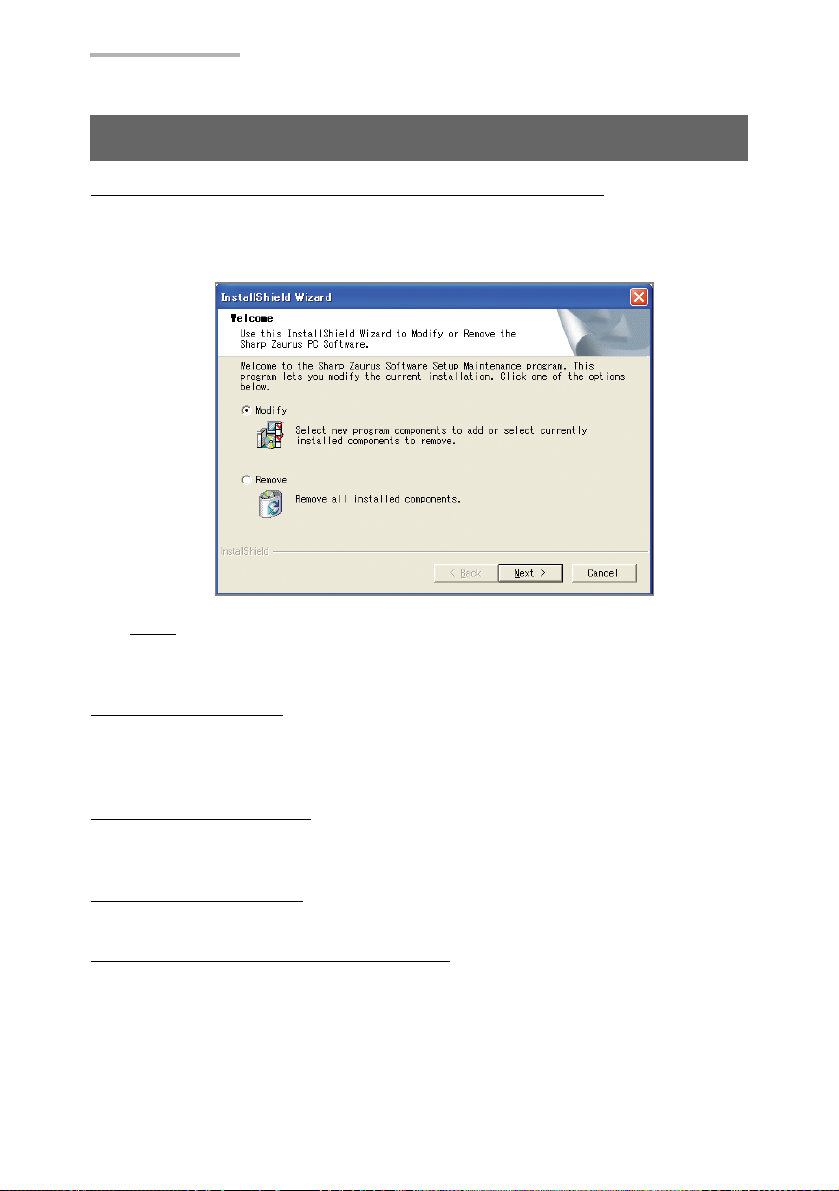
Adding or Removing PC Software
Displaying the screen for Add or Remove PC software
Select “Sharp Zaurus Software” from “Add or Remove Programs” on the Control
Panel (Or click the Start menu, then (All) programs → Sharp Zaurus 2 → Uninstall).
The following screen will be displayed.
Note:
• Executing “SHARP SL Series USB Driver” from “Add or Remove Programs”
on the Control Panel will uninstall the USB drivers.
Adding the software
Insert the included CD-ROM into your CD-ROM drive. Select “Modify” in the above
screen and follow the on-screen instructions. Select (check) the software you want to
add and what software you currently have installed on the “Select the Software” screen.
Removing the software
Select “Modify” in the above screen and follow the on-screen instructions. Uncheck
the software you want to delete on the “Select the Software” screen.
Removing all software
Select “Remove” in the above screen and follow the on-screen instructions.
Changing the communication method
Insert the included CD-ROM into your CD-ROM drive. Select “Modify” in the above
screen and follow the on-screen instructions. Select the communication method on
the “PC Communication Port Selection” screen. When you change the
communication method, also change it to the same method in the Zaurus PC Link
setting.
Page 23

About Your Zaurus 21
About Your Zaurus
Useful Functions and Services of the
SL-6000L/SL-6000N
Your Zaurus has the following features:
• A large colorful VGA LCD screen
• A full QWERTY keyboard and software keyboards (capable of handwriting
recognition)
• The ability to create and read Internet e-mail message (POP3/POP3(APOP)/
IMAP4/SMTP)
The e-mail message can include attachments.
• An HTML browser that can access a variety of information screens
• Powerful PIM functions (Address Book, Calendar, Todo List, Text Editor)
• You can easily display a file by linking it in the calendar to appear on a particular
day.
• Playback of MPEG1 movie files and MP3 music files
• Viewing and simple editing of Microsoft Word and Excel files and viewing of
Microsoft PowerPoint files (HancomMobilePresenter is available on the enclosed
CD-ROM.)
• The ability to slideshow image files
• Capturing your messages/memos and playing them back through the built-in
speaker
• Saving or transporting data via the CF or SD card expansion slots
• When connected to the PC, the Zaurus memory is displayed as a folder on the
PC. Data can be exchanged easily using the PC “drag-and-drop” operation.
• Data exchange with a PC using the PC link software
• The capacity to add applications by importing them from a PC etc.
The functions on this product (such as calendar) can handle dates from January
1, 1970 (GMT) to December 31, 2037 (GMT).
Page 24
22 About Your Zaurus
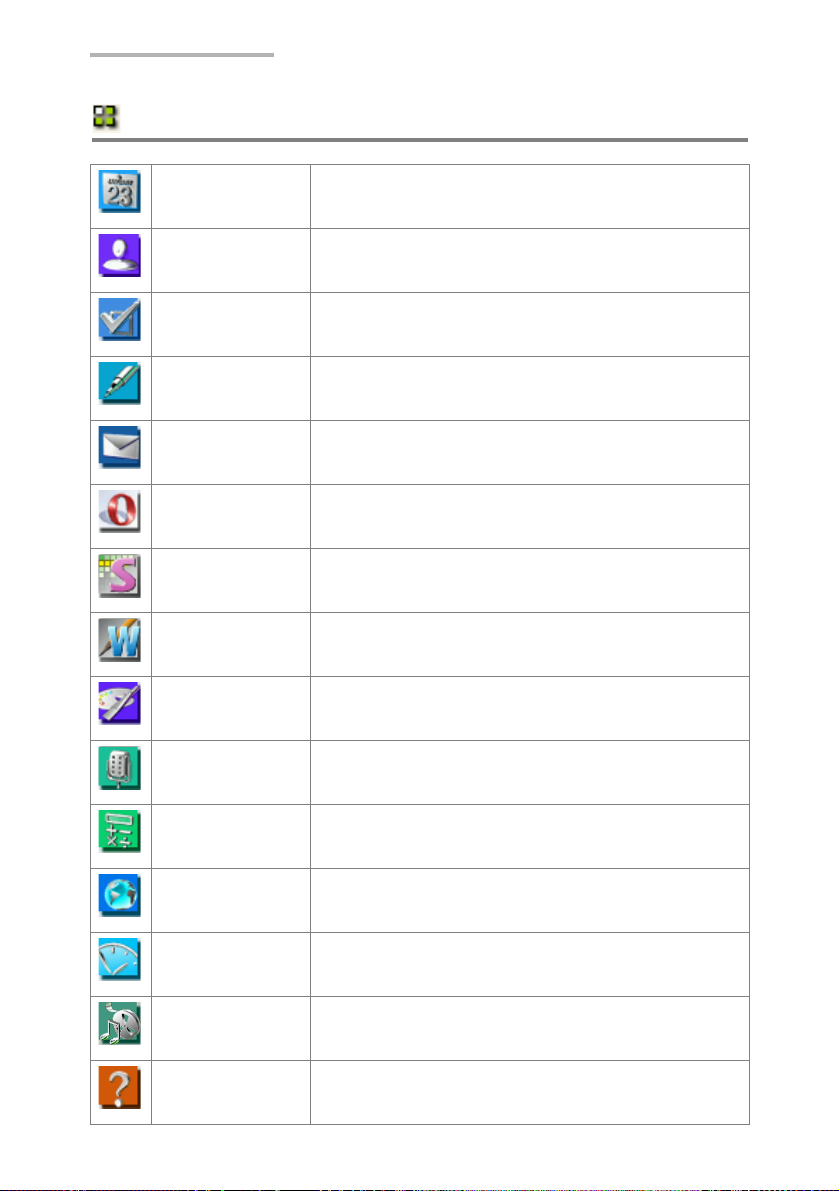
Applications
Calendar Allows you to store events and set alarms.
Address Book Allows you to add and view the list of existing names
Todo List Allows you to view a list of Todo items and reminds you
Text Editor Allows you to open a list of text files, create a new text
EMail Allows you to create and transmit e-mail messages.
Opera Browser This Web browser connects to the Internet and shows
Hancom Sheet Allows you to view and edit Microsoft Excel files.
Hancom Word Allows you to view and edit Microsoft Word files.
Imaging Allows you to view and slideshow image files. Also,
Voice Recorder Allows you to record/play your messages and memos.
Calculator Features up to 12-digit calculations and a conversion
and contact details.
of what needs to be completed and when to be done.
file and edit it.
pages in HTML format.
allows you to edit Memo and illustration files.
function.
City Time Allows you to view the time in up to six different cities
Clock Shows the current time and date and can be used as
Media Player Allows you to play movies and music stored in your
Help Browser Offers help information similar to a web browser.
of your choice.
a stopwatch.
Zaurus or from expansion memory cards.
Page 25
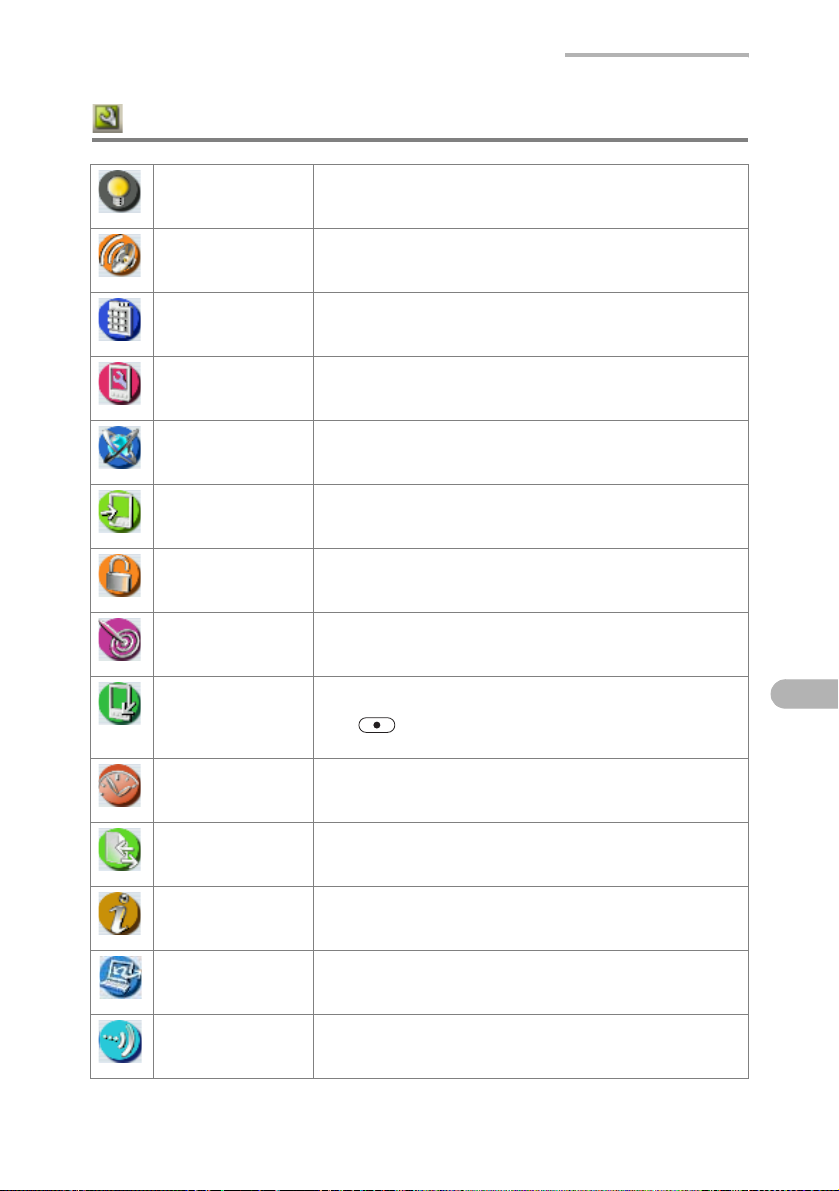
Settings
About Your Zaurus 23
Light & Power Allows you to select the amount of time that elapses
Sound Settings Allows you to change the Startup and other sounds.
Tab Setting Allows you to create an original Home screen by
Appearance Allows you to customize the desktop and window
Network Allows you to set up dial-up and LAN preferences for
Add/Remove
Software
Security Allows you to set your own passcode to protect your
Recalibrate Calibrates the touch-panel screen.
Application Key Allows you to assign the eight keys (Home key,
Date/Time Sets the current date, time and city.
before the Zaurus turns off automatically and control
the brightness of the backlight.
changing the Navigation tab order or moving the
applications.
properties.
both the EMail application and Opera Browser.
Allows you to install or uninstall applications to/from
the Zaurus.
Zaurus from unauthorized use.
Calendar key, Address Book key, Menu key, EMail
key, key, Back light key, Rec key) on the sliding
cover to any of the applications installed in the Zaurus.
Backup Restore Allows you to make a backup file of the files on the
System Info Displays information about the systems status.
PC Link Allows you to select the connection method when
Beam Receive Allows you to transfer entries from the Address Book,
Zaurus and will restore the data back to the Zaurus
from a CF or SD/MMC memory card.
connecting the Zaurus to the PC.
Calendar, Todo List, and files by an infrared beam.
Page 26

24 About Your Zaurus
Note:
• The EMail and Web Browser applications require the use of a modem or LAN
card and a service plan.
• The EMail application can be used for synchronization of Outlook email with
attachments.
Function that are available when the PC software is
installed:
Zaurus File Transfer When connected to the PC, files can be transferred
Backup/Restore The Zaurus memory can be backed up to and
Intellisync for Zaurus Synchronizes the Zaurus with Microsoft Outlook on
Qtopia Desktop for Zaurus Synchronizes the Zaurus with the PC for non-
Note: Please use either Intellisync for Zaurus or Qtopia Desktop for Zaurus on
your PC. You cannot run both programs simultaneously.
easily between the PC and the Zaurus.
restored from the PC.
the PC.
Microsoft Outlook users.
Page 27
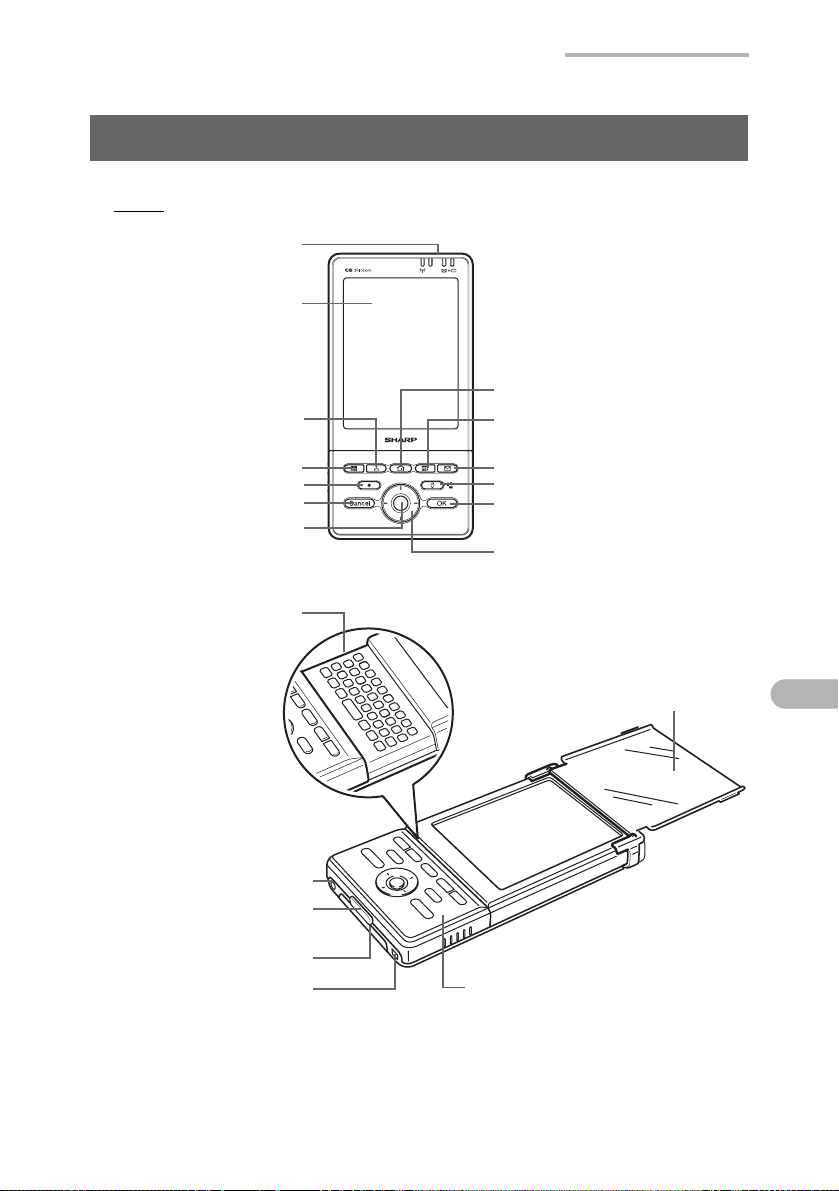
Part names and functions
Front
13.LED indicators
1.Display
2.Address Book key
About Your Zaurus 25
3.HOME key
4.Menu key
11.Calendar key
12.OK key
10.Cancel key
9.SELECT key
18.Keyboard
15.AC adapter jack
16.SHARP I/O PORT
(with the cover)
19.Expansion pack connector
20.USB port
6.EMail key
5.Back light key/Screen rotate key
7.OK key
8.Cursor key (Up, Down, Left, Right)
14.Display
protection
cover
17.Sliding cover
Page 28
26 About Your Zaurus
Back/Rear
31.Microphone
28.Stereo headphone jack
32.Rec key
29.IR port
33.POWER key
25.Speaker
22.Battery pack
23.Battery replacement
switch
24.RESET button
21.Eyelet for the handstrap
26.Stylus
30.SD card slot
27.CF card slot
1. Display: Displays applications, menus, and data stored
in the Zaurus.
2. Address Book key: Opens the Address Book application.
3. HOME key: Opens/Switches to the Home screen.
4. Menu key: Opens or closes the pop-up menu.
5. Back light key: Turns the back light on and off when briefly
pressed.
Screen rotate key: Rotates the screen display mode between
portrait and landscape when held for several
seconds.
6. EMail key: Opens the EMail application.
7. OK key: Executes the current operation, closes a
window.
8. Cursor key: Moves the cursor in the direction of the
( ) respective cursor keys you press.
9. SELECT key: Executes the current operation.
10. Cancel key: Cancels the current operation, closes a
window without saving settings.
11. Calendar key: Opens the Calendar application.
12. OK key: Executes the current operation, closes a
window (functions as same as the 7. OK
key).
Page 29

About Your Zaurus 27
13. LED indicators
Charge light (amber): Turns on when charging begins. Turns off
when it is completed.
When the light blinks: indicating trouble while
charging.
Mail light (green): Turns on for incoming e-mail messages.
Blinks when the alarm is going off as per the
setting in the Calendar application.
Wireless LAN light (SL-6000L): Turns on: Communicating with the network
through the internal wireless LAN module.
Blinks: Moved out of the network area during
communication.
14. Display protection cover Close the cover when not in use to protect the
display from damage.
15. AC adapter jack: Enables connection of the AC adapter.
16. SHARP I/O PORT (with the cover) :
Enables connection to the Docking Station.
17. Sliding cover: Covers integrated keyboard and features
convenient one-touch launch buttons and
navigation keys.
18. Keyboard: For entering characters and commands.
19. Expansion pack connector (with the cover):
Provides expanded functionality by attaching
modules or other peripherals.
20. USB port: Enables connection to specified SHARP
products through the USB. The Zaurus is the
host when it is connected.
21. Eyelet for the handstrap: Attach an optional handstrap here.
22. Battery pack: Rechargeable Lithium polymer battery pack.
23. Battery replacement switch: Switch when inserting/removing the battery.
24. RESET button: Performs the reset. To reset the Zaurus, press
the reset switch while holding the Rec and
POWER keys.
25. Speaker: For producing “Calendar” alarms, and playing
back audio files recorded with the Voice
Recorder application.
26. Stylus: Used to tap the buttons etc. on the screen.
27. CF card slot (for the CompactFlash card Type I/Type II):
Insert an optional CompactFlash memory card
or modem card here.
28. Stereo headphone jack: For connecting an optional stereo headphone.
29. IR port: When you transmit data by an infrared beam,
turn this to face the IR port of the other unit.
Page 30
28 About Your Zaurus
30. SD card slot (for the SD memory card and Multi Media Card):
Insert an optional SD memory card or Multi
Media Card here.
31. Microphone: Use the microphone for recording with the
Voice Recorder application.
32. Rec key: Opens the Voice Recorder application and
start to record voice memos when it is held for
1 second. You can open the Voice Recorder
application from the power-off status or cancel
this function in the “Preference” setting of this
application.
33. POWER key: Turns the Zaurus on when it is off.
Turns the Zaurus off when it is on.
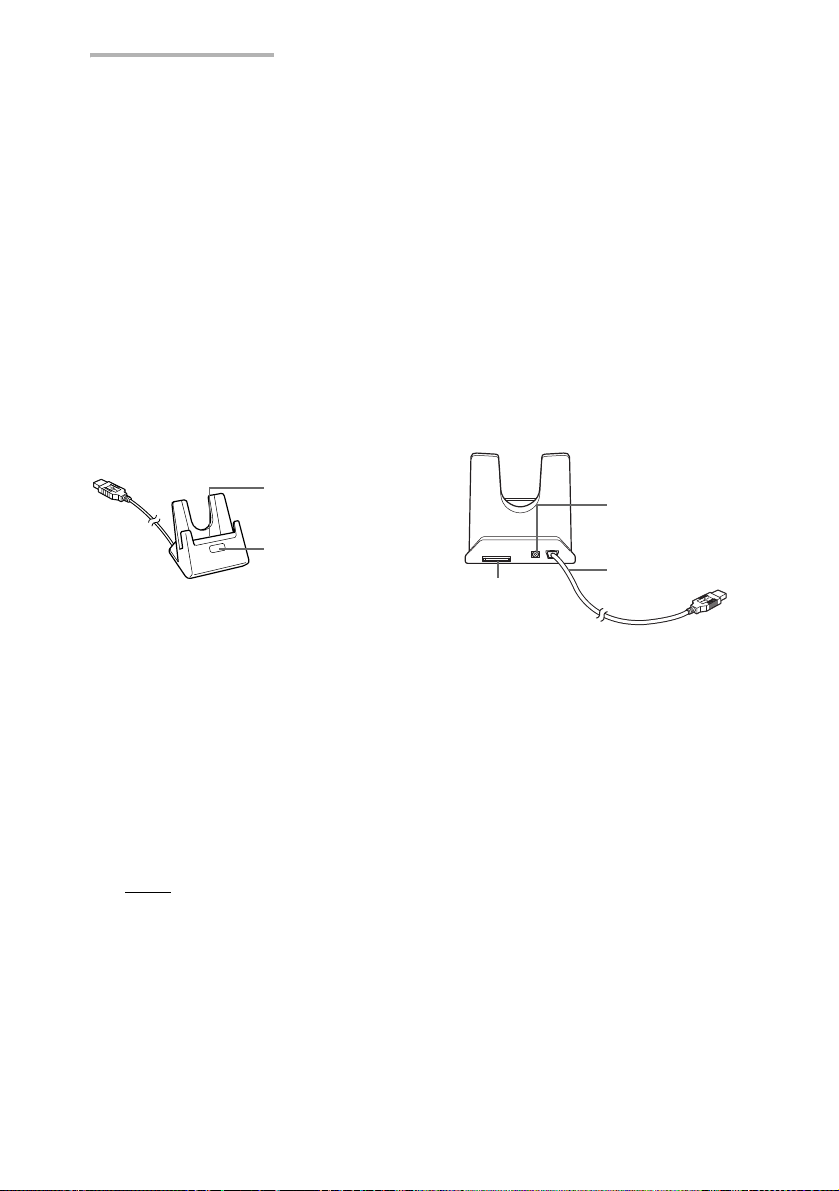
Docking Station
34.Connection Terminal
(inside)
35.SYNC button
36.SHARP I/O PORT
Connection Terminal: Enables connection with the SHARP I/O
34.
PORT of the Zaurus.
37.AC Adapter
jack
38.USB Cable
35. SYNC button: Starts synchronization between the Zaurus
and a PC.
36. SHARP I/O PORT: Enables connection to a PC with the specified
connection cable.
37. AC Adapter jack: Enables connection of the supplied AC
adapter (EA-70) for the Docking Station.
38. USB Cable: Enable connection to the USB port.
Note: It takes approximately 5 seconds to start recording when the Rec key is
pressed while the Zaurus is on. If the CF card or the SD card is inserted
in the Zaurus, it takes approximately 7 seconds.
To start recording when the Zaurus is off, see “Voice Recorder” in
Operation Manual of the CD-ROM.
Page 31

About Your Zaurus 29
Display protection cover
To open the Display protection cover
When carrying the Zaurus, be sure to close the cover to protect the LCD display.
If not closed, the display may become damaged or broken.
180°
Open or close the Display protection
cover by using the edges of the display
cover.
The Display protection cover will open
by approximately 180°.
Removing/Attaching the Display protection cover
To remove To attach
Push upwards to remove the cover. Push downwards to attach the cover.
Page 32

30 About Your Zaurus
Opening or closing the keyboard
To open the keyboard, hold the sliding cover firmly and pull it down until it is locked.
To close the keyboard, push it upwards until it is locked.
Note:
• Please close the sliding cover when you carry your Zaurus. Carrying the
Zaurus with the sliding cover open may cause damage.
• Be sure to completely open or close the slide cover into the locked position
prior to press the keys in the sliding cover.
The keys may not work if the cover is closed halfway or is not locked into
position.
Charging/Using the Docking Station
1. Connect the AC power cord to the AC adapter.
Docking Station
AC adapter jack
AC adapter (EA-70)
(Specified Charger)
2. Plug the AC adapter connector into the Docking Station.
To AC outlet
Page 33

About Your Zaurus 31
3. Plug the AC power cord into an AC outlet.
To AC outlet
USB cable
AC power cord
Docking
Station
4. Remove the SHARP I/O PORT cover of the Zaurus and then place the
Zaurus in the Docking Station by sliding it in.
The LED indicator on the unit (charge light) will turn amber when charging
begins.
Make sure that the unit is fully inserted into the Docking Station.
Note:
5. When the charging has been completed, the LED indicator will turn off. Upon
completion, lift the Zaurus from the Docking Station. Replace the SHARP I/O
PORT cover with the protruding part on the bottom.
6. Unplug the AC power cord from the AC outlet and unplug the AC adapter
connector from the Docking Station.
Note:
• The USB cable of the Docking Station is used to connect the Zaurus to a PC
(PC link). It is not used for charging.
• Do not tilt the Zaurus forward while it is placed in the Docking Station. Do not
pick up the unit by itself. If this is done, the unit connection terminal of the
Docking Station may become damaged.
Page 34

32 About Your Zaurus
Connecting the Zaurus to your PC
Using the Docking Station, you can connect to a PC and exchange files and data.
Refer to the PC operation manual for more information regarding connections.
1. Connect the USB connector of the Docking Station to the USB port of the PC.
PC
USB port
USB connector
2. Follow the instructions in Steps 1 through 4 of “Charging using the Docking
Station” above to connect the AC adapter and Zaurus to the Docking Station.
Note:
Docking Station
• Before step 1, be sure to turn the PC power on.
• When the Security application is set on Zaurus, turn the Security setting off
(in this status, entering the passcode becomes unnecessary at power-on)
before connecting to the PC (see the section on “Security” in the Operation
Manual on the CD-ROM).
• While communicating with the PC, do not perform any operations on the
device, turn off its power, remove it from the Docking Station, or disconnect
the cable from the PC.
• While communicating with the PC, the AC adapter must be connected.
• If the device has been removed from the Docking Station, make sure to wait
for 30 seconds before replacing it on the Docking Station.
If connected immediately after the device is removed, the device may not be
properly recognized as a USB device.
• Do not remove and re-connect the USB cable from/to the PC in a short time.
Page 35

Basic Operations
Turning the unit on and off
Turning the unit on
Press to turn the power on.
When the battery level is low, the power will not turn on even when you
Note:
attach the AC adapter.
Turning the unit off
Press to turn the power off.
Turning the back light on and off
Basic Operations 33
When it is dark and difficult to see the LCD display, turn the back light on for easier
viewing.
Every time you press the Back light key , the back light will turn on and off.
Auto back light off
To save the battery, the back light will automatically turn off if you do not operate the
Zaurus for a certain period of time.
The Light & Power application in the Settings Home screen allows you to change the
time that elapses before the back light will turn off automatically.
Auto power off
To save the battery, the Zaurus will automatically turn off if you do not operate the
unit for a certain period of time.
The Light & Power application in the Settings Home screen will allow you to change
the time that elapses before the unit turns off automatically.
Page 36

34 Basic Operations
Operating methods
The Zaurus can be operated by either pressing keys on the keyboard or tapping an
item (buttons, etc.) on the screen using the stylus.
The operation manual primarily describes operation using the stylus. Button or key
operations are included, if they make it easier to carry out the relative function.
Using the stylus
To tap
Touch an item (application icon, button, etc.) on the screen once to execute it.
To tap and hold
For example, tap and hold the stylus on an application icon to open the “Details”
screen.
To drag
For example, drag to select the characters you wish to copy.
Pressing keys and buttons
In the Home screen
Press the cursor key ( ) to move the focus.
Then press the SELECT key or OK key to open or launch a selected application or
file.
In an application
Press the cursor key ( ) to move the focus.
On the Setting or Edit screen, press OK key to save the settings and close the
window, or press Cancel key to close it without saving the settings.
On the Setting or Edit screen, pressing the OK key or the Cancel key
Note:
operates in the same way as tapping or respectively.
Page 37

Home Screen
n
Basic Operations 35
Press the
Home
key to display the Home screen. There are following Home screens.
Press the Home key or tap one of the Navigation tabs to switch between the Home
screens, and then tap the desired icon to start it.
Applications: consisting of built-in applications.
Java: consisting of built-in sample Java applications.
Settings: consisting of programs to control the basic operations of the
Zaurus.
Files: consisting of the files you have created or copied, and files stored
on the optional expansion memory cards inserted into the
Zaurus.
Part names
Navigation tabs
Tap to show what
applications are
available.
Qt Menu icon
Input methods icon
Input methods menu icon
Running application icons
Taskbar
Num lock symbol
Caps lock symbol
Time indicator
Battery icon
SD card icon
CF card icon
Sound volume icon
Connection status ico
Page 38

36 Basic Operations
Using the taskbar
Qt Menu icon: Tap to display the menu. This is an another way of
Input methods icon: Tap to display the input modes (see page 64).
Input methods menu icon: Tap to pop up a list of input methods.
Running application icons: The icon(s) of the applications that are open appear
Multiple applications may run simultaneously.
Note:
However, limited available working memory may cause certain running
applications to terminate or malfunction, when you try to start a new
application.
Connection status icon: The icon will appear when network settings are
Sound volume icon: Tap to reach the volume adjustment slider (see page
CF card icon/SD card icon: The icon will appear when the Zaurus recognizes that
Battery icon: Tap to get the battery’s status (see page 75).
Time indicator: Tap to adjust the date and time. For the time-critical
Num lock symbol: Displayed when the Num lock mode is entered using
accessing applications in the list view.
You can also perform a Rotation, Reboot (see page 84)
or Suspend (power off), etc.
(All running applications may not be displayed
depending on the condition of the Taskbar).
Tap the desired icon to switch between the running
applications.
completed in the Network application and a
communication card is inserted.
During wireless LAN communication, an icon will be
displayed that shows the signal strength level.
Blue: Excellent, Green: Good, Yellow: Average,
Red: Poor
74).
the memory card is inserted in the card slot. It is
required to remove the memory card by tapping the CF
card icon/SD card icon on the taskbar and then
selecting “Eject CF card” / “Eject SD-card” (see page
77).
functions to work properly, the built-in clock must be set
to the current date and time (see page 12, and the
Operation Manual on the CD-ROM).
the keyboard.
Caps lock symbol: Displayed when the Caps Lock mode is entered using
the keyboard.
Page 39

Basic Operations 37
Files Home Screen
This section gives a simple explanation of the Files Home screen. For more detailed
explanations, see “Reorganizing Your Files” (page 39).
New Folder button
Creates a new folder.
Menu bar
Folder menu
Tap here to move
to a higher folder.
Displays the folder
selected before or
after the currently
selected folder.
When “My Zaurus” is selected in the folder menu, the “Internal Flash” folder will be
displayed. If a memory card is installed, the “CF Card” or “SD Card” folder will also
be displayed. If one of these folders is opened, the folders and data files contained
in either the Internal Flash or the memory card will be displayed.
The folders are organized as follows:
Displays the contents
of the folder one level
above.
History button
Tap this to display the
file most recently used.
Lists the contents of
the folder selected in
the folder menu.
Page 40

38 Basic Operations
My Zaurus
Internal Flash
Image_Files..............
Install_Files ..............
Text_Files.................
SD Card...............................
Documents ...............
Install_Files...
CF Card ...............................
Documents ...............
Install_Files...
Contains Image files created with the Imaging
application.
This folder is used when installing software.
Contains Text files created with the Text Editor.
Displayed when an SD memory card is installed.
Created when the SD memory card is installed in
the Zaurus.
This folder is used when installing software.
Displayed when a CompactFlash card is installed.
Created when the CompactFlash card is installed
in the Zaurus.
This folder is used when installing software.
• When you tap on a folder icon, the folder will open and the data files and folders
contained within will be displayed.
• When you tap on the icon for a data file, the application linked to that file will start
and the file will open.
• You can create new folders and reorganize your files through tasks like collecting
related data in a single folder (see page 40).
Page 41

Basic Operations 39
Reorganizing Your Files
You can reorganize your files using folders in the File Home screen.
Opening folders and viewing files
This section explains how to view files created using the Imaging application.
1. Tap the Folder menu on the Files Home screen.
Folder menu
2. Tap “Internal Flash”.
3. Tap “Image_Files”.
4. Tap the file you wish to view.
The Imaging application will start and the file will open.
5. Return to the Files Home screen by pressing the Cancel key or tapping .
When you press the Cancel key, the contents of the folder one level
Note:
above will be displayed in Steps 3 and 4. You can change the operation
of the Cancel key on the Files Home screen (see page 43).
Page 42

40 Basic Operations
Creating a new folder
This section describes how to create a new folder within the “Internal Flash” folder.
If a different folder is selected in Step 1, the new folder will be created within that
folder.
1. Open the “Internal Flash” folder on the Files Home screen.
If a different folder is currently open, tap on the Folder menu, tap the “Internal
Flash” folder.
2. Tap the New Folder button.
The new folder creation screen will be displayed.
New Folder button
3. Enter the folder name, then tap .
A new folder will be displayed under the “Internal Flash” folder.
Moving or copying a file to another folder
This section describes how to move the Imaging file to the new folder created above.
1. Open the “Image_Files” folder, and select the file you wish to move.
2. Tap the “Edit” menu (or tap and hold the file) and then tap “Cut” or “Copy”.
3. Open the destination folder.
4. Tap the “Edit” menu and then tap “Paste”.
Page 43

Basic Operations 41
Changing folder and file names
1. Select the folder or file you wish to rename on the Files Home screen.
2. Tap the “File” menu (or tap and hold the folder or file) and then tap “Rename”.
The Rename screen will be displayed.
3. Change the name, then tap .
Changing date information for a file
1. Select the file for which you want to change the date.
2. Tap the “File” menu (or tap and hold the file) and then tap “Change date”.
3. On the mini-calendar that will appear, select a new date for the file.
Changing the index screen from thumbnail view to list view
Switching between thumbnail view and list view
Tap the “View” menu and then tap “List”.
1.
The index display will change to a list view.
To return to the thumbnail view index screen, tap “Thumbnails” on the “View”
menu.
Changing the items shown in the list view
You can change the items that are shown when using the list view.
1. Tap the “View” menu and then tap “List View Settings”.
The list view settings screen will be displayed.
2. Tap the Item button, and select the item name for each item you wish to display.
3. Tap .
Page 44

42 Basic Operations
Setting and clearing wallpaper from the Files Home screen
You can set an image file (JPEG, BMP, GIF and PNG format) as the wallpaper for
the Zaurus.
Setting the wallpaper
1.
On the Files Home screen, tap and hold the Image file that you want to set as
wallpaper.
A pop-up menu will appear.
2. Select “Set as wallpaper”.
The selected image file will be set as the wallpaper.
Clearing the wallpaper
1.
On the Files Home screen, tap and hold any Image file.
2. Select “Clear wallpaper settings”.
The current wallpaper will be cleared.
Wallpaper and other detailed display settings are made in the
Note:
Appearance application on the Settings Home screen. (See the
Operation Manual on the CD-ROM.)
Page 45

Basic Operations 43
Defining the Cancel key function for the Files Home screen
You can define how the Cancel key will operate on the Files Home screen. There
are three options.
1. On the Files Home screen, tap the “View” menu and then tap “Preferences”.
The Preference screen will be displayed.
2. Tap the desired radio button and then tap .
Use cancel as close When a file is open, the application and file will be closed.
Use cancel as up On the Files Home screen, the folder one level higher than
Use cancel as focus On the Files Home screen, the focus can be changed from
the selected folder will be displayed. When a file is open,
the application and file will be closed.
the list of files and folders to the Folder menu or the History
button. When a file is open, the application and file will be
closed.
Naming folders and files
Note:
• A backup of a file that has a space at the beginning of the file name cannot
be made on the PC.
• Characters that are not allowed in names for files and folders cannot be
entered from the keyboard (For example, *, /.).
• The folder and file names are case-sensitive on Internal Flash memory, which
are case-independent on an expansion memory card.
Page 46

44 Basic Operations
Menu list
File New folder Creates a new folder (see page 40).
Delete Deletes the selected file or folder. When a folder is
Duplicate Duplicates the selected folder or file. When a folder
Send by beam Transmits the selected file to another Zaurus or
Rename Changes the name of a file or folder (see page 41).
Change date Changes the date information of the file.
Prev folder Displays the folder which was previously viewed.
Next folder Displays the next folder.
Edit Cut Cuts the selected file or folder. When a folder is cut,
Copy Copies the selected file or folder. When a folder is
Paste Pastes cut or copied files or folders.
View List Switches to the list view index screen (see page 41).
Thumbnails Switches to the thumbnail view index screen (see
Preferences Change the operation when the Cancel key is
List View Settings Changes the column items shown when the List view
deleted, all of the files within the folder will also be
deleted.
is duplicated, all of the files within the folder will also
be duplicated.
similar device using infrared transmission.
all of the files within the folder will also be cut
(see page 40).
copied, all of the files within the folder will also be
copied (see page 40).
page 41).
pressed.
index screen is displayed (see page 41).
Page 47

Basic Operations 45
Basics of Using Applications
This section describes basic operations for using applications. Operations may differ
in some applications.
Starting and exiting an application
1. Display the Applications Home screen.
2. Tap the “Todo List” application icon to start the application.
Menu bar
(see page 47)
Exit
Displays the online Help.
(see page 78)
Qt Menu icon
Note:
On the Home screen, press the Menu key or tap the Qt Menu icon, then
select the desired application from the displayed menu to start the
application. Slide your stylus on the screen until you select desired
application through the sub-menu of “Applications”, “Settings” and other
menu, and release your stylus on the application to start.
Taskbar (see page 36)
3. Tap on the at the upper right of the screen to close the application.
Note:
Multiple applications may run simultaneously.
However, limited available working memory may cause certain running
applications to terminate or malfunction, when you try to start a new
application.
Page 48

46 Basic Operations
Application Fast Load
Some applications may take a while to launch when there is a large amount of data
associated with the application. There are some applications which you can reduce
the start up time by using the settings on the “Details” screen. (To open the “Details”
screen, tap and hold an application icon for a few moments in the Applications Home
screen.)
If you check the “Fast load” option in the “Details” screen, the start up time for that
application will be shortened. (There are also some applications that do not have the
Fast load checkbox.)
Note:
• Selecting the Fast Load option will consume more memory. Limited available
memory may cause the launch time to slow down.
• Even when “Fast Load” is enabled, the first time to launch the application may
not be as fast as subsequent times.
• You can disable the “Fast Load” application by removing the checkbox on the
details screen.
• When “Fast Load” is checked off, note that the ordering of the list has not be
resumed. If you change the ordering of the list again, tap column buttons.
Viewing data (Index screen/Detail screen)
1. Start the Todo List application.
The Index screen will be displayed and the entries can be viewed in list form.
Category name
Application name
You can change the list
You can change the
width of the columns
by touching and
dragging here with the
stylus (not available
for some columns).
order by tapping on the
column buttons.
2. Press the Up or Down cursor key to move the focus to the desired entry.
3. Press the OK key.
The Detail screen of the entry will be displayed.
Page 49

Basic Operations 47
Tapping an entry in the Index screen will also display the Detail screen.
Closes the screen.
Note:
For data intensive applications, the screen might display slowly.
4. Press the Cancel key or tap in the upper right to close the Detail screen.
The display will return to the Index screen.
Using the Menu bar
The Menu bar is displayed at the top of the Index, New/Edit and other screens. The
items on the Menu bar will vary depending on the application.
Menu bar
Menu
Shortcut icons
Page 50

48 Basic Operations
Menu operations
Press the Menu key or tap the desired menu command.
1.
The menu will open.
Note: Pressing the Menu key again will close the menu.
2. Press the Left/Right or Up/Down cursor keys to select the desired menu
command, then press the SELECT key to execute it.
You can also tap the desired menu to select it.
When is displayed on the right edge of the menu, a sub-menu exists.
When the menu item has a ellipsis mark suffix (...), selecting the menu item will
open another window or screen.
Page 51

Basic Operations 49
Moving the focus
The focus is moved using the cursor key. Focused items (entry, tab, shortcut icon,
etc.) are enclosed by a dotted line.
The focus will move within the allotted area (entries list, menu bar, tab, etc.).
For example, when the focus is on the shortcut icon, pressing the Left and Right
cursor keys will move the focus within the Menu bar, and not to the entries list.
Press the Tab key to move the focus to another area (the focus will differ within
applications).
If the entries highlight does not move by pressing the cursor key on the
Note:
Index screen, press the Tab key to move the focus to the entries list.
Menu and shortcut icons
The following menus and commands are common to the Index and Edit screens of
some applications.
Some of them are indicated in the shortcut icon format on the Menu bar.
Menus Shortcut icons
Data menu
Address Book
Calendar
Todo List
Category menu
Address Book
Todo List
Option menu
Address Book
Calendar
Todo List
Edit menu
Address Book
Calendar
Todo List
Text Editor
Refer to the “Categorizing Entries” for details about Categories (see page 55).
New*** (Creates a new entry)
Edit*** (Edits the entry)
Delete... (Deletes the entry)
Delete all... (Deletes all entries) -
Duplicate (Duplicates the entry) -
Send by beam...
(Transfers data by an infrared beam)
All (Displays all created entries) -
Business (default fixed category) -
Personal (default fixed category) -
Unfiled (Displays only unfiled categories) -
Find... (Finds entries) -
Font (Changes the display font size) -
Help (Displays the online Help) -
Undo (Undoes the last operation) -
Cut (Cuts selected text to the clipboard)
Copy (Copies selected text to the clipboard)
Paste (Pastes text within the clipboard
where the cursor is positioned)
-
Page 52

50 Basic Operations
Creating a new entry
1. Tap the New icon ( ).
The new entry screen for the selected application will be displayed.
Select items.
Enter text.
Note: Instead of step 1, pressing + will allow you to open a new entry
screen.
2. Select and enter the required items.
See the following pages for details about making entries.
• Entering Characters (see page 62)
• Selecting from a list (see page 51)
• Using checkboxes (see page 54)
• Using the Menu Bar (see page 47)
• Categorizing entries (see page 55)
Pressing the Tab key on the hardware keyboard will move the focus to
Note:
the next component.
3. Tap or press the OK key to save the setting.
If you tap or press the Cancel key, the entry screen will close without saving
any new data.
Note: For other ways to create an entry using the menu(s) on the Menu bar,
see page 47, “Using the Menu bar.”
Page 53

Basic Operations 51
Modifying an entry
Open the Edit screen
On the Index screen, select an entry you want to modify.
1.
2. Tap the Edit icon ( ).
The Edit screen will be displayed.
3. Make your modifications.
4. When you have finished making your modifications, tap or press the OK
key to save the modifications.
If you tap or press the Cancel key, the Edit screen will close without saving
any changes.
Moving and duplicating text
Drag the text to select it.
1.
2. To move the text, tap “Cut” on the “Edit” menu, or tap “Copy” to copy the text.
3. Move the cursor to the destination for moving or copying the text.
4. Tap “Paste” on the “Edit” menu.
The text will be pasted in the new location.
Cut, Copy, and Paste operations may not be possible if the user area is
Note:
almost full.
Selecting from a list
When entering or editing data, some items are selected from lists.
There are three types of lists, as follows:
Drop-down list
Tap the drop-down list button and select from the list.
Combobox
Tap and select from the list, or enter information directly.
Spinbox
Select numerical values by tapping or , or enter numbers directly.
Page 54

52 Basic Operations
Drop-down list
Tap the drop-down list button and select from the displayed list.
1.
Drop-down list button
When you tap here, a
list will be displayed.
Combobox
Tap the Combobox button at the right edge of the field and select from the
1.
displayed list.
When you tap here, a
list will be displayed.
Page 55

Basic Operations 53
2. When the desired entry does not appear on the displayed list, tap the field and
enter the information there.
Tap here and enter
the information.
Spinbox
1.
Tap or at the right edge of the field to change the number.
You can also tap the entry field and enter a number directly.
Tap here.
Page 56

54 Basic Operations
Using checkboxes
You can select items by placing a checkmark or deselect them by removing the
checkmark.
1. Tap a checkbox to place a checkmark there.
Tap here
2. Tap again to remove the checkmark.
Using the radio buttons
Radio buttons are used to select a single item from multiple options.
1. Tap the radio button to select.
Page 57

Basic Operations 55
Categorizing entries
Once you categorize an entry, you will be able to display the entry in the appointed
category (Address Book and Todo List). You can also assign an entry to several
different categories.
Selecting the desired category from a list
Display the New Entry screen or the Edit screen.
1.
2. Tap the Category drop-down list button.
The Drop-down list will be displayed.
Category drop-down
list button
Edit Categories button
Adds new
categories.
3. Tap the desired category to select.
Adding new categories
1.
Display the New Entry screen or the Edit screen.
2. Tap the Edit Categories button ( ).
The Edit Categories screen will be displayed.
Category checkbox
Rename button
Add button
Note: When the category has already been selected in step 1, the category
checkbox will be checked.
Delete button
Page 58

56 Basic Operations
3. Tap the “Add” button.
The Add screen will appear for entering a new category name.
4. Enter the new category name and then tap .
The newly created category name will be displayed in the Edit Categories
screen. To add additional categories, repeat steps 3 and 4.
• If you want to change the category name you created, tap the desired category
name and then tap the “Rename” button.
• If you want to delete a category you created, tap the desired category name and
then tap the Delete button ( ) (Entries that are assigned only to the category you
delete will be automatically reassigned to the “Unfiled” category).
Note:
• You cannot duplicate an existing category name.
• The default category names (Business, Personal) cannot be renamed or
deleted.
Page 59

Basic Operations 57
5. Tap or press the OK key to save the setting.
Note:
• If you tap the Category drop-down list button on the New Entry or Edit screen,
the added category will be displayed in the list.
• To view the entries of a specified category, see page 58.
Assigning one entry to multiple categories
1.
Display the New Entry screen or the Edit screen.
2. Tap the Edit Categories button ( ).
The Edit Categories screen will be displayed.
Category checkbox
3. Select a category for the entry by placing a checkmark in the appropriate
category checkbox. Multiple categories can be selected.
4. Tap to save the setting.
Return to the New Entry screen or Edit screen. If you have assigned multiple
categories, “(Multi.)” will appear in the Category name field.
Page 60

58 Basic Operations
Viewing the entries of a specified category only
In the Index screen of the Address Book or Todo List applications, you can display
only the entries that are assigned to a specified category.
1. On the Index screen, tap the “Category” menu.
The category name will appear in alphabetical order and the current category
will be checked.
If you have 13 category names (including “Business”, “Personal” and “Unfiled”)
or more, the Category menu on the Index screen lists “All”, “Unfiled”, or
“More...”.
If “More...” is displayed, skip to step 1 below.
2. Tap the category you want to display.
The entries belonging to the category you select will be displayed on the Index
screen.
The current category name will be displayed next to the application name on the
title bar of the Index screen.
Choose the “All” category to show entries in any category.
When “More...” is displayed in the Category menu
Tap “More...”.
1.
The Select category screen will appear.
Drop-down list button
2. Tap the drop-down list button.
All category names will appear in alphabetical order.
3. Tap the category you want to display and then tap .
The Select category screen will close and then the entries belonging to the
selected category will be displayed on the Index screen.
Page 61

Basic Operations 59
Note: The “New Event” screen for inputting an event entry for the Calendar
application includes a Category setting. This setting is for
synchronization with a PC. There is no function for viewing the event
entries of a specified category in the Calendar application itself.
Deleting entries
Deleting an entry
1.
On the Index screen, select an entry you want to delete.
2. Tap the Delete icon on the Menu bar.
The confirmation message will be displayed.
Pressing + will allow you to perform the delete function.
Note:
3. Tap “Yes” to delete it.
The selected entry will be deleted.
Deleting all entries in the application
Tap the “Data” menu and then tap “Delete all” in the desired application.
1.
The confirmation message will be displayed.
2. Tap “Yes” to delete them.
All entries in the application will be deleted.
Duplicating an entry
1. On the Index screen, select an entry you want to duplicate.
2. Tap the “Data” menu and then tap “Duplicate”.
The selected entry will be duplicated.
Transferring data by an infrared beam
You can transfer entries created in the Address Book, Calendar and Todo List using
the IR port (IrDA) on the left side of the unit. For detailed information, see “Beam
Receive” in the Operation Manual on the CD-ROM.
Page 62
60 Basic Operations
Changing the display font size
(For the Address Book, Todo List, and the Detail screen of the Calendar, Text Editor
and EMail applications)
You can change the display font size in the application for easier viewing.
1. Tap the “Option” menu and then tap “Font”.
The current display font size will be checked.
2. Tap the desired font size.
The selected font size will only apply to the current application.
Note:
Searching for an entry
(For the Address Book, Calendar, and Todo List applications)
The Find menu command will help you search for a specific entry stored in the
application. If only the entries of the specified category are displayed in the Index
screen, the Find function will only search the specified category. To carry out the
Find function for all categories, select “All” from the Category menu to display all
entries in the Zaurus.
1. On the Index or Detail screen, tap the “Option” menu and then tap “Find”.
The Find screen will appear.
By tapping and
dragging on the title bar
of the Find screen, you
will be able to move it.
2. Enter the keyword.
Note:
• The Search function will not distinguish between uppercase and lowercase
letters.
• For the search function of the EMail application, see the “EMail” section in the
Operation Manual on the CD-ROM.
Page 63

Basic Operations 61
3. Tap “Find Next” to continue the search in the remainder of the entries, or
“Find Prev” to search the previous part of the entries.
The search result will appear.
If multiple entries are found, tap the “Find Next” or “Find Prev” to switch between
the entries to be displayed.
4. Tap to close the Find screen.
Page 64

62 Basic Operations
Entering Characters
The Zaurus provides two ways of entering characters: using the hardware keyboard
and software keyboard.
Using these tools, you can type in letters, numbers and special characters.
The hardware keyboard
g
d
e
c
f
c Tab key ( ) Acts as a tab key. On the Edit screen, the cursor will
move to the next field.
d Shift key ( ) Shifts the mode to enter uppercase letters or lowercase
letters when the Caps lock key is active.
Also, press the key while holding down to enter the
upper left characters in number keys (such as @ and?).
e Fn key ( ) Enables the entry of numbers and symbols printed on
the keyboard in orange.
f Space key ( ) Inserts a space.
g BS key ( ) Deletes the character to the left of the cursor.
h Enter key ( ) Executes the current operation or starts a new line.
h
Page 65

key as combination key when held down
Basic Operations 63
Caps ( + ) Changes the entering mode to enter uppercase (capital)
Symbol ( + )
Num ( + )
Del ( + ) Deletes the character to the right of the cursor.
Cut ( + ) Cuts the selected text.
Copy ( + ) Copies the selected text.
Paste ( + ) Pastes the cut/copied text.
Page scroll Up/Down
( + /)
letters (Caps lock).
To cancel the function, press + again.
Opens the symbol window for entry of special characters.
Changes the entering mode to enter numbers (Num lock)
and symbols. To cancel the function, press +
again.
Scrolls pages on some screens.
Typing in text
Typing text is simple and straightforward.
Press a key to enter the corresponding letter.
For example (when Caps lock is not active):
To enter a lowercase letter “h”, press .
To enter an uppercase letter “H”, press while holding down .
When Caps lock is active, will function in reverse.
Note:
To enter a symbol “@”, press , then press .
Entering numbers
Press , and then press the number key, or put it in the Num lock mode.
To enter numbers continuously, press the number key while holding the key
down.
Deleting text
If you make a mistake while entering text, you can delete the text as follows.
1. Move the cursor to the right of the character to be deleted.
2. Press to delete a character to the left of the cursor.
Page 66

64 Basic Operations
Software keyboard
By default, “ ” will appear at the bottom left of the screen.
Input methods icons
Input methods menu
Tap the Input methods menu icon ( ) to pop up a list of input methods:
Handwriting, Keyboard, Pickboard and Unicode. Tap the input method you prefer.
The icon will change to reflect your choice.
• Handwriting ( ): Enters characters using your handwriting.
• Keyboard ( ): Enters characters by tapping a QWERTY keyboard on the
screen.
• Pickboard( ): Enters characters by tapping a keyboard similar to a phone
keyboard.
• Unicode ( ): Enters characters by tapping a list arranged according to their
Unicode.
Tapping the Input methods icon will alternately pop up the input area and will hide
the input area.
Page 67

Basic Operations 65
Handwriting
Pop up the input area in the handwriting mode.
Write a letter with the stylus.
There are three input areas: Uppercase letter input area, Lowercase letter input area
and Symbol input area.
As you write letters, a list of words will appear on the Candidates area (top of the
input area). Tap it to enter it.
Candidates area
Back space button
Return button
Help button
Setup button
Uppercase letter
input area
Lowercase letter
input area
Symbol input area
Handwriting Gestures
To insert commands other than characters, make handwriting gestures.
“Return”, “BackSpace”, “Uppercase”, and “CapsLock”.
These are indicated with brackets ([ ]) in the Character list on the Trainer screen of
the Handwriting Help (see page 66), and you can learn how they are drawn.
Page 68

66 Basic Operations
Handwriting recognition
Tap the Help button of the Handwriting input method to view the tips or to use the
trainer.
The Tips screen will show you hints of how to use handwriting effectively.
Character type
drop-down list button
Character list
Left and right
arrow buttons
Sample area
Input area
Practicing your handwriting
On the Trainer screen, tap the character type drop-down list button to switch
character types. Then, tap any character in the Character list.
As you tap, the character selected in the list will be demonstrated in the Sample area
automatically.
If you tap the right arrow button, another way of writing, if available, will be
demonstrated. When you select “Uppercase latin 1” and then tap the right arrow
button, the corresponding lowercase letter will be demonstrated, if available.
While the selected character is demonstrated in the Sample area, practice your
handwriting on the right Input area.
Page 69

Basic Operations 67
You can confirm your performance in the area above the input area showing the
matched rate (%) of the character you wrote and the matched rate of similar
characters to the character you wrote.
Tap to close the
Handwriting Help
Setting up your preferences
Tap the Setup button ( ) on the input area to set your preferences and to
customize the handwriting input.
You can customize the handwriting input area.
Timeout adjustment
Input areas displayed
Timeout adjustment (Multi-stroke character timeout)
Set the timeout (in seconds) of how to recognize one character within the specified
time set.
If you start after the specified time, it will be recognized as a second character.
Input areas displayed
You can customize the input area shown in the handwriting mode (see below).
If you want to have both an uppercase input area and a lowercase input area, select
“Upper and lower case areas” by tapping the radio button.
Page 70

68 Basic Operations
If you want to have only a lowercase input area, select “Lower case (toggle Upper
case)” by tapping the radio button. In this case, when you write in uppercase, first
perform an “Uppercase” gesture (see page 65, “Handwriting Gestures”) for writing
the uppercase character and then write the desired character (in lowercase).
Upper and lowercase
Lowercase
Customizing your handwriting
This setting will allow you to customize the handwriting to your own style of writing.
Character type
drop-down list button
Character list
Input area
“Add” button
Left and right
arrow buttons
“Clear” button
The following four parts: character type drop-down list button, character list, input
area and left and right arrow buttons, work in the same way described on page 66
(Trainer screen in the Handwriting Help).
Page 71

Basic Operations 69
Recognizing your handwriting
The input area shows the corresponding character selected in the character list.
This demonstrates the way the Zaurus recognizes the character.
You can clear it and write it your own way in the input area. This will be the way the
Zaurus recognizes your character.
1. Tap your choice from the character list.
2. Tap the “Clear” button when the character is displayed.
3. Write the character in your own style.
4. Tap the “Add” button to add your writing.
5. Tap to save your writing.
If you want to delete the way of writing recognized by the Zaurus, tap the “Remove”
button. To revert to the default setting, tap the “Default” button.
Registering new characters
This setting will allow you to add new characters to the character list. Not only
characters but input command words such as Return and Backspace, and
handwriting gestures can be selected instead of entering characters.
1. Tap the “Clear” to clear the character displayed on the input area.
2. Write the desired character in the input area.
3. Tap “New”.
The Enter new character screen will be displayed.
Character combobox
button
4. Type a character you want to register using the hardware keyboard.
If you want to add command words, tap the Character combobox button.
5. Tap on the Enter new character screen to add it.
6. Tap on the Setup Handwriting Input screen to save your writing.
Page 72

70 Basic Operations
“Character” combobox
The choices are as follows: [Esc], [Tab], [BackSpace], [Return], [Uppercase],
[Caps Lock], [Shortcut], [Punctuation], [Symbol], and [Extended].
Keyboard
Pull up the keyboard mode in the input area.
The keyboard will work just like a full-size keyboard, except that you tap the keys
instead of typing on them.
Candidates
area
Keyboard
layout
switch
button
Entering characters
As you tap, the character you tapped and candidates including it will appear above
the keyboard.
Tap the desired character to insert it.
If you tap Shift, it will remain down until you tap it again or tap a letter.
Switching the keyboard layout
Tap the keyboard layout switch button (right arrow key) to switch the keyboard
layout.
Insert, Home, PageUp, Delete, End, PageDown and arrow keys will be displayed
and hidden every time you tap it.
Page 73

Basic Operations 71
Pickboard
The Pickboard will provide fast text input using a minimum amount of screen space.
Pull up the pickboard mode in the input area.
The pickboard comprises groups of letters, plus a few symbols and command
words.
Pickboard top row
This row has the 123 letter group for entering digits, the symbols letter group and
some command words.
Tap “Space” to enter a space, tap “Back” to backspace delete, and tap “Return” to
move to a new line.
CAPS LOCK is controlled by tapping “Shift”.
The KEY group leads to a set of keyboard navigation keys, e.g. PgUp, PgDn, etc.
To return to the normal Pickboard, tap the pop-up menu button and then tap “Reset”.
To display numeric characters, tap “123”. Tap on the desired number and then tap
on the numbers in the top line for them to be entered.
To display symbols, tap “@*!?”.
To display special characters or commands, tap a letter “KEY”.
Pop-up menu
button
Pop-up menu
button
Pop-up menu
button
Page 74

72 Basic Operations
Pickboard bottom row
Tapping letter groups will enter words.
The Pickboard will present a list of letters and words at the top of the input area.
If the word you intend to type appears, tap it to insert it.
For example, to enter the word “hotel”, tap the GHI group (for “h”), then the MNO
group (for “o”), then the STU group (for “t”), then the DEF group (for “e”), then the
JKL group (for “l”). At this point the word “hotel” will appear; tap the word to enter it.
Pickboard menu
At the right of the pickboard is a pop-up menu button which offers an Add word
option and a Reset option. Use this menu if you were not able to find your word.
To add a word, tap each letter of the word in the letter groups in turn, then tap the
pop-up menu button and tap “Add...”.
To cancel selecting the letter group(s), tap the pop-up menu button and then tap
“Reset”.
This will pop up the Add dialog which will present a list of letters.
Example of selecting
Letter buttons
[“PQR” → “GHI” → “JKL”
→ “MNO”]
To switch between upper and lower case letter, tap a letter button again. The
key-top indication will switch between upper and lower case.
Tap the letter buttons to compose your word, then tap to add your word to the
dictionary.
Page 75

Basic Operations 73
Unicode
Use Unicode mode to insert special characters and symbols.
Unicode group
drop-down list
button
Character
chart
Entering characters
Unicode characters are collected in groups.
To change the group, tap the Unicode group drop-down list button, then select the
group you want.
To insert a character, tap it in the grid.
Page 76

74 Basic Operations
Adjusting the Volume
Volume setting allows you to adjust the volume setting of the built-in speaker and
the stereo headphone to listen to the Voice Recorder files or the alarm, keyclicks,
screentaps, and sound effects.
Using the task bar
The Sound volume icon will always appear on the taskbar.
1. Tap the Sound volume icon on the taskbar to display the volume adjustment
slider.
Volume adjustment slider
Sound volume icon
2. Tap and hold the slider and move up or down to adjust the volume.
3. Tap each checkbox to turn off the sound for the alarm, keyclicks, screentaps, or
sound effects if necessary.
If you want to mute all sounds, tap the “Mute” checkbox.
4. Tap anywhere outside the volume adjustment pop-up window to save the
setting and close the window.
Note: With the stereo headphone attached, you can hear all sounds from the
stereo headphone including alarms, keyclicks and screentaps.
Page 77

Basic Operations 75
Checking the battery level
1. Tap the Battery icon on the taskbar to check the battery level.
The Battery Status screen will appear.
Battery indicator
Battery icon
The battery indicator will display the remaining battery power in green when the
Zaurus is connected to the AC adapter, or in blue when not connected to the AC
adapter.
Below the battery indicator, you can see the Battery status and connection or
disconnection status of the AC adapter:
• Depending on the battery level, the Battery status reads: Good, Low, Very Low or
Charging
• When the AC adapter is connected, “Power on-line” will be displayed, and when
the AC adapter is disconnected, “External power disconnected” will be displayed.
2. Tap to close the screen.
Page 78

76 Basic Operations
Using memory expansion
You can use a CompactFlash card, an SD memory card or a Multi Media Card.
The Zaurus automatically recognizes the CompactFlash card and the SD memory
card (Multi Media Card) when the card is inserted in the Zaurus. The memory card
folders will appear in the Files Home screen.
The data in the Internal Flash can be backed up and restored using a memory card.
Caution:
Note:
Do not drop or shock the Zaurus with a card partially ejected from the
main body. Doing so may cause malfunction or damage to the Zaurus
or the card.
The copyright protection function of the SD memory card is not
implemented in the Zaurus.
Inserting
1. Be sure to turn the Zaurus on before inserting the card.
After turning the power on, check that the start-up routine has been completed
(the keyboard and other function keys will be fully operational).
2. Insert the desired card into the specific card slot until it slides securely into
position.
Be sure to insert the card in the correct direction and orientation.
CF card slot SD card slot
Front
Front
The CF (or SD) card icon will appear on the taskbar in the bottom right-hand
corner of the screen.
The memory card folders will appear in the Files Home screen.
Page 79

Basic Operations 77
Caution:
• Only insert the card after the start-up routine has been completed (the
keyboard and other function keys will be fully operational) after the power is
turned on. If the card is inserted before the start-up routine is completed, the
Zaurus will not properly recognize the card, and may result in improper
operation.
• Do not subject the card to strong electrical shocks.
• Insert the SD memory card and the Multi Media Card into the slot until they
are completely inserted.
Note:
• The Zaurus will take longer to start up when it has a memory card installed
compared to when it does not. This is because the system will check the card
at startup.
• Sharp recommends that you only use the memory cards that have been
approved by Sharp. Use of other cards may not work properly with the
Zaurus.
Removing
1. Be sure all applications are closed before removing the card.
If any applications are open, tap to close them.
2. While the card is inserted, tap the CF (or SD) card icon on the taskbar.
The pop-up menu will appear.
SD card icon
CF card icon
3. Tap “Eject CF card” (or “Eject SD-card”).
The CF (or SD) card icon will disappear.
At the same time, the memory card folder will be erased from the Files Home
screen.
Now you are ready to remove the card from the CF (or SD) card slot.
Page 80

78 Basic Operations
4. After the CF (or SD) icon disappears, remove the CF card straight out.
Or push the SD memory card or Multi Media Card inwards slowly and then
remove it.
Caution:
• The Eject Operation is not available if any files on the memory cards are
open, or if a modem card, etc. is in use.
•
When you select the destination to store files of the EMail application to the CF card
or the SD card, the CF card or the SD card may be unable to eject. In such case,
change the storing destination to the Zaurus then eject the CF card or the SD card.
• If you do not carry out the Eject Operation, the Zaurus will not recognize cards
properly, and this may result in incorrect operation.
The data on the card may also be corrupted.
• Use your fingers to prevent the card from popping out from the SD card slot.
Using Help
The Help Browser is a hyperlinked help system that works similar to a Web browser.
1. In the Applications Home screen, tap the “Help Browser” application icon.
The top screen will be displayed.
2. Tap the blue word to jump to the page concerning the word.
Note: With the following methods, you can open the context-sensitive help
screen of the Help Browser (not available for all applications).
• Tap for the application help screen.
• Tap the “Option” menu and then tap “Help” on the Index screen of the
application.
Bookmarks menu
Bookmarks menu
Add Bookmark Adds the page to the bookmarks.
Remove from Bookmarks Removes registered bookmarks.
Home
Forward
Backward
Page 81

Basic Operations 79
Registering bookmarks
By registering frequently-used pages, you can easily jump to the page.
1. Display the Help Browser page you want to register to the bookmarks.
2. Tap the “Bookmarks” menu and then tap “Add Bookmark”.
The title of the page will be registered.
Once you have registered it, the title of the bookmarked page will be displayed in the
Bookmarks menu. Tap the bookmarked page in the Bookmarks menu to jump to that
page.
Removing bookmarks
1. Tap the “Bookmarks” menu and select the bookmarked page that you want to
remove from the menu.
The bookmarked page will be displayed.
2. Tap the “Bookmarks” menu and then tap “Remove from Bookmarks”.
The bookmark of the page you are on will be removed from bookmarks.
Page 82

80 How to Install Applications on Your Zaurus
How to Install Applications
on Your Zaurus
This section provides the procedures for installing software from the accompanying
CD-ROM onto the Zaurus.
Step1: Transfer the application installation file from the CD-ROM to the Zaurus.
Insert the CD-ROM into your CD-ROM drive.
The procedure for transferring the application installation file to the
internal Flash memory of the Zaurus will be explained. (The software can
also be transferred to a memory card.)
Step2: The software installation process will be executed on the Zaurus.
The procedure for installing software into the Zaurus Internal Flash
memory will be explained. (The software can also be installed onto a
memory card.)
Step 1:
1. Check that the Zaurus File Transfer application has been installed correctly
according to the instructions that start on page 15.
2. If the Zaurus and PC are not already connected, connect them using the
Docking Station following the steps on page 32 (“Connecting the Zaurus to your
PC”).
Note:
• If you have set or changed the Security passcode on the Zaurus or changed
the method of connection in the “PC Link” application on the Zaurus, also set
or change the settings on the “Zaurus Manager” screen in your PC. (See
“Security” in the Operation Manual and “Zaurus Manager Setting” in the
operation manual for Zaurus File Transfer application, etc.)
• When communicating with the PC, do not perform any operations on the
Zaurus, do not turn off the power, do not remove it from the Docking Station,
and do not disconnect the cable from the PC.
• When communicating with the PC, the AC adapter must be connected.
3. Turn on the power for the Zaurus. If the power is already on, turn it off, wait
approximately 30 seconds, then turn the power on again.
Copying the Software to the Zaurus
Page 83

How to Install Applications on Your Zaurus 81
4. Double-click on the CD-ROM drive name (example: D) in the My Computer
application on your PC.
The menu screen will be displayed automatically. You can also display the
menu by ejecting the CD-ROM, then reinserting it.
5. Click “Additional Software for the Zaurus”.
A window will open, displaying the Applications folder on the CD-ROM.
6. Next, display the Zaurus memory window.
Click the Start menu, then (All) Programs → Sharp Zaurus 2 →
Zaurus File Transfer → Zaurus File Transfer.
The Zaurus File Transfer application window will appear on the desktop.
The Zaurus memory will be displayed on the PC using the Zaurus File Transfer
application.
The “Internal Flash” folder displays the internal flash memory of the Zaurus.
When a memory card is installed, an “SD Card” or “CF Card” folder will appear.
7. Double-click the “Internal Flash” folder, then double-click “Install_Files” folder.
When installing software on the Zaurus, copy it into the “Install_Files”
Note:
folder.
Page 84

82 How to Install Applications on Your Zaurus
8. Drag the file from the Applications folder of the CD-ROM and drop it into the
“Install_Files” folder of the Zaurus.
The file will be transferred into the Zaurus memory.
If there is a PC card slot on the PC you are using, instead of using the
Note:
Zaurus File Transfer procedure above, you can copy the software onto
a memory card, then insert the memory card into the Zaurus. You can
then continue with the following steps.
Step 2: Installing the Software for Use on
the Zaurus
Install the software you copied onto the Zaurus for use with the Add/Remove Software application.
1. Turn on the power to the Zaurus and display the Settings Home screen.
2. In the Settings Home screen, tap the “Add/Remove Software” application icon,
then tap “Install packages.”
A list of software copied to the Zaurus will be displayed.
3. Tap the software to be installed.
A screen for selecting the software installation destination will be displayed.
Page 85

How to Install Applications on Your Zaurus 83
4. Tap “Internal Flash” to select it.
5. Tap .
The installation will begin.
6. Tap “OK” on the confirmation screen.
The display will return to the screen in step 3.
The icon for the software will change from to . To install additional
software, repeat steps 3 through 6. To complete the software installation, be
sure to perform steps 7 and 8. The installation is not yet completed at this point.
7. Tap .
The display will return to the screen at the right in step 2.
8. Tap to exit the Add/Remove Software application.
After a few seconds, the Home screen will be displayed.
The software is now ready for use.
The installed application package file is listed in the related Home screen and
can be launched from there.
Note:
• If an error message is displayed while the software is being installed, follow
the instructions.
• Uninstall the software also with the Add/Remove Software application. For
details, see the Operation Manual on the CD-ROM.
Page 86

84 Appendix
Appendix
What to do if a problem occurs
When a problem occurs, first refer to the Troubleshooting section (see page 95) and
the “Troubleshooting Guide” included on the CD-ROM.
If an entry is displayed incorrectly on the screen, if tapping the screen or operating
a key does not work properly, or if other problems occur, try the following sequence
of operations:
1. Reboot
2. Reset
3. Error check (in the Maintenance menu)
When the error check is executed, corrupt files or data may be deleted if found.
If the problem is not resolved by the steps above, execute “Format”.
All data or added software will be deleted.
After performing one of the steps above, the time and date setting may
Note:
not be accurate. Be sure to check the setting and adjust the time and
date, if necessary.
1. Reboot
1. After saving any edited entry, close all applications.
2. Tap the Qt Menu icon ( ) on the taskbar and then select “Reboot”.
3. Tap “Yes” to reboot the Zaurus.
The Reboot process will begin. The screen will go blank briefly, then the Set
System Time screen will be displayed after a few minutes. Adjust the time and
date, then press the OK key
The Home screen will be displayed.
.
Page 87

Appendix 85
2. Performing a Reset
When a Reboot cannot be performed, or the Zaurus does not work correctly even
when rebooted, try the following reset operation (reset and full-reset). Editing data
will be lost by performing a reset (the stored data won’t be lost).
Resetting
1. After saving any entry being edited, close all applications.
Turn the Zaurus off and make sure that the screen has gone blank.
When the screen does not go blank after approximately 10 seconds or when the
power cannot be turned on/off, perform the next step.
2. Press the reset switch with the supplied stylus pen.
Reset switch
3. Turn the Zaurus on.
The Set System Time screen will be displayed after a few minutes.
Adjust the time and date, then press the OK key.
The Home screen will be displayed.
Full-resetting
Attempt a full-reset if the Zaurus does not work correctly even after performing a
reset.
1. After saving any entry being edited, close all applications.
Turn the Zaurus off and make sure that the screen has gone blank.
When the screen does not go blank after approximately 10 seconds or when the
power cannot be turned on/off, perform the next step.
Page 88

86 Appendix
2. Press the reset switch with the supplied stylus pen while holding the Rec and
POWER keys.
Reset switch
Rec key key
3. Release the Rec and POWER keys.
4. Turn the Zaurus on.
The Set System Time screen will be displayed after a few minutes.
Adjust the time and date, then press the OK key.
The Home screen will be displayed.
Caution:
Note:
Be careful not to drop the Zaurus when resetting.
Repeat from step 1 if resetting can not be performed.
3. Performing an Error check
This can be executed from the “Maintenance menu”. Refer to “Maintaining Your
System” for instructions and precautions.
This will check for abnormal data in the Internal Flash memory and memory card. If
any abnormalities are discovered, the files or data with the problems will be deleted,
and your files or entries may be lost.
Page 89

Appendix 87
Maintaining Your System
Zaurus system maintenance can be performed from the Maintenance menu.
You need to display the Maintenance menu first, to perform the Error check, Format,
and Update operation.
After performing one of the steps below, the time and date setting may
Note:
not be accurate. Be sure to check the setting and adjust the time and
date of the Zaurus.
Displaying the Maintenance menu
1. After saving an edited entry, close all applications.
Turn the Zaurus off and make sure that the screen has gone blank.
2. Be sure to attach the AC adapter.
Make sure that the charge light will turn on.
3. Press the reset switch with the supplied stylus pen.
Reset switch
4. Press the POWER key while holding the OK key.
Note: Repeat from step 1 if the Maintenance menu is not displayed.
Please select the menu using the numeric key, or the cursor key and
Note:
press the OK key.
Page 90

88 Appendix
1. Cancel Closes the Maintenance menu screen. After
2. Error check
(see page 88)
3. Format
(see page 89)
4. Update Performs an update on the Zaurus’s main system
Note: If you select the wrong menu, press the Cancel key to return to the
Maintenance menu screen.
performing a reset, the display will return to the Home
screen.
Checks whether there are any abnormalities in the
data in the Zaurus Internal Flash memory and
memory card.
Should be performed when abnormal operation
continues even after a Reset operation (see page 85).
The files or data with problems will be deleted,
and your files, entries, data or settings may be
lost.
Erases all data in the Zaurus Internal Flash memory
and then re-formats the memory.
Data or settings entered after purchase or
software you have added will be deleted.
Application updates and the contents of the Zaurus
system will not be erased (they will remain in the
updated version).
only.
Performing an Error check
The Error check will search for any abnormalities in Calendar, Address Book,
Todo List, EMail, and Text Editor (Notes tab) data in the Zaurus Internal Flash
memory and EMail data in the memory card.
Caution:
If any abnormalities are discovered, the files or data with problems will
be deleted, and your files, entries, data or settings may be lost.
1. Display the Maintenance menu (see page 87).
2. Press to select “2. Error check”.
The Error Check screen will be displayed.
3. Read the displayed information, then select “Yes” and press the OK key.
After a few minutes, the Error check start screen will be displayed. Follow the
on-screen instructions.
Page 91

Appendix 89
Format the Zaurus
Formatting the Zaurus will erase all data on the Zaurus and then re-format the
memory.
Caution: Any settings or add-on software entered will be deleted when you
format the Zaurus. Application updates and the contents which the
Zaurus come with standard will not be erased (they will remain in the
updated version).
1. Display the Maintenance menu (see page 87).
2. Press to select “3. Format”.
The Format screen will be displayed.
3. Read the displayed information, then select “Yes” and press the OK key.
The Format operation will begin.
When the Format operation is finished, follow the screen instructions to enter
the initial settings (see page 11 to 14).
Page 92

90 Appendix
Replacing the Battery
Caution:
• Before sliding the battery replacement switch to the “ ” position, make sure
that the Zaurus is turned off and the screen is blank. If this step is not
observed, the memory contents may be changed or lost.
• Only use the “EA-BL09” rechargeable battery.
1. Turn the Zaurus off.
2. Slide both battery replacement switches on the back of the Zaurus to the “ ”
position.
3. Remove the discharged battery.
4. Insert the new battery. Make sure that the plus (+) and minus (-) marks on the
battery are aligned correctly with those printed inside the battery compartment.
5. Push and hold the battery in the direction of the arrow while sliding both of the
battery replacement switches to the “ ” position.
If the battery is not charged, charge with the supplied AC adapter.
6. Press the POWER key to turn on the Zaurus.
If the Zaurus does not turn on, try again from step 1.
7. Check the time and date.
Page 93

Appendix 91
Conditions of Use
Your Zaurus conforms to international regulations insofar as it is used under normal
conditions and in accordance with the following instructions.
Caring for your Zaurus
• Do not open or attempt to repair your Zaurus yourself. The product may only be
repaired by authorized service personnel.
• Do not drop your Zaurus or subject it to severe impacts. Be especially careful
when a partially ejected communications or other card is in the Zaurus.
Malfunction or damage may occur to the card or the Zaurus.
• Bending the body can damage the circuitry. Do not use extreme force when
pressing the display or keys.
• Close the Display protection cover to protect the LCD from being scratched,
broken, or damaged when you carry it with other objects.
• Do not insert business cards, pens, etc. between the Display protection cover and
LCD. The LCD may be broken or damaged if the Display protection cover is
pressed with force.
• Do not use sharp, pointed objects or your fingernails to touch the display screen.
Before using your Zaurus, remove dirt and stain from the screen so as not to
damage the screen.
• Use only a soft, dry cloth to clean your Zaurus. Do not use volatile liquids like paint
thinner, benzene, or wet cloths. They may cause deterioration or color changes.
• Do not carry your Zaurus in your back pocket as it could break when you sit down.
The Display is made of glass and is particularly fragile.
• If using the Zaurus with the hand strap attached, do not subject the eyelet for the
hand strap to force and strain. Do not swing the unit from its strap or pull on the
strap very tightly. Doing so may result in damage or faulty operation.
Page 94

92 Appendix
Battery
• The Zaurus consumes battery power even when turned off.
• Before removing the battery from the Zaurus, make sure the Zaurus is turned off.
• The power supply may be blocked if there is dust on the battery terminals or the
terminals of the main unit. Use a soft dry cloth to wipe the terminals. Batteries can
cause damage, injury or burns if a conductive material touches the exposed
terminals.
In the U.S.A., Canada only
“BATTERY DISPOSAL”
CONTAINS LITHIUM-POLYMER BATTERY. MUST BE DISPOSED OF
PROPERLY. CONTACT LOCAL AGENCIES FOR INFORMATION ON
RECYCLING AND DISPOSAL PLANS IN YOUR AREA.
Other
• Use your Zaurus only with “EA-BL09” batteries, the “EA-70” AC adapter and
accessories recommended by SHARP. SHARP disclaims any liability for damage
caused by the use of other batteries, AC adapters, or accessories.
• As with any electronic storage unit, data may be lost or corrupted under various
circumstances. Back up important data regularly. We strongly recommend that
you also keep separate written copies of all important data.
In the U.S.A.
This product utilizes tin-lead solder. Disposal of these materials may be regulated
due to environmental considerations. For disposal or recycling information, please
contact your local autorities or the Electronics Industries Alliance: www.eiae.org
Environment
• The display quality may deteriorate if used beyond our recommended
temperature range 0°C to 40°C ( 32°F to 104°F). However, this is only temporary
and does not indicate a malfunction.
• Keep your Zaurus and accessories away from extreme heat. Do not leave it on
the dashboard of a car or near a heater. Do not leave it in any place that is
extremely damp or dusty.
• As this product is not waterproof, do not use it or store it where fluids such as
water can splash onto it. Raindrops, water spray, juice, coffee, steam,
perspiration, etc. will also cause a malfunction.
• The unit gets warm when used for a long period of time. Therefore, by holding the
unit in the same position during operation, you may suffer low-temperature burns.
Page 95

Appendix 93
Precautions
AC adapter and AC power cord
If the following precautions are not observed, fire or electric shock may occur.
• Only use the “EA-70” AC adapter and the recommended AC power cord.
• Do not use the AC adapter for other equipment. The equipment may be
destroyed.
• Do not use voltages beyond the indicated power supply voltage range.
• When not in use, disconnect the AC power cord and the AC adapter from the wall
outlet and from the unit for safety.
• Do not perform modifications, disassembly, or repair.
• Do not connect or disconnect the AC adapter with wet hands.
• Do not use the AC power cord and the AC adapter under the following conditions
below. When one of the following abnormalities occurs, immediately disconnect
the AC power cord and the AC adapter from the wall outlet and the unit and turn
off the power.
— In case of damage.
— When there is smoke or a strange smell.
— When an abnormal sound is heard.
• The AC plug must be appropriate for the AC outlet configuration.
• This AC adapter should be used at ambient temperatures from 32°F to 104°F
(0°C to 40°C).
• Only use the AC adapter and AC power cord indoors.
• Do not keep the AC adapter and AC power cord in places that are very dusty.
• Do not place heavy objects on the AC adapter or AC power cord and do not put
them in places where they can fall from a high level.
Rechargeable battery
• Only use the “EA-BL09” rechargeable battery.
• When charging, be sure to use the Zaurus only with the “EA-70” AC adapter.
• Do not dispose of the battery in a fire.
• Also keep the battery away from open flames.
• Never attempt to disassemble the battery pack.
• Do not short-circuit the terminals as they will become very hot and will damage
the battery.
• Do not drop or subject the battery to shock.
• Do not touch the battery or battery terminals in the battery compartment of the unit
with wet hands.
Page 96

94 Appendix
• After storing the battery for a long period of time, be sure to charge the battery
completely prior to use.
• Charge the battery properly, according to the details described in this guide.
• Fluid from a leaking battery accidentally entering an eye could result in serious
injury. Should this occur, wash with clean water and immediately consult a doctor.
• Should fluid from a leaking battery come into contact with your skin or clothes,
immediately wash with clean water.
Other precautions
• Keep batteries or accessories (I/O port cover, etc.) that might be swallowed away
from children.
• Take care the volume setting when listening with the stereo headphone. Your
ears could be injured by unexpectedly loud sounds.
• Never use the accompanying CD-ROM in an ordinary audio CD player.
Page 97

Appendix 95
Troubleshooting
If you have a problem with your Zaurus, check the following points.
If the problem remains, contact our Support center.
The screen is dark.
I want to know how to turn the back light on.
• Adjust the brightness of the light setting in the Light & Power application (See the
Operation Manual: “Managing power (Light & Power)”).
• Is the back light turned on? When the back light has been turned off due to the
power saving setting of the Light & Power application, press the Back light key to
turn the light on.
The charge light blinks or will not turn on.
• When the battery has been fully charged, charging the battery is unnecessary and
the charge light will turn off. Tap the battery icon to check the battery status.
• Make sure that the supplied “EA-70” AC adapter is used and connected correctly.
Disconnect the AC adapter and then connect it again.
• Remove and reinsert the battery. Make sure that the battery replacement switch
is set to the “ ” (see page 8).
• If the error persists, the battery or the unit may have a problem. Contact your local
SHARP dealer for repair.
The Zaurus does not turn on even after recharging.
The charge light does not turn off even though more than standard
charging time has elapsed since the charging began.
• When the battery has not been used for an extended period and has become
overly discharged (including the first use of a new one), the power may not turn
on for several minutes after charging and the charge light may not turn off even
after the standard charging time. In such cases, disconnect the AC adapter and
remove the battery. After approximately 5 seconds, replace the battery and
recharge the battery (see page 90).
• Charge at the specified temperature range: 5°C to 35°C (41°F to 95°F).
• If left unattended after charging is completed and the charge light has turned off,
the battery may discharge and charging may restart.
The Zaurus turns off by itself.
• You have not operated the Zaurus for a certain period and the Auto power off
function may be activated. Press the POWER key to turn the Zaurus on again
(see page 33).
Page 98

96 Appendix
• The battery may be exhausted. Use the AC adapter to turn on the power if
necessary, and after disconnecting the adapter tap the battery icon to check the
battery status. Charge the battery, if it is low.
• Strong extraneous electrical noises or shocks might turn the Zaurus off. Try to
turn the power on again.
The Zaurus does not turn on by pressing the POWER key.
The screen is lit but characters, etc. are not displayed.
Entries are displayed incorrectly.
Tapping or operating keys will not work properly.
• Try to change the displayed contents by pressing the Home key, etc.
• The battery may be exhausted. Connect the AC adapter and charge the battery
(see page 9).
• Remove and reinsert the battery. Make sure that the battery replacement switch
is set to the “ ”.
• Perform the Reboot/ Reset/ Error check operations in this order (see page 84).
I forgot my Security passcode, and I cannot operate my Zaurus.
• It is necessary to execute “Format” in the Maintenance menu. This will clear the
passcode, but you will lose all data created and saved, and add-on programs
added to the Zaurus (see page 89).
The AC adapter and unit become hot while using the AC adapter or
during charging.
• This is not a malfunction. The AC adapter and the unit become hot when the AC
adapter is used or during charging.
A rainbow pattern is appearing on the screen.
• A rainbow pattern may appear on the screen when the unit is outdoors on a sunny
day, etc., but this happens because of the interference occurred by the light rays
and is not a malfunction.
Application start up is slow.
•
The start up time can be shortened in some applications. Tap and hold an
application icon on the Home screen for a few moments, then check the “Fast load”
on the screen displayed. This will consume more memory (see page 46).
Page 99

Appendix 97
Entries in the Calendar application, etc. cannot be deleted.
•
When the user area of the memory is full, entries in the Calendar, Address Book,
Todo List, EMail, and Text Editor (in the Notes tab) applications may not be deleted.
In such cases, delete unnecessary files in the Imaging or Text Editor (in the Text
tab) applications or unnecessary files displayed on the Files Home screen.
A memory shortage is occurring when starting up applications.
• If some applications have already been opened, close the unnecessary ones.
• For applications you do not use frequently, turn off the “Fast load” checkbox
(see page 46).
Try to perform the Reboot/Reset/Error check operation in this order (see page 84).
•
Entries I have saved are not being displayed on the Index screens.
•
In the Address Book or Todo List application, it is possible that only the entries in a
category will be displayed. Select “All” under the “Category” section (see page 55).
On the Index screen I cannot move the highlight to select an entry by
using the Cursor keys.
• Is the focus (the rectangle drawn with dotted lines) around the highlight? When
the focus is on a tab or the menu bar, the highlight on the index screen is not
active. Press the Tab key several times to move the focus to the highlight on the
Index screen and make the highlight active.
The characters are small and I want to make them bigger.
• Character size can be changed by selecting “Font” from the “Option” or “View”
menu in the Address Book, Calendar, Todo List, Text Editor, or EMail application.
I want to know the date a file is linked to the Calendar application, and
change the date.
• Display and select the file on the Files Home screen. Select “Change date...” from
the “File” menu then select the new date on the mini-calendar (see page 41).
The file will be shown on the File link screen of the new date and the date will also
be changeable in the Calendar application. (See the Operation Manual on the
CD-ROM: “Calendar”.)
Page 100

98 Appendix
I have set a scheduled alarm but the alarm does not make a sound.
• When an optional headphone is inserted into the stereo headphone jack, alarm
sounds will be heard through the headphone.
• You might have set the sound volume to off. Tap the Sound volume icon on the
taskbar. Turn the “Mute” checkbox off, adjust the slider, and turn the “Alarms”
checkbox on (see page 74).
• You might have selected “Silent” when you set the schedule alarm. When “Silent”
was selected, a display will appear on the screen but the alarm will not produce a
sound (See the Operation Manual on the CD-ROM: “Calendar”).
The CF or SD/MMC card is not being recognized properly.
The CF or SD card icon does not appear on the taskbar.
• Turn the power off and on again.
• See page 76 and be sure to remove the card and insert it again correctly.
• Only use memory cards that have been appproved by SHARP. Ohter cards may
not work properly with the unit.
The CF or SD card icon does not disappear from the taskbar by
tapping the icon and the tapping “Eject card” (or “Eject SD-card”).
• The operation (“Eject card” or “Eject SD-card”) is not valid if any files on a memory
card are opened, if a card is selected as the storage in the EMail application, or if
a modem card is in use and so on. In such cases, please eject the card after
closing all applications and turning off the Zaurus.
IR communication is not possible.
• Is the mutual distance correct (See the Operation Manual on the CD-ROM: “Beam
Receive”)?
• Are the IR communication ports on both units (transmitting and receiving ports)
aligned straight?
• Is data being sent from the sending unit after the receiving mode has been
entered on the receiving unit?
Not sure what accessories and peripherals can be used with this
Zaurus.
• For information regarding accessories and peripherals, visit our Web site (see
page 101).
 Loading...