

Page 1
Page 2

i
Table of Contents
Introduction.............................................................1
About this manual...............................................................2
Address Book .........................................................3
Overview.............................................................................3
Creating a new Address Book entry ...................................6
Attaching a Note .................................................................7
Modifying an Address Book entry.......................................7
Duplicating an Address Book entry ....................................8
Deleting an Address Book entry .........................................8
Arranging the entry fields....................................................8
Arranging the display items on the Index screen................9
Changing the sort order of the entry.................................10
Registering/Editing your personal information (Owner
Information) ......................................................................11
Calendar ................................................................12
Overview...........................................................................12
Viewing the link files .........................................................20
Selecting the link option for the memory card ..................20
Changing the date to link files ..........................................21
Adding Events ..................................................................22
Modifying an Event entry ..................................................26
Duplicating an Event entry................................................26
Deleting an Event entry ....................................................27
Calendar Setup.................................................................28
Todo List................................................................30
Overview...........................................................................30
Creating a new Todo List entry.........................................32
Modifying a Todo List entry ..............................................33
Duplicating a Todo task entry ...........................................34
Page 3

ii
Deleting a Todo task entry................................................34
Checking a completed entry on the Index screen ............35
ImagePad...............................................................36
Overview...........................................................................36
Writing memos by hand (creating new memos) ...............40
Modifying a memo (image file) .........................................42
Deleting a memo (image file)............................................42
Changing filenames..........................................................42
Rotating the image 90° degrees and saving it..................43
Viewing a single image.....................................................43
Displaying a slideshow of the files....................................44
Changing Image view screen and slideshow settings,
and the Cancel key actions ..............................................45
Switching the view mode on the Index Screen.................47
Text Editor .............................................................48
Overview...........................................................................48
Creating a new text file (Text Index screen) .....................52
Creating a new note entry (Notes Index screen) ..............52
Modifying a text file/note entry..........................................53
Deleting a text file/note entry ............................................53
Duplicating a text file to/from a note entry ........................53
Setting up the wrap lines ..................................................54
Renaming a text file..........................................................54
Defining the Cancel key function for the Text Index
screen...............................................................................55
Selecting the character code for opening or saving files ..56
Media Player..........................................................57
Overview...........................................................................57
Playing a file .....................................................................62
Playing a file in the Playlist ...............................................63
Other functions .................................................................64
Page 4

iii
Opera Browser ......................................................66
Overview...........................................................................66
Opening the specified Web page .....................................70
Using the Web Search function ........................................71
Using the bookmarks........................................................72
Creating a new folder in the bookmark list .......................74
Saving the current page and viewing it offline ..................74
Managing the window.......................................................75
Magnifying or reducing the page ......................................77
Switching the Screen layout .............................................78
Searching for a word or phrase on the current page ........78
Setting up the Opera Browser preferences ......................80
Keyboard shortcuts...........................................................85
EMail ......................................................................86
Overview...........................................................................86
E-mail accounts ................................................................93
Creating an e-mail message.............................................96
Sending e-mail messages ................................................99
Receiving e-mail messages............................................100
Opening an e-mail message...........................................102
Opening or arranging attachments .................................103
Replying/Forwarding to an e-mail message ...................104
Editing an e-mail message .............................................104
Deleting e-mail messages ..............................................105
Registering the e-mail address of the sender in the
Address Book application ...............................................106
Changing the view pattern..............................................107
Creating a new folder and organizing e-mail
messages .......................................................................108
Filtering received e-mail messages ................................110
Searching for received e-mail messages .......................113
Moving or duplicating e-mails between the Internal
Flash and memory cards ................................................114
Page 5

iv
Voice Recorder ...................................................115
Overview.........................................................................115
Recording .......................................................................117
Launching the Recorder with the Calendar key..............118
Playing............................................................................119
Renaming a recorded file ...............................................119
Deleting a recorded file...................................................119
Setting up the preferences .............................................120
Extras...................................................................121
City Time ........................................................................121
Clock...............................................................................123
Calculator .......................................................................124
Help Browser ..................................................................127
Games..................................................................129
Asteroids.........................................................................129
Go...................................................................................129
Mindbreaker....................................................................129
Mine Hunt .......................................................................130
Patience..........................................................................130
Snake .............................................................................130
Word Game ....................................................................130
Settings................................................................131
Add/Remove Software....................................................131
Setting the Appearance (Appearance) ...........................140
Using the Application Key (Application Key) ..................142
Backup Restore (Using memory card) ...........................143
Beam Receive ................................................................145
Adjusting the date and time (Date/Time) ........................149
Managing power (Light & Power) ...................................151
Adjusting the touch panel (Recalibrate)..........................153
Setting the security (Security).........................................154
Shutting down (Shutdown) .............................................157
Sound Settings ...............................................................158
System Info.....................................................................160
Page 6

v
Tab Setting .....................................................................162
PC Link ...........................................................................166
Network Settings (Network)...............................168
Overview.........................................................................168
Creating settings using the Wizard screen .....................169
Creating a new setting without using the Wizard............184
Connecting/disconnecting to the Network ......................195
Page 7
Introduction 1
Introduction
Congratulations and thank you for purchasing the SL-5600 Personal Mobile Tool.
Before using your SL-5600 unit, we recommend that you first read the separate
Start-up Guide which mainly covers the set-up procedure, hardware operations, and
common and basic software operations. Then read this Operation Manual which
covers more in-depth software operations.
Some of the accessories described in the manuals of the SL-5600 may not be
available at the time you purchase this product.
The screens on the unit may differ from the screens in the manuals. If you would like
to change the screen appearance on the unit, please use the “Appearance”
application. (See the “Setting the Appearance (Appearance)” section on page 140.)
The information and screens provided in the manuals of the SL-5600 are subject to
change without notice.
Copyright
It is the intent of Sharp that this product be used in full compliance with the applicable
copyright laws and that prior permission be obtained from copyright owners
whenever necessary.
The functions on this product (such as the calendar) provides a date range from
January 1, 1970 (GMT) to December 31, 2037 (GMT).
Page 8
2 Introduction
About this manual
The SL-5600 can be operated by either pressing keys on the keyboard or tapping
an item (buttons, etc.) on the screen using the stylus.
• This operation manual mainly describes the stylus operation. Button or key
operations are included, if they make it easier to carry out the function.
Keys
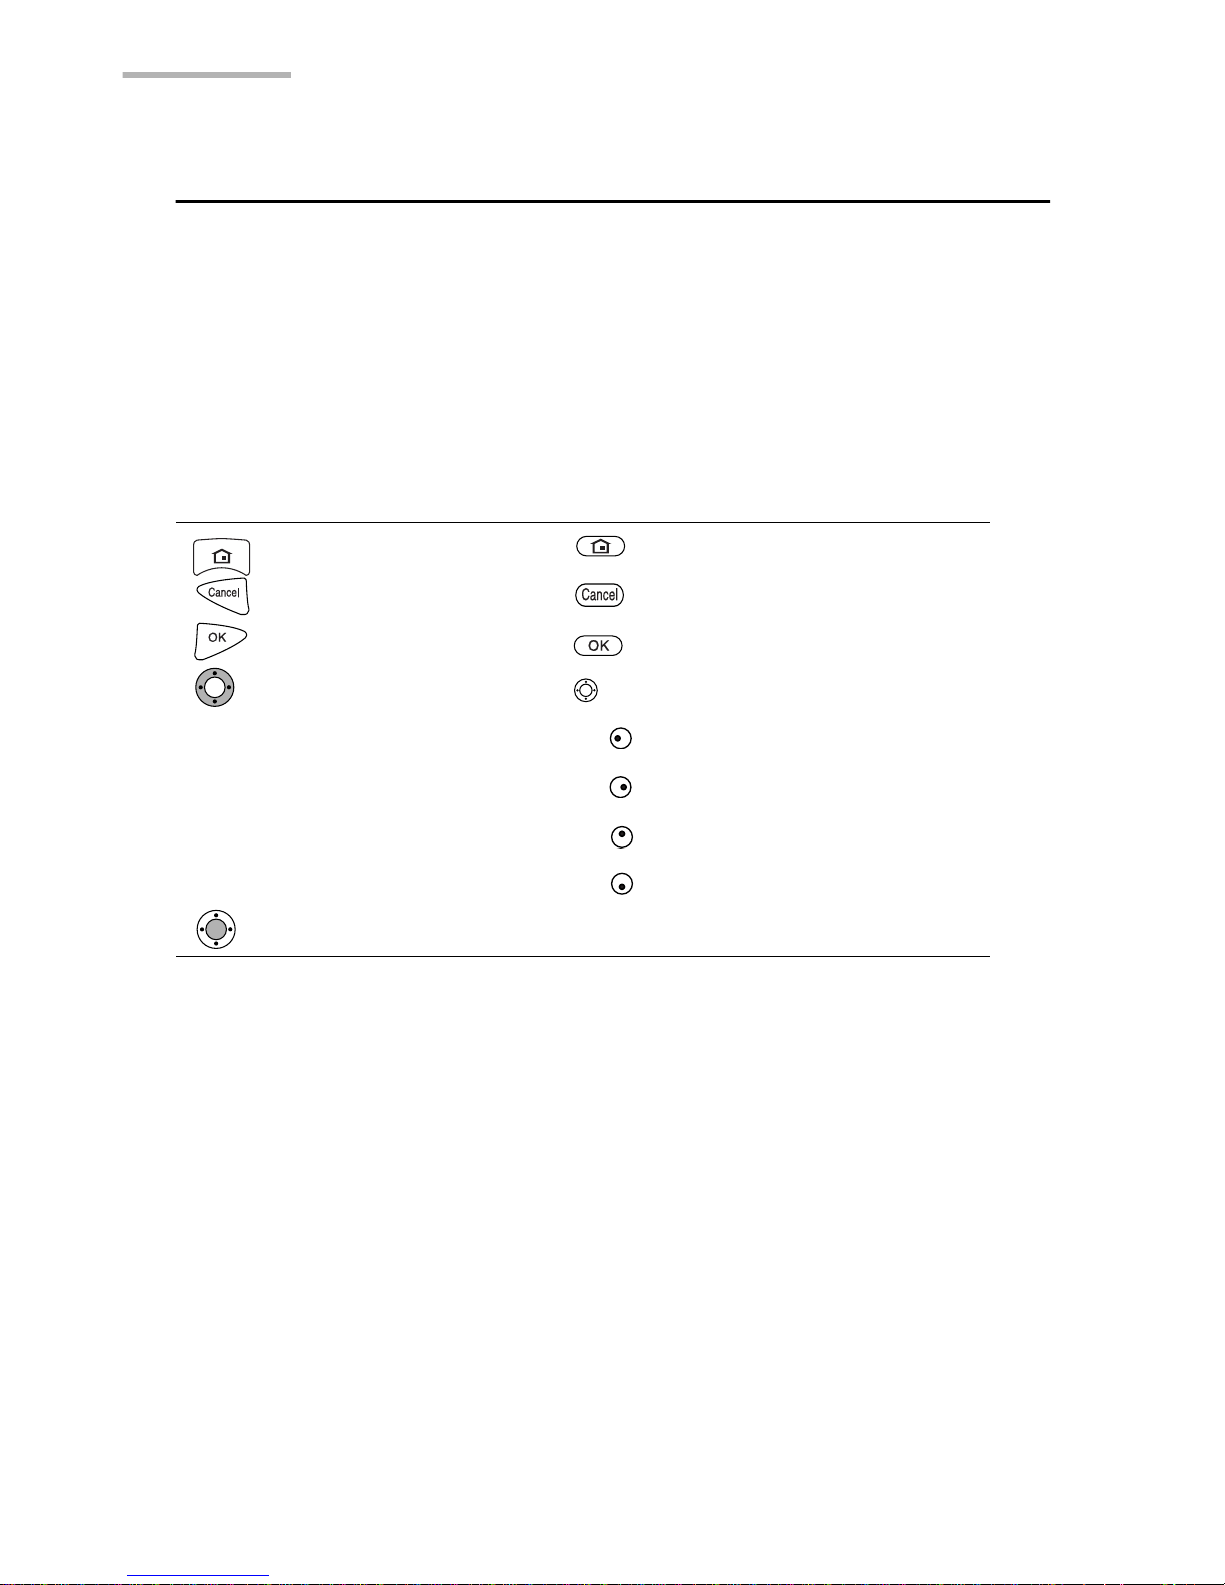
This manual represents keys with the following:
Screen Buttons and Menu Names
Screen buttons and menu names, such as “OK”, “File”, “Edit”, etc., are indicated
using quotation marks.
: HOME key
: Cancel key
: OK key
: Cursor key
: Left cursor key
: Right cursor key
: Up cursor key
: Down cursor key
SELECT key
Page 9
Address Book 3
Address Book
The Address Book application allows you to manage contact information on friends,
colleagues, etc. covering the items shown below. You can also add notes to help
you remember contacts more easily.
Entries can be organized into categories such as “Business”, “Personal”, or you can
create your own categories.
E-mail addresses entered in the Address Book application can be used to easily
address e-mails in the EMail application.
Overview
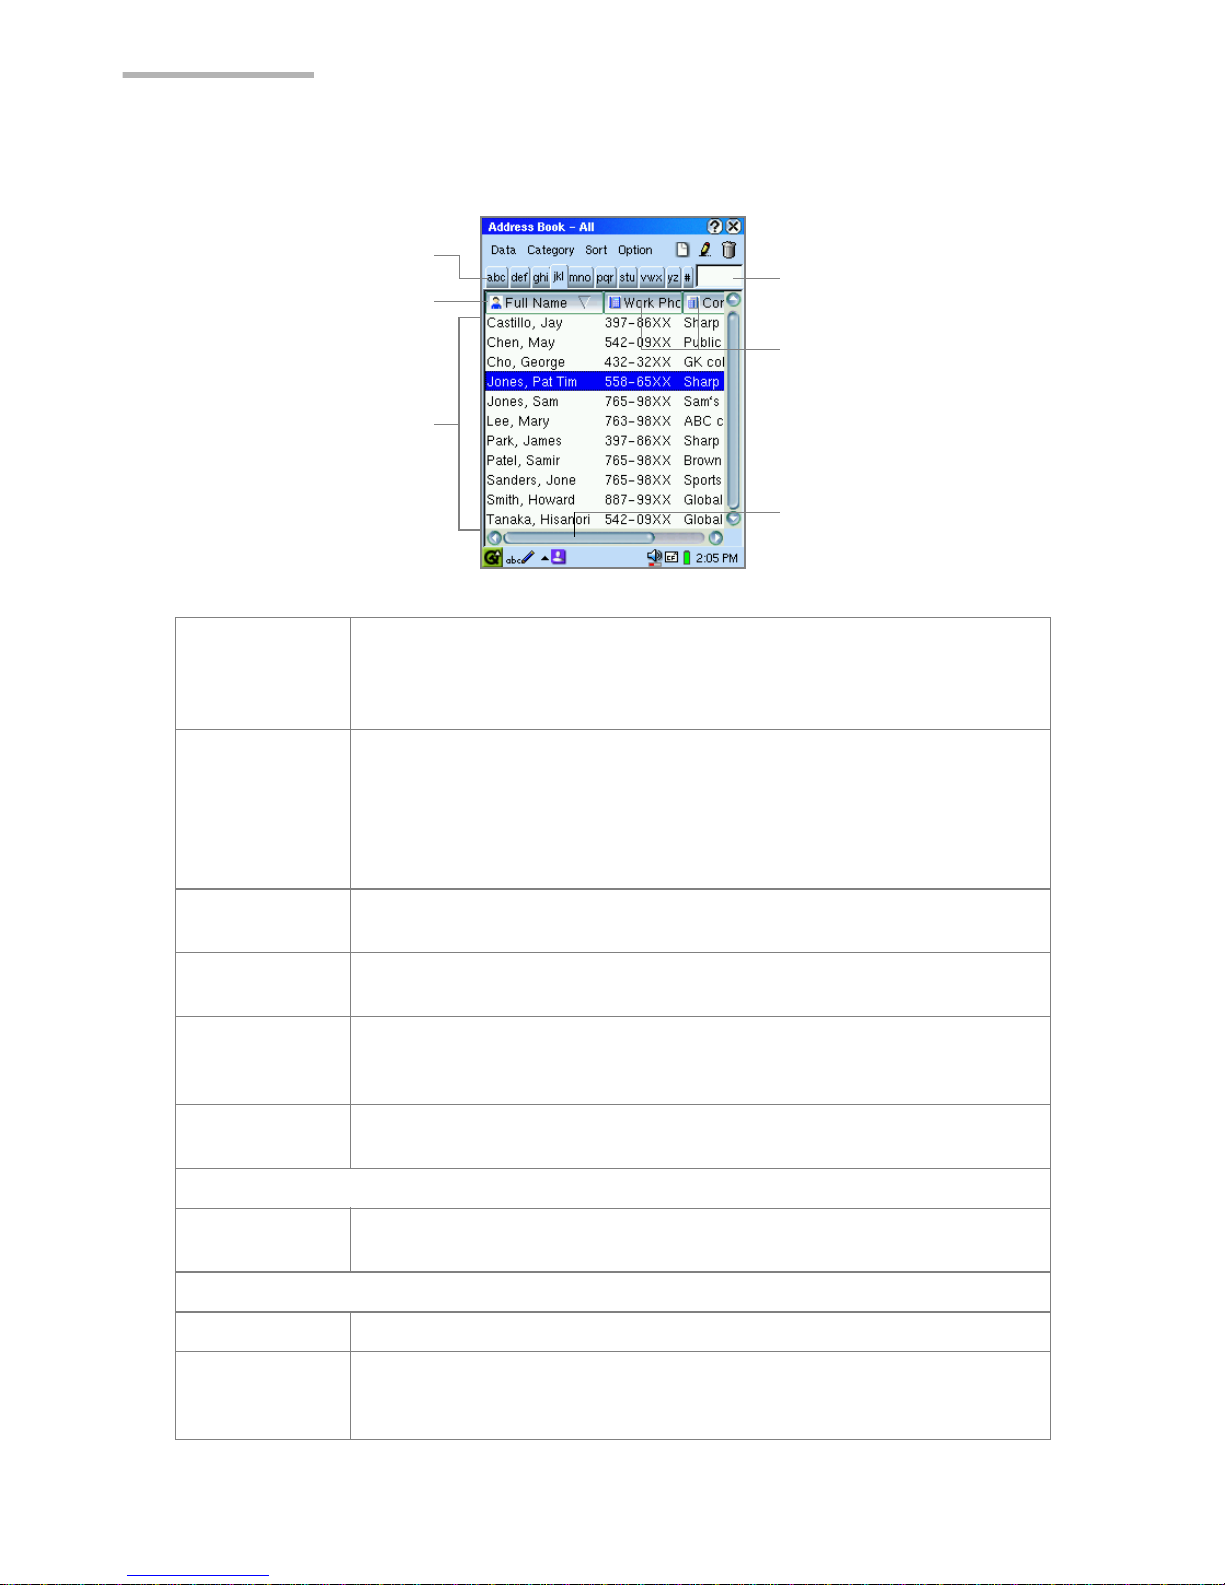
The Address Book application has three major screens:
New/Edit Address screen, Index screen, and Detail screen.
New/Edit Address screen
1.
On the Applications Home screen, tap the “Address Book” application icon.
The Index screen appears.
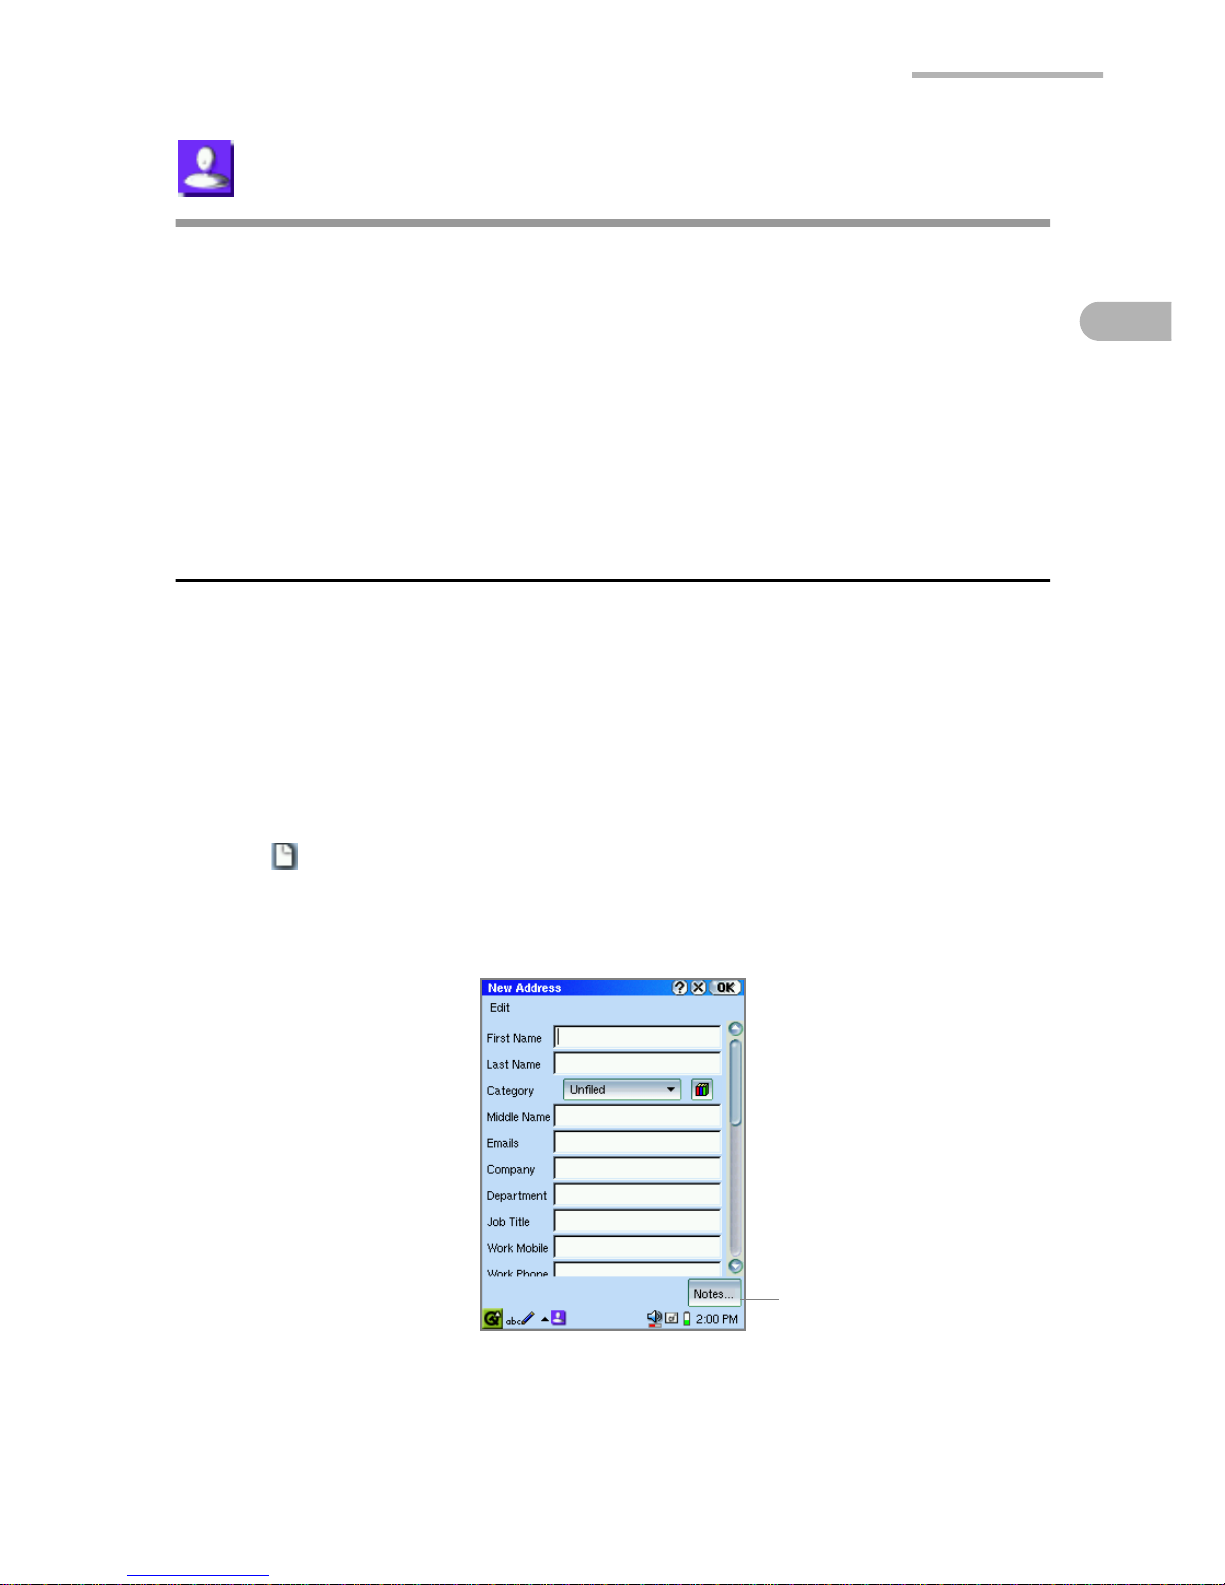
2.
Tap .
The New Address screen appears.
Here you can create a new Address Book entry.
“Notes...” button
Tap to attach a note.
Page 10
4 Address Book
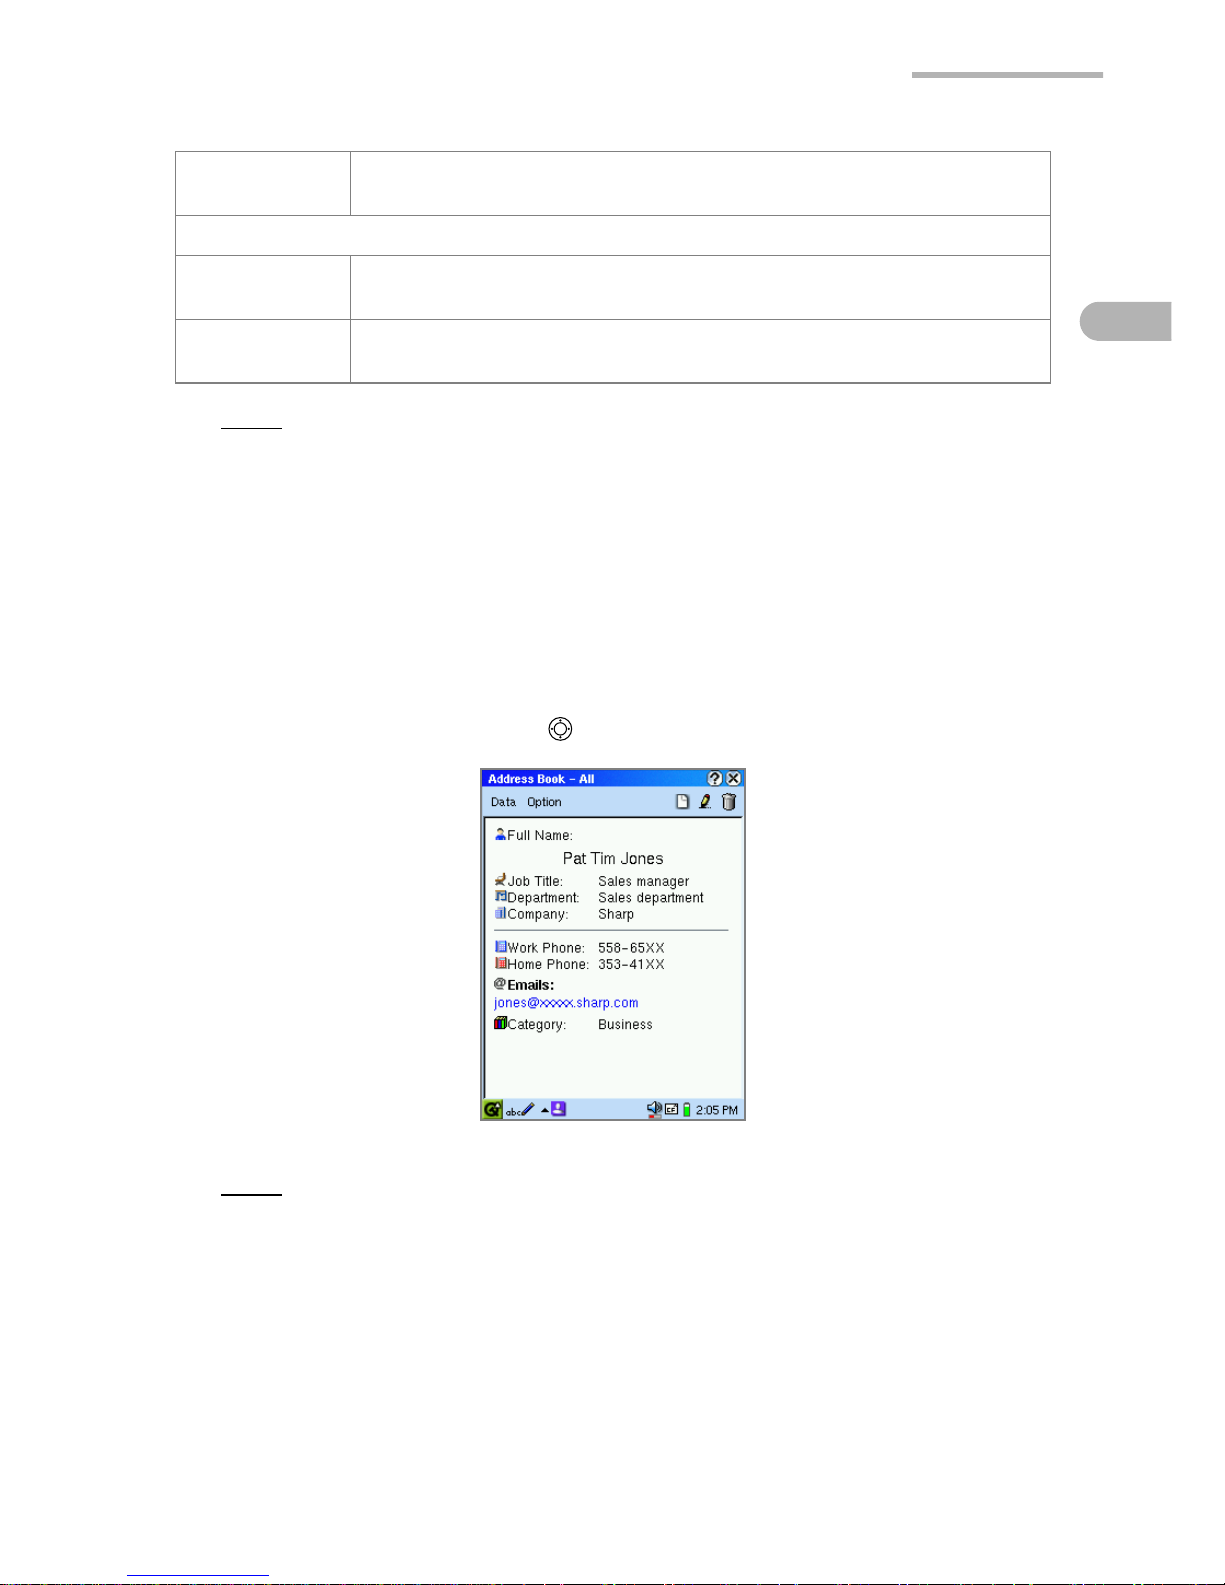
Index screen
Index tab Each index tab contains two or three letters. Every time you tap
on the tab, it will move to the next letter and start the listing with
that letter. The letters in the tabs are not case sensitive and will
not recognize European characters.
Direct Search
field
Tap this field and enter the first letter or the first few letters you
would like to find for the item currently used as the sorting order.
Entries that begin with the selected letter(s) will be displayed. The
letters are not case sensitive and will not recognize European
characters. (The letter(s) will be cleared when an Index tab is
tapped.)
Full Name
button
Tap to sort the entries by full name in ascending or descending
order.
Column button Tap to list the items for each entry, then tap the desired item. The
selected item for each entry will be displayed.
Data area Displays the contents of the entry. Full Name column displays the
First Name, Middle Name and Last Name. Tap an entry to open
the Detail screen.
Scroll bar
(for L/R)
Tap to scroll to the right to display the right column.
Data menu
Owner
Information
Displays the Owner Information screen which can be edited if
necessary (excluding the category field).
Sort menu
By Full Name Sorts the entries by Full Name in ascending or descending order.
By *** (the
center column
item)
Sorts the entries by center column item in ascending or
descending order.
Column buttons
(center, right)
Data area
Full Name button
Direct Search field
Index tab
Scroll bar (for L/R)
Page 11
Address Book 5
Note:
• When the first character of the item currently used as the sorting order is
entered, the matching entry is highlighted.
• The Index screen has three columns. By tap-and-dragging the right boarder
line of the column buttons, you can narrow the width to see all three columns
at once.
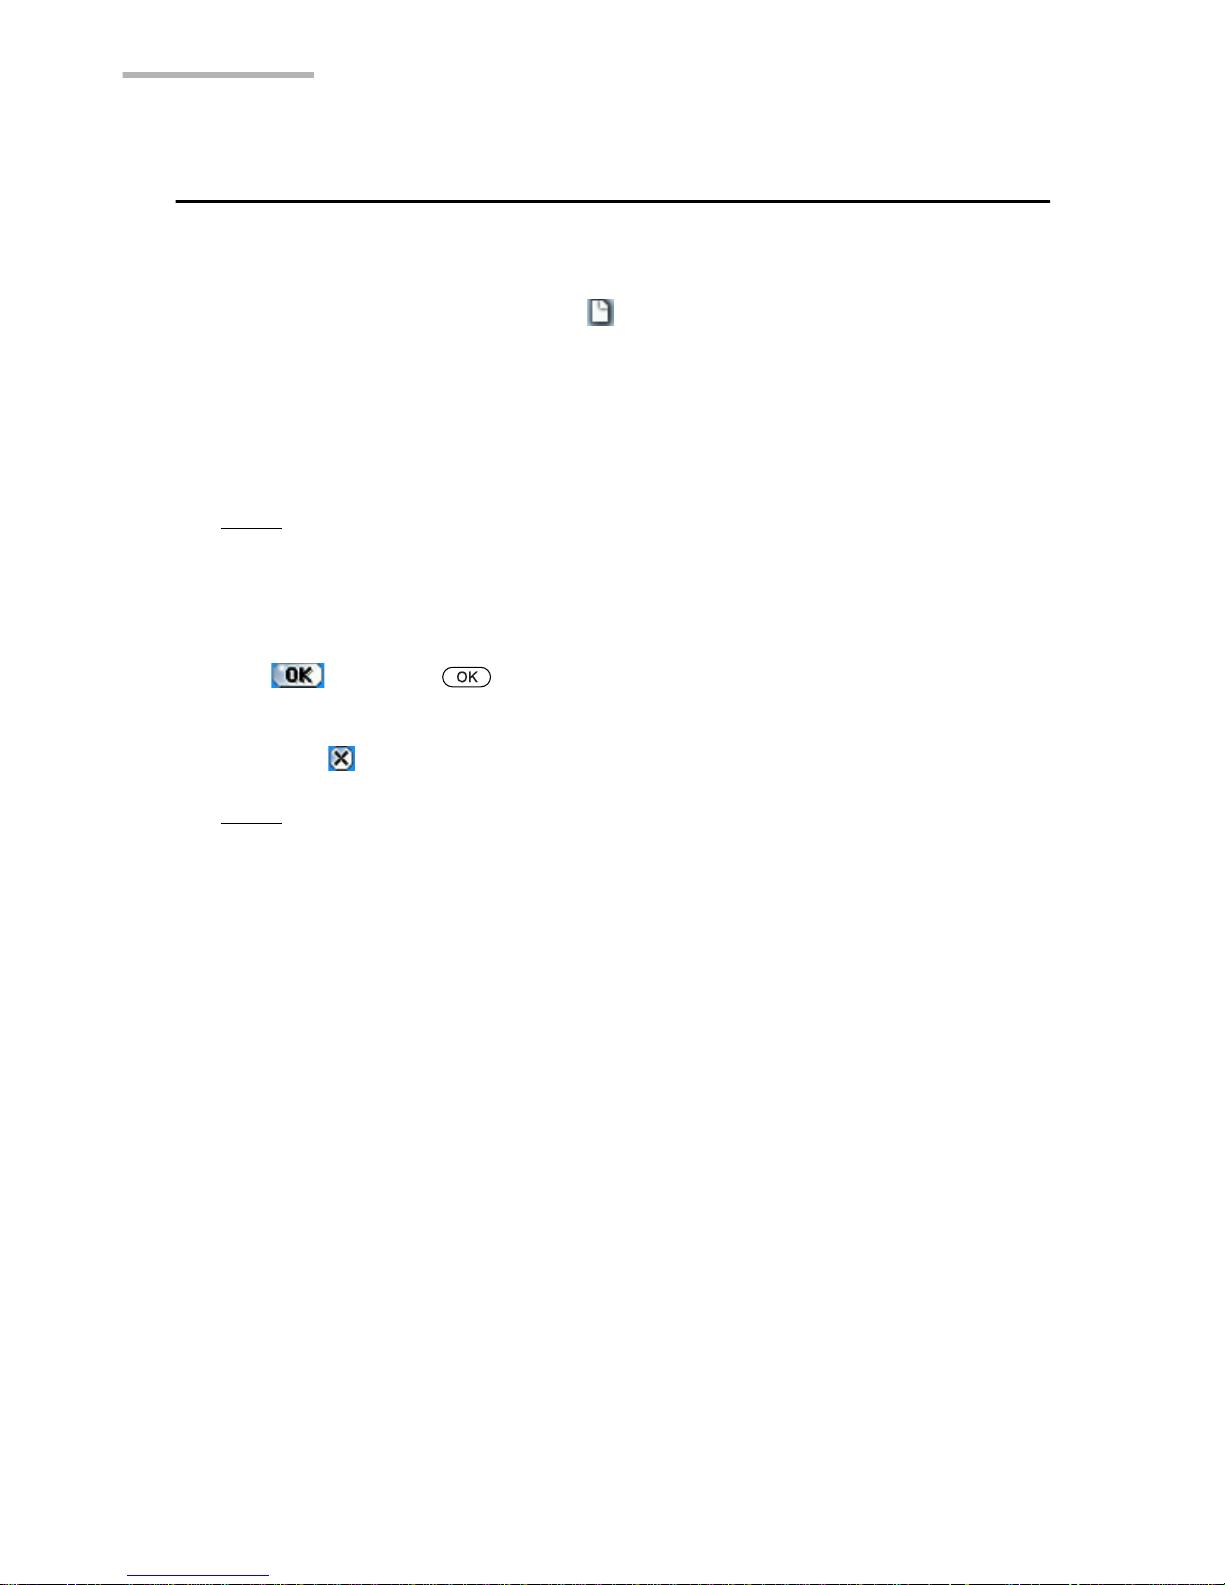
Detail screen
1.
On the Index screen, tap an entry to see the full address details.
Or highlight the entry by using and then press the SELECT key.
Note:
• To switch between the Index and Detail screens, press the Address Book key
on the sliding cover.
• Tapping an e-mail address colored in blue opens the EMail application to the
New mail screen using the address as the recipient. (See page 96.)
• Tapping a URL colored in blue launches the Web browser application and
displays the destination if you are connected to the Internet. This function
works only with URLs beginning with “http://” and “https://”.
By *** (the right
column item)
Sorts the entries by right column item in ascending or descending
order.
Option menu
List View
Settings
Allows you to customize the center column item and/or right
column item(s) on the Index screen.
Field Settings Arranges the item(s) to be displayed on the New/Edit Address
screen.
Page 12
6 Address Book
Creating a new Address Book entry
You can add a new address using the New Address screen.
1.
On the Index or Detail screen, tap .
The New Address screen for a new entry appears.
2.
Enter the contact data in the fields.
Pressing the tab key moves the cursor to the next entry field.
Pressing the shift-tab keys moves the cursor to the previous entry field.
Note:
• Tap the “Notes...” button to attach a note. (See page 7.)
• If you want to assign one or more category names, see the separate Start-up
Guide for details.
3.
Tap (or press ) to save the new entry.
The New Address screen returns to the Index screen.
If you tap , the new entry is canceled.
Note:
• An Address Book entry cannot be saved if only the Gender field and Category
field are completed.
• You can enter multiple e-mail addresses in the Emails field by inserting a
comma between them. Each e-mail address entered can be used as an e-mail
address in the EMail application.
• In some fields, the first letter will be saved as uppercase (capital)
automatically.
Page 13
Address Book 7
Attaching a Note
You can enter a note to go with the address.
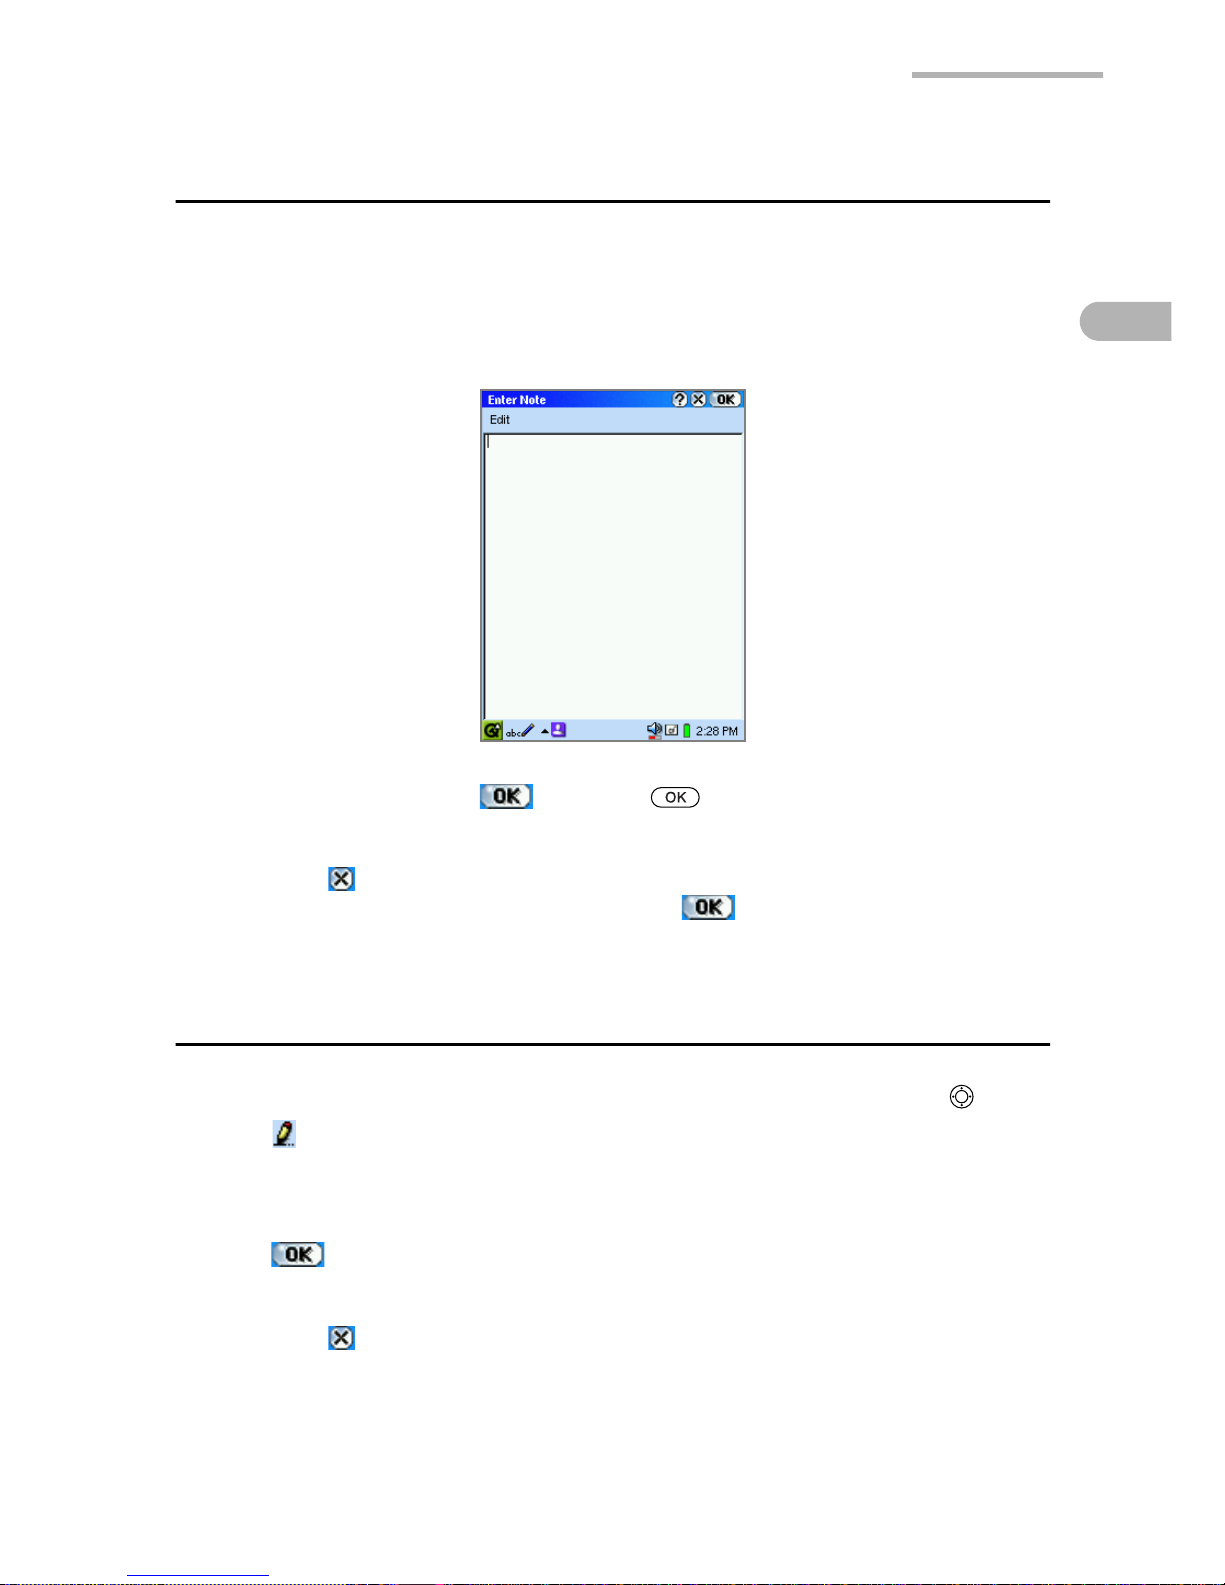
1.
On the New Address or Edit Address screen, tap the “Notes...” button.
The Enter Note screen appears.
2.
Enter your note and tap (or press ) to save it.
The Enter Note screen returns to the previous screen.
If you tap on the Enter Note screen, the attached note is canceled.
To save the entry with a note attached, tap on the New Address or Edit
Address screen.
Modifying an Address Book entry
1.
On the Index screen, highlight the entry you want to modify by using .
2.
Tap .
The Edit Address screen appears.
3.
Tap any field requiring change and modify the entry.
4.
Tap to save the modification.
The Edit Address screen turns to the Index screen.
If you tap , the modification is canceled.
Page 14
8 Address Book
Duplicating an Address Book entry
1.
On the Index screen, highlight the entry you want to duplicate by using .
2.
Tap the “Data” menu and then tap “Duplicate”.
The duplicated entry will be added on the Index screen.
Deleting an Address Book entry
1.
On the Index screen, highlight the entry you want to delete by using .
2.
Tap (or tap the “Data” menu and then tap “Delete...” ).
A confirmation message appears before the entry is deleted.
If you want to delete all entries from the Address Book application,
tap the “Data” menu and then tap “Delete all...”.
3.
Tap “Yes” to complete the deletion.
The entry will be deleted.
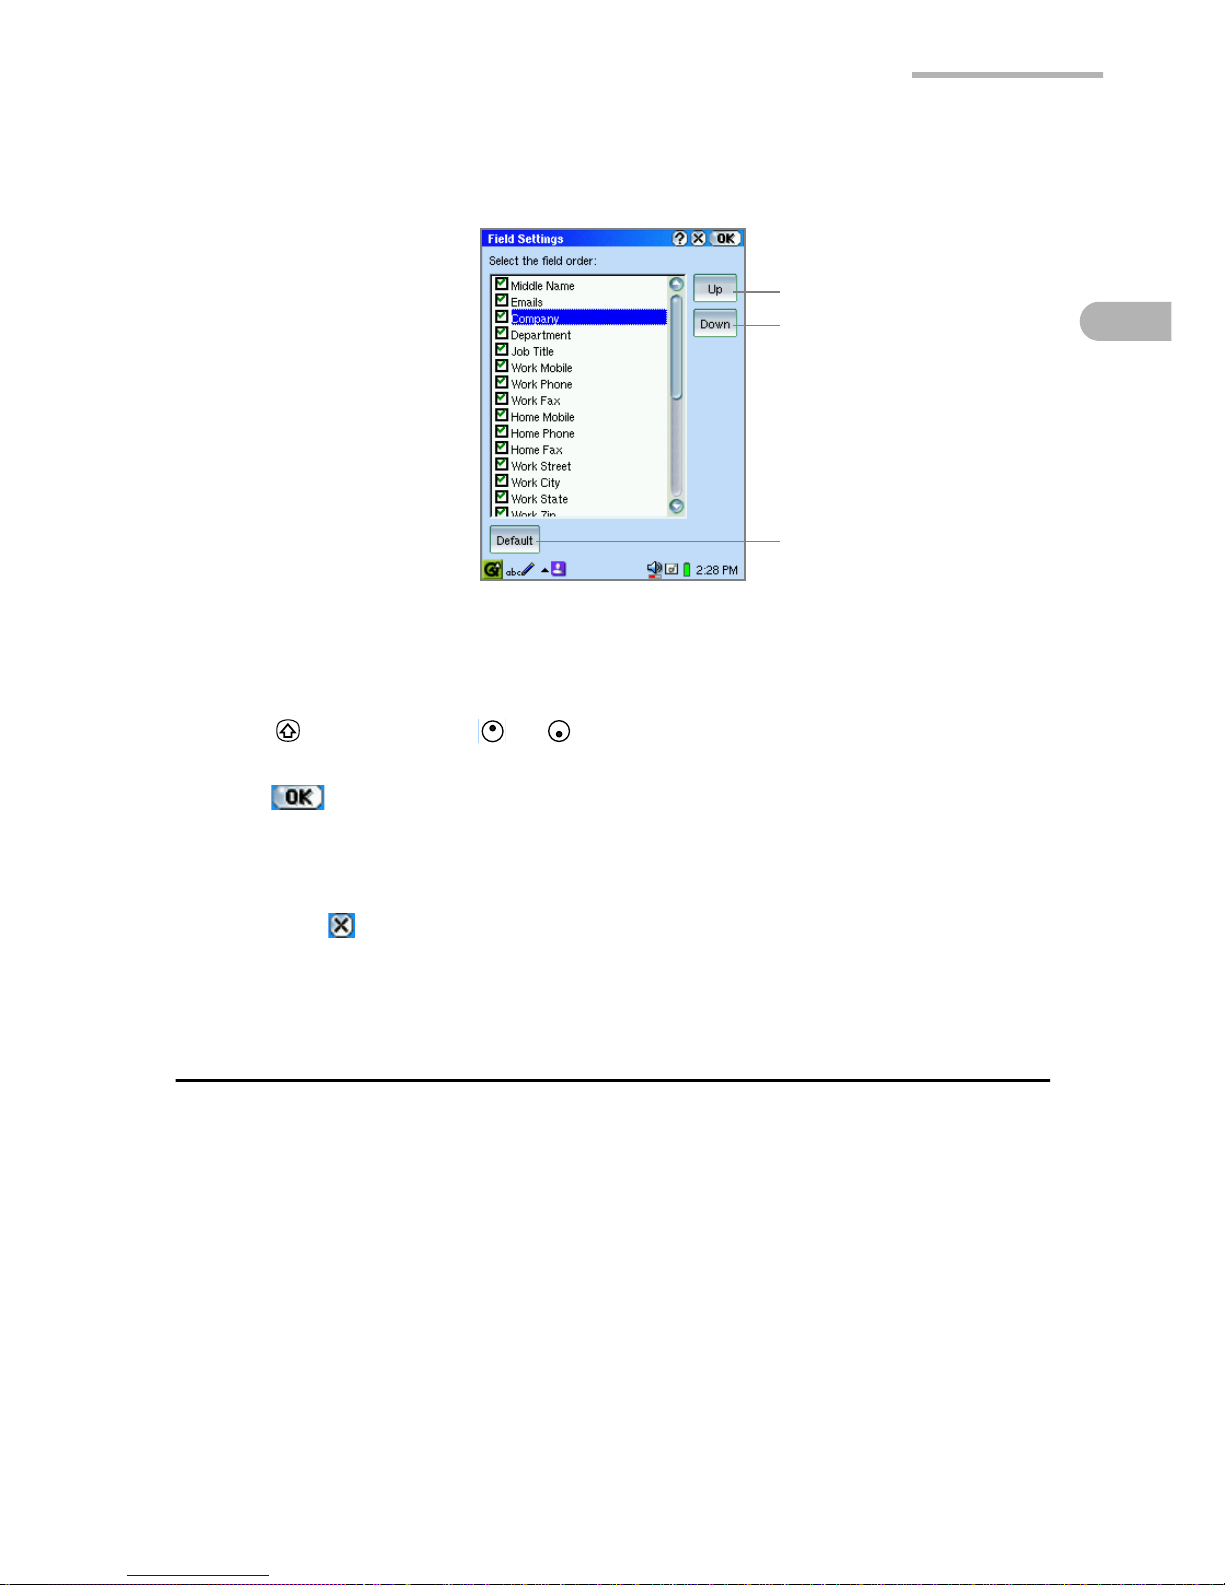
Arranging the entry fields
You can change the order of the fields and hide unnecessary fields on the New/Edit
Address screen.
Note:
The first three fields (First Name, Last Name and Category) and the last
field (Gender) cannot be arranged.
1.
On the Index or Detail screen, tap the “Option” menu, then tap “Field Settings...”.
Page 15
Address Book 9
The Field Settings screen appears, and the fields following the Category field
are listed in current order.
2.
Check (or uncheck) the fields you (do not) want to display by tapping
checkboxes.
3.
Tap the field you want to move, then tap the “Up” or “Down” button (or press and
hold and then press or ) to move the selected field upwards or
downwards to the desired position.
4.
Tap to save the settings.
The Field Settings screen returns to the previous screen.
Your setting will be displayed on the New/Edit Address screen.
If you tap , the setting is canceled.
Arranging the display items on the Index
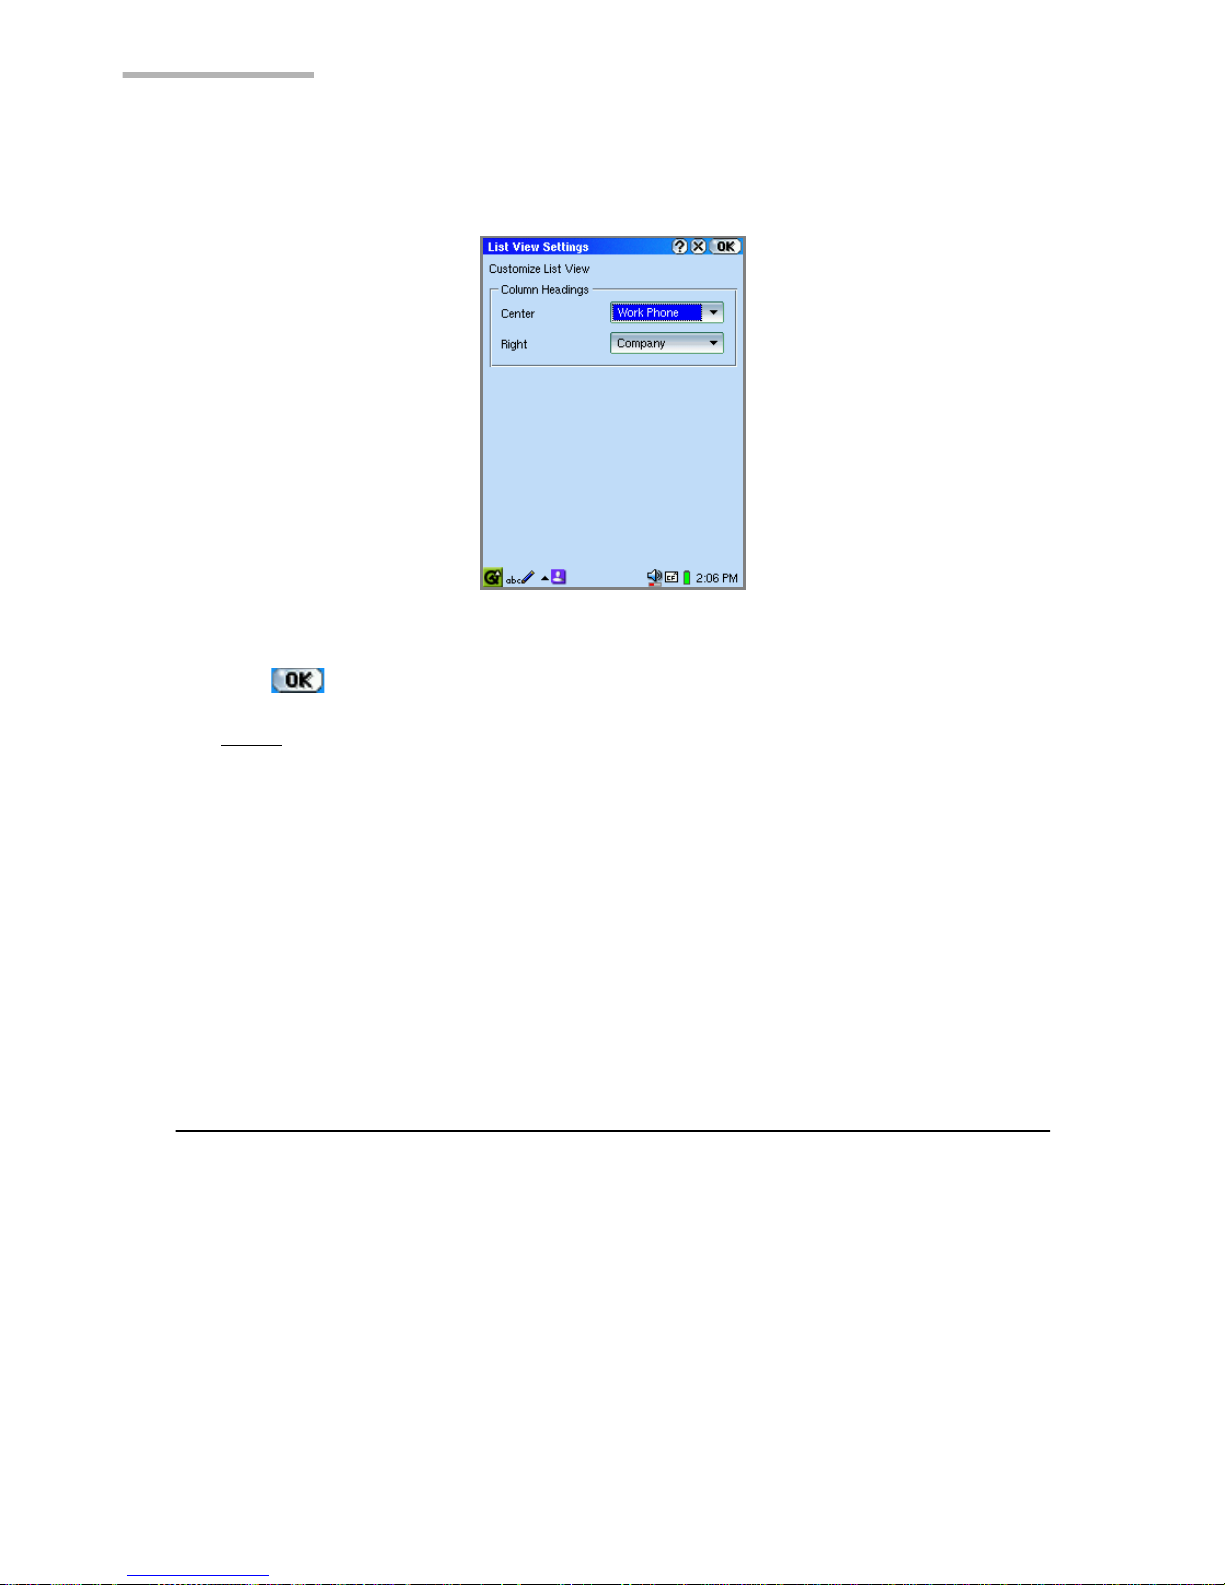
screen
The display items of the center and right columns can be changed to other items.
(Scroll to the right to display these two columns.)
“Up” button
“Down” button
“Default” button
Tap to reset the setting.
Page 16
10 Address Book
1.
Tap the “Option” menu and then tap “List View Settings”.
The List View Settings screen will be displayed.
2.
Tap each drop-down list button and select the display item.
3.
Tap to save the settings.
Note:
• On the Index screen, you can arrange the display item following the procedure
below instead of using the Option menu.
1. On the Index screen, tap the center or right column button that includes the
items you want to change.
The item list is displayed.
2. Tap the desired item.
The entry of the item selected will be displayed.
• If you select “Home Address” or “Work Address”, the contents for Home or
Work Street, City, State, Zip, and Country fields will be displayed.
Changing the sort order of the entry
You can sort the entries by Full Name, center or right column item on the Index
screen.
1.
On the Index screen, tap the “Sort” menu.
The menu displays sorting order, the Full Name, center and right column. The
item that decides the current sorting order is checked.
2.
Tap the item that decides the desired sorting order and then select ascend or
descend.
The entries on the Index screen will be sorted depending on the selection.
Page 17
Address Book 11
Note:
The items in the “Home Address” and “Work Address” cannot be sorted.
If the center or right column items are set to “Home Address” and “Work
Address”, sorting order in the menu are dimmed.
Registering/Editing your personal
information (Owner Information)
1.
On the Index screen, tap the “Data” menu and then tap “Owner Information…”.
Owner Information screen appears.
2.
Tap and then enter your information on Edit Owner Information screen that
appears.
3.
Tap to save the settings.
Owner Information screen appears listing your information.
4.
Tap .
Or tap the “Data” menu and then tap “Owner Information…”.
The display returns to the Index screen.
Note:
• On the Owner Information screen, you will not be able to select or enter the
category name.
• The personal information registered during the initial setup procedure will be
displayed on the Owner Information screen of step 1 above. (See the separate
Start-up Guide, “Registering your personal information” in “Step 4: Initial
settings”.)
Page 18
12 Calendar
Calendar
The Calendar application is used to store events you want to track and to set alarms.
Using the Calendar screen, you can view files that have the same date information
as the date displayed and that you transferred from your PC, created or modified in
other applications.
Overview
You can view one day, one week, one month or one year at a time. Tap the “View”
menu, then select “Day”, “Week”, “Month” or “Year”.
By selecting “Today” from the “View” menu, you can display a view including today.
To switch views, you can use the view icons from the Menu bar: (Today),
(Day), (Week), (Month) and (Year) on the Menu bar for switching views.
Day view
1.
On the Applications Home screen, tap the “Calendar” application icon.
2.
Tap the Day view icon ( ).
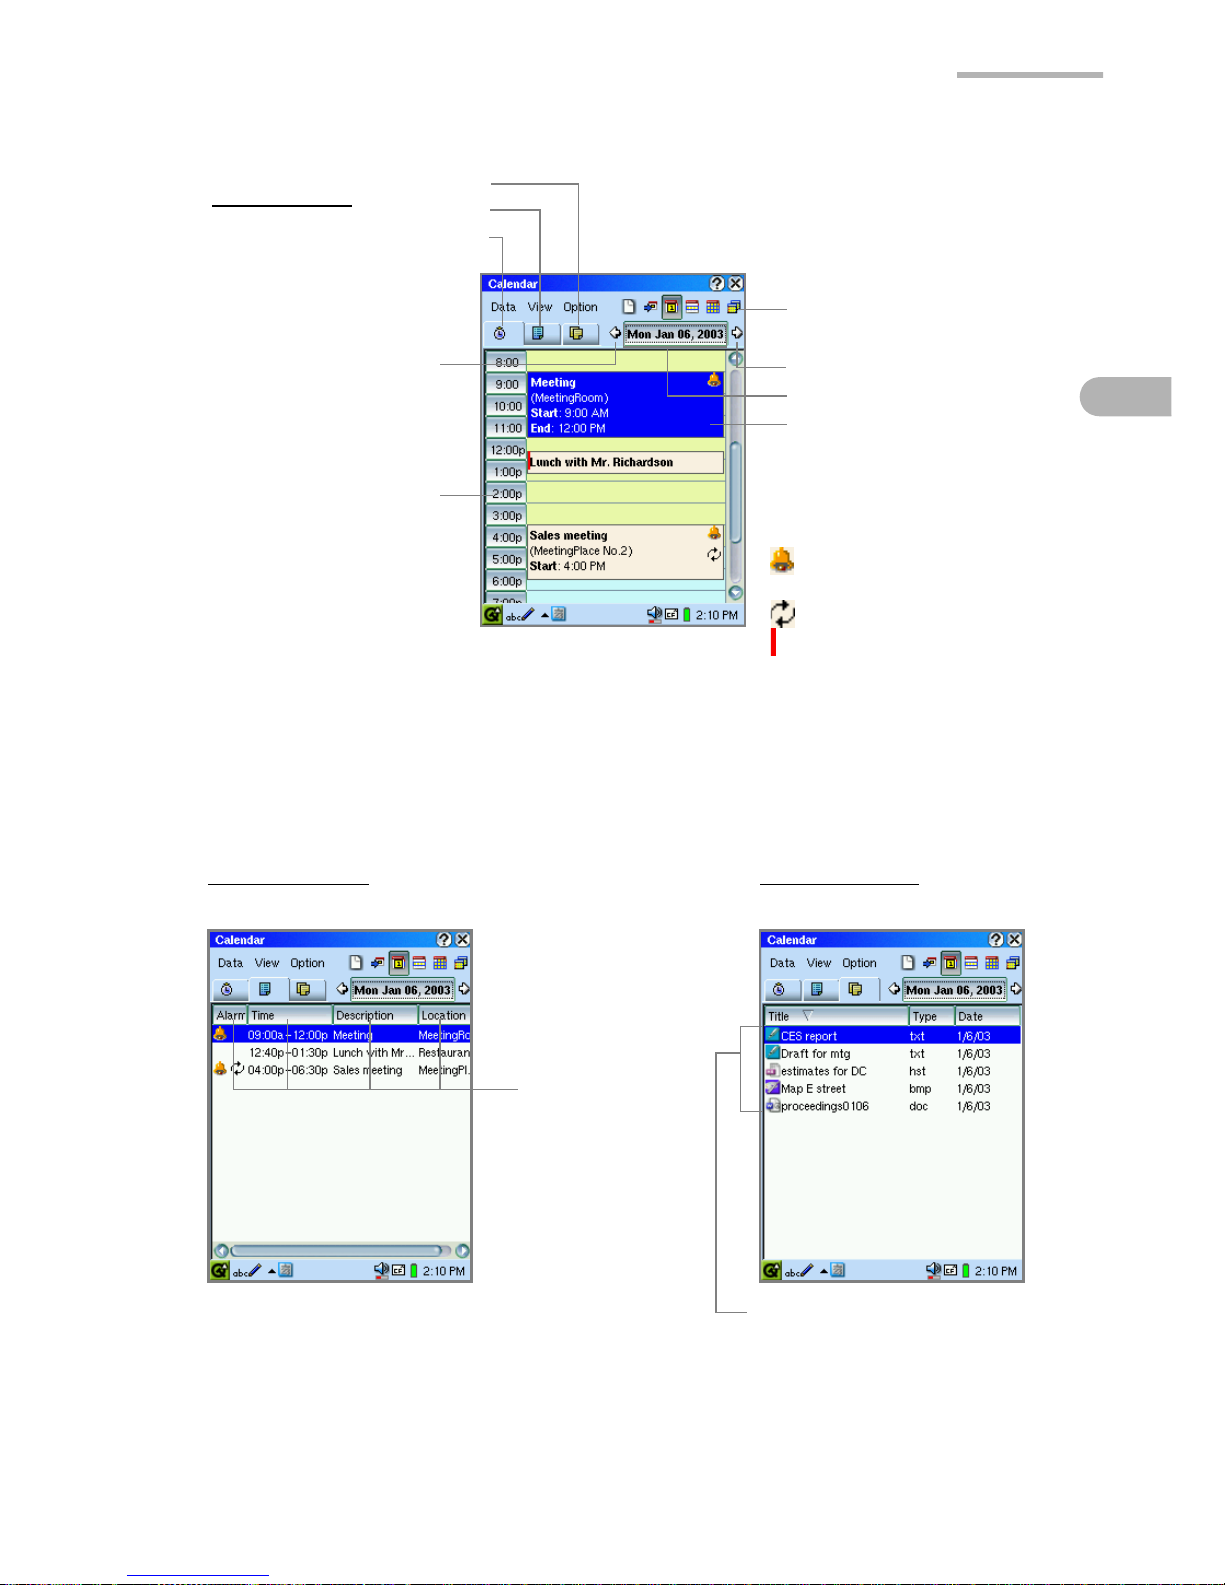
The Day view has three tabs.
Event tab Displays the Event screen in the timetable for the event of
the day.
Agenda tab Displays the Agenda screen listing the events of the day.
Tap the event to open its Detail screen.
File link tab Displays the File link screen listing files of the same date as
the event of the day. Tap a file to open it.
Page 19
Calendar 13
File link tab
Agenda tab
Event tab
View icons
(Today, Day, Week,
Month, Year)
Previous button
Next button
Date button
Time buttons
Event indication
(Focused status)
: Event with an Alarm
setting
: Repeating events
: Events of less than
one hour
(indicated in red on
the left of the
schedule title)
Event screen
Agenda screen File link screen
Indicates the files are linked
to the Calendar date.
Column buttons
These four
columns can
change their
position by tapand-holding
them to the
desired
direction.
Page 20
14 Calendar
Note:
• The Event screen in the Day view shows the pop-up menu by tap-and-holding
the Event, allowing you to edit or delete.
• The Event screen shows up to 10 events in the case of multiple events with
overlapping times.
• All day events are displayed above the time table.
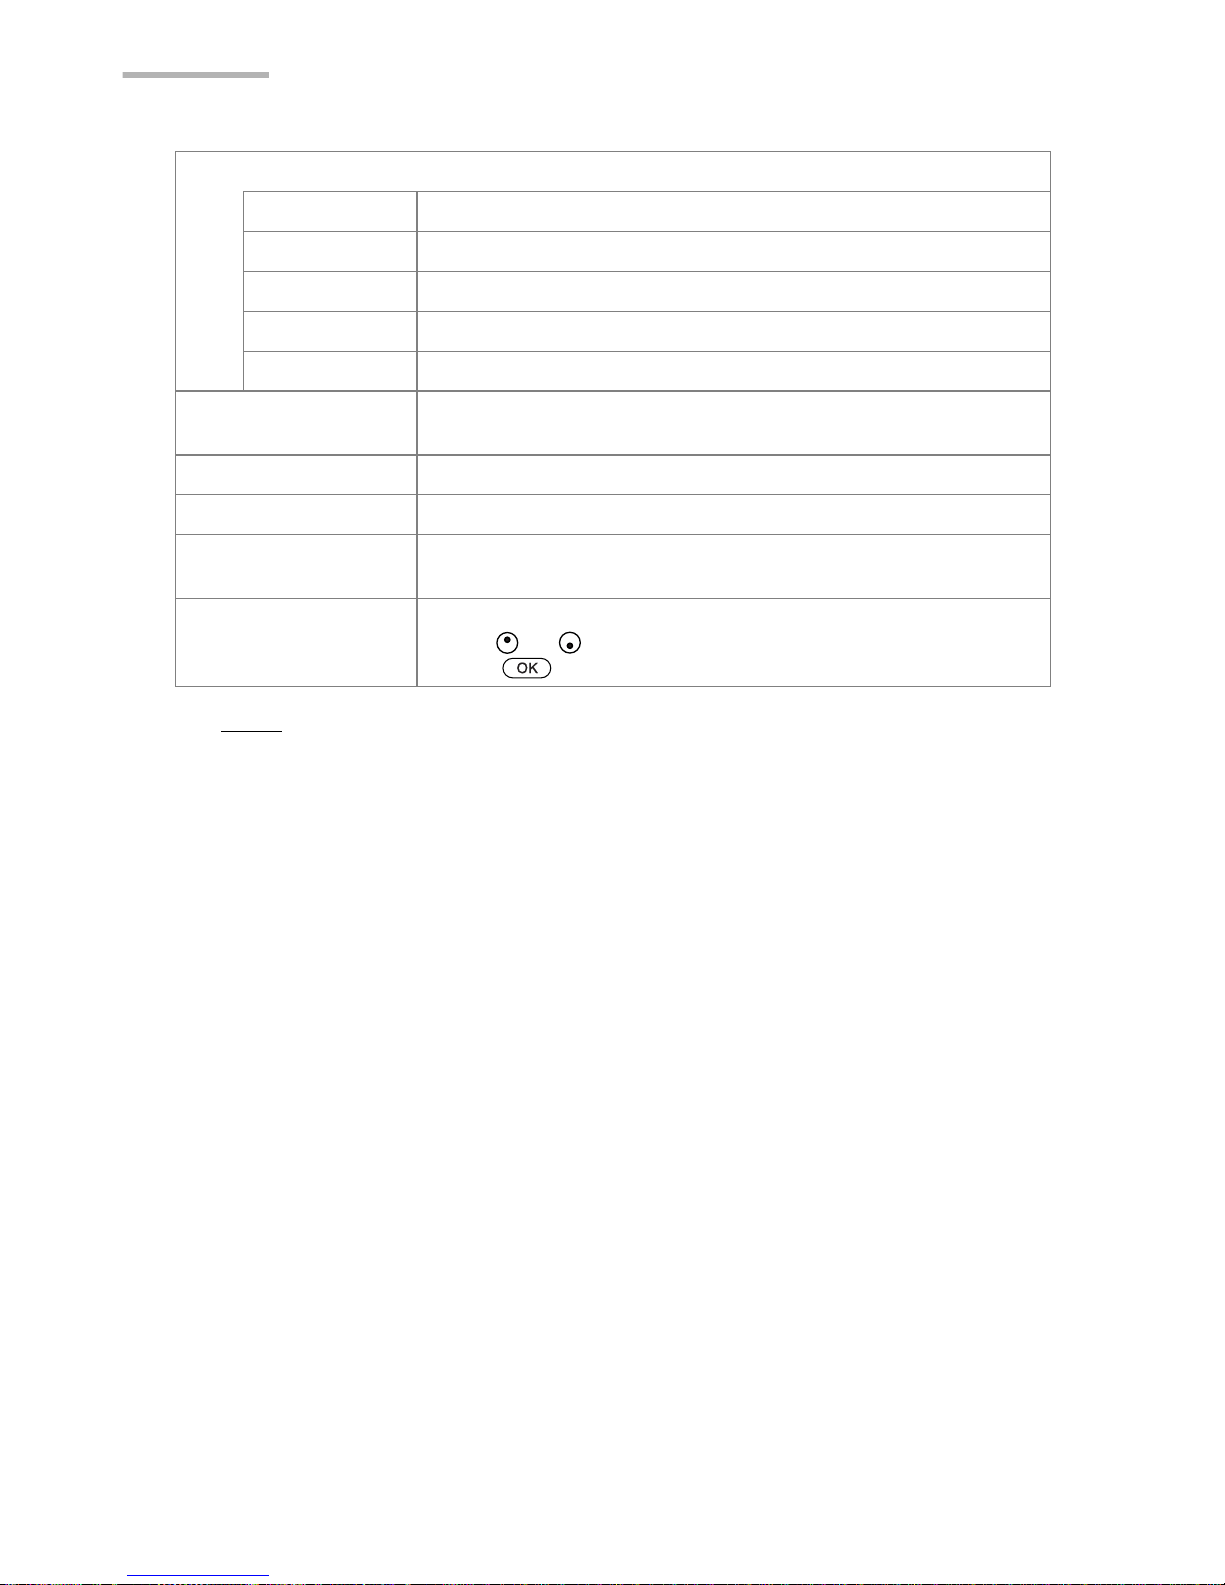
View icons
Today Displays the selected view for today.
Day Displays the Day view.
Week Displays the Week view.
Month Displays the Month view.
Year Displays the Year view.
Date button Tap to select the desired day from the mini-calendar that
appears.
Previous button Moves to the previous date.
Next button Moves to the next date.
Time buttons Tap or drag time buttons to open the New Event screen with
the Start and End time entered.
Event indication
(Focused status)
Displays the registered events.
Press or to move the focus. Then press the SELECT
key or to open the Detail screen.
Page 21
Calendar 15
Week view
1.
Tap the Week view icon ( ).
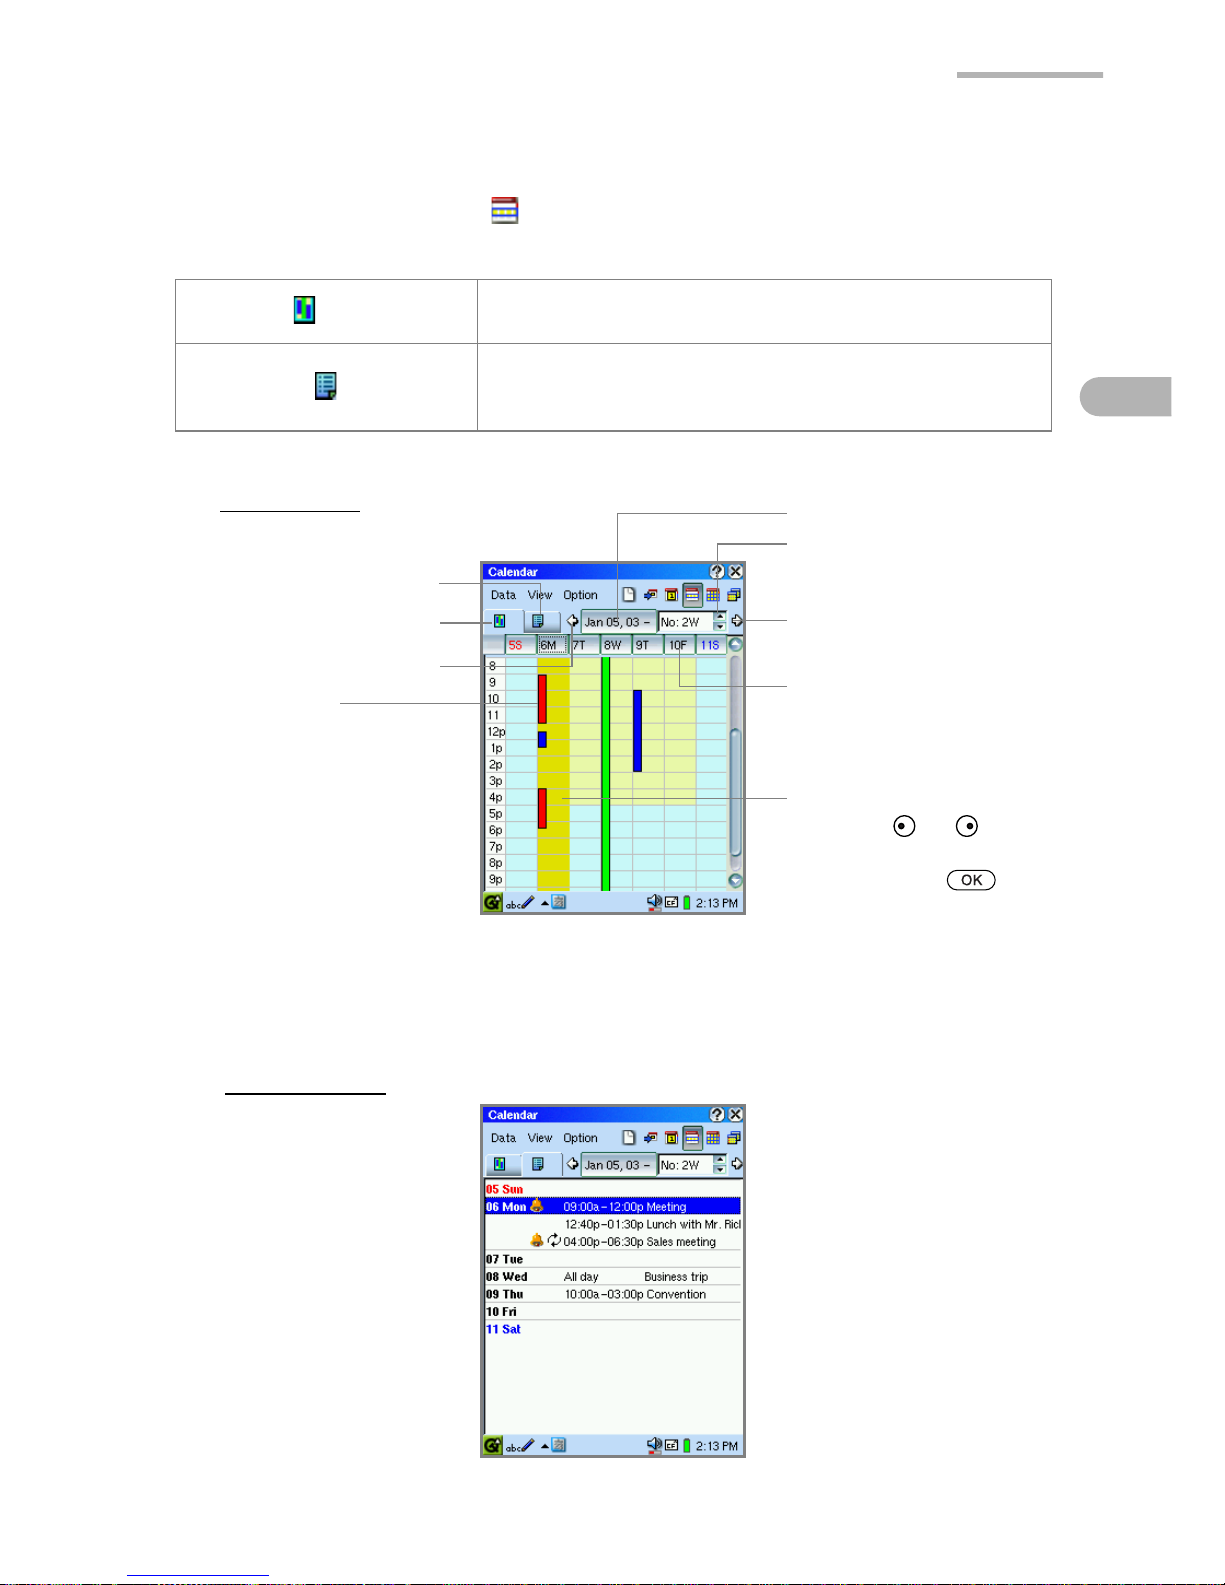
The Week view has two tabs.
Event tab
Displays the Event screen in the timetable for the
events of the week.
Agenda tab
Displays the Agenda screen listing the events of the
week.
Tap the event to open its Detail screen.
Event tab
Week spinbox
Agenda tab
Date button
Event indication
Green bar:All day event
Red bar: Event with an
Alarm setting
Blue bar: Event with
Start and End
time setting
Next button
Focused day (in amber)
Press or to
move the focus.
Then press
or the SELECT key
to open the Day
view.
Event screen
Agenda screen
Day of the week buttons
Previous button
Page 22
16 Calendar
Note:
The Event screen in the Week view shows up to four events in the case
of multiple events with overlapping times.
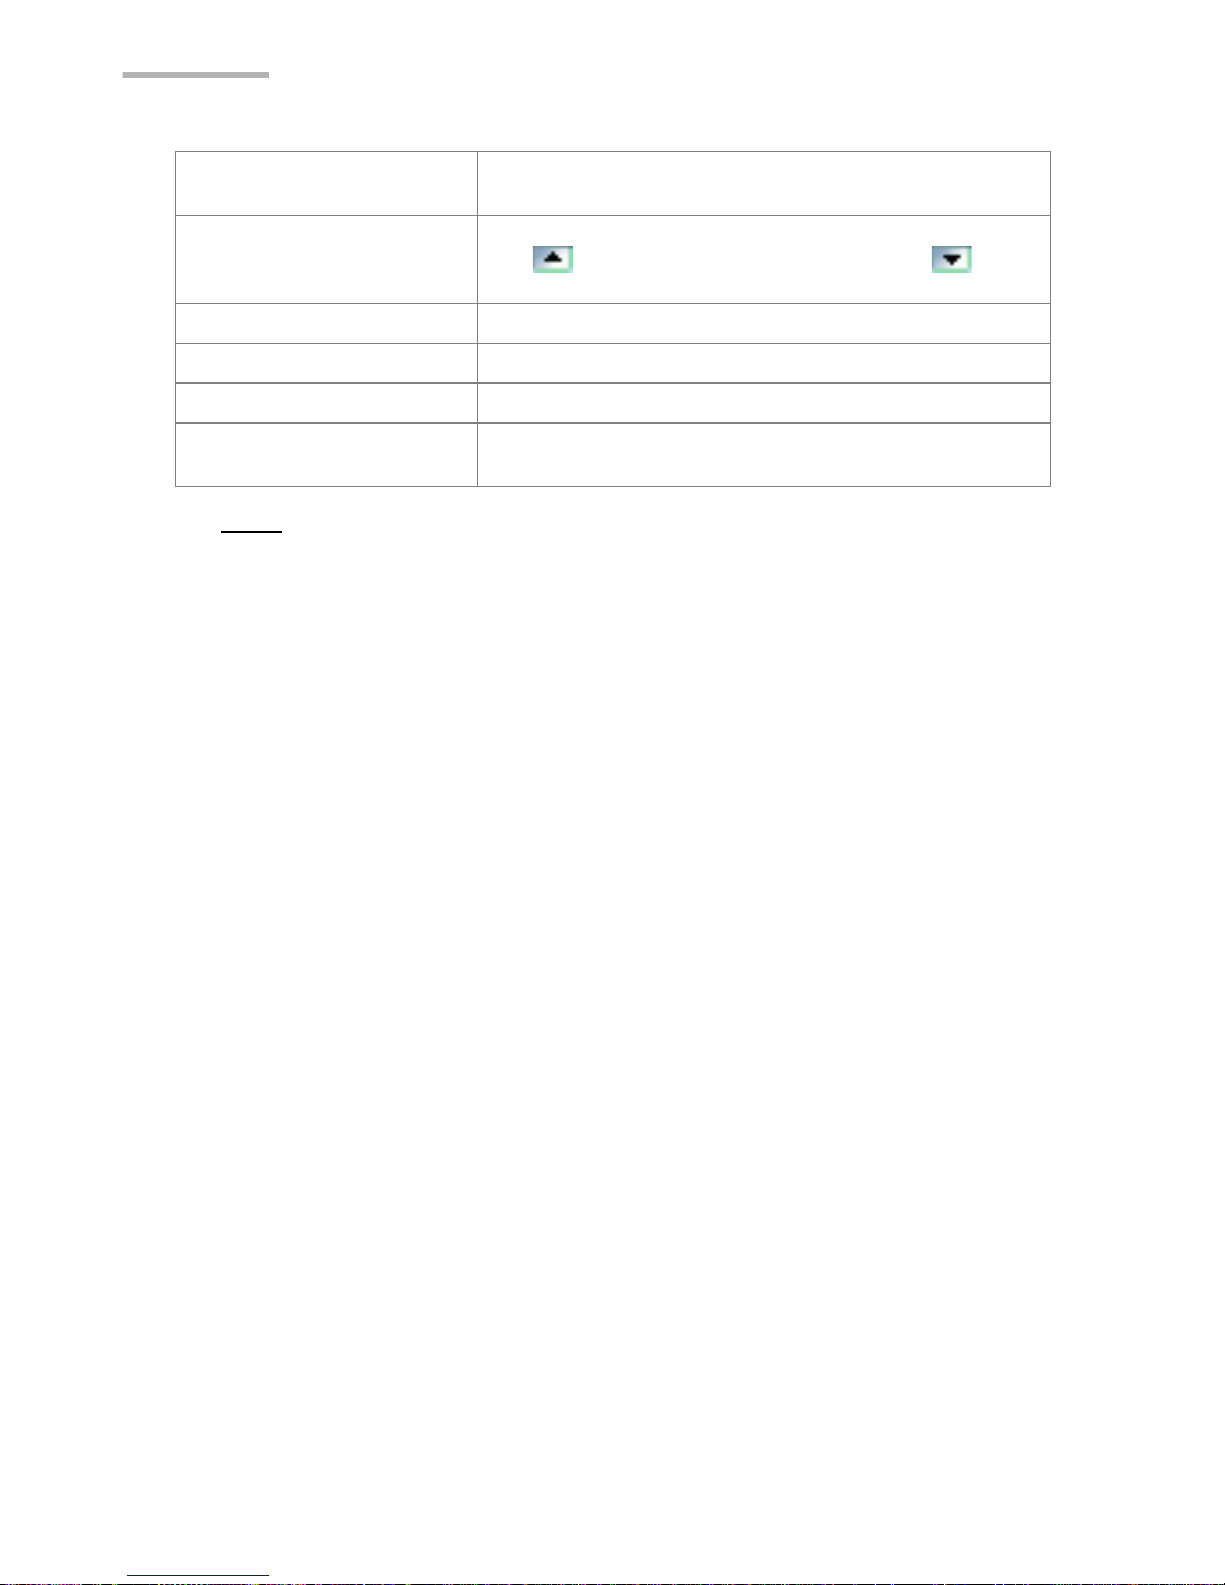
Date button
Displays the start date of the selected week.
Tap to select the desired day from the mini-calendar.
Week spinbox
Select the week of the year.
Tap to move to the next week, or tap to
move to the previous week.
Day of week buttons Tap to open the Day view of the selected day.
Previous button Moves to the previous week.
Next button Moves to the next week.
Event indication
Tap to display the detailed contents of the event for a
few seconds.
Page 23
Calendar 17
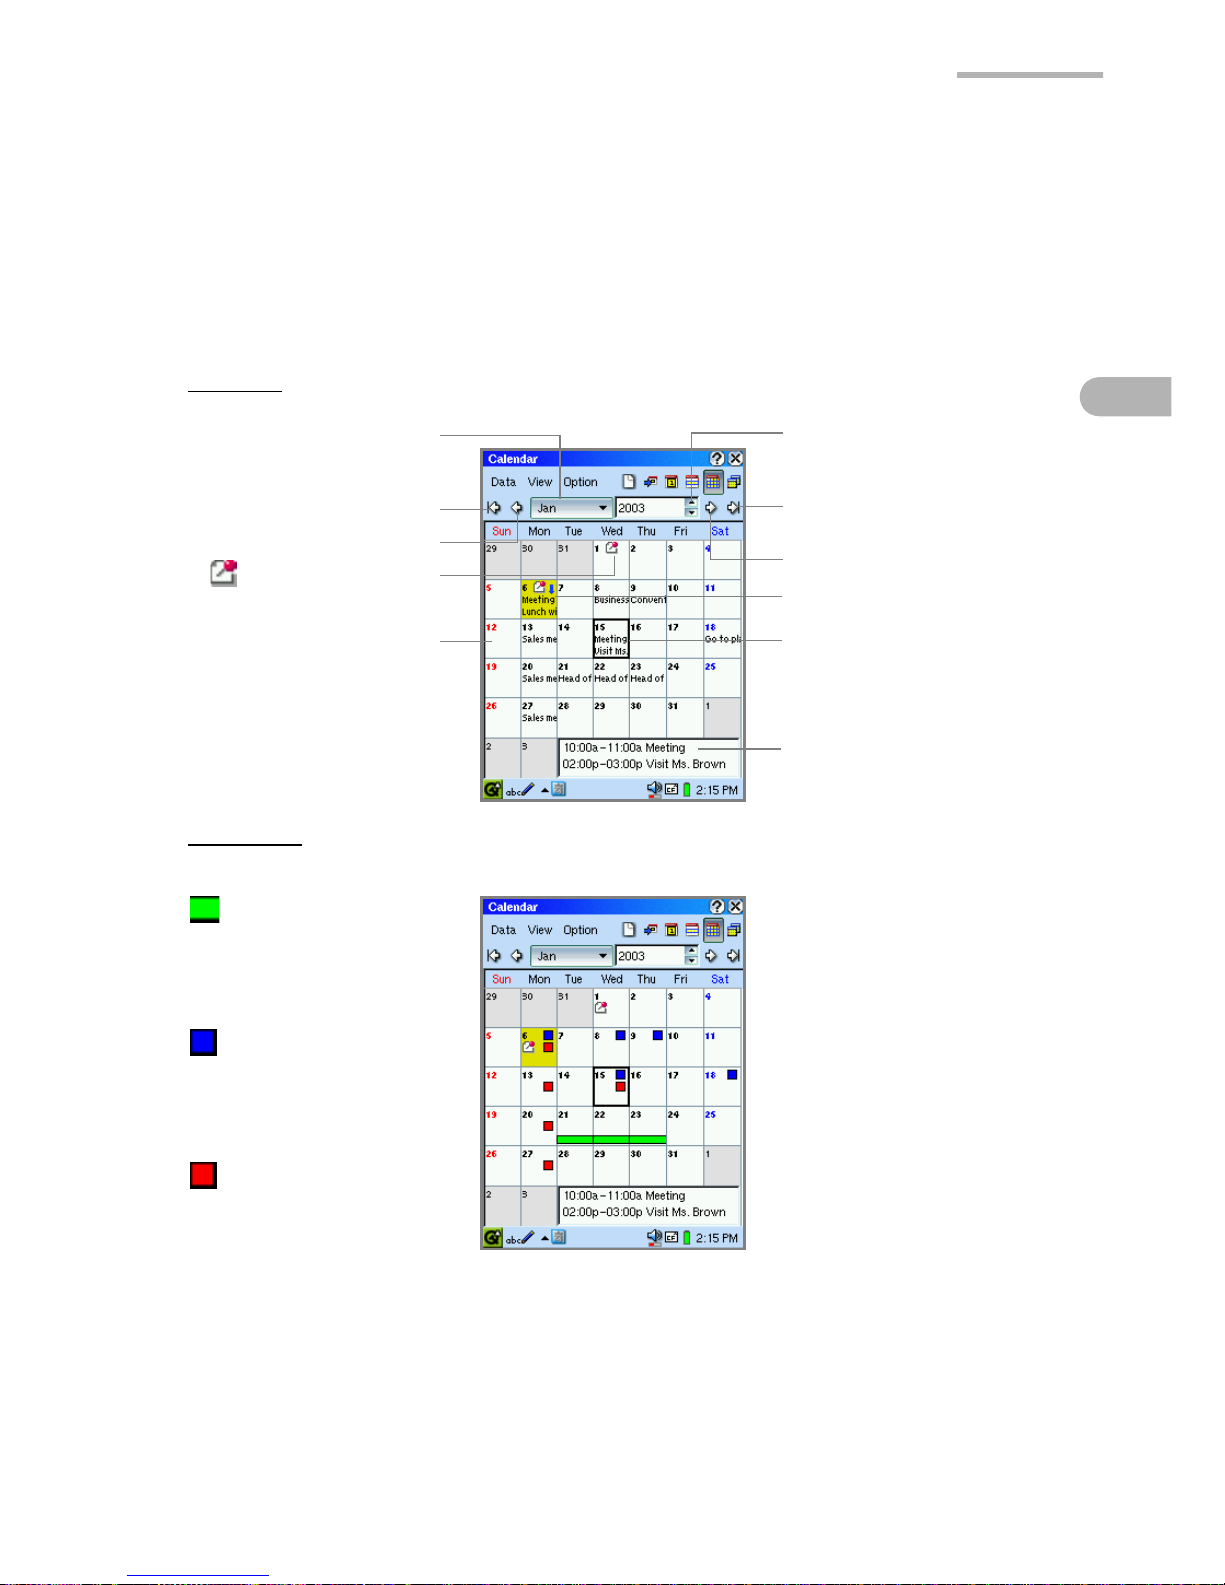
Month view
The Month view is composed of two views: Text view and Graph view.
In the Date cell, the Text view shows a part of the event description, and the Graph
view shows events in symbol.
To switch these two views, tap the “View” menu, then tap “Month View”, and then
select “Text” or “Graph”.
Text view
Graph view
: Date with a Link file
Date cell
Year spinbox
Next button
To December button
Focus frame
Today (amber Date cell)
Agenda of the day focused
To January button
Previous button
Month drop-down
list button
Colored events mean:
(green):Schedule
spanning days
which starts and
ends at different
day
(blue): Schedule
starting before
noon, or
schedule for all
day
(red): Schedule
starting after
noon
Page 24
18 Calendar
Year view
Note:
To scroll the Year view screen, press .
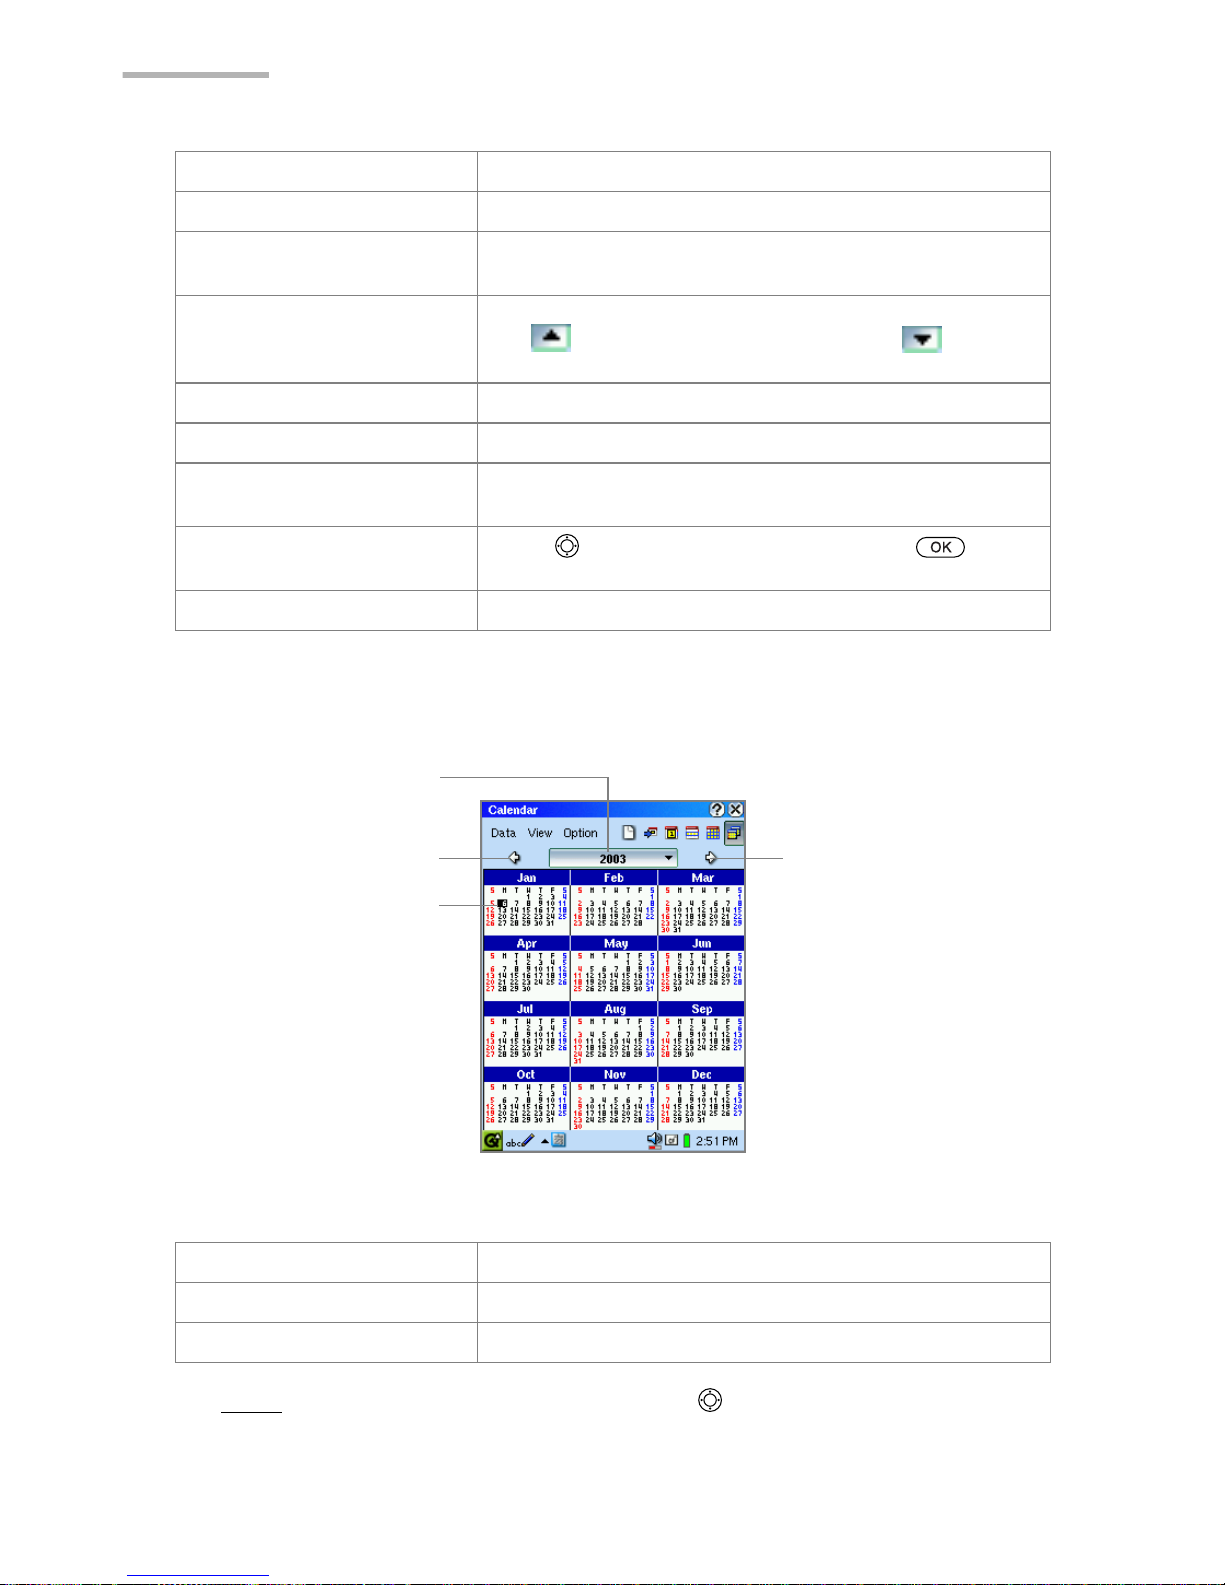
To January button Moves to January of the selected year.
Previous button Moves to the previous month.
Month drop-down list
button
Tap to select the desired month.
Year spinbox
Select the year.
Tap to move to the next year, or tap to move
to the previous year.
Next button Moves to the next month.
To December button Moves to December of the selected year.
Date cell
Tap to focus on a day. Tapping the focused day
(again) displays the Day view of that day.
Focus frame
Press to move the focus. Then press or the
SELECT key to open the Day view.
Agenda of the day focused Displays the event list of the day focused.
Previous button Moves to the previous year.
Next button Moves to the next year.
Year drop-down list button Tap to select the desired year.
Previous button
Year drop-down
list button
Next button
Tap-and-drag the
stylus on any day to
enlarge the day
number. Release the
stylus to display the
focused day in the
Day view.
Today (highlighted)
Page 25
Calendar 19
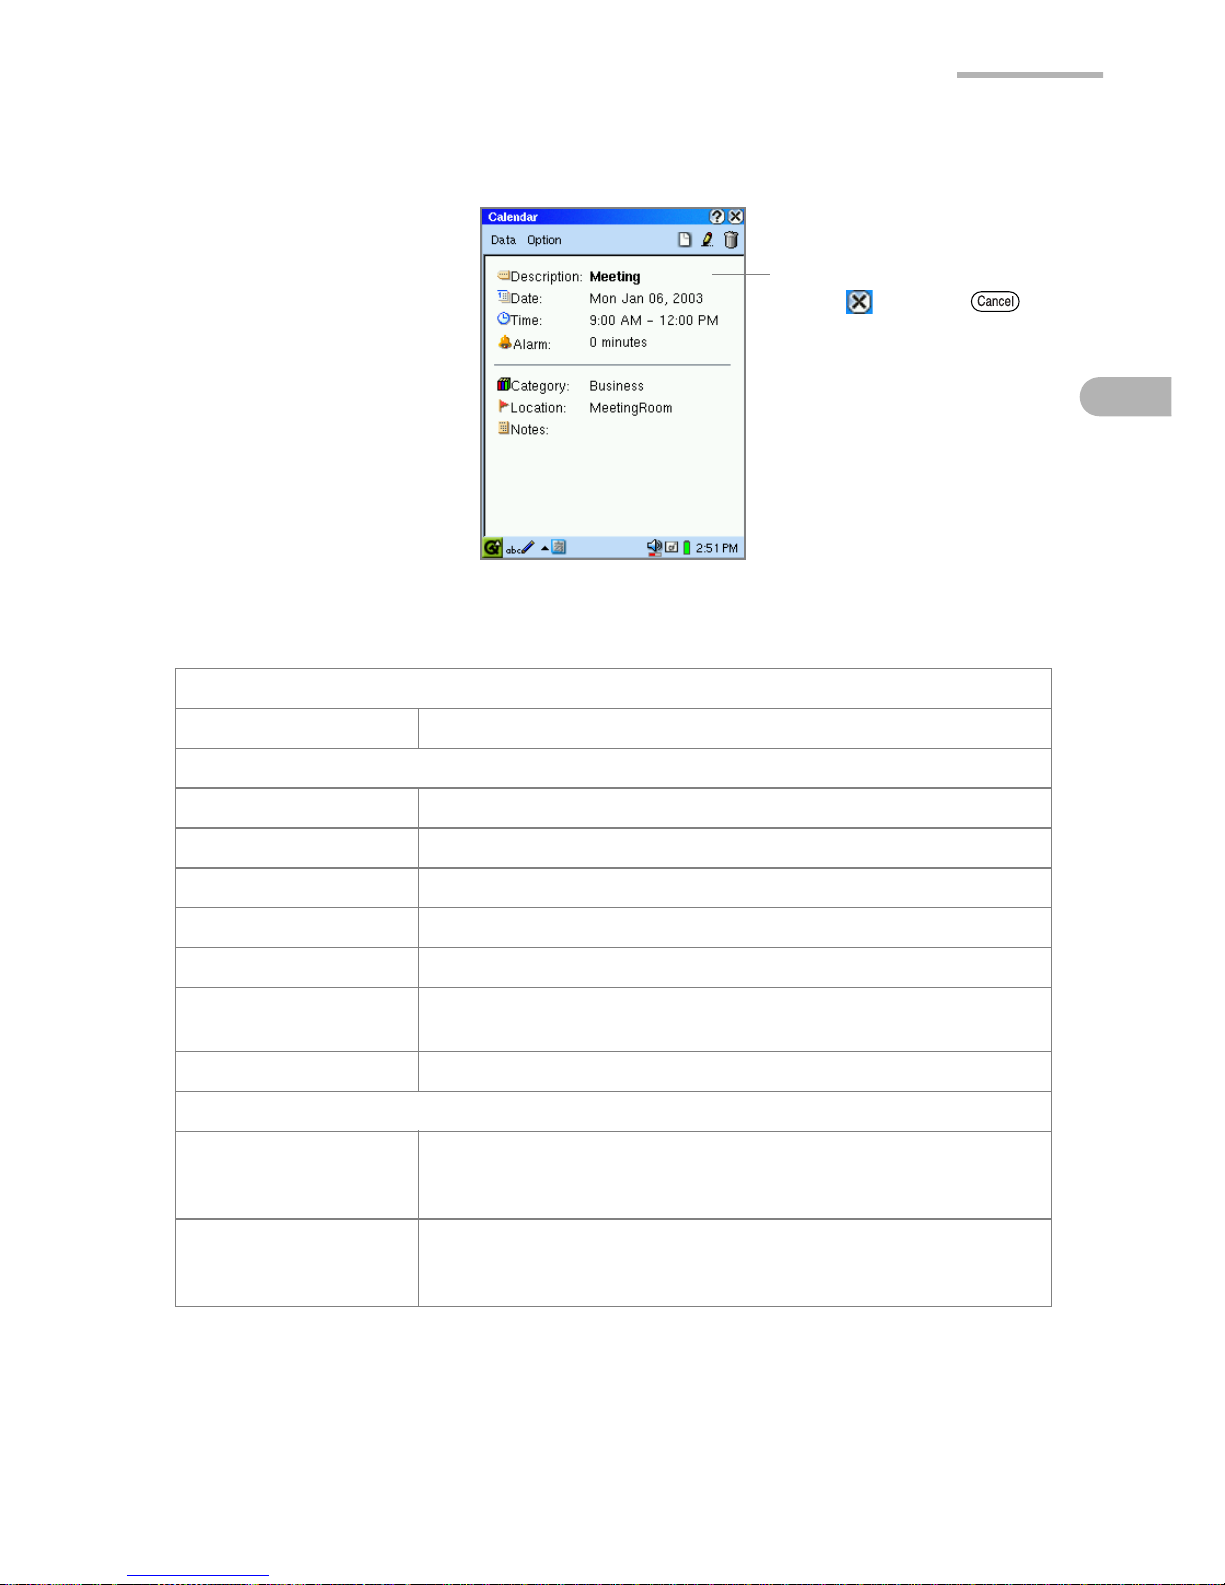
Detail screen
Specific Menu commands of the Calendar application
Data menu
Delete period Deletes the selected daily, weekly, monthly events at once.
View menu
Today Displays the selected view for today.
Day Displays the Day view.
Week Displays the Week view.
Month Displays the Month view.
Year Displays the Year view.
Day File View Selects the display format of the File link screen in the Day
view: List or Thumbnails.
Month View Selects the display format of the Month view: Text or Graph.
Option menu
Alarm and Start Time Sets the starting time on the event screen in the Day view
or Week view mode, and the Alarm setting when creating a
New event.
Link File With the memory card inserted, selects whether link files on
the memory cards are displayed in the Month view and the
File link screen of the Day view.
Detailed information
Ta p
or press
to close the Detail
screen.
Page 26

20 Calendar
Viewing the link files
On the Calendar application, you can view ImagePad, Text Editor,
HancomMobileWord, HancomMobileSheet files and files copied from a PC or other
source. The File link screen displays files created or modified on the same date as
a selected Calendar date.
1.
In the Day view, tap the File link tab.
The File link screen will be displayed with files linked to the date.
2.
Tap the desired file to open it.
Note:
• The Link file screen can display the following files:
- Files transferred from a PC (on the transfer dates)
- Files created or modified in the SL-5600 (on the creation or modification
dates)
• To change the view mode of the File link screen:
1.On the File link screen, tap the “View” menu and then select “Day File
View”.
2.Tap “Thumbnails” or “List”.
• To change the dates that are linked to a file, see page 21.
Selecting the link option for the memory card
You can select to link files on the memory cards to the SL-5600. However, to reduce
start-up time for the Calendar application and/or the display time for linked files, you
may want to unlink excess files on your memory cards.
1.
Tap the “Option” menu and then tap “Link file”.
2.
Tap “CF Card” or “SD Card” to check or uncheck.
The files on the checked memory card will be linked.
Page 27

Calendar 21
Changing the date to link files
As you change the date of the files, they will be displayed on the File link screen of
the date you change. You can then manage files according to your schedule of
events.
1.
Open the File link screen with a file of the date you want to change.
2.
Tap and hold the stylus on the file to display the pop-up menu.
3.
Select “Move”.
The mini-calendar will be displayed.
4.
Tap the new date you wish the file to be linked to from the mini-calendar
displayed.
The date information of the file will be changed and the file will appear on the
File link screen of the new date.
Page 28
22 Calendar
Adding Events
1.
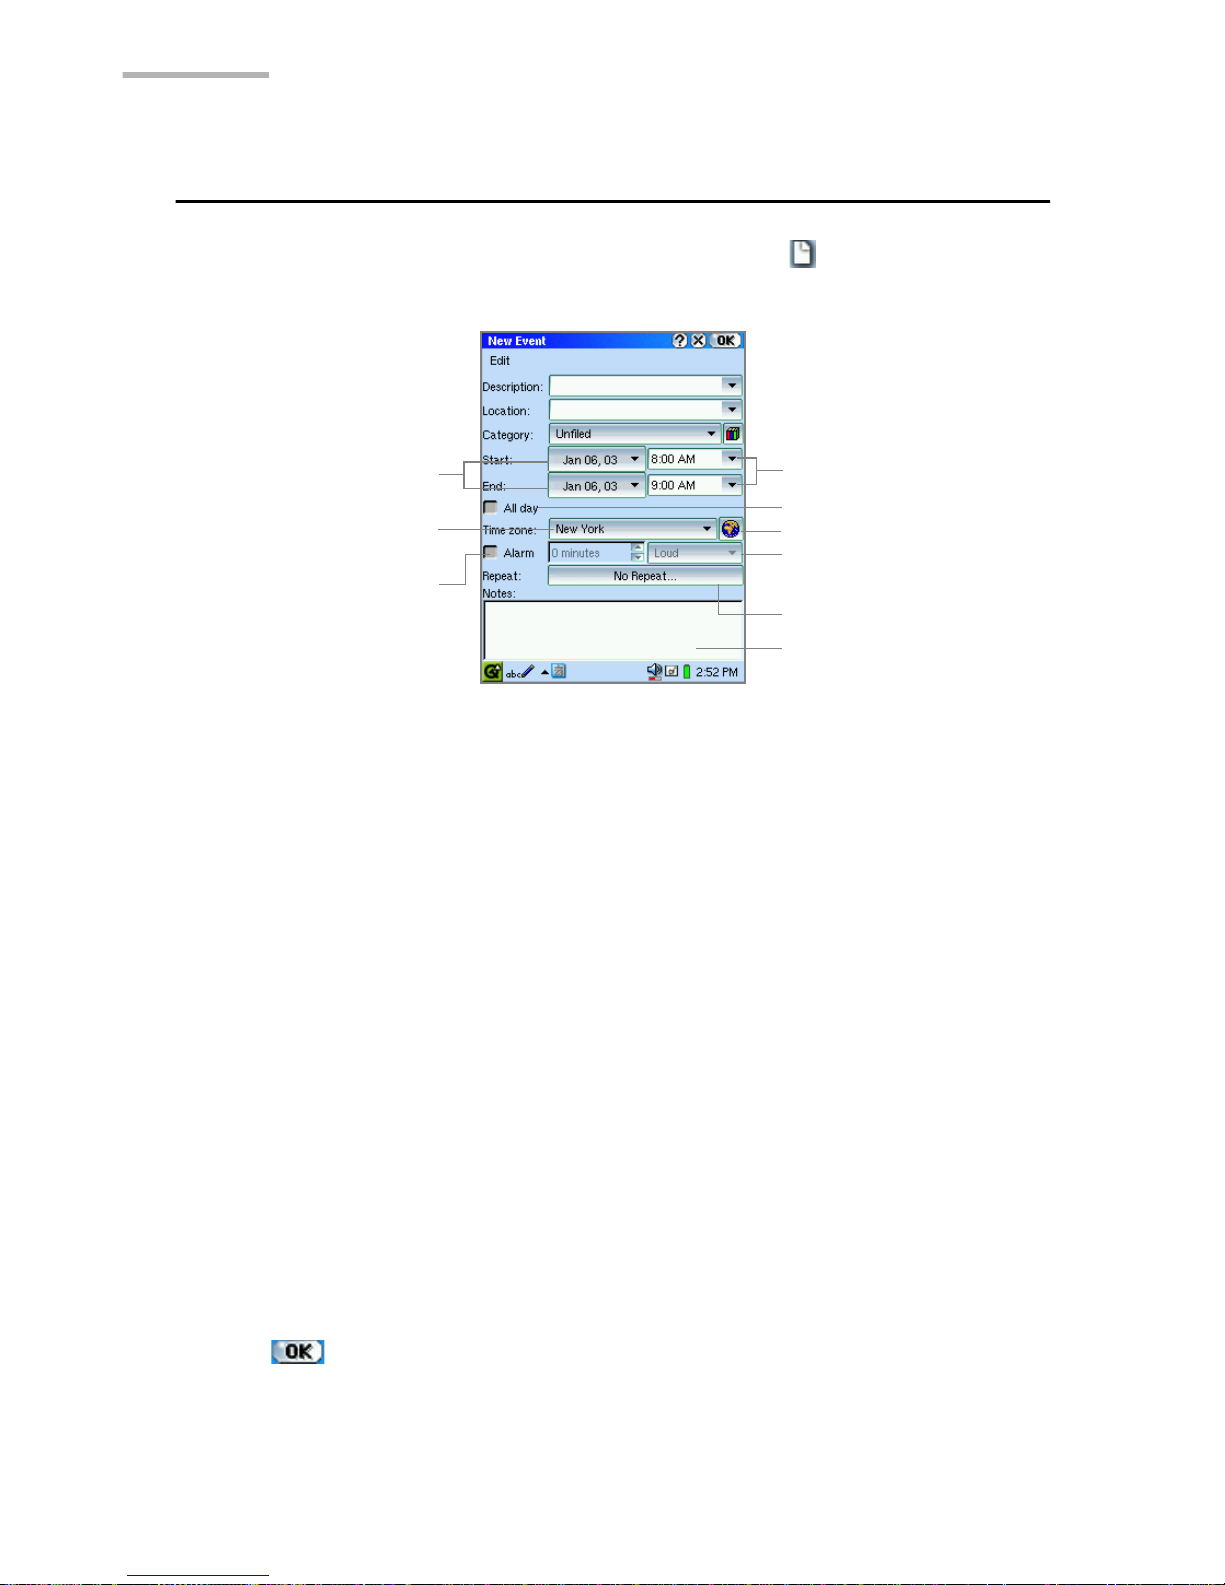
On any view screens of the Calendar application, tap .
The New Event screen appears.
2.
Select/Enter the event contents.
• For Description and Location, you can either select from the list or enter your own.
Entered items are added to the list. When items exceed 20 in number, the oldest
one will be deleted.
• Select the desired category from the drop-down list. (“Unfiled” is the default) You
can add more category names. See the separate Start-up Guide for details.
• To change the Start/End date, tap the Start/End date button and select the
desired day from the mini-calendar that pops up.
• The Start/End time will be entered automatically if you tap and drag the time
buttons on the Event screen (the Day view) to specify the time. To change the
time, enter the time directly or tap Start/End time combobox buttons.
• For the All day schedule, select the All day checkbox. With this box checked, you
cannot specify the Start/End time nor the time zone, etc.
• You can change the time zone by tapping the City Time button. (See page 121,
“To change cities”.)
• You can set an event alarm. (See page 23, “To set an alarm”.)
• You can make a repeating event. (See page 23, “To repeat an event”.)
• You can enter a note in the Notes field.
3.
Tap to save the new event entry.
The New Event screen turns to the previous screen.
Alarm sound on/off
drop-down list button
Repeat button
Notes field
All day checkbox
Start/End date buttons
Alarm checkbox
Start/End time combobox
buttons
Time zone drop-down
list button
City Time button
Page 29
Calendar 23
To set an alarm
1.
On the New Event screen, select the Alarm checkbox.
2.
Set the amount of time prior to the event you want the alarm to ring.
3.
Tap the alarm sound on/off drop-down list button, and select “Silent” or “Loud”.
• The alarm will ring and the Alarm screen will appear at the set time, even if the
SL-5600 is off. (Tap “OK” to close the Alarm screen.)
• The alarm will not ring with the following settings:
–The alarm setting is “Silent”.
–The Mute checkbox is selected, or the Alarms checkbox is not selected. (Tap
the Sound volume icon on the taskbar.)
• You can make the Email LED indicator flash at an alarm (pre)set time. (See pages
28 and 29.)
Note:
With the stereo headphone connected, you hear a sound from the
headphone, not from the built-in speaker.
To repeat an event
1.
On the New Event screen, tap the Repeat button.
The Repeating Event screen appears.
2.
Tap the appropriate repetition button for the event, i.e. “Daily”, “Weekly”,
“Monthly”, or “Yearly”.
If you do not want to repeat the event, tap the “None” button.
3.
Enter the necessary information. (See pages 24 and 25 for details.)
4.
Tap to save the repeat setting.
The Repeating Event screen returns to the New Event screen.
Page 30

24 Calendar
Daily Events
1.
Tap the Every spinbox to set the number of days between each repeat.
2.
If the event has an end date, uncheck the “No End Date”, then tap the End Date
button, and choose an end date from the mini-calendar that pops up.
Weekly Events
1.
Tap the Every spinbox to set the number of weeks between each repeat.
2.
If the event has an end date, uncheck the “No End Date”, then tap the End Date
button, and choose an end date from the mini-calendar that pops up.
3.
To add day(s) of the week the event should repeat, tap the relevant Repeat On
button(s).
To clear the added day(s) of the week, tap the same Repeat On button(s) again.
Repeating Event screen
(Daily)
Every spinbox
No End Date checkbox
End Date button
Repeating Event screen
(Weekly)
Repeat On buttons
Page 31
Calendar 25
Monthly Events
1.
Tap the Every spinbox to set the number of months between each repeat.
2.
If the event has an end date, uncheck the “No End Date”, then tap the End Date
button, and choose an end date from the mini-calendar that pops up.
3.
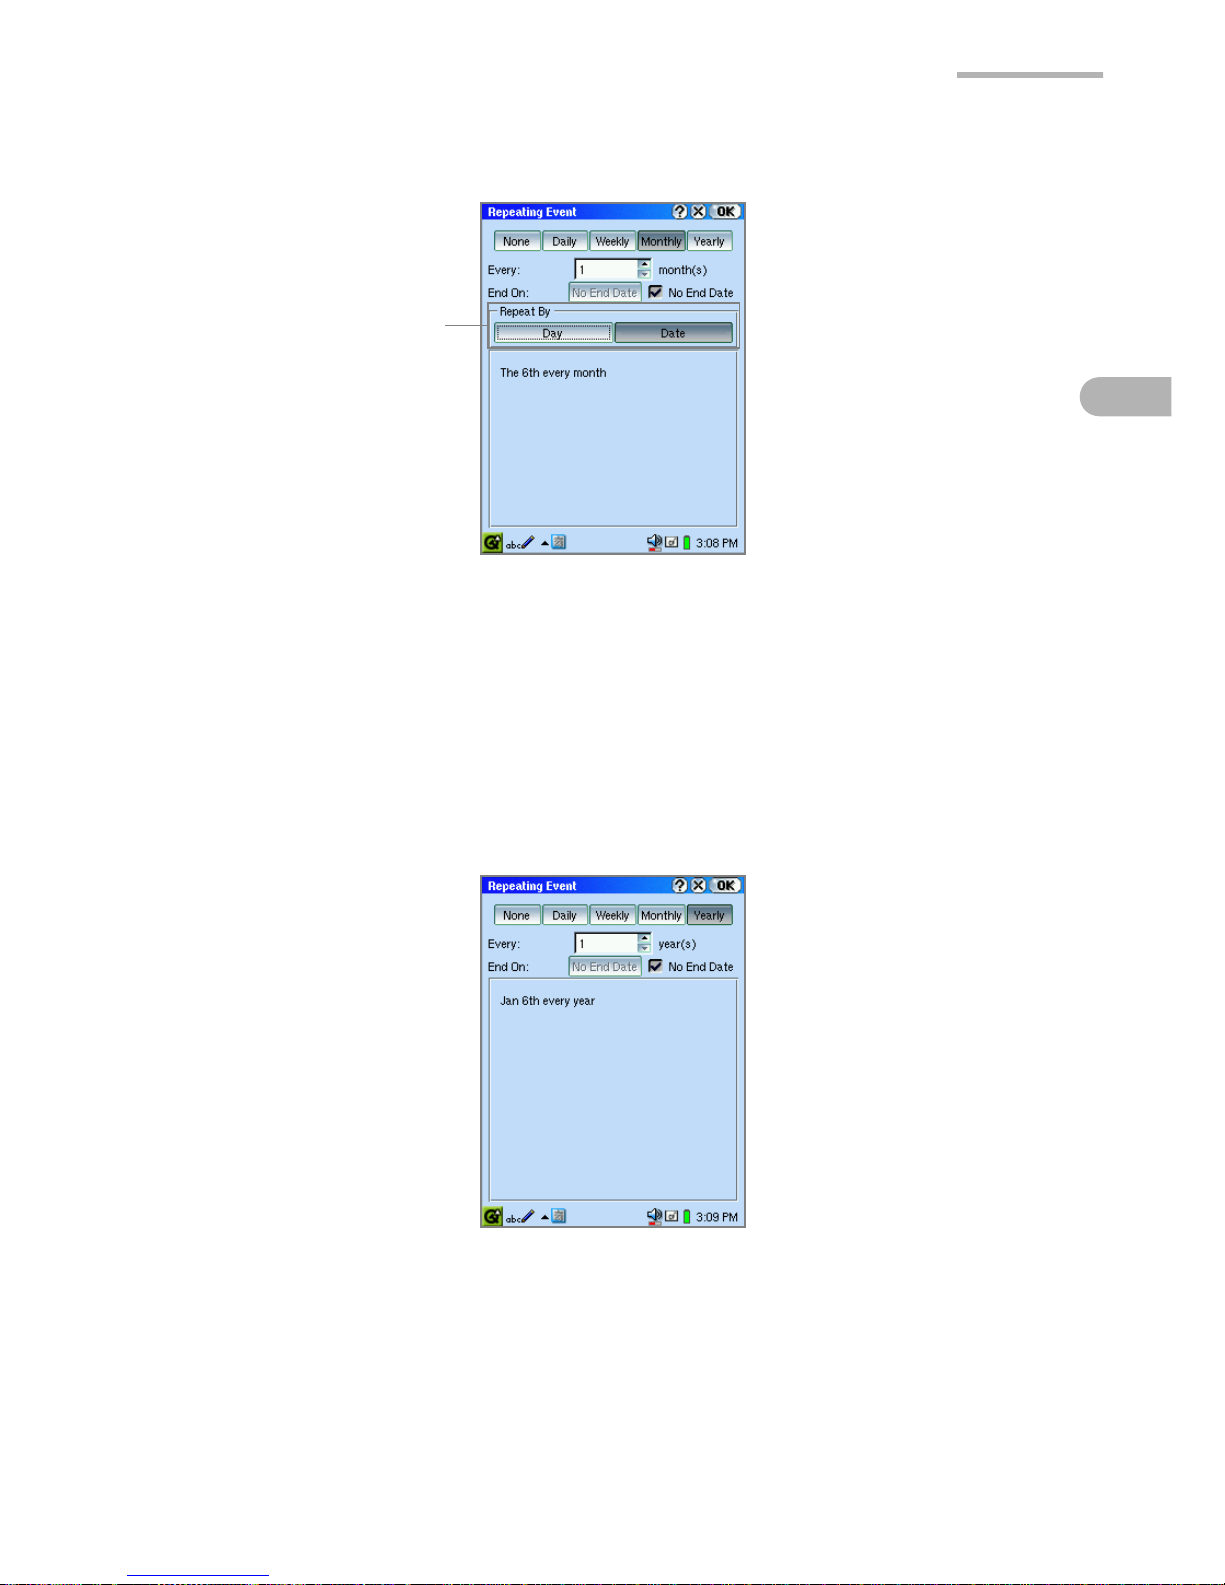
If the event repeats by day of week (i.e. every first Thursday), tap the Repeat By
“Day” button. If the event repeats by date (i.e. every 6th), tap the Repeat By
“Date” button.
Annual Events
1.
Tap the Every spinbox to set the number of years between each repeat.
2.
If the event has an end date, uncheck the “No End Date”, then tap the End Date
button, and choose an end date from the mini-calendar that pops up.
Repeating Event screen
(Monthly)
Repeat By buttons
Repeating Event screen
(Yearly)
Page 32
26 Calendar
Modifying an Event entry
1.
On the Event screen of the Day view, tap and hold the event entry you want to
modify.
The popup menu appears.
2.
Select “Edit event”.
Or on the Detail screen, tap instead of performing steps 1 and 2.
The Edit Event screen appears.
3.
Modify the event.
4.
Tap to save the modification.
The Edit Event screen returns to the previous screen.
Note:
• If you modify a repeating event, all of other occurrences of the event will be
modified.
• You can perform the same operation in step 1 from the Agenda screen of the
Day view/Weekly view.
• You cannot modify the time zone. If necessary, delete the entry and create it
afresh.
Duplicating an Event entry
1.
Highlight the event you want to duplicate from the Event screen of the Day view
by using .
2.
Tap the “Data” menu and then tap “Duplicate”.
The selected event will be duplicated.
Note:
You can perform the same operation in step 1 from the Agenda screen
of the Day view/Weekly view.
Page 33
Calendar 27
Deleting an Event entry
Deleting an event entry
1.
On the Event screen of the Day view, tap and hold the event entry you want to
delete.
The pop-up menu will be displayed.
2.
Select “Delete…”.
Or instead of performing steps 1 and 2, tap on the Detail screen.
A confirmation message will be displayed before the entry is deleted.
3.
Tap “Yes” to delete the event.
The event will be deleted permanently.
Note:
• If you delete a repeating event, all occurrences of the event will be deleted.
A single occurrence cannot be deleted solely.
• You can perform the same operation in step 1 from the Agenda screen of the
Day view/Weekly view.
Deleting Daily, Weekly or Monthly events
You can delete all the events for a given day, week or month (except for repeating
events) at one time.
1.
Open the Calendar screen in the Day, Week, or Month view in which you want
to delete events.
2.
Tap the “Data” menu and then tap “Delete period...”.
3.
Tap the drop-down list button on the screen that will be displayed and then tap
as follows:
For the events of a day, tap “Events in selected day”.
For the events of a week, tap “Events in selected week”.
For the events of a month, tap “Events in selected month”.
4.
Tap “Yes”.
A confirmation message will be displayed before the events are deleted.
5.
Tap “Yes” to delete the events.
The events will be deleted permanently.
Page 34
28 Calendar
Note:
• Events cannot be deleted from the File link screen in the Day view. On the File
link screen, you will delete files, not events.
• Repeating events cannot be deleted by periodic deletion.
• Events over successive days, weeks and months within the specified date
period will be deleted entirely.
Deleting all Calendar event entries
1.
In any view mode of the Calendar application, tap the “Data” menu and then tap
“Delete all...”.
A confirmation message appears before the events are deleted.
2.
Tap “Yes” to delete all events.
Note:
• Deleting all events cannot delete their link files.
• Event entries cannot be deleted from the File link screen.
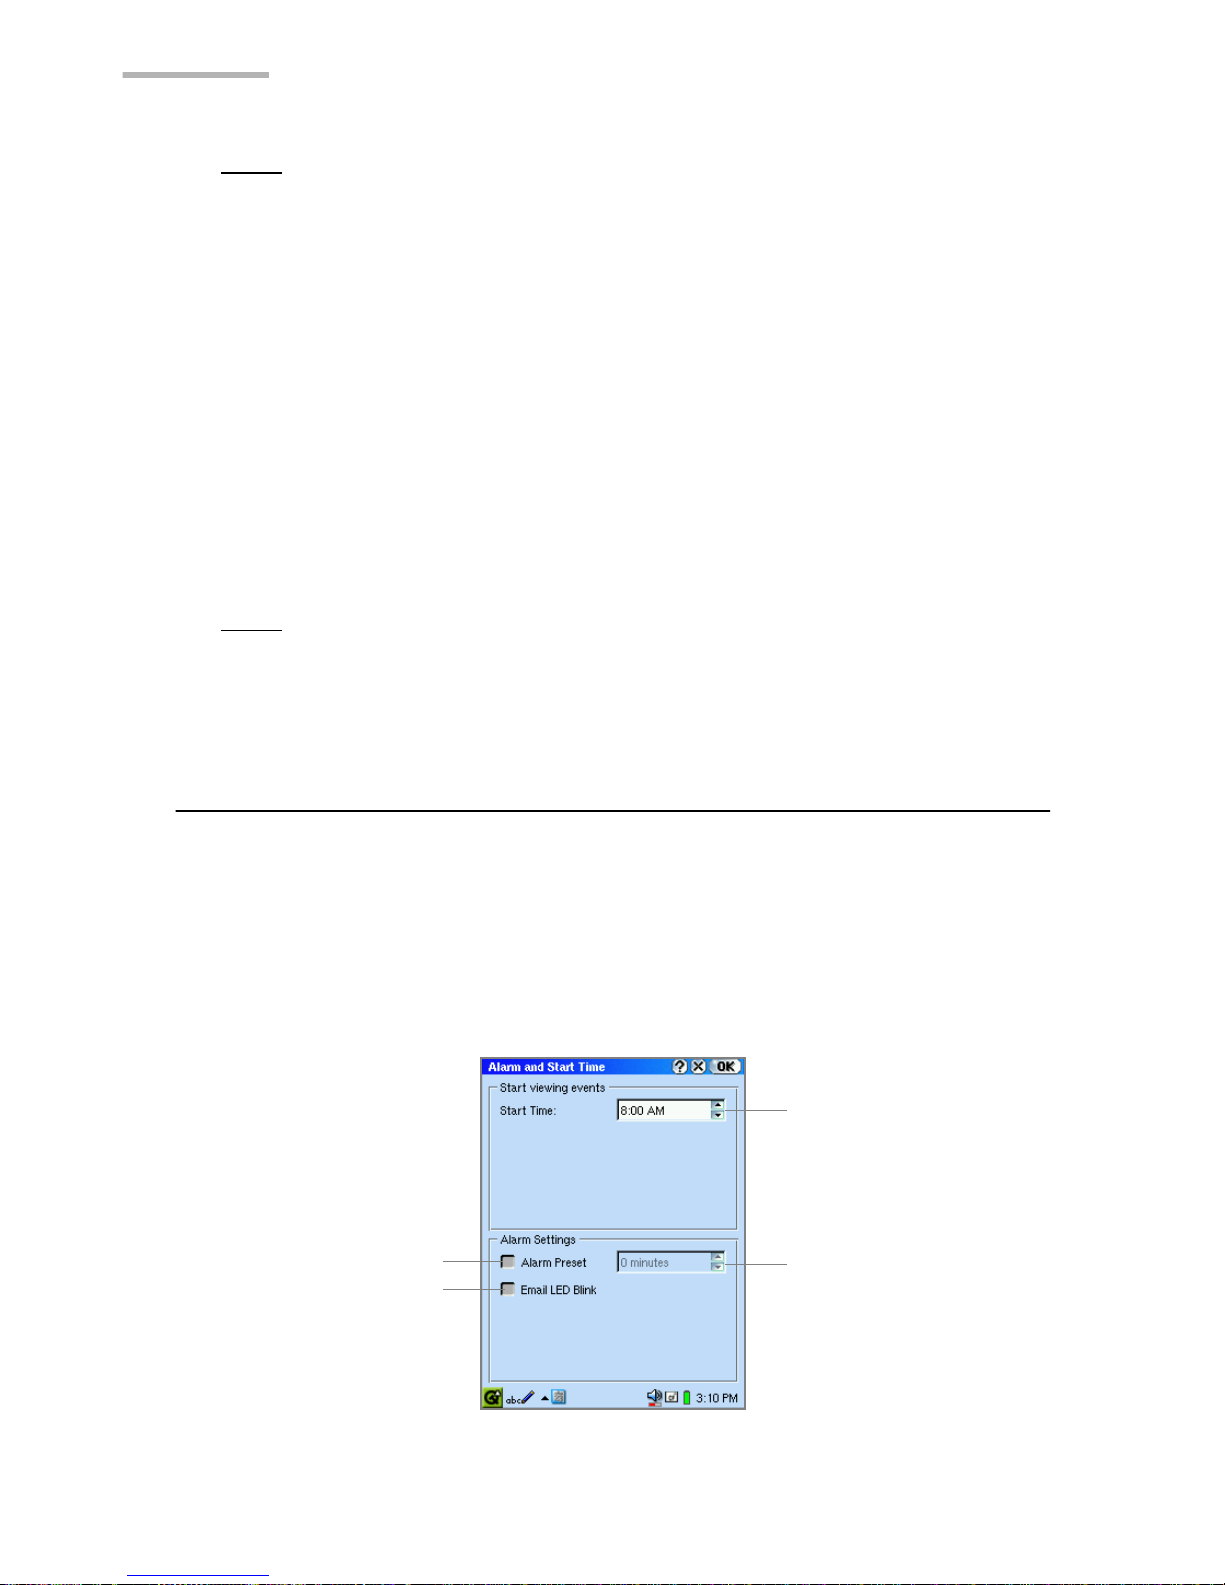
Calendar Setup
You can change the starting time on the event screen in the Day view or Week view
mode, and the Alarm settings on the New/Edit Event screen, etc.
1.
In any view mode of the Calendar application, tap the “Option” menu, then tap
“Alarm and Start Time...”.
The Alarm and Start Time screen will be displayed.
Start Time spinbox
Alarm Preset spinbox
Alarm Preset checkbox
Email LED Blink checkbox
Page 35
Calendar 29
2.
Make the necessary settings and then tap to save the settings.
The Alarm and Start Time screen returns to the previous screen.
If you tap , the setting is canceled.
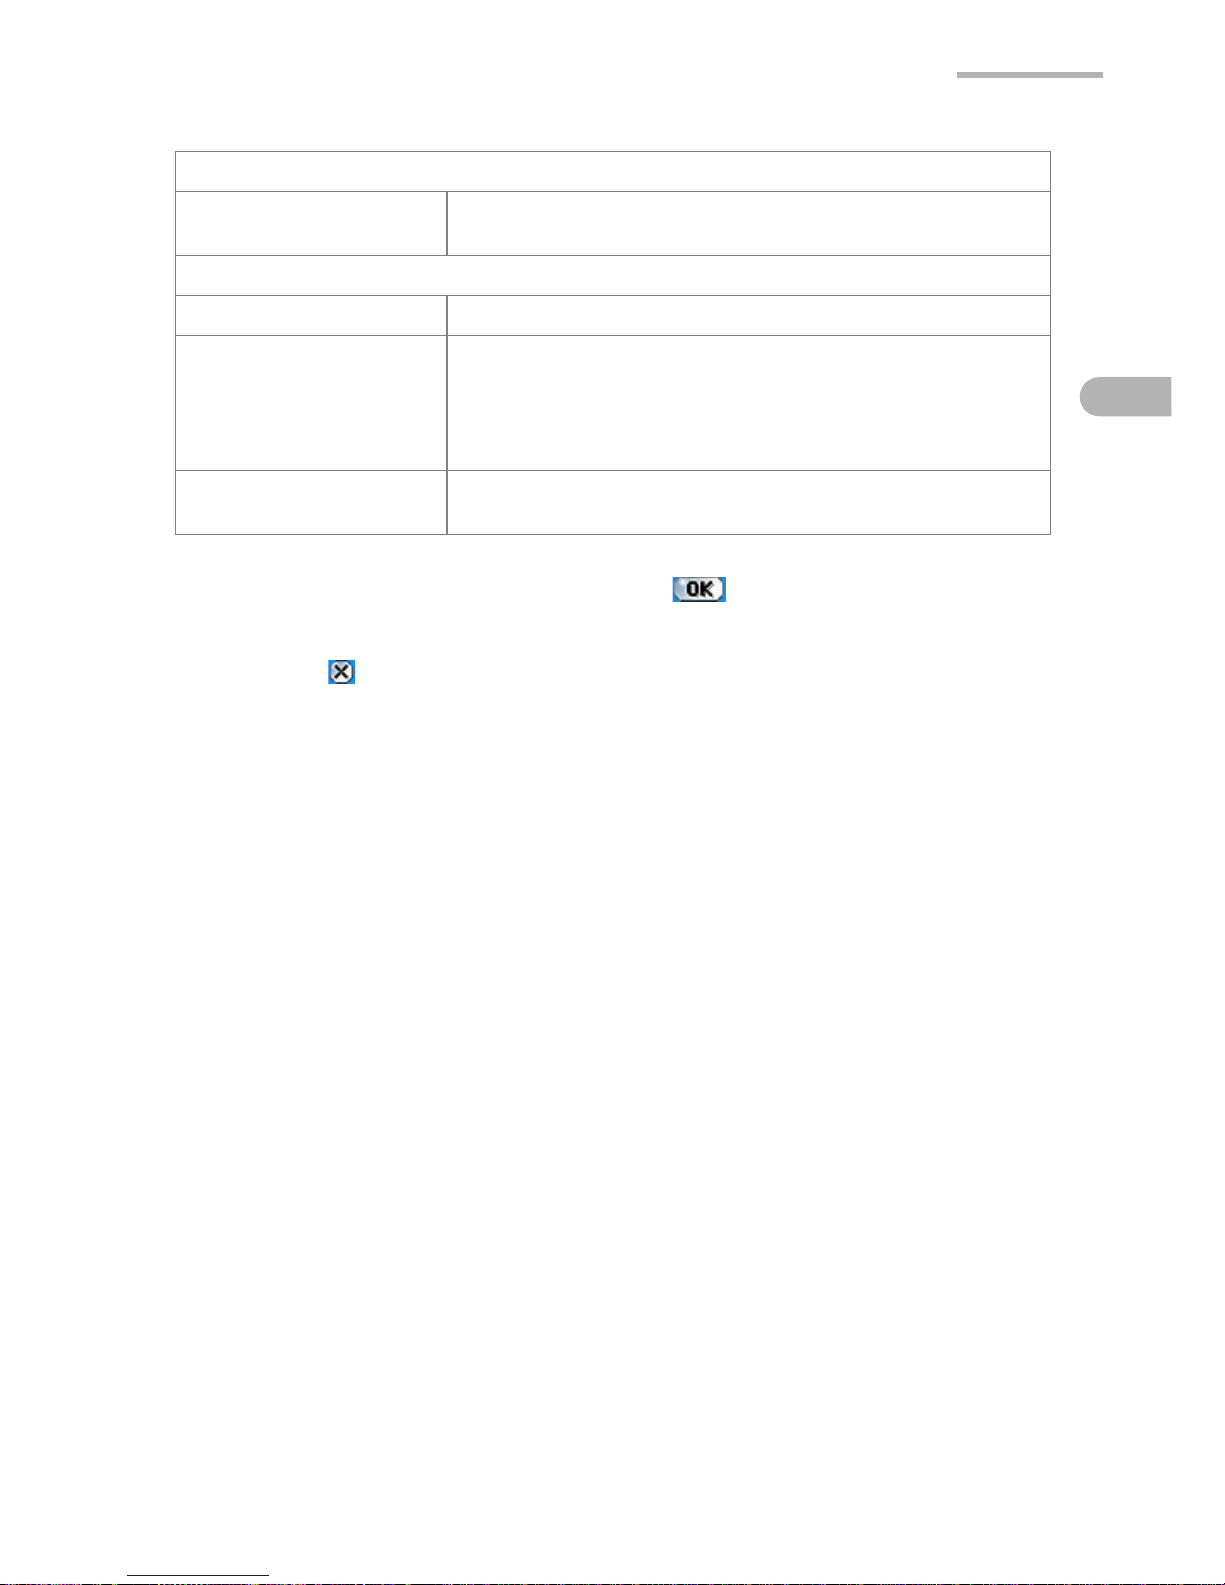
Start viewing events
Start Time spinbox Set the earliest time you want to show when you open
the Event screen in the Day or Week view mode.
Alarm Settings
Alarm Preset checkbox Check to set the Alarm preset time
Alarm Preset spinbox Set the Alarm preset time.
If you set the preset time to “5 minutes”, for example, the
alarm sounds five minutes before the event.
This setting will be the default alarm setting on the New
Event screen.
Email LED Blink
checkbox
When checked, the Mail light of the LED indicator
flashes at an alarm (pre)set time.
Page 36
30 Todo List
Todo List
The Todo List application allows you to manage tasks you should not forget and
reminds you to complete them before the due date.
You can list them in the order of the checked status, the priority or description, and
confirm them easily. Entries can be organized into categories such as “Business”,
“Personal”, or you can create your own.
Overview
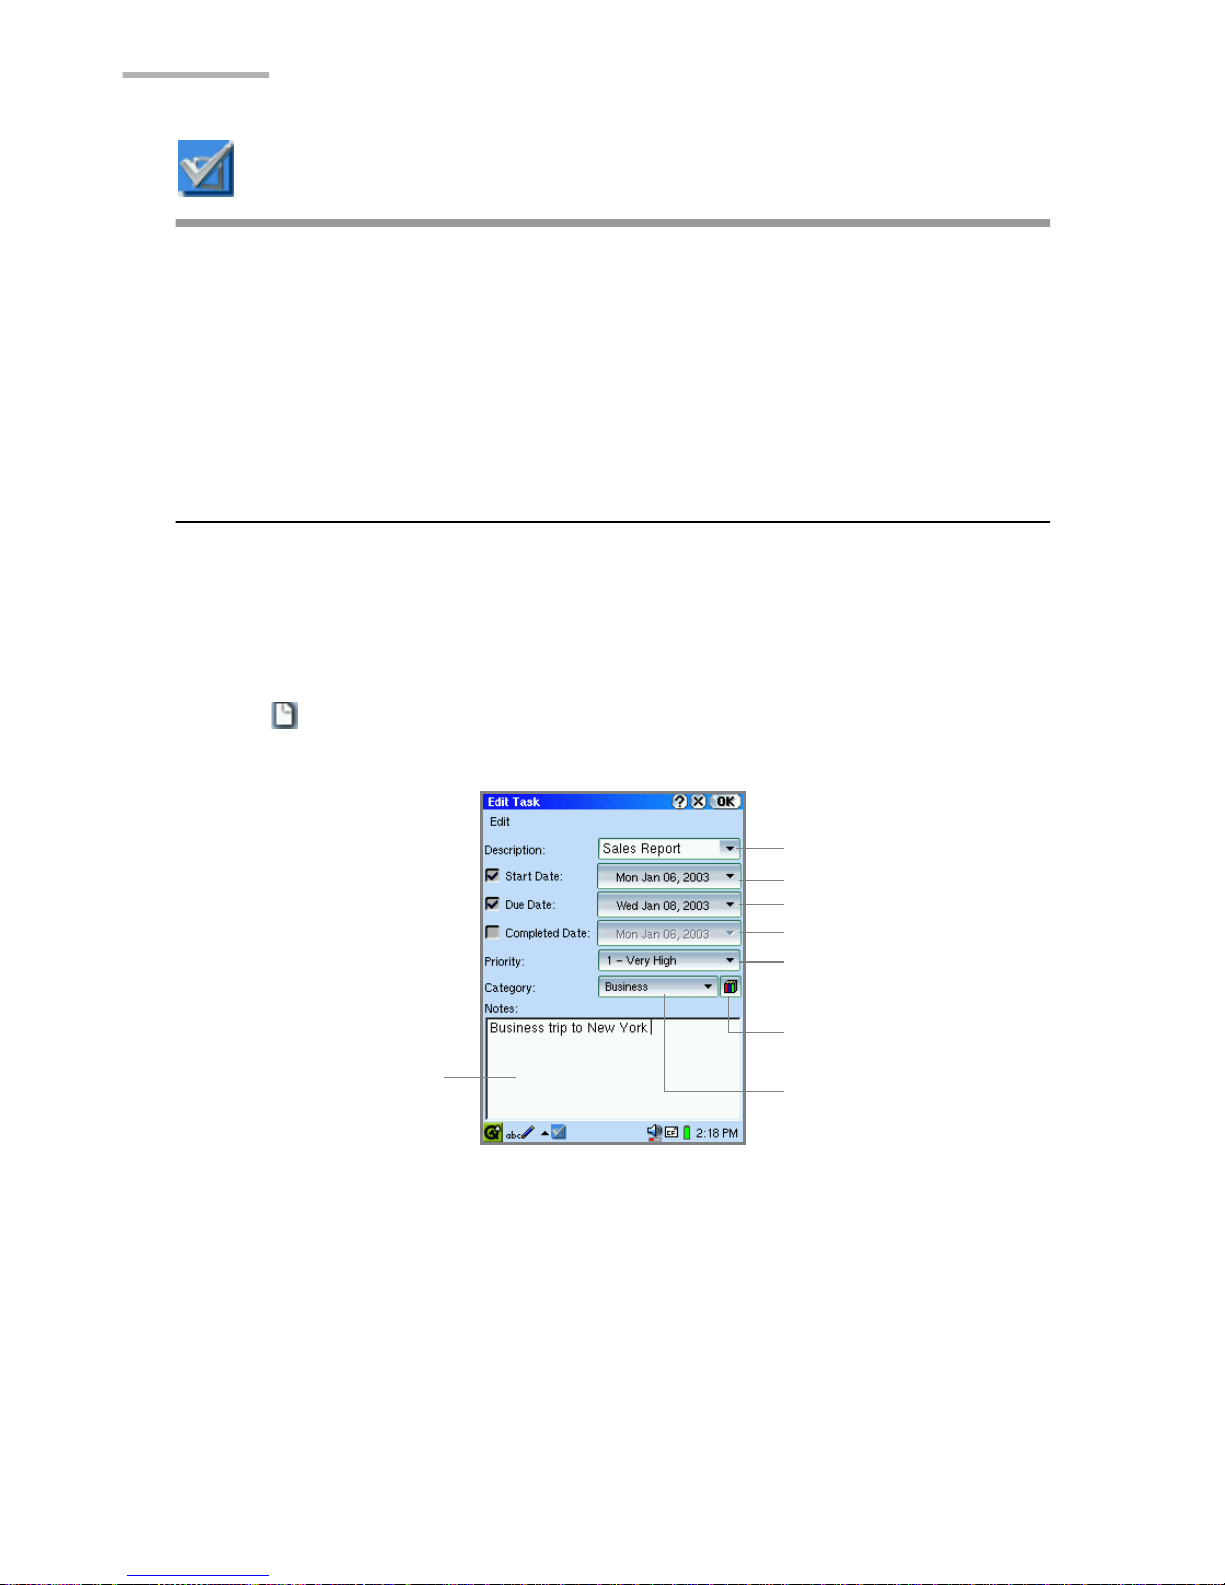
New/Edit Task screen
1.
On the Applications Home screen, tap the “Todo List” application icon.
The Index screen will be displayed.
2.
Tap .
The New Task screen will be displayed.
Start Date button
Description combobox
Due Date button
Priority drop-down list
button
Edit Categories button
Completed Date button
Category drop-down list
button
Notes field
Page 37
Todo List 31
Index screen
1.
On the Applications Home screen, tap the “Todo List” application icon.
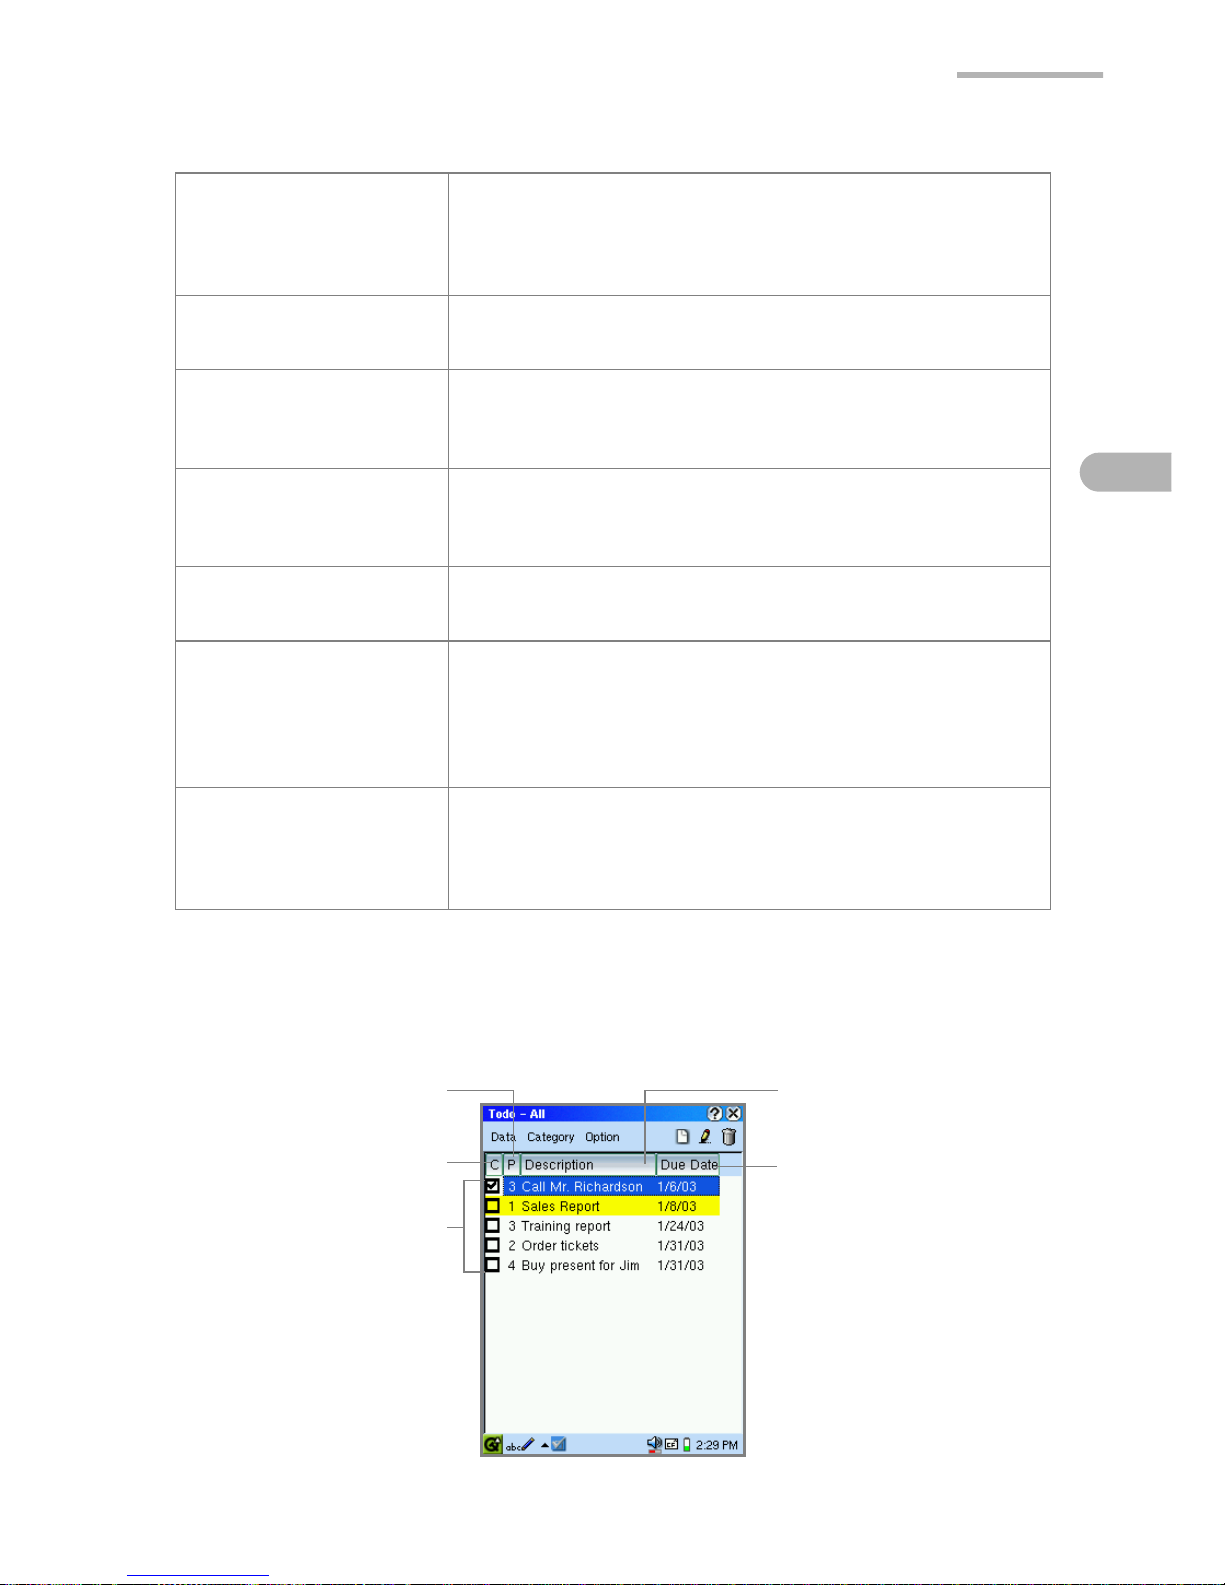
Description combobox Select your choice from the list or enter the desired
description. Entered items are added to the list. When
items exceed 20 in number, the oldest one will be
deleted.
Start Date checkbox/
Start Date button
Turn the checkbox on and tap the Start date button to
select the start date.
Due Date checkbox/
Due Date button
Turn the checkbox on if the task is due to be completed
on a specified date, and then tap the Due date button
to specify the due date.
Completed Date
checkbox/Completed
Date button
Check if the task has been completed.
To change the completed date, tap the completed date
button to select the desired date.
Priority drop down list
button
Tap to display the list of choices and then tap your
choice.
Category drop-down
list button
Tap to display the list of choices and then tap your
choice.
If you want to create a new category name, tap the Edit
Categories button. (For details, see the separate Startup Guide.)
Edit Categories button Tap to display the Edit Categories screen where you
can edit categories or assign multiple categories to an
event. (See the separate Start-up Guide for more
details.)
Checked status button
Completed checkbox
Priority button
Description button
Due Date button
Page 38
32 Todo List
Note:
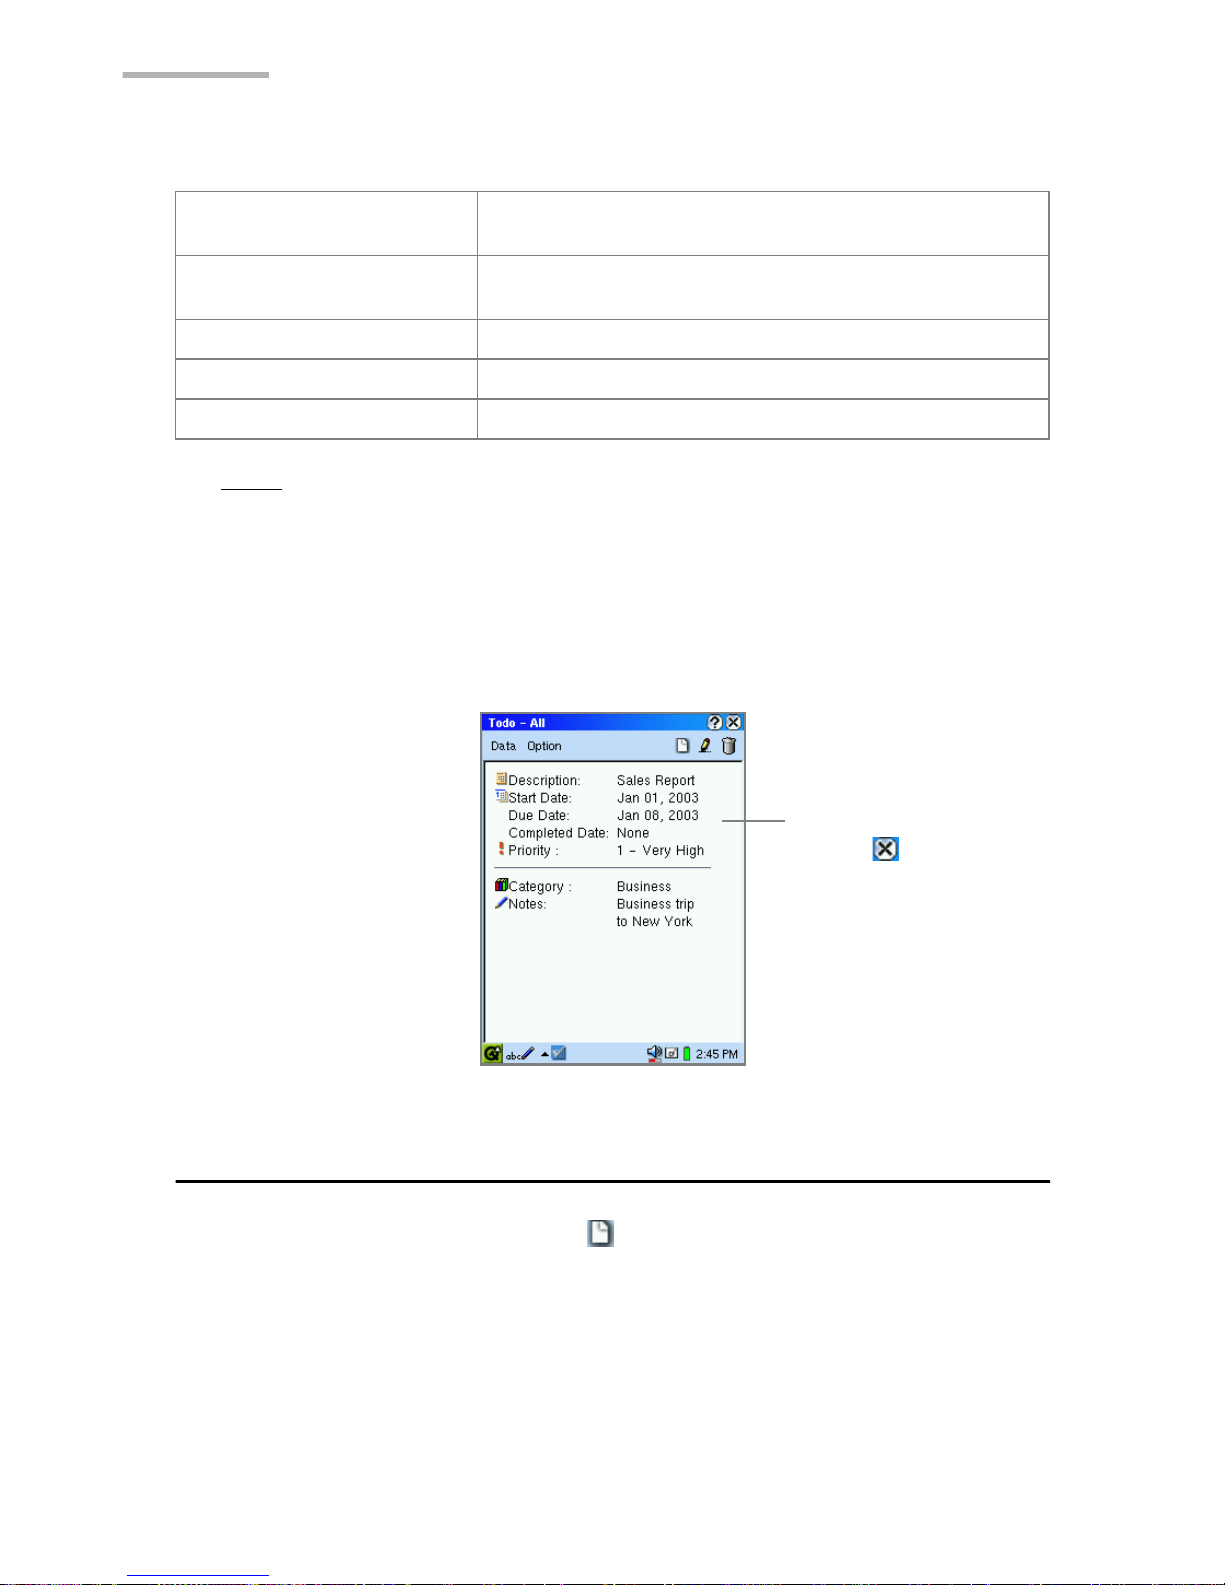
• The past-due incomplete entries will be displayed in red.
• Priority 1 task entries will be displayed in amber.
Detail screen
1.
On the Index screen, tap the desired entry.
Creating a new Todo List entry
1.
On the Index or Detail screen, tap .
The New Task screen will be displayed.
2.
Select/Enter the task contents.
• Enter or select the description from the Description combobox.
• If the task has a start date or due date, check the Start date or Due date checkbox.
• Tap the Start Date or Due Date button and then tap the date from the
mini-calendar.
Checked status button Tap to sort the entries by checked status (completed
or incomplete).
Completed checkbox When unchecked, the task is not completed; when
checked, the task is completed.
Priority button Tap to sort the entries by priority.
Description button Tap to sort the entries by description.
Due Date button Tap to sort the entries by due date.
Detailed information
Tap to close the
Detail screen.
The display returns
to the Index screen.
Page 39
Todo List 33
• Tap the Priority drop-down list button and select the priority.
• Tap the Category drop-down list button to set the task’s category. You can also
enter a desired category name. For details, see the separate Start-up Guide.
• Tap the Notes field and enter the task, etc.
3.
Tap to save the new entry.
The New Task screen will change to the Index screen.
If you tap , the new entry is canceled.
Modifying a Todo List entry
1.
On the Index screen, tap and hold the entry you want to modify.
The pop-up menu will be displayed.
2.
Select “Edit task”.
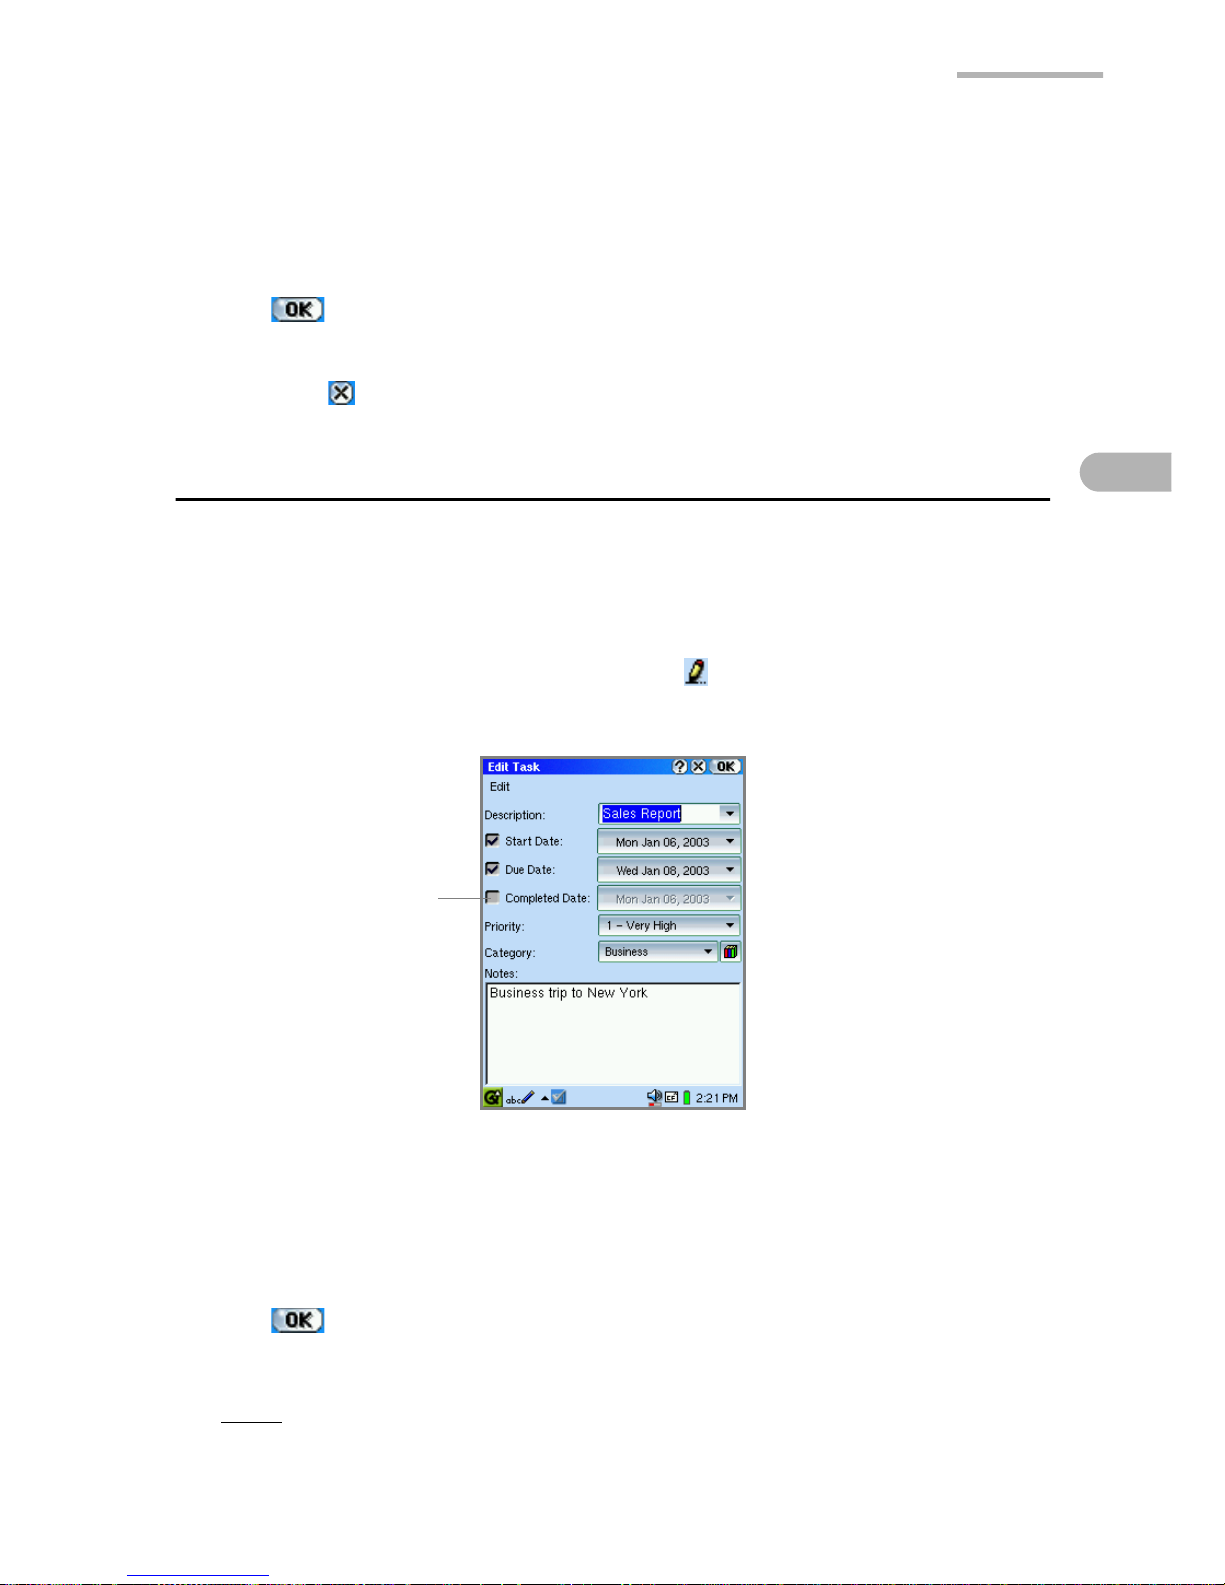
Or instead of performing steps 1 and 2, tap on the Detail screen.
The Edit Task screen will be displayed.
3.
Modify the entry.
Check the Completed checkbox if the task is completed.
If you change the completed date, tap the Completed Date button and select the
desired date.
4.
Tap to save the modification.
The Edit Task screen will return to the Index screen.
Note:
The Task status can also be changed on the Index screen. (See page
35.)
Completed checkbox
Page 40

34 Todo List
Duplicating a Todo task entry
1.
On the lndex screen, highlight the entry you want to duplicate by using .
2.
Tap the “Data” menu and then tap “Duplicate”.
The duplicated entry will be added on the Index screen.
Deleting a Todo task entry
Deleting a Todo task entry
1.
On the Index screen, tap and hold the entry you want to delete.
The pop-up menu will be displayed.
2.
Select “Delete”.
Or instead of performing steps 1 and 2, tap on the Detail screen.
A confirmation message will be displayed before the entry is deleted.
3.
Tap “Yes” to delete the entry.
The entry will be deleted.
Deleting all Todo task entries
1.
On the Index screen, select “All” from the “Category” menu.
2.
Tap the “Data” menu and then tap “Delete all...”.
A confirmation message will be displayed before the entries are deleted.
3.
Tap “Yes”.
All entries will be deleted.
Note:
When either incomplete or completed entries are viewed using the
“View” command on the “Option” menu, only viewed entries will be
deleted. (See page 35.)
Page 41

Todo List 35
Checking a completed entry on the Index
screen
After completing a Todo task, check the Completed checkbox on the Index screen
or the Todo task entry will be recognized as incomplete.
1.
On the Index screen, tap the Completed checkbox of the completed entry.
To remove the check, tap the Completed checkbox again.
To view only the incomplete/completed entries
1.
On the Index screen, tap the “Option” menu and then tap “View”.
2.
Tap “Hide completed tasks” or “Only completed tasks”.
Only incomplete or completed entries will be displayed. (See the description on
the title bar.)
To show all entries in both status, select “Show completed tasks”.
Page 42
36 ImagePad
ImagePad
ImagePad allows you to handle image files. You can view and add comments to
image files copied from your PC. You can easily handwrite memos. And, ImagePad
can display BMP, JPEG, GIF and PNG formats. ImagePad files can be displayed on
the Files Home screen too.
Overview
Index screen
1.
On the Applications Home screen, tap the “ImagePad” application icon.
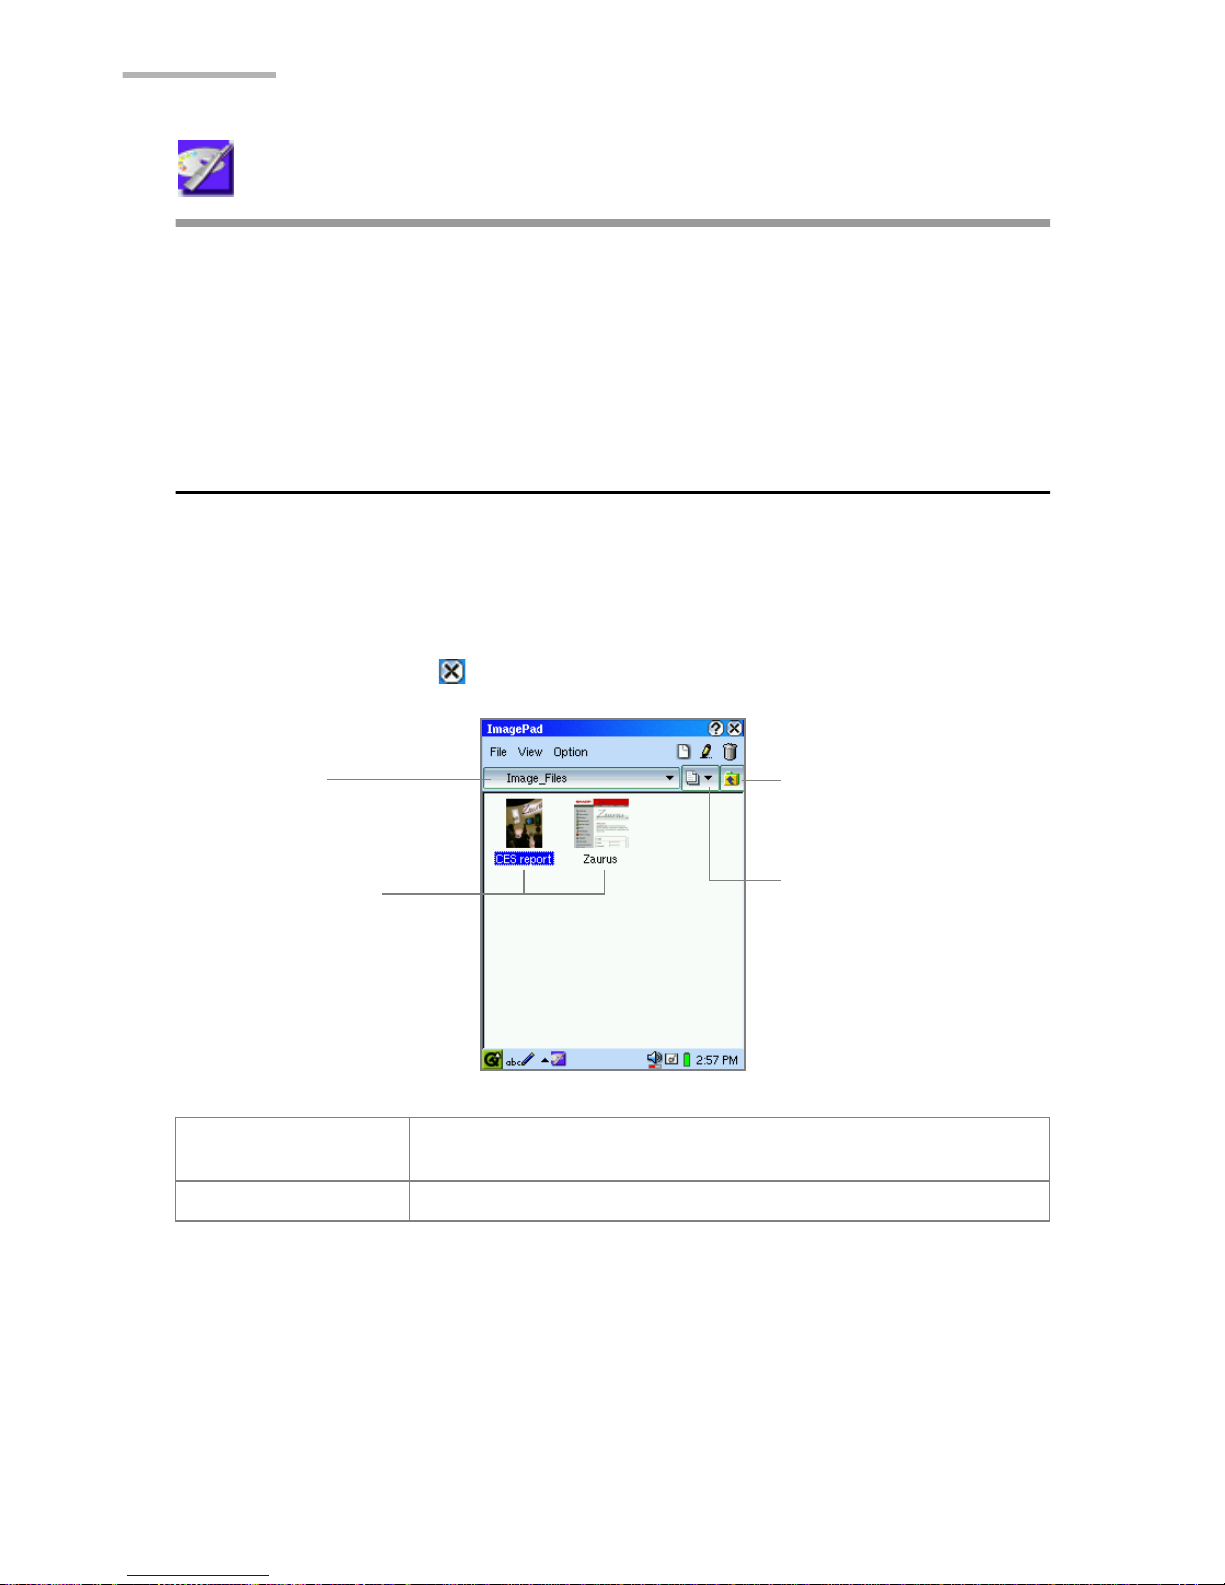
An Index screen will be displayed. If the Detail screen is displayed instead of the
Index screen, press to switch to the Index screen.
Folder menu Tap to change folders when you want to view files in another
folder or on a memory card.
History button Tap to list the files you have previously opened.
Folder menu
Indicates the current
folder name.
Files within the
Image_Files folder
History button
Moves to the folder
one level upper than
the current folder.
Page 43
ImagePad 37
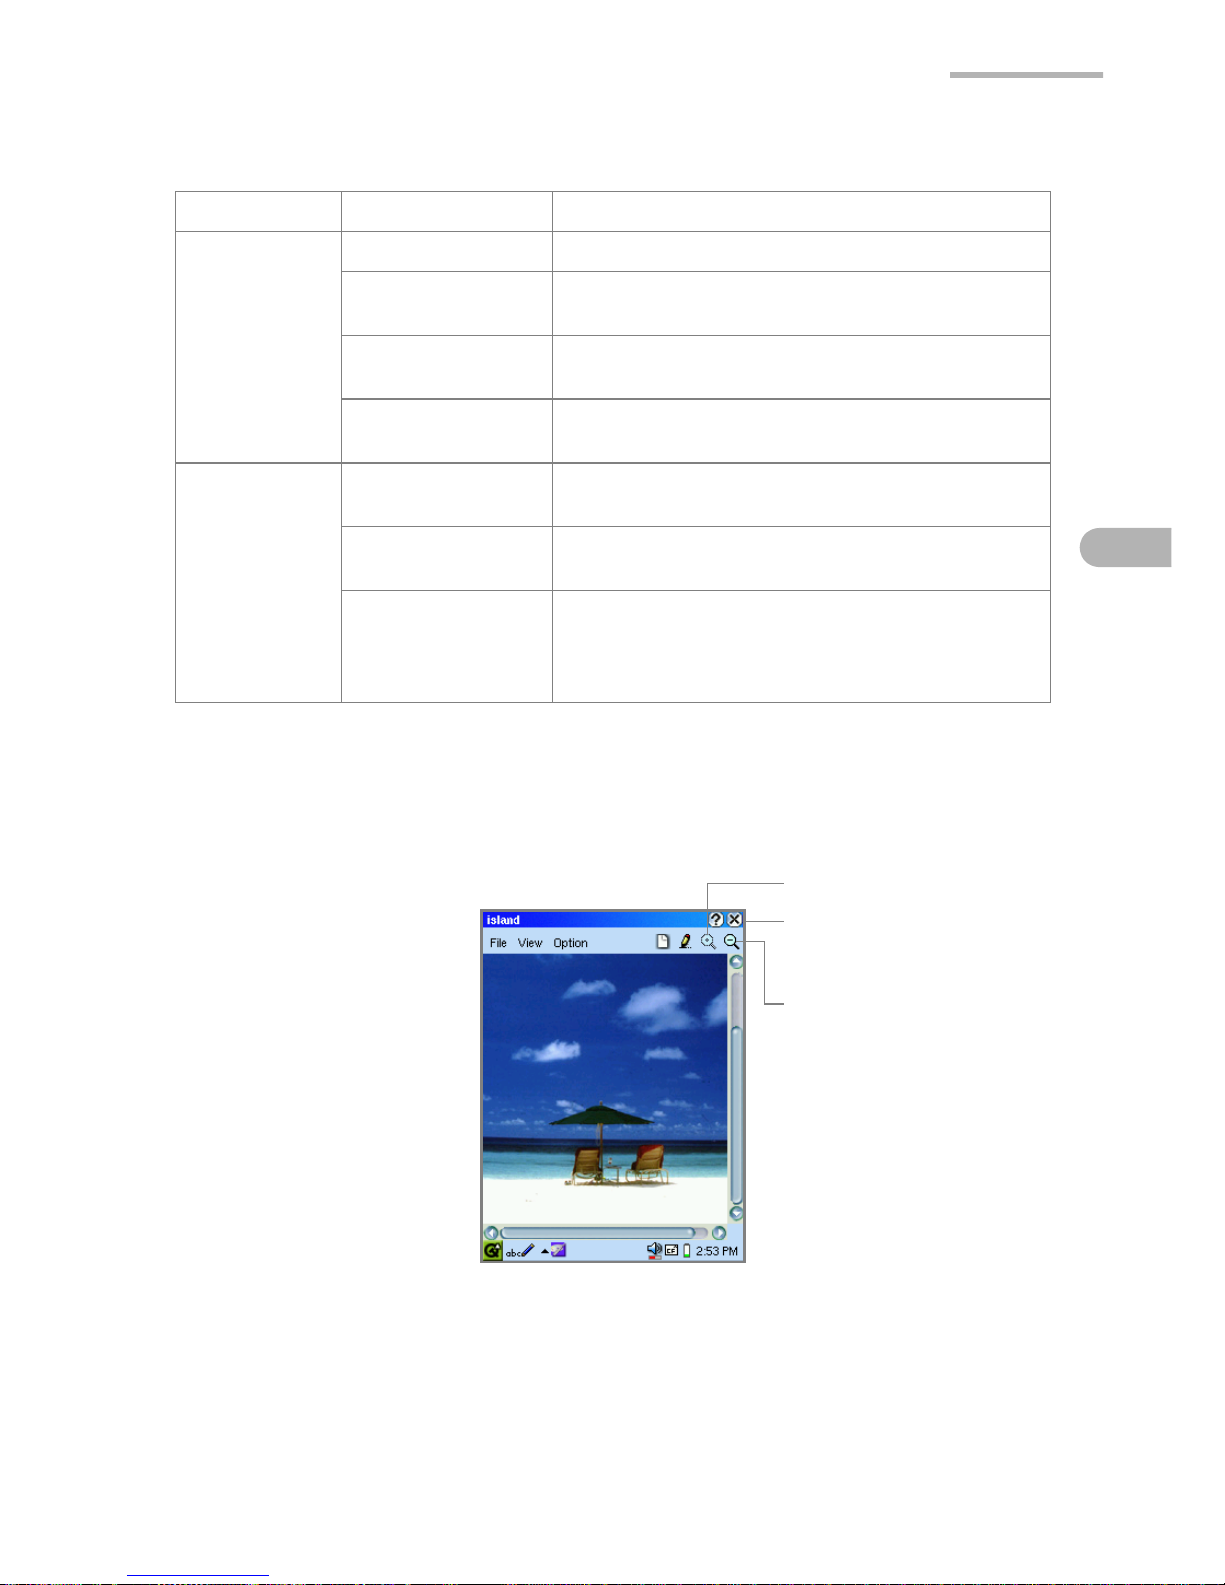
Image view screen
1.
On the Index screen, tap the desired file.
The Image view screen will be displayed.
File menu Rename Renames the image file. (See page 42.)
View menu List Lists the image files by name. (See page 47.)
Thumbnails Lists the image files by thumbnails. (See page
47.)
List View Settings Customizes the items to be displayed on the
Index screen. (See page 47.)
Refresh Icons Updates icons of the image files modified in
the thumbnail view.
Option menu Rotate Left Rotates the selected image 90 degrees
counterclockwise and saves it. (See page 43.)
Slideshow Displays a slideshow of image files in the
current folder. (See page 44.)
Preferences Configures the slideshow settings. Changes
how the Image view screen will be displayed
and how the Cancel key on the List screen
performs. (See page 45.)
Zoom In
Tap here to return to the
Index screen.
Zoom Out
Page 44
38 ImagePad
Note:
• If a file is larger than the screen, you can scroll to the hidden part by dragging
across the screen with the stylus.
• ImagePad can handle images up to 1024
×
768 pixels. Some larger images
can be displayed, but you may encounter improper scrolling or corruption of
the image display (the image file itself will not be damaged). It will also take a
long time to save or rotate the image.
• When the same image is displayed on the SL-5600 and the PC, there may be
differences such as variations in rendering colors.
• It may be impossible to display some image files.
• ImagePad may close unexpectedly due to insufficient memory when
attempting to display, rotate, or otherwise manipulate large image files.
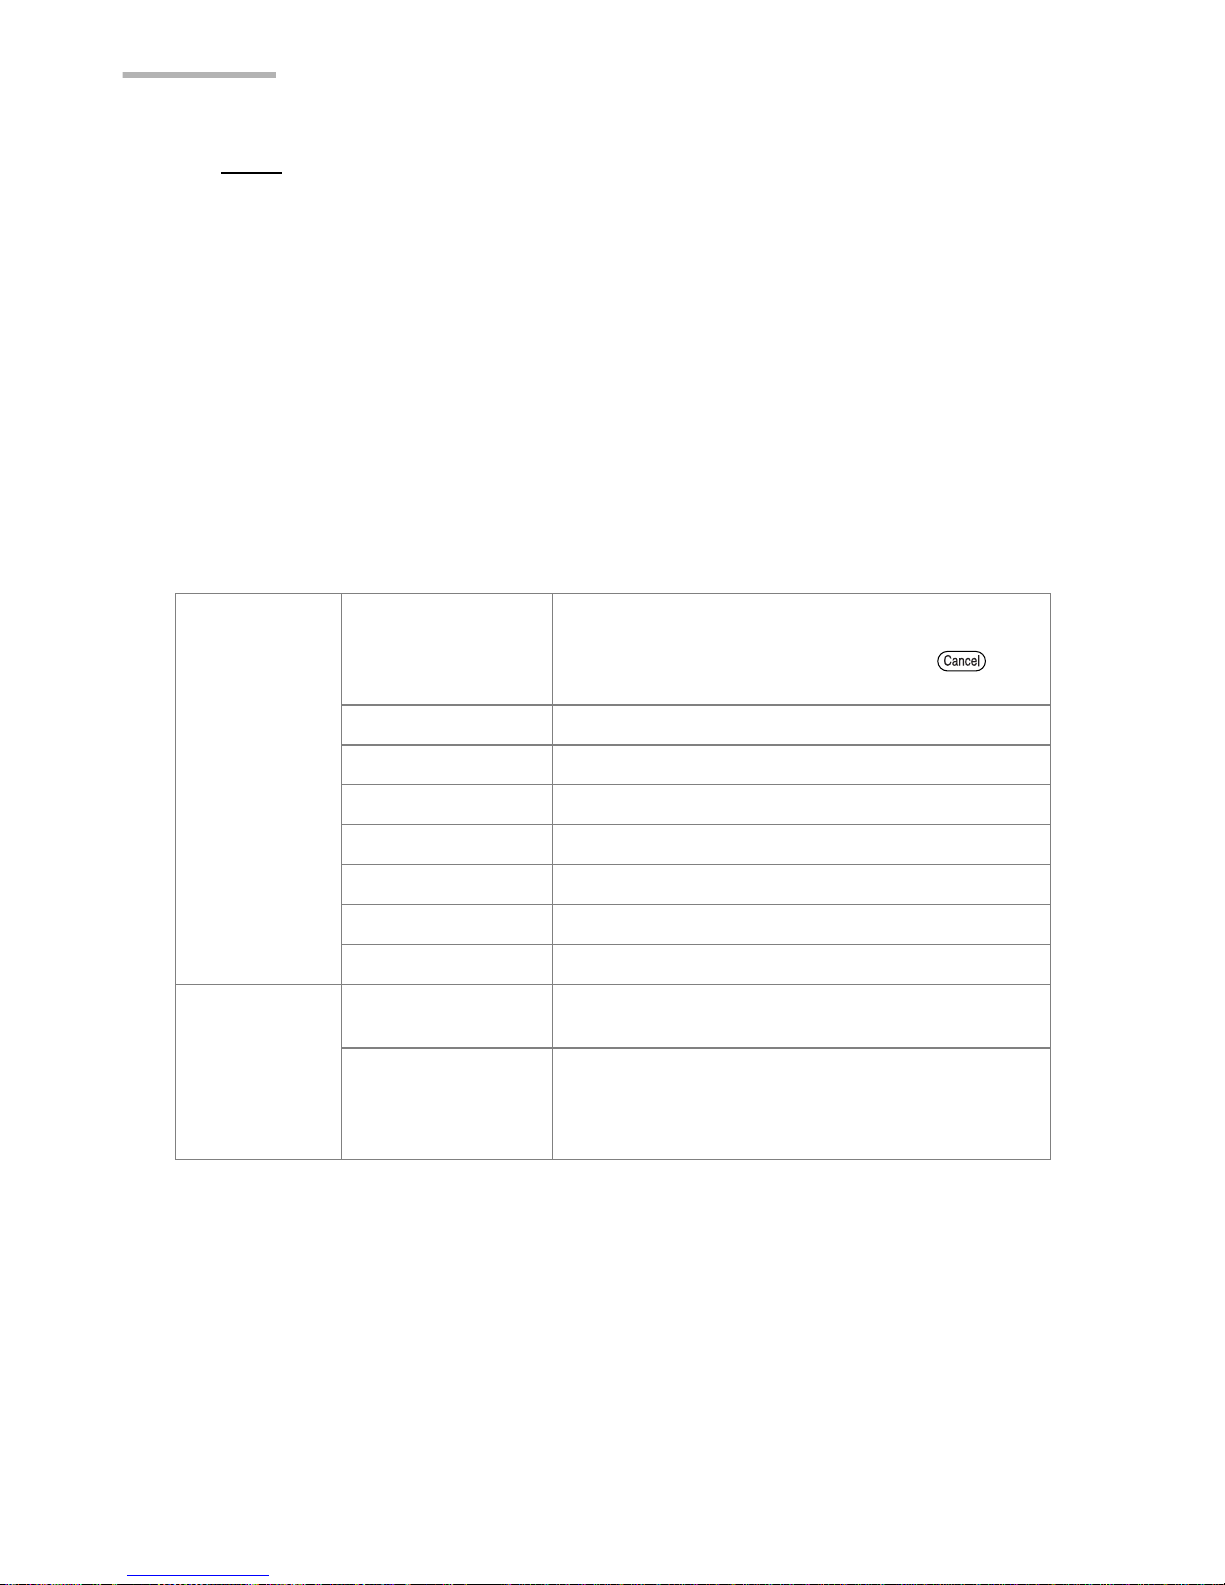
View menu Fullscreen Displays the image on the full screen with no
Menu bar or taskbar on it. (Images larger than
the display will be reduced.) Press to
return to the normal screen.
Flip Horizontal Flips the image horizontally.
Flip Vertical Flips the image vertically.
Rotate by 180 Rotates the image by 180°.
Rotate by 90 Rotates the image by 90° counterclockwise.
Rotate by 45 Rotates the image by 45° counterclockwise.
Zoom In Magnifies the image file.
Zoom Out Reduces the image file.
Option menu Slideshow Displays a slideshow of the image files in the
current folder. (See page 44.)
Preferences Configures the slideshow settings. Changes
how the Image view screen will be displayed
and how the Cancel key on the lndex screen
performs. (See page 45.)
Page 45
ImagePad 39
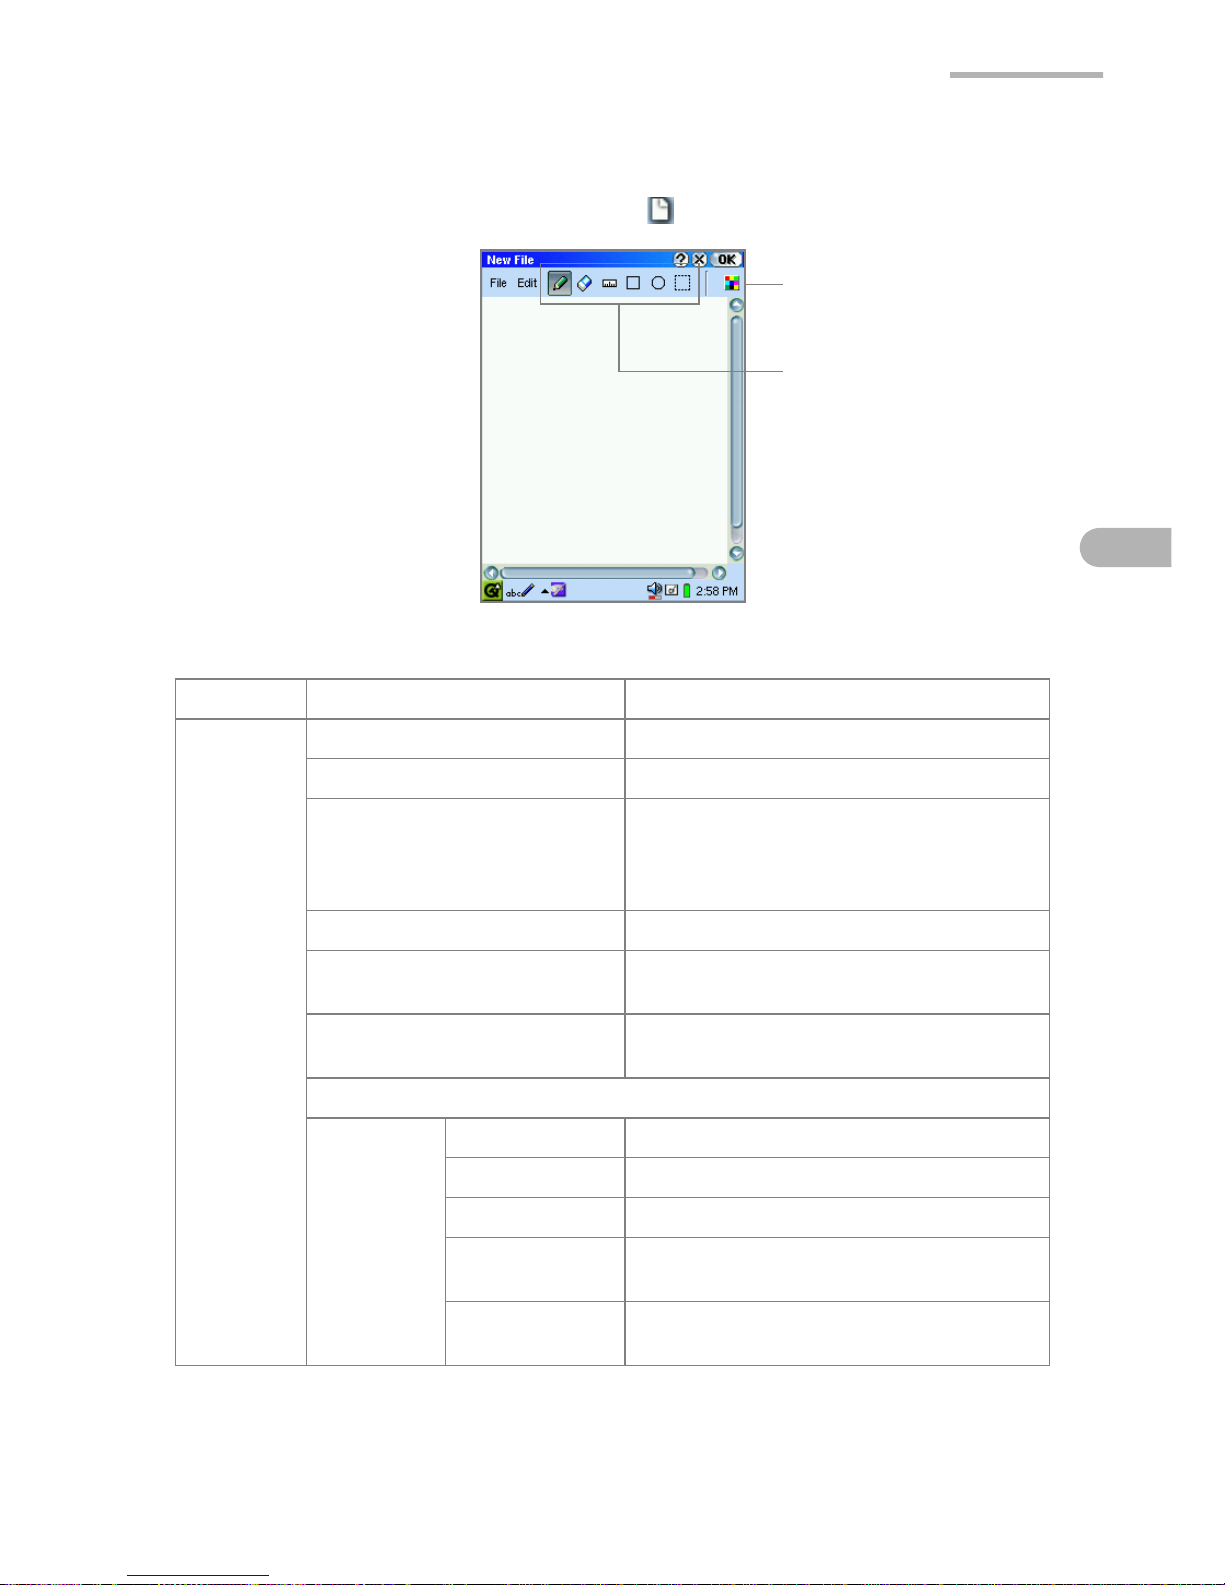
New File/Edit screen
1.
On the Index or Image view screen, tap .
File menu Save Saves the image file.
Edit menu Undo Undoes the last operation.
Clear image Deletes the selected part.
Drawing Tools Selects the tool: Pen, Eraser, Line,
Square, Circle and Select. These tools
can be selected by tapping the shortcut
icons on the Menu bar.
Line Color Specifies the line color.
Fill Color Specifies the background color for a
Square, Circle.
Line Width Specifies the line width: Small,
Medium, or Large.
Image Flip/Rotate
Flip Horizontal Flips the image horizontally.
Flip Vertical Flips the image vertically.
Rotate by 180 Rotates the image by 180°.
Rotate by 90 Rotates the image by 90°
counterclockwise.
Rotate by 45 Rotates the image by 45°
counterclockwise.
Shortcut icon for
selecting Line Color
Shortcut icons for
selecting Tools
Page 46
40 ImagePad
Writing memos by hand (creating new memos)
Writing memos
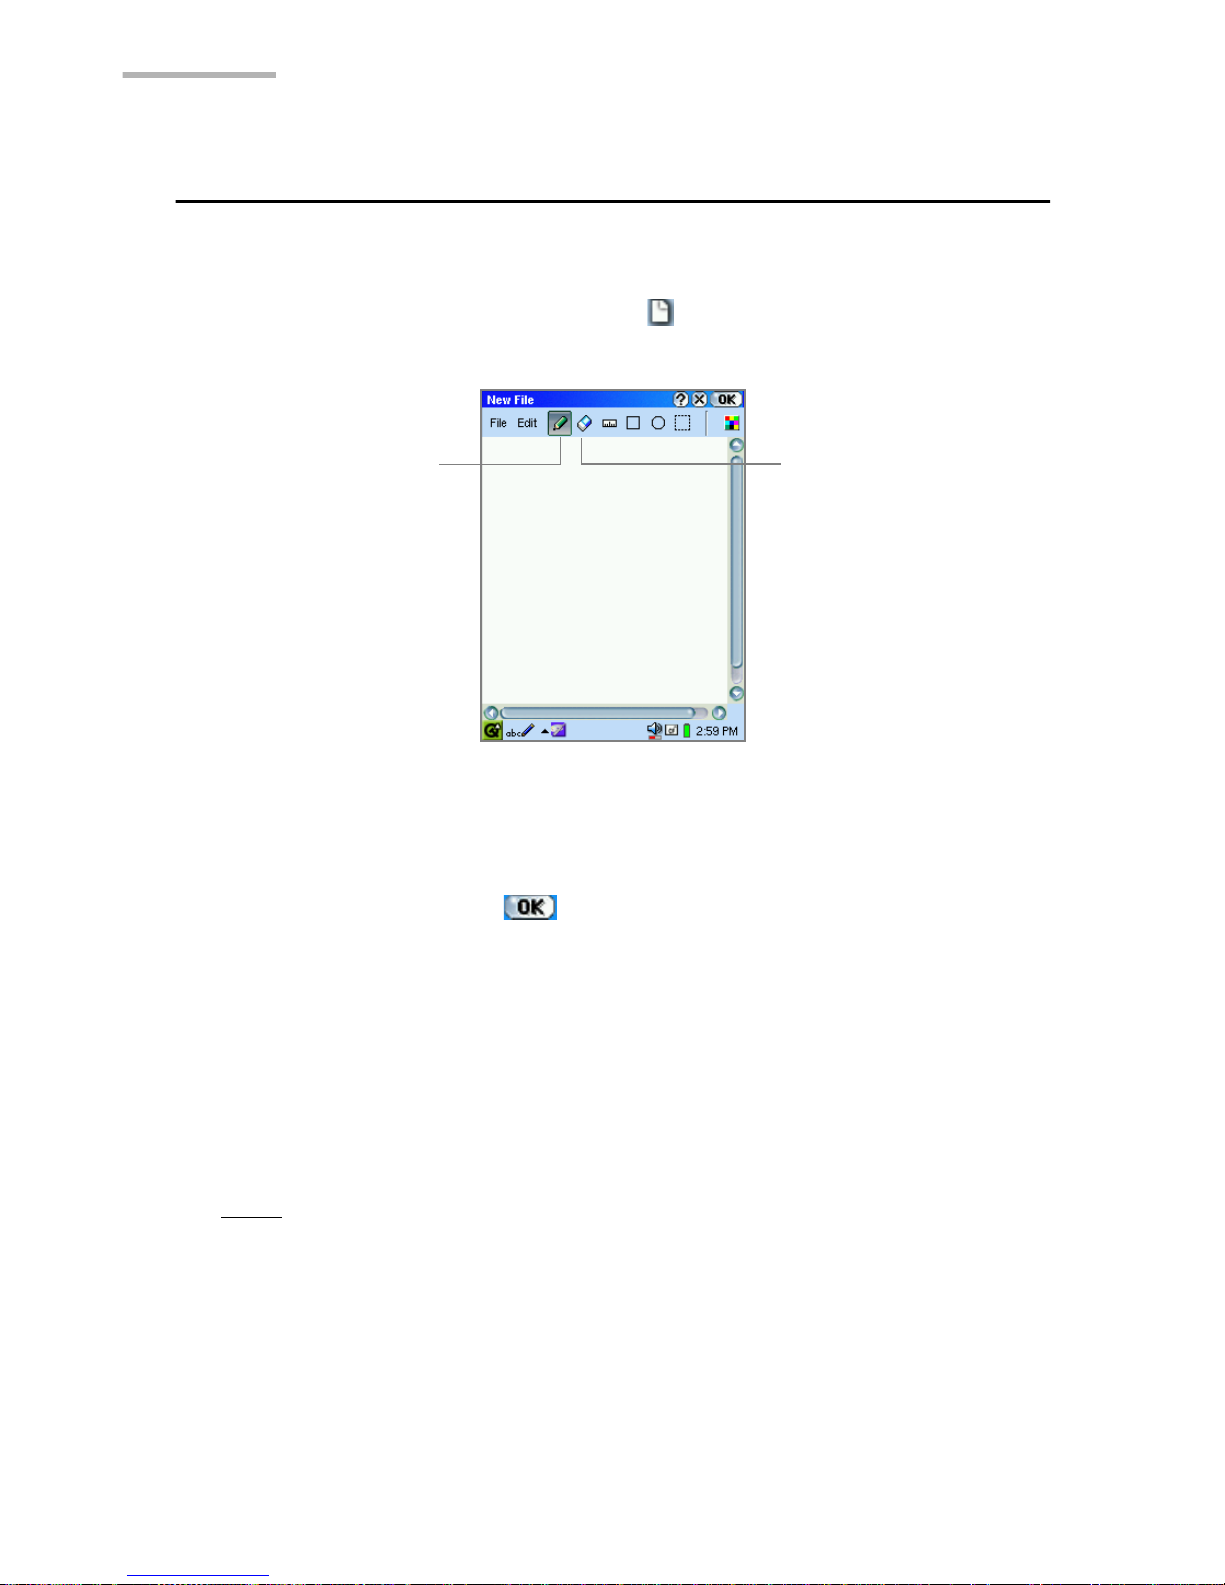
1.
On the Index or Image view screen, tap .
The new image screen will be displayed.
2.
Tap the Pen icon and write a memo.
To erase a portion, tap the Eraser icon and drag the stylus across the area to
erase.
3.
When finished writing, tap .
When an expansion memory card is inserted in the SL-5600, the screen for
selecting the destination will be displayed.
4.
Select the destination.
• The memo will be saved in the Image_Files folder with the filename showing
the date and time as follows: Date_Time (MMDD_HHMM).
• If the file is saved on the memory card it will be saved in CF Card (SD Card)/
Documents/Image_Files.
Note:
• The filename can be changed using the “Rename” function in the “File” menu
on the Index screen. (See page 42.)
• Files created by handwriting will be saved in the PNG format. Their size will
be 240 x 262 pixels.
Pen icon
Eraser icon
Page 47
ImagePad 41
Drawing straight lines, square, and circles
1.
To draw a straight line in a newly created image, tap .
To draw a square, tap .
To draw a circle, tap .
2.
Set the line color and fill color (see below).
3.
Use the stylus to draw the line, square, or circle.
Note: Because the screen is made up of pixels, inclined lines will not be
perfectly straight.
Selecting the pen and line color
Select the pen color, straight line color, and square or circle line color.
1.
Tap on the new image screen.
On the color palette, select the color by tapping it.
Selecting the Fill Color
You can select the interior color for squares and circles.
1.
On the new image screen, tap the “Edit” menu and then tap “Fill Color”.
2.
Tap the color palette to select the color.
Selecting the line width
1.
On the new image screen, tap the “Edit” menu, and then tap “Line Width”.
2.
Tap the desired line width.
Specifying an area and erasing its contents
1.
Tap on the new image screen.
2.
Drag the stylus to outline the area to be erased.
3.
Tap the “Edit” menu and then tap “Clear image”.
Page 48
42 ImagePad
Modifying a memo (image file)
You can edit files on the Edit screen.
1.
On the Index screen, highlight the file you want to edit by using .
2.
Tap .
The Edit screen will be displayed.
3.
When finished editing, tap .
Caution! Some image files may change to a lower resolution if edited. Make
a copy before editing an important file, and edit the duplicated file.
Note:
Image files in GIF format will change into PNG format when edited.
Deleting a memo (image file)
1.
On the Index screen, highlight the file you want to delete by using .
Or open the Image view screen of the file.
2.
Tap the “File” menu and then tap “Delete”.
A confirmation screen will be displayed.
3.
Tap “Yes” to delete.
Caution!
When you select a folder in step 1 above, all files (including nonimage files) are deleted. Check that no important files (of any type)
are in the folder selected to be deleted.
Changing filenames
1.
On the Index screen, highlight the file you want to rename by using .
2.
Tap the “File” menu and then tap “Rename...”.
The Rename screen will be displayed.
3.
Change the filename, then tap to save.
Page 49
ImagePad 43
Rotating the image 90° degrees and saving it
This procedure is used to rotate an image by 90° (counterclockwise) and save it in
the rotated condition. When a horizontal image like a photograph is rotated by 90°
and saved, it will appear larger in the full screen view.
1.
On the Index screen, highlight the file you want to rotate by using .
2.
Tap the “Option” menu, then tap “Rotate Left”.
A confirmation screen will be displayed.
3.
Tap “Yes” to save.
Note:
• You cannot perform this operation on the Image view screen.
• GIF format image files will change into PNG format when saved.
Viewing a single image
1.
On the Index screen, tap the image file you want to view.
The selected image will be displayed.
2.
Tap or press to return to the Index screen.
Magnifying or reducing the image
You can zoom in or out of a large-size image file on the Image view screen.
1.
In the Image view screen, tap (Zoom In) or (Zoom Out).
The image will be magnified or reduced.
Viewing the full screen display
1.
On the Image view screen, tap the “View” menu and then tap “Fullscreen”.
The image file display will fill the entire screen (full screen mode).
• Pressing or on the Cursor key ( ) will display the previous or next
image file. If the image is large, it will take time to convert the image.
• To return to the original view, press .
• Images that are larger than the screen will be reduced to fit.
Page 50
44 ImagePad
Rotating or reversing images
1.
On the Image view screen, tap the “View” menu and then tap “Rotate by 180”,
etc.
The image file will be rotated or reversed according to the command.
Displaying a slideshow of the files
All image files in a folder will be opened once from the top of the list in the full screen
mode. Be sure to collect image files into a folder and arrange them in an order by
renaming them, for example, with “01” or “02”, beforehand.
1.
On the Index screen, tap the Folder menu and select the folder including image
files you want to display a slideshow.
2.
Tap the “Option” menu and then tap “Slideshow”.
When the slideshow is finished, the display returns to the Index screen.
• If the Auto-play option is unchecked, the first file on top of the list will be
opened. (For information on the Auto-play option and others, see below.)
• When the Auto-play option is unchecked, pressing or on the Cursor
Key will display the next file, while pressing or will display the previous
file.
• To stop the slideshow, press . The display returns to the Index screen.
Page 51
ImagePad 45
Changing Image view screen and slideshow
settings, and the Cancel key actions
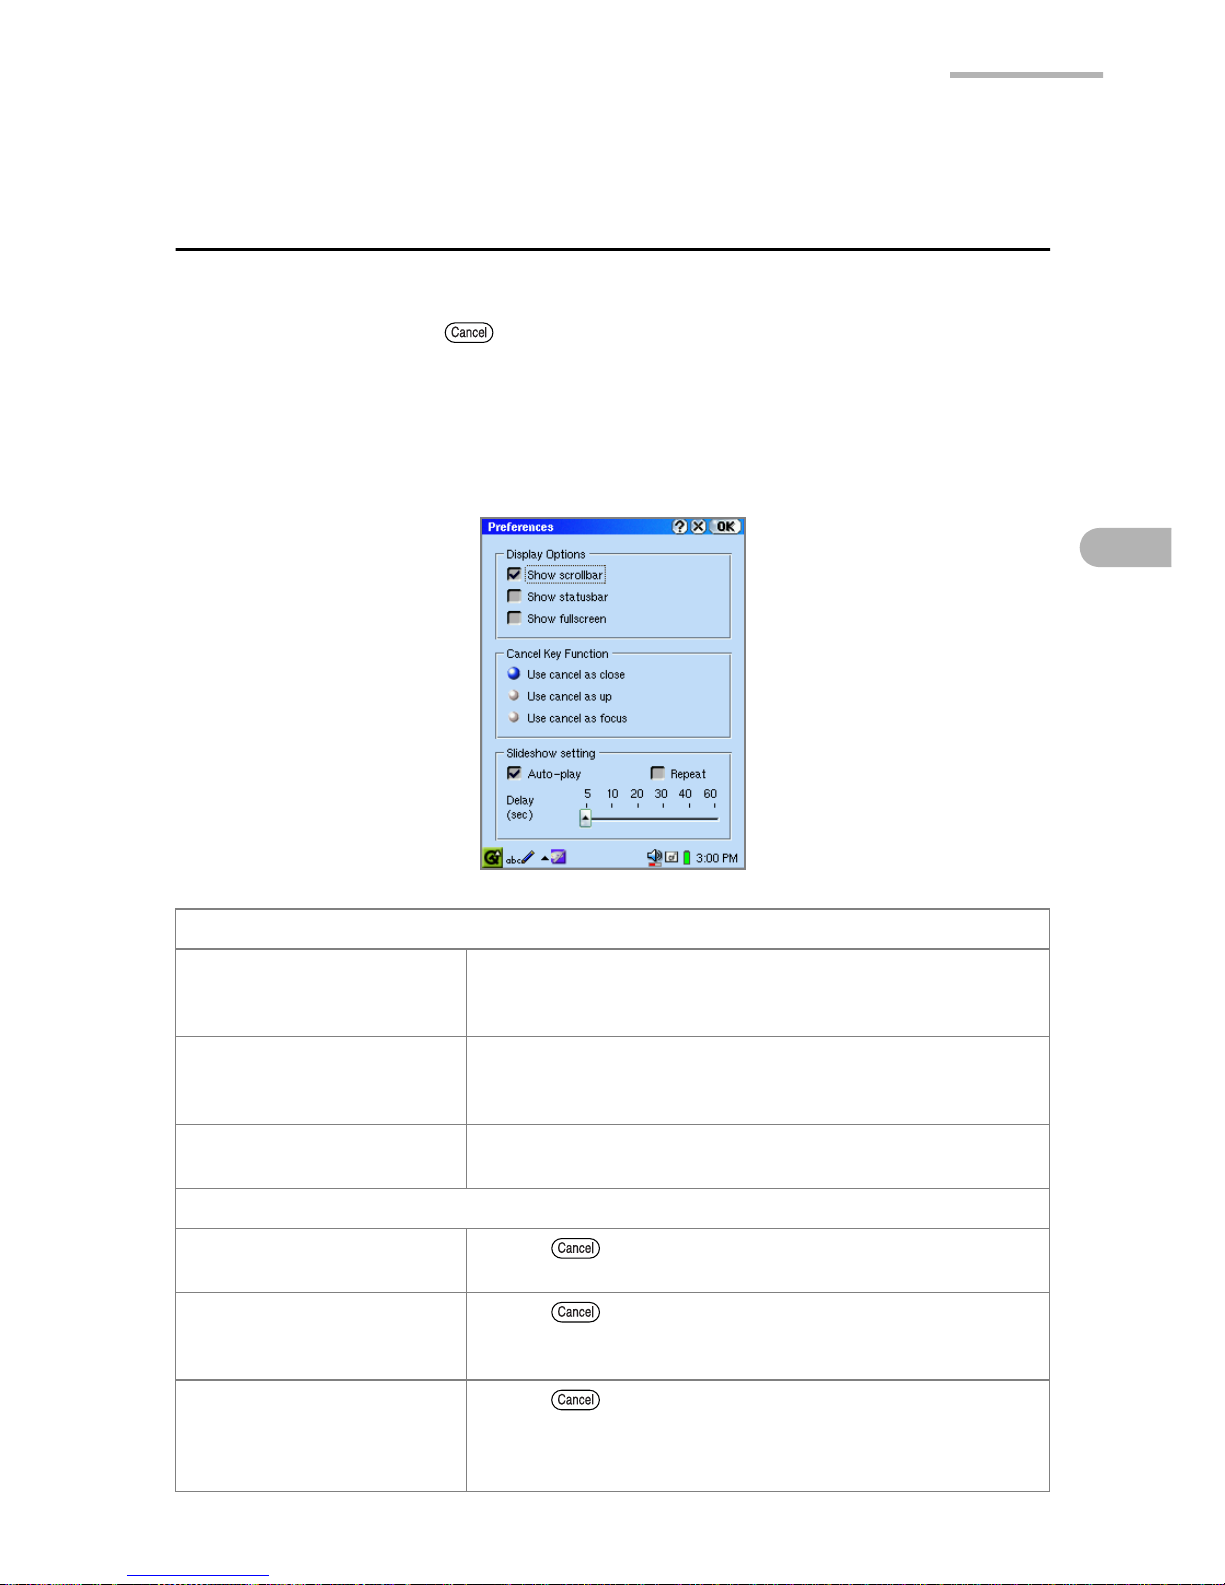
You can remove or display the scroll bar or status bar in the Image view screen and
change the action of the key in the Index screen.
Changing the action of the Cancel key is useful when you have files sorted into
various folders, because it allows you to search for files using key operations.
1.
On the Index screen or Image view screen, tap the “Option” menu, and then tap
“Preferences”.
Display options
Show scrollbar Remove the checkmark when you want to widen the
Image view screen by displaying it without the scroll
bar.
Show statusbar Place a checkmark to display the status bar on the
Image view screen, showing information like the
image size of the opened file.
Show fullscreen Place a checkmark to always open files in the full
screen mode.
Cancel Key Function
Use cancel as close When is pressed on the Index screen, this
application will be closed.
Use cancel as up When is pressed on the Index screen, the
display changes to an Index screen for the folder
above the current folder.
Use cancel as focus When is pressed on the Index screen, it cycles
the focus through Folder menu, History button, etc. In
this situation, focused item can be selected through
key operations by pressing the SELECT button.
Page 52
46 ImagePad
Note:
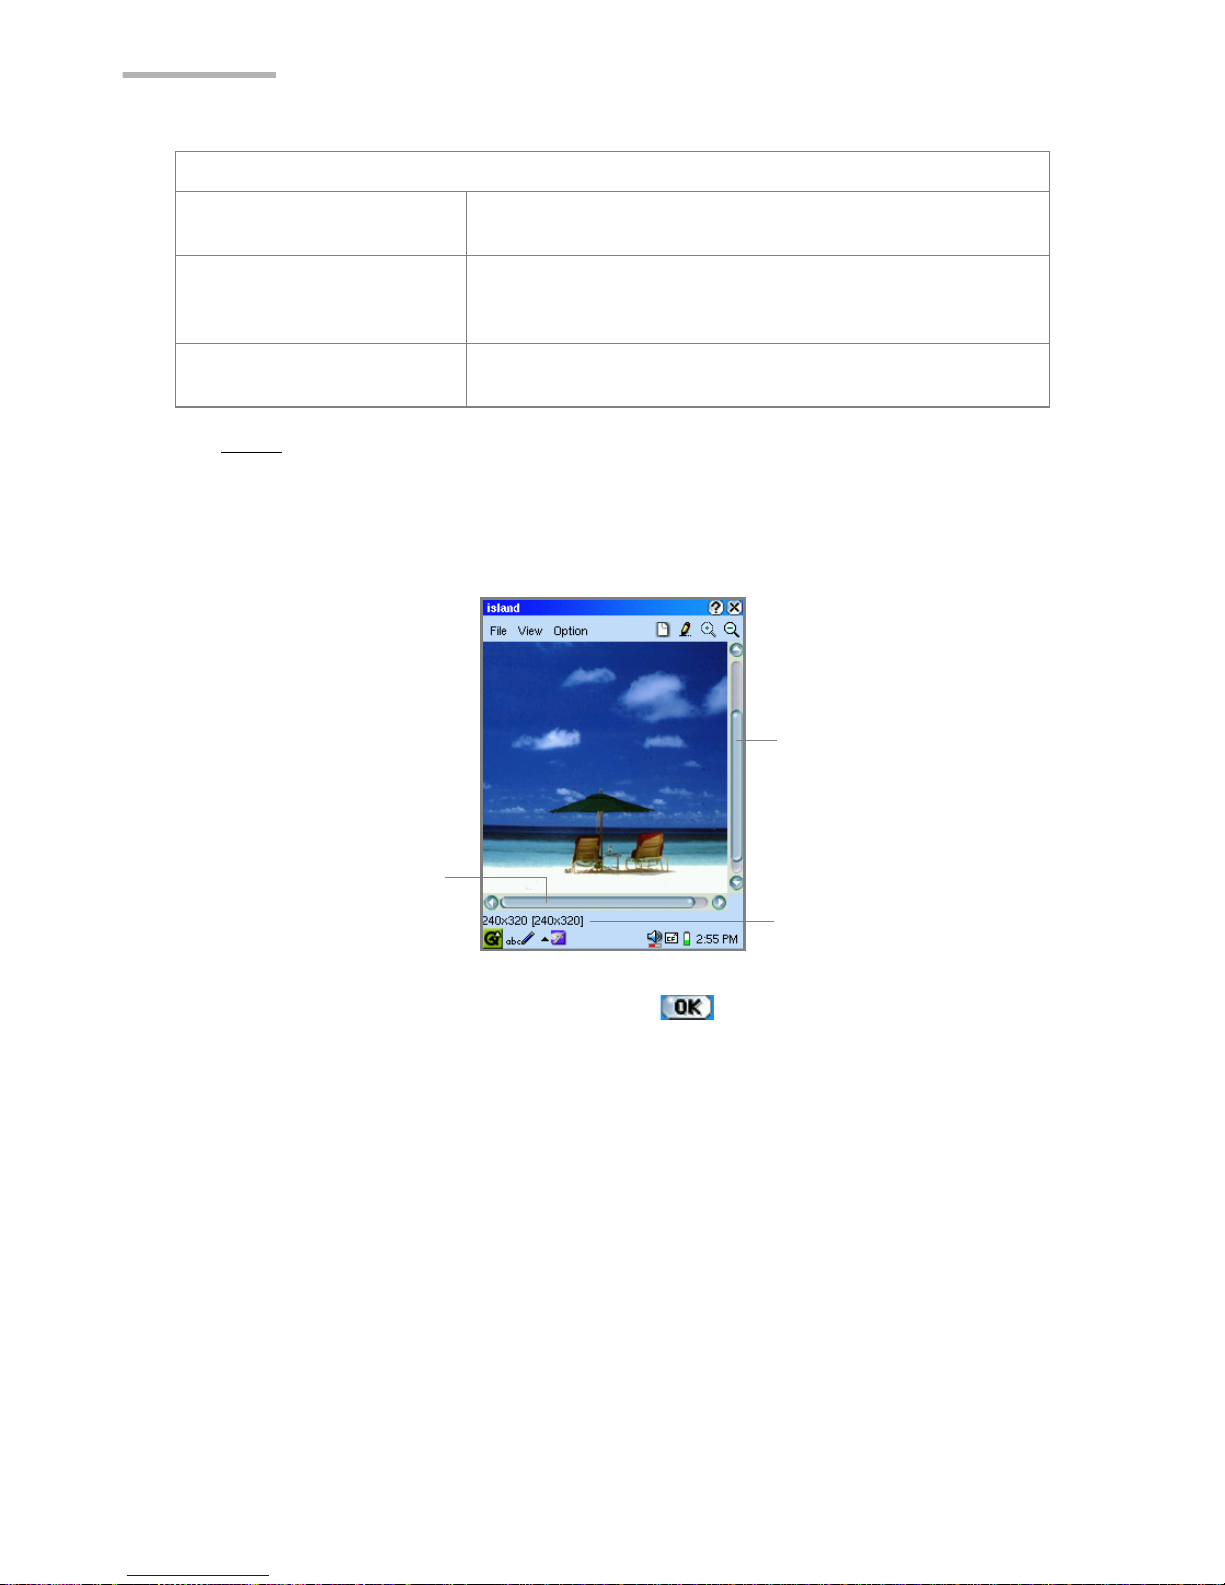
When the scroll bar and status bar are set to display, the Image view
screen will look like the example below.
In the full screen mode, the scroll bar and status bar will not be
displayed.
2.
When finished changing the settings, tap to save them.
Slideshow settings
Auto-play checkbox If checked, files will be automatically opened after the
present file has displayed a preset amount of time.
Repeat checkbox If checked, files will be automatically opened
repeatedly after the present file has displayed a preset
amount of time.
Delay time slider If the Auto-play option is checked, move the slider to
adjust the delay time before the next file is displayed.
Scroll bar
Status bar
Scroll bar
Page 53
ImagePad 47
Switching the view mode on the Index Screen
Changing from Thumbnail view to List view
1.
On the Index screen, tap the “View” menu, then tap “List”.
Tapping “Thumbnails” on the “View” menu will return to the thumbnail view.
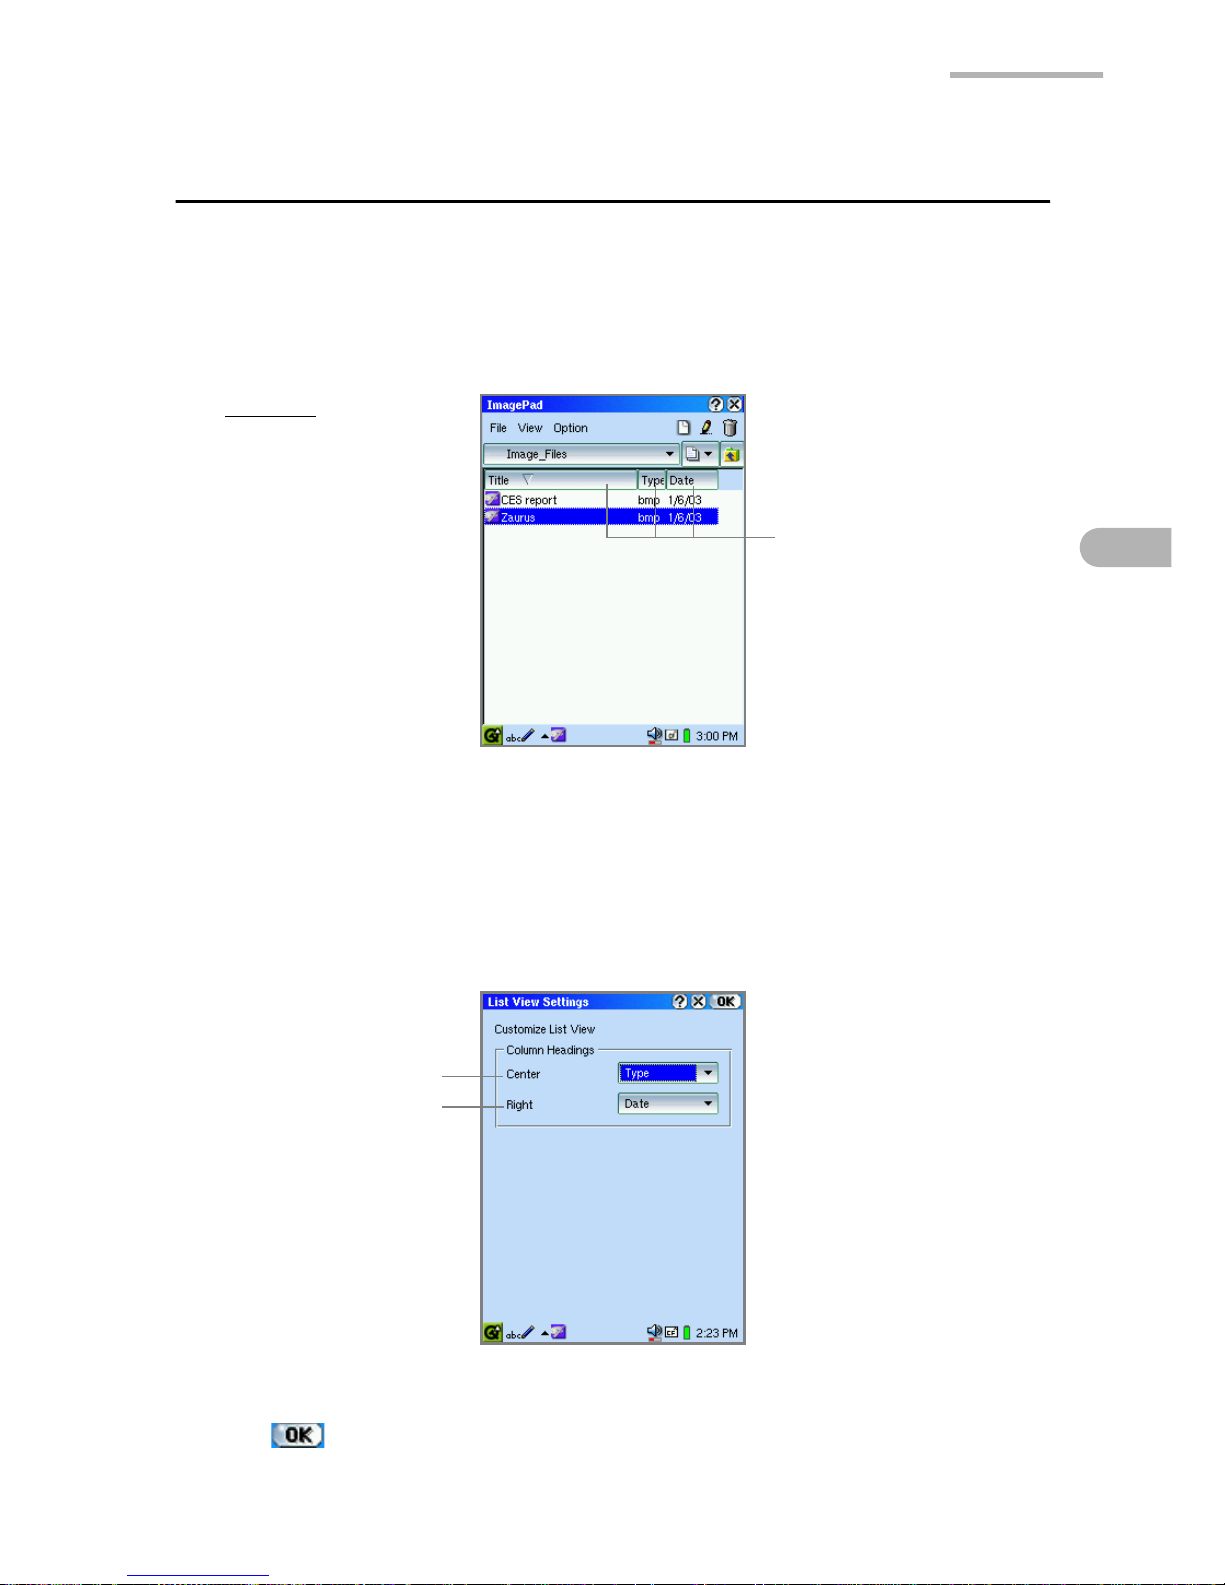
Changing the Items displayed on the list screen
The display items of the center and right columns can be changed to other items.
1.
On the Index screen, tap the “View” menu and then tap “List View Settings...”.
The List View Settings screen will be displayed.
2.
Tap each drop-down list button and select the item to be displayed.
3.
Tap to save the settings.
Column buttons
Tap to sort the files by
the column item.
List view
Center column
Right column
Page 54
48 Text Editor
Text Editor
The Text Editor application allows you to manage (create, edit) a simple text file and
synchronize with Microsoft® Outlook® to transfer its note entries.
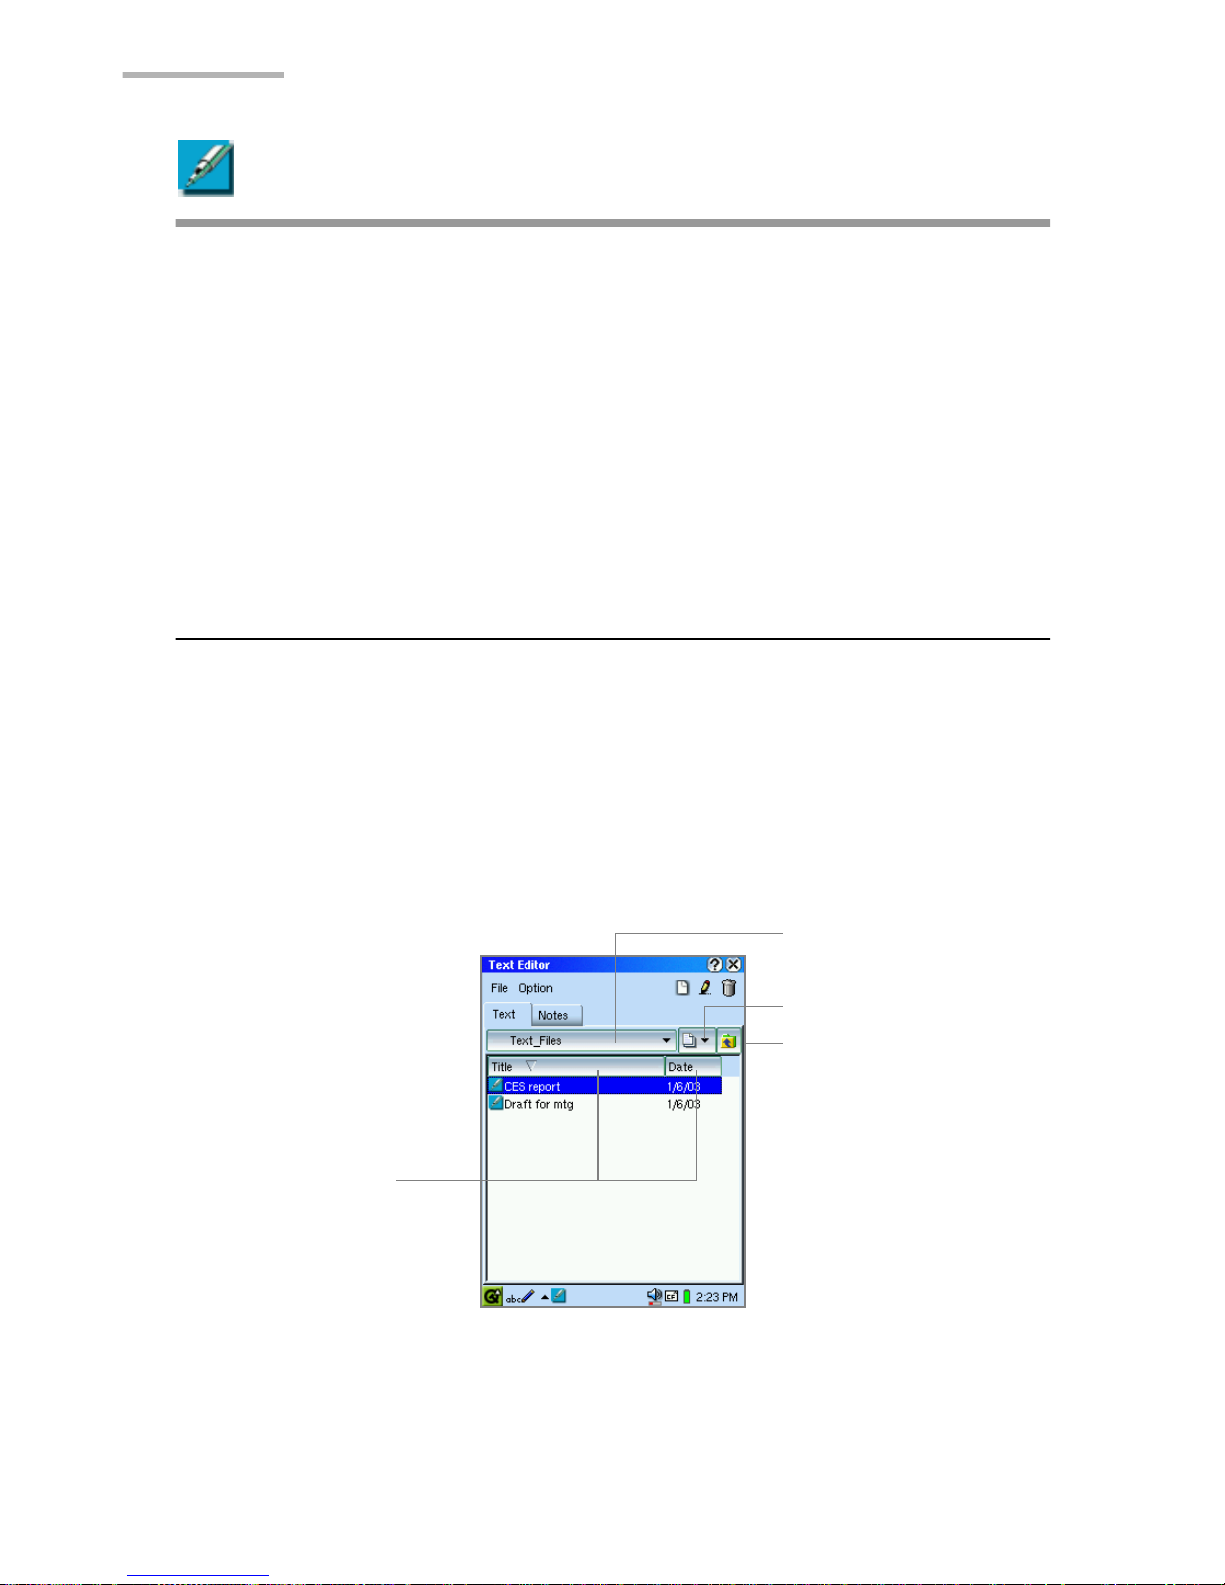
This application has two Index screens: Text Index screen and Notes Index screen.
By default, created text files are saved in the Text_Files folder in the Internal Flash
memory.
The Notes Index screen manages note entries you can synchronize with the
Microsoft Outlook on a PC using synchronization software (provided in the CDROM). The files in the Text_Files folder cannot be viewed from the Notes Index
screen and cannot be synchronized with a PC.
Overview
Use the tabs to switch between Index screens.
Index screen (Text tab)
1.
On the Applications Home screen, tap the “Text Editor” application icon.
The Text Index screen will be displayed.
The Text Index screen displays a list of text files you can open.
Column buttons
Tap to sort files.
Folder menu
Moves to the folder one
level upper than the
current folder.
History button
Page 55
Text Editor 49
Note:
To view the contents of a text file, tap the desired text file. The file will be
opened so that you can edit it.
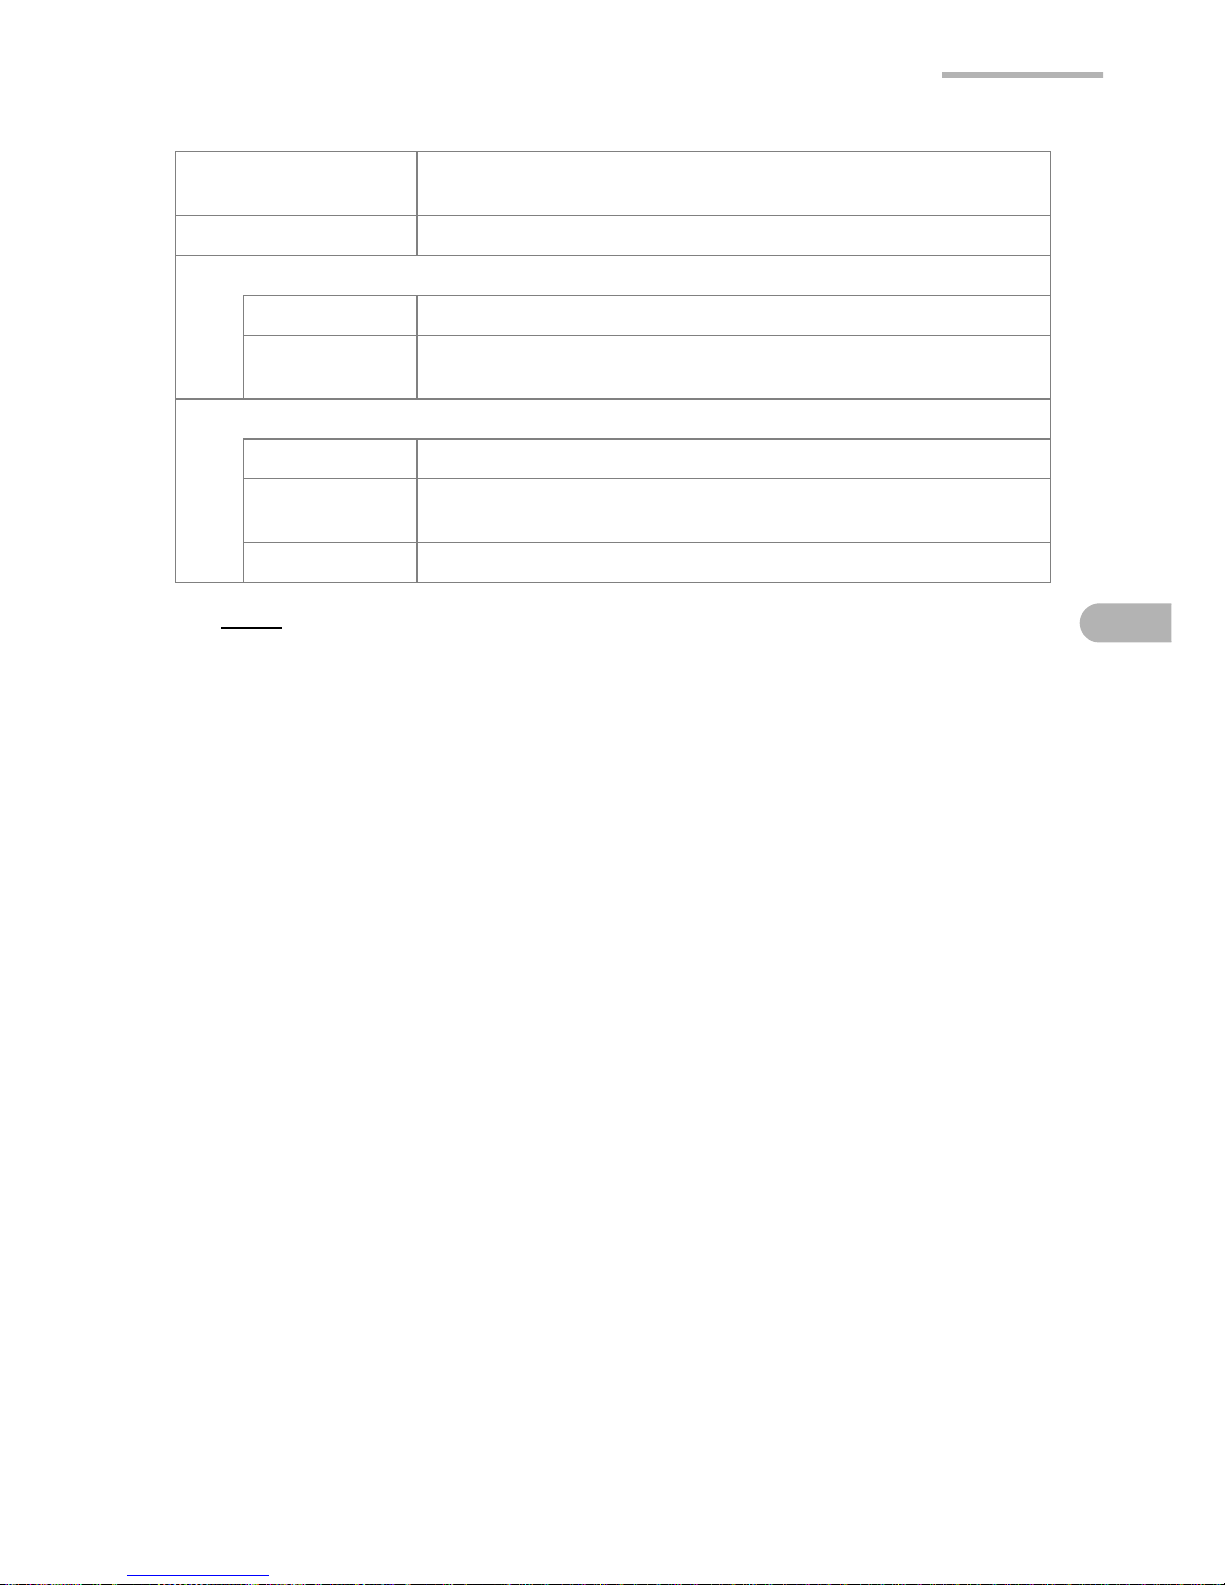
Folder menu Tap to switch folders to display text files stored in other
folders or on a memory card.
History button Tap to list the files you have previously opened.
File menu
Rename Renames the file name.
Convert to
Notes
Copies a text file and saves it as a Notes file.
Option menu
Preferences Defines how the Cancel key operates on the Index screen.
Code
Preferences
Selects the character code for opening or saving files.
Help Displays online help.
Page 56
50 Text Editor
Index screen (Notes tab)
1.
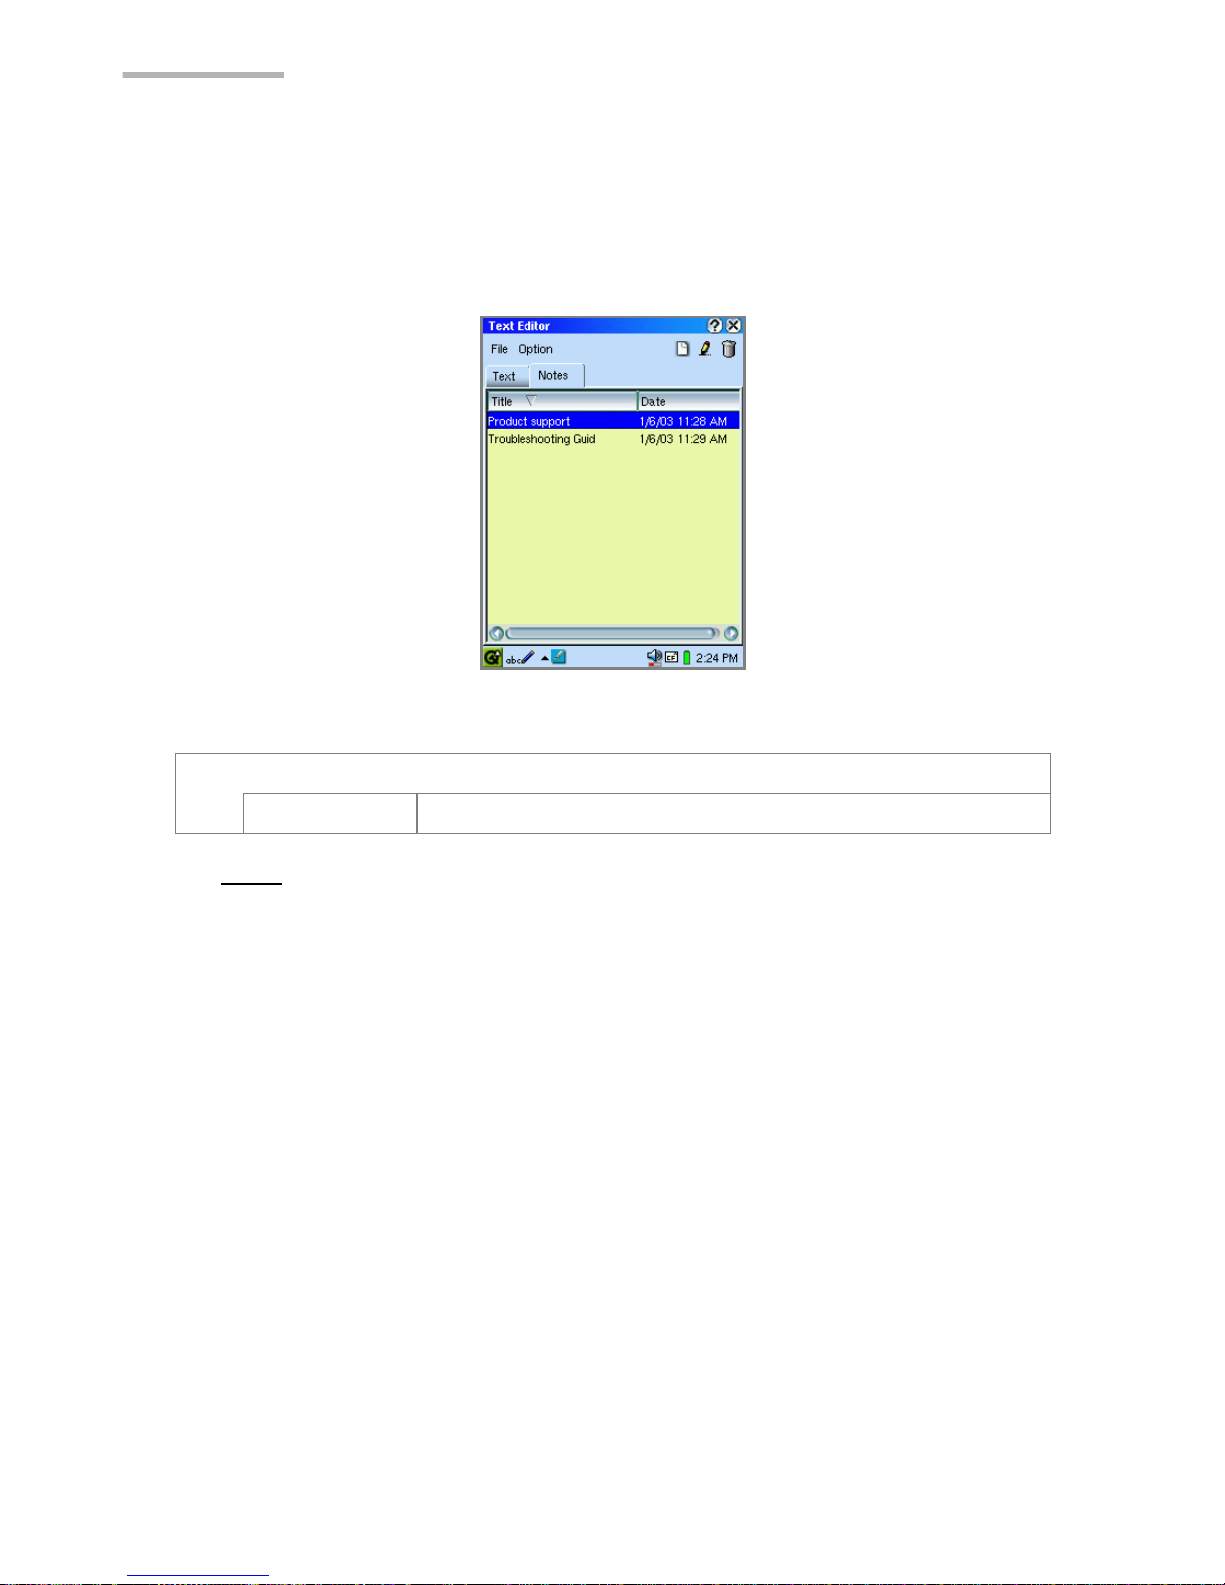
On the Text Index screen, tap the Notes tab.
The Notes Index screen (grounded in yellow) appears displaying a list of note
entries for synchronizing with Microsoft Outlook on a PC.
Note: To view a note entry, tap the file and it will be opened allowing you to edit
it.
File menu
Convert to Text Copies a note entry and saves it as a text file.
Page 57
Text Editor 51
New/Edit screen (Text/Notes)
1.
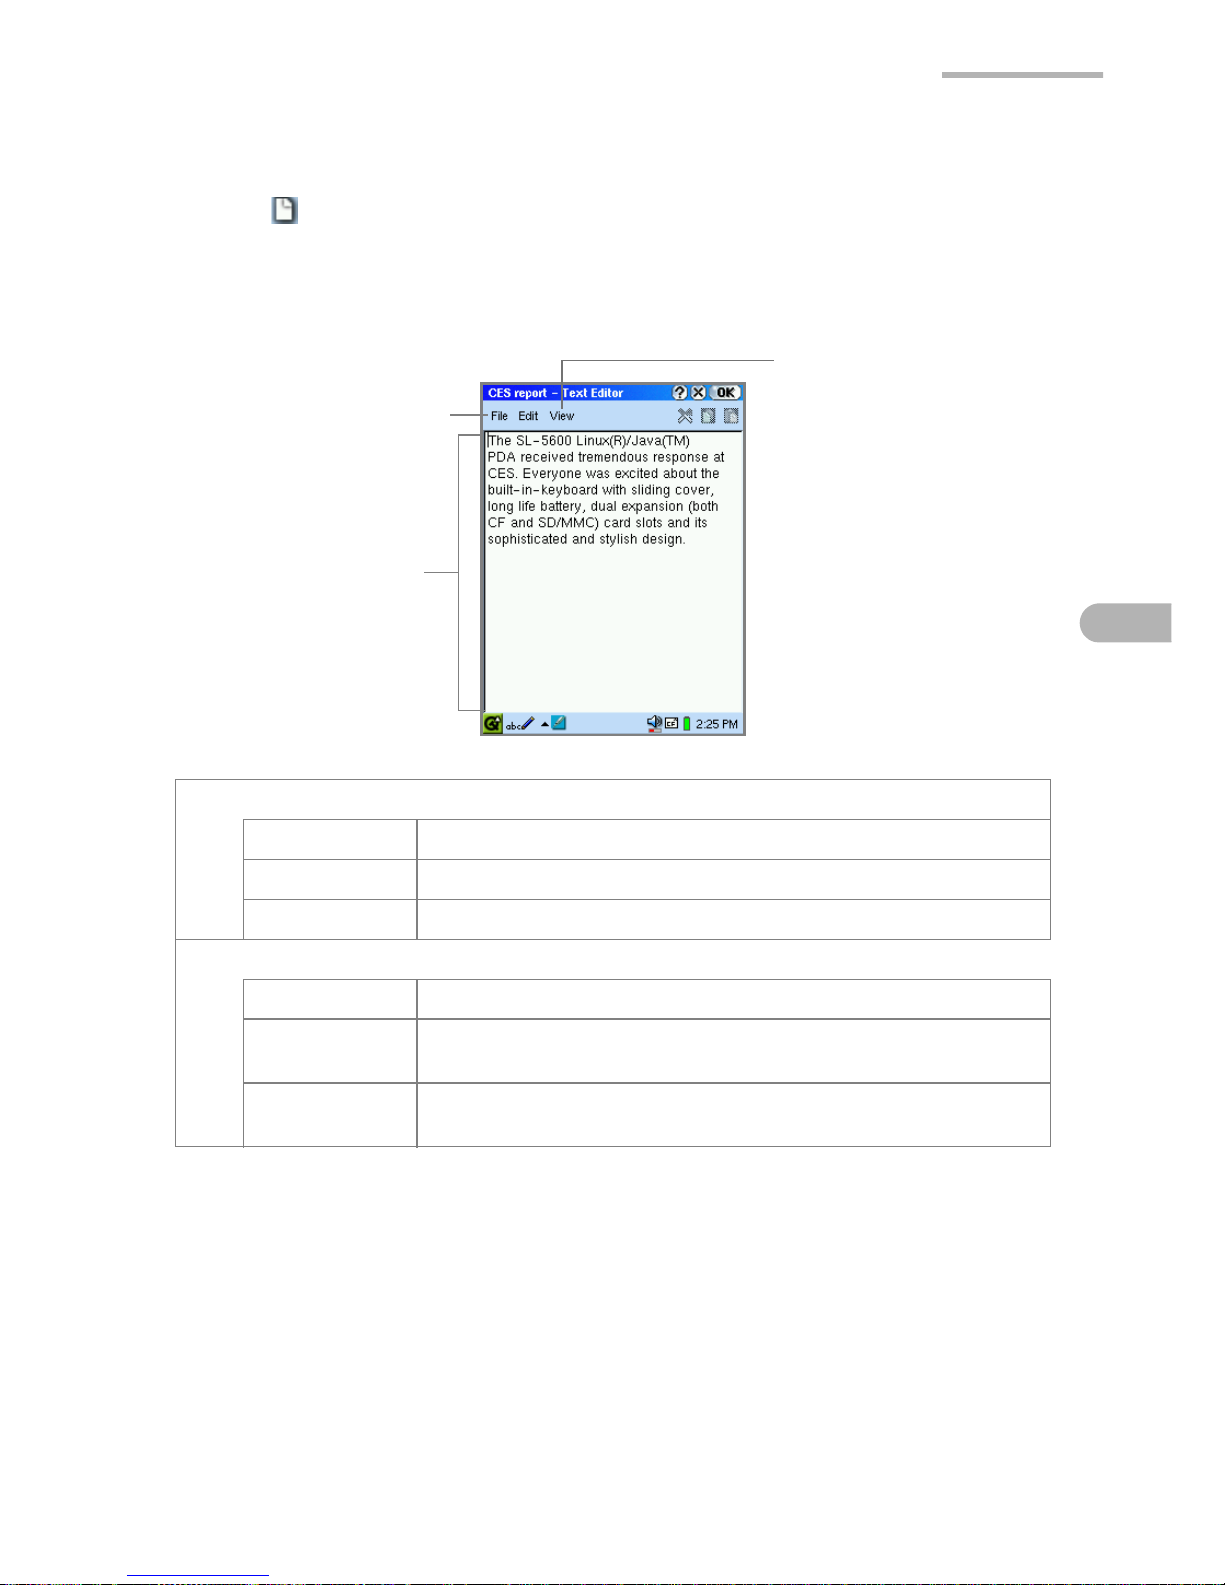
Tap to create a new file/entry or tap the file on the Index screen (with the
Text or Notes tab).
The New/Edit screen according to the tab will be displayed. (Screens for Notes
are displayed in yellow.)
File menu
New Creates a new text file or note entry.
Save Saves the current file/entry.
Save As Saves the current file as a new file (for Text tab only).
View menu
Font Changes the display font size.
Wrap lines When checked, carriage return is inserted into the text
according to the width of the screen.
Code
Preferences
Selects the character code for opening or saving files (for
Text tab only).
Edit areaEdit area
File menu
View menu
Page 58
52 Text Editor
Creating a new text file (Text Index screen)
1.
Tap the Text tab.
The Text Index screen will be displayed.
2.
Tap .
The New Text screen will be displayed.
3.
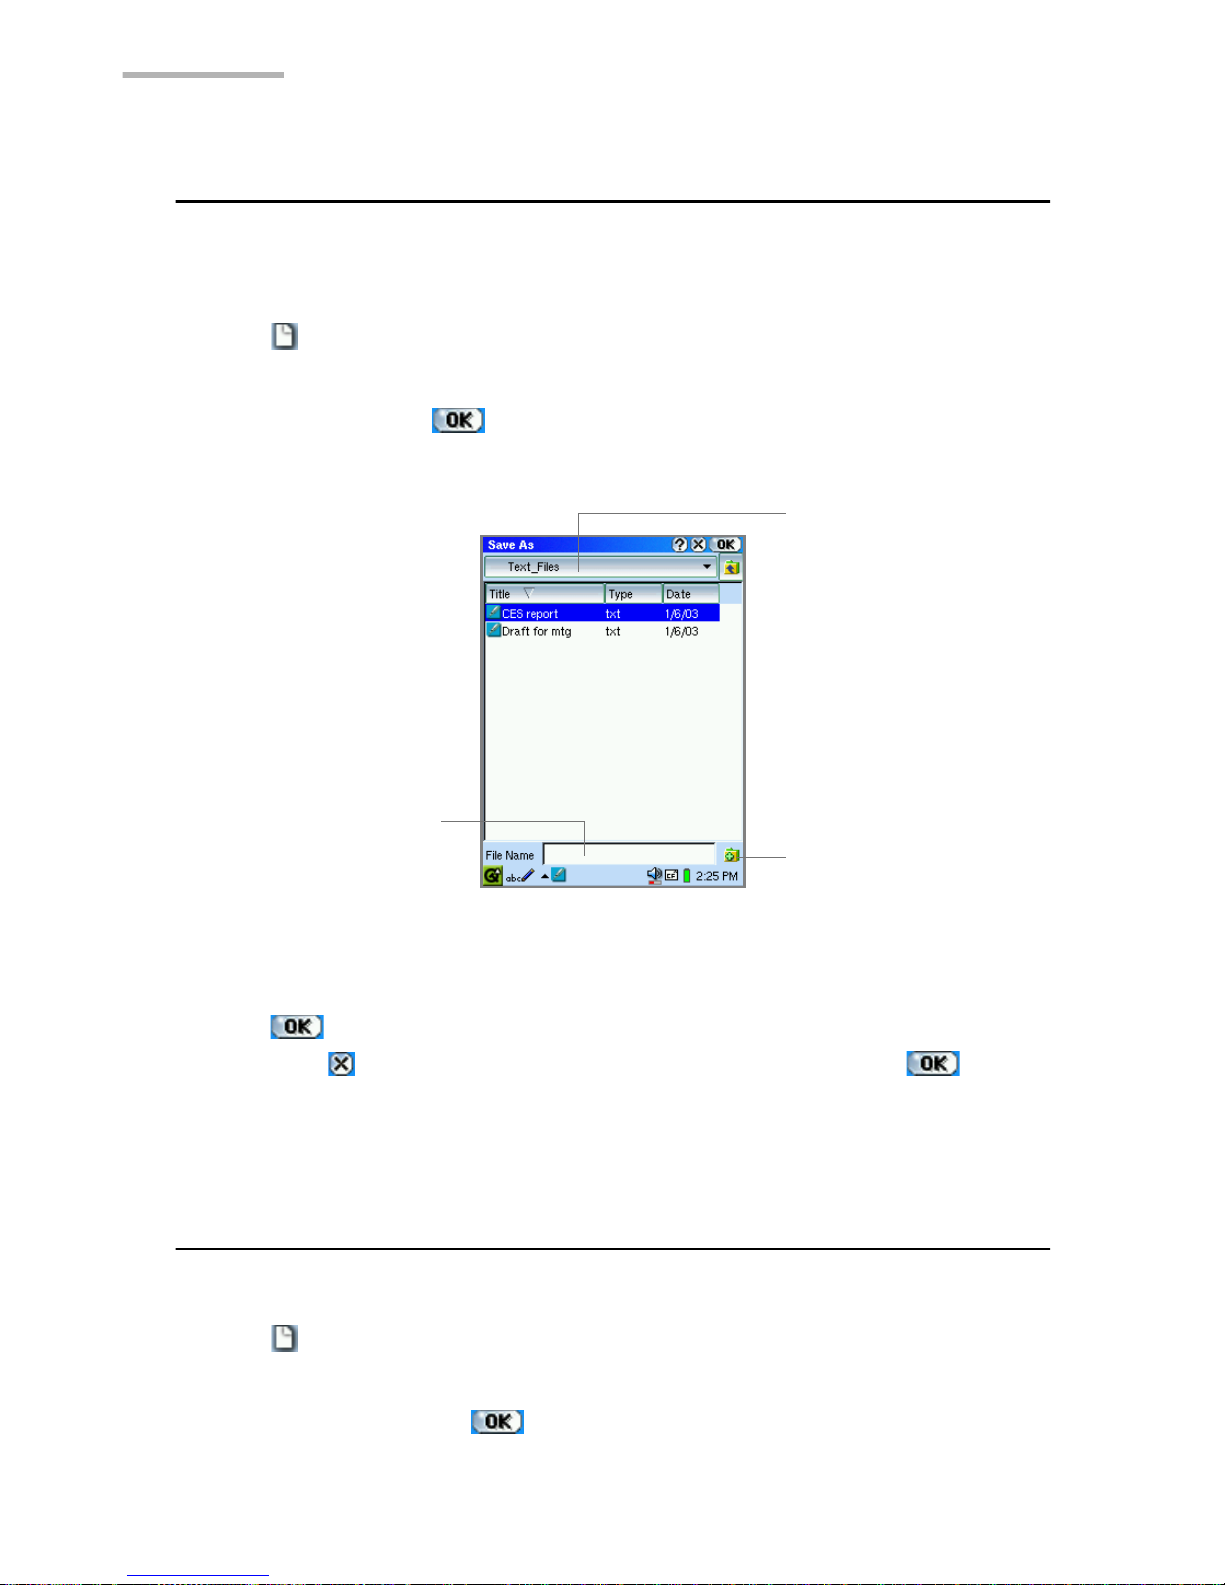
Enter text, then tap .
The screen for entering a new file name will be displayed.
4.
Select the desired folder to save a new file using Folder menu, etc.
5.
Enter a file name in the File name entry field.
6.
Tap to save the new file.
If you tap , the screen returns to the New Text before tapping in step
3. (The text file has not been saved yet.)
Creating a new note entry (Notes Index
screen)
1.
Tap the Notes tab to display the Notes Index screen.
2.
Tap .
The New Notes screen will be displayed.
3.
Enter text and then tap to save the new note entry.
File name entry field
Folder menu
Creates a new folder.
Page 59
Text Editor 53
Note:
• The new note entry will be named automatically with the first character(s) (up
to 20) entered in the body of the note.
• Note entries are created for data synchronization and cannot be shown on the
Files Home screen.
Modifying a text file/note entry
1.
On the Text or Notes Index screen, tap the file/entry you want to edit.
The Edit screen will be displayed
2.
Edit the text file/note.
3.
Tap to save the modification.
The display returns to the Text/Notes Index screen.
Deleting a text file/note entry
1.
On the Index screen, highlight the text file or note entry you want to delete by
using .
2.
Tap .
A confirmation message will be displayed before the text file/note entry is
deleted.
3.
Tap “Yes” to delete.
The text file/note entry will be deleted.
Caution! When you select a folder in step 1 above, all files (including non-text
files) are deleted. Check that no important files (of any type) are in
the folder selected to be deleted.
Duplicating a text file to/from a note entry
You can copy a text data between a text file and note entry, and save it.
1.
On the Text or Notes Index screen, highlight the text file or note entry you want
to convert by using .
2.
Tap the “File” menu and then tap “Convert to Notes” or “Convert to Text”.
Page 60
54 Text Editor
When you select “Convert to Notes”:
The created note entry will be displayed in the Notes Index screen.
When you select “Convert to Text”:
The screen for entering a file name appears.
Modify the file name, if necessary and then tap to save the text file.
Note:
When you convert a text file using the “Convert to Notes” menu, the file
name of the text file will be the first line of the converted note entry.
Setting up the wrap lines
1.
On the New/Edit screen, tap the “View” menu and then tap “Wrap lines”.
• The wrap lines setting helps you to read texts easily.
• To cancel the wrap lines setting, follow step 1 and uncheck “Wrap lines”.
Renaming a text file
1.
On the Text Index screen, highlight the text file you want to rename by using .
2.
Tap the “File” menu and then tap “Rename...”.
The Rename screen will be displayed.
3.
Modify the current file name.
4.
Tap to save the new name.
Page 61
Text Editor 55
Defining the Cancel key function for the Text
Index screen
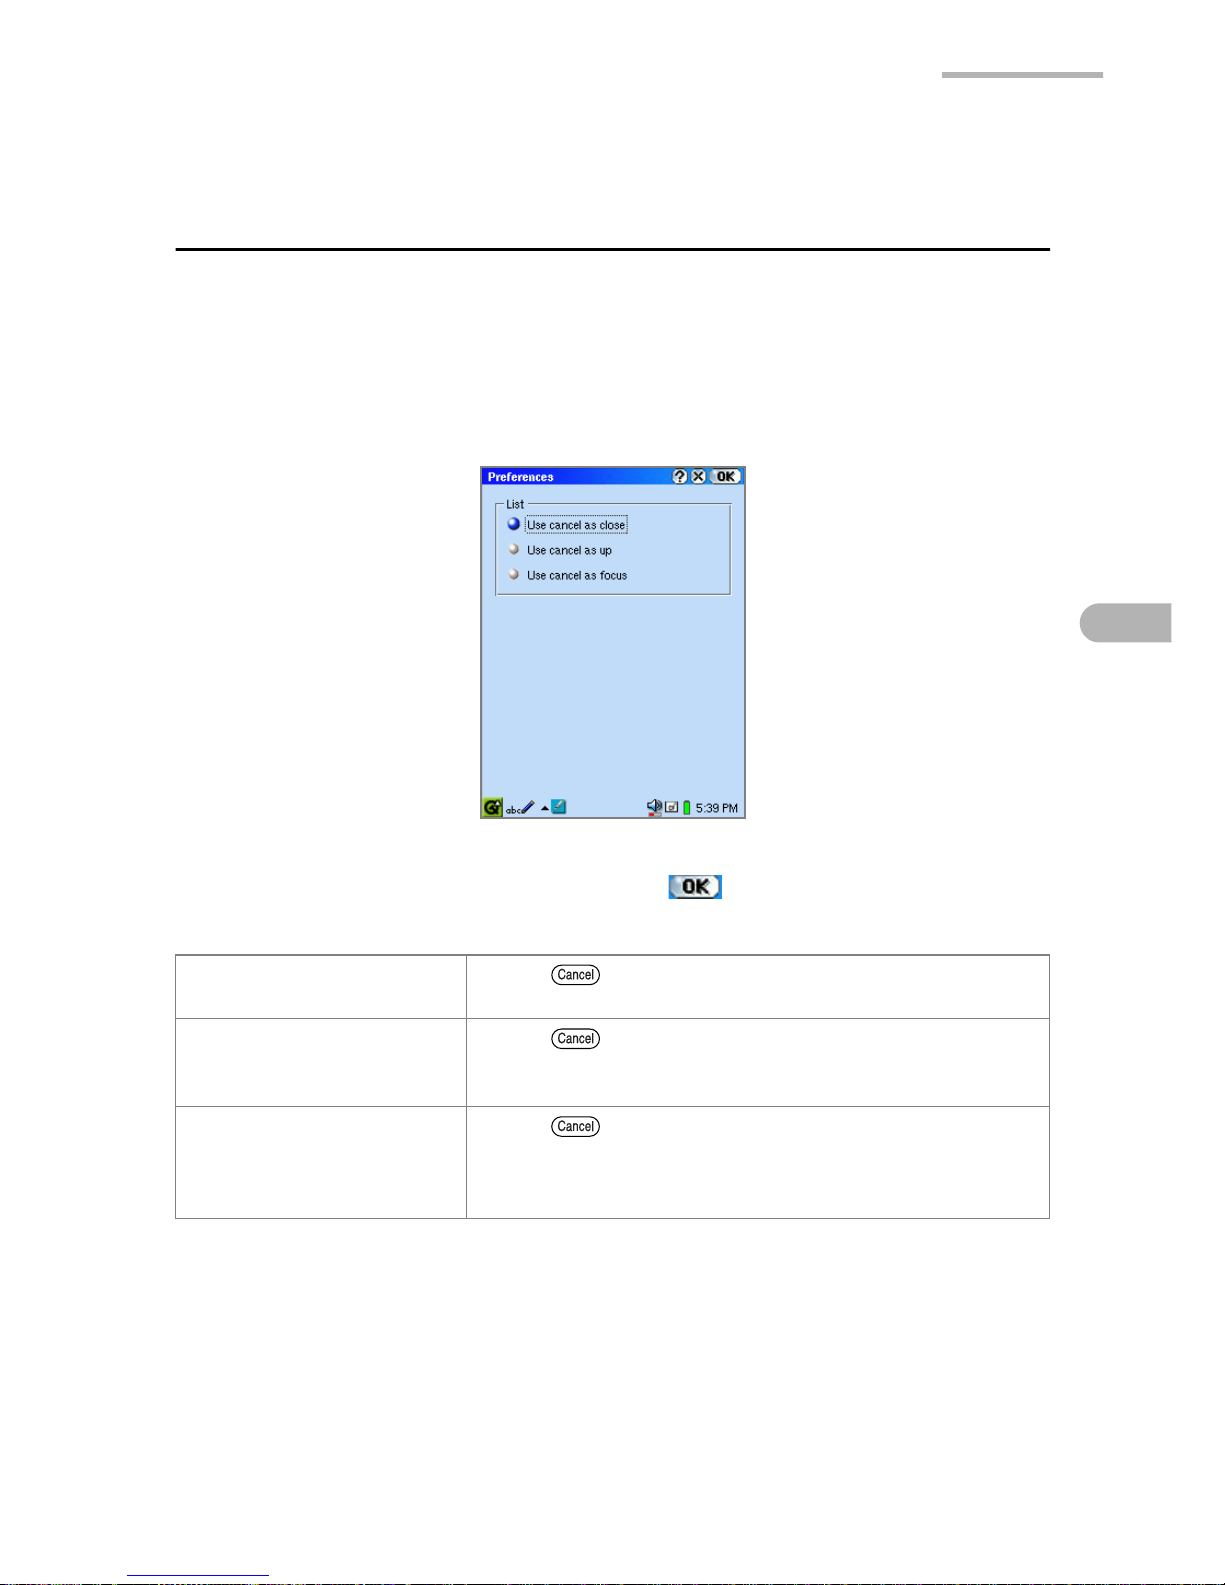
You can define how the Cancel key operates on the Text Index screen. There are
three choices of actions.
1.
On the Text Index screen, tap the “Option” menu and then tap “Preferences...”.
The Preferences screen will be displayed.
2.
Tap the desired radio button and then tap .
Use cancel as close When is pressed on the Index screen, this
application will be closed.
Use cancel as up When is pressed on the Index screen, the
display changes to an Index screen for the folder
above the current folder.
Use cancel as focus When is pressed on the Index screen, it cycles
the focus through Folder menu, History button, etc. In
this situation, focused item can be selected through
key operations by pressing the SELECT button.
Page 62
56 Text Editor
Selecting the character code for opening or
saving files
Set up the type of character code used when transferring files between this unit and
a PC.
Select “Latin-1” for transferring files with a Windows PC. The Latin-1 can also be
selected if the unit is used without a PC.
1.
On the Text Index screen, tap the “Option” menu and then tap “Code
Preferences”.
The Code Preferences screen will be displayed.
2.
Tap the following character code drop-down list button.
3.
Tap to save the settings.
Open file as Correctly opens files transferred from a PC
depending on the character code selected.
Save file as Saves files by specifying character code for the
transfer destination (PC).
(Created files can be opened correctly on the PC.)
Page 63
Media Player 57
Media Player
The Media Player application allows you to play MPEG1 video files, MP3 and WAV
music files in the Internal Flash memory or on a memory card.
You can hear the media sound from the built-in speaker on the back of the unit or
from a headphone attached to the stereo headphone jack (diameter of the plug: 3.5
mm).
Note:
• Be aware of the volume setting. Do not damage your ears. Tap on the
taskbar and adjust the slider before playback, or press ( ) during
playback.
• When using a headphone, you can hear all sounds including screentaps and
alarms from the headphone.
• Some files (such as MP3 music files of MPEG2.5 format) cannot be played
back with this application.
• The Media Player application may close automatically if multiple applications
are running simultaneously.
• The media image may be distorted and the sound may be interrupted during
playback if other programs are running simultaneously.
• Do not insert or remove the memory card during playback.
• For detailed information on how to attach and remove the memory card, see
the separate Start-up Guide.
Overview
Index screen
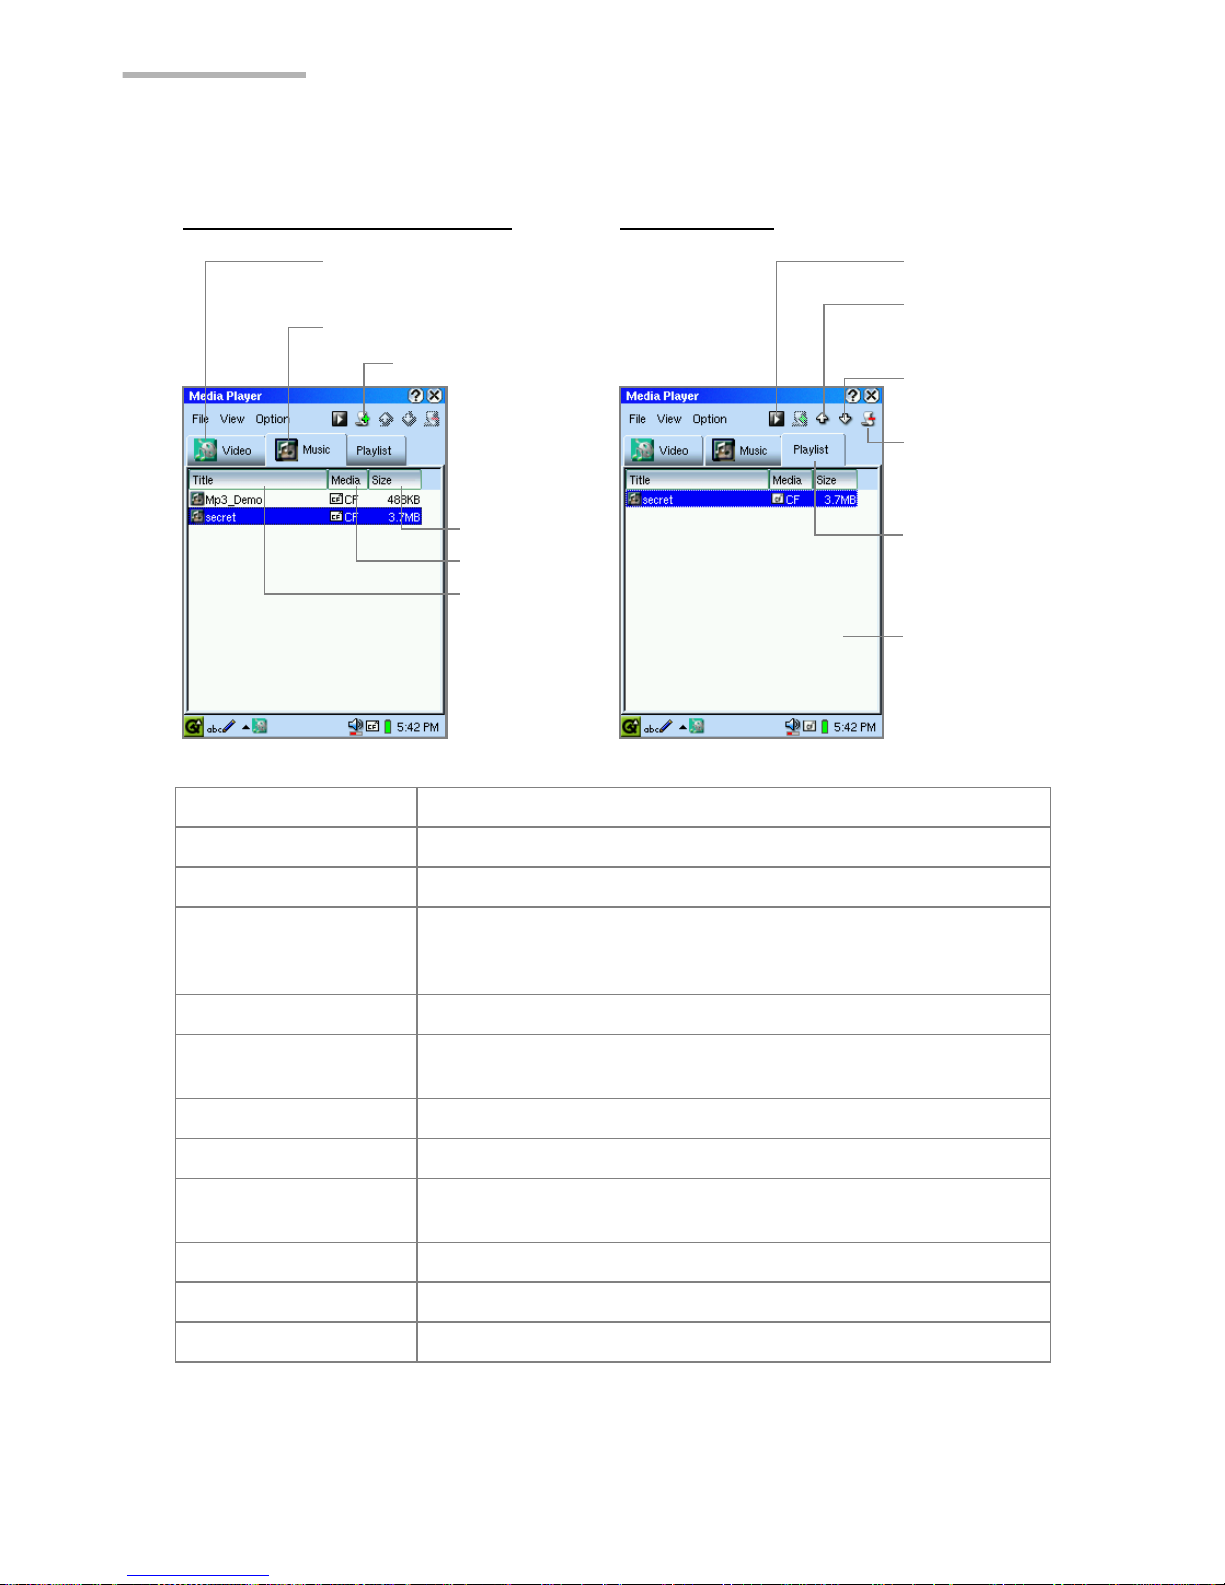
The Media Player application has three tabs on the Index screen: Video, Music,
Playlist.
1.
On the Applications Home screen, tap the “Media Player” application icon.
Page 64
58 Media Player
The Index screen appears.
Video tab Tap to display only the video files.
Music tab Tap to display only the music files.
Playlist tab Tap to display the files registered in the Playlist.
File List area Displays the files (mpg, mpeg, mp3) which are registered
on the Internal Flash memory and on the memory cards
inserted into the card slots.
Play button Tap to play the file selected or to play the Playlist.
“Add to playlist”
button
Adds a file to a Playlist.
Up button Moves the selected file up in the Playlist.
Down button Moves the selected file down in the Playlist.
“Remove from
playlist” button
Removes a file from a Playlist.
Title button Tap to sort files by title.
Media button Tap to sort files by storage media (Internal Flash, CF, SD).
Size button Tap to sort files by size.
Video tab
Music tab
Size button
Media button
Title button
Play button
Remove from
playlist button
Playlist tab
File List area
Up button
(for Playlist)
Down button
(for Playlist)
Add to playlist button
Index screen (Video/Music tab) Playlist screen
Page 65
Media Player 59
Note:
To find the desired file, enter the first few characters of the file name. The
focus moves to the matching file.
Playback screens
The Playback screen varies depending on the type of file being played.
1.
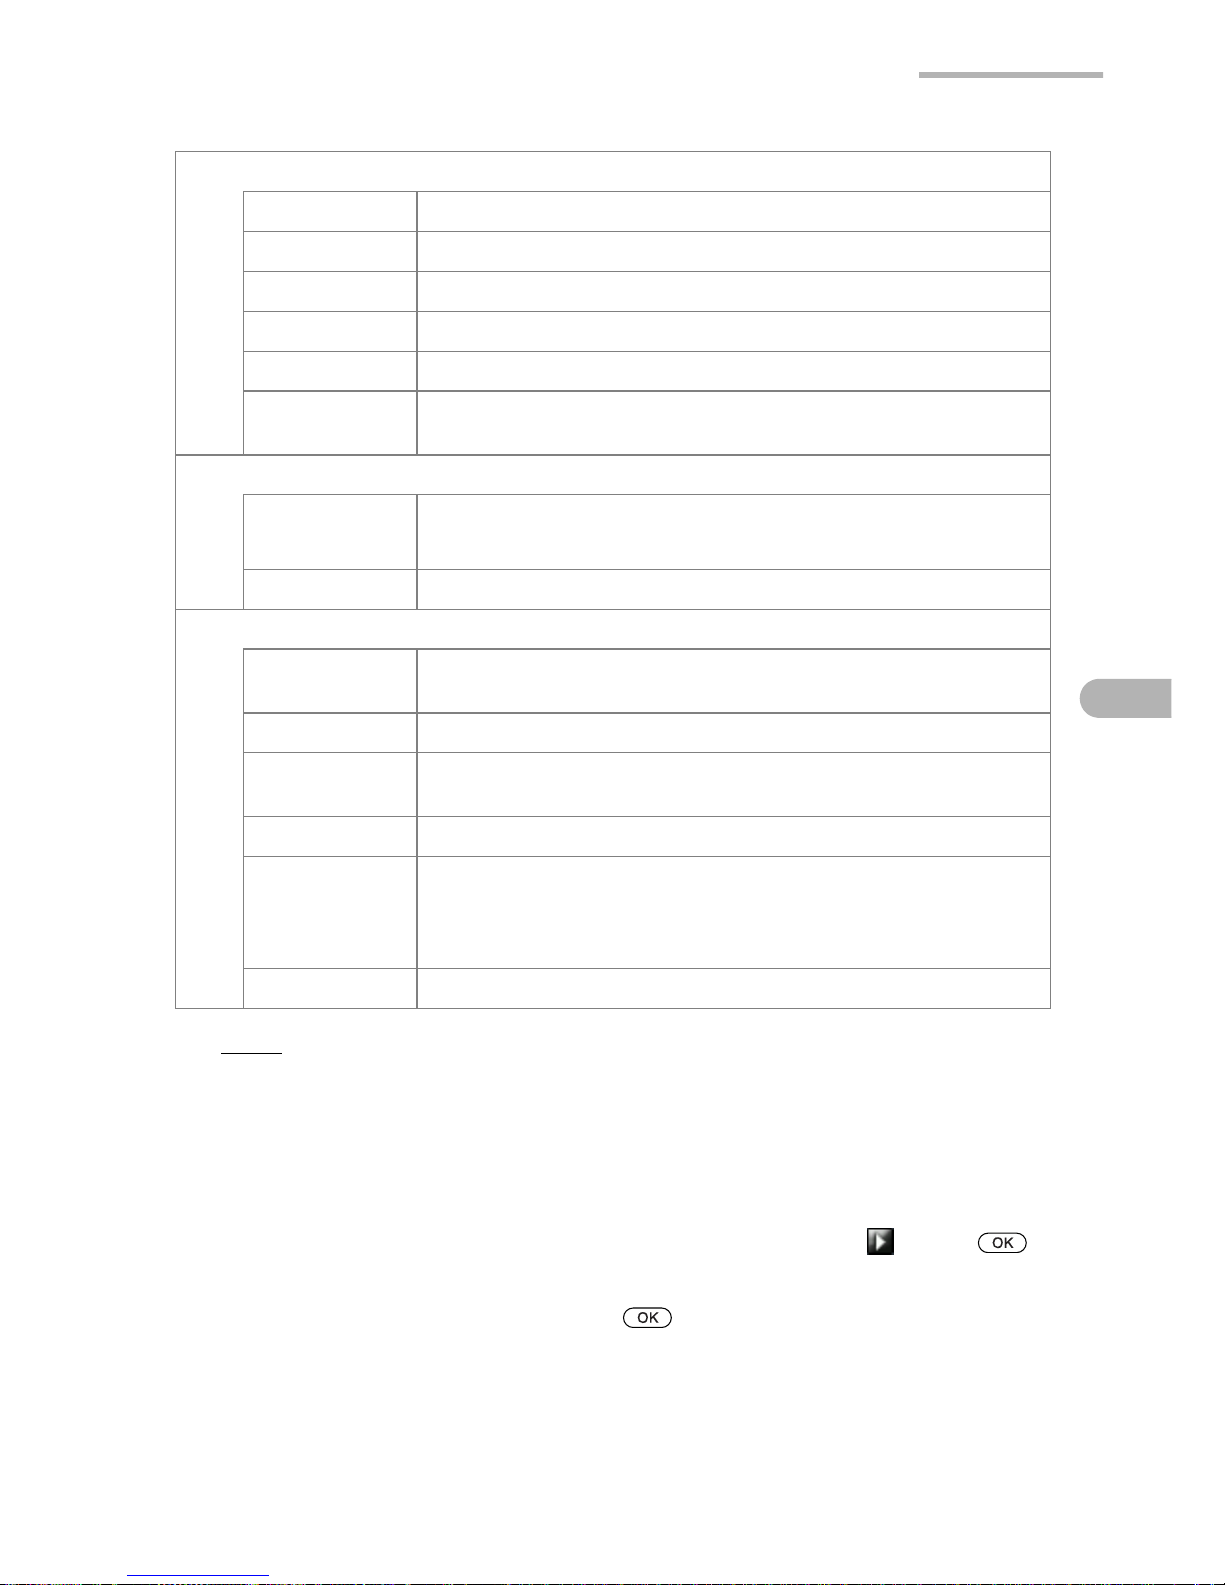
On the Index screen, tap the file you want to play and then tap , press ,
or press the SELECT key.
•To close the playback screen, press or the SELECT key again.
File menu
Play Plays the file in the Video, Music, or Playlist Index screen.
Info Displays the file information.
Add to playlist Adds a file to the Playlist.
Up Moves the selected file up in the Playlist.
Down Moves the selected file down in the Playlist.
Remove from
playlist
Removes a file from the Playlist.
View menu (used to play video files)
Fullscreen Switches the screen mode from full screen to normal
screen.
Scale Enlarges or minimizes the image (to fit the screen).
Option menu
Repeat Repeats playback of the file in the Video, Music, or Playlist
Index screen.
Random Plays files in the Playlist at random.
Continuous
Play
Plays files continuously starting with the highlighted file to
the bottom of the list.
Refresh List Updates the file names modified with other applications.
Auto Refresh When turned on, updates the file names on the Index
screen every time you insert/remove memory cards.
(When turned on, it may take some time until file names
appear if the memory card has a large number of files.)
Help Displays online help.
Page 66
60 Media Player
For video files
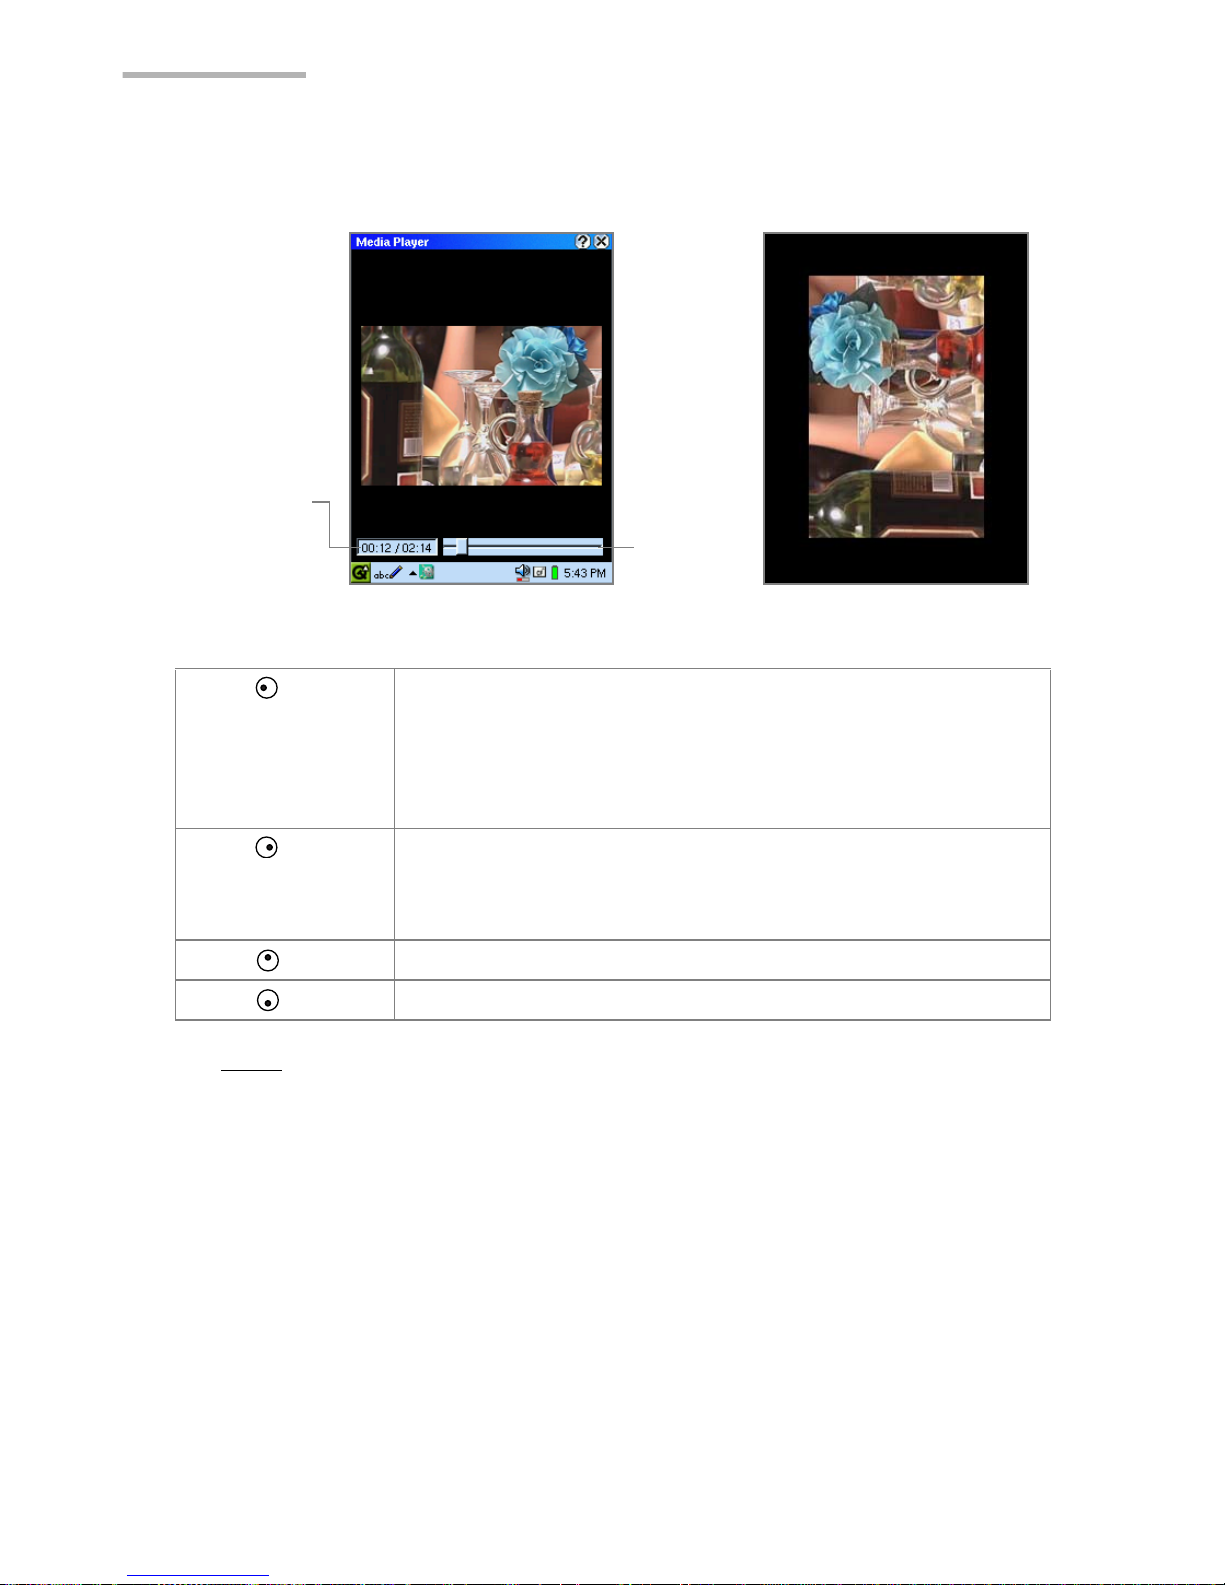
•If you tap on the screen, the display returns to the Index screen.
Note:
The playback time and locator indicators will be displayed in normal
mode only.
Press (left) When pressed after a file plays more than 2 seconds, the
current file will be played again from the beginning. When
pressed within 2 seconds, the previous file will start playback.
When only one file or the first file in the list is being played in
the non-repeating mode, the playback stops and returns to
the Index screen.
Press (right) Moves to the next file.
When only one file or the last file in the list is being played in
the non-repeating mode, the playback stops and returns to
the Index screen.
Press (up) Press and hold to turn the volume up.
Press (down) Press and hold to turn the volume down.
Normal mode Fullscreen mode
Playback
locator
Current
playback
time/total
playback time
Page 67
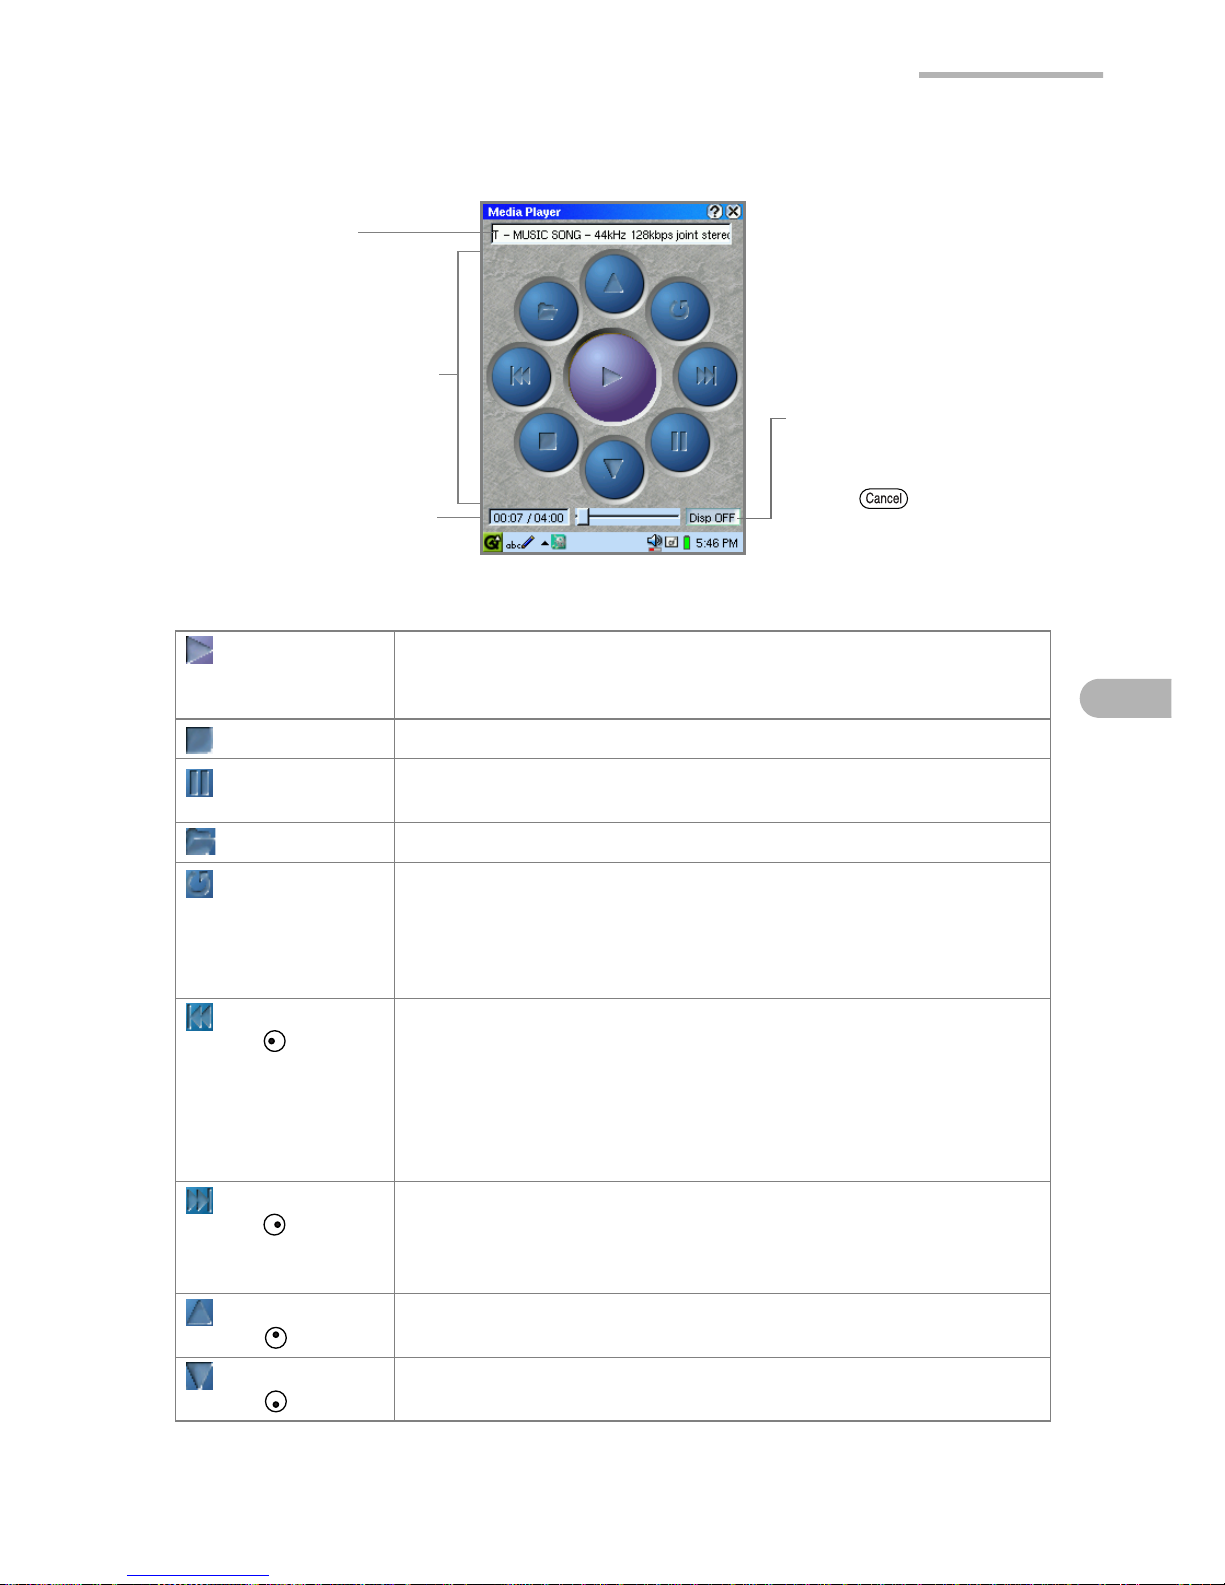
Media Player 61
For music files
Playback Control
(Play) Plays the current file from the top or resumes playback if
paused. When tapped during playback, restarts playback
from the top of the current file.
(Stop) Stops playback.
(Pause) Pauses playback.
Tap again to resume the playback.
(Open) Stops playback, and returns to the Index screen.
(Repeat) Switches the playback mode (Repeat or Play once: non-
repeating).
If you have selected the Repeat mode from the Option menu
on the Index screen, this button will already have been
pressed.
(Previous)
(Press )
When tapped (pressed) after a file plays more than 2
seconds, the current file will be played again from the
beginning. When tapped (pressed) within 2 seconds, the
previous file will start playback.
When only one file or the first file in the list is being played in
the non-repeating mode, the playback stops and returns to
the Index screen.
(Next)
(Press )
Moves to the next file if the music file is being played.
When only one file or the last file in the list is being played in
the non-repeating mode, the playback stops and returns to
the Index screen.
(Volume Up)
(Press )
Tap and hold to turn the volume up.
(Volume Down)
(Press )
Tap and hold to turn the volume down.
Playback control buttons
Current playback time/
total playback time
File information
File name,
artist name,
sampling rate,
etc.
Tap to turn off the
display to be powerthrifty during playback.
Press to turn
the display on.
Page 68
62 Media Player
Note:
The volume control in the Media Player application also affects the
volume setting of the entire SL-5600.
Playing a file
Before playing files, insert the memory card that contains the music or video file into
the appropriate card slot of the SL-5600, or copy the audio files to the Internal Flash
folder of the unit using the Zaurus File Transfer application.
To start playback
1.
On the Index screen, tap the Video or Music tab.
All files stored in the SL-5600 and memory card will be displayed according to
the file type to be played.
2.
Tap the desired file in the list.
And then tap , press , or press the SELECT key.
The selected file will be played.
The playback screen varies according to the file type to be played.
To stop playback
1.
Press or the SELECT key, the playback will be stopped and the screen
will return to the Index screen.
Setting the Repeat mode
1.
On the Index screen, tap the “Option” menu and then tap “Repeat”.
The file will be played repeatedly. The files in the Playlist will be all played
repeatedly.
To cancel the Repeat mode, repeat step 1.
Page 69
Media Player 63
Playing a file in the Playlist
By adding the video or music files in the Playlist, you can play them in the listed order
or in random sequence.
Adding files to the Playlist
1.
On the Index screen, tap the Video or Music tab.
All files stored in the SL-5600 and memory card will be displayed according to
the file type to be played.
2.
Tap the desired file in the list.
3.
Tap the Add to playlist button ( ).
Or tap the “File” menu and then tap “Add to playlist”.
The selected file will be added to the Playlist with the same file name.
Tapping the Playlist tab allows you to confirm that the selection was added.
4.
To add multiple files, repeat steps 1 through 3 above.
Arranging the file order in the Playlist
Once you have added files in the Playlist, you can change the file order (playback
order).
1.
Tap the Playlist tab.
2.
Tap the file you want to move.
3.
Tap or .
The selected file will move up or down.
Deleting files from the Playlist
1.
Tap the Playlist tab.
2.
Tap the file you want to delete.
3.
Tap the Remove from playlist button ( ).
Or tap the “File” menu and then tap “Remove from playlist”.
The selected file will be deleted immediately.
Page 70
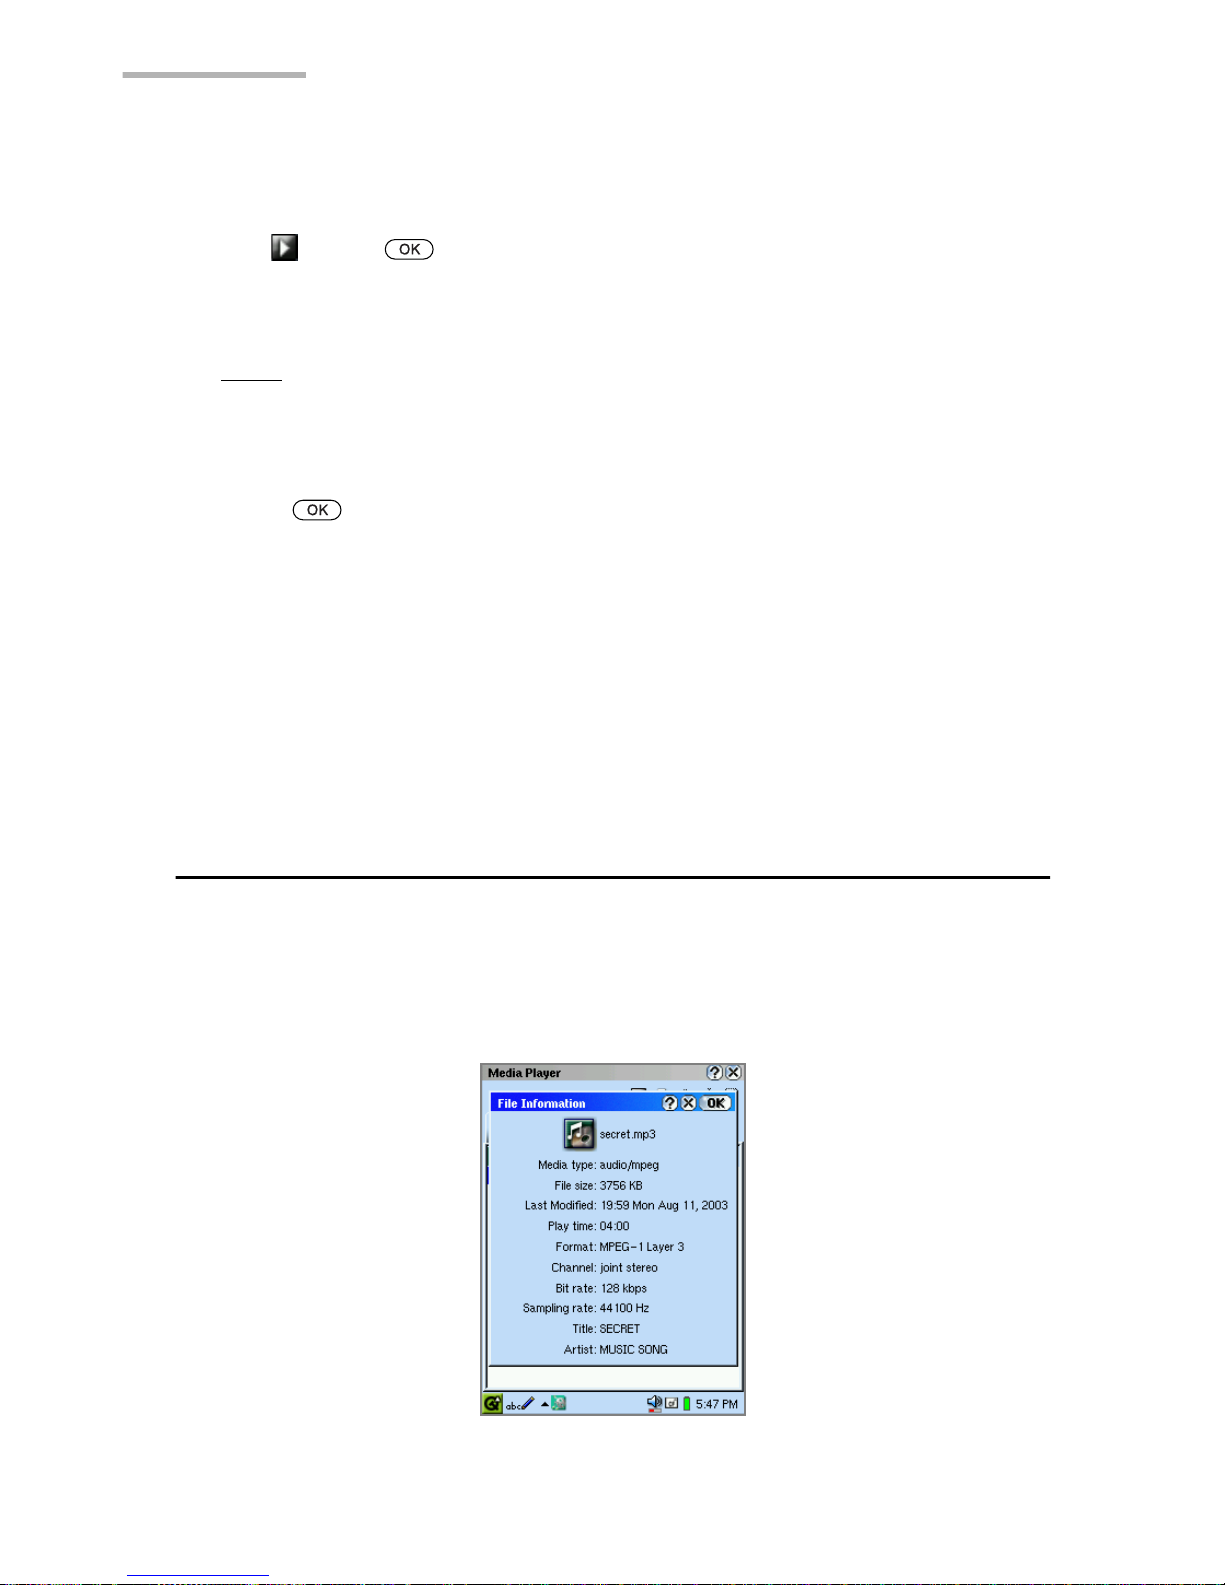
64 Media Player
To playback files in the Playlist tab
1.
Tap the Playlist tab.
2.
Tap , press , or press the SELECT key.
Files in the Playlist will be played starting with the highlighted file. Playback will
stop at the bottom of the list.
Note: If the Repeat mode is selected in the Option menu, all files in the Playlist
will be played continuously.
To stop playback
1.
Press or the SELECT key and the playback will be stopped and the Index
screen will be displayed.
To playback at random
1.
Tap the Playlist tab.
2.
Tap the “Option” menu and then tap “Random”.
All files in the Playlist will be played at random.
To cancel the Random mode, repeat step 2.
Other functions
Displaying the file information
1.
Tap the “File” menu and then tap “Info…”.
The file information screen will be displayed.
Page 71

Media Player 65
• When video files are selected, the following will be displayed:
Picture size, Frame rate, etc.
• When music files are selected, the following will be displayed:
Sampling rate, Channel, etc.
2.
Tap or to close the screen.
Note: You can extend the use of MP3 playback using the “Display off” mode.
(See the “Disp OFF” on the screen on page 61.)
Page 72
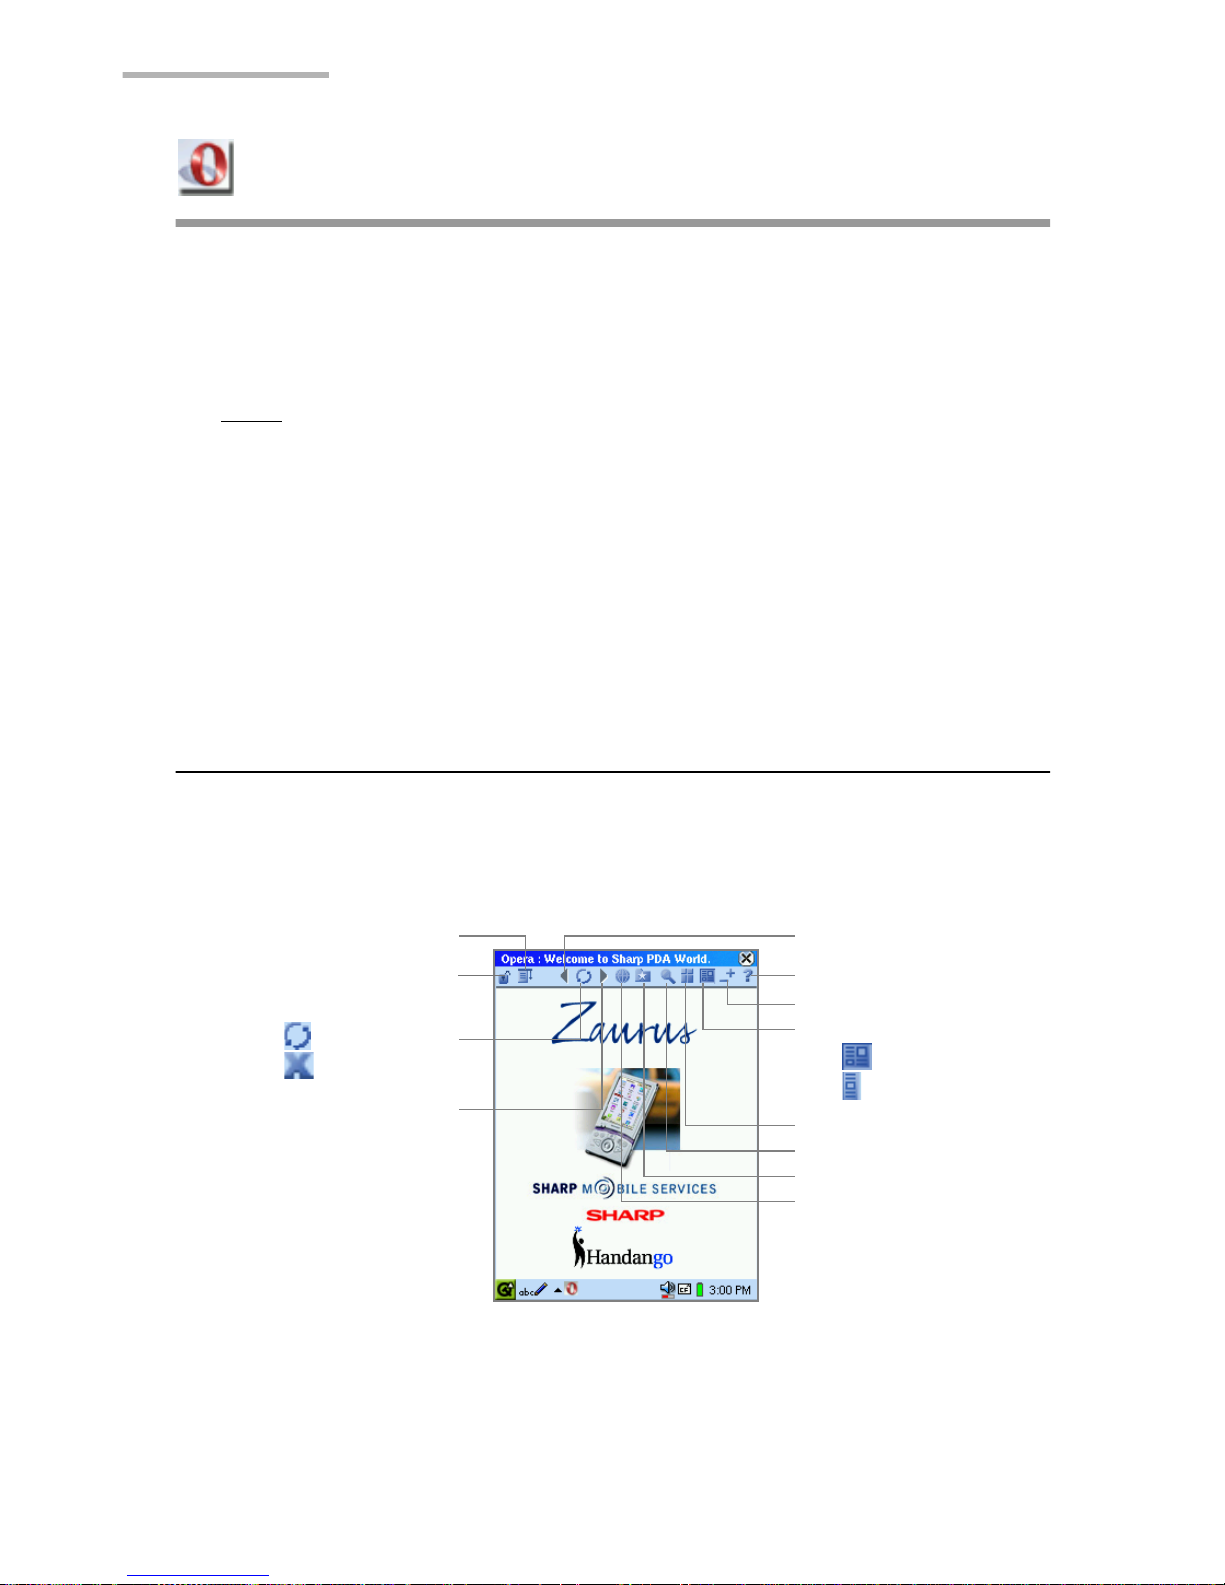
66 Opera Browser
Opera Browser
The Opera Browser application allows you to browse the Internet.
To browse the Internet, you must set up the communication method (modem card,
LAN card, etc.) and network preferences. (For connection method, see page 168.)
Note:
• Exiting the application clears the cache without saving it in a file.
• Elements of some Web pages (such as fonts, etc.) may not be displayed
correctly in this application.
• Some large graphics may not be displayed in this application.
• This application may take time to open files (pdf files, etc.) including many
graphics.
• You can check incoming e-mail messages while browsing Web pages.
Overview
Browsing screen
1.
On the Applications Home screen, tap the “Opera Browser” application icon.
Back icon
: Reload icon
: Stop icon
Forward icon
Security Status icon
Scale page icon
Windows icon
Bookmarks icon
Help icon
Go to page icon
Menu icon
Switch layout icon
: normal
: small
Find icon
Page 73
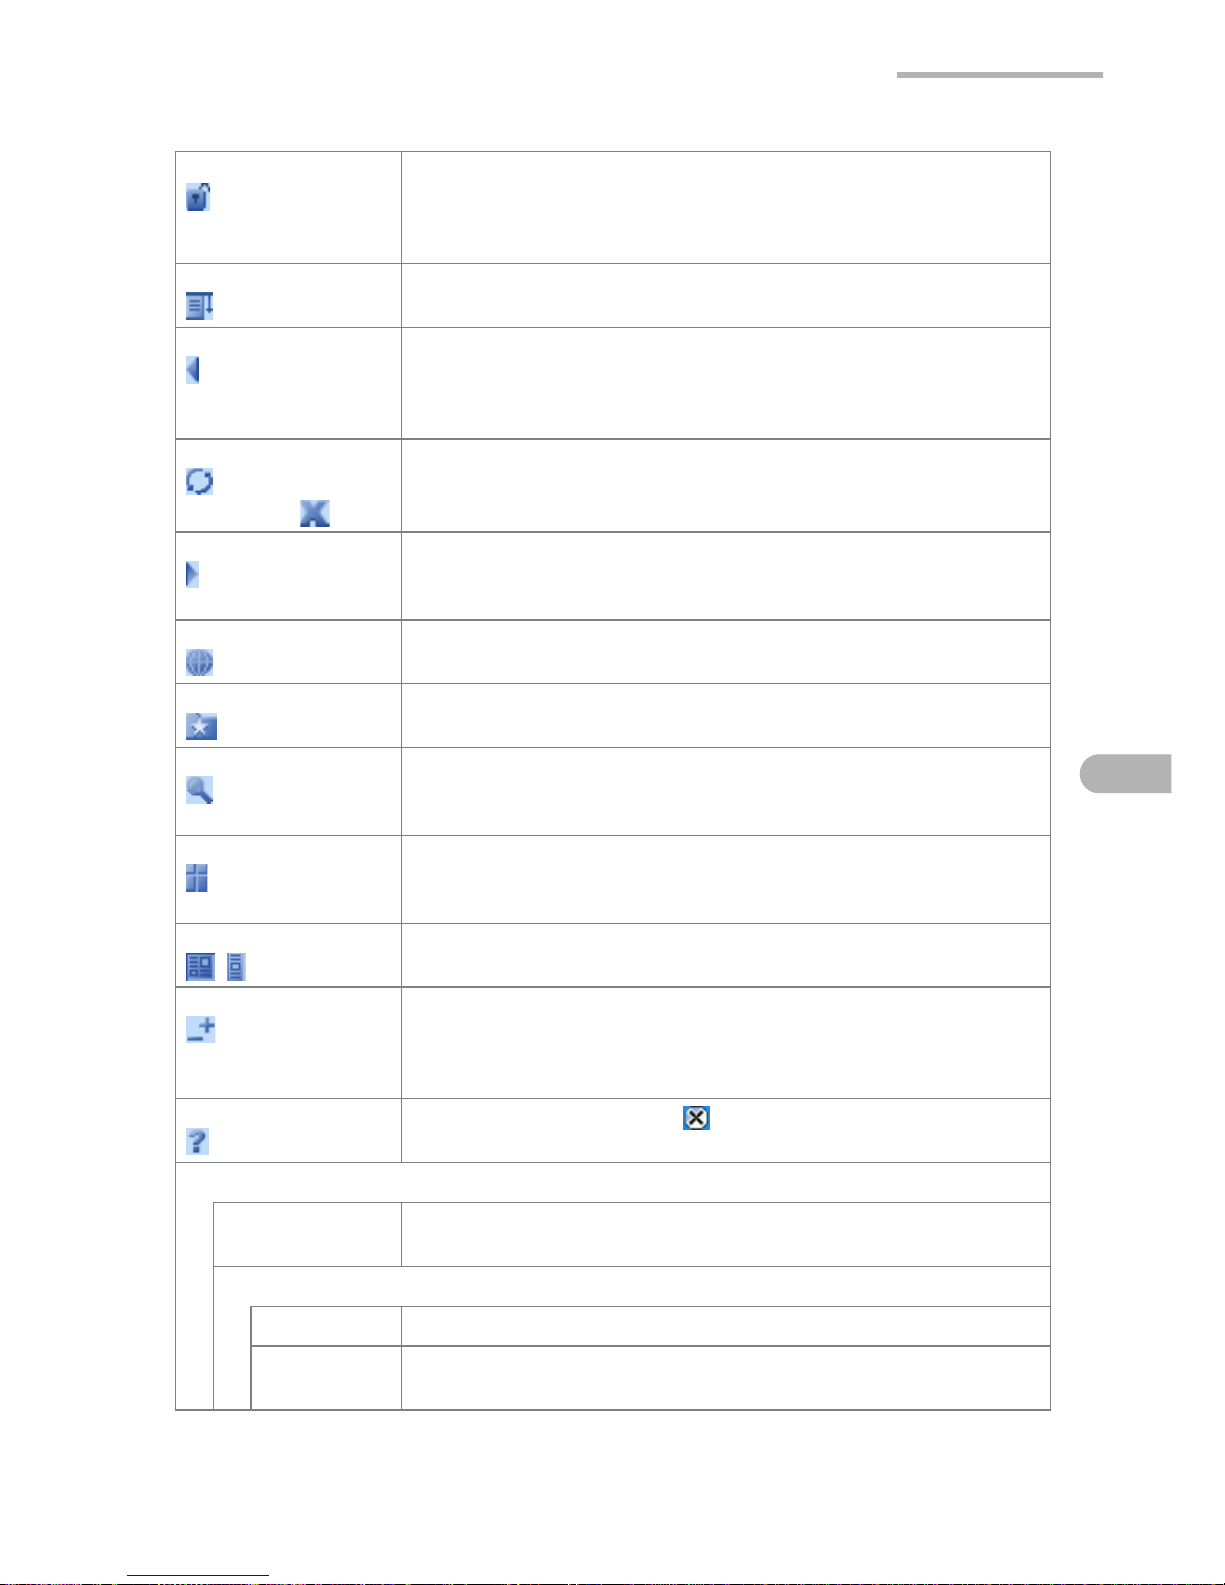
Opera Browser 67
Security Status icon Displays security information. If the page you access uses
the SSL protocol, etc., the Security Status icon will change to
the locked state at a set security level. Tap the icon to display
the security level description.
Menu icon Displays the Main menu. From this menu you can access the
main functions of the Opera Browser.
Back icon Returns to the previous page. Tap and hold to display the
address list of the recently displayed pages and then tap the
desired address to display the page. To close the list, tap the
icon again.
Reload icon
(Stop icon )
Displays the latest update of the page. When the page data
is being downloaded, the Stop icon is displayed instead.
Tap the Stop icon to stop downloading.
Forward icon Displays the next page of a series of pages you have already
displayed. Tap and hold to display the address list displayed
after the current page. To close the list, tap the icon again.
Go to page icon Displays a screen for entering a URL or searching for a Web
page. To close the screen, tap the icon again.
Bookmarks icon Displays the Bookmarks screen to access and manage the
bookmarks. To close the screen, tap the icon again.
Find icon Tap and hold to display a Find screen for searching for a
word or a phrase included in the current page. To search for
next, tap the “Find” icon.
Windows icon If multiple windows are open, tap to switch open windows.
Tap and hold the icon to display the window management
screen. To close the screen, tap the icon again.
Switch layout icon Tap to switch two types of page layout: normal and small.
The selected type reflects the icon.
Scale page icon Scales the page up and down. Tap to switch the scale
between 100% and the value specified on the Scale page.
Tap and hold the icon to display the Scale page. The Scale
page closes after you select the desired value.
Help icon Displays online help. Tap to close.
Main menu
Open local file Displays a file list stored in the SL-5600 or on a memory card.
Tap a file to open it using the Opera Browser.
Navigation
Back [Z] Returns to the previous page.
History [H] Displays the list of the pages displayed before the current
page. Tap the desired page to display.
Page 74
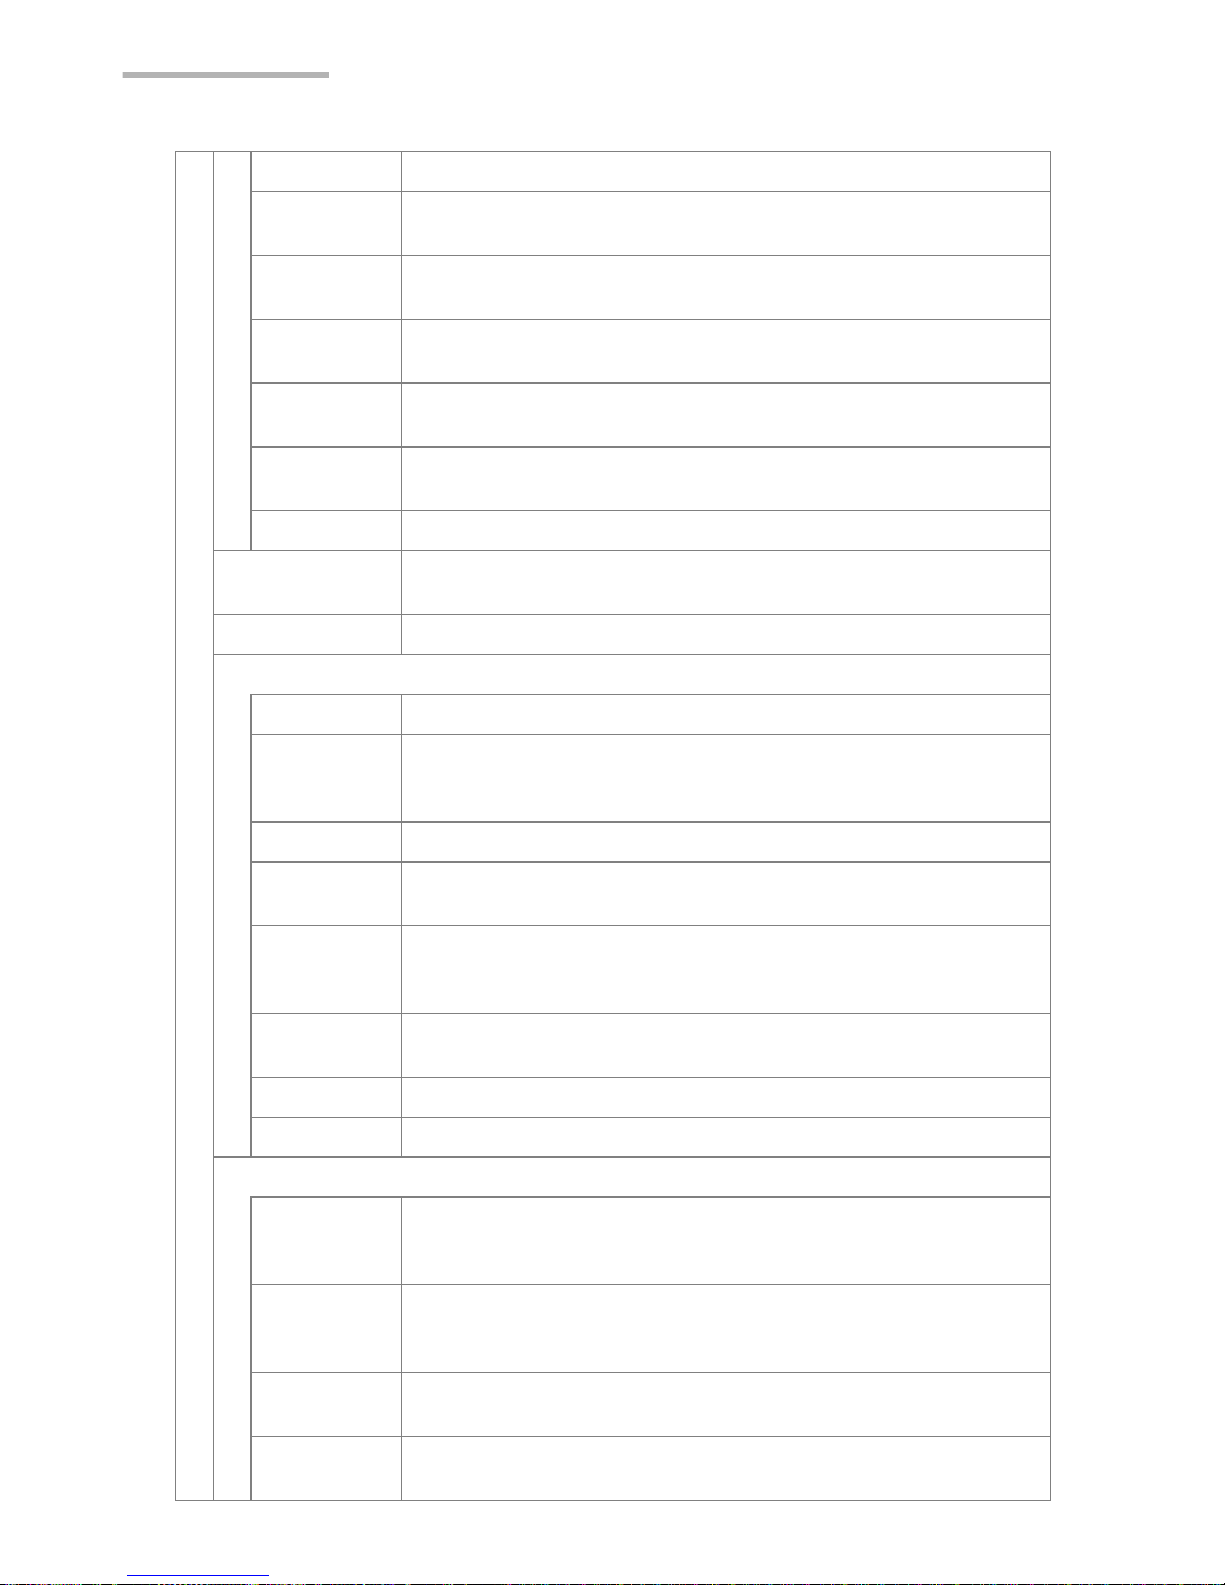
68 Opera Browser
Reload [R] Displays the latest update of the page.
Forward [X] Displays the next page of a series of pages you have already
displayed.
History [N] Displays the list of the pages displayed after the current
page. Tap the desired page to display.
Go to page
[G]
Displays a screen for entering a URL or searching for a Web
page.
Search the
web
Displays a screen for entering a URL or searching for a Web
page.
Bookmarks
[B]
Displays the Bookmarks screen to access and manage the
bookmarks.
Home Returns to the homepage set in the Preferences screen.
Find in page [F] Displays a Find screen for searching for a word or a phrase
included in the current page.
Find next Searches for the same word or phrase again.
Windows [W]
Window list Displays the window management screen.
Switch to
next
If multiple windows are open, switches open windows. When
only one window is open, displays the window management
screen.
New window Opens a new empty window on the current open window.
Save current Saves the current page in the SL-5600 or on the memory
card. To open the page, use the “Open local file” menu.
Full screen
[shift+return]
Displays the current page in full screen. To return to the
normal screen, press Shift+Return on the hardware
keyboard.
Close
current
Closes the current page.
Close others Closes all pages other than the current active page.
Close all Closes all open pages.
Viewing
Full screen
[shift+return]
Displays the current page in full screen. To return to the
normal screen, press Shift+Return on the hardware
keyboard.
Toggle small
screen
layout [L]
Switches the screen layout between normal and small. (See
page 78.)
Scale page
[S]
Displays the Scale page to scale the page up and down.
Tog gle
scaling
Switches the screen layout between normal and the size
specified on the Scale page screen.
Page 75
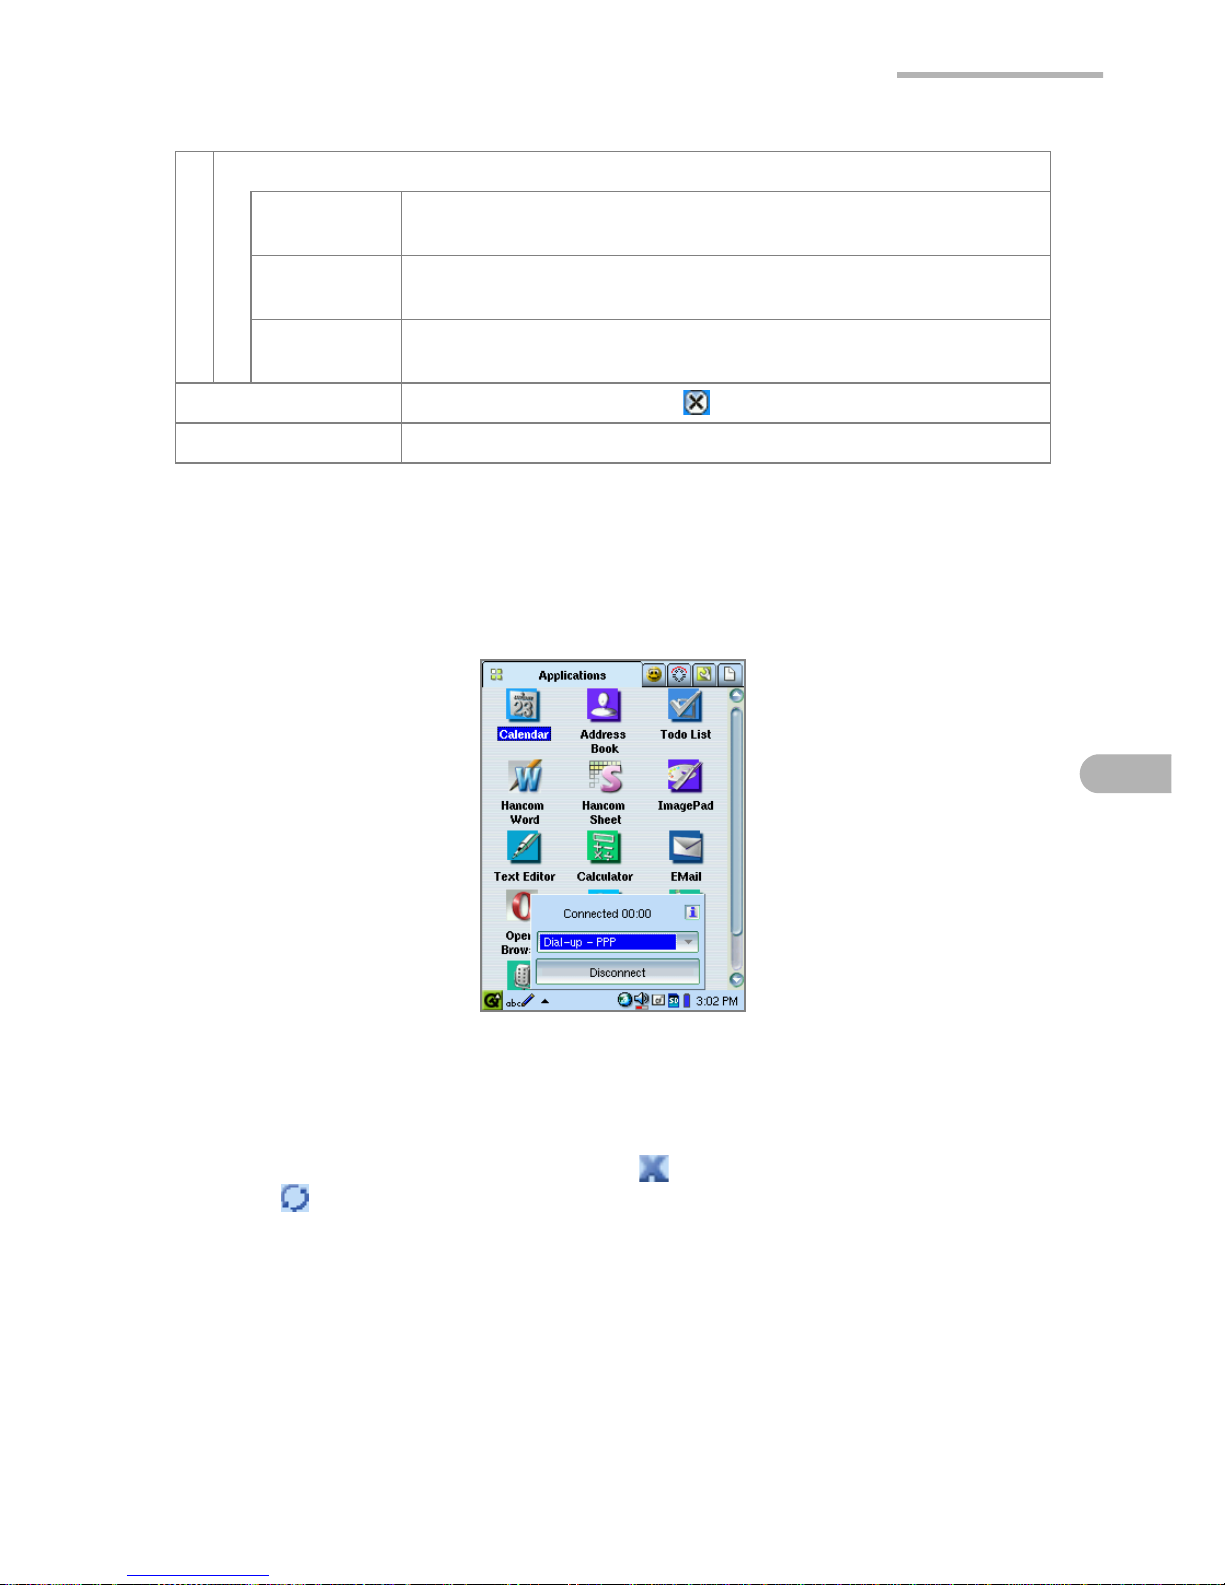
Opera Browser 69
Browsing Internet pages
1.
Perform steps 1 to 4 in “Connecting/disconnecting to the Network” (See page
195.) to establish the connection to the network.
2.
On the Applications Home screen, tap the “Opera Browser” application icon.
The Opera Browser opens to display the Browsing Home screen.
While the application is receiving the data, the elapse time, etc. is displayed
under the menu bar and the Stop icon ( ) is displayed instead of the Reload
icon ( ).
Preferences [P]
General Displays the screen for setting up the General preferences.
(homepage address, etc.)
Security Displays the screen for setting up the Security preferences.
(cookies, etc.)
File types Displays the screen for setting up the preferences for file
types. (MIME, etc.)
Help Displays online help. Tap to close.
Exit Exits the Opera Browser application.
Page 76
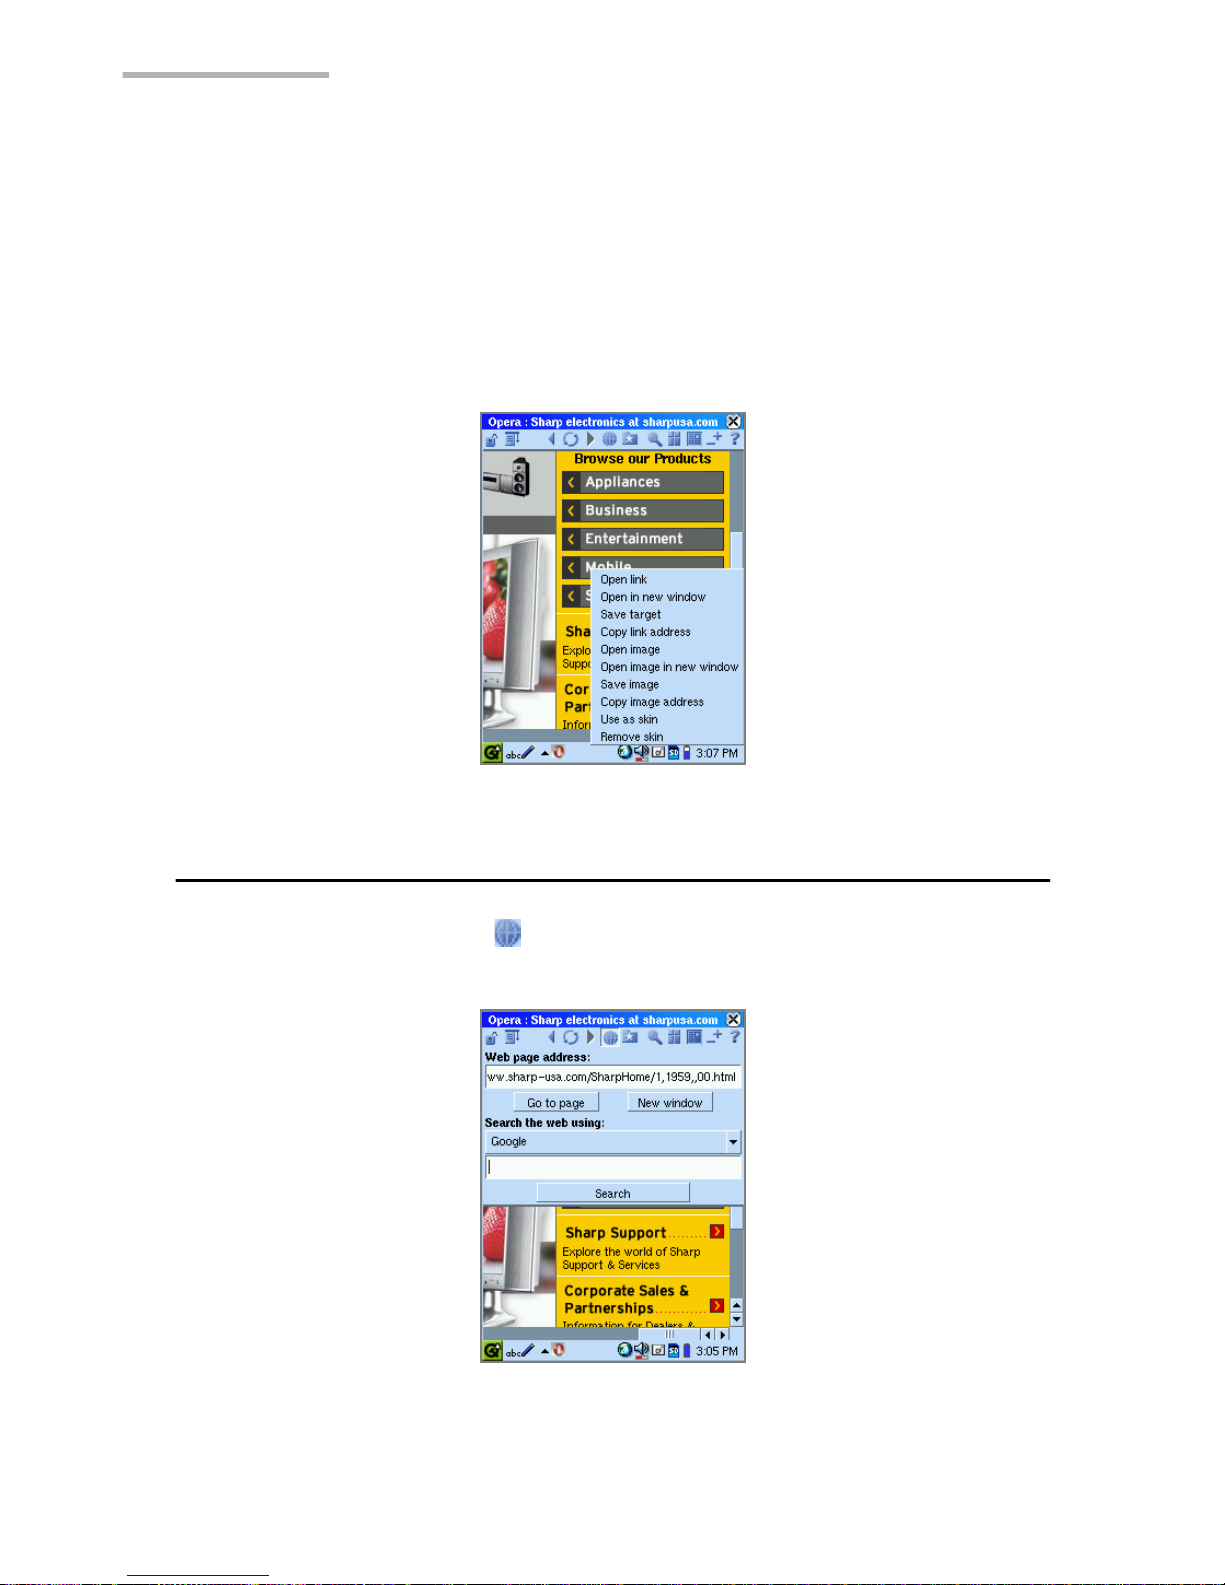
70 Opera Browser
Saving Web Contents
1.
Tap and hold an image on the page to initiate a pop up menu.
2.
Save or open the image, copy the image URL, etc, by selecting the menu
command in the menu.
Tap and hold a link to pop up the link context menu, allowing you to save the
links contexts directly to a file, etc., by selecting the menu command in the
menu.
Opening the specified Web page
1.
Tap the Go to page icon ( ).
The Go to page screen will be displayed.
Page 77
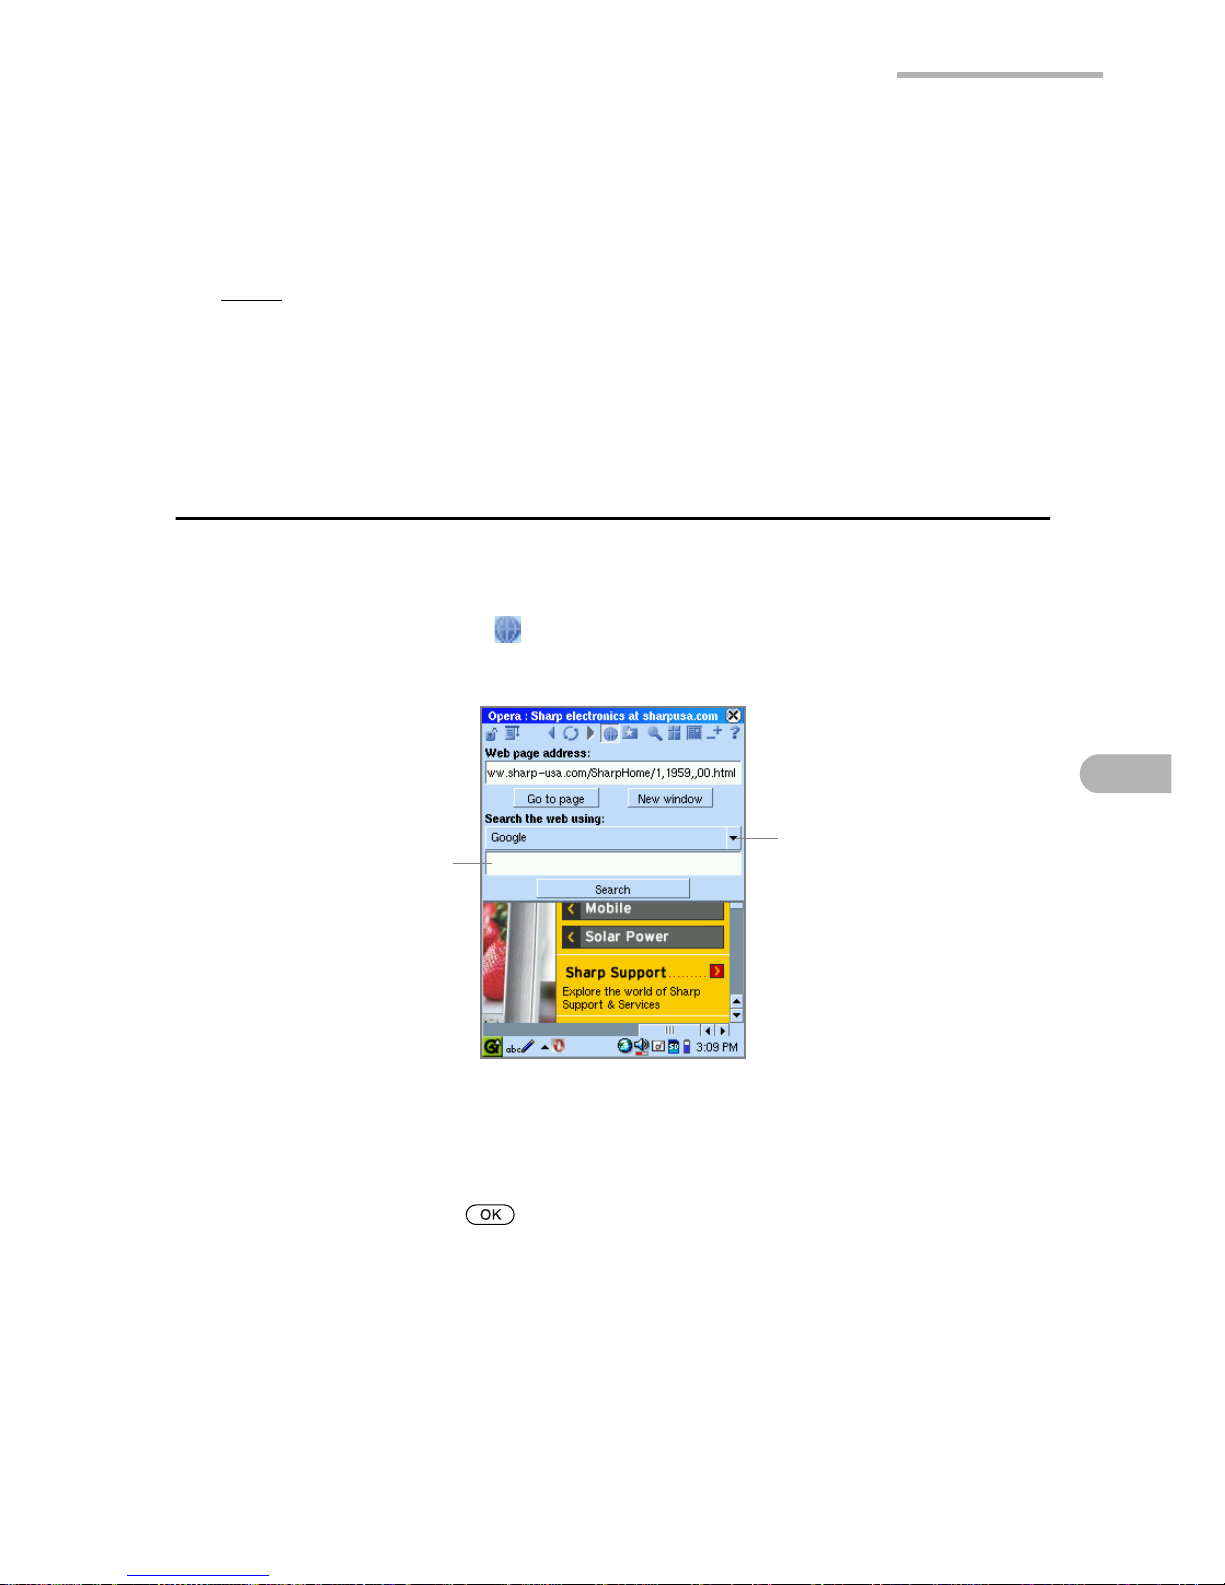
Opera Browser 71
2.
Enter the desired Web page address.
3.
Tap “Go to page”.
The specified Web page will be displayed.
Note:
• Entering “www” or “.com” in the Web page address field can be omitted.
• To display the Web page on a new window, tap “New window” in step 3.
Using the Web Search function
Search allows you to find information using the search engine you select.
1.
Tap the Go to page icon ( ).
The Go to page screen will be displayed.
2.
Tap the Search engine drop-down list button and then tap the desired search
engine.
3.
Enter the information you want to search for in the Search field.
4.
Tap “Search” or press .
The search result will be displayed.
Search field
Search engine drop-down
list button
Page 78
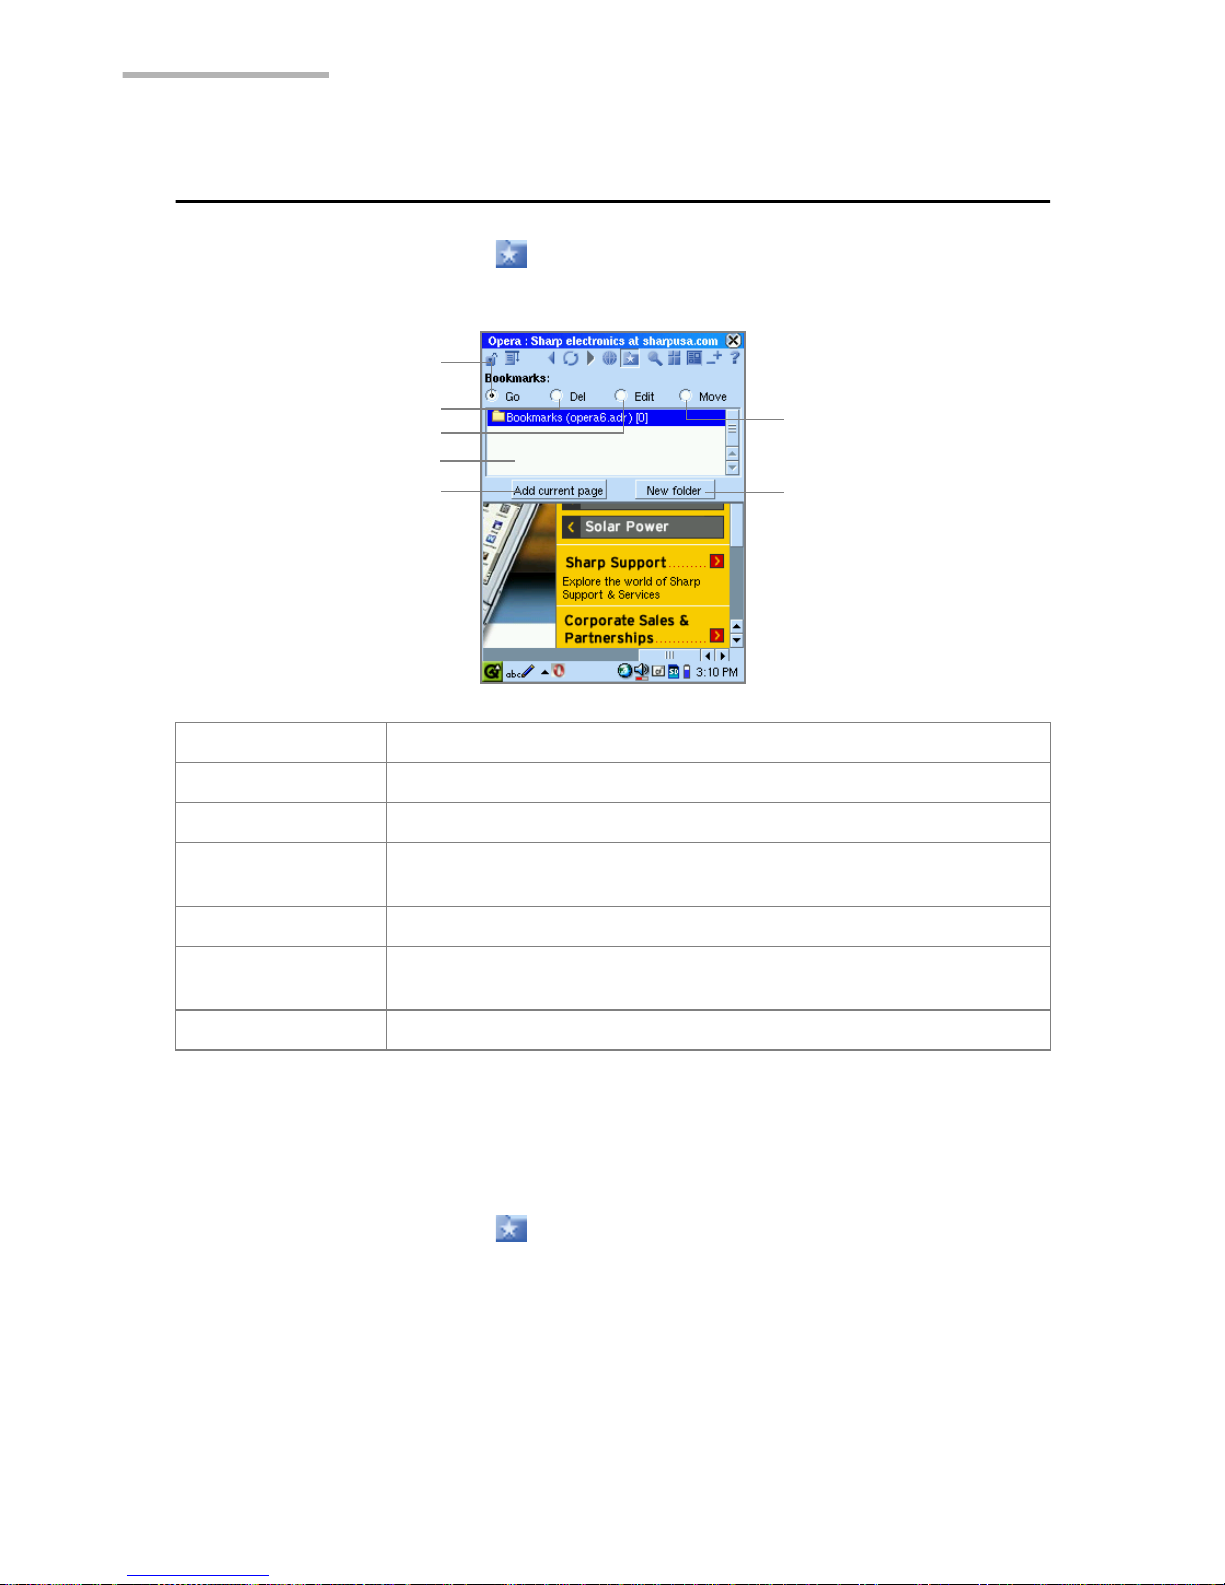
72 Opera Browser
Using the bookmarks
1.
Tap the Bookmarks icon ( ).
The Bookmarks screen will be displayed.
Registering the Web page address in the bookmark list
1.
Display the Web page you want to register in the bookmark list.
2.
Tap the Bookmarks icon ( ).
3.
On the Bookmarks screen, tap “Add current page”.
Go radio button Displays the page selected in the bookmark list.
Del radio button Deletes the bookmark selected in the bookmark list.
Edit radio button Displays the Edit Bookmark screen.
Move radio button Allows you to change the order by dragging the item in the
Bookmark list.
Bookmark list Lists all the addresses you have registered (bookmarked).
Add current page
button
Tap to register the Web page address currently displayed in
the bookmark list.
New folder button Tap to create a new folder in the bookmark list.
Go radio button
Del radio button
Edit radio button
Bookmark list
Move radio button
Add current page button
New folder button
Page 79
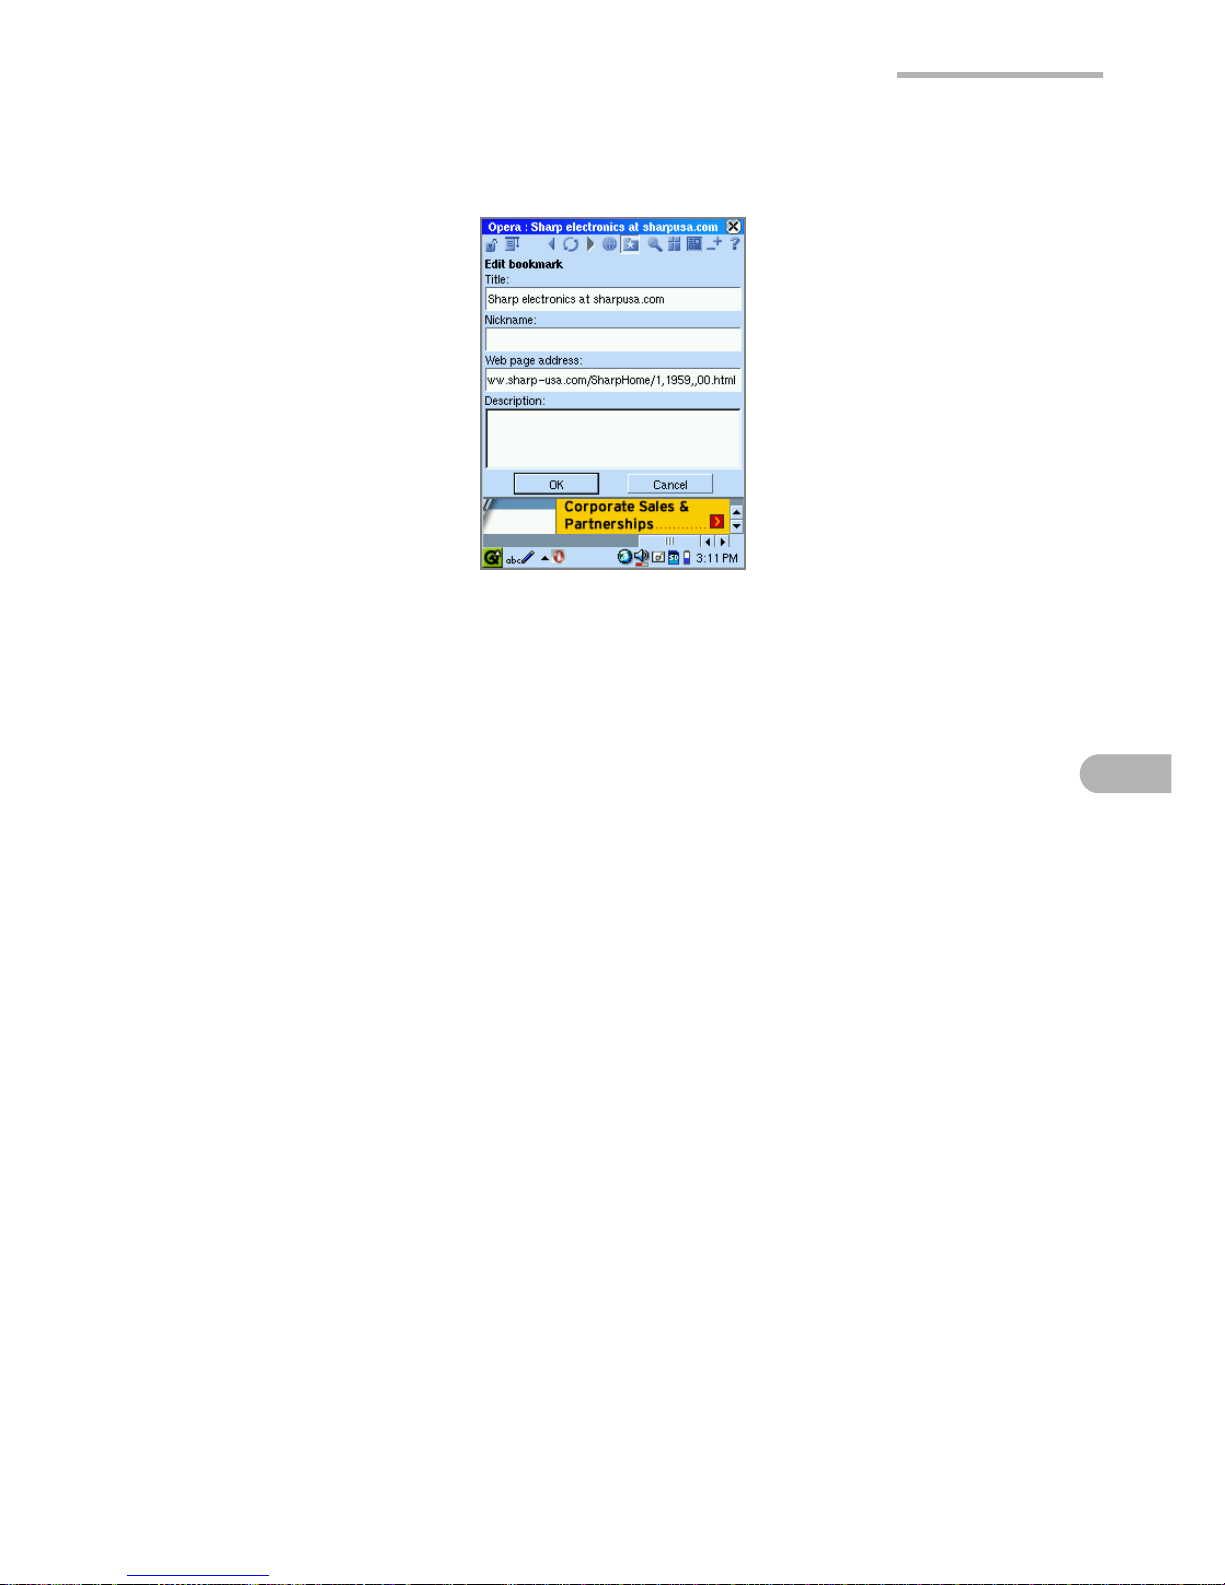
Opera Browser 73
The Edit bookmark screen will be displayed.
Web page address field will contain the address of the latest successfully
loaded Web page.
4.
Modify the bookmark title and Web page address, etc. and then tap “OK”.
The registered Web page will be added to the bookmark list.
Displaying the bookmarked page using bookmarks
1.
On the Bookmarks screen, tap the “Go” radio button and tap the desired
bookmark.
The selected Web page will be displayed.
Deleting bookmarks
1.
On the Bookmarks screen, tap the “Del” radio button and then tap the desired
bookmark.
A confirmation message appears.
2.
Tap “Yes” to delete the bookmark.
Editing bookmarks
1.
On the Bookmarks screen, tap the “Edit” radio button and then tap the bookmark
you want to edit.
The Edit bookmark screen will be displayed.
2.
Make the necessary edits and then tap “OK” to save the modification(s).
If you tap “Cancel”, the modification is canceled.
Page 80
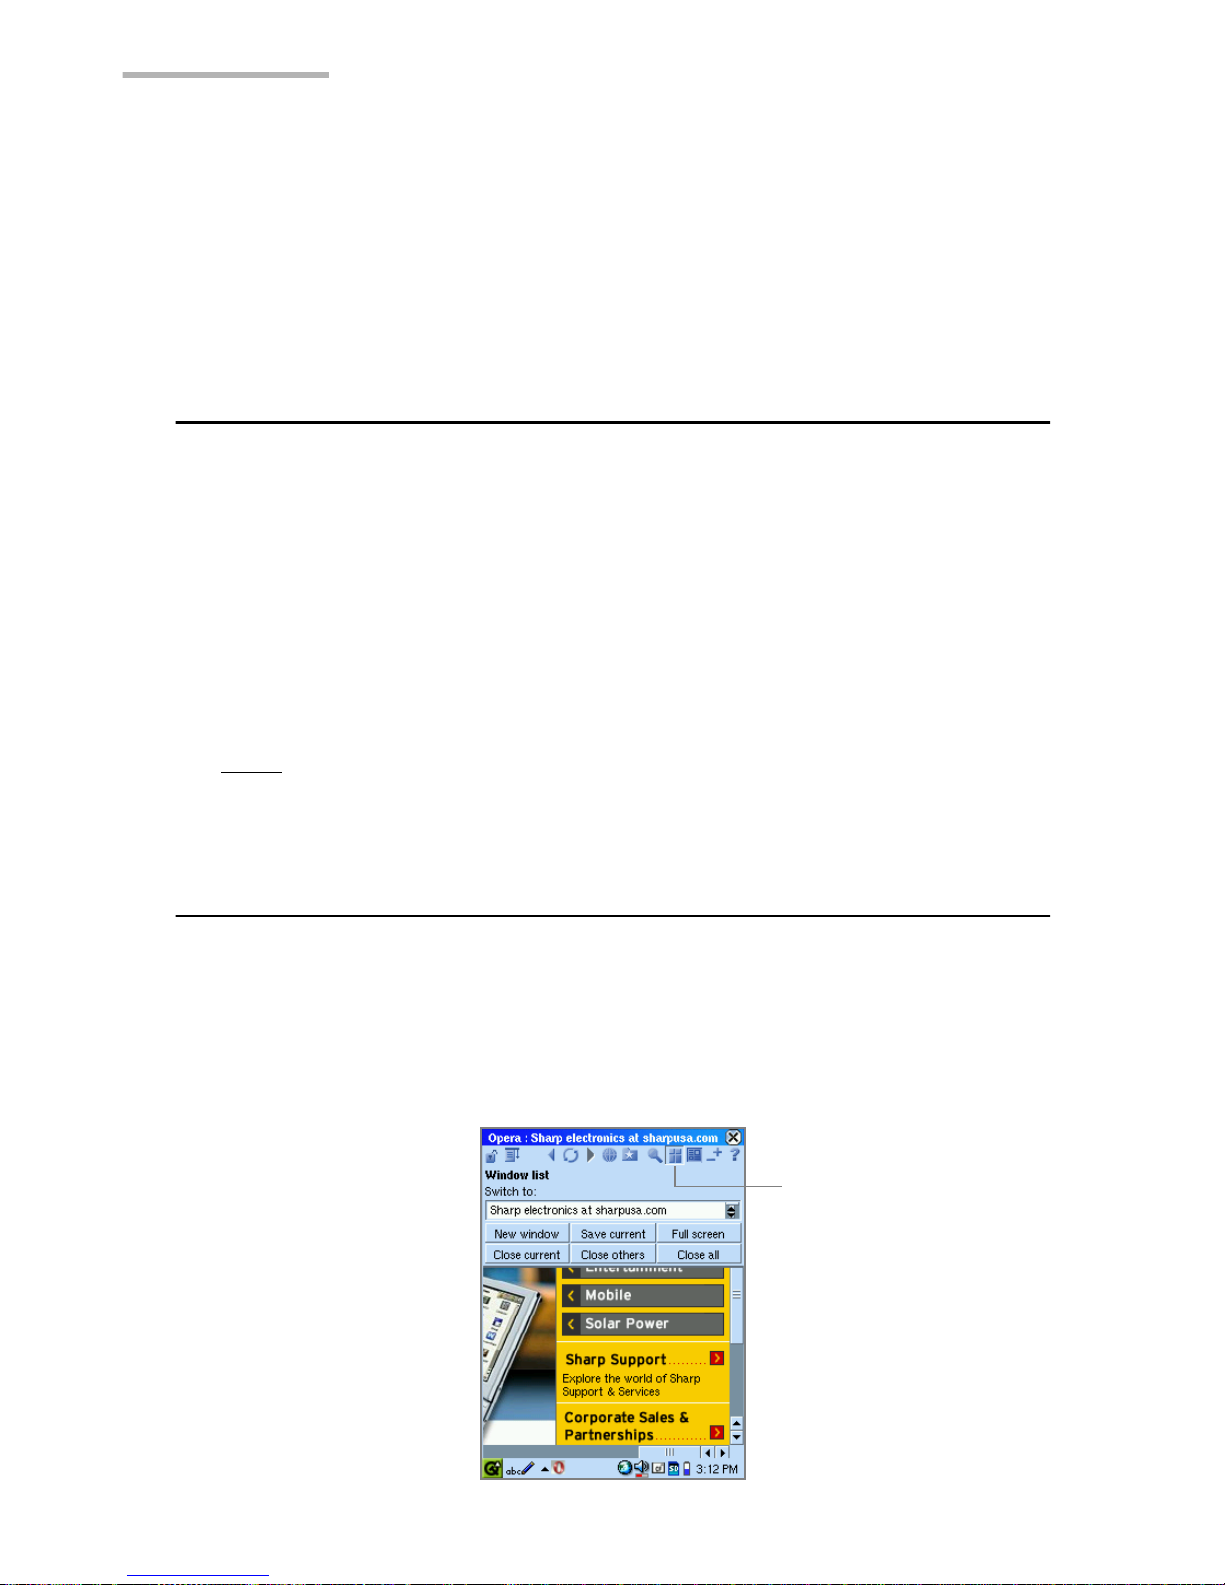
74 Opera Browser
Changing the bookmark order
1.
On the Bookmarks screen, tap the “Move” radio button.
2.
Drag the selected bookmark up or down the Bookmark list to the desired
position.
Creating a new folder in the bookmark list
1.
On the Bookmarks screen, tap “New folder”.
The Edit folder screen appears.
2.
Enter the folder title, etc.
3.
Tap “OK” to save.
A new folder appears in the bookmark list.
To open the folder, tap the “Go” radio button and then tap the folder. Tap it again
to close.
Note:
To register or move bookmarks in the folder, leave the folder open.
Saving the current page and viewing it offline
1.
Open the page you want to save.
2.
Tap the “Menu” icon and then tap “Windows” to select “Window list”.
Or tap and hold the “Windows” icon.
The Window list screen will appear.
Windows icon
Page 81
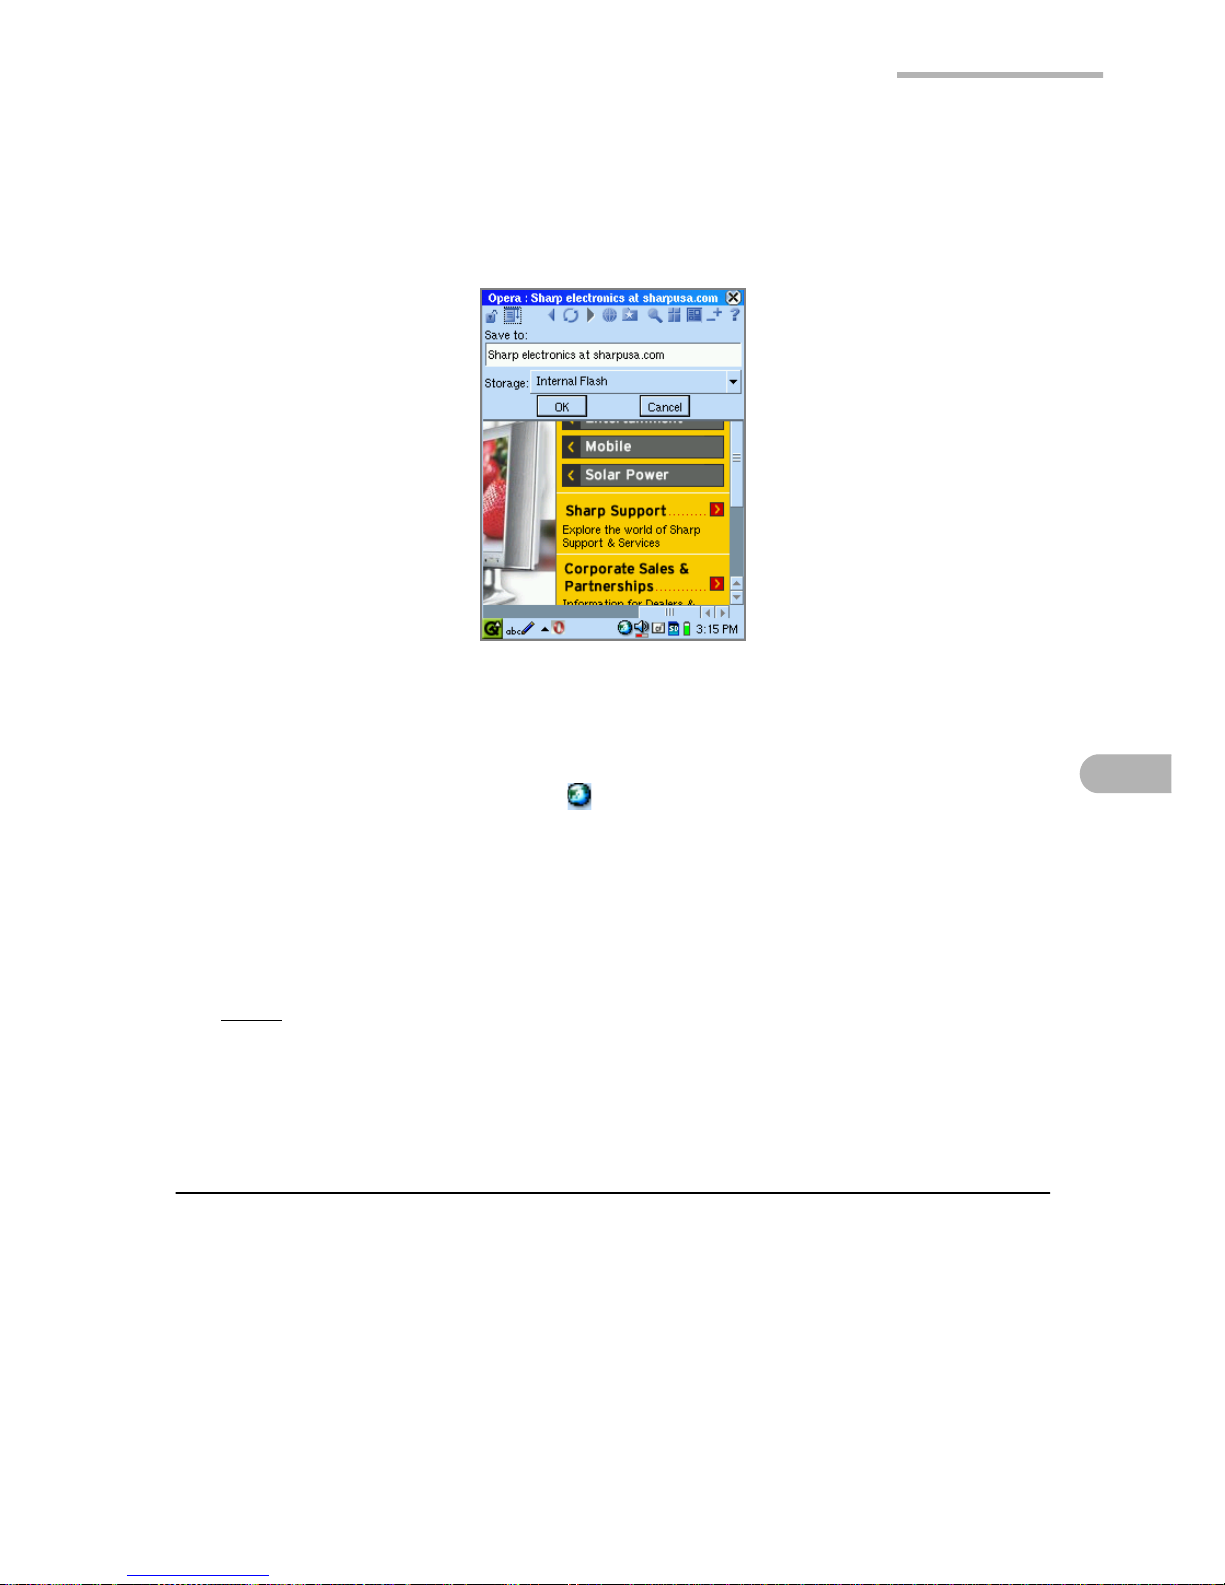
Opera Browser 75
3.
On the Window list screen, tap “Save current”.
The screen for entering the destination and file name appears.
The “Save to” field displays the default file name.
4.
If desired, modify the file name and then tap the “Storage” drop-down list button
to change the destination.
5.
Tap “OK” to save the current page.
6.
Tap the Connection status icon ( ) on the taskbar and disconnect the line.
7.
Tap the “Menu” icon and then tap “Open local file”.
The screen that lists the saved page file will be displayed.
8.
Tap the desired file name.
The file will be displayed.
Note: The pages will be saved in the Internal Flash memory (or memory card).
You can duplicate and delete the file from the Files Home screen.
Managing the window
In Opera Browser, you may open multiple windows at the same time, although you
can only view one active window at a time. The Window list screen helps you to
manage open windows.
1.
Tap the “Menu” icon and then tap “Windows” to select “Window list”.
Or tap and hold the “Windows” icon.
Page 82
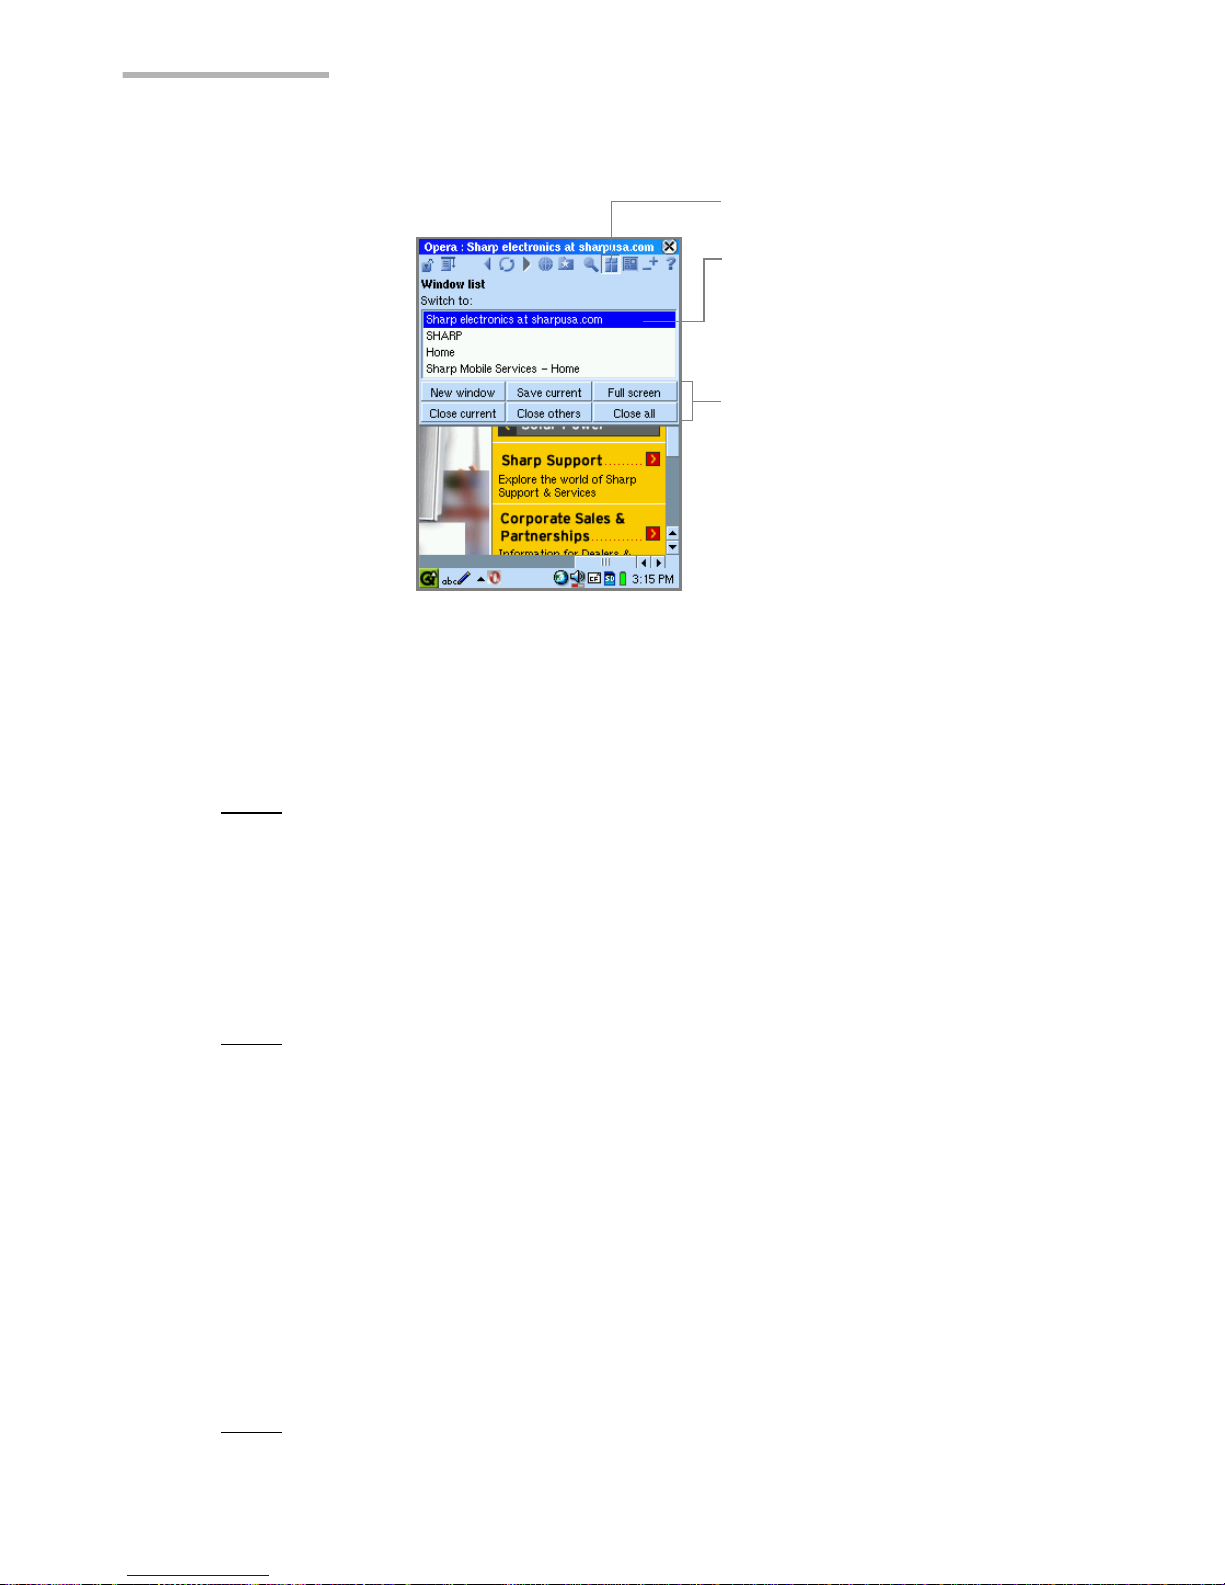
76 Opera Browser
The Window list screen appears.
Opening a new empty window
1.
On the Window list screen, tap “New window”.
A new empty window will be opened on the current open window.
Note: To open a new window by specifying the Web page address, tap the “Go
to page” icon and specify the Web address. (See page 70.)
Switching open windows
1.
Tap the Web page name on the Window list screen.
The selected window appears on the current screen.
Note: By tapping the Windows icon on the Menu bar the active window will be
switched.
Saving the current page
1.
On the Window list screen, tap “Save current”.
The screen for entering the destination and file name appears.
The “Save to” field has the default file name.
2.
If desired, modify the file name and then tap the “Storage” drop-down list button
to change the destination.
3.
Tap “OK” to save the current page.
Note: You can display the saved page offline. For details see page 74.
Window list showing all open
windows.
The window you tap will be
placed on the top and become
active.
Function buttons
These functions can also be
carried out from the
“Windows” menu
commands in the “Menu”.
(See page 68.)
Windows icon
Page 83
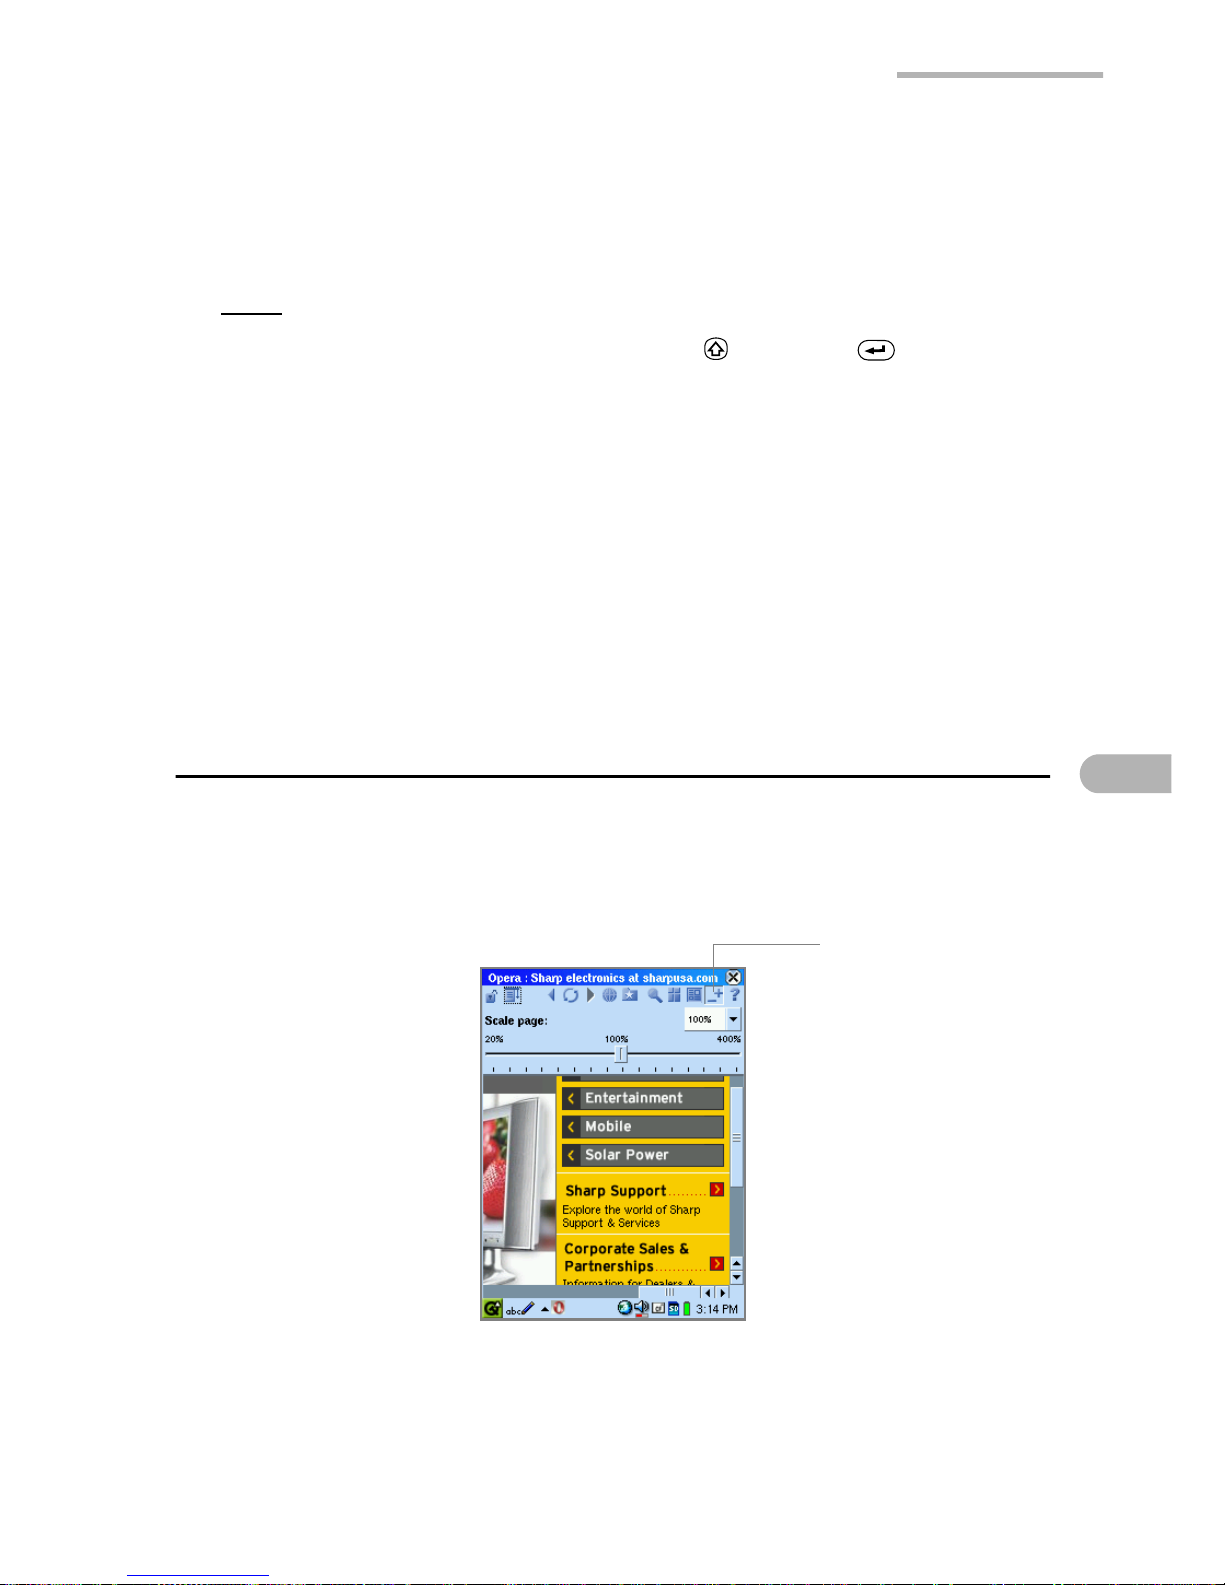
Opera Browser 77
Displaying the current window on the full screen
1.
On the Window list screen, tap “Full screen”.
The current window will be displayed in the full screen.
Note:
• To return to the normal screen, press Shift ( ) + Return ( ) on the
hardware keyboard.
• You can tap the “Menu” icon and then tap “Viewing” to select “Full screen” to
display the window in full screen.
Closing window(s)
1.
On the Window list screen, tap the desired Close button (Close current, Close
others, Close all).
The selected window(s) will be closed.
Magnifying or reducing the page
1.
Tap the “Menu” icon and then tap “Viewing” to select “Scale page”.
Or tap and hold the “Scale page” icon.
The Scale page screen appears.
2.
Adjust the slide bar with a stylus or select the value by tapping the upper right
button.
The page will be magnified or reduced.
Scale page icon
Page 84

78 Opera Browser
Switching the scaling of the page
1.
Tap the “Menu” icon and then tap “Viewing” to select “Toggle scaling”.
Or tap the “Scale page” icon.
The page view switches between 100% and the selected scaled value.
Repeating step 1 toggles the page view.
Switching the Screen layout
Opera Browser has two types of layout: Traditional (normal screen) layout and
Content column (small screen) layout. Traditional layout looks like a normal Web
page on a PC and the Content column layout is designed for a small display and for
more optimized connection.
1.
Tap the “Menu” icon and then tap “Viewing” to select “Toggle small screen
layout”.
Or tap the “Switch layout” icon ( or ).
The page layout switches between normal and small.
Repeating step 1 toggles the page layout.
Note: The “Switch layout” icon on the Menu bar switches its design for the
selected layout.
Searching for a word or phrase on the
current page
You can search for a word or a phrase in the current open page. If the selection is
found, it will be highlighted.
1.
Tap the “Menu” icon and then tap “Find in page”.
Or tap and hold the “Find” icon.
Page 85
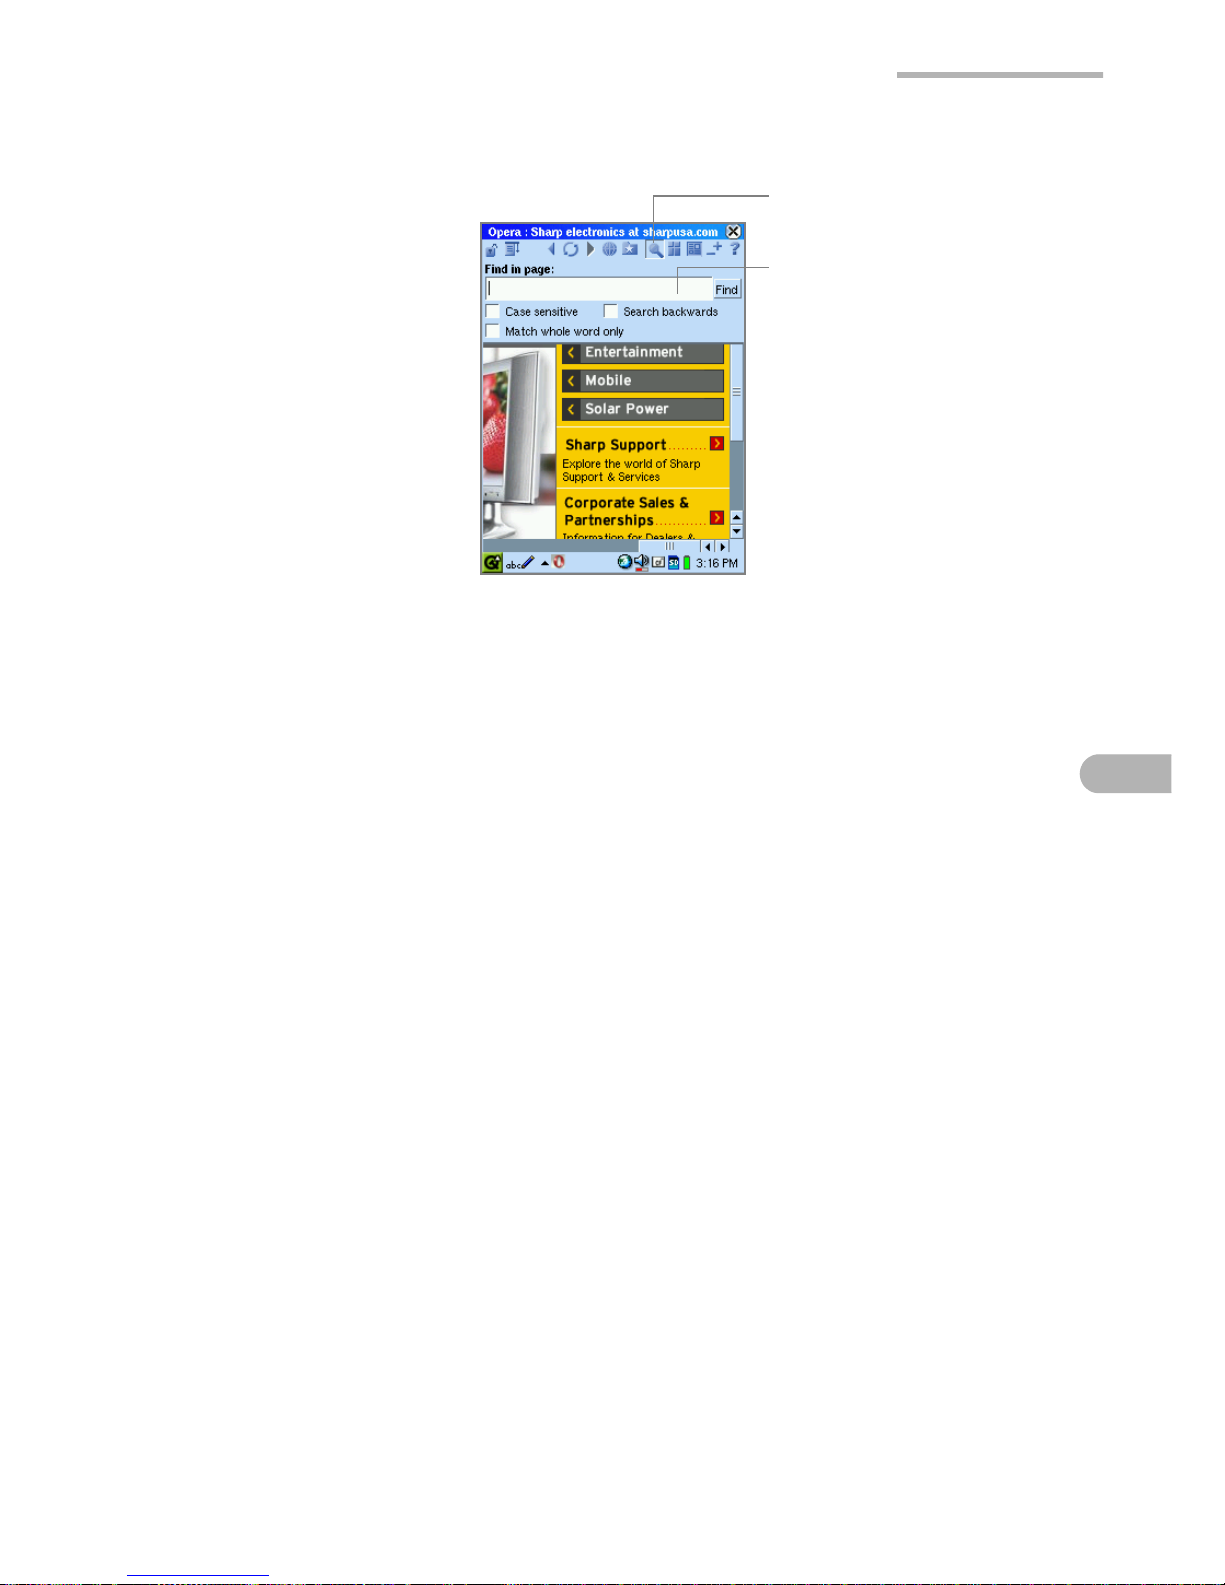
Opera Browser 79
The Find screen appears.
2.
Enter the keyword in the keyword field.
Place the checkmark on the desired Find option.
3.
Tap “Find” to start searching.
If the selection is found, it will be highlighted.
Tap the “Find” icon (or tap the “Menu” icon and then tap “Find next“) to find the
next occurrence.
Keyword field
Enter here the keyword.
Find icon
Page 86
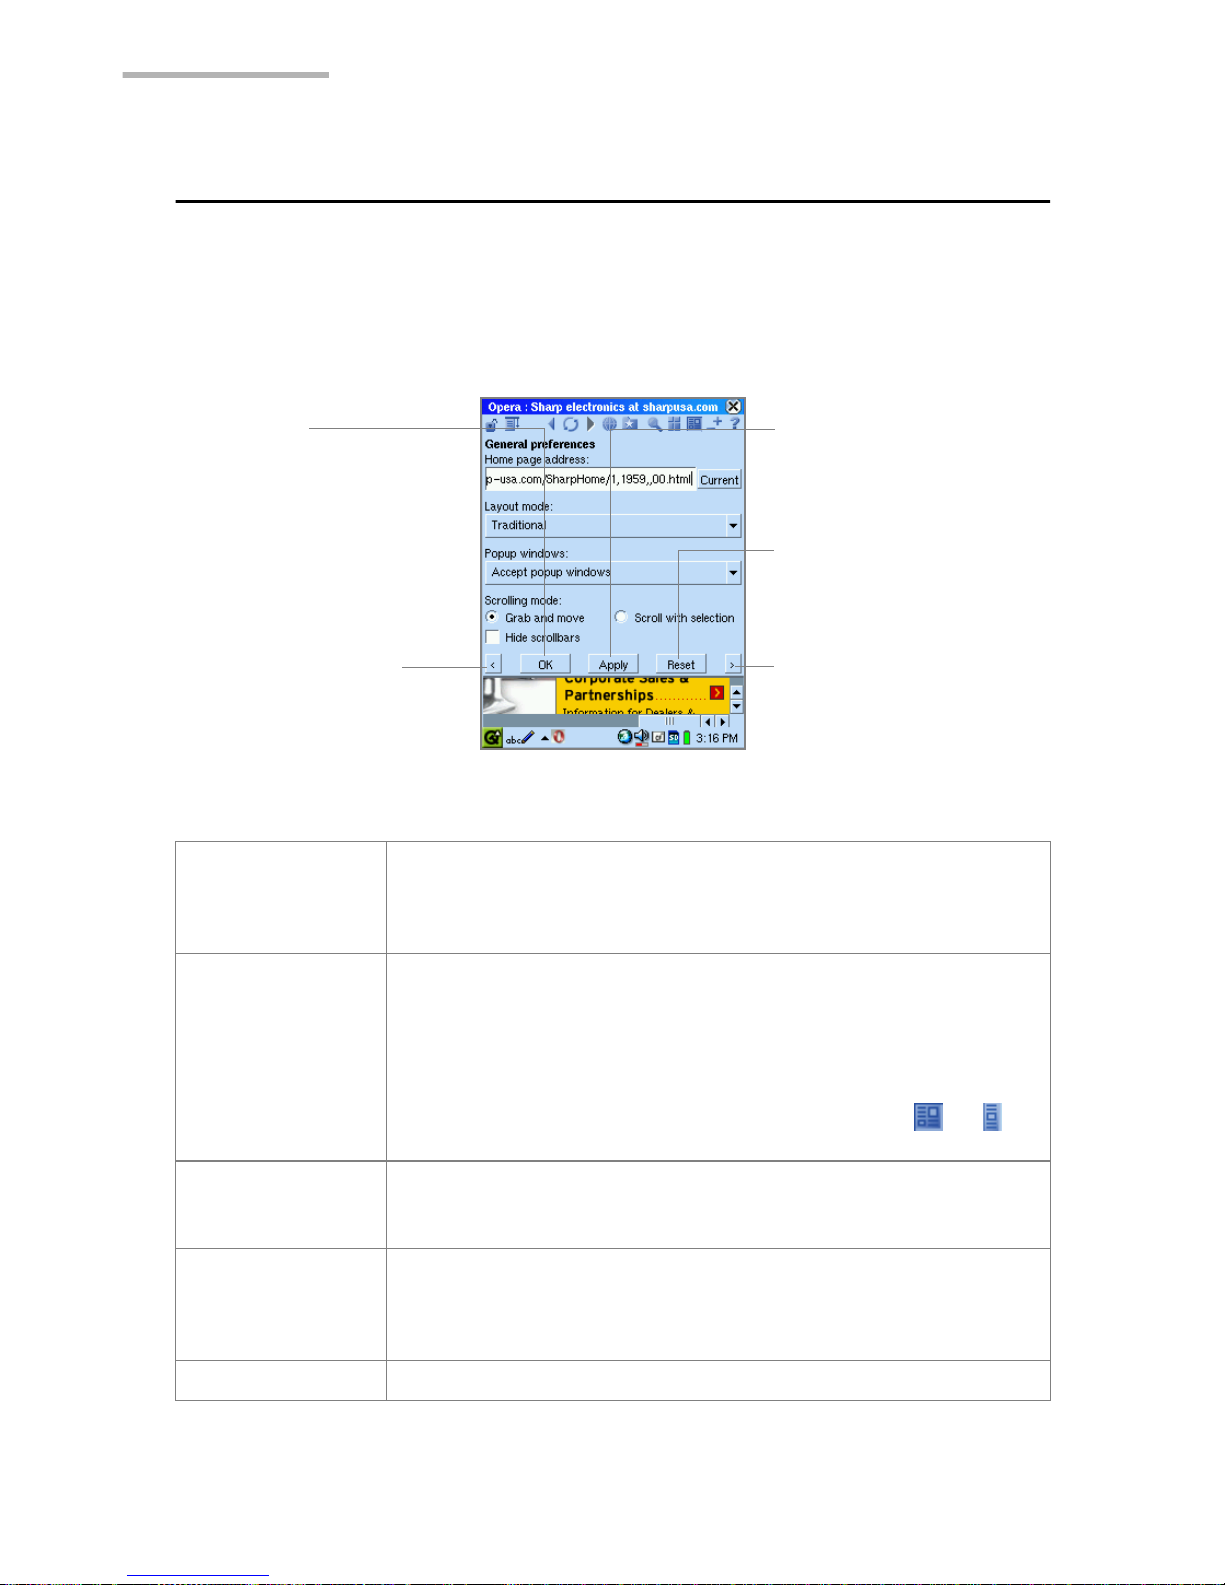
80 Opera Browser
Setting up the Opera Browser preferences
Setting up the General preferences
1.
Tap the “Menu” icon and then tap “Preferences” to select “General”.
The General preferences screen appears.
2.
Select or enter the necessary items.
Home page
address
Enter the address of the homepage you want to open when
you launch the Opera Browser.
Tapping “Current” registers the current page as the
homepage.
Layout mode Select how the Web page is displayed. Select the type of
layout and whether or not the page shows the embedded
images or not (Traditional - no images, Content column - no
images).
Traditional layout looks like a normal Web page on a PC.
Content column layout is simply designed for a small display.
Tapping the Switch layout icon on the Menu bar ( or )
also switches these layout modes.
Popup windows Select to either accept or refuse popup windows, or to open
them in the background. Popups opened in the background
will be added to the window list.
Scrolling mode Select the default to either “Grab and move” (the page will
move with the stylus), or “Scroll with selection” (the page
scrolls in the opposite direction when the stylus moves off the
page edge).
Hide scrollbars When checked, hides scrollbars to increase the viewing area.
OK button
Tap here to save the
settings and close
the screen.
Apply button
Tap here to save the
settings but leave the
screen open.
Reset button
Tap here to cancel the
settings before saving.
Tap here to go to the
previous screen (Filetype
preferences screen).
Tap here to go to the next
screen (Security
preferences screen).
Page 87
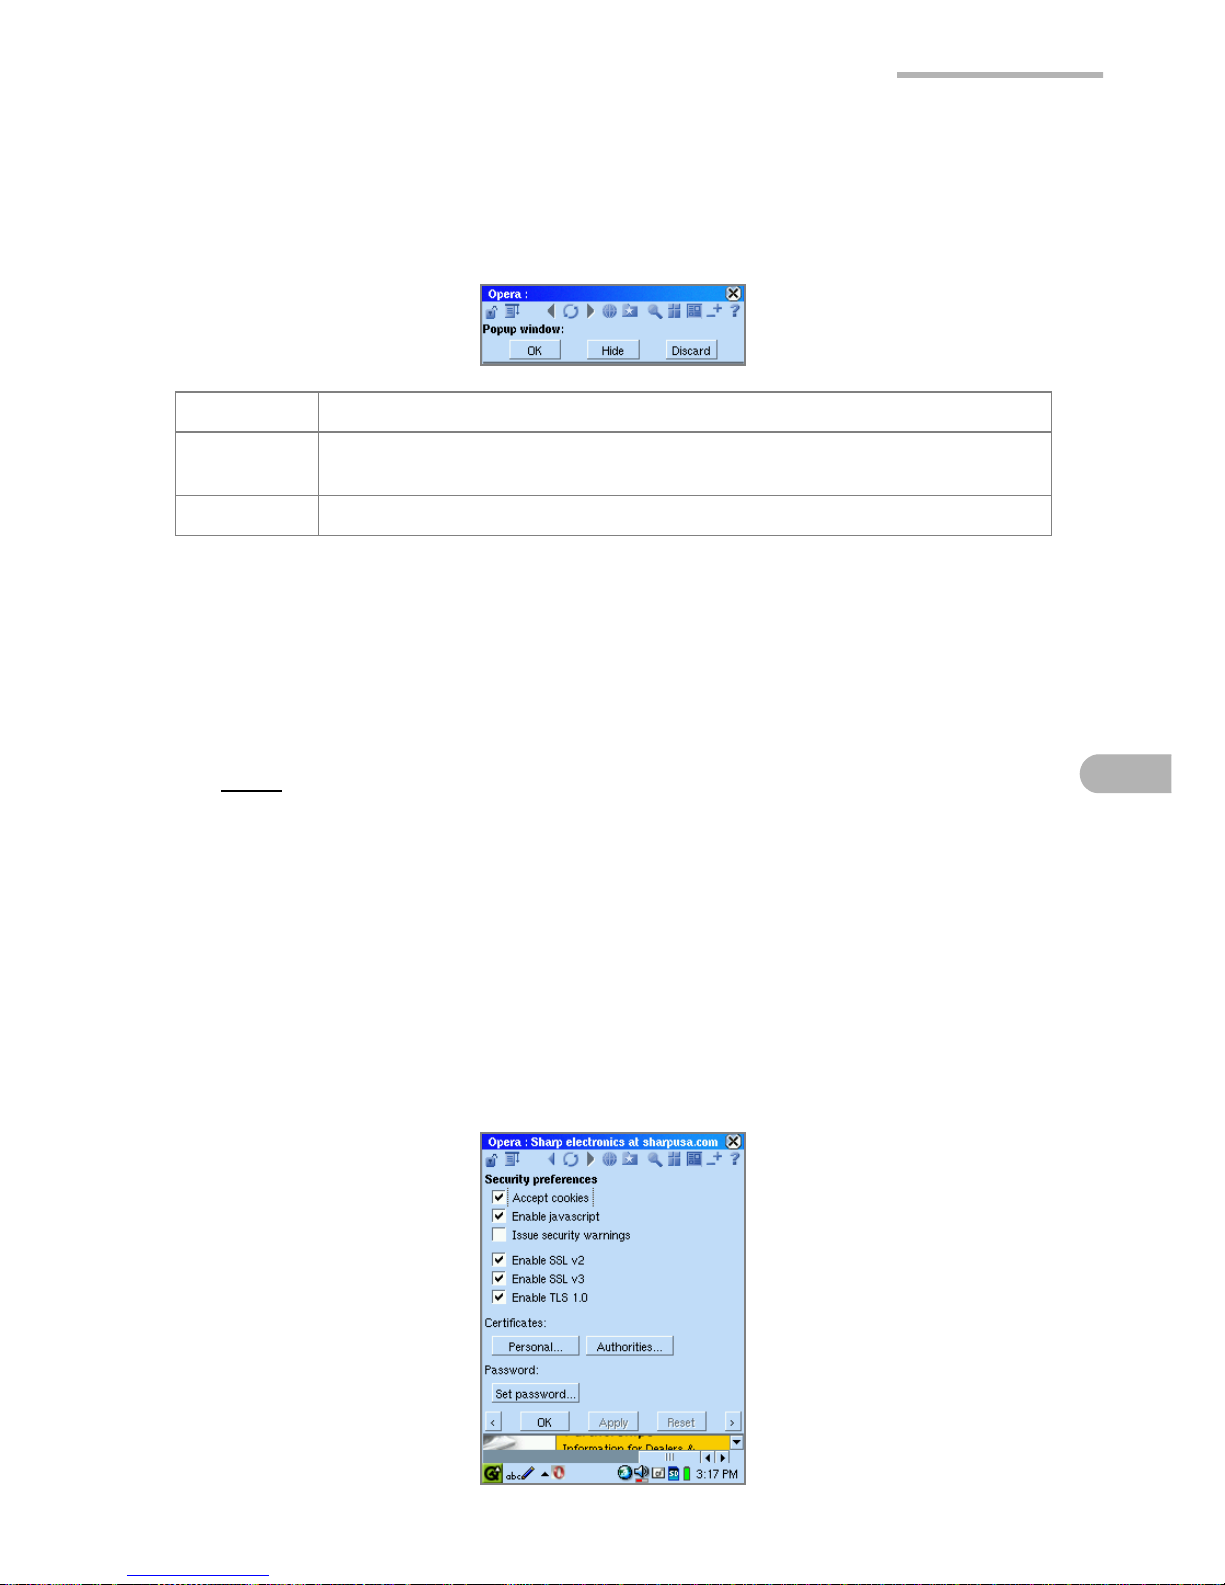
Opera Browser 81
Notes on the Popup window
When “Accept popup windows” is selected, a full screen popup window will open on
the Web page.
The following popup control dialog box also will be displayed in the popup window.
The popup control dialog box will close after a few seconds, without tapping any
buttons. The popup windows can be closed from the window list later.
3.
Tap “Apply” to save the settings.
If you tap “Reset” instead, the settings are canceled.
4.
Tap “OK” to close the General preferences screen.
Note:
Once you tap the “Apply” and “Reset” buttons, they will be dimmed.
Setting the Security preferences
The Security preferences screen manages your certifications and security protocols
for accessing the Web pages on the Internet. Opera Browser also issues security
warning messages. You do not need to change the default settings unless you are
an advanced user with special needs and technical understanding for security
settings.
1.
Tap the “Menu” icon and then tap “Preferences” to select “Security”.
The Security preferences screen appears.
OK Tap to accept the popup window.
Hide Tap to keep the popup window in the background. The popup window
is added to the window list.
Discard Tap to close the popup window.
Page 88
82 Opera Browser
2.
Enter and select the necessary items.
•SSL: Security Socket Layer is a protocol that is used to communicate over the
encrypted connection, and to authenticate none, one or both of the
participants.
•TLS: Transport Layer Security is successor of SSL, and offers up to 128 bit
encryption. The actual strength of the encryption varies depending on the
Web site.
3.
Tap “Apply” to save the settings.
If you tap “Reset” instead, the settings are canceled.
4.
Tap “OK” to close the Security preferences screen.
Note:
Once you tap the “Apply” and “Reset” buttons, they will be dimmed.
Accept cookies When checked, only the information you entered or
selected on the Web page will be saved. The cookie will
be sent back the next time when the SL-5600 browses the
same Web page.
Enable javascript Tap to activate the Javascript. (ECMAScript)
Issue security
warnings
Tap to display a warning message when you move
between the safe and unsafe Web site.
Enable SSL v2 Tap to enable the SSL v2 option.
Enable SSL v3 Tap to enable the SSL v3 option.
Enable TLS 1.0 Tap to enable the TLS 1.0 option.
Certificates
Personal/
Authorities
Personal certificates are used to identify you as the
genuine user of your secure Web services, while
certificate authorities are used to certify a Web service as
secure for you to use. Most certificate authorities you will
ever need are pre-installed with Opera Browser, and
personal certificates are automatically installed when
required by a secure Web site. These settings are here
should you want to delete or fine-tune your certificates. To
view the list of personal certificates, tap “Personal”. To
view the list of authorities, tap “Authorities”. Tap “Import”
to import a certificate from a local file. Tap “Export” to
export to a local file. Tap “OK” to save the settings.
Password
Set password Register the password to use the certificate options. The
password prevents the certificate you set up from
unauthorized use.
Page 89
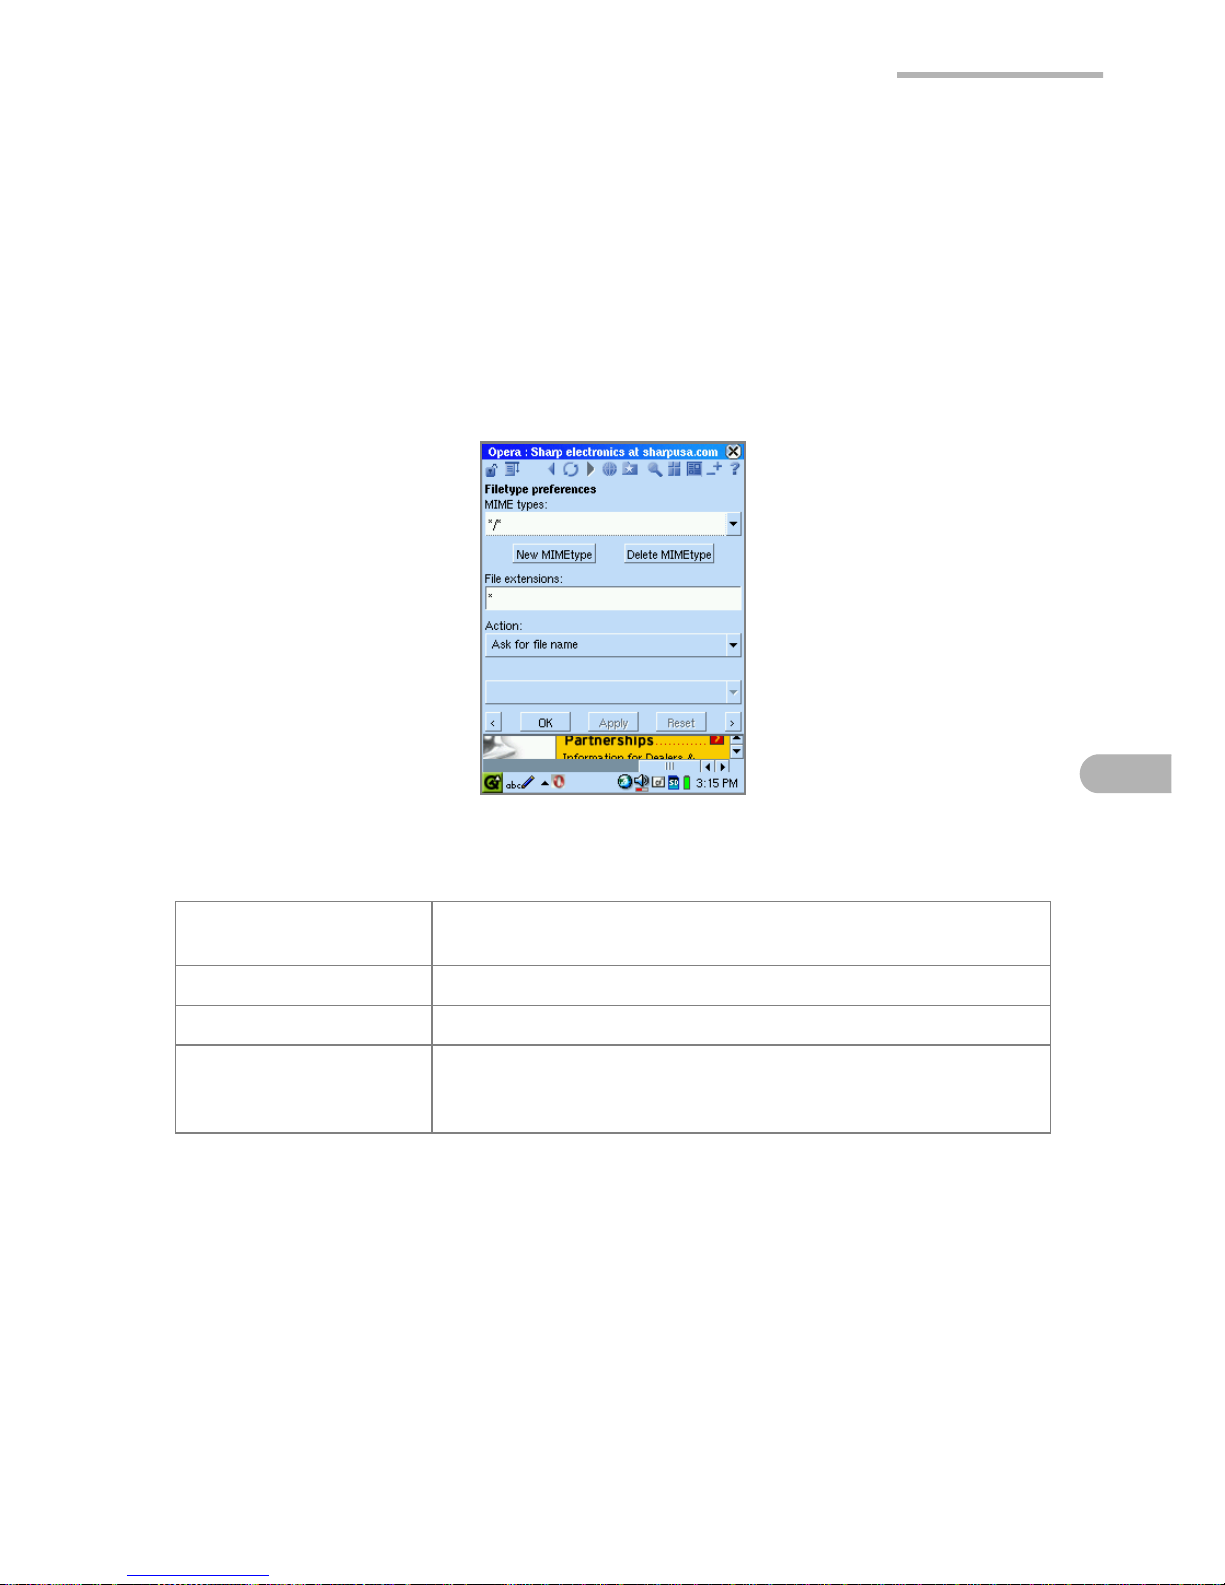
Opera Browser 83
Setting the Filetype preferences
Opera Browser handles some file types itself, such as Web page documents. Others
are passed on to plug-ins and external applications, or just saved on your PC. The
Filetype preferences let you control Opera Browser's behavior when it encounters
different file types.
1.
Tap the “Menu” icon and then tap “Preferences” to select “File types”.
The Filetype preferences screen appears.
2.
Select or enter the necessary items.
MIME types Select or enter the MIME type you want to assign an
action to.
New MIME types Adds a new MIME type to the drop-down list.
Delete MIME type Deletes a MIME type from the drop-down list.
File extensions Enter the file extension associated with the MIME type.
You can specify multiple extensions by inserting a
comma. (example: jpeg, jpg, jpe)
Page 90
84 Opera Browser
3.
Tap “Apply” to save the settings.
If you tap “Reset” instead, the settings are canceled.
4.
Tap “OK” to close the Filetype preferences screen.
Note:
Once you tap the “Apply” and “Reset” buttons, they will be dimmed.
Action
Tap the drop-down list to select how Opera Browser
operates when you click on the links embedded in the
page.
Open in browser Opens the file using Opera Browser. Opera Browser can
display text, some kinds of markup languages, images
and video formats.
Be sure that Opera Browser can display a certain file type
before choosing this setting.
Ask for file
name
Opera Browser asks you to enter a name and save the
page to the SL-5600.
Automatic
download
Opera Browser downloads and saves the page to the SL5600 with its original file name.
Open with other
application
Opera Browser asks you to choose the application to use
to view the file.
Open with
plugin
Opera Browser asks you to choose the plugin type you
want to use to view the file. Use the default setting for
normal use.
Page 91

Opera Browser 85
Keyboard shortcuts
Use the following single key or combination key shortcuts from the hardware
keyboard:
Shift+ cursor: Scrolls pages to one of the indicated directions.
Shift+Return: Toggles view mode between normal and full screen.
M: Pops up the main menu.
Z: Goes to the page viewed before the current page.
X: Goes to the page viewed after the current page.
H: Displays the list of the pages displayed before the current page.
N: Displays the list of the pages displayed after the current page.
G: Displays the Go to page screen.
B: Displays the Bookmarks screen.
F: Displays the Find screen.
W: Displays the Window list screen.
S: Displays the Scale page screen.
L: Switches the layout mode between normal and small.
P: Displays the Preferences (General) screen.
A: Focuses the next link in the current page.
Q: Focuses the previous link in the current page.
R: Displays the latest update of the page.
Page 92

86 EMail
EMail
Overview
The EMail application allows you to send and receive e-mail messages and
features:
• POP3/POP3(APOP)/IMAP4/SMTP protocols
• Multiple e-mail accounts
• Converts attachment files using the MIME format
• The Mail light (LED) flashes for an e-mail receipt
• Refers to the Address Book application to import e-mail addresses, and registers
the e-mail addresses of the e-mail you received in the Address Book application.
• Searches for received e-mail messages
• Groups received e-mail messages by mailboxes
• When sending or receiving e-mail messages offline, the pop-up screen for
network connection will be displayed. The line is terminated automatically when
task is completed. When sending or receiving e-mail messages online, the line
will not be terminated upon completion.
To send and receive e-mail messages, you must:
• Set up the communication method (modem card, LAN card) and network
preferences
• Set up an e-mail account in the EMail application
Caution!
Be sure to check that enough memory (text message size plus at
least 10 KB addition) is available before exiting the EMail application
as the EMail application needs to save the data being edited.
Note:
• The total memory for one e-mail is approximately 800 KB.
(messages = 300 KB, attachments = 500 KB)
• The EMail application may have a delayed launch depending on the quantity
of data being saved.
• The Intellisync for Zaurus (provided on the CD-ROM) allows you to
synchronize e-mail data stored on a PC. For details, refer to the Intellisync for
Zaurus online manual.
Page 93
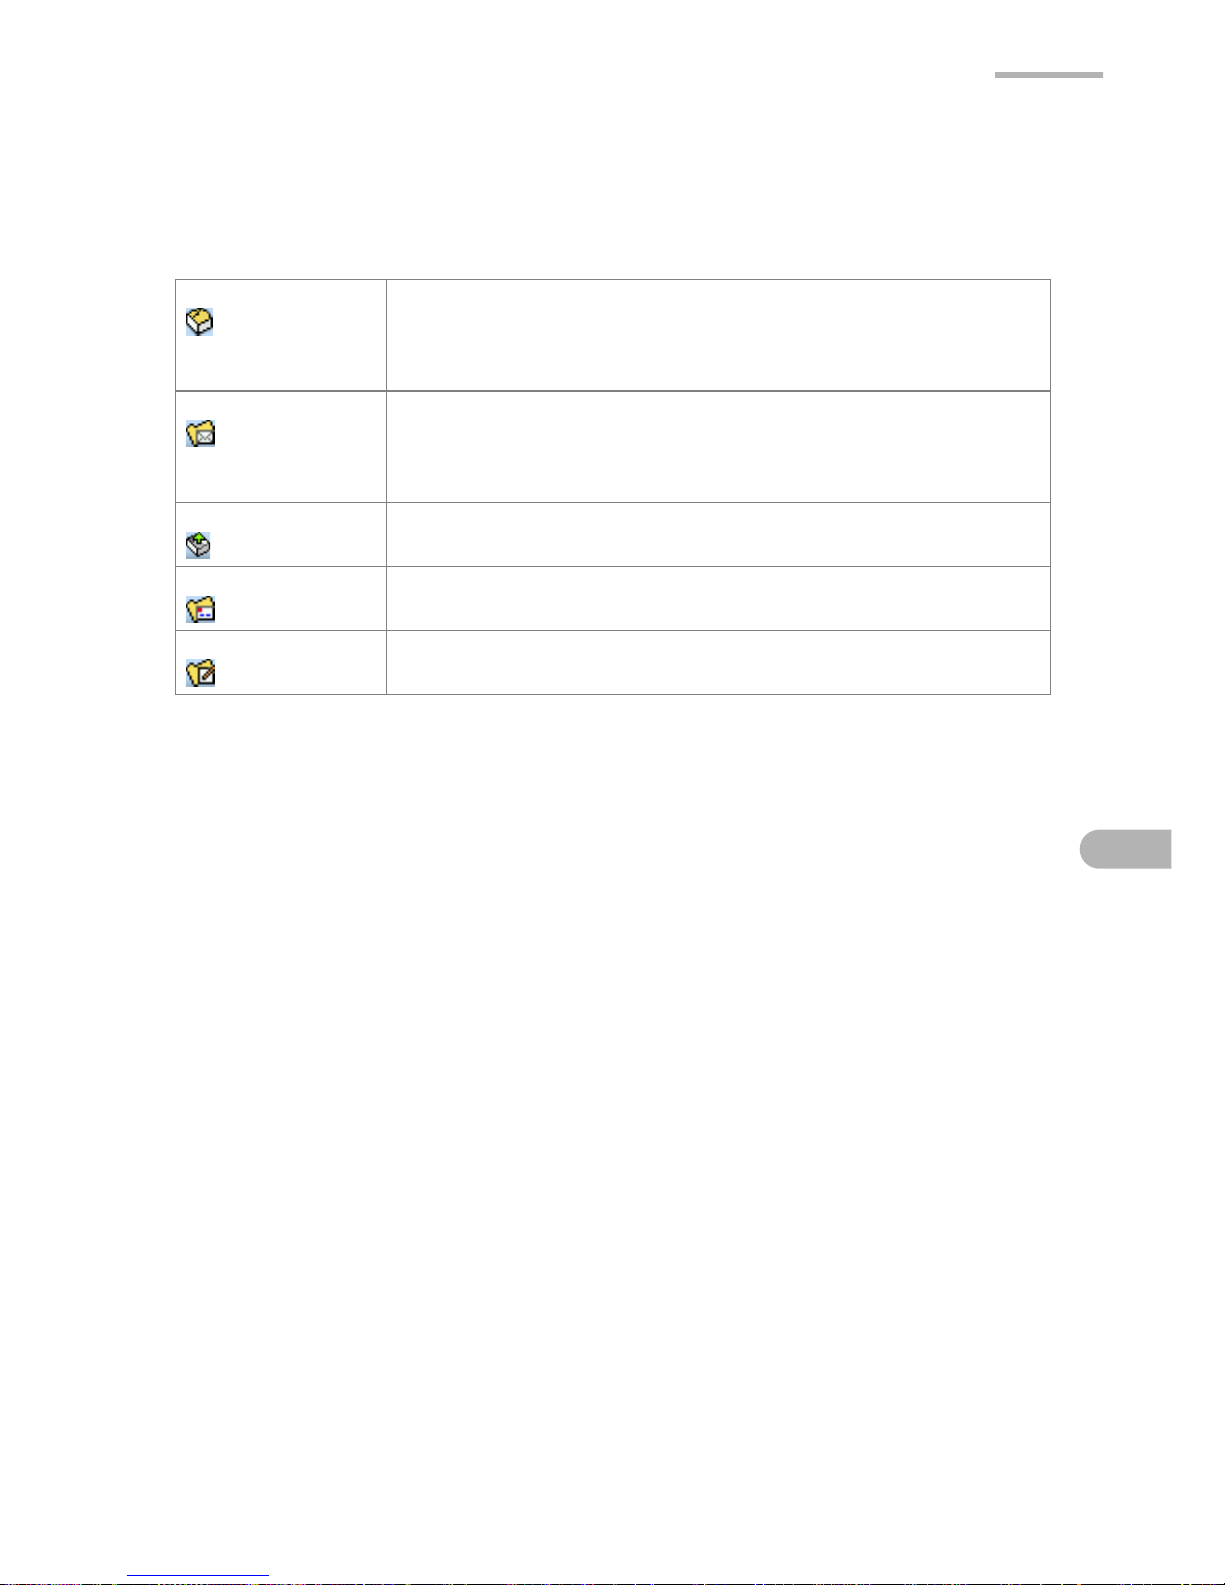
EMail 87
Index screen
1.
On the Applications Home screen, tap the “EMail” application icon.
The EMail Index screen has five tabs.
Folders tab Browses the Inbox, Outbox, Sent and Draft folders, etc. of
each account in the tree format. Synchronization folders are
used for synchronization with a PC. E-mail messages to be
synchronized only are saved in the Synchronization folders.
Inbox tab
Displays received e-mail messages.
Unread messages are displayed in blue. Read messages are
displayed in black. Messages that downloaded titles only are
displayed in red.
Outbox tab Displays unsent e-mail messages in red.
Sent tab Displays sent e-mail messages in black.
Draft tab Displays draft e-mail message.
Page 94
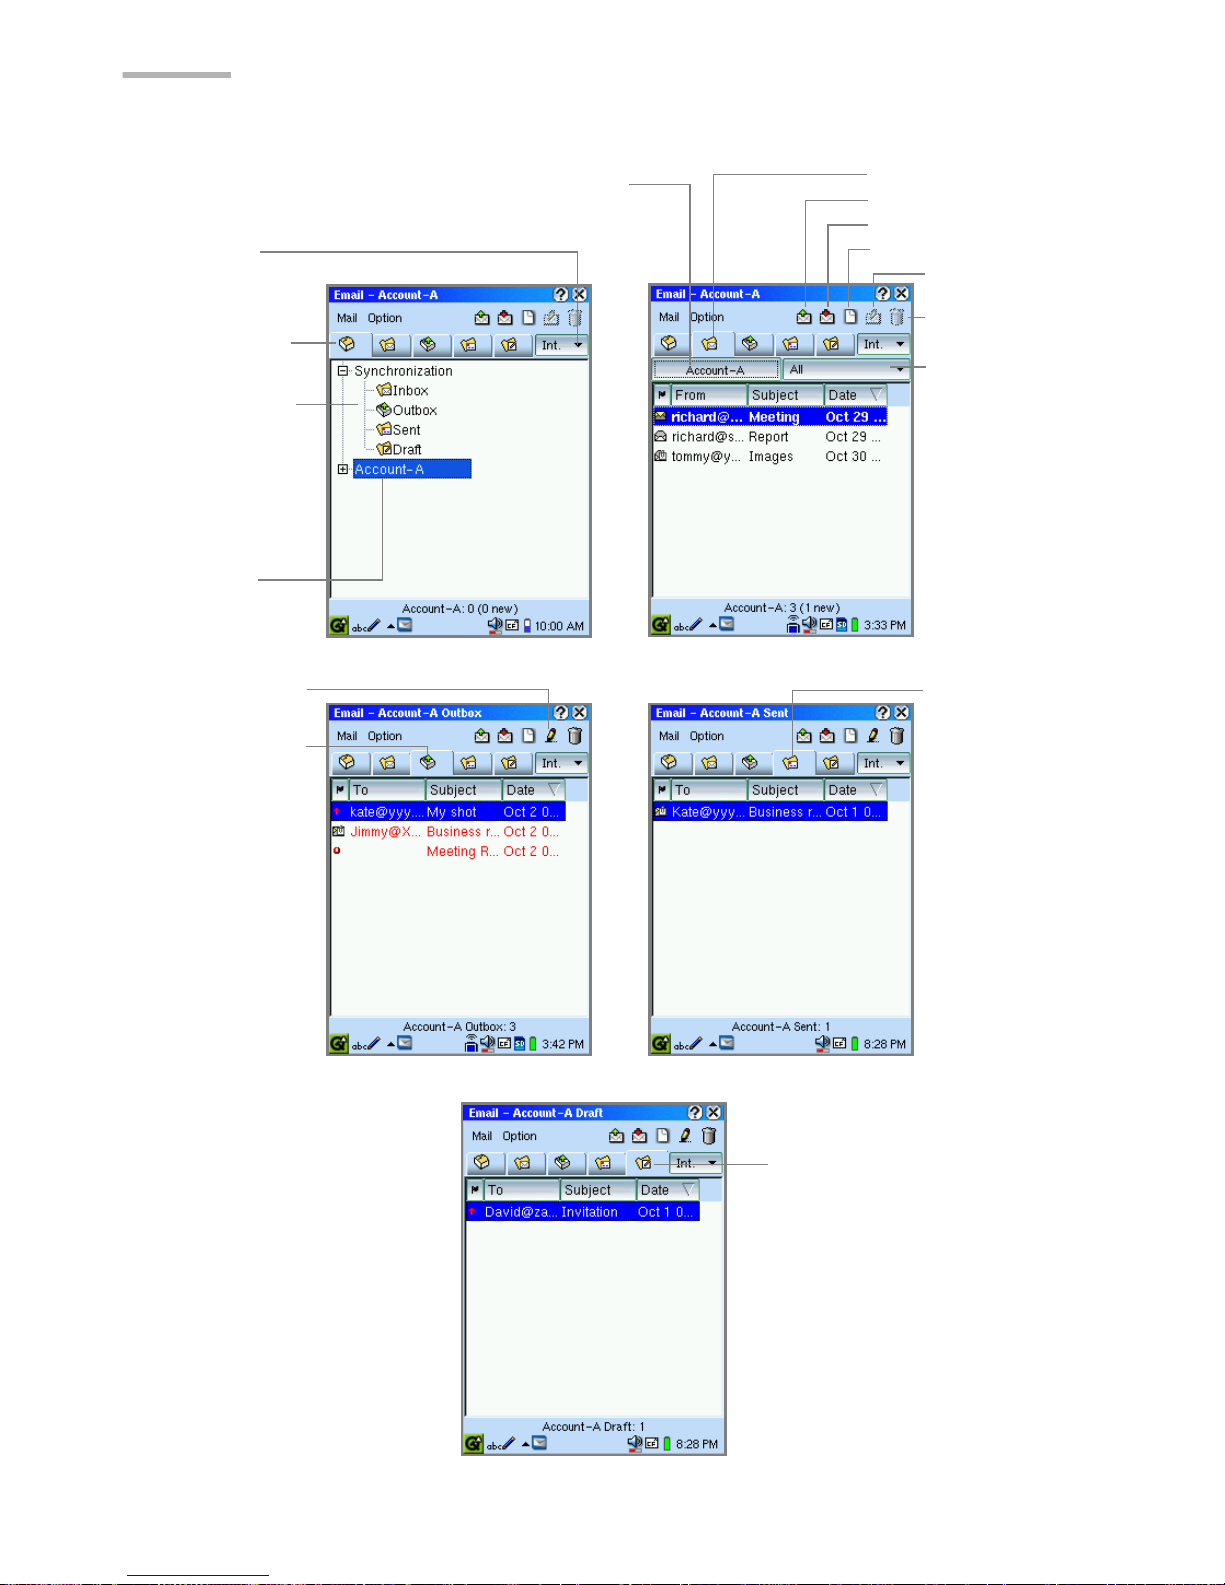
88 EMail
Folders
Outbox
Sent
Sort by folder button
Edit mail icon
Reply mail
icon
Send mail icon
Get all mails icon
New mail icon
Inbox
Folders tab
Delete icon
Sort by
status
button
Inbox tab
Storage
switch button
Outbox tab
Sent tab
Draft
Draft tab
Doubletapping the
folder in the
tree displays
the Index
screen for the
folder.
Created
account
name
Page 95
EMail 89
Storage switch
button
Switches the storage between the Internal Flash memory and
memory card to save the created or received e-mail
messages.
Send mail icon Sends all unsent e-mail messages in the Outbox.
Get all mails icon Receives all e-mail messages that are saved in the mail
server.
New mail icon Tap to create a new e-mail message.
Reply mail icon Tap to create reply/forward e-mail message.
Sort by folder
button
Tap to select folder containing e-mail messages you want to
see.
Sort by status
button
Tap to sort e-mail messages by All/Unread/Read.
Delete icon Tap to delete the e-mail message(s).
Mail menu
Send all mails Sends all unsent e-mail messages in the Outbox.
Get all mails Receives all e-mail messages for all accounts that are saved
in the mail server.
Get mail in Receives the e-mail messages in the selected account.
Send/Receive Sends and receives e-mail messages for all accounts.
Cancel transfer Cancels e-mail transfer.
New mail Opens a screen to create a new e-mail message.
Edit mail Opens an existing e-mail message to be edited.
Reply to mail Opens a reply mail screen for the sender only.
Reply to all Opens a reply mail screen for all senders and receivers.
Forward mail Opens a screen to forward the received e-mail message.
Copy/Move mail Moves or duplicates e-mail messages between the Internal
Flash memory and CF card and SD memory card.
Set status Changes the e-mail status between Sent and Unsent in the
Outbox and Sent folder, or Read and Unread in the Inbox
folder.
Delete mail Deletes the e-mail message(s).
Page 96
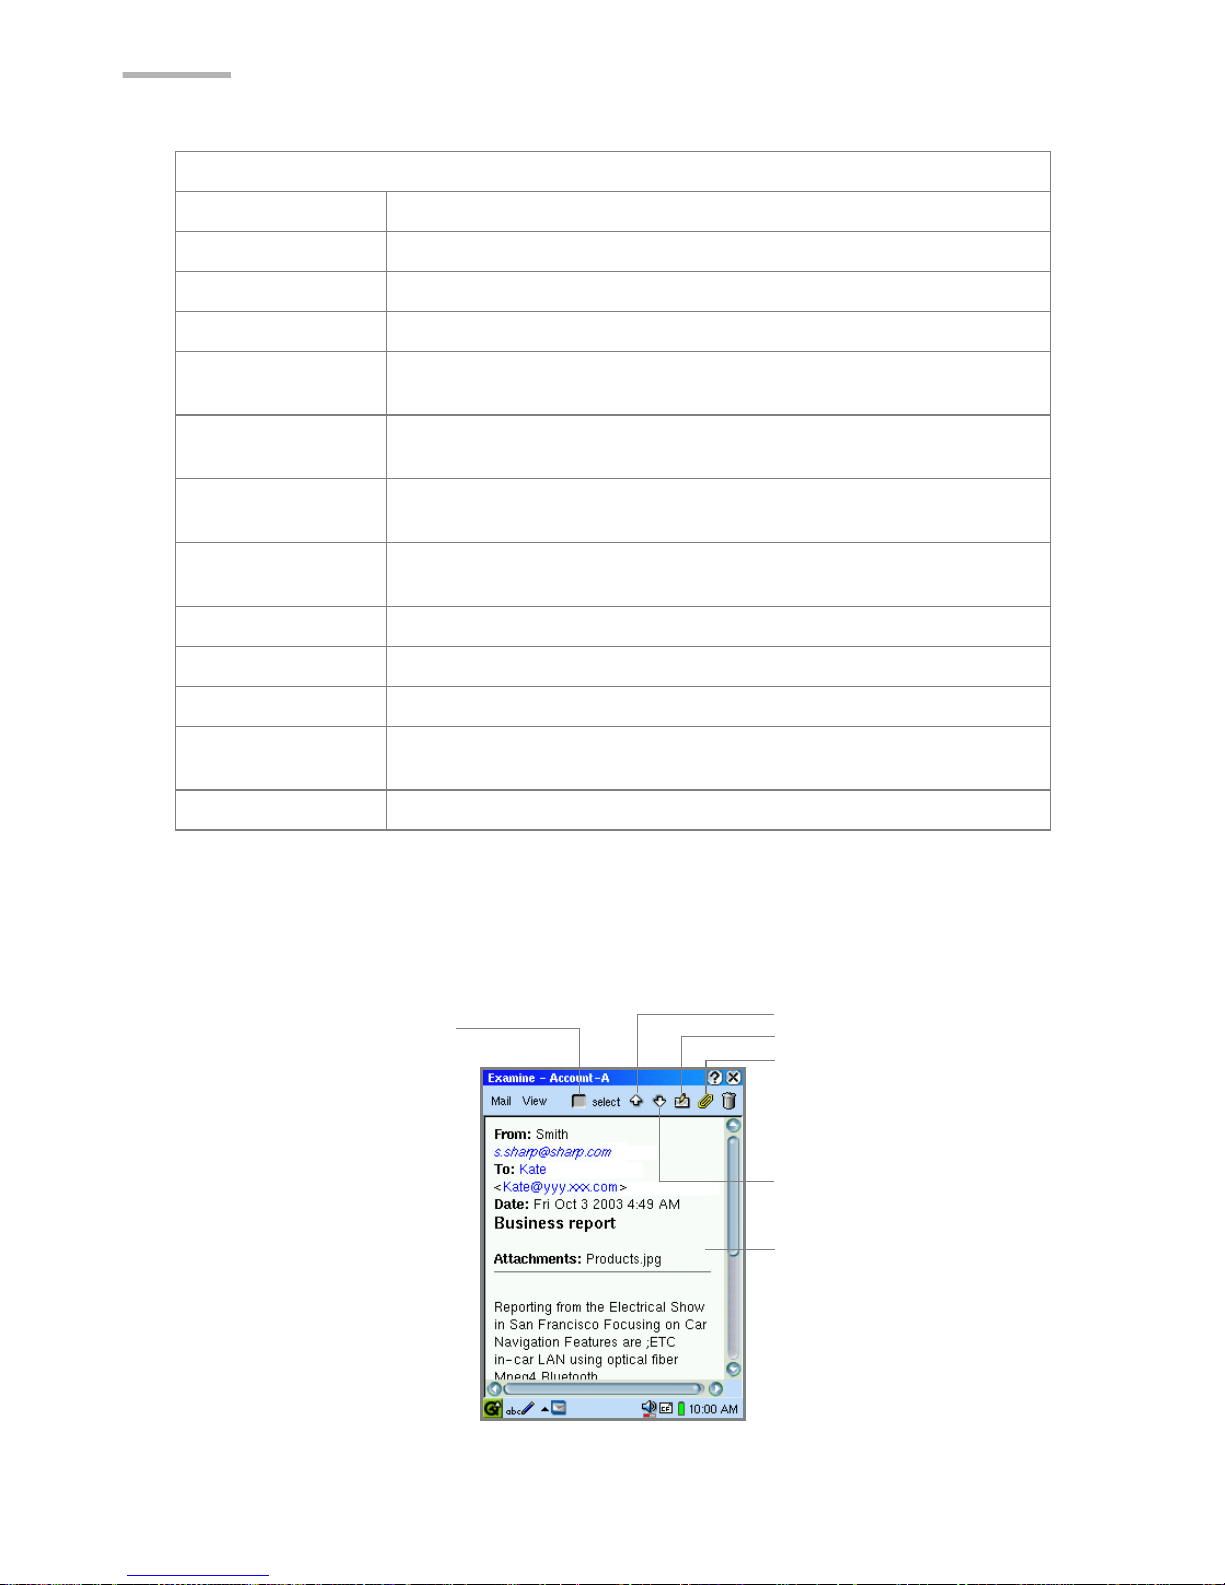
90 EMail
Examine (Detail) screen
1.
On the Index screen, tap an e-mail message.
Option
New account Opens the New account screen. (See page 93.)
Edit account Opens the Edit account screen selected in the submenu.
Delete account Deletes the selected account selected in the submenu.
Font Changes the display font size.
Show summary Selects whether or not to display the e-mail messages in
details on the Index screen. (See page 107.)
Show status Selects whether or not to display status at the bottom of the
Index screen.
Filter Creates a filter condition by folder for received e-mail
messages.
Search Searches for received e-mail messages with search
conditions.
New mailbox Creates a new mailbox folder. (See page 108.)
Rename mailbox Renames the created mailbox folder.
Delete mailbox Deletes the created mailbox folder.
Move to Moves the e-mail messages to the folder selected in the
submenu.
Help Displays online help.
E-mail message
Deletion checkbox
Previous icon
Send (Reply) mail icon
Attachments icon
Next icon
Page 97
EMail 91
Deletion checkbox Deletes e-mail messages checked by the “Delete mail” menu
on the Index screen. (This option does not work for unsent or
unread messages.)
Previous icon Displays the previous message.
Next icon Displays the next message.
Send mail icon
(Outbox, Draft)
Sends the e-mail message displayed on the Examine
screen.
Reply mail icon
(Inbox)
Tap to create reply/forward e-mail message.
Attachments icon Opens an Attachment list screen allowing you to open, or
save an attachment file to an expansion memory card, etc.
(See page 103.)
Mail menu
Receive the
rest (Inbox)
Receives an e-mail message if only the message title has
been already received.
Send this mail
(Outbox/Draft)
Sends the e-mail message displayed on the Examine
screen.
New mail Opens a screen to create a new e-mail message.
Edit mail Opens an existing e-mail message to be edited.
Reply to mail Opens a reply mail screen for the sender only.
Reply to all Opens a reply mail screen for all senders and receivers.
Forward mail Opens a screen to forward the received e-mail message.
Add to
Address Book
Adds the e-mail address of the sender to the Address Book
application.
Set status Changes the e-mail status between Sent and Unsent in the
Outbox and Sent folder, or Unread in the Inbox folder.
Copy Copies the selected text to the clipboard.
Delete Deletes the e-mail message displayed on the Examine
screen.
View menu
Previous Displays the previous message.
Next Displays the next message.
Font Changes the font size.
Attachments Opens an Attachment list screen allowing you to open, or
save an attachment file to an expansion memory card, etc.
(See page 103.)
Text view Changes the view format between the text format and rich
text format.
Page 98
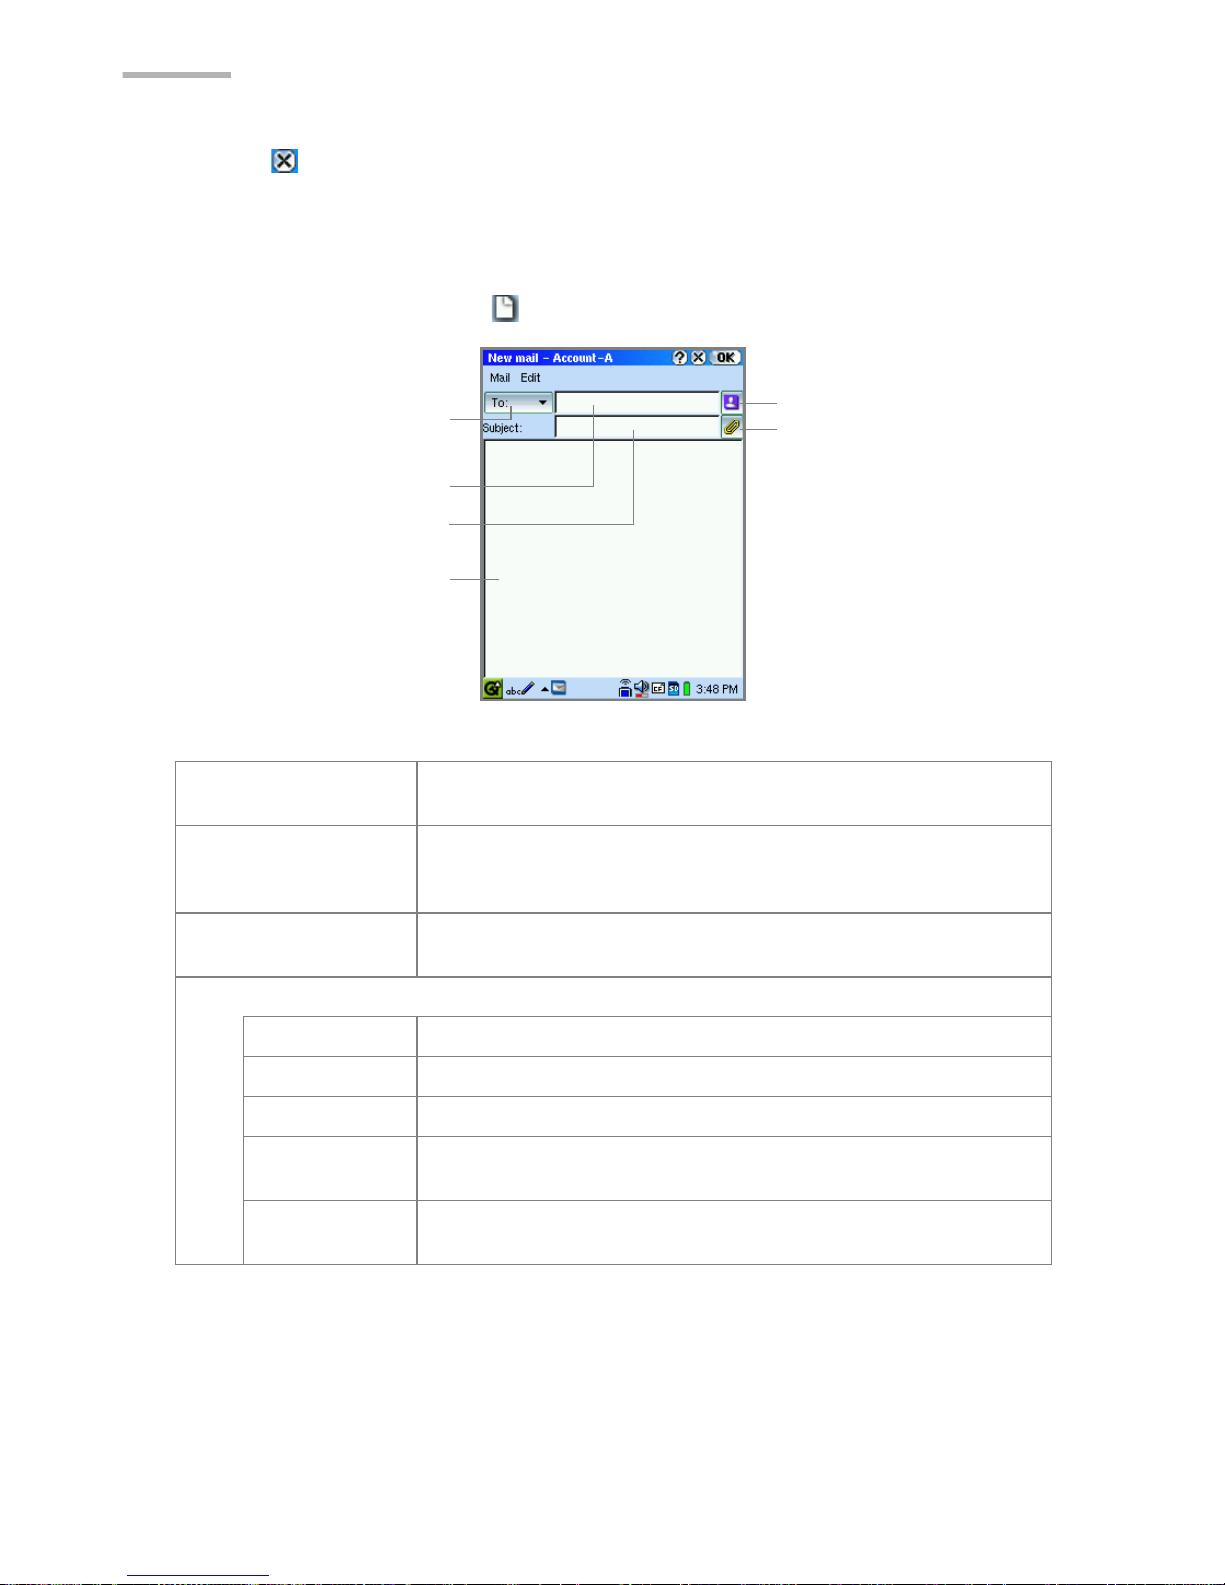
92 EMail
2.
Tap to close the Examine screen and return to the Index screen.
New mail screen
1.
On the Index screen, tap .
Direction drop-down
list button
Tap to select the e-mail address direction (To, Cc, Bcc and
From).
Address Book icon
Tap to list the e-mail addresses registered in the Address
Book application. Select the e-mail address(es) from the
list.
Attachments icon
Tap to open the screen containing the attachment files you
wish to attach to the e-mail message.
Mail menu
Send this mail Sends the currently displayed e-mail message.
Put in Outbox Saves the created e-mail messages to an Outbox folder.
Save as Draft Saves the created e-mail messages to a Draft folder.
Refer Address
Book
Lists the e-mail addresses registered in the Address Book
application. Select the e-mail address(es) from the list.
Adding
Attachments
Opens the screen containing the attachment files you wish
to attach to the e-mail message.
Direction drop-down
list button
E-mail address field
Subject field
Address Book icon
Message area
Attachments icon
Page 99
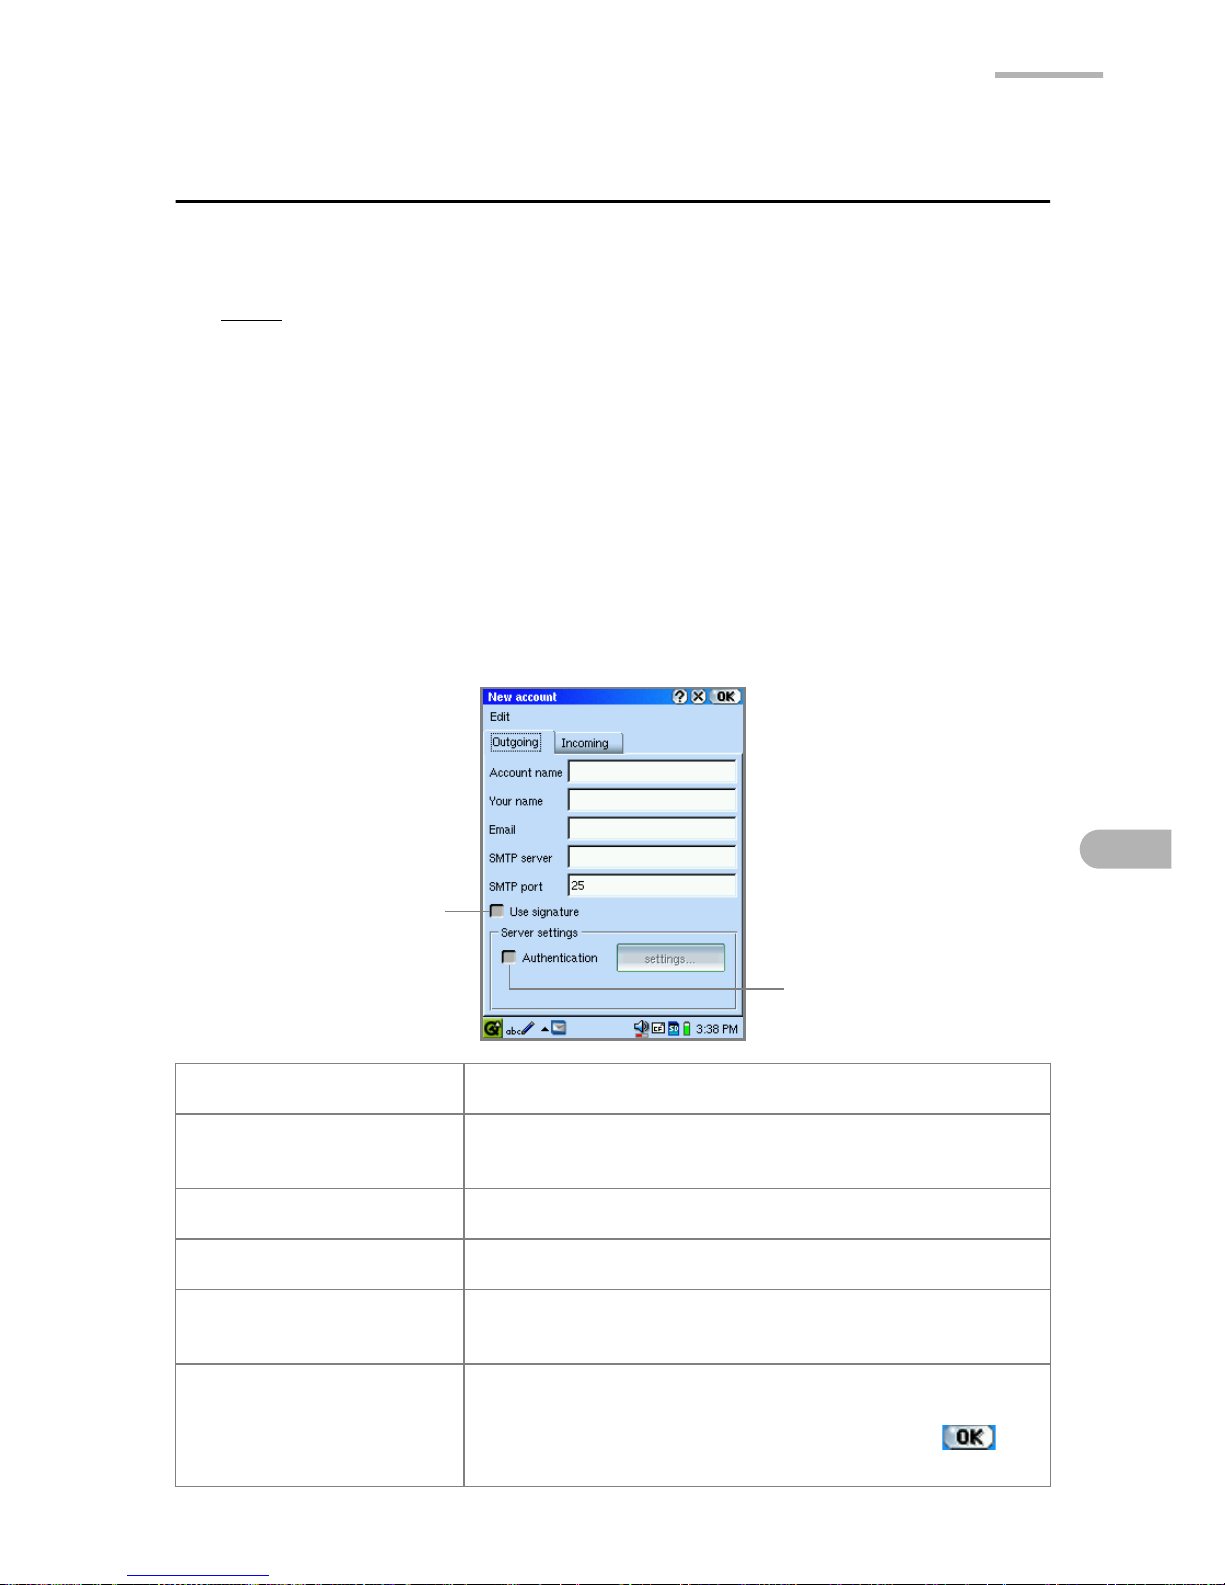
EMail 93
E-mail accounts
The EMail application allows multiple e-mail accounts to be registered.
Note: If you have already registered e-mail accounts in the Network
application, they apply to the e-mail accounts for the EMail application.
To configure detailed settings, tap the “Option” menu on the Index
screen and then tap the account from the “Edit account” submenu.
Detailed procedures are described below.
Setting up an e-mail account
1.
On the Index screen, tap the “Option” menu and then tap “New account”.
The New account screen, including the Outgoing and Incoming tabs, will be
displayed.
2.
Tap the Outgoing tab to set the sending options.
Account name Enter the account name to be set.
Your name Enter your name as used in the “From” field of the
e-mail message.
Email Enter your e-mail address.
SMTP server Enter the server name for sending e-mail messages.
SMTP port Enter the server port number for sending e-mail
messages (default setting: 25).
Use signature checkbox Check to add a personal signature. On the screen
that will be displayed, create a signature to be added
to the end of all new e-mail messages. Tap to
save the signature.
Use signature checkbox
Authentication checkbox
Page 100
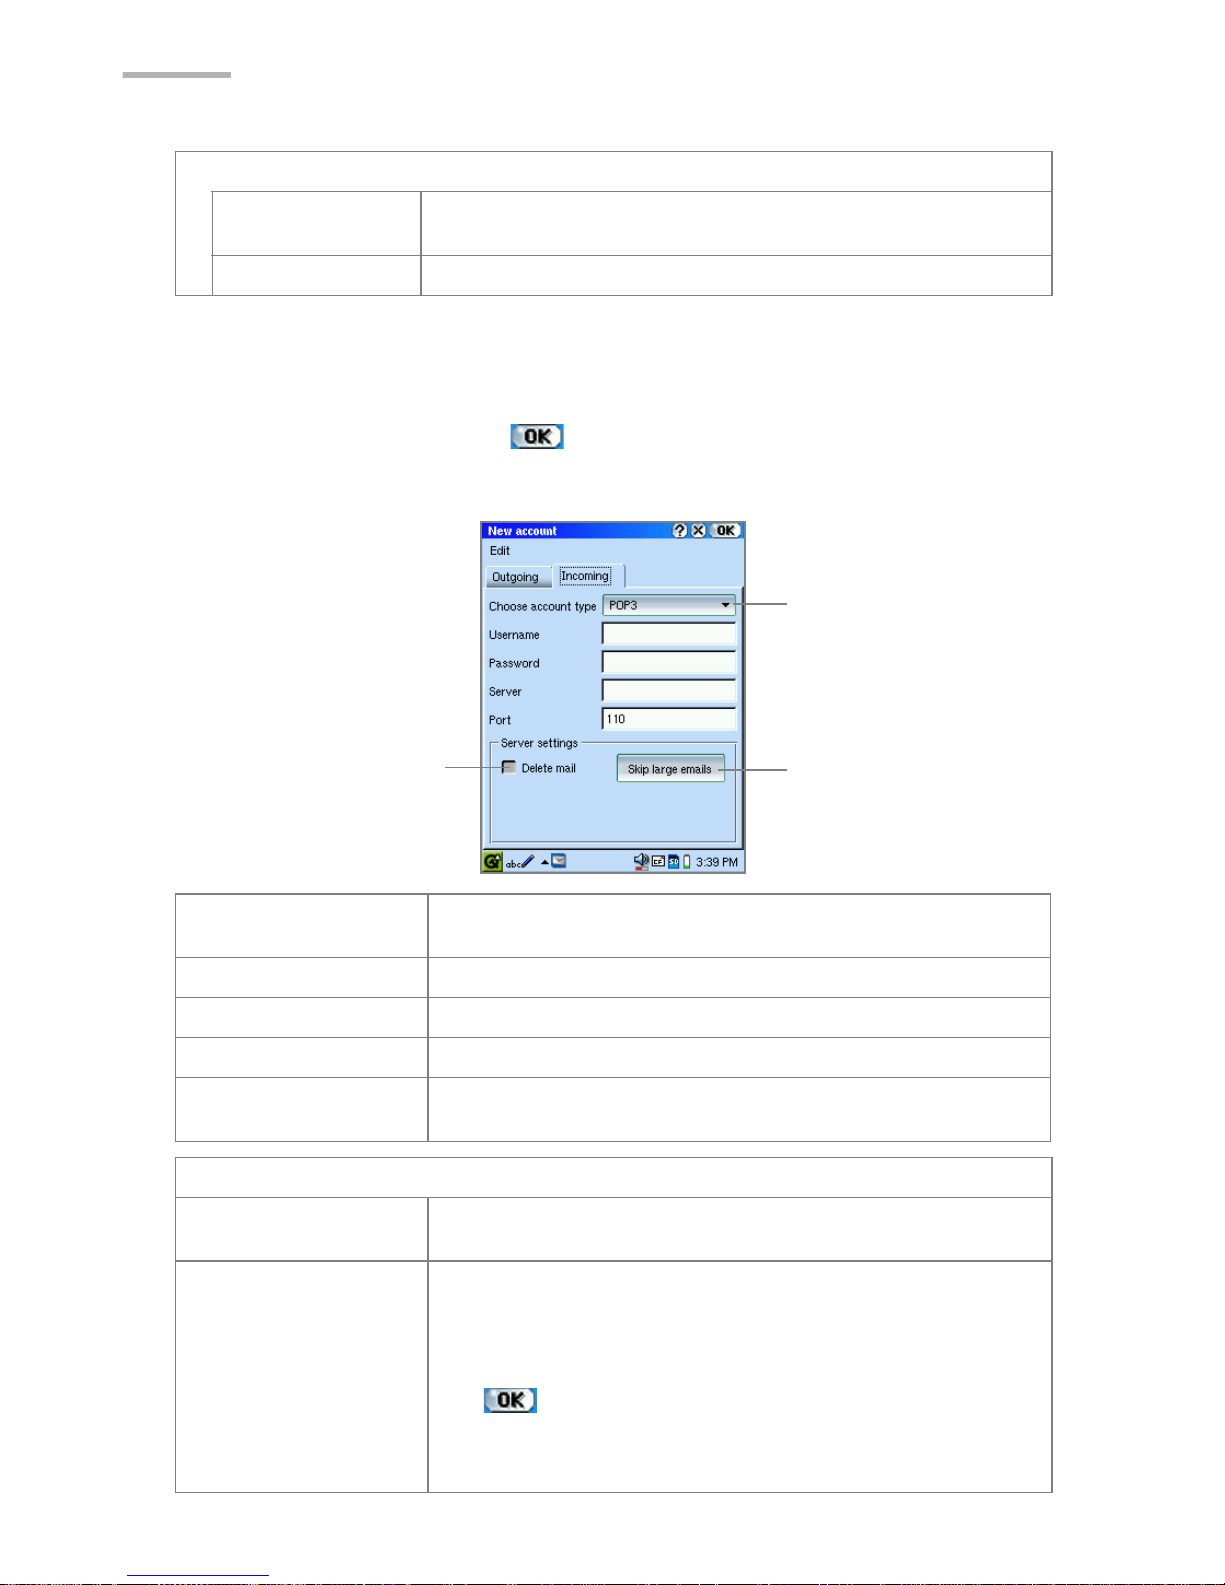
94 EMail
3.
If your server needs Authentication certification, turn the Authentication
checkbox on and then tap the “Settings” button.
Make necessary setting changes on the Authentication settings screen that will
be displayed, and then tap .
4.
Tap the Incoming tab to set the receiving options.
Server settings
Authentication
checkbox
Check this box if your SMTP server needs sending
authentication.
Settings button If the Authentication checkbox is on, tap to create settings.
Choose account type
drop-down list button
Tap to select an account type:
POP3, POP3 (APOP), IMAP4.
Username field Enter the login name used to log into an e-mail system.
Password field Enter password used to log into an e-mail system.
Server field Enter name of the server used to receive e-mail messages
Port field Enter server port number for receiving e-mail messages.
(default setting··· POP3: 110, IMAP4: 143).
Server settings
Delete mail checkbox Check if you want to erase e-mail messages saved in the
server after you have finished downloading messages.
Skip large emails
button
Tap to specify an e-mail size limit.
When tapped, the Email threshold screen will be
displayed. Tap and drag the slider to specify the maximum
size of incoming e-mail messages. (range: 10 KB - 800
KB)
Tap to save the settings.
If you attempt to receive an e-mail message that is too
large, only the message title (sender name, date and the
size of the message) will be downloaded.
Choose account type
drop-down list button
Skip large emails button
Delete mail checkbox
 Loading...