

Page 1
SJ-H511K-T
ДОМАШНИЙ ХОЛОДИЛЬНИК С
МОРОЗИЛЬНОЙ КАМЕРОЙ
ИНСТРУКЦИЯ ПО
ЭКСПЛУАТАЦИИ………………
REFRIGERATOR-FREEZER
OPERATION MANUAL……
2〜38
39〜74
Plasmacluster является торговой маркой SHARP Corporation.
Plasmacluster is a trademark of SHARP Corporation.
Домашний холодильник с морозильной
камерой с использованием хладагента,
не содержащего хлорфторуглеродов
Fluorocarbon-free refrigerator-freezer
В данном холодильнике с морозильной камерой
используется хладагент без хлорфторуглеродов и
изолирующий взрывоопасный газ.
[Хладагент: изобутан, изолирующий взрывоопасный газ:
Циклопентан] Они являются экологически безопасными
веществами, оказывающими крайне слабое воздействие и
не повреждающими озоновый слой.
This refrigerator-freezer uses fluorocarbon-free
refrigerant and insulation blowing gas.
[Refrigerant: Isobutane, insulation blowing gas:
Cyclopentane] These are environmentally-sound
substances with extremely small effects that do not
damage the ozone layer.
Мы благодарим Вас за покупку этого изделия фирмы ШАРП. Перед
использованием Вашего холодильника ШАРП прочитайте, пожалуйста, данное
руководство по эксплуатации с тем, чтобы получить от Вашего нового
холодильника максимум пользы. Все пользователи холодильника должны быть в
полной мере ознакомлены со всеми его функциями и мерами безопасности по
эксплуатации.
Храните данное руководство в течение всего срока эксплуатации холодильника,
чтобы любой, кто им пользуется, мог ознакомиться с его функциями и мерами
безопасности при эксплуатации.
Thank you very much for buying this SHARP product. Before using your
SHARP refrigerator, please read this operation manual to ensure that you gain
the maximum benefit from it.
All persons using the cabinet must be thoroughly familiar with its operation and
safety features. Keep this operation manual with the refrigerator if you move or
if the cabinet changes owners so that whoever uses it can read about the
various features and safety rules.
Page 2

Contents
Before using this product
Before using this product
Page
The appearance of this refrigerator
Door-open buzzer
Control panel
Warning
Caution
Installation
Before using your refrigerator
When using for the first time Items that are often mistaken as malfunctions
Tips for efficiently storing foods
How to use this product
How to use this product
Temperature zone selection compartment
Warming Defrosting
Express Cooling
Fridge compartment
Freezer compartment
Express Freezing Deep Freezing
Ice compartment
Making ice cubes
Auto Ice Maker (turning off)
Ice Tray Cleaning/Emptying Ice Tray
49
Temperature zone selection
52
57
58
Express ice making
40
41
42
44
45
46
48
51
53
54
56
57
58
59
60
60
Vegetable compartment
Other functions
62
Timer
Plasmacluster Ion
Temperature control
Muting Beep
Maintenance
Maintenance
Mounting and removing accompanying parts
Cleaning the refrigerator
Cleaning the automatic ice maker
Troubleshooting/application guide
Troubleshooting/application guide
Troubleshooting
What to do
Moving / Transporting
Power outage
When the compartment light is blown
Vacation Mode
64
Deodorizer (Dual deodrizer)
65
Child lock
61
62
62
63
64
65
66
68
70
71
74
39
Page 3

The appearance of this refrigerator
Cooling panel
The rear alminium panel inside is cooled to approximately 0°C, and extremetly humid,
chilled air is spread throughout the compartment to keep food fresh.
This prevents excessive dryress, uneven coling, and over cooling.
Fridge compartment
Temperature zone selection compartment
Vegeatble compartment
Capable of Warming • Defrosting • Express cooling • Temperature zone selection
Ice compartment
Freezer compartment
Temperature zone selection compartment
Warming… It can be used to keep the dinner or supper warm.
The temperature can be selected from 55°C and 60°C.
Defrosting… Warm air defrosts home-frozen meat or fish to a slightly frozen condition
so that the meat or fish can be cut easily by a knife.
Express cooling… Cool faster than usual by chilled air.
Temperature zone selection…
Temperature can be selected from 5 zones to suit the type of food stored.
40
Plasmacluster Ion
Suppresses multiplication of fungi floating inside the refrigerator.
Plasmacluster will not operate since chilled air does not
enter/exit the vegetable compartment.
Dual deodrizer
Odor element will be dissociated by electron and caught through nano deodorizer.
The vegetable compartment has a sealed structure and the effects of dual deodrizer do not reach this compartment.
Door-open buzzer
When a door is left open, beeps will sound after 1 minute
and also after 2 minutes. Beeps will sound continuously
when the door is left open for more than 3 minutes.
The buzzer will stop when the door is closed.
This feature is not available for the freezer
compartment and vegetable compartment.
Page 4
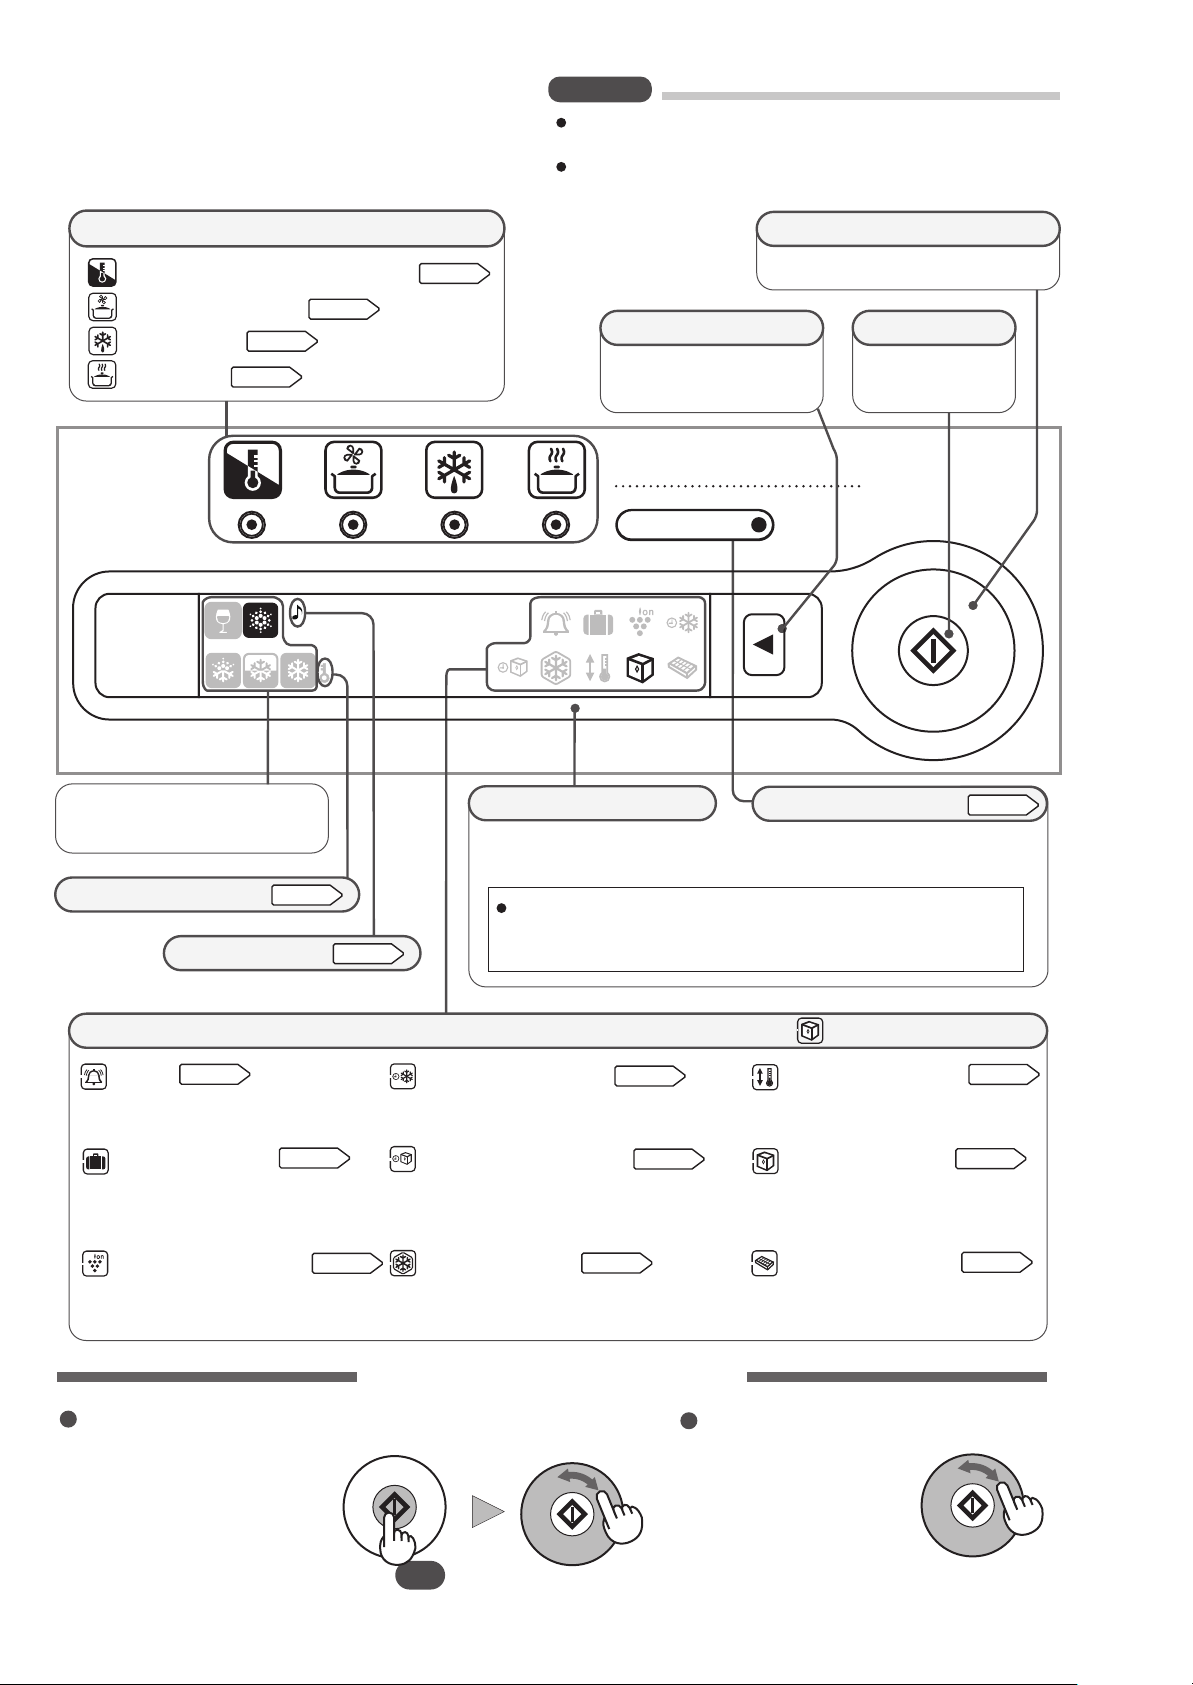
Control panel
Notes
Dark shadow may appear on LCD panel due to static.
However this is not a defect.
Do not hit or apply sharp object on to the LCD panel.
Temperature zone selection compartment lamp
Temperature zone selection
Express cooling
Defrosting
Warming
Displays the current temperature
zone selected for the temperature
zone selection compartment.
51 page
49 page
Child lock display
52 page
65 page
Beep display
65 page
53 page
LCD display (initial content)
When no operation is made for 30 seconds,
the display will automatically return to the
initial content.
The LCD display and DEODORIZER lamp that indicates deodorization
operation will go off in approximately 1 minute (to save electricity).
They will light up again by operating any button or dial.
Turn to select the menu.
Cancel button
The screen goes back to the
previous screen each time
the button is pressed.
DEODORIZER
DEODORIZER Lamp
Dial
Select button
Confirms the
selected item.
MENU SELECT
64 page
LCD Menu
Timer
Up to 99 minutes 30 seconds can
be set in interval of 30 seconds.
Vacation Mode
The refrigerator will operated in power
saving mode while the door is not
opened or closed.
Plasmacluster Ion
It releases plasmacluster ion into
the fridge compartment.
62 page
62 page
63 page
Displayed during operation. It first displays " ".
Express Freezing
High-quality frozen foods can be made using
this feature and is convenient for home-freezing.
Express ice making
Ice cubes can be made quicker
(about half the time) than normal.
Deep Freezing
Stores food at low temperatures
of approximately -23°C.
How to use a dial
To select the temperature zone selection
compartment Menu
Set the liquid crystal with
normal display and press
"Select" for 2 seconds or
longer to turn the dial.
Beep
2 sec.2 sec.
57 page
57 page
59 page
Temperature control
(Fridge compartment and
Freezer compartment)
Auto ice maker
Turns ON/OFF the
automatic ice maker.
Ice tray cleaning
When not using the
refrigerator for some time.
64 page
60 page
60 page
To select the DEODORIZER•
LCD Menu
Simply turn the dial.
For operation on each menu, please see the pages for operation procedure.
41
Page 5
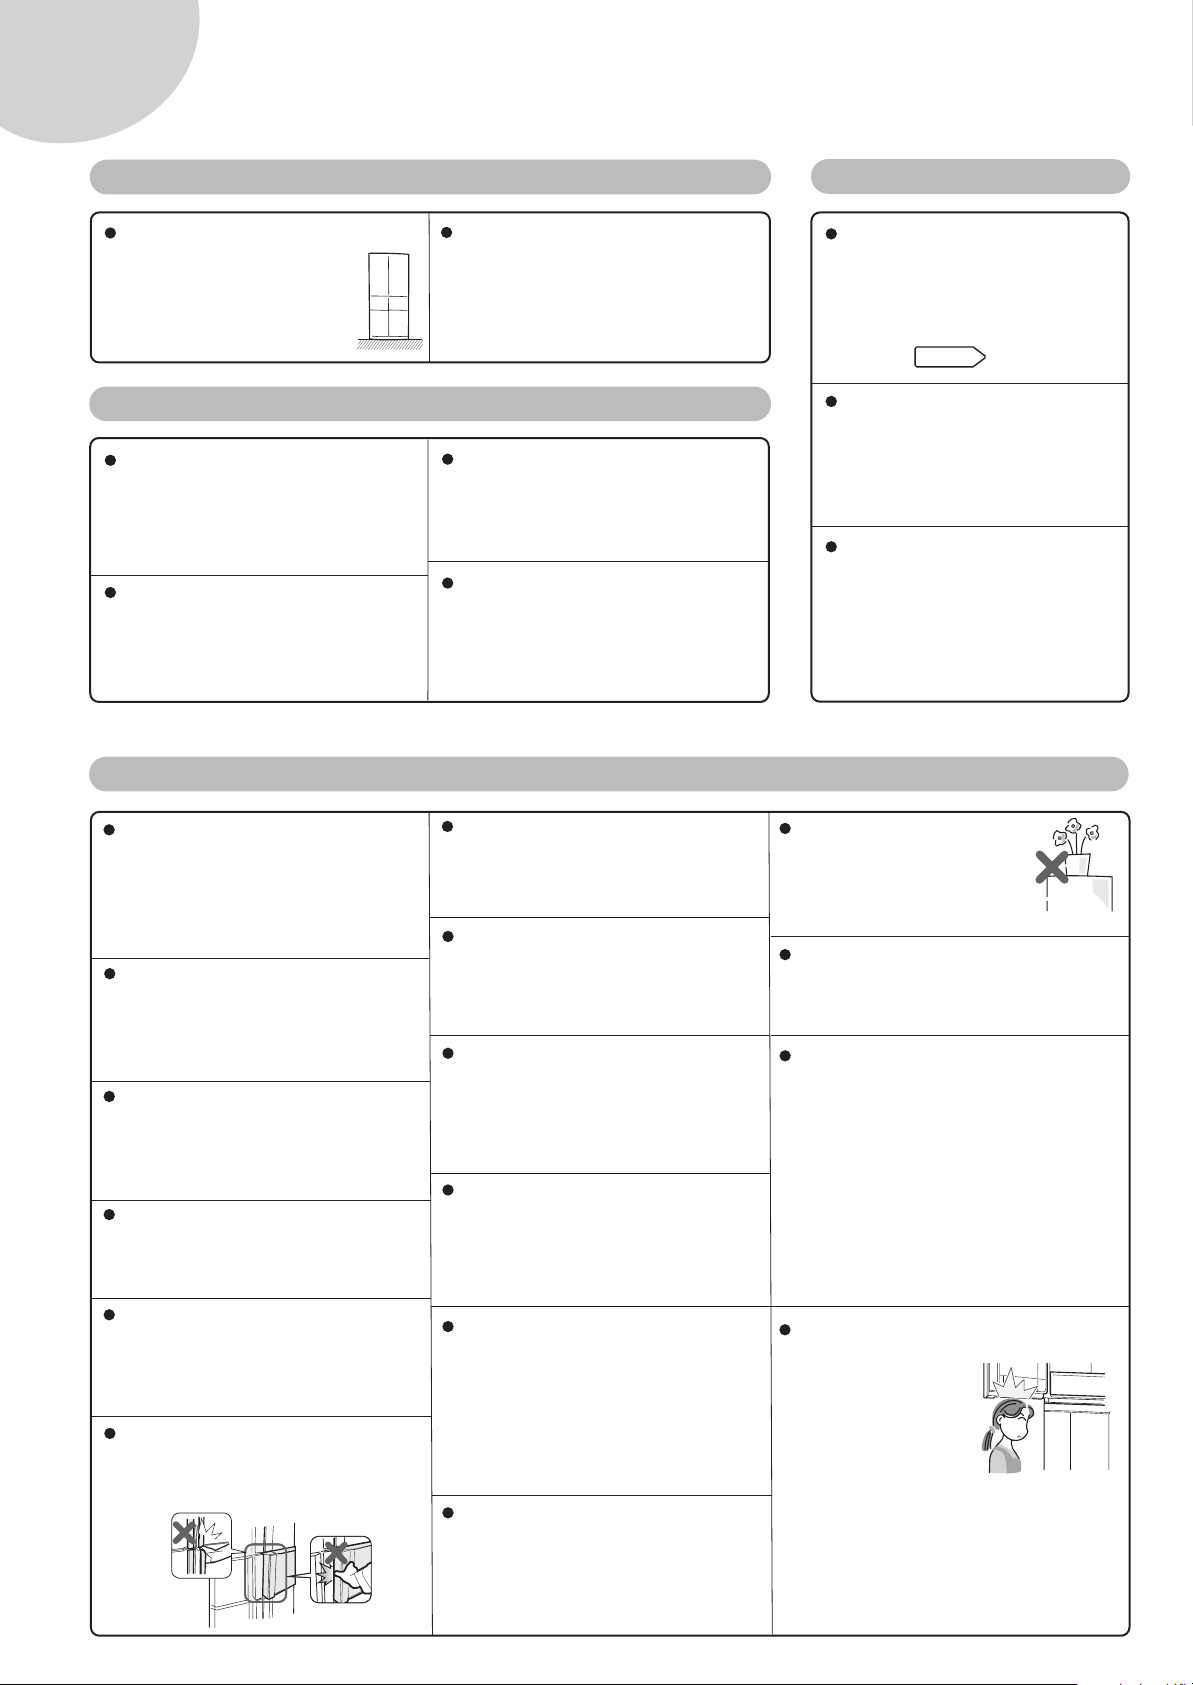
Warning
This refrigerator is contains flammable refrigerant (R600a: isobutane) and insulation
blowing gas (cyclopentane).
Observe the following rules to prevent ignition and explosion.
The refrigeration system behind and inside the refrigerator contains refrigerant. Do not allow any sharp
objects to come into contact with the refrigeration system.
Do not use electric appliances inside the refrigerator.
Use only the specified lamp for the refrigerator compartment.
Do not block the openings on the circumference of the refrigerator.
If the refrigeration system should get punctured, do not touch the wall outlet and do not use open flames.
Open the window and air out the room.
Then ask a service agent approved by SHARP for servicing.
This refrigerator should be disposed appropriately. Take the refrigerator to a recycling plant for flammable
refrigerant and insulation blowing gases.
Installation
Securely ground the unit.
Electrical shock may occur as a result.
Use belt, etc. to prevent the refrigerator from
falling over.
Bodily injury from the refrigerator falling over during
an earthquake, etc. may result.
Cleaning
When cleaning any areas adjacent to electrical
components, unplug the refrigerator first to prevent
electric shock.
Abnormality
In the case abnormality (burning smell, etc.) is
noticed, remove the power plug and stop use.
Electrical shock and/or fire may occur as a result.
For repair, call the Sharp Service Center.
Do not attempt to change or
modify this refrigerator.
This may result in fire,
electric shock or injury.
When cleaning your refrigerator, do not splash
water directly on the outer cabinet or the interior.
This may lead to rusting and deterioration of the
electrical insulation.
42
Power supply and power plug / cord
To prevent accidental power disconnection, plug the
refrigerator directly to the source.
Do not use a double adaptor as loss of power
could lead to the spoiling of the stored food.
Do not push the refrigerator against the power plug.
The plug may become damaged, causing excessive
heating/ignition as a result.
Dust deposited on the power plug may cause fire.
Wipe it off carefully.
Do not use other than AC220 ~ 240V.
Electrical shock and/or fire may occur as a result.
When disconnecting the power plug, do not touch
the pin of plug.
This may cause electric shock.
Securely insert the power plug.
Page 6
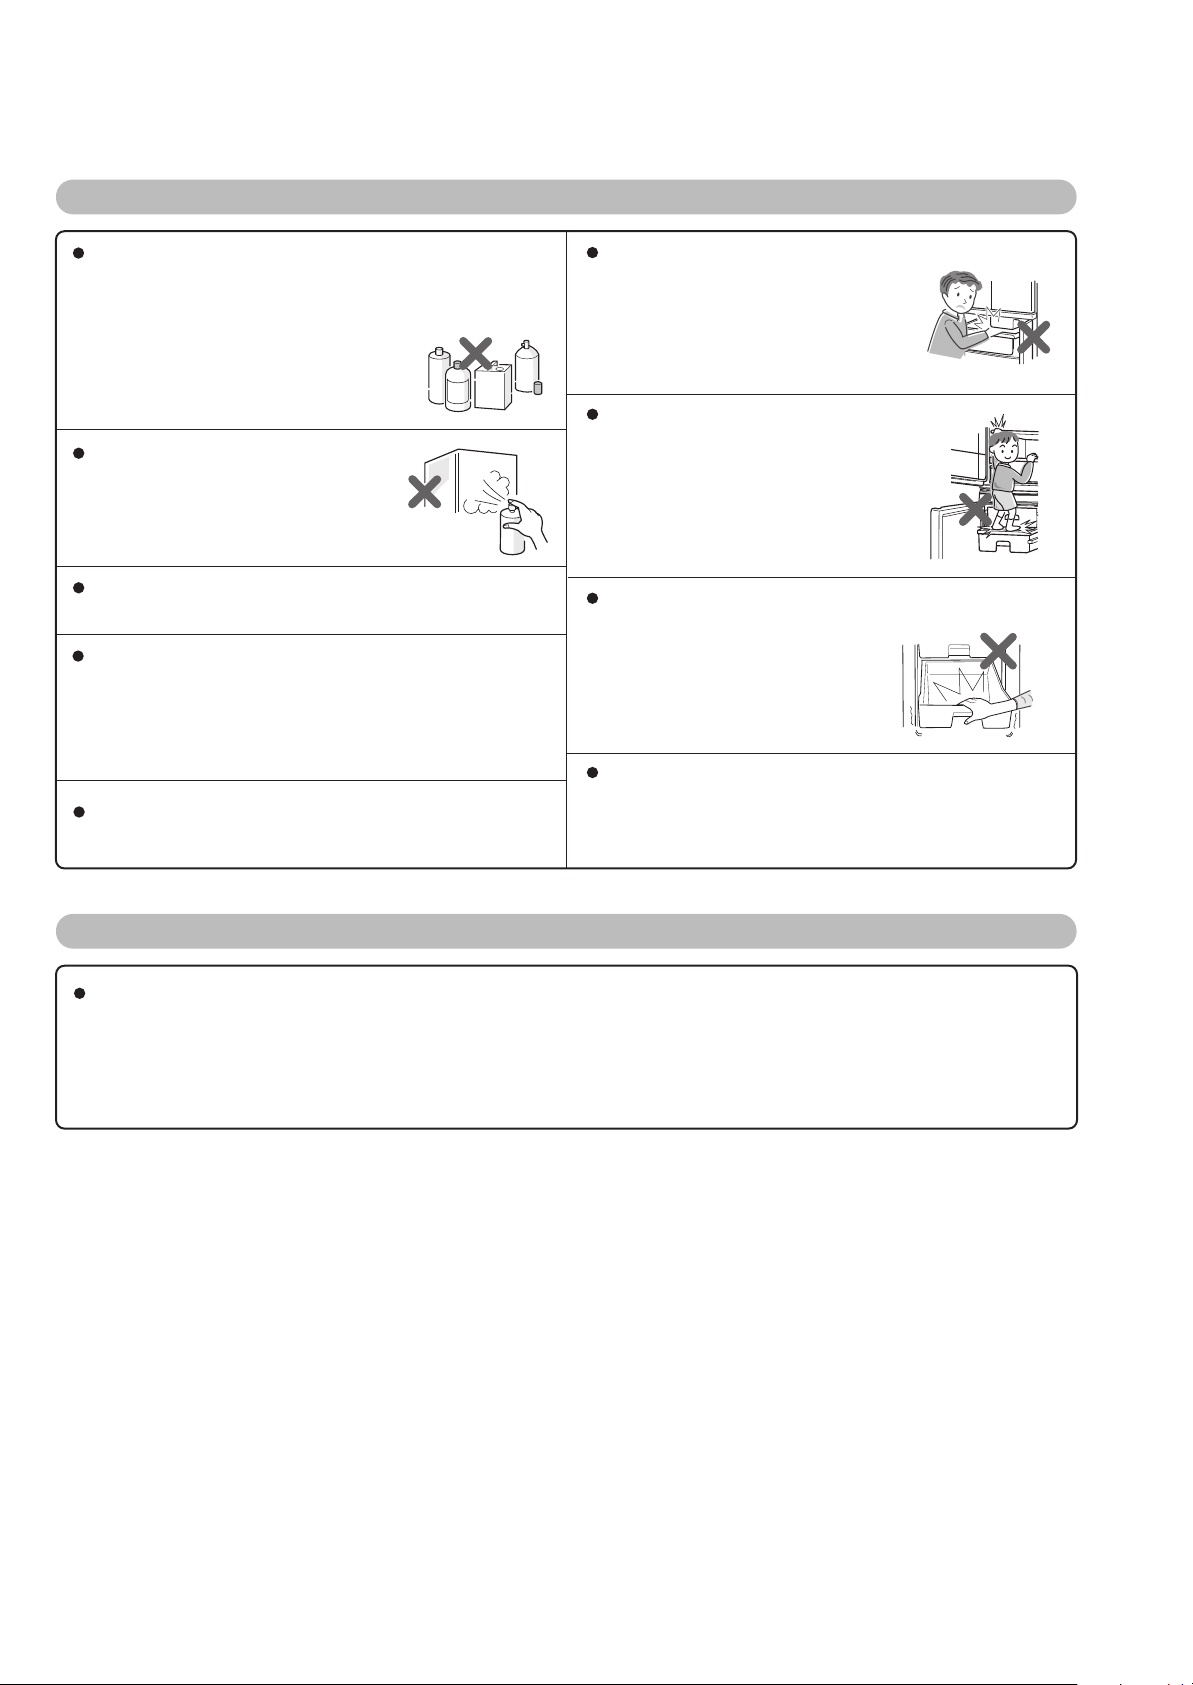
Normal use
Highly volatile and inflammable materials such as
ether, petrol, propane gas, adhesive agents and
pure alcohol etc. are liable to explode.
Do not store these materials in the
refrigerator.
Do not use flammable sprays
near the refrigerator.
Ignition may occur as a result.
To prevent damage to the outer cabinet, avoid
contact with lacquer, and paint, etc.
This refrigerator is designed solely for the purpose
of storing foodstuff for domestic use in accordance
with the instructions given in this manual.
Using the refrigerator for other purposes might be
harmful to persons or property.
This refrigerator is not suitable for the storage of
materials requiring precise temperatures.
Do not touch the machinery parts (upper section
of the ice case) of the automatic ice
maker.
Bodily injury may occur as result
when the ice cube tray turns.
Do not stand on or hang from the
doors or cases.
Bodily injury may occur as a result
from the refrigerator falling
over or hand becoming caught.
Do not apply force on fully opened cases.
Bodily injury may occur as a result
from the case deforming
and dropping.
Do not let children touch the food, container or shelves
inside the temperature zone selection compartment
during or immediately after Warming, or during
Express Cooling. It may result in accidental burn.
Disposal
This refrigerator is airtight. TO PREVENT FATAL ACCIDENTS TO CHILDREN, please completely remove the
door prior to discarding the refrigerator.
Information regarding disposal of the appliance.
Flammable insulation blowing gases should be disposed appropriately.
Ta ke the cabinet and doors to a recycling plant for flammable insulation blowing gases.
43
Page 7
Caution
Installation
Install the unit on level, sturdy surface.
Installing on unstable surface
may cause the refrigerator
to fall over when the doors
are opened/closed.
Power plug/cord
Disconnect from the mains electricity
supply by removing the mains plug
from the electricity supply socket. Do
not remove by pulling the mains lead.
This may cause electric shock or fire.
Should the flexible supply cord be
damaged, it must be replaced by
service agent approved by SHARP
as a special cord is required.
Make sure that you leave adequate
ventilation space around the
refrigerator to prevent the compressor
from overheating and stopping.
Please follow the instructions given
for installation.
Do not use this refrigerator when the
power cord or plug is damaged, or the
outlet attachment is loose, as they
may cause electric shock or fire.
When installing or moving the
refrigerator, make sure that you do
not nip or kink the power cord.
Damage of the power cord may cause
electric shock or fire.
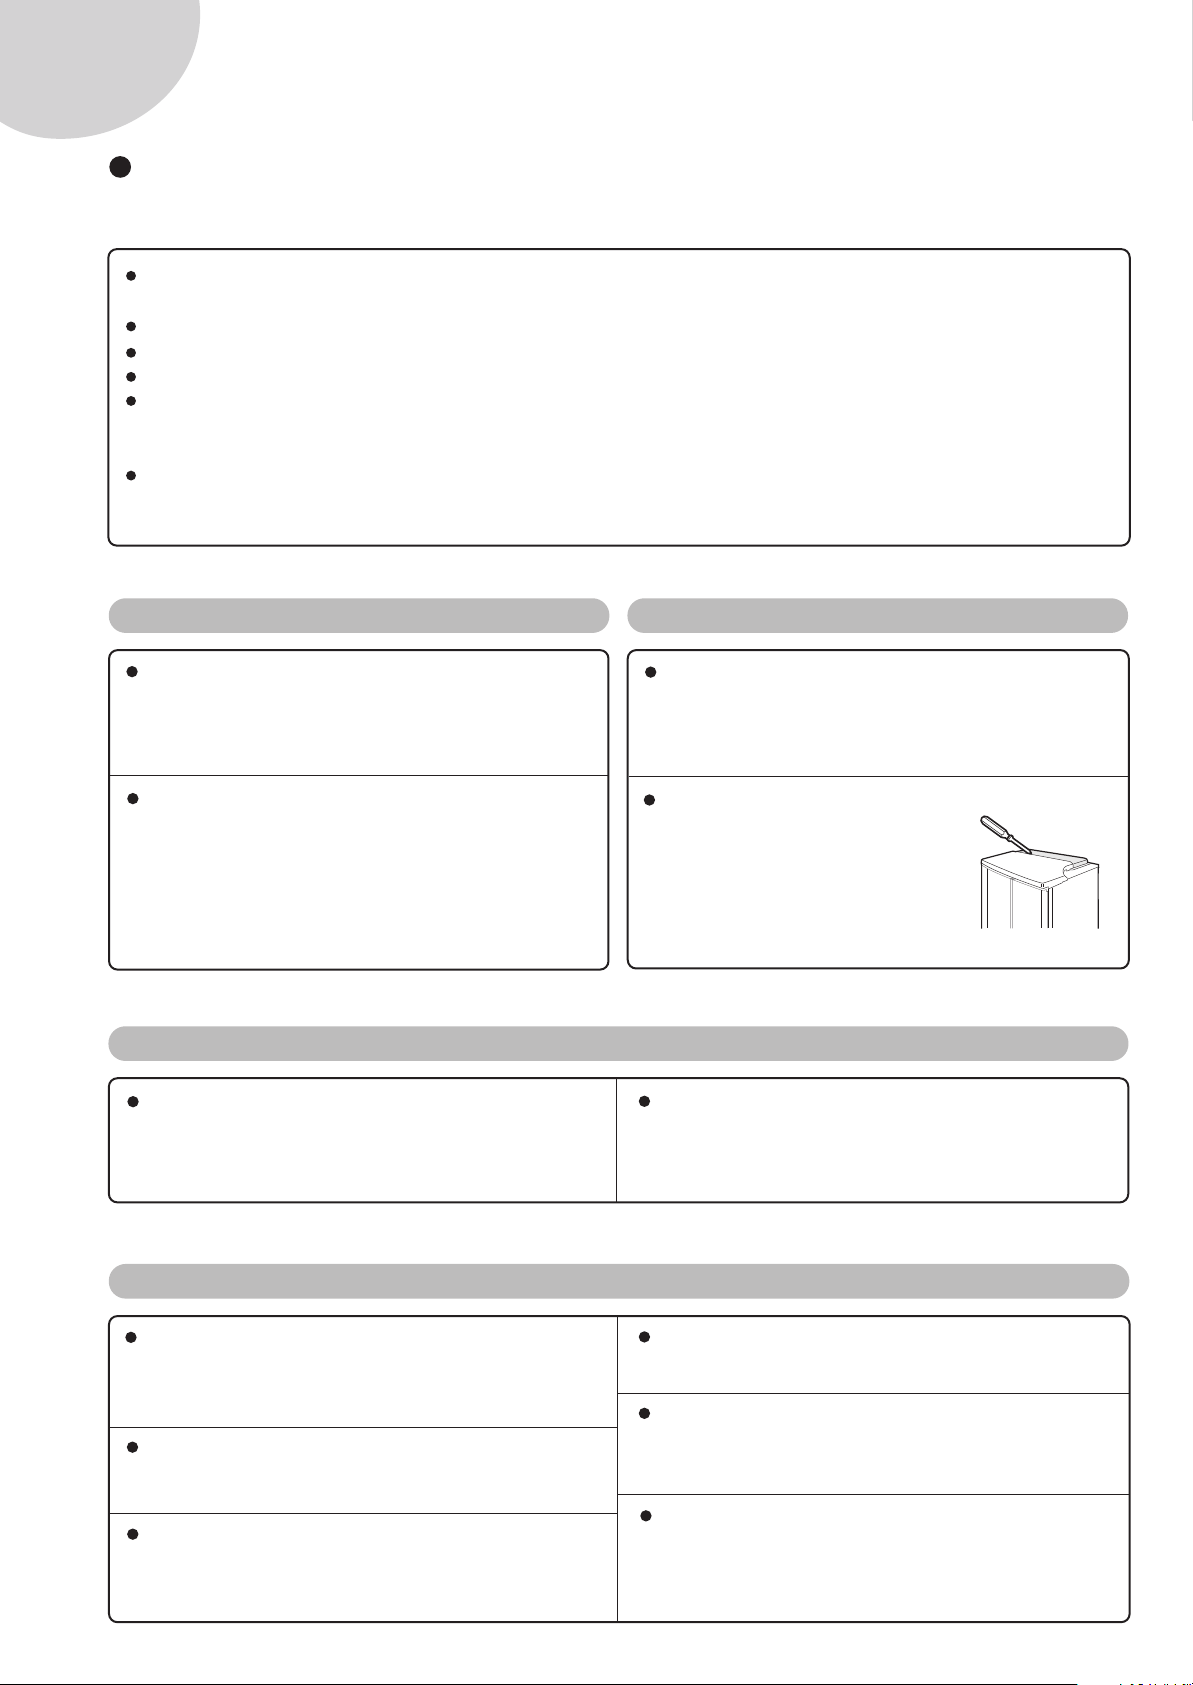
Moving / transporting / others
Securely hold the refrigerator when
moving as the refrigerator is heavy.
(Use the carrying handles)
Holding improperly may cause the
refrigerator to fall from hands
slipping.
Do not use the transport wheels
on floors that scratch easily.
Flooring may become damaged
as a result. Place a blanket, etc.
on the flooring in advance.
Remove the power plug from the
power outlet when not using for
a long time.
This prevents electrical shock,
short circuit and fire from
deterioration of insulation.
74 page
Avoid removing food from the freezer
compartment and temperature zone
selection compartment (for Freezing and
Crunchy Freezing) with your bare hands.
Directly touching products stored at
sub-zero temperatures can result in frostbite.
Do not insert hands under the refrigerator.
(Caution is needed especially for children)
Skin burns may occur as a result from
heated parts or bodily injury may occur
as a result from contact with parts.
Dispose of foods that have rotted or,
deteriorated and foods with foul odor.
Food poisoning may occur as a result.
The quality of foods will deteriorate even
when storing them in a refrigerator.
Do not place bottles in the freezer and
temperature zone selection (for Freezing
and Crunchy Freezing) compartment
and as they may crack when frozen.
If any areas adjacent to electrical
components have to be cleaned,
unplug the refrigerator first to
prevent electric shock, then wipe
the area with a dry cloth.
Ta ke caution as to not pinch fingers.
Bodily injury may occur as a result from
fingers becoming pinched when not
properly holding the handles on doors.
Do not pull hard on the shelves or cases.
Bodily injury may occur as a result from
foods falling of the shelves or the cases
becoming detached.
Make sure no one is touching the
refrigerator when opening/closing doors.
Bodily injury may occur as a result from
fingers becoming pinched.
Do not install the refrigerator in a damp
or wet location as this may cause
damage to the insulation and a leak.
Condensation may also build on the
outer cabinet and cause rust.
Keep the door securely closed. If the
door is left ajar, the controlled inner
temperature will rise, resulting in food
spoilage and increase in electricity
costs.
The refrigeration system behind and
inside the refrigerator contains
refrigerant. If this system is punctured
it could result in serious damage to
your refrigerator, therefore do not
allow any
contact with the refrigeration system.
Do not place objects on top of the
refrigerator. Bodily injury may occur as
a result from objects dropping from the
impact of doors opening/closing.
Normal use
sharp objects to come into
Do not place objects containing
liquid on top of the refrigerator.
Spillage may cause electric
shock or fire.
Do not drop objects inside the refrigerator
or strike the inner wall. This may cause
the inner surface to crack.
This refrigerator is not intended for use
by persons (including children) with reduced
physical, sensory or mental capabilities,
or lack of experience and knowledge,
unless they have been given supervision or
instruction concerning use of the refrigerator
by a person responsible for their safety.
Young children should be supervised to
ensure that they do not play with the
refrigerator.
Ta ke caution as to not
hit your head, etc. on
the bottom of the doors
(Caution is needed
especially for children)
44
Page 8

Installation
Select a location.
1
Position your refrigerator so that the plug is accessible.
Do not place next to heat generating appliance.
Keep your refrigerator out of direct sunlight.
Do not place directly on the ground. Provide a clean, level, firm floor surface such as concrete or timber.
Place a sturdy board in the case of following:
Do not place directly on a carpet as this
will cause the intake port on the bottom
of the refrigerator to become blocked.
To ensure adequate ventilation for your refrigerator, it is
recommended to provide space of 6cm on both sides and
2
at the back, and space of 9cm above the refrigerator.
Insufficient spacing will decrease the cooling efficiency,
resulting in unnecessary consumption of electricity.
9cm or more
6cm or more
Carpet
Air
Notes
Do not place objects on top
of the refrigerator.
Electric room is located on top of
the refrigerator.
Storing objects on top of the
refrigerator may lead to its failure.
Electric room
Audio and video noise may be
noticed on radios, televisions, etc.
when using near the refrigerator.
Move radios, televisions, etc. to
a location where audio and video
noises are not noticed.
Fix to a sturdy wall or pillar to
prevent the refrigerator from
3
falling over.
Use the hole
for passing
ropes.
6cm or more
Using the two front Adjustable feet, ensure that the
refrigerator is positioned firmly and level on the floor.
4
Installing on unstable surface will cause vibration and noise.
Pull out and remove the
Foot cover.
Turn the adjustable feet on both
sides until they reach the floor.
(Adjust so that the refrigerator
becomes level)
Attach the Foot cover.
6cm or more
Do not install screws, etc.
on the refrigerator.
Cooling circuit (pipes) may
become damaged as a result.
Foot cover
Right/left
adjustable foot
45
Page 9
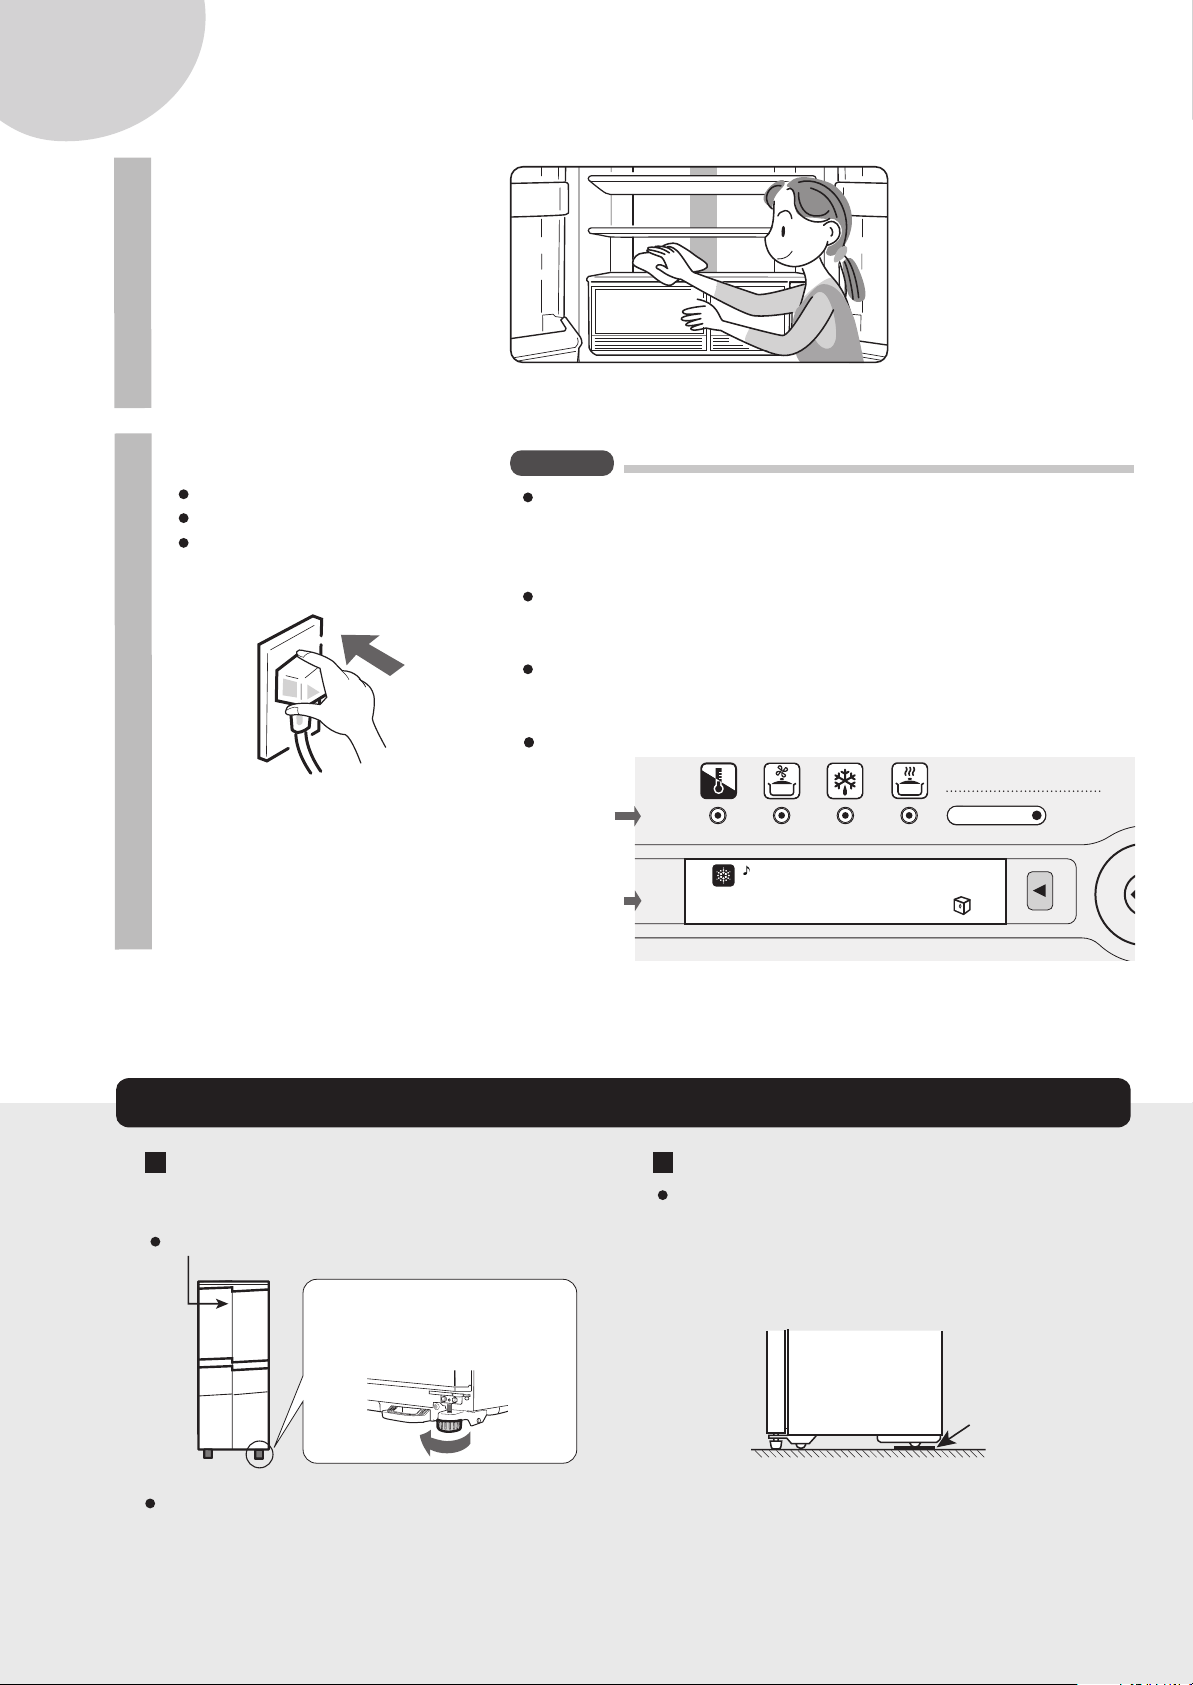
Before using your refrigerator
Clean the inside parts with a
1
cloth soaked in warm water.
If soapy water is used, wipe it off
thoroughly.
Insert the power plug.
2
Current: 220 ~ 240V
Cord facing down
Insert securely
Notes
The interior compartments of the refrigerator may become hot when
transporting in the case of hot weather.
Before turning on the power, cool the compartments by opening
the doors.
Electronic tones will sound when turning on the power with the doors
open. However, the tones will stop when the doors are closed and
operation will start momentarily.
Loud noise may be noticed at first; however, this is not a malfunction.
The noise will soften as the compartments cool.
Initial status for the Control panel
The lamps
are OFF.
Information
displayed in
the beginning
DEODORIZER
ME
46
When using for the first time
Items that are often mistaken as malfunctions
Right and left doors are not properly aligned.
Adjust using the adjustable feet.
When the left door is raised.
Lower the right side.
(Until the adjustable foot on the
other side is slightly off-ground.)
When the right door is raised.
Lower the left side.
When the door opening/closing is heavy.
The door opening/closing may feel heavy when
the refrigerator is tilted backwards.
Insert a wooden board (a relatively wide board),
etc. between the refrigerator rear and the floor
and adjust the tilting.
Front Back
A wooden board
(with relatively
large width)
Page 10
Select the temperature zone for temperature zone selection compartment.
3
It is initially set to the "Cooling" zone (see for switching procedure).
53 page
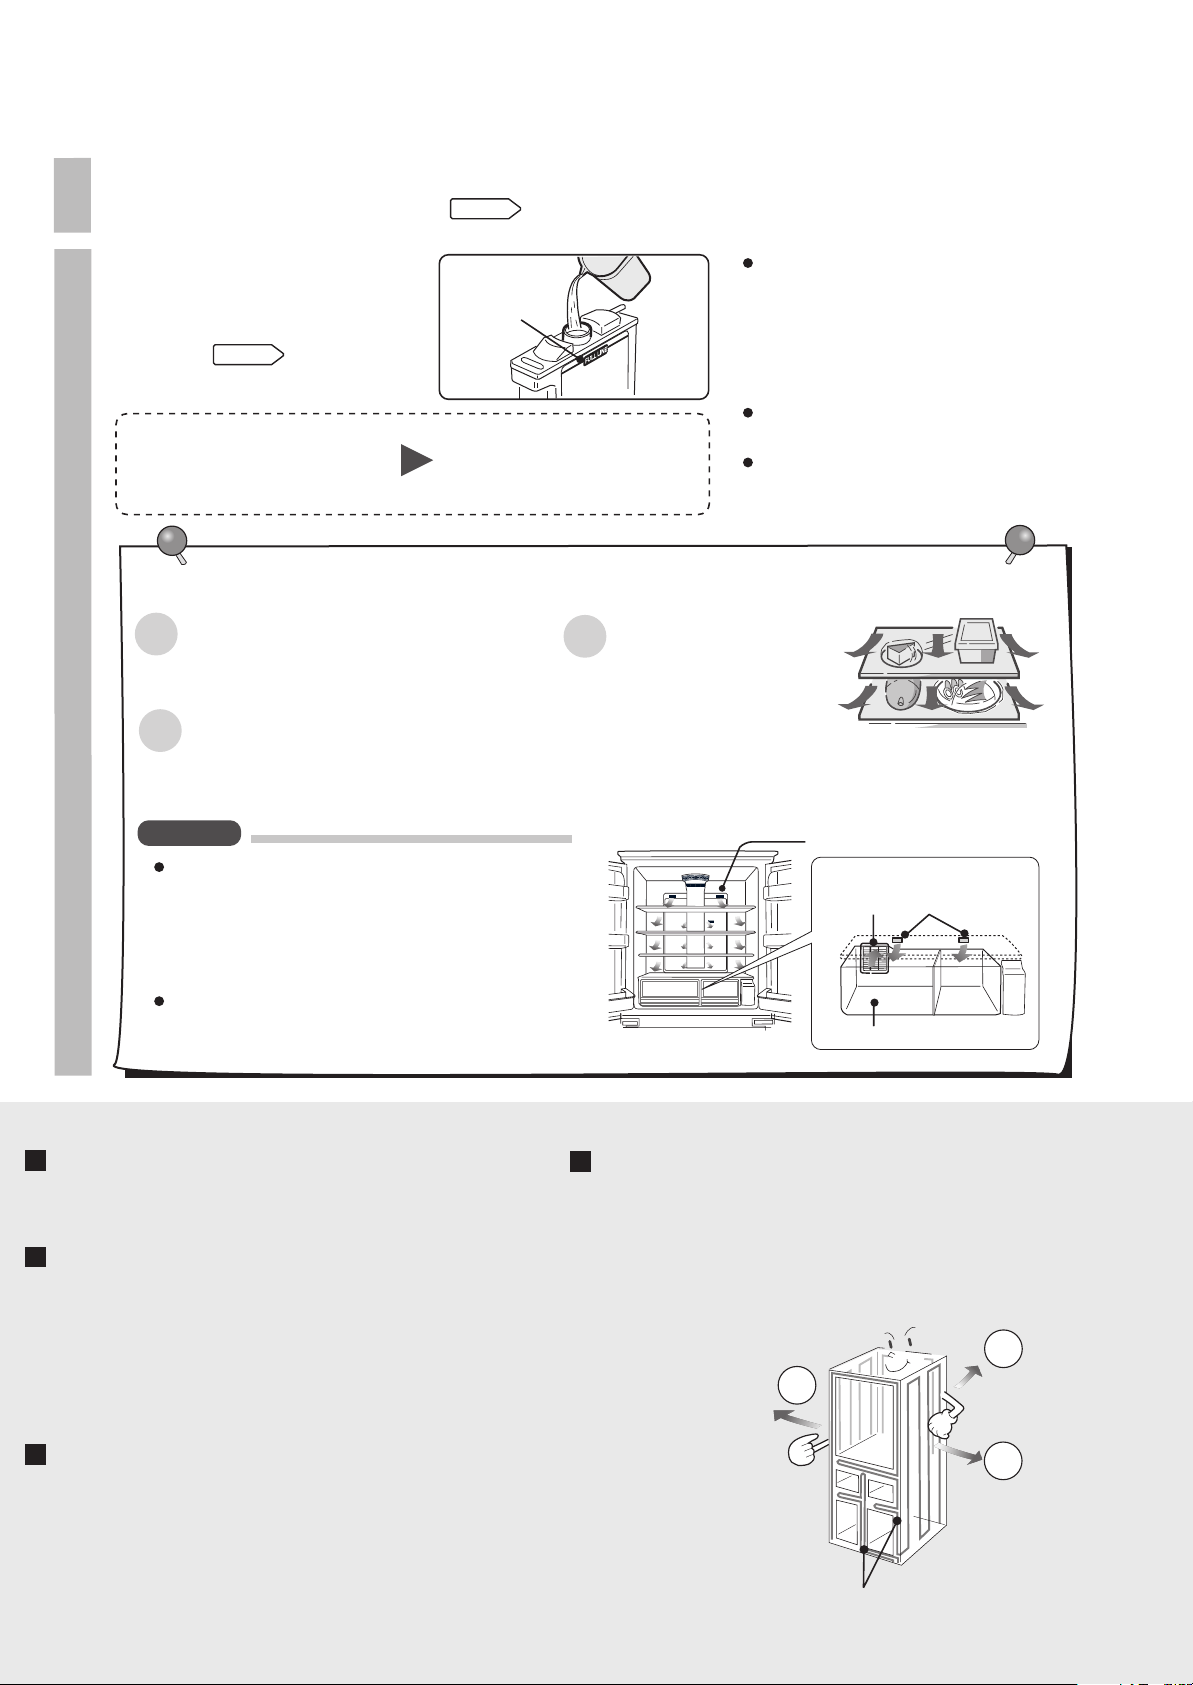
Preparing automatic ice making
4
Wash the water tank and ice case with
water and fill the water tank with water.
(For details )
Wait until the compartments cool.
(Do not open the doors as
much as possible)
58 page
About 10 hours
Tips for efficiently storing foods
Seal
Use plastic wraps and containers.
This prevents drying and transferring of odors.
Cool
Hot foods will cause the compartment temperature
to rise. Hot foods will also cause other foods to
become damaged.
(Except for Warming • Express Cooling mode)
Notes
Do not block the discharge and intake
ports with foods or bags.
Especially, the chilled cases will not cool sufficiently
when the discharge port in the back is blocked.
Do not stack foods higher than the chilled cases.
The temperature near the discharge port is
low and may cause succulent foods to freeze.
FULL LINE
Time required for first set of
ice cubes
About 24 hours
All cool air to flow
smoothly
Space out foods.
Dispose of the first set of ice
cubes made.
Interior odor and dirt may be
noticed on the first set of ice cubes.
More time may be required depending
on the ambient temperature.
Storing foods before the compartments have
cooled may cause the foods to become damaged
and more time may be required for cooling.
Discharge port (arrow)
(Back of chilled cases)
Intake port
Discharge port
Fresh cases
Odor can be noticed from the compartments.
This is due to the plastic used inside the refrigerator.
The odor will fade gradually as the compartments cool.
The refrigerator makes a banging/bumping noise
when opening the doors.
Noise will be heard when opening the doors as the
compartment temperature changes and the parts creak.
The same noise can also be heard when the
compartments are being cooled as the compartment
temperature changes. However, this is not a malfunction.
IT IS NORMAL that the outside of a cabinet
may be hot when touched.
The radiator pipe is in the cabinet in order to
prevent dew generation.
The surface may seem extremely hot to the touch
just after starting use.
The refrigerator does not become cool.
About 2 ~ 3 hours are required for the compartments to cool
after turning on the power and about 10 hours are required
in the case of hot weather. Allow the compartments to cool
sufficiently by not opening the doors as much as possible.
heat
heat
heat
Radiator pipe
47
Page 11
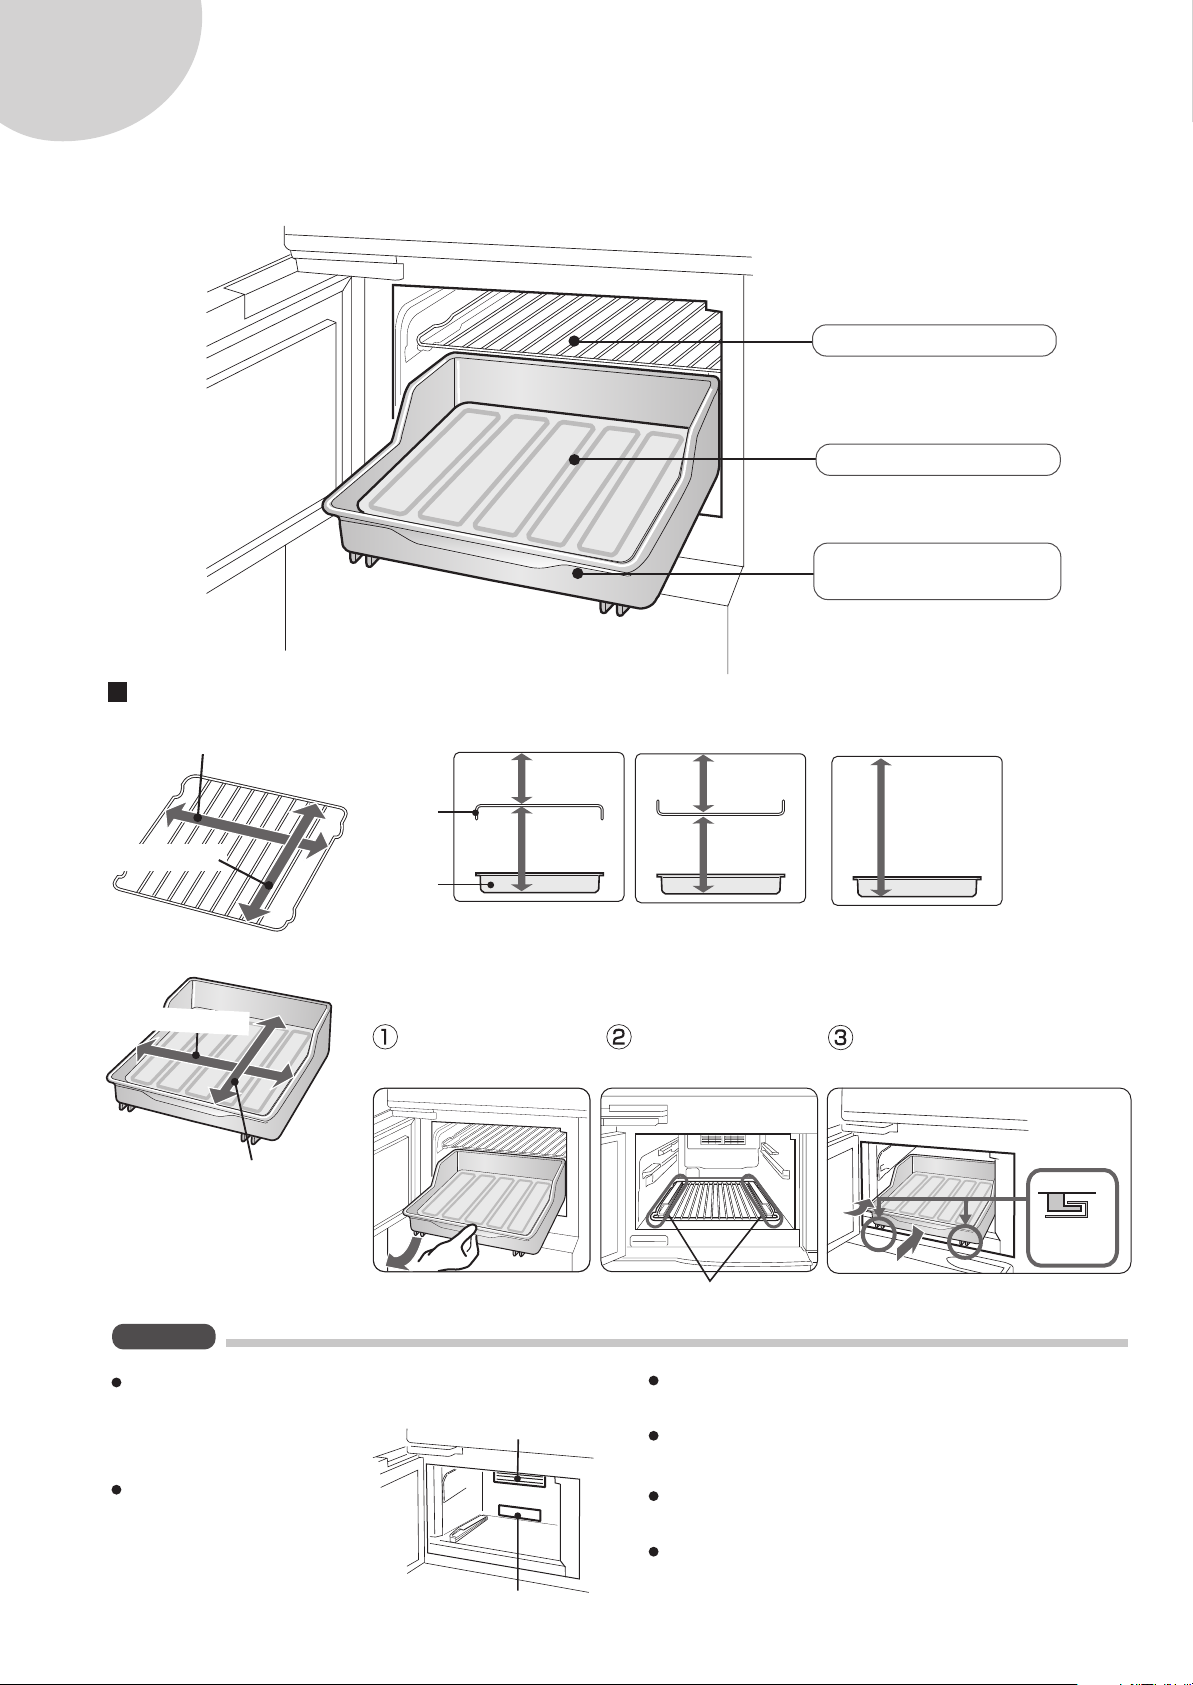
Temperature zone selection compartment
It can be selected from Warming, Defrosting, Express cooling and Temperature zone selection.
(When switching to Warming, Defrosting, or Express Cooling, remove all food materials from the temperature zone
selection compartment to a different compartment.)
Rack
Stainless tray
Temperature zone selection
compartment case
Inner dimensions
About 28 cm
About 30 cm
About 23.5 cm
About 28.5 cm
It can store dishes, containers and pots within the following dimensions:
Height inside the temperature
zone selection compartment
About 7 cm
Rack
About 8.5 cm
Temperature zone
selection
compartment case
When the rack is flipped
About 7.5 cm
About 8.0 cm
When the rack is removed
When the rack is not used (rack storage)
Pull out the temperature zone
selection compartment case.
Place the rack at the bottom
of the temperature zone
selection compartment.
About 16.0 cm
Attach the temperature zone
selection compartment case.
Fit on
rail
48
The rack width is extended to
suit the rails.
Notes
Do not block the discharge port or the intake port inside the
temperature zone selection compartment.
It may disable appropriate
temperature adjustments.
The temperatures near the
discharge port will be high
during Warming operation and
it may cause the paper towel or
cloth to become burnt or
discolored.
Discharge port
Intake port
Be sure to attach the temperature zone selection
compartment case and stainless tray.
Do not directly place salt-containing food materials.
It may cause the stainless tray or rack to rust.
Do not pull out the rack when storing/removing food materials.
The rack may come off and cause the food materials to fall.
Do not apply the food materials against the edge of the rack.
It may cause cuts on cans, etc.
Page 12

Warming
Keeps food materials warm.
The timer can be set from 1 to 8 hours.
When the set period has passed, the mode will automatically switch to "Cooling."
Do not let children touch the food
materials, containers and the rack
inside the temperature zone selection
compartment during and immediately
after Warming operation.
The food materials, containers, and parts inside the
container may be hot and cause accidental burns.
Press "Select" for more than 2 seconds.
1
Blinks
Beep
2 sec.2 sec.
Set up the Warming period with the dial,
2
Set period
hr.
It is possible to set up to 8 hours at maximum in 1-hour units.
Turning the dial in leftward direction will start from 8-hour setting.
Notes
It cannot be used to heat the food materials.
Warming unheated food materials or cooled food materials may promote bacterial multiplication.
Please be sure to use this mode to keep the already heated food materials warm.
We recommend use of plastic wraps or lids on food materials to be warmed.
It will prevent drying of the food materials and the scent of the food materials from being
transmitted to the other compartments.
Press "Select".
'0hr' blinks
Beep
hr.
Press "Select".
Temperature display
('55°C' blinks)
Beep
Select the Warming temperature with the dial,
3
55°C
Select from 55°C and 60°C.
60°C
The selected
temperature blinks
Place the food materials inside the temperature zone selection compartment.
4
Stop Warming when the food materials have been removed.
When storing 2 dishes
Use the temperature zone
selection compartment
case and the rack.
Press "Select". (Finished)
Remaining period
is displayed
Beep
Operation starts up. Although the remaining period is displayed
during Warming operation, it is possible to set up other
menu items.
When storing a pot or
a large container
Remove the rack.
48 page
50 page
hr.
Time until the compartment
is warm.
When the temperature zone
selection compartment mode
immediately before was
Wine room, Cooling or Fresh case
…Approximately 30 minutes
Crunchy Freezing or Freezing …
Approximately 40 minutes
(with ambient temperature 30°C
and no door opening/closing)
Lights
up
min.
When the set period has passed, the completion buzzer will sound.
The Warming lamp goes OFF.
The temperature zone selection compartment will be switched to "Cooling" mode (The food materials will be refrigerated if they are not removed).
Slow blinking of " " on the LCD panel indicates
that the temperature inside the temperature zone selection
compartment has not been cooled to the Cooling zone after Warming.
(It takes approximately 30 minutes to 1 hour).
Slow
blinking
49
Page 13

Warming (Continued)
To cancel operation
Press "Select" for more than 2 seconds.
The Warming lamp goes OFF.
Temperature zone selection compartment switches to "Cooling" mode.
The temperature zone selection compartment will not immediately reach the Cooling zone.
(It will take approximately 30 minutes. The LCD panel will show " ".)
Notes
To change the Warming period or extend the Warming period during Warming operation.
Set up the period within 15 minutes after
Warming completion (cancel).
(It will go into the "Do not operate warmer
function mode" after 15 minutes.)
The extension period becomes shorter
depending on the previous Warming
operation period as shown on the right.
(This product can operate continuously for
no longer than 8 hours.)
The previous Warming operation period
Up to 1 hour
~ 2 hours
1 hour
2 hours
7 hours
~ 3 hours
~ 8 hours
Extension period
It cannot be extended.
This product cannot operate Warming continuously over 8 hours.
(To prevent temperature increase in other compartments)
When it completes 8 hours of Warming operation,
it will go into the "Do not operate warmer function"
for approximately 2 hours.
("Do not operate warmer function" also works
from 15 minutes after Warming completion
less than 7 hours to 2 hours later.)
Do not operate warmer function
If you try to set up Warming
operation, there will be a beep and
the control panel will not accept the
setup operation. It will show the
approximate period until the next
Warming setup will be possible.
The figure shows that Warming
setup will be possible in
1 hour and 20 minutes.
To change the Warming temperature during warming operation.
Cancel the operation once and set up the period again (Within 15 minutes after canceling).
Up to 7 hours
Up to 6 hours
Up to 5 hours
hr.
min.
50
Notes
Do not store food materials with containers whose
outer surface temperatures are 100°C or higher.
The temperature zone selection compartment case
may become deformed by the heat.
If the Warming operation and defrosting operation are
successively carried out, the temperatures of the other
compartments may become slightly high temporarily.
However this will not affect the food storage qualities.
The temperature zone selection compartment
temperature will not be immediately cool even when
the temperature zone is selected immediately after
Warming completion (cancel). Leave approximately
30 minutes before using "Wine room," "Fresh Case,"
and "Cooling" modes and approximately 1 hour before
"Crunchy Freezing" and "Freezing" modes.
Warming of beverages
Hot only products can be kept under Warming operation.
Do not keep the following products under Warming operation:
Glass-bottled beverages, carbonated beverages,
beverages in resin containers … It may cause container
deformation.
Beverages containing milk, vegetable or juice constituents
… It may cause the constituents to deteriorate.
Do not keep beverage in containers from which it has
been sipped directly under Warming operation.
It may promote the bacteria from mouth to multiply in the bottle.
Do not keep beverages under Warming repeatedly.
Reheating of a cooled beverage may lead to ingredient
deterioration or bacterial multiplication.
Page 14

Defrosting
Place the food material
at the center of
1
temperature zone
selection compartment
case.
The rack cannot be used.
Press "Select" for more than 2 seconds.
2
Beep
2 sec.2 sec.
2 sec.2 sec.
Select "Defrosting" with the dial,
3
Blinks
Set up the defrosting period with the dial,
4
Beep
The defrosting period can be set up to 30 minutes at
maximum in the unit of 1 minute.
Turning the dial in leftward direction will start from
30-minute setting.
Set period
min.
Blinks
What is Defrosting?
It defrosts home-frozen meat or fish with warm air so that they are
slightly frozen and can be easily cut with a knife (center of the food
material: Approximately -8°C). It is possible to cut the meat or fish and
store the remaining parts in freezer again.
It is not a function to completely thaw the food materials.
It may be difficult to cut with a knife depending on the type of food.
In this case, leave it in room temperature for a while or carry out
Defrosting for additional several minutes.
The degree of defrosting may vary depending on where the food
material is placed.
Caution is required when Defrosting several different food materials.
Though it is possible to re-freeze the slightly frozen food materials,
their quality may deteriorate slightly.
Press "Select".
'00min' blinks
min.
Beep
Press "Select". (Finished)
The remaining time
is displayed
Beep
min.
Operation starts up.
The LCD panel will display the remaining time during
Defrosting operation and it will not go OFF.
It is impossible to set up other menu items.
sec.
Lights
up
Remove the food materials when
5
the completion buzzer sounds.
The Defrosting lamp goes OFF.
The temperature zone selection compartment will
automatically switch to "Fresh Case" mode.
(It will store the food material in chilled
refrigeration if it is not removed.)
Guideline for
setting period
Food
material
Weight
Food material
examples
Thickness
Up to 300g
300 ~ 500g
500 ~ 700g
The guideline period for defrosting (central temperature approximately -8°C) a frozen food material (central
temperature approximately -18°C) is provided as follows (with ambient temperature 30°C and no door opening/
closing, and when the immediately previous temperature zone selection compartment mode was "Cooling")
1cm 2cm 3cm 4cm 5cm
12min.
12min.
12min.
Meat slices,
small fish,
shrimps, etc.
15min.
17min.
19min.
Chicken,
minced meat,
cutlets,
whole fish,
minced fish,
prawns, etc.
18min.
20min.
22min.
Steaks,
bite-size meat
cubes,
tuna, etc.
To cancel operation
Press "Select" for more than 2 seconds.
The Defrosting lamp goes OFF.
Temperature zone selection compartment will
switch to "Fresh Case" mode.
25min.
It is not appropriate
for this mode.
It is not appropriate
for this mode.
Whole cut meat, tuna, etc.
30min.
The maximum weight to be used
in one Defrosting operation is 700g.
Large chunks of food materials
are not suited in Defrosting.
If Defrosting is repeated more
than twice, only the outer sections
of the food materials will be
completely thawed.
Setting
period
If the immediately previous temperature zone selection compartment mode was "Freezing" or "Crunchy Freezing,"
If the immediately previous temperature zone selection compartment mode was "Warming" or "Defrosting,"
To defrost several pieces of a food material, … Same as the period for 1 piece.
…
…
Set additional 5 minutes.
Set 5 minutes shorter than usual.
51
Page 15

Express Cooling
Notes
Do not let children touch the food
materials, containers and the rack
inside the temperature zone
selection compartment during
Express Cooling operation.
The food materials, containers, and parts
inside the container may be hot and cause
accidental burns.
To carry out Express Cooling on high-temperature
liquid food materials, be sure to close the lid or
use a well-closed container.
Neglect may cause the food material to spill and cause burns
when other people pull out the temperature zone selection
compartment case.
We recommend using a plastic wrap or lid on food products with
strong scents. Neglect to do so may cause the scent to be
transmitted to other compartments.
It refreshes the heated food materials.
The temperature zone selection compartment will automatically
switch to "Cooling" when it is completed.
Express Cooling: This mode cools down the heat of the food materials
or dishes immediately after heating to the temperatures warm to touch.
Direct the spout of a
kettle into the back!
(Hot tea, etc.)
Place the food material at the center of
1
temperature zone
selection compartment
case.
Press "Select" for more than 2 seconds.
2
Beep
2 sec.2 sec.
2 sec.2 sec.
Select "Express Cooling" with the dial,
3
Blinks
Blinks
Boiled potatoes 400g … Approximately 35 minutes
Guideline when the ambient temperature was 30°C with no
door opening/closing and the immediately previous
temperature zone selection compartment mode was "Cooling."
It may take a little longer to complete when it is successively
carried out after defrosting because the refrigerator will start
operation after completing the defrosting.
Application examples of Express Cooling function
(Use it to speed up the cooking.)
Finely chopped onion cooked for Hamburg steaks
Boiled vegetables to be used in salad
(broccoli, asparagus, etc.)
Croquette filling
Press "Select".
Beep
Guideline for required period
'OFF' blinks
OFF
ON
52
Press "Select". (Finished)
Operation starts up.
The LCD panel will return to normal display in
approximately 2 seconds.
4
Turn the dial to the right,
Around
the right
'ON' blinks
OFF
ON
Remove the food materials when the completion
5
buzzer sounds.
The Express Cooling lamp goes OFF.
The temperature zone selection compartment will automatically switch to
"Cooling" mode.
(It will be refrigerated if the food material is not removed.)
The required period will be approximately 35 to 100 minutes.
(It will vary depending on the volume and temperature of the food material.)
To cancel operation
Press "Select" for more than 2 seconds.
The Express Cooling lamp goes OFF.
Temperature zone selection compartment will
switch to "Cooling" mode.
Notes
Do not store food materials with containers whose outer surface
temperatures are 100°C or higher. The temperature zone selection
compartment case may become deformed by the heat.
The food material may become frozen if its volume is very small.
Remove the food material ahead of time.
Beep
Lights
up
ON
Lights
up
Page 16

The initial setting is "Cooling" mode.
Temperature zone selection
The temperature can be selected from
5 temperature zones.
Press "Select" for more than 2 seconds.
1
Blinks
Beep
2 sec.2 sec.
2 sec.2 sec.
Select "Temperature zone selection" with the dial,
2
Blinks
Select the temperature zone with the dial,
3
Description of the temperature
zones and food storage examples
Wine room
(About 8°C)
As a wine cellar.
The selected
temperature zone blinks
The displayed temperatures are guideline temperatures when the
temperature stabilizes with ambient temperature 30°C and the door
closed without any food material.
Cooling
(About 3~5°C)
For storage of beer and beverages.
Storage of unopened refrigerated
food products and seasonings.
As a special compartment for
frequently used food materials.
Press "Select".
Beep
'Cooling'
blinks
Press "Select". (Finished)
Lights
up
Beep
Fresh case
(About 0~2°C)
For storage of chilled food materials.
As a temporary storage of precooked
materials.
Lights
out
Crunchy Freezing
(About -8°C)
Stores food in slightly frozen conditions in which it can
be easily cut with a knife.
It is capable of storing meat and fish for approximately
2 to 3 weeks.
It keeps the food materials soft enough to be cut with a
knife and spares the time to divide them into small portions.
Notes
It will not immediately reach the set temperature
when the temperature is switched.
Leave approximately 30 minutes before storing
food materials when switching from Wine room,
Cooling or Fresh Case to Crunchy Freezing or
Freezing.
Precautions in setting "Crunchy Freezing" and "Freezing" modes
Do not touch the temperature zone selection compartment with wet hands.
Do not pour water directly into the temperature zone selection
compartment case to make ice.
The temperature zone selection compartment case may become deformed.
Do not store the following materials:
Carbonated beverages …It may cause the liquid inside to spurt and
stain the temperature zone selection compartment.
Cooling materials (materials used to cool by mixing the agents inside
by tapping, etc.) … It may generate rust when the materials inside
(urea, ammonium nitrate, etc.) leaks.
Freezing
(About -15~-17°C)
For storage of tea and dried food materials.
For storage of partially used commercial frozen food products.
We recommend storing ice cream in the freezer
compartment.
53
Page 17

Fridge compartment
Refrigerator light
Cooling panel
Deodorization system
Temperature sensor
Shelf
Small pocket (left)
Egg holder
(14 eggs storeable)
When there are no eggs
turn the case
around to
store small
foods.
Three position adjustable shelf
Bottle pocket (left)
Fresh room (left) (right)
Lid
Small pocket (right)
Bottle pocket (right)
Fresh case (left) Fresh case (right)
Changing the level of the shelf
The shelf can be adjusted by pulling it out halfway, as it does not
need to be removed completely.
Align the cutaway
of the shelf with
the rail
Rail
Move the shelf up or down.
Pass the cutaway
of the shelf
through the rail
Push in the shelf.
Mount the tabs
(2 on each side) at
the bottom of the
shelf to the rails
Shelf
Rail
Changing the height of small pocket (2 heights)
Lift up to remove
and
Insert in to the
other hooks.
Tab
The height can be
adjusted in 2 stages.
Three position adjustable shelf
This shelf has three positions; it can be
partly or fully extended or be fully folded
away simply by pushing the shelf back
then lifting it up.
54
Tab
Page 18

STORING FOOD
Refrigeration reduces the rate of food spoilage. To maximize the shelf life of perishable food products, ensure that the
food is of the freshest possible quality. The following is a general guide to help promote longer food storage.
Dairy Products & Eggs
Most dairy products have a use by date on the outer packaging which informs the recommended temperature
and shelf life of the product.
Eggs should be stored in the egg holder.
Meats / Fish / Poultry
Place on a plate or dish and cover with paper or plastic wrap. Then, place in the chilled case.
For larger cuts of meat, fish, or poultry, place to the rear of the shelves.
Ensure all cooked food is wrapped securely or placed in an airtight container.
Notes
Shelves…Do no place foods sticking out to the front.
Foods may become caught onto the doors, causing them to fall as a result.
Pockets…Do not store food containers that do not reach the pocket bottom (bottles, cans, etc.)
or unstable (tall) containers that may easily collapse (bottles, cans, etc.).
They may fall and cause injury.
…
Temperature sensor
About condensation
Condensation may be noticed within the refrigerator when the humidity is high or when doors are frequently
opened. Wipe with a dry cloth.
Since the humidity within the refrigerator is high, condensation may be noticed temporarily on foods stored
in the upper pockets.
Do not allow hard objects to hit the sensor.
Gap at the upper section of the fresh room
is required for circulating cool air.
Fresh room
Cool air
Profile
Discharge port
Intake port
Fresh case
55
Page 19

Freezer compartment
Freezer case (top)
Freezer case (center)
Freezer case (bottom)
Stainless tray
Freezer case (small)
How to use the freezer case (top)
The entire case can be pulled out.
(Full open type)
Freezer case (top)
Do not apply
downward forces
on the case.
Notes
Do not touch the freezer compartment
with wet hands.
Do not place foods higher than the
cases.
Do not make ice by directly pouring
water into the freezer case.
Deformation of the freezer
case may occur as a result.
Do not directly place foods containing salt.
Stainless tray may rust as a result.
Do not store the following:
Carbonated beverages
dirtying the freezer compartment.
Cooling agents (products used to cool by hitting
or mixing contents)
may cause rusting when leaked.
Contents may spurt out,
Contents (urea, ammonium nitrate, etc.)
STORING FOOD
FOR BEST FREEZING
Quality of foods should be fresh.
Freeze small quantities of food at a time to freeze them quickly.
Food should be properly stored or covered and the air should be removed to seal tightly.
Evenly place the food in the freezer.
Label bags or containers to keep an inventory of freezing food.
56
Page 20

1
Express Freezing
Place the food material on
the stainless tray.
Keep food materials in small sizes.
High-quality frozen foods can be made using this
feature and is convenient for home-freezing.
2
3
Select "Express Freezing" with the dial,
Blinks
OFF
ON
Turn the dial to the right,
Around
the right
OFF
'ON' blinks
ON
Press "Select".
'OFF' blinks
OFF
ON
Press "Select". (Finished)
Lights
up
ON
Beep
Operation starts up. The LCD panel returns to normal
display in approximately 2 seconds. " " will be displayed.
Lights
up
It will automatically complete in approximately 1 to 4 hours (The required time will vary depending on the ambient temperature).
" " will disappear when it completes.
To cancel operation
Same as above.
1
Turn the dial left and press "Select."
2
Operation will stop.
" " disappears.
2
Notes
This feature cannot be used simultaneously with Express Ice Making.
Start ice making by canceling Express Freezing or after it completes automatically.
The operation noise will be large during this operation (to cool rapidly using inverters).
Large foods cannot be frozen in a single Express Freezing operation.
Express Freezing may require more than 4 hours in the case operation
overlaps with defrosting as operation is started after defrosting is completed.
Avoid opening the door as much as possible during operation
of this feature.
Deep Freezing
Select "Deep Freezing" with the dial,
1
OFF
Turn the dial to the right,
2
To cancel operation
(It will automatically cancel after 90 days even
if the following operation is not carried out.)
Same as above.
1 1
Turn the dial left and press "Select."
2
Operation will stop.
" " disappears.
Around
the right
OFF
Blinks
ON
'ON' blinks
ON
Stores the daintiness of frozen food for a long period under low temperatures.
Press "Select".
'OFF' blinks
OFF
Beep
ON
Press "Select". (Finished)
Lights
ON
Beep
Operation starts up. The LCD panel returns to normal
display in approximately 2 seconds. " " will be displayed.
Notes
Deep Freezing is continued even during Express Freezing, Express ice making
or Vacation Mode.
The final temperature is approximately -23°C.
(This is when the ambient temperature is 30°C without food or door opening/closing.
It may fluctuate depending on the using conditions including door opening/closing
frequency and installation conditions.)
up
Lights
up
57
Page 21

Ice compartment
Water tank
Noise-prevention
sheet
Ice cube tray is
located at the upper
section in the back.
Partition
Ice case
Shovel
Water tank cap
Lid
Packing
Filter holder
Purifier filter
Active charcoal
suppresses chlorine of
drinking water and it
reduces the lead contained
in drinking water.
Filter case
Tank
Lid
Tab
The left side can be used as a
corner for frozen desserts when
it is attached to the center.
Frozen
desserts area
There is a magnet to detect
tank installation on the tab.
Do not remove the tab.
Partition
Ice stock corner
Making ice cubes
Wash the water tank and
ice case.
(Washing the water tank : )
Some time is required to make the first set of ice cubes. About 24 hours
Check if " " is displayed on the LCD panel.
1
If not, set Auto ice making to "ON."
60 page
Pout water into the water tank.
2
Warning
Use potable water.
Do not tilt
tank when carry as
water may spill.
the water
Tank is full at this position.
(About the same height
as the FULL LINE)
Set the water tank.
3
Securely insert the water
Ice cubes will not be made
unless the tank is inserted fully.
tank.
FULLLINE
FULL LINE
Preparation
Dispose of the first set of ice cubes.
(There may be odor or dirt within the
70 page
Notes
Do not use other than water.
Do not use hot water (heat-resistance: 60°C),
juice, tea, etc. (clogging of purifier filter and
dirtying of interior may result). Malfunction of
the ice maker may occur as a result.
Before and after replenishing water, small ice
cubes and connected ice cubes may be made.
Do not place the shovel or foods on top of the
ice cubes.
This may cause the automatic ice maker to
malfunction (damage of the detection lever, etc.) or
the case from being able to be pulled out. Place the
shovel at the designated location.
ice maker.)
58
Ice is made automatically
Replenish water when low.
4
For health reasons, replace the
water once a week even when
there is water remaining.
Detection lever
About
1cm
Page 22

How ice cubes are made
Water supply
Water is sent from
the water tank to the
ice tray
Fridge
compartment
Ice cube
compartment
Ice making
Ice cubes
are made
Releasing
The ice tray will not rotate
when the ice stock corner is full.
Water tank
(About 1.0L)
Pump
Pipe
Ice tray
Detection lever
Ice stock corner
Ice tray rotates, dropping the
ice and returns to
The volume of ice
cubes are checked
periodically by the
detection lever.
Ice cube volume will decrease
when not evening out ice cubes.
Express ice making
Select "Express ice making" with the dial,
1
Blinks
Water supply
Full volume is detected here
(About half
the volume)
Ice cubes can be made quicker (about half the time) than normal.
Press "Select".
Normally, ice cubes (8 cubes) are
made about once every 2 hours.
This is a guide when the ambient
temperature is 30°C, temperature setting is
at "NORMAL" and the doors are not
opened/closed.
Time required for ice making will be longer
than the above when the doors are frequently
opened/closed or many foods are stored.
Maximum ice cube volume
When the partition is at the center
When the partition is at the left end
'OFF' blinks
Approx. 160
Approx. 216
ON
Lights
up
ON
Lights
up
2
OFF
ON
Turn the dial to the right,
Around
the right
'ON' blinks
OFF
ON
OFF
Beep
Press "Select". (Finished)
Beep
Operation starts up. The LCD panel returns to normal
display in approximately 2 seconds. " " will be displayed.
Express Ice Making ends automatically after making ice cubes 3 times and returns to the normal ice making.
" " will disappear when it completes.
To cancel operation
Same as above.
1 1
Turn the dial left and press "Select."
2
Operation will stop. " " disappears.
Notes
This feature cannot be used simultaneously with Express Freezing.
This feature cannot be used when Auto Ice Maker is
turned off.
First set Auto Ice Maker to ON before using this feature.
Ice cubes will not be made even when turning Express Ice
Making to ON if the ice cube corner is full.
(Express Ice Making will end in about 1 hour.)
Ice making takes longer when:
The room temperature is high.
The door is frequently opened.
Many food products are stored.
Refrigerator is defrosting.
Immediately after setting Auto Ice Maker from OFF to ON.
When the ambient temperature is low. (In winter, etc.)
The operation noise will be large during this operation.
(To cool rapidly using inverters.)
Minimize door opening/closing during this operation.
59
Page 23

Ice compartment
Auto Ice Maker (turning off)
Select "Auto Ice Maker" with the dial,
1
OFF
ON
Blinks
Turn the dial to the left,
Around
2
the left
<When it will be OFF for a long time (such as in winter)>
Discard the water inside the
3
water tank and set it in its
'OFF' blinks
OFF
ON
specified position.
Dry the purifier filter in shade.
To set making ice cubes again
Same as above.
1
Turn the dial to the right, and press "Select".
2
Operation starts up. " " will be displayed.
<After a long period of stopping (such as in winter)>
3
After washing the water tank with water ,
fill the tank with water and set into the unit.
70 page
Press "Select".
Press "Select". (Finished)
Empty
Notes
Turn the setting to OFF when ice cubes
are not needed.
'ON' blinks
OFF
Beep
Lights
up
OFF
Beep
Operation starts up. The LCD panel returns to normal
display in approximately 2 seconds. " " disappears.
The water in the ice tray will be frozen as is. After ice
cubes are released, the ice tray will also be empty.
About 2 hours may be required for ice cubes to be
released.
Ice cubes will not be released when the ice stock
corner is full.
ON
Lights
up
Select "Ice tray cleaning"
2
(1)
with the dial,
Turn the dial to the right,
(2)
Ice Tray Cleaning
Use this feature when cleaning the ice tray (or pipe) .
When not using the refrigerator for some time.
Fill the water tank with
water and set into the unit.
1
Lastly, dispose of the water
in the ice case.
3
Emptying Ice Tray
Operation completes when there is
2
(3)
a beep.
'OFF' blinks
Press "Select".
(4)
When not using the refrigerator for some time
or when moving the refrigerator.
Empty the water tank
and set into the unit.
1
Lastly, dispose of the water
or ice cubes in the ice case.
3
Around
the right
'ON' blinks
Beep
OFF
OFF
Lights
OFF
up
Press "Select".
Blinks
Press "Select".
ON
Operation begins.
Operation requires about 40 seconds.
Button operation will not be accepted while it is operating.
To clean the ice tray,
Repeat several times and go to .
(2)
ON
Beep
The LCD panel returns to normal
display in approximately 2 seconds.
To empty the ice tray,
(4)
Go to .
Beep
Beep
'OFF' blinks
OFF
ON
(4)
60
Page 24

Vegetable compartment
Vegetable crisper (top)
Store small vegetables and fruit.
Vegetable crisper (center)
Store medium-size vegetables.
Case partition (V stand)
Vegetable
case
It can be flipped
forward/backward.
Vegetable
case partition
STORING FOOD
Fruit / Vegetables
To minimize moisture loss, fruit and vegetables should be loosely enclosed in a plastic material e.g.
wrap, bags (do not seal) and place in the fruit and vegetable crisper. Those fruits and vegetables with
thick skins e.g. oranges do not require wrapping.
How to use the Vegetable case (Vegetable case partition)
Stores
long vegetables.
It is also possible to store short
vegetables by setting the case
partition in horizontal direction.
Set firmly to
the back.
Click
How to use the Vegetable crisper (top)
The entire case can be pulled out.
(Full open type)
Vegetable crisper (center)
Vegetable crisper (bottom)
Store large and medium-size vegetables.
2L plastic bottles can be stored at the
front.
(Bottles may not fit depending on the shape.)
Vegetable crisper (top)
Do not apply
downward forces
on the case.
Notes
Do not throw in cans, bottles, etc.
It may cause the parts to crack.
Do not store tall food containers.
It may collide with the
vegetable crisper (top)
and cause the crisper
to crack or food
materials to be crushed.
Notes
Vegetable compartment is cooled indirectly to maintain high humidity. Thus, cooling may take some time when storing
many vegetables or beverages during the summer.
Crispers may fog or build up condensation when storing many leafy vegetables since the humidity within the vegetable
compartment is high. Wipe off condensation with a dry cloth as condensation build-up at the bottom of crisper will cause soiling.
When storing too much foods
Foods will hit the vegetable crisper lid and the
crisper cannot be pushed in/pulled out.
For the upper vegetable crisper (top)
Do not push in with your hand
on top of the crisper.
(Your hand may become caught
between the interior wall and crisper.)
61
Page 25

Other functions
Timer
Select "Timer" with the dial,
1
min.
Set up the time with the dial,
2
Set time
min.
It is also possible to set up by turning in leftward
direction to start from 99 minutes 30 seconds.
Blinks
sec.
sec.
Up to 99 minutes 30 seconds can be set in interval of 30 seconds.
Press "Select".
Beep
Press "Select". (Fnished)
The remaining time
Beep
Timer starts up.
time during Timer operation and it will not go OFF.
It is impossible to set up other menu items.
The LCD panel will display the remaining
When it reaches 0 second, there will be a beep and the screen will
start blinking
The completion beep will stop by pressing "Select" or "Cancel."
The LCD panel will return to normal display when the completion beep stops.
(for approximately 30 seconds).
To cancel the timer
Press "Select" for more than 2 seconds.
The period returns to 0 second. (The LCD panel returns to normal
display in approximately 2 seconds.)
Displays the period
for previous setting
min.
sec.
is displayed
min.
sec.
sec.
Beep
Beep
…
62
Vacation Mode
Select "Vacation mode" with the dial,
1
OFF
Turn the dial to the right,
2
To cancel operation
Same as above.
1 1
Turn the dial left and
2
press "Select."
Operation will stop.
" " disappears.
Around
the right
OFF
'ON' blinks
Blinks
ON
ON
Notes
If it is set up during Express Ice Making / Freezing, Vacation Mode
will begin after the completion of Express Ice Making / Freezing.
Vacation Mode operation will be cancelled automatically
when the fridge compartment, temperature zone
selection compartment and/or ice compartment is
opened and closed 3 times in total.
Use this feature when going on a trip or leaving the house.
Press "Select".
'OFF' blinks
OFF
Beep
ON
Press "Select". (Fnished)
Lights
up
ON
Beep
Operation starts up. The LCD panel returns to normal
display in approximately 2 seconds. " " will be displayed.
What is Vacation Mode?
Operation time of the compressor
is suppressed and defrosting is
performed at an optimal cycle.
About 10% power consumption
can be saved.
Lights
up
Page 26

Plasmacluster Ion
Releases Plasmacluster Ion into the fridge compartments.
The cool air inside the fridge compartment circulates through freezer compartment, temperature zone selection
compartment and ice compartment.
(The vegetable compartment has a sealed structure and the effects of ion do not reach this compartment.)
Select "Plasmacluster Ion"
1
with the dial,
OFF
ON
Turn the dial to the right,
2
Around
the right
OFF
'ON' blinks
ON
To cancel operation
Same as above.
1 1
Turn the dial left and press "Select."
2
Operation will stop. " " disappears.
Blinks
Press "Select".
'OFF' blinks
OFF
Beep
ON
Press "Select". (Fnished)
Lights
up
ON
Beep
Operation starts up. The LCD panel returns to normal
display in approximately 2 seconds. " " will be displayed.
Lights
up
Notes about PLASMACLUSTER operation
The ionizer inside your refrigerator releases clusters of ions, which are
collective masses of positive and negative ions, into the fridge
compartment. These ion clusters reduce airborne mold fungus.
Replacement of parts is not required.
Cluster ions are generated from water molecules (H20) and
oxygen molecules (O2) within the air.
There are not parts to be replaced periodically.
Health issues
Since cluster ions are structured by ions created from molecules
of water and oxygen commonly existing in the natural
environment, there are no effects on your health.
(Although there is slight generation of ozone, the amount
produced has no effect on your health.)
Notes
Buzzing sound will be heard during operation.
This is the sound of cluster ions being discharged and is not a malfunction.
The sound may become louder, softer or even silent depending on the humidity of the kitchen; however, this is not a malfunction.
There may be a slight odors in the fridge compartment.
This is the smell of ozone generated by the ionizer.
The amount of ozone is minimal, and quickly decomposes in the fridge compartment.
Mold fungus
inactivate
Plasmacluster Ion discharge port
63
Page 27

Temperature control
The refrigerator controls its temperature automatically.
However, if needed, adjust the temperature as follows.
Select "Temperature control" (Fridge compartment
or Freezer compartment)" with the dial,
1
To adjust the temperature
in fridge compartment
Min.
To adjust the temperature
in freezer compartment
Min.
Max.
Blinks
Blinks
Max.
Select the position with the dial,
2
MIN side
MAX side
Adjusted position
blinks
Min.
Max.
Press "Select".
Min.
Beep
Press "Select". (Finished)
Min.
Beep
The LCD panel returns to normal
Temperature guide
Fridge comp.
temperature control
Fridge compartment
Freezer comp.
temperature control
Freezer compartment
Ice compartment
The temperatures shown in the lower table are in the case of the following conditions:
Temperature within the each compartment at a location slightly lower than the center when the ambient temperature
is 30°C after the internal temperature becomes stable and the unit is operated empty with the doors closed.
Min
About 3 ~ 4°C higher
than Normal
Min
About 3°C higher
than Normal
Normal
About 3 ~ 5°C
Normal
About -18 ~ -20°C
Max
About 2 ~ 3°C lower
than Normal
Max
About 3°C lower
than Normal
display in approximately 2 seconds.
The temperatures of chilled room, vegetable compartment, and
temperature zone selection compartment cannot be controlled.
Chilled room and vegetable compartment
depending on the Temperature control for fridge compartment.
Temperature zone selection compartment
(under "Freezing" mode)… Temperature will fluctuate
depending on the Temperature control for freezer compartment.
Temperature zone selection compartment
(under "Wine room," "Cooling," "Fresh case,"
"Crunchy Freezing" or "Warming" mode)
not be ganged with the Temperature control in fridge
compartment nor freezer compartment.
The current
position blinks
Max.
Lights
up
Max.
…
Temperatures will fluctuate
…
Temperature will
Cool air is sucked by force using fans to remove the odor elements
and send clean air into the compartments.
Deodorizer (Dual deodrizer)
Select "DEODORIZER" with the dial,
1
Blinks
DEODORIZER
Turn the dial to the right,
Press "Select".
Press "Select". (Finished)
2
'ON' blinks
OFF
ON
(The vegetable compartment has a sealed structure and this effect does
not reach this compartment.)
Notes
'OFF' blinks
OFF
'ON' lights up
OFF
ON
ON
Lights
DEODORIZER
Although the deodorization lamp will go
OFF as the LCD panel light goes off,
the deodorization operation is continued.
Do not block the space in front of
deodorization system with food materials, etc.
It may interfere with efficient
deodorization function.
up
Operation starts up.
The LCD panel returns to normal
display in approximately 2 seconds.
To cancel operation
Same as above.
1 1
Turn the dial left and press "Select."
2
Operation will stop. DEODORIZER lamp disappears.
To force operation
After approximately 4 hours of continuous operation, deodorization will go into intermittent operation (The lamp indication
will not change). It is possible to operate continuously by force when storing food materials with strong scents.
Carry out procedure
1
above during
1
deodorization operation.
Press "Select" for
2
more than 3 seconds.
Beep … Beep beep beep
3 sec.3 sec.
Lights
up
Operation starts up.
Max.
It will go into intermittent operation
ON
after approximately 4 hours.
64
Page 28

Muting Beep
Electronic tones (beep) that sound when operating
the LCD panel can be muted.
Set the LCD panel to normal display and press "Cancel" for more than 3 seconds.
1
Blinks
3 sec.3 sec.
Turn the dial to the left,
2
Around
the left
Turn the dial to the left,
3
Around
the left
To cancel operation
1
3
Same as above.
2
Turn the dial right and press "Select."
" " will be displayed.
OFF
Blinks
OFF
'OFF' blinks
OFF
ON
ON
ON
Press "Select".
'ON' blinks
OFF
Beep
ON
Press "Select".
Lights
up
Lights
up
OFF
Beep
The LCD panel returns to normal
approximately 2 seconds. " " disappears.
Notes
Even when Beep is canceled, the door-open buzzer and
completion buzzers for Warming, Defrosting, Express
Cooling and Timer will still sound.
ON
display in
Child lock
Set the LCD panel to normal display and
press "Cancel" for more than 3 seconds.
1
Blinks
OFF
3 sec.3 sec.
Turn the dial to the right,
2
To cancel operation
Same as above.
1 1
Turn the dial left and press "Select."
2
" " disappears.
Around
the right
OFF
Key operations of the LCD panel can be disabled. Use this
feature to prevent children from tampering with the panel.
ON
'ON' blinks
ON
Press "Select".
'OFF' blinks
OFF
Beep
ON
Press "Select".
Lights
Lights
up
Beep
The LCD panel returns to normal
approximately 2 seconds. " " will be displayed.
up
ON
display in
65
Page 29

Tab
Crisper
or Case
Rail
Mounting and removing accompanying parts
Fresh case (Large one comes to the left)
Removing
Pull up the front
side and pull out.
Mounting
Insert while lifting
up the lid.
If the lid comes off
Insert the tab on one side
into the hole.
Hole
Tab
Tab
Hole
Then insert the tab on the
other side into the hole.
Temperature zone selection compartment case
Removing
Pull up to
remove.
Mounting
Remove the stainless tray by flipping
the temperature zone selection
compartment case upside down.
Slowly insert the case
along the rails.
Fit on
rail
Pockets
Removing
Pockets are securely mounted.
Pull up from the bottom and
remove slowly.
Mounting
Pull up from the
bottom side.
Insert in the tabs.
Securely mount the pockets.
Improper mounting will result in the pockets falling.
Removable parts
Remove
Mount
Vegetable case • Vegetable case partition
Removing
Lift up
the bottom.
Mounting
While pulling the vegetable case sideways,
push the tabs on the vegetable case partition
into the grooves of the vegetable case.
Attach the vegetable case.
Groove
Remove the
vegetable case.
Pull the vegetable case
sideways to remove
the case partition.
Vegetable crispers • Freezer cases (center) (bottom)
Removing
Groove
Pull out the vegetable
crisper or freezer case
and remove the crisper
or case by pulling up
and further out.
Mounting
Place the rollers of
the vegetable crisper
or freezer case on the
rails and push in.
66
Tab
Attach with the characters on the front.
Page 30

Crisper or Case
Rail
Shelf
Removing
Removing
Mounting
Pull up the front
side and pull out.
Mounting
Three position adjustable shelf
Press in the
front section,
Push in the front section
into the back section,
Place the back side of the shelf on the rails
and insert by fitting the tabs on the front rails.
Pull up to remove.
Put in the right and left
tabs as shownm,
The front section and the back
section.
Pull the front section.
Front section
Removing
Pull up to remove.
Vegetable crisper (top) • Freezer case (top)
Removing
Pull out and pull up
slightly to remove.
Back section
Ice case
The slides cannot
be removed.
Tabs
Mounting
Mounting
Place the freezer case (small) for freezer case (top)
on top of the freezer case after attaching the case.
Insert the case along the
rail and close the door.
Fit on rail
Fit the slides into the rails and
insert by holding the front
section slightly up.
With the slides stored
Notes
Do not remove accompanying
parts with foods stored.
Accompanying parts become
heavy and injury may occur as a
result of foods and parts dropping.
Do not leave the fridge
compartment doors open for
a long time.
The compartment lamp cover
will become hot.
Do not drop or apply strong
impacts on plastic parts.
They may become cracked.
Shelves cannot be removed if
some cases if the doors cannot
be opened fully (more than 90°).
Lubricant (silicone grease) is
applied on the crispers and cases
to facilitate sliding.
Do not wipe it off.
67
Page 31

Cleaning the refrigerator
Remove the power plug.
Cleaning
Easily dirtied parts
(Every month as the guideline)
1
Do not insert the power plug for 5 minutes once removed as this will cause burden on the refrigerator.
Remove the shelves and pockets from the cabinet and door. Wash them in warm
2
soapy water; rinse in clean water and dry.
Clean the inside with a cloth soaked in warm soapy water. Then, use cold water to wipe off soapy water.
3
Wipe the exterior with a soft cloth each time it is soiled.
4
Clean the Magnetic door seal with a toothbrush and warm soapy water.
5
Inspect the following when completed with cleaning:
Is there any damage on the power cord or plug?
Is the power plug securely inserted?
(When in doubt, contact your dealer of purchase.)
(Clean once a month)
Door packing
Thoroughly clean
sides where the right
and left doors meet.
Control panel
Wipe with soft, dry cloth.
Top shelf in chilled case
It cannot be removed and
washed with water.
Remove the chilled case and
wipe both sides of the shelf.
(When all accessories are removed)
Drip plate indentation
Thoroughly wipe off
accumulated dirt.
Foot cover
68
Page 32

Notes
Do not use polishing powder, benzine, hot
water etc.
If undiluted detergent is used or soapy water is not wiped
off thoroughly, cracking of plastic parts can result.
Wipe any food oils adhered to plastic components
as they can cause cracking of the plastic surface.
(Clean once a year)
Back of refrigerator, floor and walls
There may be build-up of dust from convection of air.
About the stainless tray
Salt adhered on the tray may cause rusting. In this case, clean the tray
with kitchen detergent (cream-type cleanser, etc.) as quickly as possible.
Do not use nylon scrubbing brushes. The tray may become scratched.
When using chemical rags, be sure to follow the accompanied
directions.
Turn the right and left adjustable feet until they
1
are off-ground and move the refrigerator.
Adjustable feet
Transportation wheels
(Front, back, left and right)
Foot cover
Pull out and remove the
1
foot cover.
Foot cover
Absorb dust with a vacuum
2
cleaner.
Remove the dust inside the
foot cover as well.
Wipe off dirt.
2
Dust and soil
Wipe off dust
from the power
plug as well.
3
Remove dust from the holes
on the lower section of the
back side using a vacuum cleaner.
Attach the foot cover at last.
Hole
Hole
Tab
Insert the tabs (right and left) on the
foot cover into the holes (right and left)
on the main unit. Insufficient attachment
may lead to abnormal noises.
69
Page 33

Cleaning the automatic ice maker
Slime bacteria and fungus can become stubborn once they build up.
Clean on a regular basis to prevent slime bacterial and fungus build-up.
(Once a week)
Wash the water tank (excluding the purifier filter) with water.
11
Disassemble and wash each part using a sponge soaked with neutral detergent (dishwashing detergent).
Notes
When using bleach, be sure to follow the accompanied directions.
Disassembly
Remove the
1 1
water tank cap.
Remove the lever and lid.
2
Lever
Lid
Pull up
straight.
2
Remove the filter case.
3
Tab
3
Press in both side and
remove from the tabs.
Pull down straight.
Remove the filter holder and
4
purifier filter.
Filter holder
Remove the packing
5
of the lid.
From here
Remove the tabs by
placing the filter holder
sideways.
Tabs
(4 locations)
4
Reassembly
Mount the packing to the lid.
Mount the purifier filter and filter
holder to the filter case.
Filter holder
Mount the tab on
one side and
press in hard.
Purifier filter
Mount the filter case.
Hole
Tab
Filter case
Mount the lid.
Tab
70
Thoroughly clean the
packing groove as it
is easily dirtied.
Purifier filter
Pull upward.
5
Wash the purifier filter with water.
2
Do not use detergent or bleach.
(Use a soft sponge when using.)
This may lead, the detergent may accumulate within
the filter or the active charcoal may become ineffective.
Notes
Do not bend or poke with stick, etc.
Do not wash by rubbing.
Ice tray and pipe
If the refrigerator has not been used for a long time, perform "Ice Tray Cleaning".
…
Cleaning is normally not required.
Replacement period of the purifier filter
Normally, replace the filter every 3 ~ 4 years.
Replacement is also required when there is
fungus, rip or odor on the purifier filter.
Contact the Sharp Service Center when ordering
a purifier filter.
Ice making capability will not change even when
the purifier filter is not used.
Hole
Close the water tank cap.
60 page
Page 34

Troubleshooting
Following sounds are normal
Sound of water flowing (also bubbling and spurting sounds)
This is the sound of refrigerant flowing.
(Sound may be loud at times)
Moaning machinery sound that lasts for about 20 ~ 30 seconds
This is the sound of the automatic ice maker releasing ice or
supplying water.
Check the following before calling for repair.
This is a malfunction.
The LCD panel shows the following display.
It is the failure of heat release fan motor.
(It cannot be seen from outside.)
Though cooling operation will be continued,
the cooling performance may deteriorate.
Although operation is accepted from the
control panel even when this error is
displayed, the error display will return
when it goes back to normal display.
Contact the Sharp Service Center for repair.
The door-open buzzer will not stop.
(When all doors are closed)
The buzzer sound can be temporarily stopped.
Press "Select" for more than
3 seconds while pressing
"Cancel" button.
(The buzzer will sound again after
about 2 days.)
Beep beep beep
3 sec.3 sec.
Beep, beep
Beep, beep
3 sec.3 sec.
These are not defects.
The following occur during the production process and are not production defects. Please be assured and continue using the product.
Cracks or flaw-like lines on a plastic part
Curve
Vegetable case
Line
Symptom
Refrigerator does not
cool or cool well
Is the Temperature control on the "Min" side?
Set it back to "Normal" to "Max" Leaving the freezer compartment with "Min"
setting may also cause the fridge compartment temperature to also become high.
In this case, set the fridge compartment setting to "Max"
Is the ambient temperature high?
Move refrigerator away from the heat source and reinstall in a place
away from direct sunlight and in a well-ventilated and cool location.
Reason / Remedy
There can be a flaw where more than one
cluster of plastic filled during part molding
meets together or on a die joint.
This is not a production fault and will not
lead up to a crack.
Reference
page
53
45
Is there space around the refrigerator?
Space is required for releasing heat.
Did you store hot food materials? Be sure to store food after cooling it down sufficiently.
Is there excessive storage of foods? Is the intake port/discharge ports blocked?
Space out foods.
Are the doors being frequently opened? Do not open the doors as much as possible.
Are doors half open from bags of food products, etc. being caught in between?
Is the refrigerator hitted by warm air directly in low outside temperature?
If the temperature does not drop even by taking the above measures, pull out the power plug once and reconnect it after 5 minutes to see if it works.
There is noticeable
noise
Is the refrigerator touching the wall?
Is the installation unstable and the refrigerator jolting?
Is it installed on an unstable floor?
Are there objects fallen around the refrigerator?
Is the foot cover off?
Is the sound-prevention sheet of the ice case removed?
The sound of ice dropping will be louder.
45
47
45
69
58
71
Page 35

Troubleshooting (Continued)
Symptom
There is fogging or
condensation within
the compartments or
condensation on the
cooling panel
There is condensation
on the vegetable crispers
There is fogging or condensation
Right and left doors
are not aligned
Doors do not seem
to close properly
Door
Closing a door will
cause another to open
The door-open
buzzer will not sound
Are succulent foods stored without wrapping?
Wrap succulent foods with plastic wrap.
Are the doors being frequently opened?
Are bags of food products caught in the door?
Is the door packing damaged?
Contact the Sharp Service Center for replacement door packing.
This is due to the high humidity maintained within the vegetable
compartment.
Is the flooring sturdy and level?
Straighten the refrigerator using the right and left adjustable feet.
In the case of the right illustration, raise the left adjustable foot.
Are there protruding food materials, commercially sold pockets or cases touching the shelves?
Lower the right and left adjustable feet
and tilt the refrigerator to the back side.
Doors may open as the result of wind pressure.
This feature is not available for the freezer compartment and
vegetable compartment.
Reason / Remedy
Reference
page
Wipe condensation
with a dry cloth
and fogging with
a wet cloth.
46
Lower the
adjustable feet
45
40
The buttons and dials
on the control panel
do not operate
Express Freezing
cannot be carried out
Express Ice Making
cannot be carried out
Control panel
The LCD panel
display is OFF
Foods in the
fridge compartment
freeze
Others
There is odor within
the compartment
Is Child lock ON?
Cancel Child lock.
Is Express Ice Making ON? This product cannot carry out two express
operations at the same time.
Cancel Express Ice Making and then start operation.
Is Express Freezing ON? This product cannot carry out two express operations
at the same time. Cancel Express Freezing and then start operation.
Is Auto Ice Maker set to OFF?
Start operation after setting Auto Ice Maker to ON.
It will light up by pressing one of the buttons or the dial.
Are succulent foods stored near the discharge port?
Foods may freeze since the top shelf and back of shelves are close to
the discharge ports.
Is the temperature setting at Max?
Return the setting to Min. The fridge compartment may also become too cold
when the freezer compartment is set to Max. In this case, return the setting of
the freezer compartment to Normal.
Is the ambient temperature 5°C or less?
When the ambient temperature is low, foods may freeze even when the temperature setting is at Min.
Are warm foods stored under the temperature sensor of the fridge compartment?
Cooling operation may continue and foods may freeze as the sensor
judges the temperature to not be cold.
Are foods with strong scents stored without wrapping?
Wrap foods with strong scents. We recommend use of a plastic wrap when using the
Warming mode or when storing food materials with strong scents in Express cooling.
Are you storing food materials with strong scents for a long period?
Did you leave the refrigerator power OFF for a long time?
It is impossible to remove all odors even by carrying out the deodorization operation.
The vegetable compartment is not deodorized because the cool air does not enter the compartment directly.
65
57
59
41
47
64
54
72
There may be a smell as ozone is produced from the operation of
plasmacluster. The amount of ozone is minimal and is not harmful to the
human body. In addition it decomposes quickly and does not accumulate.
63
Page 36

Symptom
The floor is wet
Others
Vegetables become
dry soon
Is the refrigerator tipped or moved?
If water remains on the evaporation tray (which cannot be seen from outside)
inside the refrigerator, it may become spilled on the floor.
Is the door packing damaged? Water may spill over from the evaporating pan
when the door packing is damaged as there is increase of condensation within the
refrigerator. Contact the Sharp Service Center for replacement door packing.
Are you storing vegetables that easily dry without wrapping?
Please use a plastic wrap to store.
Automatic ice maker related
Symptom
Ice cubes are not
made
or made slow
Is the water tank securely set?
Has water just been replenished in the water tank?
About 3 hours may be required for ice cubes to be made.
Are you leaving the shovel or other food products in the ice case?
The product will consider that the compartment is full of ice and stop releasing ice.
Store the shovel and other food products in their specified positions.
Is Auto Ice Maker set to OFF?
Check to see if " " is displayed on the LCD panel.
Has Auto Ice Maker just been set from OFF to ON?
About 3 hours may be required for ice cubes to be made.
Reason / Remedy
Reason / Remedy
Reference
page
61
Reference
page
58
58
41
If ice cubes are not made even when checking the above, perform steps ~ of "Ice Tray Cleaning" on page 60 and wait for half a day.
Ice cubes are melting,
round or connected
Ice cubes smell
No water or ice cubes
drop even when performing
"Ice Tray Cleaning"
The ice tray is at an angle
Ice cube corner is
never full
Has one of the doors been frequently opened or left open for a long time?
Has ice cubes been accumulated for a long time? Ice cubes may become round due to sublimation.
Is the purifier filter mounted?
Has the purifier filter exceeded its replacement period?
Is the water within the water tank old or with odor?
For health reasons, replace the water within the water tank once a week.
Is there remaining detergent or bleach used during cleaning within the water tank?
(Replace the purifier filter if detergent was used.)
Has ice cubes been left unused for a long time? Odors of foods may transfer on to the ice cubes.
Is the ice corner full with ice cubes? Remove the ice cubes in the ice corner.
Is there water in the water tank? Fill with water and set.
Has Auto Ice Making just been turned from OFF to ON? Repeat the operation again after about 30 minutes.
Perform steps ~ of "Ice Tray Cleaning" on page 60 once.
The ice corner will not full with ice
cubes.
3
1
3
1
Full level.
Temperature zone selection compartment related
Symptom
Warming mode cannot be used
(There is a beep and the operation is not
accepted when trying to set the mode.)
The product is in "Do not operate warmer function" to
prevent temperature increase in other compartments.
Operation will be accepted once the displayed period has passed.
Reason / Remedy
hr.
Reference
min.
58
70
59
page
50
" " display is
blinking slowly
There are strong scents in the
temperature zone selection
compartment
The temperature zone has
changed to " "
Did you use the Warming mode? The " " display will stop blinking once
the compartment cools down to refrigerating temperature zone.
Did you store food materials with strong scents without rapping?
Be sure to use a plastic wrap when using the Warming mode or Express cooling
mode on food materials with strong scents.
Was there power outage?
The initial setting of the control panel will be recovered when the power is restarted.
50
50
52
74
73
Page 37

What to do
Moving / Transporting
Preparation
Empty the ice tray.
1
Remove the power plug.
2
Remove the ground wire.
Pull up the adjustable foot.
3
Adjustable foot
(right and left)
When moving front / back
Raise the adjustable feet and use the
transportation wheels.
Transportation wheels
(Front, back, left and right)
page 60
Turn
Notes
To carry out the refrigerator, lay a sheet, etc. for
protection on the path.
If water remains on the evaporation tray (which cannot
be seen from outside) inside the refrigerator, it may
become spilled on the floor.
Do not hang the refrigerator using ropes, etc.
The refrigerator may drop as a result.
Do not place sideways.
Scratching and damage of the
machinery parts may occur as
a result.
When carrying
Use the transport handles on the back and the
bottom of the product.
Fix with a tape, etc. to prevent
the doors from opening.
Do not hit the control
panel on corners, etc.
Bottom
Power outage
During a power outage
Refrain from adding foods and opening/closing
doors.
After power turns back on
The LCD panel will be restored to its factory
settings.
The mode for temperature zone selection
compartment will be "Cooling" temperature zone.
……
…
On top of the
back surface
When the compartment light is blown
Contact the Sharp Service Center to request a replacement
compartment bulb.
The compartment bulb is not to be removed other than by
qualified service personnel.
74
Page 38

Page 39

Оперативное справочное руководство для значков на панели ЖКД приведено
на наклейке, прилагаемой к инструкции по эксплуатации. Пожалуйста,
прикрепите ее к холодильнику так, как нужно.
A quick reference guide to the icons on the LCD panel is provided in the label
included with the operation manual. Please attach it on your refrigerator as
necessary.
MENU SELECT
DEODORIZER
SHARP CORPORATION
Printed in Japan
TINS-A801CBRZ 07FK
1
 Loading...