

Page 1

Quick Start Guide
SH837Wi
Page 2

1
Introduction
Thank you for choosing Sharp SH837Wi phone.The
first time you use this phone, it is recommended
that you first read the User Guide to understand the
basic operation of the phone.
For more detailed information, see the user
manual.Please visit the following URL to download
the user manual:
www.sharp.cn/download/mobile/SH837Wi
Note
The phone can be used within the territory of the
People's Republic of China. This phone may not work
properly in some countries and regions outside China.
Content
Your Phone ...................................................2
Installing SIM Card, Memory Card,
and Battery ....................................................3
Charging the Battery .....................................4
First Start Up .................................................4
Home Screen ................................................4
Making Your First Call ...................................5
People ...........................................................6
Sending a Text Message ..............................7
Setting up Wi-Fi ............................................7
Setting up Email Account ..............................8
Sending and Receiving Emails .....................8
Using Browser ...............................................9
Using Bluetooth ...........................................10
Taking Photos and Videos ..........................10
Viewing Photos and Videos ........................12
Changing Basic Phone Settings .................13
Page 3
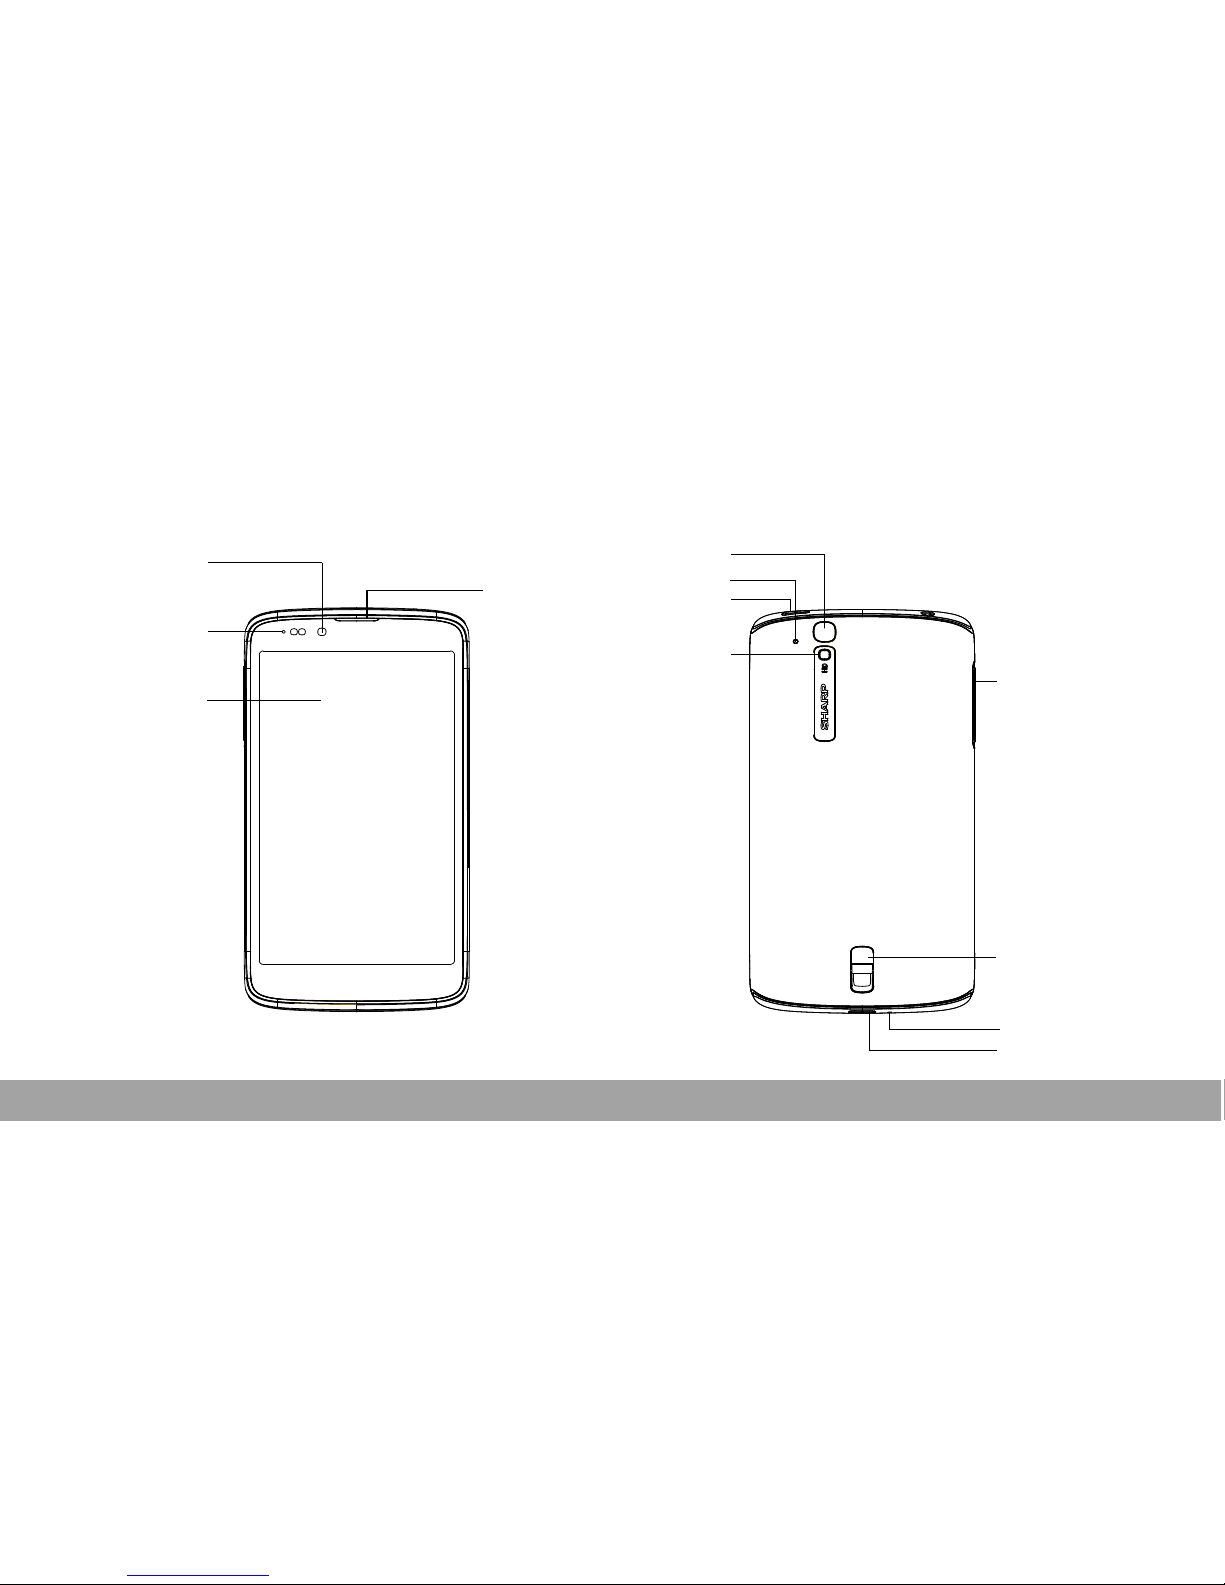
Earpiece
Power button
Microphone
Rear camera
Volume (+/-)
button
Your Phone
Front camera
Status LED
Touch screen
Flash
Speaker
USB port
Microphone
2
Page 4
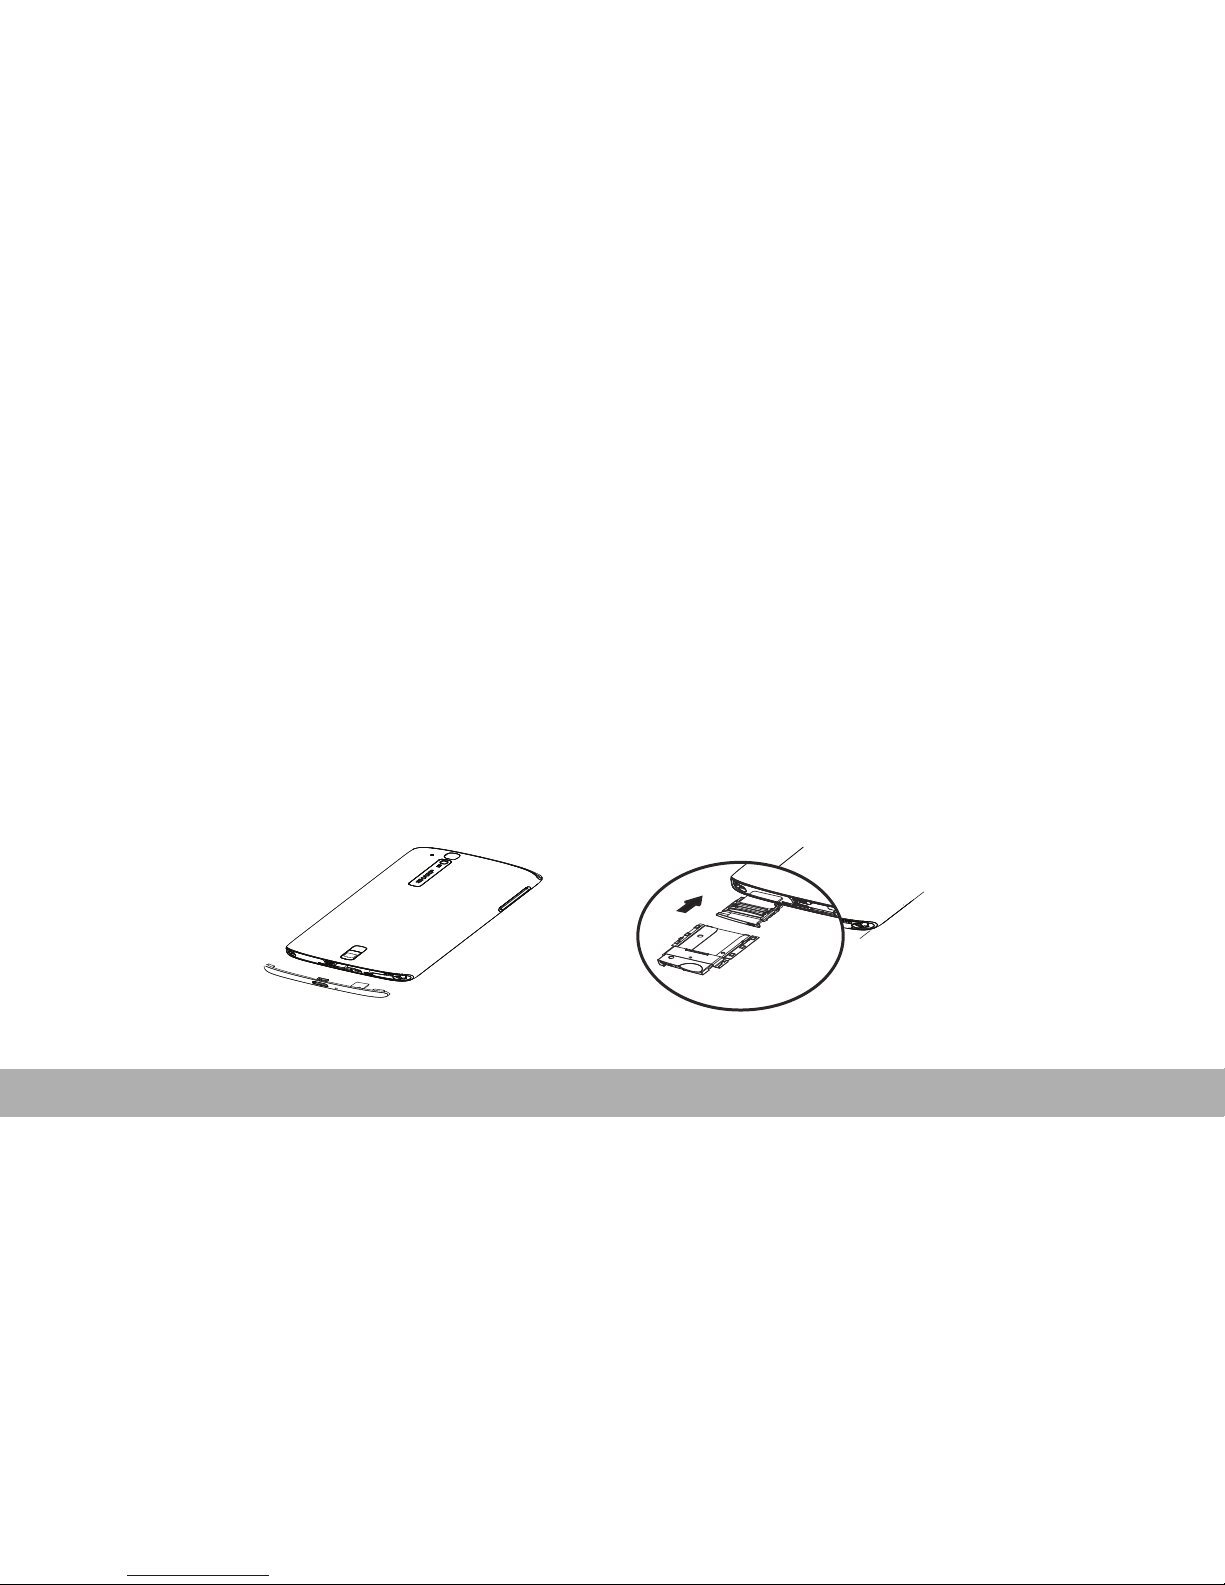
3
1. Open the bottom antenna cap.
2. Insert the SIM card into the SIM tray as shown.
3. Close the bottom antenna cap.
Installing SIM Card
Page 5
4
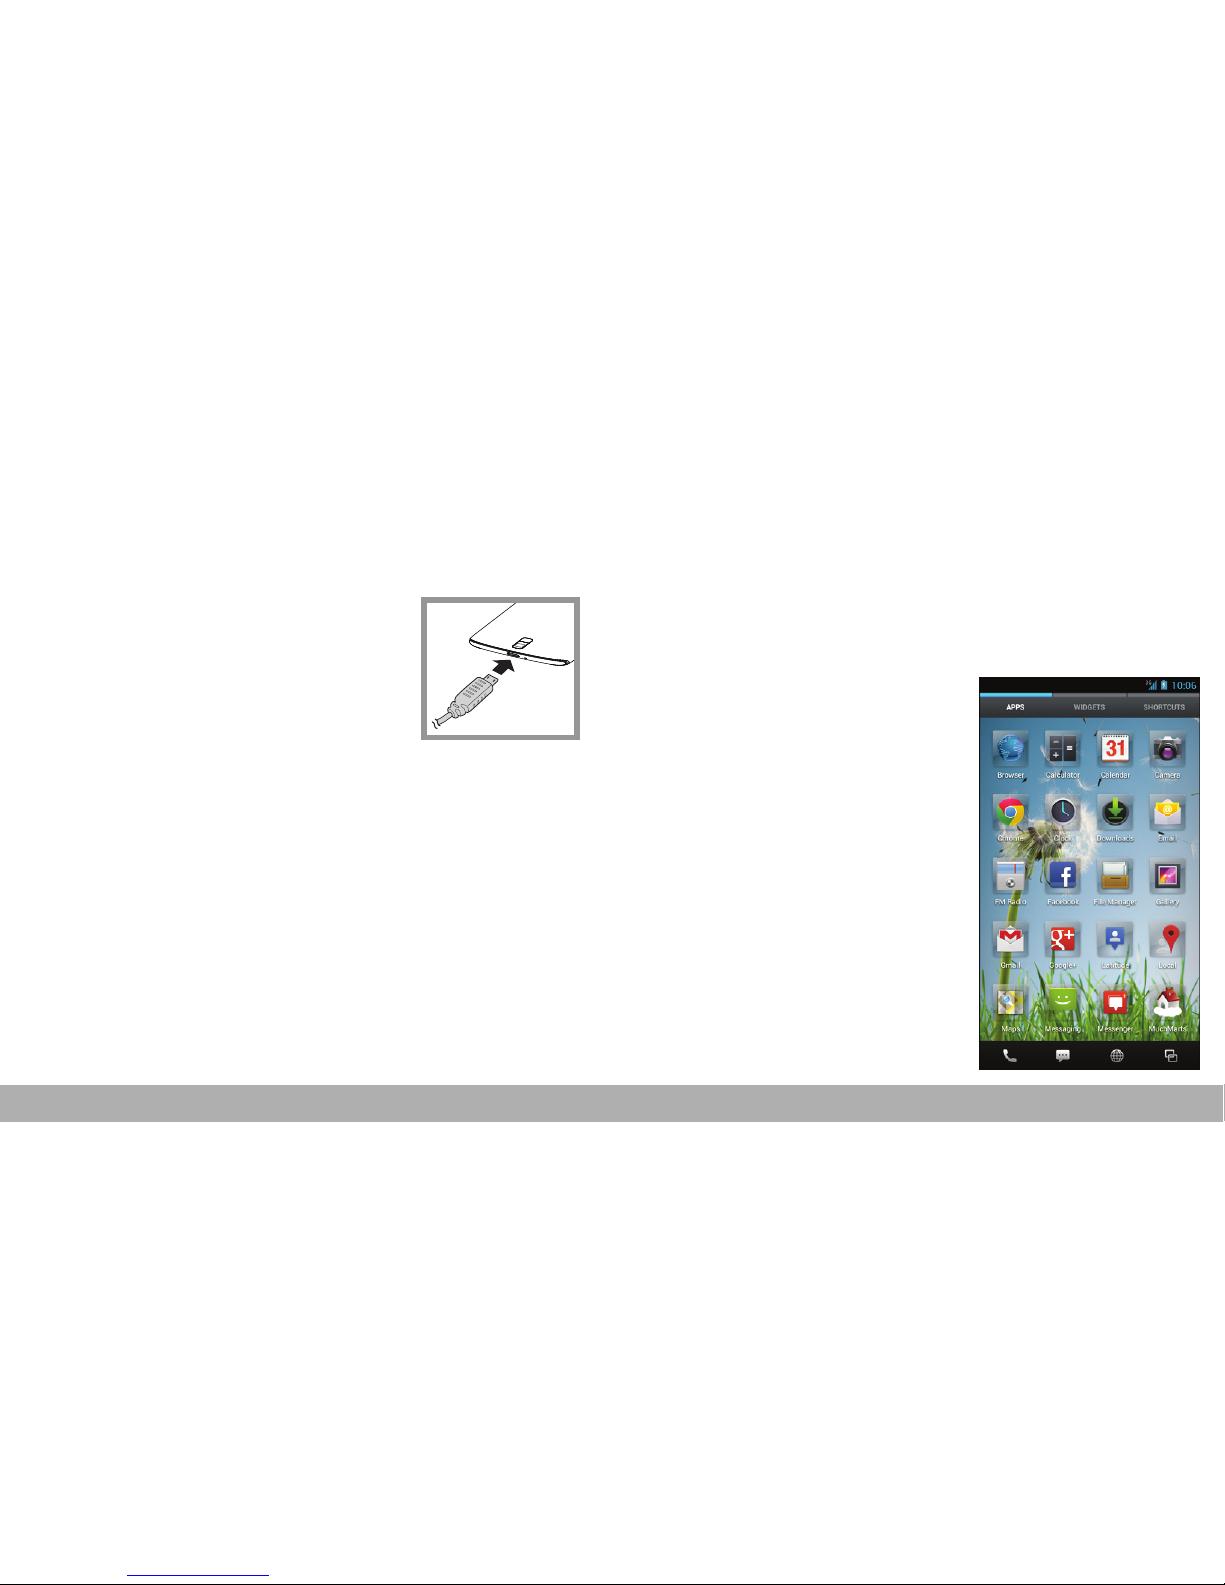
Charging the Battery
The battery is only partially charged.
1. Connect the USB cable to
the USB port of the device.
2. Connect the other end of
the USB cable to the AC
adapter.
3. Plug the AC adapter to a
wall outlet to start charging.
Warning
• Please use indoors and in dry places.
• Overheat protection mechanism is activated, the
device will temporarily stop charging:
When the system temperature reaches the
maximum operating temperature, the device will
automatically activate the overheat protection
mechanism and temporarily stops battery
charging. When the system temperature drops,
the system will automatically restart the battery
charging.
First Start Up
After installing the SIM card and charging the
battery, the device is ready to be turned on.
Home Screen
From the Home screen, you
can quickly access common
features and view
notifications of missed calls,
received messages, check
battery and connection
status.
Tap APPS tab to access all
the applications and settings
of the device.
Page 6

5
Making Your First Call
From the Home screen, tap Phone.
To make a call
1. Tap the phone number
on the keypad.
2. Tap to erase a
wrong number. Tap and
hold to erase the
entire number.
NOTE:
To call a contact,
tap the contact from the
list.
3. Tap .
4. To end the call, tap
.
To answer a call
To answer a call, tap and drag it to the right
().
NOTE:
When you tap , it automatically changes to .
Page 7

6
People
Adding contacts
1. From the Home screen, tap People.
2. Tap to add a
contact.
3. Select one of the
location to store the
contact to (USIM-only
or Phone-only).
4. Enter the contact
information such as
name, phone number,
email address, etc.
5. Tap to save the
contact.
Importing contacts
1. From the Home screen, tap People.
2. Tap > Import/export.
3. Select the contacts
location that you want
to copy from and tap
Next.
4. Select the contacts
location that you want
to copy to and tap Next.
5. Select the contacts to
copy and tap .
Page 8

7
Sending a Text Message
1. From the Home screen, tap
Messaging
.
2. Tap .
3. In the To field, enter the
recipient’s phone
number.
4. Compose your
message.
5. Tap to send your
message.
Setting up Wi-Fi
1. From the Home screen, tap Settings.
2. In WIRELESS &
NETWORKS, tap
Wi-Fi and set it to ON.
3. Available networks are
listed. Tap a network to
connect to or tap ADD
NETWORK to manually
add a connection.
NOTE:
Connecting to a
secured network will
prompt for a password.
Enter the password, then
tap Connect.
Page 9

8
Setting up Email Account
1. From the Home screen, tap Email.
2. Enter your Email
address and Password
and tap Next.
3. Set the Inbox checking
frequency settings and
tap Next.
4. Enter Name and
Account display name.
5. Tap Next. Once the
account setup is
complete, the device will
automatically retrieve
your emails.
Sending and Receiving
Emails
Composing and sending emails
1. From the Home screen,
tap Email, then tap an
e-mail account.
2. Tap .
3. In the To field, enter the
recipient’s email
address.
4. Enter the Subject.
5. Compose your email.
• Tap > Attach file
and select the item to
attach.
Page 10

9
6. Tap .
Receiving emails
Emails are automatically received in the Inbox
folder when the device connects to a network. To
manually retrieve new emails, tap .
Using Browser
To open a web page
1. From the Home screen, tap Browser.
2. Tap the address bar.
3. Type the URL then tap
Go.
4. Tap to access more
functions.
Page 11

10
Using Bluetooth
1. From the Home screen, tap Settings.
2. In WIRELESS & NETWORKS, tap Bluetooth
and set it to ON.
3. Available devices are listed. To search for a
new device, tap SEARCH FOR DEVICES.
4. Tap a detected device.
5. To start pairing, enter the PIN then tap OK.
NOTE:
• The PIN of the device must be the same PIN on the
other bluetooth device.
• On some devices, tap Pair to start pairing.
6. The paired bluetooth device name is
displayed.
Taking Photos and Videos
This device is equipped with rear and front cameras
to take photos and videos.
1. From the Home screen, tap Camera.
NOTE:
To switch
between front and rear
cameras, tap .
2. Aim the device at the
subject.
Drag to the right/left
to zoom in/out on the
subject.
3. Tap to take the shot.
Page 12

11
To record video
1. From the Home screen, tap Camera.
2. Tap and select to
enter video mode.
NOTE:
To switch
between front and rear
cameras, tap .
3. Aim the device at the
subject.
4. Tap to start
recording.
Tap and hold to
pause the recording. Tap
again to resume.
5. Tap to stop recording.
To take a panorama shot
1. From the Home screen, tap Camera.
2. Tap and select to enter panaroma
mode.
3. Aim the device at the
subject.
4. Tap to take the shot.
5. Move the device in one
direction and overlay
the focus area with the
blue frame.
6. When the shooting
guide reaches the end
of the shooting point,
the shooting ends. You
can also manually stop
recording by tapping
.
Page 13

12
Viewing Photos and Videos
1. From the Home screen, tap Gallery.
2. Tap a folder to view the recorded files in
thumbnails.
3. Tap an image or a video to view in full screen.
4. Swipe your finger to the left/right to view the
previous/next file.
• To share the photo,
tap , then tap an
application for
sharing.
• To delete the photo,
tap , then tap
Delete.
• To play the video,
tap .
• To play the
slideshow, share or
edit an image, or
show more options,
tap .
Page 14

13
Changing Basic Phone
Settings
Adjusting the volume
There are two ways to adjust
the volume:
• Press the volume (+/-)
button repeatedly to
adjust the volume.
• Press the volume button
once.
Drag the volume slider to
adjust the volume.
Setting an alarm
1. From the Home screen, tap Clock.
2. Tap .
3. To add an alarm, tap Add alarm.
4. To set the time, tap Time. Tap S or T to set
the alarm time, and tap Set.
5. To set repeat mode, tap Repeat. Tap one or
more options, then tap OK.
6. To set the ringtone, tap Ringtone. Tap an
option, then tap OK.
7. To vibrate when the alarm sounds, check
Vibrate.
8. To enter an alarm label, tap Label.
9. After all settings are complete, tap OK.
Page 15

 Loading...