

Page 1
Date: Apr. 19, 1996
COPIER : SF-2025
(Service Information)
No. : S-183
ADDITIONS TO THE SERVICE MANUAL AND PART GUIDE
1.Model Name: SF-2025/2030/2040 (Taiwan version only)
2.Description Since the T aiwan version of the SF-2025/2030/2040 differs from other models (It has an
added original size detector), we have added the information listed below.
Original sensing section
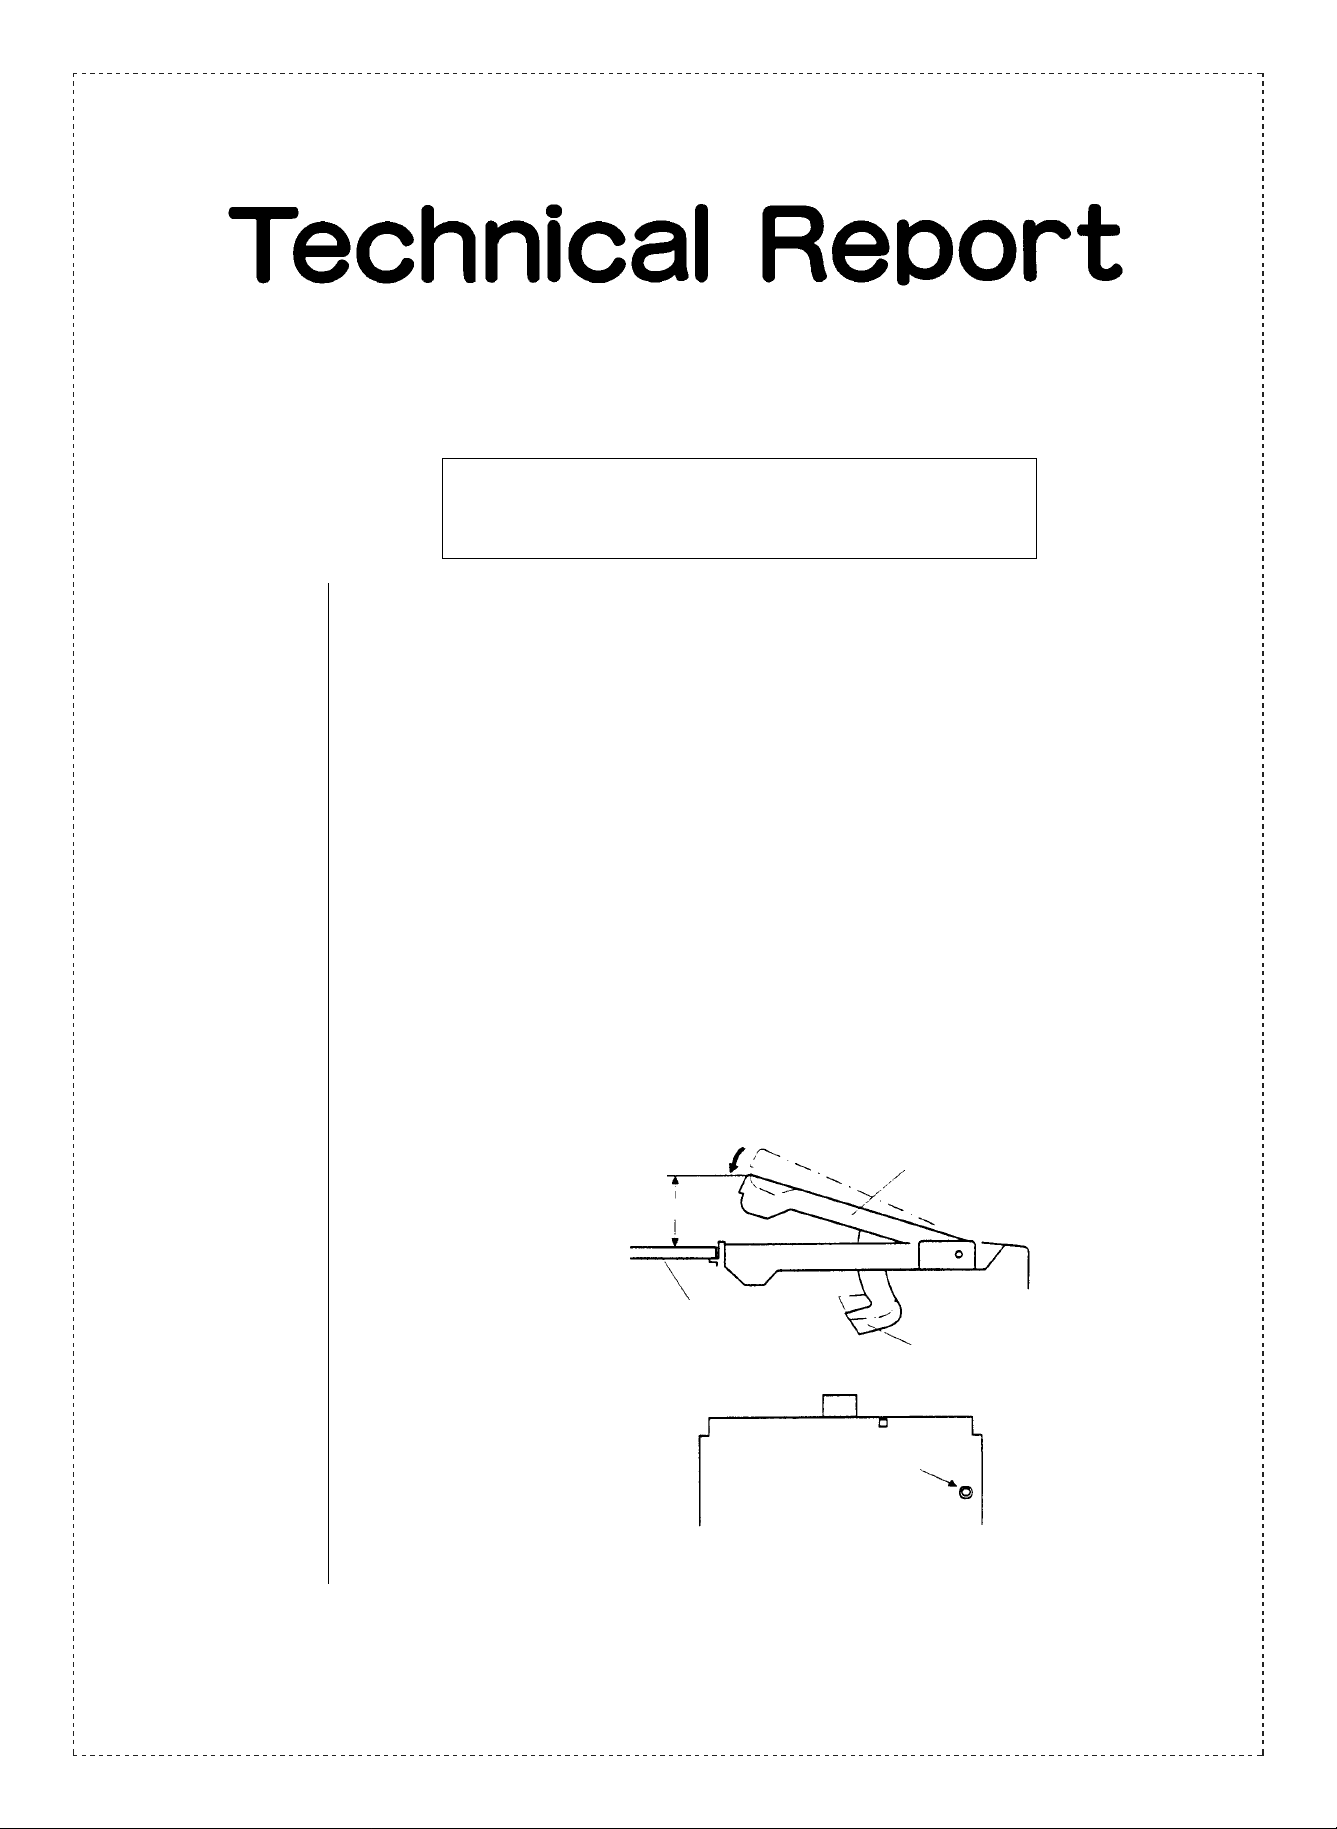
(1) Original sensing arm unit adjustment
➀ OC switch ON timing adjustment
Execute Sim. 41-01 (C → P → 0 → P → 4 → 1 → PSW → 1 → PSW).
.
Slowly tilt down the original sensing arm unit, loosen the original cover switch
actuator adjustment screw, and slide and adjust the actuator back and forth
so that the reverse display of OCSW is changed to the normal display when the
height of the arm unit top from the table glass is 36.5 ± 0.5mm. (If the original cover
switch ON timing is shifted, the original sensing function may be nullified.)
Original sensing arm unit
36.5 ± 0.5mm
Glass
Original cover switch actuator
Actuator adjustment screw
SHARP CORPORATION Reprography Division
1/5
Green
C
Page 2

(2) Original sensing level adjustment
(Original sensing level input)
The reference value used to judge whether there is an original or not is inputted. It is
used also for monitoring the sensor operation.
➀
PSW 21 PSW40C
At this time, the ready lamp (RPL) lights up.
➁ Press the PRINT (PSW) switch without any original with the cover open. The ready
lamp goes off and lights up again. For the SF-2025, the interrupt lamp is lit at the same
time. (The sensor level without original is read.)
➂ Place a transfer paper of A3 size (11" x 17") on the original table, and press the
PRINT switch with the original cover open. (The sensor level with an original is read
and the judgement level of original presence is stored into memory.)
2/5
Sensor level without an original
Sensor level
Judgement level (center value)
Sensor level with an original
➃ Adjustment is completed.
(Each sensor level can be checked with Sim. 41-03.)
<Reference> Principle of sensing level setting
The sensor level with an original and that without an original are read and the center
(average) value of the two is read.
(Sensor check mode)
The photo sensor operation can be checked with Sim. 41-01. (When the original
sensing judgement level is inputted, the machine goes into the check mode
automatically.)
Photo sensor checking procedure
Page 3

.
Key operation:
40C
11PSW
PSW
When the light emitting section of the original size sensing LED is interrupted, the
sensor name is highlighted.
∗ The photo sensors are arranged as follows:
Shaft AB series
1—
2B5
3A4
4 B5R
5 A4R
6B4
7A3
.
The OC switch is used to check the original cover open / close. It is highlighted
(reverse-displayed) when the cover is open, and normally displayed when close.
(Checking the light reception level and the judgement level)
The light reception level and the judgement level can be checked with Sim. 41-3.
.
During simulations for the SF-2030/2040, the light receipt level and set level are
displayed on the LCD.
.
During simulations for the SF-2025, the light receipt level and set level are displayed
on copy number display section.
The automatic enlargement key is used to switch between the light receipt level and set
level displays.
3/5
Page 4

Main code Sub code Description
Check the original size detection photo sensor.
This detects the length of the original using the original interception method.
When the sensor is ON (Original detected), the display reverses.
41
Shaft
AB series
1
2
3
4
5
6
7
----B5
A4
B5R
A4R
B4
A3
The OCSW is used to check if the original bar is open or closed.
Reverse display: Cover open
01
Normal display: Cover closed
02 Settings for the original size detection photo sensor.
Display of the original size detection photo sensor’s light receipt and set levels.
(SF-2030/2040)
This simulation is used to check the original detection level.
1. Light receipt level
.
Displays the light receipt level in the copy number section during the simulation.
2. Set level display
.
Displays all the sensor levels set in simulation 41-2.
4/5
03
Settings for the original size detection photo sensor (SF-2025).
This simulation is used to check the original detection sensor light receipt level, set level
display, and original detection level. (The automatic enlargement key is used to switch
between light received level and set level displays.)
1. Light receipt level
.
Displays the light receipt level in the copy number section during the simulation.
.
After the simulation is complete, the original size display lamps light up as you
input the appropriate number for each sensor using the number pad. This allows
you to check each sensor’s light receipt level.
.
The automatic paper size selection lamp is used to check if the original bar is
open or closed. It is lit when the bar is open, and off when it is closed. When you
close the original bar, the sensor levels remains at the values read just before
closing.
.
Set level display mode
PSW 01 PSW4C 0/0 3
[Automatic enlargement key]
2. Set level display
.
Displays all the sensor levels set in simulation 41-2.
.
The sensor levels set in simulation 41-2 are displayed in the copy number section.
.
After the simulation is complete, the original size display lamps light up as you
input the appropriate number for each sensor using the number pad. This allows
you to check each sensor’s light receipt level.
Page 5

3
Rear exterior upper
No. Parts code
1 LHLDZ1085FCZZ AD DJ
2 NSFTZ1805FCZZ AE DS Original detection fulcrum shaft (Japan, Taiwan)
3 XRESP30-04000 AA
4 MSPRT1563FCZZ
5 LBSHZ1102CCZZ Bushing 1 (Japan, Taiwan)
6 XBPSD30P06KS0 AA Screw (3 x 6KS)(Japan, Taiwan)
7 MARMP0147FCZZ AK EB Original detection arm upper (Japan, Taiwan)
8 PSLDH0170FCZZ AD DJ Original detection shield plate (Japan, Taiwan)
9 CPWBF0934FC31 AX FX E ORS PWB (Japan, Taiwan)
10 MARMP0148FCZZ AH DX
11 XEPSD30P05000 AA DD Screw (3 x 5)(Japan, Taiwan)
12
14 PSHEZ3879FCZZ
15 PSHEP3915FCZZ N Original detection shield sheet (Japan, Taiwan)
16 XBPBZ40P06K00 AA DD Screw (4 x 6K)(Japan, Taiwan)
GCAB-0748FCZ3
GCAB-0748FCZ2 Upper exterior rear (Except Japan, Taiwan)
Price rank
Ex. Ja.
AC
AU FG D
AC DJ
DD
New
mark
Part
rank
Original detection fulcrum holder (Japan, Taiwan)
E type ring (3mm)(Japan, Taiwan)
Manuscript detect spring (Japan, Taiwan)
C
Original detection arm lower (Japan, Taiwan)
C
Upper exterior rear (Japan, Taiwan)
Original detection sheet H (Japan, Taiwan)
C
Description
5/5
 Loading...