

Page 1
R-21ATR
R-21ATR
COMMERCIAL MICROWAVE OVEN
OPERATION MANUAL
Original Instruction
This operation manual contains important information which you should read carefully before using
your microwave oven.
IMPORTANT:There may be a serious risk to health if this operation manual is not followed or if the oven is
modified so that it operates with the door open.
INTELLIGENT THINKING
B5$735LQGG
Page 2
C
ONTENTS
Contents ............................................................................................................................1
Oven Diagram ...................................................................................................................2
Control Panel .....................................................................................................................3
Important Safety Instructions .............................................................................................4
Installation .........................................................................................................................5
Before Operation ...............................................................................................................6
How to Operate the Oven:
Memory Cooking:
Note for memory cooking ...............................................................................................7
Cooking with memory ....................................................................................................7
Cooking double quantity with memory ........................................................................... 8
Memory programme entry .............................................................................................8
Memory check ...............................................................................................................11
Manual Cooking:
Note for manual cooking ................................................................................................ 12
Manual cooking ..............................................................................................................12
Sequence programming ................................................................................................13
Other Convenient Features:
Express defrost ..............................................................................................................14
Counter check ................................................................................................................15
Counter clear .................................................................................................................15
Demonstration mode .....................................................................................................16
Information with error message .....................................................................................16
Cooking Advice:
Suitable Cookware .........................................................................................................17
Food Handling & Preparation ........................................................................................18
Advice for Defrosting .....................................................................................................19
Advice for Reheating .....................................................................................................20
Charts:
Defrosting Chart .............................................................................................................21 - 22
Cooking Chart ................................................................................................................23 - 25
Reheating Chart .............................................................................................................26 - 30
Cleaning & Maintenance ...................................................................................................31
Troubleshooting .................................................................................................................32
To Replace the Mains Plug ...............................................................................................33
Calling for Service .............................................................................................................33
Specifications ....................................................................................................................34
1
B5$735LQGG
Page 3
O
VEN DIAGRAM
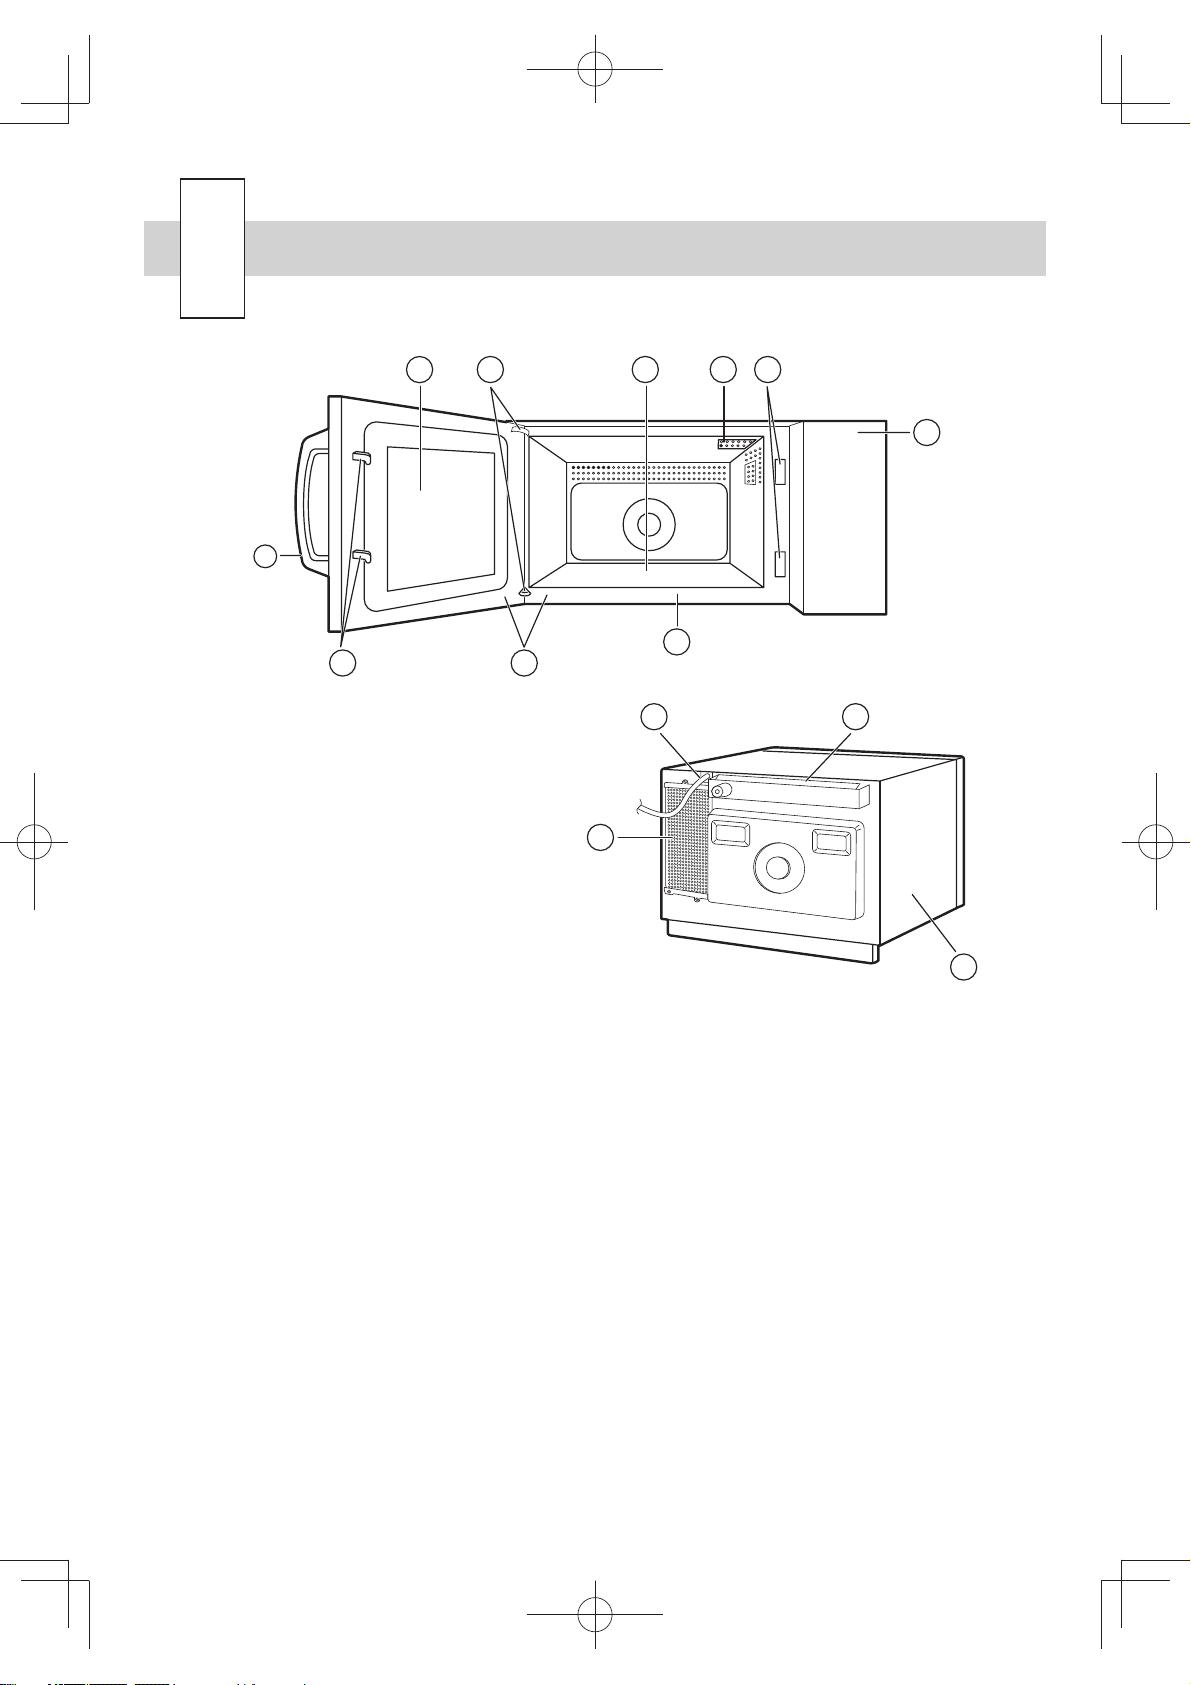
6
7
2
1. Touch control panel
2. Door safety latches
3. Oven lamp
4. Oven floor
(Not removable)
5. Door hinges
6. Oven door with see - through window
7. Door handle
8. Door seals and sealing surfaces
9. Cavity face plate
10. Air ventilation cover and openings
11. Power supply cord
12. Air intake filter (Air intake openings)
13. Outer case cabinet
5
8
4
11 10
12
3
9
2
1
13
ACCESSORIES:
Check to make sure the following accessories are supplied:
• Operation manual
• Menu sticker
Enter cooking times or dish names in this sticker and attach to the control panel.
• Caution sheet (Special lnstructions and Warnings)
B5$735LQGG
2
Page 4
C
1
7
12
14
ONTROL PANEL
DEFONNO.X2CHECK
4
5
6
CHECK
EXPRESS
DEFROST
1
11
2
12
3
13
4
14
5
15
6
16
7
17
8
18
9
19
0
20
STOP/
CLEAR
START
SIGNAL
8
1110
13
16
DOUBLE
QUANTITY
SELECT
TIME
SELECT
POWER
SET
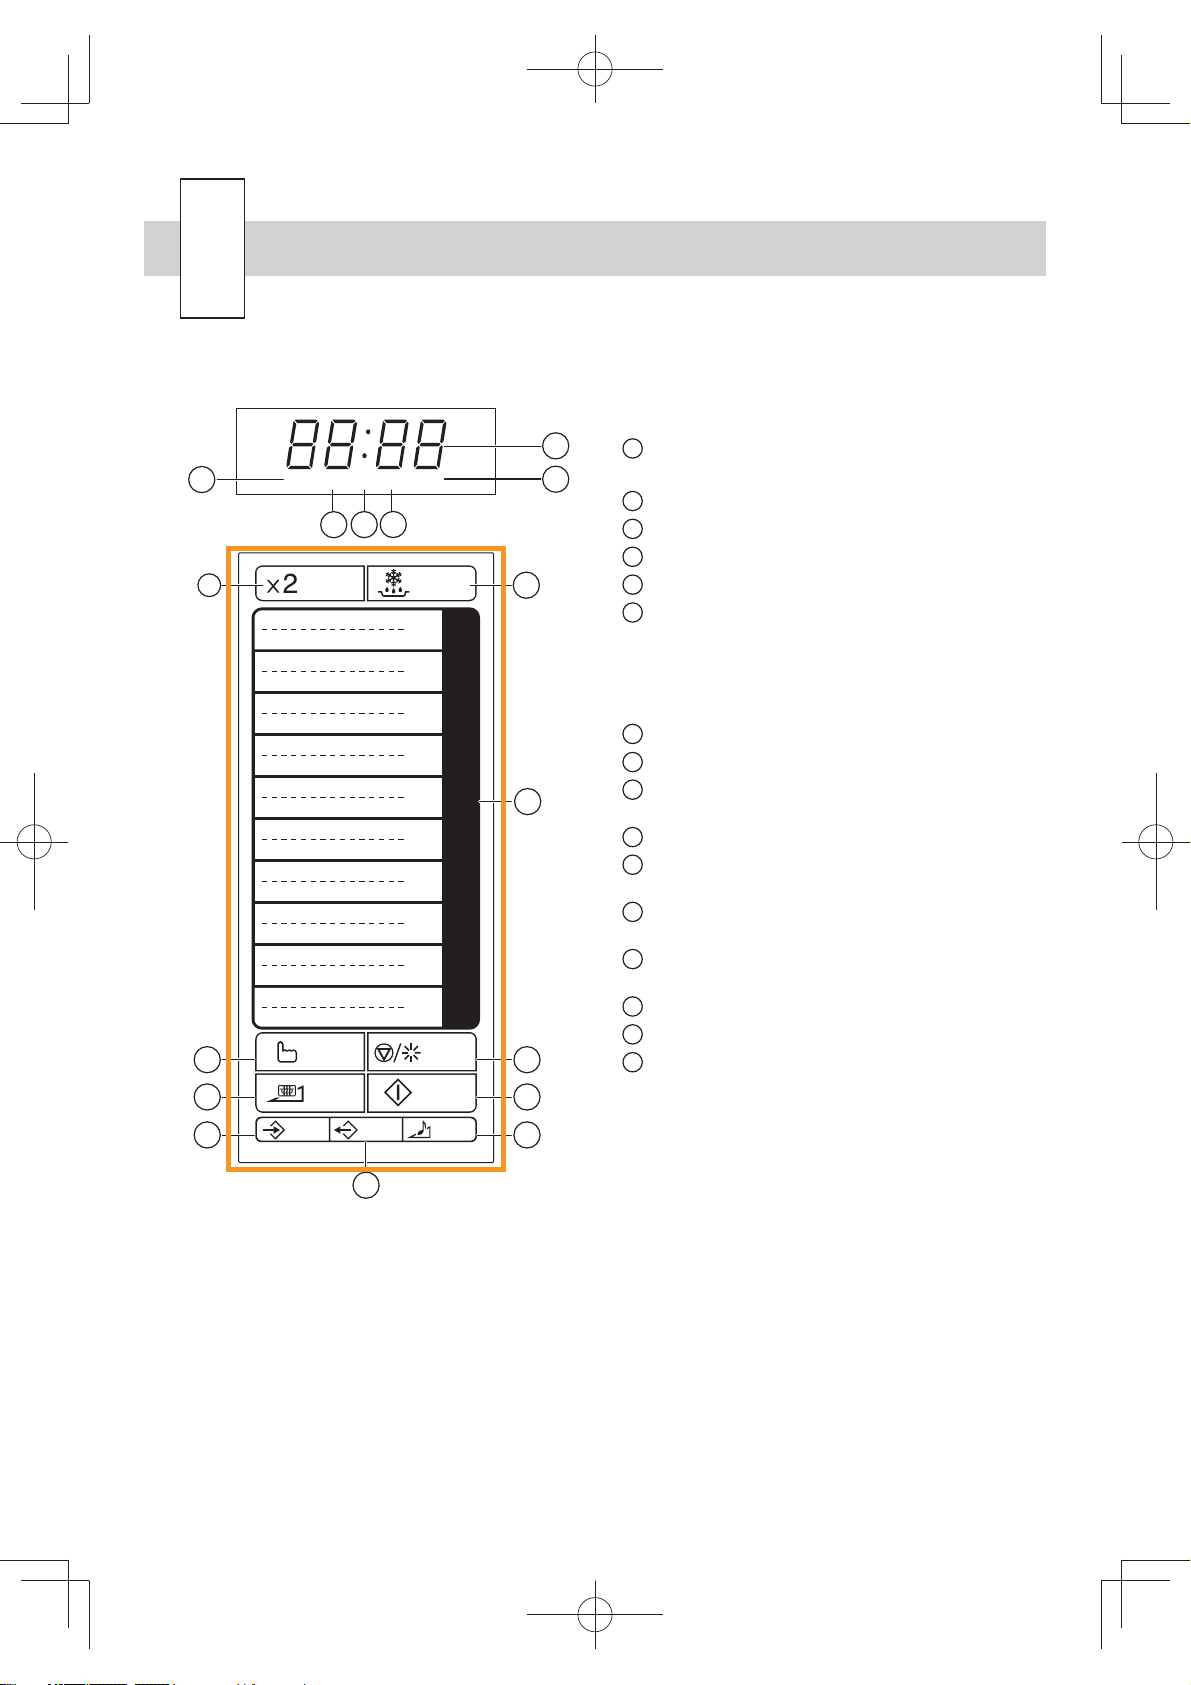
DISPLAY AND INDICATORS
2
3
9
Heating indicator:
1
This indicator shows heating in progress
Digital display
2
Check mode indicator
3
Double quantity mode indicator
4
Memory number indicator
5
EXPRESS DEFROST indicator
6
OPERATING PADS
DOUBLE QUANTITY pad
7
EXPRESS DEFROST pad
8
NUMBER pads for time and memory
9
programming
SELECT TIME pad
10
STOP/CLEAR pad; press to stop operation
11
of oven and clear remaining heating time
SELECT POWER pad for setting variable
12
power level
START pad; press to operate oven after
13
door is closed and time is set
SET pad for setting memory
14
CHECK pad for checking memory
15
SIGNAL pad for setting signal sound
16
B5$735LQGG
15
3
Page 5
MPORTANT SAFETY INSTRUCTIONS
I
IMPORTANT: PLEASE READ CAREFULLY AND KEEP FOR FUTURE REFERENCE.
This appliance is intended to be used by expert or
trained user in shops, in light industry and on farms, or
for commercial use by lay persons.
This oven is designed to be used on a countertop only.
It is not designed to be built into a kitchen unit. Do not
place the oven in a cabinet.
The electrical outlet must be readily accessible so that
the unit can be unplugged easily in an emergency.
If smoke or burn is observed: Keep the oven door
closed and switch off the power by disconnecting the
plug from the socket in order to stifle any flames.
Failure to follow this procedure may result in fire and
oven damage.
Ensure there is a minimum free space above the oven
of 15 cm.
This appliance can be used by children aged from 8
years and above and persons with reduced physical,
sensory or mental capabilities or lack of experience
and knowledge if they have been given supervision or
instruction concerning use of the appliance in a safe
way and understand the hazards involved.
Children shall not play with the appliance. Cleaning
and user maintenance shall not be made by children
without supervision.
WARNING: If the door or door seals are damaged, the
oven must not be operated until it has been repaired by
a competent person.
WARNING: Never adjust, repair or modify the oven
yourself. It is hazardous for anyone other than a
competent person to carry out any service or repair
operation which involves the removal of a cover which
gives protection against exposure to microwave energy.
If the power supply cord of this appliance is damaged,
it must be replaced by an authorised SHARP service
agent in order to avoid a hazard.
WARNING: Liquids and other foods must not be
heated in sealed containers since they are liable to
explode.
WARNING: Microwave heating of beverages can result
in delayed eruptive boiling, therefore care must be
taken when handling the container.
Do not cook eggs in their shells, and whole hard boiled
eggs should not be heated in microwave ovens since
they may explode even after microwave cooking has
ended. To cook or reheat eggs which have not been
scrambled or mixed, pierce the yolks and the whites, or
the eggs may explode. Shell and slice hard boiled eggs
before reheating them in the microwave oven.
Utensils should be checked to ensure that they are
suitable for use in the oven. See page 17-18.
Use only microwave safe containers and utensils on
microwave modes.
WARNING: The contents of feeding bottles and
baby food jars must be stirred or shaken and the
temperature checked before consumption, in order to
avoid burns.
When heating food in plastic or paper containers, keep
an eye on the oven due to the possibility of ignition.
Clean the oven at regular intervals and remove any
food deposits.
Failure to maintain the oven in a clean condition could
lead to deterioration of the surface that could adversely
affect the life of the appliance and possibly result in a
hazardous situation.
See instructions for cleaning door seals, cavities and
adjacent parts on page 31.
The oven should not be cleaned with a water jet.
The appliance must not be cleaned with a steam
cleaner.
Use oven gloves when removing food from the oven
to prevent burns.
The microwave oven should not be left unattended
during operation. Power levels that are too high, or
cooking times that are too long, may overheat foods
resulting in a fire.
A separate circuit serving only this appliance should be
provided.
Oven Use:
• The oven is for food preparation only.
Never operate when empty.
• Do not leave or store anything inside the oven when
not in use.
• Never attempt to use the oven with the door open.
It is important not to tamper with the door safety
latches.
This may result in exposure to microwave energy.
• Never operate the oven with any object caught in
the door sealing surfaces, this again may cause
microwave leakage.
• Do not insert fingers or objects in the holes of the
door latches or air vent openings as this may damage
the oven and cause an electric shock.
• Do not attempt to replace the oven lamp yourself or
allow anyone who is not an electrician authorised by
SHARP to do so. If the oven lamp fails, please consult
your dealer or an authorised SHARP service agent.
• If water or food drops inside the air vent openings
switch off the oven immediately, unplug it and call a
Service Technician appointed by SHARP.
• Never attempt to move the oven while it is operating.
• Do not use the oven near a steamer or a fryer.
• Always wipe up spills on the oven floor and splashes
on the walls after cooking. If you leave grease on the
oven floor and walls it may overheat, smoke or even
catch fire when next using your oven.
• Pacemaker: If you have a heart pacemaker, consult
your doctor or the pacemaker manufacturer prior to
oven use.
• Liquids: Microwave heating of beverages can result
in delayed eruptive boiling, therefore care must be
taken when handling the container. Stir the liquid prior
to and during heating/reheating, let liquid stand for at
least 20 seconds in the oven after cooking.
B5$735LQGG
4
Page 6
NSTALLATION
I
WARNING:
Inspect the Oven:
Check the oven carefully for damage before and
regularly after installation.
• Make sure the door closes properly, that it is
not misaligned or warped.
• Check the hinges and door safety latches are
not broken or loose.
• Ensure the door seal and sealing surfaces are
not damaged.
• Inspect the oven interior and door for dents.
Caution Sheet:
Always keep the caution sheet (Special
Instructions and Warnings) close to the oven for
your reference.
Important:
If any damage is apparent, do not operate the
oven in any way. Contact your dealer or an
authorised Service Technician appointed by
SHARP.
1 Remove all packing materials. Remove the
protective film (blue film) from the outer case cabinet
(if covered).
Do not remove the plastic film from the inside of the
oven window as this protects it from dirt.
2 Place oven on a secure, level surface, strong
enough to take the oven weight, plus the heaviest
item likely to be cooked in the oven.
Do not place this oven in a position which is not
easily accessible. To position the oven too high can
be dangerous because food can not be removed
safely.
3 Ensure there is a minimum free space above the
oven of 15 cm.
4 Do not place the oven where heat, moisture or high
humidity are generated, (for example, near or above
a conventional oven) or near combustible materials
(for example, curtains). Do not block or obstruct air
vent openings, as obstructions may ignite due to the
emission of hot air.
5 Make sure the power supply cord is undamaged and
that it does not run under the oven or oven any hot
or sharp surfaces.
6 The socket must be readily accessible so that it can
be easily unplugged in an emergency.
7 Do not use the oven outdoors.
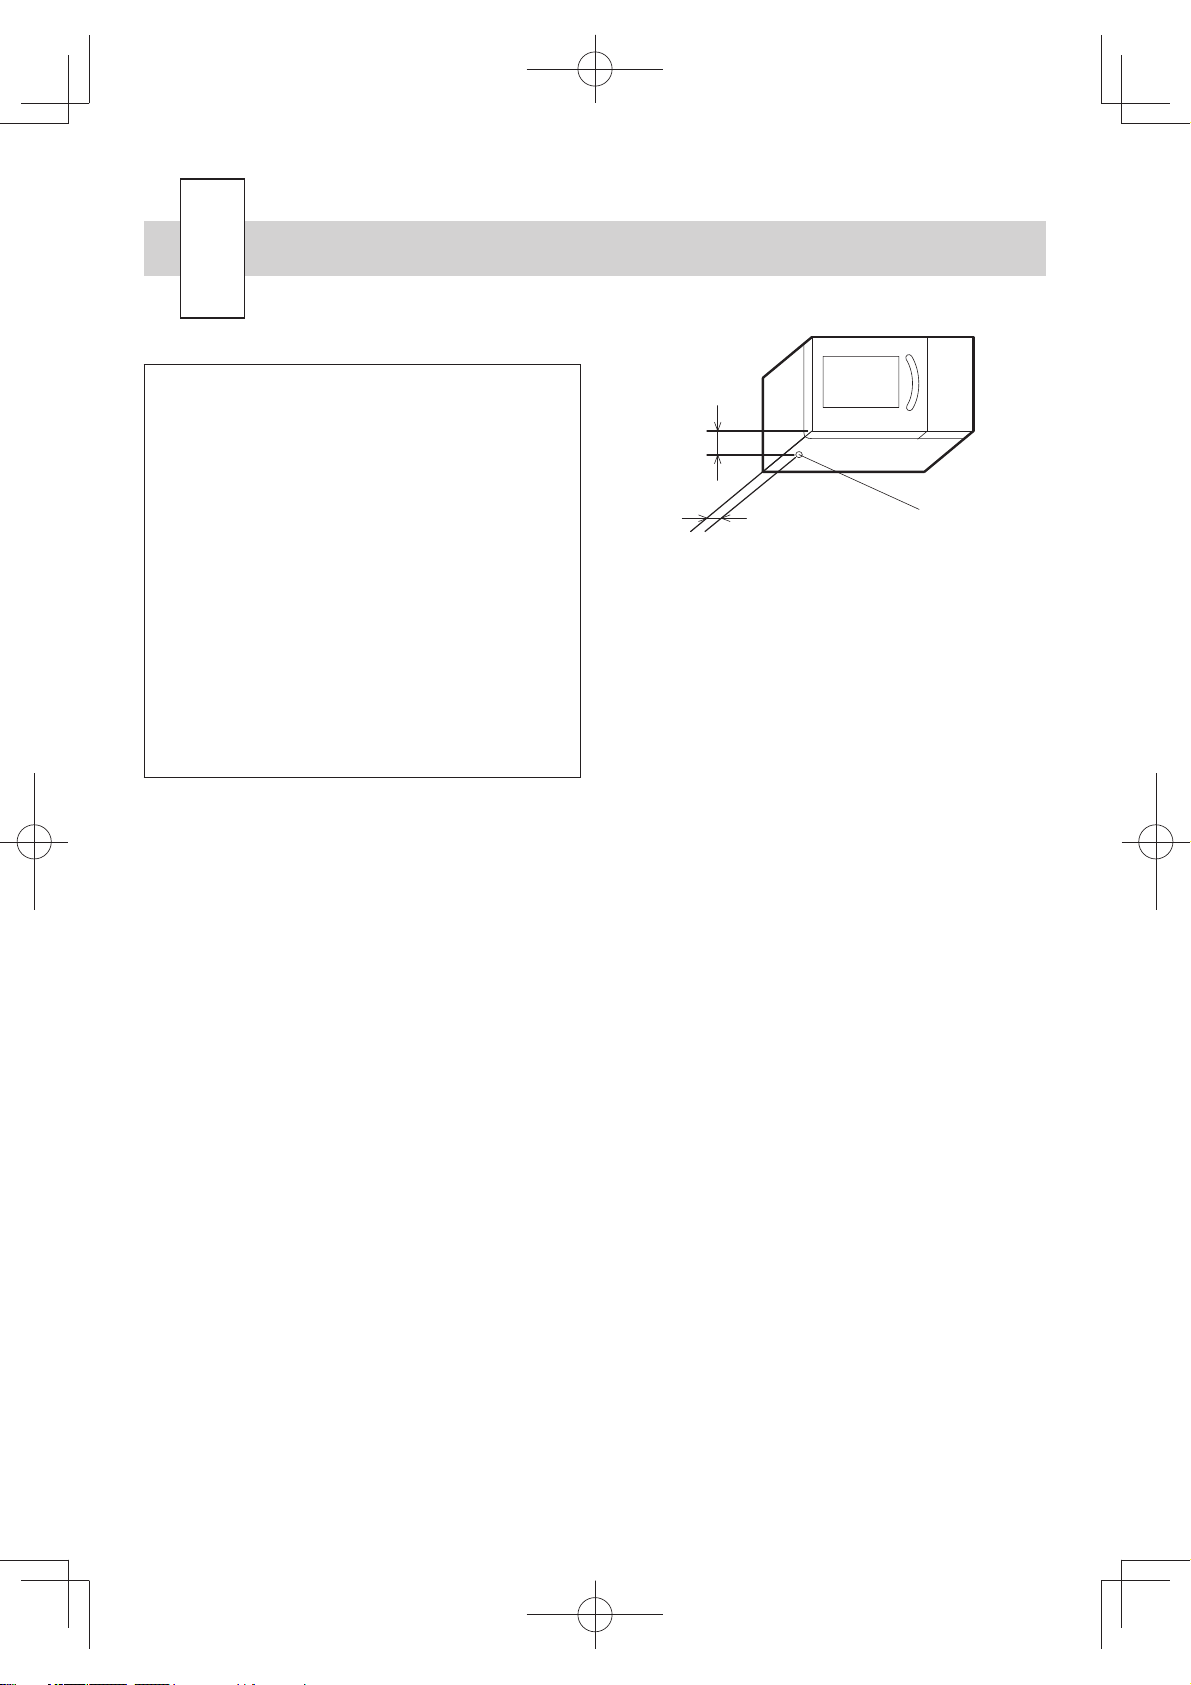
8 The unit may be secured to a countertop or stand.
There is a screw hole in the bottom of the unit. After
the oven is permanently placed, drill a hole through
the counter top for a 5 mm self-tapping screw. The
hole should be 20 mm from the left side of the outer
case cabinet and 180 mm back from the front edge
of the cavity face plate.
180 mm
20 mm
9 This oven is not intended to stack one on top of
another.
BUILDING-IN-KIT
This oven is not designed to be built into a kitchen unit.
IMPORTANT! ELECTRICAL CONNECTION
• Do not allow water to come into contact with the
power supply cord or plug.
• Insert the plug properly into the socket as the plug
may otherwise overheat and catch fire.
• Do not connect other appliances to the same socket
using an adaptor plug as it may cause the wiring to
overheat and catch fire.
• If the plug or socket is loose or the power supply
cord is damaged, do not operate the oven, it must
be replaced by the special power cord. Contact your
dealer or a Service Technician appointed by SHARP.
A defective plug, power supply cord or socket may
overheat and catch fire during operation or cause an
electrical shock.
• When removing the plug from the socket always grip
the plug, never the mains lead as this may damage
the power supply cord and the connections inside the
plug.
• The product is fitted with a non-rewireable (moulded)
plug. Should it not be suitable for the socket outlet in
your kitchen, remove the plug and fit an appropriate
type, observing the wiring code given in “To replace
the mains plug” on page 33.
The fuse from a cut-off plug should be removed
and the plug disposed of in safe manner. Under no
circumstances should the cut-off plug be inserted into a
socket outlet as serious electrical shock may occur. The
plug must not be used without the fuse cover fitted.
When replacing the plug please ensure that you use
a BSI or ASTA approved plug to BS1363, this should
be fitted with a brown coloured 13 amp fuse approved
by BSI or ASTA to BS1362. If you have any doubt
about electrical connection seek the help of a qualified
electrician.
WARNING
THIS APPLIANCE MUST BE EARTHED.
To wire an appropriate plug, follow the wiring code given
in “To replace the mains plug” on page 33.
Hole
B5$735LQGG
5
Page 7
B
EFORE OPERATION
The operation of the oven is controlled by pressing the appropriate pads on the control panel.
A signal should be heard each time you press the control panel.
• When you first connect the microwave oven to
an electrical socket, the digital display will show
.
• Key pad entries can only be made when the door is
closed.
• The programme or check mode is cancelled when
any pads are not pressed for more than 3 minutes.
•
reaches zero. It will disappear when the oven door is
opened or the STOP/CLEAR pad is pressed.
will appear on the display after the time
SOUND SETTING
• There is a choice of 2 different sounds on your oven. • To set a signal, touch the SET pad twice within
2 seconds and then touch the SIGNAL pad
continuously until you hear the tone required.
STOPPING THE OVEN
• If you want to stop the oven during cooking, press
the STOP/CLEAR pad once or open the door (except
memory cooking).
To start the oven again, close the door and press the
START pad within 1 minute.
• If you open the door during memory cooking, the
programme is cancelled.
• If you want to cancel a programme during cooking,
press the STOP/CLEAR pad twice.
• If you want to clear a mistake during programming,
press the STOP/CLEAR pad once.
B5$735LQGG
6
Page 8
H
OW TO OPERATE THE OVEN
Introduction: Water, sugar and fat in food absorbs
microwaves and causes their molecules to vibrate. This
creates heat by friction, in the same way your hands
get warm when you rub them together.
The outer areas of food are heated by microwave
energy and the remaining portions by conduction. It is
important to turn, rearrange or stir food to ensure even
heating. Where recommended, allow food to stand, this
is not optional but is necessary to ensure thorough
cooking. It is particularly important for dense food, such
as joints of meat.
MEMORY COOKING
NOTE FOR MEMORY COOKING
• This oven has 20 memory banks (1-20) which can
store cooking programmes.
• The memory banks 1-0 have been programmed
previously as shown in the table. These
preprogrammed memory banks can be changed
individually if required.
• In addition for all memory banks a time constant
1.7 for the double quantity is stored. The stored
time constant can also be changed individually if
required.
• Information in these memory banks is not lost
due to power interruptions. If the power goes off,
the oven does not need to be reprogrammed. No
batteries are necessary for this type of memory.
• If you want to memorise or check the programme
or cook using memory 11-20, press the desired
NUMBER pad twice within 1 second.
NOTES:
• Microwaves pass through non-metallic dishes and
utensils and heat the food inside the dishes.
• Microwaves are reflected by metal.
• The oven is lined with metal and has a fine metallic
mesh in the door to prevent microwave leakage.
• Metallic dishes are not suitable for microwaving.
Memory No. Cook Time Output Power
1 10 sec. 100%
2
3
4
5
6
7
8
9
0
To check the stored programmes please refer to
“Memory check” on page 11.
To change the stored programmes please refer to
“Memory programme entry” on page 8.
20 sec. 100%
30 sec. 100%
45 sec. 100%
1 min. 100%
1 min. 15 sec. 100%
1 min. 30 sec. 100%
2 min. 100%
2 min. 30 sec. 100%
3 min. 100%
COOKING WITH MEMORY
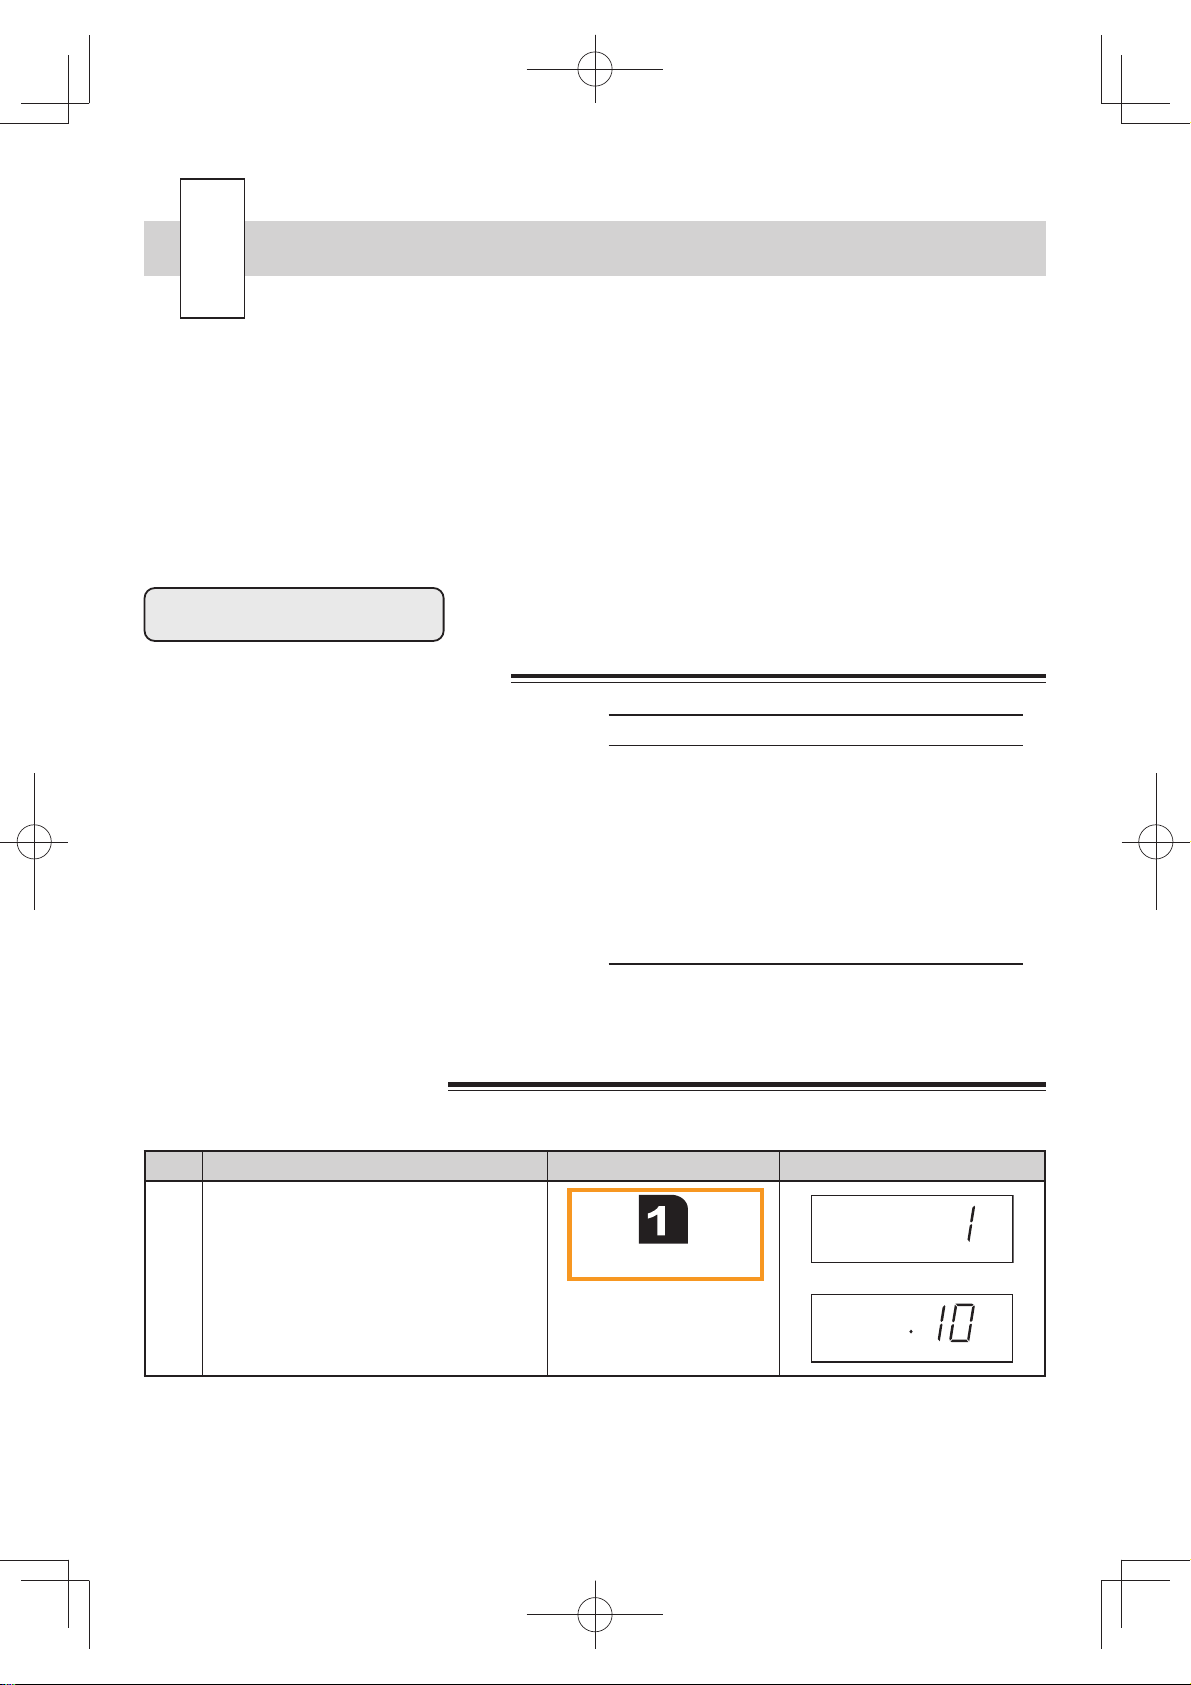
Example: If you want to cook by using memory 1, which was programmed for 10 seconds at 100%.
Step Procedure Pad Order Display
1 Press the NUMBER pad.
After about 1 sec.
7
B5$735LQGG
NO.
ON
Page 9
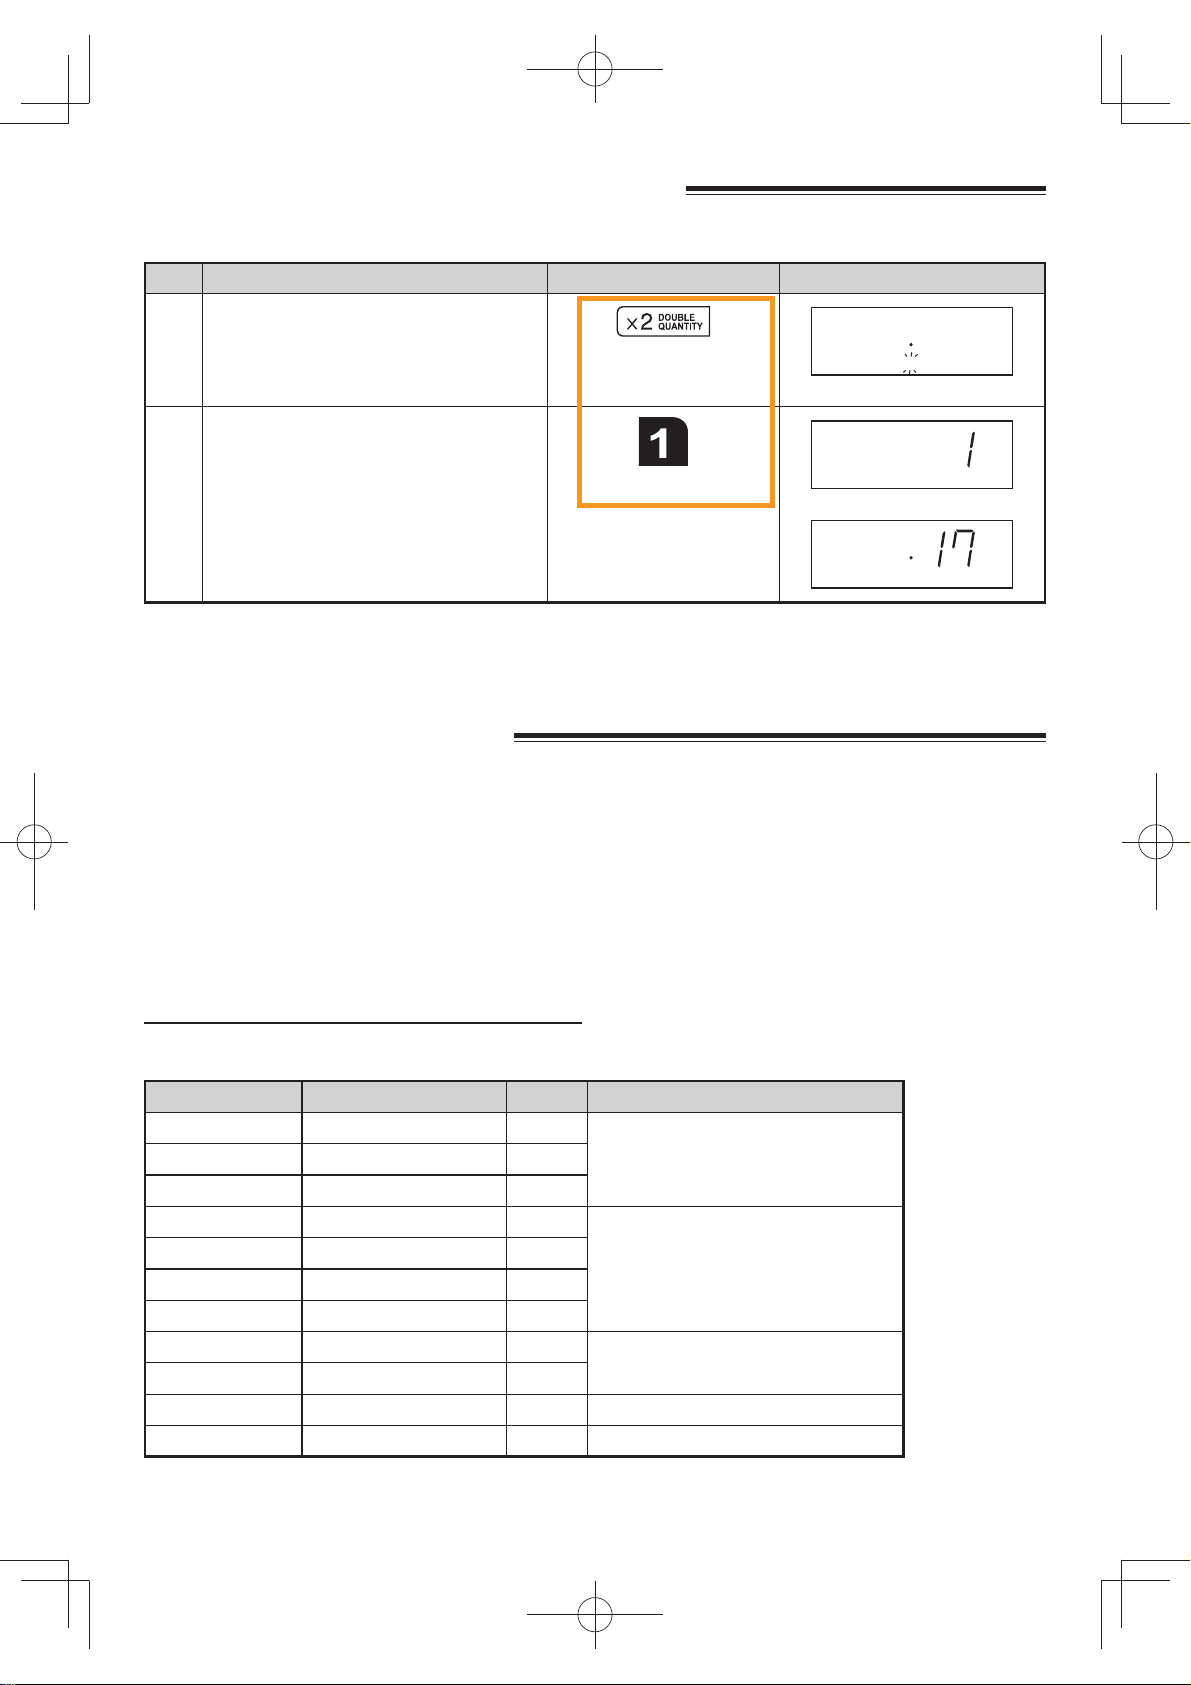
COOKING DOUBLE QUANTITY WITH MEMORY
Example: If you want to cook a double quantity using memory 1.
Step Procedure Pad Order Display
1 Press the DOUBLE QUANTITY pad.
NO.
NO. will flash on and off.
2 Press the NUMBER pad.
NO.
After about 1 sec.
X2
X2
ON
X2
Note: 1. If the cooking time of double quantity is over the max. time, the display will show “EE9”. See page 16.
2. Double quantity means best time for cooking double quantity; it is not double the time.
3. The “MEMORY” cooking system does not require the use of the START pad. MEMORY cannot be used
to start the oven if any programme is displayed.
MEMORY PROGRAMME ENTRY
You can change the memory programmes for all memory banks.
The cooking stages you can input are :
Memory NO. 1-10 Max.3 stages
Memory NO.11-20 Max.2 stages
Microwave power level 0~100%
Cooking time Max. 30 minutes for each stage.
And total cooking time is max.30 minutes.
COOKING GUIDE AND POWER LEVEL
Use the correct NUMBER pad after pressing the SELECT POWER pad.
The following chart gives examples of foods typically cooked on microwave power levels.
Number Pads Microwave Power Levels Display Examples of Foods
SELECT POWER 100% P-HI Beverage, Fruit,
9 90% P-90
8 80% P-80
7 70% P-70 Seafood,
6 60% P-60
5 50% P-50
4 40% P-40
3 30% P-30 Defrosting,
2 20% P-20
1 10% P-10 Keeping food warm
0 0% P- 0 No microwave power
Vegetables,
Rice/Pasta
Cakes, Muffins, Slices,
Casseroles, Lasagne
Softening butter
B5$735LQGG
8
Page 10
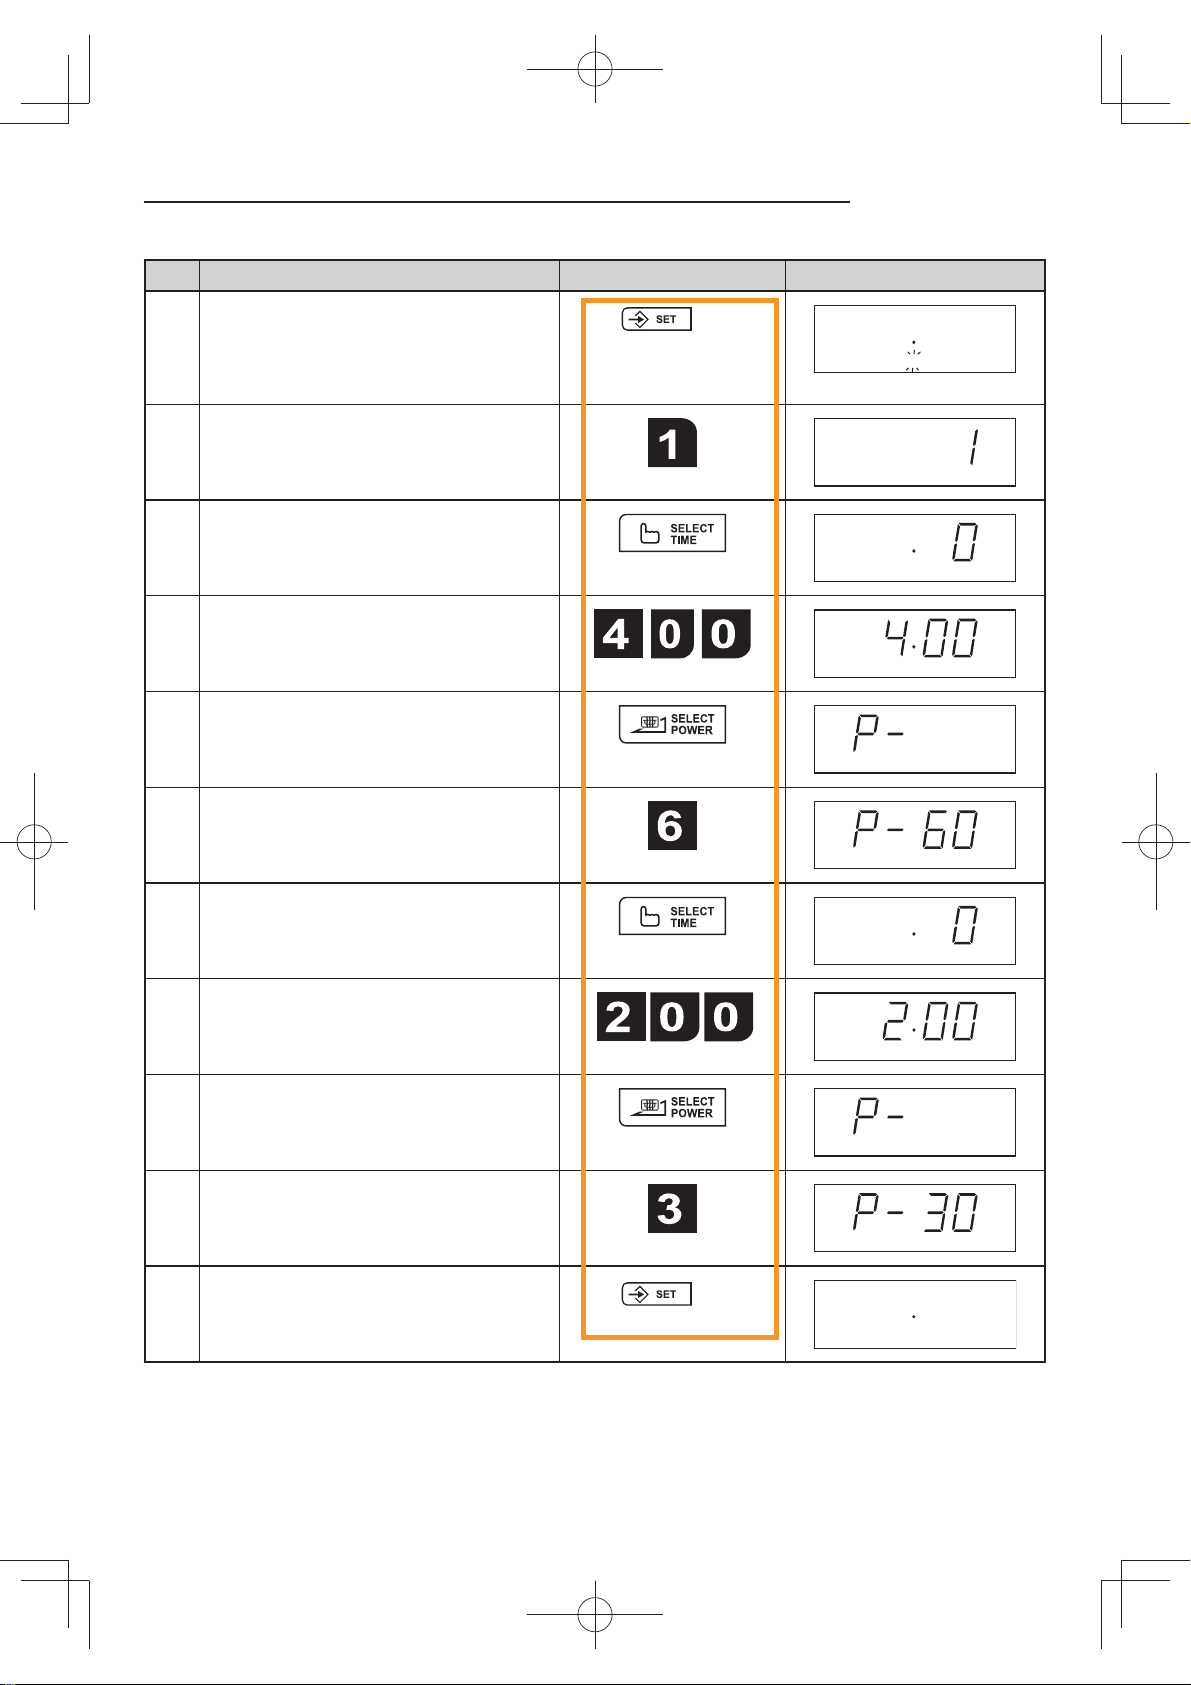
TO PROGRAMME TIME AND POWER LEVEL INTO A MEMORY
Example: If you want to set 4 minutes on 60% for the 1st sequence and 2 minutes on 30% for the 2nd sequence for
Step Procedure Pad Order Display
1 serving in memory 1.
1 Press the SET pad twice within 2 seconds.
2 Press the NUMBER pad.
3 Press the SELECT TIME pad.
4 Enter desired cooking time for the 1st
sequence.
5 Press the SELECT POWER pad.
6 Enter desired power level for the 1st
sequence.
X 2
NO.
NO. will flash on and off.
NO.
7 Press the SELECT TIME pad.
8 Enter desired cooking time for the 2nd
sequence.
9 Press the SELECT POWER pad.
10 Enter desired power level for the 2nd
sequence.
11 Press the SET pad twice to complete the
setting.
X 2
Note: 1. If the cooking time is over the max. time, the display will show “EE9”. See page 16.
2. If your programmed time is over max. time at Double Quantity, you cannot use Double
Quantity for the memory. You can cook only 1 serving.
3. It is not necessary to press the SELECT POWER pad for 100%.
4. At step 1 the audible signal will only sound on the second press of the SET button.
B5$735LQGG
9
Page 11
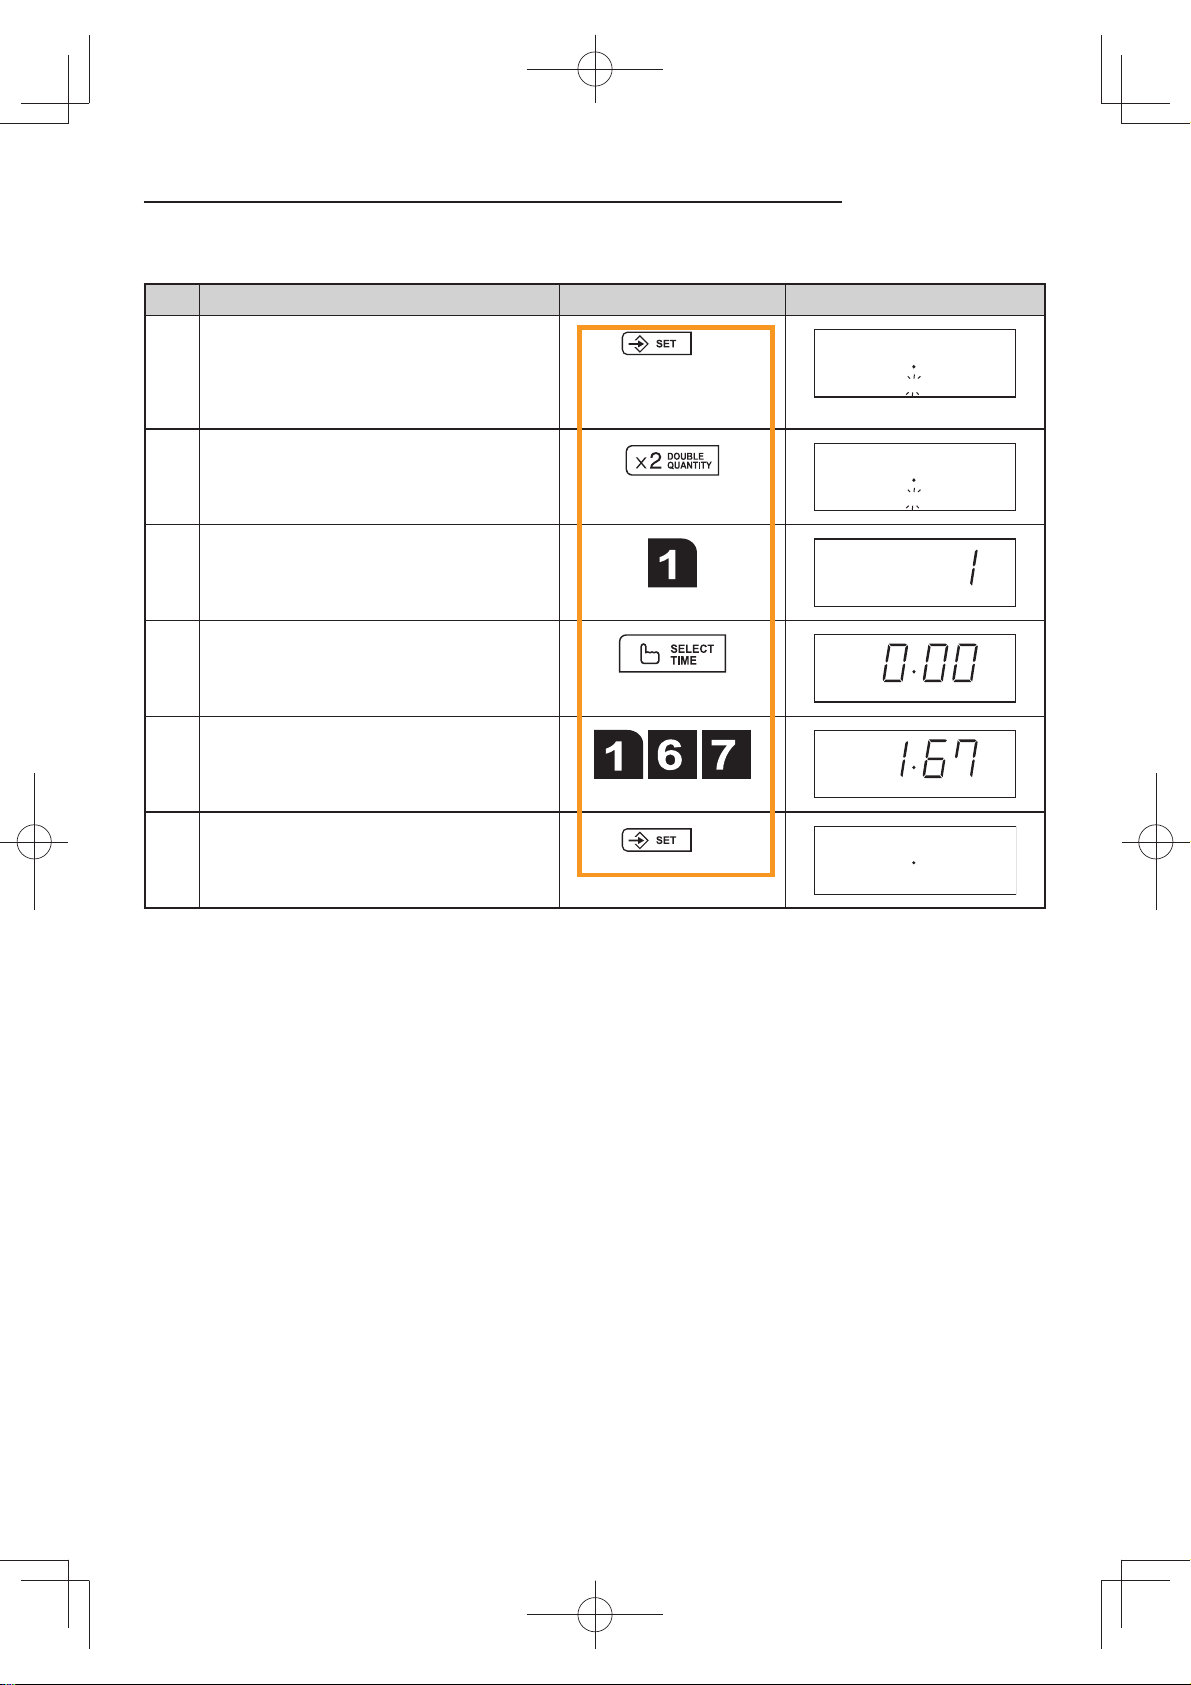
TO CHANGE THE TIME CONSTANT FOR DOUBLE QUANTITY
The time constant for double quantity is preset 1.7 times the single quantity cooking time, but you can alter this
constant to suit your needs.
Example: If you want to change the time constant to 1.67 in memory 1.
Step Procedure Pad Order Display
1 Press the SET pad twice within 2 seconds.
2 Press the DOUBLE QUANTITY pad.
3 Press the NUMBER pad.
4 Press the SELECT TIME pad.
5 Set the time constant (1.67).
6 Press the SET pad twice to complete the
setting.
X 2
X 2
NO.
NO. will flash on and off.
NO.
X2
NO.
X2
X2
X2
Note: 1. In case you want to change the time constant it must be set for each key separately.
2. The time constant can be set from 0.00 to 9.99.
3. At step 1 the audible signal will only sound on the second press of the SET button.
B5$735LQGG
10
Page 12
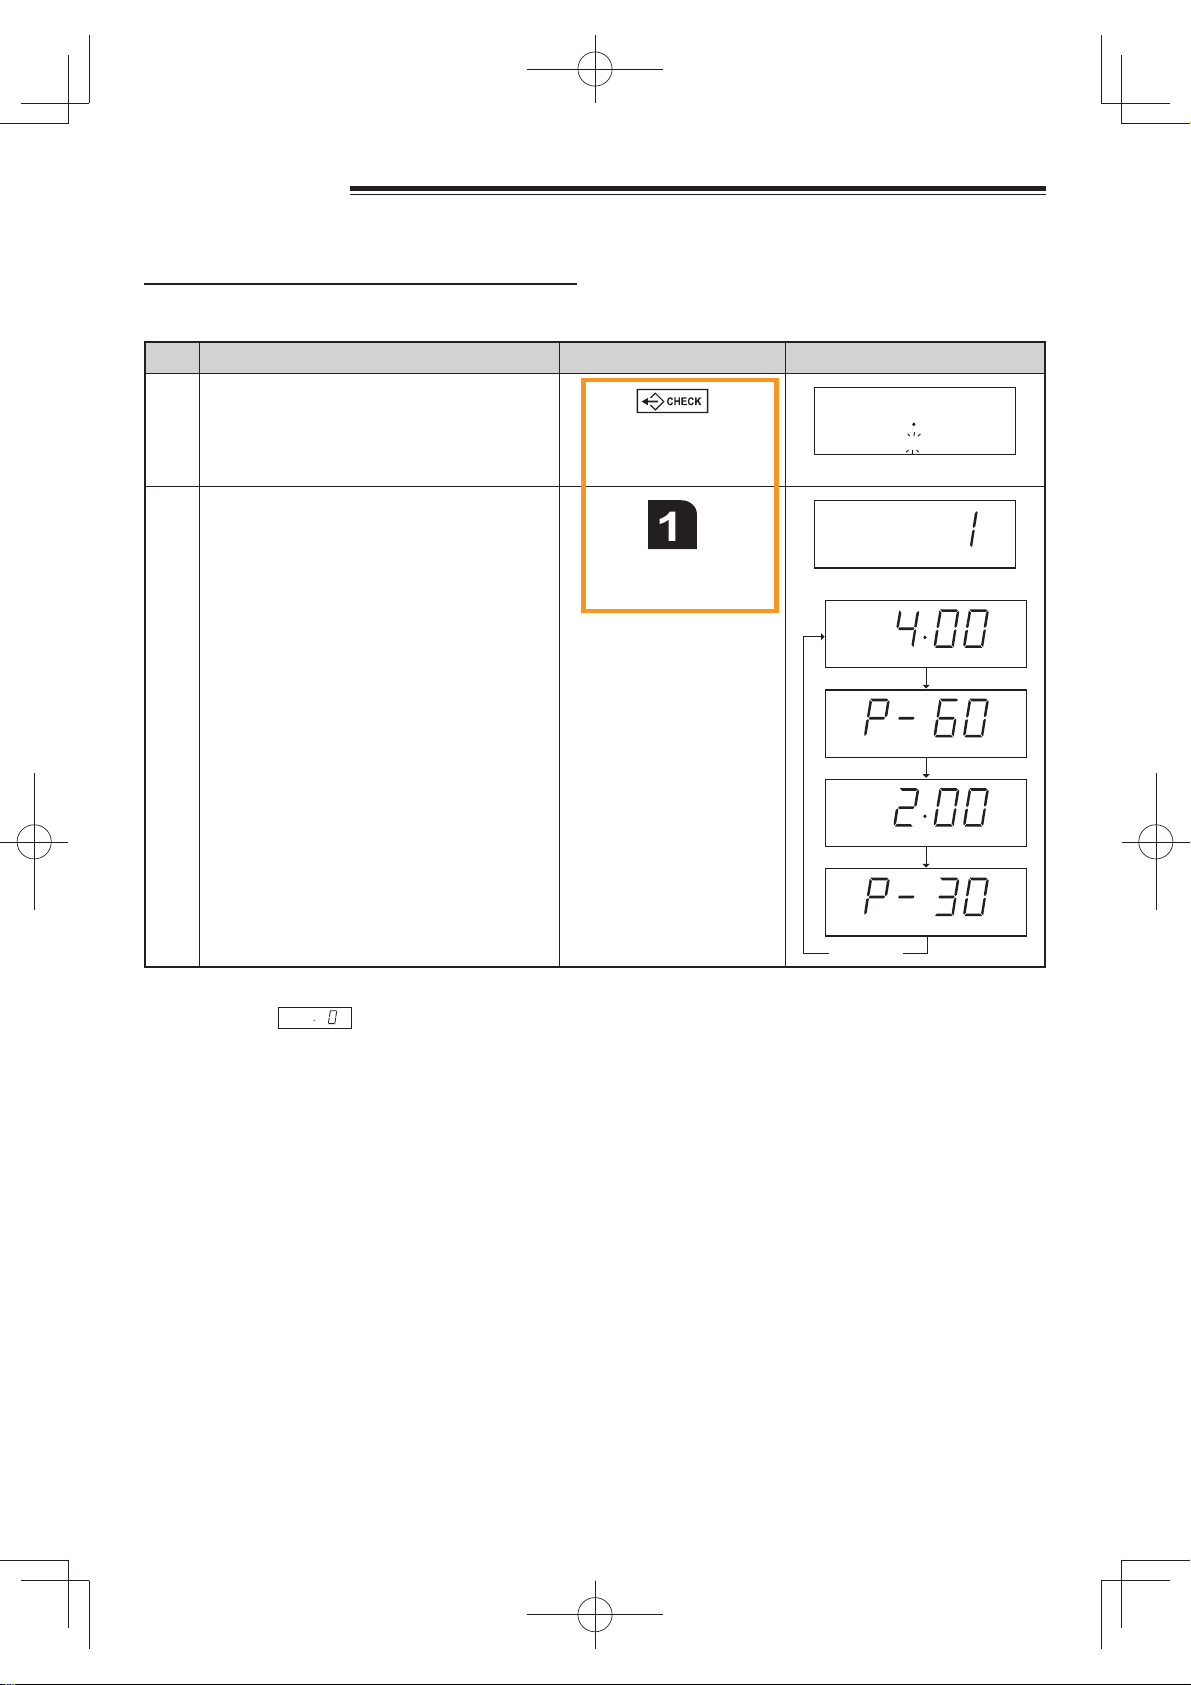
MEMORY CHECK
You can check the information programmed into the memory.
CHECKING TIME AND POWER LEVEL
Example: If you want to know the information programmed into the memory 1, memory 1 has been programmed for
Step Procedure Pad Order Display
4 minutes on 60% for the 1st sequence and 2 minutes on 30% for the 2nd sequence.
1 Press the CHECK pad.
2 Press the NUMBER pad.
NO.
NO. will flash on and off.
NO.
CHECK
After about 1 sec.
CHECK
CHECK
REPEATREPEAT
Note: 1. To cancel MEMORY CHECK, press the CHECK pad.
2. When
is displayed at Step 1, the memory is not set.
3. To check the time constant for double quantity, press the DOUBLE QUANTITY pad and the desired
NUMBER pad in step 2.
CHECK
CHECK
B5$735LQGG
11
Page 13
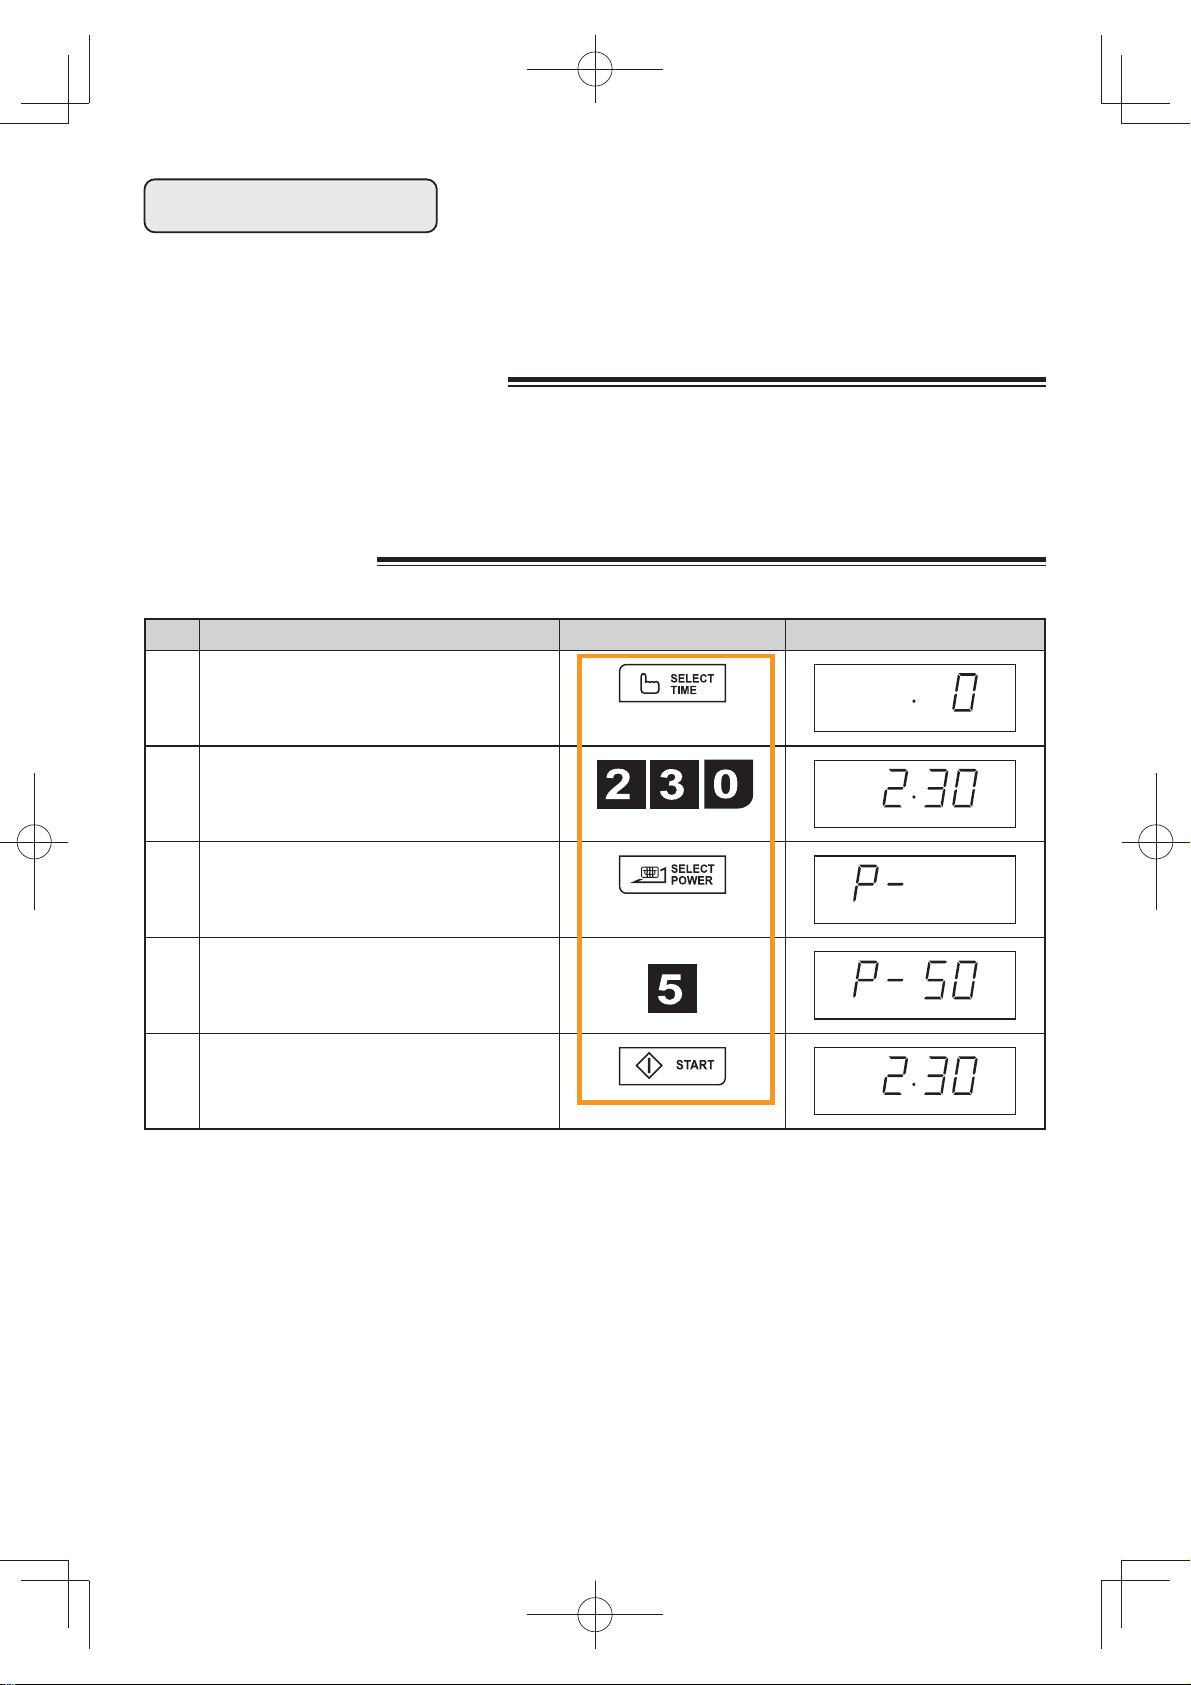
MANUAL COOKING
Your oven can be programmed for up to 3 cooking sequences and has 11 preset microwave power levels
See page 8. You can enter cooking time up to 30 minutes for each stage. The total cooking time is
30 minutes maximum.
NOTE FOR MANUAL COOKING
1. It is not necessary to press SELECT POWER pad for
100%.
2. If the cooking time is over the max. time, the display
will show “EE9”. See page 16.
3. During cooking mode, the oven stops when the door
is opened, and the programme is cancelled if the
START key is not pressed within 1 minute after the
door is closed.
MANUAL COOKING
Example: Suppose you want to cook for 2 minutes and 30 seconds at 50%.
Step Procedure Pad Order Display
1 Press the SELECT TIME pad.
2 Enter desired cooking time.
.
3 Press the SELECT POWER pad.
4 Enter desired power level. (50%)
5 Press the START pad.
ON
B5$735LQGG
12
Page 14
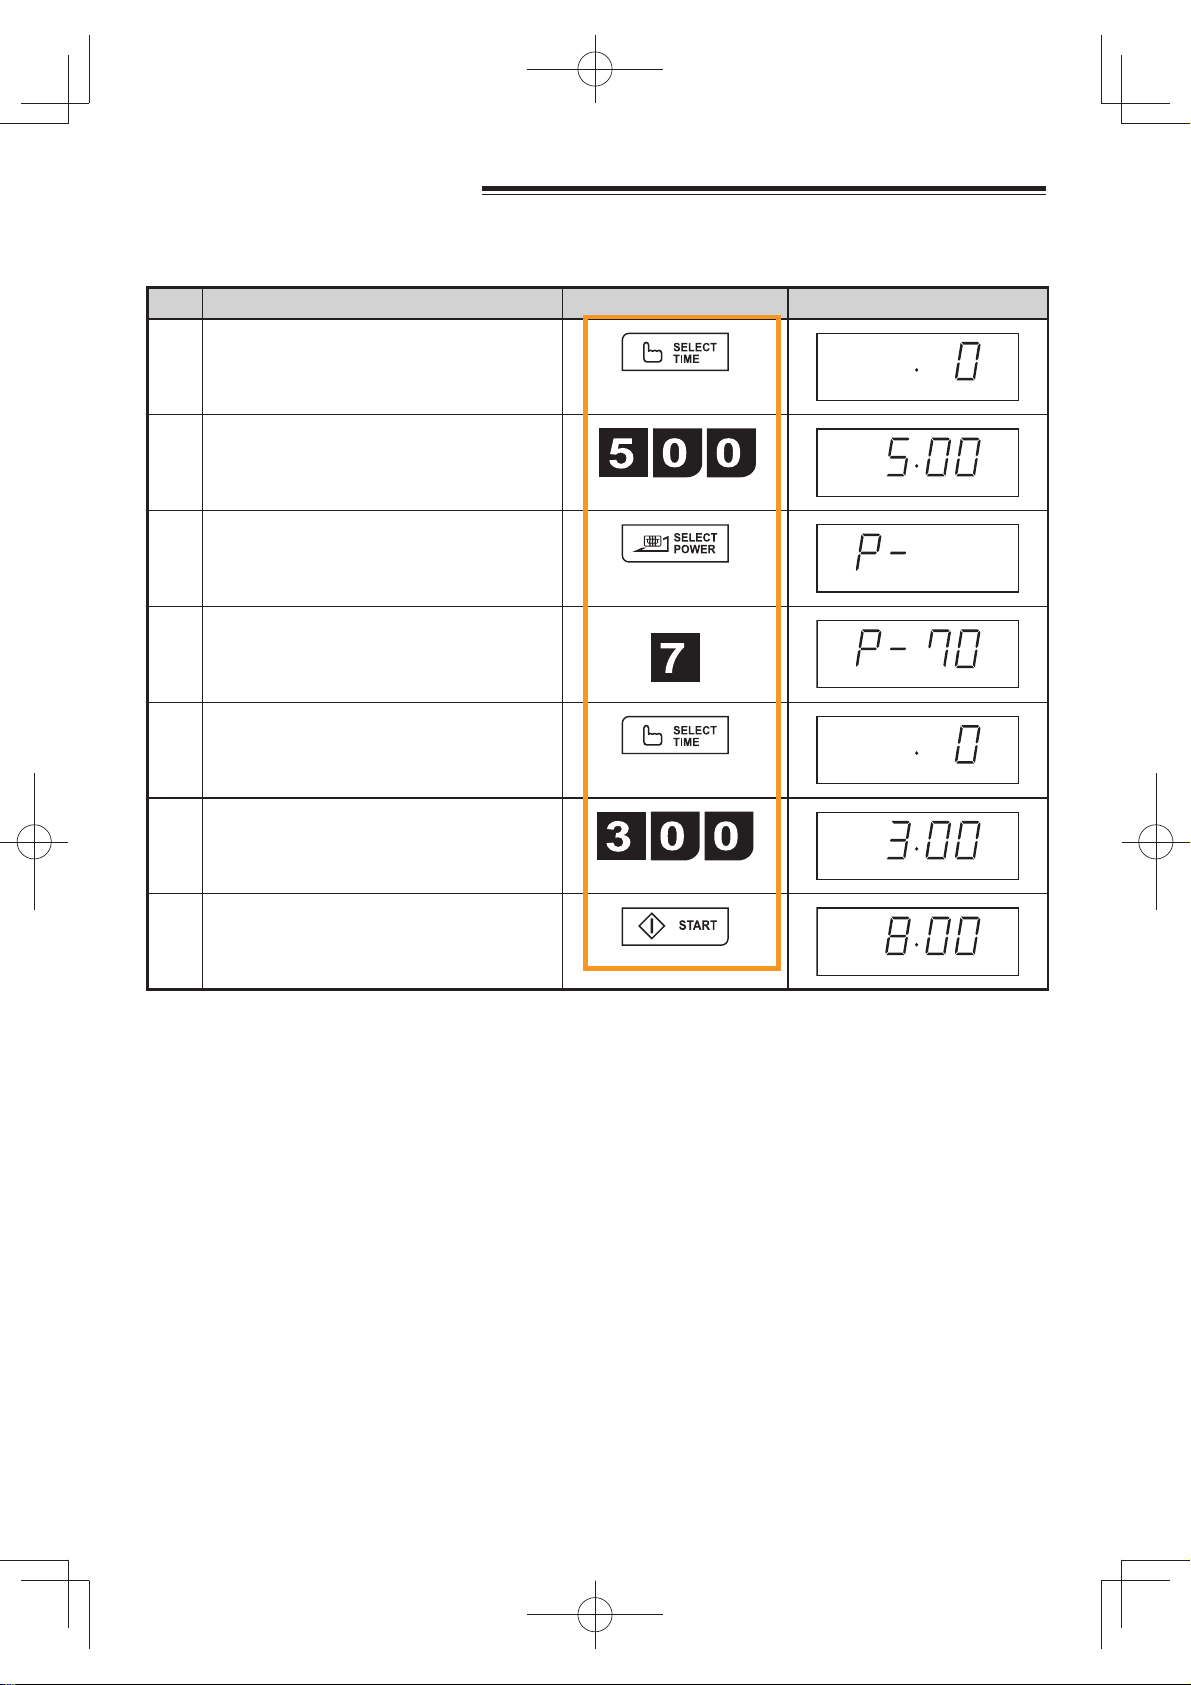
SEQUENCE PROGRAMMING
This facility enables continued and uninterrupted operation of up to three different sequences.
Example: If you want to cook for 5 minutes on 70% followed by 3 minutes on 100%
Step Procedure Pad Order Display
1 Press the SELECT TIME pad.
2 Enter desired cooking time for the 1st
sequence.
3 Press the SELECT POWER pad.
4 Enter desired power level for the 1st
sequence.
5 Press the SELECT TIME pad.
6 Enter desired cooking time for the 2nd
sequence.
7 Press the START pad.
ON
Note: If you want to programme 3 cooking sequences, repeat step 1-4 after step 6.
13
B5$735LQGG
Page 15
OTHER CONVENIENT FEATURES
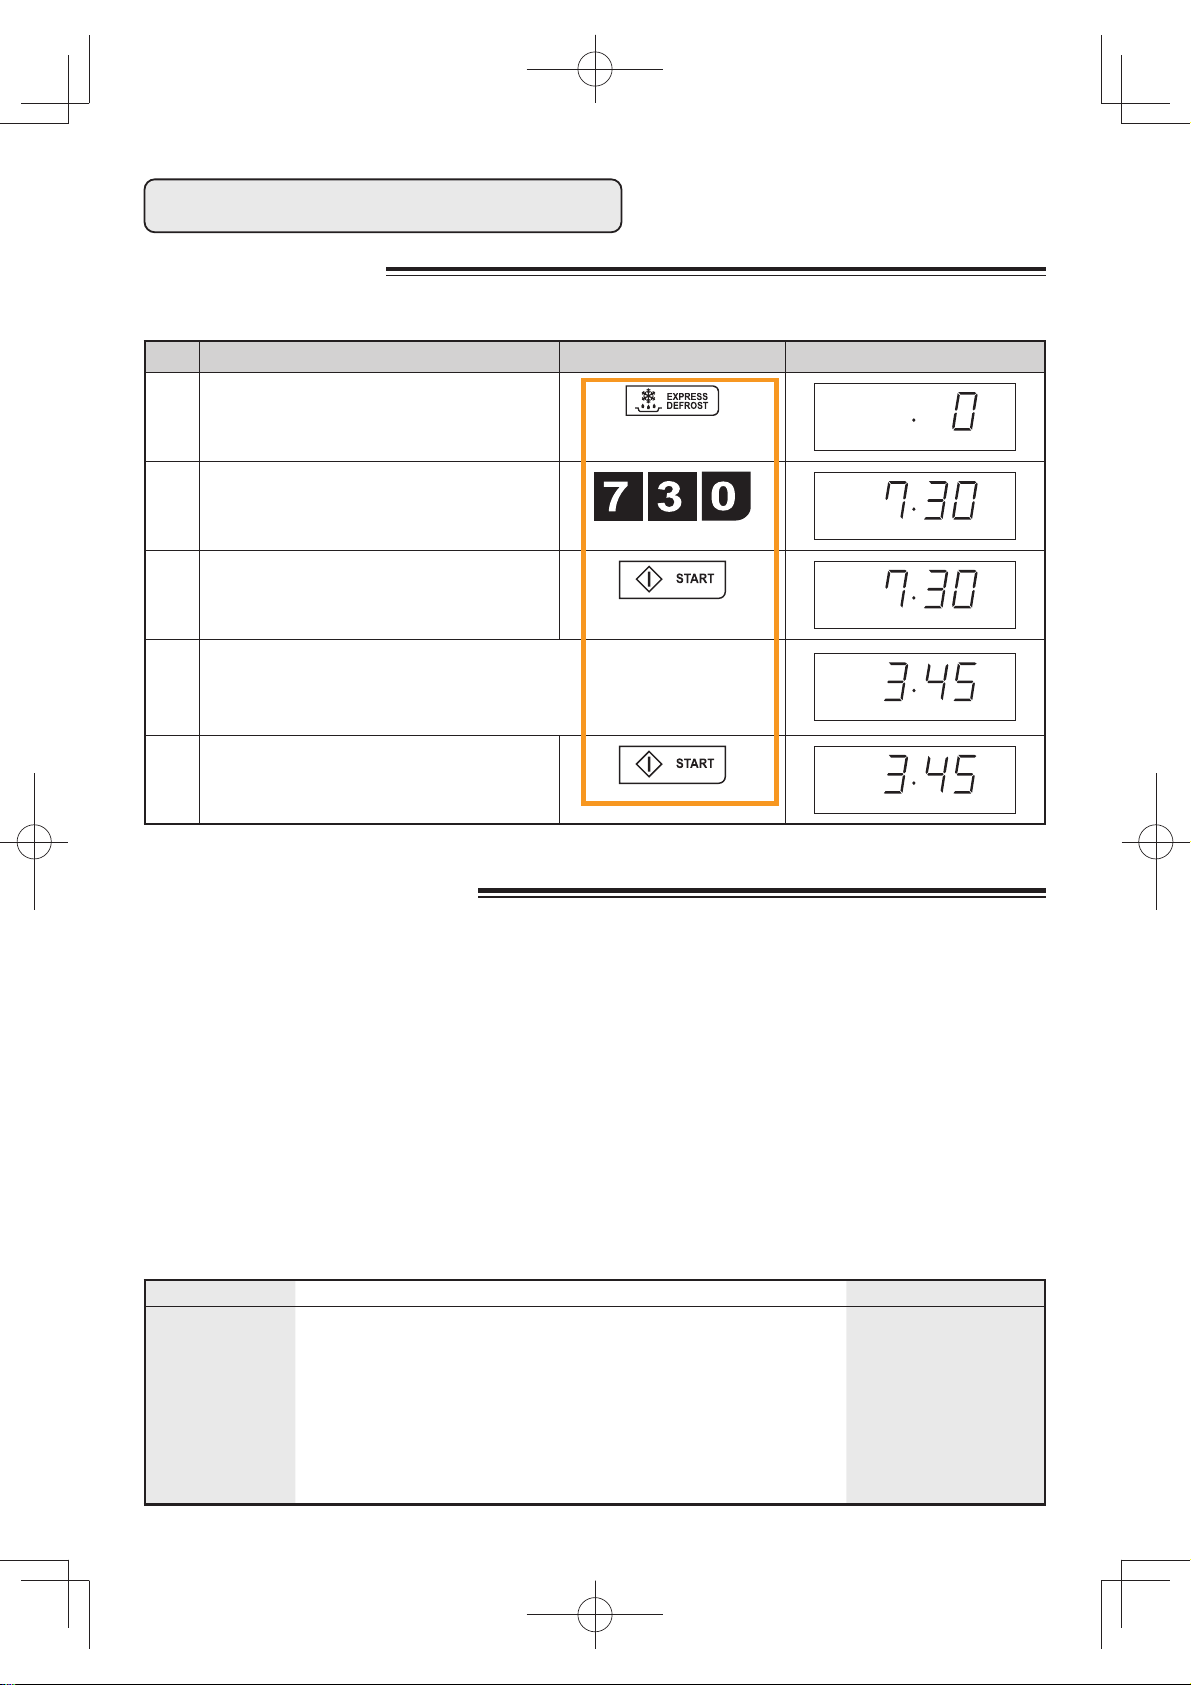
EXPRESS DEFROST
Express Defrost is used to defrost meat and poultry. Enter desired defrost time, referring to the defrost chart.
Example: If you want to defrost for 7 minutes and 30 seconds.
Step Procedure Pad Order Display
1 Press the EXPRESS DEFROST pad.
DEF
2 Enter desired defrost time.
DEF
3 Press the START pad.
DEF
ON
4 Halfway through defrost time CHECK will flash and the oven will “beep”
4 times.
Open the door. Turn food over and shield any warm portions.
Close the door.
DEF
5 Press the START pad within 1 minute after
closing the door.
DEF
ON
Note: If you do not open the door when an audible signal sounds, the defrosting cycle will continue and the
defrosting time will count down to 0.
EXPRESS DEFROST CHART
This is specially designed for smaller cuts of food. The following foods should be used on the express defrost programme.
1. Beef Steak
2. Lamb Chops
3. Pork Chops
4. Chicken Portions
5. Fish Steaks
The oven is pre-programmed with a time and power level cycle so that the food listed above is defrosted easily.
BASIC IDEAS FOR EXPRESS DEFROST
i/ Always allow food to stand for approx. 10-30 minutes after defrosting to equalise the temperature and to produce
better defrosting results.
ii/ Check food after standing. If the item is not thoroughly defrosted, continue to defrost on 20% power for additional time.
iii/ Choose foods that are the same thickness throughout. This will produce better defrosting results. Foods which
vary in thickness may require shielding with small flat pieces of tin foil to prevent over-defrosting.
iv/ For foods not listed in the chart refer to the manual defrosting chart.
v/ When freezing chicken pieces, steak, chops and fish, freeze separately in single flat layers and if necessary
interleave with freezer plastic to seperate layers. This will ensure even defrosting.
FOOD METHOD TIME PER 450g / 1lb
Steak
Pork, lamb
chops
Chicken Portions
Fish Steaks 1. Position the food in a single layer.
B5$735LQGG
1. Position the food with thinner parts in centre in a single layer, if
pieces are stuck together separate as soon as possible.
2. Turn over, rearrange after the audible sound.
After defrosting stand for 10-30 minutes.
2. Shield any thinner parts with foil if necessary.
3. If pieces are stuck together separate as soon as possible.
4. Turn over, rearrange after the audible sound.
5. After defrosting allow to stand for 30 mins.
5 mins
5 mins
14
Page 16
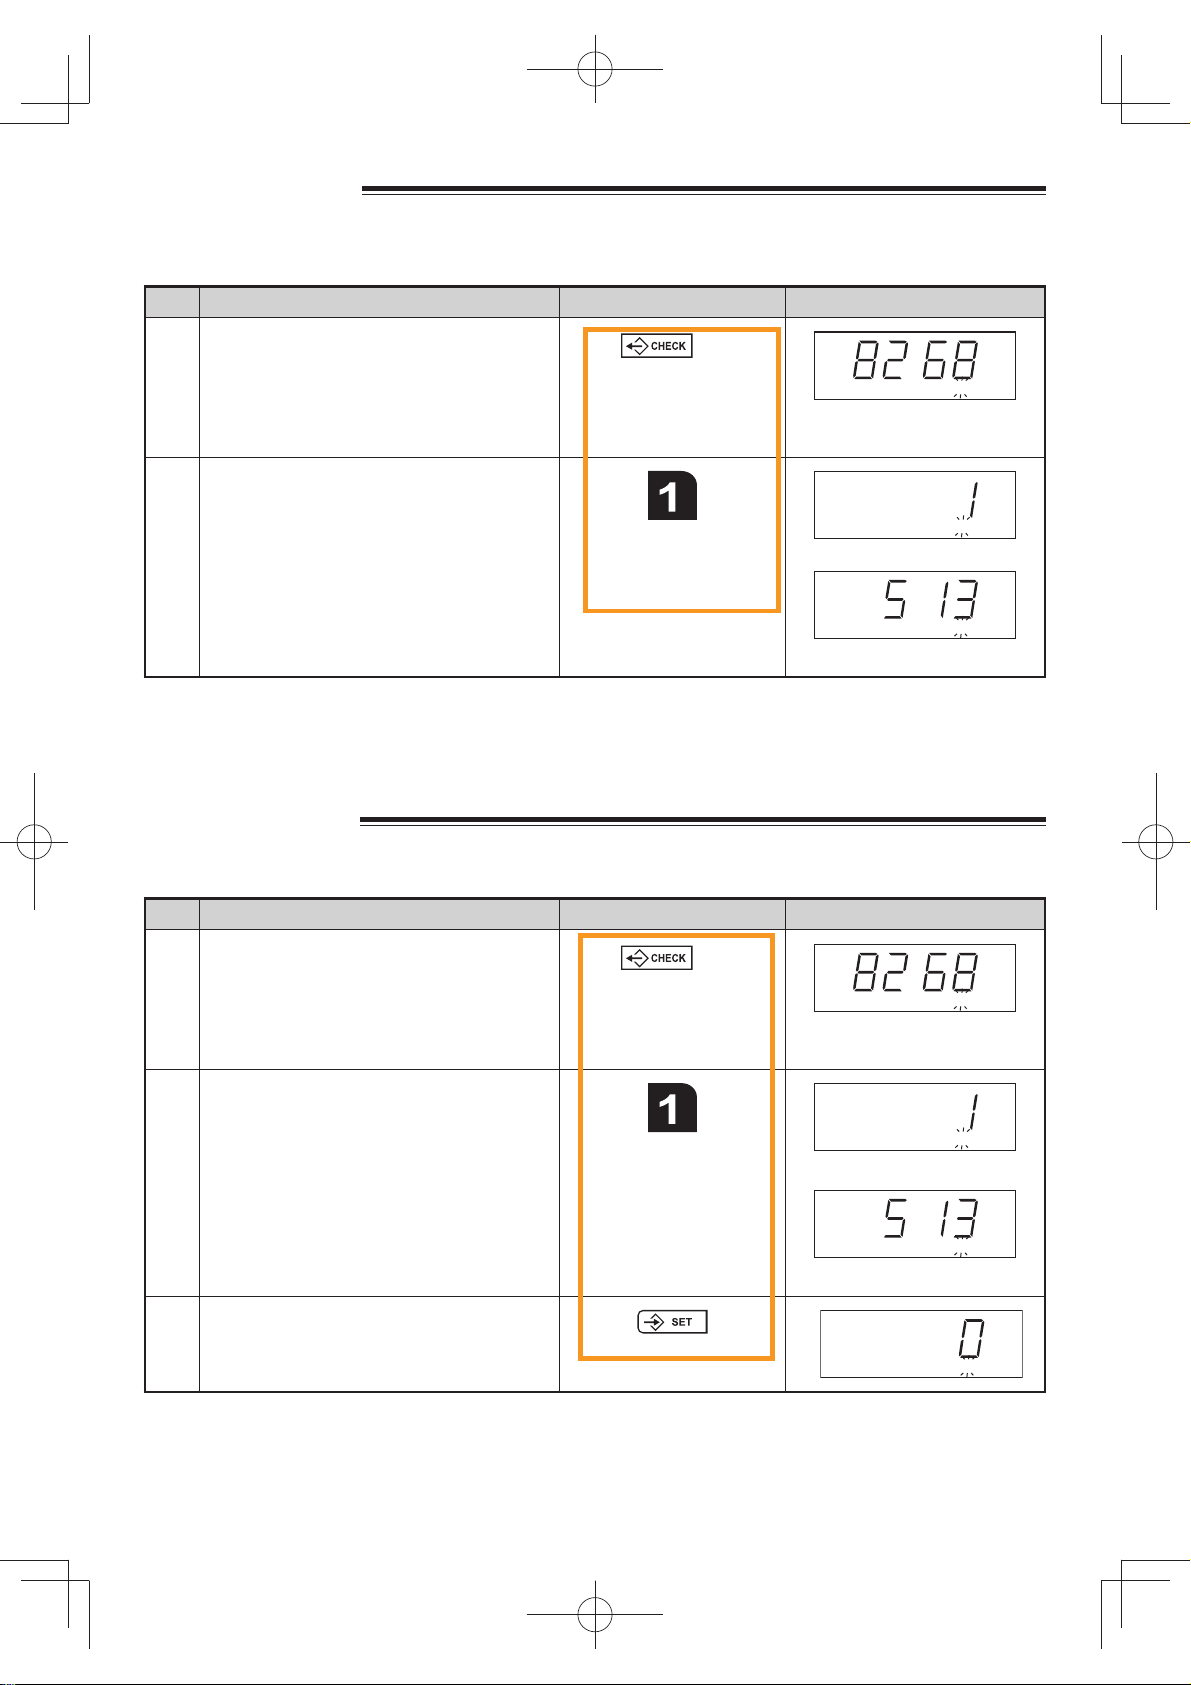
COUNTER CHECK
Set the counters to “0” before using your new oven (see COUNTER CLEAR below) to keep a record of the ovens use.
Example: If you want to know the total amount of times the oven has been used, and the number of times each
Step Procedure Pad Order Display
programme has been used. In the following example, the total time was 8268 and memory 1 was 513.
1 Press the CHECK pad twice.
X 2
CHECK will flash on and off.
(Total times used)
2 To check memory 1 usage,
press the NUMBER pad.
NO.
After about 1 sec.
(Times memory 1 was used)
Note: 1. To cancel Counter Check mode, press the CHECK pad.
Each counter can count the times up to 9999, and it will return to 0 if it is over 9999.
2. To check the times of manual cooking, press the SELECT TIME pad at Step 2 instead of the NUMBER pad.
To check the times of EXPRESS DEFROST cooking, press the EXPRESS DEFROST pad at Step 2
instead of the NUMBER pad.
COUNTER CLEAR
Each number of times can be cleared.
Example: Suppose you want to clear the times of memory 1.
Step Procedure Pad Order Display
CHECK
CHECK
CHECK
1 Press the CHECK pad twice.
X 2
CHECK will flash on and off.
(Total times used)
2 Press the NUMBER pad.
NO.
After about 1 sec.
(Times memory 1 was used)
3 Press the SET pad.
Note: 1. To cancel Counter clear mode, press the CHECK pad.
2. To clear the times of manual cooking, press the SELECT TIME pad at Step 2 instead of the NUMBER pad.
To clear the times of EXPRESS DEFROST cooking, press the EXPRESS DEFROST pad at Step 2
instead of the NUMBER pad.
3. To clear total using times, skip Step 2.
15
CHECK
CHECK
CHECK
CHECK
B5$735LQGG
Page 17
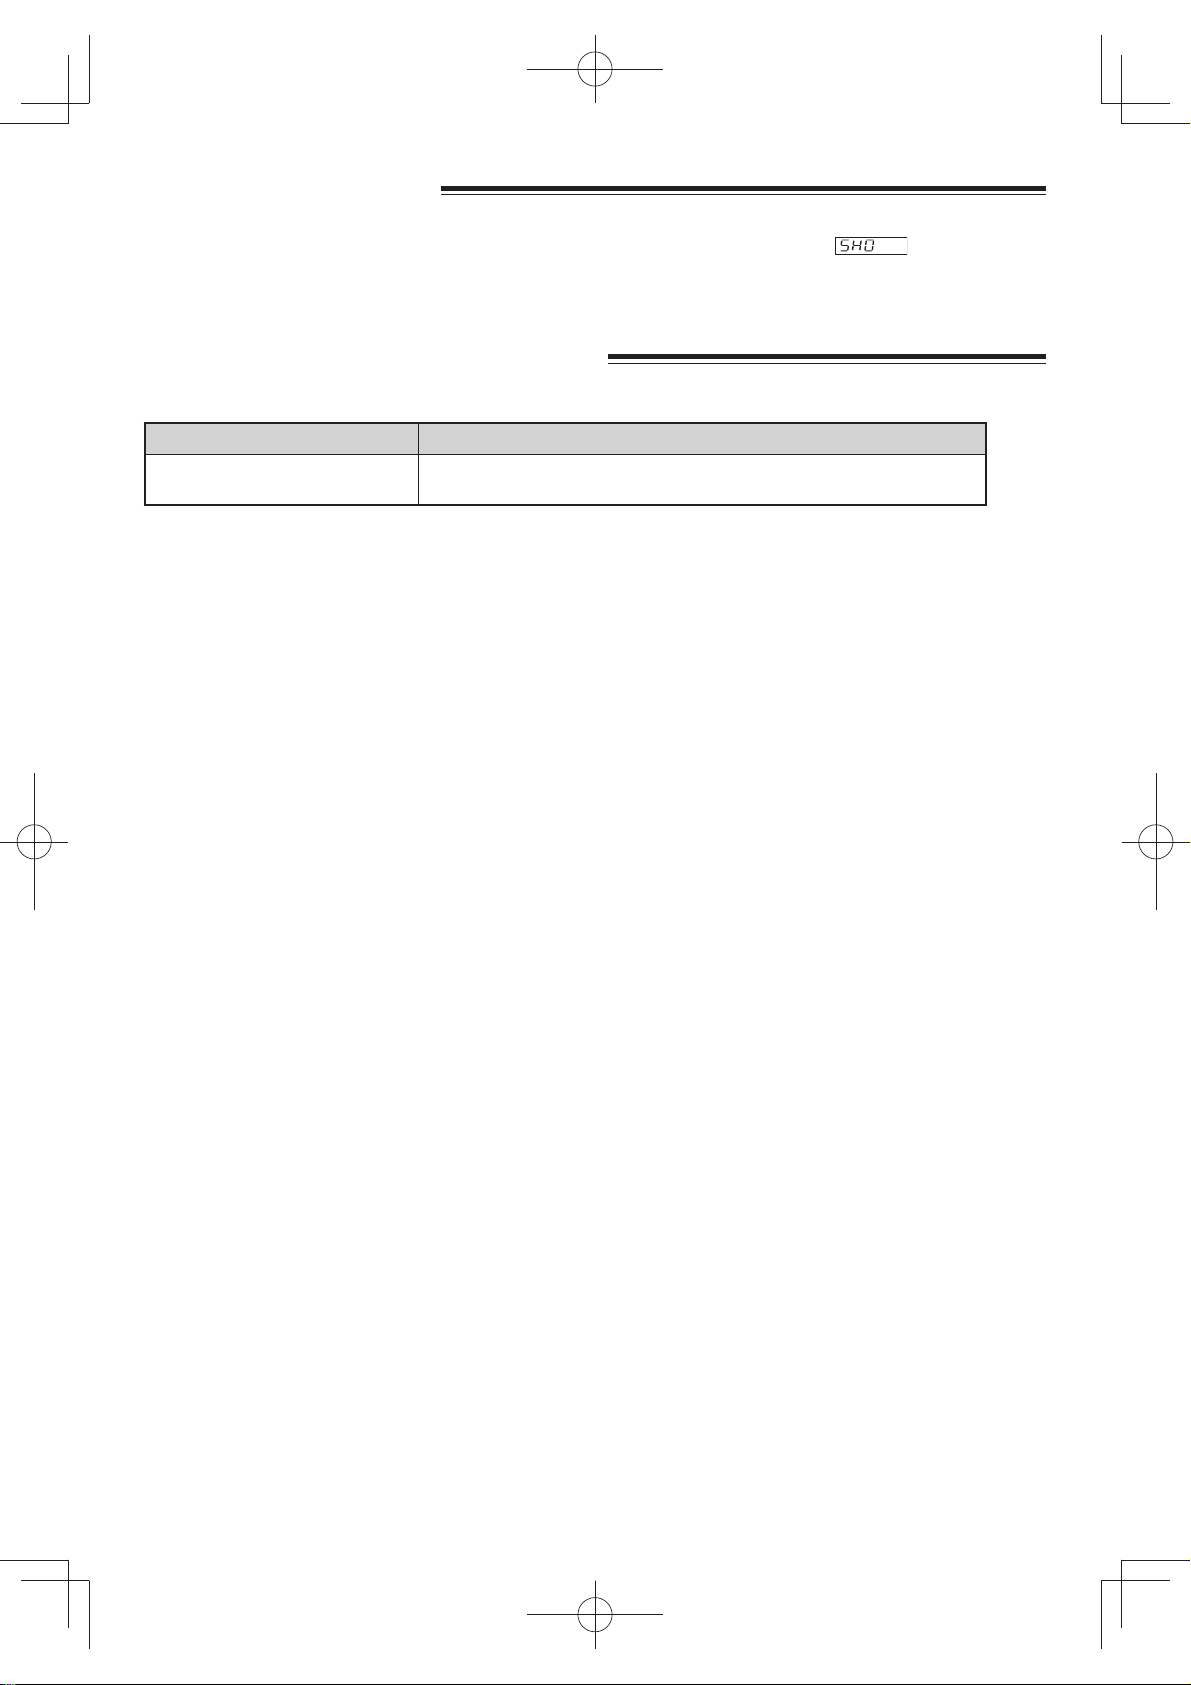
DEMONSTRATION MODE
To demonstrate,touch SELECT TIME, 0 and then touch START and hold for 3 seconds. will appear in the
display. Cooking operations can now be demonstrated with no power in the oven. The timer will count down rapidly.
To cancel, touch SELECT TIME, then 0 and STOP/ CLEAR.
INFORMATION WITH ERROR MESSAGE
If ERROR message is displayed, follow the instructions below.
ERROR MESSAGE
EE9 Cooking time exceeds the max. time. Press the STOP/CLEAR pad and
programme again.
B5$735LQGG
16
Page 18
C
• The microwave power level will default to 100% unless you press the SELECT POWER pad to reach the desired
setting. Take care when heating foods with high sugar or fat content, e.g, Christmas pudding, mince pies and fruit
cakes. Before use, check that utensils are suitable for use in microwave ovens.
• Lids:
• Do not cook eggs in their shell as they will explode. Do not heat canned potatoes in the microwave oven as they may burst.
For microwaving, use only those utensils suitable for microwave cookery as indicated below.
A variety of cookware can be used for microwaving. Round/oval dishes rather than square/oblong ones are
recommended, as food in the corners tends to overcook.
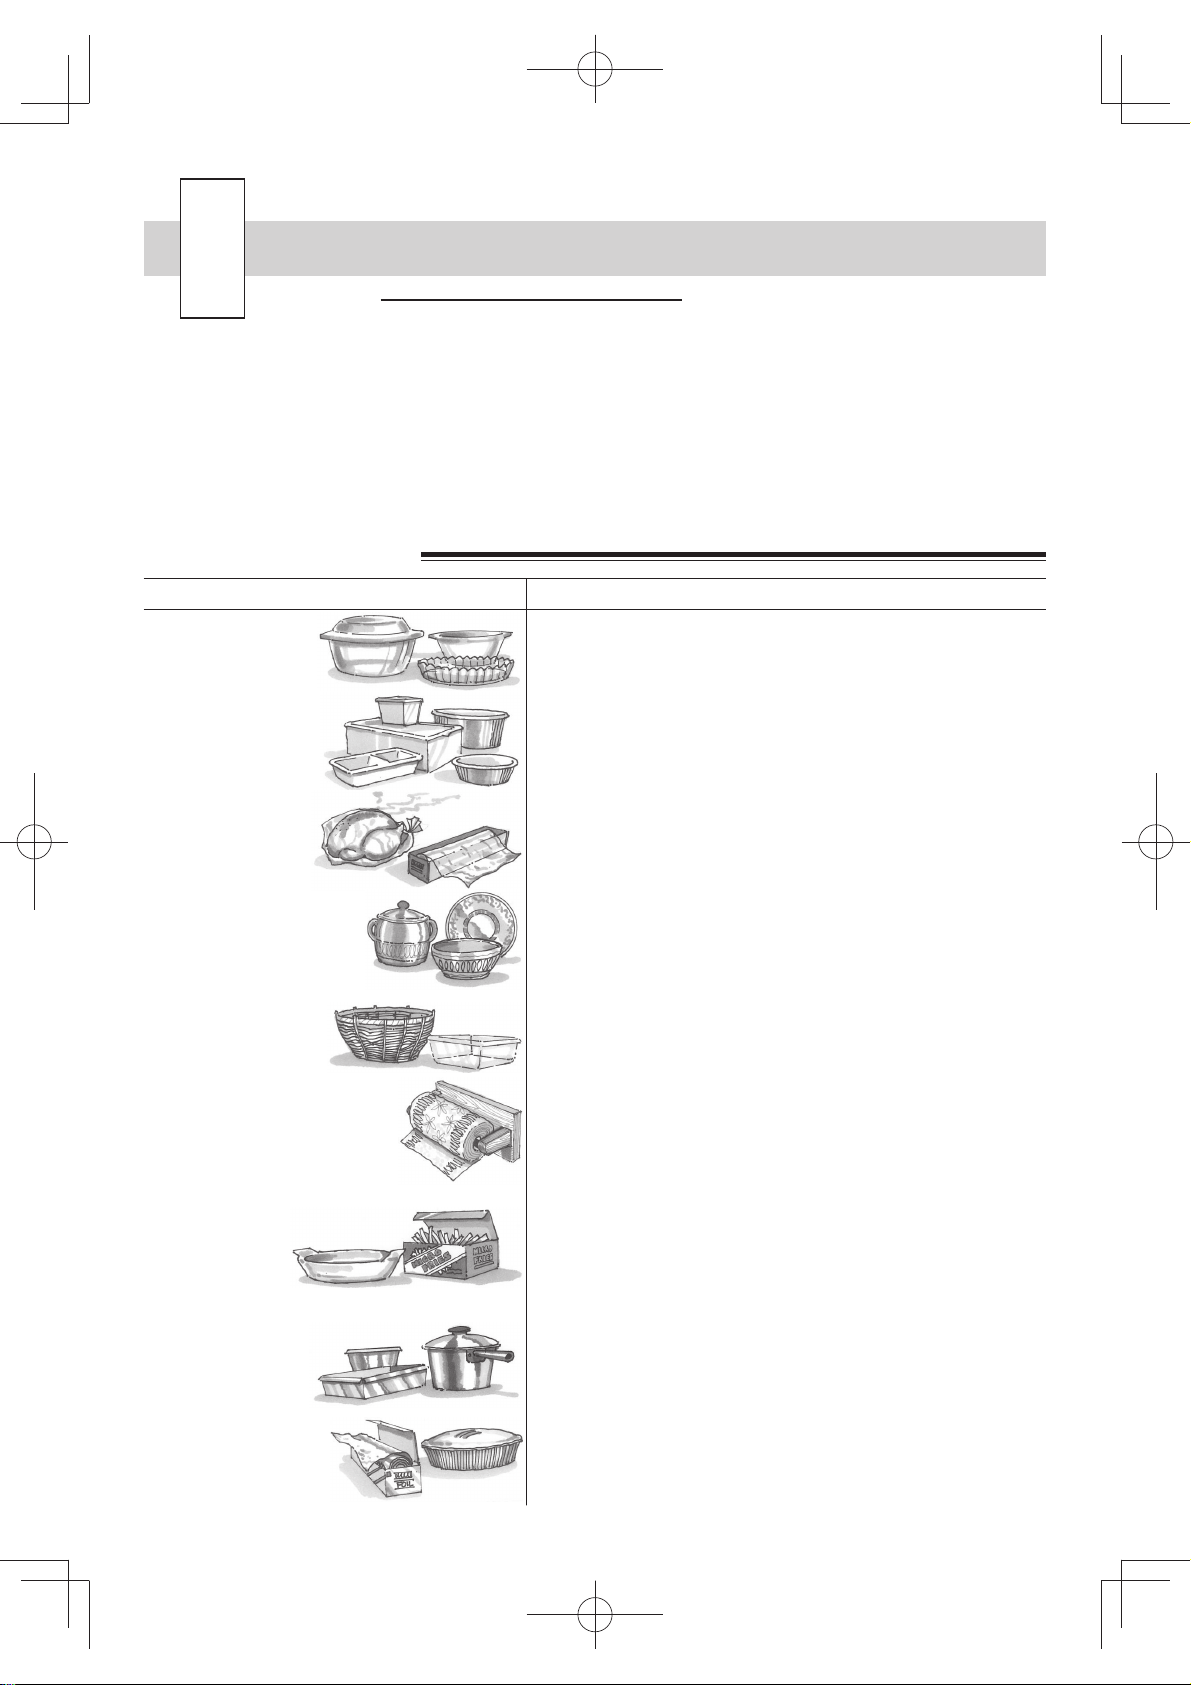
SUITABLE COOKWARE
Heat resistant glass,
(e.g. Pyrex®,
Fire King®,
Corning Ware®).
Microwave-safe
plastic cookware.
Always remove lids from food jars and containers before using them in the oven. If you do not, steam and pressure
will build up inside and the container may explode. Take care when heating contents in babies bottles, see page 18.
WARNING - Always attend the oven when in use.
Carefully follow the SHARP Operation Manual at all times. If you exceed recommended
cooking times and/or use power levels that are too high, food may overheat, burn, and in
extreme circumstances, catch fire and damage the oven.
COOKWARE SUITABLE FOR MICROWAVING
YES
YES
OOKING ADVICE
Microwave
cling film,
microwave
roasting bags.
Heat resistant
china and
ceramics.
Disposable containers:
Thin plastic,
paper, straw
and wooden
containers.
Kitchen paper. YES
Browning dishes
& self-heating
packages.
Metal cookware. NO
YES
Microwave cling film and bags must be vented for steam to
escape, pierce in 4-5 places. Do not use plastic or metal ties as
they may melt or catch fire due to ‘arcing’.
YES
Except for dishes with metallic decoration.
YES
Always attend the oven closely. Only use for warming food.
Pay special attention as over-heating may cause a fire in your oven.
NOTE: When heating food in plastic or paper containers,
Always attend the oven closely. Only use to absorb fat
and moisture when warming food. Pay special attention as
overheating may cause a fire in your oven.
YES
Always place on an up-turned plate on the turntable to prevent
heat stress. Follow manufacturer’s instructions. Be careful as
these become very hot. Popcorn: Only use microwave popcorn
within recommended packaging (follow popcorn manufacturer’s
instructions). Never use oil unless the manufacturer recommends
and never cook for longer than instructed.
monitor the oven due to the possibility of ignition.
Aluminium
foil & foil
containers, made
from “Microfoil®”.
B5$735LQGG
YES
Use small pieces of aluminium foil to shield food from overheating.
Keep foil at least 2cm from the oven walls. Foil containers are
not recommended unless specified by the manufacturer, e.g.
MicroFoil®, follow instructions carefully.
17
Page 19
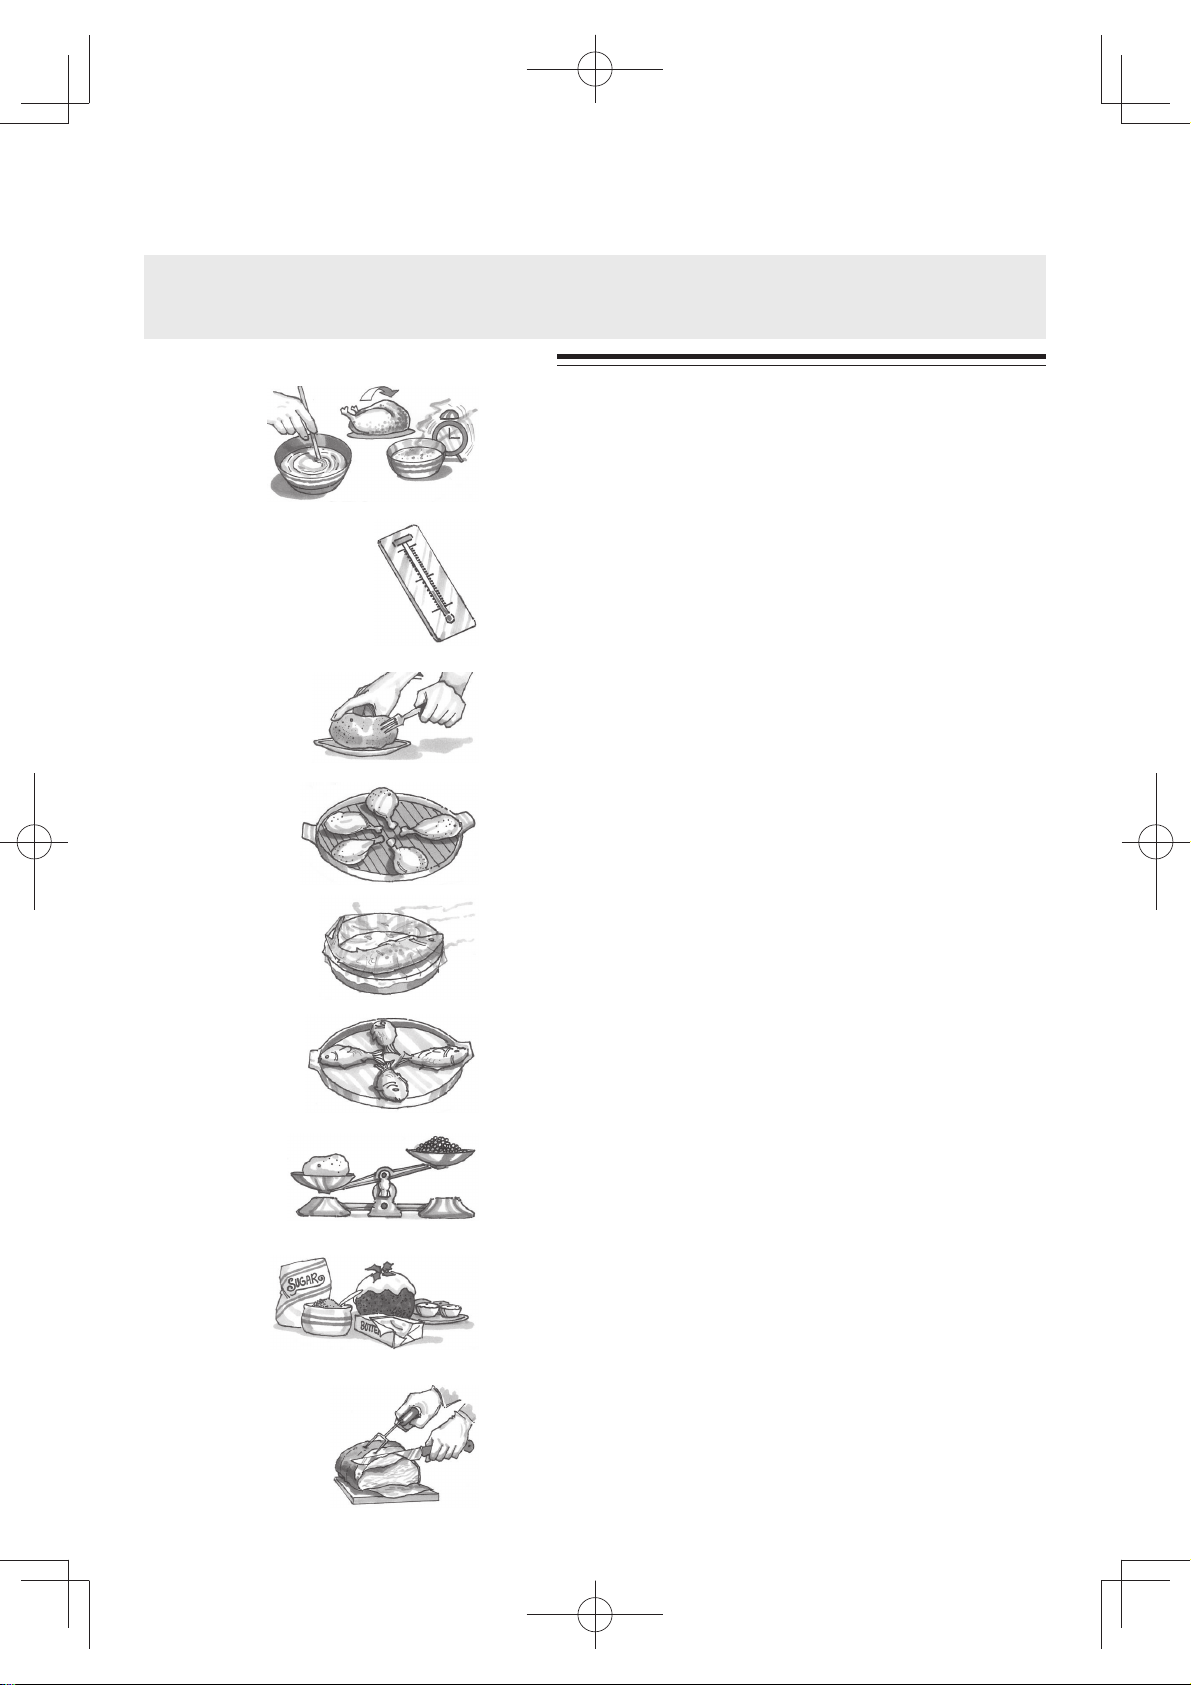
Face & Hands: Always use oven gloves to remove food or cookware from the oven. Stand back when opening the
oven door to allow heat or steam to disperse. When removing covers (such as cling-film), opening roasting bags or
popcorn packaging, direct steam away from face and hands.
Check the temperature of food and drink and stir (before serving). Take special care when serving
babies, children or the elderly. the contents of feeding bottles and baby food jars should be stirred or
shaken and the temperature checked before consumption to avoid burns.
FOOD HANDLING & PREPARATION
Stir, turn &
stand
Initial temperature The initial temperature of food affects the amount of cooking time
Piercing Foods with a shell, skin or membrane must be pierced in several
Arrangement Place thickest parts of food on the outside of the dish, e.g. place the
Covering Fish, vegetables and certain other foods benefit from being covered
For even cooking stir, turn or rearrange food during cooking. Where
recommended, leave food to stand after cooking or defrosting.
needed, for example, chilled food requires more cooking than food
at room temperature. The temperature of the container is not a true
indication of the temperature of the food or drink. Cut into foods with
fillings, for example, jam doughnuts, to release heat or steam.
places before cooking or reheating as steam will build up and may
cause food to explode, e.g. Potatoes, Fish, Chicken, Sausages.
NOTE: Eggs in their shells and whole hard / soft boiled eggs
should not be heated in the microwave oven as they may
explode, even after cooking has ended.
meaty ends of chicken drumsticks on the outside of the dish.
during microwave cookery, follow recommendations where given and
use vented microwave cling film or a suitable lid.
Size & shape Food size and shape affect the amount of cooking time needed.
Density &
quantity
Composition
& quality
Hygiene Food hygiene standards (storage, handling and preparation) apply to
When cooking more than one portion of the same food ensure they are
of a similar size and shape.
Food density and quantity affect the amount of cooking time needed,
for example, potatoes require more cooking than peas; four potatoes
will take longer to cook than two.
Food high in fat or sugar (Christmas pudding, mince pies) requires less
heating time and should be watched, over-heating can lead to fire. Use
good quality ingredients for microwaving.
Economical cuts of meat can be used for casseroles.
microwaving. Always store convenience foods as recommended by the
food manufacturer and keep no longer than the “Use By” date.
18
B5$735LQGG
Page 20
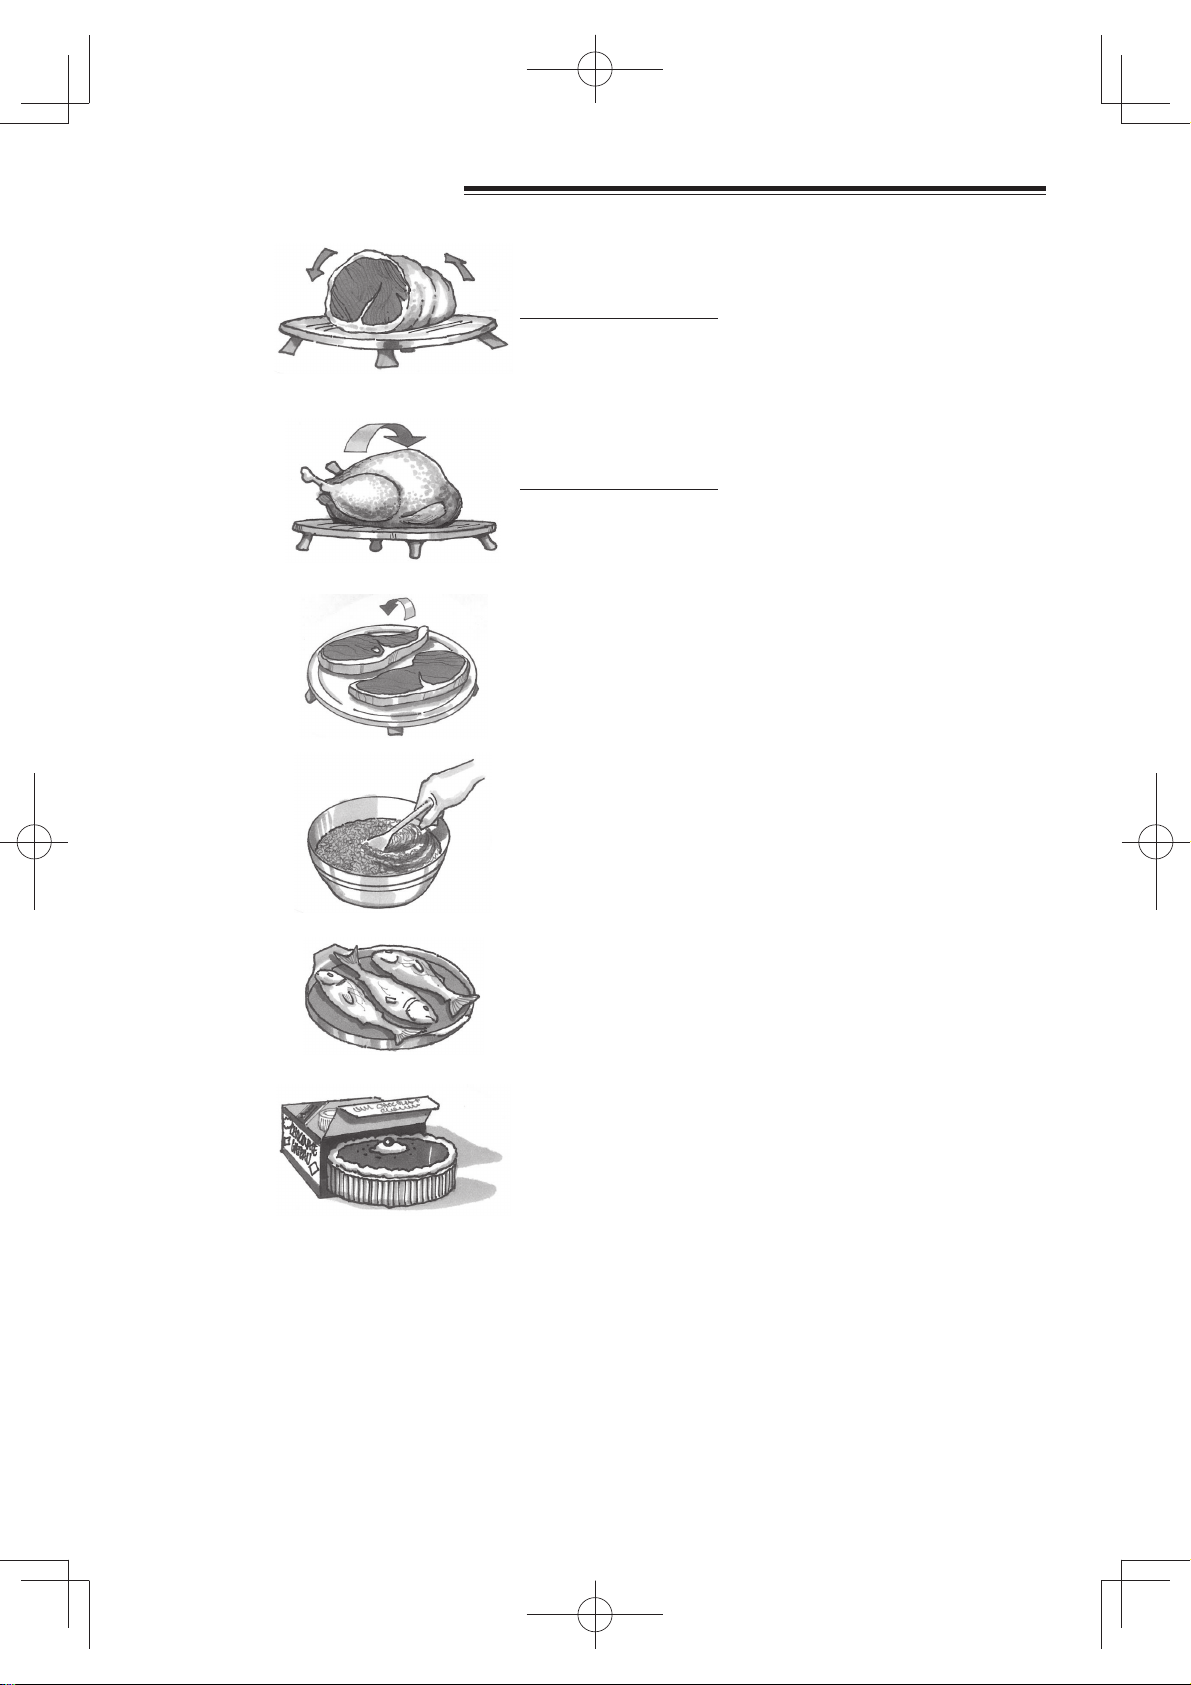
ADVICE FOR DEFROSTING
Meat joints
Poultry
Steak, Chops
& Chicken
Portions
Cubed &
Minced Meat
Place on a plastic rack, turn over at least 4-5 times during
defrosting, shield any warm areas with small, flat pieces of foil. After
defrosting, wrap in foil and allow meat to stand for 45-60 minutes,
until thoroughly defrosted.
Place on a plastic rack, turn over at least 3-4 times during
defrosting, shield any warm areas with small, pieces of foil. After
defrosting, wrap in foil and allow poultry to stand for 45-60 minutes,
until thoroughly defrosted.
NOTE: Do not defrost poultry with giblets.
Place on a plastic rack, separate during defrosting and turn over at
least 2-3 times. Shield if necessary.
Place in a bowl, remove defrosted parts and turn over at least 3-4
times during defrosting.
Whole fish
& Fillets
Prepacked
Frozen Foods
NOTES:
• To defrost food, use either 30% or 10% microwave power.
• Shield warm areas with small pieces of foil if necessary.
• It is important to turn food over, separate (where appropriate) and rearrange to ensure even defrosting.
• Standing time is necessary after defrosting to ensure thorough defrosting.
Place in a flan dish, separate and turn over at least twice during
defrosting. Shield if necessary.
Remove packaging, including any foil and place in a suitable dish.
19
B5$735LQGG
Page 21
ADVICE FOR REHEATING
WARNINGS:
Oil & Fat: Never heat oil or fat for deep frying as this may lead to overheating and fire. Stand back when opening
the oven door to allow heat or steam to disperse. When removing covers (such as cling-film), opening roasting bags
or popcorn packaging, direct steam away from face and hands.
Never heat liquids in narrow-necked containers, as this could result in the contents erupting from the
container and may cause burns.
• Remove food from foil or metal containers before reheating.
• Reheating times will be affected by the shape, depth, quantity and temperature of food together with the size,
shape and material of the container.
• To avoid overheating and fire, spacial care must be taken when reheating foods with a high sugar or fat content,
for example, mince pies, Christmas pudding.
• Canned potatoes should not be heated in the microwave oven, follow the manufacturers’ instructions on the can.
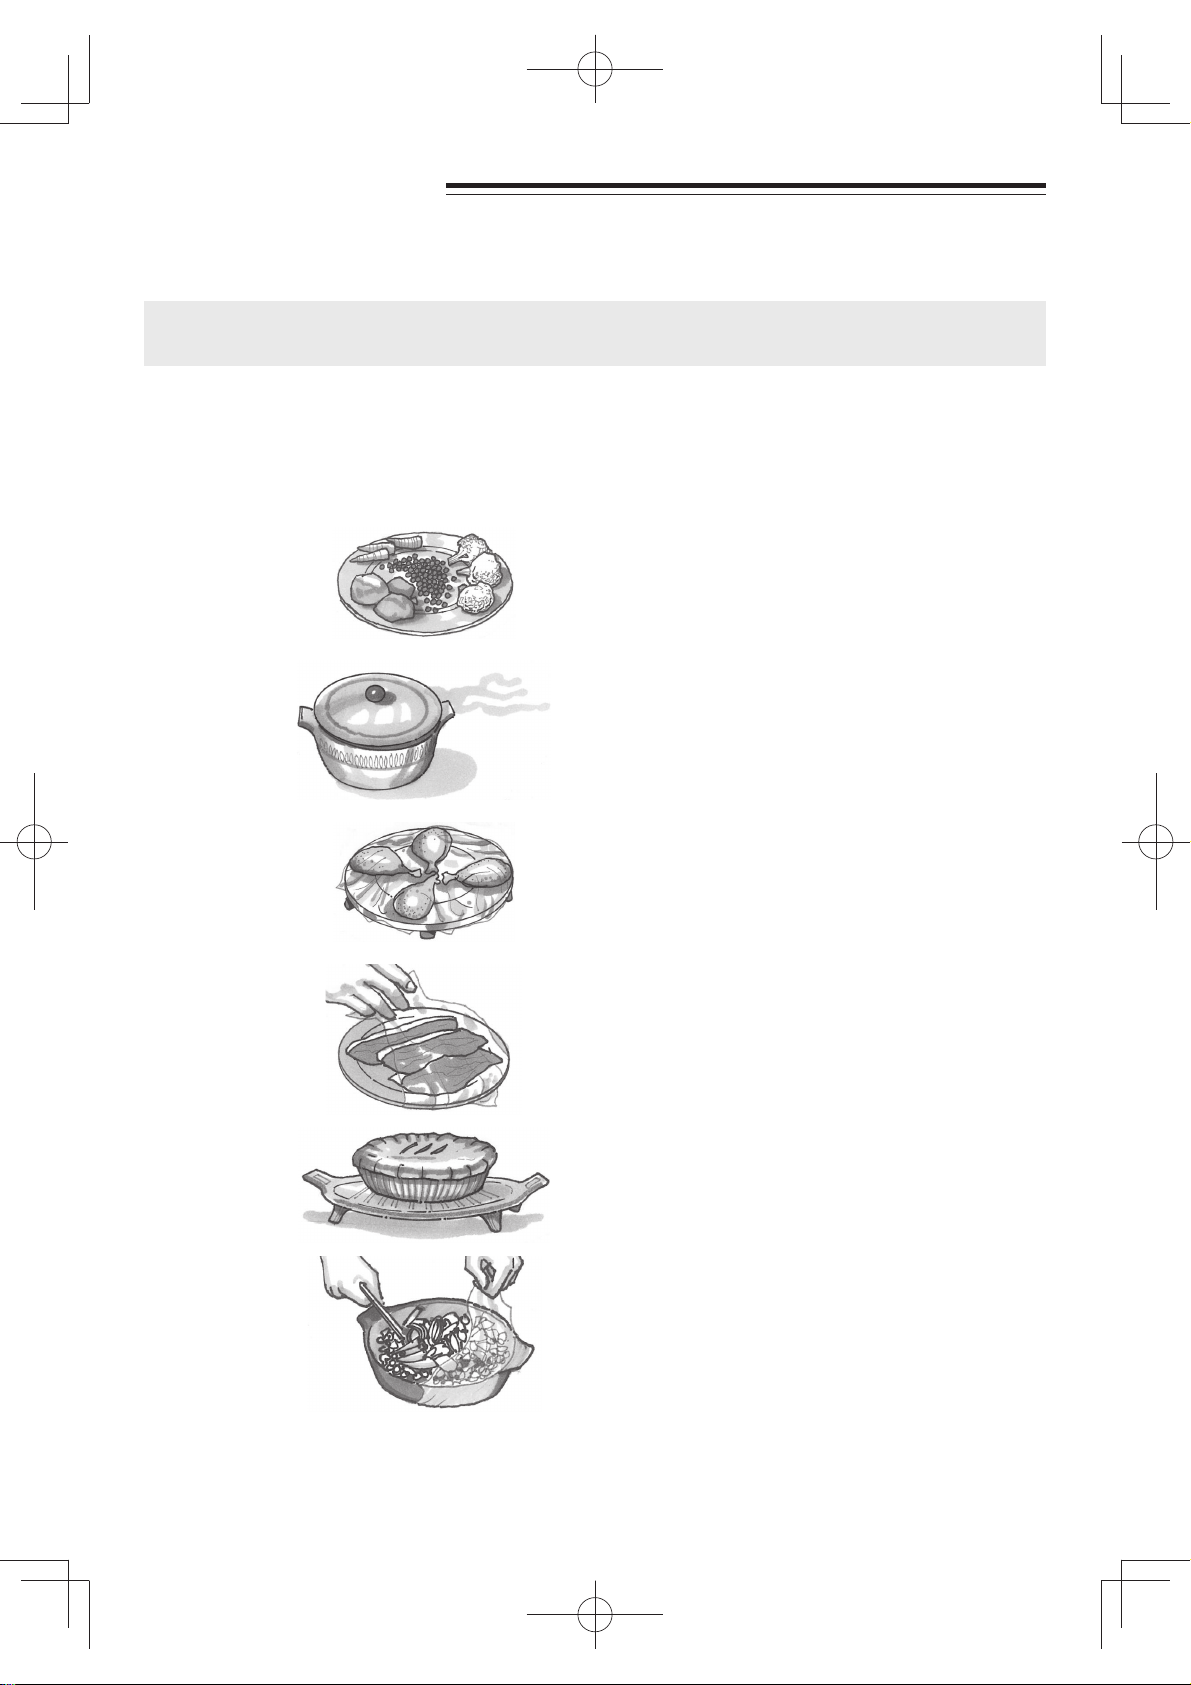
Plated meals Remove any poultry or meat portions, reheat these
Casseroles
Poultry portions
Sliced meat
separately, see below. Place smaller items of food to the
centre of the plate, larger and thicker foods to the edge.
Cover with vented microwave cling film and reheat on 50%,
stir/rearrange halfway through reheating. Ensure thoroughly
reheated before serving.
Cover with vented microwave cling film or a suitable lid,
reheat on 50%. Stir frequently to ensure even reheating.
Place thickest parts of the portions on the outside of the dish,
cover with microwave cling film and reheat on 70%. Turn over
halfway through reheating.
NOTE: Ensure poultry is thoroughly reheated, before serving.
Cover with vented microwave cling film and reheat on 50%.
Rearrange at least once to ensure even reheating.
NOTE: Ensure meat is thoroughly reheated before serving.
Pies
Vegetables
B5$735LQGG
Place pies on plate or in a flan dish. Reheat meat pies on
70% and fruit pies on 50%.
Cover with vented microwave cling film or suitable lid and
reheat on 50%. Stir at least once during reheating.
20
Page 22
D
EFROSTING CHART
MANUAL DEFROSTING
FOOD DEFROSTING
TIME
Beef, Lamb &
Pork Joints
(uncooked)
Whole
Poultry
(uncooked)
Minced Beef
(uncooked)
Sausages
(uncooked)
Bacon
(uncooked)
Sausage
Rolls Large
(cooked)
Quiche
(cooked)
Meat Pie
(cooked)
Fruit Pie/
Crumble
(cooked)
Sponge
Pudding
(cooked)
18 mins
/450g (1lb)
11 mins
/450g (1lb)
7-8 mins
/450g (1lb)
10-11 mins
/450g (1lb)
8-9 mins
/450g (1lb)
3-4 mins
for 8 rolls, 375g (13oz)
Total weight
5-6 mins
/450g (1lb)
5-6 mins
/450g (1lb)
5-6 mins
/450g (1lb)
4-5 mins
/450g (1lb)
MICROWAVE
METHOD
POWER LEVEL
LOW
(10%)
LOW
(10%)
MEDIUM LOW
(30%)
LOW
(10%)
LOW
(10%)
LOW
(10%)
LOW
(10%)
LOW
(10%)
LOW
(10%)
LOW
(10%)
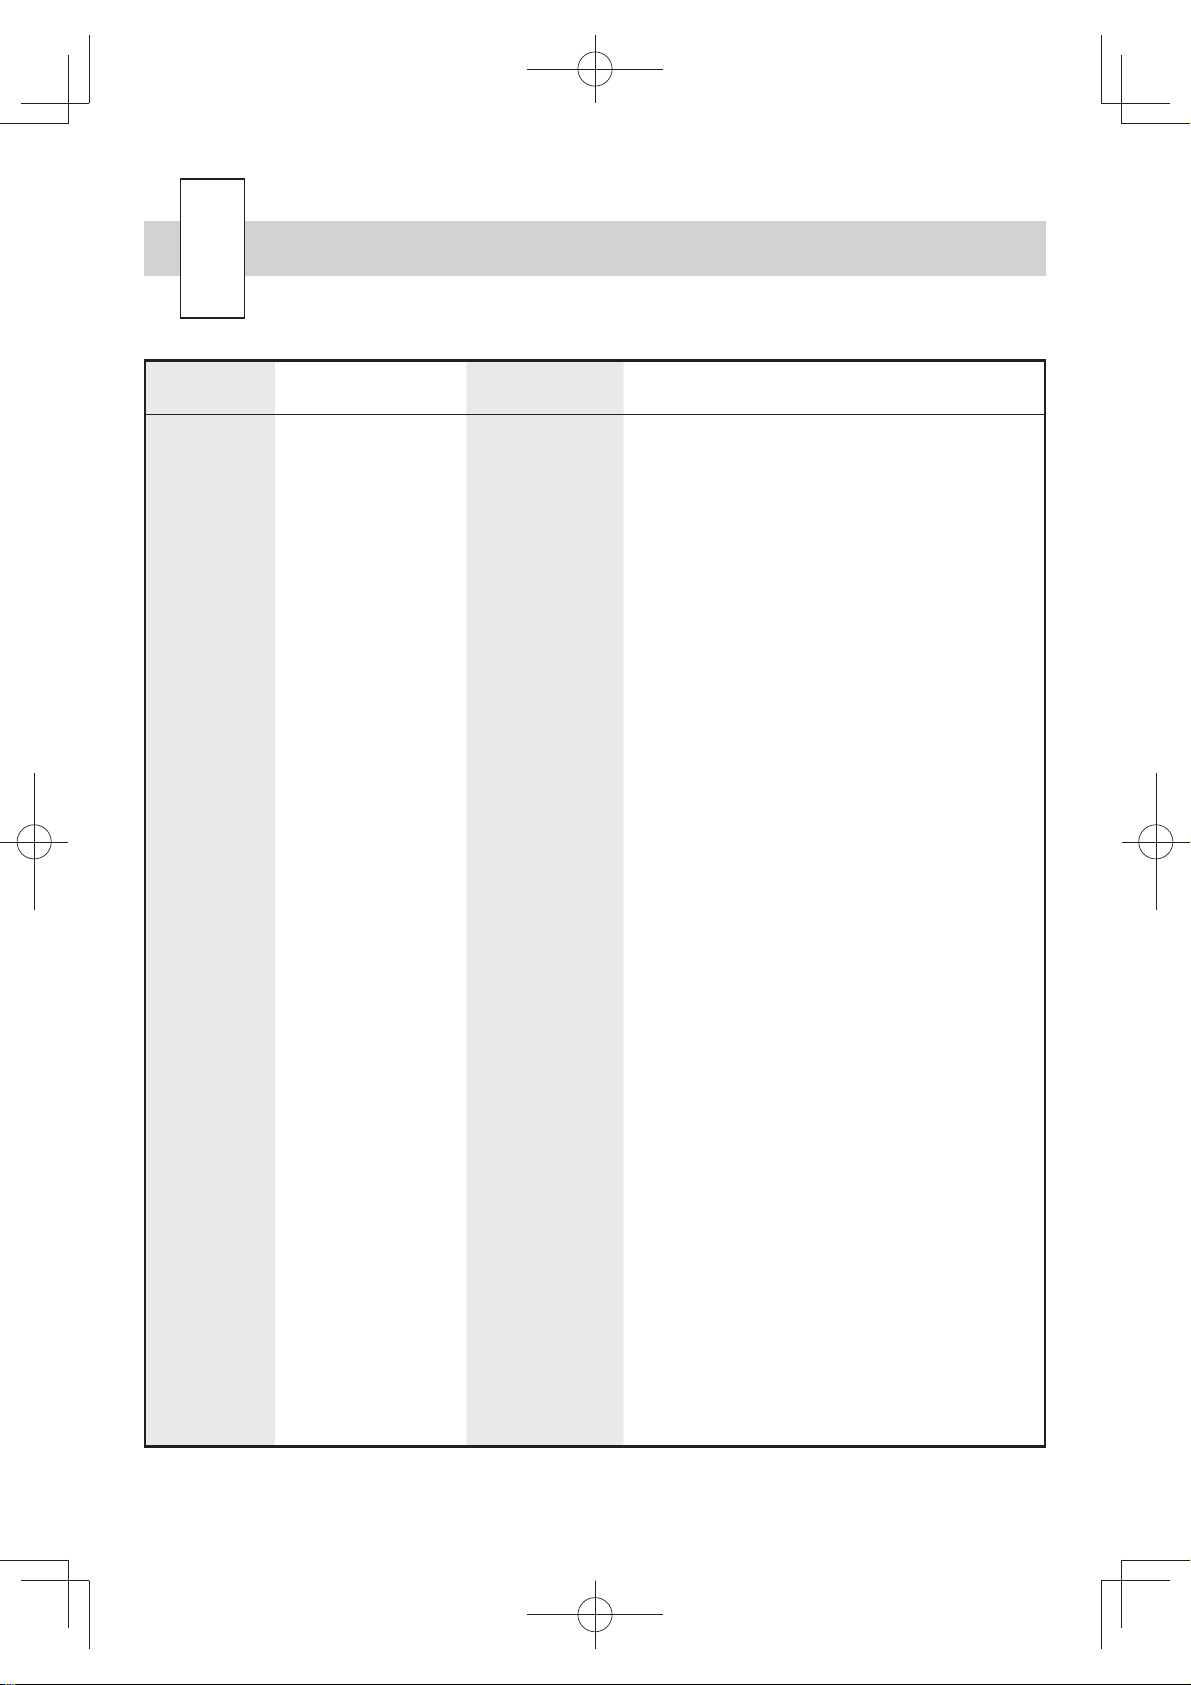
1. Place on a large plate.
2. Turn over 4-5 times during defrosting.
NOTE: If necessary, small pieces of aluminium
foil can be used to shield small areas of meat
which may become warm during defrosting.
3. After defrosting, wrap in foil and leave to stand
for 30-60 minutes or until thoroughly defrosted.
As above
1. Place on a plate or in a flan dish.
2. Turn over 2-3 times during defrosting, removing
defrosted mince each time.
3. After defrosting, cover any frozen mince
remaining in aluminium foil for 15-20 minutes or
until thoroughly defrosted.
1. Place on a large plate, in a single layer if
possible.
2. Turn over 2-3 times during defrosting and
separate if necessary.
3. After defrosting, cover with aluminium foil
and leave to stand for 15-20 minutes or until
thoroughly defrosted.
1. Place on a plate.
2. Separate and re-arrange twice during
defrosting.
3. After defrosting, cover with aluminium foil
and leave to stand for 5-10 minutes or until
thoroughly defrosted.
1. Place on a large plate.
2. Turn over and re-arrange halfway through
defrosting.
3. After defrosting, cover with foil and leave to
stand for 10-15 minutes or until thoroughly
cooked.
1. Place on a large plate.
2. After defrosting, cover with foil and leave to
stand for 15-20 minutes or until thoroughly
defrosted.
As above.
As above.
As above.
B5$735LQGG
21
Page 23
D
EFROSTING CHART
FOOD DEFROSTING
TIME
Bread Sliced 6-7 mins
/800g (1³/lb) loaf
Bread Buns 3-4 mins
for 6 buns
Rice (cooked) 9 mins
/450g (1lb)
NOTES:
Prior to defrosting, food is frozen approx. -18ºC.
If it is necessary to shield small areas of food, use small pieces of foil.
Only use food which is thoroughly defrosted, use a professional food thermometer to ensure acceptable
temperatures have been achieved throughout.
MICROWAVE
POWER LEVEL
MEDIUM LOW
(30%)
LOW
(10%)
MEDIUM LOW
(30%)
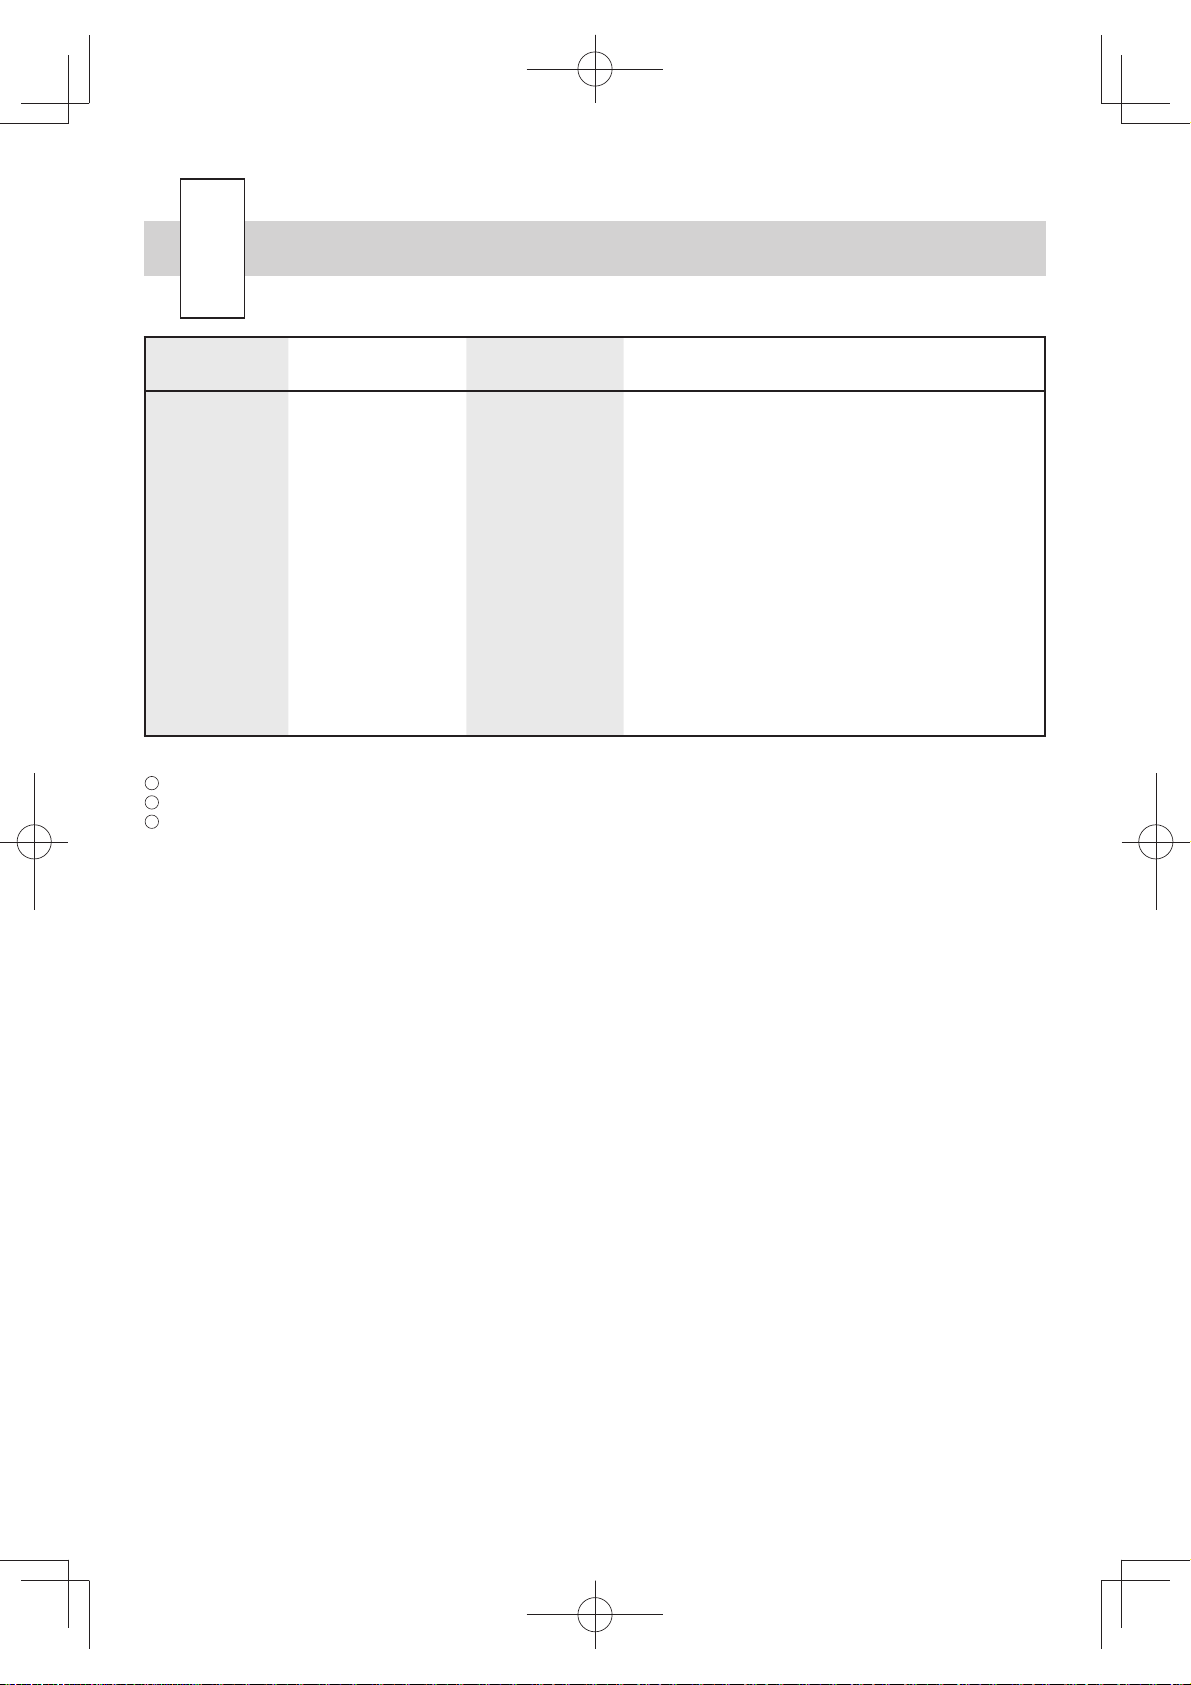
1. Arrange slices on the turntable.
2. Turn over, separate and re-arrange twice during
defrosting. Remove defrosted slices each time.
3. After defrosting, cover with foil for 5-10 minutes
or until thoroughly defrosted.
1. Place on turntable.
2. Turn over & re-arrange halfway through
defrosting.
3. After defrosting, cover with foil and leave to
stand for 5-10 minutes or until thoroughly
defrosted.
1. Place in a large bowl.
2. Break up and stir 2-3 times during defrosting.
3. After defrosting, cover bowl with foil and leave
to stand for 10-15 minutes or until thoroughly
defrosted.
METHOD
B5$735LQGG
22
Page 24
C
OOKING CHART
FOOD COOKING
Beef: Medium
(Topside,
Silverside)
Chilled (5ºC)
Lamb, medium
(fillet, shoulder,
leg)
Chilled (5ºC)
Pork (loin, leg)
Chilled (5ºC)
Poultry (whole)
(max.3.5kg(8lb)
Chilled (5ºC)
Chicken/Duck
Quarters
Chilled (5ºC)
10-11 mins
/450g (1lb)
10-11 mins
/450g (1lb)
15-16 mins
/450g (1lb)
/450g (1lb)
/450g (1lb)
TIME
7-8 mins
7-8 mins
MICROWAVE
POWER LEVEL
MEDIUM HIGH
(70%)
MEDIUM HIGH
(70%)
MEDIUM HIGH
(70%)
HIGH
(100%)
HIGH
(100%)
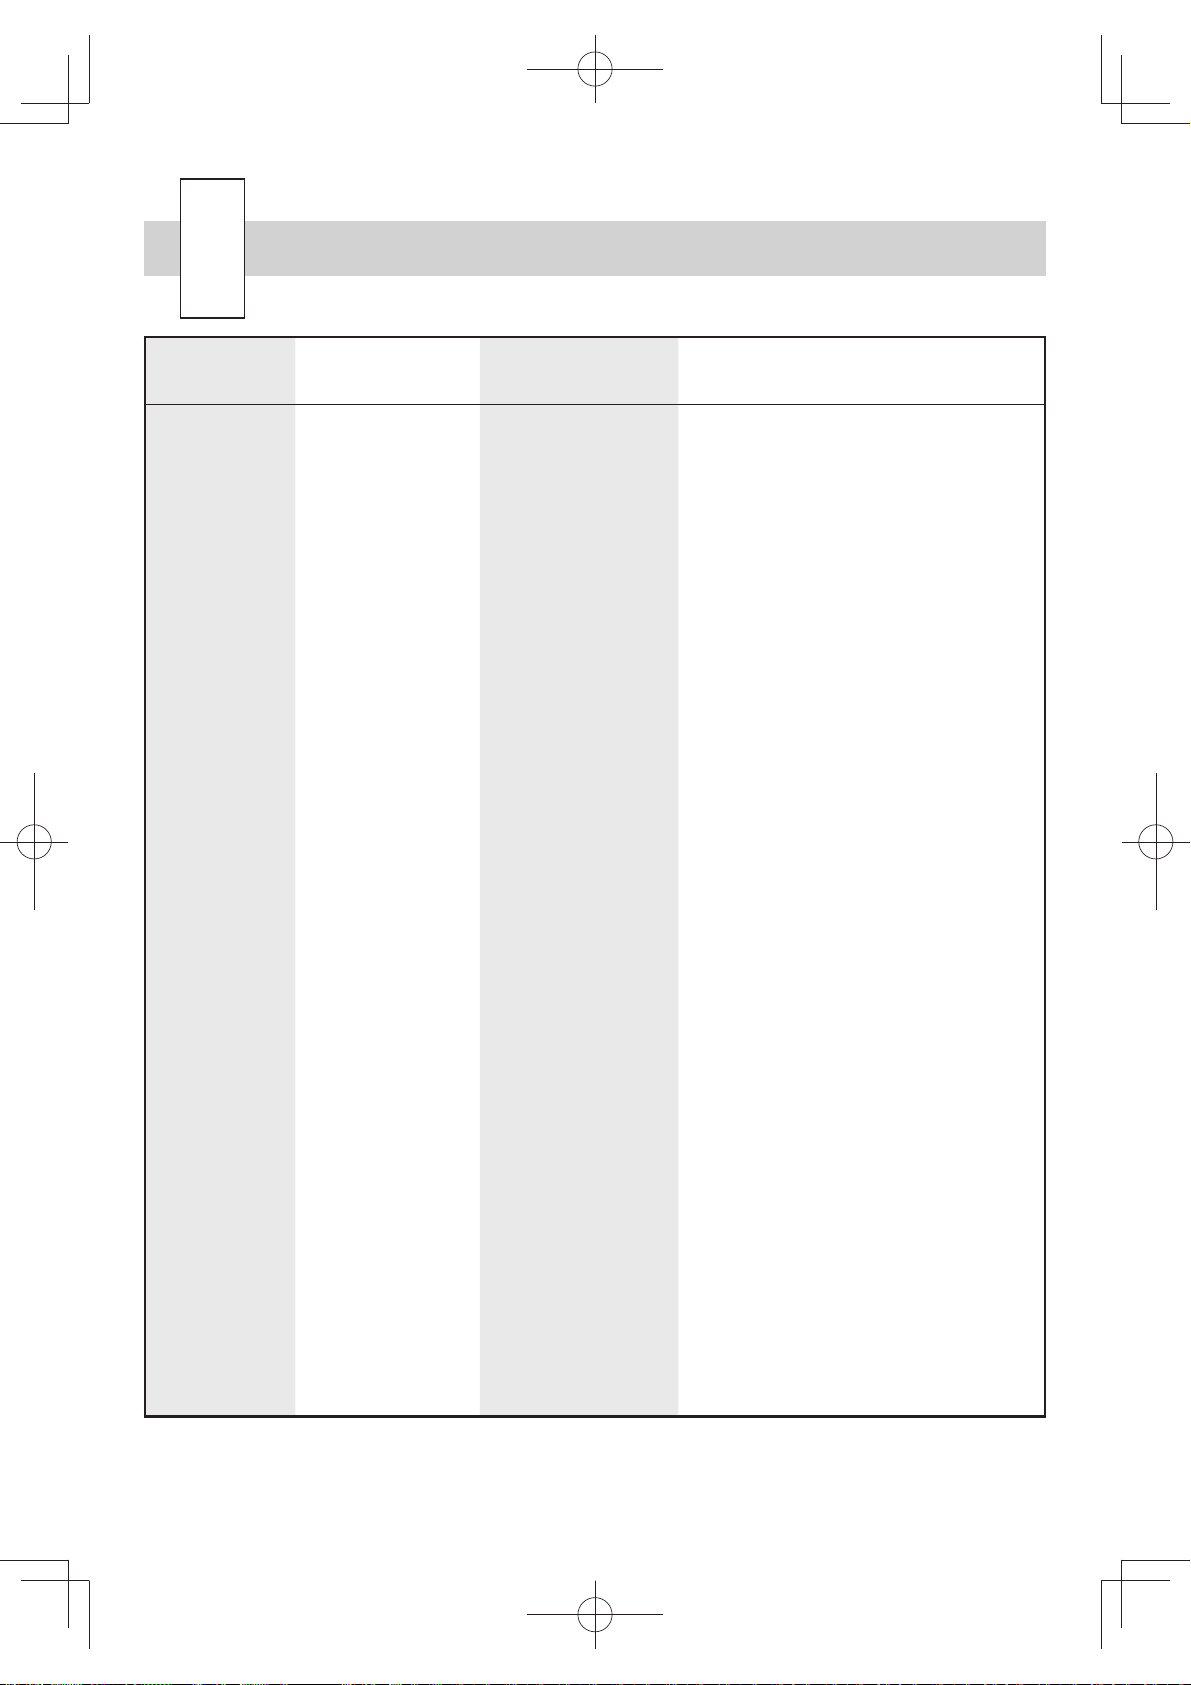
1. Place fat side down in a flan dish.
2. Turn over halfway through cooking and
remove juice.
3. After cooking, wrap in foil and leave to
stand for 8 minutes before serving.
As above.
As above.
1. Place breast side down in a flan dish.
2. Turn over halfway through cooking and
remove juice.
3. After cooking, wrap in foil and leave to
stand for 10 minutes before serving.
1. Place best side down in a single layer in
a flan dish.
2. Turn over halfway through cooking, &
remove juice.
3. After cooking, wrap in foil and leave to
stand for 5 minutes before serving.
METHOD
Minced Beef
Chilled (5ºC)
Bacon
Chilled (5ºC)
Burgers
Chilled (5ºC)
Sausages
(thick)
Chilled (5ºC)
Sliced
Gammon
Chilled (5ºC)
6-7 mins
/450g (1lb)
4 mins
for 8 rashers
4 mins
for 4 burgers
4 mins
for 8 sausages
7 mins
for 2 slices
MEDIUM HIGH
(70%)
HIGH
(100%)
HIGH
(100%)
HIGH
(100%)
HIGH
(100%)
23
1. Place in a large bowl.
2. Stir 2-3 times during cooking.
3. After cooking cover bowl with foil and
leave to stand for 2-3 minutes before
serving.
1. Place in a single layer on a large plate.
2. Turn over halfway through cooking.
3. Leave to stand for 1 minute before
serving.
As above.
As above.
As above.
B5$735LQGG
Page 25
C
OOKING CHART
FOOD COOKING
Fish Fillet/
Steaks
Chilled (5ºC)
Trout
(whole)
Chilled (5ºC)
Rice/Pasta
Room (20ºC)
Jacket
Potatoes
Room (20ºC)
Corn on the Cob
Room 20ºC
Frozen -18ºC
Beans (green)
Fresh: 20ºC
Frozen: - 18ºC
Broccoli
Fresh: 20ºC
Frozen: - 18ºC
Carrots (sliced)
Fresh: 20ºC
Frozen: -18ºC
Carrots
(baby, whole)
Fresh: 20ºC
Frozen
: -18ºC
Cauliflower
Fresh: 20ºC
Frozen: -18ºC
Fresh:
Frozen:
Fresh:
Frozen:
Fresh:
Frozen:
Fresh:
Frozen:
Fresh:
Frozen:
Fresh:
Frozen:
TIME
6 mins
/450g (1lb)
6-7 mins
/450g (1lb)
14-15 mins
for 200g (7oz)
for 2 potatoes
for 225g (8oz)
for 225g (8oz)
for 225g (8oz)
for 225g (8oz)
for 225g (8oz)
for 225g (8oz)
for 225g (8oz)
for 225g (8oz)
for 225g (8oz)
for 225g (8oz)
7oz
7 mins
6 mins
for 2 cobs
9 mins
for 2 cobs
4 mins
4-5 mins
4 mins
5 mins
4-5 mins
5 mins
4 mins
5 mins
4 mins
4-5 mins
MICROWAVE
POWER LEVEL
MEDIUM HIGH
(70%)
MEDIUM HIGH
(70%)
MEDIUM HIGH
(70%)
HIGH
(100%)
HIGH
(100%)
MEDIUM HIGH
(70%)
HIGH
(100%)
HIGH
(100%)
HIGH
(100%)
HIGH
(100%)
METHOD
1. Place in a single layer in a large flan dish, cover with
microwave cling film and pierce in 4-5 places.
2. Leave to stand for 2-3 minutes before serving.
As above.
1. Place Rice/Pasta in a 2.5 litre casserole dish.
2. Add three times the volume of boiling water to
quantity of rice. Do not cover.
3. Stir 3 times during cooking.
4. Stand for 2-3 minutes before rinsing in boiling water
and serving.
1. Pierce each potato in several places.
2. Turn over halfway through cooking.
3. Stand for 3-4 minutes before serving.
1. Place in a dish, add 60ml (4tbsp) water.
2. Cover with microwave cling film pierce in 4-5 places.
3. Turn over halfway through cooking.
4. Stand for 1-2 minutes before serving.
1. Place in a dish, add 30ml (2tbsp) water.
2. Cover with microwave cling film and pierce in 4-5
places.
3. Stir halfway through cooking.
4. Stand for 1-2 minutes before serving.
As above.
As above.
As above.
As above.
B5$735LQGG
24
Page 26
C
OOKING CHART
FOOD COOKING
Peas
Fresh: 20ºC
Frozen: - 18ºC
New potatoes
Room 20ºC
Mushrooms
(fresh)
Room 20ºC
Tomatoes
(fresh)
Room 20ºC
Fresh:
for 225g (8oz)
Frozen:
for 225g (8oz)
for 450g (1lb)
for 225g (8oz)
for 225g (8oz)
TIME
3-4 mins
4-5 mins
7-8 mins
3 mins
3 mins
MICROWAVE
POWER LEVEL
HIGH
(100%)
HIGH
(100%)
HIGH
(100%)
HIGH
(100%)
1. Place in a dish, add 30ml (2tbsp) water.
2. Cover with microwave cling film and pierce in 4-5
places.
3. Stir halfway through cooking.
4. Leave to stand for 1-2 minutes before serving.
1. Place in a large dish, add 60ml (4tbsp) water.
2. Cover dish with microwave cling film and pierce
in 4-5 places.
3. Stir halfway through cooking.
4. Leave to stand for 1-2 minutes before serving.
1. Chop or leave whole as desired.
2. Place in dish, cover with microwave cling film
and pierce in 4-5 places.
3. Stir halfway through cooking.
1. Slice or quarter as desired.
NOTE: If you wish to leave whole, pierce in
several places.
2. Place in a dish or on a plate, cover with
microwave cling film and pierce in 4-5 places.
3. Leave to stand for 1-2 minutes before serving.
METHOD
Scrambled Egg
Chilled 5ºC
NOTES
Only serve food which is thoroughly cooked, use a professional food thermometer to ensure acceptable
temperatures have been reached throughout.
Hygiene - see Food Handling & Preparation, Page 18
When cooking joints of meat small pieces of aluminium foil can be used to shield small areas of meat if they start
to overcook.
During standing time food should be covered. If covered during cooking, leave covered. If cooked uncovered,
cover with foil.
4 mins HIGH
(100%)
1. Place 6 eggs (size 3), 150ml (¹/ pint) milk, 15g
(¹/oz) butter, salt and pepper in a bowl and beat
thoroughly until smooth.
2. Beat 3 times during cooking until desirably set.
3. Leave to stand for 30 seconds before serving.
25
B5$735LQGG
Page 27
R
EHEATING CHART
REHEATING
FOOD TEMP QUANTITY METHOD
TIME ON
HIGH (100%)
BREAKFAST
Porridge Chilled 125g (5oz) Place in a bowl, uncovered 1 min
Scrambled Egg Chilled 125g (5oz) Place on a plate, uncovered 50 sec
Scrambled Egg
with bacon or
sausage
Bacon Chilled 4 rashers As above 40 sec
Sausages - thick Chilled 4 As above 1 min
Smoked
Haddock
Mushrooms Chilled 100g (4oz) Place in a bowl, uncovered 40 sec
Fresh Tomatoes Chilled 100g (4oz) As above 40 sec
Chilled 175g (6oz) As above 1 min 30 sec
Chilled 175g (6oz) As above 1 min
HOT SANDWICHES
Hamburger Chilled 125g (5oz) Place on a plate, uncovered 1 min
Cheeseburger Chilled 175g (6oz) As above 1 min
Hot Dog Chilled 175g (6oz) As above 1 min
Bacon Chilled 175g (6oz) As above 1 min
Sausage Chilled 225g (8oz) As above 1 min 30 sec
Beef Chilled 175g (6oz) As above 1 min
PREPARED DISHES
Lasagne Chilled 300g (11oz)
Chilli con Carne
& Rice
Curry & Rice Chilled 300g (11oz) As above 3 min 30 sec
Shepherds Pie Chilled 300g (11oz) As above 2 min 40 sec
Stew &
Dumplings
Chilled 325g (12oz) As above 3 min 30 sec
Chilled 400g (14oz) As above 3 min 30 sec
1. Place on a plate, cover with cling film
2. Stand covered for 2-3 minutes
26
3 min 30 sec
B5$735LQGG
Page 28
R
EHEATING CHART
REHEATING
FOOD TEMP QUANTITY METHOD
TIME ON
HIGH (100%)
PREPARED DISHES
Bangers & Mash Chilled 325g (12oz) Place on a plate, cover with cling film 2 min 40 sec
Duck à l’orange Chilled 540g (1lb 4oz) As above 8 mins
Spaghetti
Bolognese
Chicken in a
sauce
Beef Stroganoff &
Rice
BBQ Ribs Chilled 375g (13oz) As above 3 min 20 sec
Rice/Pasta Chilled 225g (8oz) As above 1 min 50 sec
Chilled 300g (11oz) As above 2 min 40 sec
Chilled 300g (11oz) As above 4 mins
Chilled 375g (13oz) As above 4 mins
SAVOURY BREAD AND PASTRY
Dinner Roll(s) Chilled
1
2
Place on the turntable, uncovered
As above
10 sec
15 sec
Croissant(s) Chilled
Garlic Bread Chilled 250g (9oz) As above 40 sec
Pizza Slice Chilled
Pizza - small Frozen Chilled
Pizza - large Frozen Chilled
Meat Pie - small Frozen Chilled 125g (5oz)
Meat Pie - large Chilled 450g (1lb)
Quiche - slice Chilled 125g (5oz)
Quiche - whole Chilled 540g (1lb 4oz)
1
2
125g (5oz)
100g (4oz)
75g (3oz)
100g (4oz)
400g (14oz)
400g (14oz)
As above
As above
Place on a plate, uncovered
As above
As above
As above
As above
As above
1. Place on a plate, uncovered
2. Stand for 2-3 minutes
1. Place on a plate, uncovered
2. Stand for 3-4 minutes
1. Place on a plate, uncovered
2. Stand for 2-3 minutes
1. Place on a plate, uncovered
2. Stand for 3-4 minutes
27
7 sec
10 sec
40 sec
2 mins
25 sec
1 min 30 sec
3 mins
6 mins
48 sec
3 min 30 sec
50 sec
3 min 30 sec
B5$735LQGG
Page 29
R
EHEATING CHART
REHEATING
FOOD TEMP QUANTITY METHOD
TIME ON
HIGH (100%)
SAVOURY BREAD AND PASTRY
Cornish Pastie(s)
(175g)(6oz) each
Sausage Roll(s)
75g (3oz) each
Chilled
Chilled
1
2
1
2
Place on a plate, uncovered
As above
Place on a plate, uncovered
As above
1 min
1 min 50 sec
CANNED FOODS
Baked Beans Room 450g (1lb)
Sausage &
Beans
Soup - thick/thin Room 425g (15oz) As above 3 mins
Hot Dogs Room 425g (15oz) Place in a bowl, cover with cling film 3 mins
Peas Room 550g (1lb 4oz)
Sweetcorn Room 325g (12oz) As above 3 mins
Room 450g (1lb) As above 3 min 25 sec
Place in a bowl, cover with cling film,
stir halfway through cooking
Place in a bowl, cover with cling film,
stir halfway through cooking
3 mins
3 min 25 sec
Potatoes Room 540g (1lb 4oz) As above 4 min 35 sec
Carrots - whole,
sliced
Tomatoes Room 400g (14oz) As above 3 min 25 sec
Asparagus Room 350g (12oz) As above 3 mins
Green Beans Room 300g (11oz)
Room 540g (1lb 4oz) As above 4 mins
Place in a bowl, cover with cling film,
stir halfway through cooking
3 min 25 sec
FRESH VEGETABLES
Green Beans Chilled 125g (5oz) Place on a plate, uncovered 1 min
Broccoli Chilled 125g (5oz) Place on a plate, uncovered 1 min
Carrots - sliced Chilled 125g (5oz) Place on a plate, uncovered 1 min
Cauliflower Chilled 125g (5oz) Place on a plate, uncovered 1 min
Corn on the Cob Chilled 200g (7oz) Place on a plate, uncovered 1 min 50 sec
Peas Chilled 100g (4oz) Place on a plate, uncovered 1 min
28
B5$735LQGG
Page 30
R
EHEATING CHART
REHEATING
FOOD TEMP QUANTITY METHOD
TIME ON
HIGH (100%)
FRESH VEGETABLES
Jacket Potatoes Chilled 250g (9oz) Place on the turntable, uncovered 2 mins
New Potatoes Chilled 225g (8oz) Place on a plate, uncovered 2 mins
Brussels Sprouts Chilled 225g (8oz) Place on a plate, uncovered 1 min
MEAT PORTIONS
Chicken
Quarters
Lamb Chops Chilled 3 (225g)(8oz) Place on a plate, cover with cling film 1 min 30 sec
Pork Chop Chilled 1 (125g)(5oz) Place on a plate, cover with cling film 2 mins
Sliced Meat
with Gravy
Gammon-sliced Chilled 1(175g)(6oz) Place on a plate, cover with cling film 1 min 30 sec
Chilled 1 (200g)(7oz) Place on a plate, cover with cling film 2 mins
Chilled 1 (225g)(8oz) Place on a plate, cover with cling film 3 mins
Trout &
Salmon Steak
Chilled 1(200g)(7oz) Place on a plate, cover with cling film 2 mins
29
B5$735LQGG
Page 31
R
EHEATING CHART
REHEATING
FOOD TEMP QUANTITY METHOD
TIME ON
HIGH (100%)
SWEET PORTIONS
Fruit Crumble Chilled 175g (6oz) Place in a bowl, uncovered 1 min
Fruit Crumble
with custard
Fruit Pie Chilled 175g (6oz) Place in a bowl, uncovered 1 min
Fruit Pie with
Custard
Sponge Pudding Chilled 125g (5oz) Place in a bowl, uncovered 40 sec
Sponge
Pudding with
Custard
Suet Pudding Chilled 175g (6oz) Place in a bowl, uncovered 40 sec
Suet Pudding
with Custard
Chilled 275g (10oz) Place in a bowl, uncovered 2 mins
Chilled 275g (10oz) Place in a bowl, uncovered 1 min 30 sec
Chilled 225g (8oz) Place in a bowl, uncovered 1 min 30 sec
Chilled 275g (10oz) Place in a bowl, uncovered 1 min 30 sec
Chocolate
Fudge Cake
NOTES
Only serve food which is thoroughly reheated, use a professional food thermometer to ensure acceptable
temperatures have been reached throughout.
Temperatures refered to in this chart are: Room, approx. 20ºC, Chilled, approx. 5ºC, and Frozen, approx. -18ºC
Hygiene - see Food Handling & Preparation, Page 18
During standing time (where recommended) food should be covered. If covered during reheating, leave covered.
If reheated uncovered, cover with foil.
Chilled 125g (5oz) Place on a plate, uncovered 40 sec
30
B5$735LQGG
Page 32
C
LEANING & MAINTENANCE
WARNING
• Do not allow grease or dirt to build up on the door
seals and adjacent parts as this may prevent
the door from closing correctly and may cause
a leakage of microwaves. To clean use a mild
detergent solution on a soft damp cloth.
• Keep the oven floor clean at all times. If you leave
grease or fat in the cavily, it may overheat, smoke or
even catch fire when next using the oven.
• Never use spray cleaners, oven keys or abrasive
scourers as these damage the surface of the oven.
OVEN INTERIOR
Clean the microwave oven cavity, at the end of each
day with a damp soft cloth. For heavier soil, use mild
soap applied with a soft damp cloth wipe clean ensuring
all mild soap is removed. Make sure that mild soap or
water does not penetrate through the small vents in the
walls which may cause damage to the oven. Take care
not to let soapy water drip through the small holes in the
• Do not remove the oven floor from the oven.
• Do not operate the oven without the air ventilation
cover.
• Do not use commercial oven cleaners, abrasive or
harsh cleaners or scouring pads on any part of your
microwave oven.
• Do not sprinkle water onto the oven directly.
It may cause electric shock, leakage of electricity or
damage of the oven.
• Failure to maintain the oven in a clean condition
could lead to deterioration of the surface that could
adversely affect the life of the appliance and possibly
result in a hazardous situation.
oven walls. Excess water spillage through these holes
will cause damage to the oven interior. It is important
that the door seals and sealing surfaces are kept clean
at all times, wipe regularly with a damp cloth.
The oven floor should be kept clean at all times. Minor
spills may be wiped with a damp cloth.
OUTER CABINET
Wipe the outside cabinet with a mild detergent solution
on a soft cloth. The control panel must be wiped clean
whilst the door is open, therefore inactivating the oven.
AIR INTAKE FILTER
Keep the air intake filter clean. Clean the air intake filter
once every two weeks.
Wash the air intake filter in mild soapy water, rinse and
dry with a soft cloth.
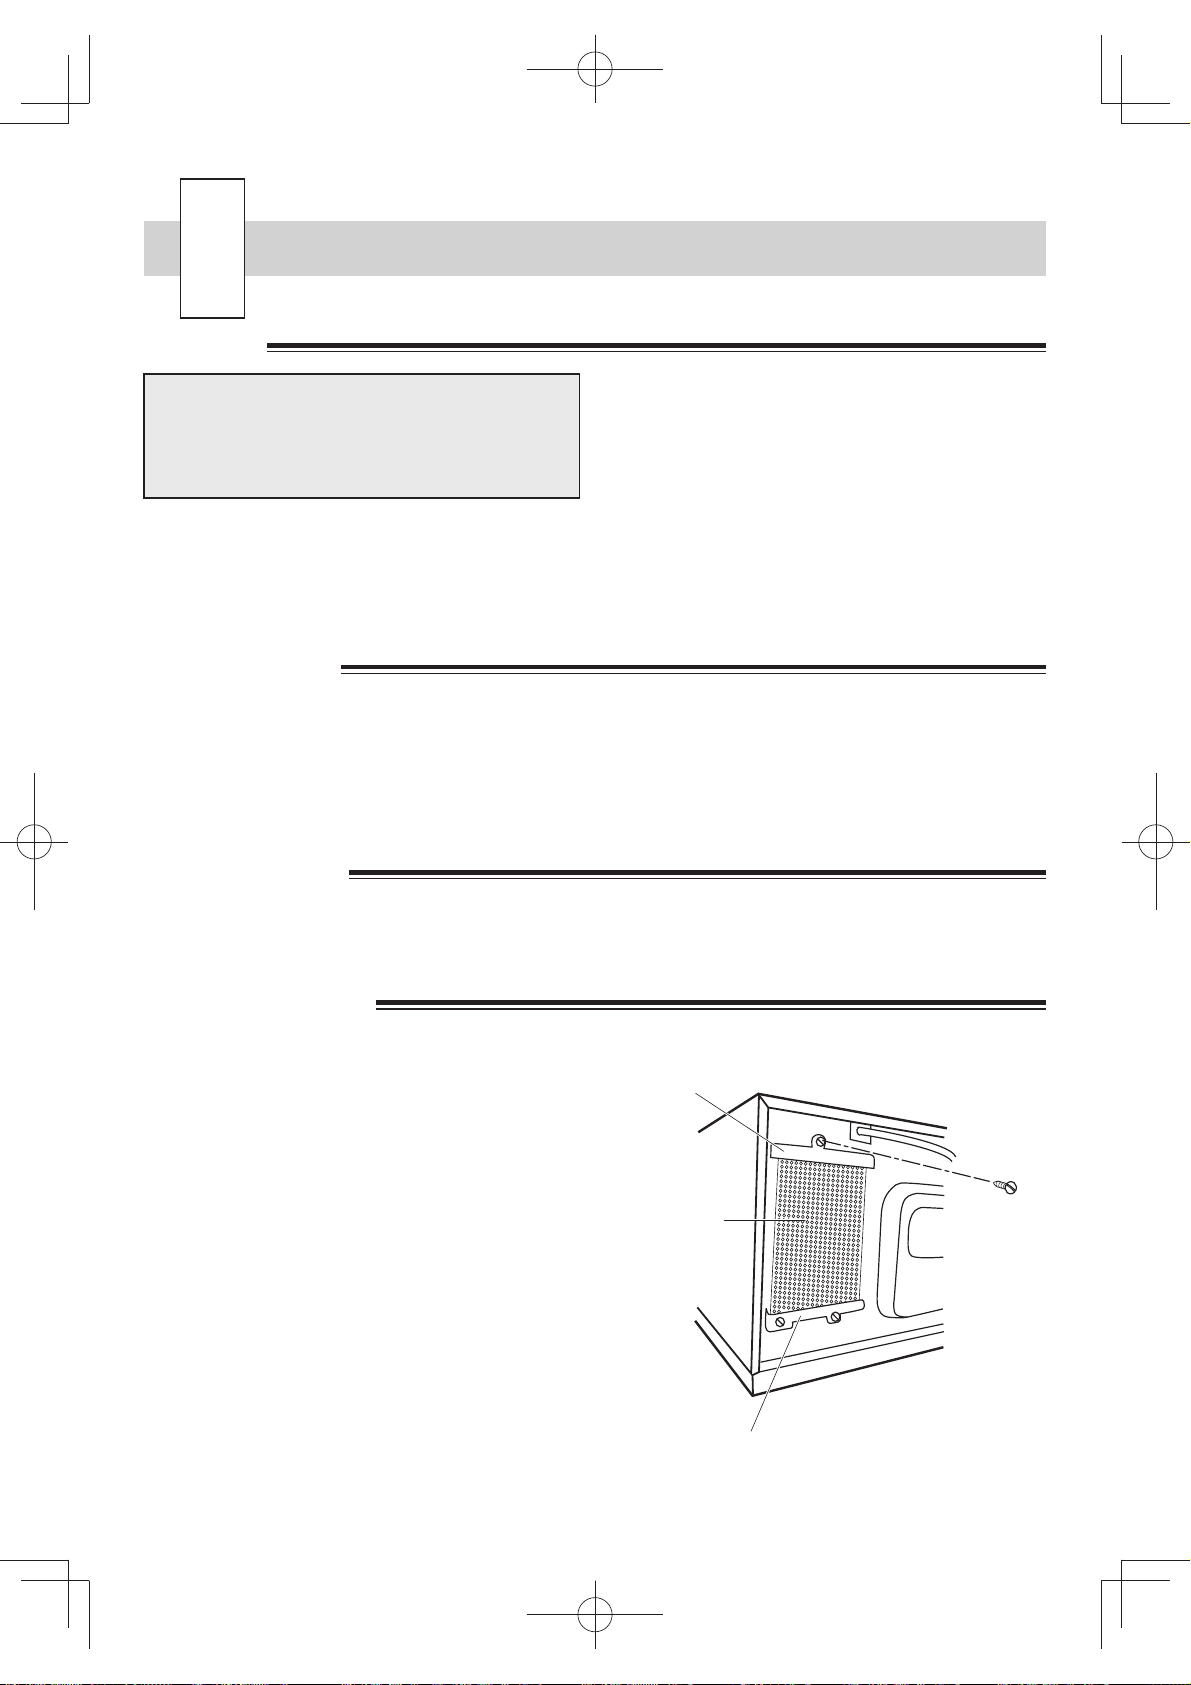
You can remove the air intake filter easily using a coin
(less than 2mm thick.)
Do not operate the oven without the air intake filter in
place.
Removal:
1. Remove one special screw (A) as shown in Fig.1.
2. Remove the upper holder from the air intake filter.
3. Remove the air intake filter from the lower holder.
Reinstall:
1. Insert the air intake filter into the slot of the lower
holder.
2. Place the upper holder on the air intake filter.
3. Secure the upper holder and air intake filter to the
oven with one special screw (A) as shown in Fig. 1.
Fig. 1
Upper holder
Air intake
filter
Lower holder
(A)
B5$735LQGG
31
Page 33
T
ROUBLESHOOTING
If you think the oven is not working properly there are
some simple checks which you can carry out yourself
before you call for an engineer. This will help prevent
unnecessary service calls if the fault is something
simple.
Simply answer “YES” or “NO” to the following questions:
1 Does the oven lamp come on when you open the
door? YES/NO
Put half a cup of water on the oven floor in the oven and
close the door. Cook for 1 minute at 100%.
2 Does the oven lamp come on? YES/NO
3 Does the fan motor work? (Check by placing your
hand above the air vent openings) YES/NO
4 After 1 minute does the “Beep” signal sound?
YES/NO
5 And did the heating indicator “ON” go out?
YES/NO
6 Is the water in the cup hot? YES/NO
If you answer “NO” to any question first check that the
oven is plugged in properly and the fuse has not
blown, if there is no fault with either, check against the
troubleshooting chart below.
WARNINGS:
• Never adjust, repair or modify the oven
yourself, or allow anyone other than a Service
Technician, appointed by SHARP to carry out
the service.
• The door seal stops microwave leakage during oven
operation, but does not form an airtight seal. It is
normal to see drops of water, light or feel warm air
around the oven door. Food with a high moisture
content will release steam and cause condensation
inside the door which may drip from the oven.
• Repairs & Modifications: Do not attempt to operate
the oven if it is not working properly.
• Outer Cabinet & Lamp Access: Never remove the
outer cabinet. This would be very dangerous due
to high voltage parts inside which must never be
touched, as this could be fatal. Your oven is not fitted
with a lamp access cover. If the lamp fails do not
attempt to replace the lamp yourself, please contact
your supplier.
PROBLEM POSSIBLE CAUSE
Draught circulates around the
door.
Condensation forms in the
oven, and may drip from the
door.
Flashing or arcing from within
the cavity when cooking.
Arcing potatoes. Ensure all “eyes” are removed and place in a heat resistant flan dish or
After setting the time, the
oven does not start.
Oven cooks too slowly. Ensure correct power level has been selected.
Oven makes a noise. The microwave energy pulses ON/OFF during cooking/defrosting.
Outer cabinet is hot. The cabinet may become warm to the touch - keep chidren away
When oven is working, air circulates within the cavity. The door does not
form an airtight seal so air may escape from the door.
The oven cavity will normally be colder than the food being cooked, and so
steam produced when cooking will condense on the colder surface. The
amount of steam produced depends on the water content of the food being
cooked. Some foods, such as potatoes have a high moisture content.
Condensation trapped in the door glass should clear after a few hours.
Arcing will occur when a metallic object comes into dose proximity to the
oven cavity during cooking. This may possibly roughen the surface of the
cavity, but would not otherwise damage the oven.
similar.
Check the door is closed properly.
32
B5$735LQGG
Page 34
T
(
O REPLACE THE MAINS PLUG
The wires in the mains cable are colour coded as
shown opposite:
As the colours of the cores in the mains lead of your
oven may not correspond with the coloured marking
identifying the terminals in your plug, connect the wires
as shown:
Make sure the terminal screws are tight and the cable is
held securely by the cable grip where it enters the plug.
Like most appliances in your home, your oven must
be connected to a single phase 230-240 Volt, 50Hz
alternating current supply.
If you do not make the proper electrical connections
you might damage the oven or injure yourself. Neither
SHARP nor the supplier will be liable if this happens.
ALLING FOR SERVICE
C
green and yellow stripes = EARTH
blue = NEUTRAL
brown = LIVE
• The green and yellow wire to the plug terminal
marked E or
green and yellow.
• The blue wire to the plug terminal maked N or
coloured black or coloured blue.
• The brown wire to the plug terminal marked L or
coloured red or coloured brown.
WARNING:
THIS APPLIANCE MUST BE EARTHED.
IF YOU HAVE ANY DOUBTS ABOUT YOUR
ELECTRICAL SUPPLY ASK A QUALIFIED
ELECTRICIAN.
or coloured green or coloured
• If you are unable to resolve a problem using the
checks covered on the last few pages, do not attempt
to service this microwave oven yourself.
• Contact the dealer or supplier from whom the
oven was purchased in order to obtain service.
01296 663400 (office hours)
• For general information & assistance with oven
queries, please contact our help desk:
Telephone: 01296 663400 (office hours)
e-mail: [email protected]
33
B5$735LQGG
Page 35
AC Line voltage ............................................. Single phase 230-240V, 50Hz
AC Power required ........................................ 1.55kW
Output power ................................................ 1000W (IEC 60705)
Microwave frequency .................................... 2450MHz *(Group 2 / Class B)
Sound level ................................................... less than 70dB (A)
Outside dimensions ...................................... 520(W) x 309(H) x 406(D) mm
Cavity dimensions ......................................... 351(W) x 211(H) x 372(D) mm
Oven capacity ............................................... 1.0 cu.ft (28 litres)
Cooking uniformity ........................................ Rotary antenna system
Weight ........................................................... Approx. 18kg
This product contains a light source of energy efficiency class G.
* This Product fulfils the requirement of the European standard EN55011. In conformity
with this standard, this product is classified as group 2 class B equipment. Group
2 means that the equipment intentionally generates radio-frequency energy in the
form of electromagnetic radiation for heating treatment of food. Class B equipment
means that the equipment suitable to be used in domestic establishments.
(This product is designed for commercial application only and as such it falls outside the
scope of Regulation (EC) 1275/2008 implementing EU Directive 2005/32/EC on ecodesign requirements for standby and off mode electric power consumption. Sharp do not
recommend the product for domestic application and will not accept any liability for such
use.)
External equipotential bonding terminal
This appliance has an external equipotential bonding terminal, and this symbol
is on the back of the microwave oven.
As part of a policy of continuous improvement, we reserve the right to alter design and
specification without notice.
B5$735LQGG
34
Page 36
Information on the Disposal of this Equipment
Takumi cho, Sakai ku, Sakai sh
(p)
K
51
IF YOU WISH TO DISPOSE OF THIS EQUIPMENT, DO NOT USE THE ORDINARY WASTE BIN, AND
DO NOT PUT THEM INTO A FIREPLACE!
Used electrical and electronic equipment should always be collected and treated SEPARATELY in
accordance with local law.
Separate collection promotes an environment-friendly treatment, recycling of materials, and minimizing
final disposal of waste. IMPROPER DISPOSAL can be harmful to human health and the environment due
to certain substances! Take USED EQUIPMENT to a local, usually municipal, collection facility, where
available.
If in doubt about disposal, contact your local authorities or dealer and ask for the correct method of
disposal.
ONLY FOR USERS IN THE EUROPEAN UNION, AND SOME OTHER COUNTRIES; FOR INSTANCE
NORWAY AND SWITZERLAND: Your participation in separate collection is requested by law.
The symbol shown above appears on electrical and electronic equipment (or the packaging) to remind the
users of this.
Users from PRIVATE HOUSEHOLDS are requested to use existing return facilities for used equipment.
Return is free of charge.
If the equipment has been used for BUSINESS PURPOSES, please contact your SHARP dealer who will
inform you about take-back. You might be charged for the costs arising from take-back. Small equipment
(and small quantities) might be taken back by your local collection facility. For Spain: Please contact the
established collection system or your local authority for take-back of your used products.
Manufacturer: SHARP Corporation
Authorised Representative: SHARP Electronics (Europe) Ltd.
B5$735LQGG
1 Takumi-cho, Sakai-ku, Sakai-shi, Osaka 590-8522, Japan
HARP Electronics (Europe) Ltd.
6-9 The Square, Stockley Park, Uxbridge, UB11 1FW, UK
-9 The Square, Stockley Park, Uxbridge, UB11 1FW, U
SHARP Electronics GmbH
Nagelsweg 33-35, 20097 Hamburg, Germany
TINSEB436WRRZ-K51
TINSEB436WRRZ-K
 Loading...