


R-1210

over the
counter
microwave oven
models
operation manual
R-1210
installation instructions
&
R-1211
Read all
instructions
carefully
before using
the oven.
FOR CUSTOMER ASSISTANCE
To aid in reporting this microwave oven in case of loss or theft, please record below the model number and serial
number located on the unit. We also suggest you record all the information listed and retain for future reference.
MODEL NUMBER ________________________ SERIAL NUMBER______________
DATE OF PURCHASE ______________________
DEALER ____________________________ TELEPHONE ________________
SERVICER ___________________________ TELEPHONE ________________
TO PHONE:
DIAL 1-800-BE-SHARP ( 237-4277 ) for :
SERVICE (for your nearest Sharp Authorized Servicer)
PARTS (for your authorized parts distributor)
ADDITIONAL CUSTOMER INFORMATION
DIAL 1-800-642-2122 for :
ACCESSORIES and COOKBOOK
TO WRITE:
Sharp Electronics Corporation
Customer Assistance Center
1300 Naperville Drive
Romeoville, IL 60446-1091
TO ACCESS INTERNET :
Please provide the following information when you write or call: model number, serial number, date of purchase,
your complete mailing address (including zip code), your daytime telephone number (including area code) and
description of the problem.
www.sharp-usa.com
PRECAUTIONS TO AVOID POSSIBLE
EXPOSURE TO EXCESSIVE
MICROWAVE ENERGY
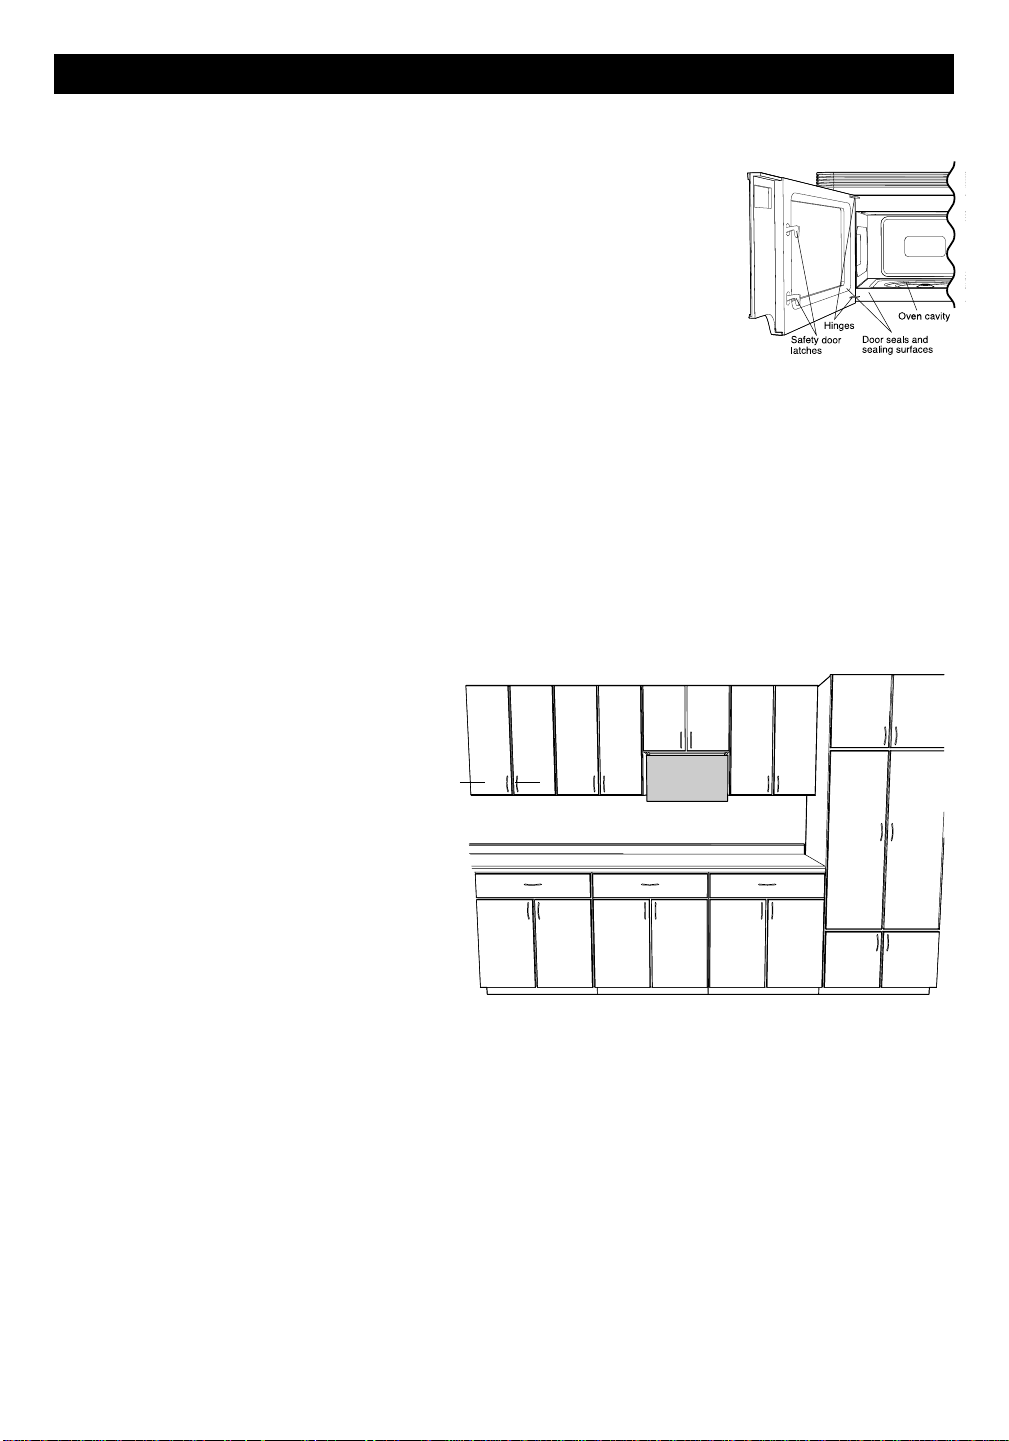
(a) Do not attempt to operate this oven with the door open since open-door operation can
result in harmful exposure to microwave energy . It is important not to defeat or tamper with
the safety interlocks.
(b) Do not place any object between the oven front face and the door or allow soil or cleaner
residue to accumulate on sealing surfaces.
(c) Do not operate the oven if it is damaged. It is particularly important that the oven door close
properly and that there is no damage to the: (1) door (bent), (2) hinges and latches (broken
or loosened), (3) door seals and sealing surfaces.
(d) The oven should not be adjusted or repaired by anyone except properly qualified service
personnel.
2

CONTENTS
For Customer Assistance.......................... 2
Precautions to Avoid Possible
Exposure to Excessive
Microwave Energy .................................. 2
Contents...................................................... 3
Consumer Limited Warranty ..................... 4
Product Information Card.......................... 4
Important Safety Instructions ................... 5
Unpacking and Installation Instructions.. 6-11
Unpacking and Examining Your Oven...... 6
Installation Instructions ............................. 6-10
Optional Accessories ................................ 11
Checklist for Installation ............................ 11
Information You Need to Know................. 12-14
About Your Oven ...................................... 12
Special Features......................................... 18-24
Sensor Cook ............................................. 18
Reheat ...................................................... 19
Sensor Cook Center ................................. 20
Sensor Cook Recipes ............................... 21
Defrost Center........................................... 22
Instant Sensor........................................... 23
Keep Warm Plus ....................................... 24
Other Convenient Features ....................... 25-26
Custom Help ............................................. 25
Demonstration Mode................................. 25
Help .......................................................... 25
Multiple Sequence Cooking ...................... 26
Minute Plus ............................................... 26
More or Less Time Adjustment ................. 26
About Food ............................................... 12
About Utensils and Coverings .................. 13
About Children and the Microwave ........... 13
About Microwave Cooking ........................ 14
About Safety ............................................. 14
Part Names ................................................. 15-16
Before Operating........................................ 16
To Set the Clock ....................................... 16
Stop/Clear................................................. 16
Manual Operation....................................... 17
Time Cooking............................................ 17
To Set Power Level .................................. 17
Manual Defrost.......................................... 17
Timer......................................................... 26
Accent Light and Task Light ..................... 26
Cleaning and Care...................................... 27
Replacing Parts .......................................... 27
Service Call Check ..................................... 28
Specifications............................................. 28
The Ultimate Accessory ............................ 29
Cookbook Order Form............................... 29
Guia Auto-Touch ........................................ 30-31
Auto-Touch Guide...................... 31-Back Cover
3
CONSUMER LIMITED WARRANTY
SHARP ELECTRONICS CORPORATION warrants to the first consumer purchaser that this Sharp brand
product (the “Product”), when shipped in its original container, will be free from defective workmanship
and materials, and agrees that it will, at its option, either repair the defect or replace the defective Product
or part thereof with a new or remanufactured equivalent at no charge to the purchaser for parts or labor for
the period(s) set forth below.
This warranty does not apply to any appearance items of the Product nor to the additional excluded item(s)
set forth below nor to any Product the exterior of which has been damaged or defaced, which has been
subjected to misuse, abnormal service or handling, or which has been altered or modified in design or
construction.
In order to enforce the rights under this limited warranty, the purchaser should follow the steps set forth
below and provide proof of purchase to the servicer.
The limited warranty described herein is in addition to whatever implied warranties may be granted
to purchasers by law. ALL IMPLIED WARRANTIES INCLUDING THE WARRANTIES OF
MERCHANT ABILITY AND FITNESS FOR USE ARE LIMITED T O THE PERIOD(S) FROM THE DATE OF
PURCHASE SET FORTH BELOW . Some states do not allow limitations on how long an implied warranty
lasts, so the above limitation may not apply to you.
Neither the sales personnel of the seller nor any other person is authorized to make any warranties other
than those described herein, or to extend the duration of any warranties beyond the time period described
above on behalf of Sharp.
The warranties described herein shall be the sole and exclusive warranties granted by Sharp and shall be
the sole and exclusive remedy available to the purchaser. Correction of defects, in the manner and for the
period of time described herein, shall constitute complete fulfillment of all liabilities and responsibilities of
Sharp to the purchaser with respect to the Product, and shall constitute full satisfaction of all claims,
whether based on contract, negligence, strict liability or otherwise. In no event shall Sharp be liable, or in
any way responsible, for any damages or defects in the Product which were caused by repairs or attempted repairs performed by anyone other than an authorized servicer. Nor shall Sharp be liable or in any
way responsible for any incidental or consequential economic or property damage. Some states do not
allow the exclusion of incidental or consequential damages, so the above exclusion may not apply to you.
THIS WARRANTY GIVES YOU SPECIFIC LEGAL RIGHTS. YOU MAY ALSO HAVE OTHER RIGHTS
WHICH VARY FROM STATE TO STATE.
Your Product Model Number
& Description:
Warranty Period for this Product:
Additional Item(s) Excluded from
Warranty Coverage (if any):
Where to Obtain Service:
R-1210 or R-1211 Home Use Carousel
sure to have this information available when you need service for
your Product.)
One (1) year parts and labor in-home service. The warranty period
continues for an additional six (6) years, for a total of seven (7)
years, with respect to the magnetron tube in the Product for parts
only. Labor and the servicer trip charge are not provided free of
charge for this additional period.
Non-functional accessories, turntable and light bulbs.
From a Sharp Authorized Servicer located In the United States. Be
sure to have Proof of Purchase available. For in-home service,
the servicer will come to the unit’s location. If it is necessary to remove the unit for repair, the servicer will reinstall the unit at no extra
charge, provided it was installed according to Sharp’s Installation
Instructions. To find the location of the nearest Sharp Authorized
Servicer, call Sharp toll free at 1-800-BE-SHARP (1-800-237-4277).
™
Microwave Oven. (Be
TO OBTAIN SUPPLY, ACCESSORY OR PRODUCT INFORMATION, CALL 1-800-BE-SHARP OR VISIT www.sharp-usa.com.
SAVE THE PROOF OF PURCHASE AS IT IS NEEDED SHOULD YOUR OVEN EVER REQUIRE WARRANTY SERVICE.
PRODUCT INFORMATION CARD
The product information card should be completed within ten days of purchase and returned. It is necessary to write
the model and serial numbers, found on the nameplate in the oven cavity , on the product information card. W e will
keep it on file and help you access the information in case of loss, damage or theft. This will also enable us to
contact you in the unlikely event that any adjustments or modifications are ever required for your oven.
4

IMPORTANT SAFETY INSTRUCTIONS
When using electrical appliances basic safety precautions should be followed, including the following:
WARNING - To reduce the risk of burns, electric shock, fire, injury to persons or exposure to
excessive microwave energy:
1. READ ALL INSTRUCTIONS BEFORE
USING THE APPLIANCE.
2. Read and follow the specific “PRECAU-
TIONS TO AVOID POSSIBLE EXPOSURE TO EXCESSIVE MICROWAVE
ENERGY” on inside front cover.
3. This appliance must be grounded. Connect
only to properly grounded outlet. See
“GROUNDING INSTRUCTIONS” on
page 7.
4. Install or locate this appliance only in
accordance with the provided installation
instructions.
5. Some products such as whole eggs and
sealed containers —for example, closed glass
jars—may explode and should not be
heated in this oven.
6. Stir liquids briskly before, during and after
heating to avoid eruption. Be careful.
7. Use this appliance only for its intended use
as described in this manual. Do not use
corrosive chemicals or vapors in this
appliance. This type of oven is specifically
designed to heat, cook or dry food. It is not
designed for industrial or laboratory use.
8. As with any appliance, close supervision is
necessary when used by children.
9. Do not operate this appliance if it has a
damaged cord or plug, if it is not working
properly or if it has been damaged or dropped.
10. This appliance should be serviced only by
qualified service personnel. Contact nearest
Sharp Authorized Servicer for examination,
repair or adjustment.
11. Do not cover or block any openings on the
appliance.
12. Do not store or use this appliance outdoors.
Do not use this product near water—for
example, near a kitchen sink, in a wet
basement or near a swimming pool, and
the like.
13. Do not immerse cord or plug in water.
14. Keep cord away from heated surfaces.
15. Do not let cord hang over edge of table or
counter.
16. See door surface cleaning instructions on
page 27.
17. To reduce the risk of fire in the oven cavity:
a. Do not overcook food. Carefully attend
appliance if paper, plastic or other
combustible materials are placed inside
the oven to facilitate cooking.
b. Remove wire twist-ties from paper or
plastic bags before placing bag in oven.
c. If materials inside the oven should
ignite, keep oven door closed, turn
oven off and disconnect the power
cord or shut off power at the fuse or
circuit breaker panel.
d. Do not use the cavity for storage
purposes. Do not leave paper products,
cooking utensils or food in the cavity
when not in use.
18. For a wall mounted oven, observe the
following instructions:
a. Do not operate any heating or cooking
appliance beneath this appliance.
b. Do not mount unit directly above a
heating or cooking appliance.
c. Do not mount over a sink.
19. If the oven light fails, consult a SHARP
AUTHORIZED SERVICER.
SAVE THESE INSTRUCTIONS
5
UNPACKING AND INSTALLATION INSTRUCTIONS
UNP ACKING AND EXAMINING YOUR OVEN
Open the bottom of the carton, bend the carton flaps back and tilt the oven over to
rest on plastic foam pad. Lift carton off oven and remove all packing materials,
WALL and TOP CABINET TEMPLATE, T urntable, and T urntable Support. SAVE THE
CARTON AS IT MAY MAKE INSTALLATION EASIER.
1. Remove the feature sticker from the outside of the door, if there is one.
2. DO NOT REMOVE THE WAVEGUIDE COVER, which is located on the right side
wall of the oven cavity. Check to see that there is a WALL TEMPLATE and TOP
CABINET TEMPLATE. Read enclosures and SAVE the Operation Manual.
Check the oven for any damage, such as misaligned or bent door, damaged door
seals and sealing surfaces, broken or loose door hinges and latches and dents inside the cavity or on the door. If
there is any damage, do not operate the oven and contact your dealer or SHARP AUTHORIZED SERVICER.
INST ALLA TION INSTRUCTIONS
Please read all instructions thoroughly before installing the Over the Counter Microwave Oven. Two
people are recommended to install this product.
If a new electrical outlet is required, its installation should be completed by a qualified electrician
before the Microwave Oven is installed. See 3 ELECTRICAL GROUNDING INSTRUCTIONS on page 7.
1 MOUNTING SPACE
This Microwave Oven requires a mounting
space on a wall as shown in Figure 1. It is
designed to be used under standard 24-inch
wide wall cabinets.
24"
Figure 1
2 WALL CONSTRUCTION
This Microwave Oven should be mounted against and supported by a flat vertical wall. The wall must be flat for
proper installation. If the wall is not flat, use spacers to fill in the gaps. Wall construction should be a minimum of
2” x 4” wood studding and 3/8” or more thick dry wall or plaster/lath. The mounting surfaces must be capable of
supporting weight of 110 pounds—the oven and contents—AND the weight of all items which would normally be
stored in the top cabinet above the unit.
The unit should be attached to a minimum of one 2” x 4” wall stud.
To find the location of the studs, one of the following methods may be used:
A. Use a stud finder, a magnetic device which locates the nails in the stud.
B. Use a hammer to tap lightly across the mounting surface to find a solid sound. This will indicate stud location.
The center of the stud can be located by probing the wall with a small nail to find the edges of the stud and then
placing a mark halfway between the edges. The center of any adjacent studs will normally be 16” or 24” to either
side of this mark.
6
UNPACKING AND INSTALLATION INSTRUCTIONS
3 ELECTRICAL GROUNDING INSTRUCTIONS
This appliance must be grounded. This oven is equipped with a cord having a grounding wire with a grounding
plug. It must be plugged into a wall receptacle that is properly installed and grounded in accordance with the
National Electrical Code and local codes and ordinances. In the event of an electrical short circuit, grounding
reduces risk of electric shock by providing an escape wire for the electric current.
WARNING - Improper use of the grounding plug can result in a risk of electric shock.
Electrical Requirements
The electrical requirements are a 120 volt 60 Hz, AC only, 15 amp. or more
protected electrical supply. It is recommended that a separate circuit serving
only the oven be provided.
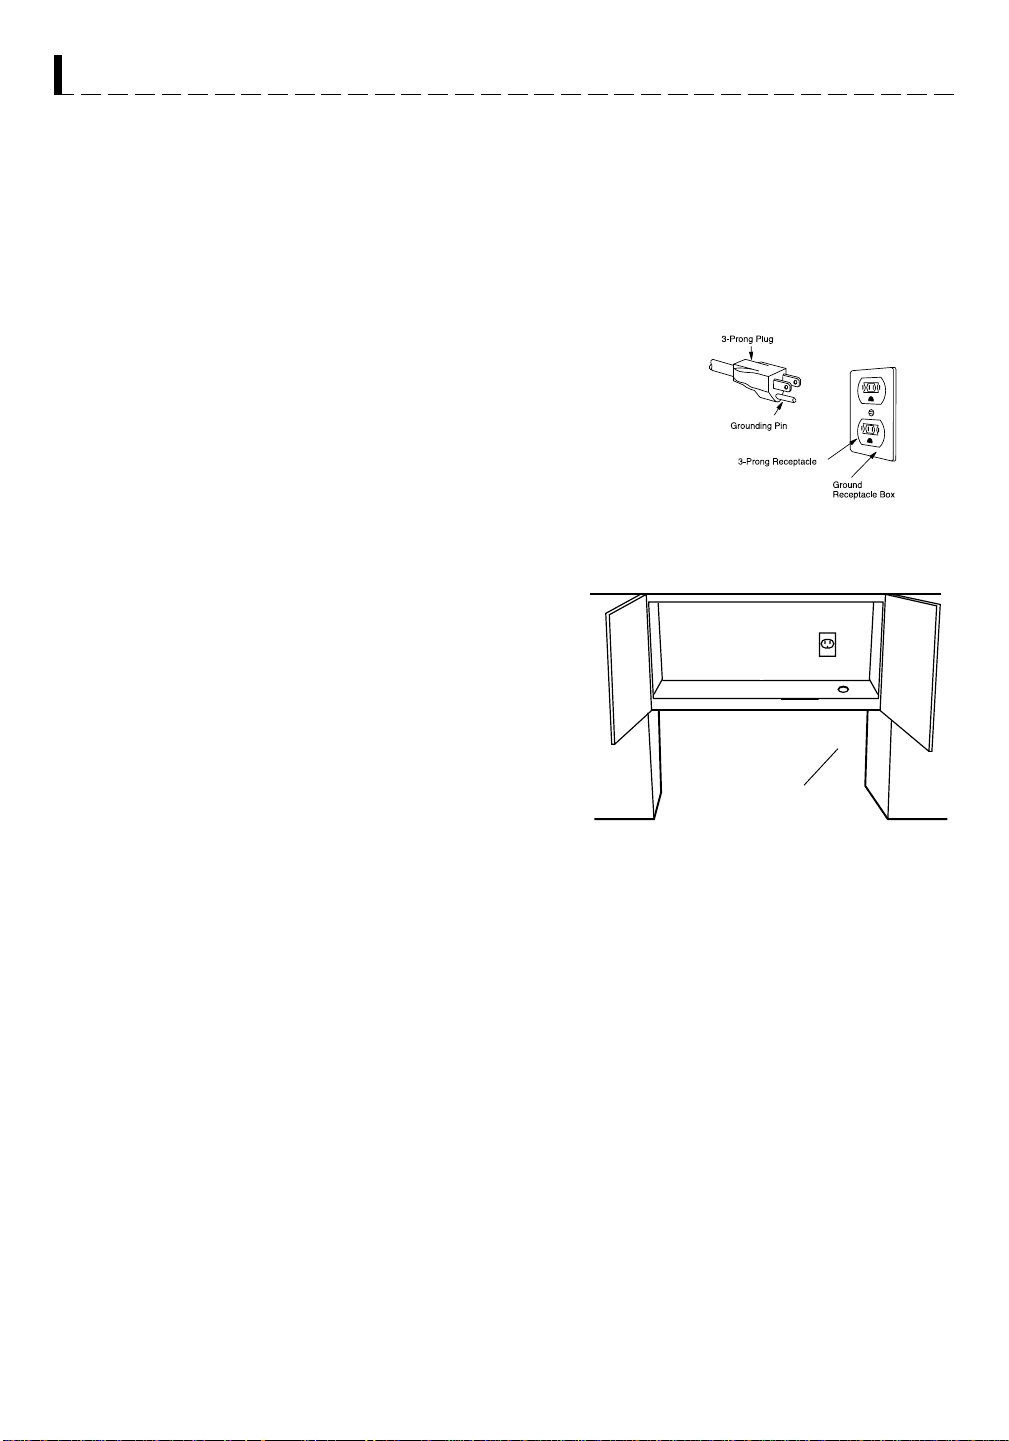
The oven is equipped with a 3-prong grounding plug. It must be plugged into a
wall receptacle that is properly installed and grounded. DO NOT UNDER ANY
CIRCUMSTANCES CUT OR REMOVE THE GROUNDING PIN FROM THE
PLUG.
The single grounded receptacle should be located inside the cabinet directly
above the Microwave Oven mounting location as shown in Figure 2.
NOTE:
1. If you have any questions about the grounding or electrical
instructions, consult a qualified electrician or serviceperson.
2. Neither Sharp nor the dealer can accept any liability for
damage to the oven or personal injury resulting from failure
to observe the correct electrical connection procedures.
Radio or TV Interference
Should there be any interference caused by the microwave
oven to your radio or TV, check that the microwave oven is on a
different electrical circuit, relocate the radio or TV as far away
from the oven as feasible or check position and signal of
receiving antenna.
Figure 2
Ground
Receptacle
Opening for
Power Cord
4 TOOLS RECOMMENDED FOR INSTALLATION
• Phillips Screwdriver
• Electric Drill
• 1/2”, 5/8” and 3/32” Drill Bits
• 1-1/2” Wood Bit or Metal Hole
Cutter (if metal cabinet is used)
• Saw to cut exhaust opening
(if needed)
• Protective Drop Cloth for product
and range - you may also use
carton for protection
• Scissors
• Pencil
• Measure
• Tape
7
UNPACKING AND INSTALLATION INSTRUCTIONS
5 INSTALLATION HARDWARE
The INSTALLATION HARDWARE items 1 - 7 are in a small bag. Item 8 is packed separately. All items are in a
small carton packed below the oven.
ITEM NAME QUANTITY PART CODE
1 Wood Screw 5 X 30 mm 6 XTSSD50P35000
2 Toggle Bolt with nuts #10 - 24 X 50 mm 4 LX-BZ0195WRE0
3 Top Cabinet Screw 5 X 60 mm 2 XBRSD50P60000
4 Power Cord Hanger 1 LX-MZB001MRE0
5 Tapping Screw 4 x 12 mm 3 XOTSD40P12000
6 Flat Washer 30 mm diameter 2 XWHSD50-16300
7 Grommet 1 LBSHC0040MRE0
8 Scale Plate 2 LANG-B003MRP0
Figure 3
Parts shown not to common scale.
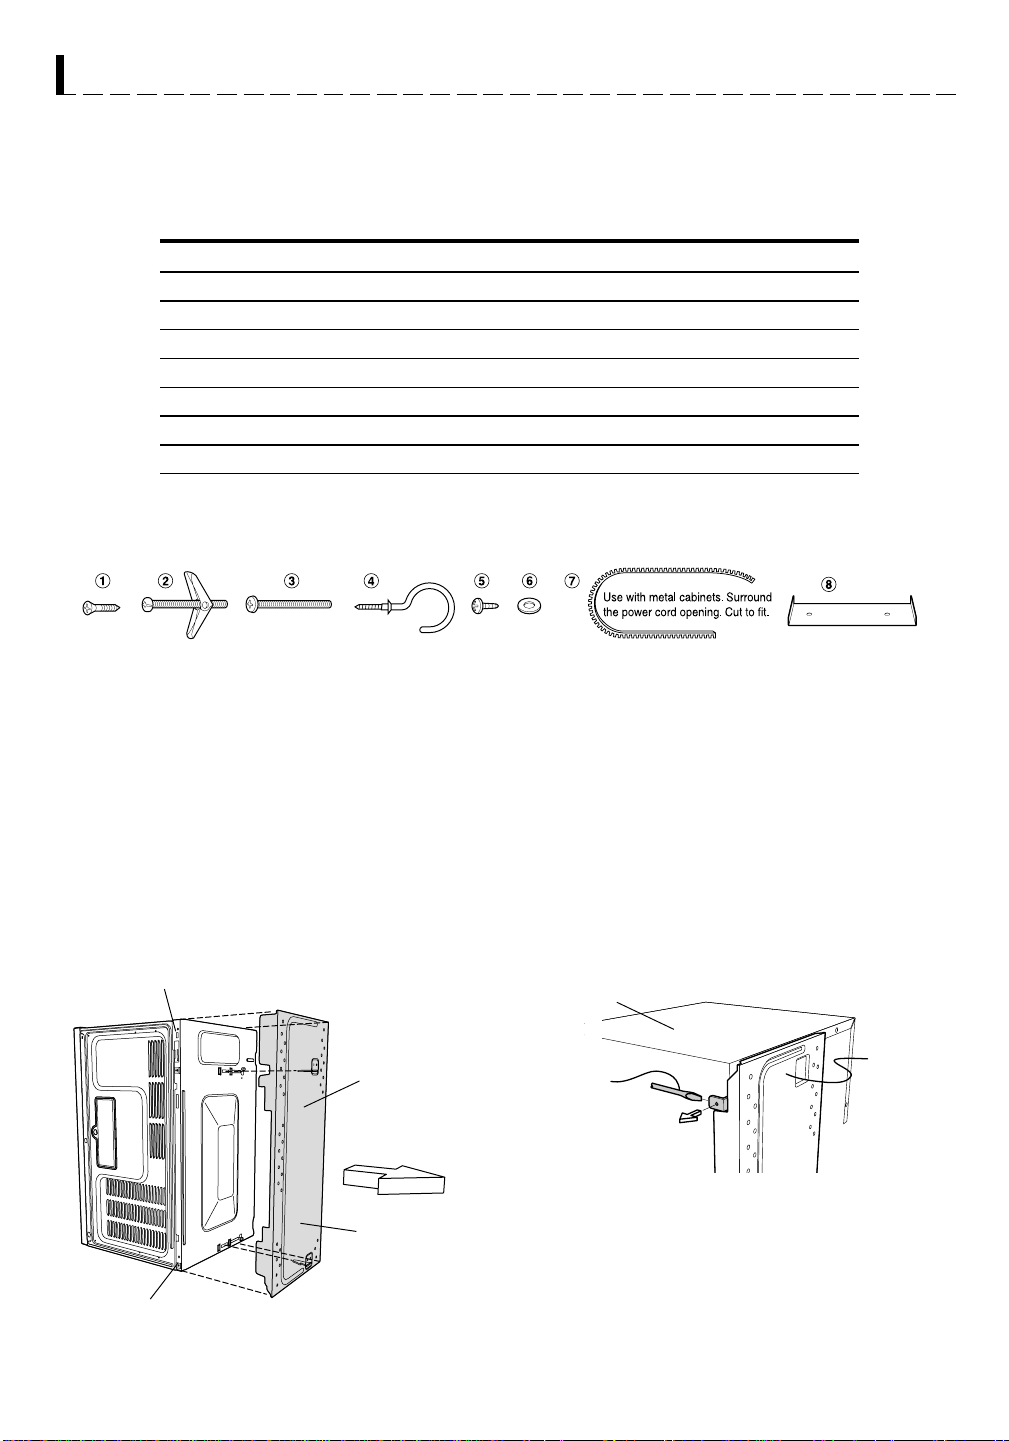
6 PREPARATION OF THE OVEN
1. Turn oven on the side. See Figure 4.
2. Follow steps (A)-(D) to remove mounting plate from the back of the oven as shown in Figure 4.
(A) Release mounting plate by pulling out the lever that is on the bottom of the oven. See Figure 5.
(B) When lever is out, pull that side of the mounting plate away from the oven. See Figure 4.
(C) Repeat step (A) on other side.
(D) Repeat step (B) on other side
Figure 4
(A)
.
Figure 5
(A)
(B)
(D)
Use screwdriver to
assist in releasing
mounting plate.
Bottom of
Microwave
Mounting Plate
(C)
8
UNPACKING AND INSTALLATION INSTRUCTIONS
7 OVEN INSTALLATION
THIS OVEN CANNOT BE PROPERLY INSTALLED WITHOUT REFERRING TO THE MOUNTING INSTRUCTIONS FOUND ON WALL AND TOP CABINET TEMPLATES.
THE NEXT STEP IS TO READ AND FOLLOW MOUNTING INFORMATION ON WALL AND TOP CABINET
TEMPLATES. THIS OVEN MUST BE ATTACHED TO AT LEAST ONE WALL STUD. SEE WALL CONSTRUC-
TION ON PAGE 6.
WHEN DONE WITH TEMPLATES, PROCEED TO MOUNTING SCALE PLATE SECTION.
MOUNTING SCALE PLATE
Attach 2 Scale Plates 8 with tape (not included). See
Figure 6 and WALL TEMPLATE for locations.
NOTE:
This Microwave Oven may not be built-in directly over gas
or electric ovens or cooktops. To reduce the risk of fire or
electrical shock, install at least 13 3/16" above the
countertop.
Figure 6
Scale Plates
Mounting Plate
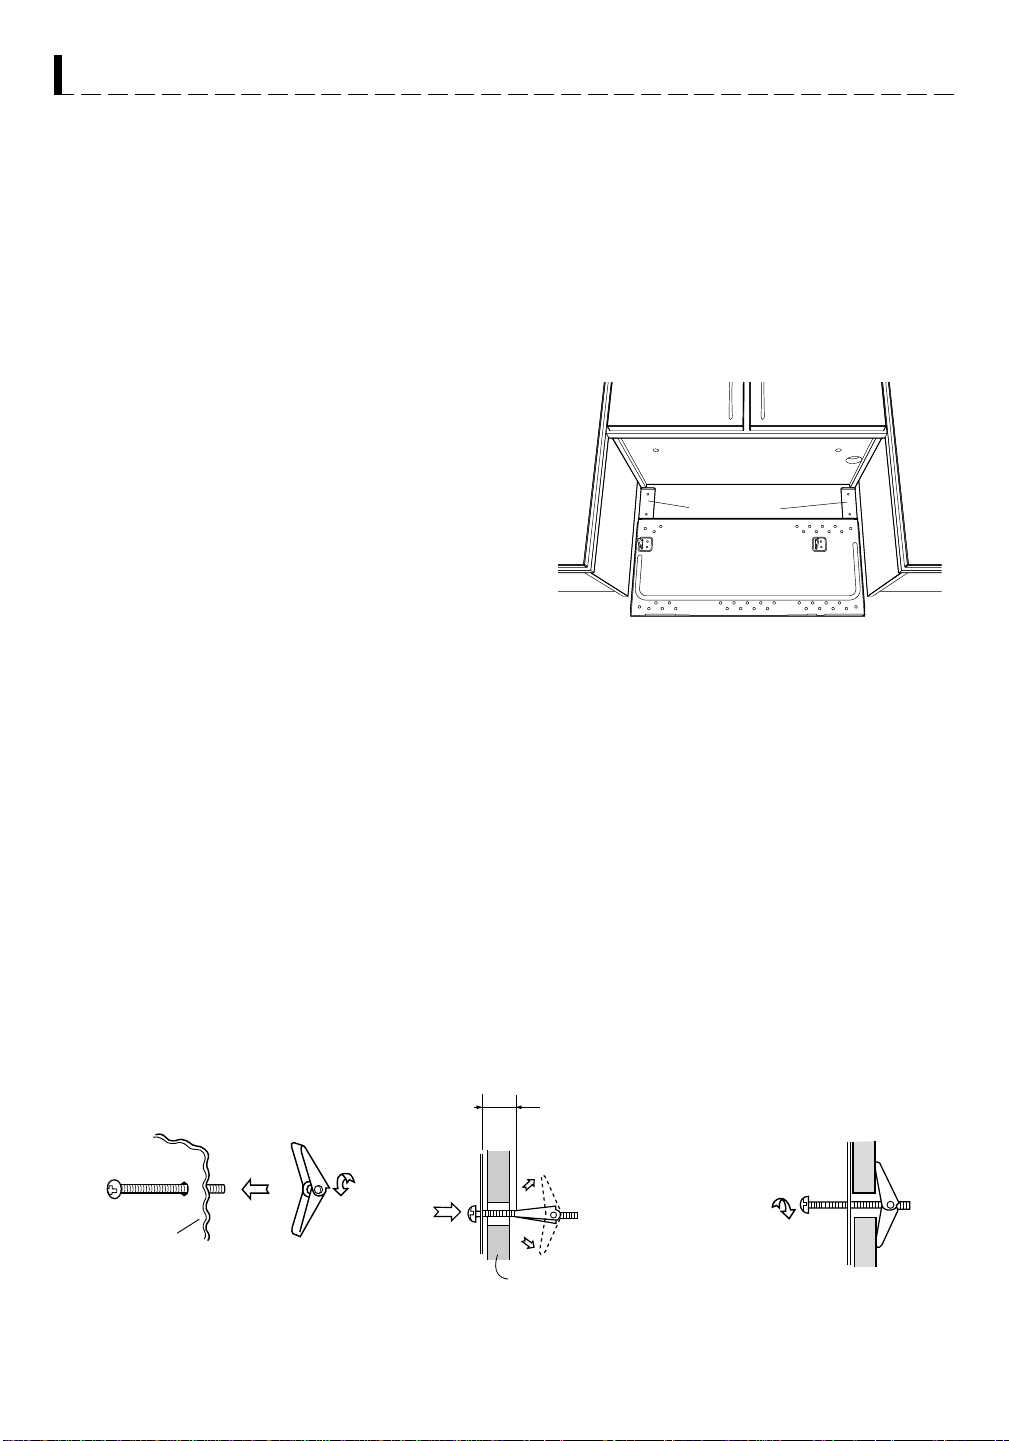
MOUNTING PLATE
1. Separate 4 Toggle Bolts 2, packed in the INSTALLATION HARDWARE, from the Toggle Nuts.
2. Match 5/8” holes (not in studs), drilled through WALL AND T OP CABINET TEMPLA TE into wall to corresponding
holes on Mounting Plate.
3. Insert Toggle Bolts into matched openings on Mounting Plate. Put Toggle Nuts on Toggle Bolts. See Figure 7.
4. Position the Mounting Plate with the Toggle Bolts attached at the wall location and insert Toggle Nuts and Bolts
through the holes in the wall with the Toggle Nuts closed. Figure 8. Use Wood Screws 1 to attach the Mounting
Plate to studs.
NOTE: Before insertion, be sure you leave a space more than the thickness of the wall between the Mounting
Plate and the end of each of the Toggle Nuts (in the closed position). If you do not leave enough space, the
Toggle Nut will not be able to open on the other side of the wall. Also, once a T oggle Nut opens, it cannot be
withdrawn from the hole; therefore make sure all of the Toggles are in the correct position before
insertion.
5. Align the Mounting Plate carefully and hold in position while tightening Toggle Bolts. Pull Toggle Bolt toward you
and turn clockwise to tighten. Figure 9.
Mounting
Plate
Figure 7
Figure 8
Wall
9
Space more than
wall thickness
Figure 9
UNPACKING AND INSTALLATION INSTRUCTIONS
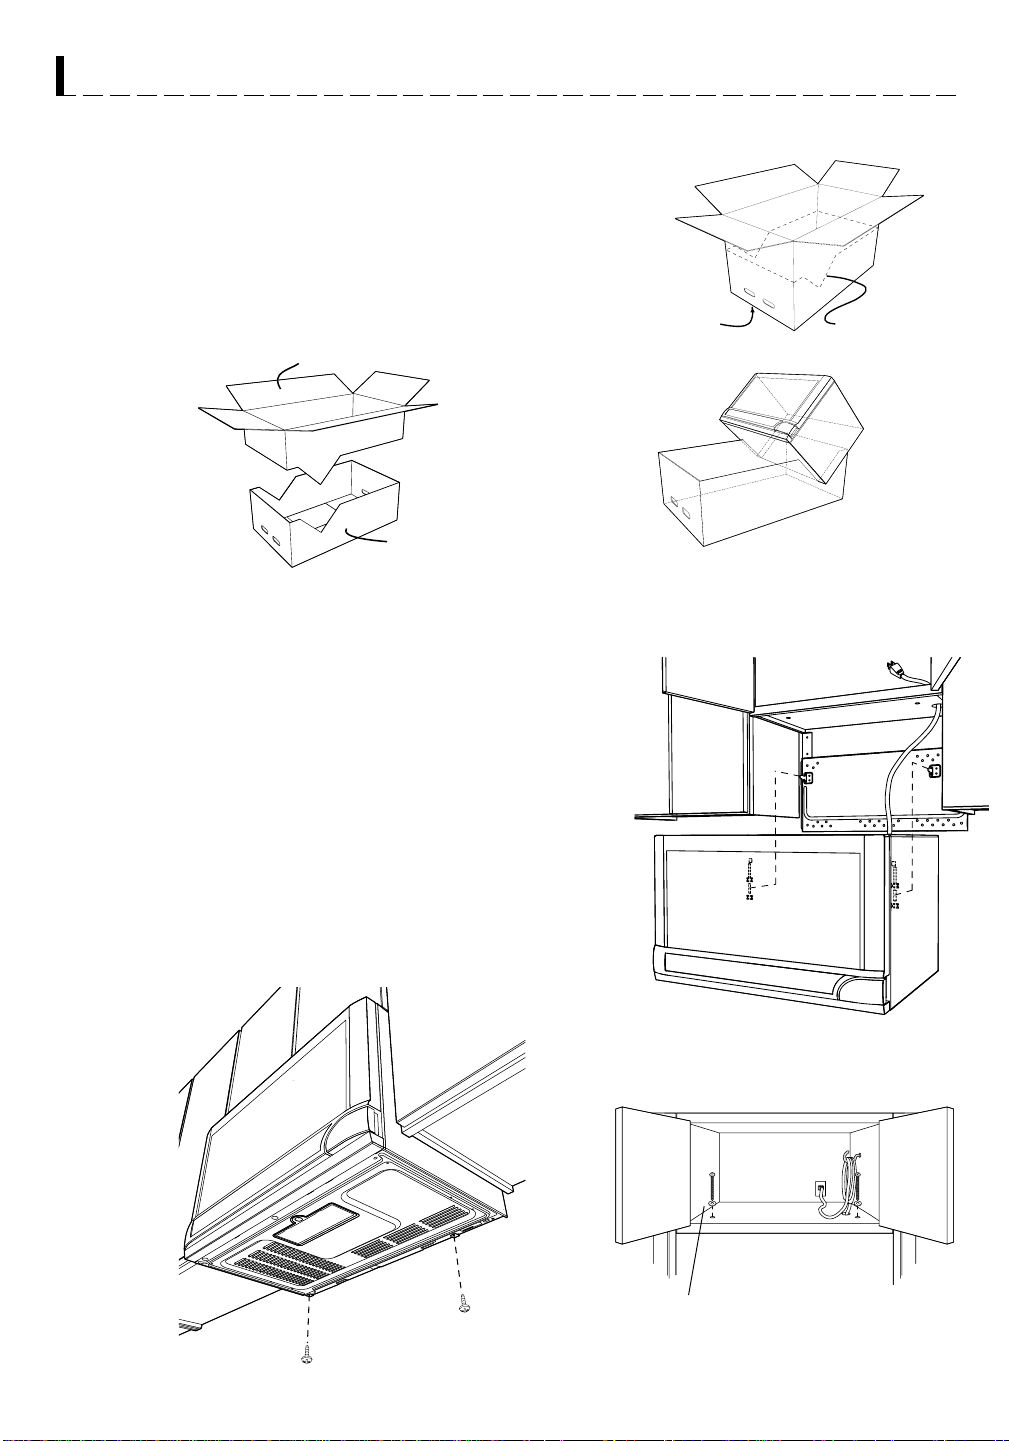
8 PREPARATION AND USE OF THE CARTON TO ASSIST
IN THE INSTALLATION OF THE MICROWAVE OVEN
Utilization of the carton may make installation easier.
1. Place carton upside down. See Figure 10.
2. Using cutting line around the carton, cut into two pieces (A) and (B).
See Figure 11.
3. Position oven to assist in mounting to the wall. See Figure 12.
(A)
Figure 11
Figure 12
(B)
MOUNTING OVEN TO THE WALL
Two people are recommended to attach the Microwave Oven to the
Mounting Plate.
1. Thread the Power Supply Cord through the hole made in the
bottom of the top cabinet. Install the oven by snapping it onto the
Mounting Plate. See Figure 13.
2. Use two Tapping Screws 5 to secure the levers that are on the
bottom of the oven. See Figure 14.
3. Use two Top Cabinet Screws 3 and two Flat Washers 6, supplied
in the INSTALLATION HARDWARE, to attach the unit to the top
cabinet. See Figure 15.
4. Make a bundle of the Power Supply Cord and attach it to the inside
of the cabinet using the Power Cord Hanger 4. See Figure 15.
Top Side
Figure 13
Figure 10
Cutting Line
Figure 14
10
Figure 15
3
6
NOTE:
Screw length has been designed to accommodate
3/8" and above cabinet depth. If less, screw must
be cut to required length.
4
 Loading...