

Page 1

PN-TPCi7W7
User Guide
Version – 1
Page 2

Getting Started
1
Getting Started
Introduction to PN-TPCi7W7
The PN-TPCi7W7 is a full-featured High Definition PC based upon Intel
H67® architecture, and powered by an Intel® Core™ i7 CPU. Targeted
for Commercial applications such as interactive digital white boards,
the PN-TPCi7W7 has been optimized for reliable operation with Sharp
PN-L series touch screen displays. The PN-TPCi7W7 includes the Sharp
Pen Software™ installer application loaded on the hard disk. It also has
the flexibility to run most third party software and custom applications.
The PN-TPCi7W7 supports true 1080P video with hardware assisted
support for formats such as MPEG2, H.264, and WM9. The PNTPCi7W7 was designed with display integration in mind and features a
full complement of video outputs including HDMI
®
and DVI. The unit
also includes an embedded Wireless 802.11 B/G/N module, RS232 port
for display control and a custom mounting bracket specially designed
to attach behind a Sharp PN-L series touch screen display. The PNTPCi7W7’s all metal chassis and small form factor make it ideal for
commercial applications requiring a powerful yet compact PC.
®
Package Contents
The packing box should contain the following
items:
Technovare™ PN-TPCi7W7
AC Power Adapter
Mounting Kit
HDMI
®
Cable
DVI to VGA adapter
Connection Diagram
System Recovery Discs
Page 3

Getting Started
2
Federal Comm u n ications Commission (FCC) Statement
This equipment has been tested and found to com ply with the limits for a Class B
digital device, pursuant to Part 15 of FCC Rules. These limits are designed to
provide reasonable protection against harmful interference in a residential
installation. This equipment generates, uses, and can radiate radio frequency
energy and, if no t ins t alled and used in accordance with instructions contained in
this manual, may cause harmful interference to radio and television
communications.
However, there is no guarantee that interference will not occur in a particular
installation. If this equipment does cause harmful interference to radio or television
reception, which can be determined by turning the equipment off and on, the user
is encouraged to try to correct the interference by one or more of the following
measures:
- REORIENT OR RELOCATE THE RECEIVING ANTENNA
- INCREASE THE SEPARATION BETWEEN THE EQUIPMENT AND THE RECEIVER
- CONNECT THE EQUIPMENT INTO AN OUTLET ON A CIRCUIT DIFFERENT FROM
THAT OF THE RECEIVER
- CONSULT THE DEALER OR AN EXPERIENCED AUDIO/TELEVISION
TECHNICIAN
NOTES:
Connecting this device to peripheral devices that do not comply with Class B
requirement s, or using an unshielded peripheral data cable, could also result in
harmful interference to radio or television reception.
The user is cautioned that any changes or modifications not expressly approved by
the party responsible for compliance could void the user’s authority to operate this
equipment. To ensure that the use of this product does not contribute to
interference, it is necessary to use shielded I/O cables.
Page 4

Specifications
3
Specifications
Chipset
o Intel® H67
Size
o Mini-ITX form factor
o Case: 7.5” x 7.4” x 1.75”
Microprocessor support
o Intel® Core™ i7-3770T® Quad-Core CPU @ 2.5GHz
Operating systems:
o Supports Windows® XP® 32bit/64bit, Windows Vista®
32bit/64bit, and Windows 7 ® 32bit/64bit
o Supports Linux®
o Windows 7 Pro installed 64bit
Software Included:
o Sharp® Pen Software™ Installer
o Sharp® SDSS Digital Signage Software Trial
Software Installed:
o Microsoft® Internet Explorer ®
o Microsoft PowerPoint® Viewer
o Windows Media® Player
o QuickTime® Player
o Adobe® Flash® Player Plug-in
System Memory support
o Supports DDR3 1333/1066
o Supports up to 16GB (2 x 8GB)
o 4GB installed – both slots occupied and need to remove
the current memory modules to upgrade
USB 2.0 Ports
o Supports hot plug and play
o Four USB 2.0 ports (rear panel ports)
o Two onboard USB headers for four extra ports
o Supports USB 2.0 protocol up to 480 Mbps transmission
rate
Hard Disk Drive
o 2.5” 500GB SATA
Onboard Serial ATA II/III
o Supports 1x SATA II (300 MB/s transfer rate)
o Supports 2x SATA III (600 MB/s transfer rate)
o Rear panel e-SATA
o Supports hot plug and Native Command Queuing
Page 5

Specifications
4
Specifications (con’t)
On board RealTek™ 8111E Gigabit LAN Chip
o Supports 10/100/1000Mbps operation
o 1 x RJ45 LAN Port
Onboard Audio
o RealTek™ ALC888S High-Definition audio chip
o Supports up to 8-channel (2/4/5.1/7.1-channel)
o 8-Channel Audio Ports on Back Panel
o Supports Jack-Sensing function (under Windows)
o Support for S/PDIF Out Header (Internal)
Green Function
o Supports ACPI (Advanced Configuration and Power
Interface)
o Supports EuP Function
o RTC timer to power-on the system
o AC power failure recovery
o Supports S0 (normal), S1 (power on suspend), S3
(suspend to RAM), S4 (suspend to disk), and S5 (soft - off)
Onboard Graphics support
o Integrated Intel® HD 4000 graphics engine
o DVI-I / HDMI® output support (Dual Header capable)
Integrated HDMI® Interface with HDCP
o Supports DVI or HDMI 1.4 interfaces
o Secure digital audio merged from integrated HDA codec
with no external audio signals required
o Support for HDCP 1.3 using soft or hard HDCP keys
o HDCP encryption support when configured as DVI or HDMI
link without the need for external HDCP key crypto ROM
Dual Head Display Controller
o Each controller can drive same or different display
contents to different resolutions and refresh rates
Expansion Slots
o 1 x PCIe 2.0 x16 slot
o 1 x COM1 Header
o Low power consumption and power management features
Page 6

Specifications
5
Specifications (con’t)
Optional
o Watchdog timer
Environmental
o Operating Temperature: 0° to 40° C
o Operating Humidity: 80% maximum relative humidity,
non-condensing
Power
o Input Voltage: 12V 7A
o Power Dissipation: 70 Watts
Wireless
o WLAN 150Mbps
o 2.4GHz 802.11 b/g/n
o 6dBi Antenna
Page 7
Installation
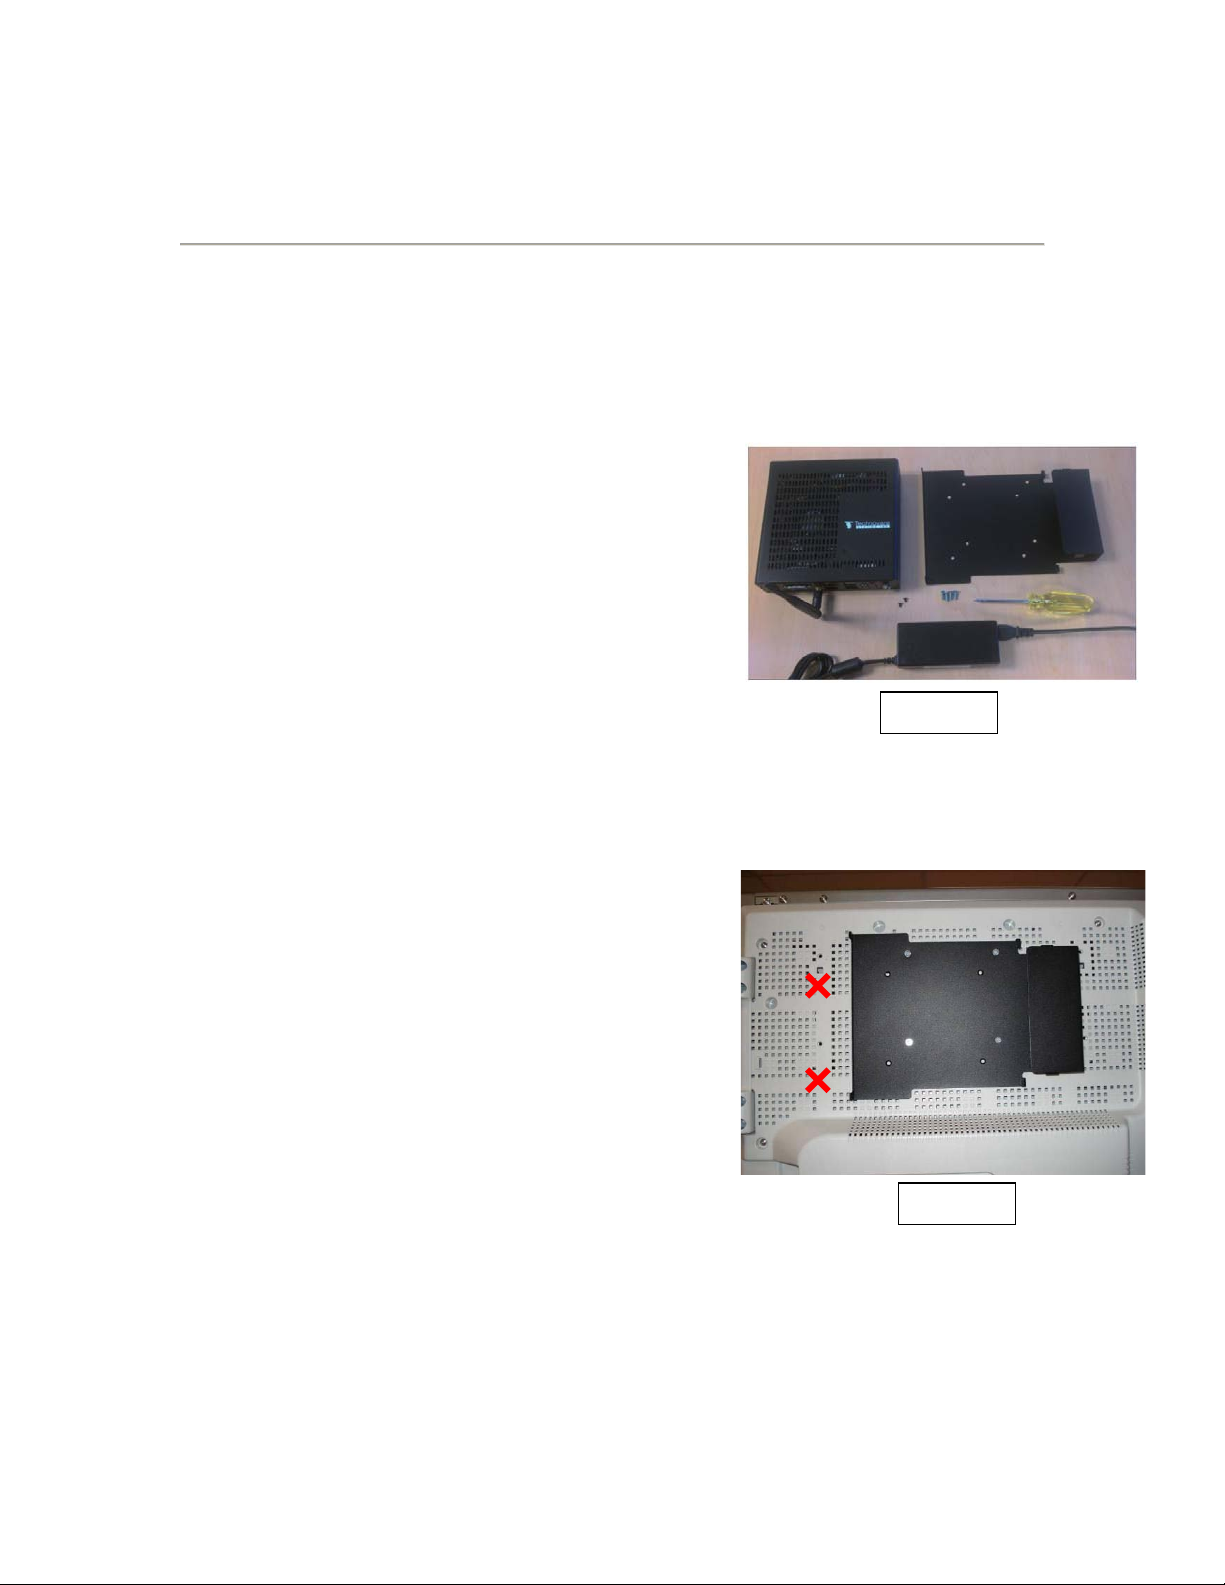
Figure 1
Figure 2
Mounting PN-TPCi7W7 on Sharp PN-L Series
Displays
1. Before beginning
Make sure to turn off the monitor and remove the AC power.
2. Items needed
• Sharp PN-L Series Touch-Screen Display
• PN-TPCi7W7
• Mounting Plate
• AC Power Adapter
• 4 x M4 (0.7x10mm) screws
• 2 x M3 (0.5x5 mm)
• Phillips® Screw Driver
3. Attach the mounting plate
There are 8 holes on the mounting
plate, but only use 4 holes to
match the monitor’s mounting
holes depending on the monitor
model.
The mounting plate is attached to
the Sharp “PN-L” series display as
in Figure 2.
Secure the mounting plate to the
monitor with four included M4 screws.
*NOTE- Do not use the holes marked with the red x
6
Page 8
Installation
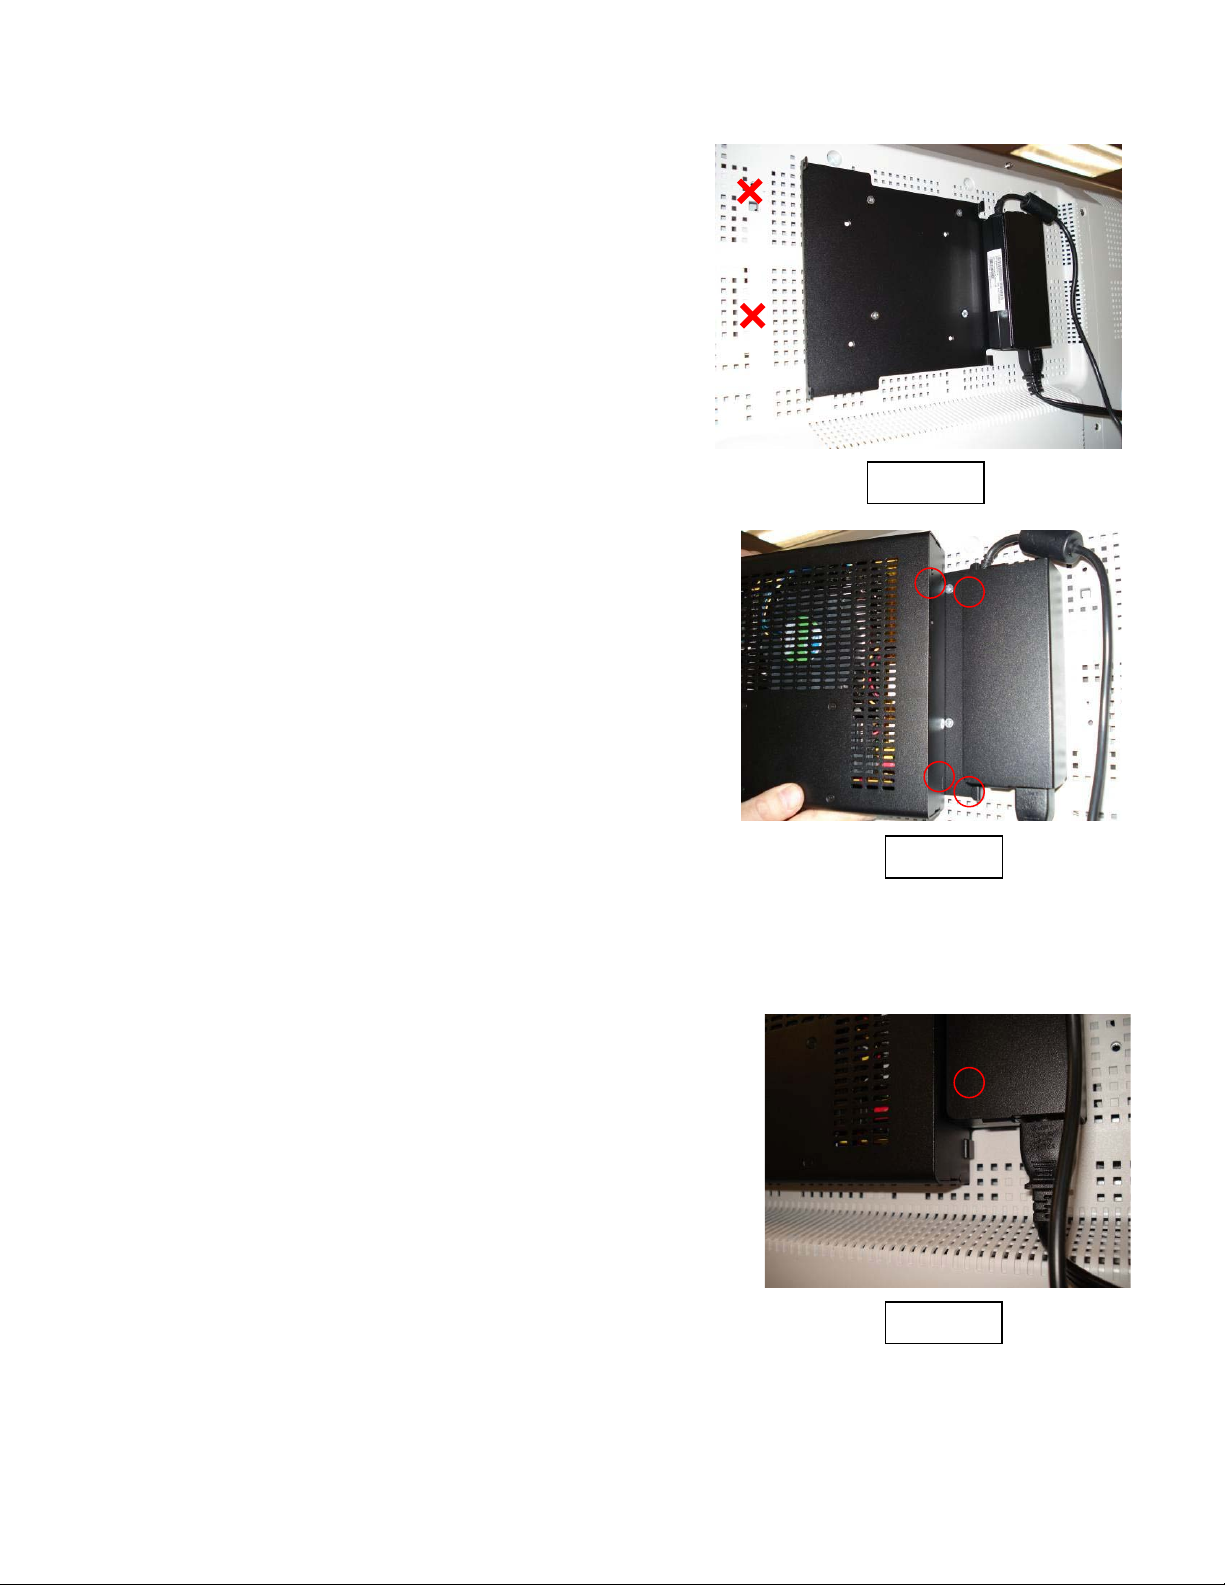
Figure 4
Figure 3
Figure 5
4. Set the AC power adapter in
5. Install the PN-TPCi7W7
place
Place the AC power adapter into
the holder on the right side of
the mounting plate as in Figure
3.
AC power cord faces d ownward
and the DC power cord to the
PN-TPCi7W7 faces upward.
If you look at the right side of the
PN-TPCi7W7 before sliding it into
the mounting plate as in Figure 4,
there are two small slits near the
edges on the PN-TPCi7W7 and
two small fingers on either side of
AC power adapter holder on the
mounting plate.
As you slide the PN-TPCi7W7 into
the mounting plate, insert the
two fingers into these slits as in
Figure 5.
7
Page 9
Installation
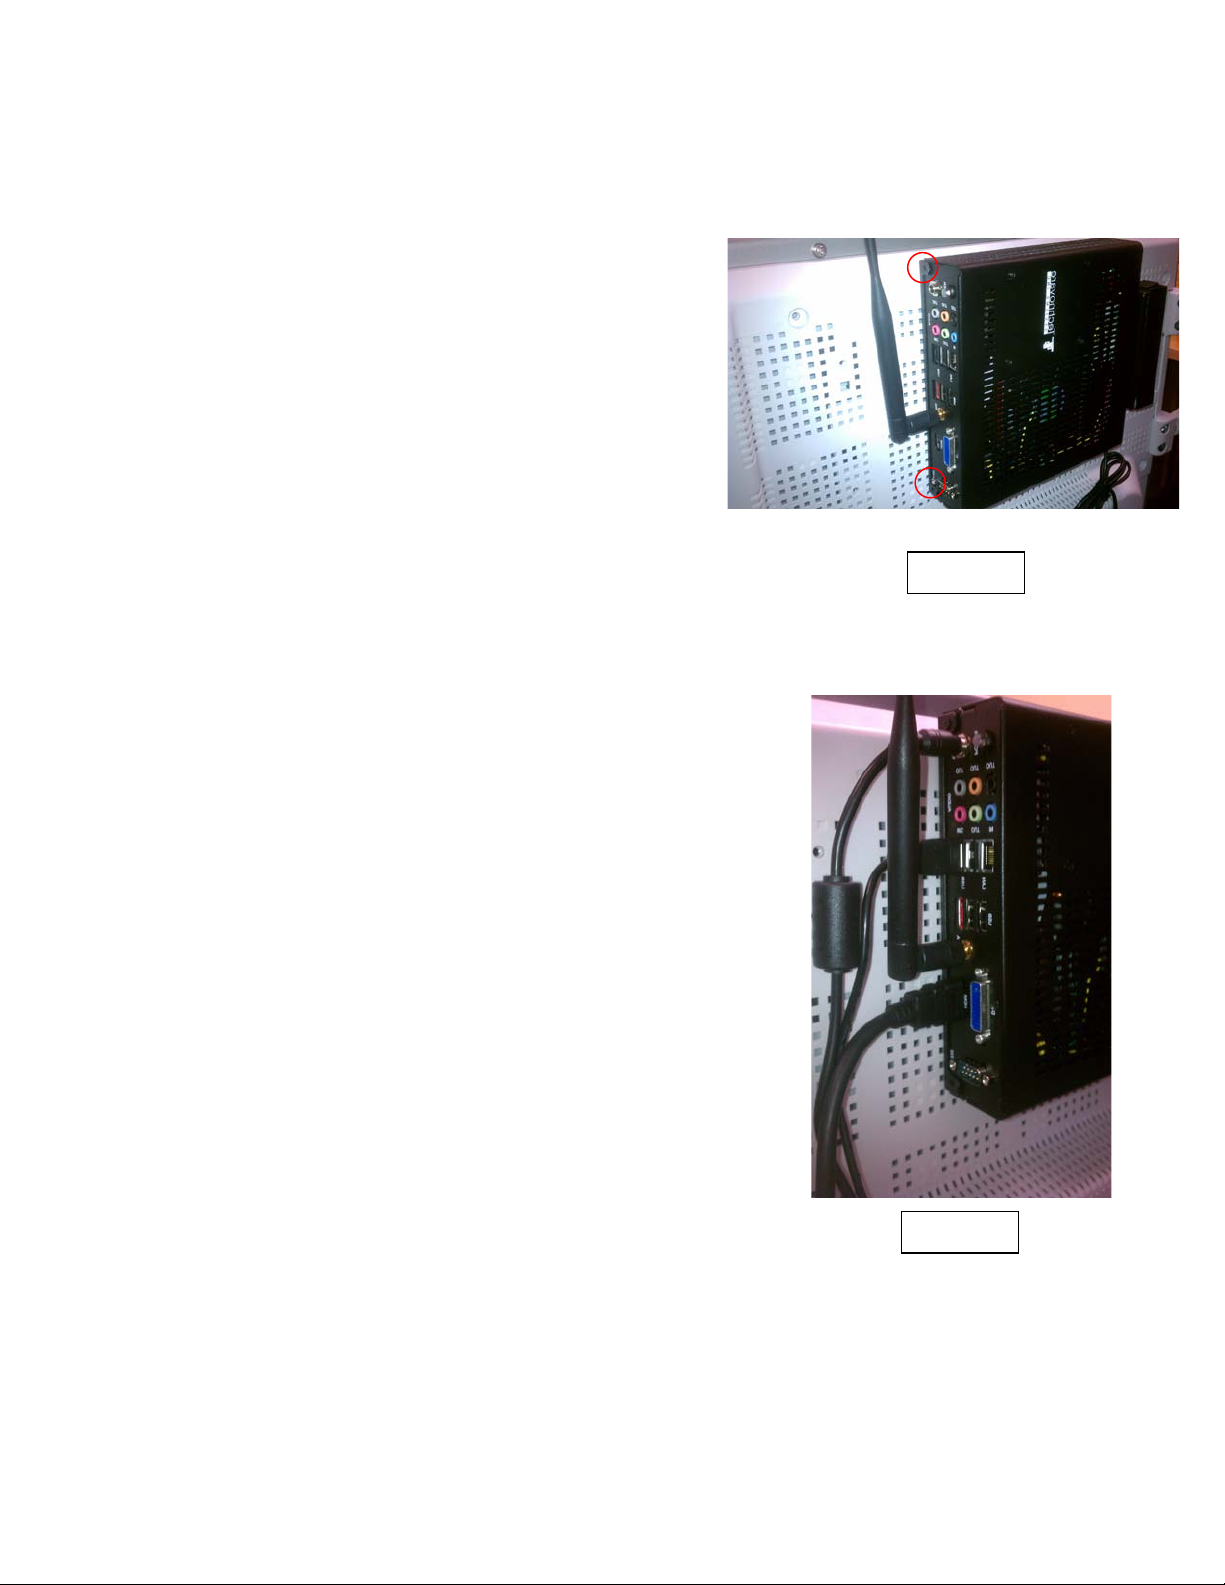
Figure 7
Figure 6
There are two fingers on the left
side of the mounting plate to
catch the PN-TPCi7W7 in place as
shown in Figure 6, and they need
to be tightened with two include
M3 screws.
6. Connect the HDMI video cable and
the USB cable
PN-TPCi7W7.
prior to turning on the
7. Finish
Plug in the DC power cord into
the PN-TPCi7W7’s power
connector as in Figure 7.
8
Page 10
Installation
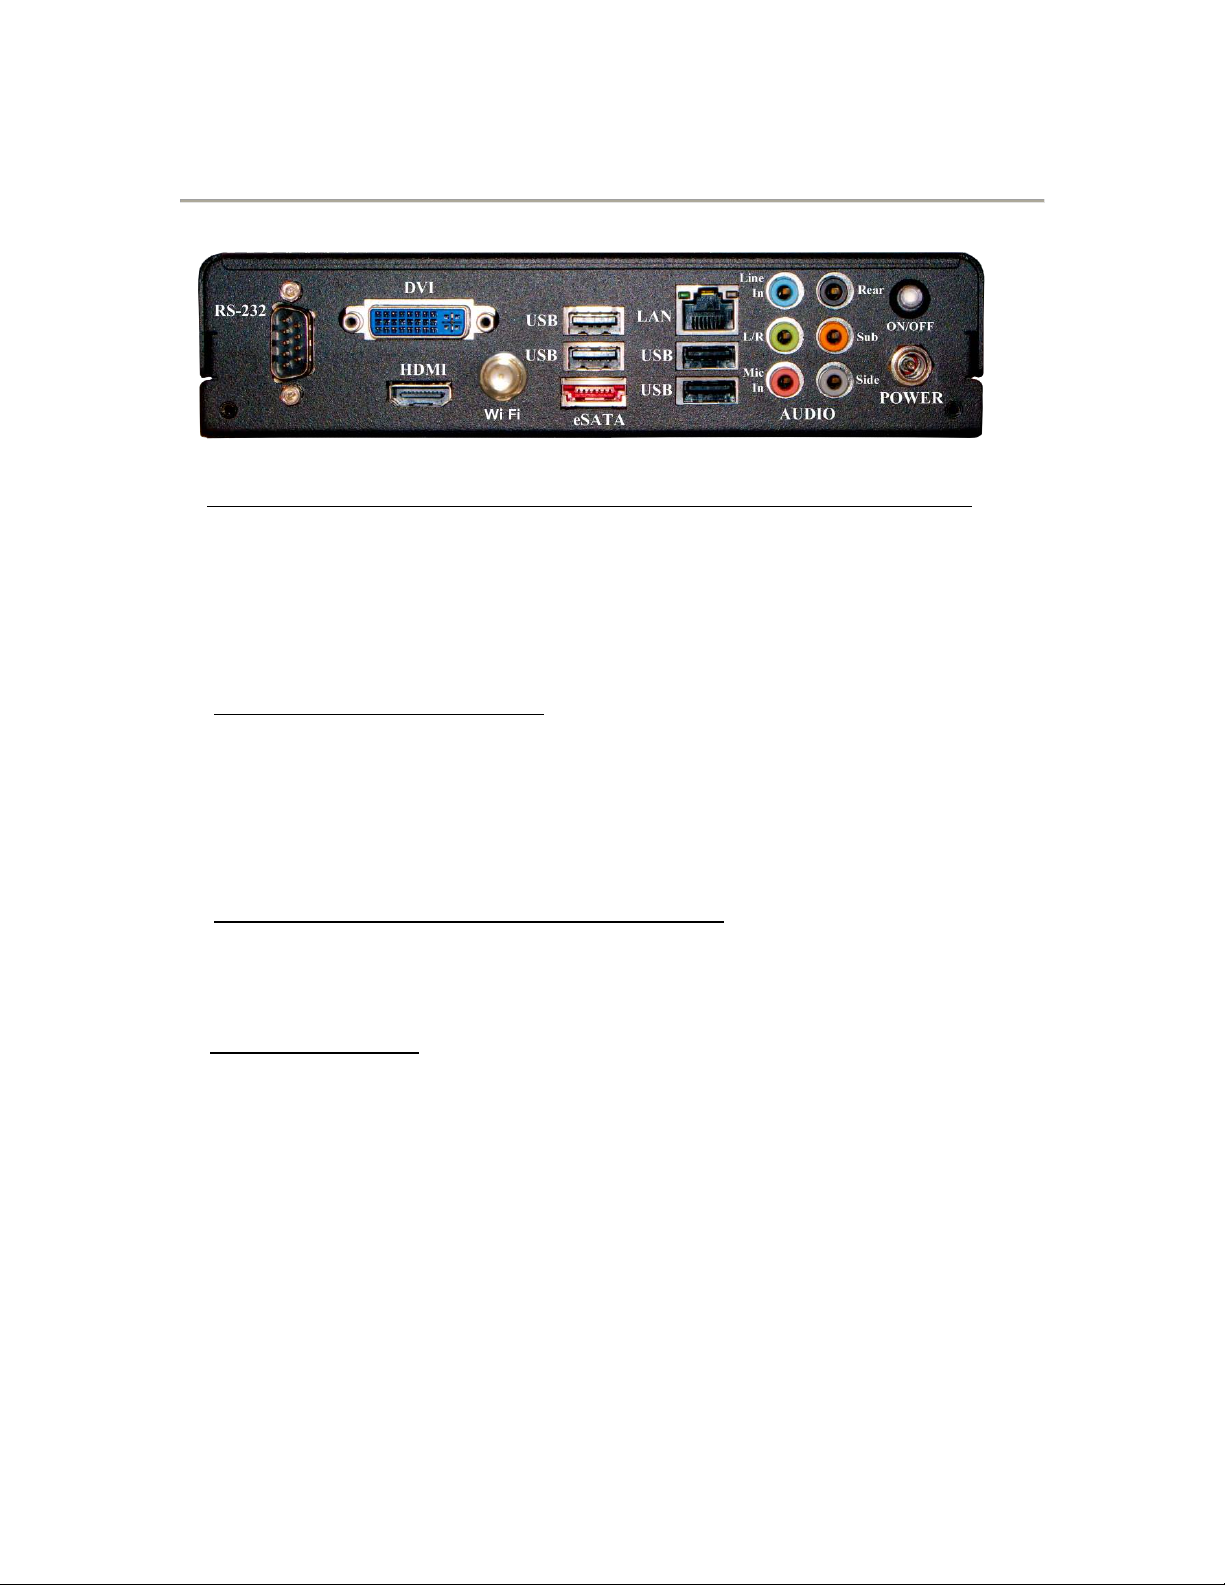
Rear Connector Layout
Audio Port 2-Channel 4-Channel 5.1-Channel
Blue Line-In Line-In Line-In
Green Line-Out Front Speaker Out Front Speaker Out
Pink Mic In Mic In Mic In
Orange N/A N/A Center/Subwoofer Out
Black N/A Rear Speaker Out Rear Speaker Out
Grey N/A N/A N/A
Audio Port 7.1-Channel
Blue Line-In
Green Front Speaker Out
Pink Mic In
Orange Center/Subwoofer Out
Black Rear Speaker Out
Grey Side Speaker Out
LAN Connector (with LED status indicator)
Green/Light Up/Blink = 10 Mbps/Link/Activity
Green and Green/Light Up/Blink = 100 Mbps/Link/Activity
Green and Orange/Light Up/Blink = 1000 Mbps/Link/Activity
Wireless Antenna Black 6dBi 2.4GHz wireless antenna
9
Page 11
Installation
Rear Connector Layout (con’t)
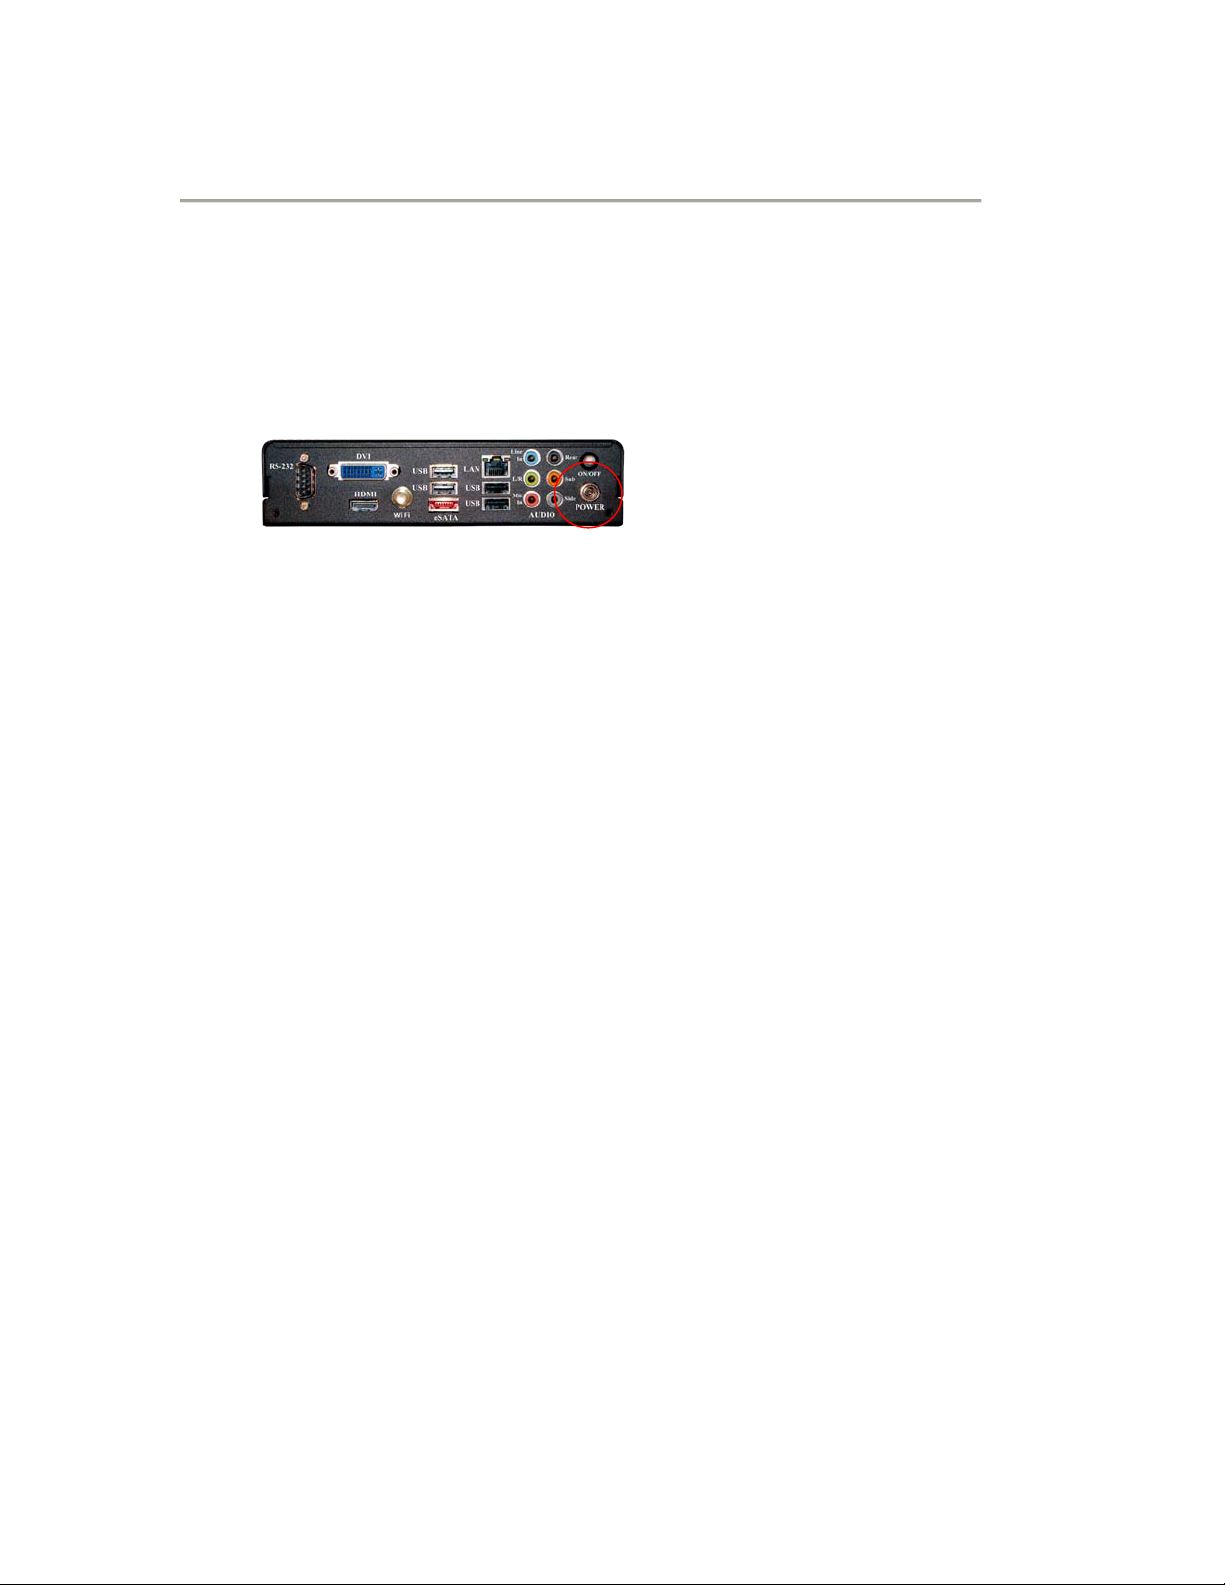
1. Power Connection (refer to the figure in the previous page)
Use only the AC power adapter supplied with the system.
Input: 100~240V AC 1.3A
Output: 12V DC 7A
Plug the 12V AC/DC adapter (as in the figure 1 above) to the PNTPCi7W7’s power input jack (as in the figure 2).
2. Power But ton
This button will stay lit if the PN-TPCi7W7 is powered on. If the
PN-TPCi7W7 doesn’t power up after the AC is connected, then
press this button to power up. If normal Windows shutdown is
not shutting down the PN-TPCi7W7, then press this button for
more than 4 seconds will turn off the PN-TPCi7W7. In this case,
run Disk Cleanup in the Windows next time the PN-TPCi7W7 is
powered up.
10
Page 12

Installation
How to Recover to Factory Installed Condition
1. Before beginning
Make sure that all the data including contents and programs you
installed are backed up. If you are trying to recover from a bad
HDD, please have a qualified technician runs diagnostics and
replaces defective components. If the unit is in warranty, please
contact Sharp Customer Service.
2. Items needed
Recovery DVD (comes with the unit)
USB DVD Drive
3. Windows® OS installation from Recovery DVD
• Attach USB DVD Drive to one of the 4 available USB ports on
the back of the unit.
• Insert the recovery DVD and reboot the PC.
• Follow instructions and install Windows OS.
• Remove the recovery DVD and reboot.
4. Install System Drivers from Recovery DVD
Insert the recovery DVD.
Install Chipset, HD audio, HDMI audio, and WiFi drivers.
5. Install 3rd Party Software from Recovery DVD
Microsoft® Internet Explorer® 8
Windows Media® Player 11
Microsoft PowerPoint® Viewer 2007
Adobe® Flash® Player 10
Apple® QuickTime® 7
Media Player Codec Pack v.3.9.5
6. Install Sharp Pen Software™ & Optimize Windows
Follow instructions from the included Sharp Pen Software
operating manual.
11
Page 13

End
Support & RMA
Warranty service is available from a Sharp
®
Authorized Service Center
located in the United States.
To receive repair handling instructions and to find the location of the
nearest Sharp Authorized Service Center, please call Sharp toll free at
1-800-BE-SHARP (1-800-237-4277).
If it is necessary to ship the Product for servicing, please be sure it is
insured and packaged securely. Sharp shall not be responsible for lost,
stolen or misdirected mail or for damage to the product incurred
during shipping. Please have proof of purchase available when
requesting warranty service.
TO OBTAIN PRODUCT INFORMATION OR ACCESSORIES,
CALL 1-888-GO-SHARP OR VISIT www.SharpUSA.com
Trademarks
• Sharp, Sha rp P e n So f t wa re and related t rademarks are tr ad emarks or
registered trade ma rk s of Shar p Cor por ation and/or its affilia ted
entities.
• Intel and Core i7 are trademarks or registered trademarks of Intel
Corporation in the U.S. and other countries.
• Microsoft, Windows, Internet Explorer, PowerPoint, Windows Media,
Windows Vista, Windows XP and Windows 7 are trade m ark s o r
registered trademarks of Microsoft Corporation in the United States
and/or other countries.
• Adobe and Flash are regi ste re d trade m ar ks or trademarks of Adobe
Systems in the United States and/or other countries
• Apple and QuickTime are trademarks or registered trademarks of
Apple Inc.
• Linux is a registered trademark of Linus Torvalds in the U.S. and
other countries.
• HDMI is a registered trademark of HDMI Licensing LLC.
• Phillips is a registered trademark of The Phillips Screw Company, Inc.
• Realtek is a registered trademark and used for Integrated Circuits
and is owned by Realtek Semiconductor Corp.
• Technovare is a trademark of Technovare Systems Inc.
• All other trademarks are the property of their respective owners.
• Product specifications and design are subject to change without
notice.
12
 Loading...