


®
MODEL
OZ-630/OZ-640/
OZ-650
ELECTRONIC ORGANIZER
OPERATION MANUAL
SHARP ELECTRONICS CORPORATION
Sharp Plaza, Mahwah, New Jersey 07430-2135.
SHARP CORPORATION
OZ-630 model requires OZ-60K for ‘Zero-Touch, PC Synchronization
Separate the Quick Reference Guide from this manual and keep for reference.
Separe la Guía de referencia rápida de este manual y quárdela para usarla como referencia.

Introduction
Congratulations on purchasing the OZ-630/OZ-640/OZ-650 Electronic Organizer.
Please read this operation manual thoroughly to familiarize yourself with all the features of the unit and to ensure years of reliable operation. You may also find it useful to keep this operation manual on hand for reference.
Some of the accessories described in this manual may not be available at the time you purchase this product.
Check with your local SHARP dealer concerning availability.
All company and/or product names are trademarks and/or registered trademarks of their respective manufacturers.
Note:
*The differences between OZ-630/OZ-640/OZ-650 are memory capacity. Also, the OZ-650 Organizer has an optical communication terminal (IrDA), while OZ-630 and OZ-640 do not. The remainder of the functions are common.
*Unless otherwise specified, the text and material in this manual apply to both models.
*One of the models described in this manual may not be available in some countries.
*Some of the accessories described in the manual may be unavailable in some countries.
NOTICE
*SHARP strongly recommends that you keep separate permanent written records of all important data. Data may belostoralteredinvirtuallyanyelectronicmemoryproduct under certain circumstances. Therefore, SHARP assumes no responsibility for data lost or otherwise rendered unusable whether as a result of improper use, repairs, defects, battery replacement, use after the specified battery life has expired, or any other cause.
*SHARP assumes no responsibility, directly or indirectly, for financial losses or claims from third persons resulting from the use of this product and any of its functions, such as stolen credit card numbers, the loss or alteration of storeddata,etc.
*The information provided in this manual is subject to change without notice.
1

Contents
Introduction ............................. |
1 |
Contents ............................... |
2-3 |
Caring for the Organizer .................... |
4 |
Chapter 1 Getting Started .................. |
5-16 |
Part Names and Functions |
|
Getting the Organizer Up and Running |
|
SettinguptheOrganizerafterInitialization |
|
Getting to Know Your Organizer |
|
Chapter 2 General Operation ................ |
17-30 |
Opening an Application
Selecting the Display Modes
Creating a New Entry
Editing an Existing Entry
Editing Techniques
Finding Specific Entries in Your Organizer
Deleting Entries
Checking the Time and Date
Checking the Memory
The TOOLS Menu - the Organizer’s Basic Utilities
Chapter 3 Time Management ................ |
31-40 |
The Calendar Application |
|
The Schedule Application |
|
The To Do Application |
|
The ANN (Anniversary) Application |
|
Chapter 4 Creating Your Own Database ........ |
41-46 |
The Tel Application |
|
User File Application |
|
Customizing the User File Application |
|
Chapter 5 Memo ......................... |
47-50 |
The Memo Application |
|
Chapter 6 Desk Accessories ................ |
51-62 |
The Calc (Calculator) Application |
|
The Clock Application |
|
Chapter 7 Expense ....................... |
63-68 |
The Expense Application |
|
The Expense Report Application |
|
Chapter 8 Features and Utilities for Added Power |
69-72 |
Copying or Moving Blocks of Text |
|
Copying or Moving Entries |
|
Special Characters |
|
Chapter 9 Using the Optional Peripherals ...... |
73-80 |
The Peripherals Menu |
|
Transferring Data |
|
Exchanging Information with a Personal Computer Points to remember when using peripherals
2
Chapter 10 Personalizing Your Organizer ....... |
81-88 |
The Start-Up Display
Setting the Owner’s Information
Locking the Organizer
Changing the Calendar Display Format
Selecting the large font view
Appendices ............................. |
89-93 |
A.Resetting the Organizer Allresetoperation
B.Battery Replacement General guidelines
Replacing the operating batteries
C.Specifications
Index .................................. |
94-98 |
Product Support.......................... |
99 |
3
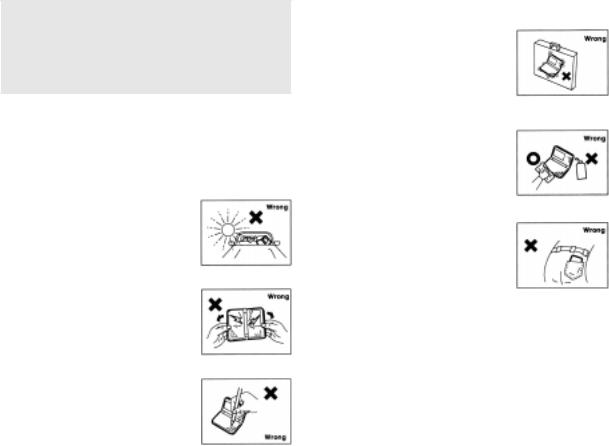
Caring for the Organizer
The Organizer contains sophisticated circuitry and a glass display panel which can be damaged if not handled with care. A few precautions should be taken regarding the Organizer’s care to ensure it gives you many years of reliable and troublefreeuse.
*Keep the Organizer away from extreme heat. Do not leave it on the dashboard of a car or near any sourceofheat.Donotleaveitinany place that is extremely damp or dusty.
*Do not drop the Organizer or subject ittosevere impact orextreme force. Bending the Organizer unduly can damage it.
*Do not use extreme force when pressing the keys. Do not use any sharp, pointed object or even your fingernails to press them.
*Sharp or hard object can scratch and damage the Organizer. Make sure it is adequately protected when carried with other objects. Do not carry it loose in a bag or briefcase: find a pocket or secure compartment within your bag.
*CleantheOrganizer onlywith asoft, dry cloth. Do not use solvents.
*Do not carry the Organizer around in your back pocket, as it may break when you sit down. The display is made of glass and is very delicate.
*Since this product is not waterproof, do not use it or store it where fluids, for example water, can splash onto it. Raindrops,waterspray,juice,coffee,steam,perspiration, etc.willalsocausemalfunction.
*Replace the batteries as soon as they become weak (see p.90). Failing to replace weak batteries may result in leakage or lost data.
4

CHAPTER 1 |
|
Getting Started |
1 |
This chapterexplainseverythingyouneedto know to set up and begin working with your Organizer, frominstallingthebatteriestoinitialization.The chapteralsoincludesa labeledillustrationofthe partsoftheOrganizer,andbasicexplanationofits keyfeatures,fromthekeyboardto thedisplayand itssymbols.
5
5-16 |
5 |
|
|
8/6/98, 4:04 PM |
|
|
|
|
|
|
|
|
|
|
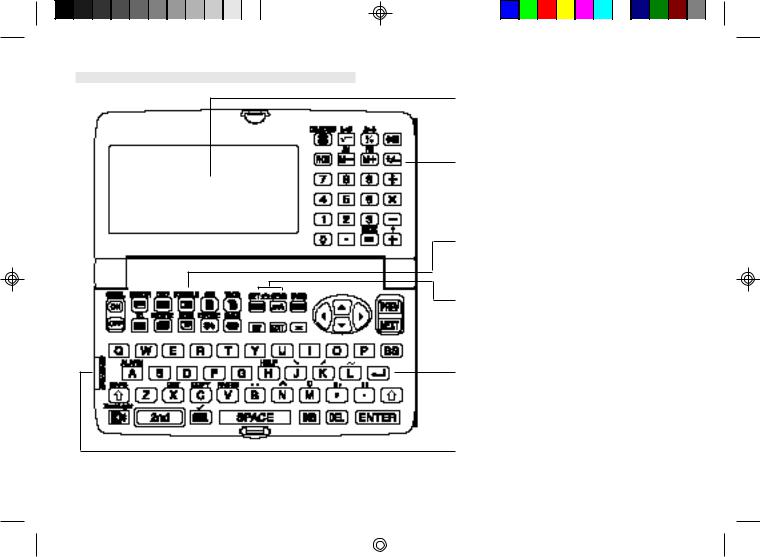
Part Names and Functions
Display
Showsinformation,andis usedfornavigating thevariousfunctions.
Numeric keypad
Usedforoperatingthecalculatorandentering numbersinotherapplications.
Applicationkeys
Startsappropriateapplications.
InfraredTransfer(IRDA)
For data transfer between two OZ-650 Organizersviatheinfraredport.(onlyOZ-650 hasthefunctionofinfraredtransfer.)
Keyboard
For entry of characters and commands.
4-pincablejack
Connects 4 pin Communication Cable for otherinterfaces,etc.
6
5-16 |
6 |
|
|
8/6/98, 4:04 PM |
|
|
|
|
|
|
|
|
|
|
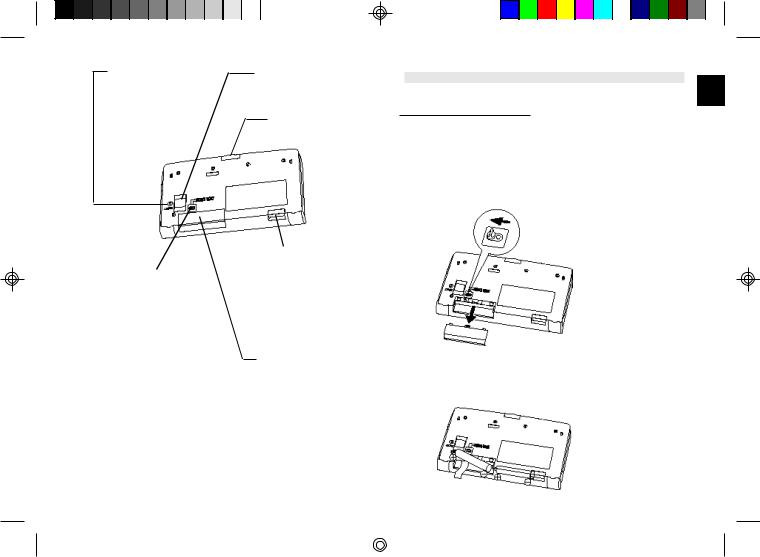
Reset button
Initializesandresets theOrganizer.
Batteryreplacementswitch
Locksthebattery compartment to prevent accesstothebatteries
Connects the docking stationforPC communication.
Lock button
Opens the Organzier.
Infraredport
Forwireless communication with other OZ-650 Organizers.
Operatingbattery compartment
Holdsoperatingbattery
Getting the Organizer Up and Running
1
Installingthebatteries
1.Set the batteryreplacementswitchon the bottom of the Organizer to REPLACE BATTERIES (the red dot becomes visible).
2.Slideofftheoperatingbatteriescover.
3.Inserttwobatteriesontopoftheribbontab,makingsure theyarepositionedcorrectlyaccordingto plus (+) and minus(-)polarity,asshownbelow.
7
5-16 |
7 |
|
|
8/6/98, 4:04 PM |
|
|
|
|
|
|
|
|
|
|
4.Replacethecover.
5.Set the battery replacement switch back to NORMAL OPERATION (the red dot disappears).
*The Organizer will not function unless the battery replacement switch is in the NORMAL OPERATION position.
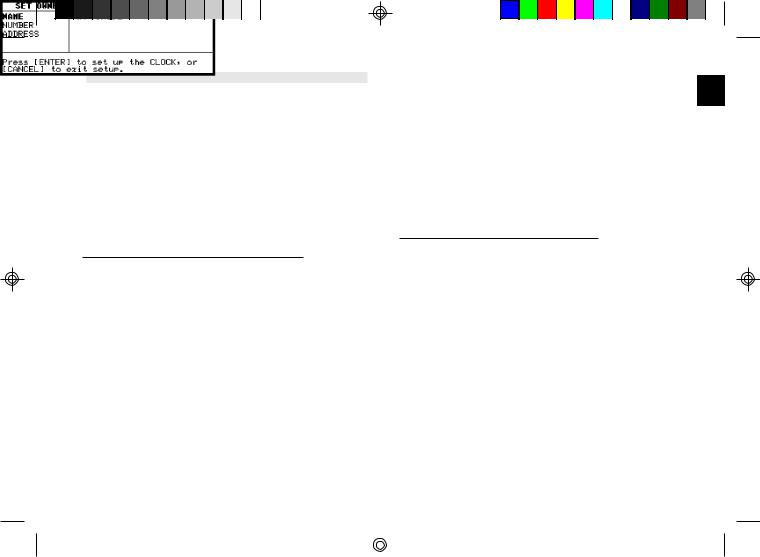
Initializing
TheOrganizermustbeinitializedwhenitisusedforthefirst time.
1.Press and hold the [ON]key.
2.While holding down the [ON] key, push the RESET button on the bottomof the Organizerusinga pen or someother pointedobject.Thefollowingmessagewillappear.
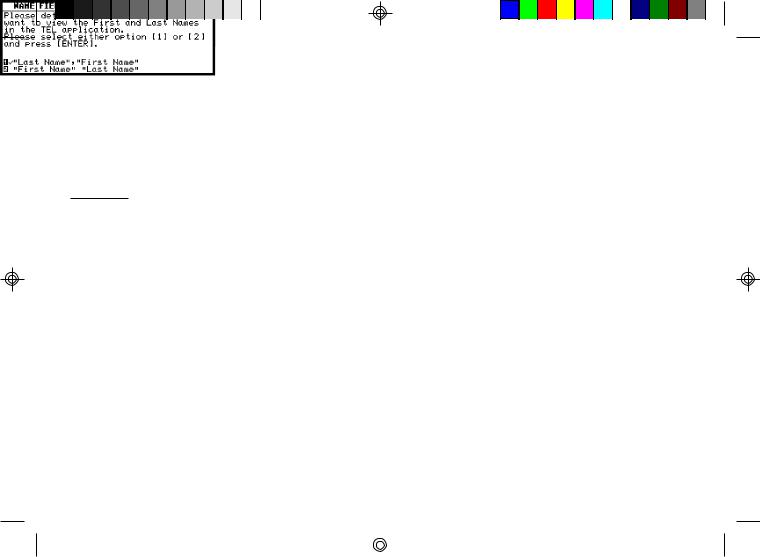
3.Press[Y]toselecttheNameFieldSetting.
The Name Field Setting window appears.
4.Press 1 or 2 to select the desired name order. Press [ENTER] when you have finished.
5.Oryoucanpress[N]toinitializetheOrganizerratherthan to selecttheNameFieldSetting.
The LCD Contrast screen then appears.
6.Ifthedisplayisnotclear,press[ ] and[
 ] or[PREV] and[NEXT]untilthedisplayissatisfactory.
7.Press [ENTER] when ready.
The message “Working...Please Wait.” appears while the Organizerproceedswiththeinitializationprocedure.
TheOrganizerthenautomaticallystartstheSETUPutility,so thattheownerinformation,thetimeanddateandvariousother settingsaredefinedbeforeuse.
8
5-16 |
8 |
|
|
8/6/98, 4:04 PM |
|
|
|
|
|
|
|
|
|
|
Setting up the Organizer after Initialization
The Organizertakes you through the various steps needed to set up the Organizer before use. These steps are described below. We strongly recommend that you complete the entire SET UP procedure before starting to actually use your Organizer.
*Welcome messages and instructions
*SettingtheOwnerInformation
*SettingtheClock
*User’sPreferences
Welcome messages and instructions
AftercompletingtheLCDContrastsettingabove,theOrganizer displaysthefollowingwelcomemessage,brieflyoutliningits functions.
Press [ENTER] to proceed with the User Setup.
TheUserSetupintroductionappearsto explaintheoperations youareabouttocarryout.
Press [ENTER] to continue.
The User SetupBasic Instructionsappearto instructyou how 1 to move aroundthe screen during User Setup and normal use.
Youcanuse[  ] [
] [  ] [
] [  ] [
] [  ] to movearoundthescreen. You can also use [PREV] and [NEXT] to move from field to field.
Press [ENTER] to proceedwith setting the Owner Information (or [CANCEL] to exit the SETUP procedure).
Setting the Owner’s Information
The Owner Information comprises your name, address and telephone number.
*If you make a mistake while entering the Owner Information, don’t worry! You can amend the Owner Informationeasilyduringnormaluse,sojustproceedwith the rest of the User Setup. (see PREFERENCES, p.82)
1.After pressing [ENTER] after the previous Basic Instructions screen, the Set Owner Information screen appears.
9
5-16 |
9 |
|
|
8/6/98, 4:04 PM |
|
|
|
|
|
|
|
|
|
|
2.Enter your name, then press [  ] or [NEXT]. Thecursormovesto theNO. field.
3.Enter your number an example, tel number, mobile phone number,etc.Thenpress[  ] or [NEXT].Thecursormoves to the ADDRESS field.
4.Enteryourfulladdress.
*Press[ ] tomovethestartofthenextlineinADDRESS.
5.Press [ENTER] when done.
Press [ENTER] to proceed with setting up the Clock as described below (or [CANCEL] to quit the User Setup procedure).
SettingtheClock
In order for the Calendar,Schedule, To Do, and other timebasedapplicationsto workcorrectly,thebuilt-inclockmust besettothecorrecttime,dateandcity.TheClockapplication displaysthetimeintwodifferentcities:theLocalcity,where theusernormallylivesor works,andtheWorldcity,whichis anyothercityoftheuser’schoice.WhentheOrganizerisfirst initialized,theLocalcityisautomaticallysettoNewYork,and the Worldcityis London.BeforesettingtheClock’scorrect time,youshouldfirstselecttheLocalCityforwhichyouwant tosetthetime.
AfterenteringtheOwnerInformationabove,thefollowinglist ofcitiesappears:
1 0
1.Ifthedesiredcitydoesnotappear,press[PREV]or[NEXT] todisplaymorecities.
*Youcanjumptoa particularcountrybypressingthefirst letterofthatcountry’sname.
2.Selectthedesiredcitybymovingthecursortoitandthen press [ENTER] to confirm. Or select numbers [1] - [4] directly.
The Daylight Saving Time screen appears.
3.IfyourcityiscurrentlyonDaylightSavingTime,press[Y], otherwisepress[N].
The ADJUST TIME/DATE window then appears.
4.Select the time system you want the Clock to use by pressing[ ] or[
] or[ ],thenpress[
 ] or[NEXT].
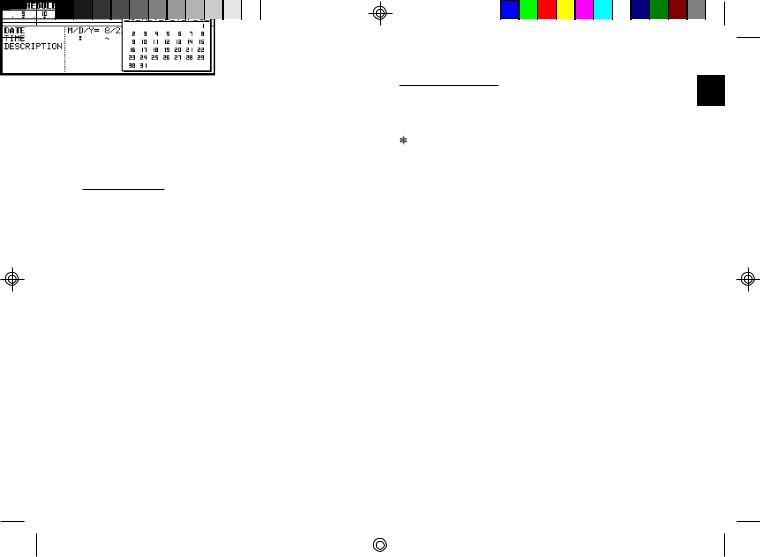
5.In theLOCALDATEfield,press [  ] to displaythepopup calendar.Use[PREV]and [NEXT]to selectthecurrent month,thenusethearrowkeysto selecttoday’sdate.
5-16 |
10 |
|
|
8/6/98, 4:04 PM |
|
|
|
|
|
|
|
|
|
|
6.Press [ENTER] once the date has been selected.
The pop-up calendar disappears and the date now appears in the LOCAL DATE field.
7.Enter the local time, precedingsingle-digithours and minuteswith“0”.
8.Press [PM] to select PM or [AM] for AM, then press [ENTER].
A new screenthen appearsto inform you that the basic setup procedure is now completed, and the Organizer is ready for use.However,thereareotherareasinwhichyoucancustomize yourOrganizerfurtherbysettingvariousoptions.
Advanced Setup
1.Select ADVANCED SETUP from the User Setup screen.
The User Setupdisplaythenappears.There are threechoices available.
1Change World City
2SetStart-upDisplay
3Lock Organizer
IfyoudonotwishtosettheAdvancedSetupatthistime,press [ENTER]to exitsetup.TheCalendarapplicationdisplaythen appears, and you can begin to use your Organizer.
To set one of the Advanced Setup, select the appropriate option.
SettingtheWorldCity
1
AswellassettingtheLocalCitypreviously,youcanalsoselect theworldcity,usedtodisplaythetimeinanothercityofyour choice alongside the Local time. When the Organizer is initialized,theWorldcityissettoLondon.
To selecttheWorldcity:
1.Select CHANGE WORLD CITY from the Advanced Setup screen.
The CHANGE WORLDCITY screenappears. A list of six capital citiesisgiven,withfourcitiesdisplayedatonetime.
2.Ifthecityyouwishtoselectdoesnotappearinthelist, typethefirstletterofthedesiredcountry.
3.Selectthedesiredcitybymovingthecursortoitandthen press[ENTER].Or selectnumbers[1]- [4]directly.
SettingtheStart-upDisplay
You cancontrolthewayOrganizerbehaveseachtimeyouturn it on, including the backgroundthat appears. The Start-up displayoffersfouroptions:
START-UP 1: Globe & SHARP logo
START-UP 2: AirPlane
START-UP 3: World Map Image
START-UP 4: NONE
1 1
5-16 |
11 |
|
|
8/6/98, 4:04 PM |
|
|
|
|
|
|
|
|
|
|
1.In the START-UP field, you can choose a decorative background to be displayed each timetheOrganizeris turnedon.
2.Pressnumber1-4to get thedesireddisplay.
The Advanced Setup screen reappears.
Settingthe Password and Locking the Organizer
The Organizer allows you to keep selected entries in your Organizer secure by locking it with a password. Once the Organizer is locked, the Secretentries cannot be accessed untiltheOrganizeris Unlocked,forwhich the passwordmust be given.
Select this optionif you want to define a passwordand lock theOrganizer.
1.From the Advanced Setup screen, select LOCK ORGANIZER.
The Set Password andLock Organizer screen appears.
2.Enter the password you wish to use then press [ENTER].
3.Re-typethepasswordto confirmandthen press[ENTER].
A message appears reminding you to remember your passwordorkeepit in a safeplace.
1 2
4.Press [ENTER].
The Advanced Setup screen reappears.
To startworkingwiththeOrganizer
After initialization and the User Setup has been set, the Organizer is ready to be used for normal work, such as the entryofinformation.
1.Select START ORGANIZING.
The Calendarapplicationopens in the 3-Monthview.
2.Select any application you wish to use by pressing the correspondingkey.
Turningthe Organizer on and off
Press [ON] to turn the power on and [OFF] to turn the power off.TheOrganizerwillnotoperateifthebatteryreplacement switch is in the REPLACE BATTERIES position.
Auto power off
Toconservebatterypower,theOrganizerwillturnitselfoffifit has not been used for about 7 consecutiveminutes.However, inordertoavoidaccidentallyinterruptingdatatransfers,the autopower-offfunctionis disabledwhilecommunicatingwith otherdevices.
IftheOrganizer’spowergoesoffautomaticallybeforeanentry you have been workingwith is stored in an application,the
5-16 |
12 |
|
|
8/6/98, 4:04 PM |
|
|
|
|
|
|
|
|
|
|
datawillnotbe lost.Whenyoupress[ON],theOrganizerwill returnto the sameoperatingstateas beforethepowerturned offautomatically.
SettingtheLCDcontrasttosuitvariouslighting
conditions
Fromtimeto time,thecontrastof theLCDdisplaymayhaveto be adjustedforidealreadability.Youmayfind,forexample, thatacontrastsettingthatwasfineforthehomeorofficeisnot adequatewhenoutdoorsor whentravelingon publictransport. Followthe procedurebelow to adjusttheLCDcontrast.
1. Press [MENU] three times to open the TOOLS menu.
2.Select ADJUST LCD CONTRAST.
3.Adjustthecontrastby pressing[  ] and[
 ] or [PREV] and [NEXT].
4.Press[ENTER]when you aresatisfiedwith the contrast.
Turning the key beep on and off
The Organizer can be set to make a sound (a beep) each time a key is pressed. This may help you to know whether a key hasbeenpressedproperly.Thedefaultsettingison,indicated by a musical symbol on the bottomof the display. You can use the TOOLS menu to change the setting.
1. Press [MENU] three times to open the TOOLS menu.
2.Select KEY SOUND ON(  indicates that theoption is
currentlyset.) |
1 |
|
|
The key beep is now turned off andthe musical symbol |
|
disappearsfromthebottomlineof thedisplay. |
|
Backlight
TheOrganizerprovidesa built-inBacklight,whichallowsyou to view the displayand use the Organizer even in low-light conditions,eg.inatheater,restaurant,orbusinesspresentation. Pressing[BACKLIGHT]onceilluminatesthedisplayforaround fifteen seconds. When already on, press [BACKLIGHT] again toturnitoff.
If youpress [2nd][BACKLIGHT],theBacklightwillremainon for as long as you continueto use the Organizer, until you havenottypedanykeyforfifteenseconds.Thisisusefulifyou wanttoenteror accesssomeinformationthatwilltakelonger thanfifteenseconds.
The Backlightmayremainon for lessthanfifteensecondsif thebatterylevelisverylow,orduringdatatransfer.
Note:Do notuse theBacklightunnecessarily.
*Since the Backlight drains power from the operating batteries,excessiveuseoftheBacklightwillsignificantly reduceyourbatterylife.
*Continuoususeof theBacklightwill,overtime,leadto graduallossofbrightness.
1 3
5-16 |
13 |
|
|
8/6/98, 4:04 PM |
|
|
|
|
|
|
|
|
|
|
Getting to Know Your Organizer
OZ-630, OZ-640, OZ-650 Organizers are a compact yet sophisticated information management device that you can useanytime,anywhere.Theirapplicationsandutilitiesallow you to enter and organize information, and it has powerful communicationsfacilitiesthatenableyoutoputthatinformation to optimum use when you return to your home or office. You can quickly update your computerized mailing lists, for example,or even transferyour notes,lettersandmemos onto a PCforfurtherprocessing.
applications have a menu forfunctions and commands that arespecifictoeachapplication.
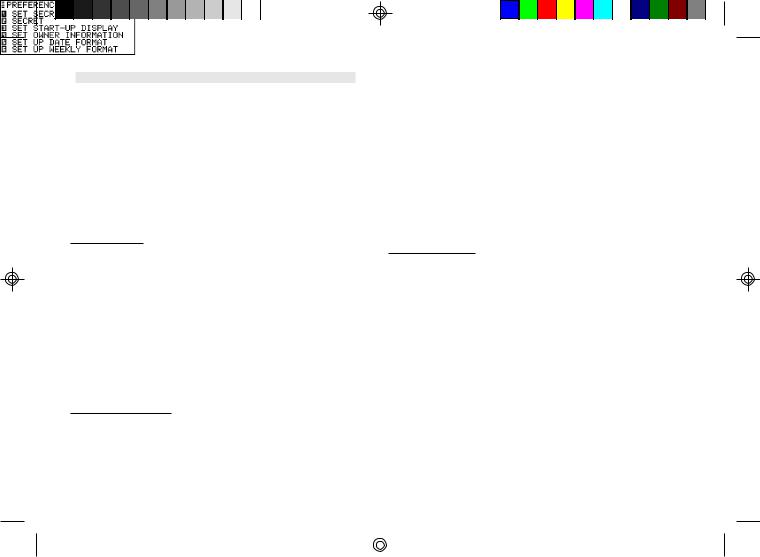
Press [MENU] once displays the application menu, which contains the operations and commands specific to the particularapplication.Pressing[MENU]successivelydisplays the PREFERENCES, TOOLS and PERIPHERALS menus.
Applications
Operationson theOrganizerareperformedusingapplications. The Organizer’s Calendar and Schedule, for example, are applicationsthatrecordanddisplaytimerelatedinformation. To start an application,press the correspondingkey on the topof thekeyboard.
When workingin one application, you can switchto another applicationsimplybypressingthatapplicationkey.Databeing processedinthefirstapplicationwillbesaved,eveniftheentry is notcomplete.
Menu operations
Another powerful aspect of using the Organizer is its menu system, which can be used to quickly issue commands and perform operations. Two universal menus, PREFERENCES and TOOLS,areavailablefromallapplications.In addition,all
1 4
Pop-up menus
TheOrganizer’spop-upmenusoffera convenientandefficient methodofselectingoptionsfrompre-definedlists,similarto many of the latest personal computer application software packages.Mostapplicationsand functionscontainsomepopup fields.Whentheusermovesto oneofthesefields,thepopup symbolappears on the right of the field. Pressing [  ] causesthepop-upmenuto appear,containinga listof options orvaluescurrentlyavailableforthatfield.Youcanthenselect thedesireditemfromthelistwithouthavingtotypeanytext.
Inaddition,alldatefieldsfunctionaspop-upfields.Whethera date can be entered,the user can press [  ] to displaythe special pop-up one-month calendar. You can use [PREV] and [NEXT] to select the desired month, then the arrow keys to select the desired date. You may find this more convenient thantypinginthedatedirectly,sincethepop-upcalendaralso shows the days of the week.
5-16 |
14 |
|
|
8/6/98, 4:04 PM |
|
|
|
|
|
|
|
|
|
|
The keyboard
The Organizer’skeyboardhas a standard layout, just like a typewriterorcomputer.[  ] worksjustliketheShiftkeyona typewriteror computer,and[2nd][
  ] is like theCapsLock key.
Above the keyboard are the special keys used to start the Organizer’svariousapplications,workwiththevariousmenus andcontrolthecursoron thescreen.
Symbols in white above a key such as ’ or : can be accessed by holdingdown[  ] andthenpressingtheappropriatekey.
Functionsin blue above a key, such as HELP, can be accessed bypressingtheparticularkeyafterpressing[2nd].Thereisno need to hold down [2nd] while you press the desired key.
*Specialsymbolsandcharacters,suchas “&”,“?”and“/”, can also be entered by using [SMBL]. For a full explanation,seeP.71.
Display symbols
1
The following symbols appear at the bottomof the screen to indicatevariousoperatingconditions.
|
This symbol appearsat the bottom of the display |
|
toindicatethatthecurrententry(inVieworEdit |
|
mode) has been marked as Secret. |
|
Thesesymbolsindicatethatallinformationin an |
|
entry cannot be shown simultaneously on the |
|
display.The additionalentries or fields which |
|
cannot fit onto the display can be viewed by |
|
pressingthedisplayedarrowkeys. |
2nd |
The [2nd] key has been pressed. |
|
The operating batteries are weak and need to be |
|
replaced(seep.90) |
CAPS |
[2nd][ ] has been pressed.In caps lock mode, |
|
alltypedletterswillbeinuppercase.Press[2nd] |
|
[ ]againtoturnoffcapslock. |
|
TheOrganizeris locked.Entriesmarkedas secret |
|
cannot be accessed without first entering the |
|
passwordandunlockingthe Organizer(seep.83). |
EDIT |
Theentryon thedisplaycanbe edited. |
|
All alarms are enabled. When this symbol is not |
|
shown, the alarm sound for any alarms that have |
|
beensetisdisabled(seep.60). |
1 5
5-16 |
15 |
|
|
8/6/98, 4:04 PM |
|
|
|
|
|
|
|
|
|
|
The key sound is on (see p.13).
This symbol appearsat the bottom of the display whilethebacklightison.
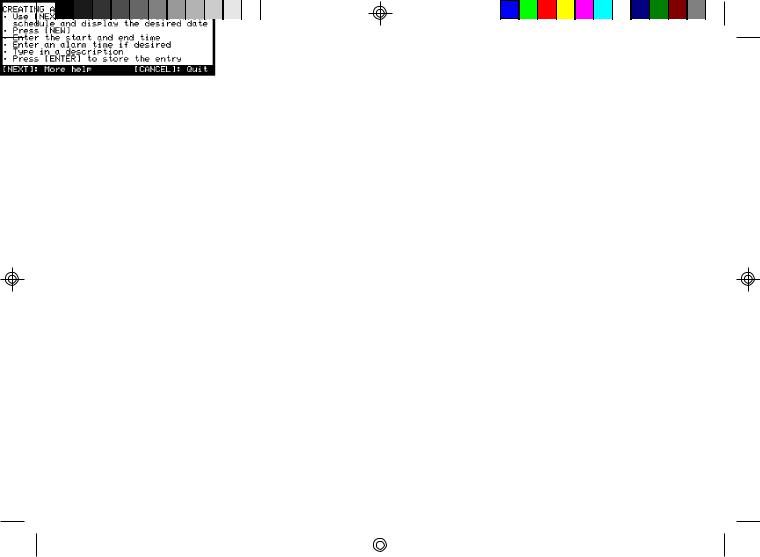
Built-in help and other messages
The Organizer has a built-in help feature which acts as a convenient,on-linereferencemanual.YoucancalluptheHelp featureat anytimesimplyby pressing[2nd][HELP].On-line help is quite extensive,so you may have to call up more than onescreentofindtheinformationyourequire.
Whenbuilt-inhelpis notavailable
On-linehelpisonlyavailablewhencalledfromanapplication screen, ie. not whileperforming a menu command, opening message box or some other operation. Pressing [2nd] [HELP] whenthereisnoapplicationdisplayonthescreenwillhaveno effect.HelpisalsonotavailablewithintheClockandCalculator application.
How to use built-in Help
If you press [2nd] [HELP] from any application screen (excluding Clock), the HELP INDEX appears:
1 6
To get Help, press the number corresponding to the menu option describing the kind of Help you want. Pressing [CANCEL]takesyoubackto thedisplayyouwereinpreviously. After selecting a number, the first page of help for correspondingtopicisdisplayed.
If you makea selectionfromthe abovemenu,thedisplaythat appearswillresemblethefollowingexample:
In thistypeof display,pressing[NEXT]takesyouto thenext pageofthedisplay,pressing[PREV]takesyoutotheprevious page, and pressing [CANCEL] takes you back to the HELP INDEX menu.
Fromtimeto timeduringnormaloperation,theOrganizerwill displaymessagesto guide you through necessarytasks. Many of these messageswill give you a choice of commands or ask youto confirmimportantoperations,whileotherswillsimply displayinformationfor youto read.In most cases,youmust make a selection or simply acknowledge the message before continuing.
Other messages may display information briefly before disappearing.
5-16 |
16 |
|
|
8/6/98, 4:04 PM |
|
|
|
|
|
|
|
|
|
|

Chapter 2
General Operation
This chapter introduces most of the Organizer’s basic operations. The Tel application will be used for the examples. However, most of the techniques described here can be applied to all of the Organizer’s applications.
Opening an Application
To start an application, simply press the corresponding key, located on the top of the 2 keyboard. Each time you press [CALENDAR], [SCHEDULE], [TO DO], [ANN], [CLOCK], [TEL], [USER FILE], [MEMO], [EXPENSE], [DAILY] or [CALC/ CONV], the selected application will appear. Any application already being displayed will
be hidden whenever a new application is selected. You can always return to another application at the exact point where you left off simply by
17
pressing its key again. However, only one
application at a time can ever be displayed.
Selecting the Display Modes
Once an application is open, you can switch between three basic display modes: Index, View and Edit. Each display mode has its own unique appearance and particular purpose. Index mode is normally the default view when an application is opened, and provides a summary of the individual entries that have been created. Pressing [ENTER] after selecting a particular entry causes the entry to be displayed in View mode, which shows the full details of the entry. During View mode, the word VIEW appears at the top of the screen, and no entry details may be altered.
Pressing [EDIT], either when an entry is displayed in View mode or is selected in Index Mode, causes the entry to be displayed in Edit
mode. The entry’s details can then be altered as desired. During Edit mode, the word EDIT appears at the top of the screen. Edit mode is also used when an entry is being created (by pressing [NEW]).
*The Calc (except Conversion function) and Clock applications do not have Index, View or Edit modes.
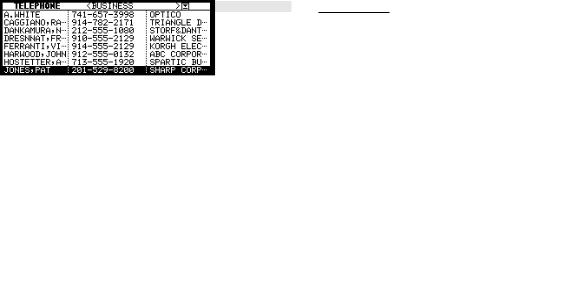
Index mode
Index mode shows you a one line view of each entry within the application. This allows you to easily find a particular entry, which you can then display in full (View mode) by pressing [ENTER].
Other[NEXT] operations:
[NEW] |
Creates a new entry for the current |
|
application (in Edit mode). |
[EDIT] |
Displays the currently selected |
|
entry and edits it (Edit mode). |
18

[DEL] |
Deletes |
the |
currently selected |
|
|
|
entry. |
|
|
[PREV] |
Displays |
any |
previous/subsequent |
|
|
|
entries not shown. |
||
[ |
] [ |
] Selects an entry |
||
[ |
] |
Displays category menu and user can |
||
|
|
select a category. |
||
View mode
View mode allows you to see the full details of an entry, without being able to edit or change it.
[NEXT]
Other operations:
[NEW] |
Creates a new entry for the current |
|||||||
|
application (in Edit mode). |
|||||||
|
||||||||
[EDIT] |
Edits the currently displayed entry. |
|
||||||
2 |
||||||||
|
|
|
|
|
|
Cursor |
||
[DEL] |
Deletes |
the |
|
|||||
currently selected |
|
|||||||
|
entry. |
|
|
|
|
|||
|
|
|
|
|
|
|
||
[PREV] |
Displays |
any |
previous/subsequent |
|||||
|
|
entries not shown. |
[ |
] [ |
] Displays any information not |
|
|
shown within an entry. |
Edit mode
Edit mode is used to create a new entry or edit an existing entry.
Other operations: |
|
|
|
|
[CANCEL] |
When user cancel |
to |
edit the |
data |
|
in edit mode, “Do you really want |
|||
|
to throw away all of these changes? |
|||
|
Yes/No ” w i l l |
b e |
shown |
for |
19
confirmation.
[ENTER] |
Stores an entry in the Organizer’s |
||
|
|
memory or initiates an operation. |
|
[ |
] |
Activates the pop-up menu for a field |
|
|
|
displaying the “pop-up” symbol. |
|
[ |
] [ |
] |
Moves the cursor |
[ |
] [ |
] |
|
[PREV] |
Selects a field. |
||
[NEXT] |
|
|
|
Creating a New Entry
In Index or View mode, pressing [NEW] opens a blank form for creating a new entry.
Make the following new Tel entry:
CATEGORY |
PERSONAL |
FIRST NAME |
Pat |
LAST NAME |
Jones |
COMPANY SHARP CORPORATION |
|
TITLE |
SUPERVISOR |
OFFICE# 201-529-8200 |
|
FAX# |
201-529-9695 |
1. Press [TEL] to open the application.
The application opens in Index mode.
20
2. Press [NEW] on the keyboard.
A blank form opens in Edit mode.
3.Type in the last name Jones.
4.Press [  ] or [NEXT] to move to the FIRST NAME field.
5.Type in Pat.
6.Press [  ] or [NEXT] to move to the COMPANY field.
7.Type in SHARP CORPORATION.
8.Press [  ] or [NEXT] to move to the TITLE field.
9.Type in SUPERVISOR.
10.Press [  ] or [NEXT] to move to the OFFICE# field.
11.Type in 201-529-8200.
12.Press [  ] or [NEXT] to move to the FAX#

13.Type in 201-529-9695.
14.Press [  ] or [PREV] to move to the CATEGORY field. Press [
  ] to open the pop-up menu. Press [1] - [8] to select the appropriate
option.
15.Press [ENTER] to store the entry.
The message “Stored!” appears briefly. The entry is now stored in the Organizer’s memory and displayed in View mode.
*For other useful methods available in Edit mode, see below.
*Press [2nd] [ENTER] to store an edited entry as new, leaving the original unchanged.
Editing an Existing Entry
To edit an entry already stored in memory, you must first access the entry in Edit mode (in 2 which it was originally created).
1. Press [TEL] to open the application.
2. Select the desired entry in Index mode.
3.Press [EDIT] to open the entry in Edit mode.
4.Make any necessary changes.
5.Press [ENTER] to store the changes when you are finished.
The new, edited entry is now stored, replacing the original entry.
Editing Techniques
This section explains all the general editing techniques used in Edit mode when making a new entry or editing an existing entry in all of the applications. (The Memo application has many additional features for working with text; see p.47 for more information.)
21

Fields
Most applications divide the display into field boxes. The number of fields in each application varies, as do the types of fields. The different types of field include text fields, a date field, time fields and pop-up fields. There are also a few special types of text fields. In the User Files application, you can define the number and names of fields according to your preferences (see p.43).
You can type any character into a text field. The size of a text field is limited only by the size of the entry. Text fields adjust their size automatically to accommodate the number of lines entered.
Only a date can be entered in a date field, usually in the format MM/DD/YYYY. For example, you would type 06231998 to enter JUNE 23, 1998.
Only a time of day can be entered in the time field, in the format of HH:MM followed by [AM] or [PM] (for AM and PM). For example, to enter 9:00 AM, you would type 0900 then press [AM].
When the pop-up symbol  appears by a field while editing an entry, this indicates that a pop-up menu is available for the field. The pop-up menu contains a list of values available for the field, and is used by pressing [
  ] and selecting the desired value from the pop-up list. Note that the pop-up symbol only appears next to a field in Edit mode, when the field is selected. When you move out of a pop-up field, the pop-up symbol disappears.
The cursor
The cursor is used to work with text, indicating the position where text will be entered or deleted. It is also used to select items from menus or lists.
In text fields, where there is no restriction on the type of text (letters or numbers) that can be entered, the cursor appears as [  ] in insertion mode, or
  as in overwrite mode (see p.23).
In the date and time fields, the cursor appears as  , indicating that numbers only should be entered in a specified format (see above).
*In text fields or boxes when there is no character at the cursor position, the cursor appears as _.
22

Typing in text
Typing in text is simple and straightforward. The Organizer’s keyboard layout is just like the keyboard on a typewriter or computer.
Letters (lower-case and upper-case)
Any of the standard letters (A to Z) can be entered by pressing the corresponding key. All letters will normally appear in lower case. Hold down either of the [  ] keys while pressing letter key(s) to enter upper-case letters. [2nd] [
  ] functions like a “Caps lock” key on a typewriter or computer. Once pressed, the symbol CAPS will appear in the display. Any letters typed while the Organizer is in CAPS mode will appear in upper case. To switch back to lowercase mode, simply press [2nd] [
  ] again. To enter lower-case letters while in CAPS mode, hold down [
  ] while pressing a letter key.
Numbers
Numbers are entered using the numeric keypad located to the right of the display. The numbers are entered regardless of whether CAPS mode is on or off.
Symbols
The symbols that appear in white above certain keys can be entered directly from the keyboard. Holding down [  ] while pressing the appropriate key will allow you to enter these symbols. 2 Colons can be entered by holding down [
  ] and pressing the [ • ] key. In addition, a large number of special symbols are available by pressing [SMBL] (see p.71)
Moving around the display
You can move the cursor around the display with the cursor keys [  ] , [
] , [  ] , [
] , [  ] and [
  ]. In addition, you can hold any cursor key down for continuous rapid movement.
The following convenient keyboard shortcuts are also available in Edit mode:
[2nd] [ |
] Moves the cursor to the end of the |
|
line. |
[2nd] [ |
] Moves the cursor to the beginning |
|
of the line. |
[2nd] [ |
] Moves the cursor to the first line |
|
of a field. |
23

[2nd] [ |
] Moves the cursor to the last line |
|
of a field. |
Inserting and overwriting text
To insert text into some existing text, move the cursor past the character after which you wish to insert text and begin typing. Insertion mode is the Organizer’s default setting, indicated by the triangle cursor  . To switch to the overwriting mode, press [INS]. Any text you enter will replace the existing text. The cursor appears as
  in the overwrite mode. To switch back to the previous mode, press [INS] again.
Deleting text
If you make a mistake while entering text, use the following keys to erase the incorrect text, then enter the correct text:
[BS] |
Deletes the character before the |
|
|
cursor |
|
[DEL] |
Deletes the character at the |
|
|
cursor’s current location. |
|
Working with blocks of text
Working with a block of text is sometimes easier
and more convenient than working with characters
one by one. The first step is to select the text to work with.
1.Hold down the [  ] key while using the cursor keys to move over the entire text that you want to work with. This will “highlight” the text (display it in reverse white on black).
2.You can now perform a number of operations on the selected text:
[BS] or [DEL] |
Deletes the selected text. |
|
[2nd] [COPY] |
Copies the selected text to the |
|
clipboard |
so that it can later be |
|
pasted to |
another location. |
|
[2nd] [CUT] Deletes the selected text from its current location and moves it to the clipboard.
[2nd] [PASTE] Replaces the selected text with whatever is currently in the clipboard.
24

Once text is selected, any new text that is typed in will replace the selected text. This can be useful if you are replacing one block of text with another, as selecting the old text and then typing the new text saves you the trouble of actually deleting it first.
*You can also delete selected text using DATA DELETION from the menu.
For a full explanation of the Cut/Copy/ Paste functions, see p.69.
Scrolling the display
If there is more information than can be displayed at one time, an arrow will appear at the bottom of the display. The arrows indicate the direction you need to scroll in. Press [  ] or [
  ] to scroll the information one line at a time.
Finding Specific Entries in Your Organizer
There are a number of ways that you can locate entries and information in your Organizer. One is to scroll between entries using the [NEXT] and [PREV] keys. Others are as follows.
2
Using Index mode
Index mode gives you a listing of all the entries in a particular application.
Index mode gives you a listing of all the entries in a particular application. It is useful for providing a summary list of the entries contained for that application, from which a desired entry may be selected.
Many applications open in whichever mode was active when they were last used, ie. View, Edit or Index mode.
1.Press the desired application key.
2.If it is not already displayed, switch to Index mode by pressing [CANCEL].
A list of the existing entries appears.
3.If the desired entry is not displayed, you can scroll the list of entries by pressing
25

[  ] and [
  ].
].
4.When the desired entry is displayed, select it and press [ENTER] to see the entry in full.
5.You can also press any letters/symbols/ numbers, then the most relevant entry will be highlighted. Press [ENTER] to see the details of the entry. (Only Telephone and User File applications provide this function.)
Using keywords
If you know a particular entry is in your Organizer, but you don’t remember where, you can use the Search command to find it.
1.Press the desired application key.
2.Press [SEARCH].
The Search window will open.
3.Enter the name you are looking for. For example, type SUMMER.
*To search only secret entries (see p.84), press [2nd] [ - ] to check the SECRET ONLY item.
The Organizer will now display the first entry that contains the “keyword” that you entered.
26

|
|
|
|
|
|
|
Deletes a selected |
|
|
|
|
|
|
|
|
||
|
|
|
|
|
|
|
entry. |
|
|
|
|
|
|
|
|
|
|
|
|
|
|
|
|
|
Deletesallentriesin |
|
|
|
|
|
|
|
|
2 |
|
|
|
|
|
|
|
|
||
|
|
|
|
|
|
|
theselectedcategory. |
|
|
|
|
|
|
|
|
|
|
|
|
|
|
|
|
|
Deletesallentriesin |
|
|
|
|
|
|
|
|
||
|
|
|
|
|
|
|
allTELfiles. |
|
If there is more than one entry that contains |
3. Press [ENTER] again to see the Weekly |
|||||||
the keyword, press [NEXT] until you find the |
Calendar. |
|||||||
entry you are looking for. Then press [ENTER] |
|
|
|
|
|
|
|
|
when you have finished searching. |
|
|
|
|
|
|
|
|
By date
You can use the various Calendar views to quickly and easily find information related to a time and/or date.
1. Press [CALENDAR].
The calendar appears in the preset view.
2.Select a day using the cursor keys, then press [ENTER] to see the Monthly Graph.
27

4. Press [ENTER] again to see the Yearly Graph.
For more information about using the Calendar application, see p.31.
*You can open the Calendar menu by pressing [MENU] to select the desired Calendar view.
Deleting Entries
Entries in the Organizer can be deleted using either the [DEL] key or the application menu.
Deleting single entries
1.Open the desired application.
2.Select the entry in Index mode.
3.Press [DEL] on the keyboard.
A confirmation message appears asking if you are sure you want to delete the selected entry.
4. Press [Y] (or [N] to cancel the deletion).
Deleting entries using the application menu
You can also make deletions using the application menu. The DATA DELETION submenu allows you to do this flexibly and easily.
1.Open the desired application.
2.Select the entry in Index mode or display it in View mode.
3.Press [MENU] to open the application menu.
28
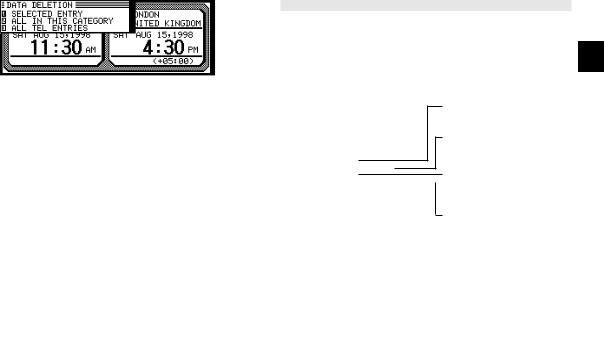
4. Select DATA DELETION, then press [ENTER].
5. Select SELECTED ENTRY, then press [ENTER].
2
A warning message appears asking if you are sure you want to delete the entry.
6. Press [Y] (or [N] to cancel the deletion).
Shows the amount of free and used memory (see p.28)
Adjusts the contrast of the LCD
Checking the Time and Date
display (see p.13)
1. To check |
the |
current |
dateTurns theandkeytime,beep on pressand off |
||
[CLOCK]. |
|
|
|
(see p.13) |
|
Sets the alarm sound on and off(seep.60)
2. Press any other application key to close the Clock application.
For a full explanation of the Clock application, see p.57.
Checking the Memory
The Organizer has a certain memory capacity in which operations are carried out and data that 29
 Loading...